When a birthday’s coming up, clay is my favorite way to make something that feels truly personal without needing fancy skills. Here are my go-to birthday clay ideas for sweet gifts, cute cake toppers, and party-ready keepsakes you’ll actually be excited to make.
Mini Birthday Cake Topper
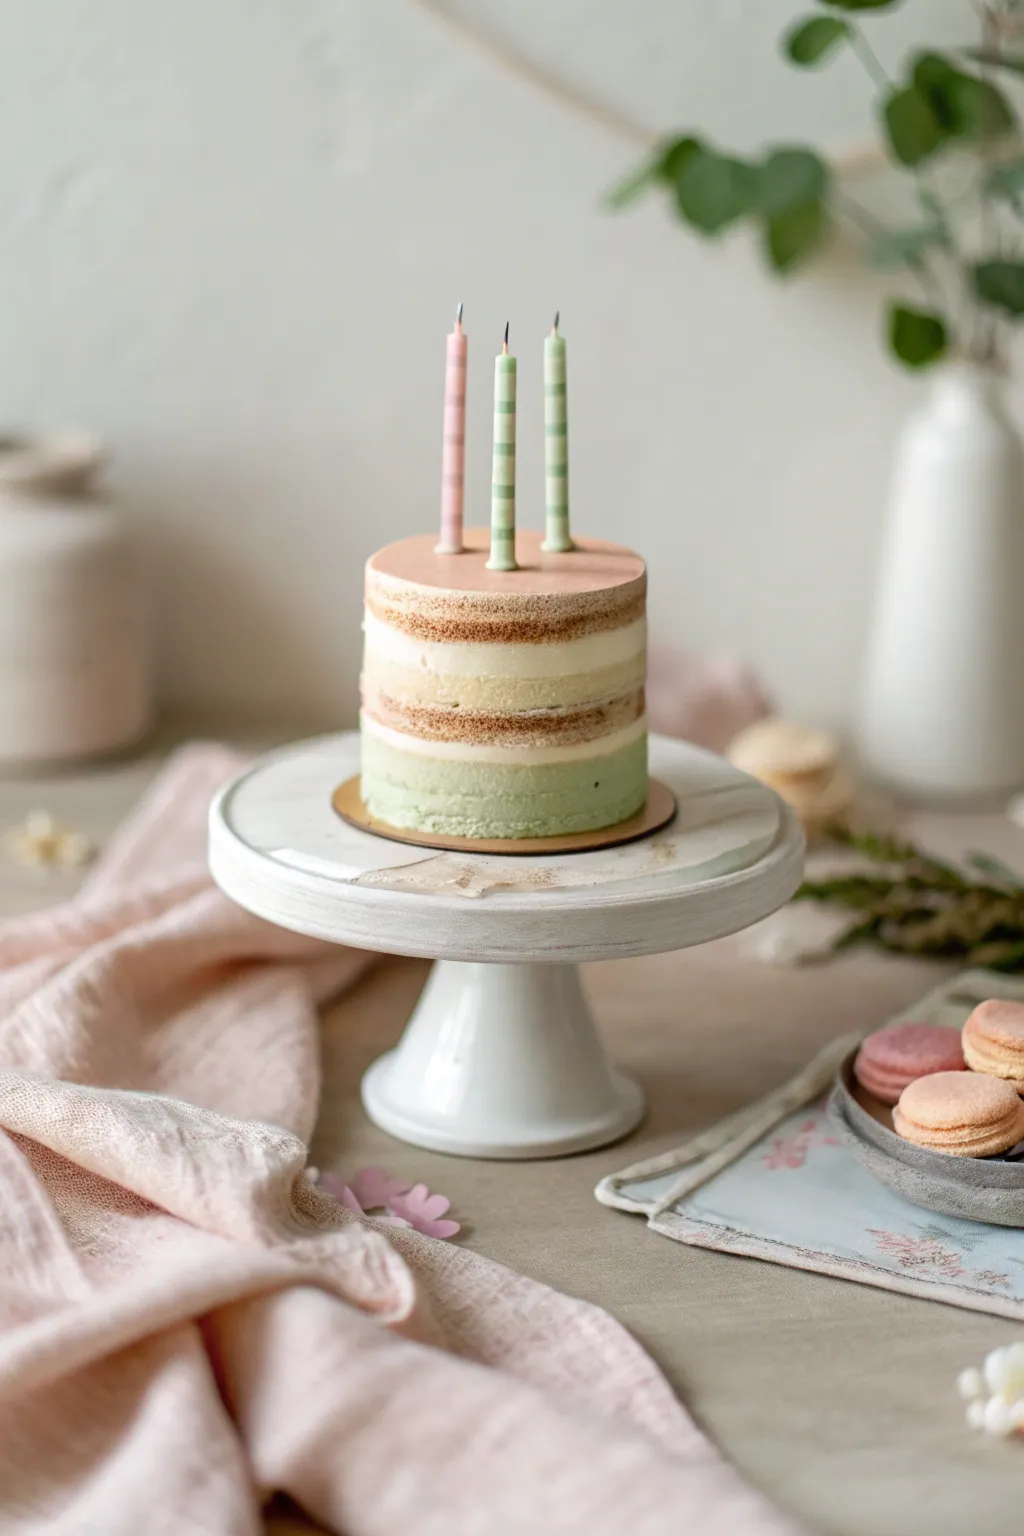
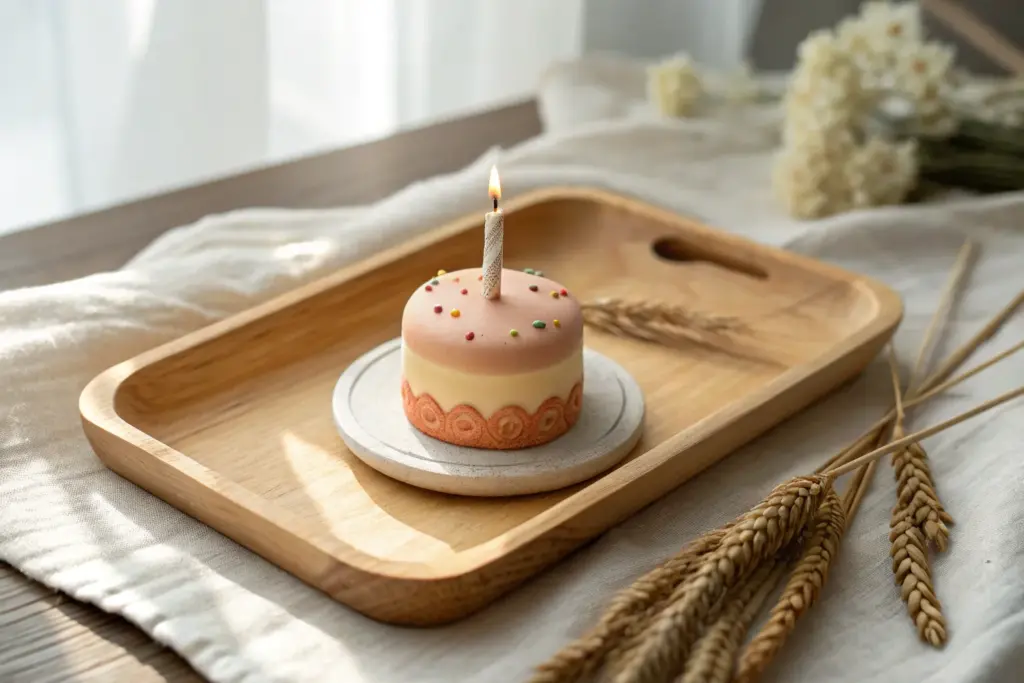
Create a delightful faux confection that looks good enough to eat with this realistic polymer clay naked cake. Featuring airy sponge layers, pastel frosting, and tiny striped candles, this miniature makes a perfect keepsake or charming birthday topper.
Step-by-Step Tutorial
Materials
- Polymer clay (white, ecru/beige, pastel pink, pastel green, translucent)
- Liquid polymer clay (translucent or white)
- Chalk pastels (brown, ochre, burnt orange)
- Soft paintbrush for shading
- Toothbrush or crumpled foil (for texturing)
- Circle cutter (approx. 1.5 – 2 inches)
- Needle tool or toothpick
- Rolling pin or pasta machine
- Craft knife
- Gloss glaze (optional)
Step 1: Creating the Cake Layers
-
Mix the batter color:
Start by mixing white clay with a small amount of ecru and a tiny pinch of translucent. This creates a realistic, baked-sponge shade that isn’t too starkly white. -
Roll out the slab:
Roll your mixed ‘sponge’ clay into a thick slab, approximately 1/4 inch thick. You want it substantial enough to simulate a fluffy cake layer. -
Cut the rounds:
Use your circle cutter to punch out three identical rounds. These will form the three visible tiers of your cake. -
Texture the sides:
Gently gently tap the sides of each clay round with a toothbrush or a ball of crumpled aluminum foil. This roughens the surface to mimic the porous texture of baked cake crumbs. -
Apply the baked effect:
Shave some brown, ochre, and burnt orange chalk pastels into a fine powder. Use a soft brush to dust the textured sides of your cake rounds, concentrating the darker brown near the edges to look like caramelized crust.
Realism Secret
Mix baking soda or coarse salt into your ‘sponge’ clay mix. It creates internal miniature air pockets that look incredibly realistic when the clay is cut or torn.
Step 2: Assembling the Naked Cake
-
Prepare the frosting colors:
Condition your pastel green, plain white, and pastel pink clays. Roll each out into a thinner sheet than your cake layers, about 1/8 inch thick. -
Cut frosting discs:
Using the same circle cutter, punch out one green disc, one white disc, and one pink disc. The pink disc will be the very top of the cake. -
Base layer assembly:
Place the green frosting disc on top of one cake sponge round. Gently press them together to seal without squishing the texture. -
Middle layer assembly:
Stack another sponge round on top of the green layer. Add the white frosting disc, followed by the third sponge round. -
Spread the frosting effect:
To achieve the ‘naked cake’ look where frosting peeks through the sides, take a small amount of white liquid clay (or soft white clay mixed with liquid) and smear it very thinly across the textured sides of the sponge layers, blending it so the ‘crumbs’ still show through. -
Top layer finishing:
Place the final pink frosting disc on top. Smooth the edges down slightly so it looks like it was spread with a spatula rather than just cut.
Step 3: Crafting the Candles
-
Form the candle cores:
Roll three very thin snakes of white clay. Cut them to be about 1.5 inches long. -
Stripe the candles:
Roll extremely thin threads of pink and green clay. Gently wrap these threads spirally around your white candle cores to create stripes, or stack tiny discs of alternating colors for a blocky stripe look. -
Add the wick:
Insert a tiny snippet of black wire or a burnt piece of thread into the top of each candle to serve as the wick. -
Attach to cake:
Press the three candles into the center of the pink top layer. I find using a needle tool to make a pilot hole first prevents the cake from squishing. -
Final texture touch-up:
Check your sponge layers; if handling the cake smoothed out the texture too much, re-tap with your toothbrush now. -
Bake the project:
Bake according to your clay manufacturer’s instructions, typically at 275°F (130°C) for 15-30 minutes depending on thickness.
Fixing Smudges
If your pastel dust smear onto the pristine frosting, use a cotton swab dipped in rubbing alcohol or baby oil to gently wipe the frosting clean before baking.
Once cooled, display your permanent pastry on a mini serving stand for a sweet visual treat


Cupcake Charm Party Favors
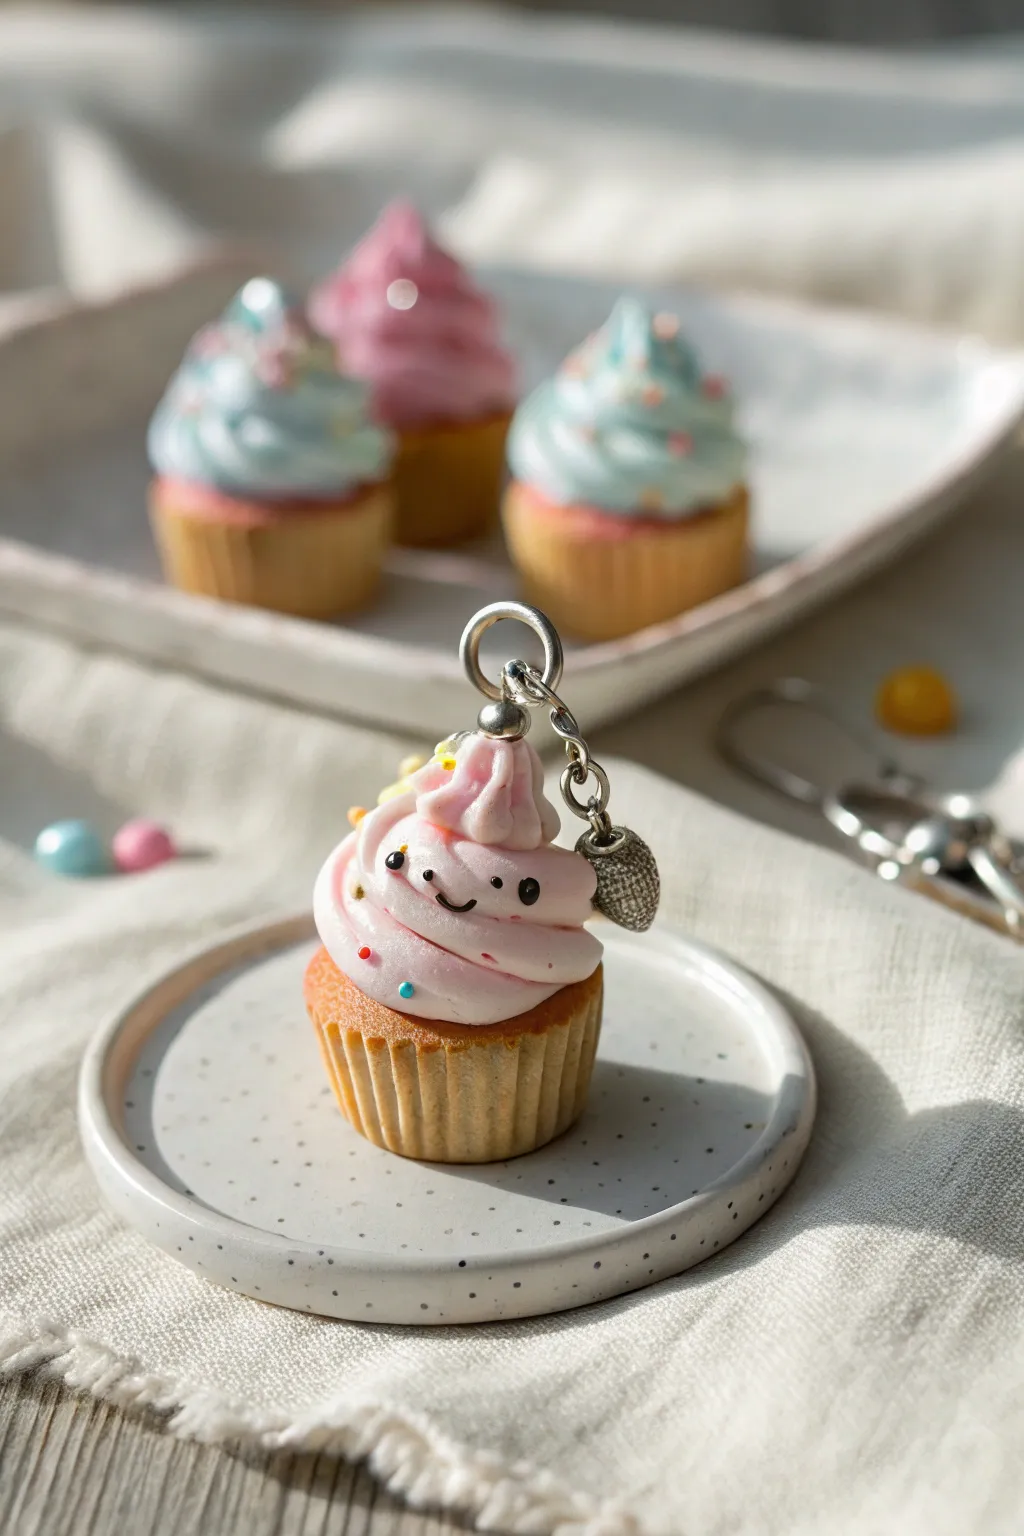
These adorable polymer clay charms feature swirling pink frosting, a textured base, and the cutest little hand-painted face. They make perfect party favors or jewelry gifts, adding a touch of sweetness to any keychain or necklace.
Step-by-Step
Materials
- Polymer clay (Tan/Beige, Pale Pink, White, Blue, Yellow)
- Liquid polymer clay (Translucent or White)
- Acrylic paint (Black, White)
- UV Resin or Gloss Glaze
- Eye screw pin (Silver)
- Jump rings and keyring/lobster clasp
- Small heart charm (optional)
- Needle tool or toothpick
- Dotting tool or ball stylus
- Fine detail paintbrush
- X-acto knife or clay blade
- Soft toothbrush (for texturing)
Step 1: Baking the Base
-
Shape the Cupcake Base:
Start by conditioning a ball of tan or beige polymer clay about the size of a marble. Roll it into a smooth sphere, then slightly taper one end to create a cylinder that is wider at the top and narrower at the bottom, mimicking a cupcake liner shape. -
Texture the Liner:
Use a needle tool or the back of a knife to press vertical identifying lines all around the side of the tan base. Space them evenly to create the ribbed effect of a paper cupcake liner. -
Add Surface Texture:
To make the ‘cake’ look baked and realistic, gently tap the top surface of the tan base with a clean, soft toothbrush or a ball of crumpled aluminum foil. This adds a subtle, sponge-like texture.
Step 2: Frosting & Face
-
Create the Frosting Swirl:
Condition your pale pink clay until it is very soft. Roll it into a long, thin snake with tapered ends. I find that twisting the snake gently first helps it coil more naturally. -
Coil the Frosting:
Starting at the outer edge of the cupcake base, wind the pink snake inward and upward, creating a classic soft-serve swirl. Taper it to a peak at the top. -
Secure the Coil:
Gently press the frosting down onto the base to ensure it sticks. You can add a tiny dab of liquid clay between the base and the pink coil for extra security. -
Smooth the Edges:
Use a silicone tool or your finger to gently smooth any harsh lines in the clay snake, making the frosting look like one continuous, creamy swirl. -
Insert the Eye Screw:
While the clay is still raw, screw the metal eye pin into the very center of the frosting peak. If you push it straight in, it might slide out after baking, so the screwing motion is key for grip. -
Add Sprinkles:
Roll tiny, microscopic balls of yellow, blue, and white clay. Gently press these randomly onto the pink frosting as sprinkles. Keep them small so they don’t overwhelm the face area. -
Bake the Charm:
Place your cupcake on a ceramic tile or baking sheet covered with parchment. Bake according to your clay manufacturer’s instructions (usually 275°F/135°C for 15-30 minutes). Let it cool completely.
Loose Eye Pin?
If the pin feels loose after baking, unscrew it, add a drop of superglue or E6000 to the threads, and screw it back in for a permanent hold.
Step 3: Finishing Touches
-
Paint the Eyes:
Using a fine dotting tool dipped in black acrylic paint, place two small dots on the front of the frosting swirl for eyes. Space them wide apart for a ‘kawaii’ look. -
Draw the Mouth:
With an ultra-fine detail brush or even a toothpick, paint a tiny, curved ‘U’ shape between and slightly below the eyes for the smile. -
Add Eye Highlights:
Once the black paint is fully dry, add a tiny speck of white paint to the top corner of each black eye dot. This reflection brings the character to life. -
Glaze for Protection:
Coat the frosting area with UV resin or a gloss glaze to make it look shiny and wet, like real icing. Avoid glazing the tan base if you want to keep the matte, cake-like texture. -
Attach Hardware:
Open a jump ring with pliers and attach it to the eye screw at the top of the cupcake. Thread on your keychain loop and the optional silver heart charm before closing the jump ring securely.
Make it Sparkle
Mix transparent glitter or mica powder into your pink clay before rolling the coil. It gives the frosting a magical, sugary shimmer without extra glazing.
Now you have a batch of incredibly sweet charms ready to share with friends


Happy Birthday Letter Plaque
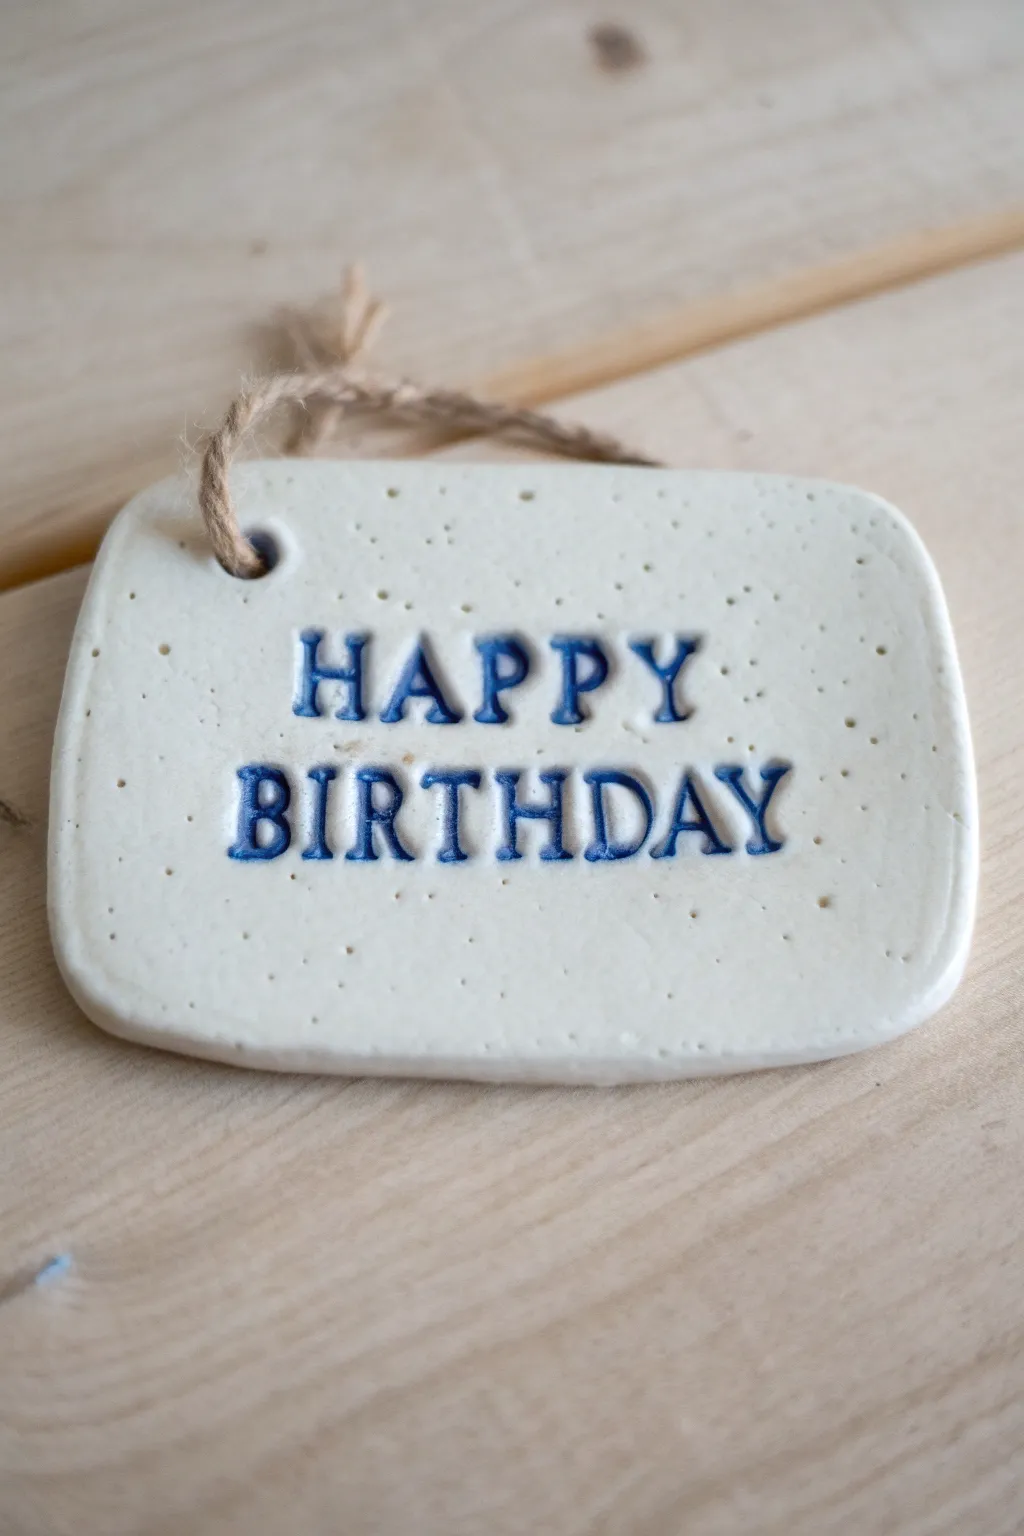
Create a rustic yet elegant greeting with this speckled clay plaque featuring stamped lettering. The deep blue glaze settled into the debossed text provides a lovely contrast against the creamy white surface, perfect for a reusable gift tag or a special keepsake hanging ornament.
How-To Guide
Materials
- White stoneware clay with speckles (or standard white clay)
- Small rolling pin
- Wooden guide strips (approx. 5-6mm thick)
- Rectangular cookie cutter with rounded corners (or a knife and template)
- Alphabet stamp set (serif font)
- Drinking straw or small hole cutter
- Underglaze or oxide wash (Cobalt Blue or Navy)
- Clear transparent glaze
- Small paintbrush
- Sponge
- Jute twine or rustic string
- Canvas mat or slab roller
Step 1: Shaping the Slab
-
Prepare the Clay:
Begin by wedging a small ball of speckled white stoneware clay to remove any air bubbles. If you don’t have speckled clay, you can wedge in some granular manganese or simply use plain white clay for a cleaner look. -
Roll the Slab:
Place the clay on a canvas mat between two wooden guide strips. Roll the clay out firmly until it is perfectly even and matches the thickness of your guides, about 5mm thick. -
Smooth the Surface:
Take a damp sponge or a flexible rubber rib and gently compress the surface of the clay slab. This aligns the clay particles and creates that super smooth finish you see in the photo. -
Cut the Shape:
Using a rectangular cookie cutter with rounded corners, press straight down into the slab to cut your shape. If you don’t have a cutter, lay a paper template on the clay and trace around it with a needle tool or fettling knife. -
Soften the Edges:
After cutting, dip your finger in water and run it gently along the cut edge to smooth out any sharpness or burrs. I like to give the corners an extra little tap to make them feel organic and soft.
Step 2: Stamping and Drying
-
Create the Hanging Hole:
While the clay is still soft, use a drinking straw or a small circular cutter to punch a hole in the top left corner. Twist the tool slightly as you remove it to ensure a clean cutout. -
Align Your Stamps:
Arrange your alphabet stamps for ‘HAPPY’ and ‘BIRTHDAY’ on the table first to check spacing. You can lightly mark a straight line on the clay with a ruler as a guide, or eyeball it for a more handmade charm. -
Imprint the Text:
Press each letter firmly into the clay. Be careful not to rock the stamp, which can create unwanted rims around the letters. Aim for a medium depth—deep enough to hold glaze, but not so deep it weakens the slab. -
Clean Up:
Inspect the letters for any little crumbs of clay displaced by the stamping. Use a soft brush or a clay pick to gently flick these away without damaging the lettering. -
Bisque Fire:
Allow the plaque to dry slowly between two boards or under plastic to prevent warping. Once bone dry, fire it in the kiln to bisque temperature (usually cone 04).
Uneven Letters?
If stamps are slippery, lightly dust the clay surface with cornstarch before stamping. This prevents sticking and helps you lift the stamp cleanly without dragging the clay.
Step 3: Glazing and Finishing
-
Apply Color to Letters:
Mix a small amount of cobalt blue underglaze with a drop of water to improve flow. Paint this liberally over the stamped letters, ensuring the glaze gets deep into the crevices. -
Wipe Back Excess:
Dampen a sponge (make sure it’s clean) and wipe across the surface of the plaque. The goal is to remove the blue from the high points while leaving it trapped inside the recessed letters. -
Check Clarity:
If the definition isn’t sharp enough, do a second careful wipe with a fresh side of the sponge. You want crisp blue letters against bare bisque. -
Apply Clear Glaze:
Dip the entire piece into a clear transparent glaze, or brush on three coats of clear brushing glaze. This will seal the clay and make the blue pop. -
Final Firing:
Place the piece on stilts in the kiln to ensure the back is glazed properly (or wipe the back clean if firing directly on the shelf). Fire to the maturity temperature of your clay body. -
Add the Twine:
Once cooled, cut a length of rustic jute twine. Thread it through the hole and tie a simple loop knot to finish the project.
Make it Shine
Brush a little clear crackle glaze over just the top surface. Then rub dark ink into the cracks after firing for an antique, aged look that highlights the ceramic texture.
Hang this charming plaque on a gift bag or use it as a permanent birthday decoration for many celebrations to come

Balloon Bouquet Cake Topper
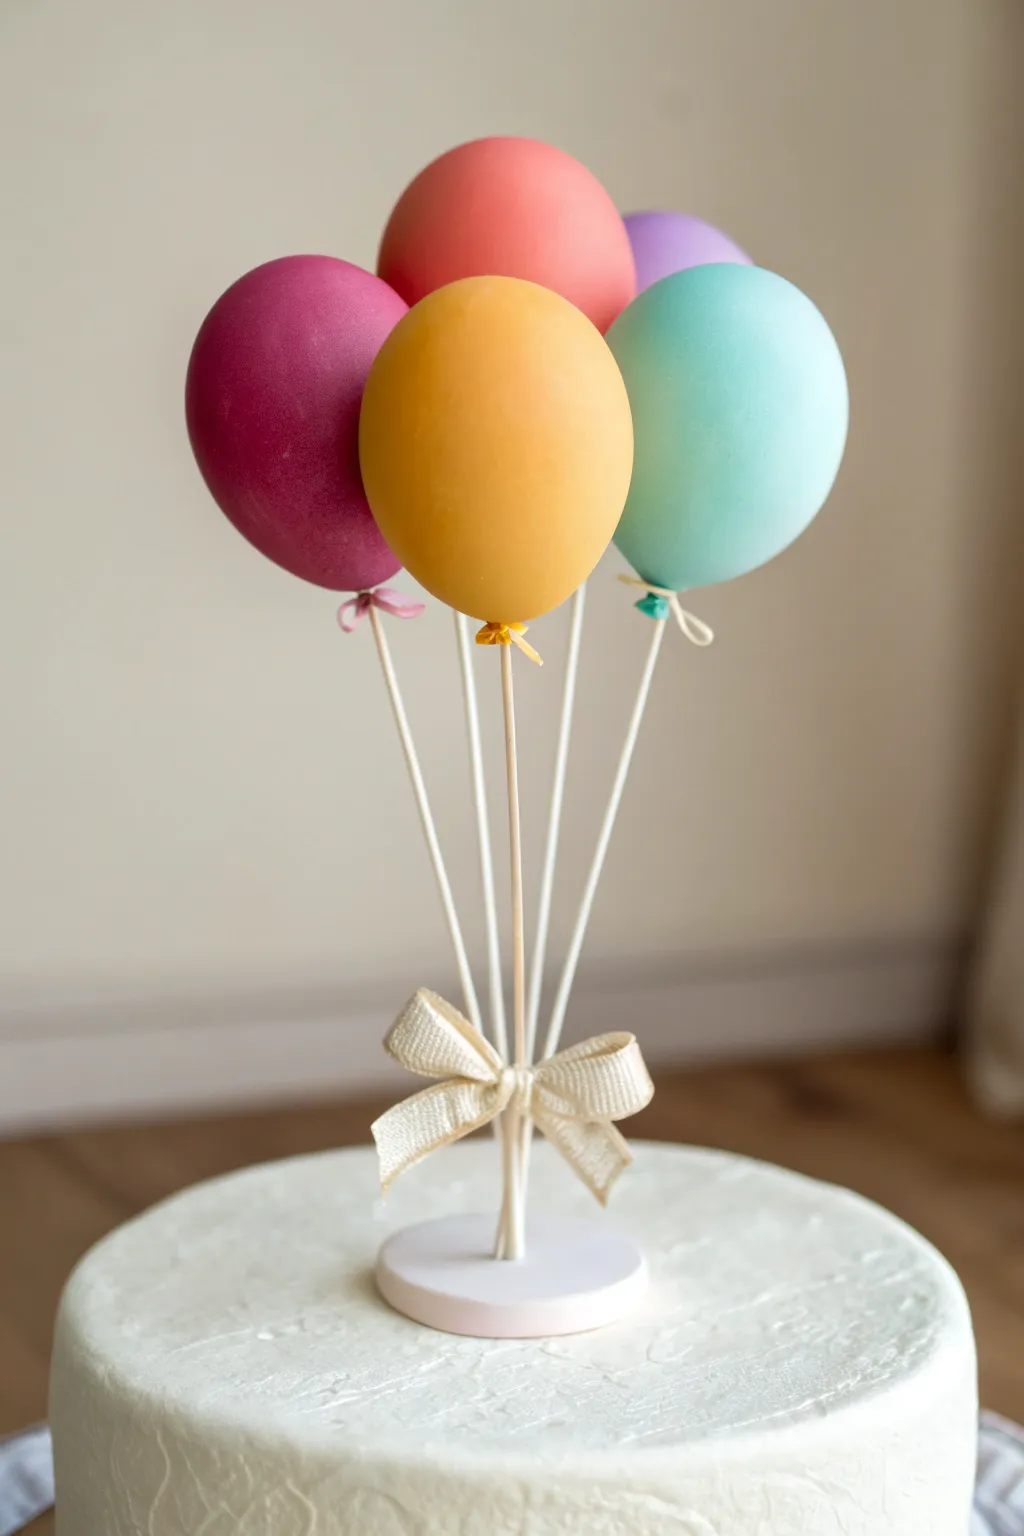
Add a festive pop of color to any celebration cake with this delightful balloon bouquet topper. Crafted from polymer clay in soft, matte shades and finished with a delicate ribbon bow, it creates an everlasting decoration that looks almost light enough to float away.
Step-by-Step
Materials
- Polymer clay (magenta, mustard yellow, coral pink, light teal, lavender)
- White floral wire (18 or 20 gauge) or stiff wire stems
- Liquid polymer clay or bake-and-bond adhesive
- Small circle cutter
- Cream-colored textured ribbon (approx. 1/2 inch wide)
- White or cream polymer clay (for the base)
- Small wooden base or circle cutter (for the stand)
- Blade or X-Acto knife
- Needle tool
- Oven
Step 1: Shaping the Balloon Bodies
-
Condition the clay:
Begin by conditioning each color of polymer clay thoroughly until it is soft and pliable. You want a smooth, crack-free consistency. -
Form the spheres:
Roll pieces of clay into smooth balls roughly the size of a walnut or large grape. Aim for slight variations in size to make the bouquet look more organic. -
Create the egg shape:
Gently roll one side of the ball between your palms to taper it slightly, creating the classic teardrop or egg shape of an inflated balloon. -
Add the balloon knot:
For each balloon, take a tiny pinch of matching clay and flatten it into a small, irregular disk. -
Attach the knot:
Press this small disk onto the tapered bottom end of the balloon. Use your needle tool to poke a hole in the center and crinkle the edges slightly to mimic tied rubber.
Drooping Balloons?
If balloons slide down the wire during baking, create a tiny ‘hook’ or bend at the top of the inserted wire. This acts as an anchor inside the clay to hold it perfectly upright.
Step 2: Assembling the Stems
-
Prepare the wires:
Cut five lengths of white floral wire. They should be long enough to group together, with excess length at the bottom to insert into the base. -
Color code the wires (optional):
If your wire isn’t white, you can cover it with a very thin snake of white clay or paint it with acrylics after baking. The example uses clean white stems. -
Insert the wires:
Dip the tip of a wire into liquid polymer clay or bake-and-bond. Insert it firmly into the knot hole you made at the bottom of a clay balloon. -
Repeat for all balloons:
Repeat this process for all five balloons. I prefer to wipe away any excess glue immediately so the finish stays matte. -
Pre-bake rigidity check:
Ensure the wires are inserted deep enough (about halfway) to support the weight of the clay head during baking.
Make it Sparkle
Before baking, brush the unbaked clay balloons with mica powder (pearl or iridescent white). This gives them a latex-like sheen without needing a glossy varnish later.
Step 3: Building the Base & Bouquet
-
Create the support disc:
Roll out a slab of white or cream clay to about 1/4 inch thickness. Cut a neat circle using a cutter to serve as the weighted base. -
Arrange the bouquet:
Gather your wired balloons in your hand. Arrange them at staggered heights so they nestle together without smashing into one another. -
Twist the bottom:
Once satisfied with the arrangement, twist the wires together near the bottom to create a single central trunk. -
Secure to base:
Insert the twisted wire trunk into the center of your clay base disc. Use a dab of liquid clay to secure the connection point.
Step 4: Baking and Finishing
-
Support and bake:
Because the balloons are top-heavy, you may need to prop the stems up against a baking safe mug or use a bead rack. Bake according to your clay package instructions (usually 275°F/135°C for 30 minutes). -
Cool completely:
Let the sculpture cool completely before handling. The clay is fragile while warm. -
Add tiny ribbons (optional):
For extra detail, you can tie tiny pieces of matching embroidery floss or thin ribbon right at the neck of distinct balloons. -
Tie the main bow:
Take your textured cream ribbon and tie a neat bow around the bundle of wire stems, about an inch or two above the base. -
Secure the bow:
Trim the ribbon ends at an angle. A tiny dot of superglue behind the knot will keep the bow from sliding down the slippery wires.
Place this charming bunch on a birthday cake or shelf for a sweet celebration that never deflates

The Complete Guide to Pottery Troubleshooting
Uncover the most common ceramic mistakes—from cracking clay to failed glazes—and learn how to fix them fast.
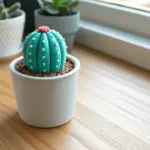
Age Number Candle Picks
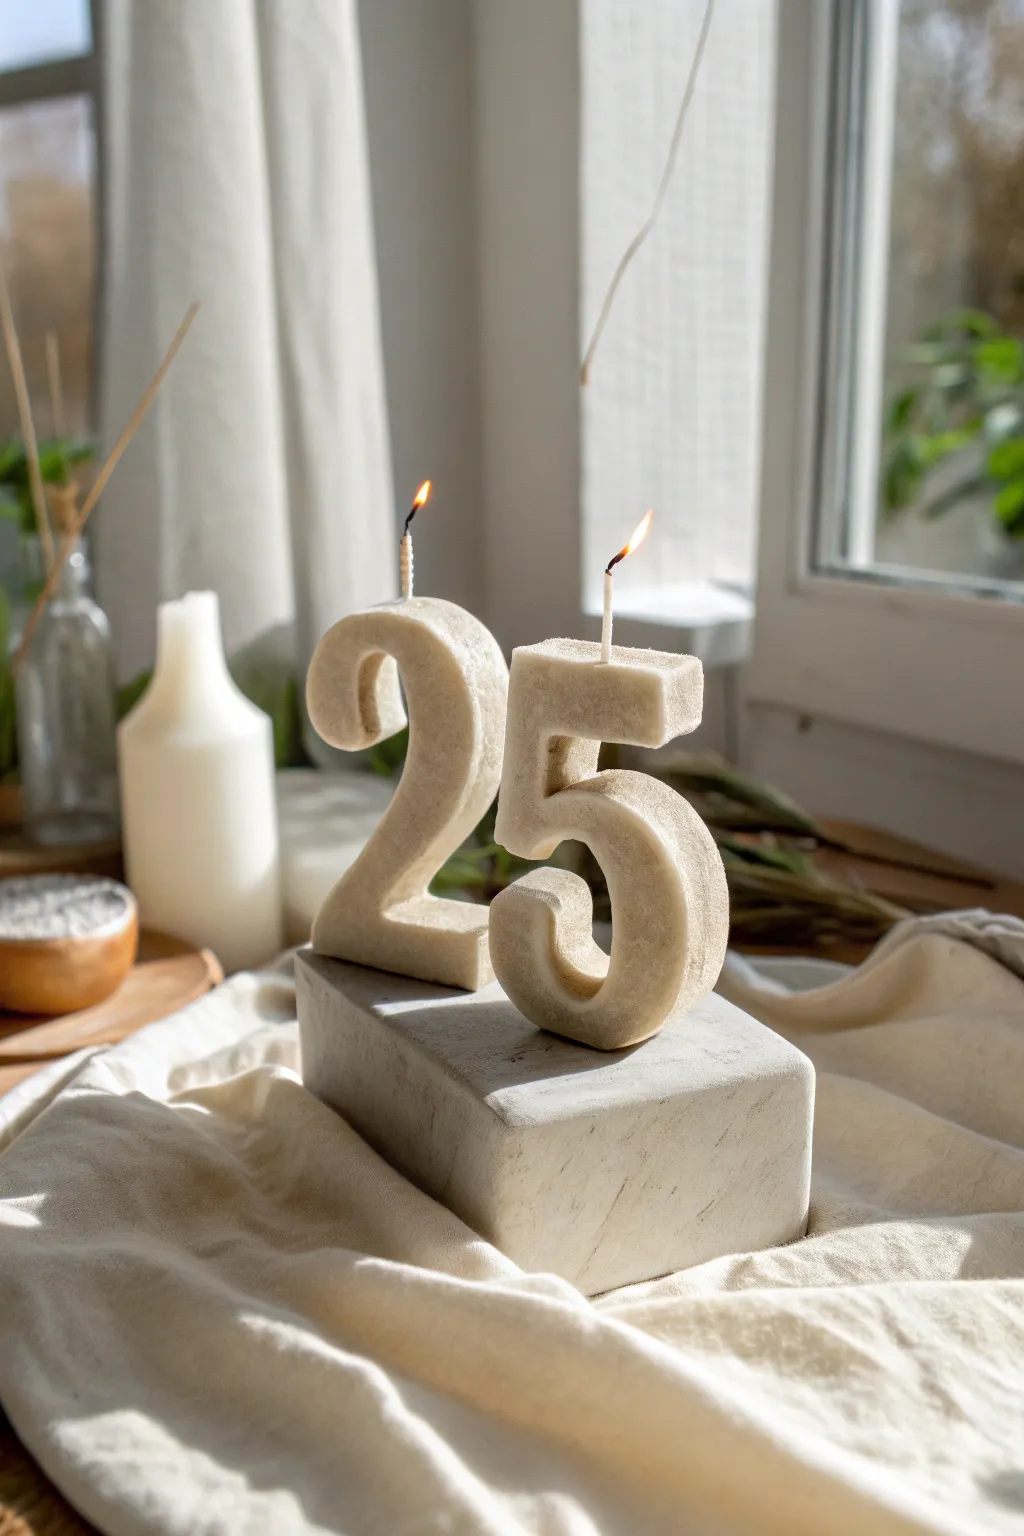
Transform simple polymer clay into sophisticated, high-end decor with these faux stone age candles. The speckled, matte finish mimics natural rock, turning a standard milestone number into a timeless keepsake.
Detailed Instructions
Materials
- Light beige or off-white polymer clay
- Coarse black pepper or dried used coffee grounds
- Translucent liquid polymer clay
- Number cookie cutters (or a printed template and craft knife)
- Candle wicks with metal tabs
- Small wooden skewer or toothpick
- Sandpaper frame (fine grit)
- Acrylic roller or pasta machine
- Oven for baking
- Cornstarch (for release)
Step 1: Preparing the Faux Stone Clay
-
Condition the base:
Start by taking your light beige or off-white polymer clay and kneading it thoroughly until it is soft and pliable. Warm clay is essential for getting smooth edges later on. -
Add texture:
Flatten the conditioned clay into a pancake shape. Sprinkle a generous pinch of coarse black pepper or dry coffee grounds onto the surface. This creates that realistic speckled stone look. -
Incorporate the inclusions:
Fold the clay over the speckles and knead it again. Continue folding and rolling until the black flecks are evenly distributed throughout the entire block of clay. -
Roll the slab:
Using an acrylic roller or a pasta machine, roll the speckled clay out into a thick slab. You want this quite substantial, about 1/2 inch to 3/4 inch thick, so the numbers can stand upright easily.
Step 2: Shaping the Numbers
-
Cut the forms:
Lightly dust your cutter or the clay surface with cornstarch to prevent sticking. Press your number cutters firmly into the thick slab. If you are cutting by hand with a template, trace carefully with a craft knife. -
Release carefully:
Gently push the clay numbers out of the cutters. If the edges get slightly squashed, I like to gently pat them back into a crisp rectangular shape with a flat ruler. -
Smooth the surfaces:
Dip your finger in a tiny bit of water or baby oil and lightly smooth away any fingerprints or sharp ridges on the face and sides of the numbers. -
Create the wick channel:
Using a skewer or a thin drill bit, poke a vertical hole into the top center of each number. This hole needs to be deep enough to hold the wick but doesn’t need to go all the way through.
Natural Stone Texture
Mix in a tiny amount of translucent clay with the beige. When baked, this adds depth and makes the faux stone look less like opaque plastic.
Step 3: Finishing and Assembly
-
Insert the wick:
Take a short length of candle wick. Dip the bottom end (or the metal tab if you are embedding it) into a drop of liquid polymer clay for extra grip. -
Secure the wick:
Insert the wick into the pre-made hole. Gently pinch the clay around the base of the wick to close the gap slightly and secure it upright. -
Texturize the surface:
To enhance the stone effect, take an old toothbrush or a ball of aluminum foil and gently tap it all over the surface of the unbaked clay to give it a porous, pitted texture. -
Bake the project:
Place the numbers upright or flat on a ceramic tile or baking sheet. Bake according to your polymer clay manufacturer’s specific temperature and time instructions. -
Cool down:
Let the numbers cool completely inside the oven with the door cracked open. This prevents thermal shock and potential cracking. -
Final sanding:
Once hard, lightly sand the surfaces if you want a smoother, tumbled-stone feel. This also helps reveal more of the speckled inclusions.
Clay Too Soft?
If the clay is too mushy to hold sharp corners, pop the slab in the fridge for 15 minutes before cutting out your numbers.
Now you have a set of custom, stony candles ready to make a sophisticated statement on any birthday cake
Tiny Present Box Gift Tags
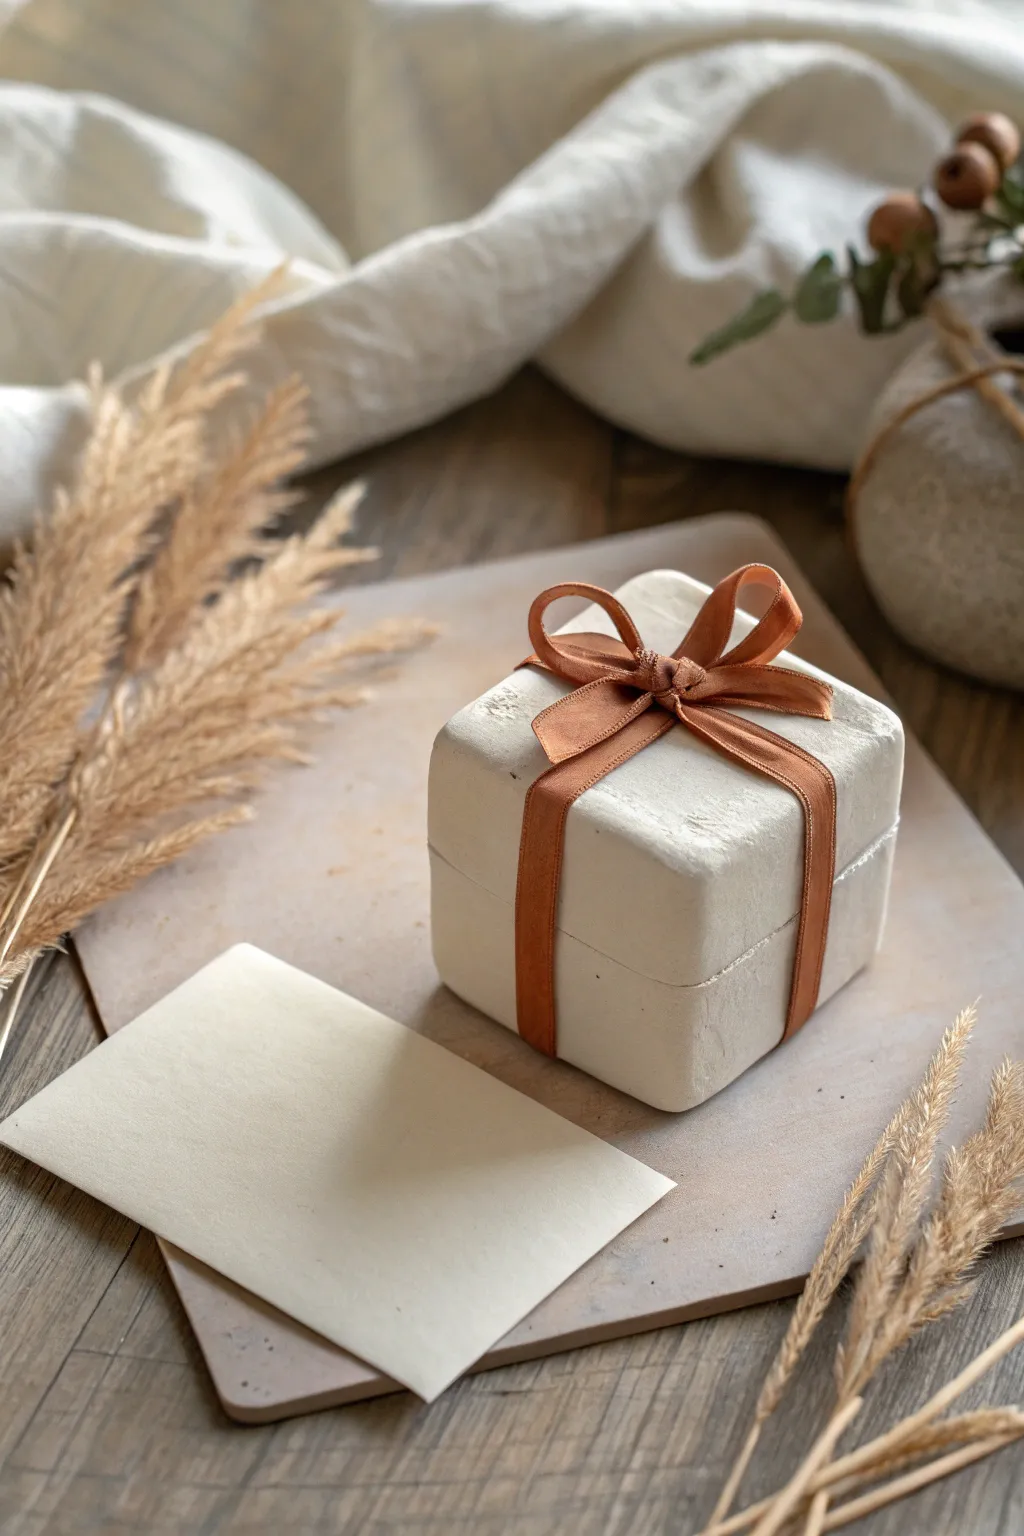
Sculpt the cutest faux gift box to adorn your presents using air-dry clay. This minimalist, rustic white cube wrapped in a delicate rust-colored ribbon acts as a charming gift tag or a keepsake ornament.
Step-by-Step Guide
Materials
- White air-dry clay or polymer clay
- Rolling pin
- Sharp crafting knife or clay blade
- Ruler
- Sandpaper (fine grit)
- Rust or terracotta colored silk ribbon (1/4 inch width)
- Small bowl of water
- Acrylic sealer (matte)
Step 1: Shaping the Base
-
Condition the clay:
Start by taking a generous chunk of your white clay and kneading it in your hands until it becomes soft, pliable, and free of cracks. -
Form a rough cube:
Roll the clay into a smooth ball first, then gently press it against your work surface to flatten the bottom. Use your fingers to press the sides in to begin forming a square shape. -
Refine the edges:
Use a flat tool or a ruler to press against the sides of the cube to sharpen the corners. You want a distinct box shape, but keep it slightly organic for that handmade pottery feel. -
Slice the lid line:
To create the illusion of a lid, use your craft knife to score a horizontal line all the way around the cube, about one-third of the way down from the top. Do not cut all the way through; just create a visible groove. -
Smooth the surface:
Dip your finger in a little bit of water and gently run it over the clay to smooth out any fingerprints or rough textures. I like to leave a few tiny imperfections to mimic stone.
Clean Lines
To get super crisp edges, freeze your clay cube for 10 minutes before doing the final smoothing with a knife blade.
Step 2: Drying and Finishing
-
Let it dry:
Place your clay box on a clean, flat surface to dry. If using air-dry clay, this usually takes 24-48 hours. Rotate it occasionally so the bottom dries evenly. -
Sand the imperfections:
Once fully cured and hard, take your fine-grit sandpaper and gently buff the sides and corners. Focus on smoothing any sharp ridges created during the shaping process. -
Clean dust:
Wipe the cube down with a slightly damp cloth or a dry brush to remove the sanding dust. -
Apply sealer:
Coat the entire cube with a matte acrylic sealer to protect the white finish and give it a professional, ceramic-like look. Let this coat dry completely.
Make it Functional
Before drying, press a small eye hook into the top center so you can actually hang this as an ornament later.
Step 3: Wrapping the Parcel
-
Cut the ribbon:
Cut a length of your rust-colored silk ribbon, approximately 12-15 inches long, ensuring you have enough for a bow. -
Center the ribbon:
Place the center of the ribbon across the top of the cube. Hold it in place with your thumb. -
Wrap the bottom:
Bring the ends of the ribbon down the sides and underneath the box. Cross them over each other on the bottom side of the cube. -
Bring it up:
Bring the ribbon ends up the remaining two bare sides of the cube, meeting back at the top center where your thumb was. -
Tie the knot:
Tie a simple knot initially to secure the ribbon tightly against the clay surface. The ribbon should sit snugly in the center of the faces. -
Form the bow:
Tie a small, neat bow on top. Adjust the loops so they are even and relatively small compared to the box size. -
Trim ends:
Snip the tails of the ribbon at an angle or into a V-shape. Keep them short so they don’t hide the clay box form.
Now you have a timeless little clay parcel perfect for birthday decor


What Really Happens Inside the Kiln
Learn how time and temperature work together inside the kiln to transform clay into durable ceramic.
Party Hat Animal Figurines
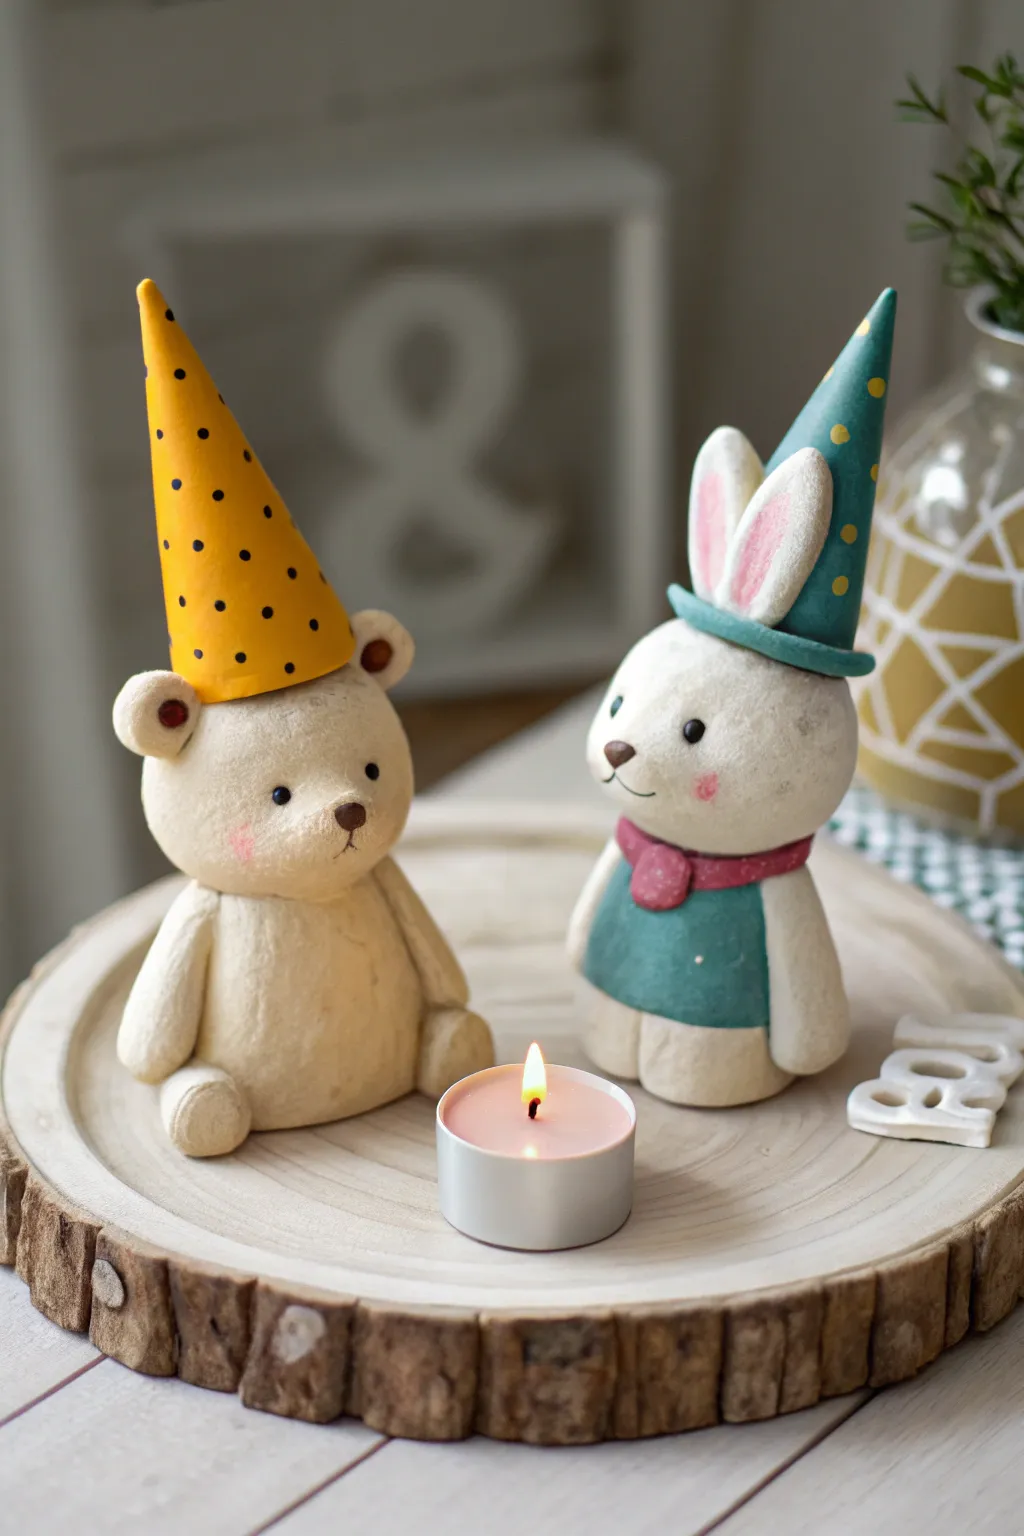
These adorable bear and bunny figurines bring a touch of handcrafted sweetness to any celebration display. Sculpted from soft clay and finished with cheerful polka-dot party hats, they make perfect cake toppers or keepsakes.
Step-by-Step Tutorial
Materials
- Polymer or air-dry clay (cream, white, teal, yellow, pink)
- Acrylic paints (black, pink, brown, gold)
- Fine detail paintbrush
- Sculpting tools (needle tool, ball tool)
- Small rolling pin
- Clear matte varnish (optional)
- Toothpicks or jewelry wire (for internal support)
- Glue (if assembling dry parts)
Step 1: Sculpting the Bear
-
Form the base:
Start with a ball of cream-colored clay about the size of a golf ball. Shape it into a rounded pear form, flattening the bottom so it sits securely without tipping over. -
Add legs and arms:
Roll two small sausage shapes for the legs and attach them to the lower front of the body. Make two smaller logs for arms and press them gently against the sides of the tummy. -
Create the head:
Roll a slightly smaller sphere for the head. Press it gently onto the body, using a small piece of toothpick inside connection points for extra stability if needed. -
Ears and snout:
Attach two tiny flattened discs to the top of the head for ears, using a ball tool to indent the centers slightly. Add a very small oval of clay to the center of the face for the snout area.
Make them Fuzzy
Before baking, gently dab the clay surface with a stiff stencil brush or toothbrush. This creates a realistic ‘stuffed animal’ fabric texture instantly.
Step 2: Sculpting the Bunny
-
Body and attire:
Form a white clay pear shape for the bunny’s body. Roll a thin sheet of teal clay and wrap it around the torso to create a little sweater or dress, smoothing the seam at the back. -
Collar detail:
Roll a small snake of pink clay and flatten it slightly. Wrap this around the neck area where the head will join, creating a decorative collar or scarf. -
Head and ears:
Roll a round white head and attach it above the collar. Form two long tear-drop shapes for ears. Press a smaller pink teardrop inside each ear for detail before attaching them to the top of the head. -
Limbs:
Add small white paws peeking out from the bottom of the teal outfit and simple rounded arms resting at the sides.
Personalized Flags
Create tiny paper pennants glued to wire and stick them into the clay hands before baking to hold custom birthday messages or names.
Step 3: Adding the Party Hats
-
Shape the cones:
Roll out yellow clay for the bear and teal clay for the bunny. Cut out a semi-circle shape from each color and roll them into sharp cone shapes. -
Fit and attach:
Check the fit on each animal’s head. The bunny’s hat might need a wider brim to accommodate the ears; I sometimes trim away a small notch at the back for a better fit. -
Secure the hats:
Gently press the hats onto the heads. Use a tiny bit of liquid clay or water (depending on your clay type) to bond them permanently.
Step 4: Refining and Baking
-
Texture the fur:
Take an old toothbrush or a stiff bristle brush and gently tap it over the white and cream clay surfaces to create a subtle, fuzzy fur texture. -
Dry or bake:
Follow the manufacturer instructions for your specific clay. If baking polymer clay, ensure your oven is preheated accurately to avoid scorching the light colors.
Step 5: Painting Details
-
Facial features:
Using a very fine brush or a dotting tool, dab on small black eyes. Paint a small brown triangle nose for the bear and a tiny pink nose for the bunny. -
Add the blush:
Dry brush a tiny amount of pink paint or crushed pastel chalk onto the cheeks of both animals for a sweet, rosy glow. -
Decorate the hats:
Dip a toothpick or small dotting tool into black paint to add polka dots to the bear’s yellow hat. Use gold or yellow paint for dots on the bunny’s teal hat. -
Final touches:
Once the paint is fully dry, seal your figurines with a matte varnish to protect the surface and eliminate any unwanted shine.
Place your festive duo on a slice of wood or cake stand to complete the celebration scene
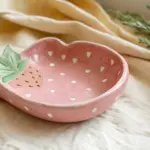
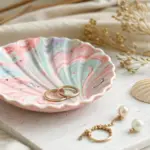
Confetti Sprinkle Trinket Dish
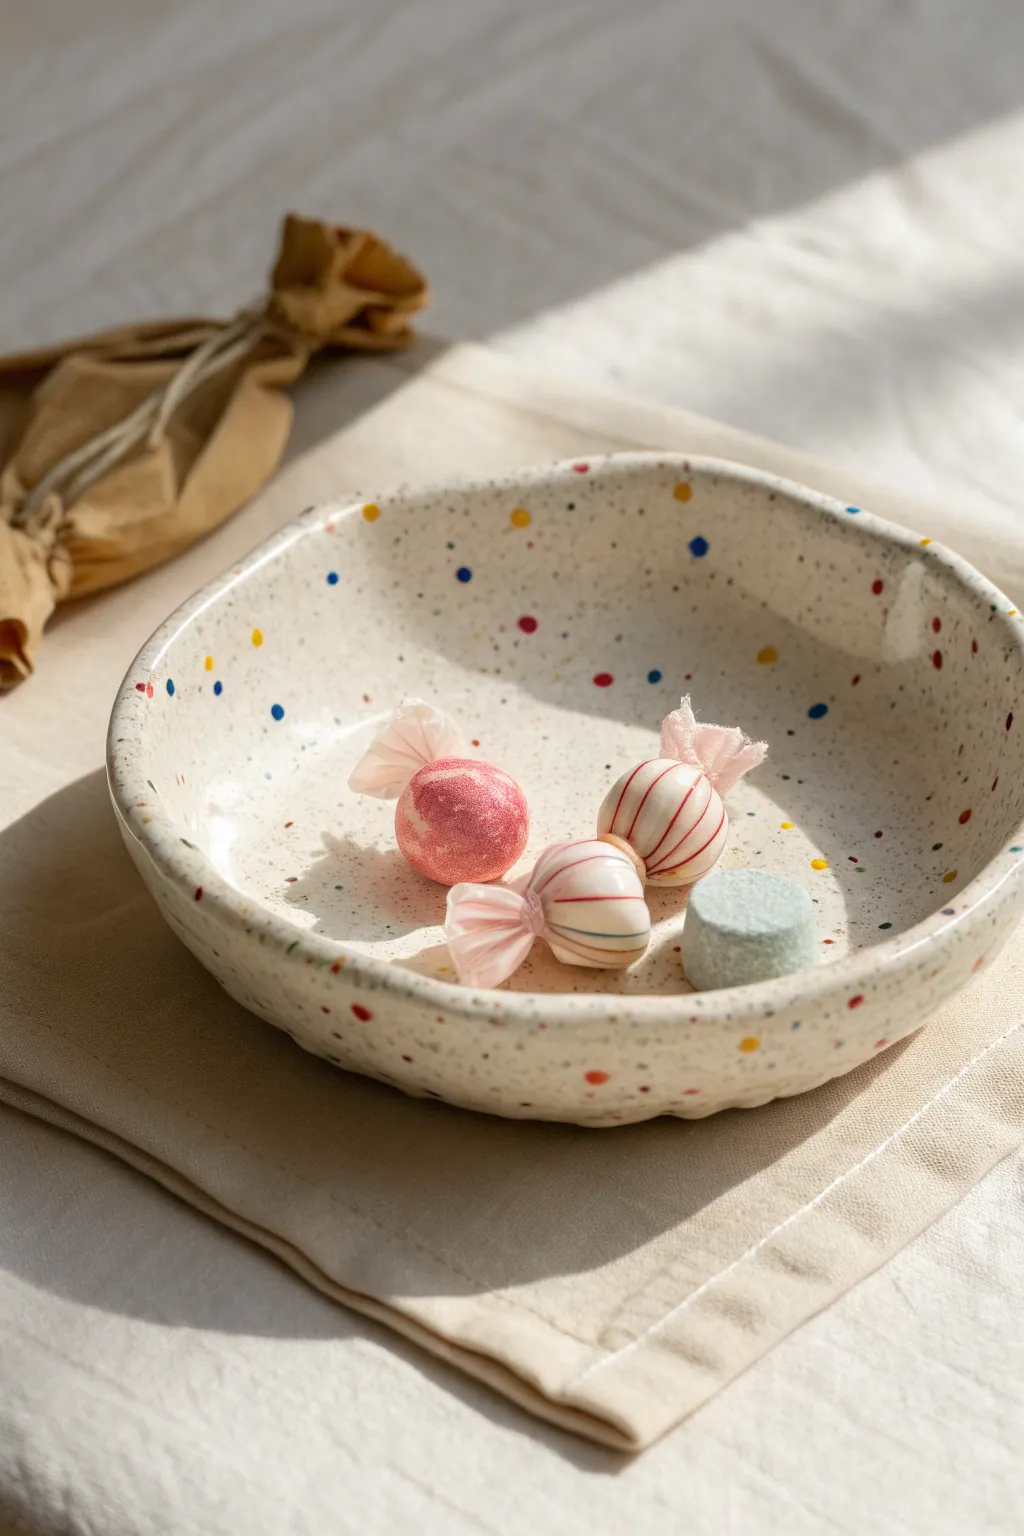
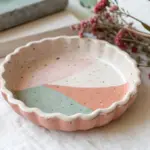
Capture the joy of a birthday party in a functional piece of art with this handmade confetti-style trinket dish. The creamy white base provides the perfect canvas for playful pops of blue, yellow, and red color, mimicking scattered sprinkles.
How-To Guide
Materials
- White or cream-colored polymer clay (approx. 200g)
- Small amounts of red, blue, and yellow polymer clay
- Rolling pin or acrylic roller
- Small circular bowl or plate (to use as a mold)
- Craft knife or clay blade
- Fine-grit sandpaper (400-600 grit)
- Food-safe gloss glaze or varnish
- Soft paintbrush
- Parchment paper
- Oven
Step 1: Preparing the Confetti
-
Condition the colors:
Start by conditioning the small amounts of red, blue, and yellow clay until they are soft and pliable. You only need a pea-sized amount of each color. -
Create clay snakes:
Roll each colored piece into a very thin snake, roughly the thickness of a piece of spaghetti or thinner. -
Chop the sprinkles:
Using your craft knife, chop these thin snakes into tiny, irregular crumbs and bits. These will be your confetti sprinkles. Keep them separated by color for now. -
Condition the base:
Take your large block of white or cream clay and condition it thoroughly until it’s warm and easy to work with. Roll it into a smooth ball.
Natural Speckle Hack
Mix black pepper or dried tea leaves into the white clay before rolling. This adds tiny, realistic dark specks that mimic natural stoneware pottery.
Step 2: Building the Slab
-
Roll the first pass:
Place your white clay ball on a sheet of parchment paper and flatten it slightly with your palm. Roll it out to a thickness of about 1/4 inch. -
Scatter the confetti:
Take your chopped colored bits and sprinkle them randomly over the top of the white slab. Aim for an uneven, natural distribution rather than perfect spacing. -
Embed the colors:
Gently roll over the slab again with the rolling pin. This pushes the colored bits into the white clay surface so they become flush. -
Add dimension (optional):
I like to tear off small bits of the slab and re-combine them, then re-roll once more. This distributes some color deeper inside the clay for a more authentic ‘terrazzo’ stone look. -
Final roll out:
Roll the clay out to its final thickness, roughly 1/8 to 3/16 inch thick. Ensure the surface is smooth.
Smudged Colors?
If the confetti colors smear during rolling, your clay is too warm. Place the slab in the fridge for 10 minutes before the final rolling pass.
Step 3: Shaping and Finishing
-
Cut the shape:
Using a large bowl or a paper template as a guide, cut a rough circle or organic oval shape from the slab using your clay knife. -
Smooth the edges:
Dip your finger in a tiny bit of water (or baby oil) and run it along the cut rim to smooth out any sharp edges or roughness. -
Form the curve:
Lift the clay slab and gently drape it inside your bowl mold. Press it lightly so it takes the curved shape of the bowl’s interior. -
Create the dimpled rim:
To match the handmade look in the photo, gently press your thumb along the rim at irregular intervals to create a slightly wavy, organic edge. -
Bake carefully:
Bake the clay while it is still inside the bowl mold according to the manufacturer’s instructions (usually 275°F/135°C for 15-30 minutes). -
Cool down:
Let the dish cool completely inside the mold before removing it to prevent warping. -
Sand for smoothness:
Once cool, use fine-grit sandpaper to lightly buff the surface and rim, removing any fingerprints or lint. -
Apply glaze:
Brush on a thin coat of gloss glaze to bring out the vibrancy of the colored speckles and give it a ceramic-like shine.
Place your finished dish on a vanity or coffee table to add a festive touch to your daily routine

TRACK YOUR CERAMIC JOURNEY
Capture glaze tests, firing details, and creative progress—all in one simple printable. Make your projects easier to repeat and improve.
Birthday Candle Holder Set
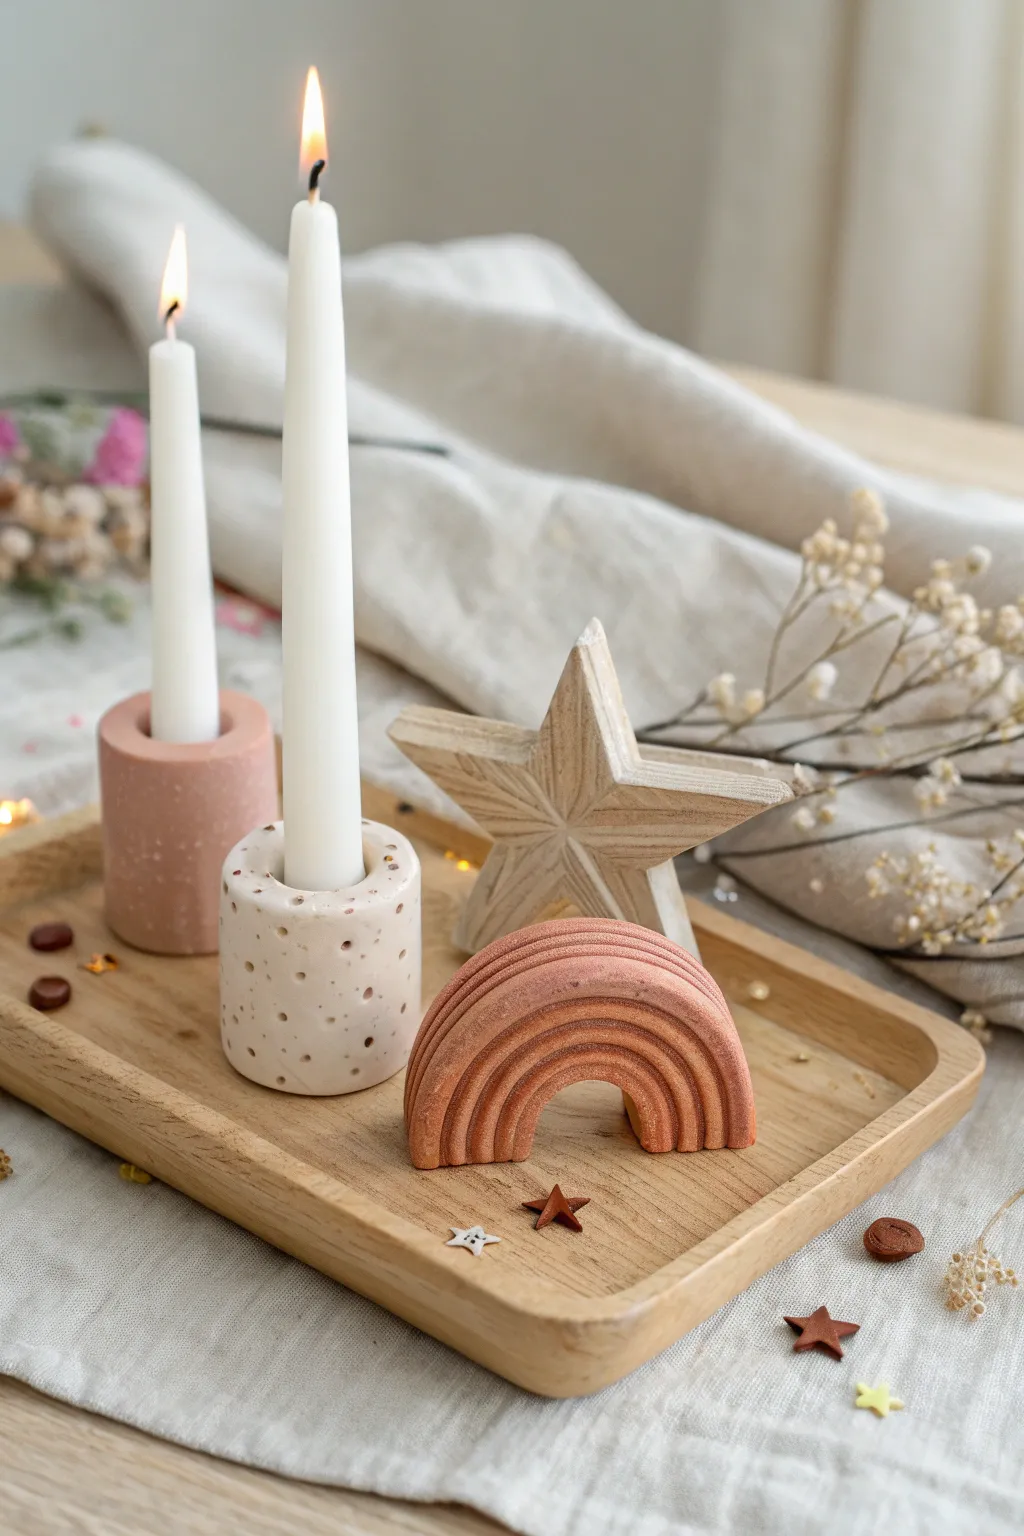
Create a cozy, modern atmosphere for any birthday celebration with this sleek set of clay decor pieces. The project features a smooth cylindrical candle holder, a shorter speckled version, and a matching textured rainbow, all finished in soft, earthy tones.
Step-by-Step Guide
Materials
- Air-dry clay or polymer clay (white)
- Acrylic paints (terracotta/dusty rose, cream/beige)
- Fine grit sandpaper
- Rolling pin
- Cutting blade or craft knife
- Taper candles (for sizing)
- Toothpick or needle tool
- Small paintbrush
- Water used for smoothing
- Varnish (matte finish)
Step 1: Shaping the Candle Holders
-
Condition the clay:
Begin by kneading your clay until it is warm, pliable, and free of cracks. Divide it into two uneven balls: a larger one for the tall pink holder and a smaller one for the short speckled holder. -
Shape the tall cylinder:
Take the larger ball and roll it into a thick log on your work surface. Tap the ends flat against the table to create a distinct cylinder shape about 2 to 2.5 inches tall. -
Insert the candle hole:
Take one of your taper candles and gently push it into the center of the cylinder top. Wiggle it slightly to ensure the hole is wide enough, going about an inch deep, then remove the candle. -
Form the short cylinder:
Repeat the rolling and tapping process with the smaller ball of clay to create a shorter, stout cylinder, roughly 1.5 inches tall. -
Create the second hole:
Press the taper candle into the top of this shorter cylinder just as before. If the clay bulges out when you press down, gently reshape the sides with your palms while the candle is still inserted. -
Smooth the surfaces:
Dip your finger in a little water and run it over the clay to smooth out any fingerprints or seams. Ensure the top rims are flat and neat.
Step 2: Crafting the Rainbow
-
Roll clay snakes:
Roll out four long, even ropes (snakes) of clay. They should be uniform in thickness, roughly the width of a pencil. -
Form the arches:
Take the smallest rope and curve it into a U-shape. Take the next rope and curve it over the first, pressing them gently together so they adhere. -
Complete the stack:
Continue stacking the remaining two ropes over the top until you have a four-layer rainbow arch. Press the layers significantly firm against each other so they become a single unit. -
Trim the bottom:
Use your cutting blade to slice straight across the bottom of the rainbow legs so it sits perfectly flat and stable on a table.
Uneven Rainbow Legs?
If your rainbow feels wobbly, tape sandpaper to a table and rub the bottom of the rainbow back and forth over it to create a perfectly flat base.
Step 3: Drying and Texturing
-
Add speckle texture:
Before the short cylinder dries, use a toothpick to poke shallow, random holes all over the sides and top rim. This creates the speckled texture seen in the image. -
Dry the pieces:
Set all three pieces (two holders and the rainbow) in a cool, dry place. Let them cure completely for 24-48 hours depending on your clay type. -
Sand for smoothness:
Once fully hard, take your fine-grit sandpaper and lightly buff the tall cylinder and the rainbow to remove any rough patches.
Candle Fit Trick
Make the candle holes slightly larger than the candle itself. Clay shrinks as it dries, and a hole that is too tight will crack the holder when used.
Step 4: Painting and Finishing
-
Paint the tall holder:
Mix a dusty rose or terracotta acrylic paint. I find that watering the paint down slightly helps it soak into air-dry clay for a more natural, stained look. Apply two coats. -
Paint the rainbow:
Paint the rainbow arch with the same terracotta shade. To enhance the grooves between the arches, you can use a slightly darker wash of the color in the seams. -
Paint the short holder:
Paint the short, textured holder with a creamy beige color. Ensure you get paint into the little indented dots. -
Highlight the speckles:
Dip a very fine brush or toothpick into brown or bronze metallic paint and carefully fill inside the indented dots on the short holder to make the speckles pop. -
Seal the set:
Finish all dry pieces with a coat of matte varnish to protect the surface from scratches and minor wax drips.
Arrange your beautiful new set on a wooden tray with dried flowers for a stunning birthday centerpiece
Photo Holder With Birthday Banner
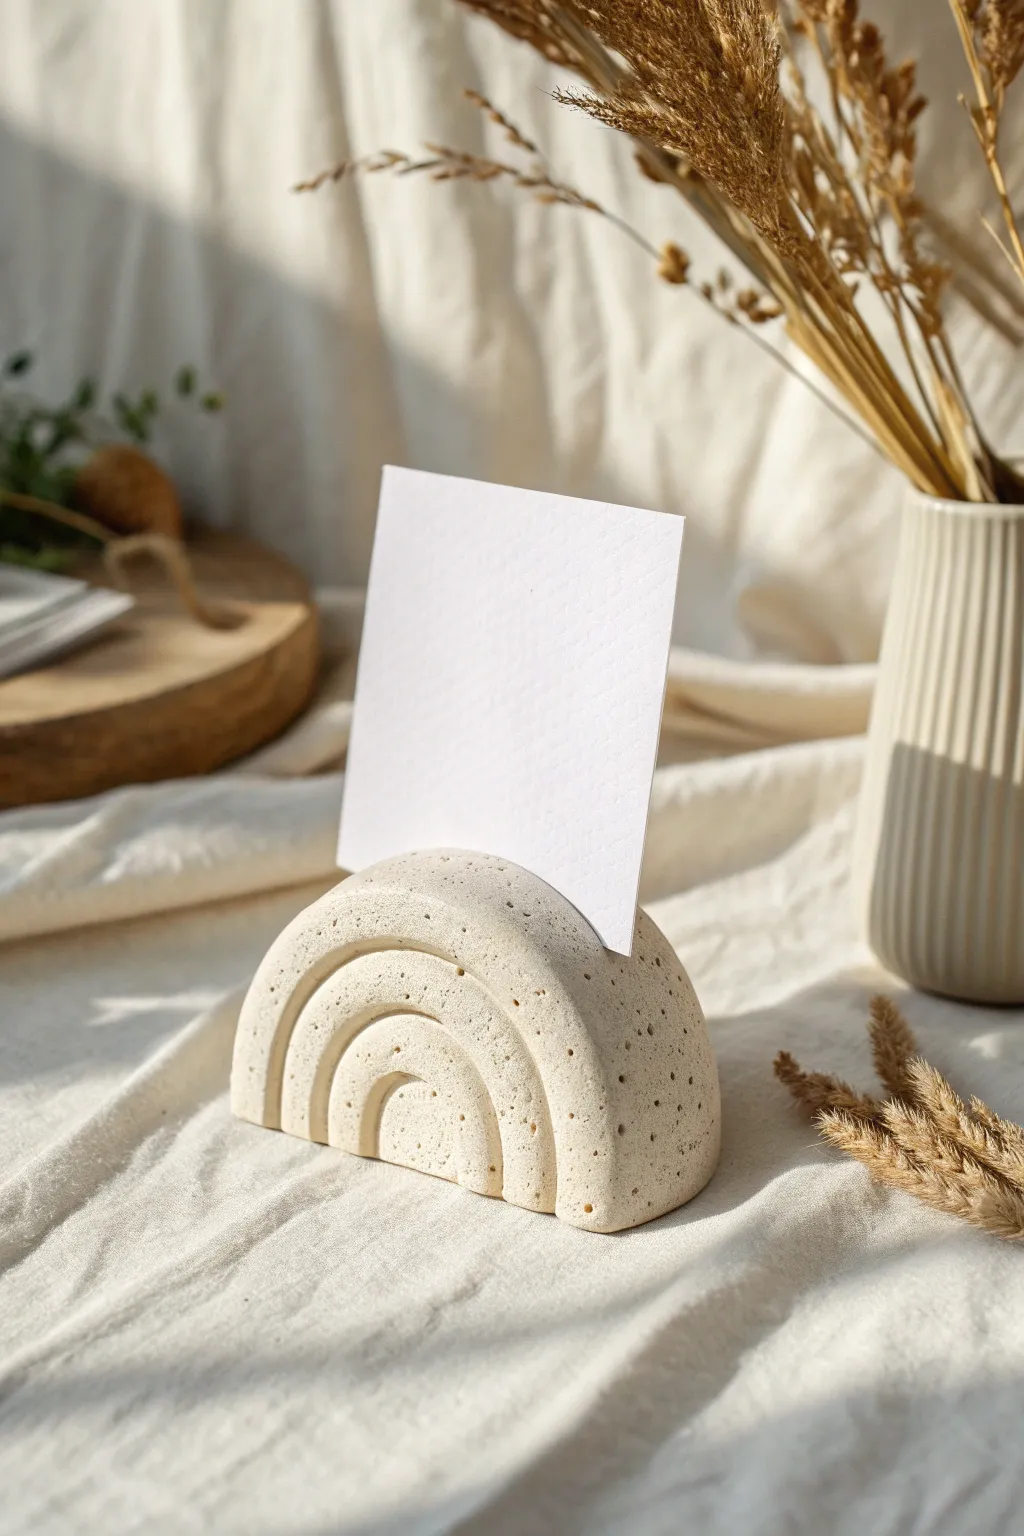
This minimalist, boho-inspired photo holder brings a touch of earthy charm to any desk or shelf. With its subtle speckled texture and soft arch design, it’s perfect for displaying birthday greetings, favorite polaroids, or even as a chic table number holder.
Step-by-Step
Materials
- Polymer clay (white or beige)
- Dried coffee grounds or black pepper (for speckles)
- Rolling pin or acrylic roller
- Craft knife or clay blade
- Round cookie cutter (approx 4-5 inches)
- Small round piping tip or straw (optional for texture)
- Modeling tool or toothpick
- Cardstock or thick paper (for testing the slot)
- Baking sheet with parchment paper
- Fine-grit sandpaper
Step 1: Preparing the Clay Base
-
Mix the Speckles:
Begin by conditioning your polymer clay until it’s soft and pliable. Flatten it out slightly and sprinkle a small pinch of dried coffee grounds or black pepper onto the surface. Fold the clay over and knead it thoroughly to distribute the speckles evenly, creating that stony, organic look. -
Form the Dough:
Roll the prepared clay into a smooth ball. Ensure there are no cracks or air bubbles trapped inside, as these can weaken the structure later. -
Initial Shape:
Flatten the ball slightly with your palm to create a thick puck shape.
Slit Too Tight?
If the card slot shrank during baking and is too tight, carefully run a folded piece of sandpaper or a thin nail file through the groove to widen it without damaging the top arch.
Step 2: Sculpting the Rainbow Arch
-
Roll to Thickness:
Use your roller to flatten the clay to a uniform thickness of about 1 inch. This needs to be sturdy enough to stand on its own, so keeping it thick is crucial. -
Create the Arch:
Use your round cookie cutter to cut a perfect circle from the slab. Alternatively, you can shape the arch freehand if you prefer a more organic silhouette. -
Cut the Base:
Slice off the bottom third of the circle using a sharp clay blade to create a flat, stable base. This semi-circle will become your standing rainbow. -
Smooth the Edges:
Gently tap the cut edges with your fingers to soften any sharpness. I like to run my finger along the curve to ensure it’s perfectly rounded.
Step 3: Detailing and Refining
-
Carve the Arches:
Using a modeling tool or the back of a knife, gently press curved lines into the face of the clay to mimic separate rainbow arches. Create three distinct concentric arches, pressing deep enough to see the shadow but not cutting all the way through. -
Add Texture:
To enhance the stone-like effect, you can lightly tap the surface with a toothbrush or crumbled aluminum foil. This breaks up the smoothness of the polymer clay. -
Create the Card Slot:
Use your clay blade to press a deep slit into the absolute top center of the arch. Gently wiggle the blade slightly to widen the gap just enough to hold a piece of cardstock. -
Test the Slot:
Briefly insert a piece of thick paper to ensure the slot is wide and deep enough. Remove the paper immediately so it doesn’t stick. -
Final Surface Check:
Inspect the piece for fingerprints. If you find any, lightly buff them away with a drop of baby oil on your finger.
Make It Glossy
For a ceramic look, apply a coat of UV resin or high-gloss glaze after baking. This seals in the speckles and makes the ‘stone’ finish look polished and high-end.
Step 4: Baking and Finishing
-
Bake the Clay:
Place your rainbow on a parchment-lined baking sheet. Bake according to your polymer clay package instructions—usually around 275°F (135°C) for 30 minutes per quarter-inch of thickness. -
Cool Completely:
Let the piece cool down fully in the oven with the door cracked open. This gradual cooling helps prevent cracks. -
Sand the Base:
Once cool, rub the flat bottom against a piece of fine-grit sandpaper placed on a table. This ensures the stand sits perfectly flat without wobbling. -
Final Polish:
If desired, you can add a matte varnish for protection, though leaving it raw preserves the natural earthy texture best.
Now your holder is ready to showcase a special memory or a thoughtful note
Mini Portrait Figurine Gift Topper
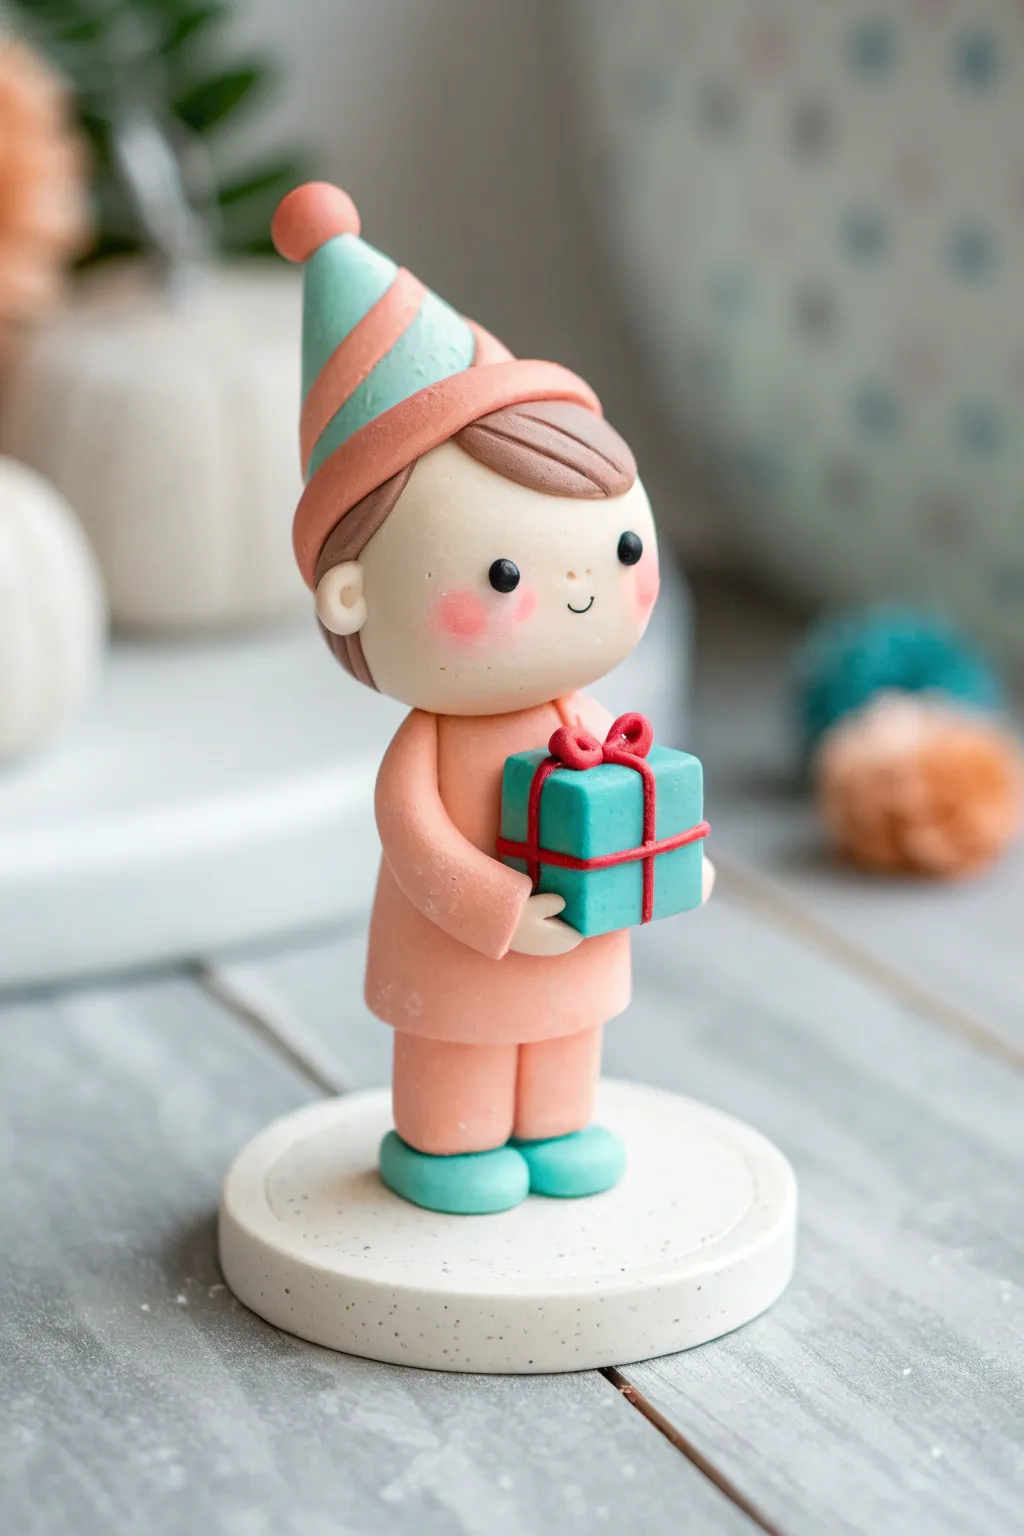
This adorable polymer clay figurine captures the joy of gift-giving with its rosy cheeks and festive party hat. Standing on a sturdy base, this sweet character makes a perfect custom cake topper or a keepsake gift for a special birthday.
Detailed Instructions
Materials
- Polymer clay (peach/flesh tone, mint green, brown, red, black, white)
- Clay tools (needle tool, ball stylus, silicone shaper)
- Acrylic rolling pin
- Small circle cutter
- Liquid polymer clay or bake-and-bond
- Pink chalk pastel and soft brush
- Gloss glaze (optional)
Step 1: Creating the Base and Body
-
Form the Base:
Start by rolling a ball of white clay and flattening it into a thick disc about 2 inches in diameter. You can use a circle cutter for a crisp edge or smooth it manually. Add a slight speckled texture by mixing in tiny bits of black clay or ‘granite’ effect clay if desired. -
Shape the Legs:
Roll two small equal-sized logs of peach clay for the pant legs. Stand them upright side-by-side in the center of your white base, pressing down gently to secure them. -
Add Shoes:
Shape two small ovals of mint green clay. Flatten the bottoms and press them onto the front of the legs to form the shoes, blending the seam slightly at the back for stability. -
Sculpt the Torso:
Mold a larger piece of peach clay into a rounded cylinder shape for the shirt. It should be slightly wider at the bottom. Attach this securely on top of the legs. -
Define the Shirt:
Use a needle tool or clay knife to create a subtle vertical indentation down the center of the shirt to mimic a button-down look, and smooth the clay at the waist where it meets the legs.
Step 2: Adding the Head and Features
-
Attach the Head:
Roll a smooth, round ball of flesh-toned clay for the head. Insert a small piece of toothpick or wire into the neck area of the torso for support, then press the head down onto it. -
Create the Hair:
Flatten a disc of brown clay and drape it over the back of the head. Use a craft knife or needle tool to texturize strands. Add a separate flattened teardrop shape to the front for the side-swept bangs. -
Make the Face:
Use a small ball tool to make slight indentations for the eyes. Press two tiny balls of black clay into these spots. Roll a microscopic snake of black clay into a ‘U’ shape for the smile and press it gently between the eyes. -
Add Ears:
Form two tiny balls of flesh-toned clay. Press them onto the sides of the head using a small ball tool to indent the center of each ear. -
Blush the Cheeks:
Scrape a little pink chalk pastel into powder. Use a soft, dry paintbrush to gently dust rosy circles onto the cheeks for that sweet, flushed look.
Clean Clay Only
White and light peach clay pick up dust instantly. Keep baby wipes nearby to clean your hands and tools often, especially before switching from dark colors like brown back to the light skin tones.
Step 3: Finishing Touches
-
Creating the Arms:
Roll two snakes of peach clay for the arms. tapering them slightly at the wrist. Attach them to the shoulders, bending them forward at the elbows so the hands will meet in the middle. -
Making the Gift Box:
Shape a cube from the mint green clay. Keep the edges relatively sharp to look like a box. -
Decorating the Gift:
Roll extremely thin snakes of red clay. Wrap them around the box to create the ribbon detail. Add a tiny red bow on top made from two small loops and a center dot. -
Positioning the Gift:
Place a dab of liquid clay on the figurine’s stomach area. Press the gift box against the body and gently curve the ends of the arms (the hands) around the sides of the box to hold it in place. -
Constructing the Hat:
Form a cone shape from mint green clay. Roll a thin snake of peach clay and create a spiral stripe around the cone. Add a peach ball to the very tip and a peach band around the brim. -
Final Assembly:
Place the finished hat on the head at a jaunty angle. Double-check that the figure is balanced before baking according to your clay manufacturer’s instructions.
Pattern Play
Personalize the figurine by pressing a texture sheet onto the shirt clay before shaping, or create a polka-dot pattern on the gift box using tiny flattened balls of contrasting clay.
Once baked and cooled, your charming little party guest is ready to celebrate the big day
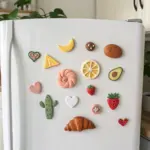
Ice Cream Sundae Magnet Set
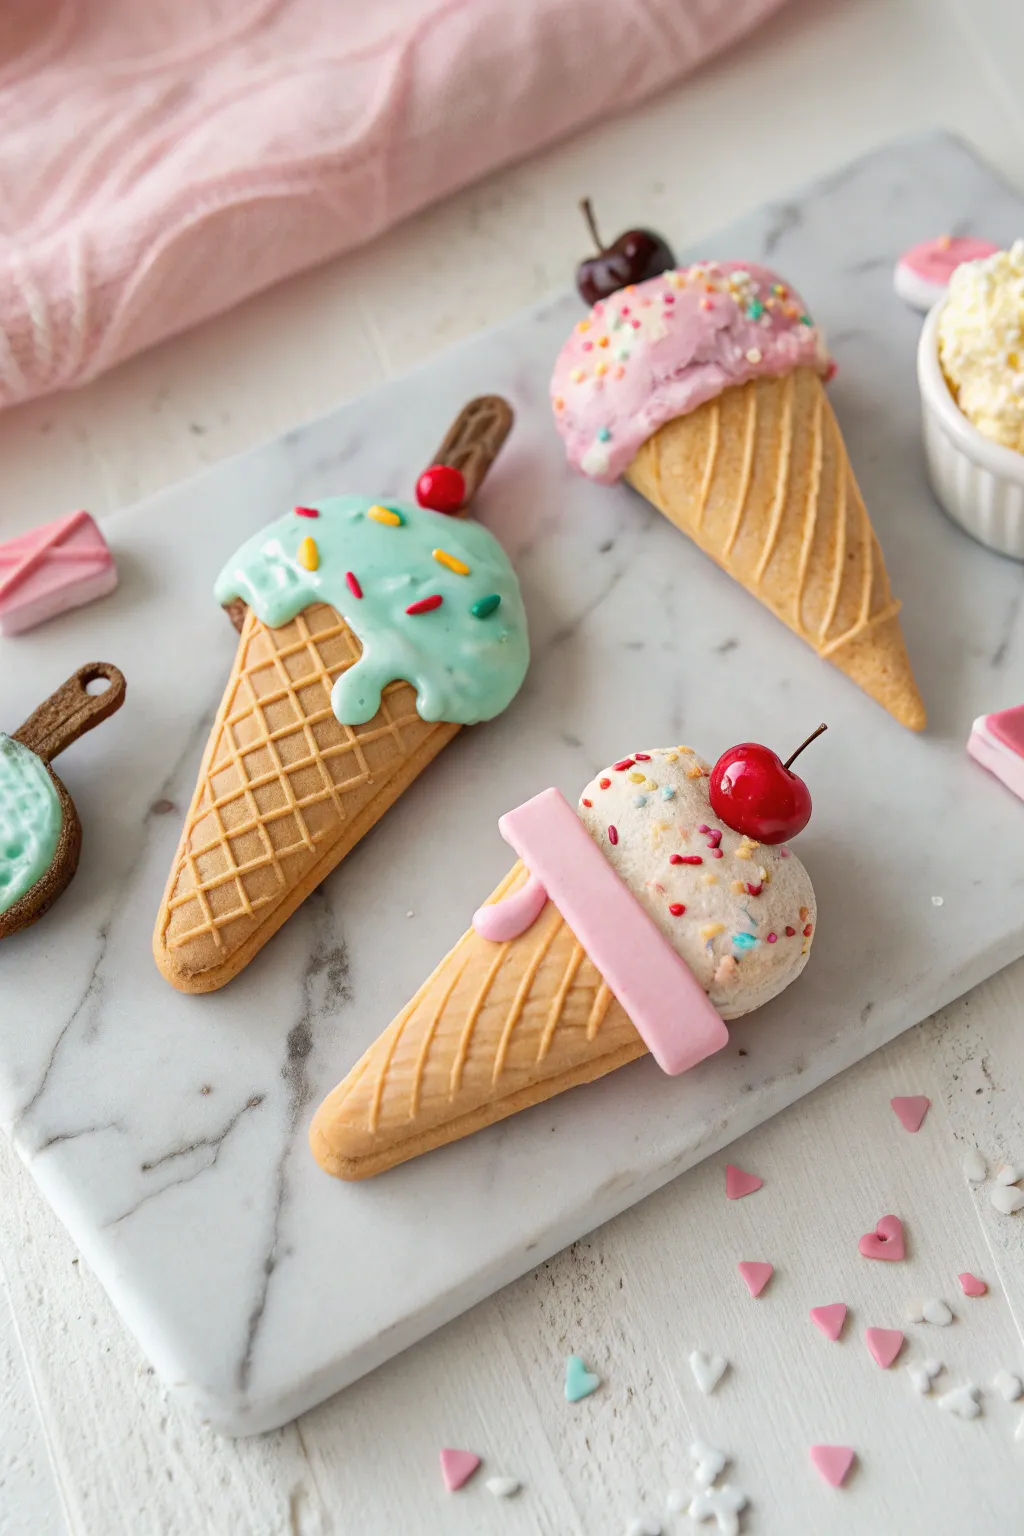
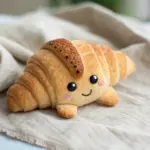
These delightful polymer clay magnets look good enough to eat, featuring realistic waffle texturing and sweet toppings. Capture the charm of a retro ice cream parlor with these miniature treats that are perfect for holding up birthday cards or photos.
Step-by-Step
Materials
- Polymer clay (tan/beige, mint green, strawberry pink, white, red, brown)
- Liquid polymer clay (various colors or clear to mix)
- Waffle design roller or texture mat
- Small round clay cutter or craft knife
- Ball stylus tool
- Needle tool or toothpick
- Pastel chalks (browns/oranges) for shading
- Old toothbrush (for texture)
- Gloss glaze or UV resin
- Strong magnets
- Super glue or E6000
Step 1: Shaping the Cones
-
Prepare the dough:
Start by conditioning your tan or beige clay until it is soft and pliable. Roll it out into a flat sheet about 1/4 inch thick. -
Create waffle texture:
Press a waffle texture mat firmly onto the clay sheet. If you don’t have a mat, carefully score a diagonal diamond grid pattern using the back of a knife or a ruler edge. -
Cut the shapes:
Using a craft knife, cut out elongated triangle shapes for the cones. You can make simple pointed triangles or round off the bottom slightly for a softer look. Smooth any rough edges with your finger. -
Add baked realism:
Shave a little brown and orange chalk pastel onto a piece of paper. Use a soft brush to dust the edges and grid lines of your cones to mimic a golden-brown baked finish.
Sticky Situation?
If clay sticks to your texture mat, dust the clay lightly with cornstarch or spray the mat with water before pressing down.
Step 2: Scooping the Ice Cream
-
Form the scoop base:
Roll balls of clay in your chosen ice cream colors—mint, pink, or white. Flatten the backs slightly so they will sit flush against the magnet surface later. -
Texture the scoop:
For a ‘hard scoop’ look (like the pink and white ones), use an old toothbrush to tap texture all over the rounded surface. Use a needle tool to drag little fissures across the top to simulate scooped textures. -
Create the melted look:
For the mint cone, flatten a piece of clay into an irregular puddle shape. Drape it over the top of the cone, gently pulling down a few drips with a silicone tool to look like melting cream. -
Attach to cones:
Place your scoops onto the wide end of the waffle cones. Blend the clay slightly at the connection point on the back to ensure they stay together during baking.
Realism Pro Tip
Mix translucent clay into your colored ice cream clay (about 1 part translucent to 3 parts color) for a deeper, more realistic dairy look.
Step 3: Toppings & Assembly
-
Add a sauce drip:
For the white cone, cut a small strip of pink clay to act as a wafer or sauce strip and drape it diagonally across the textured scoop. -
Create sprinkles:
Roll extremely thin snakes of various colored clays. Bake these snakes separately for 5 minutes, then chop them into tiny bits. Press these baked sprinkles into the raw ice cream scoops. -
Top with a cherry:
Roll a small ball of red clay. Use a needle tool to create an dimple on top, and insert a small snipped piece of brown photo wire or a dark clay stem. Press the cherry firmly into the ice cream. -
Insert wafer cookies:
If you want a cookie garnish, shape a tiny rectangle of brown clay and press it into the side of the mint scoop. -
Bake carefully:
Place your creations on a ceramic tile or baking sheet. Bake according to your specific clay brand’s instructions (usually 275°F for 15-30 minutes).
Step 4: Finishing Touches
-
Cool down:
Let the pieces cool completely before handling them, as warm clay is brittle. -
Glaze the details:
Apply a coat of gloss glaze or UV resin specifically to the cherries, the melted mint ice cream, and any sauce drips to give them a wet, sticky shine. Leave the waffle cone matte. -
Attach the hardware:
Flip the pieces over. Apply a drop of strong adhesive to the back of the cone (the widest part is usually best for balance) and press your magnet firmly in place. -
Final cure:
Allow the glue and glaze to dry fully ensuring the magnets are securely attached before placing them on your fridge.
Your sweet sundae magnets are now ready to add a sprinkle of joy to any magnetic surface
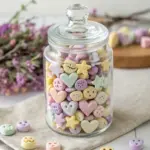
Birthday Wish Jar Keepsake
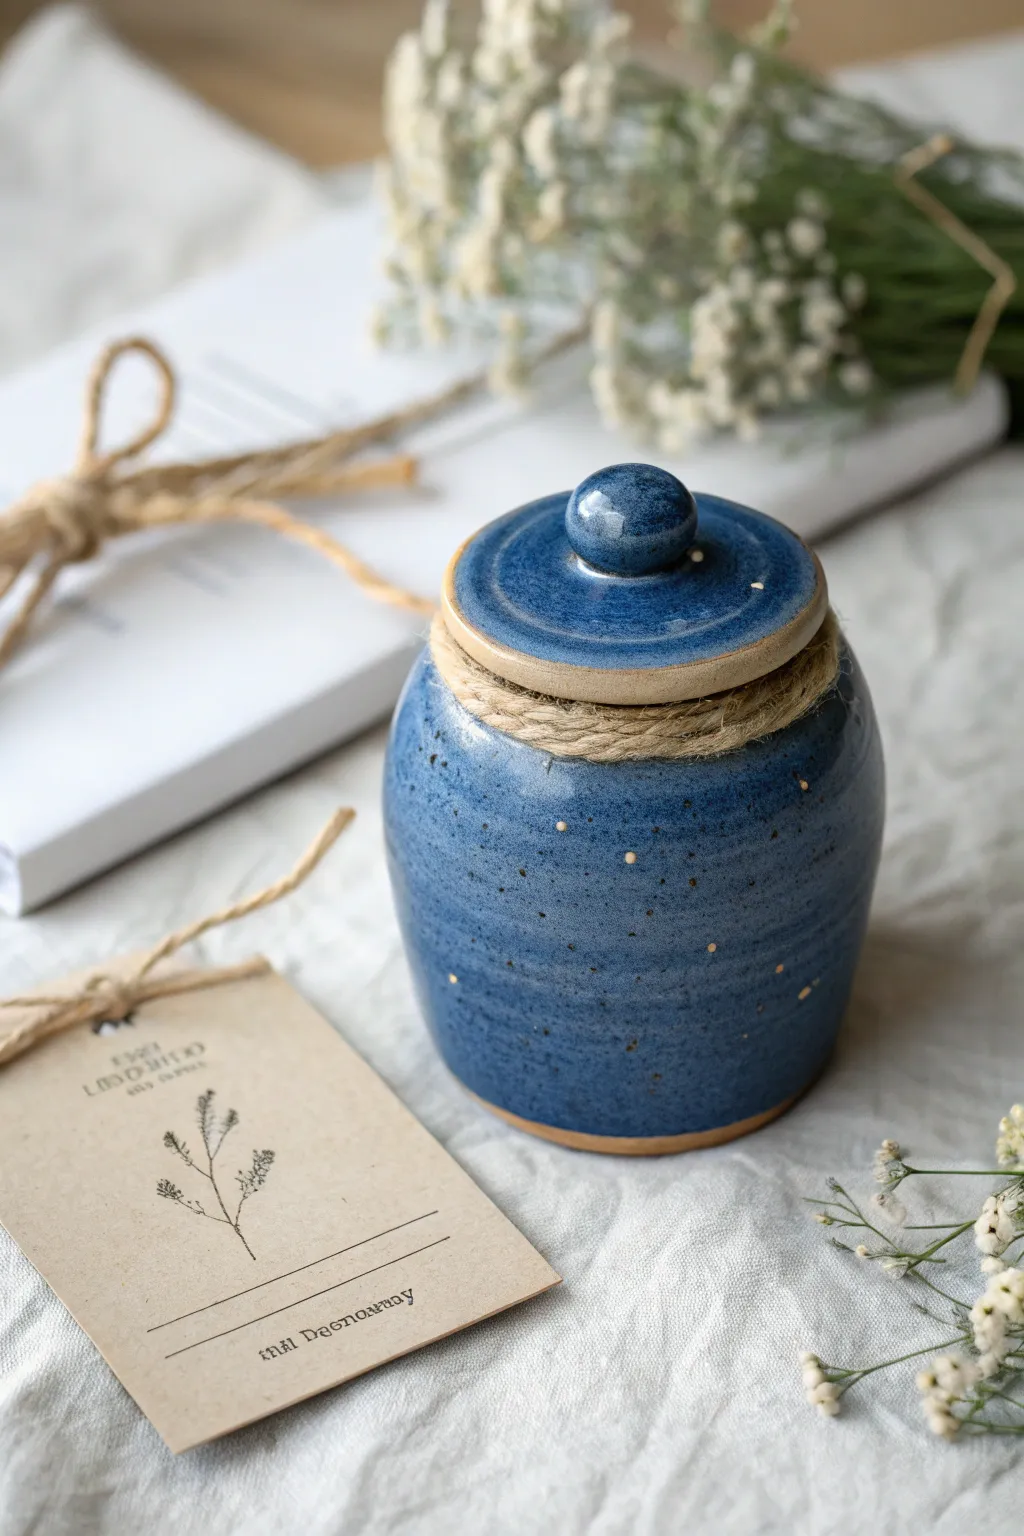
Create a meaningful vessel for collecting birthday wishes with this handcrafted ceramic jar featuring a rich cosmic blue glaze. The piece combines a classic bulbous shape with rustic touches like gold stippling and a natural hemp accent.
Step-by-Step Tutorial
Materials
- Pottery wheel (or coil-building tools)
- Stoneware clay body (approx. 2-3 lbs)
- Pottery tools: rib, sponge, wire cutter, needle tool
- Calipers
- Deep cobalt blue reactive glaze
- Liquid gold luster or gold overglaze
- Small stiff-bristle brush (like a toothbrush)
- Refined hemp twine
- Kiln accessible for bisque and glaze firing
Step 1: Throwing the Form
-
Center the clay:
Begin with about 1.5 to 2 pounds of well-wedged stoneware clay. Secure it firmly to the wheel head and center it using even pressure until it spins without wobbling. -
Open and pull the cylinder:
Open the clay down to the base, leaving about a half-inch of thickness for the bottom. Pull the walls upward into a cylinder, keeping your hand speed steady to maintain an even thickness. -
Shape the belly:
Using a rib tool on the inside and your fingers on the outside, gently push the belly of the pot outward to create that rounded, bulbous form. Aim for the widest point to be just below the center. -
Collar the neck:
Slowly collar the top inward to narrow the opening. Compress the rim frequently to keep it strong. -
Create the gallery:
Use a wooden tool or your thumb to press a small recessed shelf (gallery) into the inside of the rim. This is where the lid will sit. -
Measure the gallery:
Before removing the pot from the wheel, use calipers to measure the exact diameter of the gallery shelf. Lock the calipers in place.
Lid Fit Troubleshooting
If the lid shrinks more than the jar and is too loose, execute the glaze firing with the lid ON the jar (wax the contact points heavily!) to fuse them slightly, or add glaze thickness to the flange.
Step 2: Creating the Lid
-
Throw the lid:
Using a smaller ball of clay (about 0.5 lbs), throw a low, flat shape on the wheel. Use the calipers to ensure the base width matches the gallery measurement you took earlier. -
Trim the flange:
Refine the underside of the lid so it has a slight flange that will fit snugly inside the jar’s neck. -
Form the knob:
While the clay is still workable, pinch and shape a small, rounded knob in the center of the lid. Smooth it with a damp chamois or sponge. -
Bisque fire:
Once both pieces are bone dry, fire them to bisque temperature (cone 04-06) to prepare them for glazing.
Gold Speckle Pro-Tip
Make a test tile first to practice your splatter technique. Holding the brush closer creates dense clusters, while flicking from further away creates a dispersed starry sky effect.
Step 3: Glazing and Decoration
-
Wax resist application:
Apply wax resist to the bottom of the jar, the contact point where the lid touches the jar (the gallery), and the underside rim of the lid. I find this saves a lot of cleanup time later. -
Apply base color:
Dip the jar and lid into a deep cobalt blue reactive glaze. If brushing, apply three generous, even coats, letting them dry between layers. -
Wipe the exposed rim:
Using a damp sponge, carefully wipe the glaze off the very edge of the lid and the jar’s rim to expose the raw clay body, creating that lighter contrast line. -
Glaze fire:
Fire the pieces to the glaze’s recommended temperature (usually cone 5 or 6 used for stoneware).
Step 4: Golden Accents & Assembly
-
Apply gold splatter:
Once the piece has cooled from the glaze firing, dip a stiff brush or toothbrush into liquid gold luster. Pull your thumb across the bristles to flick tiny speckles of gold randomly across the blue surface. -
Luster fire:
Fire the piece a third time to a very low temperature (usually cone 018) to cure the gold luster permanently. -
Prepare the twine:
Cut a length of rustic hemp twine, roughly 12-18 inches long. -
Wrap the neck:
Wrap the twine snugly around the neck of the jar, right under the rim edge. Overlap it a few times for thickness. -
Secure the wrapping:
Tuck the loose ends underneath the loops of twine to secure them, or add a tiny dot of strong craft glue to hold the embellishment in place invisibly.
Now you have a stunning, timeless vessel ready to safeguard your birthday wishes for years to come
Birthday Crown Ring Holder
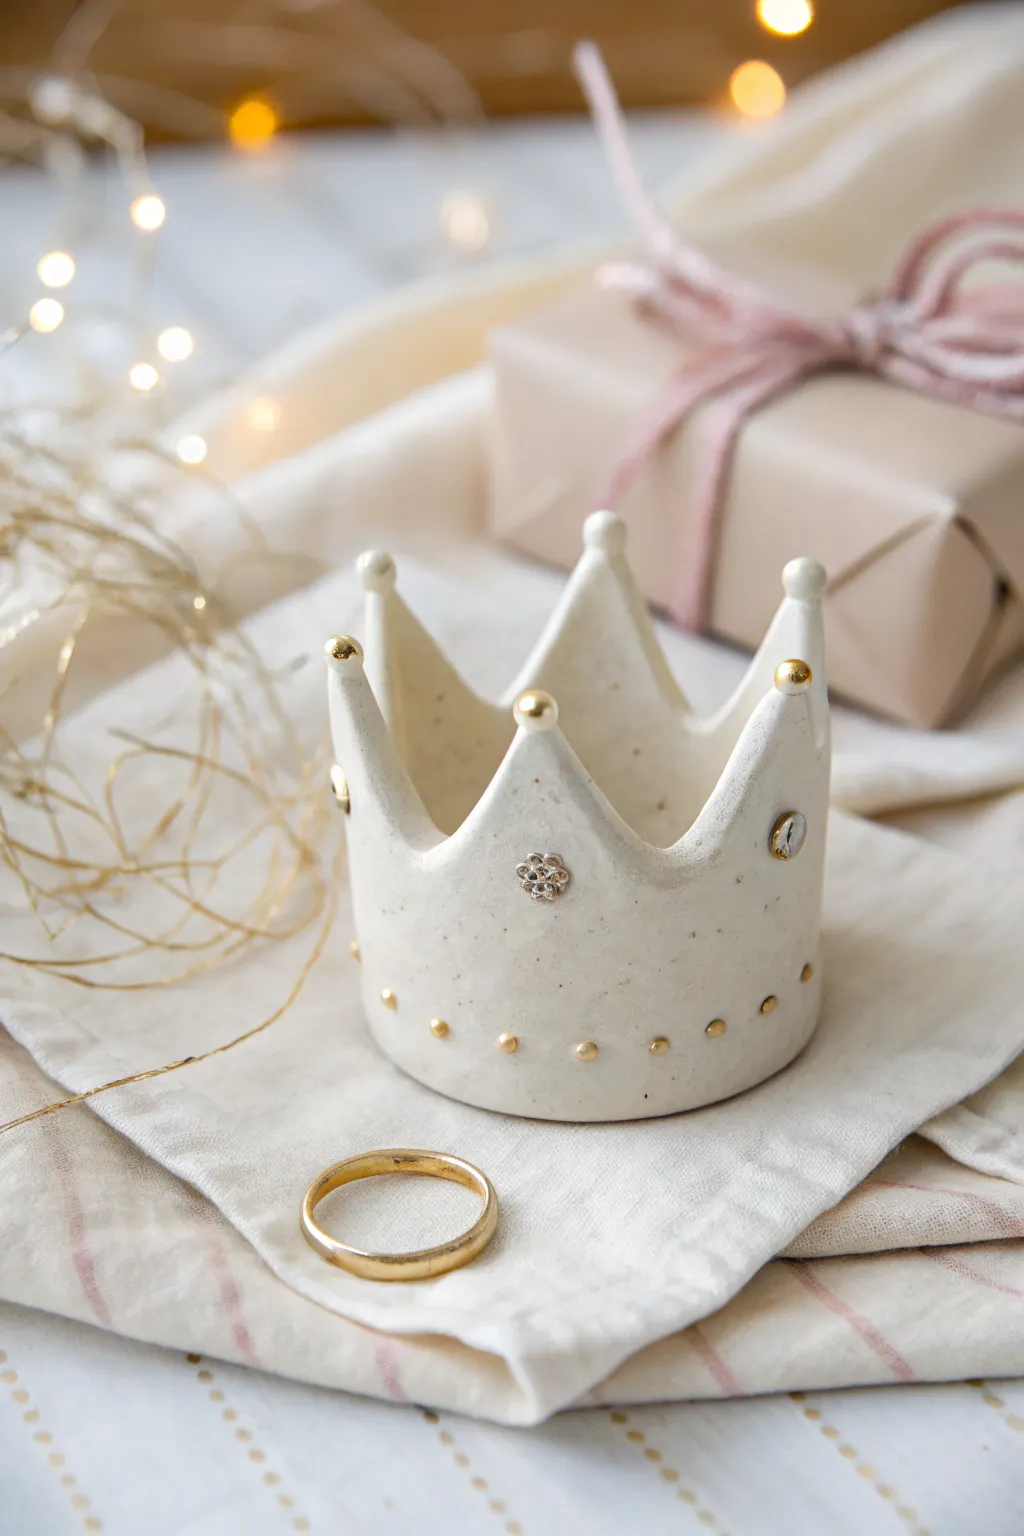
This charming, regal little dish is the perfect resting place for your favorite rings and trinkets. With its creamy speckled finish and gold accents, it looks like high-end pottery, but you can easily sculpt it at home.
Step-by-Step
Materials
- White polymer clay or air-dry clay (approx. 200g)
- Rolling pin
- Sharp craft knife or clay blade
- Circular cookie cutter (approx. 3-4 inches diameter)
- Small round piping tip or straw (for punching dots)
- Gold acrylic paint or liquid gold leaf
- Fine detail paintbrush
- Clear gloss varnish (optional)
- Small faux gems or rhinestones
- Super glue (if using baked clay)
- Speckled clay effect paint (optional, or use black pepper mixed into clay)
Step 1: Forming the Base
-
Prepare the Clay:
Condition your white clay until it is soft and pliable. If you want that organic, speckled pottery look shown in the photo, knead in a tiny pinch of cracked black pepper or dried tea leaves before rolling. -
Create the Slab:
Roll the clay out into a long, even strip about 1/4 inch thick. Aim for a strip that is approximately 8 inches long and 2.5 inches tall. -
Cut the Base Circle:
Using a separate piece of rolled clay, use your circular cookie cutter to create the flat bottom of the crown. Set this disc aside on a piece of parchment paper.
Glazing Cheats
For a true high-gloss ceramic look without a kiln, use UV resin as your final topcoat instead of varnish. Cure it under a UV lamp for a glass-like finish.
Step 2: Sculpting the Crown
-
Initial Trimming:
Trim the long edges of your clay strip so they are perfectly straight and parallel. This strip will become the walls of the crown. -
Carve the Peaks:
Using your craft knife, cut continuous ‘V’ shapes along the top edge of the strip to create the crown’s points. Try to make five or six points, keeping them relatively uniform in height. -
Soften the Edges:
Dip your finger in a little water (for air-dry clay) or baby oil (for polymer) and gently smooth the cut edges of the points so they aren’t sharp or jagged. -
Attach the Walls:
Carefully wrap the crown strip around the circular base you created earlier. The strip should sit on top of the circle’s edge, not around it. -
Seal the Seam:
Where the two ends of the strip meet, blend the clay together firmly using a modeling tool or your finger to make the seam invisible. Do the same for the interior seam where the wall meets the floor.
Step 3: Detaling and Finishing
-
Shape the Points:
Gently flare the points of the crown outward just slightly to give it an open, flower-like shape rather than a straight cylinder. -
Add Texture Dots:
Roll tiny spheres of clay—about the size of a poppy seed—and press them gently around the bottom rim of the crown to create the rivet details shown in the image. -
Create Ball Tips:
Roll slightly larger spheres of clay and gently press one onto the very tip of each crown point. Use a dab of liquid clay or water to ensure they stick. -
Bake or Dry:
Follow the manufacturer instructions for your specific clay. If baking, tent with foil to prevent browning. If air-drying, let it sit for at least 24-48 hours. -
Paint Gold Accents:
Once fully cured and cool, use a fine detail brush to apply gold paint or liquid gold leaf to the ball tips on the points and the small dots around the base. -
Add Decorative Gems:
I prefer to use a toothpick to apply a tiny dot of super glue to the center of the crown face. -
Attach the Gem:
Press a small rhinestone or a molded clay flower painted silver onto the glue spot for a jeweled effect. -
Final Seal:
Brush a coat of clear gloss varnish over the entire piece to give it that shiny, glazed ceramic appearance and protect the paint.
Drooping Points?
If the crown points flop over while the clay is soft, place a small glass or cardboard tube inside the crown to support the walls until the clay firms up.
Now you have a regal little spot to keep your most precious jewelry safe