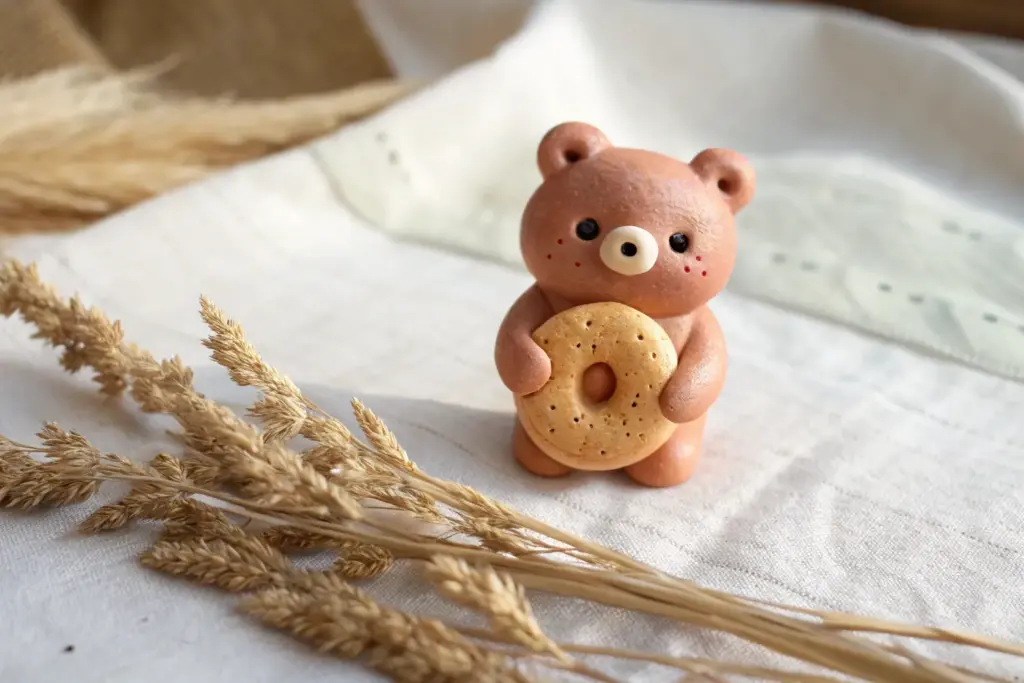
When you want easy simple clay ideas, the best projects start with the most basic shapes—balls, coils, and little slabs—and still end up looking super cute. I pulled together my go-to beginner-friendly favorites that feel low-stress, quick to finish, and perfect for small, hand-held wins.
Cute Face Magnets
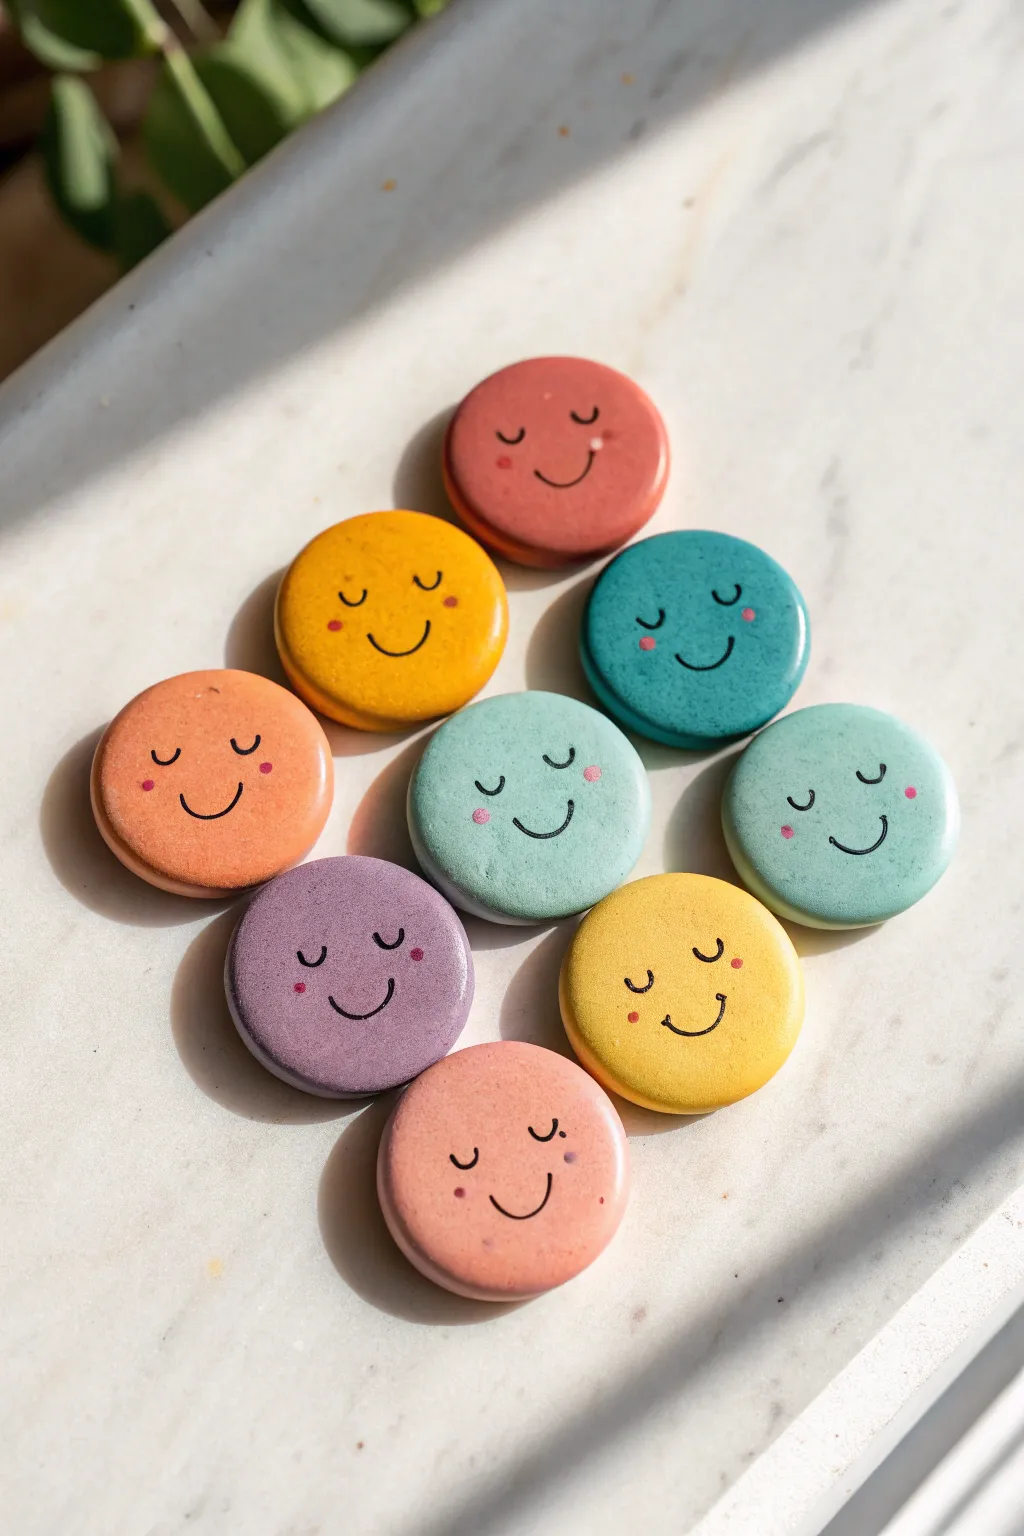
Brighten up your fridge or magnetic board with these charming little clay discs featuring sweet, sleepy smiles. Their muted, earthy tones and simple expressions make them a modern and cheerful addition to any kitchen decor.
Detailed Instructions
Materials
- Air-dry clay or polymer clay (white is best for custom coloring)
- Acrylic paints (terracotta, mustard yellow, teal, sage green, lavender, blush pink)
- Small round cookie cutter (approx. 1.5 – 2 inches)
- Rolling pin
- Parchment paper or craft mat
- Fine-grit sandpaper
- Fine point black permanent marker or black acrylic paint with a detail brush
- Small dotting tool or toothpick
- Pink or coral acrylic paint (for cheeks)
- Round magnets (strong hold)
- Super glue or E6000 adhesive
- Matte varnish or sealant (optional)
Step 1: Shaping the Discs
-
Prepare the Clay:
Start by kneading your white clay until it is soft, pliable, and free of cracks. Depending on the brand, you might want to warm it up in your hands for a minute. -
Roll it Out:
Place the clay on a sheet of parchment paper to prevent sticking. Use your rolling pin to flatten the clay into an even slab, aiming for a thickness of about 1/4 inch so the magnets feel substantial. -
Cut the Shapes:
Using your small round cookie cutter, press firmly into the clay to cut out your circles. Make as many circles as you’d like your final set to contain. -
Smooth the Edges:
Gently lift the cut circles. Dip your finger in a tiny bit of water and run it along the rim of each circle to smooth down any rough clay burrs or sharp edges. -
Dry or Bake:
If using polymer clay, bake according to the package instructions (usually around 275°F for 15-30 minutes). If using air-dry clay, leave them on a flat surface to dry completely for 24-48 hours, flipping them once halfway through. -
Sand for smoothness:
Once fully cured or dry, inspect your discs. I like to take a piece of fine-grit sandpaper and lightly buff the surface and edges to ensure they are perfectly smooth for painting.
Sticky Situation?
If your clay sticks to the cookie cutter, dip the cutter into a little cornstarch or flour before pressing it into the clay. This helps it release cleanly every time.
Step 2: Adding Color & Character
-
Base Coat:
Select your palette of muted, earthy colors. Paint the top and sides of each disc in a different solid color—mustard, teal, terracotta, etc. You may need two thin coats for full opacity. -
Let it Dry:
Allow the base coats to dry completely before moving on to the facial details to prevent smudging. -
Draw the Eyes:
Using a fine-point permanent marker or a very thin brush with black paint, draw two small ‘U’ shapes for closed, sleepy eyes. Space them widely apart for that cute ‘kawaii’ look. -
Add the Smile:
Draw a simple, small curved line centered between and slightly below the eyes to create a gentle smile. -
Create Rosy Cheeks:
Dip a dotting tool or the tip of a toothpick into pink or coral paint. Gently dab two small dots, one under each eye, to give the face rosy cheeks. -
Optional Freckles:
For extra detail, you can add tiny, scattered dots in a darker shade of the base color around the cheeks, though the simple look works beautifully too. -
Seal the Design:
To protect your paint job from scratches, apply a thin layer of matte varnish or sealant over the front and sides. Let this dry fully.
Smooth Operator
To get that super buttery matte finish seen in the photo, lightly sand your first wobbly coat of paint before applying the second. It makes a huge textural difference.
Step 3: Assembly
-
Flip and Position:
Turn all your finished clay faces upside down so the unpainted backs are facing up. -
Apply Adhesive:
Place a small drop of strong adhesive, like super glue or E6000, onto the center of the back of the clay disc. -
Attach Magnet:
Press a round magnet explicitly into the glue. Hold it there for a few seconds to ensure it grabs the surface securely. -
Final Cure:
Let the glue cure according to the manufacturer’s timeframe (usually overnight for maximum strength) before placing them on your fridge.
Now you have a whole family of cheerful magnets ready to hold your most important notes and photos


One-Shape Blob Frog
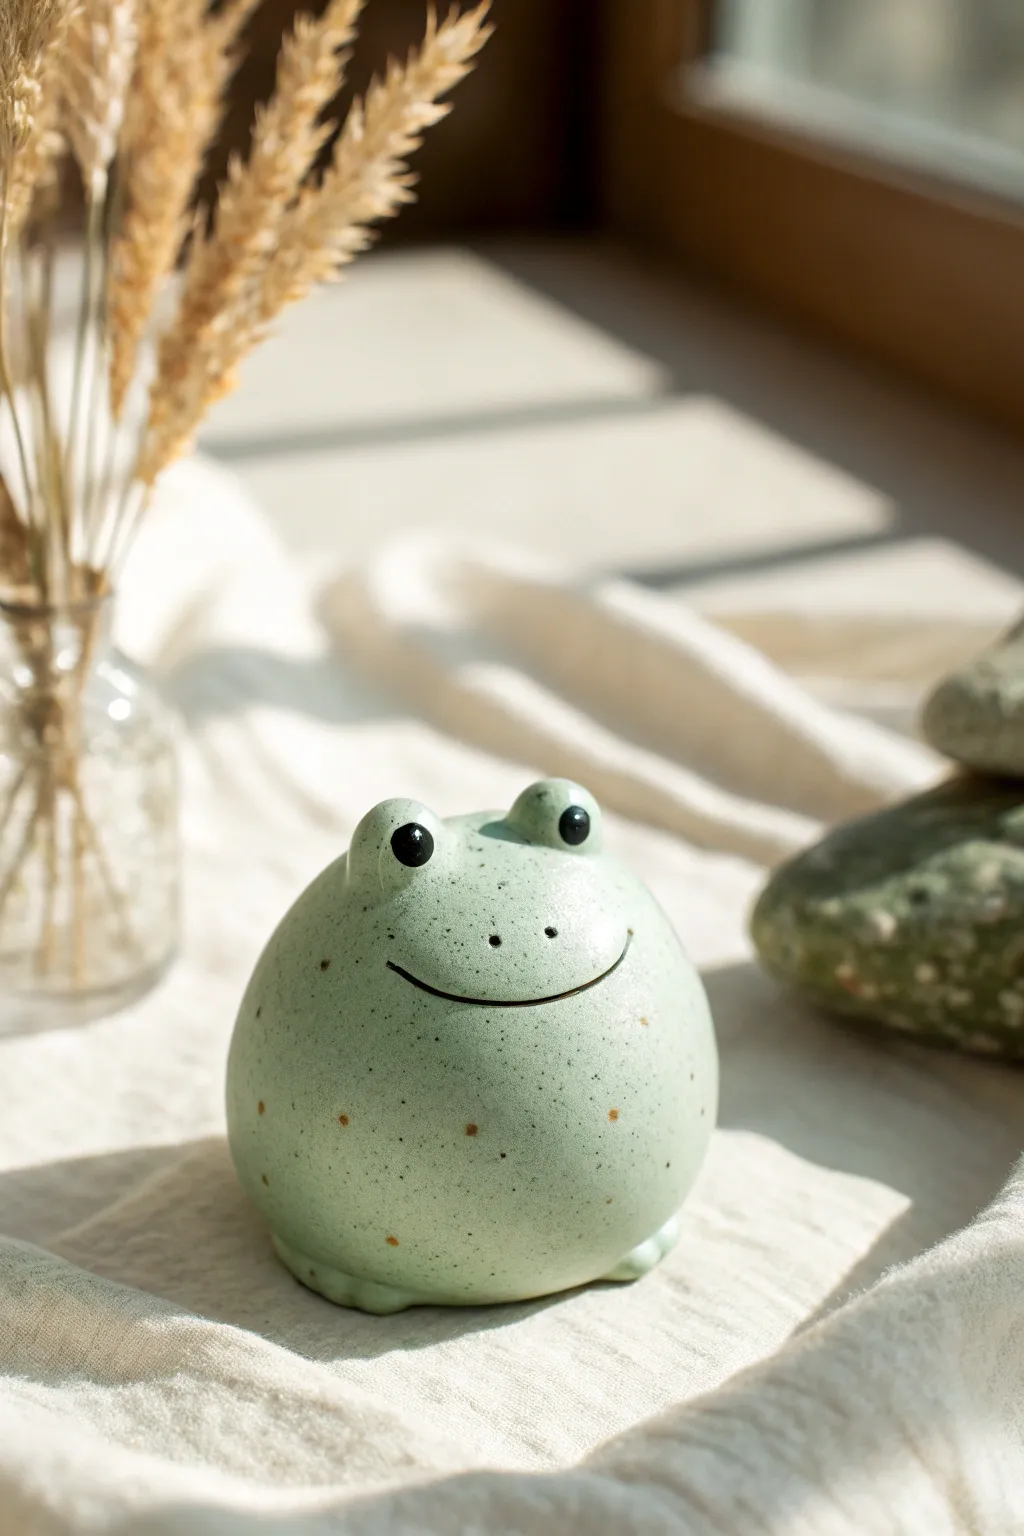
This adorable, chubby frog figurine is the perfect beginner project because it starts with a single, simple shape. Its speckled sage green finish and minimalist face give it a charming, modern ceramic look without needing complex sculpting skills.
Step-by-Step Guide
Materials
- Polymer clay (white or pale green)
- Acrylic paint (sage green, dark brown, black)
- Small paintbrush
- Old toothbrush or stiff bristle brush
- Ball stylus tool or a round-headed pin
- Needle tool or toothpick
- Gloss varnish (optional)
- Baking sheet and parchment paper
- Oven
Step 1: Shaping the Base
-
Condition the clay:
Start by warming up a significant chunk of polymer clay in your hands. Knead it thoroughly until it is soft, pliable, and free of any cracks. -
Roll a sphere:
Roll the clay into a smooth, even ball between your palms. Aim for a size slightly larger than a golf ball for a nice desk companion. -
Create the blob shape:
Gently tap the bottom of the sphere on your work surface to flatten it slightly so it sits stable. It should look like a slightly squashed droplet or a very round mounds. -
Identify the front:
Turn the shape around and decide which side looks smoothest to be the face. Smooth out any fingerprints gently with the pad of your thumb.
Faux-Stone Texture
Mix black pepper or dried tea leaves directly into the unbaked clay. When you bake and lightly sand it, it creates a natural speckled stone effect without needing paint.
Step 2: Adding Features
-
Make the eye sockets:
Pinch off two very small, pea-sized balls of clay for the eyes. Roll them until they are perfectly round. -
Attach the eyes:
Press these small balls onto the top of the head, spacing them somewhat wide apart. You can score the clay slightly under the eyes to help them stick if your clay is firm. -
Blend the seams:
Use a modeling tool or your finger to gently blend the bottom edge of the eye balls into the main body, so they look like they are growing out of the head rather than just sitting on top. -
Carve the smile:
Using a needle tool or toothpick, carefully carve a long, shallow, upward-curving line for the mouth. Position it centered below the eyes. -
Refine the smile:
Go over the smile line a second time to deepen it slightly and clean up any clay crumbs rugged edges. This ensures the paint will settle nicely into the groove later. -
Add nostrils:
Poke two tiny holes right above the smile line using your needle tool to create the nostrils. -
Form the feet:
Roll two small flattened oval and press them partially under the front of the belly. Use a tool to mark two indentations for toes on each foot. -
Bake the clay:
Place your frog on parchment paper and bake according to your clay manufacturer’s instructions. Let it cool completely before painting.
Step 3: Painting & Finishing
-
Base coat:
Once cool, paint the entire frog with a pale sage green acrylic paint. You may need two thin coats for full coverage. -
Paint the smile:
Mix a tiny bit of water with black or dark brown paint to make an ink-like consistency. Run this into the carved mouth groove, then wipe away any excess on the surface. -
Paint the eyes:
Use a small dotting tool or the back of a paintbrush handle to stamp two solid black circles onto the protruding eye bumps. -
Create the speckles:
Dilute some brown paint slightly. Dip an old toothbrush into it, and holding it near the frog, run your thumb across the bristles to flick tiny speckles over the green skin. -
Clean up speckles:
If any large blobs land on the face, quickly dab them away with a damp paper towel. I prefer to keep the speckling denser on the back and lighter on the face. -
Highlight the eyes:
Once the black eye paint is dry, add a tiny white dot to each pupil to bring the frog to life. -
Add warmth:
You can lightly dry-brush a tiny bit of diluted orange or terracotta paint near the bottom for extra visual texture. -
Seal the piece:
brush on a coat of gloss or satin varnish to protect the paint and give it that fired ceramic sheen.
Functional Froggy
Before baking, cut a thin slot into the back of your frog. Now your cute desk friend doubles as a photo holder or a place to keep important business cards.
Now you have a charming little desk buddy ready to keep you company while you work


Tiny Dino Figurines
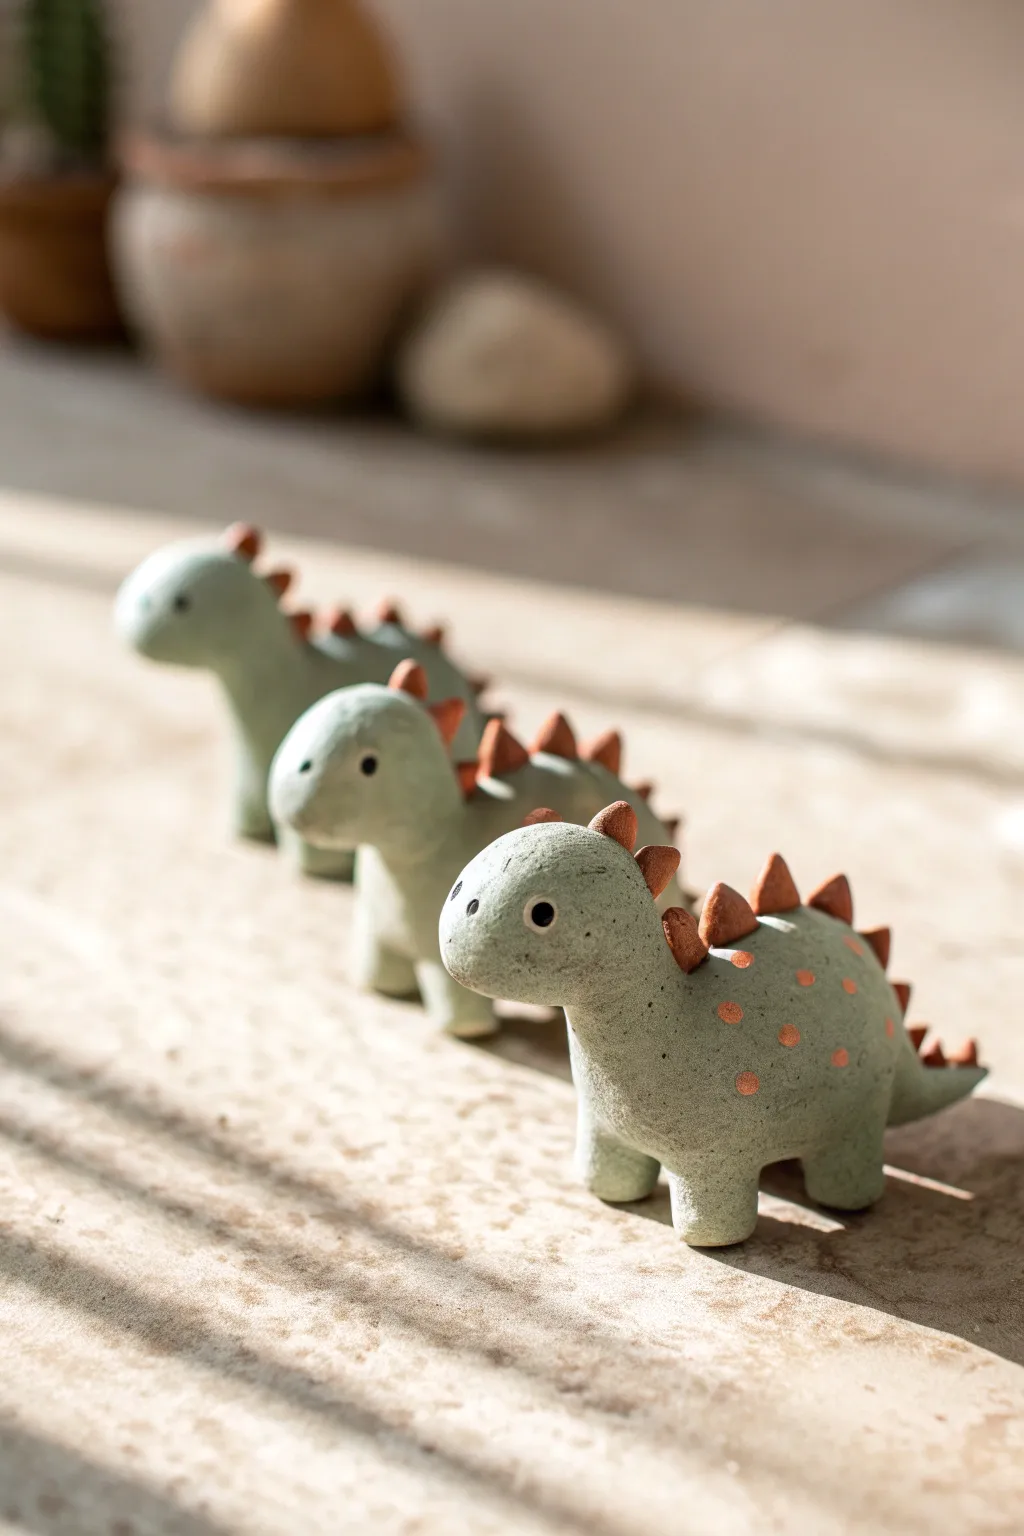
These adorable little dinosaurs bring a touch of prehistoric charm to any shelf with their soft sage green bodies and rustic, reddish-brown spikes. Their simple, rounded shapes make them perfect for beginners, while the speckled finish adds a professional, ceramic-like quality.
Step-by-Step
Materials
- Polymer clay (sage green or pale green)
- Polymer clay (terracotta or reddish-brown)
- Coarse black pepper or faux granite embossing powder
- Small black glass beads (for eyes)
- Needle tool or toothpick
- Aluminum foil (for armature)
- Baking sheet and parchment paper
- Soft paintbrush
- Matte varnish (optional)
Step 1: Preparing the Speckled Clay
-
Conditioning the base:
Start by warming up your sage green polymer clay in your hands. Knead it thoroughly until it is soft, pliable, and free of cracks. -
Adding texture:
To achieve that stony, speckled look seen in the photo, flatten your green clay into a pancake. Sprinkle a small pinch of coarse black pepper or specialty granite embossing powder over the surface. -
Mixing it in:
Fold the clay over the speckles and knead it again. Repeat this folding and kneading process until the specks are evenly distributed throughout the green dough.
Clean Seams
To erase seams where the legs attach, roll a clay tool handle over the joint. The rolling motion blends the clay smoothly without leaving the dents that fingers sometimes cause.
Step 2: Forming the Body
-
Creating the core shape:
Roll a ball of your speckled clay about the size of a golf ball. Gently roll it into a thick log shape, keeping it slightly thicker in the middle for the belly. -
Pulling the neck:
Pinch one end of the log and gently pull it upwards and forwards to form the neck. Smooth the transition so it curves naturally rather than creating a sharp angle. -
Shaping the head:
At the top of the neck, mold the clay into a rounded, slightly oval head shape. Use your thumb to smooth the snout so it looks soft and friendly. -
Forming the tail:
On the opposite end, gently pull and taper the clay into a pointed tail. Curve it slightly to the side or keep it straight, depending on the pose you want for your dino. -
Adding legs:
Roll four small, equal-sized balls of the same green clay. Press them onto the bottom of the body to form stubby legs. I like to blend the seams with my thumb or a modeling tool to ensure they stay attached. -
Checking balance:
Stand the figure up on your work surface. Tap it gently on the table to flatten the bottom of the feet slightly, ensuring it stands stably without tipping over.
Step 3: Adding Details
-
Placing the eyes:
Take two small black glass beads. Press them firmly into the sides of the head to create the eyes. If you don’t have beads, you can roll tiny balls of black clay instead. -
Creating the snout:
Using a needle tool, poke two tiny holes near the front of the face for nostrils. Keep them small and close together for a cute expression. -
Making the plates:
Condition a small amount of the terracotta-colored clay. Roll it into a thin snake, then pinch off tiny pieces and shape them into small triangles. -
Attaching the spine:
Starting from the back of the head and working down to the tail, press the terracotta triangles gently into the center of the dino’s back. Arrange them in a single row. -
Adding spots:
Roll extremely tiny balls of the terracotta clay. Press them flat onto the sides of the dinosaur’s body to create random decorative spots. -
Adding texture to plates:
Use your needle tool or an old toothbrush to gently tap the terracotta plates. This gives them a slightly rough, stone-like texture that contrasts nicely with the smooth body.
Family Variety
Make a whole family by varying the sizes! Try making a Triceratops by adding three small horns to the head instead of back plates, keeping the same color scheme.
Step 4: Baking and Finishing
-
Pre-bake check:
Do a final inspection to smooth out any unintentional fingerprints. A tiny drop of baby oil on your finger can help buff these away perfectly. -
Baking:
Place your figurine on a parchment-lined baking sheet. Bake according to your specific polymer clay’s package instructions (usually around 275°F or 135°C for 15–30 minutes). -
Cooling:
Let the figurine cool completely in the oven with the door slightly ajar. This prevents thermal shock and cracking. -
Varnishing:
For a true ceramic look, apply a thin coat of matte varnish once the piece is cool. This protects the finish and locks in the speckles.
Once cooled, arrange your new prehistoric herd on a sunny windowsill where their speckled finish can catch the light


Easy Octopus Buddy
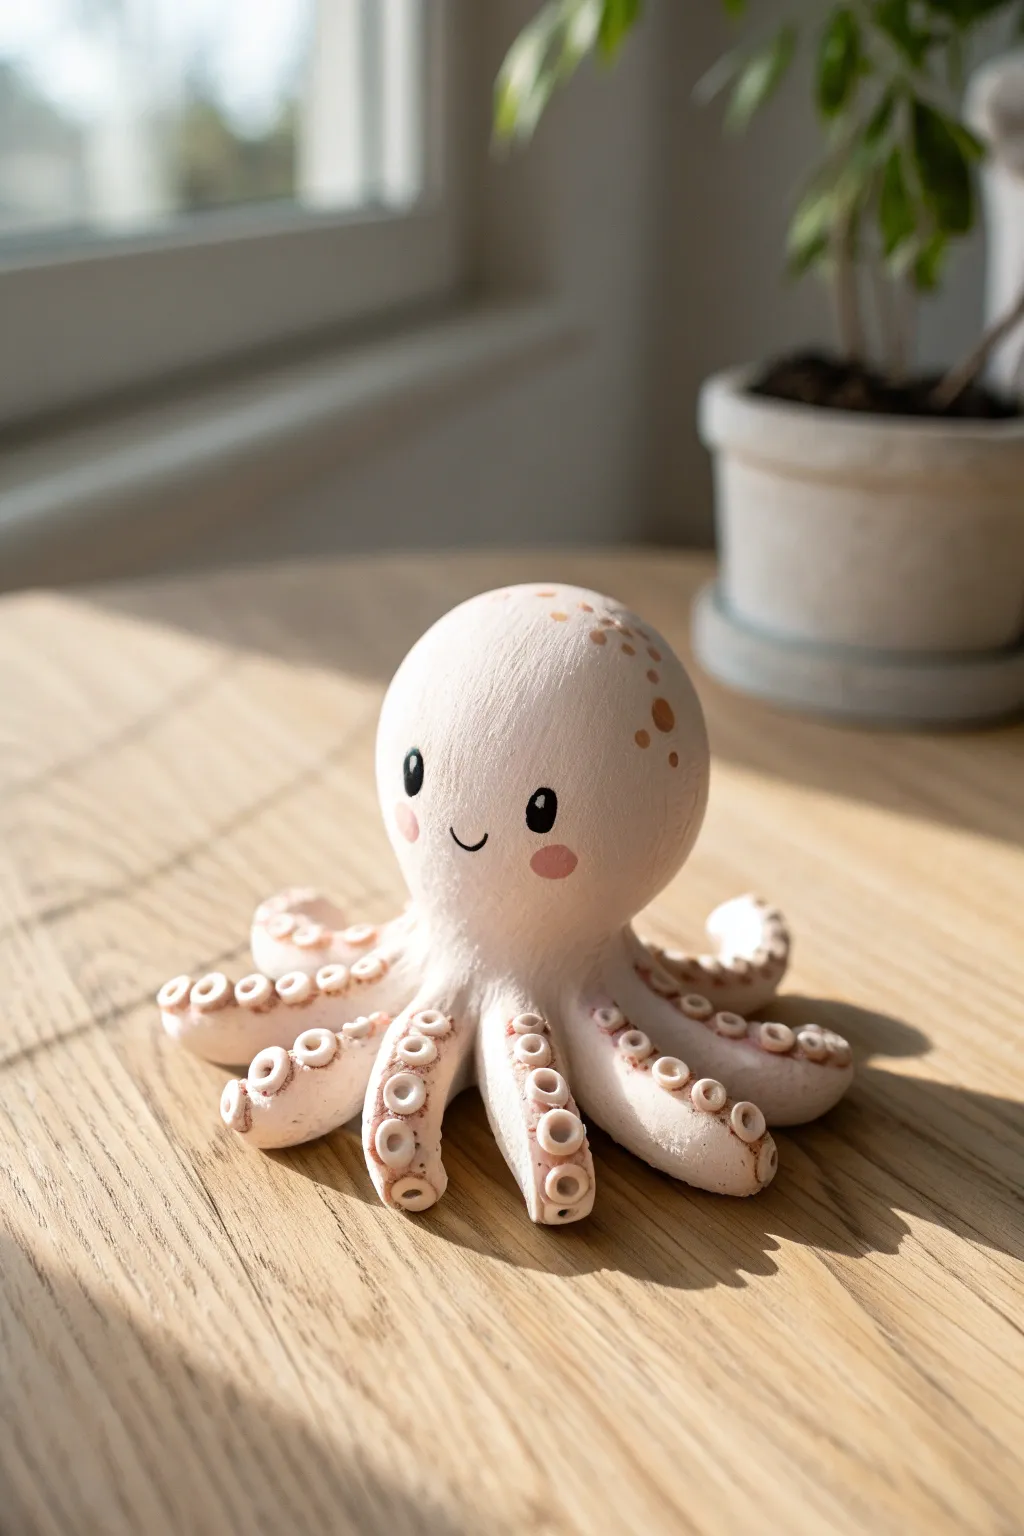
Create a cheerful ocean friend with this simple clay sculpture project. This adorable octopus features a smooth, rounded head, textured tentacles with tiny suckers, and a sweet hand-painted face.
Detailed Instructions
Materials
- Air-dry clay or polymer clay (white or pale pink)
- Acrylic paints (black, pink, terracotta/brown)
- Fine detail paintbrush
- Small dotting tool or toothpick
- Straw or pen cap (small diameter)
- Clay roller or smooth jar
- Water (for smoothing)
- Matte varnish (optional)
Step 1: Forming the Body
-
Create the head:
Start by rolling a ball of clay roughly the size of a tangerine. Roll it between your palms until it is completely smooth and free of cracks. -
Shape the dome:
Gently press the ball onto your work surface to flatten the bottom slightly, creating a stable dome shape for the octopus’s head. Smooth out any fingerprints with a drop of water. -
Prepare the tentacles:
Roll out eight smaller logs of clay, each about 2-3 inches long. Taper one end of each log so it looks like a long, thin carrot. -
Attach the legs:
Turn the head upside down. Attach the thicker ends of the eight tentacles in a circle underneath the head. Blend the clay seams together firmly so they don’t fall off. -
Pose the tentacles:
Turn the octopus back over. Gently curve and twist the tentacles outward so they flare out around the body. I like to lift a few tips slightly to give it movement.
Cracks Appearing?
If you see cracks forming as air-dry clay dries, mix a tiny bit of fresh clay with water to make a paste (slip) and fill them in, then smooth over.
Step 2: Adding Details
-
Create sucker texture:
Using a small straw, pen cap, or the end of a paintbrush, press small circles into the underside of each tentacle. Make two rows of these impressions running down each leg. -
Refine the suckers:
If the clay edges around the circles are too sharp, gently tap them with a fingertip to soften the look. -
Smooth the surface:
Do a final check over the head and tentacles. Use a damp finger or soft brush to smooth away any remaining imperfections. -
Dry the sculpture:
Let the clay dry completely according to package instructions. For air-dry clay, this usually takes 24-48 hours. Polymer clay will need baking.
Mini Accessories
Before the clay dries, sculpt a tiny top hat, a flower, or a sailor’s cap to place on its head for extra personality.
Step 3: Painting and Finishing
-
Base coat (optional):
If you used white clay, paint the entire octopus a very pale, soft pinkish-beige. If your clay was already colored, skip this step. -
add the eyes:
Dip a medium-sized dotting tool or the handle end of a paintbrush into black acrylic paint. Dot two oval-shaped eyes onto the front of the face. -
Paint highlights:
Once the black paint is dry, add a tiny white dot to the upper corner of each eye to bring them to life. -
Draw the smile:
Using a very fine liner brush and black paint, paint a small, thin ‘U’ shape between the eyes for the smile. -
Add rosy cheeks:
Mix a soft pink color and dab two small circles just below and outside the eyes to create blushing cheeks. -
Speckle the head:
Mix a terracotta or light brown paint. Dilute it slightly with water and dab random spots on the top/side of the head for a natural texture. -
Highlight the suckers:
Use the same terracotta color to carefully paint inside the sucker impressions on the tentacles, adding depth to the texture. -
Seal the work:
Once all paint is fully dry, apply a coat of matte varnish to protect your new friend and give it a finished professional look.
Place your little octopus on a shelf or desk where its friendly smile can brighten your day

The Complete Guide to Pottery Troubleshooting
Uncover the most common ceramic mistakes—from cracking clay to failed glazes—and learn how to fix them fast.
Hedgehog Paperweight
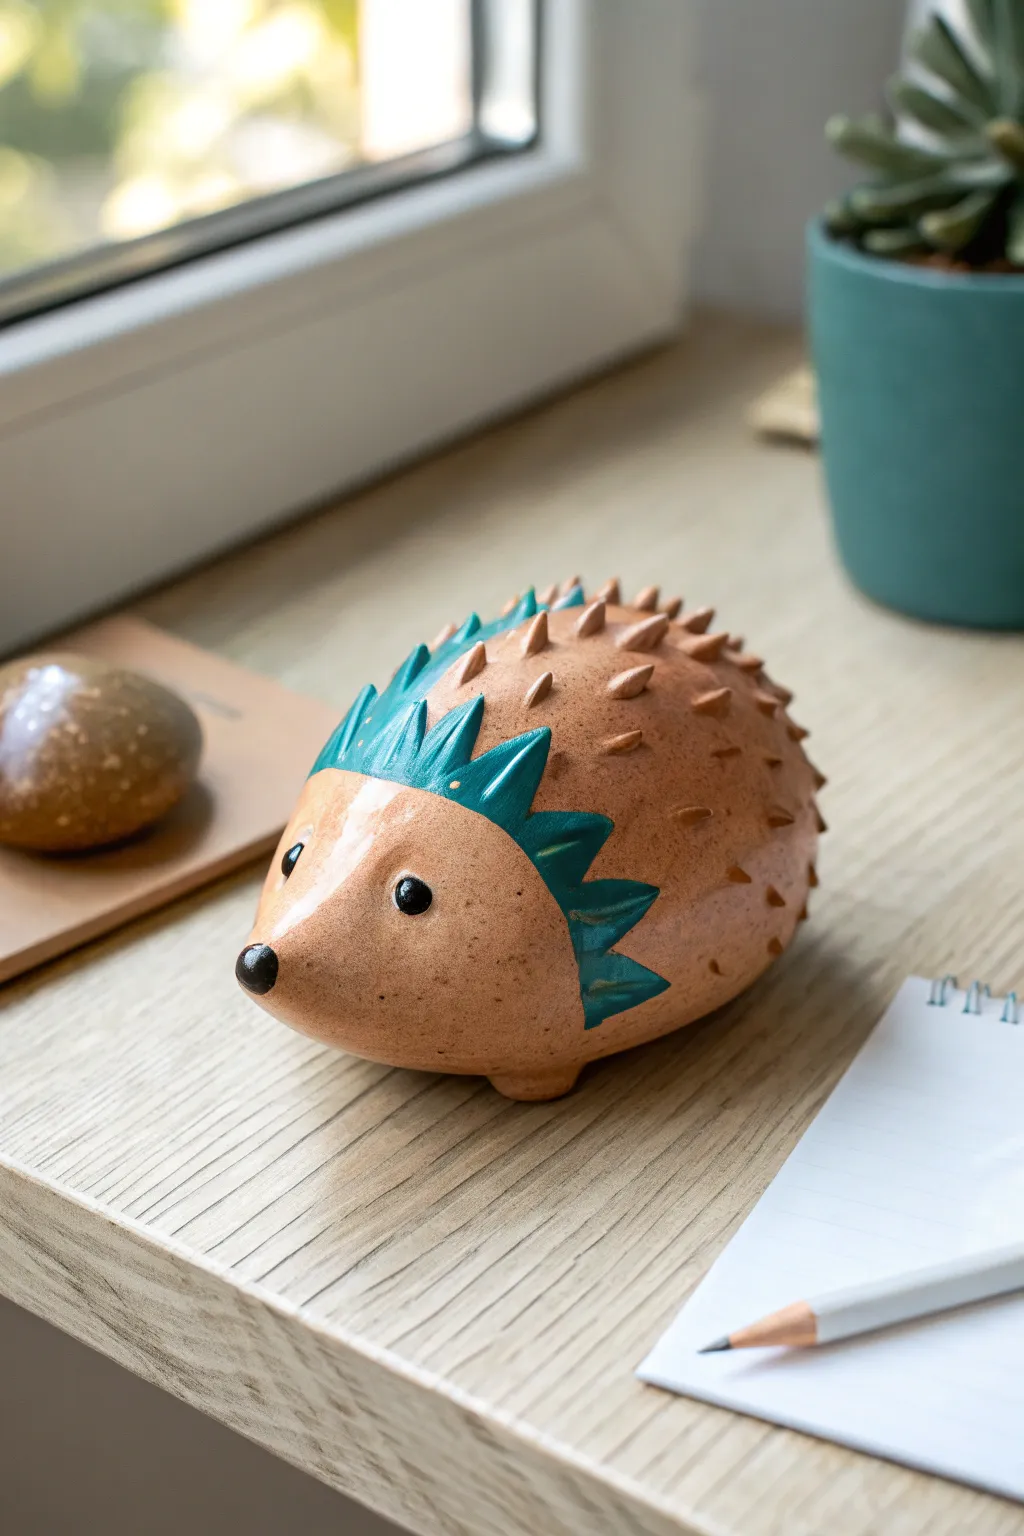
This adorable desk companion combines simple sculpting with a charming, rustic finish. With its teal-accented spines and speckled clay body, it makes for a perfect paperweight or decorative friend for your windowsill.
Step-by-Step Guide
Materials
- Air-dry clay or polymer clay (beige or light brown)
- Acrylic paints (Teal, Black, White, Dark Brown)
- Clay sculpting tools (needle tool, small spatula)
- Small paintbrush
- Fine-grit sandpaper
- Glaze or varnish (glossy)
- Toothbrush (for speckling)
- Cup of water
- Aluminum foil (optional core)
Step 1: Sculpting the Form
-
Form the Base:
Start by taking a generous amount of clay and rolling it into a smooth ball. Slowly elongate one side to create a teardrop or egg shape. This pointed end will become the hedgehog’s face. -
Flatten the Bottom:
Gently tap the bottom of your shape against your work surface to create a flat, stable base so the hedgehog doesn’t roll away. -
Refine the Snout:
Use your fingers to smooth and slightly lift the pointed end, giving the snout a cute, slightly upturned look. -
Create the Prickles:
Take small pinches of clay and roll them into tiny cones. You will need about 20-30 of these depending on the size of your hedgehog. Keep them consistent in size but a little variation adds character. -
Attach the Spines:
Starting from the top center of the back, attach the small clay cones. If using air-dry clay, score and dampen the attachment points. Arrange them in rough rows down the back, leaving the face area smooth. -
Add the Fins:
To mimic the stylized look in the photo, create a jagged ‘crown’ shape out of a thin strip of clay. Attach this just behind the forehead area, blending the bottom edge seamlessly into the head. -
Sculpt the Feet:
Roll four tiny balls of clay and flatten them slightly. Attach these to the underside of the body to create little nubby feet that just barely peek out. -
Smooth Everything:
Dip your finger in a little water and gently smooth out any fingerprints or cracks on the face and body perfectly before setting it aside. -
Dry Completely:
Let the clay dry fully according to the package instructions. This usually takes 24-48 hours for air-dry clay. I prefer to rotate it once halfway through so the bottom dries evenly.
Uneven Drying?
If your clay cracks while drying, fill the fissures with a ‘slip’ (a mixture of clay and water) and smooth it over. Let it dry again before sanding.
Step 2: Painting and Finishing
-
Sand Imperfections:
Once bone dry, use fine-grit sandpaper to gently buff away any rough spots, especially around the base and chin. -
Base Coat:
Paint the entire body in a warm beige or light terracotta color. Let this layer dry completely. -
Paint the Crown:
Using a small brush and teal acrylic paint, carefully paint the jagged ‘crown’ section behind the head. Add little V-shaped strokes extending backward to suggest layers of spines. -
Paint the Spines:
Use a slightly lighter brown or tan to paint the individual cone spikes on the back, keeping the tips lighter if possible to add dimension. -
Add the Face Details:
Using a very fine brush or dotting tool, dab two solid black circles for the eyes. Add a small white highlight dot to each eye once dry to bring them to life. Paint the tip of the nose black. -
Create the Speckles:
Dilute a tiny bit of dark brown paint with water. Dip an old toothbrush into it, and flick the bristles with your thumb to spray a fine mist of speckles over the body. Cover the teal area with paper if you want to keep that section clean. -
Seal the Project:
Finish by applying a coat of glossy varnish or glaze over the entire piece. This mimics the ceramic look of the original image and protects your paint job.
Make it Functional
Before the clay dries, create a horizontal slit across the top of the sculpted spines to turn this decorative hedgehog into a functional photo or card holder.
Place your new woodland friend on a stack of papers to keep your desk organized in style