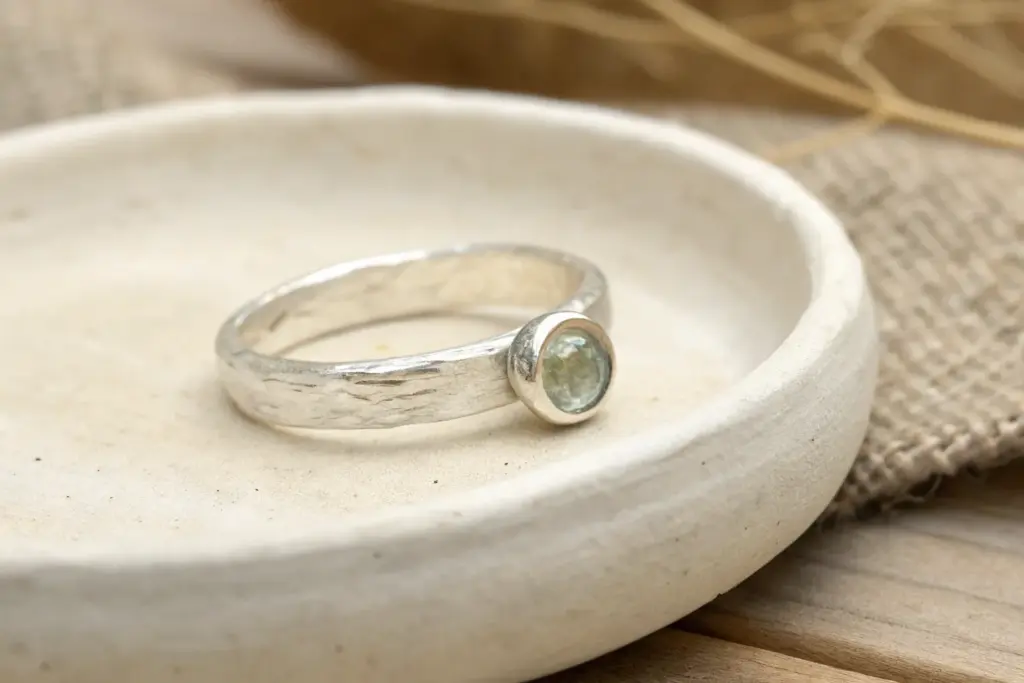
If you’ve ever rolled out silver clay and watched it turn into real fine silver, you know it feels like straight-up studio magic. Here are my favorite silver clay ring ideas, starting with the classics and drifting into more playful, artsy designs.
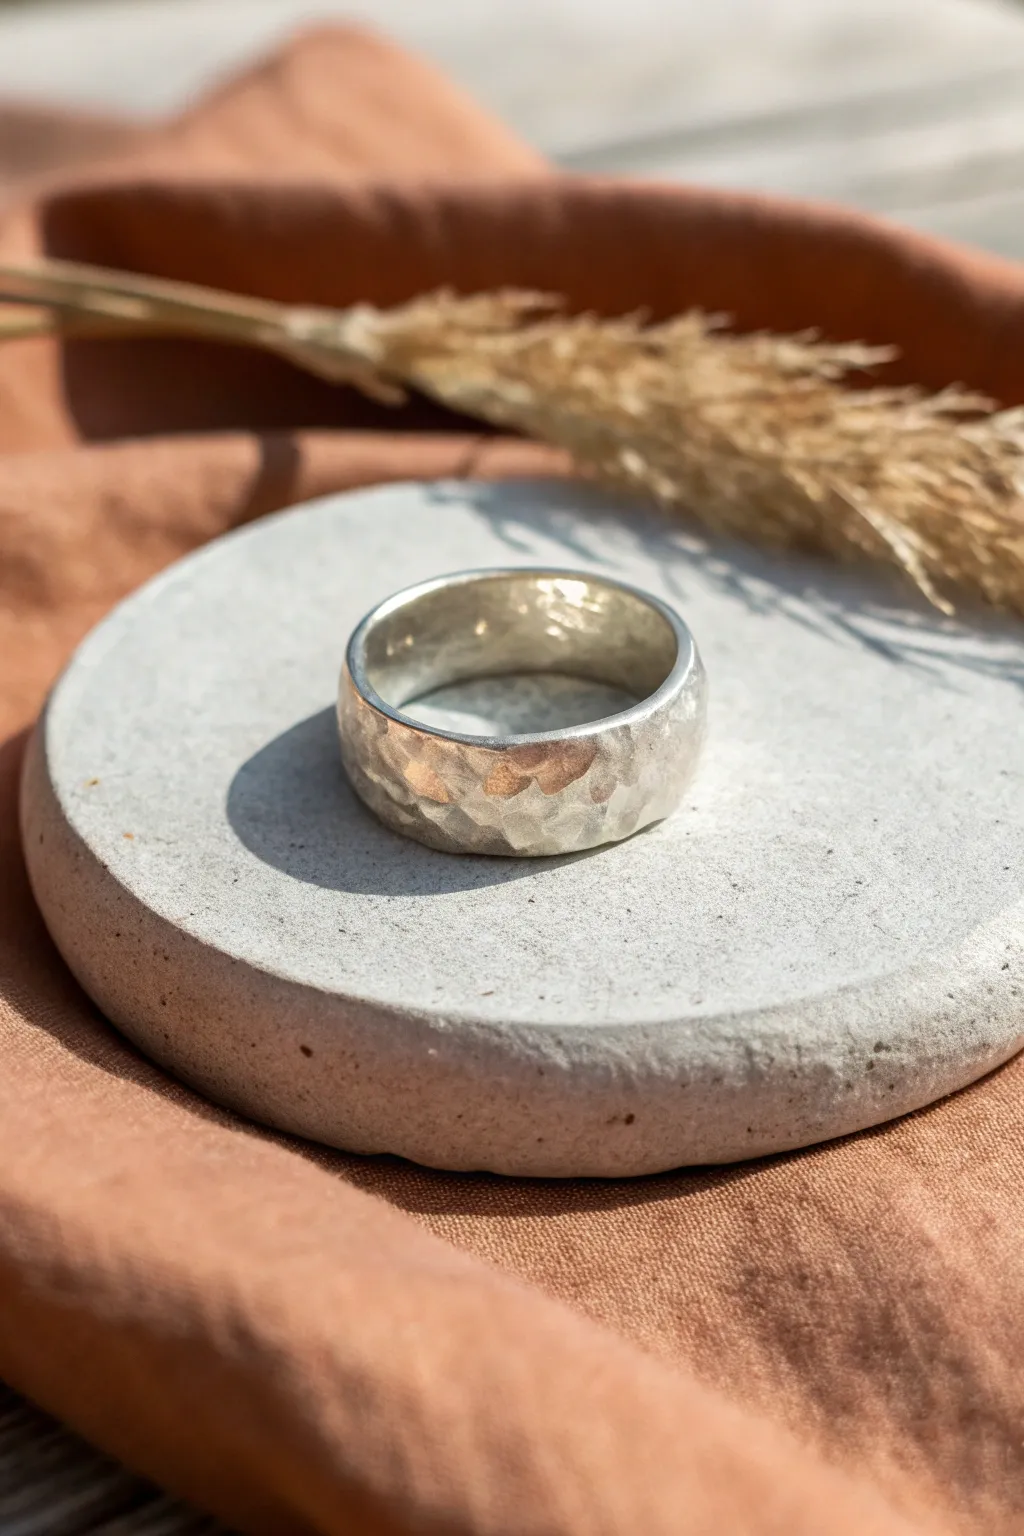
Wide Comfort-Fit Statement Band
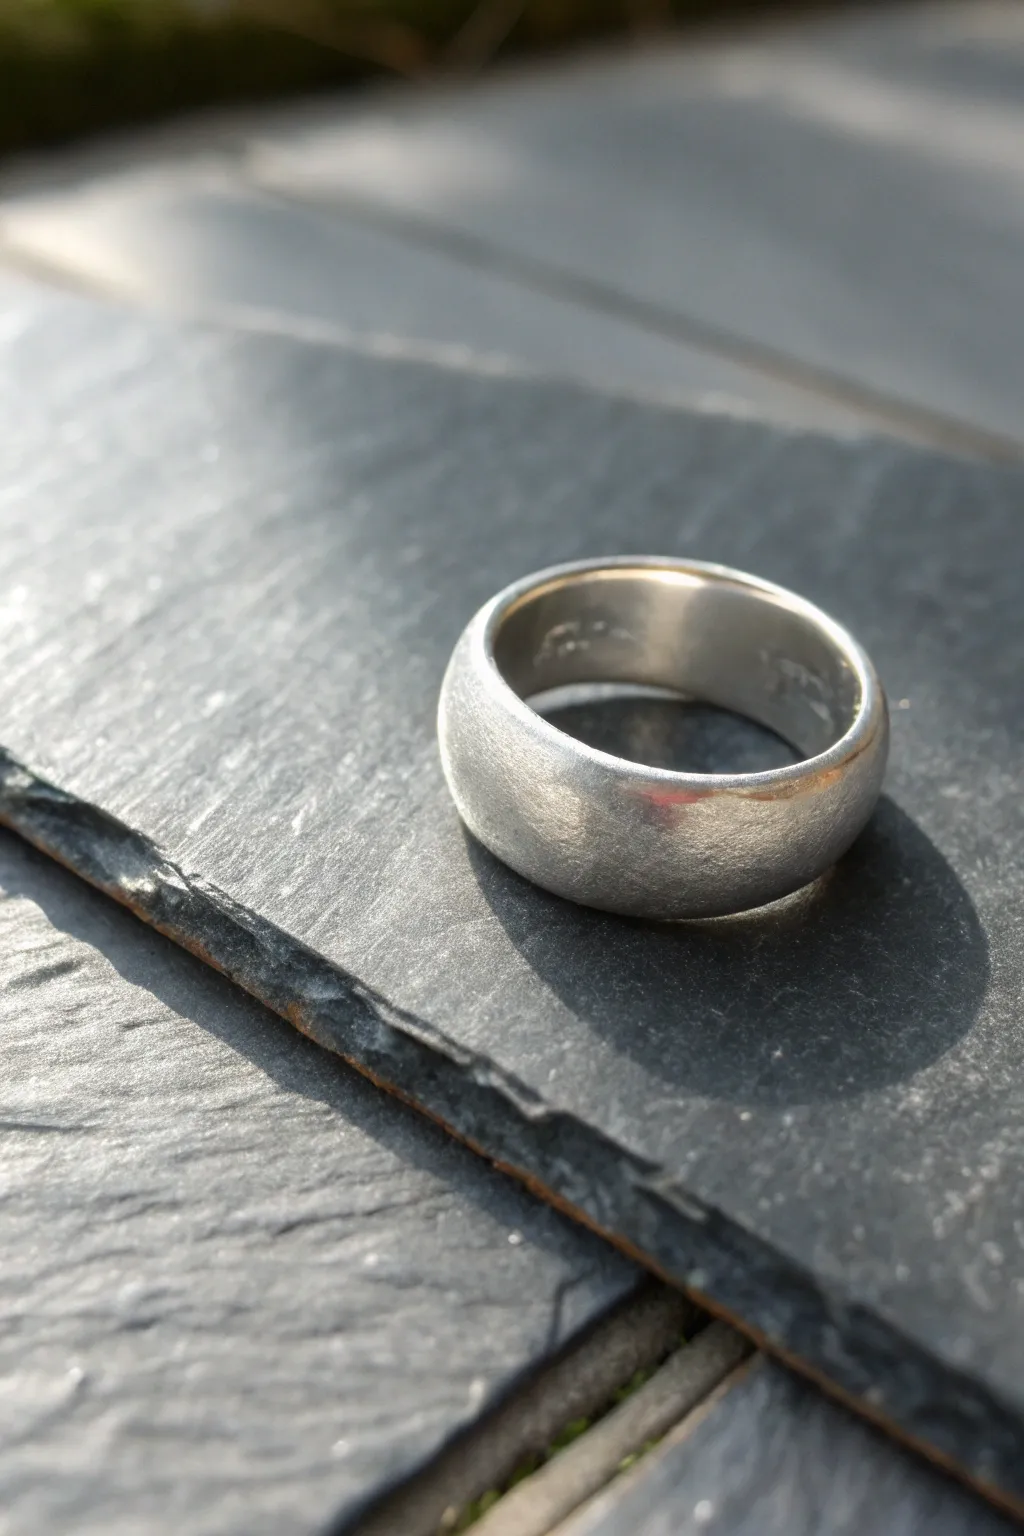
This substantial ring features a robust, wide profile with a gently rounded exterior and a polished interior designed for everyday comfort. The subtle, organic texture on the outside contrasts beautifully with the mirror-finish inner band, giving it a modern, handcrafted appeal.
Step-by-Step Guide
Materials
- 20g Silver metal clay (PMC or Art Clay)
- Ring sizing mandrel
- Post-it note or sizing paper
- Clay roller
- Playing cards or slat spacers (1.5mm and 1mm thick)
- Craft knife or needle tool
- Small bowl of water and paintbrush
- Rubber clay shaper tool
- Sanding sponges (medium to fine grit)
- Butane torch or kiln
- Stainless steel polishing brush
- Burnisher or agate tool
- Badger balm or olive oil (release agent)
Step 1: Sizing and Preparation
-
Determine your ring size:
Since wide bands fit tighter than narrow ones, you need to size up. Measure your finger, then add about 2 to 3 sizes specifically for metal clay shrinkage (check your specific brand’s shrinkage rate) plus an extra half-size for the wide band comfort allowance. -
Prepare the mandrel:
Wrap a Post-it note or a strip of paper around the mandrel at your calculated shrinkage size. Secure it with tape so the clay won’t stick to the mandrel itself. -
Condition the clay:
Rub a tiny amount of badger balm or olive oil onto your hands and work the clay briefly to ensure it is pliable and crack-free. Don’t overwork it, as it will dry out quickly.
Fixing Cracks
If you see hairline cracks while the clay is drying on the mandrel, apply a thin “paste” made of clay mush and water into the crack. Let it dry, then sand smooth again.
Step 2: Forming the Band
-
Roll the clay snake:
Roll the lump of clay into a thick snake. Since we want a wide band, ensure the snake is thick enough to be flattened into a strip roughly 8mm to 10mm wide. -
Flatten the strip:
Place your 1.5mm spacers on either side of the snake. Use your roller to flatten the clay into a long, even strip. This thickness ensures the ring feels substantial and high-quality. -
Cut to length:
Use a craft knife to trim the ends of the strip at a 45-degree angle. This scarf joint creates a stronger seam and a cleaner connection than a simple butt joint. -
Wrap the mandrel:
Carefully lift the strip and wrap it around the paper-covered mandrel. Bring the angled ends together so they overlap perfectly. -
Seal the seam:
Apply a touch of water to the seam with your brush. Use a rubber shaper to blend the clay across the join line until it completely disappears. Do this on the outside and, carefully, on the inside edges as well.
Step 3: Refining the Shape
-
Initial shaping:
While the clay is still moist on the mandrel, roll the mandrel gently on your work surface to ensure the band is perfectly round and even. -
Create the comfort fit:
I like to use a wet finger or a wet discoloration sponge to smooth and slightly round the edges of the band. A true comfort fit has no sharp corners digging into the finger, so soften those rims now. -
Dry the ring:
Allow the ring to dry completely. You can let it air dry for 24 hours or set it on a cup warmer. It must be bone dry before the next step to prevent cracking. -
Refine the surface:
Once dry, carefully remove the ring from the mandrel. Use fine-grit sanding sponges to smooth the flat sides and the interior. For the exterior, you can lightly sand, but leave a bit of natural texture if you prefer the organic look shown in the image.
Stamp Integration
Before the clay dries, gently press a hallmark stamp or a tiny personal symbol into the interior surface for a custom, branded touch hidden inside the band.
Step 4: Firing and Finishing
-
Fire the ring:
Place the ring on a firing brick. If using a torch, heat evenly until it glows a peachy orange, maintaining that temperature for at least 2-3 minutes (or follow your clay package instructions). If using a kiln, fire according to the manufacturer’s schedule for maximum strength. -
Quench and brush:
Once fired and cooled (or quenched in water), the ring will look white. Vigorously brush it with a stainless steel wire brush and a drop of dish soap to burnish the surface and reveal the silver. -
Polish the interior:
To achieve the comfort-fit feeling, focus your polishing efforts on the inside. Use a burnisher or a rotary tool with a polishing point to make the interior mirror-smooth. -
Finish the exterior:
For the exterior finish seen in the photo, use a matte sanding pad or fine steel wool to give it a soft, satin glow rather than a high-gloss shine.
Enjoy the solid weight and smooth feel of your new statement ring every time you slip it on
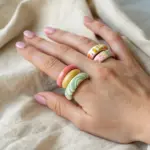

Stacked Thin Bands Set

Create a stunning trio of stackable silver bands that play with texture and celestial motifs. This project combines a beaded-look ring, a starry statement band, and a simple dotted accent ring for a cohesive yet varied set.
How-To Guide
Materials
- Silver metal clay (approx. 10-15g)
- Ring mandrel (sized for clay shrinkage)
- Clean work surface or Teflon sheet
- Rolling pin or acrylic roller
- Texture sheet or ball stylus tool
- Small star or snowflake metal stamp
- Clay knife or scalpel
- Water and paintbrush
- Fine grit sandpaper or sanding sponges
- Firing method (kiln or torch)
- Brass brush
- Liver of sulphur (optional, for patina)
- Polishing cloth
Step 1: Creating the Beaded Band (Bottom Ring)
-
Roll the Snake:
Begin by taking a small lump of clay and rolling it into a long, even snake. Aim for a thickness of about 1.5mm to 2mm. Keep your rolling even to ensure the beads look uniform later. -
Measure and Cut:
Wrap the snake around your mandrel at the desired size mark. Remember that silver clay shrinks, so you generally need to size up 2-3 sizes depending on your specific clay brand. Cut the excess simply for now. -
Form the Beads:
Before joining the ends, use a knife or a specialized bead-maker tool to gently press indentations at regular intervals along the snake. Don’t cut all the way through; just create deep grooves to simulate individual silver balls. -
Join the Band:
wrap the textured snake back around the mandrel. Apply a tiny dab of water to the ends and press them together. Smooth the seam carefully with a rubber tool or your finger so the pattern remains uninterrupted.
Seamless Ring Sizing
Wrap a Post-it note around the mandrel where you want the ring to sit. Build the ring on top of the paper; the paper burns away during firing, preventing the clay from sticking to the mandrel.
Step 2: crafting the Starry Band (Middle Ring)
-
Roll a Flat Strip:
For the middle ring, roll out a flat strip of clay, approximately 3-4mm wide and 1.5mm thick. This band needs more surface area to accommodate the stamps. -
Applying Texture:
While the clay is flat on your work surface, gently press your small star or snowflake stamp into the clay. Add a few small dots using a ball stylus to look like distant stars. -
Form the Ring:
Lift the strip carefully and wrap it around the mandrel. Cut the ends at an angle (a scarf joint) for a stronger bond. Use water and paste (slurry) to join the ends seamlessly. -
Refining the Shape:
Once on the mandrel, you can gently tap it with a flat tool to ensure it sits flat, but keep some of that slightly organic, handmade variation visible.
Cracks While Rolling?
If the clay starts cracking at the edges while rolling, it’s getting dry. Dab your finger in water and smooth the edges immediately, then cover unused clay with cling wrap tightly.
Step 3: Making the Dotted Accent Band (Top Ring)
-
Create a Square Band:
Roll another snake of clay, but this time flatten it slightly with your roller so it has a square or rectangular profile, about 2mm wide. -
Add Dotted Details:
Using a very small point tool or the tip of a mechanical pencil (without lead), press a continuous line of tiny dots around the center or edges of the band. I find spinning the mandrel while holding the tool steady helps create a straight line. -
Join and Dry:
Join the ends using the scarf joint method on the mandrel. Allow all three rings to dry completely on the mandrel or a warming plate. They must be bone dry before firing to prevent cracking.
Step 4: Firing and Finishing
-
Sand and Refine:
Once dry, gently sand any rough seams or sharp edges with fine-grit sandpaper. Be very gentle with the beaded ring so you don’t sanding away the definition. -
Fire the Rings:
Fire the pieces according to your clay package instructions. Most silver clays can be torch fired for 2-3 minutes or kiln fired. Allow them to cool completely. -
Brush to Shine:
The rings will look white after firing. Briskly brush them with a brass brush and soapy water to burnish the silver and bring out the metallic shine. -
Optional Patina:
To make the stars and dots pop, dip the rings in a warm liver of sulphur solution until they darken. Rinse immediately. -
Final Polish:
Use a polishing cloth or sanding block to remove the dark patina from the high points, leaving the black color only in the recessed stars and dots for contrast.
Slide your new textured stack onto your finger and admire the interplay of light and shadow on the silver


Open-Shank Wrap Ring
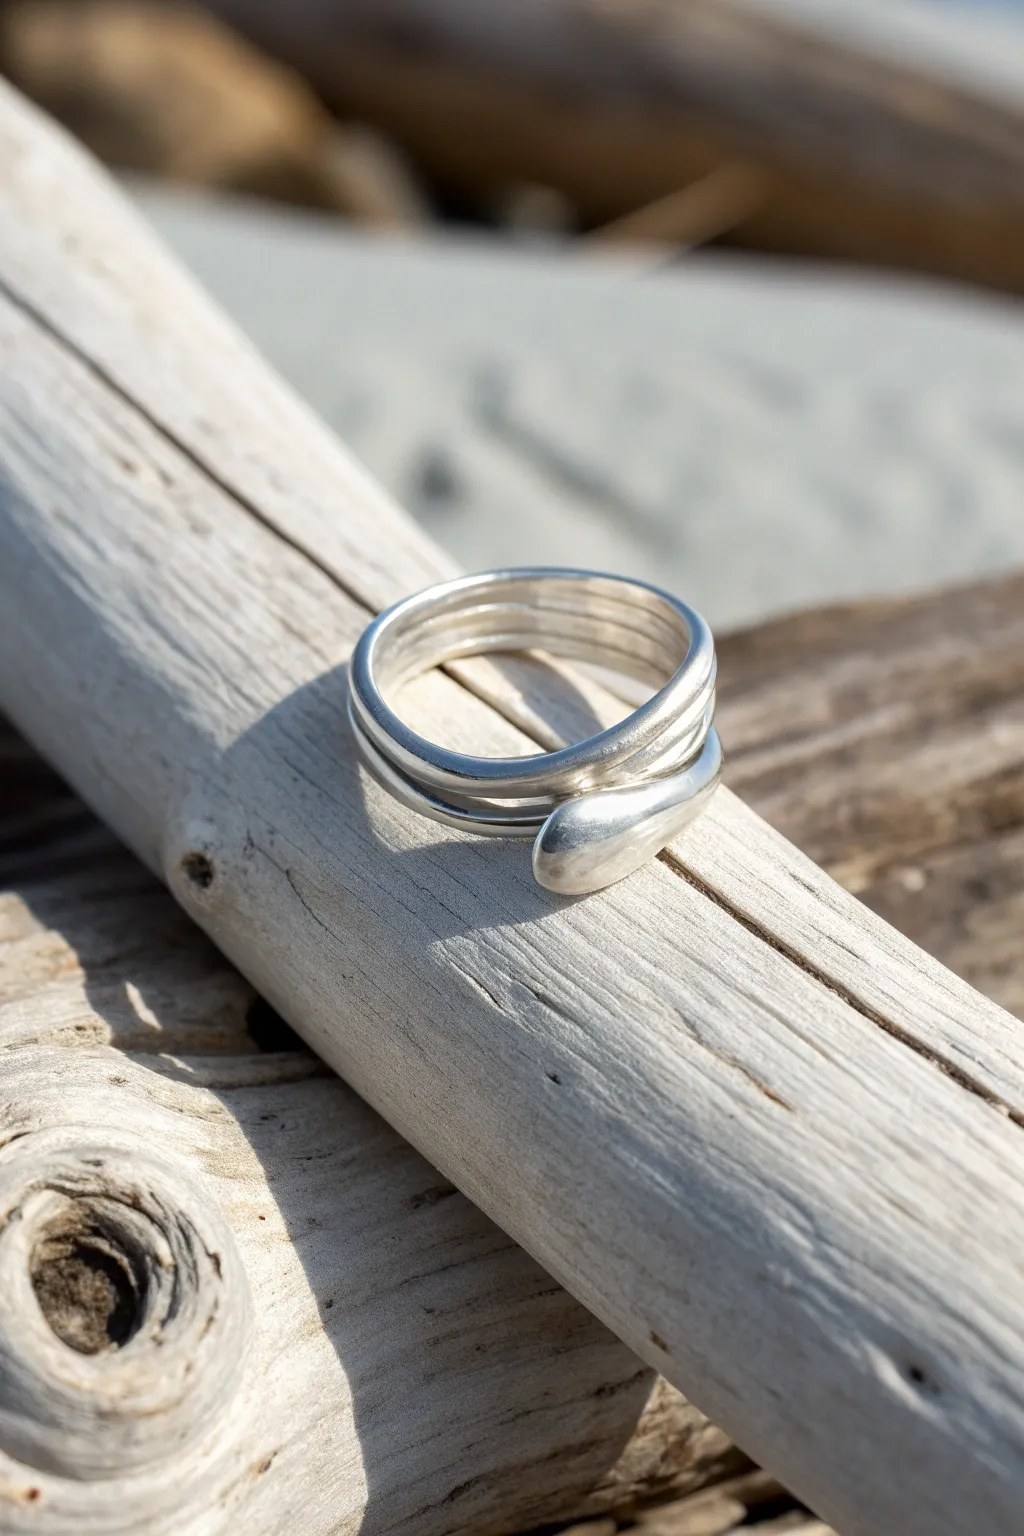
This elegant open-shank ring captures the organic beauty of shoreline treasures with its fluid, overlapping form and polished teardrop terminal. By utilizing silver clay’s versatility, you’ll create a durable piece that looks like forged sterling but is shaped by hand.
Step-by-Step Guide
Materials
- Silver metal clay (approx. 7-10g)
- Ring mandrel (wood or steel)
- Post-it notes or paper strip
- Rolling pin or clay roller
- Spacer slats (1mm or 1.5mm thickness)
- Needle tool or craft knife
- Clay shaper or rubber-tipped tool
- Small bowl of water
- Fine grit sandpaper or sanding sponges (400-1200 grit)
- Butane torch or kiln
- Brass brush
- Agate burnisher
- Polishing cloth
Step 1: Sizing and Rolling
-
Measure the Mandrel:
Since silver clay shrinks during firing, wrap a Post-it note around your ring mandrel about 2-3 sizes larger than your actual finger size. Mark the overlap to secure it. -
Condition the Clay:
Take your silver clay out of the package and knead it briefly in your palms. You want it pliable and crack-free, but work somewhat quickly to prevent drying. -
Roll the Coil:
Roll the clay into a long snake or coil on a non-stick surface. It needs to be long enough to wrap around the mandrel roughly one and a half times. -
Flatten the Clay:
Place your spacer slats on either side of the coil. Use your roller to flatten the snake into a long, uniform strip. This strip will form the body of your wrap ring.
Cracking Up?
If cracks appear while wrapping the clay around the mandrel, dab a little water on the crack and fill it with clay paste (slip). Smooth immediately.
Step 2: Shaping the Wrap Design
-
Create the Grooves:
Before wrapping, drag a needle tool or a coarse comb texture tool gently along the length of the flat strip. This creates the illusion of multiple stacked bands, a key feature of this design. -
Form the Teardrop:
On one end of the strip, add a tiny extra ball of clay and smooth it into the strip to create a bulbous, teardrop shape. This will be the prominent feature on top of the finger. -
Wrap the Mandrel:
Carefully pick up the strip and wrap it around the paper-covered mandrel. Position the teardrop end so it sits on top, and bring the other end around to tuck comfortably underneath or beside it. -
Adjust the Overlap:
Ensure there is a slight gap or a comfortable overlap between the teardrop and the underlying tail. The open-shank style allows for minor adjustments later, but get the shape close now. -
Refine the Edges:
Use a damp brush or a rubber-tipped tool to smooth the edges of the strip. I like to spend extra time here rounding off the teardrop so it looks seamless and organic.
Gem Setting
Before drying, press a small cubic zirconia into the center of the teardrop terminal. Ensure the stone’s girdle is fully embedded for a secure fire-in-place setting.
Step 3: Drying and Refining
-
Dry Completely:
Allow the ring to dry on the mandrel. Depending on humidity, this can take a few hours or can be sped up with a dehydrator or hair dryer. It must be bone dry before the next step. -
Remove from Mandrel:
Gently slide the dry clay ring off the mandrel. Peel away the paper carefully. -
Sanding:
Using fine-grit sanding sponges, gently sand the interior for comfort. Smooth the teardrop terminal until it feels like a pebble, and lightly touch up the exterior grooves without erasing them. -
Dust Removal:
Brush away all clay dust with a soft, dry paintbrush. Any dust left behind will fuse to the surface and mar the finish.
Step 4: Firing and Finishing
-
Fire the Ring:
Place the ring on a firing brick. If torch firing, heat evenly until the piece glows a peachy-orange color and hold for the manufacturer’s recommended time (usually 2-5 minutes). If kiln firing, follow the clay package schedule. -
Cool and Quench:
Allow the ring to cool completely, or quench it in water if the specific clay type permits (check instructions). -
Initial Brushing:
The ring will look white and chalky. Vigorously brush it with a brass, soapy brush to reveal the silver metal underneath. It will turn a matte silver color. -
Burnishing:
Rub the teardrop and the high points of the band with an agate burnisher. The pressure compresses the silver surface, turning it incredibly shiny and reflective appearing like molten metal. -
Final Polish:
Buff the entire ring with a polishing cloth to bring out a high luster contrast against the grooves.
Slip your custom ring on and admire the professional, fluid look you created entirely by hand


Organic Bark Texture Band
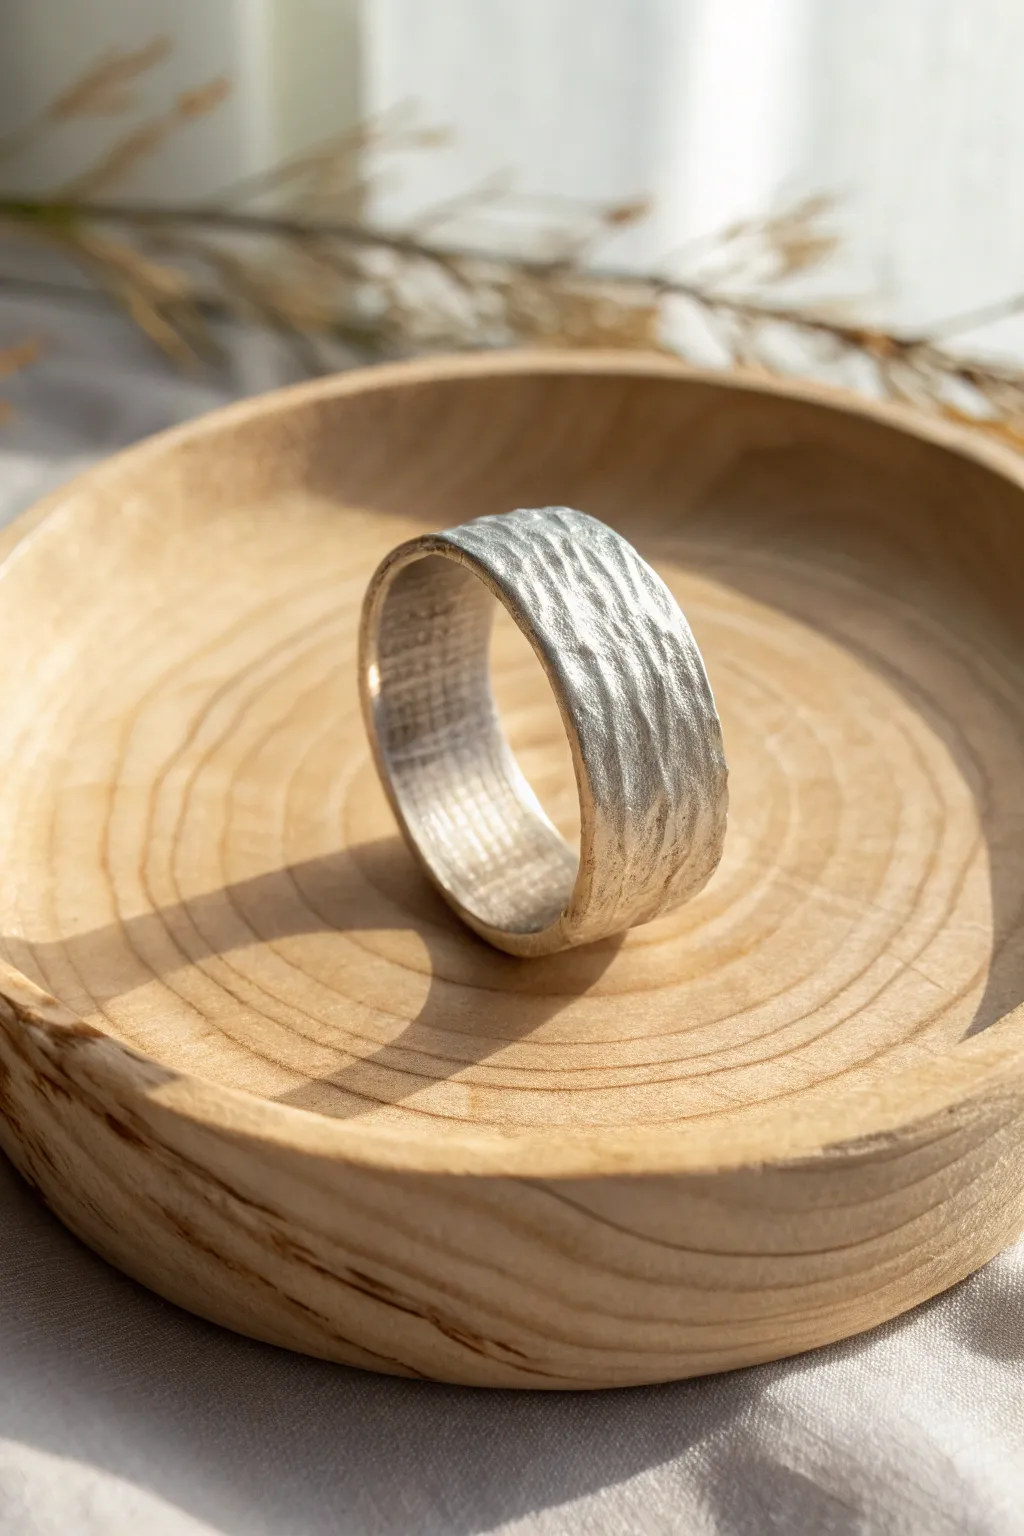
Capture the rugged elegance of nature with this organic bark texture band. By using real natural materials to impress the design, you’ll create a solid silver ring that looks as though it was hewn directly from a metallic tree.
How-To Guide
Materials
- 20g Silver metal clay (PMC or Art Clay Silver)
- Small rolling pin
- Deeply textured tree bark (dried and clean) or a bark texture silicone mat
- Ring mandrel (wooden or Teflon)
- Post-it notes or ring sizing gauge
- Olive oil or Badger balm (release agent)
- Clay knife or scalpel
- Needle tool
- Water and a small paintbrush
- Sanding sponges (medium to fine grit)
- Agate burnisher
- Patina solution (Liver of Sulfur)
- Polishing cloth
Step 1: Preparation and Sizing
-
Size your mandrel:
Since metal clay shrinks during firing (usually 8-15% depending on the brand), you need to size up. Wrap a Post-it note around your mandrel where your desired ring size sits, but move it 2-3 sizes larger to account for shrinkage. -
Lubricate surfaces:
Apply a thin layer of olive oil or balm to your hands, the rolling pin, and the work surface to prevent stickiness. This ensures your precious clay doesn’t get left behind on your tools. -
Condition the clay:
Take your silver clay out of the package and knead it briefly in your palms. You want it pliable and crack-free, but work quickly so it doesn’t dry out.
Seamless Success
Make the join invisible by pressing a small piece of the original bark texture over the seam while the clay is still wet. This bridges the gap perfectly.
Step 2: Texturing the Clay
-
Roll out the coil:
Roll the clay into a thick snake or log shape. It needs to be long enough to wrap around your expanded ring size, plus a little extra for overlap. -
Flatten the strip:
Using your rolling pin, gently flatten the log into a strip. Aim for a thickness of about 4-5 cards (roughly 1.5mm) to ensure the ring is sturdy after firing. -
Apply the texture:
Lubricate your piece of clean, dried tree bark or texture mat. Place it firmly onto the clay strip and roll over it once with significant pressure. I find rolling only once prevents ‘ghost’ images. -
Trim edges:
Use your scalpel or clay knife to trim the long edges of the strip. You can cut them straight for a modern look, or leave them slightly wavy to enhance the organic vibe seen in the photo.
Inset Gems
Before firing, press small cubic zirconia stones into the ‘knots’ of your bark texture for a hidden sparkle that mimics dew drops on a branch.
Step 3: Forming the Ring
-
Wrap the mandrel:
Carefully lift your textured strip and wrap it around the prepared spot on your mandrel, with the textured side facing out. -
Create the seam:
Where the ends meet, slice through both layers of clay simultaneously at a diagonal angle. Remove the excess scraps. This creates a scarf joint which offers more surface area for a stronger bond. -
Join the ends:
Apply a tiny amount of water to the cut edges with your brush to create a slip. Press the ends together gently but firmly. -
smooth the seam:
Use a rubber shaper tool or your finger to blend the seam on the inside and outside. If the texture gets muddied at the join, use a needle tool to re-draw some bark lines to camouflage it. -
Dry partially:
Let the ring dry on the mandrel for about 15-20 minutes until it holds its shape, then gently slide it off.
Step 4: Refining and Firing
-
Full dry:
Place the ring on a warmer or allow it to air dry completely for 24 hours. The clay must be bone dry before firing to prevent exploding. -
Pre-fire sanding:
Use sanding sponges to smooth the interior of the band and the rim edges. Be gentle with the exterior texture, only knocking back sharp spikes while keeping the deep grooves. -
Fire the ring:
Fire according to your specific clay brand’s instructions (typically kiln firing at 1650°F for two hours, or torch firing for lighter bands). The organic binders will burn away, leaving pure silver. -
Brush finish:
Once cool, brass brush the ring vigorously under running water with a drop of dish soap. This transforms the white, matte fired surface into gleaming silver.
Step 5: Finishing Touches
-
Burnish:
Rub the high points of the bark texture with an agate burnisher. This compresses the silver and makes the raised ridges significantly shinier than the valleys. -
Patina:
Prepare a warm Liver of Sulfur solution. Dip the ring until it turns dark gray or black. Rinse thoroughly with water/baking soda to neutralize it. -
Final polish:
Use a polishing cloth or sanding sponge to remove the black patina from the raised surfaces, leaving the darkness only in the deep crevices. This contrast brings the bark pattern to life.
Wear your handcrafted piece of nature with pride, knowing no two bark patterns will ever be exactly alike

The Complete Guide to Pottery Troubleshooting
Uncover the most common ceramic mistakes—from cracking clay to failed glazes—and learn how to fix them fast.
Leaf Impression Ring
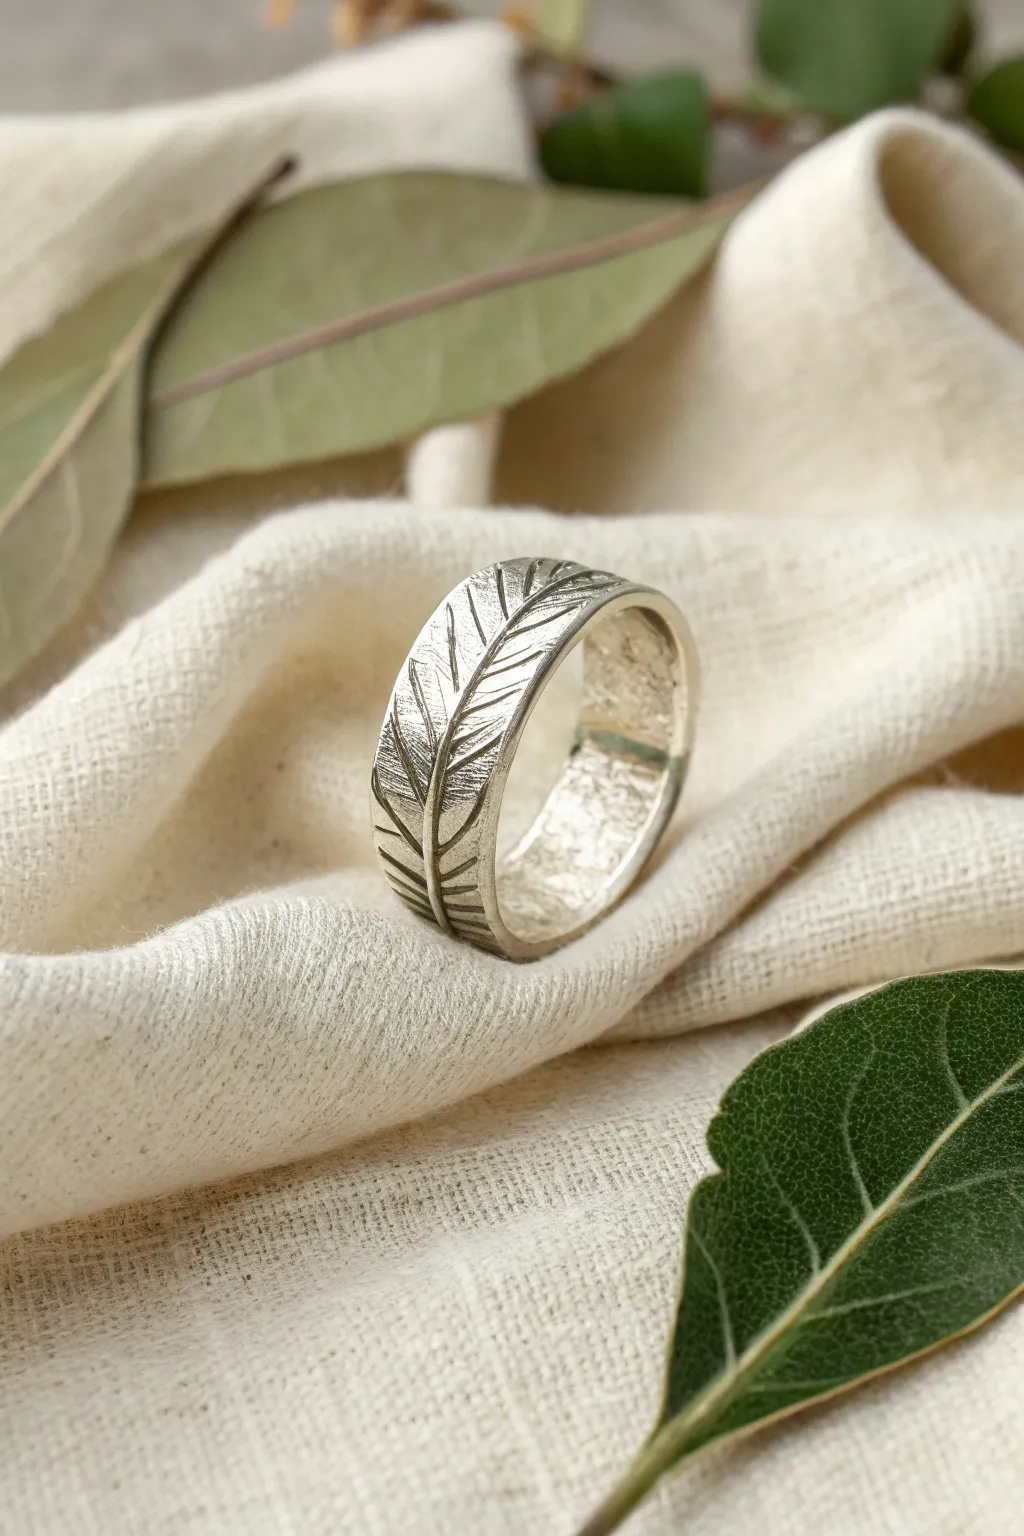
Capture the intricate beauty of nature by turning a simple leaf into an everlasting piece of jewelry. This project uses silver metal clay to pick up the finest veins and textures, resulting in a rustic, organic band that looks like a fossilized treasure.
Step-by-Step Tutorial
Materials
- Silver metal clay (approx. 10-15g for a wide band)
- Small, textured leaf (fern, sage, or olive leaves work well)
- Ring mandrel
- Post-it note or ring sizing strip
- Roller (acrylic or PVC)
- Playing cards (for thickness guides)
- Olive oil or badger balm (release agent)
- Clay knife or needle tool
- Small bowl of water
- Fine grit sandpaper or sanding sponges
- Kiln or butane torch
- Stainless steel brush
- Liver of sulfur (optional for patina)
Step 1: Preparation & Sizing
-
Measure your size:
Since metal clay shrinks during firing (usually 10-15%), you need to account for this. Wrap a strip of paper around your finger to find your size, then consult your clay brand’s shrinkage chart to determine the pre-fire size needed. -
Create a ring paper form:
Once you have your enlarged size, wrap a Post-it note around the ring mandrel at that specific size mark. Secure it tightly with tape so it doesn’t slide; this strip will support the clay while it dries. -
Prepare your workspace:
Lightly coat your work surface and your hands with a tiny bit of olive oil or badger balm. This prevents the precious silver clay from sticking to everything.
Natural Selection
Choose leaves with thick, woody veins rather than soft, fleshy ones. Herbs like sage, mint, or sturdy ferns create much deeper, crisp impressions than delicate flower petals.
Step 2: Texturing the Clay
-
Roll out the clay:
Place a stack of 3-4 playing cards on either side of your clay lump to act as depth guides. roll the clay into a long strip or snake, then flatten it with your roller until it’s an even thickness. -
Prepare the leaf:
Select a leaf with prominent veins on the back side. Lightly oil the back of the leaf to ensure it releases cleanly from the clay later. -
Impress the texture:
Place the leaf vein-side down onto your clay strip. Roll over it firmly once with your roller to embed the texture deep into the silver. Don’t roll back and forth, or you might create a double image. -
Remove the leaf:
Carefully peel the leaf away using tweezers or the tip of your needle tool to reveal the impression. I usually hold my breath here—it’s the most satisfying part. -
Trim the band:
Using a straight edge and a sharp clay knife, cut a clean, straight strip from the textured area. Ensure the strip is long enough to wrap around your mandrel size with a little overlap for the join.
Step 3: Forming the Ring
-
Wrap the mandrel:
Lift the clay strip and gently wrap it around the paper-covered spot on your ring mandrel. Position the seam on the underside where it will be less visible. -
Create the join:
Cut through both overlapping ends of the clay simultaneously at a diagonal angle. Remove the excess scraps. This creates two perfectly matching angled edges. -
Paste and seal:
Add a tiny drop of water or clay paste (slip) to the cut edges. Press them gently together. Use a rubber shaper or your finger to smooth the seam on the inside and outside, being careful not to smudge your leaf texture. -
Dry completely:
Let the ring dry on the mandrel for several hours or use a dehydrator/warmer plate. The clay must be bone dry before firing, or it could crack.
Make It Sparkle
Set a small cubic zirconia directly into the clay before firing. Press it into the center of the leaf design for a ‘dewdrop’ effect that adds a hint of glamour to the rustic look.
Step 4: Refining & Firing
-
Sand the imperfections:
Once bone dry, carefully slide the ring off the mandrel. Use fine sandpaper or sanding sponges to smooth the edges and the inside of the ring. Do not sand the textured face. -
Fire the ring:
Place the ring in a kiln or fire it with a butane torch according to your clay manufacturer’s specific time and temperature instructions. The binders will burn off, and the silver particles will sinter together. -
Cool and brush:
Let the ring cool completely. It will look white and matte. Scrub it vigorously with a stainless steel brush and a little soapy water to bring out the silver shine. -
Burnish for shine:
For extra sparkle, rub the high points of the leaf texture with a burnishing tool. This contrast between shiny veins and matte recesses creates depth. -
Optional patina:
To really make the leaf veins pop, dip the ring in a warm liver of sulfur solution until it darkens, then polish the surface again so the dark color stays only in the deep crevices.
Now you have a permanent piece of nature wrapped around your finger to enjoy every day
Delicate Lace Texture Band
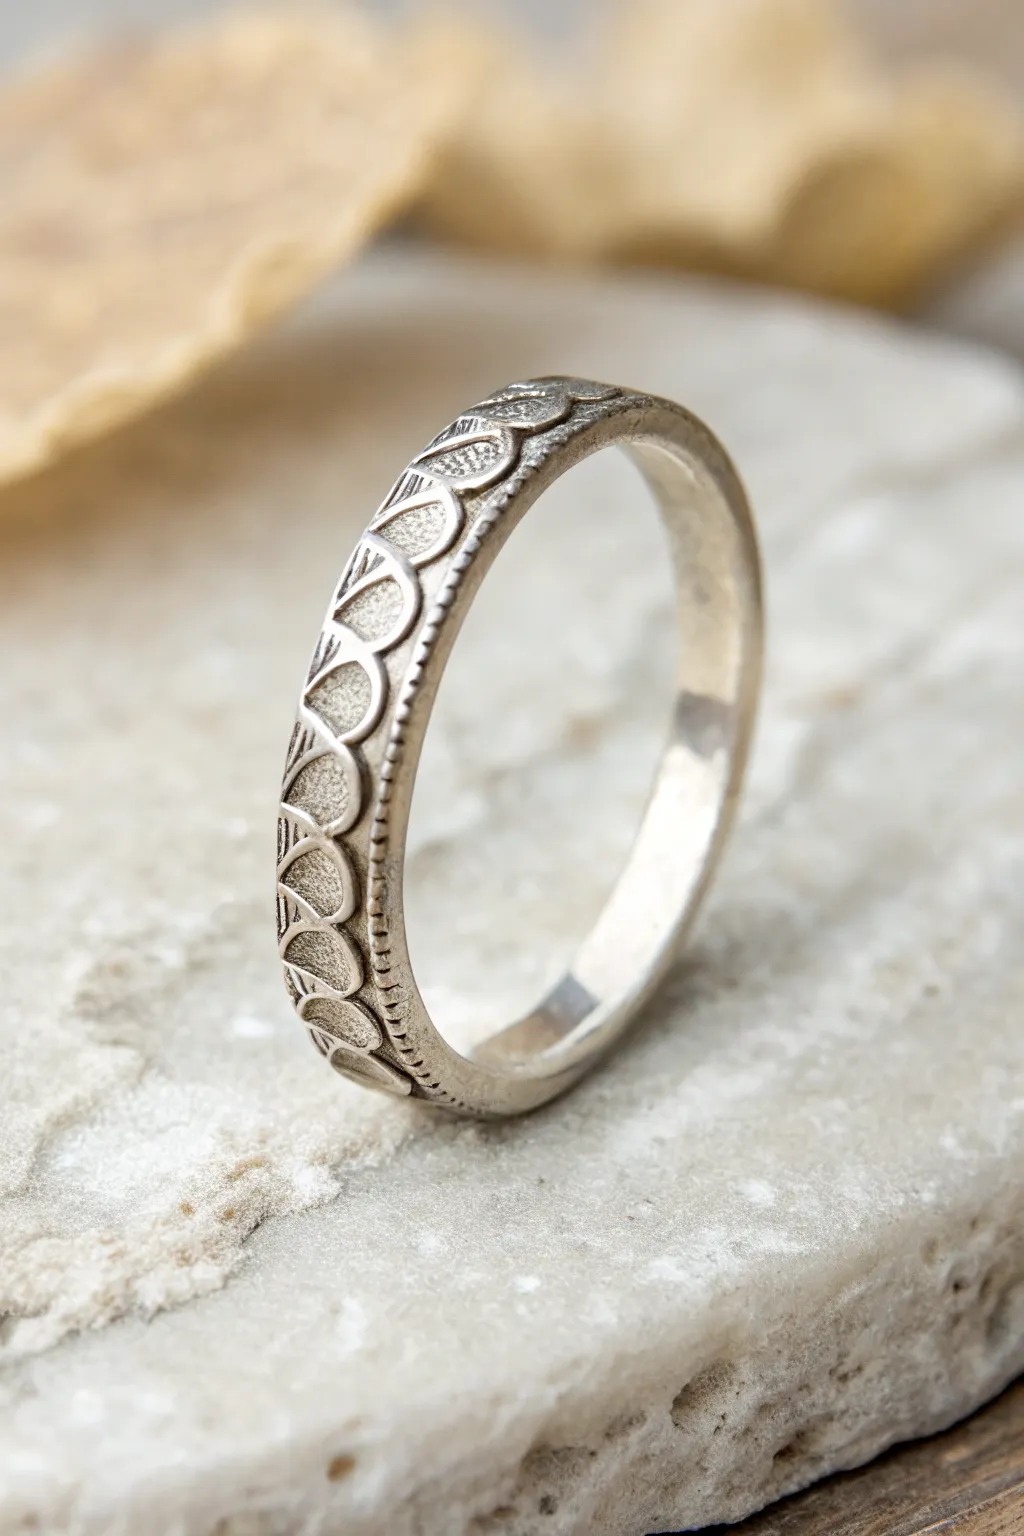
This elegant silver clay project captures the delicate intricacy of vintage lace in solid fine silver. By using a distinct texture plate and careful refining, you’ll create a seamless, scalloped pattern that feels both timeless and modern.
Step-by-Step Guide
Materials
- Silver metal clay (approx. 7-10g depending on ring size)
- Texture plate with a scalloped/half-moon lace pattern
- Ring mandrel (wooden or Teflon)
- Post-it note or ring sizing paper strip
- Clay roller
- slat spacers (1.5mm thickness)
- Clay knife or craft blade
- Needle tool
- Fine grit sandpaper or sanding sponges (400-800 grit)
- Small bowl of water and a paintbrush
- Torch or kiln for firing
- Brass wire brush
- Agate burnisher (optional)
Step 1: Preparation and Sizing
-
Determine ring size:
Measure your finger using a standard ring sizer. Since metal clay shrinks during firing (usually 10-15%, depending on the brand), consult your clay package to calculate the necessary pre-fire size. Usually, sizing up 2-3 sizes is safe. -
Prepare the mandrel:
Wrap a Post-it note or a strip of paper around your mandrel at the position of your calculated ‘shrunk’ size. Tape it securely so the clay won’t stick to the mandrel itself. -
Condition the clay:
Remove your clay from the package and knead it briefly in your palms. You want it pliable and crack-free. If it feels slightly dry, add a tiny drop of distilled water and knead it in.
Cracks at the Seam?
If the seam cracks while drying, apply a thick paste of clay and water into the crack. Let it dry, sand it smooth, and repeat until the joint is invisible before firing.
Step 2: Creating the Textured Band
-
Roll the strip:
Place your clay between two 1.5mm thick slats. Roll it out into a long snake, then flatten it into a strip that is slightly wider and longer than you think you need. -
Apply the texture:
Lubricate your scalloped texture plate lightly with olive oil or badger balm. Place the clay strip onto the texture (or the texture onto the clay) and roll firmly once to imprint the pattern deeply. -
Trim the edges:
Use a sharp blade to trim the long edges of the strip. Aim to cut right along the edge of the pattern so the ‘lace’ design runs continuously without blank clay borders. I find a straight metal ruler helps keep this line perfect. -
Cut to length:
Wrap the textured strip around the paper on your mandrel to check the length. Use your blade to cut through both overlapping ends at a 45-degree angle. This diagonal cut creates a scarf joint, offering more surface area for a stronger bond.
Pattern Alignment Trick
When cutting the scarf joint, try to cut exactly between two scallops. This makes hiding the seam much easier than trying to match up half-cut pattern shapes.
Step 3: Forming and Refining
-
Join the seam:
Apply a small amount of clay paste (or water) to the cut ends. Wrap the strip back around the mandrel and press the slanted ends together firmly but gently, ensuring the pattern aligns as closely as possible. -
Smooth the interior:
While the ring is on the mandrel, lightly smooth the interior seam with a damp brush or a rubber shaper tool to ensure it’s seamless against the finger. -
Initial drying:
Let the ring dry completely on the mandrel or carefully slide it off if it’s firm enough. Using a dehydrator or mug warmer speeds this up, but air drying for 24 hours works perfectly too. -
Refine the edges:
Once bone dry, take your sanding sponge (around 400 grit) and gently sand the top and bottom rims of the ring to make them perfectly flat and parallel. -
Clean the pattern:
Check the textured surface. If there are any stray crumbs of clay stuck in the scalloped grooves, gently pick them out with a dry needle tool or a stiff brush. -
Add beaded detail (Optional):
The example image shows a tiny beaded rim. To replicate this, roll a microscopic snake of clay, place it along one edge of the ring using water as glue, and use a needle tool to press indentations every millimeter.
Step 4: Firing and Finishing
-
Fire the ring:
Place the dried ring on a firing brick. Fire according to your clay manufacturer’s instructions—typically around 1650°F (900°C) for 2 hours in a kiln for maximum strength, or torch fire until it glows a peachy-orange for the required time. -
Quench and brush:
Once fired (and cooled if kiln firing), plunge the ring into cool water. The ring will appear white. Brushing vigorously with a brass wire brush and soapy water will reveal the silver shine. -
Burnish for highlights:
To get that high-contrast look, use an agate burnisher to rub the high points of the scallops. This compresses the silver and makes the raised pattern gleam against the matte, textured recesses. -
Final polish:
For a softer satin finish like the photo, give the whole ring a quick buff with a polishing cloth, but avoid using heavy polishing compounds that might clog the fine lace details.
Wear your handcrafted lace ring with pride, knowing you’ve transformed soft clay into a lasting piece of silver art


What Really Happens Inside the Kiln
Learn how time and temperature work together inside the kiln to transform clay into durable ceramic.
Soft Hammered Look Texture
This project creates a stunningly rustic yet elegant ring with a surface that catches the light beautifully from every angle. By strategically texturing the unfired silver clay, you achieve a classic hammered metalsmithing look without needing heavy forging tools.
Detailed Instructions
Materials
- Silver metal clay (approx. 7-10g depending on size)
- Ring mandrel (wood or steel with paper)
- Post-it note or sizing strip
- Rolling pin/PVC roller
- Clay thickness spacers (1.5mm or 4 playing cards)
- Needle tool or craft knife
- Olive oil or badger balm (release agent)
- Small ball-ended burnisher or embossing tool
- Sandpaper (various grits: 400, 600, 1200)
- Stainless steel brush
- Kiln or butane torch
- Agate burnisher (optional)
Step 1: Sizing and Preparation
-
Measure the Ring Size:
Wrap a sizing strip or a strip of paper around your finger to find the correct circumference. Mark the spot where it overlaps. -
Adjust for Shrinkage:
Silver clay shrinks when fired, usually around 10-15% depending on the brand. Move your mark outward on the paper strip to account for this calculation, then wrap this new size around your mandrel. -
Prepare the Mandrel:
Wrap a Post-it note around the mandrel at the position of your shrinkage-adjusted size. Secure it well, as this paper prevents the clay from sticking to the wood or steel.
Cracked Seams?
If the seam reappears during drying, apply a thick paste of clay and water (slip) into the crack. Let it dry completely, then sand smooth before firing.
Step 2: Forming the Band
-
Lubricate Tools:
Lightly coat your hands, roller, and work surface with a small amount of olive oil or badger balm. This prevents the precious clay from sticking. -
Roll the Clay:
Place your 1.5mm spacers on either side of the clay lump. Roll the clay out into a long snake, then flatten it into a strip. You want it slightly wider than your desired final ring width. -
Trim to Size:
Use your needle tool or a craft knife to cut straight, clean edges on the strip. Ensure the length matches your paper sizing strip perfectly. -
Wrap the Mandrel:
Carefully pick up the clay strip and wrap it around the paper-covered mandrel. Bring the two ends together. -
Join the Seams:
Apply a tiny bit of water to the seam edges. Gently push the ends together, smoothing the clay over the join with a rubber tipping tool or your finger until the seam is invisible.
Pro Tip: Depth Check
Work quickly when texturing. If the clay gets too dry, brush a tiny amount of water on the surface. Don’t press too deep or you’ll weaken the ring structure.
Step 3: Creating the Texture
-
Initial Drying:
Let the ring dry on the mandrel for about 10-15 minutes. You want it firm enough to hold its shape, but still ‘leather hard’ and receptive to impressions. -
The Hammer Effect:
Take a small ball-ended burnisher or embossing tool. Gently press the ball into the surface of the damp clay repeatedly. Vary the pressure slightly to create organic, uneven dimples that mimic hammer strikes. -
Refine the Edges:
As you press, the edges might mushroom out slightly. Use the side of your tool to gently tuck them back in, maintaining a somewhat uniform width. -
Full Drying:
Allow the ring to dry completely. This can be done by leaving it overnight or placing it on a cup warmer. The clay is dry when it feels room temperature and sounds like hardened plaster when tapped. -
Pre-Fire Sanding:
Gently sand the edges and the inside of the band with 400 grit sandpaper to remove any sharpness. Be very careful not to sand away your hammered texture on the outside.
Step 4: Firing and Finishing
-
Fire the Piece:
Place the dry ring in a kiln (follow manufacturer instructions, typically 1650°F for 2 hours) or fire with a butane torch until it glows a peachy-orange color for the required time. -
Cool and Brush:
Once cool, the ring will look white and powdery. Briskly brush it with a stainless steel wire brush. The white crystallization will fall away, revealing the shine of the silver beneath. -
Highlight the High Points:
To enhance the ‘hammered’ look, rub an agate burnisher firmly over the raised areas of the texture. This mirror-polishes the high spots while leaving the recesses slightly more matte. -
Final Polish:
Buff the entire ring with a polishing cloth to bring out the bright silver luster and protect the finish.
Slip the ring onto your finger and admire the way the faceted texture plays with the light
Chunky Signet Ring With Stamped Symbol
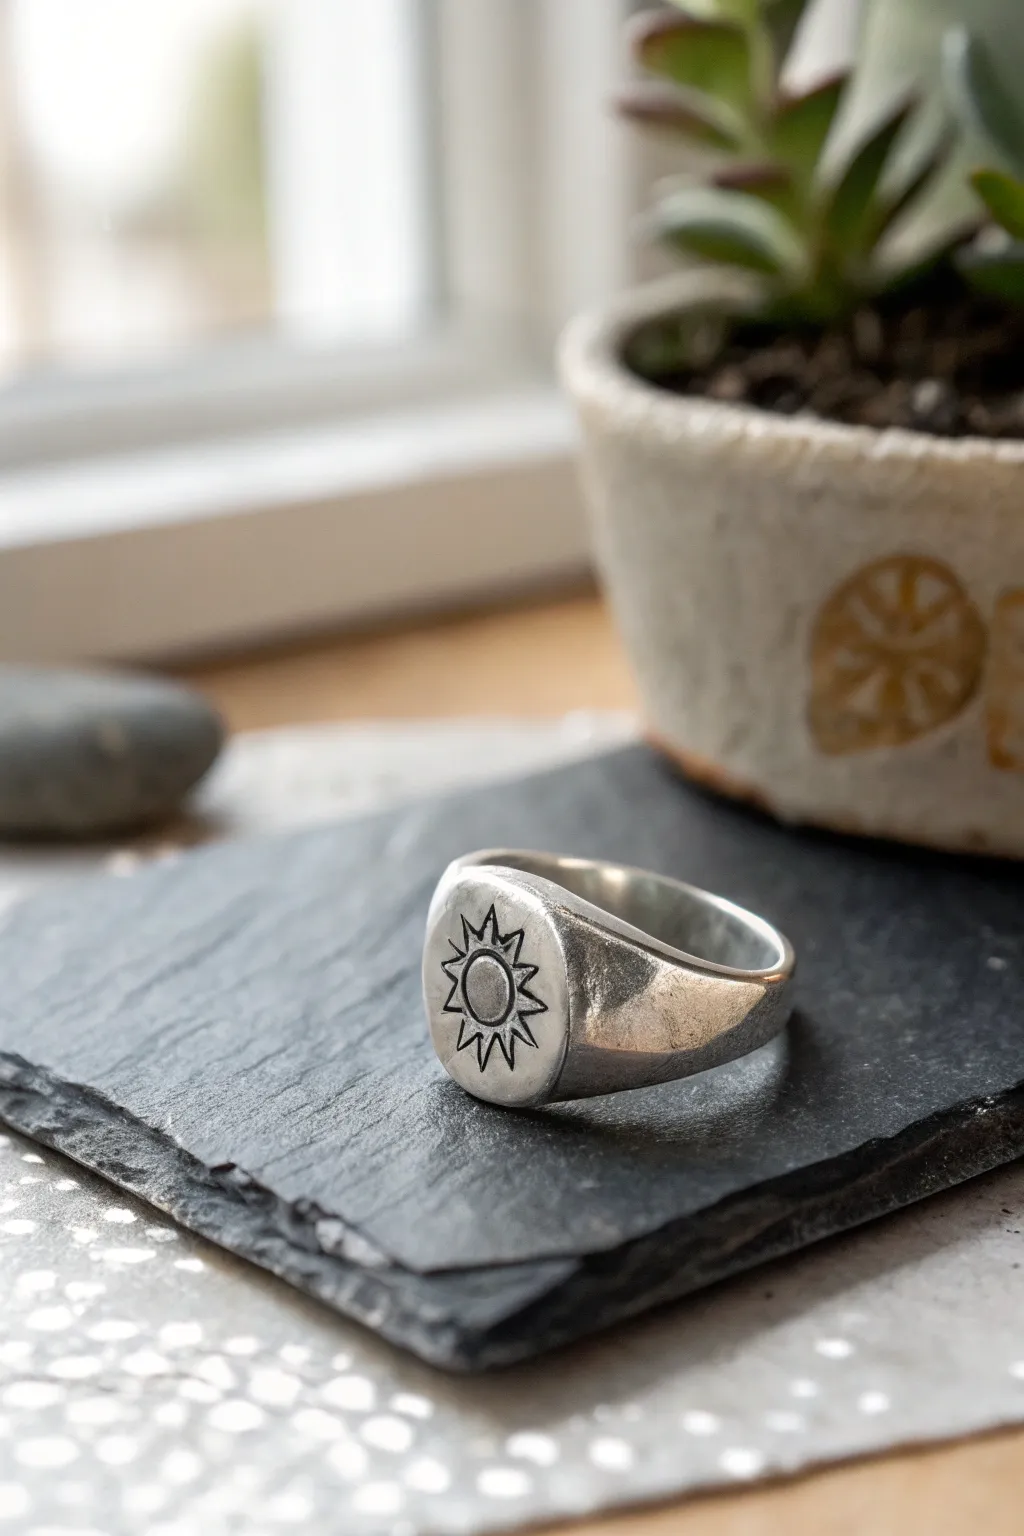
Create a bold statement piece with this chunky silver clay signet ring, featuring a rustic hand-stamped sun motif. The heavy, polished silver band has a satisfying weight and a timeless, ancient feel that looks perfect on any finger.
How-To Guide
Materials
- Silver metal clay (approx. 10-15g for a chunky ring)
- Ring mandrel (wood or Teflon-coated)
- Post-it notes or paper ring sizing strip
- Rolling pin or acrylic roller
- Playing cards (for thickness guides)
- Olive oil or badger balm (release agent)
- Clay shaper or craft knife
- Sun design stamp (metal or rubber)
- Sanding sponges (medium to superfine grit)
- Butane torch or kiln
- Stainless steel brush
- Liver of sulfur (patina solution)
- Polishing cloth or agate burnisher
Step 1: Shaping the Ring Core
-
Size the mandrel:
Wrap a Post-it note or paper strip around your ring mandrel at the desired size. Remember that silver clay shrinks during firing (usually around 10-15%, depending on the brand), so size up roughly 1.5 to 2 sizes larger than your actual finger size. -
Prepare your clay:
Lubricate your hands and work surface with a small amount of olive oil. Take your lump of silver clay and knead it briefly to ensure it is pliable and crack-free. -
Roll the coil:
Roll the clay into a thick snake or log. Since this is a chunky signet ring, you want substantial thickness, not a thin wire. Aim for a log that is roughly 8mm to 10mm thick. -
Form the band:
Wrap the thick log around the paper-covered spot on your mandrel. Overlap the ends where the signet ‘face’ will be. -
Build the focal point:
Smush the overlapping ends together firmly to create a raised mound on top of the ring. This mound will become the flat face of the signet. Add a little extra lump of clay here if the coil overlap isn’t bulky enough.
Stamp Sharpness
If your stamp impression looks messy, let the clay dry a bit more. If the clay is too wet, it drags; if it’s leather-hard, you get crisp, clean lines.
Step 2: Sculpting the Signet
-
Paddle the shape:
While the clay is still on the mandrel, use a flat tool or your fingers to shape the mound into a roughly circular or oval flat plateau. Flatten the sides of the shank so they taper smoothly up towards this face. -
Smooth the shank:
Use a clay shaper or a wet brush to smooth the transition between the band and the signet face. It should look like one continuous piece of metal, not two lumps stuck together. -
Refine the edges:
Ensure the face of the ring is level. I like to gently tap the face with an acrylic block to ensure it’s perfectly flat for stamping. -
Dry partially:
Let the ring dry on the mandrel for about 10–15 minutes until it is leather-hard. It shouldn’t be squishy, but it needs to be soft enough to take an impression without cracking.
Gem Setting
Before drying, press a small fireable cubic zirconia into the center of the sun symbol for a sparkling twist on the design.
Step 3: Stamping and Refining
-
Stamp the sun:
Lightly oil your sun stamp so it doesn’t stick. Supporting the back of the ring mandrel firmly, press the stamp into the center of the ring face with steady, even pressure. Don’t wiggle it, or you’ll get a ghost image. -
Full dry:
Allow the ring to dry completely. This can be done by leaving it in a warm place for 24 hours or using a dehydrator/mug warmer. The clay must be bone dry before firing to avoid explosions. -
Sanding and refining:
Once bone dry, gently remove the ring from the mandrel. Use fine sanding sponges to smooth out any fingerprints, bumps, or sharp edges on the rim. Be careful around the stamped area so you don’t erase the detail.
Step 4: Firing and Finishing
-
Torch or kiln fire:
Fire the ring according to your clay package instructions. For a chunky ring like this, I recommend kiln firing for maximum strength, but a long torch firing (at least 5-7 minutes at a peach glow) works if you are patient. -
Brush firmly:
After the ring cools, it will look white and matte. Scrub it vigorously with a stainless steel brush and soapy water to burnish the surface and reveal the silver shine. -
Apply patina:
Prepare a hot liver of sulfur solution. Dip the ring until it turns dark gray or black. This darkness will settle into the recessed sun lines. -
Polish highlights:
Use a polishing cloth or fine sanding sponge to remove the dark patina from the raised surface. This leaves the engraved sun black and striking against the shiny silver face.
Now you have a substantial, personalized silver ring that looks like an ancient artifact.

TRACK YOUR CERAMIC JOURNEY
Capture glaze tests, firing details, and creative progress—all in one simple printable. Make your projects easier to repeat and improve.
Fingerprint Texture Keepsake Ring
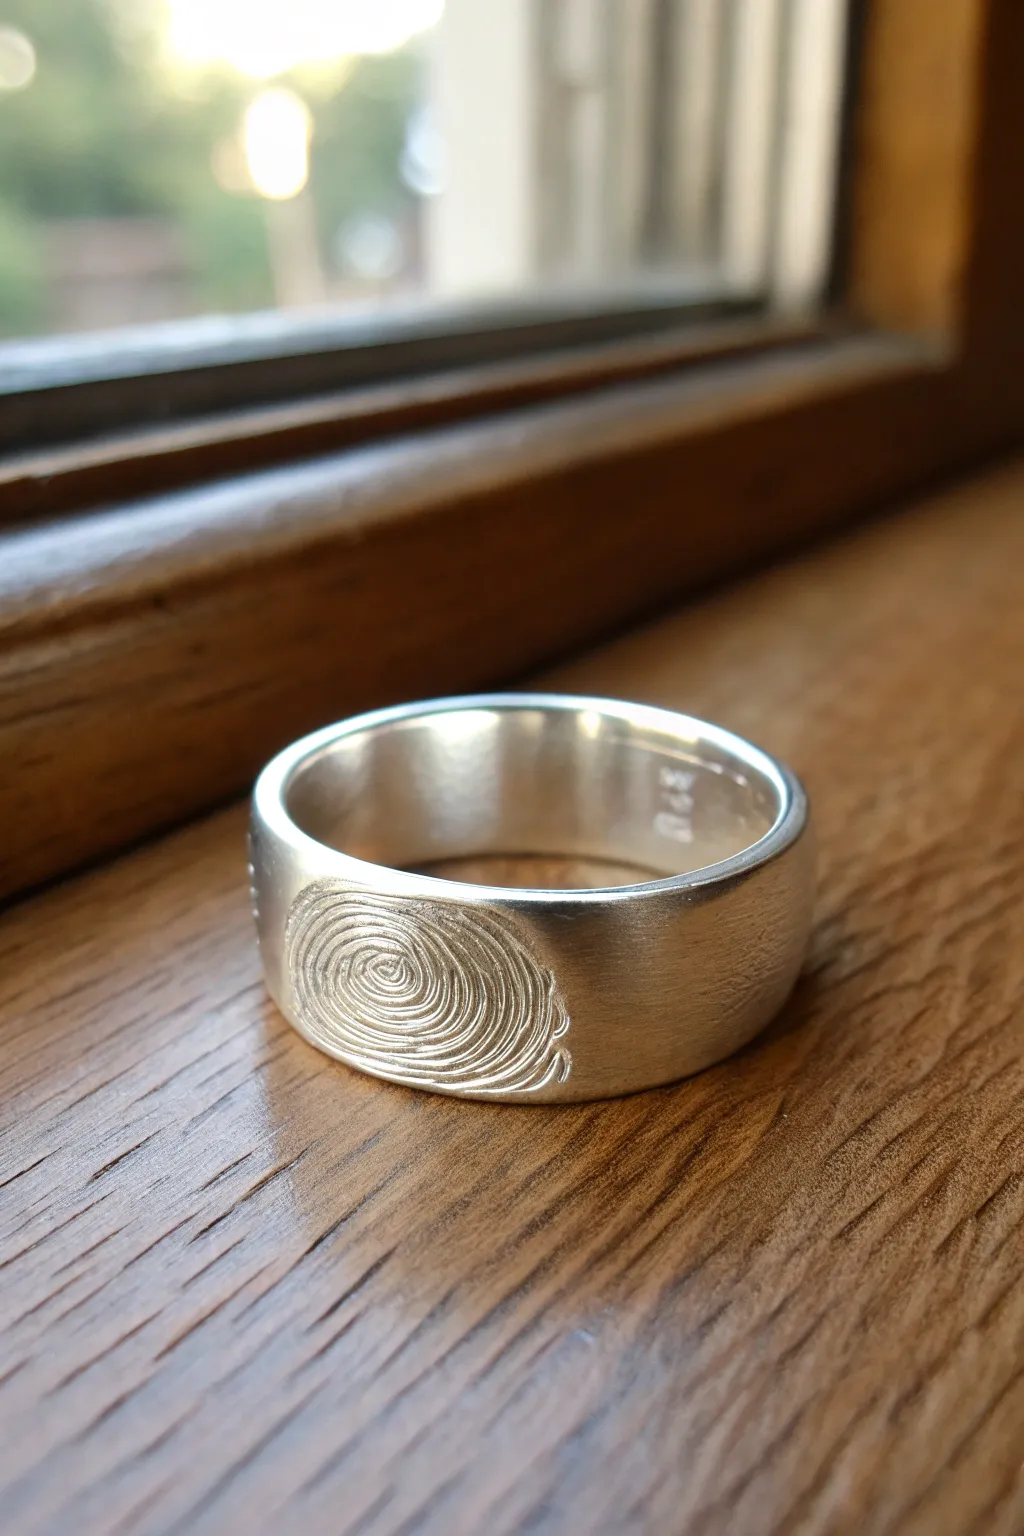
Create a deeply personal heirloom by capturing the unique whorls of a fingerprint directly into fine silver. This wide-band ring features a satin-finished exterior that contrasts beautifully with a high-shine interior, making the textured impression the star of the show.
Step-by-Step
Materials
- 20g-25g Silver Metal Clay (Art Clay Silver or PMC3)
- Ring mandrel (wooden or steel)
- Post-it note or ring sizing paper strip
- Olive oil or Badger balm (release agent)
- Clay roller
- Playing cards or slat spacers (1.5mm thickness)
- Craft knife or needle tool
- Small bowl of water and fine paintbrush
- Sanding sponges (coarse to fine grit)
- Butane torch or kiln
- Stainless steel brush
- Agate burnisher
- Polishing papers or cloth
Step 1: Sizing and Preparation
-
Calculate shrink size:
Silver clay shrinks during firing (usually 8-15%), so size up. Wrap a sizing strip around your finger, mark the overlap, then slide it to a size that is 2-3 sizes larger on your mandrel. -
Prepare the mandrel:
Wrap a Post-it note around the mandrel at your calculated size mark. Tape it securely so it doesn’t slide, but ensure the sticky part faces out or use a little balm so the clay doesn’t adhere to the paper. -
Lubricate tools:
Apply a thin layer of olive oil or balm to your hands, the roller, and your work surface to prevent sticky disasters.
Print Looking Faint?
If the print isn’t deep enough while the clay is wet, don’t try to re-press the same spot—you’ll get a ghost image. Simply ball up the clay, re-roll the strip, and try the impression again.
Step 2: Forming the Band
-
Roll the clay snake:
Take your lump of clay and roll it into a thick snake. The length should be slightly longer than the circumference of your ring size. -
Flatten the band:
Place your spacers (about 1.5mm or 5 playing cards thick) on either side of the snake. Roll over it firmly to create a long, flat strip of even thickness. -
Trim edges:
Use your craft knife to trim the long edges straight, creating a clean rectangular strip that is your desired width (remember it will shrink in width too). -
Capture the print:
This is the crucial moment. Lightly oil the finger you want to impress. Press the finger firmly and steadily into the center of the flat clay strip. Rock slightly side-to-side to catch the edges of the print, then lift straight up.
Step 3: Ring Construction
-
Wrap the mandrel:
Carefully lift the clay strip and wrap it around the paper-covered spot on your mandrel. Bring the two ends together at the back (opposite the fingerprint). -
Cut the overlap:
Where the ends overlap, slice through both layers simultaneously with your knife at a diagonal angle. Remove the excess bits of clay. -
Join the seam:
Apply a tiny bit of water to the cut edges (creating a paste called slip) and press them together gently. Use a rubber shaper to smooth the seam inside and out until it’s invisible. -
Dry partially:
Let the ring dry on the mandrel for about 15-20 minutes until it holds its shape, then carefully slide it off to finish drying completely (using a dehydrator or hair dryer helps accelerate this).
Darken the Details
To make the whorls stand out even more, apply a liver of sulfur patina solution to the fingerprint area. Polish the high spots silver again, leaving the recessed lines dark for high contrast.
Step 4: Refining and Firing
-
Sand the dry clay:
Once bone dry, use fine sanding sponges to smooth the rim edges and the interior. Be very careful not to sand over the fingerprint texture itself. -
Fire the ring:
Place the ring on a firing brick. If torch firing, heat until it glows a pale peachy-orange and hold that temperature for at least 3-4 minutes. If kiln firing, follow the clay manufacturer’s schedule (usually 1650°F for two hours for maximum strength). -
Quench and brush:
Once the piece has cooled (or been quenched in water), brush it vigorously with a stainless steel wire brush. The white crystalline surface will disappear, revealing the silver beneath.
Step 5: Polishing
-
Burnish the interior:
Use an agate burnisher to rub the inside of the ring firmly. This compresses the silver molecules and creates the high-shine mirror finish visible in the photo. -
Finish the exterior:
For the outside, avoid the burnisher to keep that soft satin look. Instead, gently buff the high spots of the fingerprint with a polishing cloth to make the texture pop against the matte background.
Wear your finished ring knowing you are carrying a unique touch of a loved one with you everywhere
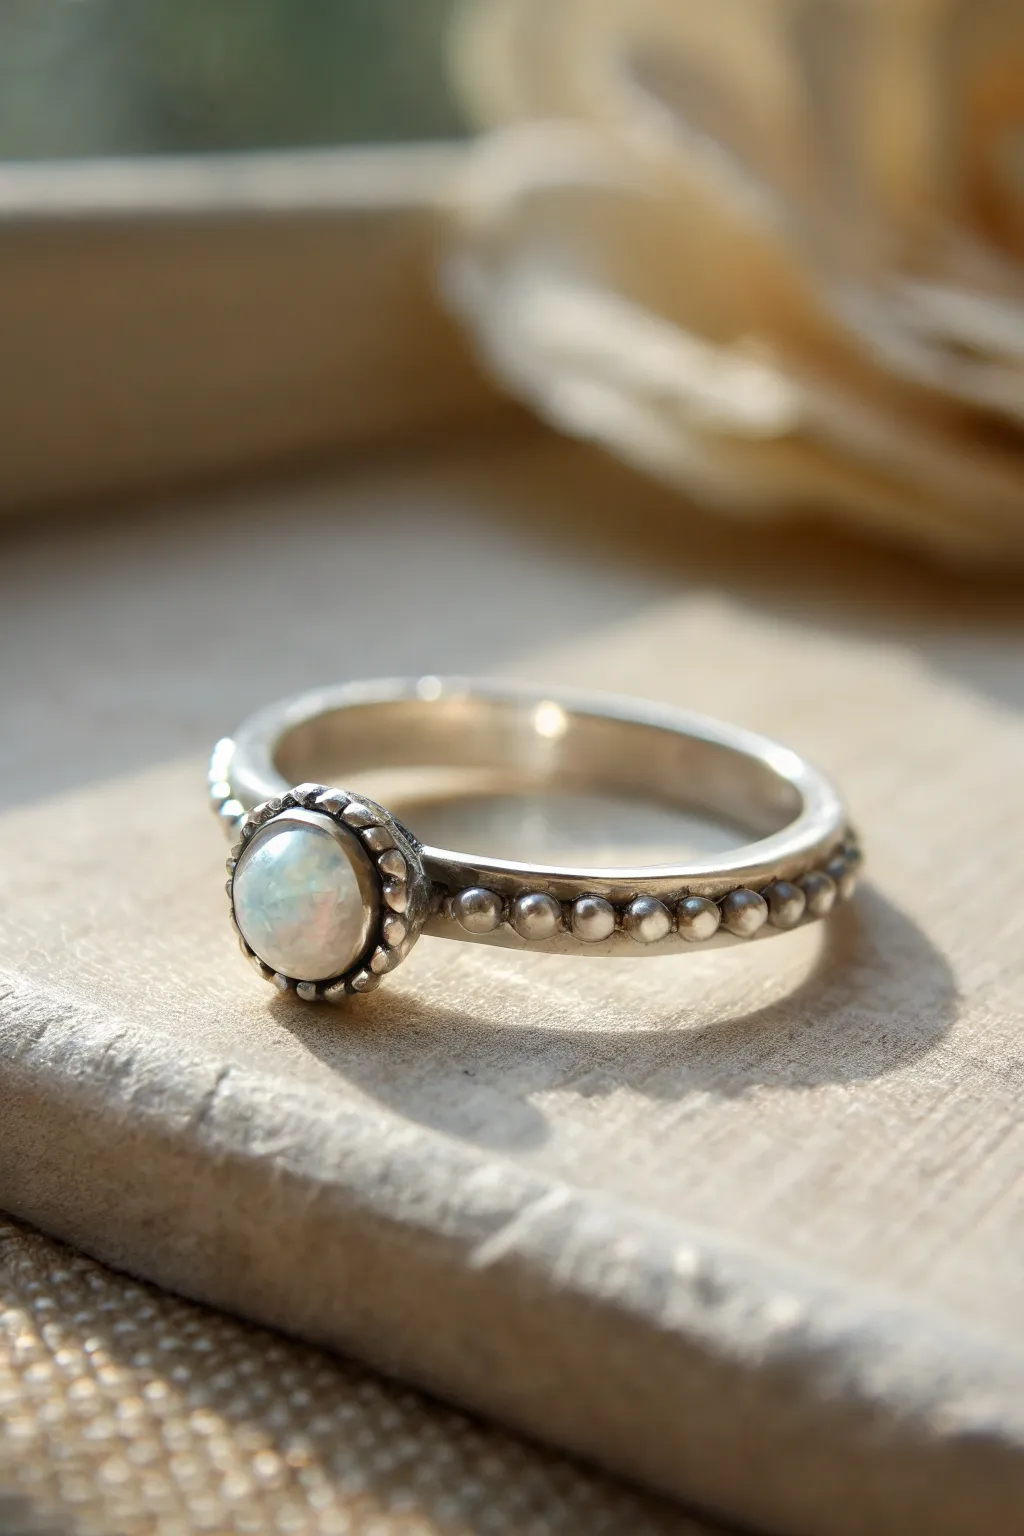
Single Fire-in-Place Stone Ring
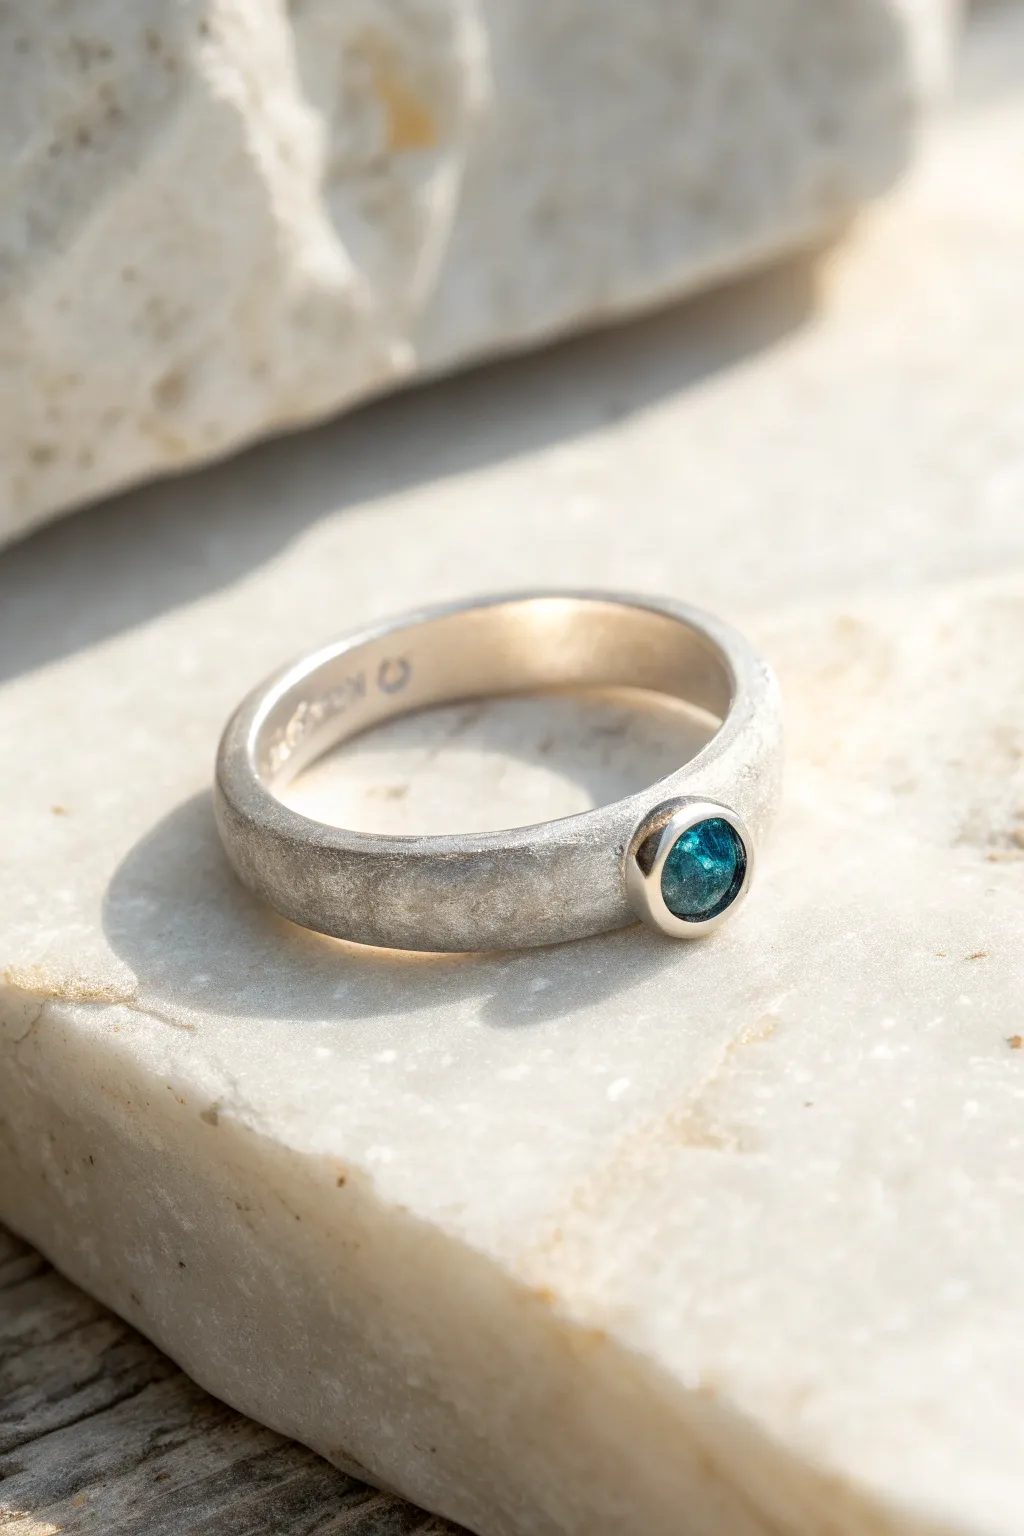
Achieve the look of a traditional silversmithing project with the ease of metal clay in this elegant ring design. This project features a fire-in-place gemstone nestled in a seamless bezel cup, set against a beautifully textured, matte-finished shank.
Step-by-Step Guide
Materials
- Silver metal clay (approx. 7–10g)
- Small round fire-in-place synthetic gemstone (blue zircon or similar, 3mm–4mm)
- Fine silver bezel cup (sized to fit your stone) OR fine silver bezel wire
- Ring mandrel and post-it notes or playing cards (for sizing)
- Rolling pin or spacers (1.5mm thickness)
- Clay knife or scalpel
- Slip (paste) silver clay
- Fine paintbrush
- Sanding sponges (polishing papers up to 1200 grit)
- Burnisher
- Kiln or torch (torch suitable for small stones only)
- Rubber block
- Brass brush
- Olive oil or Badger balm
Step 1: Sizing and Band Formation
-
Prepare the mandrel:
Begin by sizing your ring mandrel. Wrap a post-it note or a strip of paper around the mandrel at your desired size. Remember that silver clay shrinks during firing (usually around 10–15%), so you must size up accordingly based on your specific clay brand’s shrinkage rate. -
Condition the clay:
Lubricate your hands and work surface lightly with olive oil or balm. Knead the silver clay briefly to ensure it is pliable and free of cracks, but work quickly to prevent it from drying out. -
Roll the coil:
Roll the clay into a snake or coil shape. If you prefer a uniform thickness, place the clay between 1.5mm spacers and roll flat with a roller, then cut a strip for the band. -
Form the ring:
Wrap the clay strip or coil around the paper on the mandrel. Cut the ends at a 45-degree angle to create a scarf joint, which provides more surface area for a strong bond. -
Join the seam:
Apply a small amount of water or silver clay paste to the angled ends and press them together firmly. Smooth the join with a clay shaper or your finger so the seam essentially disappears.
Loose Stone?
If the stone rattles after firing due to shrinkage differences, place the specific area on a rubber block and very gently tap the bezel wall inward with a hammer and bezel rocker to tighten it.
Step 2: Setting the Bezel
-
Prepare the bezel cup:
If using a pre-made fine silver bezel cup, ensure it fits your stone perfectly. If the cup is too tall, sand the bottom gently to lower the height so the stone will sit flush or slightly proud. -
Attach the cup:
Identify the spot on the ring where you want the gem. Mark it lightly. Apply a dollop of thick silver clay paste (slip) to this spot and firmly press the bezel cup into the wet clay band. -
Reinforce the connection:
I always reinforce this connection by adding a tiny snake of clay around the base of the bezel cup. Blend this snake downward into the ring shank using a damp paintbrush or silicone tool to create a seamless transition. -
Dry partially:
Let the ring dry on the mandrel for about 10–15 minutes until it is leather-hard. This ensures it holds its shape before you manipulate it further. -
Insert the stone:
Carefully place your fire-in-place gemstone into the bezel cup. Use a burnisher or the back of a spoon to gently push the bezel walls over the stone, securing it. Because the clay shrinks, the fit will tighten further during firing. -
Refine the surface:
Once fully dry, remove the ring from the mandrel. Sand the entire surface with sanding sponges or fine sandpaper. Pay attention to the inside of the band to ensure it is smooth and comfortable.
Add a Hallmark
While the clay is still wet (leather hard) on the mandrel, use a tiny stamp to press .999 or your initials into the interior of the band for that professional jeweler’s touch.
Step 3: Firing and Finishing
-
Fire the ring:
Place the ring in a kiln or fire with a butane torch according to your clay manufacturer’s instructions. Ensure the firing schedule is appropriate for a fire-in-place stone (generally a slow ramp-up is safer). -
Cool and brush:
Allow the ring to cool completely. It will appear white and matte. Vigorously brush it with a brass, steel, or glass fiber brush to remove the white oxidation and reveal the silver shine. -
Apply matte finish:
To recreate the specific matte texture in the photo, avoid polishing to a high mirror shine. Instead, use a medium-grit sanding sponge or rotary tool with a satin-finish wheel to gently scratch the surface in a random, multi-directional pattern. -
Burnish the bezel:
For a nice contrast, use a polished steel burnisher specifically on the rim of the bezel setting to make that small ring of silver shine brightly against the matte band. -
Final check:
Inspect the stone to ensure it is secure. If there is any movement, you can gently tap the bezel rim down further with a bezel pusher, taking care not to crack the stone.
Now you have a timeless, handcrafted ring that highlights the beauty of simplicity and texture
Tiny Trio Stone Cluster Band
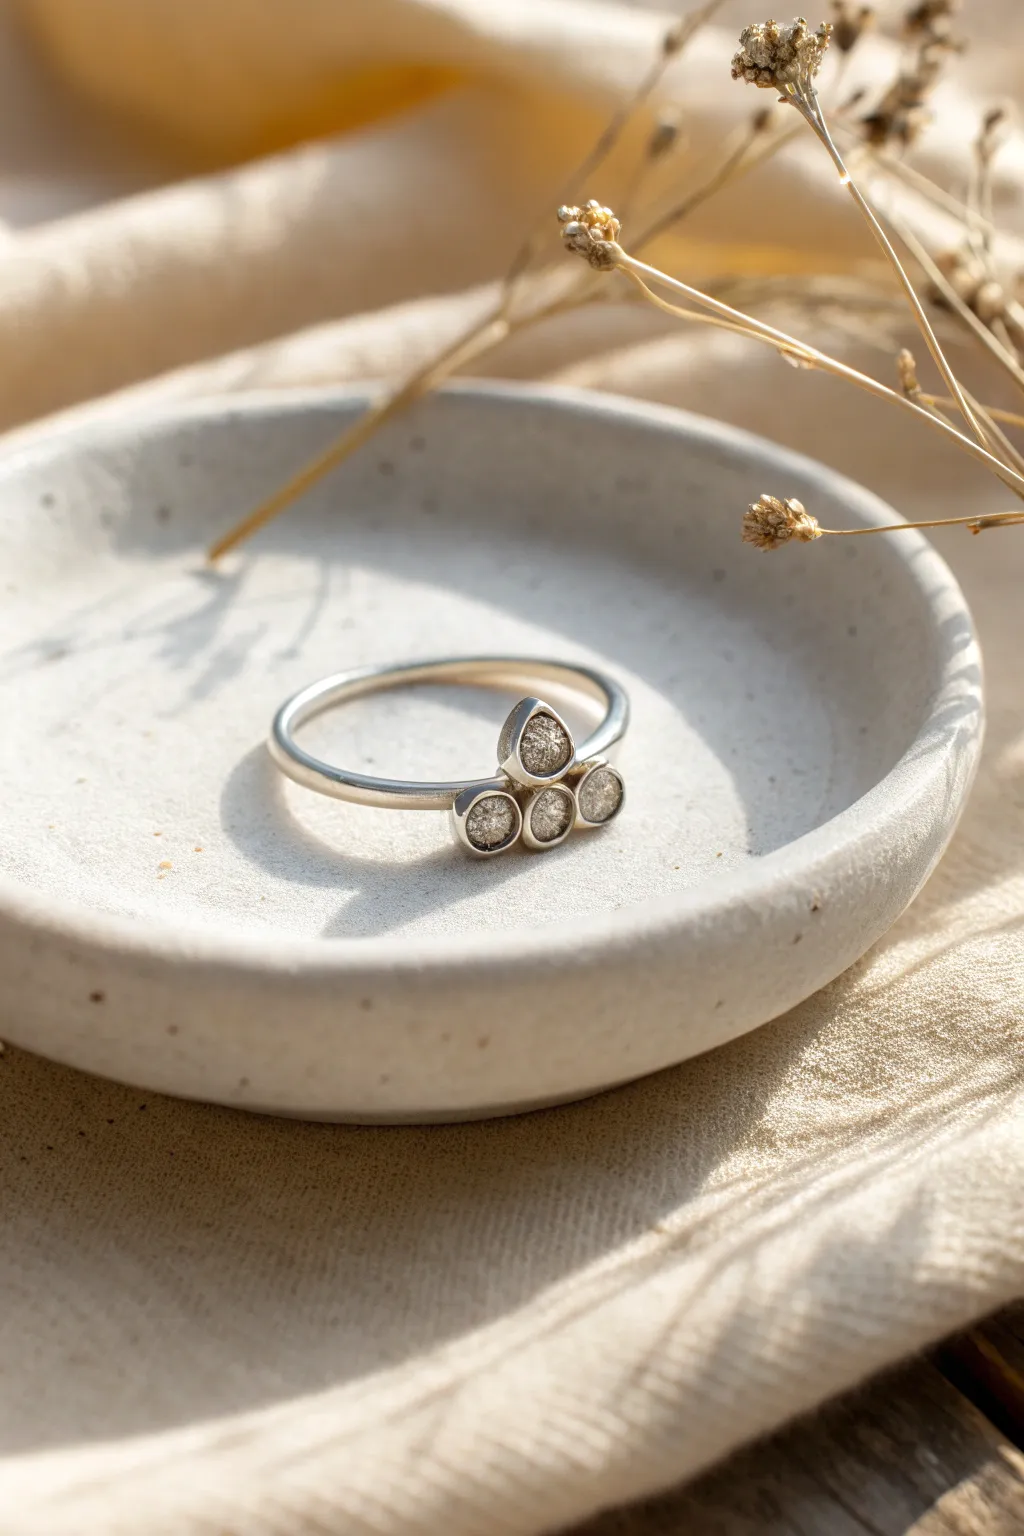
This elegant project features a delicate cluster of three stones perched atop a slender band, creating a timeless and sophisticated silhouette. It captures the look of a traditional bezel-set ring but uses the forgiving and accessible medium of silver clay.
Step-by-Step Tutorial
Materials
- Silver metal clay (approx. 5-7g)
- Three 2mm or 2.5mm fireable gemstones (cubic zirconia or lab-created sapphires)
- Ring mandrel (wood or paper mandrel works best)
- Sticky note or ring sizing paper
- Rolling pin/slats (1.5mm thickness)
- Small circle cutter or straw
- Snake roller or acrylic block
- Clay shaper tools (rubber tipped)
- Water/paste brush
- Needle tool
- Fine grit sandpaper or sanding sponges
- Kiln or butane torch
- Stainless steel brush
- Burnishing tool
Step 1: Forming the Band
-
Prepare the mandrel:
Wrap a sticky note around your ring mandrel at the desired size. Remember that silver clay shrinks during firing, so size up 2-3 sizes larger than the intended final fit. -
Roll the coil:
Take a lump of fresh clay and roll it into a snake. I prefer using an acrylic block to roll back and forth, which creates an even, round profile quickly. -
Shape the ring:
Wrap the snake around the mandrel where your sticky note is placed. Cut the ends at an angle to create a scarf joint, where the two slanted ends overlap slightly. -
Join the ends:
Apply a tiny dab of water or paste to the seam and gently press the ends together. Use a rubber-tipped tool to blend the seam until it’s invisible, then let the band dry completely on the mandrel.
Stone Safety Check
Check your gemstones after drying but before firing. If any clay is covering the top face of the stone, gently wipe it away with a damp brush so the sparkle isn’t obscured.
Step 2: Creating the Stone Cluster
-
Roll setting clay:
Roll out a small amount of clay to about 1.5mm thickness. You need enough material to support the stones. -
Cut the bezels:
Use a small straw or a tiny circle cutter to punch out three small discs. These should be slightly wider than your gemstones. -
Embed the stones:
Place your fireable stones table-side up (flat side up) into the wet clay discs. Press them down firmly until the girdle (the widest part of the stone) is just below the clay surface. -
Tighten the bezels:
Using a needle tool or small brush, gently nudge the clay edges toward the stone to ensure a snug fit. The clay needs to mechanically hold the stone once fired. -
Arrange the trio:
While the loaded bezels are still pliable, arrange them in a triangle formation—one on top, two on the bottom—on a non-stick work surface. -
Fuse the cluster:
Add a drop of water or paste between the touching clay edges of the three settings. Smooth the connections so they form a single, solid unit, then let this cluster dry completely.
Step 3: Assembly and Finishing
-
Prepare the attachment:
Once both components are dry, carefully remove the band from the mandrel. Identify the seam area (it’s best to cover this with the focal piece) and sand a small flat spot on the outer band. -
Refine the cluster:
Sand the back of the dried stone cluster so it is perfectly flat. This ensures a strong contact point. -
Attach the distinct parts:
Apply a generous amount of silver clay paste to the flat spot on the ring band. Press the stone cluster firmly onto the paste, ensuring the triangle points upwards or outwards as desired. -
Reinforce the join:
Use a fine paintbrush to add extra paste around the underside where the cluster meets the band. Often, I build up a tiny fillet of clay here for extra security. -
Final smooth:
Allow the entire assembly to dry fully. Use fine sandpaper (around 600 grit) to smooth out any fingerprints or rough edges on the band and around the settings. -
Fire the ring:
Place the ring in a kiln or fire with a butane torch according to your clay manufacturer’s specific instructions for embedded stones. Let it cool naturally. -
Polish:
Brush firmly with a stainless steel brush to burnish the white silver surface to a shine. Use a polishing cloth or tumble polisher for a high-gloss finish.
Make It Gold
For a mixed-metal luxury look, apply a layer of thick gold paste (Keum Boo style) to the bezels after firing, or use 24k gold foil accents on the band.
Enjoy wearing this delicate piece that looks impressively like traditional silversmithing work
Raised Dot Bezel Accents
This elegant silver clay project combines the organic charm of handcrafted metal with the iridescence of a round cabochon. The standout feature is the delicate row of raised dots circling the band, echoed by a beaded bezel wire that frames the stone perfectly.
Detailed Instructions
Materials
- Silver metal clay (approx. 7-10g)
- Round cabochon gemstone (fireable or add after firing; e.g., synthetic opal or moonstone)
- Fine silver bezel wire (beaded/serrated style)
- Ring mandrel (wood or paper-wrapped steel)
- Clay roller and spacers (1.5mm thickness)
- Craft knife or needle tool
- Small syringe type silver clay (for dots) or a clay shaper to make balls
- Slip (paste) silver clay
- Fine paintbrush
- Sanding sponges (various grits)
- Butane torch or kiln
- Burnisher or tumbler for polishing
Step 1: Creating the Band Base
-
Size the mandrel:
Prepare your ring mandrel by wrapping a sticky note or paper strip around your desired ring size. Remember that silver clay shrinks during firing, so size up according to your specific clay brand’s shrinkage rate (usually 2-4 sizes larger). -
Roll the clay:
Roll out a snake of silver clay, then flatten it with your roller to a consistent thickness of about 1.5mm. Ensure the strip is long enough to wrap around your sized mandrel with a little overlap. -
Cut the strip:
Use a sharp craft knife to trim the clay into a clean, straight rectangle. For this design, a width of about 4mm works well to accommodate the decorative dots later. -
Form the ring:
Wrap the clay strip around the mandrel. where the ends meet, slice through both layers at a 45-degree angle to create a seamless scarf joint. -
Seal the seam:
Apply a tiny amount of water or silver clay paste to the angled cuts and press them gently together. Use a rubber shaper to smooth the join until it’s invisible, then let the band dry on the mandrel until leathery distinct.
Uneven Dots
If your hand-rolled dots vary too much in size, try rolling a thin snake of clay and cutting it into equal tiny lengths before rolling them into balls.
Step 2: Bezel & Detail Work
-
Prepare the bezel cup:
Take your fine silver beaded bezel wire and wrap it around your stone to check the fit. Cut it precisely so the ends meet perfectly, then solder or fuse the ends (or use clay paste if you are firing a stone in place and the bezel is thick enough). -
Make the seat:
Roll a small ball of clay and flatten it into a disc slightly larger than your bezel ring. Adhere this disc to the top of your dried ring band using a dab of paste. This creates the platform for your stone. -
Attach the bezel:
Place your pre-made bezel ring centered on the clay disc. Gently press it into the wet clay seat. Use a brush with water to smooth the excess clay from the disc up against the outside of the bezel wire. -
Add side dots:
For the raised dots along the band, you have two options. I prefer to roll tiny, consistent balls of clay by hand and attach them with moisture. Alternatively, use a syringe of silver clay to pipe small dots directly onto the center line of the dry ring band. -
Refine the spacing:
Place the dots evenly all the way around the band. If a dot looks uneven, gently nudge it with a silicone tool or needle tool before it dries completely. -
Reinforce connections:
Once the added dots are partially dry, brush a very thin layer of paste around the base of each dot and around the bezel seat to ensure a solid bond during firing. -
Full dry:
Allow the entire piece to dry completely. This can take several hours or can be accelerated on a cup warmer. The clay must be bone dry before firing to prevent cracking.
Step 3: Finishing Touches
-
Pre-fire sanding:
Gently gently sand the edges of the band and the tops of the dots with a high-grit sanding sponge to remove any sharp burrs or fingerprints. Be careful not to flatten your decorative dots. -
Fire the ring:
Fire the ring according to your clay manufacturer’s instructions. If using a torch, heat until the binder burns off and hold at a peachy glow for the recommended time (usually 2-5 minutes). -
Brush finish:
Once cool, brush the white crystalline surface with a brass wire brush. This brings out the first shine of the silver. -
Set the stone:
If you didn’t fire the stone in place, place your cabochon into the bezel cup now. Use a bezel pusher or burnisher to gently rock the beaded wire over the edge of the stone to secure it. -
Final polish:
Use a tumbler with steel shot for a brilliant shine, or hand-burnish the high points—the dots and the bezel wire—to create a beautiful contrast with the recessed areas.
Oxidize for Depth
Apply a liver of sulfur patina after firing. Polish the raised dots and bezel bright, leaving the recessed areas dark to make the texture pop.
Enjoy wearing this tactile, beautifully textured ring that looks as good as it feels
Syringe-Style Linework Swirl Ring
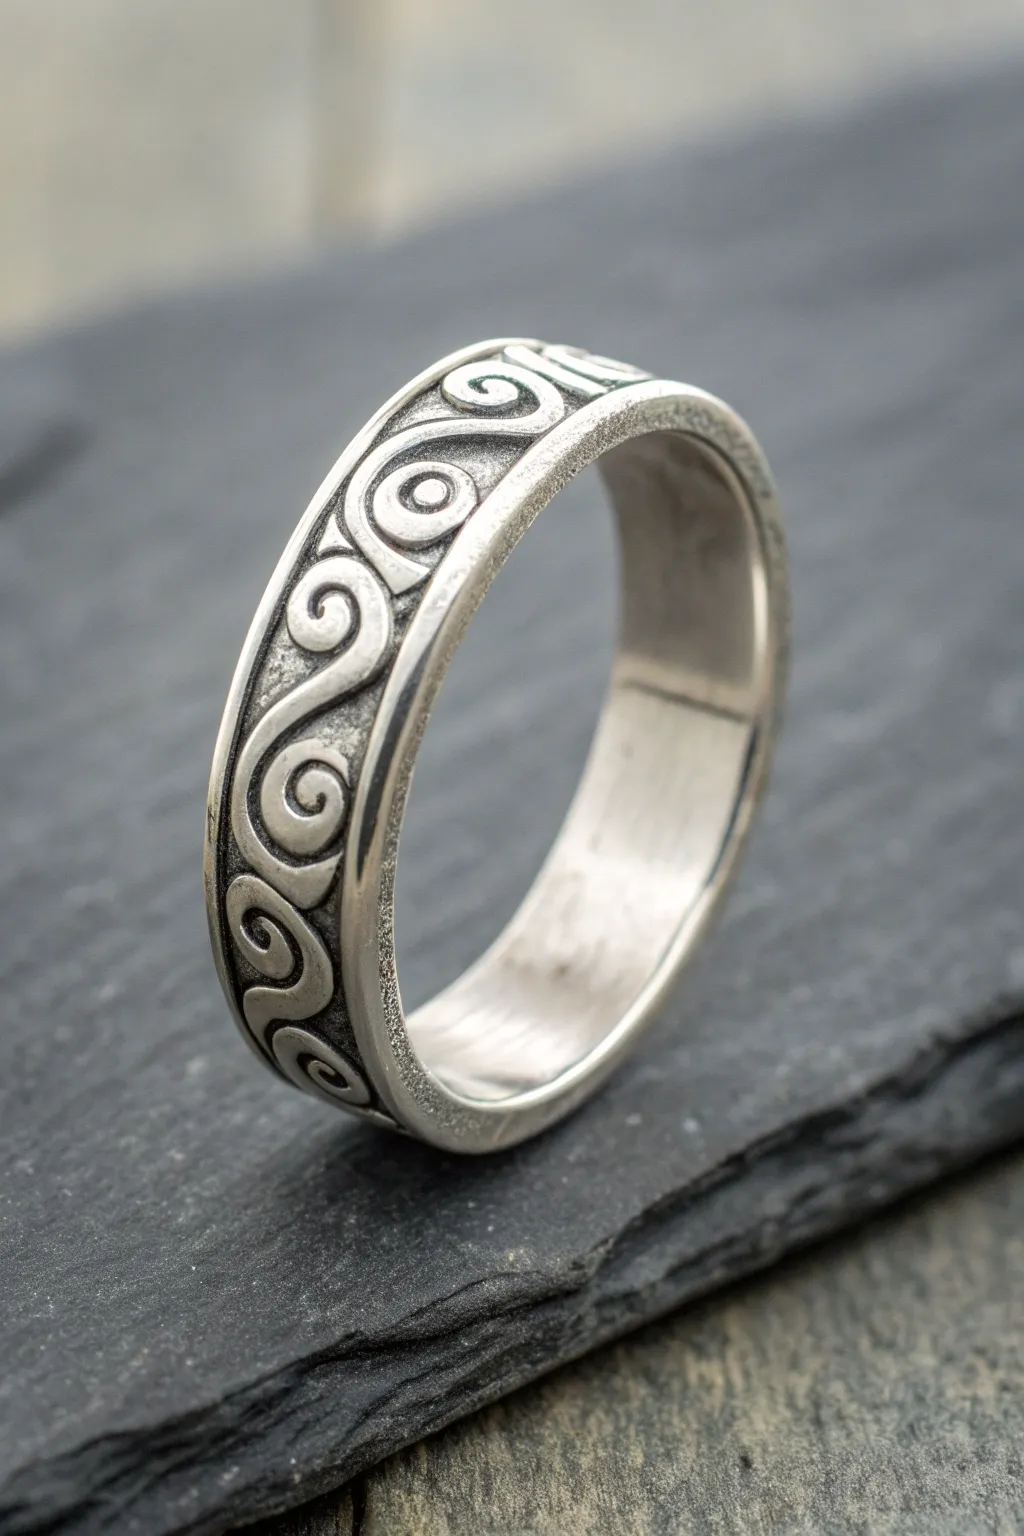
Capture the motion of ocean waves with this elegant band ring featuring a continuous, raised spiral motif. By combining syringe-type silver clay with a darkened patina, you’ll create a striking contrast that highlights every curve of your design.
How-To Guide
Materials
- Silver metal clay (lump form, approx. 10-15g)
- Silver metal clay syringe (medium or fine tip)
- Ring sizing mandrel (wooden or dedicated sizing tool)
- Sticky note or paper strip
- Pencil
- Release agent (olive oil or Badger Balm)
- Needle tool or clay shaper
- Small paintbrush and water
- Sanding sponges (fine to superfine grits)
- Firing equipment (torch or kiln)
- Stainless steel brush
- Liver of Sulfur (patina)
- Polishing cloth
Step 1: Base Construction
-
Size the mandrel:
Begin by determining your ring size. Wrap a sticky note or paper strip around your ring mandrel at the desired size, accounting for shrinkage (usually 2-3 sizes larger than the finished fit, depending on your specific clay brand). -
Prepare the base:
Roll out your lump clay into a long snake, then flatten it with a roller to a uniform thickness of about 3 playing cards (approximately 1mm). Alternatively, use pre-rolled strips for uniformity. -
Form the band:
Wrap the flattened strip around the paper on your mandrel. Cut the ends at a slant where they overlap to create a seamless scarf joint. -
Seal the seam:
Apply a tiny amount of water or paste to the slanted ends and press them gently together. Use a rubber shaper to smooth the join so it disappears completely. Let this base band dry on the mandrel until it is leather-hard.
Step 2: Pattern Application
-
Map the design:
Lightly sketch your spiral pattern directly onto the dry clay band with a pencil. Mark out evenly spaced circles or ‘S’ shapes first to ensure the pattern meets neatly at the back. -
Prepare the syringe:
Fit your silver clay syringe with a medium tip. Test the flow on a scrap piece of paper to ensure a smooth, steady line without air bubbles. -
Extrude the borders:
While rotating the mandrel, carefully extrude a continuous line of clay along the top and bottom edges of the ring to create the raised borders. -
Pipe the spirals:
Following your pencil marks, extrude the clay to form the main spiral shapes. I find it helps to anchor the tip at the center of the spiral and pull outwards for cleaner curves. -
Refine the lines:
If a line wobbles, use a slightly damp paintbrush or a clay shaper to nudge it back into place. Do this immediately before the syringe clay begins to dry. -
Connect the motifs:
Add small connecting lines or dots between the main spirals if there are gaps, ensuring the design fills the space between the borders effectively.
Wet Brush Trick
Keep your paintbrush consistently damp but not soaking. A quick swipe of water over dried syringe lines can re-activate the surface just enough to smooth out jagged peaks.
Step 3: Finishing and Firing
-
Dry thoroughly:
Allow the entire ring to dry completely. A mug warmer or dehydrator can speed this up, but ensure it is bone dry before proceeding. -
Pre-fire refinement:
Gently sand the high points of the dry clay with a fine sponge to ensure the spirals are level. Be very gentle with the syringe lines as they are fragile at this stage. -
Fire the ring:
Remove the ring from the mandrel (and peel off the paper). Fire the piece according to your clay manufacturer’s instructions, typically in a kiln at 1650°F (900°C) for two hours for maximum strength, or torch fire until it glows salmon-orange for the required time. -
Brush finish:
Once cool, brush the white, crystallized silver vigorously with a stainless steel brush. This will burnish the metal and reveal the silver shine. -
Apply patina:
Prepare a warm solution of Liver of Sulfur. Dip the ring until it turns a dark gray or black. Rinse immediately in cold water to stop the reaction. -
Polish high points:
Use a polishing cloth or a polishing pad to rub the surface of the ring. This removes the black patina from the raised spirals and borders while leaving the recessed background dark. -
Final buff:
Give the interior of the ring a final polish to ensure a smooth, comfortable fit on the finger.
Add Some Sparkle
Before firing, press small 2mm cubic zirconia gems into the center of each spiral using a setting burr. The clay will shrink around them, holding them securely in place.
Wear your new creation with pride, knowing you’ve sculpted a piece of silver art from scratch
Ocean Wave Ripple Band
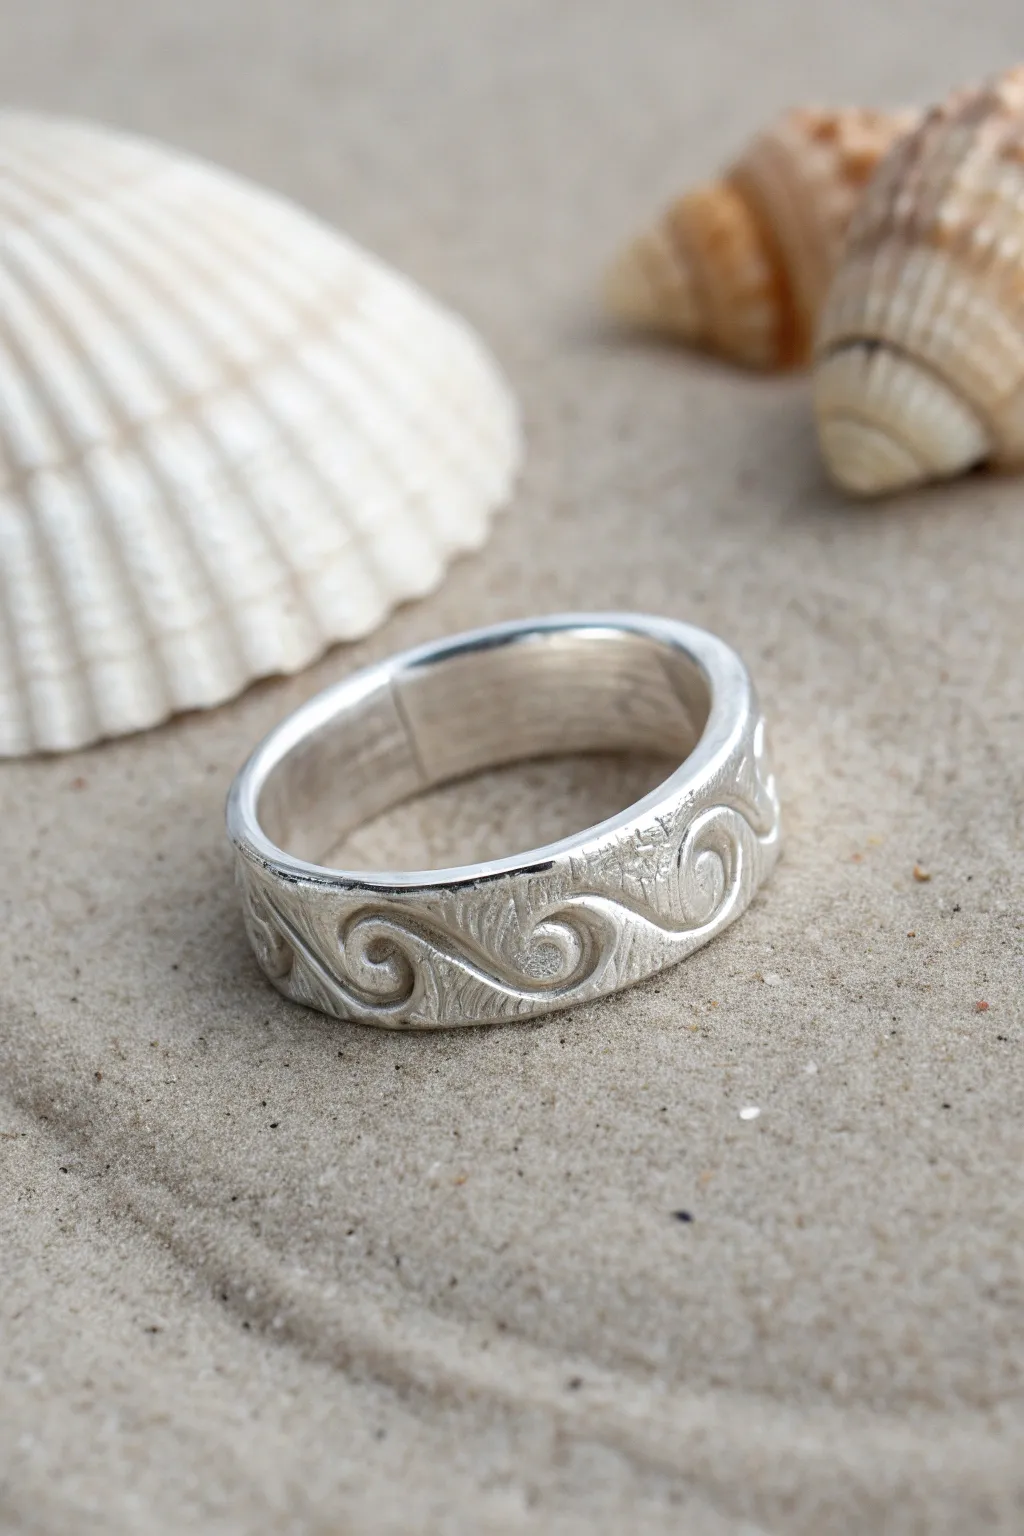
Capture the rhythmic motion of the sea with this textured silver clay ring featuring rolling spiral waves. The finished piece combines smooth, polished rims with a recessed, textured background that evokes the sandy ocean floor.
Step-by-Step Tutorial
Materials
- Silver metal clay (approx. 7-10g depending on size)
- Ring mandrel and post-it notes or ring liner paper
- Rolling pin and spacers (1.5mm thick)
- Badger balm or olive oil (release agent)
- Needle tool or sharp clay scalpel
- Small carving loop tool or linoleum cutter
- Rubber shaping tools (specifically a taper point)
- Texture sponge or coarse sandpaper
- Firing equipment (torch or kiln)
- Stainless steel brush
- Agate burnisher
- Liver of sulfur (patina)
- Polishing pads or cloth
Step 1: Preparation and Rolling
-
Size the mandrel:
Begin by wrapping a post-it note or ring sizing paper around your mandrel at the size you want the finished ring to be. Remember that silver clay shrinks during firing (usually 8-15%), so size up according to your specific clay brand’s instructions. -
Condition the clay:
Take your lump of silver clay and knead it briefly in your palms to ensure it’s pliable. Lightly coat your hands and your work surface with badger balm to prevent sticking, which is a lifesaver when working with intricate bands. -
Roll the strip:
Place the clay between two 1.5mm spacers. Roll it out into a long, even strip (snake) using your roller. Ensure the length is sufficient to go around your sized mandrel with a little overlap for joining. -
Trim the edges:
Use a sharp blade or needle tool to trim the long edges of the clay strip so they are perfectly straight and parallel. This will create the clean borders seen in the photo.
Smooth Seam Secret
When joining the ring ends, use a damp brush to create a little ‘slurry’ right at the seam. This acts like glue and ensures the joint doesn’t crack during drying.
Step 2: Forming and Carving
-
Wrap the band:
Carefully lift the clay strip and wrap it around the paper on the mandrel. Cut through the overlapping ends at an angle to create a scarf joint, which provides more surface area for a strong bond. -
Seal the seam:
Apply a tiny amount of water or clay paste to the cut ends and press them together. Use a rubber shaper to smooth the seam until it’s invisible, blending the clay across the join line. -
Define the rails:
With the clay still on the mandrel but slightly firm, lightly score two parallel lines near the top and bottom edges. These will serve as the smooth ‘rails’ or borders of your ring. -
Sketch the wave pattern:
Using a very light touch with a needle tool, gently sketch a repeating spiral wave pattern between the two rails. Think of S-shapes lying on their sides, flowing into one another continuously. -
Carve the negative space:
Once the clay is leather-hard (dry to the touch but not brittle), use a small carving loop tool or linoleum cutter to carefully remove the clay *around* the waves. You want the waves and the rails to remain raised. -
Refine the spirals:
Go back in with a fine needle tool to deepen the center of the spirals. Ensure the connection points between the ‘S’ shapes flow smoothly. -
Texturing:
To get that gritty, sandy look in the background shown in the photo, gently press a coarse texture sponge or stipple a stiff brush into the recessed areas you just carved out. -
Clean the borders:
Use a slightly damp brush or a fine sanding pad to smooth the top surfaces of the waves and the outer rails. These raised areas should be smooth to contrast with the textured background.
Step 3: Firing and Finishing
-
Dry completely:
Allow the ring to dry fully. You can use a dehydrator, a cup warmer, or just air dry it overnight. It must be bone dry before firing to prevent popping. -
Refining sanding:
Before firing, give the edges and the inside of the ring a final gentle sanding with high-grit sandpaper to ensure comfort. -
Fire the ring:
Fire the piece according to your clay package directions. If torch firing, bring it to a peach glow and hold for the recommended time. If kiln firing, follow the temperature schedule for maximum strength. -
Brush it out:
Once cool, the ring will be white. Vigorously brush it with a stainless steel brush and soapy water to burnish the silver and reveal the shine. -
Apply patina:
Prepare a hot liver of sulfur solution. Dip the ring until it turns a dark grey or black. This darkness will sit in the textured recesses. -
Final polish:
Use a polishing cloth or sanding pad to buff the raised surfaces (the rails and the waves) back to a bright silver. The patina will remain in the textured background, making the wave design pop.
Gemstone Accents
Before drying, press small cubic zirconia stones into the center of each spiral wave using a setting burr for a sparkle that looks like water droplets.
Enjoy wearing your new handcrafted piece of the ocean that captures the endless motion of the tides
Negative Space Cutout Band
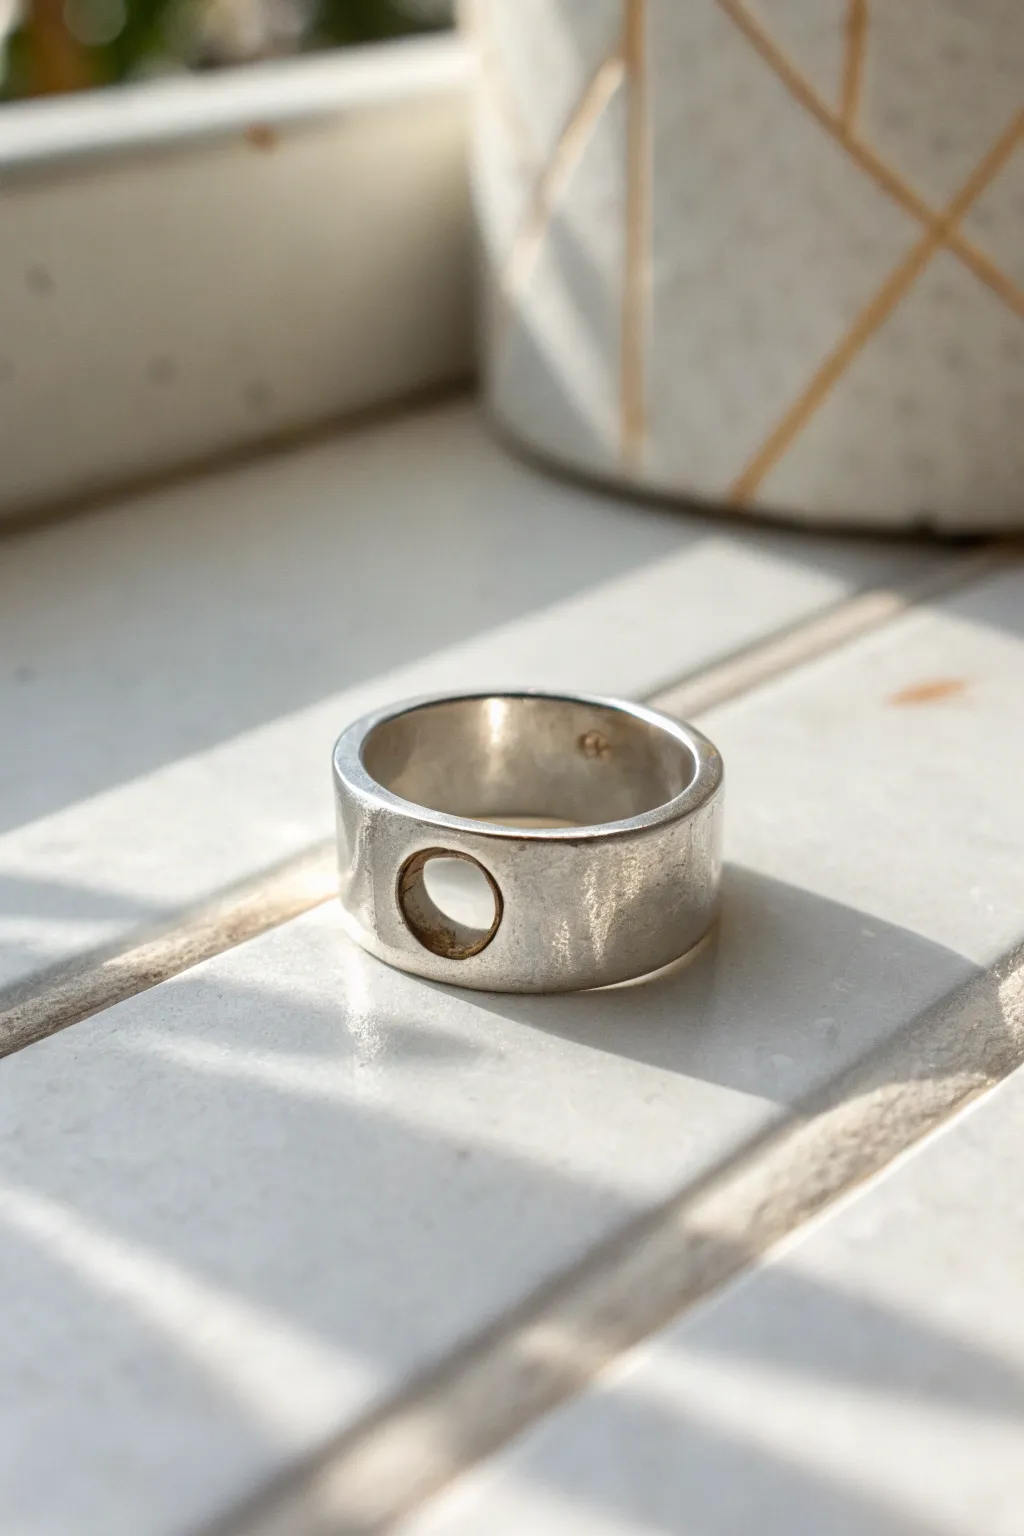
Embrace the sleek beauty of modern design with this wide-band silver clay ring featuring a bold circular cutout. The project uses the magic of silver clay to create a substantial, architectural piece that looks professionally forged but is shaped entirely by hand before firing.
How-To Guide
Materials
- Silver metal clay (approx. 7-10g depending on ring size)
- Small circular clay cutter or drinking straw
- Ring mandrel (marked with sizes)
- Post-it note or ring sizing paper
- Rolling pin
- Slat guides (1.5mm thickness)
- Craft knife or clay scalpel
- Olive oil or Badger balm (release agent)
- Small bowl of water and paintbrush
- Emery board or sanding sponges (medium to fine grit)
- Firing method (kiln or butane torch)
- Stainless steel brush
- Burnishing tool (optional)
Step 1: Sizing and Preparation
-
Prepare the mandrel:
Since metal clay shrinks during firing, wrap a Post-it note or ring sizing paper around your mandrel at a size roughly 2-3 sizes larger than your actual finger size (consult your specific clay brand’s shrinkage guide for precision). Secure it with tape. -
Condition the clay:
Remove the silver clay from its package. If it feels a bit stiff, knead it briefly in your palms, keeping your hands lightly lubricated with a little olive oil or balm to prevent sticking. -
Roll the band:
Place the clay on a non-stick surface between your 1.5mm slat guides. Roll it out into a long, even strip (snake) initially, then flatten it into a ribbon shape that is consistent in thickness.
Clean Cuts Matter
Apply a tiny dab of olive oil to your clay cutter before punching the hole. This prevents the clay from dragging or lifting when you remove the cutter, ensuring a crisp circle.
Step 2: Forming the Design
-
Cut the strip:
Using a ruler and your craft knife, trim the rolled clay into a clean, straight rectangular strip. Aim for a width of about 8-10mm to match the chunky aesthetic of the reference image. -
Create the negative space:
Before lifting the clay, use your small circular cutter. Position it squarely in the center of the strip’s width and press down firmly to punch out a perfect circle. Remove the tiny clay dot. -
Transfer to mandrel:
Carefully lift the clay strip and wrap it around the prepared mandrel. Bring the two ends together on the underside of the ring (opposite the hole you just punched) to hide the seam. -
Join the seam:
Cut straight through both overlapping ends with your knife to create a flush butt joint. Apply a little water or clay paste to the edges and press them gently together to fuse the seam. -
Refine the circle:
While the clay is still damp on the mandrel, check that your circular cutout hasn’t distorted during the transfer. If it has, gently insert a round tool or the back of a paintbrush to reshape it into a perfect circle.
Make It Gold
After firing, use the Keum-boo technique to apply gold foil to the *inside* of the cutout circle for a stunning mixed-metal contrast.
Step 3: Refining and Firing
-
Dry the ring:
Allow the ring to dry completely on the mandrel or a drying rack. This can take several hours by air or 20 minutes with a dehydrator or hair dryer. The clay must be bone dry before the next step. -
Pre-fire sanding:
Once dry, use sanding sponges to smooth the edges of the band and the surface. Pay special attention to the inside of the circular cutout—wrap a small piece of sandpaper around a toothpick to clean up any burrs inside the hole. -
Fire the piece:
Fire the ring according to your clay manufacturer’s instructions. If using a torch, place the ring on a fire brick and heat until it glows a consistent distinct orange for the required time (usually 2-3 minutes). If kiln firing, follow the temperature schedule for your clay type. -
Cool and brush:
Quench the ring in water or let it air cool. The ring will appear white. Use a stainless steel brush with a drop of dish soap and water to vigorously brush the surface, revealing the silver metal beneath.
Step 4: Finishing Touches
-
Check for imperfections:
Inspect the ring for any scratches. Now that it is solid metal, you can use traditional sandpaper or files to remove any lingering heavy marks. -
Create a satin finish:
To achieve the soft, semi-matte look seen in the photo, avoid polishing to a high mirror shine. Instead, use a fine-grit sanding sponge or a matte polishing wheel in a rotary tool to create a uniform, brushed texture. -
Highlight the interior:
If you want the inside of the hole to have that slight depth or darkness seen in the image, you can apply a tiny amount of liver of sulfur (patina) just inside the rim using a fine brush, then polish the high spots back to silver. -
Final burnish:
Run a burnishing tool firmly along the rim edges of the ring to work harden them and give a subtle gleam that defines the shape.
Slip on your new ring and admire how the negative space adds interest to a classic silver silhouette