If you love that dusty, sun-warmed Western vibe, clay bead bracelets are such a fun way to wear it right on your wrist. I’m sharing my favorite western clay bead bracelet ideas—starting with the classic turquoise looks and sliding into some creative, studio-style twists.
Turquoise and White Heishi Classic
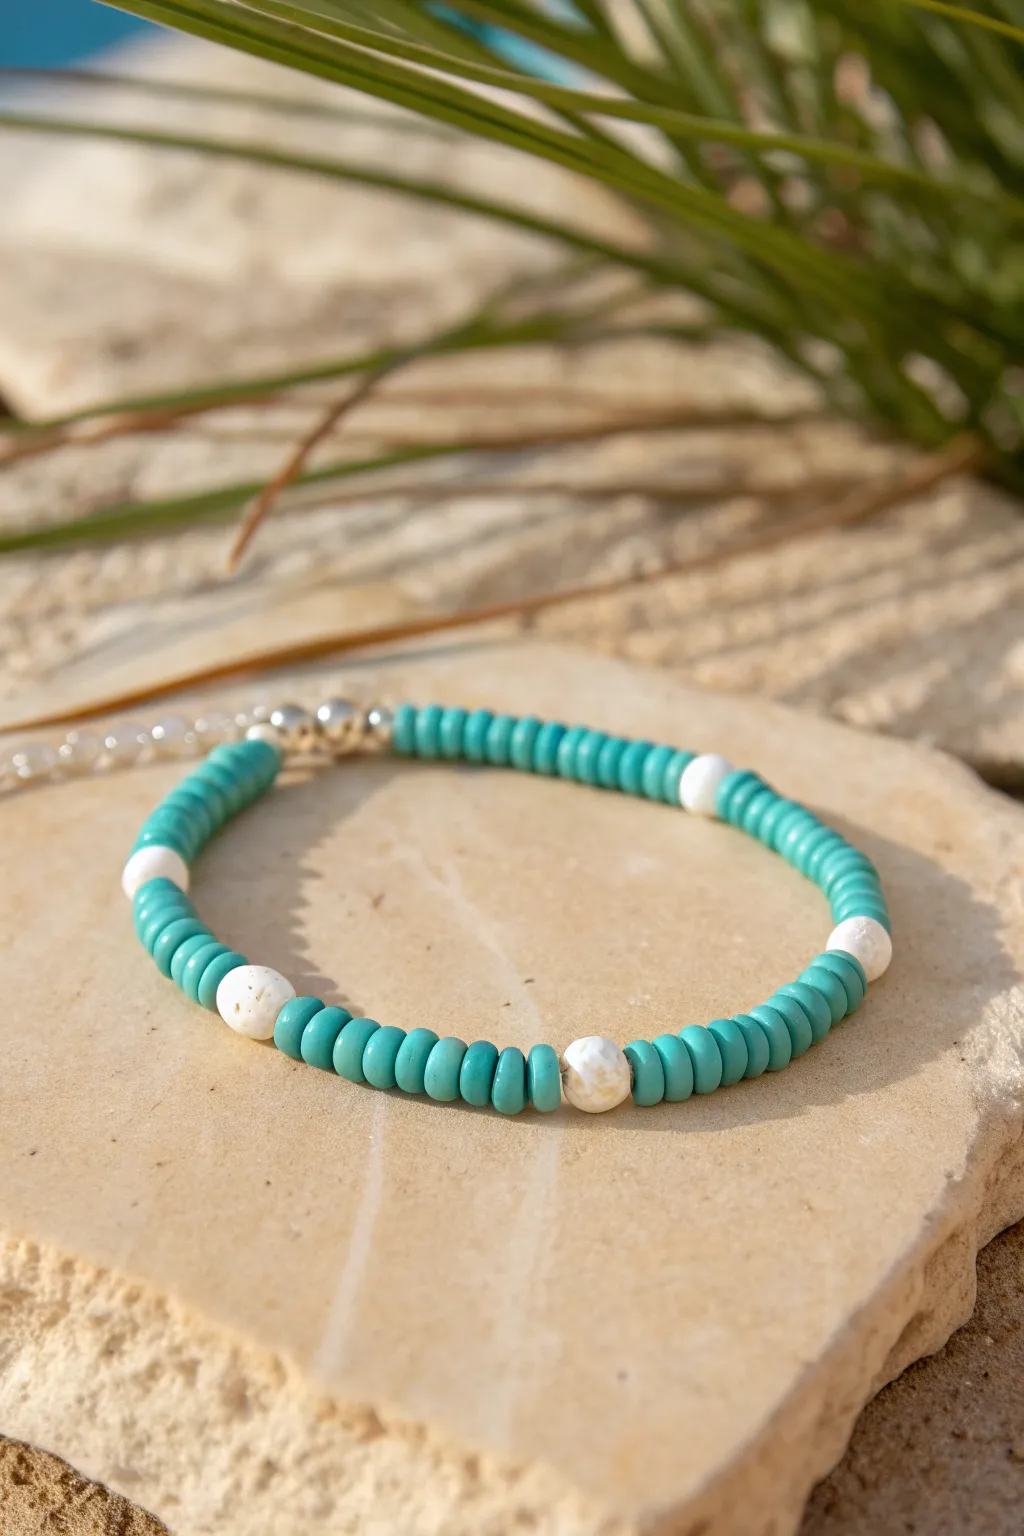
Capture the spirit of the Southwest with this timeless combination of vibrant turquoise clay discs and textured white accent beads. This simple yet striking design balances smooth heishi beads with organic, round elements for a bracelet that feels right at home in the desert sun.
Step-by-Step Tutorial
Materials
- Turquoise polymer clay heishi beads (6mm)
- White lava stone or white turquoise round beads (6mm or 8mm)
- Strong elastic beading cord (0.8mm recommended)
- Silver spacer bead (optional)
- Silver crimp bead cover (optional for hiding knot)
- Scissors
- Super glue or jewelry cement
- Bead stopper or masking tape
Step 1: Preparation & Setup
-
Measure your wrist:
Wrap a flexible measuring tape around your wrist to find your exact size. Add about half an inch to this measurement to ensure a comfortable fit that isn’t too tight. -
Cut the cord:
Cut a length of elastic cord roughly 10-12 inches long. Having this extra length makes tying the final knot much easier than struggling with short ends. -
Secure the end:
Attach a bead stopper to one end of your cord, or simply use a piece of masking tape folded over the end. This prevents your beads from sliding off while you design your pattern. -
Pre-stretch the cord:
Give your elastic cord a few gentle tugs before you start beading. This pre-stretching helps prevent the bracelet from sagging or expanding permanently after you wear it a few times.
Knot Security
When tightening your knot, pull on all four strands (the two tails and the two bracelet sides) simultaneously. This seats the knot tightly against itself.
Step 2: Pattern Design
-
Plan your sequence:
The charm of this bracelet lies in the spacing. Aim for a pattern of roughly 10 turquoise heishi beads followed by one single white round bead. -
Start beading:
Thread your first section of turquoise clay discs onto the elastic. I usually count out exactly ten to keep the symmetry consistent, but you can eyeball it for a more organic look. -
Add the accent:
Slide on one white round bead. The contrast between the flat clay discs and the round stone creates that lovely visual texture. -
Repeat the pattern:
Continue adding sections of ten turquoise beads followed by a white bead. -
Check the length:
periodically wrap the strand around your wrist to check the fit. You want the pattern to end so that the final knot will be hidden near one of the larger white beads or a silver spacer. -
Add metallic touches:
If you wish to include the silver accent shown in the inspiration, add a silver spacer bead near the end of your strand where the knot will live.
Step 3: Finishing Touches
-
Prepare to tie:
Once you’ve reached your desired length, remove the tape or bead stopper carefully. Bring both ends of the cord together. -
Tie the knot:
Tie a surgeon’s knot. This is just like a standard overhand knot, but loop the cord through twice before pulling tight. It holds much better on slippery elastic. -
Secure with glue:
Apply a tiny drop of jewelry glue or super glue specifically to the knot. Be careful not to get glue on the beads themselves, as it can discolor the clay. -
Hide the knot:
If possible, gently tug the elastic so the knot slides inside the hole of the nearest large white bead. Alternatively, cover the knot with a silver crimp bead cover for a professional finish. -
Trim the excess:
Once the glue is visibly dry, use your scissors to trim the excess cord tails close to the knot.
Texture Twist
Swap the plain white beads for white lava stones. Add a drop of essential oil to the porous lava beads to turn your jewelry into a minimal diffuser.
Slip on your new bracelet and enjoy that effortless coastal-western vibe every day


Turquoise Marble Bead Mix
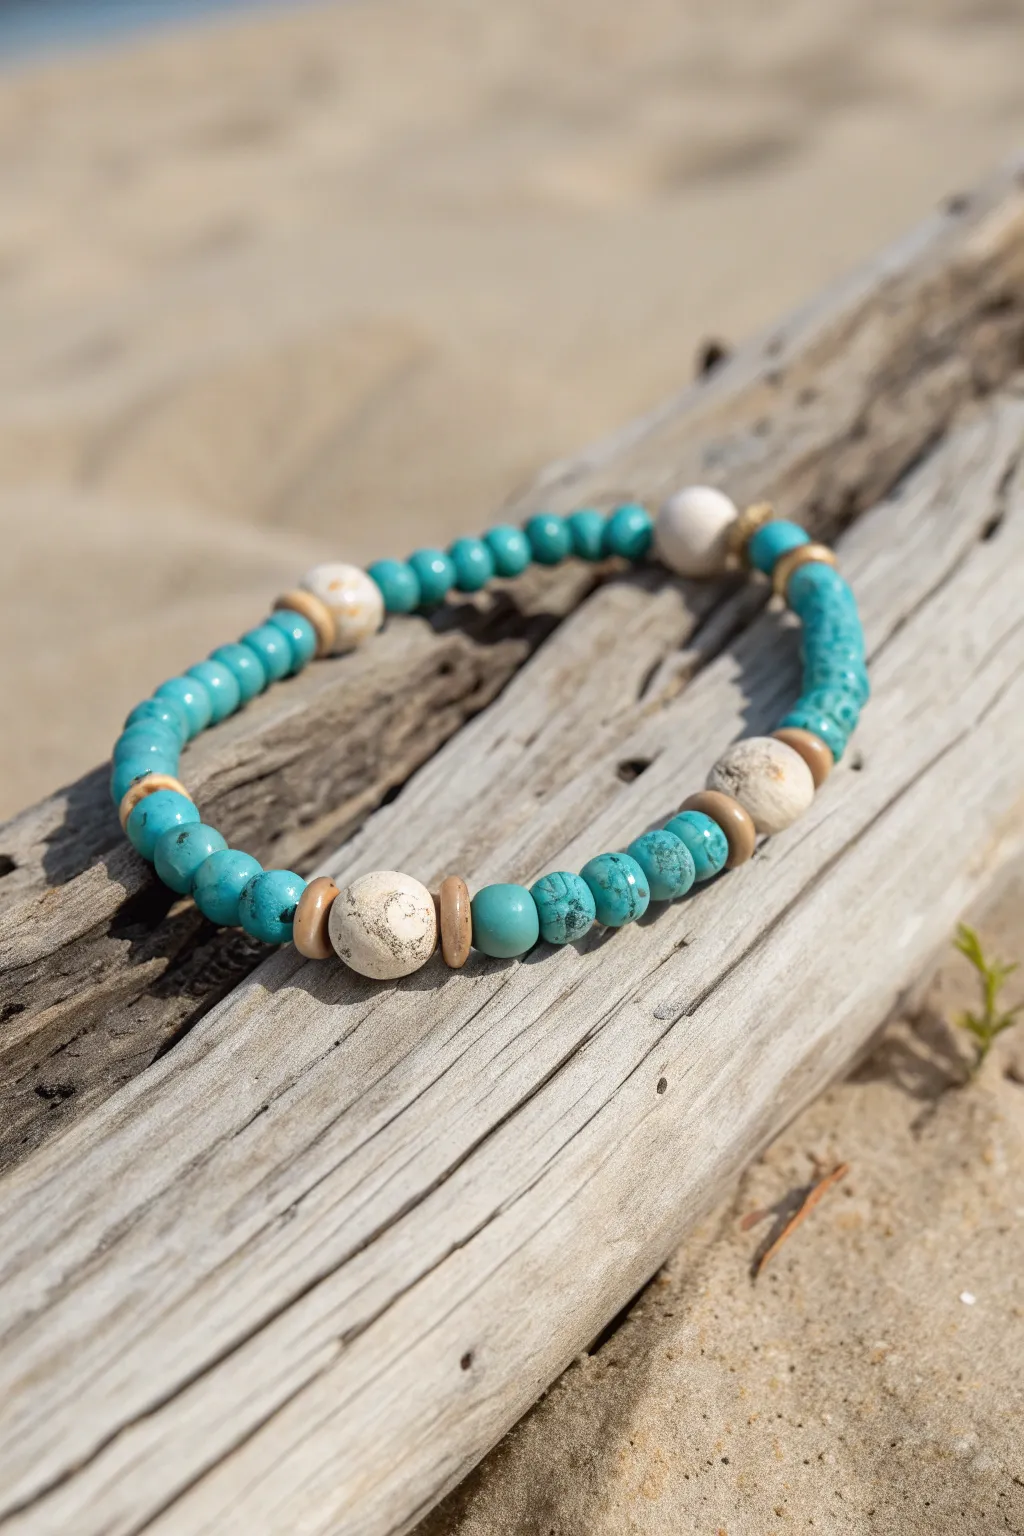
Capture the essence of a serene beach day with this beautiful bracelet, featuring an organic mix of turquoise-hued stones and creamy white accents. The natural textures of the beads, combined with warm wood spacers, create a relaxed, bohemian accessory perfect for layering or wearing solo.
Step-by-Step
Materials
- 0.8mm clear elastic cord or strong beading thread
- 6mm or 8mm round turquoise magnesite or dyed jasper beads
- 8-10mm round white howlite or white lava stone beads
- Flat rondelle wood spacer beads (light brown/tan)
- Beading needle (optional but helpful)
- Scissors
- Jewelry glue (e.g., G-S Hypo Cement)
- Bead stopper or masking tape
Step 1: Preparation & Design
-
Measure your wrist:
Cut a length of elastic cord about 10-12 inches long. This generous length gives you plenty of room to knot it securely later without struggling with short ends. -
Secure the cord end:
Attach a bead stopper to one end of your cord to prevent beads from sliding off as you work. If you don’t have a stopper, a piece of masking tape folded over the end works just as well. -
Pre-stretch the elastic:
Give your elastic cord a few gentle tugs along its length. Pre-stretching helps prevent the bracelet from loosening up after the first few wears. -
Plan your pattern:
Lay out your beads on a bead board or a towel to visualize the design. The pattern shown uses segments of turquoise beads separated by a focal point of a white bead flanked by two wood spacers.
Loosey Goosey?
If your bracelet feels loose after tying, you might not have pre-stretched the cord enough. Before cutting the ends, tug firmly on the cord; re-tie a tighter knot if slack appears.
Step 2: Stringing the Pattern
-
Start with turquoise:
Begin by threading on about 5 to 7 turquoise beads. The exact number will depend on your wrist size, but this creates the first solid block of color. -
Add the first spacer:
Slide on one wooden rondelle spacer bead. Its flat shape sits nicely against the round stone beads and adds a warm, earthy contrast. -
Place a focal bead:
Thread one large white stone bead (howlite or lava stone). This larger bead acts as a highlight in the pattern, breaking up the blue tones. -
Complete the first segment:
Add a second wooden spacer bead immediately after the white bead to frame it symmetrically. -
Repeat the turquoise section:
String another set of turquoise beads. Aim for the same number you used in the first step to keep the pattern balanced, or vary it slightly for a more organic, random look. -
Continue the pattern:
Repeat the sequence: wooden spacer, white focal bead, wooden spacer, followed by a block of turquoise beads. Continue this until the strand is long enough to wrap comfortably around your wrist. -
Check the fit:
Wrap the beaded strand around your wrist. The ends should touch comfortably without gaps, but it shouldn’t feel tight or pinch your skin. -
Make final adjustments:
Add or remove a turquoise bead from the final section if needed to get the perfect circumference before tying.
Step 3: Finishing Touches
-
Prepare to knot:
Remove the bead stopper or tape carefully, holding both ends of the elastic firmly so you don’t lose your work. -
Tie the first knot:
Bring the two ends together and tie a simple overhand knot. Pull it tight, ensuring there is no slack in the cord between the beads. -
Secure with a surgeon’s knot:
Tie a second knot, but this time loop the end through twice before pulling tight (this is a surgeon’s knot). I like to pull the elastic quite firmly here to lock the knot in place. -
Apply glue:
Dab a tiny drop of jewelry glue directly onto the knot. This extra step ensures the smooth elastic won’t slip undone over time. -
Hide the knot:
If one of your beads has a larger hole (often the wooden spacers or the white focal beads do), gently tug the elastic so the knot slides inside the bead to hide it. -
Trim the ends:
Once the glue is tacky or dry, trim the excess cord ends close to the bead, being careful not to cut the main knot.
Scent Infusion
Use white lava stone beads instead of howlite for the focal points. Their porous surface allows you to add a drop of essential oil, turning your jewelry into a wearable diffuser.
Enjoy styling your new beach-inspired bracelet along with your favorite summer outfits


Serape-Inspired Sunset Stripes
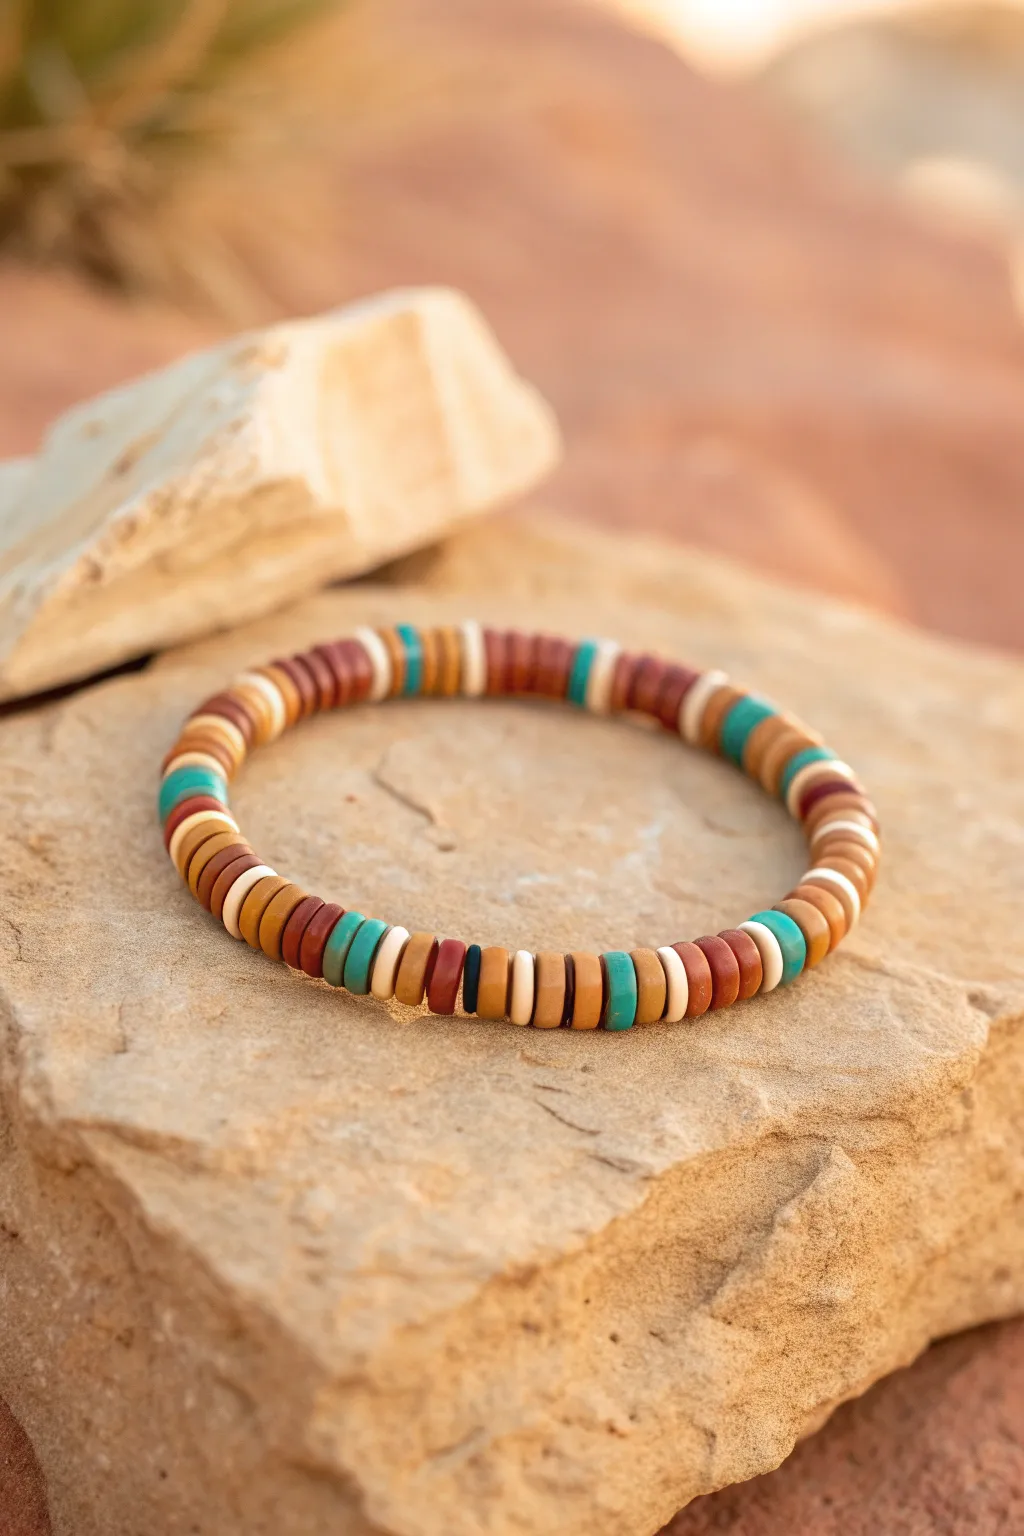
Capture the warmth of a desert twilight with this serape-inspired bracelet, featuring a rhythmic pattern of earthy polymer clay discs. The mix of terracotta, turquoise, and sandy neutrals creates a versatile accessory perfect for stacking or wearing solo.
Detailed Instructions
Materials
- 6mm flat disc (heishi) polymer clay beads in: Terracotta/Rust
- 6mm flat disc beads in: Deep Brown/Maroon
- 6mm flat disc beads in: Tan/Sand
- 6mm flat disc beads in: Cream/Off-White
- 6mm flat disc beads in: Turquoise/Teal
- A few matte black spacer beads (optional)
- 0.8mm clear elastic stretch cord
- Scissors or jewelry nippers
- Super glue or jewelry cement (e.g., G-S Hypo Cement)
- Bead stopper or binder clip
- Ruler or measuring tape
Step 1: Preparation & Planning
-
Measure and Cut:
Begin by measuring your wrist size. Cut a length of elastic cord about 4-5 inches longer than your wrist measurement to allow plenty of room for knotting. Pre-stretch the cord slightly by pulling on both ends to prevent the finished bracelet from sagging later. -
Secure the End:
Attach a bead stopper or a simple binder clip to one end of your cut elastic. This prevents your beads from sliding off while you work on your pattern. -
Sort Your Palette:
Pour small piles of each bead color onto your workspace or a bead mat. Having your terracotta, deep brown, tan, cream, and turquoise separated makes grabbing the next bead in the sequence much faster.
Sticky Situation
If the knot slips while gluing, have a friend hold a finger on the first loop of the knot while you tie the second part. Tension is key for a secure finish.
Step 2: Creating the Serape Pattern
-
Start the Sequence:
The pattern relies on small clusters of color rather than a strict 1-1-1 repetition. Begin by threading on a small block of 3-4 Terracotta beads. -
Add Contrast:
Follow the terracotta with a lighter section: add 2 Tan beads, then 1 Cream bead, and 2 more Tan beads. This creates a soft gradient transition. -
Introduce the Accent:
Slide on a single bold Turquoise bead. This pop of cool color mimics classic serape textiles and breaks up the warm tones beautifully. -
Build the Darker Stripe:
Thread on a sequence of 3 Deep Brown beads. This anchors the brighter colors and adds depth to the design. -
Repeat with Variation:
Continue adding beads, but allow for slight organic variations. For instance, instead of a single turquoise bead, occasionally place two together, or sandwich a turquoise bead between two Cream beads. -
Incorporate the Black Spacer:
Roughly halfway through your strand, add a single, thin black spacer bead or a very dark brown disc. This tiny detail acts like a visual punctuation mark in the pattern. -
Check the Length:
Periodically wrap the strand around your wrist to check the fit. Aim for the beads to just touch around your wrist without gaps, but not feel tight. -
Finish the Strand:
Continue your pattern—alternating between blocks of warm rusts, neutral tans, and singular color pops—until you reach your desired length.
Step 3: Finishing Touches
-
Remove the Stopper:
Carefully remove the bead stopper or clip while holding both ends of the elastic firmly. Bring the two ends together to form a circle. -
The Surgeon’s Knot:
Tie a surgeon’s knot to secure the bracelet. Cross the left end over the right, then loop it under twice. Pull tight. Then cross the right end over the left and loop under once. Pull tight again. -
Secure the Knot:
While holding the knot taut, apply a tiny drop of jewelry glue or super glue directly onto the knot. I find using a toothpick helps apply the glue precisely without getting it on the beads. -
Hide the Evidence:
Once the glue is tacky but not fully hard, slide an adjacent bead with a larger hole over the knot if possible to hide it. -
Trim the Excess:
After the glue has fully cured (check your glue’s instructions, usually 10-15 minutes), use your scissors to trim the excess elastic tails as close to the knot as possible without cutting the knot itself.
Golden Hour Glow
Replace the single black spacer bead with a gold-plated hematite or brass disc bead. The metallic flash adds a touch of luxury to the rustic clay look.
Slip on your new bracelet and enjoy the warm, earthy vibes it brings to your outfit


Black, Turquoise, and Silver Spacer Rhythm

This striking bracelet captures the essence of the Southwest by pairing deep, matte black clay discs with vibrant turquoise-colored stone beads. The rhythmic interruption of silver spacers and a bold focal bead creates a sophisticated texture that feels both rugged and refined.
Step-by-Step Guide
Materials
- Matte black polymer clay heishi beads (approx. 6mm)
- Turquoise-colored stone rondelle or heishi beads (approx. 6mm-8mm)
- Silver-tone metal spacer beads (small, rounded or daisy style)
- One large silver-tone focal cylinder bead with etched details
- Strong beading wire (e.g., Beadalon 49-strand)
- Two wire guardians (silver-tone)
- Two crimp tubes (silver-tone, size #2)
- Crimping pliers
- Wire cutters
- Lobster claw clasp (silver-tone)
- Jump ring (silver-tone)
Step 1: Planning and Prep
-
Measure your wrist:
Before cutting any wire, wrap a measuring tape around your wrist to find your size. Add about 0.5 to 1 inch to this measurement to account for the bulkiness of the beads and ease of fit. -
Cut the beading wire:
Cut a length of beading wire that is at least 4 inches longer than your target bracelet length. This extra length gives you plenty of room to manipulate the ends without frustration. -
Secure the first end:
Thread a crimp tube onto one end of the wire, followed by a wire guardian. Loop the wire through the guardian and back down through the crimp tube. -
Attach the clasp:
Before tightening, slide your lobster claw clasp onto the loop created by the wire guardian. Pull the wire ends so the guardian sits snug against the clasp, but not rigid. -
Crimp firmly:
Use your crimping pliers to flatten the crimp tube securely. Give it a gentle tug to ensure it holds. I usually trim the excess short tail wire now, leaving just a tiny bit to tuck into the first few beads.
Loosey Goosey
Gap showing near the clasp? You likely crimped too far away from the beads. Use a crimp cover to hide the gap and the crushed tube easily.
Step 2: Creating the Pattern
-
Start with darkness:
Begin stringing your matte black clay heishi beads. You’ll want a solid section of black to act as the ‘strap’ of the bracelet. String enough to cover about one-third of your total desired length. -
Transition slowly:
To start the color transition, slide on a silver spacer bead, followed by one single turquoise bead, and another silver spacer. This frames the color beautifully. -
Build the first color block:
Add two more turquoise beads directly after the spacer. Then, add another silver spacer. -
Expand the turquoise section:
String two more turquoise beads. Add a silver spacer. -
Introduce the focal point:
String two final turquoise beads for this side. Now, slide on your large, etched silver cylinder bead. This will sit slightly off-center or centered depending on your preference, drawing the eye immediately. -
Mirror the pattern:
On the other side of the focal bead, string two turquoise beads, followed by a silver spacer. -
Continue the rhythm:
Add two more turquoise beads, then a silver spacer. Follow this with two more turquoise beads and another spacer. -
Final color block:
Finish the turquoise section by adding one final turquoise bead, capped off with a silver spacer. This mirrors the single bead transition you created on the starting side. -
Complete the loop:
Fill the rest of the wire with the black clay heishi beads until you reach your total desired length.
Step 3: Finishing Touches
-
Prepare the final crimp:
Slide a crimp tube onto the end of the wire, followed by your second wire guardian. -
Attach the ring:
Loop the wire through the guardian and attach a jump ring (which the clasp will hook onto). Thread the wire back down through the crimp tube and through the first few black beads. -
Check the tension:
Pull the wire tight enough to remove gaps, but leave just enough slack so the bracelet loops comfortably. If it’s too tight, it will be stiff and angular rather than round. -
Final crimp and trim:
Crimp the tube securely using your pliers. Trim the excess wire flush against the beads carefully using your wire cutters.
Rustic Luxe
Swap the silver cylinder for a genuine piece of drilled turquoise nugget or a carved bone bead to give the piece a more organic, tribal feel.
Wear your new western-inspired accessory with denim or leather for a perfectly rugged look

The Complete Guide to Pottery Troubleshooting
Uncover the most common ceramic mistakes—from cracking clay to failed glazes—and learn how to fix them fast.
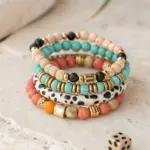
Neutral Ranch Palette in Cream and Tan
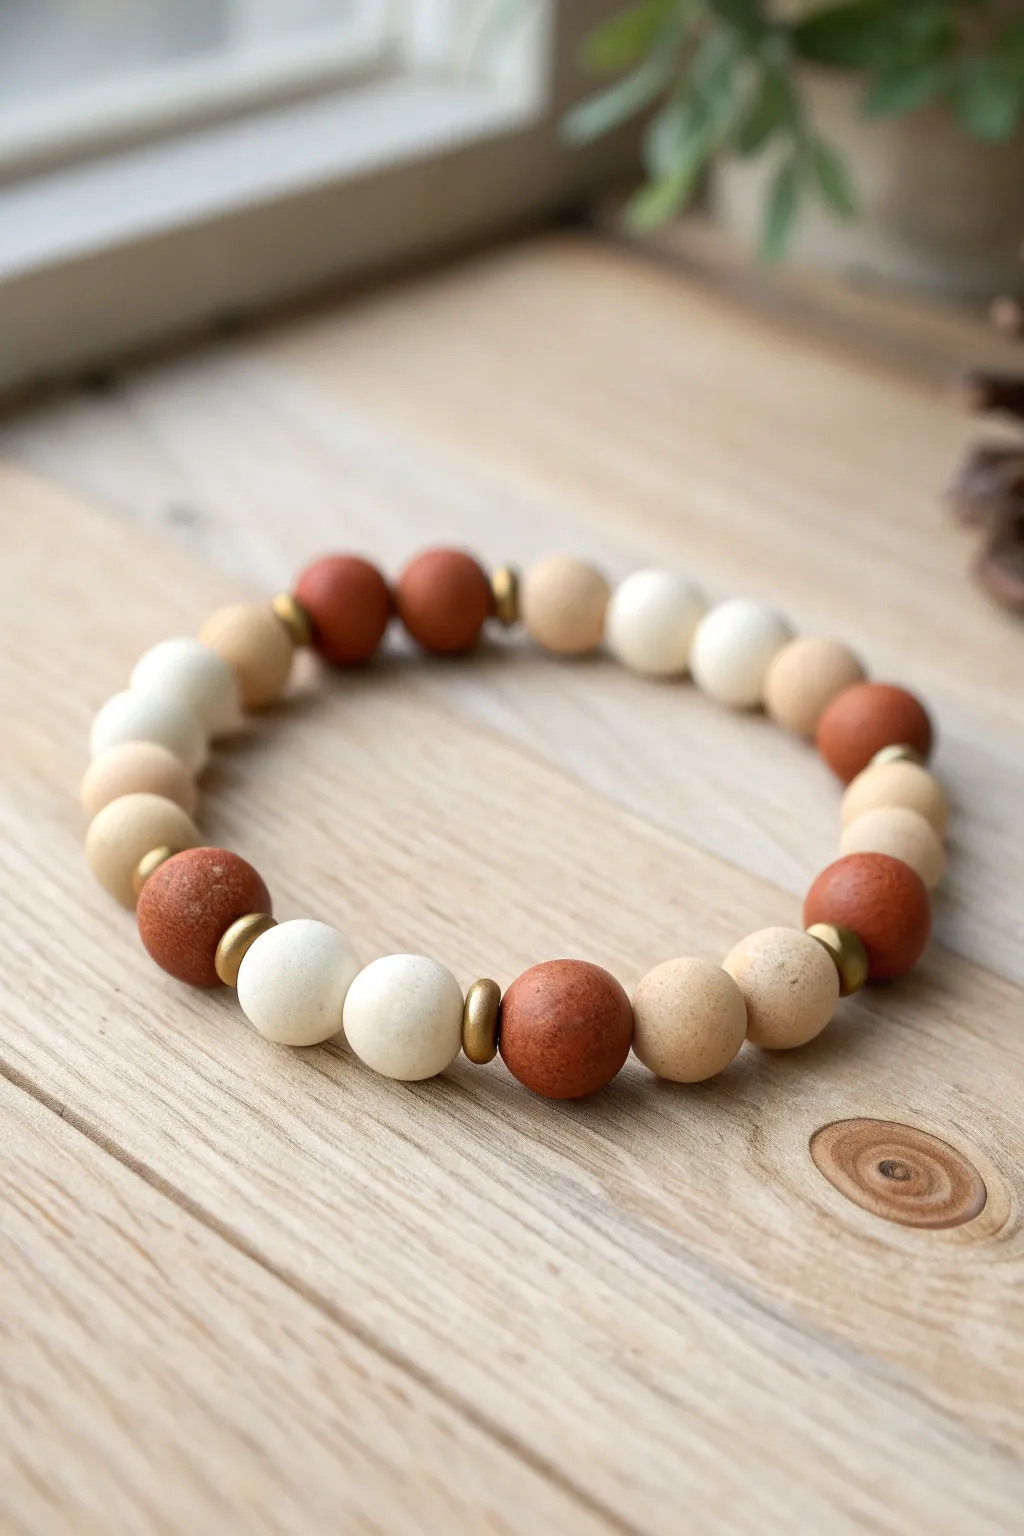
Capture the serene hues of a desert landscape with this understated clay bead bracelet. Combining matte terracotta, cream, and sandy beige tones with subtle gold accents creates a versatile accessory perfect for everyday wear.
Detailed Instructions
Materials
- Polymer clay in Terracotta (or Rust)
- Polymer clay in White (or Cream)
- Polymer clay in Beige (or Tan)
- Gold disc spacer beads (approx. 4mm)
- Elastic stretch cord (0.8mm or 1mm)
- Toothpick or bead piercing pin
- Baking sheet with parchment paper
- Super glue or jewelry cement
- Scissors
Step 1: Prepping the Clay Beads
-
Condition the clay:
Start by taking small amounts of your terracotta, white, and beige polymer clay. Work each color in your hands individually until it is soft, pliable, and warm to the touch. -
Portion the clay:
Pinch off small pieces of clay for your beads. Aim for portions that will roll into balls approximately 8mm to 10mm in diameter. -
Create consistent sizes:
To ensure your beads are uniform, I find it helpful to roll the clay into a long snake first and cut equal segments before rolling them into spheres. -
Roll the beads:
Roll each segment between the palms of your hands to create smooth, round spheres. You will need roughly 6 terracotta, 8 white/cream, and 8 beige beads for a standard wrist size. -
Add texture (optional):
The beads in the image have a lovely organic, stone-like texture. You can achieve this by gently rolling the finished spheres over a piece of sandpaper or tapping them lightly with a stiff toothbrush. -
Pierce the holes:
Using a toothpick or a bead piercing pin, carefully poke a hole through the center of each bead. Rotate the bead as you push to keep the shape from distorting. -
Widen the holes:
Ensure the hole is wide enough to accommodate your elastic cord later. Give the toothpick a little wiggle inside the bead to smooth the inner edges. -
Bake the clay:
Arrange the beads on a baking sheet lined with parchment paper. Bake them according to your specific brand of polymer clay instructions (usually around 275°F/135°C for 15-30 minutes). -
Cool down:
Once baked, let the beads cool completely before handling them. They will harden fully as they return to room temperature.
Hole Distortion?
If your beads squash into ovals when piercing, let the clay sit for 10 mins to cool slightly before piercing, or drill the holes after baking instead.
Step 2: Assembly & Finishing
-
Cut the cord:
Cut a piece of elastic cord about 10-12 inches long. This extra length makes tying the final knot much easier. -
Pre-stretch the elastic:
Give the elastic cord a few firm tugs. This pre-stretching step is crucial to prevent the bracelet from sagging or loosening after you wear it a few times. -
Plan your pattern:
Lay your cooled beads out on a table to design your pattern. The look we are going for is organic, so try grouping two creams, then a gold spacer, then a terracotta, or alternating randomly. -
Begin stringing:
Start threading your beads onto the elastic. Insert the gold disc spacers periodically between the clay beads to add that metallic warmth seen in the project photo. -
Check the fit:
Wrap the strung beads around your wrist to check the size. Add or remove beads until it sits comfortably without digging into your skin. -
Tie the knot:
Tie a strong surgeon’s knot (right over left, left over right, and loop through again). Pull the cord tight so the beads bunch together snugly. -
Secure with glue:
Apply a tiny dot of super glue or jewelry cement directly onto the knot. Allow it to dry for a few moments to ensure it won’t slip. -
Hide the knot:
Trim the excess elastic cord close to the knot, then gently pull the cord so the knot slides inside the hole of the nearest large clay bead.
Speckled Stone Effect
Mix black pepper or dried used coffee grounds into your cream and tan clay before rolling to create a realistic faux-stone speckled texture.
Now you have a custom piece of jewelry that adds a touch of earthy elegance to any outfit
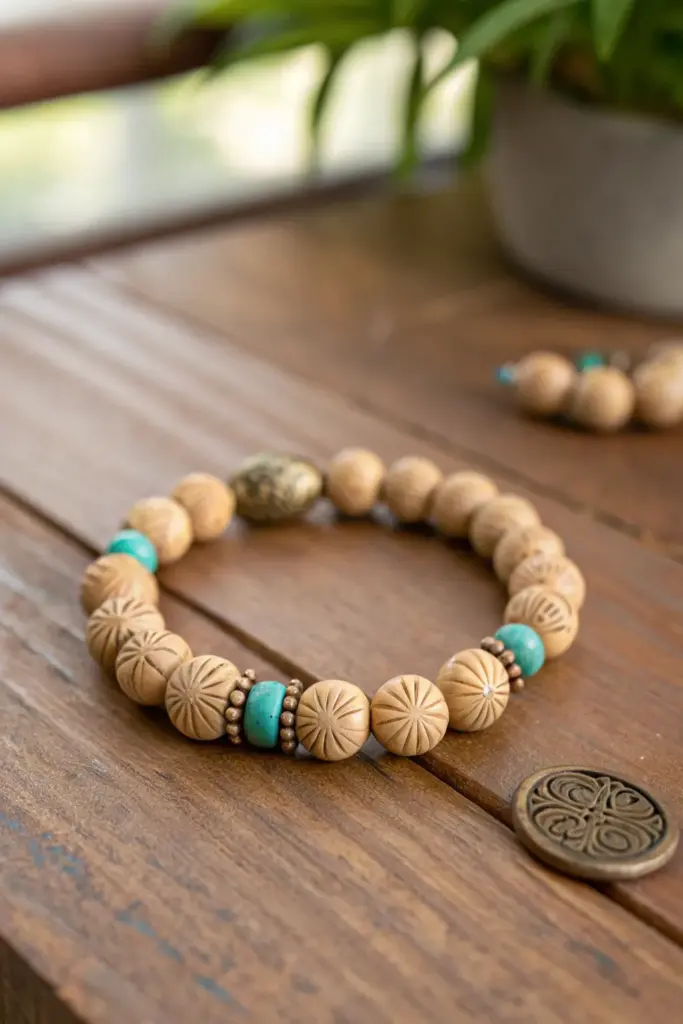
Cowboy Boot Charm Centerpiece

This rustic Western-inspired bracelet combines the earthy tones of wood and turquoise with a playful golden touch. Centered around a charming cowboy boot pendant, it’s the perfect accessory to add a hint of country flair to your denim outfits.
How-To Guide
Materials
- Turquoise-colored glass or stone rondelle beads (6-8mm)
- Natural light wood round beads (8mm)
- Gold-tone spacer beads with textured/rhinestone finish
- Gold cowboy boot charm
- Jump ring (gold)
- Elastic beading cord (0.8mm or 1mm)
- Jewelry glue or clear nail polish
- Scissors
Step 1: Planning and Prep
-
Measure your wrist:
Before cutting any cord, wrap a measuring tape around your wrist to find your size, adding about half an inch for a comfortable fit. -
Cut the cord:
Cut a piece of elastic cord about 10-12 inches long. This generous length makes tying the final knot much easier. -
Pre-stretch the elastic:
Hold the cord firmly at both ends and give it a few gentle tugs. This crucial step prevents the bracelet from stretching out permanently after you first wear it. -
Secure the end:
Place a piece of tape or a bead stopper on one end of the cord so your beads don’t slide right off while you work.
Step 2: Creating the Pattern
-
Start the center focal point:
Begin by sliding on the gold cowboy boot charm. If the charm’s loop is too small to sit nicely on the cord, use a gold jump ring to attach it to a decorative carrier bead first. -
Add wood accents:
On both the left and right sides of the charm, thread on two natural wood beads. These neutral tones frame the gold centerpiece beautifully. -
Place the first spacers:
Slide a gold textured spacer bead onto each side, right next to the wood beads. This transitions the pattern from natural wood to the bright color. -
Begin the turquoise sections:
Thread five turquoise rondelle beads on the left side and five on the right side. -
Add secondary spacers:
Add another gold textured spacer bead to both ends of the strand. -
Continue the pattern:
Add another set of five turquoise beads on each side, followed by a gold spacer. -
Fill the length:
Continue adding turquoise beads to both sides evenly until you reach your desired bracelet length. I usually check the fit around my wrist periodically during this step.
Spacer Bead Fit
If your gold spacer beads have very large holes, they might swallow the knot. Try to guide the knot into one of the turquoise or wood beads instead for a secure hold.
Step 3: Finishing Touches
-
Check the symmetry:
Lay the bracelet flat to ensure the cowboy boot hangs exactly in the center and the pattern looks balanced on both sides. -
Tie the knot:
Remove the tape or bead stopper. Bring both ends together and tie a surgeon’s knot (right over left, left over right twice) for extra security. -
Pull tight:
Pull the cords firmly to tighten the knot, making sure no gaps are showing between the beads. -
Secure with glue:
Apply a tiny drop of jewelry glue or clear nail polish directly onto the knot to seal it. -
Hide the knot:
While the glue is still slightly tacky, gently tug the cord to slide the knot inside the hole of the nearest wood or turquoise bead. -
Trim excess:
Once dry, use your scissors to trim the excess cord ends as close to the bead hole as possible without cutting the knot itself.
Charm Positioning
To ensure the boot charm always faces outward, attach it to the cord using a ‘bead bail’ or slider bead rather than stringing the cord directly through the charm loop.
Now slide on your new accessory and enjoy the custom Western vibe you created


What Really Happens Inside the Kiln
Learn how time and temperature work together inside the kiln to transform clay into durable ceramic.
Star Concho Accent Stations

Capture the spirit of the open range with this striking turquoise bracelet featuring a prominent silver star accent. The mix of smooth turquoise rounds and rustic patterned beads creates a textured, authentic Western look perfect for stacking or wearing solo.
Step-by-Step Guide
Materials
- 8mm turquoise round beads (approx. 20-22 beads)
- 8mm patterned green/turquoise ceramic or jasper beads (2 beads)
- Silver star concho bead or large hole slider bead (approx. 15-20mm)
- Small silver spacer beads or heavy-gauge jump rings (4 pieces)
- 0.8mm clear elastic cord
- Jewelry glue (GS Hypo Cement recommended)
- Scissors
Step 1: Preparation
-
Measure your wrist:
Before cutting any cord, wrap a measuring tape around your wrist to find your size. For a comfortable fit with 8mm beads, add about 0.5 to 0.75 inches to your wrist measurement. -
Prepare the elastic:
Cut a piece of elastic cord about 10-12 inches long. Having extra length makes it much easier to tie the final knot securely without fumbling. -
Pre-stretch the cord:
Hold the elastic firmly at both ends and give it a few gentle tugs. This crucial step prevents the finished bracelet from stretching out and becoming loose after only a few wears. -
Secure the end:
Attach a bead stopper or simply place a piece of tape on one end of your cord to prevent beads from sliding off while you design your pattern.
Step 2: Beading the Pattern
-
Start the main sequence:
Thread approximately 18-20 of the solid turquoise round beads onto the cord. The exact number will depend on your wrist size, but this section will form the back and sides of the bracelet. -
Add first transition:
Slide on one small silver spacer bead. These spacers act as a visual frame for the accent beads. -
Add texture bead:
Thread one of the patterned green/turquoise ceramic beads next. This adds that lovely rustic variation seen in the photo. -
Frame the texture:
Add another silver spacer bead after the patterned bead to complete this small transition section. -
Add inner turquoise:
Place a single solid turquoise round bead on the cord. This bead will sit directly between the textured section and the central star.
Star Alignment
If your star bead is top-heavy and spins, use a slightly thicker elastic cord or double up your 0.8mm cord to create more friction inside the bead hole.
Step 3: Adding the Centerpiece
-
Place the star:
Thread your silver star concho slider onto the cord. Ensure the star is facing outward and sits comfortably against the curve of the adjacent beads. -
Mirror the design:
Now, recreate the pattern in reverse on the other side of the star. Start with one solid turquoise round bead. -
Frame the second texture bead:
Add a silver spacer, followed by your second patterned ceramic bead, and finally the last silver spacer. -
Check the fit:
Bring the two ends of the elastic together to form a circle. Wrap it around your wrist to check the sizing. If it feels too tight, add another solid turquoise bead to the back section; if too loose, remove one.
Gap Prevention
Bead gaps appear if the knot isn’t tight enough. Pull the elastic taut while tying the knot, compressing the beads together slightly, as elastic relaxes over time.
Step 4: Finishing Touches
-
Tie the knot:
Remove the tape or bead stopper. Tie a surgeon’s knot (right over left, left over right, and loop through an extra time) to secure the bracelet. Pull the elastic tight so there are no gaps between beads. -
Secure with glue:
Apply a tiny dab of jewelry glue directly onto the knot. I find using a toothpick helps place the glue precisely without getting it on the beads. -
Hide the knot:
While the glue is still tacky but not wet, gently pull the elastic so the knot slides inside the hole of the nearest large bead. This keeps your finish professional and clean. -
Trim the ends:
Once the glue has fully dried (usually 10-15 minutes), use sharp scissors or flush cutters to trim the excess elastic cord as close to the bead hole as possible.
Now you have a rugged yet elegant accessory ready to add a touch of the West to any outfit
Turquoise Cross Focal Bracelet
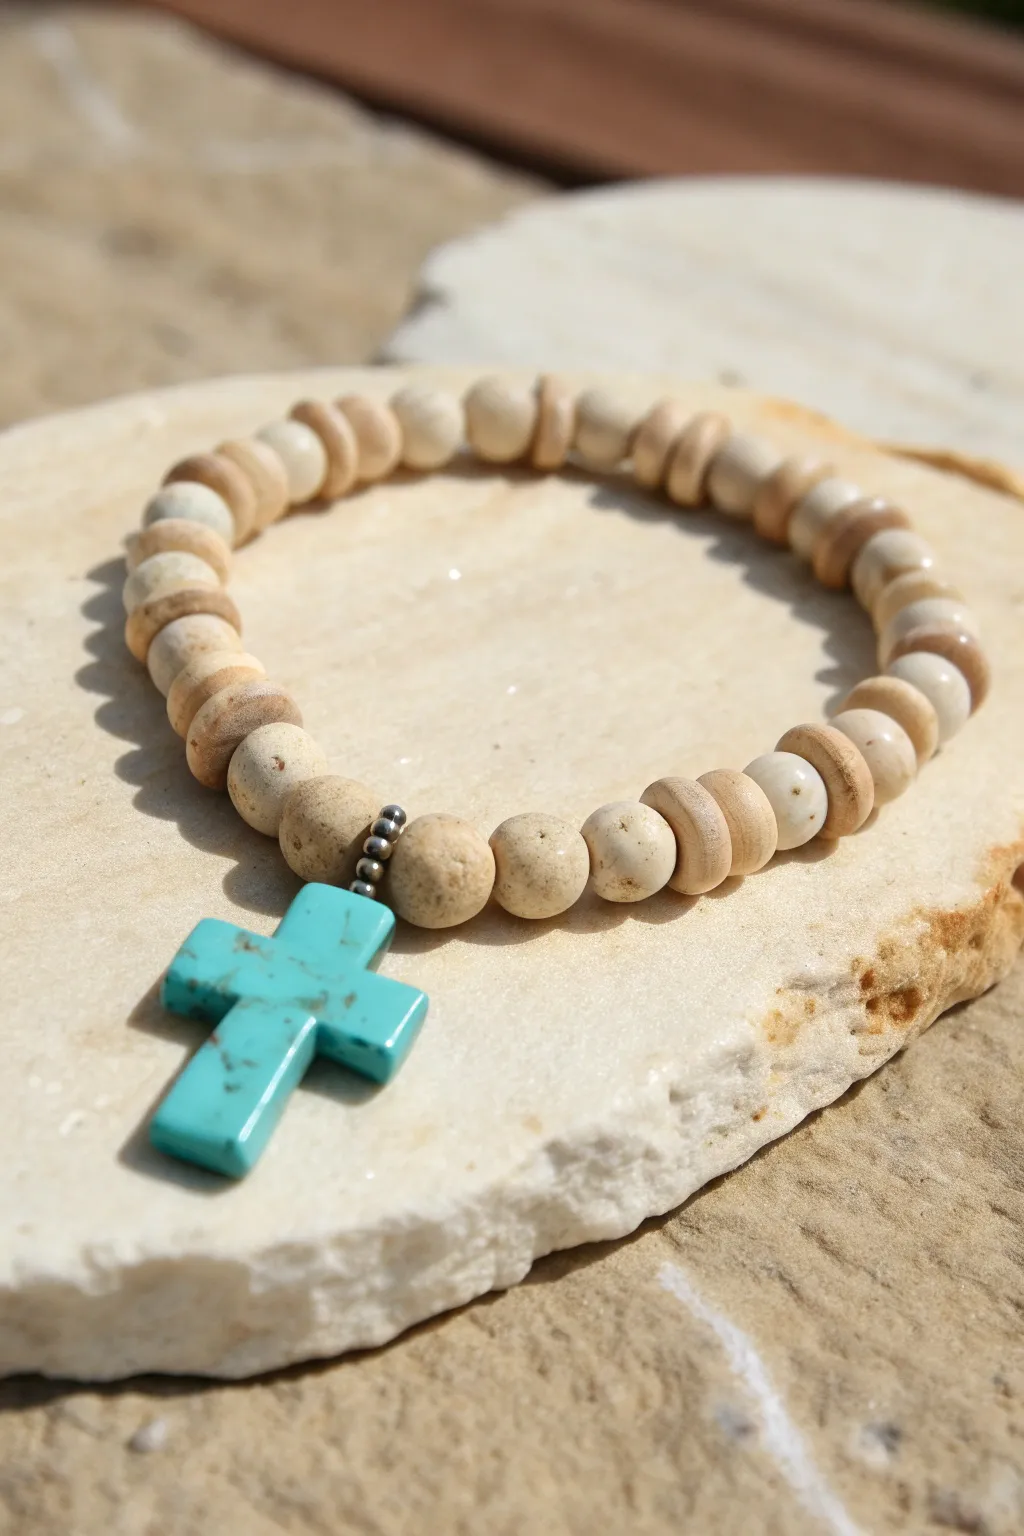
Capture the rustic warmth of the Southwest with this earthy beaded bracelet design. Featuring natural wood tones and a striking turquoise magnesite cross, this piece balances rugged textures with a serene pop of color, perfect for everyday western style.
How-To Guide
Materials
- 8mm round cream/natural wood beads (approx. 20-24 depending on wrist size)
- 6mm wooden disc spacer beads or heishi beads (light pine or coconut shell)
- Small turquoise cross pendant (drilled top to bottom)
- Silver tone spacer beads or small dark decorative beads (for the bail area)
- 1mm elastic stretch cord (clear or white)
- Jewelry adhesive (E6000 or G-S Hypo Cement)
- Scissors
- Bead stopper or tape
- Small jump ring (optional, depending on how the cross is drilled)
Step 1: Preparation & Layout
-
Measure and cut:
Begin by measuring your wrist to determine the needed length. Cut a piece of elastic cord about 10-12 inches long. Having this extra slack makes the final knotting process much easier than working with a short tail. -
Secure the end:
Place a bead stopper or a piece of masking tape on one end of your elastic cord to prevent beads from sliding off while you design your pattern. -
Plan your pattern:
Lay out your beads on a bead board or a towel. The pattern shown alternates between round beads and disc spacers, but notice the specific rhythm: often two round beads are separated by one disc spacer, creating a segmented look.
Natural Texture
For a truly rustic look, lightly sand a few of the wood beads with fine-grit sandpaper to expose varied grain colors before stringing.
Step 2: Stringing the Design
-
Start the sequence:
Begin stringing your beads. Thread on a round cream wood bead, followed by a wooden disc spacer. This basic alternation forms the backbone of the bracelet’s texture. -
Create sections:
To match the reference, vary the pattern slightly. String two round beads together, then one disc spacer. Repeat this ‘two-round, one-disc’ pattern for about half the length of the bracelet. -
Add visual interest:
Occasionally switch back to a single round bead followed by a disc spacer. This irregular organic pattern mimics natural formations and keeps the design from looking too manufactured. -
Check the length:
Periodically wrap the strand around your wrist. You want to stop adding beads when you are approximately one inch short of your total desired circumference, as the focal pendant section will take up space.
Step 3: Adding the Focal Point
-
Prepare the pendant area:
Now it is time to add the centerpiece. Thread on one of the small silver-tone metal spacer beads. These act as a visual frame and protect the wood beads from the pendant’s movement. -
Attach the cross:
Thread your elastic through the top hole of the turquoise cross pendant. If the drilling is top-to-bottom, the cord goes straight through. If it’s front-to-back, you may need to use a jump ring first, then thread the cord through the ring. -
Complete the frame:
Add the second silver-tone metal spacer bead immediately after the cross. This centers your focal point perfectly between the wooden textures. -
Finish the loop:
Continue your beading pattern (alternating rounds and discs) until the strand reaches the full length needed for a comfortable fit.
Knot Security
If your knot keeps slipping out of the bead hole, try widening the hole of that specific bead slightly with a bead reamer tool.
Step 4: Finishing Touches
-
Test the fit:
Bring the two ends together carefully. Check that the pattern flows seamlessly where the ends meet; you might need to add or remove a single disc spacer so two identical beads don’t butt against each other awkwardly. -
Pre-stretch the cord:
I always gently pull on both ends of the elastic cord a few times before knotting. This ‘pre-stretching’ helps prevent the bracelet from sagging or loosening up immediately after you wear it. -
Tie the knot:
Remove the bead stopper and tie a surgeon’s knot. This is like a standard square knot, but you loop the cord through twice on the first pass for extra friction and security. -
Secure with glue:
Apply a tiny dot of jewelry adhesive directly onto the knot. Allow it to become tacky for a moment, then pull the knot tight one last time. -
Hide the mechanism:
Once the glue is dry, trim the excess cord ends to about 2mm. Gently tug the bracelet so the knot slides inside the hole of the nearest round wood bead, hiding it completely from view.
Slip on your new creation and enjoy the grounded, natural feel of wood and stone on your wrist

TRACK YOUR CERAMIC JOURNEY
Capture glaze tests, firing details, and creative progress—all in one simple printable. Make your projects easier to repeat and improve.
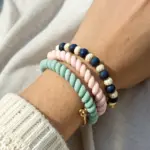
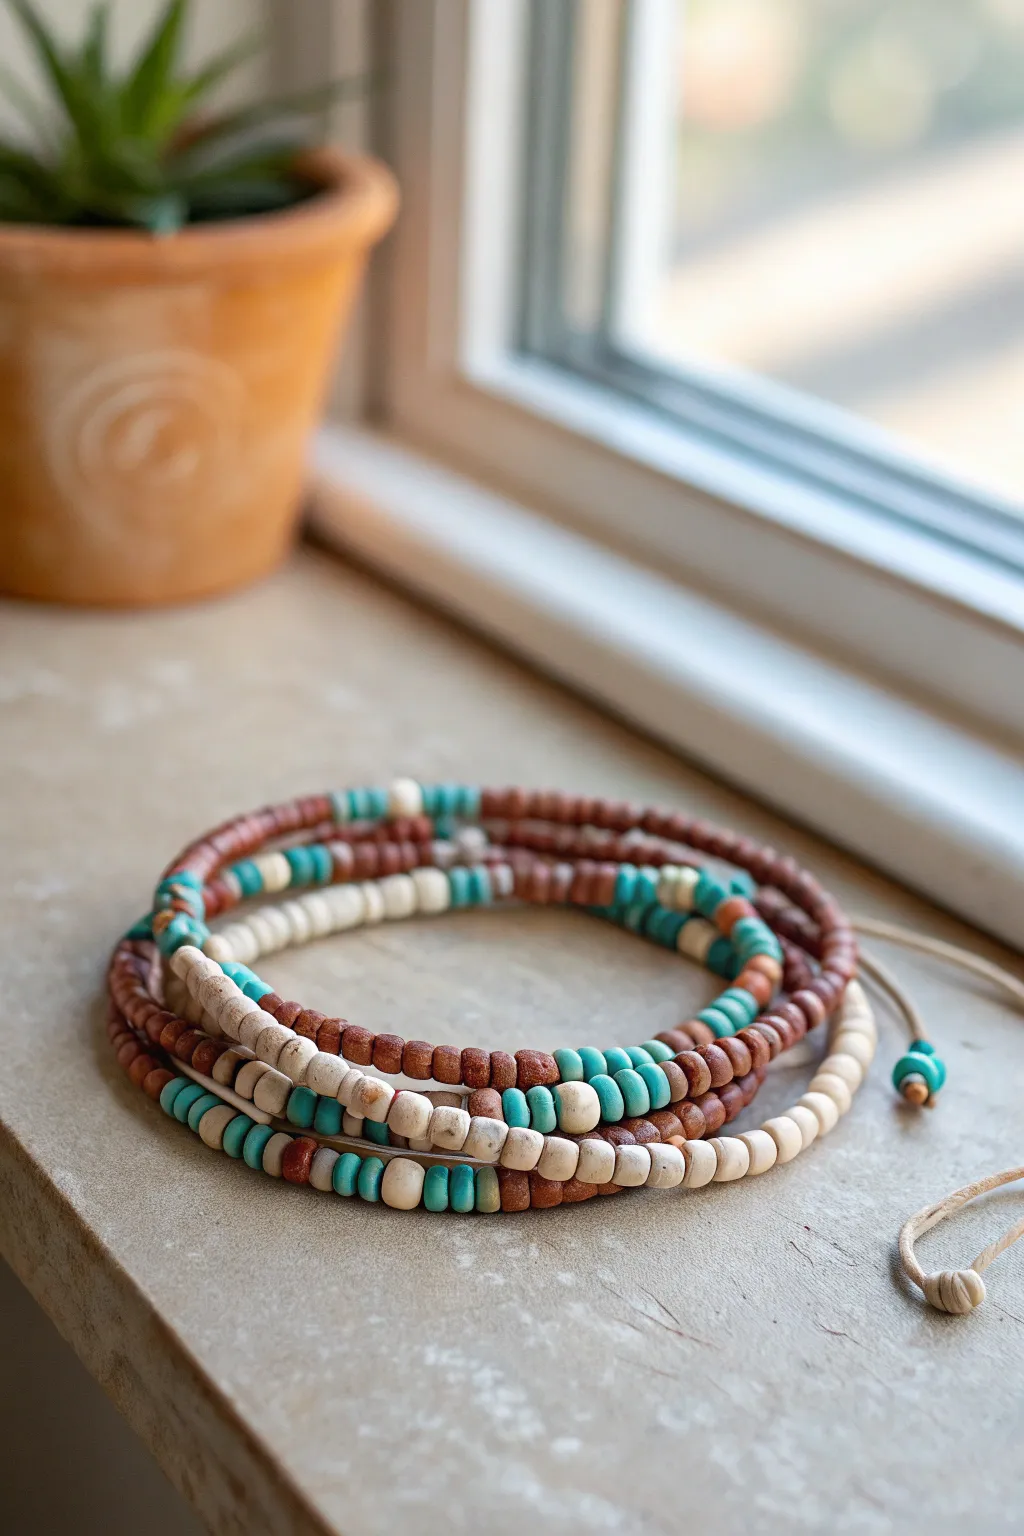
“HOWDY” Letter Bead Western Stack
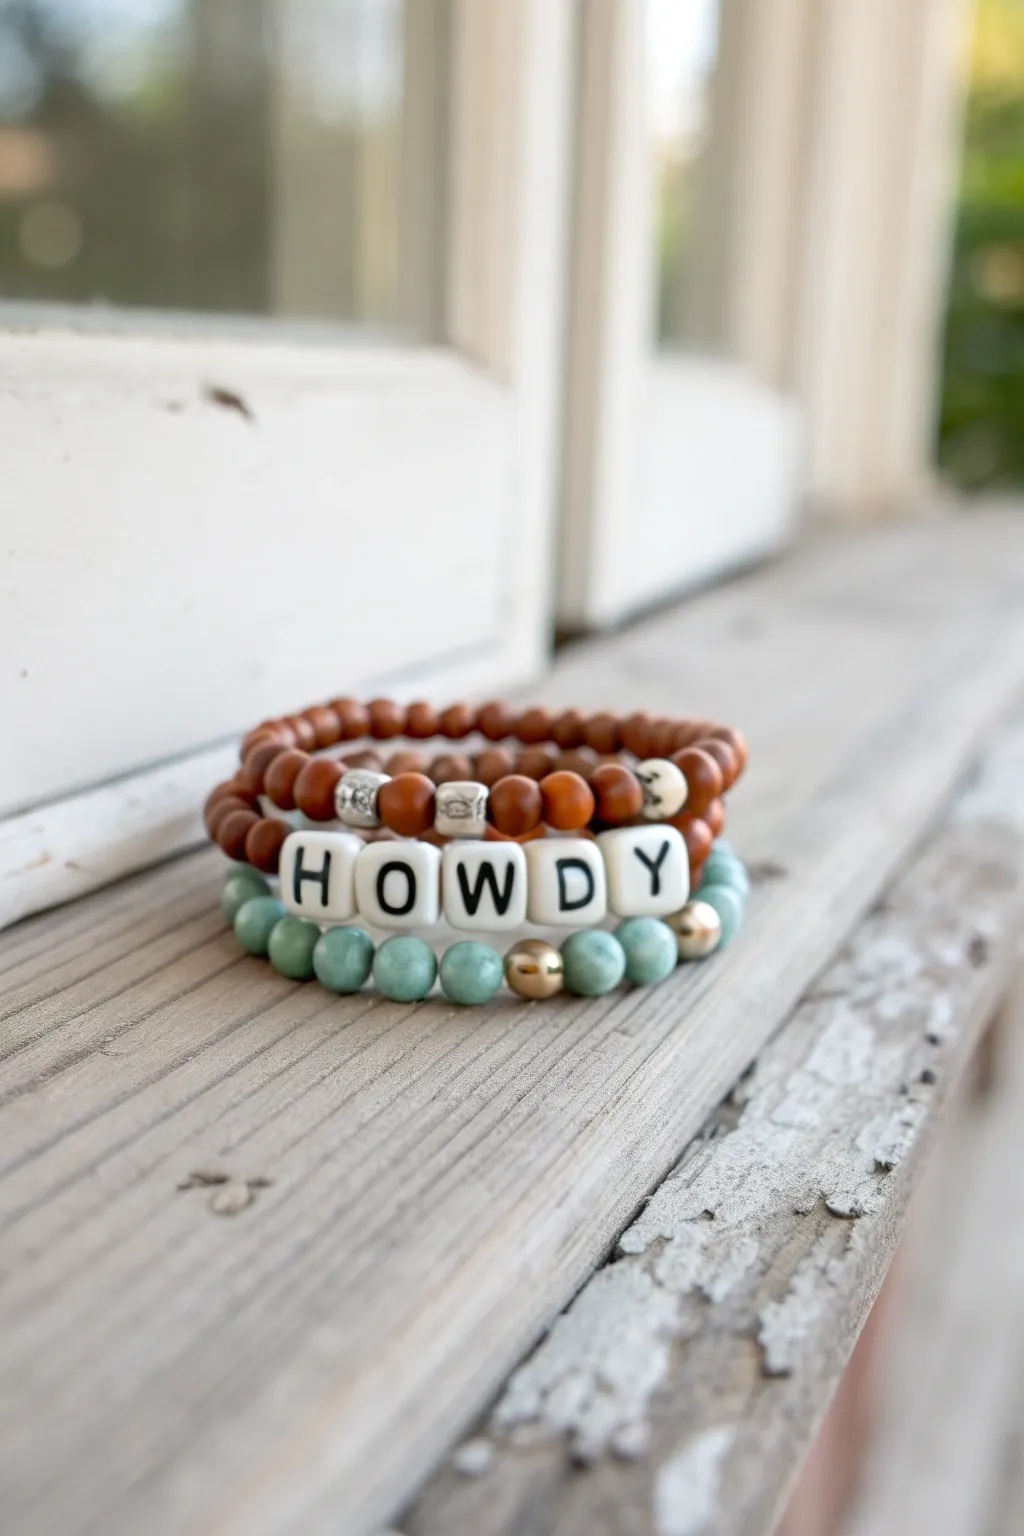
Embrace the rustic charm of the frontier with this trio of beaded bracelets featuring natural textures and a friendly greeting. This stacked set combines earthy wood tones, cool turquoise hues, and bold letter beads for a perfect pop of Western flair.
Step-by-Step Tutorial
Materials
- Stretch cord (0.8mm or 1mm thickness)
- 6mm or 8mm brown sandalwood beads
- 8mm smooth turquoise or amazonite beads
- White square alphabet beads featuring H, O, W, D, Y
- Silver metallic accent beads (rondelle or cube shape)
- Gold metallic round spacer beads (6mm)
- Super glue or jewelry cement
- Scissors or bead snips
- Bead stopper or tape
- Measuring tape
Step 1: Sizing & Setup
-
Measure your wrist:
Before you begin stringing, wrap a measuring tape snugly around your wrist and add about half an inch to determine your ideal bracelet length. This ensures a comfortable fit that isn’t too tight. -
Prepare the cord:
Cut three separate lengths of stretch cord, each about 10-12 inches long. This extra length makes tying the finishing knots much easier. I always like to pre-stretch the cord by tugging it gently a few times to prevent it from sagging later. -
Secure the ends:
Place a bead stopper or a piece of masking tape on one end of each cord segment to prevent your beads from sliding off while you work.
Loosey Goosey?
If your bracelet feels loose after a few wears, the knot likely slipped. Retie using a surgeon’s knot and let the glue cure for a full 24 hours before wearing again.
Step 2: The Top Wood Bracelet
-
String the base:
Take your first piece of cord and begin stringing the brown sandalwood beads. -
Check length:
Continue adding beads until you reach your determined bracelet length. Since this is the simplest layer, it acts as a good sizing guide for the others. -
Tie it off:
Tie a strong surgeon’s knot (right over left, left over right, and pull tight). Add a tiny dot of super glue to the knot for security. -
Hide the knot:
Once the glue is tacky but dry, trim the excess cord and gently pull the knot inside the hole of the nearest wood bead to hide it.
Make it Yours
Swap ‘HOWDY’ for other western words like ‘YEEHAW’ or ‘RODEO’, or use a specific name. You can also mix in Heishi disc beads for a flatter texture profile.
Step 3: The ‘HOWDY’ Centerpiece
-
Plan the pattern:
Lay out your beads on a table first. You want your ‘HOWDY’ letter beads to be centered. Arrange the brown wood beads on either side. -
Add metallic accents:
Place a silver metallic accent bead on the immediate left of the ‘H’ and the immediate right of the ‘Y’ for a touch of cowboy shine. -
String the first half:
On your second cord, string the wood beads that will sit on the back of the wrist first. -
Add the focal point:
Thread the first silver spacer, then H-O-W-D-Y, followed by the second silver spacer. -
Complete the circle:
Finish stringing the remaining wood beads. Wrap it effectively around your wrist to ensure the text sits centered on top before tying. -
Secure the second bracelet:
Tie your surgeon’s knot, apply glue, trim, and hide the knot just like the first bracelet.
Step 4: The Turquoise Foundation
-
Start the third strand:
Pick up your final piece of cord and begin stringing the minty turquoise or amazonite beads. -
Insert gold spacers:
Intersperse the gold round beads randomly or in a repeating pattern (like every 4th bead) to break up the color and add warmth. -
Final sizing check:
Check this bracelet against the other two; because stone beads can be heavier or slightly varied in size, you might need one less or one more bead to match the circumference. -
Final knotting:
Perform your final surgeon’s knot, glue it carefully, and trim the ends. -
Stack them up:
Slide all three bracelets onto your wrist, with the ‘HOWDY’ strand sandwiched between the solid wood and the turquoise layers for the full Western aesthetic.
Now you have a charming stack of accessories ready for your next outdoor adventure
Wood Spacer and Clay Heishi Combo
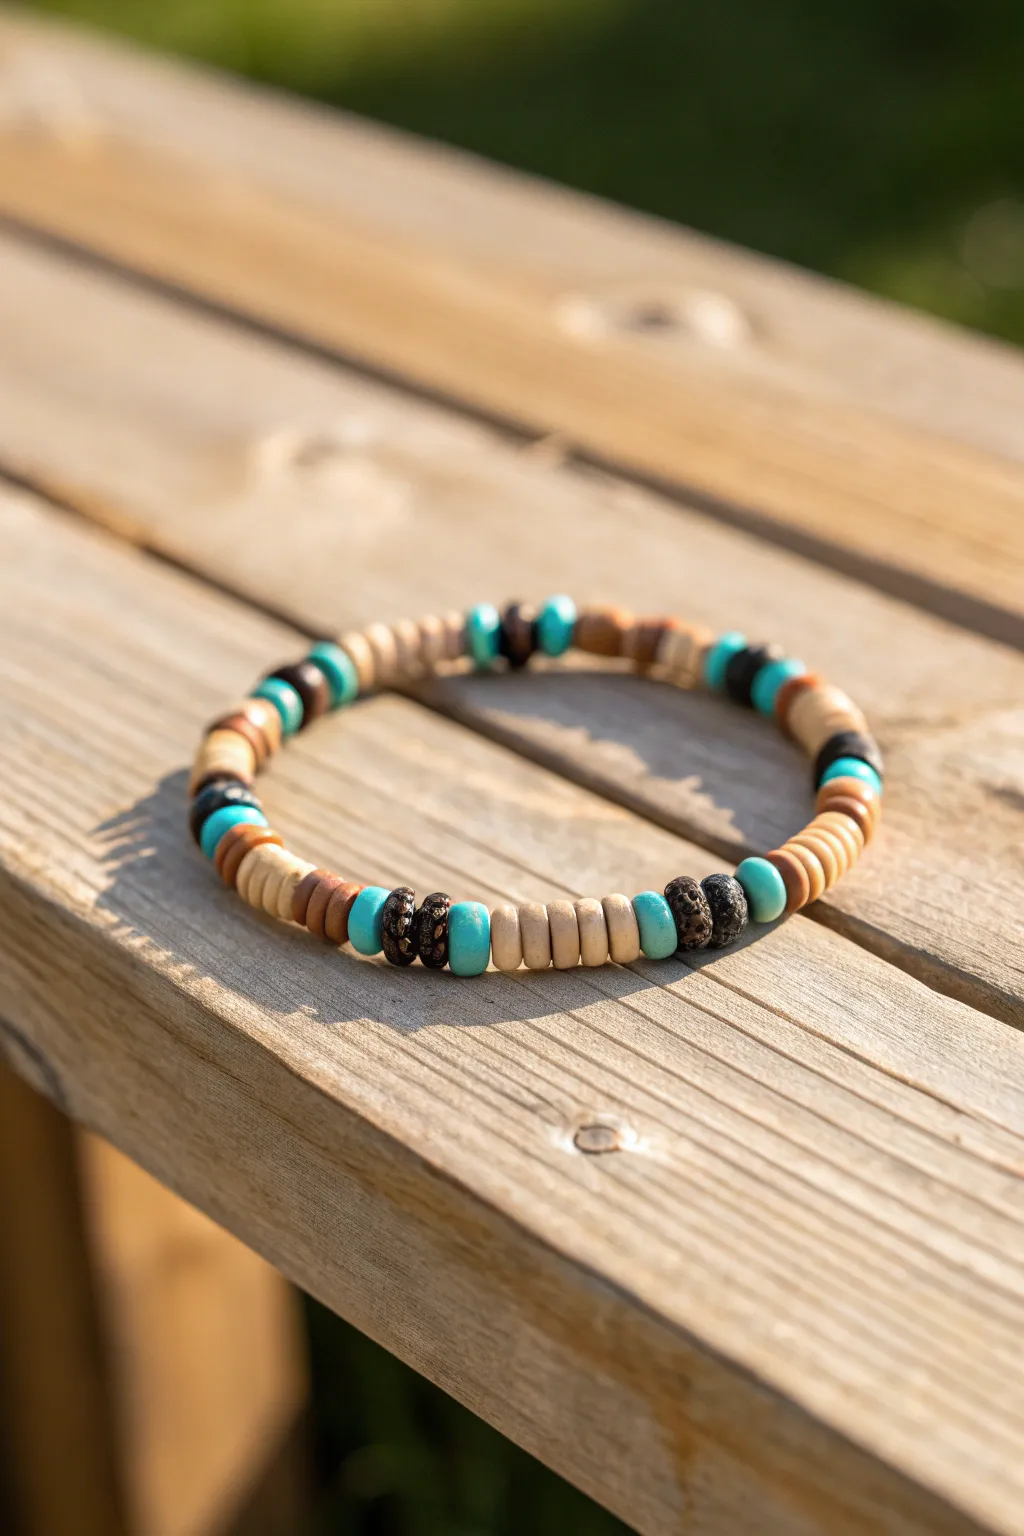
Capture the spirit of the Southwest with this earthy yet vibrant bracelet design. Combining the natural texture of wood and lava stone with pops of bright turquoise clay heishi beads creates a grounded, stylish accessory perfect for stacking.
Step-by-Step
Materials
- Turquoise polymer clay heishi beads (6mm)
- Light wood disc spacer beads (6mm)
- Black lava rock beads (6mm or 8mm)
- Dark brown/black wooden rondelle beads
- Elastic stretch cord (0.8mm or 1mm)
- Bead stopper or binder clip
- Super glue or jewelry adhesive
- Scissors
Step 1: Preparation
-
Measure and Cut Cord:
Cut a piece of elastic cord about 10-12 inches long. This generous length makes it much easier to tie the final knot without fumbling. -
Secure the End:
Attach a bead stopper or a simple binder clip to one end of your cord to prevent beads from sliding off while you design your pattern. -
Pre-stretch the Cord:
Give your elastic cord a few gentle tugs before threading. This pre-stretching helps prevent the bracelet from sagging or expanding too much after you’ve worn it a few times.
Knot Security Tip
Use a flexible adhesive like G-S Hypo Cement rather than rigid super glue. It allows the knot to flex with the stretch cord without cracking or becoming brittle over time.
Step 2: Creating the Pattern
-
The Center Focal Segment:
Start your threading with a group of 5-6 light wood disc spacers. -
Add Color Accents:
Slide on one turquoise heishi bead, followed by one dark textured lava rock bead or spacer, and then another turquoise heishi bead. This creates a bold color block. -
Repeat the Spacer Section:
Thread on another section of roughly 4-5 light wood disc spacers. -
Create Variable Rhythm:
For the next transition, use a single turquoise bead, followed by a dark wooden rondelle, and another turquoise bead. I like to vary the dark beads slightly to give it an organic feel. -
Continue the Spacer Pattern:
Add a slightly longer section of light wood beads this time—about 6 to 8 discs—to create asymmetry. -
Insert Dark Accents:
Place a dark wooden rondelle, a turquoise bead, and another dark rondelle. This flips the previous pattern for visual interest. -
Build the Body:
Continue adding sections of light wood spacers (varying between 3 and 8 beads) separated by your turquoise and dark bead combos. -
Check the Length:
Wrap the strand around your wrist to check the fit. You want the beads to touch comfortably without gaps, usually around 7 inches for an average wrist. -
Final Adjustments:
Add or remove wood spacers from the ends to ensure the pattern looks balanced before tying.
Step 3: Finishing Touches
-
Prepare to Tie:
Remove the bead stopper, carefully holding both ends of the cord. Bring the two ends together to close the circle. -
The Surgeon’s Knot:
Tie a surgeon’s knot: cross left over right and loop it under, then cross right over left and wrap it under twice. This extra loop adds significant security. -
Tighten Securely:
Pull the cord ends firmly to tighten the knot. You should feel the elasticity stretching slightly as the knot cinches down tight against the beads. -
Hide the Knot:
Ideally, your knot should be near one of the larger-holed lava or dark wood beads. Gently pull the knot so it slides inside the hole of a neighboring bead. -
Glue the Knot:
Apply a tiny dab of jewelry glue or super glue directly to the knot. Let it dry completely before trimming. -
Trim Excess Cord:
Once the glue is dry, use sharp scissors to trim the excess cord ends close to the knot, being careful not to cut the main bracelet cord.
Scent Diffuser Idea
Since lava rocks are porous, you can add a drop of essential oil to the black lava beads. The bracelet will act as a personal diffuser throughout the day.
Enjoy the rustic charm of your new bracelet, a perfect everyday piece that carries a hint of nature wherever you go
Seed Bead Spacers for a Dainty Cowgirl Look
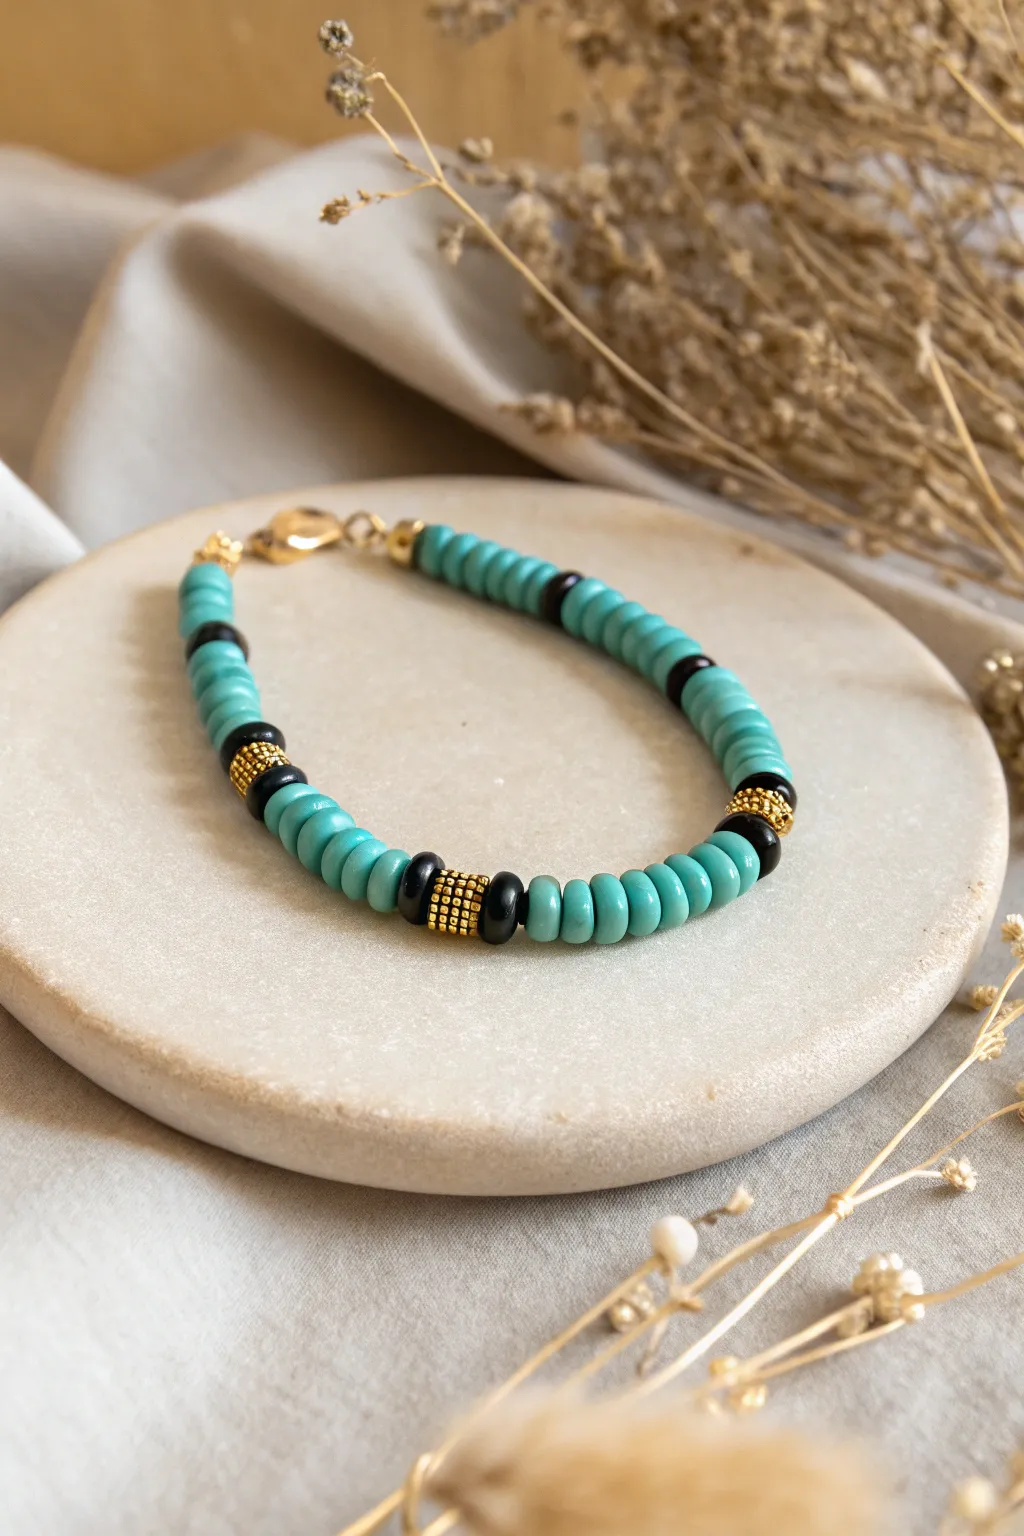
Capture the spirit of the Southwest with this elegant combination of vibrant turquoise, rugged black, and shimmering gold. This bracelet uses clever seed bead spacing to create a dainty yet striking cowgirl aesthetic that pairs perfectly with denim or sundresses.
Detailed Instructions
Materials
- Turquoise heishi or rondelle beads (approx. 4-6mm)
- Black heishi or rondelle beads (approx. 4-6mm)
- Gold seed beads (size 11/0 or 15/0)
- Gold barrel clasp or lobster claw clasp
- Gold crimp beads (2mm)
- Gold crimp bead covers (3mm)
- Beading wire (flexible, 49-strand recommended)
- Wire cutters
- Crimping pliers
- Bead stopper or masking tape
Step 1: Planning and Prep
-
Measure your wrist:
Before cutting anything, wrap a measuring tape comfortably around your wrist. Add about half an inch to this measurement to account for the bulk of the beads and the clasp. -
Cut the wire:
Cut a length of beading wire roughly 9 to 10 inches long. It is always safer to have a little extra length to work with rather than struggling with short ends later. -
Secure the end:
Attach a bead stopper to one end of your wire. If you don’t have one, a strong piece of masking tape folded over the tip works just as well to prevent beads from sliding off.
Step 2: Creating the Pattern
-
Start the sequence:
Begin by sliding on five to seven turquoise rondelle beads. This establishes the main color block of your western sky theme. -
Add first contrast:
Slide on one black rondelle bead. This acts as a distinct border before your gold accent. -
Build the gold spacer:
Now, thread on your gold seed beads. To recreate the look in the photo, you will need to stack about four to five tiny seed beads to create a block of gold that matches the width of the larger beads. -
Cap the spacer:
Add another single black rondelle bead immediately after the gold stack. This frames the gold section brilliantly against the turquoise. -
Repeat the pattern:
Return to your main color by adding another set of turquoise beads. I usually stick to odd numbers, like five or seven, for a natural look. -
Continue beading:
Repeat the sequence: Turquoise block, Black bead, Gold seed bead stack, Black bead. Continue this pattern until you are about one inch away from your desired finished length. -
Check the symmetry:
Pause and hold the bracelet against your wrist. Ensure the pattern will end symmetrically—if you started with turquoise, try to end with turquoise.
Loose Spacers?
If your gold seed bead stacks look uneven or floppy, add one extra seed bead to the stack so they sit tighter against the larger beads.
Step 3: Finishing Touches
-
Prepare the first crimp:
On the end without the bead stopper, slide on a gold crimp bead followed by one half of your clasp. -
Loop and secure:
Thread the wire back through the crimp bead to create a small loop capturing the clasp. Use your crimping pliers to flatten the crimp bead securely, ensuring the wire doesn’t slip. -
Finish the other side:
Remove the bead stopper from the beginning end. Slide on a crimp bead and the second half of the clasp. -
Tighten the slack:
Loop the wire back through the crimp bead and pull tight. Be careful not to make it too rigid; the bracelet should still be flexible enough to drape comfortably. -
Crimp and trim:
Flatten the final crimp bead with your pliers. Use your wire cutters to trim the excess tail of wire as close to the bead as possible without cutting the main strand. -
Add crimp covers:
For a professional finish, place a crimp cover over each flattened crimp bead. Gently squeeze them closed with pliers so they look like regular gold beads.
Design Pro Tip
Use matte finish turquoise beads instead of glossy ones for a more authentic, rustic ‘western’ vibe that mimics real stone.
This simple yet sophisticated accessory adds just the right amount of rustic charm to your jewelry collection
Lariat-Inspired Wrap Bracelet in Desert Tones
Capture the essence of the arid West with this multi-strand wrap bracelet featuring a rhythmic pattern of rust, cream, and turquoise clay beads. Its versatile leather cord construction allows you to wear it as a loose, layered bangle or a snug wrist wrap perfect for stacking.
Step-by-Step Tutorial
Materials
- 6mm polymer clay heishi beads (Rust brown)
- 6mm polymer clay heishi beads (Cream or bone white)
- 6mm polymer clay heishi beads (Turquoise)
- 1.5mm round natural leather cord (Light tan or beige)
- Beading needle (large eye for leather cord)
- Super glue or jewelry adhesive
- Scissors
- Ruler or measuring tape
Step 1: Preparation & Anchoring
-
Measure the Cord:
Cut a generous length of leather cord. For a bracelet that wraps around the wrist three to four times, you will need approximately 28 to 32 inches of cord, plus an extra 6 inches for knotting. -
Create the First Anchor:
Thread a single turquoise bead onto the cord and slide it down, leaving about 3 inches of tail at the end. -
Secure the End:
Tie an overhand knot directly beneath this bead to keep it in place. This acts as a decorative stopper for the finished piece. -
Second Anchor Knot:
Tie a second overhand knot roughly 2 inches up from the first bead. This space creates one of the adjustment loops for closing the bracelet later.
Leather Prep Tip
Before beading, moisten the tip of the leather cord with a little water or glue and twist it. Let it dry to create a stiff ‘needle’ that threads through beads easily.
Step 2: Creating the Pattern
-
Start the Sequence:
Begin threading your beads onto the long end of the leather cord. I find it easiest to work directly from the strand if your clay beads came pre-strung. -
Establish the Rhythm:
Create the primary pattern block: thread 10 to 12 rust-colored beads, followed by 3 turquoise beads, and then 3 cream beads. -
Vary the Texture:
For the next section, thread a longer segment of about 15 cream beads to create a bright focal point in the wrap. -
Introduce Contrast:
Follow the cream section with a small pop of color: 2 turquoise beads, 4 rust beads, and 2 turquoise beads. -
Repeat and Randomize:
Continue adding beads until you have covered enough length to wrap around your wrist comfortably 3 times (usually about 20-22 inches of beading). -
Keep it Organic:
Don’t worry about keeping the pattern mathematically perfect. Occasional irregularities in the color blocks give the bracelet that authentic, handmade Western vibe. -
Check the Fit:
Periodically wrap the cord around your wrist to ensure the sizing is correct and the color transitions are landing in pleasing spots.
Level Up: Charm Accents
Add a silver feather or cactus charm over one of the knot sections. It adds a jingle and enhances the Western aesthetic without disrupting the bead flow.
Step 3: Finishing the Wrap
-
Secure the Beads:
Once you have reached your desired beaded length, push all beads snugly (but not too tightly) toward the starting knot. -
Tie the Closing Knot:
Tie a secure overhand knot flush against the final bead to lock the entire strand in place. -
Create the Loop Closure:
Measure about 1.5 inches from that knot and tie another overhand knot. The space between these two knots creates the loop that your starting ‘anchor bead’ will slip through. -
Add the Final Detail:
Thread one last cream or bone-colored bead onto the remaining tail end. -
Final Knot:
Tie a knot at the very end of the cord to secure this last bead, trimmed to match the length of the starting tail. -
Reinforce Knots:
Apply a tiny dot of super glue to each of the structural knots (not the loop areas) to prevent the leather from slipping over time.
This earthy accessory is now ready to add a touch of desert warmth to your everyday style
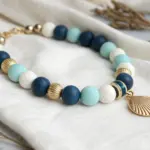
Desert Night Palette With Deep Blue and Turquoise
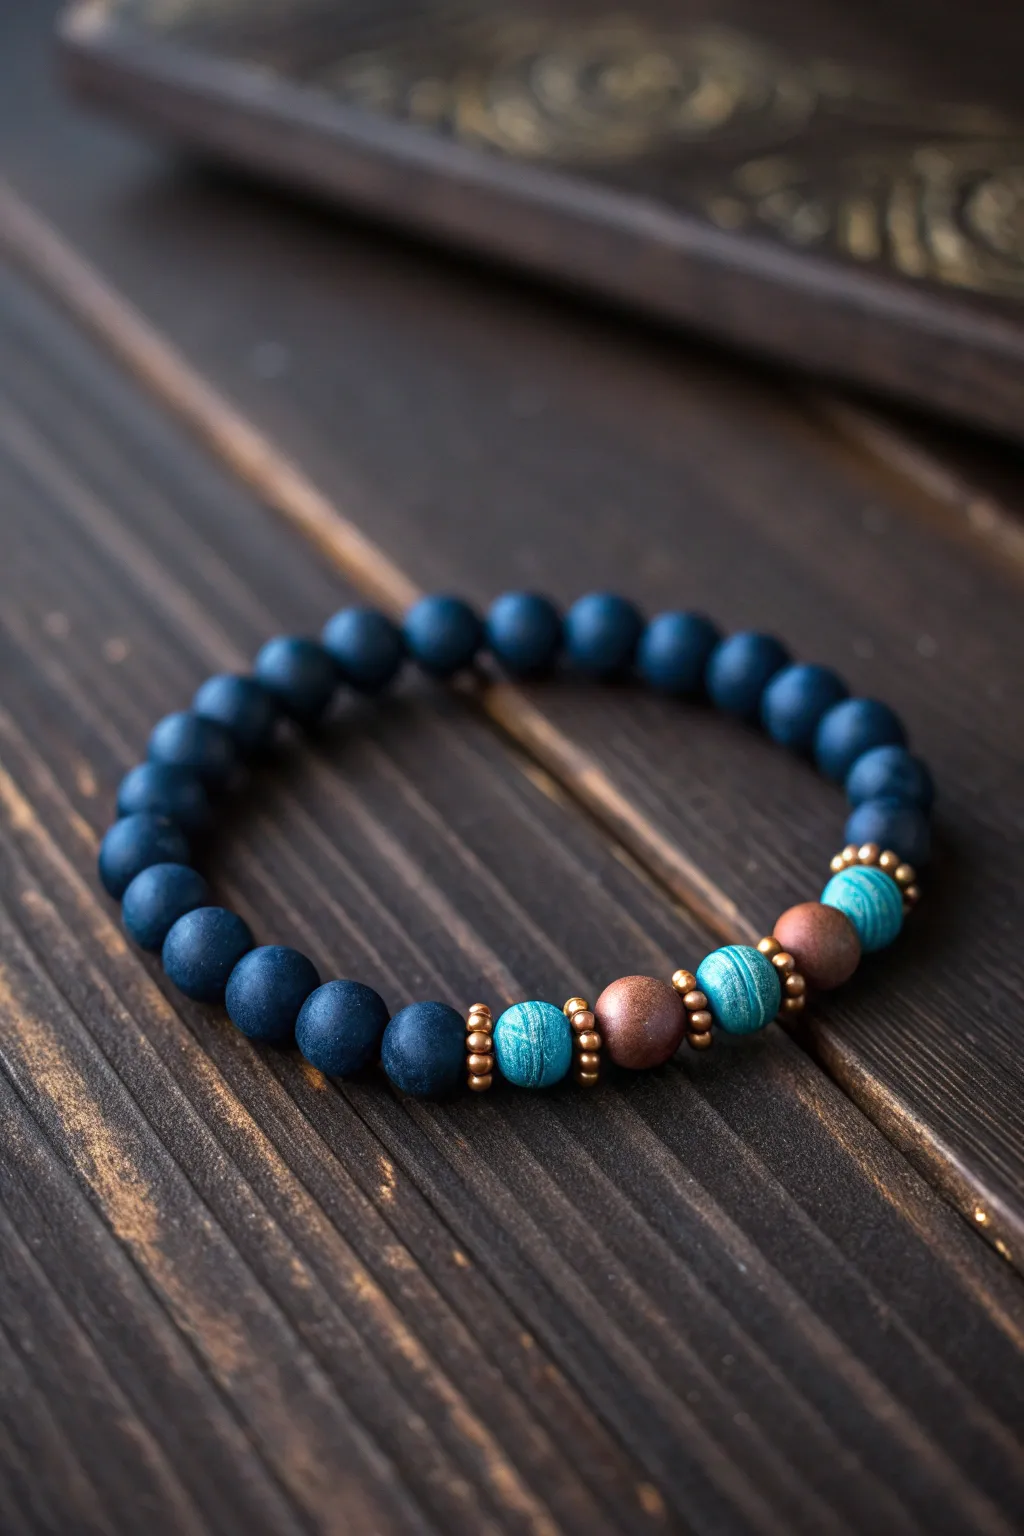
Capture the cool, mysterious tones of a desert evening with this striking bracelet design. Combining deep blue matte beads with pops of earthy turquoise and brown, this piece creates a sophisticated accessory perfect for stacking or wearing solo.
How-To Guide
Materials
- Navy blue polymer clay beads (round, matte finish, approx. 8mm)
- Turquoise polymer clay or stone beads with swirls (round, approx. 8mm)
- Brown wood or reddish-brown clay beads (round, approx. 8mm)
- Small copper or bronze spacer beads (daisy or rondelle shape)
- Strong elastic stretch cord (0.7mm or 0.8mm)
- Bead stopper or masking tape
- Jewelry glue or clear nail polish
- Scissors or jewelry cutters
- Ruler or measuring tape
Step 1: Planning and Preparation
-
Measure your wrist:
Start by measuring your wrist with a flexible measuring tape. Add about 0.5 to 1 inch to this measurement depending on how loose you want the final fit to be. -
Cut the cord:
Cut a piece of elastic cord roughly 10-12 inches long. Having extra length makes tying the final knot much easier than struggling with short ends. -
Pre-stretch the elastic:
Hold the cord at both ends and give it a few gentle tugs. Pre-stretching helps prevent the bracelet from loosening up after you wear it for the first time. -
Secure the end:
Attach a bead stopper to one end of the cord, or simply use a piece of masking tape folded over the end, to stop your beads from sliding off while you work. -
Lay out the pattern:
Before stringing, lay your beads out on a flat surface or a bead board. The central focal point consists of a specific pattern: Turquoise-Brown-Turquoise-Brown-Turquoise. -
Prepare the spacers:
Locate your small copper or bronze spacers. You will need eight of these in total for the focal section to separate the colored beads.
Knot Slipping?
If your elastic knot feels slick and wants to unravel, try roughening the cord ends slightly with sandpaper before tying, or use a tiny dot of E6000 glue for a flexible, permanent hold.
Step 2: Creating the Focal Section
-
Start the center:
Begin stringing with the central three beads. Thread on a copper spacer, then a brown bead, then another copper spacer. -
Add inner turquoise:
On either side of that central brown bead unit, thread on one turquoise swirl bead. Now your cord should have: Turquoise, spacer, Brown, spacer, waiting for the other side. -
Build outward:
Continue the pattern symmetrically. Add a copper spacer, then a brown bead, and another copper spacer next to the turquoise beads you just placed. -
Finish the focal accents:
Finally, add one turquoise bead to each outer end of the pattern, followed by one last copper spacer on each side. The core sequence is now complete.
Step 3: Completing the Band
-
Verify the focal look:
Double-check your work against the design. You should see alternating turquoise and brown beads separated by metallic spacers, bookended by turquoise. -
Begin the blue section:
Now, thread the deep navy blue matte beads onto the remaining length of the cord. I usually add 3-4 on one side, then switch to the other side to keep the focal pattern centered. -
Continue stringing blue:
Fill up the rest of the cord with the navy blue beads until you reach your desired total length. -
Check the fit:
Wrap the strand around your wrist to test the size. The two ends should meet comfortably for a pattern-break, or add one final blue bead to bridge the gap seamlessly.
Pattern Remix
Swap the brown wood beads for genuine tiger’s eye stone to add a shimmering chatoyancy that mimics desert sands under moonlight.
Step 4: Finishing Touches
-
Prepare to tie:
Remove the bead stopper or tape carefully, holding both ends of the elastic cord securely so no beads escape. -
Tie the first knot:
Cross the ends and wrap one under the other to tie a simple overhand knot. Pull it tight, bringing the beads together snugly. -
Secure with a surgeon’s knot:
Tie a second knot, but this time loop the end through twice before pulling tight. This is a surgeon’s knot and offers extra security. -
Glue the knot:
Apply a very small drop of jewelry glue or clear nail polish directly onto the knot. Let it dry for a moment to ensure it won’t slip. -
Hide the knot:
Trim the excess cord ends to about 2mm. Gently tug the bracelet so the knot slides inside the hole of one of the adjacent blue beads to hide it.
Enjoy wearing your new handcrafted piece that brings a touch of western elegance to your wrist
Bandana-Inspired Red and White Pattern Beads
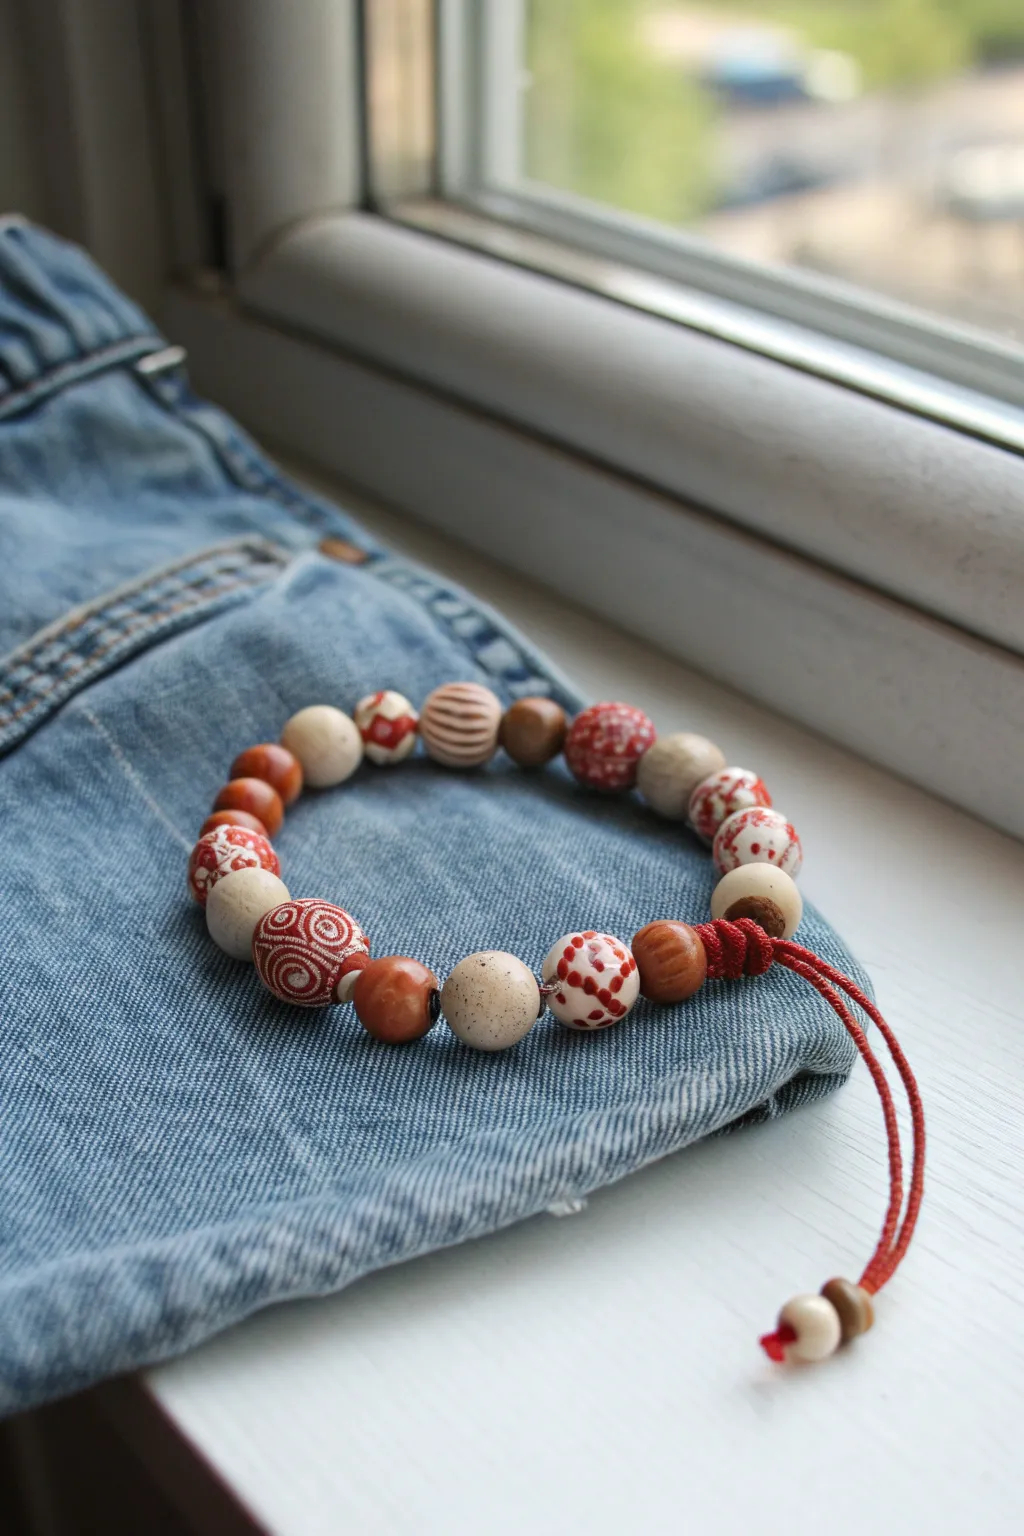
Channel a bit of rustic western spirit with this charming clay bead bracelet, featuring bandana-inspired patterns and earthy tones. The mix of hand-painted swirls, speckles, and wood textures creates a relaxed accessory perfect for pairing with your favorite denim.
Step-by-Step Tutorial
Materials
- Polymer clay (White, Terracotta/Burnt Orange, Beige)
- Acrylic paints (Red, White, Dark Brown/Black)
- Fine detail paintbrush (size 0 or 00)
- Dotting tools (or toothpicks)
- Texture tools (needle tool, comb tool)
- Bead reamer or piercing pin
- Baking sheet and parchment paper
- Oven (for curing clay)
- Red satin or nylon cord (approx. 1mm)
- Scissors and lighter (to seal cord ends)
- Glaze or matte varnish (optional)
Step 1: Shaping the Base Beads
-
Condition the Clay:
Begin by thoroughly kneading your polymer clay until it is soft and pliable. You will need separate balls of white, beige, and a warm terracotta or burnt orange color. -
Roll Spheres:
Pinch off equal-sized pieces of clay, roughly the size of a large pea or small marble. Roll them between your palms to create smooth, round spheres. Aim for about 18–20 beads total for an average wrist. -
Create Texture:
For the grooved beige beads, take a comb tool or a needle tool and gently press lines around the circumference of the sphere to mimic a carved wooden texture. -
Add Speckles:
To make the speckled stone-effect beads, take a beige or white sphere and sprinkle very fine ground black pepper or dried coffee grounds onto it, then roll it again in your hands to embed the specks. -
Pierce the Holes:
Using your piercing pin or bead reamer, carefully bore a hole through the center of each bead. Rotate the pin as you push through to avoid squashing the bead’s round shape. -
Bake:
Arrange all your beads on a parchment-lined baking sheet. Bake according to your brand of polymer clay instructions (usually around 275°F/135°C for 15-30 minutes). Let them cool completely before painting.
Use a Holder
Stick your beads on toothpicks stuck into a ball of foil while painting. This lets you paint the whole surface without smudging it with your fingers.
Step 2: Painting the Patterns
-
The Bandana Pattern:
Select a few baked red or terracotta beads. Using a fine brush and white acrylic paint, create small clusters of four dots to look like flowers. -
Adding Paisley Details:
On the same bandana-style beads, paint tiny teardrop or paisley shapes near your dot clusters to complete the classic textile look. -
The Swirl Design:
Pick a large round reddish bead. Dip your fine brush in white paint and start a spiral in the center, working your way outward. I find it easiest to rotate the bead while keeping my brush steady. -
Stripes and Dots:
For variety, paint vertical dashed lines of red dots on a white bead. This creates a simple, geometric contrast to the swirls. -
Glazing (Optional):
If you want to protect your paint job, apply a thin coat of matte or satin varnish to the painted beads. Let this dry fully.
Step 3: Assembly
-
Prepare the Cord:
Cut a length of red satin cord, approximately 12–14 inches long. Briefly singe the tip with a lighter to prevent fraying and make threading easier. -
String the Beads:
Thread your beads onto the cord. Alternate your designs: place a solid color bead between patterned ones to keep the bracelet from looking too busy. -
Check the Fit:
Wrap the beaded section around your wrist to ensure the length is correct. Add or remove beads as necessary for a comfortable fit. -
Tie the Knot:
Once satisfied with the arrangement, create a simple overhand knot immediately after the last bead to secure them in place. -
Create the Slider:
For an adjustable closure, cross the two tail ends of the cord. Tie a series of square knots (macrame style) around the overlapping cords using a short separate piece of string, or simply tie a sliding knot. -
Add Danglers:
Thread one small bead onto each tail end of the cord. Tie a knot at the very end to secure these ‘dangler’ beads and trim any excess cord.
Mix Materials
Swap a few clay beads for real wooden beads or lava stones. The different weights and textures add a professional, high-end feel to the bracelet.
Slide it on your wrist and enjoy the handcrafted western vibes of your new accessory
Tooled-Leather Texture Clay Bead Accents

Capture the rugged charm of the American West with this distinctive bracelet featuring polymer clay beads textured to mimic classic tooled leather. The warm beige tones, combined with pops of turquoise and antiqued details, create an accessory that feels both rustic and refined.
Step-by-Step
Materials
- Polymer clay (beige/tan color for leather)
- Polymer clay (turquoise blue color)
- Acrylic paint (burnt umber/dark brown)
- Elastic jewelry cord (0.7mm or 0.8mm)
- Small antique brass spacer beads
- Large antiqued brass focal bead (oval)
- Clay carving tools or a dull knife
- Needle tool or toothpick
- Tissue blade or craft knife
- Paper towels or baby wipes
- Oven for baking clay
Step 1: Sculpting the ‘Leather’ Beads
-
Condition the clay:
Start by thoroughly kneading your beige polymer clay until it is soft, pliable, and free of cracks. This ensures the beads won’t be brittle after baking. -
Form the spheres:
Roll the conditioned clay into a log and slice it into equal segments. Roll each segment between your palms to create smooth, round spheres approximately 10-12mm in diameter. aim for about 12-14 beads depending on your wrist size. -
Create the sunburst pattern:
Hold a bead gently in your hand. Using a dull knife edge or a specialized clay texturing tool, press a distinct line across the center of the bead. -
Add radial lines:
Continue pressing lines that radiate outward from the center point, creating a starburst or sun-ray effect. Ensure the indentations are deep enough to hold paint later, but not so deep they deform the round shape. -
Detail the center:
Use a small needle tool to poke a tiny dot right in the center where all the lines converge, mimicking the punch mark often seen in leather tooling. -
Pierce the beads:
Carefully insert a needle tool or toothpick through the side of each bead to create the stringing hole. Rotate the tool as you push through to avoid squishing the pattern you just created.
Step 2: Creating the Accents & Baking
-
Make turquoise spacers:
Condition the turquoise clay and roll it into a thinner log. Slice small discs or cylinders, slightly smaller than your main beads (about 6-8mm wide). -
Texture the turquoise:
To give them a natural stone look, gently roll the turquoise beads over a piece of sandpaper or tap them with a toothbrush to create subtle surface pitting. -
Create holes:
Pierce these spacer beads through the center just like the larger beads. -
Bake the beads:
Arrange all your clay beads on a baking sheet or tile. Bake according to the manufacturer’s instructions for your specific brand of clay—usually around 275°F (135°C) for 15-30 minutes. -
Cool down:
Allow the beads to cool completely before handling them. They harden fully as they cool.
Keep it Round
To prevent flat spots while baking, string your raw beads onto a bead rack or a stiff wire suspended over a baking dish so they hang freely in the oven.
Step 3: Antiquing & Assembly
-
Apply the wash:
Mix a small amount of burnt umber acrylic paint with water to create a thin wash. Brush this generously over the textured beige beads, ensuring the paint gets into all the carved crevices. -
Wipe back:
Quickly wipe the surface of the beads with a paper towel or slightly damp cloth. This removes paint from the raised areas while leaving darkness in the grooves, highlighting the ‘tooled leather’ design. -
Seal (optional):
If you want extra durability, apply a very thin coat of matte varnish to the beads. Avoid glossy finishes as they ruin the leather effect. -
Plan the layout:
Lay out your design on a bead board or towel. Start with the large antiqued brass focal bead. Place the beige textured beads around it. -
Insert spacers:
Intersperse the turquoise clay beads and the small brass metal spacers between sections of the beige beads to add visual rhythm. -
String the bracelet:
Cut a length of elastic cord about 10 inches long. Thread your beads onto the cord, double-checking your pattern as you go. -
Tie the knot:
Pre-stretch the elastic slightly, then tie a strong surgeon’s knot (right over left, left over right, loop through twice). Pull tight. -
Secure and hide:
Add a tiny drop of super glue or clear nail polish to the knot. once dry, trim the excess cord and gently pull the knot inside the hole of the large focal bead to hide it.
Stitch Marks
Use a specialized leather-stamping tool or a modified straw tip to press tiny ‘stitch’ faux-seam lines along the edges of the beige beads for extra realism.
Enjoy the satisfying weight and handcrafted feel of your new western-style accessory