Whenever I’m stuck on what to make next, a clay pitcher is my go-to because it’s useful, sculptural, and basically a playground for handles and spouts. Here are some of my favorite clay pitcher ideas—from classic forms to the quirky ones that always get the most comments in my studio.
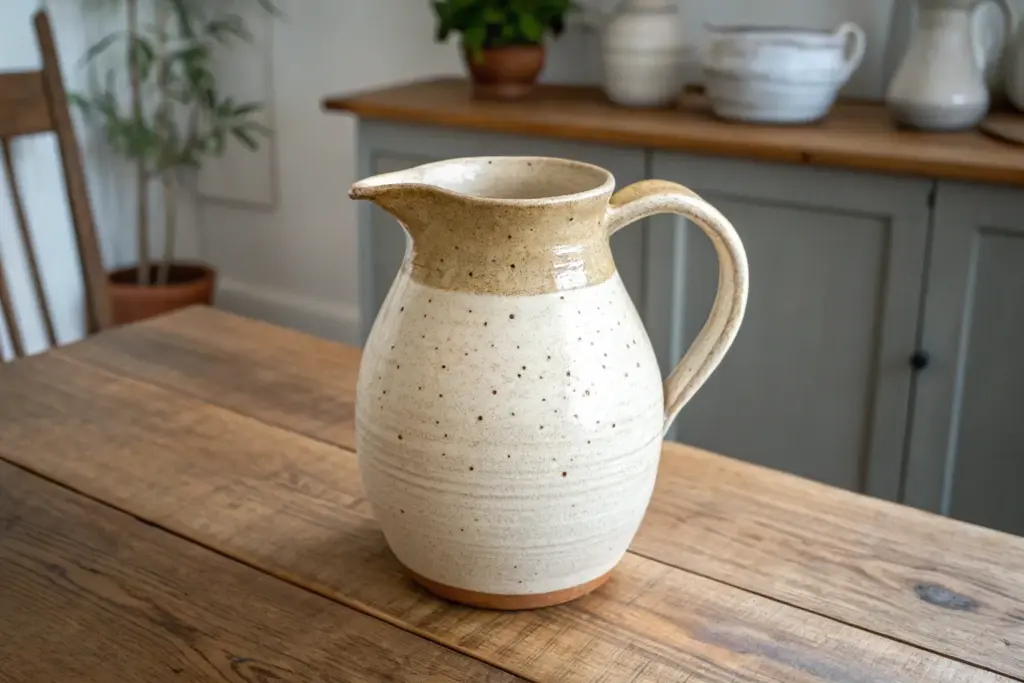
Classic Wheel-Thrown Belly Pitcher
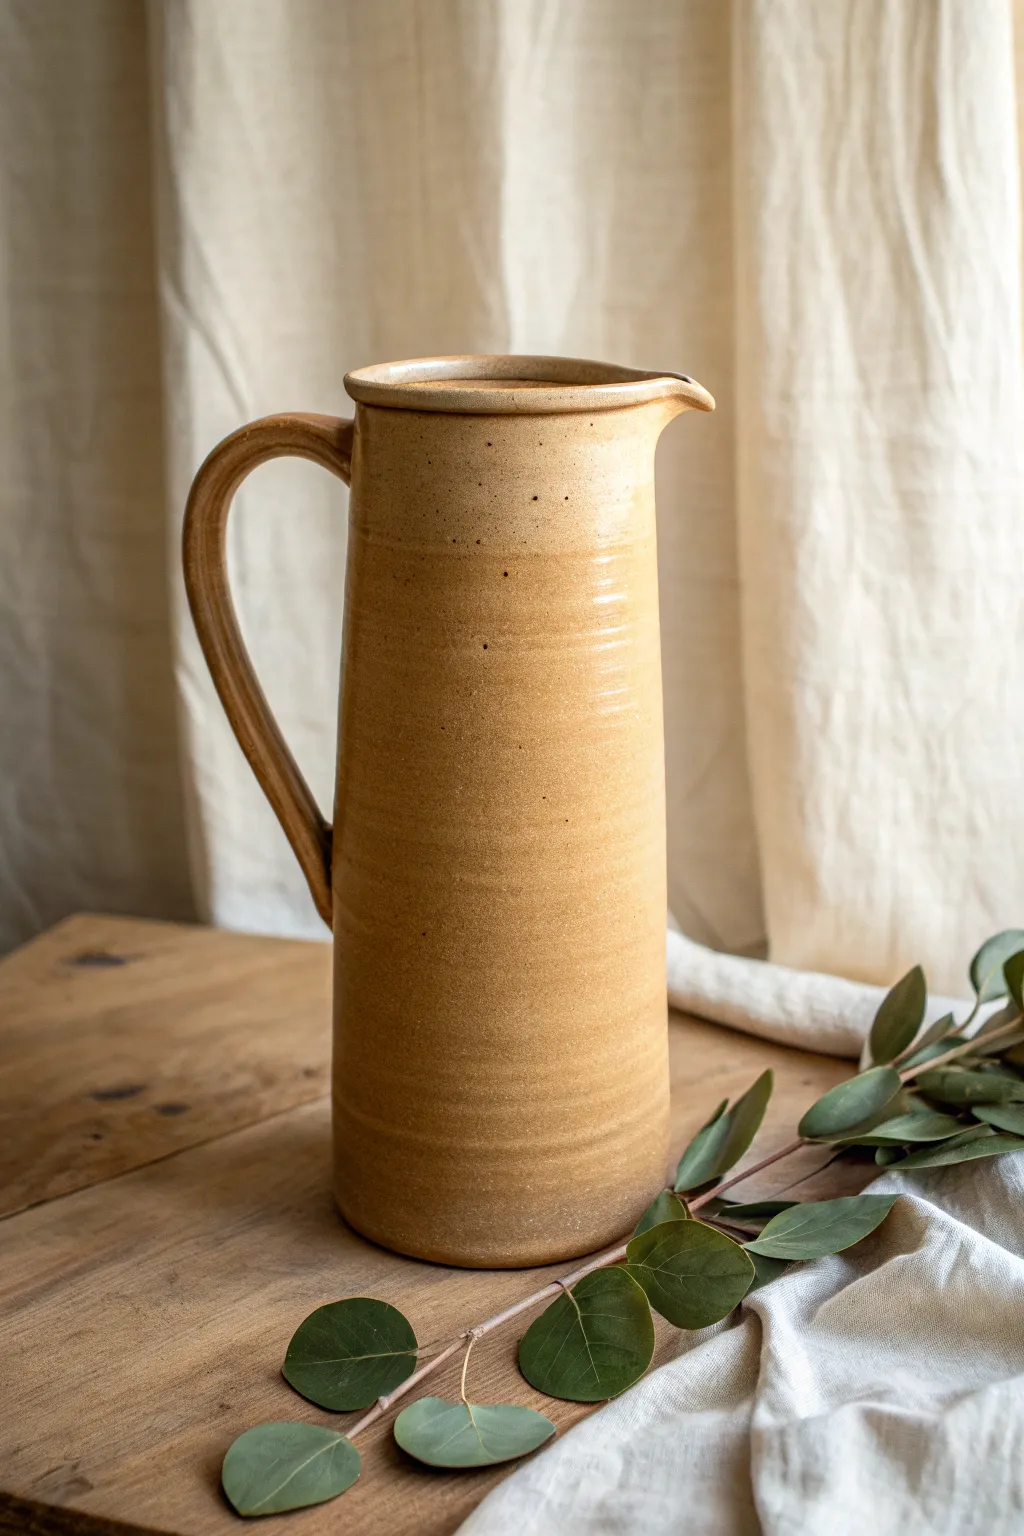
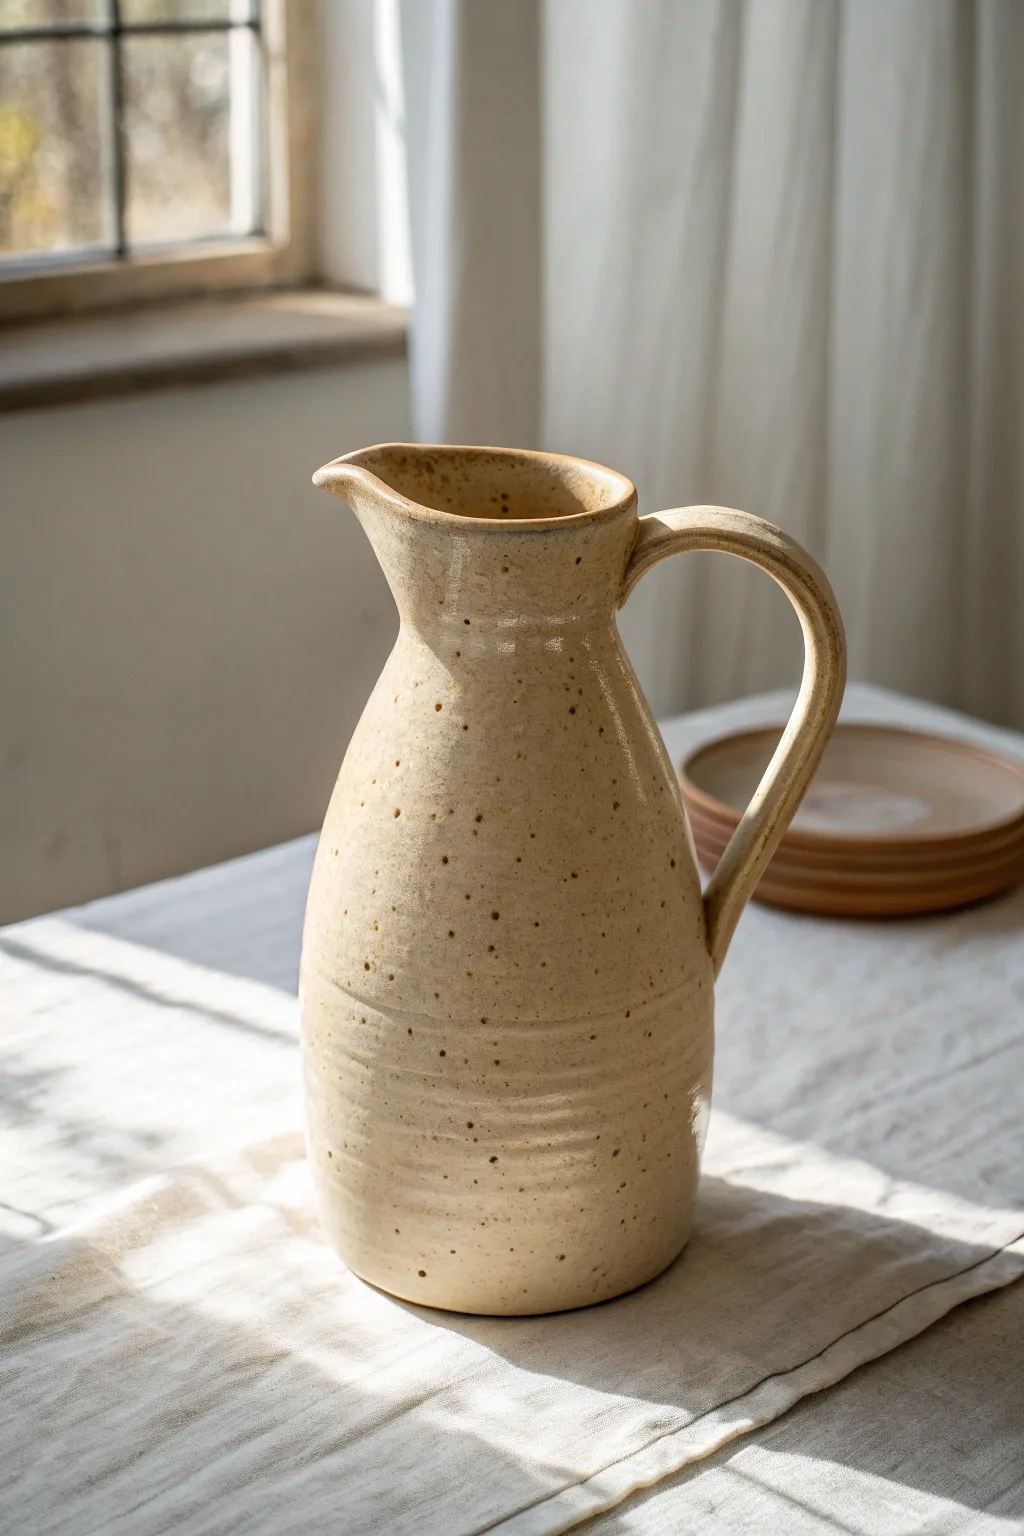
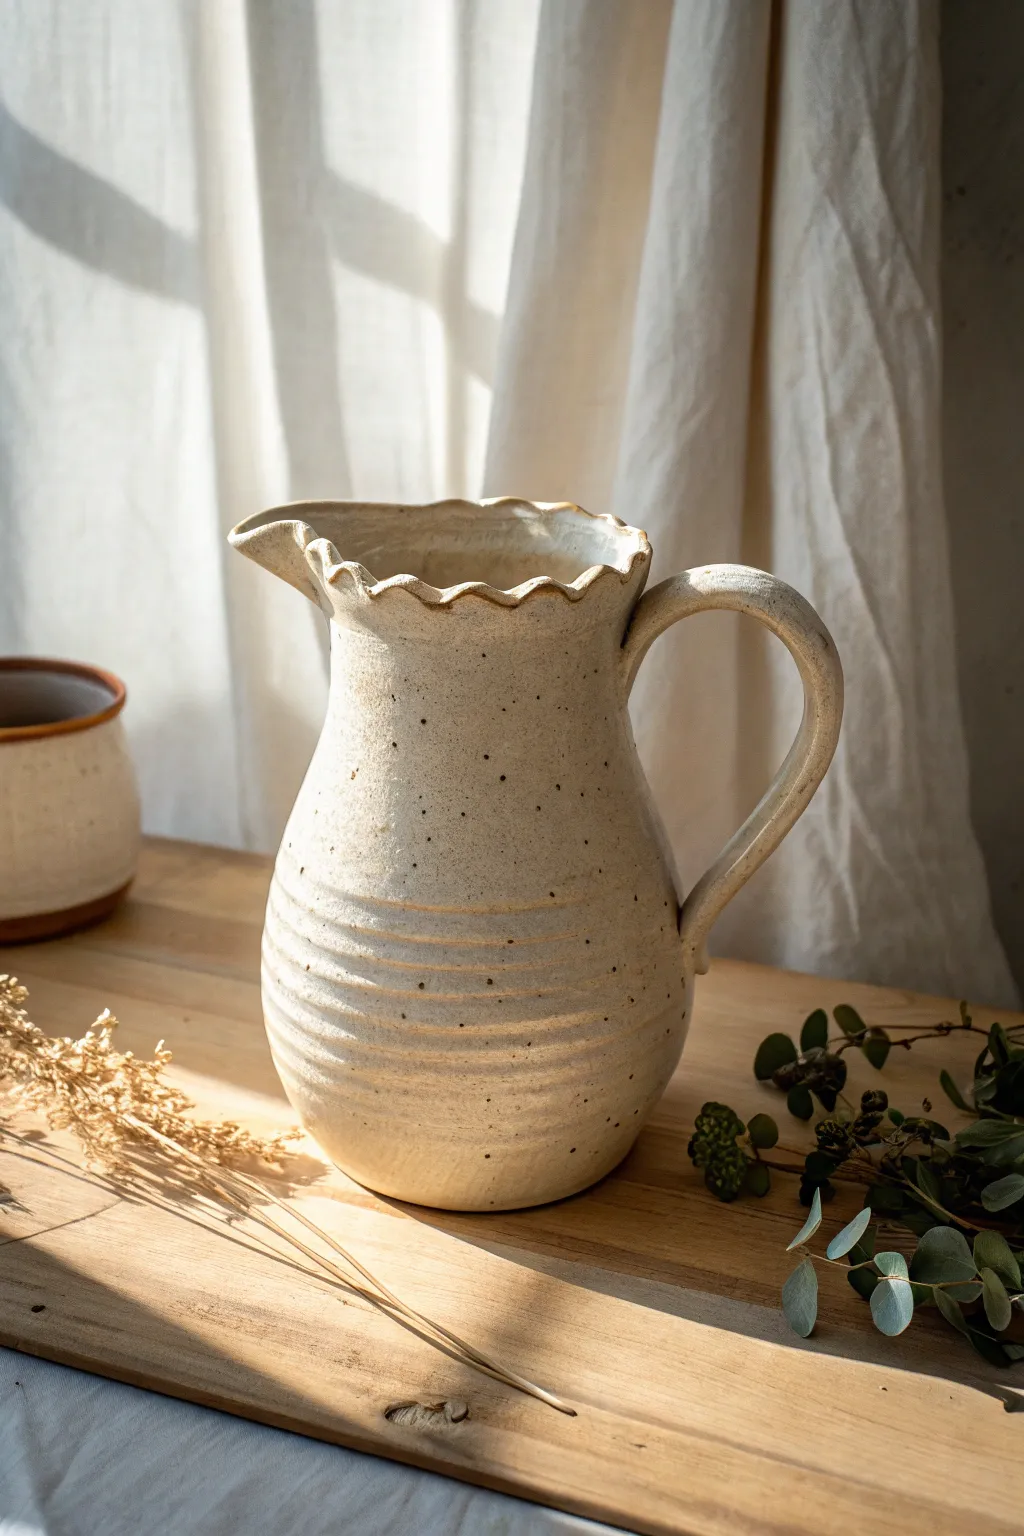
This classic wheel-thrown pitcher features a generous round body and a rustic, speckled cream glaze that emphasizes its handmade charm. The subtle throwing rings and elegant pulled handle give it a timeless, farmhouse aesthetic perfect for serving or display.
Step-by-Step Guide
Materials
- Speckled stoneware clay (approx. 4-5 lbs)
- Potter’s wheel
- Throwing bucket and sponge
- Wooden throwing ribs
- Wire cutter
- Metal kidney rib
- Needle tool
- Chamois strip
- Cream/White speckled glaze (food safe)
- Kiln
Step 1: Throwing the Body
-
Center the clay:
Start by aggressively wedging your speckled stoneware clay to remove air bubbles. Secure the clay bat to the wheel head, slam the ball down, and center it using firm pressure and high wheel speed. -
Open and widen:
Drill your thumb into the center, stopping about a half-inch from the bottom. Pull the clay outward to create a flat floor, compressing it well with a wooden rib to prevent future cracks. -
Pull the cylinder:
Slow the wheel down and begin pulling the walls upward. Aim for a distinct tall cylinder shape first, keeping the top slightly narrower than the bottom to maintain control. -
Shape the belly:
Using a rib inside the pot and your hand on the outside, gently push the clay outward from the inside to create that magnificent round belly shape. -
Leave ridges:
As you shape the belly, don’t smooth the outside perfectly. Leave subtle finger or rib trails to create the textural ridges seen in the reference image; these will break the glaze beautifully later. -
Collar the neck:
Gently choke or ‘collar’ the clay inward above the belly to form the narrow neck. Do this gradually to avoid buckling the clay walls, adding water sparingly. -
Flare the rim:
Once the neck is straight, use your fingertips to gently flare the very top rim outward, creating a smooth transition for pouring. -
Form the spout:
Stop the wheel. Use two fingers to support the outside of the rim and your index finger to pull the clay gently forward and downward between them, creating a sharp, functional spout.
Step 2: Handle and Finishing
-
Pull a handle blank:
Taking a separate carrot-shaped piece of clay, wet your hand and pull a long, tapered strip. I prefer to pull this directly off the pot for better integration, but you can pull a blank separately and attach it. -
Attach the handle:
Score the neck and the shoulder of the pitcher where the handle will attach. Add slip, press the thick end of the handle firmly to the neck, then gently curve the strap down to the belly. -
Shape the curve:
Ensure the loop of the handle is high and distinct—it should start horizontal and curve deeply downward before attaching to the belly. Use your thumb to smooth the attachment points. -
Dry slowly:
Cover the pitcher loosely with plastic. Uneven usage of clay thickness (thin walls vs. thick handle) means it must dry slowly to prevent the handle from cracking away. -
Bisque fire:
Once bone dry, load the pitcher into the kiln for a bisque firing (typically Cone 04 or 06, depending on your clay body). -
Glaze application:
Pour your cream glaze inside the pitcher, roll it around to coat, and pour out the excess. Then, dip the outside or spray the glaze evenly over the exterior. -
Wipe the foot:
Use a damp sponge to meticulously wipe any glaze off the bottom foot ring so it doesn’t fuse to the kiln shelf. -
Final firing:
Fire to the maturation temperature of your clay and glaze (likely Cone 5/6 or Cone 10 for stoneware). The heat will bring out the iron speckles in the clay through the cream glaze.
Collaring Tip
When narrowing the neck, increase wheel speed slightly and keep your hands wet. If the clay ripples, run a rib up the inside to realign the particles before shrinking it further.
Texture Enhancement
If your glaze is too opaque, the throwing rings might disappear. Use a slightly wet sponge to wipe the high points of the dry glaze before firing to reveal the clay texture.
Enjoy using your sturdy, handcrafted pitcher for everything from water to wildflowers.


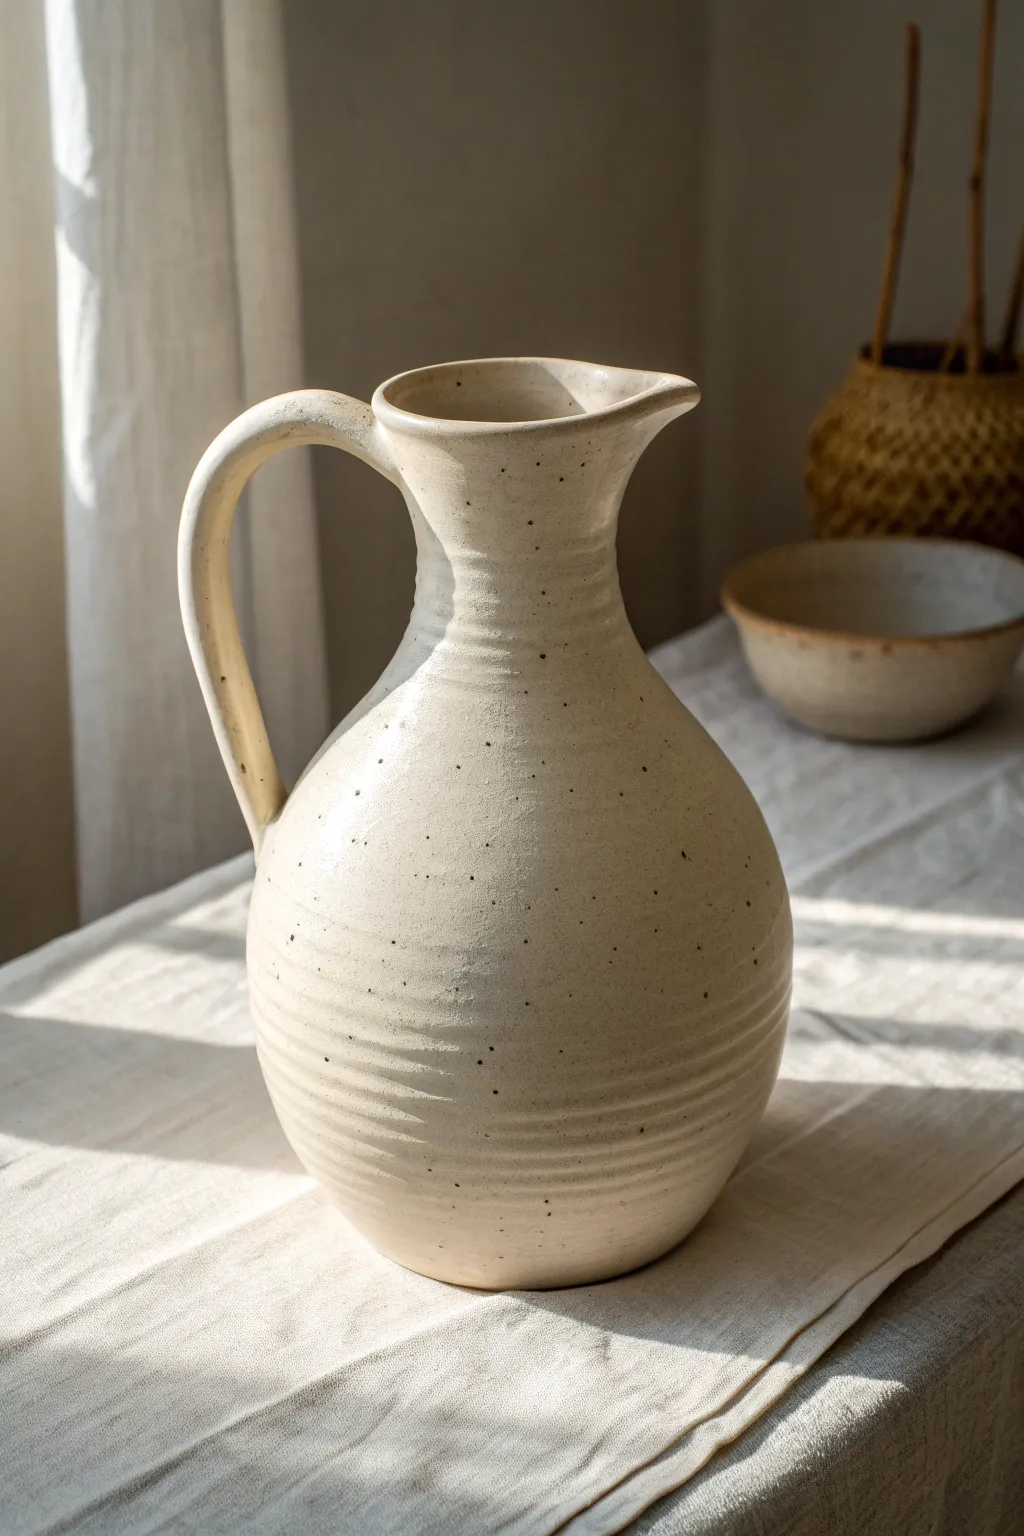
Tall Cylinder Pitcher With Narrow Pour
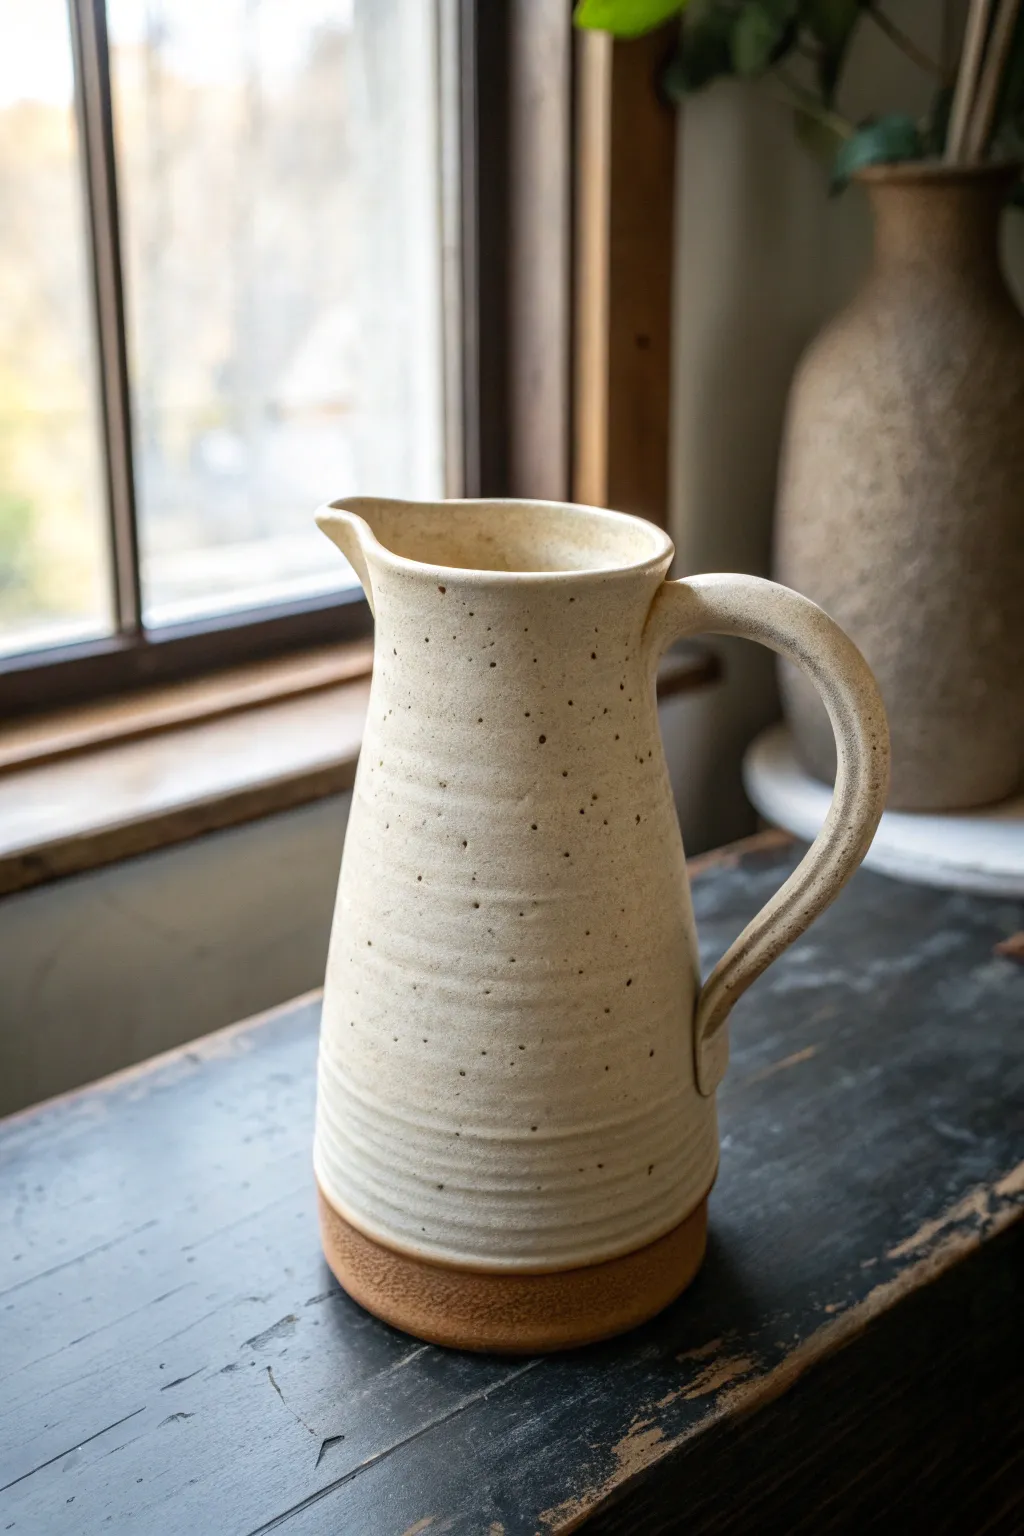
This project features a strikingly tall, cylindrical form with a minimal spout and a sturdy looped handle, embracing the natural texture of speckled stoneware. The visible throwing lines give it a tactile, handmade quality that feels both modern and timeless.
How-To Guide
Materials
- Speckled stoneware clay (approx. 4-5 lbs)
- Pottery wheel
- Throwing sponge
- Needle tool
- Wire cutter
- Wooden rib tool
- Metal kidney rib
- Trimming tools
- Serrated rib or scoring tool
- Slip
- Matte transparent glaze (or clear satin)
Step 1: Throwing the Cylinder
-
Center and open:
Begin by slamming your wedged ball of clay onto the wheel head. Center it firmly, creating a taller cone shape rather than a flat puck to support the height we’ll need later. Open the center down to about a quarter-inch from the bat. -
Establish the base:
Pull the opened floor outward to establish the width of your pitcher. For this specific look, key the width relatively narrow, about 4-5 inches wide. -
Pull the walls tall:
Begin your pulls. Because this is a tall form, ensure your first pull brings up a significant amount of clay from the base. Keep your hands steady and move upward at a consistent pace. -
Refine the cylinder:
Continue pulling the walls until you reach a height of roughly 10-12 inches. Aim for vertical straightness; avoid letting the rim flare out. I like to leave slight finger ridges on the exterior rather than smoothing them away completely, as this adds to the visual texture. -
Compress the rim:
As you reach the top, ensure the rim is slightly thicker than the walls for durability. Use a chamois or your sponge to compress and round the rim smoothly.
Pro Tip: Height Stability
For tall cylinders, leave a slightly thicker reservoir of clay at the bottom during the first pull. This ‘reserve’ allows you to pull upward later without the walls becoming paper-thin.
Step 2: Shaping the Spout
-
Form the spout:
While the clay is still freshly thrown and wet, choose the side for your spout. Support the outside of the rim with two fingers in a V-shape. -
Pull the lip:
Gently run a wet finger from the inside outward between your V-shape fingers to create a small, neat pouring channel. This pitcher features a subtle, narrow spout rather than a wide mouth, so keep the movement contained.
Troubleshooting: Warping
If your handle pulls the rim into an oval shape as it dries, place the pitcher upside down on its rim (once handle is firm enough) to let gravity keep the top circle round.
Step 3: Handle and Trimming
-
Dry to leather hard:
Wire the pitcher off the bat and let it dry slowly until it reaches a sturdy leather-hard stage. It needs to be firm enough to handle without warping. -
Pull the handle blank:
With a fresh lump of clay, pull a long, strap-like handle. It should be substantial enough to lift a heavy pitcher filled with liquid. Let this curve on a board to set up slightly. -
Trim the base:
Invert the pitcher onto a foam bat or use a chuck to trim the bottom. Clean up the foot ring, making it sharp and defined, but don’t remove too much weight from the bottom just yet, or it may become top-heavy. -
Attach the handle:
Score the attachment points on the pitcher body—one near the top rim and one lower down, about a third of the way up from the bottom. Score the ends of your handle as well. -
Secure the join:
Apply slip generously and press the handle firmly into place. Use a wooden modeling tool or your fingers to smooth the clay around the connection points, blending the seams so they look seamless. -
Shape the strong curve:
While the handle is attached but arguably still pliable, ensure it has a high, generous loop. This allows for a good grip and balances the visual weight of the tall cylinder.
Step 4: Glazing and Firing
-
Bisque fire:
Allow the entire piece to dry completely. This may take several days due to the thickness. Fire to bisque temperature (usually cone 04 or 06). -
Wax the foot:
Apply wax resist to the bottom foot ring to prevent glaze from fusing the pot to the kiln shelf. -
Apply glaze:
Dip the pitcher into a matte transparent or a warm, satin honey glaze. The goal is to let the speckles of the clay body show through, so avoid opaque colors. -
Final wipe:
Check the rim and handle for any drips or thick spots. Smooth them out with a finger to ensure a crisp finish. -
Glaze fire:
Fire the piece to maturity (Cone 5, 6, or 10 depending on your clay body specifications).
Once fired, fill your new pitcher with water or dried stems to display the beautiful warmth of the stoneware


Slab-Built Pitcher With Clean Seams

Embrace the understated beauty of raw clay with this elegant slab-built pitcher which features subtle horizontal ribbing and a classic silhouette. The focus here is on clean seam work and maintaining an organic, varied surface texture that catches the light beautifully.
Step-by-Step
Materials
- Stoneware clay (smooth or light grog)
- Rolling pin
- Guide sticks (1/4 inch thickness)
- Fettling knife
- Needle tool
- Serrated rib tool
- Smooth metal kidney rib
- Slip or magic water
- Paper templates (body cone, neck cone, bottom circle)
- Sponge
- Ware board
Step 1: Preparing Slabs and Templates
-
Roll the clay:
Begin by wedging your stoneware clay thoroughly to remove air pockets. Using guide sticks, roll out a large, even slab approximately 1/4 inch thick. Compress the slab on both sides with a smooth rib to align the clay particles and prevent warping. -
Cut the shapes:
Lay your paper templates onto the leather-hard slab. You will need one large truncated cone shape for the body, a smaller cone for the neck, and a circle for the base. Cut around them cleanly with a fettling knife. -
Texture the base (optional):
If you want the distinct ribbed texture seen at the bottom of the pitcher in the photo, gently drag a serrated rib horizontally across the lower portion of the body slab before assembly. -
Bevel the edges:
To create seamless invisible joints, cut 45-degree bevels on the vertical edges of your body and neck slabs where they will meet to form cylinders. This increases surface area for a stronger bond.
Seam Security
Reinforce the inside seams with a very thin coil of wet clay. Smooth it flat with a rounded tool. This prevents splitting during drying without adding external bulk.
Step 2: Assembling the Form
-
Construct the body:
Score the beveled edges of the main body slab and apply slip. Stand the slab up and curve it into a cylinder, pressing the beveled edges together firmly. Use a paddle to round out the form if it feels too angular. -
Attach the base:
Score and slip the bottom edge of your cylinder and the edge of your circular base piece. Press the cylinder onto the base, using a wooden tool to blend the seam on the outside and a long stick or tool to seal the inside seam. -
Form the neck:
Repeat the cylinder process with the smaller neck slab. Once joined, gently flare the top rim outward with your fingers to prepare for the spout. -
Join body and neck:
Score the top rim of the body and the bottom rim of the neck piece. Mate them together. I usually add a thin coil of soft clay at this seam, blending it upwards and downwards to ensure a seamless transition and structural integrity. -
Refine the silhouette:
With one hand inside supporting the wall, use a metal rib on the outside to smooth the transition between the body and neck, creating that continuous sloping curve seen in the image.
Add Subtle Grit
Mix a small amount of sand or grog into your white slip before coating the exterior. This creates a tactile, speckled stone finish under a matte glaze.
Step 3: Spout and Handle
-
Pull the spout:
With the clay still pliable but firm, wet your thumb and forefinger. Gently tease the front of the rim outward and slightly downward to create a functional pouring spout, ensuring the edge is sharp enough to cut the flow of liquid. -
Make the handle strap:
Cut a strip of clay for the handle, or pull a traditional handle if preferred. For this look, a slightly flattened strap works best. Smooth the edges with a damp sponge. -
Attach the handle:
Score the attachment points at the back of the neck and on the shoulder of the body. Press the handle firmly into place, blending the clay into the body for a ‘grown-on’ look. -
Shape the ear:
Adjust the curve of the handle so it mimics the shape of an ear, rising slightly above the rim before looping down. Ensure there is enough clearance for fingers.
Step 4: Finishing and Firing
-
Final smoothing:
Go over the entire piece with a barely damp sponge to soften any sharp edges, but take care not to erase the subtle throwing lines or rib marks that give the piece character. -
Add detail lines:
If your original ribbing got smoothed out, re-introduce the horizontal detail lines near the base or neck using a needle tool or the edge of a credit card while turning the piece on a banding wheel. -
Dry slowly:
Loosely cover the pitcher with plastic to let the moisture content equalize, especially around the handle joints. Let it dry slowly over several days to bone dry. -
Bisque fire:
Fire the piece to cone 04 or your clay body’s bisque temperature. -
Glaze application:
Apply a satin matte white or oatmeal glaze. This type of glaze breaks beautifully over texture, highlighting the ribbing and faint imperfections. -
Final firing:
Glaze fire to maturity (likely cone 5/6 or cone 10, depending on your clay). Sand the bottom of the foot after firing if it feels rough.
Now you have a timeless, handcrafted pitcher ready to serve water or display fresh stems on your windowsill


Pinch-and-Coil Pitcher With Soft Curves
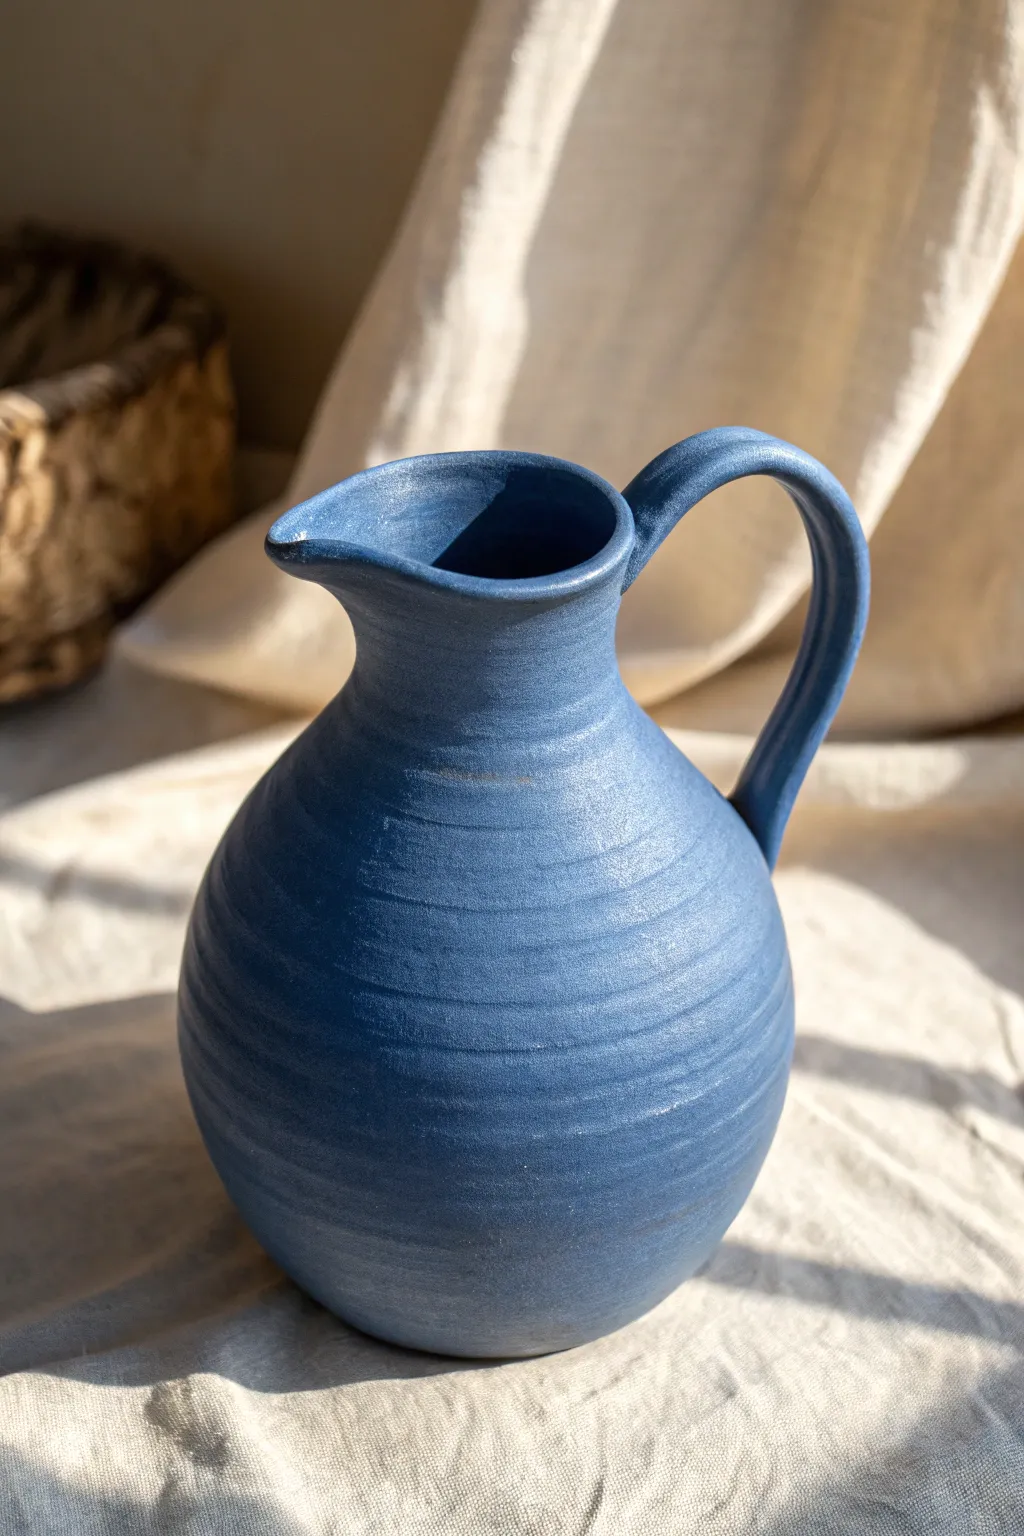
This charming pitcher features a generously rounded belly and an elegant, arched handle, all brought together with a vibrant, matte blue glaze. The visible horizontal ridges give it a distinct handmade character, perfect for serving beverages or holding a bouquet of wildflowers.
Step-by-Step Tutorial
Materials
- Stoneware clay (smooth body recommended)
- Scoring tool or serrated rib
- Slip (clay and water mixture)
- Wooden modeling tool
- Plastic rib (soft)
- Sponge
- Cutting wire
- Matte blue glaze (stoneware temperature)
- Kiln
Step 1: Building the Base and Body
-
Form the pinch pot base:
Start with a ball of clay roughly the size of a large orange. Insert your thumb into the center and pinch rotating walls to create a deep, even bowl shape. This will be the bottom of your pitcher. -
Prepare the first coil:
Roll out a coil of clay on your work surface until it is about the thickness of your thumb. Ensure it is long enough to circle the rim of your pinch pot. -
Attach the coil:
Score the top rim of your pinch pot and the underside of the coil aggressively. Apply slip to the scored areas, place the coil on top, and wiggle it slightly to secure the bond. -
Blend the seams:
Support the wall from the outside with one hand. With your other hand, smear the clay from the coil down onto the pot on the inside. Repeat this process on the outside, smoothing the clay upward. -
Build up the belly:
Continue adding coils, placing each one slightly to the outside of the previous ring to widen the form. This expands the ‘belly’ shape of the pitcher. Leave the subtle ridges visible on the outside for texture if desired, or smooth them gently. -
Taper the neck:
Once you reach the widest point suited for the belly, begin placing the next coils slightly toward the inside. This will narrow the form as you build upward, creating the transition into the neck. -
Elongate the neck:
Add two or three vertical coil layers to create a straight neck section. Smooth the interior perfectly with a rib tool so liquid flows easily later on.
Step 2: Spout and Handle
-
Pull the spout:
While the clay is soft, use your index finger and thumb to gently pull a section of the rim outward. Shape a sharp, defined ‘V’ notch to ensure a clean pour without dripping. -
Roll the handle coil:
Roll a thick coil for the handle, tapering it slightly at one end. Ideally, flatten it slightly into an oval cross-section rather than a perfect circle for a more comfortable grip. -
Shape the arch:
Bend the coil into a high arch shape, resembling a question mark. Let it stiffen slightly on the table for 15-20 minutes so it holds its shape during attachment. -
Attach the handle:
Score and slip the contact points on the pitcher neck and the belly. Press the handle firmly into place, blending the clay at the joints smoothly with a wooden tool. -
Refine the surface:
I prefer to use a slightly damp sponge to soften any sharp edges on the handle and rim, but remain careful not to erase the horizontal coil texture on the body.
Handle Cracking?
If hairline cracks appear at the handle joints during drying, wrap the joint with a tiny coil of wet clay, blend it in, and wrap the whole pot tightly in plastic for 2 days.
Step 3: Finishing and Glazing
-
Slow drying:
Cover the pitcher loosely with plastic to let it dry slowly and evenly. This prevents the handle from cracking away from the body as the clay shrinks. -
Bisque fire:
Once bone dry, fire the piece in the kiln to the bisque temperature appropriate for your specific clay body (usually cone 04 or 06). -
Clean the bisque:
Wipe the fired piece down with a damp sponge to remove any kiln dust, which can prevent the glaze from adhering properly. -
Apply the glaze:
Pour the matte blue glaze inside the pitcher, swirl to coat, and pour out the excess. Then, dip or brush the exterior. The matte finish highlights the coil ridges beautifully. -
Wipe the foot:
Use a sponge to wipe all glaze off the very bottom of the pitcher and about 1/4 inch up the side to prevent it from fusing to the kiln shelf. -
Glaze fire:
Fire the pitcher a second time to the maturation temperature of your glaze and clay (typically cone 5 or 6 for stoneware).
Dual-Tone Effect
Try layering a second, lighter glaze just on the rim and the top of the handle. When it melts, it will create a beautiful cascading effect over the blue base.
Now you have a stunning, handmade vessel ready to grace your table

The Complete Guide to Pottery Troubleshooting
Uncover the most common ceramic mistakes—from cracking clay to failed glazes—and learn how to fix them fast.
Pulled Handle Pitcher With a Smooth Join
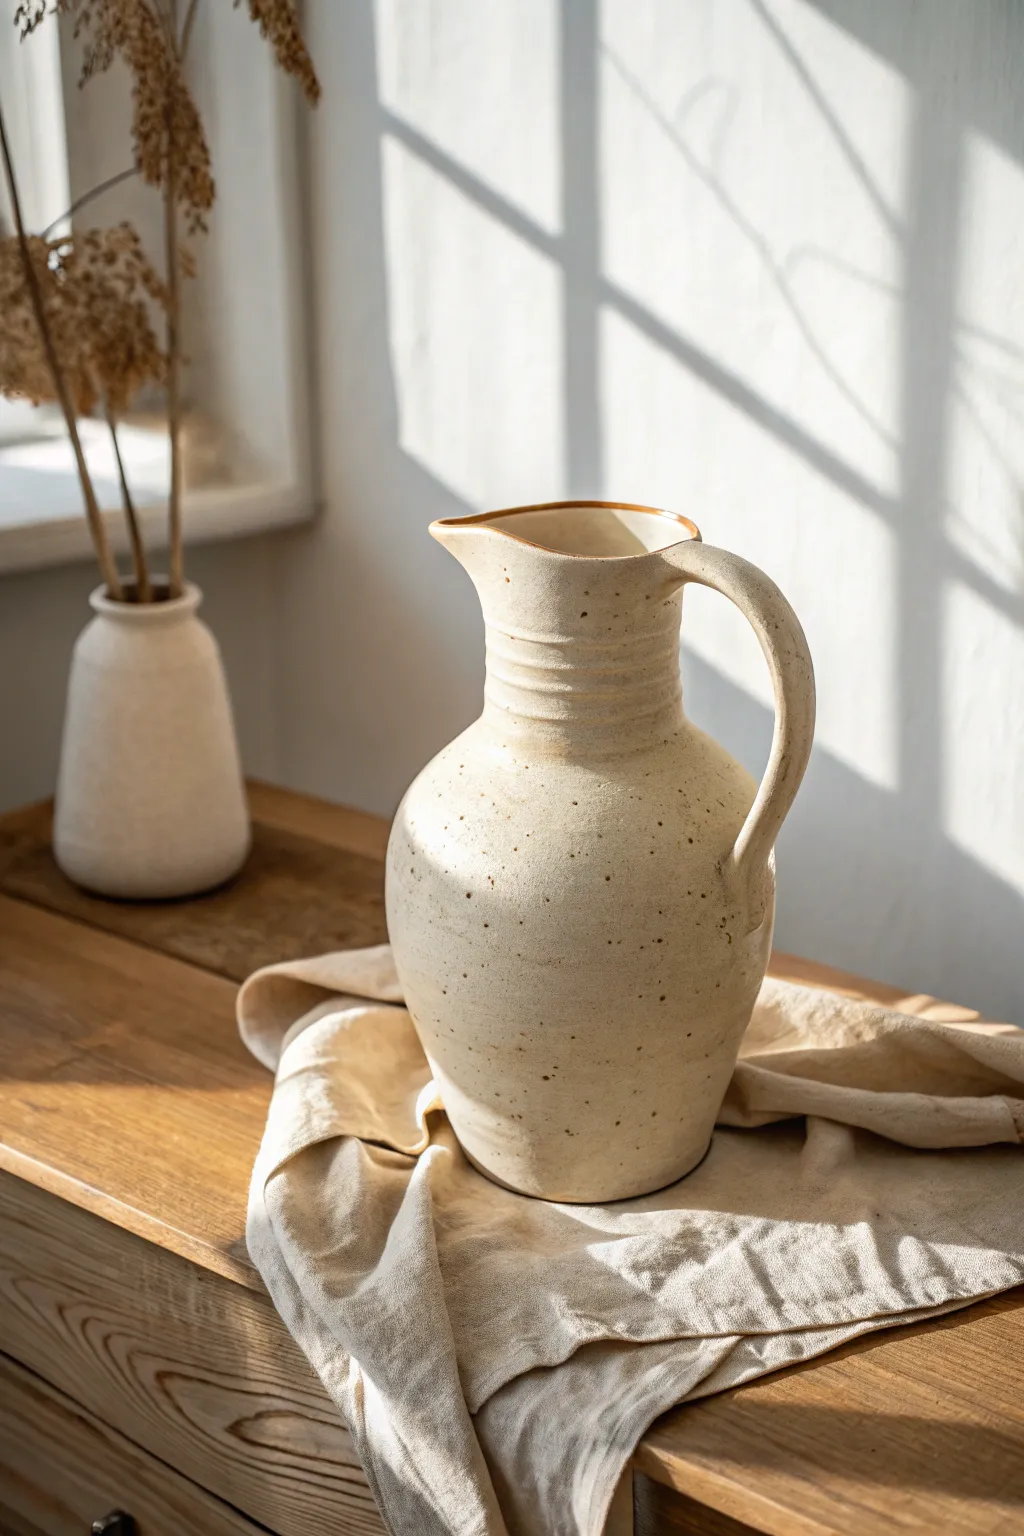
This rustic, elegant pitcher showcases the beauty of speckled clay with a tall, graceful neck and a classic pulled handle that flows seamlessly from the rim. The visible throwing rings near the base add tactile character while the smooth, creamy glaze highlights the natural iron spots in the clay body.
Step-by-Step
Materials
- Speckled stoneware clay (approx. 3-4 lbs)
- Pottery wheel
- Throwing sponge
- Bucket of water
- Wooden throwing ribs
- Pin tool
- Wire cutter
- Chamois leather strip
- Cream or oatmeal semi-opaque glaze
- Trimming tools
Step 1: Throwing the Body
-
Center the clay:
Begin with a well-wedged ball of speckled stoneware clay on your wheel head. Center it firmly, ensuring it is secure and spinning true before opening. -
Open and pull the floor:
Open the clay down to a thickness of about half an inch for the base. Widen the floor to approximately 4-5 inches depending on your desired volume. -
Establish the height:
Cone the clay up and down once to align particles, then begin your initial pulls. Focus on gaining height while keeping the walls relatively vertical at first. -
Belly the form:
Once you have significant height, use inside pressure to gently push the clay outward near the bottom third, creating a subtle belly. Leave some clay thickness at the bottom for stability. -
Create the throwing rings:
Using your fingertips or the corner of a throwing rib, gently press into the exterior clay wall as you pull up from the base. Leave these rings indented rather than smoothing them away; they provide the tactile texture seen in the lower half of the pitcher. -
Collar the neck:
As you move past the belly, begin collaring the clay inward dramatically to form the shoulder and tall neck. I find it helpful to wet my hands thoroughly here to prevent twisting the clay. -
Refine the rim:
Pull the neck straight up to create an elongated cylinder shape. Establish a sturdy, slightly thickened rim, then use a chamois to compress and smooth it. -
Shape the spout:
While the clay is still wet, support the rim with two fingers on the outside and use one finger on the inside to gently pull a spout outward. Ensure it’s sharp enough to cut the pour cleanly.
Handle Cracking?
If the handle cracks at the join during drying, cover the whole piece in plastic and spritz the handle with water daily to let moisture equalize.
Step 2: Handle and Finishing
-
Prepare the handle lug:
Take a carrot-shaped piece of clay and flatten the thick end. Score and slip the attachment point on the pitcher’s neck, just below the rim. -
Attach the lug:
Firmly press the thick end of your clay ‘carrot’ onto the scored area. Smooth the clay downward onto the neck so the join becomes invisible, blending it perfectly into the pitcher’s wall. -
Pull the handle:
With wet hands, gently pull the clay downward, stroking it into a strap shape. Use your thumb to create a subtle central groove if desired, maintaining an even thickness. -
Attach the tail:
Curl the handle into a graceful ‘ear’ shape. Attach the bottom tail to the pitcher’s shoulder. Press firmly to secure it, but keep the touch light enough to maintain the curve. -
Cleanup and dry:
Wipe away any excess slip around the handle joins. Allow the pitcher to dry slowly under plastic to ensure the handle and body shrink at the same rate. -
Bisque fire:
Once bone dry, fire the piece to bisque temperature (usually cone 04 or 06) to prepare it for glazing. -
Glaze application:
Dip or pour a semi-opaque cream or oatmeal glaze over the entire piece. Ensure the coating is even but thin enough to let the clay’s iron speckles show through. -
Final firing:
Fire the pitcher to the maturity temperature of your clay body (likely cone 5/6 or cone 10), allowing the glaze to melt fully and interact with the iron specks.
Pro Tip: Better Pours
Sharpen the very edge of the spout immediately after throwing. A sharp, distinct edge cuts the liquid flow, preventing annoying drips down the front.
Once fired, you will have a beautiful, functional pitcher ready for serving iced tea or displaying fresh flowers on your table
Ribbon Handle Pitcher for a Modern Look
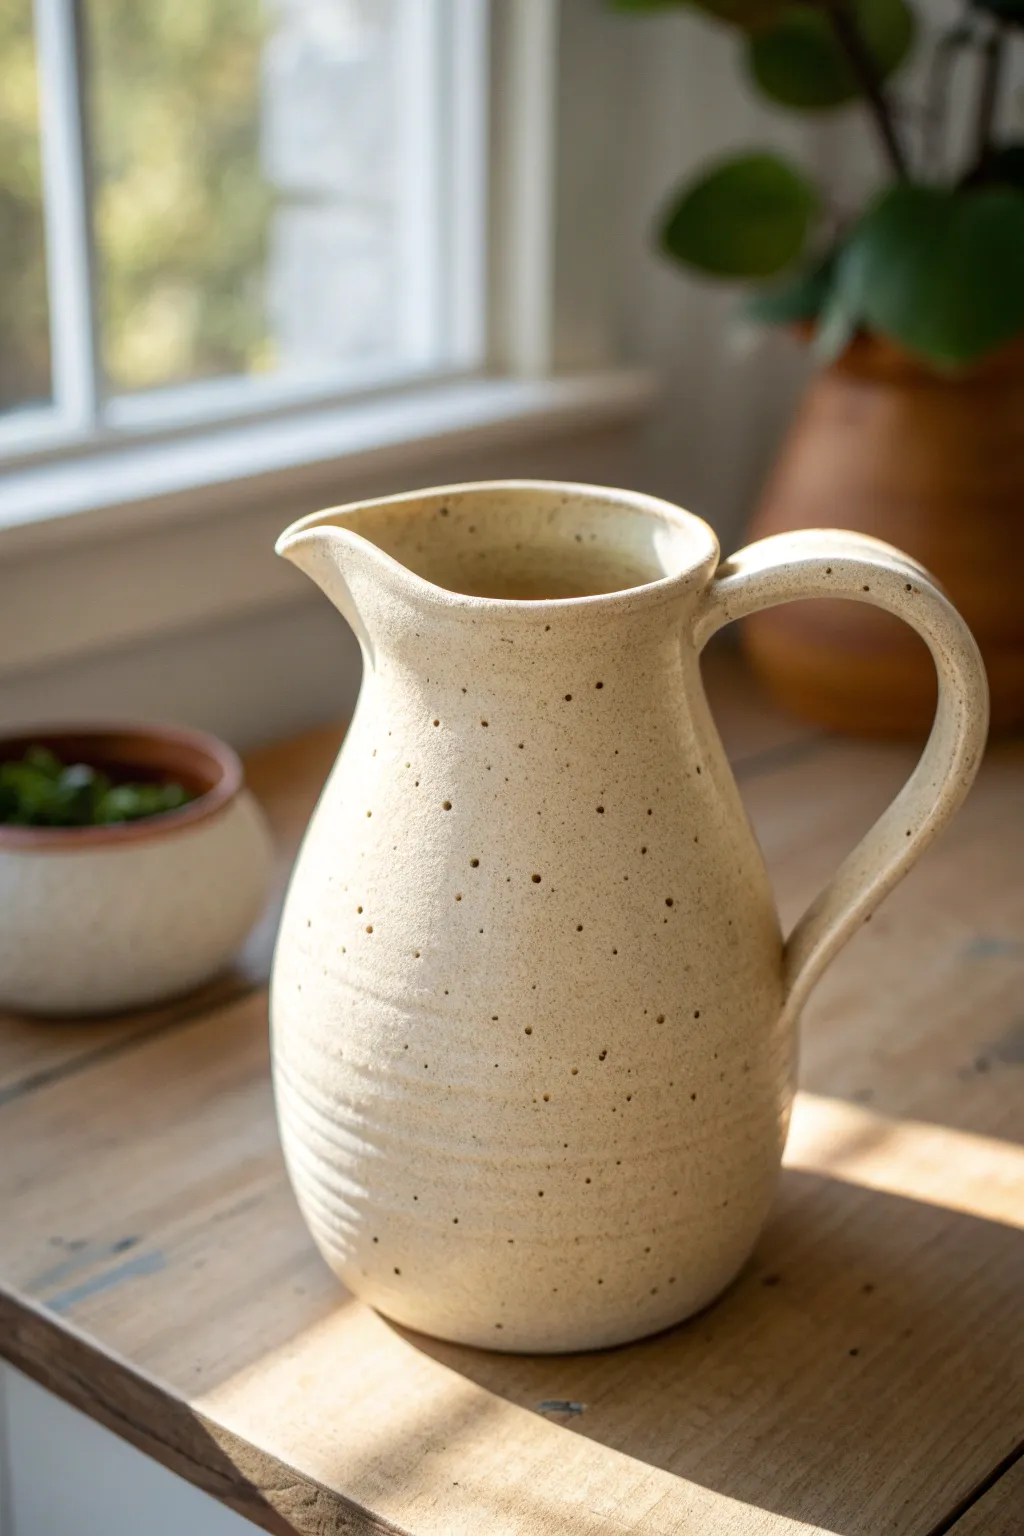
This rustic yet modern pitcher features a beautifully textured speckled finish and a classic ribbon handle that flows elegantly from the rim. The subtle ridges around the neck add a tactile element that catches the light, making it a perfect functional centerpiece for any table.
Detailed Instructions
Materials
- Speckled buff stoneware clay (or white clay with grog)
- Potter’s wheel
- Throwing sponge
- Wooden throwing rib
- Pin tool
- Wire clay cutter
- Fettling knife
- Serrated rib/kidney tool
- Clear matte glaze (food safe)
- Bucket of water
- Bat for wheel
Step 1: Throwing the Body
-
Center the clay:
Start with about 3-4 pounds of speckled buff clay. Wedge it thoroughly to remove air bubbles, then slam it onto the center of your wheel bat. With the wheel spinning at high speed, use wet hands to coning up and down until the clay is perfectly centered. -
Open the form:
Drill your thumbs into the center of the mound, leaving about a half-inch of clay at the bottom for the base. Pull the floor out towards your body until it’s about 4-5 inches wide, compressing the bottom with a flat finger or tool to prevent S-cracks later. -
Pull the cylinder:
Slow the wheel down slightly. Create a groove at the base and begin your first pull, bringing the clay walls upward. Aim for a tall, narrow cylinder shape initially, keeping the walls even in thickness from bottom to top. -
Shape the belly:
Using a rib on the outside and your hand on the inside, gently push the clay outward from the inside at the bottom third of the cylinder. This creates the bulbous, round base characteristic of this pitcher. I like to do this gradually over several passes to avoid collapsing the wall. -
Collar the neck:
With wet hands encircling the upper part of the form, gently squeeze inward as the clay spins (‘collaring’) to narrow the neck. As you collar, the clay wall will thicken, so do a quick pull upward to thin it out again. -
Create the texture:
While the wheel spins at a moderate pace, press a wooden modeling tool or the corner of your rib gently against the neck section. Create three or four distinct horizontal grooves or ridges. Soften the edges of these ridges with a damp sponge so they aren’t sharp. -
Refine the rim:
Use a chamois or a small strip of plastic to compress and smooth the rim. Flare it out ever so slightly to create a welcoming spout shape later. -
Form the spout:
Stop the wheel. Support the rim with two fingers on the outside and use your index finger on the inside to gently pull the clay forward, creating a distinct pouring spout. Ensure it’s sharp enough to cut the heavy flow of liquid.
Step 2: Adding the Handle & Finishing
-
Pull the handle:
Take a separate lug of wet clay and hold it vertically. Wet your hand and stroke the clay downward, pulling it into a long, flat strap shape. This ‘ribbon’ style should be wide and relatively thin, not round. -
Dry to leather hard:
Wire the pitcher off the bat but leave it on the board. Curve your pulled handle into a question-mark shape on a ware board. Let both the pitcher and the handle dry until they are leather hard—stiff enough to hold their shape but still cool to the touch. -
Trim the base:
Place the pitcher upside down on the wheel (you may need a chuck or foam bat to protect the rim). Trim away excess weight from the bottom and carve a clean foot ring. -
Attach the handle:
Score the attachment points on the pitcher neck and belly, as well as the ends of your handle. Apply slip to the scored areas. Press the top of the handle firmly against the neck just below the rim, and the bottom attachment onto the shoulder of the pot. -
Smooth the transition:
Use a small wooden tool to smudge the clay from the handle onto the body, reinforcing the connection. Wipe away excess slip with a damp sponge for a seamless look. -
Bisque fire:
Allow the pitcher to dry completely (bone dry). This may take several days depending on humidity. Load it into the kiln and bisque fire to Cone 04 (approx. 1945°F). -
Glaze application:
Wipe the bisque-ware down with a damp sponge to remove dust. Pour a clear matte glaze inside the pitcher, swirl it to coat, and pour it out. Dip the outside into the glaze bucket quickly to get an even coat without it becoming too thick. -
Final firing:
Clean the foot ring completely of any glaze using a sponge or wax resist before dipping. Fire the piece again to the maturity temperature of your clay body (usually Cone 5 or 6 for stoneware). The heat will pull the iron specks through the glaze.
Collaring Issues?
If the clay ripples or twists while narrowing the neck, you are squeezing too hard or the clay is too dry. Add a little water and squeeze very gently.
Ribbon Handle Tip
Make the handle slightly thicker at the attachment points. A thin ribbon handle looks elegant but needs extra clay at the joints to prevent cracking during drying.
Once cooled, fill your new handmade pitcher with iced tea or dried branches to admire your work


What Really Happens Inside the Kiln
Learn how time and temperature work together inside the kiln to transform clay into durable ceramic.
Cut-and-Fold Spout Pitcher
Embrace the rustic charm of this wheel-thrown pitcher, featuring a distinctively folded spout and a warm, speckled cream glaze. The subtle throwing rings left near the base add texture and visual interest, making it a perfect functional centerpiece for any kitchen table.
Step-by-Step Guide
Materials
- Stoneware clay body (speckled or buff)
- Pottery wheel
- Throwing sponge
- Wooden throwing rib
- Needle tool
- Wire cutter
- Trimming tools
- Serrated rib or scoring tool
- Slip
- Speckled cream or ‘oatmeal’ cone 6 glaze
- Kiln
Step 1: Throwing the Body
-
Center the Clay:
Begin with about 2-3 pounds of wedged stoneware clay. Slam it onto the wheel head and center it thoroughly, ensuring a steady, even mound before opening. -
Open and Pull:
Open the clay to create the floor, leaving it about half an inch thick for stability. Begin pulling up the walls into a cylinder, keeping your movements slow and consistent to maintain even wall thickness. -
Shape the Belly:
Once you have height, gently push the clay outward from the inside while supporting the outside to create a slight belly. Aim for a wider base that tapers gently upward into a narrower neck. -
Leave Texture:
For the bottom third of the vessel, avoid smoothing it perfectly with a rib. Instead, leave the subtle horizontal finger ridges or use a light touch with a serrated tool to emphasize those tactile ‘throwing lines’ seen in the image. -
Refine the Neck:
Collaring in the top deeply to create a defined neck area. Use a wet sponge to compress the rim, ensuring it is slightly thicker than the walls to prevent easy chipping later.
Smooth Pour Secret
After shaping the spout, run your finger sharply under the very tip of the lip. This creates a sharp ‘break’ point that cuts the flow of water, preventing drips from running down the front.
Step 2: Forming the Spout & Handle
-
Cut the Spout:
Unlike a pulled spout, this look relies on a precise cut. While the clay is still leather-hard but pliable, look at the rim and visualize where the spout will go. Use your fingers to gently pull the rim forward. -
Shape the Pouring Edge:
Using a wet finger or chamois, sharpen the very edge of that pulled section to ensure a clean pour. The distinctive look comes from lifting the front edge slightly higher than the rest of the rim. -
Pull a Handle:
Grab a separate lump of clay and pull a classic strap handle. It should be wide enough to support the pitcher’s weight but elegant. Let it stiffen into a slight curve on a board until it holds its shape. -
Attach the Handle:
Score and slip the attachment points on the pitcher body—one at the rim opposite the spout, and one about halfway down the body. Attach the handle firmly, blending the clay smoothly into the pot. -
Create the Ear Shape:
I like to adjust the handle curve once attached so it rises slightly above the rim before looping down, creating that classic ‘ear’ shape which provides excellent leverage for pouring.
Dual-Tone Effect
Try using a dark clay body (like a chocolate stoneware) with a semi-opaque white glaze. The dark clay will burn through on the edges and texture lines for higher contrast.
Step 3: Finishing and Glazing
-
Bisque Fire:
Allow the pitcher to dry slowly under plastic to even out moisture between the thick and thin parts. Once bone dry, bisque fire it to Cone 04. -
Wax the Foot:
Wipe down the bisque ware with a damp sponge to remove dust. Apply wax resist to the bottom foot ring to prevent glaze from sticking to the kiln shelf. -
Apply Glaze:
Pour a speckled cream or oatmeal glaze inside the pitcher, roll it around to coat, and pour out. For the outside, dip the pitcher or pour the glaze over, ensuring an even coat. -
Check Thickness:
Be careful not to apply the glaze too thickly near the throwing rings at the bottom, or you might lose that lovely texture. -
Glaze Fire:
Fire the piece to Cone 6 (or whatever your specific clay and glaze combination requires). A medium-hot firing often brings out the best iron speckles in the glaze.
Now you have a stunning, handmade vessel ready to serve water or hold a fresh bouquet of wildflowers
Darted Body Pitcher for a Tighter Pour
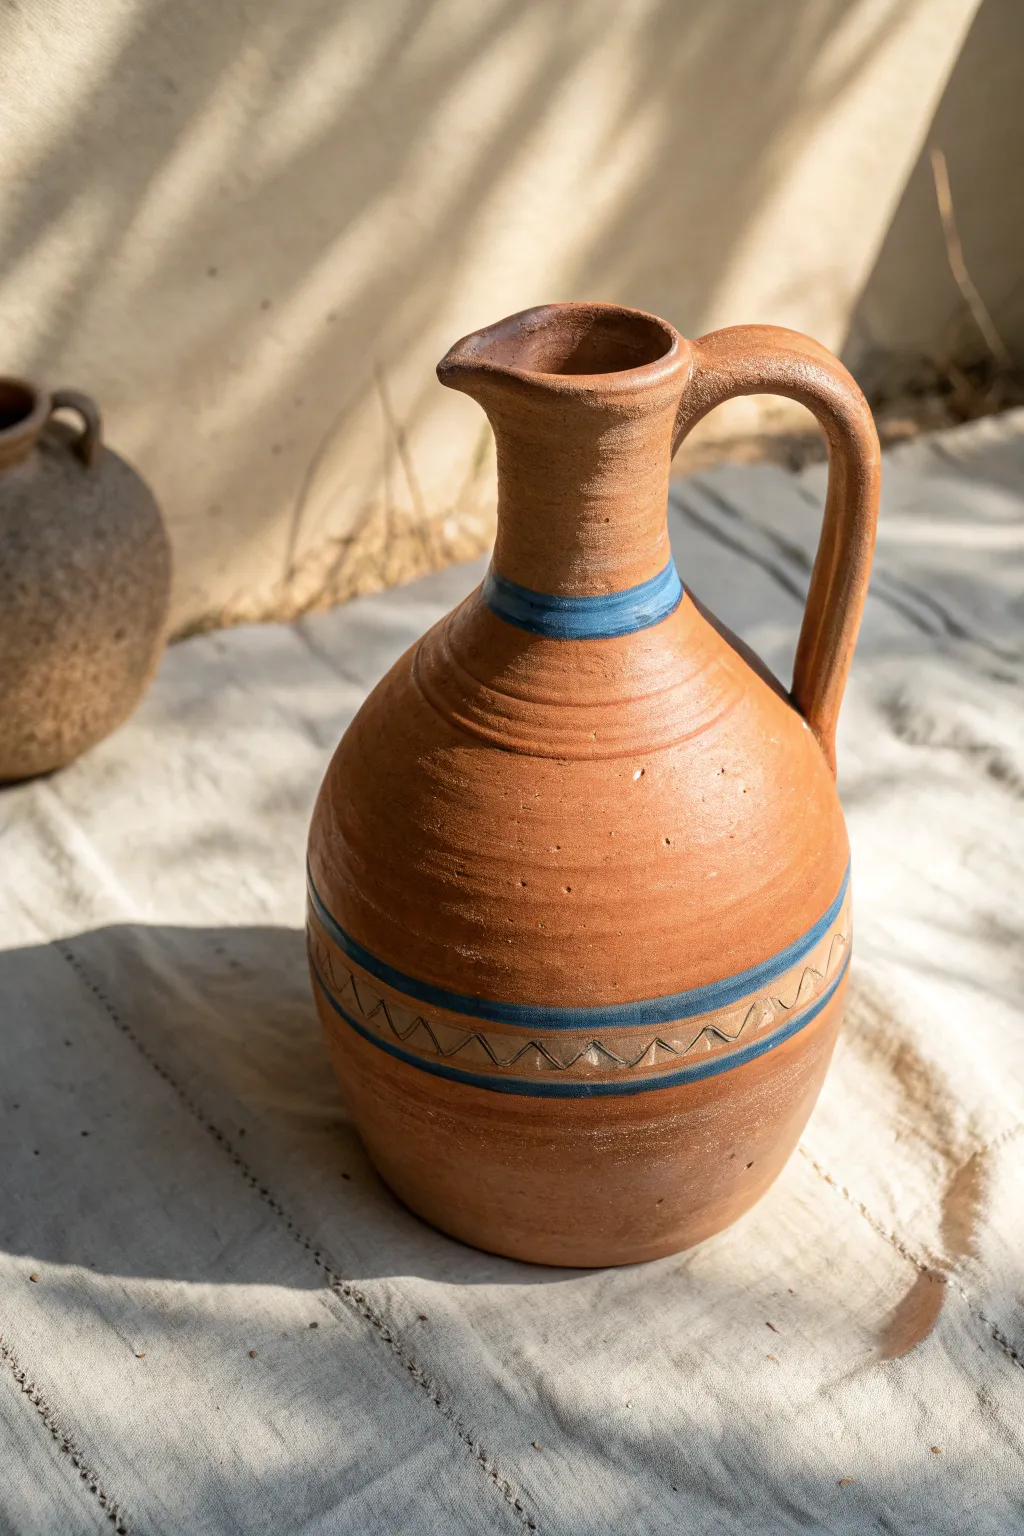
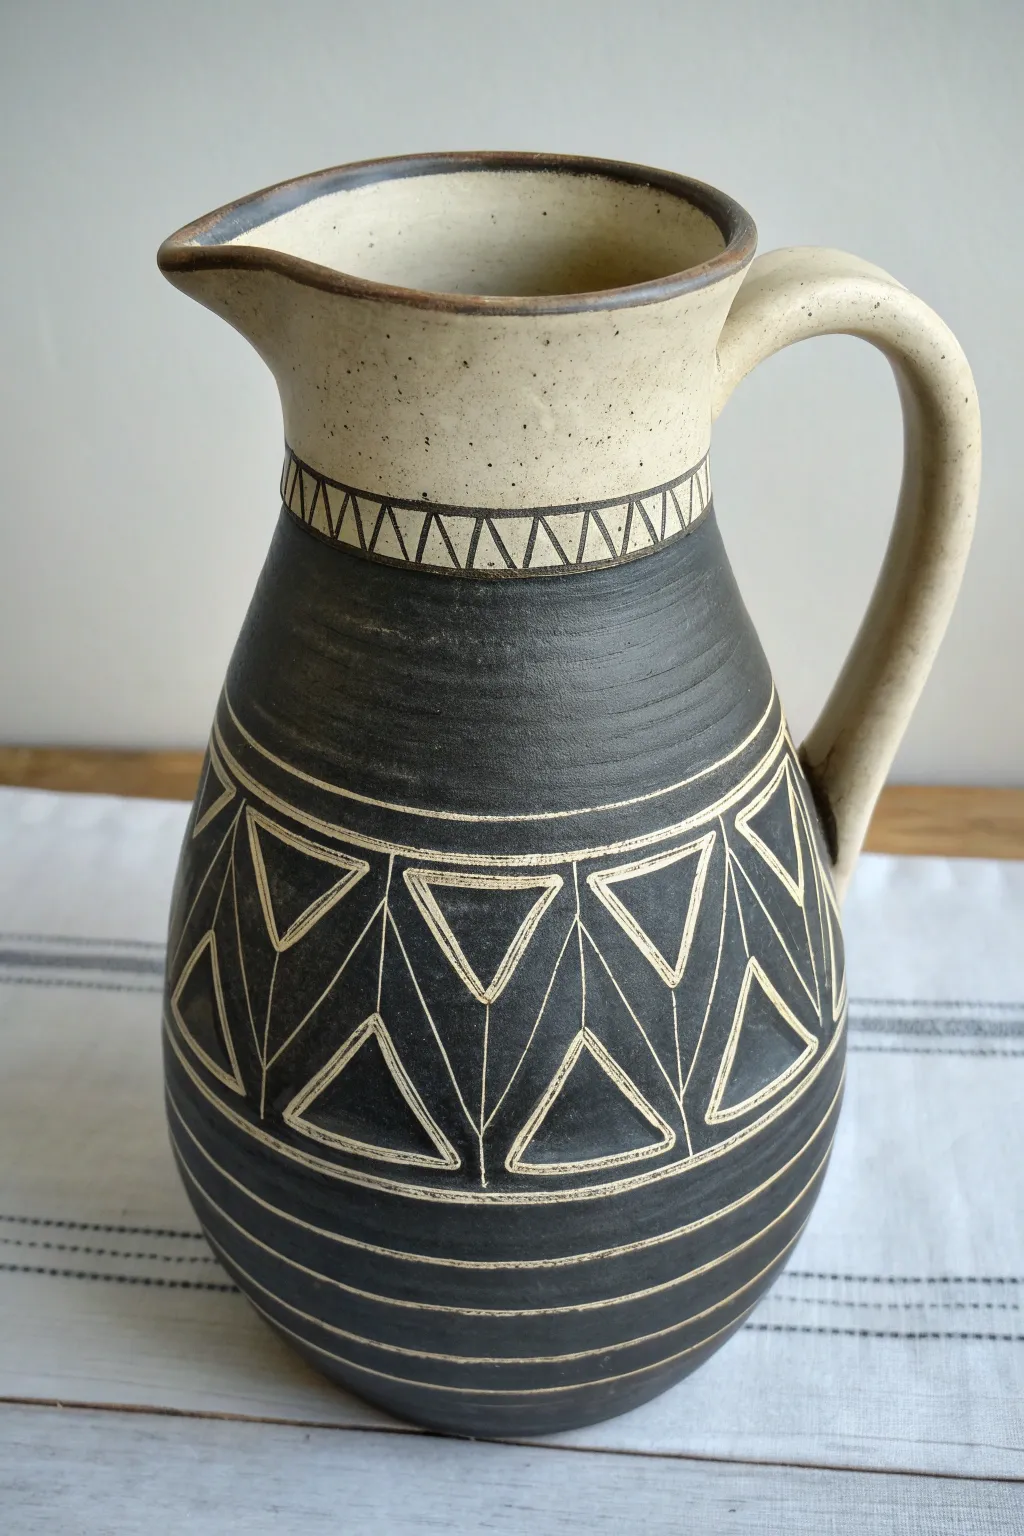
This project brings the warmth of traditional pottery into your home with a robust clay pitcher featuring distinct blue banding and incised details. Its earthy terracotta body and tactile sgraffito patterns create a piece that feels both ancient and refreshingly modern.
How-To Guide
Materials
- Terracotta or red earthenware clay (approx. 3-4 lbs)
- Pottery wheel
- Throwing tools (sponge, rib, needle tool, wire cutter)
- Trimming tools
- Slip (clay slurry)
- Blue underglaze or slip (cobalt-based)
- Small carving tool or sgraffito tool
- Soft brush
- Clear glaze (optional, for inside only if desired)
Step 1: Throwing the Form
-
Center the Clay:
Begin by firmly wedging your terracotta clay to remove air bubbles. Center the clay on the pottery wheel head, ensuring it spins true without wobbling. -
Open and Lift:
Open the centered clay and begin pulling up the cylinder. Aim for a wide base initially, as you’ll need volume for the belly of the pitcher. -
Shape the Belly:
From the inside, gently push the clay outward to form a bulbous, rounded bottom section. Use a rib on the outside to refine this curve and compress the walls. -
Collar the Neck:
Slowly collar the upper section of the clay inward to create the distinct transition from the wide body to the narrower neck. Do this gradually to avoid buckling the clay. -
Create the Spout:
Once thrown, while the clay is still wet, gently pull one side of the rim outward with your fingers to form a pouring spout. Smooth the edge so it pours cleanly.
Keeping the Round Aesthetic
Use a flexible metal kidney rib when shaping the belly. It flexes to the curve, smoothing throwing lines and expanding the form without thinning the walls too much.
Step 2: Attaching the Handle
-
Pull a Strap:
Pull a thick strap of clay for the handle. It should be sturdy enough to support the weight of a full pitcher but proportional to the neck. -
Shape on a Board:
Curve the pulled strap into an ear shape and lay it on a ware board to set up until it reaches leather-hard consistency. -
Score and Slip:
Score the attachment points on the pitcher neck and shoulder, as well as the ends of the handle. Describe generous amounts of slip to both areas. -
Secure the Handle:
Firmly press the handle onto the pitcher. Smooth the clay around the joints, ensuring a seamless connection that looks visually integrated.
Step 3: Decorating and Firing
-
Leather Hard Stage:
Allow the entire piece to dry to a sturdy leather-hard stage. The surface should be firm enough to carve without burrs but soft enough to accept underglaze. -
Apply Blue Bands:
While turning the wheel slowly (or using a decorating banding wheel), paint a thick band of blue underglaze around the base of the neck and a wider band around the lower belly. -
Carve the Borders:
Using a needle tool, incise thin parallel lines acting as borders immediately above and below the wide blue band on the belly. -
Incise the Zig-Zags:
Within the lower blue band, carefully carve a continuous zig-zag pattern. Use a tool that scrapes away the blue to reveal the red clay body underneath (sgraffito technique). -
Slow Drying:
Loosely cover the pitcher with plastic to let it dry very slowly. This helps prevent the handle from cracking away from the body as the clay shrinks. -
Bisque Fire:
Once bone dry, fire the piece to bisque temperature (usually cone 04-06 depending on your clay). -
Glazing:
I prefer to pour clear glaze only on the interior to make it functional, leaving the exterior matte and raw to highlight the texture. -
Final Fire:
Fire the pitcher a final time to the maturity temperature of your clay and glaze.
Handle Cracking Off?
This happens if the handle and pot have different moisture levels. Ensure both are exactly same leather-hard consistency before joining, and dry slowly under plastic.
Once cooled, fill your new handmade pitcher with water or dried flowers to admire your craftsmanship on the table

TRACK YOUR CERAMIC JOURNEY
Capture glaze tests, firing details, and creative progress—all in one simple printable. Make your projects easier to repeat and improve.
Wavy Rim Pitcher With Undulations
Embrace organic forms with this beautifully speckled clay pitcher, featuring a distinctively scalloped rim and gentle horizontal ridges. Its rustic off-white glaze and hand-built character make it a perfect centerpiece for displaying dried florals or serving cool drinks.
Detailed Instructions
Materials
- Speckled stoneware clay (buff or cream firing)
- Pottery wheel (optionally slab roller for hand-building)
- Ribs (wooden and rubber)
- Needle tool
- Sponge
- Wire cutter
- Loop tool for trimming
- Satin white or cream dipping glaze
Step 1: Throwing the Body
-
Center and open:
Begin by wedging about 3-4 lbs of speckled clay. Center it firmly on the wheel and open it up, creating a flat floor about 4 inches wide. -
Pull the cylinder:
Pull the walls up into a tall, consistent cylinder. Aim for a height of about 8-10 inches, keeping the walls slightly thicker at the rim to support the future shaping. -
Belly the form:
From the inside, gently push outward with your fingers or a rib to create a rounded belly in the bottom two-thirds of the pitcher. The top third should taper inward slightly to form the neck. -
Create ridges:
While the wheel is spinning slowly, use the rounded end of a wooden tool or your finger to press gentle, horizontal grooves into the clay. Focus these ridges on the bottom half of the belly for that tactile texture. -
Refine the surface:
Smooth the upper portion of the pitcher with a flexible rib to remove throwing lines, contrasting the smooth neck with the ridged belly.
Rim Crack Prevention
Wavy rims dry unevenly. Cover the rim loosely with plastic while the bottom stiffness up to ensure the delicate peaks don’t dry out and crack before trimming.
Step 2: Shaping the Rim and Spout
-
Undulate the rim:
With the wheel stopped, use your thumb and forefinger to gently pinch and lift sections of the rim. Create a rhythmic up-and-down wave pattern around the entire circumference. -
Smooth the waves:
Use a damp sponge or chamois to soften the sharp edges of your waves. I like to make sure the valleys of the waves are just as smooth as the peaks to prevent chipping later. -
Pull the spout:
Choose one section of the wavy rim to be the front. Support the clay from the outside with two fingers and gently pull the clay forward and outward with a wet finger from the inside to create a functional pour spout.
Step 3: Handle and Finishing
-
Pull a handle:
Pull a classic strap handle from a lump of clay. It should be thick enough to support the pitcher’s weight but tapered for elegance. Let it stiffen slightly into a curve. -
Attach the handle:
Score and slip the contact points on the back of the pitcher neck and the lower belly. Press the handle firmly into place, ensuring the top arch rises slightly above the rim level. -
Trim the foot:
Once the piece is leather hard, trim a neat foot ring on the bottom to give the pitcher visual lift and a clean stopping point for the glaze. -
Bisque fire:
Allow the pitcher to dry slowly and completely before loading it into the kiln for a bisque firing to cone 04 (or your clay’s specific bisque temperature).
Accentuate the Waves
After dipping the glaze, gently wipe a damp sponge over the high points of the wavy rim and the ridges to thin the glaze there, letting more raw clay color toast through.
Step 4: Glazing
-
Apply wax resist:
Paint liquid wax resist on the bottom foot ring to prevent glaze from sticking to the kiln shelf. -
Dip the pitcher:
Using dipping tongs or by hand-dipping, submerge the pitcher into a satin cream or soft white glaze. A satin finish works best to reveal the clay’s iron speckles. -
Glaze fire:
Fire the piece to maturity (usually cone 5 or 6 for stoneware). The heat will draw the iron spots through the pale glaze, creating the signature speckled look.
Now you have a stunning, functional vessel ready to pour your favorite beverages at your next gathering
Footed Pitcher With a Defined Foot Ring
This handmade ceramic pitcher balances rustic charm with elegant form, featuring a tall, tapered body and a distinctive unglazed foot ring. The speckled cream glaze highlights subtle throwing lines, creating a tactile surface that feels both modern and timeless.
Step-by-Step Guide
Materials
- Speckled stoneware clay (mid-range cone 5-6)
- Pottery wheel
- Throwing sponge
- Wooden rib tool
- Metal kidney scraper
- Wire clay cutter
- Pin tool
- Trimming tools (loop or pear-shaped)
- Cream or oatmeal semi-matte glaze
- Wax resist
- Kiln
Step 1: Throwing the Body
-
Center the clay:
Start with about 2.5 to 3 lbs of speckled stoneware clay. Wedge it thoroughly to remove air pockets, then slap it onto the wheel head. Center the clay using firm, steady pressure with wet hands until it runs smooth without wobbling. -
Open and set the floor:
Open the centered mound, establishing a floor that is approximately 4 inches wide. Compress the floor well with your fingertips or a wooden rib to prevent S-cracks later during firing. -
Pull the walls:
Begin pulling the walls upward. For this form, you want a gentle taper, slightly wider at the base and narrowing gradually as it rises. Aim for a height of roughly 8-9 inches. -
Shape the visible texture:
Leave subtle finger ridges as you pull the last few passes. Unlike some pieces where you smooth everything away, the charm here lies in those faint horizontal spirals. I like to use a soft rib to gently tidy the form without erasing those throwing lines. -
Refine the rim:
Collar the neck in slightly, then flair the very top rim outward just a bit. Use a chamois or a small strip of plastic to compress and smooth the lip so it’s comfortable to touch. -
Create the spout:
While the clay is still wet, use two fingers to support the outside of the rim and your index finger to gently pull a spout outward. Ensure it has a sharp undercut on the lip to prevent dripping when pouring.
Clean Lines Pro Tip
For the sharpest possible line between the glaze and the unglazed foot, use masking tape instead of just freehand wax. Tape the line, wax over it, then peel the tape before glazing.
Step 2: Trimming and Handle Attachment
-
Dry to leather hard:
Wire the pitcher off the wheel and let it dry until it reaches a leather-hard state. It should be firm enough to handle without deforming but still cool to the touch. -
Trim the defined foot:
Invert the pitcher onto the wheel (using a chuck if necessary for the spout). Trim away excess clay from the bottom, carving a distinct, vertical step about 1 inch high at the base. This area will remain unglazed to create the two-tone look. -
Pull a handle blank:
Take a separate lug of clay and pull a thick strap handle. It should be long enough to create a generous loops allowing for a comfortable grip. -
Attach the handle:
Score and slip the attachment points on both the pitcher neck and the body. Firmly press the handle into place, smoothing the joins with a wooden tool or your thumb. -
Shape the curve:
Pull the handle downwards to create a graceful, ear-shaped curve. Ensure the bottom attachment sits nicely against the body without warping the wall. Let the piece dry slowly under plastic to equalise moisture.
Level Up: Oxide Wash
Before glazing, rub a watered-down iron oxide wash into the throwing rings and wipe it back. This will accentuate the spiral texture significantly underneath the cream glaze.
Step 3: Glazing and Finishing
-
Bisque fire:
Once bone dry, load the pitcher into the kiln for a bisque firing (usually to cone 04). This sets the shape and prepares the clay to accept glaze. -
Apply wax resist:
This is the crucial step for the design. Carefully paint liquid wax resist over the bottom inch of the pitcher—specifically covering the trimmed foot ring area you created earlier. Include the underside of the base as well. -
Prepare the glaze:
Mix your cream or oatmeal glaze well. If your glaze is too thick, it might obscure the throwing lines we preserved; aim for a consistency similar to heavy cream. -
Dip the pitcher:
Hold the pitcher by the foot (or use tongs) and dip it into the glaze bucket. Submerge it fully for about 3 seconds, then lift it out and shake gently to remove drips. -
Clean the foot:
Even with wax resist, little droplets of glaze can stick. Use a damp sponge to wipe the waxed foot ring completely clean, ensuring a crisp line where the glaze meets the raw clay. -
Glaze fire:
Load the glazed pitcher into the kiln for the final firing, typically to cone 5 or 6 depending on your clay body specifications. -
Sand the bottom:
After firing and cooling, check the unglazed foot. If the raw clay feels slightly rough, give it a quick sand with high-grit sandpaper to ensure it won’t scratch your table.
Pouring from your own handcrafted vessel makes every beverage feel like a special occasion
Carved Sgraffito Pitcher With Bold Contrast
Learn to throw and decorate a striking two-tone pitcher featuring bold sgraffito details that pop against a dark underglaze. This project combines wheel-throwing skills with precise carving techniques to create a modern vessel with ancient roots.
Step-by-Step
Materials
- Stoneware clay (smooth body preferred)
- Black underglaze or black slip
- Clear or matte satin transparent glaze
- Pottery wheel
- Throwing tools (ribs, sponge, wire cutter)
- Sgraffito tool or small loop tool
- Needle tool
- Banding wheel
- Soft brush (hake or fan brush)
Step 1: Throwing the Form
-
Center and open:
Begin with about 2-3 pounds of wedged stoneware clay. Center it firmly on the wheel and open it up, leaving the base somewhat thick to support the height. -
Pull the cylinder:
Pull the walls up into a tall, consistent cylinder. Focus on keeping the walls even from bottom to top to ensure the final weight is balanced. -
Shape the belly:
Using a rib on the outside against your inside hand, gently push the belly of the pot outward to create a rounded, bulbous base. Taper the form inward as you move up toward the neck. -
Refine the neck and rim:
Collar the clay in at the neck to define it, then flare the rim out slightly. Use a chamois to smooth the lip for comfortable pouring. -
Pull the spout:
While the clay is still wet, gently pull a spout at the front of the rim using your forefingers and thumb. Ensure the edge is sharp enough to cut the flow of liquid preventing drips.
Chipped Lines?
If your carved lines look jagged or chip off, your clay is too dry. Mist the pot lightly with water and wrap it in plastic for an hour to rehydrate the surface before trying again.
Step 2: Trimming and Handle
-
Leather hard stage:
Allow the piece to dry to a leather-hard state. It should be firm enough to handle without deforming but still holding moisture. -
Trim the foot:
Place the pitcher upside down on the wheel (using a chuck if necessary) and trim away excess clay from the bottom, defining a clean foot ring. -
Attach the handle:
Pull a strap handle from a separate piece of clay. Score and slip the attachment points on the neck and shoulder of the pitcher, then firmly attach the handle in a graceful curve.
Pro Tip: Depth Control
Use a wire-loop tool rather than a needle tool for the sgraffito. Loops remove a specific width of clay cleanly, creating uniform line weights that look much more professional.
Step 3: Applying Slip and Carving
-
Define the zones:
Place your pitcher on a banding wheel. lightly mark a line just below the handle attachment point at the neck. This marks where the black underglaze will begin. -
Apply underglaze:
Using a soft brush, apply 2-3 even coats of black underglaze or slip to the entire body of the pitcher below your marked line. Leave the neck and handle as bare clay. -
Dry to touch:
Let the underglaze dry until it is no longer tacky but the clay beneath is still leather hard. If it gets too bone dry, the carving will chip. -
Mark the neck band:
Using a needle tool, lightly scratch two parallel horizontal lines around the top of the black section to create a narrow band. -
Carve the neck triangles:
Inside this narrow band, carve a zigzag line to form a row of small, repetitive triangles. Carve away the black areas inside specific triangles to create a positive/negative pattern. -
Outline the main body:
Move to the main belly of the pot. Lightly sketch a large band of inverted and upright triangles using a needle tool or pencil. Aim for bold scale here. -
Detail the main triangles:
Carve double outlines for each large triangle to create a border effect. Inside these borders, carve smaller concentric triangles to echo the shape. -
Carve the base lines:
At the very bottom of the pitcher, spin the banding wheel while holding your carving tool steady to cut 3-4 horizontal lines through the black slip, revealing the clay body.
Step 4: Refining and Glazing
-
Clean up burrs:
Once the pot is fully bone dry, gently brush away any clay crumbs or sharp burrs left from carving with a soft, dry brush or a rib. -
Bisque fire:
Fire the piece to bisque temperature (usually cone 04 or 06). This sets the form and prepares it for the final glaze. -
Dip in clear glaze:
Dip the entire pitcher into a clear or satin-matte transparent glaze. This seals the bare clay at the top and enhances the contrast of the black slip. -
Final firing:
Fire to the maturation temperature of your clay body (likely cone 5/6 or cone 10) to vitrify the vessel.
Now you have a stunning functional vessel ready for your next dinner party
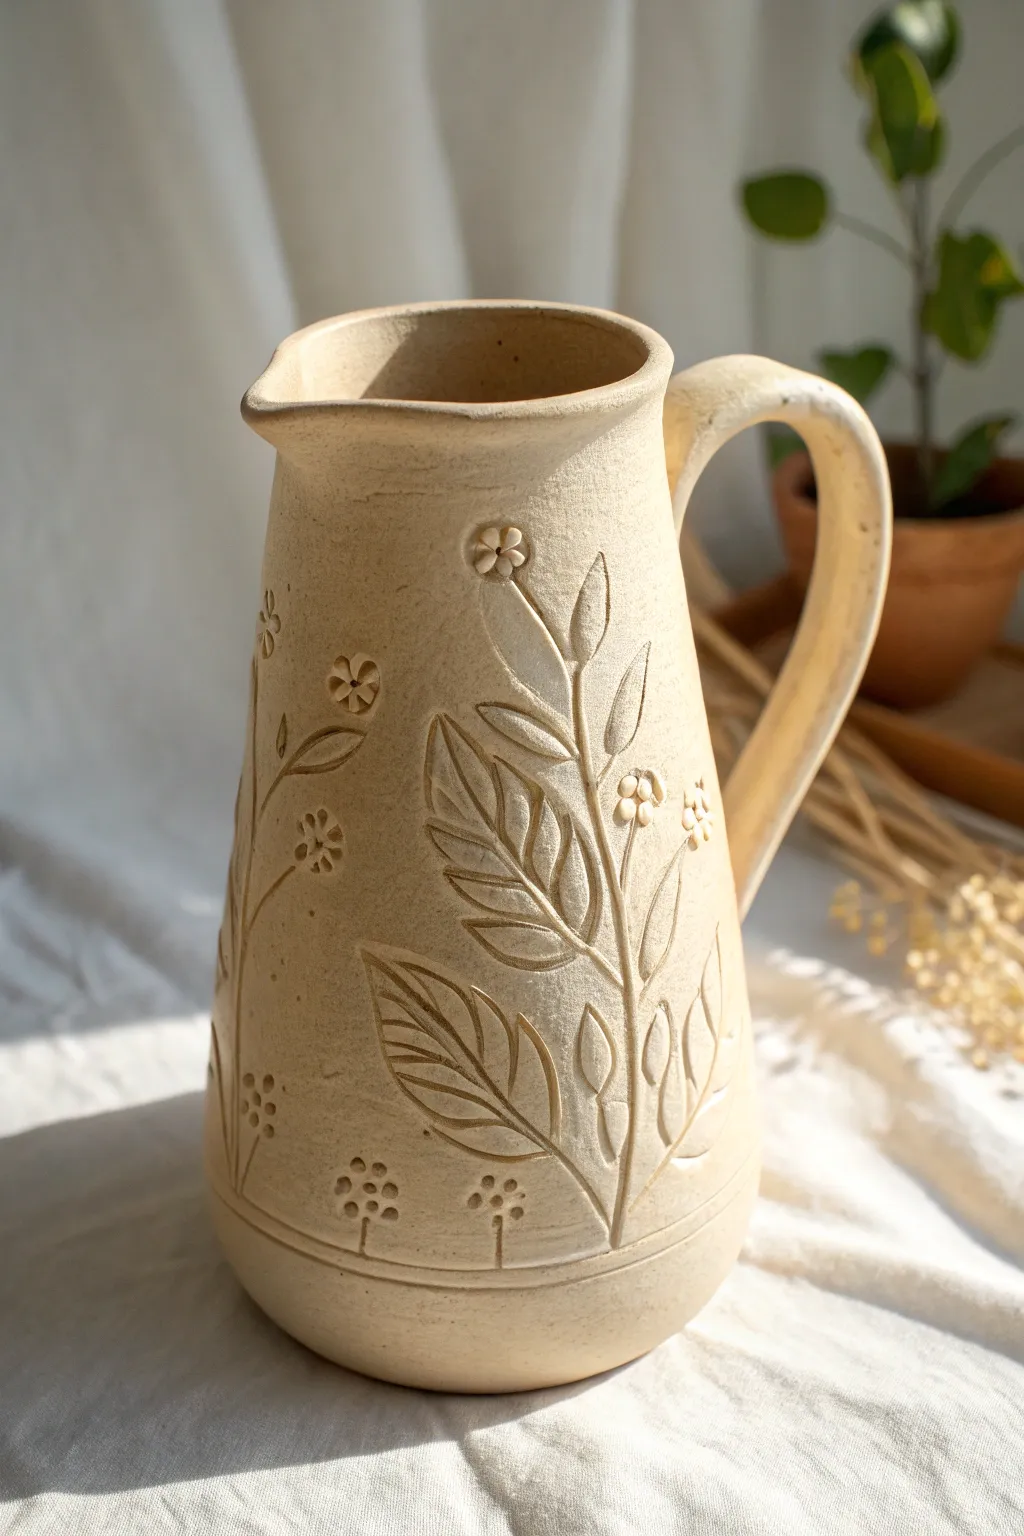
Floral Carved Pitcher With Embroidery Vibes
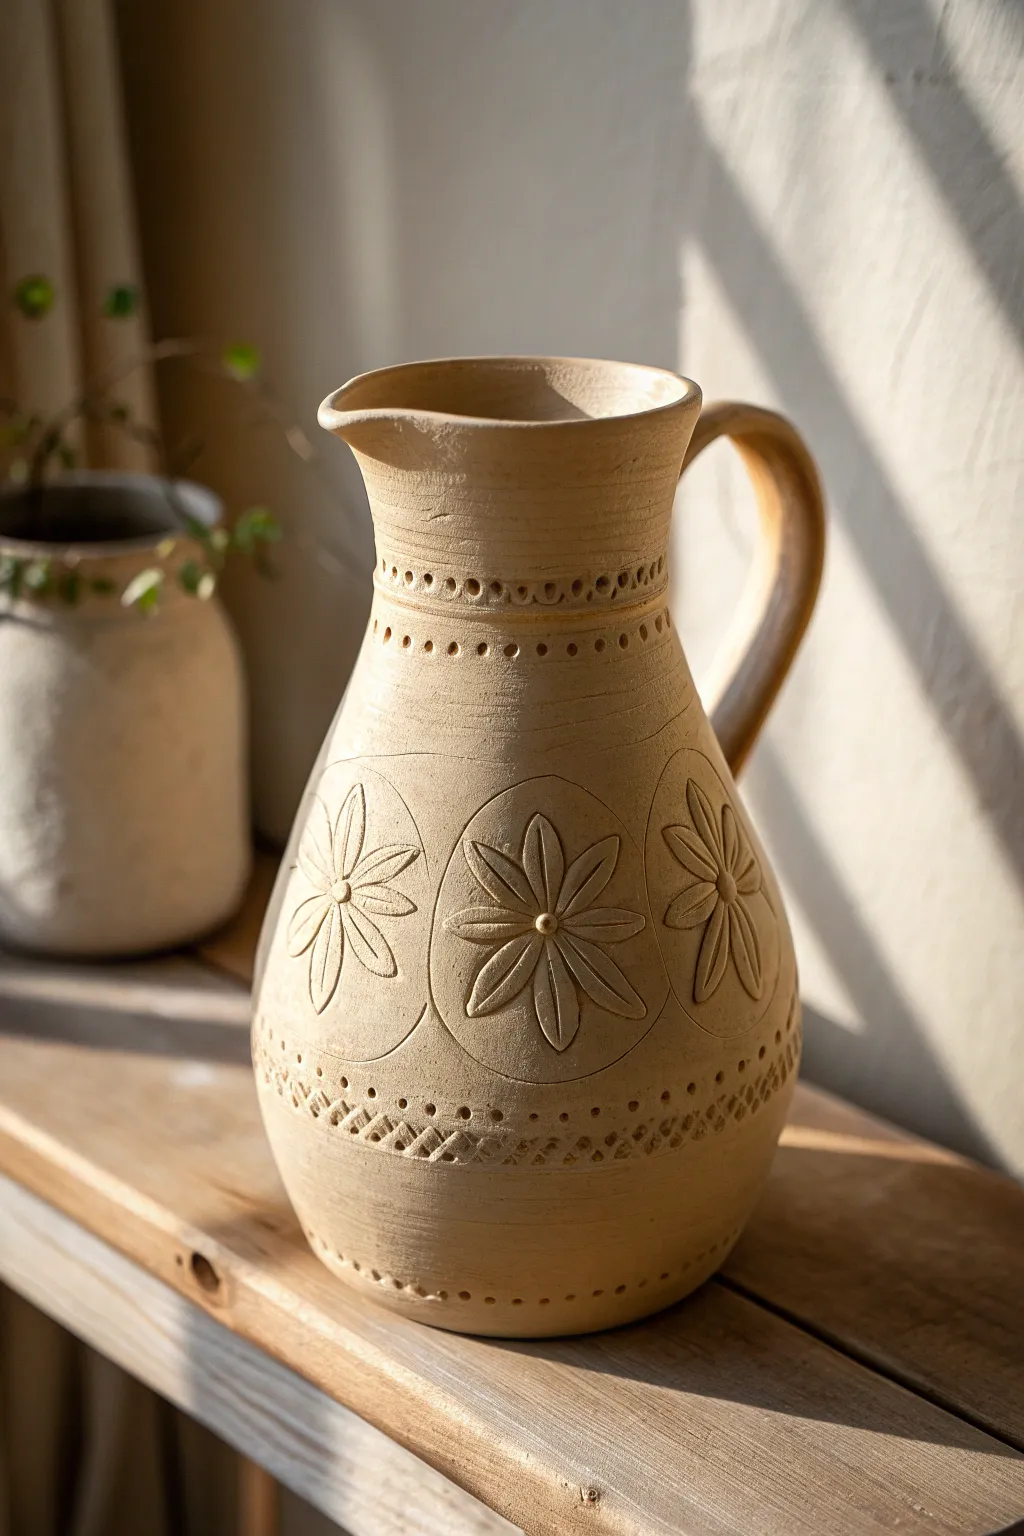
Capture the charm of traditional embroidery in ceramic form with this intricately carved pitcher. By combining wheel-throwing techniques (or coil building) with precise sgraffito-style carving, you can create a vessel that feels both rustic and refined.
Detailed Instructions
Materials
- Stoneware clay (buff or speckled)
- Pottery wheel (or coil building tools)
- Wooden ribs and metal ribs
- Needle tool
- Wire loop carving tools (small and medium)
- Sponge
- Scoring tool or serrated rib
- Slip
- Clean-up tool (for burrs)
- Small round punch or straw
Step 1: Forming the Base Vessel
-
Throw the cylinder:
Begin with about 3-4 pounds of well-wedged stoneware clay centered on the wheel. Open the center and pull the walls up into a tall, even cylinder, aiming for a height of about 8-10 inches. -
Shape the belly:
Using a rib on the inside and your hand on the outside, gently push the clay outward midway down the form to create a rounded belly, tapering it back in as you reach the neck. -
Create the spout:
While the clay is still plastic, use your index finger and thumb to gently pull a spout at the rim. Ensure the curve is smooth for a clean pour later. -
Attach the handle:
Pull a strap handle from a lug of clay. After letting it stiffen slightly, score and slip the attachment points on the neck and shoulder of the pitcher, pressing the handle firmly into place and smoothing the seams. -
Leather hard stage:
Allow the entire piece to dry slowly until it reaches a leather-hard state. This is crucial—if it’s too soft, the carving will warp the walls; too dry, and it will chip.
Clean Lines
When carving the negative space around the flower petals, work slowly and keep your tool damp. This prevents dragging and keeps the edges of your relief crisp.
Step 2: Mapping the Design
-
Define the bands:
Place the pitcher on a banding wheel. Using a needle tool, lightly incise horizontal guide lines around the neck and the lower belly to define where your pattern zones will start and stop. -
Mark the ovals:
Around the main belly section, lightly sketch large ovals. Space them evenly around the circumference. I like to use a paper cutout as a stencil here to keep them uniform. -
Sketch the flowers:
Inside each oval, lightly scratch in a six-petaled flower design. Don’t dig deep yet; this is just your roadmap for carving.
Step 3: Carving and Texturing
-
Carve the petals:
Using a small wire loop tool, carve out the negative space around the flower petals inside the ovals. You want the flower to appear raised (relief carving), so remove the background clay to a depth of about 2-3mm. -
Detail the petals:
Use a needle tool or a fine knife to carve a central vein down the middle of each petal, adding depth and that embroidered look. -
Add the centers:
Press a small ball of clay into the center of each flower to make a raised button, or simply leave the center high while carving the petals down. -
Outline the medallions:
Deepen the outline of the ovals using a stylus or dull pencil to create a distinct border separating the floral panel from the background. -
Create the dotted borders:
Along the horizontal guide lines on the neck, use a small round tool or a blunt needle to press a row of evenly spaced dots or small holes. -
Punch the neck texture:
Just below the rim and above the floral band, add a secondary row of texture. You can use a small hollow tube to create tiny ring impressions. -
Texture the base:
Near the foot of the pitcher, add a band of cross-hatching or diamond patterns using a serrated tool or by carefully cross-carving lines to mimic fabric weave.
Add Color Depth
Before the final glaze, brush a dark underglaze into the carved crevices and wipe it away with a damp sponge. This will make the floral embroidery pop significantly.
Step 4: Refining and Finish
-
Clean up burrs:
Once the carving is complete and the clay has dried a bit more (bone dry is best for this), use a stiff brush or a sponge to gently knock off any sharp clay crumbs or burrs created during carving. -
Bisque fire:
Fire the piece to cone 04 (or your clay body’s bisque temperature). -
Glaze application:
To maintain the raw texture seen in the image, apply a clear matte glaze, or perhaps a very thin wash of iron oxide to highlight the textures, wiping it back on the high points. Glaze the interior fully for functionality. -
Final firing:
Fire the pitcher to maturity (typically Cone 5 or 6 for stoneware) to finish the piece.
Enjoy using your beautifully textured pitcher for fresh lemonade or a rustic bouquet of dried flowers
Slip-Trailed Pitcher With Raised Lines
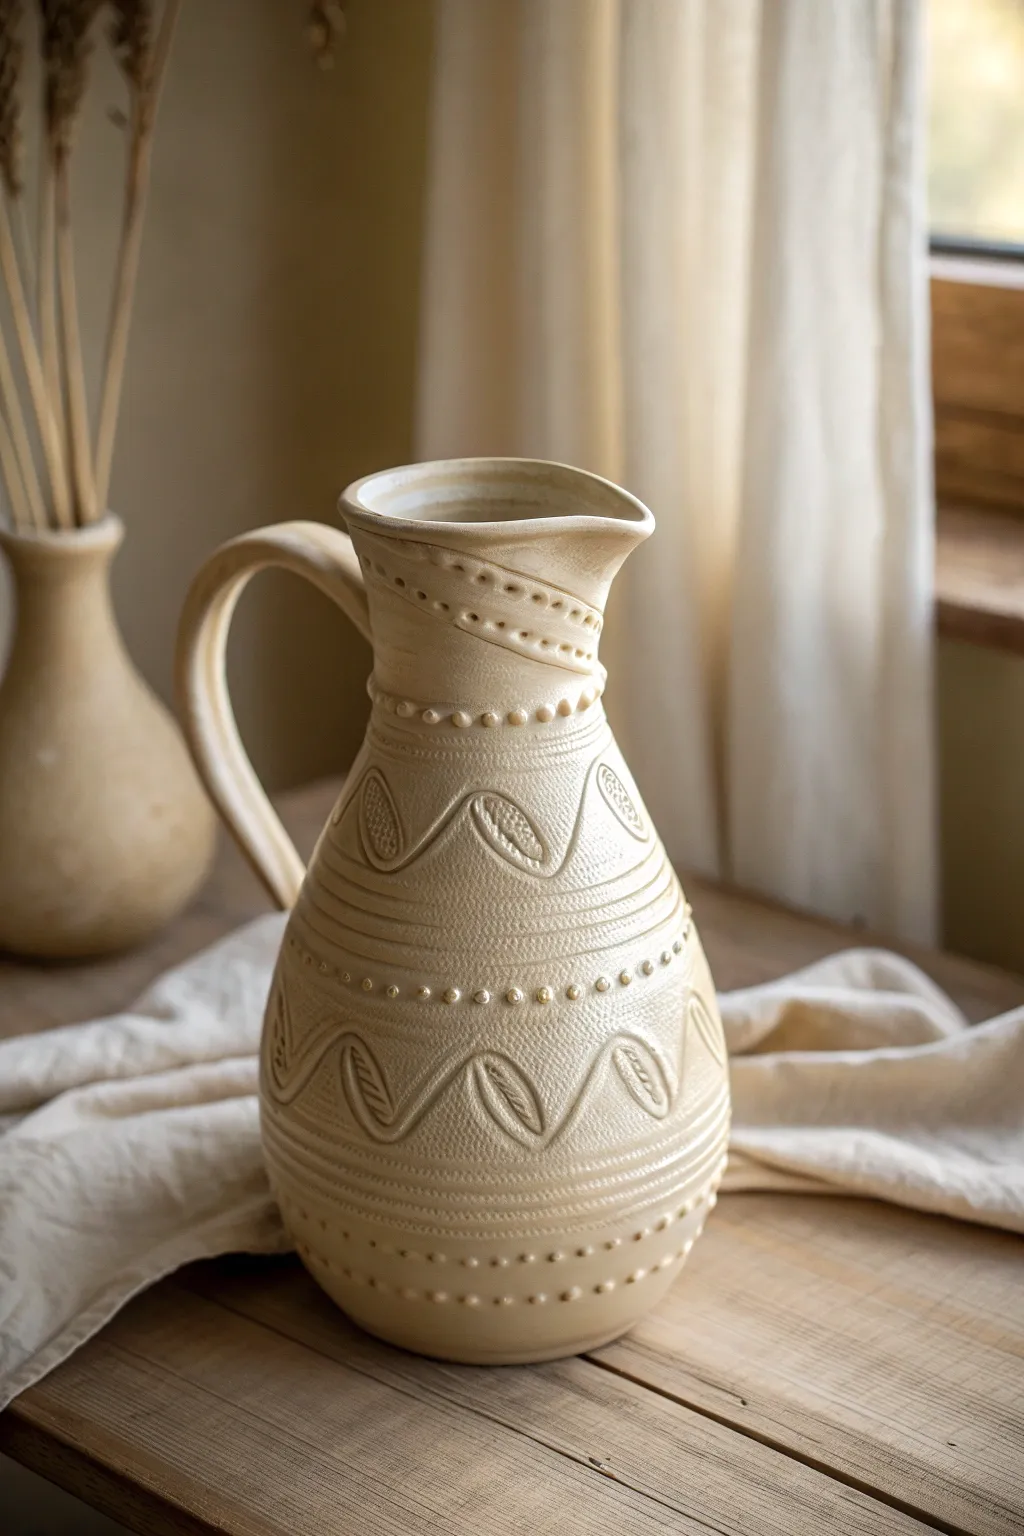
This elegant pitcher project combines rustic slab-building techniques with delicate slip-trailing decoration. The final result features a warm, creamy glaze that highlights rows of raised beading and organic, leafy swoops, perfect for a farmhouse kitchen aesthetic.
How-To Guide
Materials
- Stoneware clay (buff or white)
- Rolling pin
- Canvas cloth (rough weave for texture)
- Fettling knife
- Slip trailer (bulb or squeeze bottle with fine nozzle)
- Scoring tool and slip
- Template for pitcher body (conical shape)
- Wooden modeling tools
- Sponge
- Cream or beige semi-opaque glaze
- Kiln
Step 1: Forming the Body
-
Prepare the Slabs:
Roll out a large slab of stoneware clay to an even thickness of about 1/4 inch. Place the clay directly onto a piece of coarse canvas fabric and roll over it once firmly to imprint that distinct woven texture onto the surface. -
Cut the Shape:
Using a paper template or freehand estimation, cut out a truncated cone shape (a large arc). This will form the tapered cylinder of the pitcher’s body. -
Bevel the Edges:
Cut the two vertical edges of your slab at opposing 45-degree angles. This helps create a seamless join when you curl the clay into a cylinder. -
Assemble the Cylinder:
Stand the slab up and curl it so the beveled edges meet. Score the edges thoroughly, apply slip, and press them firmly together. Use a wooden tool to compress the seam from the inside, keeping the outside texture intact. -
Add the Base:
Roll a smaller slab for the bottom. Place your cylinder on it, trace the circumference, cut it out, and attach it securely using the score-and-slip method. I smooth the bottom seam with a rib to ensure it’s watertight. -
Shape the Belly:
Gently push the walls of the pitcher outwards from the inside using a rib or your hand while rotating the piece. This creates the rounded, bulbous ‘belly’ shape near the bottom.
Unclogging Tips
If your slip trailer clogs, don’t squeeze harder or it may explode. Use a thin needle or wire to clear the nozzle tip, or thin your slip slightly with a few drops of water.
Step 2: Spout and Handle
-
Pull the Spout:
While the clay is still leather-hard, wet your fingers and gently pull the front rim forward and outward to create a pouring spout. Smooth the curve so it flows naturally from the neck. -
Refine the Rim:
Use a damp sponge or a chamois strip to compress and round off the top rim. This prevents sharp edges after firing and gives the piece a professional finish. -
Create the Handle:
Pull a long strap of clay or extrude a coil for the handle. Shape it into a large, graceful ear-like curve that complements the pitcher’s height. -
Attach the Handle:
Score and slip the attachment points on both the handle and the pitcher body. Attach the top of the handle near the rim and the bottom at the widest point of the belly. Reinforce the joins with small coils of clay and blend them smooth.
Antique Wash
For more depth, apply an oxide wash (like iron oxide) over the slip trailing before glazing. Wipe it back with a sponge so the dark color stays only in the recesses.
Step 3: Slip Trailing Decoration
-
Prepare the Slip:
Fill your slip trailer with a thick clay slip (the consistency of heavy cream or yogurt). It should hold its shape when piped. -
Pipe Horizontal Bands:
Carefully squeeze the trailer while rotating the pitcher on a banding wheel to create raised horizontal lines around the neck and belly. These will serve as borders for your patterns. -
Add Beaded Accents:
Along the horizontal lines, pipe small, evenly spaced dots of slip. Try to keep your pressure consistent so the beads are all the same size. -
Create the Plant Motif:
In the wide spaces between your horizontal bands, pipe a wavy sine-wave line. Inside each curve of the wave, pipe an oval shape with interior lines to resemble a stylized leaf or seed pod. -
Clean Up:
Let the slip decorations stiffen slightly. If any points are too sharp, gently tap them down with a finger. Remove any stray splatter with a needle tool.
Step 4: Finishing
-
Bisque Fire:
Allow the pitcher to dry completely. This may take several days depending on humidity. Fire the piece in the kiln to bisque temperature (usually cone 04 or 06). -
Glazing:
Dip or spray the pitcher with a semi-opaque beige or cream glaze. The glaze should break over the raised slip textures, making them lighter than the recessed areas. -
Final Fire:
Fire the pitcher again to the maturity temperature of your clay and glaze (likely cone 5 or 6). Once cooled, the texture will be permanently fused.
Fill your finished pitcher with dried wheat or fresh flowers to show off your handiwork.
Appliqué Garden Pitcher With Clay Sprigs
This rustic stoneware pitcher showcases the elegance of botanical appliqué, where clay sprigs are added to the surface to create a dimensional garden scene. The natural, unglazed finish highlights the delicate carving and added textures, perfect for a cozy farmhouse aesthetic.
Detailed Instructions
Materials
- Stoneware clay body (smooth, buff or groggy depending on preference)
- Pottery wheel (or slab roller for hand-building)
- Needle tool
- Ribs (metal and soft silicone)
- Fettling knife
- Modeling tools (wood or stainless steel)
- Small carving loop tool (optional)
- Serrated rib or scoring tool
- Slip (made from the same clay body)
- Fine sponge
- Clear matte glaze (inner liner only)
- Wire cutter
- Bat
Step 1: Forming the Pitcher Base
-
Throwing the body:
Begin with about 3-4 pounds of wedged clay. Center it on the wheel and open it up, creating a flat internal floor. Pull the walls vertically, aiming for a tall cylinder with slightly slanted sides, tapering gently inward toward the top. -
Refining the shape:
Use a metal rib on the exterior and your hand on the interior to belly out the form slightly at the bottom if desired, but keep the profile mostly straight and classic like the reference image. Smooth the surface thoroughly with a soft rib to remove throwing lines. -
Forming the spout:
While the clay is still plastic but supportive, use your thumb and forefinger to pull a distinct spout at the rim. Ensure the pouring lip is sharp and well-defined to preventing dripping later. -
Making the handle:
Pull a strap handle directly from a lug of clay or roll a coil and flatten it slightly. The handle should be sturdy but elegant. Attach it opposite the spout by scoring and slipping, creating a high arch that connects near the rim and the lower third of the body. -
Drying to leather hard:
Cover the pitcher loosely with plastic and let it dry slowly to a leather-hard state. This firmness is crucial for the appliqué steps.
Step 2: Creating the Appliqué Garden
-
Sketching the layout:
Lightly trace your stem lines directly onto the leather-hard surface using a needle tool. Map out where your main vertical stems and branches will flow. -
Rolling coils for stems:
Roll out very thin, varied coils of fresh clay. These ‘sprigs’ will become the stems. Score the traced lines on the pitcher with a serrated rib and apply a small amount of slip. -
Attaching the stems:
Press the thin coils onto the scored lines. Use a wooden modeling tool to blend the edges of the coils onto the pitcher body so they look seamless and raised, rather than just stuck on. -
Shaping leaves from slabs:
Roll a small, thin slab of clay (about 1/8 inch thick). Use a fettling knife to cut out leaf shapes—some large and pointed like willow leaves, others smaller. bevel the edges slightly with your fingers. -
Attaching the leaves:
Score and slip the back of each leaf and place them along your stems. Press them firmly into place, curving them slightly to give the impression of movement. -
Carving leaf details:
Once attached, use a needle tool or small knife to carve the veins into the leaves. Press deeply enough to create shadow, but be careful not to puncture through to the pitcher wall. -
Adding floral clusters:
For the small flower clusters, roll tiny balls of clay. Group them in threes or fours at the ends of stems. Use the back of a small distinct tool or a needle to press a dot or indentation into the center of each tiny ball to mimic petals. -
Creating the base pattern:
Near the bottom of the pitcher, score a horizontal line and add a very thin coil for a border. Below this, add vertical ‘seed head’ details by pressing tiny balls of clay on short stems, creating a stylized meadow effect. -
Adding texture stamps:
If you have small flower stamps, you can press these into blank spaces for extra detail, or simply hand-model small five-petal flowers and attach them directly.
Clean Connections
Use a damp paintbrush to smooth the connection points of every leaf and stem. This erases any slip ooze and makes the decoration look like it grew naturally out of the pot.
Step 3: Finishing and Firing
-
Slow drying:
Because you’ve added wet clay to a leather-hard pot, careful drying is essential. Tent plastic over the piece for several days to equalize moisture levels before uncovering it completely. -
Bisque firing:
Once bone dry, bisque fire the piece to Cone 04 (or your clay body’s recommendation). -
Glazing the interior:
Pour a clear or white liner glaze into the interior of the pitcher, swirl to coat, and pour out the excess. Wipe any drips off the rim immediately. -
finishing the exterior:
Leave the exterior unglazed to showcase the raw clay texture, or apply a very thin wash of iron oxide and wipe it back to accentuate the appliqué crevices. -
Final firing:
Fire the piece to maturity (Cone 5, 6, or 10 depending on your clay). Ensure the unglazed exterior doesn’t touch other pots in the kiln.
Cracking Sprigs?
If your applied leaves pop off during drying, the base pot was likely too dry. Score the area deeper, use vinegar in your slip, and dry the whole piece much slower under plastic.
Fill your new handmade pitcher with fresh wildflowers or iced tea and enjoy the functional art you’ve created
Faceted Pitcher With Crisp Planes
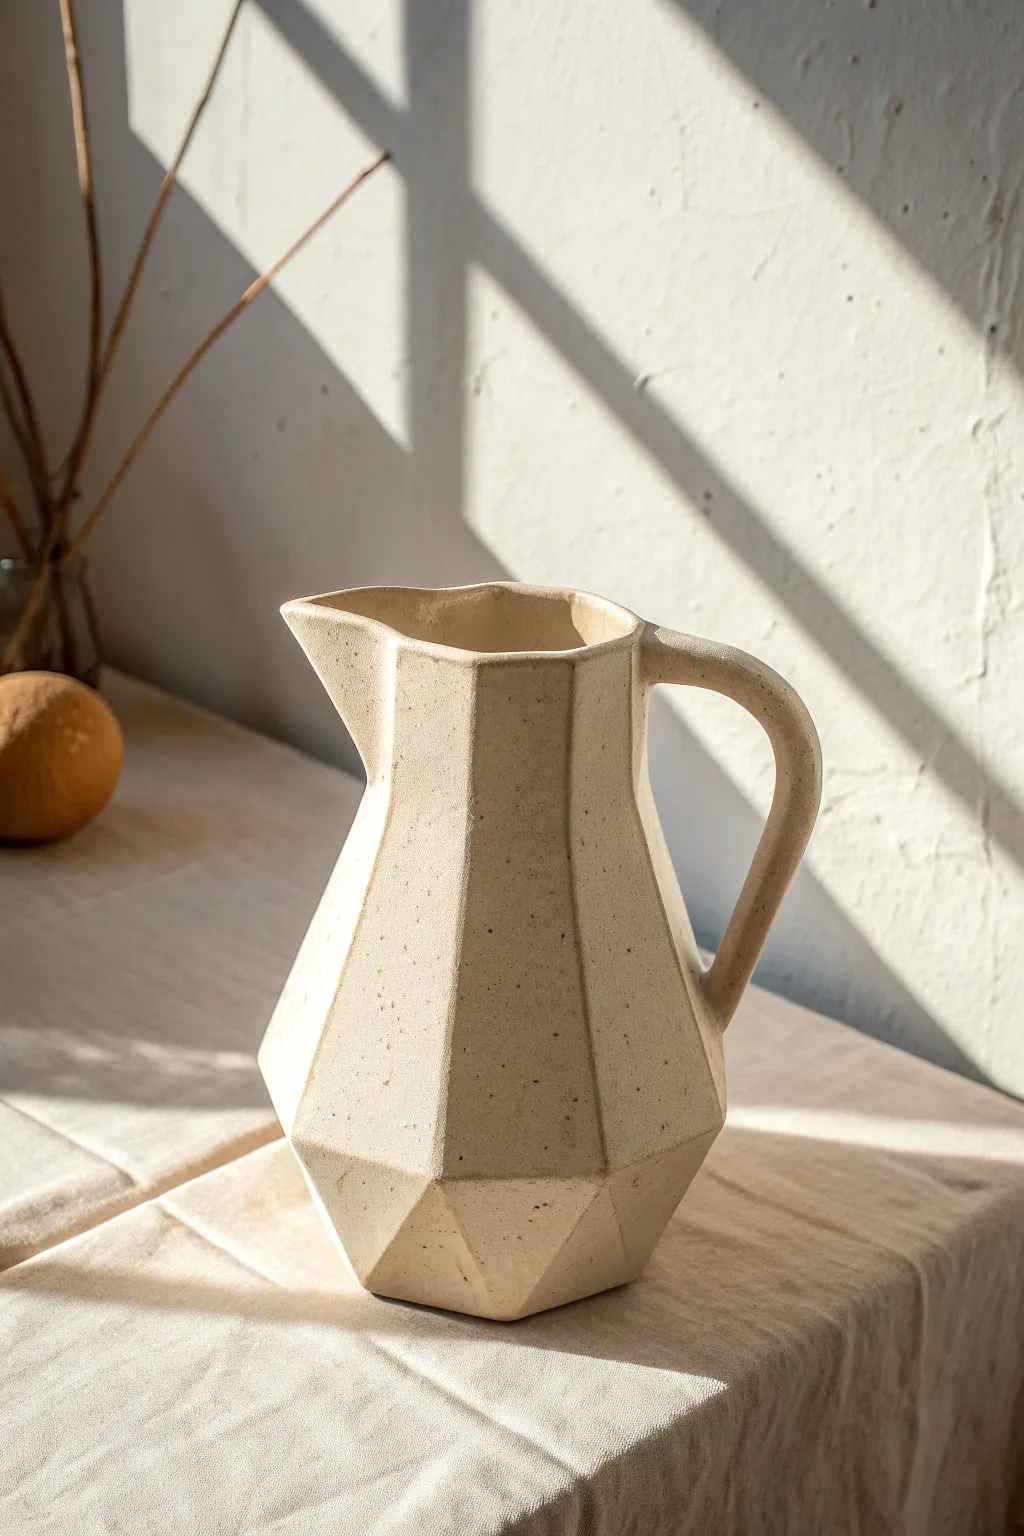
This project transforms a simple wheel-thrown cylinder into a striking piece of modern design through careful faceting. The result is a sculptural cream-colored pitcher that catches light on its crisp, angled planes while revealing natural speckles in the clay body.
Step-by-Step Guide
Materials
- Speckled stoneware clay (approx. 3-4 lbs)
- Pottery wheel
- Wire cutter
- Throwing sponge
- Needle tool
- Cheese cutter or wire faceting tool
- Ribs (metal and soft rubber)
- Wooden throwing stick (optional)
- Scoring tool and slip
- Matte white or cream glaze
- Surform tool (cheese grater style)
- Hair dryer or heat gun (optional)
Step 1: Throwing the Form
-
Center and open:
Start by wedging your speckled stoneware clay thoroughly to remove air bubbles. Center the clay on the wheel head, keeping a relatively narrow base for the pitcher shape. Open the clay down to the bat, leaving about a half-inch floor. -
Pull the walls:
Pull the walls up into a tall, thick cylinder. Crucially, you need to leave the walls significantly thicker than a standard pot—aim for nearly half an inch thickness—because you will be slicing away material later. -
Shape the collar:
Collar the neck in slightly to define the shoulder and top rim, ensuring the top opening is wide enough for a functional pitcher but narrower than the belly. -
Dry to leather hard:
This is the most critical timing step. Allow the cylinder to dry until it is stiff leather-hard. It needs to be firm enough to withstand the pressure of cutting without warping, but soft enough to slice cleanly.
Uneven Cuts?
If your wire wanders or cuts are uneven, your clay is likely too soft. Let it dry longer until it feels like cheddar cheese. Stiff clay resists the wire better for straighter planes.
Step 2: Faceting the Body
-
Mark your sections:
Using a needle tool, lightly mark the rim or the bat to divide the cylinder into roughly 6 or 8 equal sections depending on how wide you want your facets. -
First vertical cuts:
Take your cheese cutter or wire tool. Starting just below the rim, slice downward in a straight, confident motion all the way to the foot. The cut should angle slightly inward to create that tapered bottom look. -
Create the planes:
Rotate the piece and repeat the cut at the next mark. Repeat around the entire form. The goal is to remove the rounded wheel-thrown surface and replace it with flat, angular planes. -
The second angular cut:
To achieve the specific geometric shape in the image, you need a second set of cuts near the bottom. Slice starting from the lower third of the existing facets, cutting inward sharply toward the base to create the distinct ‘gemstone’ bottom angles. -
Refine the edges:
Once faceted, the edges might be quite sharp. I prefer to gently run a damp sponge or a soft rib over the corners just to knock off the sharpness without losing the crisp definition.
Step 3: Handle and Spout
-
Pull the spout:
While the clay is still leather hard, wet your fingers and gently pull one section of the rim outward to form a spout. Ensure it has a sharp edge for a clean pour. -
Pull a strap handle:
Pull a thick strap handle from a separate lug of clay. Let it curve and set up until it holds its shape but is still flexible. -
Attach the handle:
Score and slip the attachment points on both the pitcher body and the handle. Attach the top of the handle near the rim and the bottom roughly mid-body, blending the clay smoothly for a seamless connection. -
Verify the curve:
Check the profile of your handle. It should have a comfortable ‘ear’ shape that balances the angularity of the body.
Highlight the Edges
After glazing, gently wipe the glaze off the sharpest vertical edges with a sponge. This leaves the clay body exposed on lines, creating a stunning contrast after firing.
Step 4: Firing and Glazing
-
Bisque fire:
Once the piece is bone dry, bisque fire it to cone 04 (or your clay body’s recommendation). -
Prepare the glaze:
Mix your matte cream or white glaze. Ensure it’s not too thick, as a thick glaze can pool in the valleys and obscure the crisp edges you worked so hard to create. -
Dip or pour:
Dip the pitcher into the glaze quickly. Shake off excess glaze firmly to prevent drips. -
Clean the foot:
Wipe the foot of the pitcher clean with a damp sponge. -
Glaze fire:
Fire to the maturity temperature of your clay and glaze (typically cone 5 or 6 for stoneware). The heat will interact with the iron speckles in the clay, helping them bleed slightly through the white glaze.
Now you have a stunning, architectural pitcher ready to pour your favorite beverage in style
Layered Glaze Pitcher With Drippy Movement
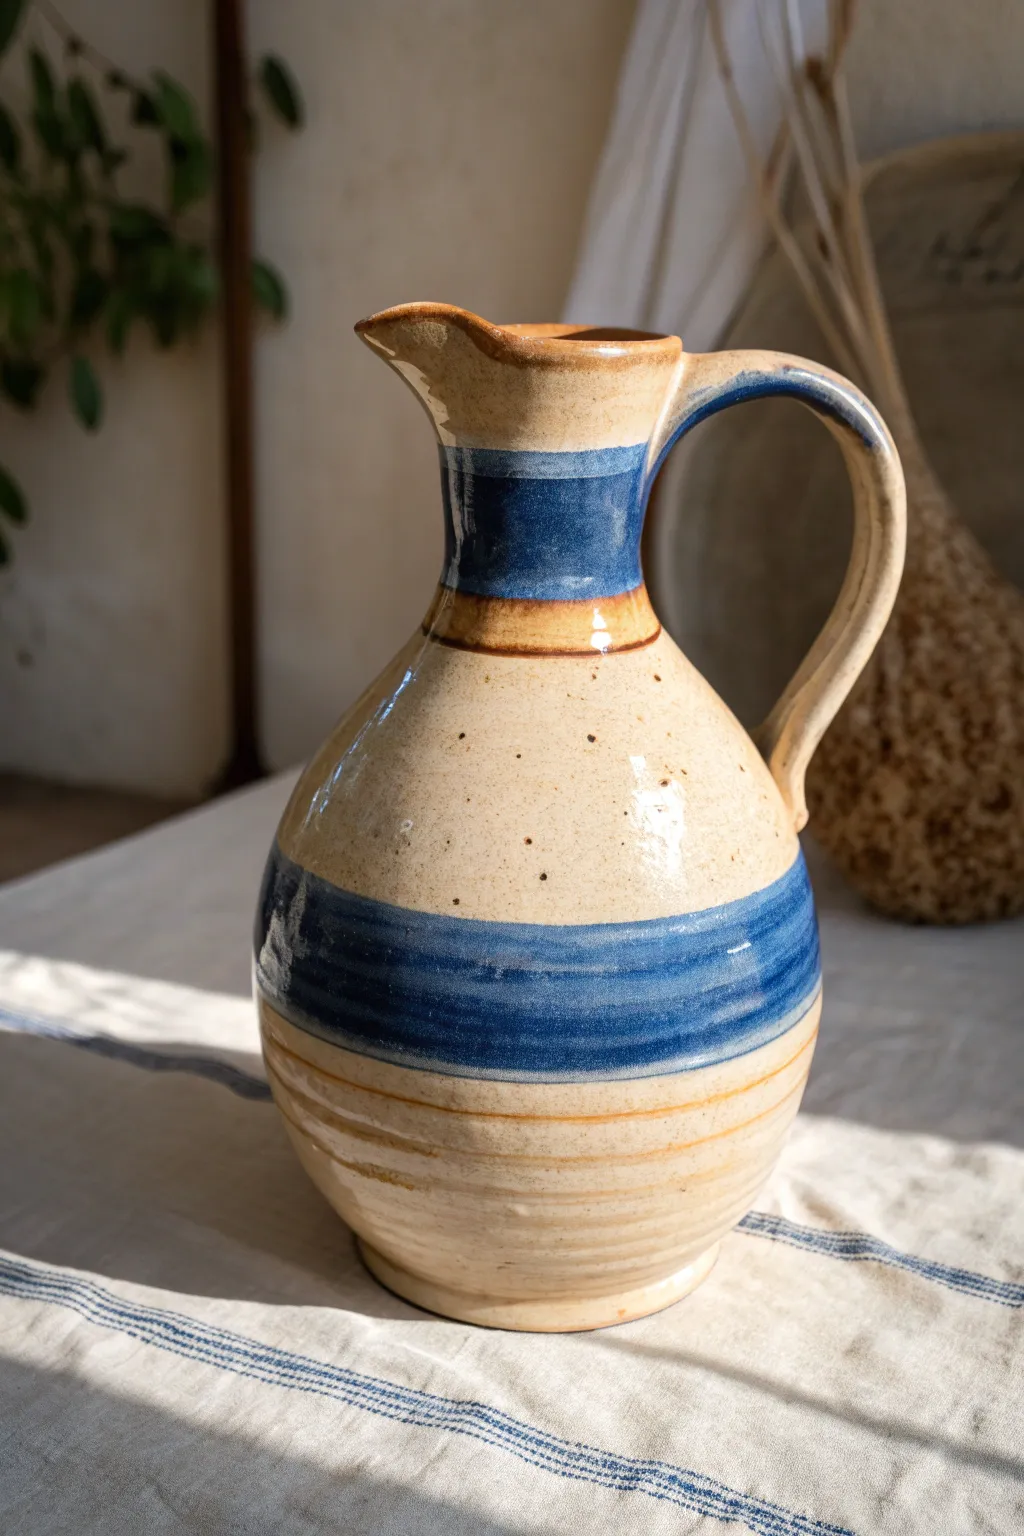
Recreate the charm of a rustic seaside cottage with this wheel-thrown pitcher, featuring a distinct bulbous body and a graceful neck. The design relies on the interplay between a speckled oatmeal clay body and bold, horizontal bands of cobalt and honey glazes.
Step-by-Step Tutorial
Materials
- Speckled stoneware clay (approx. 3-4 lbs)
- Pottery wheel
- Throwing sponge
- Needle tool
- Wooden rib tool
- Wire cutter
- Trimming tools
- Serrated kidney tool (optional for texture)
- Underglaze pencil (optional)
- Wide hake brush or soft fan brush
- Cream/Oatmeal dipping glaze (glossy)
- Cobalt blue fluid glaze
- Honey/Amber fluid glaze
- Wax resist
Step 1: Throwing the Form
-
Center the clay:
Start by wedging your speckled stoneware clay thoroughly to remove air bubbles. Place the ball on the wheel head and center it using firm pressure, coning up and down until it spins true. -
Open the vessel:
Open the center, leaving a floor about 1/2 inch thick to allow for trimming later. Compress the floor with your sponge or a wooden rib to prevent S-cracks during drying. -
Pull the cylinder:
Begin pulling the walls upward. Aim for a tall, narrow cylinder first—don’t worry about the curves yet. Keep the walls even, tapering slightly inward as you reach the top to maintain control. -
Belly out the form:
Once you have height, use a rib inside the pot to gently push the clay outward near the bottom third, creating that wide, bulbous belly. Support the outside with a sponge to keep the wall consistent. -
Collar the neck:
Gently collar the top third of the pot inward to define the narrow neck. Do this slowly in multiple passes to avoid buckling the clay. I often wet my hands slightly less during collaring to maintain better friction control. -
Shape the rim and spout:
Flair the very top rim slightly. Stop the wheel or slow it to a crawl, then use your index finger and thumb to gently pull a spout at the front, creating a confident ‘V’ shape for pouring. -
Add texture:
Before cutting it off the bat, use a modeling tool or your fingertip to press gentle spiral grooves into the bottom third of the pot while the wheel spins slowly.
Step 2: Trimming & Handling
-
Dry to leather hard:
Allow the piece to dry until it is leather hard—stiff enough to handle without deforming but still cool to the touch. -
Trim the foot:
Invert the pitcher onto a tall chuck or foam bat. Trim away excess weight from the bottom and carve a clean foot ring. This lifts the bulbous form and gives it elegance. -
Pull the handle:
Pull a strap handle from a separate lug of clay. It should be thick enough to support the pitcher’s weight but tapered for comfort. -
Attach the handle:
Score and slip the attachment points at the neck and the shoulder. Press the handle firmly into place, smoothing the joins so they look seamless. Arch the handle high and wide to mimic the curve of the spout.
Glaze Crawling?
If the blue band separates or crawls, your base glaze layer might have been too dusty or thick. Wipe bisque ware with a damp sponge before glazing to ensure adhesion.
Step 3: Glazing the Bands
-
Bisque fire:
Once bone dry, bisque fire the pitcher to cone 04 (or your clay body’s recommendation). -
Apply wax resist:
Paint wax resist on the bottom of the foot ring and slightly up the side to prevent glaze from running onto the kiln shelf. -
Base coat:
Dip the entire pitcher into a glossy cream or oatmeal glaze. Shake off any excess drips and let this layer dry completely to the touch. -
Mark your bands:
Place the pitcher on a banning wheel (or back on your pottery wheel). Spanning your brush against the spinning pot, visualize where the blue and amber bands will go. -
Apply the blue band:
Load a fan brush with cobalt blue glaze. While slowly spinning the pot, apply a thick band around the neck and a matching thick band across the belly. -
Add the honey accent:
Using a smaller brush, apply a thinner stripe of honey/amber glaze directly beneath the blue band on the neck. Allow the edges to touch slightly so they might interact during firing. -
Highlight the bottom texture:
Wipe a very thin wash of the honey glaze into the grooves you created at the bottom of the pitcher, then wipe the surface back with a damp sponge so the color remains only in the recesses. -
Glaze fire:
Fire the piece to cone 6 (or appropriate temperature for your stonewear). The glazes should melt and move slightly, creating that organic, banded look.
Layering Pro Tip
Overlap the blue and amber glazes slightly at the borders. This often creates a third, interesting chemical color reaction where the minerals mix during the melt.
Pour a cool drink from your new pitcher and enjoy the handmade aesthetic on your table
Lidded Pitcher With a Simple Gallery Seat
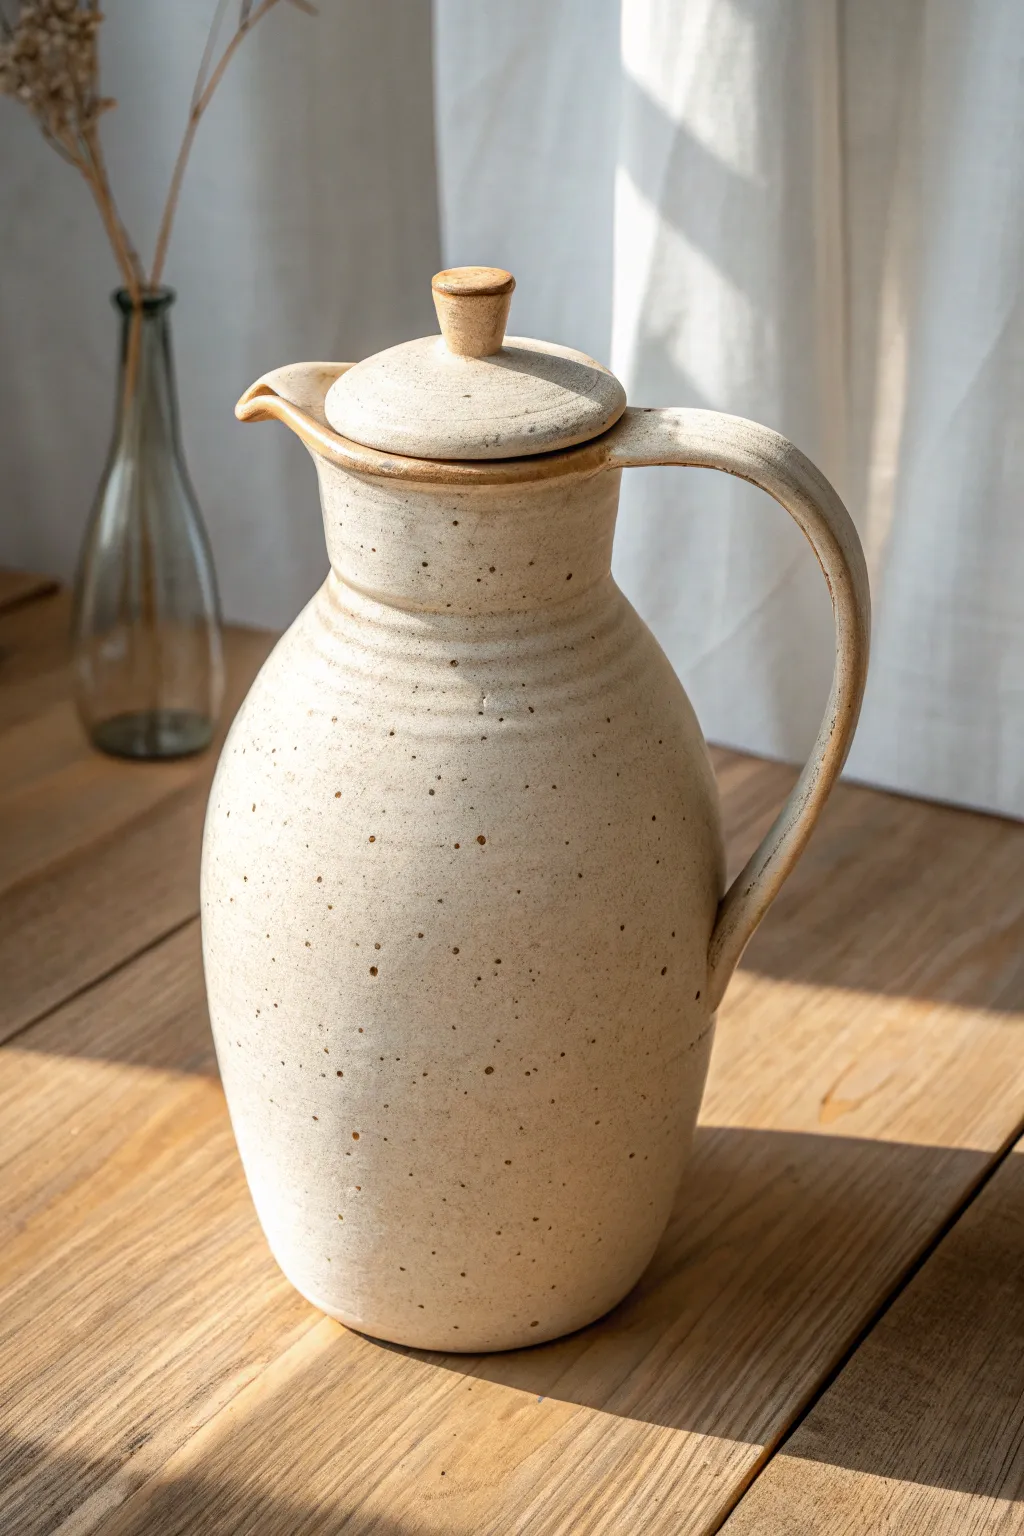
This elegant pitcher features a classic bulbous form and a distinct gallery seat that keeps the lid securely in place while pouring. Crafted from speckled stoneware clay, the neutral glaze allows the natural iron spots to shine through for a rustic, earthy finish.
Step-by-Step
Materials
- Speckled stoneware clay (approx. 3-4 lbs for pitcher body, 1 lb for lid)
- Potter’s wheel
- Throwing sponge
- Wooden throwing rib
- Pin tool
- Wire cutter
- Trimming tools
- Scoring tool or serrated rib
- Slip
- Clear or semi-transparent satin glaze
Step 1: Throwing the Body
-
Center the clay:
Start with your larger lump of speckled clay. Slam it onto the wheel head and center it thoroughly, coning up and down a few times to align the clay particles and remove air bubbles. -
Open and pull:
Open the clay down to within a half-inch of the bat. Compress the floor well to prevent cracks later. Begin pulling up the walls, focusing on maintaining an even thickness from bottom to top. -
Shape the belly:
Using a rib on the outside flexibility and your hand inside for support, gently push the clay outward from the midpoint down to create that nice, full belly shape seen in the image. -
Collar the neck:
Slow the wheel down slightly. With wet hands, gently collar the upper third of the cylinder inward to form a long, tapered neck. This creates the transition from the wide body to the narrower opening. -
Form the gallery seat:
At the rim, use your thumb or a wooden tool to press a small ledge (the gallery) inward. This ledge needs to be flat and deep enough to support the lid you will make later. Smooth the very top rim carefully. -
Pull the spout:
Stop the wheel. Support the outside of the rim with two fingers and use a wet finger from the other hand to gently pull a spout outward. Ensure the spout channel cuts through the gallery seat without ruining the ledge.
Wobbly Lid Syndrome?
If the lid rocks after firing, use a little grinding paste or fine sandpaper. Rotate the lid back and forth in the seated gallery to grind them into a perfect match.
Step 2: Creating the Lid & Handle
-
Measure the gallery:
Before throwing the lid, use calipers to measure the inside diameter of your pitcher’s gallery seat. This is crucial for a snug fit. -
Throw the lid:
Using the smaller lump of clay, throw a low, wide bowl shape inverted (or upright depending on your preference, though throwing off the hump works well here). Match the width to your caliper measurement. -
Add the knob:
While the clay is still workable, pull a small knob from the center of the lid. Shape it into a simple, tapered button shape that complements the pitcher’s silhouette. -
Pull a handle:
Pull a strap handle from a separate lug of clay. It should be long enough to arch gracefully from the top of the neck down to the belly. Let it stiffen slightly into a curve.
Add Texture
Before the clay dries, leave soft throwing rings on the neck or use a chatter tool on the belly. The transparent glaze will pool in the texture, adding depth to the surface.
Step 3: Assembly and Finishing
-
Trim the pieces:
Wait until both the pitcher body and lid are leather hard. Trim the bottom of the pitcher to create a clean foot ring. Trim the underside of the lid to remove excess weight. -
Attach the handle:
Score the attachment points on the pitcher neck and belly, as well as the ends of your handle. Apply slip and press the handle firmly into place. Smooth the joints with a damp sponge. -
Check the fit:
Gently place the leather-hard lid onto the gallery seat. If it’s too tight, carefully sand or trim the edge of the lid. Remember, clay shrinks, but they should shrink at similar rates. -
Bisque fire:
Allow the entire piece to dry slowly to avoid warping, especially around the spout and handle. Load it into the kiln for a bisque firing. -
Glaze application:
Dip or brush your clear or satin glaze over the piece. I find wiping the glaze slightly thin on the rim and gallery highlights the clay body’s warmth. -
Final firing:
Fire the pitcher to the maturity temperature of your clay (likely Cone 5 or 6 for stoneware). Let the kiln cool completely before retrieving your finished vessel.
Pour a refreshing drink from your new handmade pitcher and enjoy the functional beauty you created