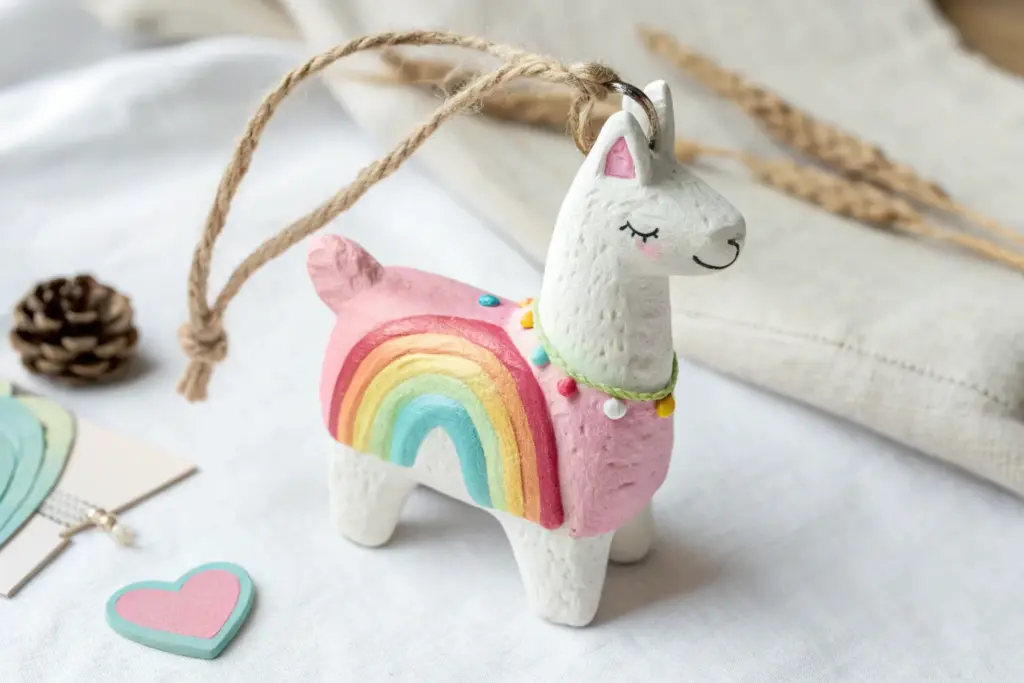
Whenever I’m teaching kids in my studio, air dry clay is my go-to because it’s forgiving, hands-on, and instantly feels like real art-making. Here are my favorite art air dry clay ideas for kids—the kind that are simple to shape but still look proudly display-worthy once they’re dry and painted.
Easy Shape Animals
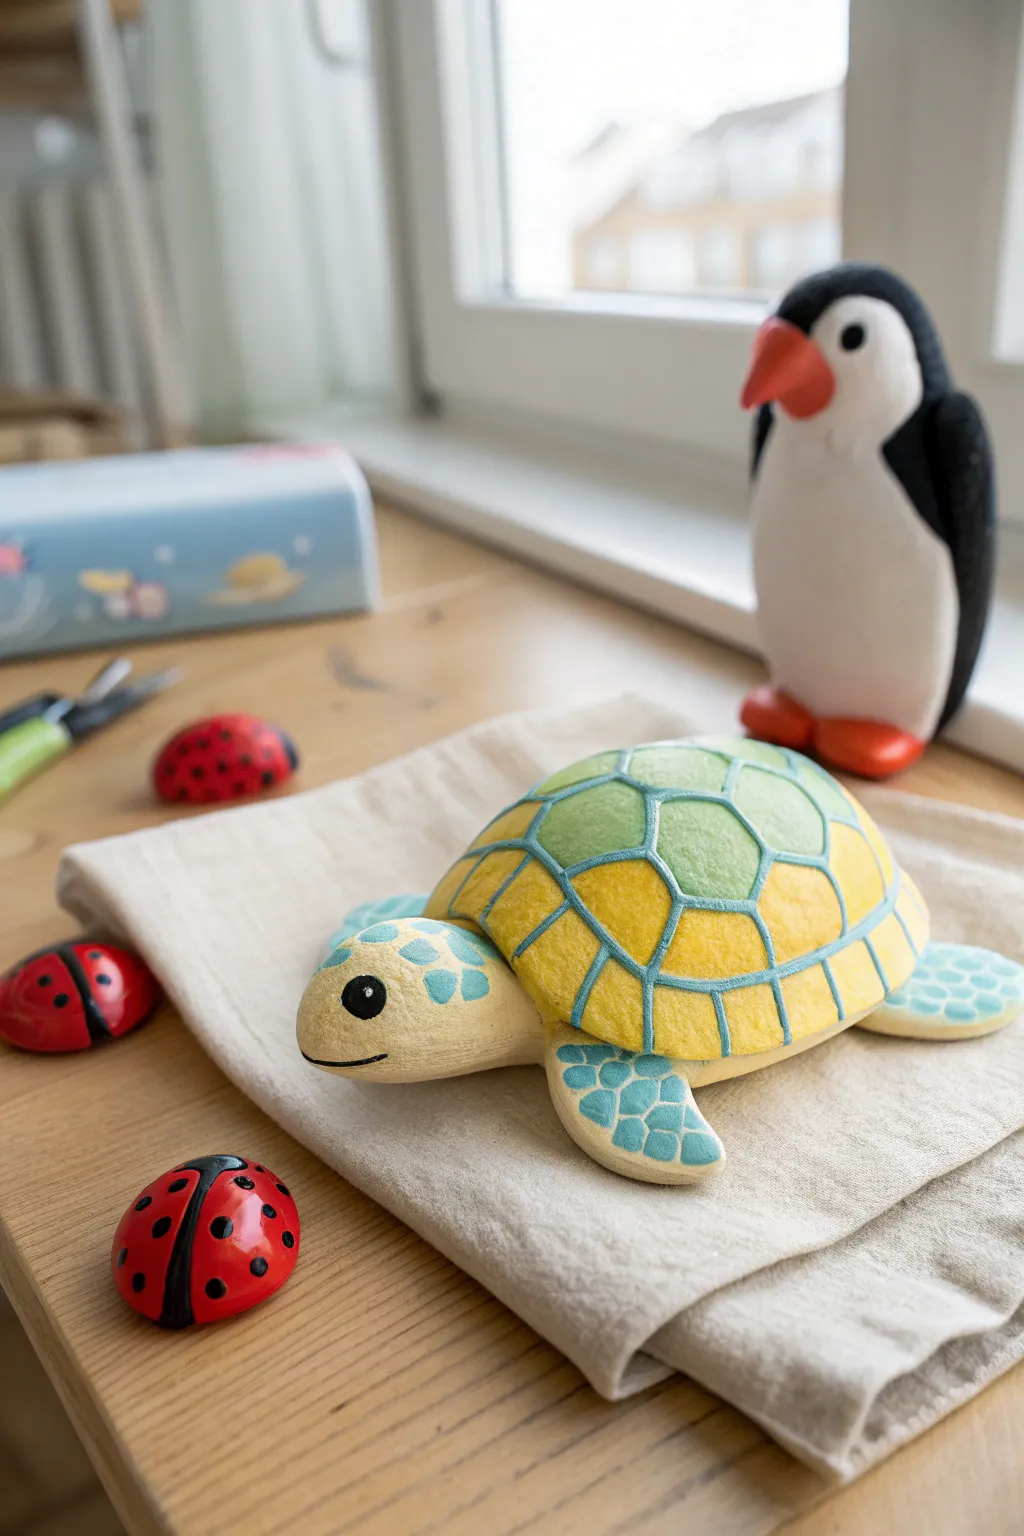
This adorable sea turtle features a beautifully patterned shell that looks intricate but is actually quite simple to achieve with a steady hand. The combination of soft lemon yellow, minty green, and teal accents makes this little ocean friend a bright addition to any desk or shelf.
How-To Guide
Materials
- Air dry clay (white)
- Acrylic paints (lemon yellow, mint green, teal/light blue, beige/sand, black, white)
- Fine detail paintbrushes (size 0 and 2)
- Clay sculpting tools (or a blunt knife and toothpick)
- Water cup and paper towels
- Rolling pin
- Aluminum foil (for the core)
- Matte varnish (optional)
Step 1: Sculpting the Form
-
Create the shell core:
Start by crumpling a piece of aluminum foil into a domed semi-circle shape. This saves clay and keeps the turtle lightweight. The dome should be about the size of a tangerine half. -
Cover the shell:
Roll out a sheet of white air dry clay to about 1/4 inch thickness. Draper this over your foil dome, smoothing it down the sides until the foil is completely hidden. -
Shape the underbelly:
Flip the dome over gently. Use your fingers to smooth the clay underneath so it is flat, creating a solid base for the turtle to rest on. -
Form the head:
Roll a separate ball of clay into a smooth teardrop shape for the head. It should be proportional to the shell, roughly the size of a walnut. -
Attach the head:
Score the clay (make little scratch marks) where the head meets the shell and dampen both surfaces slightly. Press the wider end of the teardrop firmly under the front lip of the shell. -
Make the flippers:
Shape four smaller pieces of clay into flattened paddle shapes. The front two should be longer and slightly curved, while the back two can be shorter and rounder. -
Connect the limbs:
Similar to the head, score and moisten the tops of the flippers and attach them underneath the shell’s edge. Smooth the seams with your finger or a sculpting tool so they look like one solid piece. -
Refine the surface:
Dip your finger in a tiny bit of water and run it over the entire sculpture to remove fingerprints or cracks. Ensure the shell is nice and smooth for painting later. -
Dry completely:
Let the turtle dry in a safe spot for 24-48 hours. I find flipping it over halfway through the drying process helps the bottom dry evenly.
Clean Lines Hack
If painting the lines between shell segments is tricky, paint the whole shell teal first. Let it dry, then paint the yellow and green shapes on top, leaving the teal showing in the gaps.
Step 2: Painting the Details
-
Base coat the body:
Paint the head, flippers, and the rim of the shell underbelly with a soft sand or beige acrylic paint. You may need two coats for opaque coverage. -
Paint the shell segments:
Using a small brush, block out the shell pattern. Paint misshapen pentagons and hexagons, alternating between lemon yellow and mint green. Leave a small gap of unpainted clay between each shape. -
Fill the gaps:
Mix a teal or light blue paint. Use your finest detail brush to carefully paint the lines between the yellow and green shapes. This creates a bold ‘grouted’ look. -
Add flipper details:
Using the same teal color, paint a honeycomb pattern of small, soft irregular shapes onto the top of the flippers and the top of the head. -
Detail the face:
Use black paint and a very fine brush or dotting tool to add two round eyes on the side of the head. Add a thin, curved line for a smiling mouth. -
Add the eye spark:
Once the black eye paint is fully dry, add a tiny white dot to the top corner of each eye to bring the turtle to life. -
Seal the work:
Finish by applying a coat of matte varnish over the entire piece to protect the paint and give it a finished, professional look.
Natural Texture
Before the clay dries, gently press a piece of rough fabric or burlap onto the ‘skin’ areas (head and flippers) to give the turtle a realistic, leathery skin texture.
Now you have a charming, geometric turtle friend ready to swim across your table


Painted Pinch Pot Bowls
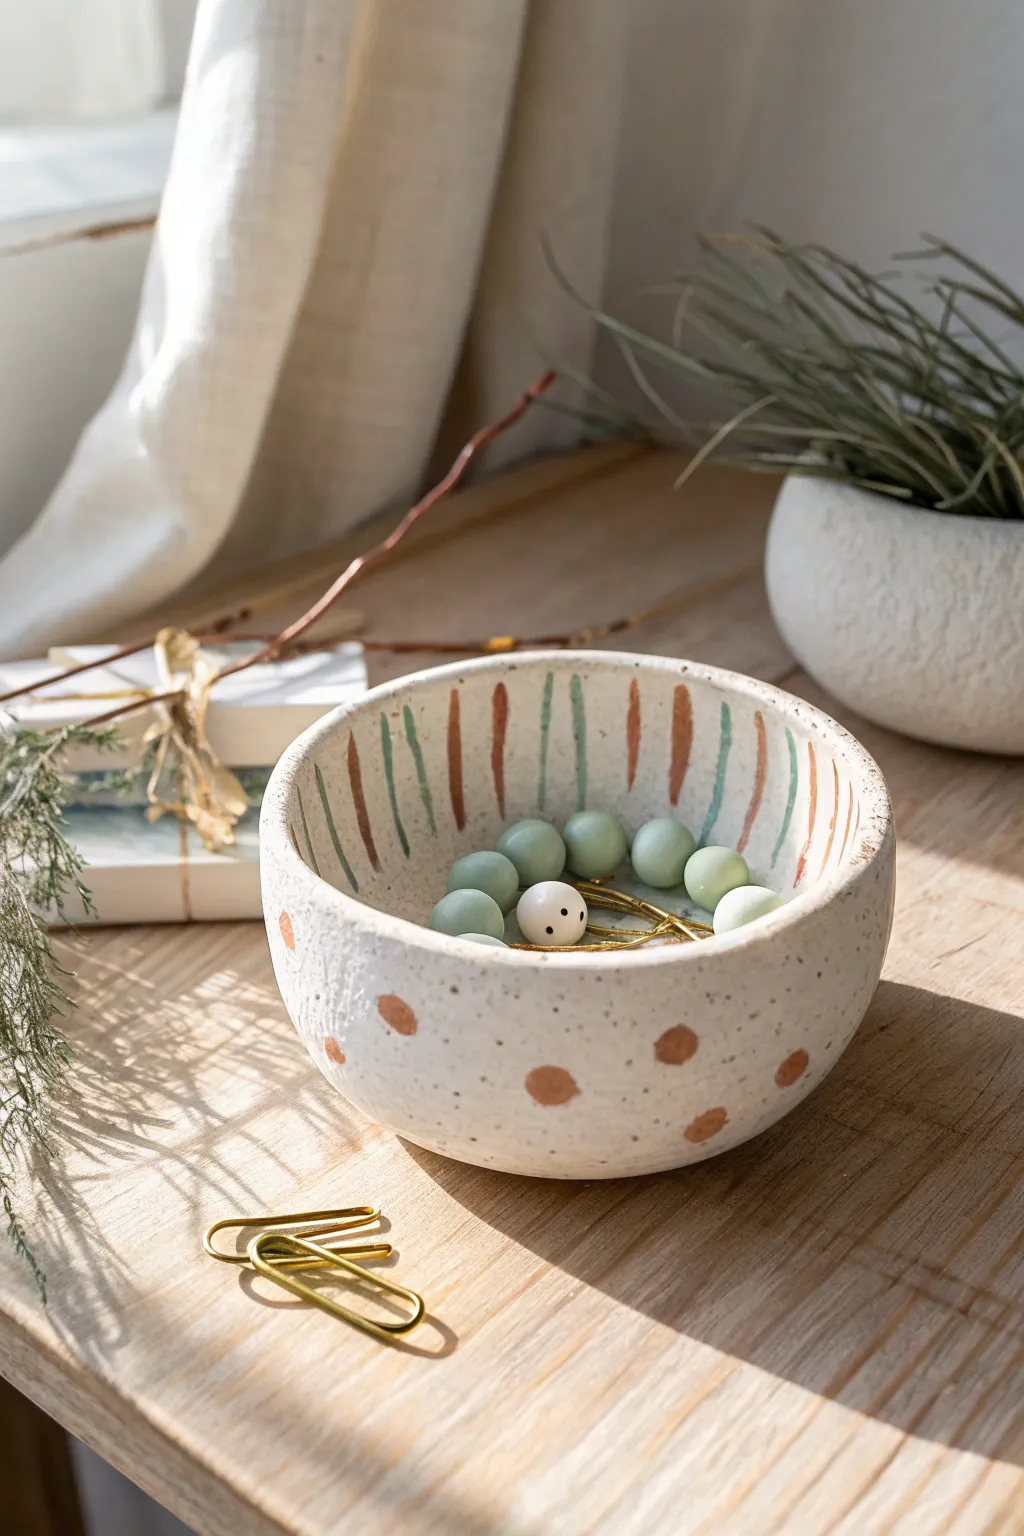
Transform a simple lump of air-dry clay into this charming, artisanal-looking bowl that’s perfect for holding tiny treasures. The design features a warm, earthy color palette with playful stripes inside and soft polka dots outside, all tied together with a speckled, stone-like finish.
Detailed Instructions
Materials
- White air-dry clay
- Small bowl of water
- Acrylic paints (terracotta, sage green, and dark brown)
- Fine detail paintbrush
- Old toothbrush
- Gloss or matte varnish (optional)
- Sandpaper (fine grit)
- Sponge
Step 1: Shaping the Clay
-
Form the base:
Start with a ball of clay roughly the size of a tennis ball. Roll it in your palms until it is smooth and round to eliminate major cracks early on. -
Create the opening:
Hold the ball in one hand and push your thumb gently into the center. Don’t go all the way through; leave about a half-inch of thickness at the bottom. -
Pinch the walls:
Using your thumb on the inside and fingers on the outside, gently pinch and rotate the clay. Work your way from the bottom up to the rim, aiming for an even thickness all around. -
Smooth it out:
Dip your finger in a little water—just a drop—and smooth any cracks that appear on the rim or sides. Keep the walls relatively thick for a sturdy, rustic look. -
Flatten the bottom:
Gently tap the bowl onto your table to create a flat base so it sits steadily without wobbling. -
Dry completely:
Set your bowl aside in a dry spot. Depending on your humidity and the clay thickness, this will take 24 to 48 hours. The clay should change from cool gray to bone white.
Keep it Clean
When doing the speckle technique, place your bowl inside a cardboard box first. This catches the stray paint spray so your furniture stays clean.
Step 2: Painting the Design
-
Refine the surface:
Once fully dry, lightly sand any rough edges or bumps on the rim with fine-grit sandpaper. Wipe away the dust with a barely damp sponge. -
Mix your colors:
Prepare your palette. You’ll need a muted terracotta orange and a soft sage green. If your paints are too bright, mix in a tiny dot of brown or gray to tone them down. -
Paint the interior stripes:
Using a fine detail brush, paint vertical stripes on the inside walls. Alternate between the terracotta and sage green colors. They don’t need to be perfectly straight; a hand-painted wobble adds character. -
Add exterior dots:
Switch to a slightly rounder brush or use your fingertip. Dab random polka dots of the terracotta color all around the outside of the bowl. -
Create the speckled effect:
Water down a small amount of dark brown paint until it’s inky. Dip an old toothbrush into it, point the bristles at the bowl, and run your thumb across them to flick tiny speckles over the entire piece. -
Dry the paint:
Let the paint dry completely. This usually takes about 20-30 minutes since acrylics dry fast. -
Seal the deal:
Apply a coat of varnish to protect your work. I find a matte varnish keeps that natural stone look, but gloss works if you want a ceramic shine.
Fixing Cracks
If a crack appears while drying, create a ‘slip’ by mixing a little clay with water into a paste. Smear this into the crack, smooth it, and let it dry again.
This lovely little dish is now ready to organize your desk clips or hold your favorite jewelry pieces


Handprint Trinket Dish
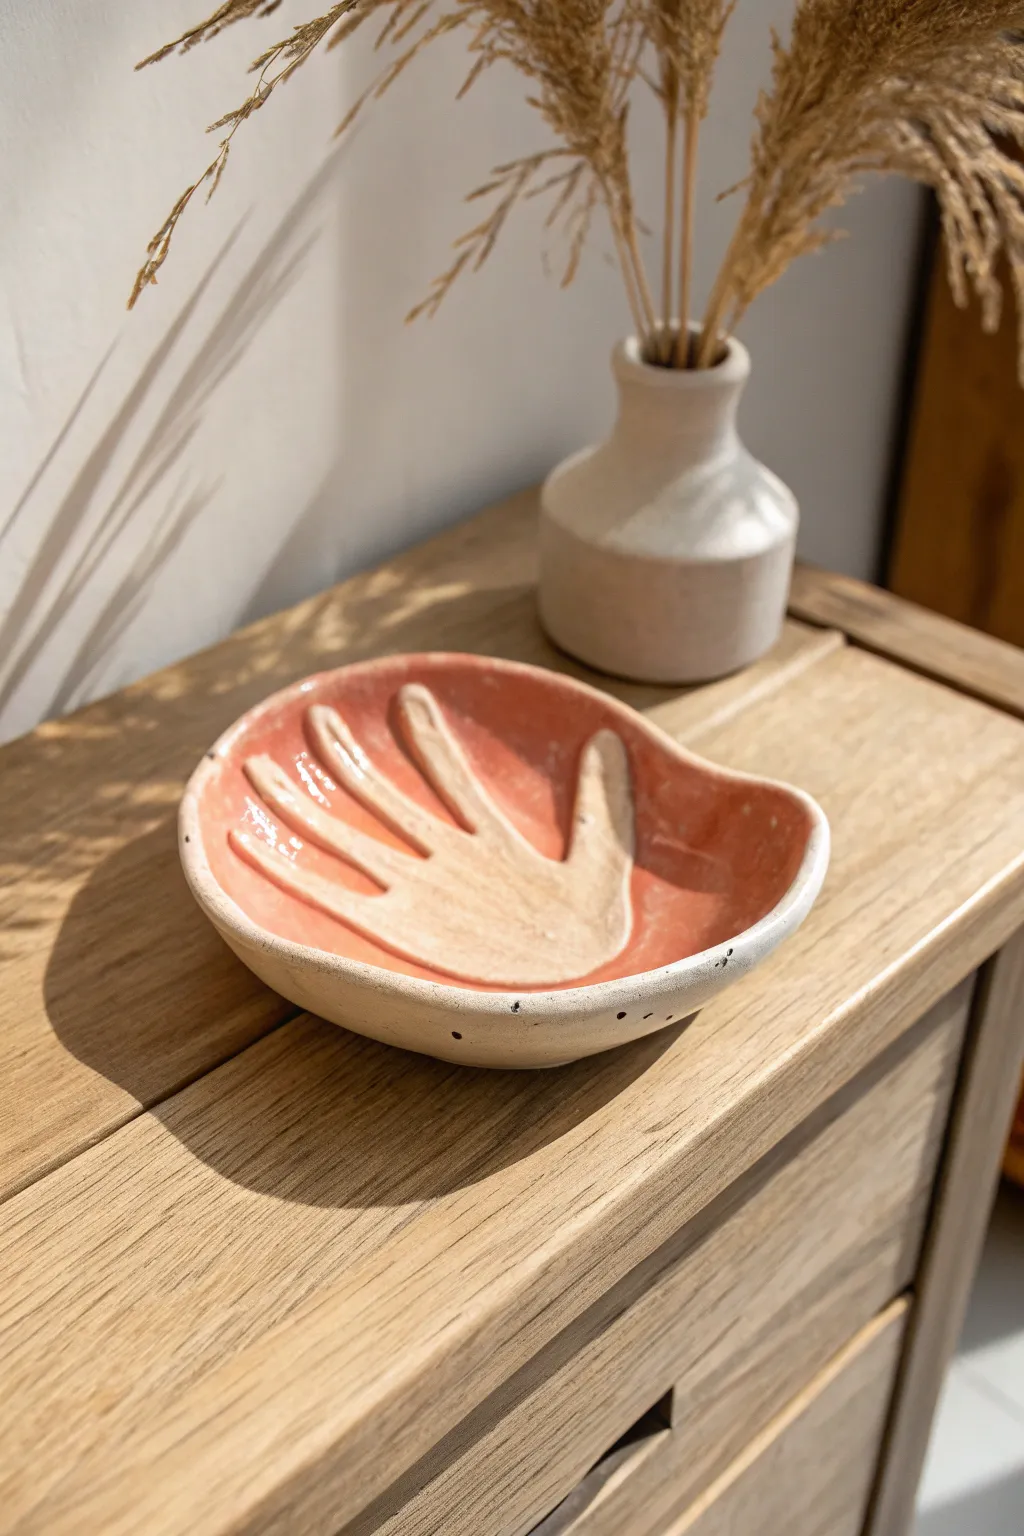
Immortalize a moment in time or simply celebrate the human form with this beautifully textured trinket dish. Featuring a raised relief handprint against a glossy, peach-colored background, this piece combines rustic charm with a modern, artistic flair.
How-To Guide
Materials
- Air dry clay (white or stone color)
- Clay rolling pin
- Small bowl (for shaping)
- Clay sculpting tools (or a butter knife and toothpick)
- Sandpaper (fine grit)
- Acrylic paints (peach/salmon, cream, off-white, black)
- Glossy varnish or sealant (Mod Podge Gloss or polyurethane)
- Matte varnish
- Paintbrushes (medium flat, small detail)
- Small sponge (optional)
- A paper template of a hand (or a willing volunteer)
Step 1: Shaping the Base
-
Roll out the slab:
Start with a ball of air dry clay about original grapefruit size. Roll it out on a flat surface until it is roughly 1/4 inch thick, keeping the thickness consistent throughout. -
Cut the organic shape:
Using a needle tool or a knife, cut a freeform, slightly irregular oval or kidney bean shape. Don’t embrace perfection here; the wavy edges add to the handmade ceramic look. -
Form the curve:
Gently lift your clay slab and drape it inside a shallow bowl lined with plastic wrap. Press it lightly so it takes on a concave, dish-like curve. -
Smooth the edges:
Dip your finger in a little water and run it along the rim of the dish to soften any sharp cuts or rough texture from the initial cutting.
Smooth Seams
When attaching the clay hand, use a slightly wet paintbrush to trace the seam where the hand meets the bowl. It seals gaps without squishing the shape.
Step 2: Creating the Hand Relief
-
Roll the hand clay:
Roll out a smaller, thinner slab of clay, closer to 1/8 inch thick. This will become the hand icon. -
Trace and cut:
Place a hand template (or lightly press a real hand) onto the thin slab. Carefully cut out the hand shape using a precision knife. -
Score and slip:
To attach the hand, scratch cross-hatch marks (scoring) onto both the back of the cut-out hand and the center of your dish. add a dab of water or liquid clay (slip) to these rough areas. -
Attach the hand:
Gently press the clay hand into the center of the dish. Start from the palm and work your way out to the fingers to avoid trapping air bubbles. -
Blend delicately:
Use a sculpting tool to smooth the edges of the hand very slightly into the bowl so it looks integrated, but keep the relief distinct and raised. -
Add texture:
I like to use a stiff brush or a crumpled ball of foil to gently tap texture onto the hand, giving it that rustic, stone-like appearance. -
Let it dry completely:
Allow the dish to dry in a cool, dry place for at least 24-48 hours. Flip it occasionally once it’s stiff enough to ensure the bottom dries evenly.
Make it Metallic
Instead of a cream hand, paint the relief with liquid gold leaf or metallic copper paint for a luxurious, high-contrast jewelry holder.
Step 3: Sanding & Painting
-
Sand for smoothness:
Once fully cured, use fine-grit sandpaper to smooth out the rim and the underside of the bowl. Wipe away all dust with a slightly damp cloth. -
Base coat the exterior:
Paint the entire outside and the rim of the bowl with an off-white or cream acrylic paint. Let this dry completely. -
Paint the background:
Using a peach or salmon color, carefully paint the interior of the bowl, painting around the hand shape. You may need two coats for opaque coverage. -
Define the hand:
Paint the hand relief in a light cream or beige tone. If you get any peach paint on the hand, simply paint over it with the cream. -
Add speckles:
Dilute a tiny amount of black paint with water. Dip a stiff brush (or toothbrush) into it and flick the bristles to spatter tiny black specks over the exterior and rim for a faux-ceramic finish. -
Detail the rim:
If you want a more defined edge, you can paint a very thin, uneven black line along the very top of the rim to mimic exposed stoneware clay.
Step 4: Sealing
-
Apply gloss varnish:
Coat the peach-colored interior with a high-gloss varnish. This mimics the look of fired ceramic glaze and makes the color pop. -
Apply matte varnish:
For the exterior and the raised hand, use a matte varnish. This contrast between the shiny ‘glazed’ background and the matte ‘raw clay’ hand is the key to this look.
Place your favorite rings or keys in your new dish and enjoy the handmade warmth it brings to your space


Nature Print Clay Medallions
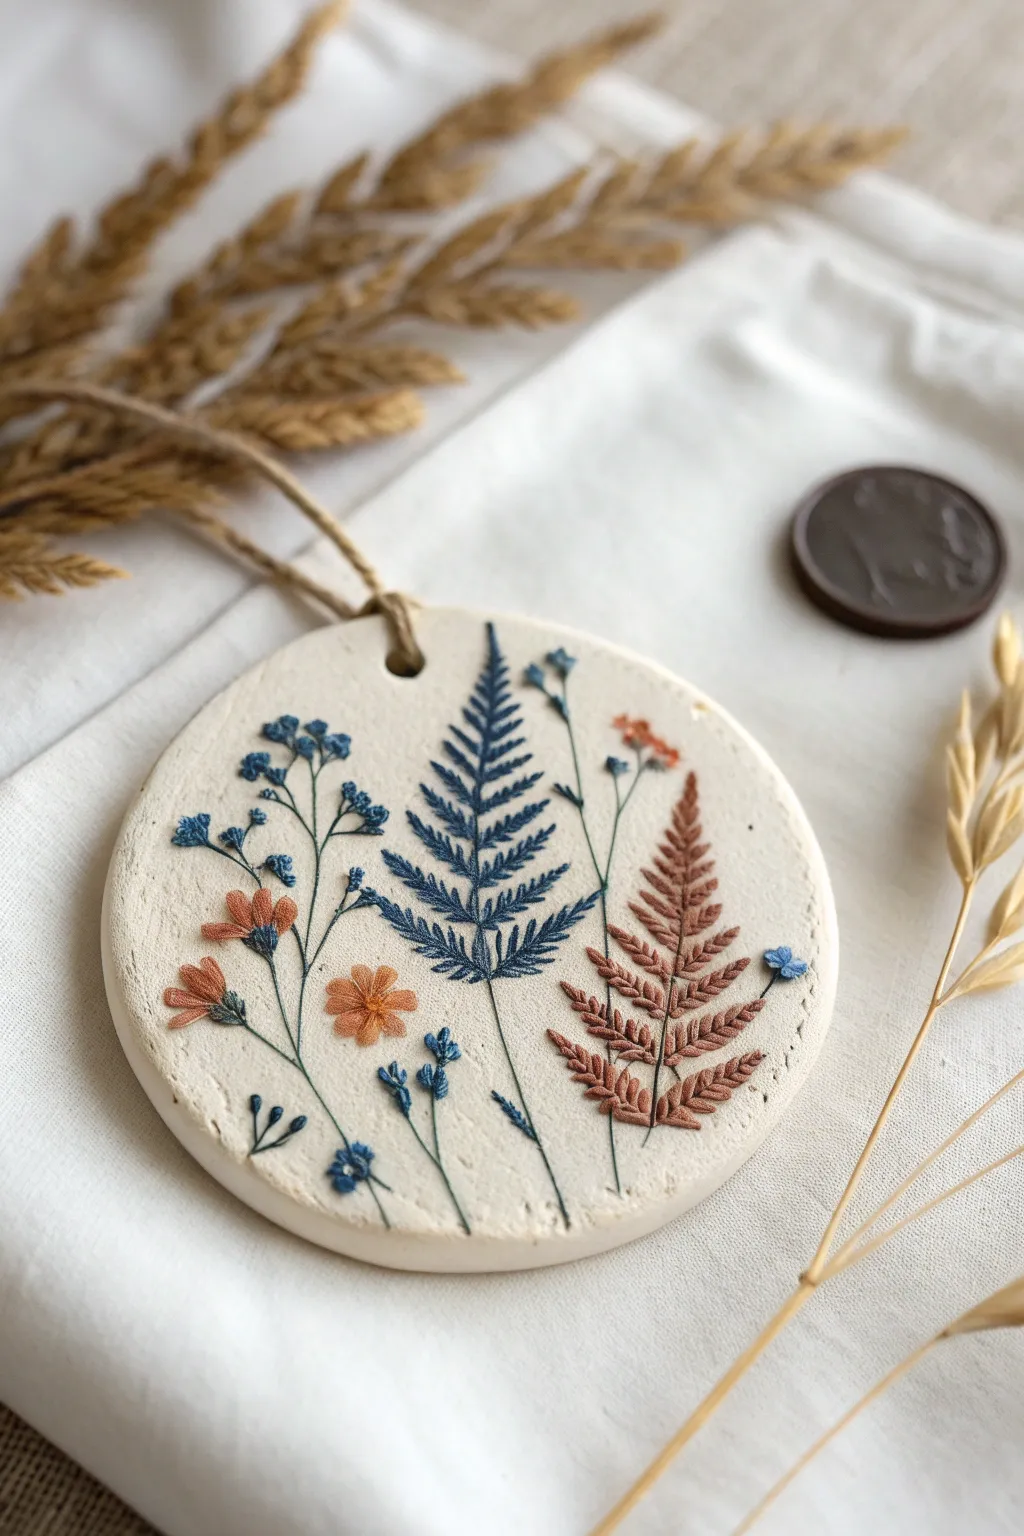
These charming medallions combine the rustic look of pottery with delicate, embroidery-inspired floral designs. Using simple air-dry clay and fine paints, you can create a nature-themed ornament that mimics the texture of stitched thread on fabric.
Step-by-Step Tutorial
Materials
- White air-dry clay
- Rolling pin
- Round cookie cutter or drinking glass (approx. 3-4 inches)
- Sandpaper (fine grit)
- Acrylic paints (navy blue, terracotta/rust orange, sage green)
- Fine detail paintbrush (size 0 or 00)
- Needle tool or toothpick
- Jute twine
- Clear matte varnish or sealant (optional)
- Parchment paper
Step 1: Shaping the Clay Canvas
-
Prepare your workspace:
Lay down a sheet of parchment paper to prevent sticking. Take a handful of air-dry clay and knead it briefly until it is warm and pliable. -
Roll out the slab:
Using a rolling pin, flatten the clay to an even thickness of about 1/4 inch. If you want a smoother surface, dip your finger in water and gently run it over the clay. -
Cut the shape:
Press your round cookie cutter or glass firmly into the clay to create a clean circle. Peel away the excess clay from the edges. -
Smooth the edges:
Dip your finger in a tiny bit of water and run it around the cut edge of the circle to soften any sharp ridges or crumbs left by the cutter. -
Create the hanging hole:
Use a straw or a tool to poke a hole near the top edge for the twine. Make sure it’s not too close to the edge to prevent tearing later. -
Initial drying:
Let the clay medallion dry completely according to the package instructions. This usually takes 24-48 hours. Flip it over halfway through to ensure even drying and prevent curling. -
Sand for perfection:
Once fully dry and hard, take a piece of fine-grit sandpaper and lightly buff the surface and edges to remove any fingerprints or bumps.
Keep it Flat
To prevent the medallion from warping or curling while it dries, place a light book on top of it once the surface is dry to the touch.
Step 2: Painting the Faux-Embroidery
-
Sketch the design (optional):
If you are nervous about freehanding, lightly sketch the main stems of the ferns and flowers with a pencil. Keep the lines very faint. -
Paint the central blue fern:
Using your finest brush and navy blue paint, draw a vertical line for the main stem. Then, paint angled, V-shaped dashes extending from the stem to mimic fern fronds. Keep the strokes short and feathered to look like thread stitches. -
Add the rust fern:
To the right of the blue fern, switch to your terracotta or rust-colored paint. Paint a similar fern shape, perhaps slightly curved, using the same small, dash-like strokes to build texture. -
Create the delicate stems:
Using thinned-down blue or green paint, draw very fine, wandering lines for the smaller wildflowers on the left and bottom. I find holding the brush vertically helps keep the lines thin. -
Add flower buds:
Dip the tip of your brush in blue paint and dab tiny clusters of dots at the ends of the wandering stems to create baby’s breath or forget-me-not shapes. -
Paint larger blooms:
With the terracotta paint, add small, simple five-petal flowers among the blue stems. Use short, controlled strokes so the petals look distinct. -
Add final details:
Use your needle tool or a clean toothpick to very gently scratch tiny lines into the painted leaves before the paint fully cures; this reveals the white clay underneath and enhances the ‘stitched’ illusion.
Pro Tip: Texture Trick
Use a needle to gently prink or scratch your painted ‘stitches’ once dry. This adds physical texture that catches the light like real thread.
Step 3: Finishing Touches
-
Seal the artwork:
Once the paint is totally dry, apply a light coat of matte varnish if you want to protect the design. A glossy finish might ruin the natural look, so stick to matte. -
Add the hanger:
Cut a length of jute twine, thread it through the hole at the top, and tie it securely. A simple loop knot works best here.
Hang your finished botanical medallion in a sunny window or use it as a special gift tag for a loved one

The Complete Guide to Pottery Troubleshooting
Uncover the most common ceramic mistakes—from cracking clay to failed glazes—and learn how to fix them fast.
Bead-Pressed Heart Ornaments
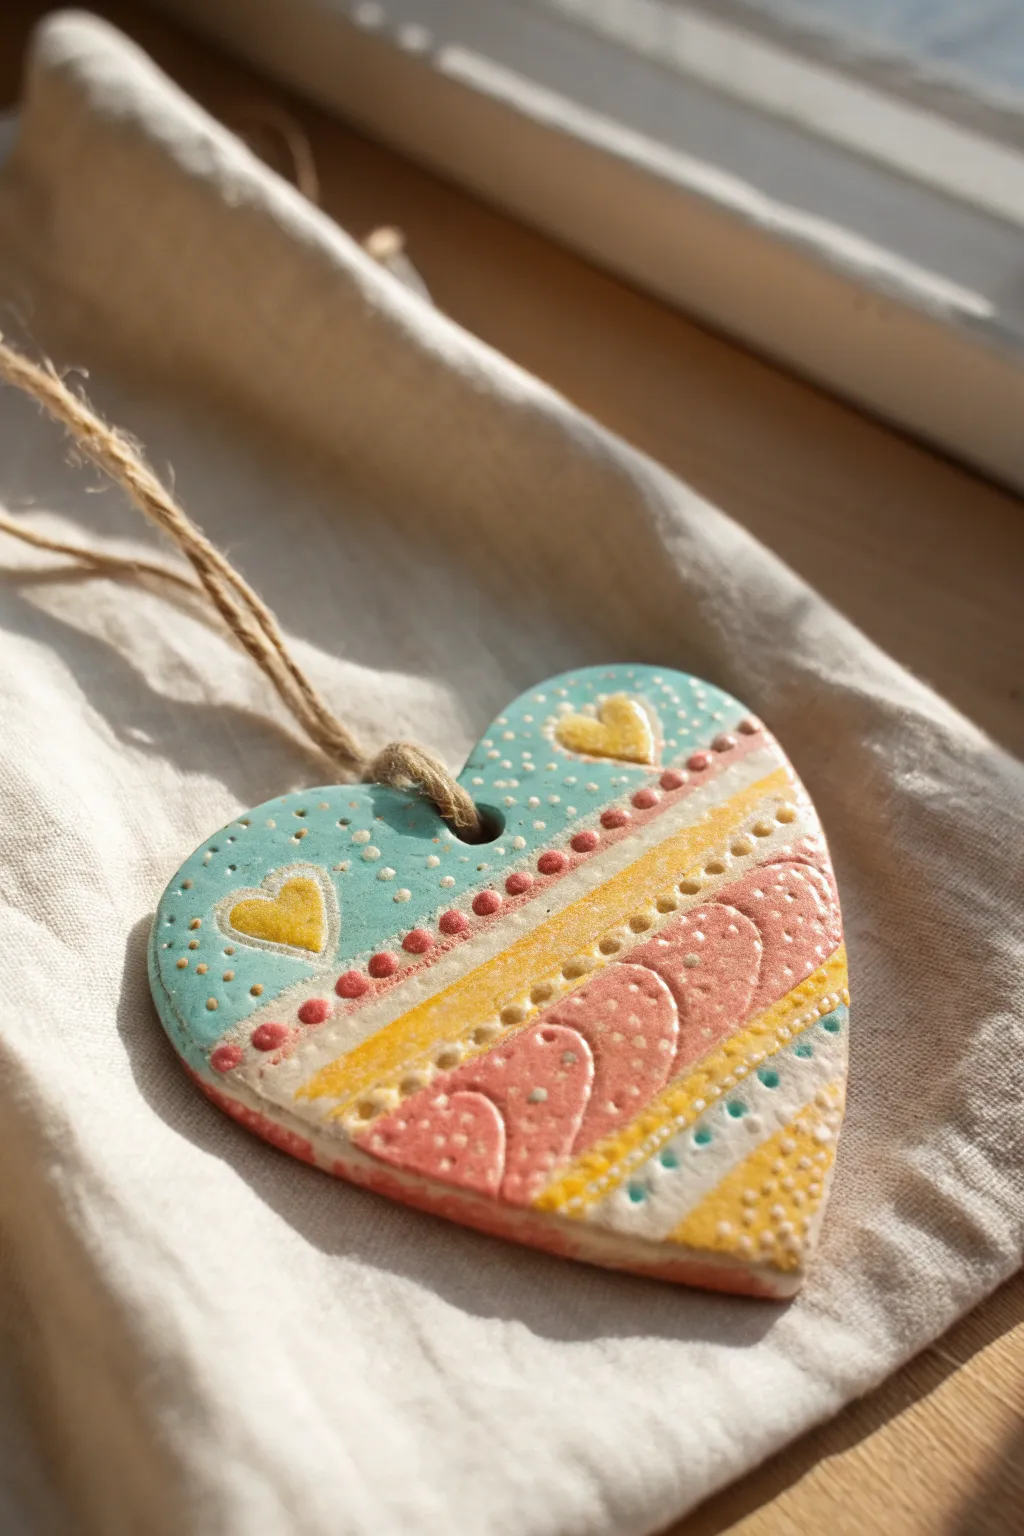
These charming heart ornaments combine soft pastel tones with intricate embossed textures to create a keepsake that looks like distinctive ceramic ware. The design features alternating bands of dotted patterns and sweet raised heart motifs, all tied together with rustic twine.
How-To Guide
Materials
- Air dry clay (white)
- Acrylic paints (teal, coral/pink, butter yellow, white)
- Rolling pin
- Heart-shaped cookie cutter (medium size)
- Small heart-shaped cutter or modeling tool
- Clay tools or toothpicks for dotting
- Clear acrylic sealer or varnish (glossy)
- Jute twine
- Straw or skewer (for hole punching)
- Fine grit sandpaper
- Small round paintbrush
Step 1: Sculpting the Base
-
Roll the clay slab:
Begin by conditioning a handful of air dry clay until it is soft and pliable. Roll it out on a smooth surface to an even thickness of about 1/4 inch (6mm). You want it substantial enough to be sturdy but not too heavy. -
Cut the shape:
Press your medium-sized heart cookie cutter firmly into the clay slab. Wiggle it slightly to ensure a clean cut, then gently remove the excess clay from around the shape. -
Smooth the edges:
Dip your finger in a tiny bit of water and run it along the cut edges of the heart to smooth out any roughness or loose bits of clay. This makes painting much easier later. -
Create the hanging hole:
Using a drinking straw or a thick skewer, punch a clean hole near the top center of the heart, right where the two curves meet. Make sure the hole is large enough for your twine to pass through later.
Step 2: Adding Texture & Detail
-
Mark the sections:
Lightly trace curved lines across the heart with a toothpick to map out where your different color bands will go. This guide helps you keep your patterns organized. -
Create raised hearts:
Roll two tiny balls of clay and flatten them into miniature heart shapes. Score the back of these tiny hearts and the spot on the main heart where they will sit. Add a dab of water (slip) to attach them firmly—I usually place one on the upper left and one on the upper right. -
Impress texture lines:
Using a clay tool or the side of a toothpick, press indentations into the clay to create the separating lines between your sections. Deep impressions hold the glaze beautifully later. -
Add dot details:
Use the blunt end of a skewer or a dotting tool to press rows of dots into specific sections. Vary the pressure to create different sized indentations, focusing on the borders of your patterned bands. -
Dry completely:
Set the ornament in a safe, dry place. Let it cure for at least 24-48 hours, flipping it occasionally to ensure both sides dry evenly and prevent curling.
Uneven drying?
If your heart starts curling up at the edges while drying, gently weigh it down with a heavy book. Place parchment paper between the clay and the book to prevent sticking.
Step 3: Painting & Finishing
-
Sand imperfections:
Once bone dry, check the edges again. If there are any sharp points, gently buff them away with fine-grit sandpaper. -
Base coat the sections:
Paint the sections in alternating colors using a small round brush. Use a soft teal for the top, a warm white or cream for the middle stripes, and a coral pink for the bottom curved sections. -
Paint the raised hearts:
Carefully paint the two raised embossed hearts with a cheerful butter yellow acrylic paint. -
highlight the texture:
Using a very fine brush or a toothpick dipped in paint, add dots of contrasting colors into the impressed holes you made earlier. For example, add pink dots along the white stripe border. -
Add the yellow stripe:
Paint a bold yellow stripe across the center section. Let the paint dry slightly, then add white or cream dots on top of the painted surface for extra dimension. -
Paint decorative scallops:
On the pink section, paint thin, curved white lines to create a scalloped fish-scale pattern. This mimics the look of hand-carved folk art. -
Apply varnish:
Once all paint is completely dry, apply a coat of glossy acrylic sealer or varnish. This gives the piece a ceramic-like shine and protects the paint from chipping. -
String the twine:
Cut a length of jute twine, roughly 8 inches long. Fold it in half, push the loop through the hole from front to back, and pull the tails through the loop to secure it with a lark’s head knot.
Add some sparkle
Mix a tiny pinch of gold mica powder into your clear varnish before sealing. This adds a subtle, magical shimmer that catches the light beautifully on a Christmas tree.
Hang this cheerful heart in a sunny window or gift it to a friend to brighten their day
Smile Face Fridge Magnets
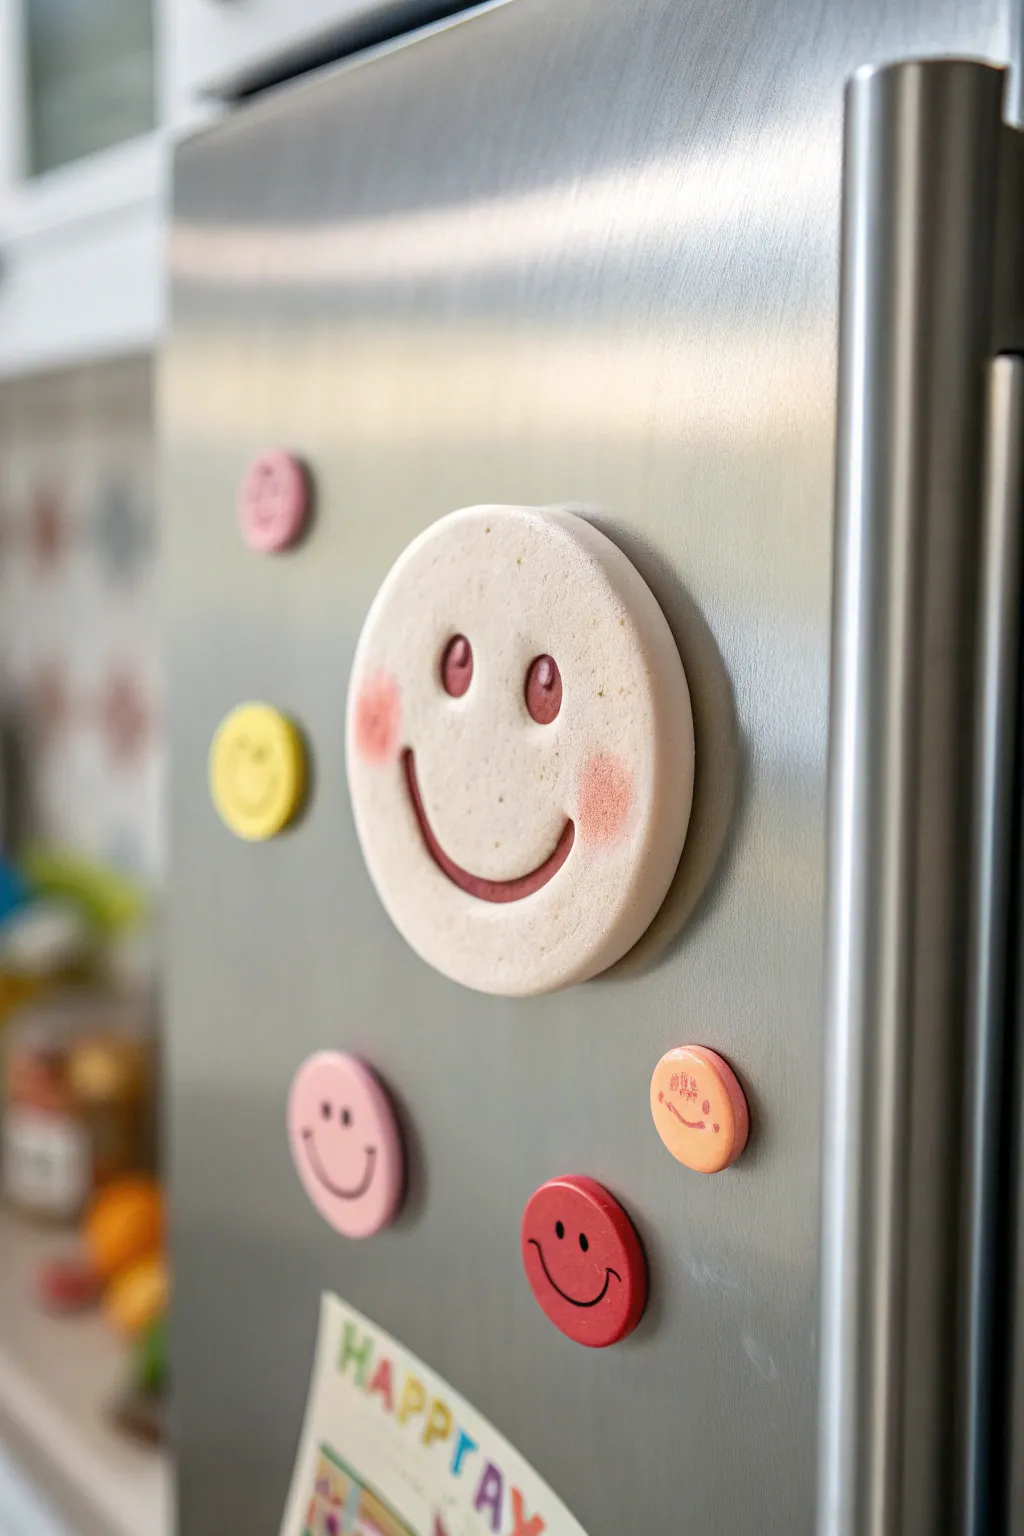
Brighten up your kitchen with these ridiculously cute, oversized smiley face magnets. With their chubby cheeks and simple expressions, they have a soft, matte finish that feels modern yet playful enough for kids to sculpt.
Detailed Instructions
Materials
- White air dry clay
- Rolling pin
- Round cookie cutters (various sizes)
- Small round sculpting tool or back of a paintbrush
- Plastic knife or clay sculpting blade
- Acrylic paints (pastel pink, red, yellow, orange)
- Small paintbrush or sponge dauber
- Strong round craft magnets
- Superglue or strong craft glue
- Fine grit sandpaper (optional)
- Parchment paper or silicone mat
Step 1: Shaping the Base
-
Prep your surface:
Lay down a sheet of parchment paper or a silicone mat to prevent sticking. Knead a handful of white air dry clay until it feels pliable and warm in your hands. -
Roll it out:
Using your rolling pin, flatten the clay to an even thickness of about 1/4 to 1/2 inch. You want these to be chunky and durable, so avoid rolling it too thin. -
Cut the circles:
Press your largest round cookie cutter firmly into the clay to create the main face. Wiggle it slightly to ensure a clean cut before lifting. Create smaller circles for accompanying magnets if you have extra clay. -
Smooth the edges:
Dip your finger in a tiny bit of water and gently run it around the cut edge of the circle. This softens any sharp ridges left by the cutter, giving it that smooth, finished look.
Cracked Clay Crisis?
Make a “slip” by mixing a tiny bit of clay with water until it’s a paste. Fill any cracks with this paste, smooth it over with a wet finger, and let it dry again.
Step 2: Creating the Expression
-
Indent the eyes:
Find a rounded tool, like the handle end of a paintbrush or a ball stylus. Press two vertical oval indents into the upper half of the circle for the eyes. Don’t push all the way through; just create deep impressions. -
Carve the smile:
With a plastic clay tool or a dull knife, carefully carve a wide ‘U’ shape for the mouth. I prefer to press the tool in and gently rock it back and forth to widen the line rather than dragging it, which can pull pieces of clay up. -
Refine the features:
Use your dampened fingertip or a soft, damp brush to smooth out any crumbs of clay inside the eye sockets or along the smile groove. -
Drying time:
Place your clay faces on a flat surface away from direct heat. Let them dry completely, which usually takes 24-48 hours depending on thickness. Flip them over halfway through so the back dries evenly.
Step 3: Adding Color & Assembly
-
Sand for smoothness:
Once fully dry and hard, check the edges. If there are rough spots, gently buff them away with fine-grit sandpaper. -
Paint the features:
Using a fine brush, fill in the indented eyes and the smile line with a reddish-brown or deep red acrylic paint. Keep the paint inside the grooves for a crisp look. -
Add rosy cheeks:
Dip a sponge dauber or a dry brush into a tiny amount of pastel pink paint. Blot most of it off onto a paper towel until almost dry, then gently dab circular cheeks onto the face for a soft, airbrushed effect. -
Color the mini magnets:
For the smaller magnets shown in the background, paint the entire circle a solid color (yellow, pink, or red) before painting on their simple black or dark red faces. -
Attach the magnet:
Apply a dab of strong superglue to the back of the clay face. Press a round magnet firmly into the glue. If your clay circle is large and heavy, you might need two magnets to hold it securely. -
Final cure:
Let the glue set completely according to the manufacturer’s instructions before sticking your new friend onto the fridge.
Glossy Upgrade
For a ceramic look instead of matte, coat the finished dry face with a layer of Mod Podge or clear acrylic gloss varnish. This also protects them from kitchen spills.
Now your fridge has a permanent cheerful greeting waiting for you every time you reach for a snack


What Really Happens Inside the Kiln
Learn how time and temperature work together inside the kiln to transform clay into durable ceramic.
Coil Snails and Coil Hearts
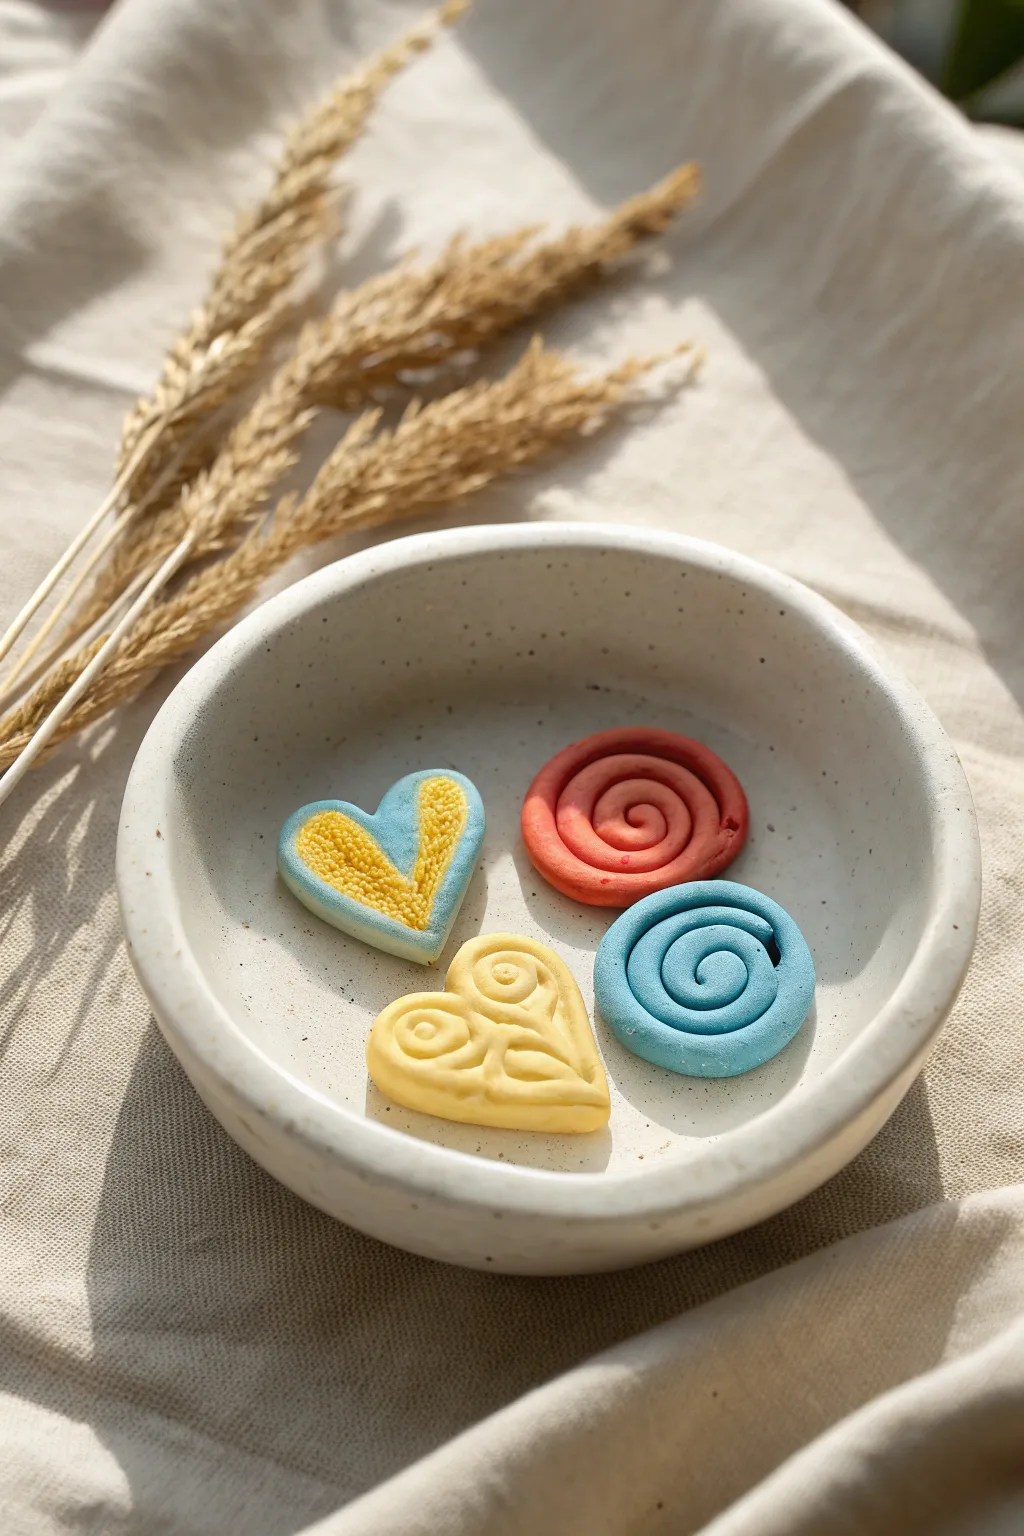
These charming little tokens are perfect for beginners exploring the tactile joy of air dry clay. You’ll create simple spiral shapes and textured hearts that showcase how contrasting colors and small details can make clay pieces pop.
Step-by-Step
Materials
- Air dry clay (white, blue, yellow, and terracotta/red)
- Clean work surface or mat
- Rolling pin or smooth bottle
- Needle tool or toothpick
- Small bowl with water
- Fine-grit sandpaper (optional)
- Clear matte varnish (optional)
Step 1: Creating the Coil Snails
-
Prepare the Clay:
Start by pinching off a small amount of terracotta or red clay, about the size of a walnut. Knead it in your hands until it’s warm and pliable. -
Roll a Snake:
Place the ball on your work surface and use the palm of your hand to roll it back and forth. Apply even pressure to lengthen it into a smooth, consistent snake about 5-6mm thick. -
Start the Spiral:
Take one end of the snake and curl it tightly inward to create the center of your spiral. Keep the coil tight so there are no gaps. -
Complete the Shape:
Continue winding the clay around itself until you reach your desired size. For a finished look, you can taper the very end of the snake by rolling it thinner before pressing it gently against the side of the spiral to seal it. -
Repeat with Blue Clay:
Clean your hands and work surface, then repeat this exact process with blue clay to make a second spiral snail token.
Cracking Clay?
If you see tiny cracks forming as you roll your coils, dip your finger in water and smooth over the clay snake immediately before coiling it up.
Step 2: Crafting the Textured Heart
-
Shape the Base:
Take a piece of blue clay and flatten it into a thick pancake, roughly 1cm thick. Use your fingers or a cutter to shape this into a soft, rounded heart. -
Create the Insert:
Roll a smaller piece of yellow clay into a thin sheet. Cut a smaller heart shape from this yellow clay that will fit inside your blue base. -
Embed the Design:
Gently press the yellow heart into the center of the blue heart. If the clay is fresh, it should stick; if not, use a tiny drop of water as glue. -
Add Texture:
Using a needle tool or toothpick, prick the surface of the yellow heart repeatedly to create a stippled, fuzzy texture. This adds lovely visual interest against the smooth blue border.
Make them Magnets
Once fully dry, glue strong round magnets to the back of each piece. They make adorable, chunky fridge magnets for holding photos.
Step 3: Sculpting the Relief Heart
-
Form the Yellow Base:
Using pale yellow clay, shape another thick heart base similar in size to the blue one. Smooth out any fingerprints with a slightly damp finger. -
Make Detail Coils:
Roll very thin, delicate snakes of yellow clay. These will be used for the raised decoration on top. -
Create Spiral Accents:
Curl two small pieces of the thin snake into tiny spirals. Place them side-by-side at the top lobes of the heart to accentuate the curve. -
Add the Center Stem:
Place a straight piece of clay running down the center of the heart, connecting from the spirals down to the point. -
Attach Leaves:
Form two small teardrop shapes and flatten them slightly. I like to attach these on either side of the center stem to look like leaves. -
Refine and Dry:
Gently press all applied details down so they bond with the base. Let all four pieces dry completely on a flat surface for 24-48 hours, flipping them once halfway through.
Once dry, display your collection in a small dish or gift them as pocket-sized tokens of affection
Desk-Friendly Pencil Holder
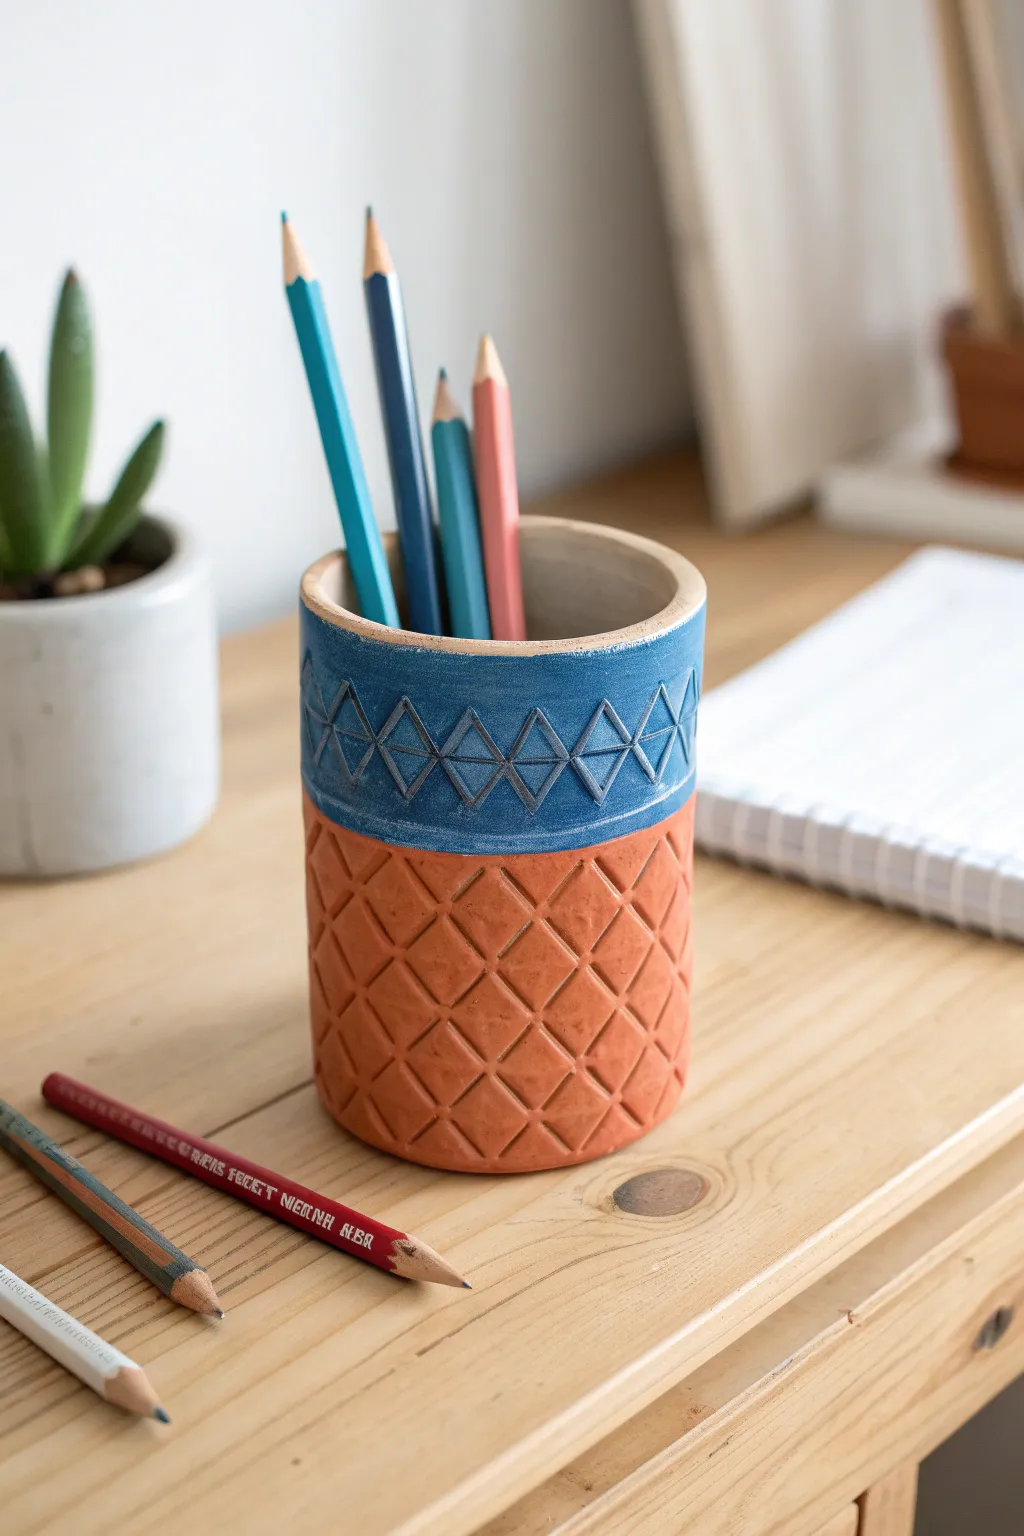
Bring a touch of modern bohemian style to your desk with this handsome two-toned pencil holder. Featuring a tactile diamond texture and a striking blue-dipped rim, it’s a functional piece of art that looks much harder to make than it actually is.
Step-by-Step Tutorial
Materials
- Air dry clay (terracotta color recommended)
- Rolling pin
- Empty cylindrical container (like a tin can or sturdy cardboard tube) to use as a mold
- Clay knife or craft knife
- Ruler or straight edge
- Needle tool or toothpick
- Small bowl of water (slip)
- Acrylic paint (Deep cornflower blue)
- Fine grit sandpaper
- Matte varnish or sealant
Step 1: Forming the Base
-
Roll the slab:
Begin by wedging your terracotta air dry clay to remove air bubbles, then roll it out into a long, rectangular slab. Aim for an even thickness of about 1/4 inch throughout. -
Measure and cut:
Wrap your chosen mold (tin can) with a piece of paper to check the circumference. Use this measurement to cut your clay slab into a precise rectangle that will wrap fully around the mold with just a tiny bit of overlap. -
Wrap the mold:
Carefully lift your clay rectangle and wrap it around the cylindrical mold. It helps to lightly dust the mold with cornstarch first so the clay doesn’t stick permanently. -
Create the seam:
Where the two ends of the clay meet, score the edges (scratch them up) and add a drop of water. Press them firmly together and smooth the seam with your finger or a modeling tool until it disappears. -
Add the bottom:
Roll out a small circle of clay for the base. Place your wrapped cylinder on top of it, score and wet the contact points, and trim away the excess clay. Smooth the connection point between the wall and the base.
Step 2: Carving the Texture
-
Draft the bottom grid:
Using a ruler and a needle tool, very lightly sketch a grid of diagonal lines on the bottom two-thirds of the cup. Then, sketch diagonal lines in the opposite direction to create a diamond lattice pattern. -
Carve the diamonds:
Now, deepen these lines using your specific carving tool. You want to create actual grooves, not just scratches. Press firmly enough to indent the clay but not cut through it. -
Define the rim section:
Leave a smooth band of clay about half an inch wide above your diamond pattern. Then, mark off the top section (the rim) which will feature a different design. -
Carve the top pattern:
For the upper rim, carve a horizontal line around the circumference. Within this band, carve a zigzag line that creates a series of triangles, matching the geometric vibe of the lower section. -
Smooth the edges:
Before the clay hardens, run a damp finger along the top lip of the cup to ensure it is rounded and smooth. Sharp clay edges can be brittle once dry. -
Dry partially:
Let the clay sit for a few hours until it is leather hard. At this stage, carefully slide the inner mold out. If you leave it in too long as the clay shrinks, the pot might crack. -
Full cure:
Allow the pencil holder to dry completely for 24-48 hours. The color will lighten significantly when all moisture is gone.
Cracks while Drying?
If small hairline cracks appear as the clay shrinks, mix a tiny bit of fresh clay with water to make a paste and fill them in before painting.
Step 3: Painting and Finishing
-
Sand imperfections:
Once fully dry, take your fine-grit sandpaper and gently smooth out any rough bumps, especially around the rim or the vertical seam. -
Tape the line:
Apply a strip of masking tape or painter’s tape just below the top carved section. This ensures a crisp, straight line between the painted area and the raw clay body. -
Paint the rim:
Using a deep cornflower blue acrylic paint, color the top section above the tape. Make sure to get paint into the carved grooves of the triangle pattern for depth. -
Detail clean-up:
If the paint looks too heavy in the grooves, you can wipe the surface lightly with a paper towel immediately after painting to let the blue stain the recessed lines while revealing some clay on the raised parts. -
Remove tape:
Carefully peel back the masking tape while the paint is still slightly tacky to avoid chipping the edge. -
Seal:
Apply a coat of matte varnish over the painted section to protect the color, or seal the entire piece if you want a uniform finish.
Pro Tip: Weathered Look
Dilute your blue paint with a little water for the top section. A wash technique sinks into the crevices better and looks more like ceramic glaze.
Place your favorite colored pencils inside and admire how the blue rim pops against the warm orange clay

TRACK YOUR CERAMIC JOURNEY
Capture glaze tests, firing details, and creative progress—all in one simple printable. Make your projects easier to repeat and improve.
Clay Bead Bracelets
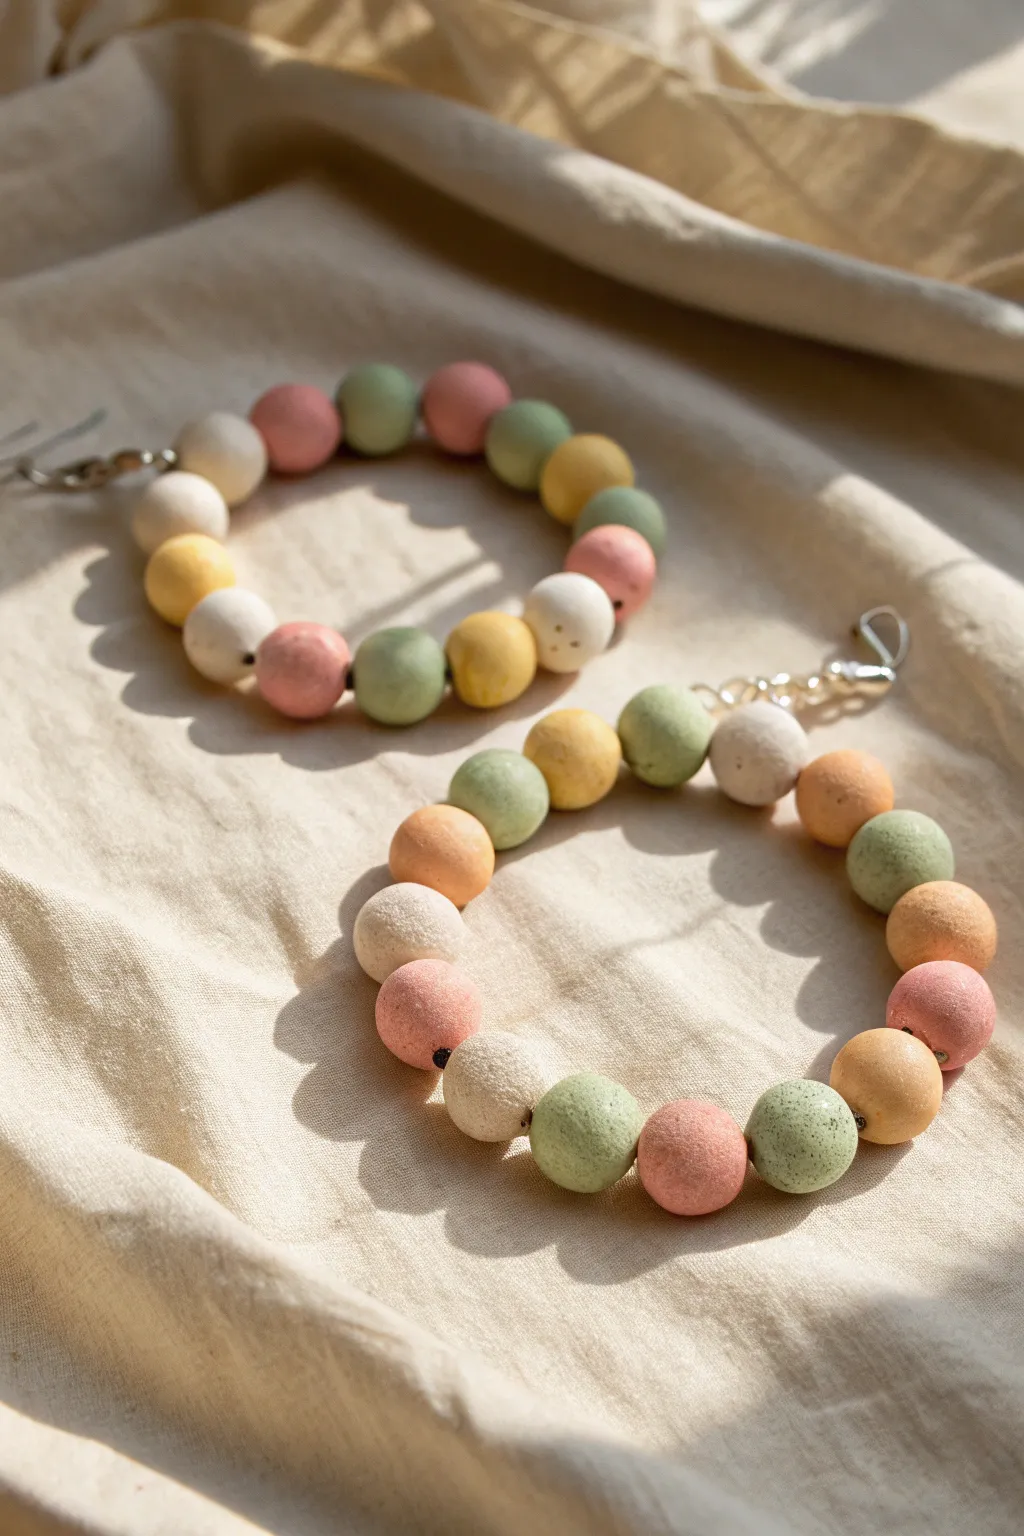
Soft pastels and a matte, stone-like texture give these oversized bead bracelets a lovely, natural aesthetic that mimics expensive ceramic jewelry. They are incredibly satisfying to roll and string, making for a perfect afternoon craft that results in wearable art.
Detailed Instructions
Materials
- Air dry clay (white)
- Acrylic paints (pale pink, butter yellow, sage green, cream)
- Disposable gloves (optional but helpful)
- Toothpicks or a wooden skewer
- Elastic cord or jewelry stretch string
- A small piece of sandpaper or a nail file
- Clear matte varnish or Mod Podge (optional)
- Jewelry jump rings and clasps (optional, simple knotting works too)
- Needle-nose pliers (if using clasps)
Step 1: Mixing & Rolling Beads
-
Prepare your palette:
Before handling the clay, pre-mix your acrylic paint colors on a palette or paper plate. You want soft, muted shades: a dusty rose pink, a creamy yellow, and a sage green. -
Portion the clay:
Pinch off small chunks of white air-dry clay. Aim for pieces about the size of a large gum ball or a small grape. You will need roughly 15-20 beads for a standard bracelet. -
Color the clay:
To get that solid, uniform color, knead a small drop of paint directly into a ball of white clay. Knead it thoroughly until no white streaks remain. Repeat this for each of your three colors, leaving some clay plain white or cream. -
Roll spheres:
Take a colored portion of clay and roll it between your palms to create a perfectly round sphere. Light pressure helps smooth out any cracks. -
Create speckles (optional):
For the stone-like texture seen in the photo, you can mix a tiny pinch of black pepper or dried used coffee grounds into the clay while kneading, or simply flick a tiny bit of darker paint onto the bead with a toothbrush. -
Repeat the process:
Continue rolling beads until you have a good mix of pink, yellow, green, and white spheres. Try to keep them relatively similar in size, though slight variations add charm.
Smooth Operator
To remove fingerprints from your wet clay beads, dip your finger in a tiny bit of water and glide it over the surface before drying.
Step 2: Piercing & Drying
-
Pierce the beads:
While the clay is still wet, gently push a toothpick or skewer through the center of each bead to create the hole. Twist the stick as you push to prevent flattening the sphere. -
Checking the exit hole:
Poke the stick through from the other side as well to ensure a clean, wide opening for the string later. -
Set up a drying station:
Place your beads on a piece of parchment paper or a drying rack. You can also leave them on the skewers to dry if you prop the skewers up. -
Let them cure:
Allow the beads to dry completely for at least 24 hours. They will feel lighter and look chalky when fully dry. -
Sand for smoothness:
Once hardened, inspect your beads. If there are any rough ridges around the holes or flat spots, gently buff them away with a small piece of sandpaper.
Cracked Beads?
If beads crack while drying, you can fill the cracks with a paste made of wet clay and water, smooth it over, and let it dry again.
Step 3: Assembly
-
Plan your pattern:
Lay your finished beads out on a table in a line. Arrange the colors in a pleasing order—alternating pink, green, yellow, and white looks balanced. -
Measure the cord:
Cut a length of elastic cord about 10-12 inches long. This gives you plenty of extra room for tying knots without struggling. -
String the beads:
Thread the beads onto the elastic cord one by one, following your planned pattern. -
Check the fit:
Wrap the strand around your wrist to see if it fits comfortably. Add or remove a bead if necessary to get the perfect size. -
Secure the ends:
Tie the elastic cord in a strong double or triple knot. Pull it tight (but don’t snap it!) to ensure it won’t come undone. -
Hide the knot:
Apply a tiny dab of glue to the knot for security, trim the excess string, and gently tuck the knot inside one of the bead holes. -
Add hardware (optional):
If you prefer a clasp like the one in the photo, use jump rings and a metal clasp instead of tying the elastic ends together directly.
You have crafted a beautiful set of custom jewelry ready to be worn or gifted
Dinosaur Fossil Impressions
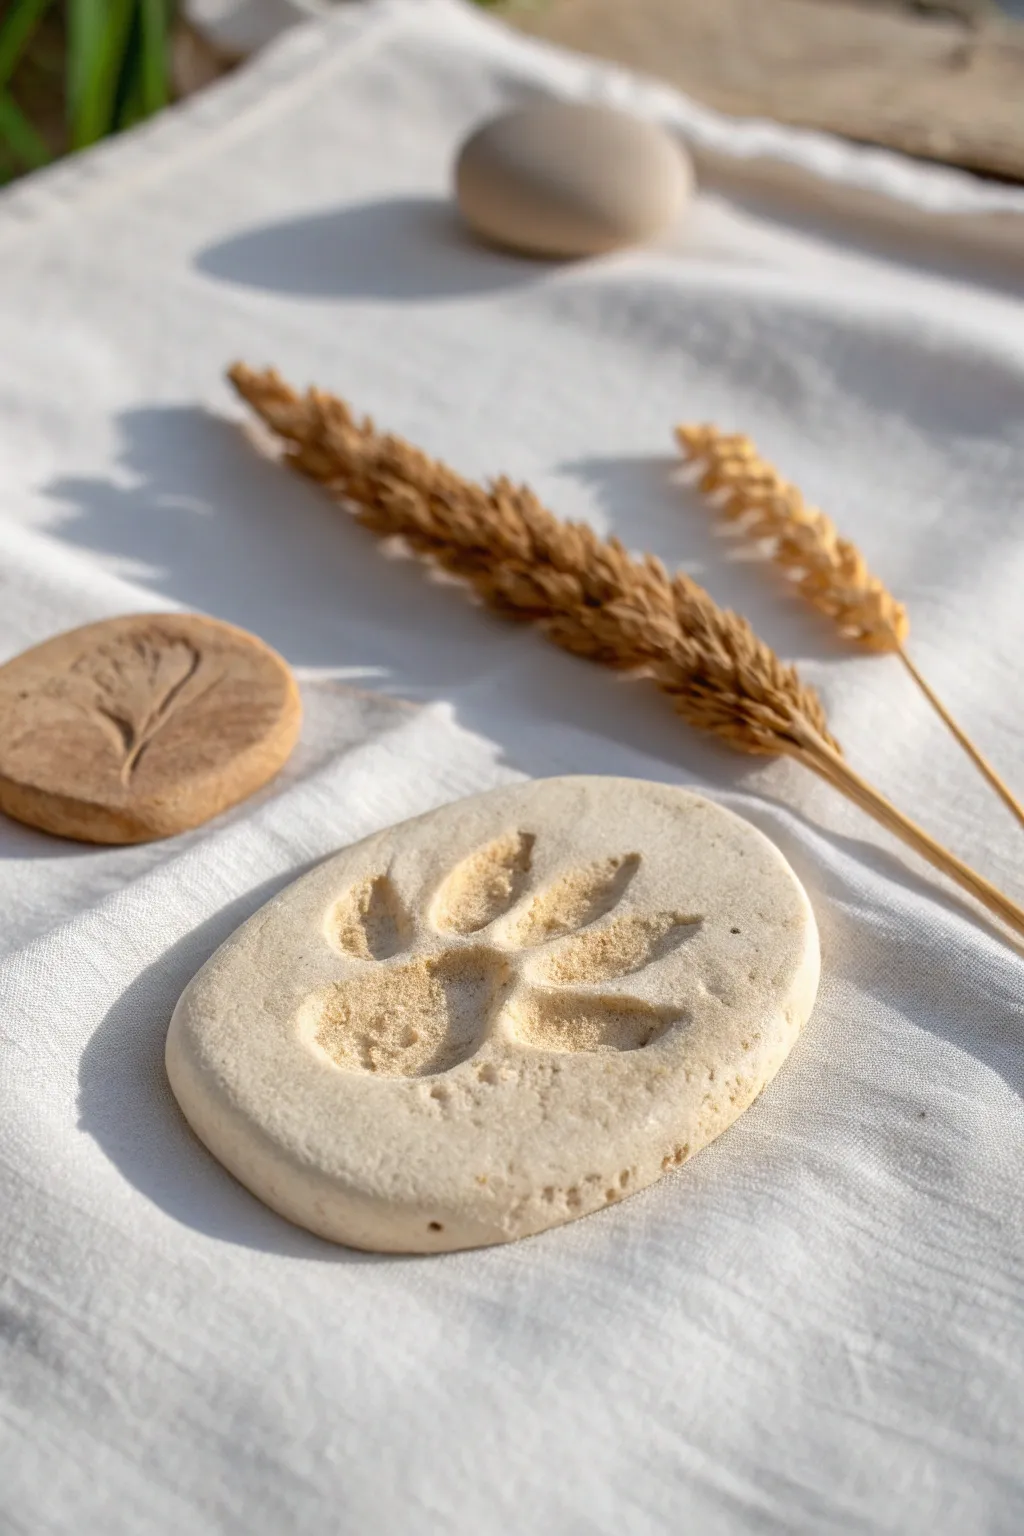
Transport your young explorers back in time with these simple yet realistic prehistoric fossil impressions. Using smooth air-dry clay and natural textures, you can create durable, stone-like keepsakes that look like they were just unearthed from an ancient dig site.
How-To Guide
Materials
- White or cream-colored air-dry clay (smooth texture)
- Small plastic dinosaur toy with distinct feet OR a carved stamp
- Rolling pin or smooth glass jar
- Fine-grit sandpaper (optional)
- Wax paper or parchment paper
- Dried wheat stalks or faux plants (for texture, optional)
- Small bowl of water
Step 1: Preparing the ‘Stone’
-
Condition the clay:
Begin by taking a handful of air-dry clay, roughly the size of a golf ball or slightly larger. Knead it in your hands for about a minute until it feels warm and pliable, which helps prevent cracks later on. -
Form the basic shape:
Roll the clay between your palms to create a smooth, round sphere. It doesn’t need to be perfect, as natural stones have irregularities. -
Flatten the stone:
Place your clay ball onto a sheet of wax paper or parchment paper. Using the palm of your hand, gently press straight down to flatten it into a thick disc. -
Refine the thickness:
Use a rolling pin to smooth the top surface, aiming for a thickness of about half an inch. You want enough depth to make a deep print without pushing through to the table. -
Shape the edges:
Use your moistened fingertips to gently pat and round off the edges of the oval. Natural river stones are rarely sharp, so smoothing the perimeter gives it an authentic tumbled look.
Stamp Release Trick
If your dinosaur toy is sticking to the clay, lightly dust the foot with cornstarch or brush on a tiny drop of baby oil before pressing. It ensures a clean release every time.
Step 2: Making the Fossil
-
Position your tool:
Identify where you want the impression to go. For a single large print like the one shown, center your dinosaur foot or stamp directly over the clay slab. -
Press firmly:
Push the object straight down into the clay with steady pressure. I find it helpful to wiggle the object very slightly side-to-side to ensure the edges of the print are clearly defined. -
Check the depth:
Lift the object carefully to peek at the impression. If the toes or heel aren’t deep enough to catch shadows, place the tool back in the exact grooves and press harder. -
Add surface texture:
To make the ‘stone’ look weathered, lightly tap a textured object—like a real rock or a piece of crumpled foil—around the empty spaces of the clay surface, avoiding the footprint itself. -
Create variations:
Repeat the process with a smaller piece of clay and use a dried plant, like the wheat stalk shown in the background, to create a botanical fossil. Press the stem flat rather than deep.
Step 3: Finishing Touches
-
Smooth imperfections:
Dip your finger in a tiny bit of water and gently run it over any unwanted cracks or sharp ridges that formed when pressing the print. -
Let it cure:
Allow the clay to dry undisturbed on the parchment paper. Depending on the humidity and thickness, this usually takes 24 to 48 hours. -
Rotate for even drying:
After the top feels dry to the touch (usually after a few hours), carefully flip the piece over to let the bottom breathe. This prevents curling. -
Sand the surface:
Once fully hardened, use fine-grit sandpaper to buff the edges and surface lightly. This removes any fingerprints and gives the clay that smooth, matte finish of real limestone. -
Dust off:
Wipe away any clay dust with a dry cloth or soft brush to reveal the clean, white fossil.
Aged Artifact Look
Mix a teaspoon of coffee or tea with water and brush it over the dry fossil. Wipe it off immediately with a rag; the dark liquid will stay in the crevices for an antique look.
Display your collection of ancient artifacts on a shelf or bury them in a sandbox for a fun excavation activity
Ocean Starfish Wall Decor
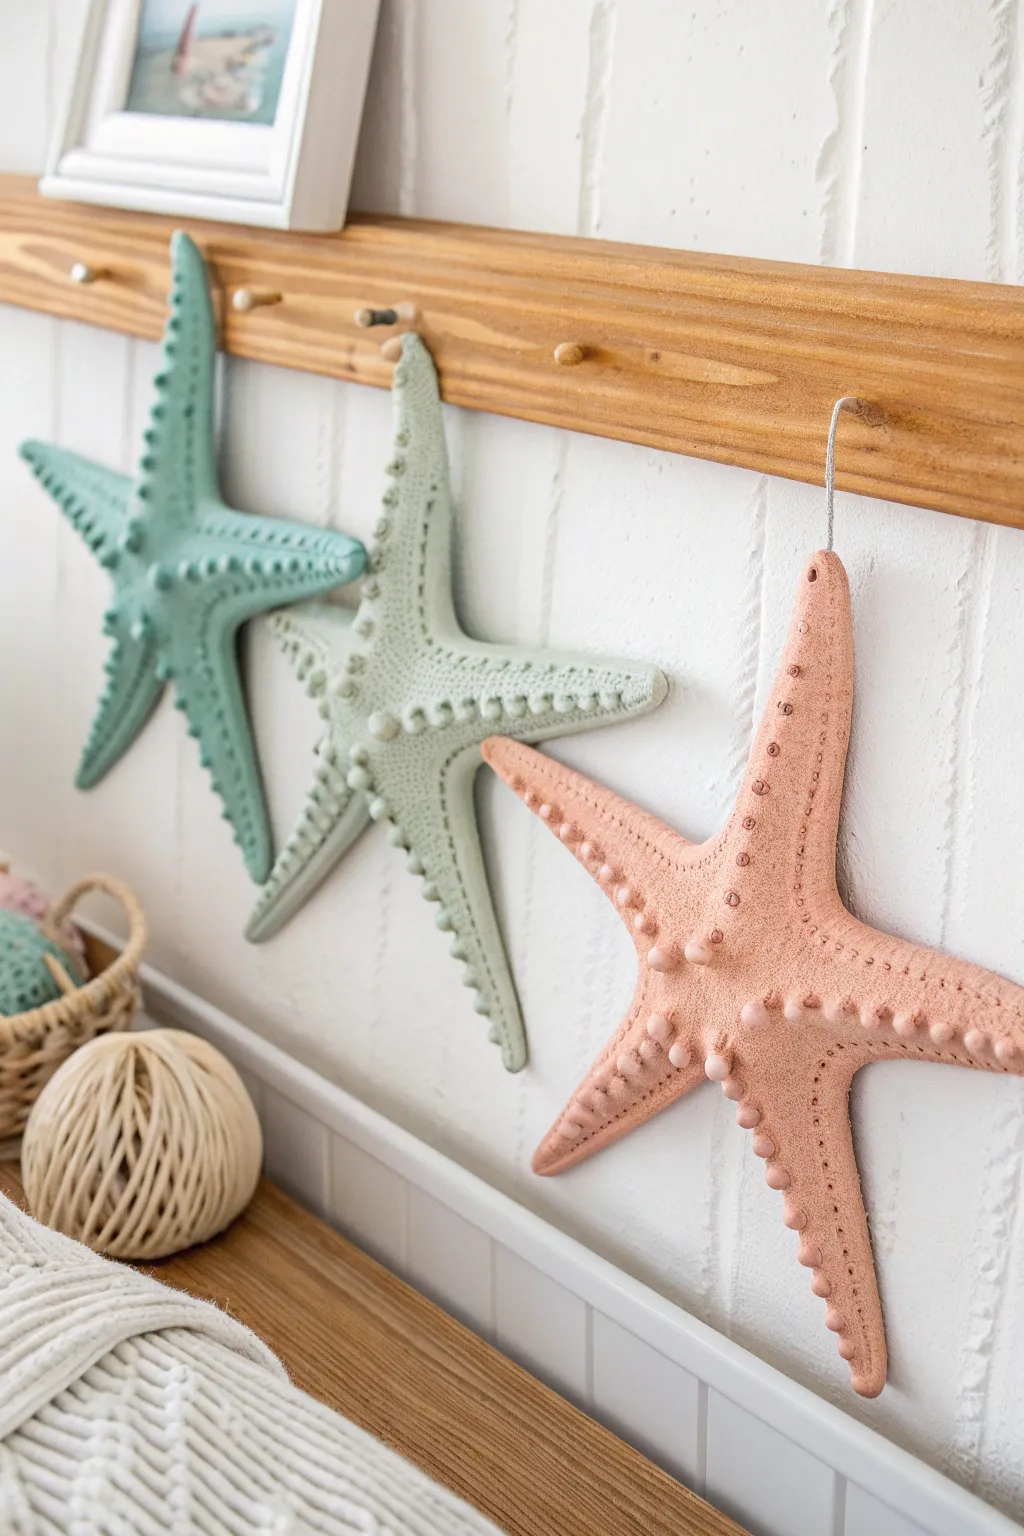
Bring the calming vibes of the coast into your home with these charming, textured starfish ornaments. These durable air dry clay creations feature delightful raised bumps and soft pastel tones, making them perfect for a nursery or beach-themed wall display.
Detailed Instructions
Materials
- White air dry clay (approx. 500g)
- Starfish paper template (printed or hand-drawn)
- Modeling tools or a dull pencil
- Rolling pin
- Parchment paper
- Craft knife or plastic clay knife
- Small bowl of water
- Sandpaper (fine grit)
- Acrylic paints (teal, mint green, coral pink)
- Paintbrushes (medium flat and small detail)
- Twine or thin rope for hanging
- Clear matte sealant spray (optional)
Step 1: Shaping the Starfish
-
Prepare the workspace:
Lay down a sheet of parchment paper on a flat surface to prevent sticking. Unwrap your air dry clay and knead it in your hands for a minute until it feels soft, pliable, and free of cracks. -
Roll out the slab:
Use your rolling pin to flatten the clay into an even slab. You want it to be about 1/4 inch thick—thick enough to be sturdy, but thin enough not to be too heavy when hanging. -
Cut the shape:
Place your starfish template gently onto the clay slab. Using a craft knife or plastic clay tool, carefully trace around the template to cut out the five-pointed star shape. Peel away the excess clay and set it aside. -
Smooth the edges:
Dip your finger into a small bowl of water and run it along the cut edges of the starfish. This smooths out any jagged bits or rough textures left by the knife. -
Create the center ridge:
To give the starfish a realistic 3D look, gently pinch along the center line of each arm, creating a slight raised ridge that runs from the tip to the center of the body.
Clay Shrinkage Tip
Air dry clay shrinks slightly as water evaporates. Make your initial star about 10% larger than you want the final hanging decoration to be.
Step 2: Adding Texture & Details
-
Make the sensory bumps:
Pinch off tiny, pea-sized pieces of the leftover clay and roll them into small balls. You will need about 20-30 balls per starfish depending on its size. -
Attach the bumps:
Score the ridge of each starfish arm lightly with a tool, dab a tiny drop of water on the spot, and press a clay ball firmly onto the ridge. Generally, place larger balls near the center and taper to smaller ones near the tips. -
Create the pore texture:
Using a small, blunt tool or the tip of a dull pencil, gently press rows of small dots on either side of the central ridge, running parallel to the bumps. This mimics the porous texture of real sea life. -
Make the hanging hole:
Before the clay begins to set, use a straw or a skewer to poke a hole through the tip of the top arm. Make sure the hole is large enough for your twine to pass through later. -
Create a scratched surface:
For that matte, organic look seen in the photo, lightly press a piece of rough sandpaper or a coarse fabric against the flat surfaces of the clay to give it a subtle, grainy texture. -
Allow to dry:
Place the starfish in a safe, dry spot. Let them air dry for at least 24 to 48 hours. Flip them over halfway through the drying process to ensure the back dries evenly and prevents curling.
Level Up: Natural Texture
Instead of rolling clay balls for texture, press actual seashells or clean coral pieces into the damp clay surface for authentic ocean patterns.
Step 3: Painting & Finishing
-
Sand imperfections:
Once fully hard and white, check for any sharp edges or rough spots. Use fine-grit sandpaper to gently smooth them down, being careful not to sand off your detailed texture. -
Base coat:
Mix your acrylic paints to achieve soft coastal hues. I find that mixing a touch of white into teal or coral creates that perfect chalky, matte finish. Apply a base coat cover the entire front surface. -
Highlight the texture:
While the paint is wet, you can dab a paper towel lightly over the raised bumps to remove a tiny bit of pigment, or dry-brush a lighter shade over them once dry to make the texture pop. -
Paint the sides:
Don’t forget to paint the edges and slightly wrap the color around to the back so it looks finished from all angles. -
Seal (optional):
If these will be handled often, give them a light mist of matte clear sealant spray to protect the paint from chipping. -
Add the hanger:
Cut a length of twine or thin rope, thread it through the hole at the top, and tie a secure knot. Your ocean art is now ready for display.
Enjoy hanging your beautiful new sea-inspired trio and admiring the pop of color they add to your walls
Mini Clay Coral Reef Scene
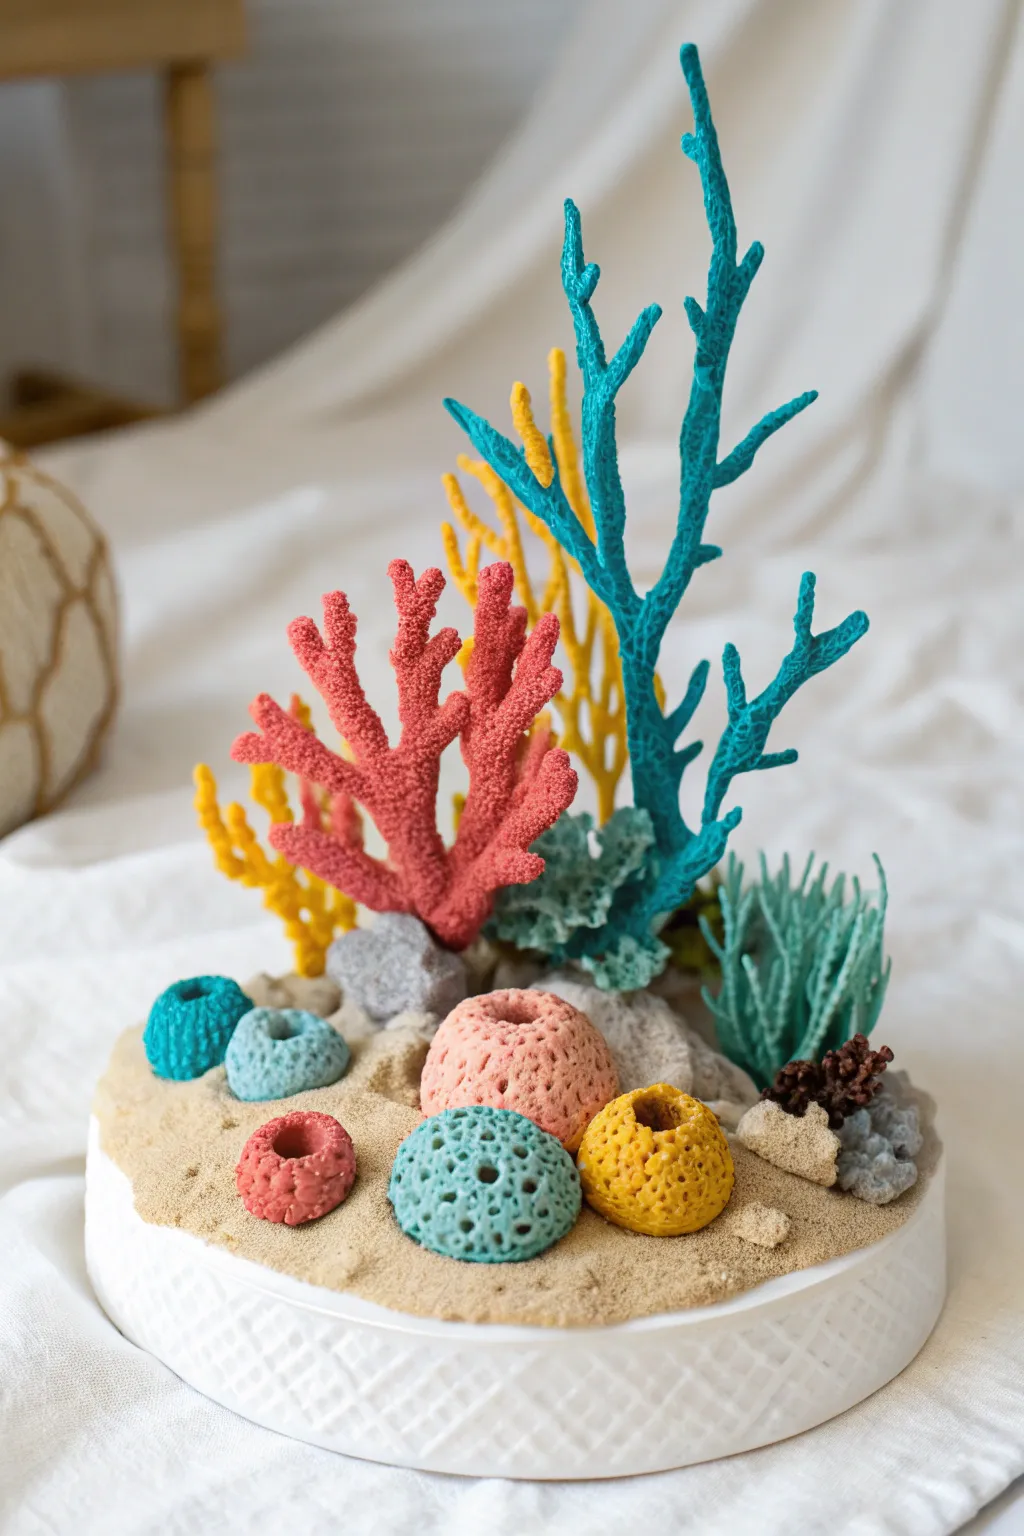
Bring the ocean floor to your tabletop with this vibrant, textured diorama made from simple air-dry clay. This project combines various sculpting techniques to create remarkably realistic coral textures set on a sandy seabed base.
How-To Guide
Materials
- Air-dry clay (white)
- Acrylic paints (teal, coral pink, bright yellow, grey, white)
- Fine sand
- School glue (PVA) or Mod Podge
- Round base (a jar lid, coaster, or hardened clay disc)
- Clay tools (needle tool, ball stylus)
- Toothpick or skewer
- Aluminum foil (for armatures)
- Old toothbrush or stiff bristled brush
- Paintbrushes (small detail and medium shader)
Step 1: Creating the Seabed Base
-
Prepare the foundation:
If you aren’t using a pre-made base (like a jar lid or wooden coaster), roll out a thick slab of air-dry clay and cut it into a clean 4-to-5-inch circle. Create a textured pattern on the side rim using a knife or clay tool for a basket-weave look. -
Build the terrain:
Add a fresh layer of wet clay on top of your base to create uneven ground. Mound it slightly higher in the center or back where the tall corals will stand. -
Apply the sand texture:
While the top clay layer is still wet, coat it generously with school glue. Sprinkle fine sand over the entire surface, pressing it gently into the clay so it adheres firmly. -
Shake off excess:
Once the foundational glue has set slightly, tip the base over a piece of paper to remove loose sand. Let this base dry completely while you work on the coral pieces.
Structure Secret
For the tall, thin teal coral, wrap your clay around a twisted pipe cleaner or floral wire. This acts as an armature, preventing the clay from drooping while it dries.
Step 2: Sculpting the Corals
-
Form the tall branch coral:
Roll thin snakes of clay. Twist and branch them out to resemble staghorn coral. Make one large structure for the focal point and a few smaller ones. I find that inserting a thin wire inside the clay snake helps these standing pieces keep their shape. -
Texture the branches:
Use an old toothbrush or a stiff brush to tap against the wet clay branches. This creates a realistic, porous stony texture. -
Create the fan coral:
Flatten a small piece of clay into a fan shape. Use a needle tool to etch radiating lines from the base to the tips, giving it a ribbed appearance. -
Shape the brain corals:
Roll small balls of clay and flatten the bottoms. Use a small ball stylus or the back of a paintbrush to indent many deep holes or hollow centers, grouping them like honeycomb. -
Make textured sea sponges:
Form hollow cylinder shapes or rounded domes. Poke holes of varying sizes all over the surface using tools of different widths to mimic the porous look of sea sponges. -
Sculpt the rocks:
Create irregular, chunky shapes from leftover clay. Press a crumpled ball of aluminum foil against them to instantly create a rough, rock-like surface texture. -
Dry all components:
Set all your coral pieces and rocks aside on parchment paper. Let them dry fully, usually for 24 hours depending on thickness.
Glow Up
Coat the finished coral pieces with a clear gloss varnish or clear nail polish. This makes them look permanently ‘wet’ like they are underwater.
Step 3: Painting and Assembly
-
Paint the tall branches:
Paint the tallest branching coral a vivid teal and the shorter branches a bright yellow. Use two coats if necessary for solid coverage. -
Color the textured pieces:
Paint the fan coral a reddish-pink or coral color. For the brain corals and sponges, use contrasting colors like teal, pink, and yellow. Ensure paint gets into the textured holes but doesn’t fill them completely. -
Paint the rocks:
Mix grey and white paint to create a stony hue for your rock pieces. You can dry-brush a little white on the edges to highlight the texture. -
Arrange the scene:
Place your dried coral pieces onto the sandy base to test the arrangement before gluing. Put the tallest teal coral in the back and layer smaller items in the front. -
Glue the elements:
Use strong craft glue or more wet clay (as slip) to attach the corals and rocks to the sandy base. Hold them in place for a moment to ensure a good bond. -
Add finishing sand:
If any glue shows around the base of your corals, brush a tiny bit more glue over it and sprinkle a final pinch of sand to conceal the joints seamlessly.
Display your colorful reef on a shelf to add a permanent splash of summer to your room
Cookie-Cut Lantern Wrap
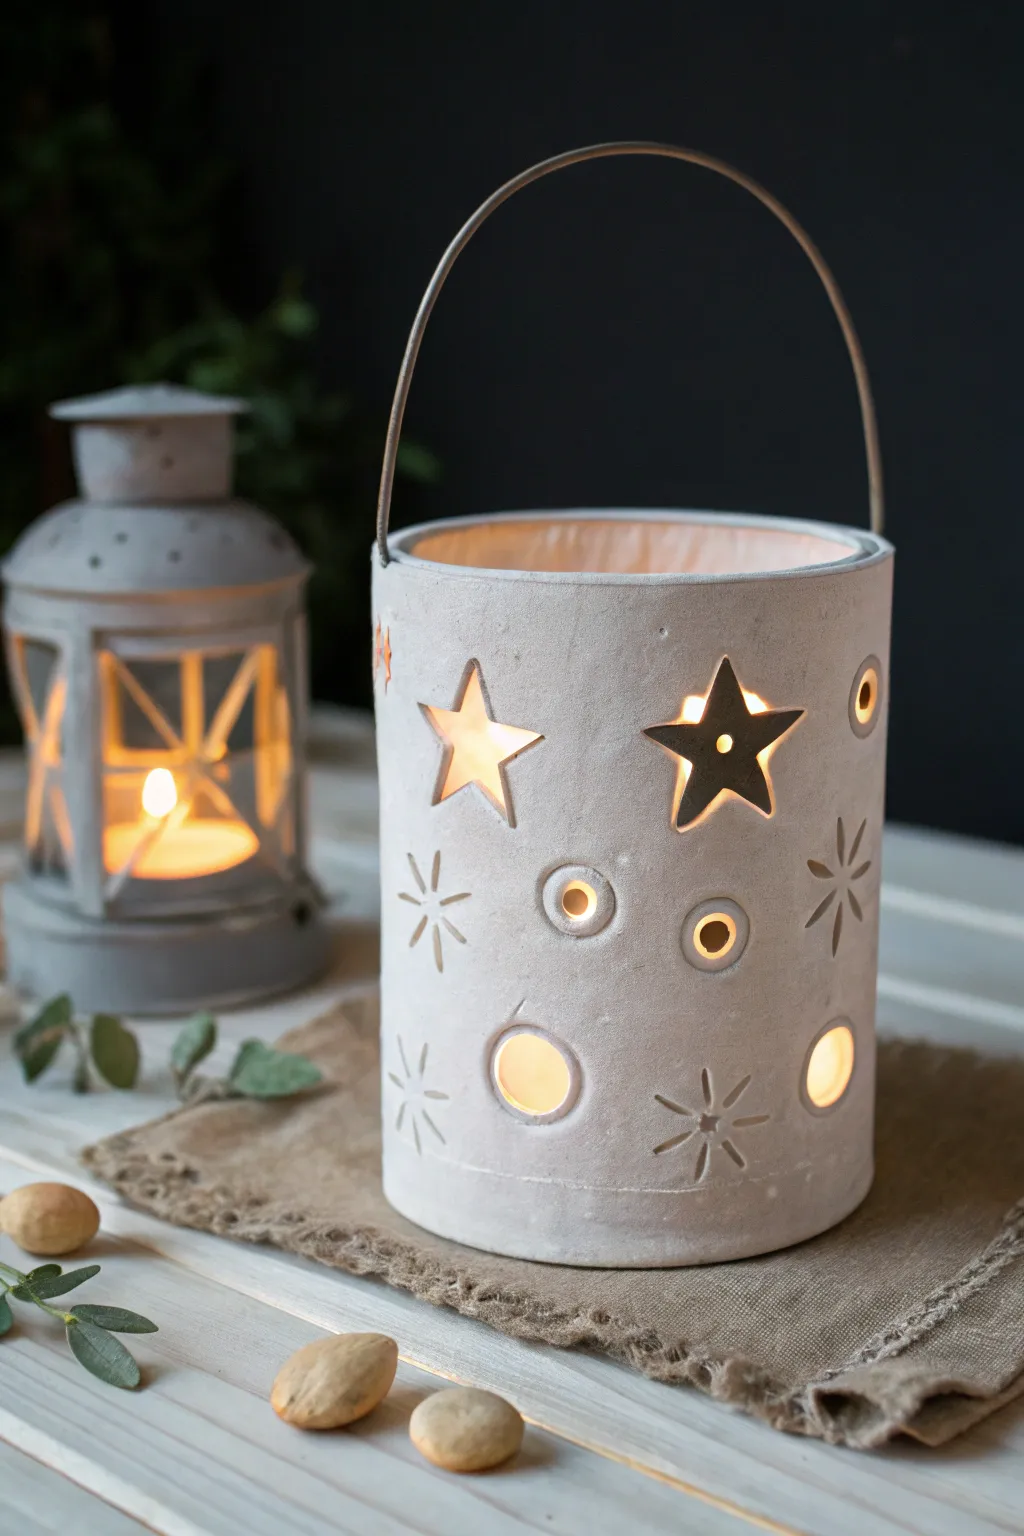
Transform a simple sheet of air-dry clay into a glowing centerpiece that casts magical shadows. This rustic lantern uses cookie cutters to create clean, celestial shapes and wraps easily around a glass jar for structure.
Step-by-Step Guide
Materials
- White air-dry clay (approx. 500g)
- Glass jar or cylinder vase (heat safe)
- Rolling pin
- Parchment paper or canvas mat
- Star-shaped cookie cutters (small and medium)
- Small circular cutter or bottle cap
- Plastic straw (for handle holes)
- Craft knife or clay needle tool
- Small bowl of water
- Sponge or smoothing tool
- Wire (16-18 gauge) for the handle
- Tea light candle (real or LED)
- Sandpaper (fine grit)
Step 1: Preparing the Clay Sheet
-
Condition the clay:
Begin by kneading your air-dry clay until it is warm, pliable, and free of cracks. If it feels too stiff, dip your fingers in a tiny bit of water and work it in. -
Roll it out:
Place the clay between two sheets of parchment paper or directly on a canvas mat. Use your rolling pin to create a long, rectangular slab. Aim for an even thickness of about 1/4 inch (6mm) throughout. -
Measure the circumference:
Take your glass jar and lay it on its side against the clay. Roll the jar across the slab to verify you have enough length to wrap all the way around, plus a little extra for overlapping or joining. -
Trim the edges:
Use a ruler and a craft knife to trim the top and bottom edges of the clay slab so they are perfectly straight. Leave the side ends rough for now until the final fitting.
Step 2: Creating the Design
-
Planning the stars:
Before cutting, gently press your star cutters into the clay just enough to leave an outline. This helps you plan a balanced composition without committing to the holes yet. -
Cut the shapes:
Press the star cutters firmly all the way through the clay slab. Wiggle them slightly to ensure a clean cut, then lift the cutter. If the clay star stays inside, gently push it out. -
Add circular details:
Use a small round cutter or a bottle cap to add circular accents between the stars. I find that grouping a few circles near the bottom edge creates a nice visual weight. -
Carve the snowflakes:
For the snowflake or starburst patterns seen in the image, use a needle tool or the tip of a craft knife. Gently clear away any clay crumbs from the carved lines. -
Prep for the handle:
Use a plastic straw to punch two clean holes near the top edge of the slab. These holes should be positioned so they will sit on opposite sides of the lantern once wrapped.
Clean Cuts Every Time
Is clay sticking to your cutter? Dip the cutting edge into a bit of cornstarch or baby powder before pressing it into the clay. The shape will pop out effortlessly.
Step 3: Assembly and Finishing
-
Wrap the jar:
Carefully lift your clay slab. If your jar is purely for shaping and will be removed, wrap the clay loosely around it. If the jar stays inside permanently, wrap the clay snugly around the glass. -
create the seam:
Bring the two ends of the clay together. Cut through both layers simultaneously with a craft knife for a perfect butt joint, or overlap them slightly and press together. -
Score and slip:
To seal the seam, rough up the touching edges with a toothbrush or needle tool (scoring), add a drop of water (slip), and press firmly together. Smooth the seam with your finger until it disappears. -
Smooth the rims:
Dip a sponge or your finger in water and run it along the top rim and bottom edge to soften any sharp angles left by trimming. -
Let it dry:
Allow the lantern to dry completely. This usually takes 24-48 hours. Keep it away from direct heat sources to prevent cracking as the moisture evaporates. -
Sand for smoothness:
Once fully dry and white, use fine-grit sandpaper to gently smooth out any bumps or rough edges around the cutouts. -
Attach the handle:
Cut a length of wire about 12 inches long. Bend it into an arch shape. Insert the ends through the straw holes you punched earlier and curl the tips upward with pliers to secure them. -
Light it up:
Place a tea light or small LED candle inside the glass jar to see your starry patterns glow against the clay walls.
Dealing with Cracks
If small hairline cracks appear while drying, don’t panic. Make a paste of clay and water (slip) and fill the crack, then smooth it over with a damp finger.
Enjoy the cozy warmth your new handmade lantern brings to the room
Window Suncatcher Charms
Brighten up any window with this charming, earth-toned mobile featuring a smiling sun, a cheerful star, and a classic rainbow arch. The lightweight nature of air-dry clay makes it perfect for creating gently swaying decorations that catch the morning light.
How-To Guide
Materials
- White air-dry clay
- Rolling pin
- Clay sculpting tools (or a butter knife and toothpick)
- Circle cookie cutters (various sizes)
- Star cookie cutter (optional)
- Acrylic paints (terracotta, mustard yellow, white, black, pink)
- Small paintbrushes
- Wooden dowel (approx. 6-8 inches)
- Natural jute twine or hemp cord
- Wooden beads (assorted sizes)
- Water bonding slip (clay mixed with water)
- Sandpaper (fine grit)
- Needle or skewer for piercing holes
Step 1: Sculpting the Shapes
-
Prepare the workspace:
Lay down a clean mat or parchment paper to prevent sticking. Knead your air-dry clay until it is soft, pliable, and free of cracks. -
Roll the rainbow coils:
Roll out three or four long snakes of clay, varying slightly in thickness. Curve the first one into a tight arch, then fit the subsequent coils snugly over the top to build your rainbow shape. -
Cut the rainbow base:
Once your coils are pressed gently together, use a knife to trim the bottom ends so they are perfectly flat and level. Smooth the seams on the back side with a little water to keep them connected. -
Create the clouds:
Roll a flat slab of clay about 1/4 inch thick. Use a knife or cutter to shape two fluffy clouds. Texture isn’t necessary here; the smooth look works best for this modern style, but make sure to round off any sharp edges with a wet finger. -
Sculpt the sun:
Cut a circle for the sun’s face. For the rays, form small triangles or teardrops and attach them around the circumference. To ensure a forever bond, I always score the contact points—making little scratch marks—before adding a dab of water slip. -
Make the star:
Roll more clay and cut out a five-pointed star shape. Smooth the edges so they are soft and rounded, giving it a friendly appearance. -
Add hanging holes:
While the clay is still wet, use a skewer or straw to poke holes for the string. You need a hole at the top of the rainbow, top and bottom of the clouds, top of the sun, and top of the star. Make sure the holes are wide enough for your twine.
Keep it Straight
To prevent your flat clay pieces from curling up like a potato chip while drying, place a heavy book on top of them once they are partially dry (leather-hard).
Step 2: Painting and Details
-
Let it dry completely:
Allow all pieces to dry for 24-48 hours. Flip them occasionally to ensure even drying and prevent warping. -
Sand imperfections:
Once bone dry, take fine-grit sandpaper and gently smooth out any rough edges or bumps on the surfaces. -
Paint the rainbow:
Paint each arch of the rainbow a different color. Use earthy tones like terracotta, soft peach, mustard yellow, and leave one stripe white or natural. -
Paint the sun and star:
Paint the sun a deep mustard yellow. For the star, you can leave it natural or give it a light beige wash. Paint the clouds a solid soft white. -
Add facial features:
Using a very fine brush or a black paint pen, draw simple happy faces on the sun and star. Add tiny pink circles for cheeks to up the cuteness factor.
Broken Ray Repair
If a sun ray snaps off after drying, don’t panic. A dab of strong white glue or superglue will fix it instantly. Sand the seam gently after the glue dries.
Step 3: Assembly
-
Prepare the dowel hanger:
Cut a length of twine and tie it to both ends of your wooden dowel to create the main hanging loop. Secure it with tight knots. -
String the sun strand:
Cut a long piece of twine. Tie it to the dowel, thread on a few beads, string it through a cloud, add a bead, and finally tie it to the sun at the bottom. -
String the rainbow strand:
Cut a central string. Thread beads and attach it to the top of the rainbow. The rainbow sits in the center, usually hanging slightly higher than the bottom charms. -
String the star strand:
Repeat the process for the third strand: attach twine to the dowel, add beads, thread through the second cloud, add a spacer bead, and tie off at the star. -
Balance and secure:
Hold the mobile up to check the balance. Adjust the knots or spacing if it tips to one side. Once perfect, you can add a drop of glue to the knots to ensure they never slip.
Now you have a whimsical, handmade decoration ready to bring a little joy to any corner of your room
Texture Stamp Art Tiles
These beautifully stamped square tiles transform simple air-dry clay into sophisticated art pieces perfect for display or coasters. The project focuses on exploring various imprinting techniques to create intricate relief patterns in a moody, nature-inspired color palette.
Step-by-Step Guide
Materials
- White or terracotta air-dry clay
- Rolling pin
- Square cookie cutter (approx. 3-4 inches) or knife and ruler
- Acrylic paints (terracotta, slate blue, ochre, warm brown)
- Small sponge or foam pouncer
- Texture tools: lace doilies, leaves, rubber stamps, burlap, textured buttons
- Fine-grit sandpaper
- Matte spray varnish or sealant
- Waffle grid or baking rack (for drying)
Step 1: Preparing the Clay Base
-
Condition the Clay:
Start by taking a substantial chunk of air-dry clay and kneading it in your hands until it becomes warm, soft, and pliable. This prevents cracks later on. -
Roll it Out:
Place the clay on a smooth surface or a silicone mat. Use your rolling pin to flatten the clay to an even thickness, aiming for about 1/4 inch thick so the tiles are sturdy but not too heavy. -
Smooth the Surface:
Before cutting, run a slightly damp finger or a damp sponge over the surface of the clay to smooth out any wrinkles or fingerprints. -
Cut the Squares:
Using a square cookie cutter or a ruler and sharp knife, cut out twelve identical squares. I like to cut a few extras just in case one warps during drying. -
Soften Edges:
Gently tap the cut edges with your finger to round them off slightly, removing the sharp, raw look from the cutter.
Curling Corners?
If tile corners lift while drying, gently weigh them down with a heavy book placed over a piece of parchment paper once they are leather-hard but not fully dry.
Step 2: Imprinting Textures
-
Select Texture Tools:
Gather your texturing items. You want a mix of organic shapes (like the leaf veins shown) and geometric patterns (like grid stamps or lace). -
Pressing Organic Patterns:
For the leaf designs, press a rubber stamp or an actual sturdy leaf firmly into the center of a square. Apply even pressure to ensure the veins transfer clearly. -
Creating Geometric Grids:
For the grid patterns, use a clean meat tenderizer mallet, a piece of burlap, or a specific clay texture sheet. Press down firmly but do not push all the way through the clay. -
Detailing with Lace:
Lay a small piece of lace or a doily over a clay square and roll over it gently with your rolling pin to embed the intricate pattern. -
Making Composite Designs:
For the complex tiles, combine stamps. Press a floral stamp in the center and use a smaller tool to add borders or corner details.
Pro Tip: Release Agent
Lightly dust your stamps or texture tools with cornstarch before pressing them into the clay. This acts as a release agent and prevents the clay from sticking to deep grooves.
Step 3: Drying and Refining
-
Initial Drying:
Transfer the tiles carefully to a wire rack or waffle grid. This allows air to circulate underneath, which is crucial for even drying. -
Flipping Phase:
After about 12 hours, flip the tiles over. This simple step helps prevent the corners from curling up as the moisture evaporates. -
Full Cure:
Let the tiles dry completely for 24 to 48 hours until they feel dry to the touch and are no longer cool. -
Sanding Edges:
Once fully bone-dry, take fine-grit sandpaper and very gently smooth the sides and corners to remove any burrs or sharp points.
Step 4: Painting and Finishing
-
Mixing Custom Colors:
Mix your acrylics to achieve those matte, earthy tones. You generally want a rusty red, a deep slate blue, a sandy beige, and a warm brown. -
Applying Base Color:
Using a sponge or soft brush, apply a solid coat of paint to each tile. The sponge helps push paint into the deep crevices of the texture. -
Wiping for Depth:
For a more weathered look, immediately wipe the surface with a paper towel after painting. This leaves darker paint in the impressions and lighter paint on the raised areas. -
Dry Brushing (Optional):
To highlight the texture further, lightly brush a lighter shade of the base color over the raised patterns once the first coat is dry. -
Sealing the Work:
Finish by spraying a coat of matte varnish over the tiles to protect the paint and give them a finished, ceramic feel without adding unwanted gloss.
Arrange your finished tiles on a wooden tray or use them as unique coasters to bring a touch of crafted elegance to your table
Mini Fairy House Hideout
This enchanting miniature cottage features textured stone walls, a scalloped roof, and golden wheat details that bring a touch of woodland magic to any shelf. It is a sturdy, freestanding structure perfect for beginner sculptors ready to try slab building.
Step-by-Step Tutorial
Materials
- White air dry clay (approx. 1-2 lbs)
- Rolling pin
- Ruler
- Craft knife or clay cutter
- Slip (clay mixed with water)
- Textured sponge or foil ball
- Modeling tools (or toothpicks)
- Acrylic paints (white, beige, sage green, terracotta, mustard yellow)
- Fine detail paintbrush
- Cardboard (for templates)
Step 1: Building the Structure
-
Prepare the templates:
Cut four pieces of cardboard for your walls: two rectangles for the sides and two pentagons for the front and back gable ends. Also, cut two rectangular roof panels that are slightly wider than the house. -
Roll out the slabs:
Roll your air dry clay into a slab roughly 1/4 inch thick. Use your cardboard templates to cut out the front, back, and two side walls. -
Add wall texture:
Before assembling, gently press a textured sponge or a crumpled ball of aluminum foil onto the clay surfaces to create a rough, stucco-like stone effect. -
Cut the windows:
Use a small bottle cap or circular cutter to punch a hole for the attic window on the front panel. Cut two small arched windows on one of the side panels. -
Assemble the walls:
Score the edges of your walls (scratch them up) and apply a little slip. Press the walls together to form the house box, reinforcing the inside seams with thin coils of clay. -
Create the roof:
Roll two slabs for the roof. Place them on top of the house so they meet at a peak. I prefer to let the eaves overhang slightly for that cozy cottage look. -
Seal the roof:
Blend the roof seam at the top and join the roof to the walls. Ensure everything is secure and smooth out any unwanted fingerprints. -
Detail the shingles:
Use a scalloped cutter or a U-shaped wire tool to impress overlapping scale patterns across the entire roof surface to mimic shingles.
Step 2: Adding Details & Painting
-
Sculpt the door:
Roll a small arch shape for the door and press it onto the front wall. Use a needle tool to draw vertical wood grain lines. -
Frame the door:
Create a thin, flat snake of clay and wrap it around the door arch. Use a tool to press horizontal indents, making it look like a stone archway. -
Add wheat stalks:
Roll very thin coils of clay for stems and tiny teardrop shapes for grains. Press these onto the front wall on either side of the door to form wheat stalks. -
Window frames and finishing touches:
Add thin clay rims around your circular and arched windows. Add small clay balls for doorknobs and a cross-hatch pattern inside the attic window. -
Let it dry:
Allows the house to dry completely for 24-48 hours. Keep it away from direct heat to prevent cracking. -
Base coat painting:
Paint the walls white (or leave natural if your clay is white) and give the roof a wash of beige acrylic paint. -
Paint the woodwork:
Paint the door a muted sage green and the window frames and door arch in a warm terracotta or brick red color. -
Highlight the wheat:
Carefully paint the wheat stalks and the attic window frame with mustard yellow or gold paint. Let everything dry completely.
Fixing Roof Sag
If the roof sags while wet, bunch up some paper towel or newspaper and stuff it inside the house to support the roof until the clay firms up.
Make it Glow
Cut a hole in the bottom of the house before it dries. Once finished, place an LED tea light underneath to make the windows glow
Place your finished cottage among some potted plants to give the local fairies a cozy place to rest
Small World Play Figures
Create a charming miniature world perfect for open-ended play using simple wooden shapes and soft acrylic colors. This sweet set features friendly peg people, polka-dot trees, and tiny architectural details that spark endless storytelling possibilities.
Step-by-Step
Materials
- Unfinished wooden peg dolls (large and small)
- Unfinished wooden cone (for the tree)
- Unfinished wooden triangular prism or tree cutout
- Small wooden house block
- Air dry clay (optional, for custom shapes)
- Acrylic paints (pastel pink, mustard yellow, white, black)
- Fine detail paintbrush
- Medium flat paintbrush
- Dotting tool or toothpick
- Clear matte varnish or sealant
- Sandpaper (fine grit)
Step 1: Painting the Peg Dolls
-
Prep the wood:
Before opening your paints, lightly sand all your wooden pieces to remove any rough splinters or fuzz. Wipe them down with a dry cloth to ensure a smooth painting surface. -
Base coat the bodies:
For the larger figures, paint the body portion (from the neck down) in your chosen colors. Use the pastel pink for one and mustard yellow for the other. You may need two thin coats for opaque coverage. -
Paint the small figures:
Paint the bodies of the tiny peg dolls in matching shades of pink. Since they are so small, I find holding them by their heads helps keep fingers clean while painting. -
Create the faces:
Leave the head spheres natural wood. Using the tiniest amount of pink paint and a dry brush, dab gentle circles for rosy cheeks on all the figures. -
Add facial features:
Use your finest brush or a toothpick dipped in black paint to add two small dots for eyes. For the yellow figure, add a simple curved smile. -
Paint the hair:
Mix a small amount of white with a drop of brown or yellow for a blonde hair color. Carefully paint the top hemisphere of the heads, adding little bangs or curves to frame their faces. -
Add polka dots:
Once the yellow dress is fully dry, use a dotting tool or the back of a paintbrush dipped in white paint to stamp a random pattern of dots all over the dress.
Step 2: Crafting the Scenery
-
Base coat the cone tree:
Paint the entire wooden cone in the pastel pink shade. Apply smooth vertical strokes to minimize brush marks. -
Dot the tree:
Just like the yellow dress, add white polka dots to the pink tree. Try to space them somewhat evenly, but keep it organic rather than perfectly gridded. -
Paint the layered tree:
Take the flat wooden tree shape and paint it solid white. Let this dry completely. -
Add tree details:
Using a diluted brown paint or a fine-tip paint marker, draw horizontal lines to define the layers of branches and a vertical line down the center for the trunk. -
Color the house:
Paint the small wooden house block in the mustard yellow. Make sure to get into any crevices if your block has texture. -
Detail the house:
Use black paint and a steady hand to add tiny windows on the side and dots on the roof for a whimsical texture. -
Seal everything:
Once all pieces are bone dry (wait at least an hour), apply a coat of clear matte varnish. This protects the paint from chipping during play.
Fixing Smudges
If you make a mistake while painting eyes or dots, don’t panic. Let the error dry completely, then gently sand it off with fine sandpaper or paint over it with the base color.
Level Up: Clay Accents
Use small bits of air dry clay to add 3D elements like buns to the dolls’ hair, tiny chimneys to the house, or textured leaves to the trees before painting.
Arrange your finished village on a tray or shelf and watch the little world come to life