Whenever I need a project that’s equal parts sculptural and expressive, I reach for a ceramic clay mask—it’s basically a face that can tell a whole story on your wall. Here are my favorite ceramic clay mask ideas, starting with the classics and drifting into the wonderfully weird.
Classic Human Face Wall Mask
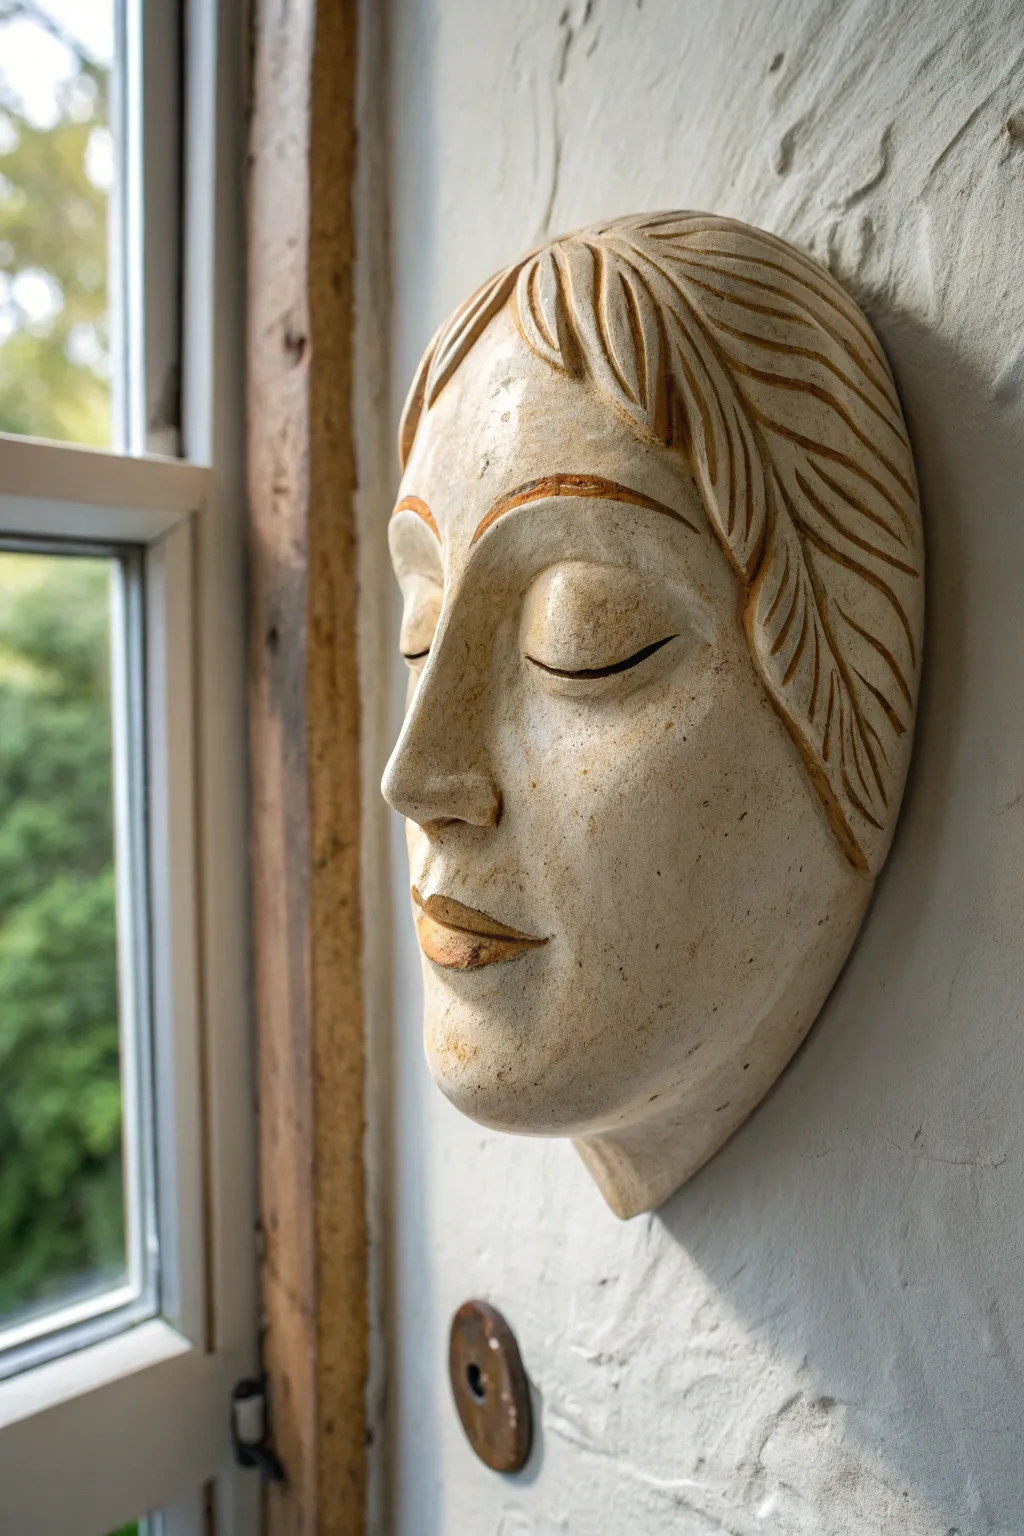
This project captures the quiet dignity of a classical sculpture with a stylized, serene clay mask. By using a light stoneware clay and subtle washes, you will recreate an artifact that looks like it has watched over a room for centuries.
Step-by-Step
Materials
- Light-colored stoneware or earthenware clay (with fine grog)
- Newsprint or canvas work surface
- Rolling pin
- Head armature or a convex mold (plaster or bisqueware)
- Basic sculpting tools (ribs, loop tools, needle tool)
- Modeling tool (wooden)
- Sponge
- Iron oxide wash or brown underglaze
- Clear matte or satin glaze
- Wax resist (optional)
- Kiln access
Step 1: Forming the Base Structure
-
Prepare the Clay Slab:
Begin by rolling out an even slab of clay, approximately 1/2 inch thick. Lift and turn the clay occasionally so it doesn’t stick to your work surface. -
Drape Over the Mold:
Gently drape your clay slab over a convex head mold or a humped form made of scrunched newspaper covered in plastic. Smooth it down to ensure it takes the general curve of a face. -
Trim the Outline:
Using a needle tool, cut the rough oval shape of the mask. Leave a little extra width at the sides for the hair, tapering slightly toward the chin.
Fixing Flat Features
If the face looks too flat, don’t just add clay on top. Push from the inside of the mask (the back) to pop the cheeks or chin forward for better dimension.
Step 2: Sculpting the Features
-
Establish the Brow Line:
Add a coil of clay across the forehead area to build up the brow ridge. Smooth this firmly onto the base slab, blending the edges seamlessly. -
Construct the Nose:
Form a triangular wedge of clay for the nose. Score and slip the attachment area in the center of the face, then press the nose firmly into place. Use a wooden tool to blend the sides of the nose into the cheeks. -
Carve the Eye Sockets:
Press your thumbs or a large loop tool gently into the area below the brow to create the hollows for the eyes. This creates the depth needed for the eyelids. -
Add the Eylids:
For the closed eyes, roll two small, flattened oval shapes. Attach them into the sockets. Smooth the top edge into the brow bone, but leave the bottom edge defined to suggest a closed lid. -
Define the Lash Line:
Take a fine modeling tool or needle and carefully incise a deep, sweeping curve along the bottom of the eyelid to create the separation between the upper and lower lid. -
Build the Mouth and Chin:
Add a small mound of clay for the chin to give the face structure. Above that, form the lips by adding two small coils. Blend them onto the face, then use a tool to press the center line, giving the mouth a soft, neutral expression.
Ancient Artifact Look
For a more weathered look, lightly sand parts of the raw clay with coarse sandpaper before the first firing to create a pitted, stone-like texture.
Step 3: Detailing and Refining
-
Sculpt the Hair Strands:
Add flattened strips or coils of clay to the top and sides of the head. I find it helpful to overlap them slightly to create volume. -
Texturize the Hair:
Use a wooden modeling tool to carve deep, flowing grooves into the added clay strips. These lines should curve downward and backward, mimicking stylized hair locks. -
Refine the Surface:
Once the clay is leather-hard, use a smooth kidney rib or a slightly damp sponge to smooth out any unwanted fingerprints on the skin areas, leaving the hair texture crisp. -
Create the Mounting Hole:
Don’t forget to cut a small hole or add a clay loop on the back of the mask for hanging later. Do this while the clay is still leather-hard.
Step 4: Firing and Finishing
-
Bisque Fire:
Allow the mask to dry slowly and completely under loose plastic to prevent warping. Once bone dry, bisque fire it according to your clay body’s specifications. -
Apply Oxide Wash:
Mix iron oxide with water (or use a watered-down brown underglaze). Brush this into the crevices of the hair, the lash lines, and the corners of the mouth. -
Wipe Back:
Using a clean, damp sponge, wipe away the oxide from the high points of the face. The dark color should remain only in the deep textures, highlighting the carving. -
Glaze Application:
Apply a thin coat of clear matte or satin glaze over the entire piece. This seals the clay while preserving the natural stone-like appearance. -
Final Firing:
Fire the piece a second time to the glaze temperature appropriate for your clay. Let it cool slowly in the kiln.
Hang your finished mask near a window where natural light can play across the serene shadows of your sculpting work


Comedy and Tragedy Theater Masks
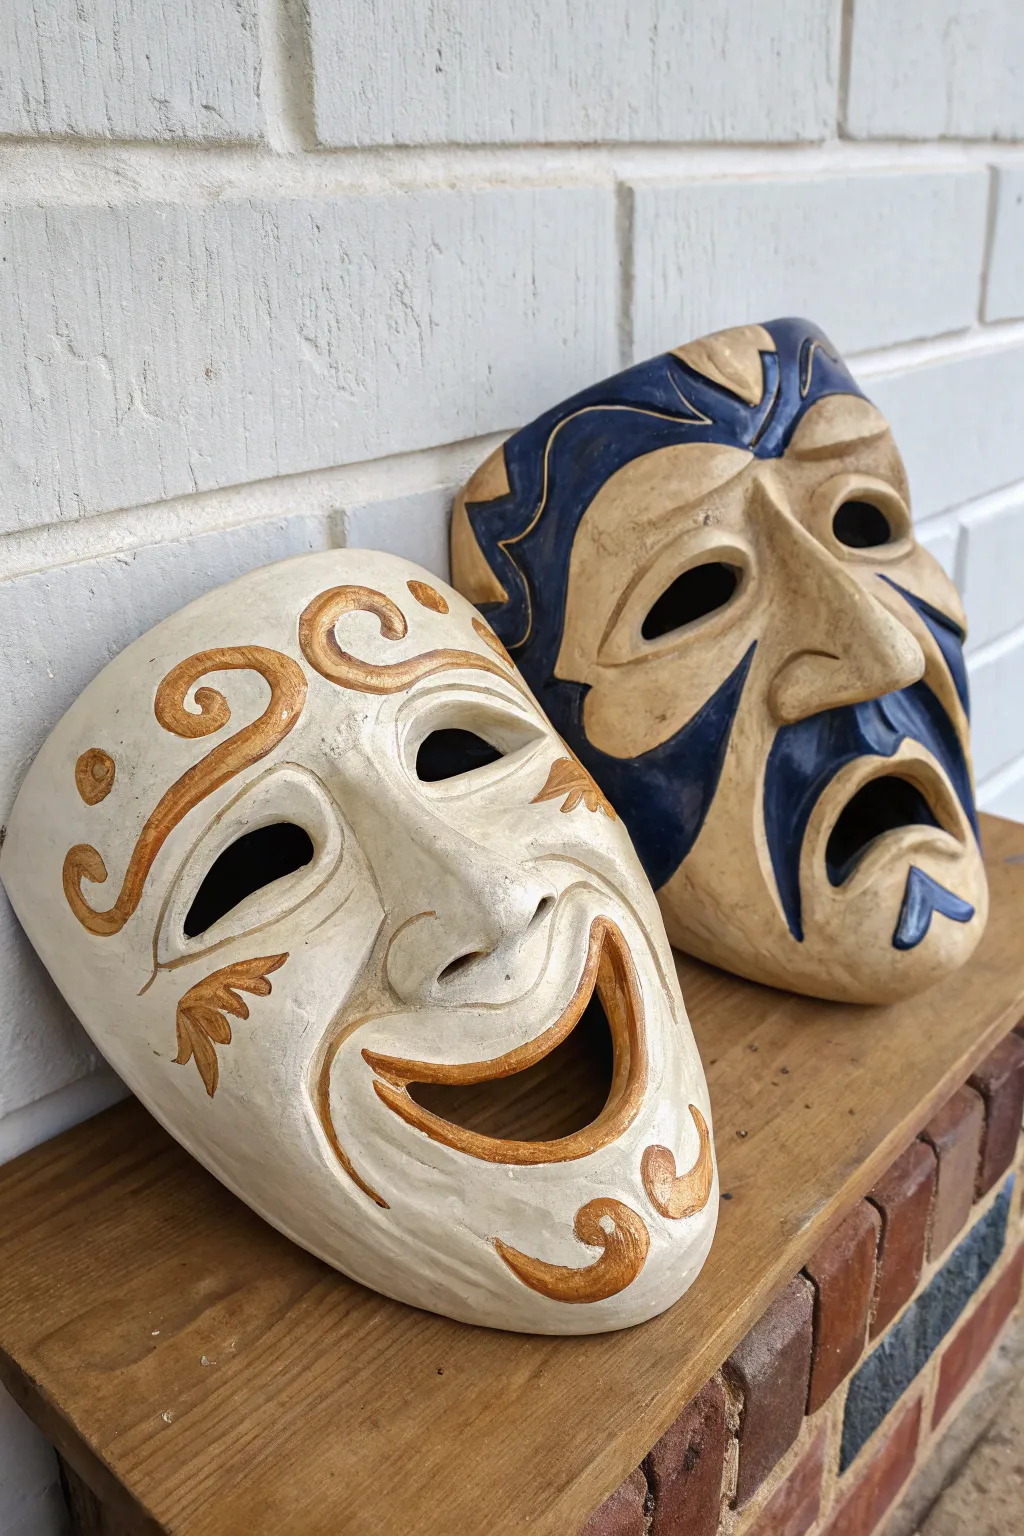
Capture the classic spirit of the theater with this striking pair of ceramic wall masks. Featuring the iconic laughing and weeping faces, this project combines sculptural relief work with a vintage-style glazed finish in cream, gold, and deep navy.
Detailed Instructions
Materials
- Earthenware or stoneware clay (white or buff)
- Clay rolling pin
- Canvas mat or slab roller
- Needle tool
- Loop tools (various sizes for carving)
- Clay knife or fettling tool
- Rib tool (rubber or metal)
- Small sponge
- Slip and scoring tool
- Underglazes: Navy Blue, warm translucent Cream/Beige
- Metallic Gold acrylic paint or luster (for post-fire accents)
- Clear matte or satin glaze
- Kiln (or air-dry clay alternative)
Step 1: Forming the Base
-
Roll the slabs:
Begin by rolling out two slabs of clay to approximately 1/4 inch thickness. You want them thick enough to support relief work but not so heavy they crack easily. -
Cut the ovals:
Cut two large oval shapes, roughly the size of a human face. Gently curve them over a hump mold or a bundled newspaper form to give them a convex, mask-like curve. -
Establish the features:
Using additional coils and small lumps of clay, build up the nose, brow ridges, cheeks, and chin on both masks. Score and slip every addition securely.
Step 2: Sculpting the Expressions
-
Shape the Comedy eyes:
For the smiling mask, carve out almond-shaped eye holes. Use your modeling tool to push the cheeks up high, creating deep creases under the eyes to emphasize the smile. -
Sculpt the Tragedy eyes:
For the sad mask, angle the inner corners of the brows sharply upward. Carve the eye holes with a droopy, downward slant at the outer corners. -
Carve the mouths:
Cut out the iconic open mouths. The Comedy mask needs a wide, upturned grin with corners stretching toward the ears. The Tragedy mask requires a downturned, gaping frown. -
Refine the brows and noses:
Smooth the noses into prominent, slightly exaggerated shapes. I like to define the brow bones sharply to catch the glaze later. -
Smooth the surface:
Use a damp sponge or a soft rib to smooth out fingerprints and tool marks across the entire face, blending all attached clay seamlessly.
Hollow It Out
To reduce weight, carefully scoop out excess clay from the back of the nose and chin areas with a loop tool while leather hard, keeping wall thickness even.
Step 3: Decoration and Firing
-
Sketch the designs:
Lightly incise decorative patterns into the leather-hard clay using a needle tool. Draw swirls on the Comedy cheeks and forehead, and wave-like abstract hair patterns on the Tragedy mask. -
Bisque fire:
Allow the masks to dry slowly and completely to prevent warping. Fire them to a bisque cone suitable for your specific clay body. -
Apply base color:
Brush a wash of watered-down cream or light beige underglaze over both masks. Wipe it back with a sponge so it stays mostly in the textures, giving an aged look. -
Paint the Tragedy accents:
Carefully paint the ‘hair’ waves, the brow area, and the mustache shape of the sad mask with a deep Navy Blue underglaze. -
Glaze fire:
Apply a clear satin or matte glaze over both masks and fire again. Avoid high-gloss glazes, as they can obscure the sculptural details. -
Add gold accents:
Once fully cooled after the final firing, use a small brush to apply metallic gold paint (or gold leaf) to the swirl patterns on the Comedy mask. -
Seal the gold:
If you used acrylic gold paint, seal just those areas with a tiny bit of varnish to protect the finish.
Display Ideas
Before drying, punch two small holes near the temples. After firing, thread sturdy wire or leather cord through them to hang the masks securely on a wall.
Now you have a timeless set of drama masks ready to bring a touch of the theatrical to your home decor


Sun Face With Radiating Rays
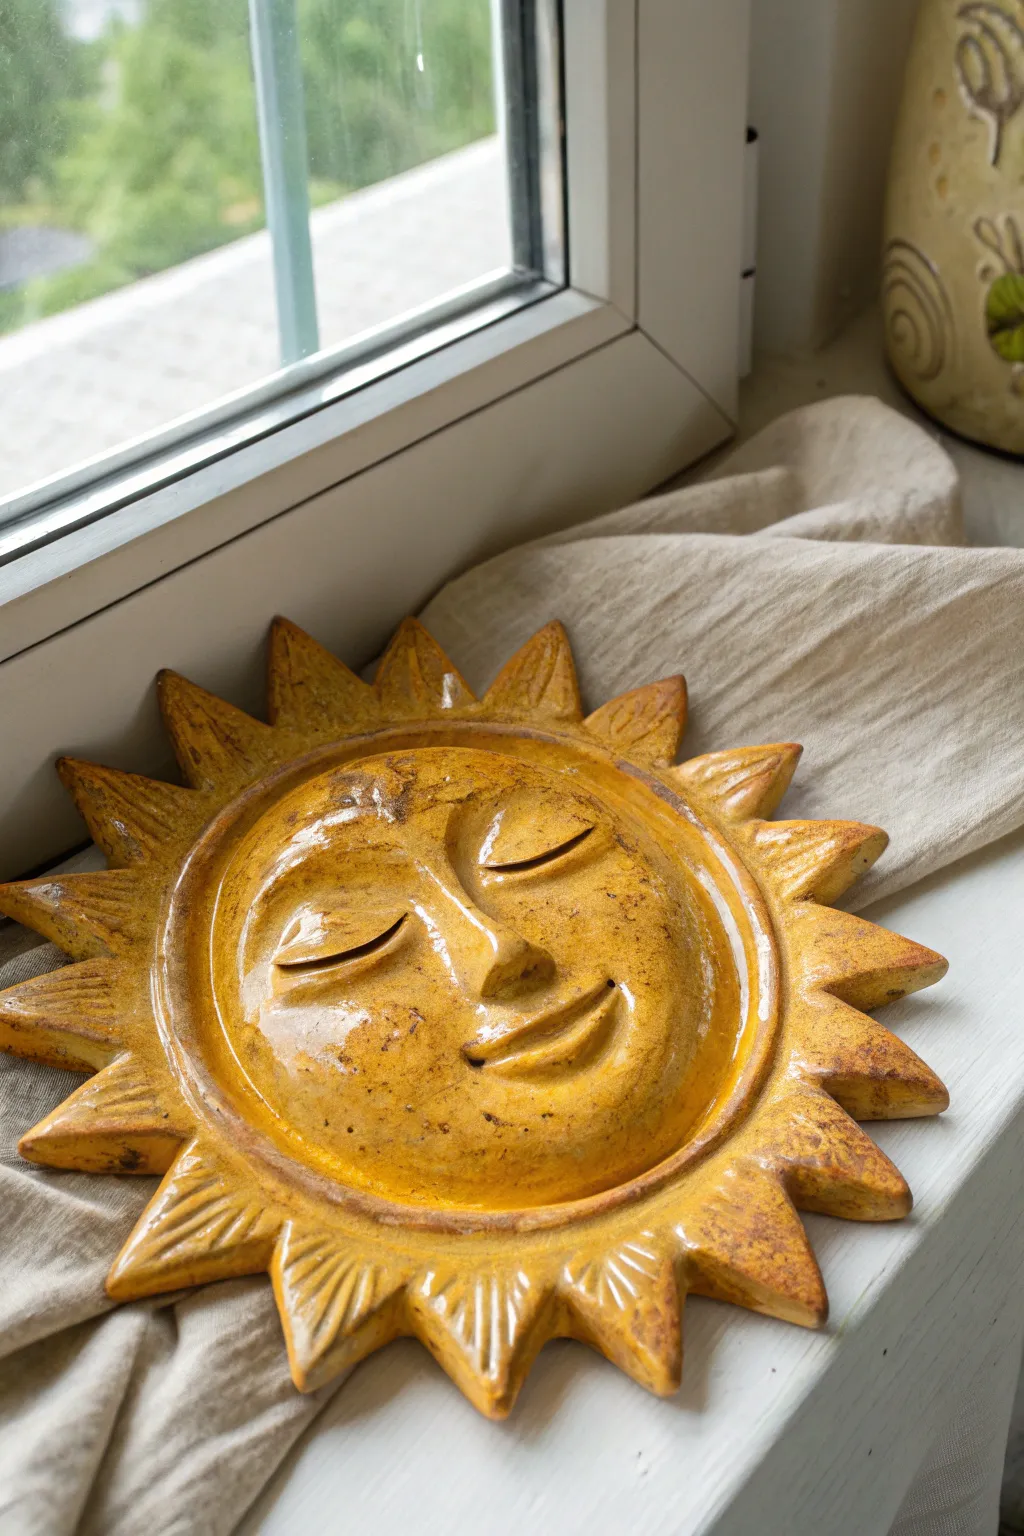
Capture the serene warmth of a summer afternoon with this cheerful ceramic sun face. Featuring a gently domed visage and radiating textured rays, this project uses an amber glaze to highlight every carved detail with a classic, sun-kissed glow.
Step-by-Step Guide
Materials
- Low-fire white earthenware clay
- Rolling pin and guide strips (approx 1/4 inch)
- Circular template or bowl (approx 6-8 inches)
- Needle tool
- Fettling knife
- Modeling tools (wooden and ribbon tools)
- Scoring tool or serrated rib
- Slip (clay mixed with water)
- Sponge
- Plastic wrap or old newspaper
- Amber or honey-colored semi-transparent glaze
- Dark brown underglaze (optional for antiquing)
- Soft fan brush for glazing
Step 1: Forming the Base
-
Roll the slab:
Begin by wedging your clay thoroughly to remove air bubbles. Roll out a consistent slab about 1/4 to 3/8 inch thick using guide strips to ensure evenness. -
Cut the central circle:
Place your circular template on the slab and cut around it with a needle tool. This will be the face portion. Save the excess clay for the rays. -
Create the dome:
To give the face its convex shape, gently press the clay circle into a shallow, concave mold or a foam cushion. Alternatively, you can drape it over a mound of newspaper covered in plastic to create a gentle curve.
Fixing Ray Cracks
If a hairline crack appears where a ray joins the face during the greenware stage, score deeply, add slip, and compress a thin coil of fresh clay into the joint to reinforce it
Step 2: Sculpting the Features
-
Map out facial features:
Lightly sketch the position of the eyes, nose, and mouth on the domed surface using a needle tool. Aim for symmetry and a peaceful expression. -
Add volume for the nose:
Score the nose area and attach a small wedge of clay. Smooth the edges down onto the face, blending the clay seamlessly so it looks like it grew from the surface. -
Shape the eyes:
Roll two small coils and attach them where the eyelids should be to create the closed-eye look. Blend the top edge of the coil into the forehead and shape the bottom edge to look like a lash line. -
Define the mouth:
Use a small coil to build up the lips, blending them into the cheeks. Use a modeling tool to press a gentle smile line into the center. -
Refine the surface:
Use a damp sponge to smooth out any harsh tool marks on the cheeks and forehead. The goal is a soft, organic skin texture.
Hanging Hardware
Before the clay dries, create two small holes near the top of the rim (hidden behind the rays) using a straw. Thread high-temp wire through them for a built-in hanger
Step 3: Adding the Rays
-
Cut the ray triangles:
From your remaining slab, cut out approximately 12-16 triangular shapes. They don’t need to be identical; slight variation adds character. -
Texture the rays:
Use a modeling tool to incise lines radiating outward on each triangle. These grooves will catch the glaze later, adding depth. -
Prepare for attachment:
Flip the domed face over carefully. Score the outer rim of the backside of the face, and score the base of each ray triangle. -
Attach the rays:
Apply slip to the scored areas and firmly press the rays onto the back rim of the face. Smooth the connection point on the back to ensure a strong bond. -
Dry slowly:
Cover the piece loosely with plastic to let it dry slowly. This prevents the rays from drying faster than the thicker face, which helps avoid cracking.
Step 4: Bisque and Glaze
-
Bisque fire:
Once bone dry, fire the piece in a kiln to cone 04 (or according to your clay’s specifications). -
Optional antiquing:
For a deeper look, brush a dark brown underglaze into the crevices of the eyes, mouth, and ray textures, then sponge most of it off, leaving pigment only in the deep lines. -
Apply the main glaze:
Apply 2-3 coats of an amber or honey-colored semi-transparent glaze. This type of glaze naturally pools in textures, creating the variation seen in the reference image. -
Clean the foot:
Wipe away any glaze from the back where the piece will touch the kiln shelf. -
Glaze fire:
Fire the piece again to the recommended temperature for your glaze (usually cone 05 or 06 for low-fire glazes).
Hang your finished sun face near a window to let the natural light play off the rich, glassy amber surface


Moon Face With Crescent Cheeks
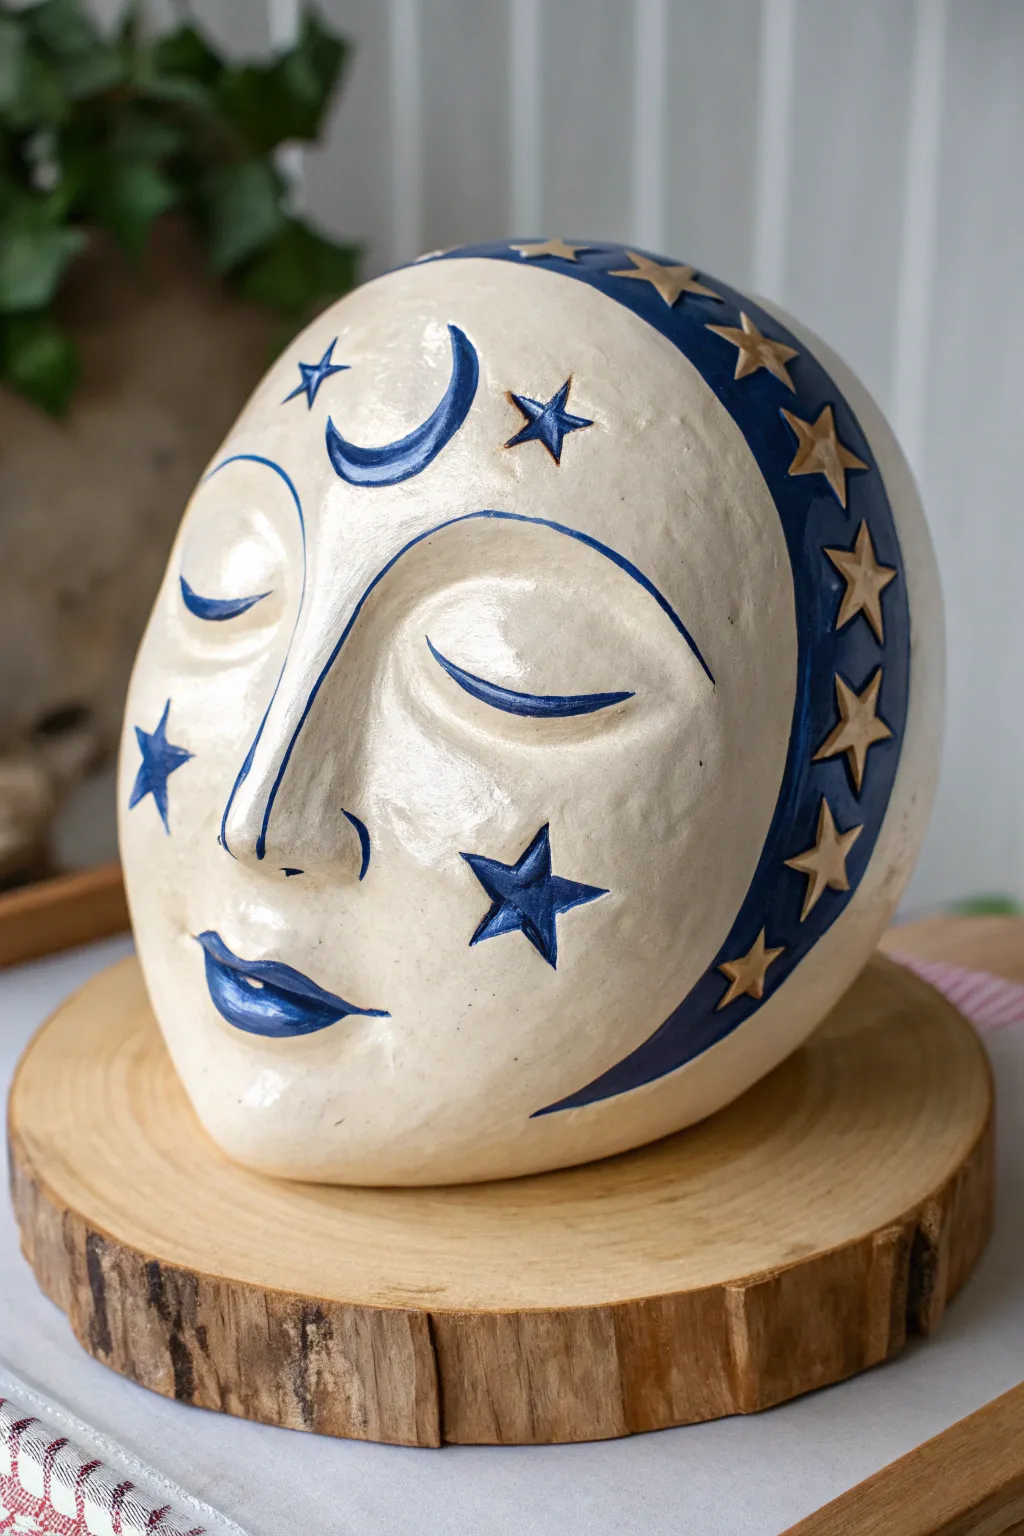
Capture the magic of the night sky with this serene ceramic moon mask, featuring a soothing expression and celestial details. The finished piece combines smooth, creamy white glaze with striking cobalt blue accents and metallic gold stars for an ethereal, dreamlike sculpture.
Step-by-Step Tutorial
Materials
- White earthenware or stoneware clay (low fire)
- Pottery wheel (optional) or slab roller/rolling pin
- Humidifying box or plastic sheets
- Pottery knife and needle tool
- Rib tools (wood and metal)
- Modeling tools for facial features
- Carving tools for stars
- Bisque fire kiln access
- Glossy white glaze
- Cobalt blue underglaze or glaze
- Gold luster or gold leaf (optional for star centers)
- Small detail brushes
- Measuring tape or calipers
Step 1: Forming the Base Structure
-
Prepare the Clay:
Wedge your clay thoroughly to remove air bubbles. This project requires a significant amount of clay, so ensure it is uniform and pliable. -
Create the Head Form:
You can either throw a closed form on the wheel that resembles an egg, or build a hollow oval shape using coil building techniques. If coil building, ensure walls are even and smoothed together perfectly. -
Shape the Face Plane:
While the clay is leather hard, gently flatten one side of the oval to create a ‘canvas’ for the facial features. Use a wooden paddle to gently shape the curve of the forehead and chin. -
Add a Band:
Roll out a flat strip of clay about 2 inches wide. Attach this strip along the back curve of the head, framing the face area like a bonnet or hairline, scoring and slipping well to secure it.
Smooth Surface Secret
Burnish the clay with a smooth stone or the back of a spoon when it’s leather hard. This compresses particles for a glass-like finish before glazing.
Step 2: Sculpting the Features
-
Map Out Features:
Lightly sketch the placement of the eyes, nose, and mouth using a needle tool. Symmetry is key for this calm expression. -
Build the Nose:
Add a wedge of clay for the nose bridge. Blend the edges seamlessly into the forehead and cheeks, keeping the bridge straight and elegant. -
Sculpt the Eyelids:
Instead of carving eyes, add two crescent-shaped pads of clay for the closed eyelids. Smooth them down so they look like resting heavy lids. -
Refine the Lips:
Add a small amount of clay for the mouth. Sculpt full, slightly pouting lips, emphasizing the cupid’s bow for a classical look. -
Smooth the Compilation:
Go over the entire face with a damp sponge or soft rib to remove tool marks and create that flawless, skin-like texture.
Drying Crack Prevention
If the nose or added banding starts separating during drying, wrap those specific areas in damp paper towels and slow the drying process for 24 hours.
Step 3: Carving & Decoration
-
Outline Celestial Elements:
Lightly draw a crescent moon on the forehead and scattered stars on the cheeks. Mark a row of stars along the side band as well. -
Carve the Stars:
Using a small loop tool or V-gouge, carefully carve out the star shapes. For the side band stars, you might choose to carve *around* them to leave them raised, or impress them into the clay. -
Dry and Bisque Fire:
Allow the piece to dry slowly under plastic to prevent cracking, especially around the added features. Once bone dry, bisque fire the piece.
Step 4: Glazing and Finishing
-
Whiten the Canvas:
Apply 2-3 coats of a glossy white glaze to the entire face area. Avoid filling in the deep carvings too thickly. -
Detailing in Blue:
Using a fine brush and cobalt blue underglaze or glaze, carefully paint the eyebrows, the lash line of the closed eyes, the lips, and the crescent moon. -
Painting the Band:
Paint the background of the side band in the same deep cobalt blue, being careful to paint around the stars if you left them raised. -
Adding Star Details:
Paint the stars on the cheeks blue. For the stars on the side band, you can leave them raw clay (if using white clay) or paint them with a beige underglaze. -
Glaze Fire:
Fire the piece again to the temperature required by your chosen glazes. -
Gold Final Touches:
Once cool, apply gold luster (if doing a third firing) or gold leaf to the stars on the band for a luxurious finish.
Place your finished moon mask on a wooden round or shelf to bring a peaceful, artistic presence to your home

The Complete Guide to Pottery Troubleshooting
Uncover the most common ceramic mistakes—from cracking clay to failed glazes—and learn how to fix them fast.
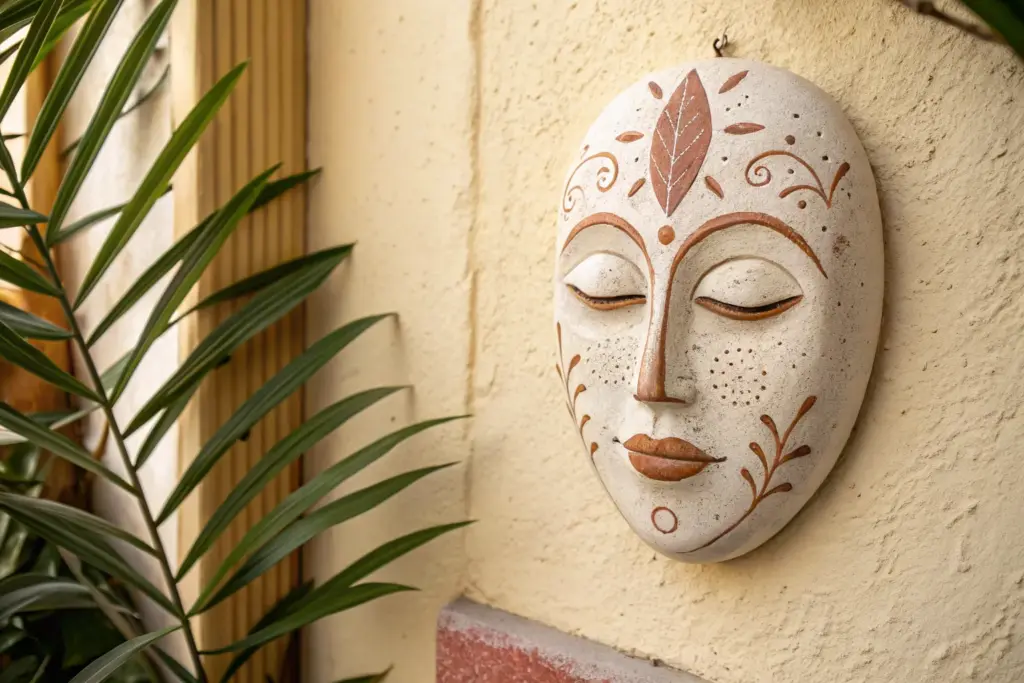
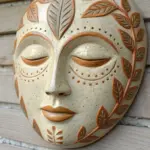
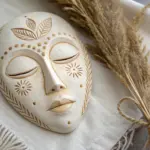
Vine-Wrapped Woodland Spirit Mask
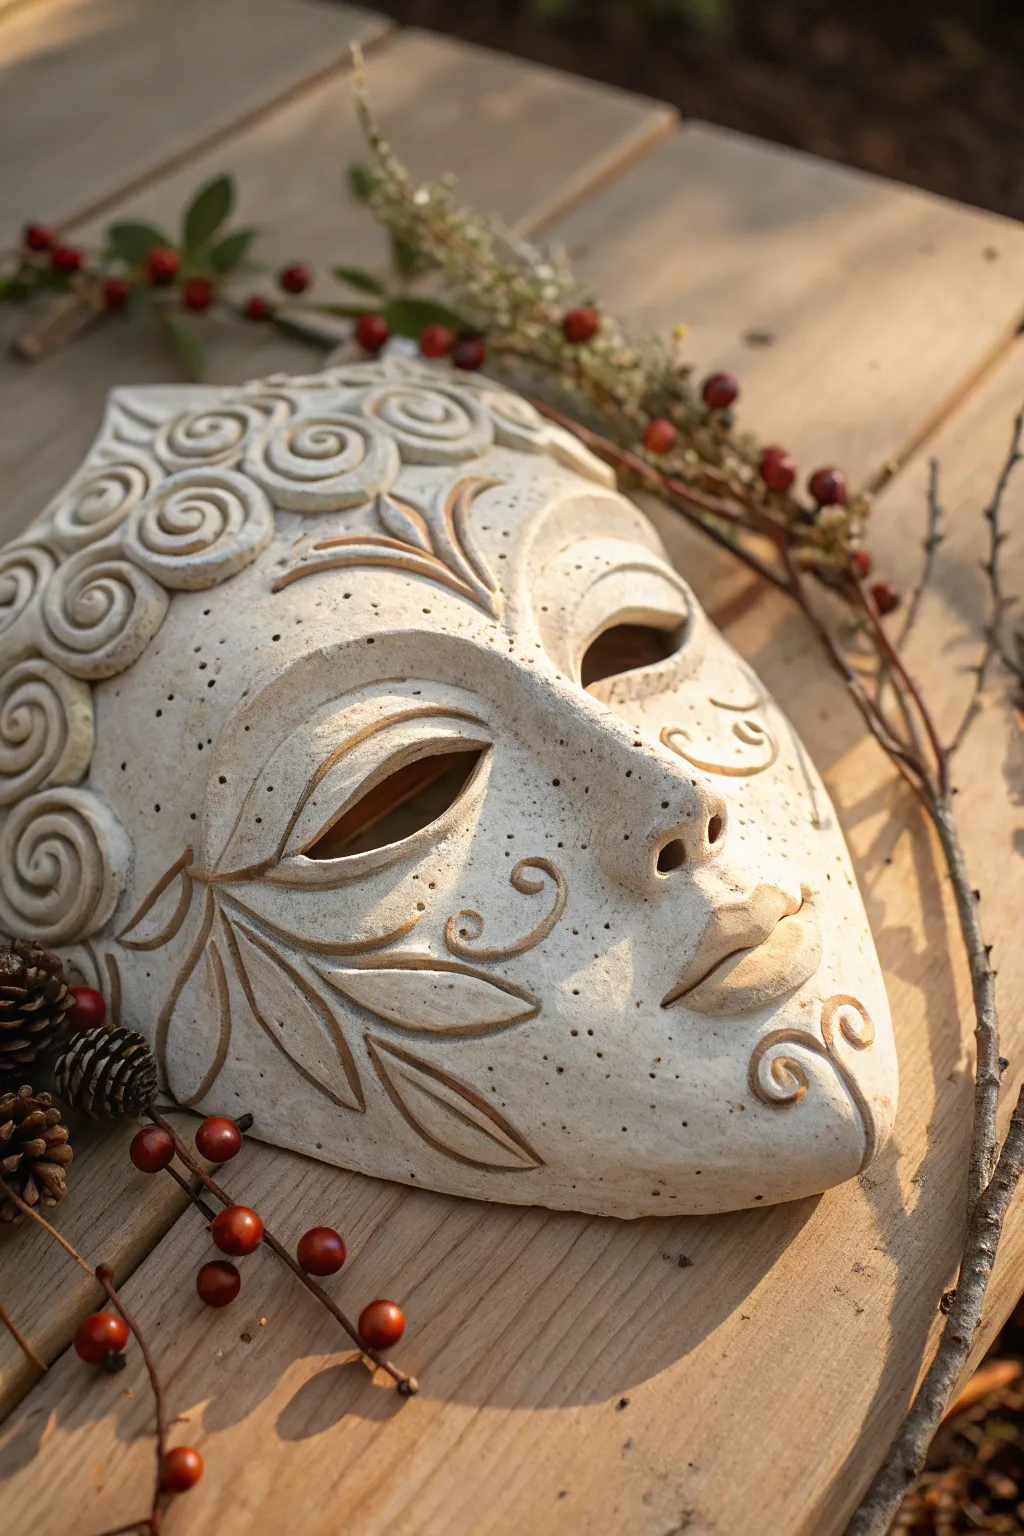
Capture the serene essence of the woods with this handcrafted ceramic mask, featuring swirling leaf motifs and delicate spiral curls. The natural, unglazed finish highlights the raw beauty of the speckled clay, making it a perfect wall adornment for any nature lover.
Step-by-Step Guide
Materials
- Speckled buff stoneware clay (or polymer clay with faux stone finish)
- Clay slab roller or rolling pin
- Ceramic face mold or plaster hump mold (face-shaped)
- Needle tool
- Loop carving tools (various sizes)
- Rib tool (wooden or silicone)
- Slip (liquid clay) and scoring tool
- Small sponge
- Pottery knife
- Fine-grit sandpaper (if using polymer or air-dry clay)
- Matte clear sealant (optional)
Step 1: Forming the Base
-
Prepare the Slab:
Begin by rolling out a medium-thickness slab of speckled clay, approximately 1/4 to 1/3 inch thick. Ensure the thickness is even to prevent cracking during drying. -
Drape the Clay:
Gently lift your clay slab and drape it over your face mold. Press the clay firmly but carefully into the contours of the nose, forehead, and chin to establish the basic human form. -
Define Features:
Use your thumbs or a wooden rib to smooth the clay over the mold’s high points. Refine the bridge of the nose and the lips, ensuring the transition from the brow to the cheekbones is smooth. -
Trim the Excess:
Using a needle tool or pottery knife, cut away the excess clay around the perimeter of the mask, leaving a clean, curved edge that frames the face. -
Cut Eye Openings:
Mark the eye positions symmetrically. Carefully slice out almond-shaped openings. I find it helpful to bevel the cut slightly inward to give the eyes deeper shadows and a more professional finish. -
Refine the Edges:
Smooth the cut edges of the eyes and the mask’s perimeter with a damp sponge or finger to remove any sharp burrs or rough spots.
Step 2: Sculpting the Details
-
Create Spiral Coils:
Roll out several thin snakes of clay. Coil them tightly into flat spirals of varying sizes to represent stylized hair or forest breezes. -
Attach the Spirals:
Score and slip the forehead area of the mask. Press the spiral coils firmly onto the brow line, arranging them in a cascading pattern that mimics a natural crown. -
Carve Leaf Motifs:
Using a V-tipped carving tool or a needle tool, lightly sketch a large leaf shape sweeping across the left cheek. The stem should originate near the jawline. -
Deepen the Relief:
Go back over your leaf sketch and carve deeper lines to define the veins and outline. Remove small ribbons of clay to create a raised, relief effect for the leaf structure. -
Add Vine Accents:
Carve delicate, swirling tendrils curling out from the nose bridge and the corners of the mouth. Use a smaller loop tool to vary the line weight, making the vines look organic. -
Detail the Forehead:
Add smaller leaf shapes or additional botanical carvings between the spiral hair coils to integrate the organic elements fully. -
Texture the Surface:
For that earthy look, use a stiff bristle brush or a needle tool to gently stipple tiny pores or dots across the nose and cheeks, enhancing the stone-like appearance.
Cracked Clay?
If small cracks appear while drying, compress the clay with a rib tool immediately. Slow down drying by keeping it under plastic to equalize moisture.
Step 3: Finishing Touches
-
Final Smoothing:
Check the mask for any unwanted tool marks. Use a slightly damp sponge to soften harsh carving lines without erasing the texture. -
Drying:
Allow the mask to dry strictly slowly under loose plastic for the first day, then uncover it to dry completely to the leather-hard stage. -
Bisque Fire:
Fire the mask in a kiln to bisque temperature (usually Cone 04). If using air-dry clay, simply let it cure fully according to package instructions. -
Finishing:
If you used ceramic clay, fire it once more to the final stoneware temperature (Cone 5 or 6) without glaze to keep the matte, earthy finish. -
Optional Wash:
To enhance the carved details, you can apply a watered-down iron oxide wash or dark acrylic paint, then wipe it back so the color remains only in the recesses.
Verdant Vibes
Mix dried moss or tea leaves directly into your clay body before sculpting. When fired, these burn out, leaving unique organic textures and pits.
Hang your finished spirit mask in a garden nook or a quiet corner of your home to bring a touch of woodland serenity to your space
Flower Crown Portrait Mask
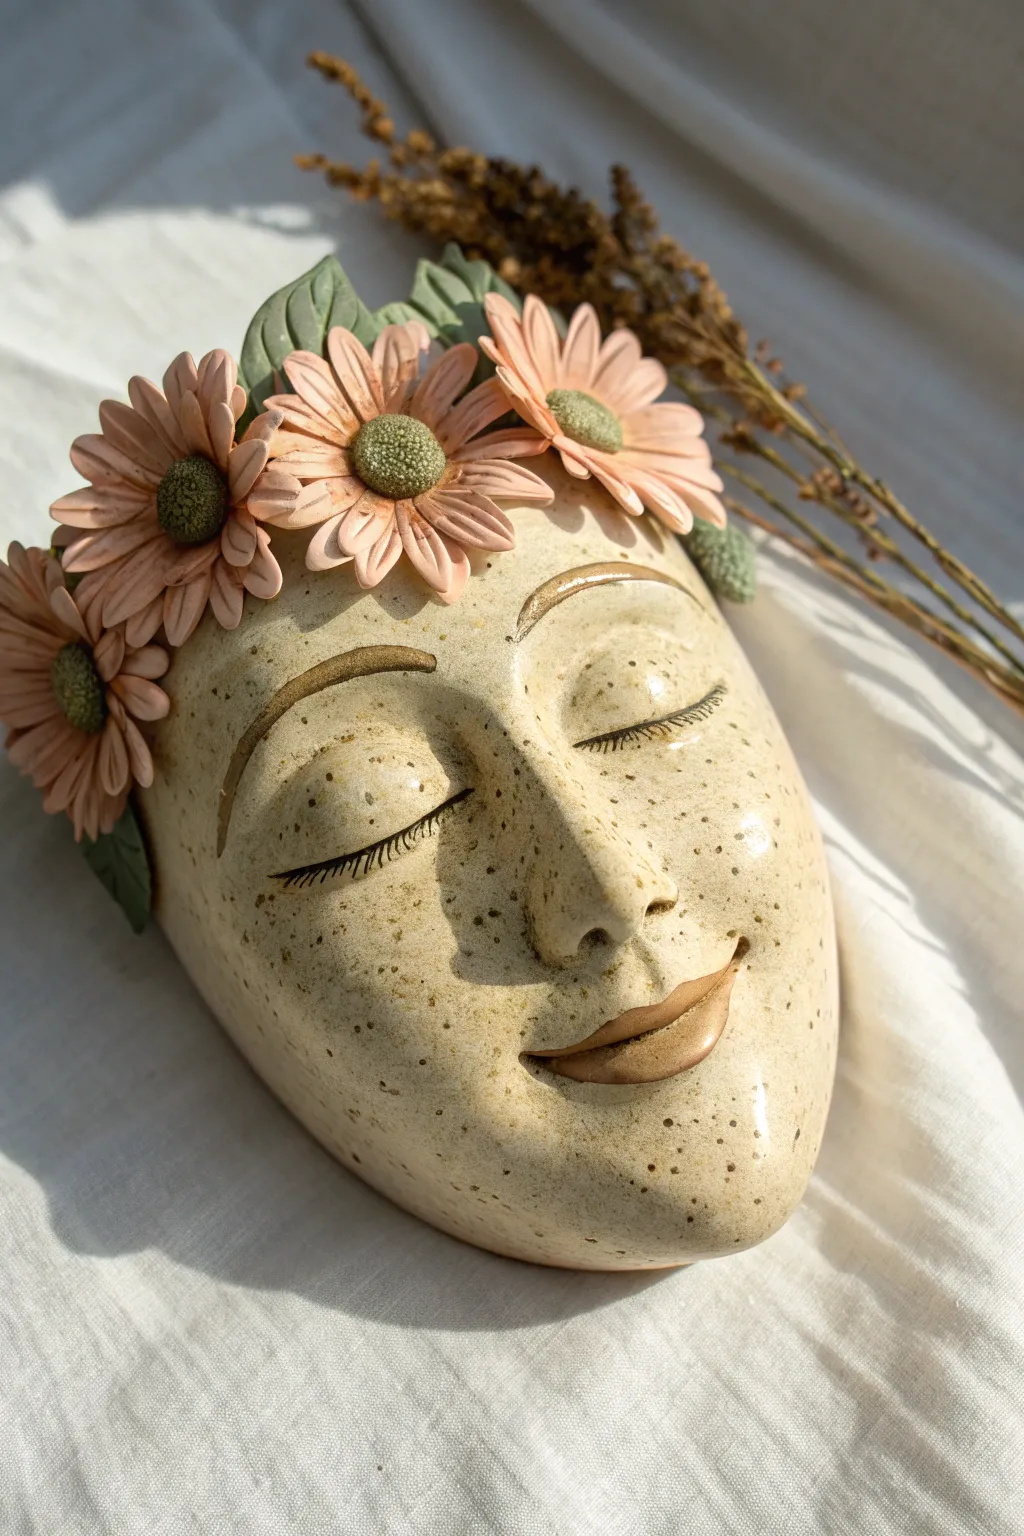
This serene ceramic wall mask captures a moment of peace with its gentle expression and delicate floral crown. Using speckled clay evokes a natural, earthy feel, while the hand-sculpted daisies bring a touch of eternal spring to your decor.
Step-by-Step Tutorial
Materials
- Speckled stoneware clay (mid-fire)
- Clay slab roller or rolling pin
- Plaster face mold or hump mold
- Pottery needle tool
- Modeling tools (wooden and metal ribs)
- Scoring tool (serrated rib)
- Slip (liquid clay)
- Underglazes: Dusty pink, sage green, olive green, warm brown
- Clear transparent glaze
- Kiln
- Small sponges and brushes
Step 1: Forming the Face Base
-
Roll the slab:
Begin by wedging your speckled clay to remove air bubbles. Roll out a uniform slab about 1/4 inch thick. I find rolling it slightly thicker than thinner is safer to prevent cracking during the molding process. -
mold the foundation:
Drape your creative slab over a plaster hump mold of a face. Gently press the clay down to conform to the basic curves—forehead, nose, cheeks, and chin—taking care not to stretch the clay too thin. -
Refine the features:
Using your fingers and modeling tools, define the facial structure. Smooth out the nose bridge and gently press inwards to create the eye sockets and the philtrum above the lip area. -
Trim the edges:
Once the face form is established, use a needle tool to cut away excess clay around the perimeter, creating a clean oval or egg shape for the mask boundary.
Hanging Tip
Before the clay dries, create two small holes near the temples or attach a clay loop on the back. This ensures you can easily hang the mask securely once fired.
Step 2: Sculpting the Expression
-
Create the eyelids:
Roll two small coils of clay and flatten them slightly. Attach them to the eye area with slip and scoring to form the closed upper eyelids. Smooth the edges down so they blend seamlessly into the face. -
Add the lashes:
Using a very fine needle tool or a specialized incising tool, carefully scratch small, curved lines along the bottom edge of the eyelid to represent eyelashes. -
Form the lips:
Add a small amount of clay for the mouth. Sculpt a gentle smile, ensuring the corners turn up slightly. Define the separation between the upper and lower lip with a modeling tool. -
Define the eyebrows:
Lightly incise the arched shape of the eyebrows using a stylus or dull pencil tool. You don’t need to add clay here; just outlining the area for painting later works best for this style. -
Smooth the skin:
Use a damp sponge or a soft rib to smooth the entire surface of the face, erasing any fingerprints or harsh tool marks to achieve a peaceful, flawless complexion.
Level Up: Gold Luster
After the final glaze firing, apply a tiny accent of real gold luster to the edges of the petals or the lash line, then refire at a very low temperature (Cone 018) for luxury.
Step 3: Crafting the Floral Crown
-
Make the leaves:
Roll out a thin strip of clay and cut out several leaf shapes. Use a needle tool to draw veins on them. Attach these to the top of the forehead using the score and slip method, bending some tips slightly for movement. -
Form flower petals:
For the daisies, create several small teardrop shapes from clay. Flatten them slightly to look like petals. You will need about 10-12 petals per flower. -
Assemble the blooms:
Arranging the petals in a circle directly onto the forehead area, layer them so they slightly overlap the leaves you just placed. Score and slip every contact point securely. -
Add flower centers:
Roll small balls of clay and press them into the center of your petal rings. Use a texturing tool or the tip of a stiff brush to stipple the centers, giving them a pollen-like texture. -
Add side details:
Continue this floral pattern down the sides of the mask near the temples, perhaps adding a half-flower or just a few leaves to frame the face naturally.
Step 4: Glazing and Finishing
-
Bisque fire:
Allow the mask to dry slowly under plastic to prevent warping, then bisque fire it according to your clay’s specifications (usually Cone 04). -
Apply underglaze washes:
Paint the petals with a soft dusty pink underglaze. Use sage green for the leaves and the flower centers. Carefully paint the lips and eyebrows with a warm brown underglaze. -
Wipe back method:
For a subtle look, you can lightly wipe the underglaze with a damp sponge after it dries, leaving color mostly in the crevices and texture, though for this opaque look, two solid coats work best. -
Clear glaze application:
Apply a clear, glossy transparent glaze over the entire piece. This will make the speckles in the clay pop and give the face a shiny, wet finish. -
Final firing:
Fire the piece a second time to the maturation temperature of your clay and glaze (typically Cone 5 or 6 for stoneware).
Hang your finished piece in a well-lit spot where the sunlight can catch the glossy glaze and highlight the gentle contours


What Really Happens Inside the Kiln
Learn how time and temperature work together inside the kiln to transform clay into durable ceramic.
Textured Bark-and-Moss Mask
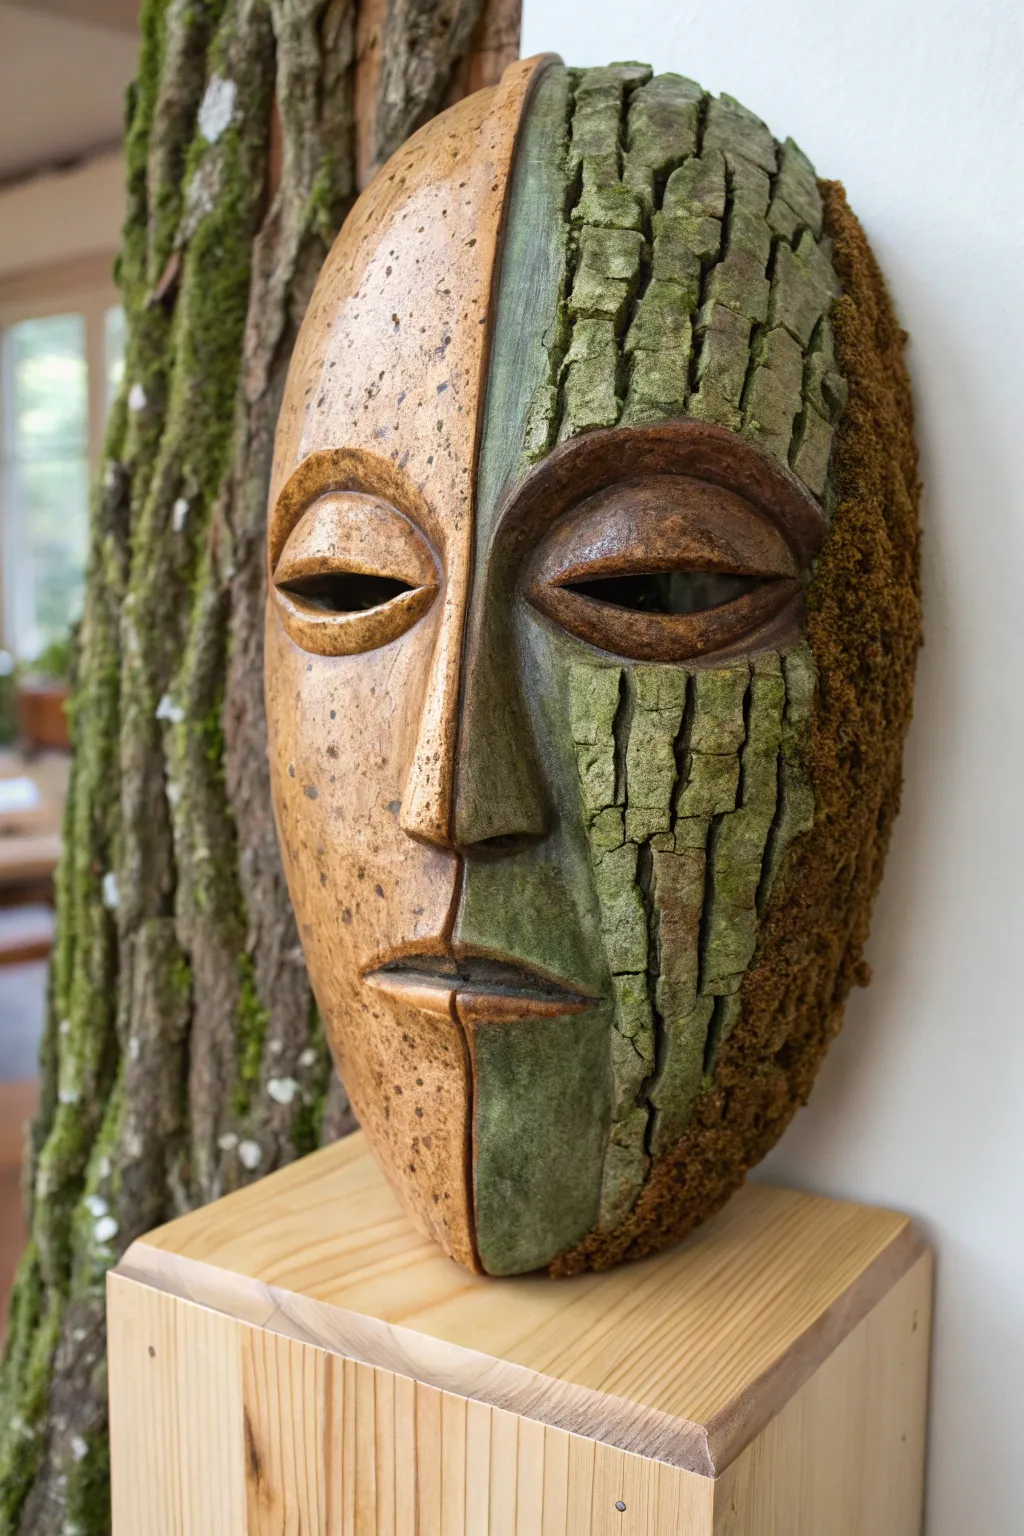
Merge the refined and the rugged with this dual-textured ceramic mask, featuring one side of smooth, speckled stoneware and another of hyper-realistic bark and moss. This striking contrast creates a captivating narrative about humanity’s connection to the forest, perfect for a gallery wall or garden feature.
Step-by-Step
Materials
- Stoneware clay (speckled or buff)
- Clay carving tools (loop tools, needle tool)
- Wooden modeling tools
- Rolling pin and canvas mat
- Paper template of a face
- Slip and scoring tool
- Underglazes (Forest Green, Moss Green, Dark Brown, Black)
- Clear matte glaze
- Real dried moss (optional, for post-firing)
- Strong craft adhesive (if using real moss)
- Sponge
Step 1: Forming the Base
-
Prepare the slab:
Roll out a slab of stoneware clay to a uniform thickness of about 1/2 inch. Keep it sturdy enough to hold deep textures later. -
Shape the face curve:
Drape the slab over a hump mold or a makeshift plaster form to establish the general convex curve of a face. Let it stiffen slightly so it holds its shape. -
Define the perimeter:
Using your paper template as a guide, cut the oval outline of the face. Smooth the edges with a damp sponge to remove any sharp burrs.
Crack Control
If the clay is too wet when you carve deep bark fissures, the mask may slump. Wait until it’s a solid leather-hard state before doing the aggressive carving work.
Step 2: Sculpting the Features
-
Build the nose:
Score and slip a wedge of clay into the center for the nose. Blend the edges seamlessly into the main mask body, ensuring a strong attachment. -
Add volume for eyes and mouth:
Add small coils or pads of clay where the eyes and lips will be. Smooth them down to create raised areas that will later be carved into detailed features. -
Divide the visage:
Use a needle tool or fettling knife to draw a vertical line straight down the center of the face, bisecting the nose and lips. This is your critical boundary line. -
Sculpt the smooth side:
On the left side, refine the eye socket, eyelid, and half-lip. Keep this side very smooth and cleaner in its lines, using a rib tool to compress the surface. -
Sculpt the rough side structure:
On the right side, sculpt the matching eye and lip, but don’t worry about surface smoothness. The underlying structure needs to match the left for symmetry before we add texture.
Seasonal Shift
Change the vibe by altering the ‘nature’ side. Use white texture paste and glitter for a winter frost look, or attach tiny clay flowers for a spring version.
Step 3: Texturing the Bark
-
Carve deep fissures:
On the right side only, use a sharp wooden tool or knife to carve deep, vertical, irregular channels. These imitate the cracks in old tree bark. -
Chop and rough the surface:
Between the deep cracks, use a wire brush or a jagged tool to scrape and roughen the clay ‘plateaus.’ You want to eliminate any evidence of smooth clay here. -
Detail the transition:
Pay special attention to the center line. The bark texture should stop abruptly at the cut, creating a sharp cliff-like edge against the smooth face. -
Hollow the back:
Once the front is firm (leather hard), carefully turn the mask over and hollow out the thickest parts of the nose and added features to ensure even drying.
Step 4: Glazing and Finishing
-
Bisque fire:
Allow the mask to dry slowly under plastic to prevent warping, then bisque fire it according to your clay body’s specifications. -
Apply base wash:
Water down dark brown underglaze and brush it into all the deep cracks of the bark side. Sponge off the high points to create depth and shadow. -
Add mossy greens:
Dab various shades of green underglaze onto the raised bark sections. I like to stipple this on with a stiff brush to keep it looking organic and patchy. -
Glaze the smooth side:
Apply a clear matte glaze over the smooth left side to highlight the natural speckles of the clay. Leave the bark side unglazed or use a very dry matte finish. -
Final firing:
Fire the piece to glaze temperature. -
Enhance with real moss:
After the final firing is complete and the piece is cool, glue small tufts of dried or preserved moss into the deepest crevices on the outer edge for a mixed-media touch.
Mount your finished mask on a wooden block or hang it directly on the wall to let the dual textures tell their story
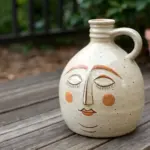
Mustachioed Character Mask
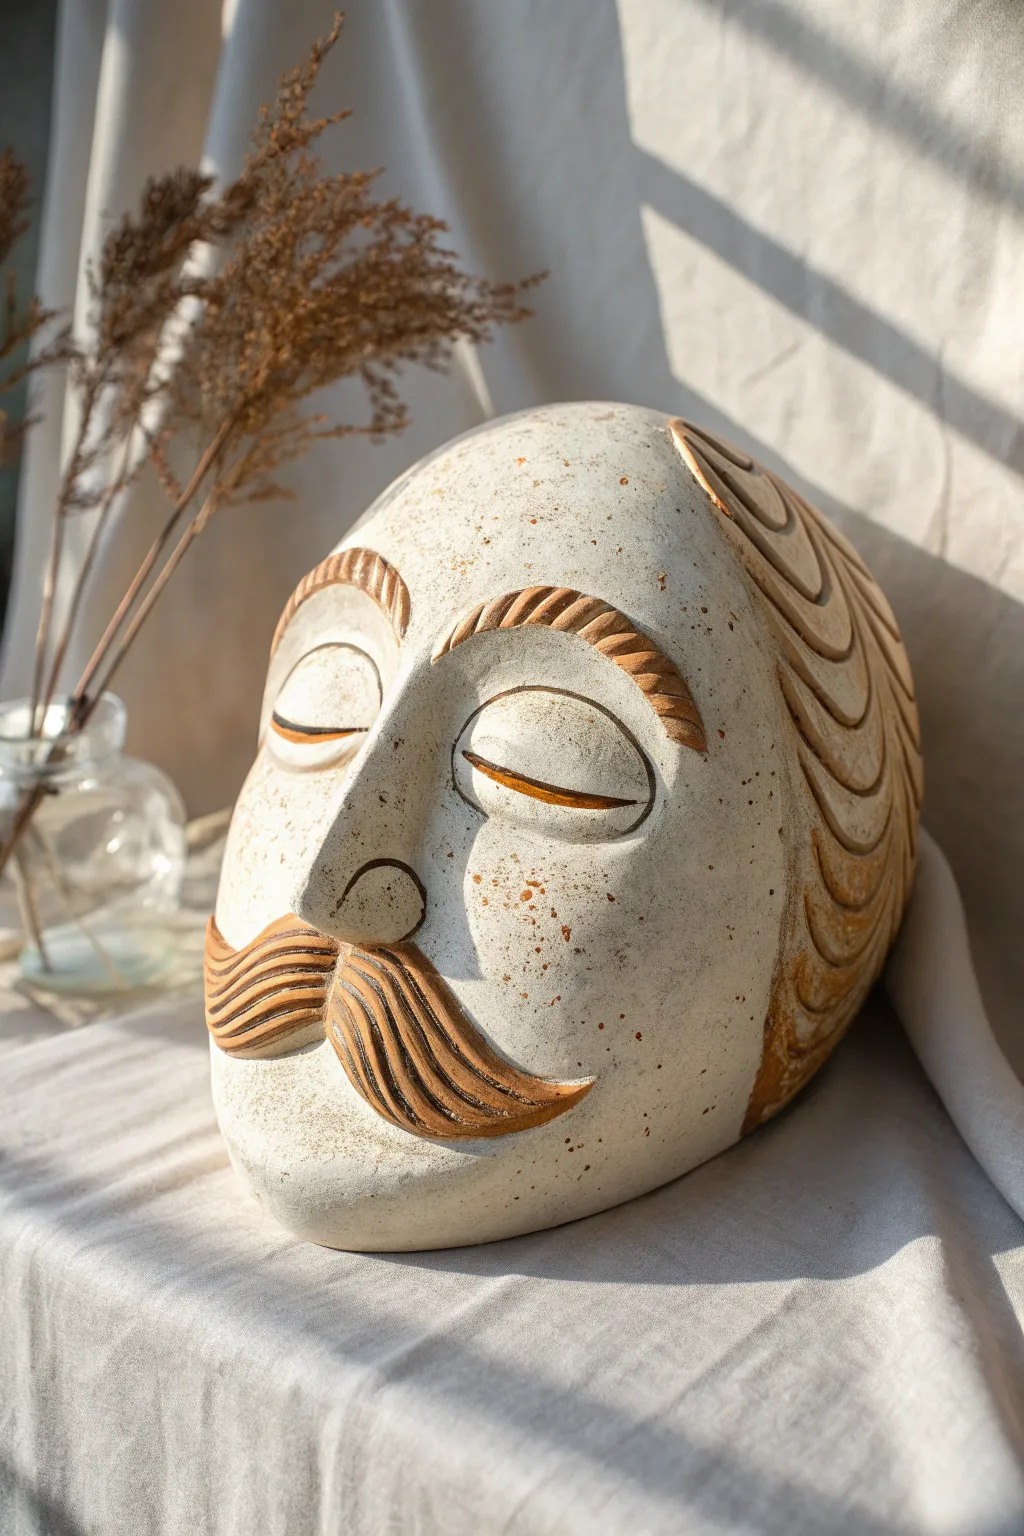
Capture a sense of peaceful contemplation with this stylized ceramic head sculpture, featuring bold textured details and an earthy, speckled finish. This project balances smooth, rounded forms with intricate carving to create a character full of quiet dignity.
Step-by-Step Tutorial
Materials
- White stoneware clay with speckles (grog)
- Pottery tools (rib, needle tool, loop tools)
- Slip and scoring tool
- Iron oxide wash or dark brown underglaze
- Medium stiff paintbrush
- Sponge
- Matte transparent glaze (optional)
- Kiln for firing
Step 1: Forming the Base
-
Prepare the slab:
Begin by rolling out a thick slab of speckled white stoneware clay, approximately half an inch thick. You will need enough clay to form a large, hollow egg shape. -
Construct the main volume:
Create the head shape using a paho or coil-building technique. Aim for an elongated, oval form that is rounded at the top and slightly flatter at the base of the chin. Ensure the walls are even. -
Close and smooth:
Close up the top of the form completely. Use a metal rib to aggressively smooth the exterior, compressing the clay to remove all join lines and create that seamless, egg-like surface. -
Establish facial planes:
While the clay is leather-hard, gently press in the eye socket areas with your thumbs to create a subtle depression where the eyes will sit.
Step 2: Sculpting Features
-
Add the nose:
Shape a triangular wedge of clay for the nose. Score and slip the attachment area securely, blending the clay seamlessly onto the face, particularly at the bridge and sides. -
Define the eyes:
Roll two flattened ovals of clay for the eyelids. Attach these into the eye sockets you created earlier. Use a modeling tool to carve a neat, curved line across the center of each to represent closed eyelids. -
Build the mustache:
Roll two thick, tapered coils of clay. Attach them under the nose, curbing them upwards at the ends to create a classic handlebar shape. Flatten them slightly against the face. -
Create eyebrows:
Add two arched strips of clay above the eyes. I like to make these slightly raised to match the prominence of the mustache.
Fixing Cracks
If hairline cracks appear at the nose or mustache joints during drying, compress the area immediately with a hard tool. Apply a tiny amount of vinegar slip to mend stubborn separations.
Step 3: Detailing and Texture
-
Carve hair strands:
Using a small loop tool or a textured rib, carve deep, rhythmic grooves into the mustache and eyebrows to simulate hair. Follow the curve of the clay form. -
Sculpt the main hair:
On the back and sides of the head, carve large, sweeping ‘C’ shaped curves. These should look like stylized waves overlapping each other, creating a distinct graphic pattern. -
Clean up edges:
Go over your carved lines with a damp brush or fingertip to remove any sharp burrs or clay crumbs. -
Final smoothing:
Check the smooth areas of the face (cheeks, forehead) again. Use significant pressure with a flexible rib to burnish these areas slightly, contrasting with the textured hair.
Add Functionality
Before closing the top of the head form, leave it open to turn this sculpture into a unique vase for dried flowers, or cut a large hole in the back to use it as a luminary.
Step 4: Firing and Finishing
-
Bisque fire:
Allow the piece to dry slowly and completely before bisque firing it to the appropriate temperature for your clay body (usually cone 04 or 06). -
Apply oxide wash:
Mix iron oxide with water or use a dark brown underglaze. Paint this wash liberally over the mustache, eyebrows, eyelids, and the hair pattern on the back. -
Wipe back:
Using a clean, damp sponge, wipe away the oxide from the raised surfaces. The dark color should remain only in the recessed grooves, highlighting the texture. -
Glaze application:
You can leave the bare clay for a raw finish, or apply a very thin coat of matte transparent glaze to seal the surface without making it glossy. -
Final fire:
Fire the piece again to the maturity temperature of your clay (e.g., cone 5 or 6). This will vetrify the clay and set the oxide definition.
Place your finished sculpture in a spot with good natural light to let the shadows play across those textured details

TRACK YOUR CERAMIC JOURNEY
Capture glaze tests, firing details, and creative progress—all in one simple printable. Make your projects easier to repeat and improve.
Art Deco Glam Mask

This striking ceramic project combines the sleek elegance of Art Deco design with the timeless appeal of a traditional mask form. High-contrast geometric lines in burgundy and cream create a sophisticated, polished look that is perfect for hanging as wall art.
Step-by-Step
Materials
- White earthenware or stoneware clay (low fire)
- Mask mold (plaster or plastic face form)
- Clay carving tools (needle tool, loop tool)
- Fettling knife
- Sponge and water
- Underglaze (Burgundy/Deep Red)
- Small round brushes (size 0 and 2)
- Clear gloss glaze
- Sanding sponge (fine grit)
- Pencil (optional)
Step 1: Forming the Base
-
Roll your slab:
Begin by rolling out an even slab of white clay, approximately 1/4 inch thick. Compress the clay with a rib tool on both sides to align the particles and prevent warping later. -
Drape the clay:
Carefully lift your slab and drape it over your mask mold. Gently press the clay down to conform to the features, starting from the nose bridge and working outward to avoid trapping air bubbles. -
Trim the edges:
Using a fettling knife, trim the excess clay around the perimeter of the mask form to create a clean, oval shape. Smooth the cut edge with a damp sponge. -
Refine the features:
Use your fingers or a modeling tool to sharpen the definition around the eyes, nose, and lips. The goal is a stylized, smooth surface, so ensure the transition from the nose bridge to the forehead is seamless. -
Cut the eyes:
Carefully slice out the slitted eye openings. Shape them into elongated almond shapes, typical of the Art Deco style, and smooth the rough cut edges with a damp brush. -
Add holes for hanging:
If you plan to hang this piece, use a straw or needle tool to poke small holes near the temples or at the top rim before the clay dries.
Symmetry Hack
Draw your design on paper first, fold it in half, then trace it onto the leather-hard clay to ensure perfectly mirrored geometric patterns.
Step 2: Designing and Bisque Firing
-
Dry partially:
Allow the clay to dry to a leather-hard state where it is firm but still cool to the touch. This is the perfect consistency for carving or sketching your design. -
Map the geometry:
Lightly sketch your symmetrical design directly onto the clay with a pencil. Start with a central vertical line, then map out the sweeping curves above the eyes and the triangular motifs on the cheeks. -
Incise the lines:
Using a needle tool or a very fine v-tip carving tool, gently incise the main structural lines of the pattern. This creates small channels that help guide your painting later. -
Smoothen and dry:
Use a soft brush or your finger to remove any clay burrs created by the incising. Let the mask dry slowly and completely to bone dry state, then bisque fire it according to your clay body’s instructions.
Warping Woes?
If the mask edges lift while drying, gently weigh them down with small sandbags or reform them daily until the clay is bone dry.
Step 3: Glazing and Finishing
-
Clean surface:
Once your bisque piece is cool, wipe it down with a damp sponge to remove any kiln dust. This ensures your underglaze adheres properly. -
Paint the burgundy details:
Using a fine round brush (size 2), fill in the ‘dark’ areas with deep burgundy underglaze. This includes the eyebrows, the wide sweep lines on the forehead, the triangles on the cheeks, and the lips. -
Detail the eyes:
Paint the eyelid area deep burgundy. I like to be very precise here to keep the almond shape sharp. Add the thin line detail below the lower lid as well. -
Add fine line work:
Switch to a size 0 brush for the intricate hatching lines inside the forehead curves and the cheek triangles. Keep your hand steady and your paint consistency fluid but opaque. -
Clean up smudges:
If you make a mistake, gently scrape the dried underglaze off the white bisque areas with an X-acto knife or a stiff clean brush. -
Apply clear glaze:
Once the underglaze is completely dry, apply 2-3 coats of clear gloss glaze over the entire front of the mask. This will seal the clay and make the burgundy pop. -
Final firing:
Load the mask into the kiln on stilts (if the back requires it) or directly on the shelf if the back is unglazed. Fire to the recommended cone for your clear glaze.
Now you have a stunning piece of ceramic art ready to bring sophisticated drama to any wall.
Grinning Jester-Style Mask
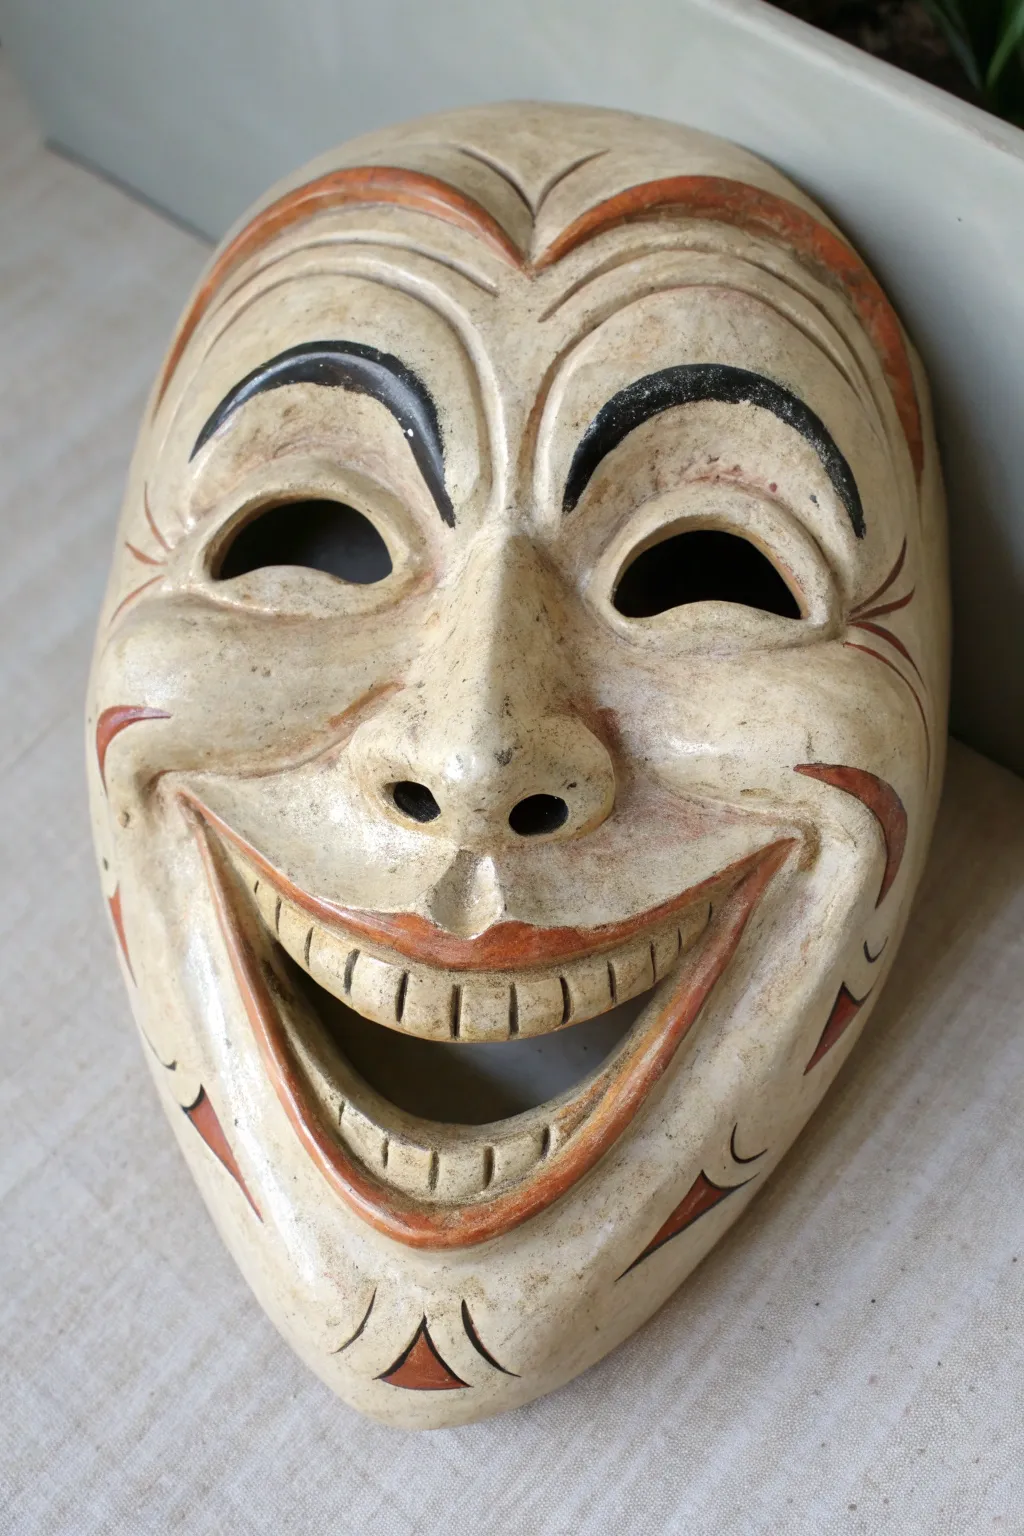
This project guides you through sculpting and finishing a highly expressive ceramic mask with a contagious, exaggerated grin. The finished piece features a lovely antiqued cream finish with terracotta and black accents, perfect for hanging as wall art.
Step-by-Step Tutorial
Materials
- White or buff stoneware clay (with fine grog)
- Plaster mold or newspaper armature for curved shape
- Pottery tool set (needle tool, ribbon tools, wooden modeling tools)
- Sponge
- Slip and scoring tool
- Underglazes: Black, Terracotta/Red-Brown
- Clear matte or satin glaze
- Brown oxide wash or watered-down acrylic paint for antiquing (optional)
- Kiln access
Step 1: Sculpting the Base Form
-
Prepare the slab:
Roll out a slab of clay to approximately 1/4 inch thickness. It needs to be large enough to cover the size of a human face plus a little extra for the curvature. -
Form the curve:
Drape your slab over a hump mold or a ball of scrunched-up newspaper covered in plastic to create the convex face shape. Smooth it down gently with a rib tool to remove canvas textures. -
Outline the face:
Using a needle tool, cut the general oval outline of the face. Taper the bottom significantly to create a somewhat pointed chin, giving it that classic jester look. -
Mark features:
Lightly sketch the placement of the eyes, nose, and the wide, up-turned mouth directly onto the clay surface to act as your guide.
Clean Lines Pro-Tip
When painting the underglaze details, use a ‘liner’ brush with long bristles. It holds more pigment and allows for smoother continuous curves on the eyebrows without stopping to reload.
Step 2: Building the Features
-
Add volume for brows:
Roll two thick coils of clay. Score and slip the forehead area, then attach the coils in high, arched shapes above the eye line to create prominent brow ridges. -
Build the nose:
Form a triangular wedge of clay. Score and slip the center of the face and attach it. Blend the edges seamlessly into the cheeks and forehead, shaping a bulbous but slightly pointed nose. -
Create the cheeks:
Add extra clay to the cheekbone areas to puff them out. This is crucial—the cheeks need to look like they are being pushed up by the massive smile. -
Carve the eyes:
Cut out two crescent or almond-shaped holes for the eyes. Use a damp sponge or finger to smooth the sharp cut edges immediately so they don’t look ragged.
Step 3: Refining the Expression
-
Sculpt the grin:
Add a long, curved coil for the lips. Blend the outer edges into the face, but keep the inner edge sharp and defined. Use a modeling tool to deepen the corners of the mouth for that gleeful expression. -
Form the teeth:
Inside the mouth area, you can either carve into the existing clay or insert a flat strip of clay. Use a knife tool to vertically incise the individual teeth, differentiating between top and bottom rows. -
Add wrinkle details:
This mask relies on line work. Use a small loop tool or wooden skewer to carve deep, curved lines radiating from the eyes (crow’s feet) and distinct ‘smile lines’ around the mouth. -
Refine the surface:
Once the clay is leather hard, smooth the skin areas with a damp sponge. Leave the carved lines crisp. I like to gently press a coarse fabric or sandpaper onto the skin areas now to create that subtle speckled texture before firing. -
Dry and Bisque Fire:
Allow the mask to dry slowly under plastic for several days to prevent warping, then bisque fire to cone 04 (or according to your clay body specs).
Level Up: Antique It
After the final firing, if the mask looks too ‘new,’ rub a dark brown acrylic wash over the surface and wipe it off immediately. The dark paint will stay in the tiny pits for an aged look.
Step 4: Decoration and Glazing
-
Apply base color:
If your clay isn’t naturally cream-colored, apply a wash of watered-down cream or beige underglaze over the entire face. Wipe it back slightly so it settles into the texture. -
Paint the accents:
Using a terracotta or red-brown underglaze, carefully paint the lips, the decorative triangles on the chin and forehead, and trace inside the deep wrinkle lines to emphasize them. -
Detail the eyes:
Use black underglaze to paint heavy, arched eyebrows high on the forehead. Imagine a clown’s makeup application—bold and graphic. -
Enhance the teeth:
Paint the gaps between the teeth with a dark wash or black underglaze to make the white of the teeth pop. This adds depth to the smile. -
Final Glaze and Fire:
Apply a clear satin or matte glaze over the entire piece. Avoid glossy glazes, as they can obscure the modeled details. Fire to the final temperature required by your clay and glaze.
Hang this cheerful character on your wall and enjoy the touch of traditional theater it brings to your space
Stitched Monster Scar Mask
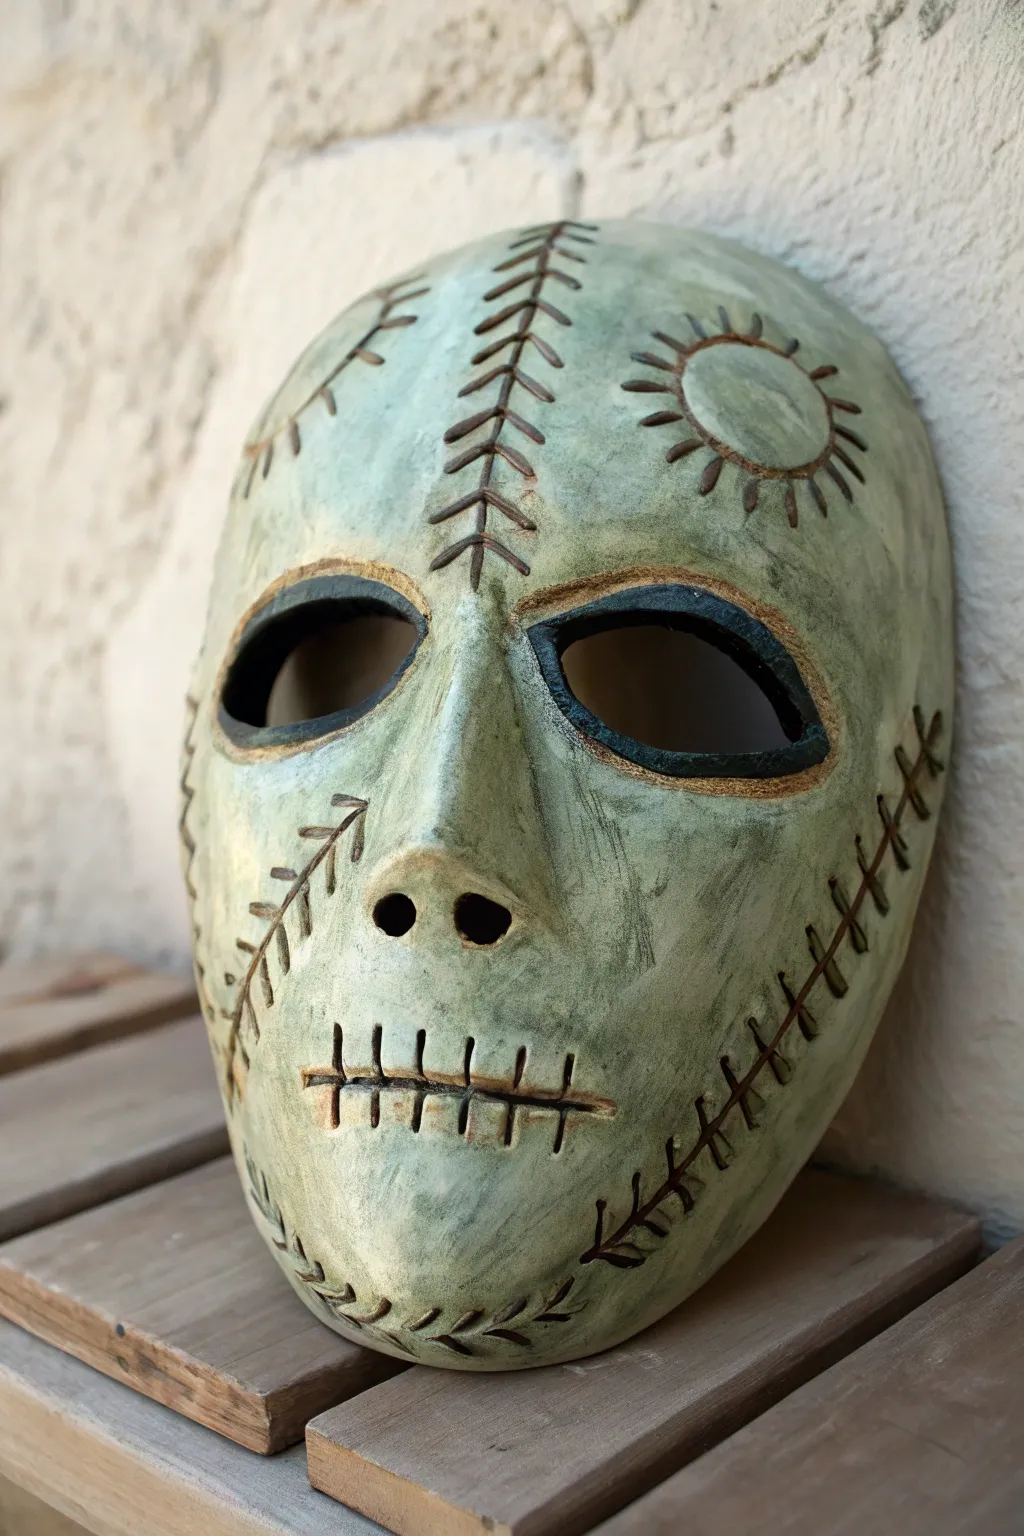
This eerie yet artistic ceramic mask captures a stitched-together, Frankenstein-esque aesthetic with its textured scars and muted green glaze. Its hollow eyes and rough-hewn features make it a perfect wall hanging or a spooky addition to your pottery collection.
Step-by-Step
Materials
- Stoneware or earthenware clay (white or buff body)
- Face mold (plaster or plastic) or newspaper armature
- Rolling pin and guide sticks (approx. 1/4 inch)
- Needle tool
- Loop tool or carving gouges
- Slip and scoring tool
- Sponge
- Underglazes (Dark Green, Black, Brown)
- Matte transparent glaze or wax finish
- Small stiff-bristle brush
- Soft fan brush
Step 1: Sculpting the Base
-
Prepare the slab:
Roll out a slab of clay to a consistent thickness of about 1/4 inch. If you want the mask to be sturdy, avoid going too thin, but keep it light enough to hang. -
Form the shape:
Drape your clay slab over your plaster face mold or a bunched-up newspaper armature to give it a convex curve. Gently press it down to establish the basic curvature of a human face. -
Trim the perimeter:
Use a needle tool or fettling knife to cut the outer oval shape of the mask. Smooth the cut edges with a damp sponge so they are rounded, not sharp. -
Establish features:
Locate the nose area and push the clay out gently from the inside, or add a small wedge of clay to the outside for the nose, blending it seamlessly. Mark the eye positions lightly.
Step 2: Carving and Detailing
-
Cut the eyes:
Use your needle tool or a small knife to cut out large, almond-shaped eye holes. Creating a slight bevel on the cut edge helps the glaze pool nicely later. -
Define the eye sockets:
Roll thin coils of clay and attach them around the eye openings to create raised ridges. Blend the outer edges into the face but keep the inner rim sharp to define the socket. -
Carve the nose holes:
Instead of sculpting a full nose, use a round tool to punch two distinct circular nostrils into the clay where the nose ridge ends. -
Stitched mouth:
Draw a long horizontal line for the mouth using a carving tool. Cross it with vertical hatch marks to simulate sutures or heavy stitches. -
Add scar details:
Carve deep decorative scars across the face. Create a vertical scar running down the center of the forehead and jaw, and a long curved scar along the cheek. Emphasize these with cross-hatching to look like stitches. -
Forehead symbol:
On the upper right forehead, incise a circle with radiating lines to create a sun or gear motif. Keep the lines deep enough to hold a dark wash later. -
Refine the texture:
Use a barely damp sponge to smooth out rough burrs, but don’t over-smooth; a little surface irregularity adds to the organic, worn leather look. Let the piece dry slowly to bone dry.
Stitch Depth Tip
Carve your stitch marks slightly deeper than you think is necessary. Glaze tends to fill shallow lines, making your cool details disappear after firing.
Step 3: Bisque and Glazing
-
Bisque fire:
Fire the mask to cone 04 (or your clay’s specific bisque temperature). -
Apply the oxide wash:
Mix black underglaze or iron oxide with water. Brush it generously into all the carved lines, stitches, and eye rims. Wipe away the excess with a damp sponge, leaving the dark color trapped only in the recesses. -
Base color application:
Apply a coat of semi-transparent celadon or a watered-down mossy green underglaze over the entire mask. The goal is a wash, not an opaque coat, so the clay body still influences the tone. -
Accentuate the eyes:
Paint a solid ring of black or dark brown around the immediate rim of the eye holes to make them pop against the lighter green skin. -
Highlight the stitches:
I like to take a very precise liner brush with brown underglaze and carefully go over the cross-hatch stitches again to ensure they stand out sharply. -
Final glaze and fire:
Apply a thin coat of matte transparent glaze to seal the piece without making it too glossy. Fire to the final temperature required for your clay body (likely cone 5 or 6 for stoneware).
Warping Prevention
If the mask edges lift up while drying, weigh them down gently with small bean bags or sandbags to keep the curve consistent.
Once cooled, thread a sturdy wire through holes in the back to display your haunting creation
Horned Demon Mask
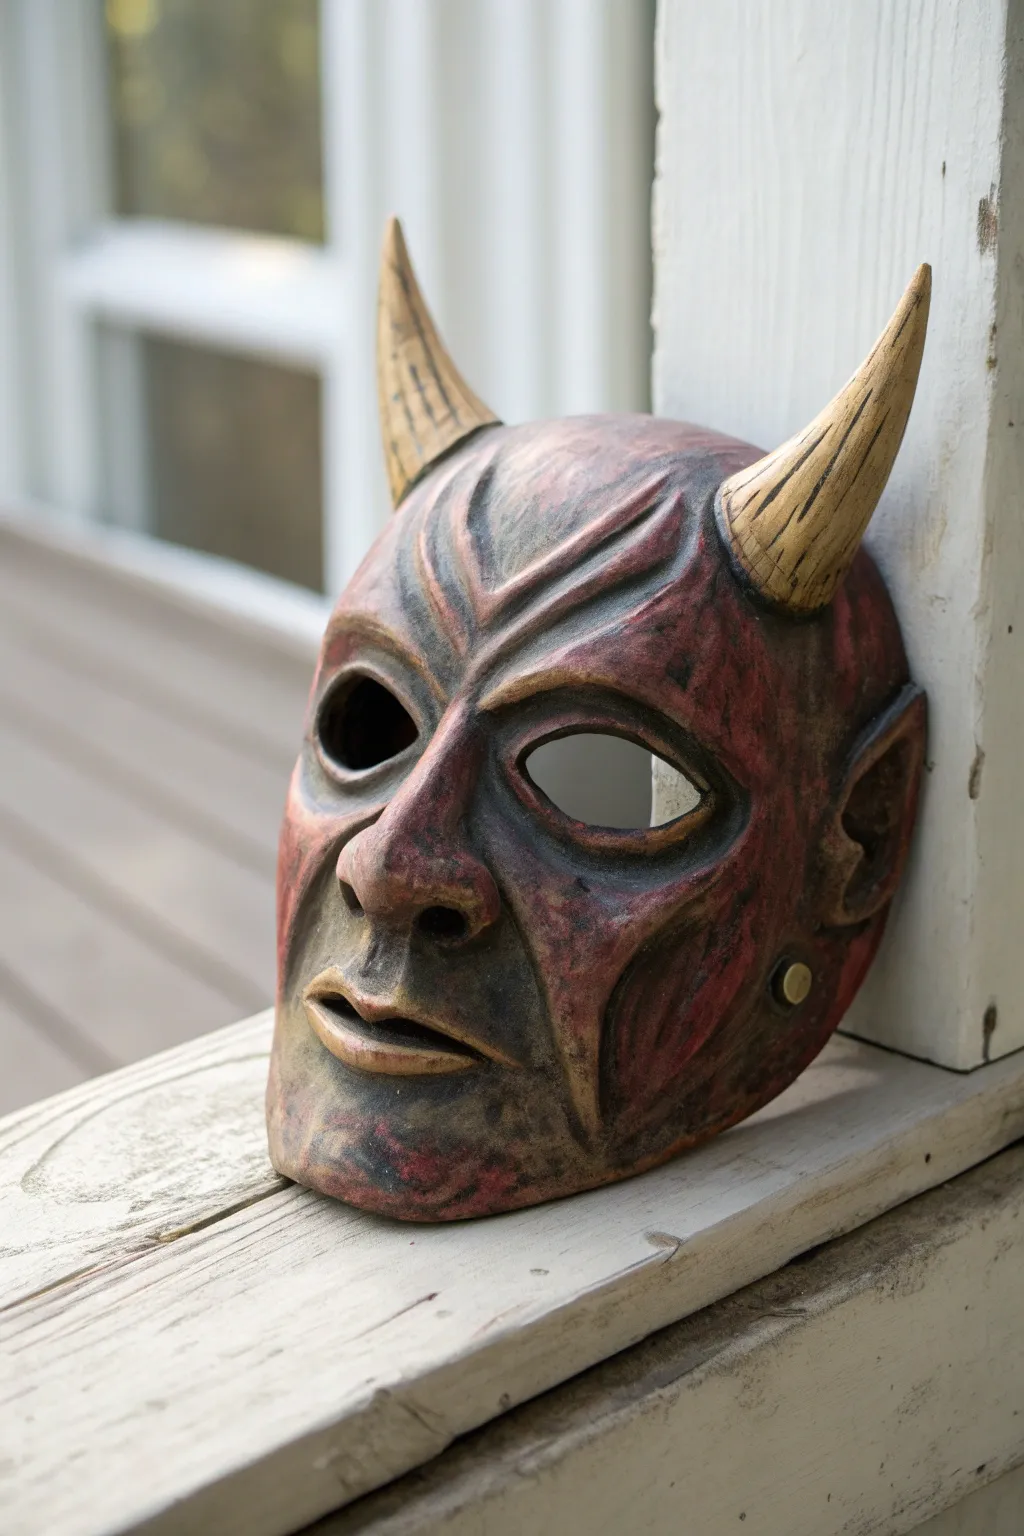
Summon a touch of the infernal with this striking ceramic mask, featuring angular demon horns and a beautifully weathered, ancient finish. The deep red and earthy ochre tones give it a look that suggests it was unearthed from a forgotten crypt rather than freshly sculpted.
How-To Guide
Materials
- Cone 5/6 Stoneware clay (buff or white)
- Clay carving tools (loop tool, needle tool)
- Wooden modeling tools
- Slip and scoring tool
- Newspaper or half-sphere plaster mold (for support)
- Small sponge
- Underglazes (Red Iron Oxide, Deep Red, Black, Golden Ochre)
- Matte clear glaze or low-sheen satin glaze
- Paintbrushes (stiff bristle and soft round)
- Kiln
Step 1: Sculpting the Base Structure
-
Form the slab base:
Begin by rolling out a clay slab approximately 1/4 to 1/2 inch thick. Drape it over a plaster face mold or a bundled ball of newspaper to create the initial curved face shape. -
Refine the perimeter:
Trim the excess clay to form a distinct face outline. This mask has a long, slightly pointed chin and a high forehead, so ensure your oval is elongated rather than perfectly round. -
Mark facial landmarks:
Using a needle tool, lightly sketch where the eyes, nose, and mouth will sit. The eyes should be fairly large, slanted teardrops to give that menacing glare. -
Build the nose:
Add a wedge of clay for the nose. Score and slip the area thoroughly before attaching. Shape it into a slightly hooked, human-like nose with defined nostrils. -
Create the brow ridge:
Roll two coils of clay and blend them above the eye holes. Sculpt these into a heavy, V-shaped brow that dips deep in the center, creating an angry, furrowed expression.
Hollow Horn Tip
To prevent explosions in the kiln, hollow out the thickest part of the horns with a loop tool before attaching them, and poke a tiny hidden air vent hole usually where they join the head.
Step 2: Refining Features & Horns
-
Carve the eyes:
Cut out the eye holes completely. Use a knife to bezel the edges slightly inward, which adds depth to the sockets. -
Sculpt the mouth:
Add a small coil for the lips. Blend it onto the face, then shape a slightly open, downturned mouth. I like to keep the lips somewhat thin and sharply defined to enhance the stern look. -
Form the cheeks:
Add clay to the cheekbones to make them high and prominent. Smooth the clay into the hollow of the cheeks below to create a gaunt, skeletal appearance. -
Construct the horns:
Roll two tapered cones of clay for the horns. They should be roughly 3-4 inches long. Curve them gently to mimic organic growth. -
Attach the horns:
Score the forehead heavily where the horns will sit. Attach the horns using slip, smoothing the seam completely so they appear to grow out of the skull. -
Texture the surface:
Use a needle tool or stiff brush to scratch vertical striations into the horns, mimicking keratin texture. Add fainter scratches across the face for a weathered skin effect. -
Initial firing:
Allow the piece to dry slowly under plastic to prevent cracking, especially at the horn joints. Once bone dry, bisque fire the mask according to your clay body’s specifications.
Cracking at Seams?
If hairline cracks appear around the horns during drying, score the crack, add a tiny bit of vinegar to your slip, and patch it with fresh soft clay immediately.
Step 3: Ancient Finishing
-
Apply base oxblood:
Paint a wash of Deep Red underglaze over the entire face area (avoiding the horns). Wipe it back with a damp sponge so the color remains strongest in the crevices and texturing. -
Darken the shadows:
Apply a Black or Iron Oxide wash specifically around the eyes, inside the nostrils, and under the cheekbones. This weathering creates the illusion of grime and deep shadow. -
Paint the horns:
Coat the horns with Golden Ochre underglaze. Let it dry, then apply a thin black wash over them, wiping it back to highlight the scratching texture you carved earlier. -
Dry brush highlights:
Using a very dry stiff brush and a lighter ochre or clay-colored underglaze, lightly brush over the high points—the brow, nose tip, and chin—to bring out the dimension. -
Final glaze and fire:
Apply a thin coat of matte clear glaze to seal the work without making it glossy. Fire to the final temperature (likely Cone 5 or 6). Once cool, you can glue a small brass tack or stud on the lower jaw for that metallic accent seen in the photo.
Hang this formidable character on your wall and enjoy the ancient atmosphere it brings to the room
Skull-Inspired Bone Mask
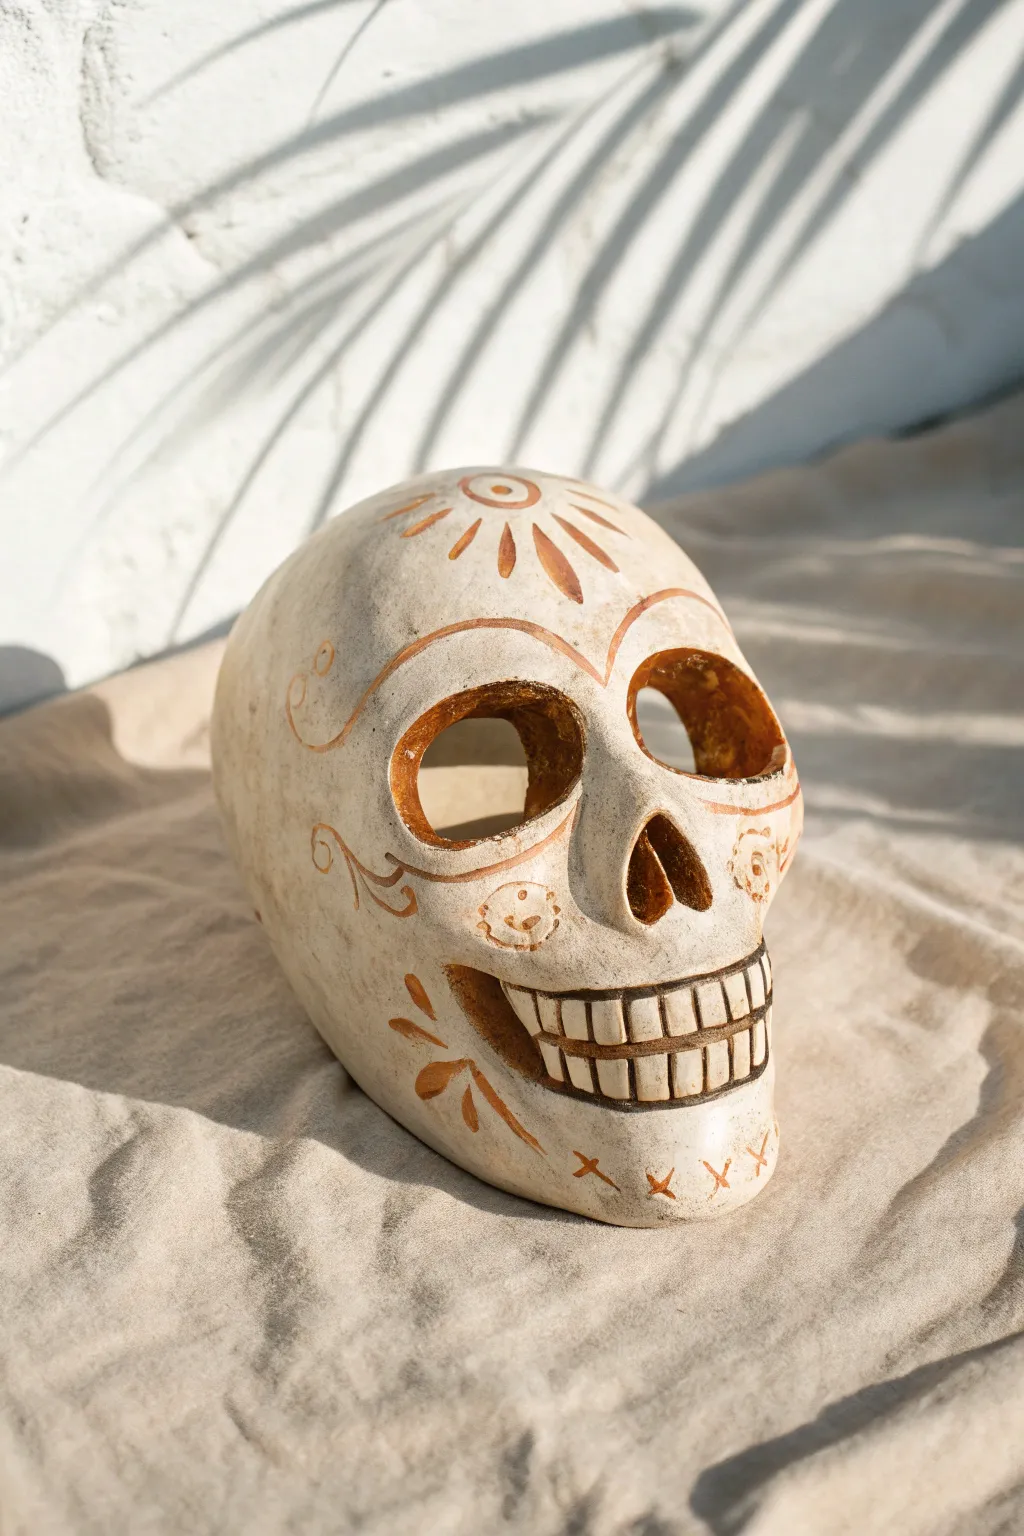
This project captures the essence of a sun-bleached desert relic with a stylized ceramic skull mask. The warm, creamy clay body features rustic rust-colored markings and deep, shadowy recesses, perfect for adding a touch of Southwest or Day of the Dead inspiration to your wall.
Step-by-Step Tutorial
Materials
- Stoneware clay (white or buff)
- Pottery tools (needle tool, rib, sponge)
- Loop tool or carving tools
- Rolling pin or slab roller
- Newspaper or a dome mold (for shaping)
- Iron oxide wash (or watered-down brown underglaze)
- Small paintbrush
- Clear matte glaze (optional)
- Sponge for wiping back oxide
Step 1: Forming the Base
-
Roll the slab:
Begin by rolling out a medium-sized slab of white or buff stoneware clay to approximately 1/4 to 3/8 inch thickness. Ensure the thickness is even to prevent cracking during drying. -
Prepare the mold:
Create a humped shape to support the mask. You can use a dedicated plaster hump mold or simply crumple a large ball of newspaper and tape it into an oval, skull-like dome. Cover the newspaper with a plastic bag or dry cleaning plastic so the clay doesn’t stick. -
Drape the clay:
Gently drape your clay slab over the mold. Smooth it down with your hands or a rubber rib to conform to the rounded shape, trimming away excess clay at the bottom where the jawline will be. -
Shape the jaw:
Extend the form slightly downward to create the mandible area. Gently press in at the temples to give the skull a more anatomical, yet stylized shape.
Clean Lines
When wiping back the oxide, rinse your sponge frequently. A dirty sponge will just smear brown across the white areas, muddying the bone effect rather than highlighting the texture.
Step 2: Sculpting the Features
-
Map the features:
Using a needle tool, lightly sketch the placement of the large eye sockets, the nose cavity, and the mouth/teeth area directly onto the clay surface. -
Cut the openings:
carefully cut out the large, rounded-triangle eye sockets and the inverted heart shape for the nose. Smooth the cut edges immediately with a damp sponge or your finger to remove sharp burrs. -
Build the brow and cheeks:
Add small coils of clay above the eyes to create a brow ridge and along the sides for cheekbones. Blend these additions seamlessly into the main form using your thumb and a little slurry. -
Sculpt the teeth block:
Instead of individual teeth, shape a raised, rectangular band of clay where the mouth sits. Attaching this as a slab strip works well; score and slip the area first to ensure a strong bond. -
Carve the teeth:
Use a carving tool or wooden knife to incise vertical lines into the mouth strip, creating the separation between individual teeth. Carve a horizontal line through the middle to separate top and bottom rows.
Antique Texture
Before the first firing, gently tap the leather-hard surface with a stiff-bristled brush or a textured stone. This creates micropores that catch the oxide wash for a more realistic aged look.
Step 3: Decoration and Firing
-
Incise designs:
Before the clay gets too dry (leather hard stage), use a fine loop tool or needle to carve the decorative scrolling patterns on the cheeks, the sunburst on the forehead, and the ‘X’ marks on the chin. -
Punch holes (Optional):
If you plan to hang this piece, punch two small holes near the temples or at the top back edge while the clay is still leather hard. -
Bisque fire:
Let the mask dry slowly under loose plastic to prevent warping. Once bone dry, bisque fire the piece according to your clay body’s specifications. -
Apply oxide wash:
Mix iron oxide with water (or use a watered-down dark borwon underglaze). Brush this mixture generously over the entire mask, ensuring it gets into all the carved lines, teeth crevices, and interior of the eyes. -
Wipe back:
Using a clean, damp sponge, wipe away the oxide from the high points of the surface. I like to leave the pigment heavy in the carved recesses and around the eyes to create that aged, antique bone look. -
Final fire:
Fire the piece again. You can leave it unglazed for a matte, bone-like texture, or apply a very thin coat of matte clear glaze if you want the surface sealed.
Hang your finished calavera in a spot where the light can catch the subtle depth of the carvings
Cubist Split-Face Mask
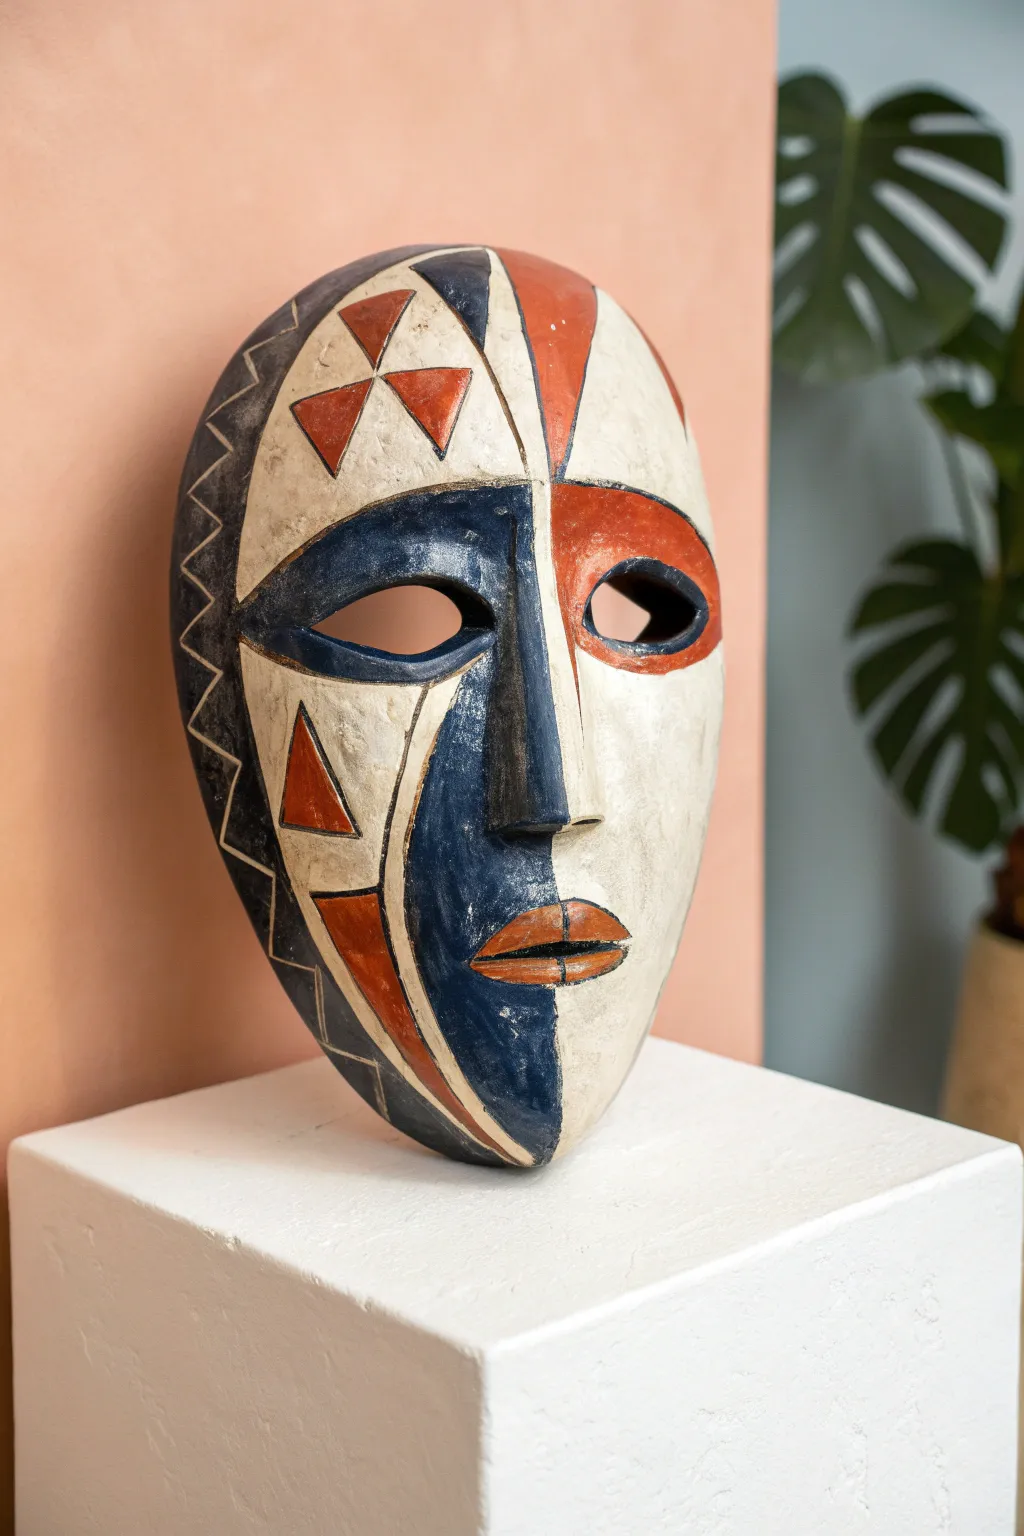
This striking mask project combines geometric abstraction with traditional tribal aesthetics, featuring a bold split design that plays with asymmetry. The finished piece simulates the look of weathered wood but is fully hand-built from ceramic clay.
Step-by-Step Tutorial
Materials
- White earthenware or stoneware clay (approx. 3-4 lbs)
- Small bowl or mask mold (optional armature)
- Plastic wrap/cling film
- Pottery tools: needle tool, fettling knife, rib tool
- Rolling pin
- Slip and score tool
- Acrylic paints: burnt orange/terracotta, navy blue, off-white/cream, black
- Paintbrushes: medium flat brush, fine detail brush
- Matte clear sealant or wax
Step 1: Forming the Base
-
Construct the Slab:
Begin by rolling out your clay on a canvas board to a uniform thickness, about 1/4 to 1/2 inch thick. Lift and flip the clay occasionally to prevent sticking. -
Shape the Mask Curve:
If using a mold or bowl to get that convex shape, cover it with plastic wrap first so the clay releases easily. Drape your slab over the form and gently smooth it down to create the rounded face shape. -
Trim the Outline:
Using a fettling knife, cut the oval face shape. Taper the chin area slightly so it’s narrower than the forehead, giving it a classic elongated mask silhouette. -
Add the Nose Ridge:
Roll a coil of clay for the nose. Score and slip the center of the mask, then attach the coil, smoothing it down. -
Sculpt the Nose Definition:
Refine the nose shape. Unlike a realistic nose, this one should be geometric—pinched and squared off, extending all the way up to separate the forehead, reinforcing the ‘split’ theme.
Step 2: Refining Features
-
Cut the Eyes:
Plan the eye placement carefully. Use a needle tool to cut out two almond-shaped holes. Keep the edges sharp and clean for that stylized look. -
Create the Eye Ridges:
Roll thin coils and attach them around shape of the eye openings to create raised lids. Blend the outer edges into the mask face but keep the inner rim distinct. -
Sculpt the Mouth:
Add a small mound of clay for the mouth area. Carve a horizontal line for the opening and shape the lips into a simple, protruding oval shape. -
Refine and Smooth:
Use a damp sponge or a rubber rib tool to smooth the entire surface. We want a surface that looks polished but retains a handmade, slightly organic feel. -
Fire the Clay:
Allow the mask to dry slowly under plastic to prevent warping. Once bone dry, bisque fire it in a kiln according to your clay body’s instructions.
Uneven Drying?
If edges lift or warp while drying, place small weights (like sandbags) on the rim during the initial leather-hard drying phase to keep it flat.
Step 3: Geometric Painting
-
Base Coat:
Before fine details, apply a wash of diluted cream or off-white acrylic over the entire bisque-fired mask as a primer. -
Draft the Design:
I prefer to lightly sketch the geometric pattern directly onto the painted clay with a pencil. Mark the central vertical dividing line and the triangular zones on the cheeks and forehead. -
Apply the White Zones:
Paint the right side of the face (except the eye and forehead triangle) with a solid coat of off-white paint. Do the same for the geometric sections on the left side. -
Block in the Navy:
Paint the large section around the left eye and the left side of the nose in a deep navy blue. This creates the dramatic high-contrast split. -
Add Terracotta Accents:
Fill in the triangles on the forehead, the left cheek designs, and the right eye area with a burnt orange or terracotta red. -
Detail Work:
Using a fine brush and black paint (or a dark grey), outline the geometric shapes. Add the zigzag pattern along the far left edge of the mask. -
Weathering:
To get that aged wood look, dry-brush a tiny amount of black or dark brown paint over raised areas and textures, scuffing up the clean paint job slightly. -
Seal:
Finish with a matte clear coat to protect the paint without adding a glossy, artificial shine.
Paint Adhesion Tip
For better acrylic adhesion on ceramic, wipe the bisque-ware with a damp sponge first to remove dust then seal with a thin 50/50 glue-water mix.
Hang your finished abstract mask on a gallery wall for an instant burst of artistic character
Sgraffito Pattern Portrait Mask
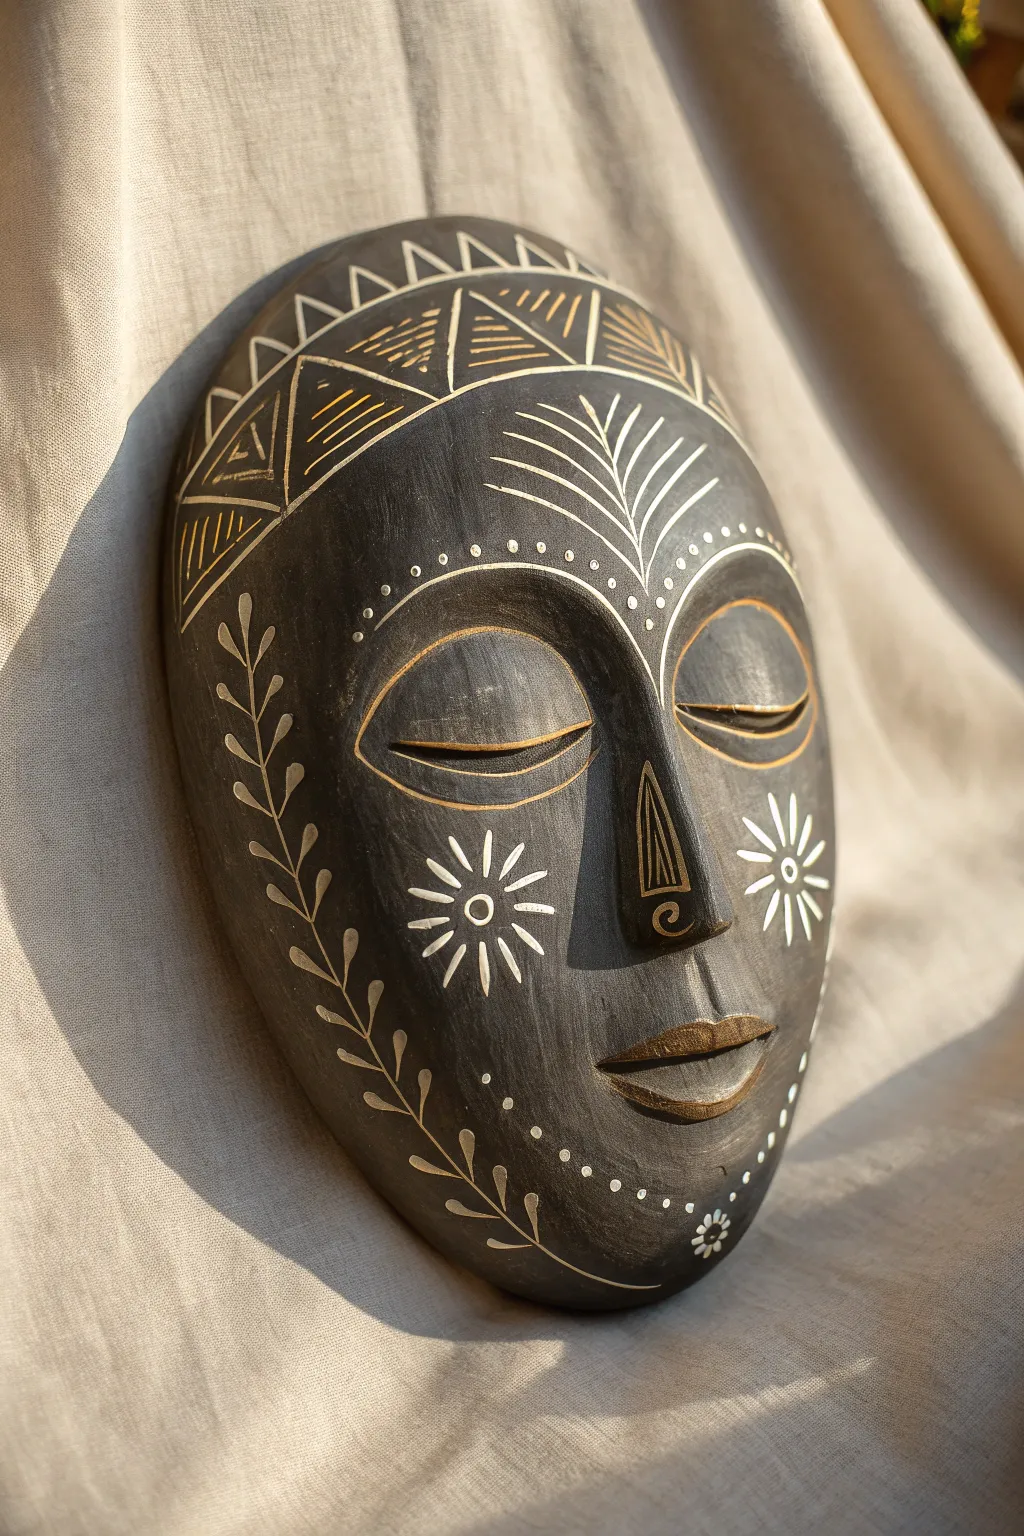
This striking ceramic wall mask combines deep matte black underglaze with the ancient technique of sgraffito to create high-contrast designs. The peaceful expression, adorned with geometric bands and organic floral motifs, makes for a captivating sculptural piece.
Detailed Instructions
Materials
- White or light-colored stoneware clay
- Rolling pin and guide sticks (approx. 1/4 inch)
- Plaster mold (hump mold) in a face or oval shape
- Rib tool (smooth metal or rubber)
- Fettling knife
- Black underglaze
- Sgraffito tools (loop tool and needle tool)
- Gold luster or gold acrylic paint (for post-firing)
- Soft fan brush
- Sponge
Step 1: Sculpting the Form
-
Roll the slab:
Begin by rolling out a smooth, even slab of white stoneware clay. Use guide sticks to transform the clay into a uniform thickness of about 1/4 inch, ensuring it’s sturdy enough to hold its shape but not too heavy. -
Drape over mold:
Gently lift your slab and drape it over your plaster hump mold. Smooth the clay down with a soft rib or damp sponge to conform to the oval shape, eliminating any air pockets trapped underneath. -
Trim the edges:
Using a fettling knife, trim away excess clay at the base of the mold to create a clean, oval perimeter. Smooth the cut edge with a damp finger to round it off nicely. -
Build facial features:
Add small coils or lumps of clay to build up the nose, brow ridge, and lips. Score and slip these additions thoroughly so they bond permanently. Use modeling tools to refine the long, elegant nose bridge and the closed eyelids. -
Refine and smooth:
Spend time smoothing the transition areas between the added features and the base mask. The surface needs to be very smooth for the sgraffito to look its best, so burnish it slightly with a flexible rib.
Step 2: Applying Underglaze & Carving
-
Leather hard stage:
Allow the mask to dry slowly until it reaches a sturdy ‘leather hard’ state. It should be firm to the touch but still contain moisture. -
Apply black underglaze:
Using a soft fan brush, apply 2-3 even coats of black underglaze over the entire front surface. Let each coat dry until it loses its sheen before applying the next to ensure solid coverage. -
Draft the design:
Once the underglaze is dry to the touch, you can lightly scratch or sketch your design layout with a very dull pencil. Mark out the forehead band, the cheek florals, and the chin curve. -
Carve the forehead band:
Using a sharp sgraffito tool, carve the geometric band across the forehead. Scrape away the black layer to reveal the white clay beneath, creating triangles filled with horizontal lines. -
Detail the center motif:
In the center of the forehead, carve a stylized fern or palm leaf shape that fans out upward from the brow line. -
Outline the eyes:
Carve thin, precise lines around the almond-shaped eyes and the eyelids. I find a fine contour line here really helps define the peaceful expression. -
Add floral cheeks:
On the cheeks, carve the radiating flower bursts. Start with a central circle and carve petal shapes extending outward. -
Carve side vines:
Working down the sides of the face, carve the long, winding vine pattern with leaf offshoots that frame the lower face. -
Dotted details:
Use a needle tool or a small drill bit to gently poke uniform dots along the brow line and jawline for added texture, being careful not to puncture all the way through. -
Clean up crumbs:
Gently brush away any clay burrs or crumbs with a large, dry soft brush. Do not use water or rub with your finger, or you might smear the black underglaze into the white lines.
Clean Lines Pro-Tip
Work when the clay is leather-hard, not bone dry. If the clay is too dry, the edges of your carving will chip. If it’s too wet, the lines will be mushy.
Step 3: Finishing Touches
-
Bisque fire:
Let the mask dry completely to the bone-dry stage. Fire the piece to bisque temperature (usually cone 04) in the kiln. -
Clear glaze (optional):
If you want a glossy finish, apply clearaze and refire. For the matte look shown in the reference, skip the clear glaze or use a matte clear finish. -
Add gold accents:
After the final firing, use gold leaf paint or gold acrylic to highlight specific areas like the lips, the eyelid creases, and the tip of the nose spiral for a touch of elegance.
Level Up: Depth
Vary your line weights. Use a wider loop tool for the main geometric bands and a needle tool for the delicate eye details to create visual hierarchy.
Hang your finished mask in a well-lit spot to let the shadows play across the textured carving