Slab trays are one of my favorite projects because you get that satisfying flat-to-functional transformation without needing a wheel. Here are my go-to slab tray ideas—from classic shapes you’ll use every day to a few playful designs that feel like instant studio wins.
Classic Rectangle Serving Tray
This project transforms a simple slab of clay into an elegant, minimalist serving vessel perfect for hosting. With its softly upturned rim and charming speckled glaze, this tray balances rustic warmth with modern lines.
Step-by-Step Tutorial
Materials
- Stoneware clay (speckled or buff)
- Rolling pin
- Canvas ware board or slab mat
- Pottery knife or needle tool
- Rectangle template (cardboard or paper)
- Sponge
- Rib tool (smooth wood or rubber)
- White or cream dipping glaze
- Kiln access
- Surform tool (optional)
- Soft paintbrush
Step 1: Preparing the Slab
-
Wedge the clay:
Begin with a thorough wedging of your clay body to remove air bubbles and align the particles. For a tray this size, you’ll need a substantial amount, roughly 3-4 pounds. -
Roll it out:
Place your clay on a canvas board or slab mat. Using your rolling pin, roll the clay out evenly. Aim for a thickness of about 1/4 inch to 3/8 inch. If you have guide sticks, use them to ensure diversity in thickness. -
Compress the slab:
This is a crucial step for flatware. Take a rubber or wooden rib tool and firmly compress the clay surface in multiple directions. I find this significantly reduces the chance of warping during firing. -
Flip and repeat:
Carefully flip the slab over and compress the other side just as thoroughly. This aligns the clay platelets and creates a smooth canvas for your glaze later.
Warping Woes
If the corners curl up during drying, weigh them down gently with small sandbags. Always dry flat pieces away from drafts to ensure even shrinkage.
Step 2: Shaping the Form
-
Cut the rectangle:
Lay your rectangular template gently onto the clay slab. Using a needle tool or fettling knife, cut straight down around the perimeter. Remove the excess clay. -
Round the corners:
Use a small circular object (like a coin or jar lid) or just your eye to gently trim the sharp corners into soft, rounded curves. This prevents chipping later and adds to the organic look. -
Smooth the edges:
Dip a sponge in a little water and wring it out well. Run the damp sponge along the cut edges to round them off and compress the rim. -
Lift the rim:
This is where the flat slab becomes a tray. Gently slide your fingers or a shallow wooden support under the outer 1-inch edge of the clay. -
Prop up the sides:
Use small pieces of foam, rolled-up newspaper, or wooden dowels to prop up the rim you just lifted. You want a subtle, consistent angle—just enough to keep grapes from rolling off. -
Define the corners:
As you lift, the corners might want to pucker. Gently smooth them with your thumb and forefinger to maintain that continuous, rounded curve.
Step 3: Frying and Finishing
-
Slow drying:
Cover the tray loosely with plastic. Flat pieces are prone to warping if they dry unevenly, so let it dry slowly over several days until it reaches the bone-dry stage. -
Bisque fire:
Load the bone-dry tray into the kiln for a bisque firing (usually Cone 06 or 04). Ensure it is supported evenly on the shelf. -
Wax the rim:
Once bisque fired, wipe the tray down with a damp sponge to remove dust. Apply a line of wax resist carefully along the very edge of the rim if you want the raw clay body to show as a border. -
Pour the glaze:
Mix your white speckle glaze thoroughly. Pour a generous amount onto the center of the tray, tilt it to coat the entire interior surface, and pour the excess back into the bucket. -
Clean the bottom:
Ensure the bottom of the tray is completely free of glaze. Wipe it with a sponge or use wax resist beforehand to protect your kiln shelf. -
Glaze fire:
Fire the piece again to the maturation temperature of your specific clay and glaze combination (often Cone 5 or 6 for stoneware). -
Final smooth:
After the kiln cools, check the unglazed foot or rim. If it feels rough, lightly sad it with wet-dry sandpaper to ensure it won’t scratch your table.
Make it Match
To create a perfectly matching set, make paper templates for different sizes (small, medium, large) before you start rolling out your clay.
Now you have a stunning, handmade centerpiece ready to elevate your next gathering


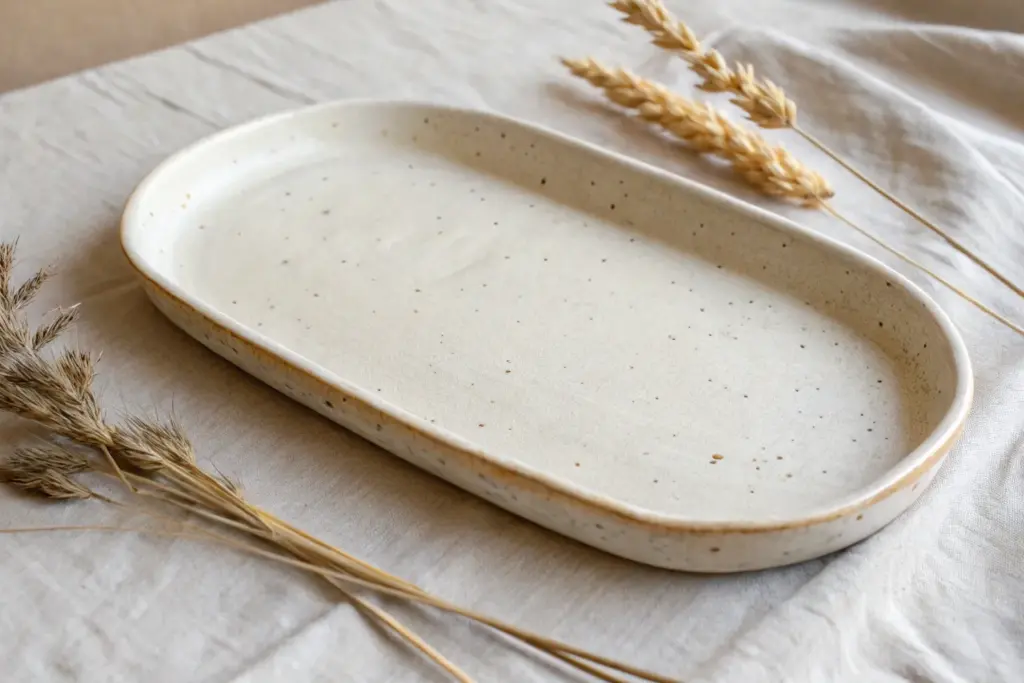
Simple Oval Slab Tray
This elegant oval tray showcases the beauty of simplicity with its clean lines and subtle speckled finish. It is the perfect beginner project for mastering slab construction and makes a stunning catch-all for your entryway or vanity.
How-To Guide
Materials
- Speckled cream stoneware clay
- Rolling pin
- Canvas or slab mat
- Oval paper template (approx. 10×6 inches)
- Needle tool or fettling knife
- Serrated rib or scoring tool
- Slip (clay and water mixture)
- Wooden modeling tool
- Smooth red kidney or sponge
- Matte white or clear glaze
Step 1: Prepping and Cutting
-
Roll the slab:
Begin by wedging your speckled clay to remove air bubbles. Roll it out on your canvas or slab mat into a large, even sheet. You want a thickness of about 1/4 inch—thick enough to be sturdy but thin enough to look refined. -
Smooth the surface:
Before cutting anything, take a smooth rib and compress the clay slab on both sides. This aligns the clay particles, preventing future warping, and removes the canvas texture for that smooth finish we want later. -
Cut the base:
Place your oval paper template onto the smooth slab. Using your needle tool or fettling knife, trace around the template carefully. Keep your knife perpendicular to the table for a straight edge. -
Cut the wall strip:
From the remaining slab, cut a long, straight strip for the tray’s wall. It should be approximately 1.5 inches tall and long enough to wrap around the entire circumference of your oval base plus a little extra for the overlap.
Warping Woes?
To prevent the tray bottom from lifting or warping during drying, place a weighted bag of sand or rice gently in the center while it dries under plastic.
Step 2: Assembly
-
Score the connection points:
Using your serrated rib or scoring tool, rough up the top edge of your oval base where the wall will sit. Do the same to the bottom edge of your wall strip. Good scoring is crucial for a strong bond. -
Apply slip:
Dab a generous amount of slip onto the scored perimeter of the base. It should be wet and tacky like glue. -
Attach the wall:
Gently lift the wall strip and place it onto the scored base. Start at one end of the oval and work your way around, pressing down firmly to ensure contact. -
Join the overlap:
Where the two ends of the wall meet, cut through both layers at a diagonal angle. Remove the excess clay pieces, score and slip the new ends, and press them together for a seamless invisible seam.
Step 3: Refining and Finishing
-
Reinforce the interior seam:
Take a tiny coil of soft clay and press it into the bottom interior seam where the wall meets the floor. I like to use the rounded end of a wooden tool to blend this coil smoothly into both surfaces. -
Blend the exterior:
On the outside, use a rib or your thumb to pull clay from the wall down onto the base, or vice versa, to lock the pieces together. Smooth this area until the transition is undetectable. -
Level the rim:
If the top edge looks uneven, use a cheese cutter or needle tool to trim it level. Then, dampen a sponge or a strip of chamois leather and run it over the rim to soften the sharp edge. -
Final smoothing:
Once the tray is leather hard, give it a final pass with a damp sponge to remove any fingerprints or rough spots. Pay special attention to the interior corners. -
Dry slowly:
Place a piece of plastic loosely over the tray to let it dry slowly. This is essential for flat items like trays to prevent the bottom from bowing or cracking. -
Bisque fire:
Once bone dry, fire the piece in the kiln to a bisque temperature (usually Cone 04). -
Glaze application:
Dip or brush on a matte white or clear glaze. Since the clay has beautiful speckles, a semi-transparent or simple matte white glaze will let those natural iron spots shine through beautifully. -
Glaze fire:
Fire the tray again to the final temperature required for your specific clay body and glaze combination (often Cone 5 or 6 for stoneware).
Make it a Set
Create a nesting set by scaling your oval template down 20% twice. Make two smaller trays that fit perfectly inside the larger one for a cohesive vanity set.
Now you have a serene, modern tray ready to organize your space with handmade charm


Round Catch-All Tray With Pinched Rim
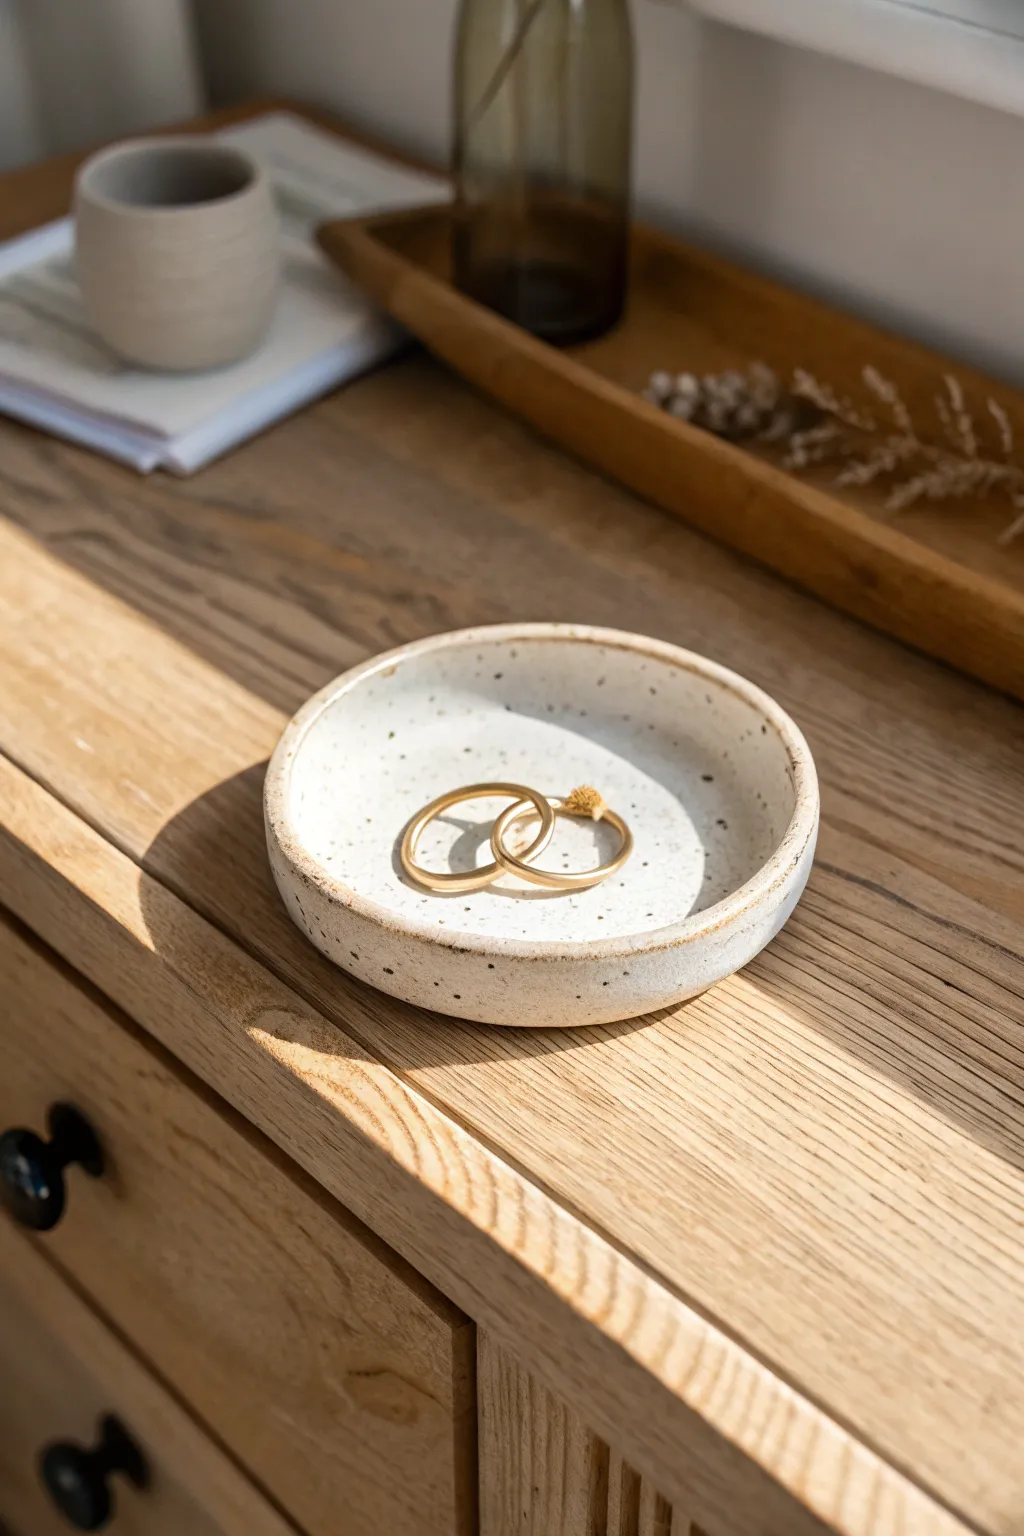
This charming, minimalist catch-all combines the organic feel of speckled clay with a soft, milky glaze. Its gentle, slightly pinched rim creates a cozy nesting spot for your favorite jewelry pieces.
Step-by-Step
Materials
- Speckled stoneware clay (mid-fire)
- Rolling pin
- Canvas board or mat
- Round cookie cutter (approx. 4 inches) or a bowl to trace
- Needle tool
- Sponge
- Smoothing rib (soft silicone or rubber)
- Milky white glaze (translucent)
- Small paintbrush
- Kiln
Step 1: Forming the Base
-
Wedge the clay:
Begin by wedging a baseball-sized amount of speckled stoneware clay to remove any air bubbles and ensure an even consistency. -
Roll the slab:
Place the clay on your canvas mat. Using a rolling pin, roll out a slab to an even thickness of about 1/4 inch. If you want perfectly even sides, use guide sticks on either side of the clay. -
Cut the circle:
Press your round cookie cutter firmly into the slab. Alternatively, place a small bowl upside down on the clay and trace around it with a needle tool to cut out your circle. -
Smooth the surface:
Before manipulating the shape, run a soft rib tool gently over the surface of the circle to compress the clay and remove any canvas texture.
Step 2: Shaping the Rim
-
Lift the edges:
Cradle the clay circle in your hand. Gently use your thumb to press into the center while pulling the outer edges slightly upward. -
Pinch the wall:
Go around the circumference of the circle, lightly pinching the very edge between your thumb and forefinger to create a defined, slightly raised wall about 1/2 inch high. -
Level the rim:
Place the tray back on the table. If the rim looks uneven, gently tap the top edge with a flat wooden tool or paddle to level it out without losing the handmade character. -
Refine the shape:
Use a barely damp sponge to smooth the rim edge. I like to run my finger along the rim one last time to ensure it feels soft and rounded, not sharp.
Clean Edges
When sponging the rim, compress the clay particles tightly. This prevents hairline cracks from forming on the edge during the drying process.
Step 3: Drying and Bisque
-
Slow drying:
Loosely cover the tray with plastic and let it dry slowly for a day or two to prevent warping. Then, uncover it and let it dry completely until bone dry. -
Bisque fire:
Load the bone-dry tray into the kiln and fire to a bisque temperature (usually Cone 04 or 06, depending on your clay body). -
Clean the bisque:
Once fired and cooled, wipe the bisque piece down with a damp sponge to remove any kiln dust before glazing.
Texture Twist
Before rolling your slab final thickness, press a piece of lace or hessian into the clay for a subtle exterior texture that contrasts with the smooth inside.
Step 4: Glazing and Finishing
-
Apply the glaze:
Dip the tray into a milky white glaze, or brush on 2-3 even coats. For this look, choose a glaze that breaks slightly translucent over edges so the speckles show through. -
Wipe the foot:
Using a wet sponge, carefully wipe the glaze off the bottom of the tray and about 1/8th inch up the side. This creates a clean line and prevents the tray from sticking to the kiln shelf. -
Check for pinholes:
Inspect the surface for any popped air bubbles in the glaze. Rub them gently with a fingertip to smooth the powder over the hole. -
Glaze fire:
Fire the tray again to the maturity temperature of your clay and glaze (typically Cone 5 or 6 for stoneware). -
Sand the bottom:
Once fully cooled and out of the kiln, use wet sandpaper or a grinding stone on the unglazed bottom ring to ensure it won’t scratch your furniture.
Place this lovely little dish on your nightstand or vanity for an instant touch of handmade warmth


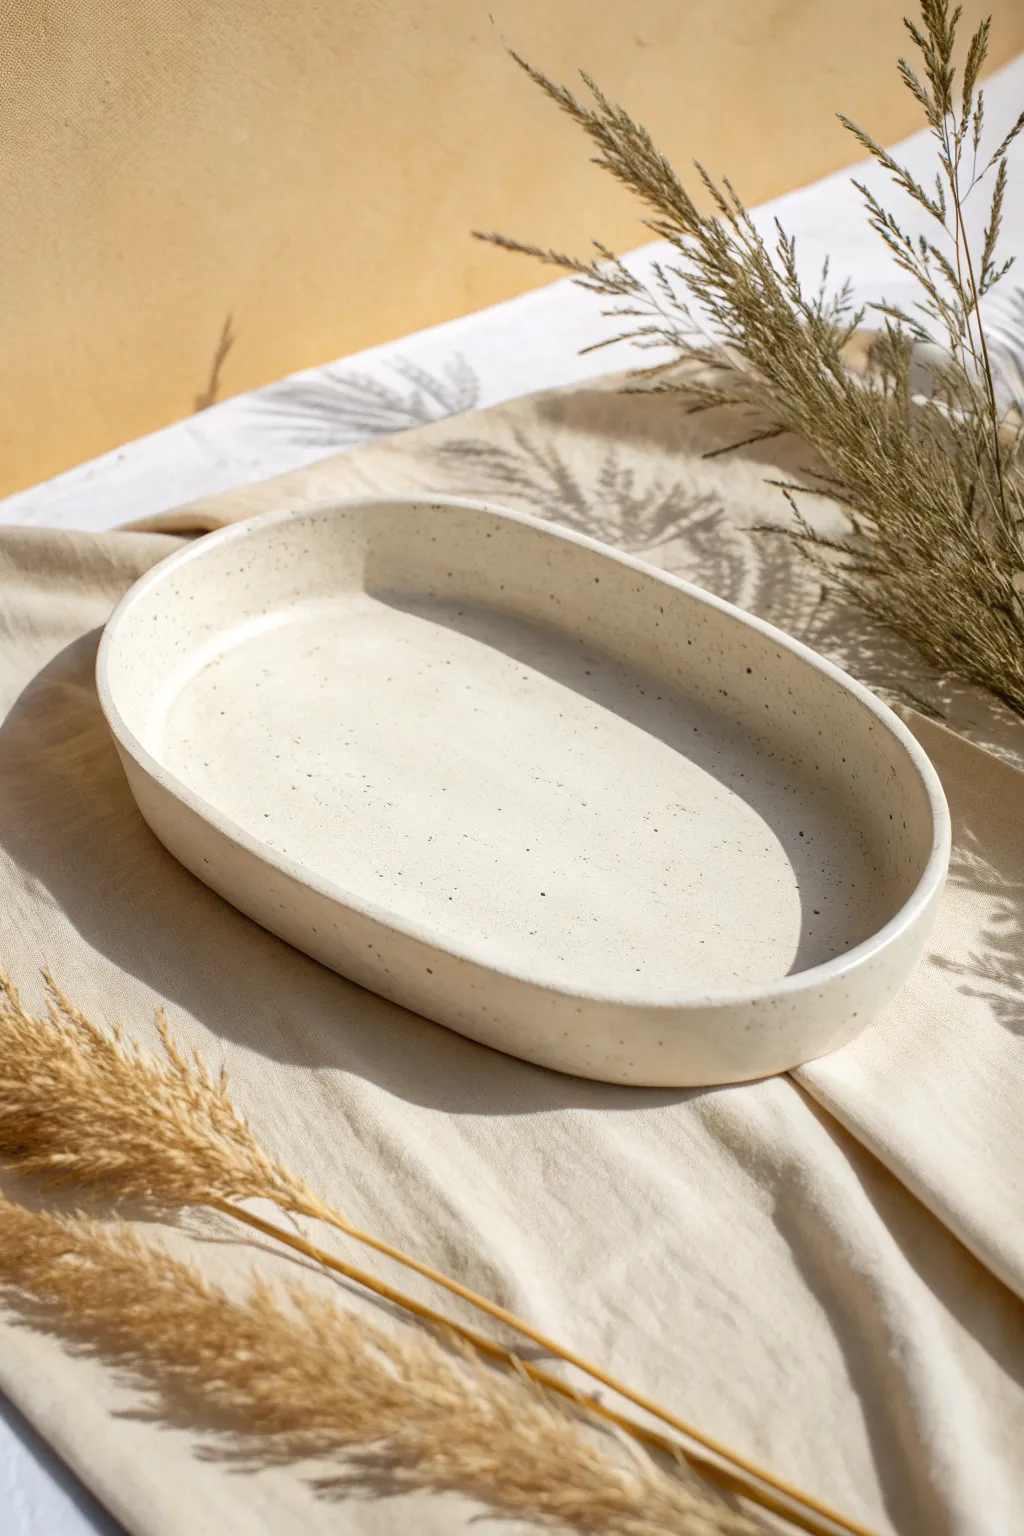
Soft Slump-Molded Bowl-Tray Hybrid
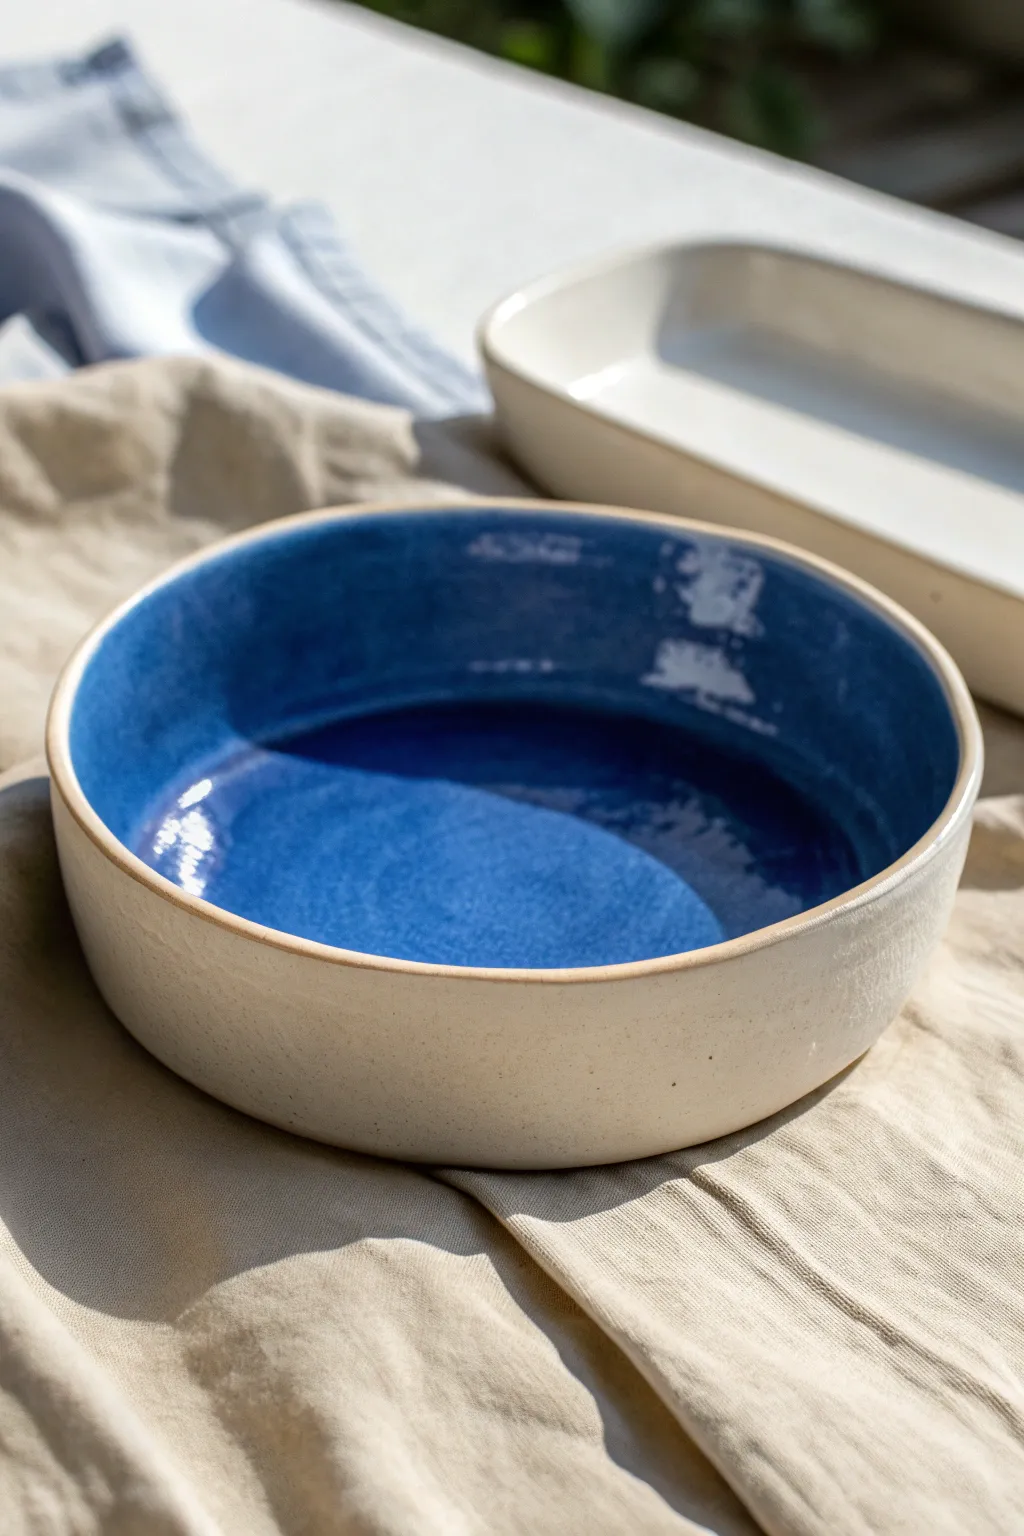
This stunning hybrid project bridges the gap between a serving tray and a bowl, featuring stark vertical walls and a breathtaking contrast between raw clay and vibrant glaze. The creamy, speckled exterior highlights the handmade nature of the piece, while the deep indigo interior adds a splash of oceanic color to any table setting.
Step-by-Step Guide
Materials
- Speckled cream stoneware clay (cone 5/6)
- Wide cylindrical slump mold or bisque mold (approx. 8-10 inches wide)
- Rolling pin with guide strips (1/4 inch thickness)
- fettling knife or needle tool
- Serrated rib tool
- Soft rubber kidney rib
- Slip (made from your clay body)
- Scoring tool
- Deep blue glossy glaze
- Clear matte or satin glaze (optional for exterior)
- Sponge and bucket of water
- Banding wheel
Step 1: Slab Preparation and Base
-
Roll the Slab:
Begin by rolling out a substantial amount of speckled stoneware clay. Use guide strips to ensure an even 1/4-inch thickness throughout, which is crucial for maintaining the structural integrity of vertical walls. -
Smooth the Texture:
Before cutting, run a soft rubber kidney rib over the surface of the clay in multiple directions. This compresses the clay partilces, preventing warping later, and removes any canvas texture. -
Cut the Base:
Place your cylindrical mold face down on the slab. Using your needle tool, trace and cut a circle slightly larger than the mold’s base to account for the wall attachment. -
Set the Base Aside:
Move the circular base onto a ware board or a bat. I like to let this stiffen up just slightly—about 20 minutes—so it can support the weight of the walls without sagging.
Keep it Round
When joining the vertical wall seam, place a rigid cylinder (like a PVC pipe or container) inside the tray temporarily. This acts as a support mold to ensure your circle stays perfectly round while smooth.
Step 2: Building the Walls
-
Measure Wall Length:
Calculate the circumference of your base circle. Roll out a long rectangular slab for the wall, ensuring the length is slightly longer than your circumference to allow for a beveled overlap. -
Determine Height:
Cut the strip to your desired height. For this deep tray style, a wall height of about 2.5 to 3 inches creates that modern, substantial look. -
Score and Slip:
Score the outer edge of your circular base and the bottom edge of your wall strip vigorously. Apply a generous amount of slip to the scored areas. -
Attach the Wall:
Carefully lift the long slab strip and wrap it around the base circle. Since the base is firm, place the wall on top of the base’s edge rather than wrapping it around the side. -
Join the Seam:
Where the two ends of the wall meet, cut through both layers at a 45-degree angle. Score, slip, and press the ends together firmly to create a seamless vertical join.
Two-Tone Texture
Sponge the exterior with red iron oxide wash before firing. Wipe most of it away, leaving color only in the clay’s pores. This enhances the speckled look and creates a deeper contrast for the blue.
Step 3: Refining and Shaping
-
Reinforce the Bottom Seam:
Use a modeling tool to blend the clay from the wall down into the base on the exterior. On the interior, roll a very thin coil of clay, press it into the corner seam, and smooth it completely to ensure no leaks. -
Trimming the Rim:
If the top uneven, use a needle tool while slowly spinning the banding wheel to trim the rim to a perfect level height. -
Softening the Edge:
Use a slightly damp sponge or a chamois cloth to compress and round the rim. This prevents the glaze from chipping later and gives the piece a finished, professional feel. -
Drying:
Cover the piece loosely with plastic for the first day to let the moisture equalize, then uncover and dry slowly to the bone-dry stage before bisque firing.
Step 4: Glazing
-
Wax the Exterior:
Once bisque fired, apply wax resist to the bottom and the lower 1/4 inch of the exterior wall. Use a steady hand or a banding wheel. -
Pour the Interior:
Pour your deep blue glossy glaze into the vessel. Swirl it carefully to coat the walls up to the rim, then pour the excess out quickly to ensure an even coat. -
Cleaning the Rim:
If glaze dripped onto the rim or exterior, wipe it back with a damp sponge. For this look, we want the raw clay to frame the blue interior, so clean the top rim edge to expose the stoneware. -
Exterior Finish:
Leave the exterior raw to show off the speckles, or apply a very thin coat of clear matte glaze if you prefer a sealed surface. Fire to the cone temperature recommended for your specific clay body.
Place this striking vessel on your coffee table or kitchen island to enjoy the interplay of rustic texture and deep color

The Complete Guide to Pottery Troubleshooting
Uncover the most common ceramic mistakes—from cracking clay to failed glazes—and learn how to fix them fast.
Hump-Molded Tray With Crisp Foot
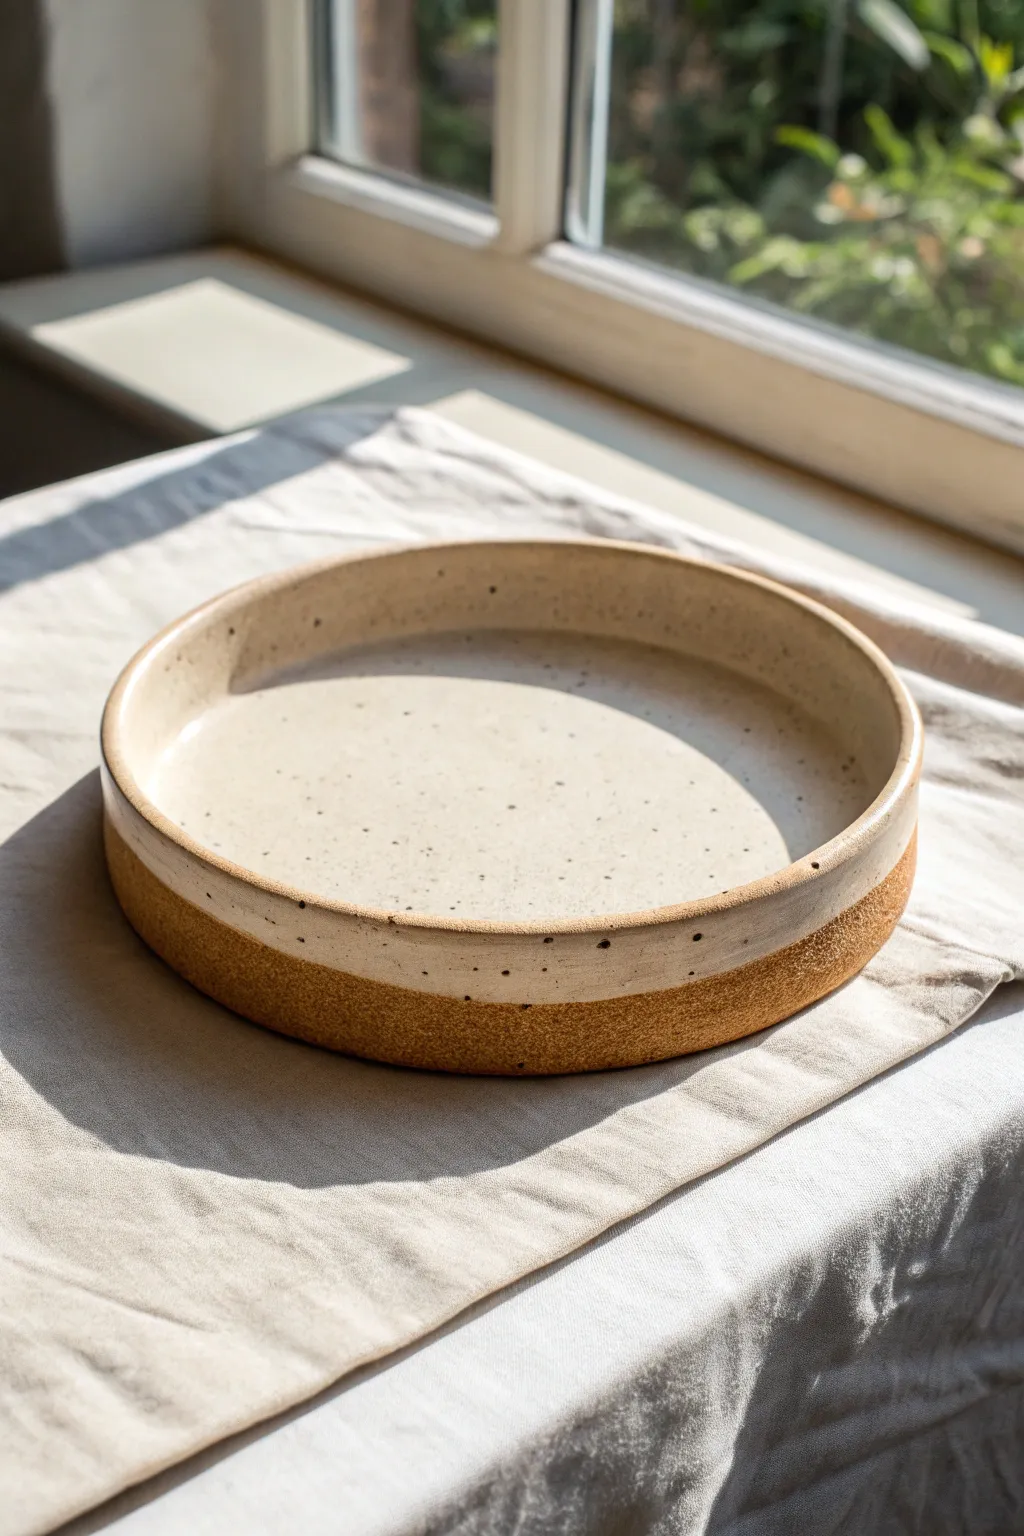
This elegant tray features clean, straight walls rising from a defined foot, creating a modern silhouette perfect for serving or display. The natural speckled clay body is highlighted by a half-dipped glazing technique, leaving the raw, textured base exposed for beautiful contrast.
Detailed Instructions
Materials
- Speckled stoneware clay (mid-fire)
- Round plaster hump mold (approx. 8-10 inches)
- Rolling pin
- Canvas or slab mat
- Thickness strips or slab roller (1/4 inch)
- Needle tool
- Fettling knife
- Rib tool (rubber and metal)
- Serrated rib or scoring tool
- Slip
- Banding wheel
- Sponge
- Glaze (glossy white or cream)
- Wire cutter
- Heavy book or board (for weighting)
Step 1: Creating the Slab Base
-
Roll the slab:
Begin by wedging your speckled clay to remove air bubbles, then roll out a consistent slab about 1/4 inch thick. Use thickness strips or guides to ensure the slab is perfectly even. -
Compress the clay:
Use a rubber rib to compress the slab on both sides. This aligns the clay particles, reducing the chance of warping later, and smooths out the canvas texture. -
Cut the base:
Place your round hump mold (or a circular template the same size as your mold’s top) onto the slab. Cut around it with a needle tool to create the circular floor of your tray. -
Dry to leather hard:
Set this circular base aside on a ware board. I like to place a piece of drywall or a wooden board on top to keep it perfectly flat while it stiffens to a soft leather-hard stage.
Use A Straight Edge
When attaching the wall, hold a right-angle triangle or set square against the outside. This ensures your walls are perfectly perpendicular to the table, not flaring out.
Step 2: Building the Walls
-
Cut the wall strip:
From the remaining slab (or a freshly rolled one), cut a long rectangular strip. The height should be about 1.5 to 2 inches, and the length must effectively wrap around the circumference of your base plus a little overlap. -
Bevel the edges:
Cut a 45-degree angle on both short ends of the strip where they will join. This creates a stronger seamless connection than a butt joint. -
Score and slip the base:
Score the outer top edge of your circular base thoroughly. Apply a generous amount of slip to the scored area. -
Attach the wall:
Place the circular base on a banding wheel. Carefully stand the wall strip onto the scored edge of the base. Curve it around, ensuring it sits squarely on top of the slab floor. -
Join the seam:
Connect the two bevelled ends of the wall strip. Score, slip, and press them firmly together. Smooth the seam with your thumb or a rib so it disappears. -
Secure the base connection:
Work your way around the tray, blending the clay from the wall down into the base on both the interior and exterior using a modeling tool or your finger to ensure a solid bond.
Step 3: Refining and Drying
-
Establish the sharp edge:
Use a metal rib to scrape the exterior walls while spinning the banding wheel. This creates the crisp, vertical profile seen in the image and removes finger marks. -
Define the rim:
Hold a damp chamois or sponge over the top rim while rotating the wheel to soften the edge slightly, making it comfortable to touch but visually sharp. -
Slow drying:
Cover the rim loosely with plastic to slow its drying, allowing the thicker connection point at the bottom to catch up. Uneven drying forces often cause warping in wide, flat forms. -
Bisque fire:
Once fully bone dry, bisque fire the tray to cone 04 (or your clay’s specific bisque temperature).
Warping Woes?
If the bottom lifts during drying, place a small bag of sand or rice gently in the center. The weight keeps the floor flat as the clay shrinks.
Step 4: Glazing and Finishing
-
Wax the exterior:
Apply wax resist to the bottom and up the side of the exterior wall about half an inch. This reserves the raw clay band at the bottom. -
Pour the interior:
Pour your white glaze inside the tray, swirl it to coat the entire interior surface and walls, and pour out the excess quickly to ensure an even coat. -
Dip the rim:
Hold the tray by the foot (or wax area) and dip the top portion into the glaze bucket, overlapping where the interior glaze ends at the rim. Aim for the glaze line to stop exactly where your wax line begins. -
Clean up:
Use a damp sponge to wipe away any stray glaze droplets on the waxed area or the bottom of the tray. -
Glaze fire:
Fire the piece to maturity (Cone 6 for most stoneware). The heat will fuse the glaze and bring out the dark speckles in the clay body.
Enjoy using this sleek, modern tray as a centerpiece on your table or a catcher for keys and trinkets.
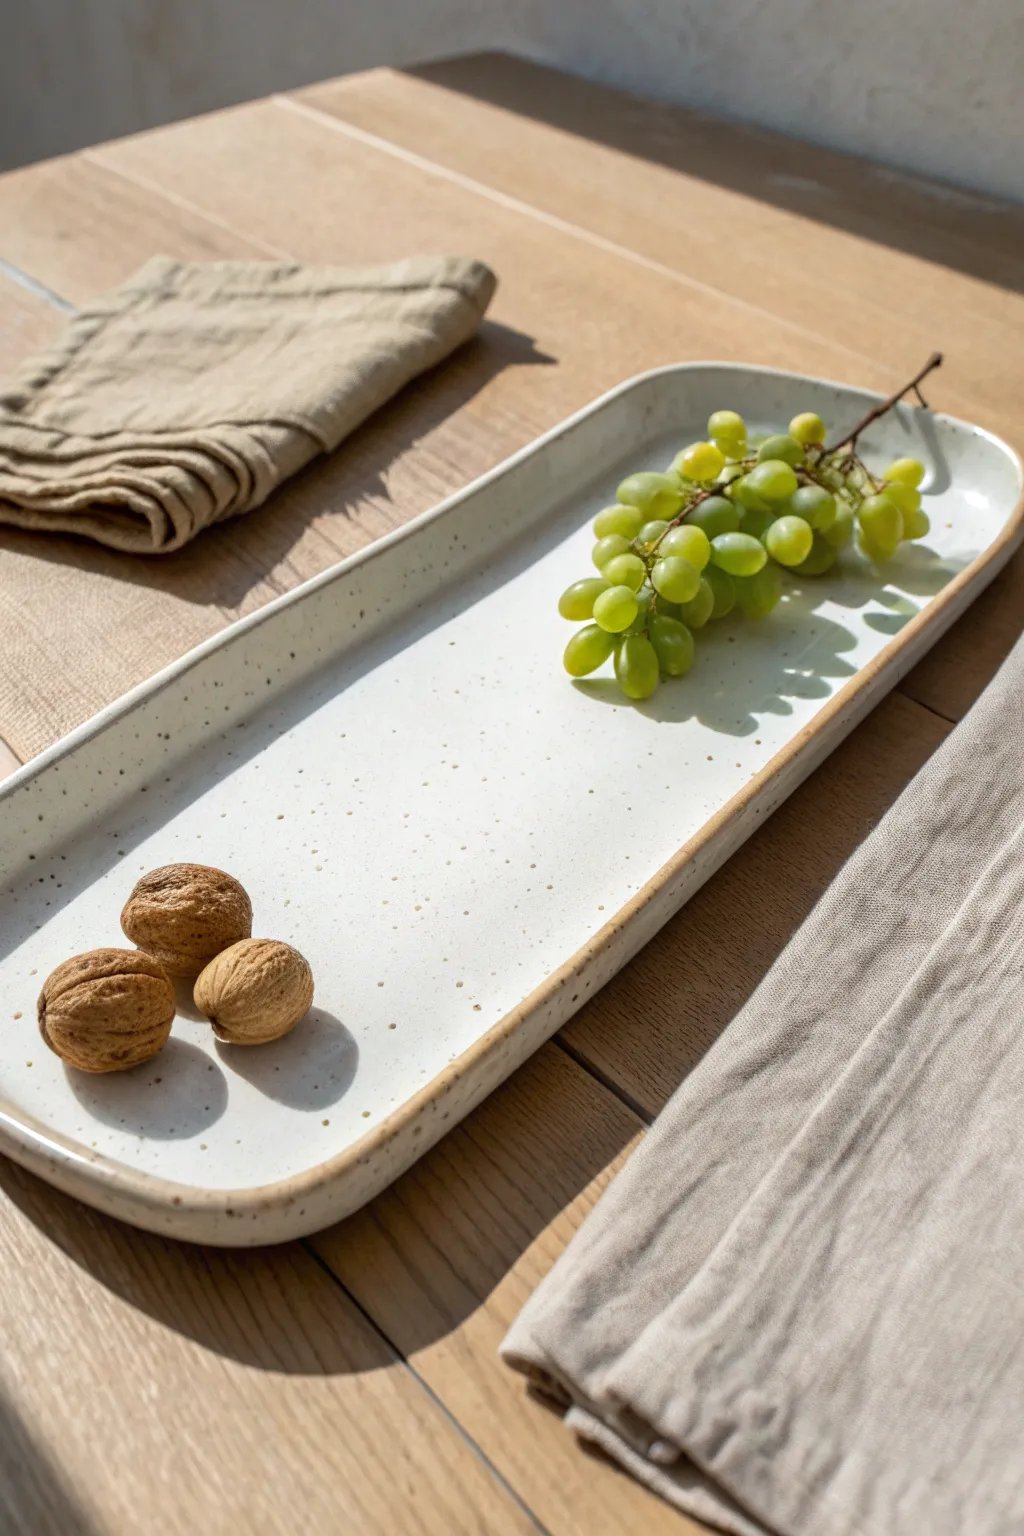
Wavy Rim Snack Tray
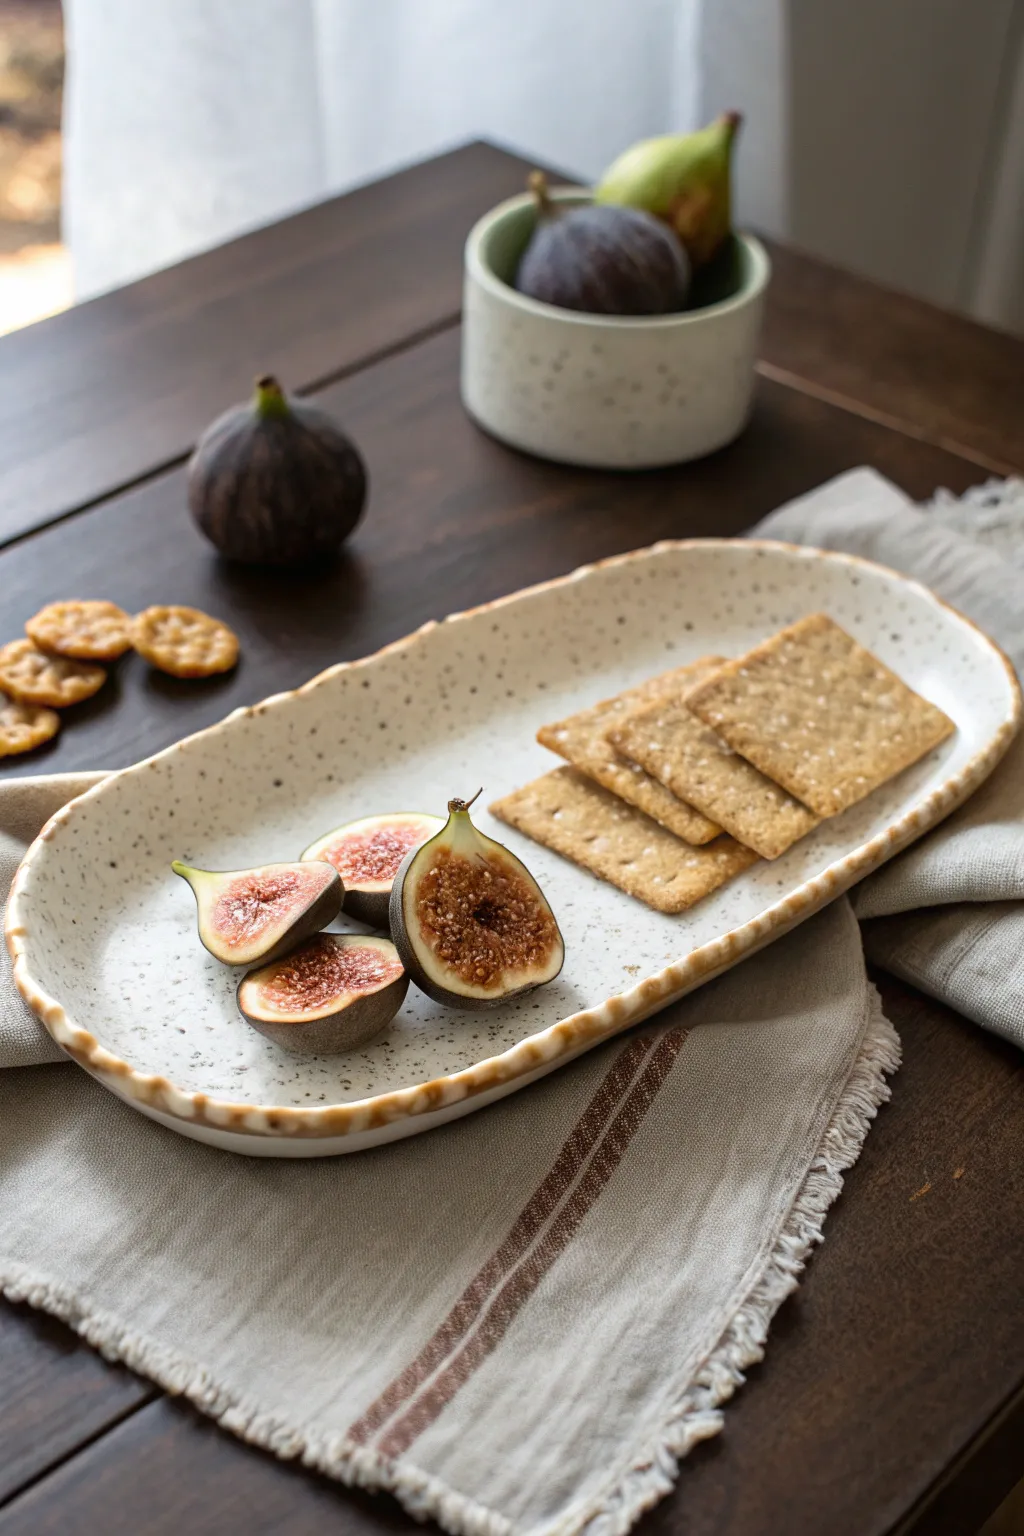
Embrace the beauty of handmade imperfection with this elongated slab tray, featuring a charmingly uneven, scalloped rim that gives it an organic feel. Finished with a speckled oatmeal glaze, this piece is perfect for serving crackers and fresh fruit with a rustic touch.
Step-by-Step Guide
Materials
- Mid-fire speckled stoneware clay (approx. 2-3 lbs)
- Rolling pin
- Two wooden thickness strips (1/4 inch thick)
- Canvas work surface or slab mat
- Rib tool (kidney shaped, soft rubber)
- Needle tool or fettling knife
- Oval paper template (approx. 12 x 5 inches)
- Small bowl relative to rim size (for shaping curves)
- Sponge
- Creamy matte white glaze (translucent enough to show speckles)
- Kiln access
Step 1: Forming the Slab Base
-
Wedge the clay:
Begin by thoroughly wedging your speckled stoneware clay to remove air bubbles and ensure a consistent texture, which is crucial for preventing warping later. -
Set up the guides:
Place your canvas on a flat work surface and position the two 1/4 inch wooden thickness strips on either side of your clay ball. -
Roll the slab:
Roll the clay out into a long ellipse shape until the rolling pin rests evenly on the wooden strips, ensuring a perfectly even thickness throughout. -
Compress the slab:
Use a soft rib tool to firmly compress the clay surface on both sides. I strongly recommend not skipping this step, as it aligns the clay particles and significantly reduces the chance of cracking. -
Cut the shape:
Lay your oval paper template onto the slab and trace around it with a needle tool or fettling knife to cut out your base shape.
Step 2: Sculpting the Wavy Rim
-
Smooth the edges:
Run a damp sponge or your finger along the cut edge to soften the sharpness before you start manipulating the form. -
Lift the sides:
Gently lift the edges of the oval slab upwards, placing small pieces of foam or rolled-up clay coils underneath the outer rim to support it in a shallow bowl shape. -
Create the scalloped effect:
Using your thumb and forefinger, gently pinch the rim at regular intervals to create indentations. Alternatively, press the handle of a paintbrush or a dowel gently into the rim every inch or so to create uniform dips. -
Refine the waves:
Go back around the rim and use your fingers to smooth and round out the high points between your indentations, enhancing that organic ‘pie crust’ look. -
Final smoothing:
Take a slightly damp sponge and run it over the entire rim one last time to ensure there are no sharp burrs that will feel rough after firing. -
Slow drying:
Loosely cover the tray with plastic to let it dry slowly to the leather-hard stage. This helps the rim maintain its shape without warping.
Keep it Warble-Free
To prevent the flat bottom from warping upwards during drying, weight the center down with a small sandbag or a bag of rice while it dries to leather hard.
Step 3: Glazing and Finishing
-
Bisque fire:
Once the piece is bone dry, fire it in the kiln to bisque temperature (usually cone 04) to prepare it for glazing. -
Wipe down:
Wipe the bisqued tray with a damp sponge to remove any kiln dust, which helps the glaze adhere properly. -
Apply glaze:
Pour or dip the tray into the creamy matte white glaze. Ensure the coat isn’t too thick, as you want the iron speckles in the clay body to burn through the glaze. -
Clean the foot:
Thoroughly wipe the glaze off the bottom of the tray so it doesn’t fuse to the kiln shelf during firing. -
Glaze fire:
Fire the piece to the maturity temperature of your clay and glaze (typically cone 5 or 6 for mid-fire stoneware). -
Sand the bottom:
After the kiln has cooled and you’ve removed the tray, use sandpaper or a sanding block on the unglazed bottom to ensure it is smooth enough to sit safely on wooden tables.
Textured Touch
Before cutting the oval, roll the slab onto a textured fabric or lace doily. The pattern will show subtly through the glaze on the inside surface for extra detail.
Enjoy styling your new handmade tray with your favorite colorful snacks


What Really Happens Inside the Kiln
Learn how time and temperature work together inside the kiln to transform clay into durable ceramic.
Textured Border Tray With Smooth Center
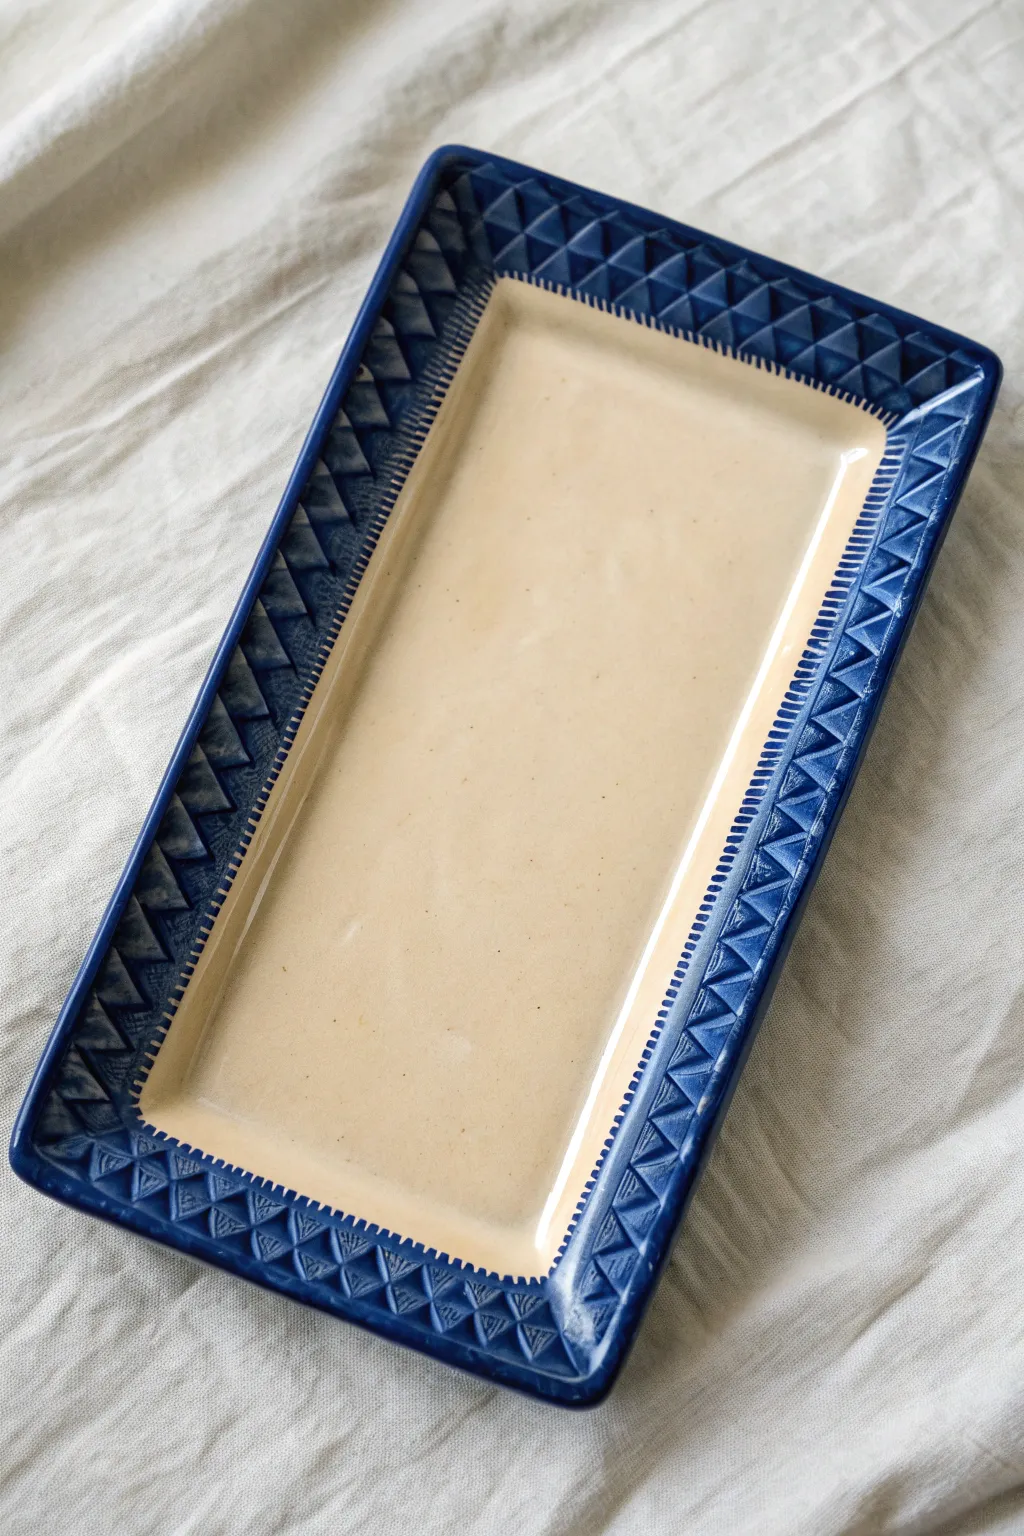
This elegant rectangular tray balances a serene, smooth center with a striking, deep blue textured border. The contrast between the creamy beige glaze and the intricate geometric relief makes it a sophisticated centerpiece for any table.
Step-by-Step Tutorial
Materials
- Light-colored stoneware clay (smooth body)
- Rolling pin
- Two wooden guide strips (approx. 1/4 inch thick)
- Rectangular paper template (approx. 6×12 inches)
- Fettling knife or needle tool
- Geometric texture roller or distinct triangular stamp tool
- Serrated rib tool
- Soft yellow sponge
- Small square wooden dowel or ruler edge
- Underglaze (Deep Cobal Blue)
- Clear or transparent Cream glaze
- Slab mat or canvas working surface
Step 1: Forming the Tray Structure
-
Roll the slab:
Begin by wedging your clay thoroughly to remove air bubbles. Place the clay between your two wooden guide strips on a canvas surface and roll it into a smooth, even slab. Aim for a consistent thickness of about 1/4 inch across the entire piece. -
Cut the rectangle:
Lay your rectangular paper template onto the smooth slab. Using a fettling knife, cut vertically around the template to create a sharp, clean rectangle. Remove the excess clay but save it for testing textures later. -
Define the border area:
Lightly mark a rectangle about 1.5 inches in from the edge using a needle tool. Do not cut through; this line simply indicates where the wall will begin to rise. -
Texture the rim:
Using a geometric texture roller or a triangular stamp, press firmly into the clay border area outside your marked line. Ensure the texture is deep enough to catch glaze later but not so deep it weakens the rim. -
Raise the walls:
Underneath the slab, place small foam supports or rolled towels just under the textured border. Gently lift the edges of the slab to create an angled rim. The center should remain flat on the table while the textured sides slope upward. -
Reinforce the corners:
Since lifting the sides creates excess clay at the corners, create a dart. Cut a small triangle of clay out of each corner, score and slip the edges, and press them together to form a seamless, upright corner seam. -
Create the divider detail:
To create the small ‘stitch’ marks seen in the photo between the rim and center, take a small tool like a serrated rib edge or a dull needle tool. Press tiny, evenly spaced dashes along the crease where the floor meets the wall. -
Smooth and refine:
Use a damp sponge to smooth the sharp edges of the rim and the interior floor. I find it helpful to run a soft rib over the center area to compress the clay and ensure it remains perfectly flat during drying.
Warping Woes?
Flat trays love to warp. Dry very slowly by weighting down the center with a sandbag or bag of rice during the leather-hard stage.
Step 2: Glazing and Finishing
-
Bisque fire:
Let the tray dry slowly under plastic to prevent warping, especially at the rim. Once bone dry, bisque fire the piece to cone 04 (or according to your clay body’s specifications). -
Apply the border color:
Paint a coat of Deep Cobalt Blue underglaze over the textured rim. While the underglaze is still slightly damp, wipe the surface gently with a clean, damp sponge. This technique leaves the dark blue in the recessed texture while revealing the lighter clay on the high points. -
Second coat for depth:
If you want a solid dark rim like the example, re-apply the blue carefully, ensuring it fills every crevice. For the specific look in the photo, allow the blue to be solid rather than wiped back, letting the glaze break over the sharp edges later. -
Glaze the center:
Pour or brush a creamy, semi-opaque glaze into the center well of the tray. Be careful not to let this lighter glaze splash onto your blue rim. If it does, wipe it away immediately. -
Glaze the rim:
Apply a clear or very translucent glaze over the blue underglaze on the rim. This will make the blue pop and give it a glossy, finished surface without obscuring the geometric pattern. -
Clean the distinct line:
Check the detailed dashed line between the center and rim. Ensure there is a clean distinction where the beige glaze stops and the blue rim begins. -
Final wipe:
Use a sponge to wipe the bottom of the tray completely clean of any glaze to prevent it from sticking to the kiln shelf. -
Glaze fire:
Fire the tray to your glaze temperature (typically cone 5 or 6 for stoneware). Allow the kiln to cool naturally to reduce thermal shock on the flat slab.
Pattern Play
Instead of a roller, try using found objects like vintage lace, screws, or leave impressions with thick rope for a rustic border vibe.
Once fired, you’ll have a stunning serving piece that looks professionally made and perfectly customized to your style
Botanical Imprint Slab Tray
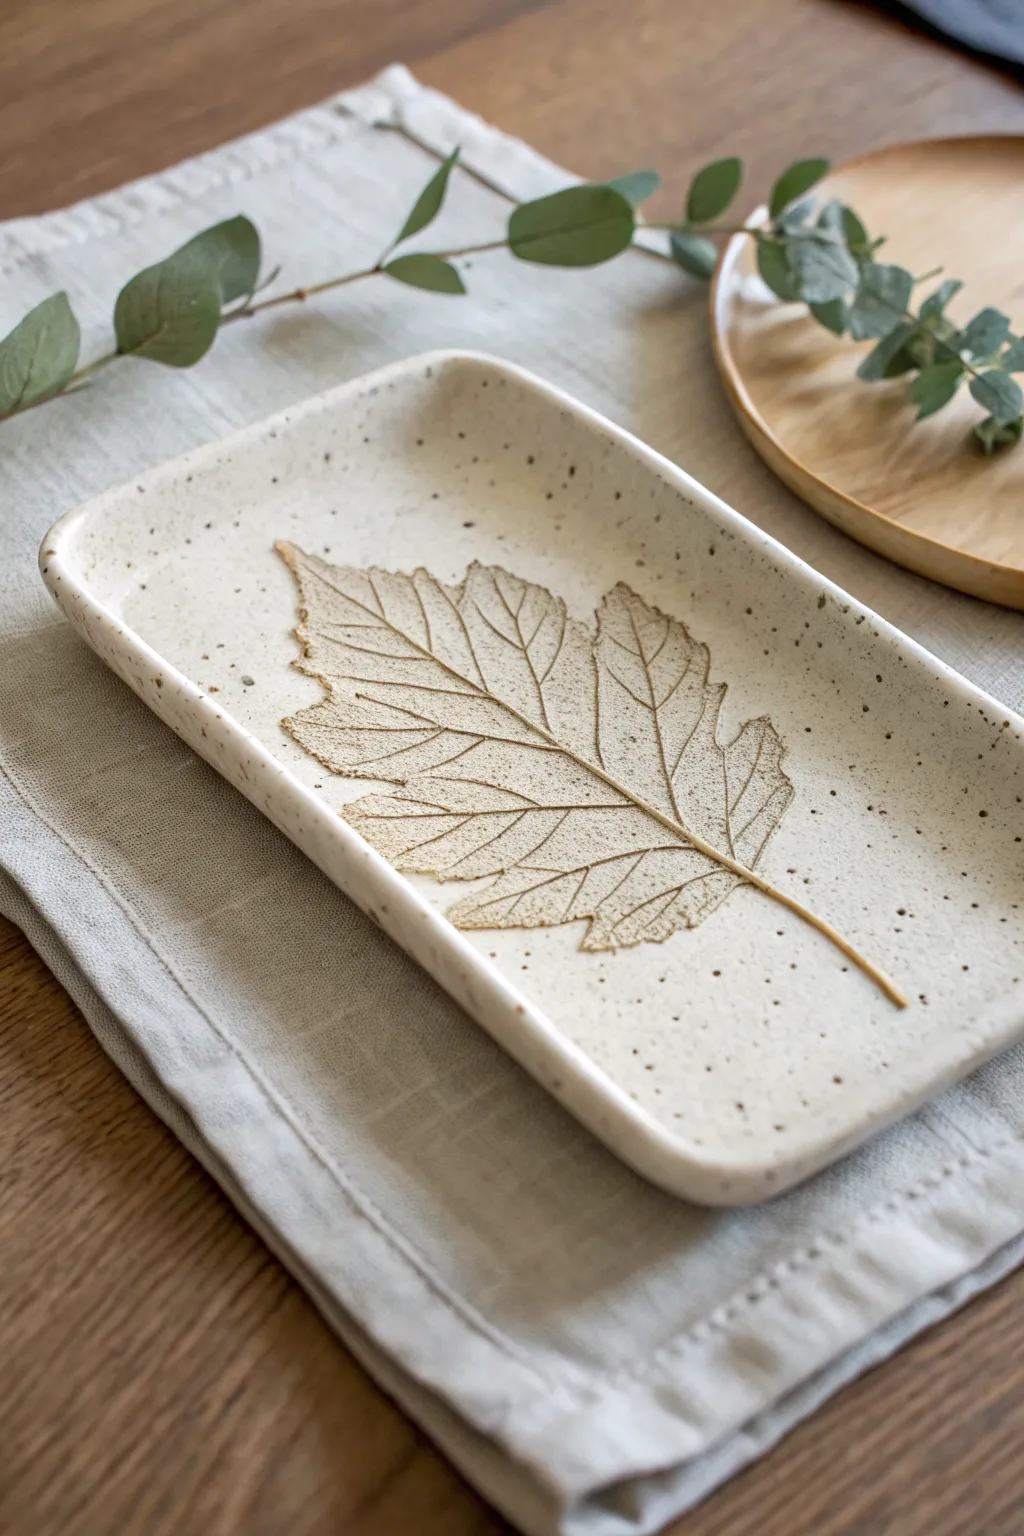
Capture nature’s intricate details forever with this elegant ceramic slab tray, featuring a real botanical imprint. The speckled clay body and iron oxide wash give the piece a warm, rustic charm perfect for displaying jewelry or serving small treats.
Detailed Instructions
Materials
- Speckled stoneware clay (mid-fire)
- Fresh leaf with prominent veins (e.g., maple, hydrangea)
- Rolling pin
- Canvas work surface or slab mat
- Needle tool or fettling knife
- Wooden guide strips (1/4 inch thick)
- Rectangular paper template (optional)
- Rib tool (soft kidney)
- Red iron oxide wash or dark underglaze
- Sponge
- Clear glaze (transparent)
- Small paintbrush
Step 1: Preparing the Slab
-
Wedge the Clay:
Begin by thoroughly wedging your speckled stoneware clay to remove any air bubbles and ensure an even consistency. -
Flatten and Roll:
Pat the clay into a rough rectangular shape with your hands. place it on your canvas work surface between two wooden guide strips. -
create the Slab:
Use your rolling pin to roll the clay out until the pin rests on the guide strips, ensuring a perfectly uniform thickness of about 1/4 inch. -
Smooth the Surface:
Take your rib tool and gently compress the surface of the clay slab. This removes canvas texture and aligns the clay particles to prevent warping later.
Step 2: Impressing and Shaping
-
Position the Leaf:
Select your fresh leaf. Place it vein-side down onto the center of your smoothed slab where you want the impression to be. -
Roll the Texture:
Gently roll your rolling pin over the leaf once. Apply firm, even pressure to push the veins deep into the clay without making the slab too thin. -
Cut the Shape:
Place your rectangular template over the slab (incorporating the leaf design) or freehand a rectangle using a needle tool or fettling knife. -
Lift the Rim:
To create the tray form, gently lift the edges of the rectangle with your fingers. I like to support the outside with my thumb while smoothing the inside curve with my index finger. -
Refine the Corners:
Smooth out the corners so they are rounded rather than sharp. Use a slightly damp sponge to soften the rim you just created. -
Remove the Leaf:
carefully peel the leaf away from the clay. Use the tip of your needle tool to lift the stem if it’s stuck. -
Slow Dry:
Cover the tray loosely with plastic to let it dry slowly to the leather-hard stage, then uncover to bone dry before bisque firing.
Use Vein-Side Down
Make sure you place the back of the leaf (the underside) against the clay. This is where the veins are most prominent and yields the crispest print.
Step 3: Finishing and Firing
-
Bisque Fire:
Fire the bone-dry piece in a kiln to cone 04 (or your clay’s specific bisque temperature). -
Apply Oxide Wash:
Mix a small amount of red iron oxide with water. Paint this wash liberally over the leaf impression, making sure it gets into all the tiny vein crevices. -
Wipe Back:
Using a damp sponge, wipe away the excess oxide from the high points of the surface. The color should remain only in the recessed lines of the leaf. -
Glaze Application:
Apply a coat of clear, transparent glaze over the entire interior of the tray. This will seal the clay and make the speckles pop. -
Final Fire:
Glaze fire the piece to the maturity temperature of your clay body (typically cone 5 or 6 for stoneware).
Dual-Tone Effect
Try layering a celadon glaze over the oxide wash. The celadon will pool in the texture, adding depth and a subtle color shift to the veins.
Enjoy using your new handcrafted tray to bring a permanent touch of the outdoors into your home

TRACK YOUR CERAMIC JOURNEY
Capture glaze tests, firing details, and creative progress—all in one simple printable. Make your projects easier to repeat and improve.
Sushi-Style Slab Tray Set
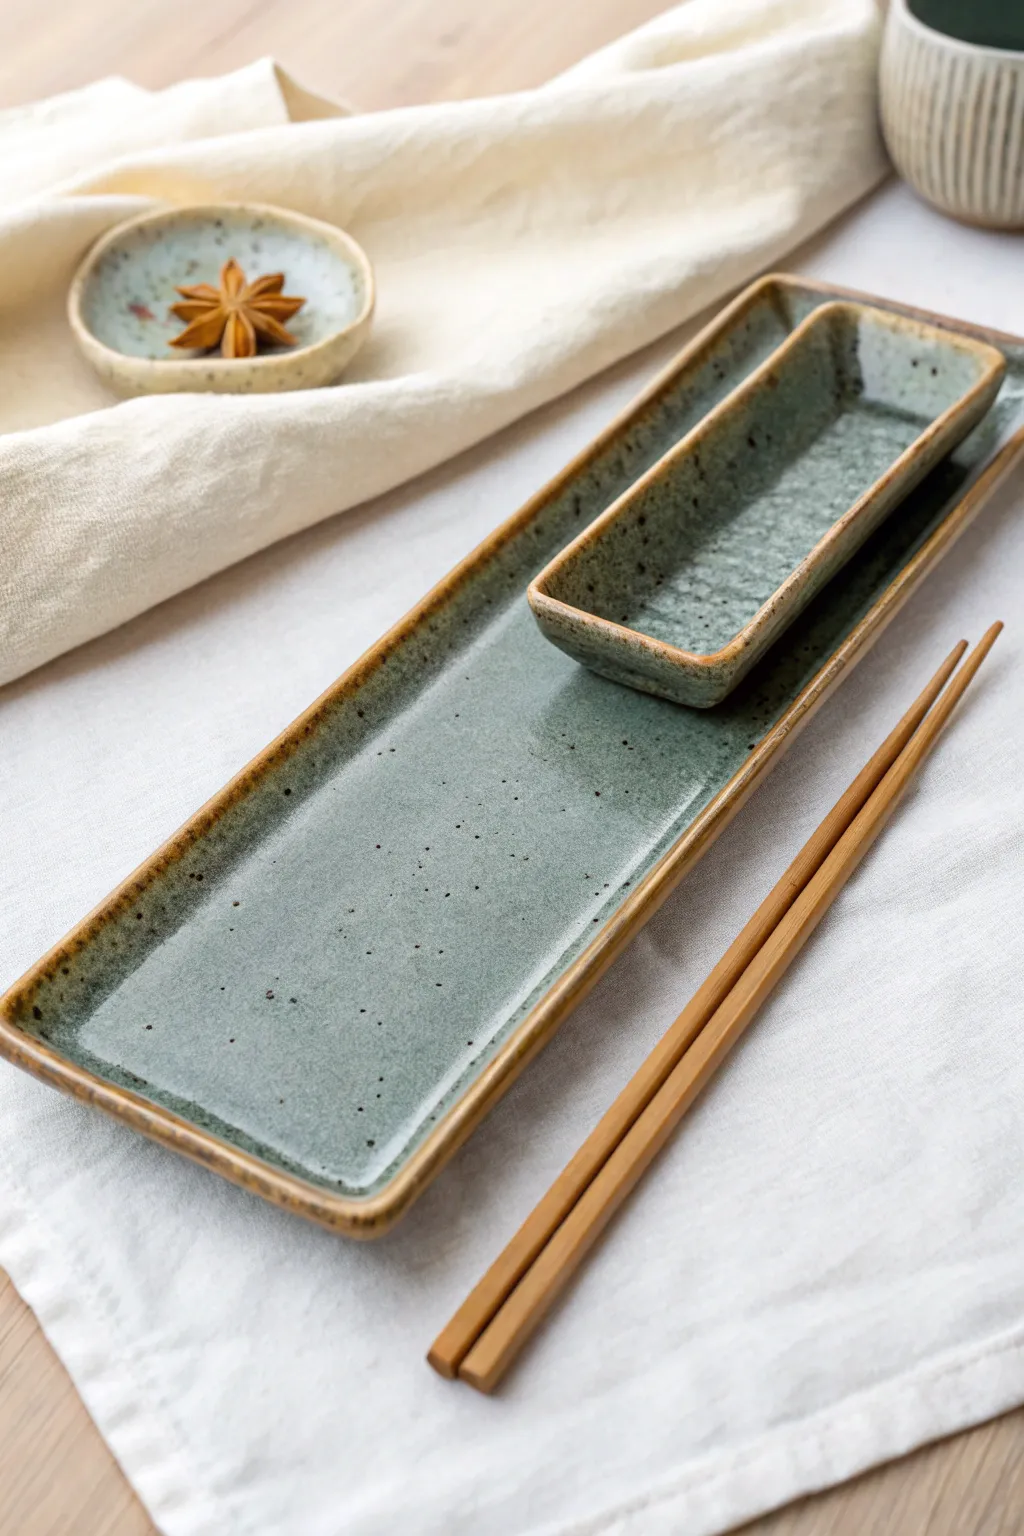
Elevate your homemade sushi nights with this hand-built ceramic set featuring a long serving slab, a matching geometric dipping dish, and a small pinch pot. The cool, speckled teal glaze contrasts beautifully with the exposed warm clay rims for a modern, earthy aesthetic.
Step-by-Step Guide
Materials
- Stoneware clay (speckled or buff)
- Rolling pin
- Canvas mat or slab roller
- Ware board
- Fettling knife or needle tool
- Ruler or straight edge
- Scoring tool or serrated rib
- Slip (clay and water mixture)
- Wooden modeling tool
- Sponge
- Teal/Grey speckled stoneware glaze
- Small paintbrush for wax resist
- Wax resist emulsion
Step 1: Creating the Main Slab Tray
-
Roll the clay:
Begin by wedging your stoneware clay to remove air bubbles. Roll out a consistent slab that is approximately 1/4 inch thick. If you want a uniform look, use guide sticks on either side of your rolling pin. -
Cut the base:
Using a ruler and a fettling knife, cut a long, narrow rectangle. A dimension of about 12 inches by 5 inches works well for a standard sushi serving tray. -
Create the rim strips:
Cut four long strips from the remaining slab to serve as the walls. These should be about 1/2 inch to 3/4 inch tall. Cut them slightly longer than the sides of your base to allow for mitering. -
Score and slip:
Rough up the edges of your rectangular base and the bottom edge of your rim strips using a serrated rib or needle tool. Apply a generous amount of slip to the scored areas. -
Attach the walls:
Press the strips onto the base firmly. For clean corners, cut the joining edges of the strips at a 45-degree angle (mitering) so they fit together snugly without bulk. -
Reinforce the seams:
Use a small wooden tool to blend the clay from the wall down onto the floor of the tray on the inside, and from the floor up onto the wall on the outside. This creates a strong bond. -
Smooth the rim:
Run a damp sponge along the top edge of the rim to round it off slightly. This prevents sharp edges after firing and mimics the soft look in the reference photo.
Warping Worries?
Long, flat slabs love to warp. Dry your tray VERY slowly. Place a piece of drywall or a wooden board on top of the rim while it dries to gently weigh it down and keep it flat.
Step 2: Forming the Dipping Dish & Pinch Pot
-
Cut the dish base:
Roll out more slab to the same thickness. Cut a smaller rectangle, roughly 4 inches by 2 inches, to serve as the soy sauce dipper. -
Assemble the dish:
Repeat the scoring, slipping, and wall-building process used for the main tray. Keep the walls roughly the same height as the main tray for a cohesive set. -
Form the pinch pot:
Roll a small ball of clay (about the size of a golf ball) for the wasabi or ginger bowl. Insert your thumb into the center and gently pinch the walls while rotating the clay to create a small, shallow curve. -
Refine the shapes:
Once all pieces are leather hard (firm but not dry), use a damp sponge to smooth any fingerprints or rough textures. Pay special attention to the corners of the rectangular pieces.
Pro Tip: Iron Burst
To get those specific dark specks if your glaze is too plain, sprinkle a tiny pinch of granular ilmenite or iron oxide into the wet glaze before firing.
Step 3: Glazing and Finishing
-
Bisque fire:
Let your greenware dry slowly under plastic for a day, then uncover to bone dry. Fire the pieces to bisque temperature (usually Cone 04) according to your clay body’s instructions. -
Apply wax resist:
Before glazing, paint a thin line of wax resist along the very top rim of all three pieces. This will keep the clay body exposed, creating that lovely brown border seen in the image. -
Wax the bottoms:
Don’t forget to wax the entire bottom of each piece and about 1/4 inch up the side foot to prevent the glaze from sticking to the kiln shelf. -
Glaze application:
Dip or brush your teal speckled glaze onto the pieces. If brushing, I usually apply three even coats, letting each dry to the touch before adding the next. -
Clean the rims:
Even with wax resist, little droplets of glaze can stick. Use a damp sponge to wipe the waxed rims clean to ensure a sharp, crisp line between the glaze and the raw clay. -
Final firing:
Glaze fire the pieces to the temperature required by your specific glaze and clay combination (likely Cone 5 or 6 for stoneware).
Once cooled, your custom sushi set is ready to wash and serve up a delicious meal with style
Nested Slab Tray Set
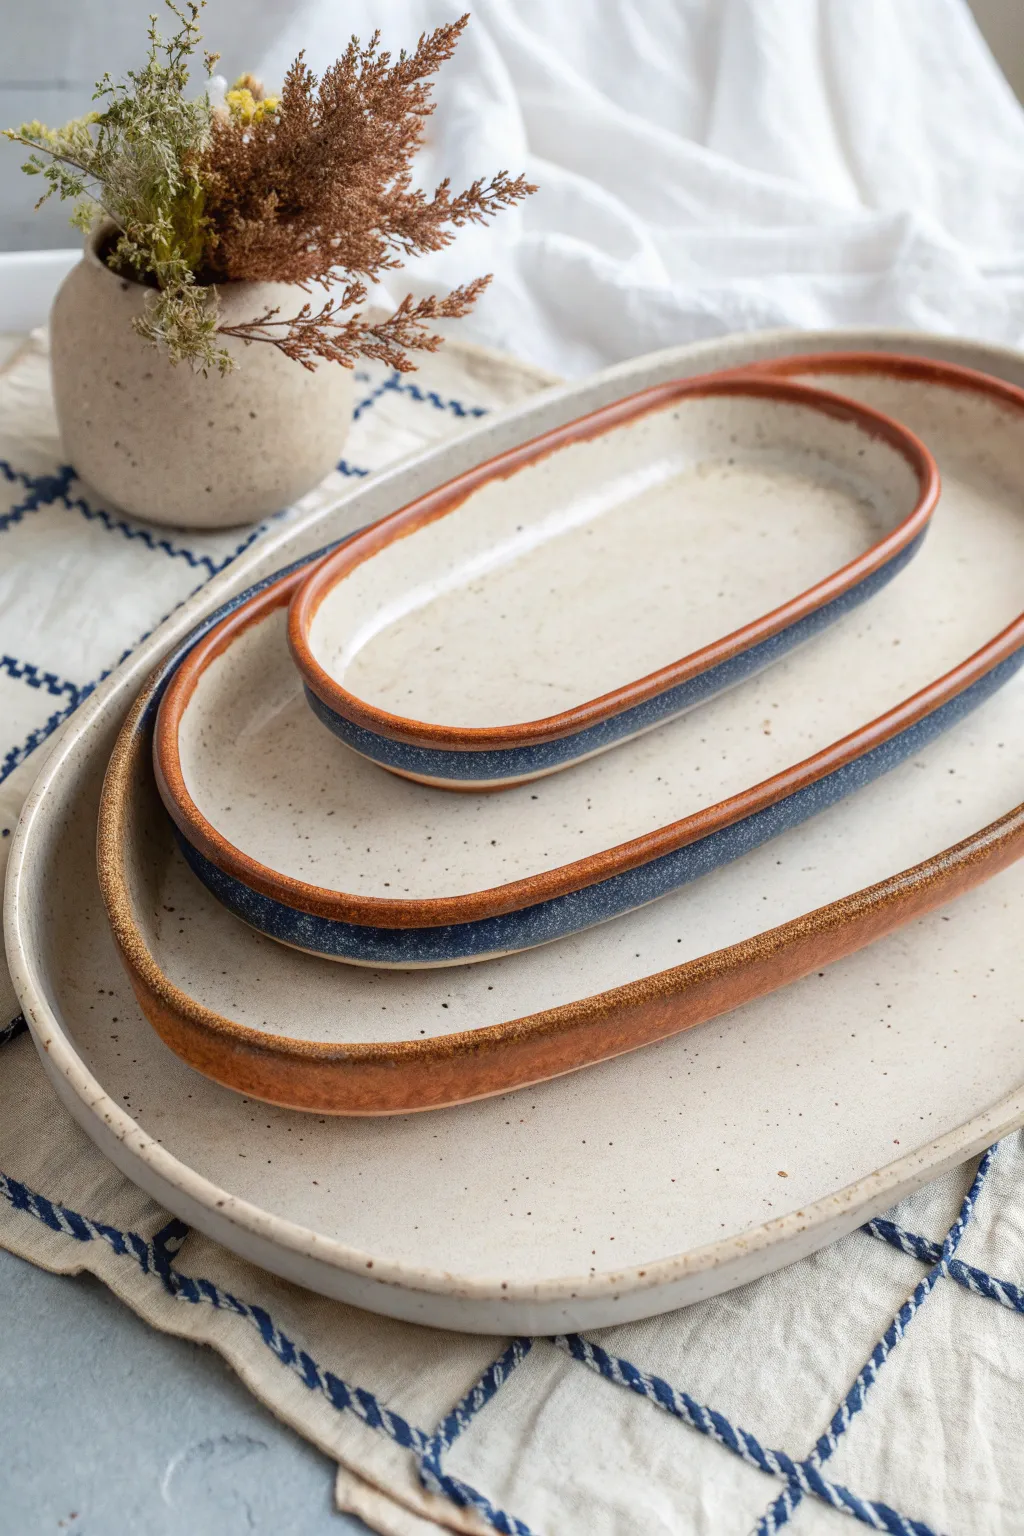
This elegant trio of oval trays features a cohesive speckled cream finish with a delightful pop of rust and indigo on the rims of the smaller vessels. The nested design creates a satisfying visual stack, perfect for serving appetizers or organizing vanity items.
Detailed Instructions
Materials
- White stoneware clay (mid-fire)
- Speckled cream glaze
- Rust orange glaze (glossy)
- Deep indigo/navy underglaze or glaze
- Oval template (paper or craft foam)
- Rolling pin
- Guide sticks (1/4 inch thickness)
- Needle tool
- Fettling knife
- Soft rib (yellow or red)
- Scoring tool or serrated rib
- Slip
- Sponge
- Wax resist (optional)
Step 1: Slab Preparation
-
Roll the clay:
Begin by wedging your white stoneware clay well to remove air bubbles. Roll out a large slab between your 1/4 inch guide sticks to ensure an even thickness across the entire surface. -
Compress the slab:
Using a soft rib tool, firmly compress the slab on both sides. This aligns the clay particles, reducing the chance of warping later, and creates a smooth canvas for the speckled glaze. -
Cut the bases:
Using your nested oval templates, cut three distinct sizes from the slab with a needle tool. Ensure there is about a 1-inch size difference between each oval to allow them to nest comfortably. -
Cut the rim strips:
From the remaining clay, cut long strips for the walls. These should be approximately 3/4 inch to 1 inch tall. You will need enough length to encircle the perimeter of each oval base.
Step 2: Assembly
-
Score and slip:
Score the outer edge of each oval base and the bottom edge of your clay strips. Apply slip generously to the scored areas on the bases. -
Attach the walls:
Gently place the strip onto the base, following the oval curve. When the ends of the strip meet, cut them at a 45-degree angle (beveled cut) for a seamless join, score, slip, and press together. -
Reinforce the seams:
Use a small modeling tool or your finger to blend the clay from the wall down onto the floor of the tray on the inside. Repeat this process on the outside seam as well. -
Refine the shape:
Smooth over your blended seams with a damp sponge. Run a soft rib along the interior and exterior walls to define the vertical rise and remove any maker’s marks. -
Round the lip:
Use a chamois or a very slightly damp sponge to compress and round the top rim of each tray. A rounded rim is more durable and holds the decorative glaze line beautifully. -
Slow drying:
Cover the trays loosely with plastic and let them dry slowly to the leather-hard stage, then uncover to bone dry before bisque firing them.
Warped Ovals?
To keep ovals from warping during drying, place a small weight (like a bag of rice) inside the tray while it dries leather-hard.
Step 3: Glazing & Decoration
-
Apply base glaze:
Once bisqued, dip or brush the largest tray entirely in the speckled cream glaze. For the two smaller trays, glaze the entire interior and exterior in the speckled cream as well. -
Blue banding:
On the two smaller trays, carefully paint a band of deep indigo glaze or underglaze on the exterior, just below the rim. I find a banding wheel helps keep this line steady. -
Rust rim accent:
Using a smaller brush, apply the rust orange glaze directly to the very top edge of the rim, allowing it to slightly overlap the top of the blue band. -
Clean the feet:
Wipe away any glaze from the bottom of all three trays with a wet sponge to prevent them from sticking to the kiln shelf. -
Final fire:
Fire the pieces to the temperature recommended for your specific clay and glaze combination (likely Cone 5 or 6 for stoneware).
Variation Idea
Swap the rust rim for a metallic gold luster applied after the final glaze firing for a more glamorous, modern look.
Stack your finished set on the table and enjoy the clean lines and earthy texture of your work
Cutout Handle Slab Tray
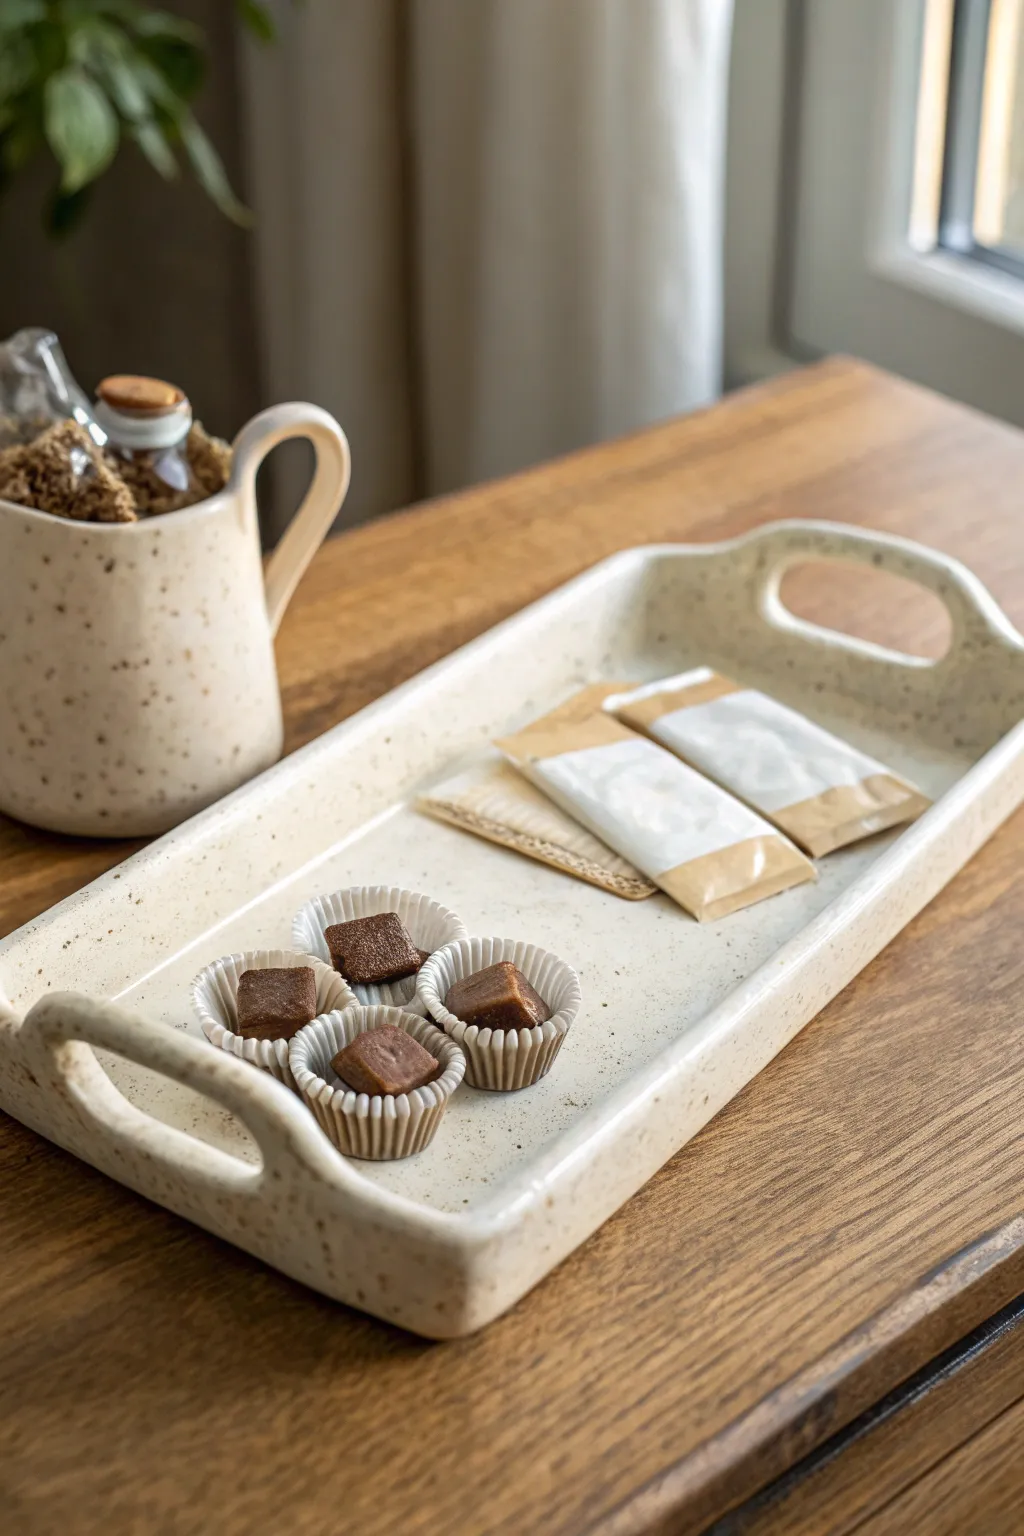
This elegant stoneware tray marries functionality with modern farmhouse aesthetics, featuring soft, curved edges and convenient cutout handles. The speckled cream glaze gives it a timeless, organic feel that looks beautiful on any coffee table.
Step-by-Step Guide
Materials
- Speckled buff stoneware clay (or white clay with speckles added)
- Rolling pin
- Canvas work surface or large slab mat
- Two wooden guide slats (approx. 1/4 inch thick)
- Fettling knife or needle tool
- Rectangular paper template (approx. 6×12 inches)
- Small oval cookie cutter or template for handles
- Rib tool (wooden or silicone)
- Sponge
- Scoring tool or serrated rib
- Slip
- Foam supports or rolled towels
- Cream or white matte glaze
Step 1: Preparing the Slab
-
Wedge the clay:
Begin by thoroughly wedging your speckled buff clay to remove air bubbles and ensure an even consistency, which is crucial for preventing warping later. -
Set up guides:
Place your canvas on a sturdy table and position your two wooden guide slats parallel to each other, slightly wider than the width of your desired tray. -
Roll the slab:
Place the clay between the guides and use your rolling pin to flatten it. Roll in multiple directions until the pin rests on the guides, ensuring a perfectly uniform 1/4-inch thickness. -
Compress the clay:
Use a soft rib tool to smooth the surface of the slab on both sides. This compression aligns the clay particles and creates a nice, clean canvas for your tray.
Use a Chamois
For the smoothest handle grips, drape a thin piece of damp chamois leather over the rim of the cutout and gently rub back and forth. It compresses the edge perfectly.
Step 2: Constructing the Form
-
Cut the base:
Lay your rectangular paper template onto the slab. Using your fettling knife, cut around the template to define the main body of the tray. -
Create the walls:
From the remaining slab, cut long strips that become the vertical walls. Aim for a height of about 1.5 inches to match the profile in the photo. -
Score and slip:
Thoroughly score the perimeter of the base slab and the bottom edge of your wall strips. Apply a generous amount of slip to the scored areas. -
Attach the walls:
Press the walls firmly onto the base. If you need to join multiple strips, cut the ends at a 45-degree angle (bevel) for a stronger, seamless connection. -
Blend the seams:
Use a wooden modeling tool or your finger to smooth the clay where the wall meets the floor, both on the inside and outside, ensuring the seam disappears completely.
Textured Base
Before cutting your slab, roll it over a piece of linen or burlap. This adds a subtle fabric texture to the bottom of the tray, preventing it from sliding on sleek tables.
Step 3: Shaping and Refining
-
Curve the corners:
While the clay is still plastic, gently push gently from the inside of the corners outward to soften the sharp angles into rounded, ergonomic curves. -
Cut the handles:
On the two shorter ends of the tray, mark the center point. Use a small oval cutter (or trace a template with a needle tool) to remove clay for the handle grips, ensuring they are level. -
Smooth the rims:
Take a damp sponge or a chamois cloth and run it over the top rim and the inside edge of the cutout handles to round them off and remove any sharp burrs. -
Dry slowly:
Loosely cover the tray with plastic. I prefer to place pieces of foam or rolled towels against the long walls to support them as they stiffen, preventing them from bowing outward.
Step 4: Firing and Glazing
-
Bisque fire:
Once the tray is bone dry, fire the piece to bisque temperature (usually cone 04 or 06) to prepare it for glazing. -
Apply glaze:
Dip or brush your cream-colored matte glaze onto the pot. If brushing, apply 2-3 even coats, letting each dry briefly in between. -
Check the speckles:
If using a transparent or semi-opaque glaze, the natural iron speckles in the clay will show through. If using white clay, this is the time to use a speckled glaze instead. -
Wipe the foot:
Use a wet sponge to completely remove any glaze from the bottom of the tray so it doesn’t fuse to the kiln shelf. -
Glaze fire:
Fire the tray to the final maturation temperature of your clay body (likely cone 5 or 6 for stoneware) to achieve that durable, vitrified finish.
Once cooled from the kiln, your custom slab tray is ready to host everything from morning espresso to evening sweets
Rippled Texture Tray With Minimal Glaze
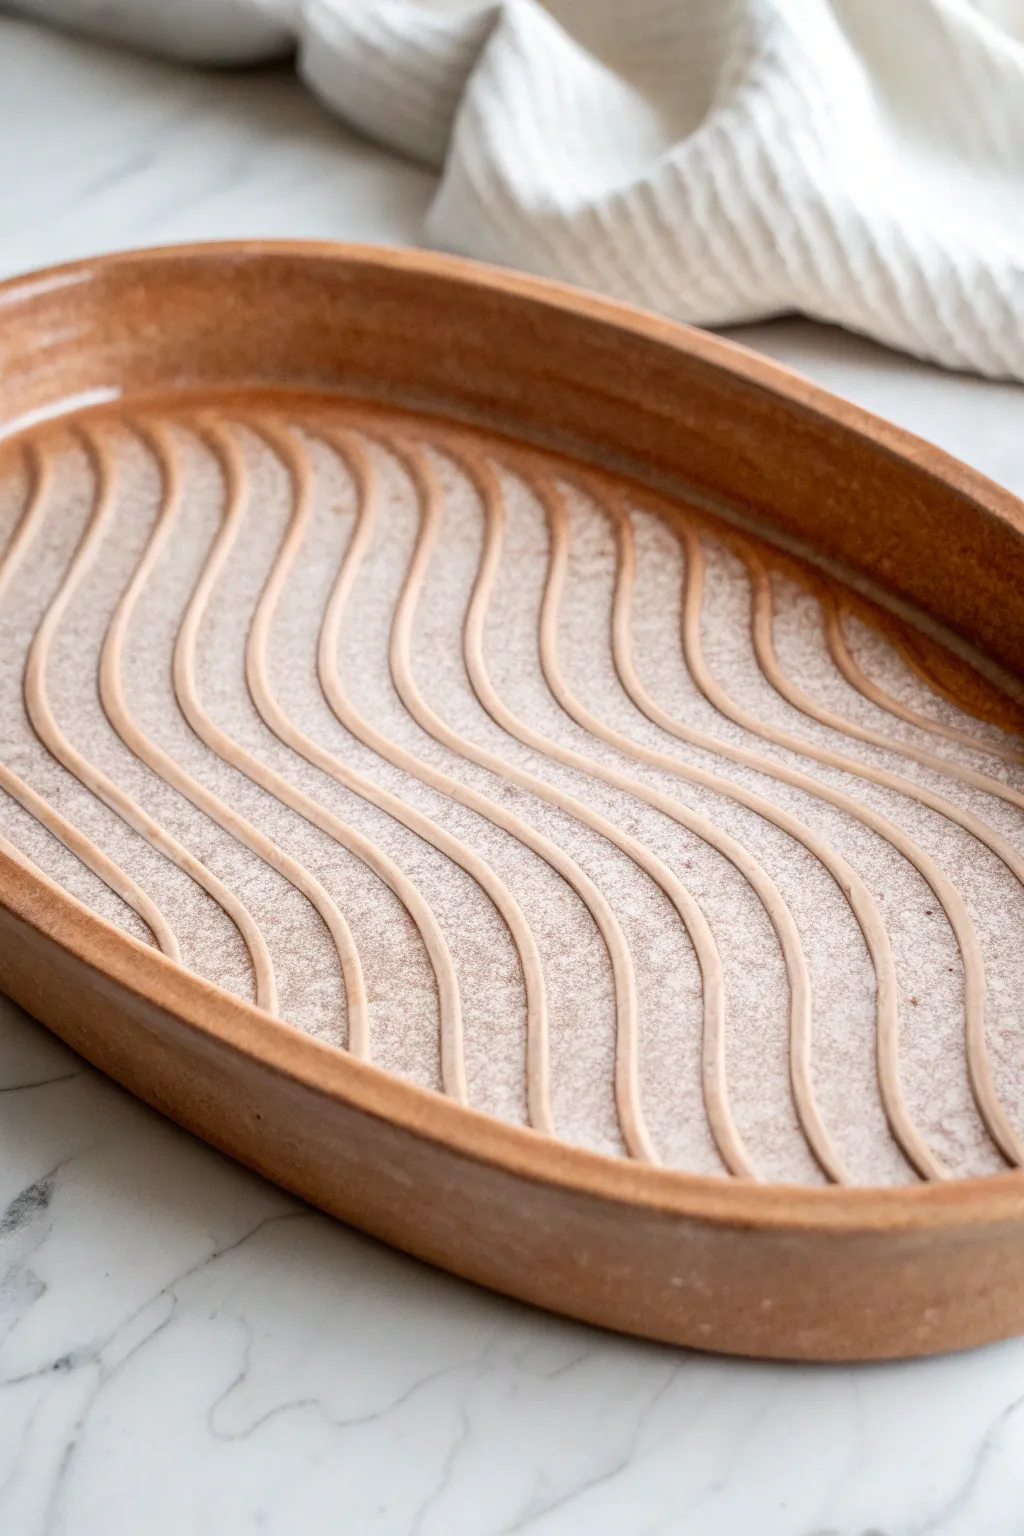
This elegant oval tray celebrates the raw beauty of clay with a mesmerizing, wave-like texture carved directly into the slab base. By keeping the glaze minimal and focusing on form, you create a piece that feels both organic and modern, perfect for a centerpiece or serving dish.
Detailed Instructions
Materials
- Stoneware or terracotta clay (grogged for strength)
- Rolling pin
- Two guide sticks (approx. 1/4 inch thick)
- Oval paper template
- Fettling knife or needle tool
- Loop tool (medium rounded profile)
- Serrated rib or scoring tool
- Slip (clay mixed with water)
- Wooden modeling tool
- Smoothing sponge
- Clear matte glaze or light oxide wash
Step 1: Preparing the Slab Base
-
Roll the Slab:
Begin by wedging your clay to remove air bubbles. Place your clay between two guide sticks on a canvas board and roll it out into a large, even slab. You want this to be substantial, roughly 1/4 inch to 3/8 inch thick, to support the carving later. -
Check for Smoothness:
Before cutting, run a soft rib over the surface of the clay slab to compress the particles and remove any canvas texture. Flip the slab and repeat on the other side. -
Cut the Oval shape:
Place your paper oval template onto the smooth slab. Using a needle tool, trace around the template to cut out the base shape. Remove the excess clay but don’t ball it up yet—you’ll need strips for the rim.
Clean Curves Tips
To get super fluid lines, lock your wrist and move your whole arm while carving the clay. Hesitating mid-stroke creates jagged steps in the wave.
Step 2: Creating the Texture
-
Plan the Waves:
Before carving, lightly visualize or gently sketch the wave pattern with a soft tool. The key to this look is continuous, parallel S-curves that flow from one short end of the oval to the other. -
Carve the Grooves:
Using a rounded wire loop tool, start at one edge and pull the tool through the clay in a fluid motion to create the first wave. Maintain steady pressure so the depth is consistent. -
Repeat the Pattern:
Carve the subsequent waves parallel to the first. Leave a ridge of uncarved clay between each groove—this contrast between the raised ‘positive’ space and the carved ‘negative’ space creates the visual rhythm. I prefer to pull the tool towards me for better control. -
Clean the Burrs:
Let the slab stiffen slightly to leather-hard. Once firm, use a soft brush or your finger to gently knock off any little clay crumbs (burrs) created by the carving tool, but keep the edges relatively crisp.
Step 3: Building the Rim
-
Form the Coil or Strip:
Re-roll your excess clay into a long strip or extrude a thick coil that matches the circumference of your oval base. Flatten it slightly so it creates a wall about 1 inch high. -
Score and Slip:
Thoroughly score (scratch) the outer perimeter of your textured base and the bottom edge of your clay strip. Apply a generous amount of slip to the scored areas. -
Attach the Wall:
Place the strip onto the base, pressing down firmly to ensure a bond. Overlap the ends of the wall strip, cut through both layers at a diagonal angle, surface with slip, and join them for a seamless connection. -
Reinforce the Inside Seam:
Use a wooden modeling tool to blend the clay from the wall down onto the base on the interior. Be careful not to smudge your beautiful wave texture; smooth only the very edge where the wall meets the floor. -
Refine the Outside:
Blend the clay upwards from the base to the wall on the exterior. Use a serrated rib to scrape and unify the surface, followed by a smooth rib to create a clean, modern profile.
Mix Up The Medium
Try using a dark clay body with a white slip inlay for high contrast, or use a celadon glaze which naturally pools in texture for a gem-like effect.
Step 4: Finishing and firing
-
Refine the Rim:
Use a damp sponge to round over the top lip of the tray. It should feel smooth to the touch. -
Slow Dry:
Loosely cover the tray with plastic to let it dry slowly. Uneven drying can cause warping in flat slabs. Once bone dry, bisque fire the piece. -
Glaze Application:
To achieve the look in the photo, apply a very thin coat of white matte glaze or a white slip wash. Wipe the surface back with a sponge so the glaze remains mostly in the carved recesses, highlighting the texture while leaving the high points raw or thinly coated. -
Final Fire:
Fire the piece to the maturity temperature of your clay body (likely Cone 5 or 6). The glaze should settle into the grooves, emphasizing the depths.
Once fired, fill your tray with fruit or simply display it to let the shadows play across those rhythmic waves