If you’ve ever wanted a fun, functional project that actually gets used, making a clay bank is such a satisfying win. I love how you can keep it super simple or go full-on character sculpt—either way, that little coin slot instantly makes it feel magical.
Easy Pinch-Pot Coin Bank
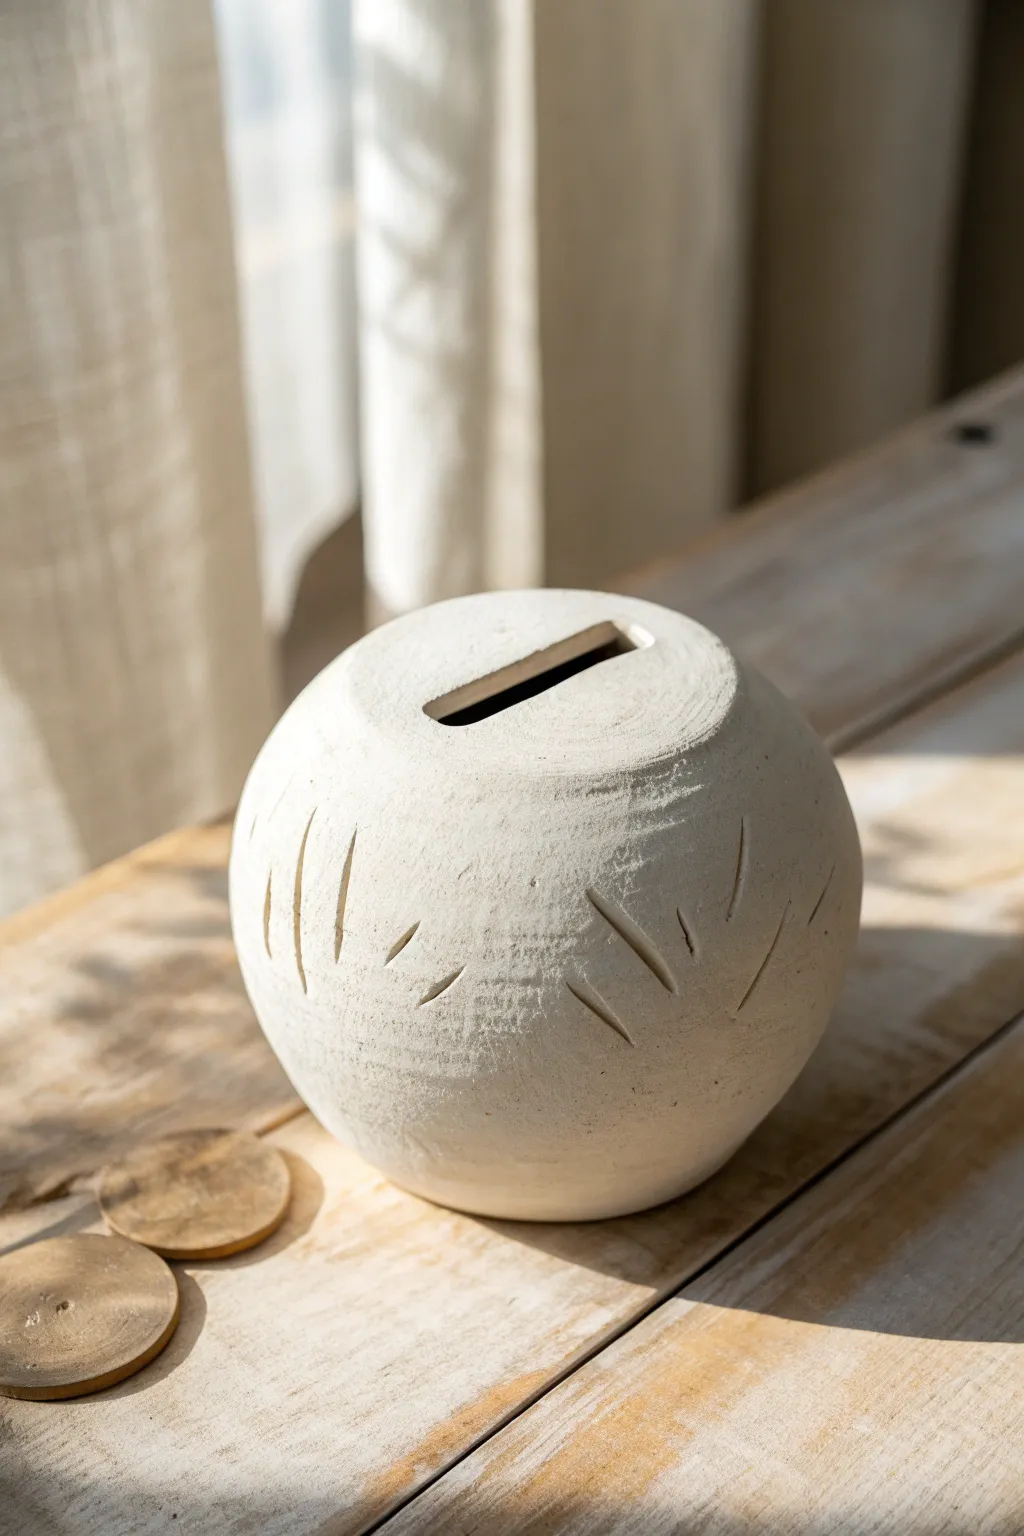
This charming, minimalistic coin bank starts as a simple clay sphere and transforms into a textured treasure with just a few deliberate marks. Its raw, matte finish and organic incised patterns give it a wonderful artisanal feel that looks great on any shelf.
Step-by-Step Tutorial
Materials
- White air-dry clay or polymer clay (approx. 1-1.5 lbs)
- Clay cutting wire or dental floss
- Wooden spoon or paddle tool
- Fettling knife or craft knife
- Small carving tool or toothpick
- Sponge
- Water cup
- Fine-grit sandpaper (optional)
- Rolling pin (optional)
Step 1: Forming the Sphere
-
Prepare the clay:
Start by kneading your white clay thoroughly to remove any air bubbles and make it pliable. Aim for a smooth consistency that doesn’t crack when bent. -
Create two pinch pots:
Divide your clay ball in half. Take one piece, roll it into a ball, and press your thumb into the center. Gently pinch and rotate the clay to open it up into a bowl shape. Repeat with the second half. -
Join the halves:
Score the rims of both pinch pots crosswise with a needle tool or fork. Apply a little water or slip (liquid clay) to the scored areas and press the two halves together firmly to create a hollow sphere. -
Seal the seam:
Use your thumb or a modeling tool to smear clay across the seam line, blending the two halves until the join is invisible. I like to support the inside of the sphere gently while doing this to maintain the round shape. -
Refine the shape:
Gently paddle the exterior with a wooden spoon or a flat piece of wood. This helps round out any lumpy areas and compresses the clay wall for strength.
Trapped Air Warning
Before sealing the sphere completely, use a needle to poke a tiny, invisible hole near the bottom. This allows air to escape as the clay shrinks, preventing cracks or explosions.
Step 2: Adding Features & Texture
-
Flatten the top:
Identify the top of your sphere and gently tap it against your work surface or press with a flat board to create a slightly flattened plateau where the coin slot will go. -
Cut the coin slot:
Using a fettling knife or craft knife, carefully cut a rectangular slot in the center of the flattened top. Make it slightly wider than your thickest coin to account for shrinkage. -
Smooth the opening:
Dip your finger in water and smooth the sharp edges of the coin slot. You want a soft, rounded edge rather than a sharp, cut look. -
Smooth the exterior:
Take a slightly damp sponge and wipe down the entire surface of the sphere. This gives it that unified, matte stone-like texture seen in the photo. -
Mark the pattern guides:
Visualize a horizontal band running around the equator of the sphere. The carved pattern sits primarily in the lower hemisphere. -
Carve the first strokes:
Using a small carving tool or the side of a toothpick, press into the clay to create short, diagonal dashes. Group them in loose clusters of three or four lines. -
Vary the direction:
As you move around the sphere, angle some groups of lines slanting left and others slanting right. This creates the organic, scattered grass-like pattern. -
Clean up burrs:
After carving, wait for the clay to firm up slightly (leather hard stage). Then, gently brush away any little crumbs of clay or ‘burrs’ created by the carving tool, but keep the indentations distinct.
Stone Effect
To get that gritty, ancient texture, mix a teaspoon of used coffee grounds or sand into your white clay before you start sculpting.
Step 3: Finishing Touches
-
Drying setup:
Place the finished bank on a porous surface like a wooden board or a piece of cardboard to dry. Avoid plastic, which can trap moisture underneath. -
Slow drying:
Let the piece dry slowly away from direct heat or sunlight to prevent cracks. Depending on humidity, this might take 24 to 48 hours for air-dry clay. -
Sanding (optional):
Once fully dry, if you want an ultra-smooth finish like the image, lightly sand the surface with fine-grit sandpaper, avoiding the carved areas to keep their depth. -
Final check:
Wipe away any sanding dust with a dry cloth. Your bank is now ready to hold your savings.
Now you have a serene, handcrafted spot to stash your spare change for a rainy day


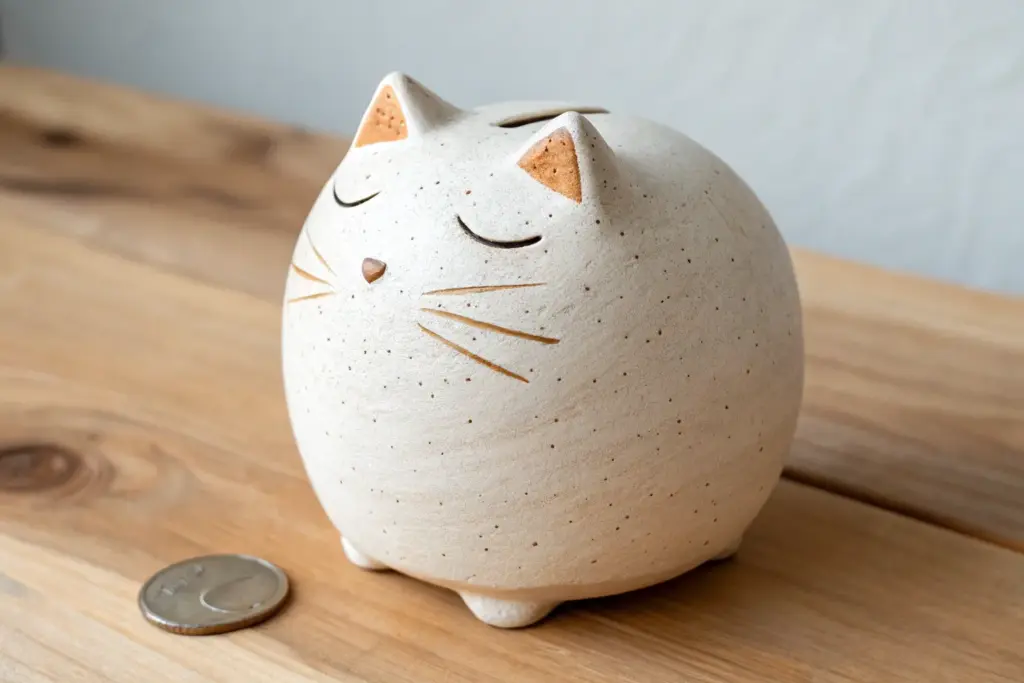
Sitting Cat Bank With Pointy Ears
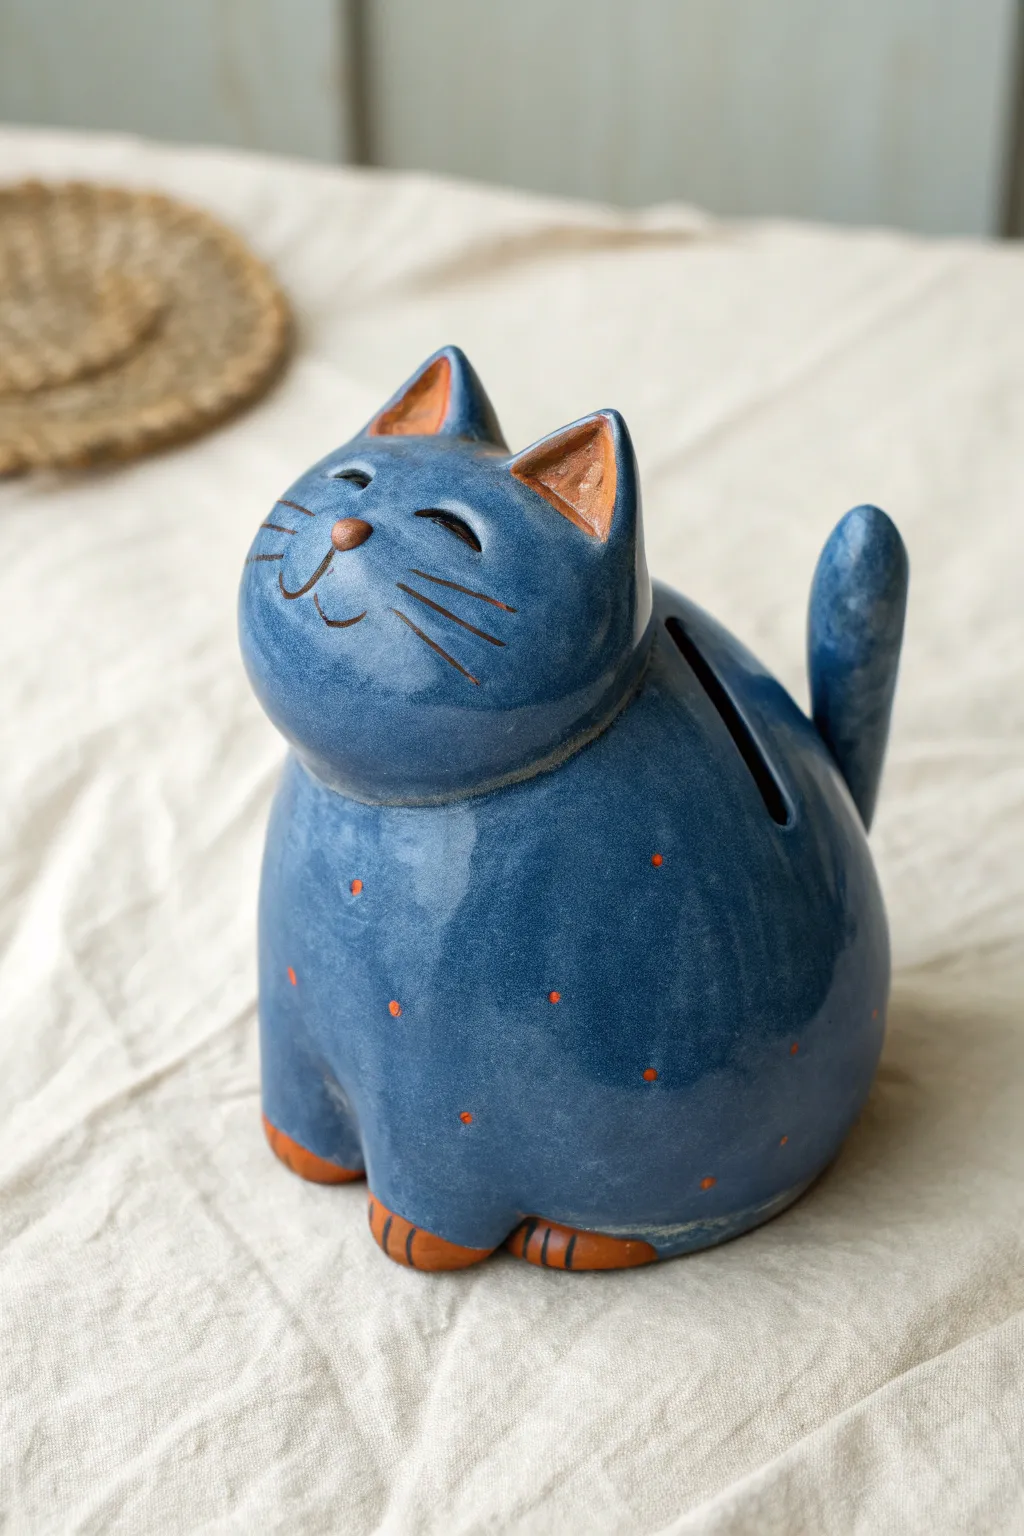
This charming ceramic project features a rotund, smiling cat with a glossy galaxy-blue glaze and rustic terracotta accents. Its simple shape makes it an approachable hand-building project that combines functionality with personality.
Detailed Instructions
Materials
- Stoneware clay (smooth body recommended)
- Pinch pot tools (rib, sponge)
- Scoring tool or needle tool
- Slip
- Underglaze (dark brown or black)
- Deep blue gloss glaze
- Small round paintbrush
- Carving tool
- Coin slot cutter or fettling knife
Step 1: Forming the Body
-
Pinch the main body:
Start with a ball of clay roughly the size of a grapefruit. Use the pinch pot method to open it up, creating a deep, rounded cup shape. Keep the walls consistently about 1/4 inch thick. -
Close the form:
Unlike a bowl, gently collar the clay inward at the top to close the sphere almost completely, leaving just a small opening for air to escape during drying. Paddle the outside gently to ensure it’s a nice, plump, rounded shape. -
Create the head:
Make a second, smaller pinch pot for the head. This should be slightly flattened on the bottom where it will attach to the body. -
Create the base connection:
Score the top of the body and the bottom of the head thoroughly. Apply slip, then press the head firmly onto the body. Smooth the clay across the seam with a wooden modeling tool or your thumb to make the neck connection seamless.
Step 2: Adding Features
-
Sculpt the ears:
Form two small triangles of clay. Use your thumb to create an indentation in the center of each, giving them depth. Score and slip them onto the top of the head. -
Add the feet:
Roll two small oval balls for the front paws. Attach them at the base of the belly, blending the top of the paws into the body while leaving the toes defined. -
Attach the tail:
Roll a coil of clay, tapering it slightly at the end. Attach it to the lower back of the bank, curving it upwards so it rests against the body for support. -
Make the coin slot:
Identify the spot on the cat’s upper back behind the head. Carefully cut a rectangular slot wide enough for coins. Smooth the edges with a damp sponge or finger to remove sharp burrs. -
Refine the surface:
Once the clay is leather-hard, use a smooth rib tool to compress the surface and remove any fingerprints. This ensures that lovely smooth finish for the glaze later.
Air Trap Warning
Since this is a hollow closed form, that coin slot is crucial! Make sure you cut the slot while the clay is leather hard. If you fire a completely sealed sphere, it will explode in the kiln.
Step 3: Detailing and Glazing
-
Carve the face:
Using a needle tool or small carving loop, gently Incise the eyes (two curved lines for a squinting look), the whiskers, and the mouth. -
Add the nose:
Roll a tiny bead of clay and attach it centered above the mouth for a cute button nose. -
Bisque fire:
Allow the piece to dry completely (slowly is best to prevent cracks) and fire it to bisque temperature according to your clay body’s specifications. -
Wax resist application:
Apply wax resist to the areas you want to remain unglazed: the inner ears, the nose button, the toes, and small random polka dots on the body. -
Darken the lines:
Brush a dark brown or black underglaze into the carved facial features (eyes, whiskers, mouth). Wipe away the excess on the surface with a damp sponge, leaving color only in the grooves. -
Apply the main glaze:
Dip the entire cat into a deep blue gloss glaze, or brush on 3 coats. The wax resist spots you applied earlier will repel the glaze, letting the raw clay show through. -
Final wipe:
Check the bottom of the bank and wipe away any glaze that might touch the kiln shelf. I always double-check the wax spots too, just to gentle wipe off any glaze beads sitting on top of the wax. -
Glaze fire:
Fire the piece again to the maturation temperature of your glaze (likely Cone 5/6 for stoneware).
Stopper Size Check
Cut the retrieval hole in the bottom BEFORE firing. Use a standard rubber stopper to measure the hole size while the clay is wet, accounting for about 10-12% shrinkage during firing.
Place your finished bank on a sunny shelf to start collecting coins


Shark Bank With a Back Slot
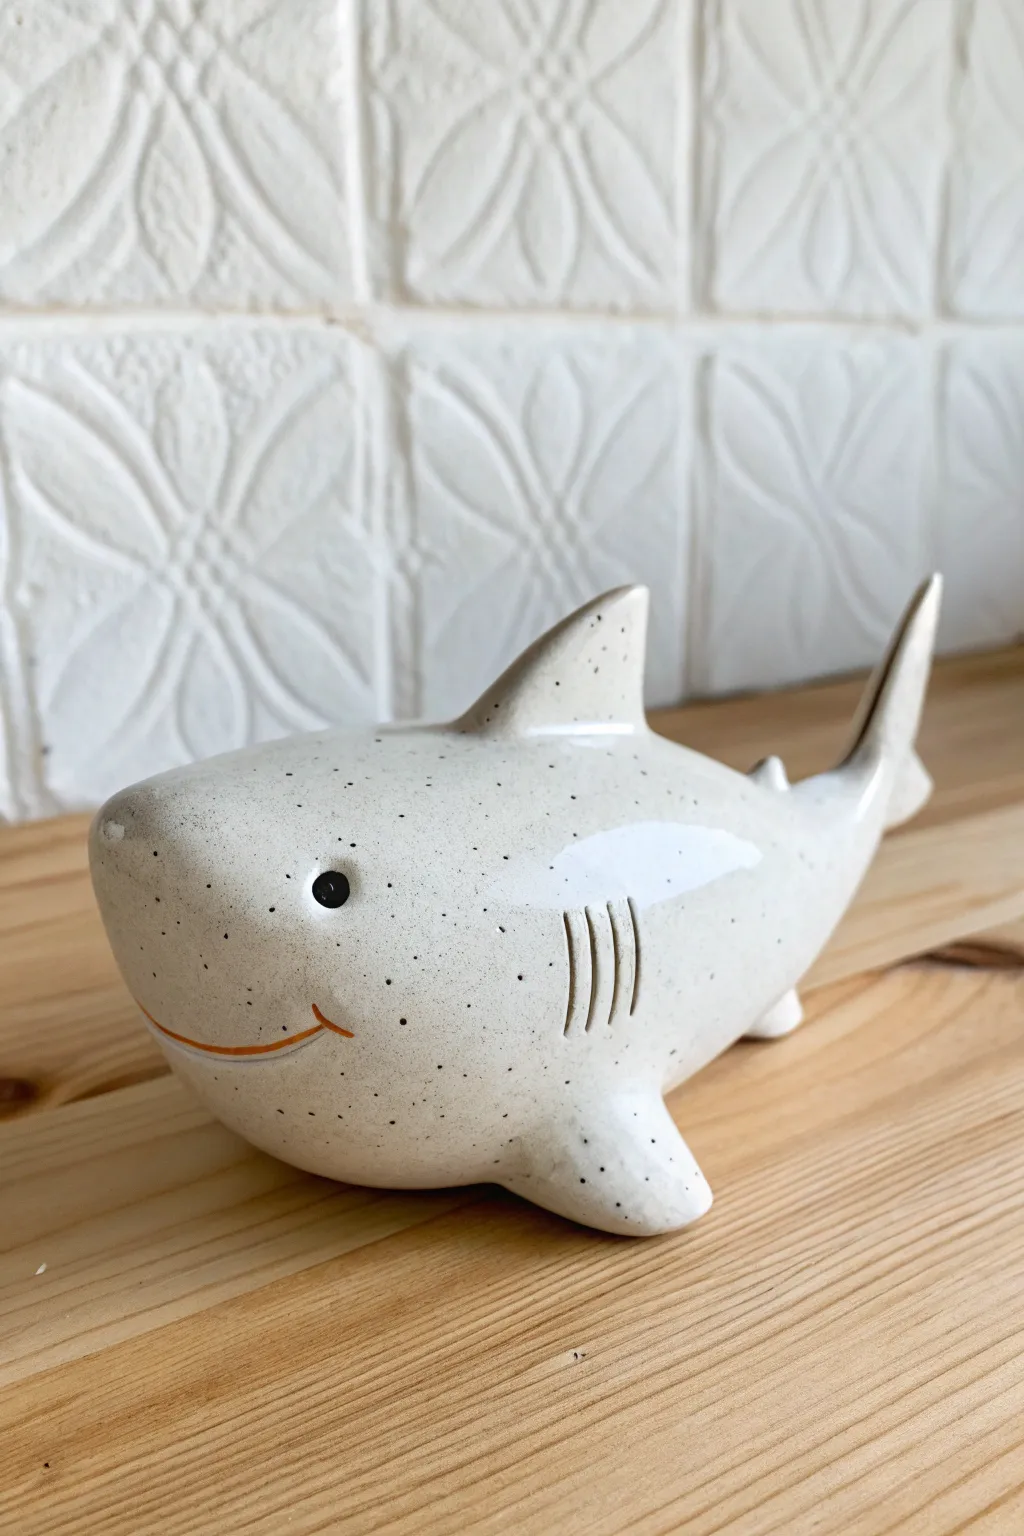
Dive into pottery with this charming, friendly shark bank featuring a speckled cream finish and a cheeky orange smile. Its hollow body is perfect for stashing coins, making it both a sculptural piece for your shelf and a functional savings jar.
Detailed Instructions
Materials
- White stoneware clay (speckled or plain)
- Pottery tools (needle tool, rib tool, loop tool)
- Slip and scoring tool
- Rolling pin
- Underglaze (Black and Orange)
- Clear glaze (if using speckled clay) or Speckled White Glaze
- Fine liner paintbrush
- Sponge
Step 1: Forming the Body
-
Shape the pinch pots:
Start by taking two equal balls of white stoneware clay. Using your thumbs, press into the center of each ball and pinch the walls evenly to create two matching bowl shapes. -
Join the halves:
Score the rims of both pinch pots thoroughly with a serrated tool and apply a generous amount of slip. Press the two halves together firmly to create a hollow sphere, trapping air inside to help it hold its shape. -
Smooth the seam:
With a rib tool or your thumb, smooth the clay across the seam where the two bowls meet. You want the join to completely disappear so the form looks like a single continuous egg shape. -
Elongate the form:
Gently roll and gently paddle the hollow sphere against your work surface to elongate it slightly. You want a tapered torpedo shape—narrower at the tail end and blunter for the nose.
Step 2: Adding Fins and Features
-
Create the dorsal fin:
Roll out a thick slab of clay and cut a triangle shape. Soften the edges with a damp sponge. Score and slip the top center of the body and attach the fin, blending the clay downwards for a seamless connection. -
Attach the tail:
For the tail fin, cut a larger, curved ‘V’ shape from your slab. Attach this to the tapered back end of the shark body. I find it helps to prop the tail up with a small sponge while the clay stiffens. -
Add side fins:
Shape two smaller, rounded triangular fins for the pectoral fins. Attach these low on the sides of the shark’s belly so it will sit stable on a flat surface without rolling over. -
Carve the gills:
Using a sharp needle tool or a small ribbon tool, carve three vertical, parallel lines onto both sides of the body just behind the head area to represent the gills. -
Make the coin slot:
Carefully cut a rectangular slot into the top of the shark’s back, just behind the dorsal fin. Ensure it is wide enough for your thickest coin to pass through. -
Define the eyes:
Using the back of a paintbrush or a small ball tool, press two indentations where the eyes will go. Roll two tiny balls of clay, place them in the sockets, and gently press them flat.
Air Pressure Tip
When closing your two pinch pots, the trapped air provides support. If the body sags while adding fins, the air pressure inside is likely too low; patch holes immediately.
Step 3: Finishing and Glazing
-
Dry slowly:
Cover the shark loosely with plastic and let it dry slowly to the leather-hard stage. Once firm, cut a hole in the bottom for the rubber stopper (essential for retrieving money later!). -
Bisque fire:
Allow the piece to become bone dry before firing it in the kiln to a bisque temperature (usually cone 04). -
Paint the face:
Once out of the bisque firing, use a fine liner brush to paint the eyes solid black with underglaze. Paint a thin, upward-curving line in orange for the smile. -
Apply the main glaze:
Dip the entire shark into a bucket of speckled white glaze. If you used pre-speckled clay, a clear glaze works perfectly here. Wipe away any glaze that covered the black eyes or orange mouth so they show through clearly. -
Final fire:
Place the shark on a stilt in the kiln and fire to the maturity temperature of your clay and glaze (typically cone 5 or 6 for stoneware).
Cracking Seams?
If the seam where you joined the pots starts to crack as it dries, dampen the area slightly, score it deep, add fresh soft clay, and compress it thoroughly with a rib.
Once cooled, pop a rubber stopper in the belly, and start feeding this friendly predator your spare change.


Turtle Shell Bank With Patterned Scutes

This elegant clay bank reimagines the classic piggy bank as a stylized turtle shell with geometric flair. Featuring deep-carved scutes and a fan-like texture pattern, this piece combines natural forms with clean, modern lines.
How-To Guide
Materials
- Stoneware clay (speckled or buff)
- Pottery wheel (or rolling pin for slab building)
- Rib tool (kidney shaped)
- Needle tool
- Carving tool (V-gouge or dull pencil)
- Sponge
- Wire cutter
- Clear or matte white glaze
Step 1: Forming the Dome
-
Center and open:
Begin by centering a 2-3 pound ball of stoneware clay on your wheel. Open it low and wide, aiming for a shallow bowl shape initially. -
Throw the dome:
Pull the walls inward and upward to form a closed dome shape. You want the curve to mimic a turtle’s shell—steep sides rounding off to a gentle peak. -
Close the form:
Gradually collar the clay inward until the top is completely sealed. Compress the top gently to ensure it doesn’t sag. -
Refine the curve:
Use a rib tool on the exterior to smooth out throwing lines and perfect the hemispherical shape. -
Create the foot:
At the base of the dome, use your fingers or a modeling tool to create a slight outward flare or ‘skirt’ that mimics the edge of a shell. -
First drying phase:
Wire the piece off the bat and let it dry to a firm leather-hard stage. It needs to be stiff enough to withstand carving pressure without warping.
Step 2: Carving the Details
-
Map the pattern:
Use a needle tool to very lightly sketch the shell pattern. Start with a central hexagon at the very top, then draw a ring of hexagons surrounding it. -
Sketch the rim scutes:
Finish the mapping by drawing trapezoidal shapes around the bottom edge that connect the hexagon ring to the flared foot. -
Carve the main lines:
Using a V-gouge tool, carve deeply along your sketched lines. I find creating confident, continuous strokes helps the pattern look organic. -
Add internal texture:
Inside each hexagonal and trapezoidal scute, carve smaller, fan-like lines. These should radiate from the center of each shape outward toward the edges. -
Cut the slot:
Carefully cut a rectangular coin slot in the center of the topmost hexagon. Smooth the edges with a slightly damp sponge so coins slide in easily. -
Clean up burrs:
Once the carving is complete, gently brush away any clay crumbs or sharp burrs with a stiff brush or your finger.
Clean Lines
Wait until the clay is truly leather-hard before carving. If the clay is too wet, the tool will drag and create messy, raised edges rather than clean cuts.
Step 3: Finishing
-
Create the stopper hole:
Flip the leather-hard shell over and cut a circular hole in the bottom. This needs to be large enough to retrieve coins but fit a standard rubber stopper. -
Bisque fire:
Allow the piece to dry completely (bone dry) before loading it into the kiln for a bisque firing. -
Glazing:
Dip or brush the piece with a matte white or clear glaze. Avoid thick applications in the carved crevices so the pattern remains distinct. -
Final wipe:
Wipe the foot ring clean with a sponge to prevent it from sticking to the kiln shelf. -
Glaze fire:
Fire the piece to the temperature recommended for your specific clay and glaze combination.
Natural Texture
Rub iron oxide inside the carved lines and wipe it back before glazing. This darkens the recesses, making the scute pattern pop dramatically.
Now you have a timeless, handcrafted vessel ready to hold your savings

The Complete Guide to Pottery Troubleshooting
Uncover the most common ceramic mistakes—from cracking clay to failed glazes—and learn how to fix them fast.
Chubby Dinosaur Bank
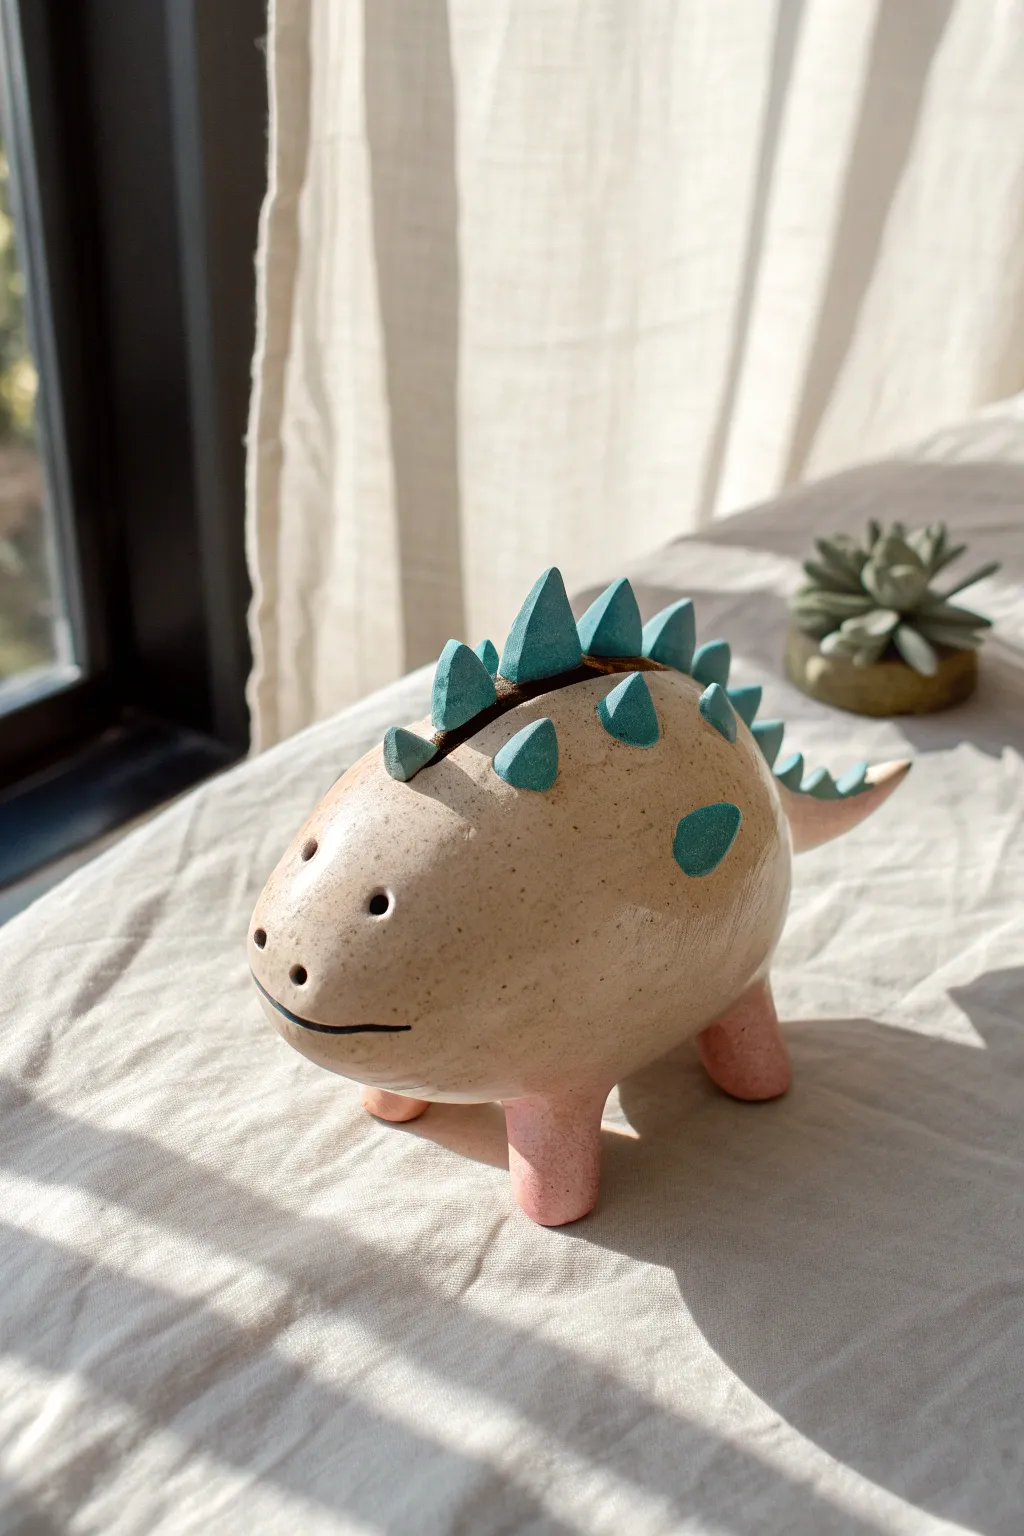
This adorable chubby dinosaur bank combines whimsical charm with practical savings. With its speckled beige body, teal spikes, and soft pink feet, it brings a prehistoric yet gentle touch to any shelf.
Step-by-Step Tutorial
Materials
- Speckled tan stoneware clay (or polymer clay with faux speckles)
- Teal underglaze or acrylic paint
- Soft pink underglaze or acrylic paint
- Black underglaze or acrylic paint (for eyes/mouth)
- Clear glaze (if firing) or gloss varnish
- Rolling pin
- Fettling knife or craft knife
- Scoring tool or needle tool
- Slip (clay/water mixture)
- Sponge
- Small paintbrush
- Newspaper or paper towels
Step 1: Forming the Body
-
Shape the main mass:
Start with a large ball of speckled clay, roughly the size of a grapefruit. Gently pat and roll it between your palms to create a smooth, elongated egg shape. This will be the main body of your dinosaur. -
Hollow out the form:
To make this a functional bank, carefully slice the egg shape in half horizontally. Hollow out both halves using a loop tool or spoon, leaving the walls about 1/4 inch thick. Keep the shape consistent. -
Rejoin the halves:
Score the edges of both hollow halves extensively using your needle tool. Apply a generous amount of slip to the scored areas. I like to press them together firmly and then wiggle slightly to creating a strong vacuum seal. -
Smooth the seam:
Use a wooden rib or your thumb to blend the clay across the seam line, smoothing it until the join is completely invisible. The body should look like one continuous, delightfully chubby oval again. -
Refine the surface:
Gently wipe the entire surface with a barely damp sponge. This removes fingerprints and exposes the nice speckles in the clay body.
Air Pocket Prevention
When attaching spikes, prick a tiny hole with a needle tool underneath where it attaches. This lets trapped air escape during firing so spikes don’t blow off.
Step 2: Adding Features
-
Attach the legs:
Roll four short, stout cylinders of clay for the legs. Score and slip the placement points on the bottom of the body. Press the legs on firmly and blend the clay upwards into the body so they don’t pop off later. -
Create the tail:
Form a small cone of clay and attach it to the rear of the body, blending the seam thoroughly. Keep the tail slightly uplifted to add to the cute, perky character. -
Cut the coin slot:
While the clay is leather hard (stiff but allows cutting), use a fettling knife to carefully carve a rectangular slot along the top center of the back. Ensure it’s wide enough for your largest coin. -
Sculpt the spikes:
Roll out a slab of clay about 1/4 inch thick. Cut out roughly 12-15 small triangles of varying sizes. Smooth the sharp cut edges with your fingertip. -
Attach the spine spikes:
Score and slip the base of each triangle. Attach the largest spikes in a row along the spine, perpendicular to the coin slot. Leave a gap for the slot itself. -
Add side spikes:
Attach a few random triangular spikes to the sides of the body and along the tail for extra texture and personality.
Level Up: Cork Stopper
Before drying, cut a specific round hole in the belly and fit it with a rubber or cork stopper. This makes the bank reusable without smashing it later!
Step 3: Firing and Glazing
-
Bisque fire:
Allow the dinosaur to dry completely (slowly, under plastic if needed to prevent cracks). Fire to cone 04 (or according to your clay instructions). -
Glaze the details:
Apply 2-3 coats of teal underglaze to the spikes. Be careful to stay within the lines of the triangles. Paint the feet with the soft pink underglaze, blending it slightly up the leg. -
Add face details:
Using a very fine brush and black underglaze, dot two small eyes on the front and paint a wide, simple curved line for the mouth. -
Clear glaze:
Dip or brush the entire piece with a clear glossy glaze. This will seal the clay and make those speckles pop. -
Final firing:
Fire the piece again to cone 5/6 (or your clay’s specific maturation temperature). Let it cool completely before removing from the kiln.
Once cooled, your sturdy little friend is ready to guard your loose change
Smiley Face Disk Bank
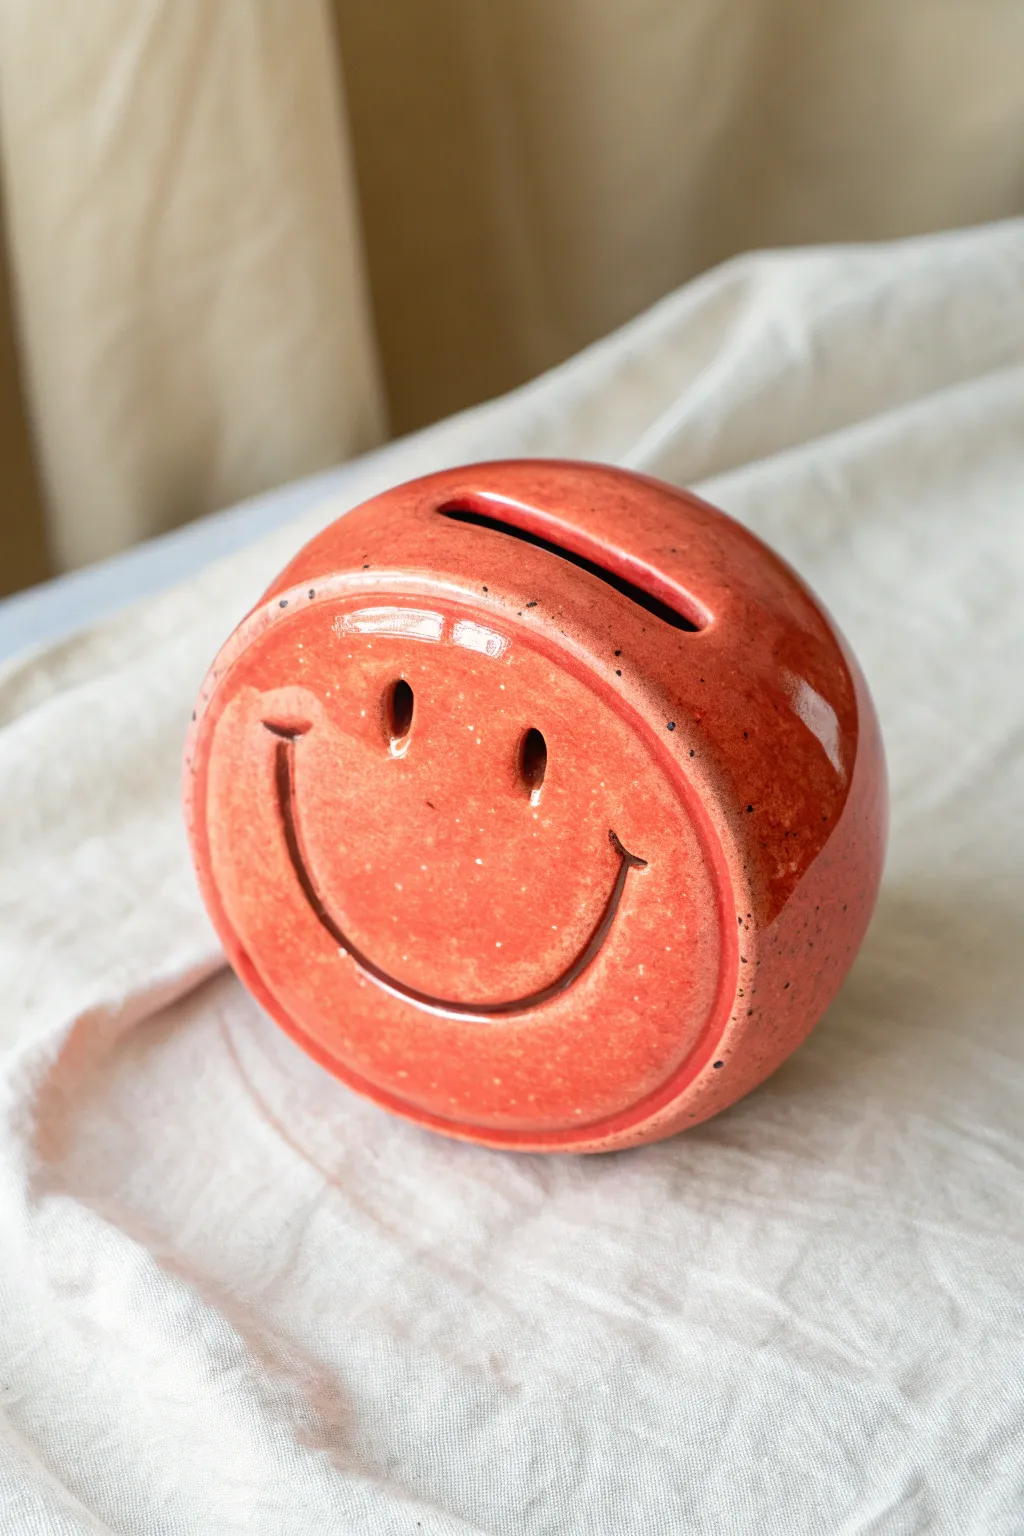
This cheerful ceramic bank features a warm, speckled terracotta glaze and a simple, classic smiley face carved into a flattened front disc. It’s a delightful way to save spare change while adding a pop of handmade charm to any shelf.
Detailed Instructions
Materials
- White or speckled stoneware clay
- Rolling pin
- Pottery needle tool
- Rib tool (wooden and rubber)
- Circle template or compass
- Small loop tool for carving
- Fettling knife
- Sponge
- Scoring tool or serrated rib
- Slip (clay and water slurry)
- Clear or translucent orange glaze (speckled optional)
- Kiln
Step 1: Forming the Base Shape
-
Prepare the Clay:
Start by wedging about 1-1.5 lbs of stoneware clay thoroughly to remove air bubbles. This ensures your bank won’t crack during firing. -
Pinch Pot Method:
Divide your clay int two equal balls. I like to shape these into perfect spheres in my palms first. Create a pinch pot from each ball by pushing your thumb into the center and pinching the walls to an even thickness of about 1/4 inch. -
Join the Halves:
Score the rims of both pinch pots and apply slip generously. Press the two halves together firmly to create a hollow sphere. Trap some air inside; this trapped air will support the walls as you refine the shape. -
Refine the Sphere:
Using a wooden paddle or a rib tool, gently tap and smooth the seam until it disappears completely and the ball is round.
Air Pressure Trick
When joining your pinch pots, the trapped air acts like a balloon, keeping the walls from collapsing while you paddle the shape. Don’t pierce the air hole until the shape is final!
Step 2: Sculpting the Face Disc
-
Flatten the Front:
Gently tap one side of your sphere against a flat surface to create a flat plane. This is where the face will go. Don’t flatten it too much; you just want a distinct face area. -
Create the Rim:
Roll out a small coil of soft clay. Score and slip a circle around the edge of your flattened face area, then attach the coil. Blend the outside edge of the coil into the body of the bank, but leave the inside edge crisp to frame the face. -
Smooth the Face:
Use a damp sponge or a soft rib to smooth the flat circular area inside your coil rim, ensuring it’s pristine for carving.
Make it Speckled
If you don’t have speckled clay, mix a small amount of granular ilmenite or manganese into your clear glaze to get those lovely vintage-style iron spots.
Step 3: Carving Details
-
Sketch the Features:
Lightly trace two vertical oval eyes and a wide U-shaped smile onto the flat face using a needle tool. Keep the pressure light so you can erase mistakes. -
Carve the Eyes:
Use a small loop tool or needle tool to deepen the eye marks. You want them to be distinct recesses, almost puncturing through but not quite—unless you want peepholes into the bank. -
Carve the Smile:
Carve the smile line deeper. A consistent depth looks best here. Add small perpendicular tick marks at the corners of the mouth for that classic smiley look. -
Cut the Coin Slot:
On the very top of the sphere (behind the face disc), cut a rectangular slot large enough for coins. Use a fettling knife and clean up the edges with a damp sponge. -
Add a Stopper Hole:
Cut a circular hole in the bottom large enough for a rubber stopper so you can eventually retrieve your savings. -
Dry Slowly:
Loosely cover the piece with plastic and let it dry slowly to the leather-hard stage, then uncover to let it become bone dry.
Step 4: Glazing and Firing
-
Bisque Fire:
Fire the bone-dry piece in a kiln to cone 04 (or your clay’s specific bisque temperature). -
Clean the Surface:
Once cool, wipe the bisque ware with a damp sponge to remove any dust that might resist the glaze. -
Apply Glaze:
Pour a translucent orange or terracotta-colored glaze inside the bank and swirl to coat the interior, pouring out the excess. Then, dip or brush the exterior. -
Highlight the Features:
Ensure the glaze doesn’t pool too thickly in the carved smile or eyes, which could obscure the details. If it’s too thick, dab a little out with a dry brush. -
Glaze Fire:
Fire the piece again to the maturation temperature of your glaze and clay body (typically cone 5 or 6 for stoneware).
Pop in a rubber stopper on the bottom and start saving your coins with a smile


What Really Happens Inside the Kiln
Learn how time and temperature work together inside the kiln to transform clay into durable ceramic.
Minimalist Arch Bank
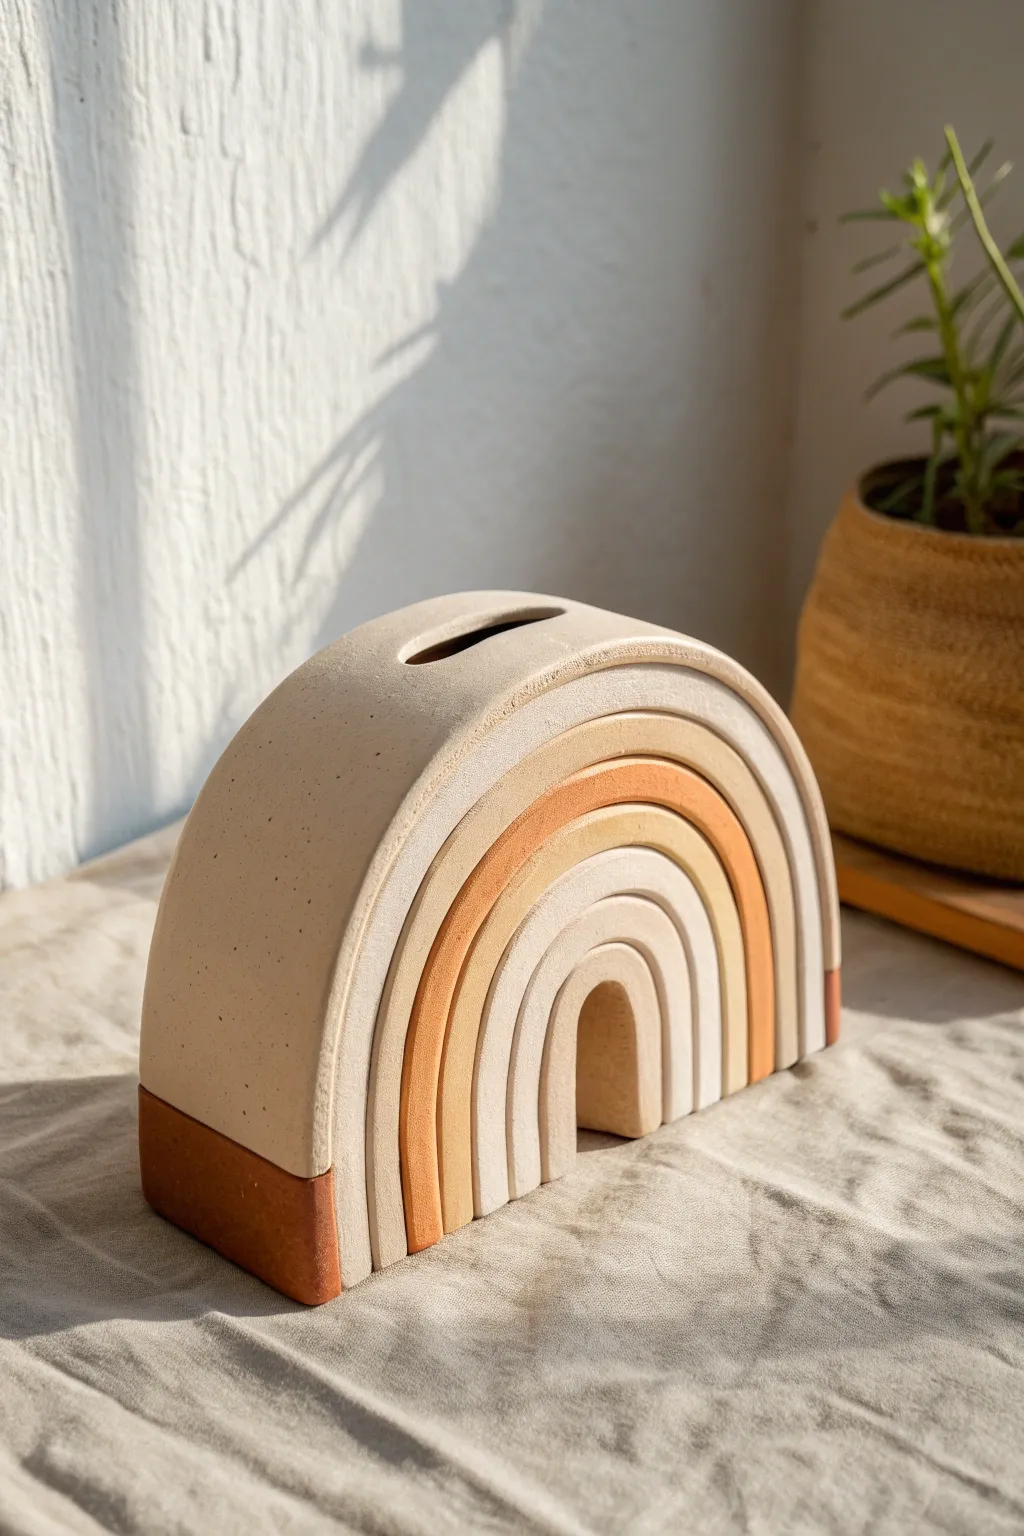
Bring a touch of modern bohemian charm to your savings with this sculptural arch bank. Featuring warm neutral tones and a layered rainbow design, this clay project doubles as functional decor for any minimalist shelf.
Step-by-Step Tutorial
Materials
- Air-dry clay (white or light grey)
- Rolling pin
- Clay knife or X-Acto blade
- Ruler
- Sandpaper (fine grit)
- Acrylic paints (terracotta, beige, cream, white)
- Paintbrushes (flat and detail)
- Water cup
- Slip (clay mixed with water)
- Cardboard or sturdy cardstock (for making templates)
- Matte varnish or sealant
Step 1: Shaping the Structure
-
Create the core block:
Start by manipulating a large chunk of clay into a solid rectangular block. This will be the main body of the bank. Aim for a thickness of about 2-3 inches and a height corresponding to your largest desired arch. -
Shape the arch:
Using your knife, carefully round off the top corners of your block to create a smooth, semi-circle arch shape. You can use a circular object like a bowl rim as a guide if you struggle with freehand curves. -
Hollow the center:
To make this a functional bank rather than a solid brick, careful excavation is needed. Slice off the back face of the arch (about 1/4 inch thick) and set it aside—this will be the cover later. Hollow out the interior of the main block, leaving walls about 1/2 inch thick. -
Carve the coin slot:
On the very top center of the arch, mark a rectangular slot large enough for coins. Use your knife to carefully cut this slot out, smoothing the inner edges with a damp finger. -
Reattach the back:
Score the edges of your hollowed arch and the back panel you sliced off earlier. Apply slip to the scored areas and press them firmly back together. Smooth the seam with your finger or a sculpting tool until it’s invisible.
Clean Slot Secret
Make the coin slot slightly wider than you think you need. Clay shrinks when drying, and paint adds thickness, which can make the slot too tight later.
Step 2: Creating the Rainbow Layers
-
Roll out clay slabs:
Roll out a fresh portion of clay to a uniform thickness of about 1/4 inch. This will be used for the decorative front arches. -
Cut the arch strips:
You need to create the visual effect of stacked arches. Cut several curved strips of varying sizes. The largest should match the outer curve of your bank, getting progressively smaller for the inner arches. -
Attach the outer face:
Score and slip the front face of your leather-hard bank. Ideally, you want to attach these strips directly to the front to build dimension. -
Layer the strips:
Place the strips onto the front face, starting from the outermost arch and working inward. Ensure they touch tightly without gaps. The smallest, central arch should be solid or have a small hollow depending on the look you want—the reference image has a small ‘doorway’ hollow at the bottom center. -
Refine the edges:
Once all layers are attached, use a damp sponge to smooth any rough textures. Ensure the transition between the added layers and the main block is neat, though a little separation adds to the ‘stacked’ look. -
Dry thoroughly:
Allow the bank to dry completely. Since the clay is thick, this might take 48-72 hours. Rotate it occasionally to ensure even drying and prevent warping.
Step 3: Painting and Finishing
-
Sand for smoothness:
Once bone dry, take your fine-grit sandpaper and gently sand the entire surface. Pay special attention to the coin slot and the rounded top to get that professional matte ceramic feel. -
Mix your palette:
Prepare your acrylic colors. Creating a gradient is key here. You need a dark terracotta, a mid-tone peach/orange, a beige, and a cream color. -
Paint the base:
Start by painting the bottom 1-2 inches of the bank in your darkest terracotta shade. Tape off a straight line if you want it crisp, or freehand it for a more organic feel. -
Paint the arches:
Paint each arch layer a different color, moving from darker on the outside to lighter on the inside. I prefer using an angled brush here to get into the crevices between the layered strips cleanly. -
Add texture (optional):
To mimic the speckled ceramic look in the photo, dip an old toothbrush in watered-down grey or brown paint and flick fine speckles over the dried paint. -
Seal the piece:
Finish with a coat of matte varnish. This protects the paint from chipping when coins are dropped in and gives the ‘clay’ a finished look without making it glossy.
Plug It Up
Before gluing the back panel on, customize the base by cutting a hole and fitting a rubber stopper. This makes the funds retrievable without breaking it!
Place your finished bank in a sunny spot and start saving for your next creative adventure.
Bank With a Removable Stopper Bottom
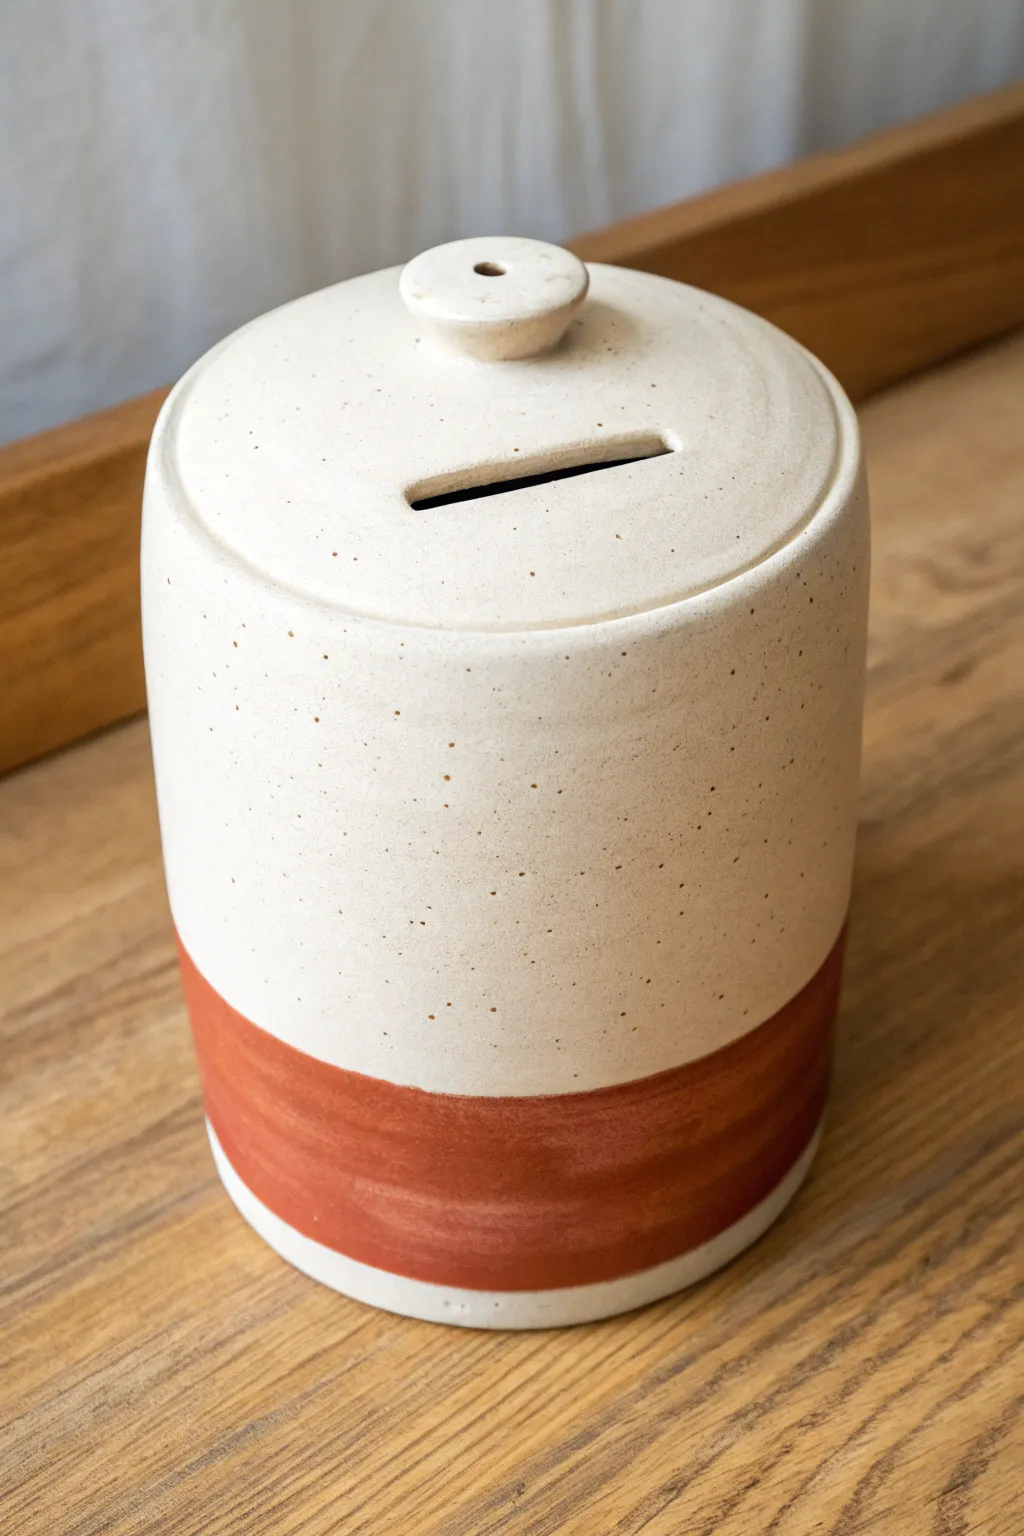
This minimalist coin bank combines clean lines with a warm, speckled clay body and a distinct rust-colored accent band. The functional design features a fitted lid with a simple knob and a precise coin slot, making it a stylish addition to any shelf while keeping your savings secure.
Step-by-Step Guide
Materials
- Speckled stoneware clay (mid-fire)
- Pottery wheel
- Throwing tools (sponge, rib, wire cutter)
- Trimming tools
- Needle tool
- Fettling knife
- Caliper
- Rust/terracotta colored underglaze
- Wide brush
- Clear glaze (transparent)
- Small drill bit (optional for vent hole)
- Sponge for smoothing
Step 1: Throwing the Body
-
Center and open:
Begin with about 1.5 to 2 lbs of speckled clay. Center it firmly on the wheel head and open it up, leaving a floor thickness of about 1/4 inch. -
Pull the cylinder:
Pull the walls straight up to create a vertical cylinder. Aim for an even thickness throughout the wall. I like to keep the walls strictly vertical rather than tapered for this modern look. -
Refine the shape:
Use a metal or wooden rib to smooth the outside and remove throwing lines. Ensure the shape is a perfect cylinder. -
Create the gallery:
At the rim, use a wooden stick or your finger to split the rim slightly towards the inside, creating a ‘gallery’ or ledge where the lid will eventually sit. Measure the diameter of this opening with calipers immediately. -
Clean up:
Cut the cylinder from the bat with a wire tool and set it aside to dry to leather-hard.
Lid Logic
If your lid warps during firing, it likely wasn’t dried slowly enough. Next time, dry the lid while it is seated on the pot to help them shrink together.
Step 2: Creating the Lid
-
Throw the lid:
Using a smaller ball of clay (about 0.5 lbs), throw a flat disk. Use your calipers to ensure the outer diameter matches the gallery measurement from the body, accounting for shrinkage if throwing off the hump. -
Shape the lid:
Refine the curve so it domes very slightly upward. This adds strength and visual appeal compared to a perfectly flat lid. -
Add the knob:
You can throw the knob directly on top of the closed form if throwing off the hump, or attach a small coil later. Shape it into a small, rounded button form. -
Check the fit:
Measure aggressively. The lid needs to fit snugly into the gallery of the main body.
Stopper Alternative
Instead of a ceramic lid, throw a closed form top and cut a hole in the bottom for a rubber stopper. This changes the ‘removable’ aspect to the base.
Step 3: Trimming and Assembly
-
Trim the body:
Once leather-hard, center the main cylinder upside down and trim the bottom. Create a flat foot or a very slight undercut to lift it off the table visually. -
Cut the slot:
On the leather-hard lid, mark a centered rectangle for the coin slot. Use a fettling knife or needle tool to carefully cut out the slot, smoothing the edges with a damp sponge. -
Vent the knob:
Use a small drill bit or needle tool to poke a hidden hole in the knob or the side of the lid to allow air to escape during firing so it doesn’t pop. -
Final fit check:
Place the lid on the body. If it’s too tight, sand it down gently; if it’s too loose, the glaze might help close the gap later.
Step 4: Decoration and Glazing
-
Bisque fire:
Fire both pieces to cone 04 (or your clay’s bisque temperature). -
Apply the band:
On the bisque-fired body, use a banding wheel and a wide brush. Spin the wheel and hold the brush steady against the bottom third of the cylinder to apply a thick, even band of rust-colored underglaze. Let the natural brush strokes show slightly for texture. -
Wax resist:
Wax the bottom of the pot and the rim where the lid sits to prevent the lid from fusing to the body during the glaze firing. -
Glaze application:
Dip the entire body and lid into a clear transparent glaze. This will seal the clay and make the speckles pop while protecting the underglaze band. -
Final fire:
Fire to cone 5/6 (or your clay’s maturity temperature).
Now you have a sleek, handmade vessel ready to hold your spare change.

TRACK YOUR CERAMIC JOURNEY
Capture glaze tests, firing details, and creative progress—all in one simple printable. Make your projects easier to repeat and improve.
Stacked Totem Creature Bank
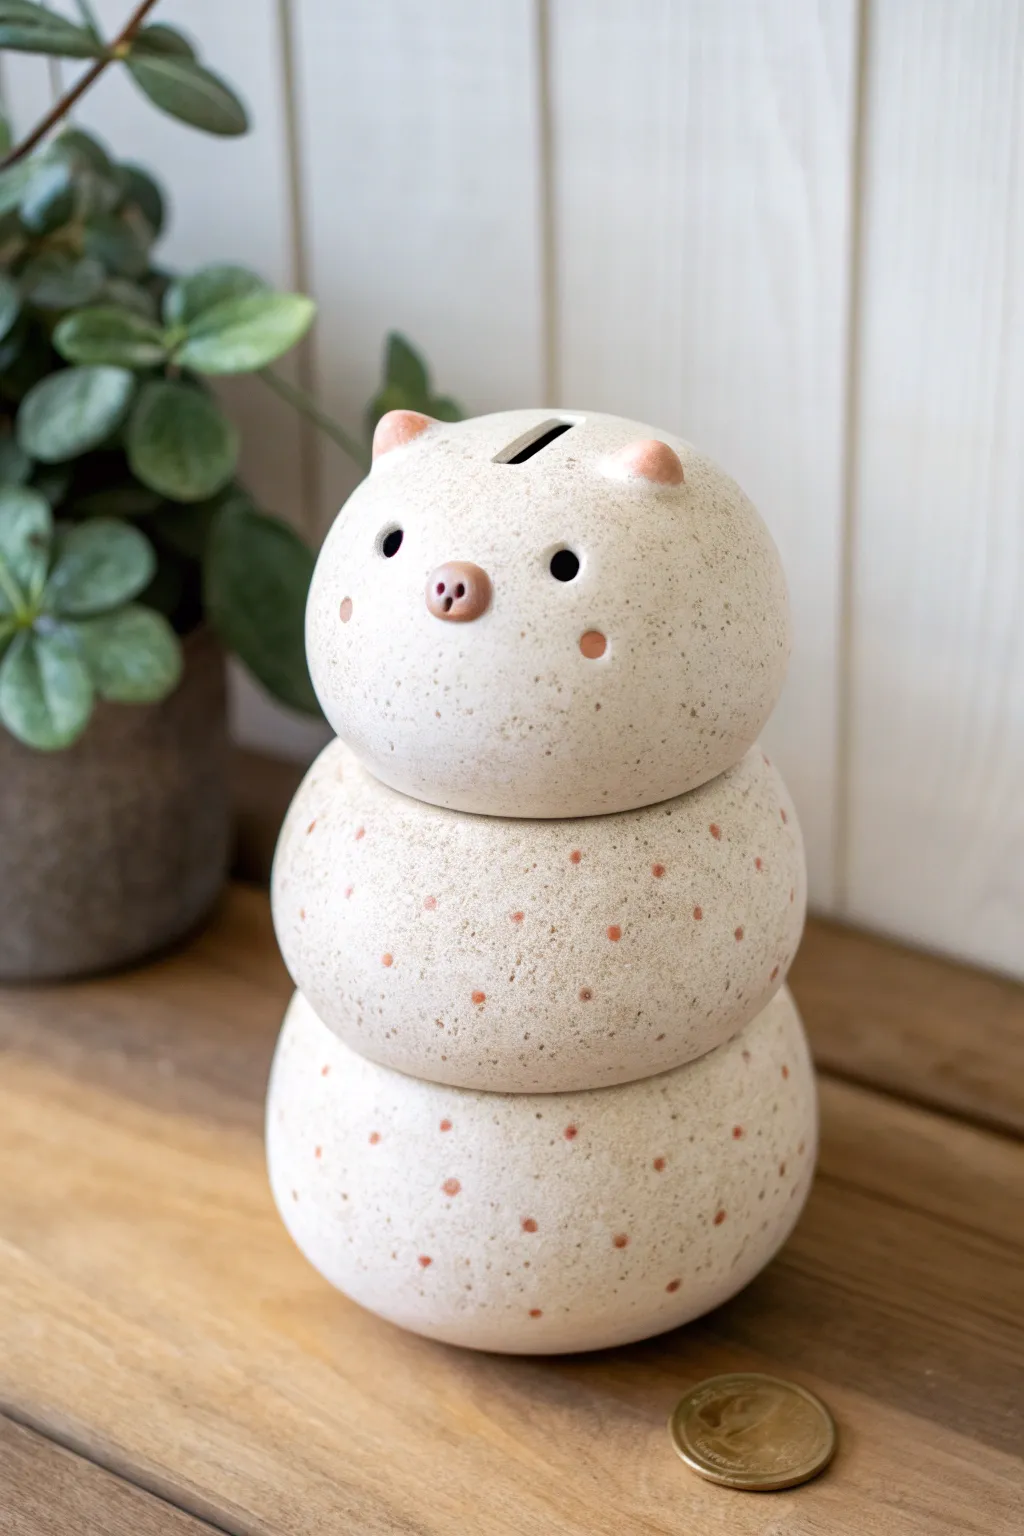
This adorable three-tiered bank combines the charm of a kokeshi doll with a classic piggy bank function. The speckled stoneware clay gives it a natural, rustic texture while the simple stacked spheres create a whimsical, totem-like silhouette.
Detailed Instructions
Materials
- Speckled stoneware clay (approx. 2-3 lbs)
- Pottery wheel (optional, can be hand-built)
- Needle tool
- Rib tool (wooden or silicone)
- Scoring tool or serrated rib
- Slip (clay slurry)
- Underglaze (pink/terracotta)
- Black underglaze or glaze for eyes
- Small sponge
- Clear matte glaze
- Paintbrush (small detail)
- Fettling knife
Step 1: Forming the Body Segments
-
Prepare clay balls:
Divide your clay into three equal portions. Wedge each ball thoroughly to remove air pockets, aiming for portions slightly smaller than a tennis ball. -
Pinch pot method:
If hand-building, take the first ball and press your thumb into the center to open it. Gently pinch and rotate the walls to create a hollow sphere. Repeat for all three balls. -
Wheel method option:
Alternatively, throw three small closed forms on the wheel. This creates a more uniform, perfectly round shape if you prefer symmetry over organic hand-building. -
Joining the spheres:
Once leather hard, trim the bottoms of the top and middle spheres and the tops of the middle and bottom spheres to create flat joining surfaces. -
Stack and attach:
Score the flat areas generously and apply slip. Stack them firmly, twisting slightly to lock the clay particles together. Smooth the seams or leave a defined groove depending on your preference; for this look, leave a definite indentation between segments. -
Hollow the totem:
Crucial step: Before sealing the stack completely, stick a hole through the connecting floors of the spheres so coins can drop all the way to the bottom section.
Air Escape Route
When stacking hollow sealed forms, poke a tiny pinhole in a hidden spot on each segment before firing. Trapped air expands in the kiln and will explode your bank without a vent.
Step 2: Sculpting Details
-
Create the coin slot:
Use a fettling knife to cut a rectangular slot into the very top of the head. Clean the edges with a damp sponge so no sharp burrs remain. -
Form the ears:
Roll two tiny, grape-sized balls of clay. Flatten them slightly and attach them to the top of the head using the score and slip method. -
Shape the snout:
Make a small oval of clay and attach it to the center of the face. Use a small tool to press two nostril indentations into it. -
Add the eyes:
Using the back of a paintbrush or a small drill bit, press two small circular indentations above the snout for the eyes. -
smooth everything:
Go over the entire piece with a damp sponge or soft rib to smooth out any fingerprints, ensuring the rounded ‘mochi’ shape is retained.
Step 3: Decoration and Glazing
-
Apply ear and cheek color:
Using pink or terracotta underglaze, paint the ears and two small circular blush marks on the cheeks. -
Dot the body:
Dip the end of a brush handle into the same underglaze and stamp small dots randomly across the middle and bottom segments. -
Bisque fire:
Allow the piece to dry slowly and completely before bisque firing to Cone 04. -
Adding the eyes:
After the bisque fire, use a tiny drop of black underglaze or glaze inside the eye indentations to make them pop. -
Final glaze application:
Dip or brush the entire piece in a clear matte glaze. This protects the surface while letting the natural speckles of the clay body shine through. -
Glaze fire:
Fire the kiln to the maturation temperature of your clay (typically Cone 5 or 6 for stoneware). -
Add a cork (optional):
If you cut a retrieval hole in the bottom, fit a rubber or cork stopper now. Otherwise, this is a ‘break to open’ bank.
Wobbly Towers
If your stack leans while constructing, the clay is too soft. Let the bottom spheres firm up to a stiff leather-hard state before attaching the weight of the head.
Start saving your coins in your new handmade friend