Halloween clay projects are my favorite kind of studio chaos: quick, colorful, and totally kid-friendly. Here are a bunch of simple Halloween clay ideas for kids that lean cute instead of creepy and feel doable with either air dry clay or polymer clay.
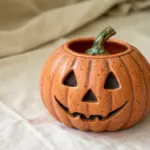
Mini Jack-o’-Lantern Pinch Pots
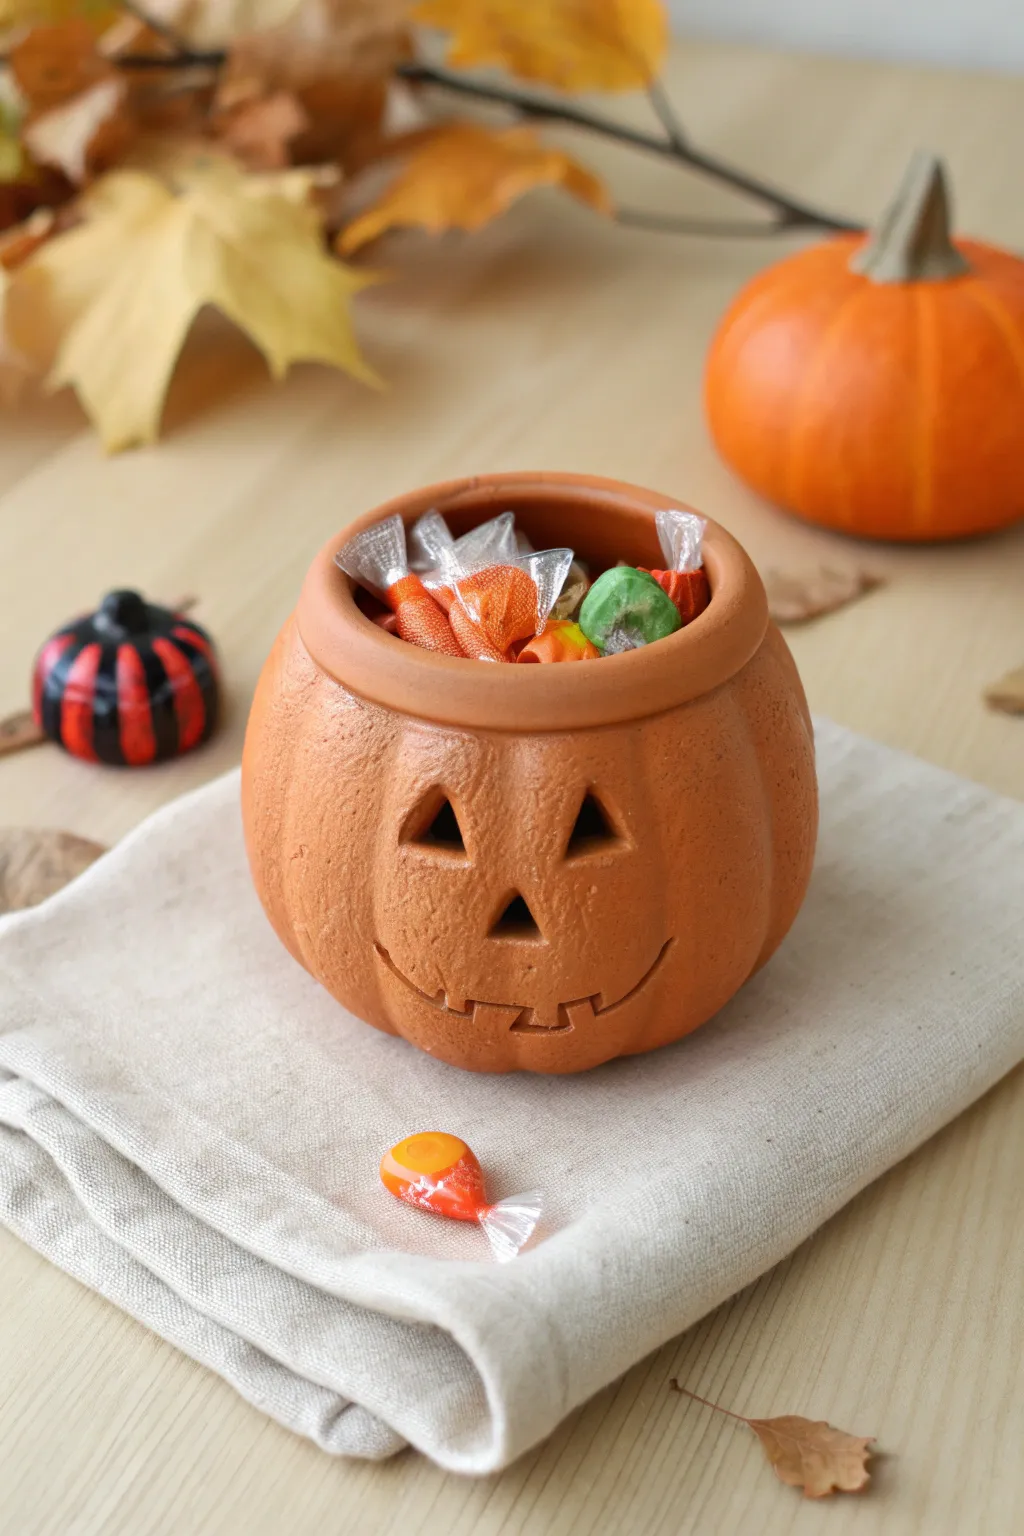
These adorable terracotta-style pumpkin pots are perfect for holding small festive treats or decorating a spooky shelf. By starting with a simple pinch pot method, you can easily sculpt a classic jack-o’-lantern face with a charming, rustic finish.
Detailed Instructions
Materials
- Terracotta-colored air-dry clay (or polymer clay)
- Small bowl of water
- Pottery sponge or soft cloth
- Needle tool or toothpick
- Small loop tool or plastic clay knife
- Smooth work surface or clay mat
- Acrylic paints (optional for shading)
- Clear matte varnish (optional)
Step 1: Forming the Base
-
Prepare your clay:
Start with a ball of terracotta-colored clay about the size of a large orange. Knead it in your hands until it is warm, pliable, and free of any large cracks. -
Create the opening:
Hold the ball in your non-dominant hand. With your other thumb, press firmly into the center of the ball, pushing down about three-quarters of the way through, but be careful not to poke through the bottom. -
Pinch the walls:
Using your thumb on the inside and your fingers on the outside, gently pinch and turn the clay. Work your way around the pot, thinning the walls evenly until they are about a quarter-inch thick. -
Shape the pumpkin:
While pinching, encourage the clay to bulge outwards slightly in the middle to create that round, plump pumpkin shape, rather than a straight-sided cup. -
Thicken the rim:
Specifically leave the top rim just a little bit thicker than the walls. Gently flatten the very top edge with your finger to create a sturdy lip for the pot. -
Smooth the surface:
Dip your finger or a small sponge into a little water and smooth out any fingerprints or small cracks on the outside of the pot. I find a slightly damp sponge gives that perfect matte texture.
Crack Control
If you see tiny cracks forming while the clay dries, mix a tiny bit of fresh clay with water to make a paste (slip) and adhere it into the cracks with a brush.
Step 2: Sculpting the Details
-
Adding texture:
To mimic the skin of a real pumpkin, take an old toothbrush or a stiff bristled brush and gently tap it all over the exterior surface. This removes the artificial smoothness of the clay. -
Marking vertical ribs:
Using the side of a needle tool or a wooden modeling tool, press vertical indentations from the base to the rim. Curve them slightly to follow the round shape of the pot. -
Refine the ribs:
Soften the edges of these indented lines with your fingertip so they look like natural grooves rather than sharp cuts. -
Plan the face:
Use a toothpick to very lightly sketch the outline of the eyes, nose, and mouth on the front of the pot. This lets you adjust the expression before committing to cutting. -
Carve the eyes:
Using a small knife tool, carefully cut out the triangular eyes. Instead of cutting all the way through the clay wall, try carving partially deep to create a recessed relief look, or cut through completely for a traditional lantern style. -
Carve the nose:
Cut a small triangle for the nose right in the center of the face, keeping the edges clean and sharp. -
Sculpt the smile:
Carve a curved line for the mouth. Add small square notches along the line to represent the pumpkin teeth. -
Deepen the features:
Go back over your carved lines with a modeling tool to deepen them and clean up any little clay crumbs. Defining these shadows makes the face pop.
Step 3: Finishing Touches
-
Create a defined rim:
Use a modeling tool to press a groove just under the rim of the pot, creating a ‘lid’ line where the top of the pumpkin would have been cut off. -
Final smoothing:
Check the bottom of the pot to ensure it sits flat. If it wobbles, gently tap the pot against your work surface to flatten the base. -
Let it dry:
Allow the clay to dry completely according to the package instructions. Air-dry clay usually takes 24-48 hours depending on thickness. -
Optional shading:
Once dry, you can brush a very diluted brown acrylic paint into the grooves and wipe the surface with a cloth. This antiquing technique highlights the texture. -
Seal the pot:
Apply a coat of matte varnish to protect the clay, especially if you plan to put wrapped candies inside.
Glow Up
Before drying, punch a small hole in the bottom details. Once finished, place a battery-operated tea light underneath to make the face glow like a real lantern.
Fill your new pumpkin pot with festive candies and enjoy the autumn atmosphere


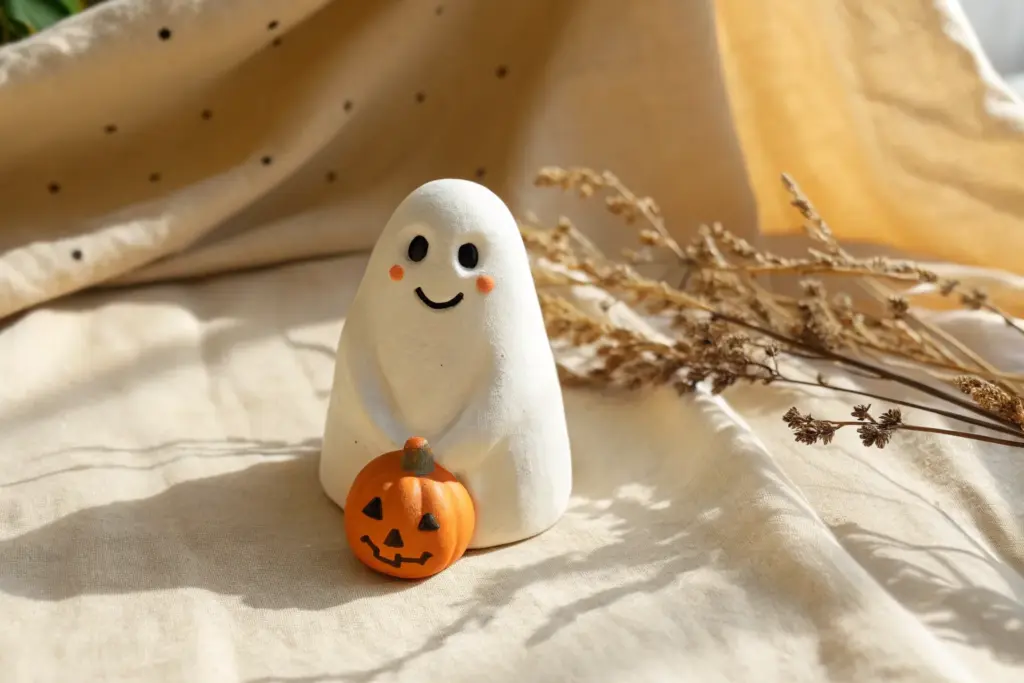
Cute Round Ghost Figurines
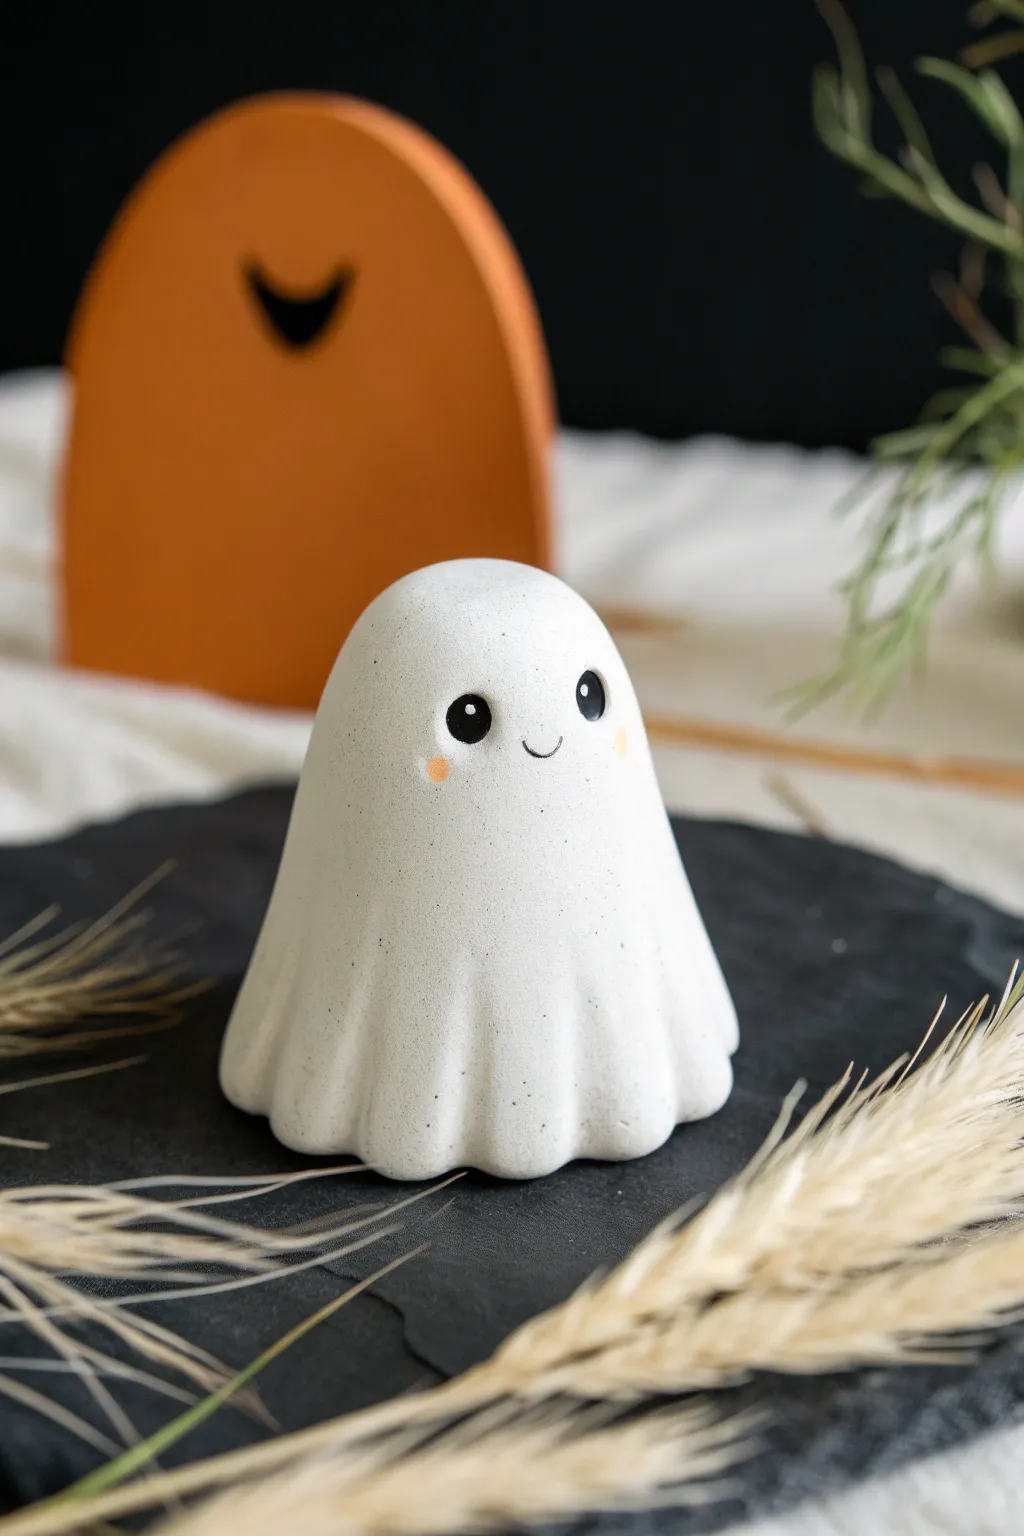
These adorable little specters have a gentle, organic shape that feels both modern and handmade. With their chubby bodies and speckled finish, they perfectly balance sweet and spooky for Halloween décor.
Step-by-Step Guide
Materials
- Air-dry white clay (or polymer clay)
- Small rolling pin
- Aluminum foil (for the core)
- Black acrylic paint
- Pink acrylic paint or blush
- Fine grit sandpaper
- Small fine-tipped paintbrush
- Dotting tool or toothpick
- Old toothbrush (for texture)
- Water in a small cup
- Matte sealant spray
Step 1: Shaping the Core
-
Crumple a base:
Start by taking a piece of aluminum foil and crumpling it into a compact, rounded cone shape. This will be the inside of your ghost, saving clay and making the figurine lighter. -
Smooth the foil:
Roll the foil shape against your work surface to ensure there are no sharp points sticking out that might poke through your clay later. -
Flatten the bottom:
Press the foil cone down firmly onto your table to create a totally flat base so your ghost will stand upright without wobbling.
Smoother Draping
If using air-dry clay, wipe the foil core with a slightly damp paper towel first. The moisture helps the clay stick to the foil rather than sliding off while you sculpt.
Step 2: Sculpting the Ghost
-
Condition the clay:
Knead a ball of white clay in your hands until it feels warm and pliable, which prevents cracking. -
Create a sheet:
Roll the clay out into a thick, even pancake, about a quarter-inch thick. You want it substantial enough to drape without tearing. -
Drape the clay:
Gently lay the clay sheet over your foil cone, smoothing it down the sides. I like to use a little water on my fingertips here to meld the seams together invisibly. -
Form the folds:
Using your thumb and forefinger, gently pinch the bottom edges of the clay into wavy ruffles. This mimics the look of a sheet dragging on the floor. -
Ensure stability:
Double-check the bottom is flat again by tapping the figure gently against the table. -
Smooth the surface:
Dip your finger in water and run it over the entire dome to remove fingerprints and bumps, aiming for a rounded, polished look. -
Dry completely:
Let the sculpture dry for at least 24-48 hours. It must be bone dry before you move to the finishing steps.
Glow Up
Make your ghost functional by sculpting the clay over an electric tea light instead of foil. Just ensure the clay dome is removable so you can switch the light on and off.
Step 3: Adding Texture and Face
-
Sand imperfections:
Once dry, use fine-grit sandpaper to gently buff away any rough spots or unevenness on the ghost’s head. -
Create the speckled look:
Here is the trick for that stone-like finish: dip an old toothbrush into diluted black paint. Run your thumb over the bristles to flick tiny specks of paint onto the white clay. -
Keep it subtle:
Apply the speckles sparingly; you want a textured stone effect, not a polka-dot pattern. -
Paint the eyes:
Using your smallest brush or a dotting tool, paint two solid black circles for eyes. Place them slightly wide apart for a cuter expression. -
Add the smile:
With a very fine brush or even a black pen, draw a tiny, optimistic curve right between the eyes. -
Add highlights:
Dip a toothpick in white paint and add a tiny white dot to the upper corner of each black eye to bring the character to life. -
Apply rosy cheeks:
Dab the tiniest amount of pink paint or actual makeup blush onto your finger and smudge it gently under the eyes. -
Seal the work:
Finish with a coat of matte sealant spray to protect the paint and give the ghost a unified, ceramic-like finish.
Now you have a charming little companion to haunt your shelves this season


Candy Corn Clay Characters

These adorable clay candy corn characters add a sweet touch to any Halloween display without the sugar rush. With their charming little smiles and soft, matte texture, they look almost like felted wool figures but are sculpted entirely from clay.
Step-by-Step Tutorial
Materials
- Air-dry clay or polymer clay (white, orange, yellow)
- Black acrylic paint or a fine-tip black marker
- Red acrylic paint or a fine-tip red marker
- Small dotting tool or toothpick
- Old toothbrush or stiff bristle brush
- Clear matte varnish (optional)
- Plastic knife or clay sculpting tool
Step 1: Sculpting the Base
-
Prepare the yellow base:
Start by pinching off a piece of yellow clay about the size of a large grape. Roll it into a smooth ball between your palms to remove any cracks. -
Form the bottom layer:
Gently flatten the yellow ball into a thick disk or a rounded square shape. This will be the sturdy bottom section of your candy corn that helps it stand upright. -
Prepare the orange middle:
Take a slightly smaller piece of orange clay and roll it into a ball. Make sure it’s smooth and pliable before moving to the next step. -
Stack and unnecessary blending:
Place the orange ball on top of the yellow base. Gently press them together so they adhere, but don’t squish them completely flat. You want distinct layers. -
Add the white tip:
Roll a small piece of white clay into a cone shape. Place the wider end onto the orange section to complete the classic candy corn pyramid structure. -
Shape the cone:
Using your fingers, gently mold the three stacked pieces into a unified cone shape. Smooth the seams lightly where the colors meet so they are connected but the color lines remain relatively straight. -
Create variation:
Don’t make them all identical. Try making some taller and narrower, and others shorter and squatter, just like real candy corn pieces found in a bag.
Step 2: Adding Texture and Details
-
Texturize the surface:
To achieve that soft, sugary look visible in the photo, take an old toothbrush or a stiff brush and gently tap it all over the surface of the clay. This stippling effect removes fingerprints and adds a lovely matte finish. -
Refine the shape:
Sometimes texturing can distort the shape, so give your candy corn a gentle squeeze to re-establish the rounded corners and flat bottom. -
Create the face placement:
Decide which side of the candy corn looks best to be the ‘front.’ The face usually looks best centered on the middle white or orange section depending on the height of your layers. -
Poke the eyes:
Use a small dotting tool or the blunt end of a toothpick to make two tiny indents where the eyes will go. This helps the paint sit neatly later. -
Dry the clay:
If using air-dry clay, set the figures aside on parchment paper for 24-48 hours. If using polymer clay, bake according to the manufacturer’s package instructions and let them cool completely.
Sugary Texture Hack
For a super realistic sugar coating, roll the finished wet clay shapes in extra-fine clear glitter or white crafting sand before you bake or let them dry.
Step 3: Painting the Personalities
-
Paint the eyes:
Dip a toothpick or fine brush into black acrylic paint. Carefully fill in the eye indents you made earlier. Two simple dots create the sweetest expression. -
Add a smile:
Using a very fine liner brush or a red thin-tip marker, draw a tiny ‘V’ or ‘U’ shape between the eyes for the mouth. Keep it small for maximum cuteness. -
Add rosy cheeks:
I find that adding cheeks really brings them to life. Dip a toothpick in red or pink paint and dab two tiny dots just outside the smile line. -
Create buttons (optional):
For extra detail like the figure on the left, roll tiny balls of yellow or orange clay and glue them down the front, or simply paint two small dots on the bottom colored section. -
Final matte coat:
To protect your work without making it shiny (which would ruin the sugary look), apply a thin coat of matte varnish once the paint is fully dry.
Level Up: Ghostly Friends
Make a few all-white figures in the same shape to create ‘ghost’ candy corn pals. Paint their eyes slightly wider apart for a spooky-cute variation.
Set out your cheerful little clay troupe on a wooden tray or shelf to welcome the season


Smiling Bat Wall or Window Clings
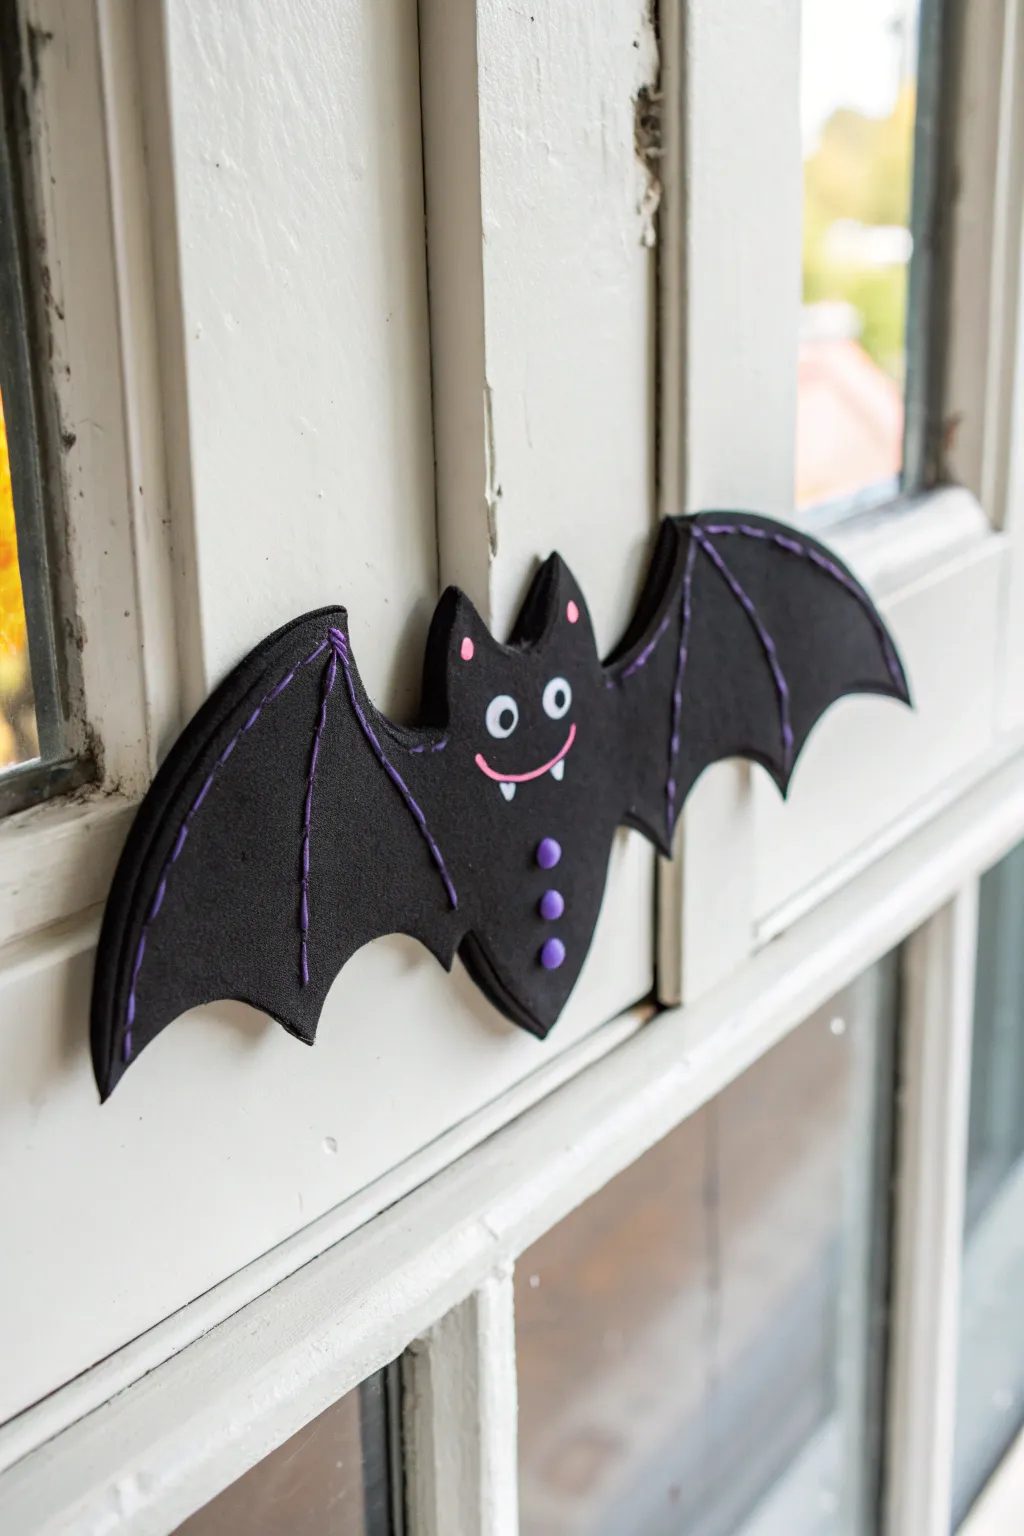
This friendly little bat adds a whimsical touch to any window or door frame without being too spooky for the little ones. Made from layers of craft foam and accented with simple stitching, it creates a charming 3D effect that looks great perched anywhere in the house.
Step-by-Step Guide
Materials
- Black craft foam sheets (2mm thick)
- Purple embroidery floss
- Embroidery needle
- White puff paint (or googly eyes)
- Pink craft paint or paint marker
- Purple puffy paint or small purple buttons
- Scissors
- Pencil or white chalk pencil
- Wait or thick cardstock (for template)
- Double-sided tape or adhesive putty
Step 1: Shaping the Bat
-
Create a template:
Sketch a bat shape onto scrap paper or cardstock. The design features a central body with a pointed bottom, rounded ears on top, and two widespread wings with scalloped bottom edges. -
Trace the pattern:
Place your template onto the black craft foam. Using a pencil or a white chalk pencil, trace the outline carefully. You will need to cut two identical shapes to create the sturdy, layered look seen in the photo. -
Cut the foam:
Use sharp scissors to cut out both bat shapes. Try to make long, continuous cuts along the curved wing edges to avoid jagged lines. -
Layer up:
Place one foam cutout directly on top of the other. The double layer gives the bat more stability so the wings don’t flop over when mounted.
Needles Getting Stuck?
Craft foam creates friction against metal. If the needle is hard to pull through, run it through some beeswax or dry soap to lubricate it before stitching.
Step 2: Stitching Details
-
Prepare the thread:
Cut a length of bright purple embroidery floss. Thread your needle and knot the end. I usually use all six strands so the stitching stands out boldly against the black foam. -
Stitch the perimeter:
Starting near the body, use a simple running stitch along the top edge of the wings. You want to stitch through both layers of foam to hold them together. -
Add wing veins:
Stitch vertical lines down the wings to create the bat’s ‘fingers’ or veins. Start at the top edge and stitch down toward the points of the scalloped bottom. -
Secure the thread:
Once your wing details are stitched, tie off the thread on the back side of the bat where it won’t be seen.
Make It 3D
Before stitching the two layers shut, stuff a tiny amount of cotton batting into the body section to give the bat a plump, dimensional belly.
Step 3: Face and Finishing Touches
-
Add the eyes:
Using white puff paint, squeeze two small circles onto the face for eyes. Add a tiny black dot of paint or marker in the center of each for pupils. -
Paint the smile:
Draw a wide curved smile using a pink paint marker or thin brush with acrylic paint. Include two tiny white triangles hanging down for the friendly fangs. -
Detail the ears:
Add two small pink dots or ovals inside the ear shapes to give them some dimension. -
Create buttons:
Apply three drops of purple puffy paint down the center of the bat’s chest to mimic buttons. Alternatively, you can glue on actual tiny purple buttons. -
Let it dry completely:
Allow the paint to dry for several hours, especially if you used puffy paint, which takes longer to set than regular acrylics. -
Mount the bat:
Apply a small piece of double-sided tape or adhesive mounting putty to the back of the foam body. -
Find a perch:
Press the bat firmly onto a window frame, door jamb, or corner of a mirror to let him hang out for the season.
Your charming stitched bat is now ready to greet visitors with a smile

The Complete Guide to Pottery Troubleshooting
Uncover the most common ceramic mistakes—from cracking clay to failed glazes—and learn how to fix them fast.
Friendly Frankenstein Mini Heads
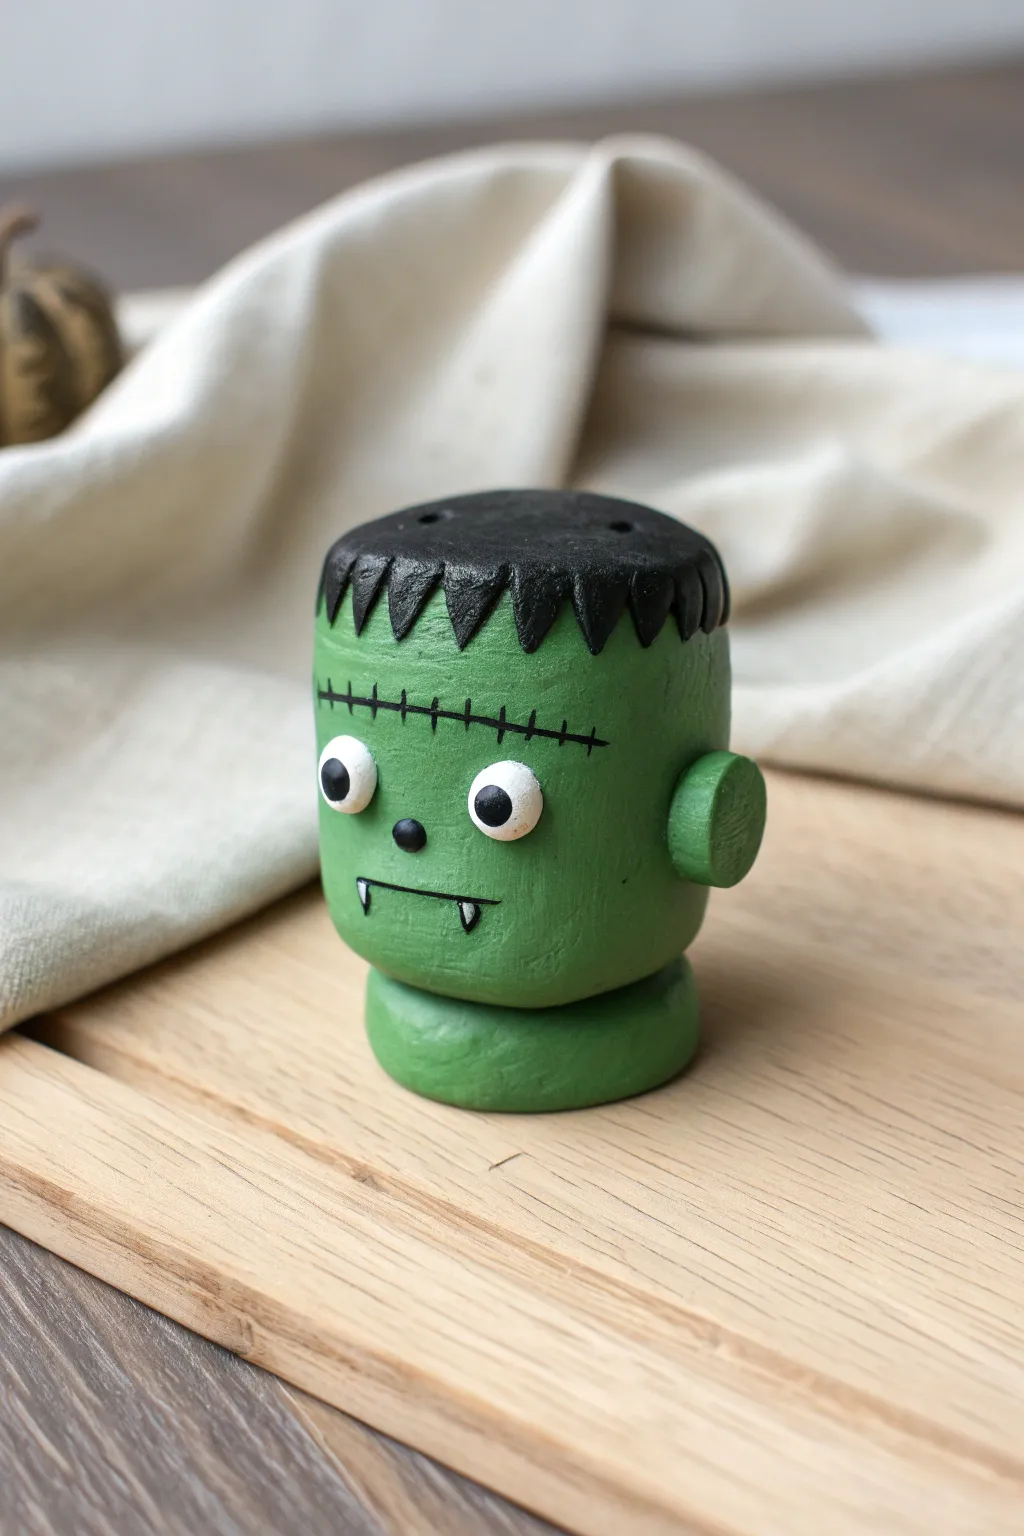
Sculpt a not-so-spooky monster mash friend with this adorable Frankenstein head project. With his chunky green face, zig-zag hair, and signature bolts, this little character adds a perfect pop of friendly fright to your Halloween decor.
How-To Guide
Materials
- Air-dry clay (white or terracotta)
- Acrylic paints (bright green, black, white)
- Paintbrushes (medium flat brush, fine detail brush)
- Small disk of wood or extra clay (for the base)
- Water cup
- Sculpting tools or a butter knife
- Toothpick
- Clear sealant (optional)
Step 1: Sculpting the Head
-
Form the main cylinder:
Start with a distinctive chunk of air-dry clay. Roll it between your palms to smooth it out, then gently flatten the sides and top to create a cylinder shape, roughly the size of a large marshmallow or a small juice glass. -
Create the base:
Take a smaller amount of clay and flatten it into a thick pancake or disk shape, slightly wider than the cylinder you just made. This will act as the neck or stand. -
Attach the head:
Place the cylinder onto the disk base. To ensure they stick, score (scratch) the bottom of the cylinder and the top of the base with a toothpick, add a drop of water, and press them firmly together. -
Smooth the seams:
Use your finger or a sculpting tool to gently smooth the connection point slightly, though leaving it distinct creates a nice ‘neck’ separation. -
Add the bolts:
Roll two very small balls of clay and flatten them into tiny disks. Attach one to each side of the cylinder, roughly where ears would go, using the score-and-water method to secure these neck bolts. -
Refine the shape:
Check your cylinder to make sure the top is relatively flat for the hair we will paint later. Tap the head gently on your work surface to ensure the bottom is perfectly flat for standing. -
Dry completely:
Set your sculpture aside in a safe, dry place. Depending on the thickness and brand of your clay, this usually takes 24 to 48 hours. The clay should be hard and room temperature to the touch when ready.
Step 2: Painting the Monster
-
Apply the base coat:
Load a medium flat brush with bright green acrylic paint. Cover the entire head, neck bolts, and base in an even coat. You might need two layers to get that solid, monster-skin coverage. -
Map out the hair:
Once the green is dry to the touch, visualize where the hairline will go. I like to lightly sketch a zig-zag line around the top rim with a pencil to guide my painting. -
Paint the hair:
Using black acrylic paint, fill in the entire top of the cylinder. Carefully paint triangles pointing downwards along the forehead to create his signature jagged bangs. -
Add the eyes:
Dip the handle end of a paintbrush into white paint to stamp two large, round circles for the eyes. Let these white circles dry completely before moving on. -
Detail the pupils:
using a smaller tool or the very tip of a fine brush, add small black dots inside the white circles. Looking slightly off-center makes him look goofier and friendlier. -
Stitch it up:
With your finest detail brush and black paint, draw a thin horizontal line across the forehead. paint small vertical hash marks across it to create the classic scar look. -
Draw the mouth:
Paint a simple horizontal line for the mouth, perhaps slightly crooked. Add two tiny white triangles hanging down from the line for his little fangs. -
Finish with details:
Add a small black dot for a nose between the eyes. Finally, outline the tiny side bolts with a touch of green or highlight them if you wish, though keeping them green blends them nicely.
Smooth Operator
Before the clay dries, dip your finger in a tiny bit of water and rub it over the clay surface. This erases fingerprints and creates a professional, smooth finish for painting.
Metallic Magic
Instead of painting the neck bolts green, use metallic silver or grey paint. It makes the ‘metal’ parts pop and adds a fun texture contrast to the green skin.
Now you have a charmingly chunky monster ready to greet your Halloween guests
Black Cat Figurines With Big Eyes
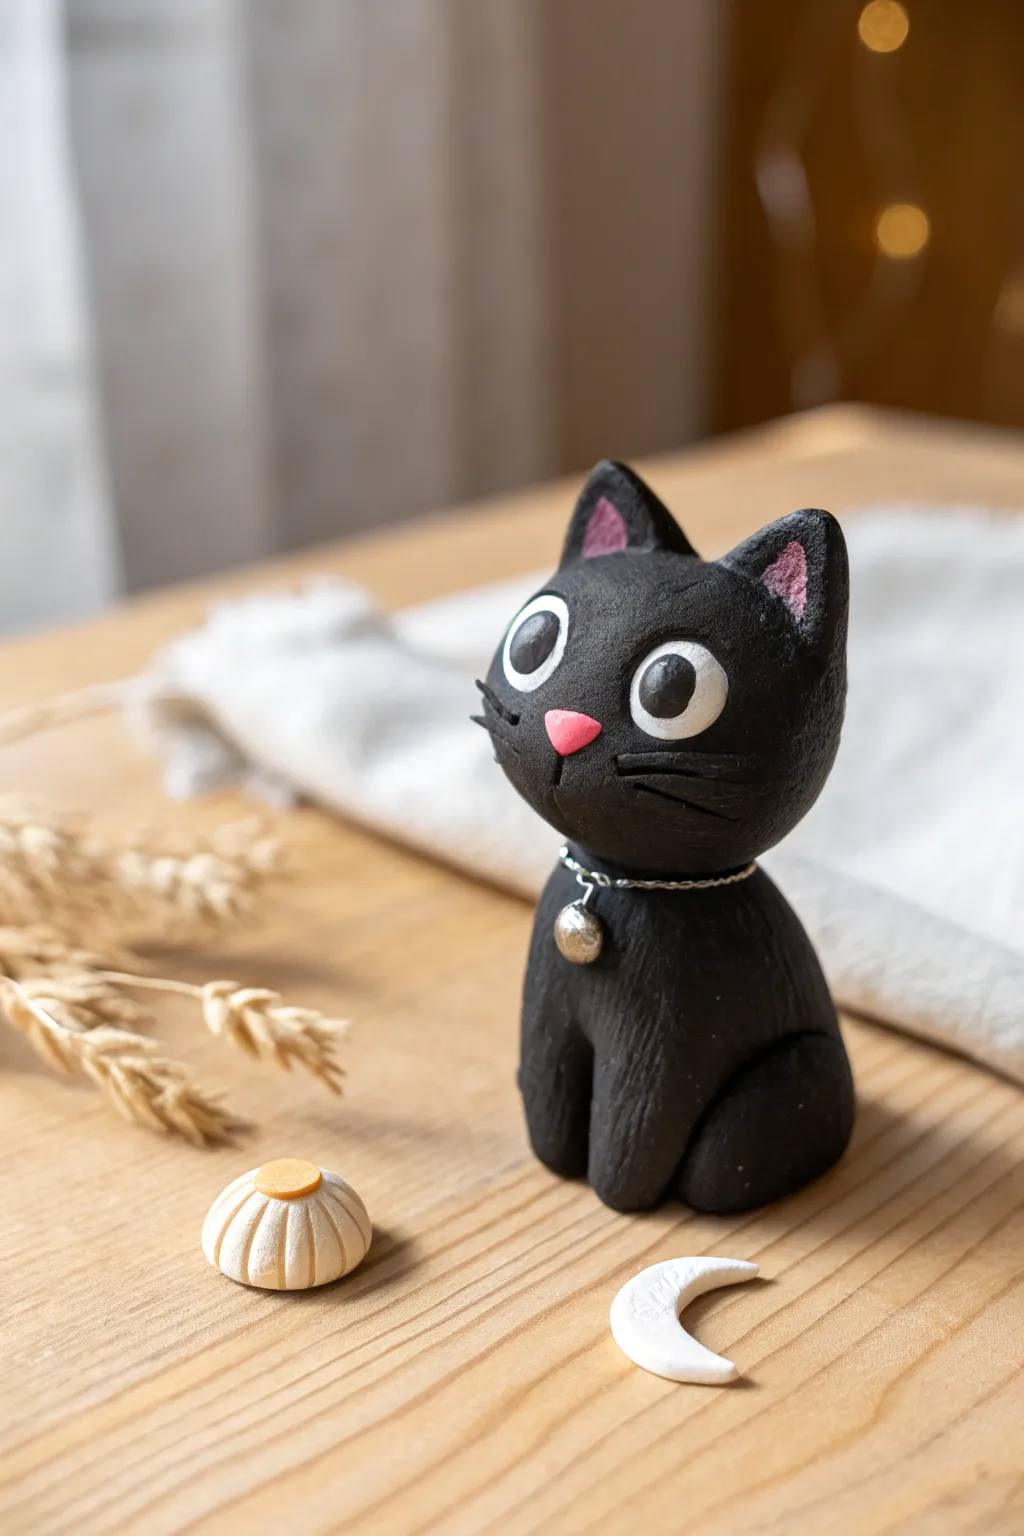
This adorable black cat figurine brings a whimsical touch to your Halloween decor with its oversized eyes and curious expression. It’s a simple sculpting project that creates a charming companion for your desk or mantelpiece.
Step-by-Step Guide
Materials
- Black polymer clay or air-dry clay
- White clay
- Pink clay
- Aluminum foil (for the core)
- Black acrylic paint (if using air-dry clay)
- Small eye hook or silver wire
- Tiny silver bell
- Sculpting tools (needle tool, ball stylus)
- Gloss varnish or glaze (optional)
Step 1: Shaping the Base
-
Prepare the core:
Start by crumpling a small piece of aluminum foil into a tight egg shape. This saves clay and helps the figurine cure evenly without cracking. -
Form the body:
Condition a chunk of black clay until it is soft and pliable. Flatten it into a pancake and wrap it completely around your foil core, rolling it in your hands until it forms a smooth, seamless pear shape. -
Create the head:
Roll a slightly smaller ball of black clay for the head. It should be roughly spherical but slightly flattened at the front for the face. -
Attach head to body:
Press the head firmly onto the narrower top of the body. If using polymer clay, blending the clay at the neck seam slightly with a tool can strengthen the bond; for air-dry clay, use a dab of water or slip.
Step 2: Adding Features
-
Sculpt the ears:
Pinch off two small triangles of black clay. Gently press your thumb or a ball tool into the center of each to create a concave inner ear shape. -
Add ear details:
Take tiny pinched pieces of pink clay and press them into the hollows of your black ears. Attach the ears to the top of the head, smoothing the seams at the back so they stand up pertly. -
Make the eyes pop:
Roll two medium-sized balls of white clay and flatten them into discs. Press these onto the upper half of the face, spacing them somewhat widely for that curious look. -
Add pupils:
Roll tiny balls of black clay, flatten them, and place them onto the white discs. Position them looking slightly sideways or up to give the cat a distinct personality. -
The pink nose:
Form a very small triangle of pink clay. Press it right between and slightly below the eyes. -
Whiskers and mouth:
Using a needle tool or a dull knife blade, gently impress three horizontal lines on each cheek for whiskers. Draw a small vertical line coming down from the nose for the mouth.
Clean Clay Tip
Black clay shows every speck of dust! Keep wet wipes nearby and clean your hands thoroughly before touching the white or pink clay to keep colors crisp.
Step 3: Limbs and Accessories
-
Front legs:
Roll two small logs of black clay. Attach them vertically to the front of the body so they look like the cat is sitting politely. -
Hind legs:
Create two tear-drop shapes and flatten them slightly. Press these onto the sides of the body near the bottom to represent the folded hind legs. -
Texture the fur:
I like to use a stiff brush or a needle tool to scratch very subtle, short lines into the black clay body, mimicking the texture of fur. -
Collar detail:
Roll a very thin snake of silver polymer clay (or use actual thin wire later) and wrap it around the neck. -
The bell:
Form a tiny ball of silver or gold clay, create a small indentation, and hang it from the collar. Alternatively, embed a real tiny jump ring into the clay now and attach a real metal bell after baking.
Witchy Vibes
Make a tiny witch hat from purple clay to perch on one ear, or sculpt a miniature pumpkin to place next to your cat’s paws for extra Halloween flair.
Step 4: Finishing Up
-
Double check:
Look over your kitty from all angles. Smooth out any accidental fingerprints with a drop of baby oil on your finger (for polymer clay) or water (for air-dry clay). -
Bake or dry:
Follow the instructions on your specific package of clay. If baking polymer clay, create a foil ‘nest’ so the round bottom doesn’t get a flat spot in the oven. -
Varnish:
Once fully cured and cooled, apply a gloss varnish specifically to the eyes and nose to make them look wet and shiny.
Place your finished black cat near a window or pumpkin display to watch over your Halloween festivities


What Really Happens Inside the Kiln
Learn how time and temperature work together inside the kiln to transform clay into durable ceramic.
Pumpkin Faces on Flat Clay Magnets
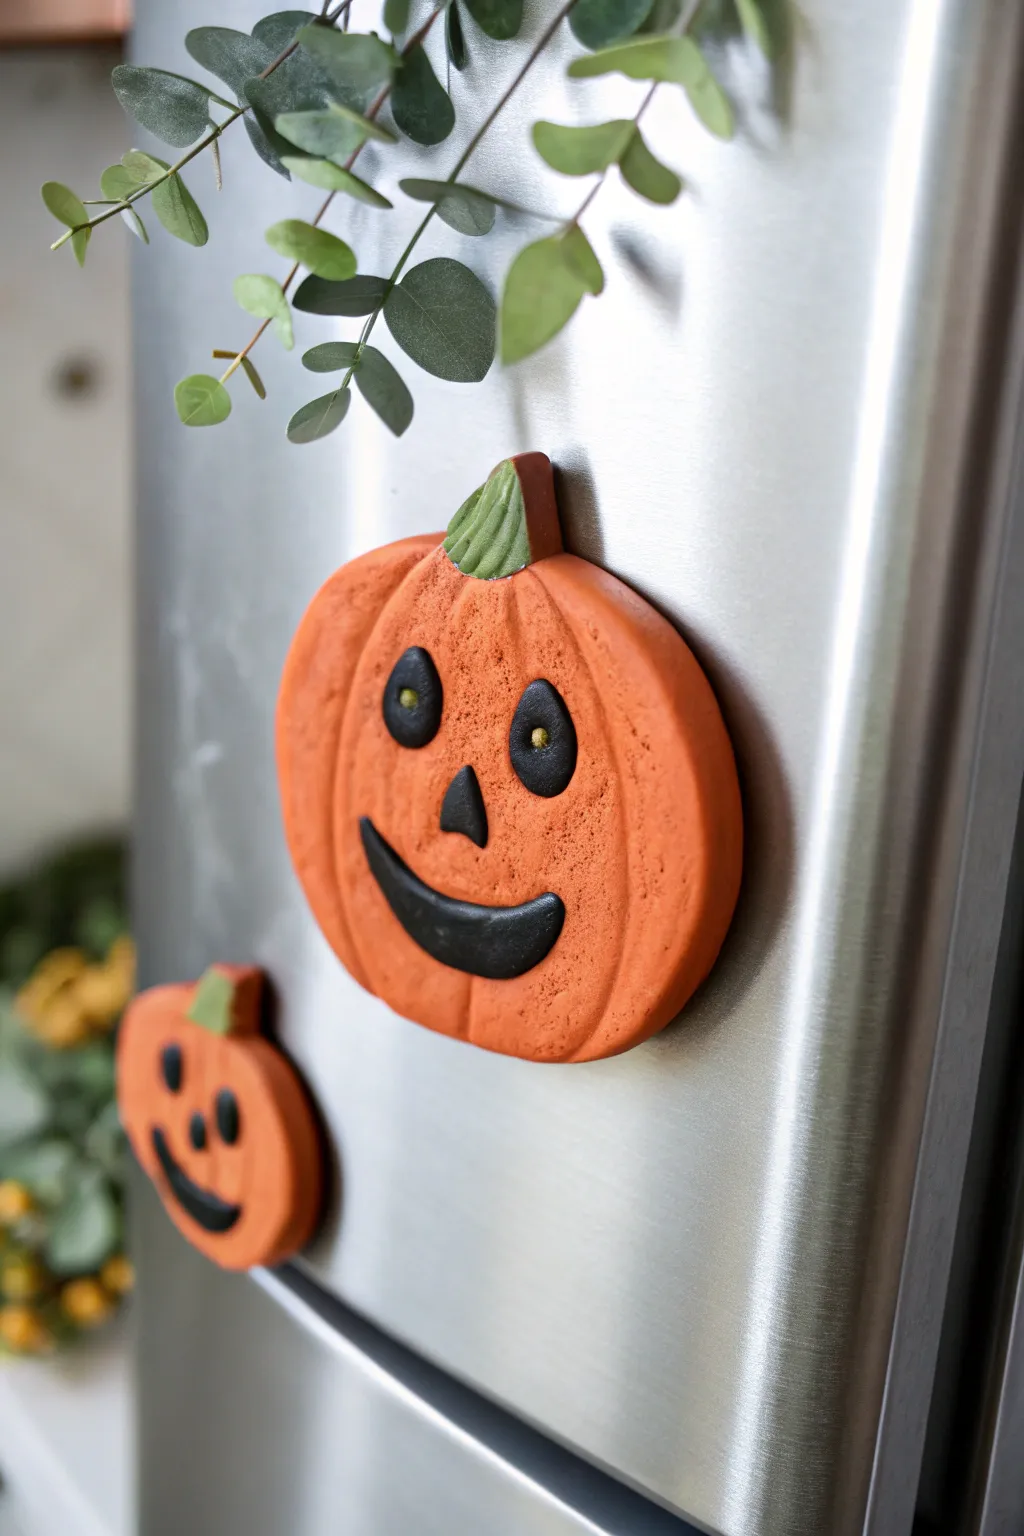
Brighten up your kitchen for spooky season with these cheerful, textured clay pumpkin magnets. Their rustic, sandy finish and friendly faces make them a perfect non-scary Halloween craft for kids.
Detailed Instructions
Materials
- Air-dry clay (white or orange)
- Acrylic paints (bright orange, black, green or sage)
- Old toothbrush or stiff bristle brush
- Rolling pin
- Circle cookie cutter or glass cup
- Butter knife or clay tools
- Strong craft glue or E6000
- Round ceramic magnets
- Small dab of yellow paint (optional for eye highlights)
- Parchment paper
Step 1: Shaping the Base
-
Prepare the clay:
Start by taking a golf-ball-sized chunk of clay. Knead it in your hands until it’s soft and pliable, which helps prevent cracking later on. -
Roll it out:
Place the clay on a sheet of parchment paper. Use a rolling pin to flatten it into an even slab, aiming for a thickness of about 1/4 inch. -
Cut the shape:
Use a round cookie cutter or the rim of a glass to punch out a circle. If you want a more organic pumpkin shape, gently squish the circle slightly from the top and bottom to make it oval. -
Texture the surface:
This is the secret to that realistic look: take an old toothbrush and gently tap the bristles all over the surface of your clay circle. This creates a wonderful pitted, skin-like texture. -
Score the lines:
Use the back of a butter knife or a clay tool to press vertical curved lines into the pumpkin. Start from the top center and curve down to the bottom center to create the segments.
Preventing Warping
As flat clay dries, edges can curl upward. Flip your pumpkin over gently halfway through the drying process to ensure both sides dry evenly and flat.
Step 2: Adding the Features
-
Make the stem:
Roll a small pinch of clay into a thick rectangle. Press it onto the top of your pumpkin, smoothing the join at the back so it sticks firmly. Add vertical texture lines to the stem with your knife. -
Create the eyes:
Roll two small pea-sized balls of clay. Flatten them slightly and press them onto the pumpkin face. -
Shape the nose:
Form a tiny triangle out of clay. Press this into the center of the face, just below the eyes. -
Add the smile:
Roll a thin snake of clay, gently taper the ends, and curve it into a smile. Press it onto the pumpkin. I like to flatten it a bit with my finger so it looks integrated rather than just sitting on top. -
Eye details:
Use a small tool or toothpick to make a tiny indentation in the center of each eye pupil for extra dimension. -
Let it dry:
Leave your pumpkin on the parchment paper to dry completely. Depending on humidity and thickness, this usually takes 24 to 48 hours.
Make it Spooky
Instead of friendly smiles, try making angular, scary triangle eyes and a jagged zigzag mouth to create a more traditional Jack-o’-Lantern look.
Step 3: Painting and Assembly
-
Base coat:
Once hardened, paint the main pumpkin body with a bright orange acrylic paint. Use a stiff brush to work the paint into all those toothbrush textures. -
Paint the stem:
Carefully paint the stem green. A muted sage green gives a nice natural look compared to a bright neon green. -
highlight the face:
Use a smaller detail brush to paint the raised eyes, nose, and mouth jet black. Take your time to get crisp edges. -
Add the sparkle:
Dip the very tip of a toothpick into yellow or white paint and dot the center of the eyes (in that little indentation you made) to bring the character to life. -
Attach the magnet:
Flip the dry, painted pumpkin over. Apply a strong craft glue to the back of a ceramic magnet and press it firmly into the center of the pumpkin’s back. -
Final dry:
Let the glue cure for several hours before testing it on your fridge.
Now your fridge is ready to greet the season with these adorable handmade faces
Witch Hat Charms and Ornaments
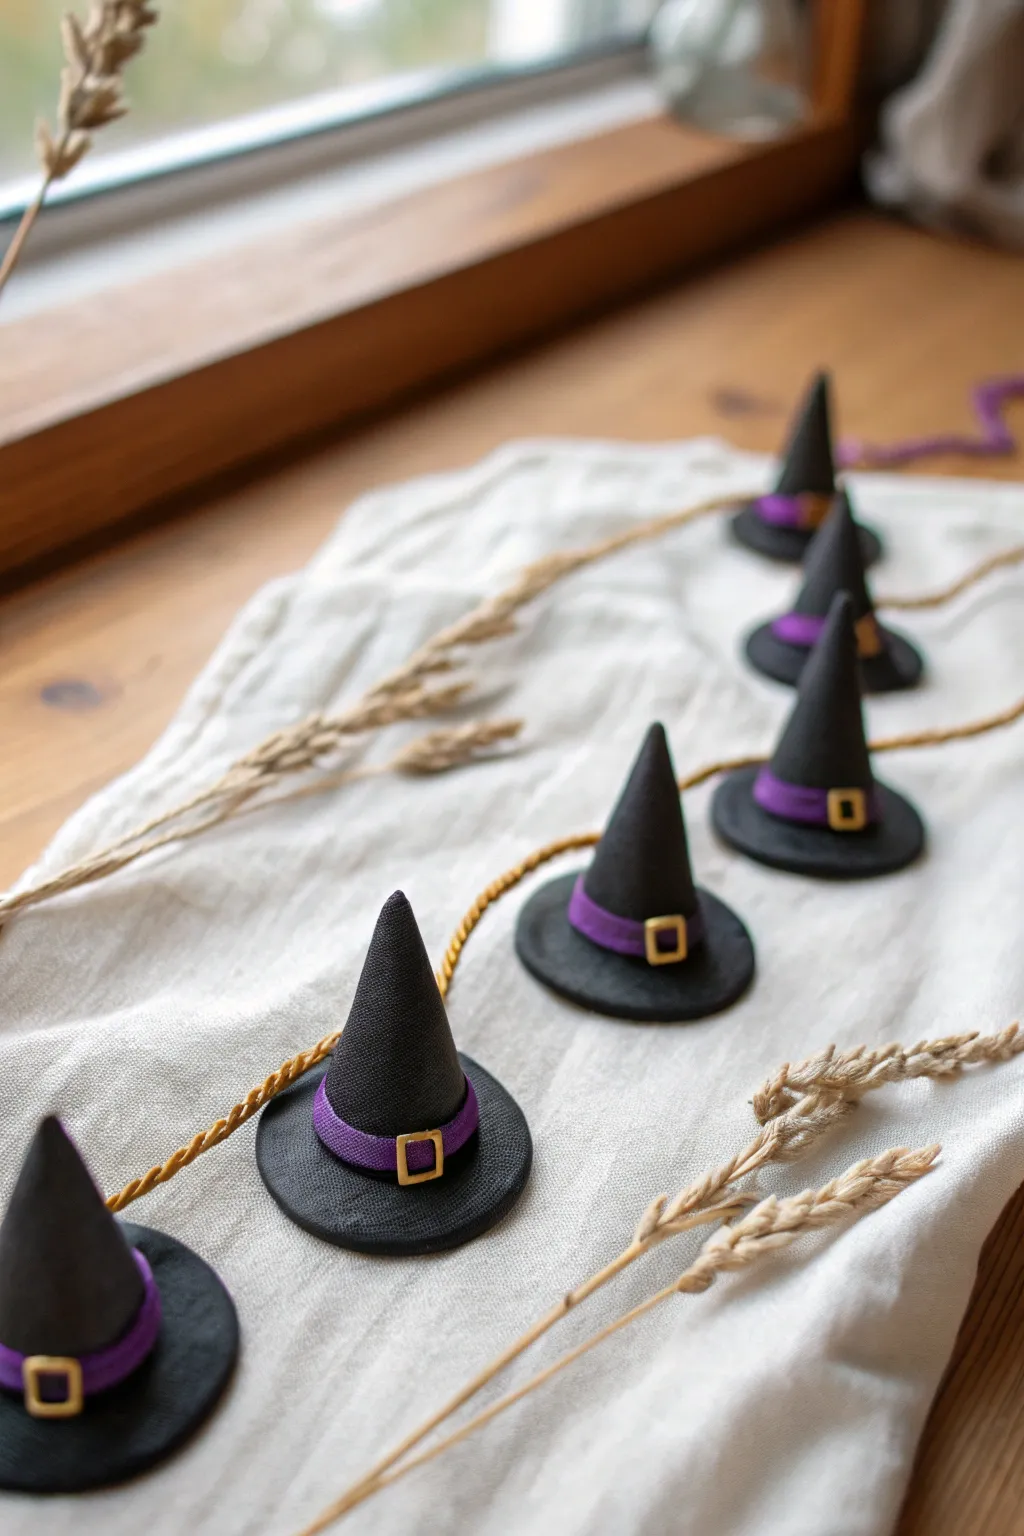
These miniature witch hats are perfect for adding a subtle spooky touch to your Halloween decor. Crafted from polymer clay with charming details like purple bands and tiny gold buckles, they’re surprisingly simple to make and look wonderful strung on twine.
Step-by-Step Guide
Materials
- Black polymer clay
- Purple polymer clay
- Gold polymer clay (or gold paint)
- Clay rolling pin or smooth jar
- Circle cutter (approx. 1.5 inches)
- Craft knife or clay blade
- Needle tool or toothpick
- Gold jute twine or string
- Super glue (optional)
Step 1: Sculpting the Base
-
Condition the clay:
Start by kneading your black polymer clay until it is soft and pliable. This conditioning step is crucial to prevent cracks later on. -
Roll out the brim:
Roll a portion of the black clay into a flat sheet, about 1/8 inch thick. Use your circle cutter to punch out five or six circles to serve as the hat brims. -
Form the cones:
Take a walnut-sized ball of black clay and roll it into a smooth ball. Slowly apply pressure to one side while rolling to taper it into a cone shape. -
Refine the shape:
Adjust the height of your cone to match the width of your brims. I like to keep the tip slightly rounded rather than super sharp for a friendlier cartoonish look. -
Attach cone to brim:
Place the cone in the center of a black circle. Press down gently but firmly to bond the two pieces of clay together. You can use a blending tool to smooth the seam on the inside if needed.
Step 2: Adding Details
-
Create the hat band:
Roll out a very thin snake or flat strip of purple polymer clay. Flatten it gently with your rolling pin so it looks like a ribbon. -
Measure and cut:
Wrap the purple strip around the base of the cone to measure the length needed. Cut the strip to size with your craft knife. -
Secure the band:
Wrap the purple band around the base of the cone, gently pressing it onto the black clay so it sticks. Make sure the seam is at the back. -
Make the buckle:
Roll a tiny, thin snake of gold clay. Carefully form it into a small square shape on your work surface. -
Attach the buckle:
Lift the gold square with the tip of your knife and place it onto the front center of the purple band. Press lightly to secure it. -
Texture the hat:
For a fabric-like appearance, gently tap the surface of the black clay with a toothbrush or a piece of sandpaper. This removes fingerprints and adds a matte finish. -
Add holes for stringing:
Using a needle tool, poke a horizontal hole through the top third of the cone. Wiggle the tool slightly to ensure the hole is wide enough for your twine.
Clean Clay Tip
Black clay shows lint easily! Keep baby wipes nearby to clean your hands before touching the purple or gold clay to avoid devastating smudges.
Step 3: Baking and Assembly
-
Bake the clay:
Arrange your hats on a baking sheet lined with parchment paper. Bake according to your clay manufacturer’s instructions (usually around 275°F for 15-30 minutes). -
Let them cool:
Allow the hats to cool completely on the baking tray. Moving them while hot can cause warping or breakage. -
Prepare the twine:
Cut a length of gold jute twine or string, measuring about 3 feet long or however long you need for your display area. -
String the hats:
Ideally, thread the twine through the holes you made. If you forgot holes or prefer them to sit flat, you can glue the twine to the back of each hat instead. -
Secure vertically:
If threading, tie a small knot on either side of the hat inside the hole, or add a dab of super glue where the string meets the clay to keep the hats from sliding around.
Make them Sparkle
Before baking, brush a tiny amount of mica powder over the purple bands or the brims to give the hats a magical, shimmery finish.
Hang your bewitching garland in a window or across a mantle to enjoy your handiwork all season long

TRACK YOUR CERAMIC JOURNEY
Capture glaze tests, firing details, and creative progress—all in one simple printable. Make your projects easier to repeat and improve.
Googly-Eyed Clay Eyeballs

These simple, eerie eyeballs are the perfect mix of creepy and cute for a Halloween bowl display. Made from smooth white clay with vibrantly painted irises, they stare back at you from every angle.
Step-by-Step Tutorial
Materials
- White polymer clay or air-dry clay
- Acrylic paints (black, orange, turquoise, purple, maroon, yellow)
- Fine-point paintbrush
- Small dotting tool or toothpick
- Gloss varnish or clear nail polish
- Parchment paper or baking sheet (if using polymer clay)
- Small bowl for water (for smoothing)
Step 1: Shaping the Eyes
-
Condition the Clay:
Start by taking a chunk of your white clay and kneading it in your hands. You want it to be warm, pliable, and free of cracks before you start rolling. -
Portion the Pieces:
Pinch off small pieces of clay, roughly the size of a walnut or a large bouncy ball. Try to keep them relatively uniform in size for a cohesive look in the bowl. -
Roll into Spheres:
Place a piece of clay between your palms and roll it in a circular motion until you form a smooth, round ball. If you see creases, keep rolling gently until they vanish. -
Smooth Imperfections:
Set the ball down on your work surface. If you notice any stubborn fingerprints or cracks, dip your finger in a tiny bit of water and gently rub the surface until it’s perfectly smooth. -
Check the Shape:
Inspect each ball to ensure it hasn’t flattened on one side. Give them a quick re-roll if needed so they stay nice and round. -
Dry or Bake:
If using air-dry clay, leave the balls on a piece of parchment paper to dry for 24-48 hours, turning them occasionally. For polymer clay, bake according to the package instructions and let them cool completely.
Flat Spots?
If your clay balls flatten on the bottom while drying, place them on a soft bed of cornstarch or within a curved spoon to maintain their round shape.
Step 2: Painting the Irises
-
Choose Your Palette:
Squeeze out small dabs of your iris colors—orange, turquoise, purple, and maroon work well for a spooky variety. -
Paint the Circle:
Using a fine-point brush, paint a solid circle of color on the ‘front’ of each white sphere. It doesn’t need to be mathematically perfect; a little wobble adds character. -
Add Depth (Optional):
While the paint is still wet, I sometimes mix in a tiny streak of a lighter or darker shade near the edge of the iris to give it a more realistic, dimensional look. -
Let the Iris Dry:
Allow the colored circles to dry completely before moving on. This prevents the pupil color from bleeding into the iris. -
Paint the Pupil:
Dip a dotting tool or the handle end of a paintbrush into black acrylic paint. Press it gently into the center of your colored iris to create a perfect black dot. -
Adjust Pupil Size:
For a staring, intense look, make the pupil small. For a cartoonier look, you can make the pupil larger by swirling the dotting tool slightly.
Step 3: Finishing Touches
-
Dry Completely:
Make sure all the paint is bone dry to the touch so you don’t smudge your hard work during the final step. -
Apply Gloss:
Coat specifically the painted iris and pupil area with a gloss varnish or clear nail polish. This mimics the wet, shiny look of a real eye. -
Optional Full Gloss:
If you want the entire eyeball to look slimy and wet, you can varnish the whole white sphere, though just glossing the colored part creates a nice contrast. -
Arrange and Display:
Once the varnish is cured, pile your eyeballs into a ceramic bowl to surprise your guests.
Make Them Bloodshot
Use a very thin brush or a red fine-tip marker to draw tiny, squiggly red veins radiating from the iris onto the white part of the eye.
Place your bowl of staring eyes on a hallway table or kitchen counter for a subtle, watchful decoration
Pumpkin Patch Coil Vines and Leaves
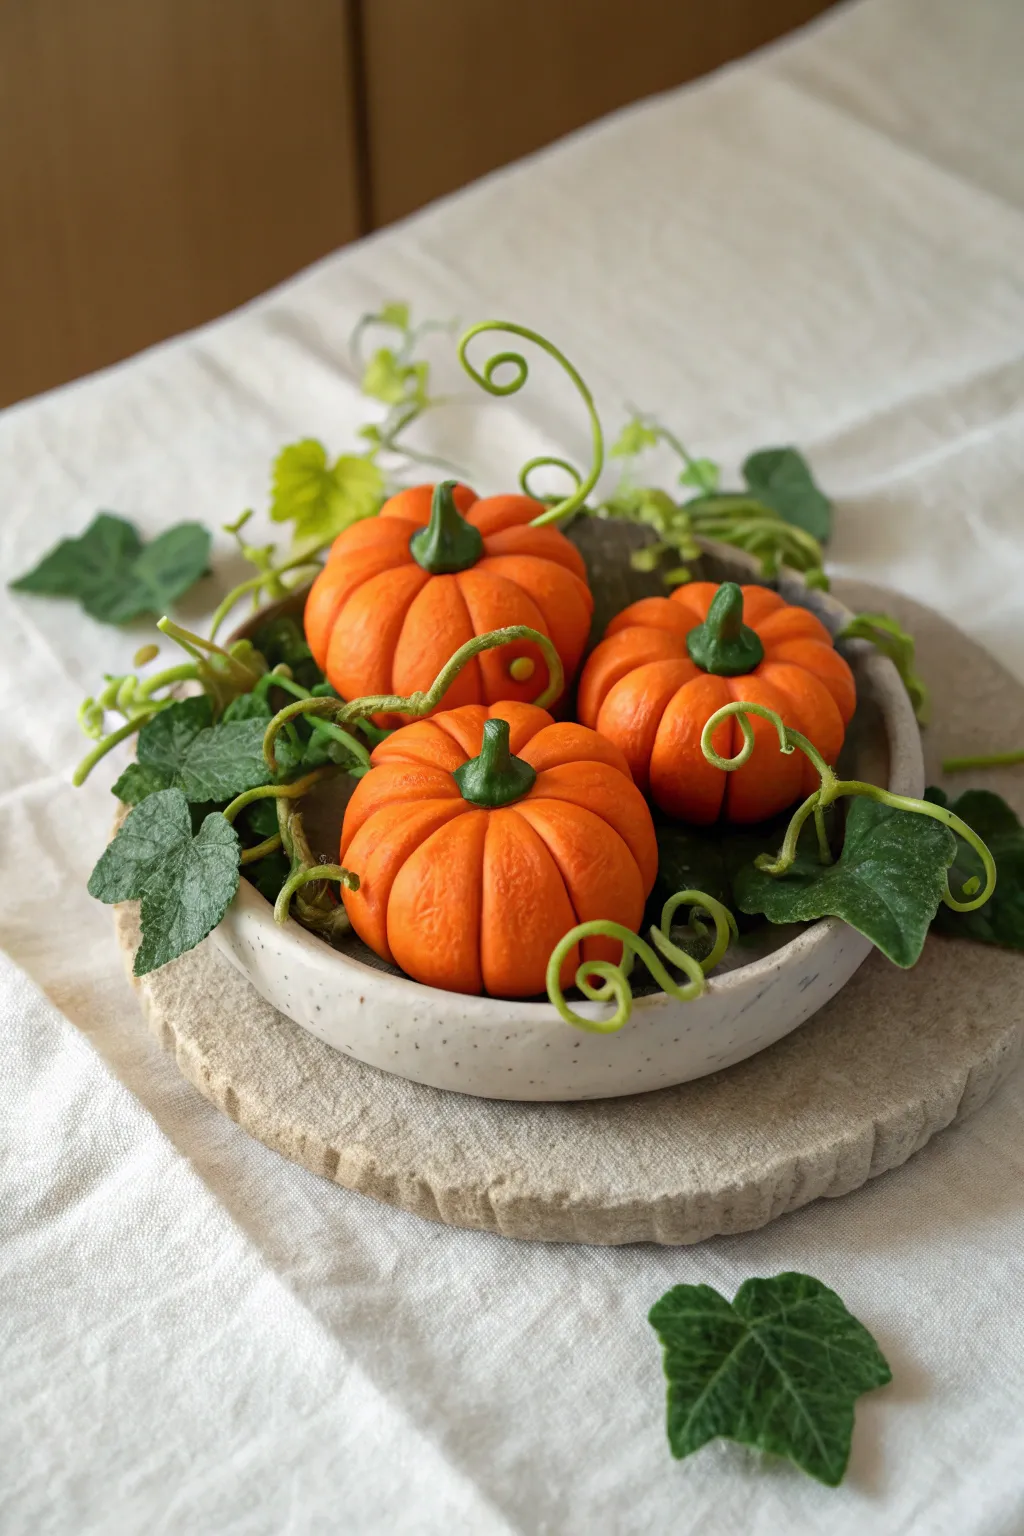
Create a charming, everlasting autumn centerpiece with these realistic polymer clay pumpkins nestled among spiraling green vines. This project focuses on texture and organic shapes to bring a small, festive pumpkin patch to life right on your table.
Detailed Instructions
Materials
- Orange polymer clay (pumpkin shade)
- Green polymer clay (two shades: deep green for stems, lighter olive green for vines/leaves)
- Sculpting tools (ball styluses, needle tool, clay knife)
- Texture sponge or stiff bristle brush
- Soft pastel chalks (orange, brown, yellow) for shading
- Small paintbrush
- Thin wire (24 or 26 gauge) for vine structure
- Wire cutters
- Liquid polymer clay (optional adhesive)
- Matte varnish
- Small ceramic dish or coaster for display
Step 1: Sculpting the Pumpkins
-
Portion the clay:
Start by conditioning your orange clay until it is soft and pliable. Divide it into three equal portions and roll each into a smooth ball about the size of a walnut. -
Flatten slightly:
Gently press the top and bottom of each ball against your work surface to create a slightly squat, flattened pumpkin shape rather than a perfect sphere. -
Mark the segments:
Using the side of a needle tool or a dull knife, press vertical lines from the top center down to the bottom center. Create 6-8 lines around the circumference to define the pumpkin’s ribs. -
Deepen the grooves:
Use a medium-sized ball tool or your finger to gently smooth the areas between the lines, making the segments poof out slightly for a plump look. -
Create the indent:
Press a small ball tool into the very top center of each pumpkin to create a divot where the stem will eventually sit. -
Texturize the skin:
For a realistic finish, I like to gently tap the surface of the clay with a texture sponge or an old toothbrush. This removes fingerprints and mimics real pumpkin skin. -
Add shading:
Shave a little brown and dark orange pastel chalk into a powder. With a dry brush, dust this powder into the deep grooves and the top indentation to add depth and realism.
Step 2: Adding Greenery and Details
-
Form the stems:
Take a small amount of deep green clay and roll it into a thick, short log causing it to taper slightly at the top. Press this firmly into the indentation on top of each pumpkin. -
Stem detailing:
Use a needle tool or craft knife to scratch vertical ridges into the green stem, blending the base of the stem into the orange clay for a seamless connection. -
Prepare the vines:
Roll out very thin snakes of the lighter olive green clay. Cut short lengths of thin wire and insert them inside these clay snakes if you want them to hold rigid spiral shapes. -
Curl the vines:
Wrap the clay-covered wire (or just the clay snakes) around a paintbrush handle or toothpick to create tight, springy corkscrew curls. Slide them off carefully to keep the shape. -
Make the leaves:
Flatten small balls of olive green clay into thin sheets. Use a craft knife to cut out basic ivy or pumpkin leaf shapes—think of a messy star or a three-pointed web. -
Texture the leaves:
Press a real leaf or a texture mat onto your clay leaves, or draw delicate veins using a sharp needle tool. -
Baking prep:
Arrange your three pumpkins on a baking tile. You can bake the vines and leaves separately, or drape them over the pumpkins now if you want them permanently attached. -
Bake the clay:
Bake according to your polymer clay package instructions (usually 275°F/135°C for 15-30 minutes per 1/4 inch thickness). Let them cool completely in the oven. -
Assembly styling:
Once cool, arrange the pumpkins in your small ceramic dish. -
Placement of vines:
Tuck the loose baked vines around the base and over the tops of the pumpkins to connect the composition visually. -
Final leaf placement:
Glue the individual leaves onto the vines or directly onto the display dish to fill in any empty gaps. -
Seal the work:
Brush a light coat of matte varnish over the pumpkins to protect the pastel shading and give the clay a finished, high-quality look.
Drooping Vines?
If clay vines sag before baking, wrap them around a metal rod or toothpick and bake them *on* the tool. Slide them off only after they are fully cool and hardened.
Pro Tip: Realism Hack
Mix a tiny speck of translucent clay into your orange. This gives the pumpkins a slight waxy depth that mimics the rind of a real gourd much better than opaque color.
Place your finished miniature patch on a windowsill or centerpiece tray to enjoy the harvest season all year round
Glow-Style Ghost Tea Light Covers
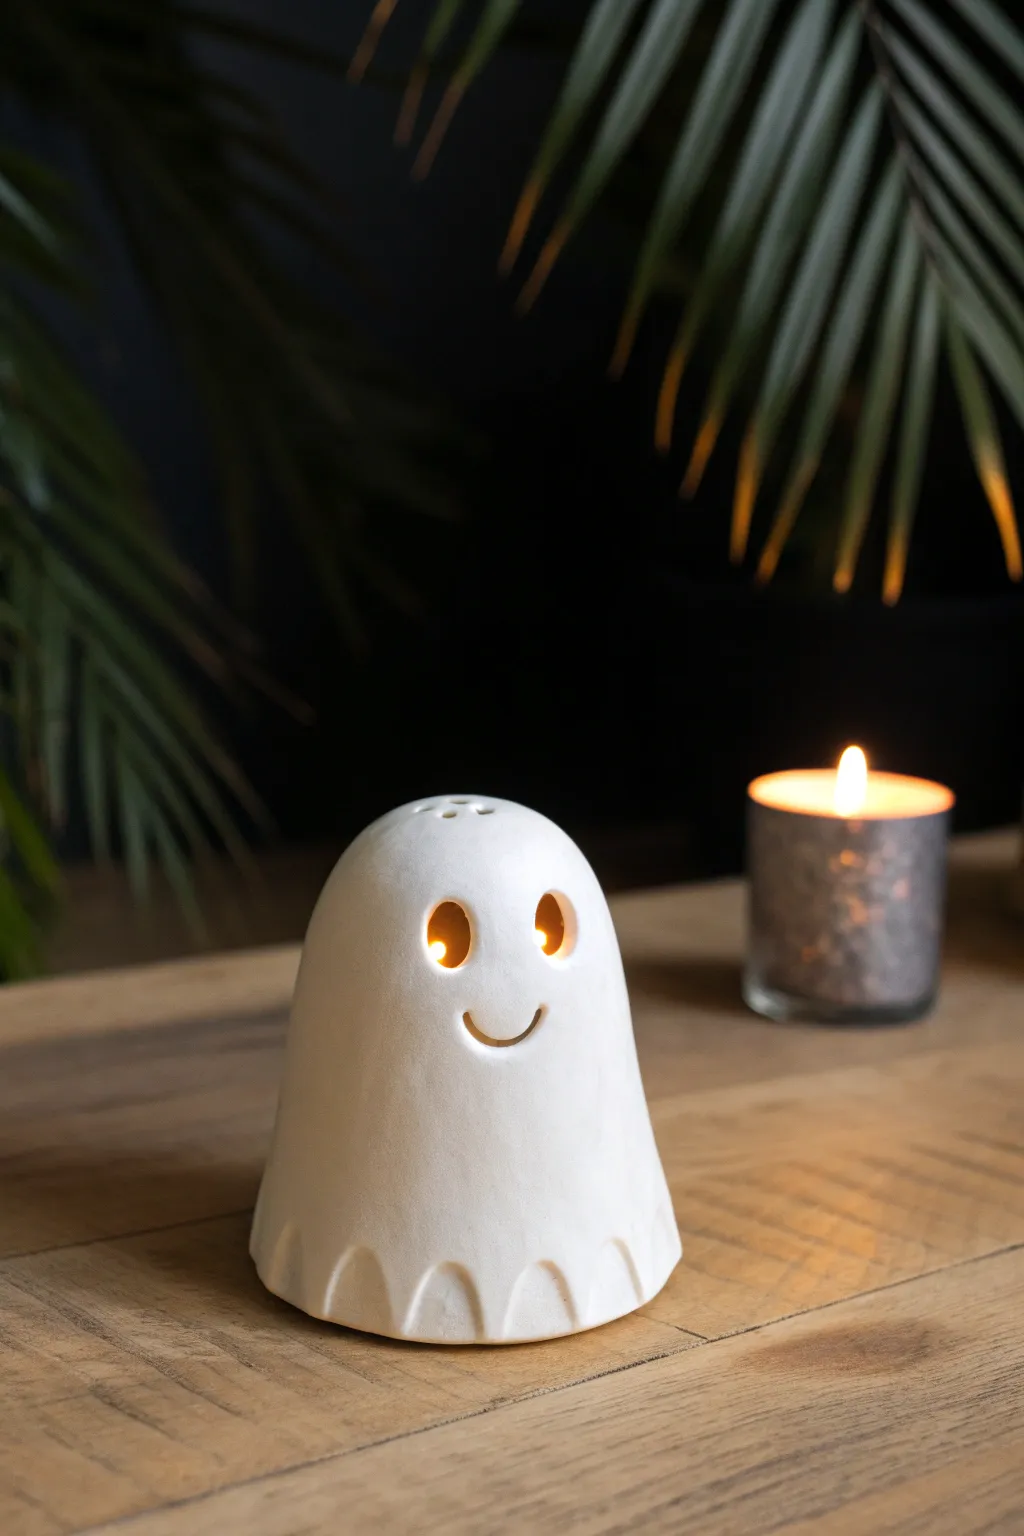
Create a friendly, illuminated spook that looks like high-end pottery using simple air-dry clay. These smooth, matte white ghosts feature a charming cutout face and a classic wavy hem that casts playful shadows when lit up.
Step-by-Step
Materials
- White air-dry clay (smooth formula)
- Small rolling pin
- Aluminum foil
- Small round cookie cutter or bottle cap (for eyes)
- Clean sponge
- Modeling tool or dull knife
- Sandpaper (fine grit)
- Water in a small cup
- Straw
- LED tea light
Step 1: Forming the Base
-
Create the foil armature:
Ball up a piece of aluminum foil into a shape slightly smaller than a tennis ball, creating a tall dome shape. This will effortlessy support the ghost’s structure while it dries. -
Prepare the clay:
Take a generous handful of white air-dry clay and knead it until it’s pliable and warm. If it feels too stiff, dip your fingers in water and work the moisture in. -
Roll the slab:
Using your rolling pin, flatten the clay into a circle about 1/4 inch thick. Aim for an even thickness so the light shines through consistently later. -
Drape the clay:
Gently pick up your clay slab and drape it over the foil dome. Smooth the clay down the sides with your palms, guiding it to create a cone-like ghost body. -
Trim the excess:
Use your modeling tool or dull knife to trim the bottom edge so it sits flush on the table, but leave a little extra length for the wavy design.
Cracks Appearing?
If hairline cracks appear while drying, mix a tiny bit of clay with water to make a paste (slip) and smooth it into the crack with your finger immediately.
Step 2: Sculpting Details
-
Create the wavy hem:
Around the bottom edge, press your thumb gently into the clay at regular intervals to create indentations. Pinch the clay between the indentations to form the distinct points of the ghostly hem. -
Mark the face:
Lightly sketch where you want the eyes and mouth to be with a toothpick before committing to the cut. -
Cut the eyes:
Use a small circular cutter or a bottle cap to punch out two clean holes for the eyes. Wiggle the cutter slightly to release the clay circle. -
Carve the smile:
With a clay knife or modeling tool, carefully slice a simple U-shape for the mouth. Using a curved tool here helps get that smooth smile shape shown in the photo. -
Add ventilation:
Use a straw to poke 3-4 small holes in the very top of the ghost’s head. This is functional—it lets heat escape if you use real candles—but also adds a sweet decorative touch.
Pro Tip: Glossy Eyes
After the clay is bone dry, paint JUST the inside rim of the eye holes with clear nail polish or gloss varnish to make the ’em shine nicely in the light.
Step 3: Refining and Finish
-
Smoothen the surface:
Dip a small sponge or your finger into water and gently rub the entire surface of the ghost. Focus on erasing any fingerprints or rough textures. -
Clean the edges:
Run a damp finger along the cut edges of the eyes and mouth to soften them so they don’t look sharp or jagged. -
Initial drying:
Let the ghost sit on the foil armature for about 2-3 hours until the outside feels leather-hard. -
Remove the armature:
Carefully pull the foil ball out from underneath the ghost. Removing it now allows the inside to dry thoroughly. -
Full cure:
Allow the project to dry completely for 24-48 hours. I find placing it on a wire rack helps air circulate underneath. -
Sanding:
Once fully dry and chalky white, take absolute fine-grit sandpaper and gently buff the surface to achieve that professional, matte ceramic finish. -
Dust off:
Wipe away all sanding dust with a dry cloth or soft brush. -
Light it up:
Place an LED tea light on the table and set your ghost over it to see the glow shine through the eyes.
Enjoy the cozy ambiance your new handcrafted ghost adds to your Halloween decor
Mini Haunted House Facades
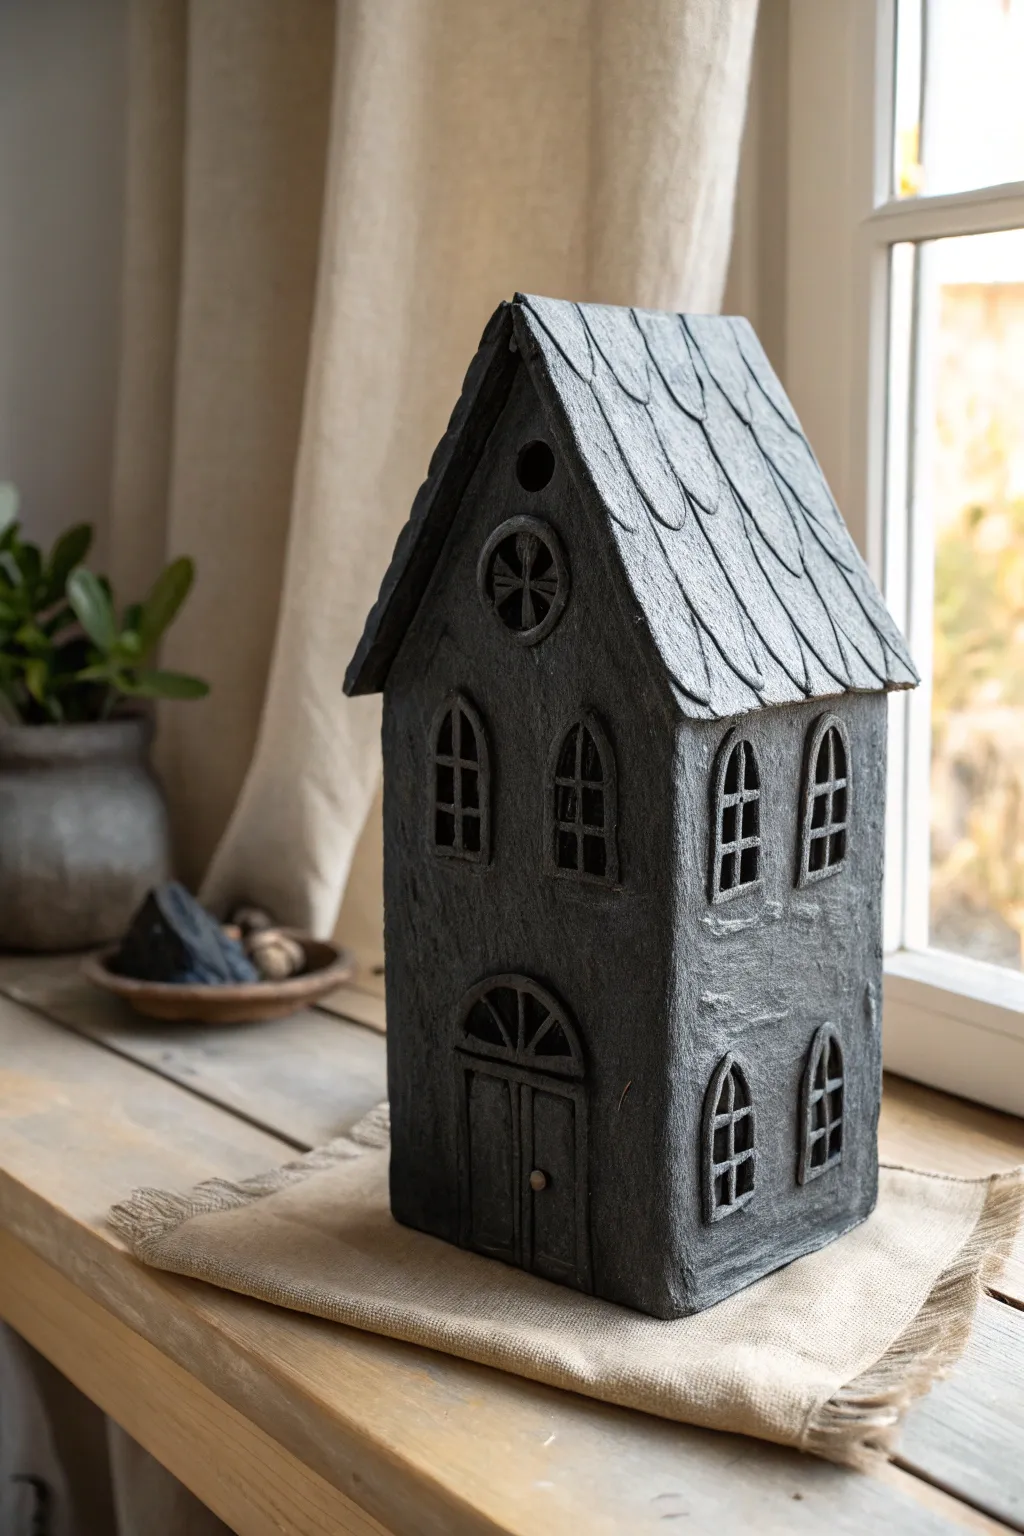
Create a delightfully eerie atmosphere with this miniature haunted house facade. Featuring textured shingles, arched windows, and a dark stone-like finish, this project is perfect for a windowsill display.
Step-by-Step Tutorial
Materials
- Air-dry clay (grey or white)
- Rolling pin
- Cardboard or foam core (for structural base)
- Craft knife or clay tools
- Ruler
- Masking tape
- Acrylic paint (black and dark grey)
- White or light grey acrylic paint (for dry bushing)
- Paintbrushes (medium flat and stiff bristle)
- Wooden skewer or toothpick
- Water cup
Step 1: Building the House Structure
-
Prepare the Base:
Begin by cutting a simple house shape from cardboard or foam core to act as an armature. You’ll need a tall front facade with a peaked roof, two side walls, a back wall, and two rectangular roof panels. Tape these pieces together securely with masking tape to form a standing 3D house structure. -
Roll Out the Clay:
Take a large chunk of air-dry clay and knead it until soft. Roll it out into a flat sheet about 1/4 inch thick. Aim for a consistent thickness to ensure even drying. -
Cover the Walls:
Cut panels of clay to match the dimensions of your cardboard walls. Press the clay firmly onto the cardboard structure. Use a little water on your fingers to smooth out any seams where the clay panels meet at the corners.
Clay Cracking?
If small cracks appear during drying, mix a tiny bit of fresh clay with water to make a paste (slip) and fill them in before painting.
Step 2: Adding Architectural Details
-
Create the Roof Shingles:
Roll out another sheet of clay for the roof. Instead of a flat sheet, cut many small ‘U’ shapes or tongue-depressor shapes to act as shingles. Starting from the bottom edge of the roof, layer these clay shingles upwards, overlapping each row slightly as you go to mimic a real slate roof. -
Form the Arched Windows:
For the windows, roll thin snakes or coils of clay. Shape them into arches directly on the wall surface. Create a cross shape inside each arch to represent window panes. Make four tall arched windows for the front facade and several for the side walls. -
adding the Front Door:
Fashion a slightly larger arched doorway at the bottom center. Use a flat piece of clay for the door itself, scoring a vertical line down the middle for double doors. Frame it with a coiled clay arch and add a small semi-circle window detail above it. -
Attic Details:
Add a small circular window near the peak of the roof using a coil ring with a cross inside. Just above that, press a small, deep hole into the clay to create a mysterious attic vent or peephole. -
Texturize the Walls:
To get that rustic, stone-like appearance, gently dab the flat wall surfaces with a stiff brush or a crumpled ball of aluminum foil. This roughens the clay so it doesn’t look too perfect or plastic.
Step 3: Painting and Finishing
-
Dry Completely:
Allow the sculpture to dry thoroughly. Depending on the thickness of your clay and humidity, this can take 24 to 48 hours. The clay will turn a lighter color and feel hard when ready. -
Base Coat:
Paint the entire house, including the roof and deep into the window crevices, with solid black acrylic paint. I usually do two coats here to ensure no raw clay color peeks through. -
First Highlight Layer:
Mix a dark charcoal grey paint. Using a technique called dry-brushing, wipe most of the paint off your brush onto a paper towel until it’s almost dry. Lightly sweep this over the textured walls and roof shingles to catch the raised areas. -
Final Highlights:
With a very light grey or off-white paint, repeat the dry-brushing process but with an extremely light touch. Focus on the edges of the shingles, the window frames, and the door details to make them pop against the dark background. -
Add a Doorknob:
Paint a tiny dot of metallic gold or silver for the doorknob. Alternatively, you can glue on a small bead if you prefer a 3D element.
Glow Up
Cut out the clay inside the windows before it dries and place a battery-operated tea light inside the finished house for a spooky glow.
Now you have a haunted mansion ready to guard your windowsill this Halloween
Colorful Skeleton Bone Tiles
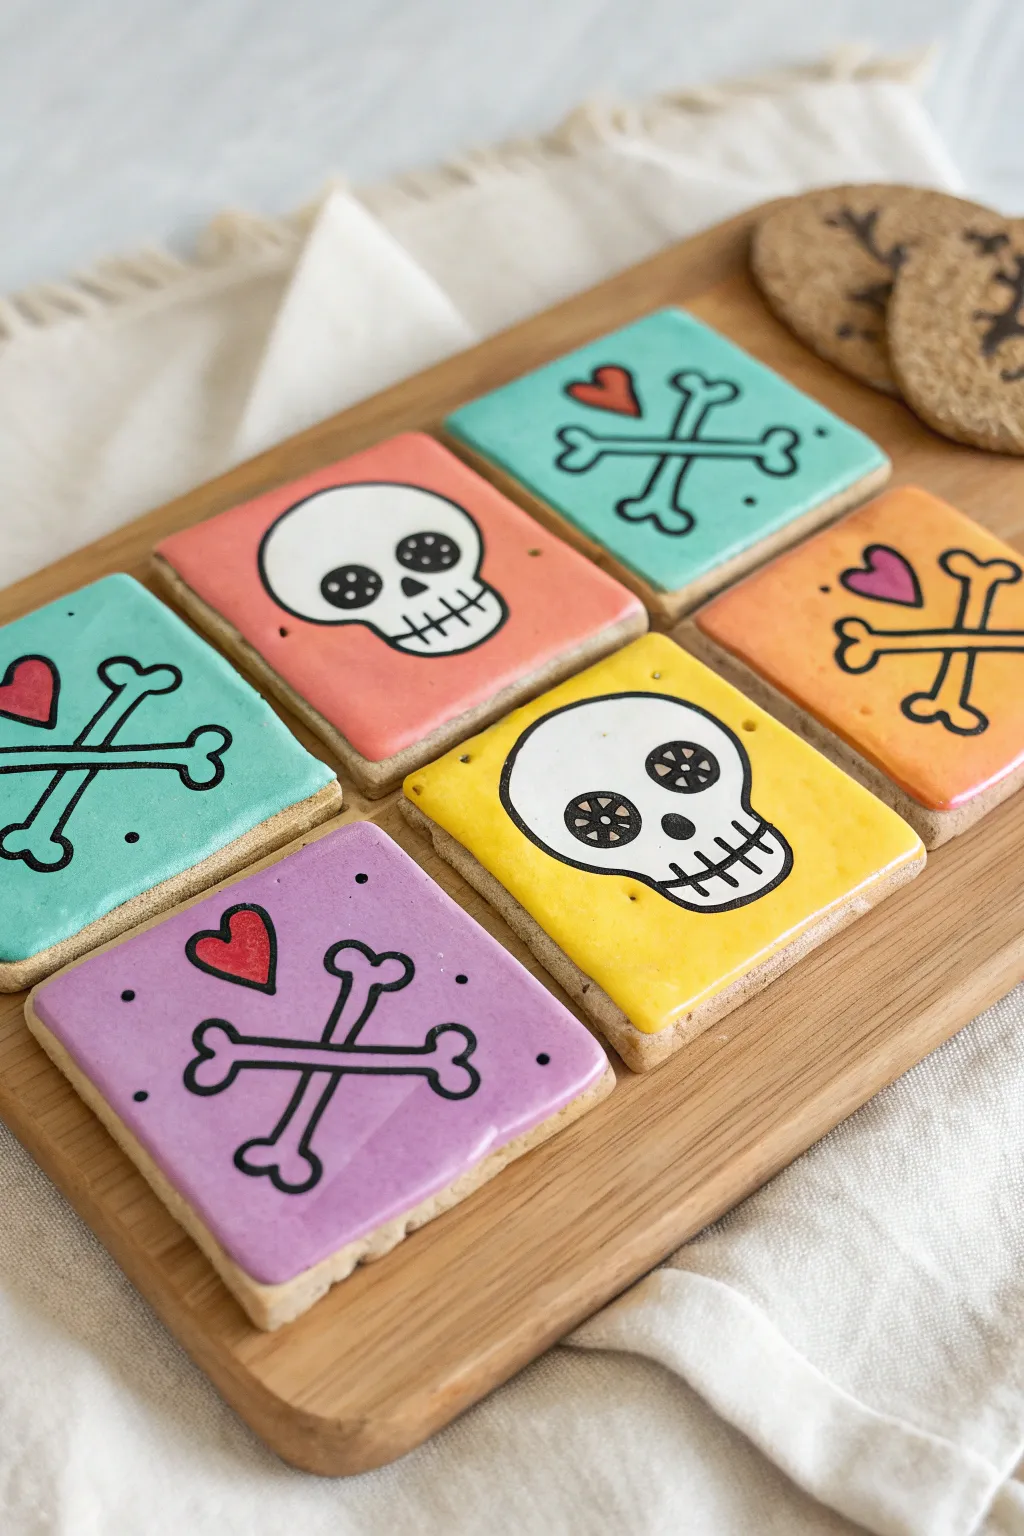
These vibrant, square clay tiles capture the festive spirit of Día de the Muertos with bold colors and classic calavera designs. They look good enough to eat, resembling sugar cookies, changing up your Halloween decor with a splash of bright fun.
Step-by-Step Guide
Materials
- Air-dry clay or polymer clay (white)
- Rolling pin
- Square cookie cutter (approx. 3 inches)
- Sandpaper (fine grit)
- Acrylic paints (teal, peach, yellow, purple, white, red)
- Black paint marker or fine liner pen (for details)
- Flat paintbrushes
- Glossy varnish or Mod Podge
- Parchment paper
Step 1: Shaping the Tiles
-
Roll the clay:
Start by conditioning your clay until it is soft and pliable, then roll it out on a piece of parchment paper to an even thickness of about 1/4 inch. -
Cut the squares:
Using a square cookie cutter, cut out six squares. If you don’t have a cutter, you can measure and cut carefully with a ruler and a craft knife. -
Soften edges:
Gently tap the sides of each square to straighten them, and smooth the sharp corners slightly with your fingertip to give them a softer, cookie-like appearance. -
Dry the clay:
Lay the squares flat on a drying rack or parchment paper. Allow them to dry completely according to your clay package’s instructions—usually 24 to 48 hours for air-dry clay. -
Sand the surface:
Once fully cured, use fine-grit sandpaper to lightly sand the top surface and edges, ensuring a perfectly smooth canvas for your painting.
Wobbly Lines?
If your black marker lines are shaky, let them dry, then clean up edges by painting over mistakes with the original background color.
Step 2: Adding Colorful Backgrounds
-
Mix your palette:
Prepare your acrylic paints. You’ll need bright, pastel-leaning shades: a sunny yellow, a warm peach (light orange), a vibrant teal, and a soft lavender purple. -
Apply base coats:
Paint the top surface of each tile with one of your colors. Aim for two tiles in teal, and one each in yellow, peach, and purple to match the set. -
Let it dry:
Allow the first coat to dry completely. I prefer to add a second thin coat here to make the colors really solid and opaque. -
Paint the sides:
Leave the edges unpainted to mimic the look of a baked cookie, or paint them a light beige/tan color if your clay relies on white.
Step 3: Drawing the Designs
-
Sketch the skulls:
On the peach and yellow tiles, lightly sketch a simple skull shape in the center using a pencil. It should look like a rounded bulb. -
Fill the skulls:
Paint the skull shapes with white acrylic paint. You may need two coats to ensure the background color doesn’t show through. -
Draw the crossbones:
On the teal and purple tiles, use your pencil to map out two crossed bones with a small heart in the upper, open quadrant. -
Outline with marker:
Once the white paint is bone-dry, use a black paint marker or fine liner to verify your outlines. Draw around the white skulls and trace the crossbone shapes on the other tiles. -
Add skull details:
On the white skulls, draw large black circles for eye sockets. Inside the eyes, add small white or colored dots for a ‘flower’ effect, and draw a grid for the teeth. -
Fill the hearts:
Paint the small hearts on the crossbone tiles with bright red or deep pink paint, then outline them in black once dry. -
Add decorative dots:
Using the tip of a paintbrush handle or a dotting tool, add tiny black dots around the empty spaces of the tiles for texture.
Make Them Magnets
Glue round ceramic magnets to the back of each finished tile to turn these decorative pieces into colorful seasonal fridge magnets.
Step 4: Finishing Touches
-
Gloss the top:
To get that ‘royal icing’ shine, apply a coat of glossy varnish or Mod Podge strictly over the painted colored area. -
Dry and display:
Let the varnish cure completely before handling. Placing them on a wooden tray completes the rustic, handmade vibe.
Now you have a set of wonderfully spooky, color-pop tiles ready to brighten up your Halloween display
Spooky-Cute Clay Cupcake Toppers
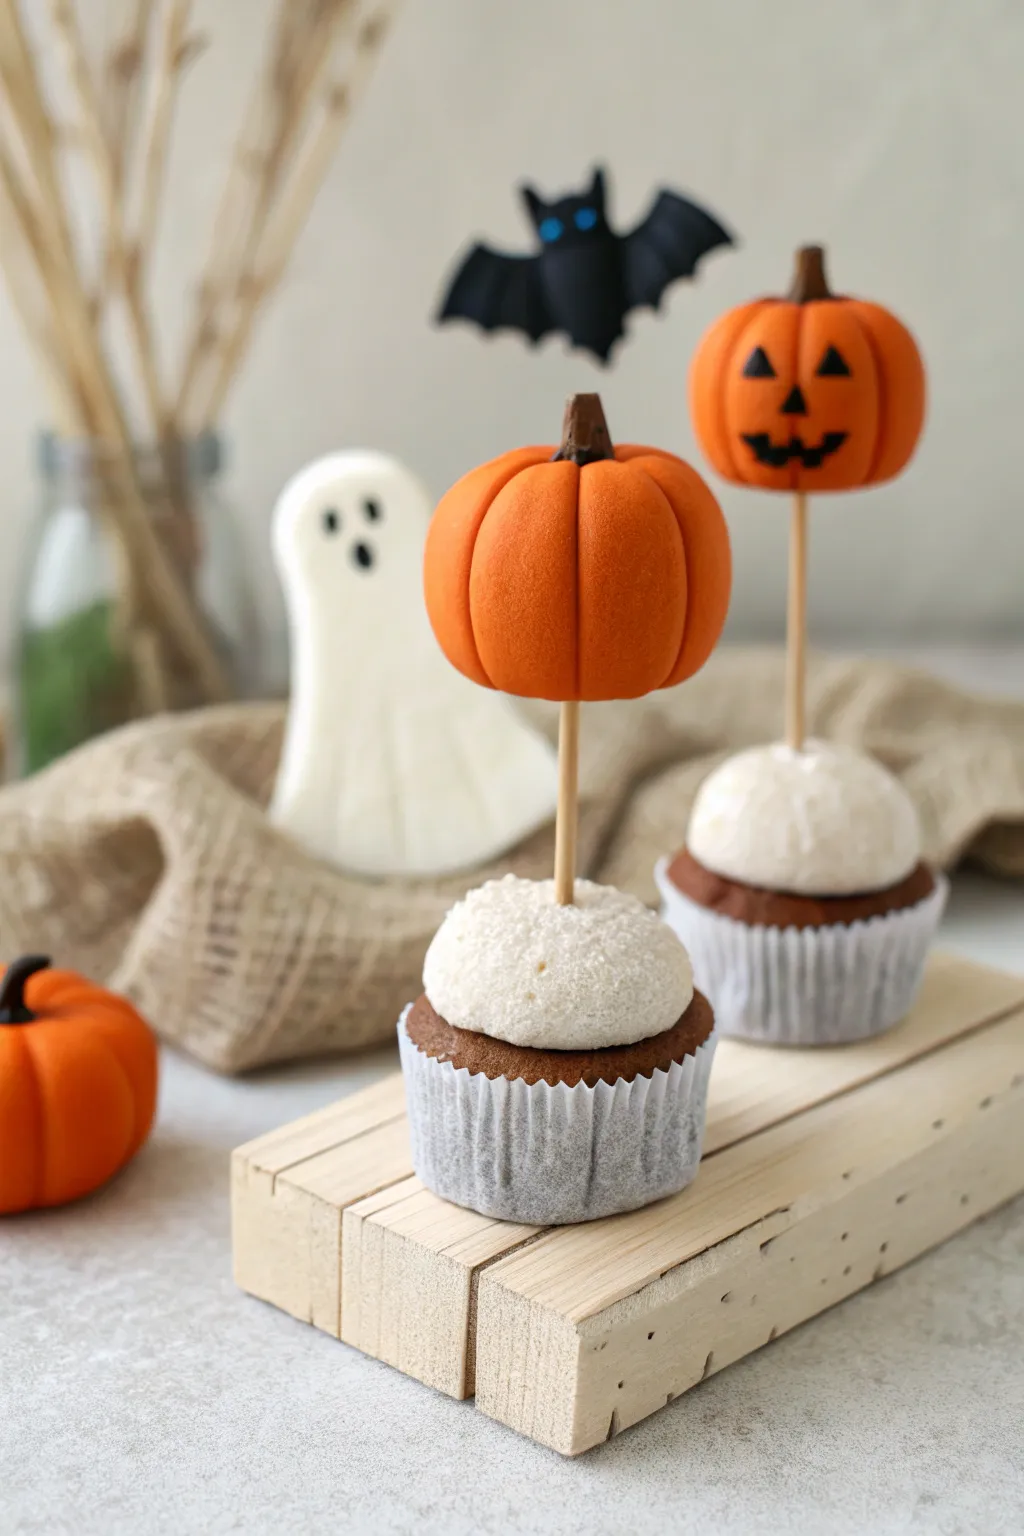
These gravity-defying pumpkin toppers add a magical touch to faux cupcakes, making for an adorable Halloween display. With smooth shapes and a simple toothpick trick, you can create a centerpiece that looks good enough to eat but will last for years.
Detailed Instructions
Materials
- Orange polymer clay (pumpkin shade)
- White or light cream polymer clay (frosting)
- Brown polymer clay (cupcake base and stem)
- Black polymer clay (face details)
- Aluminum foil
- Wooden toothpicks or skewers
- Paper baking cups (mini size)
- Needle tool or toothpick
- Small round cutter or modeling tool
- Clay roller or pasta machine
Step 1: Creating the Cupcake Base
-
Form the core:
Begin by rolling tight balls of aluminum foil to act as the core for your cupcakes. This saves clay and keeps the project lightweight. The ball should be slightly smaller than the paper baking cup you plan to use. -
Wrap the base:
Roll out a thick sheet of brown clay. Wrap the foil ball in the brown clay, smoothing the seams until you have a chocolate-colored mound. Press this firmly into your paper baking cup so it takes on the ribbed shape, then gently remove paper or leave it on depending on whether you want the paper to be permanent. -
Texture the cake:
Use a stiff brush or a crumpled ball of aluminum foil to tap the top surface of the brown clay gently. This creates a realistic, crumbly cake texture.
Clean Clay Pro-Tip
White clay picks up lint easily. Before working the frosting step, clean your hands and workspace thoroughly with a baby wipe to keep that ‘vanilla’ look pristine.
Step 2: Adding the Frosting
-
Shape the frosting dome:
Take a large ball of white or cream clay and flatten the bottom. Place this directly on top of your textured brown base to create a smooth, domed mound of ‘frosting’. -
Blend the edges:
Gently press the edges of the white clay down so it looks like it’s resting naturally on the cake, but don’t smooth it completely flush; keep that distinct ‘dollop’ look. -
Add surface texture:
To mimic the fluffy look shown in the photo, lightly prick the entire surface of the white clay with a needle tool or a stiff bristle brush. This removes the ‘plastic’ shine and makes it look like buttercream. -
Insert the support:
Take a wooden toothpick or skewer. Push it vertically down through the center of the white frosting and into the brown base until it feels secure. Leave about 2 to 3 inches exposed at the top.
Level Up: Ghostly Visitor
Use white scrap clay to sculpt a simple ghost shape (like the blurry one in the background). Prop it up next to your cupcakes for a complete scene.
Step 3: Sculpting the Floating Pumpkins
-
Roll the pumpkin shape:
Condition your orange clay until it is soft and pliable, then roll it into a smooth, round ball about 1.5 inches wide. -
Flatten slightly:
Press the ball gently between your palms to flatten the top and bottom poles just a tiny bit, giving it a squat pumpkin silhouette. -
Mark the segments:
Using the side of a needle tool or a dull knife, press vertical lines into the side of the ball, running from top to bottom. These lines create the signature segments of the pumpkin. -
Refine the segments:
Use your finger to gently soften the indented lines so they look like soft grooves rather than sharp cuts. -
Create the stem:
Take a tiny piece of brown clay and roll it into a small cone. Attach this to the center of the pumpkin’s top. I like to press a little texture into the sides of the stem to make it look woody. -
Mount the pumpkin:
Carefully slide your finished orange pumpkin onto the exposed toothpick sticking out of the cupcake. Push it down until it sits at your desired height—about an inch above the frosting create a nice ‘floating’ effect.
Step 4: Adding Details
-
Roll tiny features:
For the Jack-o’-lantern face, roll out black clay as thinly as possible. Use a craft knife to cut out incredibly tiny triangles for eyes and a jagged mouth. -
Apply the face:
Gently press the black clay pieces onto one of your pumpkins using the tip of your needle tool. The clay should stick on its own without glue if both pieces are unbaked. -
Make a plain variation:
For variety, leave one pumpkin plain without a face, focusing purely on the smooth, segmented shape like the one in the foreground of the image. -
Final check:
Ensure your toppers are straight and not leaning. If the toothpick feels loose, you can secure it with a tiny drop of liquid clay or Bake & Bond. -
Baking:
Bake the entire structure upright on a baking sheet according to your clay manufacturer’s instructions (usually 275°F for 15-30 minutes).
Let your spooky new decorations cool completely before displaying them on your mantle or Halloween table
Trick-or-Treat Sign Plaques

Welcome spooky visitors with this charming handmade clay sign that features a scalloped edge and raised black lettering. It’s a simple yet impressive project that uses air-dry clay to create a professional-looking piece of holiday decor.
Step-by-Step Tutorial
Materials
- White polymer clay or air-dry clay
- Rolling pin
- Rectangle cookie cutter (or ruler and knife)
- Small round piping tip or straw (for scalloping)
- Black polymer clay
- Orange acrylic paint
- Fine-point paintbrush or toothpick
- Jute twine
- Super glue (optional)
- Parchment paper
Step 1: Shaping the Base Plaque
-
Prepare the Clay:
Start by conditioning a large ball of white clay in your hands until it is soft and pliable. Roll it out on parchment paper to an even thickness of about 1/4 inch. -
Cut the Rectangle:
Use a rectangular cutter or measure and cut a rectangle approximately 4 inches by 6 inches using a knife and ruler. Smooth any rough edges with your finger. -
Create the Scalloped Edge:
Take a small round object, like a piping tip or straw, and gently press halfway into the very edge of the clay all the way around the perimeter to create evenly spaced indentations. -
Punch Hanging Holes:
Use a straw to punch two clean holes near the top corners of the plaque. Make sure they are about half an inch inside the border so the clay doesn’t tear later. -
Smooth the Surface:
Dip your finger in a tiny bit of water (if using air-dry clay) or baby oil (if using polymer) and gently rub the surface to remove any fingerprints or stray marks.
Clay Cracking?
If using air-dry clay, cracks can happen if it dries too fast. Drape a slightly damp paper towel over it for the first 12 hours of drying to slow the process down.
Step 2: Adding the Details
-
Form the Letters:
Roll out a thin snake of black clay. Cut and shape pieces to form the letters B, O, and O. Alternatively, you can use small alphabet cutters if you have them. -
Attach the Letters:
Place the letters onto the white plaque while everything is still wet. If they don’t stick immediately, score the back lightly or use a dab of liquid clay or water as glue. -
Sculpt the Bat:
Flatten a tiny piece of black clay. Use a needle tool or toothpick to cut out a simple bat silhouette—just two triangles for ears and scalloped wings. -
Place the Bat:
Position the bat centered above the lettering. Press it down gently to ensure it adheres to the white base. -
Create Texture:
Use the tip of your needle tool to poke tiny holes or dimples around the perimeter of the plaque, just inside the scalloped edge. This creates a guide for your paint dots later.
Glow in the Dark
Swap the white base clay for glow-in-the-dark polymer clay. Your sign will look cute during the day but turn eerily luminous once the lights go out.
Step 3: Finishing Touches
-
Dry or Bake:
If using polymer clay, bake according to the package instructions. If using air-dry clay, let it sit on a wire rack for 24-48 hours until completely hard. -
Wait to Cool:
Allow the piece to cool completely before moving on to the painting step to ensure the paint adheres properly. -
Paint the Dots:
Dip a fine-point paintbrush or toothpick into bright orange acrylic paint. Carefully dab a small dot of paint into each of the dimples or spaces between the scallops you created around the border. -
Seal the Project (Optional):
For a glossy finish like the one in the photo, apply a coat of glaze or Mod Podge over the entire piece once the orange dots are perfectly dry. -
Prepare the Twine:
Cut a length of thick jute twine, about 12 to 15 inches depending on how low you want the sign to hang. -
Thread the Hanger:
Feed one end of the twine through the front of the left hole and tie a knot at the back. Repeat with the right hole. I like to add a dab of super glue to the knots for extra security.
Now you have a spooky welcome sign ready to hang on a doorknob or hook for Halloween
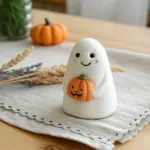
Pumpkin With a Peekaboo Ghost Inside

Create a charming Halloween surprise with this terra cotta colored pumpkin that hides a tiny, spooky ghost inside. This project combines simple pinch pot techniques with character sculpting for a finished piece that looks professionally crafted yet is accessible for budding artists.
Detailed Instructions
Materials
- Air-dry clay (terra cotta color)
- Air-dry clay (white)
- Clay sculpting tools (needle tool, rib tool)
- Small bowl of water
- Rolling pin
- Sponge
- Acrylic paint (black)
- Fine-detail paintbrush
Step 1: Sculpting the Pumpkin Base
-
Form the Pinch Pot:
Start with a baseball-sized ball of terra cotta clay. Push your thumb into the center and gently pinch the walls while rotating the ball to create a hollow pot shape. -
Close the Form:
Instead of leaving the top open like a bowl, gently curve the upper edges inward until they almost meet, leaving a circular opening about 1.5 inches wide at the very top. -
Refine the Shape:
Roll the slightly flattened ball on your work surface to smooth out fingerprints. The shape should be round but slightly squat, just like a real pumpkin. -
Mark the Segments:
Using a needle tool or the edge of a clay rib, press vertical lines from the top opening down to the base. Space them evenly to create the pumpkin’s ribs. -
Deepen the Grooves:
Use your pinky finger or a rounded modeling tool to gently rub along those vertical lines. This softens the sharp cuts into natural-looking indentations. -
Texture the Surface:
Take a slightly damp sponge or a crumpled piece of foil and dab it lightly over the entire pumpkin surface. This removes the plastic-smooth finish and gives it a realistic, organic texture. -
Define the Rim:
Smooth the clay around the top opening with a bit of water on your finger, creating a clean, flat ledge where the ghost will emerge.
Step 2: Creating the Ghost
-
Shape the Body:
Take a smaller amount of white clay, roughly the size of a golf ball. Roll it into a smooth cylinder with a rounded top. -
Test the Fit:
Gently insert the white cylinder into the pumpkin’s opening to ensure it fits snugly but comfortably. Make adjustments to the width if necessary. -
Form the Arms:
Pinch small sections of formatting clay on the sides of the ghost to create tiny, nub-like arms that stick out slightly, as if waving ‘boo’. -
Smooth the Ghost:
I like to use a very wet finger to smooth the white clay until it is perfectly sleek, contrasting with the textured pumpkin. -
Create Facial Features:
Use a small dotting tool or the end of a paintbrush to press deep indentations for the eyes and a vertically oval mouth.
Keep it Clean
Work with the white clay first or wash hands thoroughly between colors to prevent the terra cotta pigment from staining your pristine white ghost.
Step 3: Assembly and Finishing
-
Attach the Pieces:
Score the bottom of the ghost and the inside bottom of the pumpkin (if reachable) or simply apply a generous amount of slip (clay mixed with water) to the sides of the ghost where it touches the rim. -
Secure the Seam:
Gently press the ghost into place so it looks like it is popping out. Smooth the seam where the white clay meets the terra cotta inside the rim if you want a permanent bond. -
Dry Completely:
Allow the sculpture to dry for at least 24-48 hours. The terra cotta clay will lighten significantly as the moisture evaporates. -
Paint the Face:
Once fully dry, dip a fine-detail brush into black acrylic paint. Carefully fill in the indented eyes and mouth of the ghost. -
Final Polish:
Check for any rough spots on the pumpkin. You can lightly sand them down or leave them for rustic charm.
Glow Up
Instead of solid white clay, use glow-in-the-dark polymer clay for the ghost so your decoration lights up at night.
Place your finished peekaboo pumpkin on a shelf or windowsill to add a touch of handmade whimsy to your season