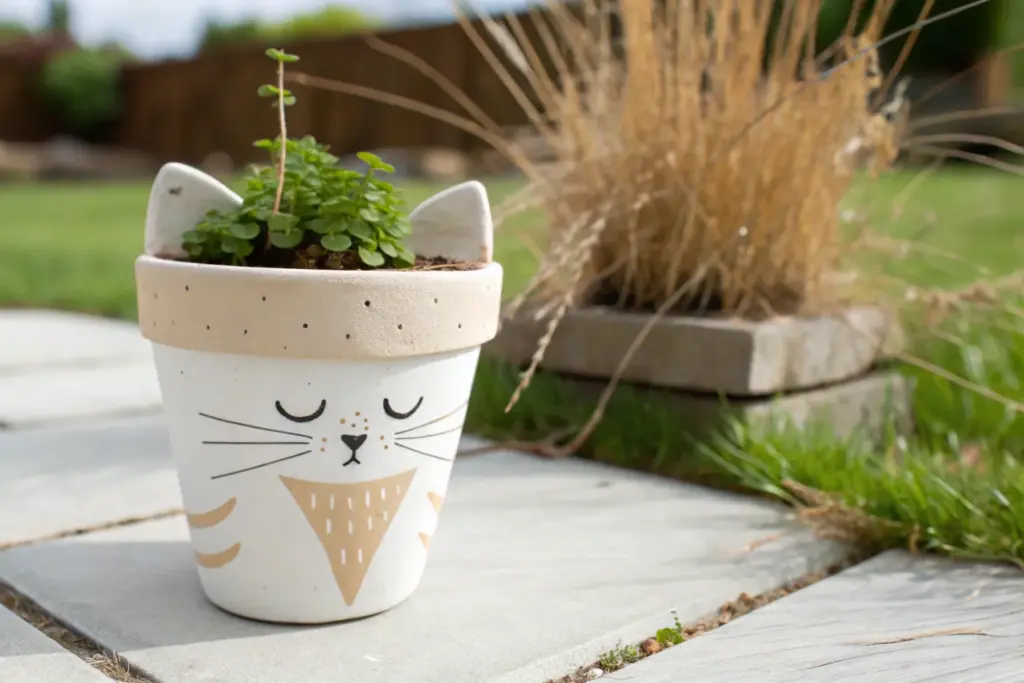
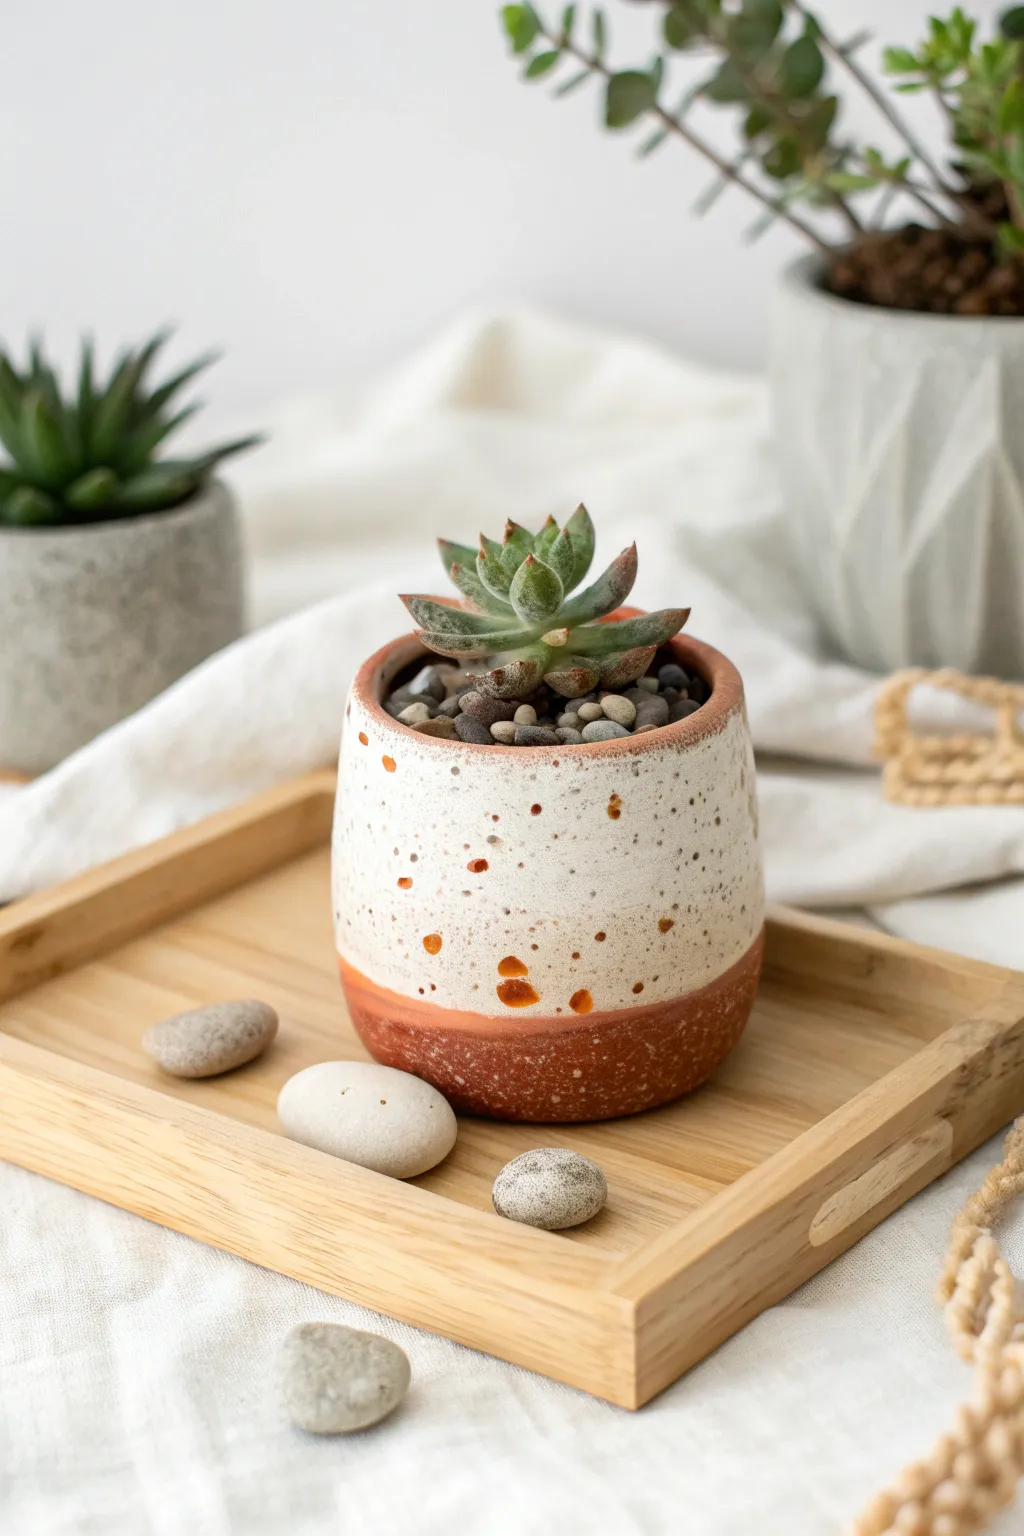
Whenever I’ve got a pile of plain clay pots in the studio, I treat them like blank canvases—because a little paint, texture, or stacking can totally change the vibe. Here are my favorite DIY clay pot ideas that start simple and classic, then gradually get more playful and show-stopping.
Simple Painted Terracotta Pots
Transform a plain terracotta pot into a modern accent piece with nothing more than masking tape and white paint. This geometric design uses the pot’s natural color as part of the pattern, creating a striking contrast that looks fresh on any windowsill.
How-To Guide
Materials
- Standard terracotta pot (with drainage hold)
- Matching terracotta saucer
- White acrylic craft paint
- Painter’s tape or masking tape (1-inch width works best)
- Flat paintbrush (medium size)
- Fine-grit sandpaper (optional)
- Clear acrylic sealer spray (matte or satin finish)
- Paper plate or palette
- Damp cloth
Step 1: Preparation
-
Clean surface:
Begin by thoroughly wiping down your terracotta pot with a damp cloth to remove any dust or warehouse grime. Let it dry completely. -
Smooth it out:
If your pot feels rough to the touch, lightly sand the exterior with fine-grit sandpaper. This helps the tape stick better and gives a smoother paint finish. -
Wipe away dust:
If you sanded, use that damp cloth again to wipe away all the sanding dust. A clean surface is crucial for crisp lines.
Seal Before You Tape
For ultra-crisp lines, paint a thin layer of clear matte sealer over the tape edges first. This seals the gap so no white paint can bleed under.
Step 2: Taping the Design
-
First diagonal:
Take a long strip of painter’s tape and apply it diagonally across the pot. Start from the top rim and angle it down toward the bottom edge. -
Wrap around:
Smooth the tape as you wrap it around the curve of the pot. Since the pot is tapered, the tape might want to buckle; just smooth it down firmly as you go. -
Create the stripe width:
Place a second strip of tape parallel to the first one. Leave a gap of about 2 to 3 inches between the strips—this exposed area is where your white paint will go. -
Repeat the pattern:
Rotate the pot and add another set of tape strips on the opposite side if you want a recurring pattern, or just stick to one bold stripe for a minimalist look. -
Seal the edges:
Firmly run your fingernail or a credit card along the edges of the tape. This is the secret to preventing paint from seeping underneath.
Metallic Twist
Instead of white, swap in gold leaf or metallic copper paint for the diagonal stripe to add a touch of glamour to your indoor garden.
Step 3: Painting
-
Apply base coat:
Squeeze some white acrylic paint onto your palette. Using your flat brush, paint the exposed terracotta area between the tape strips. -
Brush direction:
I prefer to brush away from the tape edge rather than into it. This helps minimize paint bleeding under the adhesive. -
Let it dry:
Allow this first coat to dry for about 15-20 minutes. Terracotta is porous and soaks up paint quickly, so it might look streaky at first. -
Second coat:
Apply a second layer of white paint to get that solid, opaque look shown in the photo. If needed, add a third coat for pure whiteness.
Step 4: Finishing Touches
-
Remove tape:
This is the satisfying part. While the final coat is still slightly tacky (not fully cured), carefully peel off the painter’s tape at a 45-degree angle. -
Clean up lines:
If any paint managed to sneak under the tape, use a damp toothpick or a small brush with water to gently scrape or wipe it away while fresh. -
Dry time:
Let the pot sit for at least an hour to ensure the paint is fully hardened. -
Seal the pot:
Take the pot outside and spray it with a clear acrylic sealer. This protects the paint from water damage when you water your plant. -
Saucer set:
Place the pot on its matching terracotta saucer. The painted design pops beautifully against the unpainted saucer base.
Now you have a chic, custom planter ready for your favorite herbs or succulents


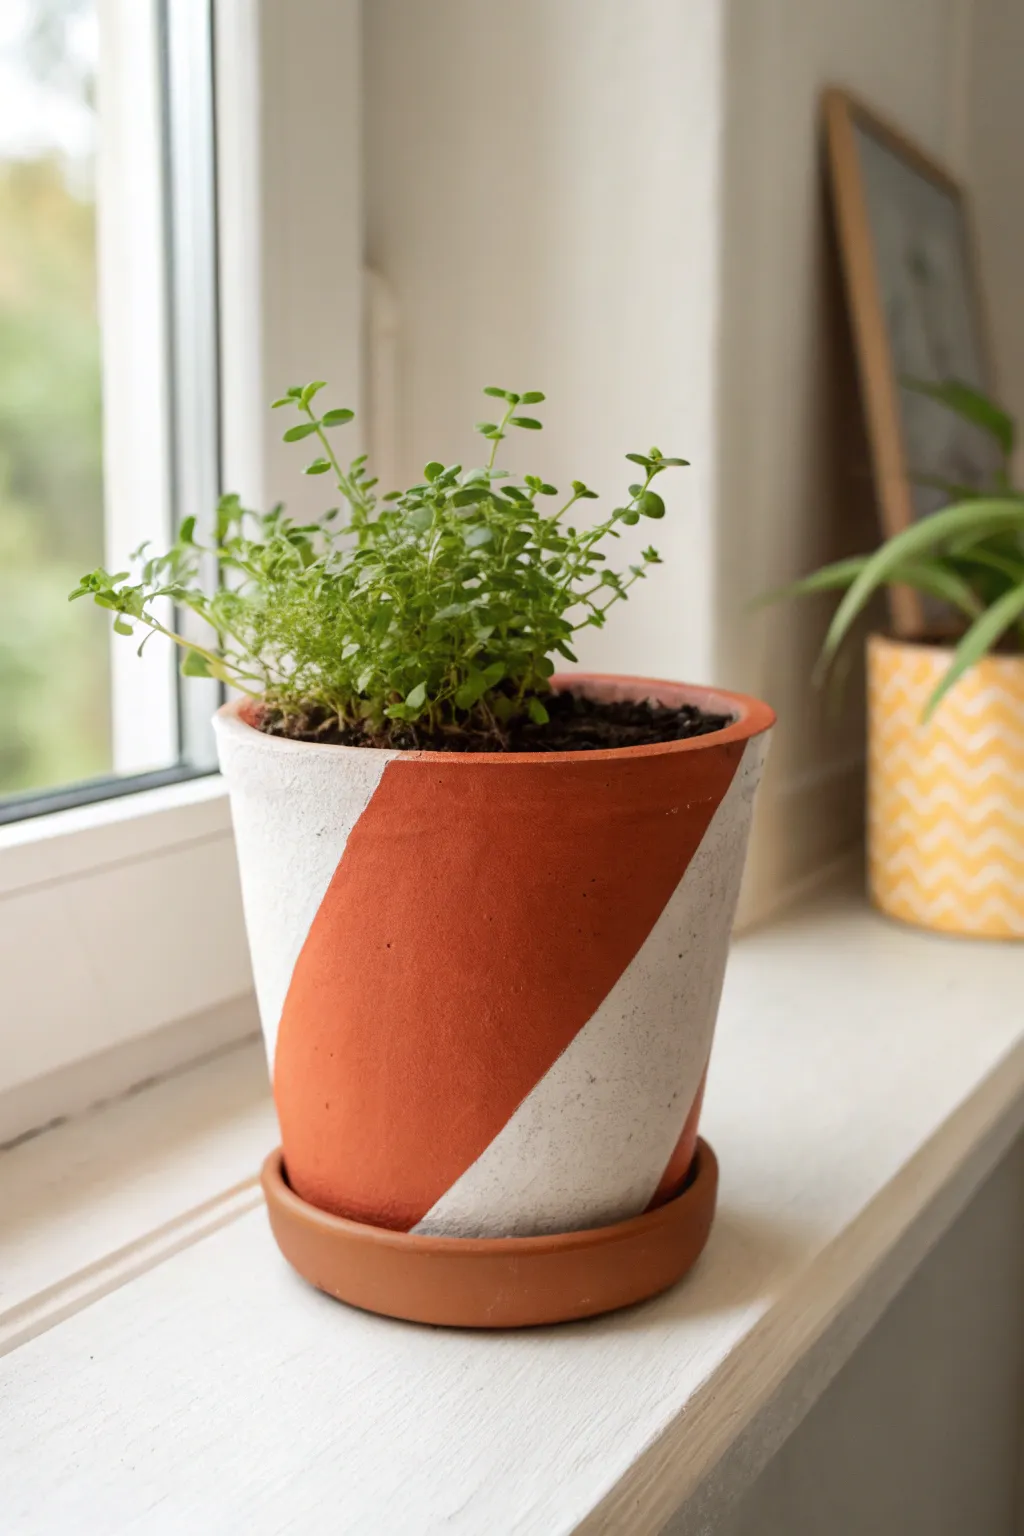
Two-Tone Color-Dipped Planters
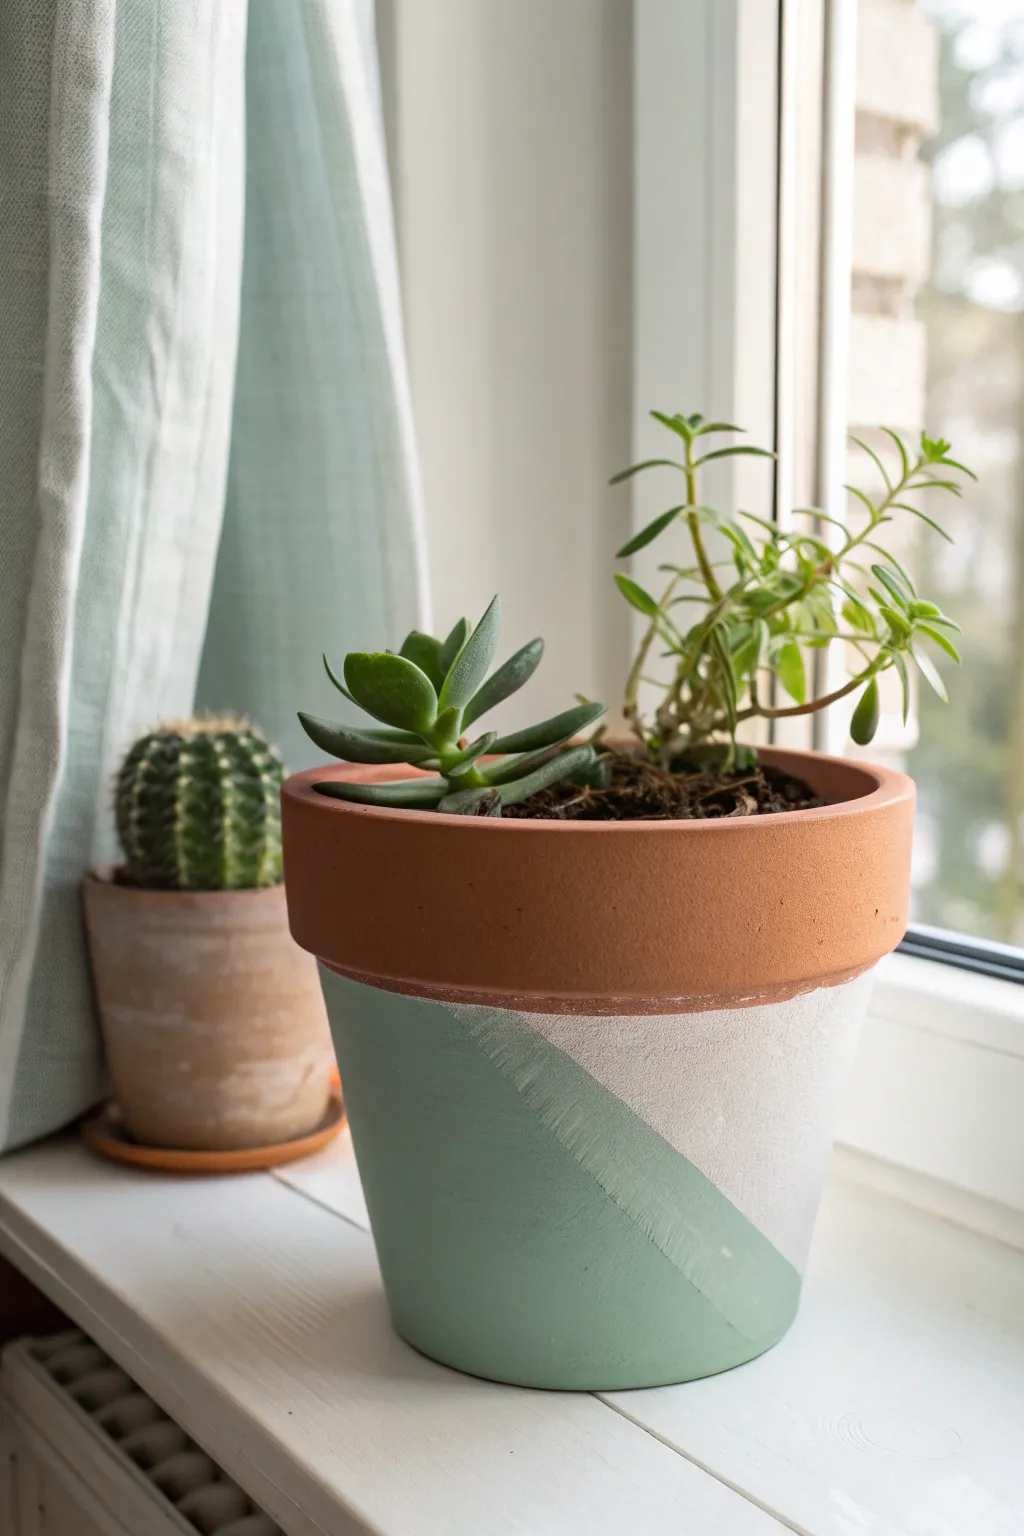
Transform a plain terracotta pot into a modern piece of decor with this simple, clean-lined project. By taping off diagonal sections and using soft, matte colors like sage green and warm white, you can create a striking geometric design that still feels organic and cozy.
Detailed Instructions
Materials
- Standard terracotta pot (cleaned)
- Painter’s tape (multi-surface or delicate surface work best)
- Sage green acrylic craft paint or chalk paint
- Warm off-white acrylic craft paint or chalk paint
- Medium-sized flat paintbrush
- Small angled shader brush (optional, for edges)
- Paper plate or palette
- Clear matte sealer spray (optional)
Step 1: Preparation
-
Clean surface:
Begin with a clean, dry terracotta pot. If reusing an old pot, soak it in a vinegar-water solution and scrub away any mineral deposits. Let it dry completely for at least 24 hours, as moisture trapped in the clay will bubble your paint. -
Define the rim:
Decide where you want the natural terracotta rim to end. Locate the groove or line just below the thick upper lip of the pot. This natural indentation is the perfect guide for your first tape line. -
Tape the rim:
Apply a strip of painter’s tape horizontally around the pot, following that groove below the rim. Press the top edge of the tape down firmly to ensure a crisp line where the paint meets the raw clay.
Bleed-Proof Lines
Before painting your color, paint a thin layer of clear matte medium or sealer over the tape edge. This seals the gap so any ‘bleed’ is clear, keeping your color line razor sharp.
Step 2: Creating the Geometry
-
Place diagonal tape:
Determine the angle for your two-tone design. Cut a long piece of painter’s tape and apply it diagonally across the body of the pot, starting from your horizontal tape line and angling down to the bottom edge. -
Seal the tape edges:
Run your fingernail or a credit card firmly along all edges of the tape. This is crucial for preventing paint bleed on the textured terracotta surface. -
Base coat white:
For the crispest colors, paint the section intended for the lighter color (the white section) first. Using your flat brush, apply a thin, even layer of warm white paint to the triangular section on the right side of the tape. -
Dry and repeat:
Allow the first coat of white to dry to the touch, usually about 15-20 minutes. Apply a second coat to ensure full opacity so the orange clay doesn’t show through. -
Paint the green section:
While the white section dries completely, you can paint the larger left section. Apply your sage green paint, brushing away from the tape edge to minimize the risk of paint forcing its way under the adhesive. -
Second green coat:
Once the first green layer is dry, add a second coat for a rich, solid color finish. I find that matte or chalk paints give the most professional look here.
Step 3: Getting the Clean Line
-
Remove tape carefully:
Wait until the paint is dry to the touch but not fully cured (about 30 minutes after the last coat). Slowly peel back the diagonal tape at a sharp 45-degree angle away from the painted edge. -
Fix imperfections:
Terracotta is porous, so minor bleeding is common. If needed, use a small angled brush or even a tiny scraper to gently tidy up the line where the two colors meet the natural clay. -
Fill the gap:
The area that was under the diagonal tape is still raw terracotta. Now you need to carefully fill this in. You have a choice: paint it green to extend that section, or white. In the reference image, the color continues seamlessly. Carefully hand-paint the strip to match the adjacent green section. -
Blend the join:
Use a steady hand and a small brush to join the newly painted strip with the existing green section, ensuring the texture looks uniform. Let this dry completely.
Tape Peeling Paint?
If your tape pulls up the base coat, your paint wasn’t fully dry or the tape is too sticky. Stick the tape to your jeans or shirt first to remove some tackiness before applying it to the pot.
Step 4: Wait, did we miss a step?
-
Alternative method explanation:
Actually, looking closely at the texture, you might find it easier to paint the *entire* lower section white first, let it dry, stick the tape over the white paint, and then paint the green layer on top. This avoids the unpainted strip issue entirely. -
Apply this better method:
To achieve the look in the photo seamlessly: Paint the whole area below the rim white first. Let it cure fully (overnight is best so tape doesn’t peel it). Then apply the diagonal tape over the white paint and paint the green section. -
Final peel:
Peel off the diagonal tape to reveal the crisp white line underneath the green layer.
Step 5: Finishing Touches
-
Remove rim tape:
Finally, remove the horizontal tape protecting the top rim. -
Seal (Optional):
If you plan to keep this outdoors or in a humid spot, spray the painted portion with a matte clear sealer. This protects the paint from water damage without making it too shiny. -
Plant:
Fill with cactus soil and add your favorite succulents to complete the look.
Now your succulents have a modern, stylish home that looks great on any windowsill


Rainbow Ombre Clay Pots
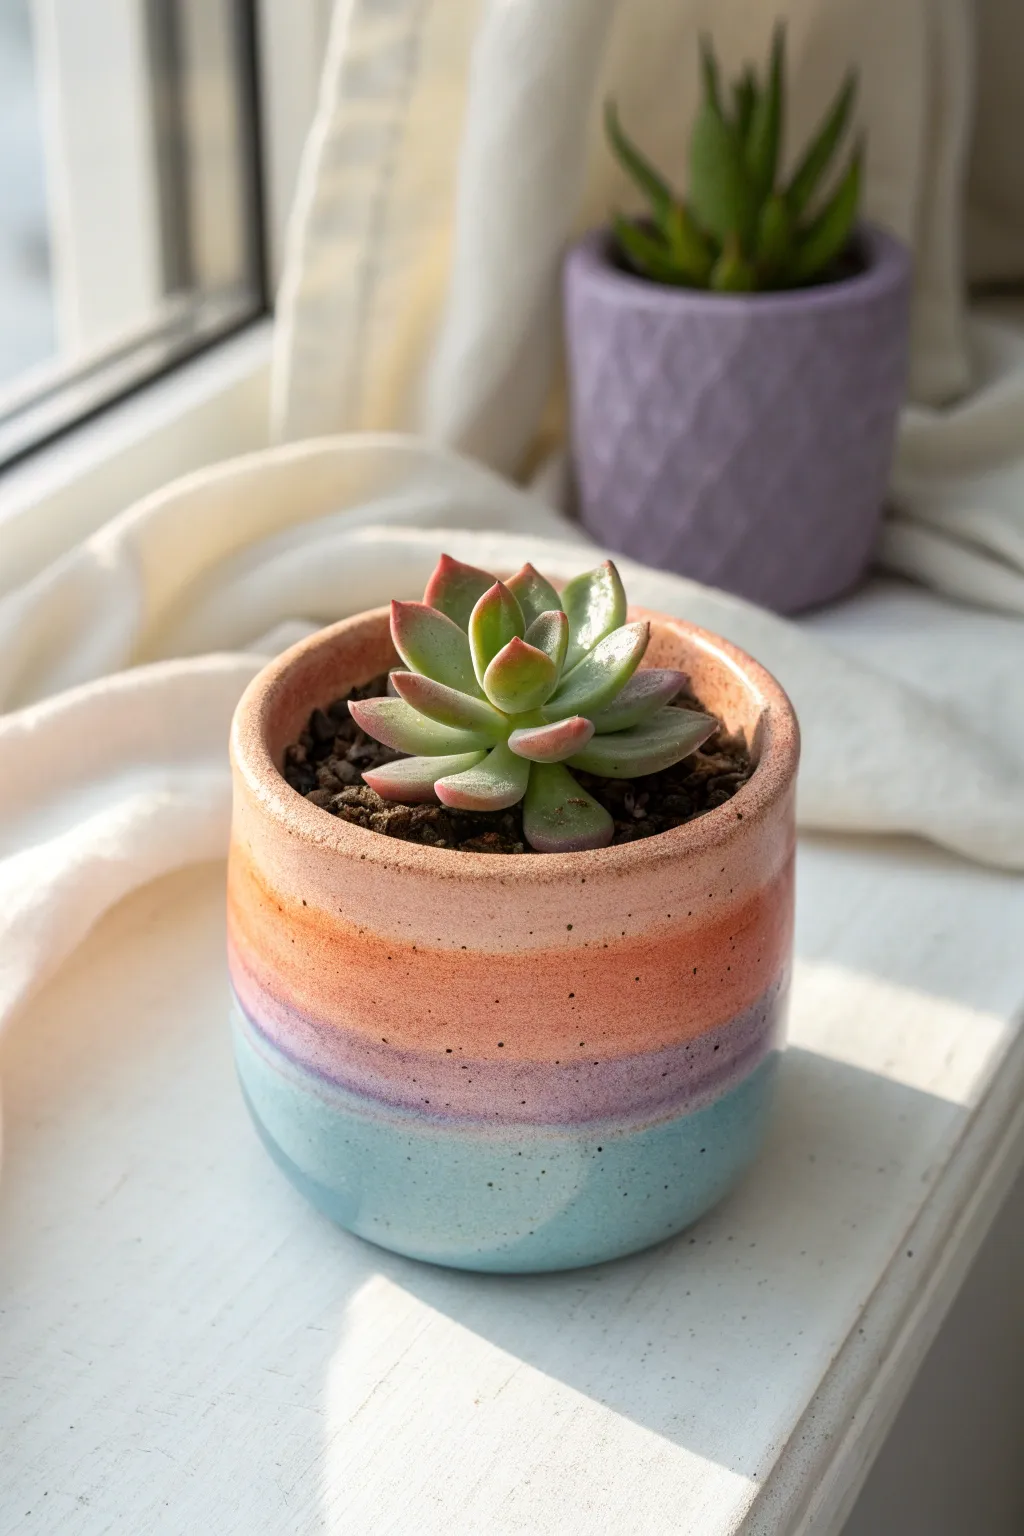
Transform a plain cylinder planter into a dreamy piece of decor with this soft, sunset-inspired gradient. By layering peach, lavender, and sky blue hues with a speckling technique, you’ll achieve a high-end ceramic glaze look without needing a kiln.
Step-by-Step Tutorial
Materials
- Cylindrical ceramic or terracotta pot (clean and dry)
- White acrylic gesso or primer
- Acrylic paints: Peach/Coral, Lavender/light purple, Sky Blue
- Glossy glaze varnish or high-gloss sealant
- Makeup sponges or soft blending sponges
- Medium flat paintbrush
- Old toothbrush (for speckling)
- Black brown acrylic paint (diluted)
- Palette or paper plate
- Water cup
Step 1: Base Preparation
-
Clean surface:
Ensure your pot is completely free of dust and oils. If using a terracotta pot, wipe it down with a damp cloth and let it dry fully to ensure the paint adheres properly. -
Apply primer:
Coat the entire exterior of the pot with white gesso or primer. This step is crucial for making the pastel colors pop later on. -
Dry thoroughly:
Allow the primer to dry completely. If the original pot color still shows through, apply a second thin coat of primer.
Muddy colors?
If your purple and peach are turning brown where they meet, let the peach dry completely first. Then apply a very thin wash of purple over the overlap for a cleaner transition.
Step 2: Creating the Ombre
-
Mix your colors:
Prepare your three main colors on your palette: peach, lavender, and sky blue. If your acrylics are too thick, you can add a tiny drop of water to improve flow, but keep them opaque. -
Apply the top color:
Using a sponge, dab the peach/coral paint around the top third of the pot. Don’t worry about a perfect straight line at the bottom edge; an uneven edge helps with blending. -
Apply the bottom color:
Sponge the sky blue paint around the bottom third of the pot. Again, keep the upper edge of this blue section soft and diffuse. -
Apply the middle color:
Sponge the lavender paint into the middle section. Slightly overlap the paint onto the bottom of the peach section and the top of the blue section. -
Blend the transitions:
While the paint is still slightly tacky, take a clean area of your sponge and gently tap over the border lines where the colors meet. This softens the transition. -
Second coat:
Let the first layer dry to the touch. Repeat the sponging process to build opacity, focusing on smoothing out the gradients so they look like melting sorbet. -
Rim detail:
Use your brush or sponge to carefully bring the peach color over the rim and just slightly inside the pot for a finished look.
Make it shimmer
Mix a tiny amount of iridescent mixing medium into your top clear gloss coat. It adds a subtle pearlescent sheen that mimics high-end kiln-fired glazes.
Step 3: Finishing Touches
-
Prepare speckle mix:
Dilute a small amount of brownish-black paint with water until it has an ink-like consistency. -
Apply speckles:
Dip the bristles of an old toothbrush into the diluted paint. Hold the brush near the pot and run your thumb across the bristles to flick tiny specks onto the surface. -
Control density:
Go lightly at first. I prefer to add fewer speckles initially and layer more if needed, simulating the natural imperfections found in stoneware clay. -
Dry completely:
Allow the paint and speckles to cure fully, ideally leaving it overnight to ensure moisture has evaporated. -
Glaze application:
Apply a thick coat of high-gloss varnish or sealant. This is the magic step that transforms the matte acrylic into a faux-ceramic glaze. -
Final cure:
Let the varnish dry according to the manufacturer’s instructions before engaging in planting.
Place your favorite succulent inside and enjoy the soft splash of color on your windowsill


Stenciled Geometric Pot Designs
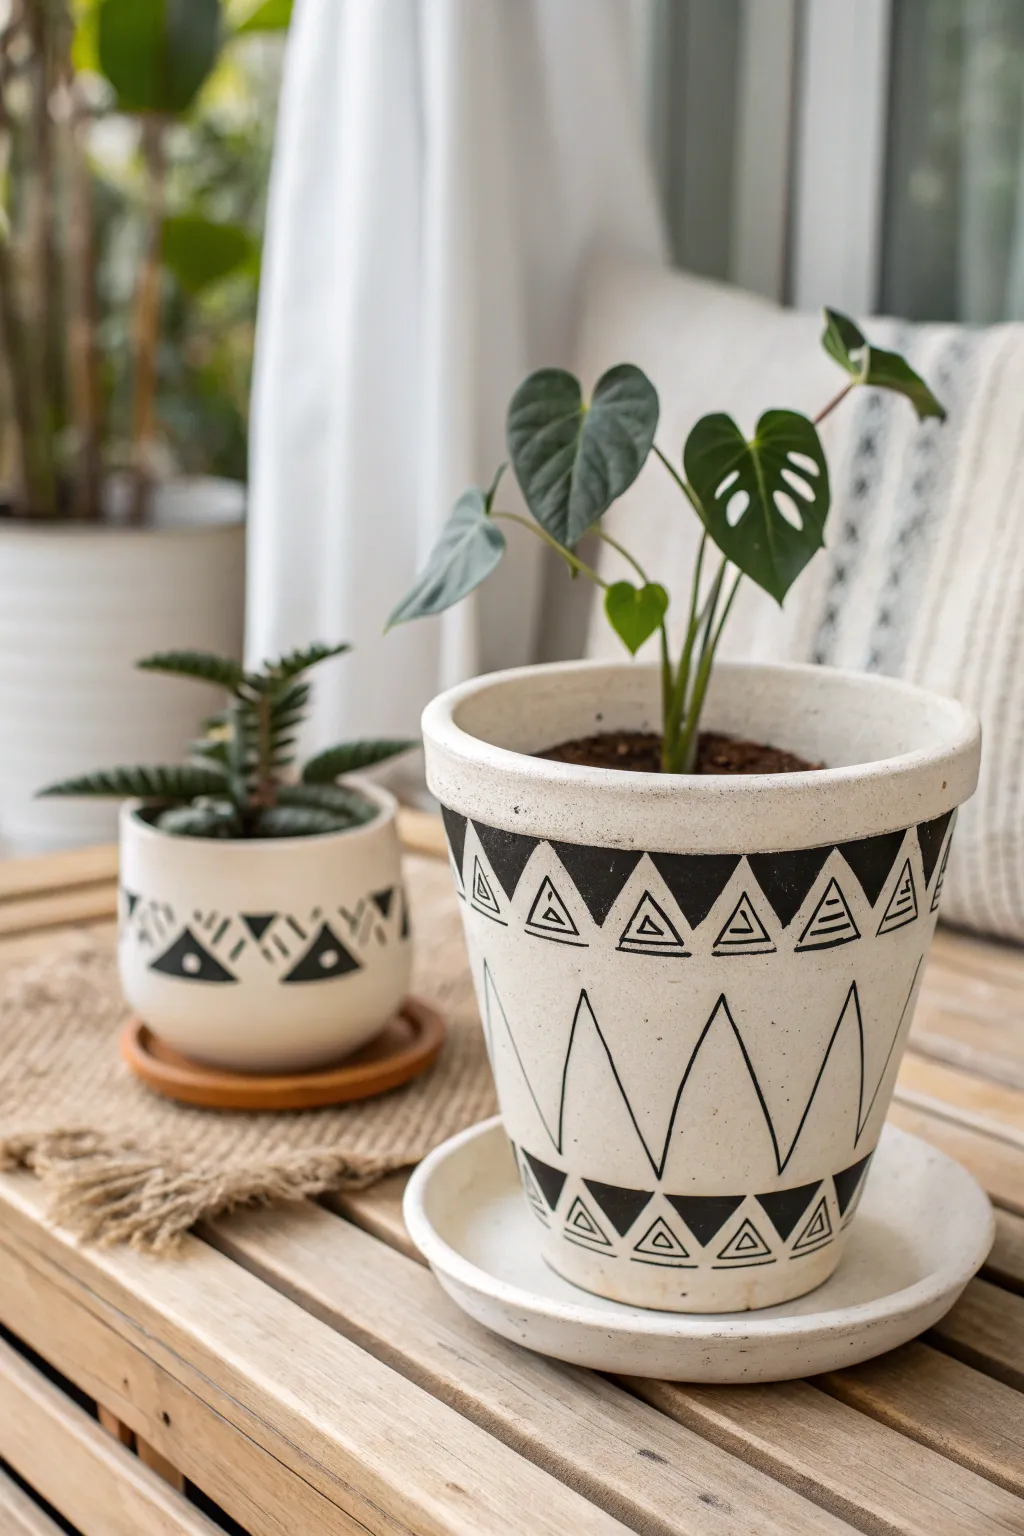
Transform standard terracotta into modern decor with this striking black and white geometric design. The crisp triangles and hand-drawn lines create a playful yet sophisticated look that perfectly highlights sleek houseplants.
Detailed Instructions
Materials
- Terra cotta pot (6-8 inch)
- Terra cotta pot saucer
- White chalk paint or flat acrylic paint
- Black acrylic paint
- Black permanent marker or paint pen (medium tip)
- Medium flat paintbrush
- Small fine-tip paintbrush
- Pencil
- Ruler or measuring tape
- Matte clear sealant spray
Step 1: Base Preparation
-
Clean the surface:
Before starting, ensure your pot is completely clean and dry. Wipe it down with a damp cloth to remove any dust or manufacturing residue that might prevent the paint from sticking. -
Apply the base coat:
Using your medium flat brush, apply a generous coat of white chalk paint to the exterior of the pot. Don’t forget to paint the top rim and a few inches down the inside. -
Paint the saucer:
While the pot dries, paint the matching saucer with the same white paint. I prefer to do the top side first, let it flip, and then do the bottom. -
Apply a second coat:
Terracotta is porous and drinks up paint. Once the first layer is dry to the touch, apply a second coat to ensure solid, opaque coverage without streaks.
Step 2: Drafting the Design
-
Mark the bands:
Using a pencil and ruler, lightly mark a horizontal line about 1.5 inches below the rim. Make a second line about 1.5 inches up from the bottom edge. These will guide your triangle borders. -
Sketch the top triangles:
Along the top pencil guide, lightly sketch a row of inverted equilateral triangles. Try to space them evenly around the circumference so they meet tip-to-tip. -
Sketch the bottom triangles:
Repeat this process along the bottom guide line, drawing a row of upright triangles pointing upward. -
Draw the main zig-zags:
In the large central white space between your two triangle bands, sketch large, tall zig-zag lines (mountain peaks) that span the full height of the center section.
Uneven Triangles?
If spacing triangles by eye is tricky, cut a triangle template out of stiff cardstock. Trace around it repeatedly to ensure every shape is identical.
Step 3: Painting and Detailing
-
Fill the black triangles:
Use a small fine-tip brush and black acrylic paint to carefully fill in the inverted triangles near the rim and the upright triangles at the base. -
Let the black dry:
Allow the paint to dry completely. If the black looks streaky, a quick second coat will make the geometry pop. -
Outline the shapes:
Switch to your black paint pen or marker. Carefully trace over your large central zig-zag pencil lines to create crisp, dark geometric peaks. -
Create the inner triangles:
Inside the white spaces between your painted black triangles, use the pen to draw smaller, nested triangles. -
Add detail lines:
Inside those small nested triangles, draw horizontal hatching lines. I like to do 3-4 lines per triangle to give it that distinct tribal-pattern look. -
Detail the central zig-zags:
Add a vertical line dropping down from the peak of every large central zig-zag to the trough of the next one, creating a segmented look.
Add Some Texture
Mix a teaspoon of baking soda into your white base paint before applying. This creates a textured, ceramic-like finish that looks more expensive than plain paint.
Step 4: Finishing Touches
-
Clean up smudges:
If you made any stray marks with the pen, touch them up with a tiny bit of white paint. -
Seal the artwork:
Once all paint and ink are fully cured (wait at least an hour), take the pot outside and spray it with a matte clear sealant. This protects your design from water damage during watering. -
Pot your plant:
Place your favorite houseplant directly inside or keep it in a nursery grower pot that rests inside your new decorative planter.
Now your shelf has a custom artisan touch that looks great with any greenery

The Complete Guide to Pottery Troubleshooting
Uncover the most common ceramic mistakes—from cracking clay to failed glazes—and learn how to fix them fast.
Botanical Napkin Decoupage Pots
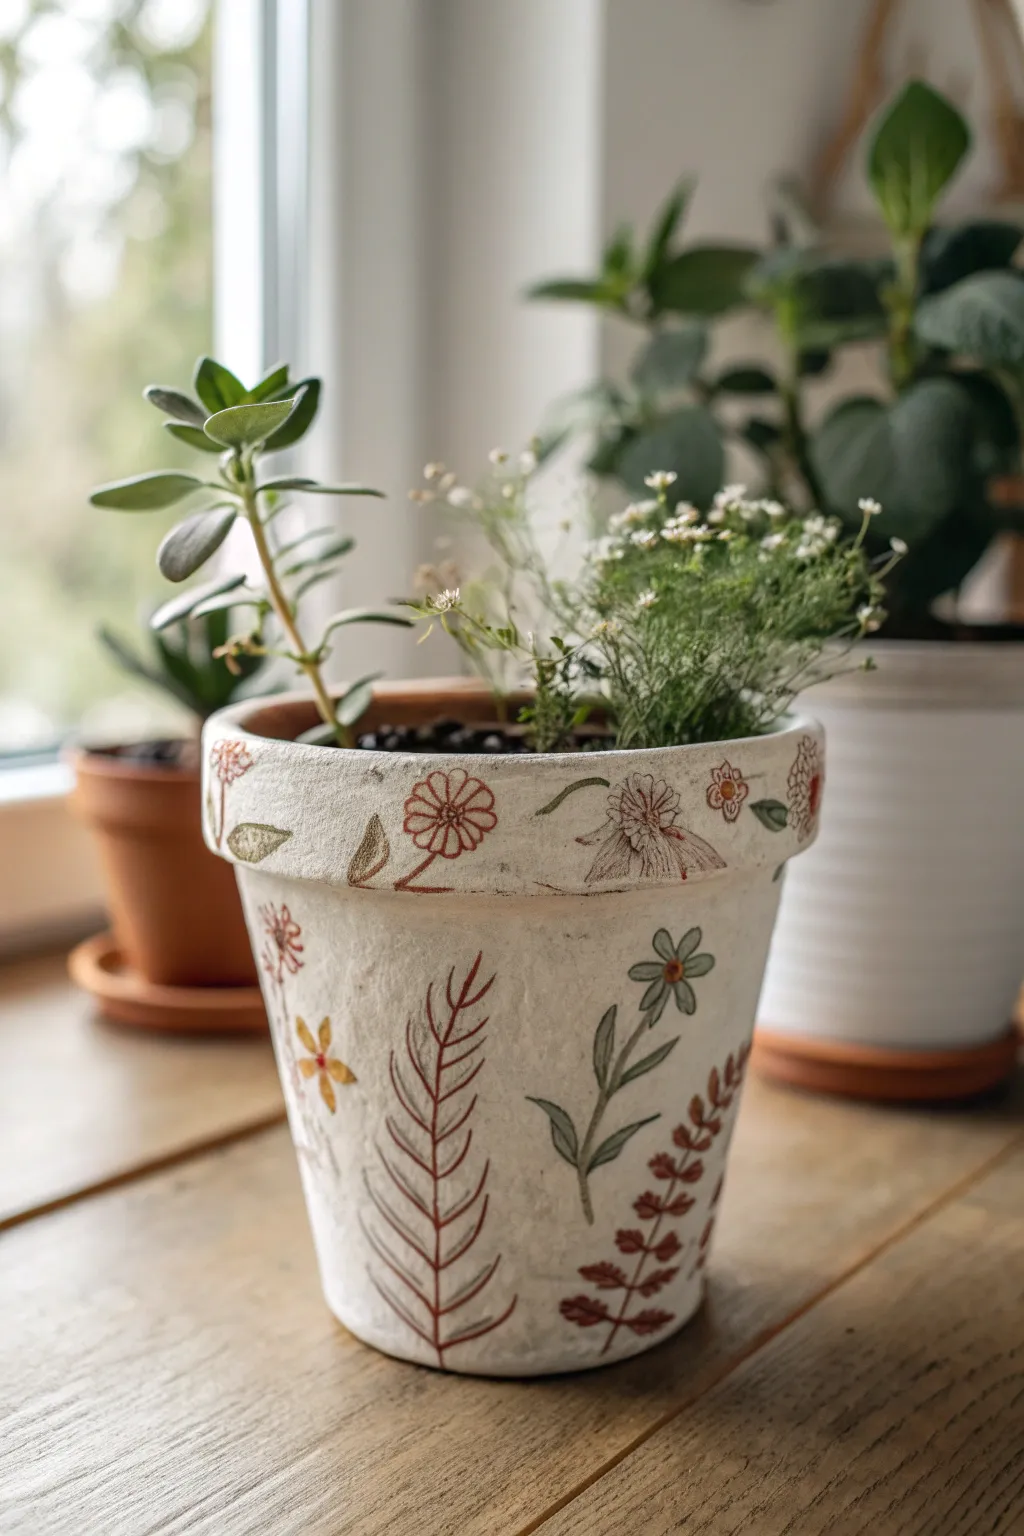
Transform a simple terracotta planter into a piece of delicate botanical art using the napkin decoupage technique. This project creates a lovely, textured finish that mimics hand-painted pottery with intricate floral details.
Step-by-Step Tutorial
Materials
- Terracotta pot (4-6 inch diameter)
- White or cream chalk paint
- Botanical pattern paper napkins
- Mod Podge (Matte finish)
- Small sharp scissors
- Flat paintbrush
- Foam brush
- Fine-grit sandpaper
- Clear acrylic sealer spray (Matte)
Step 1: Preparation & Base Coat
-
Clean the pot:
Begin by wiping down your terracotta pot with a damp cloth to remove any dust or debris. Let it dry completely. -
Apply first coat:
Using a foam brush, apply a layer of white or cream chalk paint to the exterior of the pot. Chalk paint adheres well to porous terracotta without needing a primer. -
Cover the rim:
Don’t forget to paint the inside rim of the pot, painting down about an inch, so the terracotta color doesn’t show when filled with soil. -
Dry and repeat:
Allow the first coat to dry for about 30 minutes. Apply a second coat to ensure solid, opaque coverage. -
Rough it up:
Once fully dry, lightly sand the surface with fine-grit sandpaper. This creates a smoother surface for decoupage and adds a slightly weathered, vintage texture.
Wet Brush Trick
Instead of cutting with scissors, use a wet paintbrush to trace around the napkin design. The paper will tear easily along the wet line for a soft, feathered edge.
Step 2: Preparing the Motifs
-
Separate the layers:
Take your botanical napkins and carefully peel away the white backing layers. You only want the very top, single printed ply. -
Rough cutting:
Cut out the floral and leafy elements you want to use. I find it easiest to first cut loosely around the shapes to separate them. -
Detail cutting:
Using small, sharp scissors, cut as close to the design edge as possible. The closer you cut, the better the image will blend into the paint. -
Plan your layout:
Without using glue yet, arrange your cutouts on the dry pot to finalize your design. Think about balancing larger flowers on the body and smaller vines near the rim.
Make It 3D
Add texture by using puff paint or a fine liner brush to trace over the stems of your floral designs after the decoupage is dry, giving a slight embossed effect.
Step 3: Decoupage Application
-
Apply medium:
Using a flat paintbrush, apply a thin layer of Mod Podge to the specific spot on the pot where your first design will go. -
Place the image:
Gently lay the napkin cutout onto the wet Mod Podge. Be extremely careful, as the single ply is fragile when wet. -
Smooth it out:
Dip your finger in a tiny bit of water or Mod Podge and very gently smooth the paper from the center outward to remove wrinkles. Do not rub too hard or it will tear. -
Seal the image:
Immediately apply a thin layer of Mod Podge over the top of the design to seal it into place. -
Continue the pattern:
Repeat this process for all your botanical elements, working your way around the pot until your design is complete. -
Rim details:
For the rim, use smaller horizontal elements or vines. Apply them just below the lip for a bordered look.
Step 4: Finishing Touches
-
Full seal coat:
Let the individual designs dry for at least one hour. Then, coat the entire exterior of the pot with a layer of Mod Podge to unify the sheen. -
Weathering (Optional):
If you want an aged look, you can lightly sand over the dried images in a few spots to distress them. -
Final protection:
Take the pot to a well-ventilated area and spray it with a clear acrylic sealer. This makes the pot water-resistant and durable for planting.
Now your pot is ready to be filled with herbs or succulents to complement the artwork
Marbled Paint-Pour Pots
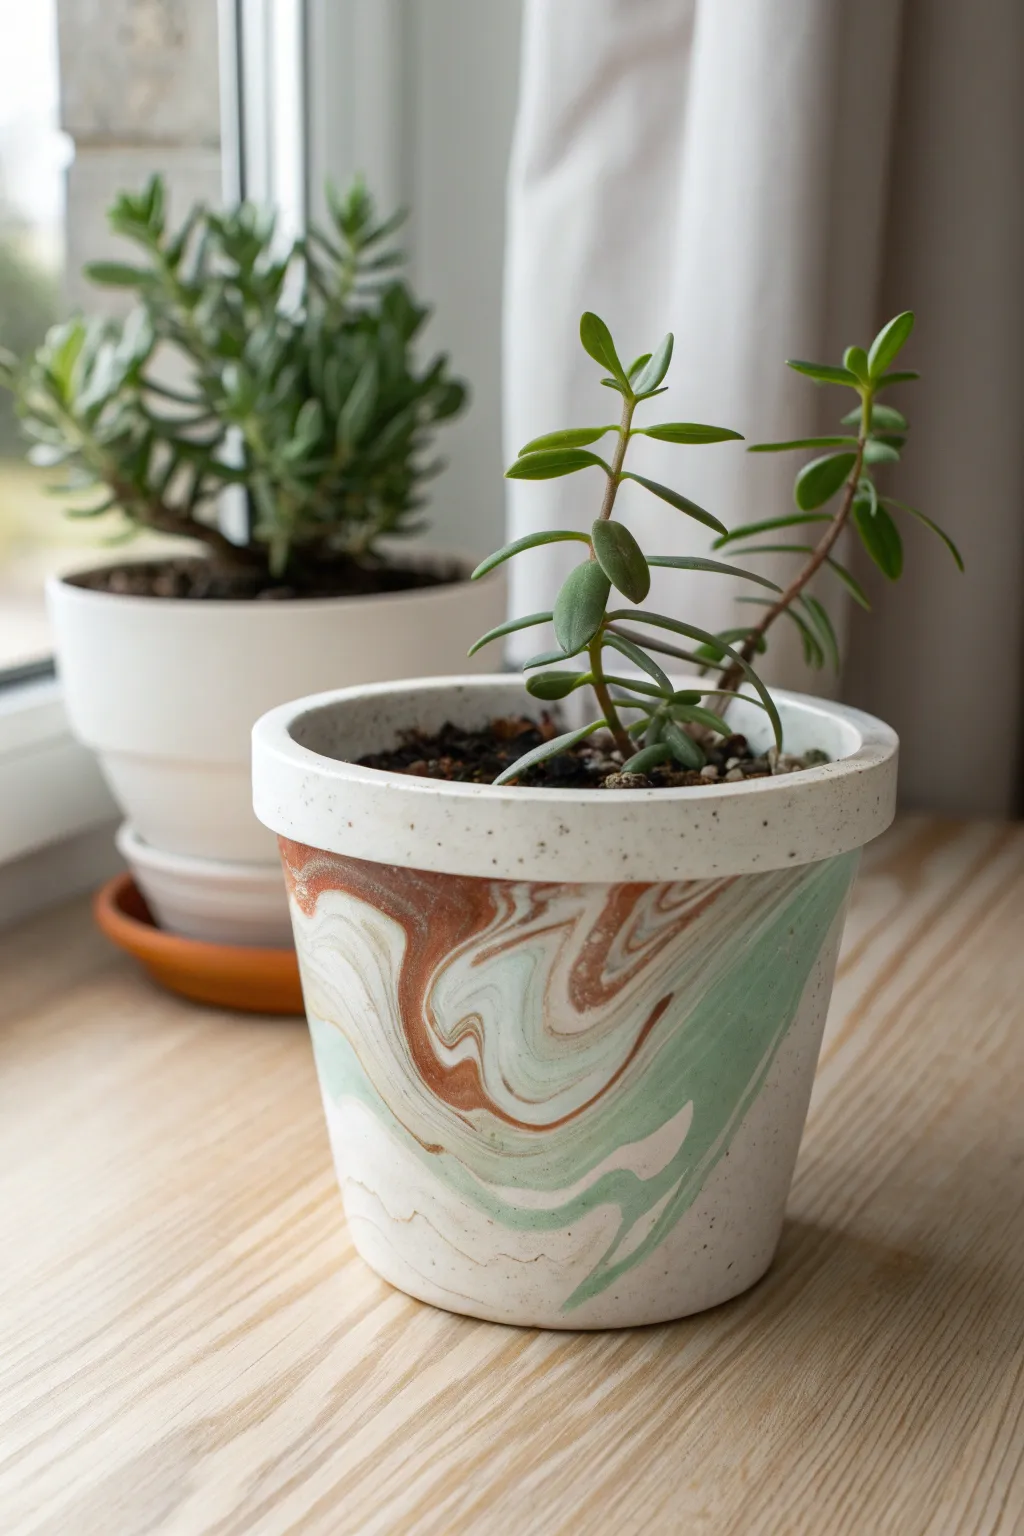
Transform a plain planter into a piece of modern art with a mesmerizing, organic marble effect. This technique combines warm terracotta and cool sage tones against a creamy white base for a sophisticated, earthy look that elevates any houseplant.
Detailed Instructions
Materials
- Terra cotta or concrete pot (clean and dry)
- White acrylic craft paint (matte finish)
- Burnt sienna or terracotta acrylic paint
- Sage green or seafoam green acrylic paint
- Pouring medium
- Disposable plastic cups (one for each color, one large for mixing)
- Craft sticks for stirring
- A cardboard box or disposable baking tray (to catch drips)
- Painter’s tape
- Optional: Clear matte sealant spray
Step 1: Preparation and Mixing
-
Prep the workspace:
Set up your work area by placing the cardboard box or tray on a flat surface. This can get messy, so protect your table. -
Tape the rim:
If you want a clean, unpainted rim like the inspo image, carefully apply painters tape around the top edge of the pot. Press it down firmly to prevent seepage. -
Seal the drainage hole:
Place a piece of tape over the drainage hole from the inside to stop paint from pouring straight through and ruining your surface. -
Prepare the paints:
In separate small cups, mix each acrylic paint color with the pouring medium. A 1:1 ratio is usually a good starting point, but check your medium’s instructions. You want a consistency like warm honey or heavy cream. -
Adjust the white base:
Mix a larger volume of the white paint mixture than the other colors, as this will be the dominant background shade.
Muddy Colors?
If your colors turn brown instead of separating, you likely over-stirred. Next time, barely touch the paints once they are in the cup—let gravity mix them as they pour.
Step 2: Creating the Dirty Pour
-
Layer the white:
Pour about half of your white mixture into the large empty mixing cup. -
Add accent colors:
Gently pour a dollop of the terracotta color right into the center of the white paint. Do not stir. -
Layer the green:
Pour the sage green mixture on top of or slightly next to the terracotta. The goal is to layer them, not blend them into a muddy color. -
Top off the cup:
Pour the remaining white paint over the top of your colored layers. This helps create that veiled, milky marble effect seen in the photo. -
The minimal swirl:
Using a craft stick, drag it through the paint in the cup just once or twice in a cross pattern. Resisting the urge to over-mix is key here.
Terrazzo Twist
Before the paint fully dries, sprinkle dry sand or tiny crushed stone chips onto the wet surface to add texture and mimic real stone or terrazzo.
Step 3: The Pour and Finish
-
Position the pot:
Place your pot upside down in the center of your catch tray. elevating it on a heavy can or jar is helpful so the paint can drip freely off the rim. -
Start the pour:
Begin pouring the mixed paint onto the bottom (currently the top) of the overturned pot. Move your hand in a slow circular motion. -
Guide the flow:
As the paint cascades down the sides, ensure the entire surface is covered. You can gently tilt the pot if needed to cover bare spots. -
Handling drips:
Let the excess paint drip off the rim. If large droplets form, you can gently wipe them with a craft stick, but mostly let gravity do the work. -
Initial drying:
Allow the pot to sit undisturbed for at least 24 hours. Moving it too soon can shift the pattern. -
Remove the tape:
Once the paint is dry to the touch but not fully cured (usually after that 24-hour mark), carefully peel away the painter’s tape to reveal the clean rim. -
Final cure:
Let the pot cure for another 1-2 days to ensure the thick paint layers are completely hard. -
Seal the surface:
To protect your beautiful new design from water damage, spray the painted area with a clear matte sealant. Two light coats work better than one heavy one.
Enjoy your stylish new planter, a perfect home for your favorite succulents


What Really Happens Inside the Kiln
Learn how time and temperature work together inside the kiln to transform clay into durable ceramic.
Faux Glazed Speckled Mini Pots
Transform a plain terracotta pot into a chic, ceramic-style planter with this easy faux glaze technique. By layering creamy acrylics and adding intentional splatters, you’ll achieve that high-end, kiln-fired look without ever touching a pottery wheel.
Step-by-Step Guide
Materials
- Small terracotta pot (approx. 3-4 inch)
- White or cream acrylic paint (matte or satin finish)
- Burnt sienna or terracotta acrylic paint
- Glossy varnish or glaze medium (Mod Podge Gloss works well)
- Painter’s tape or masking tape
- Stiff bristle brush (e.g., an old toothbrush or stiff stencil brush)
- Small round paintbrush
- Palette or small dish for mixing
- Water and paper towels
Step 1: Preparation and Base Coat
-
Clean the pot:
Ensure your terracotta pot is completely clean and dry. Wipe away any dust with a slightly damp cloth, as dust will prevent the paint from sticking properly. -
Tape the base:
Decide how much of the raw raw terracotta you want visible at the bottom. Apply a ring of painter’s tape tightly around the lower third of the pot to mask it off. Press the edges firmly to prevent paint bleed. -
Mix the cream color:
Squeeze out your white or cream acrylic paint. I like to add just a tiny dot of brown or yellow ochre if the white is too Stark; you want a warm, milky ceramic tone. -
Apply first coat:
Paint the upper section of the pot above the tape line. Use smooth horizontal strokes for a clean finish. -
Let it dry:
Allow the first coat to dry completely, which should take about 15-20 minutes depending on humidity. -
Apply second coat:
Add a second layer of the cream paint to ensure full opacity. You shouldn’t see any orange terracotta showing through the white section.
Uneven Speckles?
If your toothbrush splatters are too big or smeary, the paint is likely too watery or the brush is too loaded. Blot the brush on paper towel before flicking for a fine mist.
Step 2: Adding the Faux Glaze Details
-
Prepare the speckle paint:
Mix a small amount of burnt sienna or brown paint with a drop of water to thin it slightly. It needs to be fluid enough to flick off a brush easily. -
Create fine speckles:
Dip a stiff bristle brush or an old toothbrush into the thinned brown paint. Test on a paper towel first, then run your thumb across the bristles to flick fine speckles onto the white section of the pot. -
Vary the density:
Turn the pot as you go to ensure even coverage, but allow some areas to have slightly heavier speckling for a natural, handmade feel. -
Mix the ‘glaze drip’ color:
Combine your burnt sienna paint with a little bit of the gloss varnish or glaze medium on your palette. This will give the larger spots a shiny, translucent quality like real melted glass. -
Paint larger spots:
Using a small round brush, dab irregular spots of this glossy mixture onto the pot. Focus them randomly among the fine speckles. -
Soften the edges:
While the larger spots are wet, you can gently tap them to make them look less like perfect polkadots and more like organic glaze bubbles. -
Recreate the rim:
Run a thin wash of the brown paint along the very top rim of the pot to mimic the way glaze often thins out or gathers at the edges of ceramic ware. -
Remove the tape:
Carefully peel away the painter’s tape while the paint is dry to the touch but not fully cured to keep the line crisp.
Make It Moody
Swap the white base for a dark charcoal or navy blue, then use gold metallic paint for the speckles to create a dramatic, midnight-sky version of this pottery.
Step 3: Protection and Finish
-
Apply gloss finish:
Once all paint is 100% dry, coat only the painted white section with a high-gloss varnish. This is crucial—the contrast between the shiny ‘glazed’ top and the matte terracotta bottom sells the illusion. -
Let varnish cure:
Read the instructions on your varnish bottle for drying times. Usually, letting it sit overnight is best to ensure it handles water well. -
Seal the inside (optional):
If you plan to plant directly inside, applying a sealer to the interior prevents moisture from seeping through and bubbling your exterior paint job. -
Pot your plant:
Fill with cactus soil and add your succulent. Finish with small pebbles or gravel on top of the soil to match the earthy aesthetic.
Now step back and admire your custom ‘stoneware’ piece that looks ready for a boutique shop window
Textured Impressed Pattern Pots

This project transforms simple air-dry clay or terracotta into a striking vessel featuring a mix of geometric carvings and raised tactile details. The warm, earthy tones and intricate rhythmic patterns give it an authentic, hand-crafted artisan feel perfect for modern rustic decor.
Step-by-Step
Materials
- Terracotta-colored air-dry clay (or polymer clay)
- Pottery wheel (optional, for shaping base) or hand-building tools
- Carving tool or clay needle tool
- Small round piping tip or straw (for dots)
- Sponge
- Water bowl
- Wire cutter
- Clear matte sealant spray
Step 1: Forming the Vessel
-
Prepare the clay:
Begin by wedging your terracotta clay thoroughly to remove air bubbles, ensuring a smooth, workable consistency. -
Shape the base form:
Whether throwing on a wheel or using coil-building techniques, shape a round, bulbous vessel that tapers slightly at the top and bottom. Aim for a distinct spherical belly. -
Refine the rim:
smooth the top rim with a wet sponge or chamois cloth to create a soft, rounded lip that looks finished and professional. -
Initial smoothing:
Use a flexible rib tool to smooth the exterior surface of the pot, removing fingerprints or major imperfections before you begin texturing. -
Let it firm up:
Allow the pot to dry slightly until it reaches a ‘leather-hard’ state. This is crucial; if the clay is too soft, your patterns will deform the pot’s shape.
Step 2: Creating the Upper Pattern
-
Mark the bands:
Lightly score horizontal guidelines around the upper shoulder of the pot to define where your zig-zag pattern will live. Using a banding wheel helps keep lines straight. -
Carve the zig-zags:
Using a sharp carving tool or needle tool, incise a continuous zig-zag pattern between your guidelines. Press deeply enough to catch shadows but not so deep you weaken the wall. -
Add detail lines:
Within each triangular section created by the zig-zag, crave smaller vertical or angled hatch marks to fill the space with texture. -
Clean the burrs:
Once the carving is done, gently brush away any little clay crumbs or burrs with a soft dry brush.
Clean Lines Trick
When carving the zig-zag lines, keep your tool wet. A slightly damp tool glides through leather-hard clay much smoother, reducing jagged edges and burrs.
Step 3: Adding the Raised Dots
-
Plan the middle section:
Below the zig-zag band, mentally map out the large central area for the dot pattern. You can lightly score another horizontal line to mark the bottom boundary. -
Create clay pellets:
Roll out many tiny, uniform balls of clay, roughly the size of a peppercorn. I usually prepare a small batch at a time so they don’t dry out. -
Score and slip:
Dip the back of a clay pellet in a tiny bit of water or slip (liquid clay) and press it firmly onto the pot’s surface. -
Arrange the pattern:
Place the dots in evenly spaced rows, staggering them like bricks to create a pleasing, rhythmic texture. Continue until the entire middle band is filled. -
Secure the dots:
Gently press each dot again with a flat tool or your finger to ensure a strong bond without flattening the dome shape too much.
Rustic Wash Finish
After drying, rub a diluted darker brown paint into the crevices and wipe the surface clean. This highlights the carvings and makes the dots pop visually.
Step 4: Finishing the Lower Texture
-
Define the lower band:
Carve two horizontal parallel lines below the dot section to separate it from the bottom pattern. -
Carve geometric details:
For the bottom section, carve angled cross-hatching or diamond shapes. This mirrors the complexity of the top band and grounds the design. -
Final dry:
Let the pot dry completely. For air-dry clay, this might take 24-48 hours depending on humidity. -
Seal the piece:
Finish by spraying two light coats of clear matte sealant to protect the texture and deepen the terracotta color.
Place your finished pot in a spot where sunlight can rake across the surface to highlight all that beautiful texture

TRACK YOUR CERAMIC JOURNEY
Capture glaze tests, firing details, and creative progress—all in one simple printable. Make your projects easier to repeat and improve.
Braided Twine Wrapped Pots
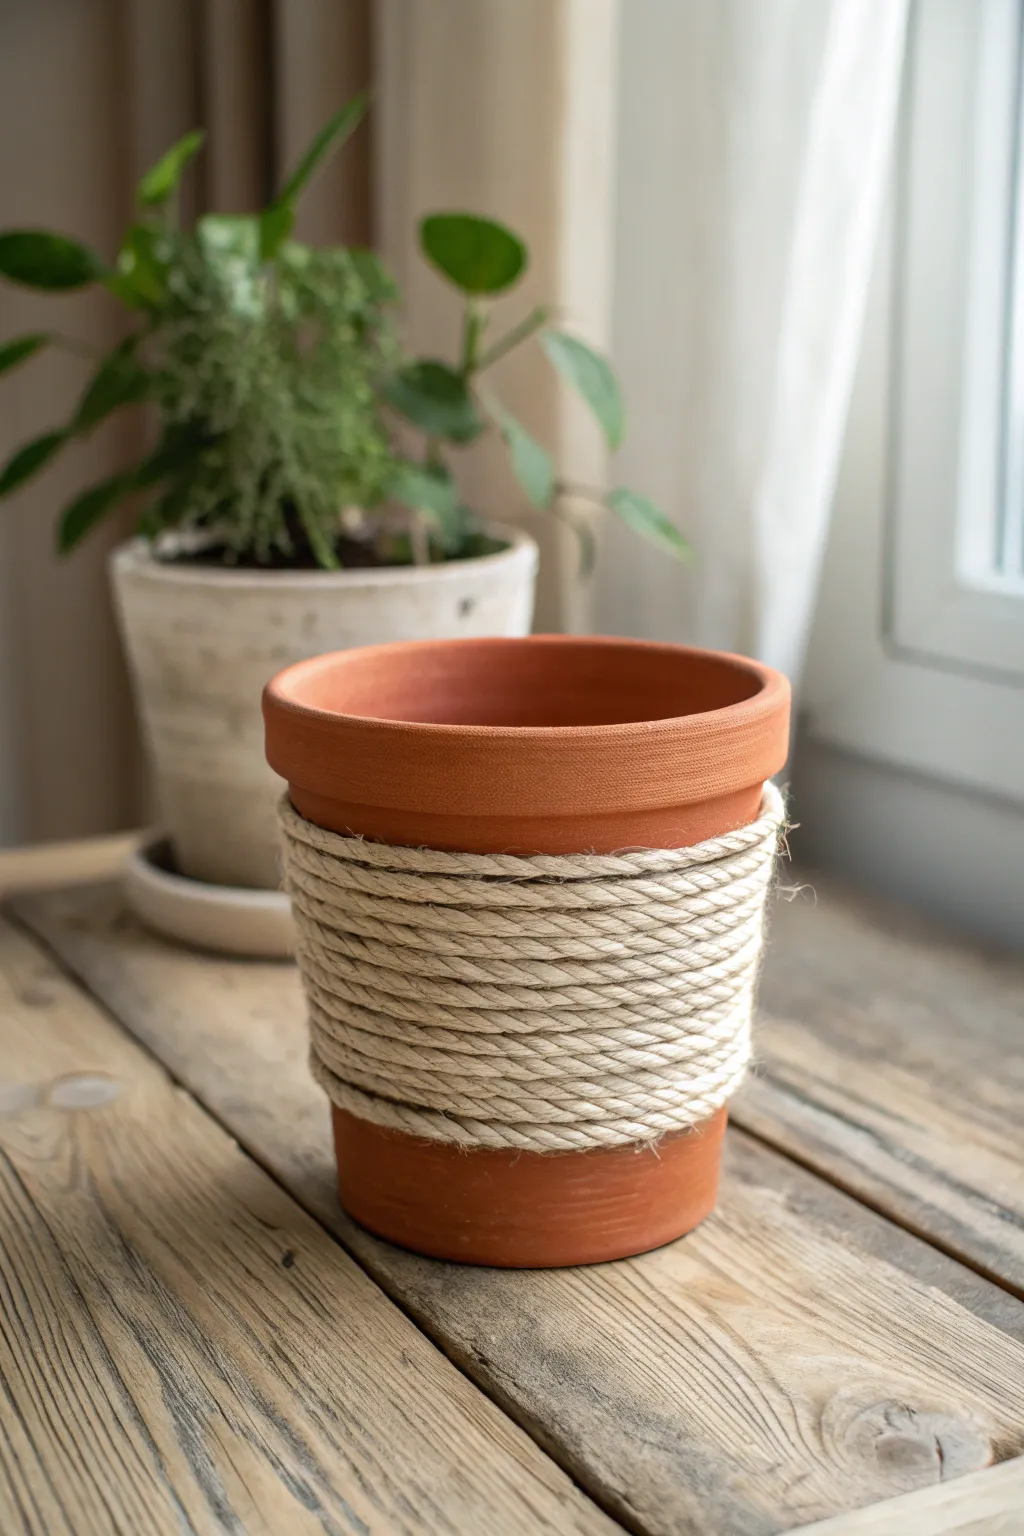
Transform a standard terracotta planter into a textured statement piece with just a bit of clever wrapping. This project combines the warmth of natural clay with the rustic charm of braided rope for a cozy, farmhouse-style look.
Step-by-Step Guide
Materials
- Standard terracotta pot (4-6 inch diameter)
- Thick braided jute or sisal rope (approx. 1/4 inch thick)
- Hot glue gun and clear glue sticks
- Scissors
- Measuring tape (optional)
- Clean cloth
Step 1: Preparation
-
Select your pot:
Begin with a classic terracotta pot. The one in the image is a standard shape with a distinct rim, which helps frame the rope section perfectly. -
Clean the surface:
Wipe down the exterior of the pot with a damp cloth to remove any dust or terracotta powder. Let it dry completely so the glue adheres properly. -
Measure the wrapping zone:
Visually decide where your rope section will begin and end. For this look, we are leaving the top rim and the very bottom base exposed to let the clay color show through. -
Warm up the glue:
Plug in your hot glue gun and insert a fresh glue stick, setting it to a high temperature for a strong bond with the rough terracotta surface.
Step 2: Starting the Wrap
-
Apply the anchor glue:
Place a small bead of hot glue just below the lip of the pot’s rim. This is where your first coil will sit. -
Attach the rope end:
Press the cut end of your braided rope firmly into the glue bead. Hold it for ten seconds until the glue cools and sets. -
Begin the first coil:
Apply a thin line of glue about two inches long, running horizontally around the pot, directly underneath the rim. -
Secure the first round:
Press the rope into the glue line, keeping it perfectly parallel to the rim. This first line sets the straightness for the entire project, so take your time here.
Clean Cuts Pro Tip
Before cutting your braided rope, wrap a piece of clear tape around the area you plan to cut. Cut through the tape to prevent the braid from unraveling instantly.
Step 3: Building the Texture
-
Continue coiling:
Apply another inch or two of glue, then press the rope down. Ensure this second coil sits snugly against the first one, leaving no gaps where the pot shows through. -
Maintain tension:
Pull the rope slightly taut as you wrap. I find that keeping a bit of tension prevents the braid from sagging or looking loose later on. -
Check your progress:
Every few rotations, step back and look at the pot from the side to ensure your rows aren’t drifting diagonally. -
Wrap the mid-section:
Continue wrapping until you have covered the main body of the pot. The project shown uses about 8-10 coils of thick braided rope. -
Align the braid pattern:
Try to nestle the twists of the new row into the twists of the previous row for a seamless, unified texture.
Add a Color Pop
Painting the exposed terracotta rim and base with white or navy acrylic paint before wrapping creates a striking modern contrast with the natural twine.
Step 4: Finishing Touches
-
Determine the stopping point:
Stop wrapping when you are about an inch from the bottom of the pot. Leaving the base exposed creates a nice visual balance with the rim. -
Cut the rope:
Snip the rope at an angle so the end can tuck in neatly. Ideally, cut it so the end aligns vertically with where you started the very first coil. -
Secure the final end:
Apply a generous dab of hot glue to the cut end and tuck it tightly against the previous row, pressing firmly until set. -
Clean up stray glue:
Inspect the pot for those pesky hot glue spiderwebs. Rub them off gently with your finger or pick them away. -
Smooth the ends:
If the cut ends of the rope are fraying, dab a tiny amount of glue on your finger (carefully!) and smooth the fibers down.
Now your custom planter is ready to add a warm, textural touch to your windowsill garden
Twine Hanging Clay Pot Planters
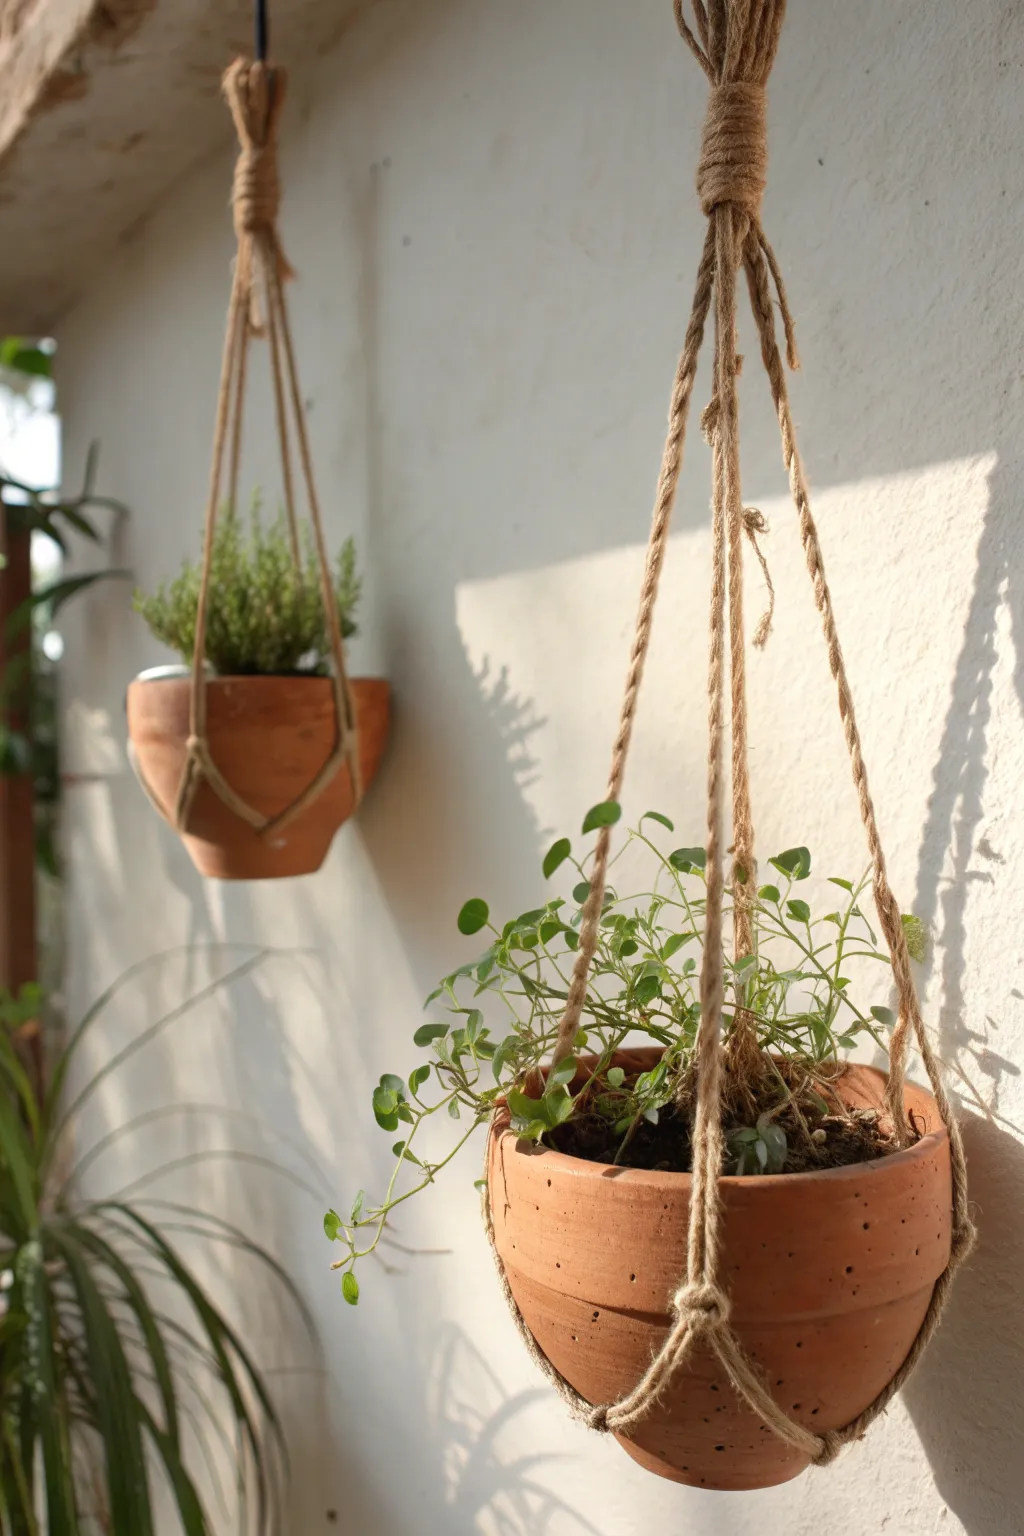
Transform standard terracotta pots into a charming floating garden with just a few lengths of natural jute twine. This minimalist macrame-style hanger showcases your plants beautifully while adding warm, organic texture to any sunny wall.
Step-by-Step Tutorial
Materials
- Small to medium terracotta pot (with rim)
- Natural jute twine (3mm – 5mm thickness)
- Scissors
- Measuring tape
- Metal ring or S-hook (optional, for hanging)
- Small potted plant (trailing varieties work best)
Step 1: Preparing the Twine
-
Measure your lengths:
Cut four equal pieces of jute twine. For a standard hanger like the one pictured, lengths of about 6-8 feet (2-2.5 meters) work well, giving you plenty of room for knots and hanging height. -
Align the strands:
gather all four strands together, ensuring the ends are flush. Fold the entire bundle in half to create a loop at the top midpoint. You should now have eight strands hanging down.
Step 2: Creating the Top Loop
-
Form the anchor loop:
Take the folded midpoint and create a simple overhand knot to form a loop about 1-2 inches wide. This will be where you hang the planter from a hook. -
Gather the neck:
Alternatively, if you want the wrapped look shown in the darker hanger in the background, don’t knot the main loop yet. Instead, cut a separate, shorter piece of twine (about 2 feet). -
Start the gathering knot:
Use the ‘gathering knot’ technique: Hold the loop in place and lay the short piece against the bundle with a small loop pointing up. -
Wrap the neck:
Wrap the long end of your short piece tightly around the main bundle and its own loop, moving downwards. Aim for about 1-1.5 inches of solid wrapping. -
Secure the wrap:
Thread the tail of your wrapping cord through the small loop you left pointing up. Pull the top tail of that gathering cord to tuck the knot underneath the wraps, hiding it completely. Trim the excess close.
Pot Slips Through?
If the netting gaps are too wide, the pot might slip. Undo the bottom knot and retie the second row of knots higher up, or add a third row of knots for extra security on smaller pots.
Step 3: Knotting the Cradle
-
Separate the strands:
Hang your loop on a doorknob or hook to make working easier. Separate the eight hanging strands into four pairs of two. -
Determine the first drop:
Decide how far down you want the pot to sit. Measure down about 12-18 inches from the top loop (depending on how long you want the hanger) for the first set of knots. -
Tie the first row:
Take one pair of strands and tie a simple overhand knot. Repeat this for the other three pairs, ensuring all four knots are level with each other. -
Separate for the second row:
Take one strand from a knotted pair and match it with a strand from the neighboring knotted pair. You are creating a diamond pattern. -
Tie the second row:
Tie these new neighbors together with a simple overhand knot about 2-3 inches below your first row of knots. Repeat around the circle until all strands are knotted again. -
Check fit:
At this point, I like to hold the pot up inside the netting to check the size. Ideally, this second row of knots should sit right around the rim or upper curve of your terracotta pot.
Pro Tip: Weathering
To get the slightly aged look of the twine in the photo immediately, soak your jute in a mixture of strong tea or coffee for 30 minutes, rinse, and let dry before knotting.
Step 4: Finishing the Base
-
Gather the bottom:
Below the second row of knots, gather all eight strands together again underneath the center of the pot’s base. -
Tie the final knot:
Tie one large, sturdy overhand knot with all strands combined. This creates the ‘seat’ that the pot will rest on. -
Tighten securely:
Pull each individual strand firmly to ensure the big knot is tight and secure so it won’t slip under the weight of the soil. -
Trim the tassel:
Decide how long you want the bottom tassel to be. Cut the remaining loose ends straight across for a neat finish, usually leaving about 2-4 inches depending on your preference. -
Insert the pot:
Gently spread the knotted netting and place your terracotta pot inside. Adjust the strands so they are evenly spaced around the pot’s circumference. -
Hang and adjust:
Hang the planter in its final spot. The weight of the pot will settle the knots; give them a final adjustment to keep the pot level.
Now you have a simple, elegant way to display your favorite trailing herbs or succulents.
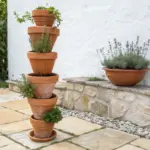
Stacked Tiered Clay Pot Planter Tower
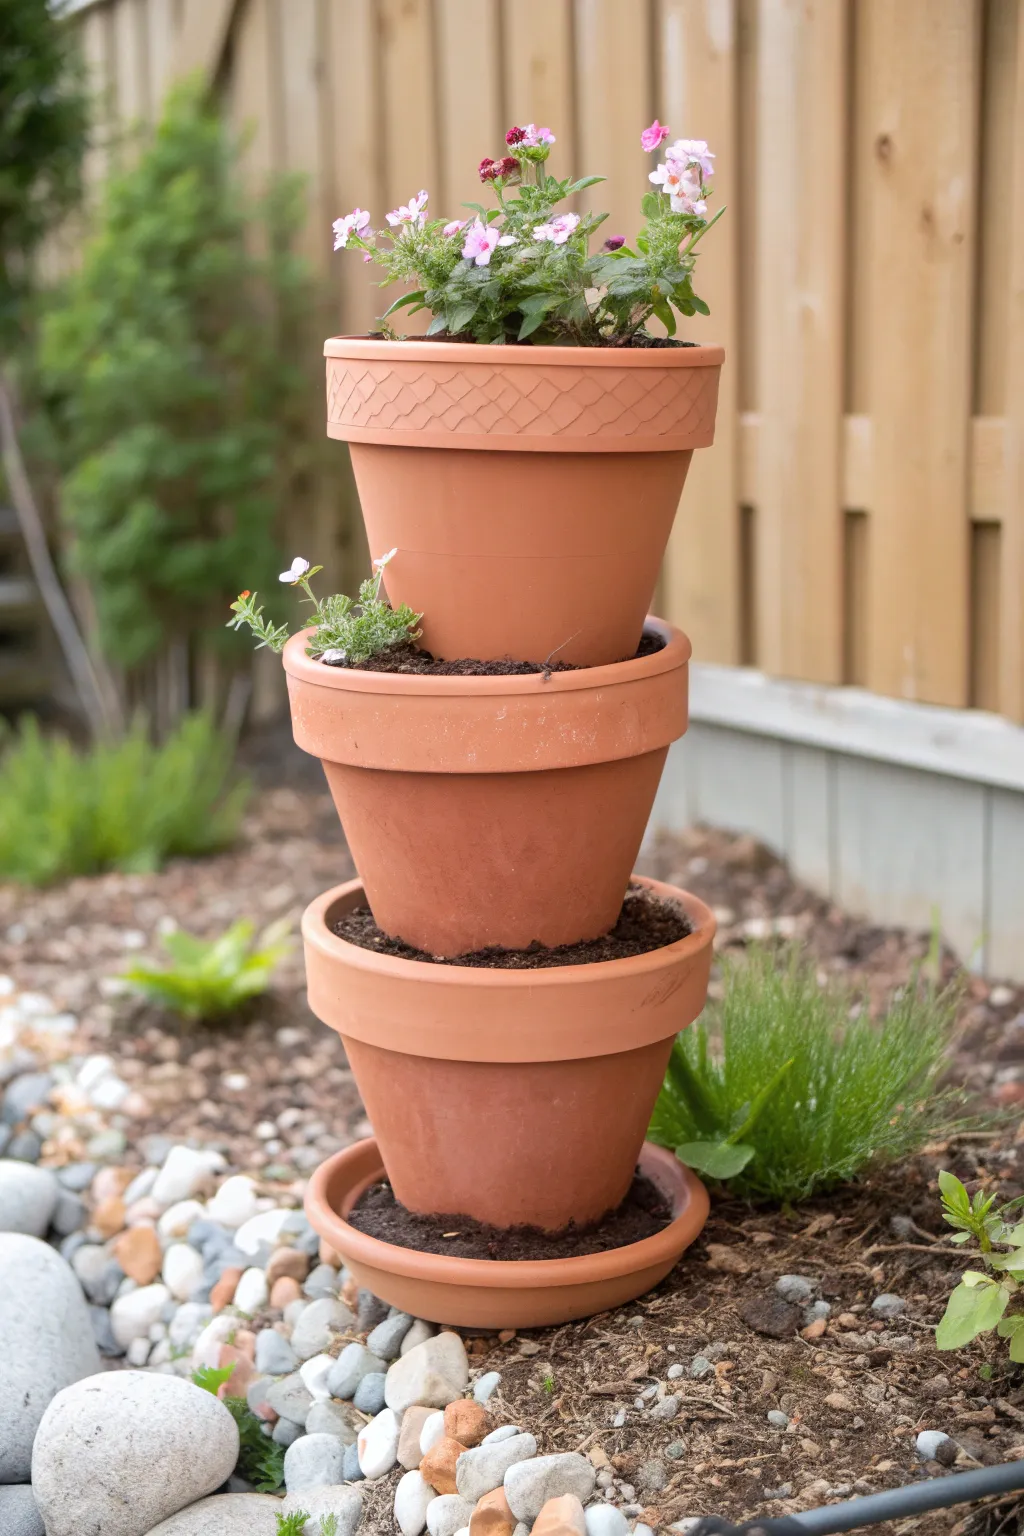
Add vertical charm to your garden bed or patio with this ingeniously simple gravity-defying planter. By stacking pots of descending sizes, you create distinct planting pockets perfect for flowers, herbs, or cascading vines without taking up much ground space.
How-To Guide
Materials
- 1 large terra cotta pot (approx. 10-12 inch)
- 1 medium terra cotta pot (approx. 8-10 inch)
- 1 small terra cotta pot (approx. 6 inch)
- 1 large terra cotta saucer (sized for the bottom pot, optional)
- Rebar stake or sturdy metal rod (approx. 3-4 feet long)
- Potting soil (high quality, well-draining)
- Small annual flowers (petunias, impatiens) or overflow greenery
- Small stones or clear drainage saucers (optional, for spacing)
Step 1: Preparation and Base
-
Select your location:
Choose a spot in your garden where the ground is relatively level. This tower is heavy once filled, so it’s best to build it exactly where it will stay. -
Secure the support rod:
Hammer your length of rebar or metal rod firmly into the ground. Ensure at least 6-8 inches go underground for stability, leaving enough height above ground to run through the stack of pots. -
Position the base saucer:
If you are using a saucer to catch water or protect patio stones, thread it over the rod and settle it on the ground. -
Thread the first pot:
Take your largest clay pot and thread the drainage hole over the rod. Slide it all the way down until it rests flat on the ground or saucer. -
Check for level:
Wiggle the base pot slightly to ensure it is perfectly level. A tilted base will make the entire tower unstable.
Lean Management
If your pots are sinking unevenly, place a small terracotta saucer upside down inside the lower pot to act as a hidden platform for the pot above.
Step 2: Filling and Stacking
-
Fill the base:
Fill the bottom pot with potting soil. Pack it down lightly but leave it roughly an inch or two below the rim to prevent water spillover later. -
Thread the second pot:
Slide the medium-sized pot onto the rebar rod. Let it rest directly on the soil of the bottom pot. -
Tilt the pot (optional):
If you want a ‘tipsy’ look, tilt this pot slightly to one side. The image shows a straight stack, so for that specific look, simply center the pot so it sits evenly in the soil below. -
Fill the middle tier:
Add soil to this middle pot, filling it up almost to the rim just like the first one. Smooth the surface. -
Add the final tier:
Thread the smallest pot onto the rod. This top pot creates the crowning jewel of the tower. -
Check stability:
Gently shake the tower. The soil in the lower pots should hold the upper pots firmly. If it wiggles too much, pack more soil around the base of the inner pots.
Step 3: Planting the Pockets
-
Prepare the top planter:
Fill the top final pot with soil. This is usually the best spot for your showiest flowers since it gets the most sun and attention. -
Plant the crown:
Place your main focal plants into the top pot. In the example, bright pink flowers with some height work beautifully here. -
Identify planting zones:
Look at the exposed ring of soil in the bottom and middle pots. These are your ‘balcony’ planting areas. -
Plant the lower tiers:
Tuck small plants into these soil rings. I often find it’s easiest to use small plugs or divide larger annuals so they fit comfortably in these narrow spaces. -
Settle the soil:
Add a little extra potting mix around the roots of your new plants to ensure there are no air pockets. -
Water carefully:
Water the tower gently starting from the top. Let the water trickle down through the tiers, but water the side pockets individually to ensure they get enough moisture.
Pro Tip: Rod Length
Cut your rebar so it ends about halfway up the inside of the top pot. This hides the metal completely while still supporting the whole structure.
Step back and enjoy the layered splash of color your new garden tower provides
Mossy Aged Clay Pot Finish
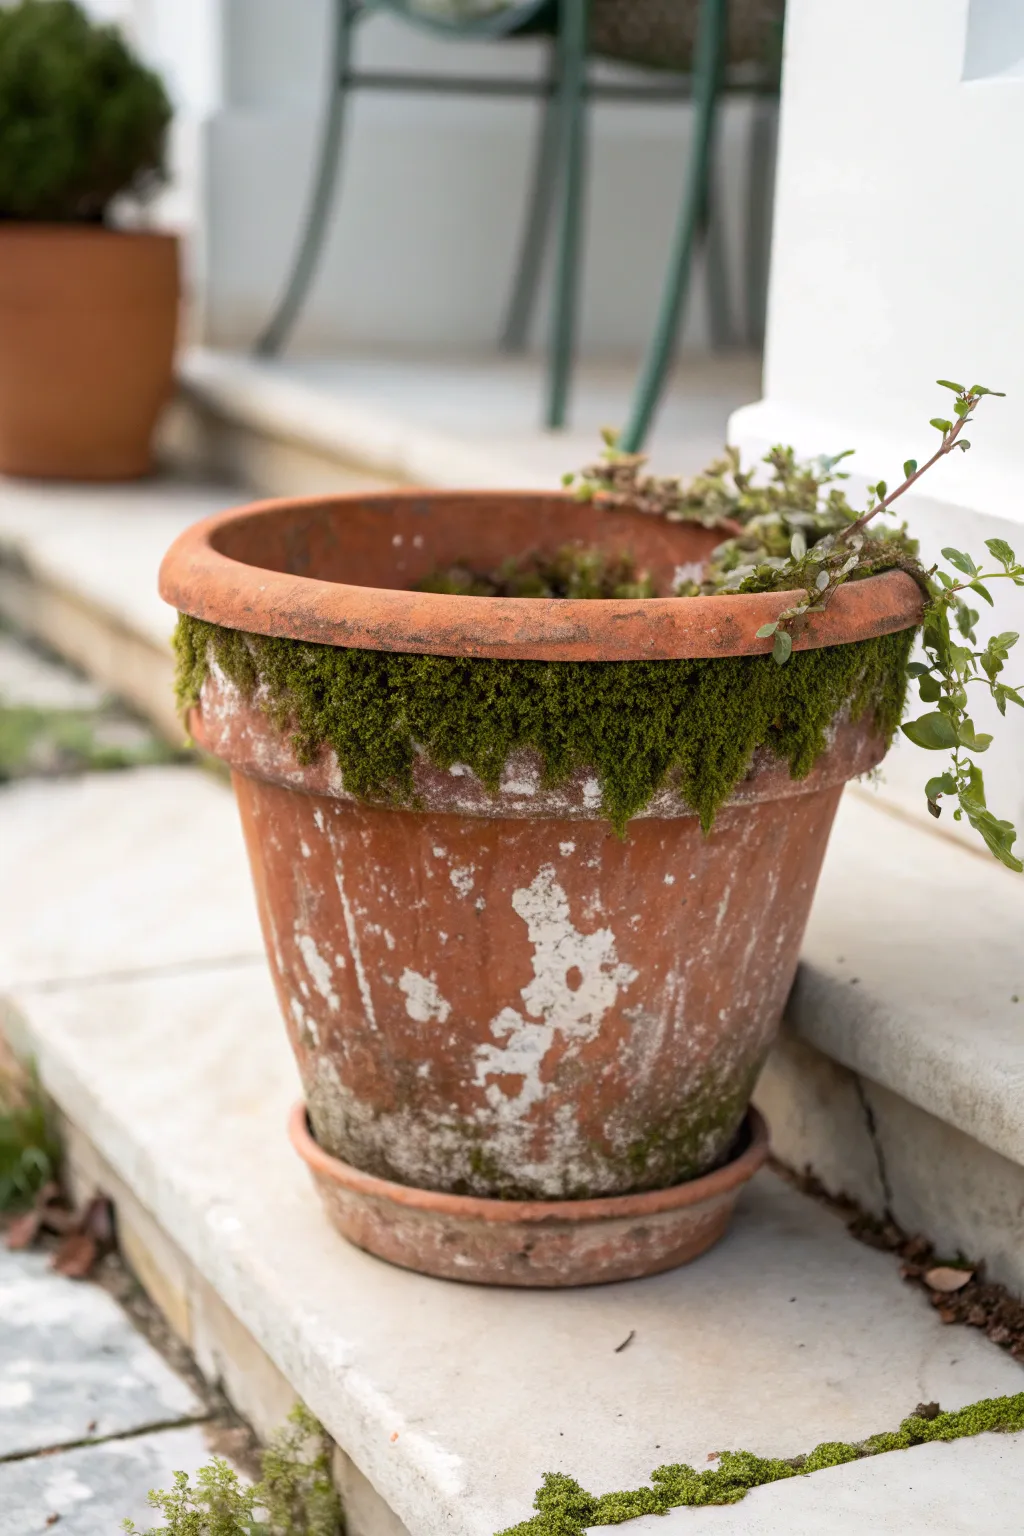
Transform a brand-new terra cotta planter into an ancient-looking garden relic brimming with character. This project replicates decades of natural weathering, featuring realistic white efflorescence and a lush, touchable moss collar.
Detailed Instructions
Materials
- Standard terra cotta pot with saucer
- Plain yogurt (unflavored)
- Moss (freshly harvested from your yard or purchased sheet moss)
- Buttermilk (optional, for faster mold growth)
- White acrylic craft paint
- Water
- Sea sponge or clean rag
- Matte clear spray sealer (optional)
- Small mixing bowl
- Chip brush or old paintbrush
Step 1: Creating the Aged Patina
-
Prepare the wash:
Start by mixing a very diluted whitewash. In your small bowl, combine roughly one part white acrylic paint with three parts water. You want a milky, thin consistency that is surprisingly runny. -
Apply the first layer:
Using a chip brush, slather the watered-down paint all over the exterior of the pot and the saucer. Don’t worry about being neat; drips run naturally down old pots, so let gravity do some of the work. -
Create texture:
While the paint is still wet, take your clean rag or sponge and dab aggressively at the surface. You are lifting the paint off to expose the raw clay underneath, creating a patchy look. -
Build the salt deposits:
Dip your sponge directly into unthinned white paint. Dab this concentrated white onto random areas, particularly focusing on the middle section or where water would naturally seep through. This mimics the salty efflorescence found on old pottery. -
Dry and assess:
Let the pot dry completely for about 30 minutes. Once dry, step back and look at it. If it looks too uniform, add another layer of the watery wash to specific spots to build depth.
Mold Troubles?
If you spot fuzzy blue or black mold growing in the yogurt, it’s too damp. Remove the bad spots, reduce misting, and move the pot to a spot with slightly better air circulation.
Step 2: Applying the Living Moss
-
Mix the bio-adhesive:
To encourage real growth or adhere dried moss naturally, mix a cup of plain yogurt with a splash of buttermilk in a bowl. This acidic, dairy-based slurry acts as a perfect food source for spores. -
Prepare the moss:
If using fresh moss gathered from outside, shake off excess dirt. If you want a smoother application, you can actually blend the moss into your yogurt mixture, but for the textured look in the photo, keep the moss clumps intact. -
Apply the adhesive:
Spread a thick layer of the yogurt mixture around the rim of the pot, just under the lip. This is where moisture naturally collects and where moss loves to grow. -
Add lower accents:
Dab small amounts of the yogurt mixture near the base of the pot and sporadically up the sides near the white ‘salt’ patches for a wild, overgrown appearance. -
Attach the moss:
Press chunks of moss firmly into the wet yogurt layer. I like to hold it there for a few seconds to ensure it grabs onto the textured terra cotta surface. -
Fill the gaps:
Take smaller bits of loose moss or moss dust and sprinkle them over the patchy white areas on the pot’s body. Press them gently so they stick to any remaining tackiness.
Step 3: Cultivating and Finishing
-
Initial misting:
Immediately mist the moss heavily with water using a spray bottle. The moss needs moisture to wake up and bond with the pot. -
The incubation:
Place the pot in a shaded, cool area—out of direct scorching sunlight. Ideally, put the entire pot inside a clear plastic bag for the first 2-3 days to create a humidity dome. -
Daily Maintenance:
Check on your pot daily. Keep the moss moist by misting it. If you see the yogurt drying out too much before the moss takes hold, add a little more buttermilk/water mixture. -
Optional sealing:
If you are using faux or preserved moss and don’t want it to grow further, skip the incubation. Instead, let the adhesive dry fully and spray the mossy areas with a matte clear sealer to lock everything in place. -
Planting:
Once your exterior moss is established (usually after about a week or two of care), you can fill the pot with soil and add your trailing plants.
Instant Age
Mix a teaspoon of garden lime or baking soda into your white paint. This creates a crusty, chalky texture that physically raises off the surface like real mineral buildup.
Enjoy the timeless beauty of your newly aged creation in your garden or on a sunny windowsill
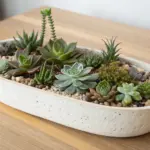
Broken Clay Pot Fairy Garden Planter
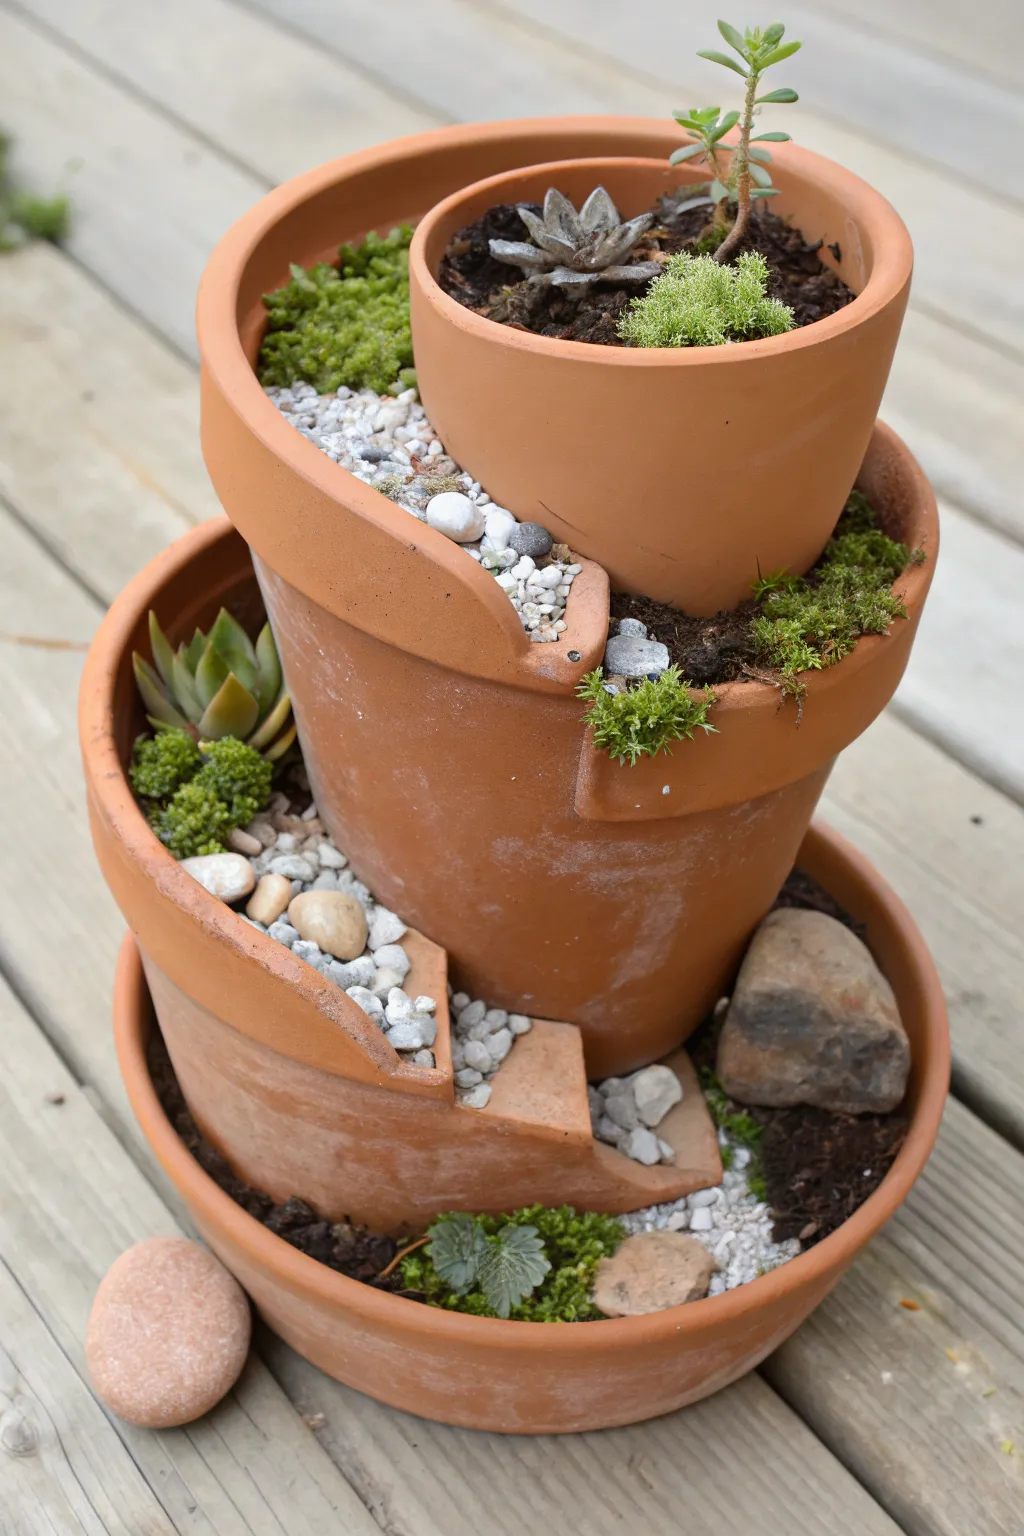
Turn a cracked terra cotta pot into a stunning, multi-tiered succulent garden that spirals upward like a staircase. This project uses the broken shards to create distinct planting pockets, filled with diverse textures from smooth pebbles to soft moss.
Step-by-Step Guide
Materials
- One large terra cotta pot (approx. 8-10 inches)
- One large terra cotta saucer (fits under the large pot)
- One smaller terra cotta pot (approx. 4-6 inches)
- Assorted broken terra cotta shards (or a spare pot to break)
- Potting soil/cactus mix
- Various small succulents (e.g., Echeveria, Sedum)
- Sheet moss or clump moss
- White aquarium gravel or pea gravel
- Large decorative river stones
- Hammer and safety glasses (for breaking pottery)
- Gardening gloves
Step 1: Preparing the Base Structure
-
Safety First:
Before you begin, put on your safety glasses and gloves. If you don’t have natural shards, you will need to gently tap a spare pot or the rim of your large pot with a hammer to create a cascading break. -
Create the Break:
Aim to break the front wall of your large pot away, leaving the back curve intact. Save the large piece that breaks off—this will become your internal retaining wall. -
Set the Foundation:
Place the large, now-broken pot into the center of the terra cotta saucer. Fill the bottom of the pot with a few inches of potting soil to stabilize it. -
Insert the Second Pot:
Nestle the smaller, whole terra cotta pot into the soil at the very top of the large pot, tilting it slightly backward so it rests securely against the back rim. -
Add Soil Support:
Pack more soil around the base of the small pot to hold it firmly in place. This soil will act as the bed for your middle-tier plants.
Clean Breaks
To get a cleaner break on your pot without shattering it, score the desired line with a file or craft knife first, then tap gently along that line with a hammer.
Step 2: Building the Spiral Staircase
-
Install the Retaining Wall:
Take a large curved shard (likely the piece you broke off earlier) and press it vertically into the soil on one side, creating a partition between the upper and lower levels. -
Create the Lower Step:
Find a smaller curved shard and insert it into the soil lower down on the opposite side. This effectively creates a spiraling staircase look with three distinct levels: the bottom saucer, the middle ledge, and the top pot. -
Backfill with Soil:
Gently add soil behind each shard ‘step.’ Ensure the soil is packed tightly enough so that it doesn’t wash away during watering, but loose enough for roots. -
Anchor with Rocks:
Place a large river stone at the base level inside the saucer. This adds visual weight and helps hold the soil back near the bottom opening.
Fairy Tale Twist
Turn this into a true fairy feature by adding a miniature wooden ladder connecting the tiers and a tiny door glued to the base of the bottom pot.
Step 3: Planting and Detailing
-
Plant the Top:
Start by planting a focal succulent and some greenery inside the small, topmost pot. Since this is the highest point, I like to put something with height here. -
Populate the Middle Tier:
Tuck a medium-sized succulent, like an Echeveria, into the soil pocket created by your middle shard. Angle it slightly outward so it faces the viewer. -
Fill the Gaps:
Add smaller sedum cuttings or creeping plants into the tiny crevices between the shards and the main pot walls. -
Apply the Moss:
Tuck pieces of bright green moss along the exposed soil edges and around the base of your plants. This helps retain moisture and hides the dark soil for a cleaner look. -
Create Gravel Paths:
Pour white gravel or small pebbles onto the exposed ‘steps’ of the shards. Imagine you are creating a tiny walkway leading up the spiral. -
Final Clean Up:
Use a soft brush to sweep any stray soil off the leaves of the succulents and the edges of the terra cotta. Water lightly to settle the soil.
Now you have a whimsical, living sculpture that breathes new life into broken pottery
Upside-Down Clay Pot Mushrooms
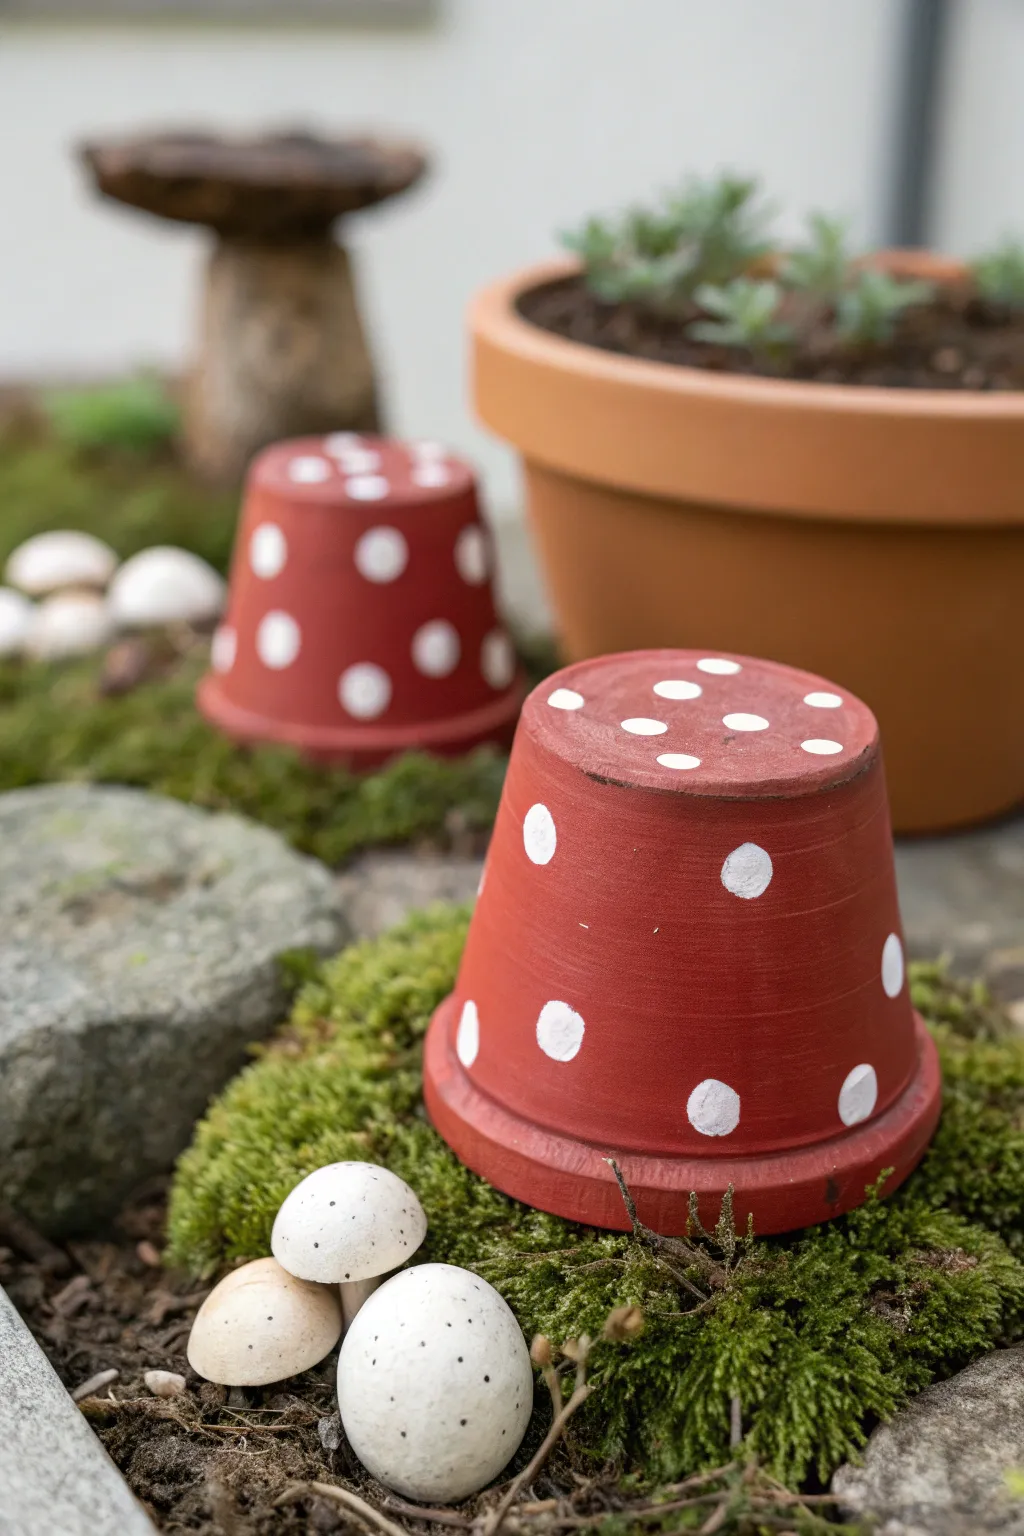
Transform ordinary terracotta pots into enchanting mushroom-inspired garden decor with just a splash of paint. These cheerful red-and-white toadstools add a pop of color to mossy patches or flower beds and are sturdy enough to weather the elements.
Detailed Instructions
Materials
- Small terracotta pots (approx. 3-4 inch diameter)
- Red outdoor acrylic paint
- White outdoor acrylic paint
- Flat paintbrush (medium size)
- Round foam pouncer or small detailing brush
- Clear outdoor sealant spray (matte or satin)
- Newspaper or drop cloth
- Water cup and paper towels
Step 1: Preparation and Base Coat
-
Clean the surface:
Begin by thoroughly wiping down your terracotta pots with a damp cloth to remove any dust or sticker residue. Let them dry completely, as moisture will prevent the paint from adhering properly. -
Set up your workspace:
Lay down newspaper or a drop cloth to protect your table. Position the pots upside down on the surface, so the bottom of the pot (which will become the mushroom top) is facing up. -
Apply the first coat of red:
Load your flat paintbrush with red outdoor acrylic paint. Start painting the exterior of the pot, brushing horizontally around the rim first. -
Paint the body:
Continue painting the rest of the pot with vertical strokes from the rim down to the base. Don’t forget to paint the flat bottom of the pot, which is now the very top of your mushroom cap. -
Let it dry:
Allow the first coat to dry for about 20-30 minutes. Terracotta is porous and tends to soak up the first layer quickly. -
Apply a second coat:
Paint a second layer of red to ensure opaque, vibrant coverage. I find two coats are usually perfect, but add a third if you can still see the orange clay peeking through. -
Dry completely:
Let the red base coat dry fully before moving on to the details. This is crucial to prevent the white paint from turning pink.
Paint Peeling?
If paint peels after rain, the pot likely wasn’t fully dry before painting. Terracotta holds moisture! Bake plain pots at 200°F for 20 mins first to ensure bone-dry clay.
Step 2: Adding Details and Finishing
-
Prepare the white paint:
Pour a small amount of white outdoor acrylic paint onto a palette or paper plate. -
Start the rim dots:
Dip your round foam pouncer or detailing brush into the white paint. Gently press dots around the thick rim of the pot. Space them somewhat randomly rather than measuring perfectly for a more organic look. -
Add dots to the body:
Move up the sides of the pot, adding more white dots. Try to vary the placement so they don’t form straight lines. -
Detail the top:
Add a few final dots to the flat top of the mushroom cap. Ensure your paint application is thick enough to be bright white, but not so thick that it drips. -
Check for consistency:
Look over your mushroom. If any white dots look a bit transparent, dab a little extra white paint over them once the first layer is touch-dry. -
Allow final drying time:
Let the painted pots sit undisturbed for at least 2-3 hours, or overnight if possible, to ensure the paint has fully cured. -
Seal the project:
Take the pots to a well-ventilated area. Apply a light, even coat of clear outdoor sealant spray to weather-proof your work. -
Place in the garden:
Once the sealer is dry, nestle your new toadstools into a bed of moss, near some stones, or alongside your potted plants.
Natural Look
Don’t make the white dots perfect. Vary the pressure on your brush to create slightly different sizes, and intentionally make some edges irregular for organic charm.
Your garden now has a magical little corner ready to welcome the fairies and gnomes