If you’ve ever wanted to make garden decor that’s both sweet and actually useful, clay birdhouses are the perfect project. Here are my favorite clay bird house ideas—from classic, bird-friendly shapes to the more playful, “I can’t believe that’s a birdhouse” designs.
Classic Slab Box Birdhouse
This project transforms simple clay slabs into a sleek, functional home for garden birds. Its clean lines and natural buff finish give it a timeless look that blends beautifully with outdoor greenery.
Step-by-Step Tutorial
Materials
- Stoneware clay buff or white)
- Rolling pin
- Two wooden guide strips (1/4 inch thick)
- Fettling knife
- Needle tool
- Ruler
- Cardboard or poster board (for templates)
- Scoring tool or serrated rib
- Slip (clay slurry)
- Circle cutter (approx. 1.5 inch)
- Small drill bit or hole punch tool
- Sponge
- Wooden modeling tool
Step 1: Preparing the Slabs
-
Design your templates:
First, cut your templates from cardboard. You will need: two side walls (rectangular), a front and back wall (rectangular bottom with a peaked top), two roof panels that are slightly wider than the walls, and a base that extends past the house footprint. -
Roll out the clay:
Working on a canvas surface, roll out a large chunk of clay. Use your wooden guide strips on either side of the clay to ensure an even 1/4-inch thickness throughout. -
Smooth the texture:
Before cutting, run a smooth rib over the clay surface to compress the particles and remove any canvas texture. This is key for that clean, finished look. -
Cut the components:
Place your cardboard templates onto the leather-hard clay slab. Trace around them with a needle tool, then cut cleanly with your fettling knife. -
Wait for leather-hard stage:
Let the cut pieces sit until they are leather-hard. They should be stiff enough to hold their shape upright without bending but still soft enough to join.
Clean Bevels
For sharper corners, miter (cut at 45 degrees) the side wall vertical edges. This creates a stronger seamless joint and hides the construction lines.
Step 2: Assembling the Structure
-
Prepare the joins:
Score the vertical edges of your side walls and the matching contact points on the front and back walls. Apply a generous amount of slip to the scored areas. -
Construct the box:
Press the side walls against the back wall first to create a U-shape. Use a small clay coil on the interior seam for reinforcement and smooth it out. -
Add the front:
Attach the front wall to close the box. Ensure the corners are square and the walls are perpendicular to your work surface. -
Cut the entry:
Use your circle cutter to create the bird entrance on the front panel. Position it centered, roughly 2/3 of the way up the wall. -
Attach the base:
Score and slip the bottom edges of your walls and the center of your base slab. Press the house firmly onto the base. I like to leave a small overhang on the base for visual grounding.
Step 3: Roof and Refining
-
Bevel the roof edges:
Cut a 45-degree angle on the top edge where the two roof slabs will meet at the peak. This ensures a tight fit without a gap. -
Install the roof:
Score the top edges of the house walls. Place the roof panels on, ensuring they overhang the sides to protect the walls from rain. Join the peak securely. -
Add ventilation:
Using a small hole punch or drill bit, create two small ventilation holes near the top of the roof panels to keep the interior cool. -
Detail the roof:
Using a ruler and a modeling tool, gently press horizontal lines across the roof panels to simulate simplified shingles or metal seams. -
Refine the surface:
Wait for the piece to stiffen further, then use a damp sponge to smooth any sharp edges on the base, corners, and especially around the entry hole. -
Dry and fire:
Let the birdhouse dry slowly under loose plastic to prevent warping. Once bone dry, bisque fire it. For the look in the image, leave the exterior unglazed or clear-glazed to show the buff clay body.
Sagging Roof?
If the roof panels sag inward while attaching, crumble up some newspaper and stuff it loosely inside the house to support the clay until it stiffens.
Place your new ceramic house in a sheltered garden spot and wait for your first feathered tenants to arrive


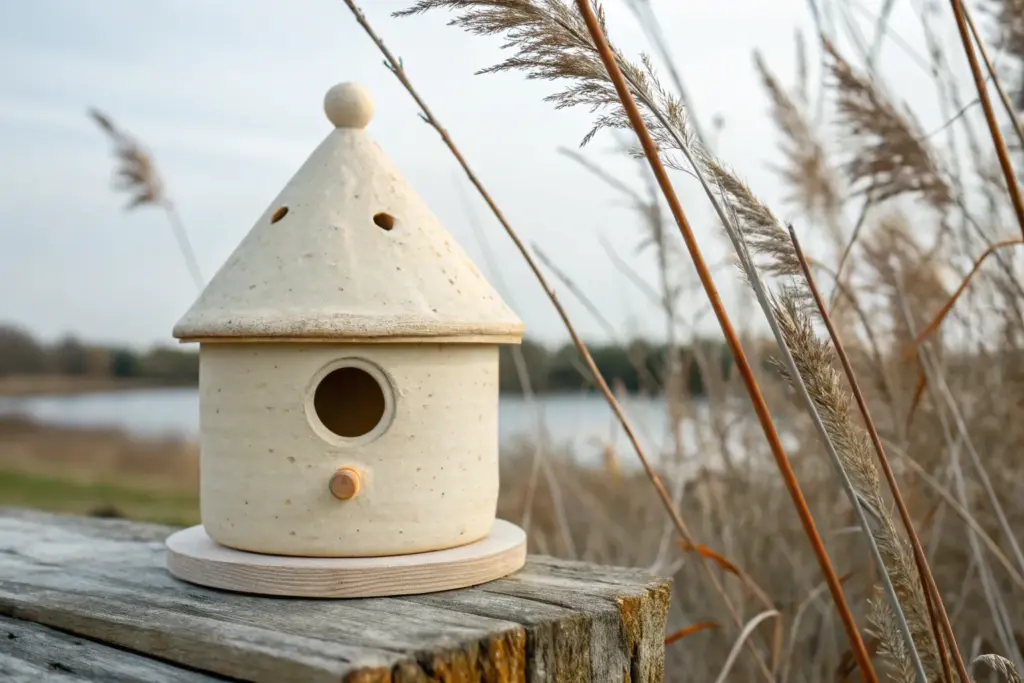
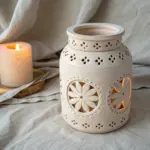
Coiled Cylinder Birdhouse
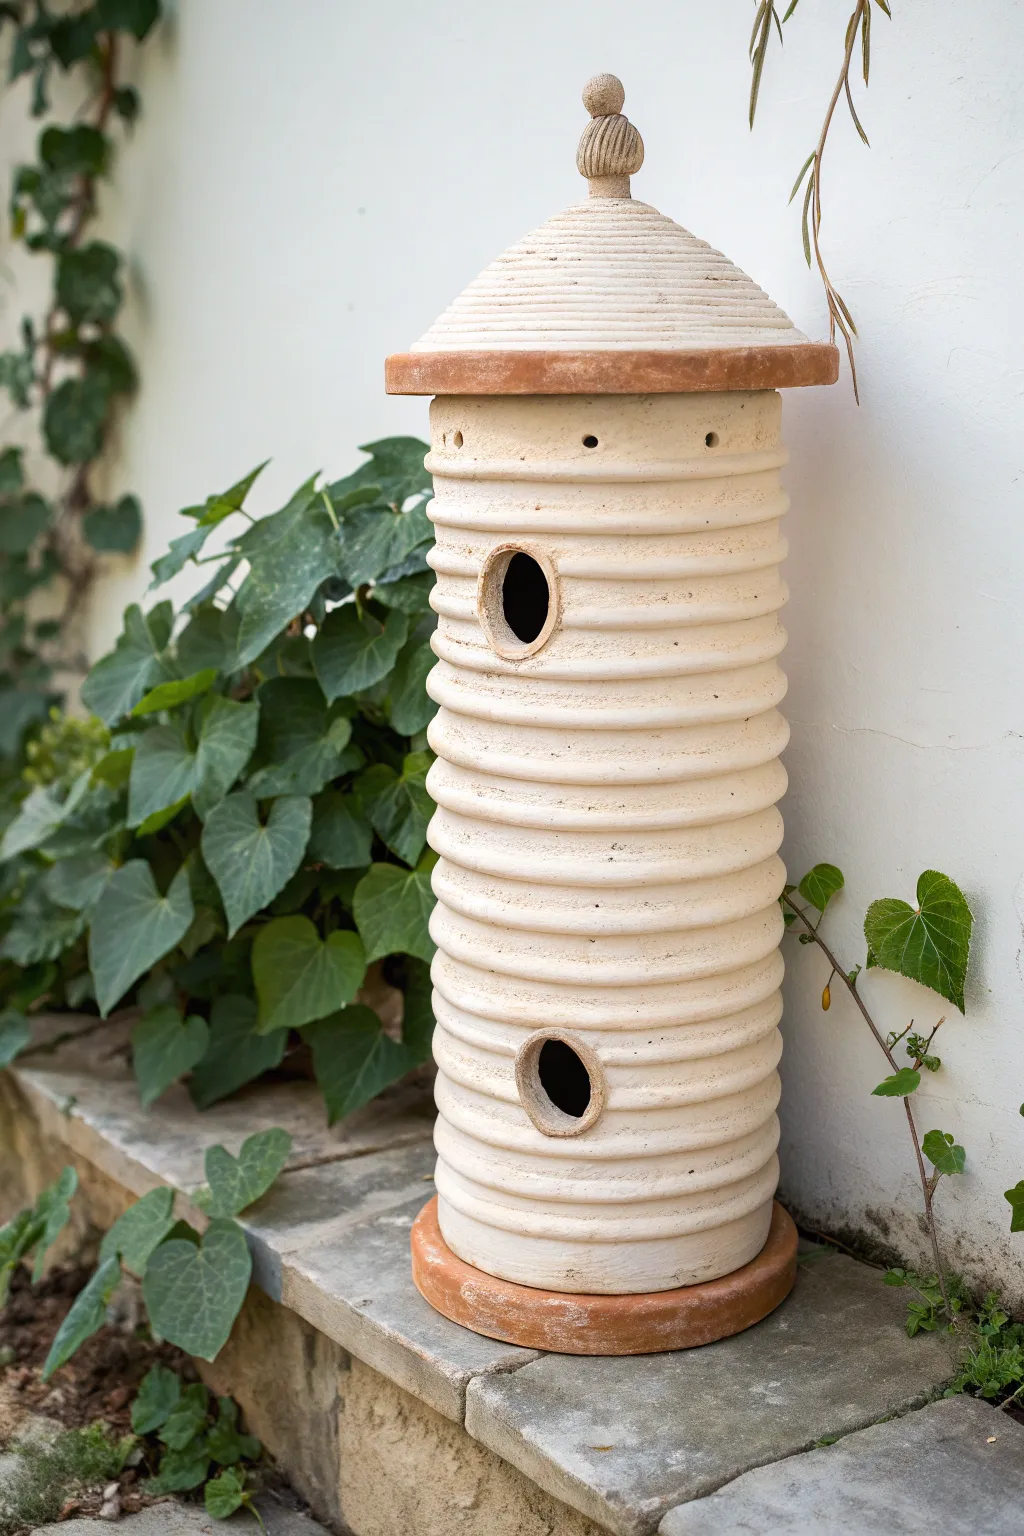
This striking vertical birdhouse mimics the look of a traditional skep hive with its textured, ribbed surface and earthy tones. Standing tall with dual entry points, this project combines coil-building techniques with a refined conical roof to create a sophisticated garden focal point.
How-To Guide
Materials
- Stoneware or Earthenware clay (approx. 5-7 lbs)
- Pottery wheel (optional, can be hand-built)
- Extruder with round die (or hand-rolled coils)
- Scoring tool and slip
- Circle cutter or fettling knife
- Wooden modeling tools
- Sponge
- Rolling pin
- Canvas mat
- Cream/White glaze (matte)
- Terra Cotta/Iron Oxide wash (optional, for accents)
- Kiln
Step 1: The Foundation
-
Prepare the base slab:
Roll out a slab of clay to approximately 1/4 inch thickness on your canvas mat. This will serve as the sturdy bottom of your birdhouse. -
Cut the base circles:
Cut two circles. The first should be slightly wider than your intended tower diameter (the terra cotta colored base in the photo). The second should be exactly the diameter of your tower’s interior. Score and slip them together. -
Create the coil supply:
Using an extruder or rolling by hand, create a significant pile of even, thick coils (rope-like strands of clay). Uniformity here is key to the ribbed look.
Smooth Seams
When bridging coils over the entry holes, reinforce the hidden inside seam with a small extra coil or ‘snake’ of clay. This prevents cracking at these high-stress points during drying.
Step 2: Building the Tower
-
Begin coiling:
Attached the first coil to the top of your base slab using scoring and slip. Continue stacking coils directly on top of one another. -
Blend the interior:
As you build upward, use your thumb or a wooden tool to smudge the clay downwards *only on the inside surface*. This bonds the coils together structurally while leaving the exterior texture distinct. -
Maintain the shape:
Periodically step back to ensure your cylinder is rising straight up and not flaring out. If hand-building, you can use a cardboard concrete tube as a temporary interior mold. -
Add entry holes:
When you reach the height for the first hole, cut a section out of the fresh coil or simply gap the coil. Bridge over it with the next layer of coils. Smooth the interior opening immediately. -
Finish the cylinder height:
Continue coiling until you reach the second hole location, repeat the bridging process, and then build up to the final rim height. I typically like to smooth the very top rim flat for the roof to sit on.
Step 3: The Roof & Finials
-
Form the overhang rim:
Roll a thicker, flat strip of clay and attach it to the top of your cylinder, allowing it to overhang slightly like eaves. This will be the terra cotta colored rim later. -
Ventilation holes:
Just under this new rim, use a small drill tool or straw to poke several ventilation holes around the circumference. -
Shape the cone:
Roll a slab and cut a large circle. Remove a pie-slice wedge and join the straight edges to create a cone shape. Texture the surface with horizontal lines using a comb tool to match the coil aesthetic. -
Create the finial:
Fashion a small, bulbous shape with a textured grip and a tiny clay sphere on top. Score and slip this securely to the peak of your cone roof. -
Dry and Bisque:
Allow the main body and the separate roof to dry slowly under plastic to prevent warping. Once bone dry, bisque fire them.
Hanging Option
Before drying, punch two holes opposite each other near the top rim (hidden under the roof overhang). Thread heavy-gauge copper wire through them later to create a hanging loop instead of a standing base.
Step 4: Glazing & Finishing
-
Masking areas:
Apply wax resist to the bottom base rim and the top overhang rim if you want these to remain raw clay color (or glaze them a specific terra cotta color separately). -
Apply main glaze:
Dip or brush the main body and roof in a matte cream or off-white glaze. Wipe back any glaze that gets into the deep coil crevices if you want to highlight the texture with shadows. -
Accent entries:
Carefully sponge away glaze from the immediate lip of the entry holes to expose the raw clay, adding contrast. -
Final firing:
Fire the kiln to the maturity temperature of your clay and glaze. Once cool, you can epoxy the roof on or leave it removable for cleaning.
Place your finished tower in a quiet corner of the garden and wait for your feathered tenants to arrive

Inverted Flowerpot-Style Clay Birdhouse
This rustic, elegant birdhouse combines the warmth of natural clay with a unique pot-bellied silhouette. It mimics the look of stacked pottery to create a cozy, ventilated nesting spot that swings gently from a sturdy branch.
Step-by-Step Guide
Materials
- Two terracotta planter bowls (approx. 6-inch diameter, matching sizes)
- One small terracotta saucers (sized to fit the bowl bottom as a lid)
- One large terracotta saucer (wider than the bowls to act as a base)
- Epoxy adhesive for masonry or strong ceramic glue
- Drill with masonry bits (various sizes)
- Hole saw bit for masonry (1.5 inch for bird entry)
- Sandpaper 120-grit
- Heavy-duty black wire or strong nylon cord
- Metal S-hook or O-ring
- Pliers
- Pencil
Step 1: Preparing the Clay Shell
-
Select your bowls:
Choose two terracotta planting bowls that have flat, wide rims. These will be glued rim-to-rim to form the central sphere of the birdhouse, so ensure they sit flush against each other without rocking. -
Mark the entry hole:
On the bowl that will serve as the top half, measure halfway up the side. Use a pencil to mark the center point for your main entrance hole. -
Drill the entrance:
Using a 1.5-inch diamond-tipped hole saw or masonry bit, carefully drill the entrance hole at your marked spot. Go slowly and keep the bit wet with a spritz of water to prevent cracking the terracotta. -
Smooth the edges:
Once the hole is cut, wrap sandpaper around a dowel or your finger and sand the interior edges of the entrance hole until they are completely smooth to protect bird feathers. -
Add ventilation:
Switch to a smaller standard masonry bit (about 1/4 inch). Drill a small ventilation hole about an inch above the main entrance hole to keep the interior cool.
Crack Prevention Tip
Terracotta breaks easily when drilled. Place masking tape over the area you plan to drill and keep the surface wet to reduce friction and chipping.
Step 2: Assembling the Structure
-
Join the hemispheres:
Apply a generous bead of high-strength ceramic epoxy or masonry adhesive to the flat rim of the bottom bowl. -
Press and set:
Invert the top bowl (the one with the holes) and press it firmly onto the glued rim of the bottom bowl. Wipe away any excess glue that squeezes out immediately with a damp rag. -
Prepare the base:
Take your large terracotta saucer—this is the landing platform. Apply adhesive to the bottom of your joined sphere and center it perfectly into this large saucer. -
Drill the hanging point:
Flip the small saucer (the ‘roof’) upside down. Drill a hole directly through the center using a standard masonry bit large enough for your wire or cord. -
Secure the roof:
Glue this small inverted saucer onto the flat bottom of the top bowl (which is now properly facing up). This creates the tiered architectural look and protects the drainage hole of the pot.
Step 3: Rigging and Hanging
-
Thread the wire:
Cut a long length of heavy-duty black wire or nylon cord. Feed it through the hole in the top saucer, passing it all the way through the birdhouse and out the drainage hole in the bottom saucer. -
Anchor the bottom:
Tie a very large knot or attach a large metal washer to the end of the wire at the bottom to prevent it from pulling back through. I like to add a dab of glue here for extra peace of mind. -
Create the top loop:
Pull the wire taught at the top. Use pliers to twist the wire into a secure loop or tie it firmly to a metal O-ring. -
Seal the holes:
Apply a small amount of waterproof silicone sealant around the wire where it enters the roof to prevent rainwater from dripping down the cord. -
Final dry time:
Allow the entire assembly to cure for at least 24 hours, or according to your adhesive’s instructions, before supporting any weight. -
Hang it up:
Use a sturdy S-hook or tie the remaining cord to a tree limb, ensuring the birdhouse hangs freely without bumping into trunk surfaces.
Rustic Aging
Rub plain yogurt or buttermilk onto the exterior of the finished house before hanging. This encourages moss growth for an ancient, weathered look.
Now you have a charming, earth-toned sanctuary ready for your local wrens or chickadees.


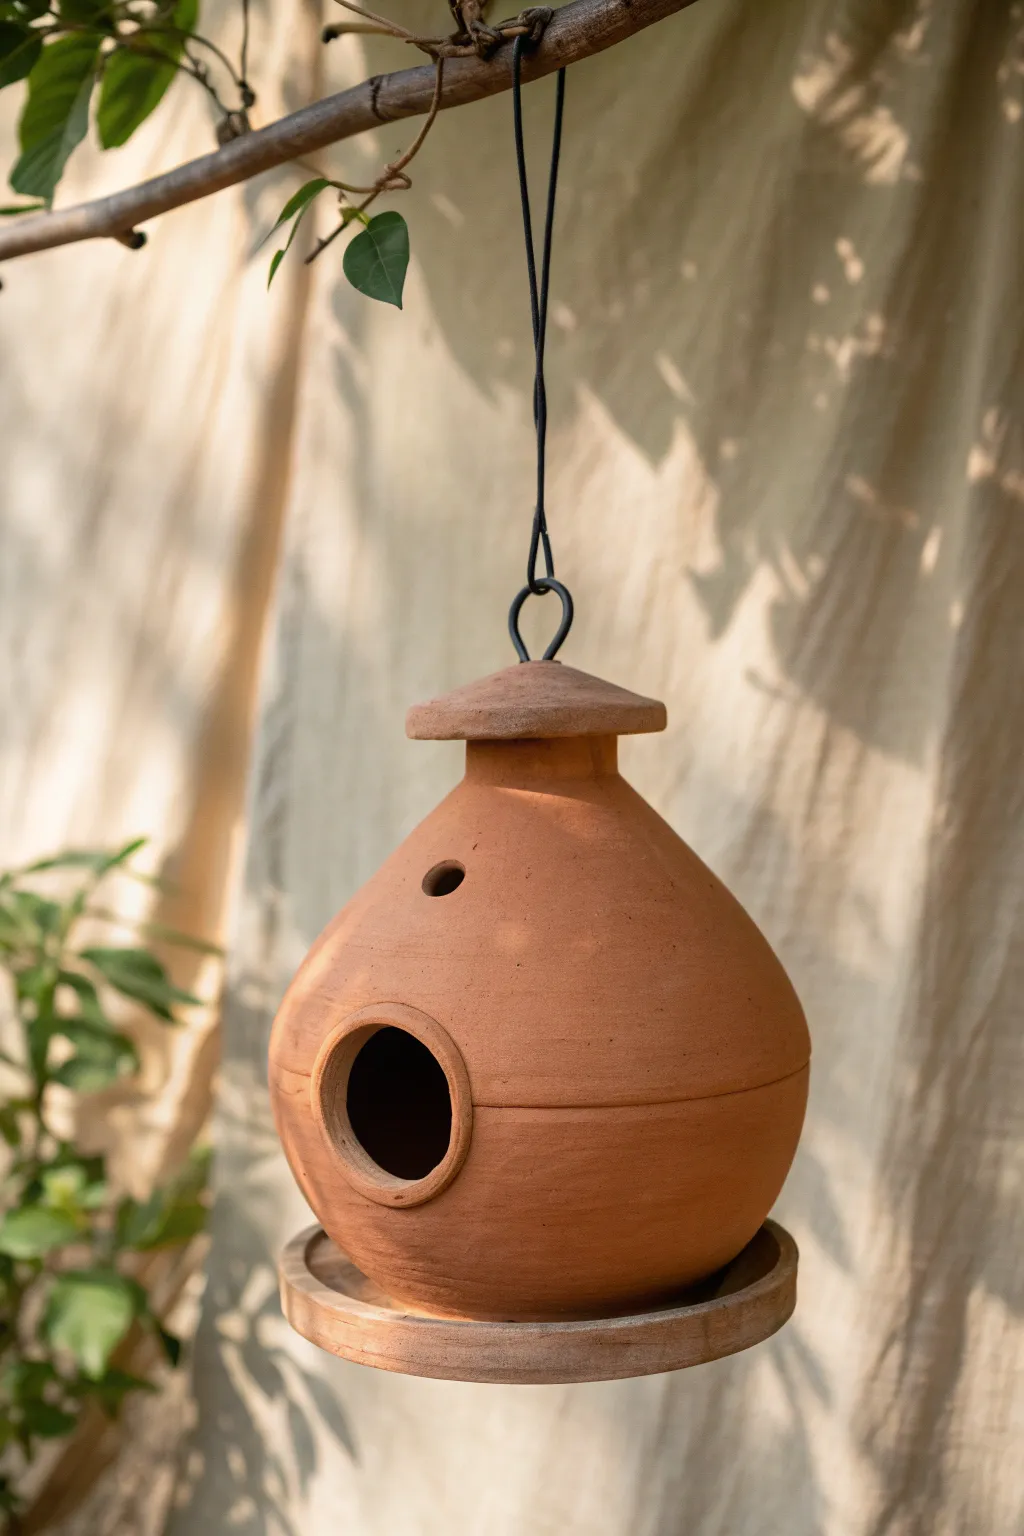
Simple Hanging Teardrop Birdhouse
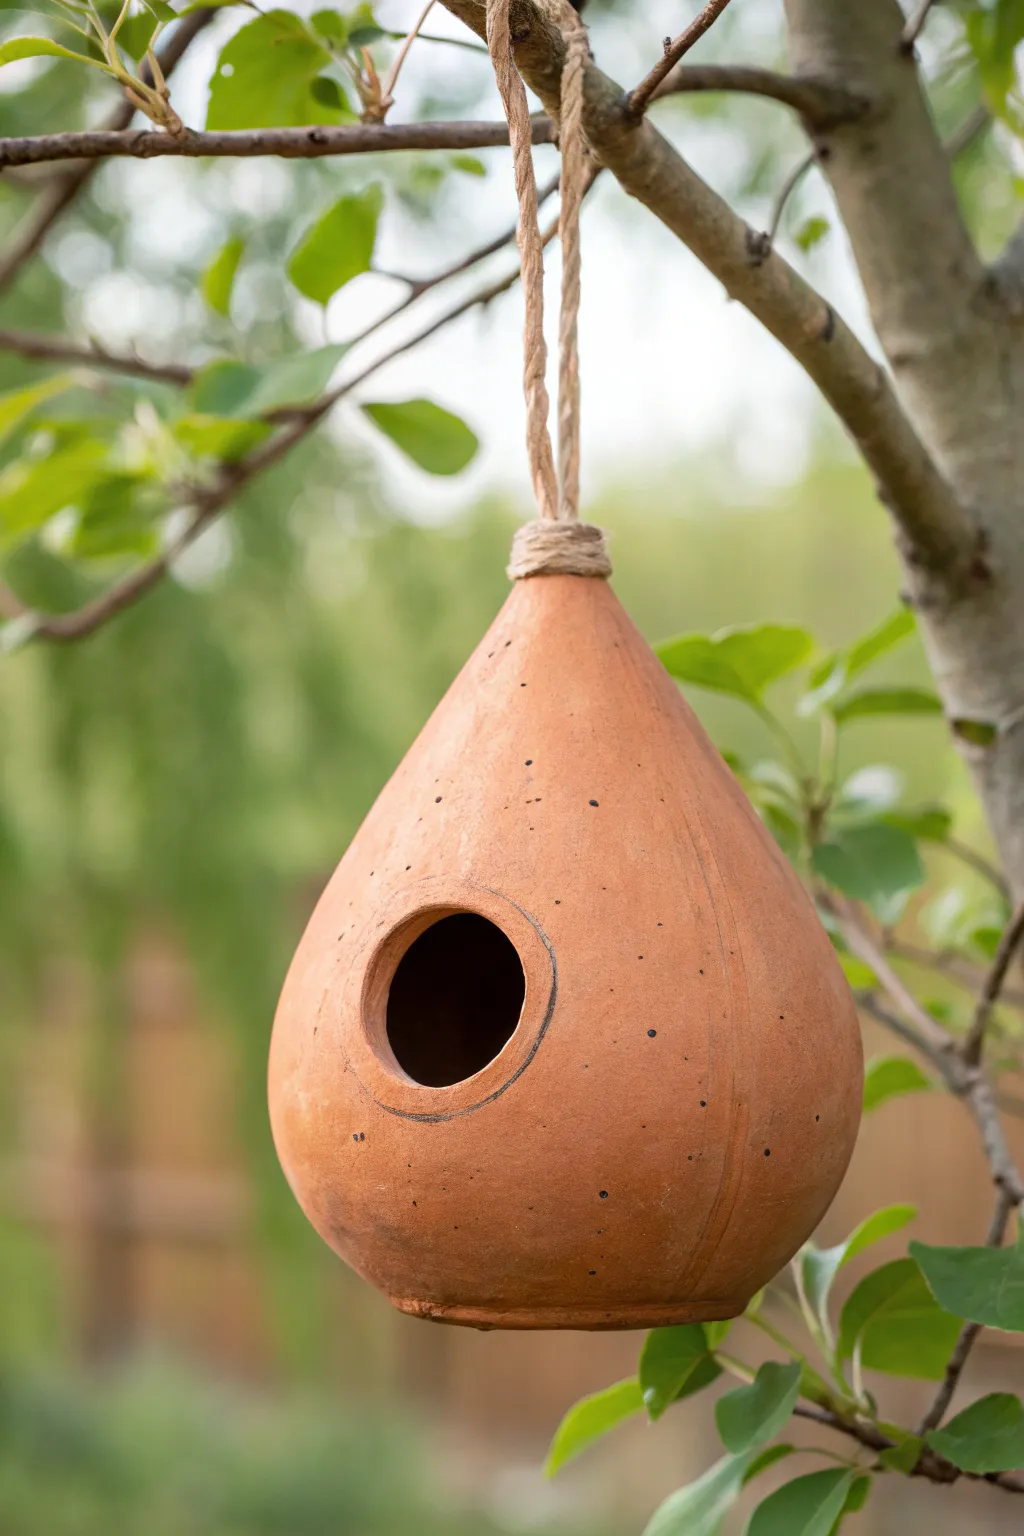
This elegant, tear-shaped birdhouse brings a touch of organic warmth to any garden with its natural terracotta finish and simple silhouette. Its suspended design not only looks charming swinging from a branch but also provides a safe, elevated nesting spot for small garden visitors.
How-To Guide
Materials
- Earthenware or stoneware clay (terracotta color)
- Pottery wheel (optional) or coil building tools
- Wooden rib tool
- Sponge
- Circle cutter or small cup (approx. 1.5 inch diameter)
- Needle tool
- Metal kidney scraper
- Natural jute rope (thick)
- Strong craft glue or epoxy
- Black underglaze (optional for speckles)
- Stiff bristle brush (optional)
Step 1: Forming the Base
-
Prepare the Clay:
Begin by wedging about 2-3 pounds of terracotta clay thoroughly to remove air bubbles. This is crucial to prevent the piece from cracking or exploding in the kiln. -
Establish the Foundation:
If throwing on a wheel, center your clay and open it up, leaving a floor about half an inch thick. If hand-building, roll out a slab for the base and begin coiling upward. -
Build the Walls:
Pull the walls upward, initially creating a bulbous, round shape for the bottom half of the birdhouse. The walls should be even, roughly a 1/4 inch thick. -
Begin the Taper:
As you get past the halfway point, start collaring the clay inward. Gently squeeze and lift to narrow the form, creating the bottom part of the teardrop shape. -
Close the Form:
Continue collaring upward until you have a long, narrow neck that closes completely at the top. It should look like an enclosed gourd or oversized fig. -
Refine the Shape:
At this stage, I like to use a wooden rib tool on the outside while the wheel spins slowly (or while turning a banding wheel) to compress the clay and perfect that smooth curve.
Step 2: Detailing and Finishing
-
Dry to Leather Hard:
Allow the enclosed form to dry until it reaches a leather-hard state. It should be firm to the touch but still cold and able to be carved without deforming. -
Smooth the Surface:
Use a metal kidney scraper to remove any throwing lines or coil marks. The goal is a uniform, matte texture that mimics natural stone or dried fruit. -
Create the Entrance:
Select a spot on the widest part of the belly for the entrance. Use a circle cutter or trace a small cup to mark the hole, then carefully cut it out with a needle tool. -
Finish the Edges:
Use a damp sponge or your finger to smooth the raw edges of the entrance hole. Sharp edges can damage delicate bird wings, so ensure this rim is perfectly rounded. -
Add Decorative Ring:
Using a needle tool, lightly score a thin, circular accent line around the perimeter of the entrance hole, about a quarter-inch away from the opening. -
Texture (Optional):
To recreate the subtle speckled look in the photo, dip a stiff toothbrush in watered-down black underglaze and flick a very fine mist of specks onto the surface. -
Creating the Hanging Loop:
At the very top peak of the teardrop, form a sturdy loop of clay or create a hole specifically sized for your rope, ensuring the clay is thick enough to support the weight.
Collaring Trick
When closing the neck narrow, the clay wall thickens. Periodically slice off the excess clay at the rim with a needle tool to keep the closing manageable.
Step 3: Firing and Assembly
-
Bisque Fire:
Load the bone-dry piece into the kiln and bisque fire it according to your clay body’s specifications (usually cone 04 or 06). -
Glaze Fire:
Since we want a natural terracotta finish, you can skip glazing the exterior. Fire the piece again to maturity to ensure it is weatherproof and durable. -
Attach the Rope:
Taking your natural jute rope, feed it through the top attachment point. If you made a loop, simply tie it securely. If you have a solid top, you may need to wrap the neck. -
Secure the Neck Wrapping:
For the look in the image, wrap the jute rope tightly around the narrow top neck of the birdhouse. Apply a strong adhesive or epoxy underneath the rope coils to keep them permanently in place. -
Final Check:
Give the rope a firm tug to ensure it will hold the weight of the ceramic house before finding the perfect branch to hang it from.
Cracking at the Top?
If the narrow neck cracks while drying, you likely let the top dry faster than the thick base. Cover the top loosely with plastic to even out drying.
You now have a beautifully organic sanctuary ready to welcome feathered friends to your backyard

The Complete Guide to Pottery Troubleshooting
Uncover the most common ceramic mistakes—from cracking clay to failed glazes—and learn how to fix them fast.
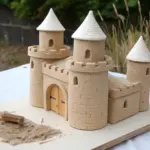
Domed Cottage Birdhouse
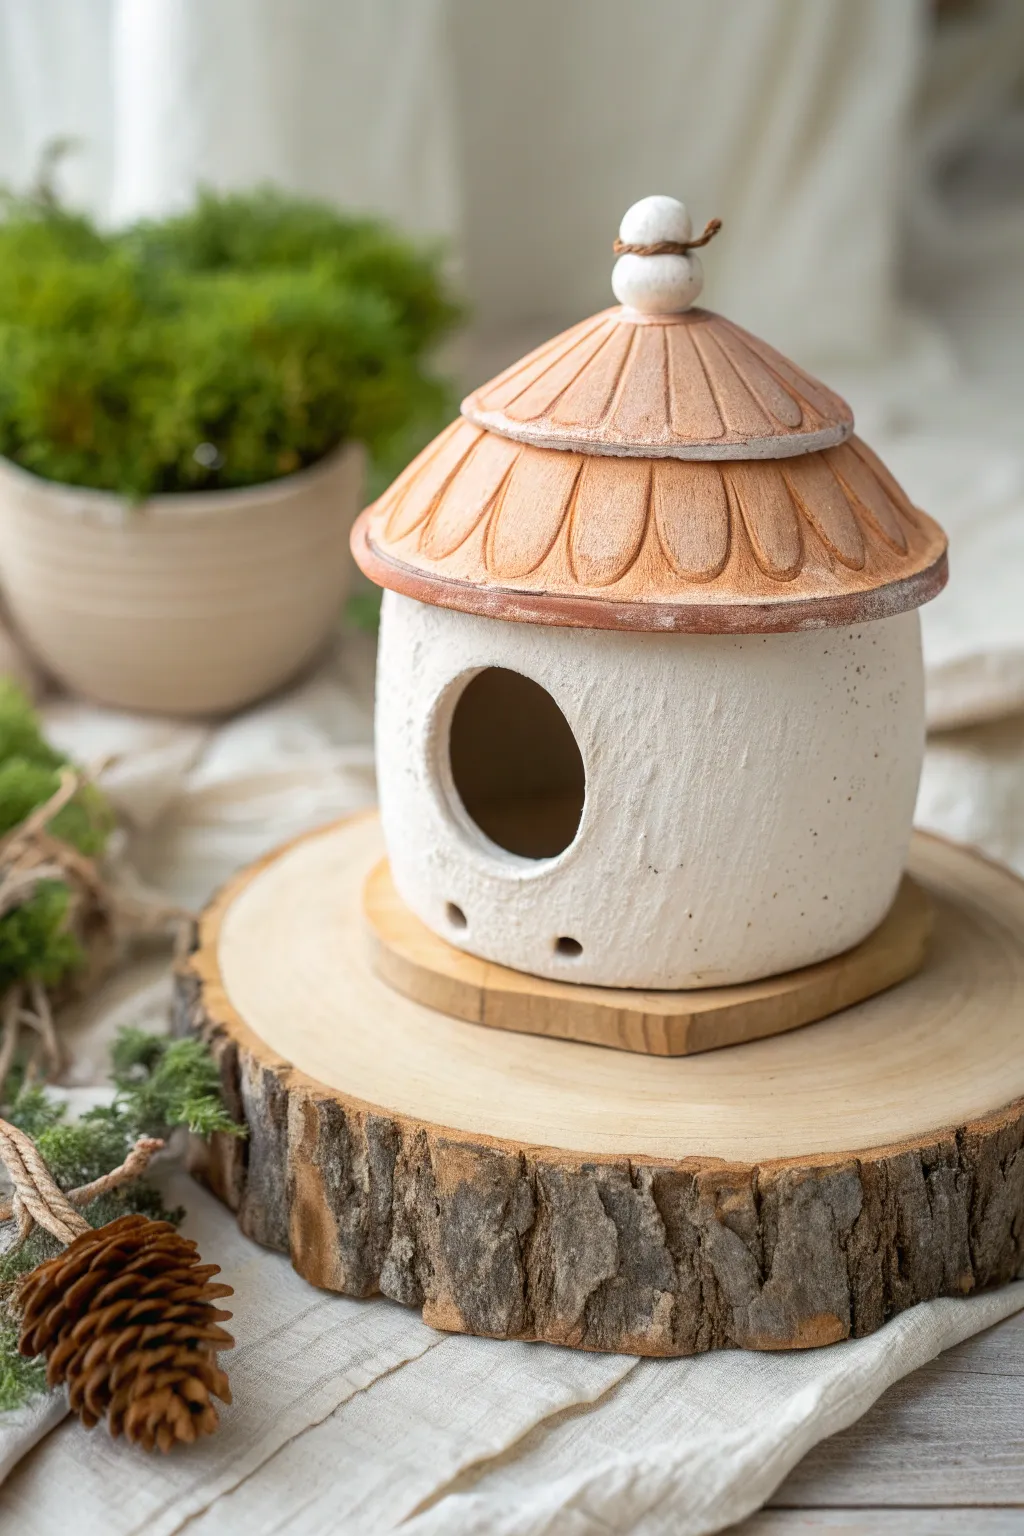
This whimsical birdhouse gets its charm from the contrast between a roughly textured white clay body and a warm, terracotta-hued roof. The layered petal design on the dome creates a fairytale aesthetic perfect for nesting garden birds.
Step-by-Step
Materials
- White stoneware clay or air-dry clay (approx. 3-4 lbs)
- Terracotta clay or oxide wash for roof coloring
- Rolling pin and canvas mat
- Circular cookie cutters or a jar lid (approx. 4 inches)
- Pottery knife or needle tool
- Slip and scoring tool (toothbrush or serrated rib)
- Small round cutter (for entrance hole)
- Wooden spoon or small dowel (for ventilation holes)
- White matte glaze (if firing) or white acrylic paint
- Sponge and water bucket
- Small wooden slab for the base (optional)
Step 1: Forming the Body
-
Roll the slab:
Start by rolling out a generous slab of white clay to about 1/4 inch thickness. You want it sturdy enough to hold the roof but not overly heavy. -
Cut the walls:
Cut a long rectangular strip, roughly 5 inches high and 12 inches long. This will form the cylindrical body of the cottage. -
Create the cylinder:
Curve the strip into a cylinder, overlapping the ends slightly. Score the overlapping edges deeply, apply slip, and press them together firmly to create a seamless join. -
Add the floor:
Roll a circular base slightly larger than your cylinder’s diameter. Join the cylinder to this base using the score-and-slip method, smoothing the inside seam with a modeling tool or your finger. -
Shape the entrance:
Use a round cutter to remove a circle from the front of the cylinder, positioning it centrally but slightly higher up to give birds a nesting cavity below. -
Make ventilation holes:
Near the bottom edge, poke two or three small holes using a dowel to allow for drainage and air circulation. -
Texture the surface:
dabbing a damp sponge or a crumpled piece of foil all over the exterior creates that lovely, stucco-like texture seen in the photo.
Roof Keep Cracking?
If the roof cracks while drying, you likely draped it over a rigid mold that didn’t shrink with the clay. Remove the mold as soon as the clay holds its shape.
Step 2: Sculpting the Domed Roof
-
Form the base dome:
Roll out a large circle of clay slightly wider than your cylinder walls. Gently drape it over a rounded mold (like a bowl covered in plastic wrap) to establish the dome shape. -
Create leaf petals:
Roll out a thinner slab of clay. Cut elongated, petal-like shapes—you will need enough to encircle the roof in two layers. -
Attach the bottom tier:
Attach the first row of petals around the bottom edge of the dome, letting them overhang slightly. Use a modeling tool to press a center vein into each petal. -
Add the top tier:
I usually offset the second layer so the points fall between the petals below. Place this smaller circle of petals on top, smoothing the center down. -
Apply roof texture:
Use your needle tool to define the edges of the petals clearly, ensuring the separation lines are deep enough to catch the glaze or wash later. -
Top the dome:
Roll two small balls of clay. Stack them on the very peak of the roof to create a finial, securing them well.
Texture Master
Wiping a damp sponge over the roof after applying oxide wash creates depth. It leaves color in the crevices while revealing the lighter clay on the petal ridges.
Step 3: Assembly and Finishing
-
Join body and roof:
Once the pieces are leather hard, score the top rim of the body and the underside of the roof. Apply slip and press the roof gently onto the walls. -
Refine the seams:
Smooth out any clay that squishes out from the join, ensuring the transition looks deliberate and clean. -
Dry slowly:
Cover the house loosely with plastic to let it dry slowly over several days. This prevents the roof from warping or detaching. -
Bisque fire:
If using kiln clay, fire to bisque temperature once fully bone dry. -
Decorate surface:
Apply a white matte glaze or paint to the body. For the roof, use an iron oxide wash or terracotta-colored glaze, wiping it back slightly to highlight the petal textures. -
Mounting prep:
If you plan to hang it, you can add a wire through the finial or glue the fired piece to a wooden slice base as shown in the inspiration image.
Place your finished cottage in a sheltered garden spot and wait for your first feathered tenants to arrive
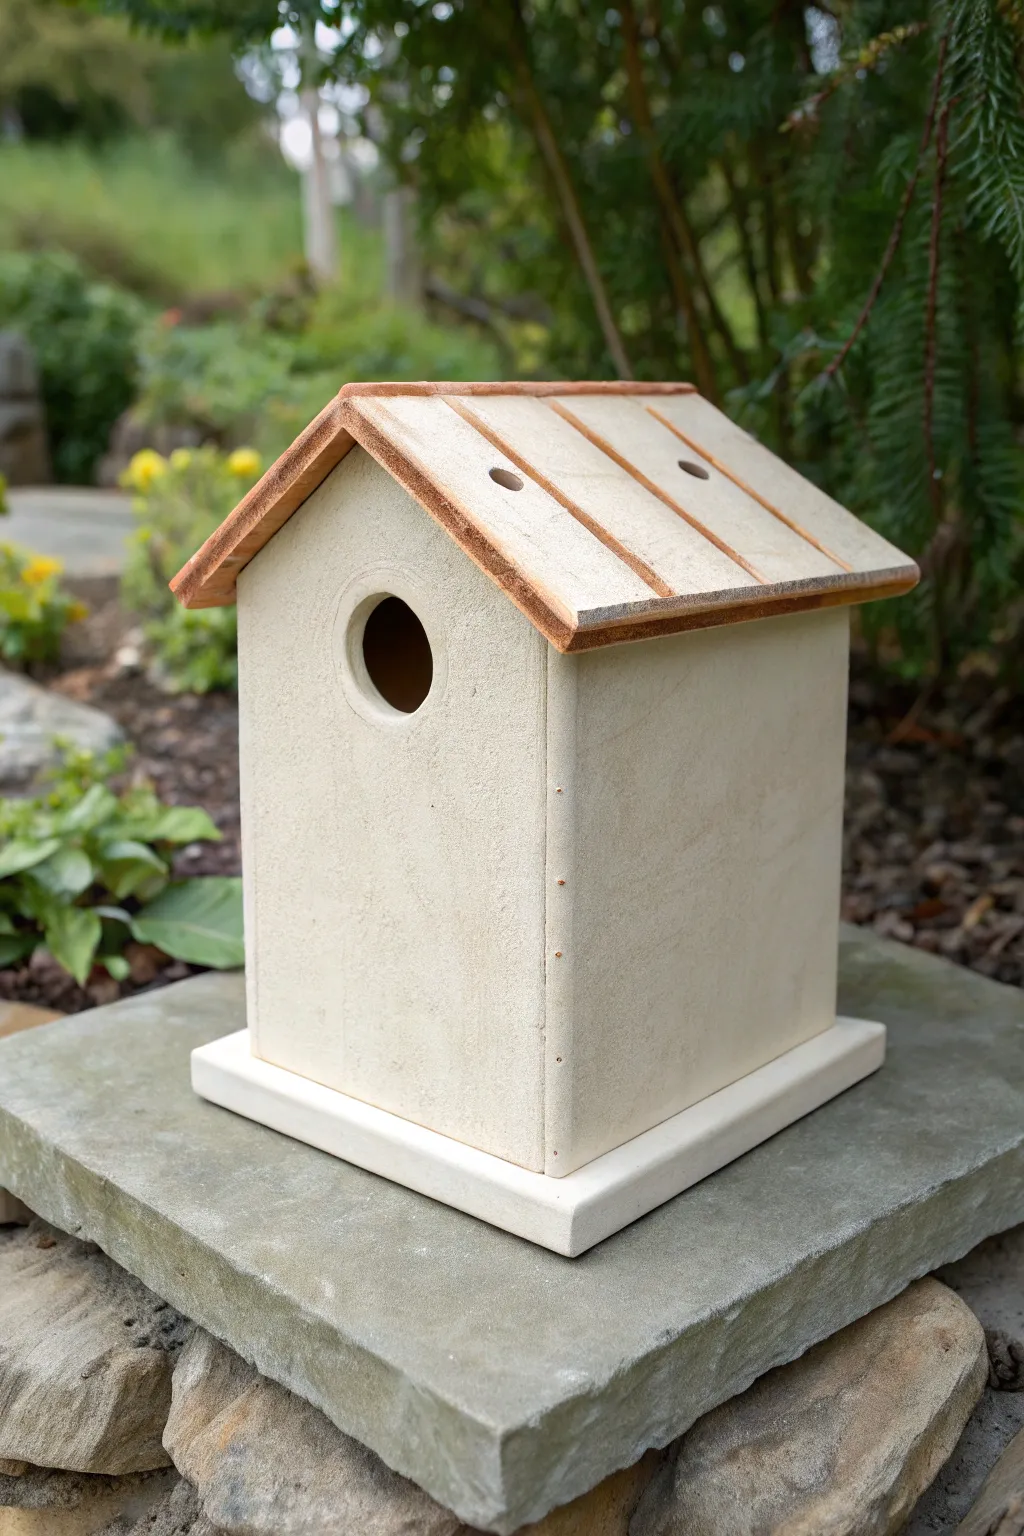
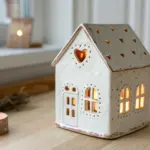
Pitched Roof With Overhang
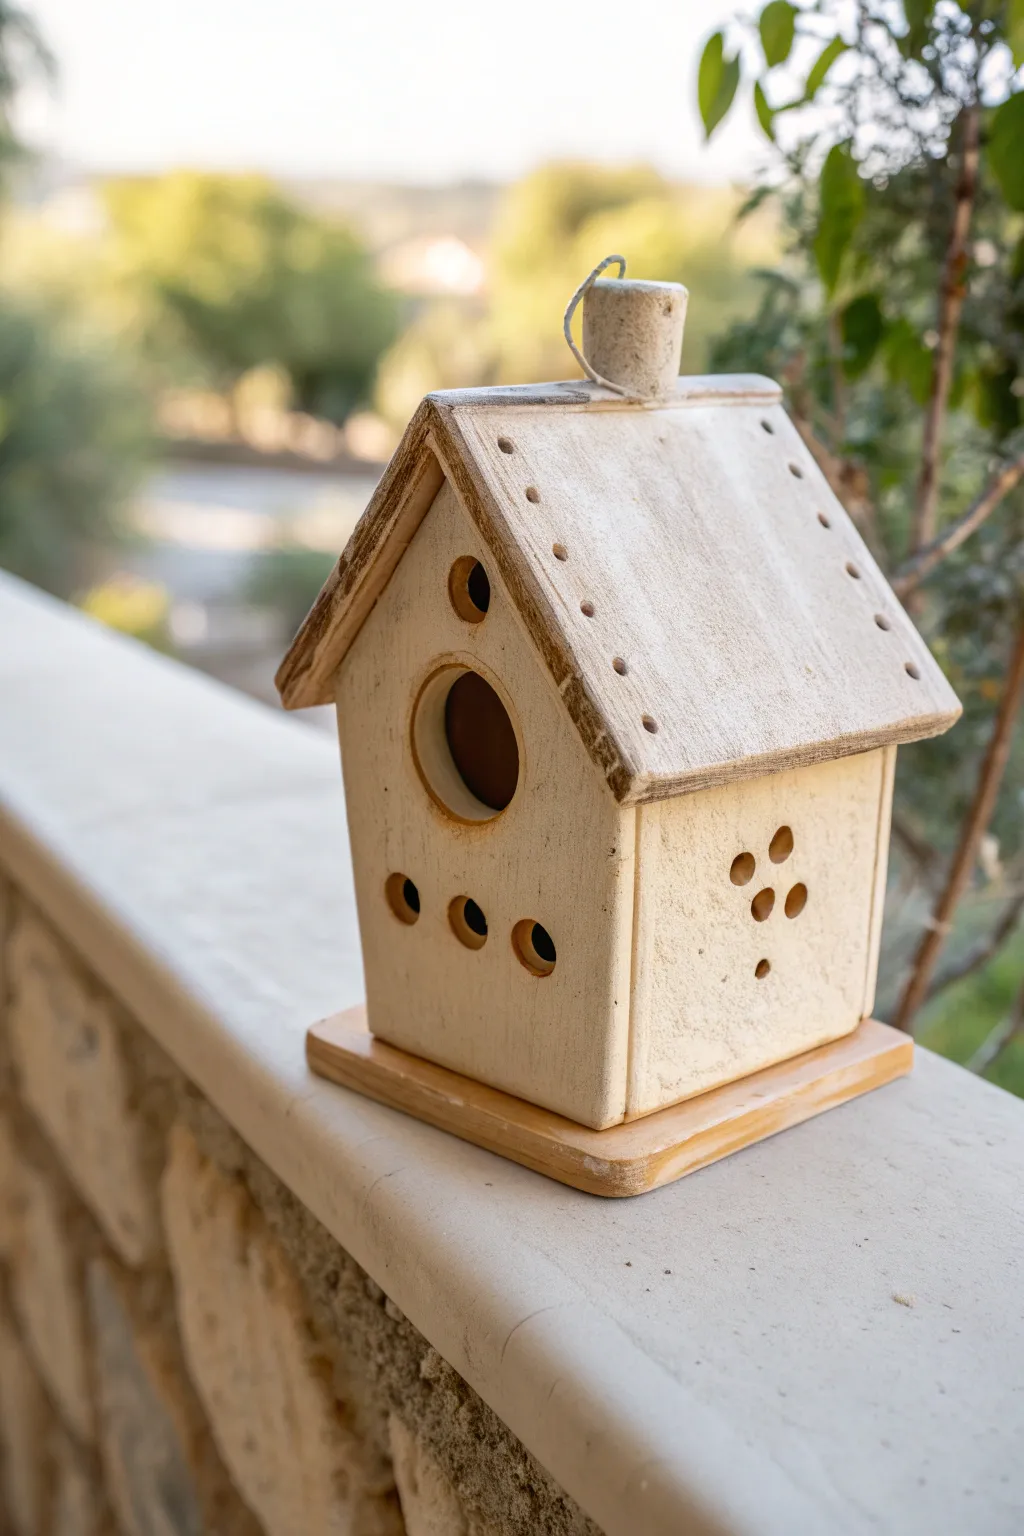
This charming ceramic birdhouse features a classic pitched roof with a generous overhang, giving it a cozy, cottage-like silhouette. The textured cream finish and exposed clay edges create a beautiful rustic effect that blends perfectly with outdoor garden spaces.
Step-by-Step Guide
Materials
- White or speckled stoneware clay (approx. 3-4 lbs)
- Rolling pin and guide strips (1/4 inch thickness)
- Fettling knife or clay cutting tool
- Circle cutters (various sizes: one large for entrance, small for vents)
- Needle tool
- Scoring tool or serrated rib
- Slip (clay slurry)
- Wooden base (pre-cut square, slightly larger than house footprint)
- Strong craft glue (e.g., E6000) or epoxy
- Metal wire for hanging loop
- Sponge and water
- Ruler and paper for templates
Step 1: Preparation & Cutting
-
Create templates:
Draft your paper templates first. You will need two rectangular side walls, a front and back wall with a pint/peak at the top, and two rectangular roof slabs that are wider and longer than the house footprint to create the overhang. -
Roll the slabs:
Roll out your clay to an even 1/4-inch thickness. Using guide strips under your rolling pin helps ensure the walls are perfectly uniform, which is crucial for structural integrity. -
Cut the components:
Lay your paper templates onto the clay slabs. Using a fettling knife, carefully cut out the front, back, two side walls, and the two roof panels. Save the excess clay for the chimney. -
Leather hard stage:
Allow the cut pieces to dry until they reach a ‘leather hard’ state. They should be firm enough to stand up without bending but still hold an impression from your fingernail.
Pro Tip: Rustic Edges
Don’t over-smooth your seams! Leave a bit of texture or gently wipe away some surface clay with a sponge to reveal the gritty ‘tooth’ of the clay body for that aged look.
Step 2: Assembly
-
Prepare edges:
Score the vertical edges of all four wall pieces using your serrated rib. Apply a generous amount of slip to the scored areas. -
Construct the walls:
Join the side walls to the front piece, pressing firmly. Then attach the back piece. Use a small coil of clay on the inside seams to reinforce the corners, smoothing it out so it’s invisible. -
Cut the entrance:
With the walls standing, use your largest circle cutter to remove the main entrance hole on the front panel. I find it easier to do this now while the walls are upright to prevent warping. -
Add ventilation details:
Use smaller circle cutters or a straw to punch three small holes below the entrance. On the side walls, create a small decorative pattern, like the cross-shape of five holes shown in the example. -
Bevel the roof line:
Before attaching the roof, slightly bevel the top edges of the peaked front and back walls so the roof slabs attractively sit flush against the angle. -
Attach the roof:
Score and slip the top edges of the walls and the contact points on the roof slabs. Place the roof panels on, ensuring they overhang evenly. Press the center seam where the roof panels meet firmly together.
Troubleshooting: Sagging Roof
If your roof slabs sag in the middle during assembly, prop them up with crumpled newspaper or foam on the inside. Leave the support in place until the clay becomes bone dry.
Step 3: Finishing Details
-
Enhance the texture:
Use a slightly damp sponge to wipe down the exterior surfaces. This removes sharp burrs and exposes the newly cut edges, giving it that weathered look. -
Add roof texture:
Take a needle tool and gently poke a line of small divots along the edges of the roof panels to mimic nail holes or decorative stitching. -
Create the chimney:
Form a small rectangle of clay and roll it into a cylinder or box shape for the chimney. Attach it to the peak of the roof using the slip and score method. -
Insert hanging wire:
While the chimney clay is still workable, carefully poke your wire loop into the top of it. Ensure it goes deep enough to be secure once fired. -
Final drying and firing:
Let the birdhouse dry slowly under plastic for a day or two to equalize moisture, then uncover for full drying. Fire completely according to your specific clay’s instructions. -
Mount to base:
Once the ceramic piece is fired and cool, apply a strong adhesive to the bottom edges and center it onto your wooden square base. Let the glue cure fully before hanging.
Hang your new rustic pottery piece in a sheltered spot and wait for the first visitors to arrive


What Really Happens Inside the Kiln
Learn how time and temperature work together inside the kiln to transform clay into durable ceramic.
Tree Stump Birdhouse
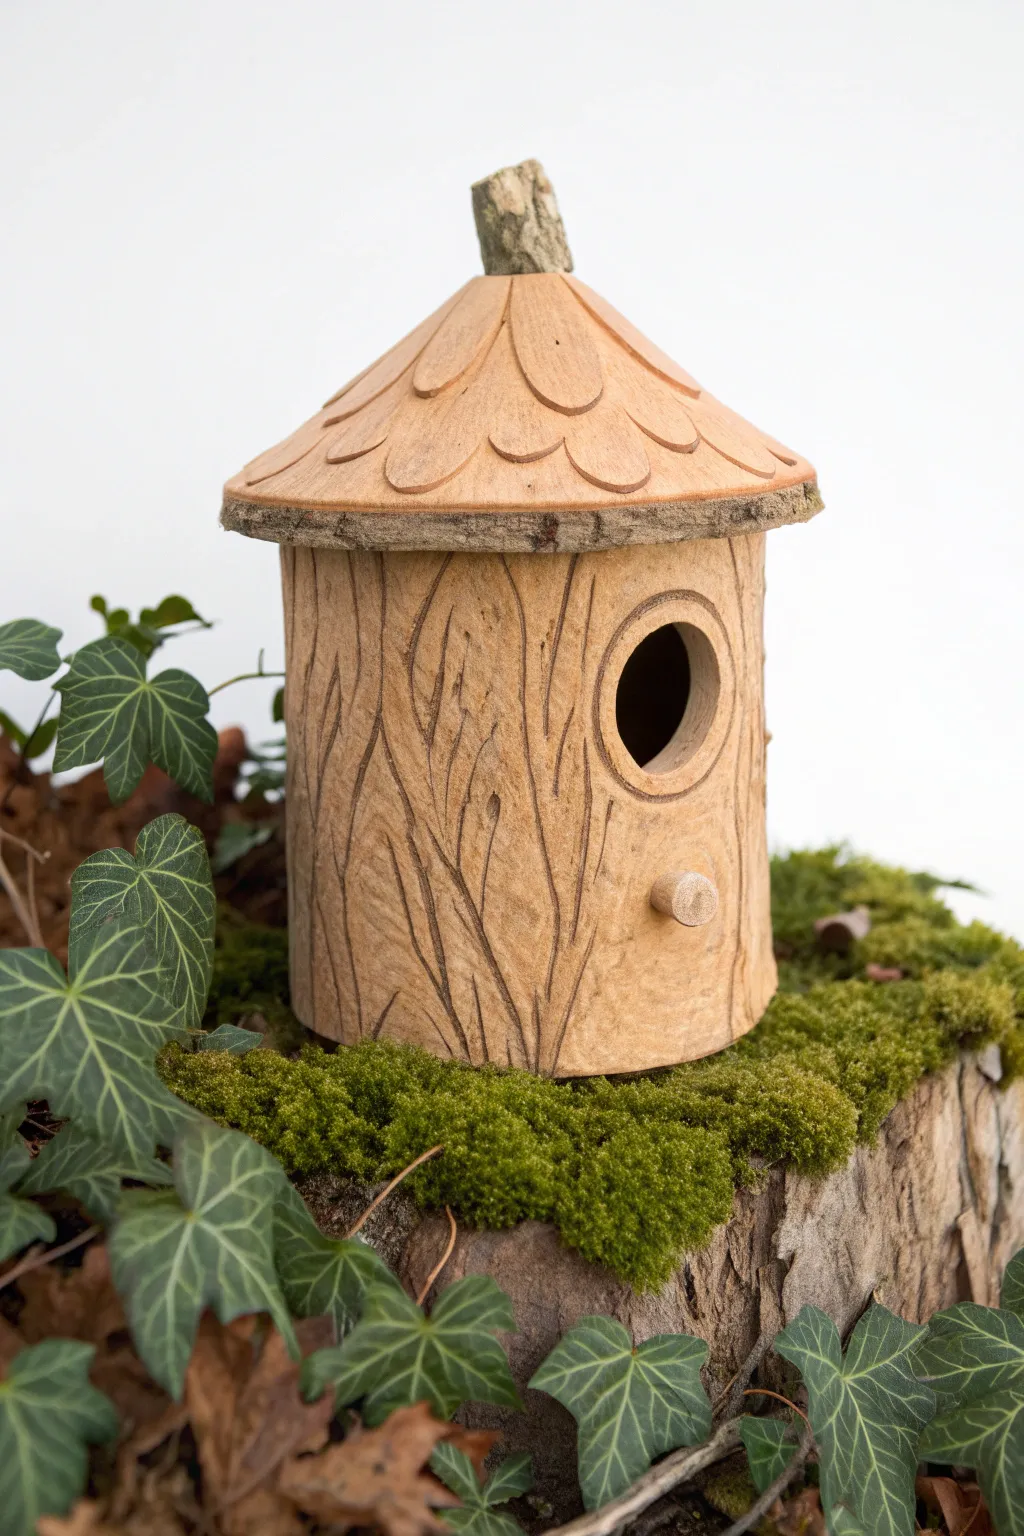
Transform a slab of clay into this enchanting woodland abode, featuring realistic bark texture and a leaf-layered roof. The natural bisque finish gives it a warm, organic feel that blends perfectly with a garden setting.
Step-by-Step Tutorial
Materials
- Stoneware clay (buff or speckled)
- Clay rolling pin
- fettling knife or needle tool
- Carving tools (loop tool and wood modeling tool)
- Slip and scoring tool
- Cardboard or paper form (for the cylinder)
- Small wooden twig (propped for the chimney)
- Circle cutter
- Sponge
Step 1: Building the Base Structure
-
Roll the slab:
Begin by rolling out a generous slab of clay to a uniform thickness of about 1/4 inch. Ensure the slab is large enough to cut a rectangle for the body and a circle for the base. -
Cut the components:
Measure and cut a rectangle that will form the cylinder of the stump. Also, cut a circular base that matches the diameter of your intended cylinder. -
Form the cylinder:
Wrap the rectangular slab around a paper or cardboard tube to help hold its shape. Score and slip the connecting edges generously to create a strong vertical seam. -
Attach the floor:
Score the bottom edge of your cylinder and the outer rim of your circular base. Press them together firmly, blending the clay on the inside and outside to ensure a water-tight seal. -
Cut the entryway:
Use a circle cutter or a steady hand with a needle tool to cut a smooth, round entrance hole near the top third of the cylinder. Smooth the edges with a damp sponge. -
Add the perch:
Create a small, thick peg of clay. Score and slip a spot just below the entrance hole and attach the peg securely.
Step 2: Texturing the Bark
-
Outline the bark:
Using a needle tool, lightly sketch vertical, wavy lines around the entire cylinder to map out the flow of the tree bark. -
Carve deep grooves:
Take a wood modeling tool or a small loop tool and carve along your sketched lines. Vary the depth and width of your cuts to mimic the random, organic nature of real wood. -
Refine the texture:
Between the deep grooves, use a scratching tool or stiff brush to add subtle grain texture. I find that layering these fine lines over the deeper cuts adds incredible realism. -
Detail the entrance:
Carve a concentric ring around the bird entrance hole to make it look like a natural knot in the wood.
Preventing Roof Collapse
If the roof cone sags while working, crumble a ball of newspaper and place it underneath the cone for support. Leave it in place until the clay is leather-hard.
Step 3: Constructing the Roof
-
Form the cone:
Roll a new slab and cut a large circle. Remove a pie-shaped wedge from the circle, then pull the cut edges together to form a shallow cone shape. Score and slip the seam. -
Create the shingles:
Roll a thinner slab of clay and cut out numerous small, oval or leaf-shaped pieces. These will act as your shingles. -
Layer the roof:
Starting at the bottom rim of the cone, attach the shingles using slip, layering them upwards in concentric circles until you reach the peak. -
Add the brim:
Roll a thin coil of clay and attach it to the very bottom edge of the roof to create a distinct rim. Texture this rim to look like rough bark or moss. -
Top with a twig:
Select a small piece of clay (or a real dried twig if firing allows/using air-dry clay) and attach it to the very tip of the roof to act as a decorative chimney or stem.
Natural Texture Hack
For realistic bark texture, press a piece of actual rough tree bark or a coarse rock against the clay surface before carving your deeper grooves.
Step 4: Assembly and Finishing
-
Check the fit:
Place the roof onto the cylinder body. You can score and slip it permanently, or create a gallery rim (an inner flange) on the roof so it sits securely but remains removable for cleaning. -
Final smoothing:
Check all seams and edges. Use a slightly damp sponge to soften any sharp bits of clay that might snag a bird’s feathers. -
Dry slowly:
Cover the birdhouse loosely with plastic to allow it to dry very slowly. This prevents the seams from cracking or the roof from warping. -
Fire the piece:
Once bone dry, bisque fire the piece. You can leave it unglazed for a natural terra cotta look, or apply a matte clear glaze to protect it from the elements.
Now you have a charming, weather-resistant home ready to welcome your feathered neighbors into the garden
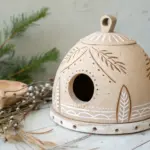
Bark Texture And Leaf Imprints
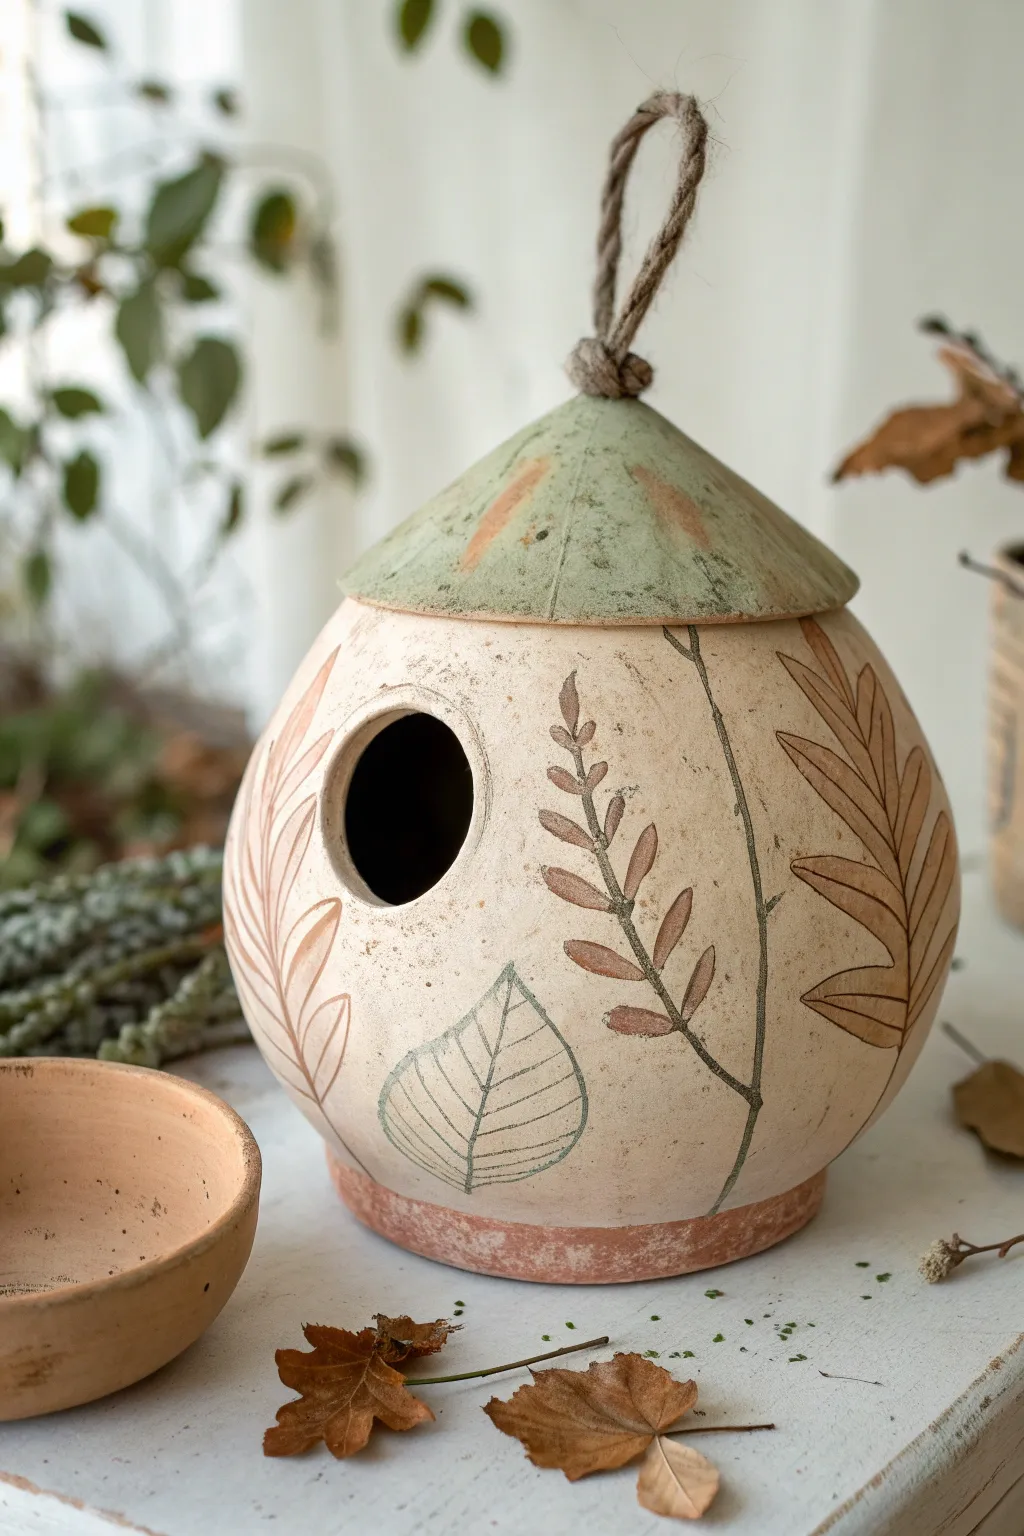
This charming, gourd-shaped birdhouse combines the warmth of natural terracotta with delicate botanical artistry. With its subtle etched leaf designs and a distinctive green-washed roof, it makes a perfect sculptural addition to your garden or sunroom.
Step-by-Step
Materials
- White or speckled stoneware clay
- Terracotta clay (or red iron oxide wash)
- Pottery wheel (optional, can be hand-built)
- Wooden sculpting tools
- Needle tool
- Circular cookie cutter (approx. 1.5 inch)
- Jute or hemp rope
- Green underglaze or oxide wash
- Clear matte glaze
- Sponge
- Rolling pin
- Slip and scoring tool
Step 1: Forming the Body
-
Shape the sphere:
Begin by throwing a closed form or pinching two large pinch pots together to create a hollow sphere about 6-7 inches in diameter. I prefer to leave the walls slightly thick for durability. -
Refine the surface:
Once the clay is leather hard, use a metal rib or paddle to smooth the exterior, ensuring a nice round shape. -
Add the base:
Roll out a thick coil or slab of terracotta clay (or color your main clay with red iron oxide). Cut a circle the size of your sphere’s bottom. -
Attach the footing:
Score and slip the bottom of the sphere and the terracotta circle, then press them firmly together to create a solid, contrasting base. -
Create the entrance:
Using a circular cutter or a needle tool, cut a clean hole in the upper third of the sphere for the bird’s entrance. Smooth the edges with a damp sponge.
Step 2: Sculpting the Roof
-
Form the cone:
Fashion a conical roof from a slab of clay. You can do this by cutting a circle, removing a wedge slice, and joining the edges to form a tent shape. -
Fit the lid:
Ensure the diameter of the roof is slightly larger than the top opening of your sphere so it creates an overhang. Test the fit before proceeding. -
Add the hanger loop:
Roll a small coil of clay and attach it securely to the very peak of the roof to create a sturdy loop for the rope. -
Texture the roof:
Using a wooden tool, press faint radial lines from the peak down to the edge to mimic the seams of a metal or folded roof.
Natural Texture Hack
Instead of carving, press real leaves into the soft clay and roll over them gently. Carefully peel them away to leave an exact, detailed imprint.
Step 3: Botanical Decoration
-
Sketch the design:
Lightly trace your leaf patterns onto the leather-hard clay using a dull pencil or tool to plan your composition. -
Carve the outlines:
Use a fine needle tool or sgraffito tool to carve the outlines of the leaves and stems. Vary your pressure to create organic, lively lines. -
Add distinct details:
Inside the leaf outlines, gently carve veins or cross-hatching to give the foliage texture and depth. -
Apply leaf color:
Mix a small amount of diluted iron oxide or brown underglaze. Carefully paint this into the carved leaf lines to make them pop.
Preventing Cracks
If the roof and body dry at different rates, they won’t fit. Dry them slowly together under plastic to ensure shrinkage happens evenly.
Step 4: Finishing and Firing
-
Antique the roof:
Apply a wash of sage green underglaze to the roof section. While it’s still damp, wipe some away with a sponge to leave color in the textures for a weathered look. -
Bisque fire:
Allow the piece to dry completely, which may take several days depending on thickness, then bisque fire to cone 04. -
Glaze application:
Apply a clear matte glaze over the entire exterior to protect the design without making it too shiny. Wipe the bottom free of glaze. -
Final firing:
Fire the piece again to the appropriate temperature for your specific clay body (e.g., cone 5 or 6). -
Attach the rope:
Once cool, thread a sturdy jute or hemp rope through the top loop and tie a knot securely.
Hang your new creation in a sheltered spot and watch your garden come alive with rustic charm

TRACK YOUR CERAMIC JOURNEY
Capture glaze tests, firing details, and creative progress—all in one simple printable. Make your projects easier to repeat and improve.
Fairy Cottage Birdhouse
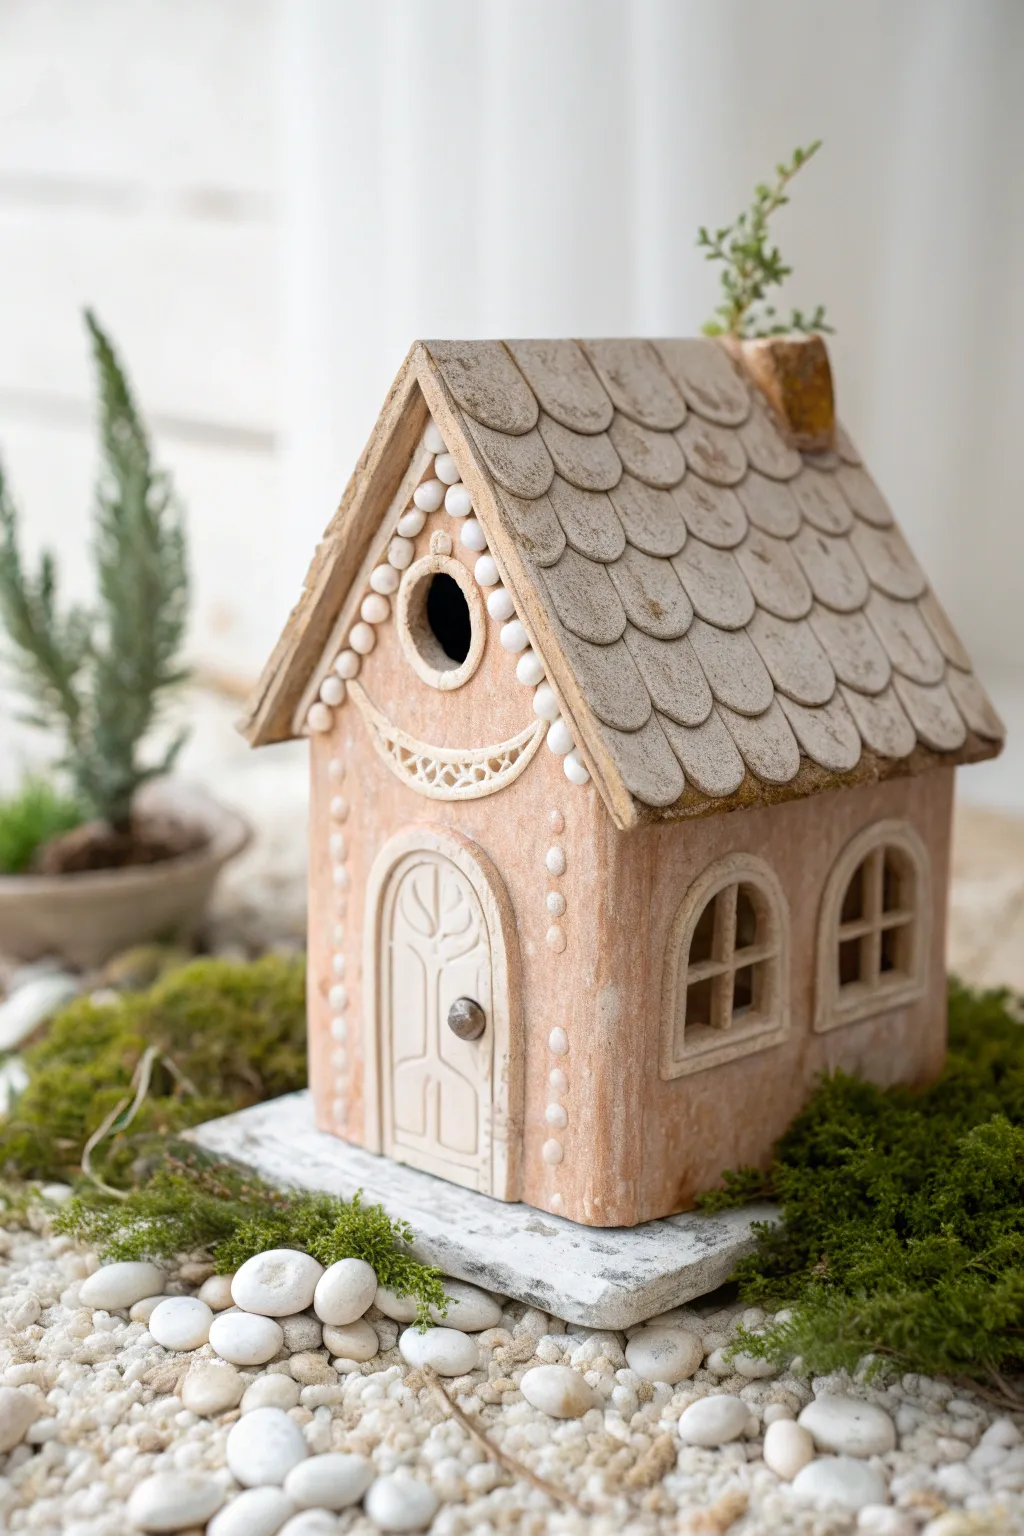
Transform humble clay into an enchanting garden dwelling with this rustic fairy cottage project. Featuring scalloped roofing, charming arched windows, and delicate pearl-like accents, this birdhouse looks as though it was plucked straight from a storybook forest.
Detailed Instructions
Materials
- Stoneware or earthenware clay (terracotta color recommended)
- Slab roller or rolling pin and guide strips (3/8 inch)
- Clay knife or fettling tool
- Circle cutter (approx. 1.5 inch for bird entry)
- Small round cutter or frosting piping tip (for scallops)
- Needle tool
- Slip and score tool
- Small geometric cutters (arch shape)
- White underglaze or slip
- Applicator bottle with fine tip (for white dots)
- Clear matte glaze (optional)
- Wooden sculpting tools
- Sponge
Step 1: Constructing the Base Structure
-
Roll the slabs:
Begin by rolling out your clay into an even slab, approximately 3/8 inch thick. Uniform thickness is crucial for even drying and preventing cracks. -
Cut the walls:
Cut out four wall panels: two rectangular side walls and two peaked front/back walls. Measure carefully to ensure the side walls match the height of the straight edges on the peaked walls. -
Cut the openings:
While the slabs are flat, use your circle cutter to create the bird entry hole near the peak of the front wall. Use arched cutters or a knife to cut out two windows on one side wall. -
Add window details:
Roll tiny coils of clay to create frames around the windows. Add a simple cross-bar mullion inside each window for that classic cottage look. -
Assemble the walls:
Wait until the clay is leather-hard. Score the edges of your walls and apply slip generously. Press the walls together to form a box, reinforcing the inside seams with thin coils of clay.
Slip Consistency
For the raised white dots, thicken your slip by leaving it open to air for a few hours. It should feel like toothpaste so the dots hold their shape without running.
Step 2: Sculpting the Door & Texture
-
Create the door frame:
Roll a thin slab and cut an arched door shape slightly smaller than the door outline you want. Attach it to the lower front wall. -
Carve door details:
Using a needle tool, gently carve a stylized tree pattern into the door surface. Add a small ball of clay for the doorknob. -
Add texture:
For a rustic finish, lightly distress the exterior walls by dabbing them with a stiff brush or a crumpled piece of foil. This mimics aged plaster or stone.
Chimney Charm
Add a small, hollow rectangular prism to the roof as a chimney. You can even plant a tiny succulent sedum inside it after firing for a ‘living roof’ vibe.
Step 3: Roofing & Decoration
-
Attach the roof slabs:
Cut two rectangular roof slabs that are large enough to overhang the walls. Score, slip, and attach them to the peaks. -
Create roof tiles:
Roll a very thin sheet of clay. Use a small round cutter or a piping tip to punch out dozens of small circles or scallops. -
Layer the shingles:
Starting at the bottom edge of the roof, slip and score these scallops in overlapping horizontal rows, working your way up to the ridge. Arrange them slightly unevenly for a whimsical feel. -
Add the crown:
Roll a thicker strip of clay to cap the very top ridge of the roof, blending it into the top row of shingles to seal the peak. -
Distress the roof:
Lightly sponge white underglaze over the roof tiles, wiping most of it back so the color remains in the crevices, highlighting the texture. -
Pipe the details:
Fill a precision applicator bottle with thick white slip or underglaze. I find this creates the cleanest raised dots. -
Decorate the facade:
Pipe small white dots along the vertical corners of the house, around the door arch, and framing the bird entry hole. Add a decorative swoop of dots beneath the entry hole. -
Final dry and fire:
Allow the piece to dry slowly under loose plastic to prevent warping. Once bone dry, bisque fire the house, then apply a matte clear glaze if desired for weatherproofing before the final firing.
Place your finished cottage in a mossy corner of the garden to invite your neighborhood fairies and feathered friends to visit
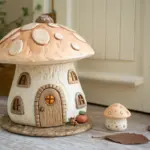
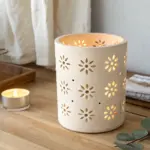
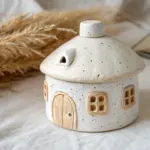
Mushroom Cap Roof Birdhouse
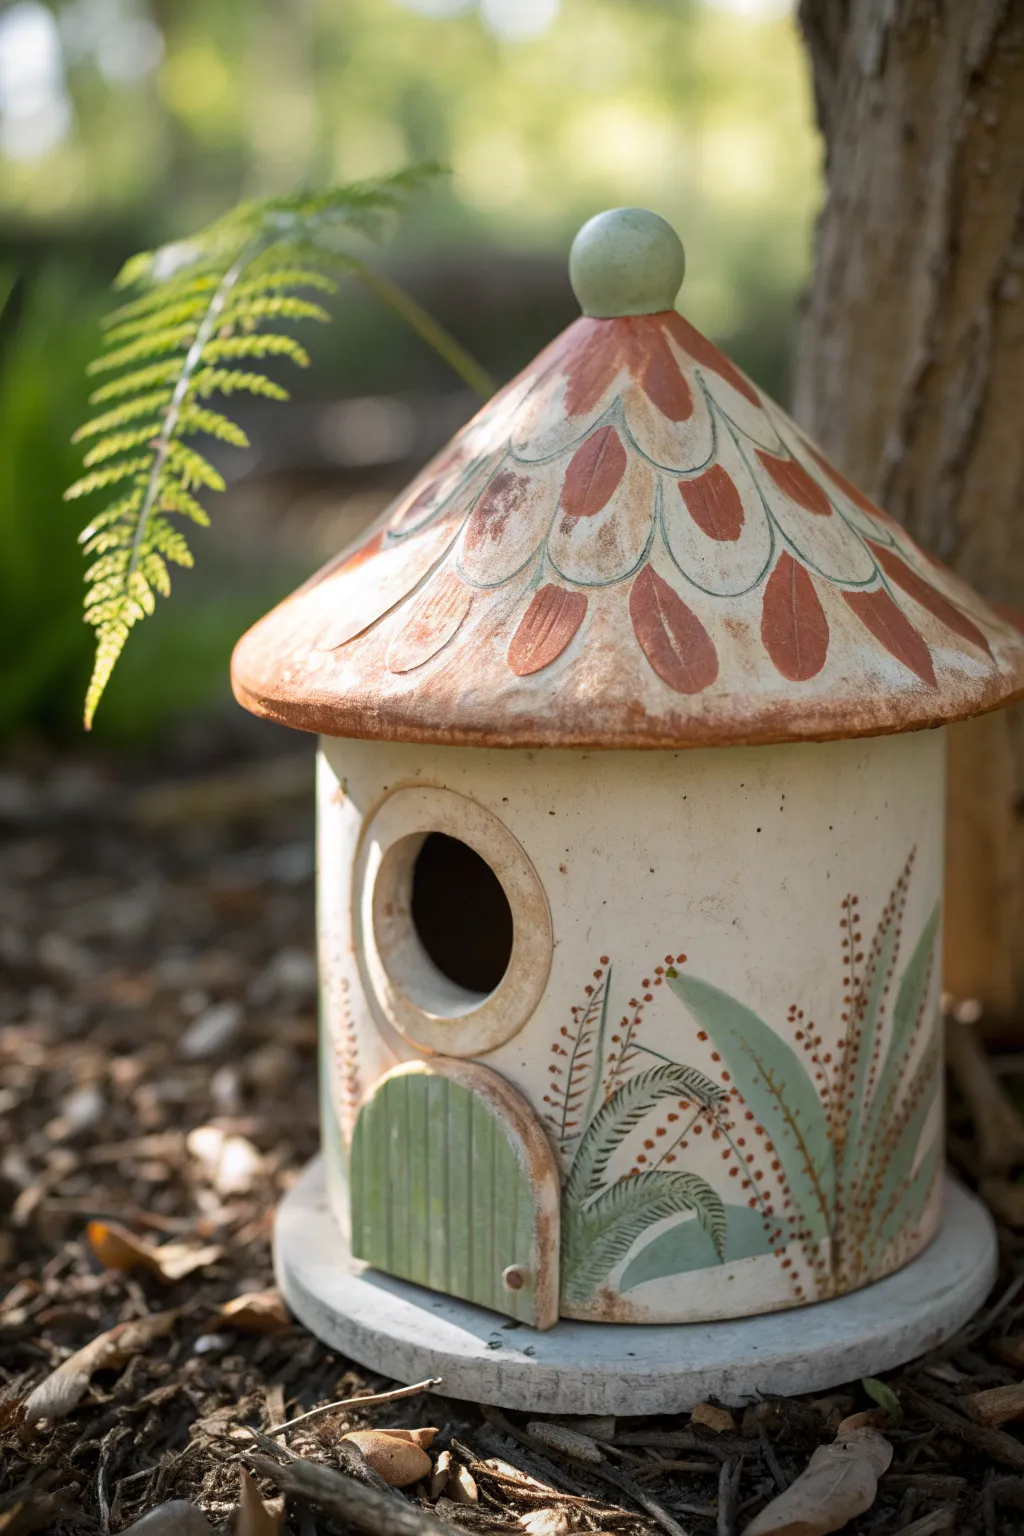
Bring a touch of fairy-tale charm to your garden with this adorable mushroom-capped clay birdhouse. Featuring a hand-painted fern design and a welcoming little green door, this project combines simple pottery techniques with delicate surface decoration.
How-To Guide
Materials
- Earthenware or stoneware clay (white or light buff)
- Rolling pin and canvas mat
- Circle cutter or template (approx. 5 inches)
- Small knife or needle tool
- Score and slip tool (or toothbrush)
- Clay paints or underglazes (terracotta/rust, sage green, forest green, cream)
- Clear outdoor sealant or glaze
- Small sponge
- Fine detail brushes
- Small ball of clay for the finial
Step 1: Forming the Base Structure
-
Roll the slab:
Begin by rolling out a medium-sized slab of clay to an even thickness of about 1/4 inch. If you want a sturdy house, ensure there are no weak thin spots. -
Cut the walls:
Cut a rectangular strip from the slab. The height should be roughly 6-7 inches and the length long enough to form a cylinder with a 4-5 inch diameter. bevel the short edges at opposite 45-degree angles to create a seamless overlap join. -
Form the cylinder:
Curve the strip into a cylinder. Score and slip the beveled edges thoroughly, then press them together firmly. Smooth the seam inside and out with a rib tool or your finger so it completely disappears. -
Create the floor:
Roll a small circle slightly larger than the cylinder’s diameter. Place the cylinder on top, trace around it, cut the circle out, and attach it to the bottom of the cylinder using the score and slip method. -
Cut the entry hole:
About halfway up the wall, use a small circle cutter or a knife to carefully remove a circle for the bird entrance. Smooth the cut edges with a damp sponge. -
Add the rim detail:
Roll a thin coil of clay and attach it around the entryway hole to create a raised frame. Blend the clay onto the wall but leave the front of the frame rounded.
Cracked Seams?
If the cylinder seam cracks during drying, make a ‘paper clay’ paste (shredded toilet paper mixed with slip) to fill the gap, then smooth it over.
Step 2: Sculpting the Door and Roof
-
Form the door:
Cut a small semi-circle from your slab scraps to act as the faux door. Score the surface gently with vertical lines to mimic wood planks. -
Attach the door:
Attach this door piece near the bottom of the cylinder, slightly off-center from the window. Add a tiny ball of clay for a doorknob. -
Mold the roof:
For the mushroom cap, roll a circle of clay approximately 1-2 inches wider than your cylinder. draped it over a curved mold (like a small bowl covered in plastic wrap) or pinch it by hand to create a shallow cone shape. -
Decorate the roof texture:
While the roof is still soft, use a looped tool or spoon edge to gently press scalloped indentations into the surface, creating rows of ‘shingles’ or feathers starting from the bottom edge up to the peak. -
Add the finial:
Roll a small ball of clay and attach it to the very peak of the roof. Make sure the connection is strong by scoring both surfaces. -
Dry and Bisque Fire:
Let both pieces dry slowly under loose plastic to prevent warping. Once bone dry, fire them in a kiln to the bisque temperature appropriate for your specific clay body.
Step 3: Painting and Finishing
-
Base coat the roof:
Apply a wash of cream or off-white underglaze to the entire roof. I like to wipe a little back with a sponge to give it an aged, weathered look before the next step. -
Paint roof details:
Using a rust or terracotta color, paint the scalloped shingle shapes you embossed earlier. Leave the outlines cream to create contrast. -
Paint the foliage:
On the main cylinder, use fine brushes to paint tall, sweeping grass blades in sage green. Add tiny terracotta dots along some stems to resemble seeds or spores. -
Detail the door:
Paint the faux door a soft sage green, wiping it back slightly so the texture of the ‘planks’ shows through. Paint the doorknob a contrasting brown or rust. -
Final glaze fire:
Apply a clear matte or satin glaze over the painted areas if desired, or leave the clay raw if using suitable outdoor paints. Fire again according to your glaze instructions. -
Assembly:
Once fully fired and cooled, place the lid on top. If you plan to hang it, you can glue the lid with strong epoxy, but leaving it loose allows for easy seasonal cleaning.
Weather Proofing
To help the house survive freeze-thaw cycles, glaze the interior walls completely to seal the clay against moisture absorption.
Now you have a charming woodland home ready to welcome your feathered neighbors into the garden
Shingled Roof Birdhouse
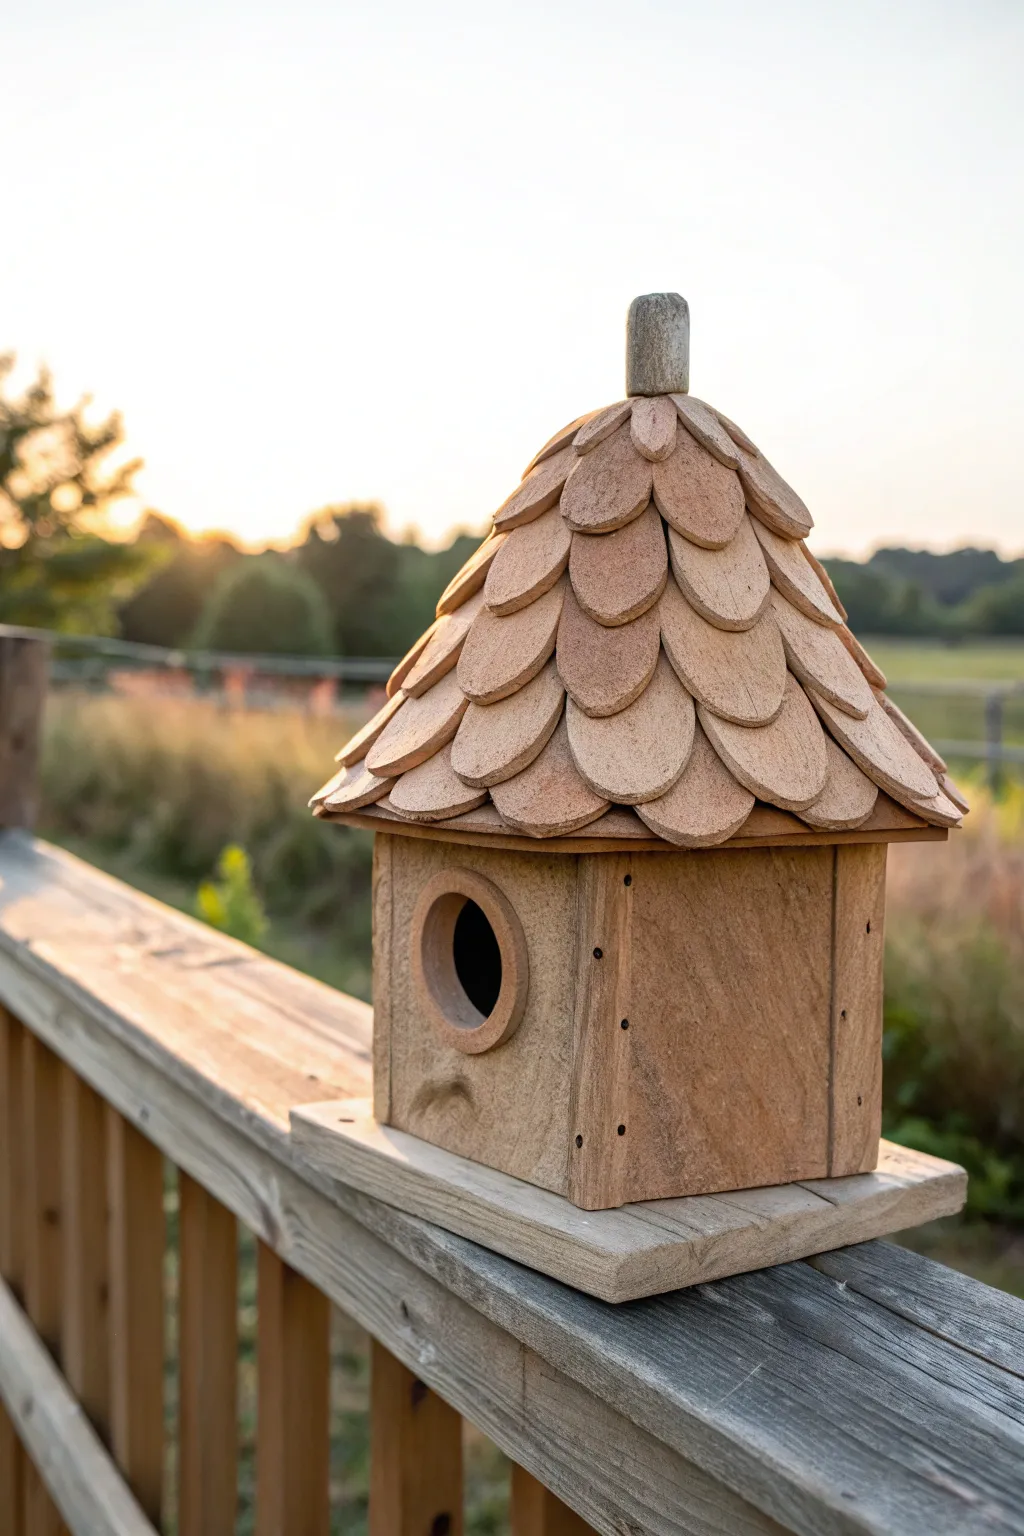
This charming birdhouse project combines the earthy texture of sandstone styling with a whimsical, fairytale roofline. Featuring individually hand-layered clay shingles and a sturdy slab-built base, this piece creates a cozy forever home for your garden’s smaller residents.
Step-by-Step
Materials
- Stoneware clay (groggy or speckled clay adds nice texture)
- Rolling pin and guide sticks (slab sticks)
- Fettling knife or craft knife
- Circle cutter (1.5 inch diameter)
- Oval or teardrop cookie cutter (for shingles)
- Scoring tool or serrated rib
- Slip (clay mixed with water)
- Wooden paddle or flat board
- Ruler
- Cardboard (for templates)
- Small wooden dowel or clay knob for the finial
Step 1: Building the Base Structure
-
Prepare your slabs:
Roll out a large slab of clay to a uniform thickness, roughly 1/4 to 3/8 inch thick. Using guide sticks helps keep the thickness perfectly even, which is crucial for structural integrity. -
Cut the walls:
Using cardboard templates or a ruler, cut four equal square panels for the walls. Typical dimensions for a wren or chickadee house are about 4×4 or 5×5 inches. -
Texture the surface:
Before assembling, add that weathered, stone-like texture to the outside of your wall panels. You can gently press a piece of coarse sandpaper, a rough stone, or a textured fabric into the soft clay. -
Create the entry:
On the front panel, cut a circular entrance hole near the top third using your 1.5-inch circle cutter. Smooth the sharp edges of the cut with a damp finger so birds don’t injure themselves. -
Form the entrance rim:
Roll a small coil or cut a ring of clay and slip-and-score it around the entrance hole to create a reinforced doorway. This adds a nice architectural detail resembling a finished window frame. -
Assemble the box:
Score the vertical edges of your four wall panels aggressively. Apply slip to the scored areas and stand the walls up, joining them to form a square box. -
Reinforce the seams:
Roll thin coils of clay and press them into the interior corners of the box. Smear the clay into the joint to ensure the walls won’t separate during firing. -
Add the floor:
Cut a square base slightly larger than your box. Score and slip the bottom edges of your walls and attach the box to the floor slab. Cut a few small drainage holes in the floor.
Clean Edges Matter
Smooth the edges of every shingle with a damp sponge before attaching. Sharp fired clay can easily cut your hands later, and smoothing makes the roof look more like weather-worn stone.
Step 2: Constructing the Shingled Roof
-
Create the roof support:
Roll out a slab and cut four triangles for a pyramidal roof, or form a coned shape if you prefer a rounded look. The base of the roof needs to overhang the walls slightly. -
Attach the roof base:
Score and slip the top edges of your box and the base of your roof structure. Join them securely. I like to let this assembly stiffen up to leather-hard before adding the heavy shingles. -
Cut the shingles:
Roll out a thinner slab of clay (about 1/8 inch). Use an oval or teardrop cutter to punch out several dozen shingles. Keep them under plastic so they don’t dry out while you work. -
Apply the first row:
Start at the very bottom edge of the roof. Score and slip the back of each shingle and press them onto the roof base, allowing them to hang over the edge slightly to shed water. -
Layering upwards:
Move up to the next row, placing the shingles so they overlap the seams of the row below. Continue this pattern all the way to the peak, ensuring plenty of overlap. -
Create the peak:
Once you reach the top, the shingles will be small and tight. You may need to trim them to fit. Top the structure with a small clay knob or leave a hole to insert a wooden finial post-firing. -
Final drying:
Loosely cover the entire birdhouse with plastic. Let it dry very slowly over several days to prevent warping or cracking where the thick and thin sections meet. -
Firing:
Bisque fire first, then glaze if desired, or fire to maturity for a raw, unglazed terracotta look as shown in the image. If glazing, avoid the interior.
Adding Dimensions
Mix two different clay bodies (like a red and a buff clay) but don’t blend them fully before rolling your slabs. This creates a marbled, natural stone effect on the walls without needing glaze.
Once fired and mounted, your handcrafted cottage will weather naturally and become a permanent part of your garden landscape
Sgraffito Pattern Birdhouse
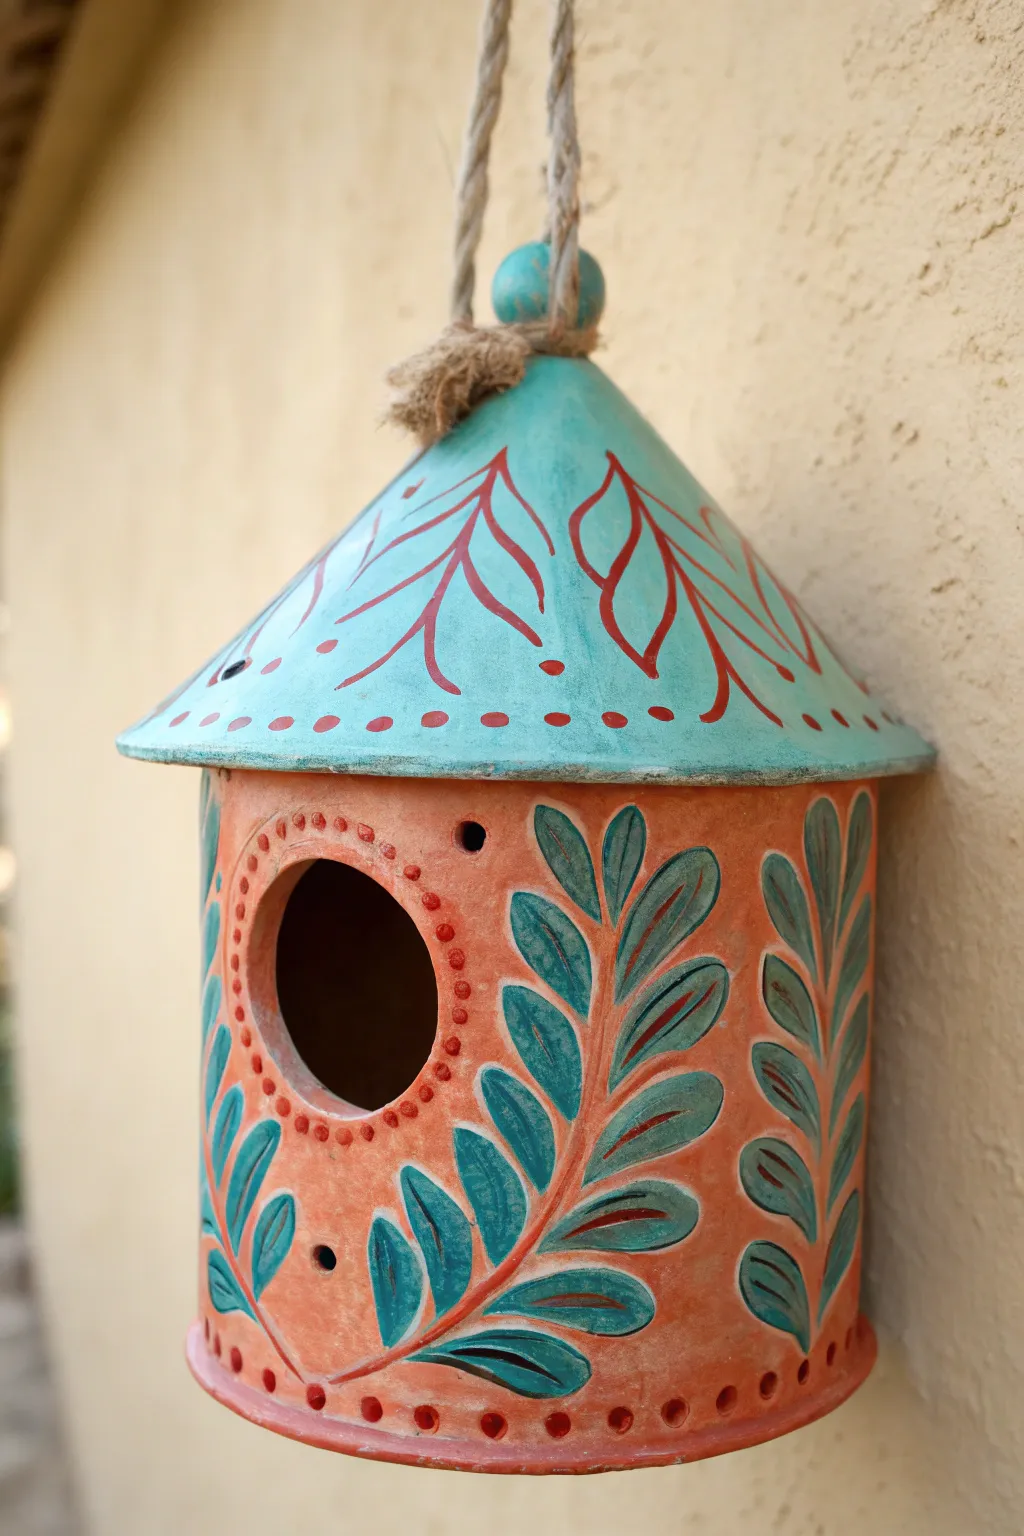
This charming ceramic birdhouse features a classic sgraffito-inspired look, combining warm terracotta tones with cool teal accents. The carved leaf motifs and dotted borders create a folk-art aesthetic that feels both rustic and refined.
How-To Guide
Materials
- Bisque-fired ceramic birdhouse (cone and cylinder shape)
- Teal underglaze or acrylic paint (if not firing)
- Terracotta colored underglaze or acrylic paint
- Deep red or rust-colored liner paint/underglaze
- Medium round paintbrush
- Fine detail paintbrush or liner brush
- Pencil
- Sponge
- Clear heavy-gloss glaze or sealant
- Jute twine for hanging
Step 1: Base Coating
-
Clean the surface:
Begin by wiping down your ceramic birdhouse with a damp sponge to remove any dust or debris. This helps the paint or glaze adhere smoothly to the porous surface. -
Paint the roof:
Apply a solid coat of teal underglaze to the entire conical roof section. Work your brush strokes from the top point down to the rim for an even finish. -
Apply a second coat:
Let the first layer dry until it’s chalky to the touch, then apply a second coat of teal to ensure the color is opaque and vibrant. -
Coat the body:
While the roof dries, paint the main cylindrical body of the birdhouse with a warm terracotta color. I find that using a slightly larger brush here helps cover the surface quickly without leaving streaks. -
Touch up the entrance:
Carefully paint the inside rim of the circular entrance hole with the terracotta color so no bare clay shows through.
Uneven Dots?
If your painted dots look messy, practice on paper first. Use drill bits or the flat head of a nail dipped in paint to act as a stamp for perfectly uniform circles.
Step 2: Designing the Body
-
Draft the leaves:
Once the terracotta base is dry, lightly sketch vertical leaf branches around the body using a pencil. Aim for three or four large, curving fronds that reach from the bottom rim toward the top. -
Paint the leaf shapes:
Using the teal color, carefully fill in the leaf shapes you just sketched. Leave the stem lines unpainted so the terracotta background creates the ‘vein’ of the branch. -
Outline the leaves:
With a fine liner brush, outline each teal leaf with a very thin line of terracotta or a slightly darker rust color to sharpen the edges. -
Add the spines:
Paint a thin, central spine line down the middle of each leaf cluster in deep red or rust. This simulates the sgraffito look where layers are carved away. -
Create the door border:
Dip the handle end of a paintbrush into red or rust paint. Dot a circle around the entrance hole to create a decorative frame.
Step 3: Detailing the Roof
-
Sketch roof patterns:
Lightly draw abstract branch or vein patterns on the teal roof. These should radiate downward from the peak. -
Paint the red motifs:
Using the deep red/rust paint and a liner brush, paint over your pencil lines. Keep the lines fluid and organic, resembling stylized tree branches. -
Add roof dots:
Using the dotting technique again, add a row of red dots along the bottom rim of the roof to mirror the pattern around the door.
Carve It Instead
For authentic sgraffito, paint the body teal first, let it dry to leather-hard, then physically carve away the teal to reveal the terracotta clay underneath.
Step 4: Final Assembly
-
Add ventilation:
If your birdhouse design has ventilation holes near the base, use a small tool or brush handle to ensure they are clear of paint. -
Seal or fire:
If using underglazes, fire the piece in a kiln according to manufacturer instructions. If using acrylics, apply two coats of a weather-resistant clear gloss sealant. -
String it up:
Cut a long length of thick jute twine. Loop it through the hanging hole at the top peak and tie a sturdy knot.
Hang your new colorful creation in a sheltered spot and wait for the birds to move in
Two-Tone Drip Glaze Birdhouse
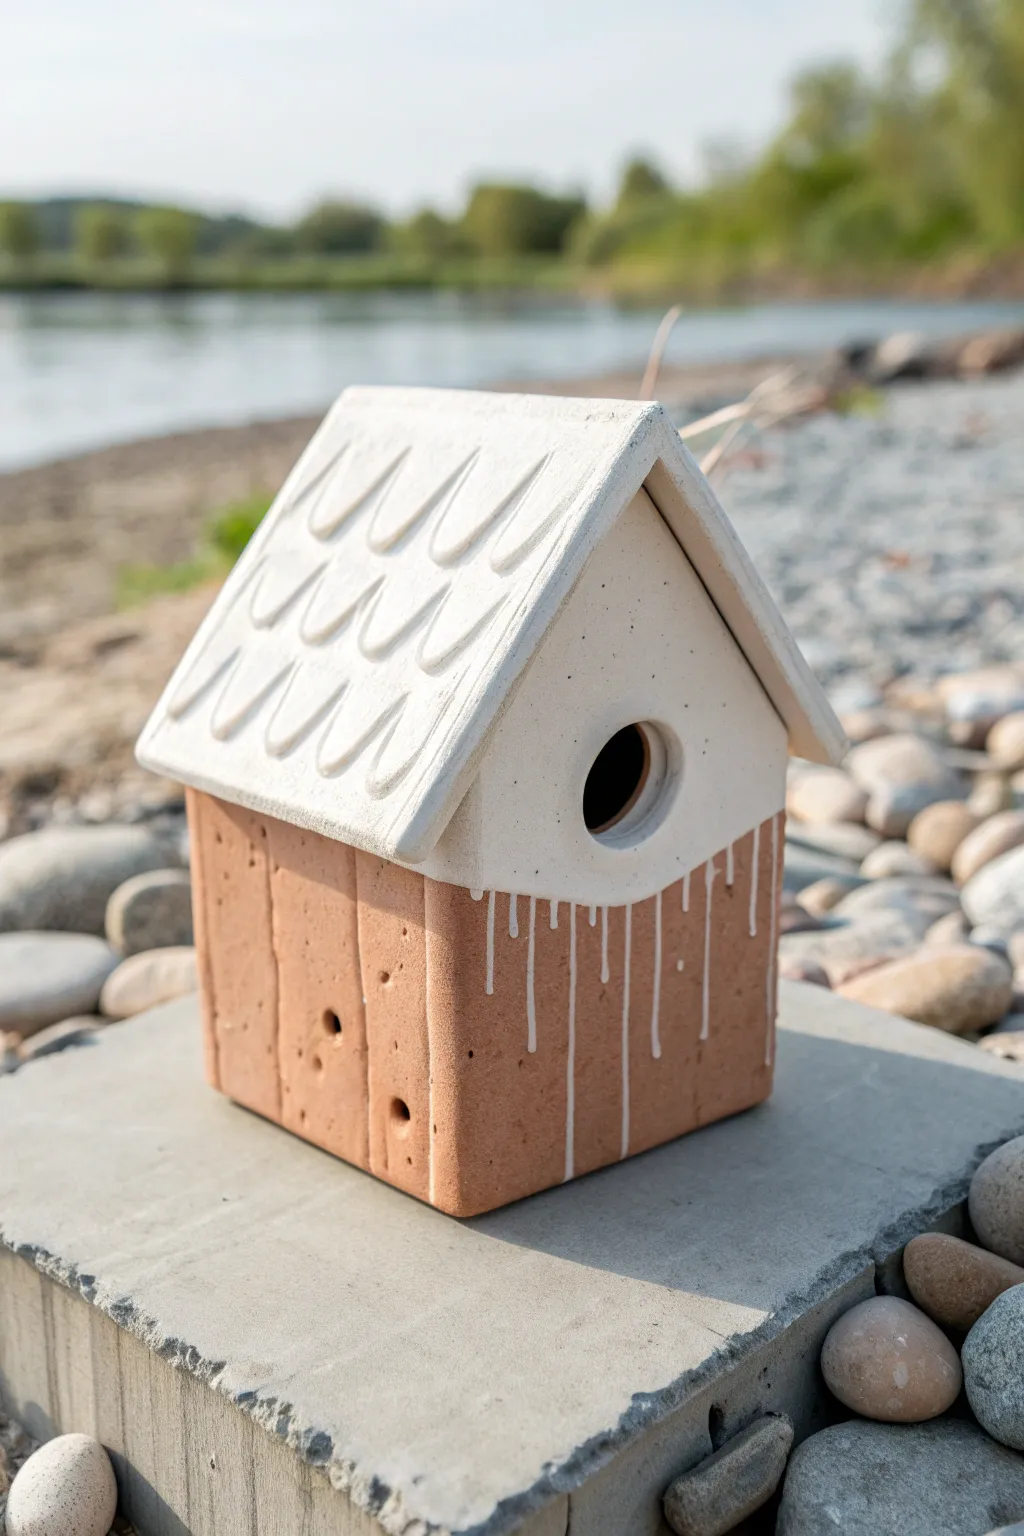
This charming birdhouse combines the rustic warmth of unglazed terracotta with a whimsical, snow-like roof. The standout feature is the drippy white glaze effect that mimics melting icicles, adding a playful touch to a sturdy slab-built structure.
Step-by-Step
Materials
- Earthenware clay (terracotta or reddish-brown body)
- White underglaze or white slip (thick consistency)
- Clear glaze (optional, for the roof only)
- Rolling pin and guide strips (approx. 1/4 inch)
- Fettling knife or craft knife
- Circle cutter (approx. 1.25 – 1.5 inches)
- Scoring tool or serrated rib
- Slip (made from the base clay)
- Loop tool or modeling tool for roof texture
- Ruler
- Small squeeze bottle or fine paintbrush
- Wooden paddle
Step 1: Constructing the Base
-
Roll your slabs:
Begin by rolling out your clay to a consistent thickness of about 1/4 inch. You will need enough clay for four walls, a floor base, and two roof panels. -
Cut the walls:
Cut two rectangular side panels and two pentagonal panels (rectangles with a triangle on top) for the front and back. The width of the side panels should match the vertical straight edge of your front/back pieces. -
Texture the walls:
Before assembling, use the edge of a ruler or a modeling tool to press vertical lines into the exterior of all four wall pieces. This mimics wood planks. I like to add a few random indentations for a weathered look. -
Cut the entrance:
On the front pentagonal piece, use your circle cutter to remove a hole centered in the upper triangular section. Smooth the edges with a damp finger or sponge. -
Assemble the box:
Score the edges of your walls and apply clay slip generously. Join the four walls together on top of your square floor base. Press the seams firmly. -
Reinforce the seams:
Roll thin coils of clay and press them into the interior corners of the birdhouse to reinforce the joints. Smooth these out so they are invisible.
Uneven Drips?
If your glaze drips are too runny or spreading too wide, let the glaze sit uncovered for 10 minutes to thicken up before putting it in the squeeze bottle.
Step 2: Adding the Roof
-
Cut roof panels:
Cut two rectangular slabs for the roof. They need to be slightly wider and longer than the footprint of your house to create an overhang. -
Attach the roof:
Score and slip the top angled edges of your front and back walls. Place the roof panels on top, ensuring they meet at the peak. Secure the peak seam tightly. -
Create the shingles:
Instead of individual tiles, use a loop tool or a U-shaped carving tool to carve repeating ‘U’ shapes into the roof clay. Start from the bottom edge and work your way up to the peak. -
Dry slowly:
Cover the house loosely with plastic. Let it dry very slowly to the leather-hard stage, then uncover to let it become bone dry before bisque firing.
Texture Tip
For deeper shingle texture, wait until the roof clay is leather-hard before carving. It makes crisper lines and fewer clay crumbs.
Step 3: Glazing and Finishing
-
Bisque fire:
Fire the piece in your kiln to cone 04 (or the recommended temperature for your clay body). -
Apply white underglaze:
Paint the entire roof surface with 2-3 coats of thick white underglaze or glaze. Extend the white color down the front and sides of the house, following the angle of the roofline. -
Create the drip effect:
Using a small squeeze bottle filled with slightly watered-down white glaze or slip, squeeze vertical lines running down from the white roof section onto the bare terracotta walls. -
Refine the drips:
Vary the length of the drips so they look natural. Some should be short stops, while others extend halfway down the wall. -
Final smooth:
Check the entrance hole to ensure no glaze has dripped inside the opening, as this can be sharp for birds. -
Glaze fire:
Fire the piece again to the maturation temperature of your glaze/clay (typically cone 06 or 04 for earthenware) to set the design.
Once fired, place this distinctive cottage in your garden to welcome your feathered neighbors
Mini Perched Bird Accent House

This charming decorative birdhouse combines the rustic appeal of white textured walls with a warm, terra cotta-style roof. The crowning touch is a delicate sculpted bird perched right on the peak, making it a perfect accent piece for a garden table or shelf.
Step-by-Step Tutorial
Materials
- White stoneware clay or air-dry clay (approx. 2-3 lbs)
- Terra cotta colored clay (or acrylic paint)
- Clay roller or rolling pin
- Fettling knife or X-Acto knife
- Ruler
- Slip and scoring tool (toothbrush works well)
- Circle cutter (approx. 1.5 inch)
- Small wooden dowel (1/4 inch diameter)
- Square wooden base (optional)
- Matte white acrylic paint (if using non-white clay)
- Clear matte varnish
Step 1: Constructing the Base Structure
-
Roll the Slabs:
Begin by rolling out your white clay into an even slab, approximately 1/4 inch thick. I find using wooden guide strips on either side of the roller helps keep the thickness perfectly consistent. -
Cut Wall Panels:
Using your ruler and knife, cut out the four walls. You will need two square side panels and two pentagonal panels (squares with triangles on top) for the front and back. The peak angle should be around 45 degrees. -
Create the Entry:
On the front pentagonal panel, use your circle cutter to punch a clean hole in the center. Smooth the edges of the cut with a damp finger or sponge to remove any burrs. -
Add the Perch Hole:
Directly below the entry hole, create a small socket for the wooden perch. Don’t insert the wood yet; just ensure the hole is the correct diameter. -
Assemble the Walls:
Score the edges of your panels where they will meet and apply a generous amount of slip. Press the walls together firmly to create a box shape. -
Reinforce Seams:
Roll a very thin coil of clay and press it into the interior corners of the birdhouse. Smooth this out with a modeling tool to reinforce the joints so they don’t crack during drying. -
Attach the Roof Base:
Cut two rectangular slabs for the roof under-structure. These should overhang the walls slightly. Score, slip, and attach them to the angled peaks of your front and back walls.
Step 2: Roofing and Details
-
Prepare Roof Tiles:
Switch to your terra cotta clay (or continue with white to paint later). Roll out a thin slab and cut numerous small, rounded tongue-depressor shapes for the tiles. -
Layer the Tiles:
Starting at the bottom edge of the roof, attach a row of tiles using a dab of slip for each. Place the next row slightly higher, overlapping the first row’s seams. Continue until you reach the peak. -
Texture the Tiles:
Before the tiles dry, gently press the edges with your thumb to give them a softened, hand-molded look rather than a sharp, machine-cut appearance. -
Sculpt the Resident Bird:
Form a simple bird shape using a pinch of clay. Start with a teardrop for the body, pull a small beak, and press in wing shapes on the sides. Texture the wings lightly with a needle tool. -
Attach the Bird:
Score the peak of the roof and the bottom of the bird. Use plenty of slip to secure the bird firmly to the very top ridge. -
Insert the Perch:
Cut a short length of wooden dowel. If firing in a kiln, wait until after firing to glue this in. If using air-dry clay, you can insert it now with a drop of glue.
Prevent Sagging Roofs
If the roof slabs sag inward while wet, stuff the inside of the house with crunched-up newspaper or paper towels to support the weight until the clay stiffens.
Step 3: Finishing Touches
-
Drying Process:
Let the piece dry slowly under loose plastic for at least 24-48 hours. This prevents the different thickness zones from warping or pulling apart. -
Refining Surfaces:
Once bone dry (or fully cured), use fine-grit sandpaper to smooth just the white walls, leaving the roof tiles slightly rough for textural contrast. -
Painting (Optional):
If you didn’t use colored clays, now is the time to paint. Use a matte white for the house body and a warm brick-orange wash for the roof tiles. Detail the bird with soft browns. -
Seal the piece:
Apply a coat of clear matte varnish over the entire project, paying special attention to the roof crevices to protect the finish. -
Mounting:
Finally, you can glue the finished house onto a square wooden coaster or base for extra stability and a polished look.
Realistic Tile Texture
To make the roof tiles look weathered like the photo, dab them with a damp sponge after attaching. This softens the cut edges and adds an aged, eroded effect.
Enjoy the peaceful vibe this little architectural sculpture brings to your space
Face Or Spirit Tree Birdhouse
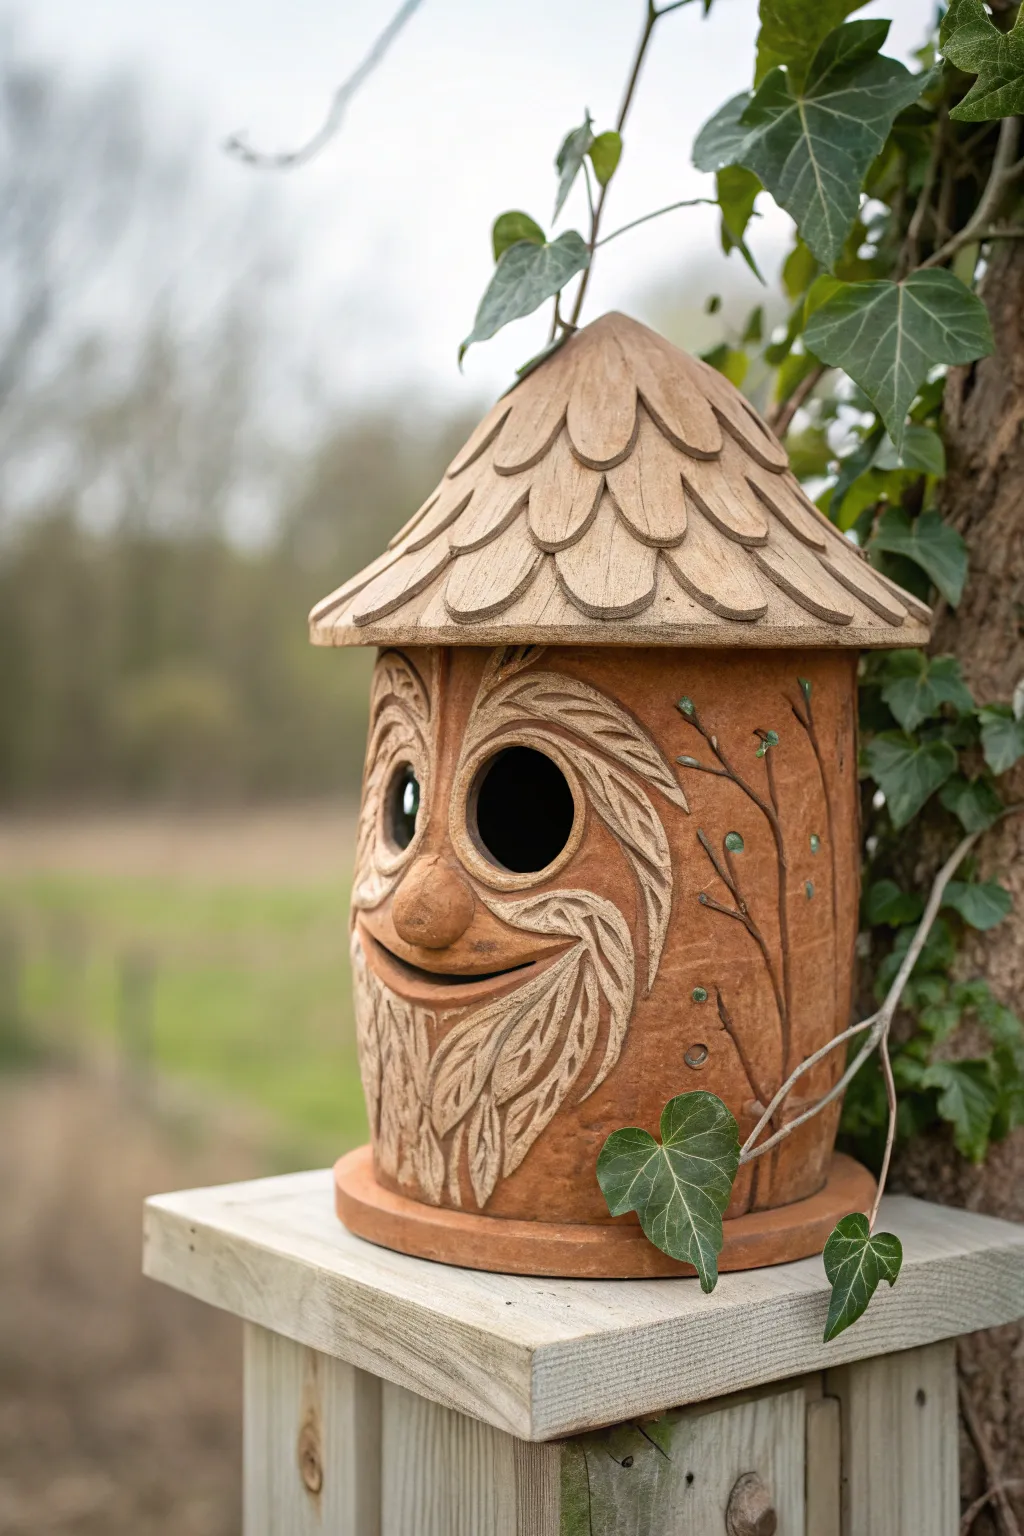
Bring a touch of woodland magic to your garden with this charming spirit face birdhouse. Crafted from earthenware clay, this project features deep textural carving to create a friendly, weather-beaten face and a delightful leaf-shingled roof.
Detailed Instructions
Materials
- Terracotta or earthenware clay (approx. 5-7 lbs)
- Rolling pin and guide sticks (slab sticks)
- Cylindrical form (PVC pipe or large can) for support
- Fettling knife
- Needle tool
- Loop tool (small and medium)
- Scoring tool or old toothbrush
- Slip (liquid clay)
- Circle cutter (1-1.5 inch diameter)
- Wooden modeling tools
- Sponge
Step 1: Building the Cylinder Base
-
Roll out the Slab:
Begin by wedging your clay to remove air bubbles. Roll out a large, rectangular slab about 3/8-inch thick. Using guide sticks helps keep the thickness uniform, which is crucial for even drying. -
Cut to Size:
Measure the height you want your birdhouse to be (around 8-10 inches is standard). Cut a clean rectangle from the slab that is wide enough to wrap around your cylindrical form with a slight overlap. -
Form the Cylinder:
Wrap the slab around your support form. Score and slip the overlapping edges thoroughly, then press them together firmly to create a seam. Smooth the seam inside and out so it disappears. -
Attach the Floor:
Roll a second, smaller slab for the base. Place your cylinder on top, trace around it, and cut out the circle. Score and slip both the bottom edge of the cylinder and the edge of the base, then join them securely. Add a small coil of clay to the interior seam for reinforcement. -
Create the Entry Hole:
Once the clay is leather hard (sturdy but not dry), decide where the face will be. Use your circle cutter to create the bird’s entrance hole near the upper third of the cylinder. This hole will eventually become one of the spirit’s eyes.
Natural Wood Look
To get that warm, toasted color without glaze, apply an iron oxide wash after bisque firing and wipe it back with a sponge. The oxide stays in the deep crevices, highlighting your carving.
Step 2: Sculpting the Spirit Face
-
Add Material for Features:
Score the area around the entry hole heavily. Add thick coils or chunks of clay to build up the eyebrows, nose, cheekbones, and beard area. Don’t worry about details yet; just get the mass onto the cylinder. -
Shape the Nose and Eyes:
Shape the added clay into a bulbous nose just below the entry hole. To the left of the nose, carve out a recess for the second eye and add a small sphere of clay inside it for a ‘pupil’ effect, or leave it hollow for symmetry. -
Carve the Eyebrows:
Use a modeling tool to texture the built-up eyebrows. Carve long, flowing lines that mimic leaves or wood grain, curving them around the top of the eye sockets. -
Sculpt the Mouth:
Carve a deep crescent shape below the nose for the smiling mouth. Be sure to angle the cut slightly upward so water drains out if it rains. Smooth the edges of the lips to make the expression look gentle. -
Detail the Beard:
Below the mouth, use a sharp needle tool or V-tip carving tool to scribe deep, flowing lines into the added clay mass. These should resemble individual leaves or coarse hair flowing downward. -
Add Branch Details:
On the sides and back of the cylinder, score the surface and attach thin coils of clay to look like twigs. Gently press small flattened balls of clay near the twigs to create texture buds.
Step 3: Adding the Roof
-
Form the Cone:
Roll out another slab and cut a large circle (approx. 8-10 inches). Cut a wedge out of the circle (like a slice of pizza) and pull the cut edges together to form a cone shape. Test fit it on the cylinder; it should have a generous overhang. -
Texture the Roof:
Before attaching, support the inside of the cone with your hand. Use a loop tool to carve scallop shapes starting from the bottom rim and working upward. This creates the overlapping shingle or feather look. -
Attach the Roof:
Score and slip the top rim of the cylinder and the underside of the roof where they will meet. Press the roof firmly onto the body. I like to reach inside the birdhouse (if my hand fits) to smooth the connection, or use a tool to seal the seam. -
Final Clean Up:
Go over the entire piece with a damp sponge to smooth any sharp burrs or rough crumbs of clay. Ensure the bottom is flat and stable. -
Drying and Firing:
Let the birdhouse dry very slowly under plastic for at least a week to prevent warping. Once bone dry, fire it in a kiln according to your clay body’s specifications (usually bisque fire, then glaze or leave raw for a natural look).
Prevent Cracks
The connection between the thick nose/eyebrows and the thin cylinder wall is prone to cracking. Score these areas very aggressively and use plenty of slip to ensure a permanent bond.
Once fired, place this spirited guardian in a tree nook or on a post to welcome your feathered neighbors
Spherical Vine-Armature Look Birdhouse

This charming, orb-shaped birdhouse brings a touch of whimsical elegance to any garden, featuring delicate vine patterns hand-painted onto a smooth clay surface. The spherical design mimics organic forms found in nature, while the sturdy jute hanger adds a rustic finish that blends seamlessly with outdoor foliage.
How-To Guide
Materials
- White stoneware or earthenware clay (approx. 2-3 lbs)
- Spherical mold (styrofoam ball or plastic ornament halves)
- Rolling pin
- Guide sticks (1/4 inch thickness)
- Needle tool or fettling knife
- Serrated rib tool
- Slip (clay slurry)
- Circular cookie cutter (1.5 inch diameter for the entrance)
- Sponge
- Underglaze (olive green and brown)
- Fine liner brush (size 0 or 1)
- Clear matte or satin glaze
- Thick jute twine
- A kiln (or access to a pottery studio)
Step 1: Forming the Sphere
-
Roll your slabs:
Start by rolling out two even slabs of clay using your guide sticks to ensure a consistent 1/4 inch thickness. Smooth the surface with a rib to remove any canvas texture. -
Drape the clay:
Carefully drape your clay slabs over your spherical mold halves. If using a styrofoam ball, cover it with plastic wrap first to prevent sticking. Gently coax the clay down the sides, smoothing out any darts or wrinkles with your fingers. -
Trim the excess:
Using a needle tool, trim the excess clay right at the equator of the mold so you have two perfect hemispheres. Allow these to stiffen to a ‘leather hard’ state so they can hold their shape without the mold. -
Score and slip:
Remove the molds. Score the rim of both hemispheres vigorously with a serrated rib or needle tool. Apply a generous amount of slip to the roughened edges. -
Join the halves:
Press the two halves together firmly. You want to see a little slip squishing out of the seam to know you have a solid seal. -
Reinforce the seam:
Roll a very thin coil of clay and press it into the seam on the outside. Smooth this coil down with a rib or your thumb until the join is completely invisible and the sphere looks seamless.
Air Trapped Inside?
Before sealing the two halves, use a needle tool to poke a tiny, invisible hole near the hanging loop. This lets expanding hot air escape in the kiln so your sphere doesn’t explode.
Step 2: Adding Details and Finishing
-
Create the entryway:
Choose a spot on the ‘front’ of your sphere and use the circular cutter to remove a hole. Smooth the edges of the cut with a damp sponge so no sharp burrs remain that could injure a bird. -
Add a hanger loop:
Form a small, sturdy loop of clay or create a distinct collar at the very top of the sphere. This needs to be thick enough to anchor the heavy twine later. If making a collar, ensure it is securely scored and slipped onto the main body. -
Refine the surface:
When the clay is bone dry, gently sand away any remaining imperfections or fingerprints. Wipe away the dust with a slightly damp sponge. -
Sketch the vines:
Lightly sketch your vine pattern using a pencil directly on the raw clay. Don’t worry about mistakes; the graphite will burn off in the kiln. -
Paint the underglaze:
Using a fine liner brush, paint over your pencil lines with brown underglaze for the stems. Mix a touch of water if the underglaze feels too thick to drag smoothly. -
Add the leaves:
Switch to your olive green underglaze. Using a ‘press and lift’ motion with your brush, create small, almond-shaped leaves along the stems. Vary the direction of the leaves to make the plant look natural and organic. -
Bisque fire:
Fire the piece to cone 04 (or according to your clay’s instructions) to set the shape and underglaze design. -
Glaze and final fire:
Dip or brush a clear matte or satin glaze over the entire exterior. Avoid gloss glaze if possible, as the natural look suits this design better. Fire again to the final temperature required for your clay body.
Step 3: Assembly
-
Attach the twine:
Cut three long strands of jute twine. Thread them through the top loop or hole you created. -
Macrame wrapping:
To mimic the image, perform a ‘gathering wrap’ knot directly above the clay loop. Lay a short loop of twine against the main strands, wrap the long end around everything tightly multiples times, and pull the end through the loop to secure it. -
Hang safely:
Tie the loose ends of the twine securely to a branch or hook, ensuring it hangs level.
Add Texture
Before painting, lightly carve or incise the vine lines into the leather-hard clay with a carving tool. The underglaze will settle into the grooves for a beautiful inlaid effect.
Once hung among the leaves, your handcrafted birdhouse will look like a natural extension of the garden itself