When I’m in the studio making clay bead necklaces, I’m always chasing that sweet spot where a design feels playful, colorful, and still totally wearable. Here are my favorite cute clay bead necklace ideas—from classic pastel chokers to a few unexpected little twists.
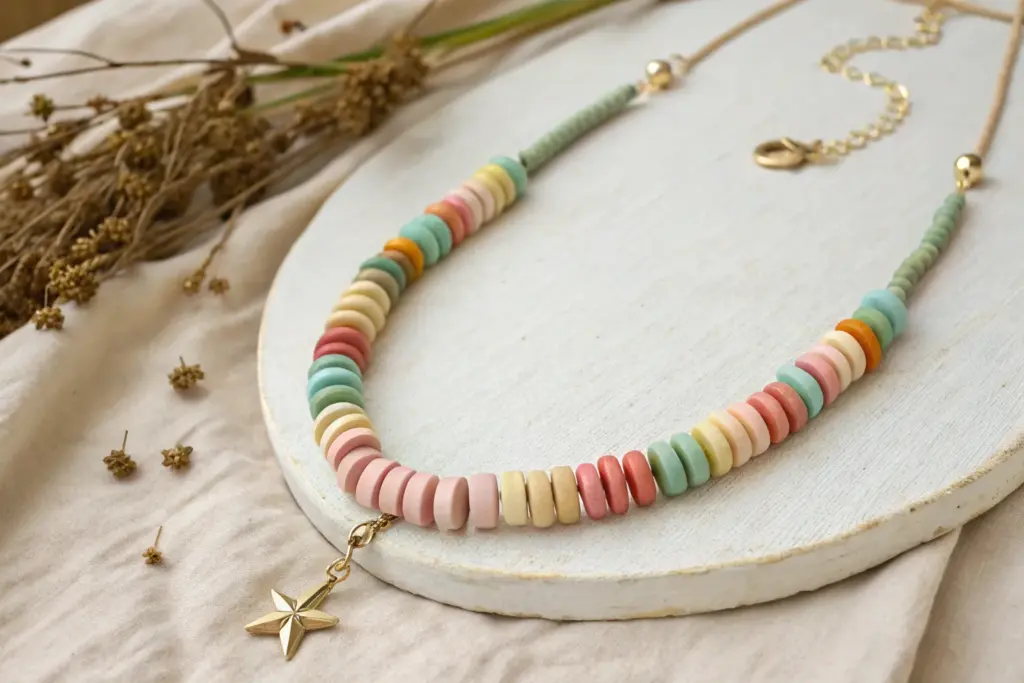
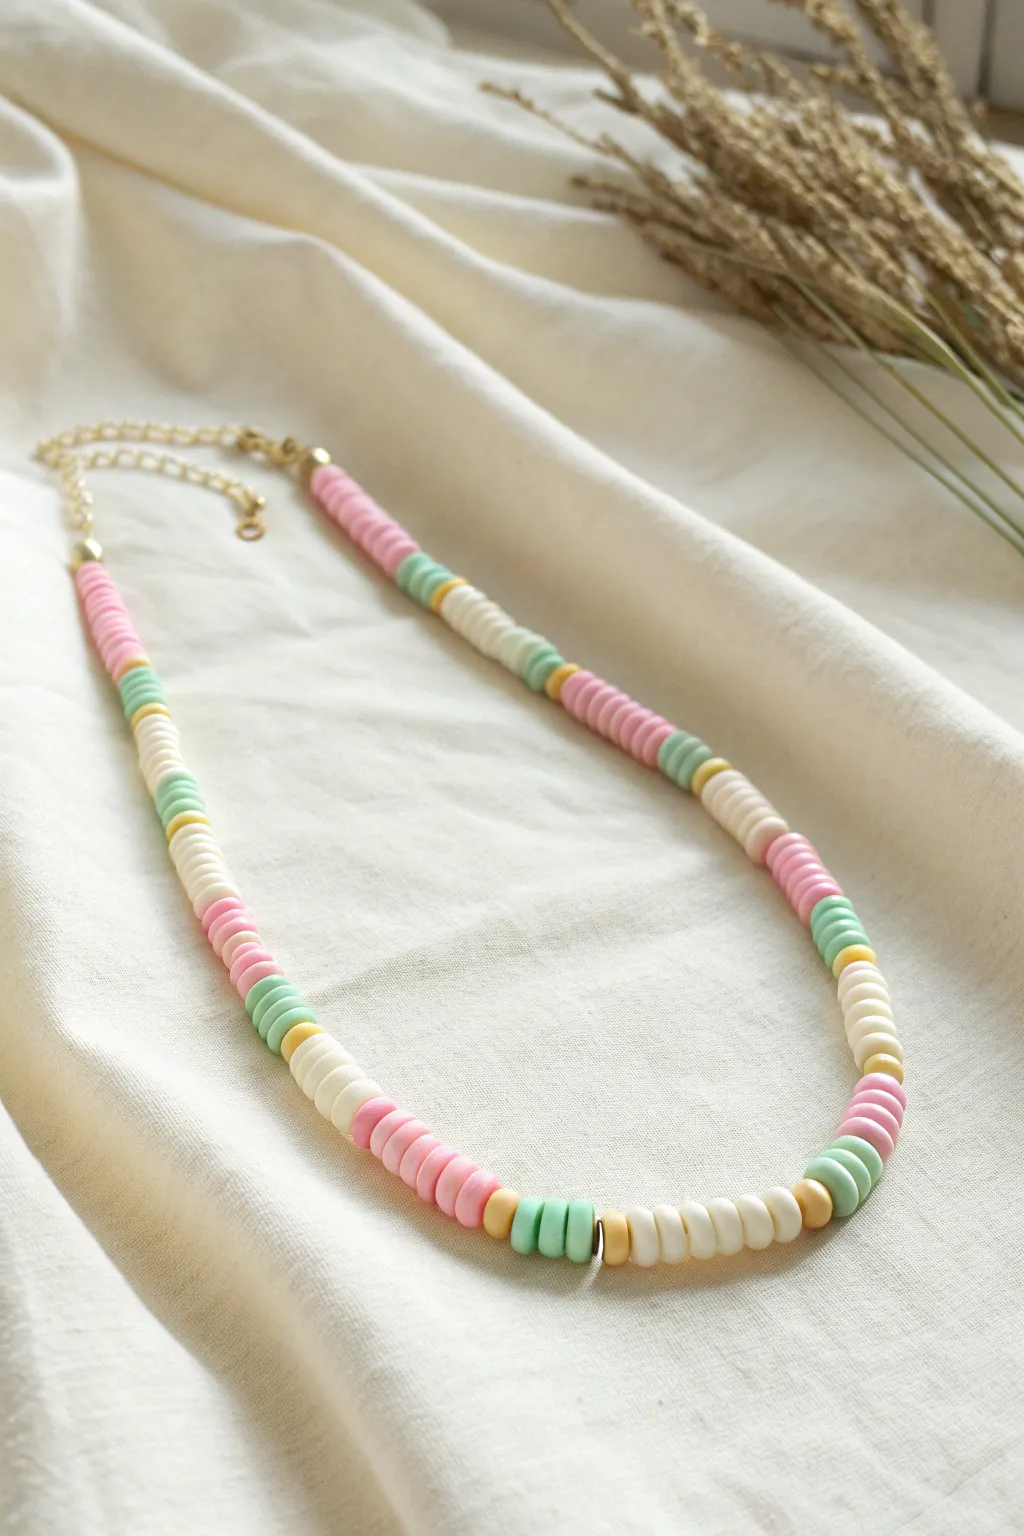
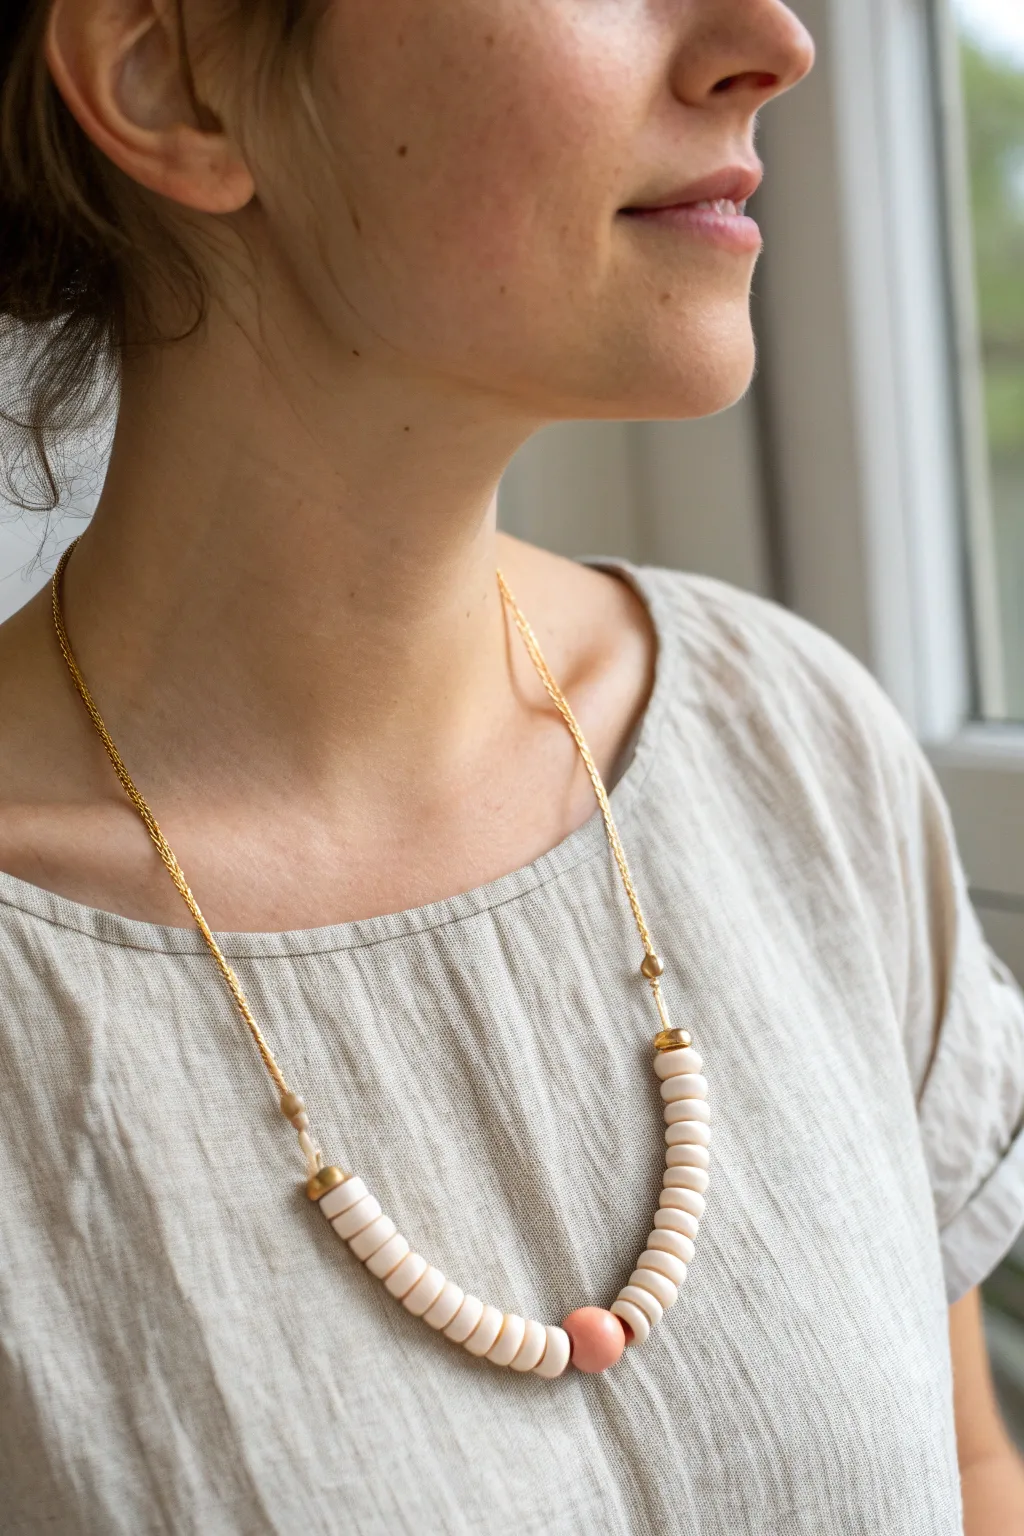
Classic Pastel Heishi Choker
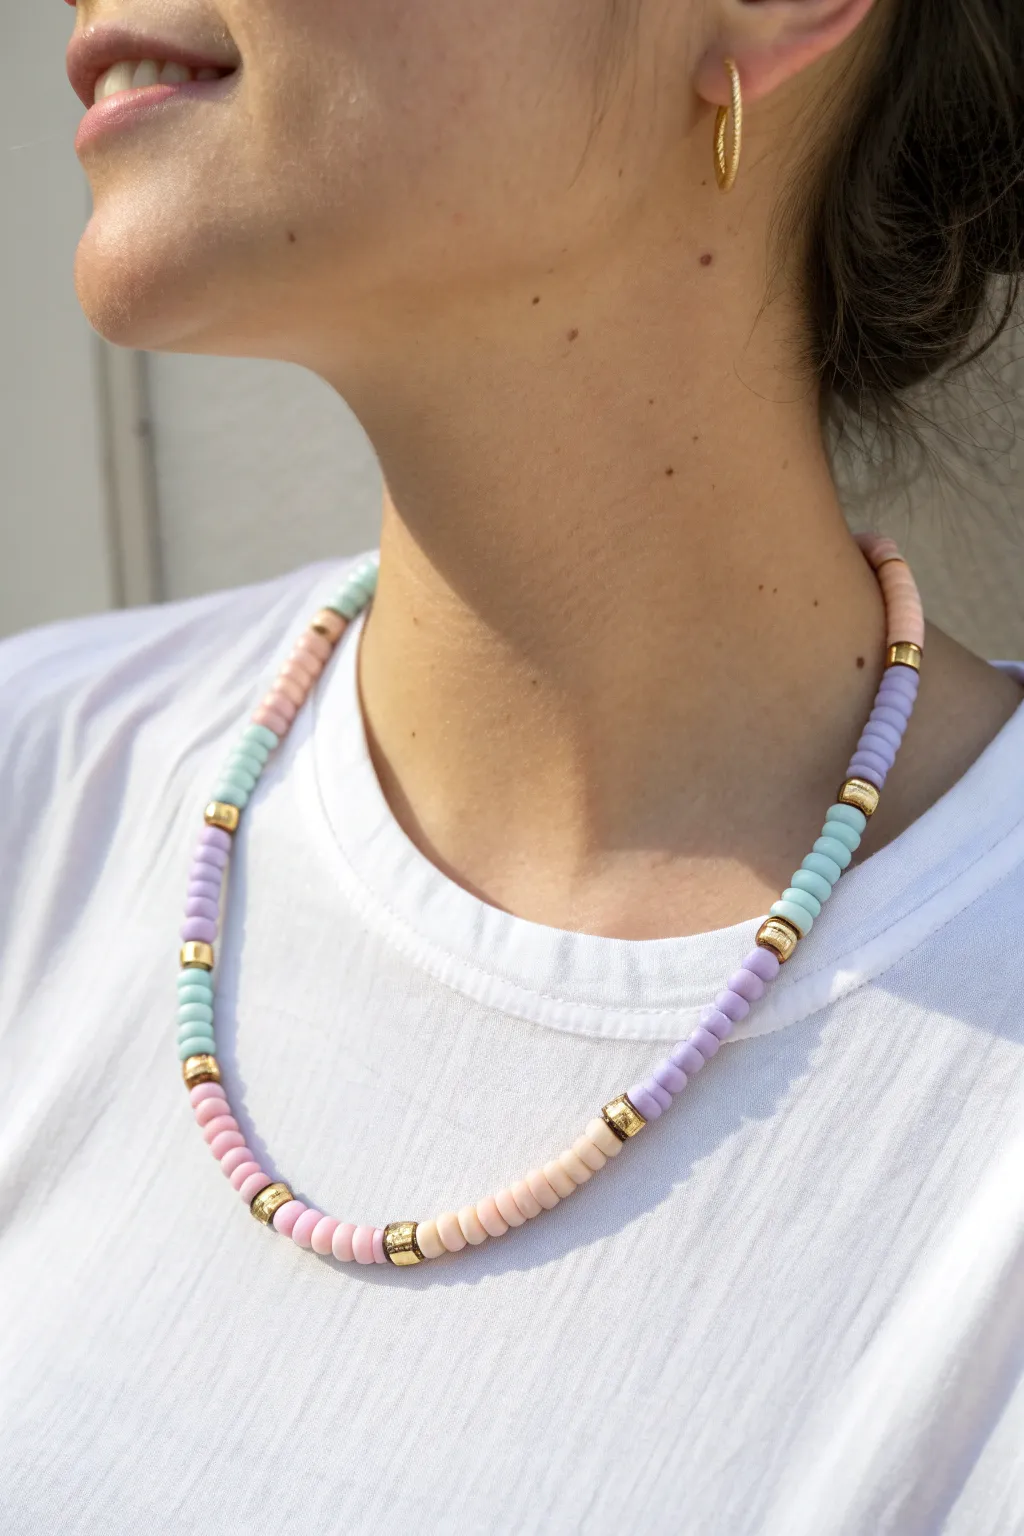
Embrace the soft, dreamy vibes of spring with this modern take on the classic heishi bead necklace. Featuring a gentle color-blocking pattern separated by gleaming gold spacers, this choker adds a touch of subtle elegance to any simple white tee.
Step-by-Step
Materials
- Polymer clay heishi disc beads (6mm or similar) in pastel pink, lilac, mint, and light beige/sand
- Gold tone metallic spacer beads (rounded or barrel shape, approx 4-5mm hole)
- Beading wire (flexible nylon-coated steel, 0.38mm or 0.45mm)
- 2 Crimp beads (gold tone)
- 2 Crimp bead covers (gold tone, optional but recommended)
- Lobster clasp and jump ring (gold tone)
- Wire cutters
- Crimping pliers or flat nose pliers
- Bead stopper or masking tape
Step 1: Planning & Preparation
-
Measure your length:
Decide on your desired choker length. A standard choker sits around 14-16 inches. Measure your neck with a piece of string to find your perfect fit, then add about 2 inches to your wire length to account for the clasp and finishing. -
Secure the end:
Cut your beading wire to size. Place a bead stopper on one end, or simply fold a piece of masking tape over the tip to prevent your beads from sliding off while you work. -
Establish the pattern:
Lay out a small section of beads on a tray to visualize your color blocks. Looking at the reference, the pattern seems to be roughly 1.5 to 2 inches of a single color, separated by one gold spacer bead.
Uneven Blocks?
Count your beads! Instead of eyeballing the length of color blocks, count exactly how many discs you use (e.g., 20 per block) for perfect symmetry.
Step 2: Stringing the Beads
-
Start the first block:
Begin stringing your first color. In our example, we start with the pastel pink heishi beads. Thread enough beads to create a solid block of color about 1.5 inches long. -
Check the stack:
Push the beads snugly together as you string them. Heishi beads look best when compact, creating that smooth, continuous tube effect. -
Add the accent:
Slide on one gold metallic spacer bead. This breaks up the matte texture of the clay with a nice pop of shine. -
Switch to color two:
Transition to your next pastel shade, perhaps the light beige or sand color. String the same amount of beads as the first block to maintain symmetry. -
Repeat the gold spacer:
Add another gold spacer bead. Ensure the spacer is large enough to be visible but not so heavy that it weighs down the wire awkwardly. -
Continue the sequence:
Move on to the lilac/purple beads for the third block, followed by another spacer, and then the mint green beads. I find repeating this four-color cycle gives the most balanced look. -
Verify the length:
Periodically hold the wire up to your neck (carefully!) to check the length. Continue the pattern until you reach your measured length minus about half an inch for the clasp hardware.
Pro Tip: Stiffness Check
Before the final crimp, curve the necklace into a circle. If you crimp while it’s straight, it might be too stiff to drape naturally around the neck.
Step 3: Attaching the Clasp
-
Prepare the first crimp:
Remove the bead stopper. Thread a crimp bead onto the wire, followed by the jump ring. -
Create the loop:
Take the end of the wire and thread it back through the crimp bead, creating a small loop that holds the jump ring securely. -
Secure the crimp:
Use your crimping pliers to flatten the crimp bead firmly. Make sure it has gripped both wires tight so it won’t slip. -
Hide the tail:
Thread the excess little tail of wire back through the first few heishi beads to hide it, then trim any remaining bit close to the beads. -
Repeat on the other side:
Move to the other end of the necklace. Thread on a crimp bead, followed by the lobster clasp. -
Close the loop:
Just like before, loop the wire back through the crimp bead. Pull the wire tight so there are no large gaps between the beads, but not so tight the necklace becomes stiff. -
Final crimp:
Flatten the final crimp bead with your pliers. Trim the excess wire tail after tucking it into the neighboring beads. -
Finishing touch:
If you are using crimp decorative covers, carefully place them over your flattened crimp beads and gently squeeze them shut with pliers to make them look like smooth gold beads.
Now you have a chic, beach-ready accessory that pairs beautifully with your summer wardrobe


Rainbow Gradient Clay Bead Necklace
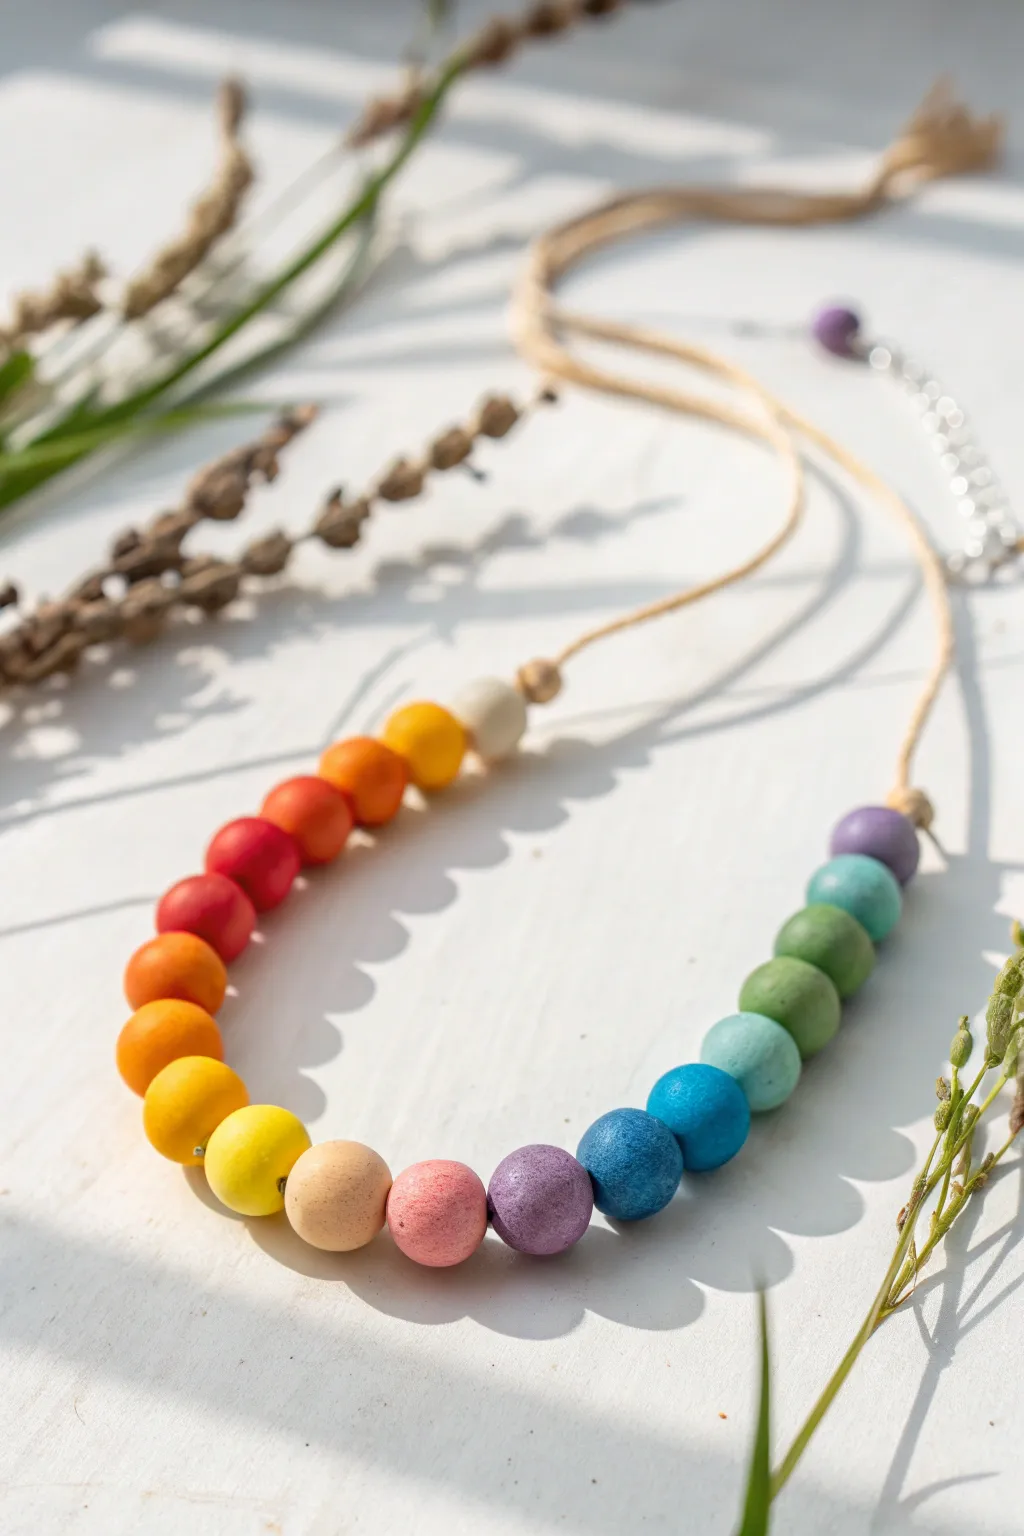
Embrace a natural aesthetic with this charming rainbow gradient necklace, featuring matte beads that transition seamlessly through the color spectrum. Strung on a simple cord, this piece balances cheerful hues with an earthy, bohemian feel that effectively brightens up any outfit.
Step-by-Step Tutorial
Materials
- 20mm wooden beads (approx. 19-21 beads)
- Acrylic paints (Red, Orange, Yellow, Green, Blue, Purple, White, Pink, Teal)
- Small flat paintbrushes
- Wooden skewers or toothpicks
- Washi tape or masking tape
- Floral foam block or styrofoam (for drying)
- Light beige waxed cotton cord or thin hemp cord (approx. 30 inches)
- Scissors
- Clear matte varnish or sealant spray (optional)
- Jewelry clasp and jump rings (optional)
- Crimping beads (optional)
Step 1: Preparing the Palette
-
Select your beads:
Choose about 19 to 21 wooden beads. The necklace in the photo uses a central graduation, so plan for an odd number if you want a perfect center bead. -
Plan the gradient:
Lay your beads out in a U-shape on your workspace. Visualize the color transition: starting from a creamy neutral at the top left, moving into warm oranges and reds, transitioning to yellows, then cool greens and blues, and finishing with purples at the other end. -
Set up drying station:
Poke your wooden skewers into a block of floral foam. This will be essential for painting the beads evenly without getting fingerprints on them.
Uneven Coverage?
If the wood grain is showing through too much after drying, lightly sand the first coat of paint with 400-grit sandpaper before applying a second coat for a super opaque finish.
Step 2: Painting the Gradient
-
Mount the beads:
Slide each wooden bead onto a skewer. If the fit is loose, wrap a small piece of washi tape around the skewer first to create a snug hold so the bead doesn’t spin while you paint. -
Mix the warm tones:
Start with your warm colors. You’ll need a pure red, a red-orange, a pure orange, and a yellow-orange. Mix small amounts of paint to get subtle transitions between each shade. -
Apply warm colors:
Paint the first few beads, starting after your neutral wood or cream bead. I find that applying two thin coats gives a smoother, more professional finish than one thick gloppy coat. -
Transition to yellow:
Paint the next few beads in bright yellow and a softer, creamy yellow to bridge the gap between the oranges and the greens. -
Mix the cool tones:
Creating the cool side of the spectrum requires a grassy green, a teal or turquoise, a sky blue, and a deeper royal blue. Don’t forget a soft lavender and a deep purple for the end. -
Apply cool colors:
Paint the remaining beads in your cool gradient order. Ensure the transition from yellow to green feels natural, perhaps by mixing a lime green shade. -
Add the center accent:
Notice the soft pink or peach bead near the center? Paint one bead in a soft pastel pink to break up the strict rainbow order and add a touch of softness. -
Seal the beads:
Once the paint is completely dry, spray the beads with a clear matte varnish. This preserves that soft, non-glossy look seen in the photo while protecting the paint from chipping.
Step 3: Assembly
-
Cut the cord:
Cut a length of your waxed cotton or hemp cord to your desired length, usually about 30 inches to allow for tying or adjustability. -
String the beads:
Remove the dry beads from the skewers. Thread them onto the cord in your specific color order. Double-check the arrangement against the photo to ensure the gradient flows correctly. -
Secure the ends:
Make a simple overhand knot tightly against the last bead on both sides to keep the beads centered and prevent them from sliding up the cord. -
Finish the closure:
You can finish the necklace by tying a simple adjustable sliding knot with the two ends, or by attaching a metal clasp and jump rings using crimp beads for a more traditional jewelry finish.
Custom Shades
To get those muted, trendy matte colors instead of bright primary colors, mix a tiny dot of white or beige paint into every single color you use. It unifies the palette instantly.
Enjoy wearing your vibrant new accessory that brings a pop of color to any day


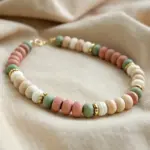
Color-Blocked Candy Stripes
This delightful design combines soft pastels in pink, mint, and cream with subtle gold accents for a look reminiscent of sweet candy stripes. The alternating blocks of color create a playful yet sophisticated rhythm perfect for everyday wear.
Detailed Instructions
Materials
- 6mm flat disc polymer clay beads (Heishi beads) in pastel pink
- 6mm flat disc polymer clay beads in mint green
- 6mm flat disc polymer clay beads in cream/off-white
- Small gold disc spacer beads (clay style or metal)
- Beading wire (nylon-coated stainless steel works best)
- 2 Gold crimp beads
- 2 Gold crimp covers
- 2 Gold wire guards (optional but recommended for longevity)
- Gold lobster clasp
- Gold extension chain
- Wire cutters
- Crimping pliers
Step 1: Planning and Prep
-
Measure your wire:
Cut a length of beading wire approximately 20-22 inches long. This gives you plenty of extra room for finishing the ends if you are aiming for a standard 16-18 inch necklace. -
Secure the start:
Attach a bead stopper or simply place a piece of masking tape over one end of the wire so your beads don’t slide right off while you work. -
Sort your palette:
Pour small piles of your pink, mint, cream, and gold beads onto a distinct tray or mat. Having them separated makes the repetitive threading process much faster.
Keep it fluid
Don’t string the beads too tightly against the clasp. Leave a millimeter of wiggle room so the rigid clay discs can bend and drape comfortably around the neck.
Step 2: Creating the Bead Pattern
-
Begin the pink section:
Start by threading on exactly 8 to 10 pink clay beads. The number depends on how long you want your color blocks, but consistency is key here. -
Add a gold spacer:
Slide on a single gold disc bead. This acts as a divider and adds a touch of shine between the color transitions. -
Create the mint block:
Thread on 4 to 5 mint green clay beads. Notice that in this design, the secondary color blocks are slightly shorter than the main pink sections. -
Second spacer:
Add another single gold disc bead to cap off the mint section. -
Add the cream block:
Thread on roughly 8 to 10 cream-colored beads. I like to match the count of this neutral section to the pink section for balance. -
Third spacer:
Slide on one gold disc bead. -
Repeat the mint accent:
Thread another short block of 4 to 5 mint green beads, followed by a gold spacer bead.
Step 3: Finishing the Length
-
Continue the sequence:
Repeat the full pattern (Pink Block, Gold, Mint Block, Gold, Cream Block, Gold, Mint Block, Gold) until you reach your desired necklace length. -
Check for symmetry:
As you near the end, try to finish on a color block that mirrors your starting block if possible, though an asymmetrical finish looks trendy too. -
Verify length:
Wrap the unfinished strand around your neck carefully to ensure it sits exactly where you want it.
Uneven blocks?
If your color blocks look uneven, count the beads. Clay disc thicknesses vary slightly, so you may need to add or subtract one bead to make lengths visually match.
Step 4: Attaching the Clasp
-
Prepare the crimp:
Remove your tape or bead stopper. Slide a crimp bead and then a wire guard onto one end of the wire. -
Loop the clasp:
Feed the wire through the loop of your gold lobster clasp, then back down through the wire guard and the crimp bead. -
Secure the crimp:
Pull the wire tight so the beads aren’t loose, but leave a tiny bit of slack so the necklace drapes naturally. Use your crimping pliers to flatten the crimp bead securely. -
Cover the crimp:
Place a gold crimp cover over the flattened crimp bead and gently close it with pliers to make it look like a round gold bead. -
Finish the other side:
Repeat the crimping process on the other end of the necklace, attaching the extension chain instead of the clasp. -
Trim excess:
Use your wire cutters to snip off any remaining tail of wire as close to the bead as possible.
Now you have a sweet, candy-colored accessory ready to brighten up any outfit


Smiley Charm Centerpiece Strand
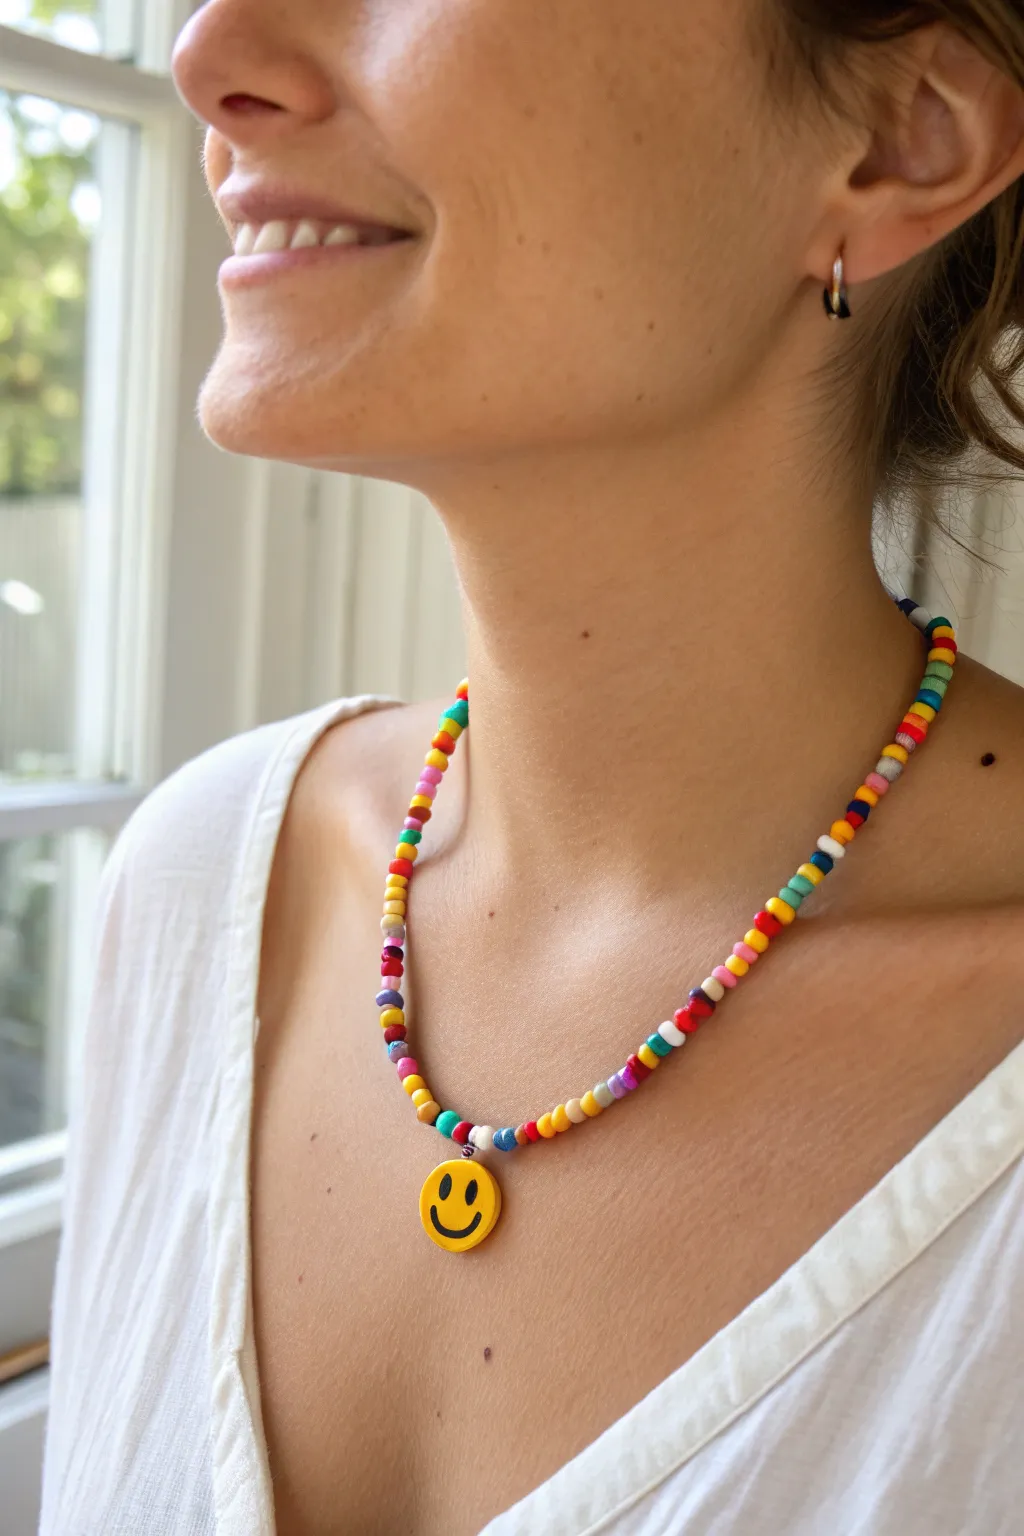
Bring a burst of nostalgia and joy to your jewelry collection with this vibrant rainbow seed bead necklace centered by a cheerful yellow smiley face. It captures the essence of carefree summer days and Y2K aesthetic in a simple, wearable piece that pairs perfectly with casual white tees.
Step-by-Step Guide
Materials
- Yellow smiley face charm (ceramic or acrylic, vertical drill hole)
- Size 6/0 or 8/0 glass seed beads (mixed rainbow colors: red, orange, yellow, green, blue, purple, white)
- Beading wire (such as flexible nylon-coated wire)
- 2 Crimp beads
- 2 Crimp bead covers (optional but recommended for a polished look)
- Jump rings
- Lobster clasp
- Wire cutters
- Crimping tool or flat-nose pliers
- Bead stopper or tape
Step 1: Preparation & Planning
-
Measure your length:
Decide on your desired necklace length. The example sits nicely at a shorter length, around 16 to 18 inches, hitting just below the collarbone. Cut a piece of beading wire about 4 inches longer than your target length to give yourself room to work. -
Secure the end:
Place a bead stopper or a piece of masking tape on one end of your wire. This crucial step prevents your beads from sliding off while you work on the pattern. -
Sort your palette:
Pour out small amounts of your seed beads. You want a mix of primary and secondary colors—bright reds, sunny yellows, deep blues, and crisp whites. Keeping them in little piles or a bead organizer helps you visualize the random pattern.
Smiley Won’t Sit Flat?
If the charm keeps flipping backward, attach it to the main strand using a small jump ring instead of threading the wire directly through it. This allows more movement.
Step 2: Stringing the Core
-
Start the sequence:
Begin stringing your seed beads. Aim for a ‘controlled chaos’ look rather than a strict pattern. Alternate colors frequently, but try not to put two identical beads right next to each other. -
Check density:
Every inch or so, push the beads down to check how the colors are interacting. If you notice a heavy concentration of dark colors, slip on a bright yellow or white bead to lighten the mood. -
Working to the middle:
Continue beading until you have reached exactly half of your desired total length (minus about half an inch for the clasp allowance). Measure this against a ruler or tape measure. -
Adding the centerpiece:
Thread your yellow smiley face charm onto the wire so it sits right in the center. Ensure the face is oriented correctly; if the charm is double-sided, this is less worry, but single-sided charms need to face ‘out’. -
Tip for stability:
I like to flank the smiley charm with two slightly smaller beads or contrasting colors (like blue or purple) to frame it and keep it sitting flat against the chest.
Step 3: Completing the Strand
-
Finish the second half:
Resume your random color stringing on the other side of the smiley face. Try to mirror the general ‘vibe’ of the first half without copying the exact bead order. -
Verify length:
Once the second side matches the length of the first side, hold the two ends together (carefully!) and let the necklace hang to ensure the smiley face is perfectly centered at the bottom of the loop. -
Add crimp bead:
Remove the bead stopper from one end. Slide a crimp bead onto the wire, followed by one half of your clasp assembly (either the jump ring or the lobster claw itself). -
Loop back:
Thread the tail of the wire back through the crimp bead and pull it tight, creating a small loop that holds the clasp component securely. Don’t make it too tight though; the clasp needs to wiggle freely. -
Crimp firmly:
Use your crimping tool to flatten the crimp bead securely. Give the wire a gentle tug to ensure it won’t slip out. -
Cover the crimp:
Place a crimp cover over the flattened bead and gently close it with pliers until it looks like a round metal bead. This hides the hardware beautifully. -
Repeat on the other side:
Slide the beads down so there are no large gaps in the wire. Repeat the crimping process on the other end with the other part of the clasp. -
Trim excess wire:
Use your flush cutters to snip off any remaining wire tails as close to the beads as possible so nothing pokes your neck.
Mix & Match Textures
For a truly eclectic look, mix matte and glossy seed beads together. The variation in finish adds subtle depth to the strand.
Wear your new creations with a smile and enjoy the pop of color it brings to your outfit

The Complete Guide to Pottery Troubleshooting
Uncover the most common ceramic mistakes—from cracking clay to failed glazes—and learn how to fix them fast.
Tiny Heart Charm With Soft Neutrals
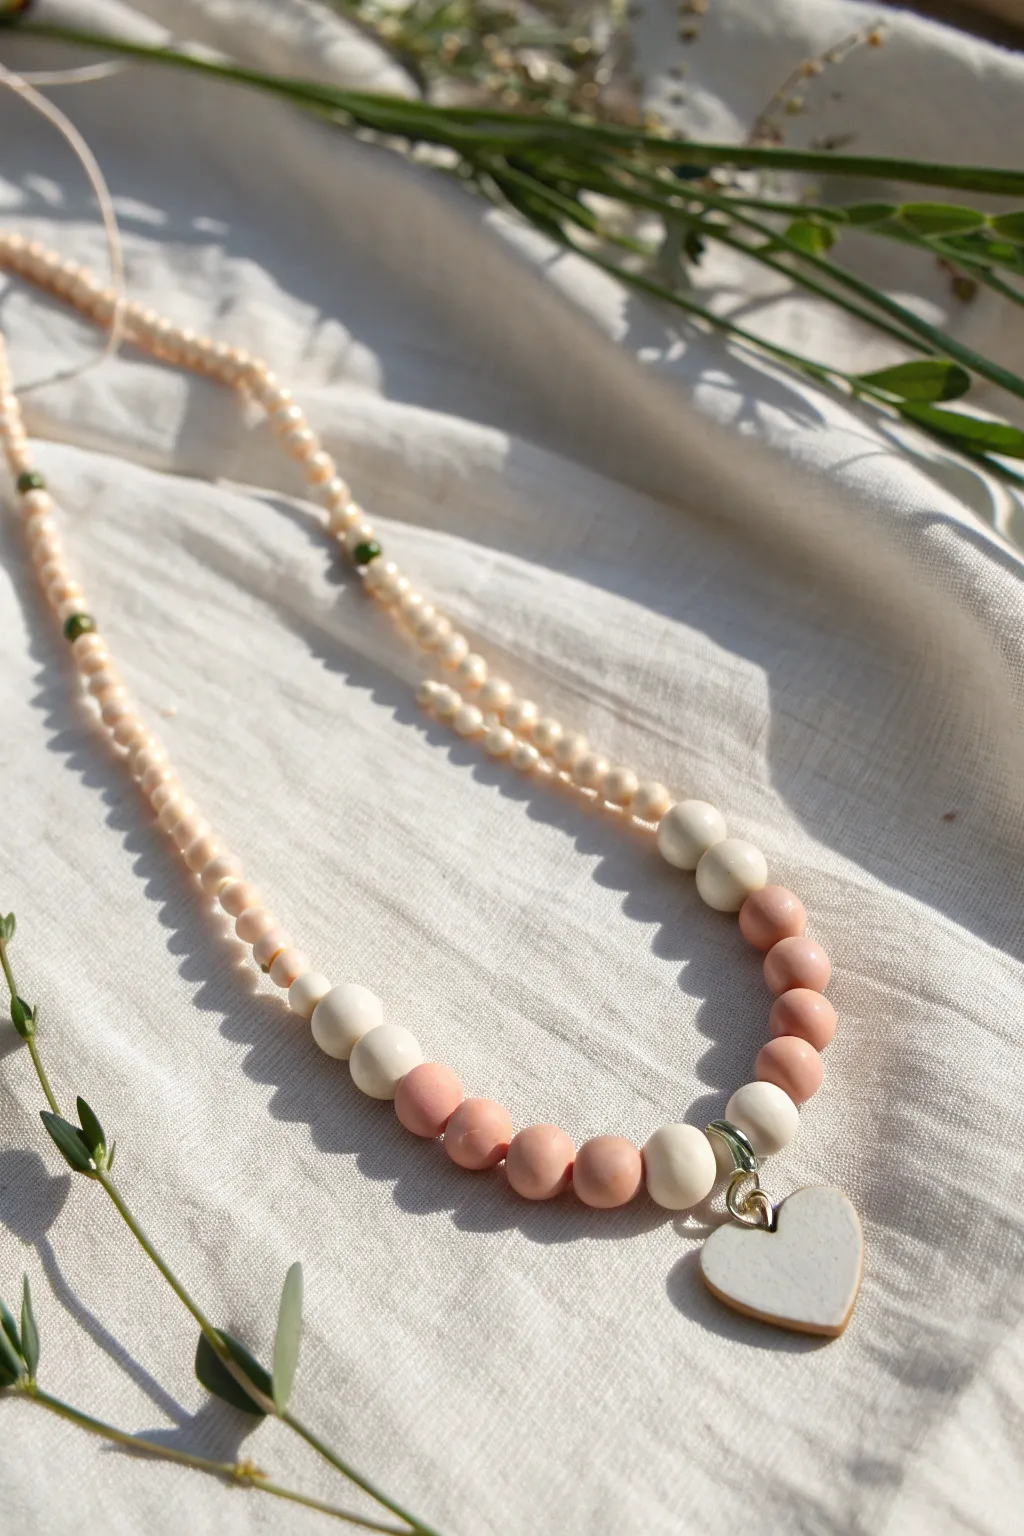
This delicate necklace balances the rustic charm of hand-rolled clay beads with the elegance of pearls and gold accents. The soft palette of blush pink, cream, and white makes it a versatile accessory that feels both earthy and sophisticated.
How-To Guide
Materials
- Polymer clay (blush pink, white)
- Small heart-shaped clay cutter (approx. 1 inch)
- Gold acrylic paint or liquid gold leaf
- Fine detail paintbrush
- Small round bead rollers (optional, for uniformity)
- Toothpick or bead piercing pin
- Small pearl seed beads (ivory/cream)
- Small green seed beads (accent color)
- Beading wire or strong nylon cord
- Crimp beads and crimp tool
- Jump rings (gold finish)
- Lobster clasp
- Gloss glaze (optional)
Step 1: Crafting the Clay Beads
-
Condition the clay:
Start by warming up your white and blush pink polymer clay in your hands until it becomes soft and pliable. This conditioning step is crucial to prevent cracks later on. -
Roll the larger beads:
Pinch off equal amounts of the blush pink clay to form round beads. Aim for about 10mm in diameter. You’ll need roughly 6-8 of these for the focal section. -
Roll the accent beads:
Repeat the rolling process with the white clay, making these beads slightly smaller than the pink ones, perhaps 8mm. -
Create the heart pendant:
Roll out a small slab of white clay to about 4mm thickness. Use your heart-shaped cutter to punch out a clean shape. Smooth the edges gently with your finger to remove any sharp ridges. -
Pierce the holes:
Using a toothpick or piercing tool, carefully create holes in the center of each round bead. For the heart, pierce a hole near the top center, ensuring there is enough clay above the hole so it won’t break. -
Bake the clay:
Arrange all your pieces on a parchment-lined baking sheet or a dedicated tile. Bake according to your specific clay brand’s instructions (usually 275°F/135°C for 15-30 minutes). Let them cool completely before handling.
Use Cornstarch
Before piercing holes, dip your toothpick in cornstarch. This prevents the raw clay from sticking to the tool and dragging, ensuring a neat, clean hole.
Step 2: Adding the Gold Detail
-
Paint the pendant edge:
Once the heart is cool, dip a fine brush into gold acrylic paint or liquid gold leaf. Carefully paint just the side edges of the heart to create a framed look. -
Add a gold bail:
Attach a gold jump ring through the hole in the heart pendant. This will act as the bail that slides onto the necklace wire.
Step 3: Stringing the Necklace
-
Prepare the wire:
Cut a length of beading wire approximately 20-22 inches long, giving yourself extra room for finishing the ends. -
Start the center pattern:
Thread your heart pendant onto the exact center of the wire. Working outwards from the heart on both sides, thread on a white clay bead, then the larger pink clay beads. -
Transition the pattern:
I like to taper the design here. After your run of pink beads (about 3-4 on each side), add a white clay bead to bookend the chunky section. -
String the straps:
Fill the rest of the necklace length using the small ivory pearl seed beads. This creates a delicate strap that won’t irritate the back of the neck. -
Add green accents:
To break up the pearls, intersperse a single green seed bead every inch or so along the strap sections. This adds a tiny pop of organic color. -
Check the length:
Hold the ends of the wire up to your neck to verify the length sits where you want it. Add or remove seed beads as needed. -
Attach the clasp:
Thread a crimp bead onto one end of the wire, followed by one half of the clasp. Loop the wire back through the crimp bead and use crimping pliers to flatten it securely. -
Secure the second end:
Repeat the crimping process with a jump ring or the other half of the clasp on the opposite end. Use wire cutters to trim any excess wire tail close to the crimp bead.
Uneven Clay Beads?
If your hand-rolled beads look lumpy, roll them gently under a flat acrylic block or cd case on your work surface. This creates perfectly spherical beads without finger marks.
Now you have a charming, neutral accessory perfect for layering or wearing solo
Initial Beads for a Personalized Pop
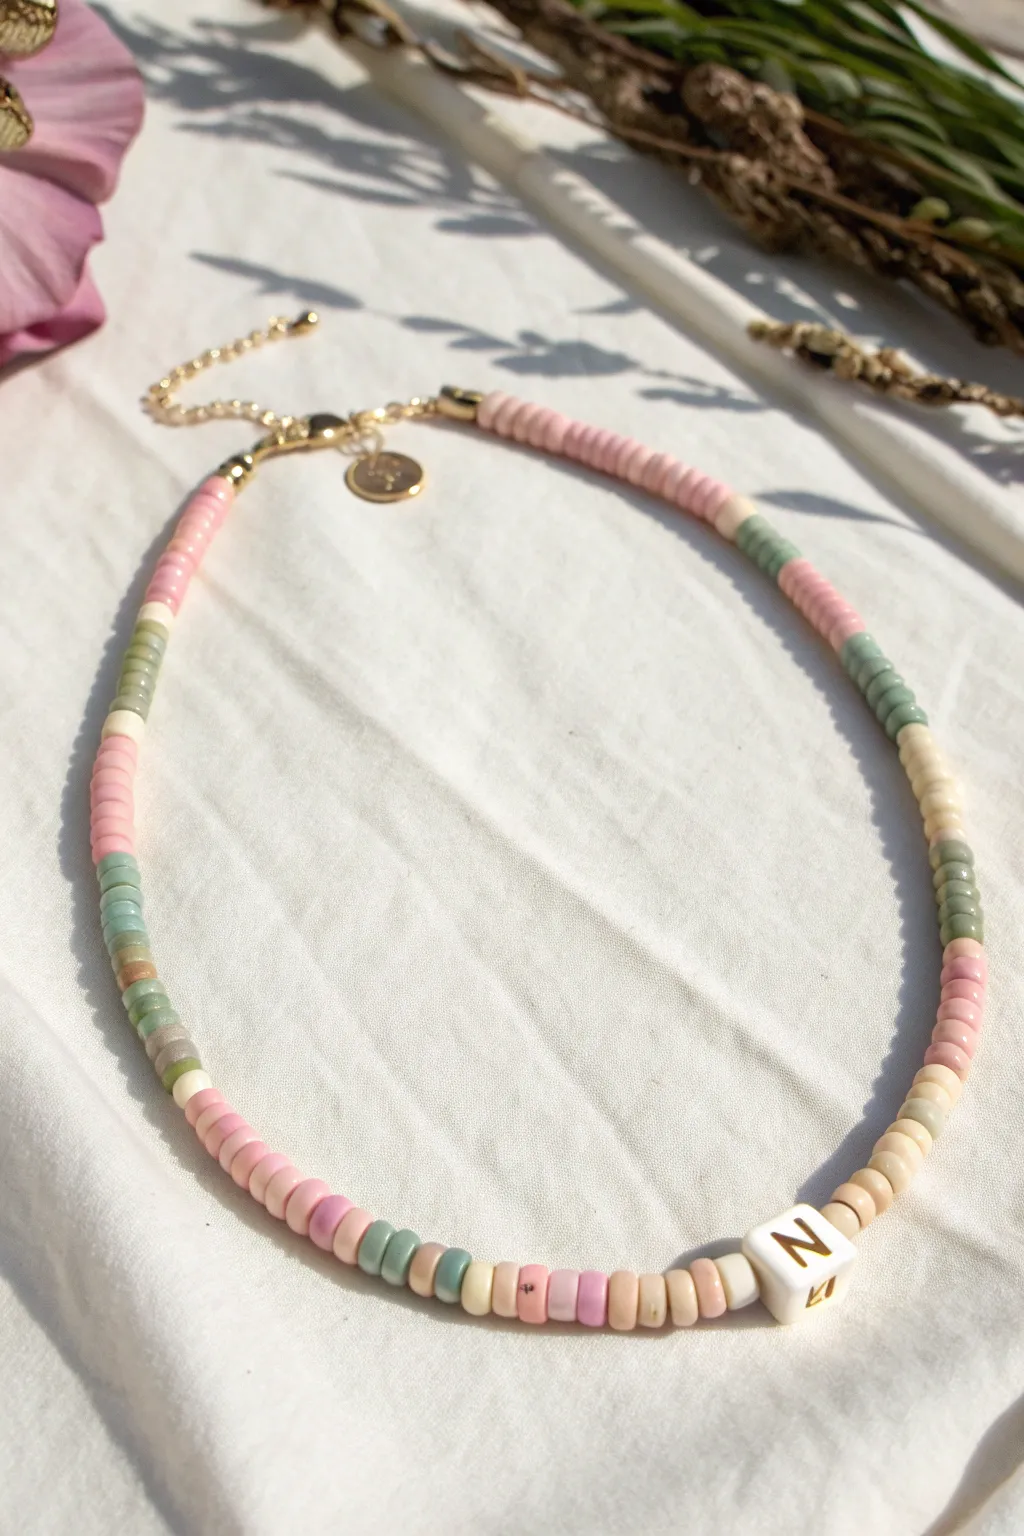
Create a personalized accessory with this sweet and simple heishi bead necklace featuring a custom initial. The soft pastel palette of pinks, sage greens, and creams gives it a gentle, romantic look perfect for everyday wear.
Detailed Instructions
Materials
- Polymer clay heishi disc beads (6mm or 4mm) in pink, dusty rose, sage green, cream, and peach
- White square letter bead with gold lettering
- Beading wire (flexible nylon-coated steel wire)
- 2 Gold crimp beads
- 2 Gold crimp covers (optional)
- 2 Gold wire guards (optional but recommended for a professional finish)
- Gold lobster clasp
- Gold extension chain with drop charm
- Small gold charm tag (optional)
- Jump rings (4mm or 5mm)
- Crimping pliers
- Wire cutters
- Flat nose pliers
Step 1: Planning Your Design
-
Measure and Cut:
Begin by measuring your desired necklace length. A standard choker length is usually around 14–16 inches. Cut a piece of beading wire about 4 inches longer than your target length to give yourself plenty of working room. -
Lay Out the Pattern:
Before threading, plan your color sequence on a bead board or a towel. The pattern shown uses blocks of solid color broken up by small striped sections. Start with a long section of pink beads for the back. -
Design the Transition:
Design the transition areas where colors shift. Instead of a hard stop, mix in a few beads of the next color—for example, a pattern of cream-green-cream-green—to create a softer, more organic flow between the solid blocks of color.
Smooth Layout Pro-Tip
Use a flocked bead board to lay out your pattern. The textured surface prevents round beads from rolling away and helps you visualize the exact length before stringing.
Step 2: Stringing the Beads
-
Secure the End:
Attach a piece of tape or a bead stopper to one end of your wire so your beads don’t slide off while you work. -
Start Stringing:
Begin threading your beads according to your layout. Start with the back section, which in this design is a solid run of pink beads. Follow this with your transitional pattern of cream and sage green. -
Add the Centerpiece:
Once you reach the halfway point of your design, thread your chosen initial bead. Ensure the letter is facing the correct direction relative to how the necklace will hang. -
Mirror the Pattern:
Continue beading the second half of the necklace. You can mirror the first side exactly for symmetry or create an asymmetrical look by varying the lengths of the color blocks slightly. -
Check the Length:
Wrap the unfinished strand around your neck to check the fit. Remember that the clasp and extension chain will add about an inch to the total length.
Step 3: Attaching the Hardware
-
Prepare the Crimp:
Slide a gold crimp bead onto one end of the wire. If you are using wire guards (horseshoe-shaped findings), thread the wire up through one side of the guard and down through the other. -
Loop the Wire:
Loop the wire back down through the crimp bead. If you aren’t using a wire guard, just form a small loop with the wire and go back through the crimp bead. -
Secure the Crimp:
Slide the crimp bead up close to the clay beads, leaving just a tiny bit of slack so the necklace stays flexible. Use your crimping pliers to flatten the crimp bead securely. -
Trim Excess Wire:
Trim the short tail of the wire as close to the crimp bead as possible using flush cutters. -
Add a Crimp Cover:
For a polished look, place a gold crimp cover over the flattened crimp bead and gently close it with flat nose pliers until it looks like a round gold bead. -
Repeat on Other Side:
Repeat the crimping process on the other end of the necklace. Be sure to pull the wire tight enough to remove gaps between beads, but loose enough that the strand drapes naturally.
Level Up: Gold Accents
Intersperse tiny gold spacer discs between every 10–15 clay beads. The metallic flash breaks up the matte texture of the clay and elevates the design from playful to chic.
Step 4: Final Assembly
-
Attach Clasp:
Open a gold jump ring by twisting it sideways with two pairs of pliers. Hook it through the loop (or wire guard) on one end of your necklace and slide on the lobster clasp. Close the jump ring securely. -
Attach Extension Chain:
On the other end, use another jump ring to attach the extension chain. This allows the necklace length to be adjustable. -
Add the Charm:
Finally, attach the small gold logo tag or a tiny charm to the jump ring near the clasp using a smaller jump ring. This adds a high-end, store-bought finish to your piece.
Now you have a custom, trendy accessory ready to layer or wear solo.


What Really Happens Inside the Kiln
Learn how time and temperature work together inside the kiln to transform clay into durable ceramic.
Gold Spacer Accents for Extra Shine
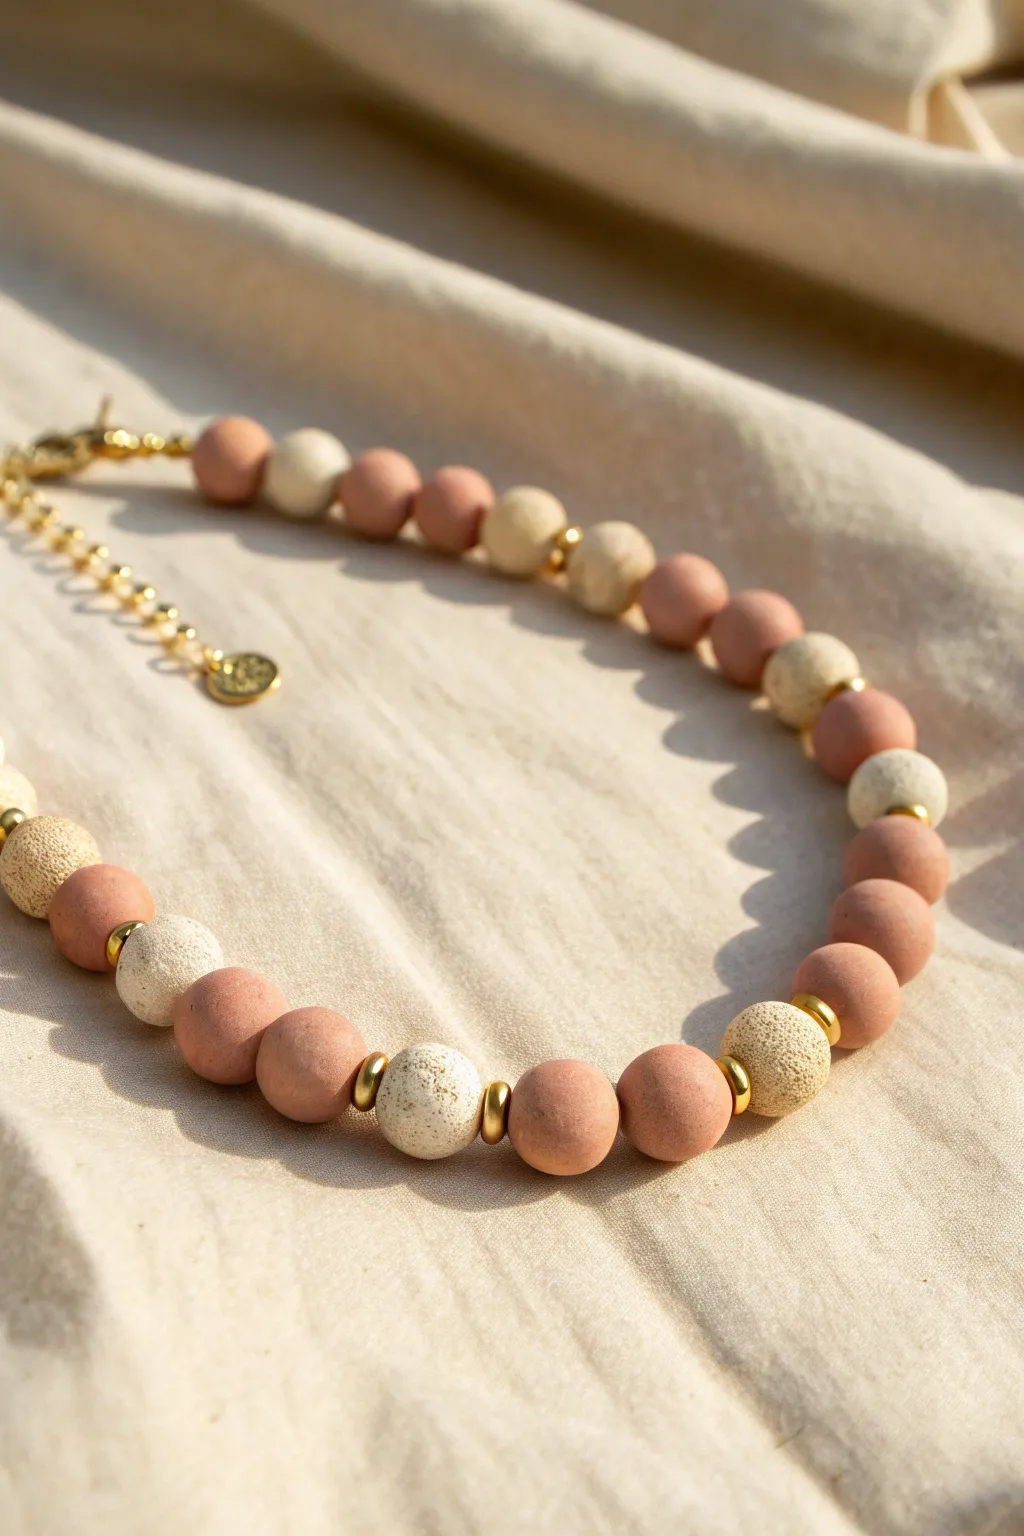
Elevate a simple strand of handmade beads with this elegant combination of earthy textures and metallic shine. By alternating matte dusty rose polymer clay with speckled cream beads and bright gold spacers, you create a piece that feels both organic and luxuriously modern.
How-To Guide
Materials
- Polymer clay (Dusty Rose or Antique Pink)
- Polymer clay (Granite or White with speckles)
- Gold tone metal spacer beads (approx. 4mm, wheel or flat disc shape)
- Gold tone metal spacer beads (approx. 3mm round)
- Flexible beading wire (gold color preferred)
- 2 Crimp beads
- 2 Crimp covers (gold)
- Gold jump rings
- Gold lobster clasp
- Gold chain extender with small charm
- Needle tool or bead piercing pin
- Ceramic tile or baking sheet
- Oven (for baking clay)
- Jewelry pliers (flat nose and cutters)
- Wet sandpaper (optional)
Step 1: Prepping and Rolling Beads
-
Condition the clay:
Begin by warming up your dusty rose and speckled white polymer clay in your hands separately. Knead them until they are soft and pliable to prevent cracking later. -
Portion the clay:
Pinch off small pieces of clay to form your beads. Aim for pieces that are roughly equal in volume to ensure consistent sizing. -
Roll spheres:
Roll each piece of clay between your palms to create smooth, round spheres. You want these to be approximately 10-12mm in diameter. -
Texture the white beads:
To mimic the stone-like look in the photo, take your white speckled beads and gently roll them over a piece of sandpaper or use a stiff toothbrush to stipple the surface for a matte, porous texture. -
Pierce the holes:
Using your needle tool or bead pin, carefully pierce a hole through the center of each bead. I find twisting the pin while pushing helps keep the bead round. -
Double-check the opening:
Ensure the hole is wide enough for your beading wire to pass through comfortably, perhaps wiggling the tool slightly to widen it. -
Bake the beads:
Arrange your beads on a ceramic tile or baking sheet lined with parchment paper. Bake according to the manufacturer’s instructions on your specific package of clay (usually around 275°F/130°C for 15-30 minutes). -
Cool and refine:
Allow the beads to cool completely. If there are any fingerprints, you can lightly buff them away with fine-grit wet sandpaper.
Step 2: Stringing the Necklace
-
Cut the wire:
Measure and cut a length of beading wire about 4-5 inches longer than your desired finished necklace length to allow room for finishing. -
Secure the first end:
Thread a crimp bead onto one end of the wire, followed by a jump ring attached to your lobster clasp. Loop the wire back through the crimp bead and use your flat nose pliers to squash the crimp flat, securing the wire. -
Cover the crimp:
Place a gold crimp cover over the flattened crimp bead and gently close it with pliers to make it look like a seamless gold bead. -
Establish the pattern:
Begin stringing your beads. The pattern shown uses a sequence like: two pink beads, one gold wheel spacer, one textured white bead, one gold wheel spacer. -
Vary the spacers:
Notice how the gold accents act as separators. Occasionally mix in the smaller round gold spacers near the back or center to add visual rhythm. -
Check the length:
Continue the pattern until you reach your desired length. Hold it up to your neck periodically to check the drape. -
Finish stringing:
Complete the strand, ensuring the pattern ends symmetrically to how it started. -
Close the strand:
Thread a crimp bead onto the remaining wire tail, then pass the wire through the ring of your chain extender. -
Secure the final connection:
Loop the wire back through the crimp bead and into the last couple of clay beads. Pull everything snug (but not too tight, or the necklace will be stiff) and flattened the crimp bead with your pliers. -
Trim and cover:
Trim any excess wire close to the beads and attach the final crimp cover over the flattened crimp for a professional finish.
Fixing Wonky Holes
If you pierced a bead off-center, re-roll the raw clay and try again. For baked beads, use a small hand drill or reamer to gently widen or correct the angle of the channel.
Tip: No Fingerprints
Lightly dust your palms with cornstarch before rolling the raw clay. This prevents sticky fingerprints and helps create that ultra-smooth matte finish on the rose beads.
Now you have a stunning, sophisticated necklace ready to wear with your favorite outfit
Pearl and Clay Sweet Mix
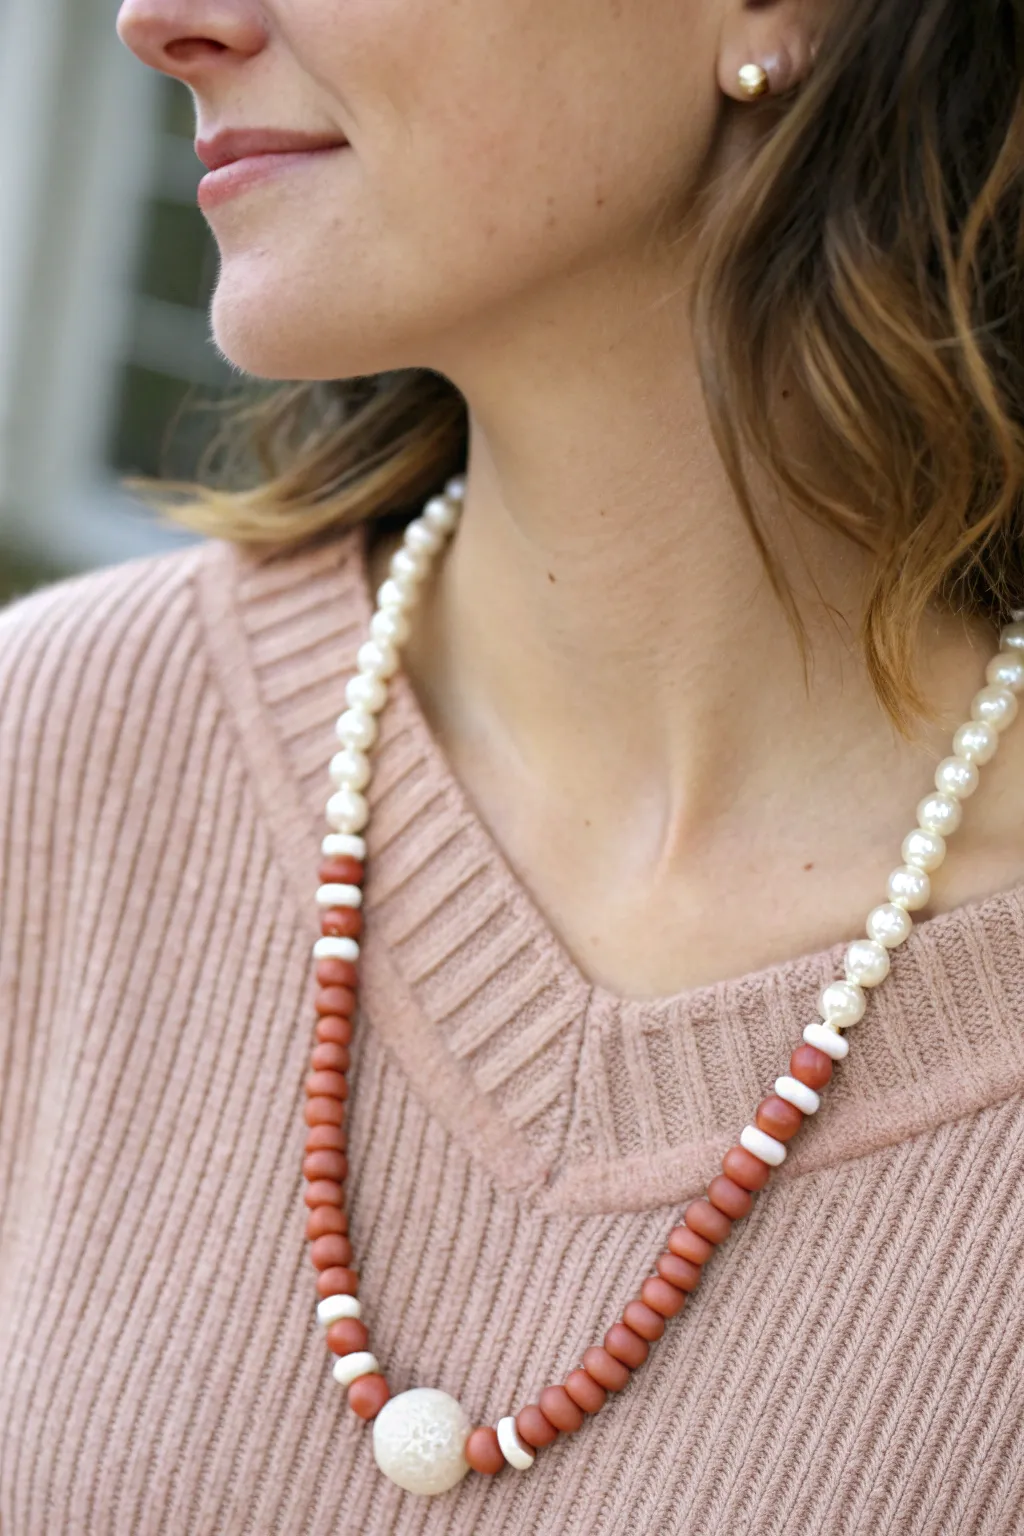
This elegant design masterfully blends the classic sophistication of freshwater pearls with the earthy, matte texture of terracotta clay beads. It creates a stunning juxtaposition of materials that feels both modern and timeless, perfect for elevating a cozy sweater.
Step-by-Step Tutorial
Materials
- Stringing wire (nylon-coated steel, medium weight)
- Faux pearl beads (approx. 6-8mm)
- Small white polymer clay disc spacer beads
- Terracotta-colored round clay beads (approx. 6-8mm)
- Large focal white clay bead (textured or crackled finish)
- 2 Crimp beads
- 2 Crimp covers (gold or silver)
- 2 Wire guardians
- Clasp (lobster claw and jump ring)
- Crimping tool or flat-nose pliers
- Wire cutters
- Bead design board (optional)
Step 1: Planning and Prep
-
Establish length:
Decide on the total length of your necklace. For the look in the photo, aim for a ‘matinee’ length, which is typically around 20-24 inches, allowing it to sit beautifully over a neckline. -
Cut the wire:
Cut a piece of beading wire about 4-5 inches longer than your desired finished length to ensure you have plenty of room for crimping the ends. -
Attach the first clasp end:
Thread a crimp bead and then a wire guardian onto one end of the wire. Loop the wire through the guardian and back through the crimp bead. -
Secure the start:
Slide one half of your clasp into the loop of the wire guardian. Use your crimping tool to flatten the crimp bead securely, then trim the excess tail wire close to the crimp. -
Cover the crimp:
Place a crimp cover over the flattened crimp bead and gently squeeze it shut with your pliers so it looks like a round metal bead.
Uneven Hanging?
If the necklace twists or doesn’t lay flat, you likely strung it too tightly. Leave a 1-2mm gap of bare wire before the final crimp to allow movement.
Step 2: Stringing the Sequence
-
Start with pearls:
Begin stringing your pearl beads on the wire. Continue adding pearls until you have covered approximately one-third of your total necklace length. -
Create the transition:
To soften the change from pearl to clay, add one small white disc spacer, followed by one terracotta clay bead, then another white disc spacer. Repeat this little sandwich once more if you want a longer transition. -
Begin the clay section:
Now, start stringing the main run of terracotta clay beads. Thread them continuously until you reach the center point of the necklace. -
Add the focal point:
At the very center, slide on your large, textured white clay bead. I think this bulky bead adds a wonderful weight that keeps the necklace centered while wearing it. -
Mirror the design:
Continue stringing the terracotta clay beads on the other side of the focal bead, matching the count or length of the first clay section exactly. -
Repeat the transition:
Recreate the transition zone by adding a white disc spacer, a single pearl (or clay bead depending on your specific pattern preference shown), and another spacer. -
Finish with pearls:
Fill the rest of the wire with pearl beads until this side matches the length of the first pearl section.
Step 3: Closing the Loop
-
Check for symmetry:
Hold the two ends of the wire together and let the necklace hang to ensure the focal bead sits exactly in the middle and both sides are even. -
Add closing hardware:
Thread on a crimp bead and a wire guardian. Loop the wire through the guardian and back down through the crimp bead. -
Attach the clasp:
Hook the second part of your clasp (or a jump ring) onto the wire guardian loop. -
Tighten the slack:
Pull the wire tail taut to remove gaps between beads, but leave just a tiny bit of wiggle room so the necklace drapes naturally instead of being stiff. -
Final crimp:
Flatten the crimp bead securely. Trim the excess wire tail and finish by applying the second crimp cover for a polished look.
Clay Bead Care
Matte clay beads can absorb oils or makeup. Lightly seal them with a matte varnish before stringing to keep them pristine without adding unwanted shine.
Now you have a chic, mixed-media accessory ready to wear with your favorite knitwear

TRACK YOUR CERAMIC JOURNEY
Capture glaze tests, firing details, and creative progress—all in one simple printable. Make your projects easier to repeat and improve.
Shell Charm Beachy Cutie Necklace
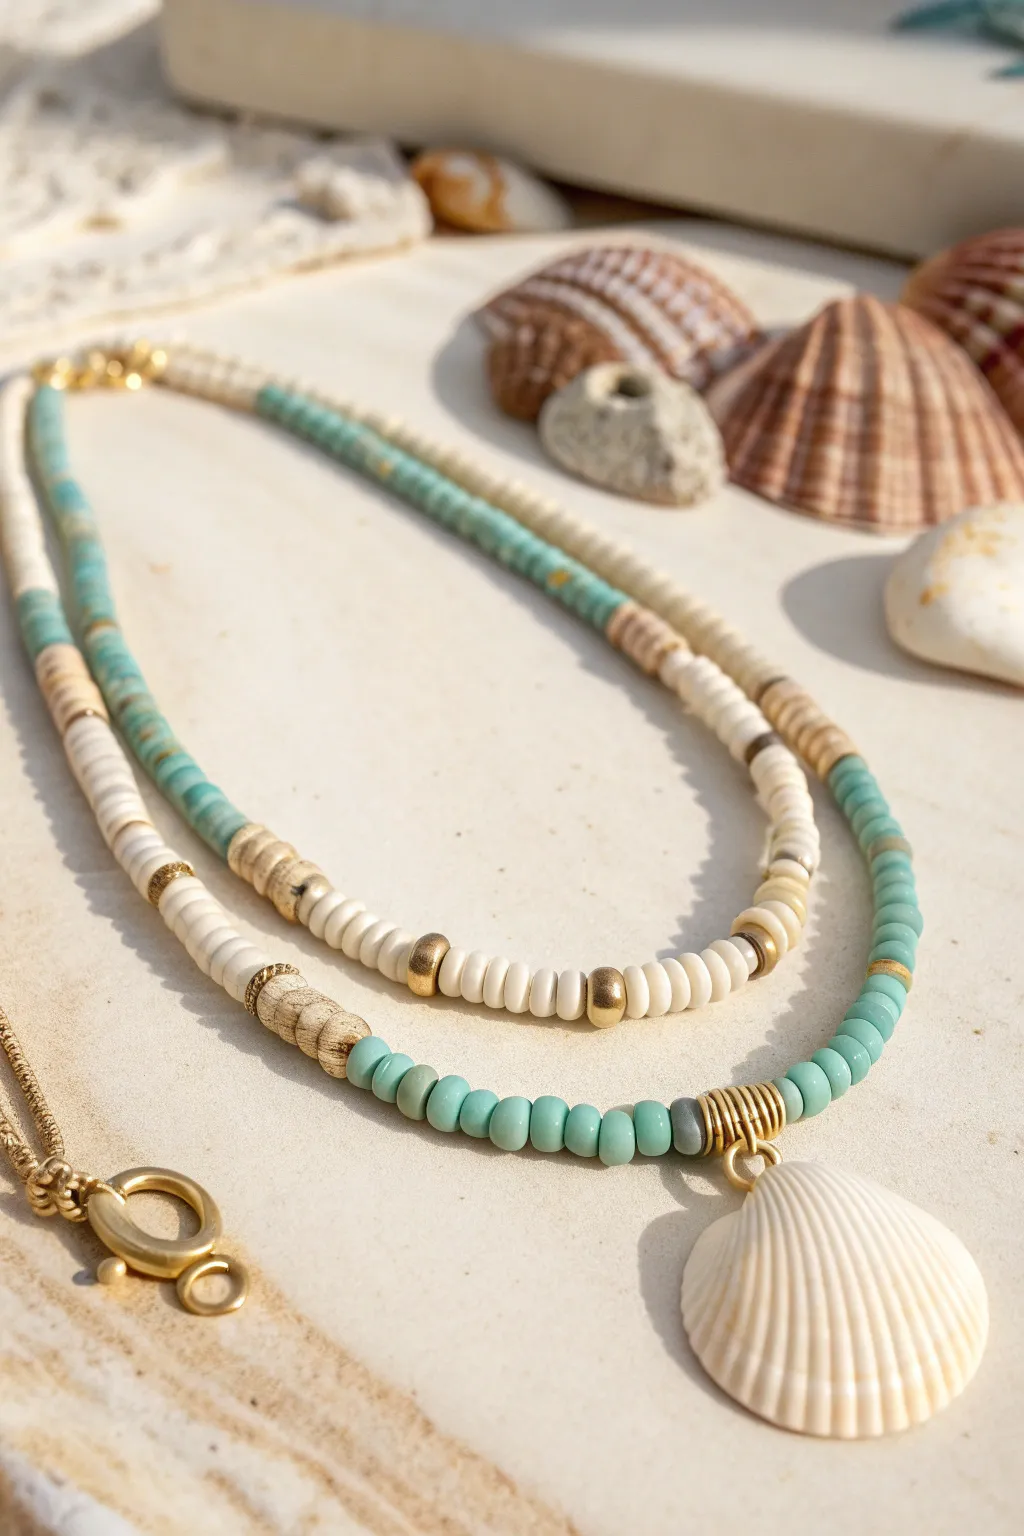
Capture the essence of a sun-soaked holiday with this layered beaded beauty. Featuring soft turquoise heishi beads, natural wood accents, and a striking scallop shell pendant, this necklace brings a touch of the ocean to any outfit.
Step-by-Step Guide
Materials
- Turquoise polymer clay heishi beads (approx. 4mm)
- Cream/off-white polymer clay heishi beads (approx. 4mm)
- Natural wood disc beads/spacers
- Gold tone spacer beads (small discs or rounds)
- Gold tone crimp beads and covers
- Beading wire (flexible, coated)
- Gold tone lobster clasp and jump rings
- Large scallop shell charm or pendant with bail
- Gold tone wire (20-22 gauge) for wrapping the bail
- Wire cutters
- Crimping pliers
- Chain nose pliers
- Ruler or tape measure
Step 1: Planning the Design
-
Analyze the layers:
Note that this is a double-strand necklace. The shorter inner strand features a mix of cream and turquoise sections, while the longer outer strand holds the shell pendant and is primarily turquoise near the center. -
Measure your wire:
Cut two lengths of beading wire. For a comfortable fit, I usually cut the inner strand at roughly 18 inches and the outer strand at 20-21 inches to allow for the drape of the pendant. -
Prepare the layout:
Lay out your beads on a bead board or soft cloth. This prevents them from rolling away and helps you visualize the color blocking before stringing.
Step 2: Stringing the Inner Strand
-
Start the first strand:
Secure one end of your shorter wire with a piece of tape or a bead stopper so your work doesn’t slide off. -
Begin with turquoise:
String a section of turquoise heishi beads approximately 2-3 inches long. This will sit near the back of the neck. -
Add wood accents:
Transition into the next section by adding a small cluster of 3-4 natural wood disc beads. -
Create the cream section:
String a long section of cream or white clay beads. To break up the solid color, add a gold spacer bead every inch or so. -
Incorporate wood details:
As you reach the center portion of this inner strand, add varied textures by alternating 2-3 wood beads with single gold spacers. -
Finish the pattern:
Mirror the pattern on the second half of the strand: cream section with gold spacers, wood transition, and finally the turquoise section at the end.
Natural Texture
For a truly authentic look, mix in coconut shell spacers or uneven wooden beads. Their slight imperfections add organic charm that plastic beads can’t replicate.
Step 3: Creating the Pendant Layer
-
Prepare the pendant:
If your shell doesn’t have a bail, create a messy wire wrap at the top using gold wire to create a loop for hanging. This adds that rustic, beachy look. -
Start the outer strand:
Secure your longer piece of wire. Begin stringing with a mix of wood and cream beads for the first few inches. -
Transition to color:
Switch to the turquoise heishi beads. This section will be the main color feature of the lower tier. -
Add the focal point:
String the turquoise beads until you reach the exact center. Slide on a gold spacer, your prepared shell pendant, and another gold spacer. -
Complete the strand:
Continue with turquoise beads to match the other side, finishing with the wood and cream bead mixture at the end used for the clasp area.
Make It Yours
Swap the scallop shell for a piece of sea glass, a small drilled driftwood piece, or a freshwater pearl to customize the beach vibe to your specific style.
Step 4: Assembly and Finishing
-
Join the strands:
Bring the ends of both wire strands together on one side. Feed both wires through a single crimp bead. -
Attach the clasp:
Loop the wires through the ring of the lobster clasp, then thread them back down through the crimp bead. -
Secure the crimp:
Use your crimping pliers to flatten the crimp bead securely. Give it a gentle tug to ensure it holds. -
Cover the crimp:
Place a gold crimp cover over the flattened bead and gently close it with pliers for a polished, professional finish. -
Repeat on the other side:
Repeat the joining process on the other side, attaching a closed jump ring instead of a clasp. Trim any excess wire close to the beads.
Enjoy wearing your new handcrafted accessory on your next sunny day out
Star Charm Pop on Bright Beads

Brighten up your jewelry collection with this cheerful polymer clay bead necklace, featuring a playful silver star at its center. The design uses color-blocking techniques with vibrant heishi beads to create a segmented rainbow effect that is both modern and nostalgic.
How-To Guide
Materials
- Polymer clay heishi beads (flat disc beads) in: pastel pink, vibrant purple, dark purple, teal/mint, bright orange, sunny yellow, lavender loops/light purple, and white
- Silver star charm (approx. 15mm) with a textured surface
- Strong beading wire or elastic cord (0.8mm recommended)
- Small silver jump ring (4mm-6mm)
- Two jewelry crimp beads (silver)
- Two clam shell knot covers or bead tips (silver)
- Lobster clasp and jump ring closure set
- Jewelry pliers (flat nose and cutting pliers)
- Bead design board or masking tape
Step 1: Planning the Pattern
-
Measure length:
Determine your desired necklace length. This style sits nicely as a choker or collarbone length, usually around 14 to 16 inches. Cut your beading wire about 4 inches longer than your target length to give yourself room to tie knots or attach clasps. -
Secure the end:
To prevent beads from sliding off while you work, place a piece of masking tape over one end of your wire, or attach a temporary stopper bead if you have one. -
Prepare the charm:
Using your flat nose pliers, carefully open the small silver jump ring. Slide the star charm onto the ring and then gently twist the ring closed again so the gap is sealed tight. -
Layout the colors:
This design relies on distinct blocks of color rather than a random mix. I like to lay my beads out on a board first to visualize the pattern. Note the specific sequence visible: sections of 5-8 beads of the same color, separated often by a single white bead.
Step 2: Stringing the Beads
-
Start the sequence:
Begin stringing from the back (clasp end). Start with a small section of purple or mixed beads to sit at the back of the neck. -
Create color blocks:
Start your main pattern. Thread on about 6 bright orange beads, followed by one white bead, then 4-5 teal beads. -
Continue the pattern:
Add a white bead, followed by 5-6 bright orange beads again, then another white bead. Follow this with a block of 3-4 yellow beads. -
Transitioning colors:
String a white bead, then a longer section (about 8-10) of pink beads. Add a white bead, then a single yellow, then a single white. -
Approach the center:
Thread a section of dark purple beads (about 5), followed by one white bead, then a section of 4-5 teal beads. -
Add the focal point:
Just before the charm, string a block of lavender/light purple beads. Now, slide your prepared silver star charm onto the wire so it rests against the lavender section. -
Mirror or asymmetric?:
Decide if you want the other side to match perfectly or be eclectic. The original design is slightly asymmetrical. Continue stringing blocks of color (teal, yellow, white, pink) on the other side of the star until you reach your desired length.
Uneven Charm Hanging?
If the star charm keeps flipping backward or twisting, use a slightly smaller jump ring to reduce movement, or secure it between two slightly larger beads to hold it straight.
Step 3: Finishing the Necklace
-
Check the fit:
Carefully lift the necklace by the ends and hold it around your neck to ensure the length is correct and the star hangs exactly where you want it. -
Attaching crimp beads:
Remove the tape from the start of the wire. Thread the wire end through a crimp bead, then through the loop of your clam shell cover (or directly through a jump ring), and back down through the crimp bead. -
Secure the crimp:
Use your flat nose pliers to squash the crimp bead flat, locking the wire in place. Trim the excess wire tail close to the bead. -
Hide the knot:
If using a clam shell cover, gently close the shell over the crimp bead using your pliers to hide the hardware. -
Add the clasp:
Attach the lobster clasp to the loop on your clam shell tip using a jump ring. Repeat the crimping and tip-closing process on the other end of the necklace, attaching a jump ring for the clasp to hook into.
Layer Up!
Make a second, shorter strand using only white beads and small gold spacer beads to wear with this one for a trendy, stacked summer look.
Now you have a vibrant, custom accessory ready to add a pop of color to any outfit
Yin-Yang Charm With Monochrome Pastels
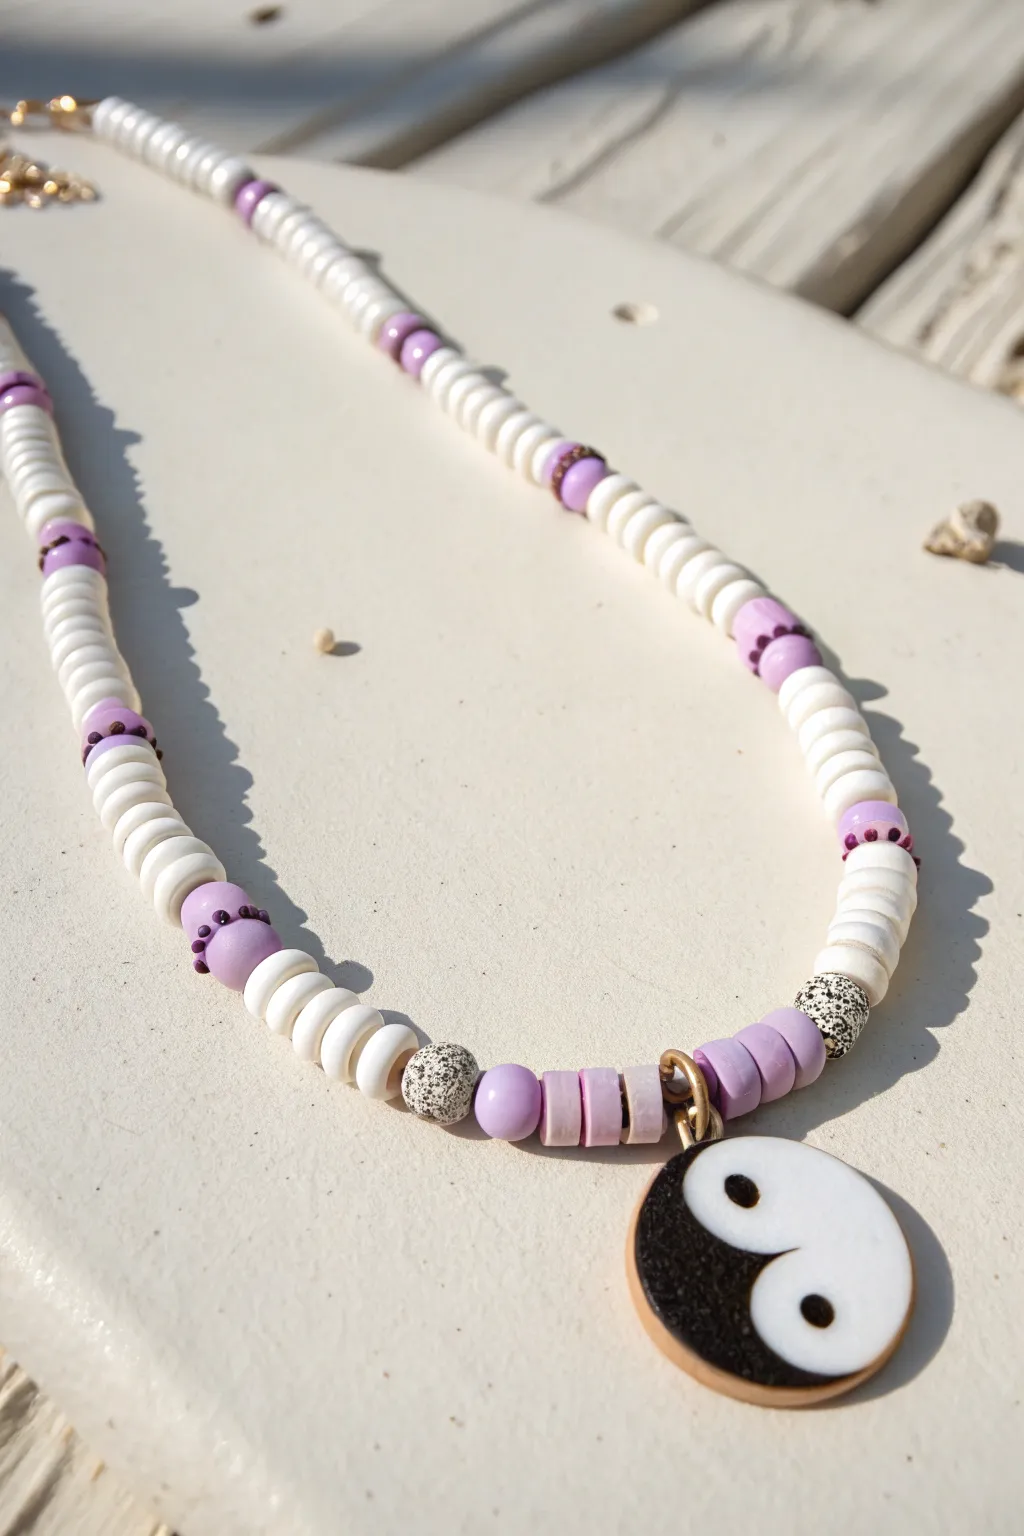
Achieve a perfectly balanced look with this charming beaded necklace that combines crisp white heishi beads with soft lavender accents. The classic yin-yang pendant adds a touch of retro whimsy to this clean, monochrome pastel design.
Step-by-Step Guide
Materials
- White clay heishi beads (approx. 4-6mm)
- Lavender clay heishi beads (same size)
- Light purple round accent beads (approx. 6mm)
- 2 Speckled grey/white ceramic or stone round beads (approx. 6mm)
- Tiny purple seed beads or micro spacers
- Yin-yang charm (black and white enamel with gold rim)
- Gold finish jump ring (6-8mm)
- Beading wire or strong nylon cord
- Crimp beads and crimp covers (gold finish)
- Gold clasp and extension chain
- Flat nose pliers
- Wire cutters
Step 1: Preparing the Foundation
-
Measure your cord:
Cut a length of beading wire approximately 18-20 inches long. This gives you plenty of extra room for finishing the ends comfortably. -
Secure one end:
Before you start stringing, secure one end of your wire. Thread a crimp bead onto the wire, loop it through a closed jump ring or the clasp loop, and thread it back through the crimp bead. -
Crimping tight:
Use your flat nose pliers to flatten the crimp bead securely. I like to give it a gentle tug to ensure it holds before proceeding. -
Cover the crimp:
Place a gold crimp cover over the smashed crimp bead and gently close it with pliers to make it look like a seamless gold bead.
Stiff Necklace?
If the necklace feels too rigid, you likely crimped it too tightly. Leave a millimeter of slack in the wire before the final crimp to allow beads to roll.
Step 2: Stringing the Pattern
-
Start with white:
Begin stringing your white clay heishi beads. Thread on a section approximately 1.5 to 2 inches long to create the back portion of the necklace. -
First purple accent:
Add a single lavender clay heishi bead, followed by one tiny purple seed bead spacer. -
Round bead placement:
Slide on a light purple round bead. Follow this immediately with another tiny purple seed bead spacer and then another lavender clay heishi bead. -
Resume white section:
String another long section of white heishi beads. Aim for about 1.5 inches of white to separate the color pops. -
Repeat accent pattern:
Repeat the previous accent sequence: lavender heishi, seed bead, round purple bead, seed bead, lavender heishi. -
Continue building length:
Continue this alternating pattern of long white sections and purple accents until you reach near the center of the necklace. You want at least three or four repeating sections on each side. -
Transition to center:
As you approach the focal point, add your last standard white section.
Pro Tip: Symmetry Check
Before doing the final crimp, lay the necklace in a ‘U’ shape on a table. Ensure the accents on the left and right align perfectly horizontally.
Step 3: Creating the Focal Point
-
Add texture:
Thread on one of the speckled grey/white ceramic round beads. This adds a nice textural break before the pendant. -
Center bead cluster:
String the following sequence for the center: one light purple round bead, followed by three lavender clay heishi beads. -
Attach the pendant:
Open your large gold jump ring using pliers. Slide the yin-yang charm onto it, then hook the jump ring onto the wire right next to the three lavender heishi beads. -
Mirror the center:
Complete the center cluster by adding three more lavender clay heishi beads and one light purple round bead on the other side of the charm. -
Second speckled bead:
Add the second speckled grey/white ceramic bead to perfectly mirror the other side.
Step 4: Finishing the Necklace
-
Complete the second half:
Mirror your pattern exactly as you work back up the other side of the necklace. Use the existing side as a reference to keep the white sections equal in length. -
Check length:
Once you’ve mirrored the pattern, hold the necklace up to your neck to verify the length is correct. -
Add final hardware:
Thread a crimp bead onto the end of the wire, followed by the jumping ring of your extension chain. -
Secure the end:
Loop the wire back through the crimp bead and pull it tight, leaving just a tiny bit of slack so the necklace drapes naturally. -
Final crimp:
Flatten the crimp bead with your pliers, apply a crimp cover, and trim any excess wire flush with the bead.
Now you have a serene, perfectly balanced accessory ready to wear with any casual outfit
Daisy Bead Flower Power Choker
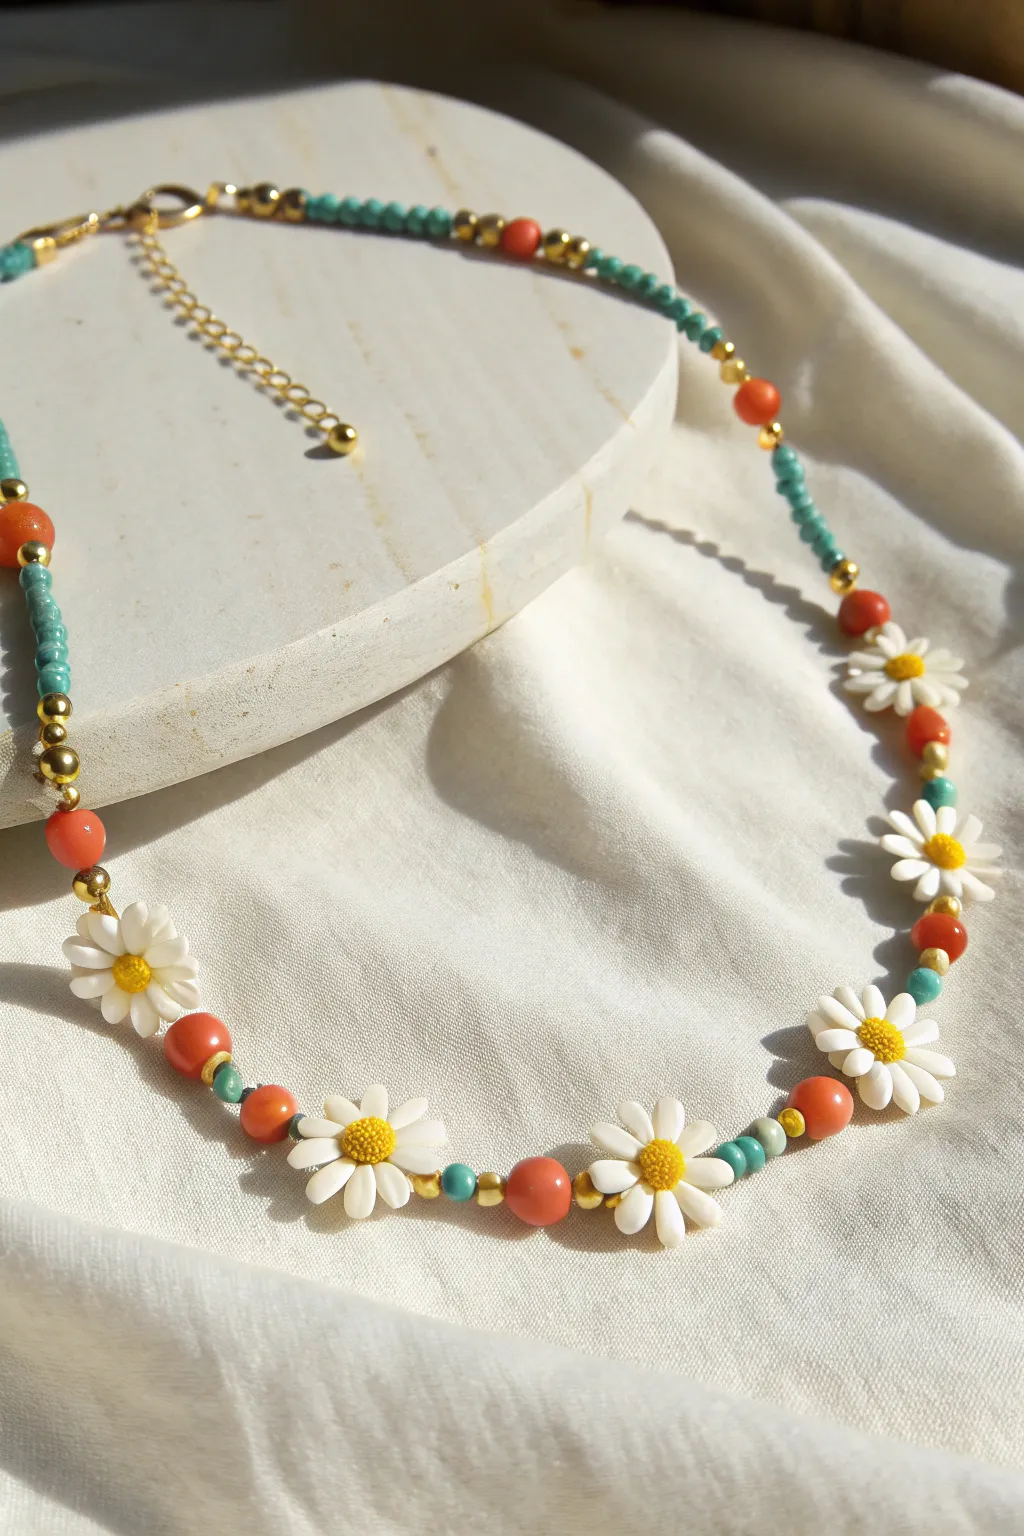
Channel the best of retro summer vibes with this delicate yet vibrant choker. Featuring white clay daisy charms interspersed with pops of coral and gold, it sits beautifully against teal seed beads for a fresh, handcrafted look.
Step-by-Step
Materials
- White or cream flower/daisy beads (approx. 10-12mm)
- Small teal seed beads (size 11/0 or 10/0)
- Coral/orange round beads (approx. 6mm) – can be glass, stone, or polymer clay
- Gold tone metal spacer beads (approx. 3-4mm)
- Gold tone crimp beads
- Gold tone lobster clasp and jump rings
- Gold tone extender chain (optional)
- Beading wire (flexible nylon-coated steel wire)
- Wire cutters
- Crimping pliers
Step 1: Setting up the Base
-
Measure and cut:
Cut a length of beading wire approximately 18-20 inches long. This gives you plenty of room for a standard choker length (usually 14-16 inches) plus extra wiggle room to secure the ends comfortably. -
Secure the first end:
Thread one crimp bead onto the wire, followed by the gold extender chain or a closed jump ring. Loop the wire back through the crimp bead. -
Crimp firmly:
Using your crimping pliers, flatten the crimp bead securely near the end of the wire. Give it a gentle tug to ensure it holds tight, then trim just the excess tail of the wire. -
The first sequence:
Begin stringing by adding about an inch of the small teal seed beads. This creates the section that will sit at the back of the neck. -
Add gold accents:
Slide on three gold spacer beads, followed by one large coral bead, and then another gold spacer bead. This is your transition into the main floral pattern.
Loose Flowers?
If your daisy beads spin too much and face the wrong way, try adding tiny clear seed beads on either side of the flower to act as stabilizers, gripping the petals gently.
Step 2: Stringing the Floral Pattern
-
Start the daisy sequence:
Thread on your first white daisy flower bead. Orient it so the petals sit flat. -
Create the spacer segment:
After the daisy, add one gold metal spacer bead to act as a buffer. -
Add the coral pop:
Slide on one of the larger round coral beads. These add a warm punch of color that contrasts perfectly with the white flowers. -
Finish the segment:
Add a second gold spacer bead immediately after the coral bead. -
The teal bridge:
String on just two or three teal seed beads. This tiny splash of blue breaks up the pattern and ties in the back section of the necklace. -
Repeat pattern:
Repeat the previous steps: Daisy -> Gold Spacer -> Coral Bead -> Gold Spacer -> Teal Seed Beads. -
Check length:
Continue this repeating pattern until you have covered the front expanse of the necklace, usually about 5 or 6 daisies total depending on your neck size.
Go Asymmetrical
Instead of centering the daisies perfectly, start the flower pattern closer to one side for a modern, asymmetrical look that creeps up the neckline.
Step 3: Finishing the Design
-
Transition out:
After your final daisy, mirror the start of the necklace. Add a gold spacer, a coral bead, three gold spacers, and then finish with the same length of teal seed beads used at the beginning. -
Prepare the clasp:
Thread a crimp bead onto the wire end, followed by the lobster clasp. -
Secure the necklace:
Loop the wire back through the crimp bead and pull it taut—but not too tight, or the necklace will be stiff. I like to leave just a millimeter of slack so the necklace drapes naturally. -
Crimp and trim:
Flatten the final crimp bead securely. Trim the remaining wire tail as close to the bead as possible without nicking the main wire.
Fasten your new choker and enjoy how the mix of gold, teal, and coral brings a touch of sunshine to your outfit
Fruit-Themed Mini Charm Necklace
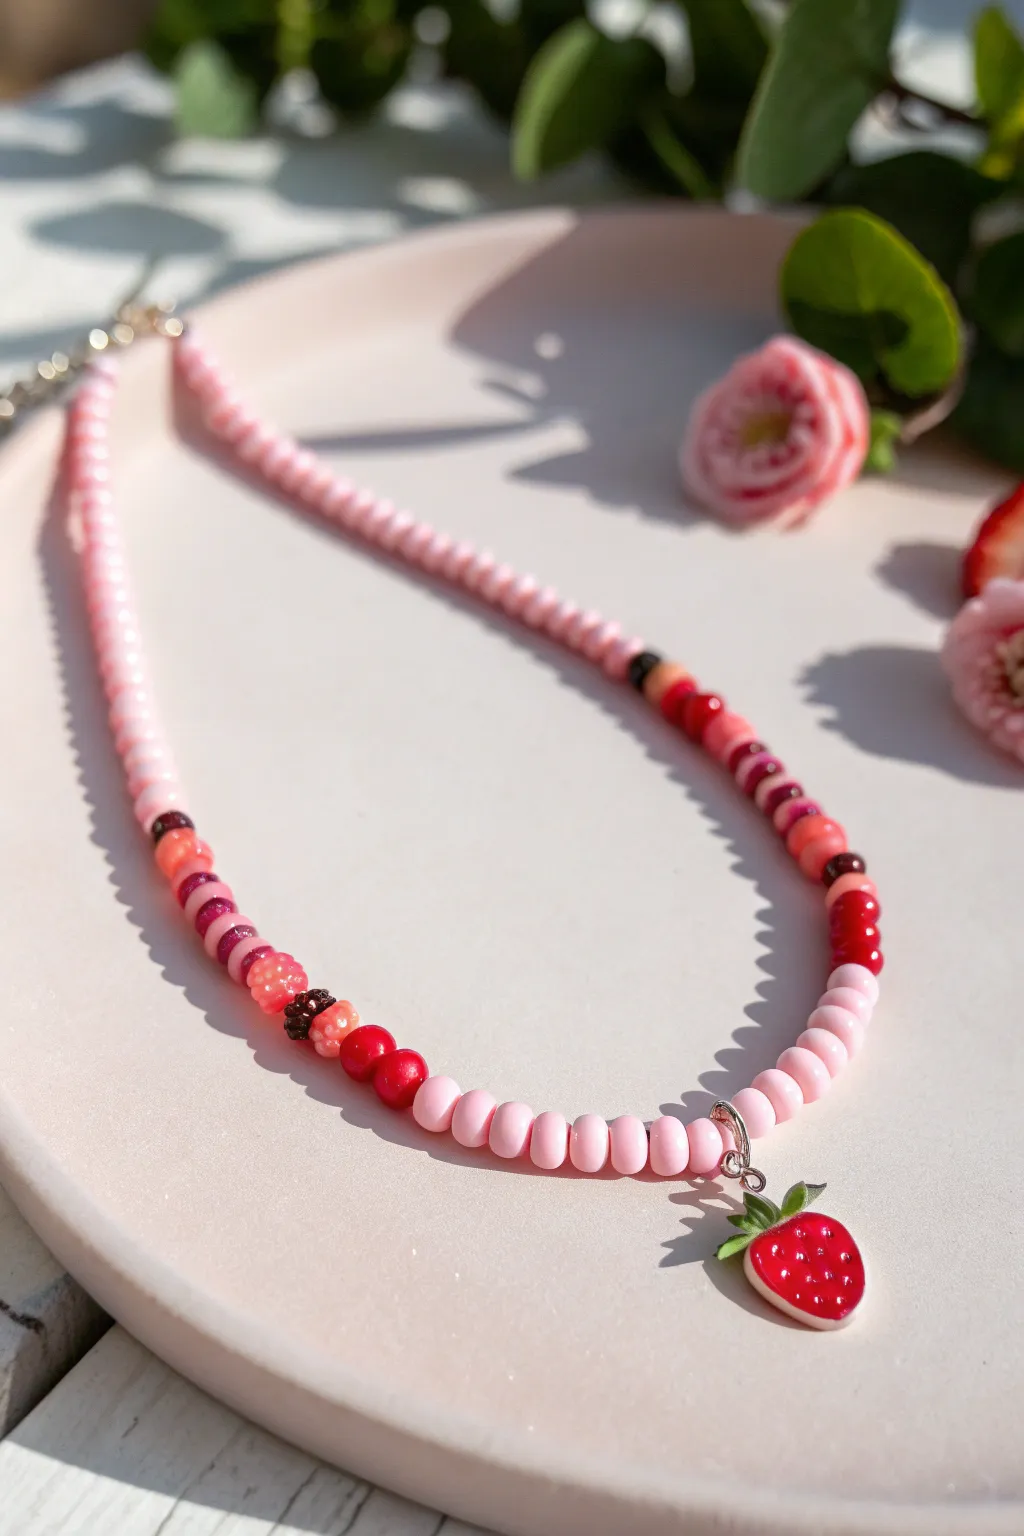
This adorable necklace combines delicate pink seed beads with a pop of fruity fun, perfect for adding a touch of whimsy to any outfit. The design features a symmetrical arrangement of variegated red and pink accent beads leading down to a cute strawberry enamel charm.
How-To Guide
Materials
- Light pink seed beads (size 6/0 or 8/0)
- Assorted accent beads in red, fuchsia, dark pink, brick red, and textured/flower shapes
- Strawberry enamel charm with a jump ring
- Beading wire or strong nylon thread
- 2 Crimp beads
- 2 Wire guardians (optional but recommended for durability)
- Lobster clasp and jump ring (or extension chain)
- Crimping pliers
- Wire cutters
- Tape or a bead stopper
Step 1: Planning and Preparation
-
Measure your wire:
Cut a length of beading wire approximately 18-20 inches long. This gives you plenty of room for a choker or collarbone-length necklace with extra space for finishing the ends. -
Secure the end:
Place a bead stopper or a piece of masking tape on one end of the wire to prevent your beads from sliding off while you work. -
Layout your pattern:
Lay out your beads on a bead board or soft cloth. Start with the strawberry charm in the center, then plan the gradient sections moving outward: about 6 light pink beads, followed by your mix of red/dark pink accent beads, and finally the long strand of light pink beads for the back.
Step 2: Stringing the Design
-
Start the first side:
Begin stringing from the clasp end towards the center. Thread on the light pink seed beads until you have covered about 5-6 inches of wire, depending on your desired total length. -
Create the accent section:
It’s time for the color pop! Thread on your assorted accent beads. Looking closely at the photo, use a pattern like: one dark textured bead, a coral bead, a dark fuchsia bead, a flower-shaped bead, and a few bright red rounds. -
Add the center spacing:
After your first accent section, thread on approximately 6 to 8 light pink seed beads. These will sit directly next to the charm. -
Attach the charm:
Slide the strawberry charm onto the wire so it rests against those center pink beads. -
Mirror the center:
Thread on another 6 to 8 light pink seed beads on the other side of the charm to create a symmetrical look. -
Mirror the accent section:
Recreate your accent pattern in reverse order. Start with the bright red rounds, then the flower/textured beads, working your way ‘outwards’ so both sides match perfectly. -
Finish the second side:
Fill the rest of the wire with light pink seed beads until this side is the same length as your starting side. Double-check the length around your neck now before crimping.
Placement Pro Tip
For a perfect drape, use flexible beading wire (like 19 or 49 strand) rather than stiff fishing line. This helps the necklace lay flat against the collarbone without kinking.
Step 3: Finishing Touches
-
Prepare the first crimp:
Remove the tape/stopper. Slide a crimp bead onto the wire, followed by a wire guardian (thread the wire up through one side and down the other). -
Attach the clasp:
Attach your lobster clasp to the guardian loop. Thread the wire back down through the crimp bead and pull tight, leaving just a tiny bit of wiggle room so the beads aren’t stiff. -
Secure the crimp:
Use your crimping pliers to flatten or fold the crimp bead securely. I like to give it a gentle tug to ensure it holds. -
Trim excess wire:
Trim the tail of the wire close to the crimp bead, or thread it back through the first couple of seed beads for a neater finish before trimming. -
Finish the other end:
Repeat the crimping process on the other end of the necklace, attaching a jump ring or an extension chain instead of a clasp. -
Final check:
Ensure all crimps are secure and the strawberry charm hangs exactly in the center when held up by the clasp.
Layer It Up
Create a matching shorter choker using only the light pink beads and smaller red accent beads, minus the charm, to wear as a layered set.
Now you have a charming, berry-sweet accessory ready to wear for brunch or a sunny day out
Confetti Sprinkle Color Mix
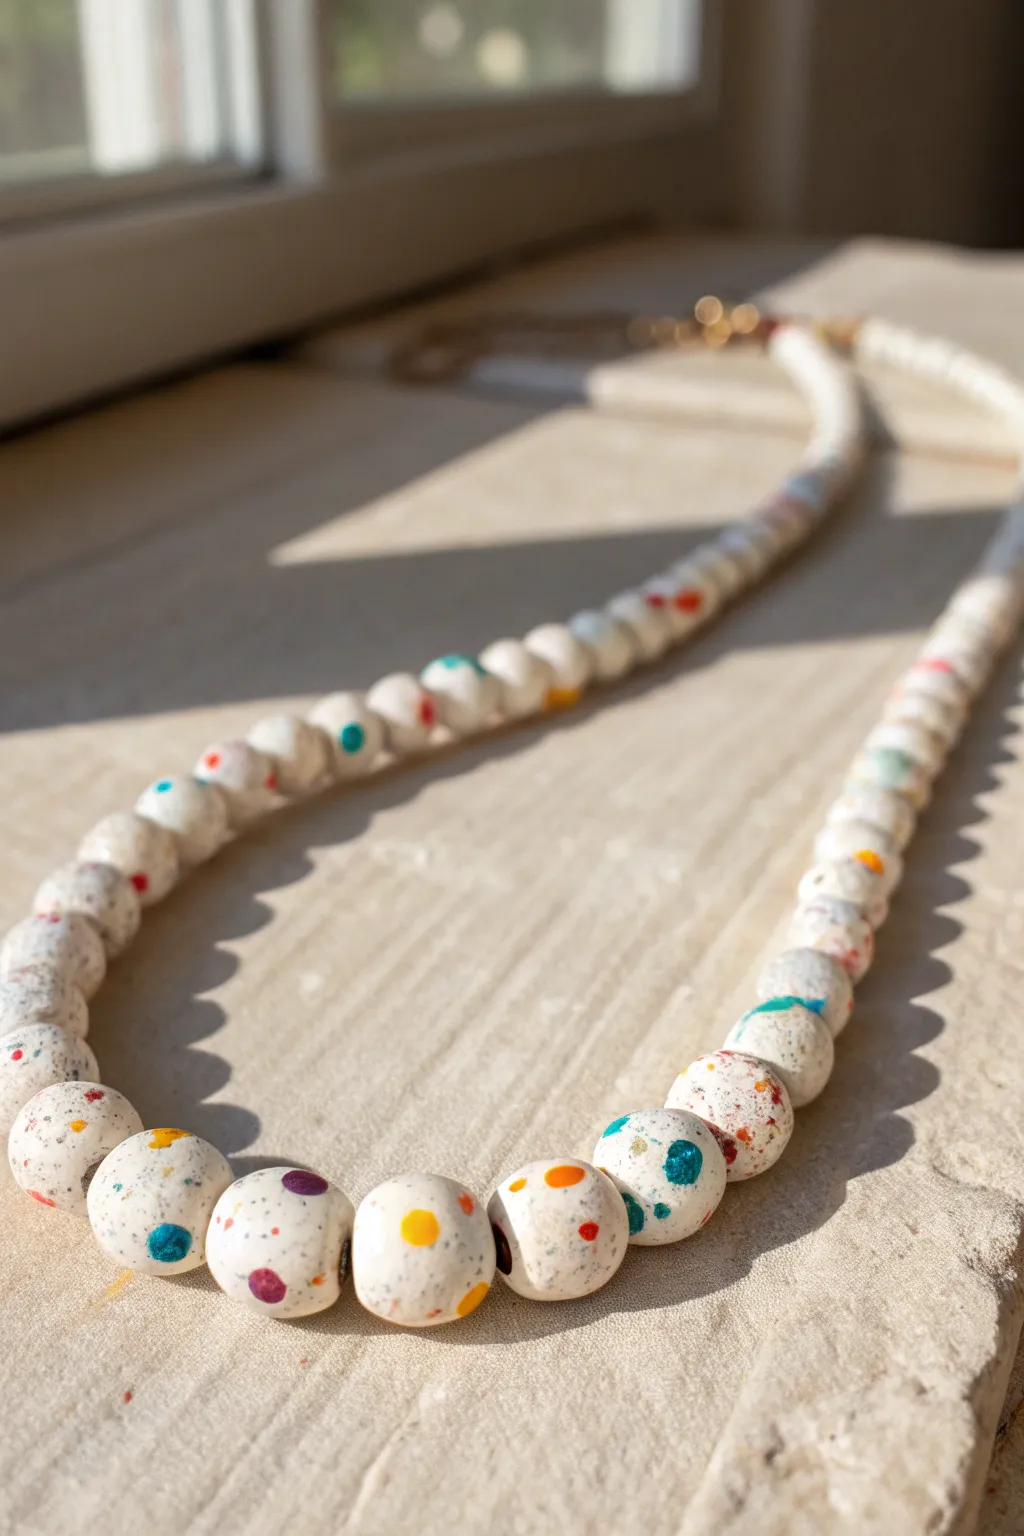
This cheerful necklace combines the simplicity of white beads with the playful pop of confetti-like color speckles. It captures the fun of cake sprinkles in a wearable, durable clay design perfect for adding a touch of whimsy to any outfit.
Step-by-Step
Materials
- White polymer clay (base)
- Small scraps of colored polymer clay (teal, yellow, purple, orange/red)
- Granite or speckled effect polymer clay (optional, for texture)
- Beading wire or strong nylon cord
- Jewelry clasp (lobster claw and jump ring)
- Crimp beads
- Pointed tool or toothpick (for piercing)
- Clay roller or acrylic rod
- Needle nose pliers
- Wire cutters
- Oven for baking
Step 1: Prepping the Clay Mix
-
Condition the base:
Start by conditioning your white polymer clay until it is soft and pliable. If you want that subtle, stone-like texture seen in the photo, mix in a very small amount of granite-effect clay or even a tiny pinch of black pepper. -
Prepare the sprinkles:
Take your colored clay scraps—teal, yellow, purple, and orange—and roll them into extremely thin snakes. The thinner the snake, the more delicate your confetti spots will be. -
Cut the confetti:
Use a craft knife or blade to chop these thin snakes into tiny, irregular bits. These little crumbs will become the colorful speckles on your beads. -
Scatter the colors:
Flatten your conditioned white clay slightly and sprinkle the colored bits randomly over the surface. Don’t overthink the placement; randomness is key to the natural look. -
Embed the colors:
Gently fold the white clay over the sprinkles and roll it in your hands a few times. I like to stop before the colors blend too much—you want distinct spots, not a muddy tie-dye effect.
Smooth Roller Trick
To fix fingerprints, gently roll the unbaked beads under a flat sheet of acrylic or glass on your work surface instead of using your palms.
Step 2: Forming the Beads
-
Portion the clay:
Roll your speckled clay sausage into a long log of even thickness. Slice the log into equal segments to ensure your beads are roughly the same size. -
Roll into spheres:
Take each segment and roll it between your palms to create a smooth ball. Don’t worry if they aren’t geometric perfection; a slightly organic shape adds to the handmade charm. -
Surface check:
Inspect your beads. If a bead looks too white, press a few extra colored crumbs into the surface and re-roll gently to smooth them in. -
Pierce the holes:
Using a toothpick or a piercing tool, gently poke a hole through the center of each bead. To avoid distorting the shape, pierce halfway through, then flip the bead and pierce from the other side until the holes meet. -
Smooth the openings:
Lightly smooth the area around the holes with your fingertip to remove any jagged edges created during piercing.
Step 3: Baking and Assembly
-
Bake the beads:
Arrange the beads on a baking sheet or a bead rack. Bake according to your polymer clay package instructions (usually around 275°F or 135°C for 15-30 minutes). Let them cool completely before handling. -
Prepare the wire:
Cut a length of beading wire or cord that is about 4 inches longer than your desired necklace length to allow room for finishing the ends. -
Start the strand:
Attach one end of the clasp first. Thread a crimp bead onto the wire, loop it through a jump ring or clasp part, and thread back through the crimp bead. Flatten the crimp bead securely with pliers. -
String the beads:
Thread all your cooled confetti beads onto the wire. Check the length as you go by holding it up to your neck. -
Finish the strand:
Add a final crimp bead and the second part of your clasp. Loop the wire back through the crimp bead and pull tight, leaving just a tiny bit of slack so the necklace drapes naturally. -
Secure and trim:
Crush the final crimp bead with your pliers to lock everything in place. Trim any excess wire tails close to the crimp bead for a neat finish.
Colors Look Dull?
If the white clay films over your colored dots during rolling, lightly sand the baked beads with fine-grit sandpaper to reveal the vibrant colors underneath.
Now you have a playful, handmade accessory that adds a subtle party vibe to your day
Ombre Sunset Palette Strand
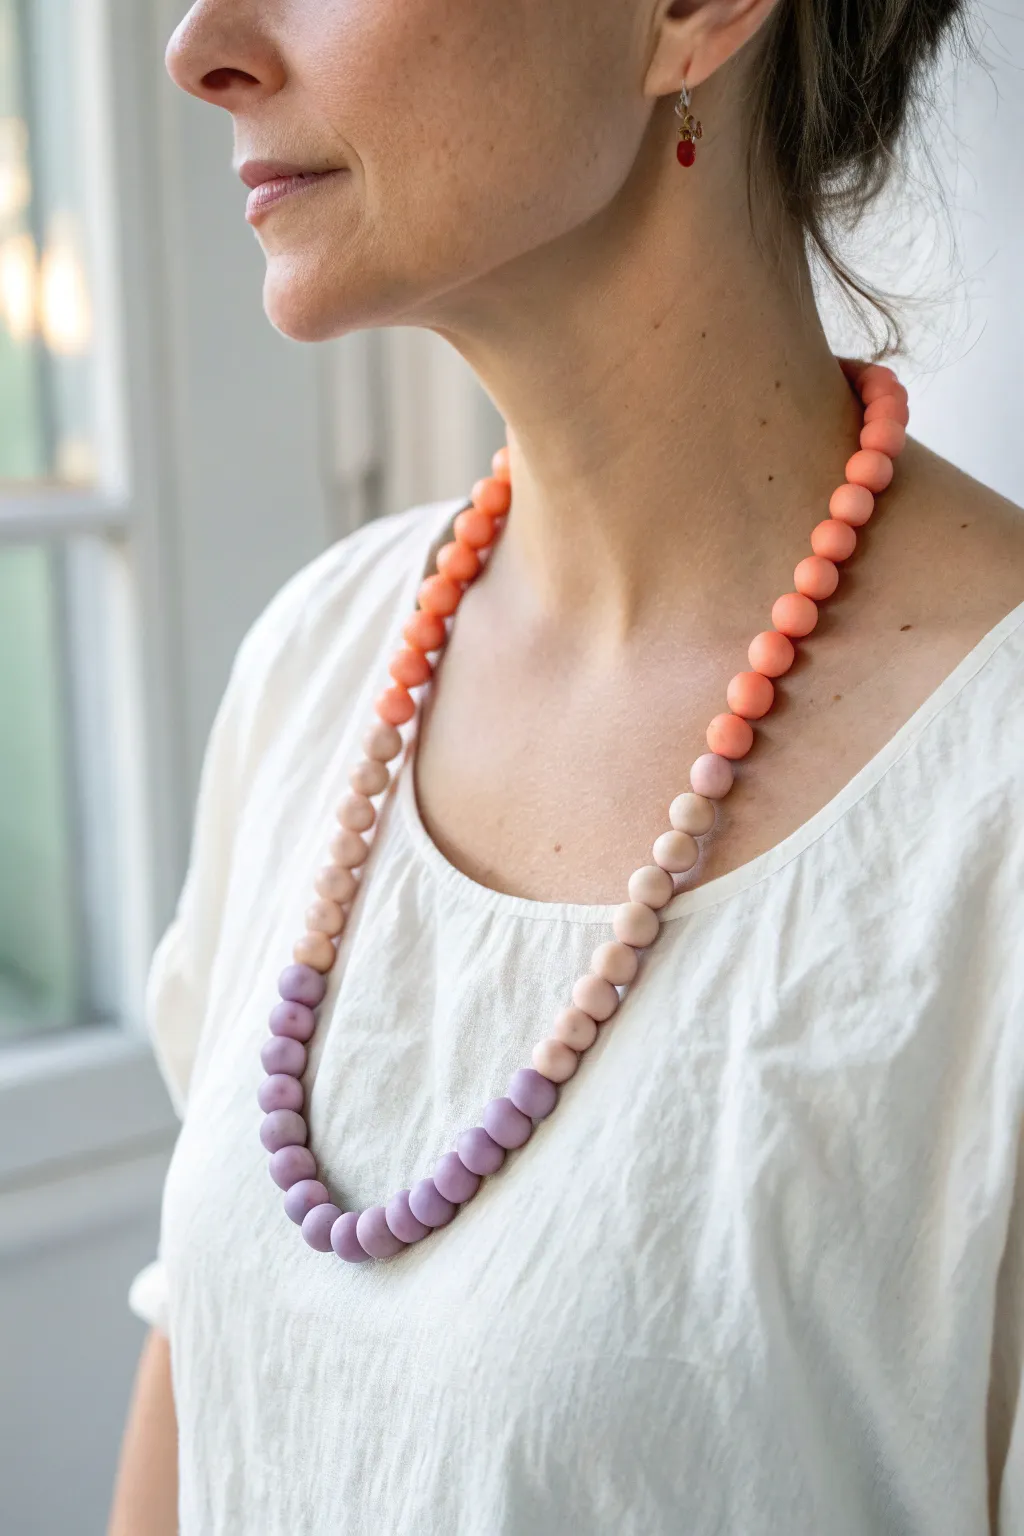
Capture the soft, fleeting colors of a summer evening with this elegant gradient bead necklace. The transition from warm coral to cool dusty lavender creates a sophisticated ombre effect that elevates a simple silhouette.
Step-by-Step Guide
Materials
- Polymer clay in Coral, White, and Dusty Purple
- Bead rolling tool (optional, for uniform sizing)
- Bamboo skewers or toothpicks
- Baking sheet and parchment paper
- Beading cord or heavy-duty thread (nylon or silk)
- Beading needle
- Jewelry clasp (lobster claw or toggle)
- Small jump rings
- Sandpaper (fine grit, 400-600)
- Acrylic roller or pasta machine
Step 1: Mixing the Gradient Colors
-
Prepare your base colors:
Start by conditioning your polymer clay blocks until they are soft and pliable. You need three main opaque colors: a vibrant coral, a pure white, and a muted lavender-purple. -
Create the main coral shade:
The necklace starts with a rich coral at the back. If your coral is too bright, mix in a tiny speck of brown or chrome yellow to warm it up. -
Mix the first transition shade:
Take a portion of your coral clay and mix it with an equal amount of white clay. Knead thoroughly until the color is uniform. This will be your soft peach tone. -
Mix the second transition shade:
Take some of your peach mixture and add even more white, creating a very pale blush—almost a skin tone. This bridges the gap between the warm and cool sections. -
Mix a transition purple:
To avoid a harsh jump to purple, mix a small amount of your lavender clay with white to create a pale lilac shade. -
Prepare the final purple:
Your bottom beads will be the darkest purple. Ensure this clay is conditioned well. You should now have about 5 distinct shades ranging from coral to purple.
Fixing Flat Spots
If baking on a flat sheet caused a flat spot on your bead, simply rotate that flat side to face the neighboring bead when stringing so it’s hidden.
Step 2: Forming and Baking
-
Portion the clay:
Pinch off pieces of clay for each bead. Aim for roughly 1/2-inch spheres. I find it helpful to roll the clay into a log first and cut equal slices to keep the size consistent. -
Roll the spheres:
Roll each piece between your palms to create a smooth, round ball. Apply gentle pressure to eliminate any seams or fingerprints. You’ll need about 10-12 beads of the main coral, and fewer of the transition shades. -
Create the bead holes:
Using a bamboo skewer or toothpick, gently pierce the center of each bead. Twist the skewer as you push it through to avoid squashing the sphere shape. -
Refine the holes:
Once the skewer pokes through the other side, remove it and re-insert it from the exit hole. This cleans up the edges and ensures the opening is neat on both sides. -
Arrange on baking sheet:
Place the pierced beads on a parchment-lined baking sheet. You can leave them on the skewers if you want to suspend them over a pan edge (to prevent flat spots), or simply lay them gently on the paper. -
Bake the beads:
Bake according to your clay manufacturer’s instructions (usually around 275°F or 135°C for 15-30 minutes). Be careful not to scold lighter colors. -
Cool and sand:
Let the beads cool completely. If there are any fingerprints, lightly buff them away with fine-grit sandpaper under running water for a matte, stone-like finish.
Texture Twist
Before baking, roll the raw clay beads over a piece of coarse sandpaper or a clean sponge to give them a stone-like, pitted texture.
Step 3: Stringing the Necklace
-
Plan the layout:
Lay your beads out on a table in the desired order. Start with the darkest coral at the ends (back of neck), fading into peach, then pale blush, pale lilac, and finally the dark purple in the center front. -
Attach the first clasp part:
Cut a length of cording about 28 inches long. Tie one end securely to a jump ring attached to half of your clasp. Add a dab of glue to the knot for security. -
Thread the beads:
Thread your needle and begin stringing. Follow your laid-out pattern: Coral -> Peach -> Blush -> Lilac -> Purple (center) -> Lilac -> Blush -> Peach -> Coral. -
Check the length:
Hold the necklace up to your neck to verify the drape. Remove or add beads symmetrically if you need to adjust the length. -
Finish the strand:
Tie the remaining end of the cord to the second part of your clasp. Knot it tightly against the last bead, ensuring there is no slack but enough flexibility for the beads to drape.
Enjoy styling your new handmade accessory with a simple white top to really let those gradient colors pop
Checkerboard Pattern Bead Sections
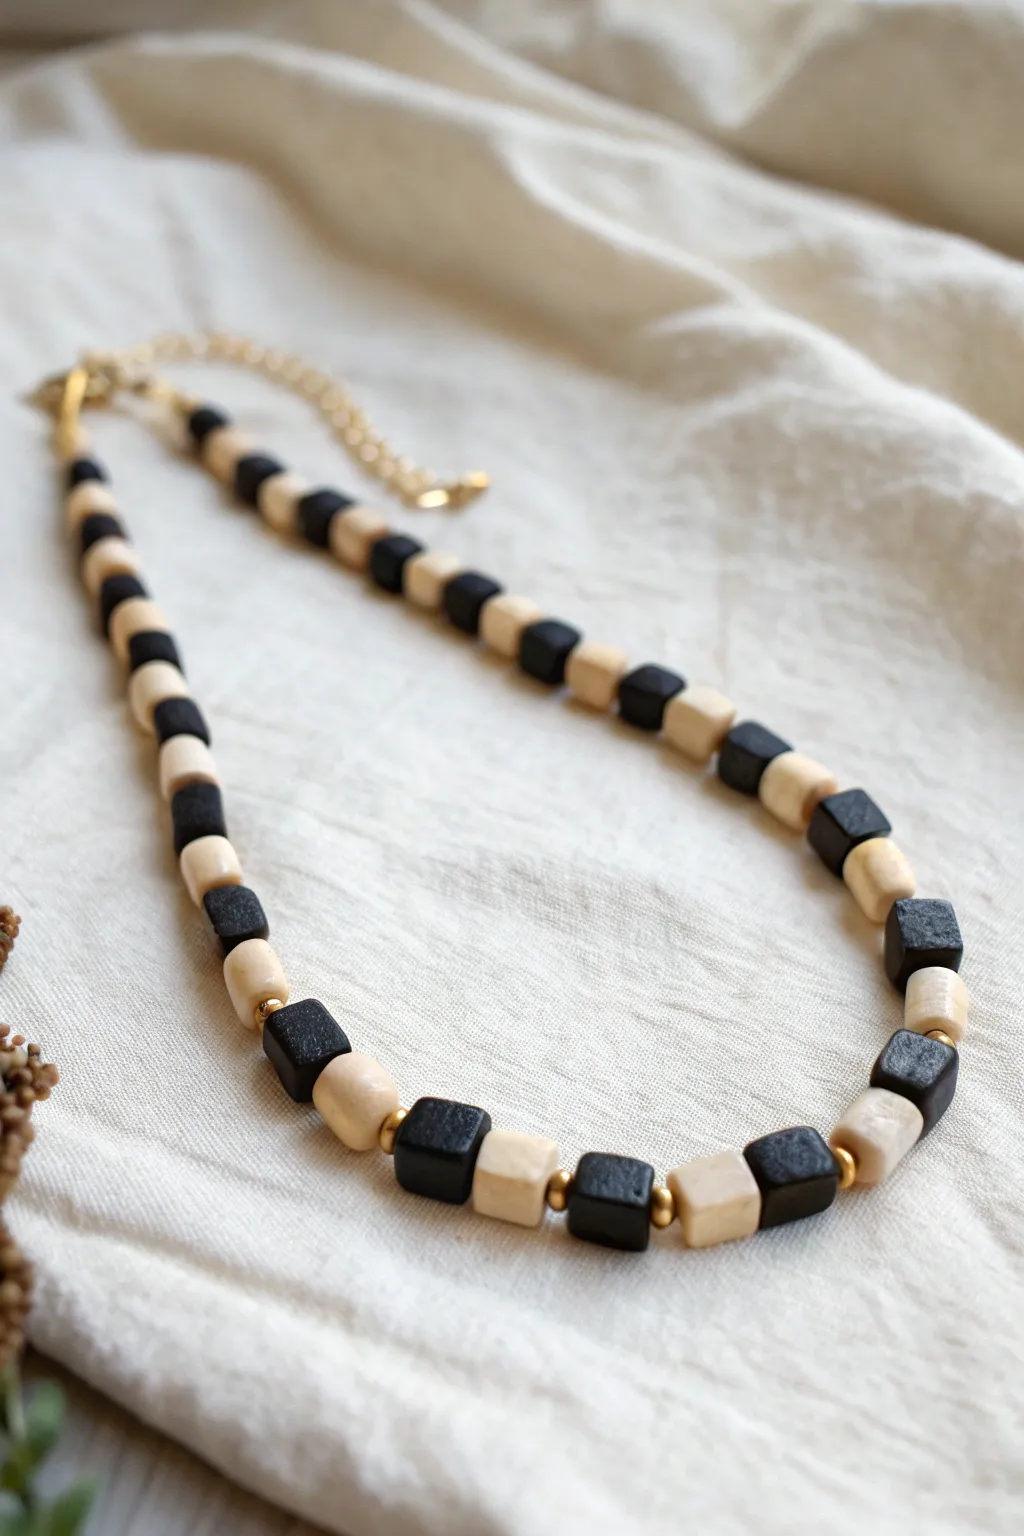
This sophisticated necklace combines the playful trend of checkerboard patterns with a refined, organic aesthetic. Using handmade cube beads in contrasting cream and charcoal, interspersed with delicate gold accents, you’ll create a piece that feels both earthy and chic.
Detailed Instructions
Materials
- Polymer clay (black and cream/white)
- Small gold spacer beads (2-3mm, brass or gold-filled)
- Beading wire or strong nylon thread
- 2 Crimp beads
- 2 Crimp bead covers (gold)
- Gold chain extender and lobster clasp
- Clay blade or craft knife
- Needle tool or toothpick
- Baking sheet and parchment paper
- Oven (for curing clay)
- Jewelry pliers (flat nose and crimping pliers)
- Fine-grit sandpaper (optional)
Step 1: Crafting the Clay Cubes
-
Condition the Clay:
Begin by conditioning your black and cream polymer clay separately until they are soft and pliable. Ensure your hands are clean when switching to the white clay to avoid color transfer. -
Form Logs:
Roll each color into a thick, even log or snake. Aim for a thickness of about 8-10mm, which will determine the size of your finished cubes. -
Shape into Squares:
Gently press the round logs against your work surface to flatten the sides. Rotate the log 90 degrees and press again to create a long rectangular prism shape with defined edges. -
Slice Segments:
Use your clay blade to slice the square logs into equal segments. To keep them looking uniform, I find it helpful to mark light measurements before committing to the cut. -
Refine the Shape:
Pick up each cut segment and gently tap the sides to perfect the cube shape. Don’t worry about machine-perfect precision; a slightly organic, handmade look adds charm to this design. -
Pierce the Beads:
Using a needle tool, carefully pierce a hole through the center of each cube. Twist the tool gently as you push through to prevent the cube from deforming. -
Bake:
Arrange your beads on a parchment-lined baking sheet and bake according to your clay manufacturer’s instructions. Let them cool completely before handling.
Smooth Finishes
Work gently with white clay to keep it pristine. If fingerprints or dust appear, lightly wipe the raw clay with baby oil or a touch of acetone on a cotton swab before baking.
Step 2: Assembly
-
Prepare the Wire:
Cut a length of beading wire approximately 18-20 inches long to allow extra room for crimping and adjusting. -
Start the Clasp:
Thread a crimp bead onto one end of the wire, followed by the loop of your clasp or a jump ring. Loop the wire back through the crimp bead. -
Secure the End:
Use your crimping pliers to flatten the crimp bead securely. Cover it with a gold crimp cover for a professional finish. -
Begin Stringing:
Start your pattern by threading on a cream cube bead. Follow this immediately with a tiny gold spacer bead. -
Build the Pattern:
Thread on a black cube bead, followed by another gold spacer. Continue this alternating pattern—Cream, Gold Spacer, Black, Gold Spacer—until you reach your desired length. -
Check the Length:
Drape the unfinished necklace around your neck to verify the length sits where you want it. Add or remove beads as necessary. -
Finish the Second End:
String a crimp bead and the chain extender onto the remaining wire end. Loop the wire back through the crimp bead and pull tight against the last clay bead, leaving just a tiny bit of slack for flexibility. -
Final Crimp:
Secure the final crimp bead with your pliers and trim the excess wire. Add a crimp cover to hide the hardware.
Style Switch-Up
For a bolder look, try making the cubes slightly rectangular instead of perfect squares, or mix matte and glossy varnishes on alternating colors for texture contrast.
Now you have a timeless, geometric accessory that pairs perfectly with almost any outfit
Linked Clay Bead Segments for Texture
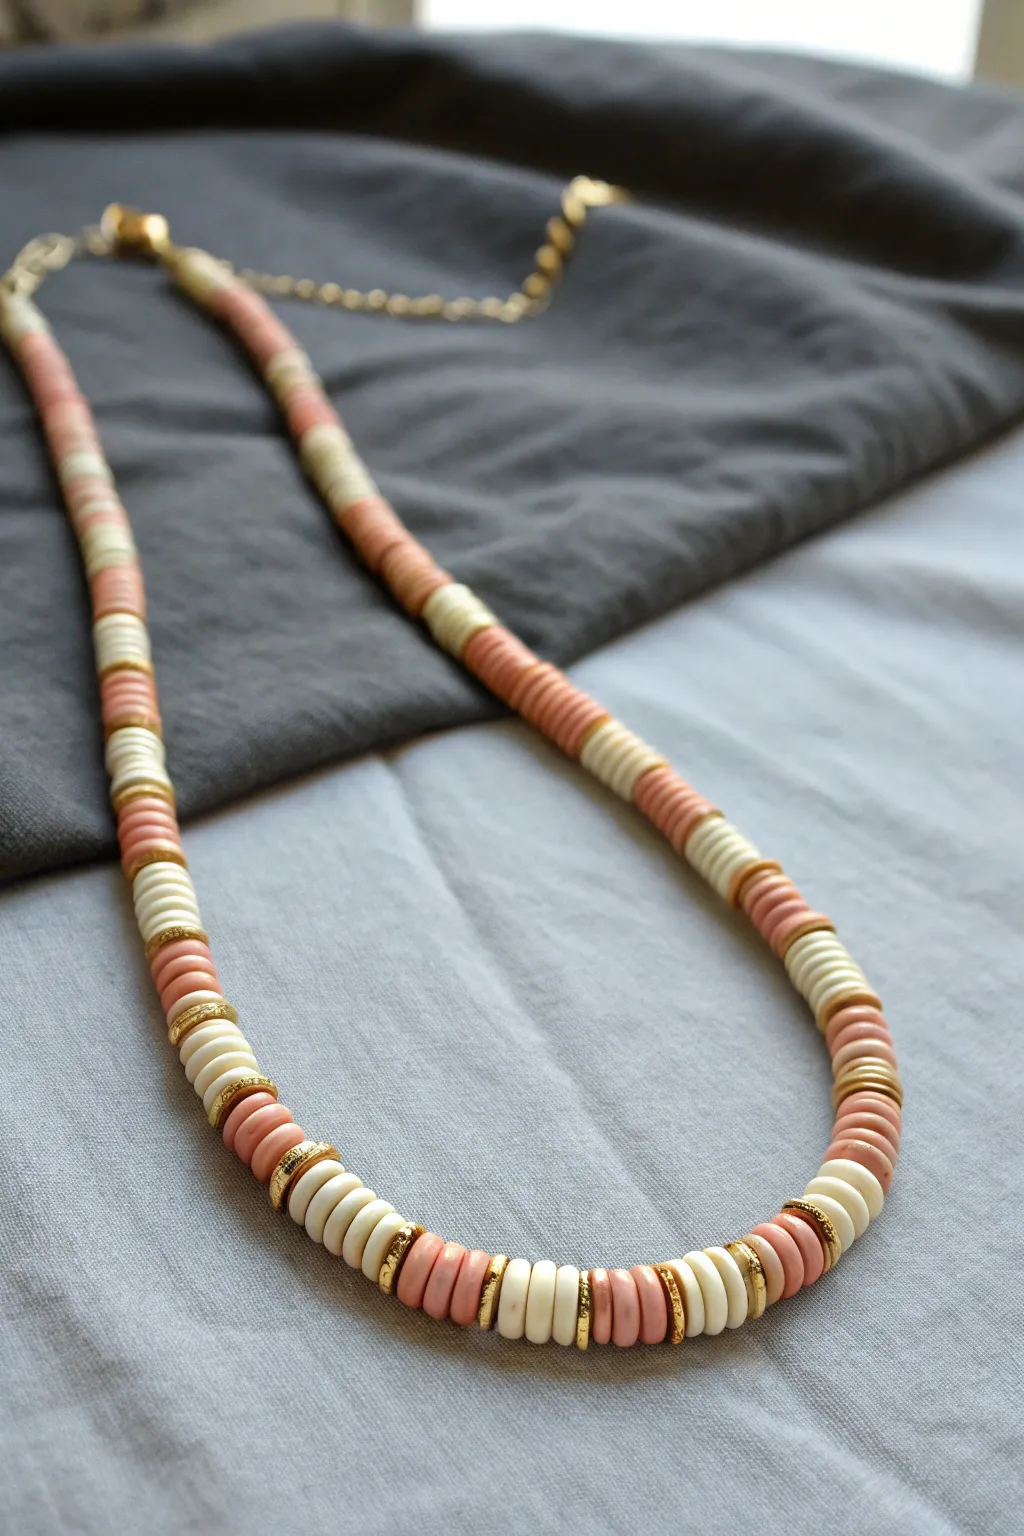
This tutorial guides you through creating a sophisticated yet playful necklace using alternating segments of pink and cream clay disc beads interspersed with shimmering gold accents. The result is a texturally rich piece that combines the casual vibe of surfer-style beads with an elegant, jewelry-store finish.
Step-by-Step Tutorial
Materials
- Polymer clay disc beads (Heishi beads) in coral pink
- Polymer clay disc beads (Heishi beads) in cream or off-white
- Gold flat disc spacer beads (textured or smooth)
- Beading wire (flexible, 7-strand or 19-strand ideally)
- 2 Crimp beads
- 2 Crimp covers
- 2 Wire guards (optional but recommended for durability)
- Clasp (lobster claw style)
- Jump rings
- Extension chain
- Crimping tool or flat nose pliers
- Wire cutters
- Bead design board or ruler
Step 1: Planning and Preparation
-
Measure your wire:
Cut a length of beading wire approximately 20 inches long. This standard length allows for a 16-18 inch necklace plus plenty of extra room for attaching the clasp without struggling. -
Lay out the pattern:
Before stringing, arrange your alternating pattern on a bead board. The design shown uses segments of 5 pink clay beads, followed by a gold spacer, then 5 cream beads, and another gold spacer. Visualizing this first ensures your color blocking stays consistent. -
Secure the start:
Attach a bead stopper or simply place a piece of tape over one end of your wire to prevent your hard work from sliding off as you string.
Step 2: Stringing the Beads
-
Begin the first segment:
Thread on five coral pink heishi beads. Push them down to the end of the wire. -
Add the metal accent:
Slide on a single gold disc spacer. These spacers act as the visual punctuation that separates your color blocks. -
Create the alternating block:
Thread on five cream-colored heishi beads followed by another gold spacer. -
Establish the rhythm:
Continue this specific pattern: 5 pink, gold spacer, 5 cream, gold spacer. -
Check density:
As you work, occasionally push the beads together gently to ensure there are no gaps, but keep the tension loose enough that the necklace remains fluid and flexible. -
Continue stringing:
Repeat the pattern until you reach your desired length, ideally ending with a complete block of color rather than a spacer bead for a cleaner look near the clasp.
Stiff Necklace Fix
If the necklace feels rigid like a stick, you strung it too tight. Restring and leave a tiny 1-2mm gap of bare wire near the clasp to allow flexibility.
Step 3: Finishing the Ends
-
Prepare the crimp:
On one end, slide on a crimp bead followed by a wire guard. Thread the wire up through one side of the guard and down the other. -
Attach the closure:
Hook the loop of the wire guard onto your jump ring (attached to the clasp) before threading the wire back down through the crimp bead. -
secure tightness:
Pull the wire snug so the loop is small but the beads aren’t stiff. I like to leave just a millimeter of wiggle room so the necklace drapes naturally. -
Crimp it shut:
Use your crimping tool or flat nose pliers to flatten the crimp bead securely, locking the wire in place. -
Cover the mechanics:
Place a crimp cover over the flattened crimp bead and gently squeeze it shut with pliers until it looks like a round gold bead. -
Repeat on the other side:
Follow the same crimping steps on the other end of the necklace, attaching the extension chain instead of the clasp. -
Trim excess wire:
Once both ends are secure, use flush cutters to trim the tail ends of the wire as close to the crimp bead as possible without cutting the main strand.
Pro Tip: Batching
Instead of picking up one bead at a time, pour a small pile onto your mat and ‘peck’ at them with the wire end to pick up 3-4 at once.
Enjoy styling your new handmade accessory with your favorite everyday outfits for a pop of textured color
Curved Bar Center With Heishi Ends
This sophisticated necklace combines the delicate shimmer of gold chain with the earthy matte texture of polymer clay heishi beads. The design features a gently curved bar effect created by stringing beads onto wire, effortlessly bridging the gap between modern chic and bohemian style.
Detailed Instructions
Materials
- Cream or nude polymer clay heishi beads (approx. 4-6mm)
- One large peach or coral round bead (clay or wood)
- Gold delicate chain (approx. 18-20 inches)
- Gold plated curved tube bead or rigid memory wire (optional, see instructions)
- Flexible beading wire (0.015 or 0.018 inch)
- 4 Gold crimp beads (2mm)
- 4 Gold crimp bead covers (3mm)
- 2 Gold geometric spacer beads (optional)
- Wire cutters
- Chain nose pliers
- Crimping pliers
Step 1: Preparing the Bar Section
-
Measure the wire:
Cut a piece of flexible beading wire approximately 6 to 7 inches long. This will form the beaded ‘bar’ section of your necklace. -
Secure the first end:
Thread a crimp bead onto one end of your wire. Pass the wire back through the crimp bead to create a small loop. -
Crimp firmly:
Use your crimping pliers to flatten the crimp bead securely. I like to give a gentle tug to ensure it won’t slip under tension. -
Cover the mechanics:
Place a gold crimp cover over the flattened crimp bead and gently close it with chain nose pliers until it looks like a round gold bead. -
Add a spacer:
Thread a decorative gold spacer bead onto the wire to sit just above the crimp cover, adding a polished transition.
Stiff vs. Slouchy
If your beads aren’t holding that nice ‘smile’ curve, switch your beading wire. 49-strand wire is very flexible, while 7-strand is stiffer and holds a shape better.
Step 2: Beading the Centerpiece
-
String the heishi beads:
Begin threading your cream-colored heishi beads onto the wire. You need enough to cover about one-third of your intended bar length. -
Check for consistency:
Pause occasionally to ensure the beads are sitting flat against each other. If any are crooked or unevenly cut, discard them to maintain a smooth line. -
Add the focal point:
Slide on the single large peach-colored round bead. This will act as the asymmetrical or centered focal point depending on your preference. -
Finish the bead strand:
Continue adding the rest of your cream heishi beads until the beaded section measures roughly 4 or 5 inches total. -
Cap it off:
Add your second decorative gold spacer bead at the end of the heishi strand. -
Secure the second end:
Thread a crimp bead onto the remaining wire tail. Loop the wire back through the crimp bead, pulling it snug against the beads but leaving just a tiny bit of slack so the bar can curve. -
Final crimp:
Flatten the crimp bead with your pliers and trim any excess wire tail flush with the bead. -
Cover the crimp:
Apply the second crimp cover over this final crimp bead to mirror the beginning side.
Step 3: Attaching the Chain
-
Prepare the chain:
Cut your gold chain into two equal lengths. The length depends on how low you want the necklace to hang, but 8-10 inches per side is standard. -
Open the chain link:
Using two pairs of pliers, carefully twist open the last link on one end of your first chain piece. -
Connect to the bar:
Hook this open link through the looped wire end of your beaded bar section. -
Close the link:
Twist the chain link back ensuring the gap is completely closed so the wire cannot slip out. -
Repeat for the other side:
Attach the second piece of chain to the opposite end of the beaded bar using the same method. -
Add the clasp:
On the free ends of the chains, attach a jump ring to one side and your preferred clasp (lobster or spring ring) to the other.
Make It Asymmetrical
Instead of centering the peach bead perfectly, try placing it off-center—perhaps two-thirds of the way down the bar—for a modern, artistic look.
Now you have a stunning, lightweight accessory that pairs perfectly with casual linen or dressy blouses
Glow-in-the-Dark Cute Night-Out Choker
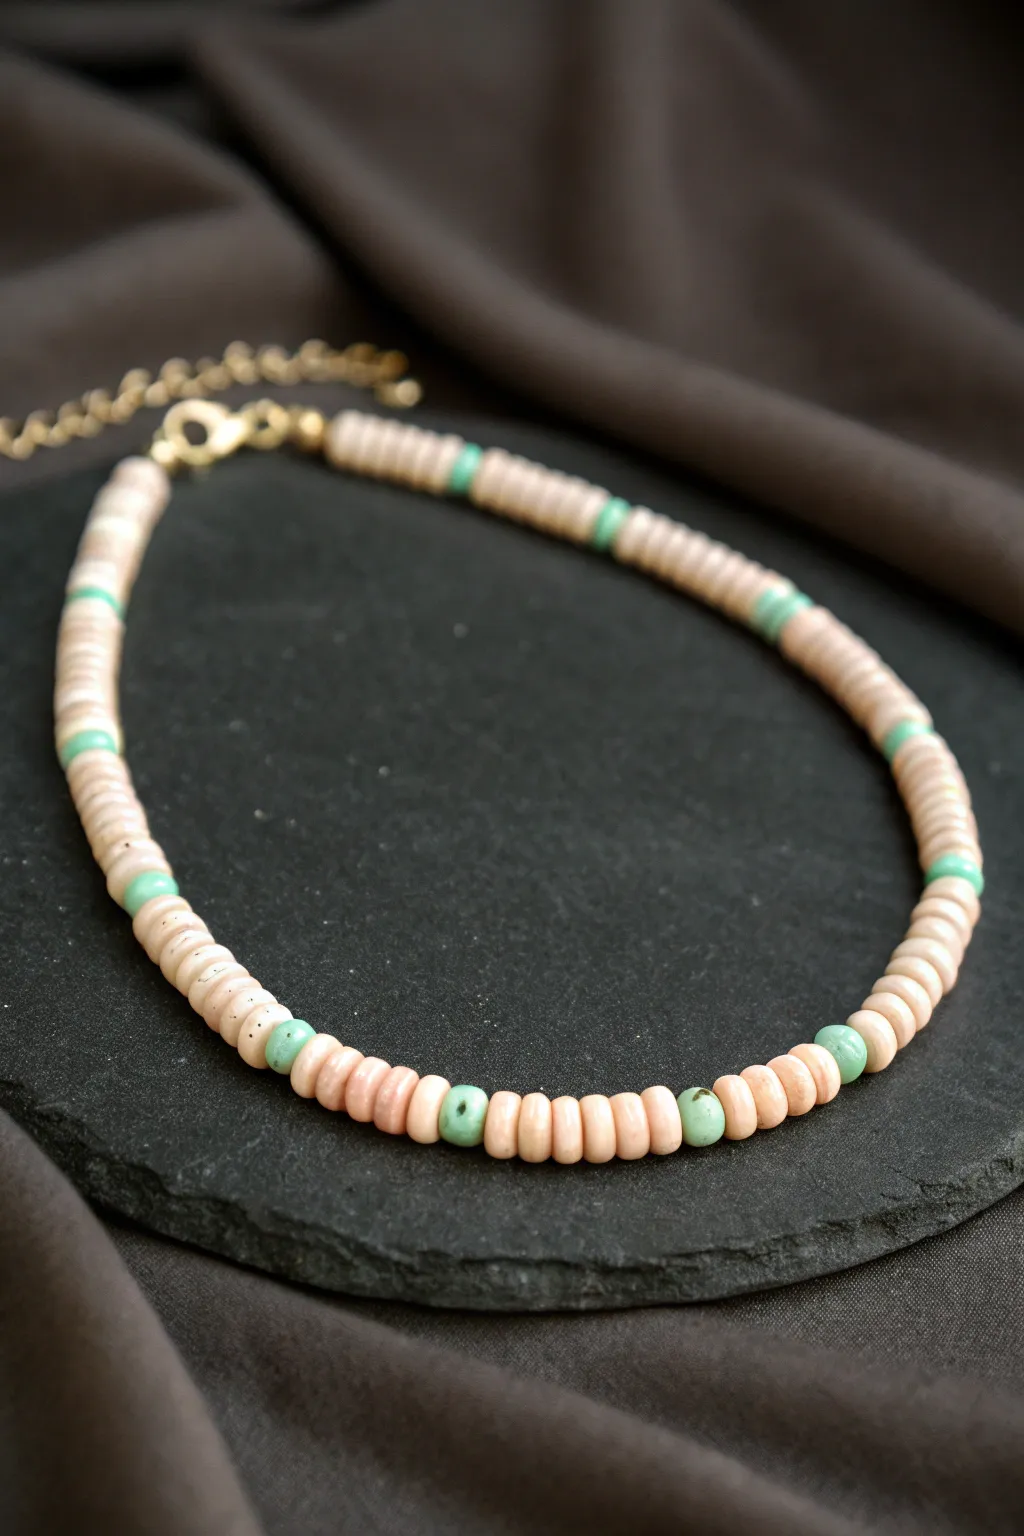
Embrace a subtle beachy vibe by day that transforms into a fun surprise when the lights go down. This choker combines matte sandy-peach heishi beads with interspersed glow-in-the-dark turquoise accents for a piece that’s elegant enough for dinner and playful enough for the dance floor.
Step-by-Step Guide
Materials
- Peach/Sand colored heishi polymer clay beads (6mm)
- Glow-in-the-dark turquoise/seafoam heishi polymer clay beads (6mm)
- Beading wire (flexible, 49-strand recommended)
- 2 Gold crimp beads
- 2 Gold wire guardians (optional but recommended)
- Gold lobster clasp
- Gold extension chain
- Crimping pliers
- Wire cutters
- Bead stopper or masking tape
Step 1: Planning the Pattern
-
Measure your fit:
Before cutting anything, decide on your desired length. For a choker style like the photo, measure the base of your neck and add about an inch for comfort. A standard choker length is usually 14-16 inches. -
Prep the wire:
Cut a piece of beading wire that is at least 4 inches longer than your final desired length. This extra room prevents beads from sliding off while you work and gives you enough tail to finish the ends securely. -
Secure the start:
Place a bead stopper or a folded piece of masking tape on one end of the wire. This is a crucial little step that saves you from the heartbreak of beads spilling everywhere. -
Analyze the pattern:
Look closely at the design. The pattern consists of a long run of the neutral sandy-peach beads separated by a single turquoise bead. Count out roughly 6 to 8 peach beads per section to start visualizing the rhythm.
Uneven Hanging?
If the necklace is stiff or kinks, you likely crimped it too tightly. Leave a tiny gap (1mm) of slack wire before crimping the second end to allow the beads to rotate and drape naturally.
Step 2: Stringing the Beads
-
Start the sequence:
Begin stringing with your neutral peach beads. Slide on about 7 or 8 of these disk beads. Make sure they sit flush against each other. -
Add the glow accent:
Slide on one single turquoise glow-in-the-dark bead. This pop of color breaks up the neutrals and provides that hidden night-out feature. -
Repeat the rhythm:
Continue the pattern: 7-8 peach beads, followed by 1 turquoise bead. I like to lay the necklace against a ruler occasionally to make sure my spacing looks consistent. -
Check the symmetry:
As you approach the middle of your strand, adjust your count if necessary. You want the pattern to look balanced, though slight irregularities add to the organic, boho charm of clay beads. -
Finishing the strand:
Continue stringing until you are about 0.5 inches short of your total desired length (the clasp and rings will add the rest). End with a section of peach beads to match the beginning.
Level Up: Surf Style
Add tiny gold spacer beads on either side of each turquoise bead. This highlights the glow-in-the-dark sections and adds a touch of metallic shine to the matte finish.
Step 3: Attaching the Hardware
-
Thread the first crimp:
Remove the tape from the starting end. On this wire, slide on a crimp bead followed by a wire guardian. -
Add the clasp:
Loop the wire through the wire guardian (which hooks onto the lobster clasp) and thread the wire back down through the crimp bead. -
Secure the crimp:
Pull the wire snug so the loop is small but flexible. Use your crimping pliers to flatten the crimp bead securely. I usually tug it gently to ensure it won’t slip. -
Hide the tail:
Thread the excess wire tail through the first few beads adjacent to the crimp, then trim the wire flush against the beads so no sharp end sticks out. -
Prepare the other end:
Move to the other end of the necklace. Slide on a crimp bead and your wire guardian. -
Add the extension chain:
Loop the wire guardian through the final link of your extension chain (or a jump ring attached to it). Thread the wire back down through the crimp bead and through a few of the neighboring clay beads. -
Tighten and trim:
Pull the wire taut to remove any slack in the necklace without making it stiff. Crimp the bead shut with your pliers and trim the remaining wire tail carefully.
Charge up your new necklace under a lamp for a minute and watch that subtle turquoise turn into a brilliant glow.