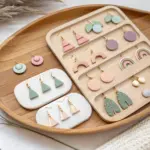
If you’ve been craving fresh air dry clay earrings inspiration, you’re in my favorite kind of territory: small projects with big personality. These ideas are all about lightweight shapes, easy textures, and finishes that make your handmade earrings feel totally you.
Minimalist Half-Moons
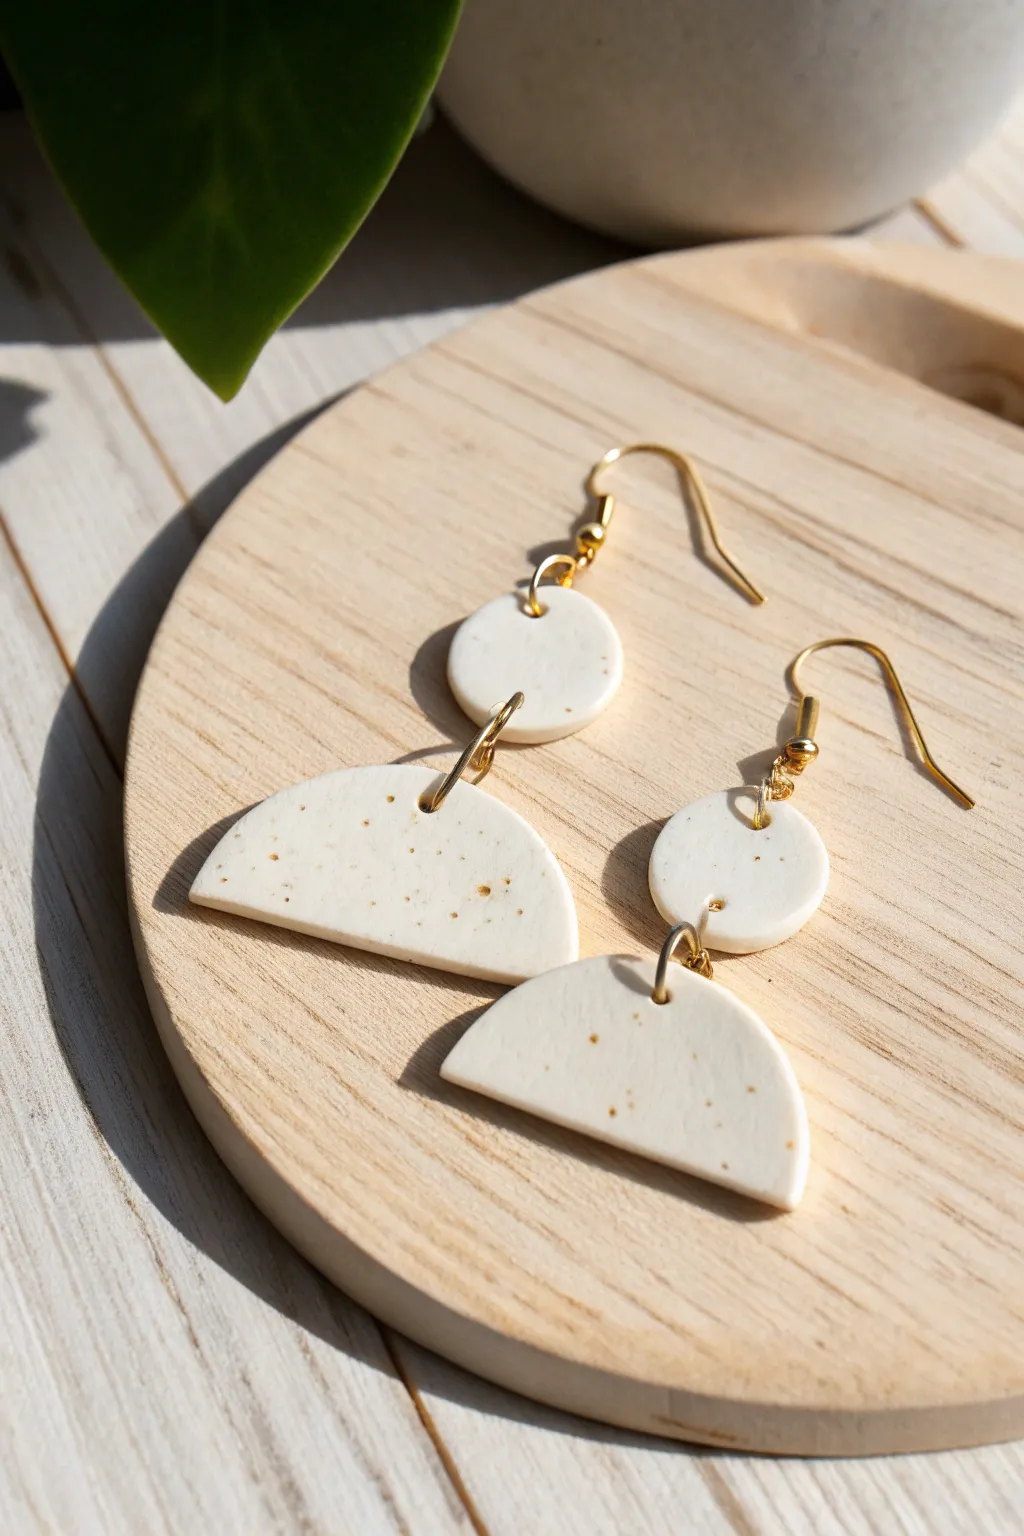
Embrace the beauty of simplicity with these geometric dangles that mimic the look of high-end speckled stoneware. The pairing of a tiny circle with a wide half-moon creates visually balanced, lightweight earrings perfect for everyday wear.
Step-by-Step Guide
Materials
- White polymer clay or air dry clay (approx. 2 oz)
- Ground cinnamon, nutmeg, or dried coffee grounds (for speckling)
- Rolling pin or acrylic roller
- Small round clay cutter (max 10mm diameter)
- Medium round clay cutter (approx. 25-30mm diameter)
- Craft knife or tissue blade
- Parchment paper or silicone mat
- Toothpick or electric drill with small bit
- Fine-grit sandpaper (400-600 grit)
- Needle nose pliers
- 4 Gold jump rings (5-6mm)
- 2 Gold earring hooks (fishhook style)
Step 1: Preparing the Faux-Stone Clay
-
Conditioning the base:
Begin by taking a chunk of your white clay and kneading it thoroughly in your hands until it becomes soft, pliable, and warm. -
Adding the specks:
Flatten the clay slightly and sprinkle a very small pinch of ground cinnamon, nutmeg, or dried coffee grounds onto the surface. This creates the faux-stone speckled look seen in the photo. -
Incorporating the spice:
Fold the clay over the spice and knead it again until the specks are evenly distributed throughout the white mixture. Add more spice sparingly if needed, but avoid saturating the clay.
Step 2: Shaping the Components
-
Rolling out the slab:
Place the clay on parchment paper or a silicone mat. Roll it out to an even thickness of about 3mm (1/8 inch). I like to use depth guides or playing cards on either side of the roller to ensure it’s perfectly level. -
Cutting the top circles:
Using your smallest round cutter, punch out two identical circles. These will be the top studs that connect to the ear wire. -
Cutting the bottom circles:
Use the medium-sized round cutter to punch out two larger circles from the remaining slab. -
Creating the half-moons:
Take your craft knife or tissue blade and slice each of the two larger circles directly in half. You now have four semi-circles; choose the two cleanest ones for your project (and save the others for a spare pair). -
Smoothing edges:
Dip your finger in a tiny bit of water and gently run it along the cut edges of all shapes to soften any sharp corners.
Fixing Cracks
Make a “slip” by mixing a tiny bit of fresh clay with water into a paste. Smear this into any surface cracks, let it dry, then sand smooth.
Step 3: Assembling the Earrings
-
Piercing holes:
Before drying, use a toothpick to poke holes in the shapes. For the small circles, place one hole near the bottom edge. For the half-moons, place one hole centered near the top straight edge. Ensure the holes are large enough for your jump rings. -
Drying process:
Let the pieces air dry completely on a flat surface for 24-48 hours. Flip them over halfway through the drying time to prevent warping. -
Sanding:
Once fully cured and hard, gently sand the edges with fine-grit sandpaper to remove any rough spots or fingerprints. -
Opening jump rings:
Using two pairs of pliers, twist one jump ring open sideways (never pull it apart). -
Connecting the shapes:
Thread the open jump ring through the hole in a half-moon and the hole in a small circle, then close the ring securely. -
Attaching ear wires:
Open the loop on your earring hook base or use a second jump ring. Connect it to the top of the jump ring that is linking your clay pieces together. -
Final check:
Repeat the assembly process for the second earring and ensure all metal connections are fully closed and secure.
Avoid Fingerprints
Lightly dust your fingertips with cornstarch before handling the clay during the final smoothing step to prevent leaving prints.
Enjoy styling these versatile neutral earrings with everything from casual denim to office attire


Tiny Heart Drops
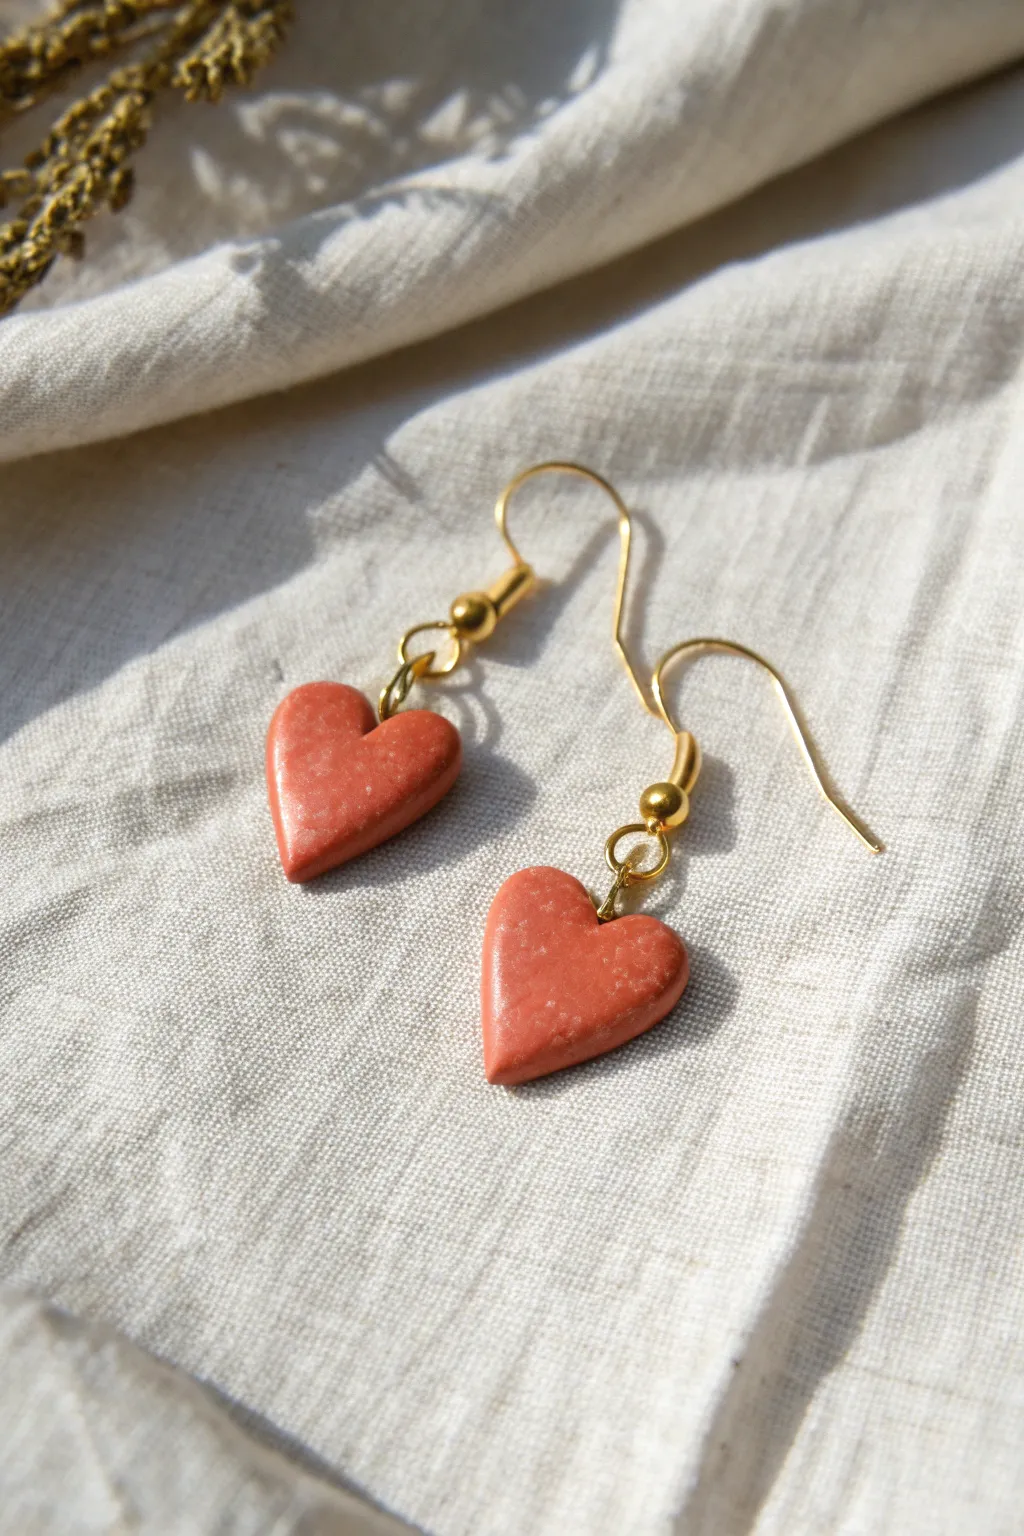
Embrace the effortless charm of these speckled terracotta-style hearts, perfect for adding a touch of warmth to any outfit. The glossy finish gives them a polished, professional look that belies how simple they are to mold by hand.
How-To Guide
Materials
- Air dry clay (white or terracotta)
- Acrylic paint (burnt sienna, red oxide, or similar terracotta shade)
- Glossy varnish or glaze (polyurethane or resin-based)
- Small heart-shaped cutter (approx. 1-1.5cm)
- Rolling pin or acrylic roller
- Parchment paper or non-stick mat
- Gold earring hooks
- 4mm or 6mm gold jump rings
- Jewelry pliers (round nose and flat nose)
- Needle tool or toothpick
- Fine grit sandpaper (400-600 grit)
- Soft paintbrush
Step 1: Shaping the Hearts
-
Prepare the Clay:
Start with a small ball of air dry clay. Condition it by kneading it in your hands until it is smooth and pliable, which prevents cracking later. -
Color Mixing:
If you are using white clay, mix in a dab of burnt sienna or terracotta acrylic paint now. Knead completely until the color is uniform. A few tiny streaks can actually look nice, resembling natural stone. -
Roll Smooth:
Place your clay on parchment paper. Roll it out to a thickness of about 3mm to 4mm. Create an even surface, checking for any air bubbles. -
Cut the Shapes:
Press your small heart cutter firmly into the clay. Give it a tiny wiggle to separate the shape before lifting the cutter. You’ll need two identical hearts. -
Smooth Edges:
Dip your finger in a tiny bit of water and gently run it along the cut edges of the hearts creating a soft, rounded bevel rather than a sharp cut line. -
Pierce the Hole:
Using a needle tool or toothpick, create a hole near the top center of each heart. Ensure the hole is large enough for your jump ring to move freely, but not too close to the edge to avoid breakage. -
Drying Time:
Set the hearts aside on a flat surface to dry. Generally, this takes 24 hours, but flipping them halfway through ensures even drying.
Clay Cracking?
If you see hairline cracks while drying, apply a tiny bit of fresh clay paste (clay mixed with water) into the crack and smooth it over with a wet finger.
Step 2: Finishing and Assembly
-
Sanding:
Once fully cured, use fine-grit sandpaper to gently buff the surface and edges. This removes any fingerprints or rough spots. -
Cleanup:
Wipe the hearts with a slightly damp cloth or paper towel to remove all sanding dust. The surface must be perfectly clean for the glaze. -
Create the Speckle:
To mimic the stone look in the photo, flick a stiff toothbrush dipped in slightly watered-down white or light beige paint over the hearts. Let dry. -
Glossing:
Apply a generous coat of high-gloss varnish or glaze. I always place the hearts on a toothpick stuck into foam or a potato to let the glaze drip off cleanly without sticking to the table. -
Second Coat:
Allow the first coat to dry to the touch, then apply a second coat if you want that super-shiny, glass-like finish shown in the image. -
Open Jump Rings:
Take two pliers. Grip a jump ring on either side of the opening and twist one hand forward and one back to open it laterally (never pull apart). -
Connect the Charm:
Slide the open jump ring through the hole in your clay heart. -
Attach Ear Wire:
Before closing, slip the loop of the gold earring hook onto the open jump ring. -
Close and Secure:
Use your pliers to twist the jump ring back into a closed position, ensuring the ends meet perfectly flush so the heart doesn’t slip off.
Make it Marble
Don’t fully mix the red paint into white clay. Stop kneading when it’s streaky for a gorgeous, natural red marble effect before rolling.
Your petite, polished hearts are now ready to wear or gift.
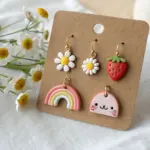

Daisy Statement Earrings

Capture the endless charm of summer with these oversized, cheerful daisy earrings crafted from air-dry clay. Their textured yellow centers and intentionally rustic petals give them a hand-sculpted warmth that feels both organic and stylish.
Detailed Instructions
Materials
- White polymer clay or air-dry clay
- Rolling pin or smooth glass jar
- Daisy flower cookie cutter (approx. 1.5 – 2 inches)
- Clean toothbrush or needle tool
- Small craft knife or sculpting tool
- Yellow ochre or mustard acrylic paint
- Small round paintbrush
- Gold jump rings (6-8mm)
- Gold earring hooks
- Jewelry pliers in two sizes
- Hand drill or needle tool for piercing
- Sandpaper (fine grit)
- Gloss or matte varnish (optional)
Step 1: Shaping the Blooms
-
Condition the Clay:
Start by taking a chunk of your white air-dry clay. Knead it in your hands for a few minutes until it is soft, pliable, and free of any large cracks. If it feels too dry, dip your finger in water and work it in. -
Roll it Out:
Place the clay on a clean, non-stick surface like parchment paper or a silicone mat. Use your rolling pin to flatten the clay to an even thickness of about 3-4mm. Avoid going too thin, as these statement earrings need some structural stability. -
Cut the Shapes:
Press your daisy cookie cutter firmly into the clay. Give it a tiny wiggle to ensure it cuts all the way through, then lift straight up. Repeat this to create two matching flower shapes. -
Clean the Edges:
Carefully remove the excess clay from around your flowers. If the petals have jagged edges from the cutter, gently smooth them over with a wet fingertip or a soft, damp brush. -
Create the Centers:
Roll two small balls of leftover white clay, roughly the size of a pea. Flatten these slightly into discs and press one gently into the center of each daisy. Use a tiny dab of water or liquid clay (slip) underneath to ensure they adhere permanently so they don’t pop off later. -
Add Texture:
To create the pollen effect seen in the photo, take a clean toothbrush or a needle tool and stipple the center disc. Press repeatedly until the surface is rough and completely textured.
Step 2: Defining & Refining
-
Sculpt Petal Details:
Using a knife tool or a toothpick, press a subtle indentation down the center of each petal. This doesn’t need to be perfectly straight; a little curve adds to the organic look. -
Create Hanging Holes:
While the clay is still wet, use a needle tool or a straw to punch a hole at the top of one petal on each flower. Make sure the hole is close enough to the edge for a jump ring to fit, but not so close that the clay will tear. -
Let them Dry:
Set the sculpted flowers aside on a flat surface to dry. Air-dry clay typically takes 24-48 hours. I find flipping them over halfway through the drying process helps prevent the petals from curling up. -
Sand Smooth:
Once bone dry, check the edges of your petals. If there are any sharp points or rough spots, gently buff them away with fine-grit sandpaper for a professional finish.
Natural Petal Tip
Before drying, gently pinch the very tips of some petals or curl them slightly upward. This breaks the flatness and makes the flowers look more like they are blooming in the wild.
Step 3: Decoration & Assembly
-
Paint the Centers:
Dip a small brush into your mustard yellow or ochre acrylic paint. Carefully paint only the textured center disc, dabbing the paint into the little crevices. -
Seal the Work:
To protect the white clay from dirt and the paint from chipping, apply a thin layer of matte varnish over the entire piece. Let this dry completely before handling. -
Prepare Jump Rings:
Using two pairs of pliers, twist open your gold jump rings. The motion should be twisting the ends away from each other (front to back), not pulling them apart laterally, to maintain the circle shape. -
Attach the Hardware:
Slide the open jump ring through the hole you made in the petal. Before closing it, add your earring hook onto the ring. -
Secure the Findings:
Use your pliers to twist the jump ring back into a closed position, ensuring the ends meet perfectly so the clay flower can’t slip out. -
Final Check:
Hold the earrings up to ensure they hang correctly and the front of the daisy faces forward. Repeat the assembly for the second earring.
Sticky Situation?
If your clay is sticking to the cookie cutter, dip the cutter into a little cornstarch or flour before pressing it into the clay. This acts as a release agent for clean cuts.
Now you have a blooming lovely pair of earrings ready to brighten up any outfit


Leafy Botanical Imprints
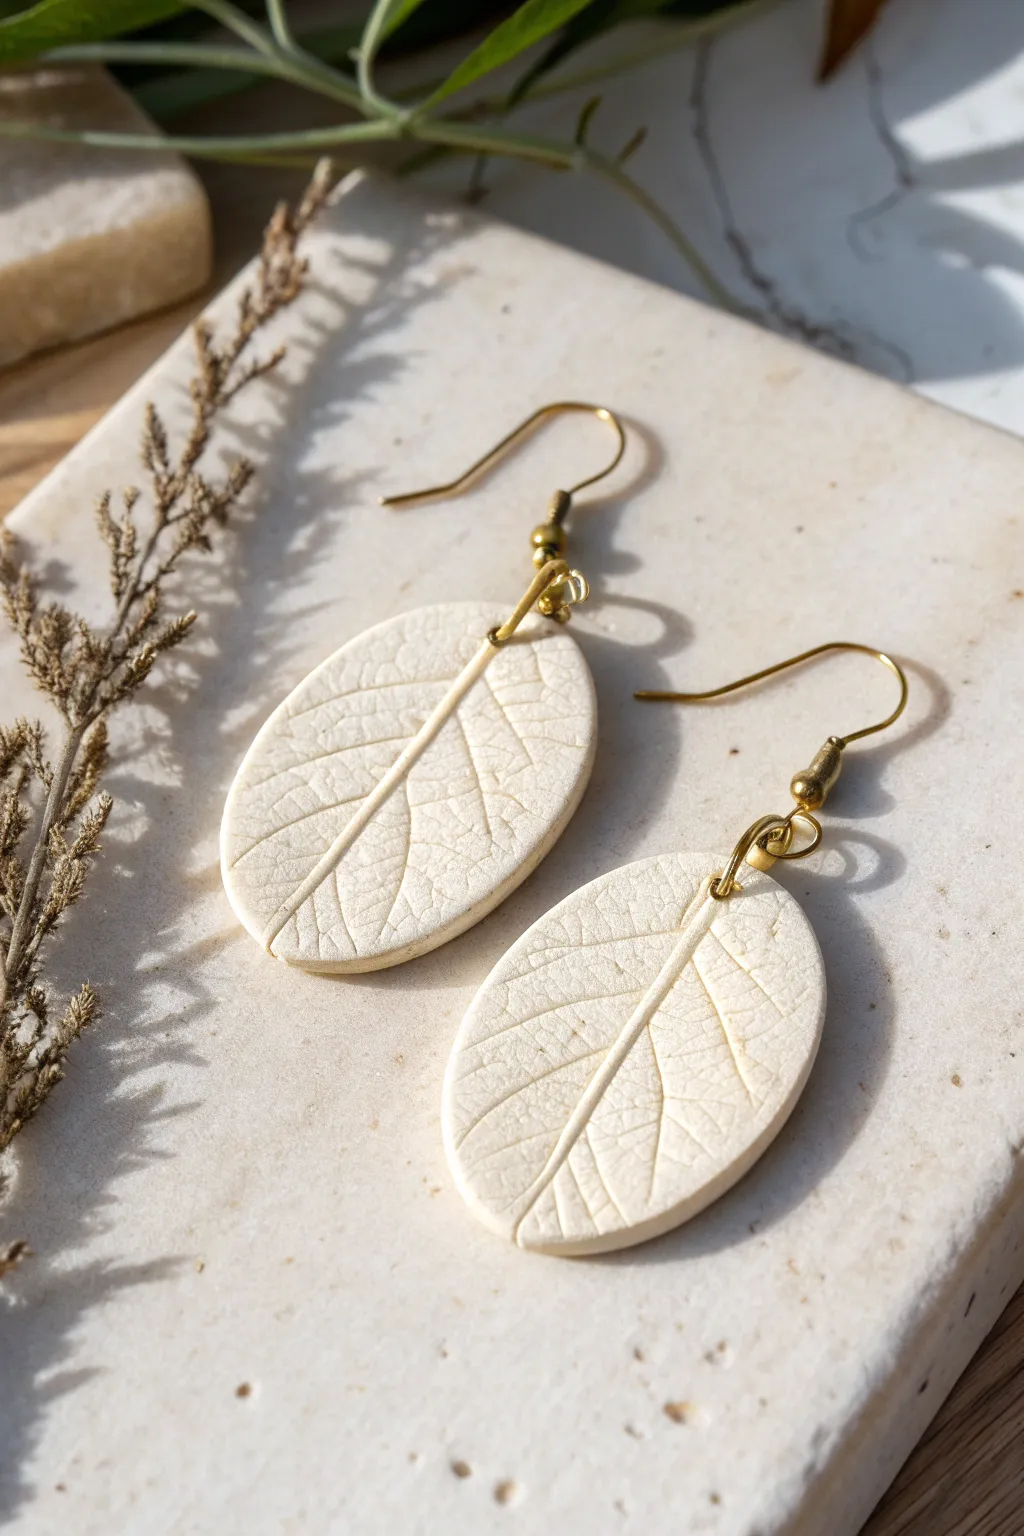
Capture the delicate details of nature with these sophisticated oval drop earrings. Featuring a subtle, raised leaf vein texture on a creamy white base, they are finished with elegant gold hardware for a piece that feels both organic and modern.
Step-by-Step
Materials
- White air-dry clay (or polymer clay)
- Small rolling pin
- Fresh leaves with prominent veins (like sage or hydrangea)
- Oval clay cutter
- Sandpaper (fine grit)
- Needle tool or toothpick
- Gold tone earring hooks
- Gold jump rings (6mm or 7mm)
- Jewelry pliers (flat nose)
- Parchment paper or work mat
- Clear matte varnish (optional)
Step 1: Creating the Clay Base
-
Condition the clay:
Begin by taking a small chunk of white air-dry clay. Knead it in your hands until it is pliable, warm, and free of any cracks. -
Roll out the slab:
Place the clay on a piece of parchment paper to prevent sticking. Use your small rolling pin to roll the clay out to an even thickness of about 3mm to 4mm—not too thin, or it will be brittle. -
Select your botanical:
Choose a fresh leaf that has distinct, raised veins on the back side. The veins are the most critical part, as they created the ‘stamp’ for your design. -
Make the imprint:
Place the leaf vein-side down onto your rolled clay slab. Apply gentle but firm pressure with your rolling pin, rolling over the leaf once to push the veins into the clay. -
Reveal the texture:
Carefully peel the leaf away from the clay. I usually lift by the stem to avoid smudging the clay surface. You should see a crisp negative impression of the leaf veins.
Clay curling up?
If your clay shapes curl while drying, place a lightweight book on top of them once they are partially dry (touch-dry) to weigh them down flat.
Step 2: Cutting and Refining
-
Position the cutter:
Take your oval cutter and position it over the most interesting part of the leaf texture. Center the main central vein if you want a symmetrical look. -
Cut the shapes:
Press the cutter straight down firmly. Give it a tiny wiggle to ensure a clean cut, then lift. Cut a second oval for the matching earring. -
Remove excess clay:
Peel away the scrap clay from around your oval shapes, leaving the earrings on the parchment paper so you don’t distort them by moving them. -
Smooth the edges:
Dip your finger in a tiny bit of water and gently run it along the cut edges of the fresh clay to smooth out any ragged bits or cutter marks. -
Add holes:
Use a needle tool or a toothpick to poke a hole near the top center of each oval. Ensure the hole is large enough for your jump ring to fit through freely, but not too close to the edge.
Step 3: Finishing and Assembly
-
Let them dry:
Allow the clay pieces to dry completely according to the package instructions. This usually takes 24 to 48 hours for air-dry clay. Flip them halfway through to ensure even drying. -
Sand for perfection:
Once fully cured, use fine-grit sandpaper to gently buff the edges and the back of the earrings. This gives them a professional, polished feel. -
Seal the surface (optional):
To protect the white clay from dirt, apply a very thin coat of matte varnish. This will seal the porous material without making it look glossy or plastic. -
Open the jump ring:
Using your flat nose pliers, twist a gold jump ring open. Always twist the ends away from each other (side-to-side) rather than pulling them apart, to maintain the circle shape. -
Attach the hardware:
Thread the open jump ring through the hole in the clay oval. Add the loop of the gold earring hook onto the jump ring as well. -
Close the ring:
Twist the jump ring back into a closed position using your pliers, ensuring the gap is completely flush so the hardware doesn’t slip out. -
Final check:
Repeat the assembly for the second earring and double-check that both hooks are facing the correct way so the textured side faces forward when worn.
Add an antique look
Rub a tiny amount of brown acrylic paint into the dried grooves, then immediately wipe the surface clean with a damp cloth to highlight the veins.
Your elegant botanical earrings are now ready to add a natural touch to your outfit

The Complete Guide to Pottery Troubleshooting
Uncover the most common ceramic mistakes—from cracking clay to failed glazes—and learn how to fix them fast.
Raised Dot Texture Discs
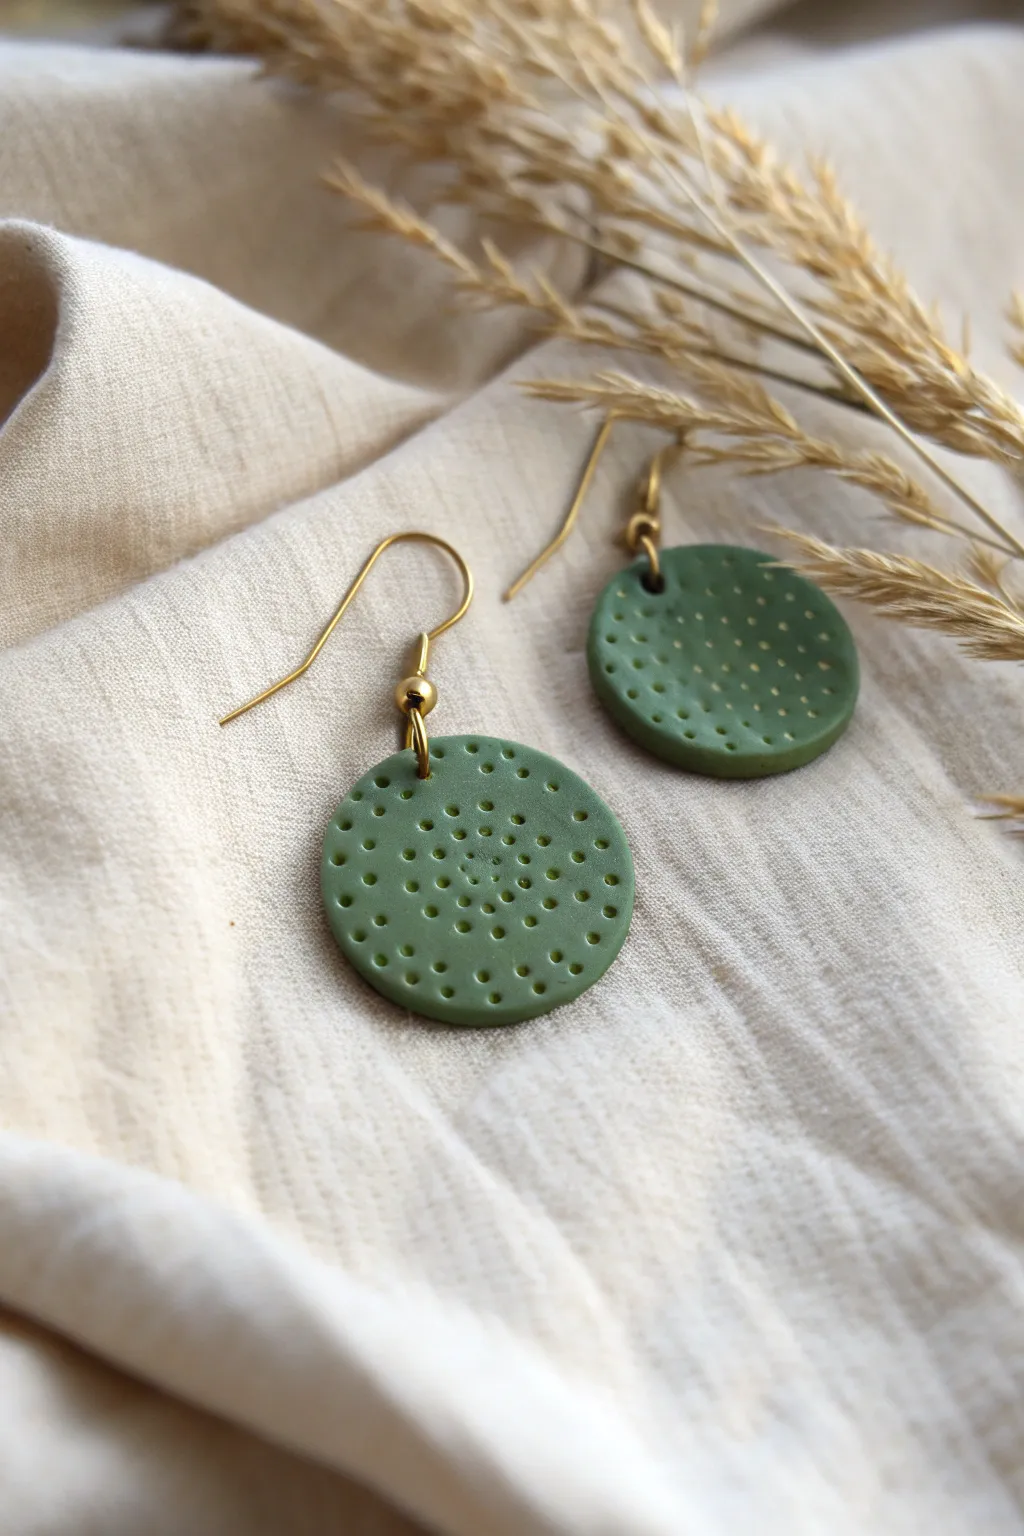
Embrace a touch of earthy elegance with these simple yet striking disc earrings. By using a basic dotting technique in a radiating pattern, you can transform plain clay into a textural statement piece perfect for everyday wear.
How-To Guide
Materials
- Air dry clay (white or pre-colored olive green)
- Acrylic paint (olive green if using white clay)
- Rolling pin or clay roller
- Small circular clay cutter (approx. 1 inch)
- Needle tool or toothpick
- Sandpaper (fine grit)
- Gloss or matte varnish (optional)
- 2 Gold earring hooks
- 2 Gold jump rings (4-6mm)
- Jewelry pliers
- Small drill bit or pin drill (if making holes after drying)
Step 1: Shaping the Base
-
Condition the Clay:
Begin by kneading a small amount of air dry clay in your hands until it becomes warm, soft, and pliable. If you are mixing custom colors into white clay, do this now by kneading in a drop of acrylic paint until uniform. -
Roll it Out:
Place the clay on a smooth, non-stick surface or a piece of parchment paper. Use your rolling pin to flatten the clay to an even thickness, aiming for about 3mm or 1/8th of an inch. -
Cut the Circles:
Take your circular clay cutter and press firmly into the rolled slab to cut out two identical discs. Twist slightly and lift to get a clean cut. -
Smooth the Edges:
Dip your finger in a tiny bit of water and gently run it along the cut edges of the circles to smooth out any roughness or sharp ridges left by the cutter.
Step 2: Texturing the Design
-
Create the Center:
Using a needle tool or the blunt end of a toothpick, gently press a single dot exactly in the center of the first clay disc. Don’t push all the way through; you just want a clean indentation. -
First Ring:
Create a small ring of dots immediately surrounding the center dot. Try to space them evenly, keeping the pressure consistent so the depth of the holes matches. -
Expand the Pattern:
Continue adding concentric rings of dots, working your way outward toward the edge of the circle. As the circles get larger, you may need to add more dots to keep the spacing visually consistent. -
Finish the Pattern:
Stop when you have covered most of the surface, leaving a very thin distinct rim at the outer edge for a framed look. Repeat the entire dotting process on the second earring. -
Add Jump Ring Holes:
While the clay is still wet, use your needle tool to poke a hole near the top edge of each disc for the hardware. Make sure the hole is large enough to fit your jump ring but not too close to the edge to avoid breakage.
Sticky Situation?
If your needle tool sticks to the clay when lifting it out of a dot, dip the tip in a tiny bit of cornstarch or baby oil before pressing it into the clay for a clean release.
Step 3: Finishing Touches
-
Drying Time:
Lay the discs flat on a clean piece of parchment paper or a drying rack. Let them dry for at least 24-48 hours, flipping them occasionally to ensure they dry evenly and don’t curl. -
Sand and Smooth:
Once fully dry and hard, use a piece of fine-grit sandpaper to gently buff the edges and the flat back of the earrings. Be careful not to sand over your beautiful texture on the front. -
Painting (Optional):
If you used white clay, now is the time to paint. Apply two thin coats of olive green acrylic paint, using a detail brush to get paint into the little indented dots. I find dabbing the brush vertically helps fill the texture. -
Seal (Optional):
To protect the earrings from moisture and give them a finished look, apply a thin coat of matte or gloss varnish. -
Open Jump Rings:
Using two pairs of pliers, twist your gold jump ring open. The motion should be twisting the ends away from each other (front to back), not pulling them apart sideways. -
Attach Hardware:
Slide the open jump ring through the hole in the clay disc, then loop the earring hook onto the jump ring. -
Close and Wear:
Twist the jump ring closed again with your pliers so the ends meet perfectly flush. Repeat for the second earring.
Go for Gold
After the base color dries, lightly brush a Gold metallic paint or wax over the raised surface. It will catch just the top ridges, highlighting the dot texture beautifully.
Now you have a stunning pair of handcrafted earrings ready for your jewelry box
Terrazzo Speckle Tiles
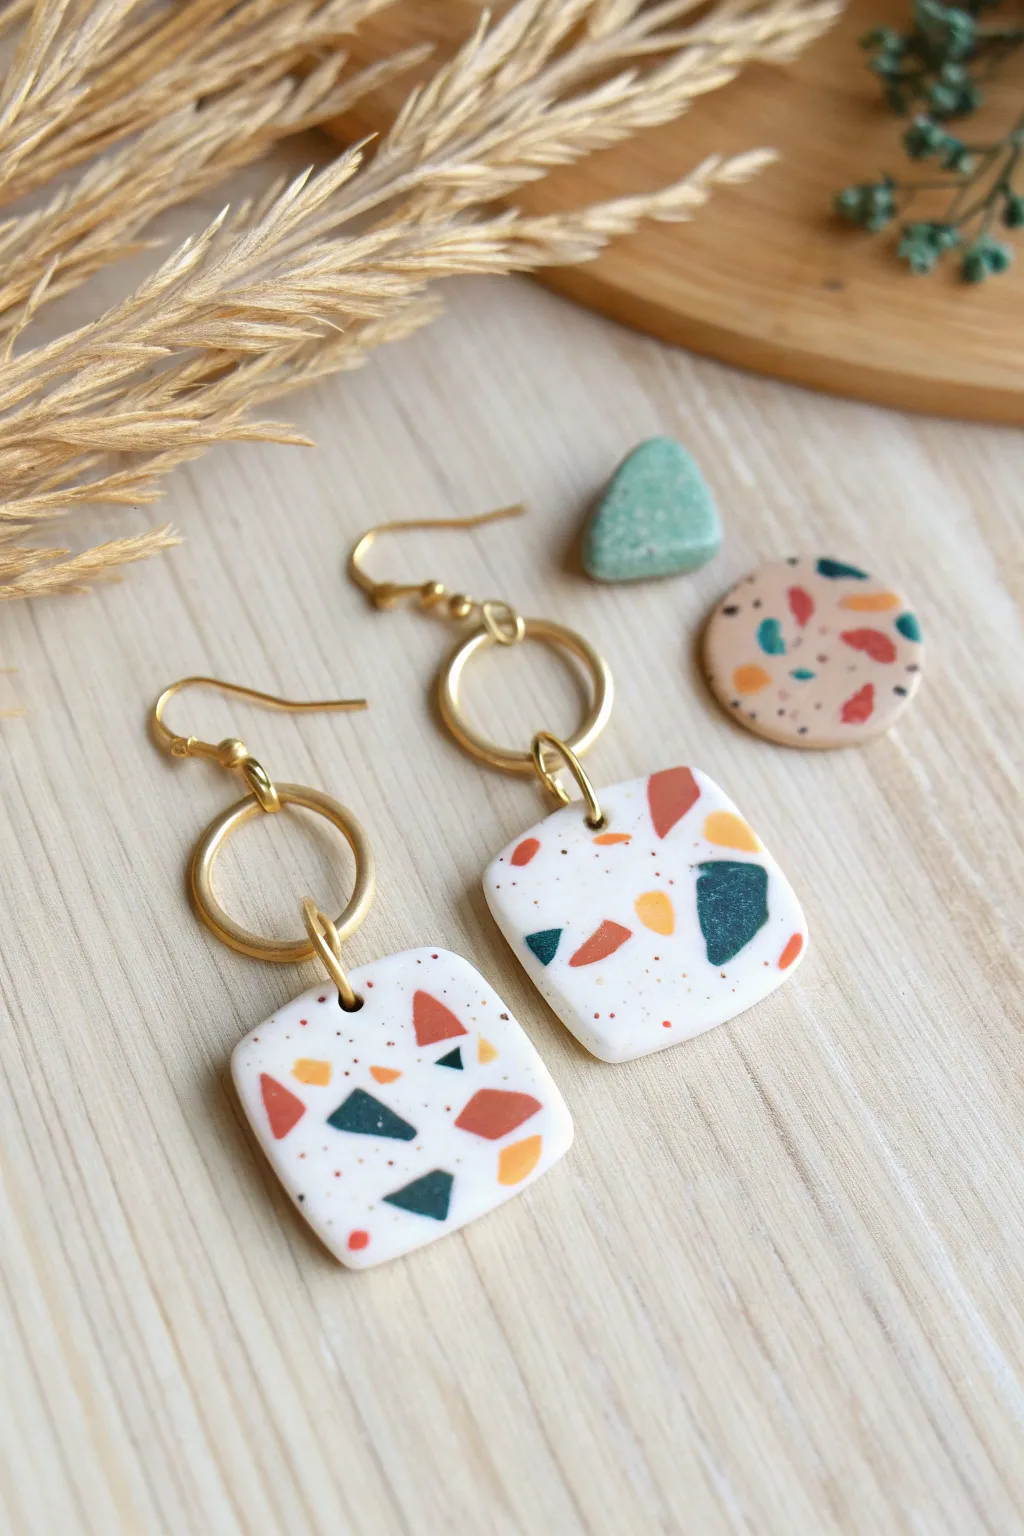
Embrace the modern, playful aesthetic of terrazzo with these chic square drop earrings. Featuring a crisp white base scattered with organic shards of teal, rust, and mustard, they bring an arty pop of color to any outfit.
Detailed Instructions
Materials
- White air dry clay
- Air dry clay in teal, rust/terracotta, and mustard yellow (or white clay mixed with acrylic paint)
- Acrylic rolling pin
- Square clay cutter (approx. 1 inch)
- Small sharp blade or craft knife
- Sandpaper (fine grit)
- Hand drill or cocktail stick (for holes)
- Gloss varnish or resin (optional)
- Gold tone jump rings (large)
- Gold tone earring hooks
- Jewelry pliers
Step 1: Creating the Terrazzo Chips
-
Prepare the colors:
Begin by conditioning small amounts of your teal, rust, and mustard clay. If you don’t have pre-colored clay, mix a dab of acrylic paint into white clay until fully blended. -
Flatten the colors:
Roll each colored piece into a very thin sheet. The thinner these sheets are, the more delicate your terrazzo shards will look. -
Create the shards:
Let the colored sheets dry slightly so they aren’t sticky. Then, use your craft knife to chop them into irregular, tiny confetti-like angular shapes. -
Set aside:
Create a small pile of these colorful chips on your work surface, ensuring they aren’t clumped together.
Muddy colors?
If your colored chips are smearing into the white base while rolling, let the chips dry for 10-15 minutes before pressing them in. This keeps the edges crisp.
Step 2: Forming the Base
-
Condition the white clay:
Take a larger ball of fresh white clay and knead it until soft and pliable. This creates a smooth canvas for your design. -
Initial rolling:
Roll the white clay out into a slab that is roughly 3-4mm thick. It doesn’t need to be perfect yet. -
Add the speckles:
Gently pick up your colored chips and sprinkle them randomly over the white slab. Don’t overthink the placement; random scattering looks most authentic. -
Add texture (optional):
For the tiny pepper-like specks seen in the photo, you can grate a tiny bit of dried brownish clay over the top, or use ground black pepper. -
Embed the design:
Place a piece of parchment paper or plastic wrap over the clay to prevent sticking, then roll over the slab again with your rolling pin to press the chips flush into the white base.
Sanding Secret
Use a 4-way nail buffer block instead of sandpaper sheets. It’s easier to grip and has progressively finer grits to polish the clay to a super smooth finish.
Step 3: Cutting and Finishing
-
Cut the shapes:
Position your square cutter over an area of the slab with a pleasing distribution of colors. Press down firmly to cut out two identical squares. -
Smooth the edges:
Dip your finger in a little water and gently run it along the cut edges of the squares to remove any jagged bits or drag marks. -
Pierce the holes:
Using a cocktail stick or a small straw, poke a hole near the top center of each square. Make sure the hole is big enough for your jump rings. -
Drying time:
Place the squares on a clean, flat surface to dry completely. This usually takes 24-48 hours depending on humidity; flipping them halfway through prevents warping. -
Sanding:
Once fully cured and hard, gently sand the surface and edges. I find sanding under a trickle of water prevents dust and reveals the sharp edges of the colored chips best. -
Seal (optional):
Apply a thin coat of gloss varnish or UV resin if you want that shiny, ceramic-like finish shown in the photo.
Step 4: Assembly
-
Open the jump rings:
Using two pairs of pliers, gently twist the large gold jump rings open sideways (never pull them apart outward). -
Attach the clay:
Slide the open jump ring through the hole in your clay square. -
Add the hook:
Before closing the ring, slide the loop of the earring hook onto the jump ring as well. -
Secure:
twist the jump ring back into its closed position, ensuring the ends meet flush so the clay doesn’t slip out.
Wear your new geometric masterpieces with pride or wrap them up as a handmade gift.

What Really Happens Inside the Kiln
Learn how time and temperature work together inside the kiln to transform clay into durable ceramic.
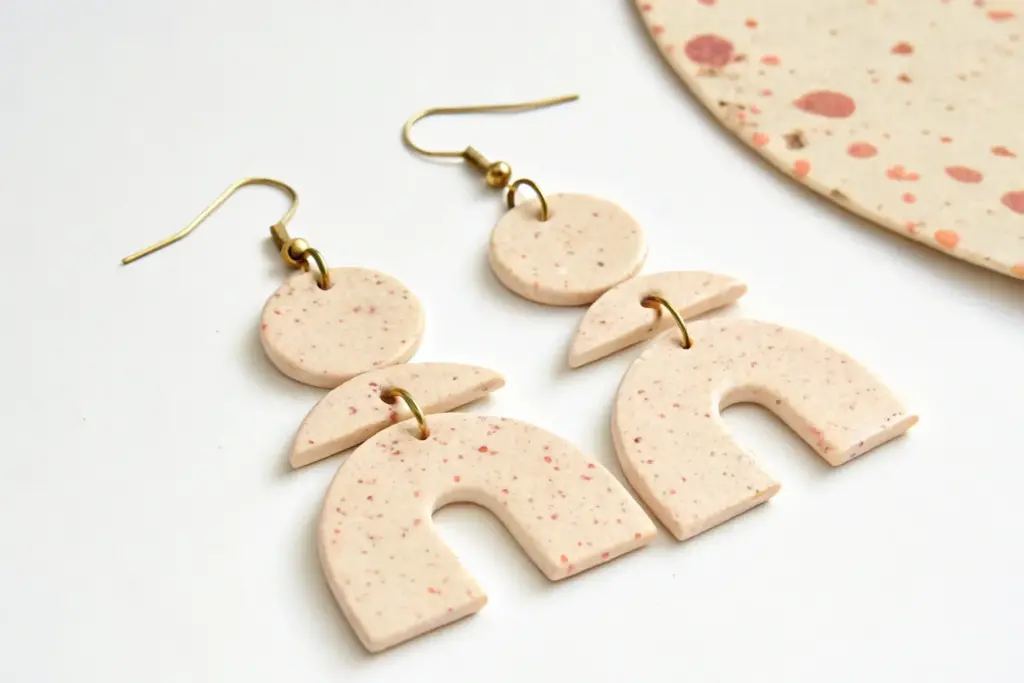
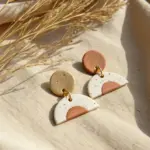
Color-Blocked Geometrics
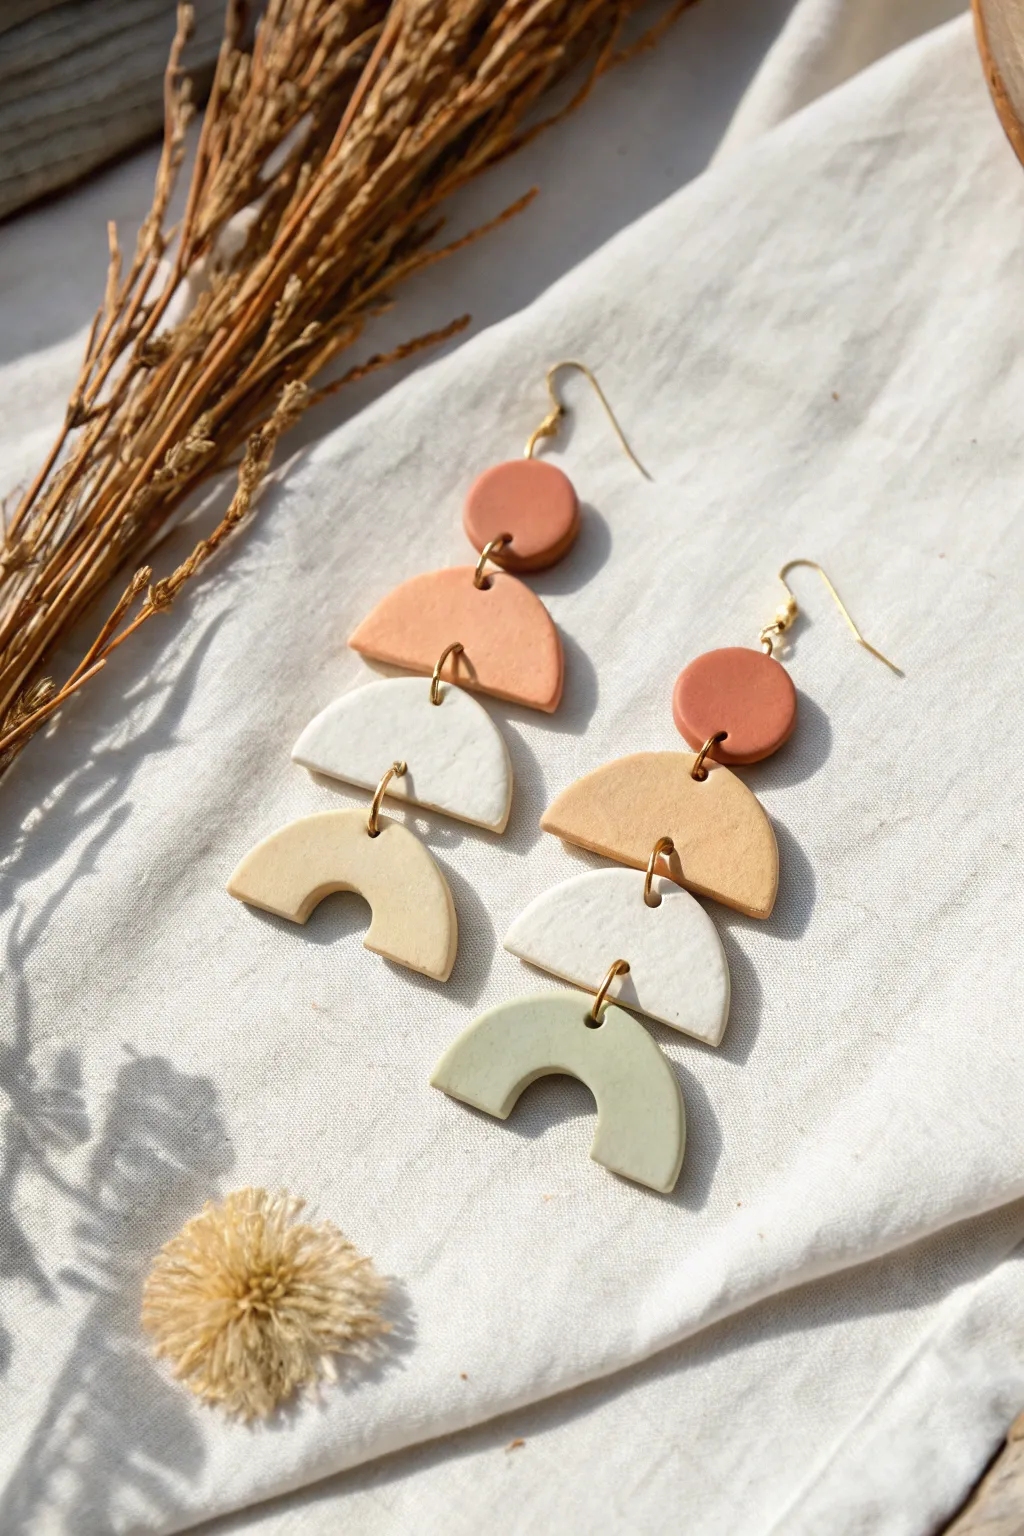
These color-blocked earrings combine soft terracotta, cream, and sage tones in a stunning tiered design. The geometric shapes hang beautifully together, offering a modern bohemian vibe that looks deceptively high-end.
Step-by-Step
Materials
- Air dry clay (white)
- Acrylic paints (terracotta/rust, peach/light orange, sage green, cream)
- Rolling pin or smooth glass jar
- Clay cutters (small circle, medium circle, arch shape)
- X-acto knife or clay blade
- Sandpaper (fine grit)
- Needle tool or toothpick
- Gold jump rings (approx. 6mm)
- Earring hooks (gold)
- Jewelry pliers (flat nose)
- Gloss varnish or sealant (optional)
- Parchment paper or non-stick mat
Step 1: Shaping the Clay
-
Condition the clay:
Begin by kneading your air dry clay until it is soft, pliable, and free of cracks. If it feels too dry, add a tiny drop of water to your fingers. -
Roll it out:
Roll your clay onto a piece of parchment paper to an even thickness of about 3mm or 1/8 inch. Try to keep the surface as smooth as possible. -
Cut the top circles:
Using your smallest circle cutter (approx. 1cm diameter), punch out two circles. These will be the top studs. -
Create the middle tiers:
Cut out two medium circles. To create the semi-circle shape seen in the second tier, use your cutter or a straight blade to slice off the bottom third of the circle tailored to your preference. -
Cut the semi-circles:
Cut two larger semi-circles for the third tier. You can achieve this by cutting a large circle and slicing it exactly in half. -
Form the bottom arches:
Use an arch cutter for the bottom piece. If you don’t have a specific cutter, use a circle cutter to make a round shape, then use a smaller circle cutter to remove the inner bottom section, creating a rainbow shape. -
Smooth the edges:
Dip your finger in a little water and gently run it along all the cut edges to smooth out any roughness or stray bits of clay.
Smooth Surface Secret
To get perfectly flat clay without rolling pin textures, roll your clay between two paint stir sticks or magazines of equal height. This acts as a depth guide.
Step 2: Refining & Assembling
-
Pierce holes:
While the clay is still wet, use a needle tool to poke holes for the jump rings. The top circle needs one hole at the bottom (and one at the top if using a hook rather than a glued post). The middle pieces need holes at both the top and bottom centers. -
Dry completely:
Let the pieces air dry on a flat surface for at least 24-48 hours. I like to flip them over halfway through to ensure even drying. -
Sand for smoothness:
Once bone dry, take fine-grit sandpaper and gently buff the edges and surface circular motions to remove any fingerprints or sharp ridges. -
Mix your palette:
Prepare your acrylic paints. You’ll need four distinct shades: a deep rust/terracotta, a lighter peach, a creamy white, and a muted sage green. -
Paint the components:
Paint the top circles rust, the second semi-circles peach, the third semi-circles cream, and the bottom arches sage green. Apply 2-3 thin coats for opacity, letting each coat dry fully. -
Seal (Optional):
For longevity, brush on a thin layer of matte or gloss varnish to protect the paint from chipping. -
Open jump rings:
Using two pairs of pliers, twist the jump rings open laterally (don’t pull them apart). -
Connect the tiers:
Thread a jump ring through the bottom hole of the top circle and the top hole of the peach piece. Close the ring securely. Repeat down the chain. -
Attach hardware:
Finally, attach the earring hook to the very top component using a jump ring.
Uneven Holes?
If your holes shrank or closed up during drying, don’t force a jump ring through. Use a small hand drill or twist a drill bit with your fingers to widen them gently.
Now you have a stunning pair of handmade geometric dangles ready to wear or gift
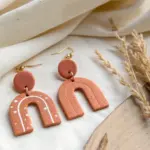
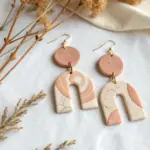
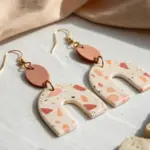
Boho Rainbow Dangles
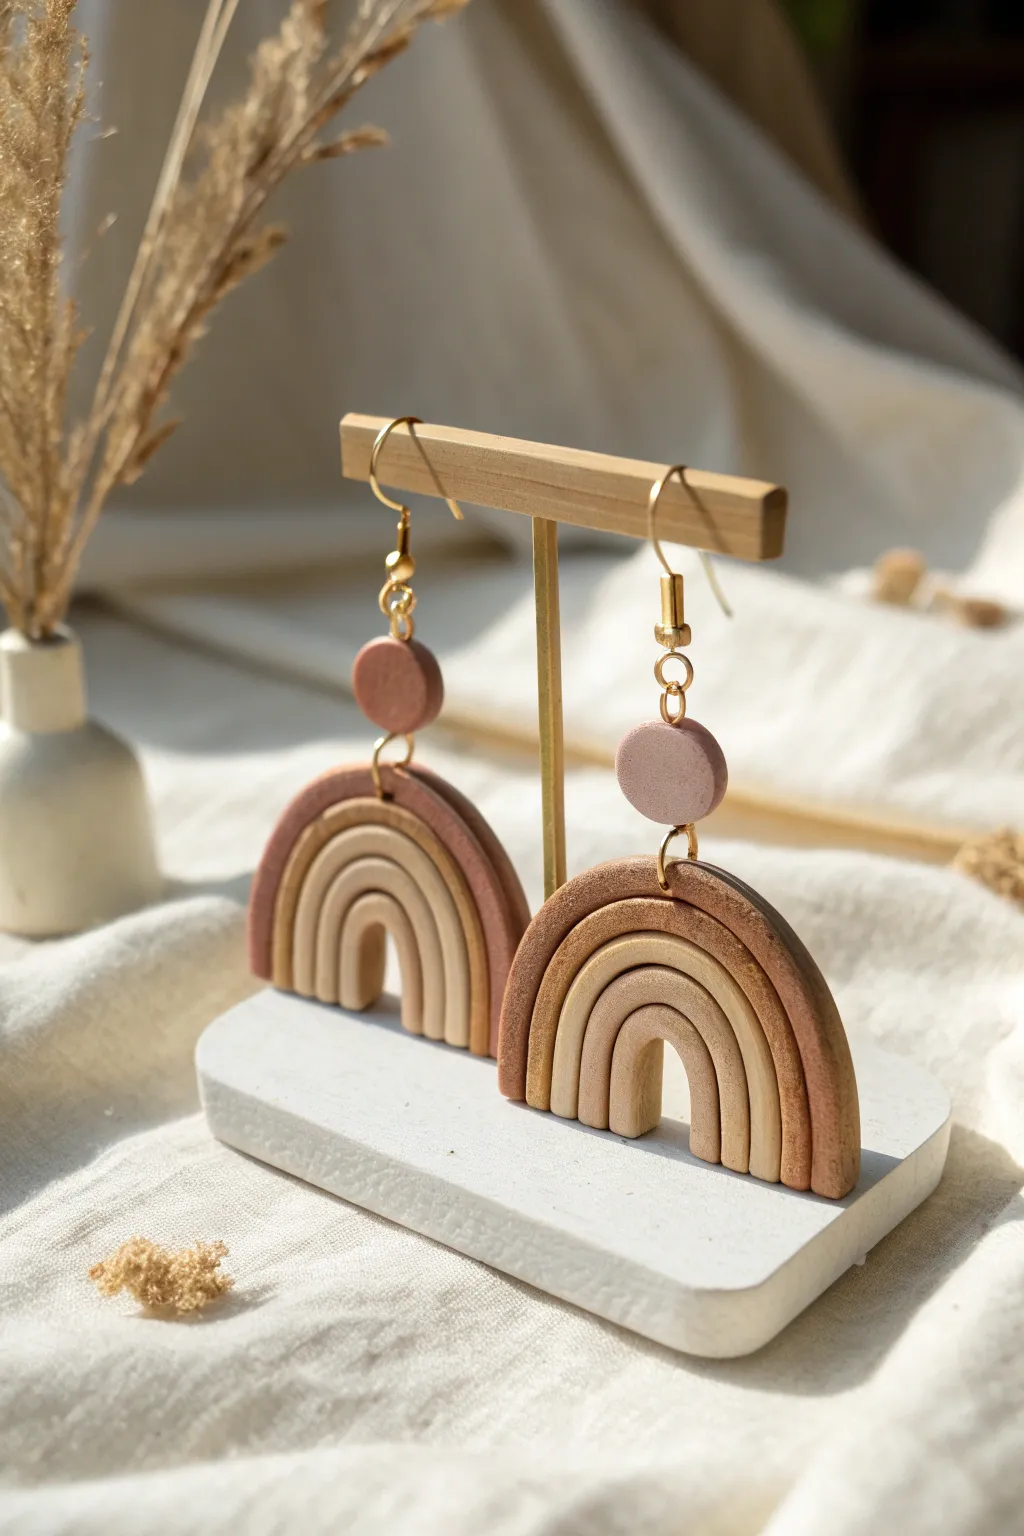
These charming dangle earrings feature four distinct arches in warm, desert-inspired tones that create a stunning, textural rainbow effect. The muted palette of terracotta, tan, and beige gives them a sophisticated bohemian vibe that is perfect for everyday wear.
How-To Guide
Materials
- Air dry clay (white)
- Acrylic paints (terracotta, warm brown, beige, cream/white)
- Clay roller or rolling pin
- X-Acto knife or clay blade
- Round clay cutter (approx. 1 cm diameter)
- Small jump rings (gold)
- Earring hooks (gold)
- Jewelry pliers
- Strong craft glue or E6000
- Smooth work surface or silicone mat
- Needle tool or toothpick
- Fine grit sandpaper
Step 1: Preparing the Clay Colors
-
Mix your palette:
Begin by separating four small balls of white air dry clay. You will need to tint these to achieve the gradient look. Knead a small drop of acrylic paint into each ball: one deep terracotta, one medium warm brown, one light tan, and keep the last one a very pale creamy beige. Add paint gradually to avoid making the clay too sticky. -
Condition the clay:
Knead each colored ball thoroughly until the pigment is evenly distributed and the clay is smooth and pliable. If the clay feels dry, add a tiny drop of water; if it’s sticky from the paint, let it sit for a few minutes.
Step 2: Forming the Arches
-
Roll the coils:
Take a piece of each colored clay and roll them into long, even snakes or coils. Aim for a thickness of about 3-4mm. Try to keep the thickness consistent across all four colors for a uniform look. -
Form the inner arch:
Start with the lightest, cream-colored coil. Bend it into a tight U-shape to form the smallest, innermost arch. -
Layer the second arch:
Take the light tan coil and gently curve it over the first cream arch. Press them lightly together along the seam so they adhere without smashing the rounded shape of the coils. -
Add the third arch:
Repeat this process with the warm brown coil, draping it snugly over the previous tan arch. -
Finish the outer arch:
Place the final terracotta coil over the stack to complete the rainbow. Gently press all layers together from the sides to ensure they bond well. -
Trim the base:
Use your clay blade or knife to slice straight across the bottom of the rainbow, creating a nice flat edge where all the arches end evenly.
Fixing Cracks
If you see tiny cracks forming as the clay dries, mix a small amount of clay with water to make a paste (slip) and smooth it over the crack with your finger.
Step 3: Creating the Toppers
-
Roll out the slab:
Take some of the leftover clay (either the terracotta or a mix for a marbled look) and roll it out flat to a thickness of about 3mm. -
Cut the circles:
Use your small round cutter to punch out two circles. These will be the top studs that connect to the ear wire.
Textured Touch
Before the clay dries, gently press a piece of canvas or rough fabric onto the surface of the arches to give them a subtle, stone-like texture.
Step 4: Assembly and Finishing
-
Add holes:
While the clay is still wet, use a needle tool to poke a hole near the bottom edge of the circle toppers and near the top center of the rainbow arch (through the outermost terracotta layer). Make sure the hole is big enough for your jump rings. -
Dry completely:
Set all pieces on a flat surface to dry. I usually let them sit for at least 24 hours, turning them over halfway through to ensure even drying. -
Sand for smoothness:
Once fully hard, gently sand any rough edges or the flat backs with fine-grit sandpaper for a professional finish. -
Connect pieces:
Use your jewelry pliers to open a jump ring. Thread it through the hole in the rainbow and the hole in the circle topper, then close the ring securely. -
Attach earring hooks:
Open the loop on your earring hook (or use a second small jump ring if needed) and attach it to the top of the circle stud relative to how you want it to hang.
Enjoy wearing your handcrafted art or gift them to a friend who loves bohemian style

TRACK YOUR CERAMIC JOURNEY
Capture glaze tests, firing details, and creative progress—all in one simple printable. Make your projects easier to repeat and improve.
Pressed Lace Texture Earrings
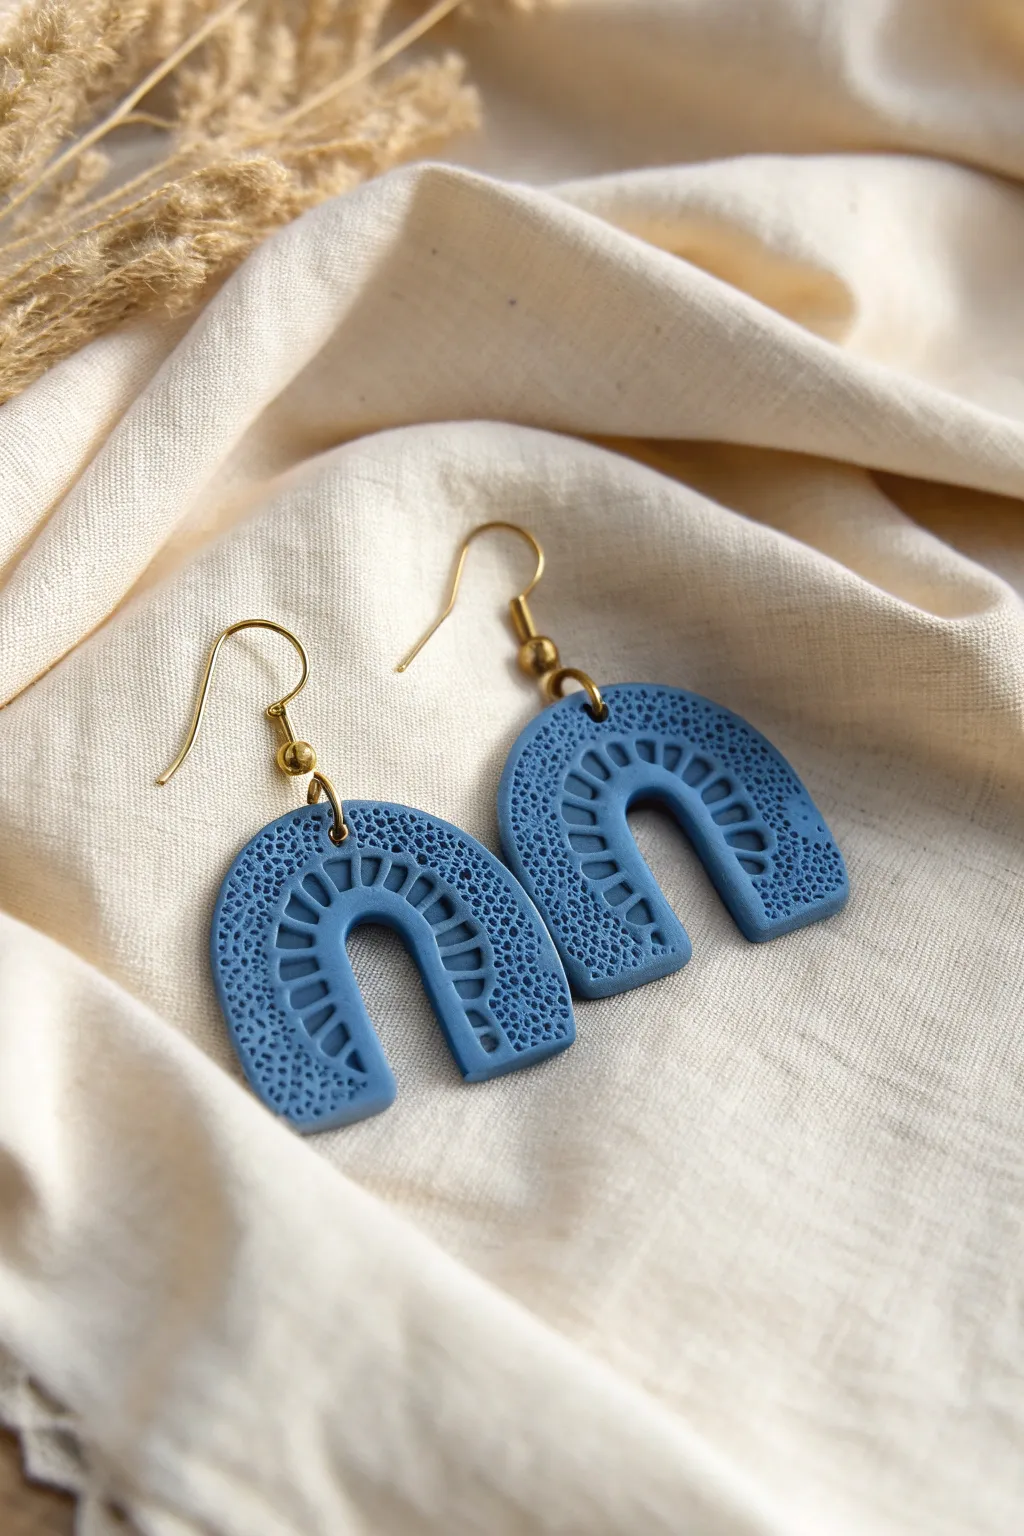
These elegant arch earrings combine a trendy U-shape with intricate surface details that look professional yet are surprisingly easy to achieve. The deep denim blue color pairs beautifully with gold hardware, while the mix of smooth ridges and stippled texture adds sophisticated depth.
Step-by-Step
Materials
- Blue air dry clay (or white clay mixed with blue acrylic paint)
- Clay roller or acrylic rolling pin
- U-shape clay cutter (arch shape)
- A small piece of lace, coarse fabric, or textured sponge
- Needle tool or toothpick
- Small straw or jewelry drill
- Fine grit sandpaper
- Gold jump rings (6mm)
- Gold fishhook ear wires
- Jewelry pliers (flat nose and round nose)
- Gloss or matte varnish (optional)
Step 1: Preparing the Base
-
Condition the clay:
Begin by kneading your blue air dry clay until it is soft, pliable, and free of cracks. If you are coloring white clay yourself, mix in your blue acrylic paint now until the color is uniform. -
Roll out a slab:
Place the clay on a smooth work surface or silicone mat. Use your roller to flatten it into an even slab, approximately 3mm to 4mm thick. Keep the thickness consistent for durability. -
Cut the shapes:
Press your U-shaped cutter firmly into the clay slab to create two identical arch shapes. If you don’t have a cutter, you can trace a paper template and cut around it carefully with a craft knife. -
Smooth the edges:
Dip your finger in a tiny bit of water and gently run it along the cut edges of your arches to smooth out any roughness or loose bits of clay.
Fixing Warp
If your clay curls up while drying, place a heavy book on top of the pieces once they are semi-dry (leather hard). Sandwich them between parchment paper first.
Step 2: Adding Texture
-
Create the radial lines:
Using a needle tool or the dull side of a craft knife, gently impress lines radiating outward from the inner curve of the arch. Press deep enough to see the groove, but be careful not to cut all the way through. -
Stipple the surface:
Now for the speckled effect. Take a small piece of coarse sponge, a ball of crumpled foil, or even a stiff toothbrush. Gently press this tool onto the flat surface of the clay, focusing on the areas between your radial lines and the outer edges to create a porous, stone-like texture. -
Refine the design:
Go back over your radial lines with the needle tool if the texturing process softened them too much. You want a clear contrast between the smooth grooves and the bumpy surface. -
Pierce the holes:
Use a needle tool or a very small straw to poke a hole at the top center of each arch. Ensure the hole is not too close to the edge to prevent breakage later.
Level Up: Color Wash
After drying, rub a little white or gold acrylic paint into the textured grooves, then wipe the surface clean. This highlights the pattern beautifully.
Step 3: Finishing and Assembly
-
Dry the pieces:
Set your clay pieces aside on a flat surface to dry. I prefer to let them sit for at least 24-48 hours, flipping them occasionally to ensure even drying on both sides. -
Sand for perfection:
Once fully cured and hard, check the edges again. If there are any sharp spots, very lightly sand them with fine-grit sandpaper until smooth. -
Seal (Optional):
If you want extra protection or a different sheen, apply a thin coat of matte or gloss varnish. Let this dry completely before handling. -
Open the jump rings:
Using two pairs of pliers, grip a jump ring on either side of the split and twist one hand forward and the other back to open it laterally. Never pull the ring outward. -
Attach the ear wire:
Slide the open jump ring through the hole in your clay arch, then thread the loop of the fishhook ear wire onto the jump ring. -
Close the ring:
Use your pliers to twist the jump ring back into a closed position, ensuring the two ends meet perfectly so the earring doesn’t slip off. -
Final check:
Repeat the assembly for the second earring and give them a gentle shake test to make sure all hardware is secure.
Now you have a stunning pair of handmade textured earrings ready to wear or gift
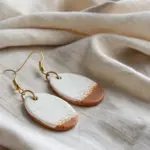
Faux Stone Speckled Pebbles
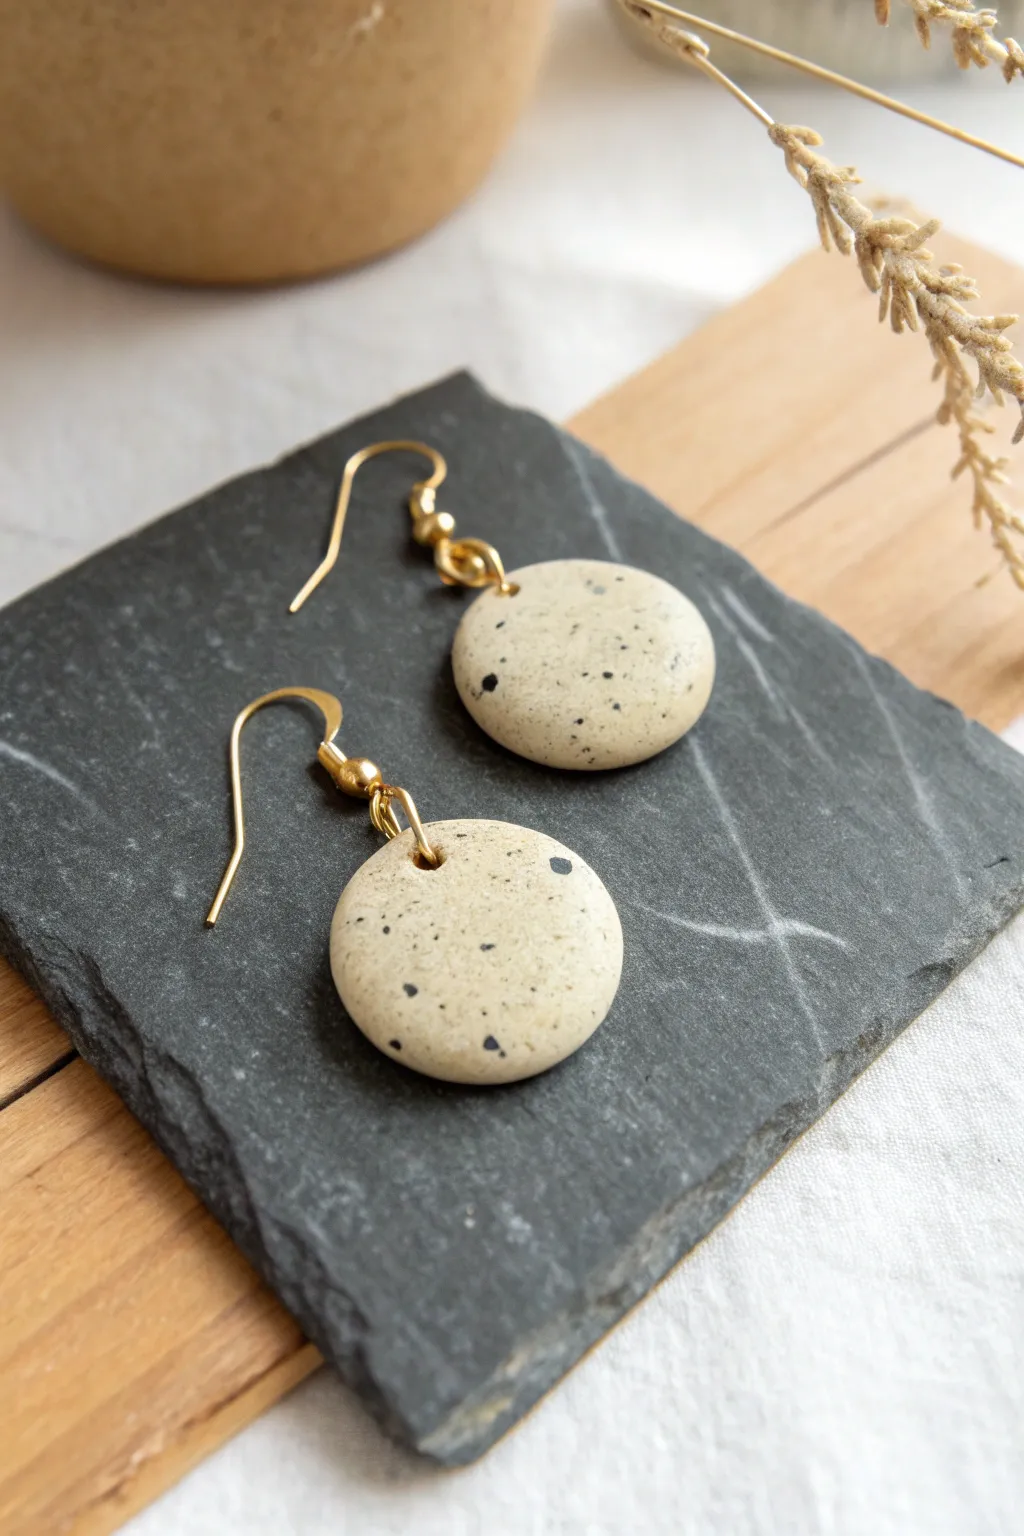
These elegant earrings mimic the organic beauty of river stones with a sophisticated speckled finish. Using air dry clay and a simple splatter technique, you can achieve this high-end ceramic look right at home.
Step-by-Step Tutorial
Materials
- White or cream air dry clay
- Acrylic rolling pin
- Small round circle cutter (approx. 1 inch)
- Black acrylic paint (liquid, not heavy body)
- Old toothbrush or stiff bristle brush
- Toothpick or small needle tool
- Fine-grit sandpaper (400-600 grit)
- Gloss or matte varnish (optional)
- Gold earring hooks (fishhook style)
- Gold jump rings (sized around 5-7mm)
- Jewelry pliers (flat nose and round nose)
- Parchment paper or silicone mat
Step 1: Shaping the Clay Pebbles
-
Condition the Clay:
Begin by taking a small handful of white or cream air dry clay. Knead it in your hands for a minute until it is soft, pliable, and free of cracks. If it feels too dry, add a tiny drop of water. -
Roll the Slab:
Place the clay on parchment paper or a silicone mat. use your acrylic roller to flatten the clay into a slab that is about 1/4 inch (6mm) thick. You want these to have a bit of ‘chunkiness’ to resemble real stones. -
Cut the Circles:
Use your small round circle cutter to punch out two identical shapes. Press straight down and lift up to ensure clean edges. -
Refine the Edges:
Dip your finger in a little bit of water and gently run it around the circumference of your clay circles. Smooth out any harsh angles left by the cutter to create a soft, pebbled edge. -
Piercing the Holes:
Using a toothpick or a needle tool, create a hole near the top edge of each circle. Make sure the hole is large enough for your jump ring to pass through, keeping in mind that clay sometimes shrinks slightly as it dries. -
Drying Phase:
Place your clay rounds on a clean, flat surface to dry. Let them sit undisturbed for 24-48 hours. I find flipping them over halfway through the drying process helps keep them perfectly flat.
Paint Oops?
If you splatter too much black paint in one spot, use a damp Q-tip to dab it away gently before it dries, or paint over the mistake with a bit of cream paint.
Step 2: Creating the Stone Effect
-
Sanding for Smoothness:
Once completely dry and hard, take your fine-grit sandpaper and gently buff the surface and edges. The goal is to make the clay feel smooth like a polished river rock. -
Prepare the Splatter Paint:
Squeeze a small amount of black acrylic paint onto a palette. Dilute it slightly with water until it reaches an inky consistency—it needs to be fluid enough to fly off the bristles. -
The Splatter Technique:
Dip your old toothbrush into the watered-down black paint. hold the brush a few inches above the clay pieces and run your thumb across the bristles to flick tiny specks of paint onto the surface. -
Controlling the Pattern:
Apply the speckles lightly at first. You can always add more density, but you can’t take them away. Aim for a random, organic distribution rather than a perfect pattern. -
Add Larger Spots:
To enhance the natural look, use the very tip of a toothpick dipped in undiluted black paint to add a few larger ‘imperfection’ dots manually among the fine mist. -
Sealing the Clay:
Allow the paint to dry completely. Apply a thin coat of varnish (matte for a raw stone look or gloss for a polished gem look) to protect the clay from moisture and seal in your design.
Marble Effect
Mix a tiny pinch of black or grey clay into your white clay before rolling. Stop kneading when streaks appear for a realistic marble vein look.
Step 3: Assembly
-
Open the Jump Rings:
Using two pairs of pliers, grip a gold jump ring on either side of the split. Twist one hand forward and the other back to open the ring sideways (never pull it apart outwards). -
Connect the Components:
Slide the open jump ring through the hole in your clay pebble. Before closing it, loop the bottom of the gold earring hook onto the jump ring as well. -
Close the Findings:
Use your pliers to twist the jump ring back into position, ensuring the ends meet perfectly flush so the hook doesn’t slip out. -
Final Check:
Repeat the assembly for the second earring. Hold them up to ensure the fronts are facing the correct way and the lengths hang evenly.
Enjoy wearing your sophisticated, nature-inspired accessories or gifting them to a friend who loves minimalist design
Sgraffito Scratch-Pattern Drops
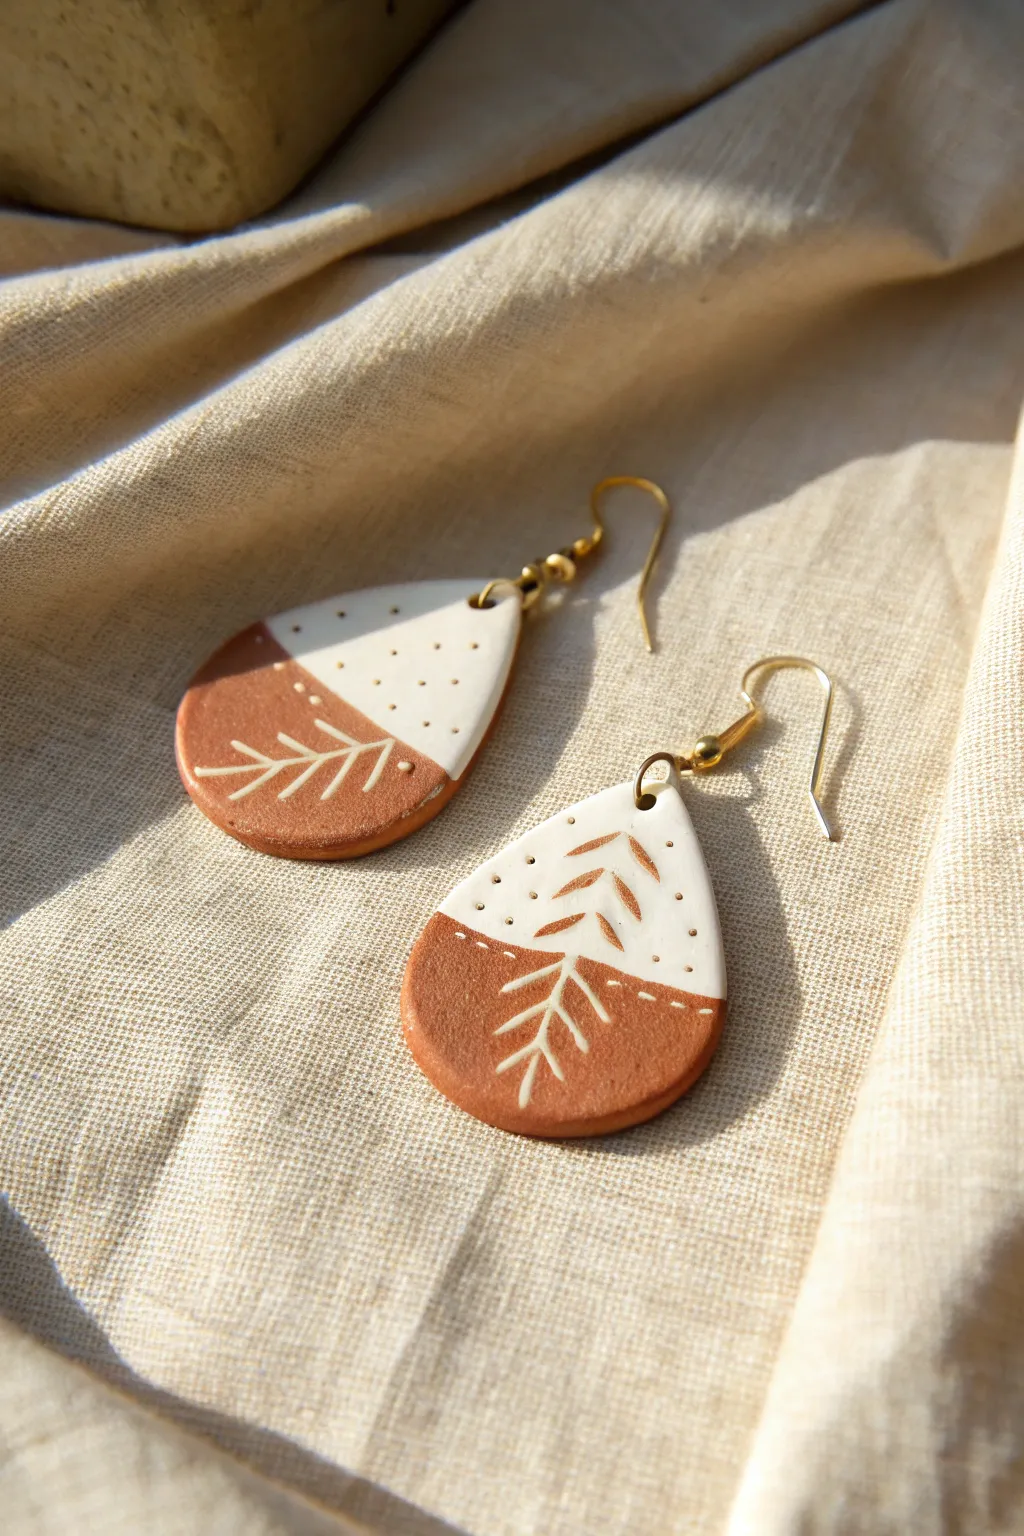
Embrace the earthy warmth of terracotta paired with crisp white in these botanical teardrop earrings. The sgraffito technique allows you to scratch delicate fern patterns through the surface, revealing a beautiful contrast underneath.
Detailed Instructions
Materials
- Air dry clay (terracotta color)
- White acrylic paint
- Rolling pin
- Teardrop-shaped clay cutter
- Carving tool, needle tool, or toothpick
- Sandpaper (fine grit)
- Small paintbrush
- Gold jump rings (6mm)
- Gold earring hooks
- Pliers
- Gloss varnish or sealant (optional)
Step 1: Shaping the Base
-
Condition the clay:
Begin by taking a chunk of your terracotta-colored air dry clay. Knead it in your hands until it feels soft, pliable, and free of cracks. -
Roll it out:
Using a rolling pin, flatten the clay to an even thickness of about 3-4mm. If you want perfectly even earrings, place two playing cards on either side of the clay as thickness guides. -
Cut the shapes:
Press your teardrop cutter firmly into the clay to cut out two identical shapes. If you don’t have a cutter, you can trace a paper template with a craft knife. -
Smooth the edges:
Dip your finger in a tiny bit of water and gently run it along the cut edges of the teardrops to smooth away any roughness or jagged bits. -
Pierce the holes:
Use a needle tool or toothpick to poke a small hole near the pointed top of each teardrop. Make sure the hole is big enough for your jump rings. -
Initial drying:
Place the clay shapes on a flat surface lined with paper towel or parchment. Let them dry completely, which usually takes 24-48 hours depending on humidity. Flip them occasionally for even drying.
Step 2: Decorating & Carving
-
Sand for smoothness:
Once fully dry, lightly sand the surface and edges with fine-grit sandpaper to create a smooth canvas for your paint. -
Paint the top section:
Using white acrylic paint, cover the top two-thirds of the teardrop at a diagonal angle. You may need two coats for opaque coverage. Leave the bottom third as bare terracotta. -
The crucial drying step:
Wait until the white paint is *mostly* dry but not rock hard. I find this creates the cleanest lines for scratching without chipping the paint excessively. -
Scratch the dividing line:
Using your needle tool or a sharp carving tool, gently scratch a dotted line right along the diagonal border where the white paint meets the bare clay. -
Carve the bottom stem:
In the bare terracotta section, carve a vertical line for the stem and small V-shapes for leaves. Since this is raw clay, you are actually carving slightly into the material to create texture. -
Sgraffito the top leaves:
Now for the magic. Scratch the continuation of the fern pattern into the white painted section. Press hard enough to scrape away the paint and reveal the terracotta color underneath. -
Add detail dots:
Use the tip of your tool to poke or scratch tiny little decorative dots scattered around the fern pattern in the white section. -
Highlight the bottom fern:
To make the carved fern on the bottom section stand out, take a tiny brush with white paint and carefully fill in the carved grooves. Wipe away excess surface paint with a damp cloth so the white remains only in the recesses.
Paint Flaking Off?
If the white paint chips off intsead of scratching cleanly, it’s likely too thick or too dry. Try painting a thinner layer, or scratching while the paint is just slightly tacky.
Step 3: Assembly
-
Seal the piece:
Apply a thin coat of varnish or sealant to protect the paint and clay. A matte finish looks very natural, but gloss adds durability. -
Open the jump ring:
Use two pairs of pliers to twist a jump ring open (twist ends away from each other, don’t pull apart). -
Attach the hardware:
Slide the jump ring through the hole in the clay, then thread on your earring hook. Close the jump ring securely by twisting it back into place. -
Final check:
Repeat for the second earring and double-check that your fronts are facing the correct way relative to the hooks.
Make it Metallic
For a glamorous twist, use gold leaf or metallic gold paint for the inlaid fern pattern on the bottom section instead of white paint.
Enjoy wearing these distinctively handcrafted earrings that highlight the natural beauty of simple clay
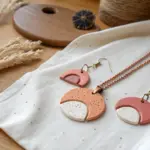
Negative Space Cutout Shapes
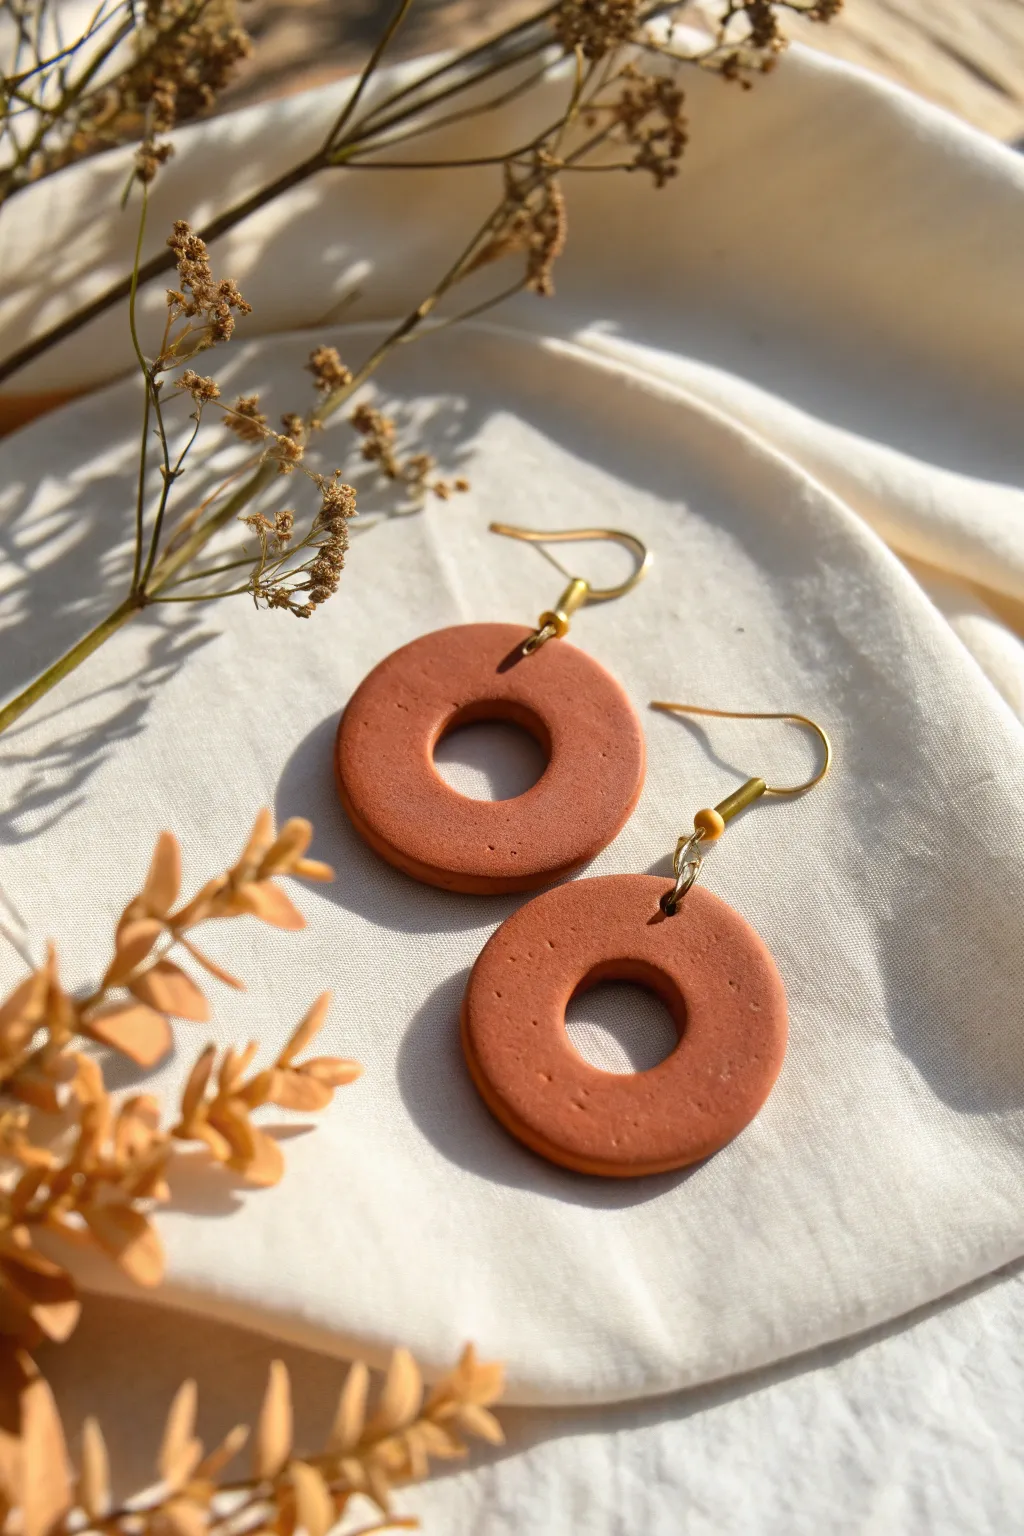
Embrace earthy neutral tones with these minimalist circular drop earrings that celebrate the beauty of negative space. Their warm terracotta hue and simple geometric shape make them a versatile accessory for any season.
How-To Guide
Materials
- Air dry clay (terracotta color or white mixed with acrylic paint)
- Acrylic rolling pin
- Two circle cutters (one approx. 1.5 inch for the base, one 0.5 inch for the center)
- Sandpaper (fine grit, 400-600)
- Hand drill or needle tool
- 2 Gold-tone French earring hooks
- 2 Gold-tone jump rings (4mm or 6mm)
- 2 Brass tube beads or cylinder spacers
- 2 Eye pins (optional, if constructing a link) or thin craft wire
- Jewelry pliers (flat nose and round nose)
- Matte spray varnish or sealant
- Parchment paper or silicone mat
Step 1: Shaping the Clay
-
Prepare your workspace:
Lay down parchment paper or a silicone mat to prevent sticking. Take a chunk of air dry clay and knead it until it’s pliable and smooth. If you are tinting white clay to achieve that terracotta look, mix in burnt orange or brown acrylic paint now. -
Roll the slab:
Roll the clay out to an even thickness of about 3mm to 4mm. I like to place playing cards on either side of my roller to ensure the slab is perfectly level. -
Cut the main shape:
Use the larger circle cutter to punch out two discs. Press down firmly and give it a little wiggle before lifting to get a clean edge. -
Create the negative space:
Take the smaller circle cutter and align it visually in the exact center of one disc. Press down to remove the middle, creating a donut or washer shape. Repeat for the second earring. -
Smooth the edges:
Dip your finger in a tiny bit of water and run it gently around the cut edges to smooth out any sharpness or burrs left by the cutters. -
Create the hanging hole:
Use a needle tool or toothpick to pierce a hole at the top of the donut shape for the hardware. Make sure it isn’t too close to the edge, or the clay might crack when drying. -
Allow to dry:
Place the shapes on a flat surface away from direct sunlight. Let them dry completely for 24-48 hours. Carefully flip them over halfway through the drying time to prevent warping.
Smooth Operator
To fix minor cracks in dry clay without sanding, make a slip paste from a tiny bit of clay and water. Paint it into the crack, let dry, then sand smooth.
Step 2: Refining and Sealing
-
Sand for perfection:
Once fully dry, the clay will be lighter in color and hard. Use fine-grit sandpaper to gently buff the surface and edges. If you want a slightly rustic texture like the photo, don’t over-sand the face of the earring. -
Dust off:
Wipe away all the clay dust with a slightly damp cloth or a dry soft brush. -
Seal the clay:
Apply a thin coat of matte varnish or spray sealant. This protects the clay from moisture and deepens the terracotta color. Let this dry completely according to the bottle instructions.
Texture Twist
Before cutting your circles, gently press a piece of coarse linen or sandpaper onto the wet clay slab to give the surface a realistic stone-like tooth.
Step 3: Assembly
-
Prepare the connector:
Take a short length of wire or an eye pin. Insert the brass tube bead onto it. -
Form the loops:
Using your round nose pliers, create a loop at both the top and bottom of the tube bead to secure it. This creates a straight bar connector. -
Attach to clay:
Open a jump ring using two pairs of pliers (twist sideways, don’t pull apart). Thread it through the hole in your clay donut and the bottom loop of your brass tube connector. Close the jump ring securely. -
Add the hook:
Open the small loop at the bottom of your French earring hook. Slide on the top loop of any additional connector or directly onto the brass bead segment you created. -
Final check:
Ensure all loops and rings are tightly closed so nothing slips off. Repeat the assembly steps for the second earring.
Wear your new earthy accessories with pride or gift them to a friend who loves natural style
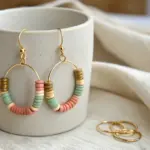
Mini Bead Fringe Earrings
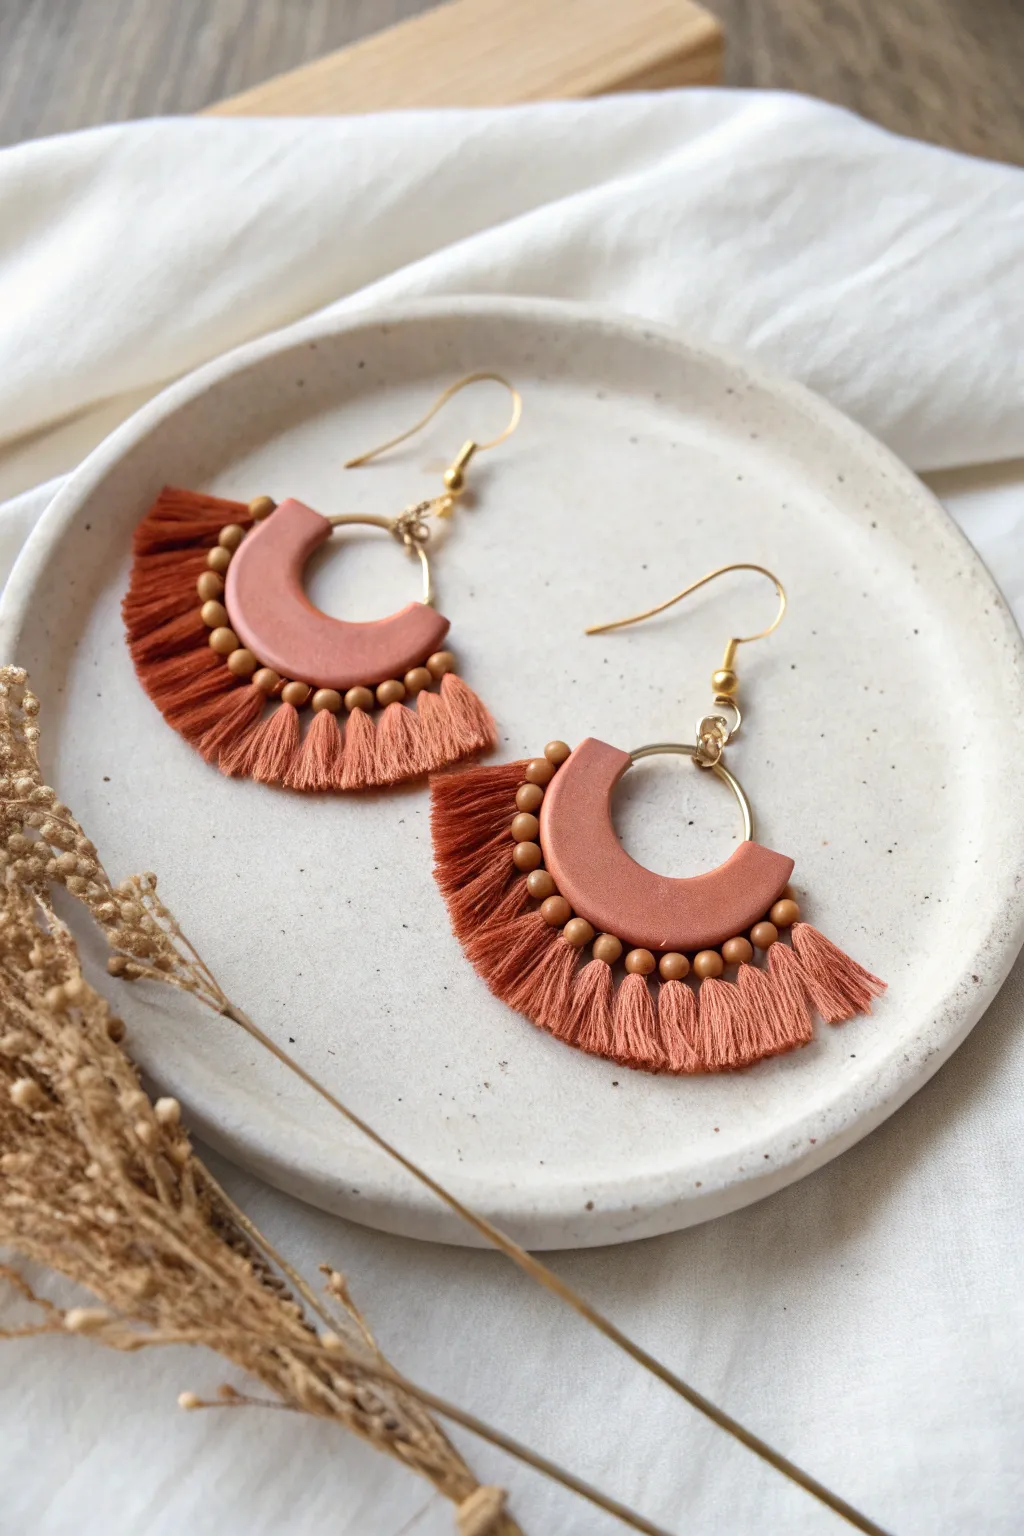
These warm, terracotta-toned earrings combine the smooth matte finish of air dry clay with the soft texture of fringe. The addition of tiny seed beads creates a polished transition between the clay arch and the playful tassels, making them perfect for everyday wear.
Detailed Instructions
Materials
- Terracotta-colored air dry clay
- Rolling pin or acrylic roller
- Circle cutters (one medium ~1.5 inch, one small ~1 inch)
- Craft knife or clay blade
- Sandpaper (fine grit)
- Small hand drill or needle tool
- Embroidery floss (burnt orange/terracotta)
- Small wooden or seed beads (approx. 2-3mm)
- Gold earring hooks
- Gold jump rings (6mm)
- Needle with an eye large enough for floss but small enough for beads
- Jewelry pliers
- Cardboard scrap (for making tassels)
Step 1: Shaping the Clay Base
-
Condition and Roll:
Start by kneading a small amount of terracotta air dry clay until it is soft and pliable. Roll it out on a smooth surface to an even thickness of about 3mm—using depth guides helps keep this consistent. -
Cut the Outer Circle:
Use your medium-sized circle cutter to punch out two identical circles. If roughed edges appear, gently smooth them with a bit of water on your finger. -
Create the Crescent:
Take the smaller circle cutter and position it inside the larger circle, slightly off-center towards the top edge to create a thicker bottom curve. Press down to remove the inner section, leaving you with a crescent moon or arch shape. -
Trim the Arch:
Using a sharp clay blade or craft knife, cut the tips of the crescent flat so they are level with each other. This transforms the crescent into a stable arch shape. -
Mark Hole Placements:
Before piercing, mark your hole spots lightly with a pin. You’ll need one hole at the very top center for the jump ring, and a series of evenly spaced holes along the bottom edge for the fringe (aim for 7-9 holes depending on your spacing preference). -
Drill the Holes:
Carefully pierce the marked spots with a needle tool. Wiggle it slightly to ensure the holes are wide enough for your embroidery floss and jump rings. Make sure not to get too close to the clay edge to prevent cracking. -
Dry and Sand:
Let the clay shapes dry completely, usually for 24-48 hours. Once fully hardened, use fine-grit sandpaper to smooth out any rough edges or uneven surfaces for a professional finish.
Step 2: Creating the Fringe
-
Prepare Tassel Guidelines:
Cut a small piece of cardboard about 1 inch wide. This will help you keep all your tassels the same length. -
Wrap and Cut:
Wrap the terracotta embroidery floss around the cardboard several times, then cut along one edge to create uniform strands. You’ll need bundles of 2-3 strands for each hole. -
Thread the Needle:
Take a bundle of floss strands and thread them onto your needle. I find it easier to work with slightly longer strands and trim them later. -
Attach the Fringe:
Pass the needle through a bottom hole in the clay arch from back to front. Thread a small seed bead onto the floss, then pass the needle back through the same hole. -
Secure the Knot:
Pull the floss tight so the bead sits snugly against the bottom edge of the clay. Tie a secure double knot with the floss ends at the bottom of the bead, ensuring the knot is hidden by the fluff of the fringe. -
Repeat Across the Arch:
Continue this process for every hole along the bottom edge of both clay pieces. Try to keep the tension consistent so the bead line looks straight. -
Trim the Tassels:
Once all fringe bundles are attached, lay the earrings flat on a table. Combe out the threads with a clean toothbrush or comb, then use sharp scissors to trim the fringe into a clean, curved line following the shape of the arch.
Pro Tip: Clean Cuts
Let the clay dry for about 15-20 minutes after rolling but before cutting the fringe holes. Slightly stiffer clay holds its shape better and deforms less when pierced.
Step 3: Final Assembly
-
Open Jump Rings:
Using two pairs of jewelry pliers, gently twist open two gold jump rings. Remember to twist sideways (bringing one hand toward you and one away), never pull them apart. -
Connect the Hardware:
Slide the open jump ring through the top hole of your clay arch. Add the earring hook onto the jump ring as well, ensuring the hook faces the correct direction relative to the front of the earring. -
Close and Finish:
Twist the jump ring back into a closed position, ensuring the ends meet perfectly so the floss or hook won’t slip out. Check that all fringe knots are tight and give the tassels one final fluff.
Level Up: Metallic Touch
Swap the matching terracotta floss for a metallic gold thread, or add a single gold bead in the middle of the fringe row for a subtle sparkle.
Now you have a stunning pair of textural statement earrings ready to wear or gift.
Faux Glazed Look With High Shine
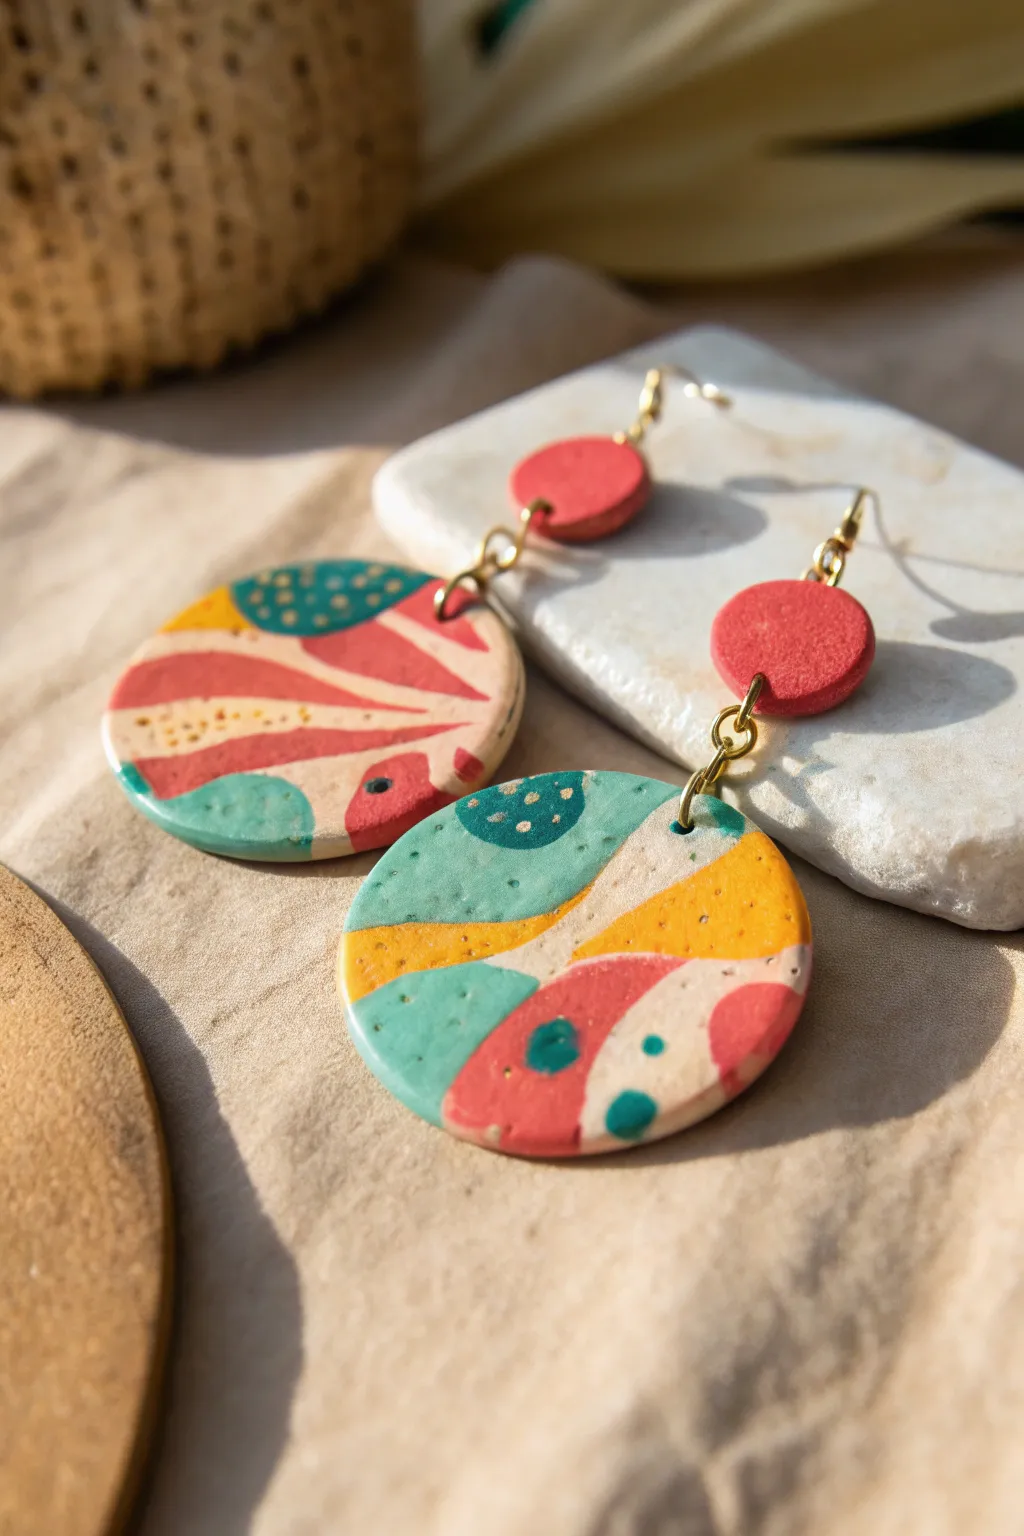
These vibrant statement earrings combine bold abstract shapes with dainty speckled details for an artistic, modern look. The design features a playful interplay of matte textures and colorful organic forms that mimics the style of terrazzo tiles.
Step-by-Step
Materials
- Air dry clay (white)
- Acrylic paints (red, teal, mustard yellow, beige/cream, gold)
- Fine detail paintbrush
- Medium flat paintbrush
- Rolling pin or acrylic roller
- Circle clay cutters (one small approx. 1cm, one medium approx. 3-4cm)
- Sandpaper (fine grit)
- Jump rings (gold)
- Earring hooks (gold)
- Jewelry pliers
- Hand drill or pin tool
- High-gloss varnish or glaze
Step 1: Shaping the Clay Base
-
Condition and Roll:
Start by kneading a chunk of white air dry clay until it is soft and conditioned. Roll it out on a non-stick surface to an even thickness of about 3-4mm. -
Cut the Circles:
Using your circle cutters, punch out two large circles for the drop pendant and two smaller circles for the top stud section. -
Create Holes:
While the clay is still wet, carefully poke a hole near the top edge of the large circles and both the top and bottom edges of the small circles using a pin tool or toothpick. Ensure the holes are large enough for your jump rings. -
Smooth the Edges:
Dip your finger in a little water and gently run it around the cut edges of the clay to smooth out any roughness or loose bits before drying. -
Let Dry:
Allow the clay pieces to dry completely according to the package instructions. This usually takes 24-48 hours. flip them occasionally to prevent warping.
Step 2: Painting the Abstract Design
-
Sand for Smoothness:
Once bone dry, use fine-grit sandpaper to gently buff the surface and edges of your clay circles for a professional finish. -
Base Coat the Tops:
Paint the two smaller circles entirely with a solid coat of red acrylic paint. Let them dry and apply a second coat for opacity. -
Map Out the Pattern:
For the large circles, lightly sketch curvy, organic sections using a pencil, or simply freehand the shapes if you feel confident. -
Block in Colors:
Start filling in the organic shapes. Paint one section teal, one mustard yellow, one red, and leave sections of beige or create a cream mix for negative space. -
Refine the Lines:
Use your smallest detail brush to tidy up the boundaries where colors meet. Getting crisp lines between the shapes is key to this look. -
Add Speckles:
Dip a detail brush or a toothpick into a contrasting color (like dark teal on the mustard section, or cream on the red). Gently tap tiny dots onto specific color blocks to mimic a terrazzo stone texture. -
Gold Accents:
Using metallic gold paint, add very fine dots or small clusters of speckles over the teal or beige sections for a subtle shimmer. -
Apply the Glaze:
To achieve that faux glazed look mentioned in the project theme, apply 2-3 coats of high-gloss varnish. Let each coat dry fully before adding the next to build up a deep shine.
Fixing Rough Edges
If edges look rough after cutting, don’t fuss too much while wet. It’s often easier to sand them perfectly smooth once the clay is fully hardened.
Step 3: Assembly
-
Open Jump Rings:
Using two pairs of jewelry pliers, twist a gold jump ring open sideways (never pull it apart). -
Connect the Pieces:
Slide the bottom of the small red circle and the top of the large patterned circle onto the jump ring, then twist it closed securely. -
Attach Earring Hooks:
Open the loop on your earring hook or a second jump ring, attach it to the top hole of the small red circle, and close it. -
Final Check:
Ensure all metal findings are closed tightly so your beautiful new artwork doesn’t slip off while wearing.
Make it UV Resin
Swap the high-gloss varnish for a layer of UV resin cured under a lamp. This creates a domed, glass-like finish that is incredibly durable.
Now you have a stunning pair of custom-patterned earrings ready to wear or gift
Sculptural 3D Petal Clusters
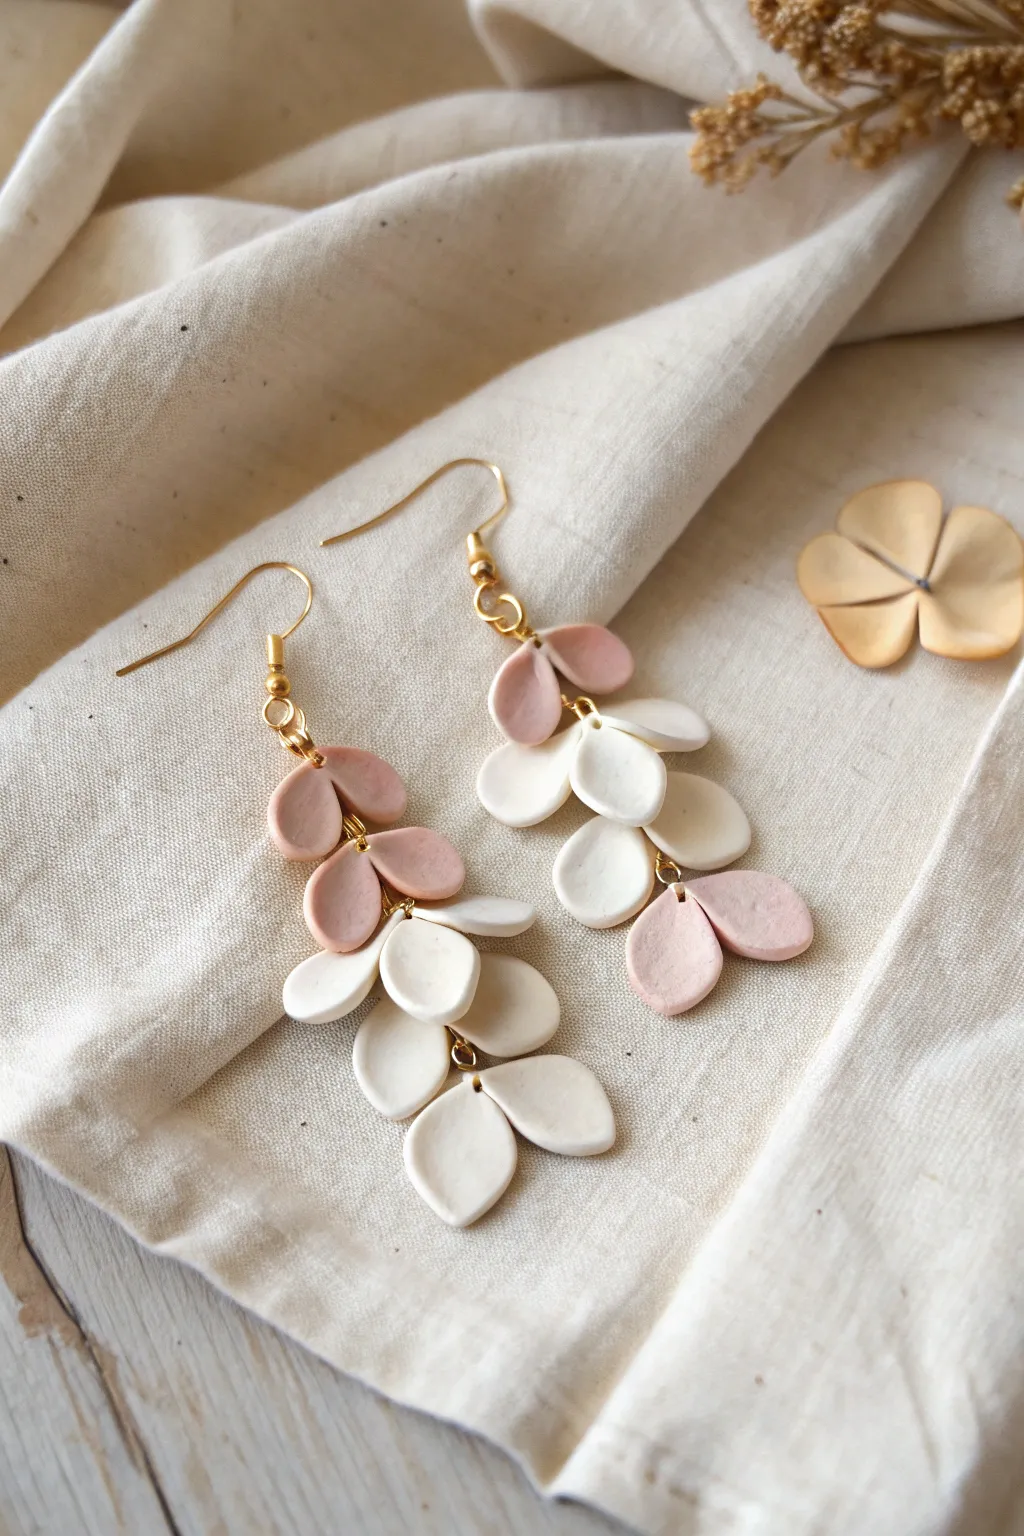
Embrace organic beauty with these cascading earrings that mimic delicate flower petals gently falling. Their soft color palette of creamy whites and dusty pinks creates a romantic, nature-inspired look perfect for everyday elegance.
Detailed Instructions
Materials
- Air dry clay (white)
- Acrylic paint or soft pastels (dusty pink/blush)
- Rolling pin or clay machine
- Small teardrop cutter (approx. 1cm) or craft knife
- Gold-tone headpins
- Gold-tone jump rings (4mm and 6mm)
- Gold-tone earring hooks
- Needle tool or toothpick
- Round nose pliers
- Flat nose pliers
- Wire cutters
- Fine grit sandpaper (400-600 grit)
- Matte varnish or sealant
Step 1: Shaping the Petals
-
Condition the white clay:
Start by taking a chunk of your white air dry clay and kneading it in your hands until it becomes soft, pliable, and free of cracks. -
Create the pink shade:
If you don’t have pink clay, mix a very small amount of pink acrylic paint or shaved pastel chalk into a portion of the white clay. Knead thoroughly until the color is an even, dusty rose shade. -
Roll out the slab:
Roll your clay out onto a non-stick surface to a uniform thickness of about 2-3mm. You don’t want it too thin, or the petals will be brittle, but too thick will make the earrings heavy. -
Cut the shapes:
Using a small teardrop cutter, press firmly to cut out your petal shapes. You will need approximately 14-16 petals total for a pair (7-8 per earring). Create a mix of white and pink petals according to your desired design. -
Soften the edges:
Gently rub the edges of each cut petal with your finger to remove any sharp cutting lines or clay burrs, giving them a smoother, more organic finish. -
Add texture and curvature:
Place a petal in the palm of your hand. Gently press a thumb into the center to curve it slightly, giving it a cupped, realistic petal shape rather than leaving it flat. -
Pierce the holes:
Use a needle tool to pierce a small hole at the tapered top of each petal. Make sure the hole is wide enough for your jump rings but not so close to the edge that the clay will break.
Step 2: Drying and Refining
-
Dry the components:
Lay the petals on a flat surface or a slight curve (like a curved drying rack or large pipe) to maintain their shape. Allow them to dry completely for at least 24 hours, flipping them once halfway through. -
Sand for perfection:
Once fully dry, inspect your petals. Use fine-grit sandpaper to gently smooth away any remaining rough edges or fingerprints. Be gentle, as air dry clay can be fragile. -
Seal the clay:
Apply a thin coat of matte varnish to both sides of each petal. This protects the clay from moisture and gives the finished piece a professional, finished look.
Smoother Edges Pro-Tip
Dip your finger in a tiny bit of water before smoothing the raw clay edges. This helps melt the clay slightly, erasing cut marks instantly for a polished look.
Step 3: Assembly
-
Plan your layout:
Arrange your dried petals on your work surface in the order you want them to hang. A typical cluster looks best with pairs of petals attached to a single jump ring, cascading down. -
Connect the first tier:
Open a jump ring using your two pairs of pliers. Thread two petals (for example, two pink ones for the top) onto the ring. Before closing it, attach another jump ring to act as the connector for the next tier. -
Build the chain:
Continue adding jump rings and petals. As you move down the chain, attach pairs of petals to the connecting jump rings. I usually alternate colors or group white petals at the bottom for a gradient effect. -
Attach the bottom petals:
For the very bottom of the cluster, you can attach a single petal or a final pair to the last jump ring to complete the tapered look. -
Add the ear wire:
Open the loop on your earring hook (or use a small jump ring if needed) and attach it to the top jump ring of your petal cluster. Ensure the hook faces the correct direction based on the front of your petals. -
Repeat for the second earring:
Follow the same assembly steps for the second earring, ensuring the pattern matches or mirrors the first one.
Level Up: Gold Leaf
Before sealing, apply tiny flakes of gold leaf to the edges of random petals. It adds a luxurious shimmer that complements the gold hardware perfectly.
Now you have a stunning pair of handmade botanical earrings ready to wear or gift