If you’re in the mood to make a clay coffee mug that feels as good in your hands as it looks on the shelf, these ideas will get your creativity humming. I’m sharing my favorite mug design directions—from classic, earthy finishes to playful details that still feel totally doable at home.
Classic Two-Tone Mug With Raw Clay Base
Embrace the natural beauty of roasted clay with this classic two-tone mug project. The design highlights the contrast between a smooth, speckled cream glaze and the raw, sandy texture of the unglazed base, giving your morning coffee a cozy, handmade feel.
Step-by-Step
Materials
- Speckled stoneware clay (mid-fire, cone 5/6)
- Pottery wheel
- Throwing tools (sponge, wire cutter, ribs)
- Trimming tools
- Needle tool
- Serrated kidney tool (for scoring)
- Slip (clay slurry)
- Cream/Oatmeal speckled glaze
- Wax resist (liquid wax)
- Kiln
Step 1: Throwing the Form
-
Prepare the Clay:
Begin by thoroughly wedging about 1 to 1.5 pounds of speckled stoneware clay. Wedging removes air bubbles and aligns the clay particles, which is essential for a smooth throwing process. -
Center on the Wheel:
Slam your clay ball onto the center of the wheel head. Use water and steady pressure to cone the clay up and down until it is perfectly centered and running true. -
Open the Clay:
Drill your thumbs into the center of the mound to open it, stopping about a quarter-inch from the bat to leave enough thickness for the base. Pull the floor outward to establish the interior width of your mug. -
Pull the Walls:
Using a wet sponge and your fingertips, make your first pull to raise the walls. Keep your pressure consistent to ensure even thickness. Aim for a simple cylinder shape, slightly tapering inward at the top to keep the heat in your coffee later. -
Refine the Shape:
Use a wooden rib on the exterior while supporting the interior with your hand to smooth out throwing lines and straighten the profile. Compress the rim with a piece of chamois or your sponge to make it pleasant for drinking. -
Cut and Dry:
Run a wire tool under the base to separate it from the wheel head. Carefully set the cylinder aside on a ware board until it reaches a leather-hard state (stiff but still cold to the touch).
Step 2: Trimming and Handle Attachment
-
Trim the Foot:
Once leather-hard, center the mug upside down on the wheel. Trim away excess clay from the bottom to create a defined foot ring. This separation is crucial for the two-tone look, as it creates a distinct stopping point for the glaze. -
Pull a Handle:
Take a separate nugget of clay and pull a strap handle using plenty of water. Taper it so it fits comfortably in the hand, then let it stiffen slightly on a board until it holds a curve without collapsing. -
Score and Slip:
Identify where you want the handle to sit. Score the mug surface and the attachment points of the handle aggressively with a serrated tool. Apply a generous dab of slip to both scored areas. -
Attach the Handle:
Press the handle firmly onto the mug. I like to use a small wooden tool to blend the seams perfectly so they disappear. Ensure the handle curve aligns vertically. -
Smooth the Transition:
Wipe away any excess slip with a damp sponge. Pay special attention to the bottom attachment point; for this specific design, the glaze won’t cover the very bottom of the handle, so clear craftsmanship here is key. -
Bisque Fire:
Allow the mug to dry completely (bone dry). This can take several days depending on humidity. Load it into the kiln for a bisque fire (usually Cone 04) to prepare it for glazing.
Pro Tip: Consistent Lines
Use a banding wheel when applying wax resist. Spin the wheel slowly while holding your brush steady against the mug to get that perfect, machine-straight horizon line.
Step 3: Glazing and Finishing
-
Wash the Bisque:
Wipe the bisque-fired mug with a clean, damp sponge to remove any kiln dust. This helps the glaze adhere properly and prevents pinholing. -
Wipe the Base:
This is the most critical step for the two-tone look. You must decide exactly where the glaze line will stop. Measure about 1/4 to 1/3 up from the bottom of the mug. -
Apply Wax Resist:
Paint liquid wax resist onto the bottom third of the mug, including the foot ring and the underside. Be very precise with your line—this determines the crisp boundary between the raw clay and the glaze. -
Extend Wax to Handle:
Carefully paint the wax up the bottom portion of the handle as well, matching the line on the body of the mug. This creates that cohesive look where the glaze ‘dips’ over the top. -
Dip Glaze:
Stir your cream speckled glaze thoroughly. Holding the mug by the foot (or using tongs), dip the mug rapidly into the glaze bucket. The wax resist will repel the glaze from the bottom section. -
Clean Up:
Once the glaze dries to a powdery touch, use a sponge to wipe any stray beads of glaze off the waxed area. The line should be clean and sharp. -
Final Fire:
Load the mug into the kiln for the final glaze firing (Cone 5 or 6, depending on your clay and glaze choice). Ensure the foot is perfectly clean so it doesn’t fuse to the kiln shelf.
Troubleshooting: Glaze Running
If your glaze runs onto the raw clay during firing, your application was too thick. Quickly dip for just 3 seconds, or add a ‘catcher’ groove during trimming to stop drips.
Once cooled, sand the unglazed bottom lightly to ensure your new favorite mug sits smoothly on any table


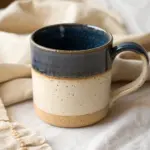
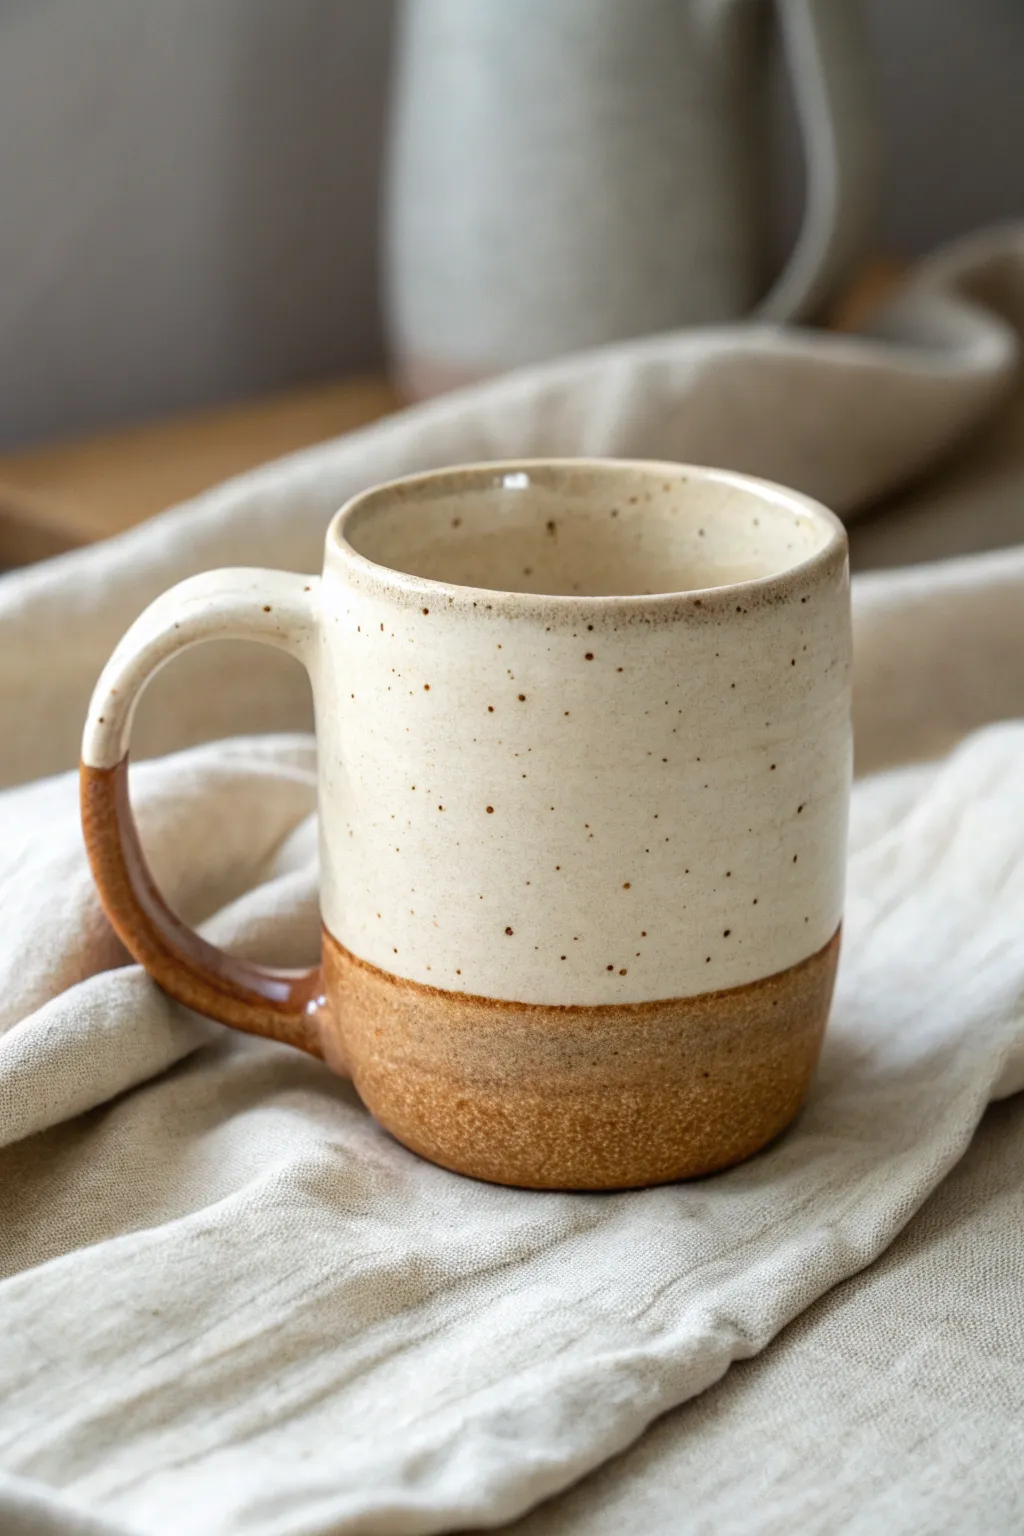
Dipped Color Mug With a Clean Edge

Embrace the beauty of contrast with this dipped color mug project featuring a speckled clay body that shines through a creamy white glaze. The deep cobalt blue base adds a grounding, sophisticated touch while the clean yet organic edge keeps the look handmade and inviting.
Step-by-Step Guide
Materials
- Speckled Stoneware Clay (e.g., Lagunitas or similar)
- Pottery Wheel
- Throwing Tools (sponges, ribs, wire cutter)
- Trimming Tools
- Bisque Kiln
- Glaze Kiln
- Cream Glossy Glaze
- Deep Cobalt Blue Glaze
- Wax Resist (optional)
- Clean Sponge
- Glaze Tongs or Pliers
Step 1: Throwing and Shaping
-
Prepare the Clay:
Begin by wedging about 1 to 1.5 pounds of speckled stoneware clay to remove air bubbles and ensure consistency. -
Center and Open:
Center the clay firmly on your wheel head, then open the center carefully, leaving about a half-inch thick floor for trimming later. -
Pull the Walls:
Pull the walls up into a cylinder shape. Aim for a straight profile initially, then slightly bell it out towards the top for a comfortable drinking rim. -
Refine the Lip:
Compress the rim with a chamois or your sponge to ensure it is smooth and pleasant against the lips. -
Shape the Curve:
Using a metal styling rib, gently push from the inside to create a subtle curve at the base while smoothing the exterior wall. -
Cut Off and Dry:
Wire the pot off the bat and set it aside to dry until it reaches a leather-hard state.
Clean Lines
For a razor-sharp line between colors, apply a band of wax resist over the edge of the cream glaze before dipping the bottom half in blue.
Step 2: Trimming and Handle Attachment
-
Trim the Foot:
Once leather-hard, center the mug upside down on the wheel and trim away excess weight from the base, creating a distinct foot ring. -
Pull a Handle:
Pull a handle from a small nugget of the same clay, tapering it slightly so it feels balanced against the cup’s size. -
Attach the Handle:
Score the mug wall and the handle attachment points, add slip, and firmly press the handle on. Smooth the joints with a damp sponge or modeling tool. -
Bisque Fire:
Allow the mug to dry completely (bone dry) before loading it into the kiln for a bisque firing.
Add Texture
Before the first firing, gently press a rough sponge or coarse fabric into the leather-hard clay surface to enhance the speckled effect.
Step 3: Glazing the Two-Tone Look
-
Clean the Bisque:
Wipe the bisque-fired mug with a damp sponge to remove any dust or oils that could repel the glaze. -
Internal Glazing:
Pour the Cream Glossy glaze inside the mug, roll it around to coat the entire interior, and pour out the excess swiftly. -
Clean the Rim:
Wipe any drips off the rim immediately to ensure a crisp start for the exterior glazing. -
First Dip (Top):
Hold the mug by the foot and dip the top two-thirds into the Cream Glossy glaze. Hold for 3 seconds and lift straight up. -
Clean the Junction:
If the glaze ran too far down, gently wipe the lower boundary to create a relatively straight line where the blue will meet it. -
Second Dip (Bottom):
Once the cream layer is dry to the touch, hold the mug by the rim and dip the bottom third into the Deep Cobalt Blue glaze. -
Glaze the Handle:
Use a small brush or ladle to carefully pour blue glaze over the handle if dipping becomes awkward, ensuring it matches the bottom section. -
Manage the Overlap:
Where the blue meets the cream, a slight overlap is fine; just ensure the glaze isn’t too thick or it might run during firing. -
Wipe the Foot:
I always meticulously sponge the bottom foot ring completely clean of glaze to prevent the mug from sticking to the kiln shelf. -
Final Firing:
Load the mug into your glaze kiln and fire to the maturity temperature of your clay and glaze combination (usually Cone 5 or 6).
Once cooled, your sturdy new mug is ready to hold your favorite morning brew


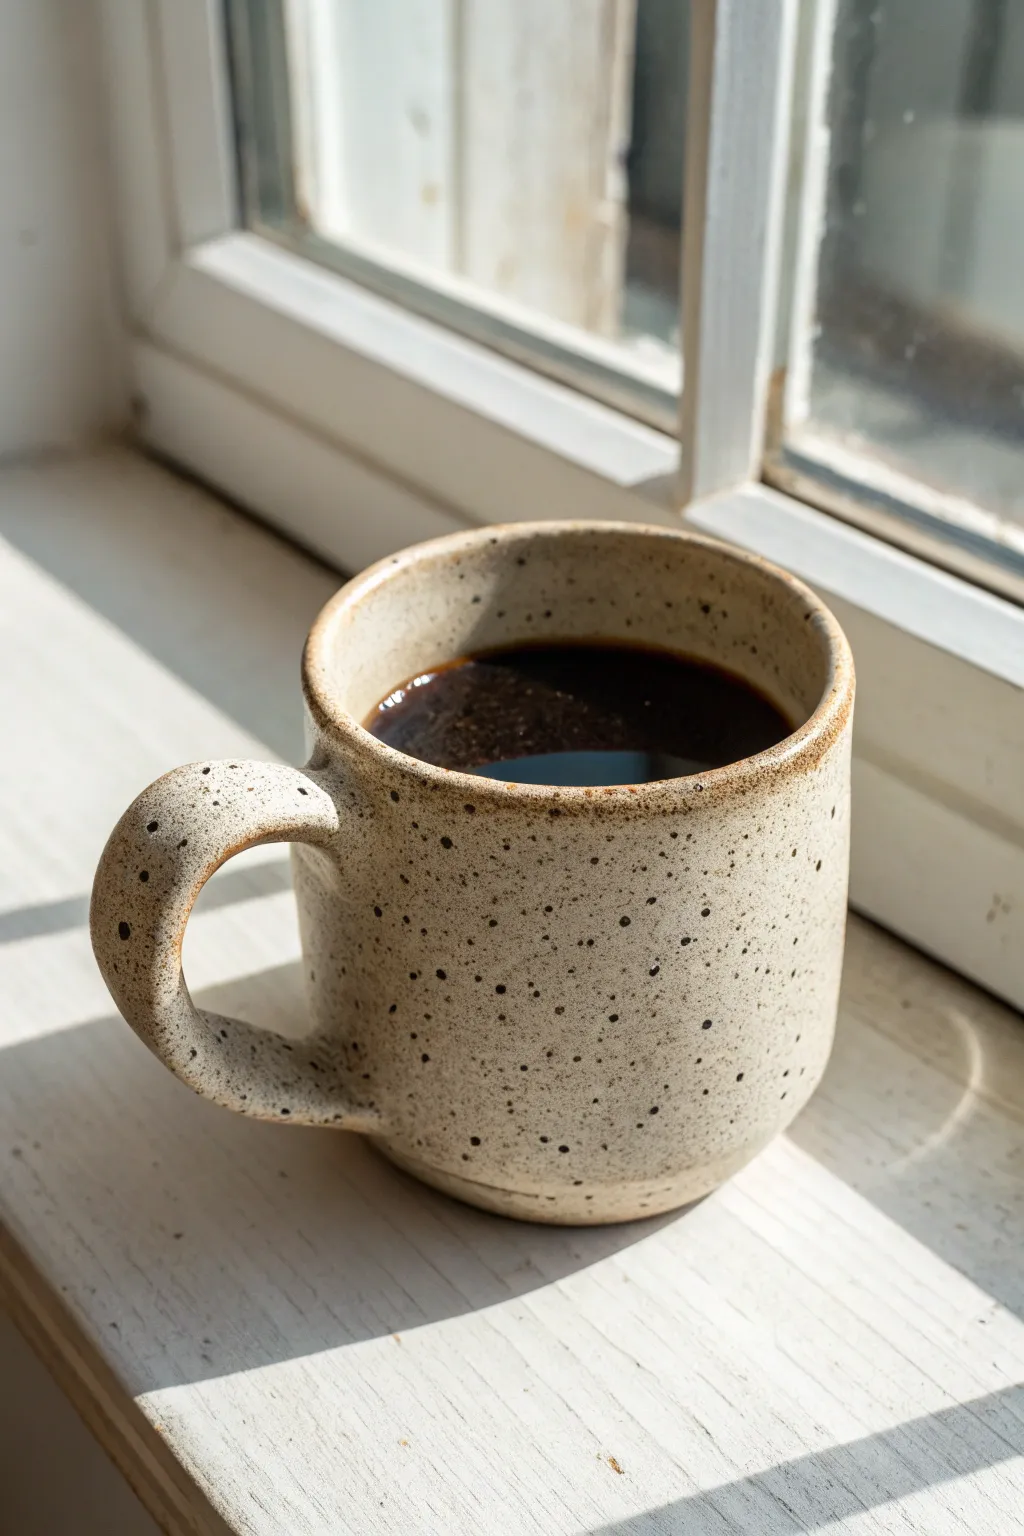
Simple Speckled Clay With Clear Gloss
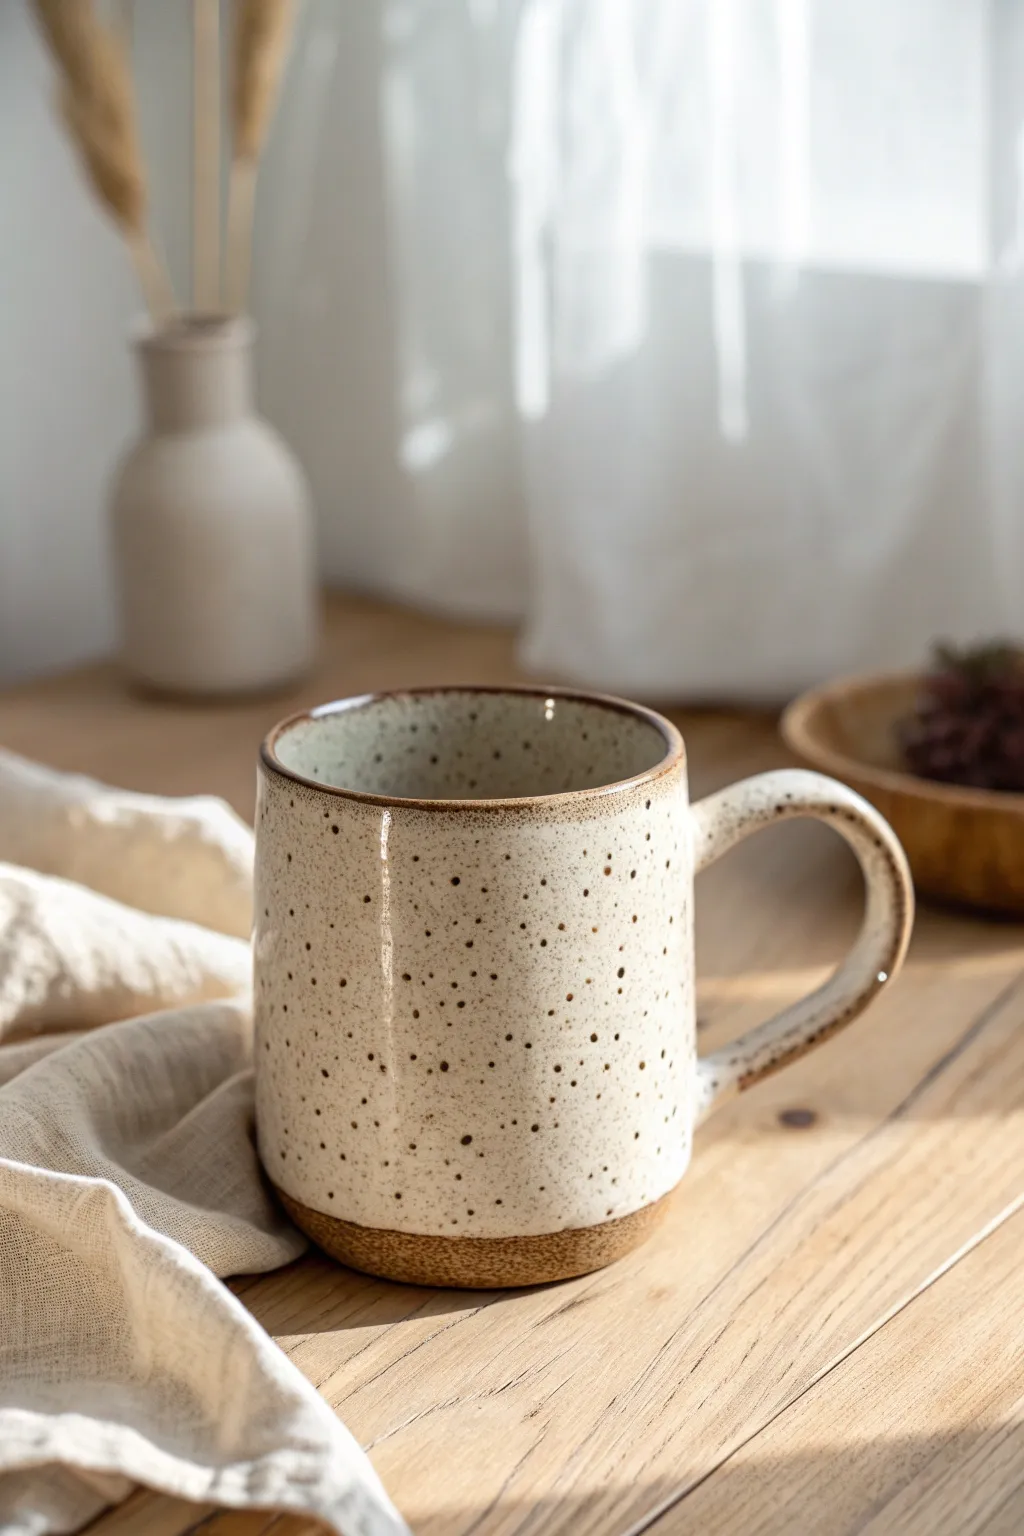
Embrace the natural beauty of speckled clay with this minimalist mug design that lets the material speak for itself. The simple cylindrical form combined with a raw, unglazed base and a glossy finish creates a perfect balance of rustic texture and polished shine.
Step-by-Step Tutorial
Materials
- Speckled stoneware clay (mid-fire suggested)
- Pottery wheel (or slab roller for hand-building)
- Wire cutter
- Rib tool (metal and rubber)
- Needle tool
- Trimming tools
- Sponge
- Clear gloss glaze
- Kiln
- Bats
Step 1: Throwing and Shaping
-
Prepare the Clay:
Begin by thoroughly wedging about 1 to 1.5 pounds of speckled stoneware clay to remove air bubbles and ensure consistency. -
Center on the Wheel:
Slam the clay onto the wheel head and use water and pressure to center it perfectly before opening. -
Open and Pull Walls:
Open the clay to create a flat internal floor, then pull the walls up vertically. Aim for a straight, cylindrical shape with a very slight taper inward at the rim. -
Refine the Shape:
Use a metal rib on the exterior to compress the clay and remove throwing lines, creating that smooth, sleek profile seen in the photo. -
Create the Rim:
Use a chamois or a piece of plastic to compress the rim, rounding it gently for a comfortable drinking edge. -
Cut and Dry:
Use a wire cutter to slice under the mug, releasing it from the bat. Set it aside until it reaches leather-hard consistency.
Iron Speckle Pop
To get more dramatic speckles, wipe the bisque ware with a slightly damp sponge before glazing. This exposes the iron pyrite in the clay, helping it bleed through the clear glaze during firing.
Step 2: Trimming and Handling
-
Trimming the Foot:
Once leather hard, center the mug upside down on the wheel. Trim the bottom to create a distinct foot ring, exposing the raw texture of the clay. -
Pulling a Handle:
Pull a strap of clay for the handle, tapering it slightly. Let it stiffen up a bit on a board until it holds a curve without collapsing. -
Attach the Handle:
Score and slip the attachment points on both the mug body and the handle endpoints. Press the handle firmly onto the mug, smoothing the joints with a wooden tool or your finger. -
Refine the Curve:
Check the handle’s profile; ensure it has a classic ‘C’ or ear shape with enough room for fingers, just like the comfortable loop in the image. -
Slow Drying:
Cover the mug loosely with plastic to allow the handle and body to dry at the same rate. This prevents cracking at the connection points.
Cloudy Clear Glaze?
If your clear gloss looks milky after firing, the clear coat is likely too thick. Try dipping for a shorter duration or thinning the glaze slightly with water for the next batch.
Step 3: Glazing and Firing
-
Bisque Fire:
Once bone dry, load the mug into the kiln for a bisque firing (usually to Cone 04) to prepare it for glazing. -
Wax the Base:
Apply wax resist to the bottom half-inch of the mug and the foot ring. This crucial step creates that beautiful contrast between the glazed body and the raw, unglazed base. -
Prepare the Glaze:
Stir your clear gloss glaze thoroughly. I find that straining it before use eliminates clumps and ensures a crystal-clear finish. -
Dip the Mug:
Holding the foot, dip the mug quickly but fully into the clear glaze. Shake it gently as you pull it out to remove excess drips. -
Clean the Line:
Use a damp sponge to wipe away any glaze beads that may have settled on the waxed area, ensuring a crisp, straight line where the glaze ends. -
Glaze Fire:
Place the mug in the kiln for the final glaze firing according to your clay’s specific temperature range (often Cone 5 or 6 for stoneware). -
Cool and Sand:
After the kiln cools completely, remove the mug. If the unglazed foot feels rough, lightly sand it with 400-grit sandpaper for a smooth finish on tabletops.
Enjoy your morning coffee in the warm, tactile comfort of your new handmade mug


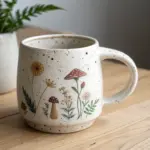
Hand-Painted Wildflower Coffee Mug
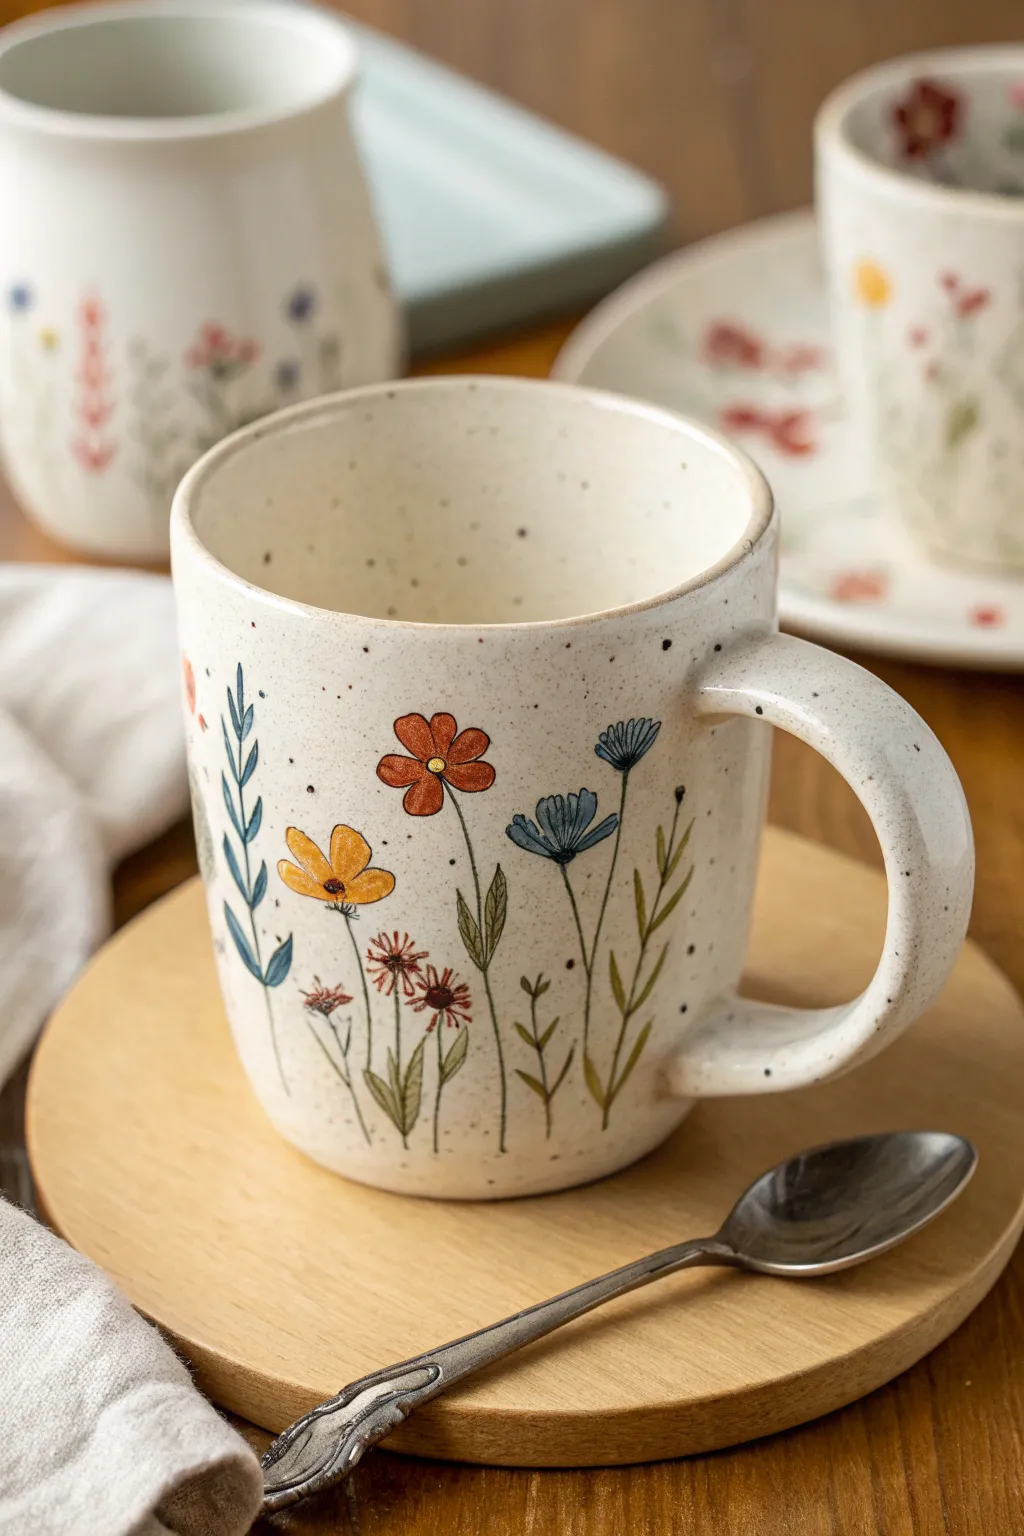
Bring the charm of a meadow to your morning routine with this hand-painted ceramic mug featuring delicate wildflowers. The design combines a speckled, rustic cream base with vibrant, stylized floral stems for a piece that feels both earthy and elegant.
Step-by-Step Guide
Materials
- Bisque-fired ceramic mug (straight-sided, approximately 12 oz)
- Underglaze paints: Rust Orange, Mustard Yellow, Cornflower Blue, Deep Green, Brick Red
- Speckled cream or ‘oatmeal’ brush-on glaze (for the base)
- Clear transparent food-safe glaze (dipping or brushing)
- Detail brushes (liner size 000, round size 2)
- Fan brush (for base coat)
- Pencil (optional for sketching)
- Sponge and water
- Kiln access (cone 6 or compatible with your clay body)
Step 1: Base Preparation
-
Clean the bisque:
Wipe down your bisque-fired mug with a slightly damp sponge to remove any dust or oils that might prevent glaze adhesion. -
Apply the speckled base:
Using a fan brush, apply 2-3 even coats of the speckled cream glaze to the entire exterior and interior of the mug. Allow each coat to dry until it’s no longer shiny before applying the next. -
Smooth the surface:
Check for any drips or uneven patches in the base glaze and gently smooth them out with a finger if needed.
Step 2: Floral Design
-
Plan the layout:
Visualize where your tallest stems will go. You want them spaced irregularly around the mug to mimic a wild field. You can lightly sketch key placement points with a pencil; the graphite will burn off in the kiln. -
Paint the stems:
Load a liner brush (size 000) with watered-down Deep Green underglaze. Paint thin, vertical lines of varying heights rising from the bottom edge of the mug. -
Add leaves:
Along the stems, add small, alternating leaves. Use a ‘press and lift’ motion with your brush to create tapered leaf shapes that look natural and organic. -
Create the orange flower:
For the prominent orange bloom, use Rust Orange underglaze and a size 2 round brush. Paint five simple, rounded petals radiating from a center point on one of the taller stems. -
Paint the yellow bloom:
Next to the orange flower, paint a smaller, cup-shaped flower using Mustard Yellow. Think of it like a tulip shape, with three visible petals pointing upward. -
Add blue accents:
Using Cornflower Blue, paint a few stems with small, clusters of petals or a single thistle-like bloom. Use quick, short strokes to give them texture. -
Detail the red sprigs:
With Brick Red underglaze, add tiny clusters of dots or miniature star-shapes on the shorter stems to fill in the gaps near the bottom. -
Add definition:
Once the flower colors are dry to the touch, use a very fine liner brush with a dark brown or black underglaze to add tiny center dots to the orange and yellow flowers for contrast.
Brush Control Pro-Tip
Rest your pinky finger on the mug surface as an anchor while painting the stems. This stabilizes your hand for straighter, more delicate lines.
Step 3: Glazing and Firing
-
Dry the design:
Let the underglaze design dry completely for at least a few hours, or overnight if possible, to ensure the colors don’t smear during the final glazing. -
Apply clear glaze:
Dip the mug into a clear transparent glaze, or brush on two thin coats. This seals the underglaze and gives the mug its glossy, food-safe finish. Be careful not to smear the painted flowers. -
Clean the foot:
Wipe the bottom foot ring of the mug completely clean with a wet sponge. Any glaze left here will fuse the mug to the kiln shelf. -
Fire the mug:
Load the mug into the kiln and fire it to the temperature recommended for your specific clay and glaze combination (typically Cone 5 or 6). -
Cool and inspect:
Allow the kiln to cool naturally before opening. Remove your mug and check that the glaze is smooth and the speckles have emerged beautifully.
Level Up: Rim Detail
Dilute a bit of iron oxide wash and gently sponge it onto the rim before the final clear glaze. This creates a vintage, toasted brown edge.
Enjoy sipping your favorite brew from a mug that captures the effortless beauty of a summer garden

The Complete Guide to Pottery Troubleshooting
Uncover the most common ceramic mistakes—from cracking clay to failed glazes—and learn how to fix them fast.
Carved Floral Sgraffito Wrap
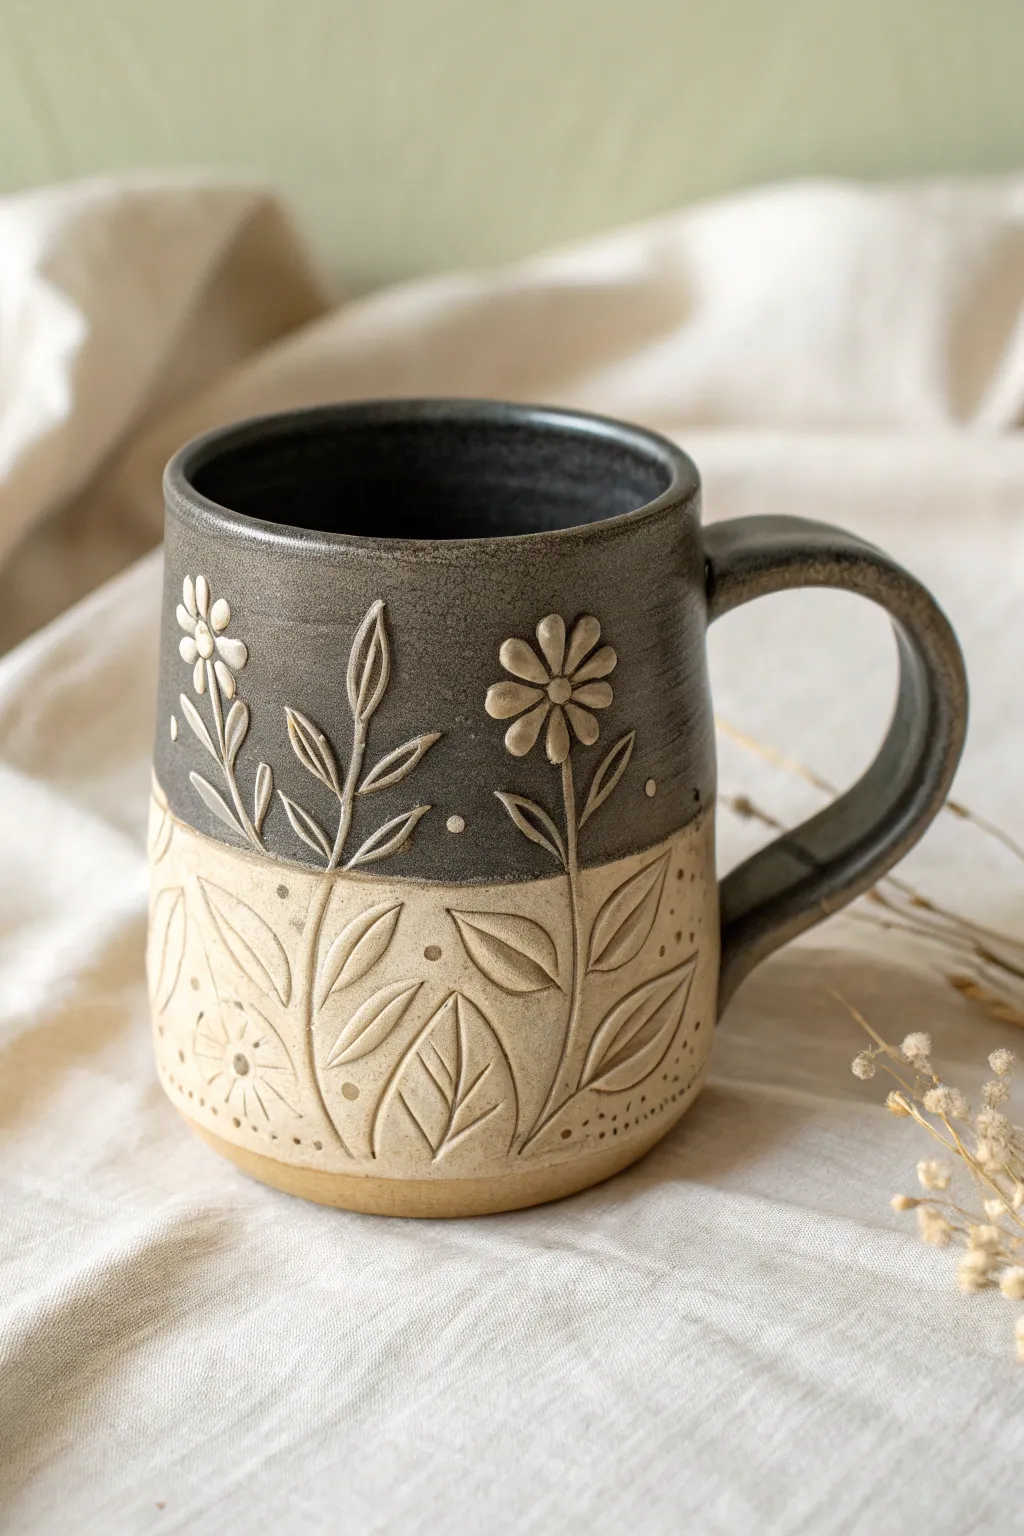
This project combines the elegant contrast of sgraffito with the tactile satisfaction of relief carving. By layering dark underglaze over a light clay body, you’ll create a striking botanical wrap design that feels as good to hold as it looks.
Step-by-Step
Materials
- Light-colored stoneware clay (white or buff)
- Black underglaze or black slip
- Pottery wheel (or slab rolling equipment)
- Loop tools (small and medium)
- Sgraffito tool or sharp needle tool
- Carving tool (small gouge)
- Soft fan brush
- Clear transparent glaze
- Sponge and bucket of water
Step 1: Forming the Mug
-
Throw the cylinder:
Begin by centering about 1-1.5 lbs of light stoneware clay on the wheel. Pull walls to a medium thickness—aim for slightly thicker than usual to allow for carving depth without puncturing the wall. -
Refine the shape:
Shape a simple, straight-sided cylinder with a subtle taper at the bottom. Smooth the rim with a chamois. -
Trim the foot:
Once the piece is leather-hard, trim a clean foot ring. I like to keep the bottom sturdy to balance the visual weight of the carving. -
Attach the handle:
Pull a strap handle and attach it firmly. Ensure the curve is comfortable for gripping and wipe away any excess slip at the connection points.
Clean Lines Pro Tip
When carving through underglaze, brush away the crumbs frequently with a very soft, dry makeup brush. Blowing them off can sometimes make the moist crumbs stick to the clean areas.
Step 2: Applying the Contrast
-
Mask the bottom:
Decide where your horizon line will be. This design features a dark top half and a raw clay bottom half. You can use wax resist on the bottom half, or simply rely on steady hand painting. -
Apply black underglaze:
Using a soft fan brush, apply 2-3 even coats of black underglaze or slip to the upper portion of the mug exterior. Let each coat dry until the sheen disappears before adding the next. -
Let it firm up:
Allow the mug to return to a firm leather-hard state. The underglaze should be dry to the touch and not tacky.
Level Up: Texture Play
Try leaving the raw clay bottom unglazed on the outside! Apply wax resist over the carved raw section before dipping in clear glaze for a distinct textural difference.
Step 3: Carving the Design
-
Sketch the stems:
Lightly scratch the main vertical lines for your flower stems using a needle tool. Extend them from the raw clay section up into the black section. -
Carve the bottom leaves:
On the raw clay bottom section, use a small loop tool to carve out leaf shapes. Carve these in relief, removing the background clay slightly so the leaves stand out. -
Add leaf veins:
Use a sharp tool to incise central veins into the relief-carved leaves on the bottom section. -
Sgraffito the top section:
Moving to the black section, use a sgraffito tool to scrape away the black underglaze where the stems and leaves continue upward. Reveal the white clay underneath. -
Create the heavy blooms:
For the main daisy-like flowers, carve firmly through the black layer. Make the petals teardrop-shaped and allow the tool to go slightly deeper than a standard scratch to create texture. -
Add detail dots:
Use the tip of your tool to scratch small dots or circles around the flowers in the black field for whimsical texture. -
Transition details:
Add small dots of black underglaze (using a fine brush or slip trailer) onto the raw clay section to mirror the texture from above. -
Define the border:
Ensure the transition line between the black top and raw bottom is clean. You can carve a shallow horizontal groove to define this border if needed.
Step 4: Finishing
-
Bisque fire:
Once the mug is bone dry, fire it to cone 04 (or your clay’s specific bisque temperature). -
Clean the surface:
Wipe the bisqueware down with a damp sponge to remove any dust or debris from inside the carved grooves. -
Glaze application:
Dip the entire mug into a clear transparent glaze. A matte or satin clear glaze works beautifully to preserve the earthy feel of the carving. -
Final firing:
Glaze fire to cone 6 (or appropriate temp for your stoneware). Ensure the foot is wiped clean so it doesn’t stick to the shelf.
Your finished mug will have a beautiful tactile quality perfect for morning coffee
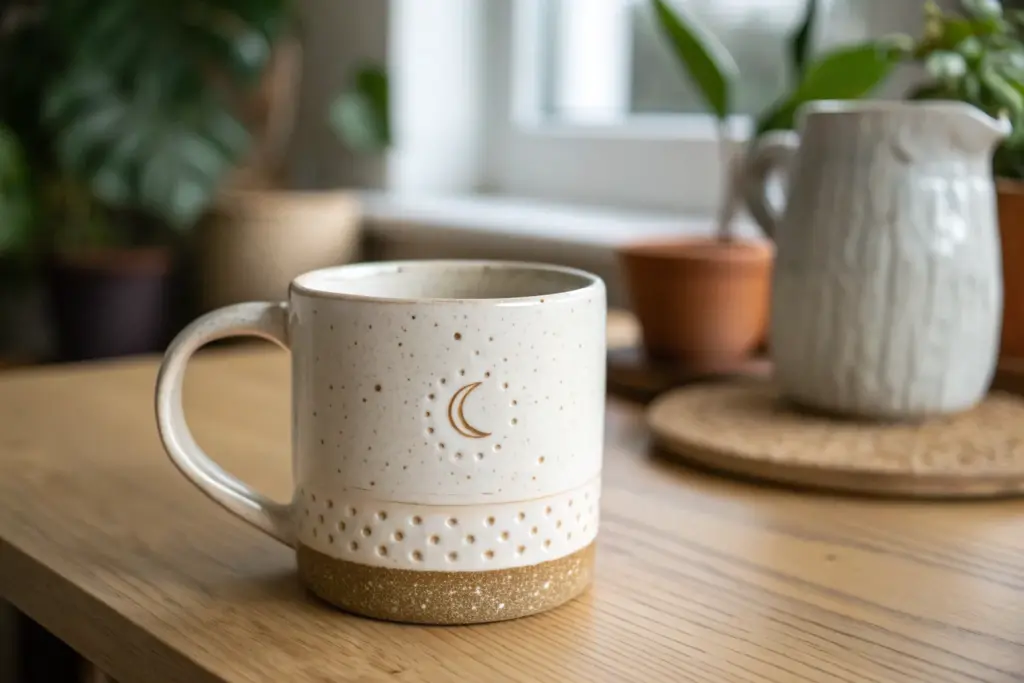
Stamped Texture Band Around the Belly
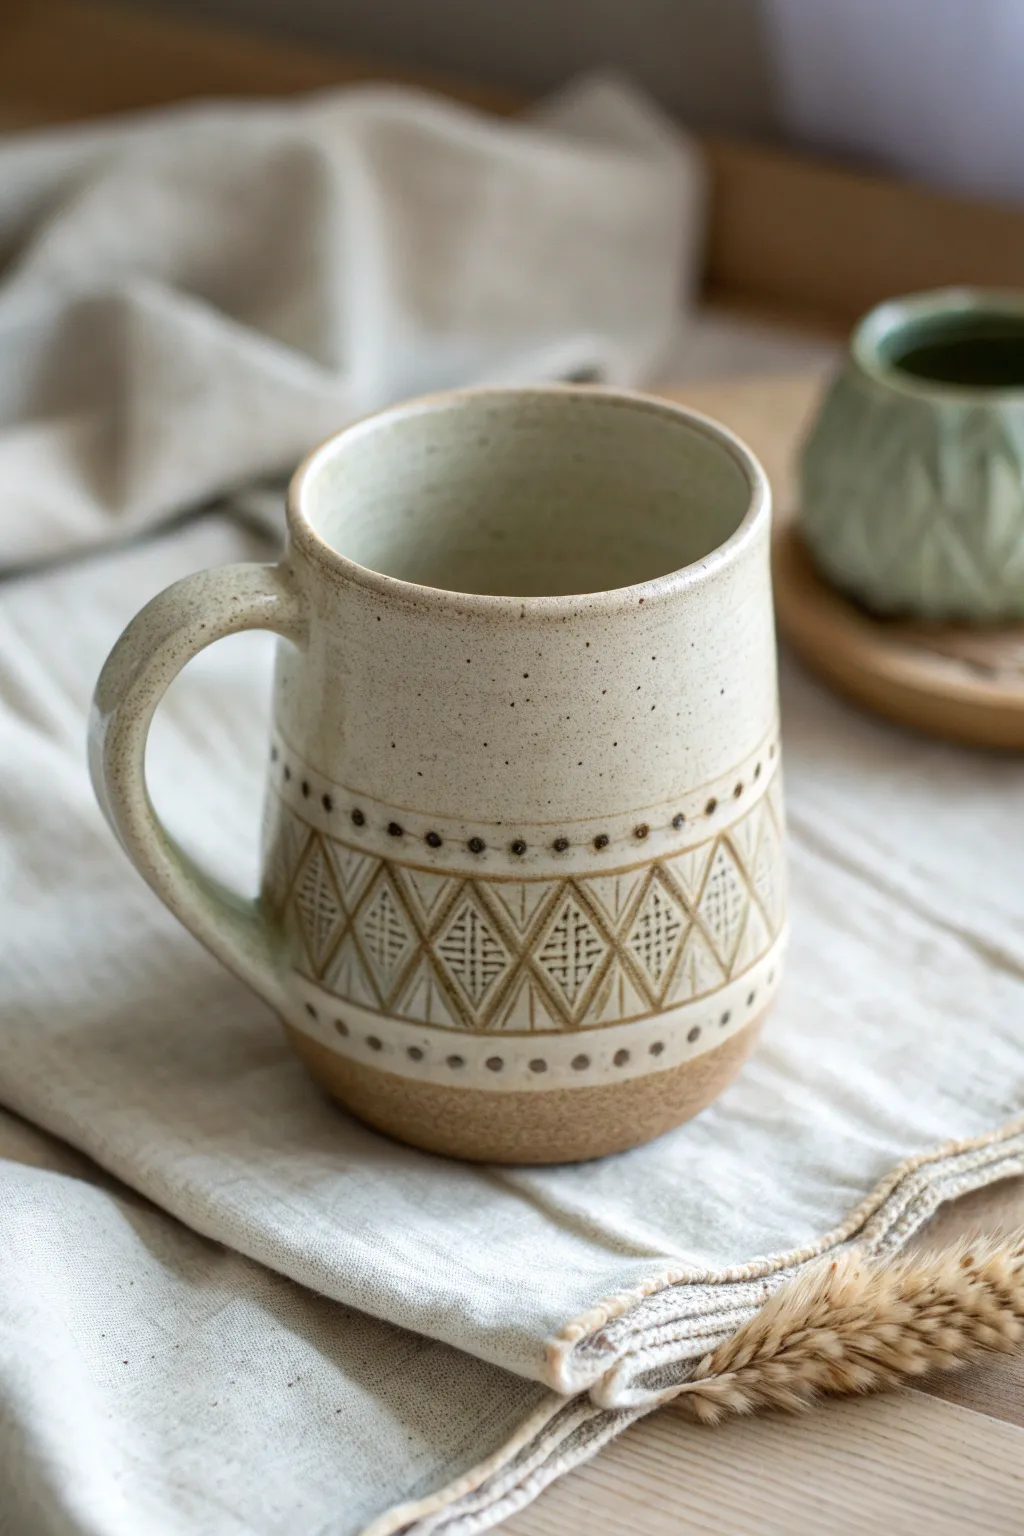
This rustic, elegant mug features a creamy speckled glaze that highlights a intricate band of geometric texture. The stamped diamond pattern wraps around the belly, grounded by rows of delicate dots and earthy clay tones.
Step-by-Step Tutorial
Materials
- Stoneware clay body (speckled buff or similar)
- Pottery wheel and throwing tools
- Diamond-shaped texture stamp (or carving tool)
- Small round stylus or drill bit (for dots)
- Sponge
- Wire cutting tool
- Creamy matte or satin glaze (speckled)
- Wax resist (optional)
- Small paintbrush
Step 1: Throwing the Form
-
Center and Open:
Begin with about 1 to 1.5 pounds of wedged speckled stoneware clay. Center it firmly on the wheel head and open the clay to establish a flat interior floor. -
Pull the Cylinder:
Pull the walls up into a tall, straight cylinder. Aim for an even thickness of about 1/4 inch from bottom to top. -
Shape the Belly:
Applying gentle pressure from the inside, puff out the middle section of the mug slightly to create a subtle curve or ‘belly’, while keeping the rim slightly tapered in to hold heat. -
Smooth the Surface:
Use a metal or rubber rib to compress the outside wall. This removes throwing lines and creates a smooth canvas for your texture work later. -
Finish the Rim:
Compress the rim using a chamois or your finger to ensure it is rounded and comfortable for drinking. Wire the pot off the wheel but leave it on a bat to firm up.
Step 2: Creating the Texture Band
-
Wait for Leather Hard:
Let the mug dry until it reaches a sturdy leather-hard stage. It shouldn’t be tacky, but it must be soft enough to take an impression without cracking. -
Mark the Band:
Lightly trace two parallel horizontal lines around the belly of the mug using a needle tool or a banding wheel to define where your pattern will live. -
Stamp the Diamonds:
Using a diamond-shaped stamp featuring a grid or cross-hatch pattern, press firmly into the clay between your guide lines. Repeat this around the entire circumference, ensuring they touch point-to-point. -
Add Upper Dots:
With a small round tool or the blunt end of a drill bit, press a row of evenly spaced indentations just above the top points of your diamond band. -
Add Lower Dots:
Repeat the dotting process along the bottom edge, aligning these dots with the ones above for vertical symmetry. -
Refine the Surface:
I like to run a finger lightly over the stamped area once the clay is slightly drier to knock off any sharp burrs created by the stamping process.
Stamp Clarity Tip
Dust your stamp lightly with cornstarch before pressing it into the clay. This acts as a release agent and prevents the stamp from sticking or pulling up the clay surface.
Step 3: Handle and Trimming
-
Trim the Base:
Turn the mug over and trim the foot. Create a distinct break where the wall meets the floor, leaving some unglazed clay visible at the very bottom for contrast. -
Pull a Handle:
Pull a strap of clay for the handle. Allow it to curve into a classic ‘ear’ shape and let it stiffen slightly. -
Attach the Handle:
Score and slip the attachment points on both the mug and the handle. Press the handle firmly onto the side, opposite the seam of your pattern if there is one. -
Bisque Fire:
Dry the mug slowly to prevent cracking, then bisque fire it to cone 04 (or your clay body’s recommendation).
Uneven Spacing?
If your diamonds don’t meet perfectly at the end of the round, gently smudge the last two impressions to blend them, or place the handle over the mismatched seam.
Step 4: Glazing
-
Wax the Pattern Details:
Paint a thin line of wax resist over the impressed lines of the diamonds if you want the raw clay to show through clearly. Alternatively, simply rely on the glaze breaking over the texture. -
Wax the Foot:
Apply wax resist to the bottom half-inch of the mug’s exterior and the entire underside to keep the raw clay exposed. -
Dip in Glaze:
Dip the mug into a creamy, speckled matte white glaze. Hold it for about 3 seconds to get good coverage without obscuring the texture. -
Wipe Back:
If the glaze looks too thick over the texture, gently wipe the raised areas with a damp sponge to reveal the clay color on the high points. -
Final Fire:
Glaze fire the mug to cone 6 (electric oxidation) or the appropriate temperature for your specific clay and glaze combination.
Once fired, the toasted clay body will peek through the glaze, emphasizing your beautiful hand-stamped design


What Really Happens Inside the Kiln
Learn how time and temperature work together inside the kiln to transform clay into durable ceramic.
Ribbed Lines for a Modern Grip
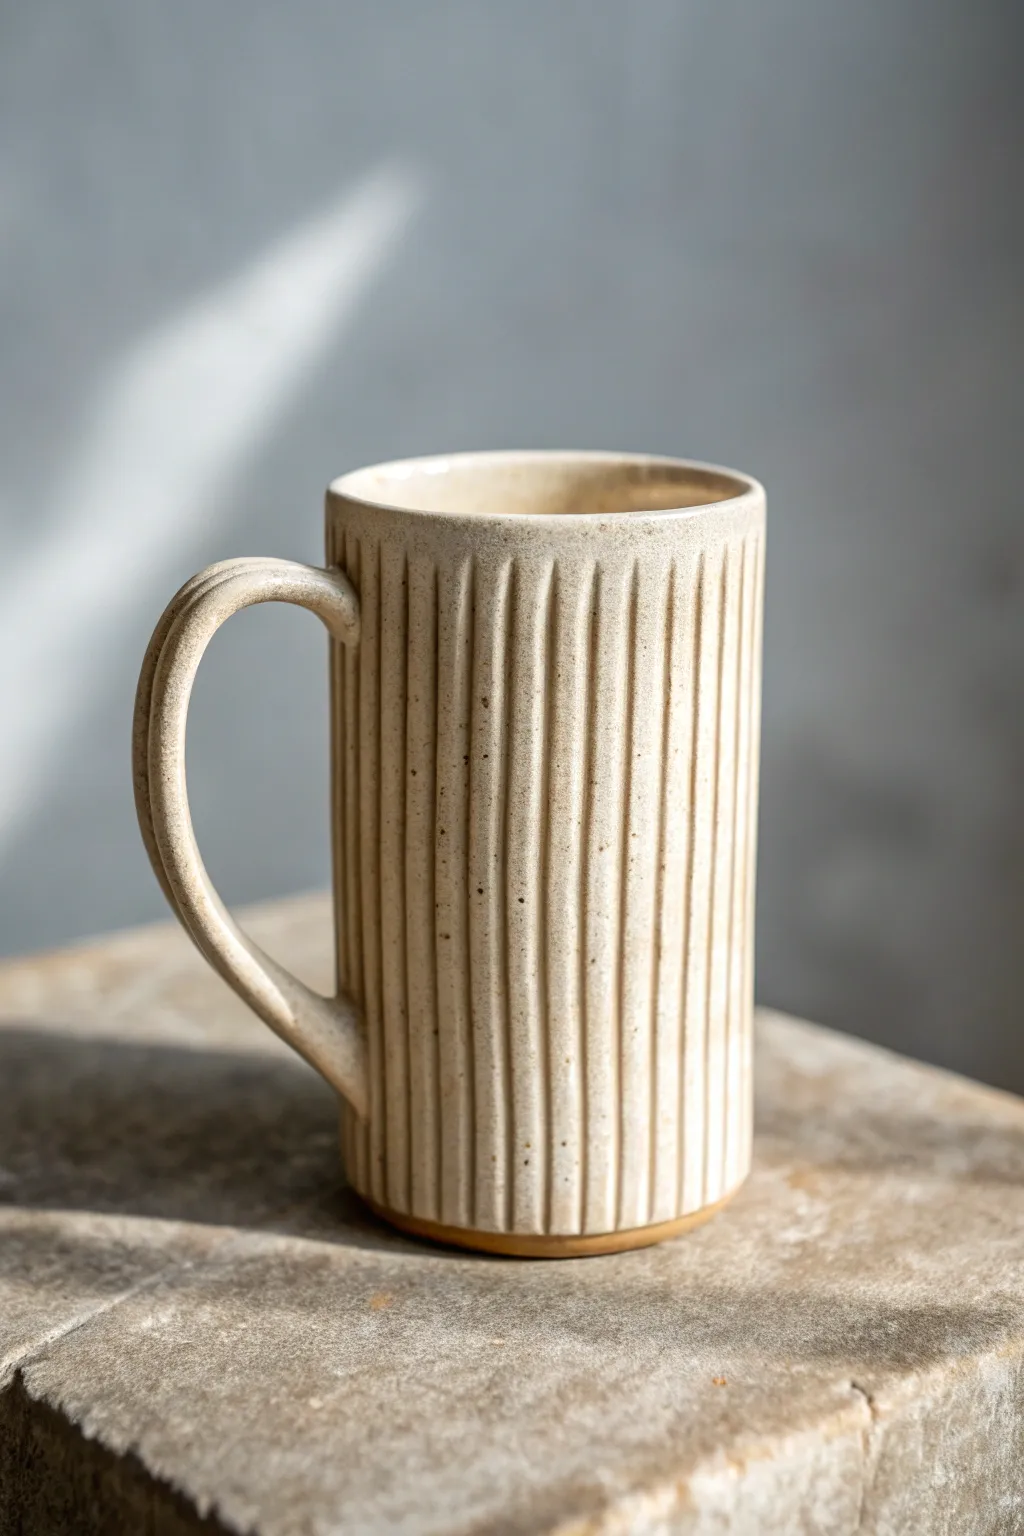
Capture a blend of modern elegance and tactile warmth with this wheel-thrown vertical ribbed mug. The rhythmic fluting not only looks sophisticated but offers a satisfying grip for your morning coffee.
How-To Guide
Materials
- Speckled stoneware clay (approx 1.5 lbs)
- Pottery wheel
- Throwing tools (sponge, needle tool, rib)
- Wire texturing tool or ribbon tool (small loop)
- Calipers (optional)
- Trimming tools
- Serrated rib/scoring tool
- Creamy matte white glaze
Step 1: Throwing the Form
-
Prepare the clay:
Begin with about 1.5 to 1.75 pounds of well-wedged speckled stoneware clay. The speckles are crucial for achieving that earthy, organic finish visible in the reference. -
Center and open:
Center your clay firmly on the wheel head. Open the vessel, leaving a floor thickness of about a quarter-inch. -
Pull the walls:
Pull the clay upward into a tall cylinder. Unlike a standard mug, you want extra height here since the vertical lines emphasize verticality. Aim for roughly 5-6 inches tall. -
Refine the shape:
Use a straight wooden rib on the inside and outside to ensure the walls are perfectly vertical and straight. Remove any throwing lines; the surface needs to be smooth for the texturing phase. -
Define the rim:
Compress the rim with a chamois or your finger to make it smooth and rounded, slightly tapering it inward for a comfortable drinking edge. -
Wire off:
Wire the cylinder off the bat but leave it in place or move it to a ware board to firm up until it reaches leather-hard consistency.
Step 2: Carving the Texture
-
Mark the spacing:
Once the clay is leather-hard (firm enough to not warp, but soft enough to carve), gently mark even intervals around the rim as guides for your lines. -
Carve the first flutes:
Using a small U-shaped ribbon tool or a specialized fluting tool, drag downward from just below the rim to just above the base in a confident, straight line. I find holding my breath for the stroke helps keep my hand steady. -
Establish the rhythm:
Continue carving lines around the circumference. Try to leave a narrow, raised ridge between each carved channel to create that sharp separation shown in the image. -
Clean the burrs:
Use a soft brush or a slightly damp sponge to gently wipe away clay crumbs or sharp burrs left by the tool, but be careful not to wash away the crispness of the ridges.
Uneven Carving?
If your vertical lines are wobbling, rest your pinky finger against the pot for stability or use a ruler held gently against the surface as a guide.
Step 3: Handle and Finish
-
Pull a strap handle:
Pull a handle from a lug of clay. It should be relatively thin and flat with a slight central groove to mimic the verticality of the mug. -
Shape the ear:
Form the handle into a tall ‘ear’ shape. The attachment points should be vertical, aligning with the grain of your carved lines. -
Attach the handle:
Score and slip the attachment points on the mug and handle. Press the handle firmly onto the mug, smoothing the joints well so they look seamless. -
Trim the foot:
Flip the mug over (using a chuck or foam bat) and trim the bottom. Reveal a bit of the raw clay at the very base to create the unglazed accent line seen in the photo. -
Bisque fire:
Allow the mug to dry slowly and completely before firing it to bisque temperature (usually Cone 04). -
Glaze application:
Dip the mug into a satin or matte cream glaze. The glaze should break over the sharp ridges (appearing thinner) and pool slightly in the flutes, enhancing the texture. -
Wax the foot:
Carefully wipe the glaze off the bottom quarter-inch of the mug or use wax resist before dipping to maintain that raw clay contrast. -
Final firing:
Glaze fire the piece to maturity (Cone 5 or 6 depending on your clay body). This will bring out the iron speckles through the creamy glaze.
Make It Pop
Use a translucent celadon glaze instead of white. It will pool darker in the grooves and stay light on the ridges for deeper visual contrast.
Enjoy the rhythmic feel of the ribbed texture every time you wrap your hands around your new favorite mug
Faceted Mug With Crisp Planes
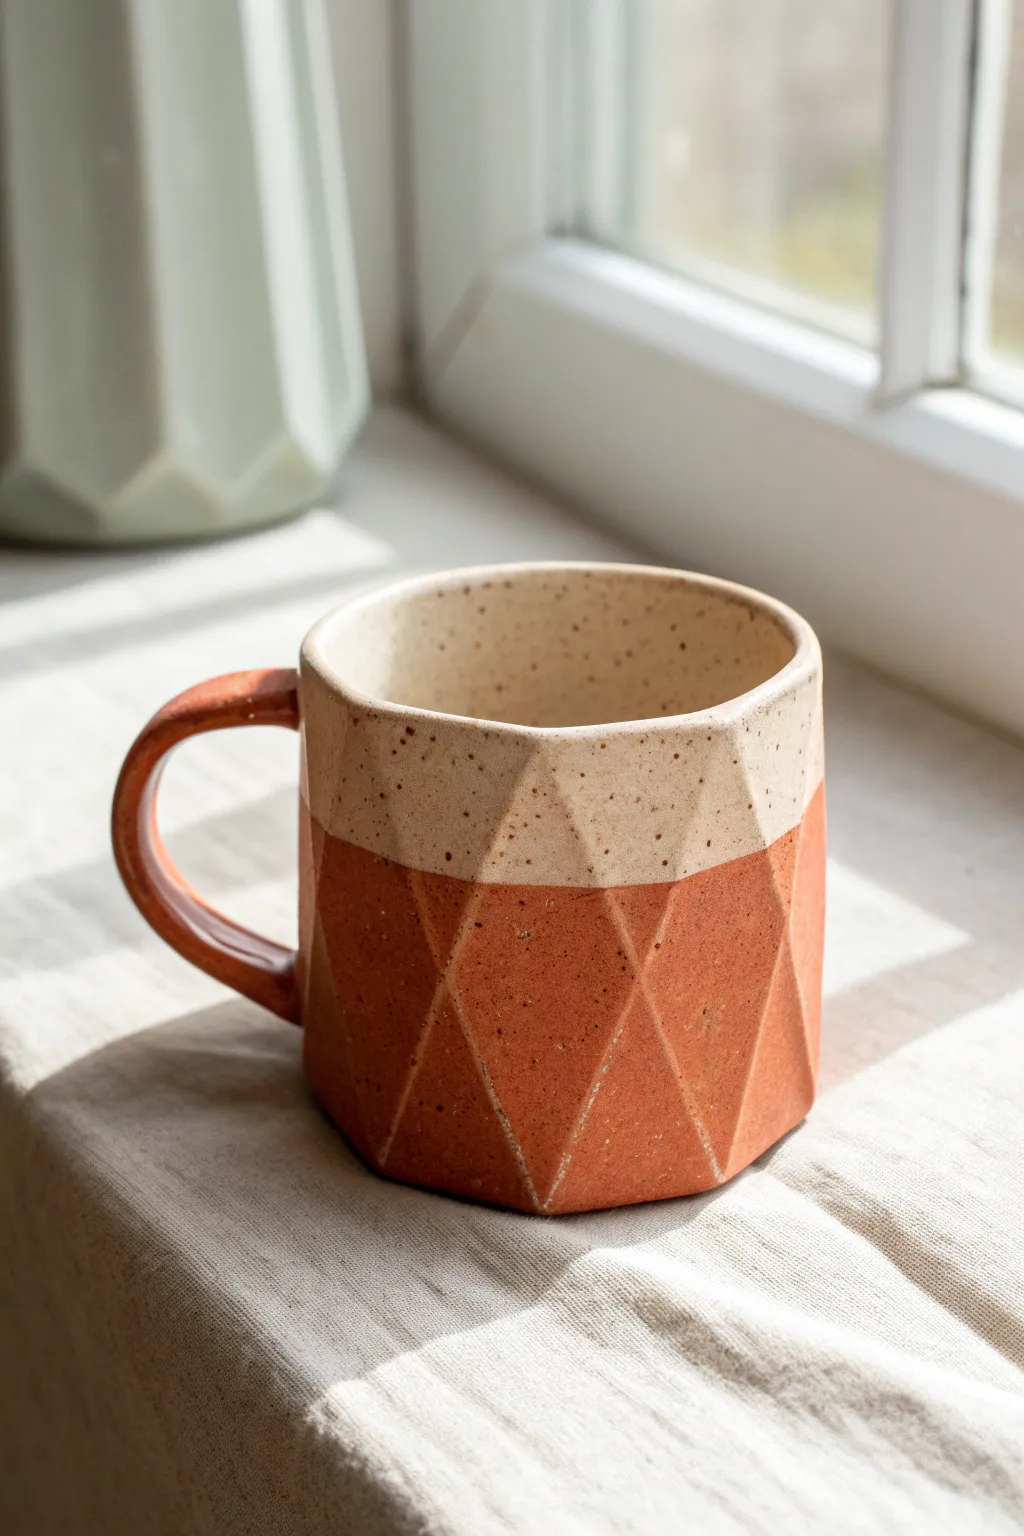
Capture the beauty of sharp angles and soft curves with this faceted ceramic mug project. The design contrasts raw, earthy clay with a creamy, speckled glaze, highlighting the crisp planes created by your surfacing tool for a modern, tactile finish.
Step-by-Step Guide
Materials
- Stoneware clay (speckled or red iron-rich body)
- Pottery wheel
- Throwing tools (sponge, water, bucket)
- Wire cutter
- Sharp faceting tool (cheese cutter or wire tool)
- Trimming tools
- Creamy white dipping glaze
- Kiln
- Sponge for smoothing
- Scoring tool and slip
Step 1: Throwing the Form
-
Center the clay:
Start by securing a pound and a half of clay onto your wheel head. Center it perfectly, ensuring there is no wobble before you open the mound. -
Open and pull the walls:
Open the centered clay and begin pulling the walls upward. For this project, aim for a cylinder that is slightly thicker than a standard mug—around 3/8 to 1/2 inch thick—to account for the material you will slice away later. -
Shape the rim:
Refine the rim while the clay is still plastic. Compress it with a chamois or your finger to prevent future chipping, keeping it smooth and rounded. -
Dry to leather hard:
Cut the cylinder from the wheel and let it dry slowly until it reaches a leather-hard state. It needs to be firm enough to hold its shape against the pressure of the cutting tool.
Sharp Cuts Are Key
For the crispest facets, commit to the cut. Don’t saw back and forth with the wire; make one smooth, confident slicing motion for each plane.
Step 2: Faceting the Surface
-
Mark your guidelines:
Lightly trace a horizontal line roughly halfway down the mug or wherever you want the transition between the handle and the facets to sit. You can also mark vertical increments if you want perfectly symmetrical facets. -
Slice the first row:
Holding your faceting tool or wire cutter taut, make a decisive downward slice starting from the top third of the mug. Angle the cut inward slightly to create a flat plane. -
Create the geometric pattern:
Rotate the mug slightly and make the next cut. I prefer to alternate the starting points of the cuts—some starting higher, some lower—so the facets intersect to form triangles and diamonds. -
Continue around the form:
Work your way around the entire cylinder. Vary the depth and angle of your cuts to create that distinct ‘gem-cut’ look, but be careful not to slice through to the inside of the mug. -
Smooth the edges (optional):
If the sliced edges are incredibly sharp or burred, run a slightly damp sponge or finger over the crisp lines just once to soften them without losing the geometric definition.
Slicing Through?
If you consistently cut through the wall, your initial cylinder is too thin. Throw thicker specifically for faceted wares to leave a margin for error.
Step 3: Handle and Trim
-
Trim the foot:
Place the mug back on the wheel (centered and secured with clay lugs) and trim the bottom. Give it a clean, predefined foot ring. -
Pull a strap handle:
Pull a strap handle from a fresh pug of clay. Keep it simple and curved to contrast with the angular body of the mug. -
Attach the handle:
Score and slip the attachment points on both the mug and the handle. Attach the handle firmly, blending the clay where it meets the body for a seamless connection. The top attachment should sit just below the rim. -
Dry and bisque fire:
Allow the mug to dry completely to the bone-dry stage. Load it into the kiln for the bisque firing (usually Cone 06 or 04).
Step 4: Glazing and Finishing
-
Wax the bottom:
Apply wax resist to the foot ring and slightly up the bottom edge to prevent glaze from running onto the kiln shelf. -
Dip the top half:
Hold the mug by the foot and dip it upside down into your creamy white glaze. Stop exactly where the facets become most prominent or halfway down, aiming for an angled dip line that complements the geometric cuts. -
Clean the transition:
If the glaze line is messy, use a damp sponge to wipe back the edge into a clean, sharp line. The goal is to leave the bottom half completely unglazed to show off the raw clay texture. -
Glaze fire:
Load the glazed mug into the kiln for the final glaze firing (typically Cone 5 or 6 for stoneware). Ensure the unglazed exterior doesn’t touch other pots.
Enjoy your morning coffee in a mug that feels as interesting as it looks, highlighting the raw beauty of the earth

TRACK YOUR CERAMIC JOURNEY
Capture glaze tests, firing details, and creative progress—all in one simple printable. Make your projects easier to repeat and improve.
Cozy Pinch-Pot Mug With Thumb Impressions
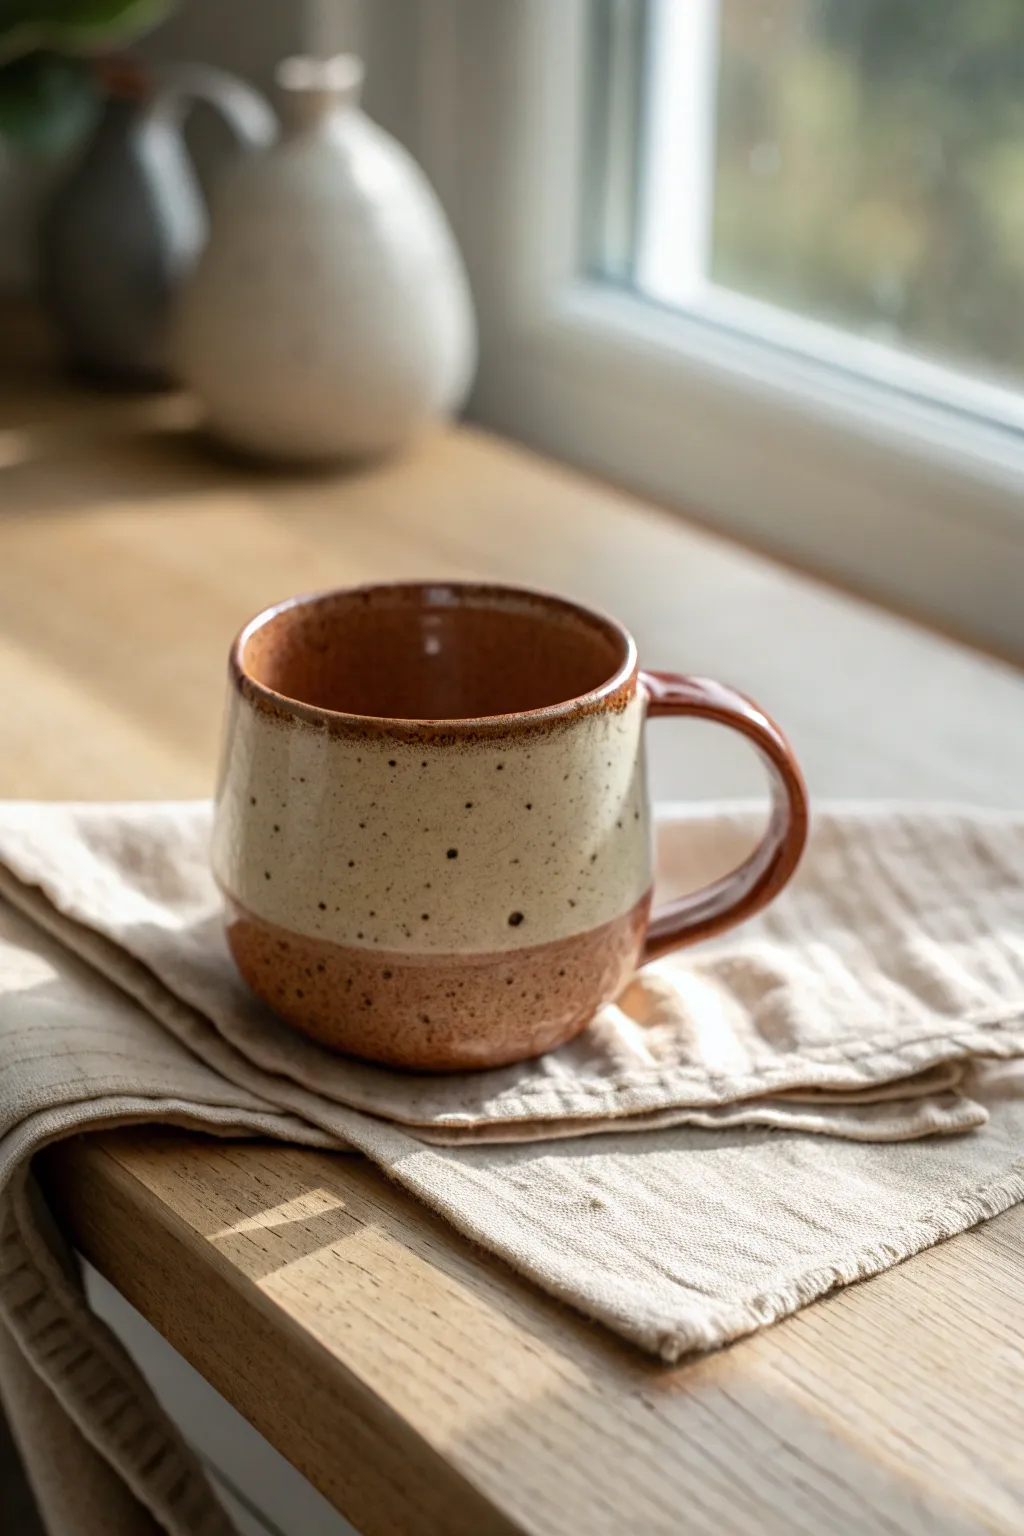
Embrace the warmth of handmade ceramics with this gorgeously simple two-tone mug design. Featuring a distinct raw clay base and a creamy, speckled upper glaze, this project perfectly balances rustic texture with modern polish.
Detailed Instructions
Materials
- Stoneware clay (a speckled buff body works best)
- Pottery wheel (or hand-building tools if pinching)
- Rib tool (kidney)
- Needle tool
- Wire cutter
- Sponge
- Loop trimming tool
- Scoring tool or serrated rib
- Slip
- Creamy white speckle glaze (cone 5/6)
- Wax resist (optional)
Step 1: Forming the Body
-
Prepare the clay:
Begin by thoroughly wedging about 1 to 1.5 pounds of speckled stoneware clay to remove air bubbles and ensure consistency. -
Center and open:
Throw the clay onto the wheel head and center it. Open up the form, leaving a floor about a half-inch thick to account for later trimming. -
Pull the walls:
Pull the cylinder walls up. For this specific shape, aim for a slightly wider belly near the bottom that tapers gently inward toward the rim. -
Refine the curve:
Use a rib on the inside of the pot to swelling out the bottom half, creating that cozy, rounded profile shown in the image. -
Smooth the lip:
Compress the rim with a damp chamois or sponge. This mug features a slightly rounded, comfortable lip, so avoid sharpening it too much. -
Cut off:
Use your wire cutter to slice underneath the mug, dry your hands, and carefully lift it off the wheel to a ware board. Let it dry to leather hard.
Iron Speckle Hack
If using plain clay, lightly sprinkle granular iron oxide into the wet glaze bucket before dipping. This creates those lovely burnt-orange spots seen in the photo.
Step 2: Trimming and Handle
-
Trim the foot:
Once leather hard, center the mug upside down on the wheel. Use a loop tool to trim the bottom, carving a distinct foot ring. -
Define the unglazed section:
Pay slight attention to the texture on the lower third of the exterior. The tutorial image shows raw clay here, so ensure this area is smooth but retains that tactile earthen quality. -
Pull the handle:
Pull a strap of clay for the handle. For this rustic look, keep the handle slightly organic rather than perfectly uniform. -
Attach the handle:
Score the mug body and the handle attachment points vigorously. Apply slip and press the handle firmly onto the mug. -
Shape the loop:
Adjust the curve of the handle so it mimics the example—an ear-shaped loop that offers plenty of finger space. -
Clean connection points:
Wipe away excess slip with a damp sponge or brush to create a seamless transition where the handle meets the mug body. -
Bisque fire:
Allow the mug to dry completely (bone dry) before loading it into the kiln for a bisque firing.
Thumb Rest Trick
Before the handle dries, press your thumb firmly into the very top of the handle curve. It creates a custom ergonomic spot for holding the mug comfortably.
Step 3: Glazing and Finishing
-
Wax the reserve:
This is crucial for the two-tone look: Apply wax resist to the bottom third of the mug’s exterior and the entire foot ring. This prevents glaze from adhering to the raw clay section. -
Prepare the glaze:
Mix your creamy white glaze thoroughly. If you want emphasised speckles like the photo, ensure your clay body has iron pyrite or choose a glaze with added speckling agents. -
Dip the interior:
Pour glaze inside the mug, roll it around to coat the entire interior surface, and pour out the excess. -
Dip the exterior:
Hold the mug by the foot (or use tongs) and dip the exterior straight down into the glaze bucket. Stop exactly where your wax resist line begins. -
Clean the line:
I like to wipe the transition line with a damp sponge just to make sure the breaks are crisp and no stray glaze droplets are sitting on the wax. -
Glaze fire:
Load the mug into the kiln for the final glaze firing, usually to cone 5 or 6 depending on your clay and glaze specifications. -
Sand the bottom:
After firing, use a diamond sanding pad to briefly smooth the unglazed raw clay on the bottom so it won’t scratch your table.
Enjoy your morning coffee in a vessel that feels as grounded and natural as the earth it came from
Slab-Built Square Mug With Soft Corners
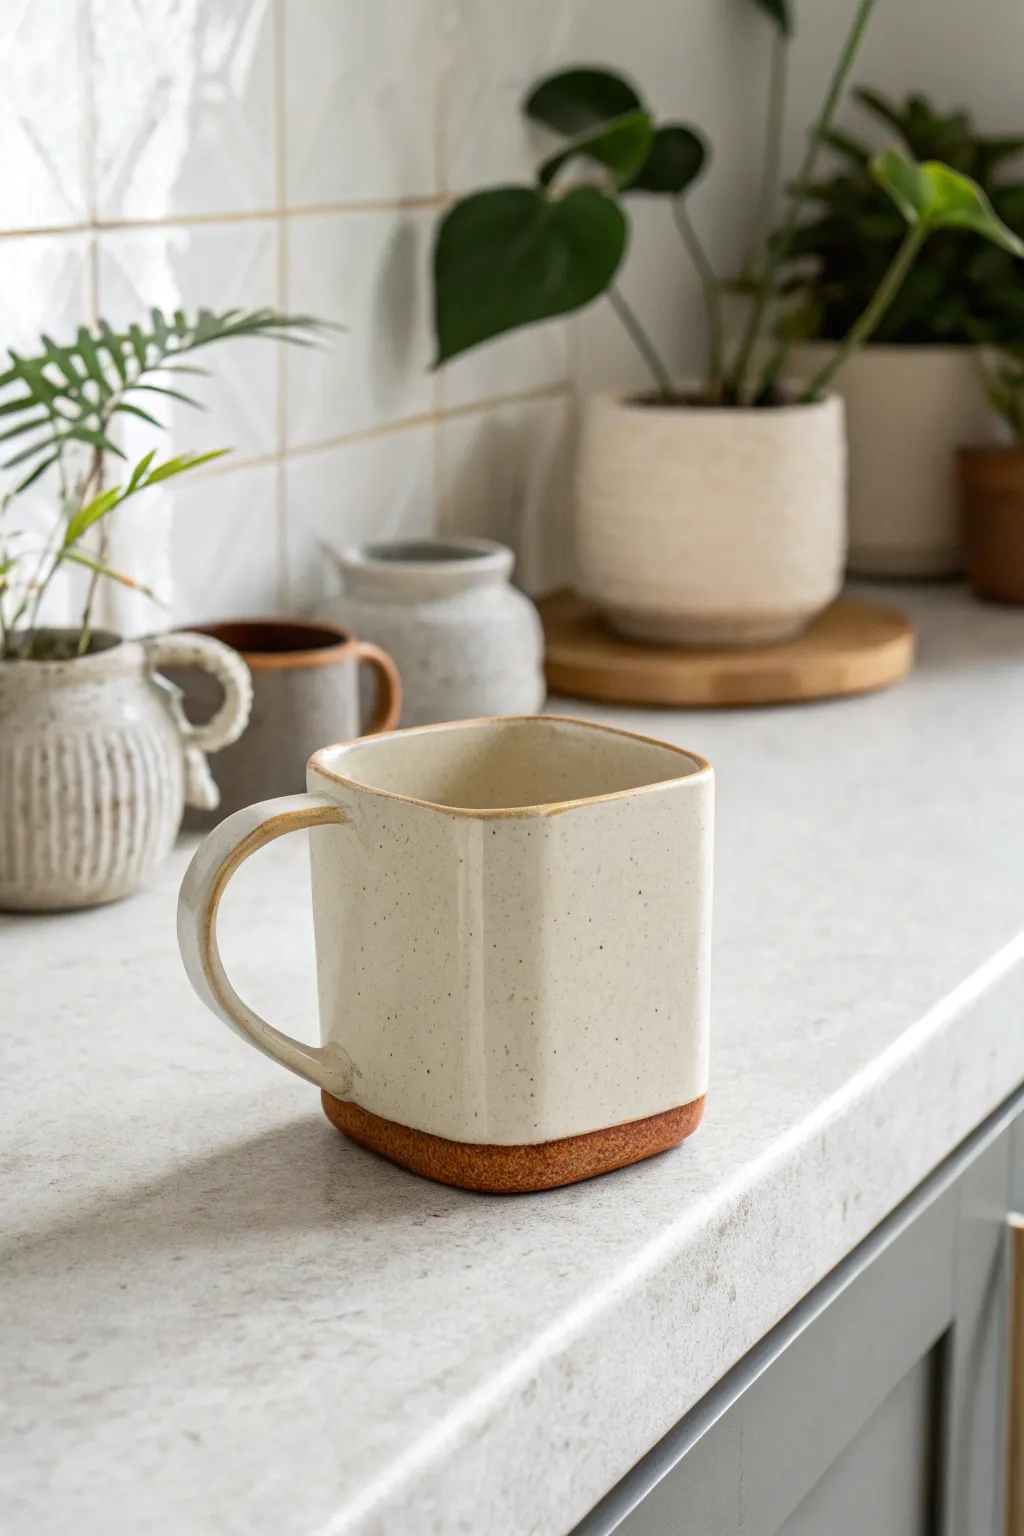
Break away from the pottery wheel with this contemporary slab-built mug featuring gently rounded corners and a charming raw clay base. The speckled white glaze contrasts beautifully with the warm, toasted terracotta clay body, creating a piece that feels both geometric and organic.
Step-by-Step
Materials
- Speckled stoneware or terracotta clay
- Rolling pin
- Two wooden guide strips (approx. 1/4 inch thick)
- Ruler
- Fettling knife or creative cutting tool
- Scoring tool (or serrated rib)
- Slip (clay mixed with water)
- Wooden spoon or dowel (for handle shaping)
- Sponge
- Speckled vanilla or oatmeal glaze
- Soft glaze brush
- Wax resist (optional)
Step 1: Preparing the Slabs
-
Roll out the clay:
Begin by wedging your clay to remove air bubbles, then flatten it slightly by hand. Place the clay between your two wooden guide strips and use the rolling pin to create a uniform slab about 1/4 inch thick. -
Smooth the texture:
Using a rib tool or a slightly damp sponge, compress the slab on both sides. This aligns the clay particles to prevent warping and creates a nice, smooth canvas for your mug. -
Cut the walls:
Using a ruler and your fettling knife, cut a long rectangle for the mug’s body. A good size is approximately 11-12 inches long and 3.5-4 inches tall, depending on how large you want your coffee vessel. -
Cut the base and handle:
From the remaining slab, cut a square piece roughly 3.5 inches on each side (we will trim this later) and a strip for the handle, about 0.75 inches wide and 5 inches long. -
Firm up:
Let your clay pieces sit until they reach a ‘soft leather hard’ stage. They should be flexible enough to bend without cracking but stiff enough to hold their shape upright.
Warping Walls?
If your square walls are curving inward or outward, the clay was likely too wet during construction. Stuff the interior with crumpled newspaper while drying to help support the geometric shape.
Step 2: Building the Form
-
Bevel the edges:
On the short ends of your long rectangle wall piece, cut 45-degree bevels in opposite directions. This allows the seam to overlap cleanly without adding bulk. -
Form the square:
Stand the rectangle up and gently bend it into a square shape. Instead of sharp creases, use your fingers to softly curve the corners, giving it that pillowy, rounded look. -
Join the seam:
Score the beveled edges thoroughly and apply slip. Press the ends together firmly. Use a wooden modeling tool to blend the seam on both the inside and outside so it becomes invisible. -
Attach the base:
Place your square tube onto the slab base piece. Lightly trace around the bottom, then score and slip both the tube bottom and the traced area on the base. Press firmly to join. -
Trim the excess:
Using your knife, cut away the excess clay from the base slab, following the soft curve of your mug’s corners. Smooth the cut edge with a sponge. -
Refine the rim:
Run a damp chamois or sponge over the top rim of the mug to soften the edge, making it comfortable for drinking.
Use a Template
Make a paper template for your wall rectangle first. Fold it to test the size and corner radius before cutting your clay. This saves material and ensures your proportions are perfect.
Step 3: Handle and Finishing
-
Shape the handle:
Take your handle strip and smooth the edges. Gently curve it into a ‘C’ or ear shape. I like to hold it up to the mug body to dry-fit and check the proportions before attaching. -
Attach the handle:
Score and slip the attachment points on both the handle and the mug wall. Press the handle firmly onto the mug wall, ensuring it is centered on one of the flat sides. -
Reinforce the connection:
Use a small coil or simply blend the clay from the handle onto the mug body to ensure a strong bond. Wipe away any excess slip with a damp brush. -
Define the raw foot:
Clean up the bottom ½ inch of the exterior wall. This area will remain unglazed to show off the raw clay texture seen in the photo. -
Slow drying:
Cover the mug loosely with plastic to dry slowly. This prevents the handle from pulling away from the body as the clay shrinks. -
Bisque fire:
Once bone dry, fire the mug in a kiln to cone 04 (or your clay’s specific bisque temperature). -
Glaze application:
Apply wax resist to the bottom and the lower ½ inch of the exterior (the raw foot). Dip or brush your speckled white glaze onto the rest of the mug. -
Final wipe:
Use a damp sponge to wipe any stray glaze droplets off the waxed, raw clay section to ensure a crisp line. -
Glaze fire:
Fire the mug to maturity (likely cone 5 or 6) to vitrify the clay and melt the oatmeal glaze.
Now you have a stunning, architectural mug ready for your morning brew
Oversized Handle for a Super Comfy Hold
Embrace the warmth of handmade ceramics with this sturdy, speckled mug featuring an exaggerated handle designed for pure comfort. The natural, stone-like glaze and generous proportions make it perfect for wrapping your hands around a morning brew.
Step-by-Step Guide
Materials
- Speckled stoneware clay (mid-fire)
- Clay rolling pin
- Canvas mat or slab roller
- Pottery wheel (optional, but assumed for the body)
- Pottery sponge
- Rib tool (wooden or silicone)
- Needle tool
- Scoring tool (serrated kidney or fork)
- Slip (clay slurry)
- Wooden modeling tool
- Cutting wire
- Matte white or oatmeal glaze (translucent)
- Kiln
Step 1: Throwing the Body
-
Prepare the Clay:
Begin by wedging about 1 to 1.5 lbs of speckled stoneware clay to remove air bubbles. This specific clay body is essential for achieving those beautiful dark spots that bleed through the glaze later. -
Center and Open:
Throw the ball of clay onto the center of your wheel head. Center it firmly, then open the clay, creating a flat floor about 3 inches wide. -
Pull the Walls:
Slowly pull up the walls of the cylinder. Aim for a straight-sided shape with a very slight inward taper near the rim to help keep coffee warm. The walls should be even, roughly 1/4 inch thick. -
Refine the Shape:
Use a rib tool to smooth the outside and compress the clay. Create a very subtle curve at the bottom so it isn’t starkly vertical, giving it a friendly weight. -
Create a Slight Detail Line:
Just under the rim, gently press with a wooden tool or your thumbnail while the wheel spins slow to create a faint groove. This breaks up the glaze later. -
Trim and Cut:
Undercut the base with your wooden tool to define the foot. Run a wire underneath and set the cylinder aside to reach leather-hard stage (usually overnight).
Crack Control
Handle falling off or cracking at the join? This usually means the moisture content didn’t match. Ensure both mug and handle offer the same resistance to a fingerprint before attaching.
Step 2: Crafting the Oversized Handle
-
Pull or Roll a Coil:
For this oversized handle, you want a thick coil. You can roll a ‘carrot’ shape by hand or pull a traditional handle blank from a lump of clay. It should be about 3/4 inch thick. -
Flatten and Shape:
Gently tap the coil on your table to flatten one side slightly—this flat side will face the mug wall. Curve it into a large ‘C’ or ear shape. The key here is a generous loop that fits three or four fingers comfortably. -
Trimming the Mug:
Once leather hard, center the mug upside down on the wheel. Trim the bottom to create a clean, distinct foot ring. This elevates the form and adds professionalism. -
Score and Slip:
Hold the handle up to the mug to check proportions. Score (scratch) the attachment points on both the handle and the mug wall thoroughly. Apply a generous amount of slip to both scored areas. -
Attach the Handle:
Press the handle firmly onto the mug. I like to wiggle it slightly to lock the clay particles together. Support the wall from the inside with your other hand so you don’t deform the cylinder. -
Blend the Seams:
Use a wooden modeling tool or your finger to smooth the clay where the handle meets the body. For this rustic look, you don’t need it seamless, but ensure there are no cracks. -
Slow Drying:
Cover the mug loosely with plastic for a day or two. This slows drying so the thick handle and thinner body shrink at the same rate, preventing cracks.
Thumb Rest Trick
Flatten the very top curve of the handle slightly with your thumb immediately after attaching. This creates a dedicated resting spot for your thumb, maximizing the ‘comfy hold’ factor.
Step 3: Glazing and Firing
-
Bisque Fire:
Once bone dry, load the mug into the kiln for a bisque fire (usually Cone 04). This hardens the clay for glazing. -
Applying Wax Resist:
Paint a layer of liquidity wax resist on the bottom foot ring and slightly up the outer edge of the base to prevent glaze from sticking to the kiln shelf. -
Dip Glazing:
Dip the mug into a matte white or translucent oatmeal glaze. Hold it by the foot and submerge for about 3 seconds. Shake off excess drips immediately. -
Cleaning the Rim:
Check the rim for drips and smooth them with a finger. The glaze should be even but can act naturally. -
Glaze Fire:
Fire the mug to maturity (likely Cone 5 or 6, depending on your clay). The heat will draw the iron speckles out from the clay body, creating that signature peppered surface. -
Finishing Touch:
Once cool, use a sanding block or diamond pad to smooth the unglazed foot ring so it doesn’t scratch your table.
Now brew your darkest roast and enjoy the tactile pleasure of your new favorite mug
Thumb Rest Notch for Daily Sipping
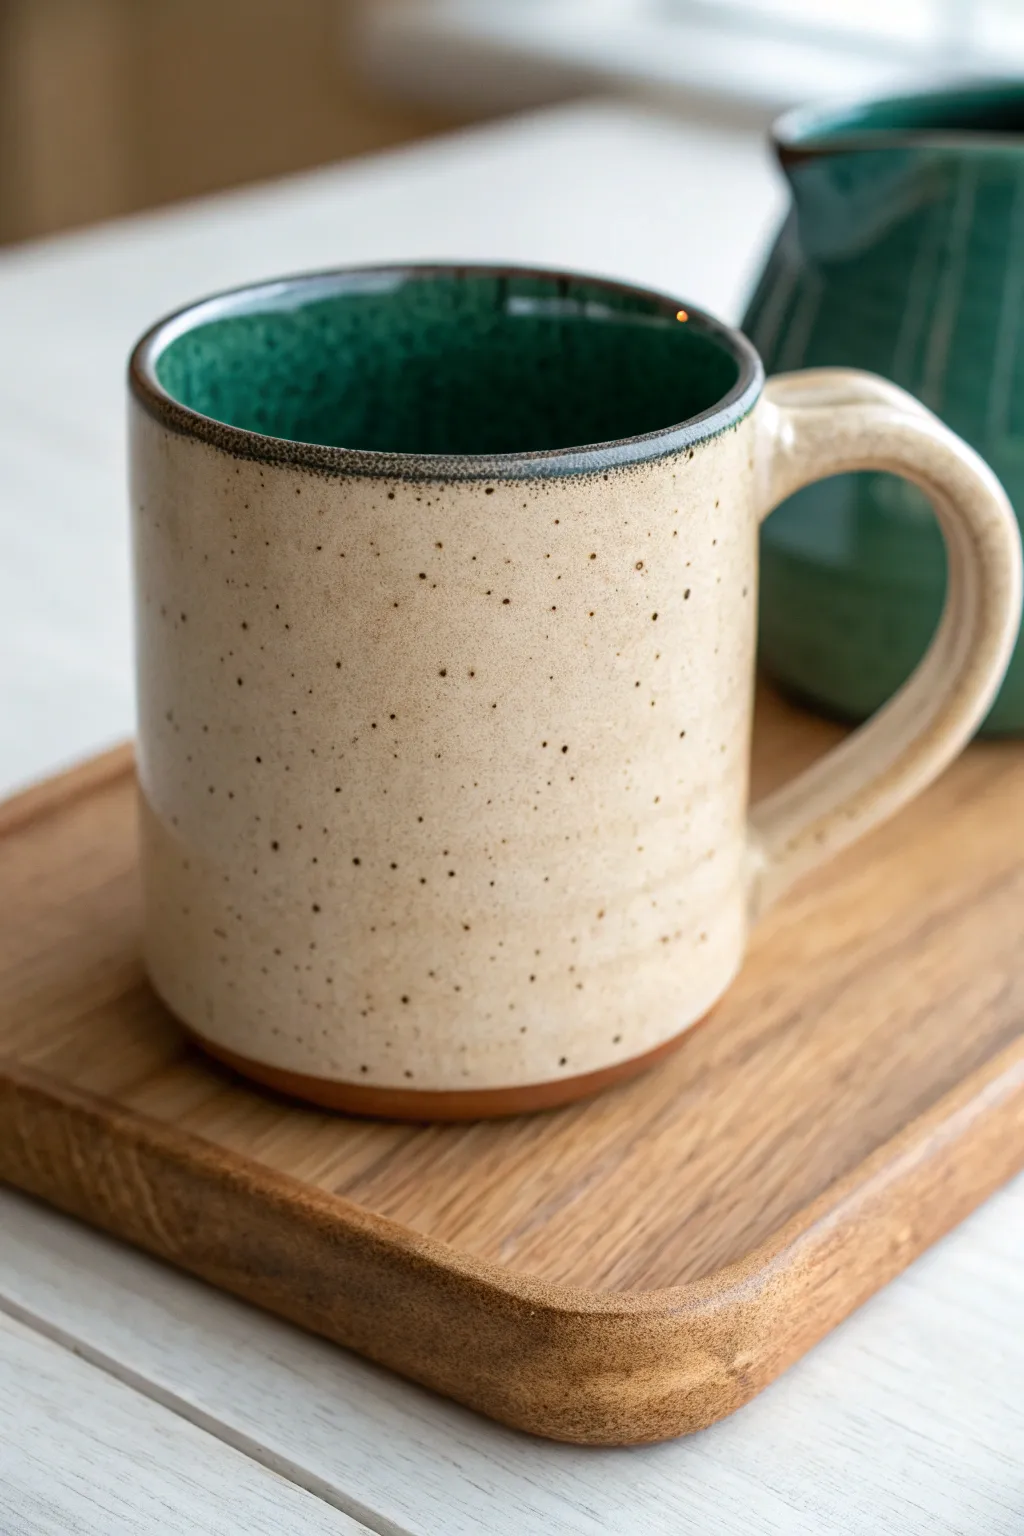
Create a cozy, handmade vessel perfect for your morning routine with this wheel-thrown mug project. Featuring a warm, speckled exterior glaze and a deep, glossy forest green interior, this design balances rustic charm with a smooth, comfortable drinking experience.
Detailed Instructions
Materials
- Stoneware clay body (speckled or buff)
- Pottery wheel
- Throwing tools (sponge, metal rib, wooden knife, needle tool)
- Wire cutter
- Trimming tools (loop tools)
- Small bucket of water
- Scoring tool or serrated rib
- Slip
- Speckled cream/oatmeal glaze (cone 6)
- Forest green gloss glaze (cone 6)
- Wax resist
- Kiln
Step 1: Throwing the Cylinder
-
Center the clay:
Start with a well-wedged ball of clay, approximately 1 to 1.5 pounds. Center it firmly on the wheel head, ensuring there is no wobble before proceeding. -
Open the form:
Press your thumbs into the center to open the clay, leaving about a half-inch thick floor. Compress the floor with a flat tool or sponge to prevent future S-cracks during firing. -
Pull the walls:
Slowly pull the walls up to create a cylinder. Aim for an even thickness from bottom to top, keeping the rim slightly thicker for durability. -
Shape the profile:
Using a metal rib on the outside relative to your inside hand, gently belly out the form slightly if you want a softer curve, or keep the walls straight for a modern cylinder look like the reference photo. -
Finish the rim:
Compress the rim with a chamois or sponge to make it smooth and pleasant for sipping. Use a wooden knife to trim away excess clay at the base before removing the piece from the wheel with a wire cutter.
Troubleshooting Cracks
Handle cracking at the joint? Dry the mug slowly under loose plastic. This ensures the handle and body shrink at the same rate, reducing stress on the connection points.
Step 2: Trimming and Handle Making
-
Leather hard stage:
Allow the cylinder to dry to a leather-hard state. It should be firm enough to handle without deforming but still cool to the touch. -
Trim the foot:
Center the mug upside down on the wheel. Use loop tools to trim away excess weight from the bottom and carve a neat foot ring. This creates a professional ‘lift’ and finishing touch. -
Pull the handle:
With a fresh lump of clay, pull a strip for the handle using water and smooth, downward strokes. Taper it slightly so it feels balanced. I often curve it on a table to let it set up briefly before attaching. -
Attach the handle:
Score the attachment points on both the mug body and the handle ends. Apply slip and press the handle firmly onto the mug. -
Create the thumb rest:
While the handle clay is still pliable, press your thumb gently into the top curve of the handle where it meets the mug body. This creates the ergonomic notch discussed in this article. -
Refine joints:
Smooth the connection points with a small damp sponge or modeling tool to ensure a seamless transition between handle and mug.
Level Up: Exposed Clay
Leave the bottom inch of the mug unglazed on the exterior. The raw clay provides a beautiful textural contrast against the smooth cream glaze and adds a modern aesthetic.
Step 3: Glazing and Firing
-
Bisque fire:
Once bone dry, fire the mug in the kiln to bisque temperature (usually cone 04 or 06) to prepare it for glazing. -
Glaze the interior:
Pour the Deep Forest Green gloss glaze into the mug, swirl it around quickly to coat the entire interior up to the rim, and pour the excess out. -
Clean the rim:
Wipe any green drips off the exterior rim with a damp sponge to keep a clean line. -
Glaze the exterior:
Dip the exterior of the mug into the Speckled Cream glaze. Be careful not to let it overlap too heavily inside the rim unless you want a distinctive blended interaction line. -
Wax the foot:
Wipe back the glaze from the foot ring about 1/4 inch or apply wax resist to the bottom before dipping to ensure it doesn’t stick to the kiln shelf. -
Glaze firing:
Load the kiln and fire to the maturity temperature of your clay and glaze (typically cone 6 for stoneware). Allow the kiln to cool completely before unloading.
Enjoy your customized mug for a comforting handcrafted coffee experience
Soft Drip-Rim Detail Without the Mess
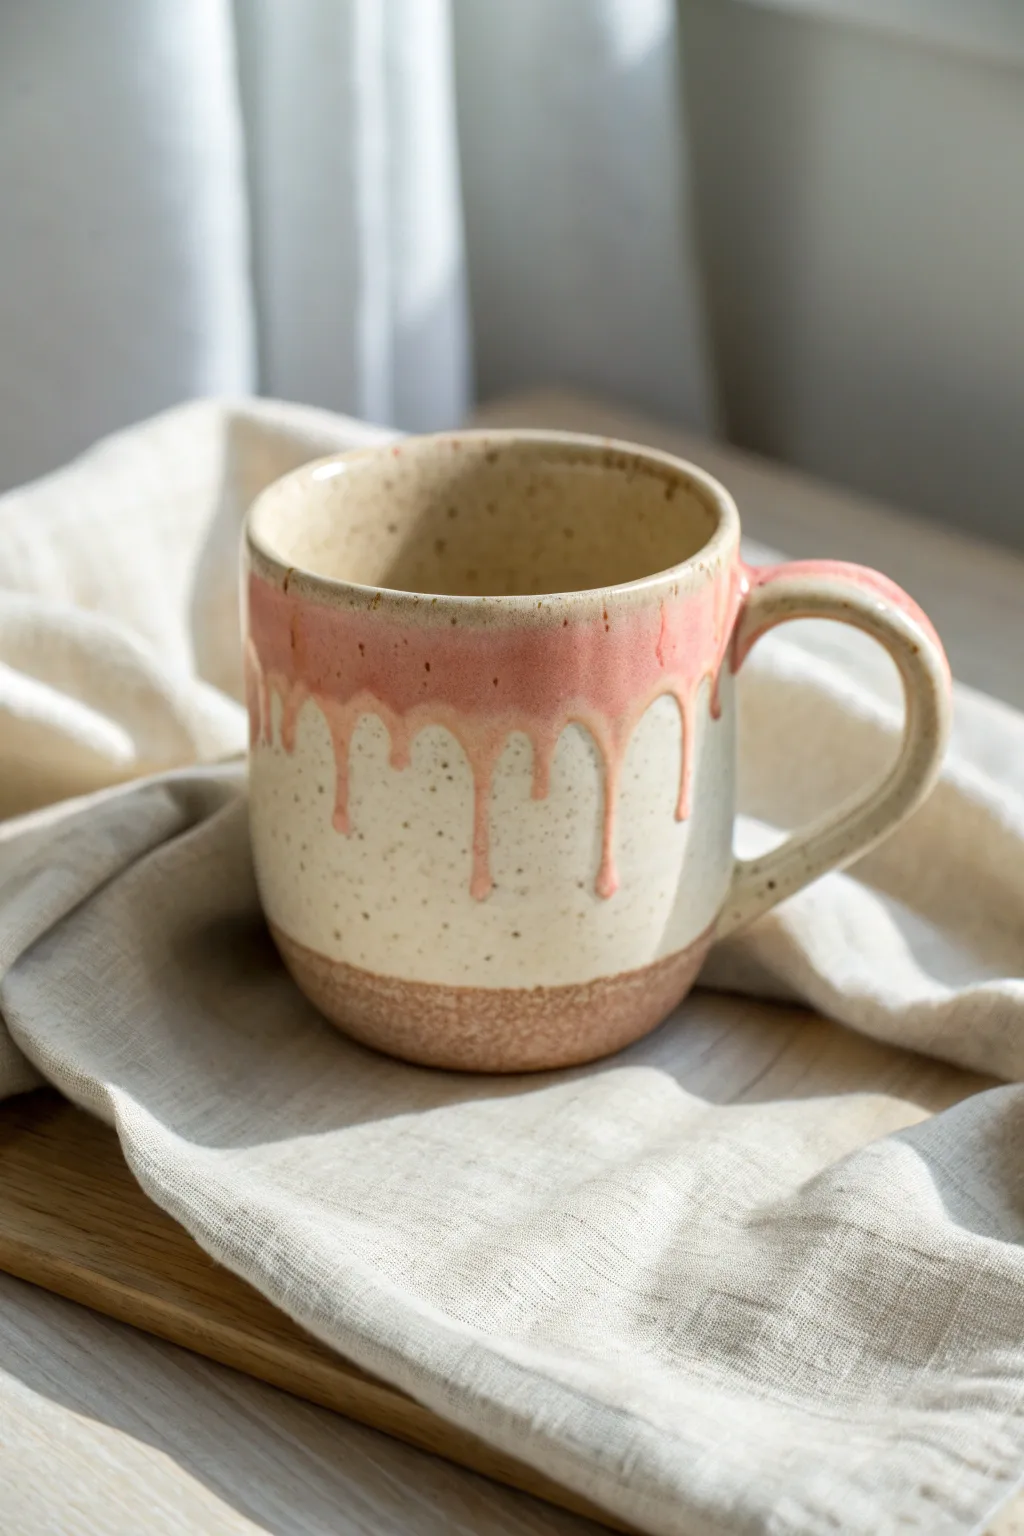
Create a cozy, professional-looking mug featuring a dreamy pink glaze that appears to melt perfectly down the sides without running off the pot. By using a specific glazing technique, you can achieve this thick, luscious drip effect while keeping your kiln shelves perfectly safe.
Step-by-Step Tutorial
Materials
- Stoneware clay (speckled or buff)
- Pottery wheel (or hand-building tools for coil/pinch method)
- Rib tool
- Wire cutter
- Sponge
- Trimming tools
- Wax resist
- Cream/White speckled stoneware glaze (matte or satin)
- Pink reactive glaze (glossy)
- Paintbrush for wax
- Kiln
Step 1: Throwing and Shaping
-
Center the clay:
Start with about 1-1.5 lbs of speckled stoneware clay. Center it firmly on the wheel head, ensuring there is no wobble before you begin opening. -
Open and pull:
Open the clay and pull the walls up into a cylinder. Aim for a slightly wider base that tapers gently inward toward the rim, which helps keep liquids hot. -
Refine the shape:
Use a rib tool on the outside of the pot while supporting the inside with your hand. Smooth the walls to remove throwing lines for a clean, modern canvas for the drip glaze. -
Form the rim:
Compress the rim with a piece of chamois or your sponge to round it off smoothly. This is crucial for drinking comfort. -
Dry to leather hard:
Wire the mug off the wheel and let it dry slowly until it reaches a leather-hard state. It should be firm enough to handle without deforming but still cool to the touch.
Drips running too far?
If the pink glaze runs onto the kiln shelf, try dipping a slightly shallower section of the rim next time, or hold the dip for one second less to reduce glaze thickness.
Step 2: Trimming and Handling
-
Trim the foot:
Place the mug upside down on the wheel center. Trim away excess clay from the bottom, creating a distinct foot ring about 1/4 inch high. Leave the bottom slightly textured if you like the rustic look. -
Pull a handle:
Pull a strap of clay for the handle. Shape it into a curve that mimics a ‘C’ or an ear shape, ensuring it’s thick enough to hold the mug’s weight but comfortable to grip. -
Attach the handle:
Score and slip both the attachment points on the mug body and the handle ends. Press the handle firmly onto the mug, smoothing the joints with a wooden tool or your finger to make them seamless. -
Bisque fire:
Allow the mug to dry completely (bone dry). Load it into the kiln for a bisque firing (usually to Cone 04 or 06, depending on your clay body).
Step 3: Glazing the Drip Effect
-
Clean the bisque:
Wipe the bisque-fired mug with a damp sponge to remove any dust, which can cause pinholes in the glaze. -
Wax the foot:
Apply wax resist to the bottom of the mug and up the side about 3/4 of an inch. This creates the unglazed ‘sand’ band at the bottom seen in the reference image. -
Apply base glaze:
Dip the entire mug (up to the wax line) into the cream speckled glaze. Hold it for about 3 seconds to get an even coat. Shake off excess gently and let this layer dry completely. -
Prepare the rim glaze:
Stir your pink reactive glaze thoroughly. If it’s very thin, I sometimes let it sit open for a bit to thicken, which helps control the drip. -
Apply the rim dip:
Dip just the top 1-2 inches of the mug rim into the pink glaze. Hold it there for a count of four—longer than the base coat—to build up a thicker layer of glaze material. -
Encourage drips:
Immediately after pulling the rim out, give the mug a quick, sharp downward shake or tap. This uses gravity to start the drips moving while the glaze is still wet. -
Clean the base:
Check the waxed bottom. If any glaze beaded up on the wax, wipe it away cleanly with a sponge. -
Glaze fire:
Load the kiln. Fire to the maturity temperature of your glaze and clay (typically Cone 6 for stoneware). The heat will cause the thick pink rim to flow down over the cream base. -
Sand the bottom:
Once cool, remove from the kiln. Use wet-dry sandpaper (400 grit) to smooth the unglazed raw clay at the bottom so it won’t scratch your table.
Level Up: Ombré Effect
Overlap a third, semi-transparent glaze right at the transition line between the pink and cream to create a three-tone gradient melt.
Enjoy your morning coffee in a custom mug that feels as fantastic as it looks.
Raised Daisy Appliqué Coffee Mug
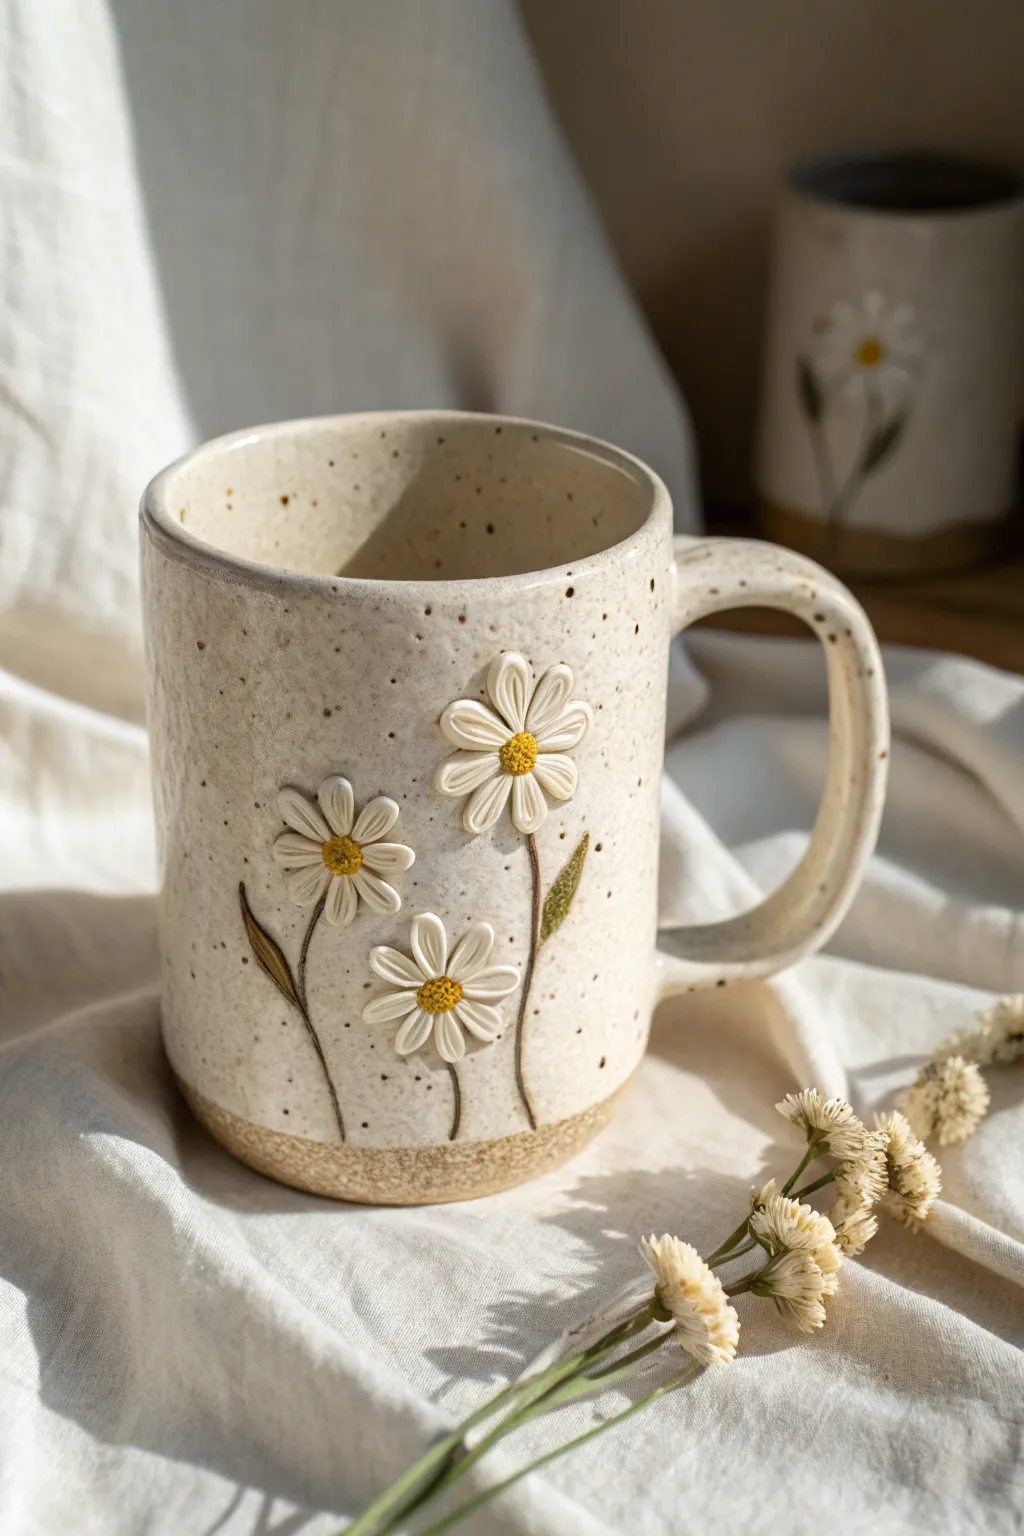
Bring a touch of charming texture to your morning routine with this speckled creamy ceramic mug featuring delightful, tactile florals. This project focuses on appliqué techniques to create dimensional daisies that pop against a smooth, speckled glaze, perfect for a cozy, handmade feel.
Step-by-Step Guide
Materials
- Stoneware clay body (speckled buff recommended)
- Damp sponge
- Pottery rib tool (flexible kidney)
- Needle tool
- Scoring tool (serrated rib or needle)
- Slip (clay slurry)
- Small wooden modeling tool
- Soft detail brushes
- White or cream speckled glaze
- Yellow underglaze
- Green underglaze
- Wax resist
Step 1: Forming the Base
-
Body construction:
Begin by either throwing a simple cylinder on the wheel or slab-building a mug body. Aim for a height of about 4-5 inches with straight walls to provide a nice ‘canvas’ for your flowers. -
Smooth the surface:
Once the clay is leather-hard, use a flexible rib tool to compress and smooth the exterior walls. This ensures a clean surface for your appliqué work without bumps underneath. -
Pull and attach handle:
Pull a strap handle from a nugget of clay. Attach it securely using the score-and-slip method, blending the seams thoroughly so they disappear.
Step 2: Sculpting the Flowers
-
Create the petals:
Roll tiny, teardrop-shaped balls of clay, about the size of a grain of rice. Flatten them gently with your finger to create soft, rounded petals. You will need 7-9 petals per flower. -
Score the placement:
decide where your three main daisies will live. Lightly score the surface of the mug in circular patterns where the flower centers will be. -
Attach the petals:
Apply a tiny dot of slip to the scored area. Place your petals in a radial pattern, pressing the inner tips firmly onto the mug wall while leaving the outer edges slightly raised for dimension. -
Add the centers:
Roll a small ball of clay for the flower center. Score the back of it and the junction of the petals on the mug. Press the center ball firmly into place. -
Texture the centers:
Using a needle tool, poke tiny holes all over the center ball to mimic the texture of a real daisy disk floret. -
Detail the petals:
Use a wooden modeling tool to gently press an indentation down the center of each petal. This adds realism and helps further secure the clay to the mug.
Clean Connection Tip
When attaching petals, use very little water in your slip. Too much moisture can cause the delicate petals to crack or detach as the clay shrinks during drying.
Step 3: Stems and Finishing
-
Roll the stems:
Roll out very thin coils of clay for the stems. I find rolling these on a slightly damp surface helps keep them from drying out too fast. -
Attach stems and leaves:
Score and slip the space beneath the flowers. Gently press the thin coils onto the mug, creating natural, slightly curved lines. A added leaf or two balances the design. -
Clean up edges:
Use a small, damp brush to wipe away any excess slip that may have squished out from under your appliqués. This keeps the glaze firing clean. -
Bisque fire:
Allow the mug to dry slowly and completely before bisque firing to cone 04.
Make It a Set
Create a matching pitcher or creamer using larger versions of the daisies, or try different flower types like raised lavender sprigs for a full garden collection.
Step 4: Glazing
-
Apply wax resist:
Paint a band of wax resist along the bottom 1/2 inch of the mug and the entire bottom foot. This creates the raw clay accent seen in the image. -
Paint the details:
Using a small brush, carefully apply yellow underglaze to the flower centers and a muted olive green underglaze to the stems and leaves. -
Apply main glaze:
Dip the entire mug into a speckled white or cream glaze. Ensure the glaze covers the white petals but wipes away cleanly from the waxed bottom. -
Check the relief:
If the glaze covers the texture of the flower centers too thickly, gently dab a sponge over them to reveal the indented texture. -
Final fire:
Glaze fire the piece to cone 5/6 (or according to your clay body specifications).
Enjoy using your new mug, where every slip creates a moment of tactile joy with your morning coffee
Pastel Rainbow and Smiley Face Mug
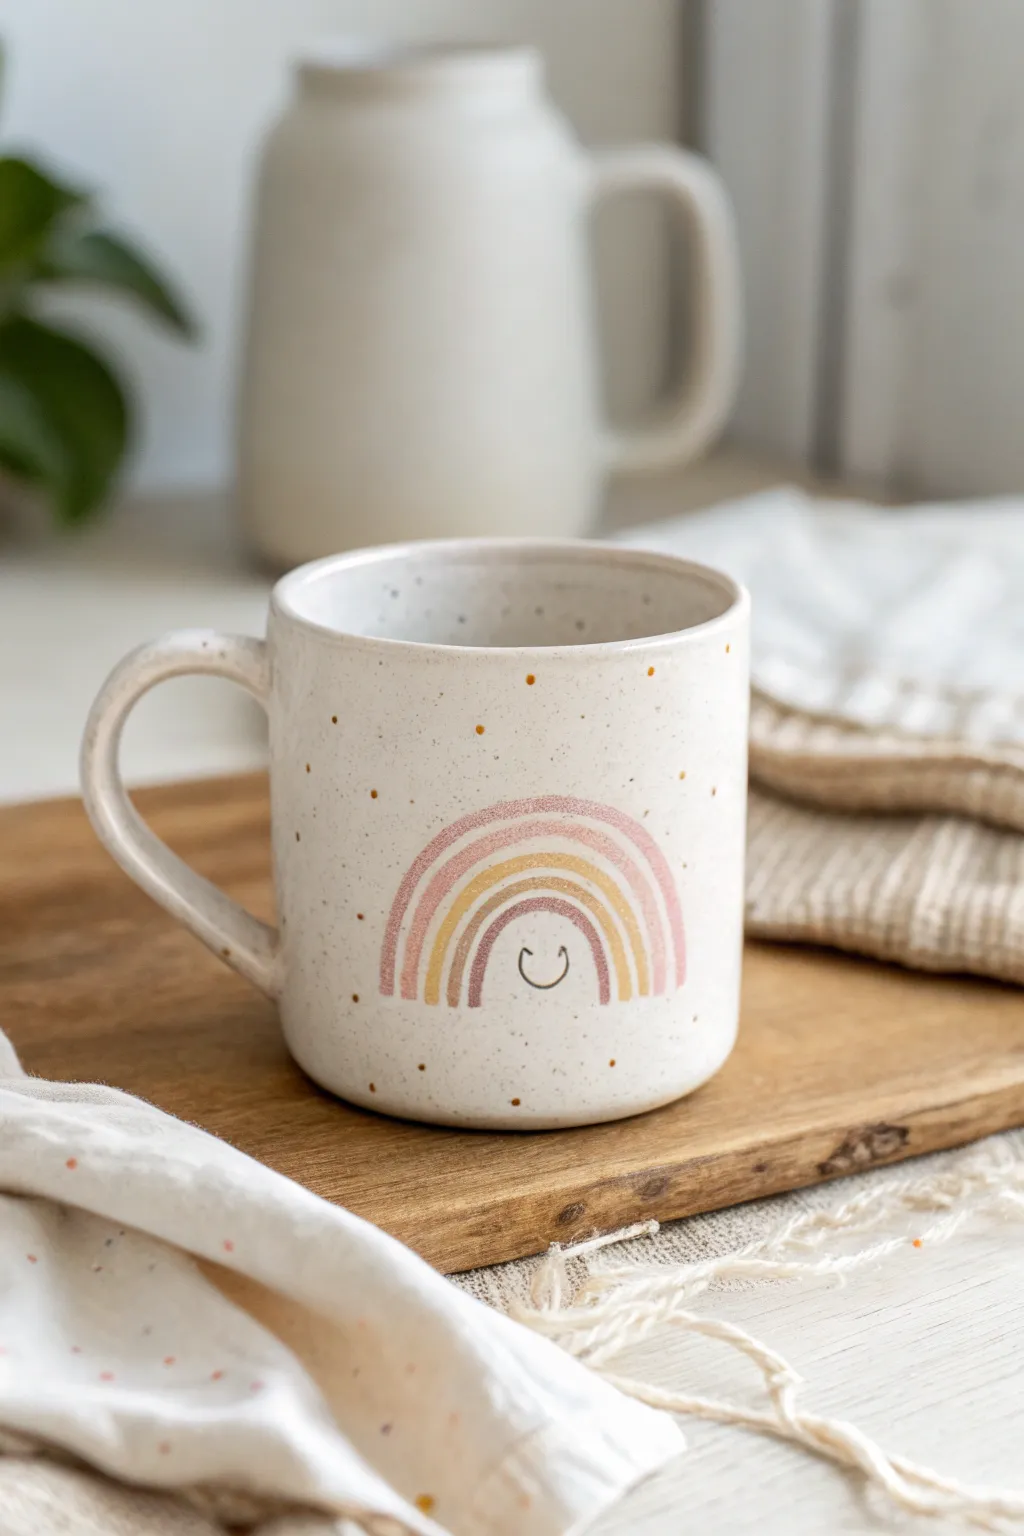
Brighten your mornings with a mug that greets you with a literal smile. This project combines a rustic, speckled ceramic base with a soft, pastel rainbow arch for a cozy and cheerful aesthetic.
Step-by-Step
Materials
- Bisque-fired ceramic mug (10-12 oz)
- Speckled cream or oatmeal glaze (stoneware specific)
- Underglazes (muted pink, mustard yellow, mauve/dusty rose, black)
- Fine detail brush (size 0 or 00)
- Small round brush (size 2)
- Flat shader brush
- Pencil (for sketching)
- Clear dipping glaze (optional, if underglazes require it)
- Kiln access
Step 1: Preparation & Base Coat
-
Clean the Bisque:
Start by wiping down your bisque-fired mug with a damp sponge to remove any kiln dust or oils from your hands, ensuring a clean surface for adhesion. -
Apply Base Glaze:
Using a wide, soft brush, apply three even coats of your speckled cream glaze to the entire mug, inside and out. Let each coat dry until it loses its sheen before applying the next. -
Check for Consistency:
Ensure the glaze layer is smooth. If you are using a dipping glaze instead of brushing, dip the mug once for a few seconds and shake off the excess gently. -
Dry Completely:
Allow the base glaze to dry completely to a powdery touch. This is crucial because painting wet-on-wet can cause the colors to muddy.
Step 2: Designing the Rainbow
-
Sketch the Outline:
Lightly sketch the rainbow shape onto the dried glaze using a soft pencil. Don’t worry about graphite marks; they will burn off in the kiln. -
Create the Arches:
Draw four concentric arches. The outer arch should be the widest, gradually getting smaller toward the center. -
Add the Smiley:
In the negative space beneath the smallest arch, lightly mark a tiny U-shape for the smile. I like to keep this quite small to maintain a minimalist look. -
Refine the Lines:
Look at your sketch from a distance to ensure the rainbow feels centered relative to the handle.
Steady Hands
Rest your pinky finger on the mug surface (where dry) while painting arches. It acts as a stabilizer for cleaner, smoother curves.
Step 3: Painting the Details
-
First Arch Layer:
Load your round brush (size 2) with the dusty rose or mauve underglaze. Paint the outermost arch with a steady hand. Apply 2-3 coats for opacity. -
Second Arch Layer:
Use the muted pink underglaze for the second arch. Leave a tiny sliver of the speckled base visible between the arches for definition. -
Third Arch Layer:
Paint the third arch with the mustard yellow underglaze. Keep your brush strokes smooth to avoid ridges. -
Final Arch Layer:
For the smallest, innermost arch, switch back to the mauve or use a slightly darker terracotta shade if you have it. -
Add Speckles (Optional):
If your base glaze didn’t have speckles, flick a toothbrush loaded with thinned brown iron oxide or underglaze over the mug now. -
Detail the Face:
Switch to your finest detail brush (size 00) and black underglaze. Carefully paint the tiny, simple smile curve centered under the rainbow.
Crawling Glaze?
If the glaze pulls back to show bare clay after firing, it was likely applied too thickly or there was dust on the bisque. Wipe carefully next time.
Step 4: Firing
-
Final Dry:
Let the decorated mug dry completely, preferably overnight, to ensure all moisture has evaporated from the clay body. -
Stilt and Load:
Wipe the bottom of the foot ring with a damp sponge to remove any glaze so it won’t stick to the kiln shelf. Place on a stilt if necessary. -
Fire to Temperature:
Fire the mug in the kiln according to the specific cone temperature required by your clay and glaze combination (usually Cone 5 or 6 for stoneware). -
Cool Down:
Allow the kiln to cool naturally before opening. Removing the piece too early can cause thermal shock and cracking.
Now you have a charming, handmade vessel ready to hold your favorite warm beverage