When you want easy easy clay ideas, you’re really looking for quick little wins—tiny projects that feel doable even if you’ve never touched clay before. I pulled together my favorite super-simple designs that start from basic shapes (balls, coils, and pinch pots) so you can make something adorable fast.
Smiley Pinch-Pot Trinket Dish
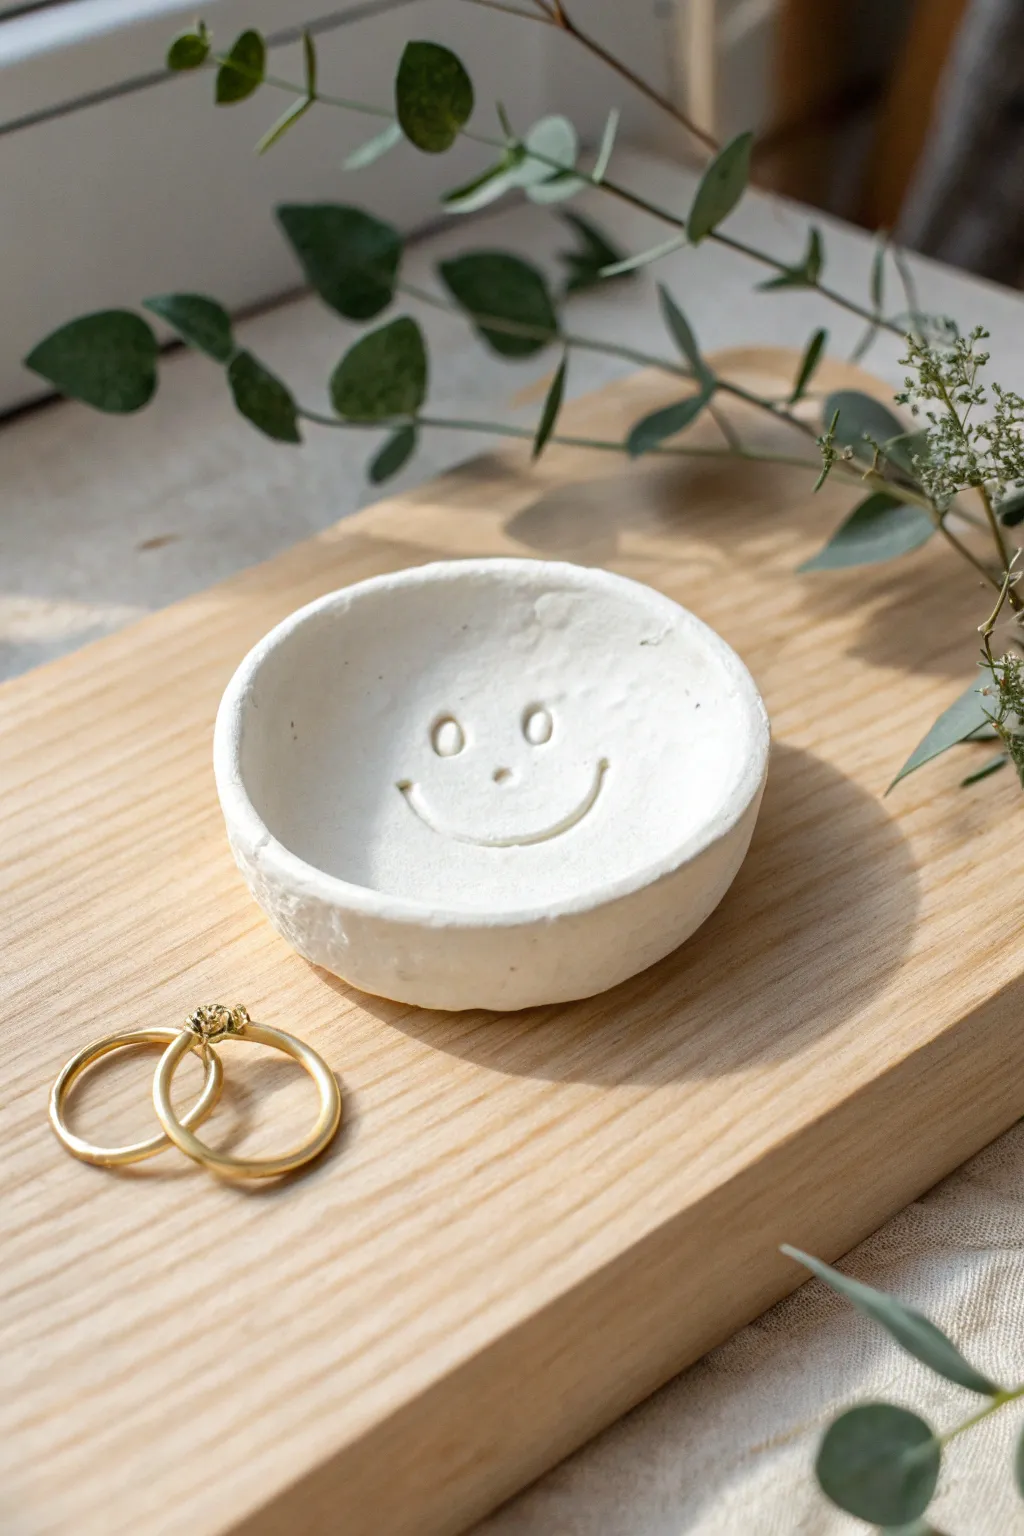
Brighten up your bedside table with this charming little catch-all tray for your favorite rings and studs. Made from simple air-dry clay, its cheerful face adds a touch of whimsy to your jewelry organization.
Step-by-Step Tutorial
Materials
- White air-dry clay (or polymer clay)
- Small bowl of water
- Rolling pin (optional)
- Small rounded sculpting tool or the end of a paintbrush
- Needle tool or toothpick
- Fine-grit sandpaper
- Clear matte varnish or acrylic sealer
Step 1: Forming the Base
-
Prepare the clay:
Start by taking a chunk of white clay roughly the size of a golf ball. Knead it in your hands for a minute to warm it up and make it pliable, removing any air bubbles. -
Create a sphere:
Roll the clay between your palms until you have a smooth, even ball. Try to smooth out any major cracks or lines at this stage. -
Start the pinch:
Hold the ball in one hand and gently press your thumb into the center, going about halfway down. Don’t push all the way through to the bottom. -
Shape the walls:
Using a pinching motion with your thumb on the inside and fingers on the outside, slowly rotate the ball while gently pressing the clay walls outward and upward. -
Flatten the bottom:
Once the basic bowl shape is formed, gently tap the bottom of the pot against your work surface. This creates a stable, flat base so it won’t wobble. -
Refine the rim:
The rim in the photo has a slightly organic, uneven feel, but you want it smooth. Dip your finger in a little water and run it along the edge to soften any sharp cracks.
Smooth Operator
Keep a damp sponge nearby while working. If the clay starts cracking at the rim, dab it lightly with the sponge rather than soaking it, which can make walls collapse.
Step 2: Adding the Smile
-
Smooth the interior:
Before adding the face, ensure the inside bottom of the dish is relatively flat and smooth. You can use a little water on your finger to buff out fingerprints. -
Attach the eyes:
Take two tiny pinch-sized bits of fresh clay and roll them into small, oval-shaped seeds. These will be the eyes. -
Secure the eyes:
Press these small ovals gently onto the interior surface of the dish. To ensure they stick, you can score the back slightly or use a tiny dab of water as glue. -
Indent the pupils:
Using the blunt end of a paintbrush or a small ball tool, press directly into the center of each eye oval to create a hollowed-out look. -
Form the nose:
Take an even smaller speck of clay, roll it into a tiny ball, and press it right in the center for the nose. It should be subtle. -
Create the smile rope:
Roll a very thin, short snake or ‘worm’ of clay on your table. It should be thin enough to look delicate but thick enough to manipulate. -
Apply the smile:
Arc the clay rope into a ‘U’ shape and press it onto the dish below the nose. Gently smooth the ends into the base clay so they don’t peel up later. -
Final smooth:
Do a final check over the whole piece. I always use a wet finger to smooth the exterior walls one last time to get that soft, matte look.
Cracks Happen
If you see hairline cracks after drying, mix a tiny bit of fresh clay with water to make a paste (slip). Fill the crack, smooth it, and let it dry again.
Step 3: Finishing Touches
-
Let it dry:
Place your dish in a safe, dry spot away from direct heat. Let it air dry for at least 24-48 hours until it is completely white and hard. -
Sand imperfections:
Once fully dry, take fine-grit sandpaper and gently rub away any rough spots on the rim or the outside. Be careful not to sand off the facial features. -
Dust off:
Wipe the dish down with a dry cloth or a soft brush to remove the white clay dust created by sanding. -
Seal the piece:
Apply a coat of clear matte varnish or acrylic sealer. This protects the clay from moisture and dirt while keeping that natural, unglazed appearance.
Place your favorite rings inside and enjoy the happy little face greeting you every morning


Mini Heart Ring Dish
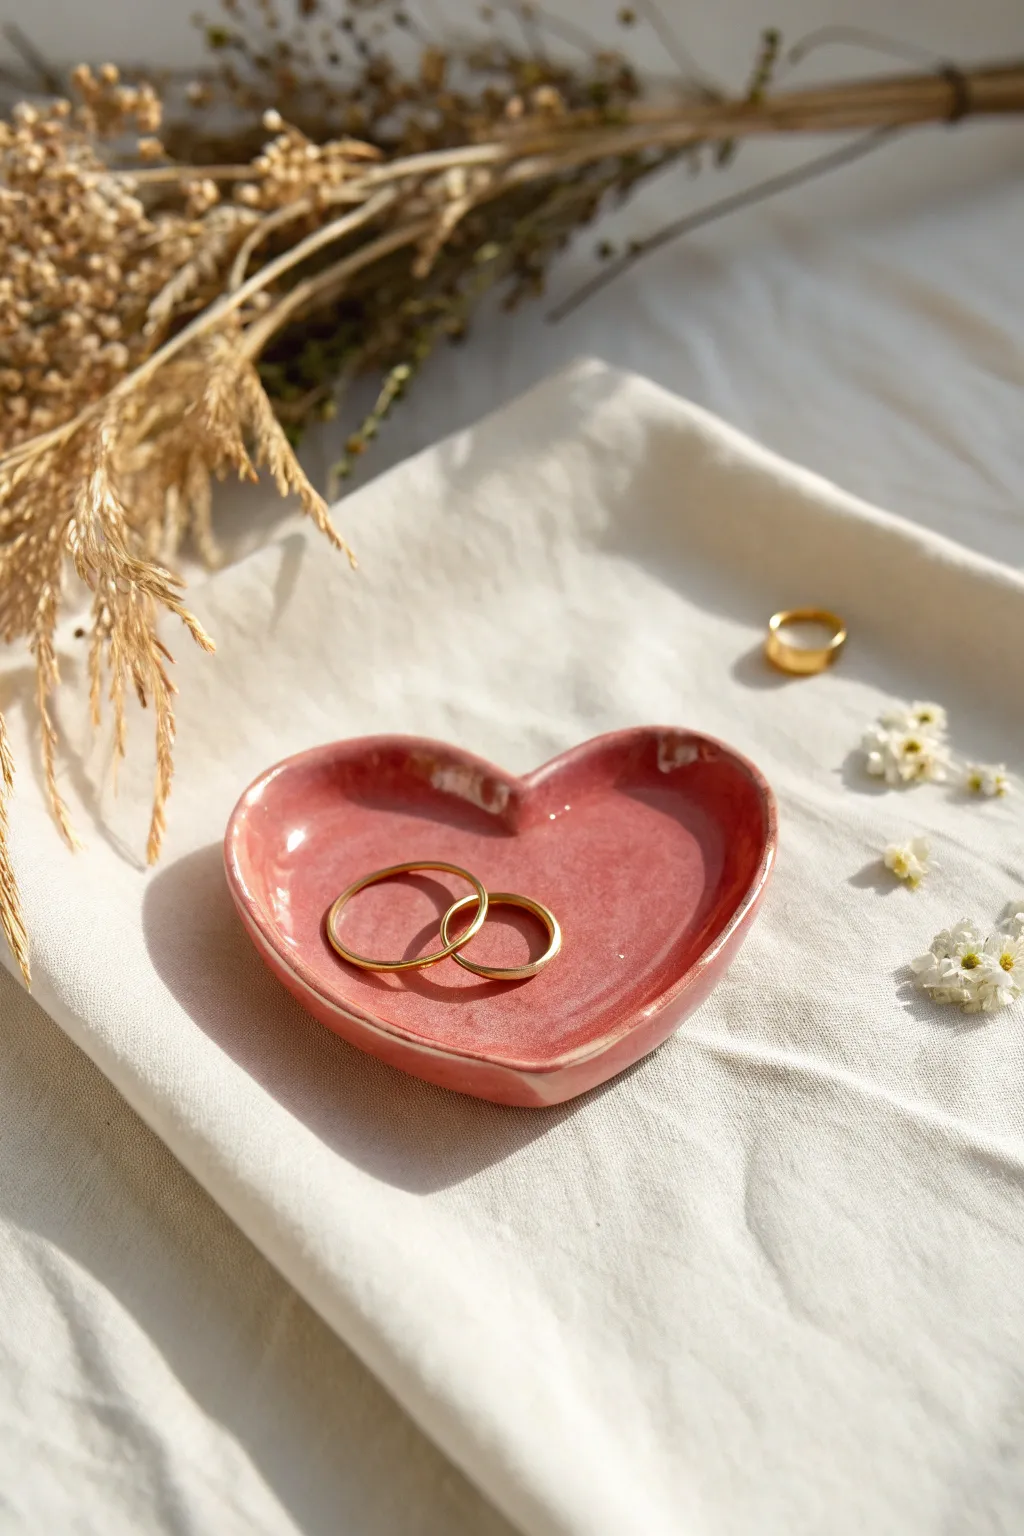
This charming little catch-all is the perfect beginner project for housing your favorite rings or trinkets. With its organic edges and glossy, speckled pink finish, it looks like a boutique ceramic find but is easily made at home.
Detailed Instructions
Materials
- Air-dry clay (white) or polymer clay
- Rolling pin or smooth jar
- Heart-shaped cookie cutter (medium size) or paper template
- Small bowl of water
- Fine-grit sandpaper
- Acrylic paint (dusty rose or coral pink)
- High-gloss varnish or glaze (polyurethane or resin recommended for that ceramic look)
- Small paintbrush
- Palette or wax paper
- Optional: Gold paint for rim accents
Step 1: Shaping the Base
-
Condition the clay:
Start by taking a golf-ball-sized amount of clay and kneading it in your hands until it becomes warm, soft, and pliable. This prevents cracks later on. -
Roll it out:
Place the clay on a clean, flat surface. Use your rolling pin to flatten it into an even slab, aiming for a thickness of about 1/4 inch (6mm). Avoid going too thin, or the dish will be fragile. -
Cut the shape:
Press your heart-shaped cookie cutter firmly into the clay slab. If you don’t have a cutter, place a paper template on top and trace around it carefully with a craft knife. -
Soften the edges:
Dip your finger into a little water and gently run it along the cut edges of the heart to smooth out any sharpness or roughness left by the cutter.
Cracks appearing?
If tiny cracks appear while shaping, your clay is too dry. Dip your finger in water and smooth a ‘slurry’ of clay over the crack to fill and bond it.
Step 2: Forming the Dish
-
Create the curve:
Pick up the clay heart carefully. Gently pinch and pull the edges upward with your thumbs and forefingers to create a raised rim. -
Smooth the interior:
While holding the shape, use a wet finger to smooth the inside curve where the wall meets the base, ensuring there are no deep creases. -
Refine the rim:
Work your way around the heart’s perimeter. I like to gently manipulate the rim to be slightly uneven for that organic, handmade ceramic look seen in the photo. -
Check the profile:
Set the dish down on your surface to ensure the bottom is flat and stable. If it rocks, tap it gently against the table to flatten the base. -
Dry completely:
Set the piece aside in a safe spot. Allow it to dry for at least 24-48 hours. Turn it over halfway through the drying process to ensure the bottom dries evenly.
Pro Tip: Drying Shape
To get a perfect gradual curve, dry your clay heart inside a plastic-wrap-lined bowl. Gravity will gently pull the clay down as it dries.
Step 3: Decorating and Finishing
-
Sand imperfections:
Once fully dry and hard, use fine-grit sandpaper to buff away any fingerprints or rough bumps on the rim and surface. Wipe away the dust with a slightly damp cloth or paper towel. -
Apply base color:
Paint the entire dish—top, bottom, and sides—with your chosen dusty rose acrylic paint. You may need two thin coats for full opacity, letting the first Coat dry before adding the second. -
Add texture (optional):
To mimic the speckled stoneware look in the image, dip a toothbrush in slightly diluted white or dark brown paint and flick the bristles to create tiny speckles across the pink surface. -
Glaze the interior:
Once the paint is bone dry, apply a thick, flood coat of high-gloss varnish to the inside of the dish. This creates that ‘wet’ ceramic appearance. -
Seal the exterior:
Apply a coat of sheen or gloss varnish to the outside and bottom to protect the paint and give the whole piece a finished feel. -
Accent the rim:
For extra definition, use a very fine brush to add a touch more gloss or a subtle lighter pink highlight specifically along the raised rim of the heart. -
Final cure:
Let the varnish cure completely according to the manufacturer’s instructions (usually 24 hours) before placing any jewelry inside.
Now you have a sweet, glossy spot to keep your rings safe and stylish


No-Fail Coil Bowl
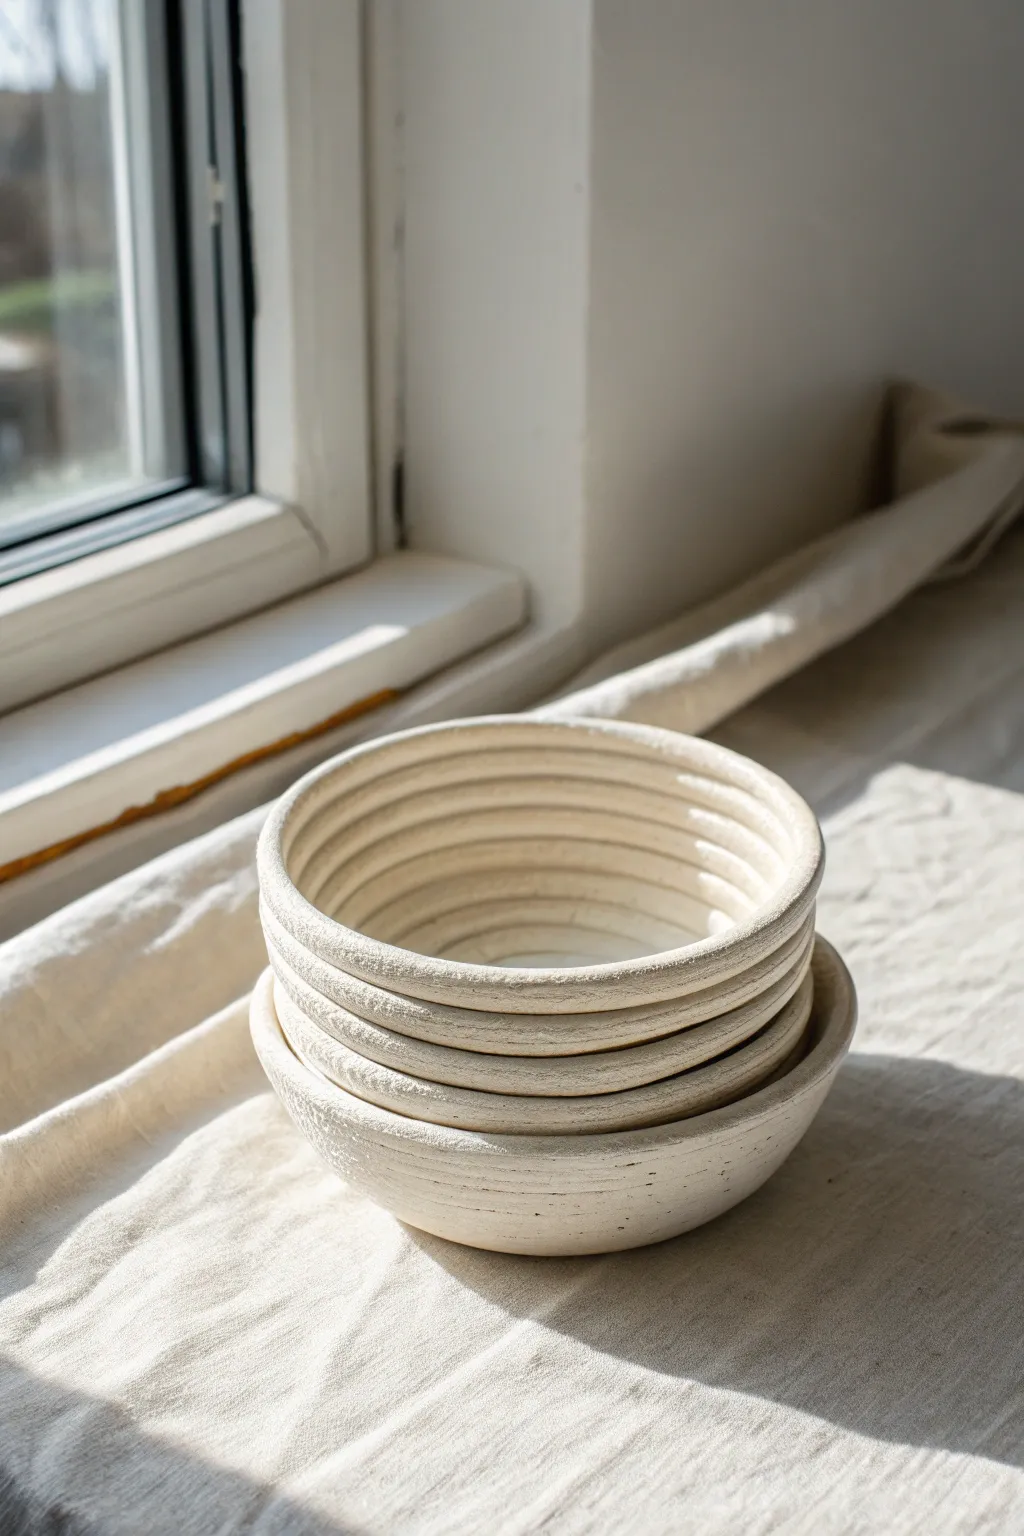
Embrace the imperfect beauty of hand-building with this textured coil bowl project. The distinct spiraled ridges create a wonderful tactile quality, highlighted by a clean white finish that looks stunning in natural light.
How-To Guide
Materials
- White sculpting clay (air-dry, polymer, or ceramic)
- Slip or water (depending on clay type)
- Small sponge
- Rolling pin (optional)
- Plastic wrap
- Serrated rib tool or fork
Step 1: Creating the Base
-
Prepare your clay:
Wedge or knead your white clay until it is soft, pliable, and free of air bubbles. -
Form the starting slab:
Take a small ball of clay (about the size of a lime) and flatten it onto your work surface. You can use a rolling pin or just pat it out with your palm. -
Cut the base:
You want a circle about 3 inches across. Use a round cookie cutter or trace around a jar lid with a needle tool to cut a perfect circle for the bottom. -
Score the edges:
Using a serrated tool or an old fork, rough up the very outer perimeter of your circle base. This scratch-texture helps the first coil grab on tightly.
Keep it Even
Roll coils with your palms, not your fingers. Move hands from the center outward to avoid creating flat spots or ‘thumping’ noises when rolling.
Step 2: Building the Walls
-
Roll your first coil:
Pinch off a chunk of clay and roll it on the table into a long snake. Try to keep the thickness even, aiming for the width of your pinky finger. -
Attach the first ring:
Apply a tiny bit of water or slip to the scored edge of the base. Gently lay your clay coil on top of the scored area, circling the base. -
Secure the join:
Cut the ends of the coil at an angle where they meet, then gently press them together so the ring is continuous. I like to blend the clay downward just on the *inside* bottom seam to anchor it firmly. -
Continue rolling:
Roll out several more long coils, trying to keep them consistent in thickness with the first one. -
Stack upward:
Add water/slip to the top of the previous ring. Place the next coil directly on top. Repeat this process, but don’t smooth the outside or inside walls—we want those horizontal ridges to remain visible. -
Adjust the shape:
To make the bowl wider, place each new coil slightly toward the outer edge of the one below it. To pull it back in, place the coil slightly toward the inner edge.
Step 3: Finishing Touches
-
Check the height:
Build up until you have about 6 to 8 stacked coils, or until the bowl reaches your desired height. The bowl in the inspiration photo is fairly shallow and wide. -
Finish the rim:
Once you’ve placed the final coil, use a damp sponge to gently run over the very top rim. This softens any sharp edges without erasing the coil definition. -
Optional texture enhancement:
If the coils got smushed during building, use a round tool or your finger to gently re-define the grooves between the rings. -
Drying setup:
Place plastic wrap loosely over the bowl. This slows down drying and prevents cracking, especially if using air-dry clay. -
Final cure:
Allow the piece to dry completely (24-48 hours for air-dry). If using polymer clay, bake according to the package instructions. -
Surface finish:
If your clay isn’t naturally white, apply two coats of matte white acrylic paint. For a dusty, rustic look seen in the photo, you can lightly sand the dried paint or apply a diluted white wash.
Color Wash Effect
For a vintage look, paint the dried bowl with diluted beige paint, then quickly wipe it off. The color will stay in the coil crevices.
Place your finished bowl on a sunny sill and enjoy the simple, organic vibe it adds to the room


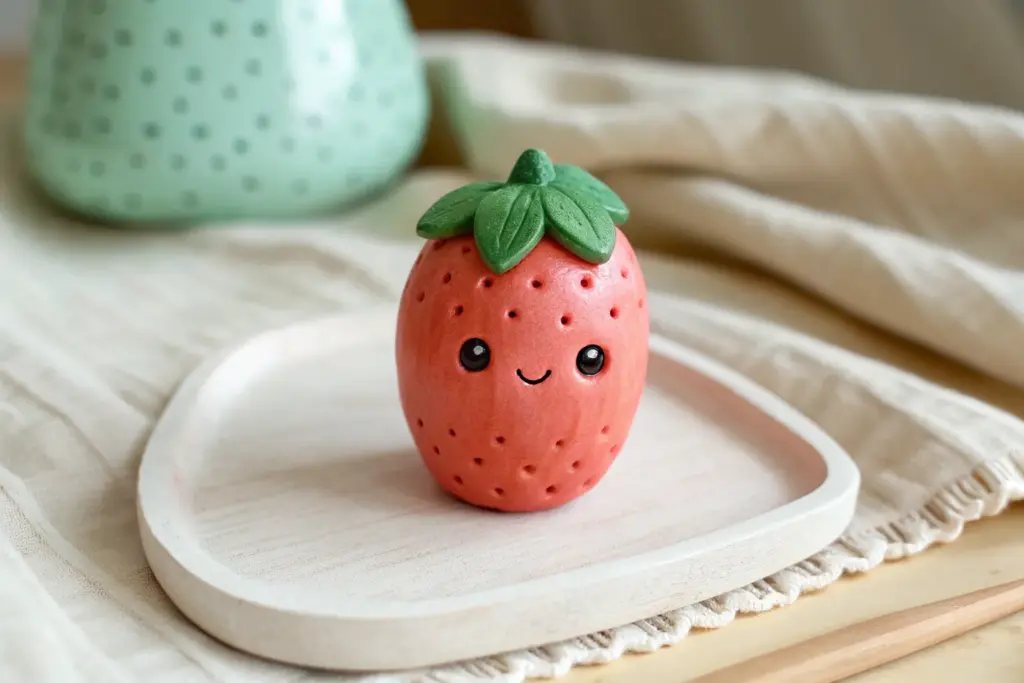
Cute Blob Chick Figure
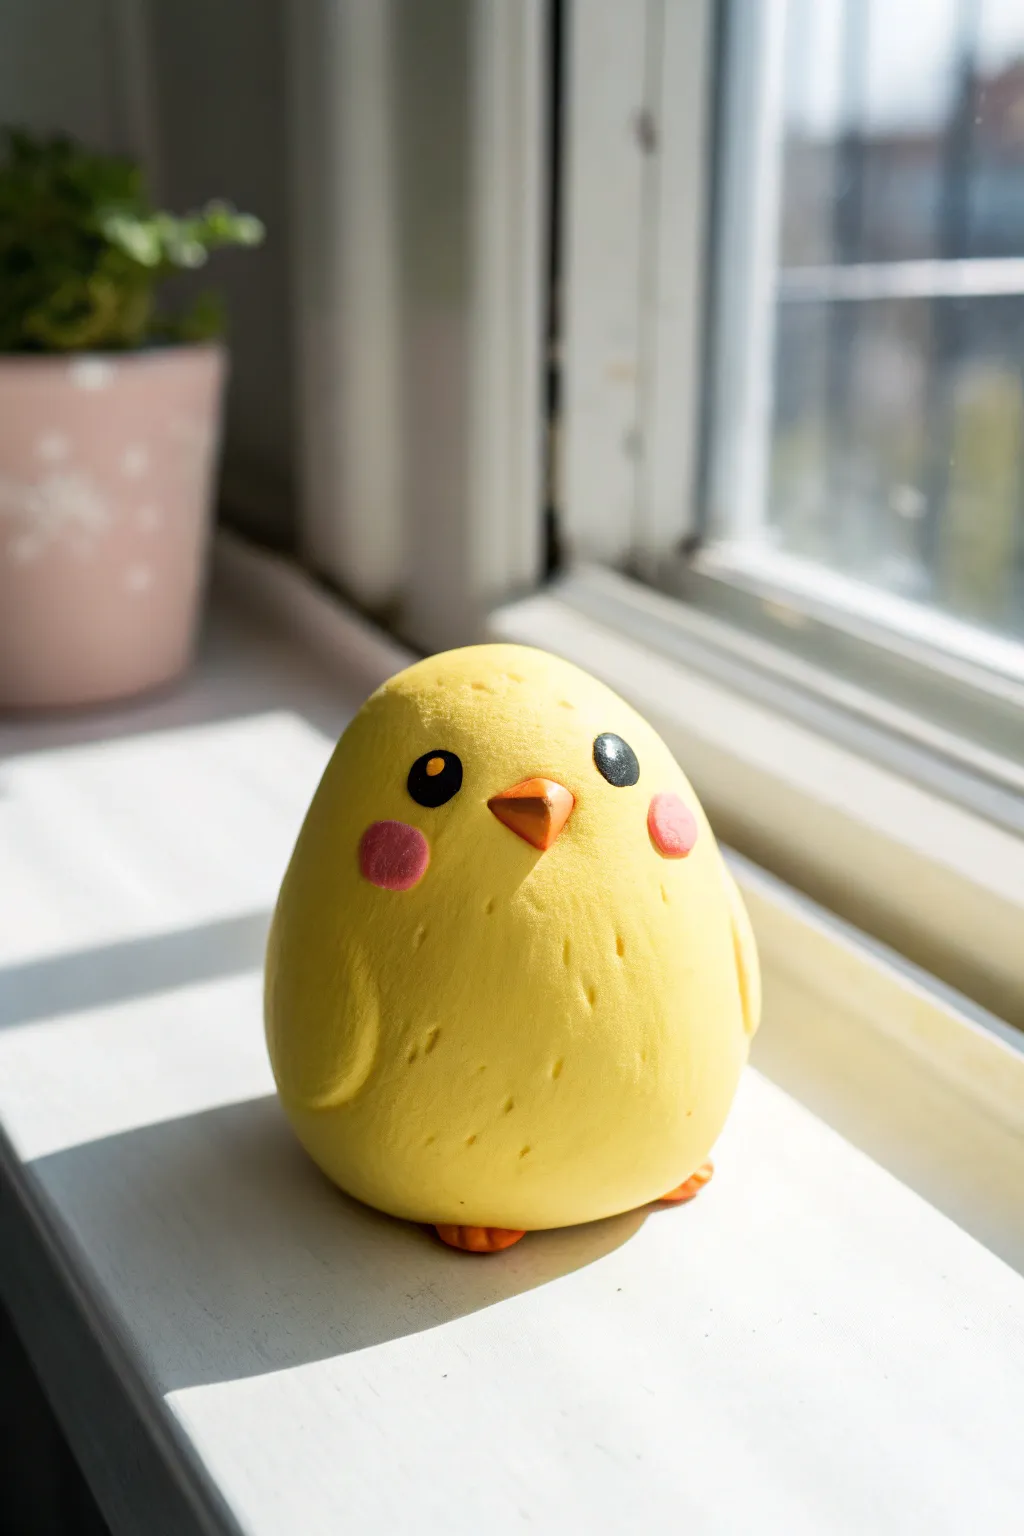
This adorable yellow chick is round, cheerful, and incredibly simple to mold, making it a perfect beginner sculpting project. With its rosy cheeks and tiny beak, it sits sweetly on any windowsill, brightening up the room.
Detailed Instructions
Materials
- Bright yellow polymer or air-dry clay
- Orange clay (small amount)
- Black clay (tiny amount or black acrylic paint)
- Pink clay (small amount)
- White clay or white acrylic paint (tiny dot for eye shine)
- Sculpting tools (or a toothpick)
- Clean work surface
Step 1: Shaping the Base
-
Create the body:
Start with a large ball of yellow clay about the size of a tangerine or golf ball. Roll it until it is perfectly smooth, removing any cracks. -
Refine the shape:
Gently taper the top of the ball slightly to create a subtle egg-like shape, keeping the bottom wide and flat so it sits stably. -
Smooth the surface:
Use your fingers to gently smooth out any fingerprints. If you are using air-dry clay, a tiny drop of water can help polish the surface.
Seamless Blending
To attach wings securely without glue, use a sculpting tool to drag a tiny bit of clay from the wing onto the body, then smooth over the seam.
Step 2: Adding Features
-
Sculpt the wings:
Pinch two small pieces of yellow clay from your stash, flattening them into teardrop shapes. -
Attach the wings:
Press one wing firmly onto each side of the body, blending the upper edge into the main body so it looks like it’s resting naturally against the side. -
Create the beak:
Take a tiny amount of orange clay and roll it into a small cone. Flatten the underside slightly to make a triangular pyramid shape. -
Place the beak:
attach the orange beak to the center of the face, slightly lower than the midline. -
Make the feet:
Form two small, flat ovals from orange clay. Use a sculpting tool or toothpick to indent two lines into each, creating three little toes. -
Attach the feet:
Place the feet underneath the front of the body, peeking out slightly. Press the body down gently to secure them.
Step 3: Details & Texture
-
Add rosy cheeks:
Roll two very small balls of pink clay and flatten them into thin discs. Press these onto the face, spaced widely apart on either side of the beak. -
Form the eyes:
Roll two small balls of black clay. Flatten them gently and press them onto the face above the cheeks. Alternatively, you can paint these on later. -
Add the sparkle:
Place a microscopic dot of white clay on the upper right corner of each black eye to give the chick a lively glint. -
Texture the body:
Taking a needle tool or toothpick, gently make tiny, shallow indentations all over the yellow body to simulate fluffy feathers. -
Check the balance:
Set your figure down on your work surface to ensure it doesn’t tip over. If it leans, gently press the base against the table to flatten it further. -
Final smooth:
I like to do one last check for fingerprints, smoothing them out lightly before the clay sets or goes into the oven. -
Cure or dry:
Bake according to your polymer clay package instructions, or let it air dry for 24-48 hours in a dry spot.
Easter Variation
Before drying, gently press the bottom of the chick into a plastic eggshell half, or sculpt a white jagged ‘broken shell’ hat for its head.
Once dry, your sunny little friend is ready to perch on your desk or windowsill to keep you company

The Complete Guide to Pottery Troubleshooting
Uncover the most common ceramic mistakes—from cracking clay to failed glazes—and learn how to fix them fast.
Fruit Slice Magnets
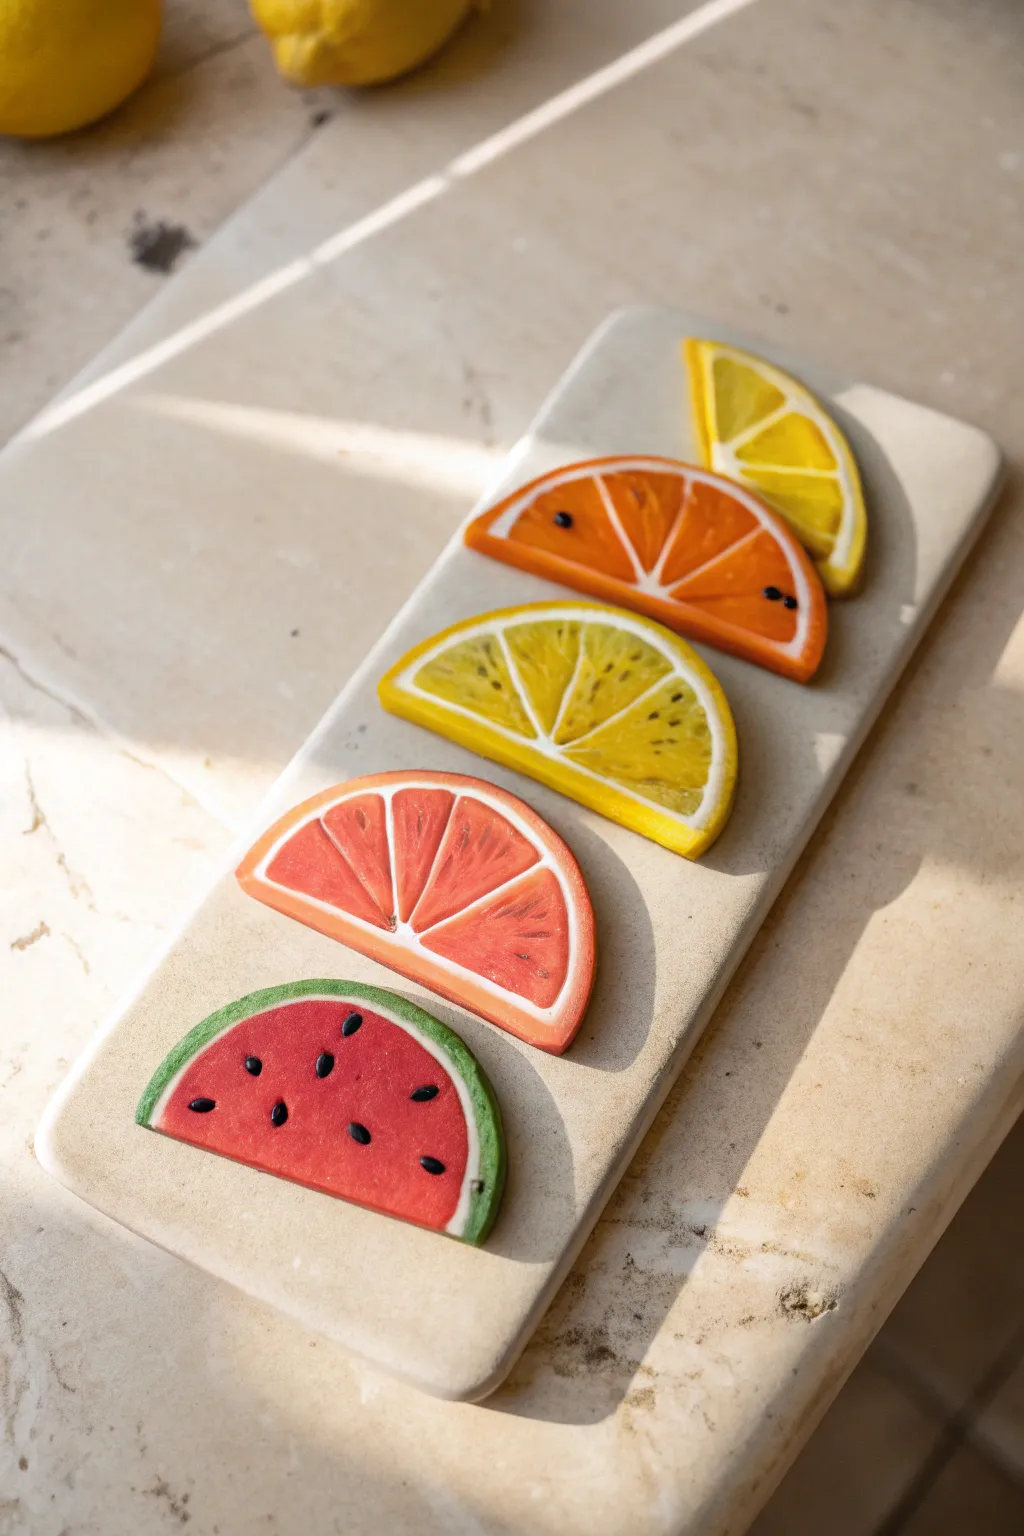
Brighten up your fridge or noticeboard with these juicy, translucent fruit slices made from polymer clay. This project uses the ‘cane’ technique to create realistic segmented details like lemon, orange, grapefruit, and watermelon that look good enough to eat.
Step-by-Step Tutorial
Materials
- Translucent polymer clay (white or uncolored)
- Opaque polymer clay (white, green, yellow, orange, red, pink, black)
- Acrylic roller
- Tissue blade or very sharp craft knife
- Small circle cutter (optional, for shaping)
- Liquid polymer clay (translucent)
- Gloss glaze or UV resin
- Small strong magnets
- Superglue
- Needle tool or toothpick
Step 1: Creating the Citrus Segments
-
Mix translucent colors:
Start by mixing translucent clay with a tiny amount of colored clay (yellow for lemon, orange for orange fruit, pinkish-orange for grapefruit). You want the clay to remain mostly see-through when baked, so use the pigment sparingly. -
Form the juicy center:
Roll your tinted translucent clay into a thick log. This will become the meaty part of the fruit segments. -
Wrap in pith:
Roll out a thin sheet of opaque white clay. Wrap this sheet fully around your translucent colored log, smoothing the seam so it disappears. This white layer represents the pith between segments. -
Shape the cane:
Squeeze and stretch the log (a process called reducing) until it makes a long, thin snake. Cut this long snake into 6 to 8 equal lengths. -
Assemble the wedges:
Pinch one side of each small log to turn the round cross-section into a teardrop or wedge shape. Arrange these wedges in a circle with the pointy white ends meeting in the center.
Smudged Colors?
If your segment lines look messy, your clay was likely too soft. Pop the cane in the fridge for 20 minutes before slicing to get crisp, sharp cuts.
Step 2: Building the Rind and Slicing
-
Fill the gaps:
Place a very thin snake of translucent clay in the center hole where the wedges meet to keep the structure solid. -
Wrap the outer pith:
Roll another sheet of opaque white clay and wrap it around your assembled circle of wedges. This creates the inner white rind. -
Add the zest layer:
Roll a sheet of the matching opaque fruit color (yellow, orange, or pinkish-red). Wrap this final layer around the white cylinder to create the fruit skin. -
Reduce the cane:
Gently squeeze and roll the large cylinder to reduce its diameter. Start from the middle and work outward to avoid distorting the pattern inside. Aim for a diameter of about 1.5 to 2 inches. -
Texture the inside:
Slice the cane into thick cookies (about 1/4 inch). Before baking, I prefer to use a needle tool to gently scratch tiny radial lines into the translucent segments for a realistic fibrous texture. -
Create seeds:
For the orange and lemon, place tiny teardrops of white clay near the center. For the watermelon, press small teardrops of black clay into the pink flesh.
Make It Juicy
Add a tiny drop of liquid translucent clay on top of the ‘seeds’ before baking. It creates a realistic wet pocket around the seed!
Step 3: Special Steps for Watermelon
-
Simplify the watermelon:
Instead of segments, form a large log of solid translucent red/pink clay. Wrap it in white clay, then wrap that in a layer of dark green clay. -
Add rind stripes:
Apply very thin, random strips of lighter green clay over the dark green skin and roll smooth to mimic watermelon stripes. -
Cut into semi-circles:
Slice your round watermelon cane into discs, then cut each disc purely in half to create the classic slice shape.
Step 4: Finishing Touches
-
Bake the clay:
Place your slices on a ceramic tile or baking sheet lined with parchment paper. Bake according to your specific clay brand’s instructions (usually around 275°F/135°C for 15-30 minutes). -
Cool and clean:
Let the pieces cool completely. If there are any fingerprints, lightly sand the surface with fine-grit sandpaper. -
Apply gloss:
Brush a layer of gloss glaze or UV resin over the fruit flesh areas (avoiding the rind if you want a matte contrast). This makes the translucent clay pop and look wet. -
Attach the magnets:
Flip the slices over. Apply a drop of superglue to the back and press a strong magnet firmly into place. -
Final cure:
Allow the glue (and resin, if used) to fully cure before placing your new fruit magnets on the fridge.
Enjoy your refreshing new decor that brings a permanent slice of summer to your kitchen
Peas in a Pod Charm
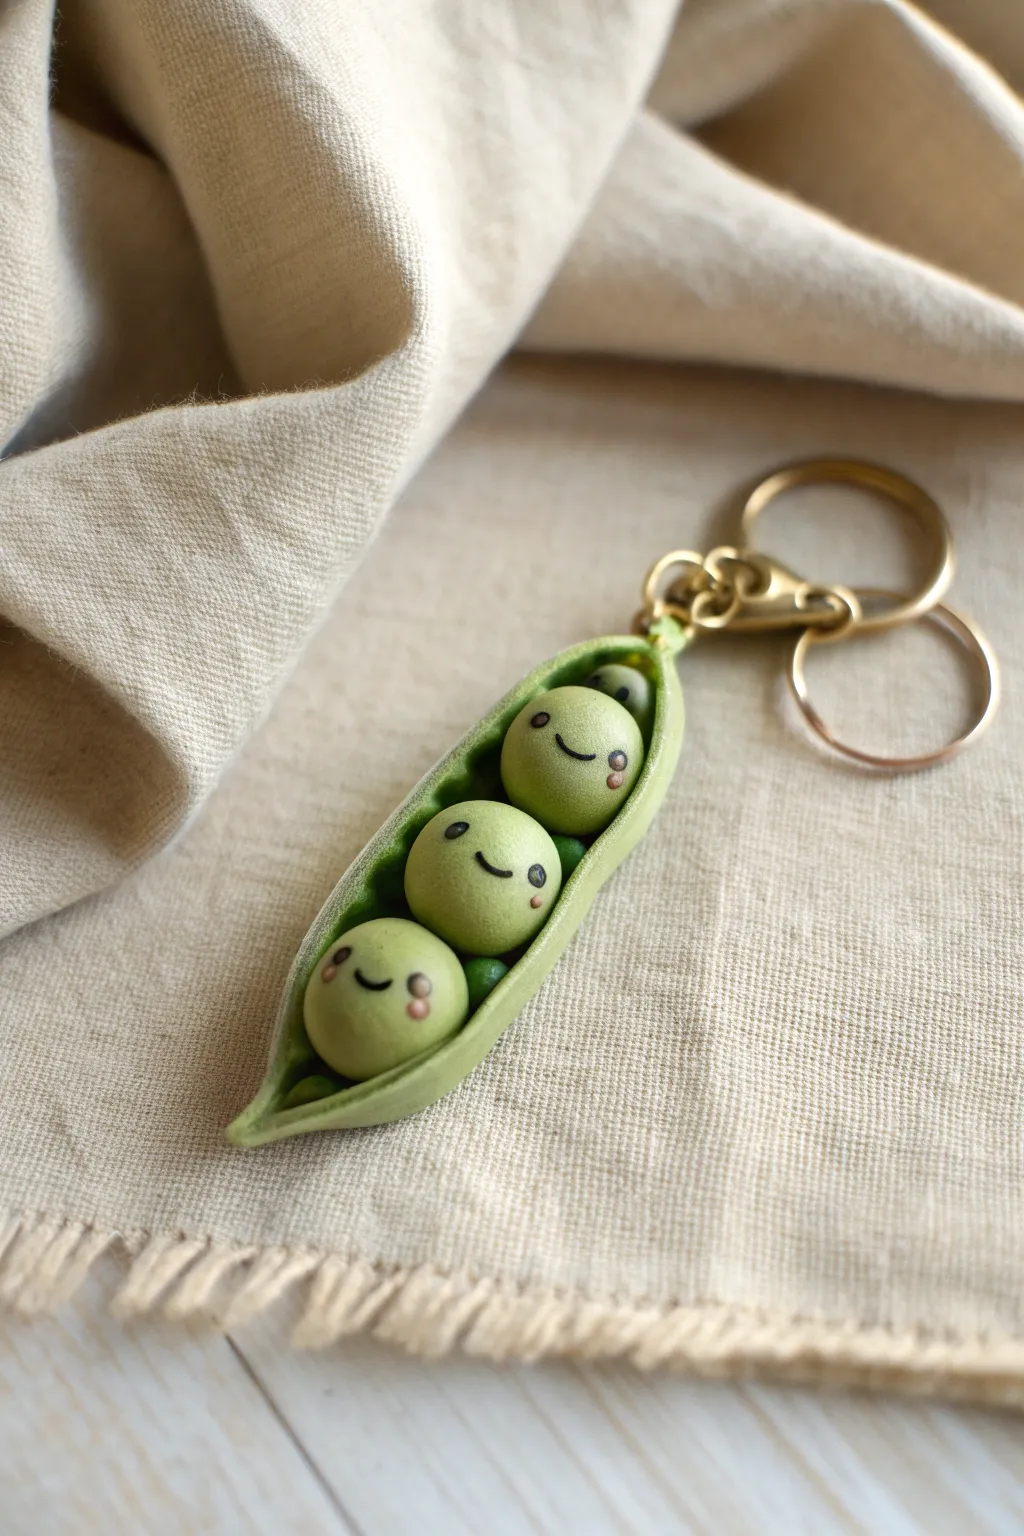
These happy little peas nestled in their snug green pods are the perfect beginner sculpting project. With their tiny smiles and rosy cheeks, they make for an adorable keychain or a sweet gift for a best friend or sibling.
Detailed Instructions
Materials
- Polymer clay (light green, medium green, black, white, and pink)
- Eye pin or screw eye
- Keychain hardware (gold or brass tone)
- Needle tool or toothpick
- Ball stylus tool (small)
- Oven for baking
- Gloss glaze (optional)
Step 1: Shaping the Peas
-
Mix the pea color:
Start by conditioning your light green clay. If it’s too bright, mix in a tiny speck of brown or white to get that natural, soft vegetable green tone shown in the photo. -
Roll the spheres:
Divide your light green clay into three equal portions. Roll each one into a perfect, smooth sphere about the size of a marble. Smooth out any fingerprints. -
Add rosy cheeks:
Take the tiniest specks of pink clay and roll them into microscopic balls. Press two onto each pea face, flattening them slightly to create blushing cheeks. -
Create the eyes:
Using black clay, roll tiny balls for the eyes. Gently press them onto the face above the cheeks. For a cute look, place them slightly wide apart. -
Add highlights:
To make the eyes sparkle, take a needle tool and place a minuscule dot of white clay on the upper corner of each black eye. -
Sculpt the smiles:
Use a needle tool or a small blade to gently impress a small, curved smile between the cheeks.
Fixing Smudges
If you smudge black clay onto the green face, don’t panic. Dip a q-tip in a tiny bit of rubbing alcohol or acetone and gently wipe the smudge away before baking.
Step 2: Creating the Pod
-
Prepare the pod clay:
Take your medium green clay (this should be slightly darker than the peas) and condition it until soft. -
Form the log:
Roll the clay into a log shape that is slightly longer than your three peas lined up together. Taper the ends to sharp points. -
Hollow the boat:
Flatten the log slightly, then use your thumb or a modeling tool to create a deep trough or boat shape down the center. It needs to be deep enough to cradle the peas. -
Texture the pod:
I like to gently press a piece of coarse fabric or a toothbrush against the outside of the pod to give it a realistic, organic texture rather than leaving it perfectly smooth. -
Insert the peas:
Gently place your three decorated peas into the pod. Press them down lightly so they bond with the bottom of the pod without distorting their round shape.
Step 3: Assembly and Finishing
-
Shape the enclosure:
Gently curb the walls of the pod inwards around the peas, making them look tucked in. Ensure the pointed ends of the pod curve up slightly for a dynamic look. -
Add the hardware:
Insert an eye pin or screw eye into the top stem of the pod. You may need to add a dab of liquid clay or bake-and-bond to ensure it stays secure. -
Final check:
Look over the piece for any lint or dust and remove it with a piece of tape or a wipe with a bit of rubbing alcohol. -
Bake carefully:
Bake your charm according to the polymer clay package instructions. Usually, this is around 275°F (135°C) for 15-30 minutes. -
Cool and inspect:
Let the piece cool completely before handling. Checking while hot can leave fingerprints or warp the shape. -
Attach keyring:
using needle-nose pliers, open the jump ring on your keychain hardware and attach it to the eye pin loop on your pod. -
Optional glaze:
If you want extra durability or shine, brush a thin layer of polyurethane gloss varnish over the peas (but consider leaving the pod matte for contrast).
Add Personality
Make each pea distinct by giving them different expressions one could be winking, one sleeping with closed eyes, and one laughing with an open mouth.
Clip your new charm onto your keys or backpack and enjoy carrying these little friends wherever you go


What Really Happens Inside the Kiln
Learn how time and temperature work together inside the kiln to transform clay into durable ceramic.
Cloud and Raindrop Minis
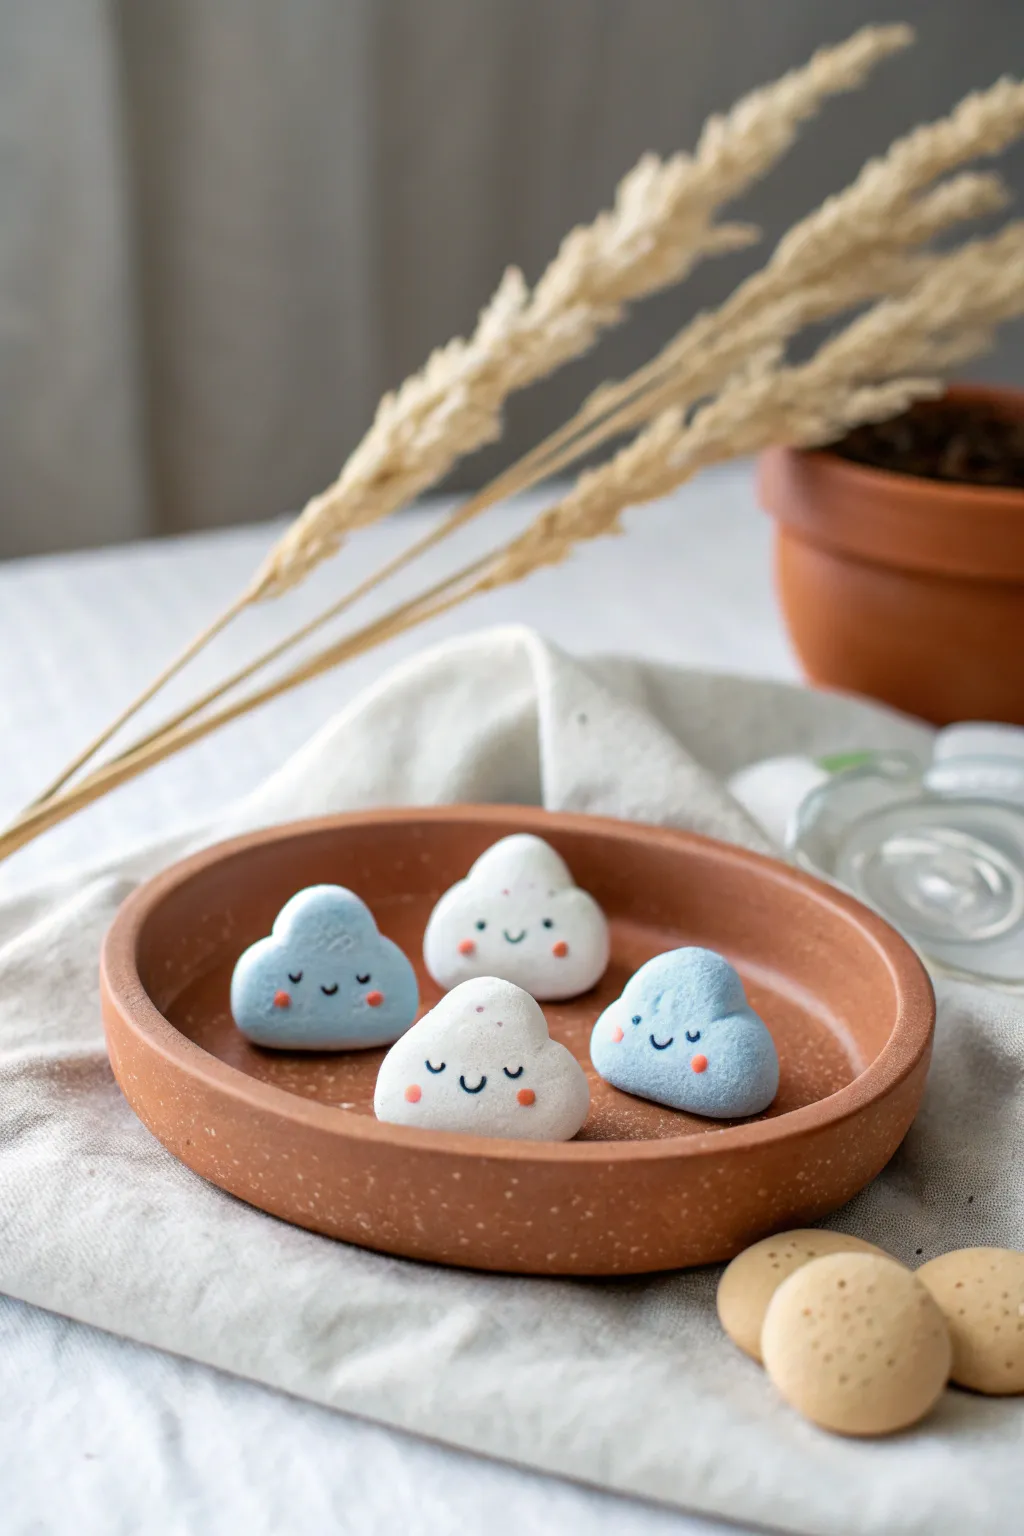
These adorable cloud figurines bring a touch of whimsy to any desk or shelf with their pastel hues and sweet, sleepy expressions. Crafted from smooth polymer clay, their rounded edges and blushing cheeks make them an incredibly soothing beginner project.
How-To Guide
Materials
- White polymer clay
- Light blue polymer clay (or mix white with a speck of blue)
- Black acrylic paint or a fine-tip permanent marker
- Pink acrylic paint or pink chalk pastel
- Small paintbrush (fine detail)
- Clay carving tools or a toothpick
- Smooth rolling pin or acrylic roller
- Baking sheet and parchment paper
- Gloss or matte varnish (optional)
Step 1: Shaping the Clouds
-
Prepare the Clay:
Start by conditioning your white clay until it is soft and pliable. If you want blue clouds, mix a very small amount of blue clay into a larger ball of white clay and knead until the color is a consistent, pale pastel blue. -
Divide Portions:
Break off pieces of clay roughly the size of a walnut. Roll each piece into a smooth ball between your palms to eliminate any cracks. -
Flatten the Base:
Gently press the ball onto your work surface to create a flat bottom. This ensures your little clouds will sit upright without rolling over. -
Form the Shape:
Pinch the top of the clay slightly to form the highest peak of the cloud. Use your thumb to smooth the sides down. -
Create the Bumps:
Using your fingers or a ball-ended tool, gently press indentations into the sides to define the fluffy cloud ‘bumps’. I like to push the clay inwards at the bottom corners to make the shape more distinct. -
Smooth the Edges:
Rub your finger lightly over all the surfaces to soften any sharp angles or tool marks. The goal is a soft, marshmallow-like appearance.
Step 2: Baking and Facial Details
-
Bake the Pieces:
Place your shaped clouds on a baking sheet lined with parchment paper. Bake according to the manufacturer’s instructions for your specific brand of polymer clay. -
Cool Down:
Allow the clouds to cool completely before handling them. The clay hardens as it cools, and painting on warm clay can ruin the finish. -
Paint the Eyes:
Using a very fine paintbrush and black acrylic paint, or a fine-tip marker, draw two small ‘U’ shapes for the closed, smiling eyes. Place them fairly wide apart for a cuter look. -
Add the Mouth:
Paint a tiny, simple curved line centered between the eyes for the smile. Keep the line thin and delicate. -
Create Rosy Cheeks:
Dip a cotton swab or a small brush into pink paint (wipe most of it off first) or rub it against a pink pastel stick. Gently dab this onto the clay just below the outer corners of the eyes. -
Dry the Paint:
Let the facial features dry completely. If you used acrylic paint, this should only take a few minutes. -
Seal the Project:
Apply a thin layer of matte or gloss clay varnish to protect the paint and give the clouds a finished look. This step is optional but helps keep the white clay looking clean over time.
Fingerprint Fix
If you see fingerprints on your raw clay, lightly brush the surface with a little baby oil or cornstarch before baking to smooth them out perfectly.
Make Them Magnets
Before baking, press a small, strong magnet into the flat back of the cloud. Remove it, bake, and then glue the magnet into the indentation.
Arranging these cheerful little clouds together creates a delightful family that brightens up even the gloomiest weather
Stamped Initial Medallions
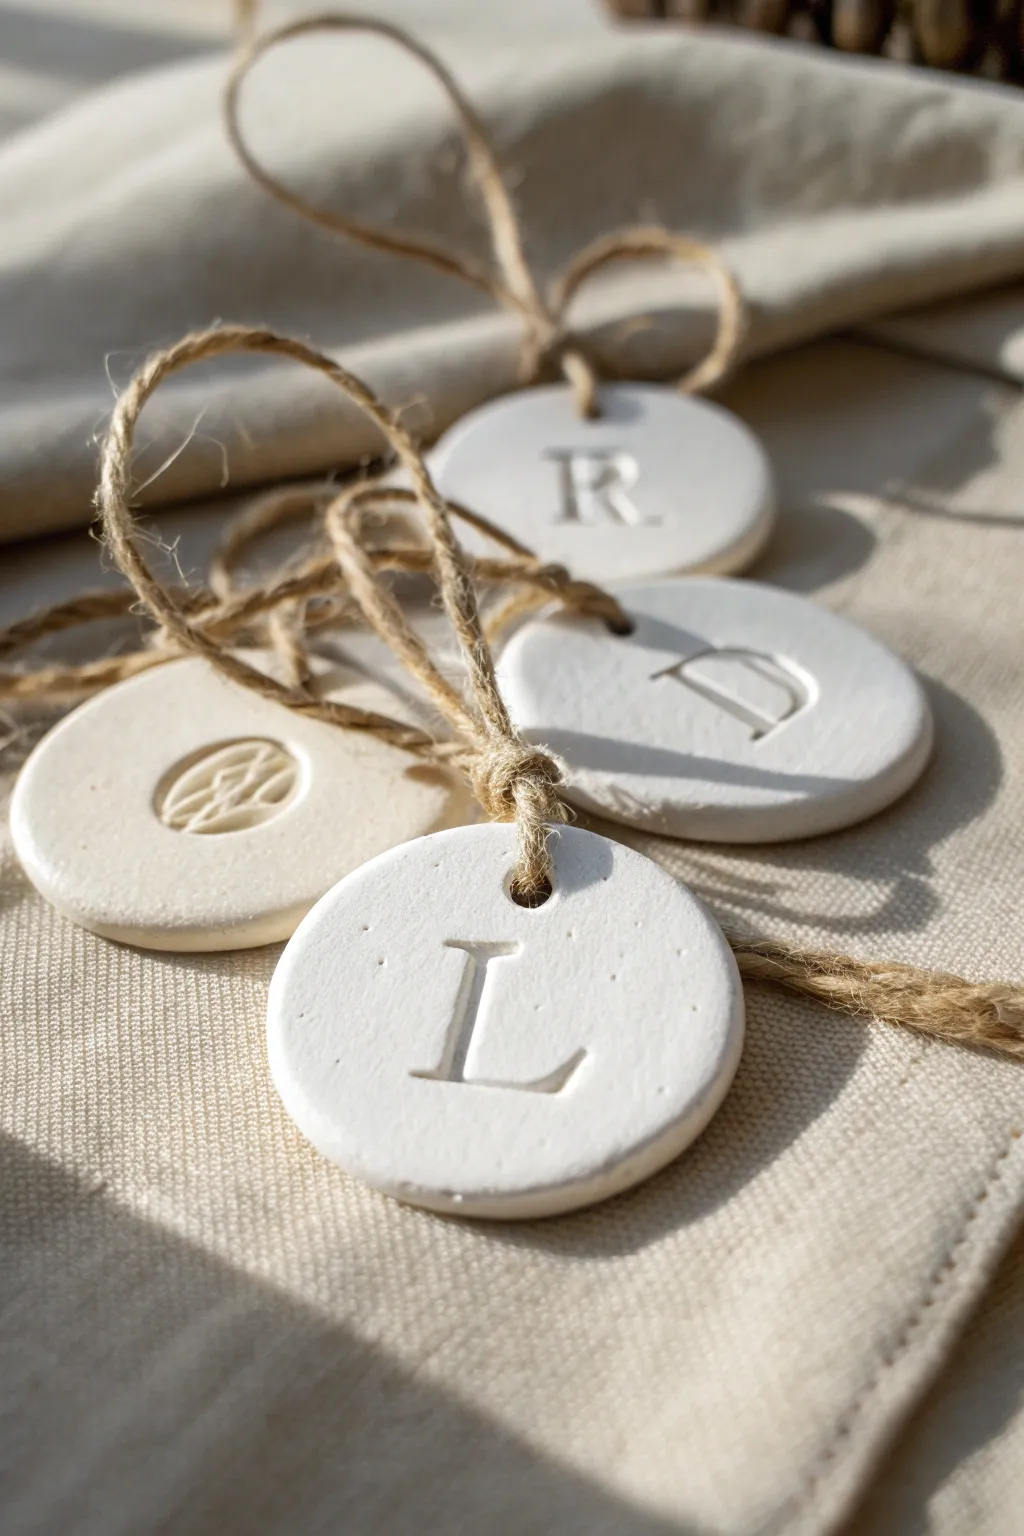
These charming, minimalist clay tags add a personalized touch to gifts, holiday decor, or even place settings. The white matte finish paired with natural jute twine creates a timeless, organic look that is surprisingly simple to achieve at home.
Step-by-Step Guide
Materials
- White styling clay (air-dry or oven-bake)
- Rolling pin
- Parchment paper or canvas mat
- Cookie cutter (round, approx. 2-3 inches)
- Letter stamps or metal alphabet set
- Drinking straw or small circular cutter
- Fine-grit sandpaper
- Jute twine or rustic string
- Scissors
- Clear matte sealant (optional)
Step 1: Prepping and Cutting
-
Prepare your workspace:
Lay down a sheet of parchment paper or a canvas mat on a flat surface. This prevents the clay from sticking and picking up unwanted textures from your table. -
Condition the clay:
Take a handful of your white clay and knead it in your hands for a minute or two until it feels pliable and warm. This helps prevent cracks later on. -
Roll it out:
Place the clay on your work surface and use the rolling pin to flatten it. Aim for an even thickness of about 1/4 inch; too thin and they might break, too thick and they look clunky. -
Cut the shapes:
Press your round cookie cutter firmly into the clay. Give it a slight wiggle before lifting to ensure a clean cut. -
Smooth the edges:
Dip your finger in a tiny bit of water and gently run it around the circumference of the circle to smooth down any rough ridges left by the cutter.
Fixing Cracks
If small cracks appear while drying, mix a tiny bit of fresh clay with water to make a paste. Fill the crack, smooth with a finger, and let dry again.
Step 2: Stamping and Finishing
-
Create the hanging hole:
Take a drinking straw or a very small circular cutter. Press it into the clay near the top edge of the circle (about a half-inch down) to punch out a clean hole for the twine. -
Position your stamp:
Select your letter stamp. Hover it over the center of the medallion to check your alignment before committing to the impression. -
Press the initial:
Press the stamp firmly and evenly into the clay. Be careful not to rock the stamp back and forth, as this can create a double image or uneven edges. Lift it straight up. -
Add decorative elements:
If you want to make the patterned version seen in the photo, use a textured tool or a different stamp to press a design into a separate medallion. -
Let it dry:
Allow the medallions to dry completely. If using air-dry clay, this usually takes 24-48 hours. I like to flip them over halfway through so the bottom dries evenly.
Gilded Touch
Use a small brush to paint liquid gold leaf into the stamped letter groove after the clay is dry for an elegant, high-contrast finish.
Step 3: Assembly
-
Sand imperfections:
Once fully cured, inspect the edges. Use a piece of fine-grit sandpaper to gently buff away any remaining roughness or sharp corners for that soft, professional finish. -
Seal (Optional):
For extra durability, you can brush on a thin layer of clear matte sealant. This preserves the raw look while protecting the clay from moisture. -
Cut the twine:
Cut a length of jute twine, roughly 8 to 10 inches long, depending on where you plan to hang the ornament. -
Thread the loop:
Fold the twine in half. Push the folded loop through the hole in the clay from front to back. -
Secure the knot:
Pass the loose ends of the twine through the loop and pull tight, creating a lark’s head knot that sits securely against the top of the medallion. -
Tie it off:
Knot the two open ends of the twine together to create a hanger.
These personalized tags are now ready to add a custom detail to your next thoughtful gift

TRACK YOUR CERAMIC JOURNEY
Capture glaze tests, firing details, and creative progress—all in one simple printable. Make your projects easier to repeat and improve.
Leaf-Imprint Mini Coasters
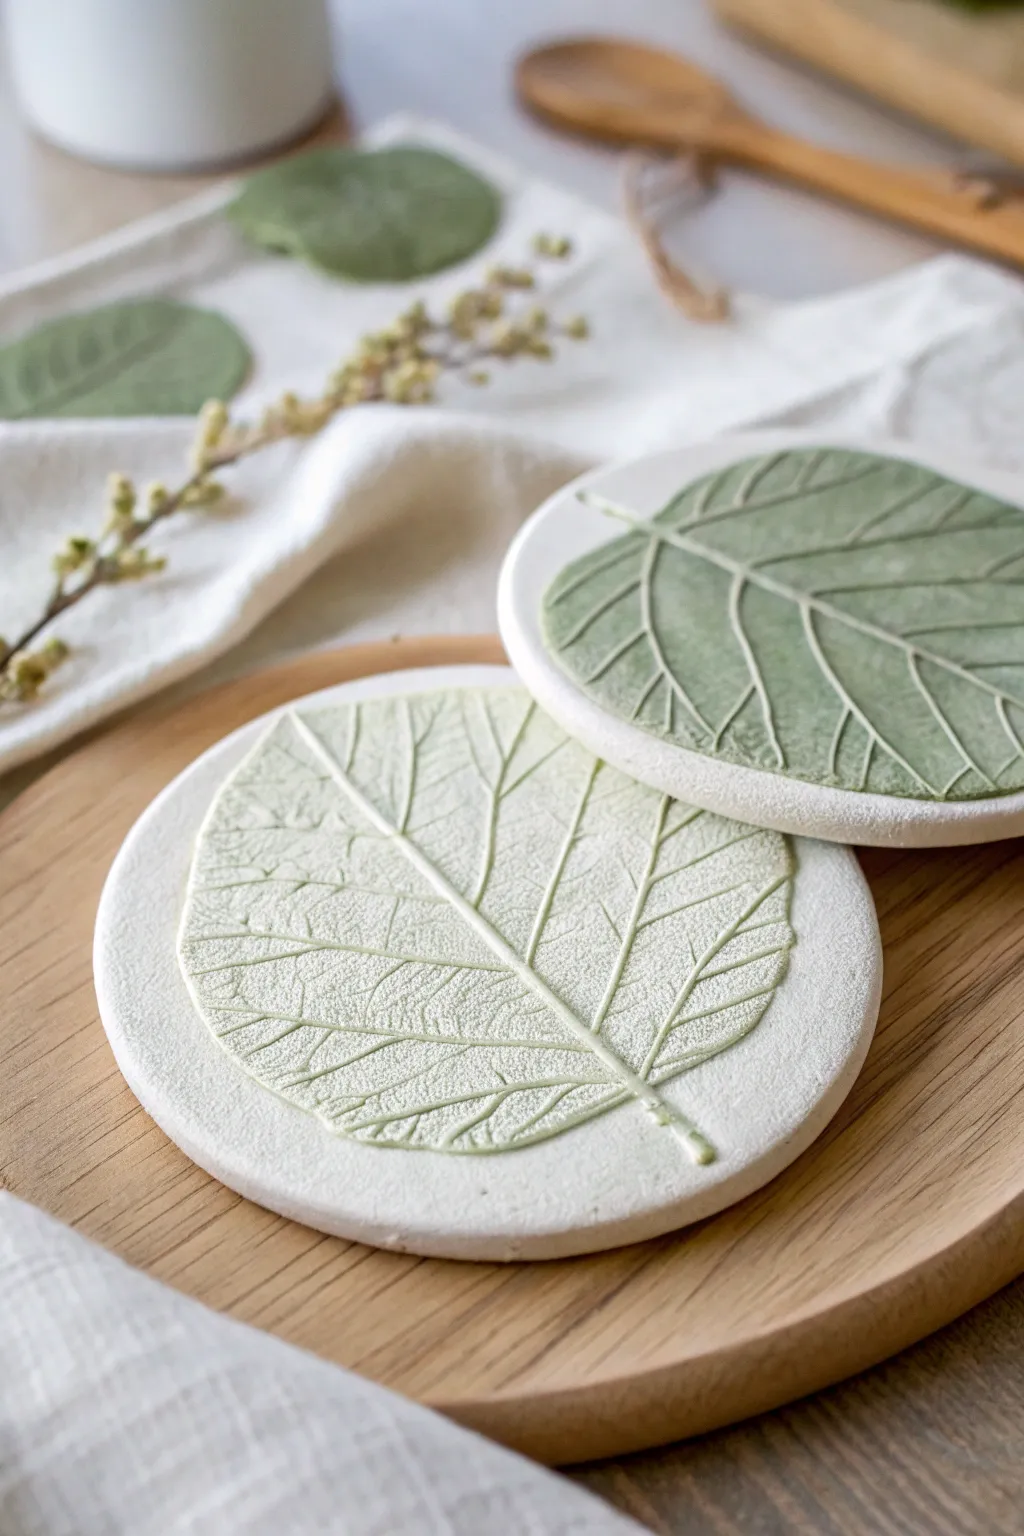
Capture the delicate beauty of nature with these rustic leaf-imprint coasters. By pressing real leaves into soft white clay, you can preserve their intricate vein structures in a functional piece of art that brings a touch of the outdoors to your coffee table.
Step-by-Step
Materials
- White air-dry clay or polymer clay
- Rolling pin
- Fresh leaves with prominent veins (like hydrangea or beech)
- Round cookie cutter (approx. 4 inches) or a bowl to trace
- Craft knife
- Fine-grit sandpaper
- Acrylic paints (pale sage green, deep forest green)
- Small paintbrush or sponge
- Matte sealant or varnish
- Parchment paper or craft mat
Step 1: Preparing the Clay Base
-
Condition the clay:
Start by kneading a generous clearer ball of white clay in your hands until it becomes warm, soft, and pliable. Getting rid of air bubbles now is crucial for a smooth surface later. -
Roll it out:
Place the clay on a sheet of parchment paper to prevent sticking. Use your rolling pin to flatten the clay into an even slab, aiming for a thickness of about 1/4 inch so the coaster is sturdy but not clunky. -
Smooth the surface:
Run your finger or a slightly damp sponge over the surface of the clay slab to remove any fingerprints or rolling marks, ensuring a pristine canvas for your imprint.
Step 2: Creating the Leaf Impression
-
Select and place leaf:
Choose a fresh leaf with thick, raised veins on the back. Place the leaf vein-side down onto the center of your rolled clay slab. -
Embed the leaf:
Gently roll your rolling pin over the leaf once or twice. Applying firm, even pressure helps push the veins deep into the clay without distorting the overall shape. -
Reveal the texture:
Carefully lift the stem and peel the leaf away from the clay. I love this moment—seeing the incredible detail left behind never gets old. -
Cut the shape:
Position your round cutter or bowl over the imprint, framing the leaf design nicely within the circle. Press down firmly to cut the coaster shape. -
Clean edges:
Remove the excess clay from around the circle. Dip your finger in a little water and gently smooth the cut edges of the circle to soften any sharp ridges.
Pro Tip: Vein Visibility
Use leaves found near the bottom of a plant or older leaves; they tend to have tougher, more prominent veins that create a much sharper, deeper impression in the clay.
Step 3: Drying and Finishing
-
Let it dry:
Allow the clay to dry completely according to package instructions. For air-dry clay, this usually takes 24-48 hours. Flip the coaster halfway through to ensure even drying and prevent curling. -
Sand for smoothness:
Once fully cured and hard, use fine-grit sandpaper to buff the edges and the surface lightly, removing any imperfections or roughness. -
Prepare the wash:
Mix a small amount of sage green acrylic paint with water to create a thin, watery wash. You want the paint to be translucent, not opaque. -
Apply color:
Brush the paint wash over the entire indented leaf area. The watery paint will naturally pool into the deep crevices of the veins, darkening them. -
Wipe back:
Immediately use a slightly damp paper towel or sponge to wipe the surface gently. This removes paint from the raised areas while leaving color in the imprinted veins, highlighting the texture. -
Add depth (optional):
For the darker coaster look, repeat the process with a deeper forest green wash, focusing specifically on the central stem and major veins. -
Seal the piece:
Once the paint is dry, apply a coat of matte sealant or varnish. This protects your coaster from moisture and gives it a finished, professional look.
Troubleshooting: Curling Clay
If your coaster edges start to curl upward while air-drying, place a light book or a flat board on top of them during the last few hours of the drying process to weigh them down.
Now you have a set of botanical coasters ready to gift or use in your home
Tiny Bud Vase Magnet
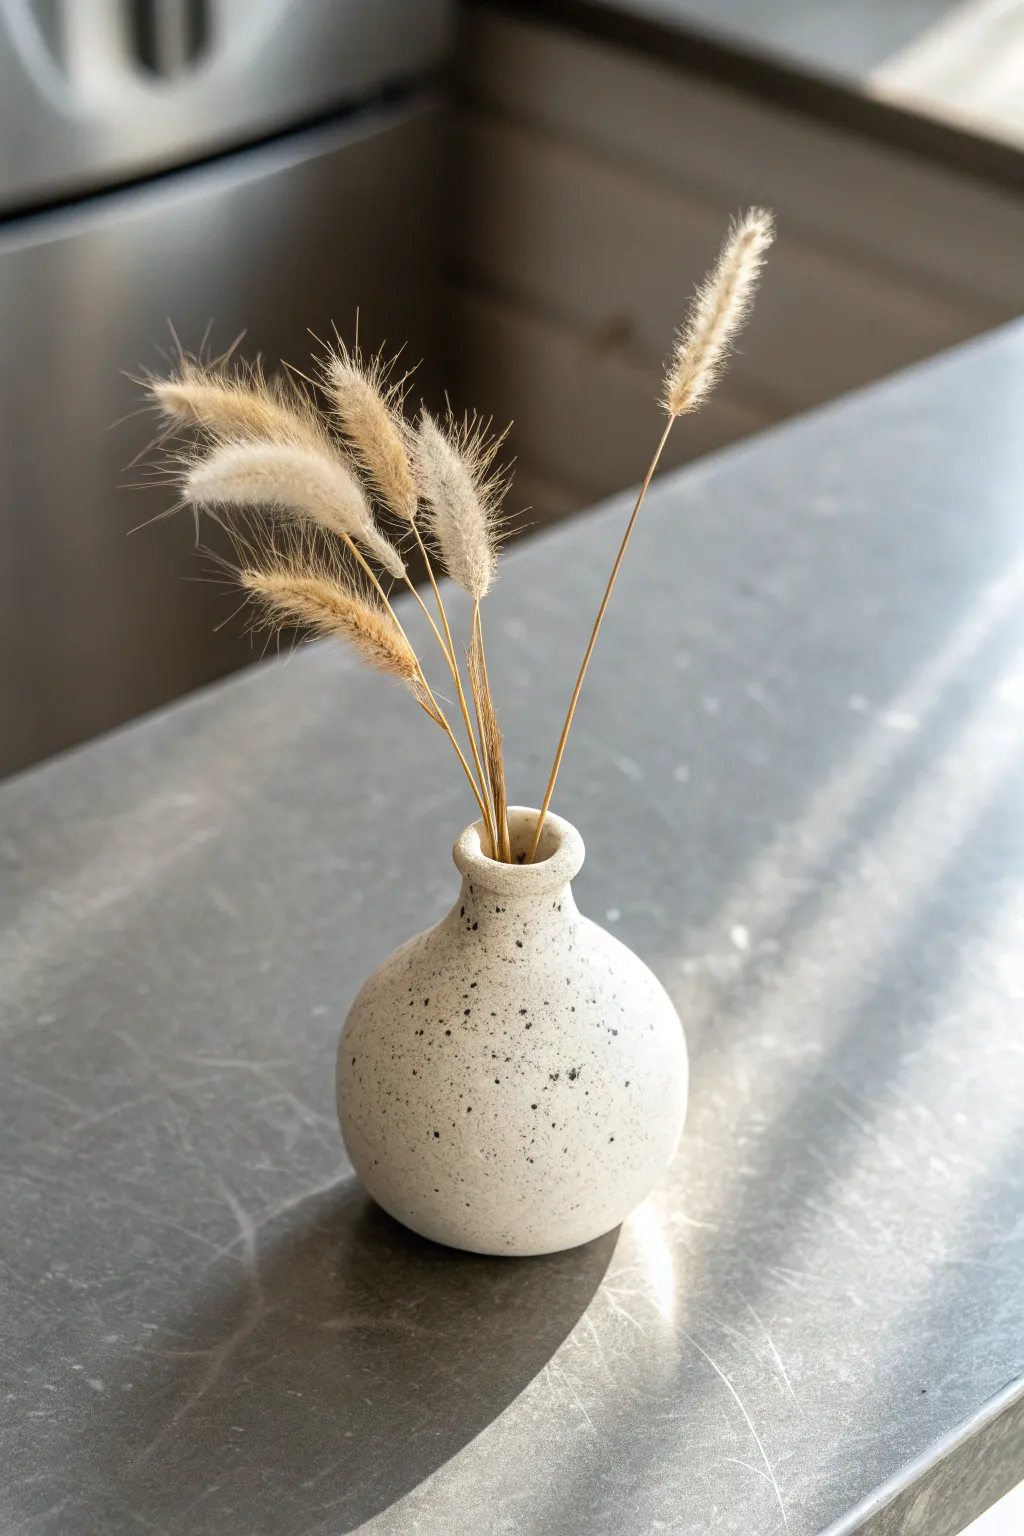
Bring a touch of organic minimalism to your fridge or locker with this tiny, speckled bud vase. This project uses a simple pinch-pot technique and a faux-stone finish to create a high-end ceramic look without a kiln.
Detailed Instructions
Materials
- White polymer clay (or air-dry clay)
- Black pepper or dried coffee grounds
- Small round magnet (strong neodymium recommended)
- Strong craft glue (E6000 or similar)
- Acrylic rolling pin (or smooth glass jar)
- Toothpick or needle tool
- Gloss or satin varnish (optional)
- Fine grit sandpaper
Step 1: Preparing the Clay
-
Condition the clay:
Start by warming a walnut-sized ball of white polymer clay in your hands. Knead it thoroughly until it is soft, pliable, and free of cracks. -
Create the speckled effect:
To achieve that beautiful faux-stone look, flatten your clay ball slightly. Sprinkle a generous pinch of cracked black pepper or dried coffee grounds onto the surface. -
Incorporate the texture:
Fold the clay over the speckles and knead it again. Continue folding and kneading until the black specks are evenly distributed throughout the white clay. -
Form the base shape:
Roll the clay back into a smooth, round sphere. It should be about 1 to 1.5 inches in diameter for a lightweight magnet.
Pepper vs. Sand
Using black pepper creates bigger, bolder organic spots. For a finer, granite-like finish, try mixing in a pinch of black craft sand instead.
Step 2: Shaping the Vase
-
Start the pinch pot:
Hold the sphere in your non-dominant hand. Gently press your thumb into the center of the ball, creating a hollow, but don’t go all the way through the bottom. -
Refine the walls:
Using your thumb and forefinger, gently pinch the walls of the pot, rotating it as you go. Aim for an even thickness, keeping the shape rounded and bulbous at the bottom. -
Narrow the neck:
Instead of widening the opening, start gently pressing the clay inward as you move toward the top to create a bottleneck shape. -
Form the rim:
Once the neck is narrow enough to hold a few stems, gently flare the very top edge outward to create a distinct lip. -
Flatten the back:
Because this needs to sit flush against a magnetic surface, press the back of the vase gently against your work surface to create a flat side. Don’t press too hard, or you’ll distort the front curve. -
Check the opening:
Use a toothpick or the handle of a paintbrush to ensure the neck opening goes deep enough into the vase body to support stems later.
Step 3: Finishing and Assembly
-
Smooth the surface:
Dip your finger in a tiny bit of water (for air dry clay) or baby oil (for polymer clay) and gently smooth out any fingerprints or harsh angled marks. -
Bake or dry:
If using polymer clay, bake according to the package instructions (usually 275°F for 15-30 minutes). If using air-dry clay, let it sit undisturbed for 24-48 hours until fully white and hard. -
Sand for perfection:
Once fully cured and cooled, I like to use a fine-grit sandpaper to briefly buff the surface. This removes any final bumps and makes the ‘stone’ texture look incredibly realistic. -
Seal the piece:
Apply a thin layer of satin or matte varnish if you want to protect the finish, though leaving it raw preserves the stony texture better. -
Attach the magnet:
Apply a dab of strong adhesive to the flat spot on the back of the vase. Press your magnet firmly into the glue. -
Let the glue cure:
Allow the glue to dry completely—usually overnight—before testing the weight. -
Add your greenery:
Trim a few stems of dried bunny tail grass or small wildflowers to size and arrange them in your new miniature vessel.
Fresh Flowers?
Polymer clay generally isn’t watertight. To hold live blooms, hide a small glass vial or straw segment inside the clay body while shaping.
You now have a charming piece of functional art ready to organize your notes
Face Mini Planter Pot
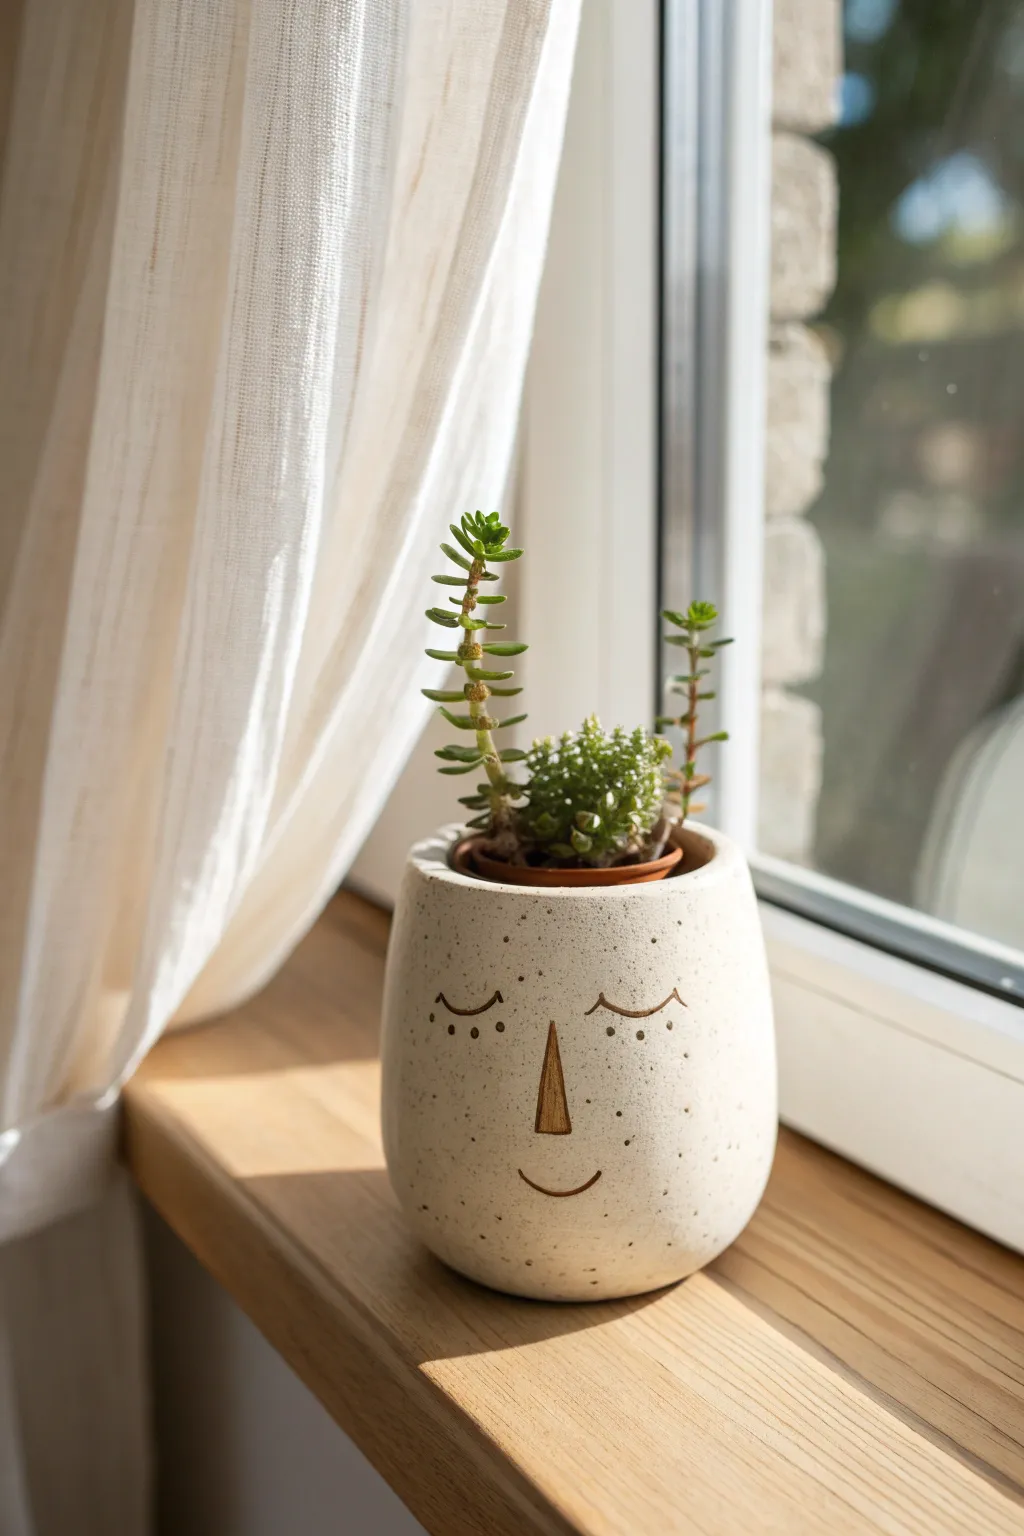
Bring a sense of calm to your windowsill with this adorable sleepy-face planter. Its gentle, rounded form and speckled finish give it an organic, handmade charm that perfectly complements succulents.
Step-by-Step Tutorial
Materials
- White polymer clay or air-dry clay (approx. 500g)
- Speckled clay additive or black pepper/sand (optional for texture)
- Rolling pin
- Cylindrical mold (like a smooth glass jar or can)
- Clay sculpting tools or a butter knife
- Small triangular wood piece or brown clay for the nose
- Brown acrylic paint or a fine-tip permanent marker
- Clear matte varnish or sealant
- Sandpaper (fine grit)
- Small paintbrush
Step 1: Shaping the Pot Base
-
Prepare the clay:
Begin by conditioning your white clay until it is soft and pliable. If you want a speckled look like the original, knead in a small amount of speckled additive, black pepper, or fine dark sand until evenly distributed. -
Roll out the slab:
Roll the clay out into a uniform slab, approximately 1/4 inch thick. Aim for a long rectangular shape that is tall enough to cover the height of your chosen mold. -
Cut the base:
Use your mold (a jar or can) to cut a perfect circle from the slab. This circular piece will serve as the bottom of your planter. -
Cut the walls:
Measure the circumference of your base circle. Cut a rectangular strip from your clay slab that matches this length, plus a little extra for overlapping the seam. -
Assemble the cylinder:
Wrap the rectangular strip around your mold or simply form a cylinder, placing it on top of the circular base. Join the ends of the strip together. -
Blend the seams:
Using your fingers or a sculpting tool, blend the vertical seam where the wall meets itself, and the bottom seam where the wall meets the base. Smooth the clay until the joins are invisible.
Use a Plastic Insert
For longevity, use the clay pot as a ‘cachepot’ (decorative cover) and keep the plant in a plastic nursery pot inside. This protects the clay from constant moisture.
Step 2: Sculpting and Refining
-
Create the rounded shape:
Gently push the walls of the pot slightly outward from the inside to create a subtle, rounded belly shape, rather than a perfect straight cylinder. Be careful not to make the walls too thin. -
Smooth the rim:
Soften the top edge of the pot with a damp finger or sponge. It should look organic and slightly rounded, not sharp. -
Add the nose:
Form a small, elongated triangle out of brown clay (or shape a small piece of wood if you prefer mixed media). Attach this to the center of the pot’s face. If using clay, score and slip the back to ensure it sticks; if using wood, create a small indentation and glue it in after baking/drying. -
Dry or bake:
Follow the manufacturer’s instructions for your specific clay. Bake it in the oven if using polymer clay, or let it air dry completely (usually 24-48 hours) if using air-dry clay.
Add Cheeky Blush
Before sealing, dry-brush a tiny amount of pink pastel chalk or diluted pink paint onto the cheeks for a sweet, rosy glow.
Step 3: Finishing the Face
-
Sand imperfections:
Once the pot is fully cured and cool, use fine-grit sandpaper to smooth out any fingerprints or rough bumps on the surface. -
Sketch the features:
Lightly sketch the sleeping eyes and smile with a pencil. Place the eyes on either side of the nose, slightly above the midline, curving downward like crescent moons. -
Paint the details:
Using a thin brush and brown acrylic paint, carefully trace over your pencil lines. Paint the curved eyelids, add three small lashes to each outer corner, and paint a simple, small curved smile below the nose. -
Add faux speckles (optional):
If you didn’t add speckles into the clay earlier, you can create them now. Dip a stiff brush (or old toothbrush) into watered-down brown paint and gently flick tiny splatters onto the pot. -
Seal the pot:
Apply a coat of clear matte varnish to the entire exterior. This protects the paint and gives the pot a finished, ceramic-like quality. -
Final assembly:
Once the varnish is dry, insert a small plastic nursery pot with your succulent inside, or plant directly if you’ve added drainage holes.
Now you have a serene little companion to hold your favorite green cuttings
Beaded-Edge Trinket Dish

This elegant little catch-all combines a smooth, speckled finish with a delicate beaded edge that mimics the look of classic pearls. It’s the perfect size for holding your favorite rings or daily stud earrings and brings a touch of refined texture to any dresser.
Step-by-Step
Materials
- White polymer clay or air-dry clay (e.g., DAS)
- Small rolling pin
- Circle cutter (approx. 3-4 inches) or a glass to trace
- Craft knife or clay blade
- Small bowl (for shaping)
- Sandpaper (fine grit)
- Acrylic sealer (matte or satin)
- Small soft brush
- Optional: Black pepper or dried tea leaves (for speckled effect)
Step 1: Preparing the Base
-
Condition the clay:
Start by warming up a handful of white clay in your hands. Knead it thoroughly until it is soft, pliable, and free of any cracks. -
Create the speckled look:
If your clay is plain white and you want the natural stone look shown in the photo, sprinkle a tiny pinch of black pepper or crushed dried tea leaves into the clay. Knead it again until the specks are evenly distributed. -
Roll out the slab:
Place the clay on a smooth surface or baking parchment. Use your rolling pin to flatten it into an even sheet, approximately 1/4 inch thick. Aim for consistent thickness to prevent warping later. -
Cut the circle:
Press your circle cutter firmly into the rolled clay. If you don’t have a cutter large enough, place a wide-rimmed glass or small bowl upside down on the clay and trace around it with your craft knife. -
Smooth the edges:
Remove the excess clay. Dip your finger in a little water (for air-dry clay) or baby oil (for polymer) and gently run it around the cut edge to smooth out any sharpness or drag marks.
Step 2: Forming the Pearls
-
Roll a snake:
Take the leftover clay scraps and roll them into a long, thin snake. Try to keep the diameter as consistent as possible, roughly similar to a small pea. -
Cut equal segments:
Using your blade, cut the snake into small, even segments. Uniformity is key here for a professional look, so take your time measuring these cuts visually. -
Roll individual spheres:
Roll each small segment between your thumb and forefinger to create perfect little spheres. You will need enough to circle the entire perimeter of your base dish. -
Arrange the beads:
Place the spheres onto the top edge of your circular base. Press them down very gently so they adhere, but not so hard that they lose their round shape. They should sit side-by-side, touching slightly.
Uniformity Hack
To get perfectly sized beads, roll your clay snake to an exact thickness, then use a ruler to mark cuts every 1/4 inch before slicing.
Step 3: Shaping and Finishing
-
Create the curve:
Carefully lift your beaded circle and drape it inside a shallow bowl to give it a slight upward curve. If using polymer clay, ensure the bowl is oven-safe. -
Blend the seams (optional):
For extra durability, I like to use a tiny clay tool or toothpick to gently blend the underside of the beads into the base rim, leaving the tops untouched. -
Dry or bake:
Follow the instructions for your specific clay type. Bake polymer clay according to package temperature, or let air-dry clay sit for 24-48 hours until completely white and hard. -
Sand for smoothness:
Once fully cured or dry, inspect the dish. Use fine-grit sandpaper to gently buff away any fingerprints on the center surface or rough spots on the bottom. -
Apply sealer:
Brush on a thin coat of matte or satin acrylic sealer. This protects the clay from moisture and gives it that finished ceramic feel. -
Final dry:
Let the sealer cure completely before placing any jewelry inside.
Gilded Touch
Once the dish is dry, paint just the beaded rim with liquid gold leaf or metallic acrylic paint for a luxurious, jewelry-store vibe.
Place your new dish on your nightstand and enjoy the satisfaction of a handmade organizer
Simple Herb Garden Markers
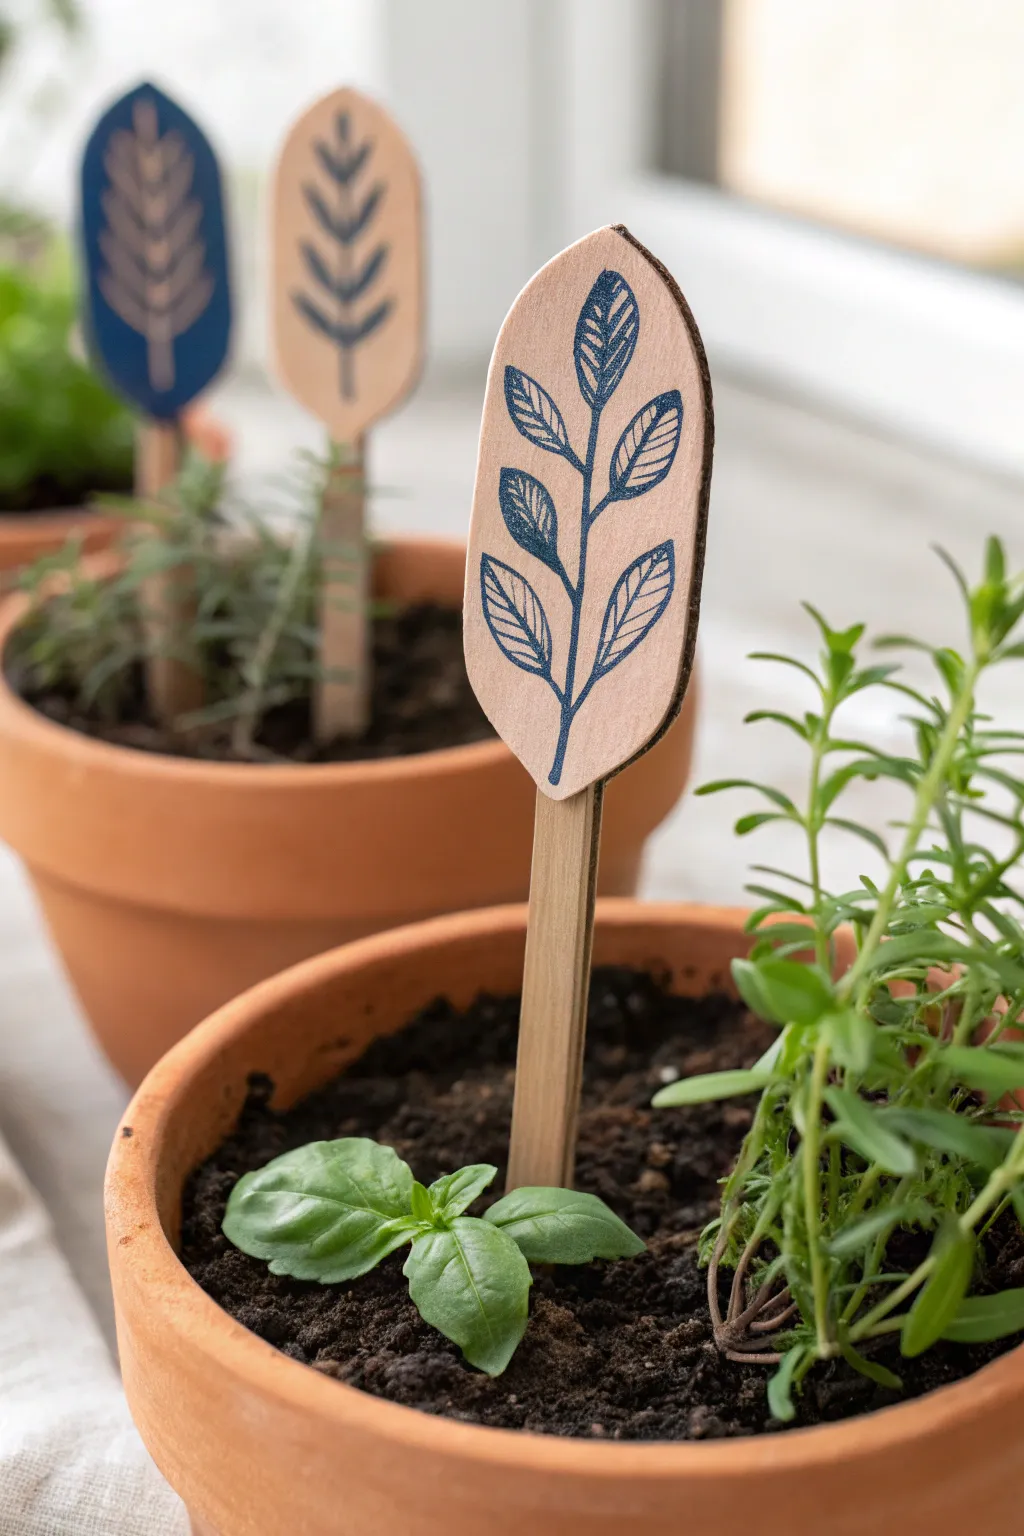
Add a touch of handmade charm to your herb garden with these simple, elegant markers featuring delicate leaf prints. The natural clay tone pairs beautifully with indigo ink, creating a rustic yet refined look that helps you identify your growing basil and thyme.
Step-by-Step Tutorial
Materials
- Air-dry clay (light beige or terracotta color)
- Wooden popsicle sticks or craft sticks
- Rolling pin
- Oval cookie cutter (or a knife and template)
- Rubber stamp with a botanical leaf design
- Dark blue ink pad (permanent or archival ink recommended)
- Fine-grit sandpaper
- Strong craft glue (e.g., E6000 or wood glue)
- Matte spray varnish (optional, for water resistance)
- Parchment paper or craft mat
Step 1: Shaping the Clay
-
Roll it out:
Begin by taking a handful of air-dry clay and kneading it briefly until it is pliable and smooth. Place it on a piece of parchment paper to prevent sticking. -
Flatten the slab:
Using your rolling pin, roll the clay out to an even thickness of approximately 1/4 inch. Creating a uniform slab ensures the markers will dry evenly without warping. -
Cut the shapes:
Press your oval cookie cutter firmly into the clay to create your marker shapes. If you don’t have a cutter, you can sketch an oval on paper, cut it out, and trace around it with a craft knife. -
Smooth the edges:
Dip your finger in a tiny bit of water and run it along the cut edges of the oval to smooth away any roughness or jagged bits left by the cutter. -
Create variation (optional):
For a set like the one shown, repeat this process to make multiple ovals. It’s okay if they aren’t identical; slight variations add to the handmade appeal.
Step 2: Stamping the Design
-
Ink the stamp:
Take your botanical rubber stamp and tap it firmly onto the dark blue ink pad. Ensure the entire design is coated evenly with ink, but avoid puddling. -
Test print:
I always recommend doing a quick test stamp on a scrap piece of paper first to check ink coverage before committing to the clay. -
Imprint the clay:
Carefully align the stamp over the center of a clay oval. Press down gently but firmly. You want to transfer the ink and leave a very slight impression in the soft clay without distorting the oval shape. -
Lift straight up:
Lift the stamp straight up to avoid smudging the blue ink design. Repeat for any other markers you are creating. -
Dry completely:
Set the stamped clay ovals aside on a flat surface to dry. Depending on humidity and clay thickness, this usually takes 24 to 48 hours. Turn them over halfway through to ensure the backs dry thoroughly.
Clean Impressions
If your stamp is sticking to the clay, lightly dust the clay surface with cornstarch before stamping. This acts as a release agent and brushes off later.
Step 3: Assembly and Finishing
-
Refine the edges:
Once fully dry and hard, inspect the edges. If there are any sharp spots, very lightly sand them with fine-grit sandpaper until smooth. -
Prepare the sticks:
Select your wooden popsicle sticks. If you want a shorter marker for smaller pots, you can snap or cut the rounded bottom off slightly, though usually, standard length works well. -
Glue the backing:
Apply a generous strip of strong craft glue to the top inch of a wooden stick. Press the back of the dried clay oval firmly onto the glued area. -
Let it set:
Lay the assembled marker flat to dry. Check that the oval is centered and straight relative to the stick before the glue sets permanent. -
Seal for protection:
Since these will be used near soil and water, take them outside and spray a light coat of matte varnish over the front and back. This prevents the clay from softening when you water your plants.
Add Color Variations
Mix a tiny drop of acrylic paint into your white clay before rolling it out to create pastel-colored markers, or use terracotta colored clay for contrast.
Pop these finished stakes into your pots and enjoy an organized, stylish windowsill garden
Marbled Clay Beads Bracelet
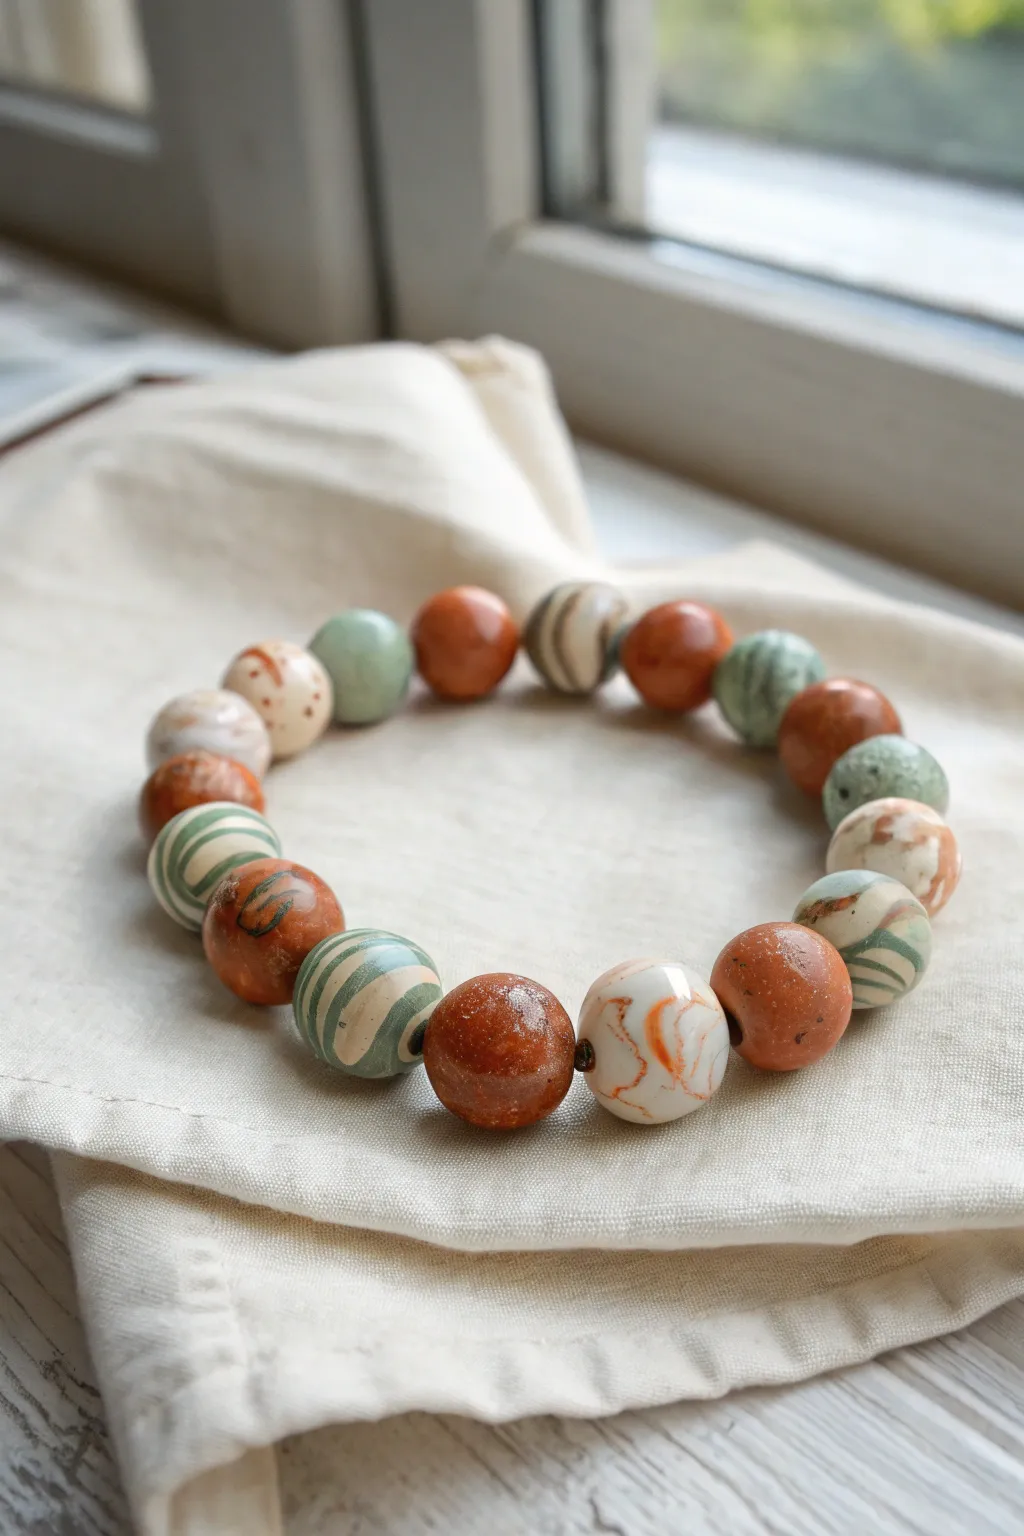
Create a sophisticated piece of wearable art with this polymer clay beaded bracelet, featuring a warm palette of burnt orange, sage green, and creamy marble. The smooth, hand-rolled beads offer a satisfying weight and a glossy finish that looks professional yet is surprisingly simple to achieve.
How-To Guide
Materials
- Polymer clay (Burnt Orange/Terracotta)
- Polymer clay (Sage Green)
- Polymer clay (White or Translucent White)
- Bead piercing pin or toothpick
- Elastic cord or bead stringing wire
- Glossy polymer clay varnish or glaze
- Soft paintbrush
- Baking sheet with parchment paper
- Oven
Step 1: Preparing the Clay Palette
-
Conditioning:
Start by warming up your clay blocks in your hands. Knead the burnt orange, sage green, and white clays separately until they are soft, pliable, and free of cracks. -
Portioning Solids:
Pinch off small amounts of the burnt orange and sage green clay. Roll them into spheres roughly 1/2 inch in diameter. You will want about 4-6 solid beads of each color to anchor the design. -
Creating the Base for Marble:
For the marbled beads, start with a larger ball of your white clay as the base color. This ensures the patterns stand out clearly. -
Making Color Snakes:
Roll very thin ‘snakes’ or logs of the orange and green clay. These should be much thinner than the white base.
Step 2: Marbling and Shaping
-
Layering:
Lay the thin colored snakes across the larger white ball of clay. You can crisscross them or lay them parallel depending on the look you want. -
Beginning the Swirl:
Twist the entire bundle of clay like a candy cane. Then, fold it in half and twist again. Repeat this twist-and-fold motion 3-4 times, but be careful not to over-mix, or the colors will turn muddy. -
Rolling the Pattern:
Roll the mixed clay into a smooth log. You should see streaks of orange and green running through the white. -
Cutting Segments:
Slice the marbled log into equal-sized segments using a clay blade or knife. Each slice will become a bead. -
Forming Spheres:
Roll each sliced segment between your palms into a perfect sphere. As you roll, the marble pattern will shift and swirl, creating unique designs on every bead. -
Creating Stripe Variations:
For the striped green beads seen in the photo, take a ball of green and wrap thin strips of white clay around it before rolling smooth.
Clean Rolling Trick
To avoid transferring dark lint or fingerprints to your white clay, wipe your hands and work surface with a baby wipe before rolling the light-colored marbled beads.
Step 3: Baking and Finishing
-
Piercing:
Before baking, carefully push a bead pin or toothpick through the center of each bead. Rotate the pin as you push to avoid squashing the round shape. -
Smoothing:
Check for any fingerprints. Gently buff them out with a light touch of your finger or a drop of baby oil. -
Baking:
Arranged your beads on a parchment-lined baking sheet. Bake according to the manufacturer’s instructions for your specific brand of clay (usually around 275°F for 15-30 minutes). -
Cooling:
Let the beads cool completely on the tray. They are fragile when hot but will harden as they cool down. -
Glazing:
Apply a thin coat of glossy polymer clay varnish to each bead. I find putting them on a toothpick and sticking the toothpick in a piece of foam makes glazed drying much easier. -
Stringing:
Once the glaze is dry, thread your beads onto the elastic cord. Alternate between solid colors and your beautiful marbled creations for a balanced look. -
Final Knot:
Tie a secure surgeon’s knot with the elastic cord, pull it tight, and trim the excess ends. You can hide the knot inside one of the bead holes.
Hole Distortion?
If piercing the bead squashes it into an oval, let the clay rest in the fridge for 10 minutes to firm up before you try making the holes again.
Wear your new bracelet stacked with others or alone as a statement of your handmade style
Mini Domino Tiles Set
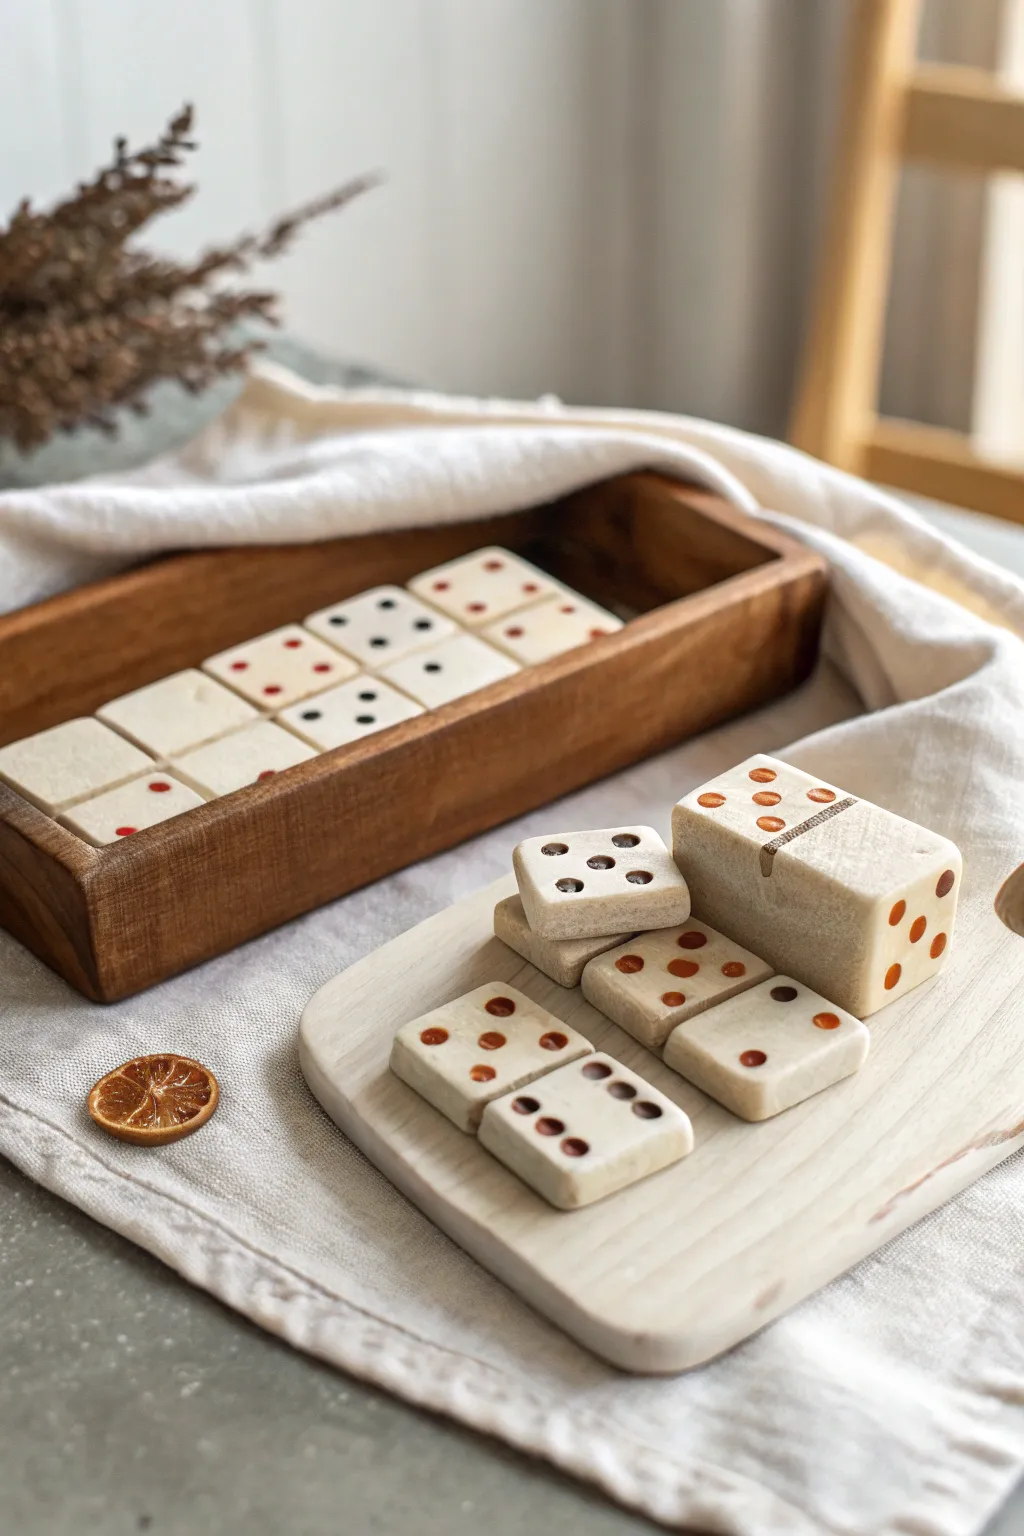
Elevate family game night with this beautiful set of handmade dominoes that mimics the look of natural stone. The soft, creamy white clay contrasted with warm rust and chocolate-brown pips creates a cozy, modern aesthetic perfect for display.
Step-by-Step Tutorial
Materials
- Polymer clay (white or translucent)
- Speckled clay or ground black pepper (for stone effect)
- Acrylic rolling pin
- Sharp craft blade or tissue blade
- Rectangular clay cutter (approx. 1 inch x 2 inches)
- Small ball stylus or dotting tool
- Acrylic paints (burnt sienna, dark chocolate brown)
- Fine detail paintbrush
- Balsa wood or basswood sheets
- Wood glue
- Wood stain (walnut or teak)
- Sandpaper (fine grit)
- Matte varnish (optional)
Step 1: Creating the Clay Stone Base
-
Conditioning the Clay:
Begin by warming and kneading your white polymer clay until it is soft and pliable. If you are using plain white clay and want that natural stone look seen in the photo, mix in a very small pinch of ground black pepper or sand-colored clay inclusions. -
Rolling the Slab:
Roll the clay out into a uniform slab. Aim for a thickness of about 1/4 inch (6mm) to give the tiles a substantial, high-quality feel similar to traditional bone dominoes. -
Cutting the Tiles:
Use your rectangular cutter to punch out 28 tiles for a standard double-six set. If you don’t have a cutter, measure a grid with a ruler and slice carefully with a long tissue blade to ensure straight edges. -
Smoothing the Edges:
Gently tap the cut edges of each tile with your finger to soften them. The goal is to round off the sharp corners slightly, giving them a tumbled, handmade appearance rather than a factory-sharp edge.
Sticky Situation?
If your clay is sticking to the table while rolling, roll it onto a piece of parchment paper or lightly dust your work surface with cornstarch.
Step 2: Adding Details and Baking
-
Marking the Divider:
Use the back of your blade or a needle tool to gently impress a shallow line across the center of each tile, separating it into two squares. -
Creating the Pips:
Using a ball stylus tool, press indentations into the clay to form the numbers. Follow a reference image for a standard double-six set to ensure you don’t miss any combinations. -
Baking the Clay:
Arrange your tiles on a parchment-lined baking sheet or ceramic tile. Bake according to your clay package instructions (usually 275°F/135°C for 15-30 minutes). I usually tent foil over them to prevent any scorching. -
Cooling and Sanding:
Allow the tiles to cool completely. Once hard, lightly sand the sides and corners with fine-grit sandpaper to remove any fingerprints or cutting burrs.
Step 3: Painting the Pips
-
Mixing the Colors:
Prepare a palette with two earthy tones: a warm burnt orange and a deep brown. The variation in color adds to the vintage charm. -
Filling the Indentations:
Dip a fine detail brush into the paint and carefully fill the impressed pips. Don’t worry if paint gets on the surface; we will clean it up later. -
Cleaning the Surface:
Once the paint is slightly set but not fully cured, wipe the surface of the tile with a damp cloth or a baby wipe. This removes excess paint from the flat top while leaving the color inside the indentations. -
Creating the Chunky Master Tile:
For the large decorative block seen in the foreground, create a thicker rectangular block of clay (about 1.5 inches thick). Impress larger pips on the sides and top for a sculptural element.
Uniform Pips Tip
To make perfectly uniform pip indentations, wrap a small piece of cling wrap over the clay before pressing your stylus down. This softens the edges of the holes instantly.
Step 4: Crafting the Wooden Storage Tray
-
Measuring the Base:
Arrange your baked tiles in a grid (e.g., 4×7) to determine the necessary dimensions for your tray. Cut a piece of balsa wood to this size for the base. -
Cutting the Sidewalls:
Cut four strips of balsa wood for the sides. They should be slightly taller than the stacked tiles to keep them secure. -
Assembling the Tray:
Glue the side strips to the base using wood glue. Use clamps or masking tape to hold the corners tight while the glue dries. -
Staining the Wood:
Apply a coat of walnut or teak wood stain with a rag. Wipe off excess stain quickly to highlight the wood grain, matching the rustic look of the clay tiles. -
Final Sealing:
For longevity, you can apply a thin coat of matte varnish to both the clay tiles and the wooden tray, protecting them from oils and scratches during play.
Once the varnish is dry, invite friends over to admire your handiwork during a classic game of dominoes
Pocket Worry Stone With a Face

This comforting little clay stone fits perfectly in your palm, offering a tactile way to soothe anxiety with its smooth surface and friendly smile. The warm terracotta tone and simple expression give it an organic, grounded feel that makes it a perfect pocket companion.
Step-by-Step
Materials
- Terracotta-colored polymer clay (or air-dry clay)
- Needle tool or toothpick
- Small circle cutter or straw (for the eyes/mouth curve)
- Smooth work surface (ceramic tile or glass)
- Fine-grit sandpaper (optional)
- Matte varnish (optional)
Step 1: Shaping the Stone
-
Condition the Clay:
Begin by warming a chunk of terracotta polymer clay in your hands. Knead and roll it repeatedly until it becomes soft, pliable, and free of cracks. -
Form a Ball:
Roll the conditioned clay into a smooth sphere between your palms. Aim for a size roughly the diameter of a ping-pong ball. -
Flatten into a Pebble:
Place the ball on your work surface. Gently press down with the palm of your hand to flatten it into an oval, pebble-like shape. It should be about 1/2 inch thick. -
Smooth the Edges:
Use your fingers to round off the edges. The goal is a super-smooth, river-stone aesthetic, so take your time rubbing out any fingerprints or sharp angles. -
Refine the Surface:
I like to lightly dampen my finger with a tiny drop of baby oil (for polymer clay) or water (for air-dry clay) and glide it over the surface one last time to ensure it’s perfectly sleek.
Uneven Smile?
If you struggle with freehand drawing, sketch the face lightly with a pencil first. If you mess up, just rub the clay smooth and start again before baking.
Step 2: Adding the Expression
-
Mark the Eyes:
Visualize where the face will sit—centered but slightly lower looks cute. For the closed eyes, use a needle tool to gently imprint two small, horizontal curves. -
Create Eyelashes:
Carefully press the tip of your needle tool perpendicular to the eye curves to create small radiating lines. Three or four lashes per eye is usually enough. -
Stamp the Smile:
To get that perfect curve, press the edge of a small circle cutter, a piping tip, or even a cut straw into the clay below the eyes. Rock it gently to make a deep impresssion. -
clean Up Details:
If the carving tools displaced any clay, gently smooth those tiny ridges down with a fingertip or a rubber sculpting tool so the surface remains uninterrupted.
Step 3: Baking and Finishing
-
Bake:
Place your stone on a baking sheet lined with parchment paper. Bake according to your specific clay package directions (usually around 275°F or 135°C for 15-30 minutes per 1/4 inch of thickness). -
Cool Down:
Allow the stone to cool completely in the oven with the door cracked open. This gradual cooling helps prevent cracks. -
Sand (Optional):
If you notice any fingerprints after baking, lightly buff the stone with fine-grit wet/dry sandpaper under running water. -
Seal:
For durability, you can apply a thin coat of matte varnish. This protects the face details while keeping that natural, earthy look intact.
Scented Stone
Use unsealed terracotta air-dry clay instead of polymer. Once dry, add a drop of essential oil to the back to make it an aromatherapy diffuser.
Slip this little friend into your pocket and give it a squeeze whenever you need a moment of calm