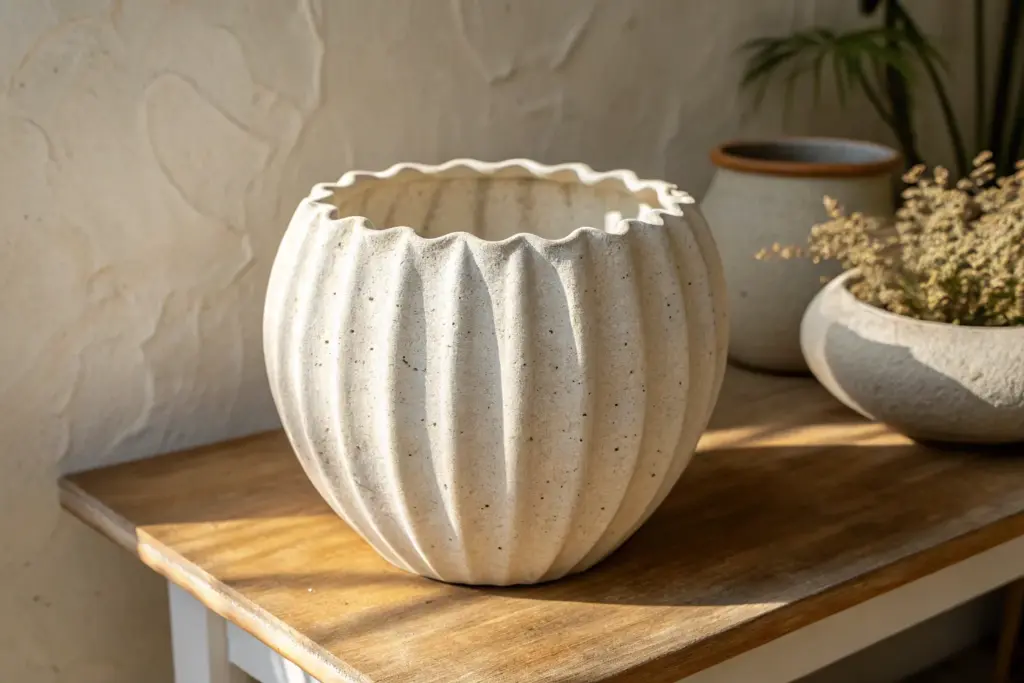
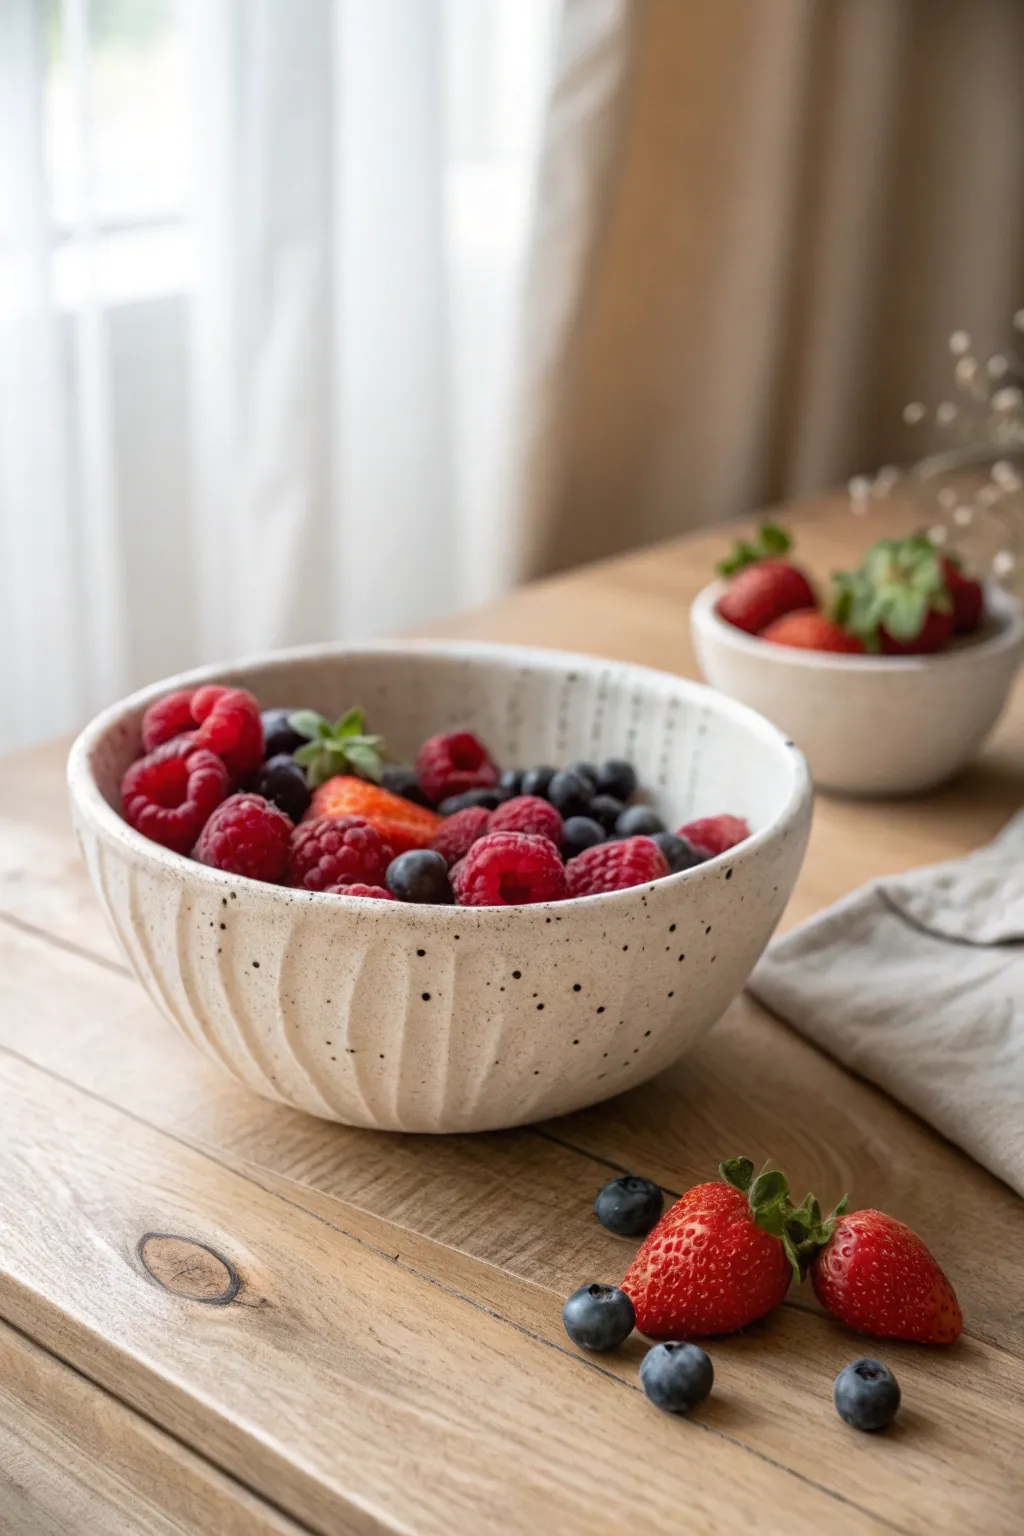
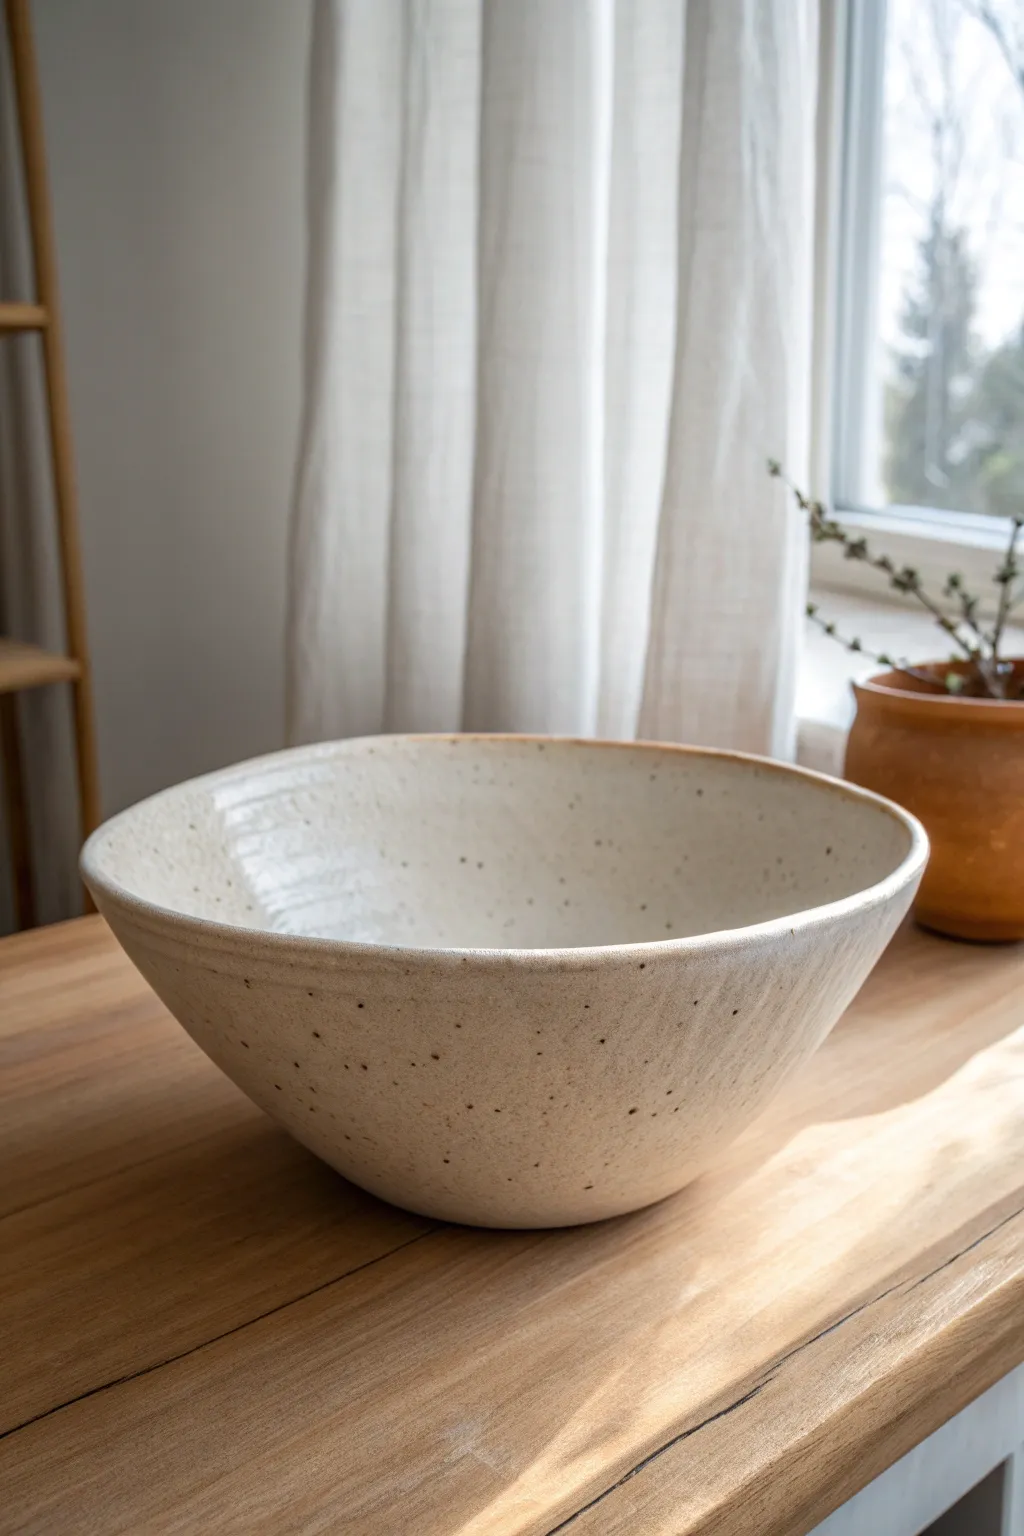
If you love the look of clay that feels effortless and a little gravity-made, you’re going to have so much fun with drape mold ceramics. These ideas all start the same cozy way: a soft slab gently draped over a hump mold (or slump form) to create consistent shapes with lots of room for personality.
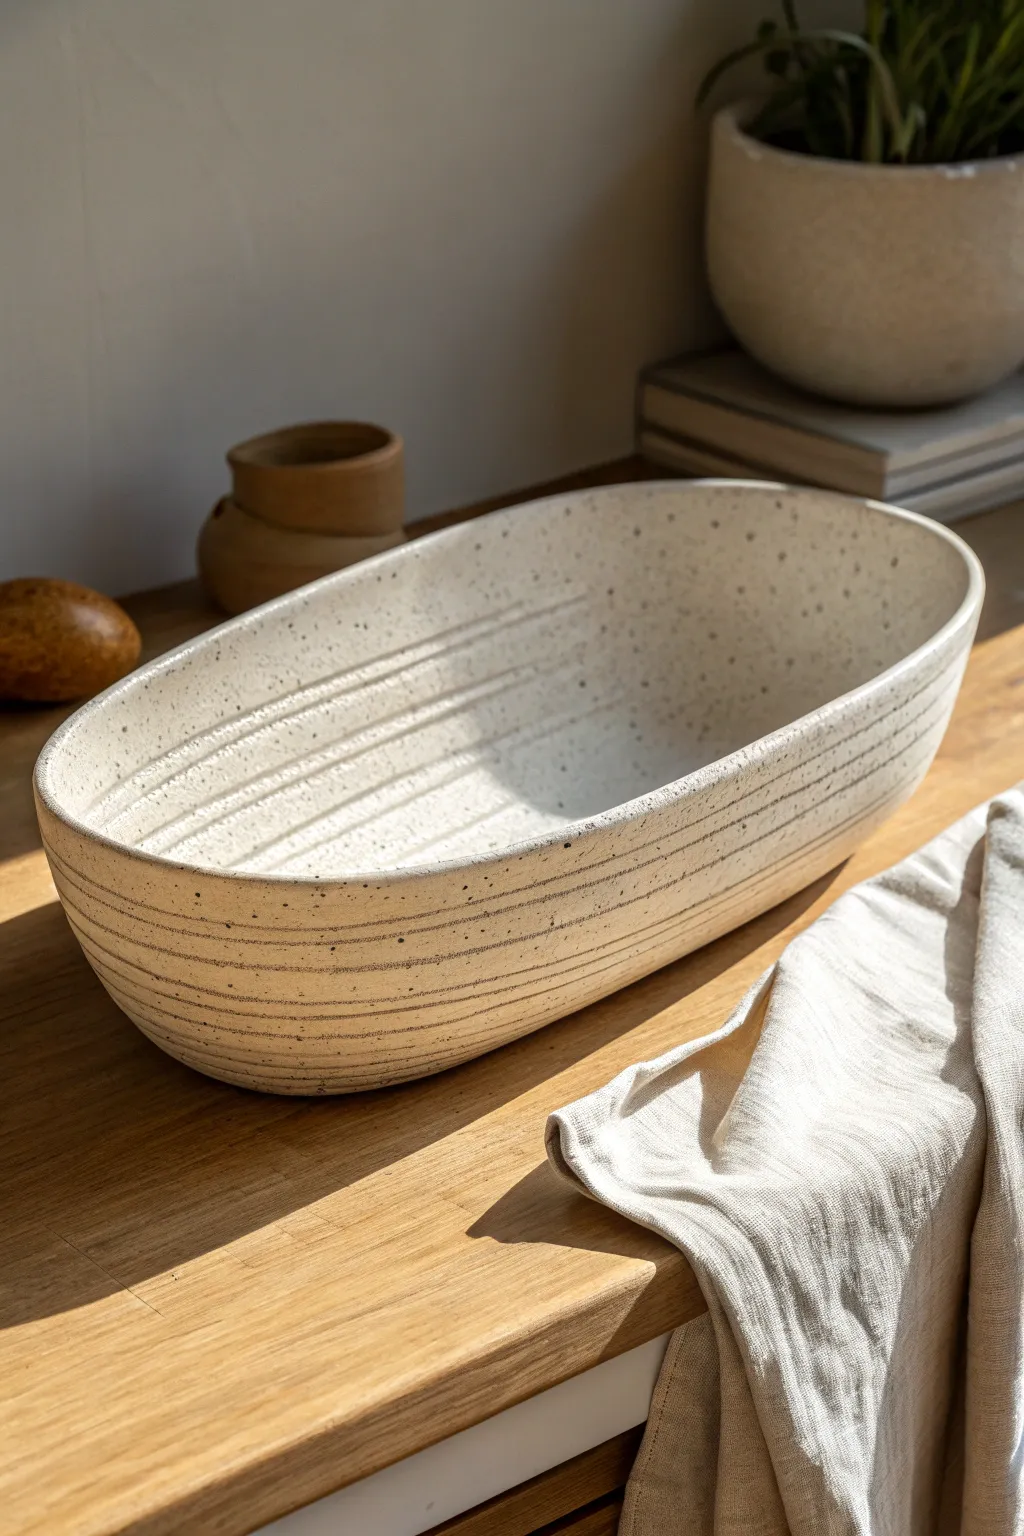
Classic Wavy-Rim Drape Bowl
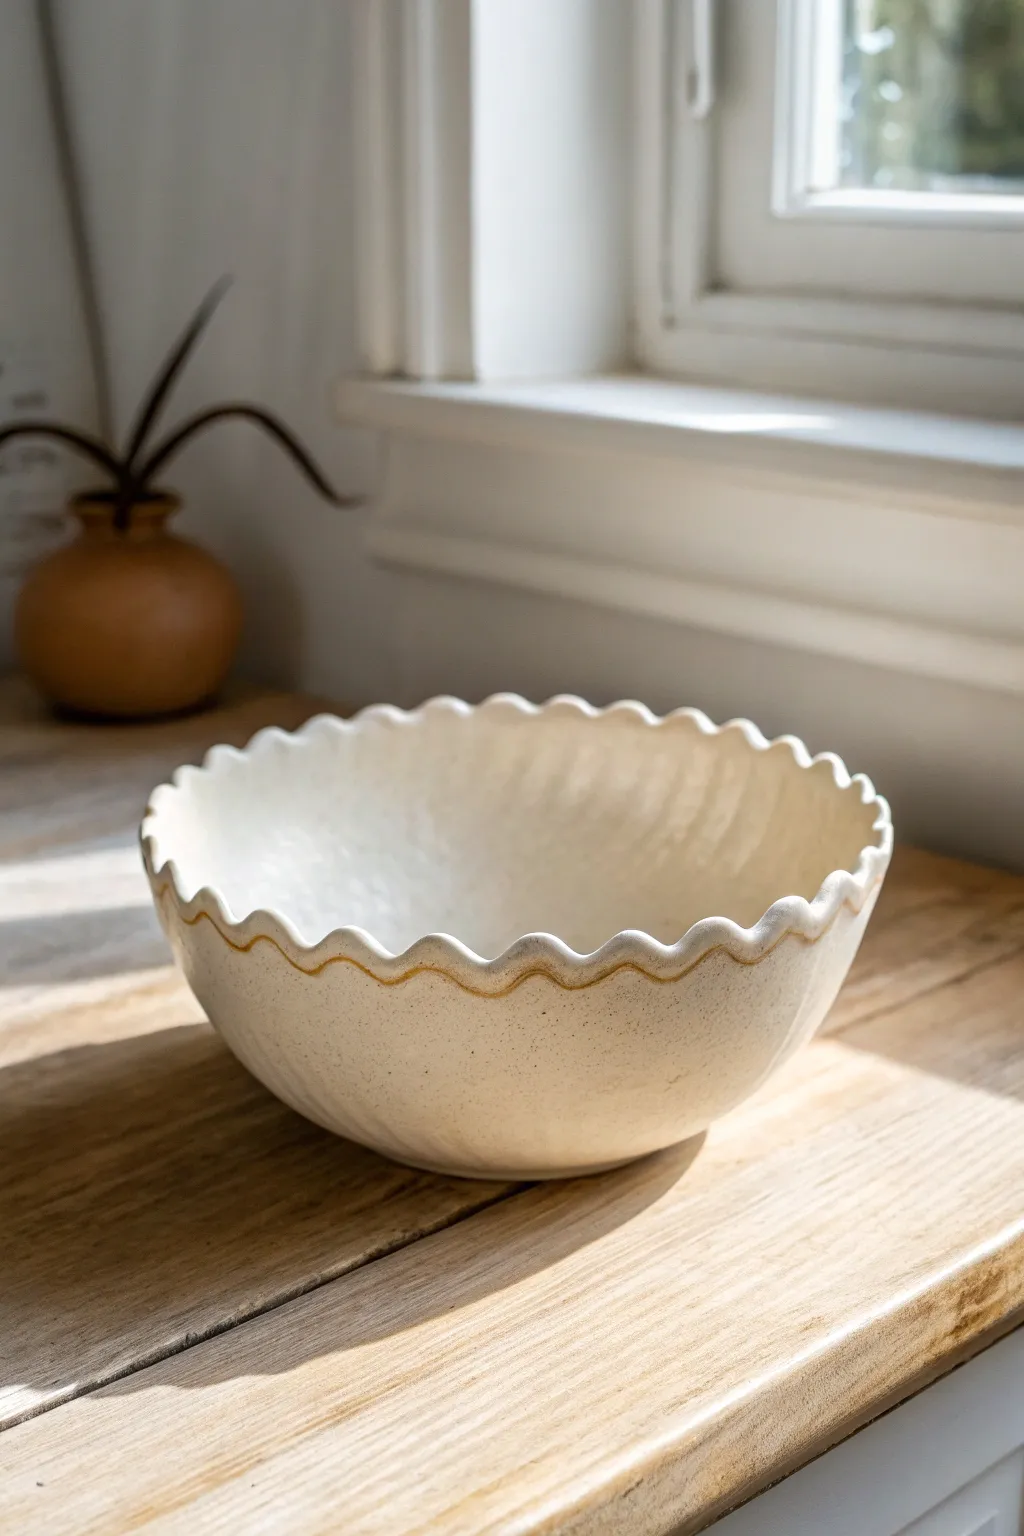
Capture the charm of a farmhouse kitchen with this elegant yet simple drape mold project. The bowl features a soft, creamy glaze and a distinctively undulating rim that mimics the organic curves of a flower or a pie crust.
Detailed Instructions
Materials
- Low-fire white earthenware clay (approx 2 lbs)
- Drape mold (or a large, inverted mixing bowl)
- Canvas mat or rolling surface
- Rolling pin with 1/4 inch thickness strips/guides
- Fettling knife or needle tool
- Rib tool (soft yellow or red polymer)
- Cookie cutter (round, roughly 1-1.5 inch diameter)
- Sponge
- Plastic sheet or bag
- Kiln
- Creamy satin-matte white glaze
- Iron oxide wash (optional, for rim definition)
- Small round brush
Step 1: Preparing the Slab
-
Wedge the Clay:
Begin by thoroughly wedging your white earthenware clay to remove air bubbles and ensure a consistent texture throughout. -
Roll the Slab:
On your canvas mat, roll the clay out into a large, even slab. Use thickness strips or guides to maintain a consistent 1/4 inch thickness, as thin spots can crack during the drape process. -
Compress the Surface:
Take your rib tool and gently drag it across the surface of the clay slab in multiple directions. This compression aligns the clay particles, preventing warping later on. -
Cut the Base Shape:
Using a needle tool, cut a large circle from your slab. Ensure it is roughly 2-3 inches wider in diameter than the mold you intend to use to allow for the tall sides.
Step 2: Creating the Scalloped Rim
-
Mark the Scallops:
Before moving the clay, take your small round cookie cutter. Instead of cutting full circles, use half of the cutter’s edge to stamp a semi-circle pattern all along the outer edge of your large clay circle. -
Cut the Wavy Edge:
Carefully follow the stamped guidelines with your fettling knife to cut out the excess clay, creating the continuous wavy, scalloped edge seen in the photo. -
Smooth the EDges:
Dip your finger or a small piece of sponge in water and run it along the freshly cut wavy rim to soften any sharp angles or burrs left by the knife.
Clean Release Tip
Dust your mold lightly with cornstarch before draping the clay. This acts as a release agent and burns off cleanly in the kiln without leaving residue.
Step 3: Draping and Forming
-
Prepare the Mold:
Set up your drape mold (or inverted bowl) on a turntable or elevated surface. If using a non-porous kitchen bowl, cover it with a layer of thin plastic or cheesecloth to prevent sticking. -
Transfer the Slab:
Carefully lift your scalloped clay circle and center it over the mold. Gently lower it down, letting gravity do most of the initial work. -
Shape the Curve:
Starting from the center and working outward, gently press the clay down to conform to the mold’s shape. I find it helpful to rotate the mold constantly during this step to ensure even pressure. -
Refine the Waves:
As the clay drapes, the scallops might flatten slightly. Use your fingers to gently push the valleys of the waves inward and pull the peaks slightly outward to accentuate that fluted look. -
Dry Slowly:
Cover the draped clay loosely with plastic sheeting. Let it dry to a stiff leather-hard stage before attempting to remove it from the mold—usually overnight.
Uneven Drying?
If the rim dries faster than the base, spritz the rim lightly with water and cover the whole piece tightly with plastic for 24 hours to redistribute moisture.
Step 4: Finishing and Glazing
-
Bisque Fire:
Once removed from the mold and bone dry, fire the piece to cone 04 (or your clay’s specific bisque temperature). -
Clean the Bisque:
Use a damp sponge to wipe down the bisque-fired bowl, removing any kiln dust that could interfere with glaze adhesion. -
Apply Base Glaze:
Pour your creamy satin-matte white glaze into the interior, swirl to coat, and pour out the excess. Then, dip or brush the exterior to achieve the milky finish shown. -
Accentuate the Rim:
To recreate that subtle golden-brown detail on the rim, load a small brush with a very diluted iron oxide wash. Carefully run the belly of the brush along the very edge of the scallops. -
Glaze Fire:
Fire the bowl again to cone 05/06 (or your glaze’s specifications). Ensure the foot is wiped clean of glaze before loading it onto the kiln shelf.
Once cooled, place your beautiful wavy bowl in a sunny spot to let the light play across those delicate ridges


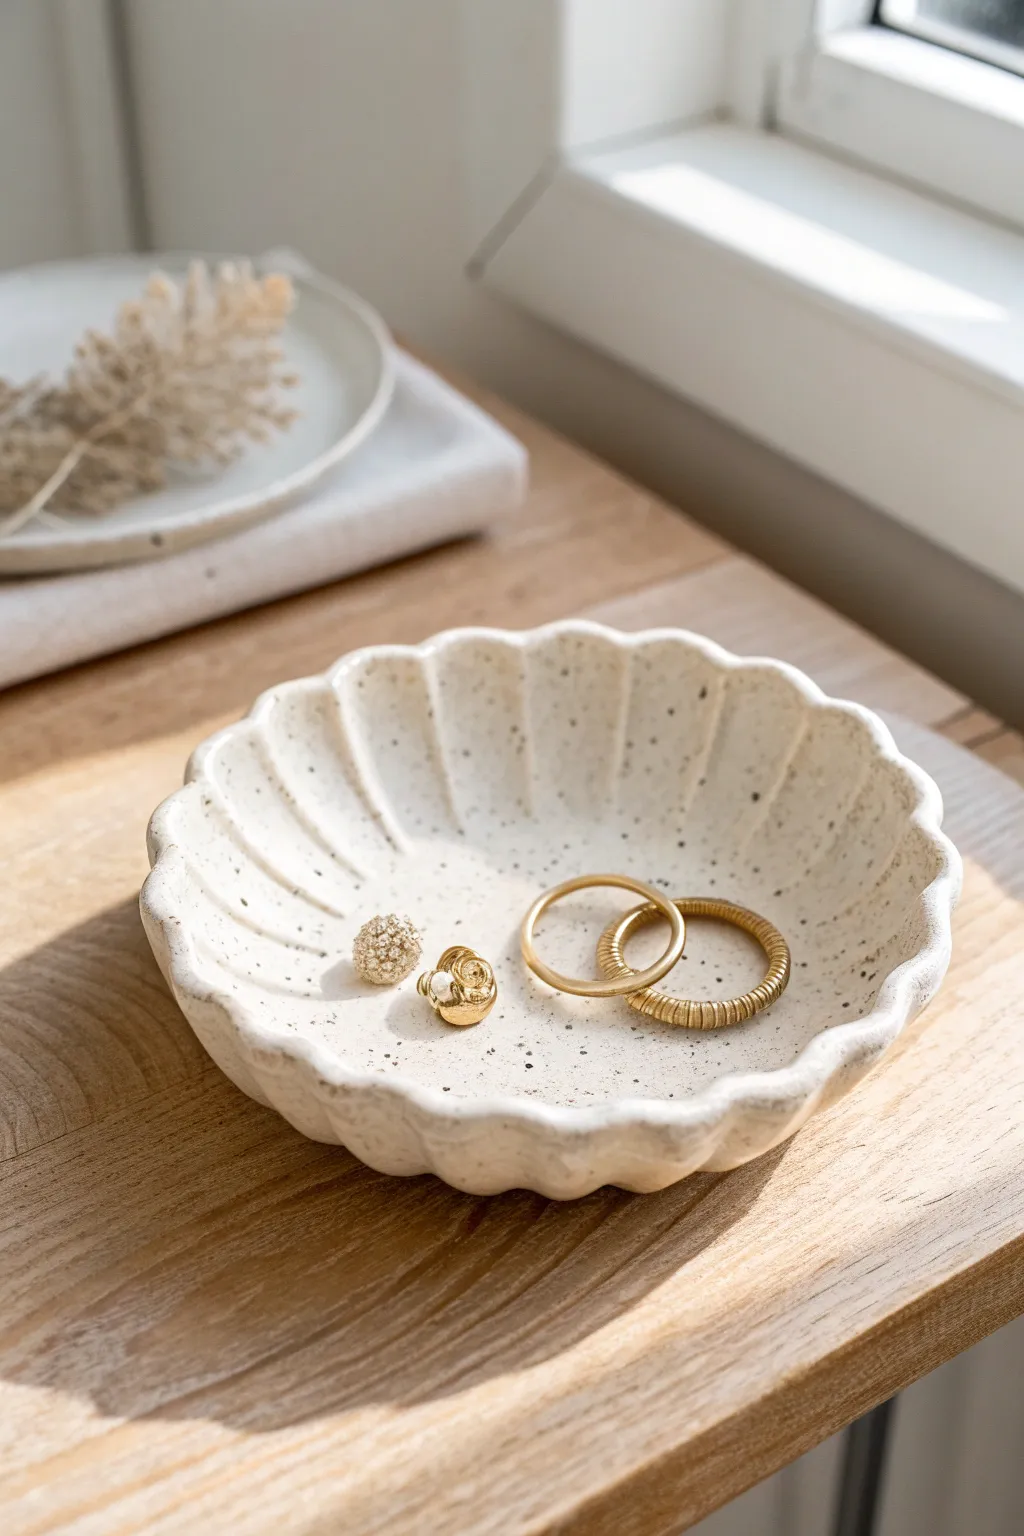
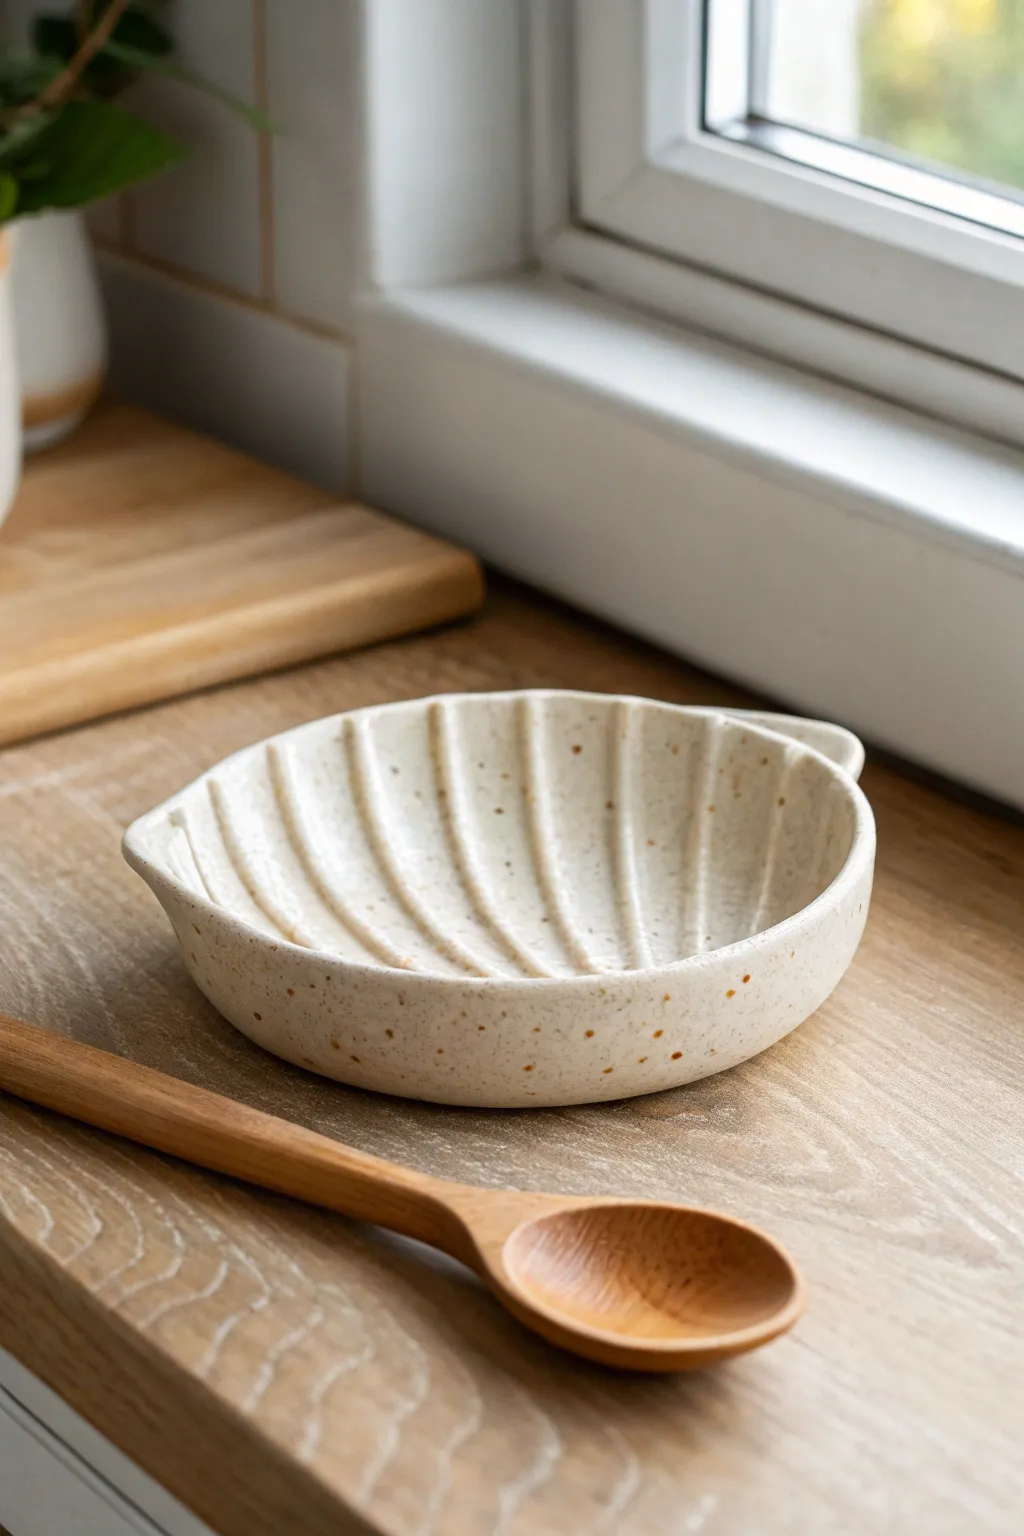
Smooth Minimal Catchall Dish
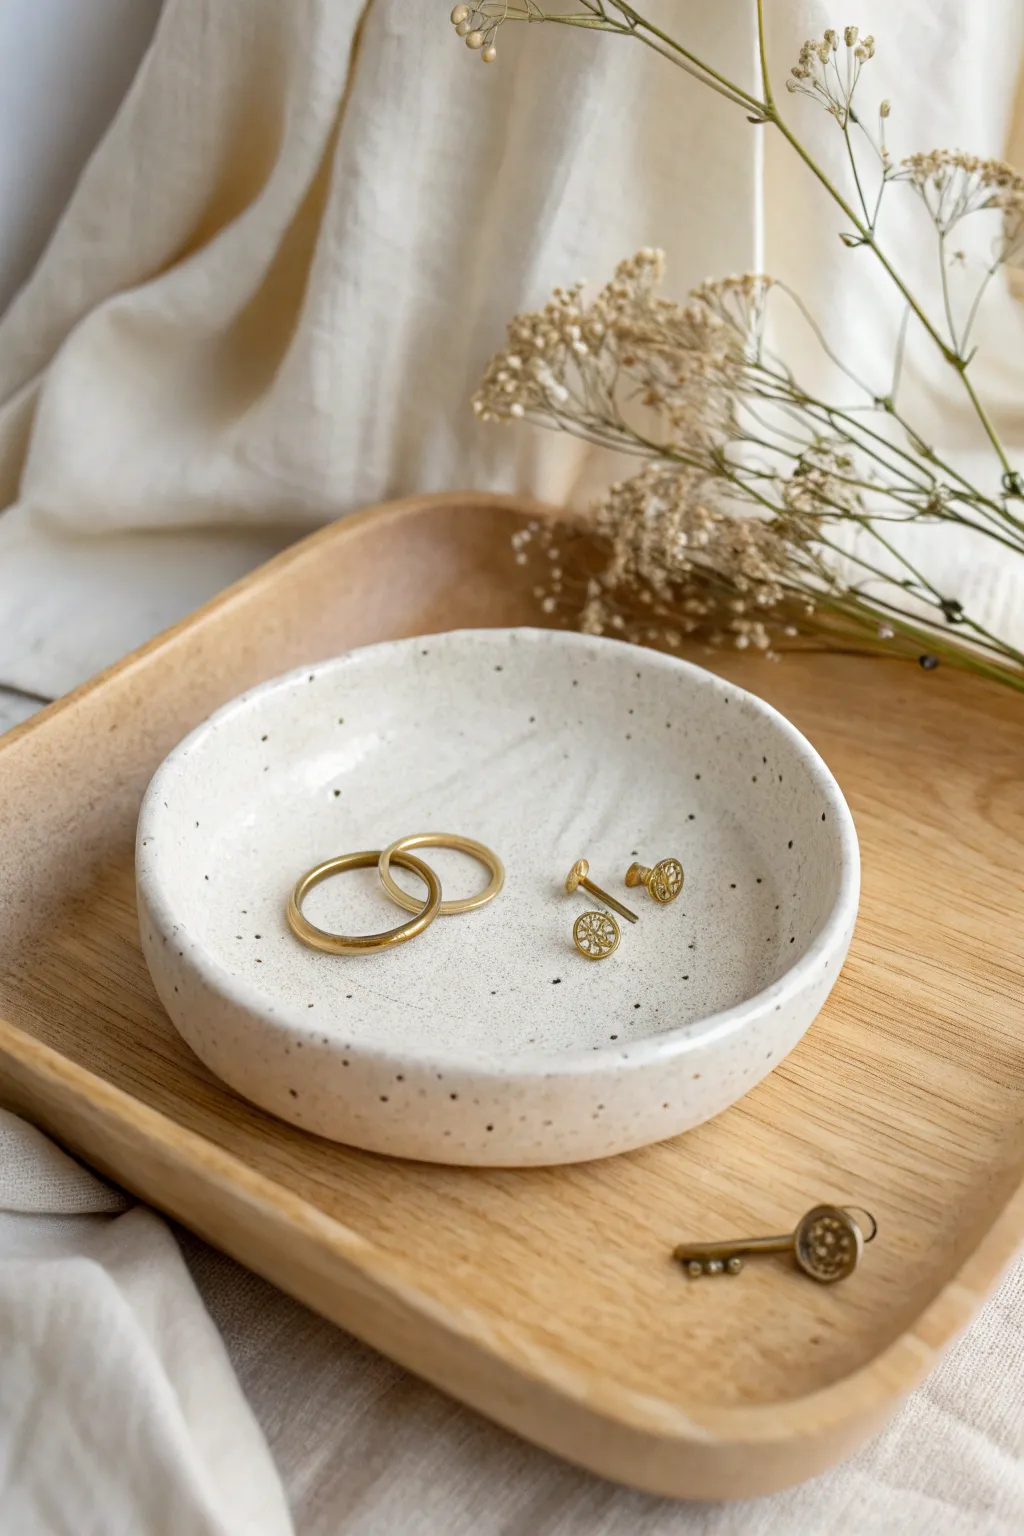
This charmingly minimal catchall dish features a soft, creamy glaze peppered with natural speckles and a beautifully imperfect rim. It is the perfect beginner-friendly project to hold your everyday jewelry, bringing a touch of organic warmth to your bedside table.
Step-by-Step Tutorial
Materials
- Speckled clay body (buff or white stoneware with grog/speckles)
- Drape mold (plaster hump mold or a thrifted bowl covered in fabric)
- Rolling pin
- Guide sticks or slats (approx. 1/4 inch thick)
- Canvas or heavy cloth for rolling
- Pin tool or potter’s knife
- Soft rib tool (rubber or silicone)
- Sponge
- Clear or glossy white glaze (make sure it’s transparent enough if relying on clay speckles)
- Kiln access
Step 1: Preparing the Slab
-
Wedge the clay:
Start with a ball of speckled stoneware clay about the size of a large orange. Wedge it thoroughly to remove air bubbles and ensure it is homogeneous. -
Set up your rolling station:
Place your canvas on a flat work surface. Position your guide sticks on either side of the clay ball to ensure an even thickness when rolling. -
Roll the slab:
Using the rolling pin, roll the clay out firmly. Rotate the clay and flip it over occasionally to prevent sticking and to keep the particle alignment random, rolling until the pin rests on the guide sticks. -
Compress the slab:
Take your soft rib tool and gently glide it over surface of the clay in sweeping motions. This compresses the clay particles, reducing the chance of warping later and creating that smooth interior finish.
Warping Woes?
If your rim lifts or curls while drying, weigh it down gently with a small bag of rice or sand during the leather-hard stage to keep it perfectly flat.
Step 2: Shaping and Refining
-
Cut the circle:
Place a circular template (a paper cutout or a small plate works well) onto the clay. Trace around it with a pin tool to cut out your circle, keeping the tool upright for a straight edge. -
Prepare the mold:
If using a plaster hump mold, ensure it is clean. If using a standard bowl as a makeshift mold, cover it tightly with a piece of cotton fabric or plastic wrap to prevent the clay from sticking to it. -
Drape the clay:
Carefully lift your clay circle and center it over the mold. Gently lower it down, allowing gravity to do most of the work initially. -
Form the curve:
Using soft, downward strokes with the fleshy part of your palm or a damp sponge, press the clay against the mold. Start from the center and spiral outward to avoid trapping air pockets. -
Create the texture:
To achieve the slightly undulating surface seen in the image, you can lightly press your fingers or ridges of the sponge into the clay interior while it’s on the mold, rather than smoothing it perfectly flat. -
Refine the rim:
While the clay is supported by the mold, run a damp chamois or sponge over the cut edge. Round it off gently so the finished piece won’t have sharp edges that could scratch your jewelry.
Speckle Hack
Don’t have speckled clay? Mix 2-3% granular manganese or ilmenite into plain white clay body before wedging or use a dedicated ‘speckled’ glaze.
Step 3: Drying and Glazing
-
Leather hard stage:
Let the dish sit on the mold until it is leather hard (stiff enough to hold its shape but still cool to the touch). This usually takes a few hours to a day depending on humidity. -
Release from mold:
Gently lift the dish off the mold. Turn it over and check the bottom; if needed, smooth it with a rib so it sits flat on a table without wobbling. -
Bisque fire:
Allow the piece to dry completely until bone dry. Fire it in the kiln for a bisque firing (typically Cone 04 or 06) to prepare it for glazing. -
Apply glaze:
Dip the bisque-fired dish into a glossy milky white or clear glaze. I prefer a quick dip to ensure an even coat that isn’t too thick, allowing the natural brown iron speckles of the clay to show through. -
Clean the foot:
Use a wet sponge to wipe away any glaze from the very bottom of the dish where it will touch the kiln shelf, preventing it from fusing to the shelf during firing. -
Glaze fire:
Fire the piece again to the temperature required by your specific clay and glaze combination (often Cone 5 or 6 for stoneware).
Once cooled, your dish is ready to organize your favorite keepsakes with handmade elegance.


Oval Trinket Tray From a Drape Mold
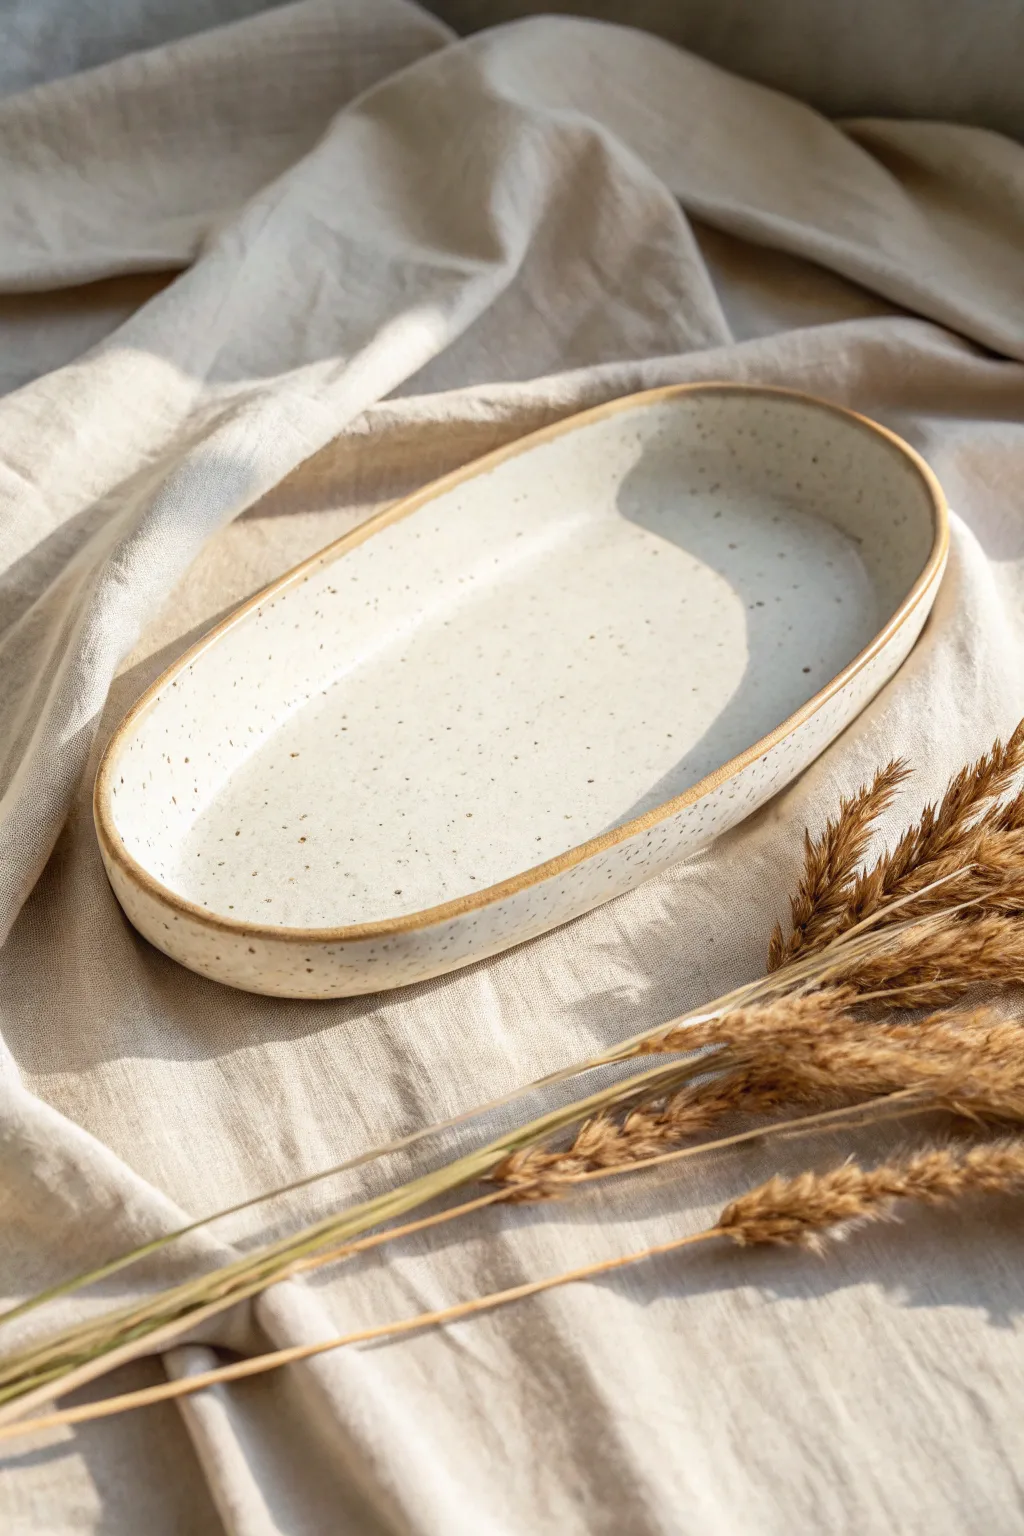
This elegant trinket tray features a gentle, organic curve and a speckled cream finish that highlights the natural beauty of the clay. Using a simple drape mold technique, you can create this minimalist piece perfect for holding jewelry or serving small bites.
Step-by-Step
Materials
- Speckled stoneware clay (mid-fire)
- Oval plaster drape mold or a plastic platter
- Canvas or slab mat
- Rolling pin
- Needle tool or fettling knife
- Soft rib tool (rubber or silicone)
- Sponge
- Surform or rasp tool
- Red iron oxide wash (optional)
- Transparent or glossy white glaze
- Kiln
Step 1: Preparation and Rolling
-
Prepare your clay:
Begin by wedging a softball-sized piece of speckled stoneware clay to ensure it is even and free of air bubbles. -
Roll the slab:
Place the clay on your canvas or slab mat. Roll it out into an even slab, aiming for a consistent thickness of about 1/4 inch. -
Compress the slab:
Run a soft rib tool gently over the surface of the slab on both sides. This compresses the clay particles, preventing warping during drying, and removes canvas textures.
Warping Woes?
Oval shapes love to warp. Dry very slowly away from drafts. You can also weight the center gently with a sandbag while it dries leather-hard.
Step 2: Shaping the Tray
-
Prepare the mold:
If using a non-porous item like a plastic platter as your mold, cover it with a thin layer of plastic wrap or a piece of old t-shirt fabric to prevent sticking. -
Drape the clay:
Carefully lift your clay slab and drape it over the hump (the convex back) of your chosen mold. -
Form the curve:
Gently press the slab down to conform to the shape of the mold. Use the soft rib again to smooth it against the form, ensuring there are no air pockets trapped underneath. -
Rough cut the shape:
Take your needle tool and trim away the excess clay around the base of the mold, leaving about a half-inch margin beyond the final size you want. -
Initial set:
Let the clay sit on the mold until it reaches a soft leather-hard stage. It should be firm enough to hold its shape but still workable.
Make it yours
Before the clay hardens, press dried flowers or textured fabric into the surface for a subtle, fossil-like relief under the glaze.
Step 3: Refining and Finishing
-
Release the form:
Carefully lift the tray off the mold and flip it right-side up onto a flat board. -
Refine the rim:
Using a sharp fettling knife, trim the rim to your final oval shape. Keep the knife perpendicular to the surface for a clean, modern edge. -
Smooth the edges:
Dip a sponge in water and squeeze it out well so it’s damp, not dripping. Run it along the rim to soften the sharp cut edge into a smooth, rounded lip. -
Dry partially:
Allow the piece to dry slowly under loose plastic to the bone-dry stage. This slow drying helps prevent the long oval shape from warping.
Step 4: Glazing and Firing
-
Bisque fire:
Load the bone-dry tray into the kiln and fire to cone 04 (or your clay body’s bisque temperature). -
Clean the bisque:
Wipe the fired piece with a damp sponge to remove any dust that might interfere with glaze adhesion. -
Accent the rim:
For that earthy definition seen in the photo, brush a thin line of red iron oxide wash along the very edge of the rim and wipe away any excess with a sponge. -
Apply glaze:
Dip or brush a transparent or semi-opaque white glaze over the entire piece. The speckles in the clay will burn through the glaze during firing. -
Clean the foot:
Wipe the bottom of the tray completely clean of glaze so it doesn’t fuse to your kiln shelf. -
Glaze fire:
Fire the tray to maturity (typically cone 5 or 6 for stoneware). Allow the kiln to cool completely before removing your finished piece.
Now you have a stunning, minimal tray ready to display your treasures


Leaf-Shaped Drape Platter
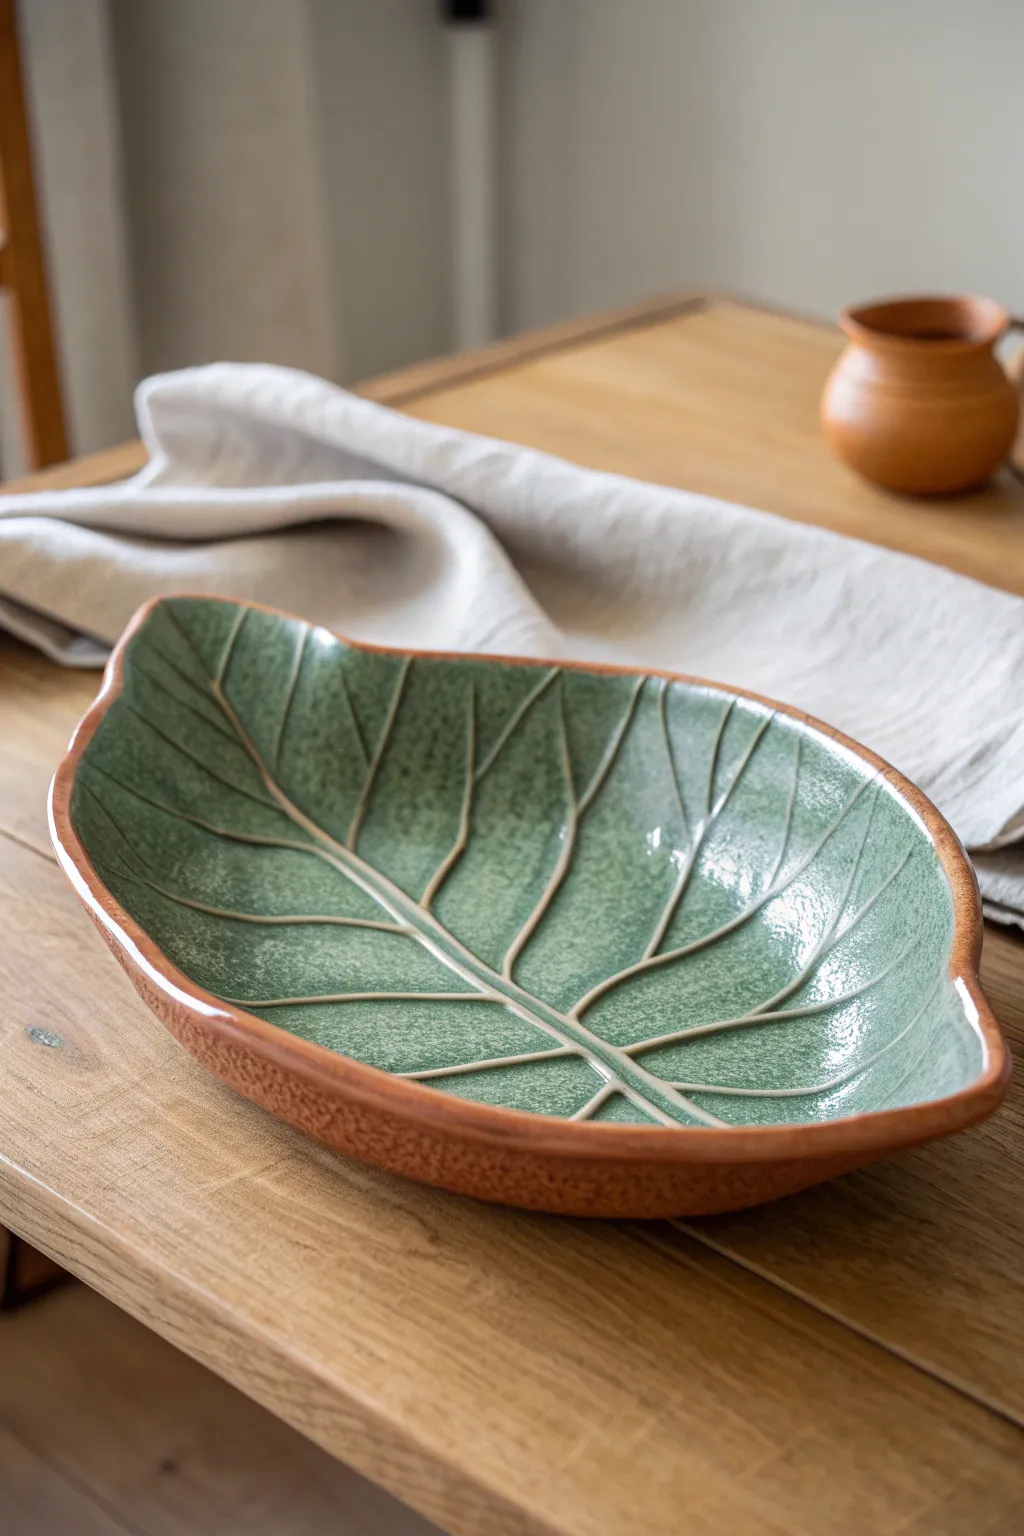
Capture the organic beauty of nature with this textured leaf-shaped platter, featuring a vibrant speckled green interior and a warm, earthy terracotta rim. By using a drape mold technique, you’ll create a gently curved serving piece that highlights raised vein details for a stunning resist effect.
Step-by-Step Tutorial
Materials
- Terracotta stoneware clay (medium grog)
- Rolling pin
- Canvas mat or slab roller
- Large real leaf (optional) or leaf template
- Needle tool
- Ribs (metal and soft rubber)
- Plaster hump mold (oval or leaf-shaped)
- Slip trailer or piping bag
- Wax resist
- Glossy speckled green glaze
- Sponge
- Fettling knife
Step 1: Preparing the Slab
-
Wedge the clay:
Start by thoroughly wedging your terracotta clay to remove air bubbles and ensure an even consistency. This is crucial for preventing warping later. -
Roll the slab:
Roll out a slab of clay to an even thickness of about 1/4 inch (6mm). Turn the slab frequently while rolling to compress the clay particles and prevent sticking to your canvas. -
Smooth the surface:
Use a soft rubber rib to compress the surface of the slab on both sides. This erases the canvas texture and aligns the clay platelets for a stronger finished piece. -
Cut the shape:
Place your large leaf template (or a real Monstera or similar leaf) onto the slab. Trace the outline with a needle tool, holding the tool vertical to get a clean cut, and remove the excess clay.
Clean Vein Definition
For sharper veins, apply wax resist directly onto the slip-trailed lines before glazing. The glaze will bead off the wax, leaving the terracotta lines crisp.
Step 2: Texturing and Draping
-
Refine the edges:
Smooth the cut edges with a damp sponge or your finger to remove sharp burrs. I like to gently round the rim at this stage so it feels nice to handle later. -
Create the texture:
On the side that will be the *outside* (bottom) of the platter, lightly press a coarse sponge or texture mat into the clay to create that pitted, earthy look seen on the rim. -
Drape the form:
Carefully lift your clay leaf and lay it over your hump mold. If you don’t have a leaf-specific mold, a gentle oval dome works perfectly. -
Shape the curve:
Gently press the clay down to conform to the mold’s curve. Use sandbags or soft foam to support the edges if you want the leaf tips to flare upward slightly.
Autumn Variation
Swap the green glaze for a glossy amber or honey celadon. The warm tones will pool in the texture and make the red clay veins glow like fall foliage.
Step 3: Adding Veins and Details
-
Pipe the veins:
Prepare a thick slip from your clay body. Using a slip trailer, pipe raised lines onto the interior surface to form the central stem and branching veins. -
Refine the piping:
Allow the slip to stiffen slightly, then gently tap down any sharp peaks with a finger to round out the veins. -
Dry slowly:
Cover the piece loosely with plastic to let it dry very slowly. This prevents the rim from drying faster than the center, which causes cracking. -
Bisque fire:
Once bone dry, fire the piece to cone 04 (or your clay’s specific bisque temperature).
Step 4: Glazing
-
Wax the rim:
Apply a band of wax resist to the very outer rim of the leaf and the entire underside. This keeps the terracotta raw and creates that beautiful contrast. -
Wipe the veins:
Using a slightly damp sponge, carefully wipe the tops of the raised slip veins. This exposes the clay body slightly so the glaze breaks over them, or you can wax the tops of the veins for a stronger resist effect. -
Pour the glaze:
Pour your glossy green glaze into the center of the platter, swirl it to coat the interior evenly, and pour out the excess. Ensure the glaze pools slightly around the veins but doesn’t obscure them. -
Clean up:
Use a sponge to wipe away any glaze drips from the waxed rim or underside. -
Glaze fire:
Fire the piece to cone 5 or 6 (mid-range), or according to your specific glaze and clay instructions.
Once cooled, your platter lies ready to serve as a stunning centerpiece for your table

What Really Happens Inside the Kiln
Learn how time and temperature work together inside the kiln to transform clay into durable ceramic.
Scalloped Rim Drape Dish
This charming ceramic bowl features gentle fluted edges reminiscent of a seashell, perfect for holding jewelry or small treasures. The black speckles against a creamy white glaze give it a modern, organic feel that looks beautiful on any dresser.
How-To Guide
Materials
- White stoneware clay with speckles (or plain white clay)
- Black clay inclusion stain or manganese speckle additive (if not using pre-speckled clay)
- Round rolling pin
- Canvas work surface or slab mat
- Scalloped round cookie cutter (approx. 4-5 inches)
- Alternatively: Paper template and needle tool
- Soft foam sheet or thick upholstery foam
- Wooden modeling tool or paintbrush handle
- Small spherical mold (like a tennis ball or round plaster hump mold)
- Sponge
- Matte white glaze
Step 1: Preparing the Slab
-
Wedge the clay:
Begin by thoroughly wedging your clay to remove any air bubbles. If you are using plain white clay and want the speckled effect shown, wedge in a small amount of manganese speckle or substitute with a pre-speckled clay body. -
Roll out the slab:
Roll your clay out onto a canvas surface or slab mat. Aim for an even thickness of about 1/4 inch (6mm). Using guide sticks on either side of your rolling pin helps maintain uniformity. -
Smooth the surface:
Use a soft, damp sponge or a rubber rib to compress the clay slab. Smooth it from multiple directions to align the clay particles, which helps prevent warping later. -
Cut the shape:
Thoroughly press your large scalloped cookie cutter into the slab to cut out the base shape. If you don’t have a cutter this specific size, trace a scalloped paper template with a needle tool.
Step 2: Forming the Scallops
-
Refine the edges:
Once your shape is cut, gently run a damp sponge or your finger along the cut edge to soften the sharpness. This makes the finished rim more pleasant to touch. -
Prepare the foam:
Place your clay circle onto a piece of soft, thick foam. This surface is crucial because it allows you to press down into the clay without flattening the back side against a hard table. -
Create the fluting:
Take a wooden modeling tool or the rounded end of a paintbrush handle. Starting from the center of the dish, gently drag the tool outwards towards the ‘valley’ of each scallop (the indent between the petals). -
Deepen the lines:
Go over your lines again, applying slightly more pressure as you near the edge. The foam underneath will give way, allowing the clay to curve and create those distinct ridges and valleys seen in the photo. -
Lift the edges:
While the clay is still on the foam, gently press the center down with your thumb while using your other hand to cup and lift the scalloped rim slightly, encouraging a bowl shape.
Use Cornstarch
Dust your foam and tools lightly with cornstarch before pressing into the clay. It prevents sticking and burns off cleanly in the kiln.
Step 3: Shaping and Drying
-
Transfer to mold:
Carefully lift your clay flower. Place it over your chosen slump or hump mold. For a gentle curve like this, simply draping it inside a slightly larger, smooth bowl lined with plastic wrap works well. -
Adjust the curve:
Once in the mold, gently press the center down to ensure it sits flat. I like to re-trace the scallop lines lightly to ensure they weren’t lost during the transfer. -
Slow drying:
Let the dish dry slowly to leather hard. Cover it loosely with plastic if your room is dry. This prevents the rim from drying too fast and warping the circular shape. -
Refining:
When leather hard, remove it from the mold. Use a damp sponge to smooth any rough spots on the rim or bottom. If you want a foot ring, now is the time to score and slip a small coil onto the base, though these look lovely sitting flat. -
Bisque fire:
Allow the piece to become bone dry before loading it into the kiln for a bisque firing (typically Cone 04).
Gold Rim Accent
After the final glaze firing, apply a thin line of gold luster to the scalloped rim and fire it a third time (low fire) for a touch of luxe.
Step 4: Glazing
-
Clean the bisque:
Wipe the bisque-fired dish with a damp sponge to remove any kiln dust. This ensures the glaze adheres properly without crawling. -
Apply the glaze:
Dip the piece into a matte white glaze. A matte finish is key to achieving the soft, stone-like look in the image. Shake off excess glaze gently. -
Check the speckles:
If your clay body is speckled, the iron or manganese spots will bleed through the white glaze during firing. If you used plain clay, you can flick a toothbrush loaded with black underglaze over the surface now. -
Glaze fire:
Fire the piece to the maturation temperature of your clay and glaze (often Cone 5 or 6 for stoneware). Ensure the bottom is wiped clean of glaze before firing.
Now you have a delicate, organic dish perfect for showcasing your favorite rings
Textured Lace-Imprint Drape Bowl
Capture the charm of vintage textiles in solid form with this deeply textured drape mold bowl. The piece features gently fluted sides and a decorative twisted rim, all unified by a warm, speckled cream glaze that pools beautifully in the imprinted details.
Detailed Instructions
Materials
- Stoneware clay (speckled or buff)
- Deep mixing bowl (for use as a mold)
- Textured lace doily or embossing mat (leaf/fluted pattern)
- Canvas work surface
- Rolling pin
- Guide strips (approx. 1/4 inch thick)
- Fettling knife
- Serrated rib or scoring tool
- Sponge
- Warm cream/oatmeal reactive glaze
Step 1: Texturing the Slab
-
Prepare the workspace:
Begin by setting up your canvas work surface. Place your guide strips on either side to ensure an even thickness for your clay. -
Roll the slab:
Roll out a generous amount of stoneware clay between the guide strips until it is perfectly flat and smooth, about 1/4 inch thick. -
Apply the texture:
Lay your chosen lace doily or textured mat over the clay slab. If using a directional pattern like the leaves/flutes shown, think about how they will radiate from the center. -
Check the impression:
Use the rolling pin to firmly press the texture into the clay. Lift a corner gently to ensure the impression is deep enough to catch the glaze later. -
Cut the rough shape:
Remove the texture tool and cut a large circle from the slab, ensuring it is significantly larger than the rim of your mold bowl to allow for depth.
Rim Cracks?
If the rim coil starts to crack while attaching, the clay is too dry. Use a damp sponge to rehydrate the rim or spritz the coil with water.
Step 2: Forming the Bowl
-
Prepare the mold:
Cover your mixing bowl mold with a layer of plastic wrap or cheesecloth to prevent sticking. -
Drape the clay:
Carefully lift your clay circle and drape it *inside* the mold (slump method) if you want the main texture inside, or *over* the mold (hump method) for outside texture. The example image suggests an inside mold technique because of the interior volume. -
Press into shape:
Gently press the clay into the bottom and up the sides of the bowl. Since you are pressing a flat slab into a curve, you will encounter excess clay folds. -
Create flutes from folds:
Instead of cutting darts to remove excess clay, use the natural folds to your advantage. Press these folds down to create the vertical, leafy fluted ridges seen on the exterior. -
Refine the exterior:
Use a damp sponge to smooth the folds on the outside so they look intentional and organic rather than erratic.
Step 3: Detailing the Rim
-
Trim the edge:
Once the clay is settled, use a needle tool to trim the excess clay at the rim of the mold. Keep it slightly thick to support the decoration. -
Roll a coil:
Roll a small, even coil of fresh clay, roughly the thickness of a pencil. -
Make the twist:
You can gently twist this coil or press diagonal indentations into it with a modeling tool to mimic a rope texture. -
Score and slip:
Thoroughly score the rim of your bowl and the bottom of your textured coil. Apply slip to both surfaces. -
Attach the rim:
Press the coil firmly onto the rim. I like to use my thumb to gently meld the bottom of the coil into the bowl wall for a seamless transition.
Level Up: Oxide Wash
Before glazing, apply an iron oxide wash and wipe it back. This leaves dark pigment in the deep textures, making the pattern pop under a sheer glaze.
Step 4: Finishing and Glazing
-
Slow dry:
Loosely cover the bowl with plastic and let it dry slowly to the leather-hard stage before removing it from the mold. -
Bisque fire:
Once bone dry, bisque fire the piece according to your clay body’s specifications (usually Cone 04 or 06). -
Apply glaze:
Select a semi-transparent cream or oatmeal glaze. Pour glaze inside, swirl to coat, and pour out. Dip the exterior carefully. -
Wipe back (optional):
If the glaze is very thick, gently wipe the high points of the texture with a damp sponge to reveal the clay color and accentuate the pattern. -
Final fire:
Glaze fire to maturity (likely cone 5 or 6). The glaze should break over the texture and pool in the recesses.
Now you have a stunning, functional bowl that carries the delicate memory of lace forever.


The Complete Guide to Pottery Troubleshooting
Uncover the most common ceramic mistakes—from cracking clay to failed glazes—and learn how to fix them fast.
Botanical Stamp Drape Serving Bowl
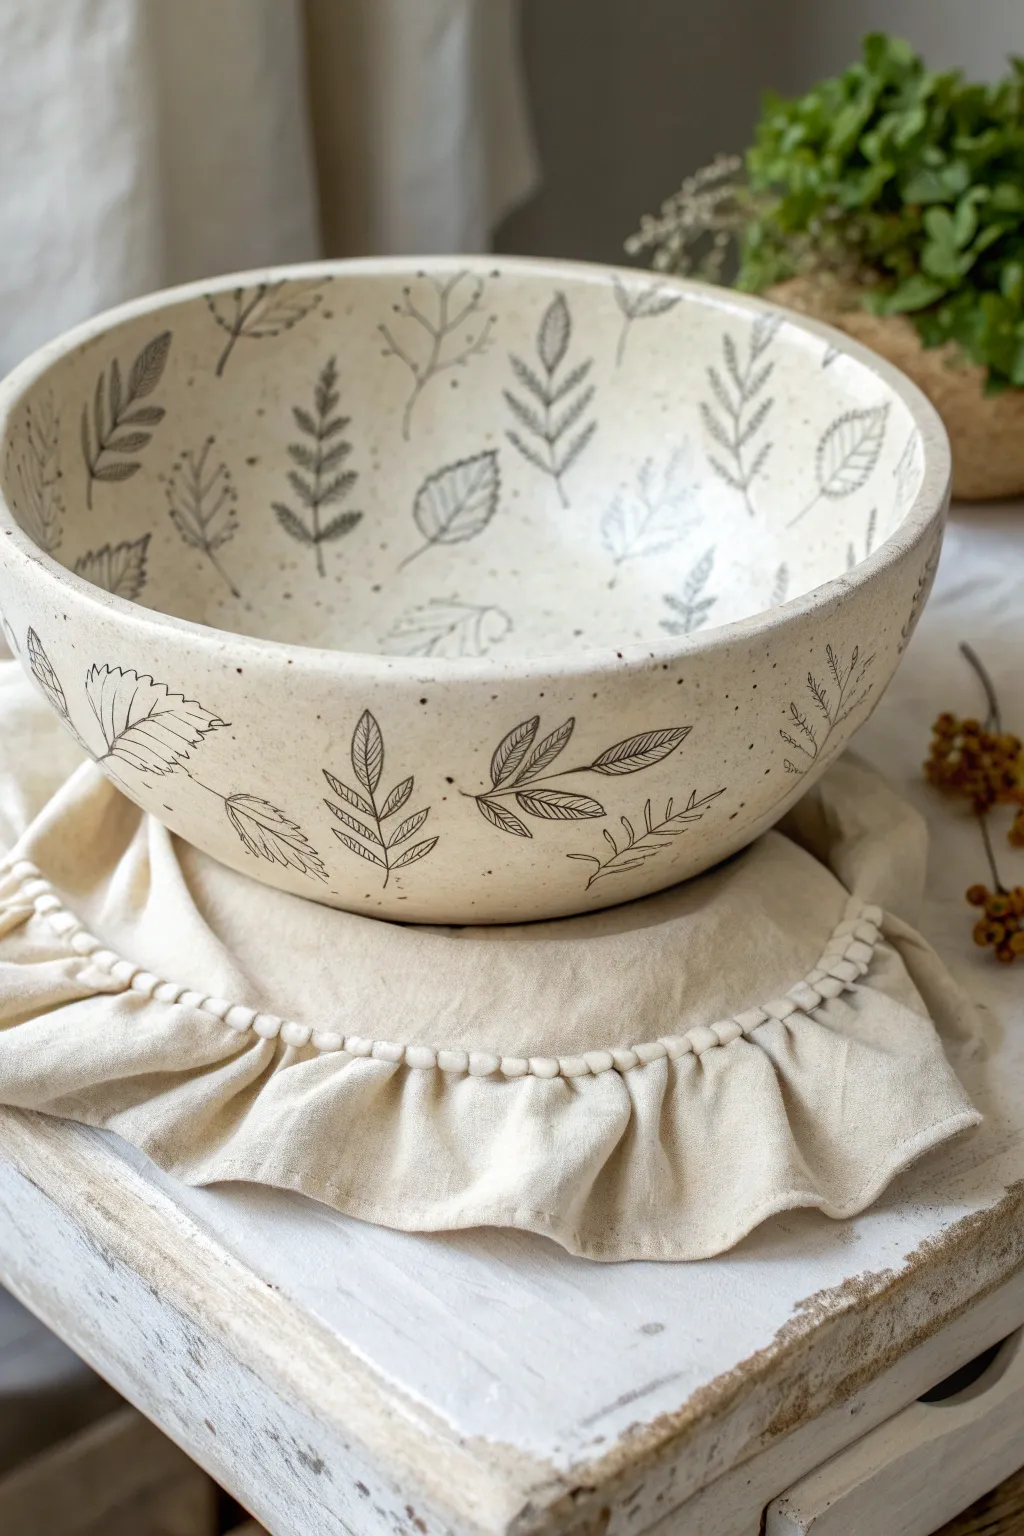
Bring the effortless beauty of a forest floor to your table with this speckled ceramic serving bowl. Featuring simple line-drawn foliage and a soft, organic shape, this project is perfect for beginners looking to master the drape mold technique.
Step-by-Step
Materials
- Speckled stoneware clay (mid-fire)
- Drape mold (plaster, or a sturdy bowl covered in canvas)
- Canvas work surface
- Rolling pin and guide strips (approx. 1/4 inch)
- Rib tool (soft silicone or rubber)
- Needle tool or fettling knife
- Sponge
- Underglaze pencil (black or dark brown) or fine-tip underglaze applicator
- Clear matte glaze
- Kiln
Step 1: Preparation and Forming
-
Wedge the Clay:
Begin by thoroughly wedging your speckled stoneware clay. This removes air pockets and ensures the particles are aligned for a smooth slab. -
Roll the Slab:
On your canvas surface, roll out the clay using guide strips to ensure an even thickness. Aim for about 1/4 inch thick to keep the bowl substantial but elegant. -
Smooth the Surface:
Take your soft rib tool and compress the slab on both sides. This is a crucial step I never skip, as it strengthens the clay and creates that buttery smooth canvas for your future drawings. -
Drape the Clay:
Gently lift your clay slab and carefully drape it over your chosen mold. If you are using an inverted mixing bowl, ensure you’ve covered it with a layer of thin fabric or plastic to prevent sticking. -
Shape the Form:
Using your hands or the soft rib, gently press the clay against the mold to establish the shape. Work from the center (part of the bowl that will be the bottom) outward to release trapped air. -
Trim the Rim:
Use a needle tool or fettling knife to cut away the excess clay at the base of your mold to define the bowl’s rim. You can spin the mold on a banding wheel for a cleaner cut. -
Refine the Edge:
While the clay is still leather-hard on the mold, take a damp sponge and round off the sharp cut edge of the rim for a professional finish. -
Initial Drying:
Allow the clay to dry to a firm leather-hard stage while still on the mold. This helps it retain that perfect curve when you remove it.
Uneven Rim?
If your rim warps after removing the mold, gently paddle it back into round while leather hard, or embrace the ‘wabi-sabi’ look of an organic edge, which suits this botanical style perfectly.
Step 2: Decoration and Finishing
-
Remove from Mold:
Once the clay holds its shape firmly but isn’t bone dry, carefully lift it off the drape mold and flip it right side up. -
Sketch the Design:
Lightly sketch your botanical placement. You can do this mentally or use a very soft brush with water to map out where the leaves will flow. -
Apply Botanical Art:
Using a dark underglaze pencil or a fine-tip applicator bottle, draw your leaf patterns. Focus on variety—ferns, single leaves, and branches—spacing them irregularly for an organic feel. -
Detail the Interior:
Don’t forget the inside of the bowl. Continue the pattern onto the interior surface, perhaps letting some leaves ‘grow’ up from the center. -
Set the Underglaze:
If using an underglaze pencil, lightly mist the surface with water or dab delicately with a sponge to set the pigment so it doesn’t smudge during glazing. -
Bisque Fire:
Load your bowl into the kiln for a bisque firing according to your clay body’s specifications (usually Cone 04 or 06). -
Glaze Application:
Once bisqued, wipe the bowl down with a damp sponge to remove dust. Dip or brush on a clear matte glaze. The matte finish enhances the rustic, earthy look of the speckled clay. -
Final Firing:
Fire the glazed piece to the maturity temperature of your clay and glaze (typically Cone 5 or 6 for mid-fire stoneware). -
Sanding the Bottom:
After the kiln cools, check the foot of the bowl. If there are rough patches, lightly sand them with wet-dry sandpaper to ensure it sits smoothly on your table.
Stamp Instead of Draw
Not confident in drawing? Carve a simple leaf shape into a linoleum block or a piece of scrap clay (bisque fired) to create a custom stamp. Press it into the leather-hard clay, then fill with dark slip.
Now you have a stunning, nature-inspired vessel ready to serve your favorite salad or fruit
Footed Drape Bowl With Coil Ring
Create a stunning tactile experience with this drape-molded bowl featuring deep exterior grooves and a contrasting glossy blue interior. The combination of raw, speckled stoneware on the outside and a liquid-like glaze pool inside makes this a perfect centerpiece or serving dish.
Detailed Instructions
Materials
- Speckled buff stoneware clay
- Plaster or bisque hump mold (bowl shape)
- Wooden modeling tool or chamois
- Rib tool (kidney)
- Needle tool
- Scoring tool (serrated rib)
- Slip
- Rolling pin and guide sticks (1/4 inch)
- Loop carving tool
- Potter’s wheel (optional, for foot ring)
- Banding wheel
- Cone 6 darker blue pooling glaze (e.g., floating blue)
- Wax resist
- Sponge
Step 1: Preparing the Slab
-
Roll out the clay:
Begin with a well-wedged ball of speckled stoneware clay. Roll it out into a smooth, even slab approximately 1/4 inch thick, using guide sticks to ensure consistent thickness throughout. -
Smooth the surface:
Compress the slab on both sides using a rib tool. This aligns the clay particles to prevent warping and creates a pristine canvas for the texture we will add later. -
Cut the circle:
Place your hump mold upside down on the slab to gauge the size, or use a paper template. Cut a circle that is slightly larger than the mold to allow for the drape and eventual foot.
Clean Lines Pro Tip
When doing the final sponge wipe on the rim, rotate the sponge frequently to a clean spot. This prevents smearing a thin haze of diluted glaze onto the raw clay exterior.
Step 2: Forming the Bowl
-
Drape the clay:
Carefully lift your clay circle and lay it gently over the plaster hump mold. Let gravity do most of the work initially so you don’t stretch the clay too thin. -
Compress against the mold:
Starting from the top center and working downward in a spiral motion, gently press the clay against the mold with a damp sponge or soft rib. Ensure there are no air bubbles trapped between the clay and the plaster. -
Trim the rim:
Once the clay is snug, use a needle tool held parallel to the table surface (or a specific height gauge) to trim the excess clay at the bottom edge, creating an even rim for your bowl.
Slumping Issues?
If your bowl slumps or warps after removing it from the mold, you took it off too soon. Leave it on the mold until it’s stiff leather-hard and holds its shape firmly.
Step 3: Adding the Foot & Texture
-
Prepare the foot ring:
Roll a thick coil or cut a strip of clay for the foot ring. Place the mold (with the bowl still on it) on a banding wheel to center it. -
Attach the foot:
Score the center of the bowl’s bottom and one side of your coil. Apply slip, place the coil, and firmly adhere it. I find using a small wooden tool to blend the seam creates the strongest bond. -
Mark the spiral guide:
While the clay is still leather hard on the mold, lightly sketch curved spiral lines from the foot ring to the rim using a needle tool to guide your carving. -
Carve the grooves:
Using a loop tool, carve deep, rounded channels following your guide lines. Vary the pressure slightly to give the grooves a natural, organic feel that widens as it reaches the rim. -
Refine the texture:
Smooth the sharp edges of your carved grooves with a damp sponge or a chamois cloth. You want the texture to be distinct but comfortable to hold. -
Dry and remove:
Allow the clay to dry to a firm leather hard stage. Once it pops loose from the mold easily, remove it and carefully smooth the rim edge.
Step 4: Glazing and Finishing
-
Bisque fire:
Fire the bowl to cone 04 (or your clay body’s bisque temperature). Once cool, wipe it down with a damp sponge to remove any dust. -
Wax the exterior:
Apply wax resist to the entire exterior of the bowl and the bottom of the foot ring. We want the raw, carved stoneware to remain unglazed to contrast with the interior. -
Pour the interior:
Pour a generous amount of your chosen blue floating glaze into the bowl. Roll it around to coat the entire interior surface evenly, then pour out the excess. -
Clean the rim:
Even with wax, some glaze might drip. Use a wet sponge to meticulously wipe any glaze off the rim and the textured exterior, ensuring a crisp line where the glaze stops. -
Final firing:
Fire the piece to cone 6 (or your glaze’s maturation temperature). The glaze should pool slightly in the bottom and break over the texture at the rim.
Once fired, the interplay between the deep blue interior and the earthy, spiraled exterior creates a bowl that begs to be held.

TRACK YOUR CERAMIC JOURNEY
Capture glaze tests, firing details, and creative progress—all in one simple printable. Make your projects easier to repeat and improve.
Nested Set of Drape Bowls
Create a stunning table centerpiece with this set of nesting bowls featuring a distinctively ribbed exterior texture. By utilizing a simple draping technique over custom molds, you can achieve these gentle, organic curves and a delightful contrast between the smooth pink interior and the textured, speckled cream exterior.
Step-by-Step
Materials
- Stoneware clay (speckled or buff)
- Plaster or bisque hump molds (various sizes for nesting)
- Large rolling pin or slab roller
- Carving tools (specifically a U-gouge or fluting tool)
- Rib tool (flexible metal or rubber)
- Canvas or slab mat
- Sponge
- Fettling knife
- Slip and scoring tool
- Pink glaze (glossy or satin)
- Cream or white glaze (matte or satin)
- Clear glaze (optional)
Step 1: Slab Preparation and Forming
-
Roll the Slabs:
Begin by rolling out your clay into an even slab. Aim for a thickness of approximately 1/4 to 3/8 inch. If you are making the largest bowl first, ensure your slab is wide enough to drape completely over your largest mold with excess to trim. -
Smooth the Surface:
Before moving the clay, compress both sides of the slab using a flexible rib tool. This aligns the clay particles to prevent cracking and creates the smooth surface that will eventually become the inside of your bowl. -
Drape Over the Mold:
Carefully lift your slab and lay it gently over your hump mold. Start pressing the clay down from the very center (the foot area) outward to avoid trapping air bubbles. Use the heel of your hand or a damp sponge to smooth the clay against the mold’s form. -
Establish the Rim:
Once the clay is snug against the mold, use a needle tool or fettling knife to trim the excess clay at the bottom (which is actually the rim of your bowl). Hold the tool steady and rotate the banding wheel if you have one, or move carefully around the mold for an even cut. -
Refine the Shape:
With the clay still on the mold, use a chamois or a damp sponge to compress and round the cut rim. It should feel smooth to the touch. -
Initial Drying:
Let the bowl sit on the mold until it reaches a soft leather-hard stage. It needs to be firm enough to hold its shape when removed, but soft enough to carve texture into.
Step 2: Carving the Flutes
-
Mark Guide Lines:
While the bowl is still inverted on the mold (or supported by foam if you’ve removed it), you can lightly sketch vertical lines to guide your fluting, though freehanding yields a lovely organic look. -
Carve the Texture:
Using a sharp U-gouge or fluting tool, carve vertical channels from the rim toward the center of the base. Apply consistent pressure to create deep, defined grooves. I personally find it rhythmic to work in quarters—twelve, six, three, and nine o’clock—to keep the spacing even. -
Soften the Edges:
After carving all the flutes, small crumbs of clay will remain. Wait a few minutes for them to stiffen slightly, then brush them away with a soft brush. Use a damp sponge to gently soften the sharp ridges of the flutes without losing their definition. -
Repeat for Nesting:
Repeat the forming and carving process for the medium and small bowls. Ensure the wall thickness is consistent across all pieces so they look cohesive when stacked. -
Dry Slowly:
Place the finished greenware bowls rim-down on a flat board to dry. Cover them loosely with plastic for the first day to equalize moisture, then uncover to dry completely before bisque firing.
Clean Lines Pro-Tip
When carving vertical flutes, pull the tool from the rim downward toward the foot. This prevents the tool from accidentally chipping or warping the delicate rim edge.
Step 3: Glazing and Finishing
-
Bisque Fire:
Fire your bone-dry pieces to cone 04 (or your clay body’s bisque temperature). -
Clean the Bisque:
Wipe down the fired pieces with a damp sponge to remove any dust that might resist the glaze. -
Glaze the Interior:
Pour a soft pink glaze into the interior of each bowl. Swirl it around quickly to coat the entire inside surface and pour out the excess. Wipe any drips off the rim immediately. -
Glaze the Exterior:
For the outside, you want to highlight the texture. Dip or brush a cream or white matte glaze onto the exterior. The glaze should break over the high points of the flutes, revealing the speckled clay body beneath. -
Wipe the Foot:
Ensure the bottom of each bowl is completely free of glaze so it doesn’t fuse to the kiln shelf. -
Final Fire:
Load the kiln and glaze fire to the maturation temperature of your clay and glaze combination (likely cone 5 or 6 for stoneware).
Level Up: Rim Detail
Brush a thin layer of iron oxide wash just on the very rim before the final glaze firing. This creates a toasted, rustic definition that frames the pink interior beautifully.
Now stack your finished bowls to admire the beautiful rhythm created by those repeated vertical lines
Faceted Drape Tray With Crisp Planes
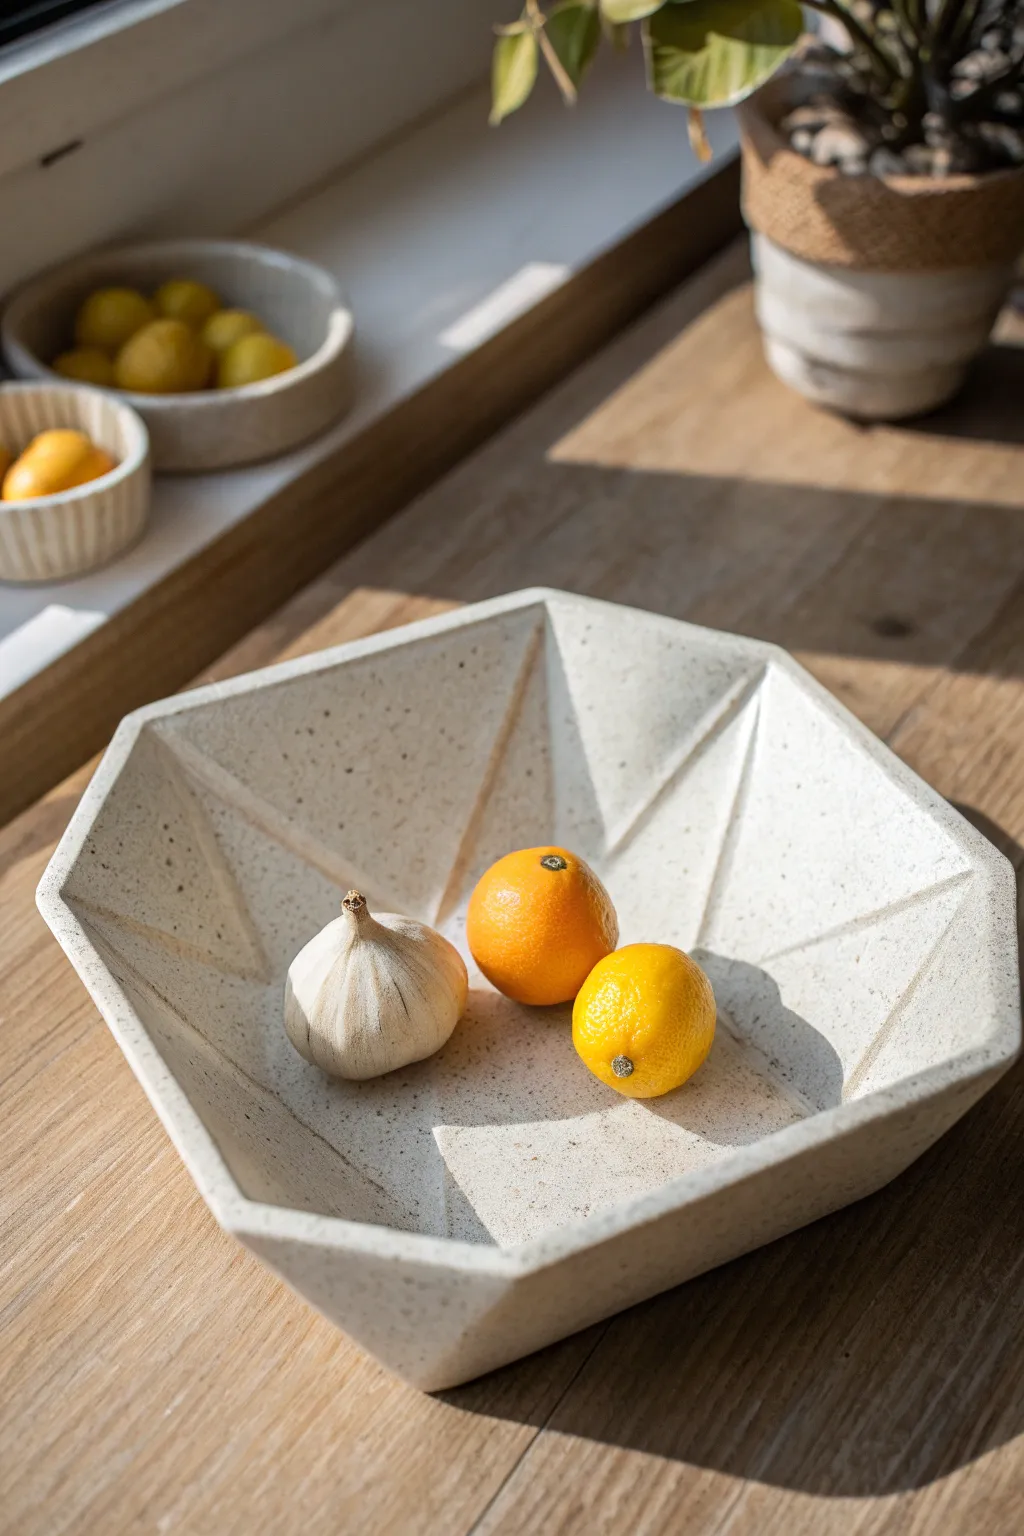
This project combines the organic speckle of stoneware clay with sharp, modern geometry. By creating a custom faceted texture on a flat slab before draping it, you transform a simple hexagon shape into a sophisticated, visually striking centerpiece bowl.
Detailed Instructions
Materials
- Speckled stoneware clay (mid-fire)
- Rolling pin
- Two long wooden slats (approx. 1/4 inch thick) for depth guides
- Fettling knife or needle tool with a ruler
- Paper template (hexagon shape, approx. 10-12 inches wide)
- Rigid wooden rib or metal rib
- Canvas or slab mat
- Large sponge or foam pad (for the drape mold)
- Plastic wrap
- Score and slip tool
- Matte white glaze (optional, or rely on clay body)
Step 1: Preparing the Slab
-
Wedge the clay:
Begin by thoroughly wedging your speckled stoneware clay to remove air bubbles and ensure particle alignment, which is crucial for preventing warping in flat forms. -
Set up guides:
Place your wooden depth guides on either side of your canvas workspace. These ensure your slab is perfectly even, which is essential for the geometric look. -
Roll the slab:
Roll out a generous amount of clay between the guides. Make sure the slab is slightly larger than your paper template in all directions. -
Compress the surface:
Using a rib tool held at a 45-degree angle, firmly compress the clay surface in multiple directions. This aligns the clay particles and creates a smooth canvas for your faceting.
Step 2: Creating the Faceted Texture
-
Position the template:
Place your hexagonal paper template gently in the center of the slab. Don’t cut it out yet; you need the surrounding clay to hold the shape stable while you texture. -
Mark the center:
Lightly mark the center point of the hexagon and draws faint guide lines extending from the center to each of the six corners. -
Carve the relief lines:
Using a ruler and a modeling tool, press or carve ‘crease’ lines into the clay. Connect the center point to the corners, and add intermediate triangles as seen in the photo to create the geometric facets. -
Refine the planes:
I like to take a flat wooden modeling tool and gently press down the varying triangular sections to create actual planar depth, rather than just drawn lines. This emphasizes the 3D effect. -
Smooth the ridges:
Use a slightly damp finger or a soft chamois to smooth any sharp burrs created during carving, but be careful not to lose the crispness of the geometric edges.
Warping Woes?
If your hexagon corners lift during drying, weight them down gently with small sandbags or extra clay chunks wrapped in plastic while the piece is in the leather-hard stage.
Step 3: Cutting and Draping
-
Cut the perimeter:
Now, use your fettling knife held vertically against the template edge to cut out the hexagonal shape cleanly. -
Bevel the rim:
For a professional finish, you can slightly bevel the underside of the rim or smooth it with a damp sponge to remove the cutting marks. -
Prepare the mold:
Cover your foam pad or a shallow, wide slump mold with plastic wrap to prevent the clay from sticking. -
Drape the form:
Carefully lift your slab and place it centered onto the foam or mold. Allow gravity to pull the sides down gently. -
Shape the depth:
Gently press the center of the slab down to achieve the desired depth. The sides will naturally flare upward. -
Refine the geometry:
Once draped, the straight lines might curve slightly. Use your ruler or flat tool to gently re-straighten the internal facet lines while the clay is soft.
Add a Foot Ring
When leather hard, flip the bowl and score/slip a small hexagonal foot ring onto the base. This adds height and creates a beautiful shadow gap on your table.
Step 4: Drying and Finishing
-
Slow drying:
Cover the piece loosely with plastic. Allow it to firm up to leather-hard consistency slowly to prevent the corners from curling up. -
Clean up edges:
Once leather hard, remove it from the mold. Use a damp sponge to wipe down the rim one last time for a soft, touchable edge. -
Bisque fire:
Fire the piece to cone 04 (or your clay’s specific bisque temperature). -
Glazing:
Apply a thin, matte white glaze that allows the speckles of the clay body to bleed through, or leave the exterior unglazed if using a pristine clay body. -
Glaze firing:
Fire to the final maturity temperature of your clay (likely Cone 5 or 6 for stoneware).
Once fired, fill your modern tray with citrus or decorative objects to highlight those crisp shadow lines
Handled Drape Platter for Sharing
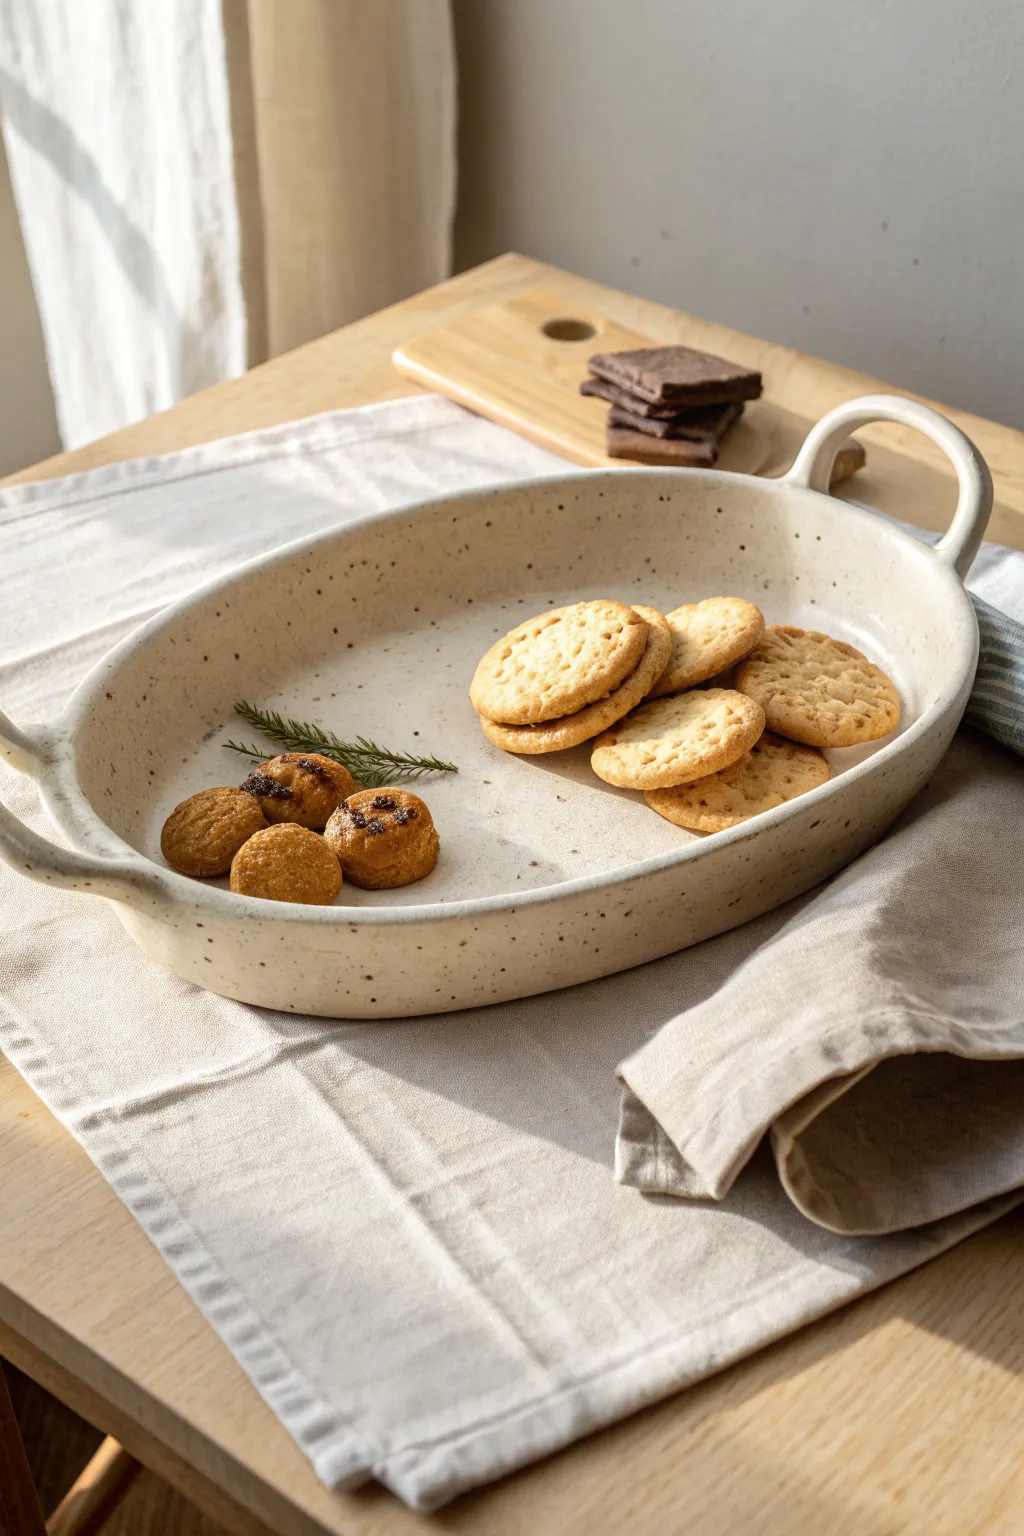
This rustic, elegant sharing platter features a generous oval shape and convenient loop handles, perfect for passing cookies or appetizers. Its gentle curve is achieved using a simple drape mold technique, giving it a cozy, handmade feel with a speckled glaze finish.
Step-by-Step
Materials
- Speckled stoneware clay (approx. 2-3 lbs)
- Oval plaster or bisque drape mold (approx. 12-14 inches long)
- Canvas mat or slab roller
- Rolling pin
- Active wire clay cutter
- Needle tool or fettling knife
- Rubber kidney rib
- Serrated rib or scoring tool
- Slip (liquid clay)
- Sponge
- Chamois leather strip
- Clear or transparent matte glaze
Step 1: Preparing the Slab
-
Wedge the clay:
Begin by thoroughly wedging your speckled stoneware clay to remove any air bubbles and ensure an even consistency, which is crucial for preventing cracks during firing. -
Roll out the slab:
Using a slab roller or a rolling pin with guide sticks, roll out a generous slab of clay to a uniform thickness of about 1/4 to 3/8 of an inch. Ensure the slab is large enough to cover your oval mold with some excess. -
Smooth the surface:
Before draping, compress both sides of the slab using a rubber kidney rib. This aligns the clay particles and removes any canvas texture, creating a smooth canvas for the speckled clay to shine.
Cracking Handles?
Handles often dry faster than the body. Wrap just the handles in damp paper towel under the plastic to slow their drying and prevent separation cracks.
Step 2: Forming the Platter
-
Drape the clay:
Carefully lift your slab and lay it centrally over your oval hump mold. Let gravity do most of the work, allowing the clay to conform to the mold’s curve. -
Form to the mold:
Using a slightly damp sponge or your hands, gently press the clay against the mold, starting from the center and working outward to eliminate trapped air pockets. -
Trim the excess:
Once the clay is snug against the mold, use a needle tool or fettling knife to trim the excess clay around the base of the mold, leaving a clean oval edge. I find holding the knife at a slight angle creates a nice bevel. -
Refine the rim:
With the clay still on the mold, run a damp sponge or a strip of chamois leather around the cut edge to round it off and compress it, ensuring there are no sharp burrs.
Level Up: Texture
Before draping the slab, roll a piece of lace or a textured mat into the surface. The glaze will break beautifully over the pattern.
Step 3: Adding the Handles
-
Roll coils for handles:
Take the excess trimmings and roll out a thick coil, roughly the thickness of your finger. Cut two equal lengths, approximately 4 inches long each. -
Shape the loops:
Bend the coil segments into ‘U’ shapes to form the loop handles. Tap the ends gently on the table to flatten the attachment points slightly. -
Score the attachment sites:
Identify where you want the handles on the short ends of the platter. Use a serrated rib or needle tool to thoroughly score these areas and the ends of your handle coils. -
Apply slip and attach:
Dab a generous amount of slip onto the scored areas. Press the handles firmly onto the rim, blending the clay from the handle down into the platter body for a seamless connection. -
Reinforce the join:
Roll tiny thin coils of clay and place them around the connection points of the handles. Smooth these in with a modeling tool to reinforce the join and create a clean transition.
Step 4: Finishing and firing
-
Slow drying:
Cover the piece loosely with plastic to allow the handles and the body to dry at the same rate. Once distinct leather-hard, carefully pop the platter off the mold to finish drying. -
Bisque fire:
Once bone dry, fire the piece to bisque temperature (usually cone 04 or 06) to prepare it for glazing. -
Glazing:
Dip or brush your bisque-fired platter with a clear or transparent matte glaze. This transparency allows the natural speckles of the clay body to remain the star of the show. -
Final wipe down:
Ensure the foot or bottom contact points are completely free of glaze with a wet sponge to prevent the platter from fusing to the kiln shelf. -
Glaze fire:
Fire the kiln to the maturity temperature of your clay and glaze (typically cone 5 or 6 for stoneware) to achieve that durable, vitrified finish.
Once cooled, fill your beautiful speckled platter with treats and enjoy the sturdy feel of your new handmade serving ware
Drape-Mold Berry Bowl With Cutouts
This charming, speckle-glazed bowl captures the essence of rustic elegance with its gentle fluting and organic rim. The project uses a simple drape mold technique to form a generous curve, perfect for cradling your summer berry harvest.
Step-by-Step Guide
Materials
- Speckled stoneware clay (mid-fire)
- Plaster or bisque hump mold (hemisphere shape)
- Canvas or thick fabric for rolling
- Rolling pin and guide strips (approx. 1/4 inch thick)
- Fettling knife or needle tool
- Rubber kidney rib
- Serrated metal rib
- Carving tool (loop tool or fluting tool)
- Sponge
- Matte white or oatmeal glaze
Step 1: Preparing the Slab
-
Roll the clay:
Begin by wedging your speckled stoneware clay thoroughly to remove air bubbles. Lay out your canvas and roll the clay into a slab, using guide strips to ensure an even thickness of about 1/4 inch. -
Compress the slab:
Using a rubber kidney rib, firmly compress the clay slab on both sides. This aligns the clay particles, reducing the chance of warping later and creating a smooth canvas for your texture. -
Cut the circle:
Place your hump mold upside down on the slab to gauge the size, or use a paper template. Cut a circle slightly larger than you want the finished bowl to be, allowing extra clay to drape down the sides.
Step 2: Forming the Bowl
-
Draping the clay:
Carefully lift your clay circle and drape it over your hump mold. Start pressing the clay gently against the mold from the top center, working your way down the sides in a spiral motion. -
Secure the fit:
Continue smoothing the clay against the mold with the rubber rib to ensure it hugs the form completely without trapping air pockets. Trim away any excessive unevenness at the bottom edge (which will become the rim). -
Define the rim:
While the clay is still on the mold, use your needle tool to cut the rim. You can make it perfectly straight or leave it slightly undulating for that organic, handmade look seen in the photo. Smooth the cut edge with a damp sponge. -
Let it stiffen:
Allow the clay to dry to a ‘leather hard’ state on the mold. It needs to be firm enough to hold its shape when removed, but soft enough to carve into.
Cracking at the rim?
If the rim cracks while drying on the mold, drape a loose sheet of plastic over it to slow the drying process. Uneven drying causes tension.
Step 3: Texturing and Finishing
-
Release the bowl:
Gently lift the bowl off the mold. If it sticks, give it a tiny rotational twist. Turn it right-side up and set it on a banding wheel if you have one. -
Marking vertical guides:
Lightly mark vertical lines around the exterior where you want your fluting to go. I find spacing them about an inch apart works well for this size bowl. -
Carving the flutes:
Using a loop tool or a dedicated fluting tool, carve vertical channels from the bottom of the bowl up toward the rim. Vary the pressure slightly to create a tapered effect—deeper at the bottom, shallower near the rim. -
Refining the texture:
Go over the carved lines with a damp sponge or your finger to soften any sharp ridges or clay burrs. The goal is a soft, worn feel rather than sharp, mechanical lines. -
Add the foot (Optional):
If you want a foot ring, score and slip a coil of clay onto the bottom, then smooth it onto the body. Alternatively, simply flatten the bottom slightly so the bowl sits stable on a table. -
Bisque fire:
Let the bowl dry completely (bone dry) before loading it into the kiln for the bisque firing (usually Cone 04 or 06, depending on your clay body).
Add drainage holes
To make this a functional colander, use a hole cutter to add patterns of drainage holes between the flutes while the clay is leather hard.
Step 4: Glazing
-
Wax resist:
Apply wax resist to the bottom of the bowl and the foot ring to prevent glaze from adhering to the kiln shelf. -
Apply glaze:
Dip or pour a matte white or oatmeal glaze over the bowl. The translucnecy of a lighter glaze is crucial here as it allows the natural speckles of the clay body to show through. -
Wipe back (Optional):
If the glaze is too thick in the flutes, gently wipe the raised areas with a sponge. This highlights the vertical texture. -
Final firing:
Fire the piece to the maturity temperature of your clay and glaze (typically Cone 5 or 6 for stoneware). Allow the kiln to cool naturally before removing your finished berry bowl.
Fill your new handmade vessel with fresh fruit and enjoy the simple beauty of your craftsmanship
Low Drape Planter With Soft Corners

This charming, square-ish planter features gentle, rounded corners and a dual-finish aesthetic created by partial glazing. The result is a modern yet rustic vessel that perfectly highlights small succulents with its speckled, creamy glaze and exposed raw clay base.
Step-by-Step Tutorial
Materials
- Mid-fire stoneware clay (speckled or tan buff)
- Square drape mold (wood block or plaster) with rounded edges
- Rolling pin
- Canvas work surface or slab mat
- Fettling knife or needle tool
- Rib tool (flexible rubber or metal)
- Scoring tool or serrated rib
- Slip
- Sponge
- Speckled white dipping glaze (or brush-on alternative)
- Kiln
Step 1: Preparing the Slab
-
Wedge the Clay:
Begin by thoroughly wedging about 1-2 lbs of stoneware clay to remove air bubbles and ensure a consistent texture. -
Roll the Slab:
Roll out a slab of clay to an even thickness, ideally around 1/4 inch. Keep your pressure consistent to avoid thin spots. -
Smooth the Surface:
Use a flexible rib tool to compress both sides of the slab. This aligns the clay particles, reducing warping later, and creates a smooth canvas for the glaze.
Step 2: Draping and Forming
-
Prepare the Mold:
Ensure your square mold form has softened corners. If using a wooden block, sand the sharp edges down slightly so they don’t cut through the clay. -
Place the Slab:
Gently lift your clay slab and drape it over the mold. Allow gravity to do the initial work, letting the clay slump naturally over the sides. -
Shape the Corners:
Unlike a sharp fold, you want to ease the clay down the sides. Gently press and smooth the clay against the mold, paying special attention to the corners to avoid pleating. If pleats form, you may need to cut a dart, but for a shallow planter, compression usually works. -
Establish the Base:
Flatten the top (which will become the bottom) with a flat board or paddle to ensure the planter sits level on a table. -
Trim the Excess:
Using a needle tool or fettling knife, trim the uneven skirt of clay at the bottom of the mold to create a straight, level rim for your pot.
Newspaper Barrier
Place a single sheet of newspaper between the mold and the clay slab. This prevents the clay from sticking to the mold material as it dries and shrinks.
Step 3: Drying and Refining
-
Leather Hard Stage:
Let the clay stiffen on the mold until it is leather hard. This usually takes a few hours depending on humidity; it should hold its shape but not be bone dry. -
Release the Pot:
Carefully lift the pot off the drape mold. Because the corners are soft and the walls are slightly tapered, it should slide off easily. -
Refine the Rim:
Flip the pot right-side up. Smooth the cut rim with a damp sponge or a chamois strip to round it off comfortably. -
Add Drainage:
I always use a hole cutter or drill bit to add a drainage hole in the center of the bottom now, so the succulent roots don’t rot later. -
Bisque Fire:
Allow the piece to dry completely to the bone-dry stage, then fire it in the kiln to a bisque temperature (usually cone 04).
Carved Texture
Before the clay hardens, try pressing a textured fabric or lace into the exterior walls while it’s on the mold for a tactile, patterned surface.
Step 4: Glazing and Finishing
-
Wax the Bottom:
Apply wax resist to the bottom of the pot and up the sides about 1/2 to 3/4 of an inch. This creates the straight line where the glaze will stop. -
Dip the Pot:
Hold the pot by the foot (or use glazing tongs) and dip it into a bucket of speckled white glaze. Submerge it quickly and evenly to the wax line. -
Clean the Line:
Once the glaze dries slightly, wipe any stray droplets off the waxed area with a sponge to ensure a crisp horizon line between glaze and raw clay. -
Glaze Fire:
Load the kiln and fire to the maturity temperature of your clay and glaze (typically cone 5 or 6 for stoneware). -
Sand the Base:
After firing, check the unglazed bottom. If the raw clay feels rough, give it a quick sand with high-grit sandpaper to protect your furniture.
Pot your favorite succulent in this handmade vessel and enjoy the contrast of organic greens against the clean ceramic lines
Drape Spoon Rest With a Gentle Saddle
This charming, shell-inspired spoon rest brings a touch of coastal elegance to your kitchen counter with its gentle curves and speckled finish. The distinctive fluted interior adds beautiful texture while serving the practical purpose of catching drips from your cooking utensils.
How-To Guide
Materials
- Speckled cream stoneware clay (e.g., Laguna Speckled Buff)
- Canvas work surface or rolling mat
- Rolling pin
- Pin tool or needle tool
- Soft rubber rib
- Flexible metal rib
- Round plaster drape mold (gentle curve)
- Wooden modeling tool with a rounded edge
- Loop tool (optional)
- Sponge
- Clear or transparent glossy glaze
Step 1: Preparing the Slab
-
Wedge the clay:
Begin with a ball of speckled stoneware clay slightly larger than a grapefruit. Wedge it thoroughly to remove any air bubbles and ensure particle alignment. -
Roll out the slab:
Using your rolling pin, roll the clay out on your canvas surface. Aim for an even thickness of approximately 1/4 inch across the entire slab to prevent warping later. -
Compress the surface:
Run a soft rubber rib over the clay surface in multiple directions. This compression step is crucial for strength and also smooths out the canvas texture. -
Cut the rough shape:
Use your needle tool to cut a roughly circular or oval shape, leaving about an inch of excess clay around the circumference of your intended final size.
Clean Fluting Tip
Use a piece of plastic wrap between your tool and the clay when pressing the flutes. This softens the edges instantly and prevents rough clay crumbs.
Step 2: Creating the Texture
-
Support the form:
Place your slab over your gentle drape mold. If you don’t have a specific plaster mold, a large, smooth bowl turned upside down and covered with cornstarch or thin plastic works perfectly. -
Shape the drape:
Gently press the clay down to conform to the mold’s curve. Use your rubber rib to smooth it against the form, ensuring there are no air pockets trapped between the clay and the mold. -
Mark the center:
Lightly mark a center point at the bottom of the curve with your needle tool as a reference guide for your fluting. -
Impress guidelines:
Using a wooden modeling tool or the handle of a paintbrush, lightly press radial lines extending from the center point outward to the rim to map out your sections. -
Sculpt the flutes:
Using the rounded edge of your wooden modeling tool, press firmly into the clay between your guidelines. I find dragging the tool from the center upward toward the rim creates the cleanest trough. -
Deepen the definition:
Go back over your impressed lines. For a sharper, more shell-like ridge, you can carefully remove a tiny strip of clay with a small loop tool, though simple compression usually suffices for this soft look.
Step 3: Refining and Finishing
-
Trim the rim:
Once the texture is established, use your needle tool to cut the final rim shape. Follow the natural scalloped edge created by your fluting, cutting curves at the top of each ridge. -
Form the spout and handle:
On one side, gently pull the clay rim outward to form a subtle pouring spout. On the opposite side, attach a small coil or pull a lug to create the small handle tab seen in the image. -
Smooth the edges:
With a slightly damp sponge, wipe the entire rim to round off sharp cutting marks. Pay extra attention to the ‘valleys’ of the scallops to prevent cracking. -
Dry slowly:
Let the piece stiffen to leather-hard on the mold. Once it holds its shape, remove it and cover loosely with plastic to dry slowly for 2-3 days. -
Bisque fire:
Fire the bone-dry piece in the kiln to Cone 04 (or your clay body’s specific bisque temperature). -
Glaze application:
Apply a clear or semi-transparent glossy glaze. This is essential to let the natural speckles of the clay body shine through. -
Wipe the foot:
Ensure the bottom of the spoon rest is completely free of glaze before firing to prevent it from fusing to the kiln shelf. -
Final firing:
Glaze fire the piece to the maturation temperature of your clay and glaze, typically Cone 5 or 6 for stoneware.
Warping Woes
If your spoon rest wobbles after drying, gently sand the bottom flat on a piece of drywall screen or sandpaper before the bisque firing.
Now you have a functional piece of art that keeps your kitchen tidy and displays your handiwork beautifully
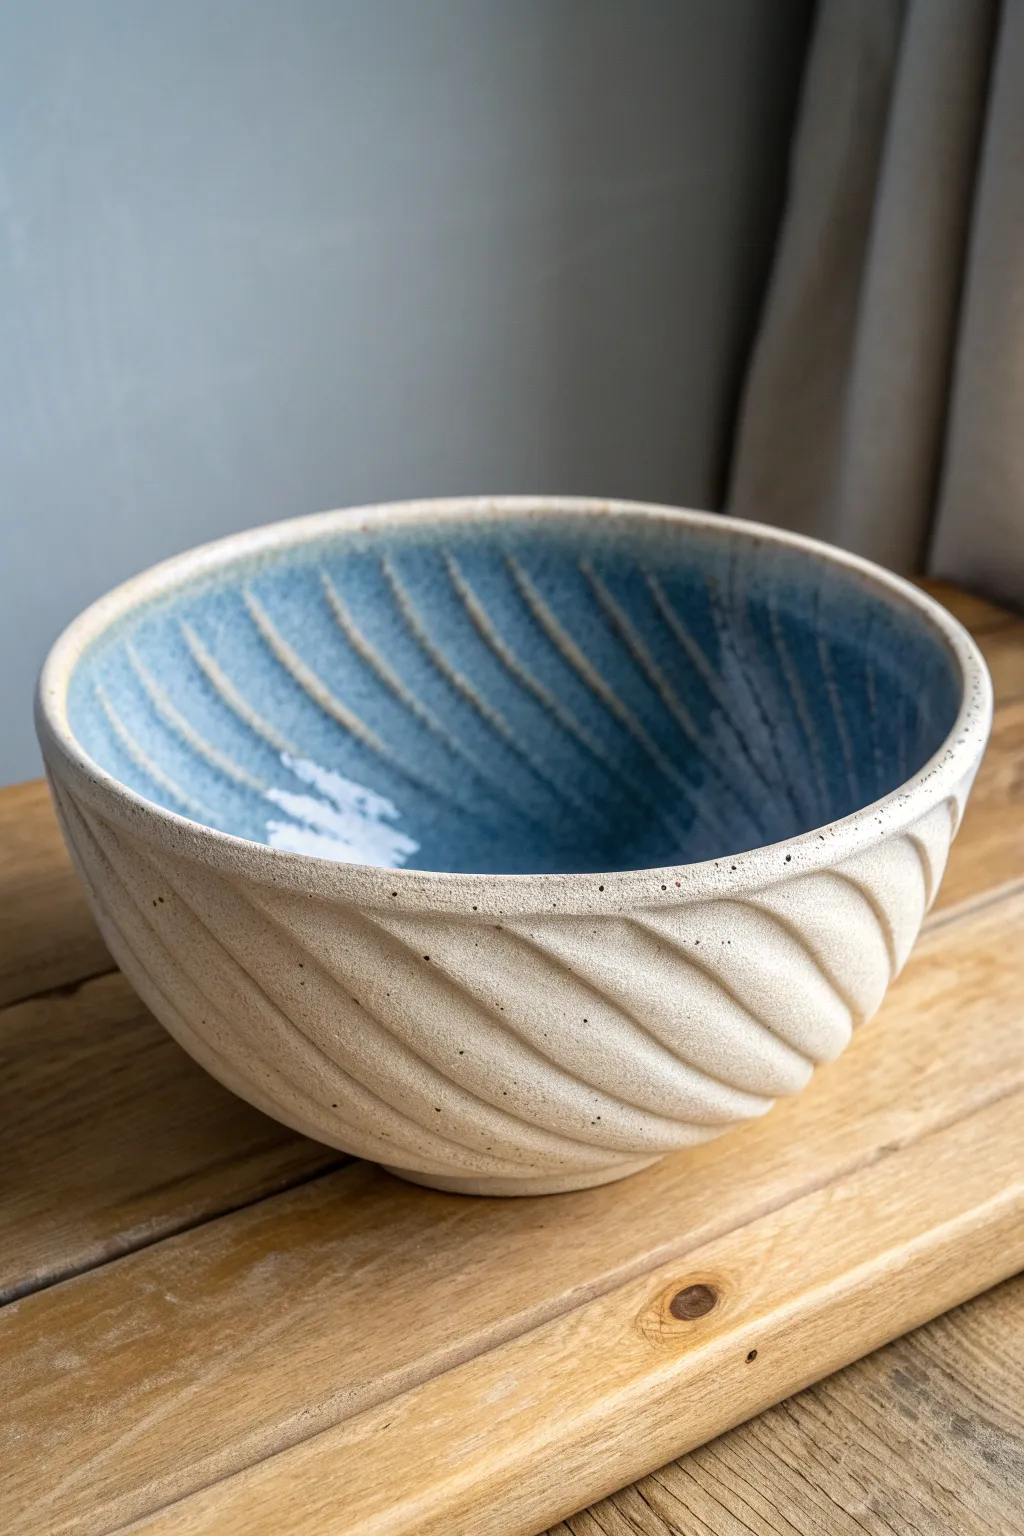
Rippled Drape Bowl With Finger-Grooved Texture
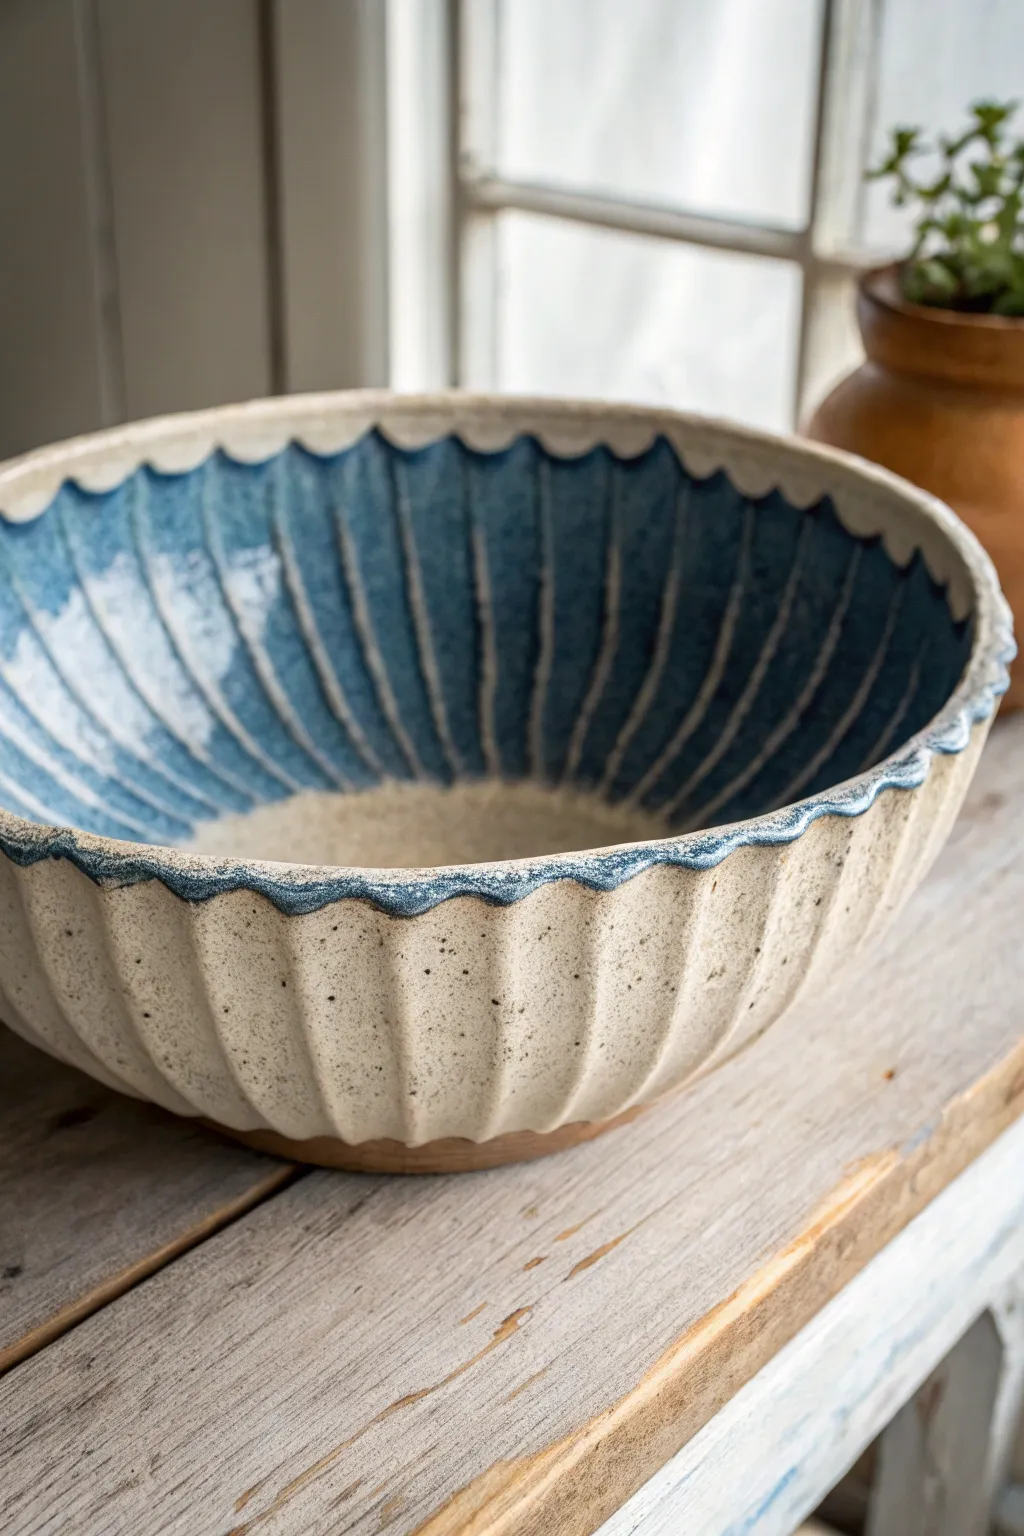
This project combines the reliability of a drape mold with hand-carved textures to create a stunning functional centerpiece. The contrast between the deep, flowing blue interior glaze and the raw, speckled exterior clay highlights the rhythmic fluted design.
Step-by-Step Guide
Materials
- Speckled buff stoneware clay (mid-fire)
- Large plaster or bisque drape mold (hemisphere shape)
- Rolling pin and guide strips (3/8 inch thickness)
- Canvas work surface
- Rib tool (soft rubber)
- Loop tool (medium size)
- Sponge
- Fettling knife or needle tool
- Deep blue variation glaze (cone 5/6)
- Clear matte glaze (optional for exterior)
- Wax resist
Step 1: Forming the Bowl
-
Roll the slab:
Begin by wedging your speckled buff clay to remove air bubbles. Roll out a large, even slab approximately 3/8 inch thick, ensuring it’s wide enough to cover your chosen mold with excess for the rim. -
Smooth the surface:
Before moving the clay, compress both sides of the slab with a soft rubber rib. This aligns the clay particles to prevent warping and creates a smooth canvas for the glaze later. -
Drape the clay:
Carefully lift your slab and center it over your drape mold. Gently press the clay down against the mold, starting from the top center and working your way down the sides to avoid trapping air pockets. -
Trim the edge:
Use a needle tool or fettling knife to trim the excess clay at the base of the mold to establish a rough rim. Don’t worry about the scalloped shape yet; just aim for a general circle. -
Wait for leather hard:
Let the clay sit on the mold until it reaches a soft leather-hard stage. It should be firm enough to hold its shape but soft enough to carve easily without chipping.
Step 2: Carving & Texture
-
Mark vertical guides:
Lightly sketch vertical lines from the center of the bowl’s bottom to the rim using a needle tool. These will act as guides for your fluting to ensure spacing is relatively even. -
Carve the grooves:
Using a medium loop tool, carve vertical channels along your guide lines. Start shallow at the bottom and deepen the cut as you move up toward the rim. -
Shape the scalloped rim:
The carved grooves naturally create high and low points at the rim. Use your knife to accentuate this by cutting a curved ‘scallop’ between each vertical ridge, following the flow of the carving. -
Refine the edges:
Take a damp sponge and gently smooth the sharp edges of your rim cuts and the carved grooves. I find that wrapping the sponge around my finger helps get inside the channels without flattening the texture. -
Create the foot ring:
If your mold doesn’t have a flat bottom, attach a small coil or slab ring to the base to create a foot, ensuring the bowl sits level. -
Slow drying:
Remove the bowl from the mold once it pops loose. Loosely cover it with plastic to dry slowly, which is crucial for preventing cracks in the rim.
Clean Grooves Tip
After carving with the loop tool, run a slightly damp paintbrush down each groove. This smooths tool marks more effectively than a sponge without washing away the deep definition.
Step 3: Glazing & Finishing
-
Bisque fire:
Fire the bone-dry piece to bisque temperature (usually Cone 04) to prepare it for glazing. -
Wax the exterior:
Apply wax resist to the entire exterior of the bowl and the very top edge of the scalloped rim. This ensures the raw speckled clay remains visible on the outside. -
Pour the interior:
Pour a generous amount of deep blue variation glaze into the bowl. Roll the bowl around to coat the entire interior surface thoroughly. -
Pour out excess:
Quickly pour out the excess glaze. As you pour, rotate the bowl so the glaze flows over the scalloped dips of the rim, creating that beautiful contrast line. -
Clean the exterior:
Use a damp sponge to wipe away any glaze beads that may have stuck to the waxed exterior. The rim should have a clean, distinct line where the glaze meets the raw clay. -
Glaze fire:
Fire the piece to maturity (Cone 5 or 6 depending on your clay body). The heat will cause the blue glaze to break over the interior texture, pooling darker in the bottom.
Color Break Effect
To get the streaky effect shown inside, choose a ‘rutile’ based blue glaze. If yours is too uniform, layer a thin coat of white flowing glaze just near the rim to drip down during firing.
Place your finished bowl in a well-lit spot to enjoy how the light catches the interior fluting and exterior curves
Off-Center Drape Bowl With One Tall Side
This project embraces the natural, slight imperfections of hand-building to create a stunningly simple serving vessel. Using a drape mold allows for a gentle, rounded bottom while the speckled clay body adds immediate visual texture without complex glazing.
Step-by-Step Tutorial
Materials
- Speckled stoneware clay (mid-fire)
- Round plaster or bisque drape mold (approx. 10-12 inches)
- Rolling pin
- Canvas ware board or cloth
- Rib tool (kidney shaped, soft rubber)
- Needle tool
- Fettling knife
- Sponge
- Surform tool (cheese grater style)
- Clear or transparent white glaze
Step 1: Preparation & Rolling
-
Wedge the clay:
Begin by thoroughly wedging about 3-4 lbs of speckled stoneware clay to remove any air bubbles and ensure the particles are aligned. -
Flatten the mass:
Pat the clay into a thick pancake shape with your palms on a canvas-covered surface. -
Roll the slab:
Using a rolling pin, roll the clay out into a slab. Aim for an even thickness of approximately 1/4 to 3/8 of an inch. -
Check consistency:
Pick up the slab and gently drop it onto the canvas to release tension, flipping it occasionally to smooth both sides with a rib tool. -
Cut the shape:
Use a needle tool or fettling knife to cut a rough organic circle. I prefer to make this shape slightly oval or egg-shaped rather than a perfect circle to emphasize the handmade aesthetic.
Step 2: Shaping the Form
-
Prepare the mold:
Ensure your drape mold is clean. If using a plaster mold, the clay will release easily; if using a makeshift bowl, cover it with a thin layer of plastic wrap or cheesecloth. -
Drape the slab:
Carefully lift your clay slab and gently drape it over the mold. Center it roughly, but don’t worry about perfect symmetry. -
Establish the curve:
Starting from the center and working outwards, gently pat the clay down against the mold using a soft rubber rib or your hands. -
Create the asymmetrical height:
To achieve the ‘one tall side’ look, gently stretch the clay down further on one side of the mold, or trim the opposite side slightly higher. -
Refine the rim:
While the clay is on the mold, use a damp sponge to compress the rim. Smooth out any sharp edges left from cutting. -
Initial drying:
Let the bowl sit on the mold until it reaches a soft leather-hard stage. It should hold its shape but still be flexible.
Uneven Drying?
If the rim dries much faster than the base, it may crack. Drape a strip of damp paper towel over just the rim while the rest dries to even out the moisture loss.
Step 3: Refining & Finishing
-
Remove from mold:
Gently lift the bowl off the drape mold. Place it right-side up on a ware board. -
Address the rim:
Now that it’s upright, look at the flow of the rim. Use a surform tool to gently shave down any uneven bumps to create a smooth, undulating line. -
Smooth the surface:
Take a damp sponge and wipe down the entire surface to expose the grog or speckles in the clay. This also removes any marks from the canvas. -
Dry slowly:
Loosely cover the bowl with plastic to allow it to dry slowly to bone dry status, preventing warping. -
Bisque fire:
Fire the piece in a kiln to bisque temperature (usually cone 04 or 06). -
Glaze application:
Dip or brush a clear or semi-transparent white glaze over the entire piece. The transparency is key to letting the natural clay speckles shine through. -
Final wipe:
Wipe the foot of the bowl clean with a sponge to prevent it from sticking to the kiln shelf. -
Final firing:
Glaze fire the bowl to the maturity temperature of your clay body (likely cone 5 or 6).
Add a Foot Ring
Before taking the bowl off the mold, score and slip a coil of clay onto the bottom. Paddle it flat to create a sturdy, elevated foot for a more professional lift.
Once cooled, your speckled bowl is ready to bring a touch of earthy elegance to your table setting
Double-Hump Drape Centerpiece Bowl
This project uses a drape mold technique to create a stunningly simple centerpiece bowl with subtle texture. The creamy, speckled clay body and understated horizontal ridge lines give it a modern, organic aesthetic perfect for holding fruit or styling empty.
How-To Guide
Materials
- Speckled stoneware clay (approx. 3-4 lbs)
- Oval drape mold (plaster or bisqued clay)
- Slab roller or rolling pin
- Canvas work surface
- Flexible rib tool
- Serrated rib tool
- Needle tool
- Sponge
- Wire clay cutter
- Plastic sheeting for drying
Step 1: Preparing the Slab
-
Wedge the clay:
Begin by thoroughly wedging your speckled stoneware clay to remove any air bubbles. You’ll need a generous amount, roughly 3 to 4 pounds, to ensure you have enough surface area for a large oval bowl. -
Roll out the slab:
Using a slab roller or a heavy rolling pin on canvas, roll the clay out to a consistent thickness. Aim for about 3/8 of an inch thick; this adds a bit of visual weight and durability suitable for a centerpiece. -
Compress the clay:
Take a flexible rib tool and compress both sides of the slab. I always do this in multiple directions—horizontal, vertical, and diagonal—to align the clay particles, which significantly reduces the chance of warping later. -
Add texture:
Before draping, use a serrated rib or a makeshift texture tool to create the horizontal lines seen on the exterior. Drag the tool gently across the surface in long, parallel strokes. You don’t need to dig deep; just create a subtle ribbed pattern.
Step 2: Draping and Forming
-
Prepare the mold:
Ensure your oval drape mold is clean. If it’s a non-porous material, lightly dust it with cornstarch or place a thin piece of plastic wrap over it to prevent sticking. -
Position the slab:
carefully lift your slab and center it over the mold, keeping the textured side facing down (towards the mold surface if you want the lines inside, or facing up/out away from the mold if you’re draping over a hump to make the outside textured). Looking at the image, the texture is on the exterior, so face the texture *away* from the mold surface. -
Slump the clay:
Gently press the clay down onto the mold. Start from the very center and work your way outwards to the edges to avoid trapping any air pockets between the clay and the form. -
Trim the excess:
Once the clay is snug against the form, use your needle tool to trim the excess clay around the base of the mold. Hold the needle tool perpendicular to the table for a straight rim, or angle it slightly for a beveled edge. -
Refine the shape:
Use a damp sponge or a soft rib to smooth the bottom (which is currently facing up). If the texture got smudge during handling, re-trace those lines gently now.
Clean Lines
To get perfectly parallel texture lines, rest your hand on a stack of books while rotating the banding wheel, holding the tool steady at one height.
Step 3: Finishing Touches
-
Let it firm up:
Allow the clay to dry on the mold until it reaches leather-hard. This is critical; if you remove it too early, the oval shape will distort and slump into a pancake. -
Remove from mold:
Carefully lift the bowl off the drape mold. Turn it right-side up and set it on a flat board. -
Refine the rim:
The rim will likely be sharp from cutting. Use a damp sponge to round it over softly. Run your finger along the edge to ensure there are no snagging points. -
Smooth the interior:
Inspect the inside of the bowl. Use a very smooth rib tool to compress the interior floor and walls, erasing any marks left by the mold surface. -
Dry slowly:
Cover the rim loosely with plastic sheeting to let the thicker bottom dry at the same rate as the thinner walls. This prevents rim cracking.
Natural Stain
Skip the glaze! After bisque firing, apply a black wash to the texture lines, wipe it back, and fire to maturity for a raw, earthy finish.
Step 4: Glazing and Firing
-
Bisque fire:
Once bone dry, fire the piece to cone 04 (or your clay’s specified bisque temperature). -
Select a matte glaze:
To achieve the look in the photo, choose a matte white or jagged cream glaze that is semi-opaque. This allows the dark speckles of the clay body to bleed through. -
Apply glaze:
Dip or pour the glaze over the piece. If brushing, use three even coats. Ensure the glaze breaks slightly over the texture lines to highlight them. -
Final fire:
Fire to the maturity temperature of your clay and glaze (typically Cone 5 or 6 for stoneware). Let the kiln cool completely before unloading.
Place your finished bowl in a sunlit spot to let the shadows play across those beautiful horizontal ridges