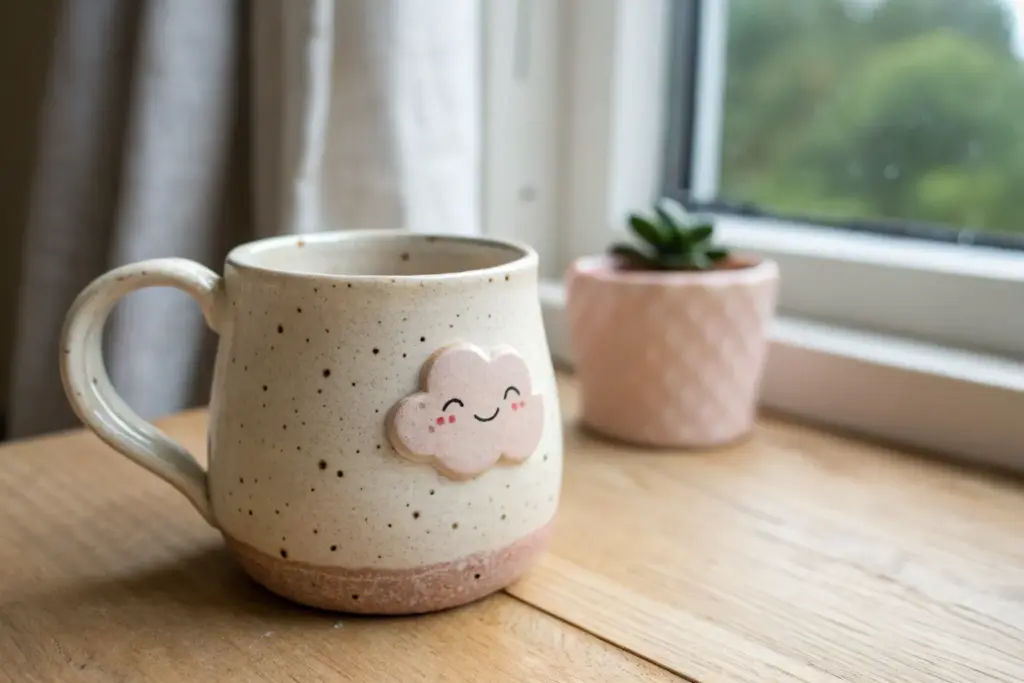
Whenever I want a quick win in the studio, I reach for a cute clay cup—it’s functional, giftable, and it instantly shows off your style. Here are my favorite cute clay cup ideas that turn a simple vessel into something you’ll want to hold all day.
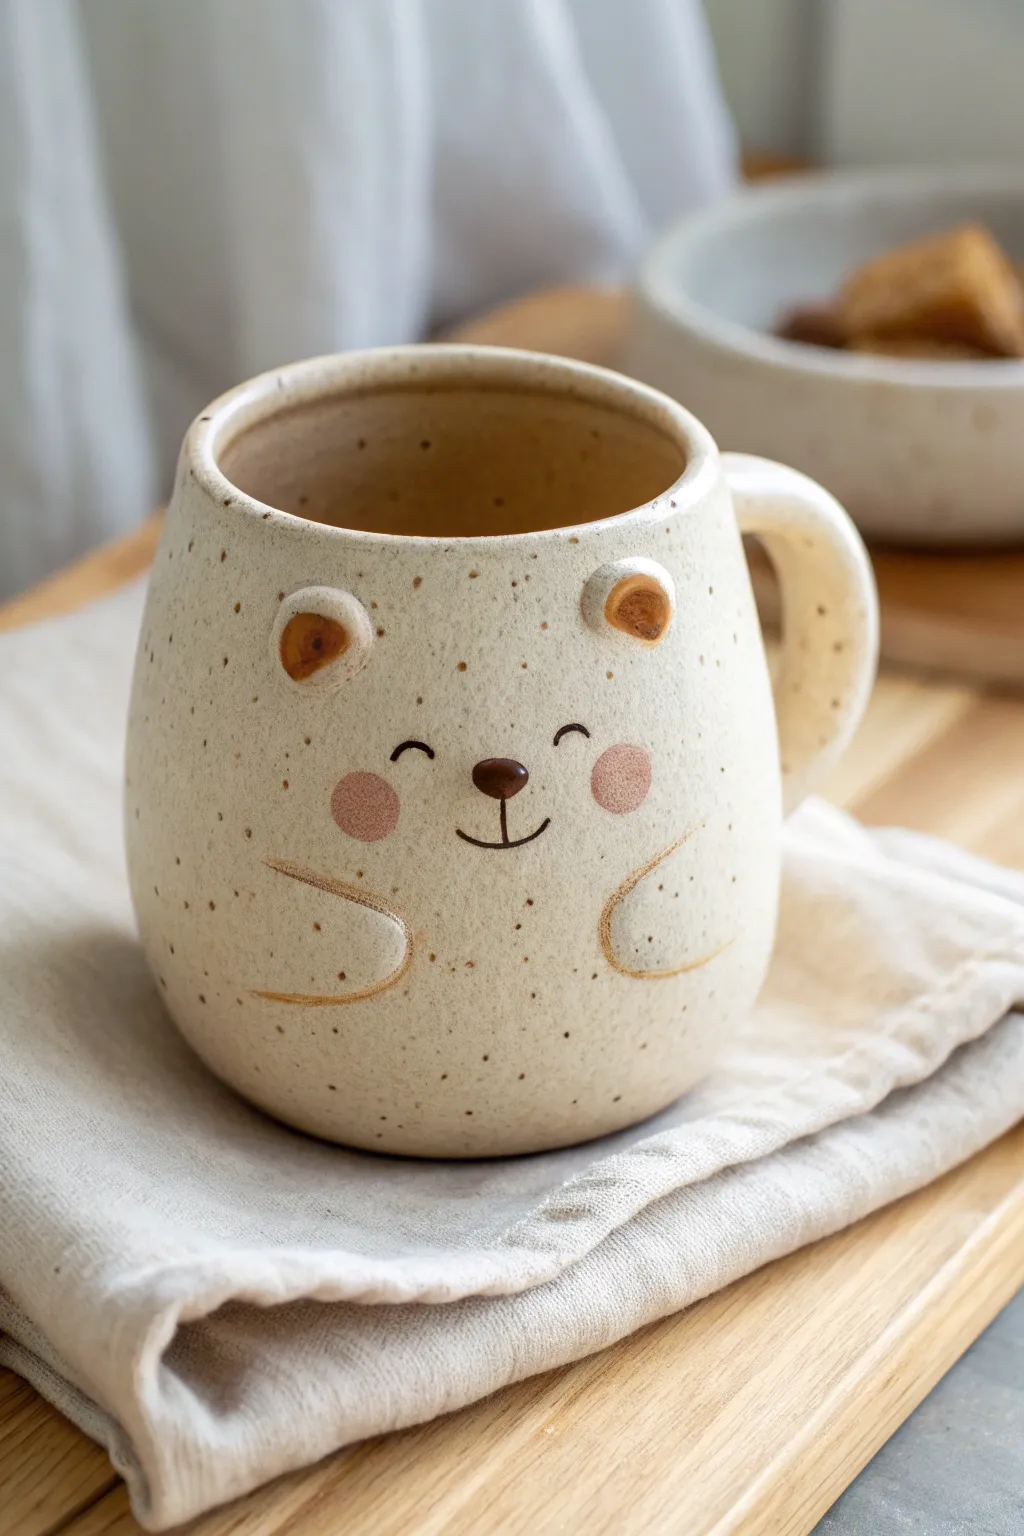
Smiley Face Cup With Blush Cheeks
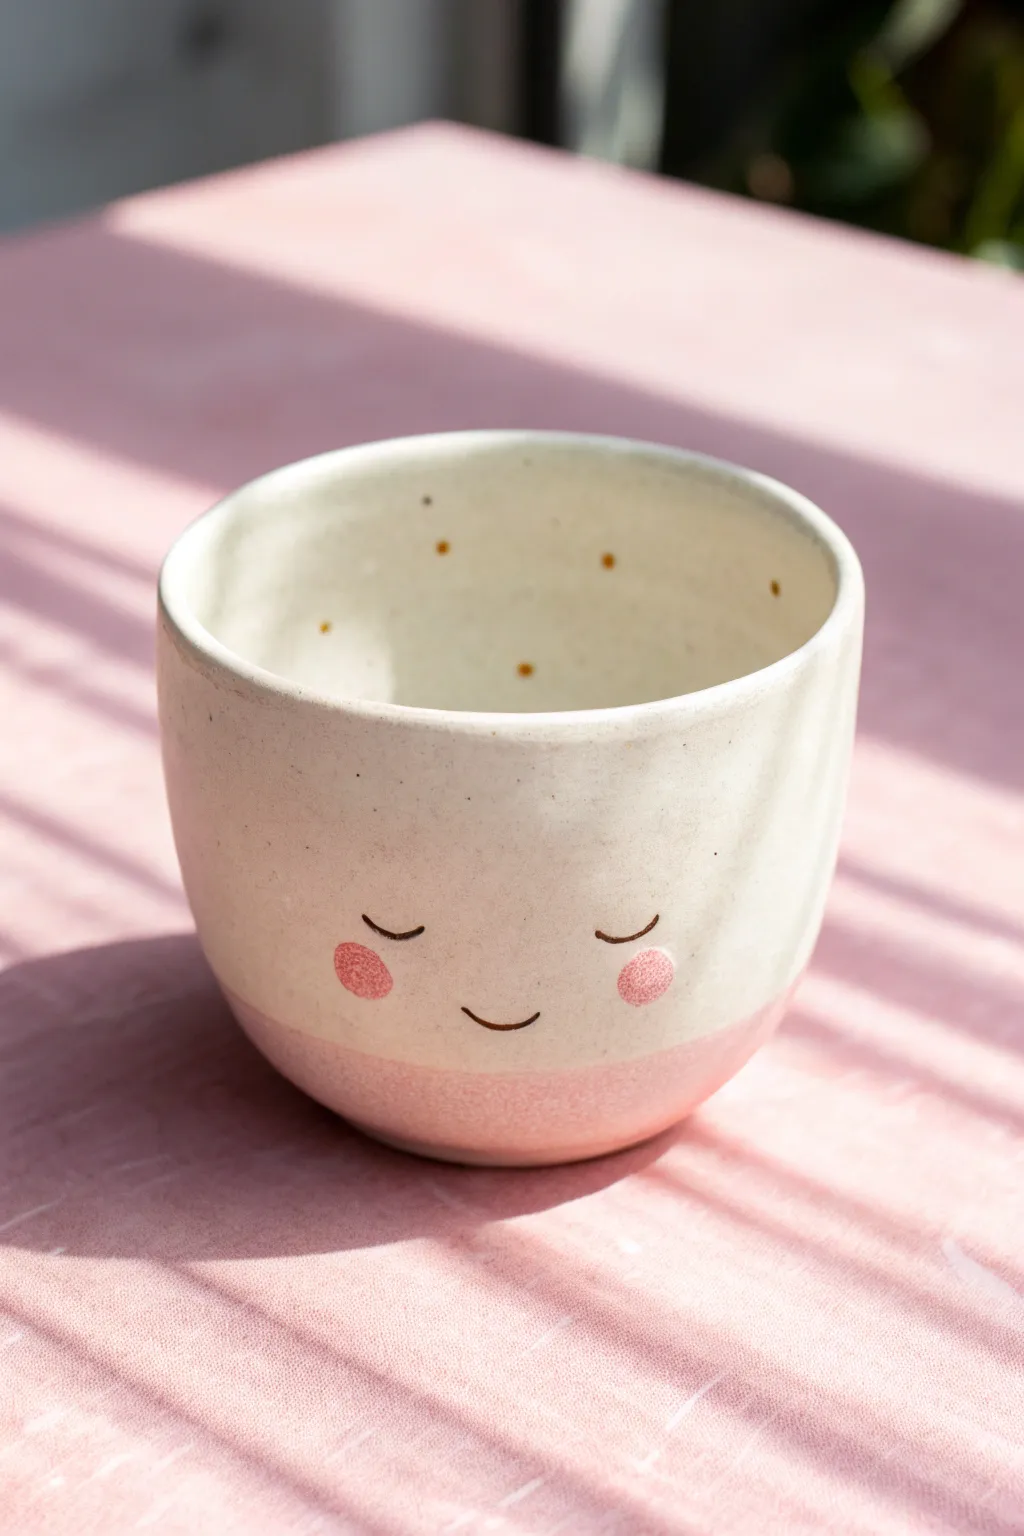
This adorable project combines simple ceramic techniques with charming illustrative details. You’ll create a perfectly imperfect pinch pot with soft blushing cheeks and hidden golden sparkles inside.
Step-by-Step Guide
Materials
- Light-colored stoneware clay (white or cream)
- Pottery wheel (optional, can be hand-built)
- Rib tool
- Underglaze in pink and black
- Fine liner brush
- Small round sponge
- Clear glaze
- Gold overglaze luster
- Small detail brush for luster
- Kiln access
Step 1: Forming the Cup
-
Prepare the Clay:
Start with a ball of light stoneware clay about the size of a large orange. Wedge it thoroughly to remove air bubbles. -
Shape the Base:
Center the clay on your wheel or work surface. If hand-building, press your thumb into the center and gently pinch outwards to form walls; if throwing, pull the walls up to create a simple, rounded cylinder. -
Refine the Walls:
Use a rib tool to smooth the exterior. You want a slightly rounded, organic shape that feels nice in the hand, avoiding sharp angles at the bottom. -
Smooth the Rim:
Take a moment to compress and round the drinking rim with a chamois or your finger. A smooth rim is crucial for a comfortable sip. -
Dry to Leather Hard:
Allow the cup to dry slowly until it reaches the leather-hard stage, where it’s firm enough to handle but not completely dry. -
Trim the Foot:
Turn the cup over and trim away any excess clay at the base to define the bottom curve.
Step 2: Decorating & Glazing
-
Paint the Bottom:
Using pink underglaze, paint the bottom third of the cup. Create a clean, straight line where the pink meets the raw clay, or keep it slightly soft for a watercolor effect. -
Sponge the Cheeks:
I like to use a small, round sponge or a stencil dabber for this part. Dip it lightly in the pink underglaze and dab two perfectly round cheeks onto the upper half of the cup. -
Detail the Face:
With a very fine liner brush and black underglaze, carefully paint two curved lines for sleepy eyes and a small U-shape for the smile centered between the cheeks. -
Bisque Fire:
Once bone dry, load the piece into the kiln for a bisque firing (usually cone 04 or 06) to harden the clay. -
Apply Clear Glaze:
Dip the entire cup into a clear glossy glaze. This will seal the clay and make the underglaze colors pop. -
Glaze Fire:
Fire the cup again to the maturation temperature of your specific clay and glaze (often cone 5 or 6).
Fixing Smudges
If you smudge the black underglaze smile, don’t wipe it! Let it dry completely, then gently scratch the mistake off with a needle tool before trying again.
Step 3: The Golden Touch
-
Clean Surface:
Before the final step, ensure the glazed and fired surface inside the cup is perfectly clean and free of dust or oils. -
Apply Gold Dots:
Using a dedicated brush and gold overglaze luster, carefully dab small, scattered polka dots on the interior walls of the cup. -
Luster Fire:
Place the cup in the kiln for a final, low-temperature firing (around cone 018) to set the gold.
Personalize It
Instead of dots, paint tiny gold stars or moons inside the cup to match the sleepy theme, or add a gold rim for extra elegance.
Enjoy your morning coffee in this sweet, handmade mug that is sure to start your day with a smile


Cute Cat Face Cup With Pointy Ears
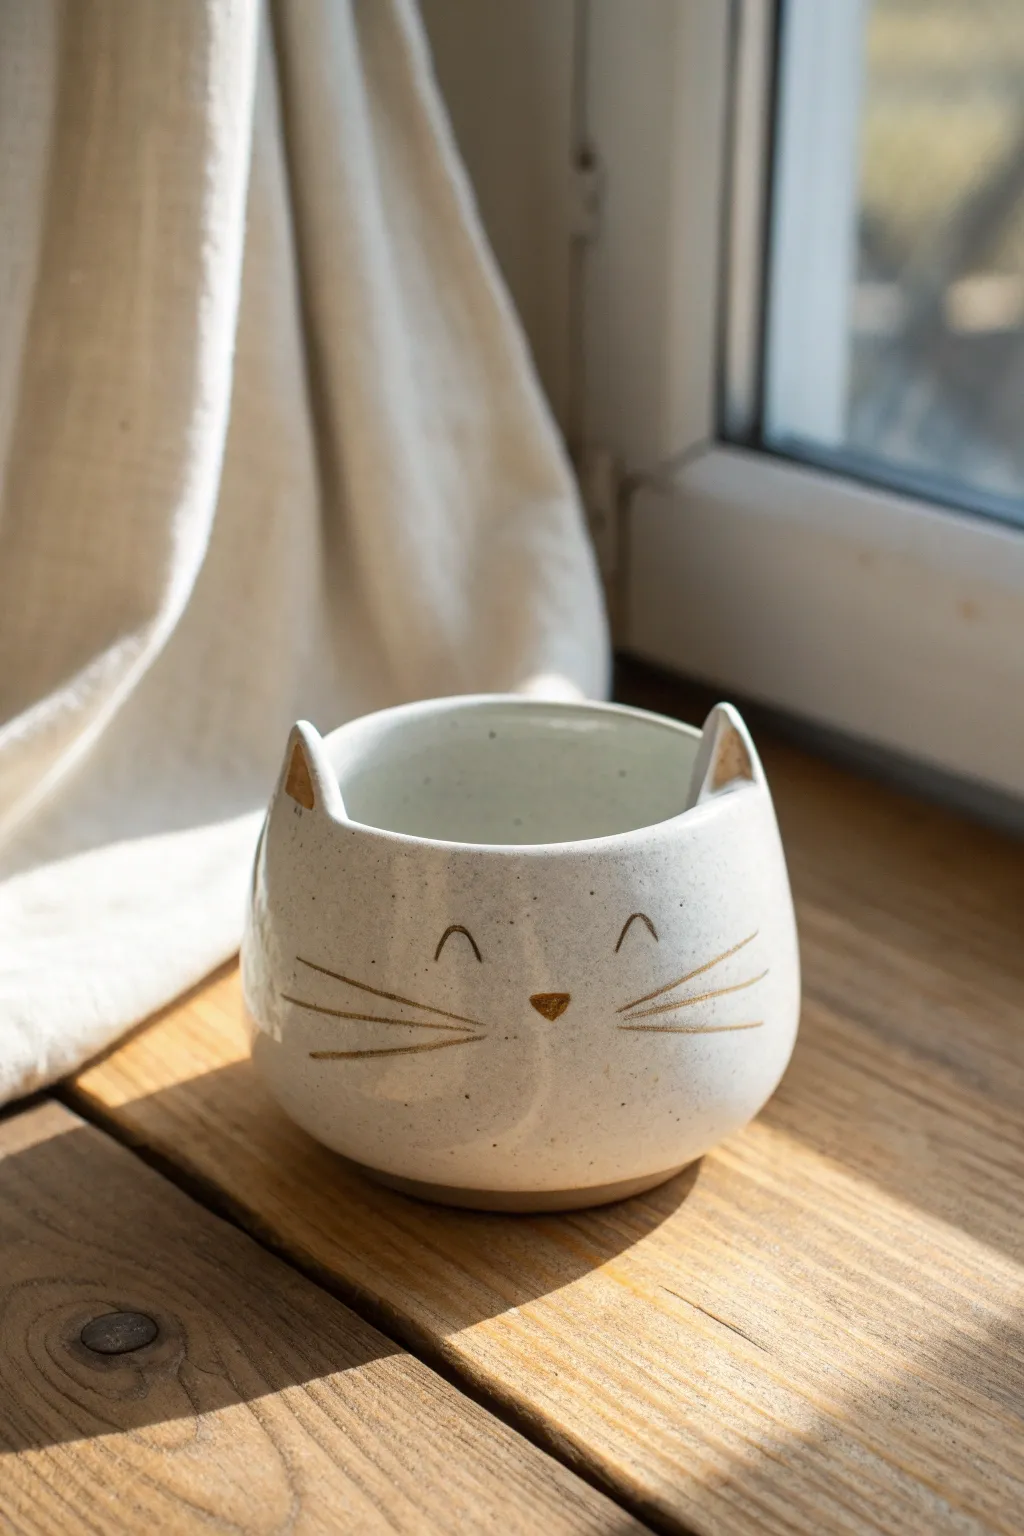
Transform a simple pinch pot into an adorable feline friend with this minimalist cat face cup project. Featuring subtle pointy ears integrated right into the rim and delicate gold detailing for the whiskers, this piece is as charming as it is functional for your morning tea.
Step-by-Step Tutorial
Materials
- White stoneware or porcelain clay
- Pottery wheel (optional) or rolling pin for slab building
- Needle tool
- Small sponge
- Rib tool (kidney)
- Scoring tool or old toothbrush
- Slip (clay and water slurry)
- Clear or white glossy glaze
- Underglaze pencil or dark stain (for eyes/mouth)
- Gold luster overglaze
- Fine liner brush
- Kiln
Step 1: Forming the Body
-
Create the base form:
Begin by throwing a simple cylinder on the wheel with a slightly rounded belly, or hand-build a cylinder using the slab method. Aim for a vessel that is roughly 3-4 inches tall and wide. -
Smooth the walls:
Use a rib tool to gently smooth out any throwing lines or seams, creating a clean, canvas-like surface. The walls should curve inward slightly at the top rim to give it a cozy, cupped shape. -
Shape the rim:
Before the clay stiffens, use your fingers or a chamois to compress and round the lip of the cup so it’s pleasant to drink from.
Don’t Rush the Gold
Gold luster is pricey and runny! Use a very small amount on your brush. If you apply it too thick, it can drip during firing; too thin, and it looks purple.
Step 2: Adding the Ears
-
Prepare the ear triangles:
Roll out a small slab of excess clay to the same thickness as your cup walls. Cut out two small, symmetrical triangles for the ears. -
Curve the attachments:
Lightly curve the base of each triangle so it will match the curvature of your cup’s rim. -
Score and slip:
Identify where you want the ears to sit on the rim. Score (scratch) both the bottom of the ears and the rim spots, then apply a dabb of slip. -
Attach and blend:
Press the ears firmly onto the rim. Using a wooden modeling tool or your finger, blend the clay downwards from the ear into the cup body so the seam disappears completely. The ears should look like they grew out of the cup naturally.
Add a Tail Handle
Instead of a handle-less cup, roll a coil of clay and attach it to the back as a ‘tail’ handle that curves upward for extra feline flair.
Step 3: Refining and Bisque Firing
-
Dry slowly:
Let the cup dry slowly under loose plastic to ensure the ears don’t dry faster than the body, which could cause cracking. -
Final sponge:
Once bone dry, take a slightly damp sponge to smooth out any tiny imperfections or sharp edges. -
Bisque fire:
Load the piece into the kiln for a bisque firing to cone 04 (or your clay’s specific bisque temperature).
Step 4: Glazing and Decoration
-
Dip in glaze:
Dip the entire bisque-fired cup into a glossy white or speckle-white glaze. Wipe the foot ring clean so it doesn’t stick to the kiln shelf. -
Glaze fire:
Fire the cup again to the glaze’s maturity temperature (usually cone 5 or 6 for stoneware).
Step 5: The Golden Details
-
Plan the face:
Once the cup is cooled from the glaze firing, use a dry erase marker to lightly sketch where the eyes, nose, and whiskers will go. This wipes off easily if you make a mistake. -
Paint the eyes:
Using a very fine liner brush and black china paint or overglaze enamel, carefully paint two small inverted ‘V’ shapes for the squinting eyes. -
Apply gold luster:
Dip a dedicated brush into gold luster (precious metal overglaze). Paint a small triangle nose, three long whiskers on each cheek, and fill in the triangular recess of the ears. -
Ventilation check:
I always make sure my studio is well-ventilated during this step because luster fumes can be quite strong. -
Third firing:
Place the cup back in the kiln for a final, lower-temperature firing (usually cone 018-019) to set the gold and china paint.
Once the kiln cools, your shimmering cat cup is ready to hold your favorite warm beverage


Bear Hug Cup With Tiny Paws
This adorable handmade mug combines earthy speckled stoneware with a charming bear character that seems to offer a warm hug with every sip. The minimalist facial features and small, sculpted paws transform a simple vessel into an irresistibly cute morning companion.
Step-by-Step Guide
Materials
- Speckled buff stoneware clay (or beige clay with grog)
- Pottery wheel (or slab roller for hand-building)
- Modeling tools (wooden knife, needle tool)
- Kidney scraper (metal and rubber)
- Slip and scoring tool
- Underglaze (black, pink, and burnt orange/brown)
- Fine detail paintbrush
- Sponge
- Clear food-safe glaze
- Kiln
Step 1: Forming the Body
-
Prepare the Clay:
Begin by wedging about 1 to 1.5 lbs of speckled buff clay to remove air bubbles. This clay body is essential for achieving that natural, freckled look without painting on faux specks later. -
Throw or Build the Cylinder:
On the wheel, throw a cylinder that is slightly wider at the bottom and tapers gently inward toward the rim. If hand-building, roll a slab and form a cylinder, smoothing the seam invisible. -
Shape the Belly:
While the clay is still plastic, push the wall gently from the inside out to create a rounded, bulbous shape for the bear’s belly. It should feel full and rounded, not straight-sided. -
Refine the Rim:
Smooth the drinking rim with a chamois or sponge. It’s important to keep the rim slightly distinct from the body curve.
Step 2: Sculpting the Features
-
Attach the Ears:
Roll two small balls of clay and flatten them slightly. Score and slip the upper sides of the mug, then attach the balls. Use your thumb to create a small indentation in the center of each ear. -
Form the Paws:
Roll two tear-drop shapes for the arms. Flatten them against the body so they curve inward as if hugging a belly. Score and slip them securely, smoothing the edges into the mug body so they look integrated. -
Add the Handle:
Pull a classic thick strap handle or roll a coil. Attach it to the side opposite the face. Ensure the curve is comfortable for gripping and flows visually with the rounded mug shape. -
Slow Drying:
Cover the mug loosely with plastic and let it dry slowly to the leather-hard stage. This prevents cracking at the attachment points.
Clean Lines
If you are shaky with a brush, use a needle tool to lightly scratch the face design onto the leather-hard clay first. Then, simply fill the grooves with underglaze.
Step 3: Decorating and Glazing
-
Paint the Ears:
Once leather hard, use burnt orange or brown underglaze to paint the inside depressions of the ears. This adds depth and defines the bear shape. -
Outline the Paws:
Take a very fine brush with diluted brown underglaze and trace the top curve of the paws to distinguish them from the body. -
Add Cheeks:
Dab two soft circles of pink underglaze onto the cheeks. I like to sponge this slightly to keep the edges soft and blushing rather than harsh circles. -
Draw the Face:
Using black underglaze and your finest liner brush or a trailing bottle, paint two small arches for closed, smiling eyes. Add a small rounded triangle nose and a simple anchor shape for the mouth. -
Bisque Fire:
Once bone dry, fire the piece to bisque temperature (usually cone 04) to set the shape and underglaze decorating. -
Apply Clear Glaze:
Dip the entire mug into a transparent, food-safe clear glaze. This will make the clay specks pop and ensure the mug is washable. -
Final Firing:
Fire the mug to the maturity temperature of your clay (usually cone 5 or 6 for stoneware). Be careful not to over-fire, which can cause the underglaze face to run.
Make it a Set
Make a “family” of mugs by varying the sizes and facial expressions. Try open eyes, winking faces, or adding small clay accessories like a bow tie or flower.
Once cooled, your bear mug is ready to hold your favorite warm beverage and brighten your morning routine


Bunny Cup With Long Ear Rim Details
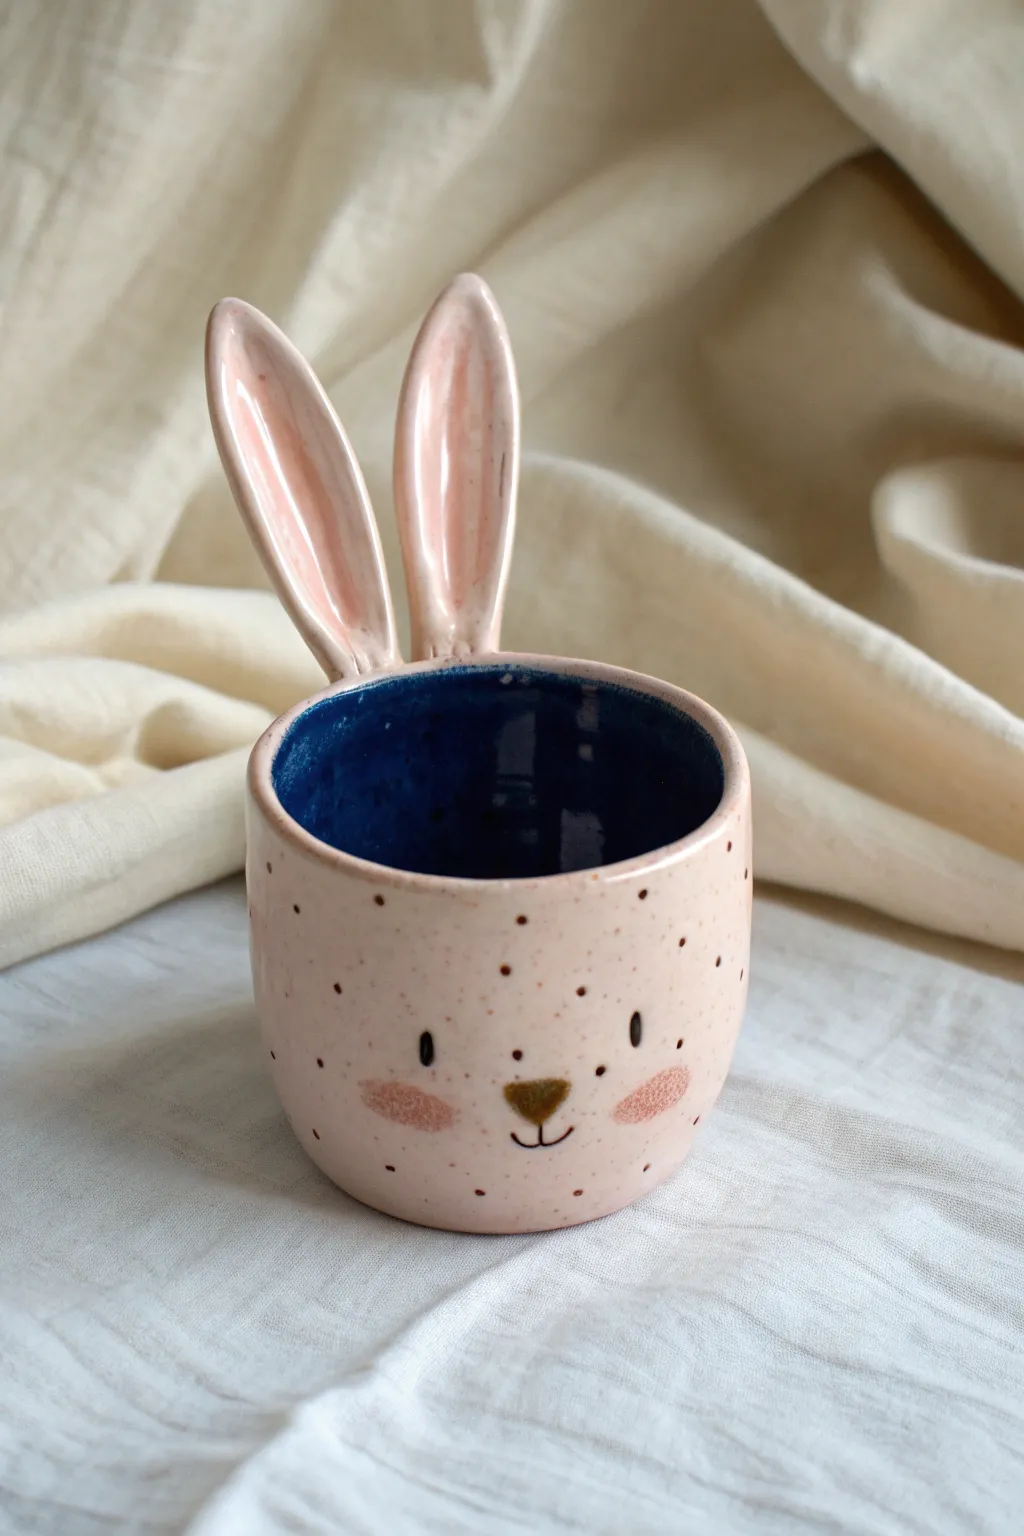
This charming ceramic cup features playful long ears perched on the rim and a sweet, hand-painted bunny face. The contrast between the speckled pale pink exterior and the deep, glossy blue interior makes it a standout piece for your morning routine.
How-To Guide
Materials
- Stoneware clay (speckled or plain)
- Pottery wheel or rolling pin and slab mat
- Modeling tool or dull knife
- Needle tool
- Scoring tool (or fork)
- Slip (liquid clay)
- Sponge
- Deep glossy blue food-safe glaze
- Pale pink or beige speckled underglaze
- Black underglaze pencil or fine brush
- Pink or blush underglaze styling accents
- Clear transparent glaze (if needed)
Step 1: Forming the Cup Base
-
Prepare the Clay:
Begin by wedging about 1 pound of stoneware clay to remove any air bubbles. If you want the speckled look from the scratch, choose a clay body with grog or speckles already mixed in. -
Construct the Cylinder:
Depending on your preference, either throw a simple cylindrical cup on the pottery wheel or hand-build one using the slab method. Aim for a wall thickness of about 1/4 inch. -
Smooth the Walls:
Use a rib tool or a smooth sponge to compress the clay walls. Ensure the rim is even and rounded, smoothing out any sharp edges. -
Shape the Bottom:
Gently gently taper the bottom of the cup inward slightly to give it a soft, rounded appearance rather than a strict cylinder.
Ear Stability
If the ears flop while wet, prop them up with small pieces of foam or rolled-up newspaper until the clay stiffens to leather-hard.
Step 2: Sculpting the Ears
-
Roll Ear Slabs:
Roll out a small slab of clay, slightly thicker than the cup walls. Cut out two elongated oval shapes that taper to a rounded point. -
Shape the Curve:
Gently pinch and curl the long edges of the ears inward to create a concave inner ear shape. Smooth the edges with a damp sponge. -
Test Placement:
Hold the ears up to the back rim of the cup to test the positioning. They should sit upright and close together. -
Attach the Ears:
Score the bottom of the ears and the corresponding spot on the cup rim deeply. Apply slip generously to both surfaces. -
Secure the Joint:
Press the ears firmly onto the rim. Use a modeling tool to blend the clay from the ear down into the cup wall on both the inside and outside for a strong bond.
Make it a Set
Create a matching saucer shaped like a bunny tail or paw prints to hold your cup for a complete breakfast set.
Step 3: Decorating the Face
-
Bisque Fire:
Allow the cup to dry slowly and completely to the bone-dry stage. Fire it in the kiln to bisque temperature (usually Cone 04). -
Base Glaze Exterior:
Apply a pale pink or beige speckled glaze to the exterior. If your clay body is already speckled, a semi-transparent beige glaze works beautifully here. -
Paint the Inner Ears:
Using a small brush, paint the inner curve of the ears with a soft pink underglaze to give them depth. -
Detail the Face:
Using a fine liner brush or underglaze pencil, carefully draw two small vertical ovals for eyes and a small triangular nose. -
Add Cheeks and Mouth:
Dab two soft circles of pink underglaze for the rosy cheeks. Below the nose, draw a simple anchor shape for the mouth. -
Add Whimsical Dots:
If your exterior base wasn’t pre-speckled, use a fan brush or toothbrush to lightly flick brown or black underglaze speckles across the exterior surface.
Step 4: Glazing and Finishing
-
Glaze the Interior:
Pour a deep, glossy blue glaze inside the cup. Swirl it around carefully to coat every inch of the interior, then pour out the excess. -
Clean the Rim:
I like to wipe the very top edge of the rim with a damp sponge to create a clean separation between the interior blue and exterior pink. -
Clear Coat (Optional):
If your underglazes and exterior glaze require a glossy finish, dip the exterior into a clear transprent glaze. -
Final Fire:
Place the cup in the kiln for the final glaze firing according to your clay and glaze instructions (typically Cone 5 or 6).
Enjoy sipping your favorite beverage from your adorable new bunny friend

The Complete Guide to Pottery Troubleshooting
Uncover the most common ceramic mistakes—from cracking clay to failed glazes—and learn how to fix them fast.
Duck Footed Cup With Webbed Feet
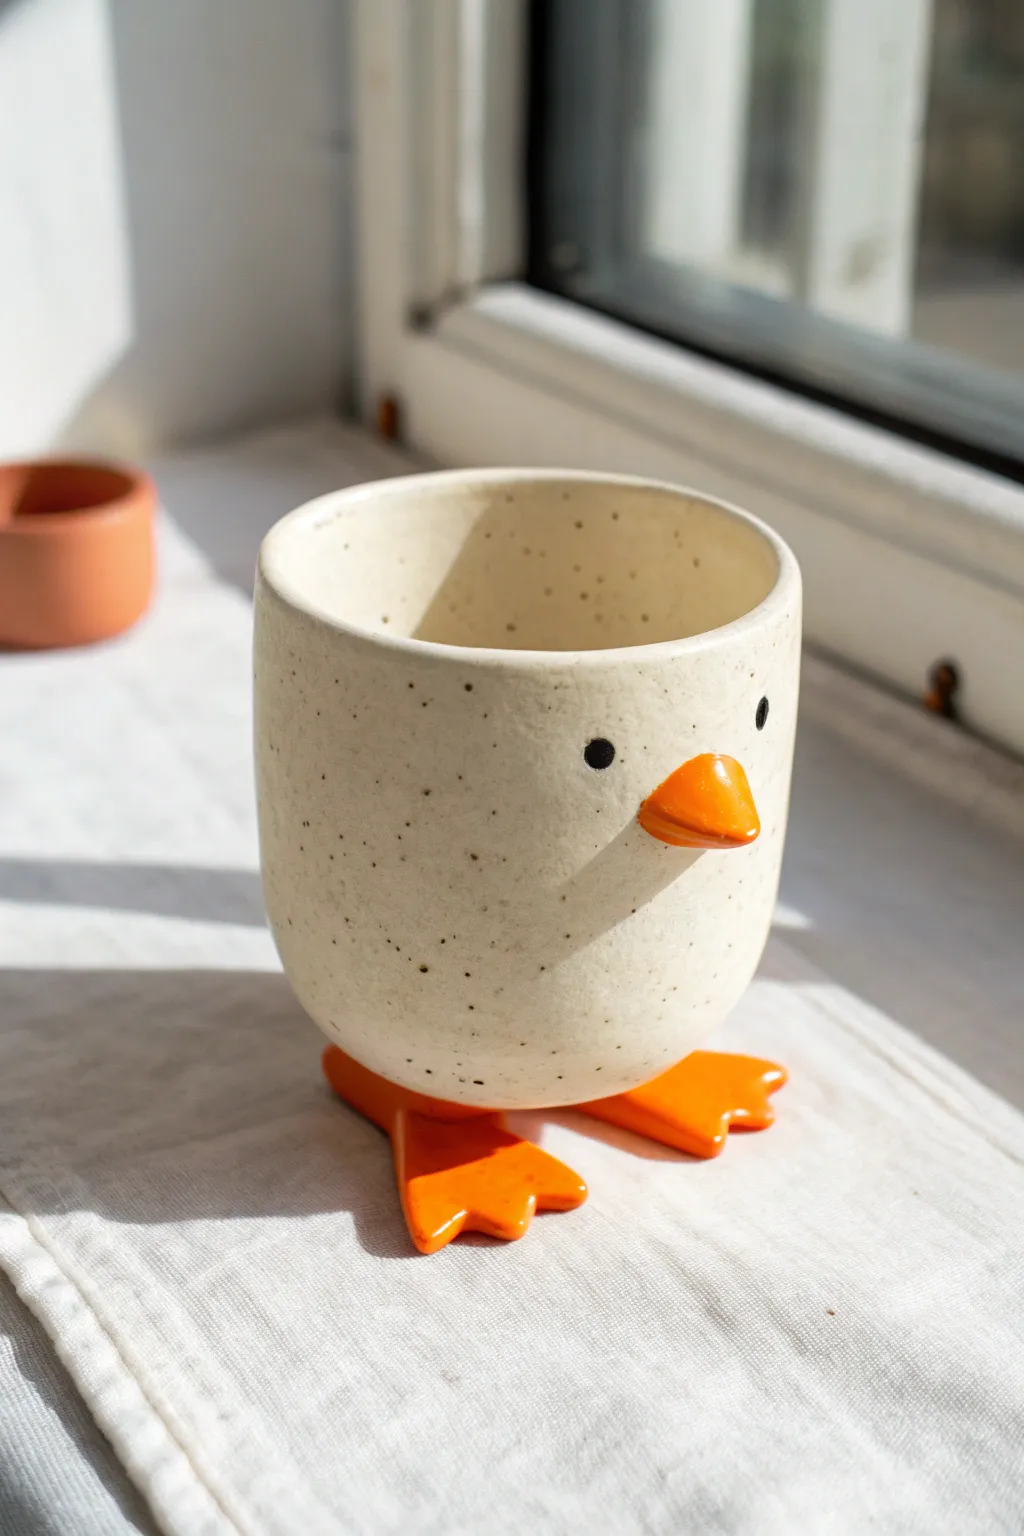
This adorable speckled mug adds personality to your morning routine with its charming orange webbed feet and sweet little beak. The project combines wheel-throwing (or pinch construction) with hand-building techniques to create a functional piece that looks like a little chick taking a rest.
Step-by-Step
Materials
- Speckled Stoneware Clay (white or cream)
- Small Rolling Pin
- Underglaze (bright orange and black)
- Clear Food-Safe Glaze
- Scoring Tool (or needle tool)
- Slip (clay mixed with water)
- Small Paintbrushes
- Pottery Wheel (optional – can be done by hand)
- Sponge
Step 1: Forming the Body
-
Prepare the Clay:
Wedge a ball of speckled stoneware clay thoroughly to remove air bubbles. If you want prominent speckles, choose a clay body specifically formulated with manganese or iron speckles. -
Shape the Cup Base:
If using a wheel, throw a simple cylinder with slightly rounded walls to give it a ‘chubby’ feel. If hand-building, create a sturdy pinch pot and smooth the walls upward until you have a uniform cup shape. -
Refine the Rim:
Smoothing the rim is crucial for a comfortable drinking experience. Use a damp chamois or a small piece of plastic to compress the lip while the wheel spins or while smoothing by hand. -
Dry to Leather Hard:
Set the cup aside until it reaches the leather-hard stage. It needs to be firm enough to handle without warping but soft enough to accept attachments. -
Trim the Bottom:
Flip the cup over and trim the bottom so it is rounded and smooth. You don’t need a traditional foot ring since the duck feet will support it, but ensure the curve is continuous.
Wobbly Duck?
If the cup rocks after attaching feet, gently tap the whole assembly on a flat table while the clay is still soft. This levels the feet bottoms perfectly.
Step 2: Creating the Duck Features
-
Model the Feet:
Roll out a small slab of clay, about 1/4 inch thick. Cut out two identical webbed foot shapes. I find it helpful to draw the shape on paper first to use as a template. -
Shape the Toes:
Gently round the edges of the cut feet with a damp sponge so they look soft and organic, not sharp. Press lightly into the top of the webbing to give them dimension. -
Form the Beak:
Roll a very small cone of clay. Flatten it slightly into a triangular pyramid shape to mimic a beak. -
Attach the Feet:
Score the bottom of the cup and the top surface of the feet where they will connect. Apply slip generously and press the feet firmly onto the base. Ensure the cup stands level before the clay dries. -
Attach the Beak:
Score and slip the small beak onto the front of the cup, positioning it about halfway up the wall. Press it on securely and smooth the seam with a small wooden tool so it looks integrated. -
Smooth Connections:
Go over all connection points (feet and beak) with a damp brush to clean up any excess slip. This ensures a clean, professional finish.
Step 3: Glazing and Finishing
-
Bisque Fire:
Allow the piece to dry completely (bone dry), which may take several days depending on humidity. Fire the piece in a kiln to bisque temperature (usually Cone 04). -
Apply Orange Underglaze:
Using a small brush, carefully paint the beak and the feet with three coats of bright orange underglaze. Let each coat dry slightly before applying the next for solid opacity. -
paint the Eyes:
Dip a rounded tool handle or a small brush tip into black underglaze. Dot two small eyes just above the beak line, spacing them widely for a cute, innocent expression. -
Clear Glaze Application:
Dip the entire cup into a clear, food-safe glaze. Ensure the glaze covers the painted areas without smearing the underglaze. -
Wipe the Feet Bottoms:
Crucially, wipe the very bottom of the feet clean of clear glaze with a damp sponge. If glaze remains on the bottom contact points, the duck will stick to the kiln shelf. -
Final Firing:
Fire the piece again to the recommended temperature for your clay and glaze (often Cone 5 or 6 for stoneware). This will vitrify the clay and make the speckles pop through the glossy finish.
Make it a Set
Create a whole family by varying the sizes! Make a taller pitcher ‘mother duck’ and several smaller ‘duckling’ espresso cups to trail behind.
Now you have a cheerful little companion ready to hold your favorite tea or coffee
Heart Appliqué Cup With Puffy Texture

This adorable handleless tumbler features a dreamy two-tone glaze effect and charming puffy heart appliqués that are irresistible to touch. The subtle speckling in the clay and soft pastel palette give it a cozy, romantic feel perfect for your morning brew.
How-To Guide
Materials
- Speckled stoneware clay body
- Rolling pin and guide sticks (approx. 5-6mm)
- Small heart-shaped cutter (or a sharp needle tool)
- Slip (clay slurry)
- Scoring tool or serrated rib
- Sponge
- Pottery wheel (optional, can be hand-built)
- Soft pink glaze (food safe)
- Lavender or lilac glaze (food safe)
- Clear glaze (optional)
Step 1: Forming the Body
-
Prepare the Clay:
Begin by wedging your speckled stoneware clay thoroughly to remove air pockets. You’ll need about 1 pound (450g) for a standard tumbler size. -
Construct the Base Form:
Throw a cylinder on the wheel, pulling the walls to an even thickness. If you prefer hand-building, roll out a slab, cut a rectangle, and join the seams to form a cylinder on a circular base. -
Shape the Walls:
Gently curve the walls outward slightly for a comfortable hold, keeping the rim smooth and rounded. Aim for a height of about 3.5 to 4 inches. -
Refine the Surface:
Once the form is leather-hard, trim the bottom to create a neat foot ring. Smooth out any throwing lines or canvas marks with a damp sponge or a soft rib.
Clean Edges
Use a small, damp paintbrush to clean up any slip that squishes out from under the hearts. This keeps the outline crisp.
Step 2: Adding the Appliqués
-
Roll Clay for Hearts:
Roll out a very thin slab of fresh clay, approximately 2-3mm thick. It helps to use playing cards or thin guide sticks to keep it even. -
Cut the Hearts:
Using a small heart cutter, punch out about 15-20 tiny hearts. If you don’t have a cutter, I find carefully freehanding them with a needle tool works just fine. -
Score the Placement:
Plan your pattern on the cup. Lightly mark where each heart will go, creating staggered rows around the circumference. -
Attach the Hearts:
Score the back of a heart and the marked spot on the cup. Dab a tiny amount of slip on the scored area and press the heart gently onto the surface. -
Create the Puffy Effect:
Instead of flattening the heart completely, press primarily around the edges to seal them, leaving the center slightly raised like a pillow. -
Add Polka Dots:
Roll tiny spheres of clay between your fingers. Attach these in the empty spaces between hearts using the same score-and-slip method, pressing them flatter to act as dots. -
Dry Slowly:
Cover the cup loosely with plastic to let it dry slowly. This prevents the small appliqués from popping off as the main body shrinks.
Step 3: Glazing and Finishing
-
Bisque Fire:
Fire the bone-dry piece in a kiln to cone 04 (or your clay’s specific bisque temperature). -
Wax Resist:
Apply wax resist to the bottom foot ring to keep it clean. You can also lightly wax the tops of the raised hearts if you want the raw speckled clay to show through, though in this project we glaze over them. -
Apply Interior Glaze:
Pour your soft pink glaze inside the cup, swirl to coat evenly, and pour out the excess. Wipe the rim clean. -
Dip the Top Half:
Hold the cup by the base and dip the top two-thirds into the soft pink glaze. Hold it for a few seconds and lift. -
Dip the Bottom Half:
Once the top is dry to the touch, dip the bottom third into the lavender glaze, creating a slight overlap zone where the colors might blend. -
Wipe the Reliefs:
Using a damp sponge, very gently wipe the glaze off the very tops of the hearts and dots. This thins the glaze on the high points, allowing the clay color to peek through warmly. -
Final Fire:
Glaze fire the piece to cone 5 or 6 (mid-range), ensuring the glazes melt fully and the clay vitrifies.
Golden Touch
Apply gold luster to the tiny dot accents or the rim for a third firing to add a luxurious, shiny finish.
Enjoy your beautiful new handmade cup with your favorite warm drink


What Really Happens Inside the Kiln
Learn how time and temperature work together inside the kiln to transform clay into durable ceramic.
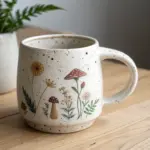
Daisy Meadow Relief Cup
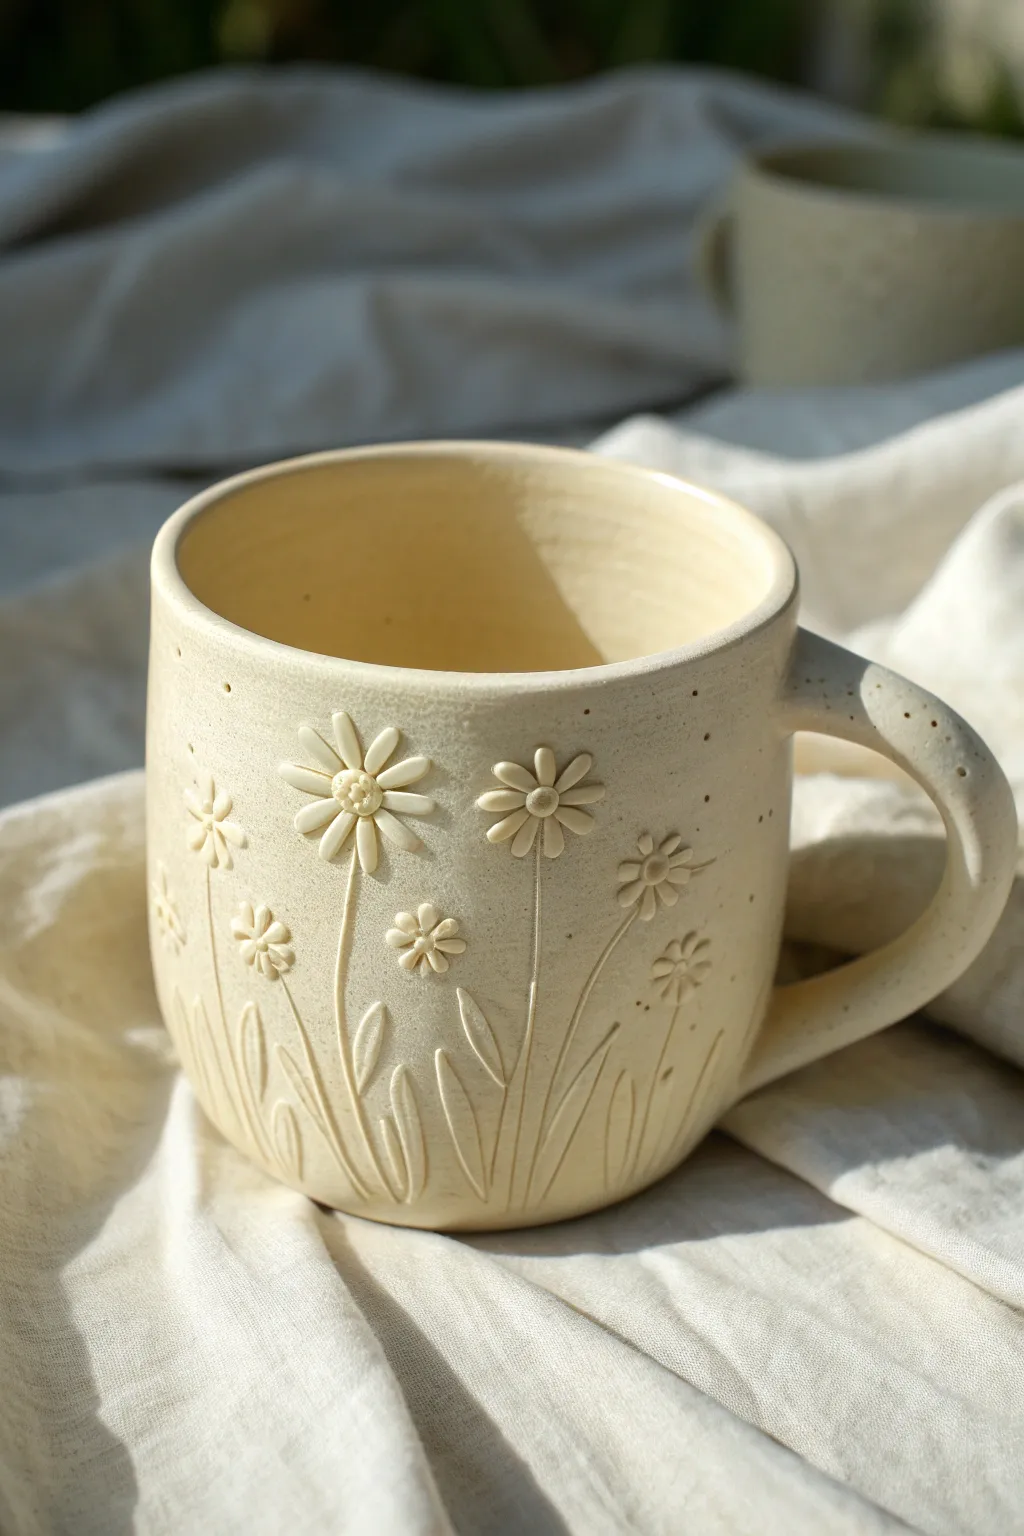
Bring the gentle charm of a wildflower meadow to your morning coffee with this textural ceramic mug. Featuring raised daisy motifs and incised stems on a speckled cream clay body, this project balances rustic warmth with delicate floral details.
Detailed Instructions
Materials
- Stoneware clay (speckled or buff)
- Pottery wheel (or slab roller for hand-building)
- Needle tool
- Small carving loop tool
- Slip (liquid clay)
- Scoring tool (or serrated rib)
- Small paintbrush
- Sponge
- Clear or translucent satin glaze (cone 5/6)
- Wooden modeling tool
Step 1: Forming the Base
-
Throw the cylinder:
Begin by centering your clay on the pottery wheel and throwing a cylinder with a slightly rounded bottom. Aim for walls that are about 1/4 inch thick to allow for later carving and additions. -
Refine the shape:
Use a rib tool to smooth the exterior and gently bell out the body of the mug, narrowing slightly at the rim to keep your beverage warm. -
Trim the foot:
Once the mug is leather hard (firm but still cool to the touch), trim the bottom to create a neat foot ring. Smooth any rough edges with a damp sponge. -
Pull and attach the handle:
Pull a strap of clay for the handle. Allow it to stiffen into an arch shape, then score and slip the contact points on both the handle and the mug body to attach it securely.
Step 2: Creating the Daisy Reliefs
-
Roll tiny clay balls:
To create the raised flowers, roll several tiny balls of soft clay. For each daisy, you will need one center ball and 5-8 slightly elongated petal shapes. -
Plan your placement:
Lightly mark where you want your main flower heads to sit using a needle tool. Vary the heights to create a natural, growing meadow effect. -
Score the attachment sites:
Thoroughly score the marked spots on the mug surface. This rough texture is crucial for the added clay to bond permanently. -
Build the first flower:
Apply a dab of slip to a scored area. Press your petals onto the mug in a radial pattern, then press the center ball into the middle. -
Model the petals:
Use a wooden modeling tool to gently press an indentation down the center of each petal, creating that classic daisy shape and ensuring a strong bond with the mug wall. -
Texture the center:
Take your needle tool or a small stamp and stipple the center ball of the flower to mimic pollen textures. -
Add floating petals:
For a sense of movement, add a few smaller, singular flowers or drifting petals around the main blooms.
Slip Consistency
Ensure both your mug and the added flower clay are at similar moisture levels (leather hard). Use thick slip—like heavy cream—for the strongest bond to prevent decorations popping off.
Step 3: Carving Stems and Details
-
Sketch the stems:
Using a needle tool, lightly sketch vertical lines flowing downward from your flower heads to the base of the mug. -
Carve the stems:
Go over your sketch using a carving tool or a slightly blunted pencil to create deep, smooth grooves for the stems. Vary the pressure to make the lines feel organic. -
Add leafy details:
Carve simple, elongated leaf shapes branching off the stems near the bottom of the mug. I like to keep these low to ground the design. -
Incise background texture:
Use a needle tool to poke random, deliberate dots around the flowers. These pinholes add visual interest and emphasize the handmade aesthetic. -
Clean up:
Once bone dry, gently rub the surface with a dry green kitchen scrubber or stiff brush to remove any sharp clay burrs left from carving.
Color Wash Accent
Before the clear glaze, brush a diluted iron oxide wash or underglaze over the flowers and wipe it back with a sponge. This leaves color just in the crevices to highlight details.
Step 4: Glazing and Firing
-
Bisque fire:
Fire the mug in a kiln to cone 04 (or your clay’s specified bisque temperature). This prepares the piece for glazing. -
Apply glaze:
Dip the mug into a clear or translucent satin glaze. A translucent glaze allows the natural speckles of the clay and the shadow of the relief work to shine through. -
Wipe the foot:
Carefully sponge off any glaze from the bottom foot ring to prevent the mug from sticking to the kiln shelf. -
Final firing:
Fire the mug to maturity (usually cone 5 or 6 for stoneware). Allow the kiln to cool completely before removing your new favorite mug.
Enjoy the tactile comfort of the raised flowers every time you hold your warm cup of tea
Rainbow Arch Appliqué Cup
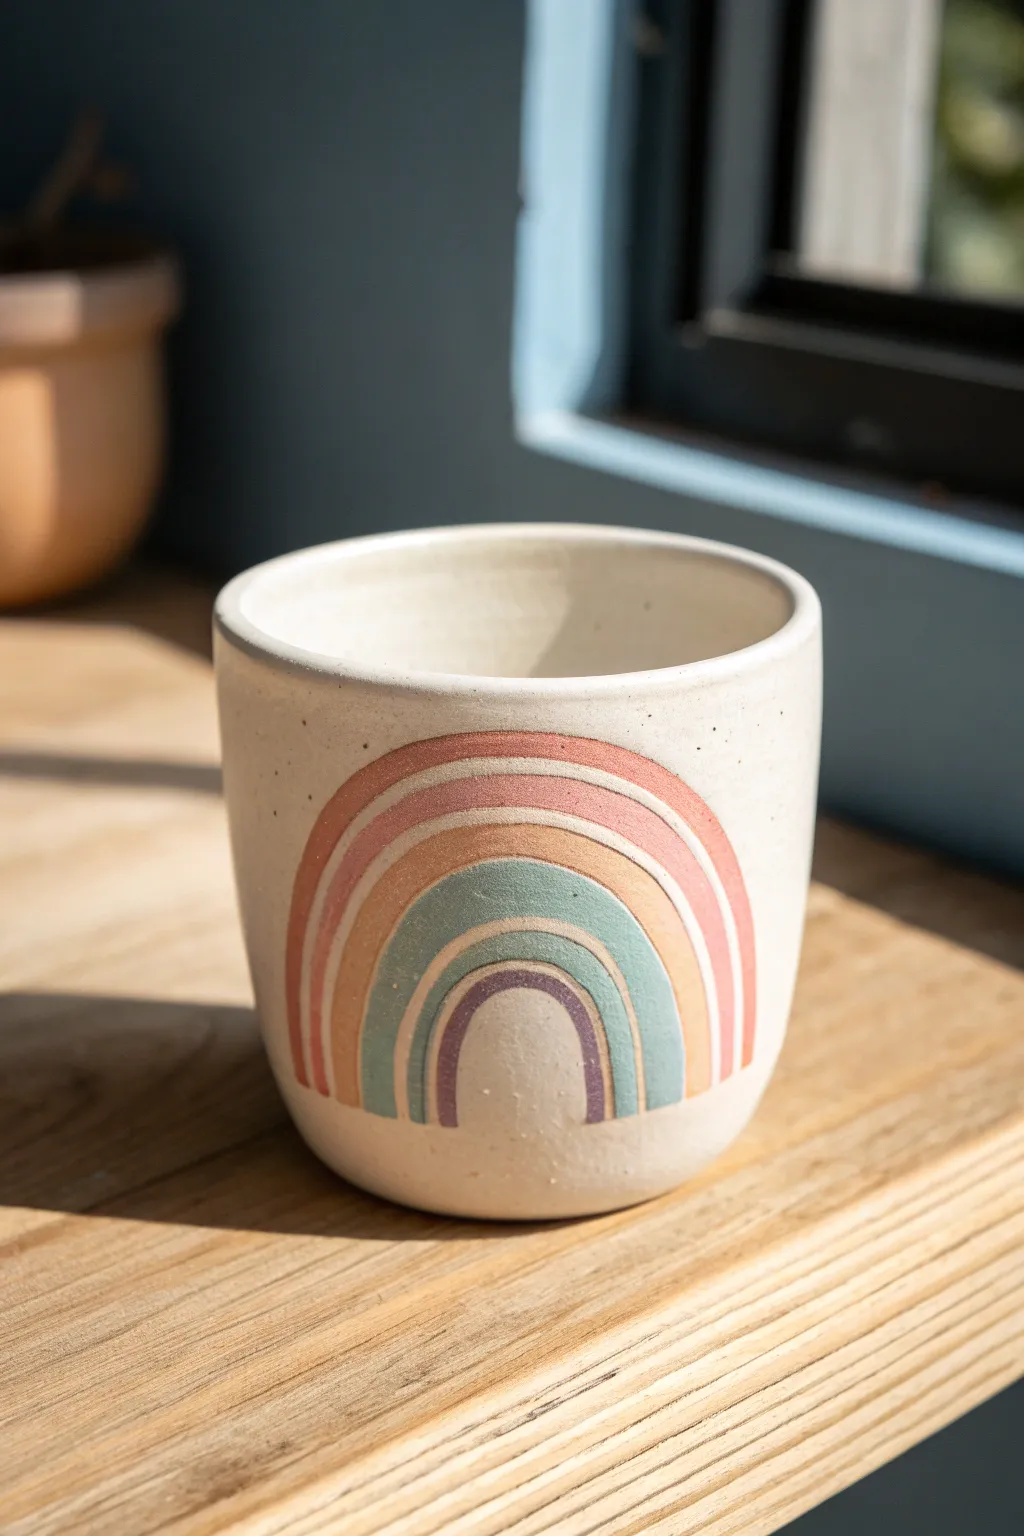
Bring a touch of sunshine to your morning coffee with this delightful ceramic cup, featuring a muted, earthy rainbow arch. The design combines gentle carving techniques with underglaze application to create a piece that feels both tactile and cheerfully modern.
Step-by-Step
Materials
- Speckled clay body (stoneware recommended)
- Pottery wheel or slab roller (for cup construction)
- Needle tool
- Small loop carving tool
- Fettling knife
- Underglazes (terracotta/muted red, peach, sage green, lavender)
- Small detailing brushes
- Clear matte glaze
- High-grit sandpaper or sanding sponge
Step 1: Forming the Cup
-
Prepare the Clay:
Begin by wedging about 1 pound of speckled stoneware clay to remove air bubbles. Ensure it’s pliable and consistent, as this prevents warping later. -
Construct the Body:
Throw a simple cylinder on the wheel or hand-build one using the slab method. Aim for a vessel with slightly rounded walls and a comfortable thickness, roughly 1/4 inch. -
Refine the Rim:
Smooth the drinking rim carefully with a chamois or sponge. It should be pleasantly rounded since this is where your lips will touch. -
Dry to Leather Hard:
Set the cup aside to dry slowly until it reaches a leather-hard state. It should be firm enough to handle without deforming but soft enough to carve into effortlessly.
Clean Lines Tip
Use ‘wax resist’ between the rainbow bands before painting underglazes. This creates an invisible barrier so your colors don’t bleed into each other.
Step 2: Drafting the Design
-
Mark the Center:
Identify the ‘front’ of your cup. Use a needle tool to make a tiny, almost invisible mark where the top center of your rainbow arch will sit. -
Sketch the Arches:
Still using the needle tool, very lightly sketch four concentric arches. Don’t press deep; you just want a faint guide. Keep the spacing between the bands relatively even. -
Check Symmetry:
Step back and look at the cup from a distance. Ensure the legs of the rainbow end at the same height. If it’s crooked, simply smooth the clay with your finger and re-sketch.
Step 3: Carving and Definition
-
Carve the Outlines:
Using a small loop tool or a sharp sgraffito tool, gently carve shallow grooves along the lines you sketched. This creates physical separation between the color bands. -
Clean the Burrs:
Carving often leaves little clay crumbs or ‘burrs’ along the edges. Wait until the clay is bone dry to brush these off, or carefully smooth them now with a barely damp sponge. -
Texturize the Background (Optional):
If you want the rainbow to stand out more, you can lightly compress the clay around the rainbow, leaving the arch slightly raised, though simple line carving works perfectly fine too.
Make it Shine
Instead of matte glaze overall, use a clear glossy glaze ONLY on the rainbow stripes and leave the raw speckled clay bare for a stunning texture contrast.
Step 4: Painting and Finishing
-
Apply the First Band:
Start with the outermost arch using your terracotta or muted red underglaze. Use a steady hand and a small brush to fill in the band. -
Layering Colors:
Moving inward, paint the next bands: peach/pink, sage green, and finally the small lavender arch in the center. Apply 2-3 coats for opaque coverage. -
Clean Edges:
If any underglaze spills into the carved grooves, use a clean, stiff tool to scrape it out. This crisp separation is key to the finished look. -
Bisque Fire:
Once the cup is bone dry, load it into the kiln for the bisque firing (usually Cone 04 or 06, depending on your clay). -
Glazing:
For the interior, pour in a food-safe clear glaze and swirl to coat, then pour out excess. For the exterior, brush a clear matte glaze over the entire surface, including the rainbow. -
Final Fire:
Fire the piece to maturity (Cone 5 or 6 for most stoneware). The matte glaze will protect the design while showcasing those lovely clay speckles. -
Sanding the Bottom:
After firing, use a sanding stone or high-grit sandpaper to smooth the unglazed foot of the cup so it doesn’t scratch your table.
Now you have a cozy, custom mug ready for your favorite warm beverage

TRACK YOUR CERAMIC JOURNEY
Capture glaze tests, firing details, and creative progress—all in one simple printable. Make your projects easier to repeat and improve.
Mushroom Garden Cup With Tiny Caps
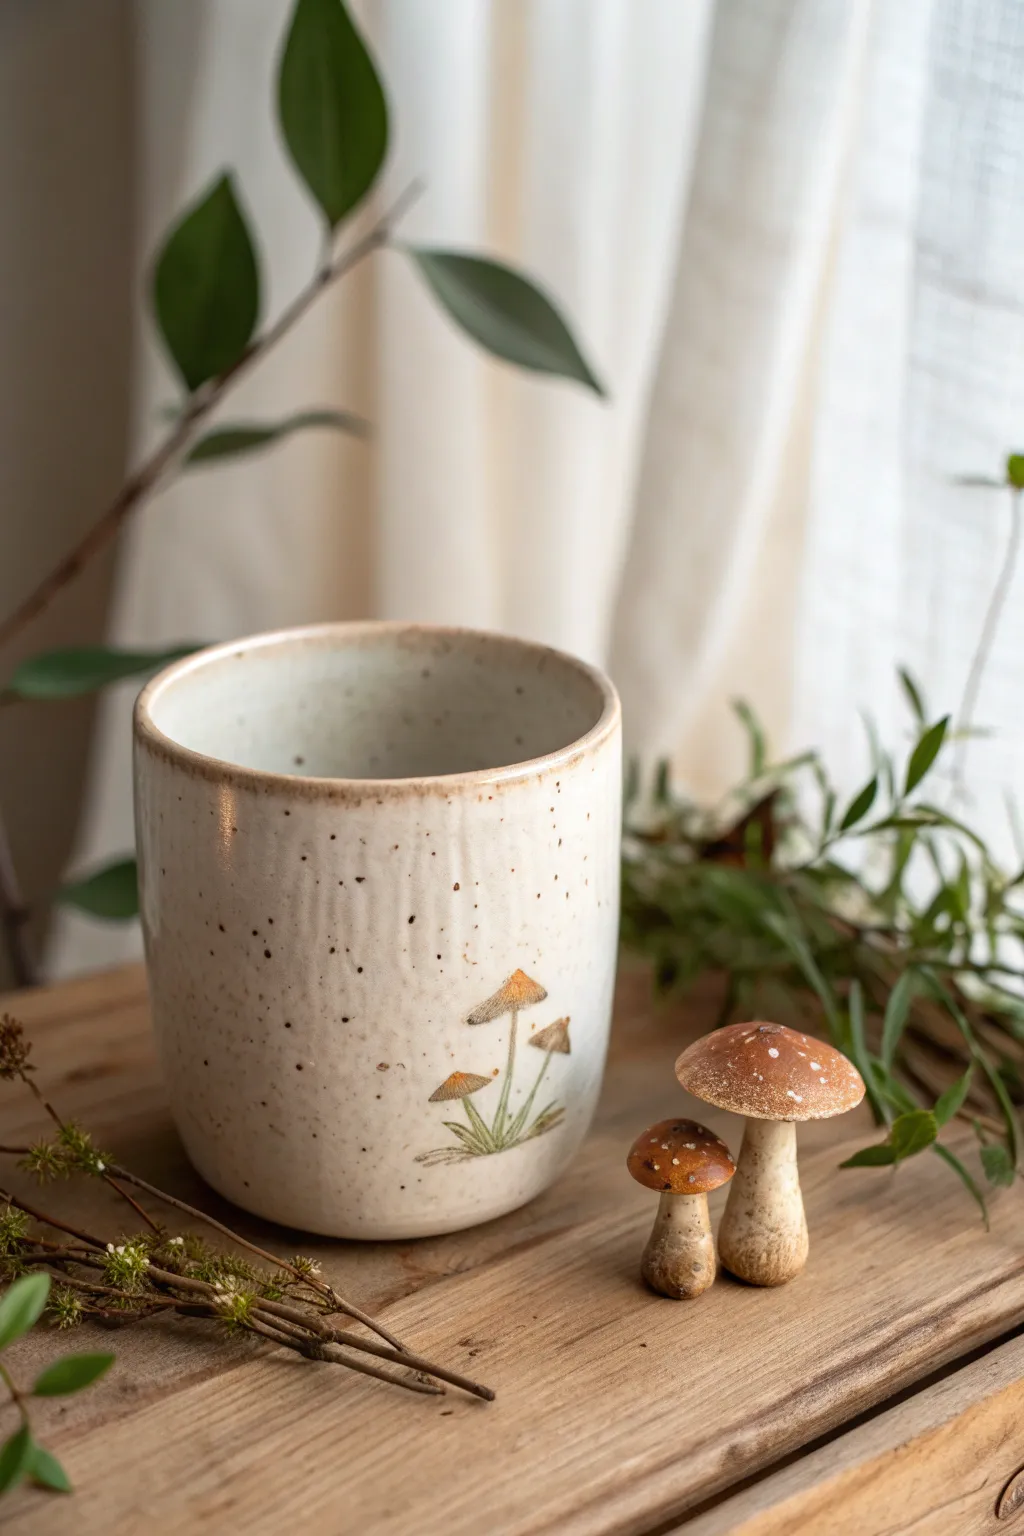
Bring a touch of the forest floor into your home with this charming hand-built ceramic cup, featuring a cozy speckled glaze and delicate mushroom illustrations. It pairs perfectly with adorable sculpted mushroom figurines to complete your enchanting morning coffee setup.
Detailed Instructions
Materials
- White stoneware clay with grog or speckles
- Pottery wheel (optional) or rolling pin for slab building
- Sponge and bucket of water
- Pottery trimming tools
- Loop tool for texturing
- Underglazes (ochre, burnt orange, moss green, brown)
- Fine detail paintbrush
- Clear or translucent matte glaze
- Kiln for firing
Step 1: Forming the Cup
-
Shape the vessel:
Begin by either throwing a simple cylinder on the wheel or rolling out a clay slab and joining it into a cylinder shape. Aim for a height of about 4 inches with straight, vertical walls. -
Refine the walls:
Pull the walls to an even thickness, ensuring they aren’t too heavy. If hand-building, smooth the seam thoroughly so it becomes invisible. -
Soften the rim:
Use a chamois or a wet sponge to gently round over the rim. It should feel smooth to the touch and slightly thicker than the walls for a comfortable drinking experience. -
Add subtle texture:
While the clay is still workable but firming up, use a rib tool or your fingers to create very faint, vertical ridges on the exterior. This shouldn’t be a deep pattern, just a whisper of unevenness to give it an organic, handmade feel. -
Dry to leather hard:
Set the cup aside until it reaches a leather-hard state, where it is firm enough to handle without deforming but still cool to the touch.
Step 2: Painting the Garden
-
Sketch the stems:
Using a very fine brush and watered-down green underglaze, lightly map out where your mushrooms will grow. Paint three thin, clustered stems rising from a central point near the base. -
Paint the caps:
Dip your detail brush into ochre and burnt orange underglazes. Paint small, triangular caps on top of your stems. I like to vary the sizes, making the center one slightly taller. -
Add foliage details:
With moss green underglaze, add tiny grass blades at the base of the stems, using quick, upward flicking motions to mimic natural growth. -
Enhance with texture:
Once the underglaze is dry, use a needle tool to gently scratch through the paint on the mushroom caps to reveal the clay body underneath, creating gills or texture lines.
Smudged Paint?
If underglaze smears during glazing, you likely applied the clear glaze too vigorously. Next time, try dabbing the glaze on over the design rather than brushing, or spray the glaze if possible.
Step 3: Creating the Tiny Caps
-
Shape the stems:
Take two small balls of leftover clay (about the size of a grape) and roll them into thick, sturdy cylinders. Widen the bases slightly so they stand upright on their own. -
Form the caps:
Roll two smaller balls of clay and flatten them into dome shapes. Score and slip the tops of the stems and the undersides of the caps, then press them together firmly. -
Paint the figurines:
Paint the mushroom caps with a rich reddish-brown underglaze. Leave the stems bare to show the natural clay speckle. -
Add white spots:
using a needle tool or a very fine brush tip, dot the tops of the brown caps with white underglaze to create the classic ‘toadstool’ look.
Level Up: Hidden details
Add a tiny surprise mushroom painted on the inside bottom of the cup, so the drinker reveals a little secret garden as they finish their tea or coffee.
Step 4: Glazing and Firing
-
Bisque fire:
Load your cup and tiny mushrooms into the kiln for a bisque firing (usually cone 04 or 06) to harden the clay. -
Wax resist:
Apply wax resist to the bottom of the cup and the base of the tiny mushrooms to prevent them from sticking to the kiln shelf. -
Apply the main glaze:
Dip the entire cup into a translucent, matte white or cream glaze. This glaze should be sheer enough to let the speckles of the clay and your underglaze painting show through clearly. -
Glaze the figurines:
Brush the same clear or translucent matte glaze over the tiny mushrooms to seal them and deepen the colors. -
Wipe the rim:
Gently wipe the very edge of the rim with a damp sponge if you want to expose a bit of the raw clay meant to look like a toasted edge, or leave it glazed for a smoother finish. -
Final firing:
Fire the pieces to the temperature appropriate for your clay and glaze (often cone 5 or 6). Let the kiln cool completely before unloading.
Now you have a cozy, woodland-inspired set ready for your favorite warm beverage
Strawberry Milk Cup With Seed Dots
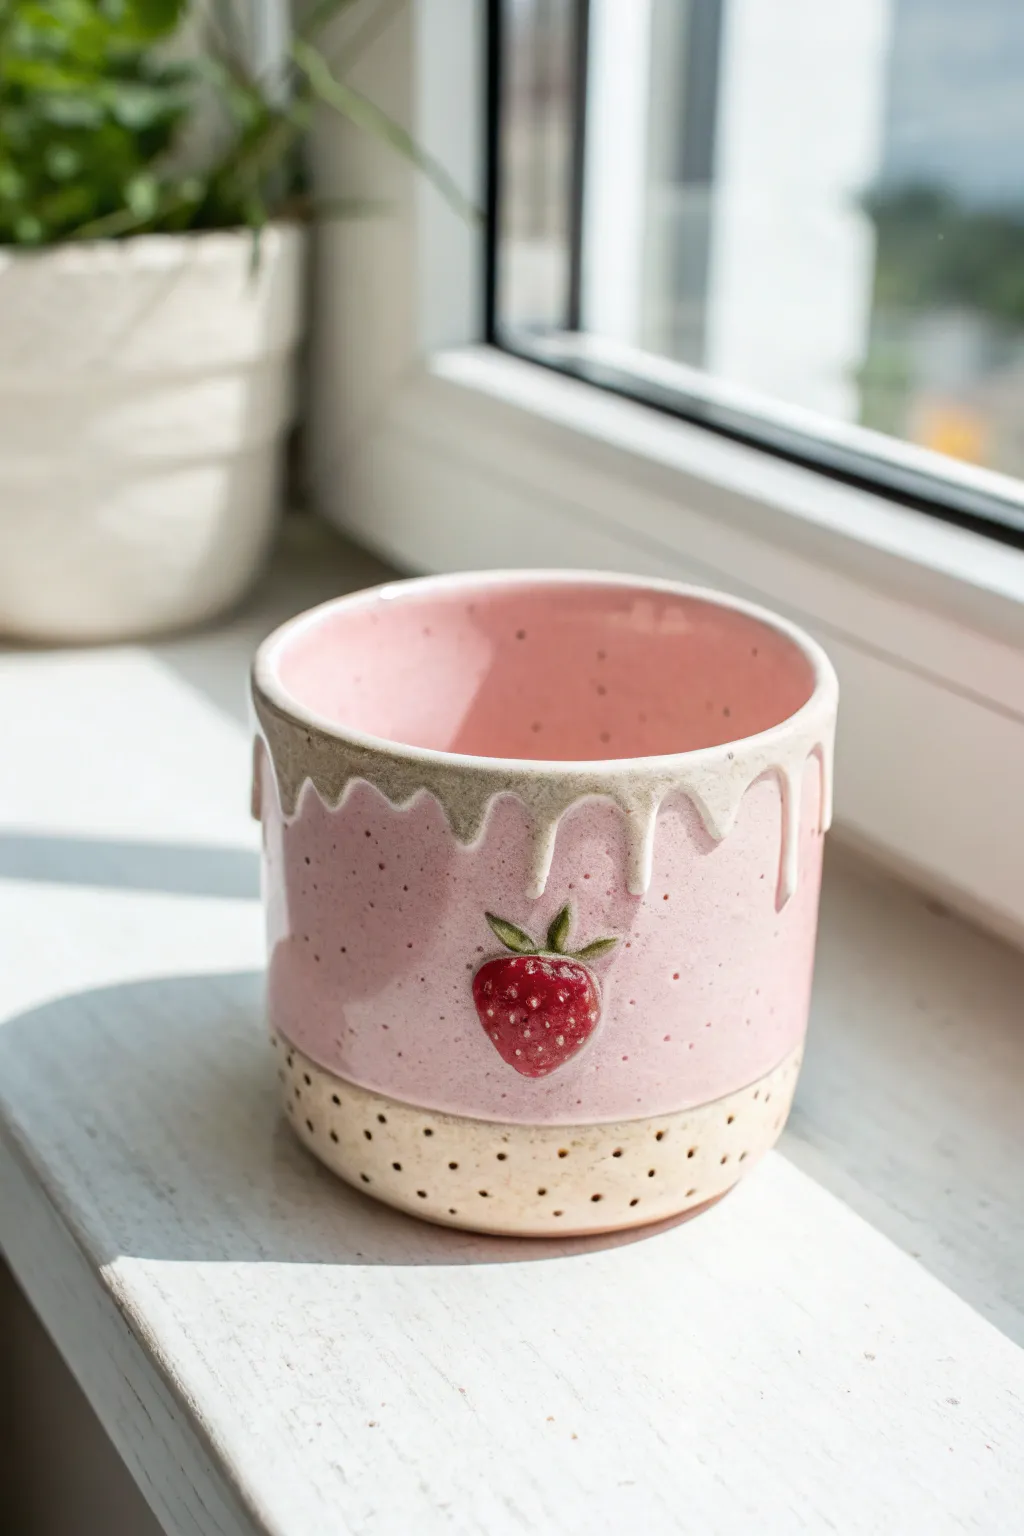
This charming ceramic cup mimics the look of sweet strawberry milk topped with a splash of cream. The design features a tactile, unglazed dotted base and a glossy, drippy rim that makes every sip feel like a treat.
Step-by-Step Tutorial
Materials
- White or speckled stoneware clay
- Rolling pin
- Pottery knife or needle tool
- Rib tool
- Scoring tool (or fork)
- Slip (clay and water mixture)
- Small round tool or drill bit (for divots)
- Pink underglaze (speckled optional)
- Red and green underglaze
- White dipping glaze or heavy white underglaze
- Clear transparent glaze
- Kiln access
Step 1: Forming the Cup Body
-
Roll the Slab:
Start by rolling out a medium-sized slab of clay to a consistent thickness, around 1/4 inch. If you want that speckled look in the clay body itself, you can wedge in some granular manganese or use a pre-speckled clay body. -
Cut the Shape:
Cut a long rectangle for the walls of the cup (approx. 10-12 inches long depending on desired width) and a circle for the base. -
Assemble the Cylinder:
Score and slip the short ends of the rectangle. Bring them together to form a cylinder, pressing the seam firmly and smoothing it inside and out with a rib tool so the join becomes invisible. -
Attach the Base:
Score and slip the bottom edge of your cylinder and the edge of your circular base. Press them together, smoothing the clay connection to ensure a watertight seal. -
Refine the Form:
Use a sponge or a soft rib to smooth out the transition between the wall and the floor, giving the cup a straight, clean silhouette.
Drip Control
If your white glaze is very runny, stop painting the drips about half an inch higher than you want them to finish. Gravity will pull the glaze down during the firing process.
Step 2: Sculpting the Details
-
Design the Rim:
Using a needle tool, lightly sketch a wavy, dripping line around the top exterior of the cup to map out where the ‘cream’ glaze will eventually go. This is just a guide for later glazing. -
Create the Texture:
On the bottom inch or so of the cup, use a small, round-tipped tool to press tiny divots into the clay. These represent seeds or biscuit texture and will remain unglazed. -
Shape the Strawberry:
Roll a small ball of clay and flatten it slightly into a teardrop shape. This will be your strawberry relief. -
Add Strawberry Leaves:
Fashion tiny, thin triangles of clay for the leaves. Attach these to the top of your strawberry shape using a tiny bit of slip. -
Attach the Fruit:
Score the back of the strawberry and the spot on the cup where you want it to sit. Applying firm but gentle pressure, attach it to the cup wall, smoothing the edges slightly so it’s secure. -
Add Strawberry Seeds:
Press tiny indentations into the surface of the applied strawberry using a needle tool to mimic real seeds. -
Bisque Fire:
Allow the cup to dry slowly and completely before firing it in the kiln for a bisque fire (usually Cone 04).
Step 3: Glazing and Finishing
-
Paint the Strawberry:
Using a small brush, carefully paint the strawberry relief with vibrant red underglaze and the leaves with green. You may need 2-3 coats for solid opacity. -
Apply Pink Underglaze:
Paint the main body of the cup (above the dotted texture line) with a soft pink underglaze. If your underglaze doesn’t have speckles, you can flick a toothbrush with darker paint to add them now. -
Apply the Drippy Rim:
This is the crucial step. Use a thick white glaze or a heavy white underglaze. Apply it to the rim and intentionally let it pool and drip down unevenly over the pink section, creating that melting cream effect. -
Wax Resist:
Apply wax resist to the very bottom dotted section and the underside of the cup. This creates the clean line between the pink body and the raw, sandy base. -
Clear Glaze:
Dip the entire cup into a clear transparent glaze to seal the underglazes and make the cup food safe and glossy. Wipe away any drips from the waxed bottom area. -
Final Fire:
Fire the cup again to the maturity temperature of your clay and glaze (often Cone 5 or 6). I always double-check that the drips aren’t too close to the kiln shelf before loading.
Make it a Set
Create a matching saucer or small pitcher using the same pink glaze and dotted texture, but try sculpting a blueberry or peach relief instead for a mixed fruit theme.
Now you have a delightfully sweet vessel ready for your morning coffee or afternoon tea
Drippy Icing Cup With Sprinkle Bits
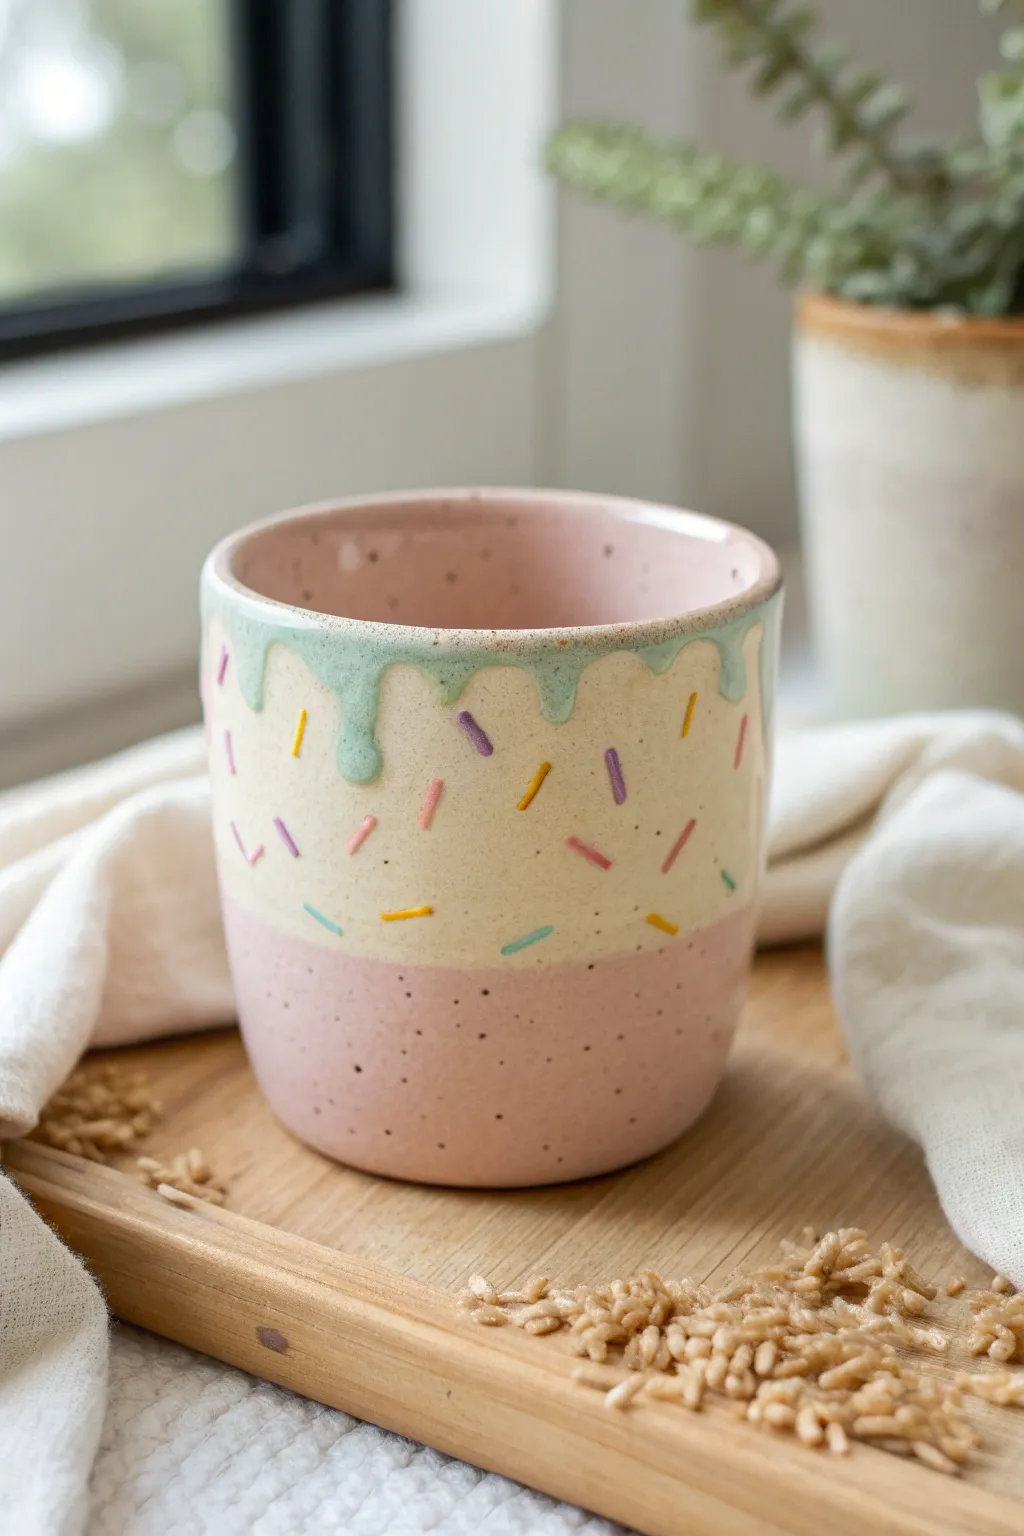
Capture the sweetness of a bakery treat with this adorable ceramic mug inspired by a sprinkle donut. Featuring a speckled pink base, a creamy middle, and a delightful drippy green icing rim, this project brings a touch of whimsy to your morning coffee routine.
Step-by-Step
Materials
- Stoneware clay body (white)
- Pottery wheel (or slab roller for hand-building)
- Rib tool
- Sponge
- Wire cutter
- Trimming tools
- Underglazes: Baby Pink, Cream/Butter Yellow, Mint Green
- Underglazes (for sprinkles): Purple, Pink, Yellow, Blue, Orange
- Small detail brush
- Clear glaze (zinc-free recommended for brighter colors)
- Slip trailer or bulb
Step 1: Forming the Cup
-
Throw the cylinder:
Center your ball of stoneware clay on the wheel and open it up. Pull the walls to create a straight-sided cylinder with a slightly rounded bottom edge. Aim for a height of about 4 inches. -
Refine the shape:
Using a rib tool, smooth the exterior walls to remove throwing lines, giving the cup a sleek, modern finish. I prefer to slightly bulb out the bottom curve just a bit to make it feel friendlier in the hand. -
Smooth the rim:
Compress the rim with a chamois or sponge to ensure it is rounded and smooth for drinking. -
Wire off and dry:
Wire the cup off the bat and set it aside to dry until it reaches a leather-hard state.
Drip Control
If your ‘icing’ underglaze is running too fast down the cup, thicken it by leaving the jar open for a few hours before applying to get that thick drip.
Step 2: Trimming and Prep
-
Trim the foot:
Place the leather-hard cup upside down on the wheel. Trim a clean, defined foot ring, removing any excess weight from the bottom. -
Smooth the surface:
Wipe the entire piece down with a barely damp sponge to move any grog around and ensure a perfect canvas for your glaze work. -
Bisque fire:
Load the bone-dry mug into the kiln and bisque fire it according to your clay body’s specifications (usually Cone 04).
Raised Sprinkles
Mix a tiny bit of clear glaze into your sprinkle colors. This helps them flux and flux, creating a slightly raised, glassy texture after firing.
Step 3: Applying the Design
-
Base coat the bottom:
Mix a small amount of dark speckles or sand into your Baby Pink underglaze if it isn’t already speckled. Paint the bottom third of the cup with 2-3 coats of this pink mixture for solid coverage. -
Apply the middle layer:
Paint the middle section of the cup, from the top of the pink line almost to the rim, with the Cream/Butter Yellow underglaze. Apply 2-3 coats, letting each dry in between. -
Create the drip effect:
Load a slip trailer or a heavy brush with the Mint Green underglaze (or a thickened glaze). Apply it heavily along the very rim, allowing gravity to pull it down slightly to create irregular ‘drips’ over the cream section. -
Refine the drips:
If the drips are too runny, catch them with a brush. You want them to look thick and suspended, like royal icing. -
Paint the sprinkles:
Using a very fine detail brush and your assortment of bright underglaze colors, paint small dashes randomly across the cream section. Vary the angles so they look like scattered manufactured sprinkles. -
Add dimension (optional):
For a tactile feel, you can go back over the painted sprinkles with a tiny second coat to raise them slightly off the surface. -
Add speckles:
If your pink base didn’t include speckles, flick a stiff toothbrush dipped in brown iron oxide wash lightly over the pink section to create that toasted ceramic look. -
Clear glaze:
Once all underglazes are completely dry, dip the entire mug into a clear glaze. Shake off excess gently.
Step 4: Final Firing
-
Clean the foot:
Wipe the bottom foot ring thoroughly with a sponge to ensure no glaze touches the kiln shelf. -
Glaze fire:
Fire the mug to maturity (typically Cone 5 or 6 for stoneware). Allow the kiln to cool completely before unloading to prevent thermal shock. -
Sand the bottom:
After firing, briefly sand the unglazed foot ring with wet sandpaper to make it buttery smooth for table surfaces.
Enjoy sipping from your sweet new creation knowing it will never go stale
Oversized Wavy Handle Cup
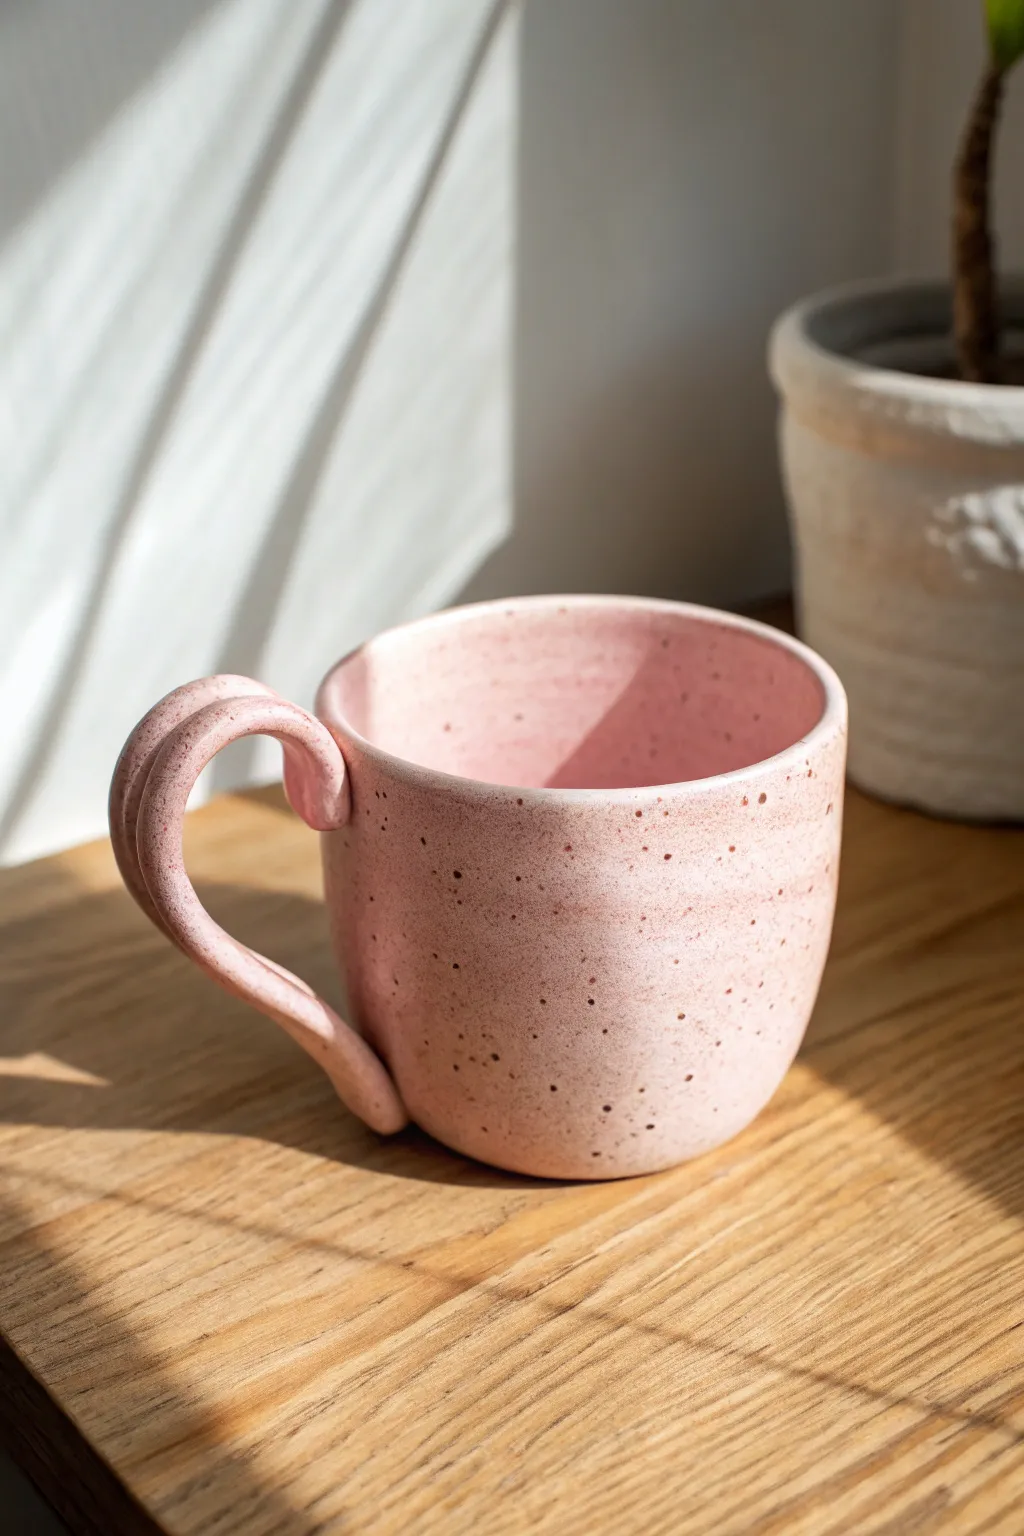
This charming mug features a soft, dusty pink glaze with delicate speckles, giving it a warm, handmade feel. The standout feature is its oversized, sculptural handle made from two clay coils joined together, adding both comfort and a playful artistic touch.
Detailed Instructions
Materials
- Stoneware clay (smooth or lightly grogged)
- Pottery wheel (or rolling pin for slab building)
- Rib tool
- Pin tool
- Sponge
- Scoring tool (or serrated kidney)
- Slip (clay mixed with water)
- Cutting wire
- Dusty pink speckled glaze
- Clear glaze (optional)
Step 1: Forming the Body
-
Preparing the clay:
Begin by wedging about 1 to 1.5 pounds of stoneware clay to remove air bubbles and ensure a consistent texture. Form it into a smooth ball. -
Centering:
Throw the ball onto the wheel head and center it using water for lubrication. Make sure your hands are steady to get the clay perfectly centered before opening. -
Opening the clay:
Press into the center of the mound to open the floor. Pull the floor out to your desired width, remembering that the clay will shrink about 12% during firing. -
Pulling the walls:
Gently pull the walls up to create a cylinder. Aim for a slightly rounded bottom that tapers just barely inward at the rim for that classic cup shape. -
Refining the shape:
Use a rib tool on the outside and your fingers on the inside to compress the walls and smooth out any throwing lines. I like to leave the rim slightly rounded for comfortable sipping. -
Drying to leather hard:
Cut the cup from the wheel using a wire tool. Let it dry until it reaches a leather-hard state—firm enough to handle without deforming, but soft enough to carve. -
Trimming:
Place the cup upside down on the wheel (or use a Giffin Grip) and trim away excess weight from the bottom, creating a clean foot ring.
Smooth Moves
When joining the two coils for the handle, don’t over-smooth the visible side. Keeping that deep groove defined is key to the aesthetic.
Step 2: Creating the Wavy Handle
-
Rolling coils:
Roll out two even coils of clay about the thickness of a pencil. Ensure they are long enough to form the oversized loop shape shown in the photo. -
Joining the coils:
Gently press the two coils together side-by-side. You want them attached but still retaining the definition of two separate strands. Smooth the seam slightly on the underside where it won’t be seen. -
Shaping the wave:
Bend the doubled coil into a large, exaggerated ear shape. The top attachment point should curve dramatically outward before swooping back down. -
Scoring the attachment points:
Hold the handle up to the cup to check the placement. Mark where the top and bottom will connect, then score both the cup and the handle ends deeply with a scoring tool. -
Attaching with slip:
Apply a generous amount of slip to the scored areas. Press the handle firmly onto the cup body. The top connection should be near the rim, and the bottom should curve inward toward the foot. -
Reinforcing the join:
Use a small modeling tool or your finger to smooth the clay from the handle onto the cup body, ensuring a seamless and strong bond. Clean up any excess slip with a damp sponge.
Speckle Hack
No speckled clay? Mix a teaspoon of granular ilmenite or coarse iron oxide into your pink glaze for that instant speckled effect.
Step 3: Glazing and Firing
-
Bisque firing:
Allow the mug to dry completely (bone dry) before loading it into the kiln for the bisque fire (usually cone 04 or 06). -
Wiping down:
Once fired, wipe the bisque-ware with a damp sponge to remove any dust, which can prevent glaze from adhering properly. -
Applying the glaze:
Dip the mug into your dusty pink speckled glaze. If you don’t have a pre-speckled glaze, you can add iron oxide speckles to a base pink glaze. -
Checking the foot:
Wipe the foot of the mug completely clean with a sponge to prevent it from sticking to the kiln shelf. -
Glaze firing:
Fire the mug to the temperature recommended for your specific clay and glaze combination (typically cone 5 or 6 for stoneware). -
Cooling:
Let the kiln cool naturally before removing your finished piece. Sand the bottom lightly if the foot feels rough.
Now you have a cozy, custom mug perfect for your morning coffee rituals
Bow Detail Cup With Ribbon Charm
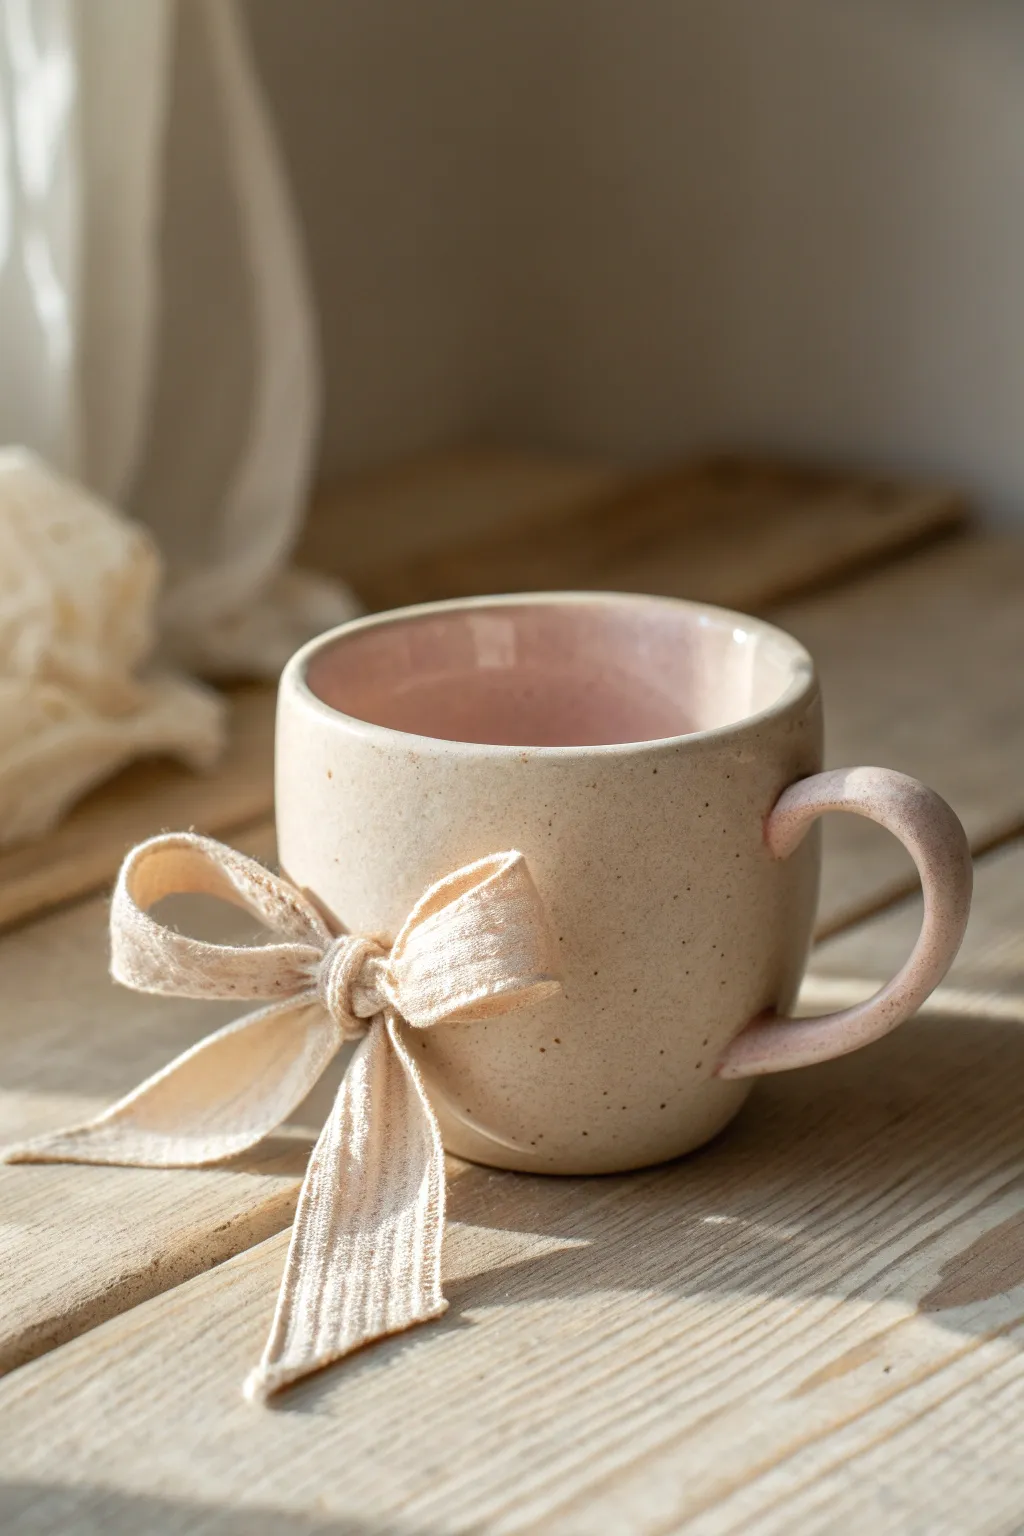
Elevate your morning coffee ritual with this charming handmade mug, featuring a speckled cream finish and a delicate fabric bow accent. The juxtaposition of the modern ceramic form with the soft, rustic texture of the ribbon creates a cozy, cottage-core aesthetic perfect for slow living.
Step-by-Step Tutorial
Materials
- Light stoneware or porcelain clay body (speckled works best)
- Pottery wheel or slab roller (and rolling pin)
- Rib tool
- Sponge
- Wire cutter
- Scoring tool or fork
- Slip (clay mixed with water)
- Inside glaze: Glossy pale pink
- Outside glaze: Satin or matte cream/beige (transparent if using speckled clay)
- Natural cotton or linen ribbon (cream/beige color)
- Kiln access
- Small drill bit tool or hole cutter (approx. 3-4mm)
Step 1: Forming the Cup Body
-
Prepare the clay:
Begin by wedging about 1 pound of speckled clay to remove air bubbles. This ensures a smooth throwing process and prevents explosions in the kiln later. -
Throw the cylinder:
Center your clay on the pottery wheel. Open the center and pull up the walls to create a cylinder approximately 3.5 inches tall. Aim for straight walls with a very subtle curve towards the bottom for a comfortable hold. -
Refine the rim:
Using a chamois or a wet sponge, compress and smooth the rim. A rounded, smooth rim is crucial for drinking comfort. -
Create the base:
Use a wooden rib to clean up the bottom edge of the cup where it meets the wheel head, creating a slight undercut to give the mug a ‘lofted’ appearance. -
Dry to leather hard:
Wire the cup off the bat and let it dry until it reaches a leather-hard state—firm enough to handle without deforming, but soft enough to carve.
Glaze Clogging Holes?
If glaze fills the tiny holes during firing, use a diamond drill bit and a Dremel tool to carefully re-open them after the kiln run. Go slow to avoid cracking.
Step 2: Handle and Details
-
Pull the handle:
Pull a strap of clay for the handle. For this design, aim for a medium thickness that feels sturdy. Shape it into a ‘question mark’ curve and let it stiffen slightly. -
Attach the handle:
Score the attachment points on both the cup and the handle. Apply slip generously. Press the handle firmly onto the mug, smoothing the seams so it looks like it grew out of the cup. -
Drill the holes:
This is the signature step. Locate a spot on the front of the cup, opposite or perpendicular to the handle. Carefully drill two small holes about 0.5 inches apart horizontally. These will anchor your bow later. -
Clean the holes:
Use a small brush or sponge to smooth the edges of the drilled holes. Sharp clay burrs can cut your ribbon, so ensure these are perfectly smooth. -
Bisque fire:
Allow the mug to dry completely (bone dry). Fire it in the kiln to a bisque temperature (usually cone 04) to prepare it for glazing.
Step 3: Glazing and Finishing
-
Glaze the interior:
Pour a glossy pale pink glaze into the interior of the mug. Swirl it around to coat every surface evenly, then pour out the excess. -
Dip the exterior:
Hold the mug by the foot and dip the exterior into a matte or satin cream glaze. If you used speckled clay, a semi-transparent glaze helps the specks show through. -
Clean the holes (again):
Before the glaze dries completely, use a needle tool or small drill bit to clear any glaze that may have clogged the two ribbon holes. -
Glaze fire:
Fire the mug again to the maturation temperature of your clay and glaze (often cone 5 or 6). This vitrifies the clay, making it food safe. -
Add the ribbon:
Once the mug is completely cool, cut a length of textured cream linen ribbon. Thread it through the two holes from the inside out. -
Tie the bow:
Tie a neat, floppy bow on the outside of the cup. Trim the ends at an angle for a polished look.
Pro Tip: Ribbon Choice
Use ‘bias cut’ silk or linen ribbon. The bias cut prevents the edges from fraying too quickly when washing the cup (remove ribbon before washing usually).
Enjoy your beautiful new mug, remembering to untie the ribbon before popping it in the dishwasher
Cozy Sweater Texture Cup
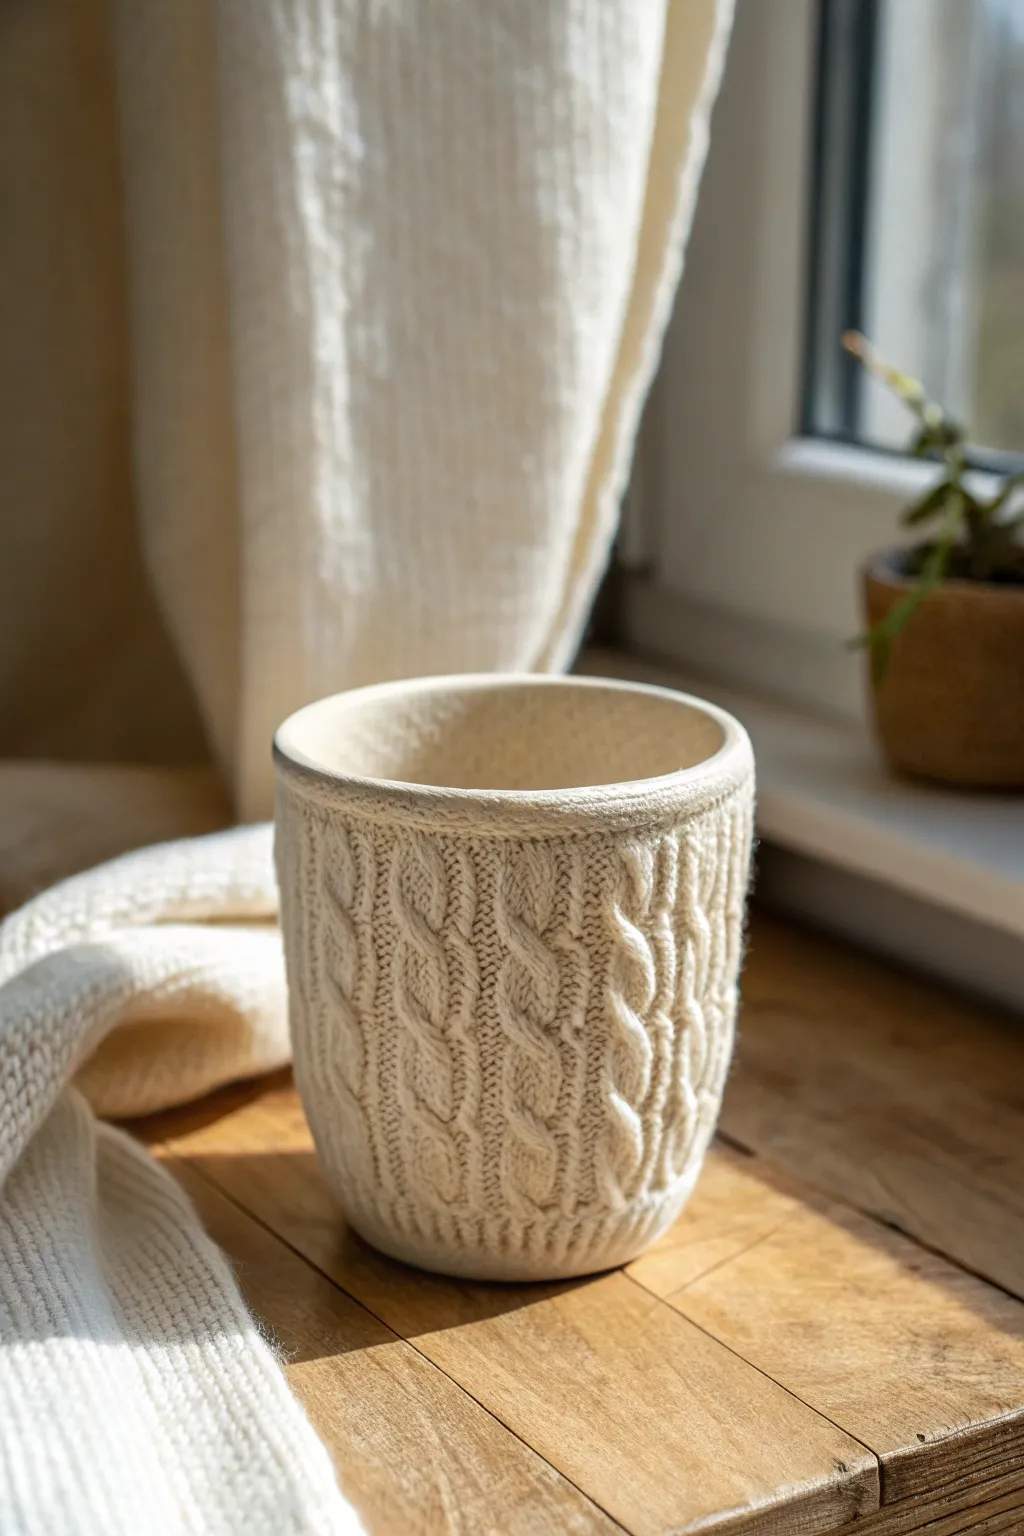
Bring the warmth of your favorite winter sweater to your morning coffee with this charming clay project. By carefully sculpting individual strands of clay, you will create a convincing knit texture that wraps around a simple cup form, perfect for cozying up a workspace or kitchen.
How-To Guide
Materials
- Air-dry clay or polymer clay (creamy white or beige)
- Small cup or mug to use as a base/armature (oven-safe if using polymer)
- Clay extruder (optional but helpful)
- Needle tool or toothpick
- Rolling pin
- Slip (clay and water mixture) or liquid clay adhesive
- Clear acrylic sealant or clay varnish
- Plastic wrap (if using air-dry clay on a non-porous base)
Step 1: Preparation & Base Layer
-
Prepare your workspace:
Clean your working surface thoroughly to avoid getting dust or lint into your white clay. If using a porous cup as a permanent base, clean and dry it well. If you plan to remove the clay cup from the mold later (air-dry only), wrap your base cup tightly in plastic wrap to prevent sticking. -
Roll out the foundation:
Roll out a thin, even sheet of clay, approximately 3-4mm thick. This will be the foundational wall of your cup. Measure the height and circumference of your base cup to ensure the sheet is large enough to wrap around fully. -
Wrap the base:
Carefully wrap the clay sheet around your cup form. Trim the excess clay where the ends meet and smooth the seam completely so it becomes invisible. I like to use a tiny bit of water or slip on my finger to really blend this join seamlessly. -
Secure the bottom:
Trace the bottom of the cup onto a slab of clay, cut out the circle, and attach it to the bottom of your wrapped cylinder. Use slip or liquid clay to ensure a strong bond, smoothing the edges upward into the walls.
Step 2: Creating the Cable Knit Texture
-
Extrude or roll coils:
The secret to this look is consistency. Use a clay extruder to create long, thin snake-like coils of clay. If rolling by hand, try to keep the thickness as uniform as possible, roughly the width of a thick yarn strand. -
Twist the cables:
Take two clay strands and gently twist them together to form a rope. Make several of these twisted ropes. For variety, twist some clockwise and others counter-clockwise, or make some tighter than others. -
Create the braid pattern:
To mimic the central cable pattern seen in the image, lay two twisted ropes side-by-side vertically. You can also create a flat three-strand braid for a more complex look. Prepare enough of these cable sections to go around the cup with spacing in between. -
Form the filler stitches:
For the ‘purl’ or background stitches between cables, take two single strands and twist them together tightly. Alternatively, you can use a needle tool to impress small ‘V’ shapes directly into the base layer, though adding clay strands adds better dimension. -
Attach the first cable:
Apply a thin line of slip or liquid clay vertically on the cup. Gently press your main cable twist into place, being careful not to flatten the texture. Ensure it runs straight from the top rim area to the bottom. -
Fill the gaps:
Next to your main cable, attach your background texture strands. These should look like simpler vertical knitting stitches. Continue alternating between complex cables and simpler filler stitches until you have circled the entire cup. -
Refine the texture:
Use a needle tool to gently poke or scratch the surface of the clay coils. This mimics the fibrous, fuzzy texture of real wool yarn and removes the smooth, plastic look of the clay.
Pro Tip: Realistic Wool
To make the clay look fuzzy like real wool, gently dab the surface with an old toothbrush or a stiff bristle brush before baking or drying. This removes the shine and adds organic texture.
Step 3: Rim, Finish & Drying
-
Create the top ribbing:
Roll a slightly thicker coil of clay for the rim. Flatten it slightly and press vertical indents into it with a dull knife or tool to simulate the ribbed collar of a sweater. -
Attach the rim:
Place this ribbed strip around the top edge of the cup, covering the raw tops of your vertical cables. Blend the inside edge of this rim smoothly into the inner cup wall so it’s comfortable to drink from. -
Check the bottom edge:
Repeat the ribbing process for the bottom edge if desired, or simply curl the bottom ends of the cables underneath the cup slightly for a finished look. -
Final smoothing:
Check the interior of the cup. It should be perfectly smooth. Use a damp sponge or finger to buff away any fingerprints or rough spots on the inside. -
Dry or Bake:
If using polymer clay, bake according to the package instructions (usually around 275°F/135°C). If using air-dry clay, let it dry slowly away from direct heat for 24-48 hours to prevent cracking. -
Seal the surface:
Once fully cured or dry, apply a matte varnish or sealant. This protects the textured surface from dirt and moisture. If you plan to put liquid in it, ensure you use a food-safe, waterproof sealant specifically designed for your clay type.
Troubleshooting: Cracking Clay
If your air-dry clay starts cracking while working, your coils are too dry. Keep a spray bottle of water nearby and mist your clay lightly as you twist the cables to keep it pliable.
Now you have a wonderfully tactile piece of art that makes every warm beverage feel just a little bit cozier
Best Friends Portrait Relief Cup
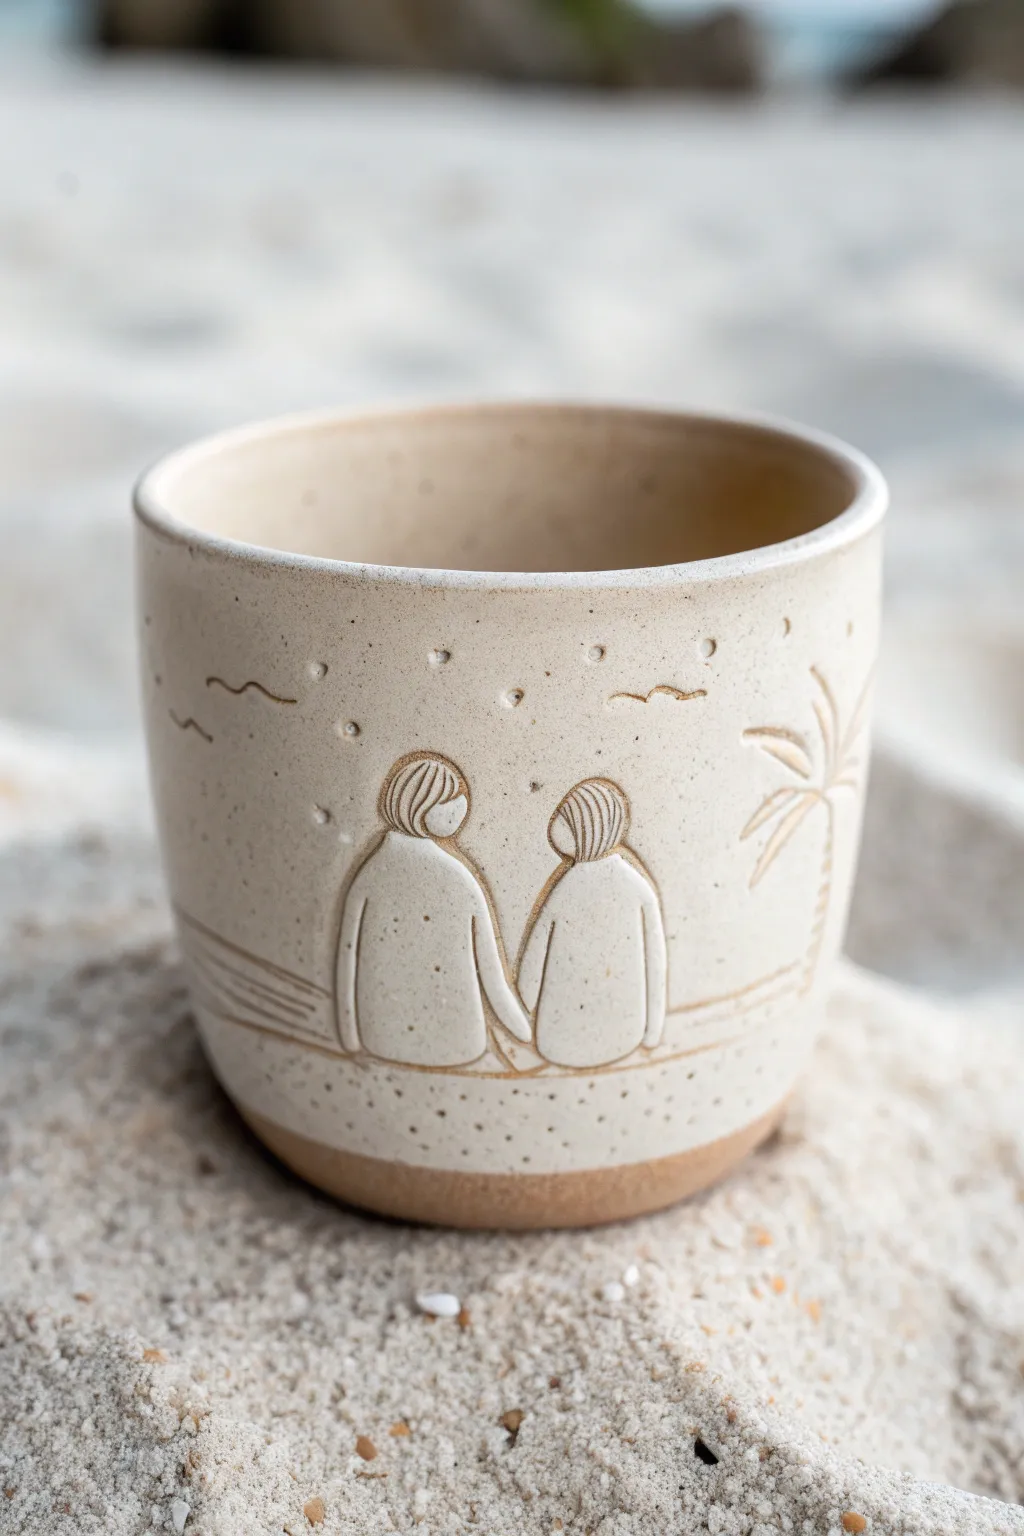
Capture the serenity of a beach sunset with this charming ceramic project featuring two friends gazing at the horizon. The design uses sgraffito-style carving on raw clay to create a tactile, relief-like illustration that stands out beautifully against a speckled cream glaze.
Step-by-Step
Materials
- Stoneware clay body (smooth, speckled buff recommended)
- Pottery wheel or slab roller
- Rib tool (wooden and metal)
- Needle tool
- Loop trimming tools
- Carving tool set (small gouges)
- Sponge
- Clear or translucent satin glaze
- Kiln
Step 1: Forming the Vessel
-
Throw or Build the Base:
Begin by throwing a cylinder on the wheel with about 1 pound of clay. If you are hand-building, roll a slab and form a clean cylinder, smoothing the seam invisible. Aim for a straight-sided shape with a slightly rounded bottom. -
Refine the Shape:
Use a rib tool to compress the walls and remove throwing lines or finger marks. The surface needs to be very smooth to serve as a canvas for your drawing. -
Trim the Foot:
Once the cup is leather hard, trim the bottom to create a neat foot ring. Leave the bottom inch or so untextured, as we want that raw clay contrast later.
Step 2: Sketching the Design
-
Plan the Composition:
Visualize where your figures will sit. They should be positioned in the lower third of the cup, centered on the front face. Lightly scratch a horizon line with a needle tool. -
Outline the Figures:
Using a needle tool with extremely light pressure, sketch the outline of two people sitting side-by-side. Focus on the simple shapes: rounded shoulders and oval heads. Don’t worry about hair details yet. -
Add Scenery Elements:
To the right of the figures, sketch a simple palm tree trunk and arching fronds. Above the horizon, mark small dots for stars and simple ‘v’ shapes for seagulls.
Oops, Clay Crumbled?
If the clay crumbles while carving, it’s too dry. Mist it lightly with water, wrap it in plastic, and let it sit for an hour to regain leather-hard moisture.
Step 3: Carving the Relief
-
Carve the Outlines:
Using a fine-point carving tool or a small V-gouge, carefully carve deeply along your sketched lines. You want a distinct groove that will catch the glaze later. -
Detail the Hair:
Switch to your finest carving point to add texture to the hair. Use vertical, slightly curved strokes to mimic strands, differentiating the two figures (perhaps a bob cut for one and shorter hair for the other). -
Sculpt the Horizon:
Carve the horizon line, making it slightly thicker than the other lines to ground the image. Add a few horizontal strokes below it to suggest the texture of sand or a wooden bench. -
Define the Palm Tree:
Carve the fronds of the palm tree with confident, sweeping strokes that taper at the ends. Ensure the trunk has a few horizontal notches for texture. -
Create the Sky:
Press a small, round tool into the clay to create crater-like indentations for the stars. Carve the birds with swift, shallow strokes. -
Clean Up Burrs:
Once the carving is complete, gently brush away any clay crumbs with a soft brush. If there are sharp burrs, smooth them lightly with a finger, but be careful not to smudge the lines.
Customize It
Personalize the figures! Change hairstyles or add small details like glasses to match real-life best friends or partners for a heartfelt gift.
Step 4: Glazing and Finishing
-
Bisque Fire:
Load your bone-dry mug into the kiln and bisque fire it to cone 04. This hardens the clay and prepares it for glazing. -
Wax Resist (Optional):
If you want the carved lines to remain darker or rawer, you can carefully apply wax resist to the figures, but for the look in the image, we will glaze over everything. -
Apply Glaze:
Dip the mug into a satin cream or translucent white glaze. I find that pouring the glaze out quickly prevents it from getting too thick inside the carved grooves. -
Wipe the Foot:
Using a damp sponge, wipe the glaze completely off the bottom inch of the cup. This creates the beautiful two-tone effect seen in the photo, revealing the toasted clay color. -
Final Fire:
Fire the mug to maturity (Cone 5, 6, or 10 depending on your clay). The glaze should break over the carved edges, highlighting the drawing.
Enjoy using your custom cup, knowing it holds a special memory carved in stone.
Stackable Mix-and-Match Cute Cup Set
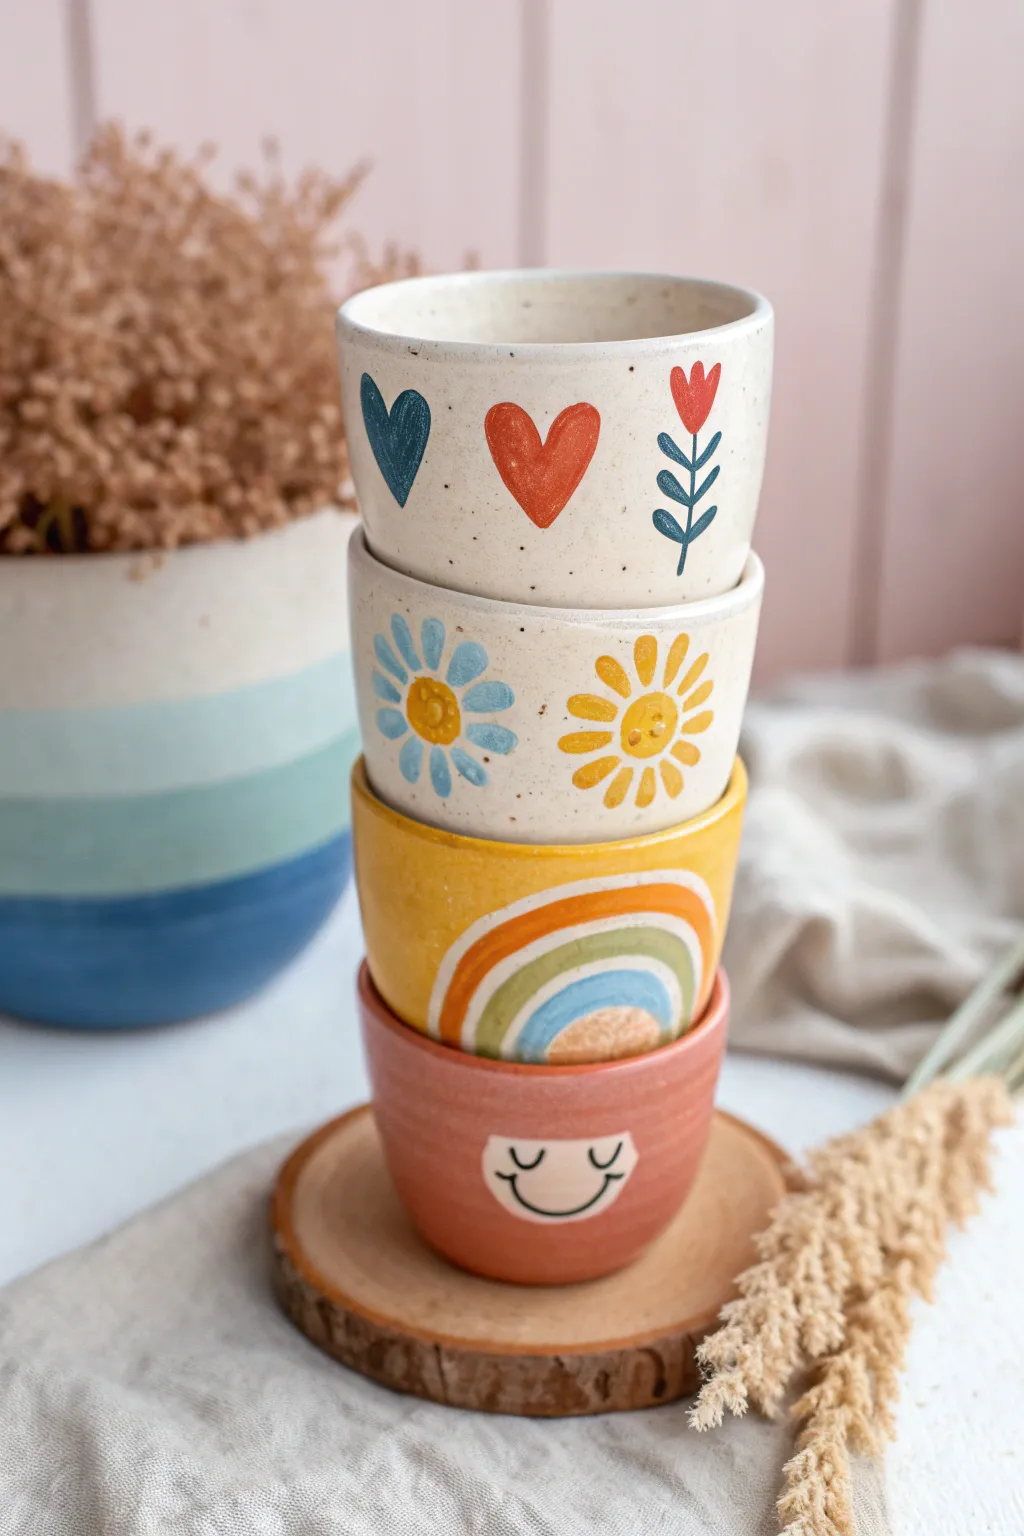
Create a delightful set of four stackable cups that bring a touch of playfulness to your kitchen shelf. Featuring hand-painted motifs like hearts, daisies, rainbows, and a sleepy face, this mix-and-match collection is as fun to make as it is to use.
How-To Guide
Materials
- White stoneware clay body (cone 6)
- Pottery wheel (or slab roller for hand-building)
- Small kidney rib tool
- Trimming tools
- Sponge
- Underglazes: Navy Blue, Deep Red, Yellow, Sky Blue, Orange, Pink, Black
- Fine detail brushes (sizes 0 and 1)
- Clear transparent glaze (food safe)
- Kiln
Step 1: Forming the Cups
-
Prepare your clay balls:
Weigh out four equal balls of white stoneware clay, approximately 350-400g each. Wedging the clay thoroughly is crucial to remove air bubbles and ensure even consistency. -
Throw the cylinders:
Center a ball on the wheel and open it up. Pull the walls to create a simple, straight-sided cylinder or a slightly tapered vessel. Aim for a height of about 3 inches and a width of 3.5 inches. -
Refine the shape:
Use a kidney rib to smooth the outside and compress the inside floor. Repeat this process for all four cups, using calipers to ensure the rim diameters are identical so they stack neatly. -
Dry to leather hard:
Allow the cups to dry slowly until they reach a leather-hard state. This usually takes a day depending on humidity. -
Trim the foot rings:
Invert the cups on the wheel and trim the bottoms. Create a slight recess or a clean flat foot. Smooth the rims with a damp sponge to make them comfortable for drinking.
Step 2: Painting the Designs
-
Plan the stack order:
Decide which cup gets which design. The image features a white base for the top two, a yellow base for the third, and a pink base for the bottom. -
Underglaze the base colors:
For the bottom cup, apply 2-3 coats of pink underglaze to the exterior. For the second-from-bottom cup, apply 2-3 coats of yellow underglaze. Leave the top two cups clearly raw clay (white). -
Paint the top cup (Hearts):
On the top cup, paint a blue heart, a red heart, and a stylized flower. Use a fine brush for the flower stem and leaves. I find resting my pinky on the cup helps stabilize my hand for the thin lines. -
Paint the second cup (Daisies):
Paint two large flower heads. One should be a blue daisy with a yellow center, and the other a yellow sunflower-style bloom. Keep the petals loose and painterly rather than geometrically perfect. -
Paint the rainbow cup:
On the yellow background cup, paint a large rainbow arch using white, blue, green, and orange. Since you are painting over a yellow base, you may need extra coats of the lighter colors to ensure opacity. -
Paint the face cup:
On the pink background cup, paint a small white semi-circle patch. Once dry, use a very fine liner brush and black underglaze to paint closed eyelids and a smile. Add tiny rosy cheeks if desired. -
Bisque fire:
Load the thoroughly dried cups into the kiln for a bisque firing (usually Cone 04). This sets the shape and underglaze designs.
Stack Check
Before bisque firing, test stack your greenware cups gently. If they wobble, slightly sand the rims level to ensure a perfect fit later.
Step 3: Finishing Touches
-
Apply clear glaze:
Wipe the bisqued cups with a damp sponge to remove dust. Dip each cup into a clear, food-safe transparent glaze. Make sure the coverage is even and consistent. -
Wipe the feet:
Clean the bottom of the cups (the foot ring) with a wet sponge to ensure no glaze touches the kiln shelf, or use wax resist before dipping. -
Glaze fire:
Fire the cups a second time to the maturation temperature of your clay and glaze (likely Cone 6). This makes the clay vitrified and the surface glossy and food safe.
Smeared Underglaze?
If you smudge a design, don’t wipe it with water immediately. Let it dry, then gently scrape the mistake off with a needle tool.
Now you have a charming, personalized set of stackable cups ready for your morning coffee or tea