Whenever I need color that looks like glass and detail that feels effortless, I reach for liquid polymer clay. It pours, it drizzles, it bakes up translucent and glossy-looking, and it’s honestly the easiest way to get those “how did you do that?” effects.
Faux Resin Bezel Pendants
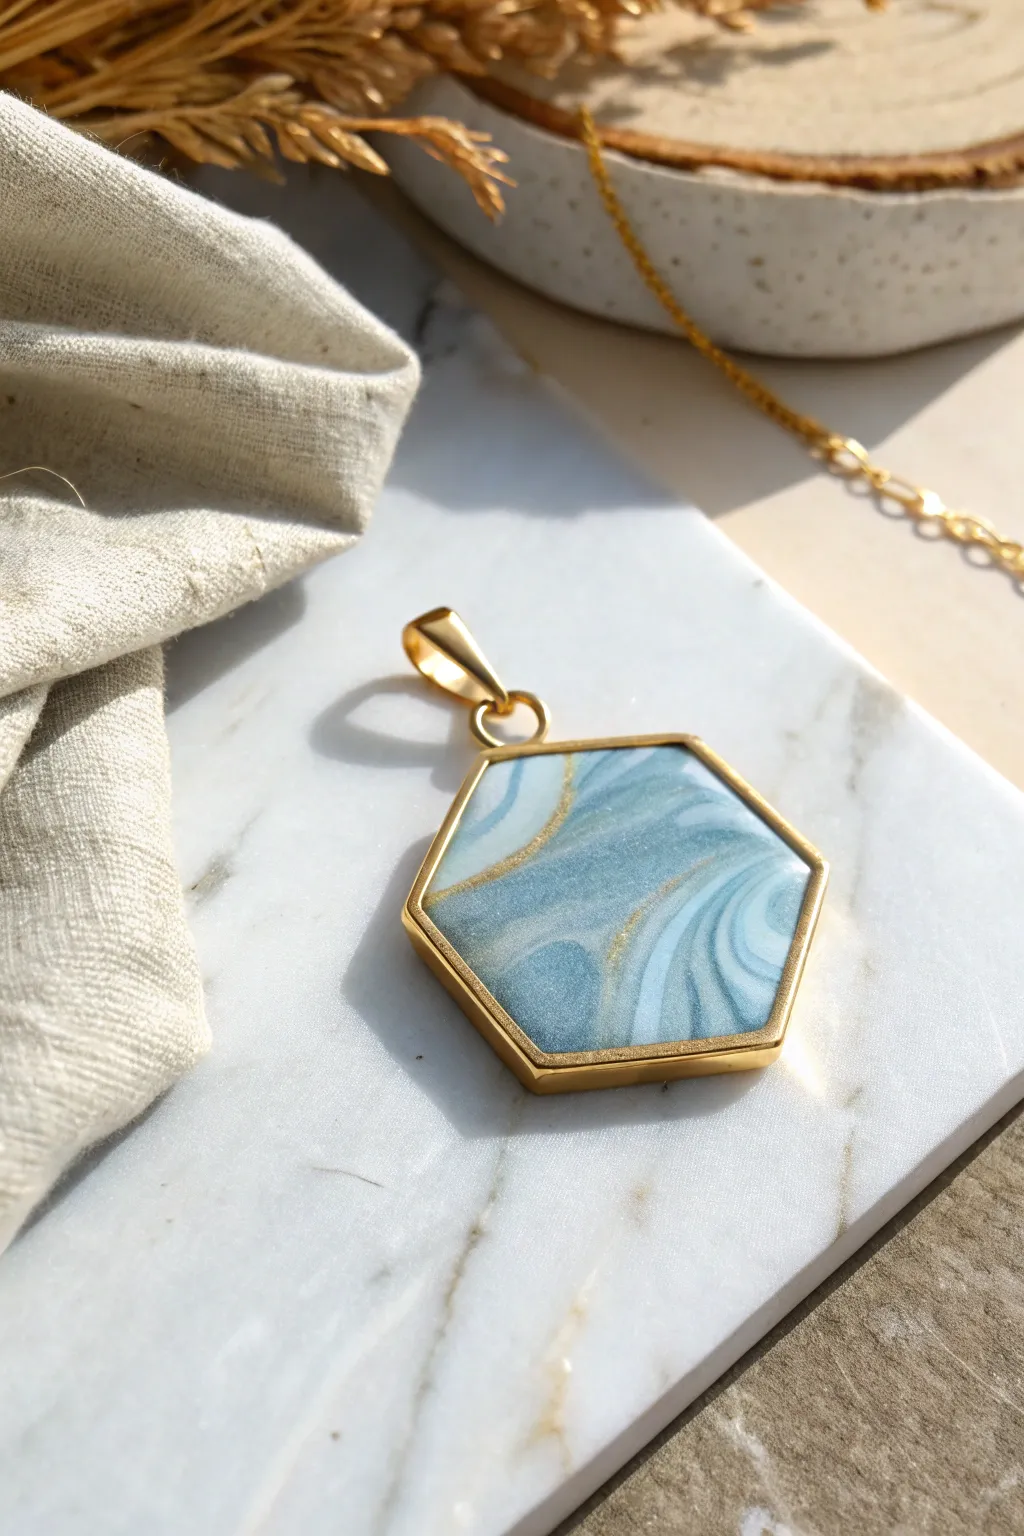
Create a sophisticated faux stone pendant using the simple technique of swirling liquid polymer clay. This project combines soft blues and whites with elegant gold veining, all encased in a geometric gold bezel for a high-end jewelry look.
Step-by-Step Guide
Materials
- Open-back gold bezel frame (hexagon shape)
- Liquid polymer clay (White, Translucent, Blue)
- Pearl ex powder or mica powder (Gold)
- UV resin tape or sturdy packing tape
- Fine detail tool or toothpick
- UV resin (clear)
- UV lamp
- Small mixing cups or silicone palette
- Jewelry pliers and jump rings
- Heat gun or lighter (optional)
Step 1: Preparation
-
Seal the bezel:
Cut a piece of UV resin tape slightly larger than your hexagon bezel. Press the bezel firmly onto the sticky side of the tape, rubbing along the edges to ensure a tight seal prevents leakage. -
Mix your colors:
In a small mixing cup, tint a portion of white liquid polymer clay with a tiny drop of blue alcohol ink or blue liquid clay to achieve a soft sky blue. Prepare a separate blob of plain white and a small amount of translucent liquid clay. -
Prepare the gold accent:
Mix a small amount of gold mica powder into clear or translucent liquid clay until it forms a rich, metallic paste. Alternatively, you can use pre-made gold liquid clay.
Step 2: Creating the Design
-
Base layer application:
Squeeze a small amount of the light blue mixture into the corners of the bezel. Follow this by adding drops of the plain white liquid clay in the center and gaps. -
Swirling the marble:
Take your fine detail tool or toothpick and gently drag it through the wet clays. Create curved, organic lines rather than mixing them completely together; you want distinct streaks of color to endure. -
Adding gold veins:
Dip the very tip of your tool into the gold mixture. Drag fine, jagged lines through the blue and white marble, mimicking the natural fractures found in agate stones. -
Settling the clay:
Let the piece sit for about 5 to 10 minutes. This allows the liquid clay to self-level and smooth out any peaks created by the tool. -
Baking:
Place the taped bezel onto a baking tile or heat-safe surface. Bake according to your specific liquid polymer clay’s instructions, usually around 275°F (135°C) for 15-20 minutes.
Sticky Situation?
If clay leaks under the bezel during baking, let it cool completely. Then, gently scrape the excess off the metal frame with a craft knife before adding the final resin dome.
Step 3: Finishing Touches
-
Cooling and removal:
Once baked, remove the piece from the oven and carefully peel off the tape from the back once the metal is cool enough to touch. -
Correcting the back:
If there is any sticky residue on the back, use a little rubbing alcohol to clean it. If the back texture is rough, apply a thin layer of UV resin to the back and cure it under the lamp for a smooth finish. -
Sealing the front:
Apply a generous dome of clear UV resin over the top of the baked clay. Spread it to the very edges of the gold frame using a toothpick. -
Pop bubbles:
Pass a lighter or heat gun quickly over the wet resin to pop any surface micro-bubbles for a glass-like finish. -
Final cure:
Place the pendant under a UV lamp for 2-3 minutes until the surface is rock hard and no longer tacky. -
Assembly:
Use jewelry pliers to open a gold jump ring. Thread it through the loop at the top of the bezel and attach your preferred bail or chain.
Adding More Depth
For a 3D stone effect, pour a thin layer of clear liquid clay first, bake it, then add your colored swirls on top. The separation creates incredible visual depth.
Now you have a stunning custom stone pendant that looks remarkably high-end


Poured Mold Earrings in Simple Shapes
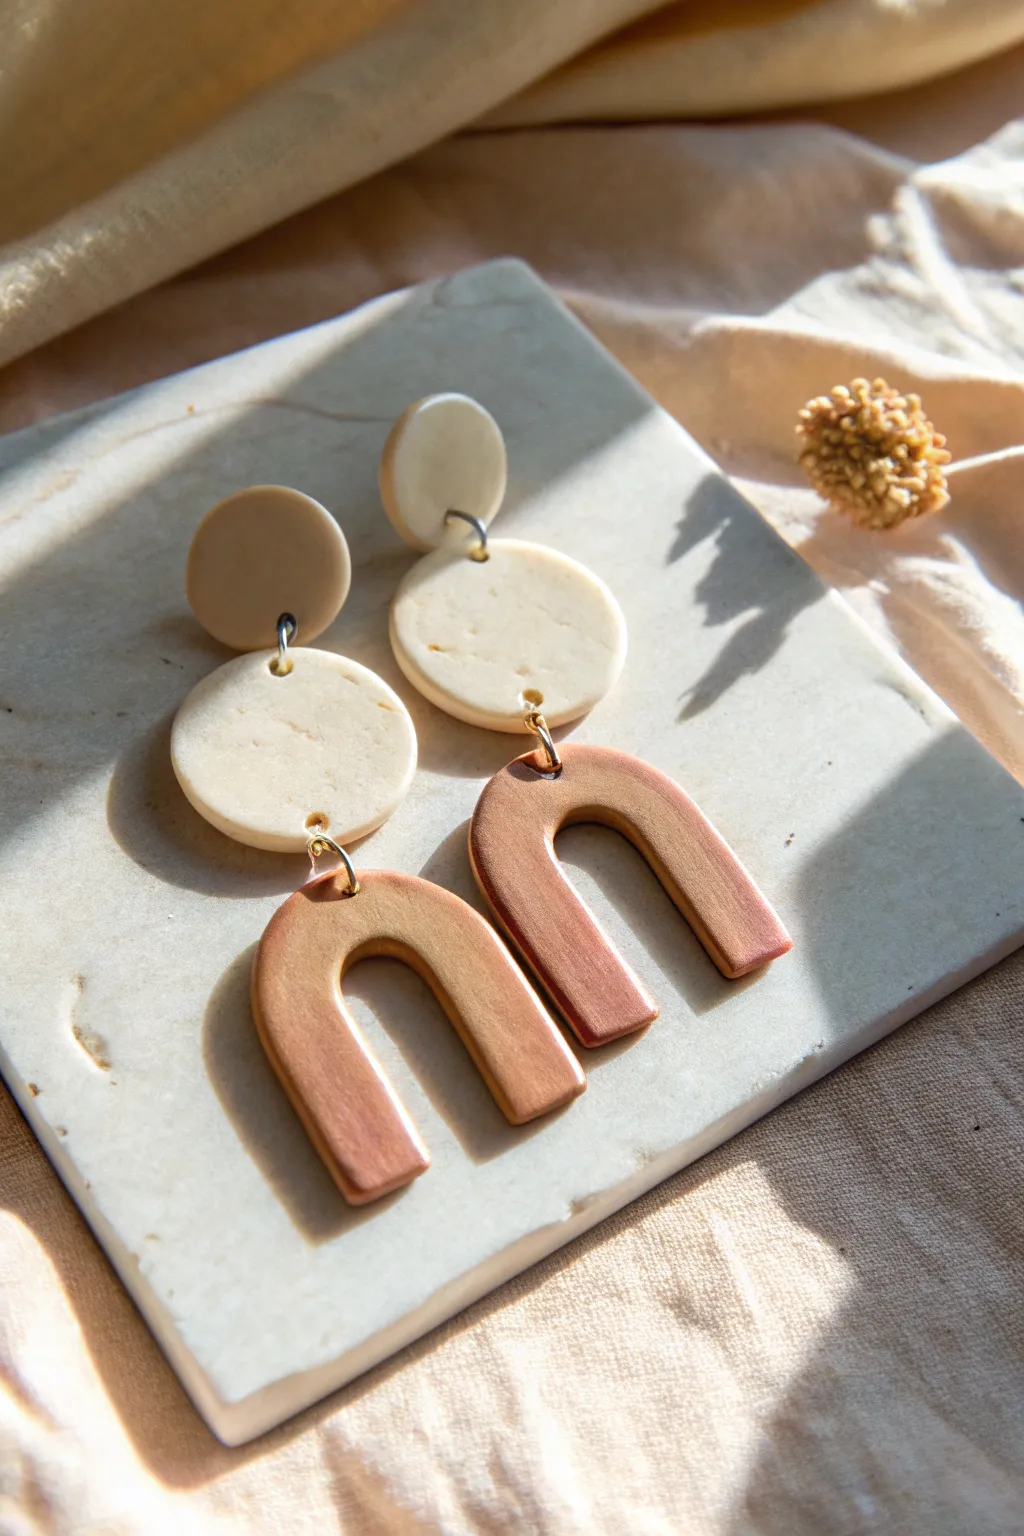
These elegant earrings combine the organic look of speckled stone with the sophisticated sheen of metallic copper. By pouring liquid polymer clay into simple molds, you can achieve a flawless, smooth finish that mimics high-end resin jewelry without the mess.
Step-by-Step Tutorial
Materials
- Liquid polymer clay (Translucent or White base)
- Alcohol inks (White, Brown/Sepia)
- Fine glitter or spices (like nutmeg) for speckling
- Mica powder (Copper or Rose Gold)
- Silicone earring mold (Circles and Arch/U-shapes)
- UV resin or gloss glaze (optional for finish)
- Jewelry pliers (flat nose and round nose)
- Jump rings (gold or brass)
- Earring posts and backs
- Superglue or liquid clay for attaching posts
- Toothpicks or needle tool
- Small silicone mixing cups
- Oven or craft heat tool
Step 1: Mixing the Liquid Clay
-
Prepare the Stone Mix:
In your first mixing cup, pour a base of liquid polymer clay. If using translucent, add a few drops of white alcohol ink to make it opaque but milky. -
Add Texture:
To create the faux stone look, sprinkle in a tiny pinch of fine glitter, black pepper, or even nutmeg. Stir gently with a toothpick to distribute the specks evenly without creating too many bubbles. -
Prepare the Metallic Mix:
In a separate cup, pour clear or translucent liquid clay. Add a generous amount of copper or rose gold mica powder. -
Stir for Shimmer:
Mix the metallic clay thoroughly. You want the mica to be fully incorporated so the pearlescent swirl is visible. If the color feels too sheer, add a tiny drop of brown alcohol ink to deepen it. -
Let it Rest:
Allow both mixtures to sit for about 10-15 minutes. This helps any air bubbles introduced during stirring rise to the surface and pop.
Step 2: Pouring and Curing
-
Fill the Stone Shapes:
Carefully pour the speckled white mixture into the small circle cavities (closest to the ear) and the medium circle cavities for the middle section. -
Fill the Metallic Shapes:
Pour the copper metallic mixture into the U-shaped arch cavities. Fill them right to the brim, but be careful not to overfill, or you’ll have jagged edges to clean up later. -
Pop Air Bubbles:
Inspect the molds closely. If you see trapped bubbles, especially in the corners of the U-shape, gently pop them with a needle tool or pass a lighter quickly over the surface. -
Bake Phase 1:
Place the silicone mold on a baking sheet and bake according to your liquid clay’s package instructions (usually around 275°F or 135°C for 15–20 minutes). -
Cool Down:
Remove the mold from the oven and let it cool completely before attempting to demold. Liquid clay is flexible when hot and can warp if removed too early.
Bubble Trouble?
If stubborn bubbles won’t pop with a lighter, put the filled mold in the oven for just 2 mins, remove, let bubbles rise, pop, then bake fully.
Step 3: Assembly
-
De-mold the Pieces:
Gently flex the silicone mold to pop out your cured pieces. They should feel rubbery but firm. -
Drill Holes:
If your mold didn’t have built-in posts for holes, use a small hand drill or pin vise to drill holes at the top and bottom of the middle circle, the bottom of the top circle, and the top of the arch. -
Attach the Posts:
Turn the smallest top circles over. Apply a small dot of superglue or liquid clay to the flat pad of an earring post and press it against the back of the clay. -
Secure the Backs:
If using liquid clay to attach the post, you will need to bake this top piece one more time for 10 minutes to bond the metal to the clay permanent. -
Connect the Links:
Open a jump ring using two pairs of pliers (twist sideways, don’t pull apart). Thread it through the hole in the U-shape and the bottom hole of the middle circle. -
Close the Ring:
Twist the jump ring closed until the flush ends meet perfectly. Repeat this process to connect the middle circle to the top stud piece. -
Final Polish:
Wipe the surface with a soft cloth to remove any fingerprints and enhance the sheen of the metallic lower arch.
Marble Magic
Don’t fully mix the metallic mica powder. Leave streaks of clear gel visible for a stunning, dimensional swirling lava effect in the final piece.
Wear these lightweight beauties with pride, knowing you created that custom stone texture yourself


Marbled Swirl “Latte Art” Cabochons
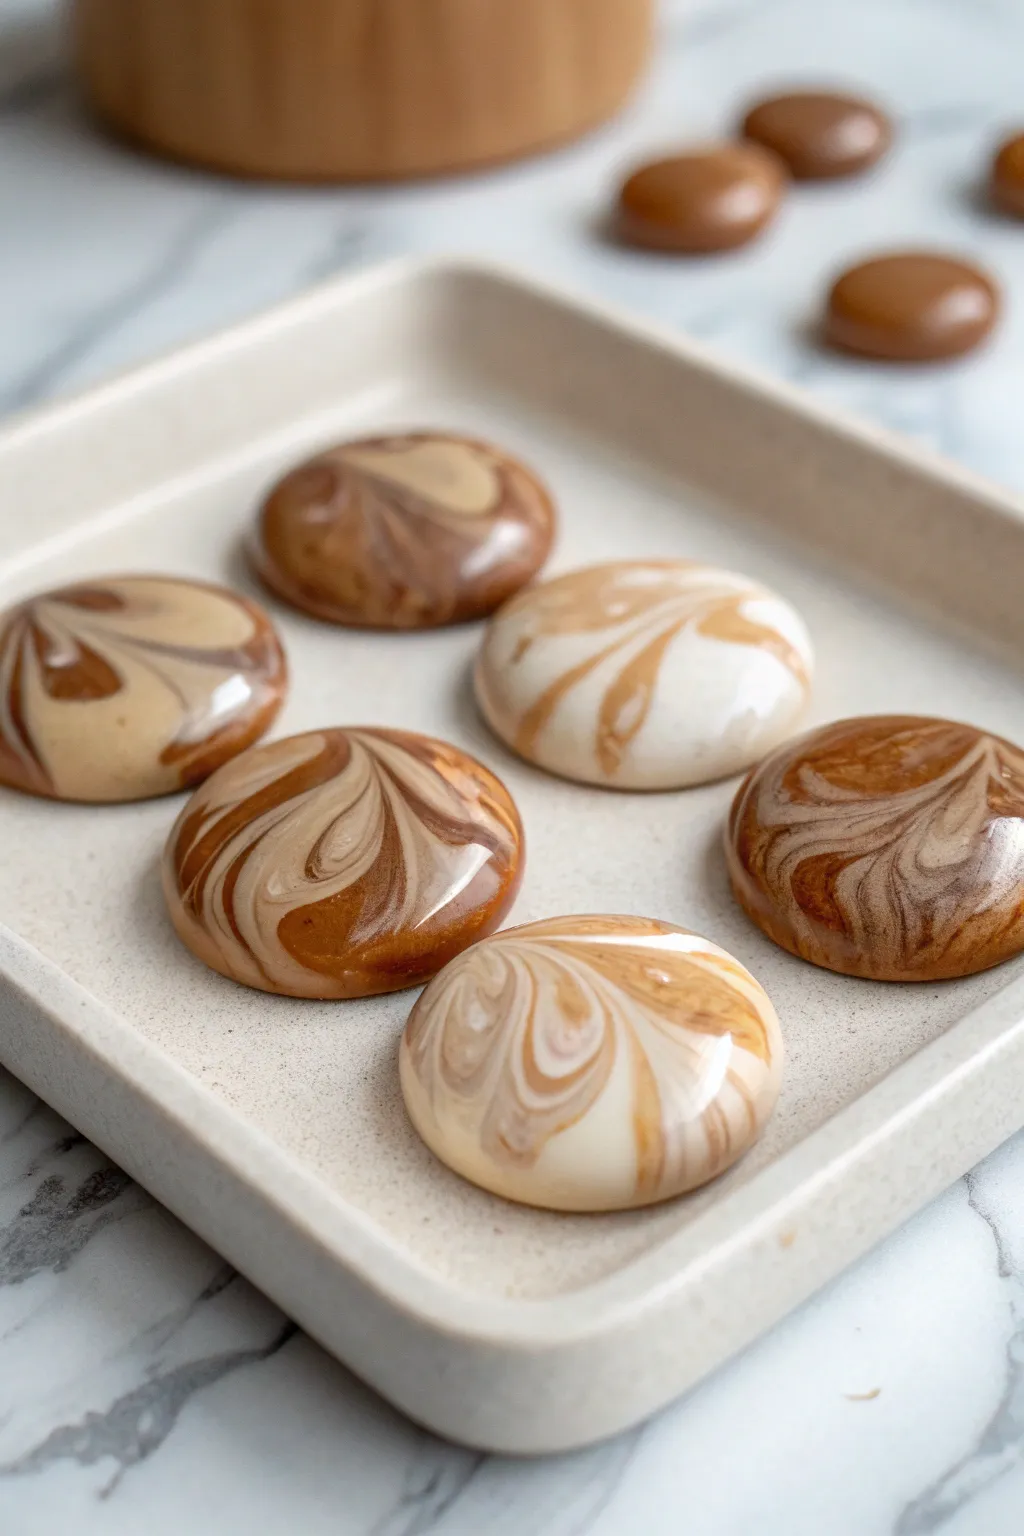
Capture the cozy elegance of your morning coffee in these glossy, swirl-patterned cabochons. By manipulating liquid polymer clay in earthy tones, you’ll create professional-looking components perfect for jewelry or magnets.
Step-by-Step Guide
Materials
- Liquid polymer clay (White, Translucent, Gold, and Brown)
- Alcohol inks (Espresso or Caramel colors)
- Silicone dome mold (approx. 1-inch cavities)
- Needle tool or toothpick
- Small mixing cups (silicone or disposable)
- Wooden stir sticks
- Heat gun or embossing tool
- Oven (dedicated to crafting)
Step 1: Color Preparation
-
Mix the Base Coffee Shade:
Pour about a tablespoon of translucent liquid clay into a small cup. Add a drop or two of brown alcohol ink to tint it into a rich espresso color. Stir thoroughly until the color is uniform. -
Create the Crema Tone:
In a second cup, mix white liquid clay with a tiny amount of gold liquid clay. This creates a warm, creamy off-white that mimics micro-foam better than plain white. -
Prepare the Caramel Tint:
For the medium tone seen in the swirls, mix a small amount of the espresso mixture with some of the white mixture to create a soft caramel tan. -
Check Consistency:
Ensure all three mixtures have a similar viscosity, like thick honey. If one is too runny, let it sit for a few minutes; if too thick, add a drop of clay thinner.
Muddied Colors?
If your swirls turn gray or brown immediately, your liquid clay is too thin. Let mixed clay sit open for 20 mins to thicken before pouring.
Step 2: Pouring and Swirling
-
Fill the Mold Cavity:
Choose a cavity in your silicone mold. Pour your dark espresso color to fill the mold about 90% of the way full. This acts as your canvas. -
Drop in Contrast Colors:
Carefully drip 2-3 drops of the white ‘crema’ mixture onto the surface of the dark clay. Follow this with 1-2 drops of the caramel tint right next to or on top of the white. -
Begin the Swirl:
Insert just the very tip of your needle tool into the clay. Drag the tool gently through the dots of color in a figure-eight or ‘S’ motion. -
Refine the Pattern:
Continue dragging the tool from the center of the colored dots outward to create wispy tails, mimicking the look of milk foam dispersing in coffee. -
Don’t Overmix:
Stop swirling sooner than you think you need to. Overworking the clay will muddy the colors and turn everything beige instead of distinct marbled layers. -
Pop Bubbles:
Let the mold sit for 10 minutes so air bubbles rise to the surface. Pass a heat gun quickly over the top to pop them.
Step 3: Baking and Finishing
-
Bake the Pieces:
Place the mold on a baking sheet and bake according to the manufacturer’s instructions for your specific brand of liquid clay, usually around 275°F (135°C) for 15-20 minutes. -
Cool Completely:
Remove the mold from the oven and let it cool completely before touching. Liquid clay is very flexible when hot and can warp if demolded too soon. -
Demold Carefully:
Pop the cabochons out by pushing from the bottom of the silicone mold. They should release easily with a glossy finish. -
Optional Glazing:
While liquid clay cures shiny against silicone, if you want an extra ‘wet’ look, apply a thin layer of UV resin or clear gloss varnish to the top. -
Trim Edges:
If there is any thin flashing around the base of the cabochon where the clay met the mold edge, carefully trim it away with small scissors or a craft knife.
Turn Them Into Magnets
Glue a strong neodymium magnet to the flat back of each cooled cabochon to create a stunning set of refrigerator magnets or office decor.
Enjoy styling these warm, coffee-inspired gems on your next creative project


Ombre “Icicle” Dangles
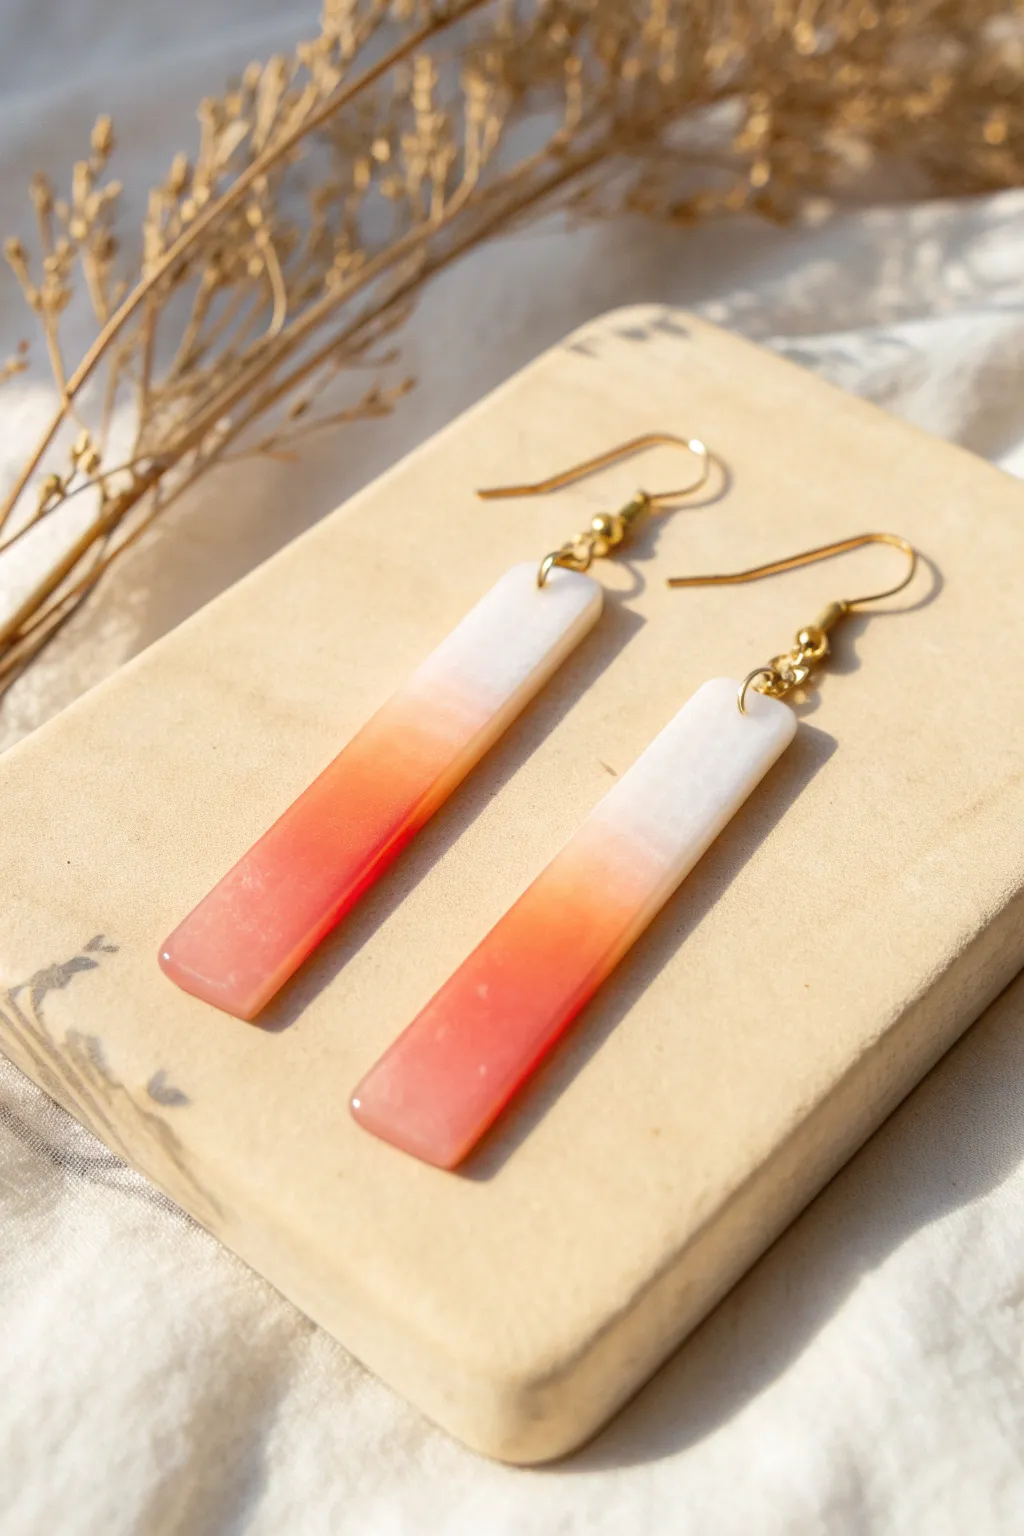
Capture the soft glow of dusk with these elegant, long dangle earrings featuring a seamless gradient. The blend of opaque white into translucent coral creates a sophisticated, glass-like finish that feels incredibly light to wear.
How-To Guide
Materials
- Liquid polymer clay (Translucent)
- Liquid polymer clay (White – Opaque)
- Alcohol inks (Coral red, Orange)
- Silicone bar mold (long rectangle)
- Toothpick or needle tool
- UV resin (optional, for extra gloss)
- UV lamp (if using resin)
- 2 Gold fishhook ear wires
- 4 Gold jump rings (small, approx 4-5mm)
- Jewelry pliers (round nose and flat nose)
- Hand drill or pin vibe with small bit
- Heat gun (optional)
Step 1: Mixing the Gradient
-
Prepare the Translucent Base:
Pour a small amount of translucent liquid polymer clay into a small mixing cup or a palette well. -
Tint the Clay:
Add one drop of coral alcohol ink and a tiny touch of orange to the translucent liquid. Stir thoroughly until the color is uniform and vibrant. -
Prepare the White:
In a separate well or cup, pour out your opaque white liquid clay. It needs no tinting, as it will serve as the ‘snowy’ top of the icicle. -
Create a Middle Tone:
I like to mix a third intermediate shade for a smoother transition. Take a small amount of your coral mix and blend it with an equal part of the white liquid clay.
Clean Edges Trick
If you overfilled the mold and have ragged edges after baking, use a nail file or fine-grit sandpaper to smooth the sides before adding the gloss coat.
Step 2: Pouring Phase
-
Fill the Bottom:
Squeeze or drip the translucent coral mixture into the bottom third of your silicone bar mold. -
Fill the Middle:
Add the intermediate mixture into the middle third of the mold, letting it touch the coral section. -
Fill the Top:
Fill the remaining top third of the mold with the plain white liquid clay. -
Blend the Seams:
Take a needle tool or toothpick and very gently drag it back and forth across the lines where the colors meet. Don’t overmix; you just want to blur the hard line. -
Level and Tap:
Tap the mold gently on your work surface to release any trapped air bubbles and ensure the liquid settles evenly. -
Pop Bubbles:
If stubborn bubbles remain on the surface, quickly pass a heat gun or lighter flame over top to pop them.
Step 3: Baking & Assembly
-
Bake:
Bake the mold according to the liquid clay manufacturer’s instructions (usually around 275°F/135°C for 15-30 minutes). -
Cool and Demold:
Allow the mold to cool completely before flexing it to pop out your hardened clay bars. They should feel flexible but firm. -
Gloss Coat (Optional):
For a glass-like shine, apply a thin layer of UV resin to the front face and cure under a UV lamp for 60 seconds. -
Drill Holes:
Mark a spot in the center of the white end, about 2-3mm from the edge. Use a hand drill or pin vise to carefully bore a hole. -
Attach Jump Rings:
Using two pairs of pliers, twist open a jump ring and thread it through the drilled hole. -
Add a Second Ring:
Close the first ring, then add a second jump ring linked to the first. This double-ring technique helps the long bar dangle with more movement. -
Finish Hardware:
Open the loop on your fishhook ear wire, slide it onto the top jump ring, and close it securely.
Sparkle Upgrade
Mix ultra-fine holographic glitter into the translucent coral layer before pouring. It mimics sunlight hitting ice.
Enjoy wearing these lightweight, luminous drops that look difficult to make but come together quickly

What Really Happens Inside the Kiln
Learn how time and temperature work together inside the kiln to transform clay into durable ceramic.
Confetti Sprinkle Fill for Jewelry
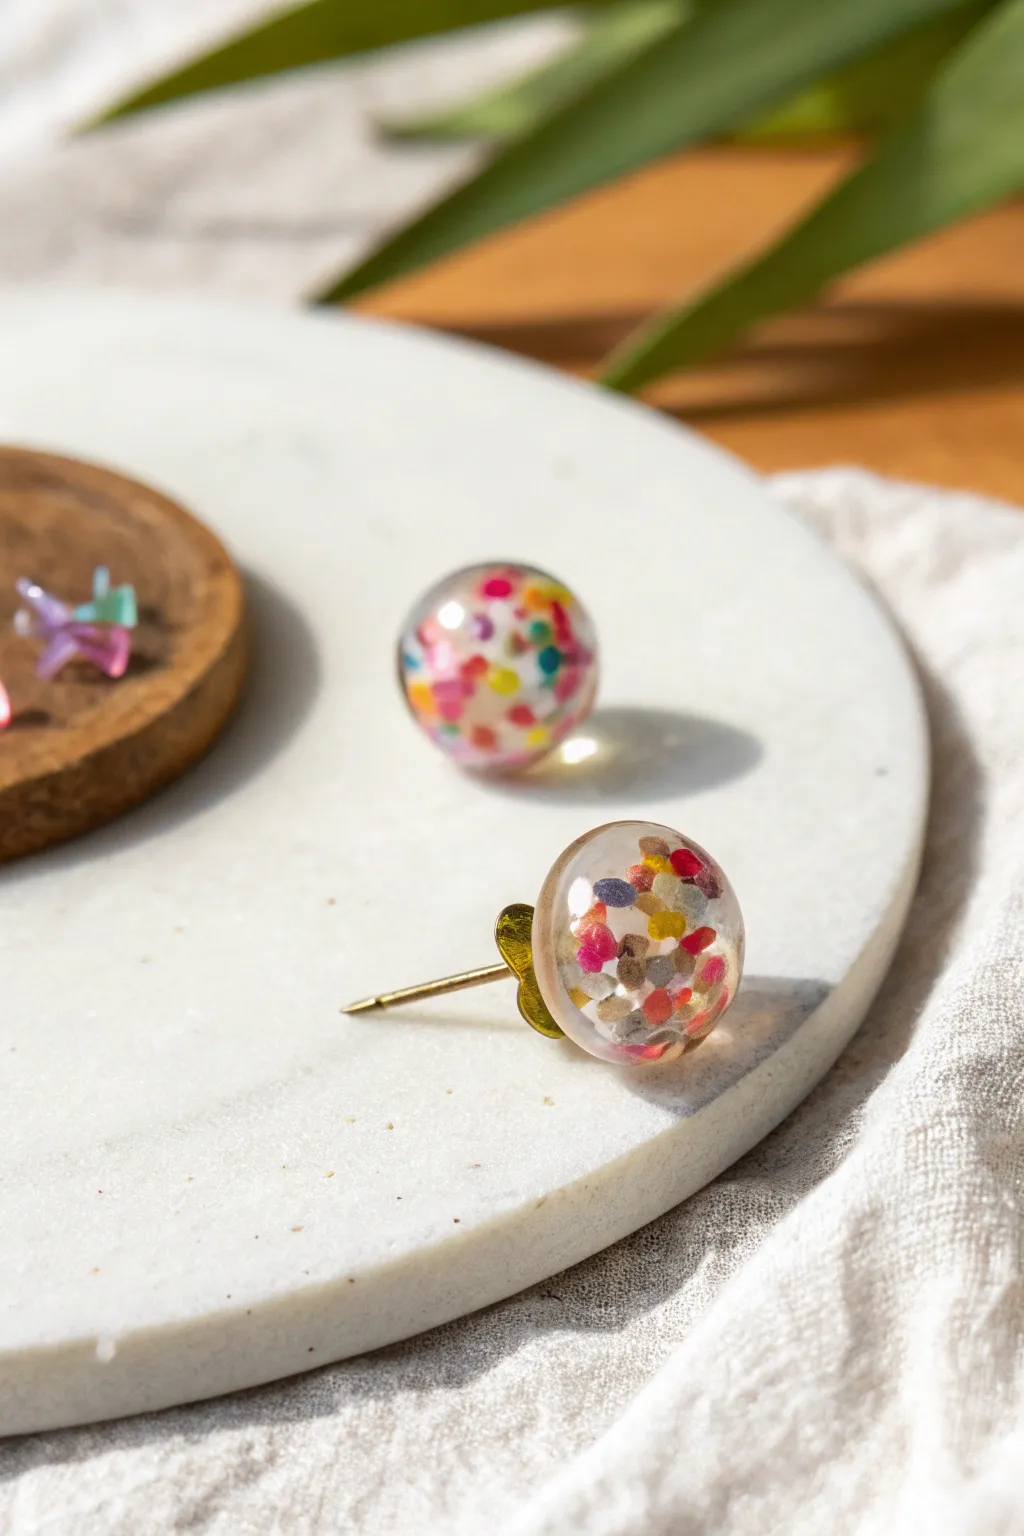
These delightful confetti stud earrings capture a burst of color suspended in clarity, perfect for adding a playful touch to any outfit. Using clear liquid polymer clay and tiny speckles of color, you’ll create durable, glass-like spheres that mimic miniature snow globes without the water.
Step-by-Step Guide
Materials
- Clear liquid polymer clay (high transparency needed)
- Confetti sprinkles (polymer clay slices) or pre-baked clay chips
- Silicone sphere mold (stud earring size, approx. 10-12mm)
- Earring stud posts with flat pads
- Gold or silver earring backs
- UV resin or strong jewelry adhesive (E6000)
- Toothpick or needle tool
- Heat gun or lighter
- Oven thermometer
- Baking tile or tray
Step 1: Preparing the Confetti Mix
-
Select your palette:
Gather your tiny polymer clay sprinkles. If you don’t have pre-made ones, you can chop up very thin sheets of baked polymer clay into tiny, irregular shards. Aim for a bright mix of pink, yellow, blue, and orange. -
Pre-mix the liquid clay:
In a small silicone cup or on a non-porous palette, pour a small amount of clear liquid polymer clay. Stir it gently to ensure the medium is consistent, as some settling can occur in the bottle. -
Add the confetti:
Sprinkle your colorful chips into the liquid clay puddle. You want a high density of confetti so the colors are vibrant, but ensure every chip is fully coated in the liquid. -
Let it rest:
Allow the mixture to sit for about 10 minutes. This lets air bubbles rise to the surface naturally and ensures the confetti is fully saturated.
Heat Gun Clarity Hack
Using a heat gun primarily builds clarity. Hit the liquid clay with high heat (staying moving constantly!) just before baking to make it crystal clear.
Step 2: Filling the Mold
-
Pour the base layer:
Pour a tiny drop of plain clear liquid clay into the bottom of your silicone sphere mold cavities. This creates a smooth outer window for the confetti to show through. -
Add the confetti mixture:
Using a toothpick, scoop your pre-mixed confetti slurry into the mold. Fill it almost to the top rim. -
Top off with clear:
Add a final drop of clear liquid clay to create a slight dome effect at the top of the mold (which will be the back of the earring). This accounts for the slight shrinkage that happens during baking. -
Remove bubbles:
Tap the mold gently on your work surface to dislodge trapped air. I also like to quickly pass a heat gun over the surface to pop any stubborn surface bubbles.
Step 3: Baking and Assembly
-
Bake the pieces:
Place the mold on your baking tile. Bake according to the liquid clay manufacturer’s instructions—usually around 275°F (135°C) for 15-20 minutes. Use an oven thermometer to ensure the heat is accurate. -
High heat finish:
For maximum clarity, some artists prefer to bump the temperature up to 300°F (149°C) for a shorter time (approx 10 mins), but watch closely to avoid yellowing. -
Cool down:
Remove from the oven and let the mold cool completely before attempting to demold. Removing them while hot can warp the shape or cloud the finish. -
Pop them out:
Gently flex the silicone mold to pop out your hard, glossy spheres. -
Prepare the posts:
Rough up the flat pad of your earring post with a nail file or sandpaper. This texture helps the glue adhere better. -
Attach the hardware:
Apply a dab of strong jewelry glue or a drop of UV resin to the flat back of the sphere. Press the earring post firmly into place. -
Cure or dry:
If using UV resin, cure under a UV lamp for 60 seconds. If using glue, let it set undisturbed for at least 24 hours for a permanent bond.
Cloudy Output?
If your spheres emerge cloudy, the oven wasn’t hot enough. Liquid clay needs distinctively high heat to clarify. Re-bake at a slightly higher temp to fix.
Now you have a vibrant pair of custom studs ready to catch the light
Faux Enamel Color Blocking on Studs
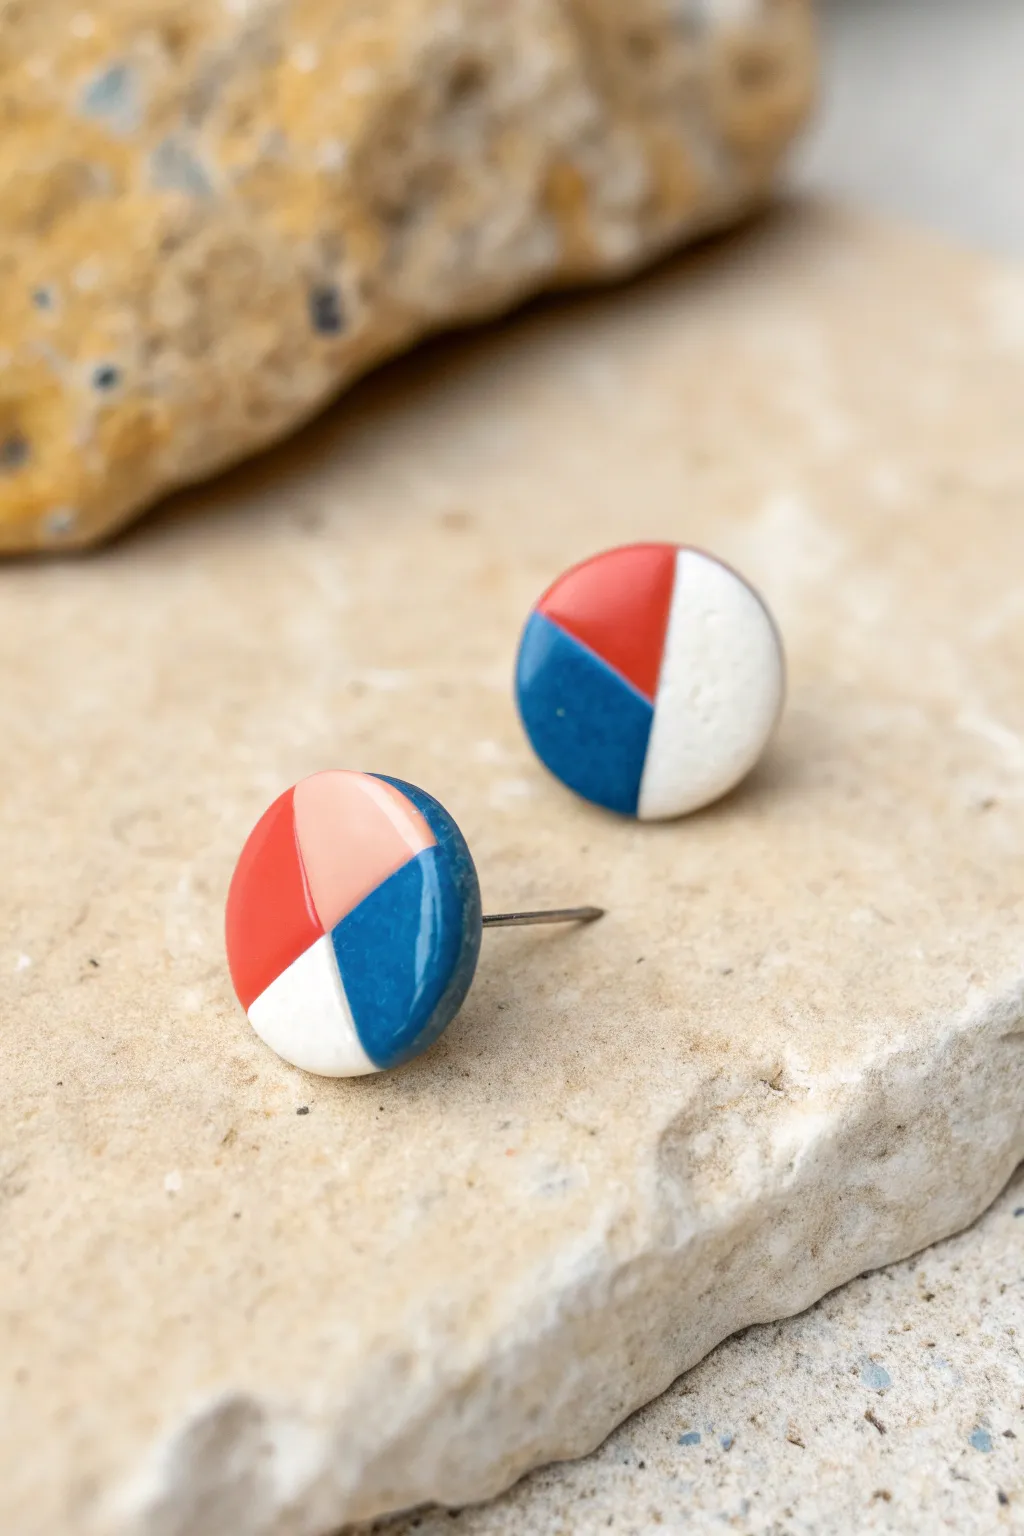
Achieve the high-shine, sophisticated look of enamel jewelry using nothing more than liquid polymer clay. These stud earrings feature crisp geometric sections in a classic color palette, creating a modern accessory that pops.
Step-by-Step Tutorial
Materials
- Liquid polymer clay (Red, Blue, White, Clear)
- Small amount of solid polymer clay (in any neutral color like white or beige) for the base
- Circle clay cutter (approx. 10-12mm)
- Earring stud posts with flat distinct pads
- Sharp craft knife or tissue blade
- Fine-point needle tool or toothpick
- Ceramic tile or glass work surface
- Heat gun (optional)
- Oven thermometer
- UV resin or gloss glaze (optional for extra shine)
Step 1: Creating the Base
-
Condition the base clay:
Start by conditioning a small amount of solid polymer clay until it is soft and pliable. This will act as the ‘canvas’ for your liquid clay design. -
Roll out the sheet:
Roll the clay into a sheet approximately 2mm thick. You want it substantial enough to hold the post but light enough for comfortable wear. -
Cut the circles:
Use your small circle cutter to punch out two identical rounds. Ensure the edges are clean; if there are any ragged bits, smooth them gently with your fingertip. -
Attach the posts:
Gently press the flat pad of an earring post into the back of each clay circle. To secure it, you can add a tiny drop of liquid clay or bake the post directly into the raw clay. -
Initial bake:
Bake these base circles according to the manufacturer’s instructions for the solid clay (usually 275°F/135°C for 15-30 minutes). Let them cool completely before moving to the liquid clay phase.
Step 2: Color Blocking
-
Plan your design:
Visualize a geometric pattern on the circle. In the example, we are using a pie-chart style division. You can lightly score lines onto the baked clay surface with a needle tool to guide your pouring. -
Prepare liquid clay:
Stir your liquid polymer clay colors well. If you want a custom shade, like the soft pink seen in the image, mix a tiny drop of red into a larger amount of white liquid clay on a palette. -
Outline the sections:
Using a needle tool dipped in liquid clay, or a very fine applicator tip, carefully outline the first color section. The surface tension of the liquid clay will help it stay within the boundaries if you go slowly. -
Flood the section:
Fill in the outlined area with the matching color. Use the needle tool to gently nudge the liquid to the edges without overflowing. -
Pop bubbles:
If you see tiny air bubbles trapped in the liquid, quickly graze them with a flame or heat gun, or pop them with your needle tool. -
Flash bake (Optional):
I usually like to bake the piece for 5-10 minutes between colors to ‘set’ the liquid. This prevents the wet colors from bleeding into each other if your hand shakes. -
Add remaining colors:
Repeat the outlining and flooding process for the blue, red, and white sections. Ensure the colored sections touch perfectly to create clean, sharp lines.
Color Bleeding?
If your liquid colors are running into each other, your clay might be too thin. Let the liquid clay sit on an open palette for 30 minutes to thicken slightly before applying.
Step 3: Finishing Touches
-
Create the dome:
Once the colors are applied and look flat and even, carefully add a layer of clear liquid clay over the entire top surface. This creates a domed effect. -
Final bake:
Bake the earrings again at the recommended temperature (often higher for liquid clay translucency, around 300°F/149°C, but check your specific brand) for 15-20 minutes. -
Cool down:
Remove from the oven and allow the studs to cool completely. The liquid clay will clarify as it cools. -
Resin top coat (Optional):
For a glass-like ‘faux enamel’ finish, apply a thin layer of UV resin to the top and cure under a UV lamp. This adds depth and extreme durability.
Needle Tool Trick
Wipe your needle tool clean with a paper towel between every single color adjustment. Even a tiny speck of blue on the tip can ruin your pristine white section.
Wear your new geometric studs with pride, knowing you created that perfect glossy finish yourself


The Complete Guide to Pottery Troubleshooting
Uncover the most common ceramic mistakes—from cracking clay to failed glazes—and learn how to fix them fast.
Drizzled Line Art and Dots
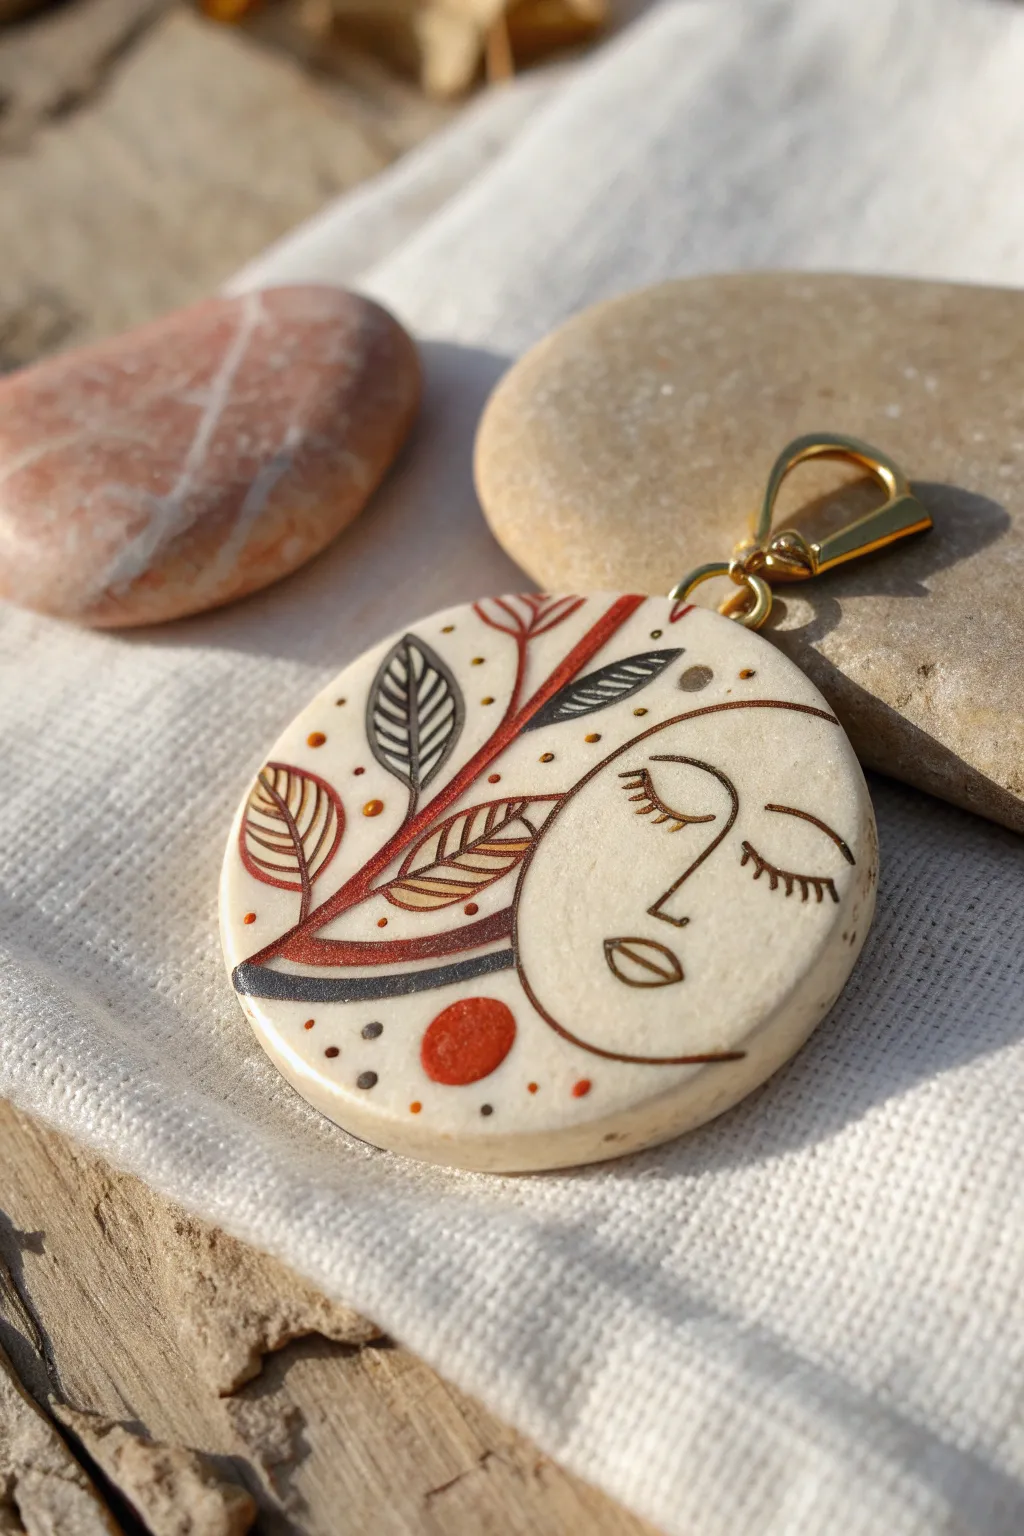
This project combines the smooth finish of liquid clay with precise line art to create a striking, mystical pendant. The warm earth tones and delicate facial features create a serene, nature-inspired accessory perfect for everyday wear.
Detailed Instructions
Materials
- White or beige polymer clay (solid)
- Liquid polymer clay (clear or translucent)
- Liquid polymer clay (red, brown/copper, black)
- Fine detail needle tool or dotting tools
- Round clay cutter (approx. 2 inches)
- Fine tip paint brushes (size 000 or 00)
- Gold or brass bail finding
- Jump ring
- Ceramic tile or glass work surface
- Oven for baking polymer clay
- UV resin (optional, for final seal)
- UV lamp (if using resin)
- Fine sandpaper (400-800 grit)
Step 1: Base Preparation
-
Condition the Clay:
Begin by conditioning your solid white or beige polymer clay until it is soft and pliable. Roll it out to a medium thickness, about 3-4mm, to ensure the pendant feels substantial but not heavy. -
Cut the Shape:
Using your round cutter, press firmly into the clay sheet to create a perfect circle. Gently release the clay from the cutter and place it on your baking tile. -
Smooth the Edges:
Before baking or decorating, run your finger lightly around the rim of the circle to smooth out any sharp edges or burrs left by the cutter. A smooth edge elevates the professional look. -
Initial Bake (Optional):
Some artists prefer to bake the base first to provide a hard surface for drawing. If you choose this route, bake according to the manufacturer’s instructions (usually 275°F/135°C for 15-30 minutes) and let it cool completely.
Step 2: Creating the Line Art
-
Drafting the Design:
Lightly sketch the moon face profile and the main branch line using a pencil directly on the cooled clay. This guide will help you place the facial features and leaves symmetrically. -
Preparing the Liquid Clay Palette:
Squeeze small amounts of your black, copper/brown, and deep red liquid clay onto a separate palette or tile. You want easy access to dipping your tools. -
Outlining the Face:
Using a very fine brush or a needle tool dipped in black liquid clay (or black acrylic paint if preferred for finer lines), carefully trace the profile of the face, the nose, and the lips. -
Adding Facial Details:
Paint the closed eye with delicate eyelashes. Keep your hand steady and use only the very tip of your tool for the thinnest possible lines. -
Drawing the Stem:
Draw a sweeping, curved line using a reddish-brown liquid clay that creates the main stem separating the floral side from the face side. Vary the pressure slightly to give the line organic thickness.
Smudged Lines?
Before baking, liquid clay can be wiped away with a Q-tip dipped in rubbing alcohol. If a line goes astray, clean it up immediately before it sets.
Step 3: Filling and Detailing
-
Creating Leaf Outlines:
Using the same dark outline color (black or dark grey), draw leaf shapes extending from the main stem. Create a mix of large and small leaves for visual interest. -
Filling the Leaves:
Now, use your red and metallic copper liquid clays to fill inside the leaf outlines. You can use a ‘drizzle and drag’ technique: place a tiny drop of liquid clay and drag it into the leaf shape with a needle tool. -
Adding Veins:
While the filled color is still wet, carefully drag a clean needle tool through the liquid clay to create negative space lines that mimic leaf veins, or paint new dark lines on top if the base feel dry enough. -
The Red Sun Dot:
Place a prominent drop of red liquid clay near the bottom curve of the face. Use a dotting tool to gently spread it into a perfect, flat circle. -
Decorative Dotted Accents:
Using a small dotting tool, dip into orange and grey liquid clay. Add tiny speckles around the leaves and the chin area to fill empty space and add texture.
Level Up: Metallic Pop
Mix a tiny pinch of mica powder into your clear liquid clay before applying. It adds a subtle shimmer that catches the light without overpowering the line art.
Step 4: Final Assembly
-
Final Bake:
Drizzle a very thin layer of clear liquid clay over the top if you want a self-leveling finish, or simply bake the piece again to set the liquid clay details. Follow package directions, usually baking for another 15-20 minutes. -
Finishing Touches:
Once fully cooled, lightly sand the edges if needed. If you didn’t use clear liquid clay, you can apply a layer of UV resin now for a high-gloss, domed finish and cure it under a UV lamp. -
Drilling the Hole:
Use a small hand drill or rotary tool to bore a hole near the top edge of the pendant. Ensure you aren’t drilling through any important design elements. -
Attaching Hardware:
Open a jump ring with two pairs of pliers (twist, don’t pull apart). Thread it through the drilled hole and attach your gold bail finding. Close the jump ring securely.
Once you’ve attached the bail, string it on a simple cord or chain to let your artwork take center stage.
Sea Glass-Style Pebbles and Beads
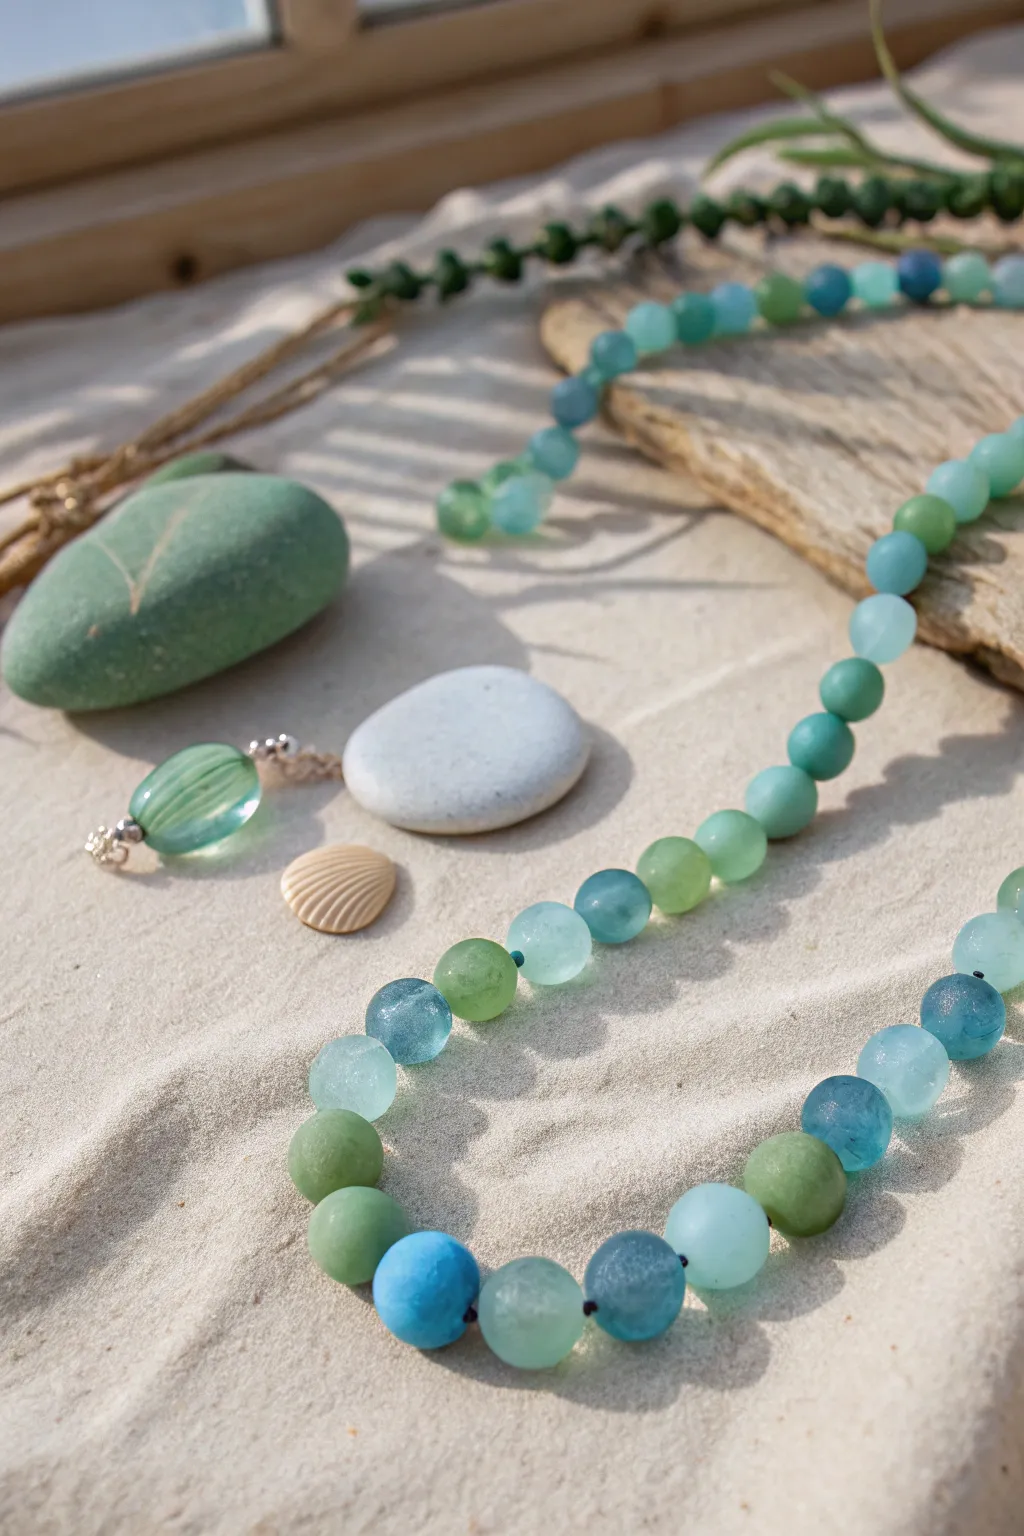
Capture the frosted, tumbled magic of sea glass without stepping foot on a beach. By combining liquid polymer clay with alcohol inks and a unique texturing method, you can create luminous, semi-translucent beads that glow with coastal charm.
Step-by-Step
Materials
- Translucent liquid polymer clay
- Alcohol inks (teal, sapphire blue, lime green, bottle green)
- Round silicone bead mold (various sizes)
- Silicone cabochon or pebble mold
- Heat gun
- Oven or craft oven (dedicated for clay)
- Fine grit sandpaper (400-800 grit)
- Small plastic cups for mixing
- Stirring sticks or toothpicks
- Beading wire or cord (for assembly)
- Salt or sugar (for texture method optional)
Step 1: Mixing the Colors
-
Prepare the liquid clay:
Pour a small amount of translucent liquid polymer clay into separate plastic mixing cups. You will need one cup for each shade of sea glass you intend to make. -
Add the tint:
Add just one drop of alcohol ink to your first cup. Sea glass is subtle, and liquid clay colors darken when baked, so start with a very light hand. -
Stir thoroughly:
Mix the ink into the clay slowly to avoid creating too many air bubbles. The color should look pale and milky at this stage. -
Create variations:
Repeat this process for your other colors. To get that authentic sea glass spectrum, try mixing a drop of blue with a tiny hint of green for a deep teal, or use yellow and blue for a soft aqua. -
Let it sit:
Allow the mixtures to sit for about 10-15 minutes. This helps any air bubbles introduced during stirring rise to the surface and pop.
Step 2: Molding and Baking
-
Fill the bead molds:
Carefully pour your tinted liquid clay into the round silicone bead molds. Fill them exactly to the top, as liquid clay can settle slightly. -
Fill the pebble molds:
Pour the remaining mixture into irregular pebble or cabochon molds to create the larger accent stones seen in the project. -
Remove bubbles:
Tap the mold gently on your work surface to dislodge trapped air. I also like to run a heat gun quickly over the surface to pop any stubborn surface bubbles. -
Bake the clay:
Place the molds in your preheated oven at the temperature recommended by your liquid clay manufacturer (usually around 275°F or 135°C). Bake for roughly 15-20 minutes initially to set them. -
Cool and demold:
Let the molds cool completely before popping the beads out. They will be quite clearer now, but too shiny to look like real sea glass.
Cloudy Perfection
To mimic the opaque white spots often found in aged sea glass, stir a tiny speck of white oil paint into your translucent mix, but don’t blend it fully.
Step 3: Creating the Frosted Finish
-
Tumbling method (Jar):
Place your baked beads into a plastic jar with a small handful of coarse salt or rock salt. Shake vigorously for several minutes to create micro-scratches. -
Sanding the pebbles:
For the larger flat pebbles, manually sand the surface with 400-grit wet/dry sandpaper. Sand within a bowl of water to keep the dust down and achieve a smoother matte finish. -
Matte finishing option:
If sanding feels too laborious, you can apply a very thin layer of matte varnish to the beads, though mechanical abrasion looks more authentic. -
Buffing edges:
Focus extra sanding attention on any sharp edges or seam lines from the mold. Real sea glass is characterized by its soft, rounded contours. -
Wash and dry:
Rinse the beads thoroughly to remove any salt residue or sanding dust, then dry them completely.
Wire Wrap Accents
Don’t just string the large pebble pendant; use sterling silver or copper wire to wrap the top chaotically for a piece that looks like flotsam found on the shore.
Step 4: Assembly
-
Drill the pebbles:
If your pebble molds didn’t have holes, use a hand twist drill to carefully bore a hole near the top of your large focal bead. -
Stringing the beads:
Arrange the round beads in a gradient pattern, transitioning from greens to teals to blues. String them onto durable beading wire. -
Adding texture:
Knot the cord between beads if you prefer a spaced-out look, or string them tightly together for a solid strand of color.
Now you have a stunning collection of beach treasures that will last forever without eroding

TRACK YOUR CERAMIC JOURNEY
Capture glaze tests, firing details, and creative progress—all in one simple printable. Make your projects easier to repeat and improve.
Glitter, Foil, and Mica Suspensions
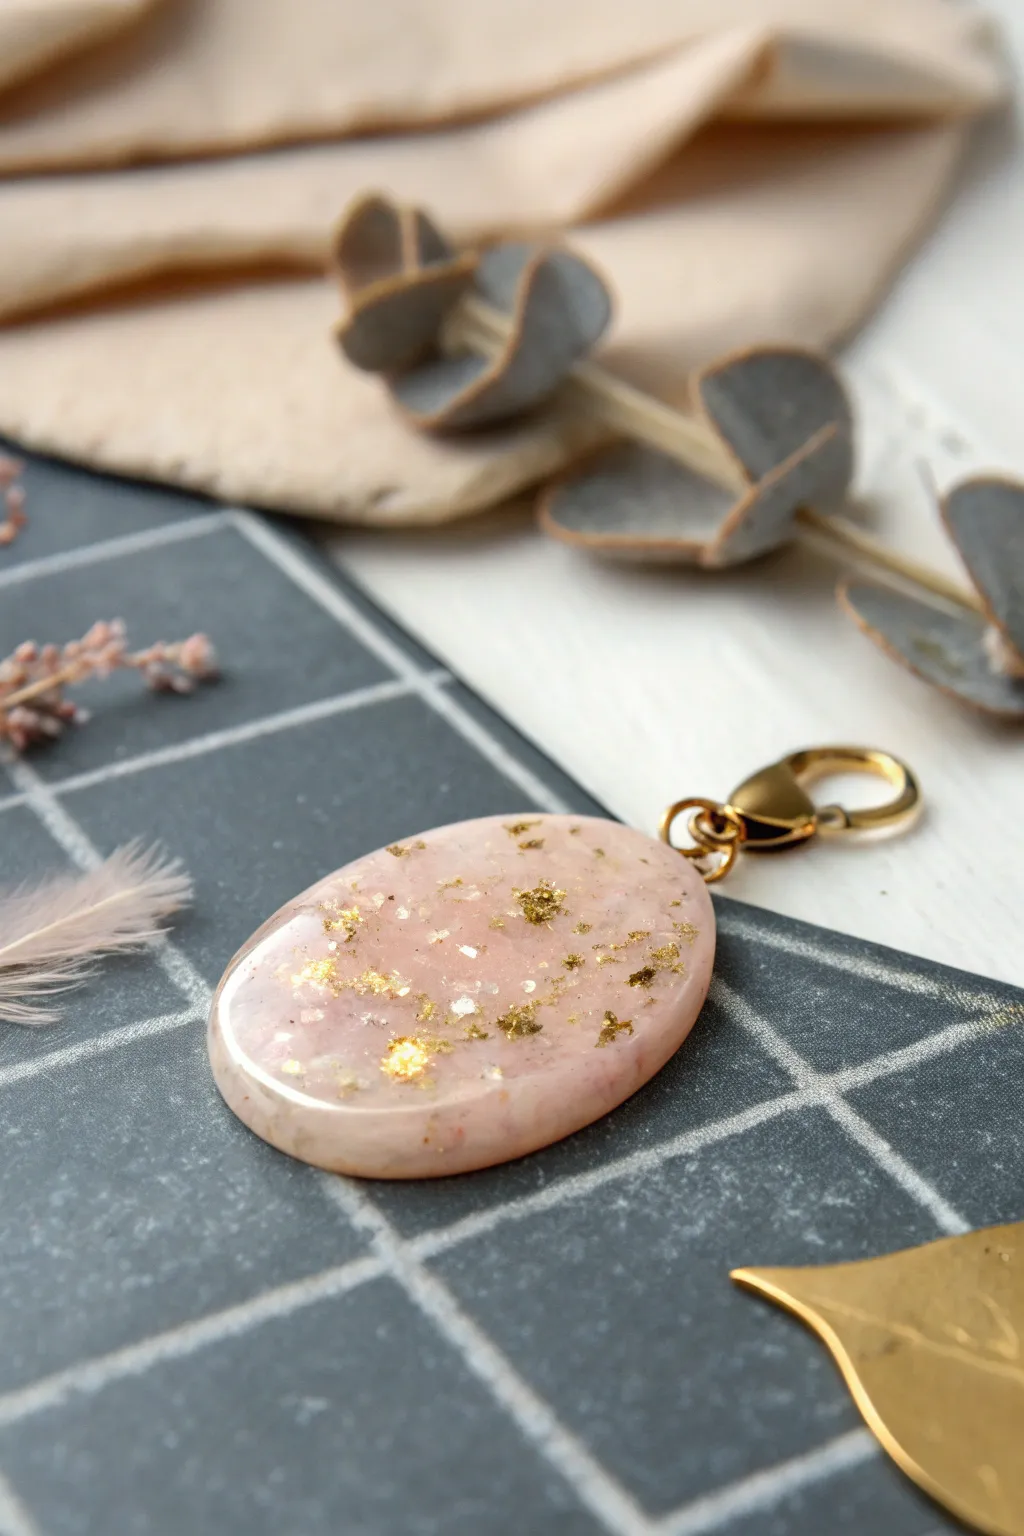
Capture the elegance of suspended gold with this delicate, rose-tinted oval pendant. The translucent finish creates a gentle depth, allowing the gold leaf flakes to appear as if they are floating within a soft pink haze.
Detailed Instructions
Materials
- Translucent liquid polymer clay
- Alcohol ink (rose or pale pink)
- Gold leaf flakes or gold foil pieces
- Oval silicone mold (flat, smooth finish)
- Gold jump ring (6-8mm)
- Gold lobster clasp
- UV resin (optional, for doming)
- UV lamp (if using resin)
- Toothpick or needle tool
- Small mixing cup
- Stirring stick
- Jewelry pliers
- Hand drill or pin vibe (if mold lacks a hole)
Step 1: Preparation and Mixing
-
Prepare the workspace:
Ensure your work surface is dust-free, as translucent clay shows every speck. Wipe out your silicone mold with a lint-free cloth or a piece of tape to remove any debris. -
Pour the base:
Pour a small amount of translucent liquid polymer clay into your mixing cup. You’ll need enough to fill the oval mold cavity comfortably. -
Tint the clay:
Add just one very small drop of rose alcohol ink to the liquid clay. Translucent clay tints quickly, so start with less than you think you need. -
Stir gently:
Mix the ink and clay slowly to avoid creating air bubbles. The color should be a soft, even blush pink. -
Prepare the gold:
Using tweezers or a dry brush, tear small, irregular pieces of gold leaf. You want a mix of tiny specks and slightly larger flakes for visual interest.
Step 2: Casting
-
First layer push:
Pour a thin layer of the pink liquid clay into the bottom of the mold, covering the surface completely. -
Add gold accents:
Gently place your gold leaf flakes onto this wet layer. Use a toothpick to submerge some pieces slightly while leaving others near the top. -
Fill the mold:
Pour the remaining tinted clay over the gold leaf until the mold is filled level with the top edge. Do not overfill. -
Pop bubbles:
Let the mold sit for 10-15 minutes so trapped air can rise. Gently pop any surface bubbles with a lighter or a needle tool. -
Bake:
Place the mold in your preheated oven according to the liquid clay manufacturer’s instructions (usually around 275°F or 135°C) for 15-20 minutes.
Cloudy Results?
If your transparent clay looks milky after baking, you likely didn’t bake it hot enough. Use an oven thermometer to ensure you hit the exact temp recommended.
Step 3: Finishing Touches
-
Cool down:
Remove the mold from the oven and let it cool completely before attempting to demold. The clay is fragile while hot. -
Demold:
Gently flex the silicone mold to release the hardened pendant. -
Dome (Optional):
If you want an extra glossy, glass-like finish, apply a thin layer of UV resin to the top surface and cure it under a UV lamp. -
Drill hole:
If your mold didn’t have a built-in post for a hole, use a small hand drill or pin vise to drill a hole near the top edge for the hardware. -
Attach hardware:
Using two pairs of jewelry pliers, twist open the gold jump ring. -
Connect clasp:
Thread the jump ring through the hole in the pendant and attach the gold lobster clasp. -
Close ring:
Twist the jump ring back into a closed position, ensuring the ends meet perfectly flush.
Make it Organic
Instead of a generic oval, create a custom organic shape by pouring liquid clay onto a glass tile and letting it spread naturally, then adding gold.
Enjoy wearing this shimmering piece of art that catches the light beautifully
Domed “Lens” Effects Over Patterns
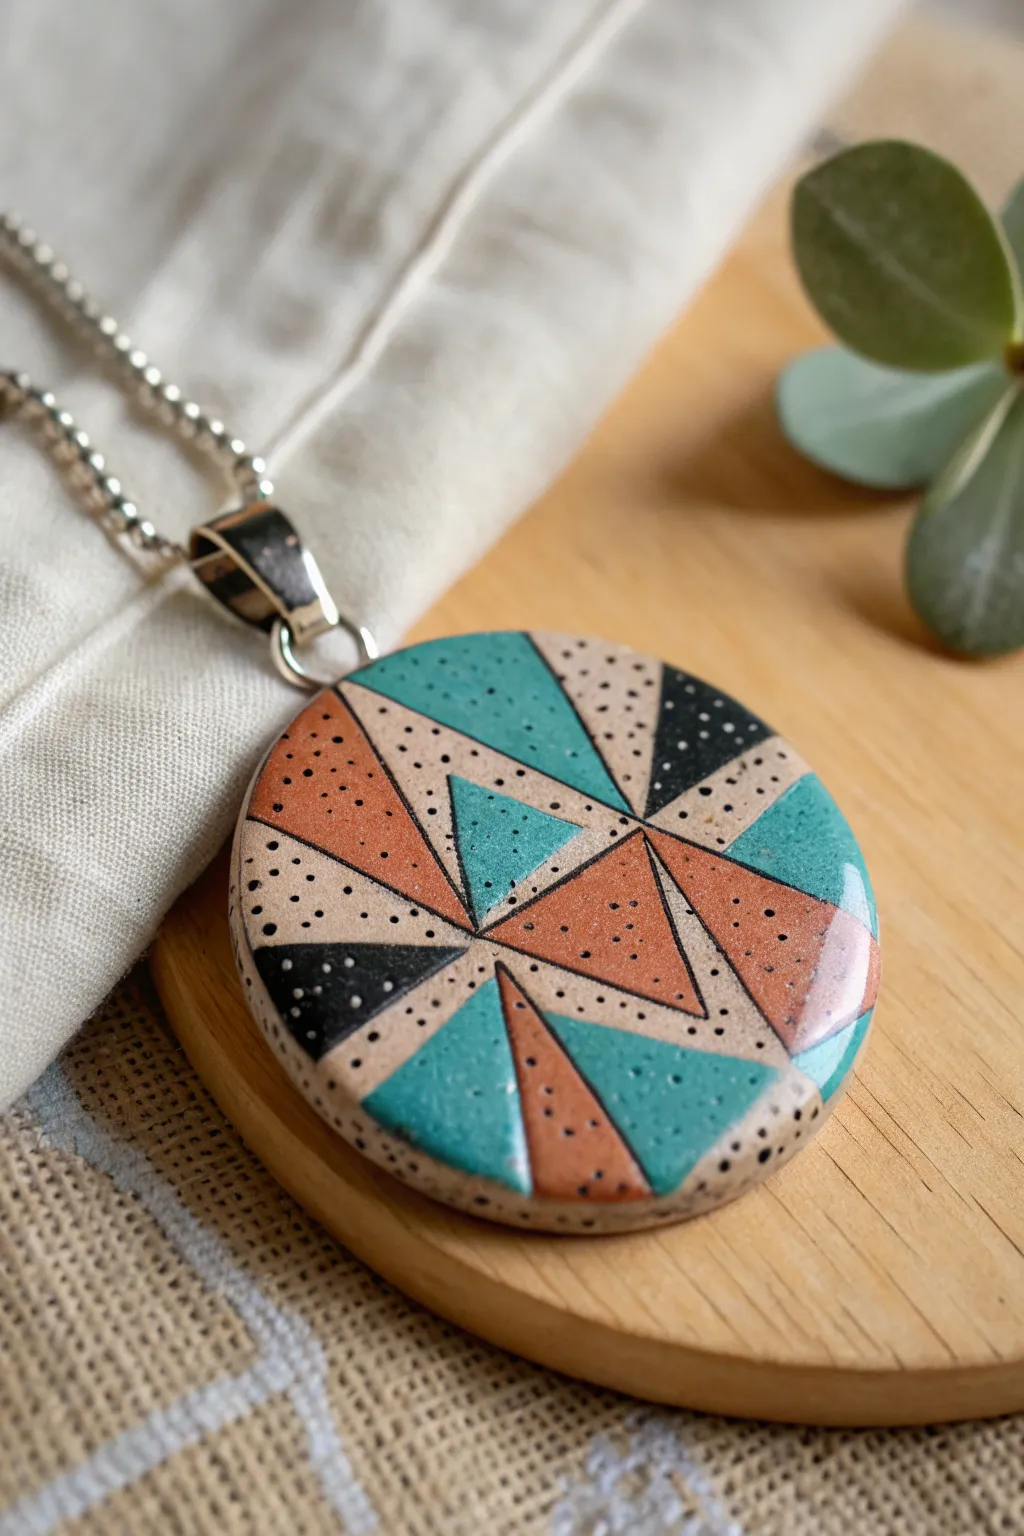
This striking pendant combines a classic geometric pattern with a modern speckled finish. The secret to that glass-like shine isn’t resin, but a carefully applied layer of clear liquid polymer clay that creates a magnifying lens effect.
Step-by-Step Tutorial
Materials
- Polymer clay (Teal, Terracotta/Rust, Black, Beige)
- Black pepper or pre-mixed ‘granite’ effect clay (for speckles)
- Round cookie cutter (approx. 2 inches)
- Acrylic rolling pin and pasta machine (optional)
- Tissue blade or X-Acto knife
- Clear Liquid Polymer Clay (high gloss)
- Heat gun (embossing tool)
- Oven thermometer
- Ceramic tile or glass baking surface
- Pendant bail and chain
- Super glue or jewelry adhesive
- Hand drill or pin vibe (if drilling a hole)
- Medium and fine grit sandpaper
Step 1: Creating the Base Pattern
-
Prepare the Speckled Base:
Start by conditioning your beige clay. To get that organic speckled look seen in the background triangles, mix in a tiny pinch of ground black pepper or black sand. Condition until well incorporated. -
Sheet Your Colors:
Roll out the teal, terracotta, black, and your new speckled beige clay into sheets of equal thickness. A middle setting on a pasta machine works best to keep everything uniform. -
Cut the Triangles:
Using a sharp blade, cut freehand triangles from each colored sheet. Vary the sizes slightly but keep them relatively small and sharp-angled. You want a mismatched mosaic feel rather than a rigid grid. -
Assemble the Slab:
On a clean work surface, begin fitting the triangles together like a puzzle. Place them side-by-side so their edges touch perfectly without overlapping. Aim for a balanced distribution of the teal and rust colors against the neutral beige and black. -
Consolidate the Slab:
Once your pattern is assembled, place a piece of parchment paper over the top. Gently roll over the surface with your acrylic roller to bind the seams together and smooth out any unevenness between the colors. -
Cut the Shape:
Position your round cutter over the most interesting part of your geometric pattern. Press down firmly to cut your pendant shape. Don’t lift the clay yet; remove the excess clay from around the outside of the cutter first. -
Add Texture Details:
Before baking, use a needle tool or a stiff toothbrush to add tiny prick marks or ‘pits’ specifically to the beige and terracotta sections. This adds depth beneath the clear coat later.
Cloudy Finish?
If your dome looks milky after baking, you didn’t get it hot enough! Clear liquid clay requires high heat to achieve transparency. Pop it back in the oven at 300°F for another 10 min.
Step 2: Baking and Doming
-
First Bake:
Bake the round piece on your ceramic tile according to the manufacturer’s instructions (usually 275°F/130°C for 30 minutes). Let it cool completely before moving to the next step. -
Clean the Edges:
I prefer to lightly sand the edges of the cured piece now to ensure they are perfectly smooth. Wipe away any dust with a damp cloth or a bit of rubbing alcohol. -
Apply Liquid Clay:
Place the cooled pendant on a level surface. Squeeze a pool of Clear Liquid Polymer Clay onto the center. Use a needle tool to drag the liquid to the very edge, letting surface tension stop it from spilling over. -
Pop Bubbles:
Watch closely for tiny air bubbles. If you see any, briefly pass a heat gun over the surface or pop them with a needle. The liquid needs to be crystal clear. -
Second Bake:
Carefully transfer the tile back to the oven. Bake again at a slightly higher temperature (usually 300°F/150°C) for 15-20 minutes to ensure maximum clarity and gloss. Check your specific liquid clay brand’s instructions. -
Drill and Assemble:
Once fully cooled, the top should be hard and glassy. Drill a hole at the top edge for a jump ring, or glue a flat-pad bail to the back for a cleaner look. -
Final Polish:
Thread your chain through the bail and give the domed surface a final buff with a soft cloth to remove any fingerprints.
Add Metallic Sparkle
Before pouring the clear liquid layer, dab a tiny bit of gold mica powder or gold leaf onto the black triangles. The dome will magnify the sparkle beautifully.
Wear your glossy geometric masterpiece with pride or gift it to a friend who loves modern design
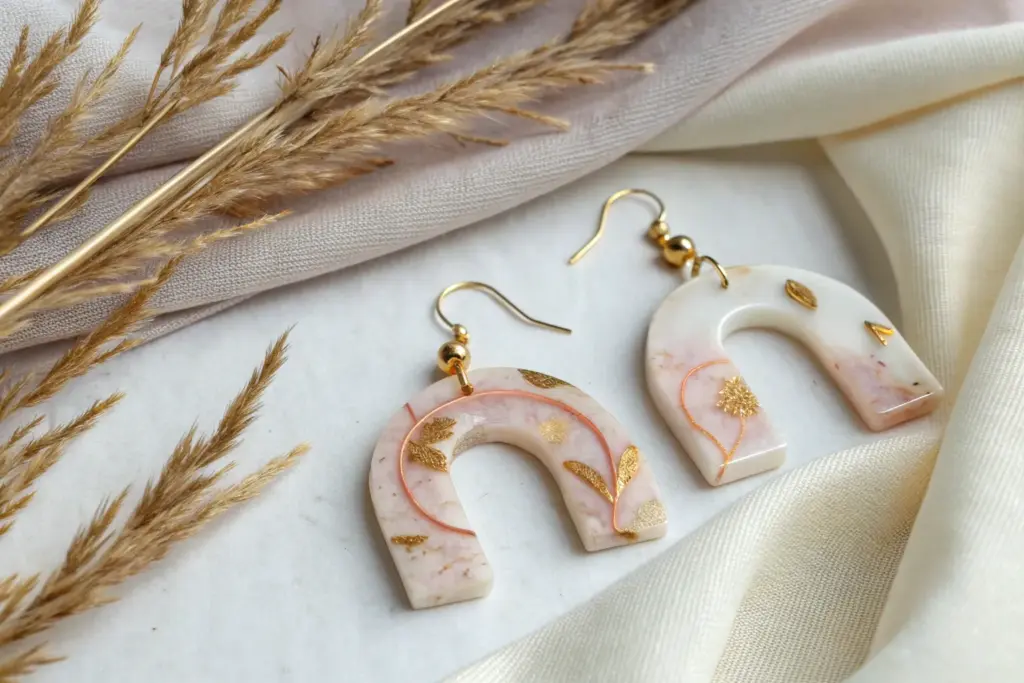
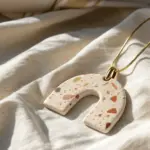
Crackle and Veining Faux Stone Insets
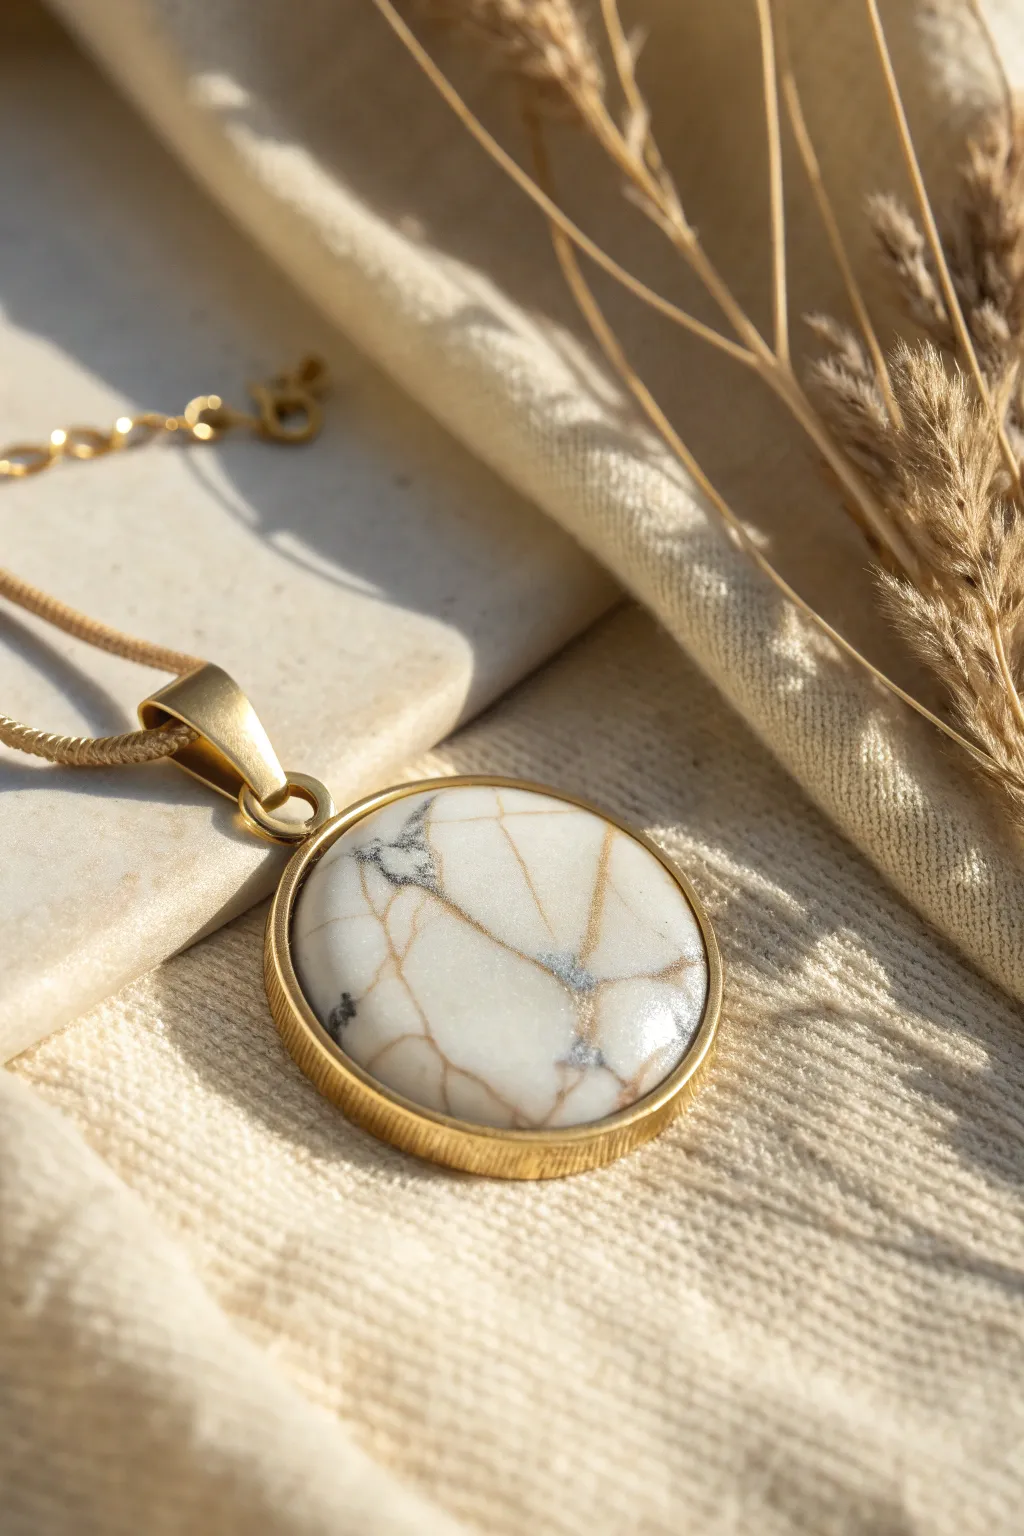
Capture the elegance of Kintsugi—the Japanese art of repairing broken pottery with gold—in this sophisticated faux stone pendant. Using liquid polymer clay and gold leaf, you’ll create a striking white stone effect with intricate, metallic veining that looks far more expensive than it is.
Step-by-Step Guide
Materials
- White or bright porcelain liquid polymer clay
- Gold leaf flakes or gold foil transfer sheet
- Grey or black alcohol ink
- Round open-backed gold bezel or pendant tray
- UV resin (optional, for doming)
- UV lamp (if using resin)
- Heat gun or baking oven
- Needle tool or toothpick
- Fine grit sandpaper (1000-2000 grit)
- Gloss varnish (if not using resin)
- Gold chain and jump rings
Step 1: Preparing the ‘Stone’ Base
-
Prepare the bezel:
Select your gold bezel. If you are using an open-backed bezel, place it firmly onto a piece of heat-resistant tape or a silicone mat to seal the bottom temporarily. -
Lay the gold foundation:
Tear small, irregular pieces of gold leaf flakes. You want long, jagged strips rather than squares. -
Position the veins:
Place these gold leaf fragments into the bottom of the bezel. Arrange them so they cross the space like natural veins in marble; don’t cover the entire bottom, as the white clay needs to peek through. -
Initial clay pour:
Squeeze a small amount of white liquid polymer clay into a mixing cup. If you want a subtle grey marbling, mix in a *tiny* drop of grey alcohol ink and swirl it barely—don’t fully blend it. -
Fill the bezel:
Pour the liquid clay into the bezel, covering the gold leaf. Fill it almost to the top rim, but be careful not to overflow.
Don’t Overmix
When adding grey ink for mottling, don’t stir it completely. A partial swirl creates realistic ‘stone’ clouds rather than just solid grey plastic.
Step 2: Creating the Crackle Effect
-
Reveal the gold (Option A):
If your gold leaf is floating, use a needle tool to gently push it down or drag the clay aside so the gold lines become visible on the surface. -
Add surface veining (Option B):
I prefer to add more definition here by taking a toothpick dipped in gold mica powder or extra gold leaf and pressing it into the wet clay surface, connecting it to the deeper layers visually. -
Add mineral depth:
To mimic the grey speckles seen in the photo, dip the very tip of a needle tool into black or grey alcohol ink. touching it to the surface of the wet clay in just 2-3 spots. The ink will spread slightly on its own. -
Bake the piece:
Bake the piece according to your liquid clay manufacturer’s instructions (usually around 275°F/135°C for 15-30 minutes). Use a heat gun for a quick cure if you are working continuously, but an oven provides a stronger finish. -
Cool down:
Let the metal bezel cool completely before handling, as it will be very hot.
Step 3: Finishing and Polishing
-
Sand the surface:
Once cool, the surface might be slightly uneven. Wet sand the top of the ‘stone’ gently with 1000 grit sandpaper to create a perfectly flat, matte stone texture. -
Reveal the hidden gold:
As you sand, you’ll likely reveal more of the gold leaf that was submerged just under the surface, creating that flush, inlaid look. -
Clean the piece:
Wipe away all sanding dust with a damp cloth or a baby wipe. The surface should look chalky and dull at this stage. -
Apply the finish:
For a glass-like shine (like the photo), apply a layer of UV resin or high-gloss varnish. If using resin, dome it slightly by adding a droplet in the center and letting it spread to the edges. -
Final cure:
Cure the resin under a UV lamp for 2-3 minutes or let the varnish air dry completely. -
Assembly:
Attach a heavy jump ring to the bezel loop and thread your gold snake chain through to complete the necklace.
Turquoise Variation
Swap the white liquid clay for turquoise or teal, and use excessive copper foil instead of gold to mimic high-quality Arizona turquoise matrix.
Wear your new stone pendant with a simple white top to let the gold veining truly shine
Glow-Look Night Sky Charms
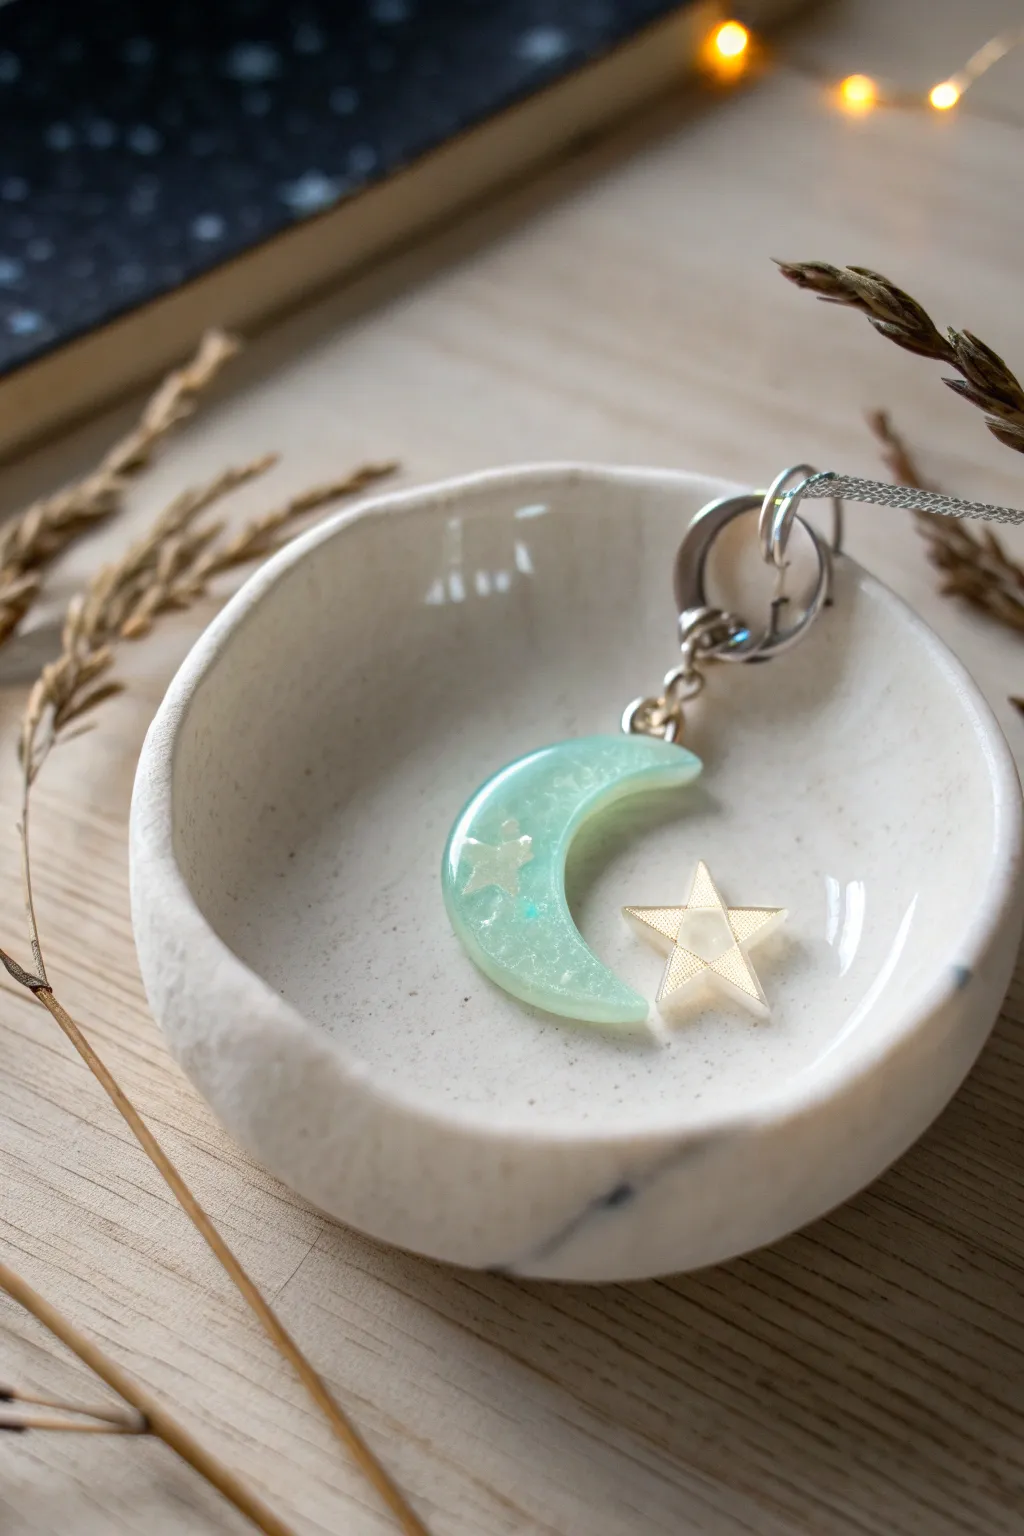
Capture the ethereal beauty of a starlit night with this delicate crescent moon pendant. Made from translucent liquid polymer clay, this charm features a soft, milky blue-green tint and suspended metallic star inlays for a dreamy, high-end finish.
Detailed Instructions
Materials
- Clear liquid polymer clay
- Blue and green alcohol inks
- White or pearl alcohol ink (optional for opacity)
- Fine iridescent glitter
- Crescent moon silicone mold
- Small gold or silver star sequins/inlays
- Gold or silver star charm (for pairing)
- UV resin (optional for doming)
- UV lamp (if using resin)
- Jump rings and jewelry pliers
- Jewelry chain
- Toothpick or needle tool
- Heat gun or lighter
- Oven or toaster oven dedicated to clay
Step 1: Mixing the Moonlight
-
Prepared the Base:
Start by pouring a small amount of clear liquid polymer clay into a mixing cup or directly onto a glass palette. -
Tinting:
Add just a tiny drop of blue alcohol ink and a smaller drop of green. The goal is a very pale teal, so start with less than you think you need. -
Adding the Milky Haze:
If you want that semi-opaque look shown in the photo, mix in a tiny drop of white liquid clay or white alcohol ink. Stir slowly to combine without creating too many bubbles. -
Stardust Sparkle:
Sprinkle in a pinch of fine iridescent glitter or mica powder. Mix gently until the sparkle is evenly distributed throughout the liquid clay.
Step 2: Casting the Charm
-
First Pour:
Carefully pour your tinted liquid clay into the crescent moon silicone mold, filling it about halfway. -
Removing Bubbles:
Let the liquid sit for a few minutes so bubbles rise, then pop them with a needle tool or quickly pass a heat gun over the surface. -
Placing the Inlay:
Using tweezers, gently place a gold star sequin into the liquid clay. Position it near the center or bottom curve of the moon. -
Submerging:
Use your toothpick to gently press the star down so it is fully submerged but remains visible. I like to tilt it slightly to catch the light. -
Final Fill:
Top off the mold with the remaining liquid clay until it creates a slight dome effect, being careful not to overfill the edges.
Clear Cast Trick
Warm your liquid clay bottle in a bowl of warm water for 5 minutes before pouring. This thins the viscosity and helps trapped air bubbles rise to the surface faster.
Step 3: Baking and Assembly
-
Baking:
Bake the mold according to your liquid clay manufacturer’s instructions, usually at 275°F (135°C) for 15-30 minutes. -
Cooling:
Allow the mold to cool completely before attempting to remove the charm. Removing it while hot can warp the shape. -
Demolding:
Gently flex the silicone mold to pop out your hardened moon charm. -
Drilling:
If your mold didn’t have a pre-made hole, use a small hand drill or pin vise to carefully drill a hole at the top tip of the moon. -
Doming (Optional):
For extra shine and depth, apply a thin layer of UV resin over the front of the moon and cure it under a UV lamp. -
Attaching Hardware:
Open a jump ring using two pairs of pliers. Slide it through the hole in your moon charm. -
Adding the Companion Star:
Thread a separate metal star charm onto the same jump ring so it sits next to the moon, adding a nice contrasting texture. -
Final Assembly:
Attach the jump ring to your necklace chain and close it securely.
Make It Glow
Mix a pinch of phosphorescent glow-in-the-dark powder into your liquid clay base. It will look milky white in daylight but glow green or blue when the lights go out.
Now you have a serene piece of sky to wear wherever you go