Whenever I’m making air dry clay gifts for Mother’s Day, I aim for that sweet spot: heartfelt, useful, and totally doable on a kitchen table. These ideas are the kind of keepsakes Mom will actually use—and smile about every time she does.
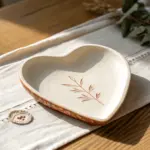
Stamped Floral Trinket Bowl
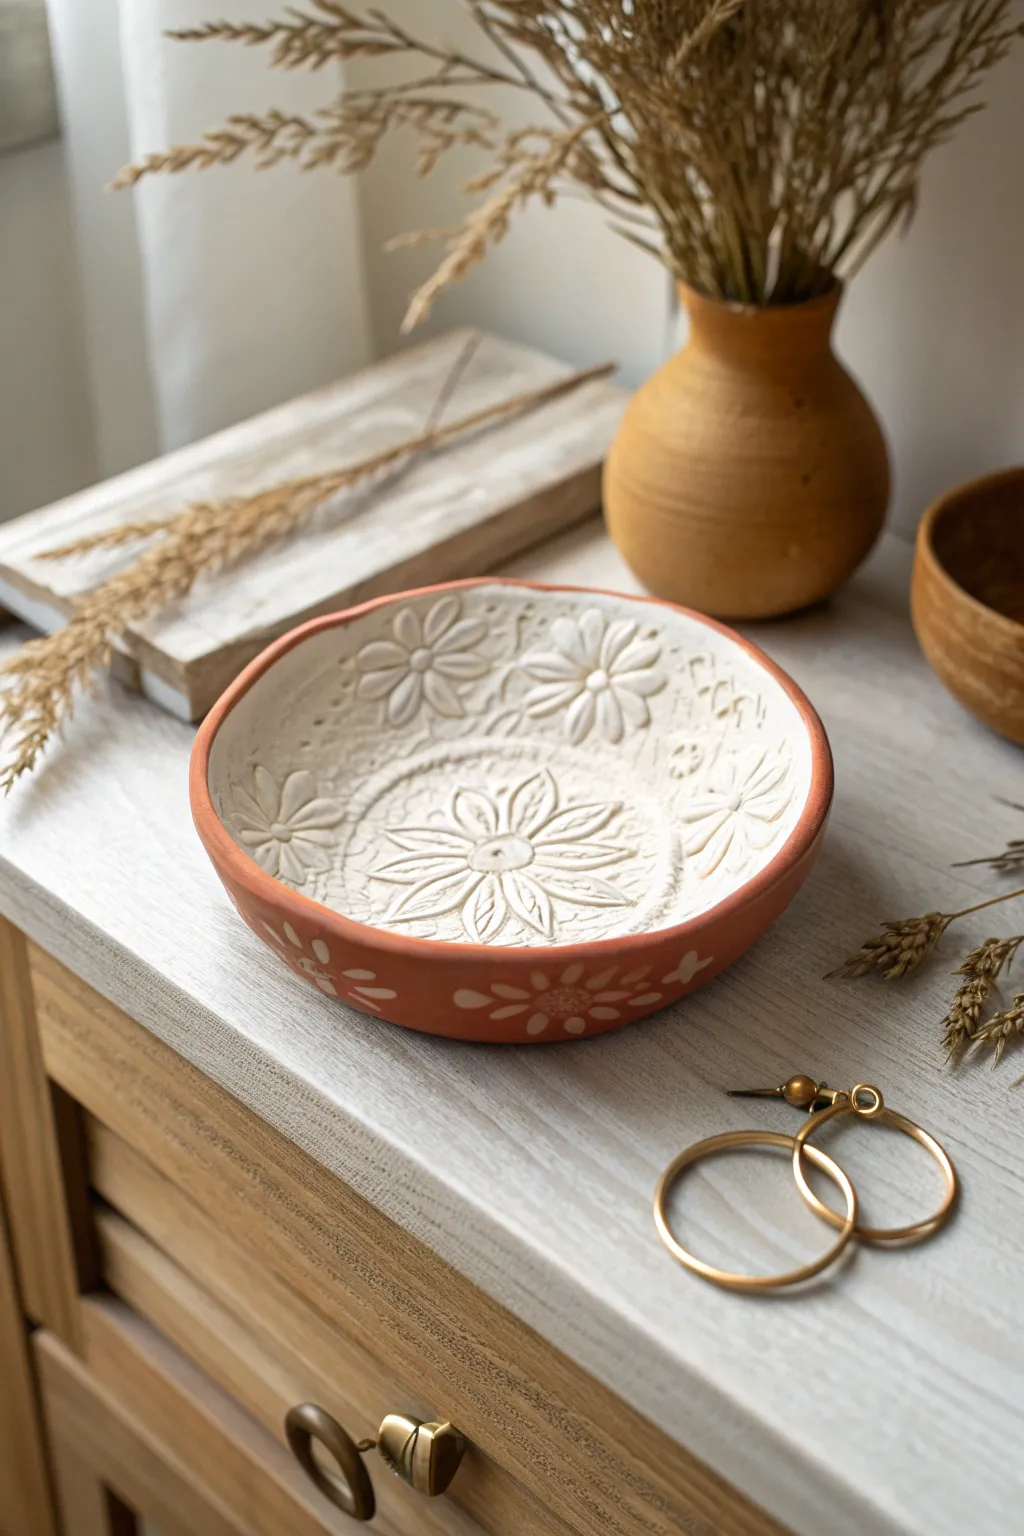
This charming trinket bowl combines the warmth of terracotta tones with delicate white floral relief patterns. The contrasting textures and colors create an artisanal, high-end look that is surprisingly simple to achieve with stamps and paint.
Step-by-Step
Materials
- Air-dry clay (white)
- Small rolling pin
- Floral rubber stamps or embossed rollers
- Small bowl (to use as a mold)
- Plastic wrap
- Terracotta colored acrylic paint
- Detail paintbrush
- Sponge or larger brush
- Sandpaper (fine grit)
- Clear matte varnish or sealant
- Craft knife or clay tool
Step 1: Creating the Form
-
Prepare the workspace:
Lay down a non-stick mat or parchment paper to prevent sticking. Take a large ball of white air-dry clay and knead it until it’s soft, pliable, and free of cracks. -
Roll the slab:
Roll out the clay to a uniform thickness of about 1/4 inch. Lift and rotate the clay occasionally to ensure it isn’t sticking to your work surface. -
Stamp the texture:
Before cutting the shape, press your floral stamps firmly into the clay slab. Create a central focal flower and arrange smaller floral motifs around it in a circular pattern. -
Cut the circle:
Place a bowl or circular template upside down over your stamped pattern. Use a craft knife to cut a clean circle around the template, ensuring your stamped design is centered. -
Shape the bowl:
Line a similarly sized bowl with plastic wrap to prevent sticking. Gently lift your clay circle and lay it inside this mold, pressing softy so it takes the curved shape without distorting the stamped impressions. -
Refine the rim:
While the clay is in the mold, smooth the top edge with a little water on your finger. I find that slightly rounding this rim now saves a lot of sanding time later. -
Let it dry:
Allow the clay to dry in the mold for at least 24 hours. Because it’s inside a bowl, the bottom may take longer to dry, so flip it out carefully once the top feels solid to let the underside air out.
Clean Impressions
Dust your stamps lightly with cornstarch before pressing them into the clay. This acts as a release agent and ensures the clay doesn’t get stuck in the fine details of the stamp.
Step 2: Painting & Finishing
-
Sand imperfections:
Once fully dry and hard, lightly sand any rough edges on the rim or exterior with fine-grit sandpaper. Wipe away all dust with a slightly damp cloth. -
Paint the exterior:
Using terracotta acrylic paint, cover the entire outside of the bowl. Bring the color up and over the rim, creating a defined terracotta border that frames the white interior. -
Paint the interior details:
To achieve the look in the photo, keep the stamped interior mostly natural white. However, you can use a very dry brush with a tiny amount of terracotta paint to lightly distress the raised areas if you want more contrast. -
Decorate the rim:
The example shows simple white floral motifs painted on the terracotta exterior. Use a fine detail brush and white acrylic paint to add small flowers or leaves along the outside rim. -
Add rim details:
If your interior rim needs defining, carefully paint a thin terracotta line just inside the lip of the bowl to sharpen the transition between the colored exterior and textured interior. -
Seal the project:
Protect your work by applying a coat of clear matte varnish. This seals the clay and paint, making the bowl durable enough for holding jewelry or keys.
Warping Woes
If the clay shrinks and warps while drying, let it dry slowly away from direct heat or sunlight. You can also place a light weight, like a small bag of rice, inside while it dries.
This lovely little bowl is now ready to hold your favorite rings or serve as a thoughtful handmade gift


Pressed Flower Keepsake Ornament
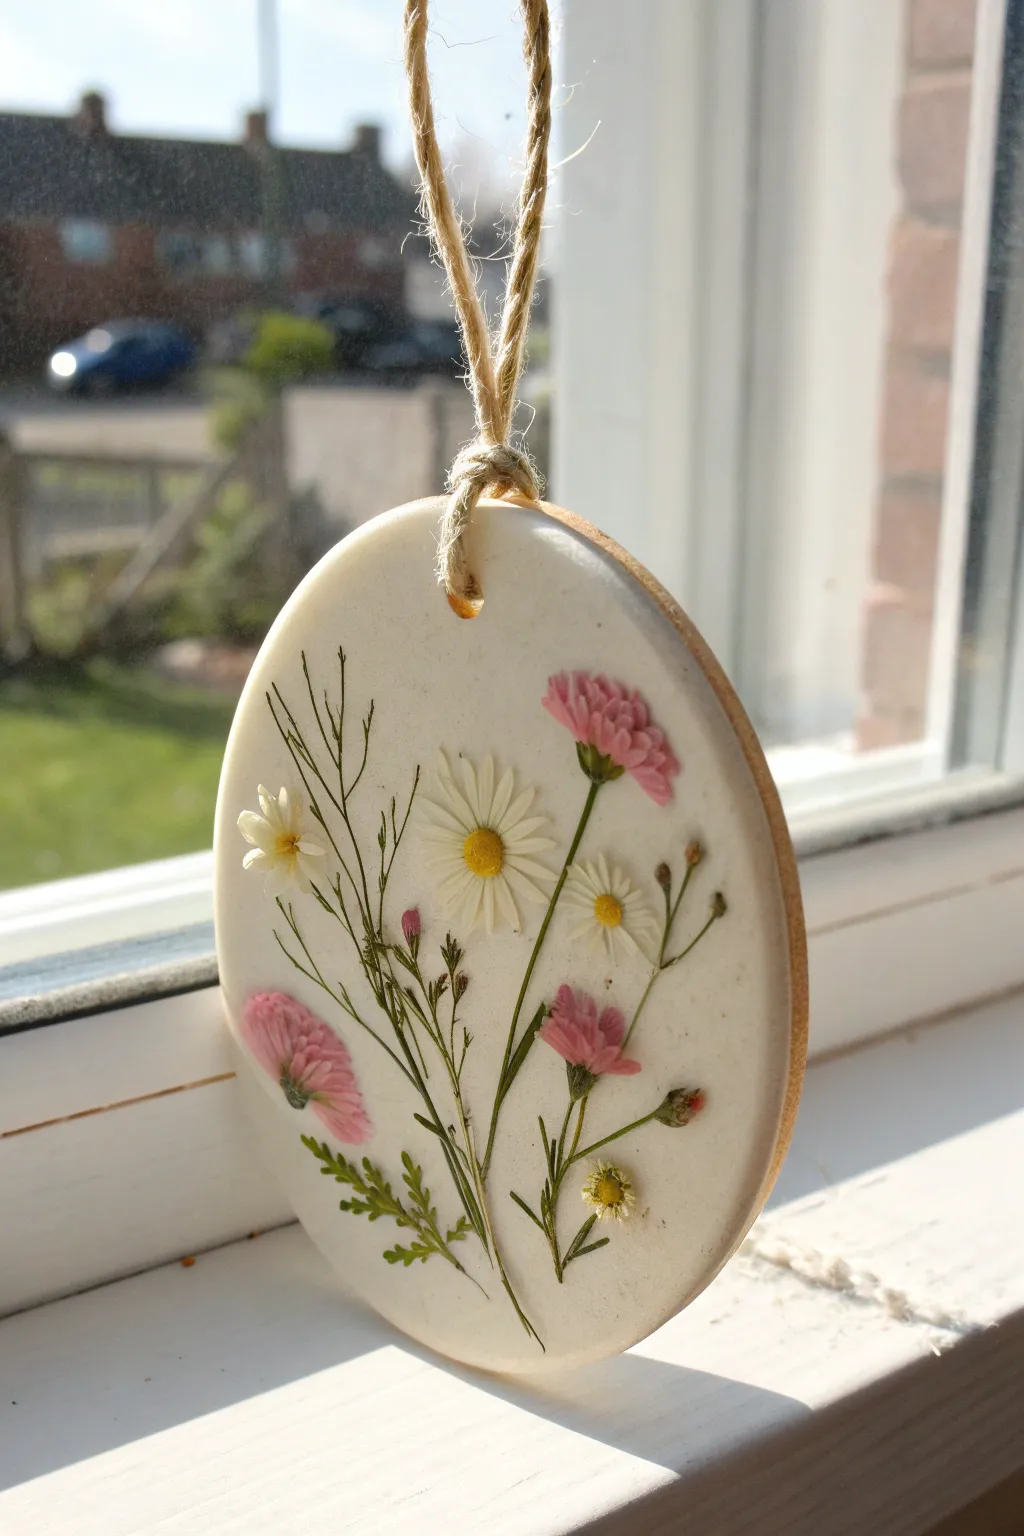
Capture the delicate beauty of a spring garden with this elegant pressed flower clay ornament. It combines the clean, matte finish of white air-dry clay with the vibrant, natural colors of real blooms to create a timeless keepsake.
Step-by-Step
Materials
- White polymer clay or air-dry clay (smooth textured)
- Collection of pressed flowers (small daisies, pink asters, ferns/greenery)
- Rolling pin or smooth glass jar
- Oval cookie cutter (or a knife and oval paper template)
- Sandpaper (fine grit)
- Small straw or cocktail stick for the hole
- Jute twine or thin hemp cord
- Mod Podge or clear craft varnish (optional but recommended)
- Parchment paper or non-stick craft mat
- Tweezers
Step 1: Preparing the Base
-
Condition the clay:
Begin by working a handful of white clay in your hands until it becomes warm, pliable, and free of any cracks. This ensures a smooth surface later. -
Roll it out:
Place the clay on a sheet of parchment paper. Use your rolling pin to flatten the clay to an even thickness of about 1/4 inch (6mm). Try to keep the surface as level as possible. -
Cut the shape:
Press your oval cookie cutter firmly into the rolled clay. If you don’t have a cutter, place a paper oval template on top and carefully trace around it with a craft knife. -
Smooth the edges:
Gently lift away the excess clay. Dip your finger in a tiny bit of water and run it along the cut edges of the oval to smooth out any roughness or burrs.
Step 2: Arranging the Botanicals
-
Plan your design:
Before committing to the clay, lay out your pressed flowers on a separate surface to finalize your composition. A central focal point with taller stems fanning out works beautifully. -
Start with greenery:
Using tweezers for precision, pick up your base foliage stems. Press them gently onto the clay surface. I find starting with the tallest stems establishes the vertical flow of the piece. -
Add focal flowers:
Place the larger blooms, like the white daisy and pink flowers, into position. Make sure they overlap the stems naturally to hide the cut ends. -
Fill in details:
Add tiny buds or smaller greenery sprigs to fill any gaps, creating a balanced bouquet look. -
Embed the flora:
Once you are happy with the arrangement, place a clean piece of parchment paper over the entire ornament. Very gently roll your rolling pin over the paper once to press the flowers flush into the clay surface.
Pro Tip: Clean Cuts
If your clay drags when lifting the cutter, let the rolled slab sit for 5-10 minutes before cutting. This slight drying makes the edges crisp and easier to handle.
Step 3: Finishing Touches
-
Create the hanging hole:
Use a drinking straw or a thick cocktail stick to punch a hole near the top center of the oval. Make sure it’s not too close to the edge to prevent tearing. -
First drying phase:
Let the ornament sit in a safe, dry place for at least 24 hours. Flip it over halfway through the drying process to prevent the edges from curling upward. -
Sand edges:
Once fully hardened, inspect the edges. If there are any sharp spots or irregularities, gently buff them away with fine-grit sandpaper. -
Seal the piece:
To preserve the color of the flowers and protect the clay, brush a thin layer of matte Mod Podge or varnish over the front surface. Let this dry completely. -
Add the twine:
Cut a length of jute twine about 10 inches long. Thread one end through the hole. -
Secure the hanger:
Bring the two ends of the twine together and tie a simple overhand knot. Slide the knot down so it sits right at the top of the ornament hole for a rustic look. -
Final inspection:
Check that the knot is secure and the sealant is dry. Your botanical keepsake is now ready to be gifted.
Troubleshooting: Curling
If the edges curl up while drying, place a lightweight book or flat board on top of the ornament (sandwiched between parchment paper) during the final stages of drying.
Now you have a charming, handmade piece of art that perfectly preserves the beauty of nature for Mom to enjoy year-round


Mini Bud Vase Gift Set
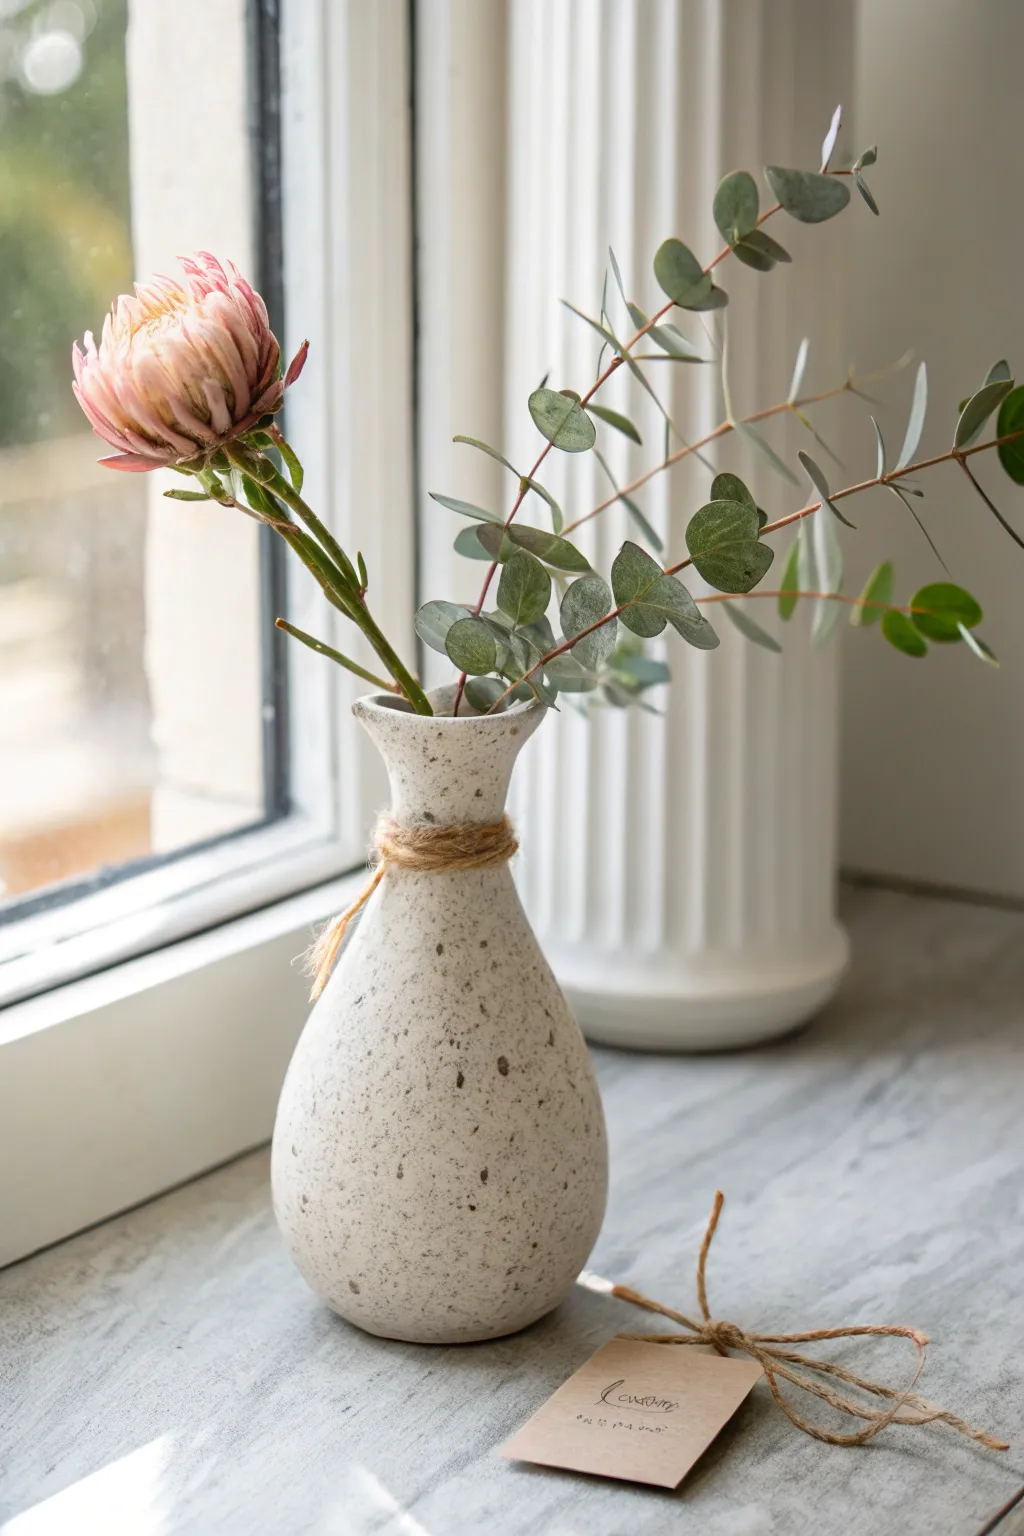
This charming, tear-drop shaped bud vase combines a modern matte finish with rustic twine accents, making it a perfect handmade gift for Mom. The faux-stone speckled texture gives it a high-end pottery look without needing a kiln.
Detailed Instructions
Materials
- White air dry clay
- Rolling pin
- Small glass bottle or bud vase (to use as an armature)
- Clay sculpting tools (sponge, metal rib, needle tool)
- Water in a small bowl
- Sandpaper (fine grit)
- Acrylic paint (creamy white/beige)
- Old toothbrush
- Dark brown acrylic paint
- Matte varnish or sealant
- Jute twine
Step 1: Building the Form
-
Prepare the Armature:
For this project, using a glass insert is crucial so the vase can actually hold water. Find a small, bulbous glass bottle or a simple glass test tube. Clean and dry the glass thoroughly before starting. -
Condition the Clay:
Take a large handful of air dry clay and knead it until it’s soft and pliable. If the clay feels dry, dip your fingers in water and work the moisture in. -
Roll a Slab:
Roll your clay out into a slab approximately 1/4 inch thick. You want it thick enough to be sturdy but thin enough to not look bulky. -
Wrap the Base:
Cut a circle for the base slightly larger than your glass vessel’s bottom. Place the glass on top. Cut a rectangular strip of clay long enough to wrap around the widest part of your glass armature. -
Encase the Glass:
Wrap the clay sheet around the glass, smoothing the seam where the clay meets. Use a little water on your finger to blend the join until it disappears. -
Shape the Neck:
Gently squeeze and mold the clay upwards towards the neck of the bottle. If your armature has a narrow neck, trim excess clay so it doesn’t get too thick. Flare the clay slightly at the very top rim for that classic vase silhouette. -
Bulking the Bottom:
To achieve the tear-drop shape shown in the picture, add extra clay to the bottom half of the vase. Smooth these additional pieces down with a wet sponge so the transition is seamless and the bottom feels weighted and round.
Secret Splatter Tip
For more natural-looking ‘stone’ speckles, use two different shades of brown paint. Splatter the lighter shade first, let dry, then add sparse darker specks.
Step 2: Refining and Finishing
-
Smooth the Surface:
Dip a sponge in water and wring it out almost completely. Wipe the entire surface of the vase to remove fingerprints and bumps. The aim is a smooth, organic finish. -
Dry Completely:
Let the vase dry for at least 24-48 hours. I like to rotate it occasionally so air reaches all sides evenly. It will turn a stark white when fully dry. -
Sanding:
Once bone dry, use fine-grit sandpaper to gently buff away any remaining imperfections or ridges. Wipe away the dust with a barely damp cloth. -
Base Coat:
Paint the entire exterior with a creamy white or beige acrylic paint. You might need two coats for opaque coverage. Let this dry completely. -
Create the Speckles:
Mix a small amount of dark brown paint with a drop of water to thin it slightly. Dip an old toothbrush into the paint. -
Splatter Technique:
Hold the toothbrush near the vase and run your thumb across the bristles to flick tiny specks of paint onto the surface. Practice on a paper towel first to control the size of the splatters. -
Seal the Work:
Once the paint is dry, apply a coat of matte varnish. This protects the clay from moisture and gives it a finished professional look. -
Add Decorative Twine:
Wrap a length of jute twine around the narrowest part of the neck multiple times. Tie it off securely, tucking the end under the wrap or securing it with a dot of glue. -
Tag and Floral:
Add a small kraft paper gift tag to some loose twine on the table for the gift presentation, and place your fresh eucalyptus and flowers into the glass insert inside the vase.
Cracks Appearing?
If small drying cracks appear, don’t panic. Mix a small amount of clay with water to make a paste (slip) and fill the cracks, then sand smooth once dry.
Now you have a stunning, trendy vase that looks professionally thrown but was made right at your kitchen table


Coil Vase With Sweet Message
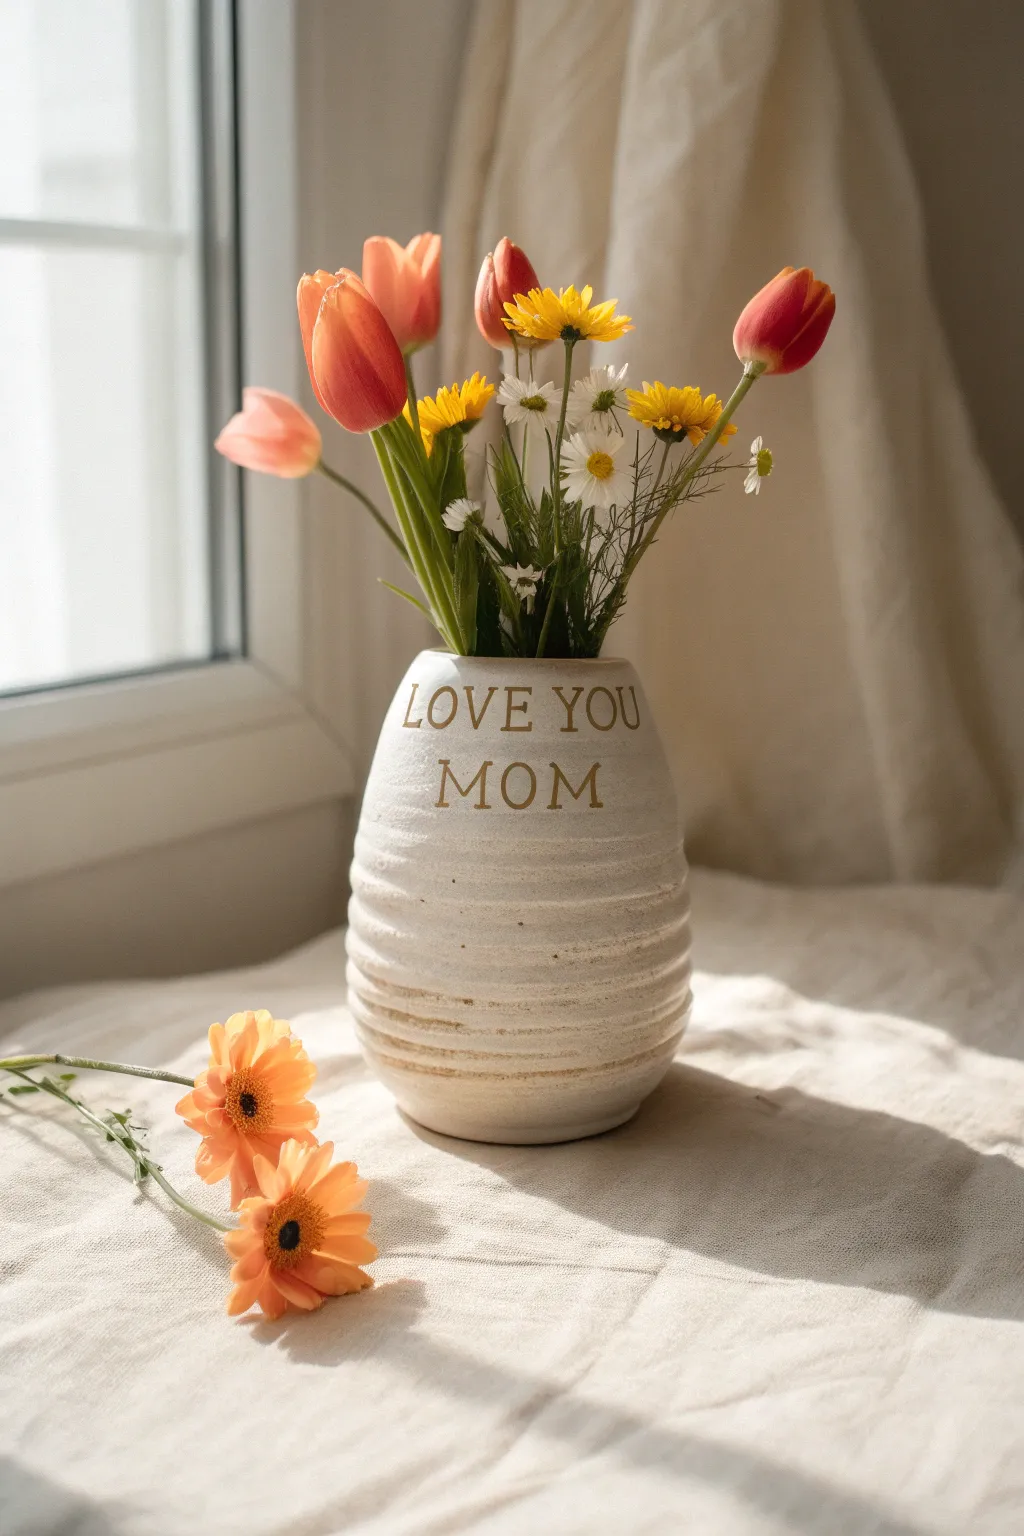
Create a heartfelt centerpiece with this charming coil-built vase, featuring rustic ridges and a personalized message stamped front and center. Its gentle, rounded form and imperfect handmade texture make it a warm and loving gift for Mom.
Step-by-Step Tutorial
Materials
- White air dry clay (approx. 2-3 lbs)
- Small individual letter stamps (uppercase)
- Clay rolling pin
- Clay knife or fettling knife
- Sponge
- Small bowl of water
- Scoring tool or old fork
- Clear acrylic sealant (matte or satin)
- Fine grit sandpaper
- Gold acrylic paint
- Fine detail paintbrush
Step 1: Building the Base
-
Form the bottom slab:
Start by rolling out a ball of clay into a flat, circular slab about 1/4 inch thick. This will be the base of your vase. -
Cut the circle:
Use a round object like a jar lid as a template to cut a perfect circle for your base, or freehand it for a more organic look. -
Score and slip:
Rough up the outer edge of your base circle with your scoring tool and dab a little water on it to create ‘slip’ which acts like glue.
Step 2: Coiling and Shaping
-
Roll your coils:
Take chunks of clay and roll them out on your table to create long snakes or coils. Aim for an even thickness, roughly the width of your pinky finger. -
Stack the first coil:
Lay your first coil onto the scored edge of the base. Gently press it down to adhere it. -
Blend the inside:
Use your thumb or a modeling tool to smear the clay from the coil down onto the base on the *inside* of the vase only. This bonds the layers together while keeping the outside ridges visible. -
Build the height:
Continue adding coils one on top of another. Remember to score and slip between each layer to ensure a strong bond. -
Create the taper:
As you build upwards, place each coil slightly further inward than the one below it. I find this creates that gentle, narrowing curve towards the neck of the vase. -
Smooth the upper body:
Once you reach the top half where you want the text, stop leaving the coil ridges visible. Instead, smooth the outside of the coils completely flat with a damp sponge or rib tool to create a clean canvas for stamping. -
Refine the rim:
Finish the top edge with a final coil or by smoothing the clay into a straight, even rim. Use a wet finger to round off distinct sharp edges.
Clean Imprints
To keep the stamped letters sharp and prevent clay from sticking inside the stamps, dust the stamp faces lightly with cornstarch before pressing them into the clay.
Step 3: Detailing and Finishing
-
Stamp the message:
While the clay is still leather-hard (firm but not dry), gently press your letter stamps into the smooth upper section to spell ‘LOVE YOU MOM’. Support the wall from the inside with your hand to prevent collapsing. -
Enhance the texture:
If your lower coils lost definition during building, use a modeling tool to gently redefine the grooves between them. -
Dry thoroughly:
Let the vase sit in a cool, dry place for 24-48 hours. Turn it occasionally to ensure even drying. -
Sanding:
Once bone dry, use fine-grit sandpaper to smooth out any rough patches on the rim or the stamped area, being careful not to sand away your lettering. -
Paint the letters:
Dip a fine detail brush into gold acrylic paint and carefully fill inside the stamped letters. This gives the text a beautiful, elegant pop against the white clay. -
Optional gold accent:
Dry brush a tiny amount of gold paint onto a few of the lower coil ridges to highlight the texture, blending it out for a weathered look. -
Seal the piece:
Apply a coat of clear acrylic sealant to protect the clay. Note that air dry clay is not waterproof, so insert a glass or plastic cup inside if you plan to use fresh flowers.
Waterproof Hack
Make the vase functional for fresh flowers by hiding a cut plastic water bottle or a small glass jar inside the clay structure as you build around it.
This personalized vase is sure to become a cherished keepsake on her shelf.

The Complete Guide to Pottery Troubleshooting
Uncover the most common ceramic mistakes—from cracking clay to failed glazes—and learn how to fix them fast.
Botanical Leaf-Imprint Coasters
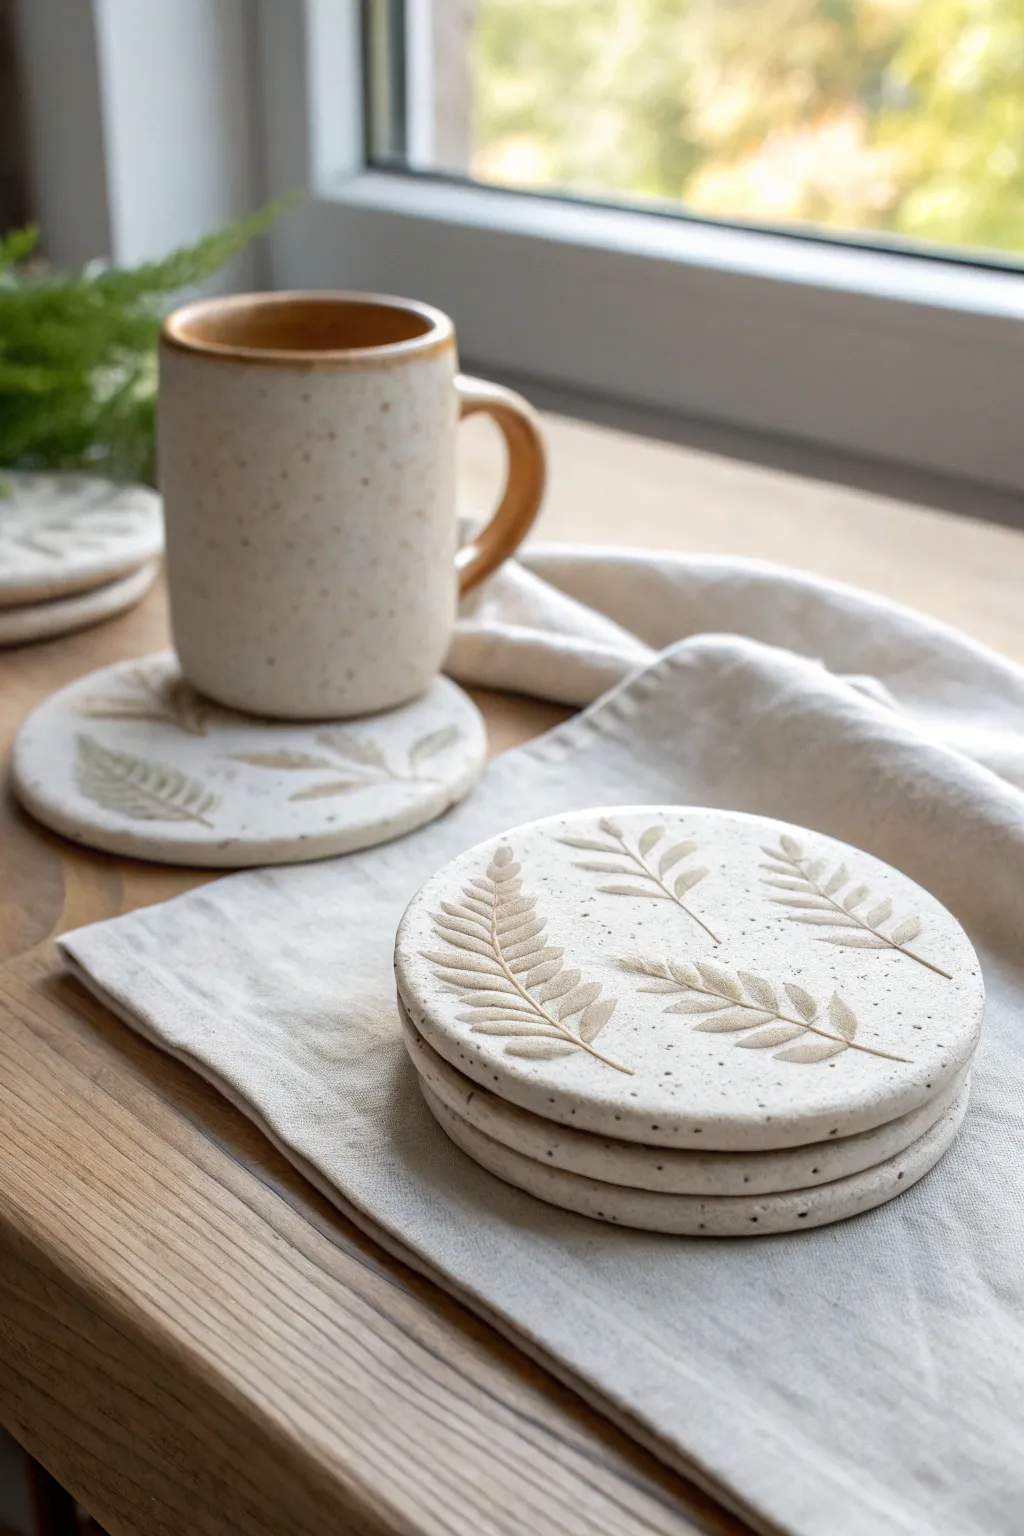
Bring the calming vibes of a forest walk into the kitchen with these elegant, speckled clay coasters. Featuring delicate fern impressions and a natural, earthy finish, they make a sophisticated yet heartfelt gift for Mom.
Step-by-Step
Materials
- White or speckled air-dry clay (e.g., DAS stone effect or standard white clay mixed with sand/pepper)
- Fresh fern leaves or similar botanical sprigs
- Rolling pin
- Circle cookie cutter (approx. 4 inches) or a bowl to trace
- Craft knife
- Sandpaper (fine grit)
- Acrylic paint (warm beige or diluted brown)
- Small paintbrush
- Matte varnish or sealant (water-resistant)
- Parchment paper or canvas cloth
Step 1: Preparation & Rolling
-
Prepare your workspace:
Lay down a piece of parchment paper or a canvas cloth on a flat surface. This prevents the clay from sticking and makes it easier to move later without warping. -
Condition the clay:
Take a handful of air-dry clay and knead it until it’s soft and pliable. If you are using plain white clay and want the speckled look from the photo, knead in a pinch of black pepper or fine sand now. -
Roll out the slab:
Place the clay ball on your workspace and use the rolling pin to flatten it into an even slab. Aim for a thickness of about 1/4 inch (6-7mm) to ensure the coasters are sturdy. -
Check for bubbles:
Running your hand over the surface, check for any air pockets. If you find one, prick it gently with a needle tool and smooth it over.
Fixing Curled Clay
If edges curl while drying, slightly dampen the concave side and place under a heavy book overnight to flatten.
Step 2: Creating the Impressions
-
Arrange your botanicals:
Select your fresh fern leaves. Place them vein-side down onto the clay slab. I like to arrange 2-3 small sprigs in a random, natural pattern similar to falling leaves. -
Press the leaves:
Gently roll your rolling pin over the leaves once. Apply firm, even pressure to push the veins into the clay, but be careful not to make the slab too thin. -
Remove the greenery:
Carefully peel the fern leaves off the clay. Use tweezers if the stems are delicate. You should be left with a clean, detailed impression. -
Cut the shapes:
Position your circle cutter or bowl over the imprinted area to frame the best part of the design. Press down firmly to cut the coaster shape. -
Refine the edges:
Remove the excess clay from around the circle. Dip your finger in a little water and gently smooth the cut edges to remove any sharpness or drag marks.
Level Up: Color Pop
Instead of brown, try a muted sage green wash in the veins for a fresher, spring-time botanical look.
Step 3: Drying & Finishing
-
Let them dry:
Place the coasters on a flat, clean surface to air dry. This usually takes 24-48 hours depending on humidity. Flip them over halfway through the process to ensure even drying and prevent curling. -
Sand for smoothness:
Once fully cured and hard, use fine-grit sandpaper to buff the edges and surface lightly. This gives that professional, polished ceramic feel. -
Enhance the imprint:
Mix a tiny drop of warm brown or beige acrylic paint with water to create a thin wash. Paint this into the leaf impressions. -
Wipe back excess:
Immediately wipe the surface with a damp paper towel or sponge. The paint will stay in the deep crevices of the leaf veins, highlighting the details, while the surface remains clean. -
Seal the coasters:
Apply 2-3 coats of a matte, water-resistant varnish. This is crucial for coasters to protect them from condensation and spills. -
Add a backing (optional):
For extra furniture protection, you can glue a circle of cork or felt to the bottom of the finished coaster.
Stack them up and tie with a ribbon for a beautiful handmade gift that Mom will use every morning
Tea Light Holder With Flower Cutouts
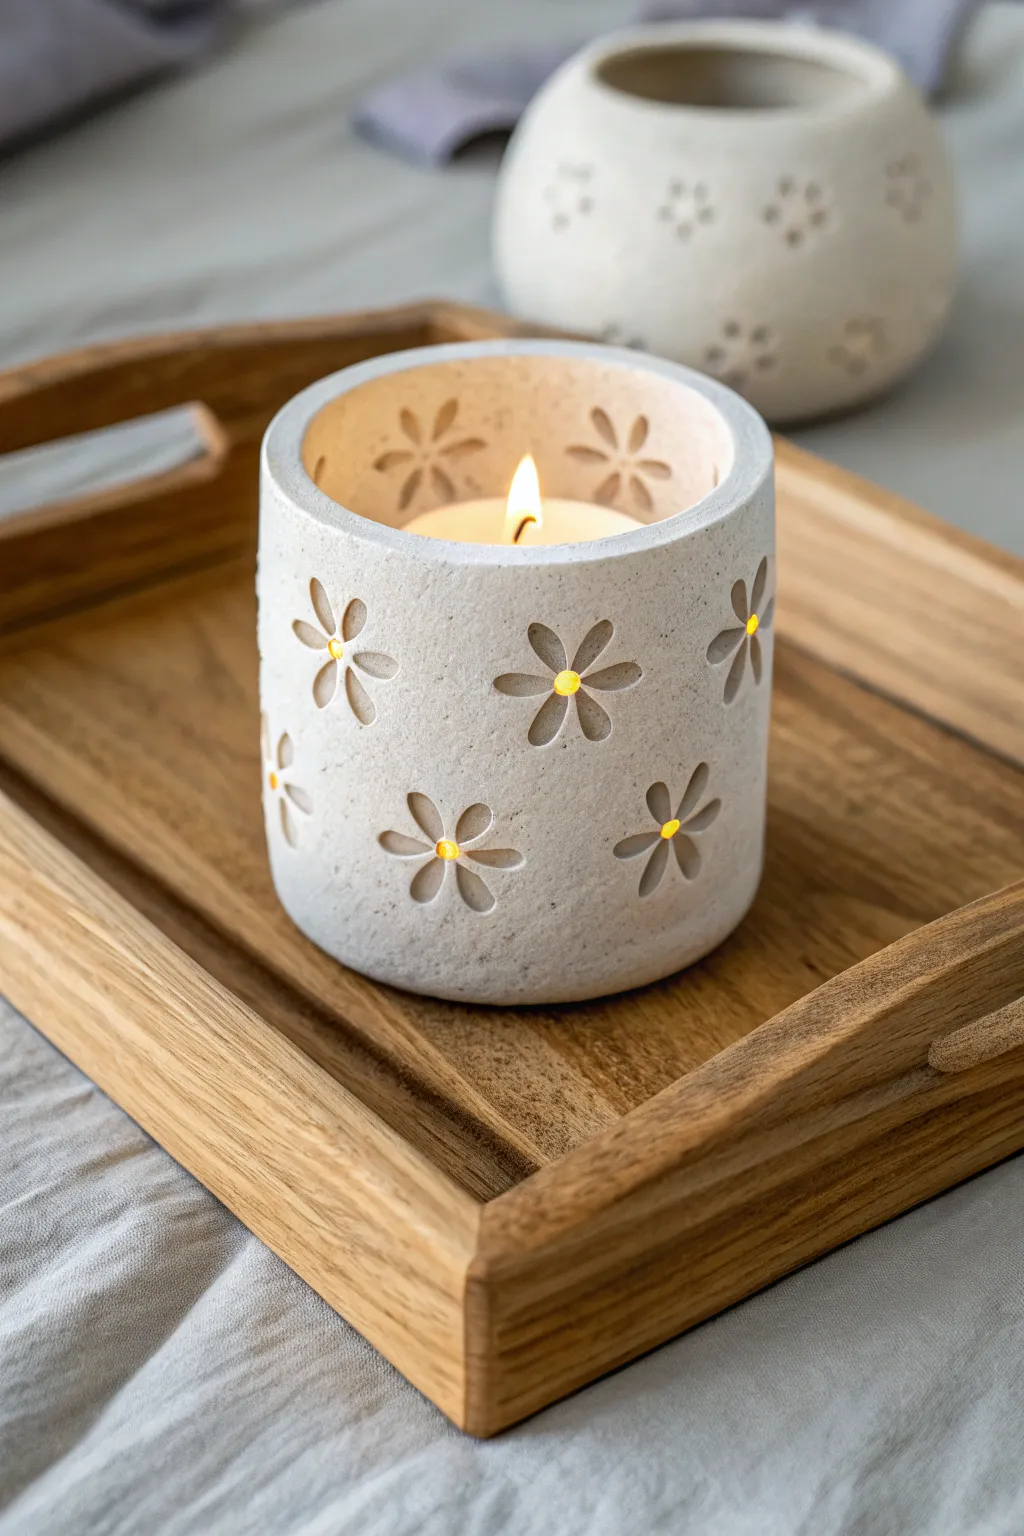
Brighten Mom’s special day with this elegant, rustic tea light holder featuring charming flower cutouts. The natural texture of the air dry clay combined with the warm glow shining through the petals creates a cozy and sophisticated atmosphere.
How-To Guide
Materials
- White ceramic-style air dry clay
- Rolling pin
- 4-inch circular cookie cutter (or bowl)
- Small flower fondant plunger cutter (six-petal daisy shape)
- Clean glass jar or can (to use as a mood)
- Parchment paper
- Craft knife
- Bowl of water
- Sponge or soft paintbrush
- Fine-grit sandpaper
- Tea light candle (battery-operated recommended)
Step 1: Preparing the Base
-
Roll the clay:
Begin by taking a generous chunk of air dry clay and kneading it until soft and pliable. Place it on a sheet of parchment paper and roll it out into a long rectangular slab. Aim for an even thickness of about 1/4 inch; too thin and it might crack, too thick and the light won’t shine through well. -
Measure the length:
Take your glass jar or can that you are using as a mold. Wrap a piece of string around it to find the circumference, then add about half an inch for overlap. Use this measurement to trim your clay slab into a neat rectangle using a craft knife and a ruler. -
Create the base:
Roll out a separate small piece of clay. Use your circular cutter or the bottom of your mold to cut out a circle. This will serve as the floor of your tea light holder.
Cracking Up?
If small cracks appear while drying, mix a tiny bit of fresh clay with water to make a paste (slip). Fill the cracks, smooth it over, and let it dry again slowly away from drafts.
Step 2: Adding the Floral Design
-
Plan placement:
Before cutting, gently lay your rectangular slab flat. Visualize where you want your flowers to sit. A scattered, random pattern often looks more organic and pleasing than rigid rows. -
Punch the flowers:
Using your flower plunger cutter, press firmly into the flat clay slab to punch out the flower shapes. Remove the cutout clay carefully. If the edges are ragged, dip your finger in a little water and smooth them immediately. -
Refine the petals:
Sometimes the cutter leaves slightly sharp edges. I like to use a damp paintbrush to gently round over the inside edges of each petal cutout for a softer, more finished stone look. -
Add texture (optional):
If you want that slightly speckled, stone-like texture seen in the photo, gently dab the surface with an old toothbrush or a crumpled ball of aluminum foil. Be careful not to distort your flower holes.
Golden Glow
Paint the inside of the holder with metallic gold acrylic paint. When the candle is lit, the gold interior will reflect a much warmer, richer light through the flower petals.
Step 3: Assembly and Finishing
-
Wrap the mold:
Wrap your glass jar or can in a layer of parchment paper. This is crucial so the clay doesn’t stick to the mold as it dries. -
Form the cylinder:
Carefully lift your flowered clay slab and wrap it around the parchment-covered mold. Bring the two short ends together. -
Seamless join:
Score the edges where the clay meets (cross-hatch with a knife), apply a little water or clay slip, and press the seam together firmly. Smooth the seam with your finger or a damp sponge until it effectively disappears. -
Attach the base:
Score the bottom edge of your cylinder and the outer edge of your circular base. Press the cylinder onto the base. Use a modeling tool or your finger to blend the clay on the inside and outside seams to ensure a strong bond. -
Smooth the rim:
Check the top rim of the holder. If it’s uneven, trim it gently with your craft knife. Dip your finger in water and run it along the rim to create a smooth, rounded lip. -
Partial drying:
Let the clay sit on the mold for about 1-2 hours until it is leather-hard—firm enough to hold its shape but not fully dry. -
Remove mold:
Very carefully slide the glass jar/can out, then peel away the parchment paper. Removing the mold at this stage allows the inside to dry thoroughly. -
Full dry:
Allow the piece to dry completely for 24-48 hours. Keep it away from direct heat sources to prevent cracking. -
Sand and soften:
Once fully bone dry, take your fine-grit sandpaper and gently sand away any rough spots, particularly around the top rim and the flower cutouts. -
Seal (Optional):
To protect the finish, you can apply a matte varnish. This helps keep the ‘raw stone’ look while making it easier to dust later.
Place a tea light inside and watch the floral shadows dance on the table for a truly heartwarming display


What Really Happens Inside the Kiln
Learn how time and temperature work together inside the kiln to transform clay into durable ceramic.
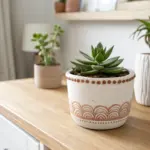
Planter Cover With “Best Mom” Text
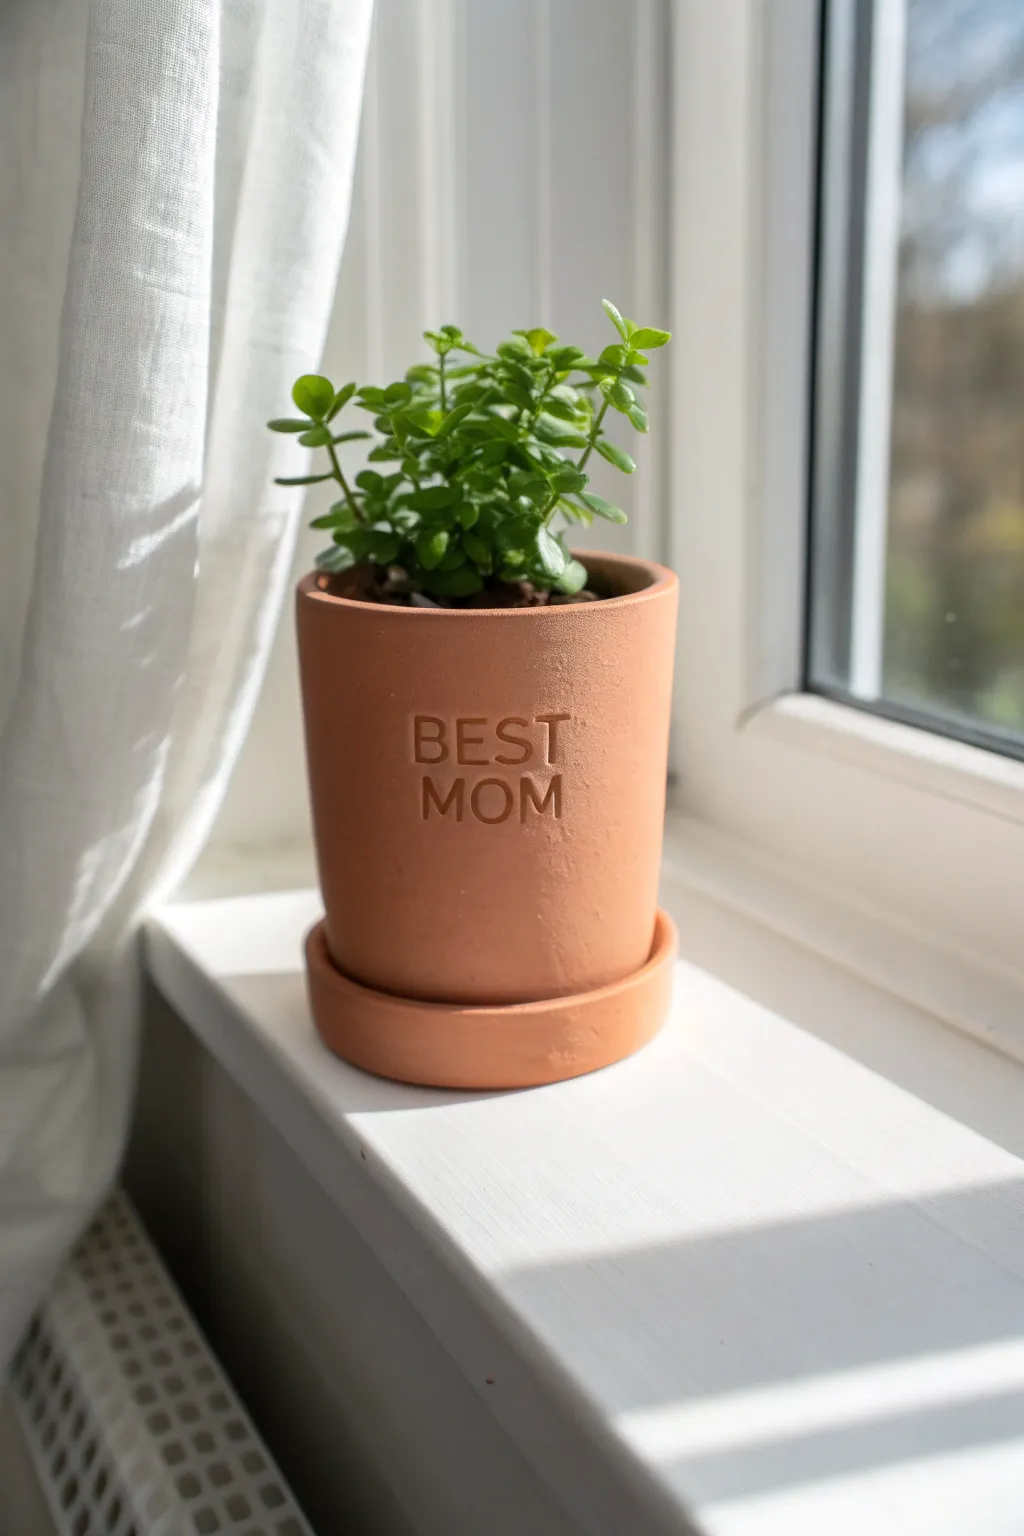
Transform simple air dry clay into a minimalist terracotta-style planter that looks effortlessly chic. This project uses stamping techniques to emboss a heartfelt message, creating a durable and personalized home for a small succulent or houseplant.
Step-by-Step Tutorial
Materials
- Air dry clay (terracotta color)
- Rolling pin
- Drinking glass or cylinder (for mold)
- Parchment paper
- Craft knife or clay tool
- Alphabet stamp set
- Small bowl or cup (for saucer mold)
- Sandpaper (fine grit)
- Clear matte varnish or sealant
- Water and sponge
- Ruler
Step 1: Forming the Planter Body
-
Prepare your clay:
Start by kneading a large handful of terracotta-colored air dry clay until it is pliable and smooth. This warms up the material and removes any potential air bubbles. -
Roll out a slab:
Place the clay on a sheet of parchment paper. Use a rolling pin to roll it out into a long rectangular slab, aiming for an even thickness of about 1/4 inch. -
Measure and cut:
Using a ruler and craft knife, cut a clean rectangle from the slab. Measure the height and circumference of your chosen glass mold first to ensure the rectangle is large enough to wrap around it with a slight overlap. -
Prepare the mold:
Wrap your glass or cylinder mold in a piece of parchment paper. I find this critical because it prevents the clay from sticking to the glass as it dries and shrinks. -
Wrap the clay:
Carefully pick up the clay rectangle and wrap it around the parchment-covered mold. Bring the two ends together. -
Seal the seam:
Where the ends meet, score both edges with your knife (make small hatch marks) and add a dab of water. Press the edges together firmly and smooth the seam with your finger or a wet sponge until it disappears. -
Create the base:
Roll out a smaller piece of clay to the same thickness. Place your wrapped cylinder on top of this piece and trace around the bottom with your knife to cut out a circular base. -
Attach the base:
Score the bottom edge of the cylinder wall and the outer edge of the circular base. Add water, press them together, and smooth the join on the outside using your finger or a sculpting tool to create a seamless transition.
Cracks Appearing?
If you see hairline cracks while drying, mix a tiny bit of clay with water to make a paste (slip). Fill the cracks with this paste and smooth it over immediately.
Step 2: Adding Details & The Saucer
-
Smooth the surfaces:
Dip a sponge in water and gently wipe the entire outer surface of the pot to remove fingerprints and minor imperfections. -
Stamp the message:
While the clay is still soft but supportive, press your alphabet stamps into the center of the pot to spell ‘BEST MOM’. Press firmly enough to leave a clear impression but support the inner wall with your hand so the pot doesn’t deform. -
Form the saucer:
Roll out another slab of clay for the saucer. Use a slightly larger bowl or circle cutter to cut a round base that is wider than your pot. -
Build the saucer rim:
Roll a long, thin snake of clay. Flatten it slightly into a strip. Attach this strip to the edge of your saucer base using the score-and-slip method to create a raised rim, smoothing it thoroughly. -
Dry slowly:
Place both the pot (still on the mold) and the saucer in a cool, dry area away from direct sunlight. Let them dry for 24-48 hours. Remove the mold after the first 12 hours to help the inside dry evenly.
Make it Shine
For a more contrasted look, after the pot is dry, carefully paint the inside of the stamped letters with white acrylic paint using a fine detail brush.
Step 3: Finishing Touches
-
Sand for perfection:
Once fully dry and hard, take your fine-grit sandpaper and gently sand the rim, the seam area, and any rough edges to get that smooth, manufactured look. -
Dust off:
Wipe away all sanding dust with a slightly damp cloth or a dry brush. -
Seal the interior:
Apply two coats of waterproof varnish to the *inside* of the pot and saucer. Air dry clay dissolves in water, so this step is non-negotiable if you plan to put a real plant inside. -
Seal the exterior:
Apply a coat of matte varnish to the outside to protect the finish while maintaining that natural clay texture.
Pop in a small succulent and you have created a thoughtful, modern gift that will brighten any windowsill
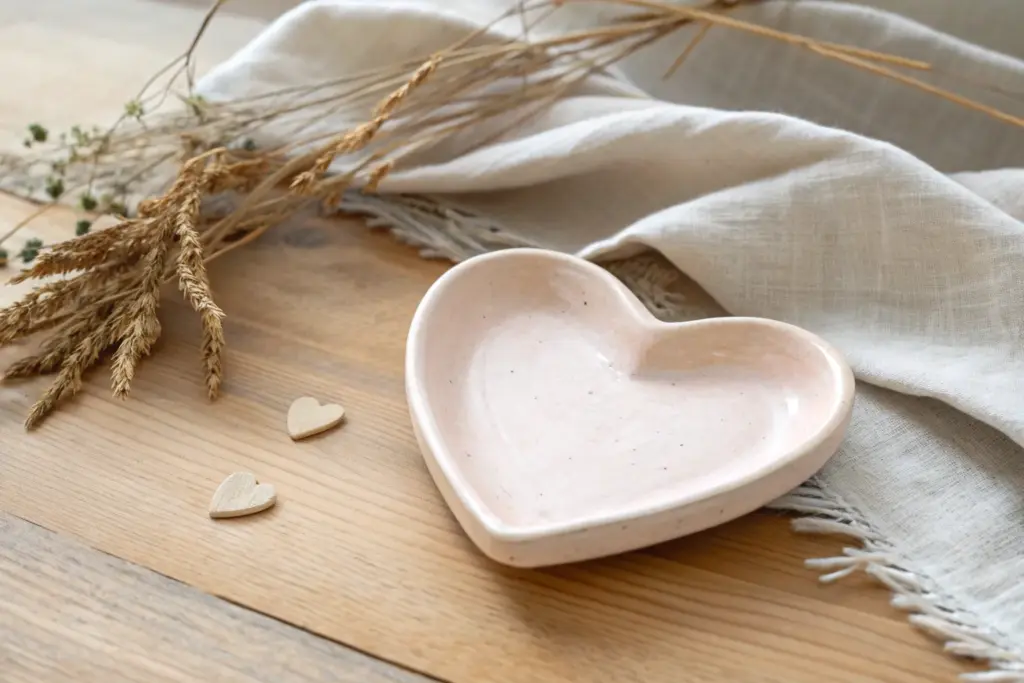
Floral Spoon Rest for Mom’s Kitchen
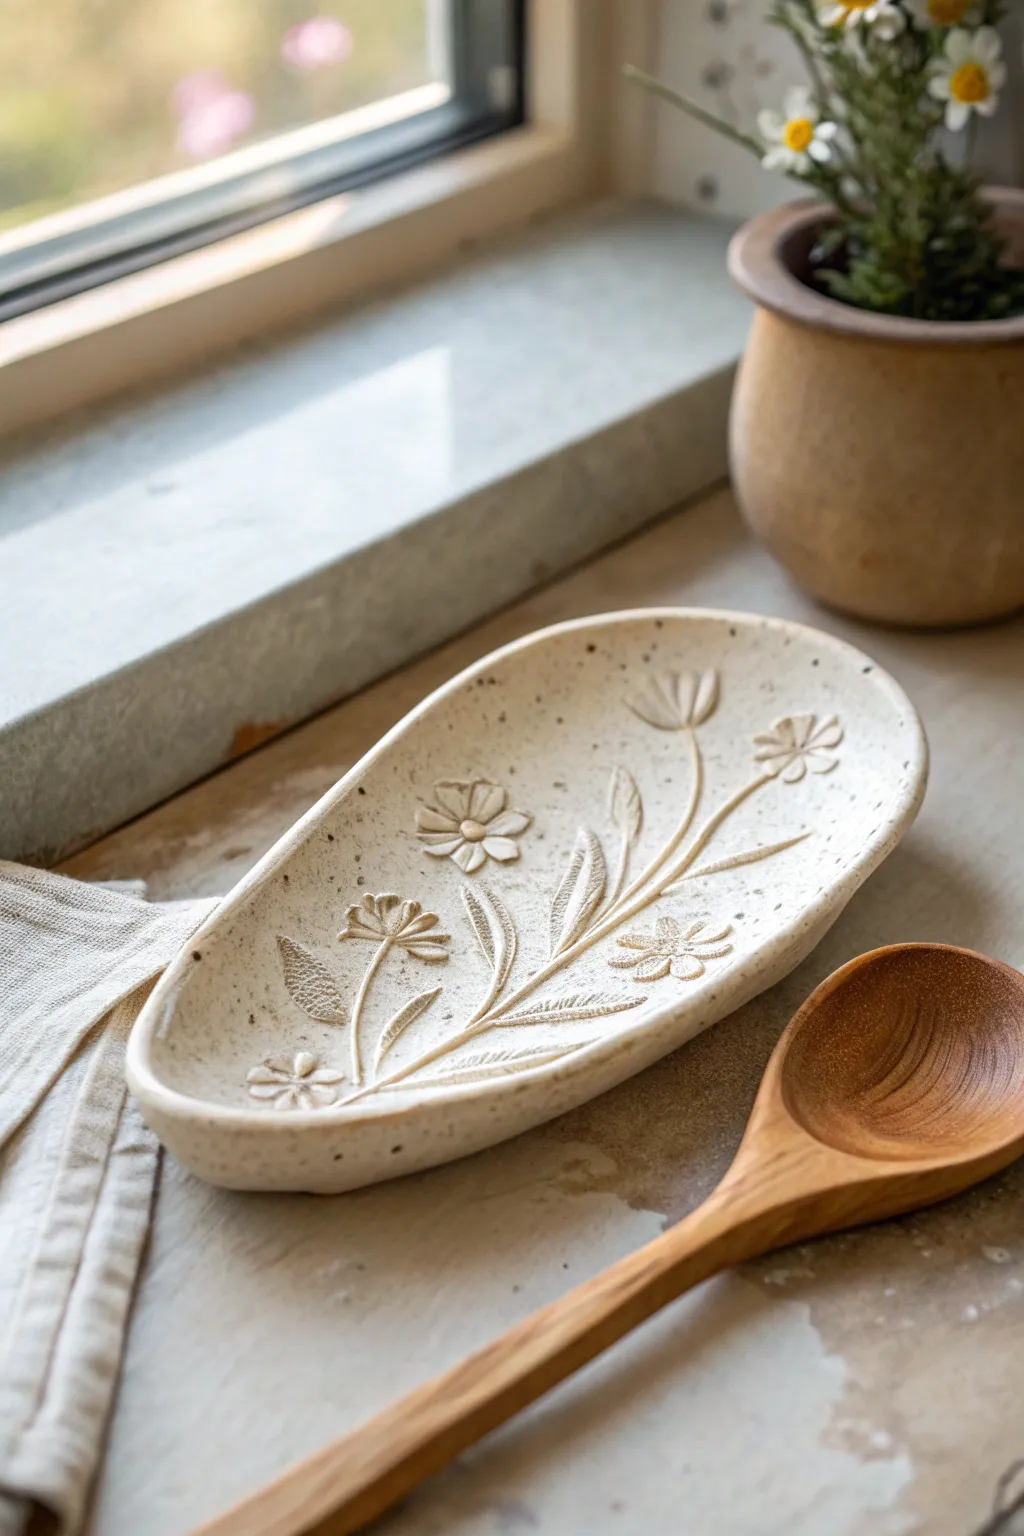
Create a practical piece of kitchen art that looks like it came from a boutique studio with this lovely speckled spoon rest. Its gentle oval shape and embossed wildflowers add a touch of rustic elegance to any countertop.
Step-by-Step Tutorial
Materials
- Air dry clay (white or off-white)
- Faux speckled clay additive (or black pepper)
- Small rolling pin
- Carving tools or needle tool
- Small round clay sculpting tool (ball stylus)
- Sponge and water
- Clear acrylic sealant (gloss or satin)
- Fine grit sandpaper
- Optional: Real or artificial flowers for impressing
Step 1: Shaping the Base
-
Prepare the clay:
Start with a ball of white air dry clay about the size of a tennis ball. If you want that trendy speckled pottery look, knead in some pre-bought speckle additive or even coarse black pepper until it’s distributed evenly. -
Roll it out:
Roll the clay out on a smooth surface or canvas mat until it finds an even thickness of about 1/4 inch. Keep it relatively thick to ensure durability in the kitchen. -
Cut the shape:
Use a needle tool or a dull knife to freehand an elongated oval shape that tapers slightly at one end, resembling a large teardrop. This organic shape doesn’t need to be mathematically perfect. -
Smooth the edges:
Dip your finger in a little water and run it along the cut edges to round them off. I like to spend extra time here to make sure there are no sharp angles. -
Create the curve:
Gently lift the edges of the oval to create a shallow bowl shape. You can prop up the sides with crumpled paper towels underneath while you work on the inside, preventing it from flattening back out.
Cracking Up?
If small cracks appear while drying, mix a tiny bit of fresh clay with water to make a paste (slip) and fill them in. Smooth it out with your finger and let dry again.
Step 2: Sculpting the Florals
-
Plan the stem:
Lightly trace a central curved line down the middle of the rest using a needle tool. This will serve as the main stem for your floral design. -
Add dimension:
Roll very thin coils of clay—think spaghetti thickness—and press them gently onto your traced line to create a raised stem. Blend the edges slightly into the base with a modeling tool. -
Form the leaves:
Roll small, tear-shaped pieces of clay and flatten them. Attach these along the stem. Use a needle tool to press a central vein into each leaf, giving it texture and securing it to the base. -
Sculpt the petals:
For the flowers, create small flattened circles or semi-circles of clay. Press them onto the ends of your stems. Use a carving tool to indent lines separating the petals. -
Detail the centers:
Roll tiny balls of clay for the flower centers. Press them into the middle of your petal arrangements using a ball stylus to get that classic daisy look. -
Refine the texture:
Go back over your raised elements with a damp brush or sponge. This softens any harsh tool marks and makes the flowers look like they are naturally emerging from the stone.
Pro Tip: Texture Trick
Instead of sculpting from scratch, you can press real wildflowers or leaves into the wet clay, remove them, and then paint the impressions for a simpler botanical look.
Step 3: Finishing Touches
-
Check the rim:
Make sure the rim is still slightly lifted. If the sculpting process flattened the dish, gently reshape the curve again so it can hold a spoon securely. -
Let it dry:
Set the piece aside in a cool, dry place. Allow it to air dry for at least 24 to 48 hours. Flip it over halfway through the drying process so the bottom dries evenly. -
Sand for smoothness:
Once fully cured and hard, use fine-grit sandpaper to gently smooth the rim and the underside. Be careful around your raised floral details. -
Seal the piece:
Apply a coat of waterproof acrylic sealant or varnish. This is crucial for a kitchen item, as it protects the clay from moisture and stains. -
Apply a second coat:
Once the first layer is dry, add a second coat of sealant for extra durability. Ensure you get into all the nooks and crannies of the flowers.
Wrap this handmade beauty in tissue paper for a gift that Mom will cherish every time she cooks