Whenever I’m making clay plant pots, I’m always chasing that sweet spot between adorable and actually functional for real plants. Here are my go-to clay plant pot ideas—starting with the classics and ending with a few studio-favorite twists that feel extra special.
Painted Color-Block Pots
Transform a basic terracotta planter into a stylish accent piece with this simple color-blocking technique. The muted, earthy stripes create a modern yet soft look that perfectly complements succulent greens.
Step-by-Step
Materials
- Standard terracotta pot (4 to 6-inch size)
- Acrylic craft paints (muted pink/terra cotta, sage green, pale yellow, cream)
- Painter’s tape or masking tape (approx. 1 inch width)
- Flat shader paintbrush (medium size)
- Small round paintbrush (for touch-ups)
- Plastic palette or paper plate
- Water cup and napkins
- Matte finish clear sealant (spray or brush-on)
- Fine-grit sandpaper (optional)
Step 1: Setting the Stage
-
Clean the surface:
Before you begin painting, make sure your terracotta pot is completely clean and dry. Wipe it down with a damp cloth to remove any dust or debris, as this ensures the paint adheres smoothly. -
Smooth imperfections:
Run your fingers over the surface of the clay. If you feel any rough bumps or sharp bits, gently sand them down with fine-grit sandpaper so your painted stripes look crisp. -
Base coat decision:
Decide on your base color. For this project, the top rim and bottom stripe match the natural clay tone, but to get a uniform look, I actually like to paint the entire pot with a muted pink or terra cotta color first. -
Apply the first layer:
Using your flat shader brush, apply an even coat of your chosen base color (muted pink) all over the exterior of the pot, including the rim. -
Let it dry completely:
Wait for the base coat to dry fully. Acrylics dry fast, but give it about 20-30 minutes so the tape won’t peel up the paint in the next steps.
Burnish for Sharp Lines
After applying your tape, run a credit card or your thumbnail firmly along the tape’s edge. This ‘burnishing’ seals the gap and stops paint from bleeding underneath.
Step 2: Creating the Stripes
-
Position the first tape line:
To create the sage green stripe, place a loop of painter’s tape around the pot just below the rim. Press the edges of the tape down firmly to prevent paint bleed. -
Position the second tape line:
Place a second strip of tape a little further down the pot, leaving a gap of exposed painted clay about 1 inch wide. This gap will become your green stripe. -
Paint the green stripe:
Load your flat brush with sage green acrylic paint. Fill in the spaced section between your two tape lines using horizontal strokes. -
Check for opacity:
If the green looks a bit sheer, let it dry for a few minutes and add a second coat for solid coverage. -
Remove tape carefully:
While the paint is still slightly tacky (not fully wet but not rock hard), gently peel away the tape at a 45-degree angle to reveal your clean line. -
Prepare for the yellow stripe:
Once the green stripe is bone dry, apply new tape over the bottom edge of the green stripe to protect it. -
Define the yellow area:
Place another strip of tape below that, leaving a new 1-inch gap for the yellow section. -
Apply yellow paint:
Fill this new gap with your pale yellow acrylic paint. Use smooth strokes to avoid ridges in the paint. -
Peel and repeat:
Remove the tape as before. Allow the yellow stripe to dry completely before moving to the final white stripe.
Paint Peeling Off?
If removing the tape lifts exactly where you painted, you likely waited too long. Peel tape while paint is still slightly damp to keep edges crisp and intact.
Step 3: Finishing Touches
-
Tape the final section:
Mask off the bottom edge of the yellow stripe. Leave a final gap below it for the cream/white band. -
Paint the cream stripe:
Apply the cream-colored acrylic paint in the final gap. This lighter color might need two or three thin coats to cover the base color underneath. -
Reveal the full pattern:
Remove the final piece of tape. You should now have a rim color, followed by green, yellow, cream, and finally the base color at the very bottom. -
Touch up edges:
If any paint bled under the tape, use a small round brush and the appropriate color to carefully neaten up the lines. -
Seal the pot:
To protect your work from water damage, apply a matte clear sealant over the entire painted exterior. This is crucial if you plan to water a real plant inside.
Once the sealant dries, your pot is ready to house a succulent and brighten up your windowsill


Minimal Face Planters
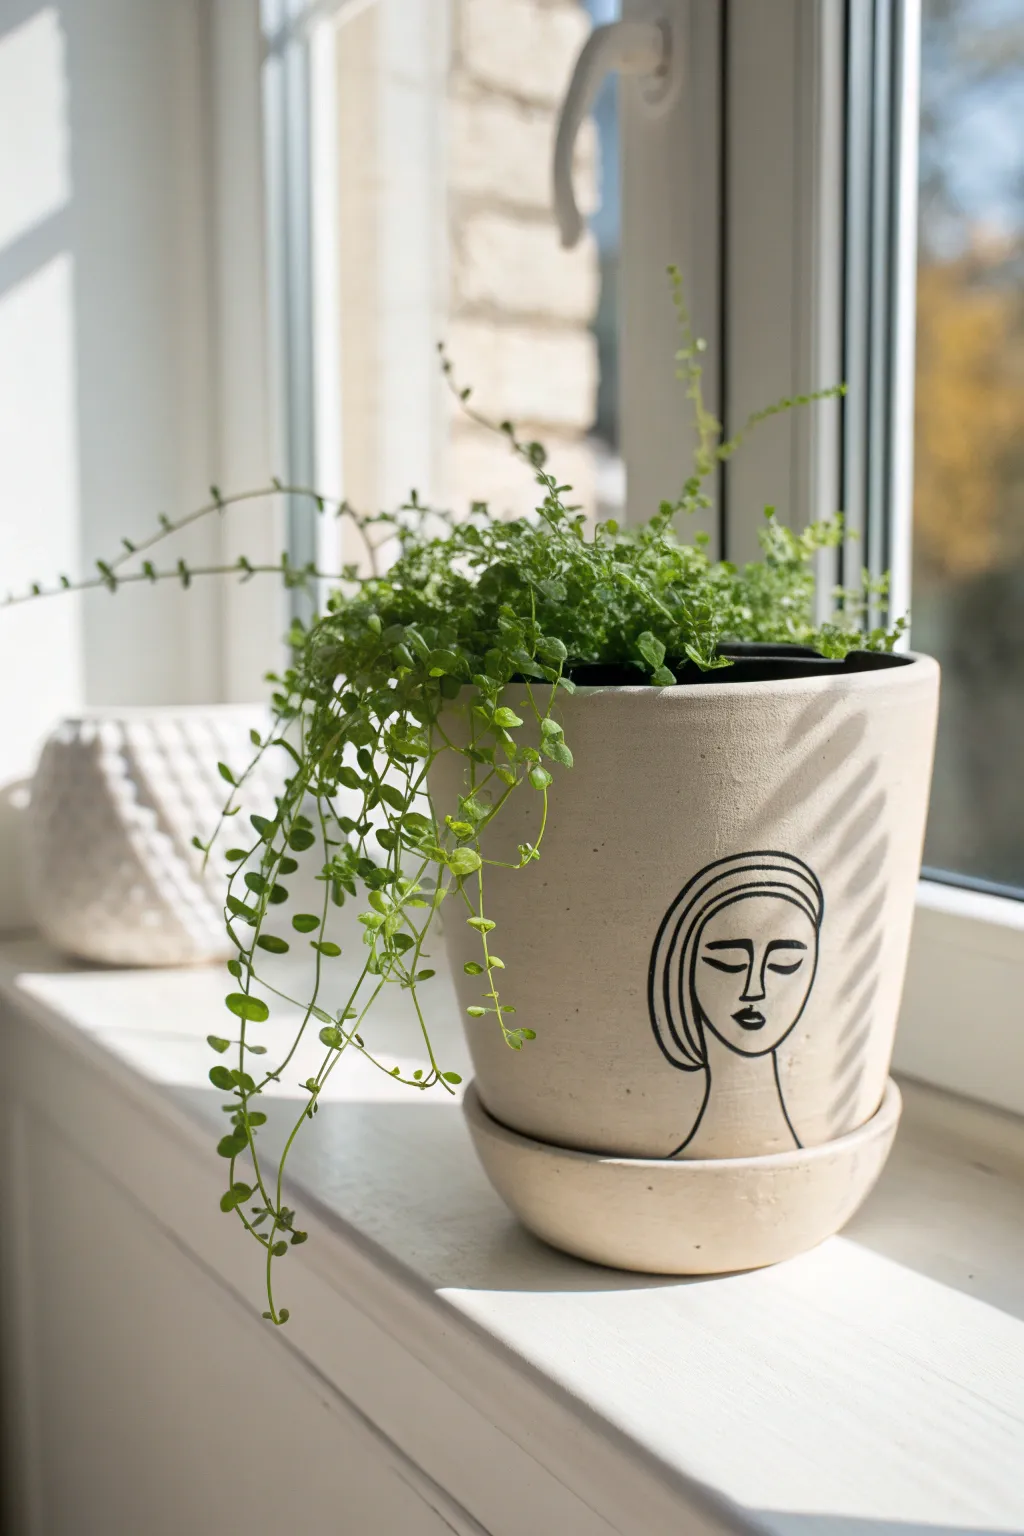
Transform a plain terracotta pot into a modern art piece with a few simple strokes. This minimalist design features a sleek line drawing of a face, adding a touch of serene elegance and personality to your indoor garden setup without overwhelming the space.
Step-by-Step Guide
Materials
- Unfinished terracotta pot (straight-sided cylinder shape)
- Matching terracotta saucer
- Gesso or matte cream acrylic paint
- Black oil-based paint marker (medium tip)
- Black oil-based paint marker (fine tip)
- Pencil (HB or lighter)
- Eraser
- Clear matte spray sealer
- Wide flat paintbrush
- Fine grit sandpaper (optional)
Step 1: Preparation and Base Coat
-
Clean surface:
Begin by wiping down your terracotta pot and saucer with a damp cloth to remove any dust or manufacturing residue. Let it dry completely. -
Smooth imperfections:
Inspect the clay for any rough bumps or sharp edges. If you find any, gently buff them away with fine-grit sandpaper for a smoother painting surface. -
Mix base color:
If you want the creamy, off-white look shown in the image rather than standard orange terracotta, mix a small amount of white gesso with a drop of warm beige acrylic paint. -
Apply first coat:
Using a wide flat brush, paint the entire exterior of the pot and the saucer. Use long, horizontal strokes to minimize brush marks. -
Dry and repeat:
Allow the first coat to dry for about 20 minutes. Apply a second coat to ensure opaque coverage, hiding the original clay color underneath. -
Inside edge:
Create a professional finish by painting the inner rim of the pot, extending down about one inch. This ensures no bare clay shows when the soil level drops slightly.
Curve Control
Drawing on a rounded surface is tricky. Rest the heel of your drawing hand on a stack of books equal to the pot’s height to stabilize your strokes.
Step 2: Drawing the Face Design
-
Sketch placement:
With a pencil, lightly mark where the center of the face will be. Aim for the lower third of the pot so the plant leaves act as the ‘hair’ flow. -
Outline the face shape:
Lightly sketch the U-shape of the chin and jawline. Keep the lines deliberate but faint so they are easy to erase later if needed. -
Draft the features:
Add the closed eyes with simple curved arches, a small nose line, and lips. The style relies on negative space, so keep details minimal. -
Sketch the hair outline:
Draw the stylized hair shape surrounding the face, using clean curves that mimic a bob cut or headscarf look, just like in the photo. -
Refine sketch:
Step back and look at your pencil sketch from a distance to ensure the proportions feel balanced on the curved surface.
Step 3: Inking and Sealing
-
Begin inking:
Shake your medium-tip oil-based black paint marker well. Test the flow on a scrap piece of paper first to prevent blobs. -
Trace main lines:
Starting with the hair outline, trace over your pencil marks with steady, confident strokes. I find it helpful to turn the pot slowly with my other hand as I draw curves. -
Fill bold areas:
Go over the thicker lines of the hair and jaw twice to give them visual weight, creating that striking graphic look. -
Detail work:
Switch to the fine-tip marker for delicate areas like the eyelashes, nose, and lips. These lines should be thinner to keep the expression soft. -
Cleanup:
Let the paint marker cure for at least an hour. Once fully dry, gently erase any visible pencil marks with a clean eraser. -
Seal the work:
Take the pot outside or to a well-ventilated area. Apply a light, even coat of clear matte spray sealer to protect your design from moisture and dirt.
Smudge Rescue
If you smudge the black marker, don’t wipe it! Let it dry completely, then paint over the mistake with your base cream color before redrawing.
Once the sealer cures, pot up a trailing plant like string-of-tears or ivy to give your new face planter a living, green hairstyle


Easy Air-Dry Pinch Pot Planters
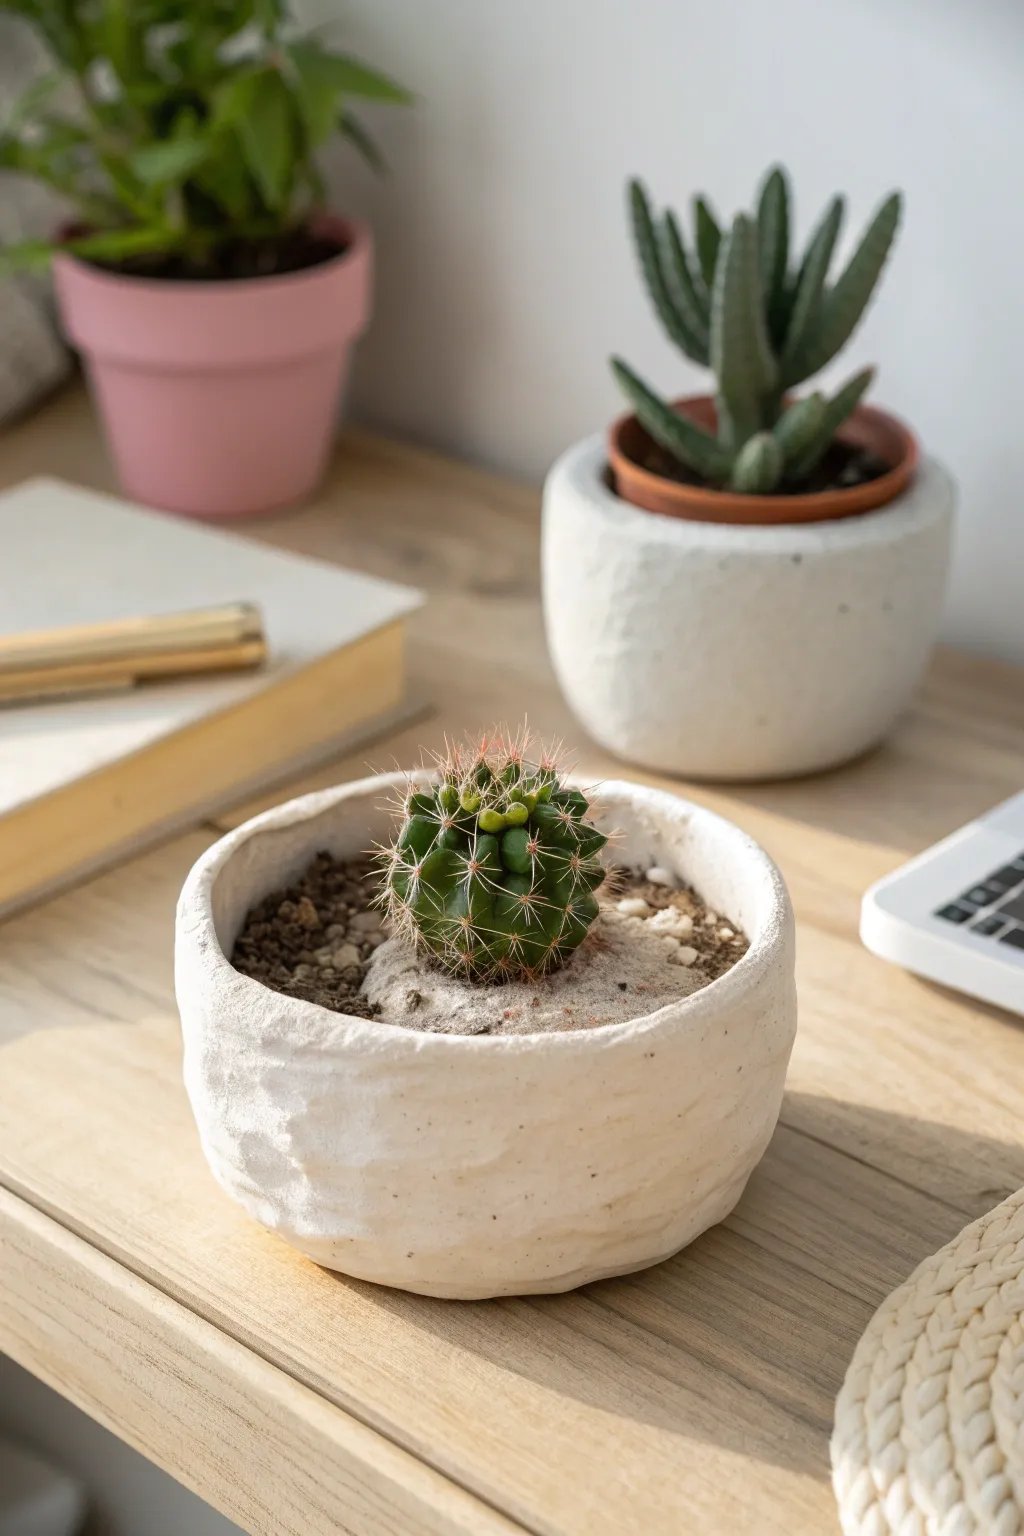
Create a charmingly rustic home for your succulents with this simple pinch pot planter tutorial. The intentionally uneven rim and subtle finger-marked texture give this piece an organic, handmade aesthetic that fits perfectly with natural decor.
Detailed Instructions
Materials
- White stone air-dry clay (or white polymer clay)
- Circular cookie cutter or jar lid (approx. 4 inches)
- Rolling pin
- Small bowl relative to your cutter size (for molding)
- Plastic wrap
- Medium-grit sandpaper sponge
- Water in a small cup
- Matte sealant or varnish (optional but recommended)
Step 1: Prepping and Shaping the Base
-
Condition the Clay:
Start by taking a generous handful of white air-dry clay. Knead it in your hands for a minute or two until it feels pliable, soft, and warm to the touch. This prevents cracking later on. -
Roll the Slab:
Place your clay on a flat, clean surface. Use a rolling pin to flatten the clay into a slab that is roughly 1/4 inch thick. Try to keep the thickness consistent across the entire piece. -
Cut the Circle:
Press your circular cutter or jar lid firmly into the rolled clay to create a perfect circle base. Remove the excess clay around the edges and set it aside for later repairs if needed. -
Prepare the Mold:
Take your small bowl and line the inside with plastic wrap. This step is crucial so you can easily lift the clay out later without it sticking to the ceramic or glass.
Don’t Over-Smooth!
Resist the urge to make the walls perfectly flat. The charm of this specific design relies on the subtle, lumpy texture created by your fingerprints during the pinching process.
Step 2: Building the Walls
-
Initial Form:
This planter combines slab and pinch techniques. Gently lift your clay circle and press it into the bottom of the lined bowl, curving the edges up the sides to start forming the cup shape. -
Pinch the Walls:
Using your thumb and forefinger, begin pinching the walls of the clay upward. work your way around the circumference, thinning the walls slightly while increasing the height. -
Maintain Thickness:
Keep checking the bottom and lower sides with your fingers. You want the base to remain sturdy while the walls become more delicate. Aim for a consistent 1/4 inch thickness throughout. -
Create Texture:
Instead of smoothing everything perfectly, leave your subtle finger impressions on the exterior. I like to gently press my thumb into the clay at random intervals to create divots that catch the sunlight. -
Shape the Rim:
Don’t trim the top edge flat with a knife. Instead, tap it gently with your finger to blunt sharp areas, but allow the rim to wave and dip naturally for that organic, handmade look visible in the photo.
Step 3: Refining and Drying
-
Smooth the Interior:
Dip your index finger in a tiny bit of water and run it along the *inside* of the pot to smooth out major cracks or rough patches where the soil will sit. -
Initial Touch-Up:
Inspect the outside. If you see any deep structural cracks forming, patch them now with a tiny bit of wet clay (slip), but leave the intentional texture alone. -
Dry in Mold:
Leave the clay inside the bowl to dry for at least 12–24 hours. The bowl supports the walls so they don’t slump while the clay is wettest. -
Remove and Air Dry:
Once the clay is firm enough to hold its shape (leather hard), gently lift it out of the bowl using the plastic wrap. Peel off the plastic and let the pot sit on a wire rack for another 24–48 hours until fully white and dry. -
Test for Dryness:
The pot should feel room temperature, not cool to the touch. If it feels cold, there is still moisture inside the clay, so give it more time.
Faux Glaze Effect
For a glossy finish that mimics fired ceramic, apply a coat of high-gloss polyurethane varnish or ‘Triple Thick’ glaze to just the rim, leaving the body matte.
Step 4: Finishing Touches
-
Gentle Sanding:
Take your sandpaper sponge and very lightly graze over the sharpest peaks of your texture. You don’t want to remove the bumps, just soften them so the pot feels nice to hold. -
Wipe Down:
Use a dry cloth or soft brush to remove any clay dust created by the sanding process. -
Seal the Pot:
Because air-dry clay dissolves in water, apply two coats of matte varnish or sealant inside and out. This protects the pot from occasional moisture when you mist your cactus. -
Final Assembly:
Once the sealant is cured, add a layer of gravel to the bottom for drainage (essential since pinch pots rarely have holes), add cactus soil, and nestle your small cactus inside.
Enjoy your customized, sculpturally beautifully planter on your desk or windowsill.


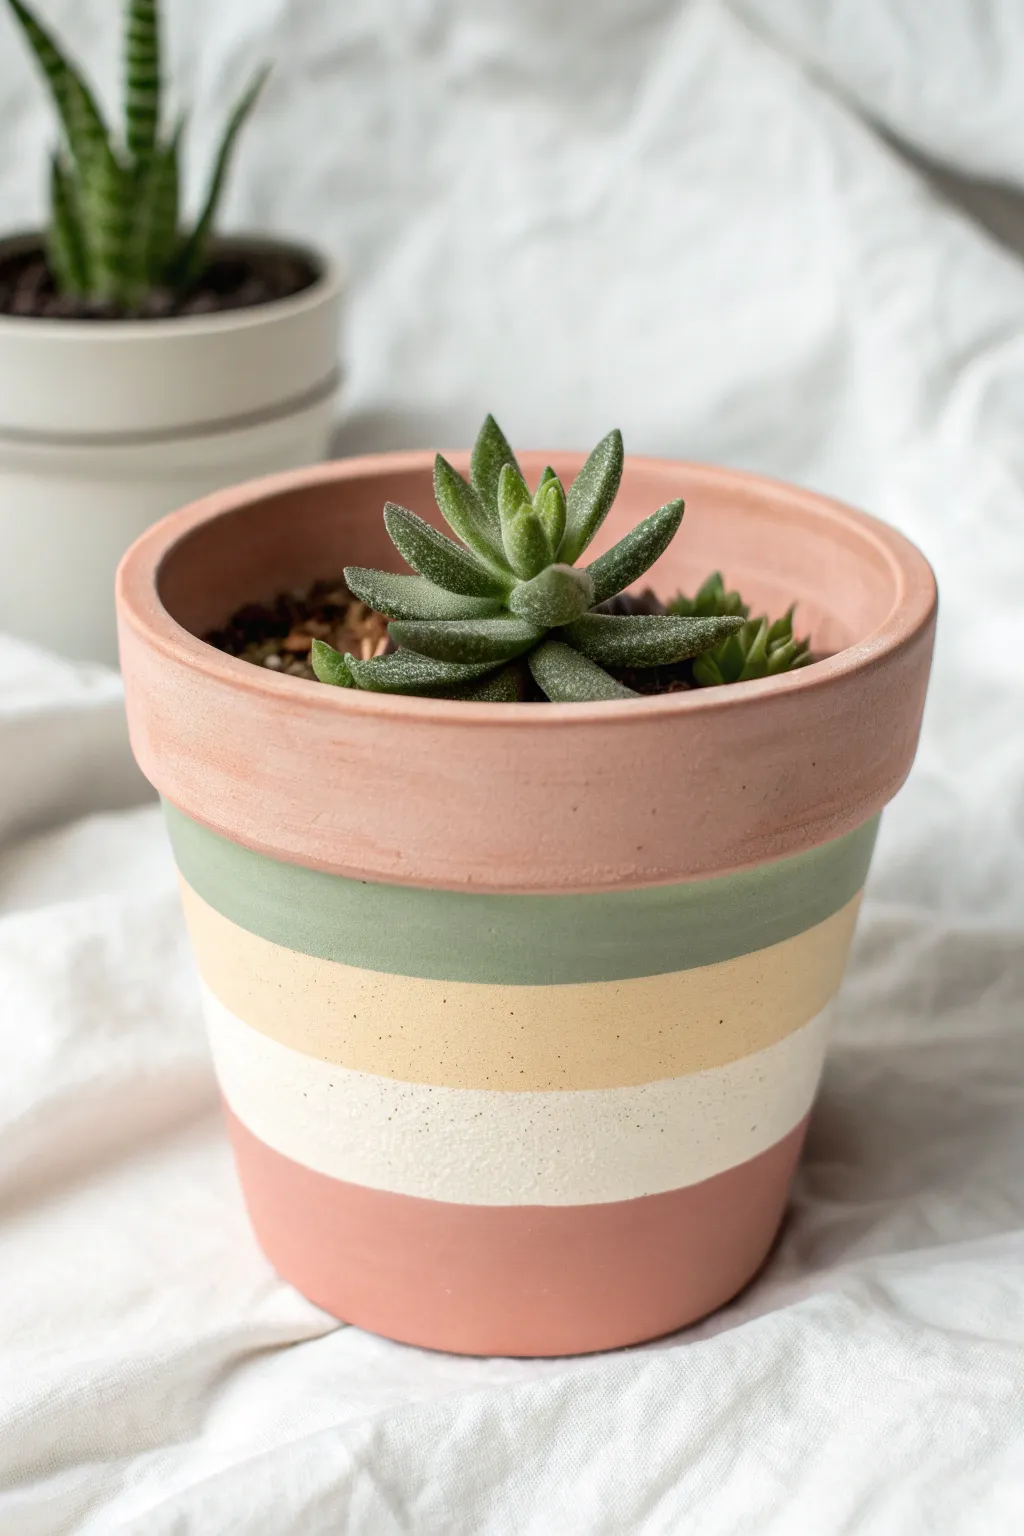
Soft Ombre Painted Pots
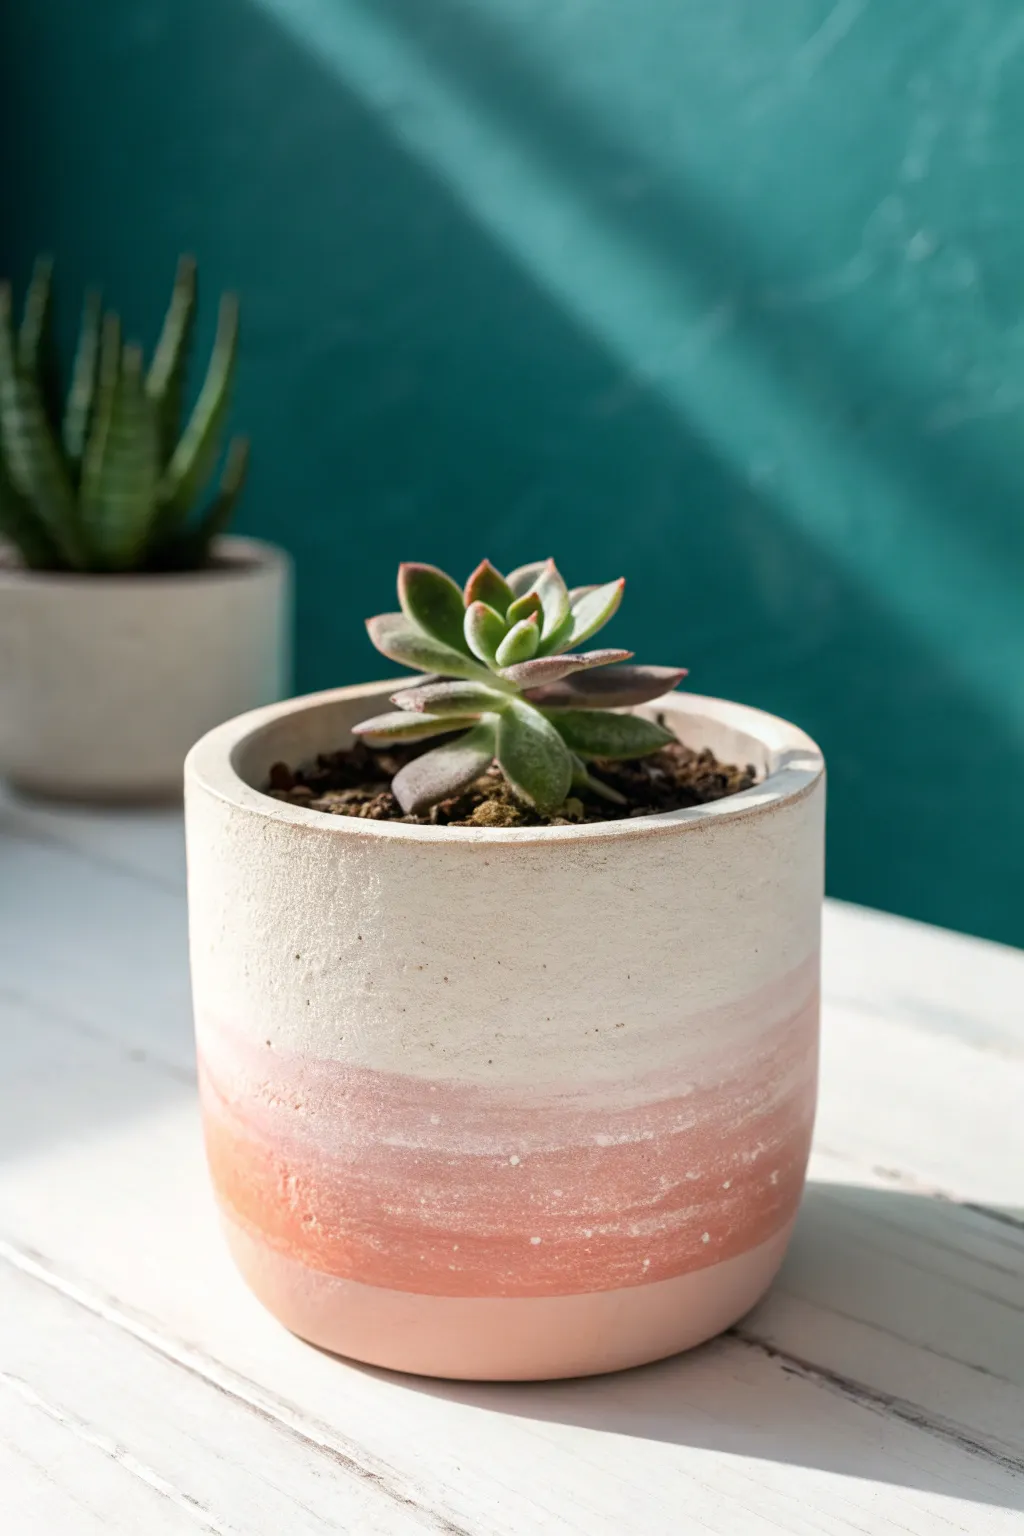
Transform a plain cylinder planter into a dreamy piece of decor with this soft ombre technique. The subtle transition from creamy white to rosy pink and warm terracotta mimics a gentle sunset, adding warmth to any succulent collection.
Step-by-Step Guide
Materials
- Cylindrical terracotta or concrete pot (clean and dry)
- White acrylic paint (matte finish)
- Blush pink acrylic paint
- Terracotta or coral orange acrylic paint
- Flat paintbrush (approx. 1 inch width)
- Soft blending brush or sponge
- Palette or paper plate for mixing
- Water cup
- Paper towels
- Clear matte sealer spray (optional)
Step 1: Preparation & Base Coat
-
Clean surface:
Begin by ensuring your pot is completely free of dust and dirt. Wipe it down with a slightly damp cloth and let it dry fully before painting. -
Mix the base white:
Squeeze a generous amount of white acrylic paint onto your palette. If the paint is very thick, you might want to thin it slightly with a drop of water for smoother application. -
Apply the top section:
Using your flat brush, paint the top third of the pot with the white paint. Don’t worry about a perfectly straight bottom edge; a messy edge actually helps with blending later. -
Paint the rim:
Carry the white paint over the top rim and slightly down the inside edge of the pot for a finished, professional look. -
Let it set:
Allow this white layer to dry to the touch, which usually takes about 10-15 minutes, before moving on to the colors.
Step 2: Creating the Ombre Gradient
-
Apply the bottom color:
Load your cleaned brush with the terracotta or coral orange paint. Apply this to the bottom third of the pot. -
Cover the base:
Ensure you paint all the way to the bottom edge. If the pot will be seen from below, paint the underside rim as well. -
Apply the middle shade:
While the bottom orange is still slightly wet, clean your brush and pick up the blush pink paint. Apply this to the middle section of the pot. -
Bridge the gap:
Paint the pink right up to the white section and down into the wet orange section. You want these color bands to touch and slightly overlap. -
Prepare blending mix:
On your palette, mix a little white with a tiny dot of pink to create a very pale transition shade. -
Blend the upper transition:
Using a slightly damp soft brush or sponge, gently dab or stroke horizontally where the white meets the pink. I find a light hand works best here to feather the edges together. -
Prepare lower blending mix:
Mix a bit of the pink with the terracotta orange to create a mid-tone for the lower transition. -
Blend the lower transition:
Work the seam between the pink and orange sections using horizontal strokes. The goal is to eliminate hard lines, creating a soft, hazy shift. -
Add texture (optional):
To mimic the look in the photo, you can use a fairly dry brush to drag streaks of the lighter pink slightly down into the darker orange, creating a ‘brushed’ texture.
Wet-on-Wet Magic
For the smoothest ombre, work quickly so the paints stay wet. If they dry too fast, mist the pot lightly with water to reactivate blending.
Step 3: Finishing Touches
-
Assess and adjust:
Step back and look at the gradient. If any area looks too abrupt, add a tiny bit of fresh paint and re-blend while wet. -
Dry completely:
Let the pot sit for at least an hour until the paint is completely dry and cured. -
Seal the work:
To protect your paint job from water damage when watering your plant, apply a light coat of clear matte sealer spray over the entire exterior. -
Pot your plant:
Once the sealer is dry, fill your pot with succulent soil and your chosen plant.
Texture Twist
Before the paint dries, gently dab the surface with a crumpled tissue or coarse sponge to add a stone-like texture to the finish.
Place your new creation in a sunny spot to let those warm sunset tones glow

The Complete Guide to Pottery Troubleshooting
Uncover the most common ceramic mistakes—from cracking clay to failed glazes—and learn how to fix them fast.
Terrazzo Speckle Clay Pots
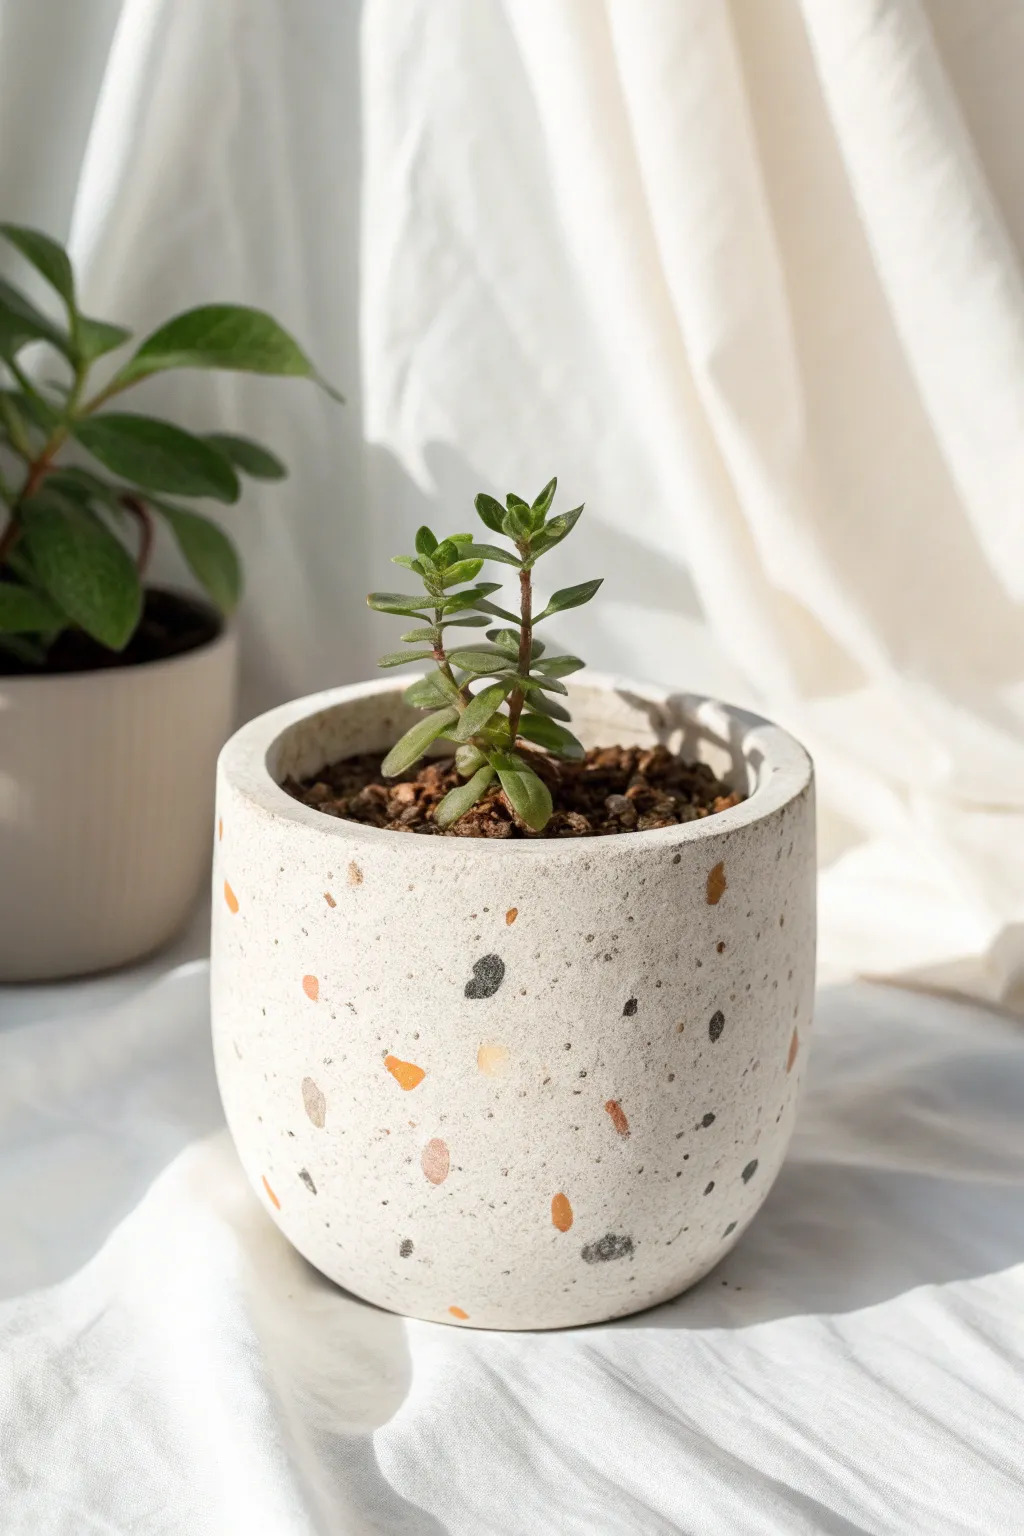
Bring the timeless elegance of terrazzo floors to your shelves without the weight of concrete. By mixing colored clay chips into a neutral base, you create a convincing speckled stone effect that is modern, playful, and surprisingly simple to achieve.
How-To Guide
Materials
- White or cream polymer clay (primary base)
- Rust orange polymer clay
- Dark grey or black polymer clay
- Tan/beige polymer clay
- Rolling pin or pasta machine
- Sharp clay blade or X-Acto knife
- Round cookie cutter or template (for base)
- Oven-safe glass bowl or metal form (for shaping)
- Parchment paper
- Medium and fine grit sandpaper (400 – 1000 grit)
- Matte varnish (optional)
Step 1: Prepping the Chips
-
Condition the colors:
Start by conditioning your colored clays—rust orange, dark grey, and tan—separately until they are soft and pliable so they mix well later. -
Flatten the colors:
Roll each colored piece into a very thin sheet. You want these quite thin because they will be the flat ‘chips’ inside the stone. -
Create the confetti:
Using your sharp blade, chop the thin colored sheets into jagged, irregular bits. Aim for varied sizes, from tiny specks to slightly larger chunks, to mimic real aggregate. -
Mix colors if desired:
I like to keep the piles of colored chips separate at first, then sprinkle them intentionally, but you can also mix them into a single confetti pile for random distribution.
Clean Cuts Matter
For the crispest terrazzo look, chill your clay sheet in the fridge for 10 minutes before slicing. Cold clay drags less and keeps the speckles distinct.
Step 2: Creating the Terrazzo Slab
-
Prepare the base:
Condition a large block of the white or cream clay. This needs to be enough to cover your mold form comfortably. -
Roll the base sheet:
Roll the white clay out into a thick sheen, approximately 1/4 inch thick. It needs substantial thickness to hold the pot shape. -
Apply the chips:
Scatter your prepared colored clay chips over the top of the white sheet. Press them down gently with your fingers so they stick. -
Embed the texture:
Run your rolling pin over the sheet again. This forces the colored chips into the white base, creating a smooth, unified surface where the colors are flush with the white. -
Roll and repeat:
Pass the sheet through a pasta machine or roll it thinner. If the chips distort too much, fold the clay and roll again to distribute the pattern through the depth of the slab.
Step 3: Forming the Pot
-
Cut the base:
Using a round cutter or template, cut a circle from your terrazzo sheet that matches the bottom diameter of your chosen mold. -
Cut the walls:
Measure the circumference and height of your mold. Cut a long rectangular strip from the remaining terrazzo sheet to serve as the pot walls. -
Assemble on the mold:
Wrap the rectangular strip around your oven-safe form. Ensure the seam is clean and smoothed over with your finger or a smoothing tool. -
Attach the bottom:
Place the circular base onto the form and gently blend the edges where it meets the wall. A seamless connection is crucial for stability. -
Smooth the surface:
Check the entire outer surface for fingerprints or uneven seams. Lightly smooth them out before baking.
Stone Effect
Mix a tiny amount of translucent clay into your white base. It adds depth and makes the faux stone look less like plastic and more like real ceramic.
Step 4: Baking and Finishing
-
Bake the pot:
Bake the clay directly on the form according to the manufacturer’s instructions (usually around 275°F/135°C for 15-30 minutes). -
Cool down:
Let the pot cool completely before attempting to remove it from the form to prevent warping or cracking. -
Initial sand:
Once cool, wet sand the pot under running water with medium-grit sandpaper. This reveals the true sharpness of the terrazzo chips. -
Final polish:
Switch to fine-grit sandpaper to buff the surface until it feels smooth like honed stone. -
Seal (Optional):
Apply a coat of matte varnish if you want extra protection, though the sanded clay often looks beautiful and natural on its own.
Fill your new creation with a hardy succulent and enjoy the uniquely modern texture you’ve added to your space
Raised Flower Appliqué Pots
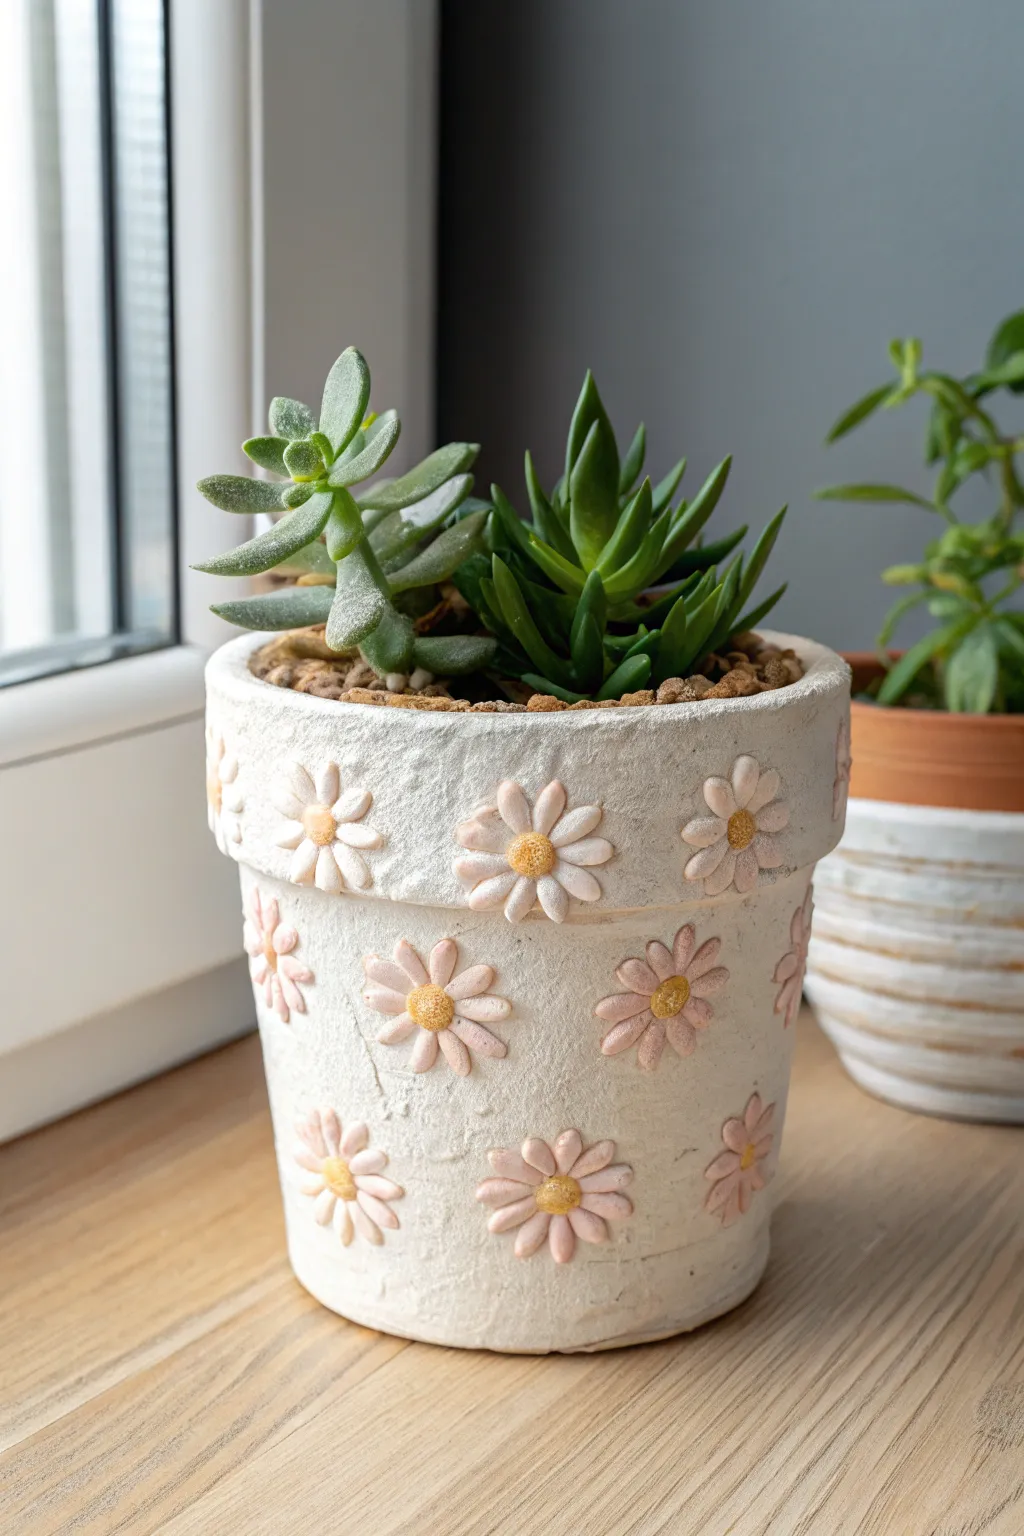
Transform a basic planter into a textured, blooming masterpiece with this raised flower appliqué technique. The tactile surface and soft pastel daisies give the pot a charming, handcrafted feel that perfectly complements succulent arrangements.
Step-by-Step
Materials
- Small terracotta or plastic pot (as a base)
- White stone-texture spray paint or textured primer
- Air-dry clay (white)
- Acrylic paints: Soft pink, white, mustard yellow
- Small detail paintbrush
- Water cup
- Sculpting tool or toothpick
- Strong craft glue or E6000
- Matte sealant spray
Step 1: Preparing the Base
-
Clean surface:
Begin by wiping down your base pot with a damp cloth to remove any dust or oils. Let it dry completely. -
Add texture:
Spray the entire pot with a stone-texture spray paint or a heavy coat of textured white primer. This creates that slightly rough, gritty background seen in the photo. -
Second coat:
Once the first layer is dry, apply a second coat to ensure full coverage and a consistent, stone-like finish. Allow this to cure fully before handling.
Petals Falling Off?
If clay flowers detach after drying, the textured surface might be too rough. Sand the specific attachment spot slightly smooth, then re-glue using heavy-duty epoxy.
Step 2: Sculpting the Daisies
-
Mixing clay color:
Take a chunk of white air-dry clay. Knead a tiny drop of pink acrylic paint into it to create a very pale, fleshy pink base color. -
Forming petals:
Pinch off tiny, pea-sized pieces of clay and roll them into small balls. Then, roll each ball into a teardrop shape. -
Flattening petals:
Gently press each teardrop flat with your finger to create an oval petal shape. I like to keep them slightly thick so they pop off the pot’s surface. -
Assembling flowers:
On your workspace, arrange 6-8 petals in a circle with the pointed ends meeting in the center to form a single daisy. -
Adding texture:
Use a sculpting tool or a toothpick to press a subtle indentation down the center of each petal for a natural look. -
Creating the centers:
Roll tiny balls of fresh clay for the flower centers and press them gently into the middle of your petal arrangements. -
Texturing centers:
Poke the center ball repeatedly with a toothpick or a stippling brush to give it a pollen-like texture. -
Repeat sculpting:
Continue creating individual daisies until you have enough to cover your pot in a scattered pattern.
Step 3: Assembly and Painting
-
Planning placement:
Before gluing, hold your clay flowers up to the dry pot to decide on a layout. A staggered, random pattern works best. -
Attaching flowers:
Apply a dab of strong craft glue to the back of each flower and press firmly onto the textured pot. Hold for a few seconds to ensure adhesion. -
Painting centers:
Once the glue is set, mix a mustard yellow and white paint. Carefully paint only the textured centers of the daisies. -
Enhancing petals:
Dilute some soft pink paint with water to make a glaze. Lightly brush it over the petals, focusing on the crevices, then wipe the high points with a paper towel to highlight the texture. -
Adding highlights:
Use a dry brush with pure white paint to lightly dust the very tops of the petals and the pot rim to unify the look. -
Sealing:
Finish by misting the entire pot with a matte sealant spray. This protects the clay from moisture, which is crucial when watering plants.
Go Vintage
After the final seal dries, rub a tiny amount of diluted brown antique wax over the entire pot and wipe it back immediately for an aged, weathered garden look.
Now you have a charming vessel ready to house your favorite succulents or small houseplants


What Really Happens Inside the Kiln
Learn how time and temperature work together inside the kiln to transform clay into durable ceramic.
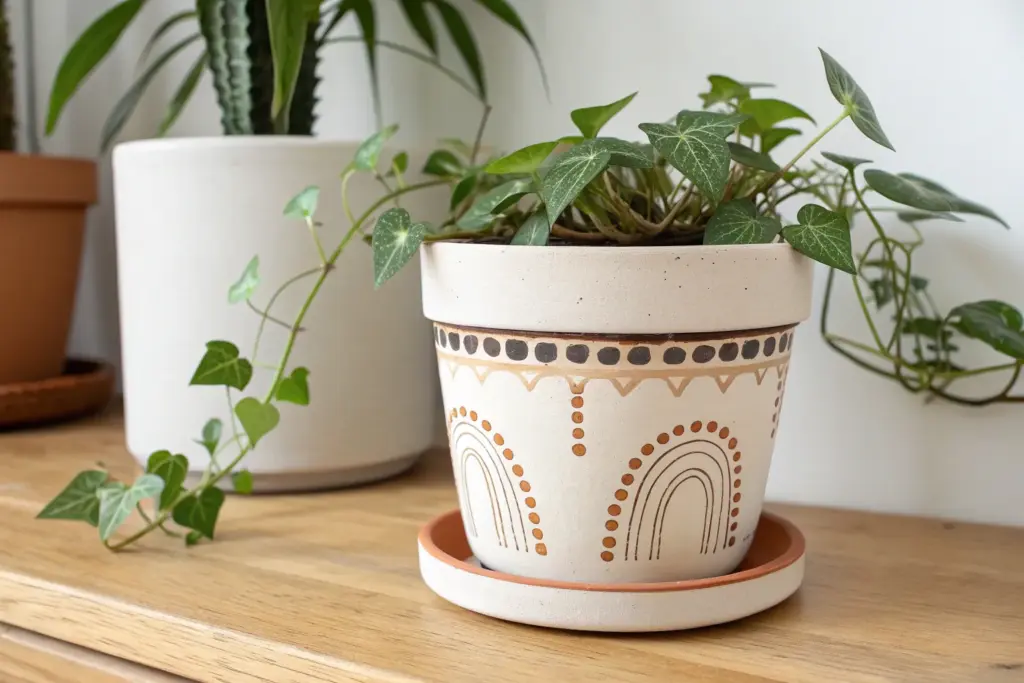
Boho Arches and Rainbows
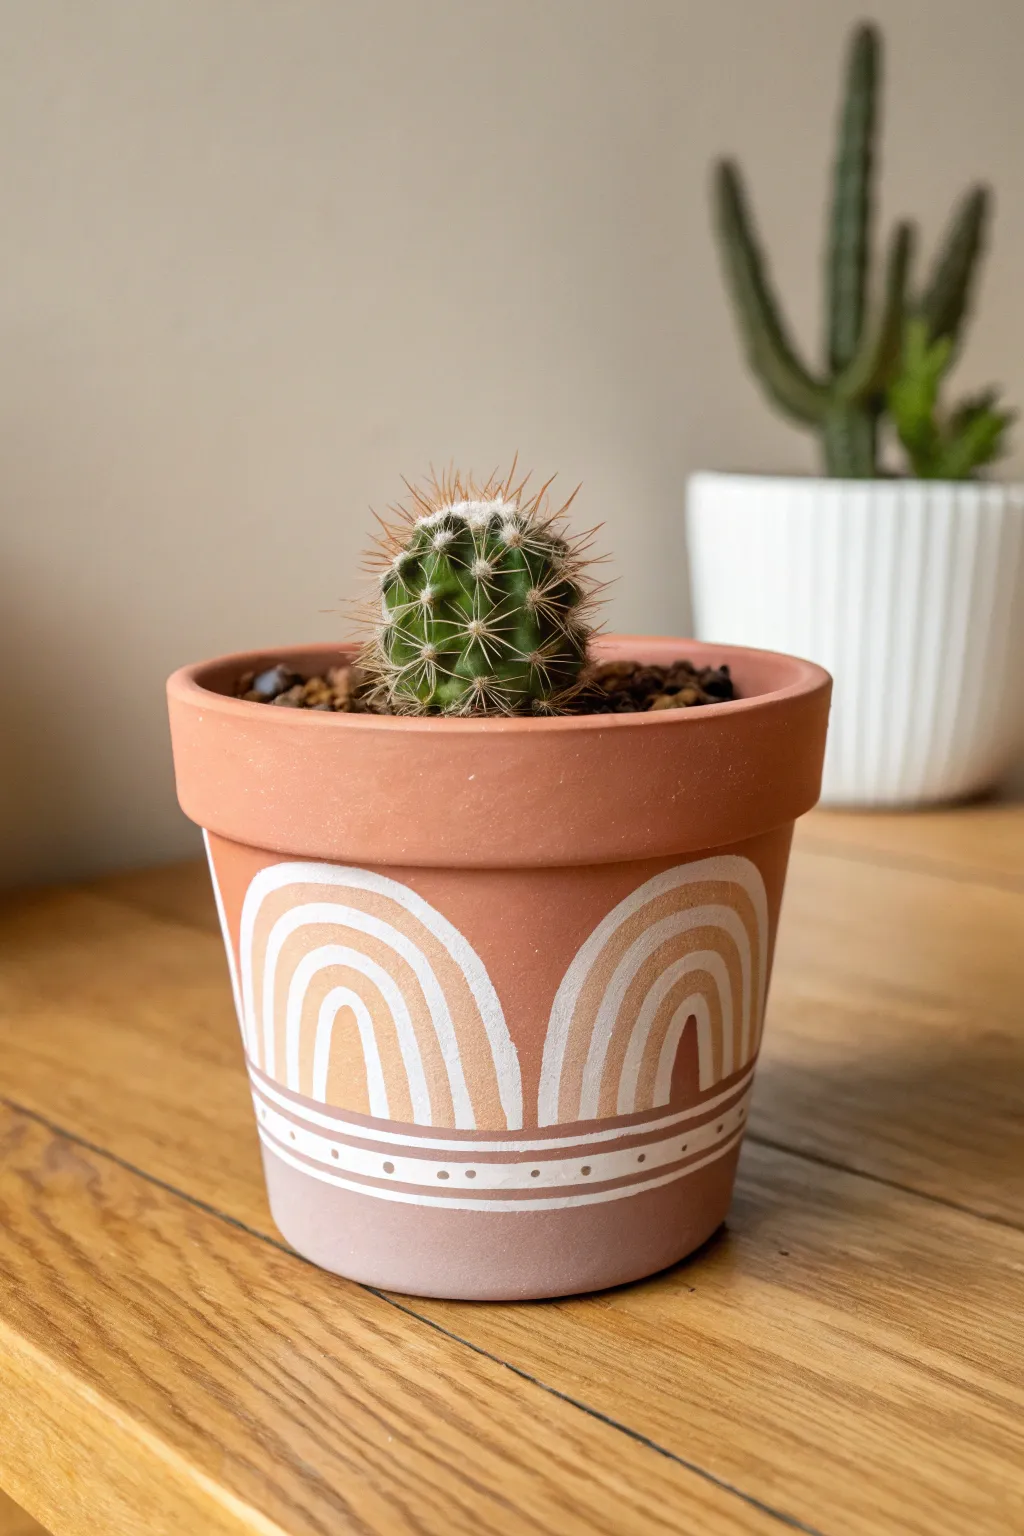
Embrace a warm, bohemian aesthetic with this simple yet striking painted pot design. By using the natural terracotta as a base color alongside muted blush and crisp white lines, you create a trendy rainbow motif that feels grounded and organic.
Step-by-Step Tutorial
Materials
- Small terracotta pot (cleaned and dried)
- White acrylic paint
- Muted blush pink or mauve acrylic paint
- Small flat brush (size 6 or 8)
- Fine liner brush (size 0 or 1)
- Pencil
- Palette or small plate
- Water cup and paper towels
- Matte spray sealer (optional)
Step 1: Preparation
-
Prepare the surface:
Ensure your terracotta pot is completely clean and free of dust or price sticker residue. If you washed it recently, let it dry for at least 24 hours so moisture doesn’t trap under the paint. -
Sketch the baseline:
Using a pencil, lightly mark a horizontal line around the entire circumference of the pot, about one inch up from the bottom edge. This will be the top of your solid painted base section.
Steady Hand Trick
Rest your pinky finger on the pot’s surface while painting delicate lines. It acts as an anchor, stopping your hand from shaking for cleaner strokes.
Step 2: Painting the Base
-
Mix your base color:
Pour out some of the muted blush pink paint. If the color feels too saturated, I like to mix in a tiny drop of white or brown to soften it into that earthy boho tone. -
Paint the bottom section:
Using your flat brush, paint the entire bottom section of the pot below your pencil line with the blush pink. Use smooth horizontal strokes. -
Smooth the edges:
Carefully trace along the pencil line to create a crisp upper edge for this color blocked section. Don’t worry if it’s not machine-perfect; a little wobble adds handmade charm. -
Apply a second coat:
Terracotta is very porous and absorbs the first layer quickly. Once dry to the touch, apply a second coat of blush pink for a solid, opaque finish.
Step 3: Creating the Arches
-
Plan the rainbow spacing:
Lightly sketch the outlines of your rainbow arches with a pencil. Aim for three or four large arches around the pot, ensuring the bottoms of the arches sit just above your painted pink base. -
Paint the heavy white arches:
Load your flat brush with white paint. Paint the outermost thick arch shape first. Use the width of the brush to help keep the line thickness consistent. -
Layering for opacity:
White paint on terracotta often looks streaky at first. Allow the first layer to dry completely, then add a second or even third coat until the white stands out bright against the clay. -
Paint the inner colored arch:
Switch back to your blush pink mixture. Paint a smaller arch nested inside the white one, leaving a gap of natural terracotta showing between them. -
Add the center detail:
Using the white paint again, paint a small, solid semi-circle or tiny arch at the very center of your rainbow design.
Make it Pop
Mix a tiny bit of baking soda into your blush paint for the bottom section. This adds a gritty, ceramic texture that contrasts beautifully with the smooth arches.
Step 4: Detailing
-
Add the horizontal stripes:
Switch to your fine liner brush. Paint two thin horizontal white lines directly on top of the blush pink base section you painted earlier—one near the top edge of the pink, and one slightly below it. -
Create the dot pattern:
Dip the tip of your liner brush handle or a toothpick into the dark blush paint (or a darker brown if you have it) to create small dots. -
Place the dots:
Carefully place these dots in a horizontal row between the two thin white lines you just painted. Space them evenly for a clean, tribal-inspired look. -
Clean up lines:
Take a close look at your arches. If any edges are rough, use your liner brush with the appropriate color to sharpen the curves. -
Final drying:
Let the pot sit undisturbed for several hours. Acrylics dry fast, but thicker layers need time to harden fully. -
Sealing the deal:
If you plan to plant directly into the pot, spray the outside with a matte clear sealer to protect your design from water damage during watering.
Pop in your favorite succulent or cactus and enjoy the desert vibes this little pot brings to your shelf
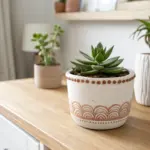
Stamped Texture Pattern Pots
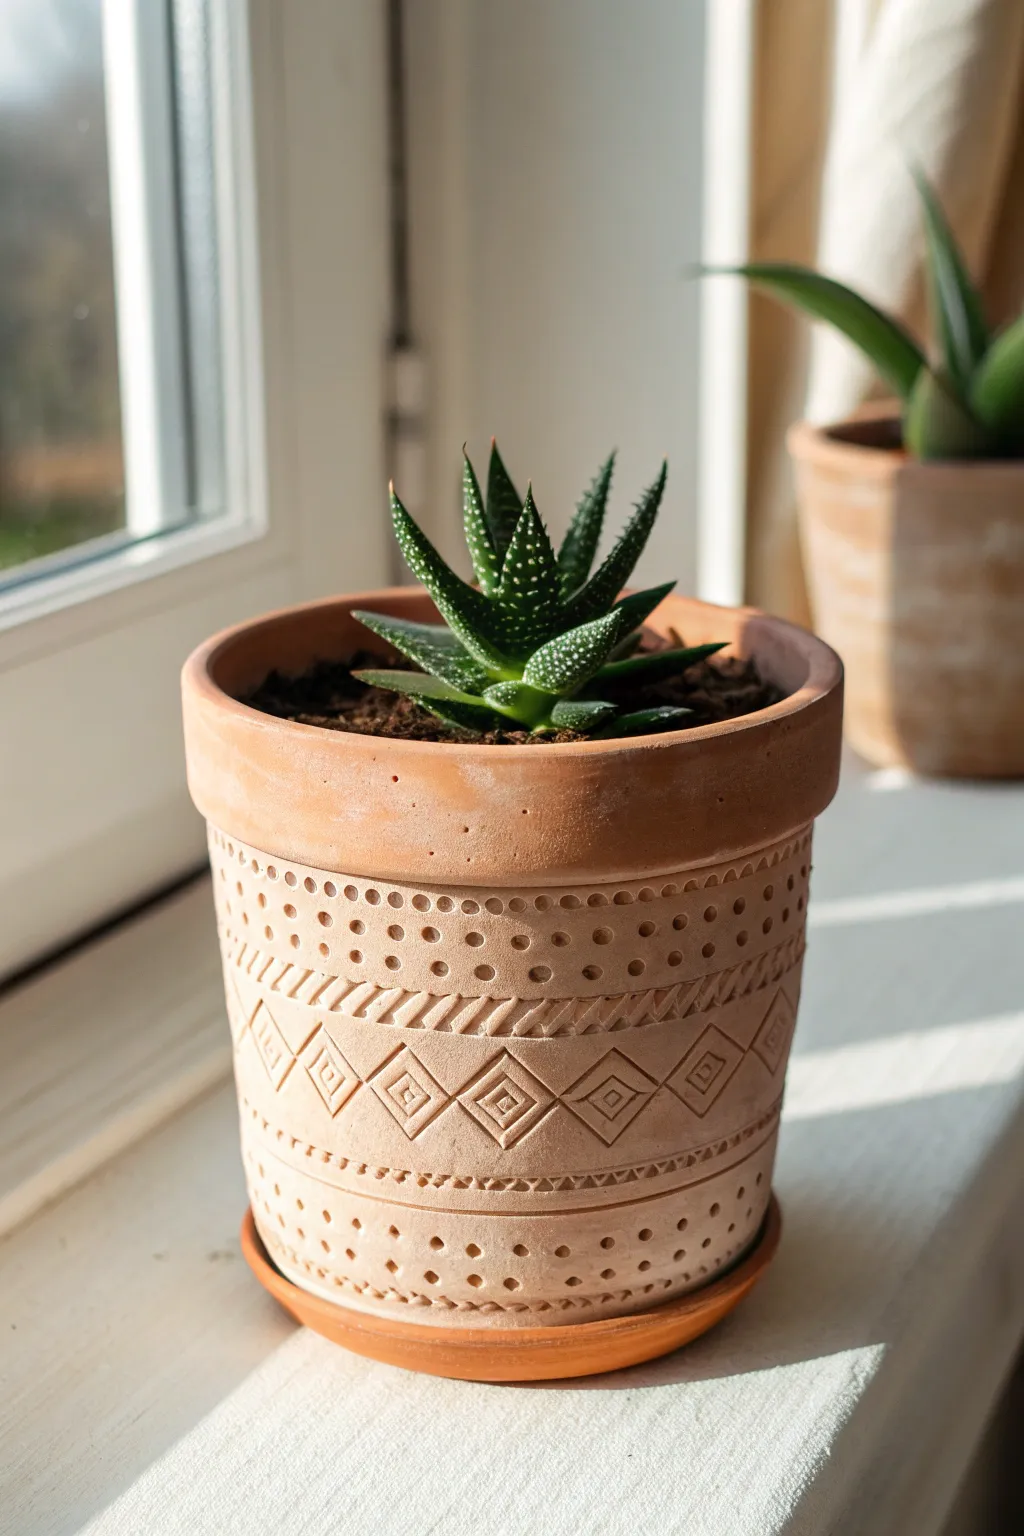
Transform a plain terracotta pot into a piece of artisanal decor with intricate stamped textures. This project relies on geometric repeating patterns and delicate pointillism to create a warm, tactile design that looks beautifully hand-carved.
How-To Guide
Materials
- Standard unglazed terracotta pot (4-6 inch size)
- Matching terracotta saucer
- Self-hardening air-dry clay (terra cotta color) OR polymer clay
- Rolling pin
- Sculpting knife or clay cutter
- Strong craft glue (like E6000) or scoring tool and slip (if using kiln clay)
- Diamond-shaped clay stamp or small cookie cutter
- Wooden skewer or needle tool
- Ruler
- Small square sculpting tool
- Fine-grit sandpaper
- Matte sealant spray (optional)
Step 1: Preparation & Base Layer
-
Clean surface:
Begin by wiping down your store-bought terracotta pot with a damp sponge to remove any dust or manufacturing oils, then let it dry completely. -
Measure the bands:
Using a pencil and a ruler, lightly mark horizontal guidelines around the pot where you want your textured sections to sit. This ensures your pattern stays level as you work around the circumference.
Clean Impressions
If your needle tool or stamps stick to the clay, dip the tip in a tiny bit of cornstarch or water before pressing. This ensures crisp, clean edges for every mark.
Step 2: Creating the Texture
-
Roll out the veneer:
Roll a thin sheet of your terracotta-colored clay (about 1/8 inch thick). You want enough to wrap around the exterior of the pot, though you can do this in sections if the clay is hard to handle. -
Adhere the clay:
Apply a thin layer of strong craft glue to the exterior of the pot below the rim. Carefully wrap your clay sheet around the pot, smoothing it down firmly to remove air bubbles. Trim the excess at the bottom and create a seamless join. -
Smooth the transition:
Use a little water on your finger to blend the upper edge of the new clay layer into the existing rim of the pot, creating a subtle ridge rather than a sharp step. -
Create the diagonal band:
About an inch down from the rim, use a dull knife or sculpting tool to impress a horizontal line around the pot. Repeat this a half-inch lower to create a band. -
Add diagonal notches:
Inside that band, press the side of your sculpting tool into the clay at an angle to create repeating diagonal slashes. I find counting a rhythm helps keep the spacing consistent. -
Stamp the diamonds:
Below your diagonal band, use your diamond-shaped stamp or cutter. Press gently to indent the clay without cutting all the way through, creating a row of diamond outlines. -
Detail the diamonds:
Using a smaller square tool or the head of a small screw, press a concentric diamond shape inside each of the larger diamonds you just stamped. -
Add the center point:
Take your needle tool or skewer and prick a small dot in the exact center of each diamond for a classic geometric finish.
Step 3: Pointillism Details
-
Upper dot border:
Above the diagonal slash band, use a larger blunt tool (like the back of a paintbrush) to press a row of circles into the clay. -
Fill with texture:
In the space between those large circles and the rim, use your needle tool to create rows of tiny pinpricks. Vary the spacing slightly for an organic, hand-crafted look. -
Lower dot border:
Repeat the pinprick technique near the bottom of the pot. Create two horizontal lines with your needle tool first, then fill the space between them with vertical rows of tiny dots. -
Base texture:
Finish the bottom section with larger, deeper circular indentations similar to the top band, creating visual balance.
White Wash Finish
Once dry, brush diluted white acrylic paint over the texture and immediately wipe it off with a rag. The white will settle into the grooves, highlighting your pattern.
Step 4: Finishing Touches
-
Dry properly:
Allow the clay veneer to dry completely. If using air-dry clay, this usually takes 24-48 hours. Keep it away from direct heat to prevent cracking. -
Sand imperfections:
Once hardened, take a piece of fine-grit sandpaper and very gently buff any sharp burrs raised by the needle tool, being careful not to erase your texture. -
Seal the work:
To protect the air-dry clay from moisture when watering your plants, spray the exterior with a matte clear sealant. Apply two light coats for best durability.
Place your favorite succulent inside and enjoy the earthy charm of your new patterned pot

TRACK YOUR CERAMIC JOURNEY
Capture glaze tests, firing details, and creative progress—all in one simple printable. Make your projects easier to repeat and improve.
Scalloped Rim Planters
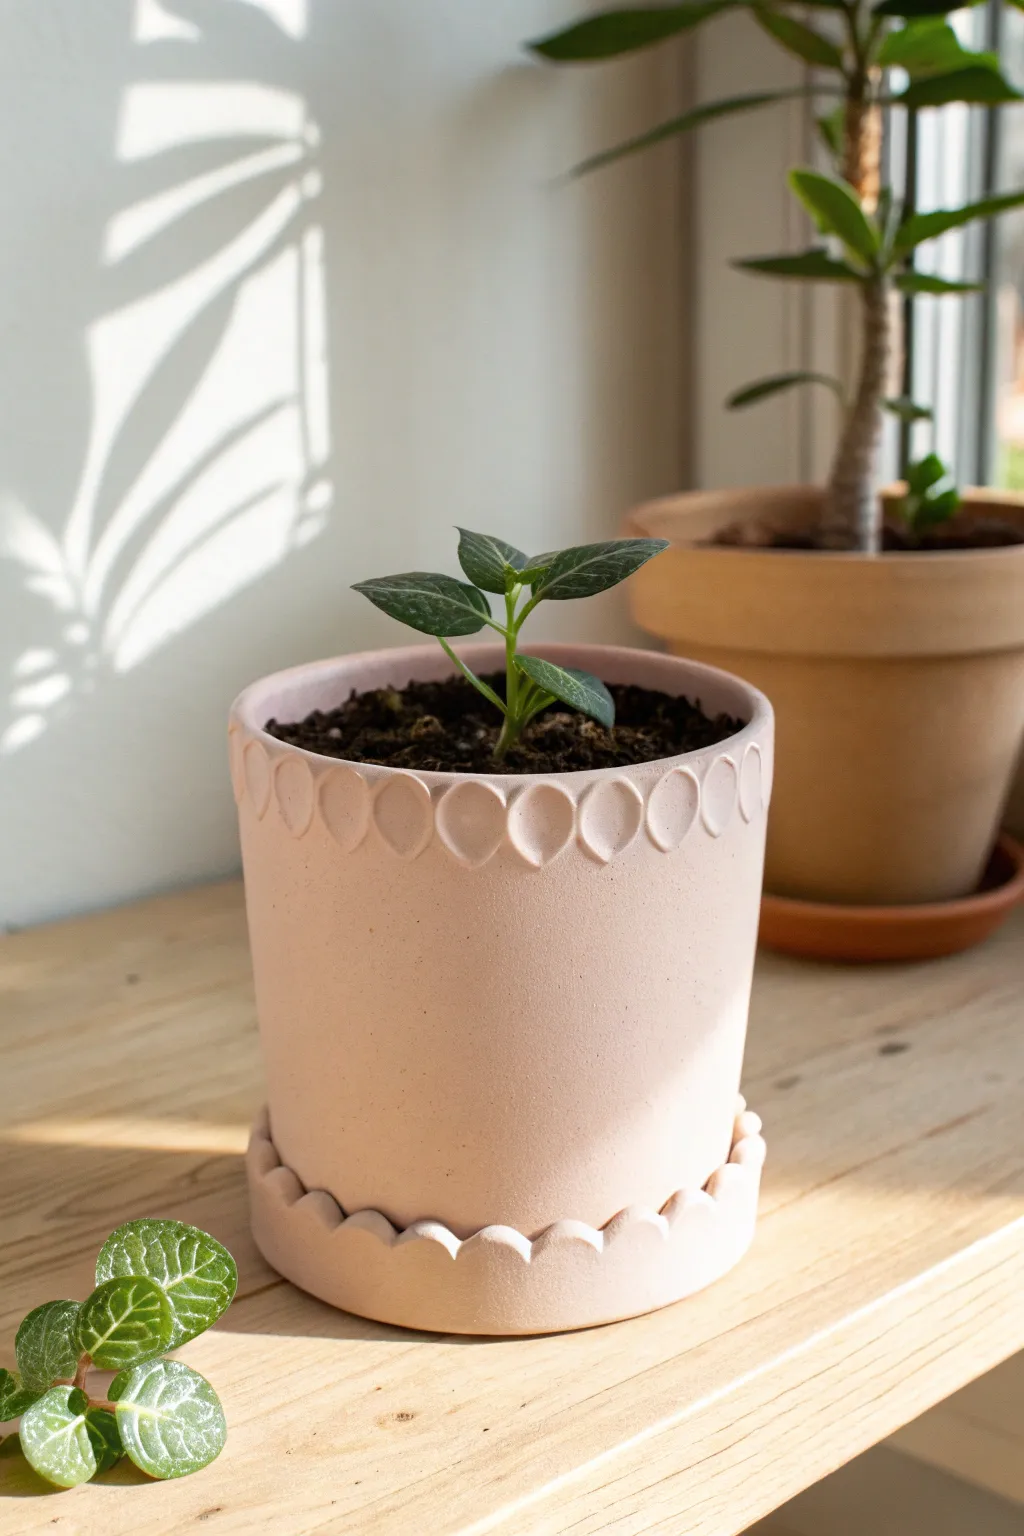
Transform a plain terra cotta pot into a charming, high-end planter with just a little air-dry clay and some soft pink paint. This project creates a delicate scalloped edge and a matching saucer that adds instant whimsy to any windowsill arrangement.
Step-by-Step Guide
Materials
- Standard terra cotta pot and saucer
- Air-dry clay (white or terra cotta color)
- Rolling pin
- Small round cookie cutter (approx. 1 inch)
- Craft knife or clay sculpting tool
- Water in a small cup
- Strong craft glue (e.g., E6000) or heavy-duty construction adhesive
- Fine-grit sandpaper (220 grit)
- Matte acrylic paint (pale blush pink)
- Paintbrush (flat bristle)
- Matte spray sealer
Step 1: Preparing the Scallops
-
Condition the clay:
Start by taking a chunk of air-dry clay and kneading it in your hands until it is warm, pliable, and free of cracks. -
Roll it out:
Using your rolling pin, flatten the clay on a clean surface to an even thickness of about 1/8 to 1/4 inch. -
Cut the shapes:
Use your small round cookie cutter to punch out numerous circles. You’ll need enough to circle the rim of the pot and the rim of the saucer. -
Create teardrops:
Take each clay circle and gently pinch one side to form a teardrop or petal shape. This tapered end will be pointing downward on the pot. -
Keep them moist:
As you work, keep the finished clay shapes under a slightly damp paper towel so they don’t dry out before you can attach them.
Step 2: Attaching the Details
-
Clean the surface:
Wipe down your terra cotta pot with a damp cloth to ensure there is no dust or dirt that might prevent adhesion. -
Apply the glue:
Apply a small dab of strong craft glue to the back of your first teardrop shape. -
Set the first piece:
Press the clay teardrop firmly against the outside rim of the pot, aligning the top round edge with the pot’s lip. The pointed end should face down. -
Continue the pattern:
Glue the next teardrop directly beside the first one, ensuring they touch slightly. Continue this all the way around the rim. -
Smooth the edges:
Dip your finger in a little water and gently smooth any rough edges on the clay pieces where they join the pot. -
Decorate the saucer:
Repeat the same process for the saucer, but this time, adhere the clay teardrops pointing upward, creating a standing scalloped rim around the base. -
Dry completely:
Let the pot and saucer sit undisturbed for at least 24 hours to allow the clay to cure and the glue to fully set.
Seamless Join
Use a wet sculpting tool to smudge the bottom point of each clay teardrop into the pot surface for a molded, rather than glued-on, look.
Step 3: Painting and Finishing
-
Sand imperfections:
Once fully dry, inspect your scallops. Use fine-grit sandpaper to gently buff away any fingerprints or rough spots on the air-dry clay. -
Apply the base coat:
Brush on a layer of matte blush pink acrylic paint. Start by working the paint into the nooks between the scallops, then cover the main body of the pot. -
Conceal the texture:
I like to apply a slightly thicker second coat to help blend the texture of the clay with the terra cotta, making it look like one cohesive ceramic piece. -
Paint the inside rim:
Don’t forget to paint the inner rim of the pot down about two inches so the bare clay doesn’t show when soil is added. -
Seal the work:
Finish by spraying the entire exterior with a matte sealer to protect the paint from water damage and UV fading.
Texture Twist
Before the clay dries, press a piece of lace or textured fabric onto the scallops to add an intricate embossed pattern to the rim.
Place your favorite small houseplant inside and enjoy the soft architectural detail this pot brings to your space
Coil-Built Fluted Pots
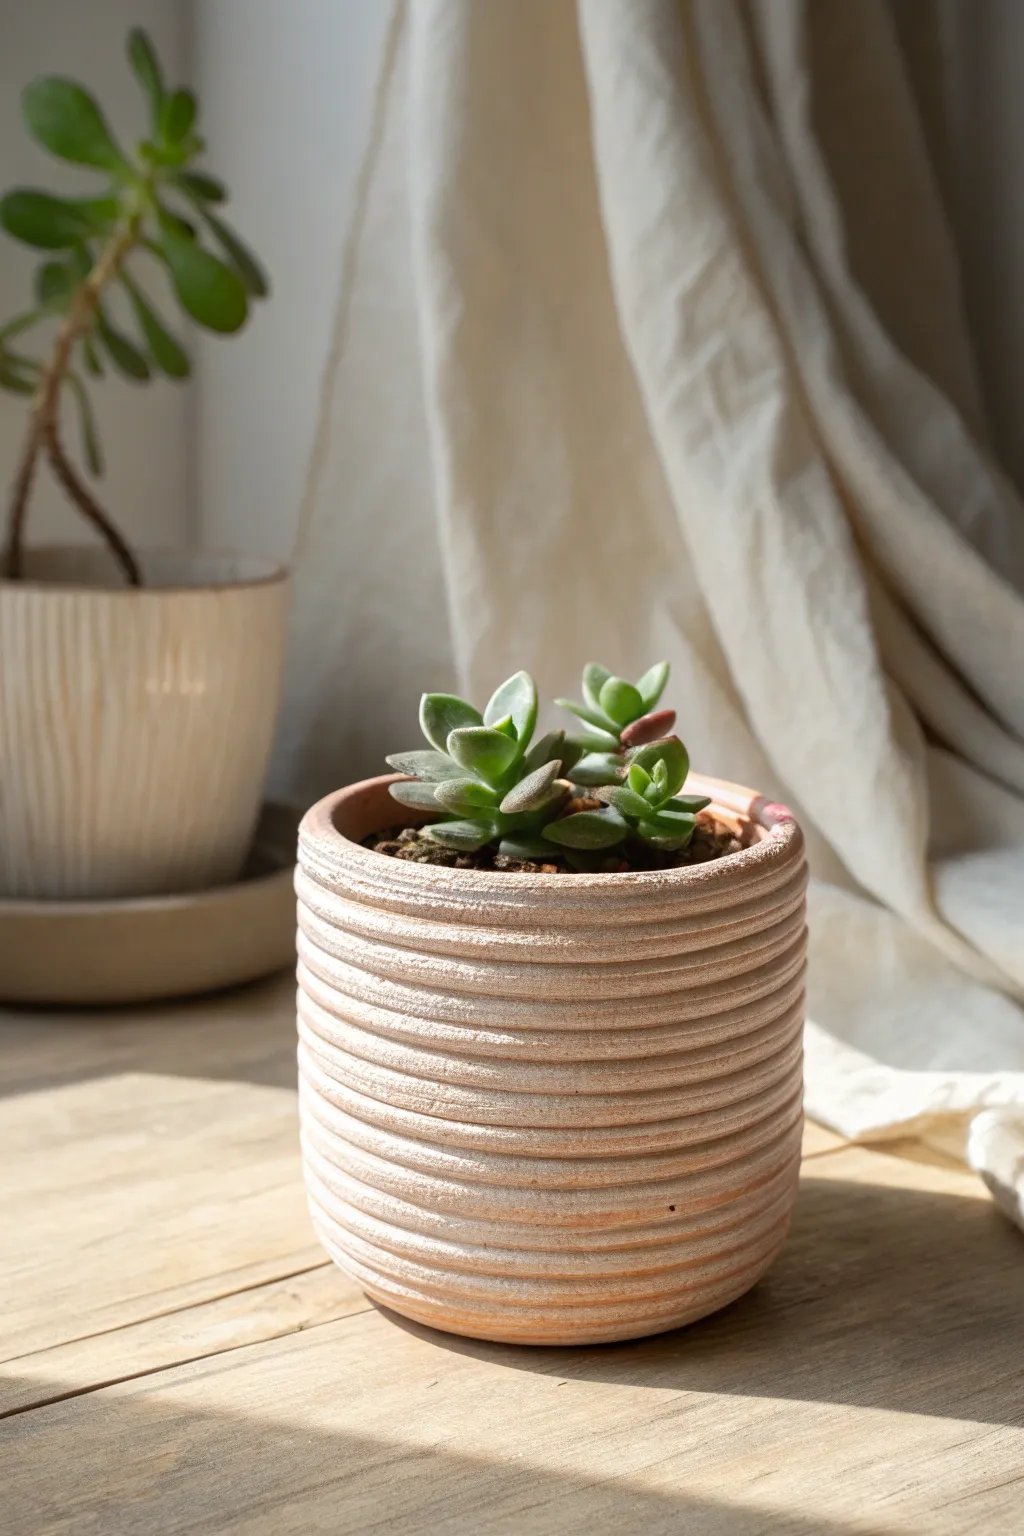
Embrace the tactile beauty of hand-building with this coil-method planter, featuring distinct horizontal ridges that give it a beautifully weathered, artisanal look. The natural terracotta clay, finished with a subtle whitewash or sanded texture, creates a warm home for your favorite succulents.
How-To Guide
Materials
- Terracotta air-dry clay or firing clay
- Clay scoring tool or fork
- Slip (clay mixed with water)
- Wooden modeling tool or spoon back
- Sponge
- Fine-grit sandpaper
- Matte white acrylic paint (optional for wash)
- Clean cotton cloth
- Plant pot sealer (if using air-dry clay)
Step 1: Base and Wall Construction
-
Create the base:
Begin by rolling out a smooth slab of clay about 1/4 inch thick. Use a circular cookie cutter or trace around a bowl to cut a perfect circle for the base of your pot, roughly 3-4 inches in diameter. -
Roll the first coils:
Take a chunk of clay and roll it back and forth on your work surface to create a long, even snake or coil. Aim for a thickness similar to your pinky finger. You’ll need several of these. -
Attach the first layer:
Score the outer edge of your circular base using a fork or scoring tool to roughen the surface. Apply a dab of slip to the scored area. Lay your first coil around the perimeter, pressing it gently onto the base. -
Blend the inside:
To ensure structural integrity, use your thumb or a wooden tool to smear the clay from the coil down onto the base on the *inside* of the pot only. Keep the outside distinct for now. -
Build upward:
Continue stacking coils one on top of another. Remember to score and slip between each layer. As you stack, ensure the join is tight, but try not to flatten the rounded outer edge of the coil too much, as this forms the ridge. -
Align the walls:
Check your profile frequently. For this specific cylinder shape, stack the coils directly vertical rather than flaring out. If your walls start to wobble, pause and let the clay stiffen slightly before adding more height. -
Smooth the interior:
After every 2-3 coils, stop to blend the coils together on the inside surface. A smooth interior is crucial for strength and holding soil properly later.
Coil Gap Fix
If you see light shining through gaps between coils, patch them immediately with soft clay from the inside. Don’t just smear over them; fill the void completely.
Step 2: Detailing and Texture
-
Refine the ridges:
Once you have reached your desired height (about 4-5 inches), inspect the exterior. Use a damp finger to gently run along the grooves between coils, softening any sharp jagged bits without losing the definition of the horizontal lines. -
Create the heavy texture:
To mimic the specific look in the photo, take a damp sponge or a piece of rough canvas and press it gently against the coils as you rotate the pot. This knocks back the shine and adds a stone-like grain. -
Level the rim:
The top rim should be flat and clean. Use a knife or wire cutter to slice off any unevenness at the very top, then use your wet sponge to round over the cut edge slightly so it isn’t sharp. -
Slow drying:
Place a loose plastic bag over your pot to let it dry slowly over 24-48 hours. Drying too fast can cause cracks, especially where coils join. Once it’s leather hard, remove the bag to finish drying completely.
Even Ridges Tip
To keep your coils perfectly uniform in thickness, try rolling them out next to two wooden ruler guides, or use a clay extruder if you have one available.
Step 3: Finishing Touches
-
Sanding for distress:
Once the pot is bone dry, take fine-grit sandpaper and lightly sand the protruding parts of the ridges. This creates the lighter, dusty highlight effect seen on the ridges in the photo. -
Optional whitewash:
If your clay is too dark red, dilute a tiny drop of white acrylic paint in water (about 1:10 ratio). Brush this watery mix over the pot and immediately wipe it back with a rag, leaving white residue only deep in the crevices. -
Seal the interior:
If you used air-dry clay, apply two coats of a waterproof sealer to the inside to prevent moisture from deteriorating the pot when you water your plant. -
Final wipe down:
Give the exterior one last wipe with a dry cloth to remove loose clay dust from sanding, revealing the beautiful contrast between the shadowed grooves and the highlighted ridges.
Enjoy styling your new textured pot with a bright green succulent for a lovely natural contrast
Marbled Swirl Painted Pots
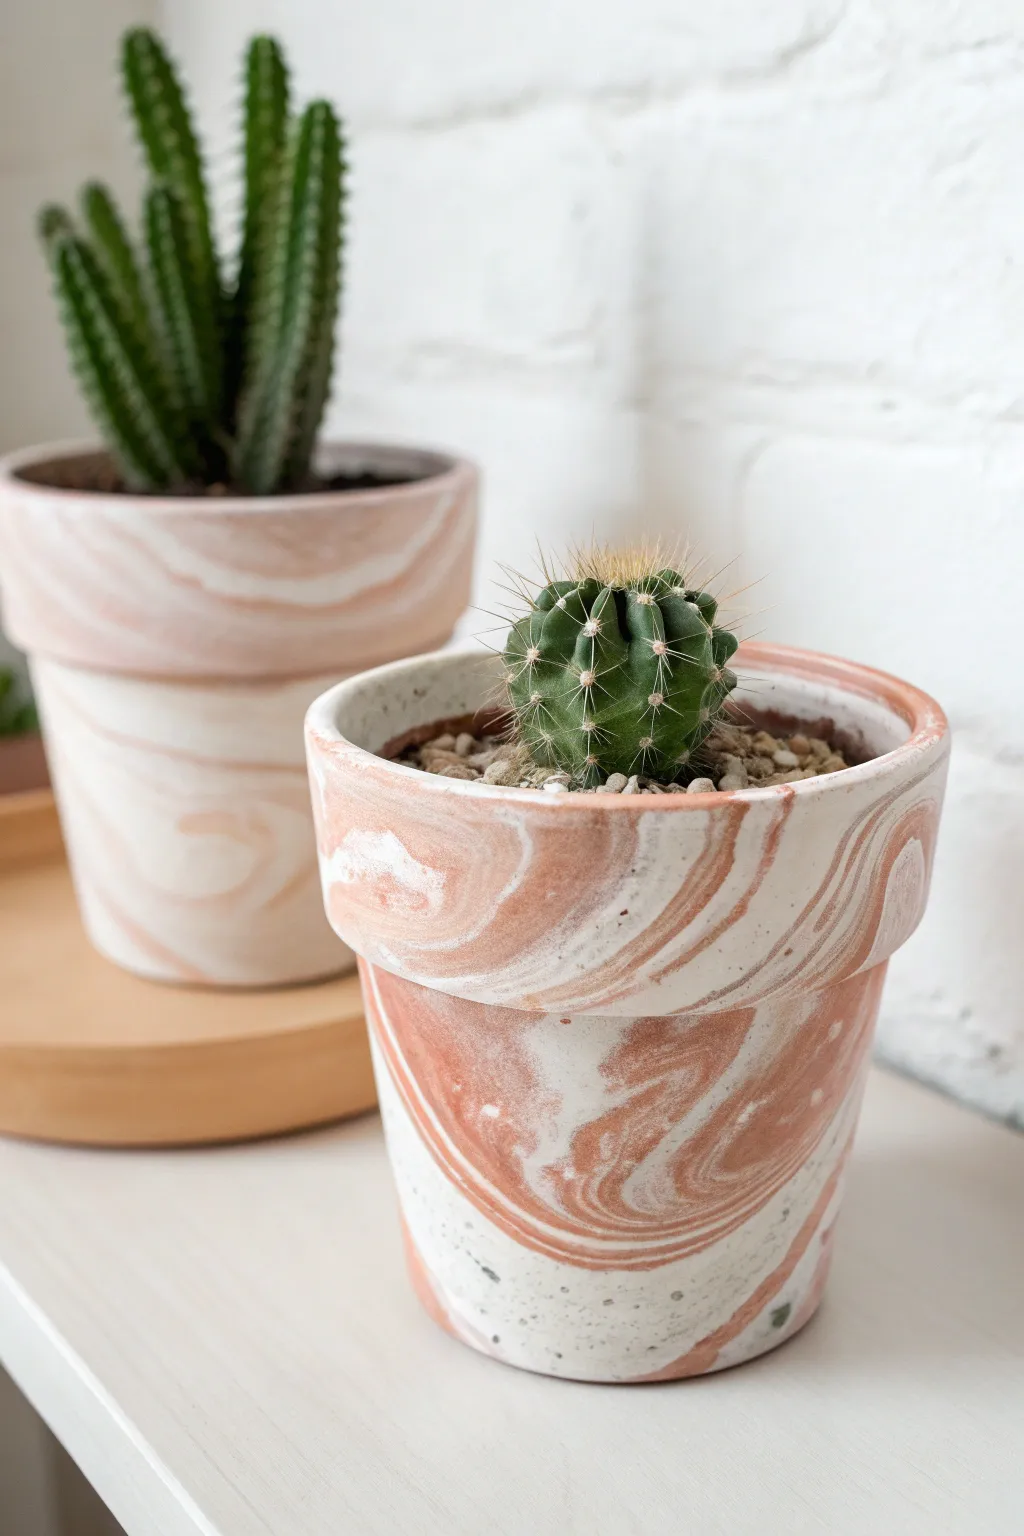
Transform standard terracotta into modern art pieces with this mesmerizing marbling technique that mimics poured concrete or agate. The soft blend of warm peach and crisp white creates an organic, high-end look that elevates even the simplest cactus.
Detailed Instructions
Materials
- Terracotta pots (cleaned and dried)
- Acrylic craft paint (Warm Peach/Terracotta color)
- Acrylic craft paint (White)
- Acrylic medium or flow aid (optional but recommended)
- Large disposable plastic container or bin (deep enough to submerge the pot)
- Stir sticks or toothpicks
- Water
- Clear matte spray sealer
- Painter’s tape
- Plastic drop cloth or newspaper
- Disposable gloves
Step 1: Prepping the Surface
-
Clean the pots:
Ensure your terracotta pots are completely free of dust and sticker residue. Wipe them down with a damp cloth and let them dry fully. -
Seal the drain hole:
Place a piece of painter’s tape securely over the drainage hole from the inside. This prevents water from rushing in too quickly during the dip. -
Protect the inside:
If you want to keep the inside rim looking natural like the photo, tape off the top inch of the interior. Alternatively, wad up newspaper inside to protect the interior walls. -
Base coat (Optional):
For a pure white background, paint the entire exterior white first and let it dry. However, for the raw look shown in the image, we will be dipping directly onto the clay.
Paint Sinking?
If paint sinks to the bottom instead of floating, your mixture is too heavy. Add a few drops of water to thin it, or the water in the bin is too cold.
Step 2: Preparing the Paint Bath
-
Fill the container:
Fill your disposable bin with room-temperature water. You need enough depth to dip the pot mostly or entirely, but leave room for displacement so it doesn’t overflow. -
Prepare paint mixtures:
In small separate cups, mix your peach and white paints with a little water or flow medium. You want a consistency similar to heavy cream—runny enough to float, but pigment-rich. -
Drop the first color:
Gently drip your white paint onto the surface of the water. Do not pour heavy streams; let drops fall and spread naturally. -
Add the accent color:
Immediately drip the peach/terracotta color into and around the white patches. Aim for a 50/50 balance or favor the white for a lighter look. -
Create the swirl:
Using a toothpick or skewer, very gently drag through the floating paint. Don’t over-mix; just swirl the colors enough to create marble veins.
Step 3: The Dip Technique
-
Position the pot:
Put on your gloves. Hold the pot firmly by the rim (or place your hand inside if it fits tight enough to grip). -
Dip and roll:
Slowly lower the pot into the water at an angle. To get the wrapped look, rotate the pot securely as you push it down through the paint film. -
Submerge fully:
Continue pushing down until the water line reaches just under the rim. The paint layer wraps around the surface as it breaks the water tension. -
Clear the surface:
Before pulling the pot back up, blow gently on the water surface to push excess floating paint away from where you will exit, ensuring a clean finish. -
Remove and inspect:
Lift the pot out. If there are bare spots, you can carefully re-dip that specific area into a remaining patch of paint.
Gold Veins
For a luxe upgrade, sprinkle loose metallic gold pigment powder or a few drops of metallic gold paint into the swirl just before dipping.
Step 4: Finishing Up
-
Initial dry:
Set the pot upside down on a plastic sheet or raised on a small jar to drip dry. Avoid touching the wet paint. -
Clean up drips:
Check the bottom rim. If water droplets are collecting there, dab them gently with a paper towel so they don’t streak the design. -
Remove tape:
Once the exterior feels dry to the touch (usually 1-2 hours), carefully peel off the painter’s tape from the drainage hole and interior. -
Seal the design:
Since terracotta is porous and wicks moisture, seal your work with two light coats of clear matte spray. This stops the paint from bubbling when you water your plants.
Once fully cured, these bespoke pots are ready to be the stylish new home for your favorite succulents
Sgraffito Carved Line Designs
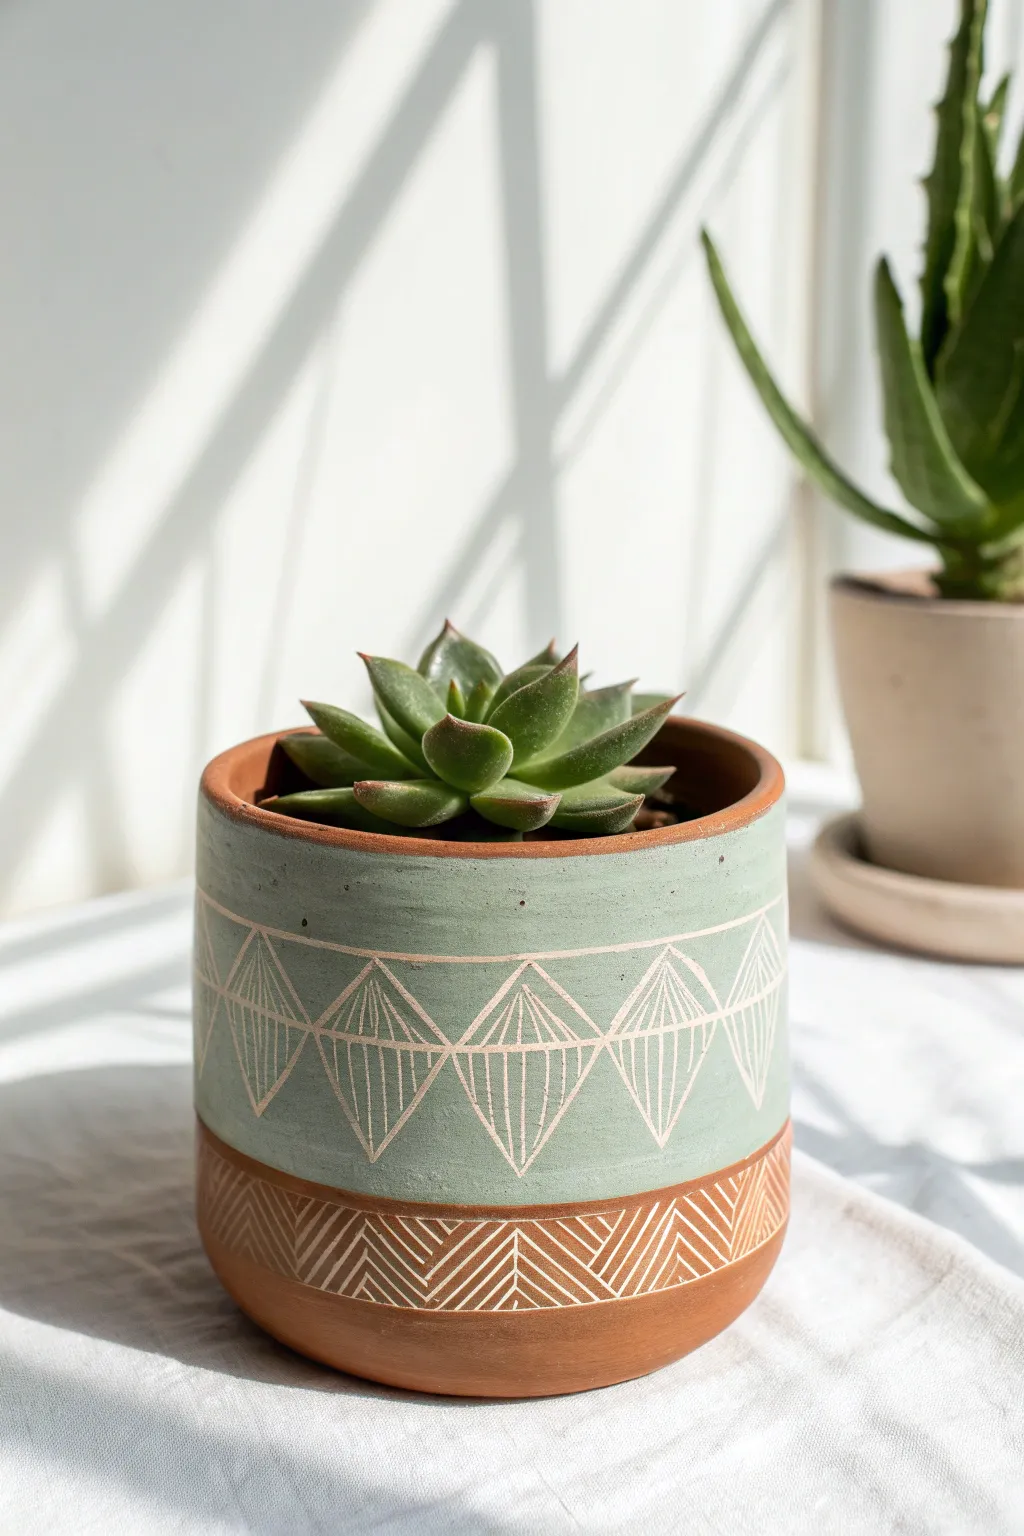
This project transforms a standard terra cotta pot into a modern art piece using the sgraffito technique, where you scratch through a surface layer to reveal the contrasting clay beneath. The design features a calming seafoam green band adorned with crisp, geometric diamond and chevron patterns.
Step-by-Step
Materials
- Terra cotta pot (clean and dry)
- Seafoam green acrylic paint or underglaze (if firing)
- Wide flat paintbrush
- Pencil
- Ruler or measuring tape
- Sgraffito tool or a simple sharp implement (large clean nail, dental pick, or clay carving loop)
- Damp sponge
- Clear matte sealant spray (optional)
Step 1: Preparation and Painting
-
Clean surface:
Ensure your terra cotta pot is completely free of dust and oils by wiping it down with a damp sponge and letting it dry fully. -
Masking zones:
Decide on the width of your main color band. The design in the image leaves the very top rim and the bottom third as exposed raw clay. -
Applying the base coat:
Using a wide flat brush, apply a generous coat of seafoam green paint to the middle section of the pot. -
Layering for opacity:
Let the first coat dry to the touch. I usually apply a second or even third coat to ensure the color is solid and opaque, so the carving stands out clearly. -
Drying time:
Allow the paint to dry until it is firm but not fully cured—’leather hard’ refers to clay, but for acrylics, you want it dry enough not to smear but soft enough to carve easily.
Paint Flaking Off?
If the paint chips rather than carves smoothly, it’s too dry. Try misting the area lightly with water or scraping sooner after painting.
Step 2: Planning the Pattern
-
Marking horizontal guides:
Lightly trace a horizontal line around the circumference of the painted band, splitting it roughly in half, to guide your diamond centers. -
Sketching the diamonds:
Use a pencil to lightly sketch a row of connecting diamonds across the green band. Try to keep their widths consistent. -
Bottom zigzag:
Sketch a zigzag line along the bottom edge of the green band to verify spacing for the lower raw clay section.
Add Texture
Try varying your line weights. Use a thicker tool for the main diamond outlines and a needle tool for the delicate interior hatching lines.
Step 3: Carving the Design
-
Carving the main diamonds:
Take your carving tool and firmly scratch along your pencil lines, removing the green paint to reveal the orange clay underneath. Create the outline of the diamonds first. -
Adding vertical lines:
Inside each diamond, carve vertical lines. Start with a central vertical line, then add parallel lines on either side, getting shorter as they reach the diamond’s edge. -
Horizontal divider:
Carve a straight horizontal line connecting the horizontal points of the diamonds, effectively bisecting the pattern band. -
Detailing the triangles:
In the triangular spaces between the diamonds (top and bottom), create a similar vertical line pattern, mirroring the interior of the diamonds.
Step 4: The Lower Band
-
Defining the border:
Carve a crisp line separating the green paint from the unpainted bottom section. -
Carving the chevron:
On the raw terra cotta section below the green band, carve a bold chevron or zigzag pattern. -
Filling the chevron:
Fill these carved chevrons with angled lines. I like to alternate the direction of the lines for visual interest—vertical in one section, horizontal or diagonal in the next. -
Cleanup:
Use a soft, dry brush to gently sweep away all the paint crumbs and clay dust created during the carving process. -
Touch-ups:
If you accidentally scratched off too much paint, use a fine detail brush to carefully patch the green areas. -
Sealing:
Once you are happy with the design and the paint is fully cured, spray the pot with a clear matte sealant to protect the design from water damage.
Fill your new pot with a soil mix suitable for succulents and enjoy the handmade geometric flair.
Speckled Pastel Matte Planters
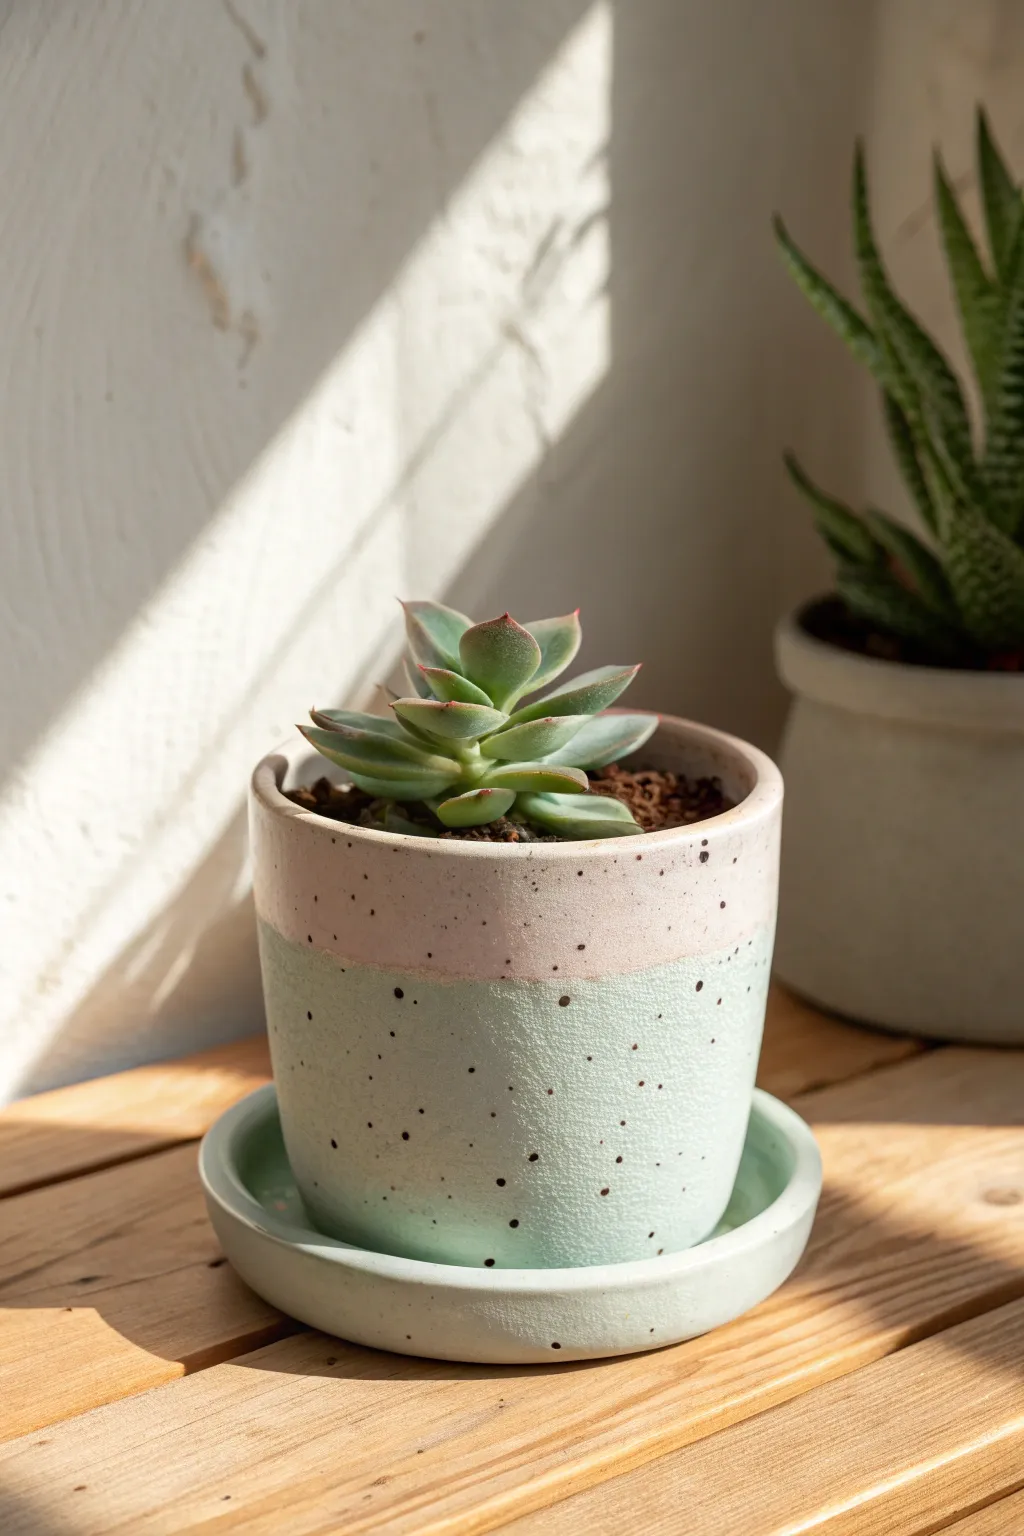
Transform a plain terracotta or ceramic vessel into a trendy piece of modern decor with this two-tone pastel design. The soft matte finish paired with scattered speckles mimics the look of high-end artisanal stoneware.
Step-by-Step Tutorial
Materials
- Plain ceramic or terracotta pot with matching saucer
- Matte acrylic craft paint (Pale Pink)
- Matte acrylic craft paint (Mint Green)
- Black acrylic paint
- White primer spray paint (optional but recommended for terracotta)
- Wide flat paintbrush
- Painter’s tape or masking tape
- Old toothbrush or stiff bristle brush
- Matte spray sealer or clear varnish
- Cardboard box or drop cloth
- Water cup and paper towels
Step 1: Preparation & Base Coat
-
Clean surface:
Begin by thoroughly wiping down your pot and saucer to remove any dust, oils, or price tag residue. Let it dry completely. -
Prime the surface:
If you are using raw terracotta, apply a coat of white primer spray paint. This seals the porous clay and ensures your pastel colors pop without needing ten layers. -
Paint the top section:
Using a wide flat brush, paint the upper third of the pot with your Pale Pink matte acrylic. Keep your brush strokes horizontal for a smooth finish. -
Extend the color:
Bring the pink paint slightly lower than where you want the final line to be, just to ensure full coverage at the seam. -
Paint inside rim:
Don’t forget to paint the inside rim of the pot about an inch down, so the clay color doesn’t show when soil is added. -
Dry the first color:
Allow the pink paint to dry fully to the touch. This usually takes about 20-30 minutes.
Step 2: Creating the Two-Tone Effect
-
Apply tape line:
Once the pink is perfectly dry, wrap a piece of painter’s tape around the circumference of the pot. Press the edge down firmly to prevent paint bleeding underneath. -
Paint the bottom section:
Apply the Mint Green acrylic paint to the bottom two-thirds of the pot, below the tape line. -
Paint the saucer:
While you have the green paint out, cover the entire saucer with the Mint Green shade to match the pot base. -
Apply second coats:
I usually find that pastels need a second coat for full opacity. Apply another layer of green to the pot and saucer, and a second layer of pink to the top if needed. -
Remove tape:
Carefully peel off the painter’s tape while the final coat of green is still slightly tacky. This helps create a crisp, sharp line. -
Touch up:
If any paint seeped under the tape, use a tiny detail brush to fix the line.
Clean Lines
For the sharpest line between colors, paint a thin layer of the *base* color (pink) over the tape edge first. This seals the tape so the green can’t bleed under.
Step 3: The Speckled Finish
-
Prepare the splatter mix:
Mix a small amount of black acrylic paint with a few drops of water. You want a runny, ink-like consistency. -
Set up splatter station:
Place your pot and saucer inside a cardboard box or on a large drop cloth to contain the mess. -
Load the brush:
Dip an old toothbrush into the watered-down black paint. Shake off any excess drips. -
Flick the paint:
Hold the toothbrush near the pot and run your thumb across the bristles to flick tiny droplets onto the surface. Rotate the pot to cover all sides. -
Control the density:
Add more speckles to the saucer to match. Vary your distance from the object: closer creates denser clusters, while further away creates a finer mist. -
Seal the project:
Once the black speckles are completely dry, spray the entire pot and saucer with a matte clear sealer to protect your work from water damage.
Blob Control
If your speckles are turning into big blobs, your paint is too watery or your brush is overloaded. Dab the brush on a paper towel before flicking.
Now your custom planter is ready to house your favorite succulent in style
Fruit-Shaped Clay Pots
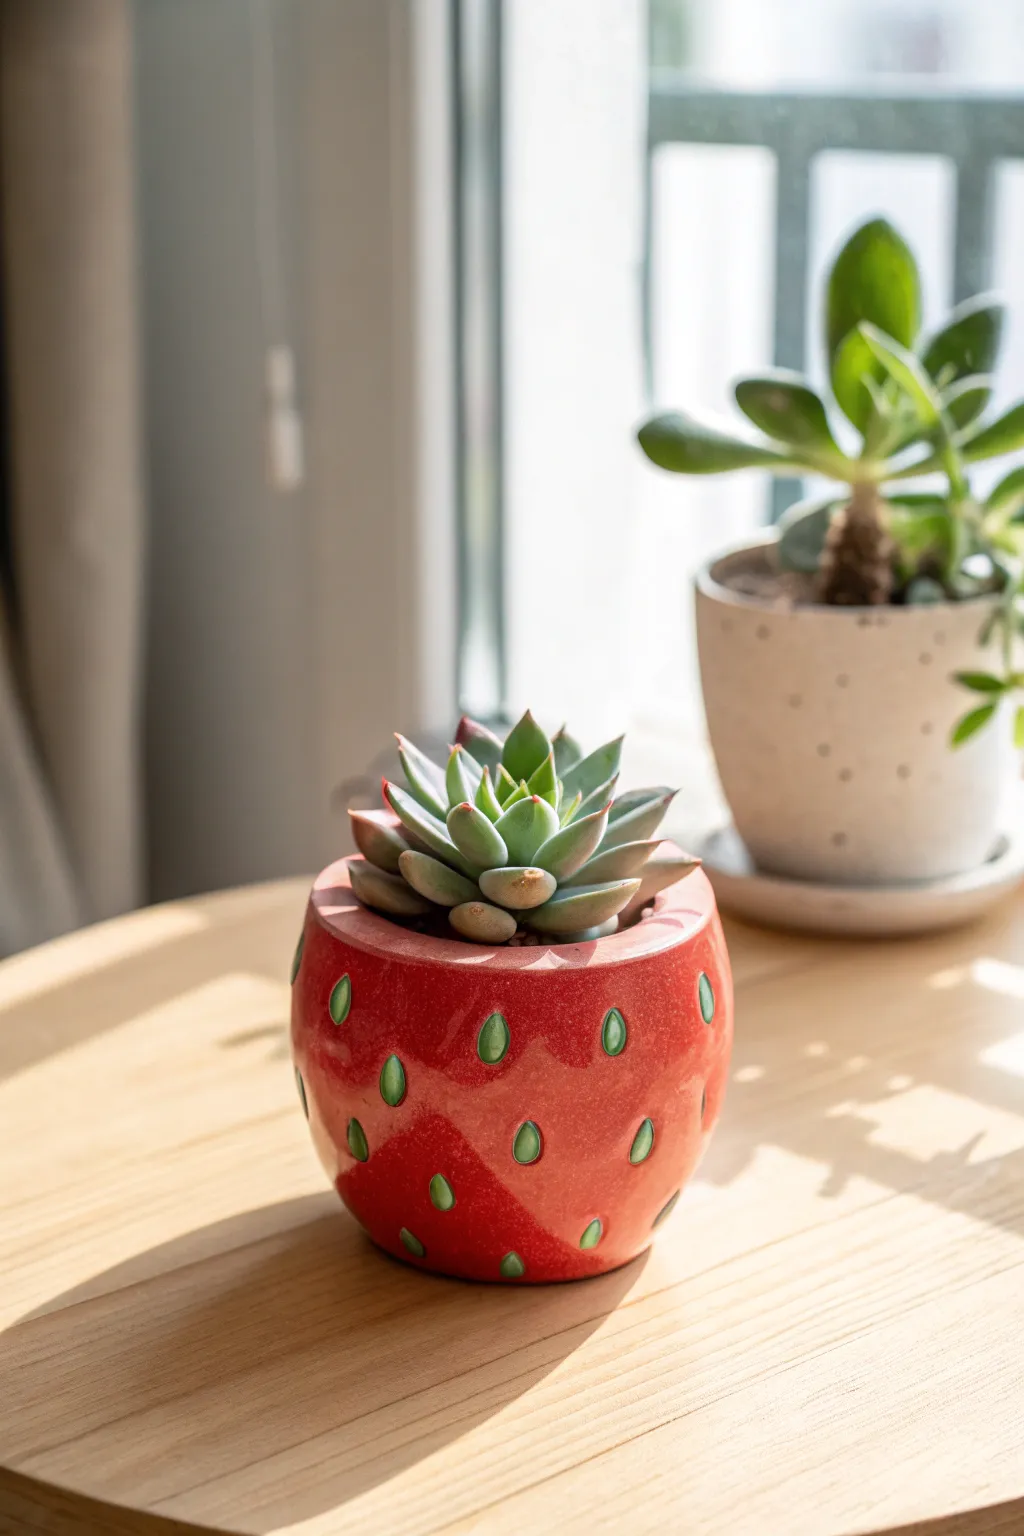
Bring a burst of summer sweetness to your windowsill with this adorable strawberry-shaped clay pot. Perfect for housing small succulents, this project combines simple sculpting techniques with a vibrant glaze finish to create a charming, functional piece of decor.
Step-by-Step
Materials
- Air-dry clay or polymer clay (terracotta or white works best)
- Clay sculpting tools (specifically a needle tool and a small loop tool)
- Rolling pin
- Small bowl or cup (to use as a mold/armature)
- Plastic wrap
- Acrylic paints (bright red, leaf green, and a darker green)
- Small detail paintbrushes
- Glossy varish or sealant (waterproof if using real plants)
- Sandpaper (fine grit)
Step 1: Shaping the Base
-
Prepare the Armature:
Select a small, round bowl or cup that has the rough dimensions you want for your pot. Wrap the outside completely in plastic wrap to ensure the clay doesn’t stick to the mold later. -
Roll the Clay:
Condition your clay by kneading it until it’s pliable. Roll it out into a flat slab, approximately 1/4 inch thick. You want it substantial enough to hold its shape but not too heavy. -
Form the Pot Body:
Drape the clay slab over your plastic-covered mold. Gently press and smooth the clay down the sides, trimming away excess at the bottom edge so it sits flat. -
Refine the Shape:
Strawberries aren’t perfectly round; they taper slightly. While the clay is still on the mold, gently squeeze the lower section to create a slight taper toward the base, mimicking that classic berry silhouette. -
Create the Opening:
Using a knife or needle tool, trim the top rim to be even. I like to smooth this edge with a little water on my fingertip to prevent any sharp or jagged bits when it dries. -
Initial Drying Phase:
Let the clay sit on the mold until it is leather-hard—firm enough to hold its shape but not fully dry. This usually takes a few hours depending on your clay type. -
Remove the Mold:
Carefully slide the bowl out and peel away the plastic wrap. If the bottom feels a bit uneven, gently tap the pot on your work surface to flatten the base again.
Step 2: Adding Texture and Detail
-
Marking Seed Placements:
With a needle tool or the tip of a pencil, lightly mark small oval shapes all around the exterior of the pot. Stagger them in offset rows rather than a grid for a more natural look. -
Sculpting the Seeds:
Using a small loop tool or a rounded sculpting tool, gently press into your marked ovals to create shallow indentations. You want them deep enough to paint later, but not so deep they pierce the wall. -
Smooth the Surface:
Look over the pot for any unintentional fingerprints or rough spots. Use a slightly damp sponge or your finger to smooth the surface around the seed indentations. -
Full Cure:
Allow the pot to dry completely according to your clay manufacturer’s instructions. For air-dry clay, this might be 24-48 hours; for polymer, bake it in the oven as directed.
Drainage Drill
Don’t forget drainage! If using real plants, carefully drill a hole in the bottom after the clay is dry but before painting, or form a hole while the clay is wet using a straw.
Step 3: Painting and Finishing
-
Sanding:
Once fully cured, use fine-grit sandpaper to gently buff out any remaining imperfections on the rim or base. Wipe away all dust with a tackle cloth or slightly damp paper towel. -
Base Coat:
Apply a coat of bright red acrylic paint to the entire exterior. You may need two or three thin layers to get that rich, opaque strawberry color. Let each layer dry before adding the next. -
Painting the Seeds:
Using your finest detail brush, carefully paint inside each indented seed shape. Use a light leaf green color first to fill the depression. -
Adding Dimension:
To make the seeds pop, add a tiny sliver of darker green or even a mix of teal along one side of each seed indentation. This slight shadow creates depth. -
Sealing:
Apply a high-gloss waterproof varnish over the entire pot. The glossy finish is crucial—it mimics the shiny skin of a ripe strawberry and protects your paint job from watering. -
Final Setup:
Once the sealant is fully cured, fill your new planter with gritty succulent soil and snuggle your favorite Echeveria inside to serve as the strawberry’s ‘leaves’.
Berry Patch
Make a trio of pots in different sizes and slightly different shades of red (from unripe pink to deep maroon) to create a realistic growing strawberry patch display.
Now you have a refreshing splash of color ready to brighten up any corner of your home
Mushroom-Inspired Planter Pots
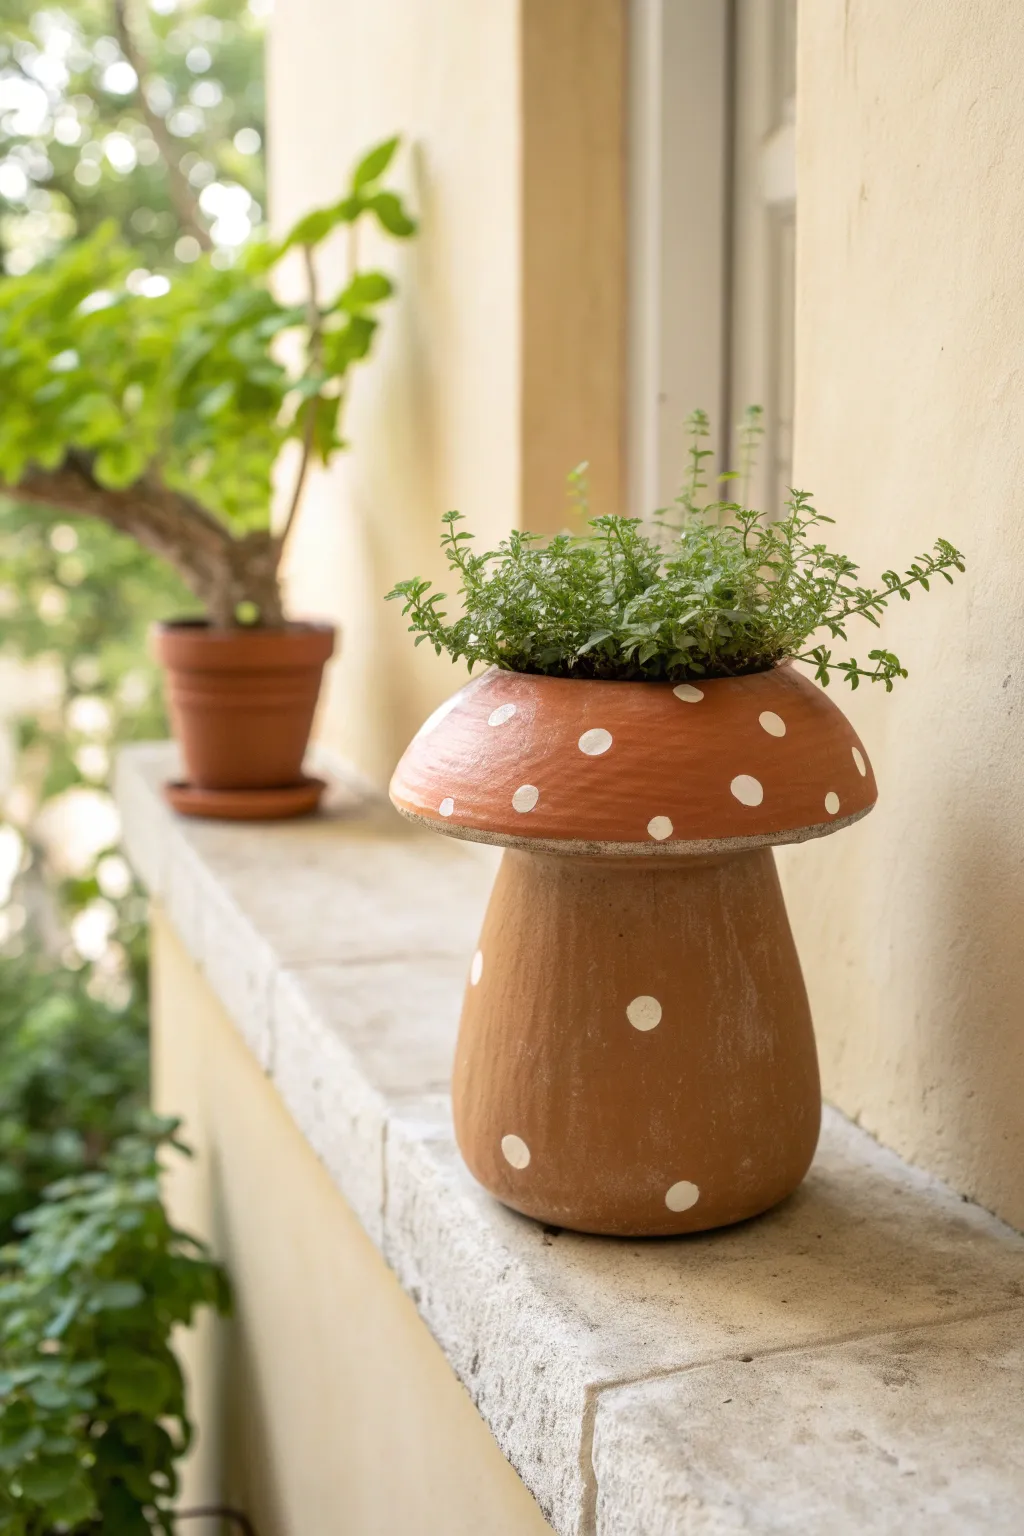
Transform two standard terracotta pieces into a delightful mushroom-shaped home for your herbs. This simple assembly project uses the natural warmth of clay paired with playful white accents to create a charming woodland vibe for your windowsill or garden wall.
How-To Guide
Materials
- One 6-inch standard terracotta pot (for the base/stem)
- One 8-inch shallow terracotta bulb pan or bowl (for the cap)
- Strong construction adhesive (like E6000) or two-part epoxy
- White outdoor acrylic craft paint
- Small round sponge pouncer or medium paintbrush
- Pencil
- Sandpaper (medium grit)
- Small herb plant (like thyme or oregano)
- Potting soil
Step 1: Preparing the Pieces
-
Clean surface:
Begin by thoroughly wiping down both the terracotta pot and the shallow bowl with a damp cloth to remove any dust or store residue. -
Dry completely:
Allow the clay to dry fully; any trapped moisture can prevent the adhesive and paint from bonding correctly. -
Test the fit:
Invert the tall standard pot so the bottom is facing up. Place the shallow bowl right-side up on top of it to check stability. -
Check proportions:
Ensure the ‘cap’ (the bowl) overhangs the ‘stem’ (the inverted pot) enough to look like a mushroom. You want a distinct overhang. -
Scuff contact points:
Use your sandpaper to rough up the bottom of the inverted pot and the center bottom of the bowl where they will meet. This rough texture helps the glue grip better.
Step 2: Assembly and Painting
-
Apply adhesive:
Apply a generous ring of construction adhesive or epoxy to the bottom rim of the inverted standard pot. -
Join pieces:
Center the shallow bowl on top of the glue ring. Press down firmly to create a seal. -
Cure time:
Let this bond cure completely according to your glue’s instructions, usually at least 24 hours, before moving to the next step. -
Plan the dots:
Once dry, lightly mark where you want your polka dots with a pencil. I find that spacing them randomly looks more organic than a perfect grid. -
Paint cap dots:
Dip your round sponge pouncer or brush into white acrylic paint. Press firmly onto the pencil marks on the top bowl ‘cap’ to create crisp circles. -
Paint stem dots:
Continue the pattern onto the ‘stem’ or base. Make sure to rotate the pot as you work to get even coverage. -
Touch up:
If the terracotta absorbs the first layer of white paint too much, wait for it to dry and dab a second coat on the dots for opacity.
Paint Bleeding?
If paint seeps into the porous clay, switch to a slightly drier brush method or use a primer only on the spots where you plan to paint dots.
Step 3: Finishing Touches
-
Seal (optional):
If this will live outdoors in the rain, apply a clear matte spray sealer over the painted dots to protect them. -
Prepare drainage:
Note that since the original drainage hole of the top bowl is now glued shut, you are creating a cachepot or need to be careful with watering. -
Add gravel:
Place a one-inch layer of small gravel at the bottom of the bowl to help keep roots out of standing water. -
Add soil:
Fill the top bowl with high-quality potting mix suitable for your chosen plant. -
Planting:
Transplant your herb into the soil. A creeping plant like thymus or creeping jenny looks fantastic spilling over the edge.
Pro Tip: Drainage Hack
Before gluing, drill 2-3 small holes in the bottom of the top bowl (outside the glue ring area) so water can drain down through the ‘stem’.
Enjoy the woodland charm this little mushroom brings to your plant collection
Little Feet and Pedestal Pots
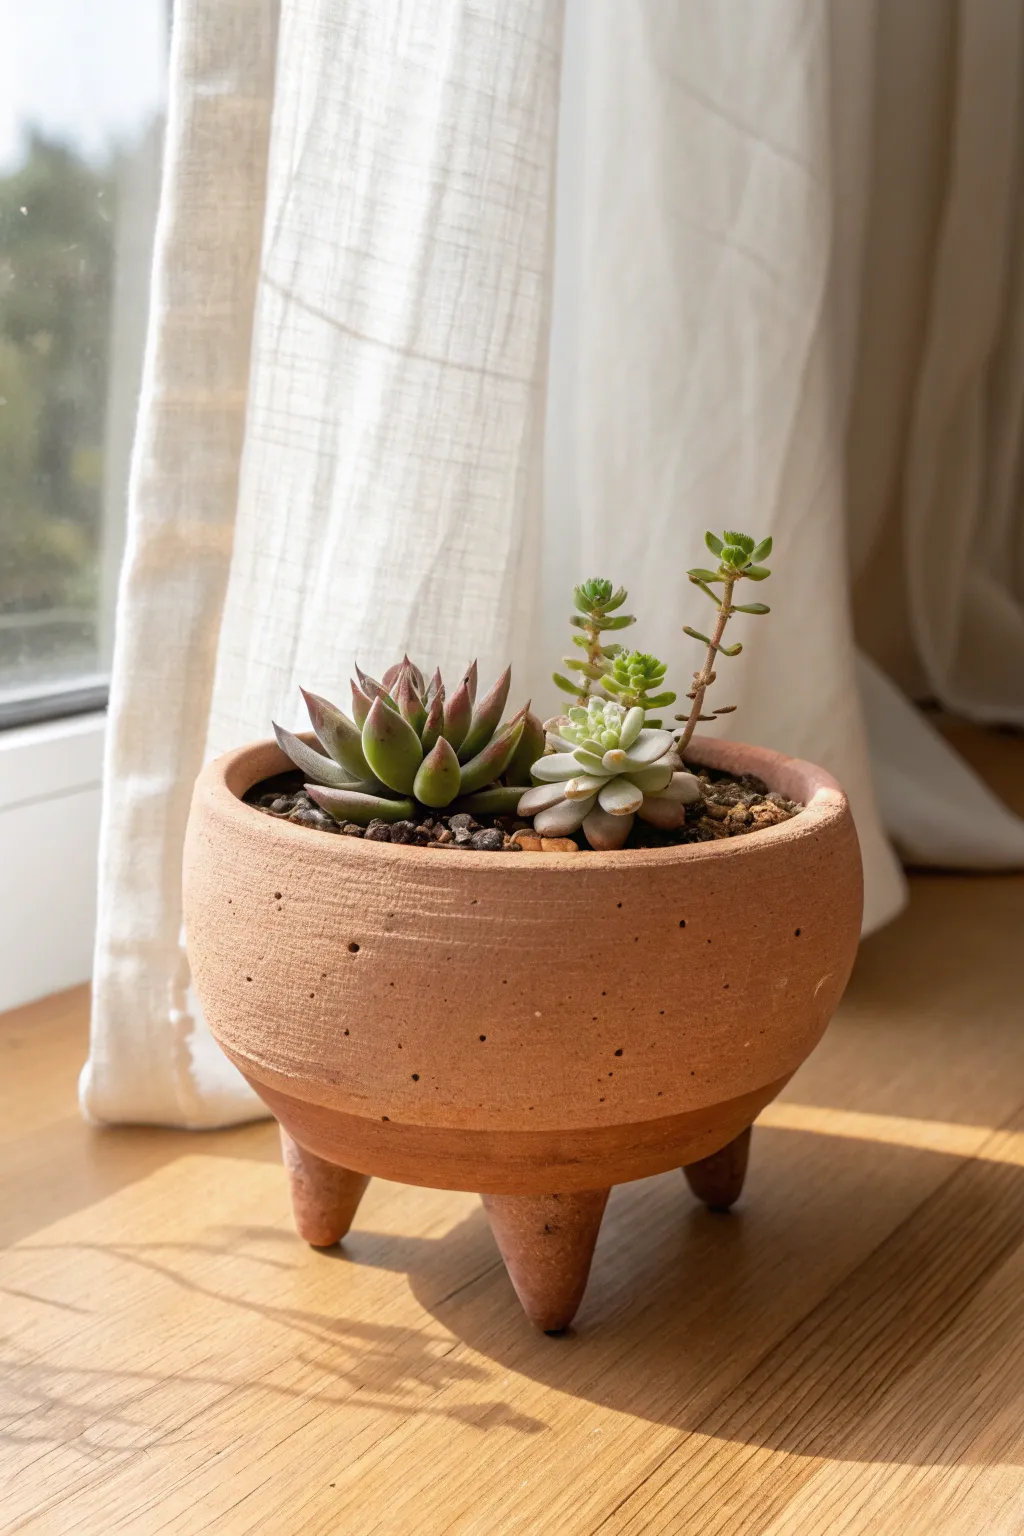
Elevate your favorite succulents—literally—with this charming raw terracotta planter featuring three sturdy tripod feet. The natural, porous clay finish provides the perfect breathable home for desert plants while adding a modern, sculptural touch to any windowsill.
Step-by-Step Tutorial
Materials
- Air-dry clay (terracotta color) or kiln-fire clay if you have access
- Rolling pin
- Circular bowl or template (approx. 5-6 inches diameter)
- Small craft knife or clay needle tool
- Sponge
- Water in a small cup
- Sandpaper (fine grit)
- Small wooden sculpting tool or popsicle stick
- Succulent potting mix
- Small succulents (Echeveria, Sedum varieties)
Step 1: Shaping the Bowl
-
Condition the clay:
Begin by taking a large handful of your terracotta clay and kneading it thoroughly. You want to warm it up and remove any trapped air bubbles to prevent cracking later. -
Roll out the slab:
On a flat surface or canvas mat, roll the clay out into an even slab, aiming for a consistent thickness of about 1/4 inch. -
Cut the base circle:
Place your circular template or bowl upside down on the slab. Use your needle tool or craft knife to trace around it, cutting out a perfect circle. -
Form the walls:
Roll a long snake or coil of clay, roughly the same thickness as your base. Place this coil on top of the outer edge of your circle base. -
Blend the coil:
Using your thumb or a wooden tool, smear the clay from the coil down into the base on both the inside and outside. I like to support the wall with one hand while smoothing with the other to keep the shape round. -
Build height:
Add 2-3 more coils on top of the first one, blending each layer seamlessly into the one below it. Aim for a total height of about 3-4 inches. -
Smooth the surface:
Once the height is reached, use a damp sponge to smooth out the coil lines completely. The goal is a uniform, bowl-like shape. Don’t worry if it has tiny pores; that adds character.
Step 2: Adding the Feet
-
Form the cones:
Roll three equal-sized balls of clay, roughly the size of a walnut. Shape each ball into a short, stout cone or tapered cylinder. -
Check sizing:
Stand the cones up next to the bowl to ensure they are the same height and thickness. Adjust as needed so your pot will sit level. -
Score the surfaces:
Flip your bowl upside down. Mark three equidistant spots for the feet. Use your needle tool to scratch up (score) both the bottom of the pot and the top of the clay feet. -
Apply slip and attach:
Dab a little water or liquid clay (slip) onto the scored areas. Press the feet firmly onto the bottom of the pot. -
Reinforce the joint:
Use a small modeling tool to smudge the clay from the foot onto the pot base, ensuring a strong bond avoiding any visible seams. -
Level check:
Flip the pot right-side up gently. Press down lightly to ensure all three feet touch the surface evenly. If it wobbles, gently tap it on the table to flatten the feet bases.
Stay Grounded
When attaching feet, wiggle them slightly as you press them on. This suction helps drive out air pockets and creates a much stronger bond than just pressing straight down.
Step 3: Finishing Touches
-
Add texture:
This pot has a rustic look, so you can gently poke the surface with a stiff brush or a needle tool to create random tiny pores if your clay is too smooth. -
Dry slowly:
Cover the pot loosely with plastic wrap and let it dry slowly for 24-48 hours. This prevents the feet from cracking off. -
Sand edges:
Once fully dry (bone dry), use fine-grit sandpaper to soften the rim and any sharp edges on the feet. -
Seal or fire:
If using kiln clay, fire it now. If using air-dry clay, apply a matte sealant to the inside to make it water-resistant. -
Planting:
Fill with gritty succulent soil and arrange your Echeveria and trailing stems. The raised feet allow excellent airflow underneath the pot.
Make it Marble
Mix a small amount of white clay into your terracotta before rolling the slab. Don’t over-mix; stop when streaks appear for a beautiful, subtle marble effect.
Now your custom pedestal planter is ready to catch the morning sun on your windowsill
Hanging Clay Pocket Planters
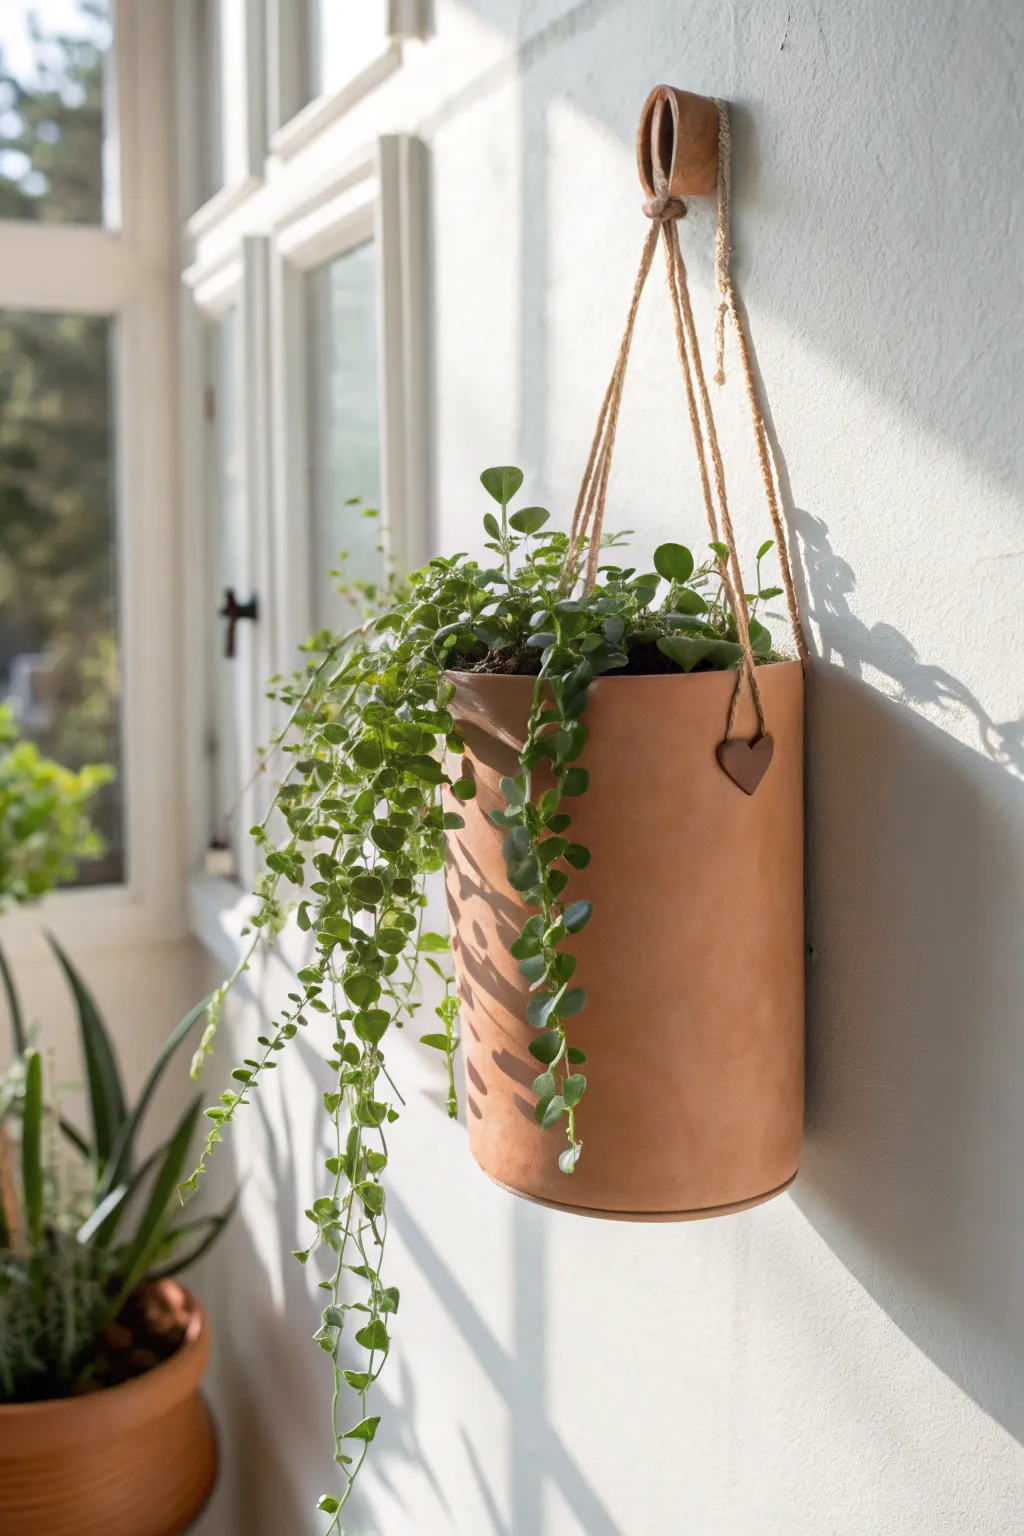
This unique hanging planter combines the classic warmth of terracotta with a soft, pouch-like silhouette that sits flush against your wall. Suspended by rustic twine and accented with a charming heart detail, it creates a cozy, sun-drenched home for your favorite trailing vines.
How-To Guide
Materials
- Terracotta air-dry clay or polymer clay (approx. 2 lbs)
- Rolling pin
- Parchment paper or canvas mat
- Ruler
- Craft knife or clay cutter
- Large cylindrical form (like a coffee can or oatmeal container)
- Clay slip (or water for air-dry clay)
- Scoring tool or fork
- Sanding sponge
- Jute twine or hemp rope
- Small heart-shaped clay cutter (optional)
- Wooden O-ring or leather strap (for hanging)
- Matte spray sealant
Step 1: Shaping the Clay Pocket
-
Prepare your workspace:
Lay down parchment paper or a canvas mat to prevent sticking. Knead your clay until it is pliable and free of air bubbles, which helps prevent cracks later. -
Roll out the slab:
Use your rolling pin to flatten the clay into a large, even slab about 1/4 inch thick. Aim for a consistent thickness to ensure the planter dries and hangs evenly. -
Cut the main rectangle:
Using a ruler and craft knife, cut a large rectangle. For a planter like the one shown, a 12-inch wide by 8-inch tall rectangle works well, but you can adjust based on your desired size. -
Cut the base circle:
Roll a smaller piece of clay and cut a circle that matches the diameter of your cylindrical form. This will be the bottom of your pocket. -
Form the cylinder:
Wrap your rectangular slab loosely around your cylindrical form (wrap the form in parchment first for easy removal). Overlap the vertical seam slightly. -
Score and slip the seam:
Where the clay overlaps, scratch both surfaces with a scoring tool and apply a little water or slip. Press the seam firmly together to bond it, smoothing the outside with your finger or a rib tool. -
Attach the base:
Score and slip the bottom edge of your cylinder and the edge of your clay circle. Press them together firmly, blending the clay from the walls down onto the base to create a seamless, watertight seal. -
Flatten the back:
Since this hangs against a wall, gently press the back side of the cylinder against a flat surface while the form is still inside. This creates a slightly semi-circular profile rather than a perfect circle.
Smooth Seams Pro-Tip
Use a drop of vinegar on your finger when smoothing air-dry clay seams. It breaks down the surface slightly, creating a “slurry” that bonds cracks better than water alone.
Step 2: Details and Assembly
-
Add holes for hanging:
Use a straw or a small circular cutter to punch two holes on opposite sides of the rim, about 1/2 inch down from the top edge. Ensure they are aligned. -
Create the heart accent:
Roll a tiny scrap of clay and cut out a small heart shape. Poke a hole through it as well. -
Refine the edges:
Dip your finger in water and smooth out the top rim and any rough edges on the seam or base. I like to sponge the surface lightly here to give it that soft, weathered texture. -
Dry the planter:
Let the clay dry completely according to package instructions. For air-dry clay, remove the inner form after a few hours to let the inside dry, then wait 24-48 hours. -
Sand and seal:
Once bone dry, use a sanding sponge to buff away any sharp bumps. Spray the entire piece inside and out with a matte sealant to protect it from moisture. -
Prepare the suspension rope:
Cut two long lengths of jute twine. Fold them in half to create a loop at the top. -
Create the top loop:
Pass the folded ends of the twine through a leather strap loop or a wooden ring, securing them with a knot. -
Attach to the planter:
Thread the loose ends of the twine through the holes in your planter from the outside in. Adjust the length so it hangs level, then tie sturdy knots on the inside to hold the weight. -
String the charm:
Before tying off one side, thread your little clay heart onto the twine so it rests just below the rim.
Level Up: Leather Look
Before drying, gently press a piece of wrinkled fabric or raw denim into the clay surface. This imitates the texture of worn leather once the terracotta color is dry.
Now simple hang your handcrafted pocket on a sunny hook and watch your greenery thrive in its new home