When you’re craving hard clay ideas, it’s usually because the simple stuff doesn’t scratch the itch anymore. These projects are the kind that make you slow down, study real forms, and flex those advanced sculpting muscles in the best way.
Dragon Head Bust With Layered Scales
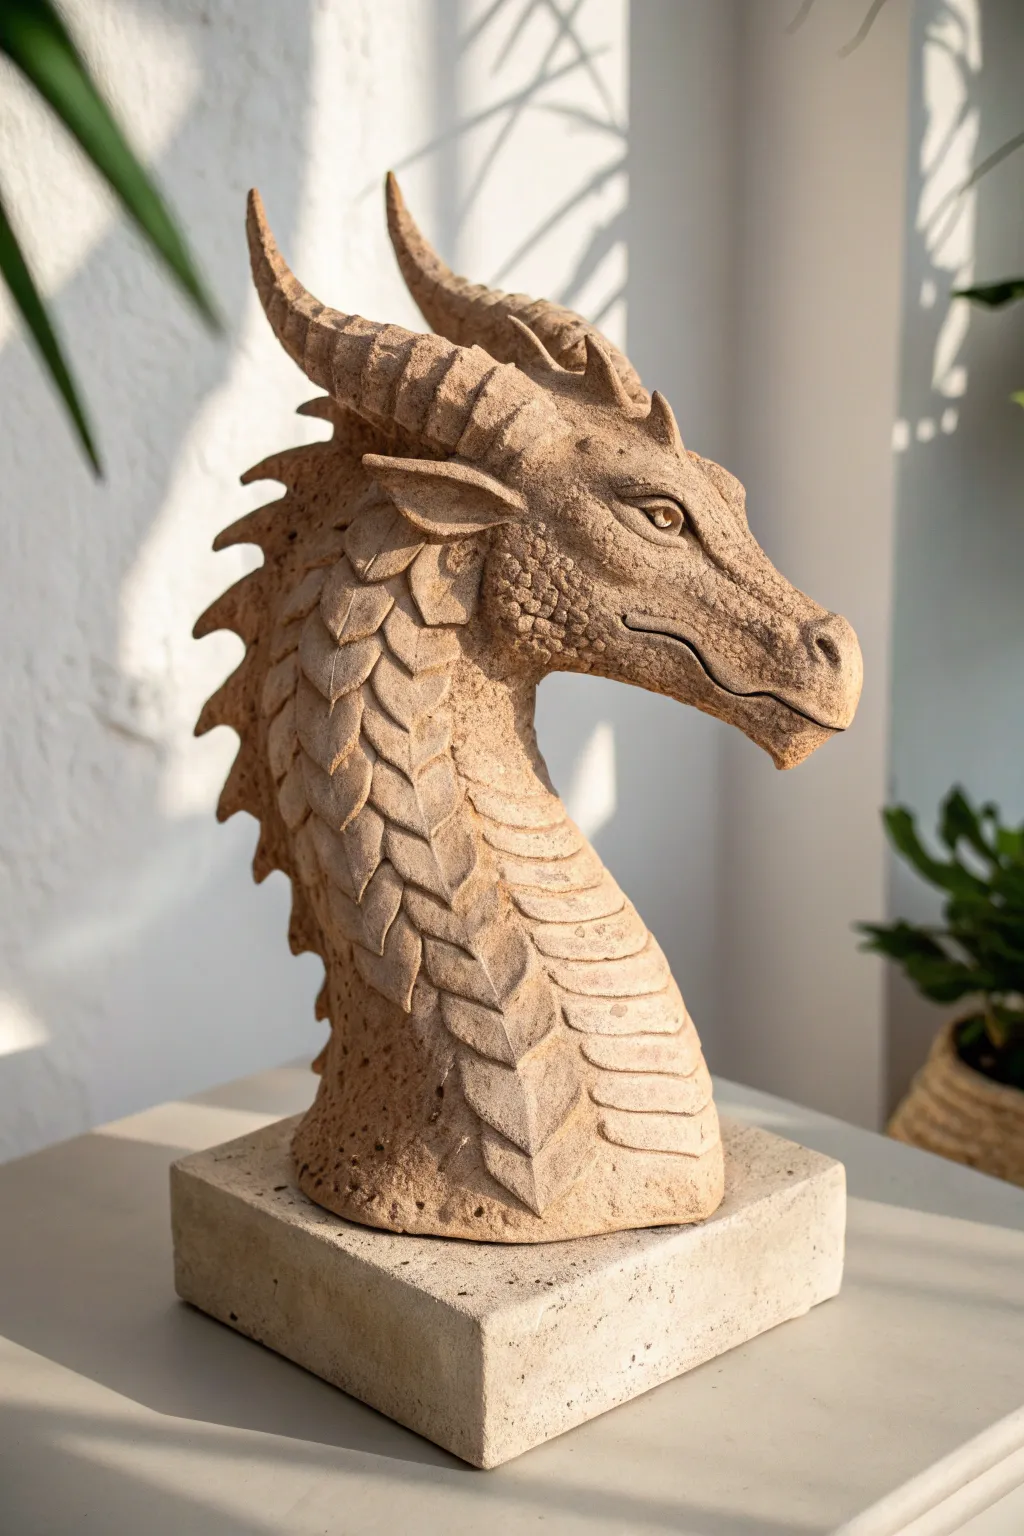
This majestic dragon bust captures the raw, weathered look of ancient castle gargoyles with its textured finish and intricate neck scales. The piece balances fierce details like horns and spines with a noble, upright posture, making it a striking centerpiece for any shelf.
How-To Guide
Materials
- Grogged stoneware clay or sculpture clay body
- Sturdy armature (wire and foil)
- Wooden sculpting tools
- Needle tool
- Loop tool for carving
- Rubber kidney tool
- Scoring tool or serrated rib
- Slip (clay mixed with water)
- Sponge
- Spray bottle with water
- Canvas or wooden board
Step 1: Armature and Base Structure
-
Prepare the base:
Begin by forming a solid rectangular block of clay for the pedestal. Ensure it is thick and heavy enough to support the head, then score the top center where the neck will attach. -
Build the armature:
Since this is a heavy bust, construct a temporary internal armature using crumpled foil shaped like a long neck and head, secured onto a dowel or wire frame if possible. This saves clay and reduces weight. -
Form the basic mass:
Pack slabs of clay around your foil core, pressing firmly to remove air pockets. Shape a thick, tapered cylinder for the neck that curves slightly forward. -
Define the head shape:
Add a large mass of clay to the top of the neck. roughly block out the skull shape—elongated for the snout, wider at the jaw, similar to a horse’s head but more angular.
Drooping Horns?
If horns sag, use toothpicks as internal supports. Leave them in until the clay is leather-hard, then carefully twist them out before firing to prevent cracking during shrinkage.
Step 2: Facial Features
-
Carve the mouth line:
Use a needle tool or knife to cut a deep, wavy line for the mouth. Curve it slightly upwards at the corner to give the dragon a subtle, stoic expression rather than a snarl. -
Sculpt the eye sockets:
Press your thumbs deep into the sides of the head to create orbital sockets. Roll small balls of clay for the eyes, place them in, and add upper and lower sculpted eyelids for a brooding gaze. -
Shape the snout:
Refine the nose area by adding two raised mounds for nostrils. Keep the bridge of the nose straight and bony. -
Add cranial details:
Build up the brow ridge over the eyes and add cheekbone structures to triangularize the face.
Ancient Stone Effect
Mix sand or grog into your clay body before sculpting. After the final sponge wipe, the sand grains will become exposed, creating that gritty, realistic sandstone texture.
Step 3: Horns and Spines
-
Attach the main horns:
Roll two thick coils of clay into tapered cones. Score and slip the attachment points on the top of the head heavily, then twist the horns into place so they curve backward. -
Detail the horns:
Once the horns are firm, use a wire tool to carve rings around them, mimicking the growth texture of a goat or ram horn. -
Create the dorsal spines:
From the back of the skull down the spine of the neck, attach a series of triangular spikes. Make them largest at the head, gradually getting smaller as they descend. -
Add secondary spikes:
Add smaller spike details near the jawline or behind the ears for added complexity.
Step 4: Scale Texture and Finishing
-
Draft the neck scales:
Lightly sketch a grid pattern down the front and sides of the neck to guide your scale placement. They should overlap like armor plating. -
Sculpt individual scales:
Using a small wooden tool, carve out the leaf-shaped scales. Instead of just drawing them, press the bottom edge of each scale inward to make the scale above it look raised and layered. -
Add central ridges:
For each neck scale, carve or pinch a subtle ridge down the center line to give it a sharp, leaf-like definition. -
Texturize the skin:
Dragon skin shouldn’t be perfectly smooth. Use a coarse sponge or a crumpled ball of foil to press a pitted, sandy texture into the cheeks, snout, and non-scaled areas. -
Final smoothing:
Run a slightly damp sponge over sharp edges on the base and the highest points of the face to soften tool marks, but leave the texture in the crevices. -
Hollow out the piece:
If you plan to fire this, slice the head off carefully once leather-hard, remove the foil armature, hollow out the neck walls to an even thickness, and reattach with slip.
Allow the dragon to dry slowly under plastic to prevent delicate spines from cracking as it cures


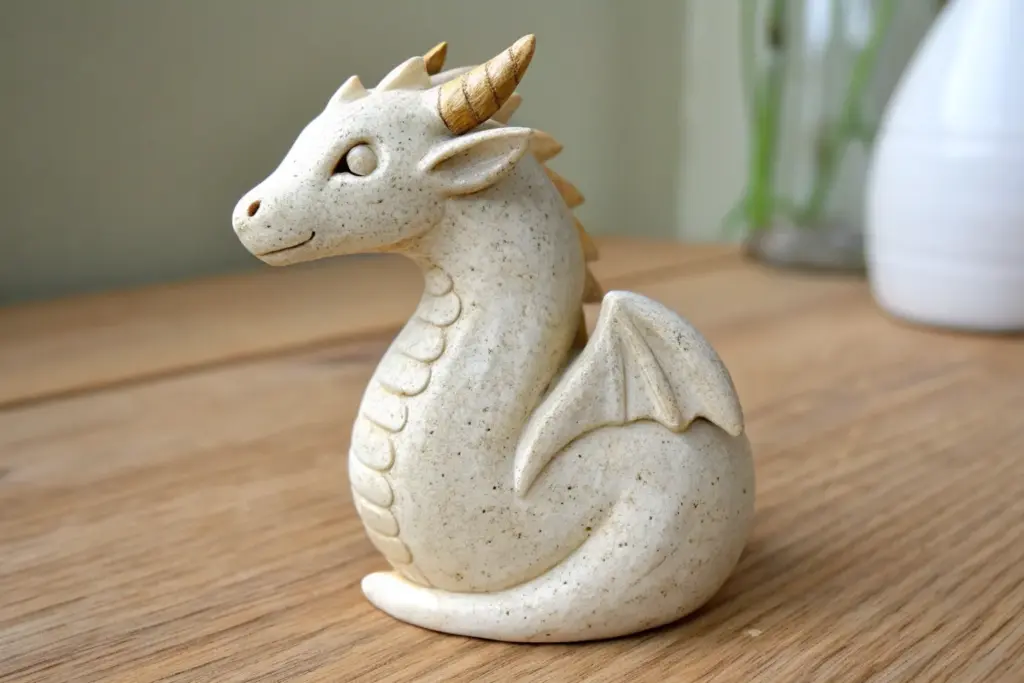
Realistic Sleeping Cat With Fur Texture
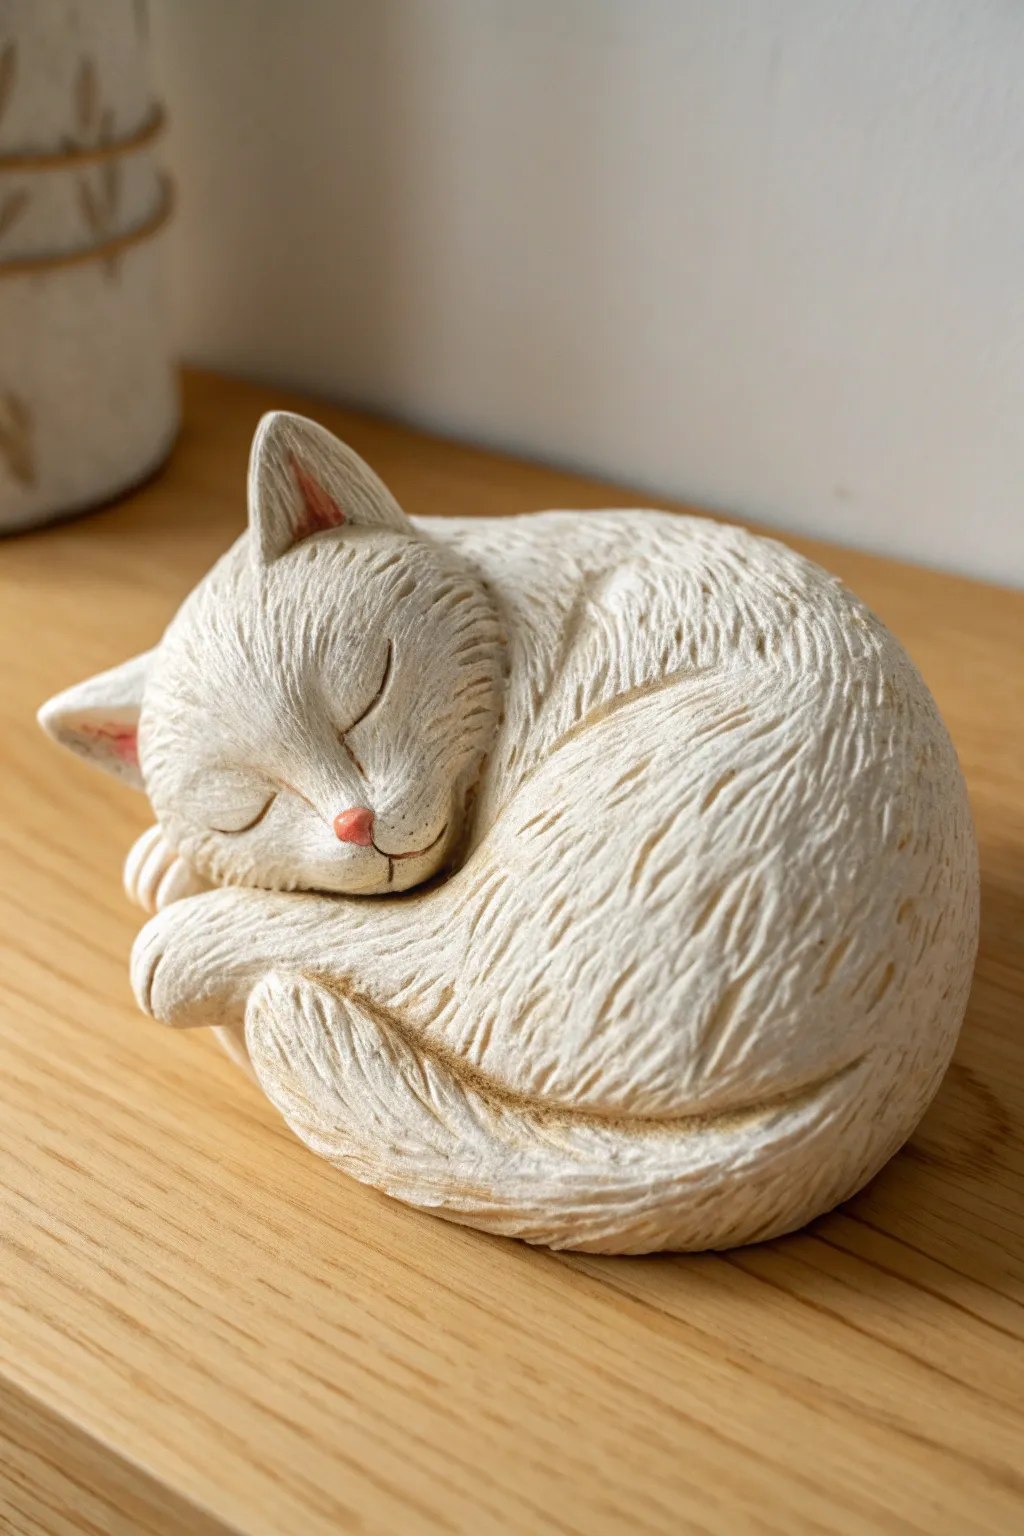
Capture the peaceful essence of a sleeping feline with this incredibly detailed clay project. By focusing on heavy texturing and subtle washes of color, you will transform a simple lump of clay into a lifelike, curled-up cat sculpture that looks soft to the touch.
Step-by-Step Guide
Materials
- High-quality polymer clay (white or beige, approx. 1 block)
- Needle tools or clay carving set
- Wire armature texturing tool (or a stiff wire brush)
- Aluminum foil
- Acrylic paints (burnt sienna, raw umber, white, soft pink)
- Small detail paintbrushes
- Paper towels or sponge
- Matte sculpting varnish
- Rubbing alcohol (for smoothing)
Step 1: Forming the Base
-
Create the core:
Start by crumpling aluminum foil into a tight oval shape, roughly the size of a tangerine. This saves clay and prevents cracking during baking. Compress it firmly so it is dense. -
Sheet the clay:
Condition your polymer clay until it is soft and pliable. Roll it out into a sheet about 1/4 inch thick using a rolling pin or pasta machine. -
Cover the armature:
Wrap the clay sheet around your foil core. Press the seams together firmly and smooth them out with your thumbs until the foil is completely hidden and the surface is seamless. -
Shape the body:
Mold the oval into a rounded kidney bean shape. This suggests the curled posture of a sleeping cat. Gently flatten the bottom so the sculpture sits stable on your work surface.
Fixing “Fuzzy” Clay
If your clay builds up burrs while scratching textures, chill the sculpture in the fridge for 10 minutes to harden it slightly, making clean cuts easier.
Step 2: Sculpting the Features
-
Add the head:
Roll a smaller ball of clay for the head. Attach it to one end of the bean shape, blending the clay downwards into the body so there is no visible neck seam. The head should rest on the ‘chest’ area. -
Form the ears:
Pinch two small triangles of clay. Attach them to the top of the head, gently curving them forward. Use a small ball tool to indent the inner ear slightly. -
Define the face:
Using a modeling tool, press gently into the center of the face to create the eye line. Add a tiny triangle of pink-tinted clay (or paint it later) for the nose. Scribe two curved lines for the sleeping eyes. -
Position the paws and tail:
Roll a long snake for the tail and wrap it around the body’s curve. Add a small oval for the front paw, positioning it so it looks tucked under the chin or cheek. Blend all attachment points smoothly.
Step 3: Texturing the Fur
-
Map the fur direction:
Before texturing, lightly scratch guidelines with a needle tool to indicate which way the fur flows. Typically, it flows away from the nose and down the spine. -
Start the deep texture:
Using a needle tool, begin carving short, repetitive strokes. Start at the bottom of the sculpture and work your way up so the upper layers of ‘fur’ overlap the lower ones. -
Refine the face fur:
Switch to a finer needle or x-acto knife for the face. The strokes here should be much shorter and finer, radiating outward from the nose and eyes. -
Add variance:
Vary the pressure of your strokes. I prefer to make the fur on the tail and back slightly clumpy and deeper, while keeping the paws and ears very smooth and short. -
Clean up debris:
As you carve, small crumbs of clay will accumulate. Gently brush these away with a soft, clean makeup brush so they don’t get baked onto the surface.
Calico Customization
Instead of a single wash, apply patches of orange and black washes before the final white dry-brushing to create a realistic calico or tortoiseshell pattern.
Step 4: Finishing and Painting
-
Bake the piece:
Bake the sculpture according to your clay manufacturer’s instructions (usually 275°F/135°C for 15-30 minutes). Let it cool completely. -
Apply a wash:
Mix burnt sienna and raw umber acrylic paint with plenty of water to create a thin wash. Brush this over the entire sculpture, ensuring it gets into all the fur grooves. -
Wipe back:
Immediately use a damp paper towel or sponge to wipe the paint off the raised surface areas. The dark paint will remain in the crevices, highlighting the texture instantly. -
Dry brush highlights:
Dip a dry brush into white acrylic paint and dab off almost all the pigment. Lightly skim the brush over the tips of the fur textures to make the details pop. -
Detail the face:
Use a tiny brush to paint the inside of the ears a soft pink. Add a touch of pink to the nose pad if you didn’t use colored clay earlier. -
Seal:
Finish with a coat of matte varnish to protect the paint without making the fur look unnaturally shiny.
Place your finished sleeping cat on a shelf where its peaceful posture can add a touch of calm to your room


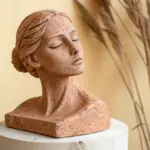
Human Portrait Bust With Lifelike Features
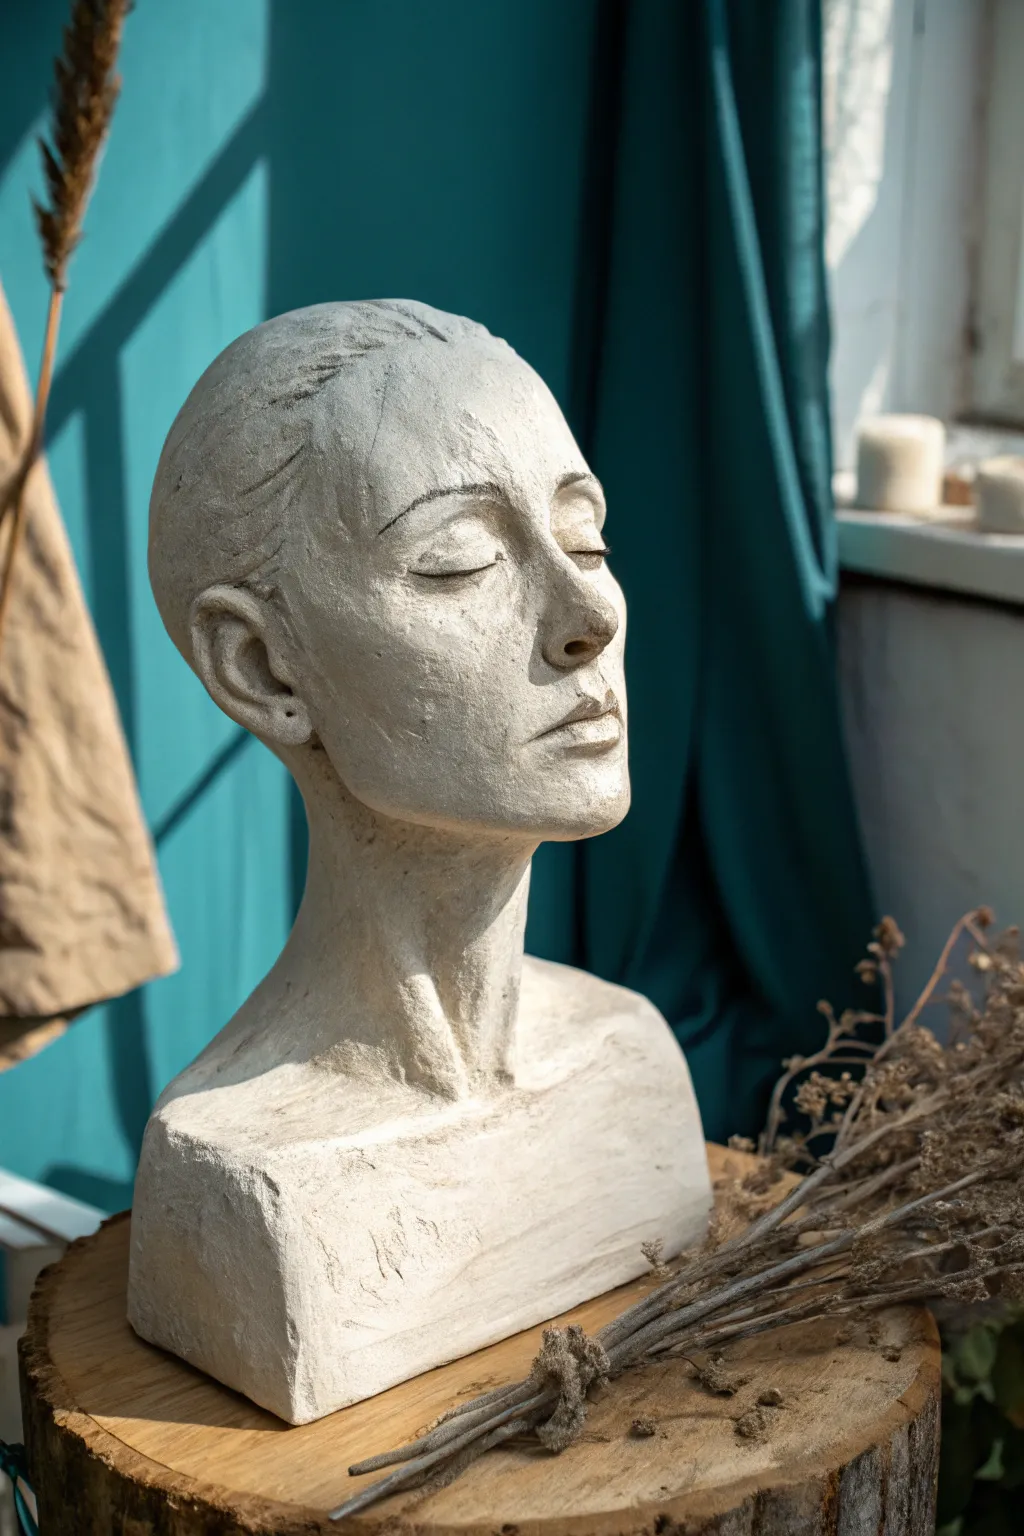
This project captures the quiet elegance of a sleeping figure through a lifelike clay bust with a raw, textured finish. By focusing on anatomical planes and subtle expression, you will create a piece that feels both classical and contemporary.
Detailed Instructions
Materials
- White stoneware clay (finely grogged) or high-quality air-dry clay
- Armature wire and wooden base
- Newspaper or aluminum foil (for bulking)
- Wooden modeling tools
- Loop tools (various sizes)
- Wire clay cutter
- Needle tool
- Sponge
- Water spray bottle
Step 1: Building the Armature & Core
-
Prepare the Base:
Secure a sturdy metal wire loop or pipe into a wooden base. This will act as the spine and neck support for your sculpture. -
Bulk the Form:
Crumple newspaper or aluminum foil tightly around the wire to form the basic egg shape of the head and the width of the shoulders. Secure this bulk with masking tape or thinner wire so it doesn’t shift. -
Apply the Initial Clay:
Cut slabs of clay about half an inch thick. Press these slabs firmly onto your foil armature, covering the entire head and neck area. Ensure you merge the seams thoroughly so no air is trapped between layers. -
Rough Shaping:
Using your hands, shape the clay into a basic bust form. Distinguish the cranium (skull) from the jawline and establish the cylindrical shape of the neck leading into the trapezius muscles.
Anatomy Check
Step back frequently. The distance between the eyes is roughly the width of one eye. Profile matters—check that the ear aligns vertically with the back of the jaw.
Step 2: Establishing Proportions
-
Mark the Guidelines:
Use a needle tool to lightly draw a vertical centerline down the face. Then, mark horizontal lines for the eyes (halfway down the head), the bottom of the nose, and the mouth. -
Build the Nose:
Add a small wedge of clay to the center of the face for the nose. Blend it smoothly into the forehead and cheeks, keeping the bridge straight and the nostrils subtle. -
Carve the Eye Sockets:
Use a thumb or a large loop tool to press indentations where the eyes will sit. This establishes the brow ridge and the orbital bone structure. -
Define the Jaw and Chin:
I prefer to add strips of clay along the jawline to strengthen the bone structure. Smooth these down towards the neck to create a seamless transition.
Cracking Clay?
If small fissures verify around the nose or neck, the clay is drying too fast. Mist immediately with water, smooth with a soft brush, and cover with plastic to slow drying.
Step 3: Sculpting the Features
-
Create the Closed Eyelids:
Roll two small spheres of clay and place them in the sockets. Slightly flatten them, then add thin coils above and below to form the eyelids. Blend the edges so the eyes look gently closed, not swollen. -
Shape the Mouth:
Add a small barrel-shaped piece of clay for the mouth area. Cut a horizontal line for the opening, then shape the upper and lower lips. Keep the expression neutral and relaxed by slightly softening the corners. -
Refine the Nose:
Carve out the nostril flair and define the tip of the nose. Ensure the transition from the side of the nose to the cheek is gradual, not a sharp 90-degree angle. -
Add the Ears:
Shape two C-shaped ears and attach them between the eye line and the nose line. Don’t over-detail the insides; simpler forms often read better on a bust like this.
Step 4: Refining and surface Texture
-
Sculpt the Hair Suggestion:
Instead of sculpting individual strands, add thin slabs of clay to the scalp area to suggest pulled-back hair. Use a wooden tool to make sweeping directional marks that mimic the flow of hair. -
Define the Neck and Shoulders:
Enhance the sternocleidomastoid muscles (the ‘V’ shape on the neck) leading to the collarbones. Keep the shoulders relatively blocky and abstract to focus attention on the face. -
Surface Texture:
Use a damp sponge to smooth out major fingerprints, but leave some tool marks and ‘imperfections’ visible. This gives the piece the raw, artistic stoneware look seen in the photo. -
Detailing the Brows:
Lightly etch the eyebrows with a needle tool or modelling tool, following the natural arch of the brow bone. Keep the texture light. -
Hollowing Out (If Firing):
If you are using kiln-fire clay, slice the top of the head off carefully once leather-hard, remove the armature and filling, hollow out the neck and head to an even thickness, and reattach the top piece using slip and score. -
Final Polish:
Do a final pass to sharpen the edges of the eyelids and lips. Let the clay dry slowly under loose plastic to prevent cracking.
Once fully dried or fired, the natural texture of the clay will give your sculpture a timeless, museum-quality presence


Anatomical Hand Sculpture With Gesture
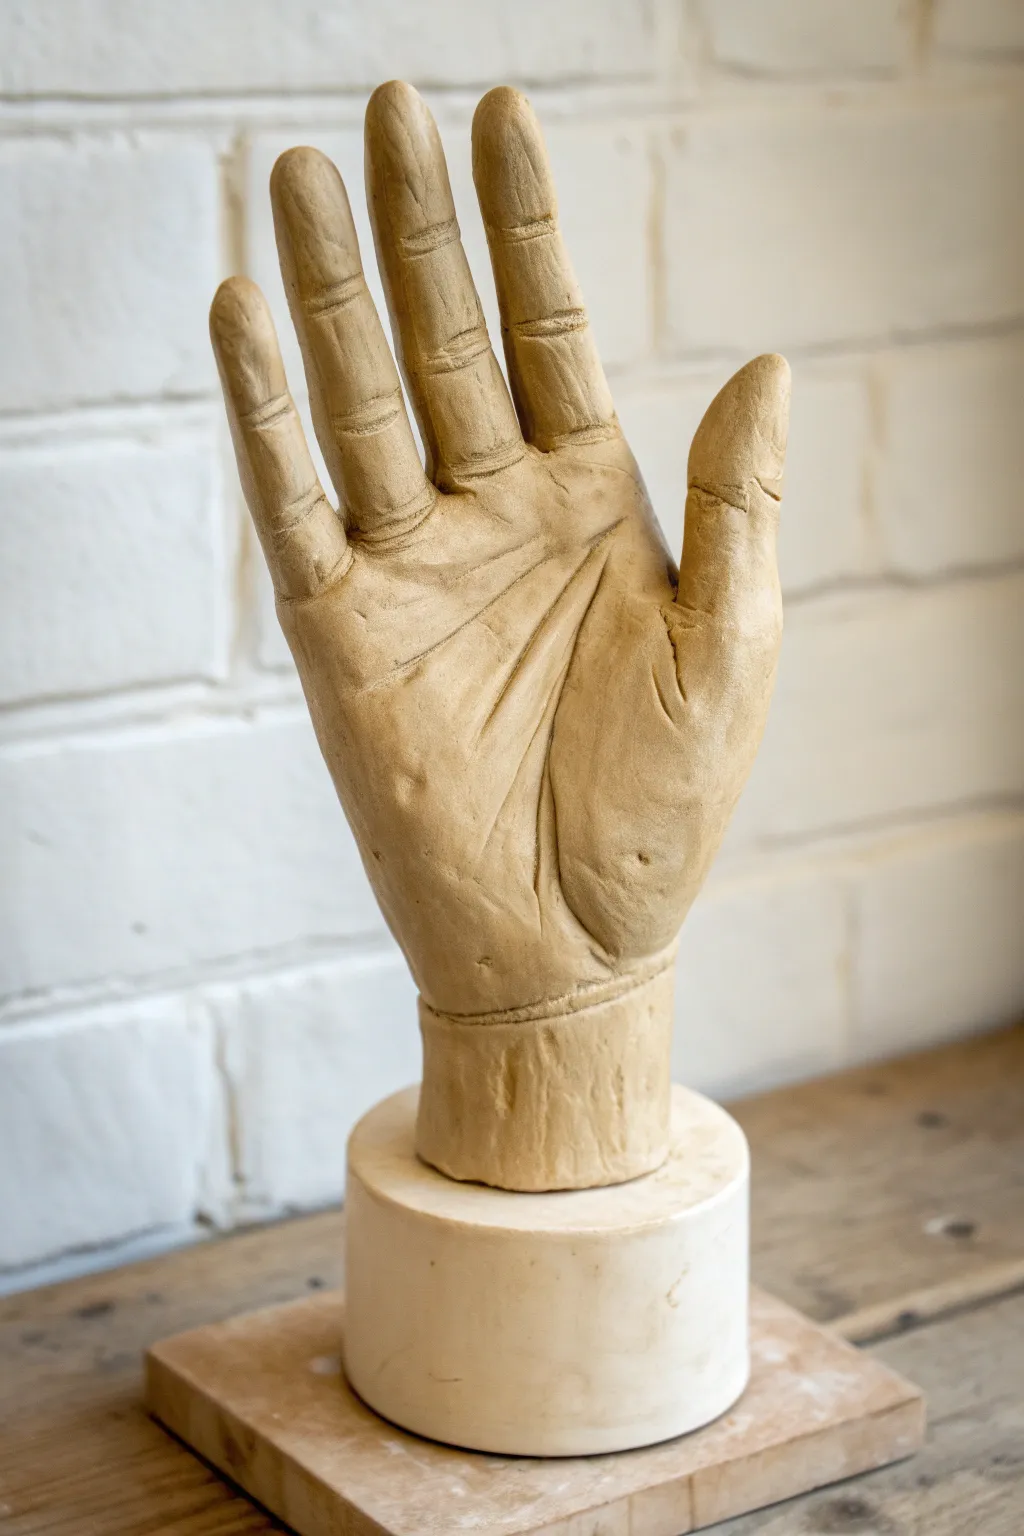
Capture the nuanced anatomy of the human hand with this intermediate clay sculpting project. This piece focuses on realistic proportions and subtle skin textures, finished in a natural, stony tone that highlights every crease and knuckle.
Step-by-Step Guide
Materials
- Air-dry clay or polymer clay (natural/stone color)
- Wire armature kit (thin aluminum wire + pliers)
- Wooden dowel or stiff rod for the wrist base
- Sculpting tool set (needle tool, loop tool, wooden rib)
- Cylindrical jar lid or PVC pipe end (for molding the base)
- Square wooden mounting board
- Water spray bottle
- Fine grit sandpaper
- Acrylic paint (optional wash)
- Clear matte sealant
Step 1: Building the Armature
-
Establish the Core:
Begin by twisting lengths of aluminum wire together to create a five-fingered skeletal structure. Ensure the wire ‘wrist’ is long enough to wrap securely around your central wooden dowel. -
Secure the Base:
Attach the wire hand structure to your wooden dowel using thinner floral wire or strong tape. The dowel will act as the internal support for the wrist and forearm section. -
Pose the Skeleton:
Before adding any clay, bend the wire fingers into your desired gesture. For this specific look, keep the fingers mostly upright but naturally relaxed, slightly separating them to create dynamic negative space.
Crack Control
If hairline cracks appear while drying, mix a small amount of fresh clay with water to make a paste (slip) and fill the cracks, then smooth over.
Step 2: Applying the Bulk Clay
-
Create the Palm:
Flatten a large ball of clay into a thick patty. Press this into the palm area of your armature, wrapping it around the wire structure to form the meat of the hand. -
Wrap the Fingers:
Roll small sausages of clay and carefully slide them over each wire finger. Use your thumbs to blend the clay downward into the palm area so there are no seams. -
Form the Wrist:
Build up the clay around the dowel to create a thick, sturdy wrist column. This needs to be substantial enough to support the weight of the hand above it. -
Create the Cylindrical Plinth:
Use a cylindrical object (like a jar lid or PVC ring) as a mold or guide to shape the circular base directly under the wrist. Blend the clay from the wrist seamlessly into this geometric base.
Use A Reference
Use your own non-dominant hand as a live model! Constantly look at your own palm to understand how skin folds when fingers are straight vs. bent.
Step 3: Sculpting Anatomy
-
Delineate the Thumb Pad:
Add extra clay to the base of the thumb (the thenar eminence) to create that distinct muscular bulge. Smooth it into the palm. -
Carve the Life Lines:
Using a needle tool or a small wooden modeling tool, gently carve the major lines of the palm—the life line, head line, and heart line. Don’t just draw lines; try to make them look like folds in skin. -
Define Knuckles:
Add tiny flattened balls of clay to the finger joints. Smooth the edges to create the dorsal knuckles and the subtle bulges on the inner fingers. -
Refine Finger Segmentation:
Use a knife tool to mark the horizontal creases on the inner fingers where the joints bend. I find rolling the tool slightly creates a softer, more natural crease than a sharp cut. -
Texture the Wrist:
For the wrist section, leave the texture slightly rougher or vertical, almost like rough-hewn stone or tree bark, to contrast with the smooth skin of the hand.
Step 4: Finishing Touches
-
Smoothing Phase:
With a slightly damp sponge or finger, go over the entire hand (except the rough wrist base) to remove fingerprints and tool marks. You want a smooth, skin-like finish. -
Drying:
Allow the sculpture to dry completely. If using air-dry clay, loosely cover it with plastic for the first 24 hours to prevent cracking, then let it air dry for another 2-3 days. -
Sanding:
Once fully cured, use fine-grit sandpaper to buff out any remaining imperfections or sharp clay burrs. -
Mounting:
Glue the cylindrical clay base securely onto your square wooden board. -
Optional Wash:
To enhance the details, you can apply a very watered-down brown acrylic wash, wiping it off immediately so pigment remains only in the deep creases.
Now you have a timeless anatomical study that captures the expressive power of the human hand

The Complete Guide to Pottery Troubleshooting
Uncover the most common ceramic mistakes—from cracking clay to failed glazes—and learn how to fix them fast.
Thrown Vessel With Sculpted Creature Wrap
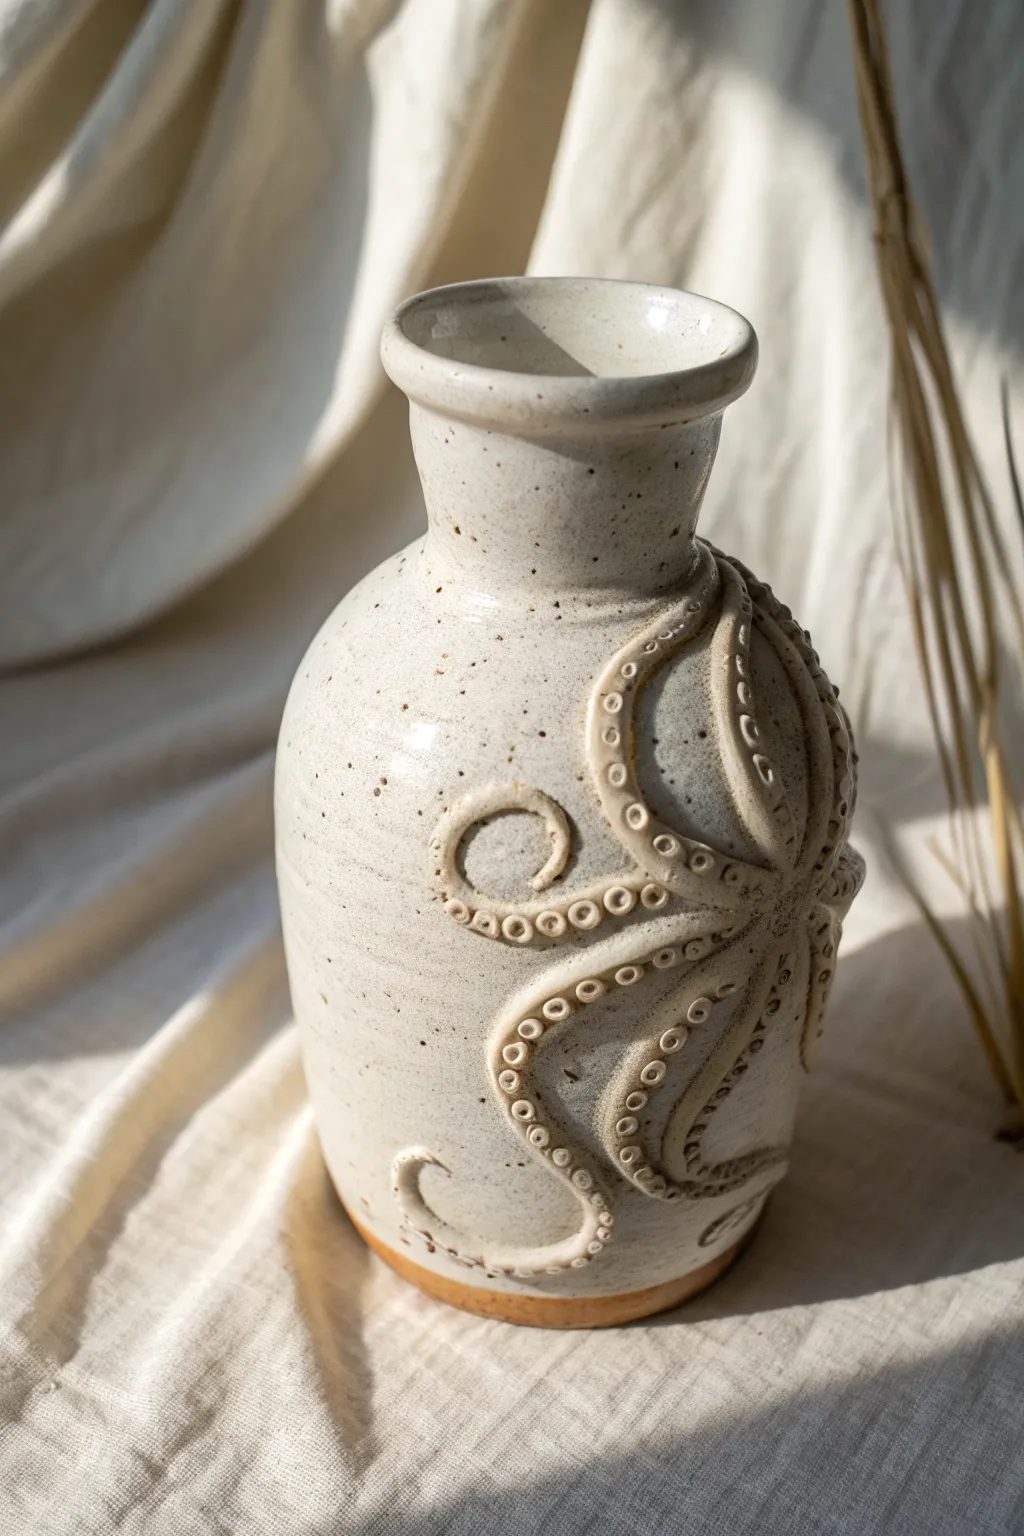
Embrace the fluid beauty of the ocean with this stoneware vase featuring sculpted octopus tentacles. The contrast between the smooth, speckled glaze on the thrown form and the tactile suction cups creates a piece that begs to be touched.
Step-by-Step Guide
Materials
- Stoneware clay (speckled or buff)
- Pottery wheel
- Throwing tools (rib, sponge, wire)
- Needle tool
- scoring tool (or serrated kidney)
- Slip (made from your clay body)
- Small loop tool or ball stylus
- Modeling tools (wooden or rubber)
- White breaking glaze (semitransparent)
- Clear glaze (optional)
Step 1: Throwing the Base Form
-
Center and Open:
Begin with about 2-3 pounds of wedged clay. Center it firmly on the wheel and open the well, leaving a floor thickness of about a quarter-inch. -
Pull the Cylinder:
Pull the walls up into a tall, even cylinder. Focus on keeping the walls distinctive and uniform in thickness to support the added weight later. -
Shape the Belly:
Using a rib on the outside and your hand on the inside, gently push the belly of the pot out, creating a rounded, pear-like shape that tapers near the top. -
Collar the Neck:
Slow the wheel down and gently collar the top section inward to create a defined neck. I find using a wet sponge here helps prevent the clay from torquing too much. -
Refine the Rim:
Flare the rim slightly outward for a classic vase silhouette. Use a chamois or sponge to compress the lip so it is smooth and durable. -
Trim and Rest:
Undercut the foot with a wooden knife. Wire the pot off the bat but leave it in place or move to a ware board. Let it dry to a solid leather-hard state—it needs to be sturdy enough to handle sculpting.
Crack Control
If tentacles crack away from the pot during drying cover the specific area with a damp paper towel and plastic wrap to rehydrate and slow down the drying speed.
Step 2: Sculpting the Tentacles
-
Roll Coils:
While the pot dries, roll out several long, tapered coils of fresh clay. These should start thicker at one end and taper down to a fine point, mimicking tentacle anatomy. -
Plan Placement:
Gently lay the coils against your leather-hard pot to visualize the flow. Try curving them around the belly and up toward the neck for dynamic movement. -
Score and Slip:
Once happy with the placement, trace the coil positions slightly. Remove the coils, score the pot surface and the back of the coils thoroughly, and apply a generous amount of slip. -
Attach the Tentacles:
Press the coils firmly onto the pot. Use a modeling tool to blend the edges of the coil onto the pot surface so they look like they are emerging from the vessel rather than just stuck on. -
Refine the Shape:
Smooth out the attached coils. You can flatten them slightly against the pot to create a more realistic, muscular look. -
Make Suction Cups:
Roll many tiny balls of clay, varying their sizes from small to tiny. Adhere them in two parallel rows along the length of the tentacles using a dab of slip. -
Detail the Suckers:
Using a small ball stylus or the back of a small drill bit, press into the center of each tiny ball. This creates the classic ‘donut’ shape of a suction cup and firmly attaches the clay simultaneously. -
Clean Up:
Check for any sharp burrs or rough crumbs of clay around the sculpted areas. Smooth these away with a soft brush.
Step 3: Finishing
-
Drying and Bisque:
Dry the piece very slowly under loose plastic to ensure the added clay dries at the same rate as the pot. Once bone dry, bisque fire to cone 04. -
Glazing:
Pour a white, semi-opaque glaze inside the liner. For the outside, dip or brush the same glaze. A glaze that ‘breaks’ over texture is essential here to highlight the suction cups. -
Wiping Back:
If your glaze is too thick, gently wipe the high points of the suction cups with a damp sponge to reveal the speckled clay body underneath. -
Final Fire:
Glaze fire the piece to cone 6 (or your clay’s maturity temperature).
Advanced Texture
Before glazing, brush a dark oxide wash (like iron or manganese) over the tentacles and sponge it off. This will leave dark deeper shadows in the recesses.
Enjoy using your new sculptural vessel as a stunning centerpiece for dried grasses or fresh blooms
Deep-Carved Botanical Relief Tile
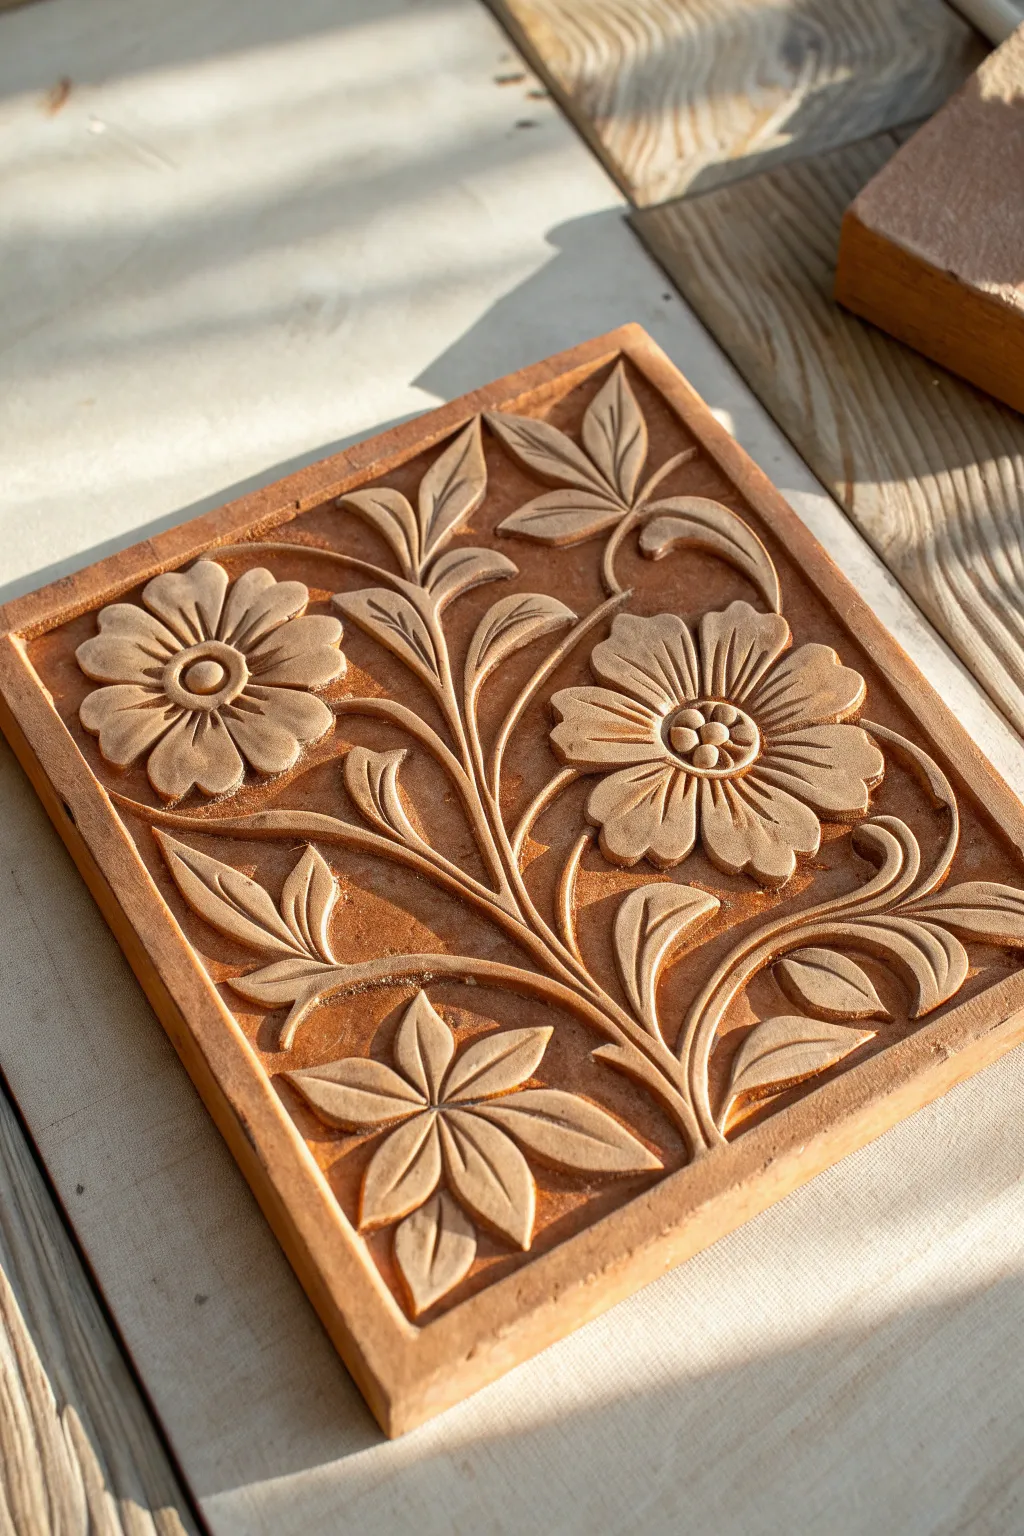
This project captures the rustic warmth of unglazed earthenware with a deeply etched floral design. The satisfying contrast between the smooth raised surfaces and the textured depths brings the organic motifs to life.
Detailed Instructions
Materials
- Earthenware or Stoneware clay (terracotta color recommended)
- Wooden rolling pin
- Two 1/2-inch thick wooden guide strips
- Square template (paper or cardboard, approx. 6×6 or 8×8 inches)
- Needle tool
- Loop tools (various sizes for carving)
- Small carving gouges (U-shape and V-shape)
- Rubber kidney tool or soft rib
- Clean sponge and water
- Canvas or heavy cloth work surface
Step 1: Preparation & Slab Rolling
-
Prepare the workspace:
Set up your canvas or heavy cloth on a flat table to prevent the clay from sticking. Place your two wooden guide strips parallel to each other, slightly wider apart than the width of your final tile. -
Wedge the clay:
Take a generous ball of terracotta clay and wedge it thoroughly to remove air bubbles. This ensures a consistent texture for carving later. -
Roll the slab:
Place the clay between the guide strips. Using the rolling pin, roll the clay out until the pin rides smoothly on top of the wooden strips, creating a perfectly even slab about 1/2-inch thick. -
Smooth the surface:
Use a rubber kidney or soft rib to compress the clay surface gently. Stroke in multiple directions to align the clay particles, which helps prevent warping during drying. -
Cut the square:
Lay your square template over the smoothed slab. Using a needle tool, cut vertically along the edges of the template to create your tile shape. Remove the excess clay. -
Create the border:
Lightly score a line about 1/4 inch from the edge all the way around to define the frame. Don’t cut through; just mark where the border will be.
Keep it Clean
Don’t try to brush away clay crumbs while the clay is still wet and sticky; you’ll just smear them. Wait for the leather-hard stage to brush clean.
Step 2: Drafting and Carving
-
Sketch the design:
Using the needle tool with very light pressure, sketch the main stem flowing diagonally across the tile. Add circles for the two large flower heads and the smaller star-like flower at the bottom. -
Map the leaves:
Lightly draw the outlines of the leaves branching off the main stem. Keep the layout balanced, ensuring the leaves fill the negative space without overcrowding. -
Define the background:
Use a medium-sized loop tool to begin removing the clay around your drawn shapes. I like to carve down about 1/8 to 1/4 inch, leaving the flowers, stems, and border standing tall. -
Refine the edges:
Switch to a smaller loop tool to clean up tight corners where leaves meet stems. The goal is to have vertical walls on your raised elements, making them pop against the background. -
Texture the background:
If the carved background looks messy, smooth it slightly with a tool or fingertip, but some texture is desirable as it contrasts with the smooth flowers.
Functional Art
Before drying, use a straw to punch two holes in the top corners. After firing, thread rustic twine through them to hang this as a wall decoration.
Step 3: Detailing & Finishing
-
Carve flower centers:
Use a small U-gouge to create the indentations in the center of the two main flowers. Add tiny balls of clay if needed for raised stamens, or carve around a central nub to leave it raised. -
Add petal details:
With a V-shaped gouge or needle tool, carve lines radiating from the flower centers to define individual petals, giving them slight curves for a natural look. -
Vein the leaves:
Carve central veins into each leaf using a sharp tool. For larger leaves, you can gently bevel the edges downward to make them look more three-dimensional. -
Clean up crumbs:
Wait until the clay is leather-hard (stiff but cool to the touch). Use a dry soft brush to sweep away any clay crumbs or burrs left from carving. -
Smooth the raised edges:
Dip your finger or a small piece of sponge in water—squeeze it out well so it’s just damp—and run it over the top surfaces of the flowers and frame to soften any sharp cutting lines. -
Drying:
Place the tile on a wire rack or a piece of drywall to dry slowly. Cover loosely with plastic for the first day to prevent the corners from curling up.
This carving technique creates a timeless piece that looks beautiful whether left as raw terracotta or finished with a transparent glaze.


What Really Happens Inside the Kiln
Learn how time and temperature work together inside the kiln to transform clay into durable ceramic.
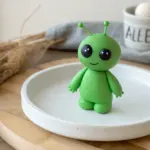
Mini Mushroom Cottage With Micro Details

Transport yourself to a fairytale forest by sculpting this enchanting mushroom cottage, complete with a cozy illuminated window and charming stone details. Its rustic textures and earthy palette make it a perfect centerpiece for a fantasy garden or bookshelf display.
Detailed Instructions
Materials
- Air-dry clay or polymer clay (white and terracotta/brown)
- Clay sculpting tools (needle tool, ball stylus, knife)
- Small rolling pin
- Textured sponge or foil ball
- Acrylic paints (browns, beiges, creams, grey)
- Small paintbrushes
- Empty glass jar or cardboard tube (for structure armature)
- Small LED tea light (optional)
- Gloss varnish or sealant
- Small pebbles and dried moss (for base)
- Toothpicks or wire (for structural support)
Step 1: Forming the Base Structure
-
Build the armature:
Begin by selecting a sturdy cylindrical form like a small glass jar or a sturdy cardboard tube to act as the internal wall support. If you want the cottage to light up, ensure your armature is hollow and open at the bottom. -
Wrap the walls:
Roll out a sheet of white clay to about 1/4 inch thickness. Wrap this securely around your armature, smoothing the seam where the clay edges meet so it becomes invisible. I like to leave the top slightly open for the roof to sit on. -
Texturize the facade:
Before the clay hardens, gently press a textured sponge or a crumpled ball of aluminum foil against the entire surface of the ‘walls’ to give it a rough, stucco-like plaster effect. -
Cut the openings:
Use a sharp craft knife to carefully cut out an arched doorway and a small arched window. Remove the clay from these sections.
Step 2: Creating the Mushroom Cap Roof
-
Shape the cap:
Take a large ball of brown or terracotta-colored clay and shape it into a dome. Use your thumbs to hollow out the underside so it fits comfortably over your wall structure with a slight overhang. -
Detail the rim:
Using a needle tool or knife, etch vertical lines all around the bottom rim of the mushroom cap to mimic the gills of a fungus. -
Add the spots:
Roll out small, flat circles of beige or lighter brown clay. Press these randomly onto the roof dome. Don’t worry about making them perfect circles; organic shapes look more natural. -
Attach the chimney:
Form a small cylinder from brown clay and attach it to the very top or side of the roof to act as a stem-like chimney.
Smoother Stone Texture
When making the stone door frame, lightly roll your finger over the clay balls after attaching them. This flattens them slightly and merges them for a more aged, built-in look.
Step 3: Sculpting the Micro Details
-
Frame the door:
Roll tiny balls of white or light grey clay and press them around the door arch to create a stone frame. Use a needle tool to poke a small hole in the center of each ‘stone’ for texture. -
Craft the door:
Roll a slab of tan clay to fit inside the door arch. Use a knife to score vertical wood grain lines. Add a tiny heart emblem and a small ball for the doorknob. -
Build the window:
Create a similar stone frame around the window opening using flattened clay balls. Inside the opening, place thin strips of clay in a cross shape to form the window pane grid. -
Add nature elements:
Sculpt a very small rose or flower and a few tiny leaves. Attach these near the base of the cottage wall for a touch of life.
Secret Stash Roof
Keep the roof unglued! Sand the contact points so they sit flush. This turns your cottage into a secret hiding spot for keys, jewelry, or other tiny treasures.
Step 4: Assembly and Finishing
-
Assemble the pieces:
Place the roof onto the walls. You can secure it with a bit of water (if using air-dry clay) or liquid clay (if using polymer), or leave it removable to easily access the inside for an LED light. -
Create the cobblestone base:
Press small, real pebbles or hand-rolled grey clay balls around the very bottom perimeter of the house to create a foundation and retaining wall look. -
Paint the washes:
Once dried or baked, apply a watered-down wash of dark brown acrylic paint over the textured walls and the door. Wipe it back quickly with a paper towel so the dark paint only stays in the crevices, highlighting the texture. -
Highlight the roof:
Dry brush a lighter beige paint over the roof spots and the ‘gills’ on the rim to make the details pop. -
Final touches:
Glue small tufts of dried moss between the stones at the base. Place a small LED tea light underneath to watch your cottage glow warmly.
Now you have a magical little dwelling ready to bring a touch of enchantment to your home
Feathered Wing Plaque With Layered Quills
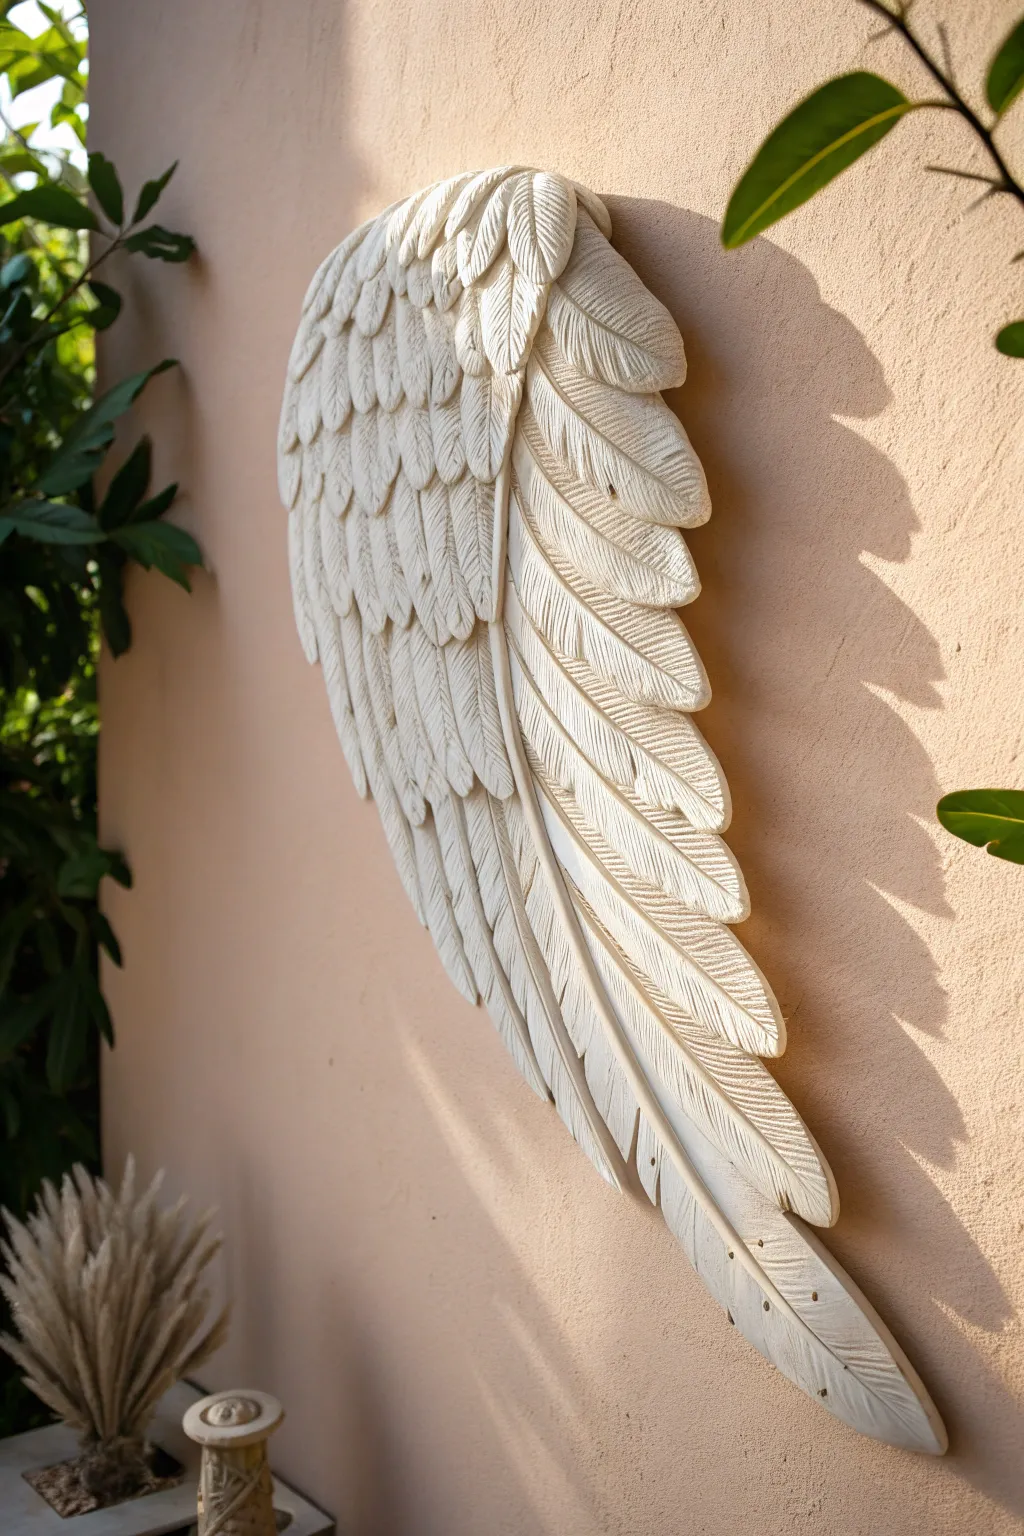
Capture the ethereal beauty of flight with this intricate clay relief sculpture. By building up layers of individually textured feathers, you will create a stunning, dimensional wall piece that mimics the softness and structure of a real bird wing.
How-To Guide
Materials
- White sculpting clay (air-dry or polymer, approx. 2-3 lbs)
- Rigid backing board or wooden plaque (oval or wing-shaped)
- Rolling pin
- Leaf-shaped clay cutters (multiple sizes)
- Needle tool or dental pick
- Modeling tools (specifically a vein tool or knife tool)
- texture sponge
- Wire armature or mesh (optional for structural support on larger pieces)
- Heavy-duty mounting adhesive
- Acrylic sealant (matte)
Step 1: Planning and Foundation
-
Sketch your template:
Begin by drawing the outline of your wing on a large piece of paper. Map out the ‘flow’ of the feathers, marking where the shorter covert feathers at the top transition into the long primary flight feathers at the bottom. -
Prepare the base:
If you are working on a backing board, ensure it is clean and slightly textured to grip the clay. If creating a standalone piece, roll out a thick slab of clay (about 1/2 inch) in the shape of your template to serve as the foundation. -
Establish the armature ridge:
Roll a snake of clay and adhere it along the top curve (the ‘arm’ bone of the wing). Blend this down onto your base to create a raised, rounded ridge that gives the wing its three-dimensional volume.
Cracking Feathers?
If thin feather tips crack while drying, patch them with a mix of clay and white glue (paste). Cover the repair with a damp cloth to dry slowly.
Step 2: Sculpting the Lower Feathers
-
Form the primary feathers:
Start at the very bottom tip of the wing. Roll out long, tapered teardrop shapes of clay for the primary flight feathers. These should be the longest feathers in your composition. -
Texture the quill:
Using a needle tool, draw a central shaft (rachis) down the middle of each long feather. Don’t make it perfectly straight; a slight curve adds realism. -
Add vane details:
With a fine knife tool, score closely spaced diagonal lines radiating from the shaft to the edge of the feather. Vary the pressure to create depth and shadow. -
Attach the first layer:
Attach these long feathers to the bottom of your clay base using slip or scoring. Overlap them slightly so the one ‘behind’ is partially covered by the one ‘in front’. -
Build the second tier:
Create slightly shorter, wider feathers for the secondary layer. Texture them using the same method, but consider roughening the edges slightly for a softer look. -
Layering up:
Place this second row so it overlaps the top third of the bottom row. I like to lift the tips of these feathers just a tiny bit before the clay dries to give the wing a sense of movement.
Antique Stone Look
After sealing, apply a diluted brown or grey wash over the feathers and wipe it back immediately. The dark paint will stay in the grooves.
Step 3: detailed Upper Coverts
-
Switch to smaller shapes:
As you move up the wing toward the curved ridge, transition to smaller, rounded leaf shapes. Use cutters if you have them, or hand-form small flattened ovals. -
Denser texturing:
For these smaller covert feathers, make the texture finer. Instead of long strokes, use short, quick flicks of your tool to simulate downy fluff. -
Create the shoulder:
At the very top rounded ‘shoulder’ of the wing, lay the smallest feathers in a tight, overlapping scale pattern. They should curve around the top ridge you built earlier. -
Refine the edges:
Go back over the edges of your feathers. If any look too sharp or manufactured, soften them with a damp brush or your finger. -
Add finishing details:
Use a small ball tool to indent the very tips of a few feathers or create tiny separations in the vanes to make the wing look well-preened but natural.
Step 4: Finishing Touches
-
Slow drying:
Allow the piece to dry very slowly away from direct heat to prevent the delicate feather tips from cracking or curling up too much. -
Sanding:
Once fully cured, use fine-grit sandpaper to gently smooth any rough burrs on the feather edges, being careful not to sand away your texture. -
Sealing:
Apply a matte acrylic sealer to protect the clay while maintaining that plaster-like, stone finish shown in the reference.
Mount your finished wing on a textured garden wall or above a doorway to add a serene, classical touch to your home decor