Whenever I’m stuck on what to make next, I come back to clay slab houses—they’re basically the perfect mix of simple shapes and endless personality. Here are my favorite clay slab house ideas to help you build a tiny world, whether you want classic cozy cottages or something delightfully weird.
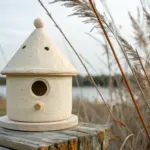
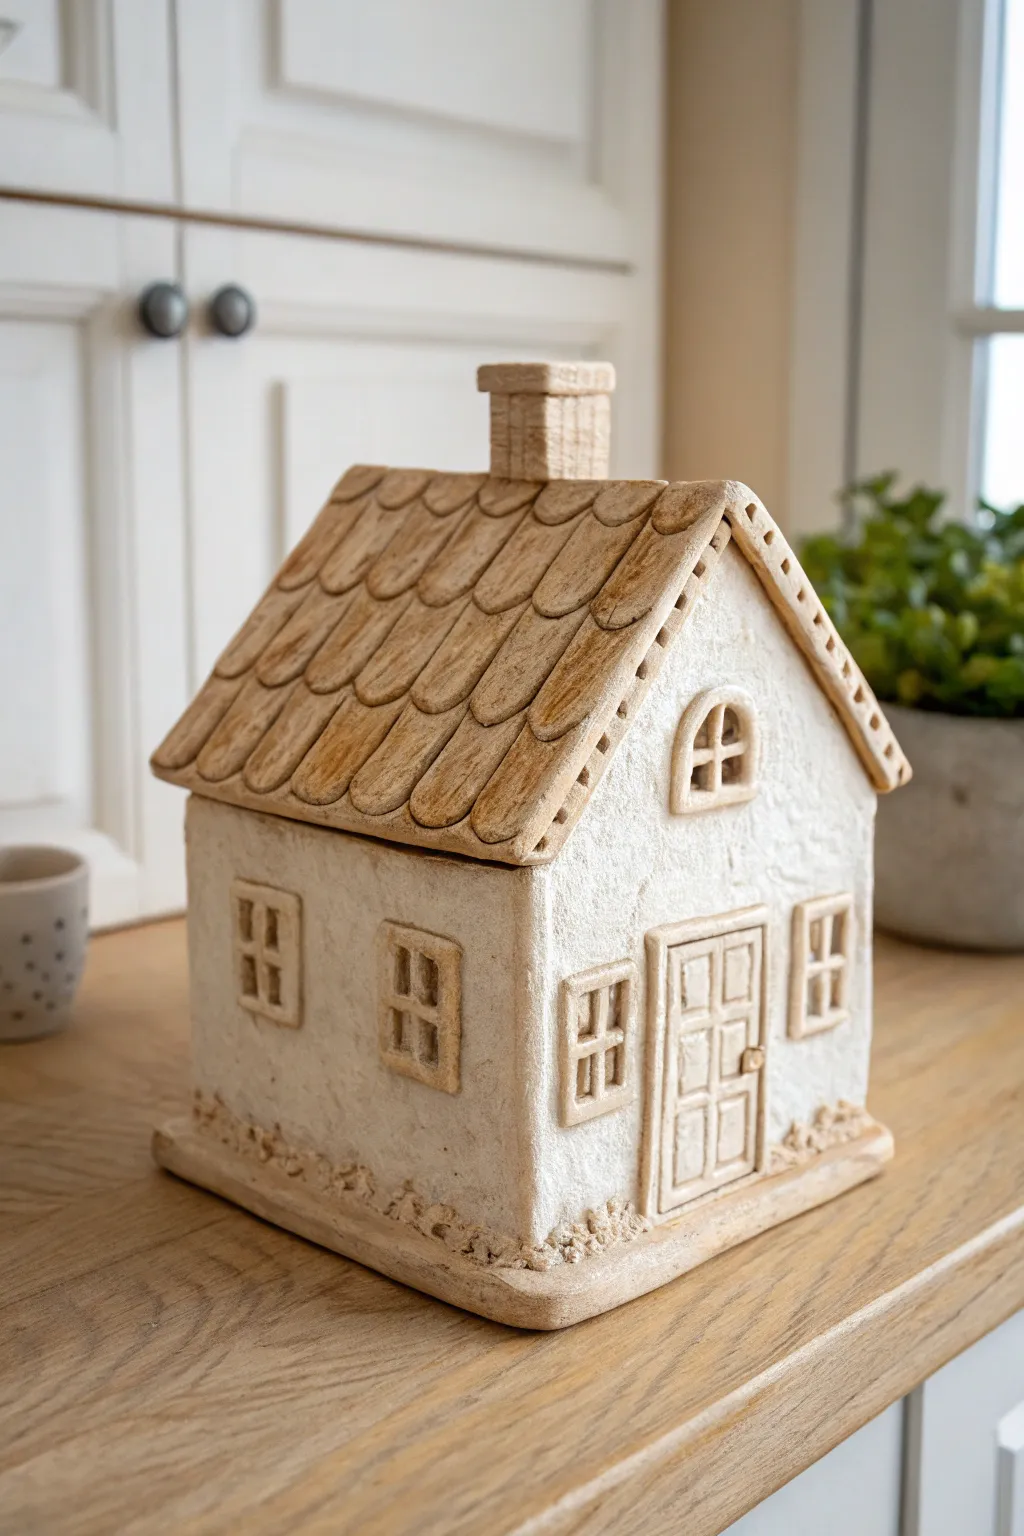
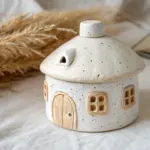
1. Classic Gable-Roof Slab House Luminary
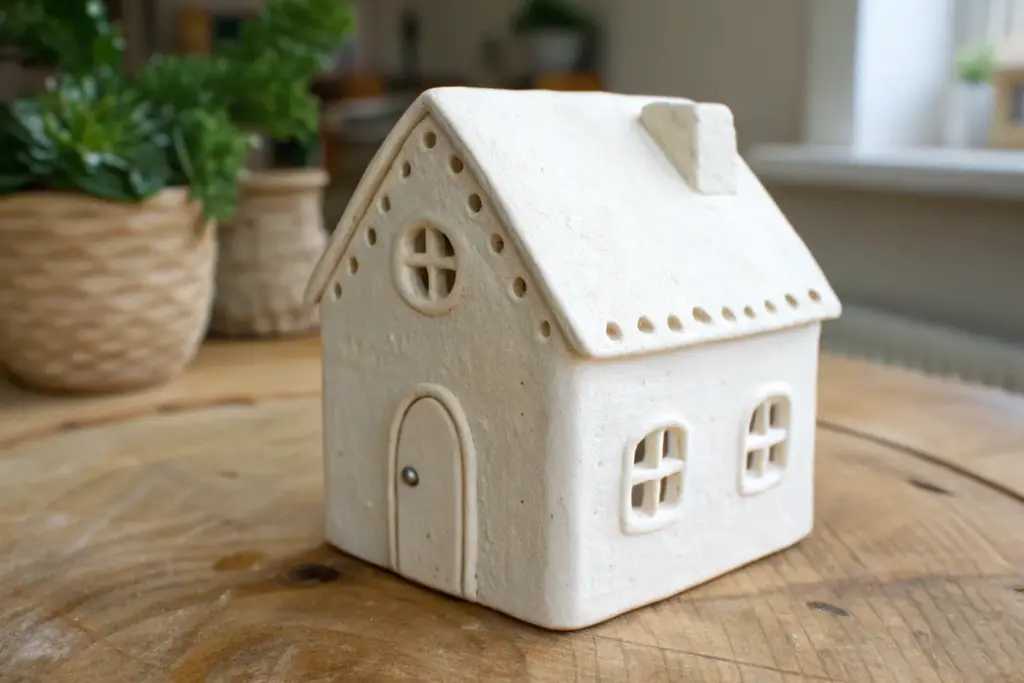
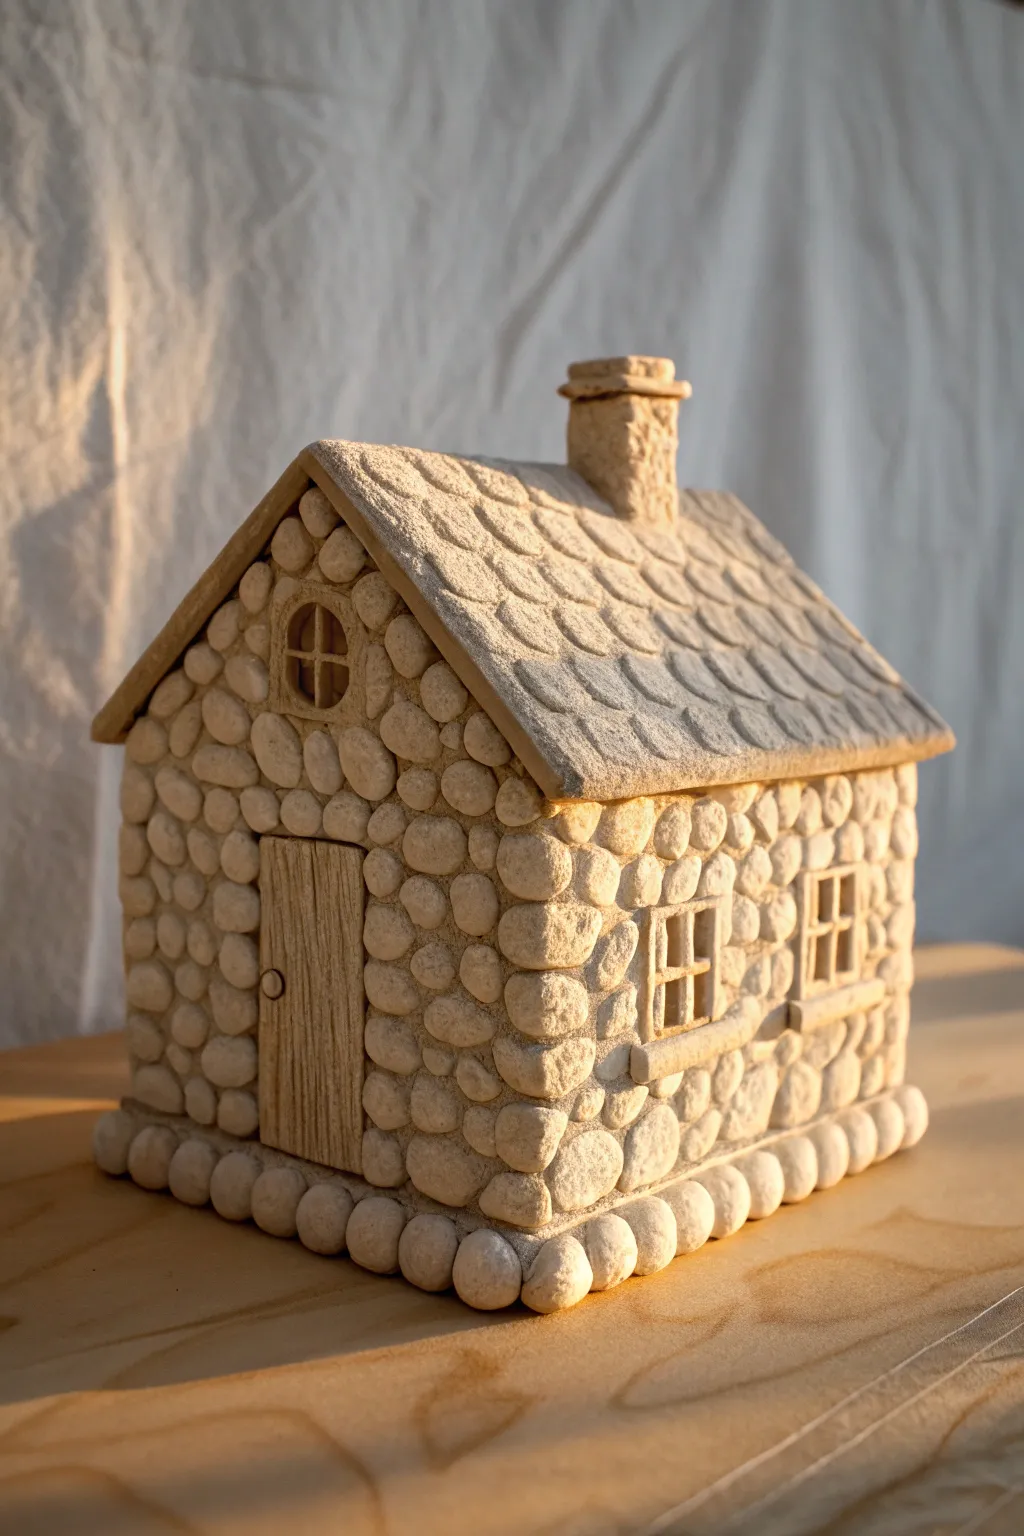
This charming ceramic house features a speckled clay body, a clean-lined gable roof, and warmly lit windows that create a cozy atmosphere. The design is simple yet effective, relying on crisp slab construction and strategic cutouts to let the candlelight shine through from within.
Step-by-Step Tutorial
Materials
- Speckled stoneware clay (mid-fire)
- Rolling pin with thickness guides (approx. 1/4 inch)
- Canvas or slab mat
- Fettling knife or craft knife
- Ruler or T-square
- Slip and scoring tool (serrated rib)
- Paper templates (Front/Back, Sides, Roof)
- Small square and round cookie cutters (optional)
- Modeling tool or wooden skewer
- Sponge and water
- Kiln and clear matte glaze (optional)
Step 1: Preparing the Slabs and Cutting
-
Roll out the clay:
Begin by wedging your speckled stoneware clay thoroughly to remove air bubbles. Roll it out into a large, even slab approximately 1/4 inch thick. I find using wooden guide strips on either side of the rolling pin helps ensure a perfectly uniform thickness. -
Smooth the surface:
Before cutting, take a rubber rib or a slightly damp sponge and compress the clay surface on both sides. This removes the canvas texture and aligns the clay particles to prevent warping later. -
Cut the walls:
Place your paper templates onto the slab. You will need two pentagon shapes for the front and back (the gable ends) and two rectangles for the side walls. Use a fettling knife and a ruler to cut clean, straight lines around the templates. -
Cut the roof pieces:
Cut two rectangular slabs for the roof. Make sure these are slightly wider and longer than the house footprint to allow for an overhang, which gives the house that classic cottage look. -
Leather hard stage:
Let all your cut pieces sit on a ware board until they reach a leather-hard state. They should be firm enough to stand up without bending but still soft enough to join. This is crucial for straight walls.
Step 2: Adding Details and Windows
-
Carve the windows:
While the slabs are flat, carefully cut out the window openings. For the side walls, create a grid of six rectangular windows. On the front gable, cut three small rectangular windows and one round window near the peak. -
Add window panes:
Instead of cutting out the entire window hole, you can cut the frames, or add tiny coils of clay back into the openings to create the muntins (the crossbars). Smooth these tiny connections carefully. -
Construct the door:
Roll a small, separate rectangle of clay for the door slab. Score and slip it onto the front wall. Use a modeling tool to press indented lines for panels and add a tiny ball of clay for the doorknob. -
Create texture:
If you want to emphasize the speckled look, wipe the surface gently with a damp sponge to expose the grog or speckles in the clay body slightly.
Clean Cuts Matter
When cutting windows, let the clay firm up slightly more than usual. Use a very thin, sharp blade (like an X-Acto) and cut straight down to keep corners crisp and prevent dragging.
Step 3: Assembly
-
Miter the edges:
For the cleanest corners, cut a 45-degree angle (miter) on the vertical edges of your wall pieces. This creates a stronger joint and a sharper corner than a simple butt joint. -
Join the walls:
Score the mitered edges aggressively and apply slip. Stand the walls up and press them together firmly. Reach inside to reinforce the seams with a small coil of clay, smoothing it out so it’s invisible. -
Attach the roof:
Once the four walls are secure, score the top angled edges of the gable walls. Place the roof slabs on top. I like to join the two roof pieces at the peak first, then lower them onto the house structure. -
Add the chimney:
Form a small rectangular chimney from leftover slab scraps. Cut the bottom at an angle to match the roof’s slope. Score, slip, and attach it to one side of the roof. -
Refine the surface:
Use a damp sponge to smooth all sharp outer edges and clean up any slip that squeezed out during joining. Poke a small, hidden hole in the back or bottom to allow air to escape during firing if you plan to seal the house completely (though leaving the bottom open for a candle is standard).
Textured Roof
Before assembly, press a piece of lace or a textured rolling pin lightly onto the roof slabs. This adds instant shingled detail that catches the glaze beautifully.
Step 4: Finishing
-
Dry slowly:
Cover the house loosely with plastic to let it dry slowly over several days. This prevents the seams from cracking as the clay shrinks. -
Bisque fire:
Once bone dry, fire the piece to bisque temperature (usually Cone 04). -
Glaze and final fire:
Apply a clear matte glaze or leave the raw clay bare if it is fully vitrified at high temperatures. Fire to the final temperature (e.g., Cone 5/6) for that durable, stone-like finish shown in the photo.
Place a tea light or LED candle inside your finished house to see the warm glow spill through the windows


2. Minimal Modern Box Slab House

This minimalist, unglazed ceramic house captures the charm of modern rustic decor with its warm, sandy texture and simple architectural lines. Perfect as a standalone sculpture or a votive holder, its clean design highlights the natural beauty of the clay itself.
Detailed Instructions
Materials
- Stoneware clay with fine grog (buff or sand color)
- Rolling pin
- Two 1/4-inch wooden guide strips
- Needle tool or fettling knife
- Ruler or set square
- Scoring tool (serrated rib or needle tool)
- Slip (clay and water slurry)
- Small circle cutter (approx. 1 inch)
- Smoothing sponge
- Plastic sheet or ware board
Step 1: Preparing the Slabs
-
Wedge the clay:
Start by thoroughly wedging your clay to remove air bubbles and ensure particle alignment. This foundational step is crucial for preventing cracks later. -
Roll out the slab:
Place your 1/4-inch guide strips on either side of the clay. Roll the clay out into a large, even sheet using the guides to maintain consistent thickness. -
Compress the clay:
Take a rib tool and firmly compress the slab on both sides. This aligns the clay platelets and adds strength, which is vital for standing structures. -
Cut the templates:
Using a ruler and needle tool, cut your walls. You need two rectangular side walls (e.g., 5″ x 6″) and two peaked end walls. For the peaked walls, ensure the rectangle base matches the height of your side walls before angling up for the roof. -
Create the roof pieces:
Cut two rectangular roof slabs. Make them slightly wider and longer than the house footprint to allow for an overhang.
Keep it Straight
Use a square block of wood or a rectangular object inside the house while joining walls to ensure perfect 90-degree corners before they dry.
Step 2: Assembling the Structure
-
Leather hard stage:
Let the cut slabs sit until they reach a ‘leather hard’ state. They should be firm enough to stand up without bending but still soft enough to join. I usually wait a few hours depending on humidity. -
Cut the windows:
Before assembly, cut your window openings while the slabs are flat. Use your ruler to measure and cut rectangular windows—four on the long sides and two on the peaked sides. Use the circle cutter for the attic window. -
Refine the circle window:
To create the cross-frame in the circular window, carefully cut out four pie-shaped wedges, leaving a thin cross of clay in the center intact. -
Bevel the edges:
Cut 45-degree angles (miters) on the vertical edges of your wall slabs. This creates a stronger, cleaner corner joint than a butt joint. -
Score and slip:
Scratch up the beveled edges aggressively and apply a generous amount of slip. Join the four walls together on a ware board, pressing the corners firmly. -
Reinforce corners:
Roll thin coils of soft clay and press them into the interior corners of the house. Smooth these coils completely so they blend into the walls.
Step 3: Roof and Details
-
Attach the roof:
Score and slip the top edges of your walls and the undersides of your roof panels. Place the roof slabs on top, ensuring they meet at the peak. -
Seal the roof peak:
Add a thin coil along the very top ridge where the roof slabs meet. Smooth it down to ensure a watertight seal and a clean visual line. -
Build the chimney:
Cut four small rectangle strips for the chimney. Assemble them into a box, then cut the bottom at an angle that matches the slope of your roof. -
Attach the chimney:
Score the roof spot and the chimney base, then attach. Add a tiny rim around the top of the chimney for extra detail. -
Final smoothing:
Use a slightly damp sponge to wipe down all sharp edges and corners. The texture should remain somewhat gritty, but sharp burrs should be removed. -
Drying and firing:
Loosely cover the house with plastic to let it dry remarkably slowly over several days to prevent warping. Once bone dry, bisque fire, and then fire to temperature without glaze for that matte, sandy finish.
Warped Walls?
If slabs begin to warp while drying flat, flip them over every 30 minutes. Dry them between two pieces of drywall (sheetrock) to keep them perfectly flat.
Place an LED tea light inside to see the warm glow spill through the windows

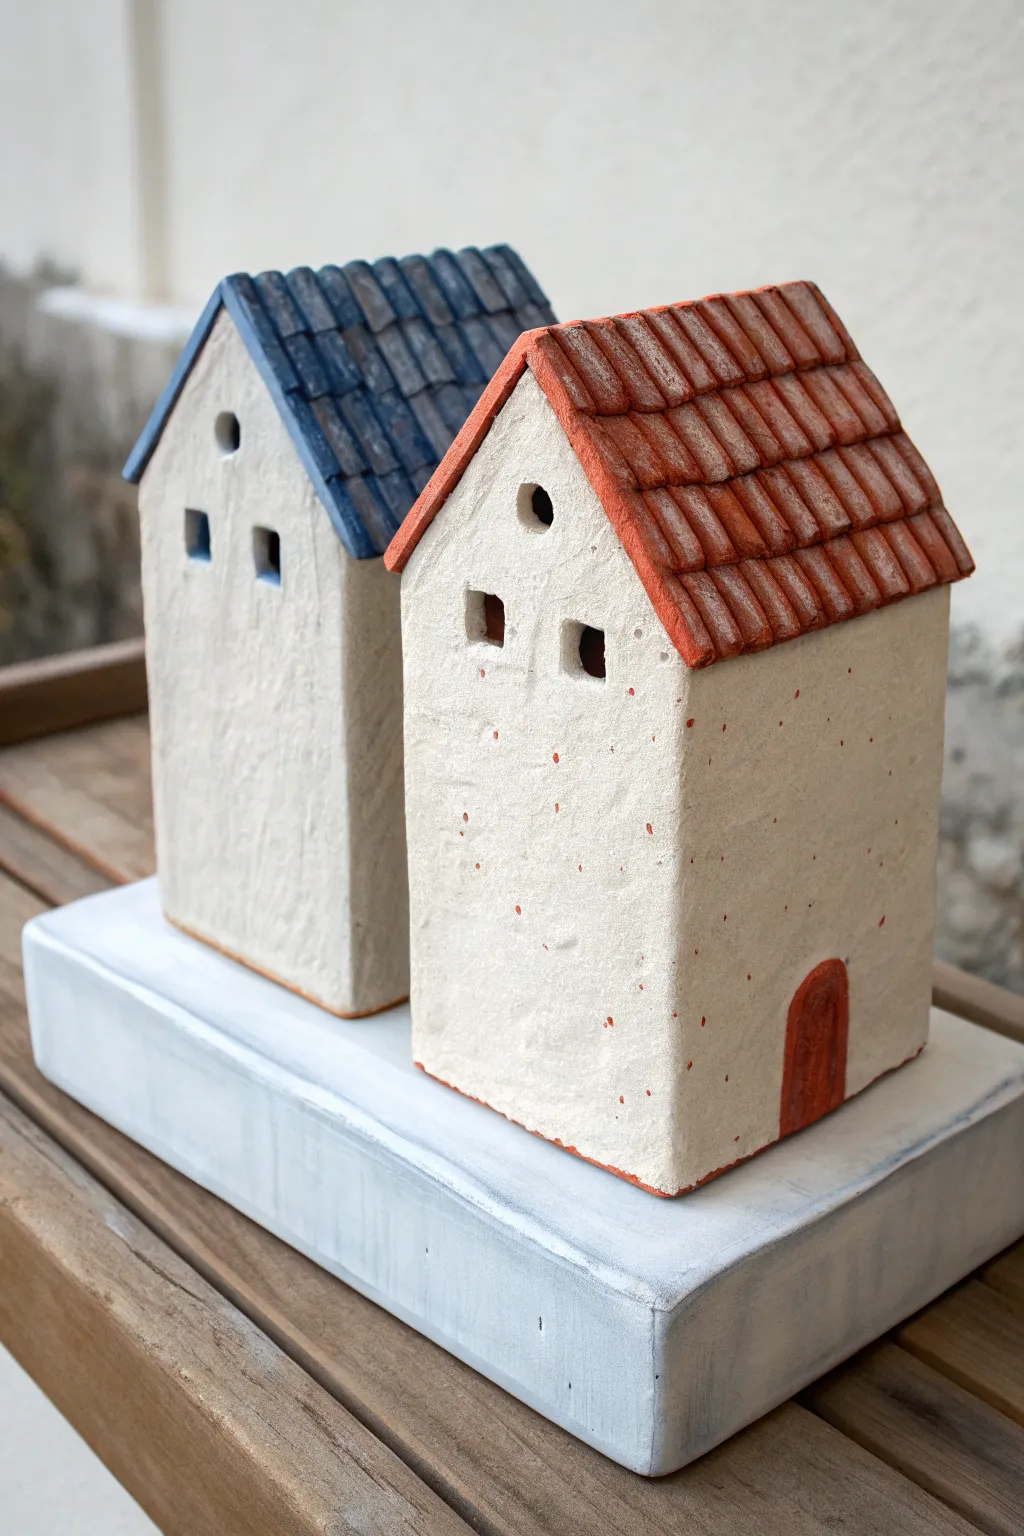
3. Mix-and-Match Slab House Village Set

Create a charming miniature village with these geometrically simple, slab-built houses featuring textured finishes and contrasting roofs. This project allows for endless variation by mixing different clay bodies or surface treatments to achieve a cohesive yet eclectic set.
Step-by-Step Guide
Materials
- Stoneware clay (smooth or speckled)
- Terra cotta clay (optional, for contrast)
- Rolling pin
- Guide sticks (approx. 1/4 inch thick)
- Fettling knife or X-Acto blade
- Paper templates (rectangles and pentagons)
- Slip and scoring tool (or serrated rib)
- Small square clay cutter or straw (for windows)
- Underglaze (white, brown, or oxide wash)
- Sponge
- Ruler
Step 1: Preparing the Slabs
-
Create templates:
Begin by sketching simple house profiles on cardstock. You will need a pentagon shape for the front and back walls, and rectangles for the side walls and roof panels. Vary the heights and widths to create the ‘mix-and-match’ look seen in the photo. -
Roll the clay:
Roll out your clay slab between two guide sticks to ensure an even thickness of about 1/4 inch. I prefer rolling in multiple directions to compress the clay platelets, which helps prevent warping later. -
Texture the surface:
Before cutting, gently press a texture onto the slab if you want a rougher look. You can use a piece of canvas, sandpaper, or a finishing sponge to dab the surface for a stone-like effect. -
Cut the shapes:
Place your paper templates onto the leather-hard clay slab. Using a fettling knife or sharp blade, cut out two pentagons (front/back), two side rectangles, and two roof rectangles for each house. -
Dry slightly:
Let the cut pieces sit until they are leather-hard—firm enough to hold their shape upright without slumping, but soft enough to join.
Warping Walls?
If walls bow inward while drying, place a crumpled ball of newspaper inside the house during assembly to support the structure until it stiffens.
Step 2: Assembly and Details
-
Cut windows:
While the walls are lying flat, use a small square cutter or a knife to carefully remove clay for the windows. For the arched window seen on the speckled house, use a small round cutter for the top and cut the bottom flat. -
Miter the edges:
For cleaner seams, bevel the edges of your walls at a 45-degree angle where they will meet. This isn’t strictly necessary for a rustic look, but it adds stability. -
Score and slip:
Rough up the edges you plan to join using a scoring tool or serrated rib. Apply a generous amount of clay slip (liquid clay) to the scored areas. -
Construct the walls:
Stand up the four walls and press the seams together firmly. Use a small coil of soft clay on the inside corners to reinforce the joints, smoothing it down with your finger or a tool. -
Attach the roof:
Score and slip the top edges of the house walls and the underside of your roof panels. Press the roof slabs gently onto the structure. You can leave a slight overhang as shown in the white house, or align them flush like the textured stone house. -
Refine the surface:
Once assembled, wipe away any excess slip that squeezed out of the seams with a damp sponge. Gently tap the house on the table to level the bottom.
Level Up: Illumination
Cut a large hole in the base or leave the bottom entirely open. This allows you to place an LED tea light inside for a cozy, glowing village display.
Step 3: Finishing Touches
-
Add roof texture:
If you want the scratched roof look seen on the terra cotta accents, use a needle tool to lightly drag vertical lines down the roof panels while the clay is still leather hard. -
Bisque fire:
Allow the houses to dry slowly under plastic to prevent cracking. Once bone dry, bisque fire them in a kiln according to your clay body’s specifications (usually cone 04 or 06). -
Apply finish wash:
To recreate the weathered look, apply an iron oxide wash or a diluted brown underglaze. Brush it over the textured surfaces and wipe most of it back with a wet sponge, leaving color only in the crevices and textures. -
Dry glaze effect:
For the white houses, apply a matte white glaze or white slip that allows the clay texture to show through. Avoid thick gloss glazes if you want to maintain the rustic, stony appearance. -
Final firing:
Fire the pieces a second time to the maturation temperature of your clay and glaze (e.g., cone 5/6 for stoneware).
Arranged together on a wooden shelf or mantel, these little structures create a cozy, handmade atmosphere.


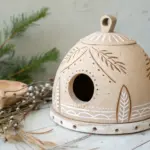
5. Cottage Slab House With Porch Roof
This delightful ceramic project combines the functionality of a lidded jar with the whimsical aesthetic of a country cottage. Using basic slab-building techniques, you’ll create textured walls, scalloped roof tiles, and charming architectural details that give this house a cozy, lived-in feel.
Step-by-Step Guide
Materials
- White stoneware or earthenware clay
- Rolling pin and guide sticks (approx. 1/4 inch thickness)
- Fettling knife or X-Acto knife
- Serrated rib and scoring tool
- Slip (clay and water slurry)
- Rectangle paper templates (for walls and roof panels)
- Small round cutter (for roof tiles) or a sculpting tool
- Wooden modeling tools
- Brown iron oxide wash or underglaze
- Clear matte glaze (optional)
- Sponge
Step 1: Constructing the Base Structure
-
Roll the slabs:
Begin by wedging your clay thoroughly to remove air bubbles. Roll out a large slab using 1/4 inch guide sticks to ensure even thickness. Smooth the surface with a rib to compress the clay particles. -
Cut the walls:
Using your paper templates, cut out two rectangular side walls and two peaked end walls (like a pentagon shape). I recommend letting these stiffen to a ‘soft leather hard’ stage so they stand up easier. -
Assemble the box:
Score the vertical edges of your wall pieces and apply slip. Stand the walls up on a slightly larger square slab base, pressing the scored seams firmly together. Reinforce the inside corners with small coils of clay, blending them smooth. -
Trim the base:
Once the walls are secure, trim the excess clay from the bottom slab, leaving a small lip of about 1/4 inch extending beyond the walls to create the foundation look shown in the photo.
Step 2: Adding Architectural Details
-
Create the windows:
Cut small rectangles from spare slab clay for the window frames. Attach them to the walls with slip and score. Use a knife to carefully cut out the inner panes, or simply indent the clay if you want a solid wall behind them. -
Fabricate the door:
Cut a larger rectangle for the door frame and a slightly smaller inner rectangle for the door itself. Score detailed vertical and horizontal lines to mimic wood paneling, and add a tiny ball of clay for the doorknob. -
Texture the walls:
To achieve that stucco look, gently pat the exterior walls with a coarse sponge or a crumpled ball of aluminum foil. Avoid the window and door frames to keep them distinct. -
Add the foundation rubble:
Take small scraps of clay, crumble them into irregular pebbles, and attach them along the bottom trim of the house using slip. This grounds the structure and adds great visual weight.
Secret Lid Fit
To ensure a perfect fit, build the roof directly on top of the walls with a sheet of newspaper in between. This prevents sticking while ensuring the angles match perfectly.
Step 3: Building the Removable Roof Lid
-
Form the roof base:
Cut two rectangular slabs that act as the roof panels. Instead of attaching them permanently to the house, you will join them together at the peak to form a V-shape lid that sits strictly on top of the walls. -
Add the flange system:
Flip the V-shape roof over. Attach small strips of clay on the underside that fit *inside* the house walls. This ‘flange’ prevents the lid from sliding off. -
Create the chimney:
Construct a small hollow square tube for the chimney. Cut the bottom at an angle so it sits flush against the slope of the roof, then score and attach. Add a decorative rim at the top. -
Decorate with tiles:
For the shingles, roll a thin coil or strip of clay. Press it flat and use a tool to imprint scalloped U-shapes, or layer individual small clay tongues. Overlap them slightly starting from the bottom edge and working up to the peak. -
Refine the eaves:
Use a needle tool to add small holes or decorative indents along the under-edge of the roof overhang for a timber-frame detail.
Warping Walls?
If your straight walls start bowing inward during construction, place a crumpled ball of newspaper inside the house to support the structure until the clay stiffens.
Step 4: Finishing and Firing
-
Bisque fire:
Allow the piece to dry slowly under plastic to prevent warping, then bisque fire it according to your clay body’s specifications. -
Apply the antique wash:
Mix brown iron oxide or a dark brown underglaze with water. Brush this wash over the entire piece, getting it deep into the textures of the roof and stucco walls. -
Wipe back:
Using a clean, damp sponge, wipe away the majority of the oxide from the high points. You want the dark color to remain only in the crevices, defining the shingles and wall texture. -
Final glaze firing:
You can leave the clay raw for a matte finish or apply a very thin clear matte glaze. Fire to the final temperature required by your clay.
Place your finished cottage on a shelf or use it as a delightful cookie jar to bring warmth to your kitchen

The Complete Guide to Pottery Troubleshooting
Uncover the most common ceramic mistakes—from cracking clay to failed glazes—and learn how to fix them fast.
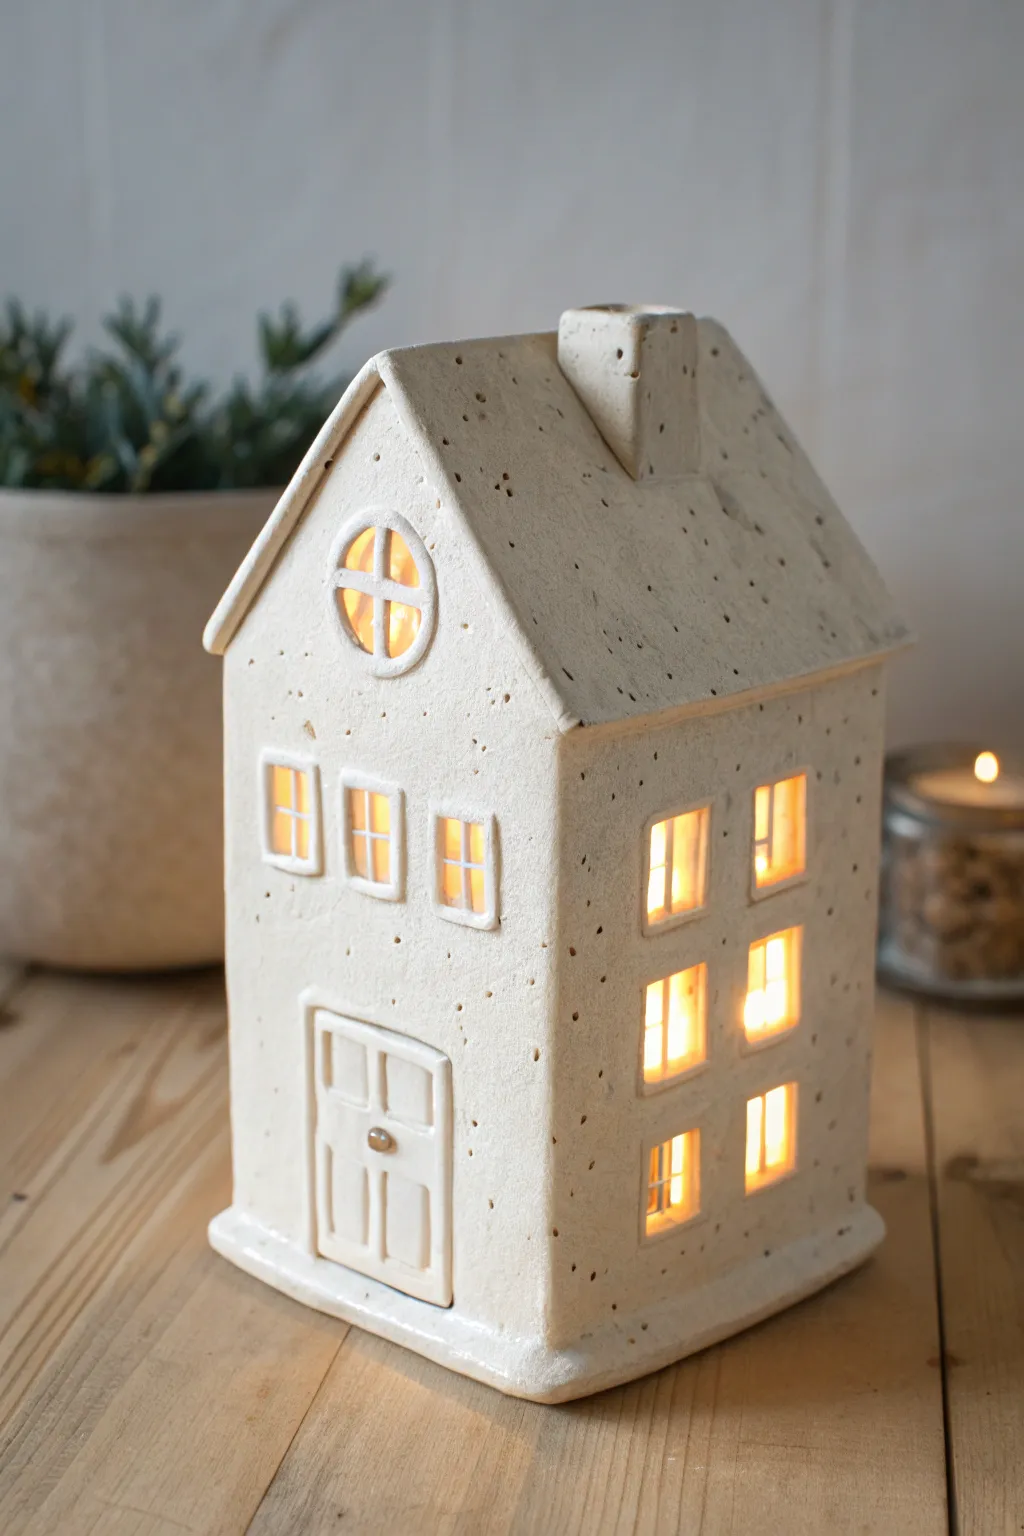
6. Two-Story Stacked Slab House
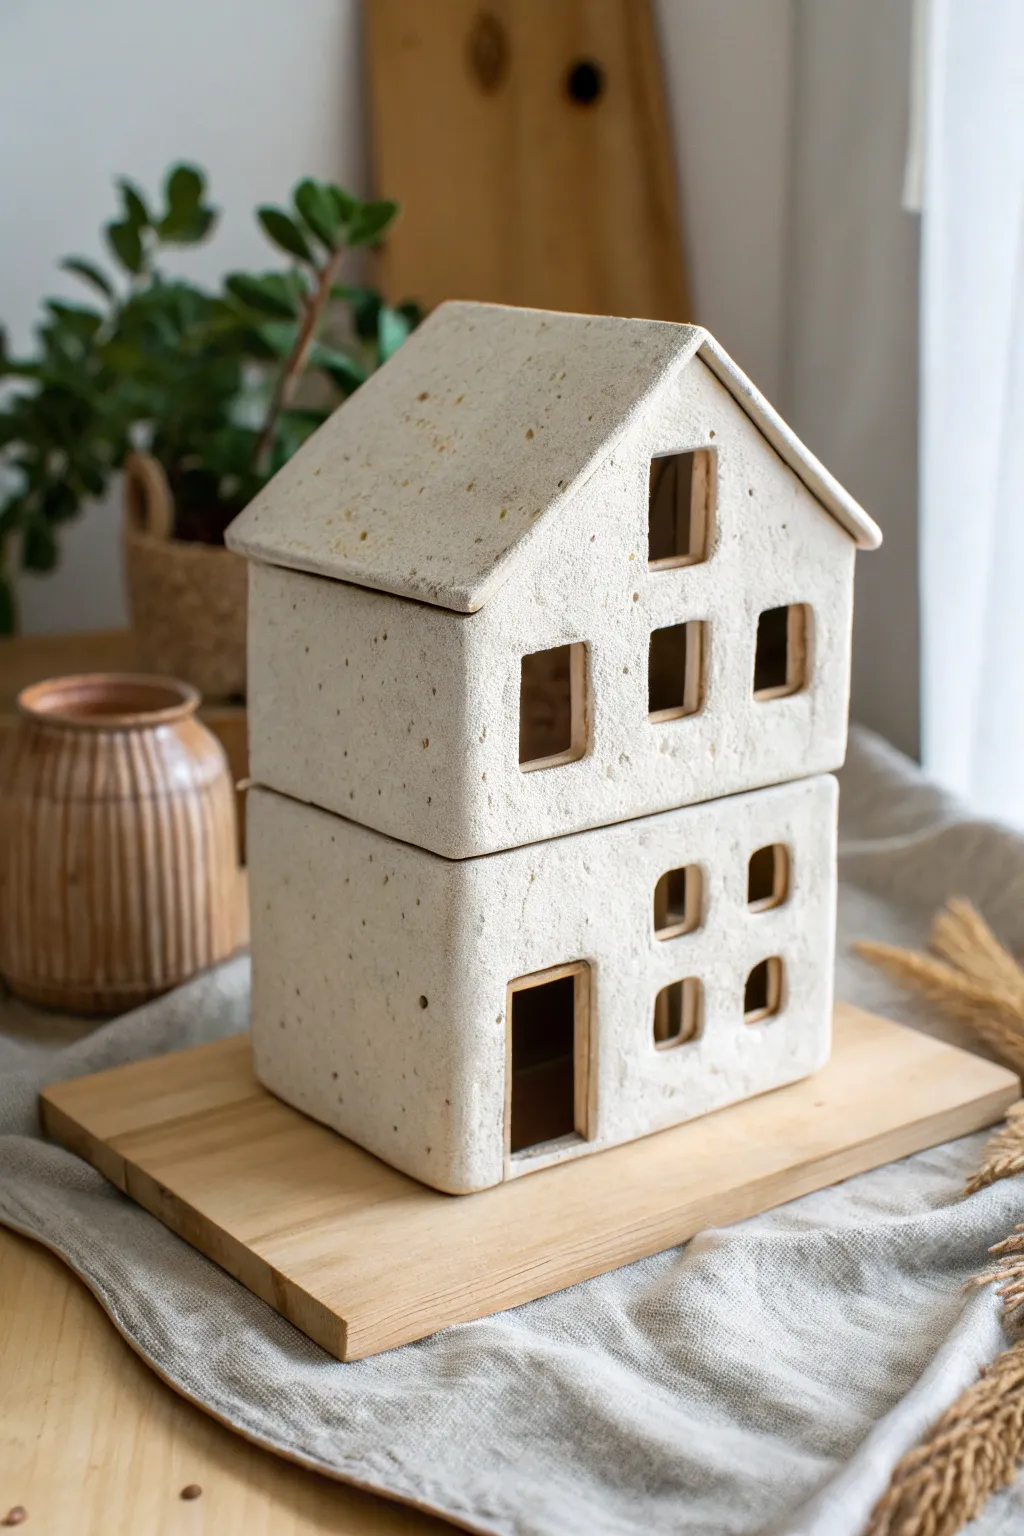
This charming architectural project features a modular two-story house constructed from textured ceramic slabs. The natural speckled clay body gives it a rustic, stone-like appearance, while the stacking mechanism adds a playful, interactive element to your pottery collection.
Step-by-Step Tutorial
Materials
- Speckled stoneware clay (mid-fire)
- Canva or heavy fabric (for rolling)
- Rolling pin with ½ inch guide sticking
- Fettling knife
- Needle tool
- Square template or ruler
- Slip and scoring tool (serrated rib)
- Wooden paddle
- Sponge
- Matte transparent glaze (optional)
Step 1: Preparing the Slabs
-
Roll the Clay:
Begin by wedging your speckled clay to remove air bubbles. Roll it out on your canvas to a uniform thickness of about ½ inch (6-8mm). Uniformity is crucial for a stacking structure, so use guide sticks if you have them. -
Add Texture:
Before cutting, you can enhance the stone-like feel. Gently roll a rough fabric or a textured roller over the surface. Alternatively, the natural grog in the clay might be enough texture for this rustic look. -
Cut the Components:
Using a ruler or paper templates, cut out your walls. You will need four rectangular walls for the bottom cube and four walls for the top section (two rectangular sides, two pentagonal peaked gables). Don’t forget the two roof panels. -
Leather Hard Stage:
Allow your cut slabs to stiffen up to a soft leather-hard stage. They should hold their shape when lifted but still be flexible enough to join without cracking.
Step 2: Constructing the Base
-
Miter the Edges:
For clean corners, I prefer to bevel the vertical edges of the walls at a 45-degree angle. This creates a stronger seamless joint than a butt joint. -
Score and Slip:
Rough up the edges you plan to join using a serrated rib or needle tool. Apply a generous amount of slip (clay slurry) to these scored areas. -
Assemble the Cube:
Join the four walls of the bottom story together. Press the seams firmly from both the inside and outside. Use a small coil of soft clay on the interior seams to reinforce the bond. -
Add a Floor:
While not strictly necessary, adding a floor slab to the bottom piece adds stability. Cut a square slightly larger than your box, score and slip, and attach the walls on top of it. Trim the excess flush. -
Cut the Openings:
Once the box is sturdy, use a sharp fettling knife to cut out the door. Leave the door opening empty. -
Carve Windows:
Cut out the small square or arched windows on the adjacent side. Smooth the rough edges of the cuts with a damp finger or a small sponge.
Clean Cuts
When cutting windows, let the clay firm up slightly past leather hard. The knife will drag less, giving you crisp, architectural lines without warping the walls.
Step 3: Creating the Top Story
-
Build the Upper Walls:
Repeat the assembly process for the top section using your two rectangular sides and two peaked gable ends. Ensure the width matches the bottom box exactly so they stack neatly. -
Attach the Roof:
Score and slip the angled tops of the gable walls. Attach your two roof panels, allowing a slight overhang at the eaves if desired. Smooth the peak where the roof panels meet. -
Upper Windows:
Cut windows into the top story. In this design, notice how the windows align or offset from the bottom ones for visual interest. Clean up the edges carefully. -
The Flange (Crucial Step):
To ensure the top stacks securely without sliding, add a small flange or inner rim to the bottom of the top house section (or the top of the bottom section). This hidden lip keeps the pieces locked in place.
Level Up: Illumination
Cut a large hole in the floor of the bottom section and the floor of the top section. This allows you to place an LED tealight inside that illuminates both stories at once.
Step 4: Refining and Firing
-
Paddle into Shape:
Gently paddle the exterior walls with a wooden paddle. This squares up the form and compresses the joints, making the house structural and sharp. -
Texture Touch-up:
If you smoothed over too much texture during handling, lightly re-texture the surface with a stiff brush or tool to match the speckled aesthetic. -
Slow Dry:
Loosely cover the pieces with plastic to dry slowly. This prevents warping, which is vital for pieces that need to stack flush. -
Bisque Fire:
Once bone dry, fire the pieces in a bisque kiln according to your clay body’s specifications (usually Cone 06/04). -
Glazing:
Apply a very thin coat of matte transparent glaze just to seal the clay, or leave the exterior raw to highlight the natural speckles. If glazing, wipe the contact points (where the houses touch) clean. -
Final Fire:
Glaze fire the pieces separately. Do not stack them in the kiln for the final firing or they will fuse together.
Stack your finished pieces and enjoy the warm, architectural vibe they bring to your shelf
7. Tall Tower Slab House With Turret Roof
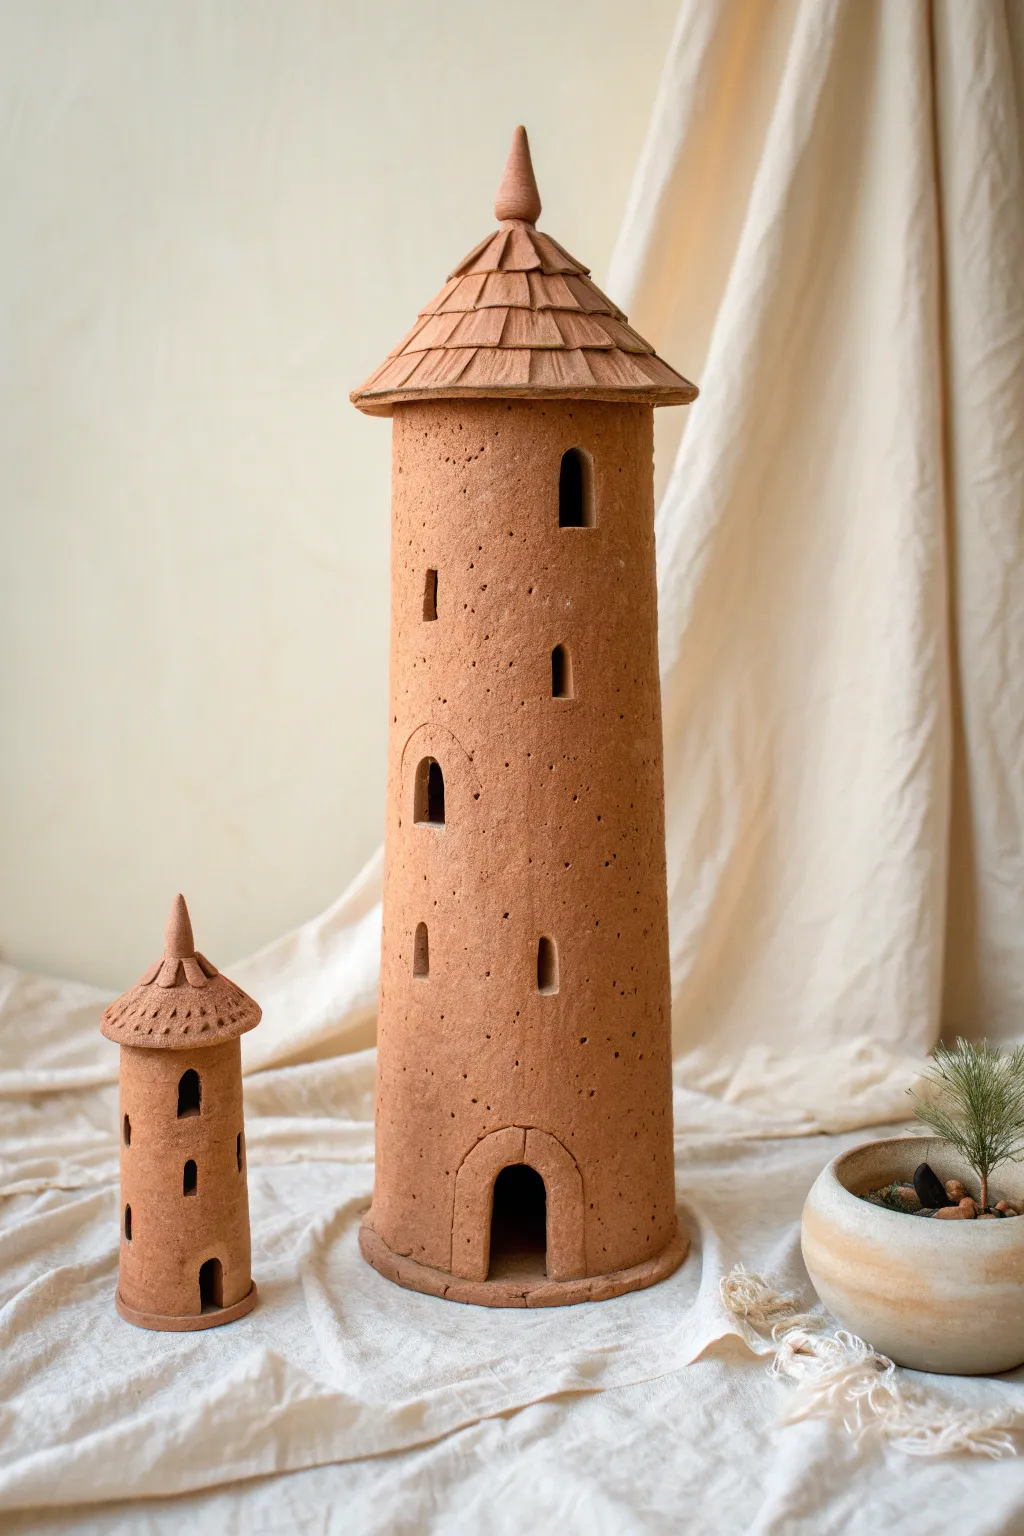
Elevate your slab building skills with these charming, rustic towers that look straight out of a fairy tale. The project features a tall cylindrical body with scattered arched windows and distinctive shingled roofs, all crafted from warm, textured stoneware clay.
Step-by-Step Guide
Materials
- Light brown stoneware clay (groggy/sandy texture recommended)
- Rolling pin and guide strips (approx. 1/4 inch)
- Ruler and needle tool
- Cardboard mailing tube or PVC pipe (for a form)
- Newspaper or craft paper
- Scoring tool (serrated rib or needle)
- Slip (clay mixed with water)
- Fettling knife
- Small loop tool or hole cutter
- Wooden modeling tool
- Sponge
Step 1: Forming the Tower Body
-
Prepare the Clay Slab:
Begin by wedging your clay to remove air bubbles. Roll it out into a large, consistent rectangular slab about 1/4 inch thick. I like to use wooden guide strips on either side of my rolling pin to ensure the thickness is perfectly even. -
Measure and Cut:
Determine the desired height of your tower (the example is quite tall, perhaps 12-14 inches). Measure the circumference of your tube form and add an inch for the overlap. Trim your slab into a clean rectangle using a ruler and fettling knife. -
Prepare the Form:
Wrap your cardboard tube or PVC pipe in a layer of newspaper. This step is crucial because it prevents the clay from sticking to the form and allows you to slide the tube out easily later. -
Wrap the Cylinder:
Carefully lift your clay slab and wrap it around the paper-covered form. Bring the long edges together to meet. -
Join the Seam:
Score both overlapping edges aggressively and apply a generous amount of slip. Press the edges together firmly. Use a wooden tool to blend the clay across the seam on the outside until the join is invisible. -
Create the Base:
Roll a small coil of clay. Place the cylinder (still on the form) upright. Wrap the coil around the bottom edge where it meets the table and blend it upwards into the wall to create a slightly flared, grounded base.
Clean Cuts Pro-Tip
When cutting windows, let the clay stiffen to leather-hard first. Wet, soft clay tends to warp or drag when you cut small details, but firmer clay yields crisp, architectural lines.
Step 2: Modeling Features
-
Carve the Doorway:
Decide on the placement of your main entrance. Use a needle tool to sketch a tall arch shape at the base. Once satisfied, cut through the clay and remove the piece. Smooth the cut edges with a damp finger. -
Add Door Detail:
Roll a very thin coil of clay and attach it around the arch of the doorway to create a protruding stone frame. Gently press it onto the body, blending just the back edge so the front creates a defined rim. -
Cut the Windows:
Using a small knife or a specialized clay window cutter, carve out small, scattered arched windows up the length of the tower. Varing their placement prevents the tower from looking too rigid. -
Refine Edges:
Use a damp sponge or a soft brush to smooth the raw edges of every window and the door frame. Sharp clay edges can become very sharp after firing. -
Remove the Form:
Once the clay is leather hard—stiff enough to support its own weight but not bone dry—carefully slide the internal tube form out. Peel away the newspaper.
Illumination Upgrade
Before firing, cut a hole in the bottom or back of the tower base. This allows you to insert an LED tealight or fairy lights later, turning your sculpture into a warm, glowing luminary.
Step 3: Constructing the Roof
-
Create the Cone Base:
Roll a fresh slab of clay. Cut a circle (slightly wider than your tower’s diameter) and remove a wedge shaped slice (like a slice of pie). Pull the cut edges together to form a shallow cone. -
Fit the Roof:
Place the cone on top of your tower to check the fit. It should overhang slightly. Score and slip the contact points, then permanently attach the roof to the cylinder body. -
Make Shingles:
Roll a thin strip of clay and cut it into many small trapezoids or rectangles. These will be your shingles. -
Apply Shingles:
Starting at the bottom edge of the roof overhang, slip and score rows of shingles, working your way upward. Overlap each row slightly over the one below it. -
Top the Spire:
When you reach the peak, the shingles might get messy. Hide the join by creating a small finial or pointed cap from a coil of clay and attaching it securely to the very top.
Allow your tower to dry slowly under loose plastic to prevent warping before bisque firing and enjoying your architectural creation


What Really Happens Inside the Kiln
Learn how time and temperature work together inside the kiln to transform clay into durable ceramic.
8. Whimsical Crooked Slab House
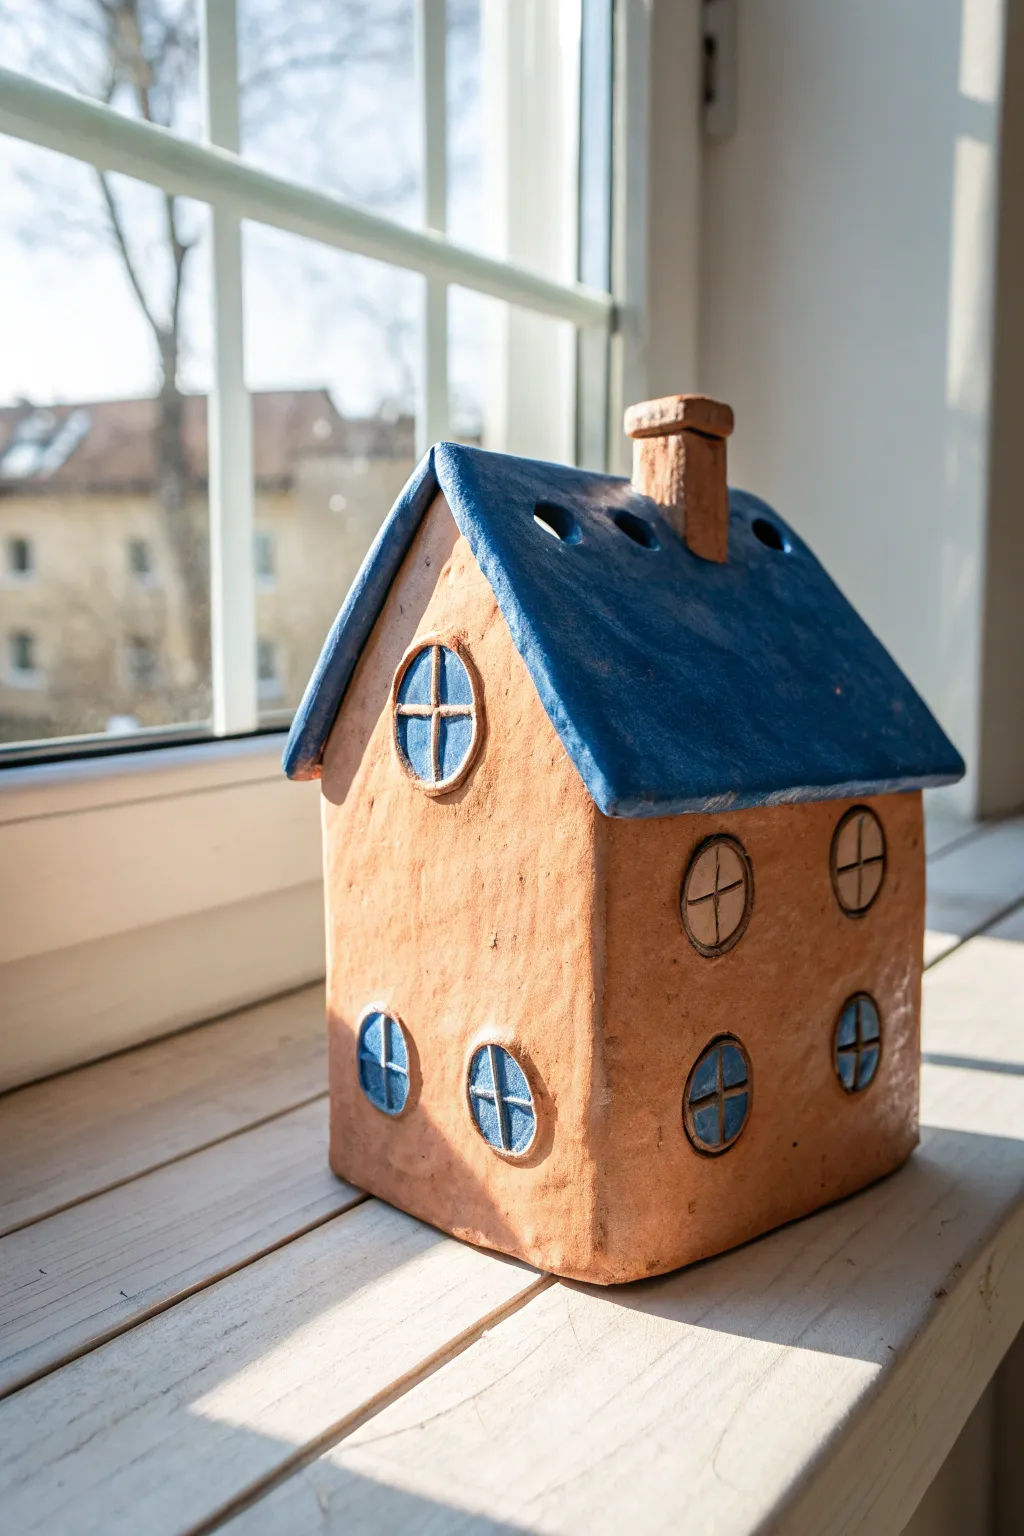
This charming, rustic house combines warm terracotta tones with a striking denim-blue roof for a cozy effect. Its slightly uneven walls and hand-carved circular windows give it a delightful, whimsical character perfect for a windowsill display.
Step-by-Step Tutorial
Materials
- Earthenware clay (terracotta or groggy plain)
- Rolling pin
- Two guide slats (approx. 1/4 inch thick)
- Fettling knife or craft knife
- Needle tool
- Circular clay cutters (small and medium)
- Underglaze (Dark Blue, White)
- Clear glaze (optional)
- Scoring tool or serrated rib
- Slip
- Sponge
Step 1: Preparing the Slabs
-
Roll the clay:
Begin by wedging your clay to remove air bubbles. Place it between your guide slats and roll out a smooth, even slab about 1/4 inch thick. -
Let it firm up:
I usually let the slab sit until it reaches a ‘soft leather-hard’ state. This makes it sturdy enough to stand up but flexible enough to join without cracking. -
Cut the walls:
Using a paper template or ruler, cut out your four walls. You’ll need two rectangular side panels and two gable-end panels (pointed at the top like a triangle). -
Cut the roof pieces:
Cut two rectangular slabs for the roof. Ensure they are wide enough to create an overhang on the sides and long enough to meet at the peak.
Slumping Roof?
If the roof sags in the middle, prop it up from the inside with a wad of newspaper. The paper will support the clay while it dries and safely burn away in the kiln.
Step 2: Assembling the Base
-
Score and slip:
Score the vertical edges of your wall pieces thoroughly. Apply a generous amount of slip to these roughened areas. -
Join the walls:
Press the walls together to form the house body. Reinforce the inside corners by running your finger or a small coil of clay up the seams to seal them tight. -
Smooth the outside:
On the exterior, smooth over the seams so the connections disappear. A rubber rib works well here to compress the clay and remove fingerprints.
Step 3: Roof and Details
-
Bevel the roof:
For a cleaner peak, bevel the top edge of your roof slabs at a 45-degree angle where they will meet. This creates a stronger joint. -
Attach the roof:
Score and slip the top ridges of the walls and the contact points on the roof slabs. Place the roof pieces on, pressing gently to seal the peak and the wall connection. -
Create the chimney:
Form a small rectangular tube from leftover clay. Cut the bottom at an angle that matches the slope of your roof. Attach it near the peak using the score-and-slip method. -
Add a chimney cap:
Add a tiny, slightly larger rectangle of clay to the top of the chimney stack to mimic a masonry cap. -
Ventilation holes:
Use a medium-sized circular cutter or hole punch tool to create three or four vent holes along the roof ridge. This is crucial if you plan to put a candle inside.
Light Level Up
Make the house functional! Cut the bottom floor out entirely before firing so it can be placed over a battery-operated tea light to glow warmly at night.
Step 4: Carving Windows
-
Mark window placement:
Lightly sketch circles specifically where windows should go. Aim for a larger one in the gable peak and symmetrical rows on the sides. -
Carve the frames:
Press a circular cutter gently into the clay to define the window rim. Instead of cutting all the way through, you can adhere a thin ‘snake’ of clay in a circle to create a raised frame. -
Add crossbars:
Roll very thin coils of clay. Cut them to size and press them into the window circles in a ‘plus’ sign shape to create windowpanes. -
Refine the texture:
Take a damp sponge and gently wipe the entire piece to soften sharp edges, giving the house that weathered, rustic look seen in the photo.
Step 5: Glazing and Firing
-
Bisque fire:
Allow the house to dry slowly under plastic to prevent warping. Once bone dry, fire the piece to bisque temperature. -
Apply roof color:
Brush three even coats of dark blue underglaze onto the roof. Be careful to stop neatly at the eaves. -
Detail the windows:
Carefully paint the inside ‘glass’ areas of the windows with the same blue, leaving the raised frames and crossbars unpainted to show the raw clay. -
Final fire:
Fire the piece to the maturity temperature of your clay body. You can leave the orange clay unglazed for a matte finish or apply a clear matte glaze for protection.
Place your finished cottage on a sunny shelf and enjoy the rustic charm it adds to your room
9. Half-Timber Style Clay Slab House
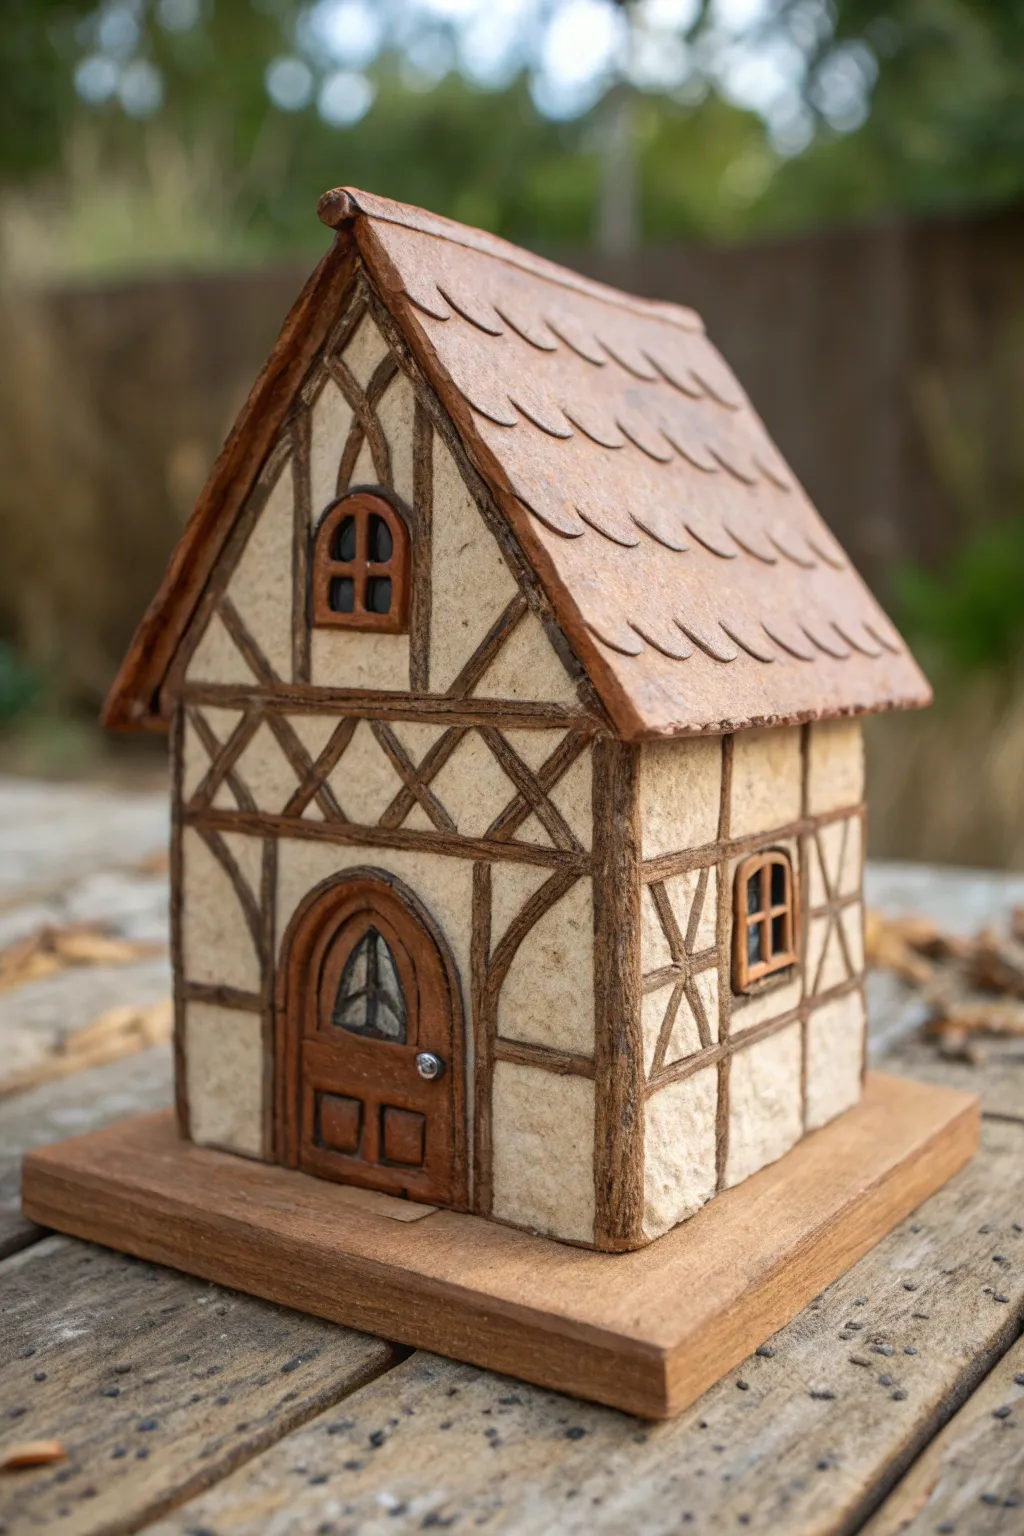
Transport your shelf to a storybook village with this charming half-timbered structure built entirely from clay slabs. It features realistic wood-beam detailing, textured plaster walls, and a scalloped shingle roof that looks aged to perfection.
Step-by-Step Guide
Materials
- Polymer clay or air-dry clay (terra cotta and white/cream colors)
- Clay slab roller or rolling pin
- Precision craft knife (X-Acto)
- Texture tools (toothbrush, needle tool)
- Liquid clay or clay slip (for joining)
- Acrylic paints (browns, black, ochre)
- Small square wooden base
- Ruler and paper for templates
- Small round or silver bead (for doorknob)
- Matte varnish
Step 1: Preparing the Structure
-
Design and templates:
Begin by sketching a simple house shape on paper: two rectangular side walls, and two peaked walls for the front and back. The pitch of the roof should be relatively steep to mimic Tudor architecture. Cut these shapes out to use as cutting guides. -
Rolling the base slabs:
Roll out a slab of cream-colored clay to an even thickness of about 1/4 inch. This will mimic the ‘wattle and daub’ plaster look. Place your paper templates on the clay and cut out the four main wall sections. -
Texturing the plaster:
Before assembling, create a stucco texture on these cream slabs. Gently tap the surface with a clean toothbrush or a crumpled ball of aluminum foil. This subtle roughness is key to avoiding a plastic look. -
Rolling the timber beams:
Roll out a thinner slab of brown clay (or terra cotta that you plan to paint darker). Cut thin, long strips about 1/8 inch wide. These will serve as the timber framing. -
Applying the half-timbering:
Press the brown strips onto your cream wall slabs in a geometric pattern. Arrange them horizontally to separate floors, vertically at corners, and include diagonal cross-bracing. I find that pressing them in firmly helps them bond without needing extra adhesive at this stage.
Warping Walls?
If your slab walls sag while assembling, temporarily support the inside corners with small cardboard boxes or crumpled paper towels until the clay firms up or is baked.
Step 2: Assembly and Roofing
-
Assembling the walls:
Stand the four walls up and join them at the corners. Use liquid clay or slip to ensure a strong bond. Smooth the inside seams with a modeling tool or your finger to reinforce the structure. -
Creating the roof base:
Roll out a rectangular slab of clay large enough to fold over the peak of the house, creating an overhang on all sides. Place this over your wall structure to form the sub-roof. -
Making the shingles:
Roll out more brown/terra cotta clay very thinly. Use a small round cutter or the cap of a marker to punch out numerous half-circles or scalloped shapes for the shingles. -
Layers of roofing:
Starting at the bottom edge of the roof, layer the shingles rows, overlapping them as you move upward toward the peak. Ensure each row is slightly offset from the one below it. -
The roof ridge:
Once you reach the top, create a single long strip of clay, fold it slightly into a V-shape, and place it over the peak to cover the seam where the top rows of shingles meet.
Pro Tip: Realistic Roof
Before baking, lightly brush the roof shingles with a coarse sponge or sandpaper. This adds a gritty, weathered texture that looks like real terracotta tiles.
Step 3: Details and Finishing
-
The front door:
Cut an arched door shape from brown clay. Use a needle tool to scribe vertical lines for wood planks. Add an arched frame around it and attach it to the front wall. Gently press a tiny silver bead (or ball of silver clay) into the door for the knob. -
Window construction:
Create small arched windows using thin brown clay coils for the frames. Place a small piece of dark clay inside the frame to represent glass, then overlay a cross shape of thin clay for the panes. -
Mounting to the base:
Prepare your wooden base. You can stain or paint it beforehand. Secure the clay house to the center using strong craft glue or by pressing the raw clay onto the wood if the clay type permits baking on wood. -
Baking or drying:
Follow the specific instructions for your clay type. If baking polymer clay, tent it with foil to prevent scorching the thin roof edges. If using air-dry clay, allow 24-48 hours for complete drying. -
Washing the timber:
Mix a very watery wash of dark brown acrylic paint. Brush it over the beams and the door, wiping away excess immediately. This settles into the crevices and adds aged depth. -
Highlighting the plaster:
Dry brush a tiny amount of white or light ochre paint over the cream plaster sections to make the texture pop. -
Final coat:
Seal the entire piece with a matte varnish to protect the paint and give the clay a unified, non-shiny finish that resembles real building materials.
Now you have a quaint Tudor cottage ready to anchor your miniature village display.

TRACK YOUR CERAMIC JOURNEY
Capture glaze tests, firing details, and creative progress—all in one simple printable. Make your projects easier to repeat and improve.
10. Carved Brick Facade Slab House
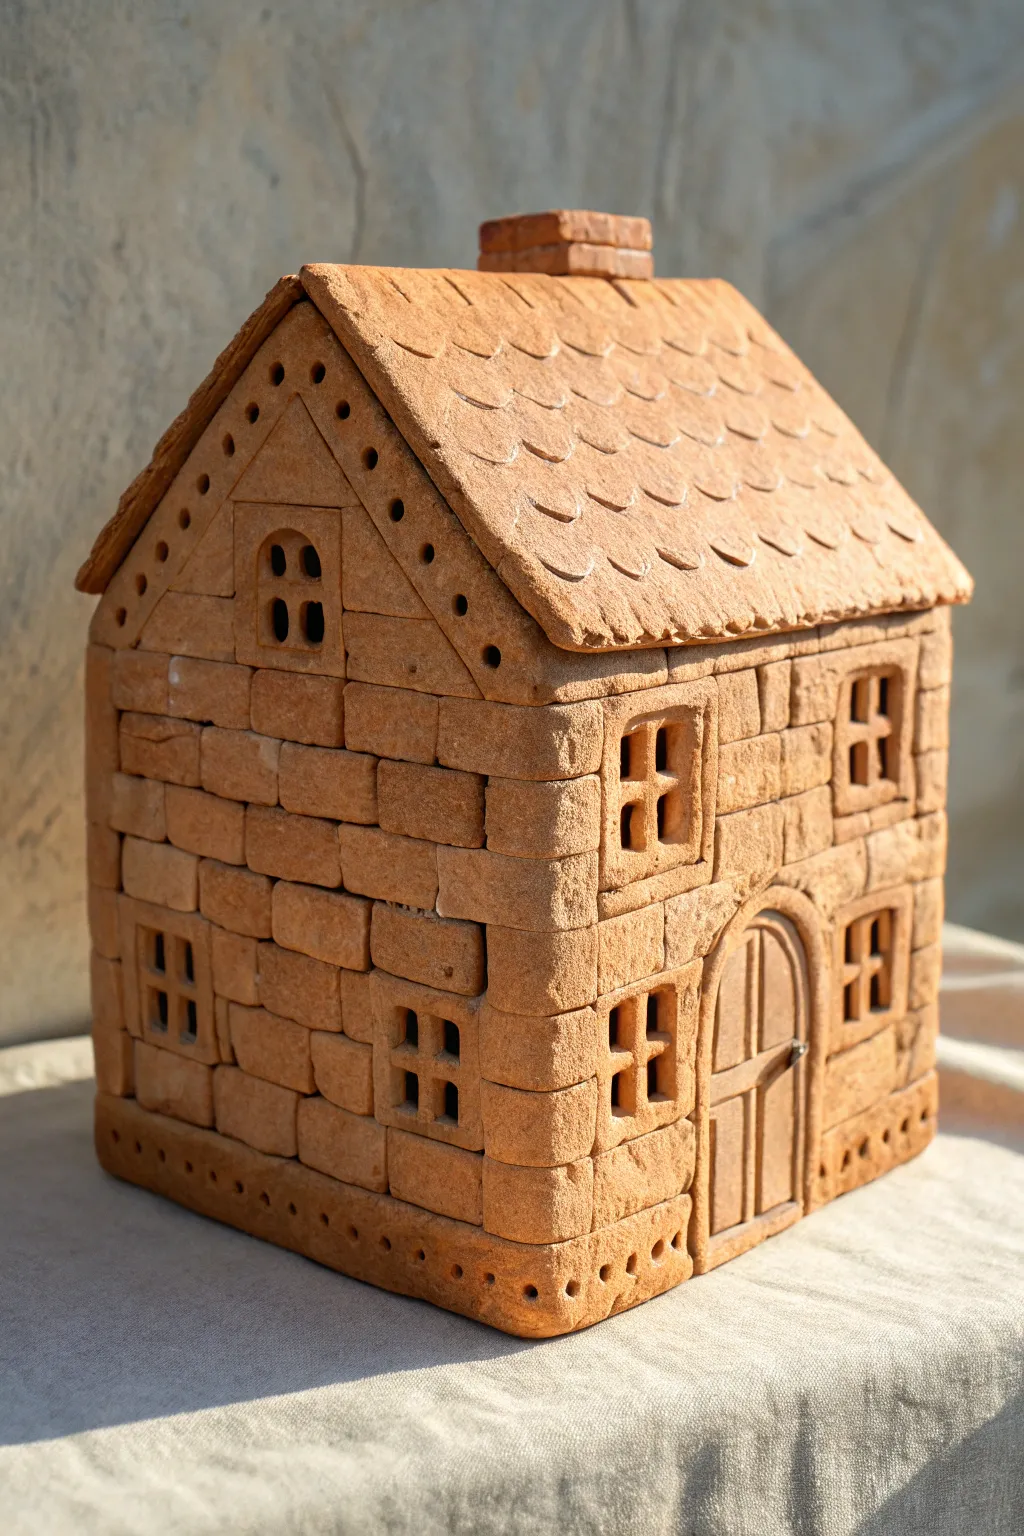
This rustic clay slab house features a beautifully textured brick facade and a classic scalloped roof, giving it the charm of an old English cottage. The unglazed finish highlights the natural warmth of the clay, with carved details that create delightful shadows and depth.
Step-by-Step Tutorial
Materials
- Earthenware or stoneware clay (grogged for stability)
- Rolling pin
- Guide sticks (1/4 inch thickness)
- Fettling knife or craft knife
- Needle tool
- Ruler
- Slip and scoring tool
- Loop tool or carving gouge
- Clay shaper or small wooden modeling tool
- Small round hole punch or straw
Step 1: Slab Preparation & Cutting
-
Roll the slabs:
Begin by rolling out your clay to a consistent 1/4 inch thickness using guide sticks. You will need enough surface area for four walls, two roof panels, and a chimney. -
Create templates:
Cut paper templates for your structure. You need two rectangular side walls, and two peaked walls (front and back) where the gable end rises to a point. -
Cut the shapes:
Lay your templates on the slightly firm leather-hard slabs. Cut out the four wall pieces cleanly with a fettling knife, ensuring the edges are perpendicular to the table for better seams later. -
Cut windows and doors:
While flat, use a small knife to cut out the window squares and the arched doorway. Save the arched cutout for the door itself if you wish, or make a separate slab piece for the door.
Depth Perception
Make the horizontal grooves deeper than the vertical brick joints. This mimics gravity’s effect on mortar and adds structural realism.
Step 2: Brickwork & Texture
-
Draft the brick lines:
Before assembling, lightly score horizontal lines across all wall slabs using a ruler and needle tool to ensure your brick courses are straight. -
Define individual bricks:
Mark variable vertical lines to create the brick bond pattern. I find staggering the vertical joints creates the most realistic masonry look. -
Carve the joints:
Using a small carving tool or the edge of a modeling stick, deepen the lines between the bricks. Press slightly at the corners of each brick to round them off, making them look tumbled and aged. -
Texture the surface:
Tap a stiff bristle brush or a textured stone gently against the individual brick faces to give them a gritty, realistic stone feel. -
Detail the door and windows:
Add frames around the windows by scoring separate border lines. For the door, carve vertical planks and add a tiny clay ball for the handle.
Light within
Leave the bottom open or cut a large hole in the base slab. This allows you to place an LED tea light inside to illuminate the windows.
Step 3: Assembly
-
Join the walls:
Once the textured slabs are stiff enough to stand, score and slip the vertical edges. Press the four walls together, reinforcing the interior seams with thin coils of clay. -
Add the chimney:
Construct a small hollow chimney box and attach it to the peak of one gable end. Remember to carve brick details onto the chimney to match the walls. -
Prepare the roof slabs:
Cut two roof rectangular slabs that extend slightly past the walls for an overhang. Texture these before attaching. -
Create roof tiles:
Use a U-shaped loop tool or a makeshift stamp to impress a scalloped ‘fish scale’ pattern across the roof slabs, mimicking roofing tiles. -
Attach the roof:
Score and slip the top edges of the wall structure. Place the roof panels on, ensuring they meet at the peak, and seal the top seam carefully.
Step 4: Finishing Touches
-
Add decorative vents:
Using a small hole punch or straw, punch a line of small decorative holes along the bottom edge of the house and along the gable eaves for airflow and visual interest. -
Clean up edges:
Smooth any rough burrs created during carving with a soft brush or fingertip, but leave the texture rugged. -
Dry slowly:
Loosely cover the house with plastic to let it dry very slowly. This prevents the seams from cracking as the clay shrinks. -
Bisque fire:
Fire the piece to cone 04 (or your clay’s specific bisque temperature). The piece in the image is likely stained with iron oxide and wiped back to enhance the grooves before a final firing.
Once fired, the distinct brick texture will catch the light beautifully, making your little cottage a timeless decor piece
11. Stone Cottage Texture Slab House
Transform simple clay slabs into a charming, rustic cottage that feels like it was plucked from a fairy tale hillside. This project focuses on meticulous surface texturing to replicate the cozy look of stacked river stones and a slate-shingled roof.
Detailed Instructions
Materials
- Stone-colored stoneware clay (with fine grog)
- Rolling pin and guide strips (approx. 1/4 inch thick)
- Fettling knife or X-Acto blade
- Ruler
- Paper templates (walls and roof pieces)
- Slip and scoring tool
- Small loop tool or carving, tool
- Modeling tool with a small ball end
- Wooden paddle
- Ware board
Step 1: Slab Preparation & Cutting
-
Roll the slabs:
Begin by rolling out your clay on a canvas-covered surface. Use guide strips to ensure an even thickness of about 1/4 inch. For a sturdy house that won’t warp, compress the slab on both sides with a rib tool to align the clay particles. -
Cut the components:
Lay your paper templates onto the leather-hard slab. You’ll need two peaked walls (front and back), two rectangular side walls, and two roof panels. Cut cleanly around them with your fettling knife. -
Create the windows and door:
Before assembly, decide where your windows and door will go. Cut out the window openings completely, but save the clay for later detailing. For the door, you can either cut an opening or simply incise deep lines to suggest a frame.
Stone slip alert
If your added stones keep falling off as they dry, your base slab might be too dry. Spray the walls lightly with water and use extra thick slip (magic mud) as glue.
Step 2: Assembly
-
Bevel the edges:
To ensure a seamless 90-degree corner, cut a 45-degree angle (bevel) on the vertical edges of your walls. This increases the surface area for the join. -
Score and slip:
Roughen the beveled edges with a scoring tool or fork and apply a generous amount of slip. Press the walls together firmly to form the base box of the house. -
Reinforce the seams:
Roll tiny coils of soft clay and press them into the interior corners where the walls meet. Smear this coil into the clay on both sides to lock the walls together permanently. -
Attach the roof:
Bevel the top edges of your walls and the corresponding contact points on the roof slabs. Score, slip, and attach the roof panels. I find it helpful to hold the roof in place for a minute to let the clay grab.
Grout effect
After attaching stones, brush a thin, contrasting colored slip into the cracks between them to create a realistic ‘grout’ look that makes the stones pop.
Step 3: Texturing the Stone Facade
-
Form the base stones:
Now for the fun part. Roll dozens of small, slightly irregular balls of clay in varying sizes. Flatten them slightly with your thumb so they look like river stones. -
Apply the foundation:
Start at the very bottom edge. Score and slip the back of each ‘stone’ and press it onto the smooth wall surface. Create a specific foundation row of slightly larger, uniform round stones to ground the structure visually. -
Build the walls:
Work your way up the walls, attaching stones tightly together. Vary the sizes to fill gaps naturally, just like a real mason would. Leave space around the window and door cutouts. -
Add the chimney:
Construct a small chimney box from scrap slab. Attach it to the roof slope. Cover this with very tiny clay pellets or textured markings to match the stone aesthetic of the walls.
Step 4: Refining Details
-
Texture the stones:
Once all stones are attached, take a stiff bristle brush or a piece of actual rock and gently press it against each clay stone to give it a realistic, grainy pit texture. -
Create the roof shingles:
Instead of individual tiles, you can carve the slab roof directly. Use a small loop tool to carve upward-curving scallops across the roof surface. -
Roughen the roof:
Tap a stiff brush over the carved roof tiles to mimic the texture of weathered slate or thatch, removing any sharp burrs from the carving process. -
Install the door:
Roll a small slab for the door. Use a needle tool to draw vertical wood grain lines. Attach a tiny clay pellet for the doorknob and slip slightly into the doorframe area. -
Window frames:
Roll very thin coils (snakes) of clay. Carefully place them inside your window openings to form a cross or grid pattern. Secure them with a dot of slip at the connection points.
Allow your cottage to dry very slowly under plastic to prevent the seams from cracking before firing
12. Roof Shingles and Tiles for Slab Houses
Create a charming pair of ceramic houses featuring distinctively tiled roofs and a rustic, textured finish. These slab-built structures sit atop a clean white base, making for a sophisticated yet earthy home decor piece.
How-To Guide
Materials
- Grogged stoneware clay (white or light stoneware)
- Rolling pin
- Two wooden guide strips (approx. 5mm thickness)
- Fettling knife or craft knife
- Needle tool
- Slip and scoring tool (or serrated rib)
- Cardboard or stiff paper for templates
- Blue and terracotta underglazes
- Small flat brush
- Clear matte glaze or low-sheen glaze
Step 1: Preparing the Slabs
-
Roll the clay:
Begin by rolling out your clay on a canvas or cloth surface. Place the wooden guide strips on either side of the clay to ensure a uniform thickness of about 5mm as you roll. -
Create templates:
Cut your cardboard templates. You will need a tall rectangular shape for the side walls, and a matching rectangle with a peaked triangular top for the front and back walls. Size them according to your preference, but keep the proportions tall and narrow. -
Cut the shapes:
Place your templates onto the rolled clay slab. Use your fettling knife to cut cleanly around the edges. You will need four wall pieces for each house. Save the excess clay for the roofs later. -
Dry to leather hard:
Let the cut slabs sit until they reach a leather-hard state. They should be firm enough to stand up without bending but still soft enough to join.
Clean Seams
After joining your walls, roll a thin ‘snake’ of soft clay and press it into the interior corners. Smooth it out to reinforce the joint and prevent cracking during drying.
Step 2: Assembling the Structures
-
Bevel the edges:
For cleaner corners, cut a 45-degree angle along the vertical edges of your wall pieces. This miter joint creates a stronger, seamless box. -
Score and slip:
Rough up the beveled edges with a scoring tool and apply clay slip generously to act as glue. -
Join the walls:
Press the walls together carefully to form the house body. Use a small wooden modeling tool to smooth the seams on the inside and outside ensuring a solid bond. -
Cut the windows:
Using a needle tool or small square cutter, remove clay to create small, square windows near the top of the structure. I like to keep them slightly irregular for a handmade feel.
Speckled Effect
If you don’t have grogged clay, you can flick iron oxide wash lightly onto the wet white clay walls with a toothbrush to create faux speckles before firing.
Step 3: Roofing and Base
-
Form the roof slabs:
Roll out two rectangular slabs slightly larger than the footprint of your house tops. These will be the foundation for the tiles. -
Attach the roof:
Score and slip the top angled edges of the house walls and attach the roof pieces, pressing firmly at the peak. -
Create individual tiles:
Roll a thin coil or strip of clay and cut it into tiny, uniform rectangular bits. These will be your shingles. -
Apply the shingles:
Starting from the bottom edge of the roof, attach the tiles one by one using a dab of slip. Overlap the row above slightly over the row below until you reach the peak. -
Build the base:
Construct a simple, low rectangular hollow box from thicker slabs to serve as the plinth. Ensure the top surface is flat so the houses sit level.
Step 4: Decoration and Firing
-
Add surface texture:
Before the clay is bone dry, gently tap the walls with a wooden paddle or rough sponge to bring out the grog texture and soften any sharp manufactured edges. -
Bisque fire:
Allow the piece to dry completely (slowly, to prevent cracking) and fire it to bisque temperature. -
Apply underglaze:
Paint the roof tiles carefully with underglaze—deep blue for one house and terracotta orange for the other. Use a fine brush to get into the crevices between shingles. -
Glaze the base:
Apply a white or very light grey wash to the base plinth. Leave the house walls unglazed to show off the raw clay texture, or apply a very thin matte clear wash. -
Final firing:
Fire the pieces to the final maturity temperature of your clay body.
Display your finished village on a shelf where the light can catch the texture of those tiny roof tiles
13. Patterned Cut-Out Windows on a Slab House
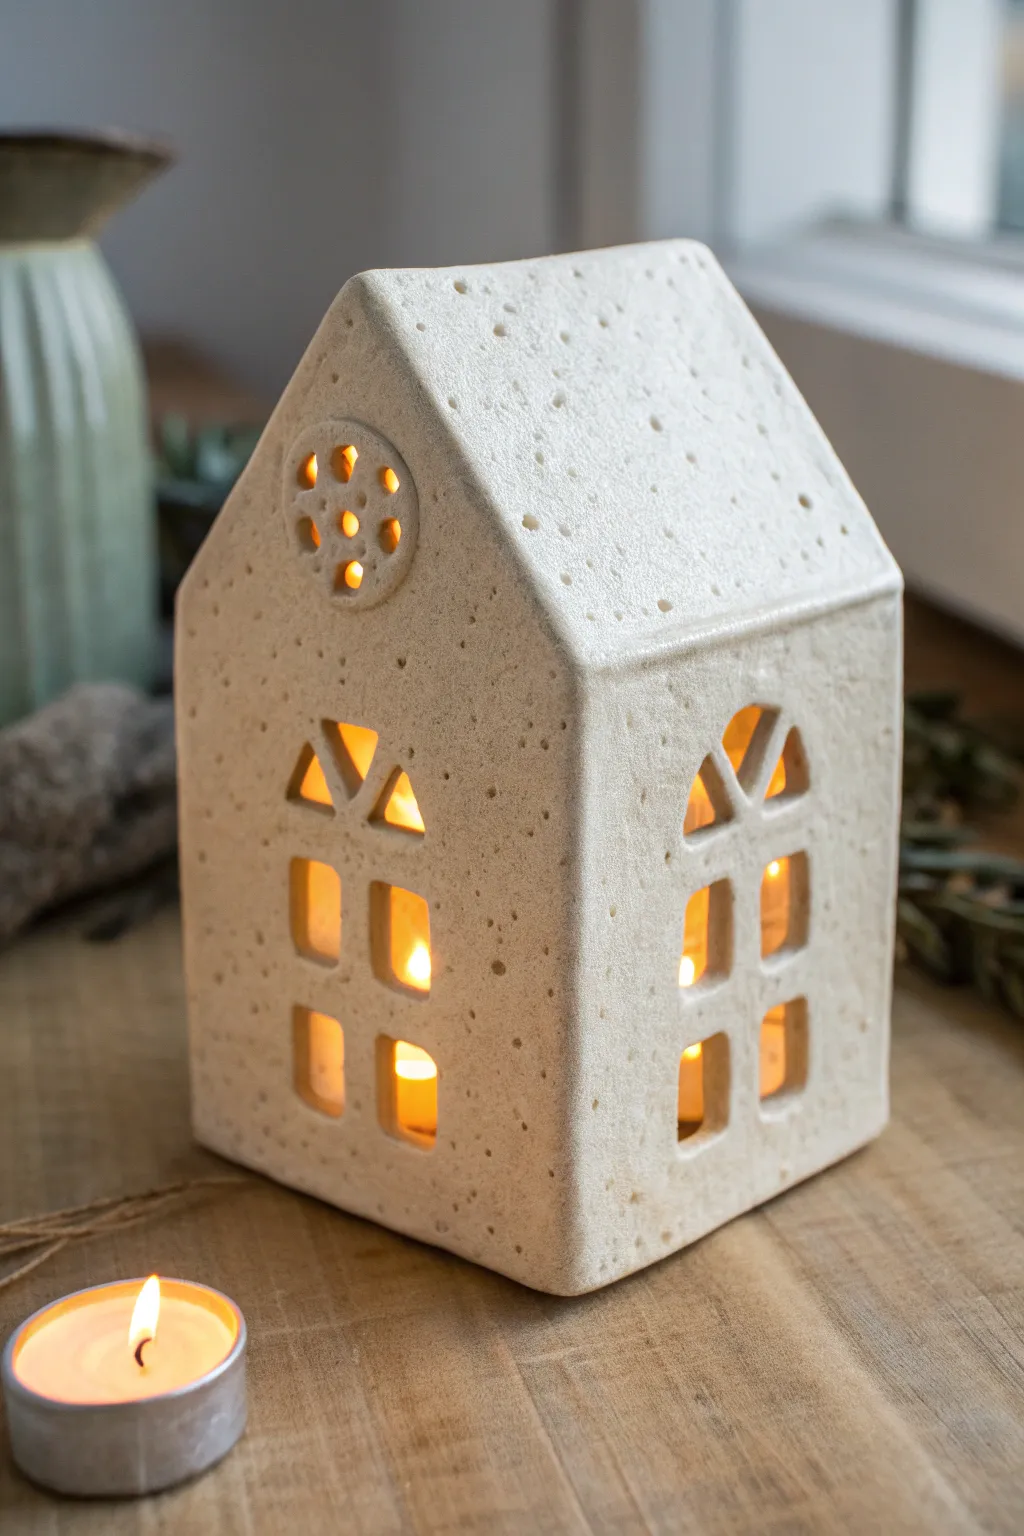
This charming, minimalist house lantern features a beautifully textured surface and warm geometric windows that glow from within. The simple gable roof and carefully carved cut-outs create a cozy atmosphere perfect for housing a flickering tealight.
Step-by-Step Guide
Materials
- White stoneware clay with speckles (or plain white clay + speckled grog)
- Rolling pin
- Two wooden guide strips (approx. 5-6mm thick)
- Fettling knife or X-Acto knife
- Paper templates (front/back gable wall, side walls, roof pieces)
- Slip and scoring tool (or serrated rib)
- Small geometric clay cutters (optional)
- Needle tool
- Smoothing sponge
- Clear matte or satin glaze
- Kiln
Step 1: Preparing the Slabs
-
Roll the clay:
Begin by wedging your speckled stoneware clay to remove air bubbles. Place the clay between two wooden guide strips on a canvas surface and roll it out into a smooth, even slab. The guides ensure your walls maintain a consistent thickness, which is crucial for drying. -
Smooth the surface:
Before cutting anything, take a slightly damp rib or a soft sponge and compress the surface of the slab on both sides. This aligns the clay particles and removes the canvas texture if you prefer a smoother look like the example. -
Cut the components:
Place your paper templates onto the slab. You will need two pentagonal shapes for the front and back (the gable ends), two rectangular side walls, and two rectangular roof panels. Cut around them precisely using a fettling knife or X-Acto blade. -
Let them stiffen:
This is a critical step I always prioritize: set the cut pieces aside on a ware board until they reach ‘leather hard’ consistency. If you assemble them while too soft, the walls will sag and warp.
Cracking Seams?
If seams crack during drying, your clay was likely too dry when joining. Create ‘paper clay’ by mixing toilet paper pulp into your slip for a super-strong patching compound to fill the gaps.
Step 2: Carving the Details
-
Map the windows:
Once leather hard, lightly sketch your window placement on the front and side panels using a needle tool. For this design, create arched tops for the upper windows and simple rectangles for the lower ones. -
Cut the panes:
Carefully slice out the window openings. Keep your knife perpendicular to the clay surface for clean, ninety-degree edges. Remove the clay scraps gently. -
Add the circular motif:
Near the peak of the front gable, press a small circle cutter halfway into the clay to mark the boundary. Then, perforate the inside of this circle with small holes using a drill bit or a small hole punch tool to create the decorative vent. -
Refine the edges:
Use a damp paintbrush or the tip of your finger to smooth the sharp edges of every cut-out. This softens the look and prevents sharp burrs after firing.
Level Up: Texture
Before cutting your slabs, gently press a piece of coarse linen or sandpaper into the surface. This subtle texture catches the glaze beautifully and enhances the rustic, stony feel.
Step 3: Assembly
-
Miter the corners:
For a seamless look, cut the vertical edges where the walls meet at a 45-degree angle. This allows them to fit together snugly without a visible butt joint. -
Score and slip:
Rough up the mitered edges with a scoring tool and apply a generous amount of clay slip. This acts as the glue for your structure. -
Join the walls:
Press the four walls together firmly. Use a small coil of soft clay on the interior seams to reinforce the joints, smoothing it down so it completely disappears. -
Attach the roof:
Score and slip the top edges of the walls and the underside of the roof panels. distinct roof overhang isn’t necessary for this modern look, so align the roof edges flush with the walls or allow a very tiny overhang if preferred. -
Seal the peak:
Ensure the very top ridge where the two roof panels meet is well-connected. I like to run a smooth rib over the exterior seam to make it invisible.
Step 4: Finishing and Firing
-
Final texture check:
Inspect the house for any fingerprints or unintentional marks. Since the clay itself is the main visual feature, the surface needs to be clean. Tidy up the bottom edge so it sits flat. -
Slow drying:
Loosely cover the house with plastic to let it dry very slowly. This prevents the seams from cracking as the clay shrinks. -
Bisque fire:
Once bone dry, fire the piece to bisque temperature (usually cone 04) to prepare it for glazing. -
Glazing:
Use a clear matte or satin glaze. Dip the house or brush the glaze largely on the outside. You can leave the inside unglazed if desired, or glaze it to reflect more candlelight. -
Final firing:
Fire correctly according to your clay body’s maturation point (likely cone 5 or 6 for stoneware) to bring out the natural speckles.
Place a tea light inside your finished cottage and enjoy the warm, welcoming glow through the windows
14. Removable Roof Slab House Lantern
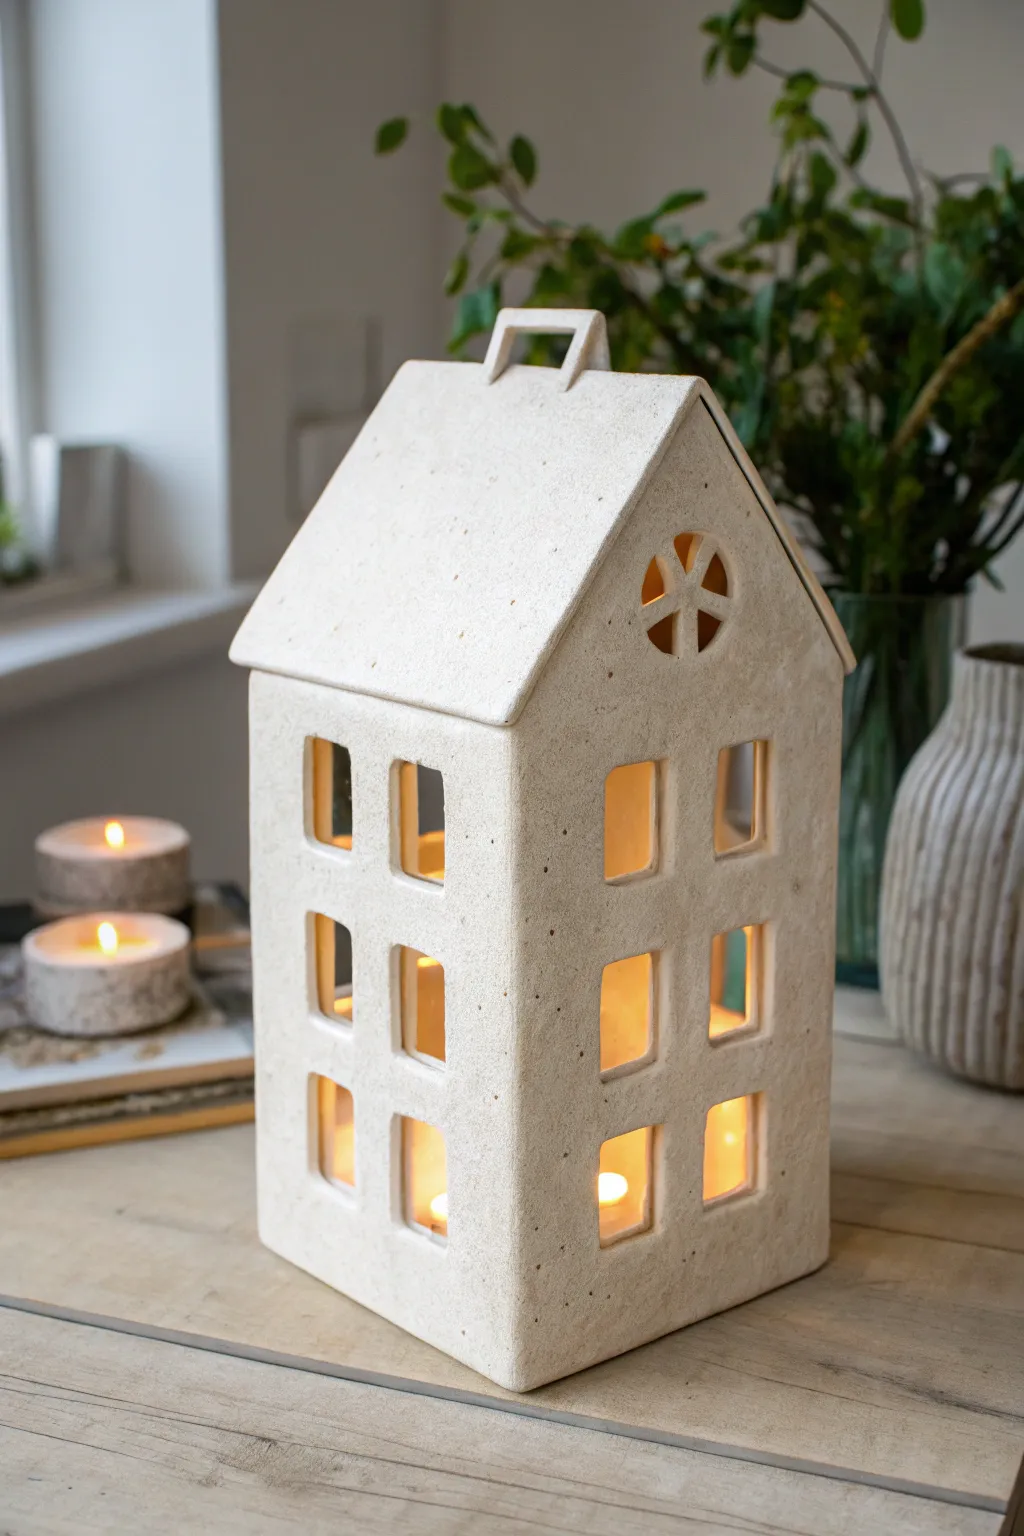
This charming three-story slab house features a removable roof and plenty of windows to let warm candlelight spill through. The natural, speckled clay body gives it a timeless, rustic ‘stone’ appearance without needing any glaze.
Detailed Instructions
Materials
- Speckled stoneware clay (with grog/chamotte)
- Rolling pin
- Wooden guide strips (approx. 1/4 inch thickness)
- Fettling knife or X-Acto blade
- Ruler
- Paper templates (cardstock recommended)
- Slip and scoring tool
- Sponge
- Small circular cookie cutter or bottle cap
- Banding wheel (optional)
Step 1: Planning and Rolling
-
Template Creation:
Begin by cutting your templates from cardstock. You will need two tall rectangular side walls, two tall gabled ends (pointed at the top), and two rectangular roof slabs. Ensure the roof slabs are slightly wider than the house body to create an overhang. -
Rolling the Slabs:
Wedge your speckled clay thoroughly to remove air bubbles. Roll it out into a large, consistent slab using wooden guide strips to maintain a 1/4-inch thickness, which provides sturdy walls for a multi-story structure. -
Cutting Components:
Lay your paper templates onto the leather-hard slab. Using a fettling knife or needle tool, trace and cut out all four walls and the two roof pieces. Don’t forget to cut a small strip for the handle. -
Drying to Leather Hard:
This is crucial for structural integrity. Let your slabs dry until they are ‘leather hard’—stiff enough to hold their shape vertically but still soft enough to join. I usually flip them once during drying to prevent warping.
Step 2: Constructing the Body
-
Cutting Windows:
Before assembly, use a ruler to mark a grid for your windows. Carefully cut out rectangular openings for the three ‘floors’ on all sides. Keep the spacing consistent for a neat architectural look. -
Gable Detail:
On the two peaked wall pieces, create the attic window. Cut a circle, then leave a cross-shaped clay section in the middle, or cut small triangular wedges out of the circle to create the wheel-spoke design shown in the image. -
Beveling Edges:
For a seamless 90-degree corner, cut a 45-degree angle (miter) on the vertical edges of your wall slabs. This isn’t strictly necessary, but it makes the join much stronger and cleaner. -
Scoring and Slipping:
Score (scratch) the connecting edges vigorously and apply clay slip. Press the walls together firmly to create a box. Run your finger or a wooded tool along the inside seams to reinforce them. -
Smoothing Seams:
On the outside corners, use a rubber rib or a damp sponge to blend the clay together until the seam disappears. You want the house to look like a solid block of stone.
Warping Walls?
If your straight walls start bowing inward while working, the clay is too wet. Prop the walls up with temporary cardboard supports inside the house until the clay stiffens.
Step 3: Roof and Finishing
-
Assembling the Roof:
Take your two roof slabs and join them at the peak with a mitered joint, scoring and slipping well. The angle should match the pitch of your house’s gable walls. Test the fit on the house body, but don’t attach it permanently. -
Adding the Flange:
To keep the removable roof secure, add a small rim or ‘flanges’ of clay on the underside of the roof slabs. These should sit just inside the house walls to prevent the lid from sliding off. -
Attaching the Handle:
Form a small, geometric bridge handle from your leftover strip. Score and attach it to the very peak of the roof ridge. -
Surface Refining:
Take a slightly damp sponge and wipe down the entire piece to smooth sharp edges around the windows and handle. This exposes the grog/speckles in the clay, enhancing the texture. -
Drying:
Place the roof onto the house body while drying; this ensures they warp or shrink together and will still fit after firing. Cover loosely with plastic for the first day to slow down the drying process. -
Firing:
Bisque fire the piece. Since the beauty of this project relies on the raw clay body, you can skip the glazing step entirely and fire it directly to vitrification (high fire) to bring out the toasty, speckled stone color.
Glow Up
Instead of real candles, place a small string of battery-operated fairy lights inside. The multiple light points create a magical, evenly lit effect through all the windows.
Now you have a cozy, architectural centerpiece ready to warm up your windowsill
15. Slab House on a Landscape Base
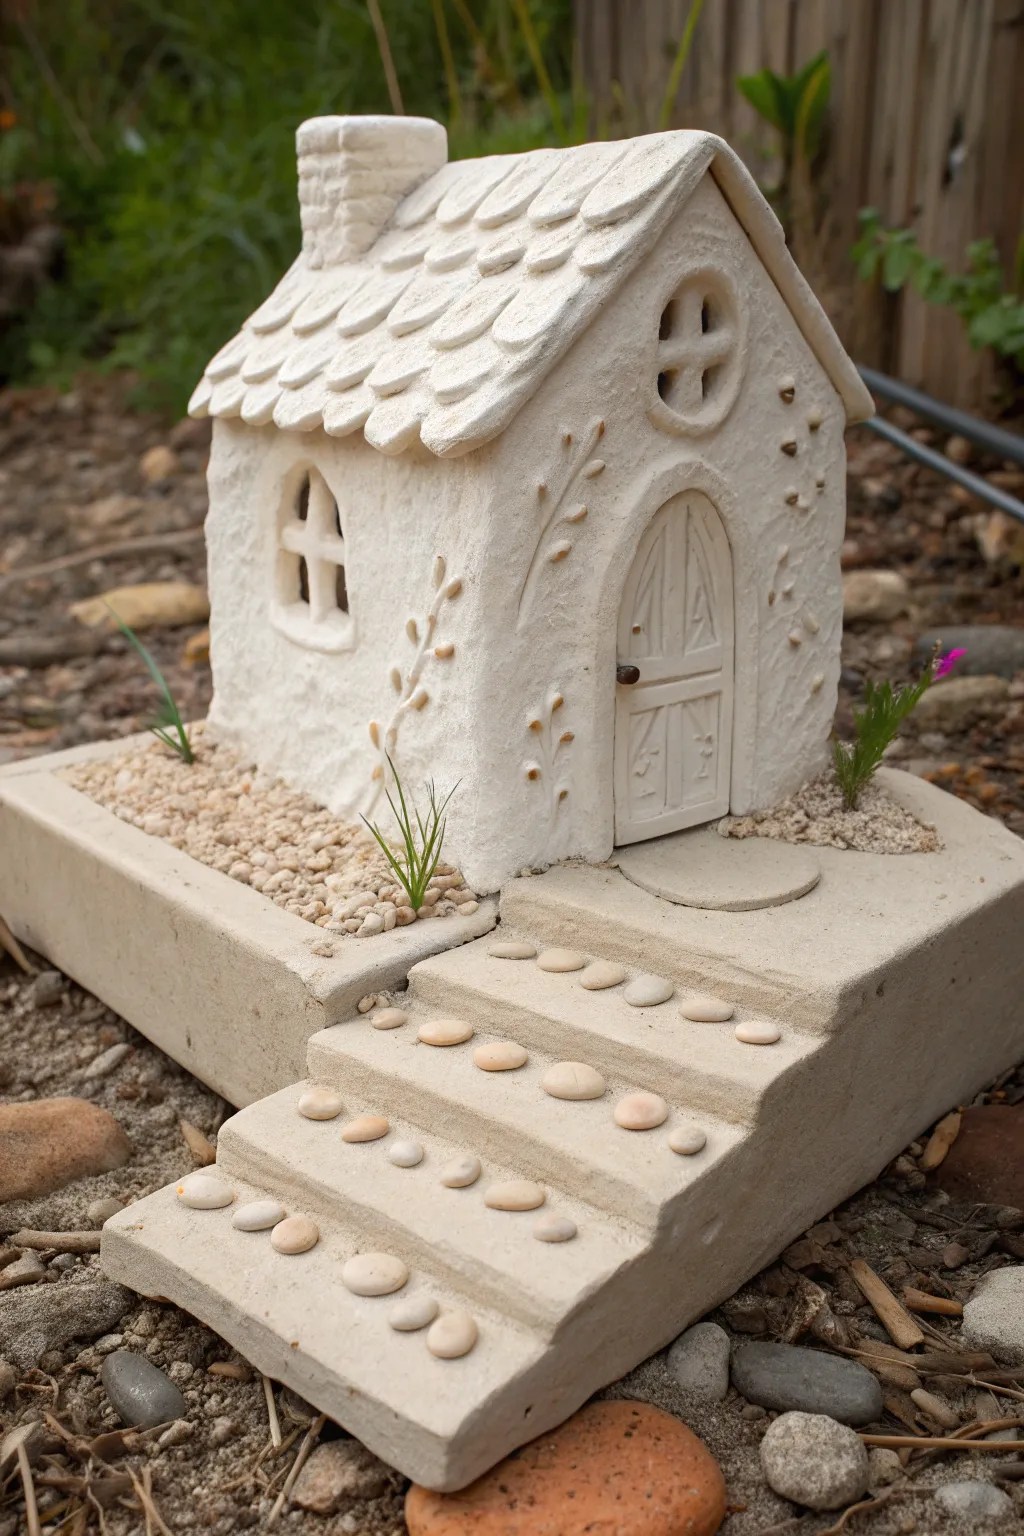
This charming project features a cozy, textured cottage perched atop a stepped landscape base, all constructed from clay slabs. The integration of the house onto its own elevated foundation creates a complete, miniature scene perfect for a garden nook.
How-To Guide
Materials
- White or speckled stoneware clay (groggy clay works well for texture)
- Rolling pin and guide sticks (about 3/8 inch thick)
- Fettling knife or X-Acto blade
- Slip and score tool
- Small round cookie cutters (or a bottle cap)
- Various texture tools (dried wheat, clay stamps, or carving tools)
- Small, smooth pebbles (for the steps)
- Coarse grit sand or grog (for the gravel areas)
- Plastic greenery or moss (post-firing addition)
- Template paper and scissors
Step 1: Building the Foundation Base
-
Roll the main slabs:
Begin by rolling out a large, even slab of clay, roughly 3/8 inch thick. You’ll need enough for the base platform, the stairs, and the house walls. -
Shape the landscape:
Cut a large rectangular piece for the main base. To create the elevation, layer slabs or build a hollow box shape at the back where the house will sit. -
Construct the staircase:
Cut graduated rectangular strips to form the stairs. Stack them off-center, leading up to the main platform area. Be sure to score and slip each layer thoroughly so they don’t separate during drying. -
Embed the step stones:
While the clay is still plastic, gently press small, smooth pebbles into the leading edge of each step to create a decorative tread. -
Add texture to the landscape:
Using a stiff brush or coarse sponge, texture the flat surfaces of the base to resemble dirt or stone, leaving the area under the future house slightly rough for better adhesion.
Warping Base?
Large flat bases love to warp. Dry very slowly on a drywall board or wooden bat. Weight the corners gently with sandbags while drying if they start to lift.
Step 2: Constructing the Cottage
-
Cut the house components:
Using paper templates, cut out your four walls (two pointed gable ends, two rectangular side walls) and two roof panels. Cut openings for the door and windows now while the slabs are flat. -
Detail the door and windows:
Carve wood grain patterns into a separate arch-shaped slab for the door. Attach it over the door opening. Roll thin coils to create the window cross-bars and attach them inside the window cuts. -
Texture the walls:
Before assembly, gently paddle or press a subtle stucco texture onto the exterior walls. I like to use a crumpled ball of aluminum foil for this organic look. -
Assemble the walls:
Score and slip the edges of your wall pieces. Stand them up on the elevated platform of your base, pressing the corners firmly together. Add a tiny coil of clay on the inside seams for extra strength. -
Add decorative vines:
Roll tiny, tapered coils and press them onto the exterior walls to mimic vines. Use a small tool to press minimal leaf shapes directly into the wall alongside the ‘stems’.
Light It Up
Cut a 1-inch hole in the bottom of the base, beneath the house. This allows you to insert a battery-operated tea light later to make the windows glow.
Step 3: Roofing and Finishing Touches
-
Attach the roof:
Score the top angles of your gable walls. Place the two roof slabs on top, ensuring they meet at the peak and overhang the walls slightly. -
Shingle the roof:
Instead of individual shingles, create a scalloped texture directly on the roof slabs or layer thin, scalloped strips of clay starting from the bottom edge and working upward. -
Install the chimney:
Form a small rectangular chimney block. Cut the bottom at an angle to match the roof slope and attach it securely. -
Apply gravel accents:
Brush a little slip or water onto the flat areas next to the house (the ‘garden’ beds). Sprinkle coarse sand or grog onto these wet areas and press down gently to embed the texture. -
Dry and fire:
Let the entire piece dry slowly under loose plastic to prevent the base from warping. Bisque fire, apply a matte white or clear glaze if desired, and fire again. After firing, glue in small sprigs of artificial greenery.
Once fired, place this little dwelling in your garden or on a shelf to invite a sense of magic into your home
16. “Impossible” Floating Levels Slab House
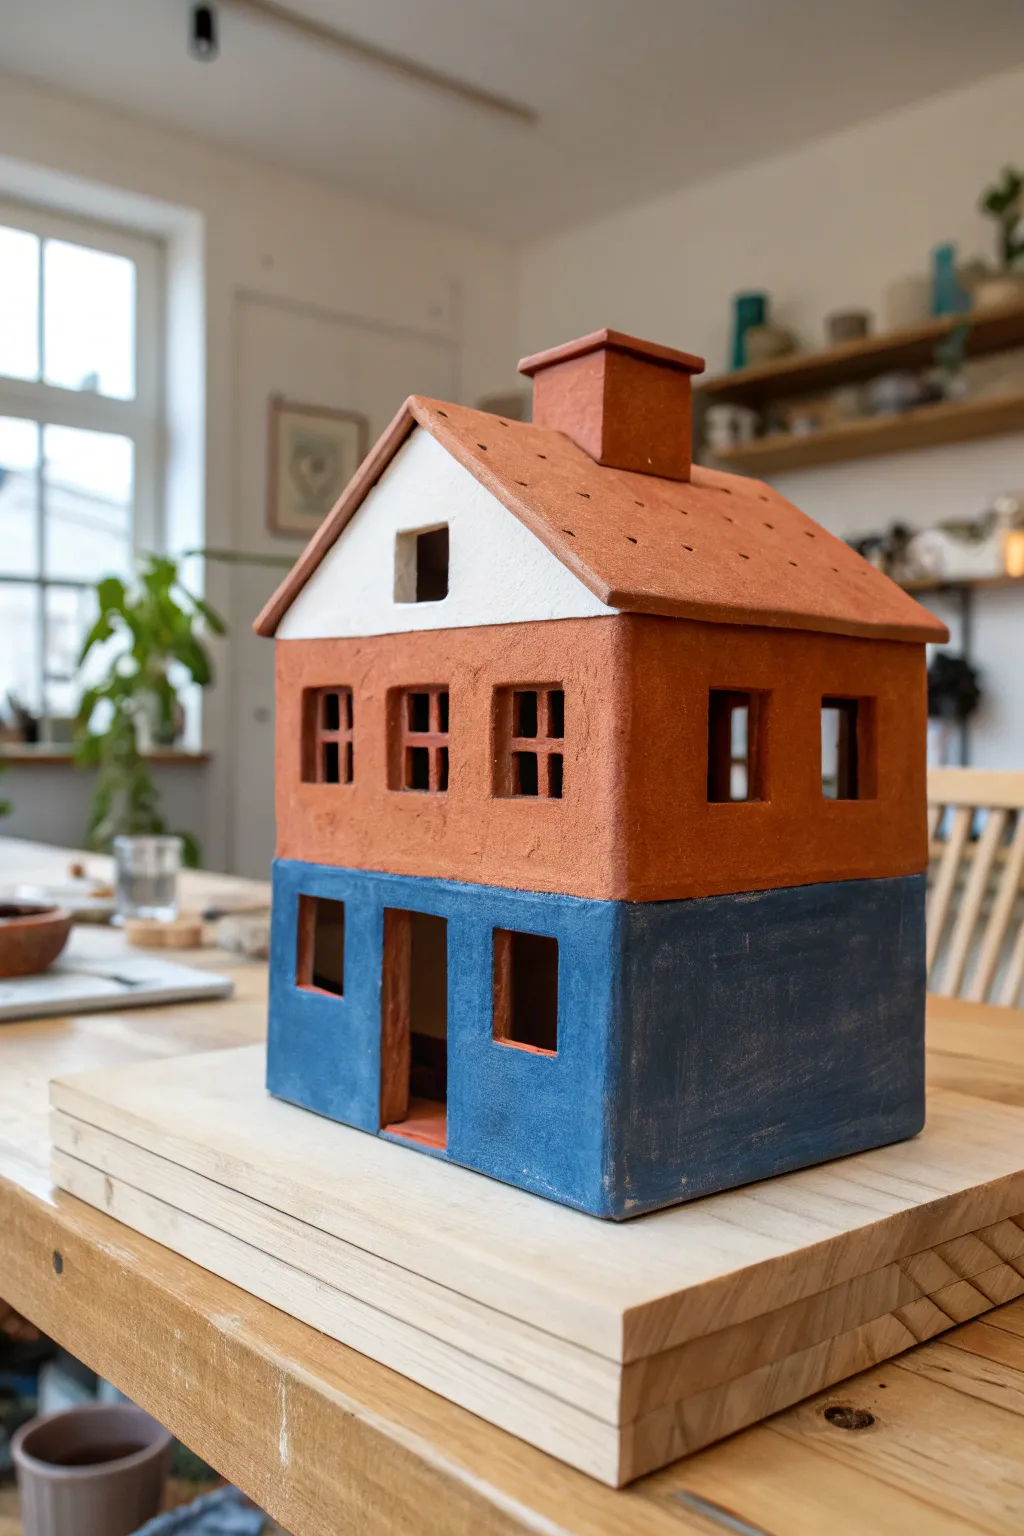
This charming two-color clay house combines structured slab building with a bold architectural design. By stacking a vibrant red-orange upper floor onto a solid blue base, you create a striking modern-meets-rustic ceramic piece perfect for a shelf display.
Step-by-Step
Materials
- Earthenware or stoneware clay (terracotta or white)
- Rolling pin
- Guide sticks or slats (approx. 1/4 inch thick)
- Needle tool or fettling knife
- Ruler
- Slip and scoring tool (serrated rib or old toothbrush)
- Underglazes: Cobalt blue, bright white, terracotta orange
- Paper templates (cardstock) for walls and roof
- Smoothing sponge
- Small square cutter (optional)
Step 1: Preparation and Cutting
-
Roll Your Slabs:
Begin by wedging your clay to remove air bubbles. Using guide sticks on either side, roll out a large, even slab approximately 1/4 inch thick. Compress the clay with a rib tool to align the particles and prevent warping. -
Design and Template:
Draft your templates on cardstock first. You’ll need four walls for the base, four walls for the second story (two rectangular, two peaked gables), and two roof panels. Cut these out carefully. -
Cut the Base Pieces:
Lay your templates on the leather-hard slab. Use a needle tool or fettling knife to cut out the four walls for the blue ‘basement’ level. Keep your knife perpendicular to the table for straight edges. -
Cut the Upper Pieces:
Cut out the walls for the upper story and the roof panels. For the two side walls of the upper story, ensure the peak is centered perfectly so the roof sits evenly later. -
Detailing Windows:
While the slabs are flat, carefully cut out the window and door openings. Creating a clean 90-degree corner requires patience; don’t drag the knife, but rather cut and lift. -
Adding Mullions:
For the upper story windows, create thin strips of clay to form the cross-shaped mullions. Slip and score them gently into the window frames from the back for a cleaner front appearance.
Step 2: Assembly
-
Construct the Base:
Score the vertical edges of your blue base walls and apply slip. Stand them up and press the corners together firmly. I like to reinforce the interior seams with thin coils of clay for extra stability. -
Add a Floor Divider:
To support the second story, you can add a horizontal slab on top of the base box, or simply ensure the walls of the upper story align perfectly with the walls below. A divider slab adds significant strength. -
Construct the Upper Story:
Score and slip the bottom of your upper walls and attach them to the base structure. Ensure the corners line up directly with the corners of the base for a continuous vertical line. -
Attaching the Roof:
Score the angled tops of the gable walls. Place your rectangular roof slabs on top, ensuring they meet at the peak. Secure the peak seam with slip and a coil on the underside if accessible. -
The Chimney:
Fabricate a small, four-sided chimney box. Cut the bottom at an angle that matches the slope of your roof. Score, slip, and attach it near the peak.
Warping Walls?
If walls bow inward, the clay was too wet during assembly. Let slabs dry to a firm leather-hard stage before building. Use crumpled newspaper inside the house for support while drying.
Step 3: Finishing and Decoration
-
Texture the Roof:
Using a needle tool, poke small, random holes across the roof surface to simulate texture or nail holes. This breaks up the flat surface and adds visual interest. -
Color Blocking – Base:
Once the piece is bone dry, clean it with a slightly damp sponge to remove dust. Apply three coats of cobalt blue underglaze to the bottom story and the interior window frames. -
Color Blocking – Upper:
Apply a terracotta or rust-orange underglaze to the main walls of the second story and the roof. Be careful near the borderline where the blue meets the orange to keep a crisp line. -
The White Accent:
Paint the triangular gable end white. Use a steady hand or masking tape to create a sharp horizontal line where the white gable meets the orange wall below it. -
Firing:
bisque fire the piece according to your clay body’s instructions. Afterward, apply a clear glaze if you want a glossy finish, or leave it unglazed for a matte, architectural look, then fire again.
Light It Up
Leave the bottom of the house open (no floor slab). This allows you to place an LED tea light or string lights underneath, illuminating the windows for a cozy night-time glow.
Place your finished architectural sculpture on a wooden board or shelf to admire the striking contrast of colors