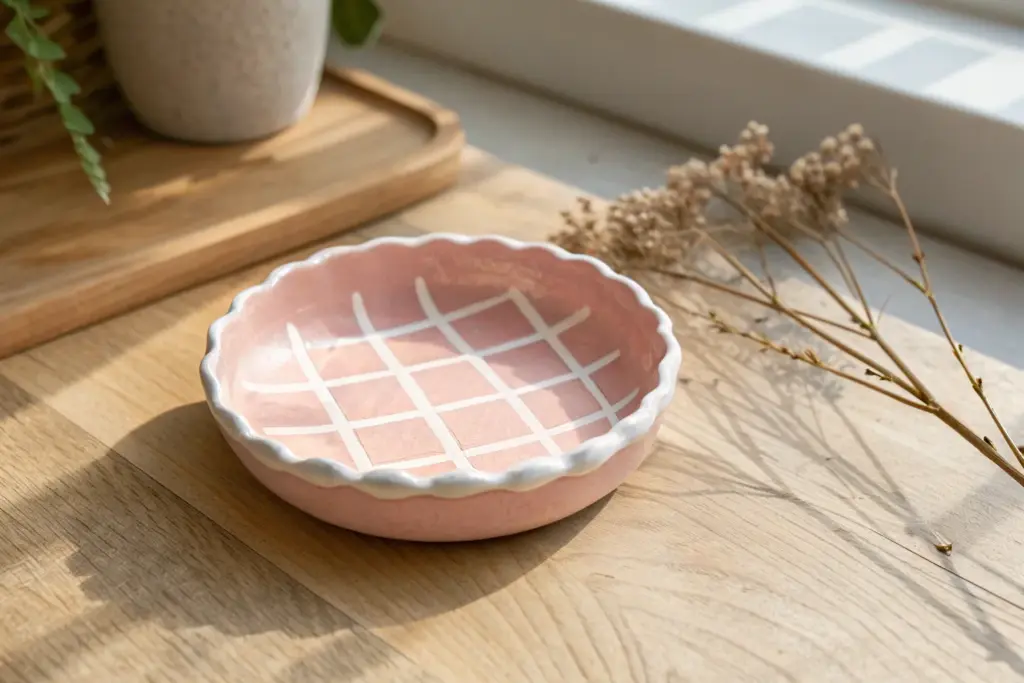
If you’re craving that preppy air dry clay vibe, think sweet pastels, bold patterns, and cute shapes that still do something useful. These are the kinds of projects I love making when I want my desk, vanity, and nightstand to look instantly more trendy and put-together.
Pastel Checkerboard Trinket Tray
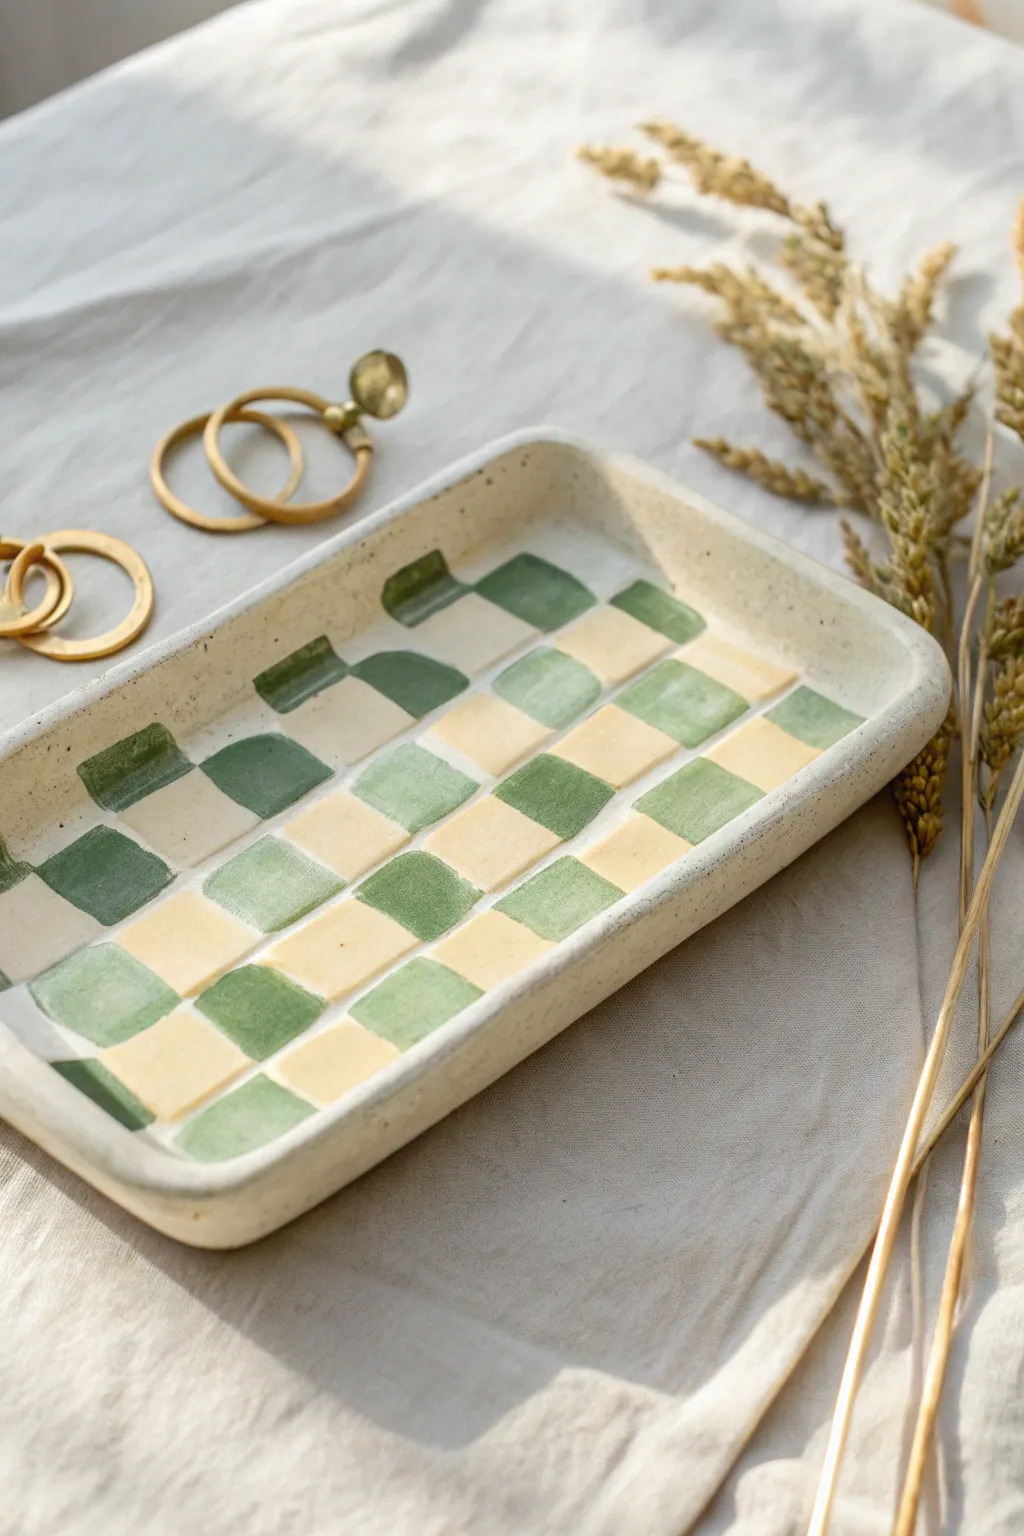
Embrace the imperfect charm of handmade ceramics with this delightful air-dry clay tray featuring a soft green and cream checkerboard pattern. It’s the perfect size for holding your daily jewelry or keys and adds a touch of preppy sweetness to any dresser.
Detailed Instructions
Materials
- Air-dry clay (white)
- Rolling pin
- Clay cutting tool or craft knife
- Small bowl of water
- Fine-grit sandpaper (200-400 grit)
- Acrylic paints (Sage Green, Cream/Pale Yellow)
- Flat paintbrush (medium size)
- Fine liner brush
- Gloss varnish or sealant (Mod Podge or specialized clay sealer)
Step 1: Shaping the Tray
-
Condition the clay:
Cut off a generous chunk of air-dry clay and knead it in your hands for a minute to warm it up and make it pliable. -
Roll out the slab:
Using your rolling pin, flatten the clay into a smooth slab about 1/4 inch thick. Try to keep the thickness consistent across the entire piece. -
Cut the rectangle:
Use your cutting tool to slice a clean rectangle shape. You can use a ruler or a rectangular object (like a phone case or notebook) as a template if you want straighter lines. -
Create the walls:
Instead of attaching separate coils, gently pinch the edges of your rectangle upwards to create a lip. Use your thumbs to press the center down while your fingers mold the sides up. -
Round the corners:
Smooth out the sharp corners by gently pressing them inward with a damp finger to create a soft, rounded curve similar to the photo. -
Smooth the surfaces:
Check for any cracks or uneven spots. Dip your finger in a little water and buff the surface until it’s silky smooth, paying extra attention to the rim. -
Let it dry entirely:
Place the tray on a wire rack or piece of parchment paper to dry. This usually takes 24-48 hours depending on humidity; don’t rush this step or the paint won’t adhere properly.
Warped Clay?
If the tray edges curl up while drying, flip the tray over carefully about halfway through the drying process to ensure even airflow on both sides.
Step 2: Painting the Pattern
-
Sand imperfections:
Once bone dry, take your fine-grit sandpaper and gently sand away any rough edges or bumps on the rim and surface. Wipe away the dust with a dry cloth. -
Apply base coat:
Paint the entire tray, front and back, with your cream or pale yellow acrylic paint. You may need two thin coats for full opacity. -
Mark the grid:
Lightly sketch a grid inside the tray using a pencil. Don’t worry about measuring perfectly; the charm of this piece lies in the slightly organic, hand-drawn look. -
Start the checkerboard:
Load your flat brush with sage green paint. fill in alternating squares of your grid. I find it easiest to work row by row to keep track of the pattern. -
Extend the pattern:
Continue painting the green squares up the inside walls of the tray so the pattern looks like it flows naturally up the sides. -
Clean up lines:
Use a fine liner brush and your cream paint to touch up any green squares that bled outside their lines, sharpening the checkerboard effect. -
Seal the piece:
After the paint is completely dry, apply a coat of gloss varnish. This protects the clay from moisture and gives it that finished ceramic look.
Level Up
Mix a tiny amount of baking soda into your acrylic paint for a more textured, matte, terra-cotta feel vs. the glossy ceramic look.
Style your new tray with your favorite gold jewelry or dried stems for a beautiful vignette


Cow-Print Heart Ring Dish
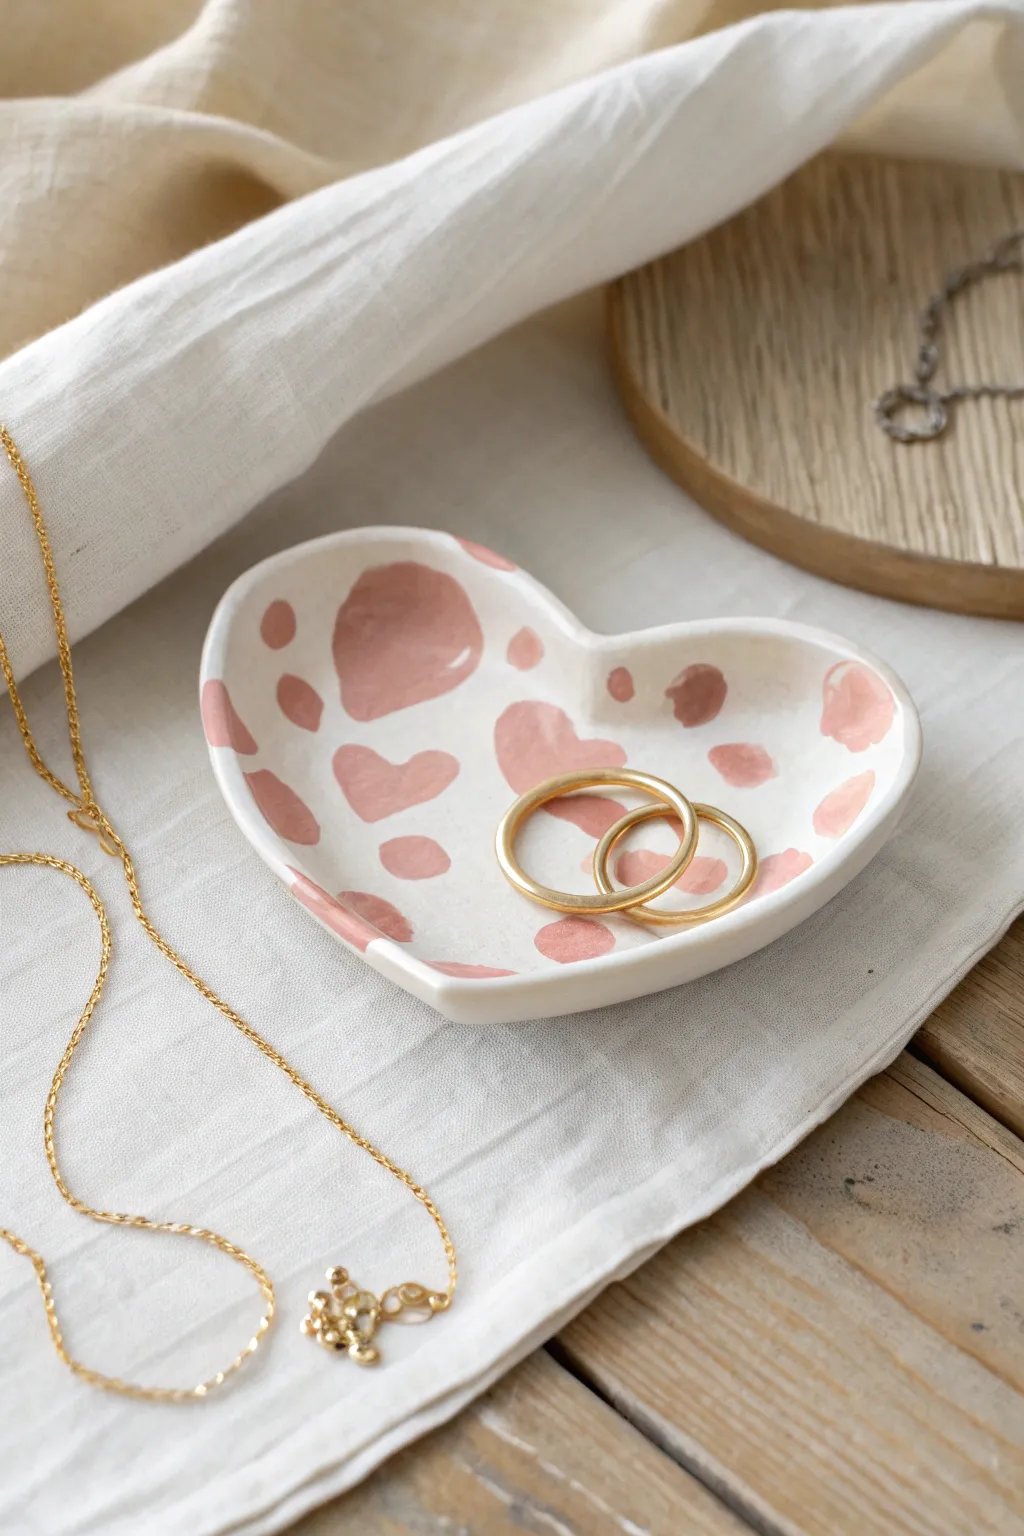
This trendy, preppy trinket dish combines a classic heart shape with a playful pink cow-print pattern. It’s the perfect size for holding your favorite rings and adds a soft pop of color to any nightstand or vanity.
Step-by-Step
Materials
- White air dry clay
- Rolling pin
- Heart-shaped cookie cutter (medium size)
- Small bowl or sponge (for drying)
- Water (for smoothing)
- Sandpaper (fine grit)
- Acrylic paint (light dusty pink)
- Small round paintbrush
- Glossy varnish or sealant (Mod Podge or polyurethane)
Step 1: Shaping the Clay
-
Condition the clay:
Start by taking a handful of white air dry clay and kneading it in your hands until it becomes soft, warm, and pliable. -
Roll it out:
Place the clay on a smooth surface or craft mat. Use a rolling pin to flatten it into an even slab, approximately 1/4 inch thick. -
Cut the shape:
Press your heart-shaped cookie cutter firmly into the clay slab. Wiggle it slightly before lifting to ensure a clean cut, then peel away the excess clay from the outside. -
Smooth the edges:
Dip your finger in a little bit of water and run it gently along the cut edges of the heart to remove any roughness or stray clay bits. -
Curve the sides:
Gently lift the clay heart and pinch the edges upward slightly with your fingertips to create a shallow rim. You want it to be bowl-like rather than completely flat.
Smooth Operator
Use a tiny amount of water on your fingertip to smooth out cracks immediately while shaping. It saves you tons of sanding time later
Step 2: Drying and Refining
-
Set the form:
Place your shaped heart inside a small, shallow bowl or rest it on a curved sponge to help it maintain its cupped shape while drying. -
Let it dry:
Allow the clay to dry completely for at least 24 to 48 hours. I like to flip it over halfway through the process to ensure the bottom dries evenly too. -
Check for imperfections:
Once fully hardened, run your fingers over the dish. Use fine-grit sandpaper to gently buff away any bumps on the rim or surface, then wipe away the dust with a slightly damp cloth.
Gold Rim Upgrade
Paint the very top edge of the rim with metallic gold liquid leaf paint for an extra elegant, high-end jewelry store finish
Step 3: Painting the Design
-
Mix your paint:
Prepare your palette with a light dusty pink acrylic paint. If you only have bright pink, mix in a tiny drop of brown or white to mute the tone to match the photo. -
Paint the first spots:
Using a small round brush, paint organic, irregular blob shapes onto the white dish. These should look like cow spots, but slightly softer. -
Add variation:
Vary the size of your spots. Make some large and round, and others smaller and oblong. Ensure some spots go over the edge of the rim for a natural pattern look. -
Include hidden hearts:
To mimic the specific design in the image, paint a few of your ‘cow spots’ vaguely in the shape of hearts. They should fit into the pattern without looking too perfect or uniform. -
Let paint dry:
Allow the pink paint to dry completely to the touch before moving to the final step.
Step 4: Finishing Touches
-
Apply sealant:
Apply a coat of glossy varnish or sealant over the entire top surface of the dish. This gives it that ceramic-like shine seen in the photo and protects the paint. -
Second coat:
Once the first coat is tacky or dry, apply a second thin coat of varnish for extra durability. -
Final cure:
Let the dish cure for the time recommended on your varnish bottle before placing any jewelry inside.
Your adorable new ring dish is now ready to keep your treasures safe and stylish


Concentric Heart Nesting Trays
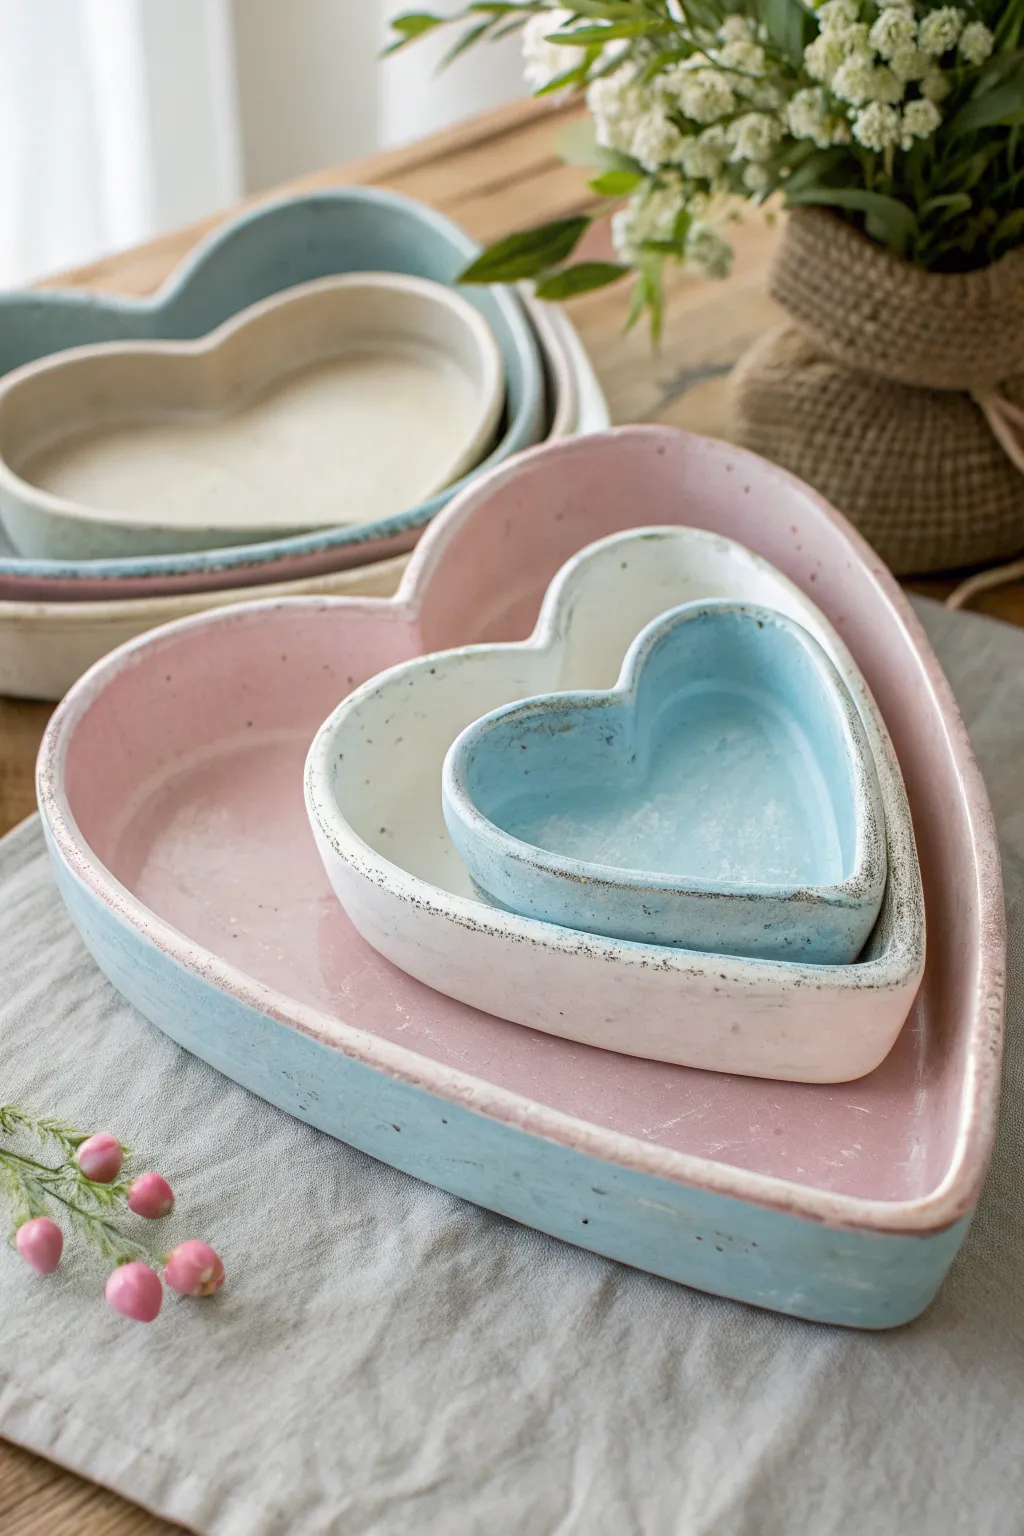
Bring a touch of cottagecore charm to your vanity with this adorable set of heart-shaped nesting trays. Featuring a glossy, speckled finish and sweet pastel hues, these dishes look like kiln-fired ceramics but are easily made at home without a potter’s wheel.
Detailed Instructions
Materials
- High-quality white air dry clay
- Rolling pin
- Heart-shaped cookie cutters (3 sizes) or paper templates
- Craft knife
- Small bowl or sponge for water
- Fine-grit sandpaper
- Acrylic paints (pastel pink, sky blue, cream)
- Brown acrylic paint (for speckling)
- High-gloss varnish or glaze
- Old toothbrush
- Soft paintbrushes
Step 1: Shaping the Clay
-
Roll the clay slab:
Begin by taking a large chunk of air dry clay and kneading it briefly until it is pliable. Roll it out on a smooth surface or a silicone mat until you have an even slab roughly 1/4 inch thick. Ensuring the thickness is consistent will help prevent warping later. -
Cut the heart bases:
Using your three different-sized heart cookie cutters, press firmly into the clay slab to cut out the base shapes. If you don’t have cutters, you can trace around paper heart templates with a craft knife. -
Prepare the walls:
Gather the excess clay and roll it into long, thin coils or ‘snakes.’ You’ll need enough length to outline the perimeter of each heart base. -
Attach the coils:
Score the edges of your heart bases by making small cross-hatch marks with your knife. Dab a little water on the scored area, then gently press the clay coil onto the edge of the heart to create the wall. -
Blend the seams:
This is the most crucial part for structural integrity. Use your finger or a modeling tool to smooth the clay coil downward onto the base, blending the seam until it disappears completely on both the inside and outside.
Fixing Cracks
Mix a small amount of fresh clay with water to make a paste called ‘slip.’ Use this to fill in any surface cracks that appear during drying, then sand smooth once dry.
Step 2: Refining and Drying
-
Smooth the surfaces:
Dip your finger in a tiny bit of water and run it over the rim and walls of the trays to smooth out any fingerprints or bumps. You want the rim to look slightly rounded and organic, not sharp. -
Dry gradually:
Place your trays on a wire rack or a piece of cardboard to air dry. Turn them over gently every few hours to ensure the bottom dries evenly. This prevents the hearts from curling up as they shrink. -
Sand for perfection:
Once fully dry (usually 24-48 hours), use fine-grit sandpaper to gently buff the entire surface. Pay special attention to the rim to get that professional ceramic look. -
Wipe clean:
Use a dry brush or a barely damp cloth to remove all clay dust before you start painting.
Level Up: Gold Rims
For a more glam look, swap the rustic brown rim for liquid gold leaf. Apply it carefully along the top edge after your sealant has dried for a chic jewelry dish vibe.
Step 3: Painting and Finishing
-
Apply base coats:
Paint the interior of the largest tray a soft pastel pink and the exterior a light sky blue. For the medium tray, paint it entirely cream or off-white. For the smallest tray, paint the interior sky blue. -
Add vintage detailing:
To mimic the look of exposed ceramic edges, mix a tiny bit of brown paint with water. Use a nearly dry brush to lightly distress the very top rim of each heart, giving it a toasted, rustic definition. -
Create the speckled effect:
Dilute brown acrylic paint with water until it’s quite runny. Dip an old toothbrush into this mixture, stand back a bit, and run your thumb across the bristles to flick tiny speckles over the trays. -
Seal heavily:
To achieve the ‘faux ceramic’ look, apply two to three thick coats of high-gloss varnish. Let each coat dry completely before adding the next. This gives the clay that glassy, kiln-fired shine.
Stack your finished trays together or scatter them across your dresser to organize your favorite rings and trinkets


Smiley Face Catchall Dish
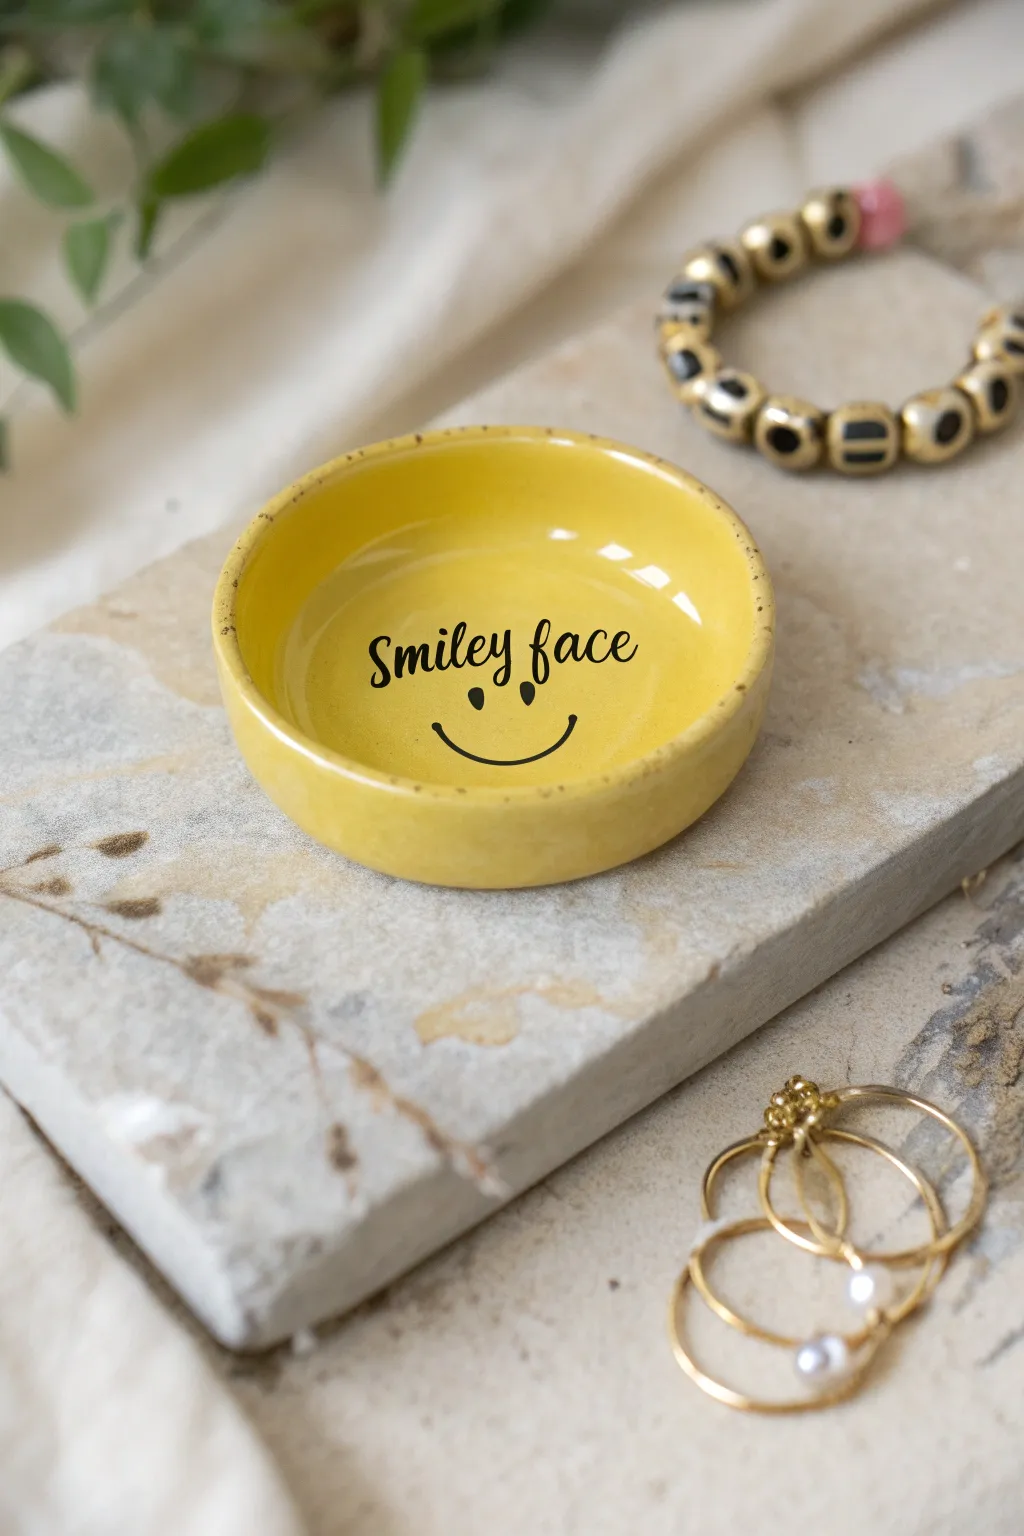
Bring a permanent dose of happiness to your vanity with this vibrant yellow catchall dish featuring a classic smiley design. It is the perfect size for holding your favorite rings or bracelets, adding a pop of cheerful preppy style to any room.
Step-by-Step Tutorial
Materials
- White classic air dry clay
- Rolling pin
- Circular cookie cutter (approx. 4 inches) or a bowl to trace
- Small bowl of water
- Sponge or craft knife
- Fine-grit sandpaper (220 grit)
- Glossy yellow acrylic paint
- Black acrylic paint pen (fine tip) or small round brush
- Glossy varnish or sealant (Mod Podge or spray)
- Parchment paper or silicone mat
Step 1: Shaping the Clay
-
Prep your surface:
Lay down parchment paper or a silicone mat on a flat work surface to prevent the clay from sticking as you roll it out. -
Roll out the slab:
Take a handful of white air dry clay and condition it briefly in your hands. Use the rolling pin to flatten it into an even slab, aiming for a thickness of about 1/4 inch. -
Cut the circle:
Press your circular cutter firmly into the clay. If you don’t have a cutter, place a small bowl upside down on the clay and trace around it with a craft knife to get your round base. -
Create the rim:
Gently lift the edges of your clay circle upwards to create a shallow vertical rim. You can pinch the clay slightly between your thumb and forefinger to define the wall height. -
Smooth the imperfections:
Dip your finger into a little water and run it along the rim and the interior of the dish to smooth out any cracks or fingerprints. A damp sponge works wonders here for a flawless finish. -
Dry completely:
Place the dish in a safe spot to dry. Air dry clay typically needs 24-48 hours. I find flipping it over halfway through the process helps the bottom dry evenly.
Cracks happen
If small cracks appear while drying, mix a tiny bit of fresh wet clay with water to make a paste (slip) and fill them in before sanding.
Step 2: Sanding and Painting
-
Sand for smoothness:
Once the dish is bone dry, take your fine-grit sandpaper and gently buff the entire surface. Focus on the rim to ensure it feels nice and rounded to the touch. -
Clean dust:
Wipe away all the clay dust with a slightly damp cloth or paper towel so your paint adheres properly. -
Apply base color:
Paint the entire dish—inside, outside, and bottom—with glossy yellow acrylic paint. You will likely need 2-3 coats for opaque, vibrant coverage, letting each layer dry in between. -
Draft the design:
If you are nervous about freehanding, use a pencil to very lightly sketch the words ‘Smiley face’ and the simple face arc and eyes onto the center of the yellow dish. -
Lettering:
Using a fine-tip black paint pen (or a very thin liner brush with black paint), carefully trace over your lettering. Use a flowing, cursive style for the text. -
Draw the face:
Add two small oval dots for eyes and a wide U-shape for the smile directly beneath the text. Keep the lines clean and simple. -
Seal the deal:
After the black paint is fully dry, apply a glossy varnish or sealant over the entire dish. This protects the paint from chipping and gives it that finished ceramic look.
Speckled Effect
Flick a stiff toothbrush loaded with brown paint over the yellow base before adding text to create a trendy ceramic speckle texture.
Place your new dish on your dresser and enjoy the smile it brings to your daily routine

What Really Happens Inside the Kiln
Learn how time and temperature work together inside the kiln to transform clay into durable ceramic.
Daisy Coaster Set
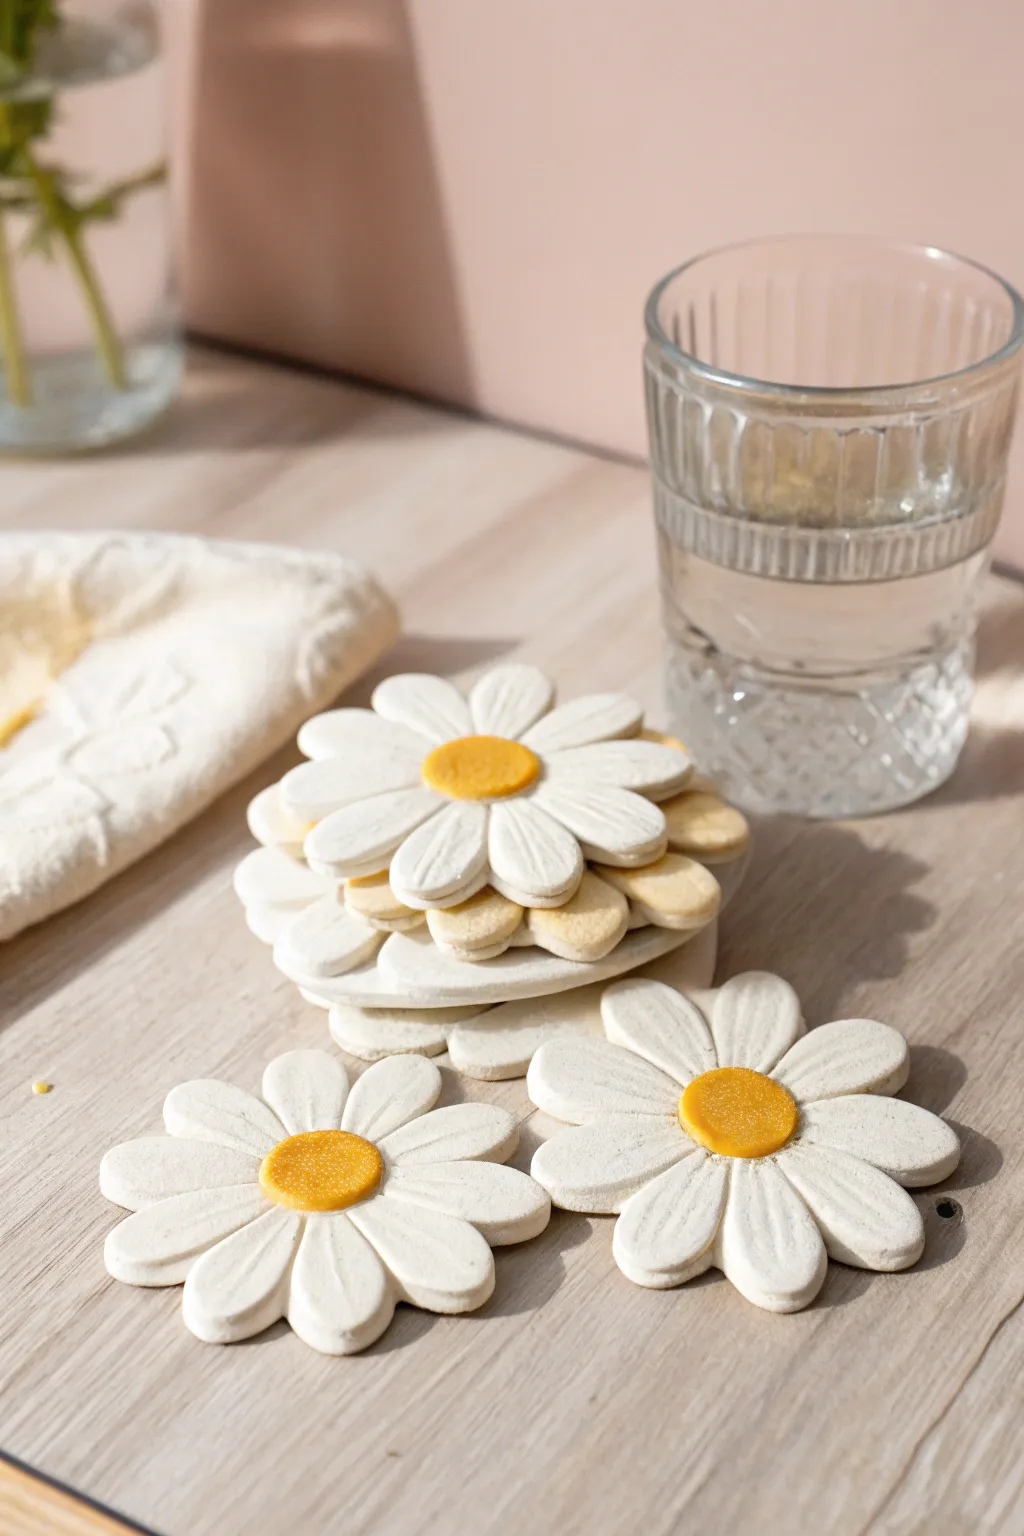
Bring a fresh, floral touch to your table setting with these charming daisy-shaped coasters. Their clean white petals and sunny yellow centers offer a delightful ‘cottagecore’ aesthetic that is surprisingly simple to sculpt.
Step-by-Step Guide
Materials
- White smooth air-dry clay
- Rolling pin
- Daisy flower cookie cutter (large, approx. 3.5-4 inches)
- Small circle cookie cutter (approx. 1 inch)
- Modeling tool or butter knife
- Yellow acrylic paint
- Clear matte or gloss sealant
- Fine-grit sandpaper
- Water in a small cup
- Paintbrush
Step 1: Shaping the Base
-
Condition the clay:
Start by taking a large chunk of air-dry clay and kneading it in your hands until it becomes warm and pliable. This prevents cracks later on. -
Roll the slab:
Place the clay on a smooth surface or canvas mat. Roll it out evenly to a thickness of about 1/4 inch (6mm). You want it thick enough to be sturdy but not chunky. -
Cut the shapes:
Press your large daisy cookie cutter firmly into the clay slab. Wiggle it slightly to ensure a clean cut, then lift the excess clay away. -
Smooth the edges:
Dip your finger in a little bit of water and run it along the cut edges of the flower petals to smooth down any rough textures or jagged bits.
Step 2: Adding Detail & Volume
-
Create the center:
Roll out a separate, thinner piece of clay. Use the small circle cutter to make the flower centers. -
Attach the center:
Score the back of the small circle and the center of the daisy with a needle tool or toothpick. Add a drop of water as ‘glue’ and press the circle firmly into place. -
Texture the center:
To mimic pollen texture, gently dab the surface of the center circle with an old toothbrush or a stiff bristled brush. -
Detail the petals:
Using a modeling tool or the back of a butter knife, gently press a line down the middle of each petal, radiating from the center outwards. I find this really brings the flower to life. -
Refine the shape:
If the pressure of detailing flattened the petals, gently push the edges inward to puff them back up slightly.
Fixing Petal Cracks
If you see tiny hairline cracks appearing as the petals dry, mix a tiny bit of wet clay into a paste (slip) and fill the crack, smoothing it over with a damp finger immediately.
Step 3: Finishing Touches
-
Let it dry:
Place your coasters on a wire rack or parchment paper. Let them dry for 24-48 hours, flipping them halfway through to ensure even drying and prevent curling. -
Sand for smoothness:
Once fully cured and hard, use fine-grit sandpaper to gently buff away any remaining fingerprints or rough edges. -
Paint the center:
carefully paint the textured center circle with sunny yellow acrylic paint. You may need two coats for vibrancy. -
Seal the coaster:
Since these are coasters, protection is key. Apply 2-3 coats of a waterproof varnish or sealant to the entire piece. -
Add felt backing:
Optional: Cut a circle of felt and glue it to the underside of the coaster to protect your table surfaces.
Personalize It
Create a pastel set by kneading very small amounts of pink, blue, or lavender acrylic paint directly into the white clay before rolling out your petals.
Stack your new floral coasters on the coffee table for a sweet, functional piece of decor
Scalloped Vanity Trinket Bowl
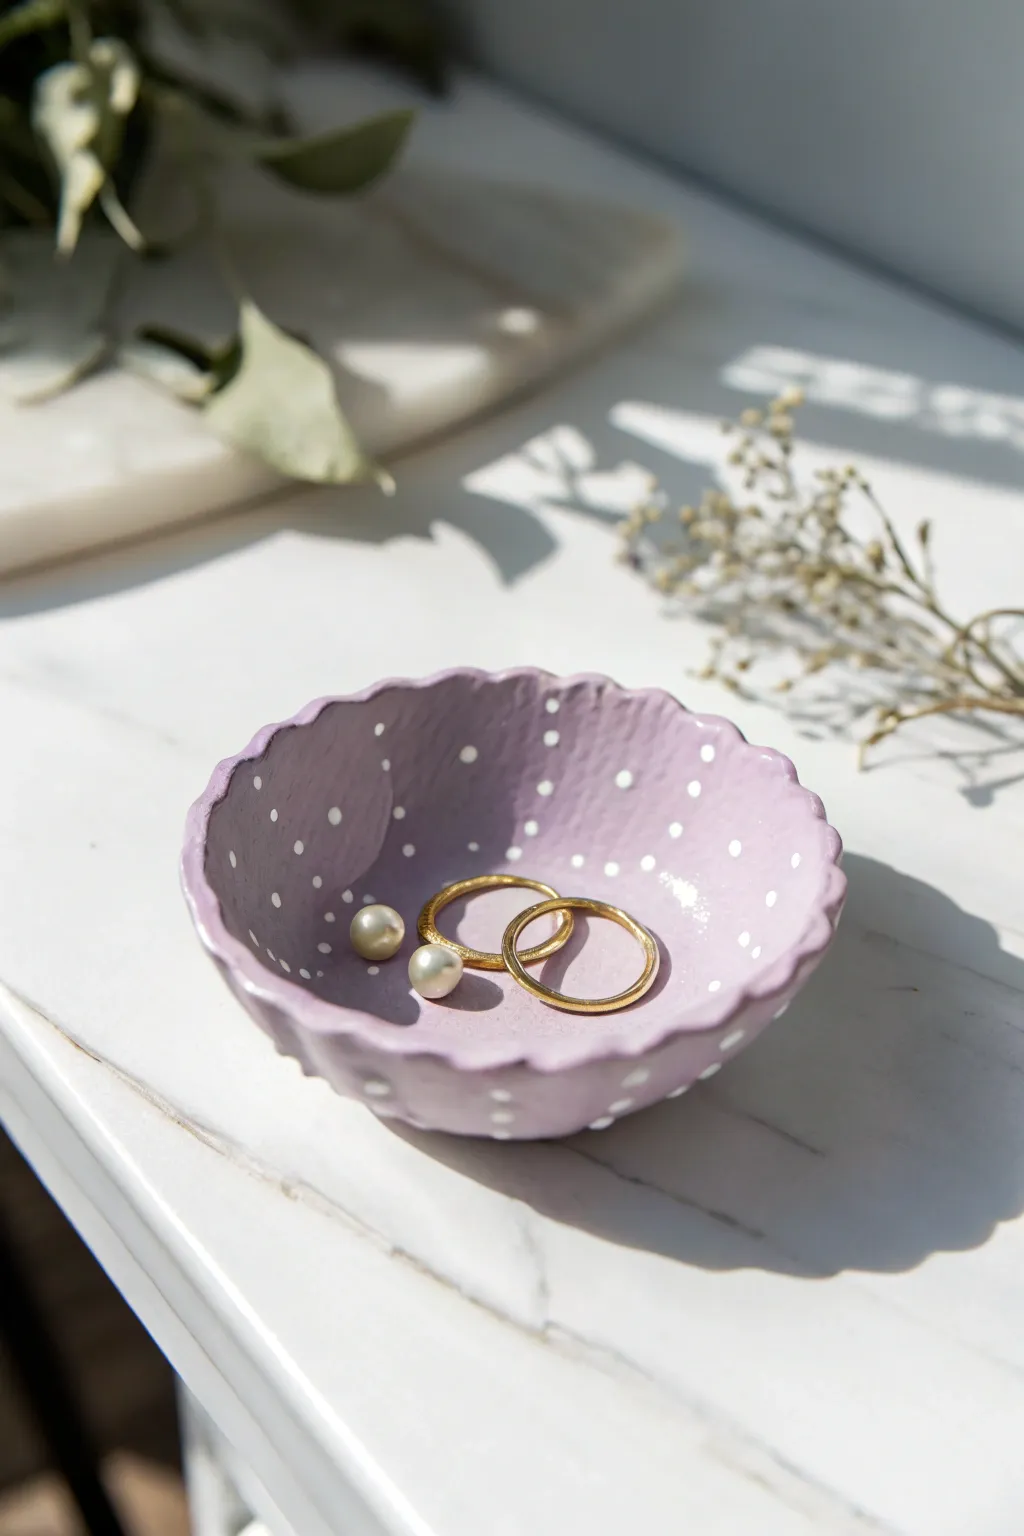
This charming lavender trinket dish combines a soft, organic shape with a playful polka dot pattern for the ultimate preppy accessory. It is the perfect size for holding your favorite delicate gold rings or pearl earrings on your bedside table.
Detailed Instructions
Materials
- White polymer clay or air-dry clay
- Acrylic rolling pin
- Round cookie cutter (approx. 3-4 inches)
- Small round piping tip or straw (optional for scallops)
- Lavender acrylic paint
- White acrylic paint
- Fine detail paintbrush (size 0 or 00)
- Flat shader brush
- Glossy varnish or glaze
- Small bowl of water
- Fine-grit sandpaper
Step 1: Shaping the Clay
-
Condtion the clay:
Start by kneading a ball of white clay in your hands until it becomes soft, pliable, and free of cracks. If using air-dry clay, keep your fingers slightly damp. -
Roll it out:
Use your acrylic rolling pin to flatten the clay into an even slab. Aim for a thickness of about 1/4 inch so the bowl feels substantial but elegant. -
Cut the circle:
Press your round cookie cutter firmly into the slab to cut out a perfect circle. Peel away the excess clay and set it aside. -
Create the scallops:
To form the scalloped edge, gently press your thumb or the back of a small spoon into the edge of the circle at regular intervals. Alternatively, use the side of a small piping tip to indent curves along the perimeter. -
Refine the shapoe:
Use a damp fingertip to smooth out the sharp edges of your scallops. The clay should look soft and rounded, not jagged.
Smooth Operator
dip your finger in water and run it over the cut edges of the raw clay before drying. This ‘burnishing’ step removes ragged cuts and minimizes sanding time later.
Step 2: Forming the Bowl
-
Use a mold:
Place your clay circle inside a small, shallow bowl (like a measuring cup or dessert bowl) to give it a curved shape. Gently press the center down so it conforms to the mold. -
Define the rim:
While it is in the mold, go around the rim one last time to ensure your scallops haven’t flattened out. Push them slightly outward if needed. -
Let it dry:
Allow the clay to dry completely according to the package instructions. For air-dry clay, this usually takes 24-48 hours. I prefer to rotate it halfway through drying to expose the bottom to air. -
Smooth the surface:
Once fully cured and hard, remove the dish from the mold. Gently sand any rough spots on the rim or surface with fine-grit sandpaper until buttery smooth.
Cracked Clay?
If minor cracks appear while drying, don’t panic. Mix a tiny bit of fresh clay with water to make a paste (slip) and fill in the cracks, then sand smooth once dry.
Step 3: Painting and Finishing
-
Base coat application:
Using a flat shader brush, paint the entire interior and exterior of the bowl with a lovely lavender acrylic paint. You may need two coats for full opacity. -
Dry the base:
Wait for the lavender paint to be completely dry to the touch before moving on to the details. -
Add the dots:
Dip the handle end of your fine detail brush or a dedicated dotting tool into white acrylic paint. Gently dot the paint onto the interior surface in a random, scattered pattern. -
Vary the spacing:
Keep the spacing slightly irregular to maintain that organic, handmade charm rather than a rigid grid. -
Dot the rim:
Add a few tiny white dots along the sculpted scalloped edge to highlight the shape. -
Seal the piece:
Once all paint is perfectly dry, apply a generous coat of glossy varnish. This not only protects the paint but gives it a high-end ceramic look.
Place your new dish on your vanity to enjoy a pop of pastel color every morning


The Complete Guide to Pottery Troubleshooting
Uncover the most common ceramic mistakes—from cracking clay to failed glazes—and learn how to fix them fast.
Pill-Shaped Candle Tray
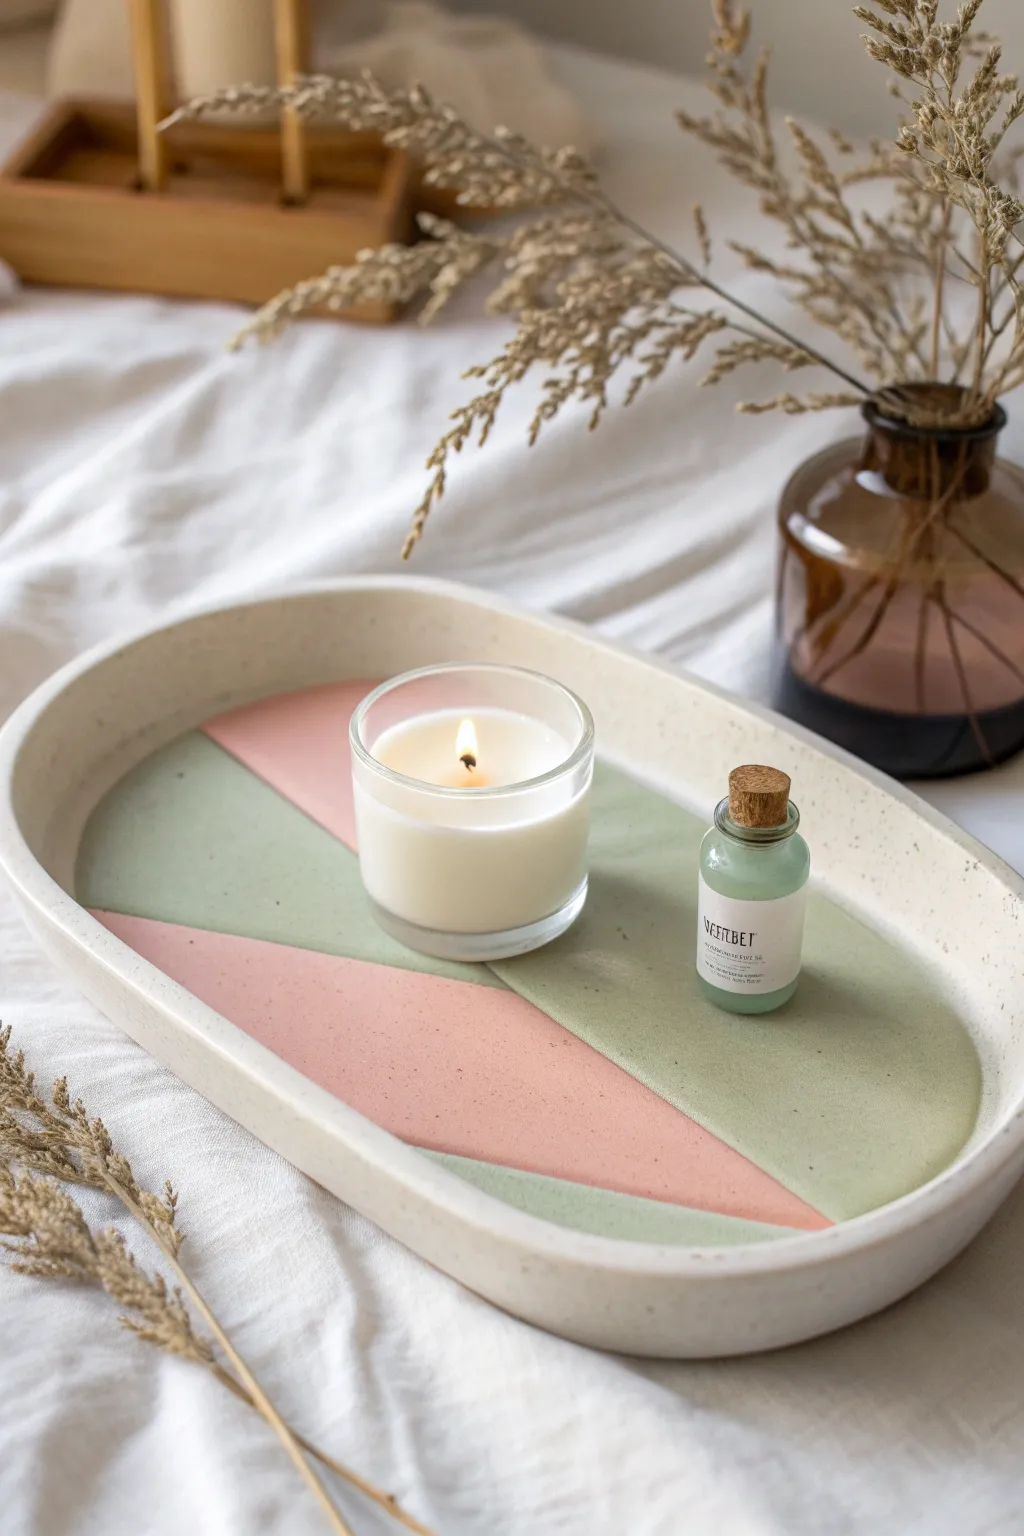
Bring a touch of modern pastel elegance to your vanity with this custom pill-shaped tray. Featuring subtle speckled textures and a soft color-blocked interior, it’s the perfect resting spot for your favorite candle or skincare minis.
Step-by-Step Tutorial
Materials
- White air dry clay
- Rolling pin
- Craft knife or scalpel
- Dough scrapers or ruler
- Sandpaper (fine and medium grit)
- Acrylic paints (pastel sage green, dusty pink, cream)
- Dark brown or black acrylic paint (for speckles)
- Old toothbrush
- Matte varnish or sealant
- Bowl of water
- Sponge
Step 1: Shaping the Base
-
Condition the Clay:
Begin by taking a substantial chunk of white air dry clay and kneading it in your hands until it’s warm, pliable, and free of cracks. -
Roll the Slab:
Roll the clay out onto a smooth surface to a thickness of about 1/4 inch (6mm). Aim for an even thickness throughout to prevent warping later. -
Cut the Pill Shape:
Sketch a large pill shape (an elongated oval with flat sides) on paper first to use as a template. Place it on the clay and cut around it using your craft knife. -
Create the Sidewalls:
Roll a long snake or coil of clay, then flatten it into a long strip about 1 inch high. This will form the rim of your tray. -
Attach the Rim:
Score the edges of your base and the bottom of your clay strip. Apply a little water or slip, then wrap the strip around the base, pressing firmly to join them. -
Smooth the Seams:
Use a damp sponge or your finger to blend the clay where the wall meets the base, both inside and outside, until the seam is invisible.
Step 2: Refining and Drying
-
Smooth the Edges:
Run a wet finger along the top rim to round it off slightly. Check the overall shape and gently push any warped sides back into a perfect curve. -
Slow Drying:
Place the tray in a cool, dry spot away from direct sunlight. Let it dry for 24-48 hours, flipping it occasionally to ensure the bottom dries evenly. -
Sanding:
Once fully cured and bone dry, use medium grit sandpaper to level out any bumps, followed by fine grit to make sure the surface is silky smooth.
Cracks Appearing?
Mix a small amount of clay with water to create a paste (slip). Fill the cracks, smooth over, and let dry again before sanding.
Step 3: Painting the Design
-
Base Coat:
Paint the entire tray—inside, outside, and bottom—with a creamy off-white acrylic paint. You may need two thin coats for opaque coverage. -
Draft the Pattern:
Lightly trace your geometric design onto the inside base with a pencil. The design consists of intersecting triangles or curved wedges radiating from the center. -
Color Blocking:
Fill in the specific sections with pastel sage green and dusty pink acrylics. Use a small flat brush to get crisp lines where the colors meet. -
Adding Speckles:
Dilute a tiny amount of dark brown paint with water. Dip an old toothbrush into the mixture and run your thumb across the bristles to flick tiny specks over the entire tray for a faux-stone look.
Tape Tip
For super sharp lines on your color blocks, use low-tack painter’s tape or washi tape to mask off sections before painting.
Step 4: Finishing
-
Sealing:
Allow the paint to dry completely. Apply a coat of matte varnish to protect the surface from scratches and minor moisture. -
Final Cure:
Let the varnish cure according to the bottle instructions before placing any candles or bottles on the surface.
Now stepping back to admire your work, you have a chic, functional piece of decor ready for display
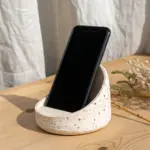
Color-Blocked Phone Stand
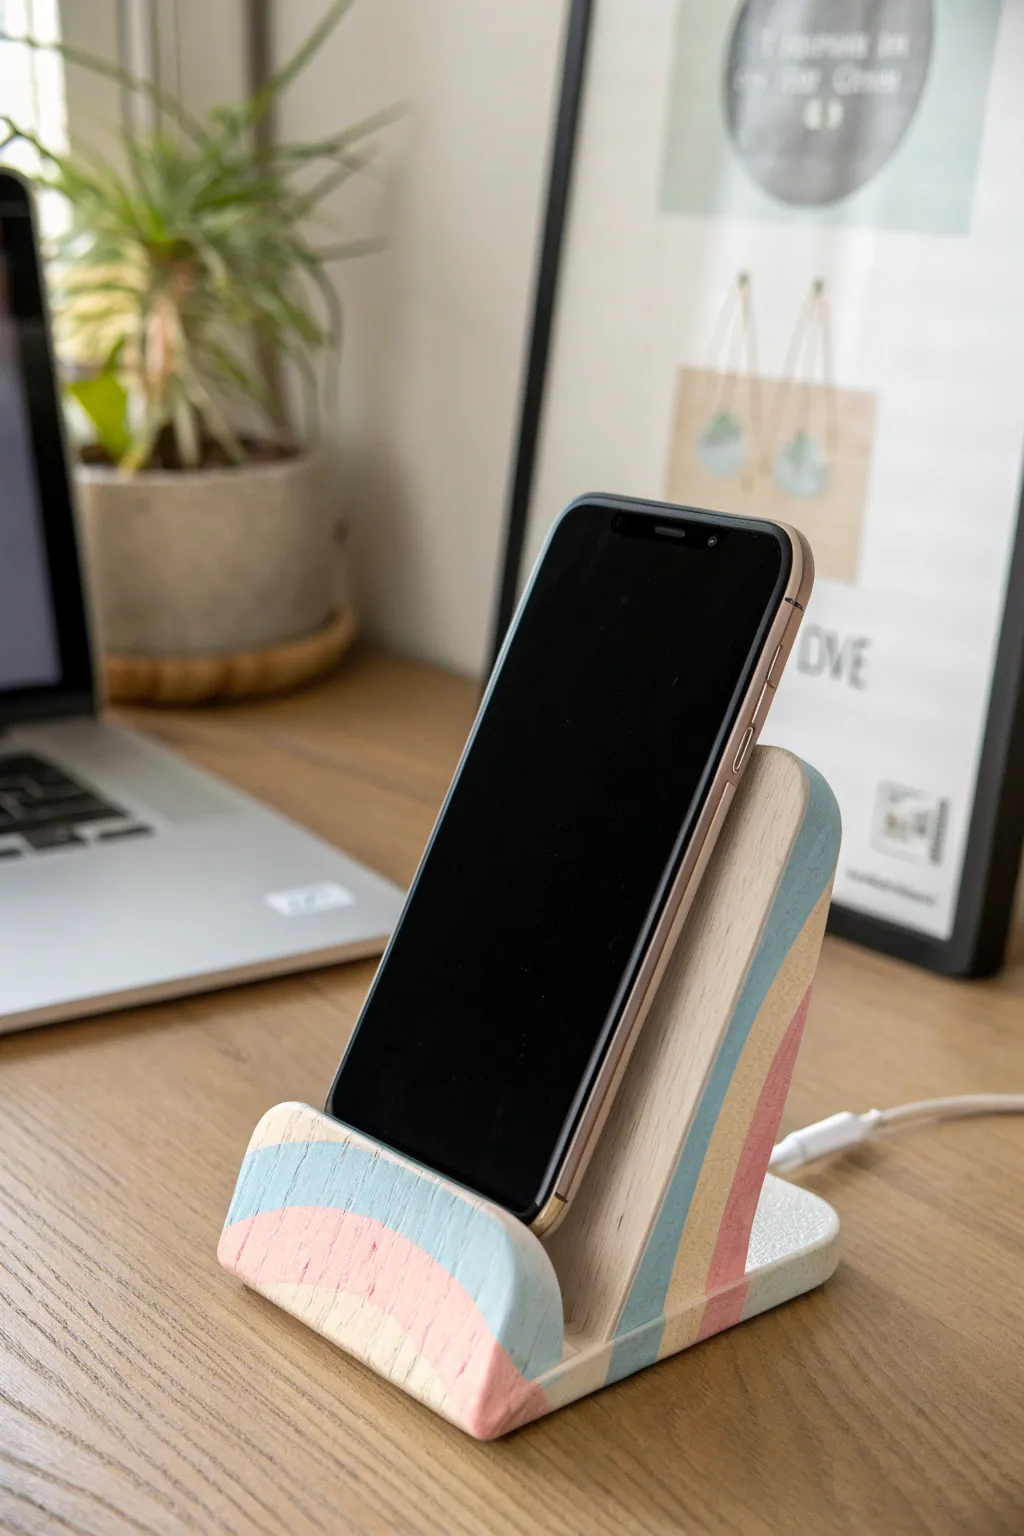
Give your desk a colorful, functional upgrade with this chic phone stand featuring soft pastel color-blocking. The clean lines and cheerful stripes create a modern ‘preppy’ aesthetic that keeps your device upright and visible while charging.
Step-by-Step
Materials
- Air dry clay (white or natural)
- Phone stand template (cardboard or sturdy paper)
- Clay roller or rolling pin
- Craft knife or clay slicing tool
- Sandpaper (fine grit)
- Acrylic paints (pastel blue, light pink, soft yellow)
- Painter’s tape or washi tape
- Small flat paintbrush
- Clear matte sealant or varnish
- Ruler
- Water in a small cup
Step 1: Shaping the Structure
-
Roll the slab:
Start by conditioning a large chunk of air dry clay in your hands until it’s pliable. Roll it out on a non-stick surface into a thick, even slab, aiming for about 1/2 inch to 3/4 inch thickness for stability. -
Cut the base:
Using a ruler and craft knife, cut a rectangular base piece. Make it slightly wider than your phone and long enough to support the lean. -
Create the back support:
Cut a second rectangle for the backrest. This needs to be tall enough to support at least two-thirds of your phone’s height. I prefer to cut the bottom edge at a slight angle so it leans back naturally. -
Fashion the front lip:
Cut a smaller, shorter rectangle or semi-circle shape for the front. This piece acts as the stopper to keep the phone from sliding forward. -
Score and slip:
Before joining, score (scratch) the contact points on the base, the backrest, and the front lip. Apply a little water or liquid clay ‘slip’ to these roughed-up areas. -
Assemble the stand:
Press the backrest firmly onto the rear of the base and the stopper onto the front. Smooth the seams with your finger or a clay tool to merge the pieces into one solid unit. -
Add cable access:
If you want to charge your phone while it stands, use a straw or clay tool to carve a small channel or hole near the bottom center of the backrest before the clay hardens. -
Refine edges:
Dip your finger in water and run it along all cut edges to soften them slightly. Ensure the stand sits flat on the table without wobbling. -
Let it cure:
Set the stand aside in a dry, safe place. Allow it to air dry for at least 24-48 hours. Turn it over gently halfway through to ensuring the bottom dries completely.
Step 2: Sanding and Painting
-
Smooth the surface:
Once fully dry and hard, use fine-grit sandpaper to buff away any fingerprints, bumps, or rough edges. Wipe away the dust with a slightly damp cloth. -
Tape the first stripe:
To get those crisp color-blocked lines, apply painter’s tape diagonally across the side of the stand. Press the edges of the tape down firmly to prevent paint bleed. -
Paint the bottom section:
Apply your pastel pink paint to the bottom section defined by your tape. Let it dry to the touch, then carefully peel back the tape. -
Tape the middle stripe:
Once the pink is fully dry, apply new tape to define the middle stripe. You’ll want to cover the pink edge slightly to protect it. -
Apply yellow paint:
Paint the middle stripe with your soft yellow acrylic. It might need two coats for opaque coverage. -
Finish the top color:
Tape off the yellow section once dry and paint the remaining top section and the back in pastel blue. -
Detail the edges:
Use a small brush to tidy up any lines where the colors meet. You can choose to paint the flat faces of the stand or leave them natural white for contrast. -
Seal for protection:
Apply a coat of clear matte sealant over the entire piece. This protects the paint from chipping and makes the stand easier to wipe clean.
Clean Lines
For ultra-crisp lines, paint a thin layer of the *base* color (white) over the tape edge first. This seals the tape so the colored paint won’t bleed underneath.
It’s Cracking!
Small cracks during drying are normal. Make a paste of clay and water, fill the crack, let it dry, and sand it smooth before painting.
Now you have a stylish spot to park your phone that perfectly matches your decor

TRACK YOUR CERAMIC JOURNEY
Capture glaze tests, firing details, and creative progress—all in one simple printable. Make your projects easier to repeat and improve.
Candy-Stripe Toothbrush Holder
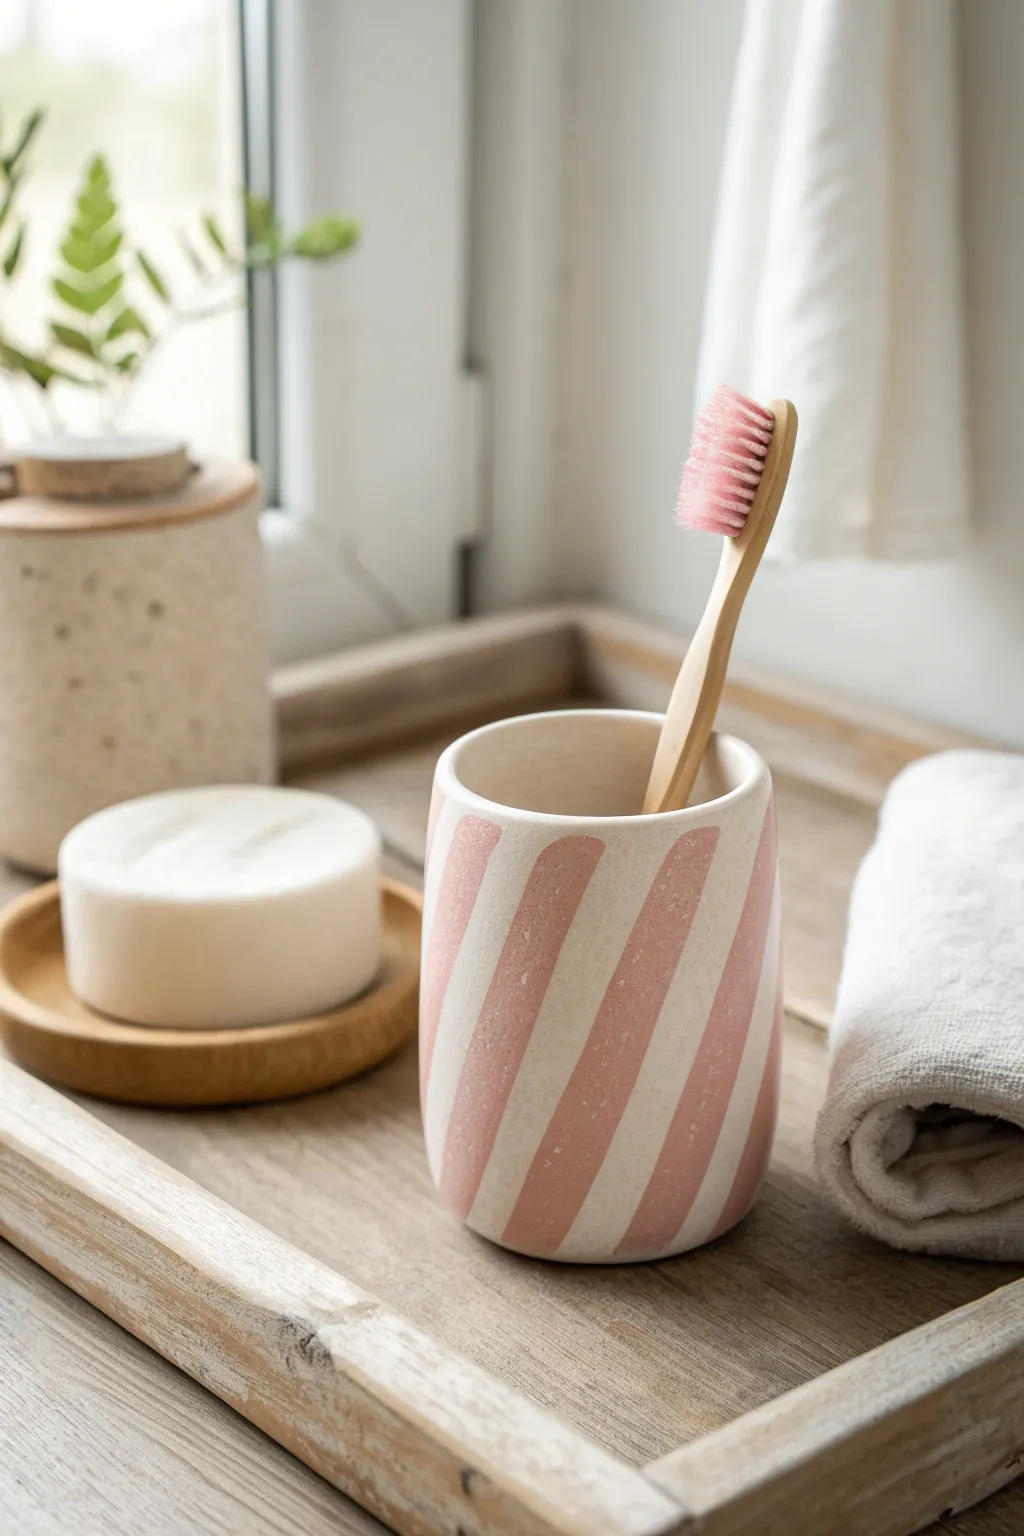
Bring a fresh, preppy aesthetic to your bathroom counter with this charming striped vessel. The soft pink and speckled cream stripes create a timeless look that feels both modern and handmade.
How-To Guide
Materials
- Air dry clay (white or cream)
- Acrylic rolling pin
- Cylindrical mold (e.g., a glass jar or cardboard tube)
- Clay knife or craft blade
- Bowl of water
- Smooth work surface or clay mat
- Soft pink acrylic paint
- Masking tape or painters tape (thin, approx 0.5 inch)
- Two paintbrushes (one flat, one splatter)
- Matte spray varnish or sealant
- Sandpaper (fine grit)
Step 1: Forming the Base Vessel
-
Condition the Clay:
Start by kneading a large handful of air dry clay until it feels warm and pliable without cracking. If it feels too dry, dip your fingers in water and work the moisture in. -
Roll the Slab:
Using your acrylic rolling pin, roll the clay out into a long rectangle. Aim for a consistent thickness of about 1/4 inch to ensure the holder is sturdy. -
Measure and Cut:
Wrap your chosen cylindrical mold with a piece of paper to find the circumference, then use this as a guide to cut your clay rectangle to size. Leave a tiny bit of extra length for the overlap. -
Create the Base:
Cut a separate circle of clay using the base of your mold as a template. This will be the bottom of your toothbrush holder. -
Score and Slip:
Before joining, score (scratch) the edges of both the rectangle and the circle base with your knife, then add a drop of water to create a slippery ‘glue’. -
Assemble the Cylinder:
Wrap the clay rectangle around your mold. Join the side seam first by smoothing the clay together with your fingers or a modeling tool until the line disappears. -
Attach the Bottom:
Place the cylinder onto the circular base. Smooth the clay upwards from the base into the walls to create a seamless, watertight seal. -
Smooth the Rim:
Dip your finger in water and run it along the top rim to round off any sharp edges. It should look soft and finished, not jagged. -
Drying Time:
Carefully slide the mold out if possible, or let it dry slightly before removing. Allow the piece to dry completely for 24-48 hours until it turns chalky white.
Step 2: Adding the Preppy Stripes
-
Sand for Perfection:
Once fully dry, lightly sand the exterior to remove any bumps or fingerprints. Wipe away the dust with a barely damp cloth. -
Base Coat (Optional):
The clay itself is a lovely cream color, but if you want finish consistency, paint the entire exterior with a cream or off-white acrylic paint. Let it dry. -
The Speckle Effect:
To mimic the stone-like texture in the photo, dilute a tiny bit of brown paint. Dip a toothbrush or stiff brush in it and flick the bristles to spray tiny speckles over the vessel. -
Apply the Tape:
Once the speckles are dry, apply your masking tape diagonally across the cylinder. Press the edges of the tape down firmly to prevent paint bleed. -
Space the Stripes:
Continue adding diagonal tape strips, trying to keep the spacing equal to the width of the tape. The exposed clay areas will become your pink stripes. -
Paint the Pink:
Using your flat brush, fill in the exposed diagonal spaces with soft pink acrylic paint. Apply two thin coats rather than one thick one for the smoothest finish. -
Remove Tape:
I prefer to peel the tape off while the second coat is still slightly tacky—this helps keep the lines crisp. -
Clean Up:
If any paint seeped under the tape, gently scrape it away with your craft knife or touch it up with a small brush and your cream paint. -
Seal and Protect:
Since this will live in a bathroom, apply at least two coats of matte spray varnish to protect the clay from humidity and splashes.
Fixing Paint Bleed
If paint seeps under your tape, don’t panic. Wait for it to dry fully, then gently scratch the excess away with the tip of a craft knife for a clean edge.
Pro Tip: Weighted Drying
To keep the bottom perfectly flat while it dries, place a small, flat weight (like a coaster) gently inside on the base while the clay is still leather-hard.
Place your new creation by the sink and enjoy that perfect pop of patterned color every morning
Wavy Photo Holder With Pastel Dots
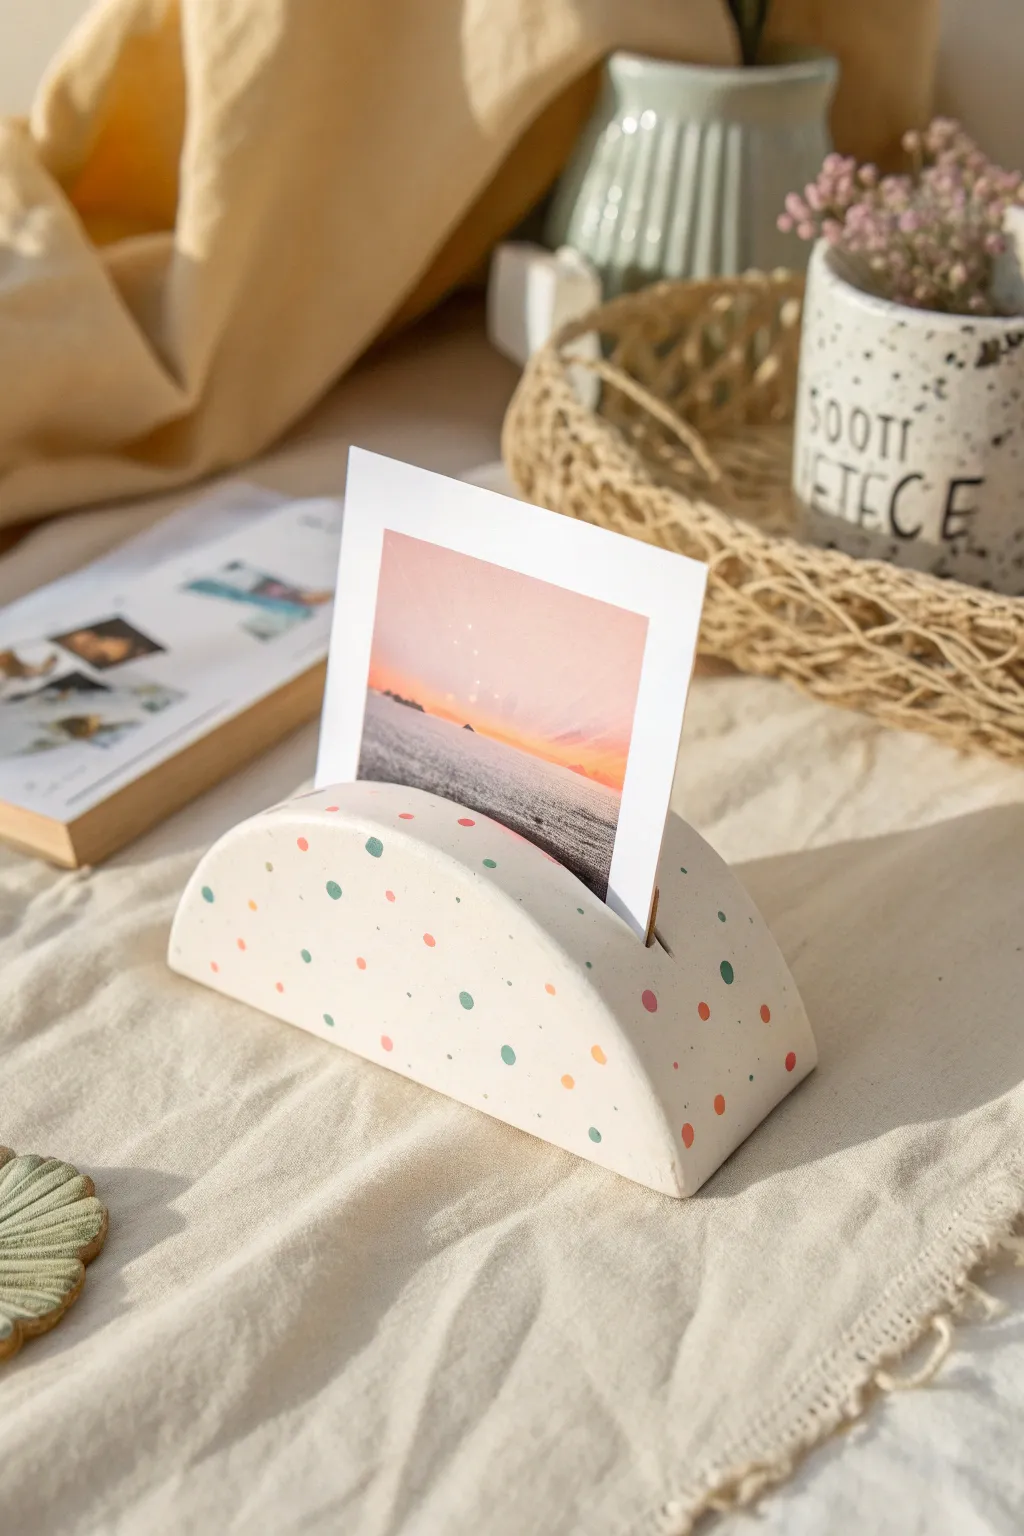
This charming, arch-shaped photo holder brings a soft, playful aesthetic to any desk or shelf with its confetti-like pattern. Its minimal, wavy form is surprisingly sturdy, making it the perfect way to display your favorite polaroids or postcards.
Detailed Instructions
Materials
- White organic air-dry clay
- Rolling pin
- Sharp crafting knife or clay blade
- Small bowl of water
- Sandpaper (fine grit)
- Acrylic paints (pastel pink, mint green, soft orange/coral)
- Small round paintbrush or dotting tool
- Matte finish sealant (spray or brush-on)
- Playing card or thick cardstock (to create the slot)
Step 1: Shaping the Clay
-
Condition the clay:
Start by taking a generous handful of white air-dry clay. Knead it in your hands for a few minutes until it feels warm, pliable, and free of any internal air bubbles. -
Roll it out:
Using your rolling pin, flatten the clay into a thick slab. You want it to be substantial enough to stand on its own, so aim for a thickness of about 1 inch (2.5 cm). -
Cut the base shape:
Use your craft knife to cut a long rectangle from the slab. The length will determine the final width of your holder, while the height of the rectangle will become the height of the arch. -
Form the arch:
Gently curve the top corners of your rectangle downwards to create a semi-circle or arch shape. Smooth the edges with a bit of water on your finger to round them off perfectly. -
Refine the surface:
Dip your fingers in water and run them over the entire surface of the distinct half-moon shape to ensure it is completely smooth and free of fingerprints. -
Create the photo slot:
Take a playing card or a piece of thick cardstock. Press it firmly into the center of the arch’s curved top, pushing straight down to create a groove about half an inch deep. -
Widen gently:
Wiggle the card ever so slightly back and forth to ensure the slot is wide enough to hold a photo without being too loose. -
Clean up edges:
When you remove the card, the clay might bulge slightly at the opening. Use your wet finger or a tool to smooth these edges back down flat.
Cracks appeared?
If tiny cracks form while drying, don’t panic. Mix a tiny bit of fresh clay with water to make a paste (slip) and fill the cracks, then sand smooth once dry.
Step 2: Finishing Touches
-
Let it dry completely:
Place your piece in a cool, dry spot away from direct heater vents. Because this piece is thick, let it dry for at least 48 to 72 hours. Flip it occasionally to ensure the bottom dries evenly. -
Check for dryness:
The clay should look chalky white and feel room temperature to the touch—if it feels cold, it still holds moisture. -
Sand imperfections:
Once fully dry, take your fine-grit sandpaper and gently buff away any rough spots, especially around the base and the curve of the arch. -
Dust it off:
Wipe the sculpture down with a slightly damp brightness cloth or a dry brush to remove all the sanding dust before you start painting. -
Prepare your palette:
Squeeze out small amounts of your pastel acrylic paints. You’ll want a soft mint, a blush pink, and a warm coral tone to match the preppy vibe. -
Start dotting:
Dip the end of a small paintbrush handle or a dotting tool into the mint green paint first. Randomly press dots all over the surface of the arch. -
Add second color:
Clean your tool and switch to the blush pink. Fill in some of the empty spaces, varying the spacing so it looks organic and confetti-like. -
Finish the pattern:
Finally, add the coral dots. I like to step back at this point to see if any areas look too empty and need just one more speck of color. -
Seal the piece:
Allow the paint to dry fully, which should only take about 20 minutes. Then, apply a coat of matte sealant to protect the clay and keep the colors looking soft.
Level Up: Terrazzo Look
Instead of painting dots, mix small chunks of colored clay into your white clay block before rolling. Sand heavily after drying to reveal real terrazzo chips.
Now you have a stylish spot to showcase your favorite memory
Mini Planter With 3D Daisies
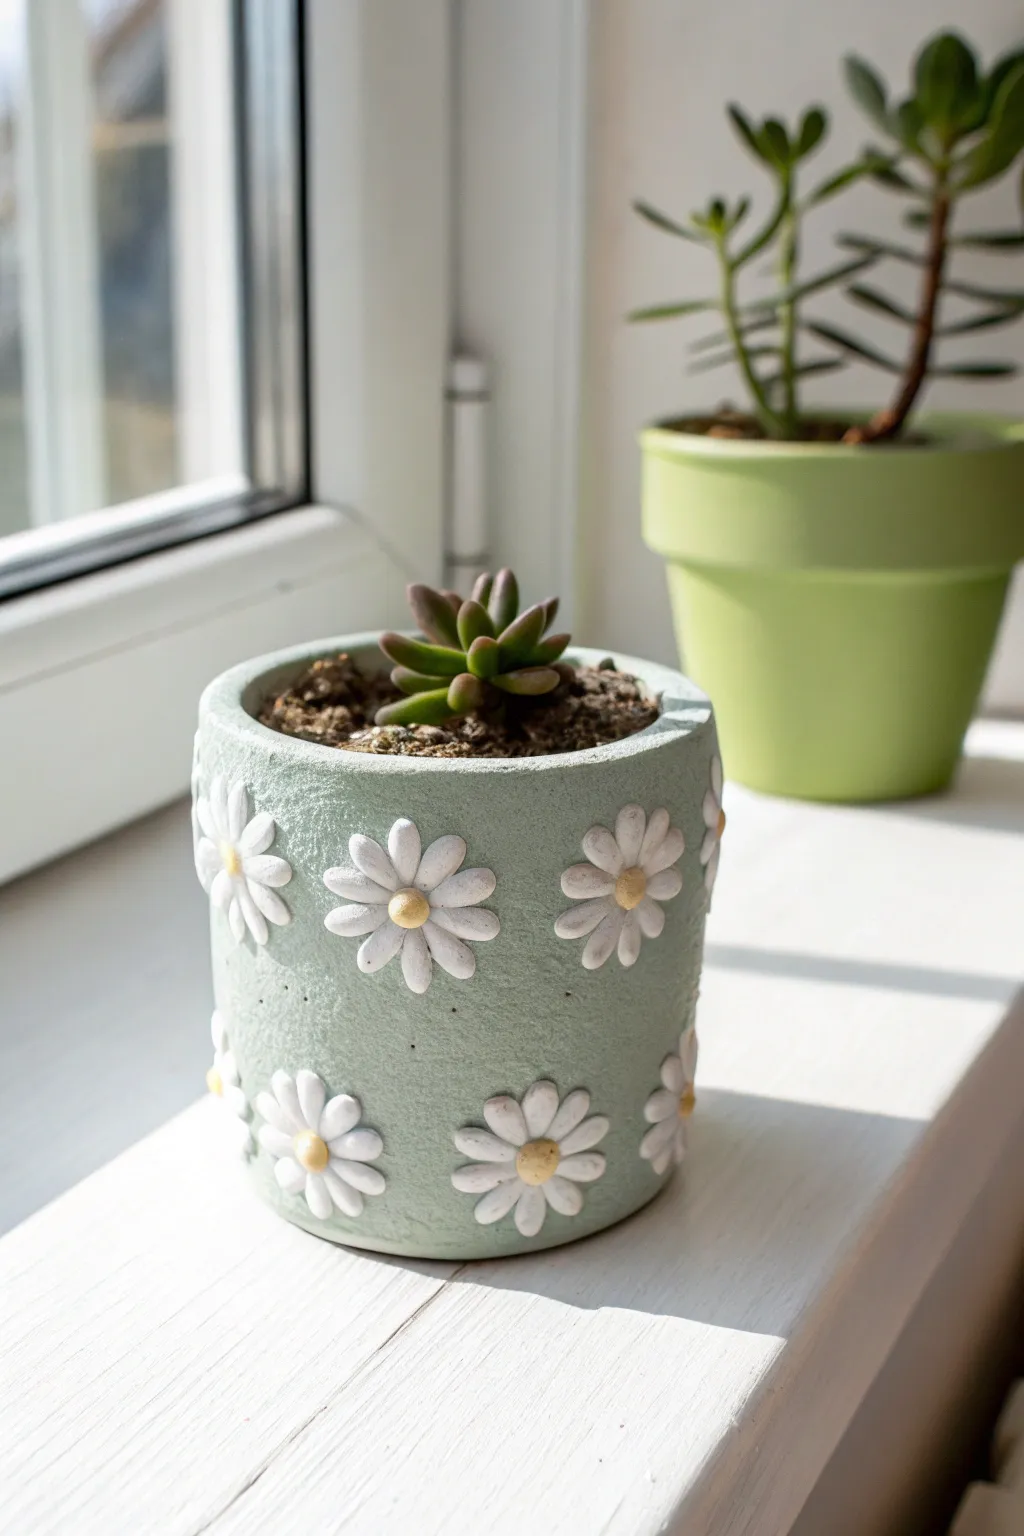
Transform a basic air dry clay cylinder into a charming home for your succulents with this raised floral design. The soft sage green backdrop makes the crisp white 3D daisies pop, adding a touch of preppy garden freshness to any windowsill.
How-To Guide
Materials
- Air dry clay (white)
- Circular cookie cutter or jar lid (approx. 3-4 inch diameter)
- Small rolling pin
- Craft knife or clay shaping tools
- Acrylic paint (Sage Green, White, Mustard Yellow/Gold)
- Paintbrushes (flat brush for base, small liner brush for details)
- Water cup and slip (clay/water mixture)
- Small bowl or cup (to use as a mold)
- Sandpaper (fine grit)
- Varnish or sealant (matte or satin finish)
Step 1: Shaping the Base Vessel
-
Roll the base:
Begin by taking a substantial chunk of air dry clay and rolling it out into a slab about 1/4 inch thick. Use your circular cutter or trace a lid to cut out a perfect circle for the bottom of your pot. -
Cut the walls:
Roll out another slab of clay to the same thickness. Measure the circumference of your base circle, then cut a long rectangular strip that matches that length (plus a tiny bit for overlap) and your desired height. -
Assemble the cylinder:
Score (scratch) the edges of your base circle and the bottom edge of your rectangular strip. Apply a little water or slip to the scored areas. -
Join the seams:
Wrap the rectangle around the base circle. Gently press the seams together where the wall meets the floor, and where the two ends of the wall meet. Use a modeling tool or your finger to smooth the clay so the seams disappear completely. -
Refine the shape:
If the walls feel a bit wobbly, I like to gently slide a glass or small jar inside the pot to help it hold a perfect cylindrical shape while it firms up.
Step 2: Creating the 3D Daisies
-
Form the petals:
While the main pot is setting but still workable, roll out a very thin sheet of fresh clay. Use a small teardrop cutter or hand-cut tiny oval shapes for your daisy petals. You will need about eight petals per flower. -
Attach the petals:
Score the side of your pot where you want the first flower. Dab a dot of slip, then press the petals onto the pot in a radial circle pattern. Flatten them slightly as you attach them to ensure a strong bond. -
Add the centers:
Roll a tiny ball of clay for the flower center. Press this firmly into the middle of your petal circle. Repeat this process until your pot is covered in scattered daisies. -
Detail the petals:
Use a knife tool or toothpick to gently press a single line down the center of each petal for added texture and realism. -
Dry thoroughly:
Let the entire project dry completely. This usually takes 24-48 hours depending on humidity. Flip it over halfway through to let the bottom breathe.
Flower Power Tip
Make the petals slightly thicker at the base where they connect to the center. This structural support prevents them from cracking off during drying or painting.
Step 3: Painting and Finishing
-
Sand limitations:
Once dry, lightly sand the top rim to smooth it out. Be very careful avoiding the 3D flowers, as sanding them can snap off the delicate petals. -
Paint the background:
Using a small flat brush, carefully paint the container’s surface with your sage green acrylic paint. Work slowly around the daisies to keep them clean, though don’t worry about perfection yet. -
Paint the petals:
Paint the raised petals with crisp white acrylic. You may need two coats to cover any accidental green smudges and get a bright, solid finish. -
Highlight the centers:
Dab the round center of each flower with a mustard yellow or soft gold paint. -
Seal the piece:
Apply a coat of waterproof varnish or sealant inside and out. Since air dry clay isn’t naturally waterproof, this step is crucial if you plan to put a real plant inside.
Go Pastel
Swap the sage green for a soft lavender or baby blue background. You can even paint the daisy centers with metallic gold leaf for a chic, high-end finish.
Pop in a small succulent and enjoy the handcrafted charm of your new planter
Cactus Ring Holder Sculpture
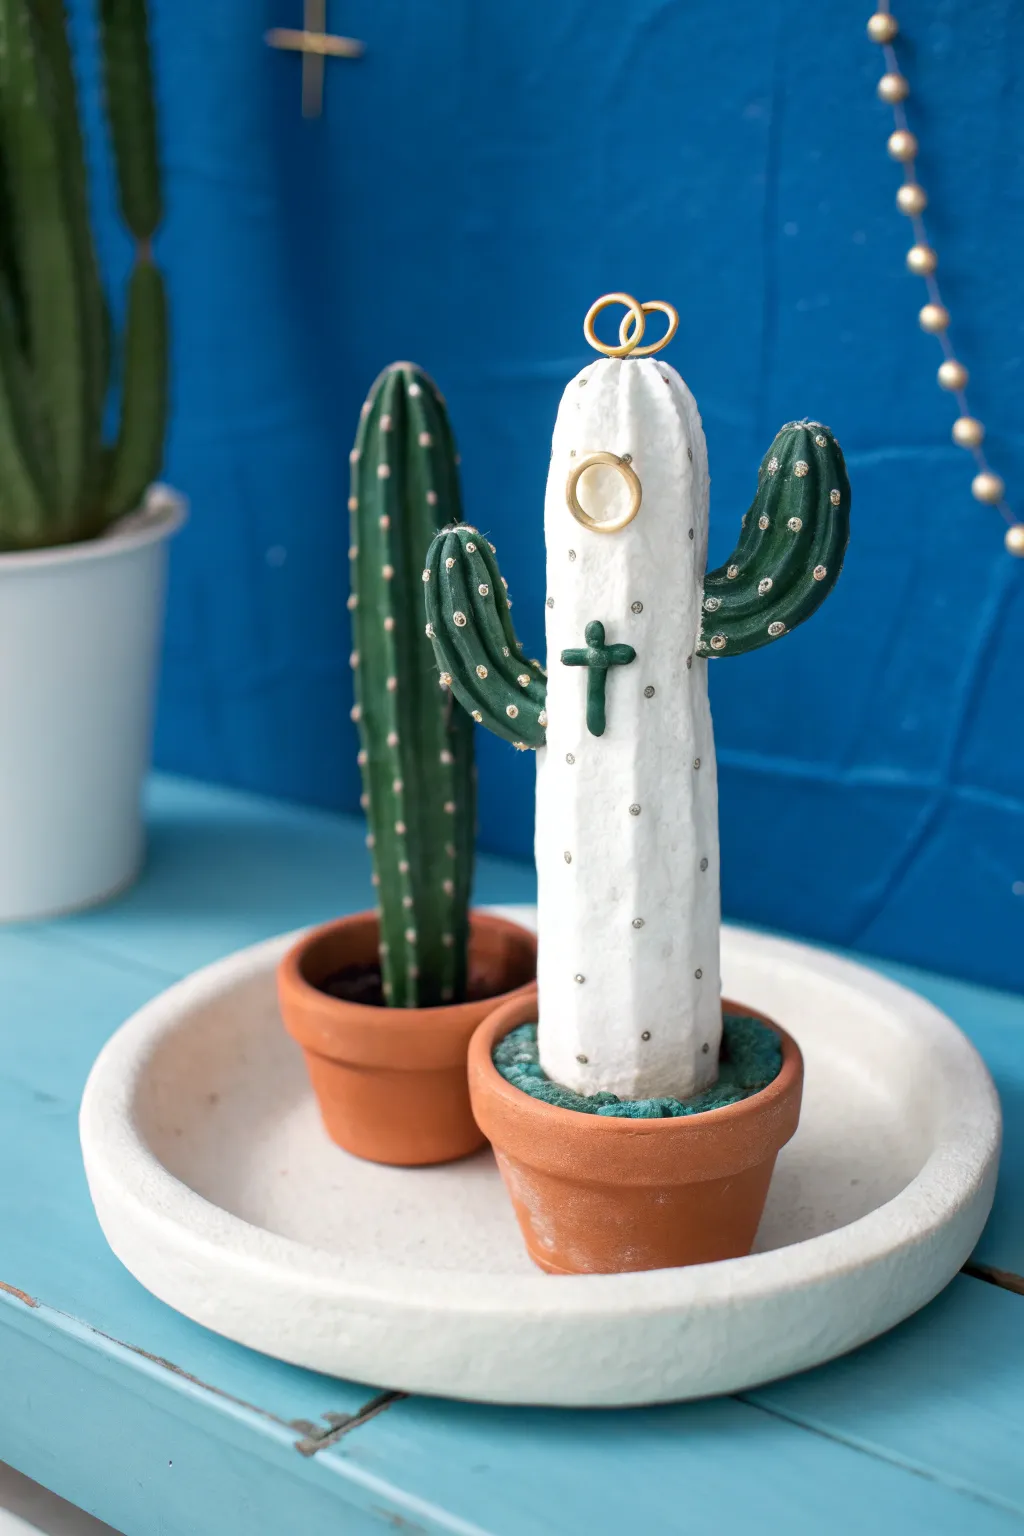
Transform your vanity with this quirky cactus ring holder that doubles as modern art. Featuring a sleek white body with contrasting green arms and delicate gold accents, this sculpture offers a playful yet sophisticated spot to organize your favorite accessories.
Step-by-Step Guide
Materials
- Air dry clay (white)
- Small terracotta pot (2-3 inch diameter)
- Acrylic paints: White, Dark Green, Metallic Gold
- Paintbrushes: Flat brush for base coats, fine detail brush
- Rolling pin
- Toothpicks or crafting wire (for armature)
- Water cup
- Mod Podge or clear spray varnish
- Sandpaper (fine grit)
- Fake moss or small pebbles (optional)
Step 1: Sculpting the Base
-
Prepare the main body:
Start by conditioning a generous chunk of air dry clay in your hands until it’s pliable. Roll it into a thick cylinder shape that fits snugly inside your terracotta pot, ensuring it stands about 4-6 inches tall. -
Shape the cactus top:
Gently round off the top of the cylinder to create a soft, dome-like peak. This is where your rings will eventually rest, so make sure it’s smooth and slightly tapered but not sharp. -
Add texture:
Using a modeling tool or the back of a butter knife, gently press vertical indentations running down the length of the cylinder to mimic the ribs of a cactus. Keep these grooves shallow but distinct.
Loose Arms?
If the arms keep sliding down despite the toothpick, prop them up with crumpled paper towels or sponges underneath while the clay dries completely.
Step 2: Adding Arms & Details
-
Form the arms:
Roll out two smaller logs of clay for the cactus arms. Bend them into an ‘L’ shape, curving upwards. Experiment with different lengths to add character to your sculpture. -
Secure the armature:
To ensure the arms don’t droop while drying, insert a toothpick or small piece of wire halfway into the side of the main body, leaving half poking out. -
Attach the arms:
Slide your clay arms onto the exposed toothpicks. Use a little water on your finger to smooth the seam where the arm meets the body, blending the clay until the join is invisible. -
Sculpt the cross accent:
Roll two tiny, thin snakes of clay. Cross them over each other to form a small crucifix shape and press this gently onto the front center of the cactus body. Use a drop of water to secure it if needed. -
Create the halo loop:
Roll a very thin snake of clay and form a small circle. Attach this to the very top of the cactus dome vertically, creating a loop that can hold an extra ring or earring. -
Dry completely:
Let the sculpture sit in a safe, dry place for 24-48 hours. I usually rotate it occasionally so it dries evenly on all sides.
Step 3: Painting & Finishing
-
Smooth the surface:
Once bone dry, lightly sand any rough patches or fingerprints with fine-grit sandpaper to achieve a professional, matte finish. -
Base coat:
Paint the entire main body of the cactus with two coats of opaque white acrylic paint, allowing the first coat to dry before applying the second. -
Paint the arms:
Using a steady hand, paint the cactus arms and the small cross detail in a deep, forest green. You can leave the main body white for that high-contrast, preppy look. -
Add the dots:
Dip the non-brush end of your paintbrush into metallic gold or silver paint. Dot small ‘spines’ vertically down the ribs of the cactus body and along the green arms. -
Highlight the loop:
Paint the small loop at the top of the cactus with your metallic gold paint to make it look like a piece of jewelry itself. -
Seal the piece:
Apply a coat of Mod Podge or clear spray varnish to protect the paint and give the cactus a subtle sheen. -
Pot assembly:
Place a lump of leftover clay or styrofoam into the bottom of the terracotta pot. Place your finished cactus on top. -
Filling the base:
Fill the gap around the base of the cactus with green painted clay, fake moss, or loose pebbles to secure it firmly in the pot.
Make it Marble
Instead of painting it solid white, gently twist grey and white clay together before sculpting to create a faux marble effect for the main body.
Now you have a stylish little guardian for your daily jewelry rotation
Frog Trinket Bowl Buddy
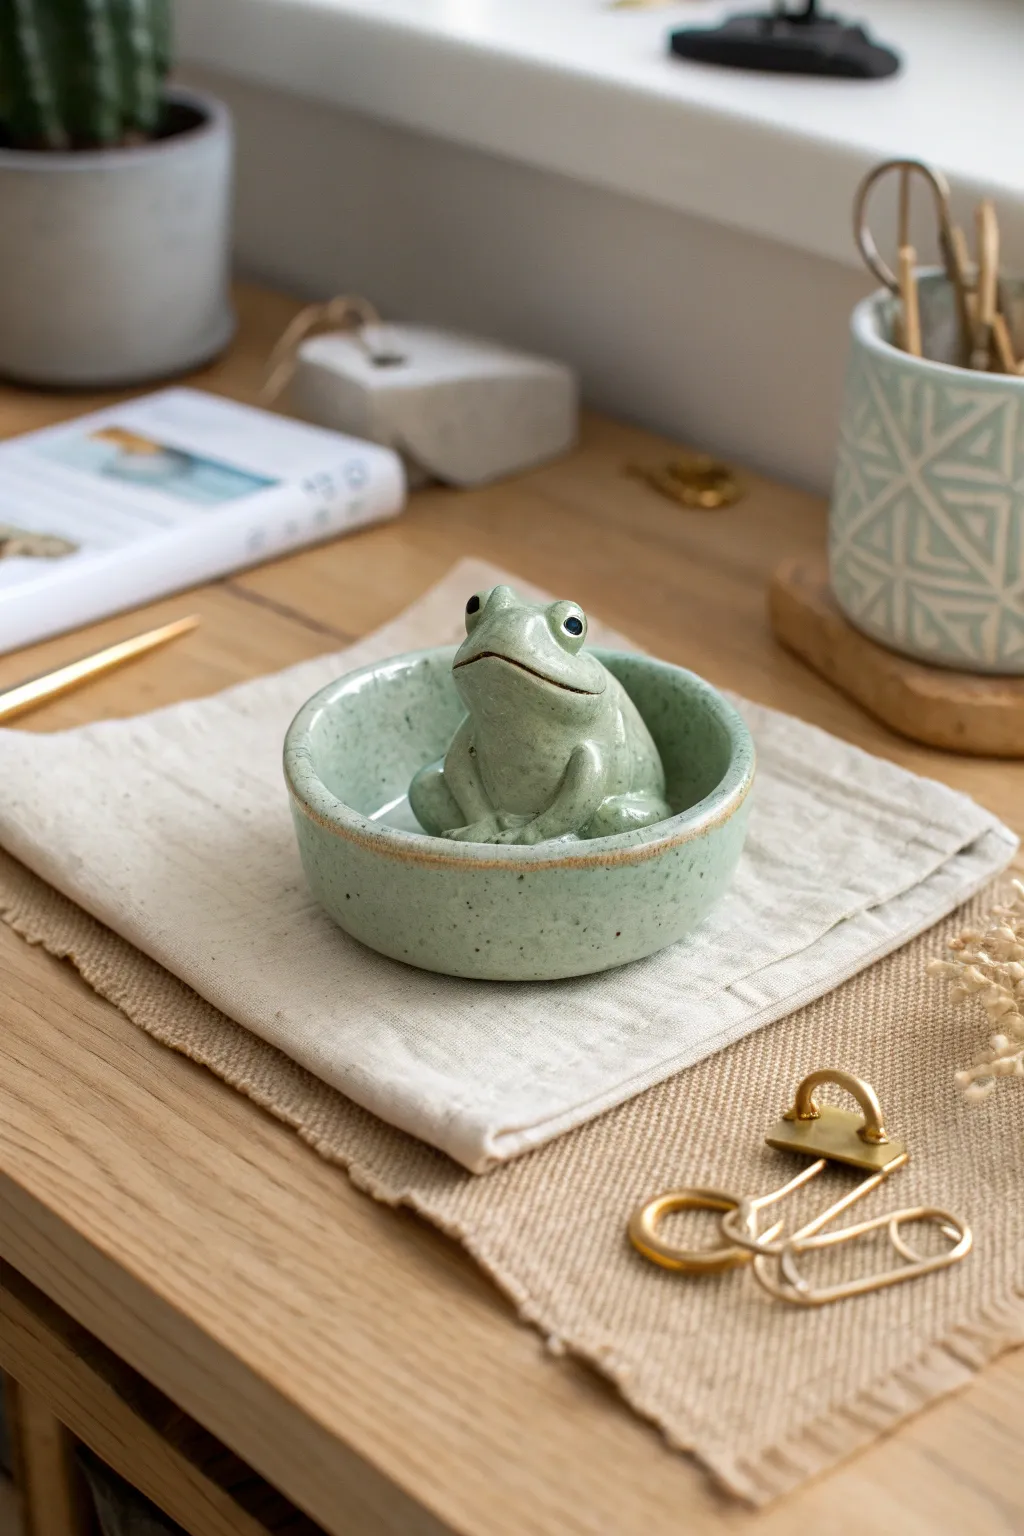
Hop into crafting with this adorable, functional trinket dish featuring a sculpted frog sitting patiently in the center. Its muted sage green glaze and subtle speckled finish give it a high-end ceramic look without the need for a kiln.
How-To Guide
Materials
- Air dry clay (white or light grey)
- Acrylic paints (sage green, white, black, brown)
- Glossy varnish or glaze (polyurethane or resin recommended)
- Rolling pin
- Circular cutter or small bowl (approx. 4 inches)
- Sculpting tools (needle tool, blending tool)
- Small cup of water
- Fine grit sandpaper
- Old toothbrush (for speckling)
Step 1: Forming the Base
-
Preparation:
Begin by kneading a fist-sized ball of air dry clay until it is smooth, pliable, and free of air bubbles. -
Roll the Slab:
Roll the clay out onto a flat surface to an even thickness of about 1/4 inch. If you want a uniform thickness, place wooden guide sticks on either side of your roller. -
Cut the Circle:
Use a circular cutter or trace around a small bowl to cut out a perfect circle, which will form the base of your dish. -
Create the Walls:
Roll a long snake of clay, slightly thicker than the base slab. Flatten it gently with your fingers into a long ribbon. -
Attach the Walls:
Score the outer edge of your base circle and apply a dab of water. Wrap the clay ribbon around the edge to create the bowl’s wall. -
Blend the Seams:
Use a blending tool or your thumb to smooth the clay where the wall meets the base, both on the inside and outside, until the seam completely disappears. Smooth the top rim with a wet finger.
Smooth Operator
Keep a damp sponge handy while sculpting. Regularly wiping the clay prevents cracking edges and reduces the amount of sanding needed later.
Step 2: Sculpting the Frog
-
Shape the Body:
Roll a ping-pong ball sized piece of clay into a smooth teardrop shape. This will be the frog’s main body. Flatten the bottom slightly so it sits stable. -
Position the Frog:
Score the center of the bowl and the bottom of your frog shape. Add a little water ‘slip’ and press the body firmly into the center of the dish. -
Add Back Legs:
Roll two smaller balls of clay into chubby teardrops. Press these against the sides of the body to form the folded back legs. -
Form Front Legs:
Roll two thin coils for the front arms. Attach them so they start at the chest and rest plainly on the floor of the bowl or tuck slightly under the chin. -
Sculpt the Face:
Add two small spheres to the top of the head for eyes. Use a needle tool to gently carve a wide, slightly curved line for the mouth to give him a neutral, placid expression. -
Refine Details:
Dip your finger in water and smooth out any fingerprints on the frog’s back. I like to make sure the connection points between the legs and body are seamless for a sturdy finish. -
Dry Completely:
Allow the entire piece to dry for 24-48 hours. Turn it occasionally if possible to ensure the bottom dries evenly.
Step 3: Painting and Finishing
-
Sand Smooth:
Once bone dry, use fine-grit sandpaper to buff away any rough spots, especially around the rim of the bowl. -
Base Coat:
Mix a muted sage green using green, white, and a tiny dot of brown acrylic paint. Paint the entire bowl and frog in this solid color. Let it dry. -
Add Speckles:
Dilute a small amount of brown paint with water. Dip an old toothbrush into the mixture and flick the bristles with your thumb to spray fine speckles over the entire piece. -
Detail the Eyes:
Using a fine detail brush, paint the eyes black with a tiny white highlight dot to bring the frog to life. -
Rim Detail:
For that exposed ceramic look, lightly sponge a warm tan or ochre paint just along the very top rim of the bowl. -
Seal It:
Finish with two coats of high-gloss varnish. This mimics the look of fired ceramic glaze and protects your paint job.
Make It Glossy
Use UV resin instead of varnish for the final coat. It creating a glass-like shell that makes the clay look exactly like kiln-fired pottery.
Place your new amphibian friend on your desk to hold your rings or paperclips in style
Rainbow Arch Key Dish
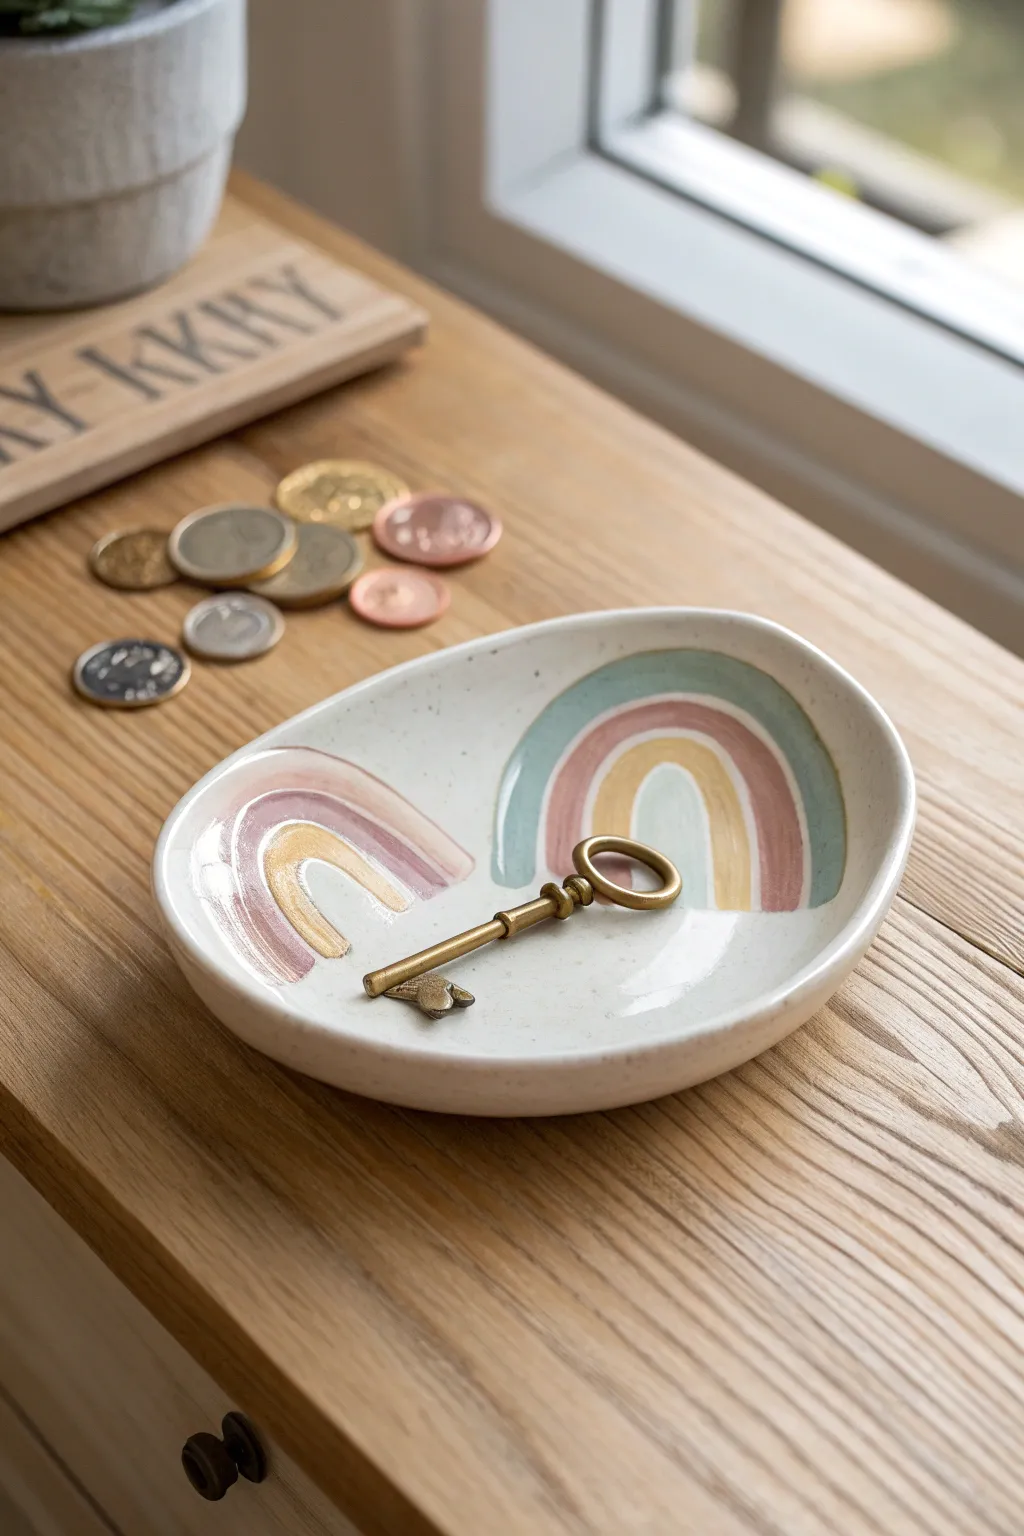
Keep your entryway organized with this trendy, speckled key dish featuring a soft, pastel rainbow motif. The natural pottery look combined with modern arch designs makes this a perfect preppy-meets-boho accent piece.
Step-by-Step
Materials
- White air-dry clay (about 1 lb)
- Rolling pin
- Oval template (paper or flexible plastic)
- Craft knife or clay cutter
- Water and a small sponge
- Sandpaper (fine grit)
- Acrylic paints (Soft Pink, Mustard Yellow, Sage Green, Terracotta)
- Small flat paintbrushes
- Brown acrylic paint + old toothbrush (for speckling)
- Gloss or satin varnish/sealant
Step 1: Shaping the Base
-
Condition the clay:
Begin by taking a chunk of air-dry clay and kneading it in your hands until it feels warm, pliable, and free of cracks. -
Roll it out:
Place the clay on a smooth surface or canvas mat. Use your rolling pin to flatten it into an even slab, aiming for a thickness of about 1/4 inch. -
Cut the oval:
Lay your oval template lightly on top of the slab. Using your craft knife, carefully trace around the template to cut out the clean base shape. -
Smooth the edges:
Dip your finger or a small sponge in water and run it along the cut edges to smooth out any sharpness or drag marks from the knife. -
Form the rim:
Gently lift the edges of the oval slab upwards with your fingertips to create a shallow, curved wall. I like to pinch and smooth simultaneously to ensure an organic, pottery-like curve. -
Refine the shape:
Go back over the entire piece with a barely damp sponge, smoothing out fingerprints and ensuring the transition from the base to the rim is seamless. -
Dry completely:
Set the dish aside in a safe spot to dry. Depending on humidity, this usually takes 24-48 hours. Using a wire rack helps air circulate underneath.
Warping Warrior
If the clay starts curling up while drying, gently weigh down the center with a small bag of rice or sand during the first few hours of drying.
Step 2: Sanding and Painting
-
Sand for smoothness:
Once fully dry and hard, take your fine-grit sandpaper and gently buff the entire surface, paying special attention to the rim to make it perfectly smooth. -
Dust off:
Wipe the dish down with a dry cloth or tack cloth to remove all proper white clay dust before you start painting. -
Outline the large rainbow:
Using a very light pencil touch, sketch a large arch on the right side of the dish. It should contain three bands. -
Paint the Sage arch:
Mix a muted Sage Green. Paint the outermost band of the large rainbow, keeping your brush strokes following the curve of the arch. -
Add the Rose band:
Using a Terracotta or deep Rose color, paint the middle band of the large rainbow. Leave a tiny gap of white space between colors for that distinct illustrative look. -
Center the Yellow:
Fill the smallest inner arch with a muted Mustard Yellow paint. -
Paint the small rainbow:
On the left side of the dish, paint a smaller, two-band rainbow using Soft Pink for the outer arch and Mustard Yellow for the inner arch. -
Create the speckles:
Dilute a small drop of brown paint with water. Load an old toothbrush with the mixture, hold it over the dish, and flick the bristles with your thumb to create a fine mist of speckles. -
Seal the dish:
Allow the paint to dry completely. Apply two coats of gloss or satin varnish to protect the clay from scratches and give it a finished ceramic sheen.
Gold Glam
Make it extra chic by painting the very rim of the dish with a metallic gold leaf paint or a gold paint pen after the varnish has dried.
Place this lovely dish on your entryway table and enjoy a spot of color every time you come home
Charmy Wall Hooks With Hearts
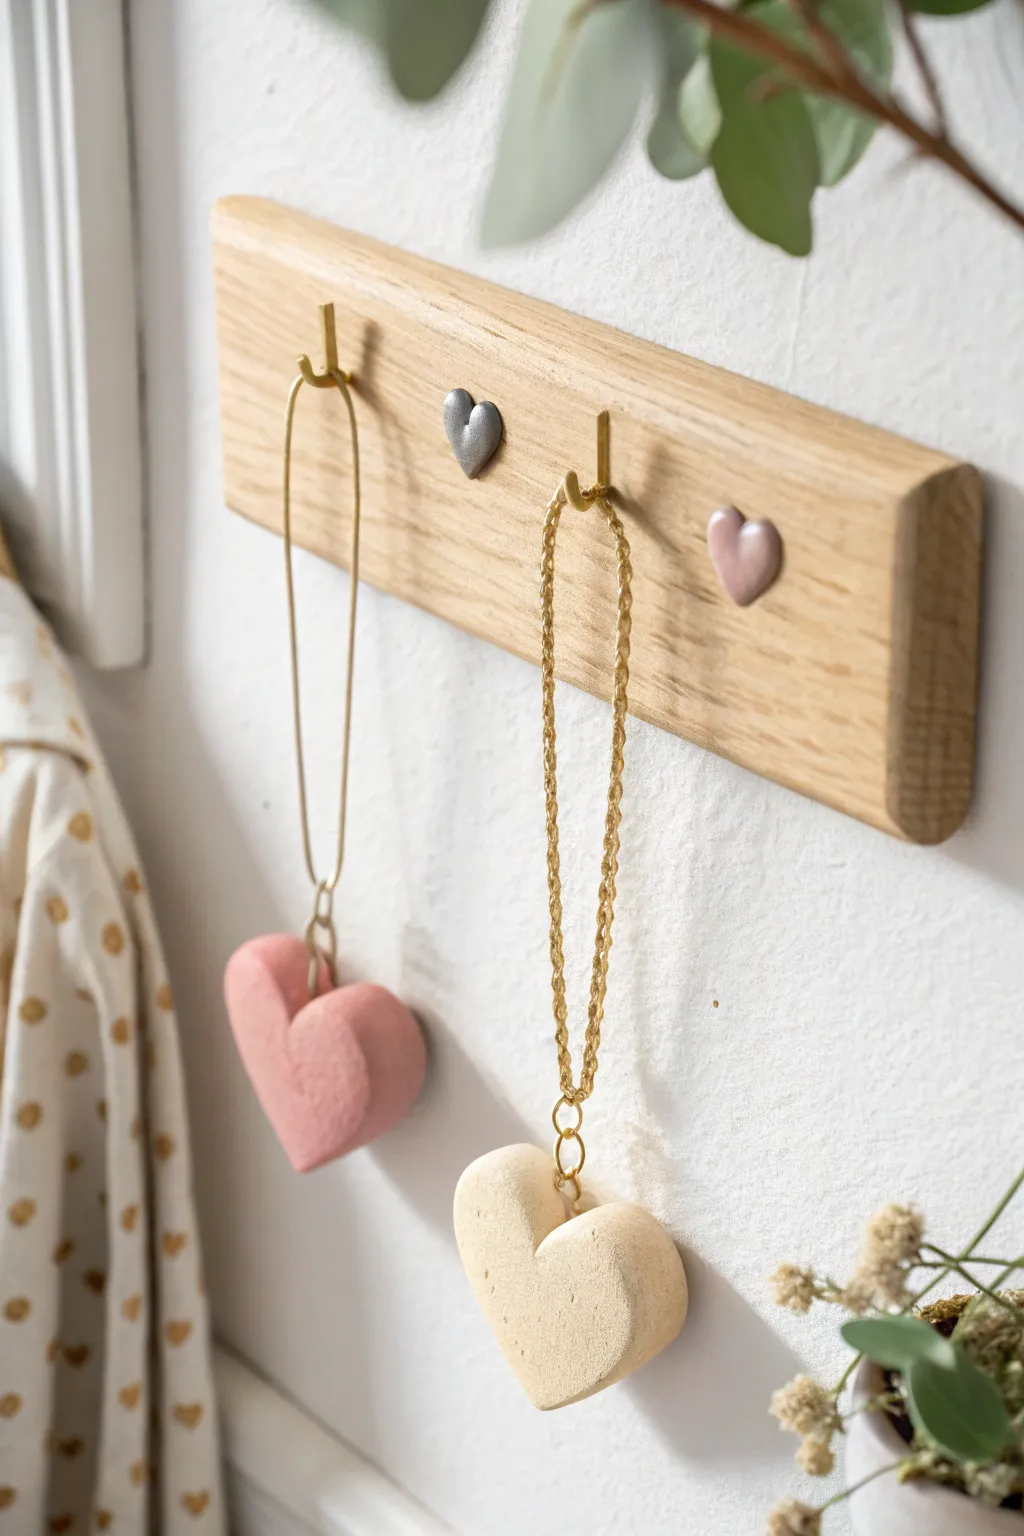
Add a touch of sweet, handmade charm to your entryway or bedroom with this delightful wall, featuring custom clay heart accents and matching dangling ornaments. The combination of natural wood, soft clay textures, and metallic gold hooks creates a modern yet romantic aesthetic.
Step-by-Step Guide
Materials
- Rectangular wooden board (oak or pine)
- Air dry clay (white or terracotta)
- Gold L-hooks or cup hooks
- Rolling pin
- Heart-shaped cookie cutters (small and medium sizes)
- Sandpaper (medium and fine grit)
- Acrylic paints (pastel pink, cream, silver/grey)
- Gold jewelry chain and jump rings
- Strong craft glue (E6000 or wood glue)
- Drill with small bit
- Sealer or varnish (matte finish)
- Gold spray paint (optional for hooks)
Step 1: Prepping the Wood & Hooks
-
Sand the base:
Begin with your wooden board base. Use medium-grit sandpaper to smooth out any rough patches, paying special attention to the corners. We want those edges softly rounded, not sharp, so sand them down until they feel comfortable to the touch. -
Complete the sanding:
Follow up with fine-grit sandpaper over the entire surface to achieve a professional, silky finish. Wipe away all dust with a tack cloth or slightly damp rag. -
Mark hook placement:
Decide where you want your hooks to live. Measure equal distances from the edges and mark the spots lightly with a pencil. In the photo, the hooks are spaced to allow room for the hanging hearts without crowding. -
Install the hooks:
Pre-drill small pilot holes at your marked spots to prevent the wood from splitting. Screw your gold L-hooks firmly into place. If you only have silver hooks, a quick coat of gold spray paint before installation works wonders.
Cracked Clay?
If small cracks appear during drying, make a ‘slip’ paste by mixing a tiny bit of clay with water. Fill the cracks, smooth with a finger, and let dry again.
Step 2: Crafting the Clay Hearts
-
Condition the clay:
Take a chunk of air dry clay and warm it up in your hands by kneading it. This makes it pliable and prevents cracks. Roll it out on a smooth surface to about 1/4 inch thickness for the small wall accents and slightly thicker (about 1/2 inch) for the hanging ornaments. -
Cut the shapes:
Use your smaller cookie cutter to punch out two hearts for the wood board. Use the medium cutter for the two larger hanging hearts. -
Refine the edges:
Dip your finger in a little water and gently smooth the cut edges of your clay hearts. This gets rid of any jagged bits left by the cutter. -
Add hanging hardware:
For the two larger hearts intended as hanging ornaments, insert a small eye pin or form a loop with wire and push it into the top center of the heart while the clay is still wet. Ensure the clay closes around the wire securely. -
Let them dry:
Place all your clay pieces on a flat surface lined with parchment paper. Let them dry completely, which usually takes 24-48 hours depending on humidity. Flip them halfway through to ensure even drying.
Step 3: Decoration & Assembly
-
Sand imperfections:
Once bone dry, inspect your clay hearts. If there are any rough spots, lightly sand them with fine-grit sandpaper. -
Paint the small accents:
Paint one of the small wall-accent hearts silver (or grey) and the other a soft dusty pink. I find that two thin coats give a smoother finish than one thick gloop. -
Paint the hanging hearts:
Paint the larger hanging hearts in your chosen palette—perhaps one in a deep rose pink and the other in a natural cream or beige to match the photo. -
Seal the clay:
Apply a matte varnish to all painted clay pieces. This protects the paint and gives them a finished, high-quality look without being too shiny. -
Attach the accents:
Apply a dab of strong craft glue (like E6000) to the back of the small painted hearts. Press them onto the wooden board in the empty spaces between your hooks. Hold them in place for a minute to ensure a good bond. -
Assemble the chains:
Cut your gold chain to your desired lengths. Use pliers to open a jump ring, thread it through the eye pin on your large clay heart, and attach the chain. Close the jump ring securely. -
Final display:
Once the glue on the board is fully cured, hang your new rack on the wall. Drape the gold chains over the hooks to display your beautiful clay heart ornaments.
Make it Functional
Swap the clay hanging ornaments for functional items like house keys with clay heart keychains, turning this art piece into a cute key holder.
Now you have a charming, personalized wall piece that perfectly balances rustic texture with sweet details
Monogram Letter Desk Weight
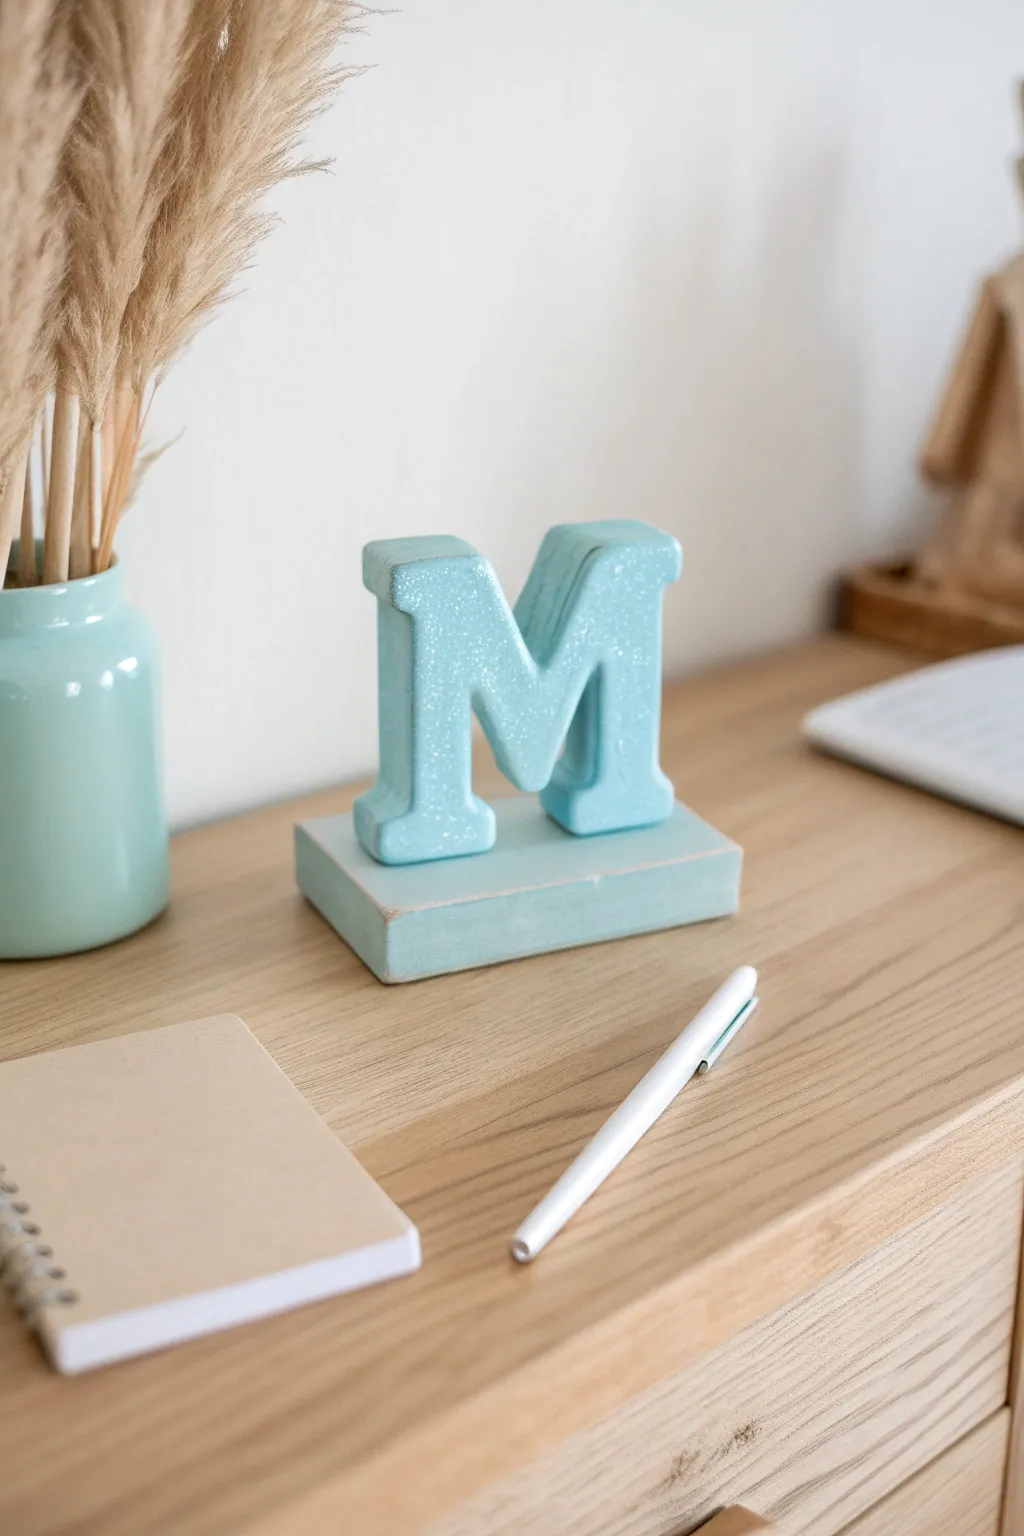
Personalize your workspace with this chic, prep-inspired desk weight that doubles as decor. This project transforms simple air dry clay into a sturdy, dimensional letter M mounted on a rectangular base, finished with a trendy robin’s egg blue and a touch of sparkle.
How-To Guide
Materials
- Air dry clay (white)
- Acrylic paint (robin’s egg blue or light turquoise)
- Fine iridescent glitter
- Rolling pin or smooth bottle
- Pottery knife or craft knife
- Ruler
- Sandpaper (fine grit)
- Acrylic sealer (glossy)
- Cardboard or cardstock (for templates)
- Small bowl of water
- Strong craft glue (E6000 or similar)
Step 1: Shaping the Base
-
Prepare the Clay:
Start by conditioning a large chunk of air dry clay. Knead it in your hands until it is warm, pliable, and free of cracks. -
Roll the Slab:
Place the clay on a smooth work surface or mat. Roll it out into a thick slab, aiming for a thickness of about 3/4 inch to ensure the base is heavy enough to act as a paperweight. -
Cut the Rectangle:
Use a ruler and a craft knife to cut a clean rectangle from the slab. A size of approximately 4 by 2.5 inches works well for a standard letter, but adjust based on your intended monogram size. -
Smooth the Base:
Dip your finger in a little water and run it along the cut edges and the top surface to smooth out any imperfections. Set this piece aside on a flat surface to begin drying.
Fixing Cracks
If tiny cracks appear during drying, make a ‘slip’ paste by mixing a bit of fresh clay with water. Fill the cracks, smooth it out, and let dry again.
Step 2: Creating the Letter
-
Make a Template:
Draft a block letter ‘M’ (or your chosen initial) on a piece of cardstock and cut it out. This ensures your final clay piece is symmetrical and sharply defined. -
Roll Clay for Letter:
Roll out a second slab of clay. You want this one to be slightly thinner than the base, perhaps around 1/2 inch thick, so it doesn’t look too bulky. -
Trace and Cut:
Place your paper template onto the clay. Carefully trace around it with your craft knife, keeping the blade perpendicular to the table for straight sides. -
Define the Serifs:
If your letter style has serifs (the little feet at the ends of the strokes), use a pottery tool or a toothpick to sharpen those corners carefully. -
Final Smoothing:
Use a damp finger to smooth every edge of the letter. Pay special attention to the inner curves where the knife might have left drag marks. -
Long Drying Phase:
Place both the base and the letter on a wire rack or parchment paper. Let them dry completely, which can take 24 to 48 hours depending on humidity. Flip them occasionally for even drying.
Step 3: Assembly and Finish
-
Sand for Perfection:
Once fully dry and hard, take your fine-grit sandpaper and gently sand away any bumps or rough textures on both pieces. I like to focus on the flat faces to get that crisp, manufactured wood look. -
Dust Clean:
Wipe both pieces with a slightly damp cloth to remove all the sanding dust before painting. -
Applying Base Coat:
Paint the entire surface of the base and the letter with your robin’s egg blue acrylic paint. Let the first coat dry. -
Second Coat:
Apply a second coat of paint for full opacity. While the paint is still wet on the front face of the letter, sprinkle a dusting of fine iridescent glitter over it for a subtle shimmer. -
Distressing (Optional):
If you want the slightly weathered look seen in the photo, lightly sand the edges of the base after the paint is dry to reveal a bit of the white clay underneath. -
Glue Together:
Apply a strong craft glue to the bottom feet of your letter. Press it firmly onto the center of the rectangular base. -
Seal the Project:
Once the glue is cured, coat the entire sculpture with a glossy acrylic sealer. This protects the paint and keeps the glitter in place.
Ombre Effect
Instead of solid blue, paint the base a darker shade and mix white into your blue as you move up the letter for a stunning gradient effect.
Place your finished monogram on a stack of books or use it to weigh down loose pages for an instantly tidier desk
Mini Preppy Vanity Set Trio
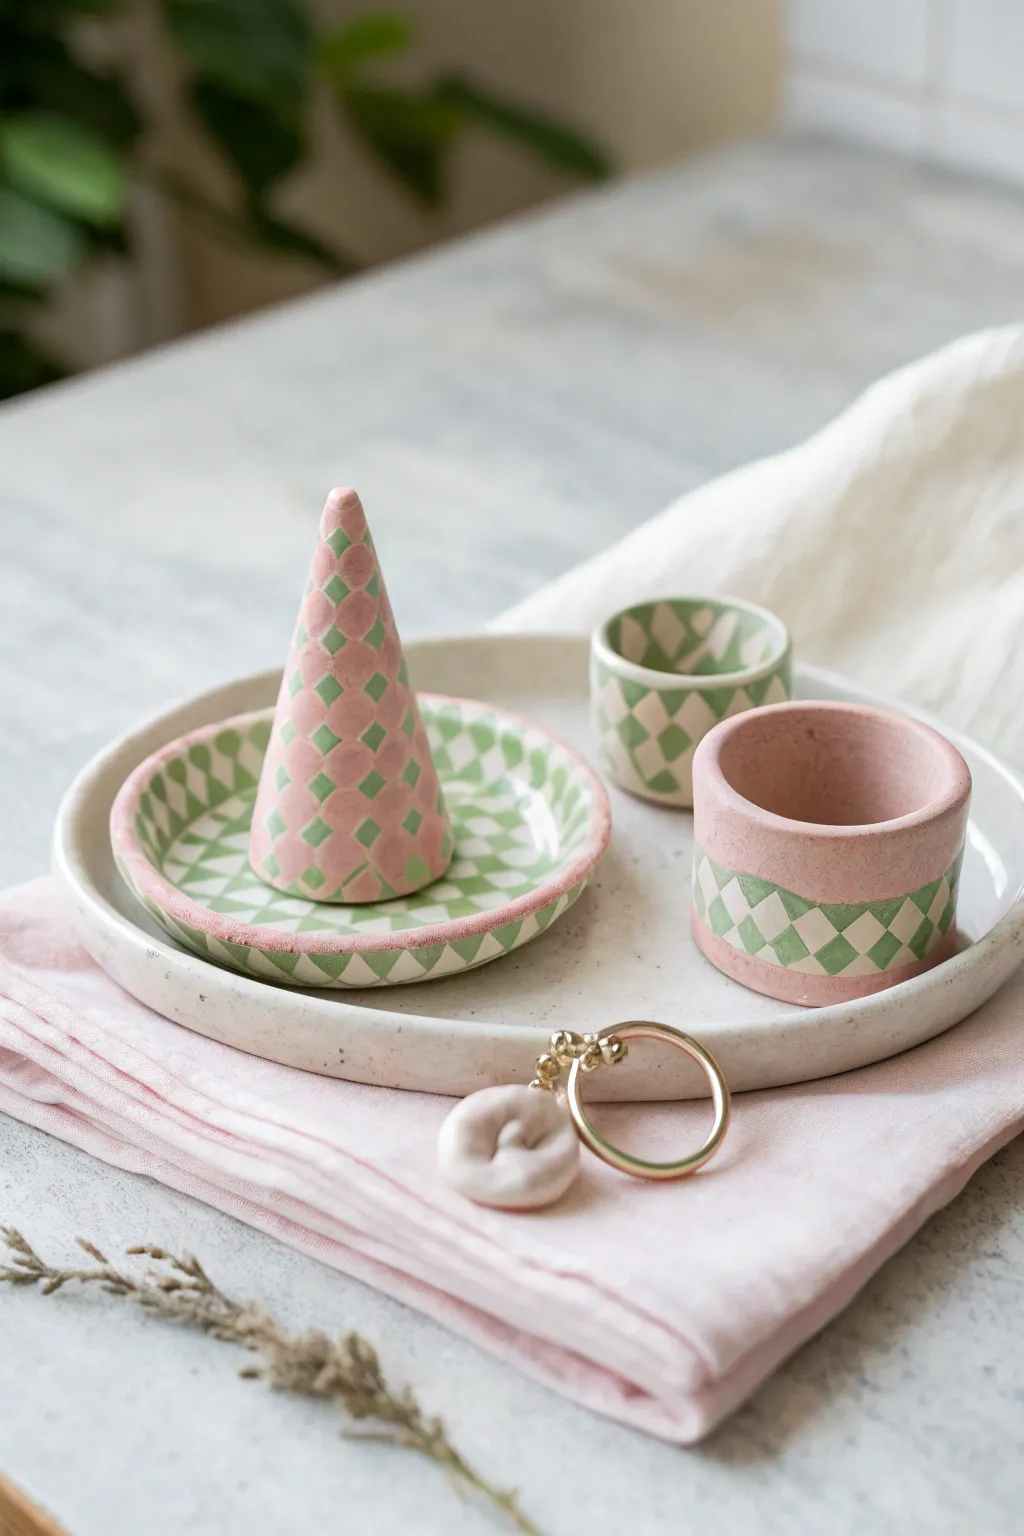
Upgrade your vanity with this charming, preppy-inspired set that combines soft pinks and sage greens in a classic diamond check pattern. This three-piece collection features a ring holder cone, a trinket dishes, and matching cylinder pots that bring a playful yet sophisticated touch to your organization.
Step-by-Step Tutorial
Materials
- White Air Dry Clay (approx. 500g)
- Acrylic rolling pin
- Clay knife or craft scalpel
- Circle cutters (various sizes) or jar lids
- Sandpaper (fine grit)
- Acrylic paints (Matte Sage Green, Dusty Pink, White)
- Fine detail paintbrushes (flat and liner)
- Ruler
- Pencil
- Small bowl of water
- Varnish or sealant (matte or satin finish)
Step 1: Sculpting the Shapes
-
Roll the clay base:
Begin by conditioning your air dry clay until it is pliable. Roll it out on a smooth surface to an even thickness of about 1/4 inch (6mm). -
Cut the trinket dish:
Use a medium-sized circle cutter or trace around a bowl to cut a flat circle for the dish base. Gently curve the edges upward with your fingers to create a shallow rim. -
Form the ring cone:
Take a ball of clay and roll it into a cone shape between your hands or against the table. Refine the shape until it has a flat, stable base and a smooth, pointed tip. It should stand straight without wobbling. -
Create the cylinder pots:
Roll out a slab of clay into a long rectangle and a separate circle for the base. Wrap the rectangle around the circle base to form a wall, cutting off excess clay with a knife. -
Join the seams:
Score (scratch) the connecting edges of the cylinder walls and base, apply a little water, and press them firmly together. Use a modeling tool or your finger to smooth the seam completely so it disappears. -
Smooth the surfaces:
Dip your finger in a tiny bit of water and run it over all your pieces to remove fingerprints or cracks. Ensure the rims of the pots and dish are nice and rounded. -
Complete drying:
Place all pieces on a drying rack or parchment paper. Let them dry fully for 24-48 hours, turning them occasionally to ensure even drying.
Clean Lines Hack
For sharper diamonds, use thin washi tape or nail art tape to mask off your grid before painting. Peel it off while the paint is still slightly wet.
Step 2: Sanding & Painting
-
Sand for smoothness:
Once fully dry, gently sand any rough edges, seams, or bumps with fine-grit sandpaper until the surface feels like smooth stone. Wipe away the dust with a slightly damp cloth. -
Apply base coats:
Paint the inside of the ring dish with a solid coat of white or very pale cream. Paint the entire ring cone a solid dusty pink. For the cylinder pots, paint one entirely dusty pink and portions of the other with a cream base. -
Pencil the grid:
Very lightly use a pencil and ruler to draw a diamond grid pattern on the areas you want to decorate. On the cone, these are vertical diamonds; on the pots and dish rim, create a horizontal band of diamonds. -
Paint the sage diamonds:
Using your fine brush and sage green paint, carefully fill in alternating diamonds to create a checkerboard effect. -
Add pink accents:
For the dish rim and the banded pot, fill in the remaining diamonds with dusty pink or white as needed to complete the argyle look. -
Detail the cone:
On the pink ring cone, use the sage green to paint small, spaced-out diamonds rather than a full checkerboard, giving it a polka-dot style pattern. -
Clean up lines:
Go back with a very fine liner brush to touch up any fuzzy edges between the colors for a crisp, geometric finish. I find holding my breath for a second helps steady my hand for these tiny corrections. -
Seal the set:
Allow the paint to cure completely. Finally, apple a coat of matte or satin varnish to protect your paint job and give the pieces a finished, ceramic look.
Level Up: Gold Rim
Add a luxurious touch by painting the very rim of the dish and the pots with liquid gold leaf or metallic gold acrylic paint.
Arrange your jewelry on this sweet handmade set and enjoy the pop of pastel color it adds to your space