When I’m in the mood to make something delightfully unhinged, I reach for clay and lean hard into ugly-cute and uncanny details. These ideas are all about turning the everyday into little clay oddities—think teeth, tongues, bulging eyes, and creatures that make you laugh and slightly shiver at the same time.
Toothy Planter With Succulent Hair
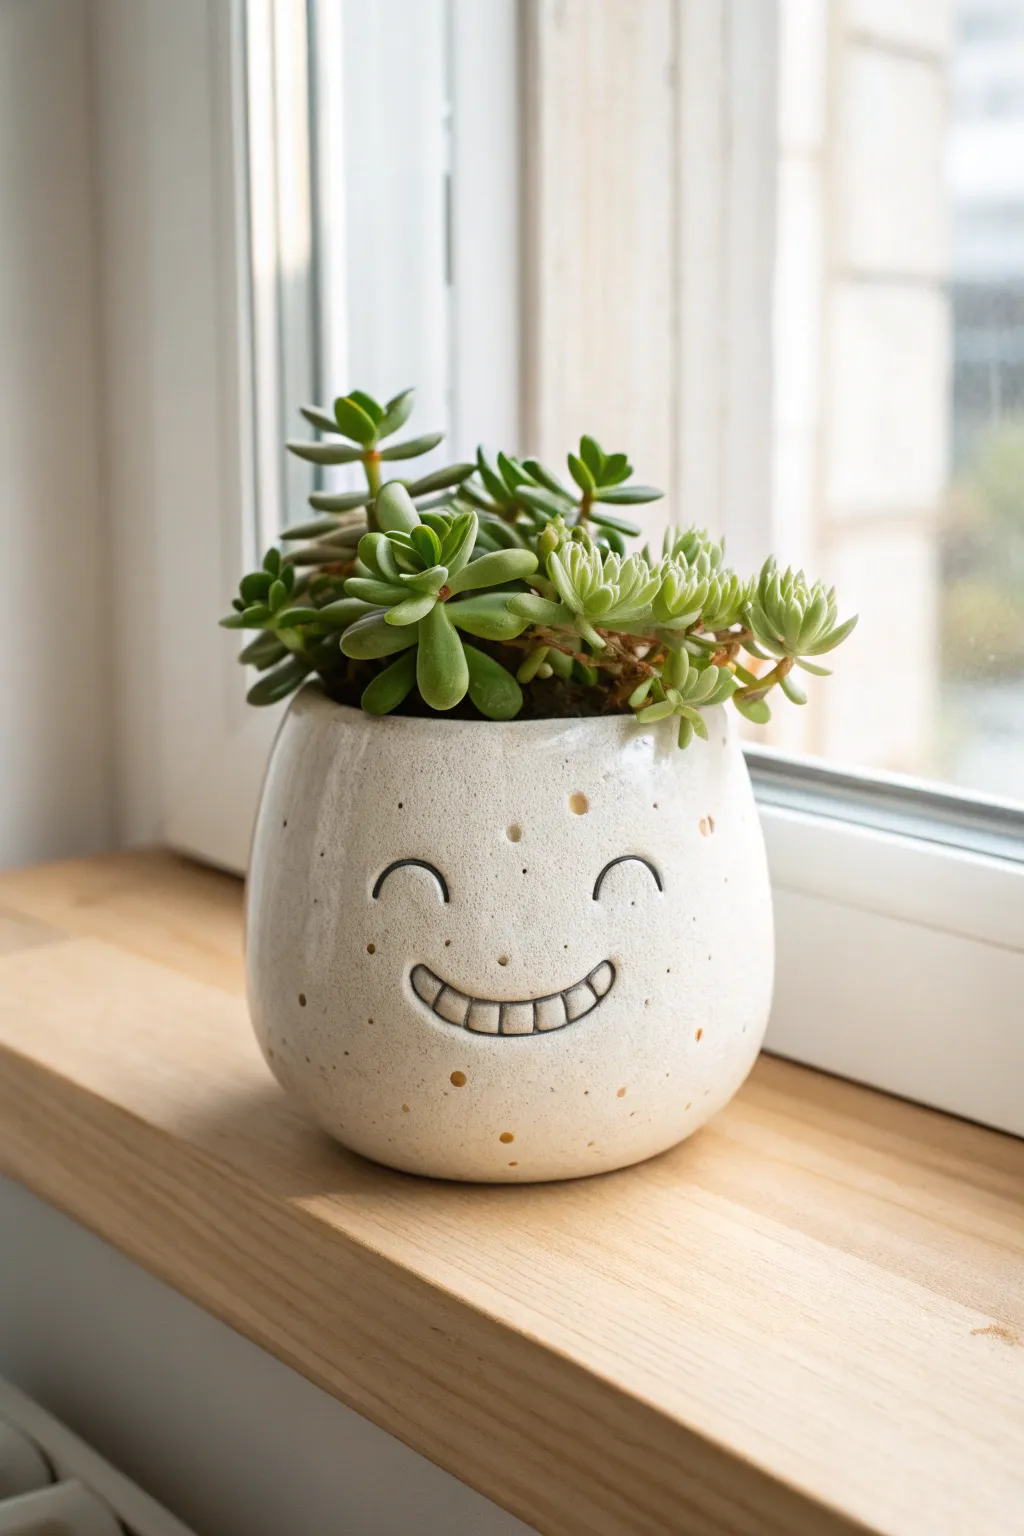
Bring some cheerful personality to your windowsill with this adorable, speckled ceramic planter. Its charming closed-eye expression and wide, toothy grin create the perfect whimsical contrast with a wild hairdo of mixed succulents.
How-To Guide
Materials
- White or light stoneware clay (about 1.5 – 2 lbs)
- Pottery wheel or slab roller (for hand-building)
- Small loop tool for carving
- Wooden modeling tool with a tapered point
- Pin tool
- Sponge
- Kidney rib tool
- Speckled cream or off-white glossy glaze
- Black underglaze (optional, for enhancing lines)
- Stiff paintbrush
- Kiln access
Step 1: Forming the Body
-
Prepare the Clay:
Begin by thoroughly wedging about 1.5 to 2 pounds of your chosen stoneware clay to remove any air bubbles. Form it into a smooth, even ball. -
Create the Cylinder:
If you are throwing on the wheel, center your clay and pull a cylinder that is roughly 4-5 inches tall and 4-5 inches wide. Focus on creating a slightly rounded belly rather than vertical walls; you want a cute, chubby shape. -
Hand-Building Alternative:
Alternatively, if hand-building, roll out a uniform slab about 1/4 inch thick. Cut a rectangle based on your desired circumference and join the ends to form a cylinder on a circular base, smoothing the seams completely. -
Shape the Curve:
Using a rib tool on the inside of the pot, gently push the walls outward to create a convex, bulbous curve. The pot should taper slightly inward at the rim to give it a soft, enclosed feeling. -
Refine the Rim:
Smooth the rim with a damp sponge or piece of chamois leather. You want a rounded, comfortable edge, not a sharp one, as this matches the friendly aesthetic. -
Dry to Leather-Hard:
Set the pot aside to dry slowly. Cover it loosely with plastic if necessary. You need it to reach a ‘leather-hard’ state—firm enough to handle and carve without warping, but still containing moisture.
Step 2: Carving the Face
-
Sketch the Expression:
Using a needle tool or a very light touch with a pencil, sketch out the face placement. Position the smile centrally on the belly of the pot, with the eyes spaced widely above. -
Carve the Smile Outline:
Take a sharp pin tool or a small knife and carve the outline of the mouth. It should be a wide ‘U’ shape, slightly flattened at the bottom. -
Relief Carving the Teeth:
Using a small loop tool, gently carve away a very thin layer of clay *inside* the mouth outline, but leave a raised horizontal strip in the middle for the teeth. This creates depth. -
Define the Teeth:
Use a tapered wooden modeling tool to press vertical lines into that raised strip, separating the individual teeth. Round the corners of each tooth slightly so they look friendly, not aggressive. -
Carve the Eyes:
For the eyes, carve two simple, downward-curving arcs. I find that making the line slightly thicker in the middle and tapering at the ends gives a sweeter expression. -
Add Texture Spots:
Using the rounded end of a tool or a small drill bit (hand-turned), gently press random divots into the surface of the pot. These will catch the glaze later and add to the organic, speckled look. -
Smoothing:
Use a barely damp sponge or your fingertip to smooth down any clay burrs or sharp crumbs created during the carving process.
Clean Lines Tip
When wiping back underglaze from the carved lines, use a firm sponge and wipe in one direction only. This prevents smearing the black pigment onto the surrounding white clay.
Step 3: Finishing and Firing
-
Bisque Fire:
Allow the pot to dry completely to the bone-dry stage. Fire it in the kiln to bisque temperature (usually cone 04 or 06, depending on your clay). -
Apply Underglaze (Optional):
If you want the facial features to really pop, paint black underglaze into the carved lines of the eyes and around the teeth. Wipe away the excess on the surface with a damp sponge, leaving color only in the recesses. -
Glaze Application:
Dip the entire pot into a speckled cream or off-white glaze. If you used a clay body that already has speckles (like a stoneware with iron pyrite), a simple semi-transparent white glaze works beautifully. -
Check the Reservoirs:
Make sure the glaze isn’t pooling too thickly in the carved teeth or eye lines, which could obscure the details. If it looks too thick, dab a little out with a brush. -
Final Fire:
Fire the piece for the final glaze firing according to your clay and glaze specifications (likely cone 5 or 6). -
Planting:
Once cool, fill with cactus soil and arrange a variety of succulents—use trailing ones like ‘String of Pearls’ or spiky ones like Sedum to create a messy ‘hair’ effect.
Hair Stylist
For the best ‘hair’ effect, mix textures! Combine a tall succulent (like a jade) for height with creeping varieties (like stonecrop) to spill over the rim like bangs.
Now you have a charming little character that will greet you with a smile every morning


Eyeball Trinket Dish
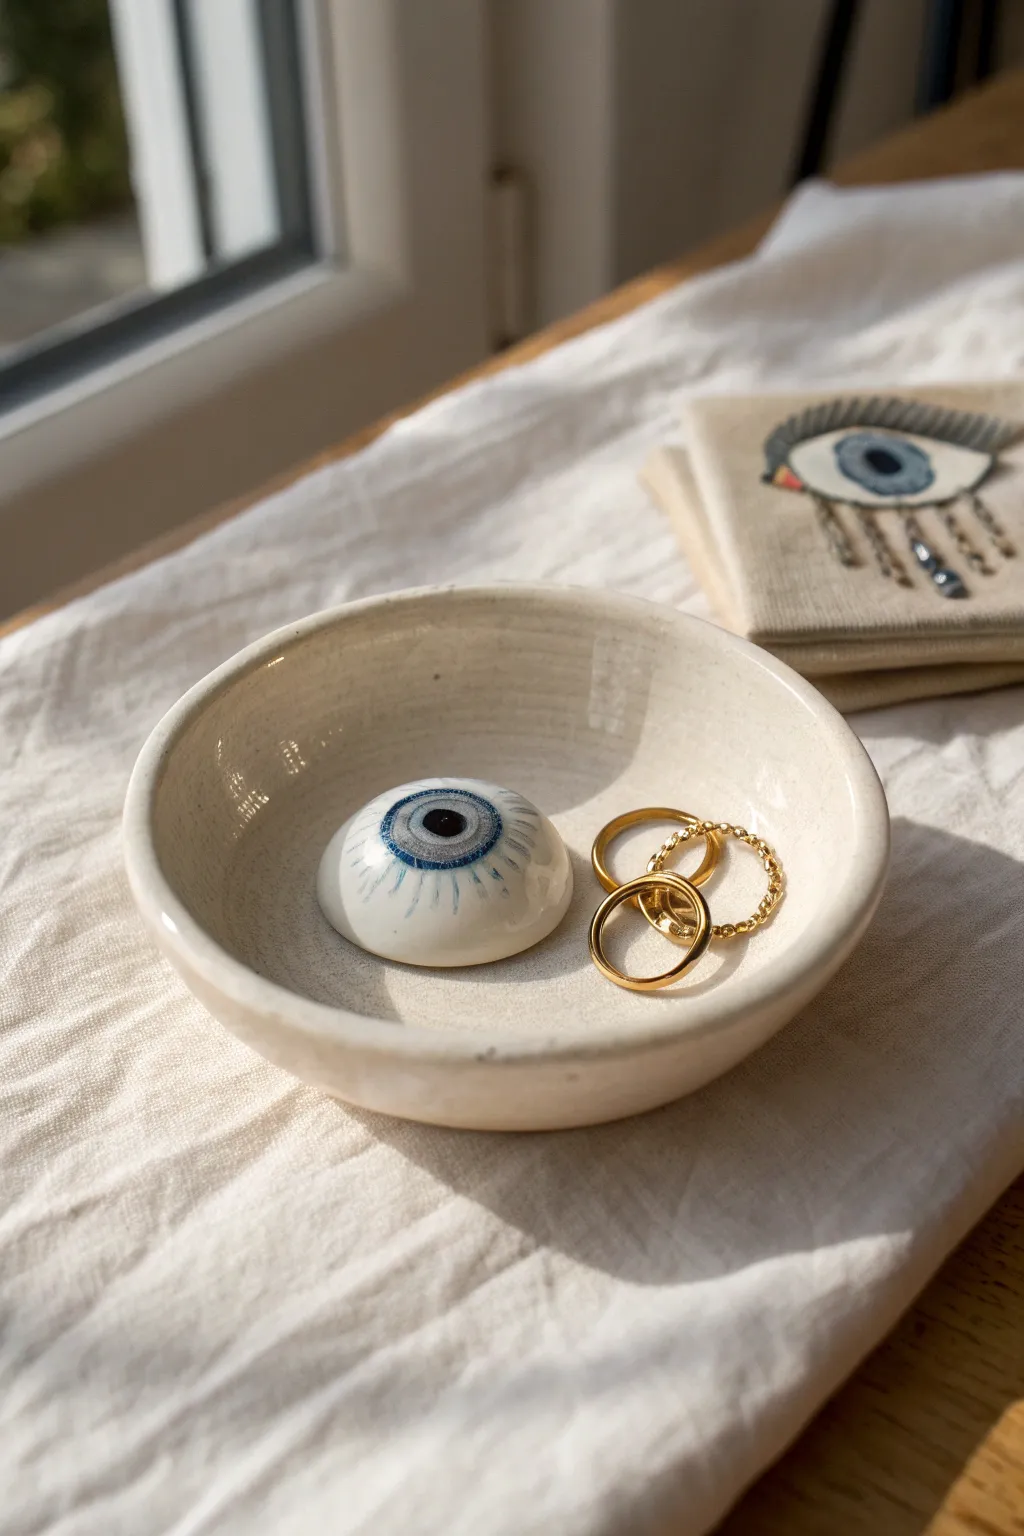
Keep an eye on your jewelry with this surreal yet minimalist ceramic piece. This project combines a simple catch-all bowl with a realistic, convex 3D eyeball feature that adds just the right amount of weirdness to your nightstand.
Step-by-Step Tutorial
Materials
- White air-dry clay or stoneware clay (depending on kiln access)
- Small bowl or sphere mold (for draping)
- Pottery sponge
- Pin tool or needle tool
- Rolling pin
- Slip (clay mixed with water)
- Acrylic paints (or underglazes if firing)
- Fine detail paintbrush (0 or 00 size)
- Clear high-gloss varnish (or clear glaze)
- Water cup
- Sandpaper (fine grit)
Step 1: Forming the Base Dish
-
Roll the slab:
Begin by wedging your white clay to remove air bubbles. Roll it out into an even slab, approximately 1/4 inch thick. Aim for a smooth surface without cracks. -
Cut the circle:
Find a circular template (like a cereal bowl rim or a dedicated cutter) that is slightly larger than your desired finished dish size. Place it on the clay and cut around it with your pin tool. -
Shape the curve:
Gently lift your clay circle and drape it into a shallow bowl mold to establish the curve. I find using a makeup sponge to press it gently into the form helps avoid finger marks. -
Refine the rim:
While the clay is in the mold, smooth the rim with a damp sponge. You want a rounded, organic edge rather than a sharp cut. Let this set until it’s leather-hard.
Iris Woes?
If painting a perfect circle is hard, find a small washer or bottle cap. Dip the rim in paint and stamp the heavy circle guide lightly onto the dome before filling it in.
Step 2: Creating the Eye
-
Form the eyeball mound:
Take a separate small ball of clay and roll it into a neat sphere, then slice it in half. You want a smooth dome shape that fits comfortably in the center of your dish. -
Score and slip:
Score the bottom of your eye dome and the center spot of your dish dish heavily with your needle tool. Apply a generous amount of slip to both scored areas. -
Attach the eye:
Press the dome firmly into the center of the dish. Wiggle it slightly to ensure a tight bond and vacuum suction between the pieces. -
Blend the seams:
Use a modeling tool or your finger to smooth the clay where the dome meets the dish. The transition should be seamless, as if the eye is swelling up from the dish itself. -
Final smoothing:
Go over the entire piece, especially the eye dome, with a barely damp sponge to remove any tool marks. The surface of the eye needs to be perfectly smooth for painting later. -
Drying:
Allow the piece to dry completely. If using air-dry clay, wait 24-48 hours. If firing, proceed with your bisque fire schedule now.
Step 3: Painting and Finishing
-
Base coat:
If your clay isn’t naturally bright white, paint the entire dome and the surrounding interior of the dish with a creamy off-white or white base coat. -
Iris wash:
Mix a watery blue paint. Paint a perfect circle in the center of the dome. Keep this layer translucent to add depth to the eye. -
Pupil definition:
Using straight black paint and a steady hand, paint a smaller solid circle directly in the center of the blue iris. -
Adding details:
With your finest brush, paint tiny, radiating lines from the pupil outward through the blue iris using a darker blue or grey. This mimics the muscle structure of a real eye. -
Rim lines:
Paint a very thin, dark blue ring around the outer edge of the iris to define the shape and make the color pop. -
Highlight:
Add a tiny dot of pure white paint overlapping the pupil and iris slightly. This ‘catchlight’ brings the eye to life instantly. -
Gloss finish:
Once the paint is fully dry, apply a high-gloss varnish (or clear food-safe glaze) over the entire dish. The glossy finish is crucial for the wet look of the eyeball.
Make it Veiny
To increase the creep-factor, use a very watered-down red paint to draw subtle, squiggly veins extending from the sides of the eyeball into the white dish area.
Place your rings around the iris and enjoy the feeling that your jewelry is being carefully watched


Blob Buddy With Tiny Hands
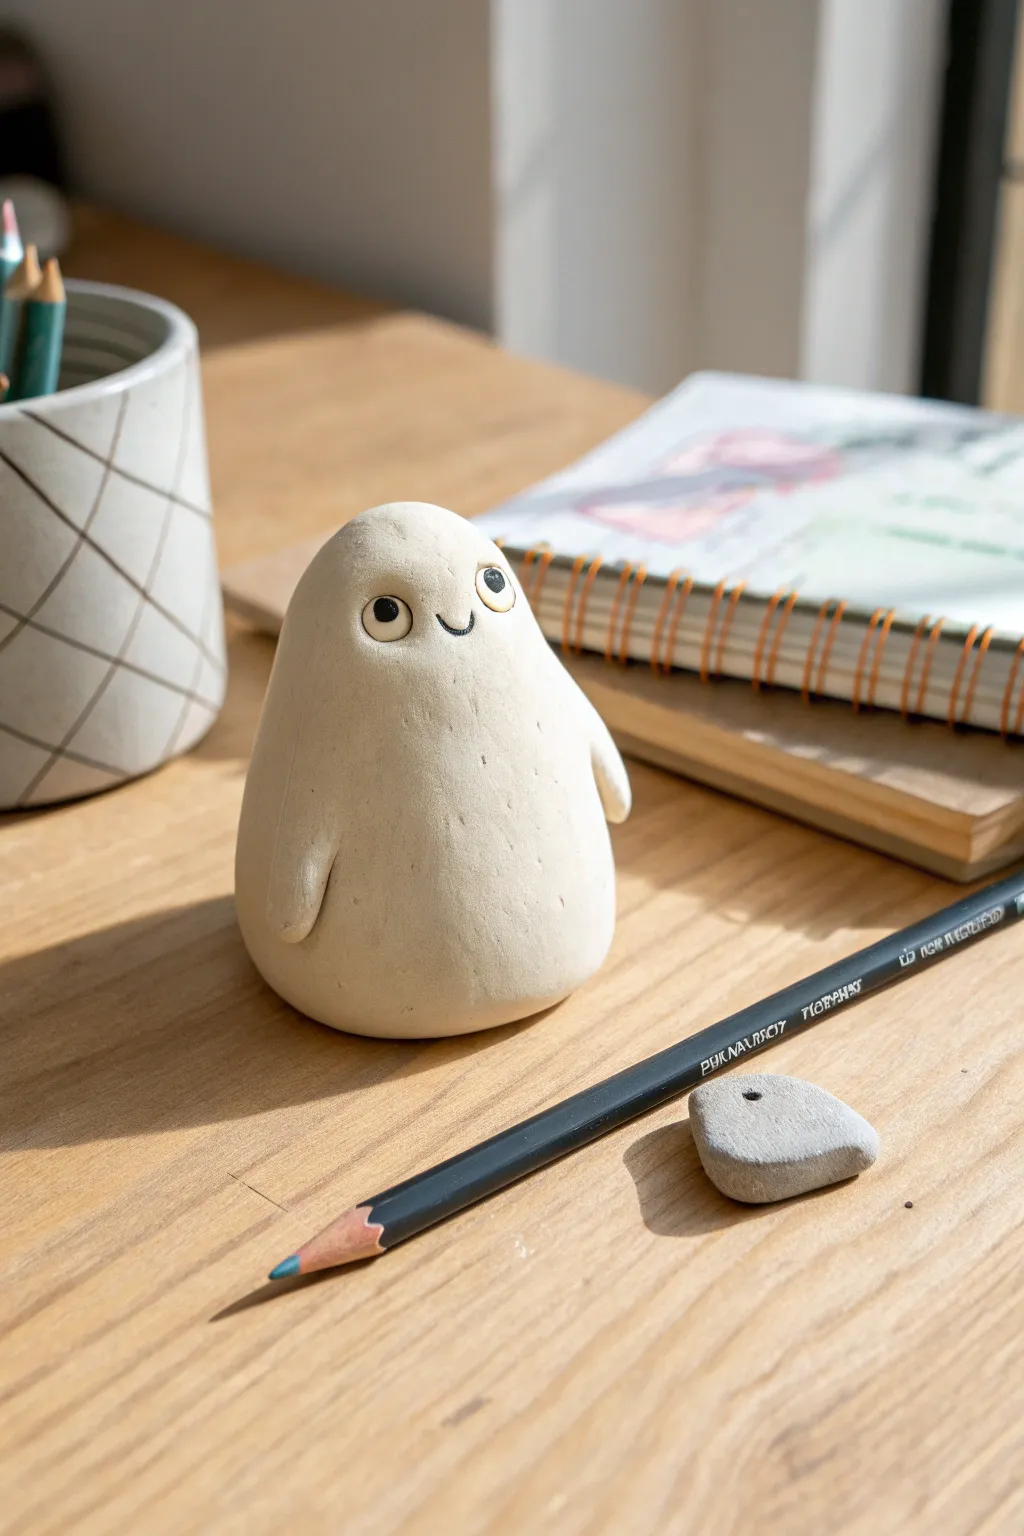
Meet your new favorite desk companion: a delightfully simple, egg-shaped clay creature with stubby little hands and a curious expression. This minimalist sculpture relies on clean curves and expressive eyes to bring personality to a basic form.
Step-by-Step
Materials
- White polymer clay or air-dry clay (approx. 150g)
- Black acrylic paint
- Small detail paintbrush (size 0 or 00)
- Needle sculpting tool or toothpick
- Ball stylus tool (medium size)
- Fine-grit sandpaper (optional)
- Matte varnish or sealant
Step 1: Shaping the Body
-
Condition the clay:
Begin by kneading your white clay thoroughly until it’s warm, pliable, and free of cracks. This conditioning step is crucial for a smooth final surface. -
Form the base shape:
Roll the clay into a smooth ball between your palms to remove any initial seams. -
Elongate the form:
Gently gently apply pressure while rolling the ball into a tapered egg shape. You want a wider base that sits flat and a slightly narrower, rounded top for the head. -
Flatten the bottom:
Tap the wider end of your egg shape firmly against your work surface. This creates a stable base so your buddy won’t wobble or roll away. -
Smooth the surface:
Use your thumb to lightly rub out any fingerprints or subtle dents. I find dipping my finger in a tiny drop of water (for air-dry) or baby oil (for polymer) helps get it glass-smooth.
Keep it Clean
White clay picks up dust instantly. Keep baby wipes nearby and clean your hands and tools before touching the final shape to ensure a pristine finish.
Step 2: Adding the Arms & Face
-
Create the arm nubs:
Pinch off two very small, pea-sized pieces of matching white clay. Roll them into tiny elongated teardrops. -
Attach the arms:
Press the rounded end of the teardrops onto the side of the body, about one-third of the way up from the base. They should hang downwards naturally. -
Blend the seams:
Using your thumb or a modeling tool, gently blend the clay from the top of the arm into the body so there is no visible seam, leaving the bottom tip distinct. -
Indent eye sockets:
Use your ball stylus tool to press two shallow, circular indentations near the top of the head. Space them somewhat wide apart for that goofy, endearing look. -
Scribe the mouth:
With your needle tool or a toothpick, gently carve a small, upward-curved smile right between the eyes. Keep the line depth consistent. -
Refine the texture:
If you want the slightly rustic look shown in the image, you can gently tap the surface with a stiff bristle brush or a crumpled piece of aluminum foil to add tiny pores.
Fixing Cracks
If you see tiny cracks forming as air-dry clay dries, mix a small amount of fresh clay with water to make a paste and fill the gaps before painting.
Step 3: Finishing Up
-
Cure or dry:
Bake your polymer clay according to the package instructions, or let your air-dry clay sit for 24-48 hours until fully hardened. -
Sand imperfections:
Once fully hard, check for any rough spots. A quick pass with fine-grit sandpaper can smooth out bumps on the back or base. -
Paint the eyes:
Using a tiny detail brush, fill the indented eye sockets with matte black acrylic paint. Be careful to stay inside the recess. -
Define the mouth:
Use the very tip of your brush (or a fine-tip black marker) to trace the carved smile line, giving it definition. -
Add the highlights:
Dip a toothpick into white paint and create a tiny dot in the upper corner of each black eye pupil. This ‘catchlight’ brings the character to life. -
Seal the piece:
Apply a coat of matte varnish over the entire piece to protect the paint and give the clay a finished, professional ceramic feel.
Set your little companion on your desk to supervise your work with a smile


Tongue-Lolling Candle Holder
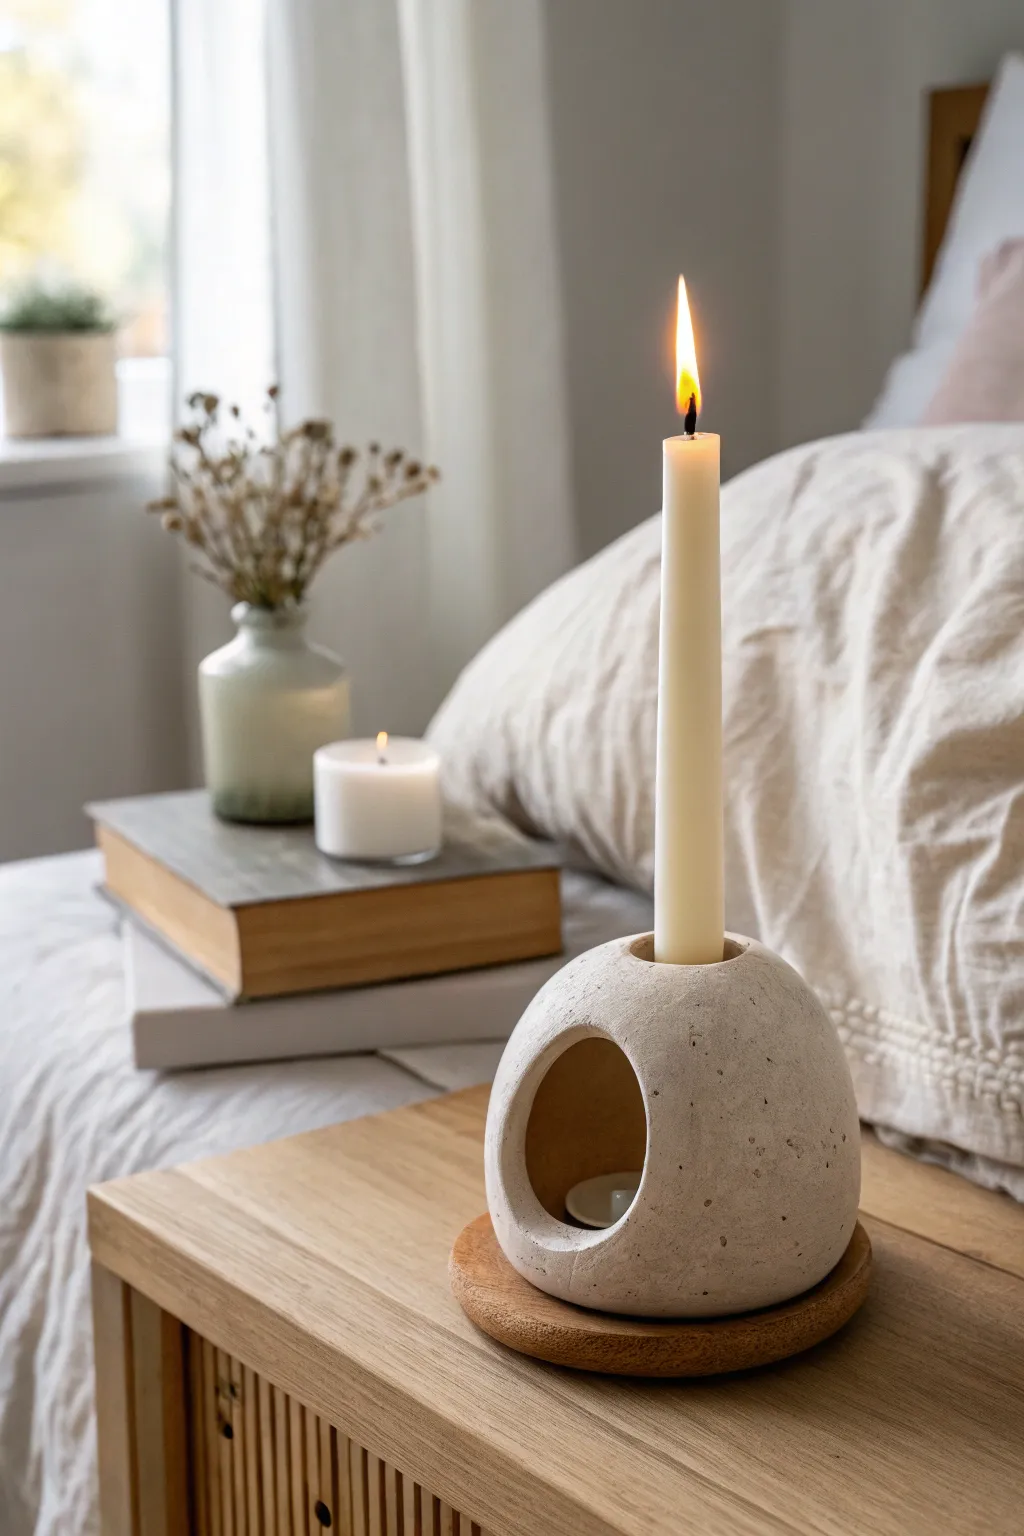
This whimsical yet minimalist piece combines the functionality of a taper holder with the charm of an abstract sculpture. Resembling a simplistic creature with a gaping mouth, its speckled stoneware finish adds a touch of organic warmth to any bedside table.
Detailed Instructions
Materials
- Speckled cream stoneware clay (or polymer clay with granite effect)
- Wooden rolling pin
- Small balloon (about 4-5 inches inflated)
- Needle tool or fettling knife
- Sponge
- Small bowl of water
- Circular cookie cutter (approx. 2 inches)
- Standard taper candle (for sizing)
- Mod Podge or clear matte sealant (if using air-dry clay)
- Round wooden coaster (optional, for base)
Step 1: Forming the Base Shape
-
Prepare the balloon:
Inflate your small balloon until it forms a nice round shape, roughly the size of a large grapefruit or small cantaloupe. Tie it off securely so no air escapes. -
Roll out the clay:
Take a generous chunk of your speckled clay and roll it out into a flat slab about 1/4 inch thick. Aim for an even thickness to prevent cracking during drying. -
Drape the clay:
Gently lift your clay slab and drape it over the top of the balloon. Smooth it down the sides with your hands, cupping the form to ensure it hugs the balloon without trapping air pockets. -
Trim the excess:
Using a needle tool, trim the excess clay around the bottom where the balloon starts to narrow, but leave enough to create a stable, flat base. You essentially want a clay dome covering about 3/4 of the balloon. -
Flatten the bottom:
Gently press the drape-covered balloon onto your work surface to create a flat bottom. This ensures your candle holder won’t wobble later.
Collapsing Dome?
If the clay slumps while drying, keep the balloon inflated inside for longer. Don’t pop it until the clay is stiff and truly leather-hard to the touch.
Step 2: Sculpting the Features
-
Create the mouth opening:
Decide where the ‘front’ of your orb is. Using a circular cookie cutter or freehanding with a needle tool, cut a large, centered circle out of the side of the dome. Remove this disc of clay. -
Refine the edges:
Dip a sponge in a little water and smooth the cut edges of the mouth opening. You want them rounded and soft, not sharp or jagged. -
Create the candle well:
On the very top of the dome, place the base of your taper candle to mark the size. I like to twist it slightly to make an impression. -
Cut the top hole:
Carefully cut out the hole for the candle. Alternatively, build a small coil of clay, attach it to the top, and smooth it seamlessly into the dome to create a raised neck for extra stability. -
Insert an internal support:
This is crucial: create a small cylinder of clay that fits inside the orb, sitting directly beneath the top candle hole. This acts as a ‘cup’ to catch the candle base so it doesn’t just fall through into the hollow sphere. -
Attach the internal cup:
Reach through the large mouth opening to smooth and score the internal cup to the inside bottom of the orb. Ensure it aligns perfectly with the top hole.
Tealight Transformation
Make the mouth opening slightly larger and omit the top taper hole. Now you can slide a battery-operated tealight inside for a glowing lantern effect.
Step 3: Finishing Touches
-
Initial Drying:
Let the clay sit on the balloon until it is leather hard. This usually takes a few hours depending on humidity. -
Remove the balloon:
Pop the balloon with a needle and carefully peel the rubber away from the inside of the clay shell. -
Smooth the interior:
Reach inside the mouth opening again with a damp sponge to smooth out any rough texture left by the balloon or your attachment points. -
Create the ‘tongue’ (Optional):
If you want the full ‘lolling’ effect, fashion a small, flat U-shape of clay and attach it to the bottom lip of the mouth opening, curving it slightly outward. -
Final textural check:
Wipe the entire exterior with a slightly damp sponge to bring the grog (speckles) to the surface and ensure a matte, stony finish. -
Firing or sealing:
If using ceramic clay, fire it according to your clay body’s cone (e.g., Cone 6). If using air-dry clay, let it dry for 48 hours and then seal with a matte varnish. -
Pair with wood:
Once finished, place the orb on a small wooden coaster or disk to replicate such a grounded, earthy look.
Light a candle and enjoy the cozy, modern vibe this little character adds to your room

The Complete Guide to Pottery Troubleshooting
Uncover the most common ceramic mistakes—from cracking clay to failed glazes—and learn how to fix them fast.
Derpy Monster Ring Cone
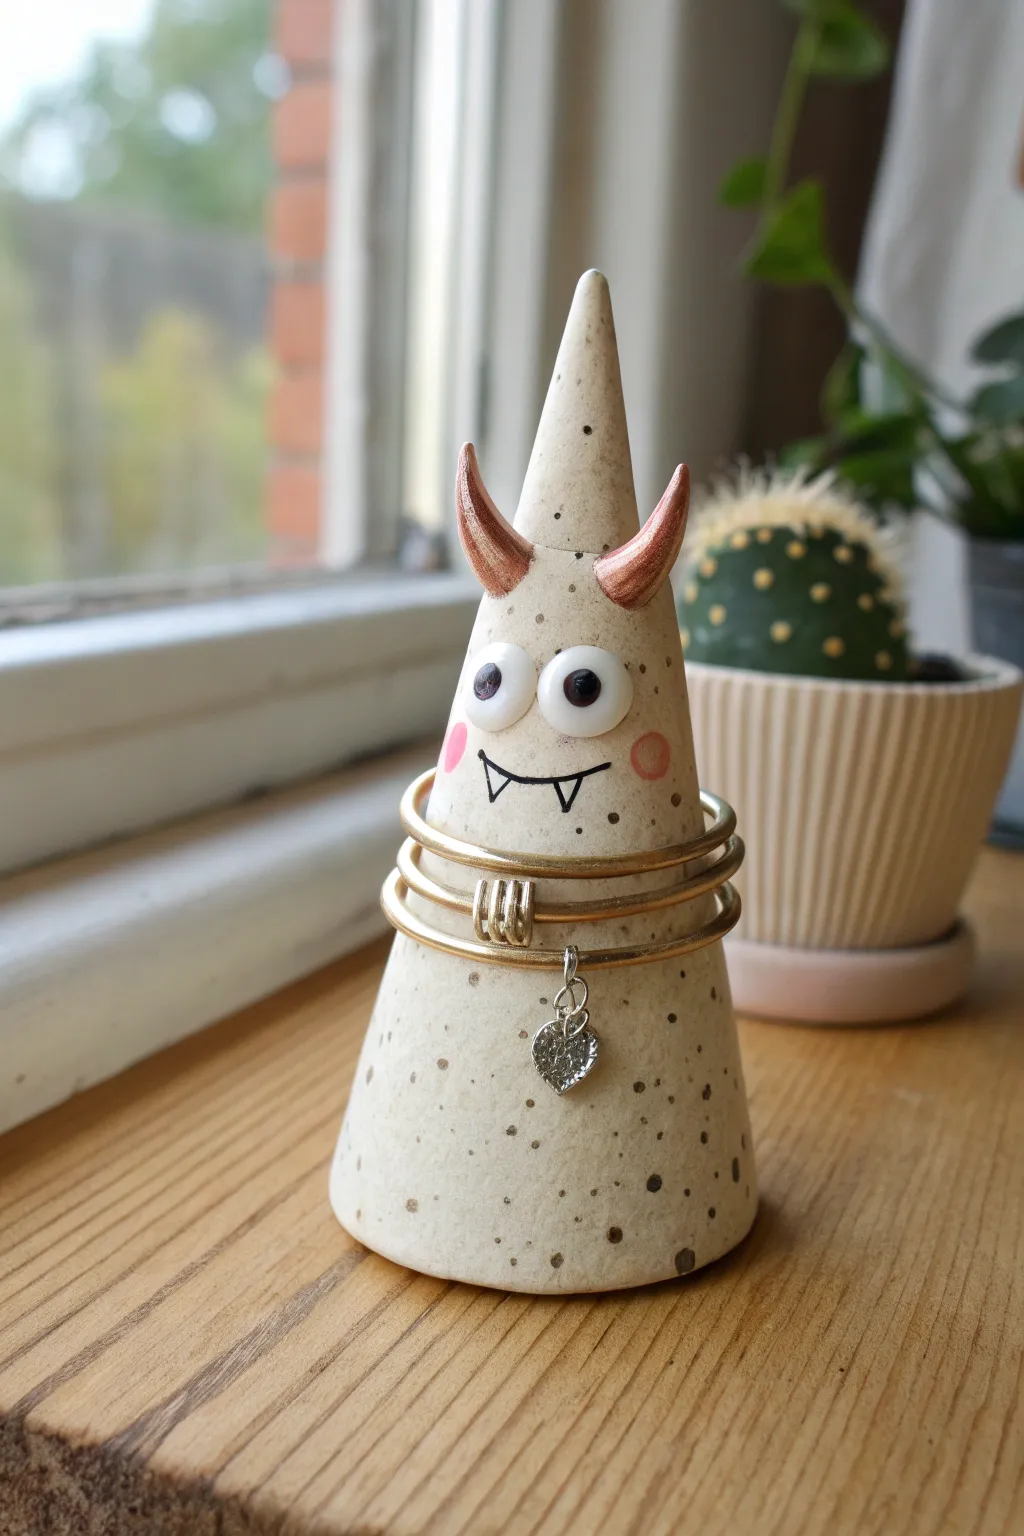
This whimsical little creature serves a double purpose: keeping your rings safe and adding a touch of personality to your dresser. With its speckled finish, copper horns, and slightly confused expression, this ceramic cone is as fun to make as it is functional.
How-To Guide
Materials
- White polymer clay or air-dry clay
- Acrylic rolling pin
- Craft knife or clay blade
- Copper or rose gold metallic acrylic paint
- Black acrylic paint
- Pink acrylic paint
- White acrylic paint (if not using white clay)
- Small fine-point paintbrush
- Dotting tool or toothpick
- Glaze or varnish (glossy finish)
- Old toothbrush (for speckling)
- Small cup of water
- Palette or paper plate
Step 1: Shaping the Base
-
Prepare the Clay:
Start by conditioning a chunk of white clay in your hands until it is soft and malleable. Roll it into a smooth ball to remove any air bubbles or cracks. -
Form the Cone:
Begin rolling the ball against your work surface, applying more pressure on one side to taper it. You want a tall, smooth cone shape that is stable at the bottom but comes to a distinct point at the top. -
Smooth the Surface:
Use a little bit of water on your finger (if using air-dry clay) or baby oil (for polymer) to smooth out any fingerprints. The surface needs to be sleek so your rings won’t snag. -
Check Stability:
Tap the wide base of the cone firmly on the table to flatten it. Ensure the cone stands perfectly straight and doesn’t lean to one side.
Step 2: Adding Features
-
Create the Eyes:
Roll two small balls of white clay. Press them gently onto the upper third of the cone, flattening them slightly into discs. Place them close together for that goofy look. -
Sculpt the Horns:
Roll two small, tapered ropes of clay for the horns. Curve them slightly upwards like crescent moons. -
Attach the Horns:
Score the clay where the horns will go (scratch tiny cross-hatch marks) and add a dab of water or liquid clay. Press the horns firmly onto the sides of the cone’s ‘head’ area. Blend the seams smoothly with your finger or a tool. -
Dry or Bake:
If using polymer clay, bake according to package instructions (usually 275°F/135°C for 15-30 mins per 1/4 inch). If using air-dry clay, let it sit for 24-48 hours until completely hard and white.
Horns Falling Off?
If horns won’t stick, insert a small piece of toothpick or wire into the cone and slide the horn onto it for an invisible internal skeleton.
Step 3: Painting and Finishing
-
Base Coat (Optional):
If your clay dried a bit grey or uneven, give the main body a coat of creamy white acrylic paint. Avoid painting the horns. Let this dry completely. -
Speckling the Body:
Dilute a tiny amount of brown or black paint with water. Dip an old toothbrush into it, and running your thumb across the bristles, flick paint droplets onto the cone to create the speckled ceramic potter’s clay effect. -
Paint the Horns:
Using a small brush, carefully paint the horns with metallic copper or rose gold paint. You may need two coats to get that rich, shiny opacity. -
Paint the Pupils:
Use a dotting tool or the end of a paintbrush handle dipped in black paint to add pupils to the white eye discs. Make one pupil slightly larger or looking off-center to enhance the ‘derpy’ personality. -
Add Cheeks:
Dilute a drop of pink paint so it acts like watercolor. Dab two soft pink circles on the cheeks just below the eyes. -
Draw the Mouth:
With your finest paintbrush or a black paint pen, draw a thin smile line. Add two tiny triangles pointing down for the little monster fangs. -
Seal the piece:
Once all paint is bone dry, coat the entire piece in a high-gloss glaze or varnish. This protects the paint and mimics the look of fired glazed ceramic.
Pro Tip: Weighted Base
Before drying, press a heavy washer or coin into the underside of the base and cover with clay. This stops it from tipping over when holding heavy rings.
Now slide your favorite rings onto your new little buddy and let him guard your jewelry
Mini Food Characters With Faces
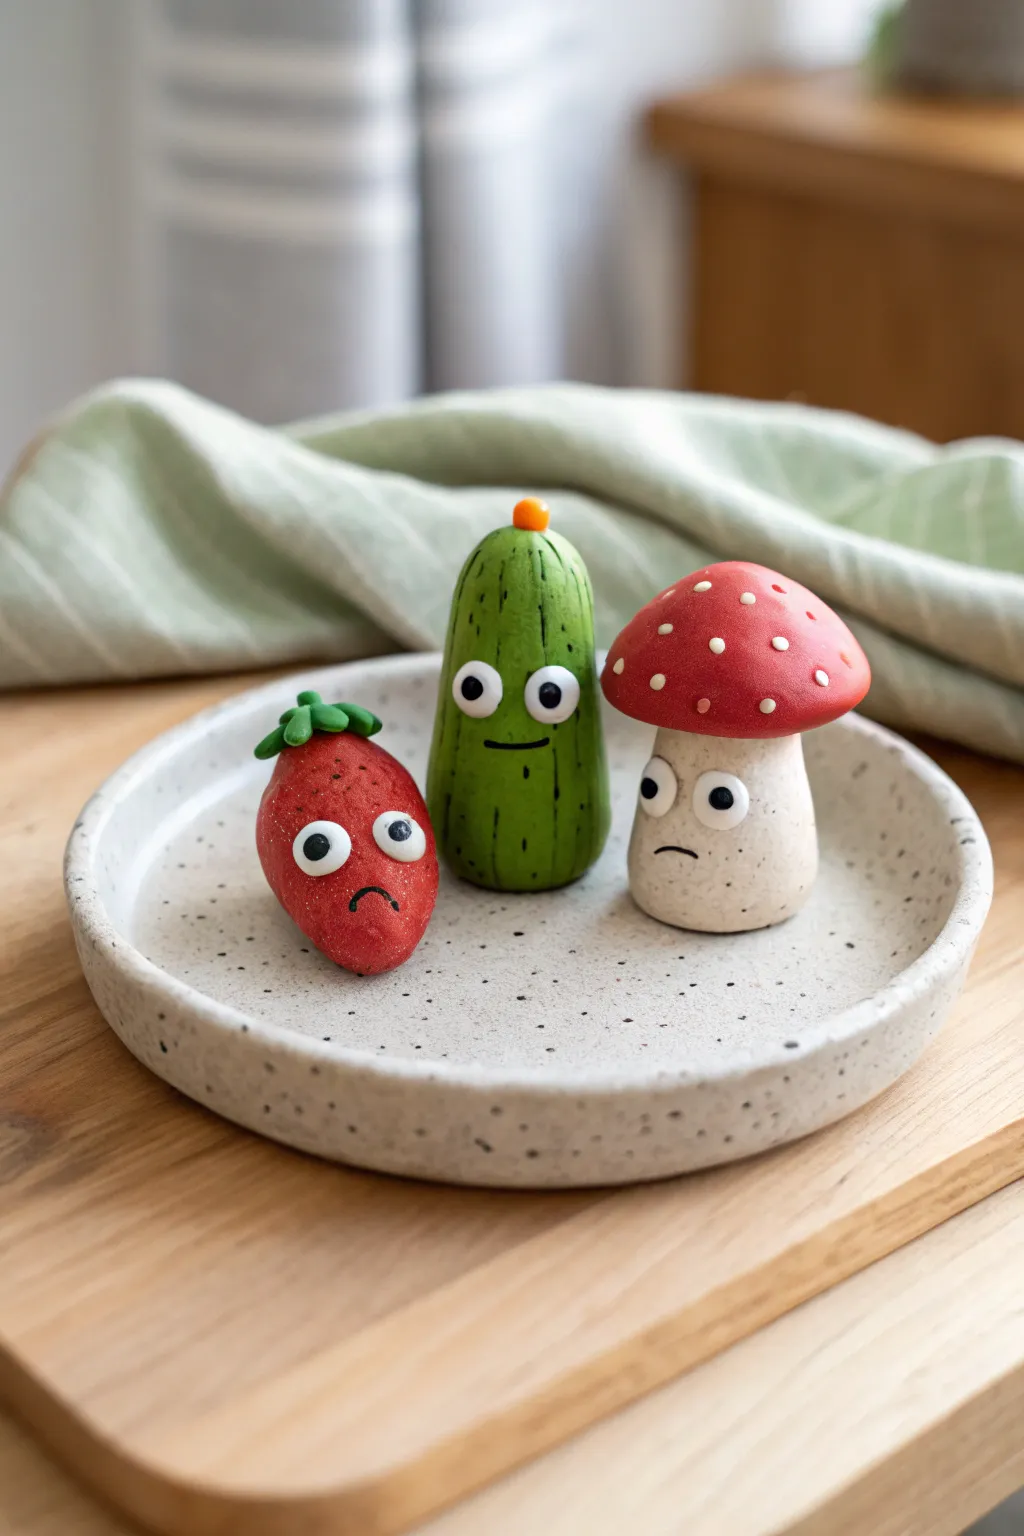
This trio of emotive clay characters combines stylized food shapes with surprisingly expressive faces. Using speckled and solid polymer clays, you’ll sculpt a strawberry, cucumber, and mushroom that look charmingly worried on your shelf.
Step-by-Step Tutorial
Materials
- Polymer clay (Speckled beige/sand, Red, Green, White)
- Black acrylic paint or fine-tip permanent marker
- Sculpting tools (needle tool, small ball tool)
- Rolling pin
- Aluminum foil (optional, for cores)
- Gloss glaze (optional)
- Baking sheet and oven
Step 1: The Worried Strawberry
-
Form the base:
Start with a ball of red polymer clay roughly the size of a walnut. Gently roll it between your palms, tapering one end to create a classic strawberry teardrop shape. -
Add texture:
Using a needle tool or a stiff toothbrush, gently stipple the surface of the red clay to mimic seeds. Don’t press too hard; you want subtle indentations. -
Create the leaves:
Take a small amount of green clay and flatten it into a star shape. Press this onto the wider (top) end of your strawberry. -
Add the stem:
Roll a tiny cylinder of green clay and attach it to the center of the leaves to finish the fruit’s body.
Sticky Fingerprints?
If you are leaving fingerprints on smooth areas, lightly brush the raw clay with a little baby oil or cornstarch before baking to smooth them out.
Step 2: The Stoic Cucumber
-
Shape the body:
Condition a piece of green polymer clay until soft. Roll it into a thick log shape, slightly rounding the top and flattening the bottom so it stands upright on its own. -
Line details:
Take a needle tool and drag vertical lines down the length of the cucumber. These don’t need to be perfectly straight; slight wobbles add character. -
Highlight the grooves:
If you want extra definition, you can lightly brush black pastel dust into these grooves before baking, though painting them later works too. -
Top blossom:
Roll a miniscule ball of orange or yellow clay and press it onto the very top center of the cucumber.
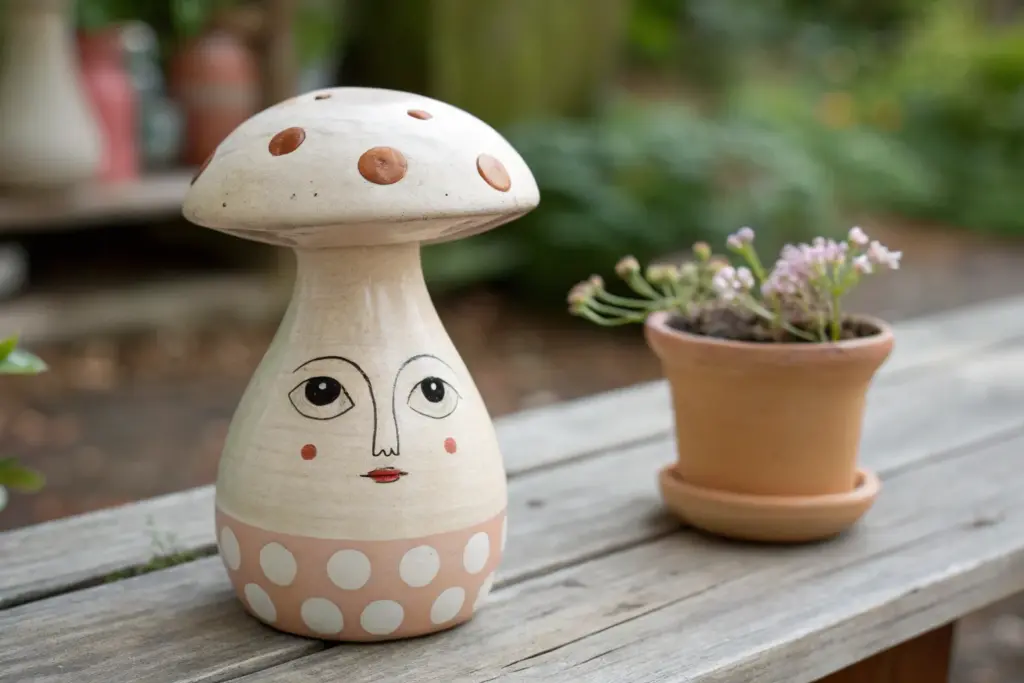
Step 3: The Concerned Mushroom
-
Create the stalk:
Roll a cylinder using speckled beige or sand-colored clay. I find that slightly tapering the top makes the cap sit more naturally. Flatten the base so it stands sturdy. -
Shape the cap:
Form a red clay ball, then flatten the bottom and round the top into a dome. Place this onto your speckled stalk, pressing gently to fuse them. -
Add dots:
Roll tiny balls of white clay in varying sizes. Press these flat onto the red cap to create the classic toadstool look.
Pro Tip: Eye Placement
Place eyes lower on the object than you think you should. Low-set eyes instantly make inanimate objects look cuter and more ‘chibi’ style.
Step 4: Bringing Them to Life
-
Make the eyes:
Roll pairs of small white clay balls for each character. Flatten them slightly and press them onto the faces. -
Bake the clay:
Arrange the trio on a baking sheet. Bake according to your brand of polymer clay instructions (usually around 275°F/135°C for 15-30 minutes). -
Cool down:
Let the figures cool completely before handling so the clay hardens fully. -
Add pupils:
Using black acrylic paint and a dotting tool (or a toothpick), add the pupils. Placing them slightly off-center or crossing them gives them a goofy personality. -
Draw the mouths:
Use a fine paintbrush or marker to draw the mouths. A downward curve creates sadness for the strawberry and mushroom, while a straight line suits the cucumber. -
Paint details:
For the cucumber, carefully trace the indented vertical lines with diluted black paint or a fine marker to emphasize the texture.
Set up your little food family on a shelf or desk for a daily dose of whimsy


What Really Happens Inside the Kiln
Learn how time and temperature work together inside the kiln to transform clay into durable ceramic.
Screaming Vegetable Magnet Set
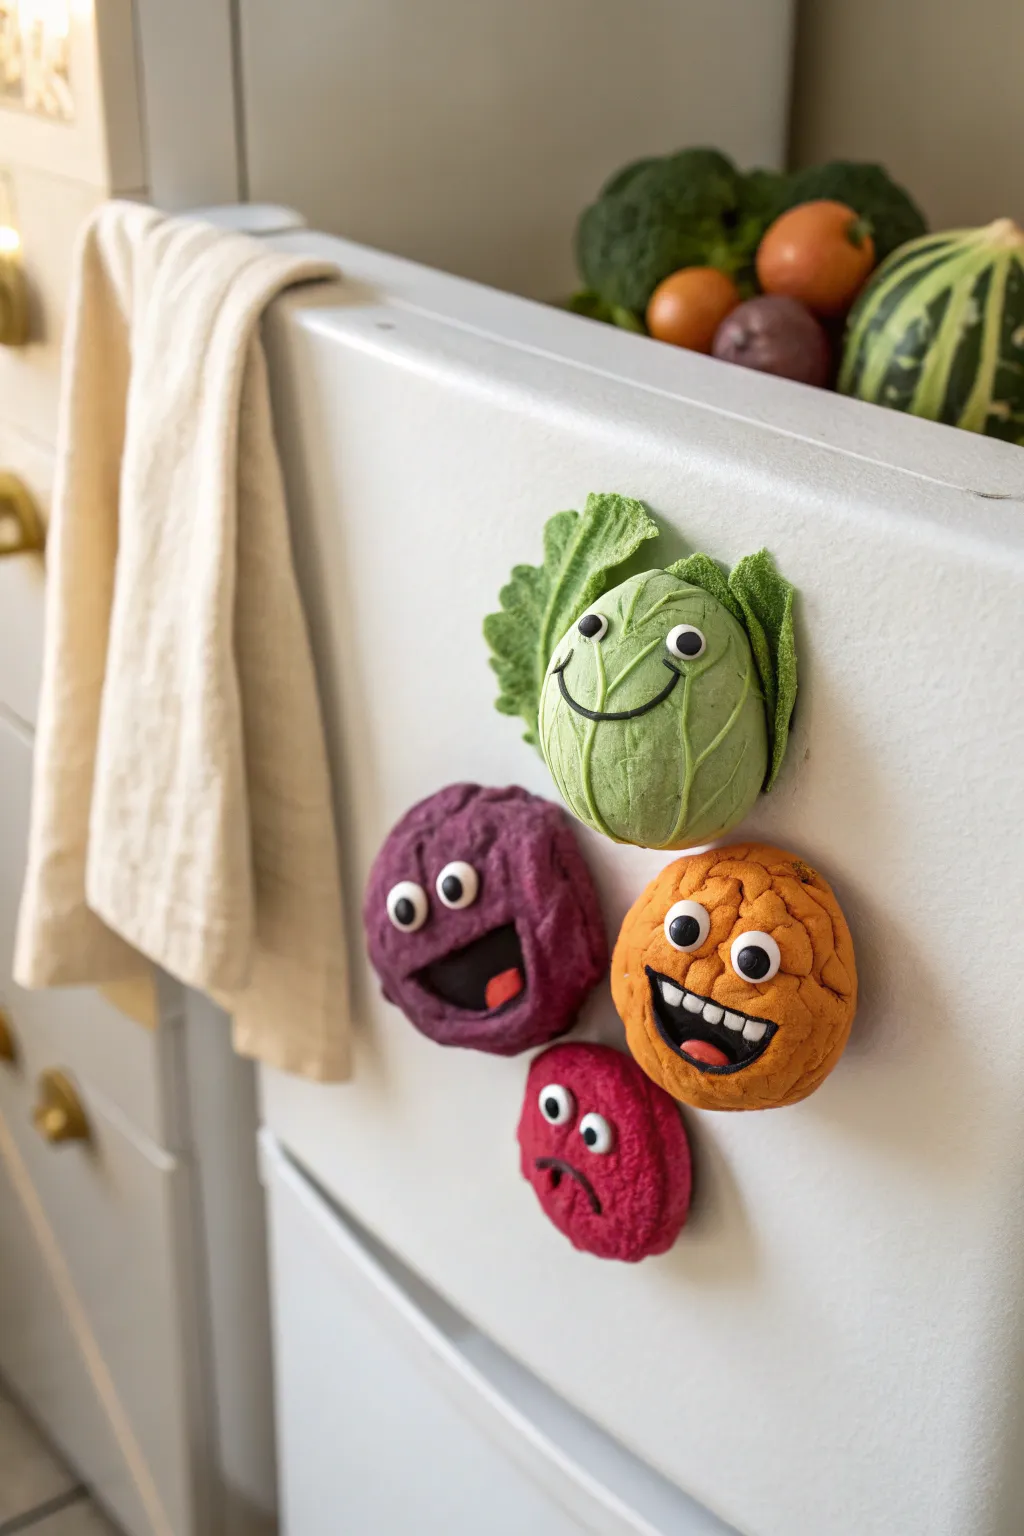
Brighten up your appliance with this quirky quartet of screaming produce, featuring textured skins and exaggerated expressions. These playful vegetable magnets add a dose of humor to your kitchen, transforming ordinary clay into characters bursting with personality.
Step-by-Step
Materials
- Polymer clay (shades: leaf green, light green, deep purple, orange, bright red, white, black, pink)
- Strong craft magnets (round)
- Strong craft glue (E6000 or similar)
- Texture tools (coarse sponge, needle tool, old toothbrush)
- Clay sculpting tools (ball stylus, flexible blade)
- Gloss glaze (optional for eyes/mouths)
- Aluminum foil (optional core for larger pieces)
- Oven for baking
Step 1: Sculpting the Happy Cabbage
-
Form the base:
Start by conditioning a chunk of light green clay and rolling it into an oval shape with a slightly flattened back where the magnet will go. -
Add vein texture:
Using a needle tool, gently score curved lines vertically down the oval to mimic the ribs of cabbage leaves. -
Create outer leaves:
Flatten two thin pieces of darker ‘leaf green’ clay into uneven, wavy shapes. Press a coarse sponge onto them to create a heavy leaf texture. -
Attach the foliage:
Wrap these darker leaves around the sides and top of the cabbage base, flaring them outward slightly so they look loose and organic. -
Give it a face:
Roll a very thin snake of black clay and press it into a wide U-shape for the smile. Add short vertical ticks at the ends of the smile for cheeks. -
Detail the eyes:
Press two small white balls of clay above the smile, then add tiny black pupils. Position them wide apart for a goofy look.
Drooping Clay?
If the cabbage leaves flop during sculpting, prop them up with cardstock or folded foil while baking. Remove the props once the clay is cool and rigid.
Step 2: Crafting the Screaming Root Vegetables
-
Base shapes:
Create three round mounds with flattened backs using deep purple, orange, and bright red clay. Make the purple and orange ones slightly larger than the red one. -
Texturize the surface:
Roll a ball of aluminum foil or use a stiff-bristled toothbrush over the entire surface of each mound to give them a rough, organic skin texture. Don’t be afraid to be quite firm here. -
Carve the mouths:
For the purple and orange veggies, use a blade or sculpting tool to cut out deep, wide open mouth cavities. For the red one, carve a smaller, downward-turned frown. -
Fill the mouths:
Fill the back of the mouth cavities with black clay to create depth. For the orange veggie, add a row of small white squares for teeth along the top and bottom ridges. -
Add tongues:
Place a small flattened teardrop of pink or red clay inside the open mouths to act as tongues. -
Position the eyes:
Just like the cabbage, add white balls with black pupils. For the ‘screaming’ look, vary the pupil size—I sometimes make one pupil slightly smaller than the other to enhance the manic expression.
Make Them Pop
Brush a tiny amount of cornstarch or baby powder onto the clay before texturing. This prevents your toothbrush or foil ball from sticking to the surface.
Step 3: Finishing Touches
-
Baking:
Place all four characters on a parchment-lined baking sheet and bake according to your clay manufacturer’s instructions (usually 275°F/135°C for 15-30 minutes). -
Cooling down:
Let the veggies cool completely on the tray before handling them to ensure the clay hardens fully. -
Glazing eyes:
Carefully apply a tiny drop of gloss glaze or UV resin just to the eyes and tongues to make them look wet and alive against the matte skin. -
Attach magnets:
Flip the veggies over. Apply a strong dab of E6000 glue to the center of the back and press your magnet firmly into place. -
Final cure:
Allow the glue to cure for at least 24 hours before sticking your new friends onto the refrigerator door.
Now your fridge has a lively personality that greets you every time you reach for a snack
Dessert With Human Teeth
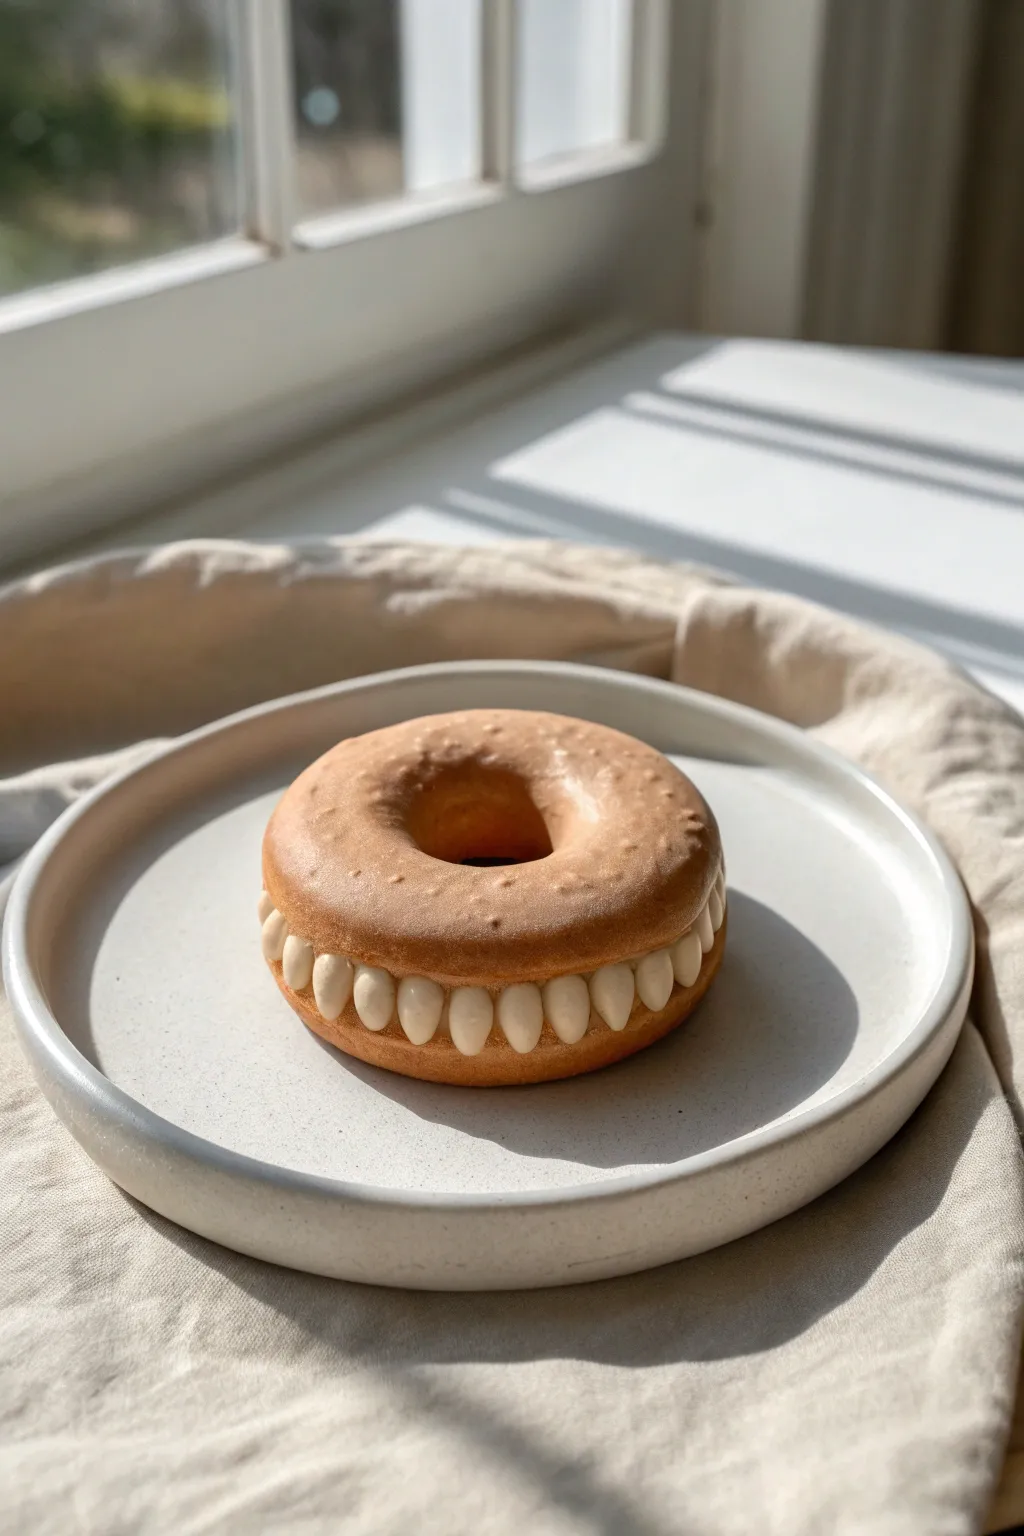
This unsettlingly realistic sculpture combines the innocent sweetness of a glazed donut with the jarring visual of a full set of human teeth. It’s a surrealist conversation piece that looks good enough to eat—until it smiles back at you.
Detailed Instructions
Materials
- Polymer clay (beige/tan for dough, white for teeth, translucent)
- Liquid polymer clay (translucent)
- Soft pastels (ochre, burnt sienna, brown)
- Acrylic paint (glossy clear coat)
- Sculpting tools (needle tool, small ball stylus)
- Texture sponge or toothbrush
- Rolling pin
- Circle cutters (large and small)
- Aluminum foil
- Paintbrush
Step 1: Forming the Dough
-
Mix the dough color:
Start by mixing beige polymer clay with a tiny amount of translucent clay and a pinch of white. This creates a realistic, baked-dough opacity rather than a flat plastic look. -
Create the core:
Crumple a ring of aluminum foil to serve as the armature. This saves clay and keeps the donut lightweight. Ensure the ring is donut-shaped but slightly thinner than your final desired size. -
Cover the armature:
Roll out a sheet of your mixed dough clay to about 1/4 inch thickness. Wrap it completely around your foil ring, smoothing the seams with your fingers until they disappear. -
Shape the bun:
Gently press the clay into a perfect torus shape. Slightly flatten the top and bottom surfaces, as a real donut isn’t a perfect tube. -
Texturing the surface:
Use a toothbrush or a coarse texture sponge to tap the entire surface of the clay. This mimics the tiny air bubbles found on fried dough. -
Slice the donut:
Using a very sharp tissue verify blade or knife, slice the donut horizontally through the middle to create a top bun and a bottom bun. Separate them carefully.
Uneven Teeth?
If teeth look too uniform or ‘chiclet-like,’ vary the shapes. Make canines sharper and molars flatter towards the back. Real teeth aren’t perfect rectangles.
Step 2: Sculpting the Teeth
-
Prepare the gums:
Mix a small amount of beige clay with a tiny dot of pink to create a very pale, fleshy gum color. Roll a snake of this clay and place it along the cut edge of the bottom bun. -
Shape individual teeth:
For the teeth, use white clay mixed with a hint of translucent. Roll small teardrop shapes—you will needed about 20-25 depending on the donut size. Flatten the wider end slightly to look like incisors and canines. -
Place the bottom row:
Press the teeth into the gum snake on the bottom bun, pointing upwards. Ensure they are evenly spaced and follow the curve of the donut perfectly. -
Add the top row (optional):
If you want a full bite, repeat the process on the underside of the top bun, or simply sculpt the bottom row taller so they meet the top bun directly, which is often easier for structural stability. -
Refine the dental shapes:
Use a small silicone tool or needle to smooth the clay where the tooth meets the gum. Shaping the gums to look like they are receding slightly creates a creepier, more realistic effect.
Step 3: Baking and Glazing
-
Assemble the sandwich:
Gently place the top bun over the teeth. Press down very lightly to ensure the clay bonds, but be careful not to squash your meticulously sculpted teeth. -
Pre-bake shading:
Grate some soft pastels into powder (ochre and burnt sienna). Use a dry fluffy brush to dust the top and bottom of the donut, concentrating the darker brown on the edges to simulate a baked crust. -
First Bake:
Bake the piece according to your clay manufacturer’s instructions (usually 275°F/135°C for 15-30 minutes). Let it cool completely. -
Mixing the glaze:
Mix liquid polymer clay with a small scraping of beige pastel dust. You want it to be translucent but slightly milky, like sugar glaze. -
Apply the glaze:
Brush the liquid clay mixture over the top of the donut. Let it drip slightly down the sides, but avoid covering the teeth. You want the contrast between the matte dough and the shiny teeth to remain. -
Final Bake:
Bake the piece again for about 10-15 minutes to set the liquid clay glaze. Watch closely to ensure the glaze doesn’t burn or turn yellow. -
Finishing touches:
Once fully cooled, apply a high-gloss acrylic varnish specifically to the teeth to give them a wet, enamel look. Leave the dough areas matte or satin.
Cavity Creep
Add realism by painting subtle yellow staining near the gumline or drilling a small hole and filling it with black paint for a cavity.
Display your disturbing dessert on a classic ceramic plate to really confuse your guests

TRACK YOUR CERAMIC JOURNEY
Capture glaze tests, firing details, and creative progress—all in one simple printable. Make your projects easier to repeat and improve.
Snail With a Human Smile
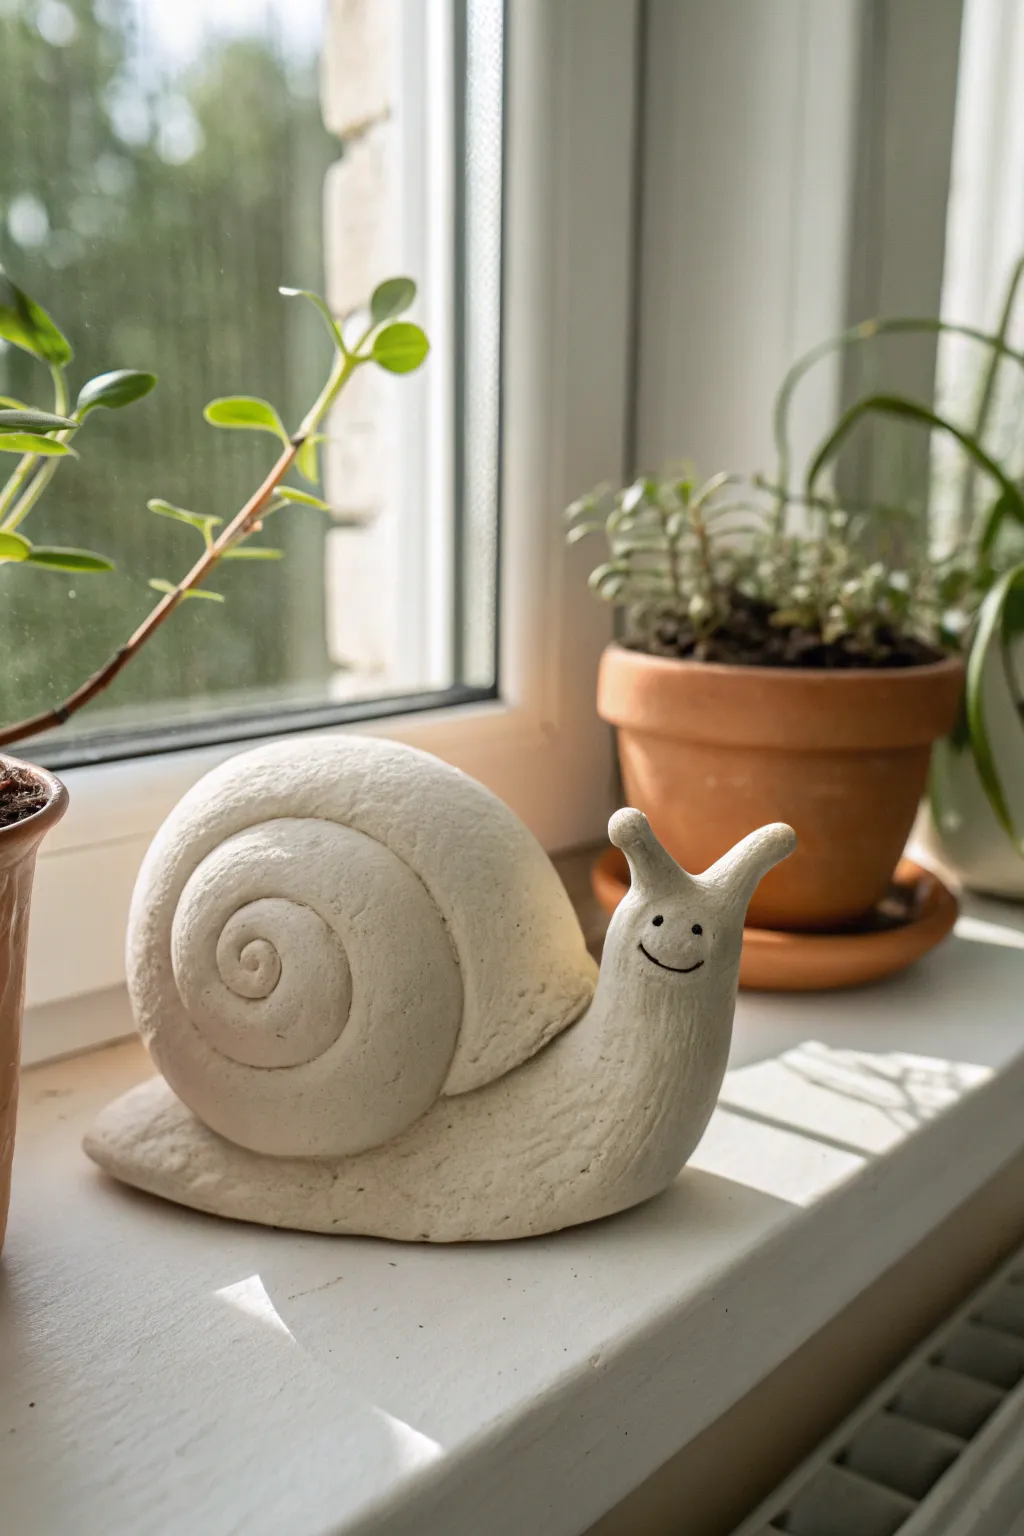
Sculpt a charming, minimalist snail that brings a touch of unexpected humor to your windowsill with its strangely human smile. This project focuses on clean lines, a textured matte finish, and comical facial expression using air-dry or polymer clay.
Step-by-Step Tutorial
Materials
- White air-dry clay or polymer clay (approx. 500g)
- Small rolling pin
- Sculpting tools (needle tool, ball stylus)
- Water cup and sponge (for smoothing)
- Fine-grit sandpaper (200-400 grit)
- Texture sponge or toothbrush
- Acrylic matte varnish (optional)
Step 1: Forming the Shell
-
Prepare the clay:
Begin by conditioning a large ball of white clay in your hands until it is pliable and free of cracks. I like to knead it for a few minutes to ensure it’s perfectly smooth before starting. -
Roll the coil:
Roll the clay into a long, tapered snake shape. One end should be quite thick (about 2 inches wide) and it should gradually taper down to a fine point at the other end. -
Flatten slightly:
Gently press down on the tapered coil with your palm to flatten it just a tiny bit; this helps the spiral sit securely without rolling away later. -
Start the spiral:
Take the thinnest pointed end and begin rolling it inward tightly. Keep the roll vertical so the shell builds outward like a cinnamon roll standing on its side. -
Complete the shell:
Continue rolling until you reach the thickest part of the coil. Leave a small section at the end unrolled to blend into the body later. -
Refine the shape:
Cup the spiral in your hands and gently press the sides to ensure it looks round and uniform. Smooth out any initial cracking with a damp finger.
Keeping the Shell Upright
If the shell feels heavy and wants to slump backward while the neck is wet, prop it up with a small wad of crumpled aluminum foil or paper towel until the clay firms up.
Step 2: Sculpting the Body
-
Shape the base:
Take a second large lump of clay and form it into a thick, elongated tear-drop shape. This will be the snail’s foot and neck. -
Raise the neck:
Bend the thicker, rounded end of the teardrop upward to create the neck and head area. The neck should curve gracefully, not at a sharp 90-degree angle. -
Flatten the foot:
Press the bottom of the body firmly onto your work surface to create a flat, stable base. Ensure the tail end tapers off naturally. -
Join the pieces:
Place the shell onto the back of the body. Score (scratch) the contact points on both pieces and add a dab of water or liquid clay (slip) to act as glue. -
Blend the seam:
Use a modeling tool to drag clay from the underside of the shell down onto the body, smoothing the seam until the two parts look like a single unit.
Step 3: Detailing the Face & Texture
-
Form the eye stalks:
Pull two small nubs of clay up from the top of the head. Gently roll them between your fingers to elongate them into stalks with slightly rounded tips. -
Position the stalks:
Angle the eye stalks slightly outward and backward for a relaxed, curious expression rather than having them point straight up. -
Carve the smile:
Using a needle tool or a small blade, carefully carve a simple, curved line for the mouth. Make it slightly asymmetrical to give it that quirky human-like smirk. -
Add the eyes:
With a small ball stylus or the end of a paintbrush, press two small indentations centered above the smile to create the beady eyes. Keep them relatively close together. -
Texturize the surface:
Take a texture sponge or an old toothbrush and gently dab the entire surface of the snail (avoiding the smooth spiral lines). This creates a stone-like, organic matte texture. -
Final smoothing:
Check the smile and eyes again; if the texturing blurred them, carefully redefine the lines with your needle tool. -
Drying:
Allow the sculpture to dry slowly away from direct heat sources. This usually takes 24-48 hours depending on thickness. -
Sanding and finishing:
Once fully dry, lightly sand any rough imperfections. You can leave it raw white for the stone look or apply a matte varnish for protection.
Cracks Appearing?
Air-dry clay shrinks. If hairline fractures appear during drying, make a paste of clay and water (slip) and fill the cracks, then sand smooth once dry.
Place your finished snail near some potted plants to let him survey his leafy kingdom
Fish With Legs Desk Pet
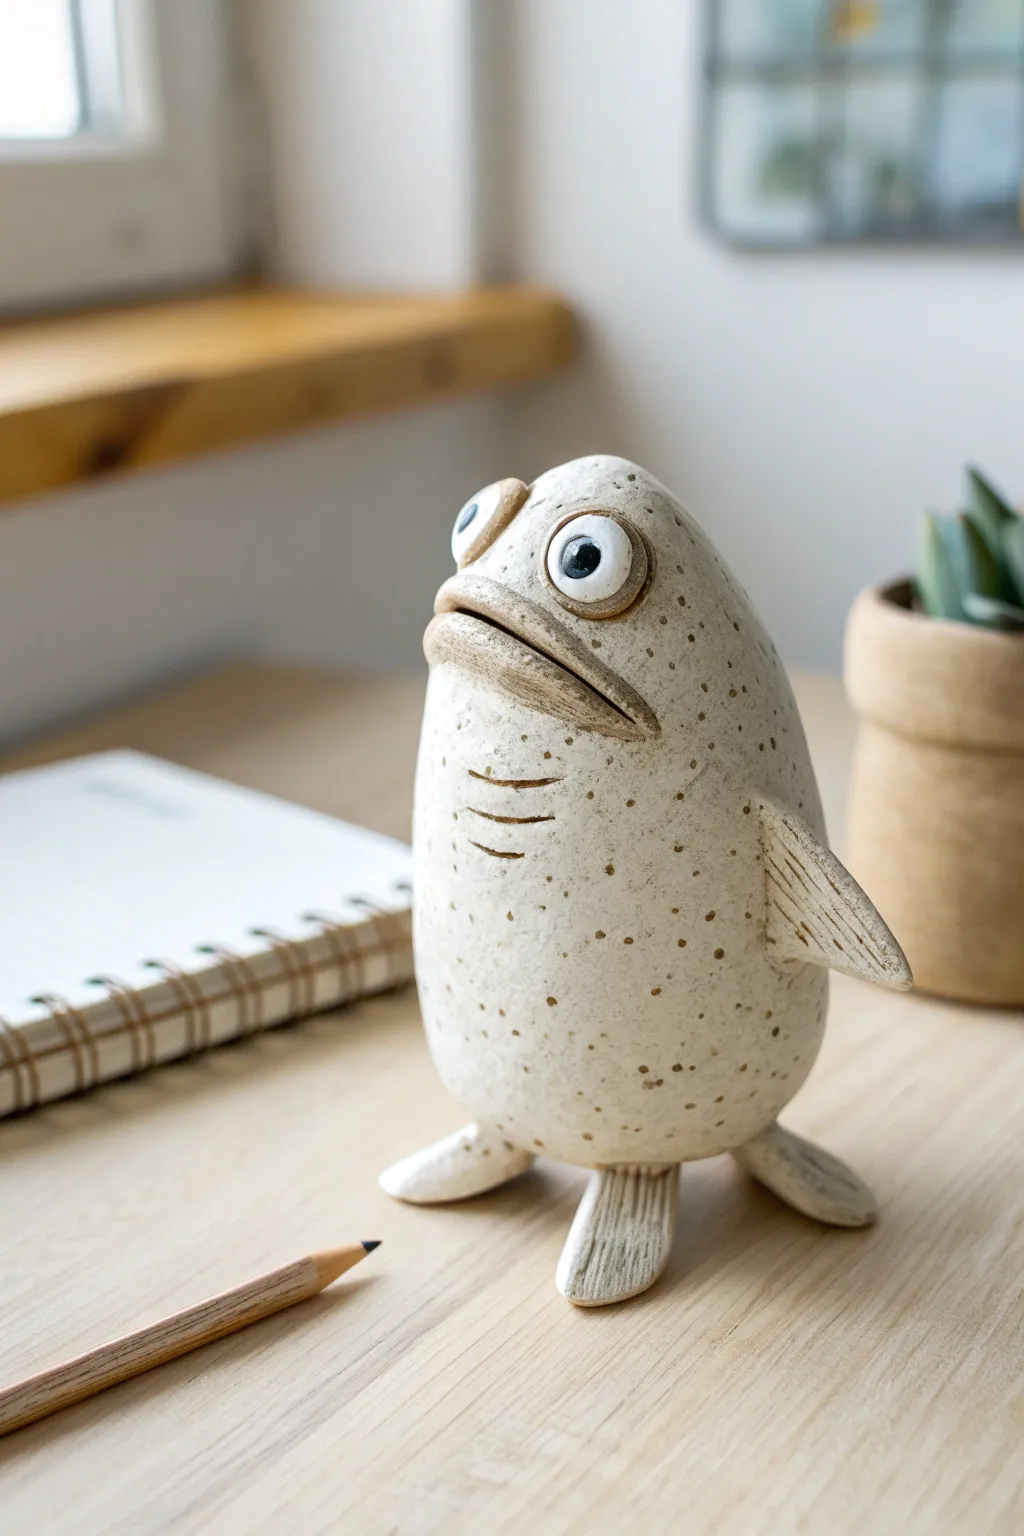
This whimsical desk pet combines a surprised fish expression with stubby little feet for a touch of surreal humor. Its textured, speckled beige finish gives it an organic, stone-like appearance perfect for guarding your workspace.
Detailed Instructions
Materials
- Polymer clay or air-dry clay (white or beige base)
- Acrylic paints (beige/cream, dark brown, black, white)
- Sculpting tools (needle tool/toothpick, smoothing tool)
- Water or clay softener
- Aluminum foil (for the core)
- Small paintbrush
- Stiff bristle brush (e.g., old toothbrush) for texture
- Varnish or sealant (matte or satin finish)
Step 1: Forming the Body
-
Create the core:
Crumple a piece of aluminum foil into an elongated egg shape, slightly wider at the bottom; this saves clay and keeps the figure lightweight. -
Cover the core:
Roll out a slab of your base clay to about 1/4 inch thickness and wrap it completely around the foil egg. -
Smooth the seams:
Where the clay edges meet, blend them together firmly using your thumbs or a smoothing tool so no lines are visible. -
Refine the shape:
Roll the form gently on your work surface to ensure it’s smooth and egg-like, tapering slightly toward what will be the top of the head.
Pro Tip: Balanced Standing
Make the back ‘tail’ fin slightly wider and lower than the front feet. This hidden tripod structure ensures your fish won’t tip over on your desk.
Step 2: Sculpting Features
-
Define the mouth:
Using a knife tool, slice a long, horizontal line across the upper third of the ‘face’ area, angling it slightly downwards for that grumpy look. -
Shape the lips:
Gently press above and below the cut line to create protruding lips, running a smoothing tool along the edges to round them off so they look puffy. -
Add the eyes:
Roll two small balls of clay and flatten them into thick discs; press these onto the head just above the mouth corners. -
Detail the eyes:
Use a ball tool or the end of a paintbrush handle to create indents in the center of the eye discs for the pupils later. -
Add gills:
Use a needle tool to etch three short, curved horizontal lines on the chest area for gills.
Step 3: Adding Limbs and Texture
-
Make the feet:
Roll two small cones of clay, flatten them slightly, and use a knife to press vertical lines into the wider end to suggest toes or fins. -
Make the tail stand:
Create a third ‘foot’ shape that acts as a tail fin in the back, ensuring the fish can stand stable like a tripod. -
Attach the legs:
Score the bottom of the body and the tops of the feet, add a dab of water or liquid clay, and press them firmly together. -
Attach the arm fin:
Shape a small triangle fin, detail it with striation lines, and attach it to the side of the body. -
Check stability:
Stand the figure up on a flat surface and adjust the angle of the feet and tail so it balances perfectly on its own. -
Dry or Bake:
Follow the instructions for your specific clay type to cure the sculpture completely before painting.
Troubleshooting: Cracking Clay
If you see cracks forming as air-dry clay dries, dip your finger in a little water and smooth a small amount of fresh soft clay into the fissure immediately.
Step 4: Painting and Finishing
-
Base coat:
Paint the entire sculpture with a creamy beige or off-white acrylic paint; you may need two coats for opaque coverage. -
Speckling technique:
I like to dilute dark brown paint slightly, load a stiff brush or toothbrush, and flick the bristles to splatter tiny dots all over the body. -
Wash the details:
Apply a very watered-down brown paint into the mouth crease, gill lines, and fin textures, then wipe away the excess on the surface to highlight depth. -
Paint the eyes:
Fill the eye sockets with white paint, let it dry, and then carefully paint a black pupil in the center with a tiny white reflection dot. -
Seal the work:
Once fully dry, apply a matte or satin varnish to protect the paint and give it a finished ceramic look.
Your strange new amphibious friend is now ready to keep you company during long work sessions
Stackable Face Totems
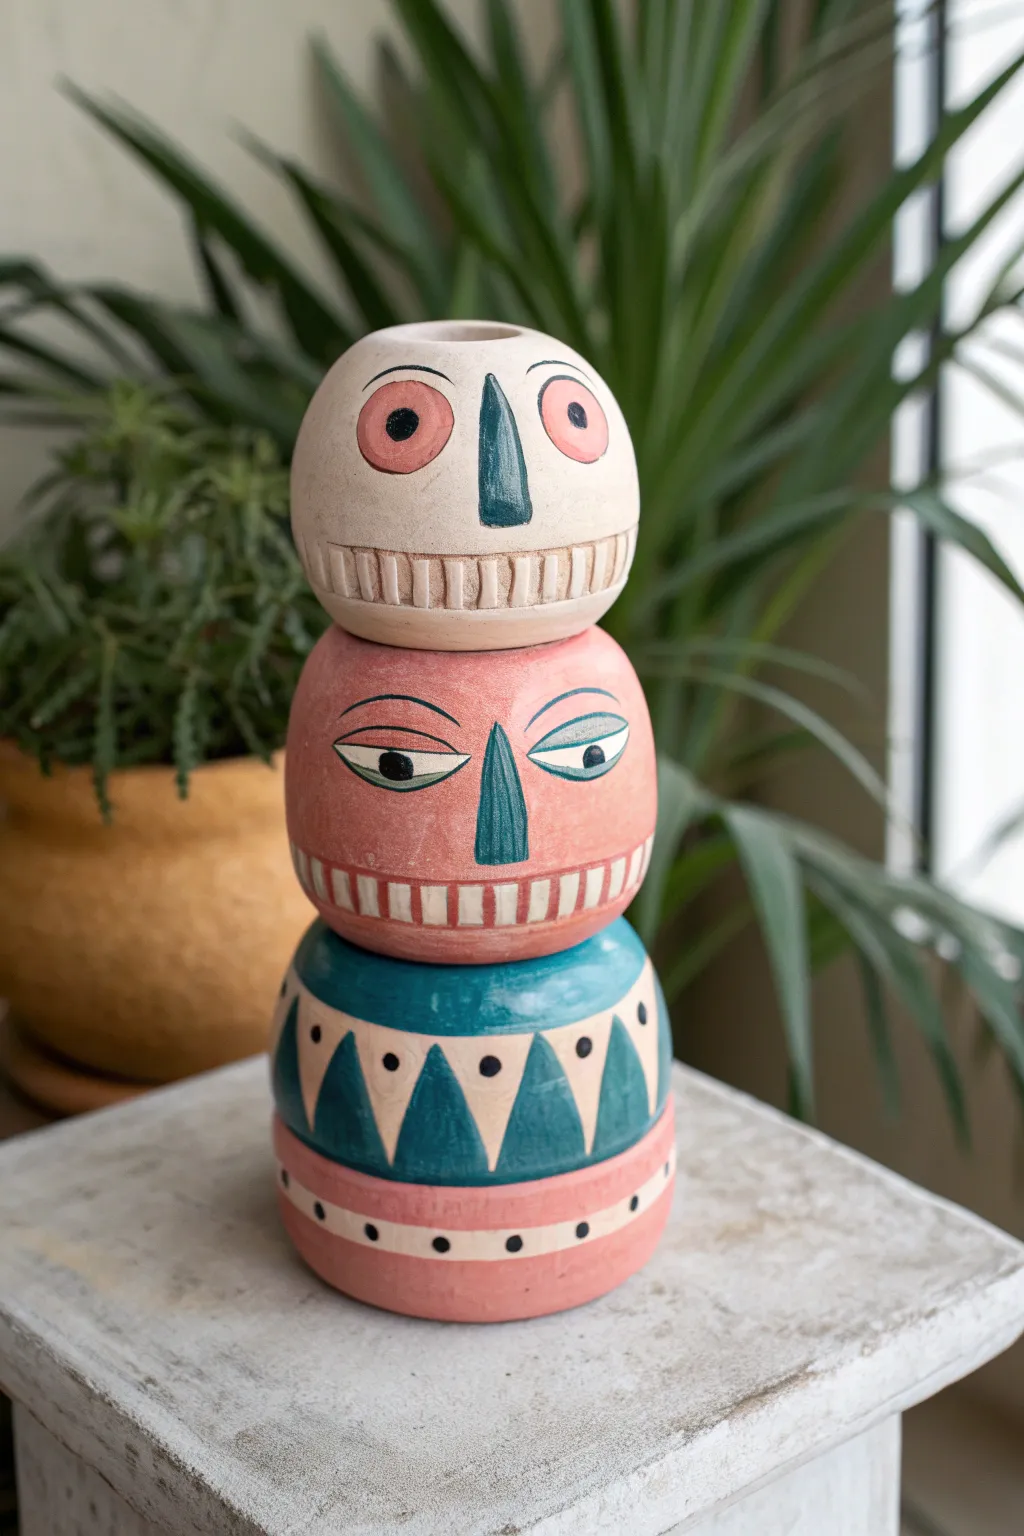
These quirky, modular characters bring a pop of personality to any shelf with their expressive eyes and stackable design. Crafted from smooth clay and painted in soft matte earth tones, this project combines sculpture and illustration for a truly unique piece of home decor.
Step-by-Step Guide
Materials
- White or light-colored earthenware clay
- Rolling pin
- Pottery knife or fettling knife
- Needle tool
- Loop tool (for hollowing)
- Small sponge
- Slip and scoring tool
- Acrylic paints (Cream, Terracotta/Salmon, Teal/Turquoise, Black)
- Fine detail brushes
- Matte clear sealant or varnish
- Water cup
Step 1: Sculpting the Base Forms
-
Prepare the Clay:
Begin by wedging your clay thoroughly to remove air bubbles. Divide the clay into three roughly equal balls, each about the size of a large orange. -
Shape the Spheres:
Roll each portion into a smooth sphere. Gently flatten the top and bottom of each sphere just slightly so they can sit stably on a flat surface and stack upon one another. -
Hollow the Forms:
If you are planning to fire these, you need to hollow them out. Slice a small cap off the bottom, scour out the inside with a loop tool until walls are evenly 1/4 inch thick, and reattach the bottom securely with slip. -
Refine the Shape:
Smooth out the seams with your thumb and a damp sponge. These forms don’t need to be perfectly round; a slightly organic, hand-modeled look adds character. -
Create the Top Opening:
On the sphere intended for the very top (the white head), use your thumb or a tool to press a small, deep indentation into the center of the top, creating a candle-holder style opening.
Wobbly Stack?
If your dried pieces don’t stack straight, use a piece of coarse sandpaper on a flat surface. Rub the bottom of the wobbly piece in circles until it sits flush.
Step 2: Adding Facial Features
-
Map the Faces:
Use a needle tool or toothpick to very lightly sketch where the eyes, noses, and mouths will go. The top two spheres will be faces; the bottom one is decorative. -
Sculpt the Noses:
Take a small pinch of excess clay and shape two elongated triangles. Score and slip the back of these, then attach them firmly to the center of your sketched faces for the noses. -
Blend the Seams:
Use a modeling tool to blend the edges of the attached noses into the main sphere so they look seamless and integrated. -
Refine the Surface:
Go over all three pieces with a damp sponge to remove any fingerprints or rough tool marks. I prefer to let them dry to leather-hard now to make painting easier later. -
Bisque Fire or Dry:
If using kiln-fire clay, fire to bisque temperature (usually cone 04). If using air-dry clay, allow the pieces to dry completely for 24-48 hours until room temperature to the touch.
Clean Lines Hack
For the geometric triangles on the bottom piece, use thin automotive masking tape or washi tape to mask off the shapes before painting for crisp edges.
Step 3: Painting and Finishing
-
Base Coats:
Paint the top head entirely in a creamy off-white. Paint the middle head a warm terracotta salmon color. -
Patterning the Base:
For the bottom sphere, paint the upper half teal and the lower half salmon. Let these base coats dry completely before adding details. -
Detailing the Eyes:
On the top head, paint large salmon circles with black pupils. For the middle head, paint wide teal almond shapes, adding black outlines and half-lids for a sleepy look. -
Painting the Noses:
Paint both sculptural noses in the teal color. This unifies the design across the different stacked elements. -
The Tooth Grin:
Using a fine liner brush and the cream paint (or simply leaving the clay bare if it’s light enough), create the horizontal mouth strips. Carefully paint vertical salmon or terracotta lines to define the teeth. -
Geometric Decos:
On the bottom sphere, paint cream-colored triangles over the teal section. Add black dots at the tips of the triangles and along the salmon base stripe. -
Final Outlines:
Use a very thin brush with black paint to outline the eyes, noses, and add subtle details like eyelids to make the expressions pop. -
Seal the Work:
Once the paint is fully cured, apply a coat of matte varnish. This protects the finish while maintaining that lovely, chalky ceramic aesthetic.
Now try rearranging the order of your totem pieces to create new expressions and characters interactively
Object With Misplaced Body Parts
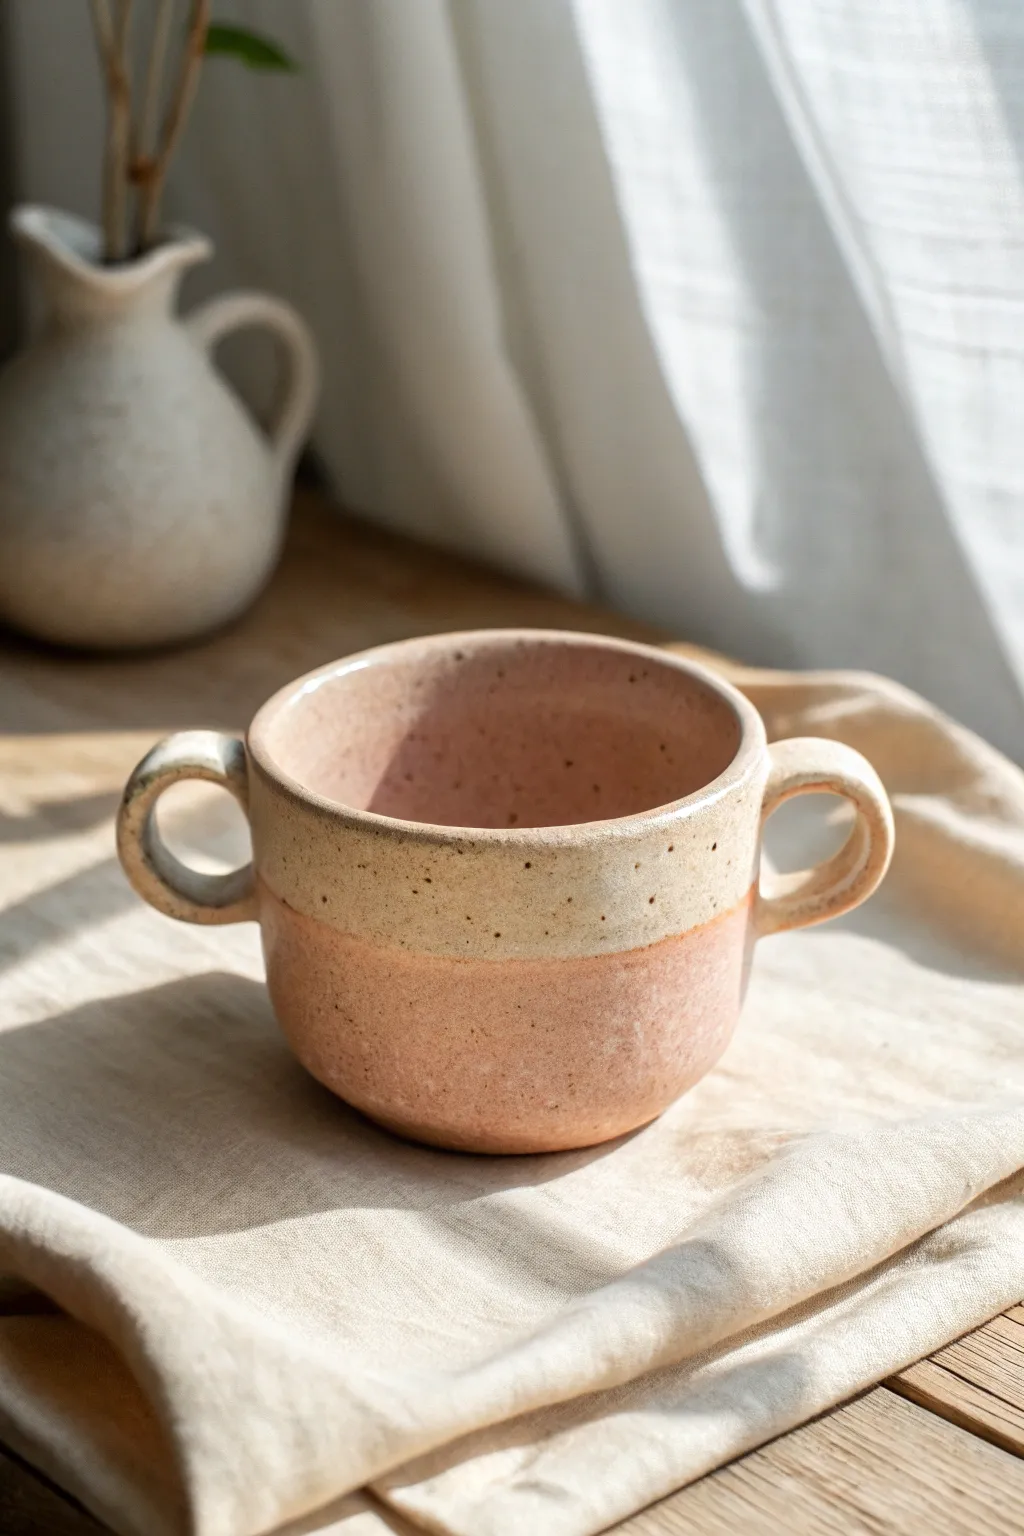
This charming, double-handled vessel plays with symmetry and texture, featuring a warm terracotta base dipped in a speckled cream glaze. Its sturdy, grounded form and dual handles make it a unique statement piece perfect for cozy rituals.
Step-by-Step Tutorial
Materials
- Speckled stoneware clay (or white clay with grog)
- Pottery wheel (or rolling pin for hand-building)
- Rib tool
- Wire cutter
- Needle tool
- Sponge
- Loop tool for trimming
- Scoring tool
- Clear glaze (food safe)
- Cream/oatmeal reactive glaze
- Terracotta or pink underglaze (if using white clay)
Step 1: Shaping the Vessel
-
Prepare the clay:
Begin by thoroughly wedging about 1.5 lbs of speckled stoneware clay to remove any air bubbles. This ensures your walls will throw evenly without weak spots. -
Center on the wheel:
Slam the clay onto the wheel head and center it using firm pressure. Cone it up and down a few times to align the clay particles before flattening it into a puck shape. -
Open the form:
Press your thumbs into the center to open the floor, leaving about a half-inch thickness at the bottom. Pull the floor out to your desired width—this piece works best with a slightly wider, bowl-like bottom. -
Pull the walls:
Slowly pull the walls upward. Unlike a standard mug, you want a slightly squat, rounded belly that tapers just slightly inward at the rim. Aim for an even thickness of about 1/4 inch. -
Refine the curve:
Use a rib tool on the exterior while supporting the interior with your hand to smooth the surface and emphasize that gentle curve at the base. Compress the rim with a piece of chamois or your sponge to make it pleasant to drink from. -
Cut and dry:
Wire the pot off the wheel but leave it on the bat. Let it dry to a leather-hard state; the rim should be firm enough to handle without warping.
Droopy Handles?
If handles sag while attaching, prop them up with small sponges or wadded newspaper until they are firm enough to defy gravity on their own.
Step 2: Handles and Trimming
-
Trim the foot:
Once leather hard, flip the pot over and center it on the wheel. Use a loop tool to trim away excess weight from the bottom, carving a distinct foot ring that lifts the curve off the table. -
Pull the handles:
Take two small balls of clay and pull two identical strap handles. They should be relatively thick and sturdy, with a comfortable curve that mirrors the roundness of the cup. -
Let handles set:
Shape the pulled handles into curves on a board and let them stiffen up slightly until they can hold their shape without drooping. -
Symmetry check:
Mark the attachment points on opposite sides of the cup. I always measure this carefully or use a ruler across the rim to ensure perfect alignment for that ‘ears’ look. -
Attach the handles:
Score the attachment points on the cup and the ends of the handles. Apply slip, press them firmly into place, and smooth the seams with a modeling tool or your finger. -
Slow drying:
Cover the piece loosely with plastic to let it dry very slowly. This prevents the handles from cracking away from the body as the clay shrinks.
Make it a Face
Turn this into a character by trimming the handles to look distinctively like ears and adding a small, sculpted nose between them before firing.
Step 3: Glazing and Firing
-
Bisque fire:
Once bone dry, fire the piece to Cone 04 (or your clay’s specific bisque temperature) to prepare it for glazing. -
Wax the foot:
Apply wax resist to the foot ring and the very bottom of the pot to prevent glaze from adhering to the kiln shelf. -
Glaze the interior:
Pour your interior glaze (a pinkish-terracotta or satin pink) inside, swirl to coat completely, and pour out the excess. Wipe any drips off the rim immediately. -
Dip the exterior top:
Hold the cup by the foot and dip the top half—including the handles—into a creamy, speckled glaze. Hold it at an angle to create a natural, slightly wavy line where the glaze meets the raw clay body. -
Glaze the exterior bottom:
If your clay isn’t naturally terracotta-colored, brush or dip the bottom half in a matte terracotta or coral glaze, slightly overlapping the cream section to create a beautiful reactive line. -
Final fire:
Fire to Cone 6 (or your clay/glaze maturity temperature). Ensure the piece is well-ventilated in the kiln so the speckles in the glaze develop properly.
Now you have a wonderfully tactile, symmetrical vessel ready to hold your morning coffee or evening soup
Multi-Eyed Pocket Guardian Creature
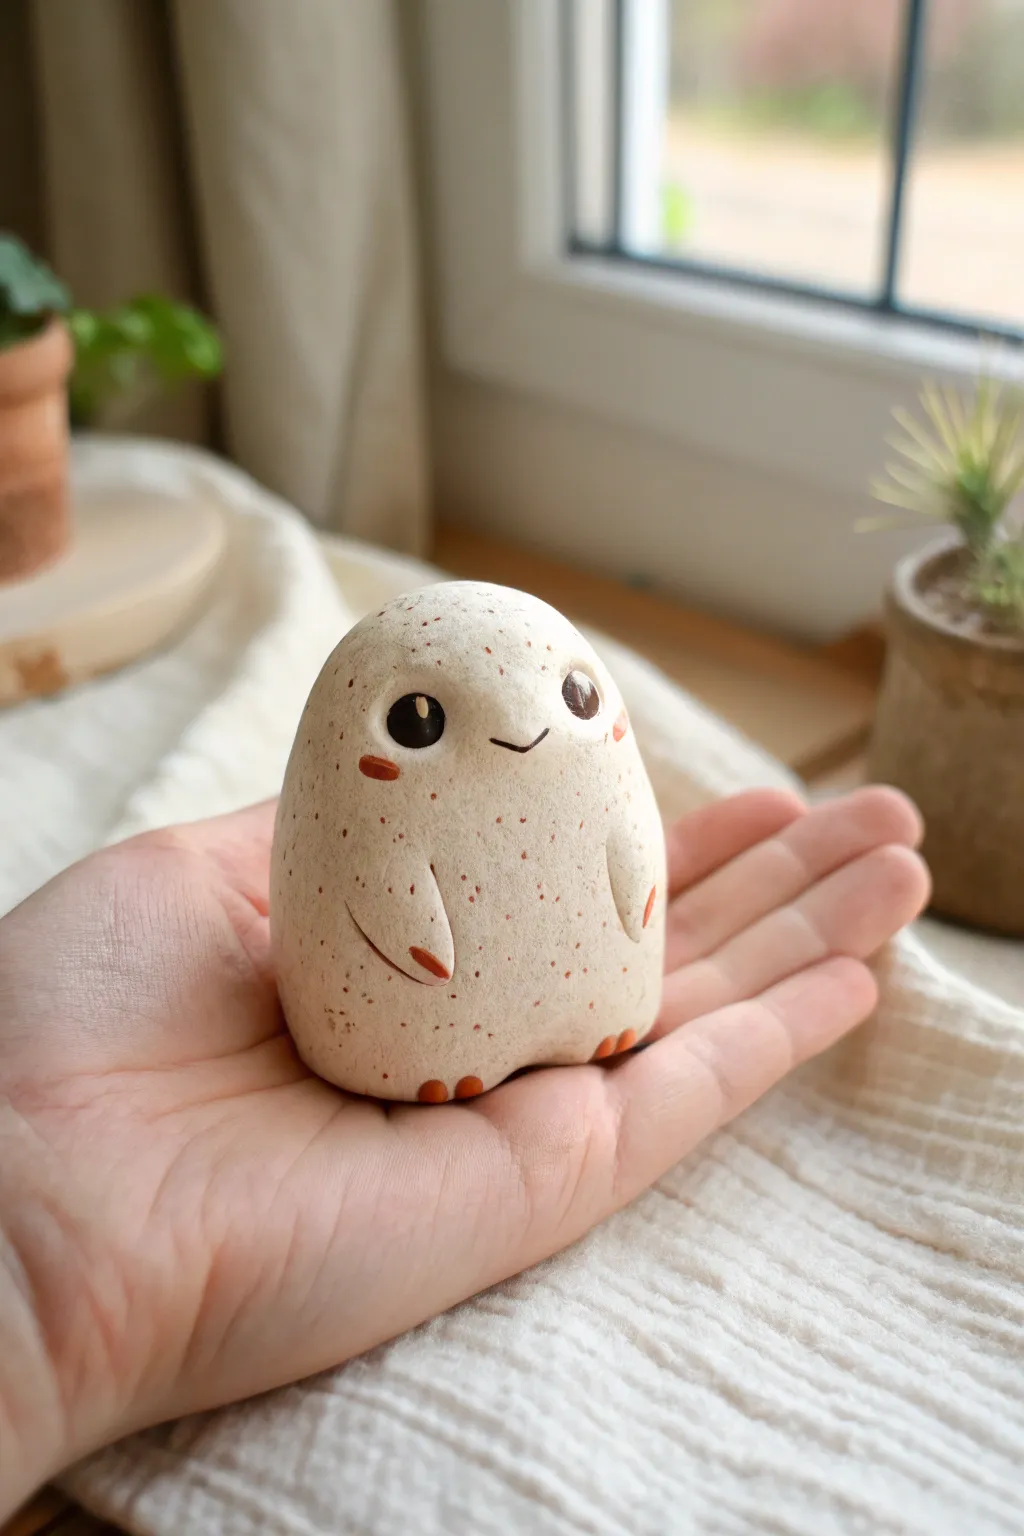
This adorable, egg-shaped pocket guardian features a natural, speckled stone finish and a friendly, minimalist face. Its compact, smooth form makes it perfect for holding in your palm as a comforting worry stone or desk buddy.
Step-by-Step Guide
Materials
- White or beige polymer clay (about 2 oz)
- Speckled clay additives (faux granite embedding powder or ground black pepper/dried tea leaves)
- Acrylic paint (black, burnt orange/terracotta)
- Gloss varnish or UV resin
- Matte varnish (optional)
- Dotting tools or ball stylus (various sizes)
- Fine detail paintbrush
- Modeling tool or toothpick
- Oven/baking tile
Step 1: Shaping the Base
-
Prepare the Clay:
Start by conditioning your white or beige polymer clay until it is soft and pliable. If you aren’t using pre-speckled clay, mix in your faux granite powder or a tiny pinch of ground pepper now to create that natural stone texture. -
Form the Body:
Roll the clay into a smooth ball between your palms to remove any seams or lines. Gently elongate it into a rounded egg shape, keeping the bottom slightly flatter so it can stand on its own. -
Smooth the Surface:
Check the surface for fingerprints. I like to lightly buff the clay with a tiny bit of cornstarch or baby oil on my fingertip to get it perfectly smooth before adding details.
Natural Texture Hack
Use a clean toothbrush to gently stipple the unbaked clay surface. This creates realistic micropores, making it look much more like real rock.
Step 2: Carving Features
-
Mark Arm Placement:
Identify where the little arms will sit on the lower third of the body. Use a needle tool to lightly mark two curved lines on either side. -
Sculpt the Arms:
Using a curved modeling tool, press into your guide lines to create relief. You want the arms to look like they are carved out of the main shape rather than attached separately. Smooth the edges so they blend seamlessly into the body. -
Create Eye Sockets:
Take a medium-sized balled stylus and press two shallow indentations where the eyes will go. Place them wide apart for a cuter look. -
Indent the Smile:
Use a very fine needle tool or a small blade to gently press a tiny smile between the eyes. Keep it subtle and slightly curved.
Level Up: Hidden Gems
Before forming the egg shape, hide a small quartz crystal or a folded paper wish inside the core of the clay body for secret good energy.
Step 3: Baking and Painting
-
Baking:
Place your creature on a baking tile or parchment paper. Bake according to your clay manufacturer’s instructions (usually 275°F/135°C for 15-30 minutes per 1/4 inch thickness). -
Cooling:
Allow the piece to cool completely before touching it with paint. The clay hardens fully as it cools. -
Painting the Feet:
Mix a warm terracotta or burnt orange acrylic paint. Using a fine brush, paint two tiny, semi-circles at the very bottom front for feet. Add three tiny toes to each foot. -
Adding Arm Details:
Use the same orange paint to add a tiny accent mark on the tip of each carved arm, giving the impression of hands or paws. -
Cheek Blush:
Dilute the orange paint slightly or dry-brush it to create soft, oval blush marks just under the eye area. -
Painting the Eyes:
Fill the eye indentations with solid black acrylic paint. You may need two thin coats for full opacity. -
Highlighting:
Once the black paint is bone dry, use a toothpick to add a tiny white dot (the ‘catchlight’) to the upper right corner of each eye. This brings the character to life. -
Defining the Mouth:
Carefully trace the smile indentation with a very fine line of brownish-black paint.
Step 4: Finishing Touches
-
Glossing the Eyes:
Apply a drop of UV resin or high-gloss radiance varnish strictly to the eyes. Cure or let dry to create a wet, glass-like look. -
Protective Coat:
For the rest of the body, if you want to protect the paint without adding shine, apply a thin layer of matte varnish. This preserves the stone-like aesthetic.
Now you have a quiet little friend to keep on your shelf or carry in your pocket for luck
Mini Blob “Slice of Life” Diorama
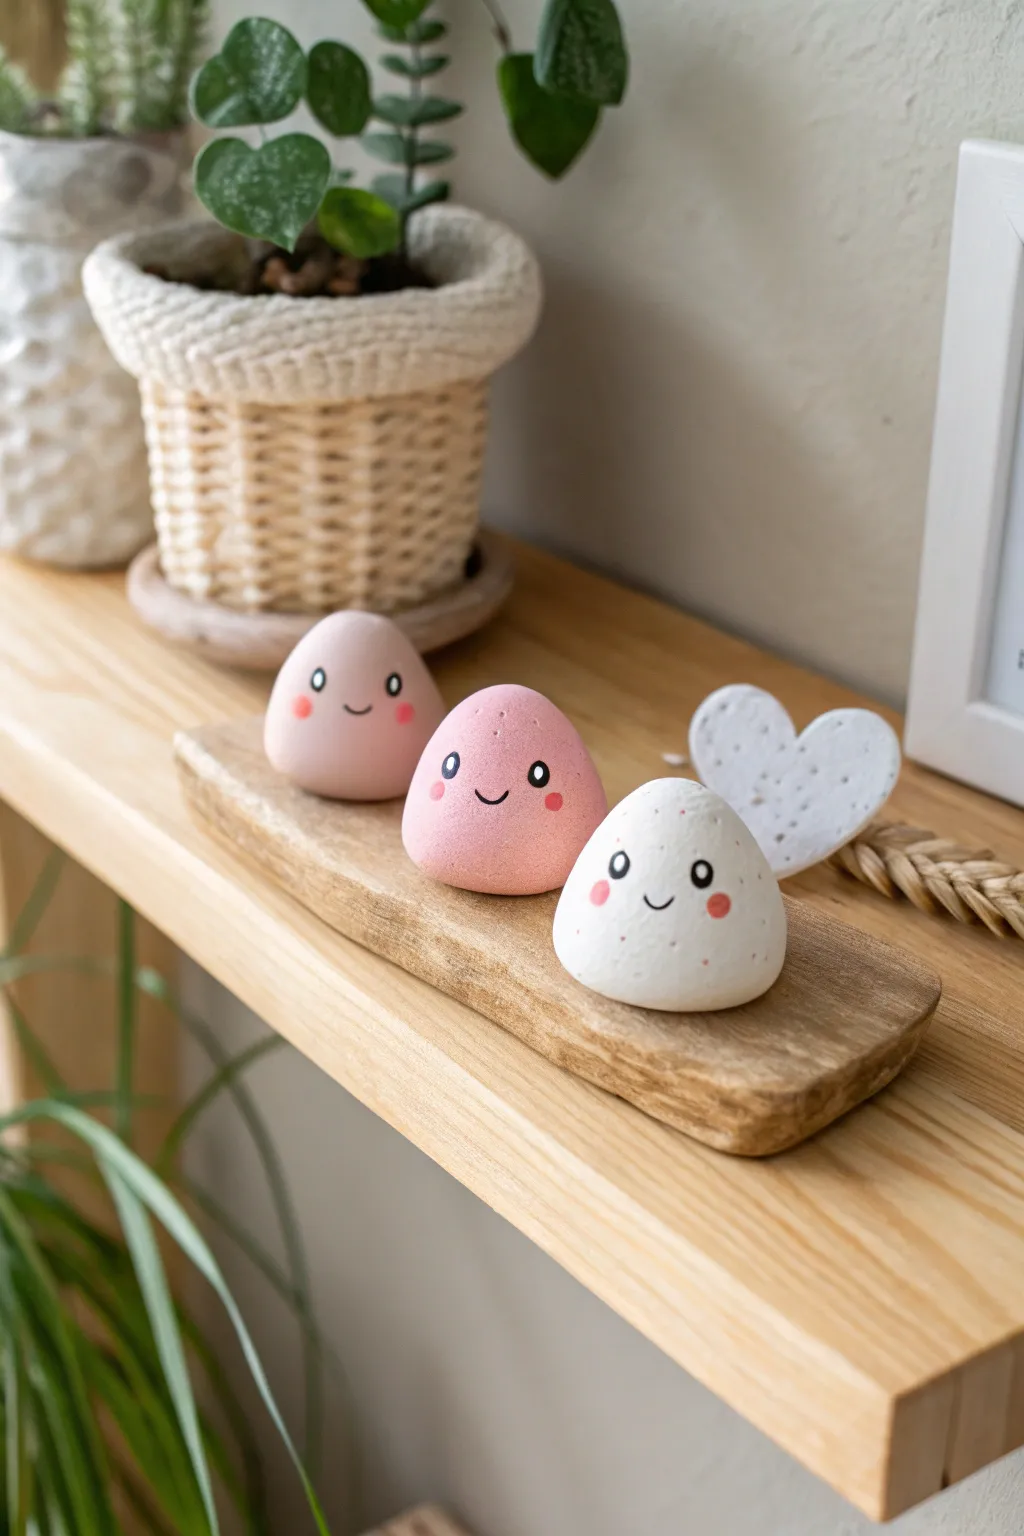
Create a cheerful little family of smooth, rounded characters that bring a touch of whimsy to any shelf. These minimalist clay blobs, accompanied by a textured heart, are perfect for beginners looking to practice achieving smooth forms and delicate painted details.
Step-by-Step Tutorial
Materials
- Polymer clay (white, light pink, medium pink)
- Acrylic paint (black, white, coral/pink)
- Small piece of driftwood or wood slab (approx. 4-6 inches)
- Fine detail paintbrush (size 0 or 00)
- Ball stylus tool or toothpick
- Sandpaper (fine grit)
- Matte varnish (optional)
- Baking sheet and parchment paper
- Texturing tool or stiff toothbrush
Step 1: Sculpting the Blobs
-
Condition the Clay:
Begin by kneading your polymer clay until it is soft and pliable. You’ll need three separate balls: one white, one very pale pink, and one slightly deeper pink. -
Form the Base Shapes:
Roll each piece of clay into a smooth ball between your palms. Gently press the bottom against your work surface to flatten it slightly so it sits stable without rolling away. -
Refine the Silhouette:
Using your thumb and forefinger, gently pinch the top of each ball to create a slight teardrop or gumdrop shape. You want them to look like soft, settled mounds rather than perfect spheres. -
Check the Size:
Place the three blobs side-by-side on your intended wooden base to ensure they fit comfortably. I like to vary the sizes slightly, making the middle pink one just a tiny bit larger for visual interest. -
Create the Heart:
Take a small amount of white clay and flatten it into a thick pancake. Use a small heart cutter or cut a heart shape freehand with a craft knife. -
Texture the Heart:
Using a stiff toothbrush or a texturing tool, gently tap the surface of the clay heart to give it a stone-like, pitted texture. This contrasts nicely with the smooth blobs. -
Smoothing:
Before baking, dampen your finger with a tiny bit of baby oil or water and rub it over the blobs to remove any fingerprints. This step is crucial for that polished look. -
Bake:
Arrange your pieces on a parchment-lined baking sheet. Bake according to your specific clay manufacturer’s instructions (usually around 275°F/135°C for 15-30 minutes). Let them cool completely.
Step 2: Painting and Assembly
-
Paint the Eyes:
Using your finest detail brush and black acrylic paint, paint two small, vertical ovals for eyes on each blob. Keep them relatively wide-set for maximum cuteness. -
Add Eye Highlights:
Once the black paint is dry, use a toothpick or a very small dotting tool to add a tiny white dot in the upper corner of each eye. This brings them to life instantly. -
Paint the Smiles:
With the thinnest brush or a fine-tip black paint pen, draw a small, shallow ‘U’ shape between the eyes for the mouth. -
Add Blushing Cheeks:
Mix a coral or soft pink paint. Dip a ball stylus or the end of a paintbrush handle into the paint and stamp a dot on either side of the smile. -
Texture Speckles (Optional):
To mimic the stone look in the photo, dilute a tiny bit of grey or brown paint and flick it very lightly off a toothbrush onto the blobs for a speckled effect, or use a fine tip marker to add tiny stray dots. -
Seal the Clay:
Apply a thin coat of matte varnish to the clay pieces to protect the paint and give them a finished, ceramic-like sheen. -
Prepare the Base:
If your driftwood or wood slab is rough, sand it lightly with fine-grit sandpaper until smooth. -
Final Arrangement:
Glue the blobs onto the wood base using strong craft glue or E6000. Place the textured heart slightly behind the white blob so it peeks out.
Fingerprint Fighter
Can’t get a smooth finish? Lightly dust your clay with cornstarch before rolling. It acts as a barrier against fingerprints and washes off after baking.
Seasonal Swaps
Don’t glue the figures down! Keep them loose so you can swap the heart for a tiny pumpkin in autumn or a clover in spring for a year-round display.
Place your adorable new friends on a bookshelf or windowsill where they can greet you with a smile every day
Split-Face Double Personality Jar
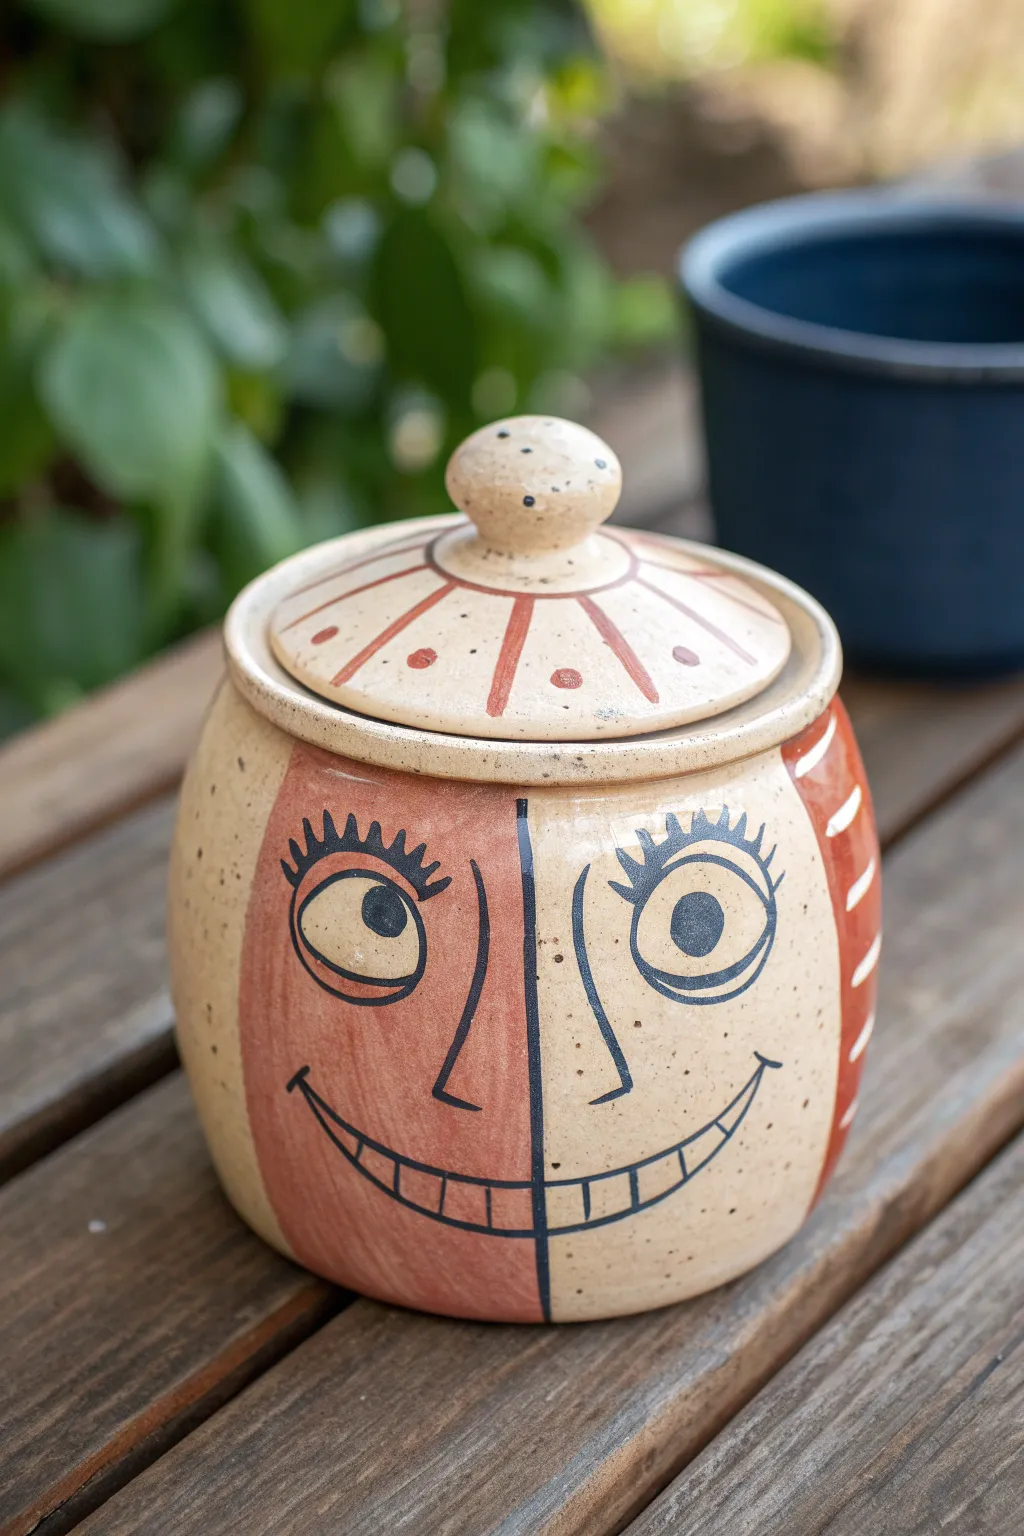
This whimsical ceramic jar plays with duality, featuring a cheerful face split right down the middle with contrasting clay colors. It’s a fantastic project for practicing precise glazing and illustrative sgraffito-style brushwork on a functional lidded vessel.
Step-by-Step Guide
Materials
- Speckled buff stoneware clay
- Pottery wheel (or slab roller for hand-building)
- Throwing tools (ribs, sponge, wire cutter)
- Trimming tools
- Terra cotta or red underglaze
- Black underglaze
- Fine liner brush
- Soft fan brush
- Clear transparent glaze
- Calipers (for lid measurement)
Step 1: Forming the Vessel
-
Prepare the clay:
Begin by wedging about 1.5 to 2 pounds of speckled buff clay to remove air bubbles. This speckled body is crucial for the final look. -
Throw the base cylinder:
Center your clay on the wheel and open it up. Pull the walls to create a cylinder, then gently belly it out from the inside to create a rounded, inviting jar shape. -
Create the gallery:
At the rim, use your finger or a tool to split the clay and press down a gallery—this is the internal ledge where the lid will sit. Keep it distinct and clean. -
Measure for the lid:
While the jar is still on the wheel, use calipers to measure the exact width of the gallery seating. Write this measurement down to account for shrinkage later. -
Throw the lid:
Using a smaller ball of clay (about 0.5 lbs), throw a basic lid shape upside down. Ensure the flange matches your caliper measurements. Pull a small knob handle on the top while it’s malleable. -
Slow drying:
Wire the pieces off the bats and let them dry to a leather-hard state. I like to cover them loosely with plastic so the rim doesn’t dry too fast.
Clean Lines Pro-Tip
For the crispest central dividing line, use a piece of painter’s tape or masking tape on the bisqued pottery to mask off one side before painting the red block.
Step 2: Refining and Decorating
-
Trim the pieces:
Once leather hard, center the jar upside down and trim the bottom to create a neat foot ring. Refine the lid shape if necessary to ensure a perfect fit. -
Map the face:
Using a needle tool or faint pencil line, lightly sketch a vertical line dividing the face exactly in half, running from the rim down to under the chin area. -
Sketch the features:
Lightly draw the large oval eyes, the long nose bridge, and the wide, toothy grin. Ensure the features line up symmetrically across your center line. -
Apply the color block:
On the left side of the face (or whichever you choose), apply 2-3 coats of terra cotta or red underglaze. Paint carefully around the eye area and follow the center line strictly. -
Decorate the lid:
Paint radial stripes of the red underglaze on the lid, emanating from the knob like sun rays. Add small dots between the stripes for texture. -
Outline in black:
Using a fine liner brush and black underglaze, paint the bold outlines. Go over the nose, the eye shapes, and the pupils. Use a steady hand for the vertical center line. -
Detail the lashes and smile:
Add the distinct eyelashes on top of the eyes. Paint the curved smile line and add the perpendicular hatch marks to create the ‘teeth’ effect. -
Add side patterns:
On the sides of the jar (the ‘ears’ area), paint vertical curved blocks of red underglaze. Once dry, you can scratch through this (sgraffito) or paint white stripes over it to create the ribbed pattern seen on the right. -
Bisque fire:
Let the piece bone dry completely. Fire it to your clay body’s bisque temperature (usually roughly Cone 04).
Step 3: Glazing and Finishing
-
Clean the bisque:
Wipe the bisqued jar with a damp sponge to remove any dust that might resist the glaze. -
Apply clear glaze:
Dip the entire jar and lid into a clear transparent glaze. This will make the underglaze colors pop and show off the speckles in the raw clay. -
Wipe the foot:
Clean the glaze off the bottom foot ring and the gallery where the lid sits to prevent the pieces from fusing together during firing. -
Final firing:
Fire the piece to maturity (Cone 5 or 6 depending on your clay). Once cool, test the lid fit.
Wobbly Lines?
If your black outlines look shaky, wait for the underglaze to dry slightly, then gently use a wooden skewer to scrape and tidy up the edges for a sharper look.
Fill your new two-faced jar with treats or trinkets and enjoy the quirky personality it adds to your shelf.