
When I’m craving a quick clay win, I always reach for iconic animated shapes that read instantly—even in miniature. These Disney-inspired clay ideas lean into simple forms, bold color cues, and charm-friendly finishes you can actually pull off at your table.
Mouse-Ear Silhouette Charms
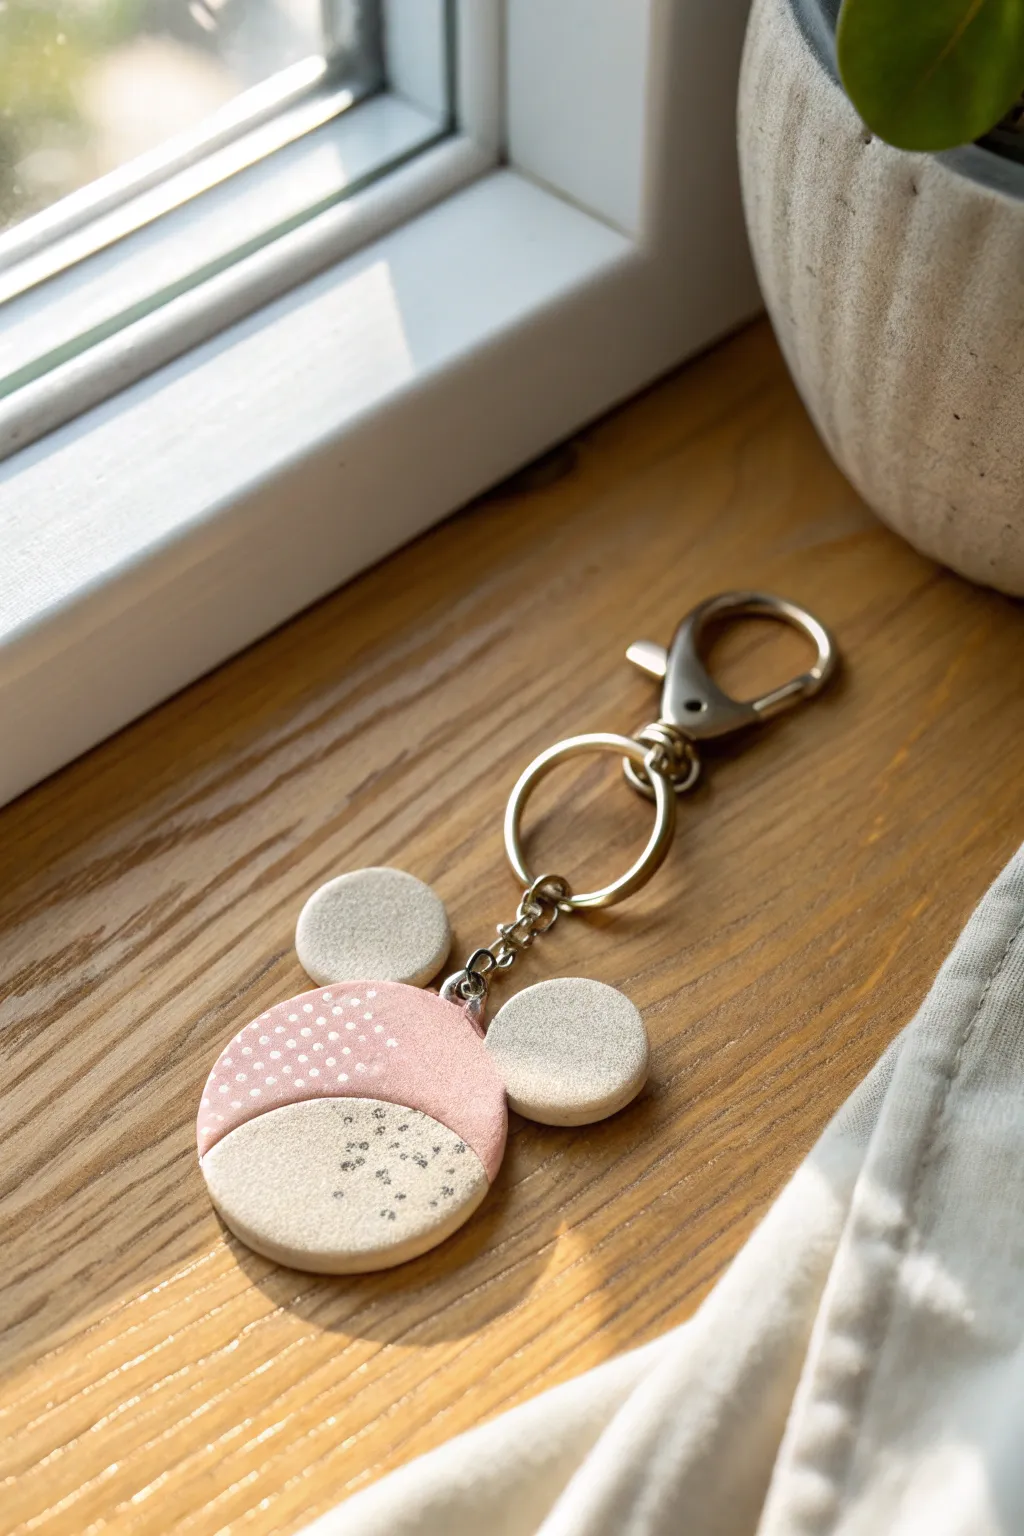
This charming keychain puts a sophisticated, neutral spin on the classic mouse ear silhouette. Featuring split-pattern detailing with delicate polka dots and scattered speckles, it’s the perfect minimalist accessory for Disney fans.
How-To Guide
Materials
- Polymer clay (Light beige/sand color)
- Polymer clay (Pastel pink/blush color)
- Round clay cutters (one large approx 2-2.5 inches, two small approx 1 inch)
- Acrylic roller
- Liquid polymer clay or bake-and-bond
- Needle tool or toothpick
- Scalpel or craft knife
- White acrylic paint
- Black acrylic paint
- Fine detail paintbrush or dotting tool
- Fine toothbrush or heavy bristle brush (for speckling)
- Small eye pin
- Jump rings and lobster clasp keychain hardware
- Jewelry pliers
- Gloss or matte varnish (optional)
- Oven for baking
Step 1: Shaping the Base
-
Condition the clay:
Start by warming up your beige/sand-colored polymer clay in your hands until it is pliable and smooth. Conditioning is crucial to prevent cracks later. -
Roll out the slab:
Using your acrylic roller, flatten the beige clay into an even slab. Aim for a thickness of about 4-5mm so the keychain is sturdy enough to be used daily. -
Cut the main circles:
Use your large circle cutter to punch out the main head shape. Then, use the smaller cutter to create two circles for the ears from the same beige slab. -
Attach the ears:
Arrange the two small circles at the top of the large circle. To ensure a fierce bond, I like to rough up the connecting edges slightly with a needle tool before pressing them together. -
Secure the seams:
Flip the shape over to the back. Use a blending tool or your finger to smooth the clay across the seams where the ears meet the head, making the silhouette one solid unit. -
Insert the hardware:
Take a small eye pin and gently push it into the top center of the head, between the ears. Ensure it goes deep enough to be secure but doesn’t poke through the front or back faces.
Step 2: Creating the Split Pattern
-
Prepare the pink clay:
Condition and roll out a thin sheet of the pastel pink clay. This layer should be much thinner than your base, roughly 1-2mm. -
Cut the pink overlay:
Use the same large circle cutter you used for the head to cut a pink circle. -
Slice the curve:
Using a craft knife, freehand a gentle, flowing curve across the pink circle. You only need the top section, which should cover about half to two-thirds of the head. -
Apply the overlay:
Apply a tiny amount of liquid clay or bake-and-bond to the back of the pink piece. Place it onto the beige head base, aligning the top curves perfectly. -
Smooth the edges:
Gently gently rub the pink clay down so there are no air bubbles trapped underneath. Smooth the edges with your finger so it looks integrated rather than just stuck on.
Uneven Seams?
If the joint between the pink and beige clay looks messy, roll a very thin ‘snake’ of white clay and press it into the seam to create a neat border.
Step 3: Details & Baking
-
Add white polka dots:
Dip a small dotting tool or the blunt end of a toothpick into white acrylic paint. Carefully create a grid of small dots solely on the pink section of the clay. -
Create the speckles:
Dilute a tiny drop of black acrylic paint with water. Dip a toothbrush or stiff brush into it, and flick the bristles with your thumb to spray fine speckles over the bottom beige section. -
Clean up stray marks:
If any black speckles landed on the pink area where you don’t want them, quickly wipe them away with a damp cotton swab before the paint dries. -
First Bake:
Place your piece on a ceramic tile or baking sheet lined with parchment paper. Bake according to your clay package instructions (usually 275°F/135°C for 15-30 minutes). -
Cool down:
Allow the piece to cool completely in the oven with the door slightly ajar. Sudden temperature changes can sometimes cause brittleness.
Make it Sparkle
Mix a small pinch of gold leaf flakes or glitter into the beige clay before rolling it out for a subtle, embedded shimmer that catches the light.
Step 4: Assembly
-
Varnish (Optional):
For extra durability, coat the front of the charm with a matte or satin varnish. This protects the painted details from scratching off in your pocket. -
Open the jump ring:
Using two pairs of jewelry pliers, twist a jump ring open sideways (never pull it apart outwards). -
Attach the chain:
Thread the open jump ring through the eye of the pin embedded in your clay charm, and attach the keychain mechanism. -
Close the ring:
Twist the jump ring back into a closed position, ensuring the ends meet perfectly flush so the chain doesn’t slip out.
Now you have a stylish, park-ready accessory that adds a touch of magic to your everyday keys


Kawaii Tsum-Style Mini Heads
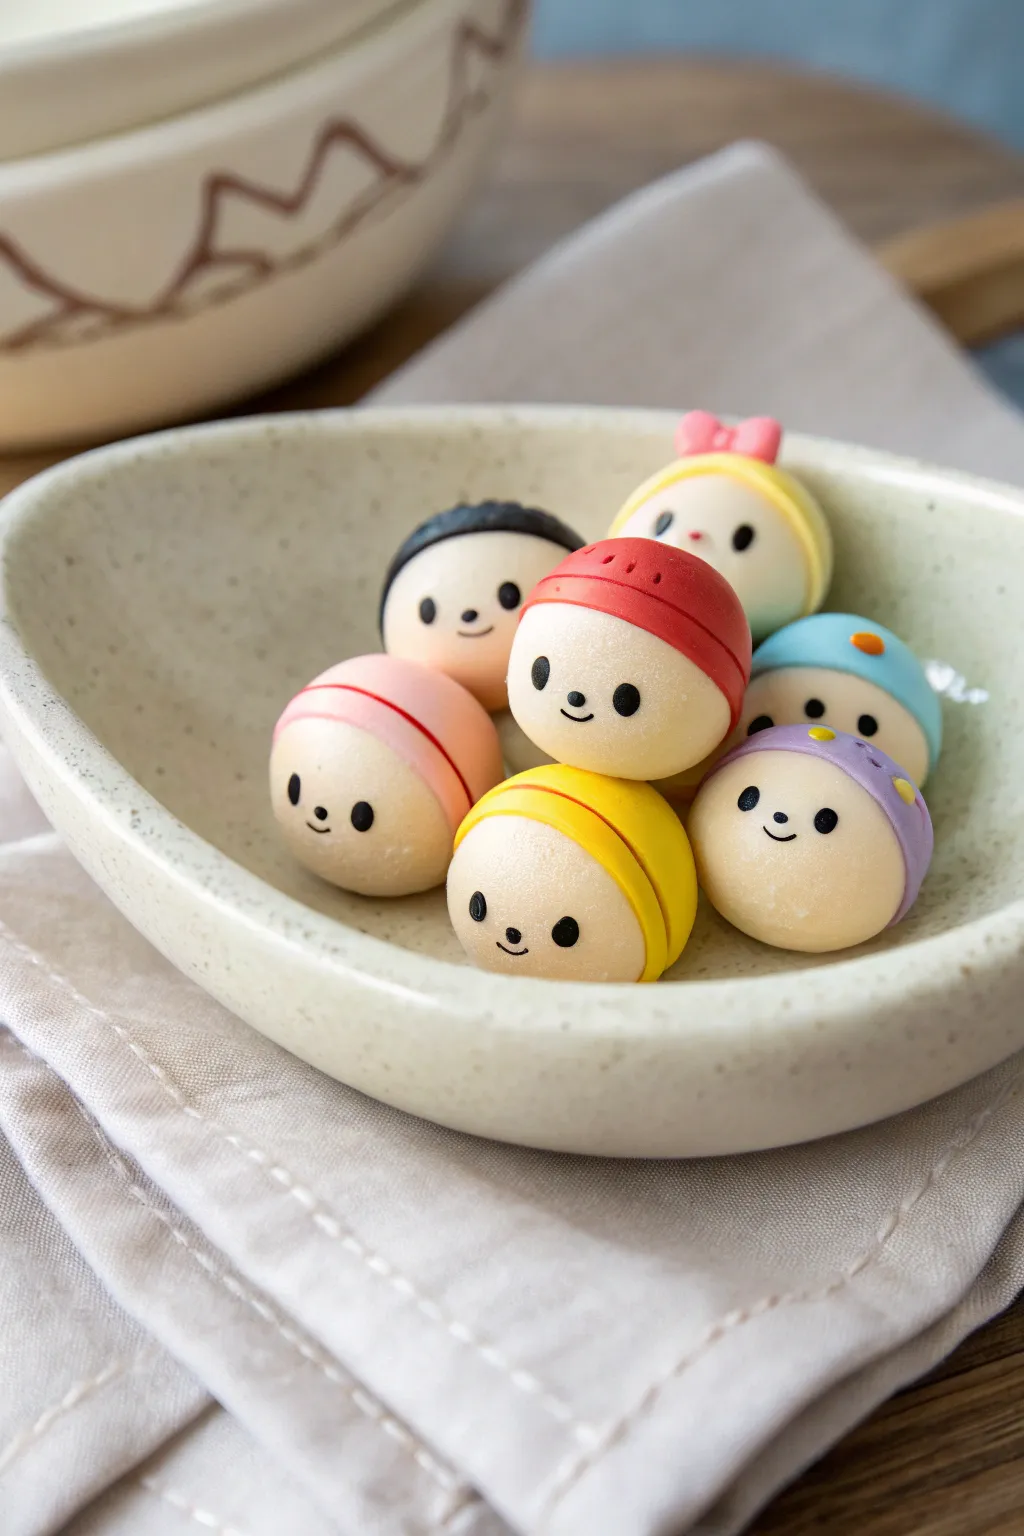
These adorable, bite-sized clay characters capture the sweet simplicity of kawaii design with their round faces and soft pastel helmets. Modeled after the popular stacking plush toys, these mini heads make perfect desk companions, jewelry charms, or even decorative magnets.
Detailed Instructions
Materials
- Polymer clay (white, mild skin tone, red, yellow, pink, blue, purple, black)
- Clay roller or pasta machine
- Small circle cutter (approximately 1-inch)
- Small ball stylus tool
- Needle tool or toothpick
- Baking sheet and parchment paper
- Oven (for baking)
- Optional: Gloss glaze for finish
Step 1: Forming the Base
-
Mix Your Skin Tone:
Start by conditioning your clay. If you don’t have a pre-mixed skin tone, create a pale, creamy color by mixing a large amount of white with a tiny dot of orange or beige. You want a very soft, wagashi-sweet look. -
Roll the Spheres:
Roll the skin-tone clay into a consistent log and slice it into equal segments. Roll each segment between your palms to create smooth, perfect spheres about the size of a large marble or a bouncy ball. -
Surface Smoothing:
Inspect each sphere for fingerprints. I like to gently roll the ball against a smooth acrylic block or glass surface to buff out any tiny imperfections before moving on.
Clean Clay Pro Tip
Keep baby wipes or a scrap piece of white clay nearby. Clean your hands and tools often, especially between switching from black or red clay back to the pale skin tone.
Step 2: Adding the ‘Helmets’
-
Prepare the Colors:
Condition your colored clays (red, yellow, pink, blue, purple). Roll each color out into a thin sheet, roughly 1-2mm thick. -
Cut the Circles:
Using your circle cutter, punch out round discs from the colored clay sheets. These will become the hair or ‘helmet’ wrapping around the faces. -
Draft the Shape:
For the character with the red cap, you can leave the circle whole. For others, use your cutting blade to trim away about one-third of the circle, creating a crescent or straight edge where the face will peek through. -
Apply the Cap:
Gently drape the colored clay circle over the top of a skin-tone sphere. Press it down softly, starting from the center and smoothing outward to avoid trapping air bubbles. The colored clay should cover about half of the sphere. -
Refine the Seam:
Use a smooth tool or your finger to gently blend the edge of the colored cap so it sits flush against the head without a bulky ridge. -
Detailing the Bands:
For the characters with headbands (like the pink and yellow ones), roll a very thin snake of clay in a contrasting shade (or the same shade) and wrap it around the rim of the cap for extra dimension.
Level Up: Magnet Mania
Before baking, press a small, strong neodymium magnet into the back of each head. Seal it in with a drop of liquid clay or bake it in directly for instant fridge decor.
Step 3: Bringing Them to Life
-
Map the Features:
Before adding clay, visualize where the eyes and mouth will go. Kawaii proportions usually mean eyes are wide-set and aligned with the top of the nose or mouth. -
Create the Eyes:
Roll tiny, tiny balls of black clay. Press them gently onto the face using the ball stylus to flatten them slightly into flush ovals or circles. Keeping them small ensures the cuteness factor remains high. -
Add the Smile:
Roll an incredibly thin thread of black clay for the mouths. Cut tiny segments and curve them into a ‘U’ shape using a needle tool, then press them onto the face between the eyes. -
Character Specific Details:
For the girl character, add a tiny pink bow on top made from two small triangles and a center dot. For the blue character, add a tiny orange beak if mimicking a duck, or small ears for bears. -
Final Texture:
Use a needle tool to add tiny indentations for ‘stitching’ marks on the hats if desired, or small dots for blushing cheeks using diluted pink chalk pastels.
Step 4: Baking and Finishing
-
Bake:
Arrange your finished heads on a parchment-lined baking sheet. Bake according to your polymer clay manufacturer’s instructions (usually 275°F / 135°C for 15-30 minutes depending on thickness). -
Cool Down:
Let them cool completely in the oven or on the counter. Do not handle them while hot, as the clay is still fragile. -
Protection:
If you want a look like porcelain or polished plastic, apply a thin coat of gloss glaze. For a soft matte look like the photo, leave them unvarnished or use a matte sealant.
Enjoy arranging your tiny collection of characters in a small dish for a delightful display


Bow-and-Ears Pendant Set
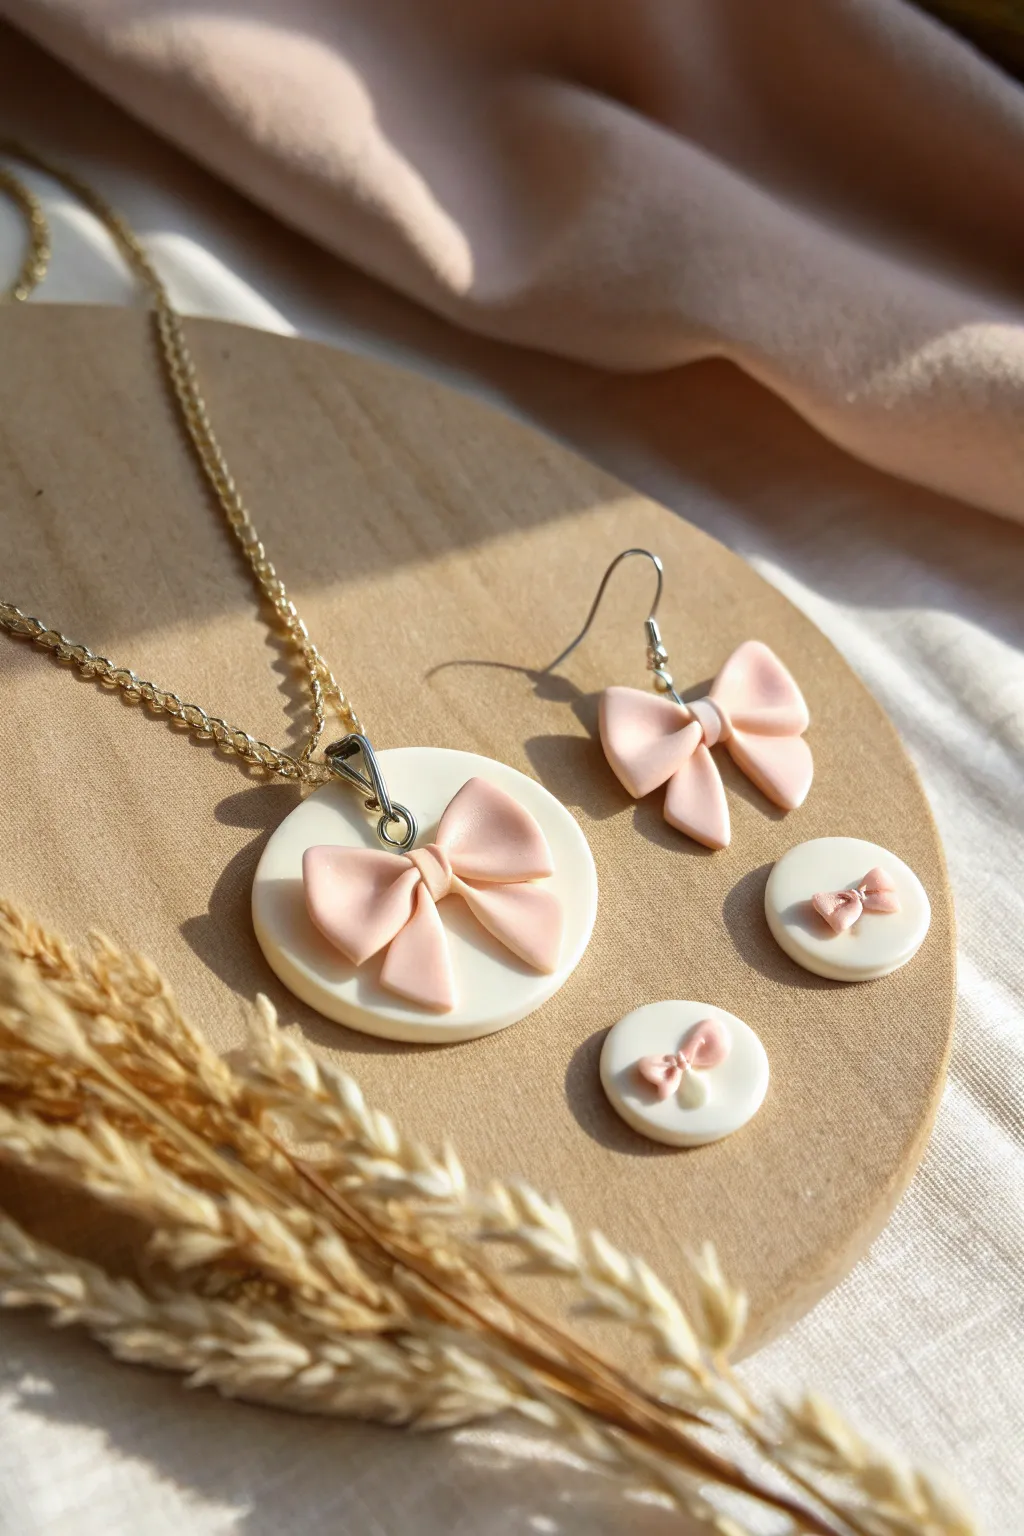
Capture the sweetness of Minnie Mouse with this elegant, minimalist jewelry set featuring soft blush pink bows on creamy white discs. This polymer clay project creates a coordinated necklace and earring collection that feels both whimsical and sophisticated enough for daily wear.
Step-by-Step Tutorial
Materials
- White or cream polymer clay
- Soft blush pink polymer clay
- Clay roller or pasta machine
- Circle cutters (various sizes: approx. 3cm for pendant, 2.5cm for studs)
- Small blade or X-acto knife
- Needle tool or dotting tool
- Jewelry headpins or eye screws
- Earring hooks and small jump rings
- Gold necklace chain with clasp
- Gloss glaze or semi-gloss finish (optional)
- Parchment paper and baking tray
- Super glue or liquid polymer clay
Step 1: Creating the Pendant Base
-
Condition the white clay:
Begin by thoroughly kneading your white or cream clay until it is soft and pliable. Use a roller or pasta machine to flatten it into a sheet about 3-4mm thick, ensuring no air bubbles trapped inside. -
Cut the pendant shape:
Select your largest circle cutter (around 3cm diameter) and press firmly into the white sheet to create the base for your necklace pendant. Lift it gently to avoid distorting the circle. -
Cut the stud bases:
Using a slightly smaller circle cutter, cut out two additional discs if you plan to make the stud-style earrings shown in the set. Smooth the edges of all circles with your fingertip to remove any rough cutter marks. -
Add connection points:
For the main pendant, carefully insert a small metal eye pin or screw eye into the top edge of the clay circle. If you don’t have these, use a needle tool to pierce a clean hole near the top edge for a jump ring later.
Fixing Fingerprints
If you notice fingerprints on your unbaked clay, lightly brush the surface with a tiny amount of baby oil or cornstarch before baking to smooth them out completely.
Step 2: Sculpting the Bows
-
Prepare the pink clay:
Condition your blush pink clay and roll it into a thin sheet, slightly thinner than your base discs (approx. 2mm). This keeps the bows delicate. -
Cut bow strips:
Cut a long, even strip of pink clay. For the large pendant bow, the strip should be about 6-8mm wide. For the tiny stud bows, cut a very thin strip, about 2-3mm wide. -
Form the loops:
To make one side of the bow, fold one end of the strip toward the center to create a loop. Repeat on the other side so the two loops meet in the middle. Press gently to adhere them together. -
Add the center knot:
Cut a small rectangle from your pink strip and wrap it vertically around the center where the loops meet. This creates the ‘knot’ and hides the seam. Pinch the center slightly to give the bow dimension. -
Create the ribbon tails:
Cut two small angled pieces of pink clay for the tails. Attach these underneath the loops, angling them outward slightly to mimic hanging ribbon. -
Make the hook earrings:
For the standalone bow earrings (the ones without white discs), repeat the bow-making process above but make them slightly smaller than the pendant bow. Insert an eye pin into the top of the knot before baking. -
Form the mini bows:
For the small stud earrings, create tiny versions of the bow using your thinnest strips. You might need to use a needle tool to help manipulate these tiny pieces since fingers can be too clumsy here.
Step 3: Assembly and Baking
-
Attach bows to bases:
Place the large pink bow onto the center of your large white pendant disc. Gently press down so the clay bonds. I find a touch of liquid clay here helps ensure a permanent bond. -
Attach mini bows:
Place the tiny bows onto the smaller white stud discs, positioning them slightly off-center or centered depending on your preference. -
Refine the shapes:
Give everything a final inspection. Use your needle tool to fluff up the bow loops so they aren’t flat, ensuring they retain a nice 3D puffiness. -
Bake the pieces:
Arrange all pieces on a parchment-lined baking tray. Bake according to your polymer clay manufacturer’s instructions (usually 275°F/130°C for 15-30 minutes). -
Cool and assemble:
Allow the clay to cool completely before handling. Once cool, attach the jump rings and necklace chain to the pendant. For the hook earrings, attach your ear wires. For studs, glue earring posts to the back of the discs.
Add a Little Sparkle
Before baking, lightly brush the pink bows with Pearl Ex mica powder. This gives the matte clay a subtle, sophisticated shimmer that catches the light beautifully.
Now you have a charming, handmade jewelry set ready to wear or gift to a fellow Disney fan


Sailor Duck Hat Charms
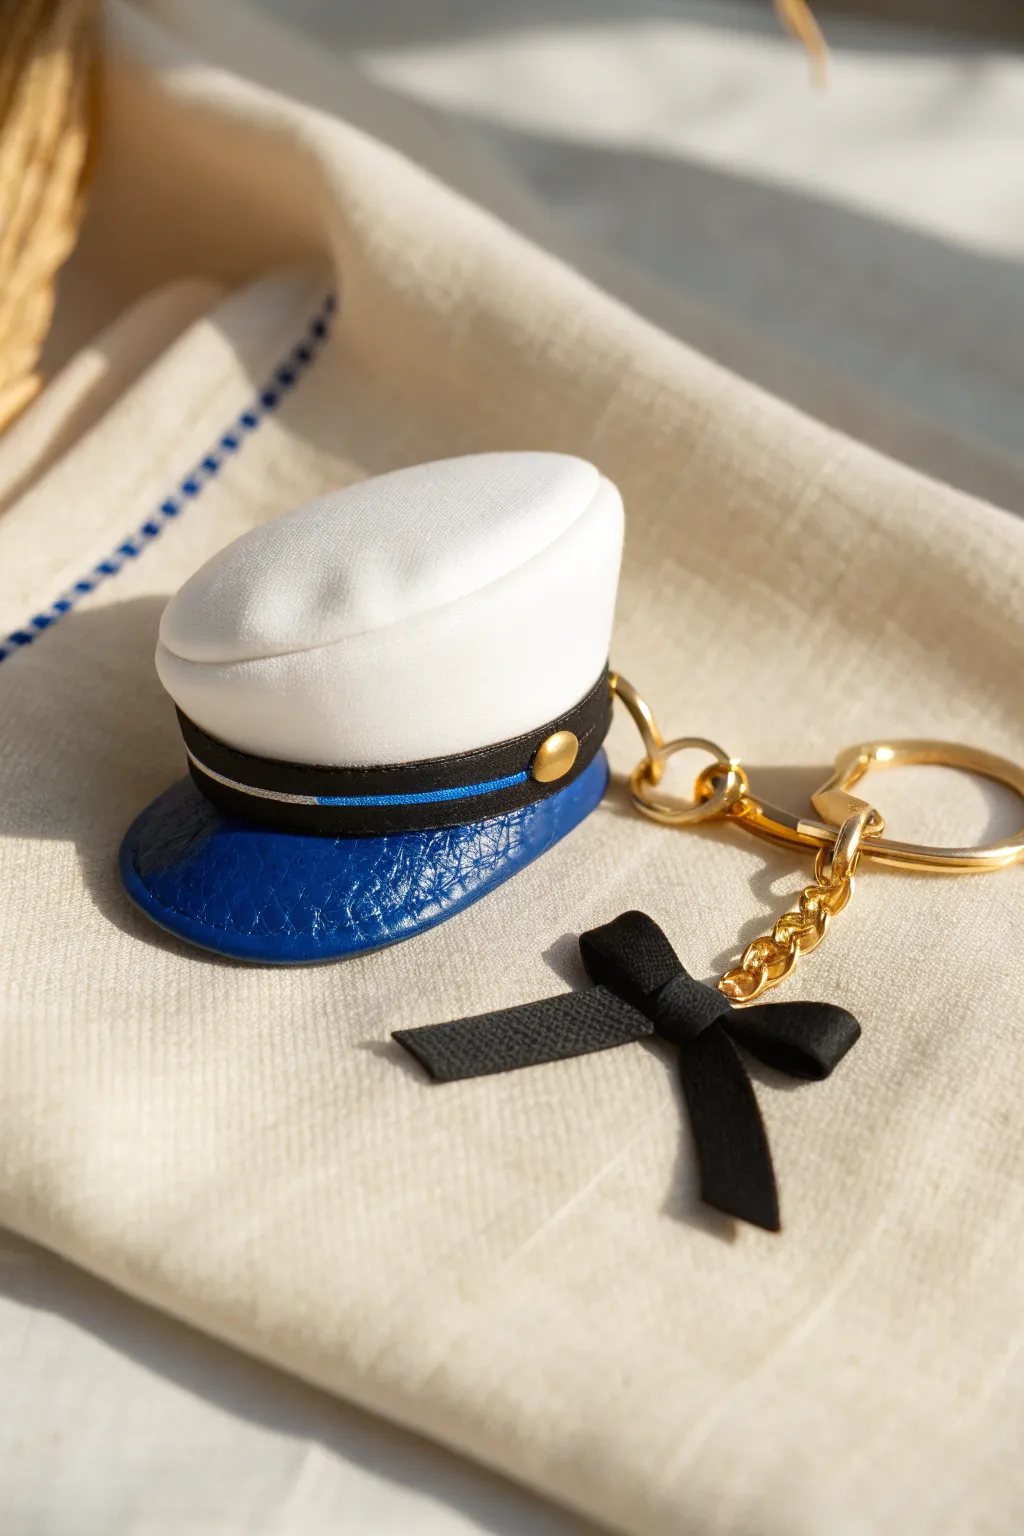
Capture the whimsical spirit of everyone’s favorite temperamental duck with this polished clay charm. This jaunty sailor hat features a pristine white crown, a textured blue brim, and dainty ribbon details that make it a perfect accessory for any Disney fan.
Detailed Instructions
Materials
- White polymer clay
- Blue polymer clay (royal blue)
- Black polymer clay
- Gold polymer clay or small gold stud/bead
- Liquid polymer clay (Translucent or Bake & Bond)
- Gloss glaze or UV resin
- Gold keychain hardware with chain
- Small black ribbon and jump rings
- Texture sponge or sandpaper
- Clay tools (needle tool, rolling pin, blade)
- Small circle cutter (approx. 1 inch)
Step 1: Sculpting the Base Form
-
Form the Crown:
Start by conditioning a ball of white polymer clay until it’s soft and pliable. Roll it into a smooth sphere about the size of a large gumdrop. -
Shape the Hat Top:
Gently press the sphere down onto your work surface to flatten the bottom. Use your fingers to shape the top into an oval, slightly indented ‘muffin top’ shape characteristic of a sailor cap. -
Create the Crease:
Using a large ball tool or your thumb, press a subtle indentation into the very center of the top white piece to give it that fabric-like slump. -
Prepare the Brim:
Roll out a sheet of royal blue clay to about 3mm thickness. Use your circle cutter to punch out a round base. -
Create Leather Texture:
To mimic the leather texture seen in the photo, gently press a piece of coarse sandpaper or a texture sponge onto the surface of the blue clay circle. -
Attach Crown to Brim:
Apply a tiny drop of liquid clay to the center of the textured blue circle. Place the white crown on top, ensuring the blue brim sticks out primarily in the front to form the visor shape.
Clean Clay Pro-Tip
White clay picks up everything! Keep a pack of wet wipes or baby wipes nearby and rigorously clean your hands and tools before touching the white clay to keep it pristine.
Step 2: Adding Details & Hardware
-
Make the Hat Band:
Roll a very thin snake of black clay and flatten it into a ribbon strip using a rolling pin or acrylic block. Trim it to be uniform in width. -
Apply the Band:
Wrap this black strip around the base of the white crown where it meets the blue brim. Trim any excess at the back and smooth the seam. -
Add the Blue Stripe:
Roll an incredibly thin thread of blue clay. Carefully press this into the center of the black band for that specific detail seen in the image. -
Place the Gold Button:
Form a tiny dot of gold clay (or use a metal stud) and press it onto the side of the hat band where the ribbon would realistically attach. -
Insert Eyelet:
Screw a small metal eye pin into the side or back of the white crown before baking. Using a dab of liquid clay here helps ensure it stays put. -
Bake the Piece:
Bake the charm according to your clay package instructions (usually 275°F/130°C for 15-30 minutes). Let it cool completely.
Step 3: Finishing Touches
-
Glazing:
Once cool, apply a coat of gloss glaze or UV resin to the blue brim and the gold button to make them shine like patent leather and metal. -
Matte Finish:
I prefer to leave the white fabric part unglazed or use a matte varnish to keep the contrast between the fabric and leather textures. -
Ribbon Assembly:
Tie a small piece of black ribbon into a tight bow. Use a lighter quickly on the cut ends to prevent fraying. -
Attach Hardware:
Using pliers, open a jump ring and attach the keychain clasp to the eye pin on the hat. -
Final Connection:
Add the black ribbon bow to the keychain chain using a second jump ring so it dangles alongside the hat.
Fixing Fingerprints
If you accidentally leave fingerprints on the smooth white crown, brush a very light amount of baby oil or clay softener over the surface with a soft brush before baking.
Clip this adorable charm onto your bag or keys and get ready to show off your handcrafted Disney style

The Complete Guide to Pottery Troubleshooting
Uncover the most common ceramic mistakes—from cracking clay to failed glazes—and learn how to fix them fast.
Honey-Loving Bear Mini Charm Set
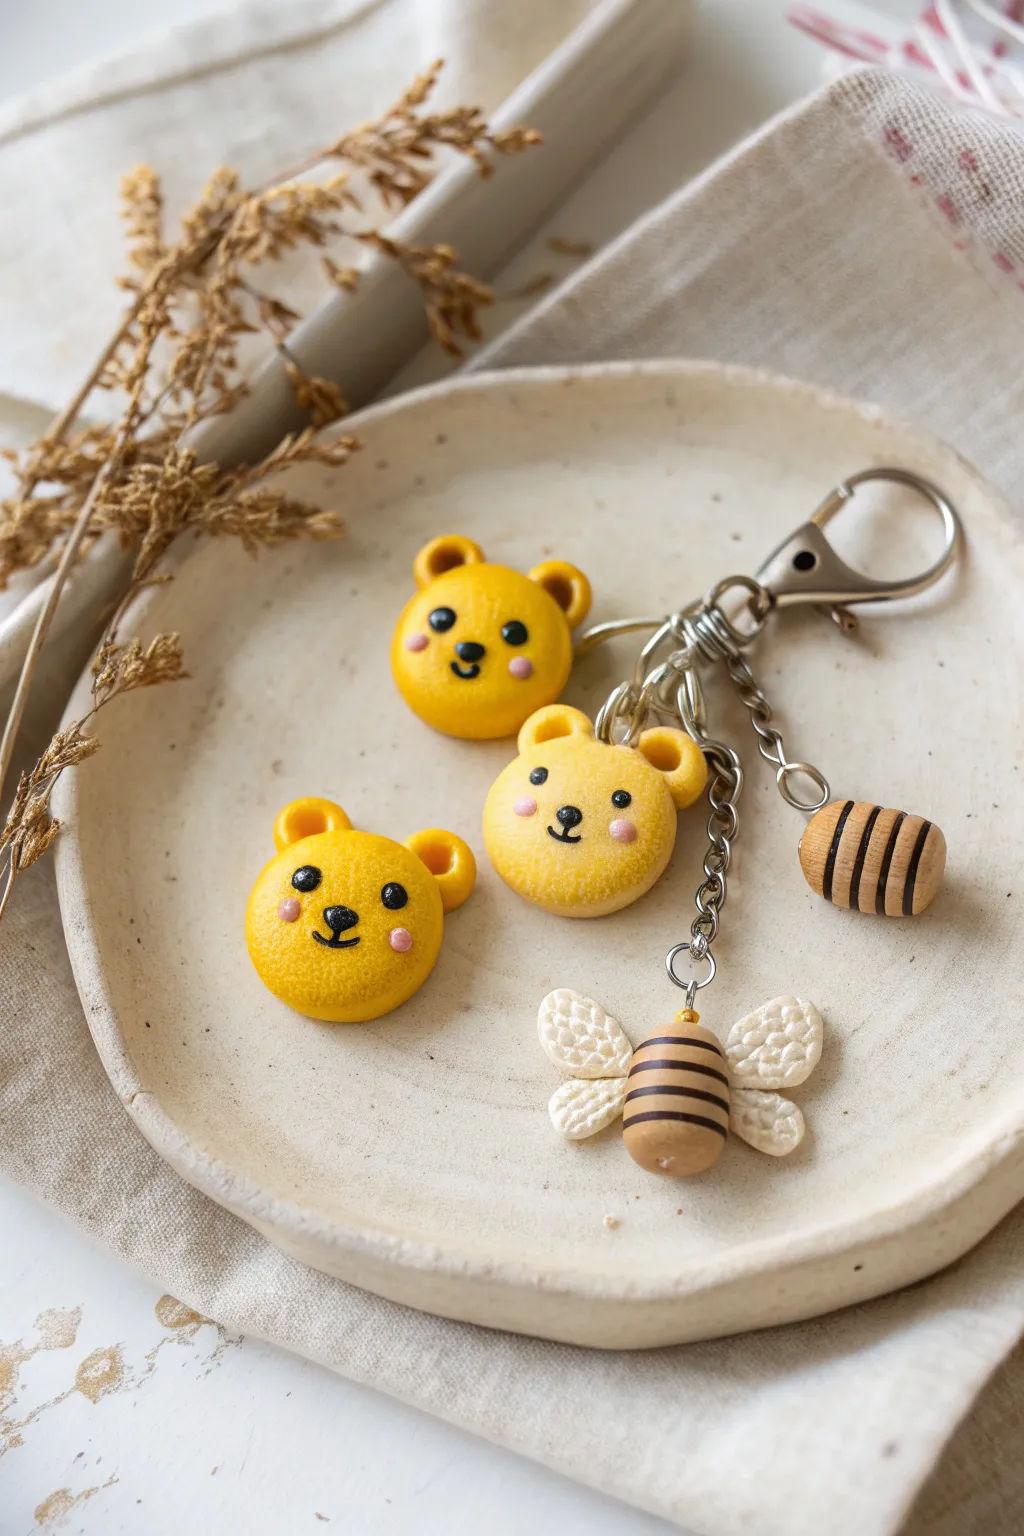
Recreate the magic of the Hundred Acre Wood with this adorable charm set featuring honey-loving bear faces, a buzzy bee, and a tiny honey pot bead. The slightly textured, matte finish gives these polymer clay pieces a soft, biscuit-like appearance perfect for everyday accessories.
Step-by-Step Guide
Materials
- Polymer clay (golden yellow, dark brown/black, pale yellow, translucent white, pink)
- Eye pins (silver tone)
- Jump rings and keychain hardware
- Pointed sculpting tool or toothpick
- Ball tool (small)
- Toothbrush or sandpaper (for texturing)
- Liquid clay or bake-and-bond
- Gloss glaze (optional for eyes/nose)
- Oven for baking
Step 1: Sculpting the Bear Faces
-
Mix the perfect honey hue:
Blend golden yellow clay with a tiny touch of translucent and white to get a soft, warm honey-yellow color. You need enough for three uniform balls about the size of large peas. -
Shape the base:
Roll the clay into smooth spheres and gently flatten them into thick discs. They should be rounded on top but flat on the back. -
Add surface texture:
For that soft, biscuit-like look, gently tap the surface of the yellow discs with a clean toothbrush or a piece of crumpled aluminum foil. This removes the plastic shine and adds character. -
Attach the ears:
Roll tiny balls of the same yellow clay. Press them gently onto the top left and right of each head to form ears. Use a small ball tool to make a slight indentation in the center of each ear. -
Create the face details:
Using black clay, roll miniscule balls for the eyes and a slightly larger oval for the nose. Press the nose into the center and the eyes just above it. I find using a needle tool helps place these tiny pieces accurately. -
Add cheeks and eyebrows:
Take the tiniest speck of pink clay and press it onto the cheeks. Use a needle tool or black clay snakes to add tiny eyebrows for expression. -
Insert hardware:
Carefully insert a silver eye pin into the top of each bear head slightly behind the ears. Secure with a dab of liquid clay if needed.
Stay Clean!
Keep baby wipes nearby to clean hands between colors. Yellow clay is notorious for picking up dark lint, so clean hands are vital before shaping the bears.
Step 2: Crafting the Bee and Bead
-
Form the bee body:
Shape a small oval from light brown or tan clay. Create thin strips of dark brown clay and wrap them around the body to create stripes. -
Sculpt the wings:
Use translucent white or pale cream clay to form four teardrop shapes—two larger for the top wings, two smaller for the bottom. Flatten them and press a textured tool or toothpick into them to create a honeycomb or vein pattern. -
Assemble the bee:
Attach the wings to the back of the striped body. Insert an eye pin into the top of the bee. -
Make the honey dipper/pot bead:
Roll a cylinder of tan clay. Wrap three bands of dark brown clay around it to mimic a honey dipper or a striped wooden bead. Use a tool to make hole through the center lengthwise so it can slide on a chain, or insert an eye pin like the others.
Winnie’s Glow
Mix a tiny pinch of gold mica powder into your yellow clay before sculpting. It won’t be glittery, but it will give the bears a warm, magical shimmer.
Step 3: Baking and Assembly
-
Bake the clay:
Place all your pieces on a ceramic tile or baking sheet lined with parchment paper. Bake according to your polymer clay manufacturer’s instructions (usually around 275°F/130°C for 15-30 minutes). -
Cool and inspect:
Allow the pieces to cool completely inside the oven to prevent cracking. Once cool, check that the eye pins are secure; if loose, pull them out, add a drop of super glue, and reinsert. -
Glaze details:
For a bit of life, add a tiny drop of gloss glaze or UV resin only to the black eyes and noses. Keep the rest of the clay matte. -
Attach to keychain:
Using pliers, open jump rings and attach each charm to different lengths of chain on your main keychain clasp. Varying the lengths creates a nice clustered look.
Clip your new handmade friends onto your bag and enjoy carrying a little sweetness with you everywhere
Bouncy Tiger Stripe Beads
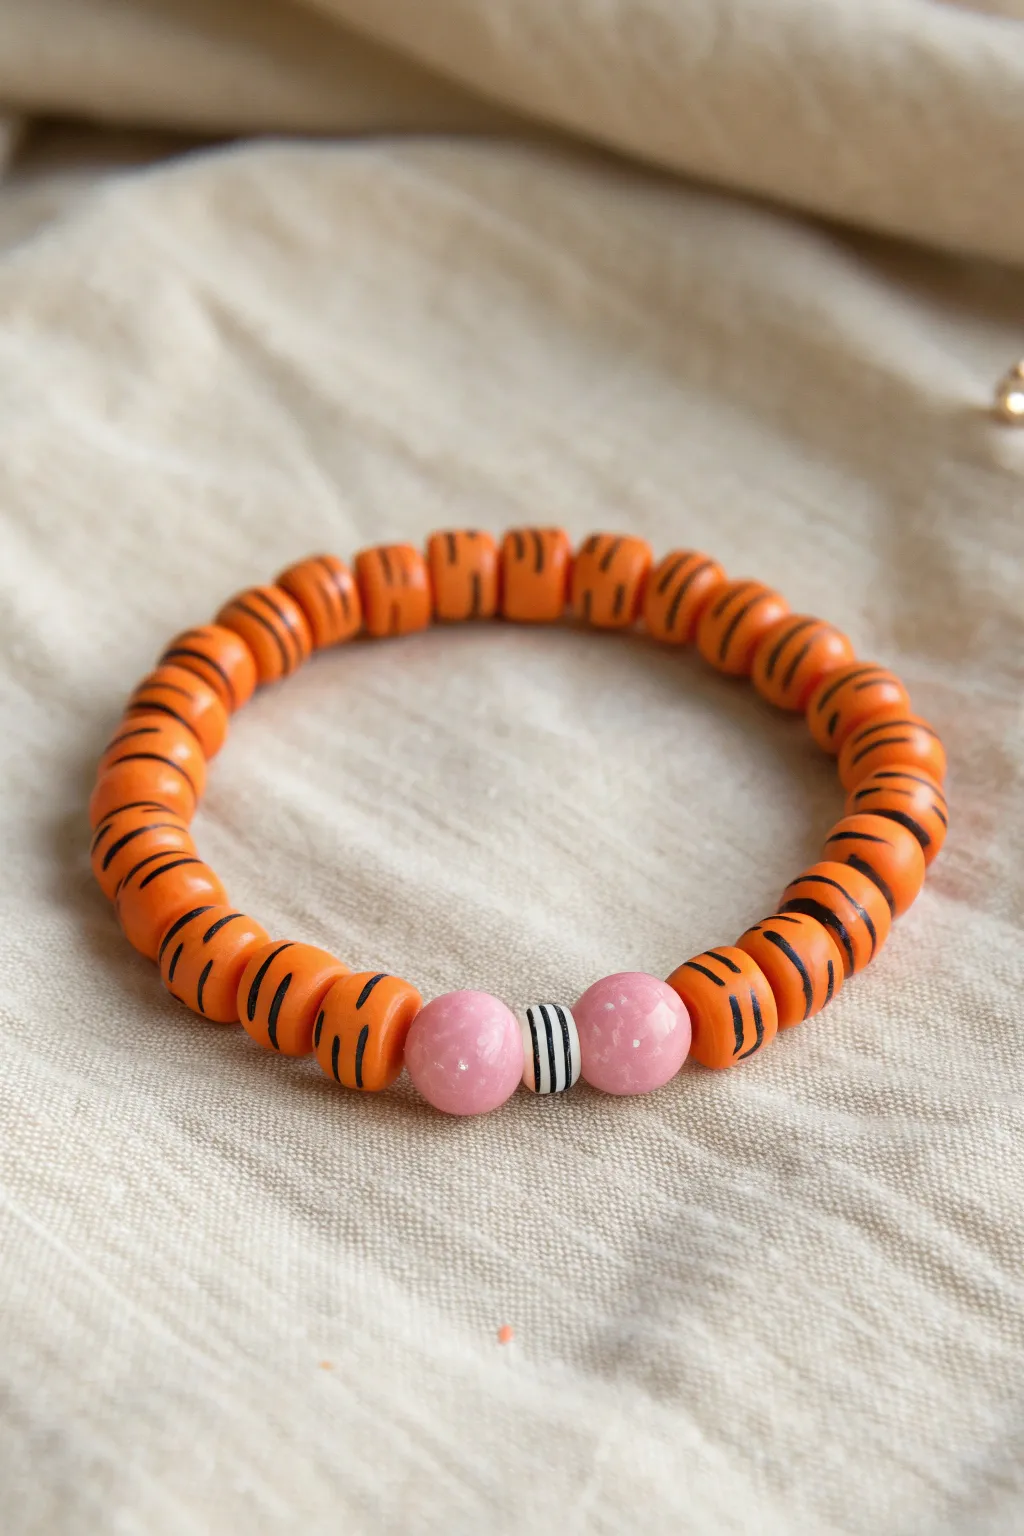
Capture the bouncy, pouncing spirit of the Hundred Acre Wood with these handmade polymer clay beads. The vibrant orange and black tiger stripes paired with soft pink accents make for a fun accessory perfect for any Disney fan.
Step-by-Step
Materials
- Orange polymer clay (bright tangerine shade)
- Black polymer clay
- Pink polymer clay (bubblegum shade)
- White polymer clay
- Acrylic roller or pasta machine
- Clay blade or craft knife
- Bead piercing pin or toothpick
- Elastic stretch cord (0.7mm or 0.8mm)
- Super glue or jewelry adhesive
- Gloss glaze (optional)
- Baking sheet and parchment paper
- Wet wipes (for cleaning hands between colors)
Step 1: Creating the Tiger Stripe Cane
-
Condition the orange base:
Start by conditioning your orange polymer clay until it is soft and pliable. Roll it into a thick log, approximately 1 inch in diameter and 3 inches long. -
Prepare black stripes:
Condition a piece of black clay and roll it out into a thin sheet using your acrylic roller or pasta machine on a thin setting. -
Cut the stripes:
Using your clay blade, cut irregular, thin strips from the black sheet. They don’t need to be perfect; varied widths look more organic. -
Apply stripes to the log:
Place the black strips onto the orange log, spacing them out unevenly. Wrap some all the way around and leave others shorter to mimic natural fur patterns. -
Smooth the log:
Gently roll the log on your work surface to embed the black stripes into the orange clay so the surface becomes smooth and seamless. -
Reduce the cane:
Carefully stretch and roll the log to reduce its diameter. Aim for a thickness of about 0.8cm to 1cm, depending on how chunky you want your beads.
Smudged Stripes?
If black smears onto the orange while rolling, wipe the surface gently with a baby wipe or a q-tip dipped in rubbing alcohol before baking.
Step 2: Forming the Beads
-
Slice the tiger beads:
Use your sharp blade to slice the log into equal segments. For the disc shape shown in the photo, cut slices roughly 4mm to 5mm thick. -
Round the edges:
Pick up each slice and gently tap the edges with your finger to round them off slightly, removing the harsh cut marks while keeping that cylindrical disc shape. -
pierce the beads:
Using a bead piercing pin, careful poke a hole through the center of each tiger slice. Rotate the pin as you push to avoid distorting the stripe pattern. -
Make the pink accent beads:
Roll two balls of pink clay, slightly larger than your tiger discs. Pierce a hole through the center of each. -
Create the center bead:
Form a small cylinder from white clay. Roll tiny thins snakes of black clay and wrap them around the white cylinder to create rings. Smooth it out and pierce the center.
Step 3: Baking and Assembly
-
Bake the beads:
Arrange all your beads on a baking sheet lined with parchment paper. Bake according to your clay manufacturer’s instructions (usually 275°F/135°C for 15-30 minutes). -
Cool and glaze:
Let the beads cool completely. I like to apply a light coat of water-based gloss varnish at this stage to make the colors pop and protect the stripes. -
Measure the cord:
Cut a piece of elastic cord about 10 inches long. Pre-stretch it by pulling firmly on both ends a few times to prevent it from sagging later. -
String the pattern:
Thread the beads onto the cord. Start with the tiger beads, then add one pink bead, the center striped bead, the second pink bead, and finally the rest of the tiger beads. -
Tie the knot:
Tie a surgeon’s knot (a square knot with an extra loop through) to secure the bracelet. Pull it tight. -
Secure the finish:
dab a tiny drop of super glue on the knot. Once dry, snip the excess cord close to the knot and tuck the knot inside one of the bead holes if possible.
Clean Cuts
Chill your clay cane in the fridge for 15-20 minutes before slicing. Firm clay resists squishing, giving you perfectly round slices.
Wear your Tigger-inspired bracelet with pride and enjoy the bounce in your step


What Really Happens Inside the Kiln
Learn how time and temperature work together inside the kiln to transform clay into durable ceramic.
Shy Piglet Pink Cabochons
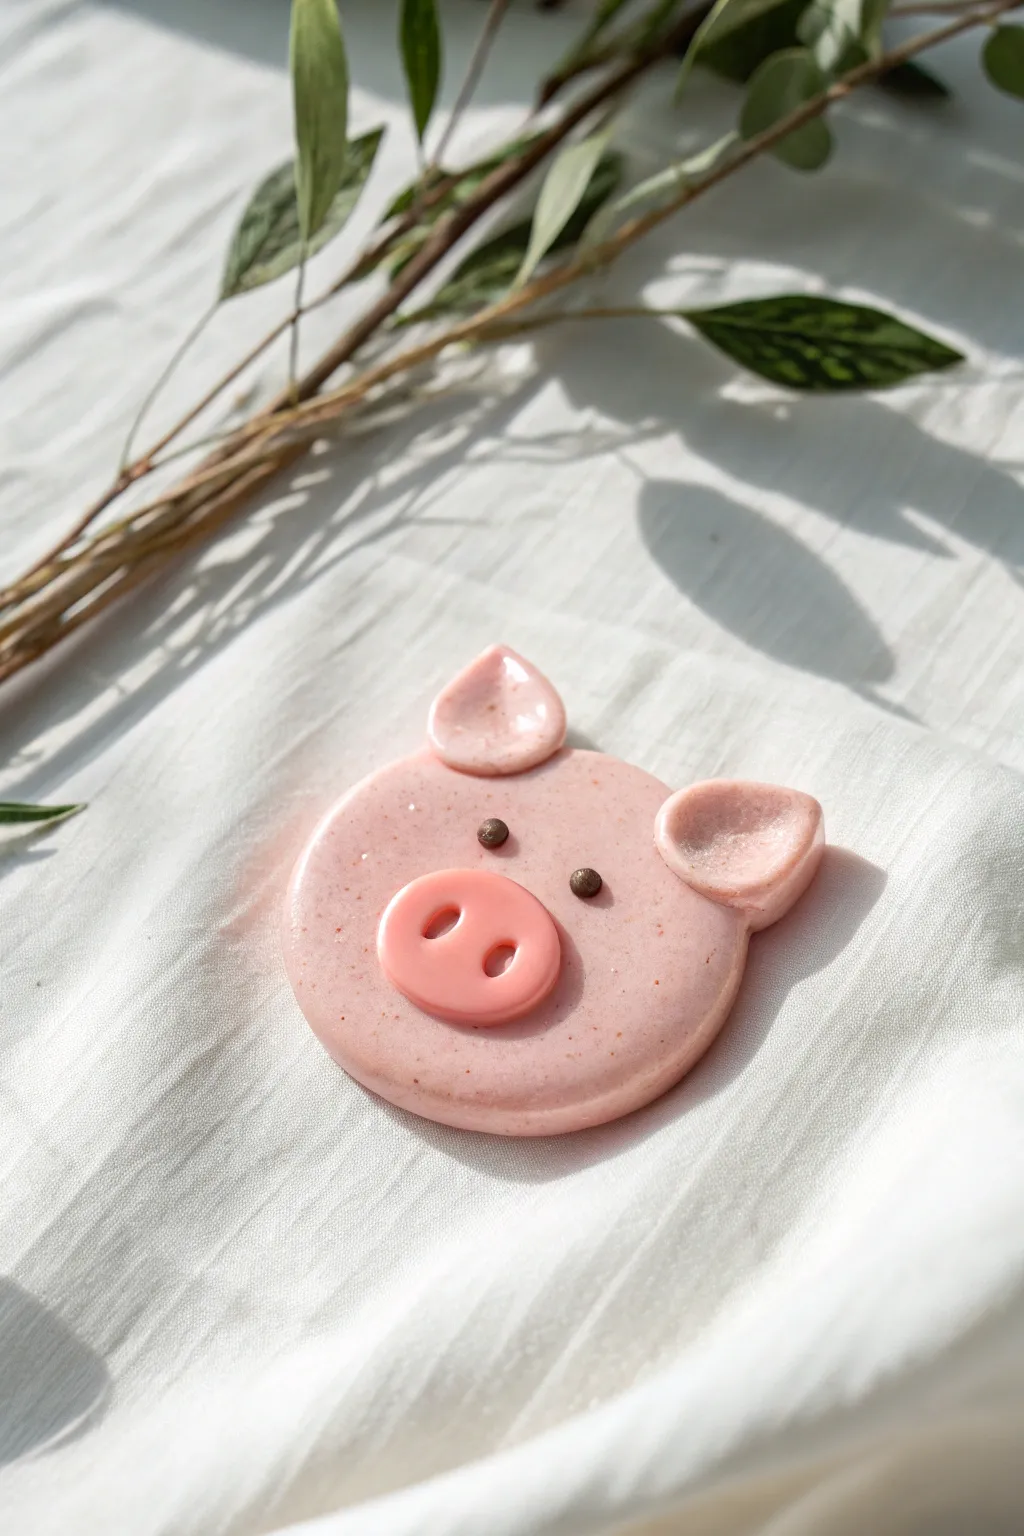
These high-shine, baby pink piglet cabochons are perfect for adding a touch of cuteness to hair bows, phone cases, or magnets. The design features a smooth, flattened profile with a distinctive shiny finish and a classic button nose.
Detailed Instructions
Materials
- Light pink polymer clay (with optional granite effect or added glitter)
- Darker pink polymer clay (for the nose)
- Dark brown or black polymer clay (for eyes)
- Small circle cutter (approx 1.5 inch)
- Miniature circle cutter (for the snout)
- Sculpting tool with a small ball end
- UV resin or high-gloss polyurethane varnish
- UV lamp (if using resin)
- Acrylic rolling pin
- Ceramic tile or baking surface
- Baking oven
Step 1: Base Construction
-
Prepare the Clay:
Condition your light pink clay until it is soft and pliable. If you want the speckled look seen in the photo, mix a tiny amount of “granite” effect clay or fine glitter into your pink base. -
Roll out the Sheet:
Using your acrylic rolling pin, roll the light pink clay into a sheet approximately 1/4 inch thick. You want it substantial enough to be sturdy but flat enough for a cabochon. -
Cut the Head Shape:
Use your main circle cutter to punch out the base head shape. If edges are rough, gently smooth them with your finger. -
Form the Ears:
Take two small balls of the same light pink clay. Flatten them slightly into teardrop shapes. -
Attach the Ears:
Press the teardrop shapes firmly onto the top left and right edges of the circle. I find blending the seam on the back side helps them stay attached during baking. -
Indent the Ears:
Use the ball-end tool to press a gentle indentation into the center of each ear, giving them a cupped, realistic look.
Clean Clay Tip
Baby wipes are essential! Wipe your hands and tools before switching to the light pink clay to avoid transferring lint or dark pigments.
Step 2: Adding Details
-
Create the Snout:
Roll out a small piece of the darker pink clay. Use your miniature circle cutter (or a straw) to cut a small disk. -
Shape the Snout:
Gently press the edges of the dark pink disk to round them off so it resembles a button rather than a sharp cylinder. -
Attach the Snout:
Place the snout in the lower center of the face. Press down gently to adhere it without distorting the shape. -
Add Nostrils:
Using a small dotting tool or a needle tool, press two oval-shaped indents into the snout for nostrils. -
Make the Eyes:
Roll two extremely tiny balls of dark brown or black clay. Try to make them identical in size. -
Place the Eyes:
Position the eyes wide apart, roughly midway between the snout and the ears. Press them gently into the clay so they don’t fall off.
Make it a Magnet
Before baking, press a small, strong neodymium magnet into the back of the clay, or glue one on after the piece is cured and glazed.
Step 3: Finishing
-
Bake:
Place your piglet on a ceramic tile and bake according to your clay manufacturer’s instructions (usually 275°F for 15-30 minutes). -
Cool Down:
Allow the piece to cool completely before handling. It will be slightly soft when hot but hardens as it cools. -
Prepare Resin:
If using UV resin for that glass-like finish, pour a small amount onto the center of the face. -
Spread the Glaze:
Use a toothpick or brush to guide the resin or varnish to the edges of the face, ears, and snout. Be careful not to let it drip over the sides. -
Cure:
Place under a UV lamp for 2-3 minutes until the surface is rock hard and non-tacky. If using varnish, let it air dry for 24 hours.
Your adorable glossy piglet is now ready to be glued onto your favorite accessory
Blue Donkey Patchwork Charms

Create these adorable, melancholy donkey charms reminiscent of a certain resident of the Hundred Acre Wood. With their soft blue clay and sweet pink bows, these tiny figurines make perfect keychains or zipper pulls.
Step-by-Step Tutorial
Materials
- Polymer clay in medium blue, light blue, pink, black, and white
- Clay sculpting tools (specifically a dotting tool and a small blade)
- Eye pins (silver or gold tone)
- Small keychain rings or lobster clasps
- Pliers (round nose and wire cutters)
- Oven for baking polymer clay
- Gloss glaze (optional)
Step 1: Shaping the Head
-
Form the Base:
Start by conditioning a piece of medium blue polymer clay until it is soft and pliable. Roll it into a smooth, crack-free ball about the size of a large marble (approximately 1 inch in diameter). Repeat this for as many charms as you wish to make. -
Flatten Slightly:
Gently press the ball down against your work surface just enough so it sits flat without rolling away, but keeps its rounded dome shape on top. -
Create the Snout:
Take a smaller piece of light blue clay and roll it into an oval. Flatten it into a thick disc and press it onto the lower half of the blue face ball. Use your fingers to smooth the edges so it adheres well but retains a slight puffiness.
Dust Dangers
Light blue clay shows dust easily! Wipe hands with baby wipes before handling light colors, and keep a piece of scrap clay nearby to roll in your hands to pick up lint before starting.
Step 2: Adding Facial Features
-
Indent Nostrils:
Using a small, round dotting tool, gently press two indentations into the light blue snout to create the nostrils. You want these to be definitive but not too deep. -
Fill Nostrils:
Take two minuscule specks of black clay and roll them into balls. Place them into the nostril indentations and flatten slightly so they look like deep, dark holes. -
Make the Eyes:
Roll two small balls of white clay and press them onto the face, just above the snout. They should be close together but not touching. Flatten them into ovals. -
Add Pupils:
Add smaller black discs on top of the white ovals for pupils. Place them slightly cross-eyed or looking up to capture that innocent expression. Add a tiny white speck for a catchlight if desired. -
Sculpt Eyebrows:
Roll very thin snakes of black clay. Cut two small curved pieces for eyebrows. Place them high on the forehead, angling them slightly upwards in the center to create a worried or surprised look. -
Draw the Mouth:
Use a needle tool or a curved blade to gently press a smile line into the bottom of the light blue snout. A slightly crooked or subtle smile works best for this character. -
Stitch Markings:
To mimic a plush toy look, use a needle tool to make a tiny vertical line down the center of the snout, starting from between the nostrils down to the mouth.
Step 3: Ears and Bow
-
Form the Ears:
Create two teardrop shapes from the medium blue clay. They should be fairly long. Flatten them slightly. -
Add Inner Ear:
Make two smaller pink teardrops and press them into the center of the blue ear pieces for the inner ear detail. -
Attach Ears:
Press the wider end of the teardrops onto the top sides of the head. Bend the tips downward or flop them around the sides of the face to give them character. -
Make the Bow Loops:
Roll two small balls of pink clay and shape them into triangles. Indent the center of the wide side to create a heart-like loop shape. -
Assemble the Bow:
Place the two pink triangles point-to-point on the top of the head, between the ears. Place a tiny flattened ball of pink clay in the center to connect them.
Stitched Texture
For an authentic plush toy look, use a needle tool to press tiny dashed lines along the seams where the ears meet the head and down the center of the face.
Step 4: Finishing Touches
-
Insert Hardware:
Trim an eye pin to the appropriate length. Insert the pin into the top center of the head, behind the bow. I suggest adding a tiny dab of liquid clay or bake-and-bond on the pin shaft for extra security. -
Bake:
Place your charms on a baking sheet lined with parchment paper or a ceramic tile. Bake according to your clay manufacturer’s instructions (usually around 275°F/135°C for 15-30 minutes depending on thickness). -
Cool and Glaze:
Allow the charms to cool completely before handling. If you want a shiny finish, apply a thin coat of gloss glaze to the eyes and nose, or the entire piece. -
Attach Keychain:
Use pliers to open the jump ring on your keychain and loop it through the eye pin on the charm. Close the ring securely.
Now you have a charming little blue friend ready to brighten up your bag or keys

TRACK YOUR CERAMIC JOURNEY
Capture glaze tests, firing details, and creative progress—all in one simple printable. Make your projects easier to repeat and improve.
Snowman Buddy Nose-and-Twig Pins
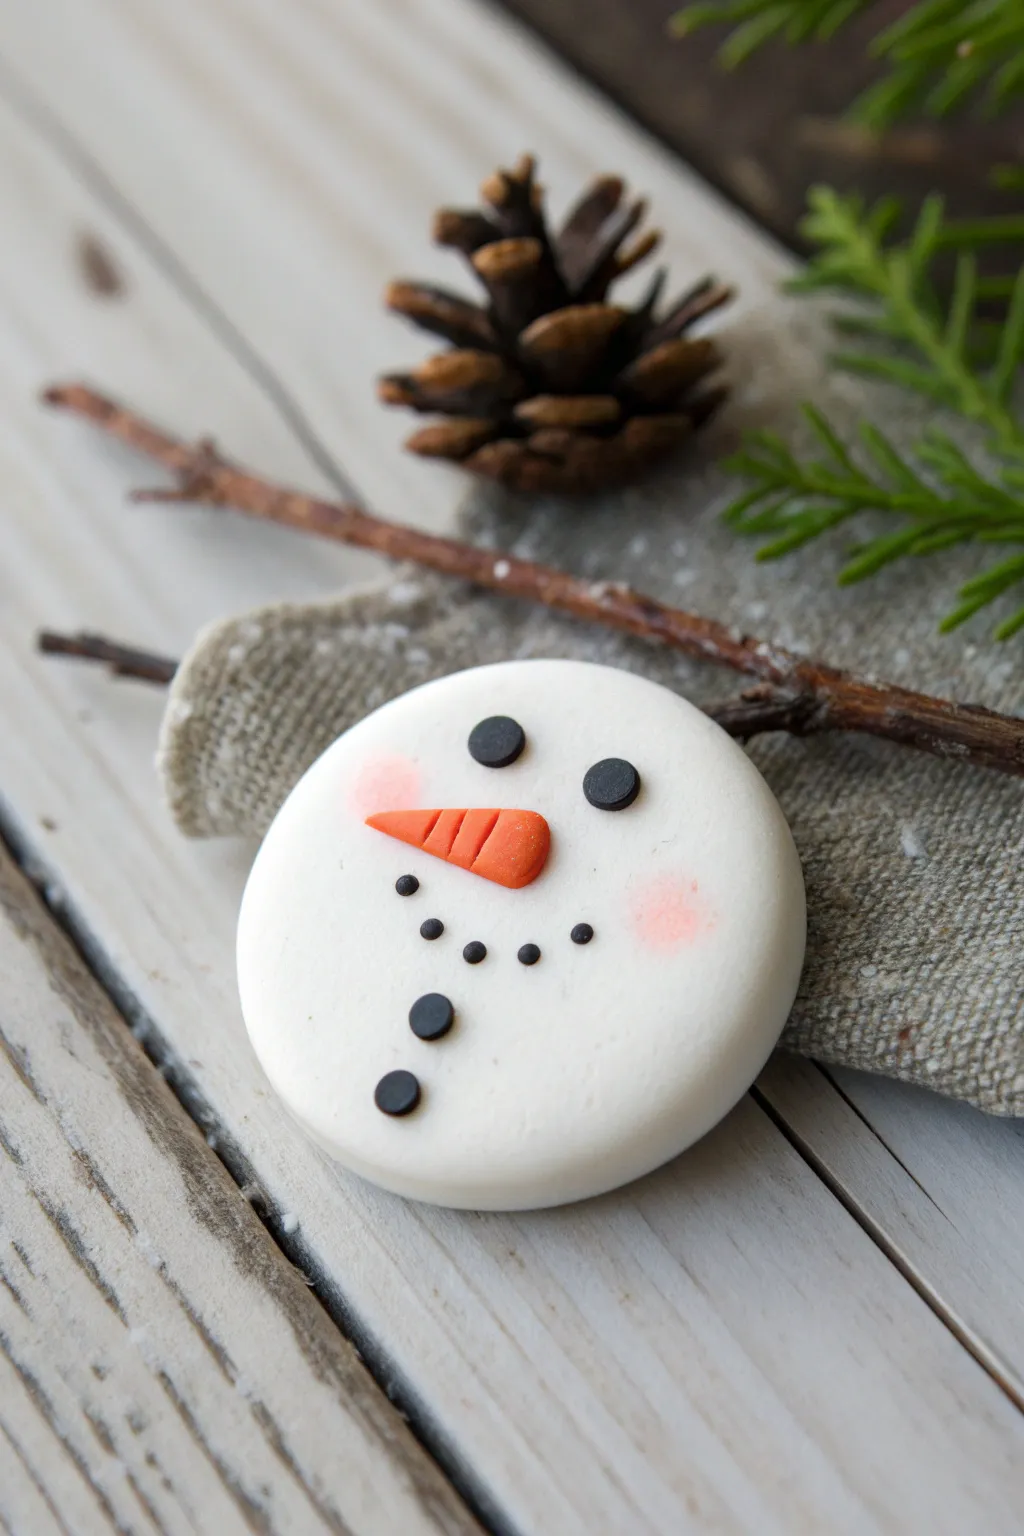
Bring a little winter magic to your jacket or bag with this adorable, minimalist snowman face. This simple polymer clay project captures the charm of a classic snowman with a cute carrot nose and rosy cheeks.
Step-by-Step
Materials
- White polymer clay
- Black polymer clay
- Orange polymer clay
- Pink soft pastel chalk (or pink clay)
- Small paintbrush
- Needle tool or toothpick
- Circle cutter (approx. 1.5 – 2 inches)
- Small ball stylus tool
- Acrylic rolling pin
- Baking sheet
- Parchment paper
- Strong craft glue (e.g., E6000)
- Pin backing hardware
Step 1: Forming the Base
-
Condition the Clay:
Start by conditioning your white polymer clay until it is soft and pliable. This prevents cracks and makes it easier to work with. -
Roll the Sheet:
Roll the white clay out into a smooth, even sheet. You want it to be thick enough to be sturdy, about 1/4 inch thick is ideal for a pin. -
Cut the Circle:
Use your circle cutter to punch out a perfect round shape. If the edges are a little sharp from the cutter, gently smooth them with your fingertip to create a nice, rounded finish like a packed snowball.
Dirty Clay Blues?
White clay picks up dust easily. Keep a pack of baby wipes nearby to clean your hands and tools often, especially before switching back to white clay after touching the black clay.
Step 2: Creating the Features
-
Make the Nose:
Take a small pinch of orange clay and roll it into a tiny cone or teardrop shape for the carrot nose. -
Texture the Carrot:
Use your needle tool or a toothpick to press small, evenly spaced indentations along the length of the carrot to mimic the ridges of a real vegetable. -
Attach the Nose:
Place the slightly curved carrot nose in the center of the white circle, pointing off to the left side for a jaunty look. Press it down gently to secure it. -
Create the Eyes:
Roll two tiny balls of black clay. Flatten them slightly into small discs to resemble coal eyes. -
Place the Eyes:
Position the black discs above the nose. Ensure they are evenly spaced, but give them a slight jaunty angle if you want more personality. -
Add Cheeks:
Scrape a little bit of pink soft pastel chalk into a fine powder. Use a dry, soft paintbrush to gently dust two circular rosy spots onto the white clay right where the cheeks would be.
Frosty Finish
Before baking, gently tap some iridescent white glitter onto the white clay surface. This gives your snowman a magical, freshly-fallen snow sparkle effect.
Step 3: Adding the Smile
-
Roll Tiny Balls:
For the mouth, roll five very tiny balls of black clay. These should be significantly smaller than the eyes. -
Form the Smile:
Arrange the five dots in a curved ‘U’ shape below the nose to form the classic coal mouth. -
Secure the Mouth:
Gently press each tiny black dot into the white clay using your finger or a flat tool so they don’t fall off during baking.
Step 4: Finishing Details
-
Add Jacket Buttons:
Create two more black clay discs, slightly smaller than the eyes but bigger than the mouth dots. -
Place the Buttons:
Line these two black discs up vertically beneath the center of the mouth, giving the illusion of buttons on the snowman’s body. -
Final Inspection:
Check your surface for any dust or lint. If you see speckles on the white clay, you can carefully remove them with a bit of rubbing alcohol on a cotton swab or a piece of tape. -
Bake:
Place your snowman on a parchment-lined baking sheet. Bake according to your specific brand of clay’s temperature and time instructions (usually 275°F for 15-30 minutes). -
Cool Down:
Let the piece cool completley before handling it, as hot clay can be fragile.
Step 5: Assembly
-
Attach Backing:
Flip the cooled snowman over. Apply a strong craft glue to the flat side of your pin backing. -
Set the Pin:
Press the pin backing firmly onto the center of the back of your clay piece. -
Dry:
Allow the glue to cure fully—usually for 24 hours—to ensure the pin is secure and ready to wear.
Now you have a charming winter accessory to brighten up cold days
Glass-Slipper Shoe Charms
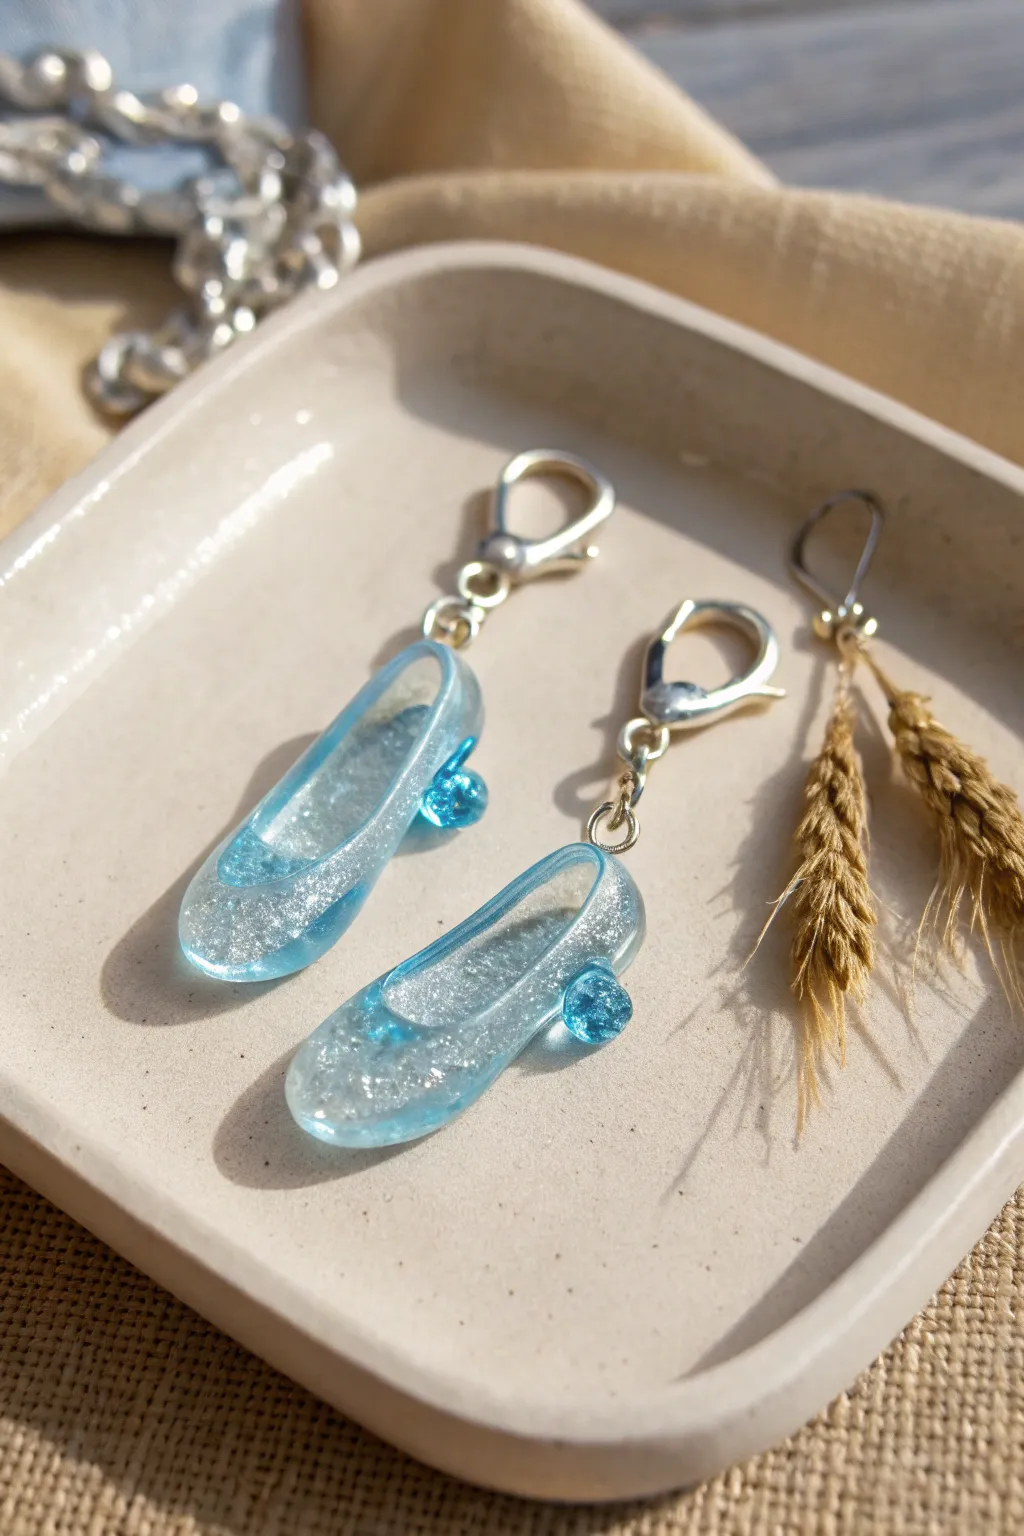
These enchanting glass slipper charms capture the magic of the ballroom with their translucent, icy blue hue and embedded glitter. Perfect as a dangling accessory for a bag or keychain, they feature a delicate heel detail and a glossy, gem-like finish.
How-To Guide
Materials
- UV resin (hard type)
- Blue resin dye or alcohol ink (transparent)
- Fine iridescent white glitter
- Silicone mold for miniature high-heeled shoes
- UV lamp
- Silver eye screw pins
- Silver jump rings (4mm or 5mm)
- Silver lobster clasps
- Silicone mixing cup
- Toothpick or silicone stir tool
- Needle-nose pliers
- Hand drill or pin vise (optional)
Step 1: Preparing the Magic Mixture
-
Mix the base resin:
Pour a small amount of clear UV resin into your silicone mixing cup. You won’t need much, so start with a coin-sized amount. -
Tint it blue:
Add just a tiny drop of transparent blue dye. Use a toothpick to swirl it in thoroughly until you have a consistent, paleicy blue color. Remember, we want it translucent like glass, not opaque. -
Add the sparkle:
Sprinkle in a generous pinch of fine iridescent white glitter. Stir gently to distribute the sparkles evenly without creating too many air bubbles.
Sparkle Depth Trick
Mix two batches of resin: one with glitter and one purely clear blue. Fill the mold halfway with glitter, cure, then top with clear blue for a 3D depth effect inside the glass.
Step 2: Casting the Slippers
-
Fill the toe:
Carefully pour the resin mixture into the toe section of your silicone shoe mold first. Use a toothpick to guide the resin into the very tip to prevent air pockets. -
Fill the heel:
Continue filling the rest of the mold, paying special attention to the narrow heel stem. I often poke the toothpick down into the heel to ensure the resin flows all the way to the bottom. -
Check for bubbles:
Let the resin sit for a minute so bubbles rise to the surface. Pop any surface bubbles with a lighter or a heat gun, moving quickly so you don’t burn the mold. -
Cure the resin:
Place the mold under a UV lamp. Cure for 2-3 minutes, or until the resin is hard to the touch. Flip the mold over and cure the underside for another minute to ensure the bottom is solid.
Sticky After Curing?
If the surface remains tacky after UV exposure, wipe it with a cotton pad soaked in isopropyl alcohol, or leave it in direct sunlight for 30 minutes to finish curing.
Step 3: Adding Detail & Hardware
-
Demold gently:
Once fully cooled, carefully pop the shoes out of the silicone mold. Check for any sharp edges and file them down lightly if needed. -
Create the structural clear coat:
Dip a toothpick in clear (untinted) UV resin and brush a thin layer over the entire shoe. This amplifies the glass-like effect and smooths out any surface imperfections. -
Add the heel accent:
Place a small bead of blue-tinted resin on the back of the heel as a decorative ‘gem’ accent, similar to the photo. Flash cure specifically just to set this bead in place. -
Final cure:
Place the coated shoes back under the UV lamp for a final 2-3 minute cure to harden the top coat completely. -
Prepare the attachment point:
If your mold didn’t have a hole, use a small hand drill or pin vise to carefully drill a hole through the back of the heel loop or the side of the shoe. -
Install the eye pin:
Screw a small silver eye pin into the hole. If the hold feels loose, dip the tip of the screw in a tiny dot of resin before screwing it in, then cure to lock it. -
Attach the jump ring:
Using two pairs of pliers, twist open a jump ring and thread it through the eye of the screw pin. -
Connect the clasp:
Slide the loop of the lobster clasp onto the open jump ring alongside the shoe. -
Close the loop:
Twist the jump ring closed securely, ensuring there is no gap for the charm to slip through.
Now your fairy tale accessories are ready to dazzle on any bag or zipper pull you choose
Mermaid Tail Gradient Pendants
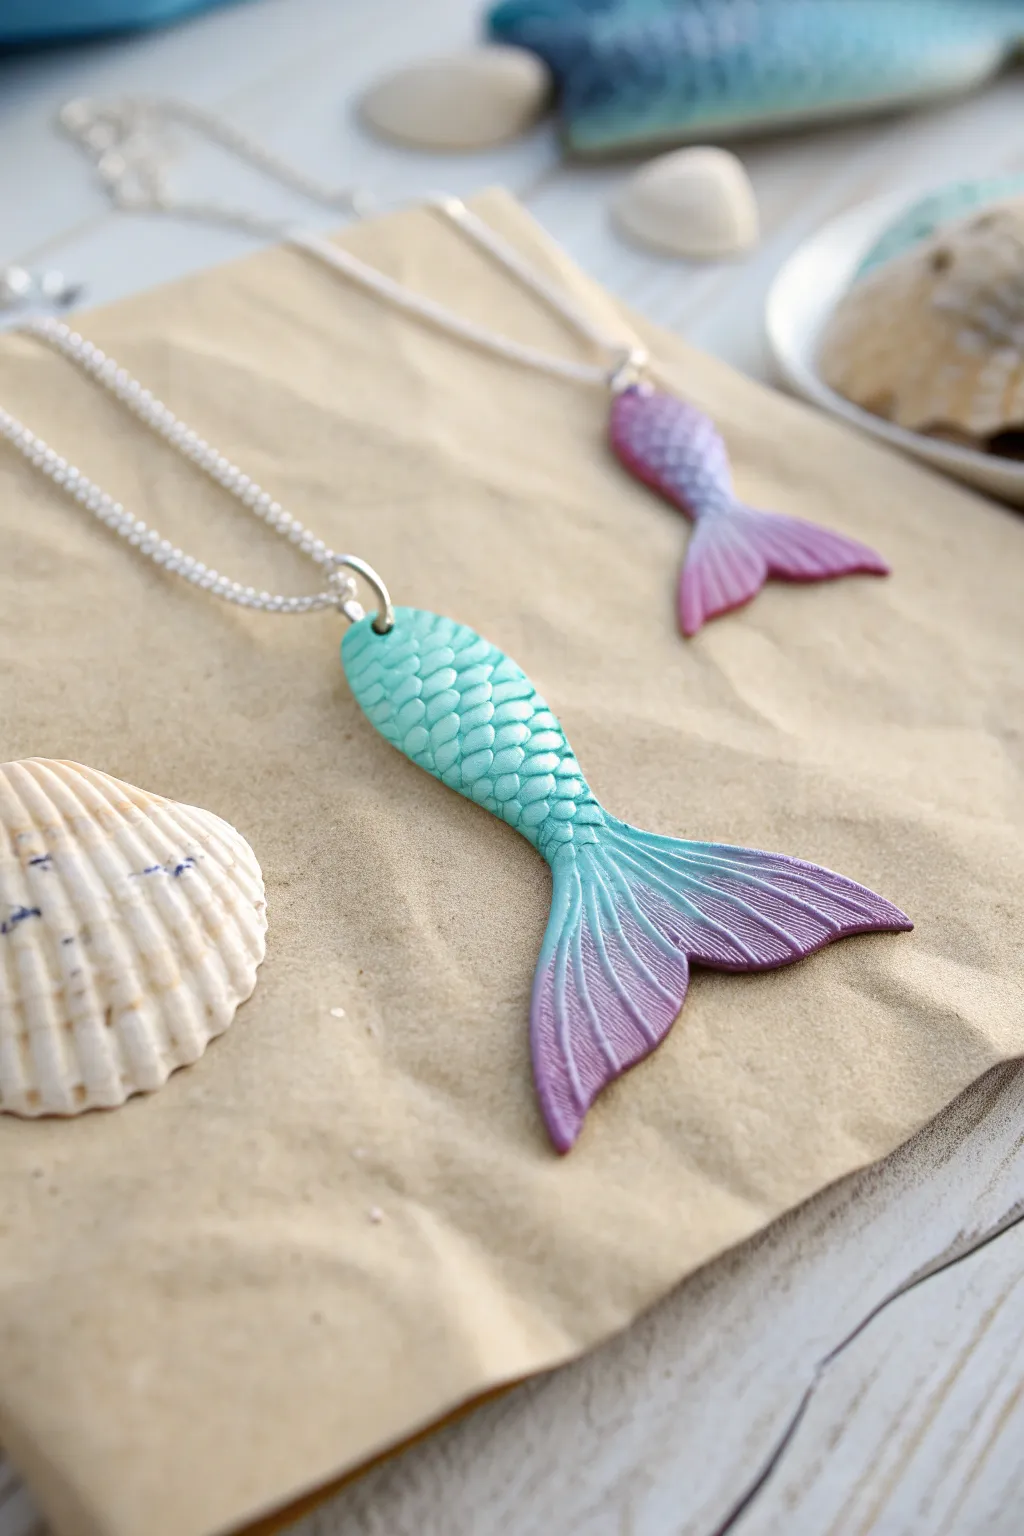
Capture the magic of the ocean with these stunning mermaid tail pendants that feature a beautiful ombre gradient. The textured scales and iridescent finish make them look like they were just found on the shore.
Step-by-Step Tutorial
Materials
- Polymer clay in teal, light purple, and translucent
- Silver mica powder or pearlescent pigment
- Fish scale texture mat or modeling tool
- Needle tool
- Clay roller or pasta machine
- Flexible tissue blade
- Jump rings and silver necklace chain
- Gloss glaze or resin (optional)
- Small paintbrush
- Work surface (tile or glass)
Step 1: Creating the Gradient Base
-
Condition the clay:
Start by thoroughly conditioning your teal and purple polymer clay until it is soft and pliable. You’ll also want a small amount of translucent clay mixed into both colors to give the fins a slightly watery, realistic look. -
Form the gradient:
Create a ‘Skinner blend’ or simple gradient by rolling the teal and purple clays into teardrop shapes. Place them side-by-side with the narrow end of one touching the wide end of the other, then roll them flat. -
Blend the transition:
Fold the sheet in half and run it through your pasta machine or roll it by hand. Repeat this folding and rolling process (always folding in the same direction) until you have a smooth transition where the colors meet in the middle. -
Shape the tail:
Roll your blended sheet to a thickness of about 4-5mm. Using a tissue blade, cut out a long, tapered shape for the body of the tail, positioning the teal section at the top (waist) and the purple section at the bottom.
Scaling Issues?
If hand-sculpting scales with a tool is smooshing the clay shape, place the clay in the fridge for 10 minutes to firm it up before detailing.
Step 2: Sculpting and Texturing
-
Imprint the scales:
For the upper ‘body’ portion of the tail, gently press a fish scale texture mat onto the clay. If you don’t have a mat, I find that using the rounded end of a small piping tip or a U-shaped modeling tool works perfectly to press individual scales one by one. -
Refine the scale edges:
Check the edges of the scaled area. If the texture pressed the clay out too wide, gently push the sides back in to maintain a sleek, tapered silhouette. -
Form the fin:
Take a separate piece of purple clay (or the purple end of a leftover blend) and shape it into a wide, flattened heart shape or fan shape. This will become the fluke of the tail. -
Texture the fin:
Use a needle tool or a dull knife to draw long, sweeping lines radiating from the center of the fin to the outer edges. Vary the pressure to create deep ridges that mimic the boning of a fish fin. -
Attach the distinct parts:
Press the bottom of the scaled body onto the center of your fin piece. Blend the seam on the back of the pendant so it is secure, but leave the front distinct to show the start of the fin. -
Curve the tail:
To give the pendant movement, gently twist the tail slightly or curve the tips of the fin upward. This dynamic pose looks much better than a perfectly flat piece.
Step 3: Finishing Touches
-
Add shimmer:
Dip a soft paintbrush into silver mica powder or pearlescent pigment. Lightly dust the top of the scales and the ridges of the fin. The powder will catch on the raised textures, highlighting the details beautifully. -
Insert hardware:
Carefully insert a heavy-gauge jump ring or an eye pin into the very top of the tail. Ensure it goes deep enough to be secure but doesn’t distort the shape of the top scales. -
Bake the clay:
Bake the pendant according to your polymer clay manufacturer’s instructions. Usually, this is around 275°F (130°C) for 15-30 minutes, depending on thickness. Let it cool completely. -
Seal (Optional):
For extra durability and a ‘wet’ look, brush a thin layer of gloss glaze or UV resin over the piece. This really pop the colors, though the matte texture of the clay is also lovely on its own. -
Assemble necklace:
Once fully cured and cooled, thread your silver chain through the jump ring to complete your necklace.
Make It Sparkle
Before baking, press tiny rhinestones or Swarovski crystals into the center of a few random scales for a magical, light-catching effect.
Wear your new mermaid tail necklace to bring a little splash of ocean magic to your everyday outfit
Tower Hair Braid Coil Necklaces
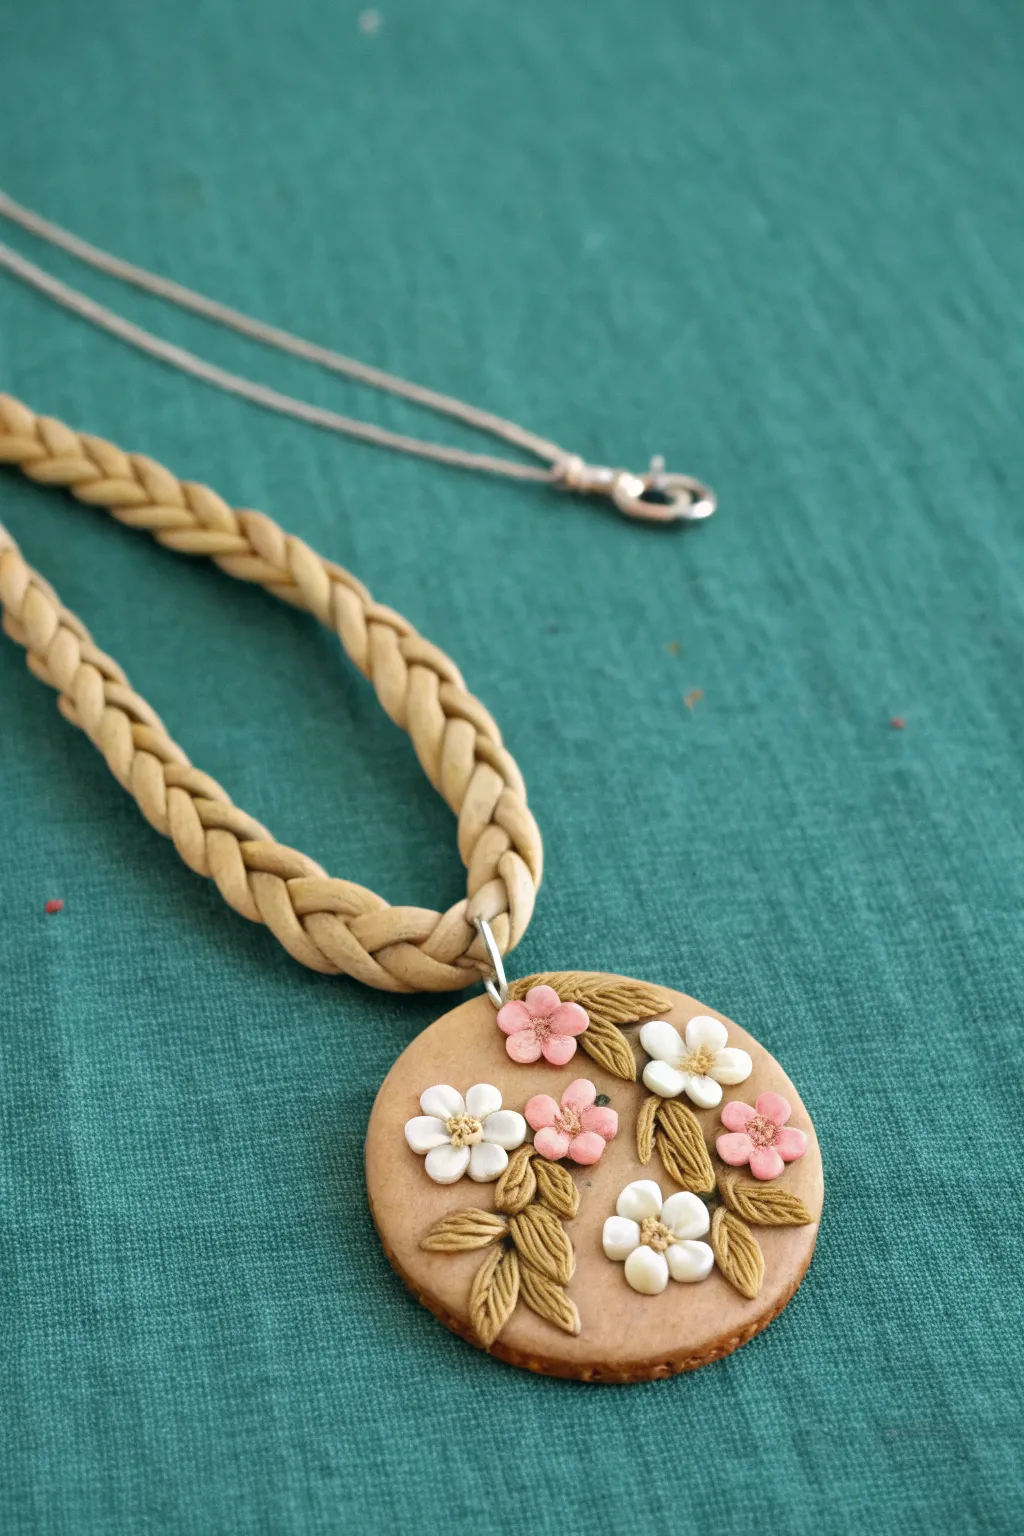
Capture the magic of Rapunzel’s long, braided locks with this charming polymer clay pendant necklace. Featuring delicate sculptured blossoms on a textured cookie-like base, it hangs from a faux-suede braid that perfectly mimics the famous golden hair.
Detailed Instructions
Materials
- Tan or beige polymer clay (for the base)
- White polymer clay
- Soft pink polymer clay
- Olive green polymer clay
- Liquid polymer clay (or Bake & Bond)
- Tan faux suede cord (3 strands, approx. 20 inches each)
- Small circle cutter (approx. 2 inches diameter)
- Needle tool or toothpick
- Small jewelry jump ring
- Jewelry pliers
- Acrylic rolling pin
- Necklace clasp findings
Step 1: Creating the Base
-
Condition the Clay:
Begin by thoroughly kneading your tan polymer clay until it is soft and pliable, ensuring there are no air bubbles trapped inside. -
Roll and Cut:
Roll the tan clay out to a medium thickness, roughly 1/4 inch, or slightly thinner depending on how heavy you want the pendant. Use your circle cutter to punch out a perfect round disc. -
Smooth the Edges:
Gently run your finger around the circumference of the disc to smooth down any sharp edges left by the cutter, giving it a soft, organic look. -
Add the Hanging Hole:
Using a needle tool, pierce a hole through the top of the disc, about 1/8th inch from the edge. Make sure the hole is wide enough for your jump ring to fit through after baking.
Step 2: Sculpting the Botanicals
-
Form Flower Petals:
Take tiny pinches of white and pink clay. Roll them into extremely small balls—you will need five equal-sized balls for each flower. -
Assemble the Blossoms:
Press five balls together in a circle directly onto the tan base. Flatten them gently with your finger to merge them slightly, creating a flower shape. -
Indent Traditional Centers:
Use the tip of a needle tool or a small ball stylus to press into the center of each flower, creating a small depression. -
Texture the Petals:
For added realism, use the needle tool to gently scratch tiny lines radiating from the center of each petal, or simply press a tiny dot of yellow or textured tan clay into the center for pollen. -
Create Leaves:
Roll small bits of olive green clay into teardrop shapes. Flatten them slightly and place them near the flowers. -
Detail the Foliage:
Use your needle tool to press a central vein down the middle of each leaf, then add smaller diagonal veins on either side for a textured effect. I find pressing firmly creates a nice shadow later. -
Secure the Arrangement:
If your base clay feels dry, apply a tiny drop of liquid polymer clay to the back of your flowers and leaves before placing them to ensure a permanent bond.
Needle Tool Trick
To get the intricate texture on the leaves, rock your needle tool slightly side-to-side as you press down rather than just dragging it. This creates deeper, more organic grooves.
Step 3: Finishing Touches
-
Bake the Pendant:
Bake the clay piece according to the manufacturer’s instructions on your clay package (usually around 275°F for 15-30 minutes). Let it cool completely. -
Prepare the Braid:
While the pendant cools, take your three strands of tan faux suede cord. Knot them together at one end or secure them in a clam-shell cord tip. -
Braid the Cord:
Create a simple three-strand braid for the entire length of the cord. Keep the tension even so the ‘hair’ looks neat and uniform. -
Attach the Findings:
Secure the other end of the braid with a knot or cord tip. Attach your clasp mechanism (lobster claw and ring) to the ends using jump rings and pliers. -
Assemble the Necklace:
Open a large jump ring with your pliers. Thread it through the hole in your cooled clay pendant and then around the center of your braided cord. -
Close and Secure:
Close the jump ring tightly with pliers, ensuring there occurs no gap where the pendant could slip off. Double-check all connections before wearing.
Add Some Sparkle
Before baking, brush a tiny amount of pearlescent mica powder over the white flower petals. It adds a magical shimmer without altering the soft colors of the clay.
Now you have a whimsical accessory ready for your next fairytale adventure
Floating Lantern Night Charms
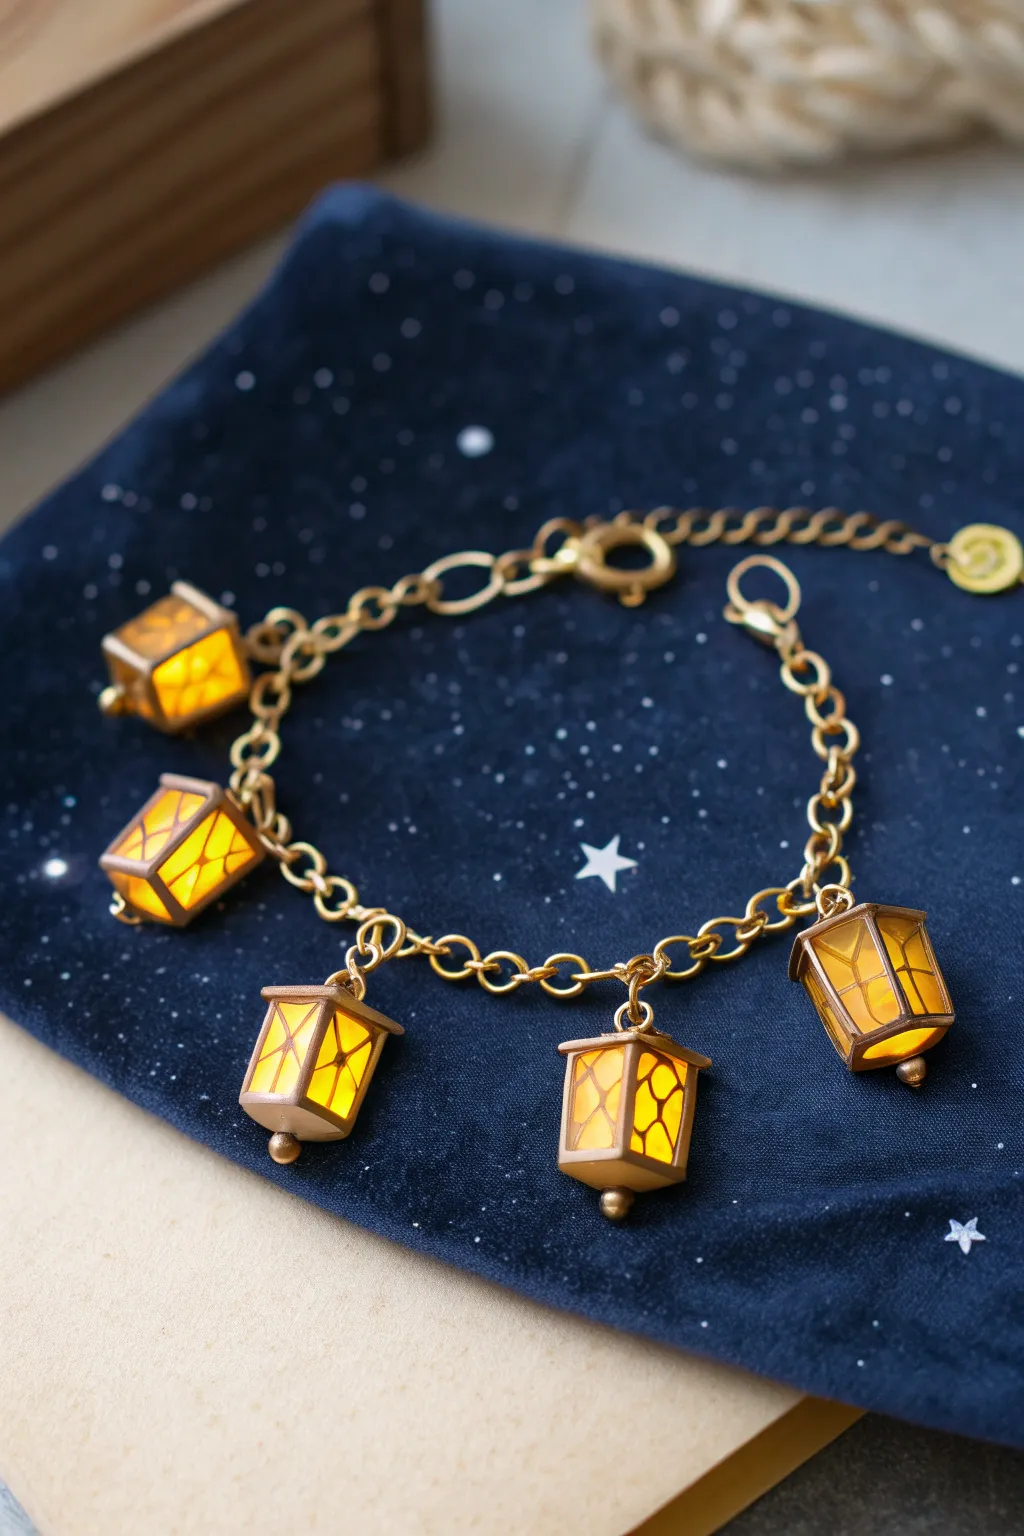
Capture the magic of the floating lights scene with this delicate charm bracelet made from polymer clay. These semi-translucent lanterns seem to glow from within, creating a beautiful accessory perfect for any Disney fan.
How-To Guide
Materials
- Translucent polymer clay (yellow or white stained with yellow alcohol ink)
- Gold polymer clay or antique gold acrylic paint
- Gold chain bracelet with jump rings
- Headpins (gold)
- Small round-nose pliers and wire cutters
- Detail paintbrush
- Brown acrylic paint
- Sculpting tools (needle tool and craft knife)
- Gloss glaze or UV resin (optional)
- Oven for baking
Step 1: Lantern Base
-
Prepare the Clay:
Condition your translucent polymer clay until it is soft and pliable. If you are using white translucent clay, mix in a very small drop of yellow alcohol ink or a tiny pinch of yellow clay to tint it without losing transparency. -
Form the Cubes:
Roll the clay into a log and cut five equal segments. Shape each segment into a small rectangle or cube, roughly 1cm tall. Keep the edges slightly soft rather than perfectly sharp for a more organic, animated look. -
Add Headpins:
Carefully insert a gold headpin through the center of each lantern from the bottom to the top. Ensure the flat head of the pin sits flush against the bottom of the clay block. -
Shape the Tops:
Using your fingers, gently pinch the top four corners of each rectangle slightly inward to taper the shape, mimicking the structure of a paper lantern.
Uneven Lantern Sides?
If your rectangles distort while pushing the headpin through, freeze the clay for 10 minutes first. This hardens it temporarily, allowing you to pierce it without squishing the shape.
Step 2: Adding Details
-
Create the Frame:
Roll out a very thin snake of gold polymer clay. If you find the clay too soft, I like to leach it on paper for a few minutes first. Alternatively, you can paint these details later, but clay frames add nice dimension. -
Apply Top and Bottom Borders:
Wrap a thin strip of the liquid or solid gold clay around the very top and very bottom edges of each lantern rectangle. Smooth the seams so they disappear. -
Texture:
Use a needle tool to gently press little indents into the corners and edges of the gold clay to simulate a wooden or metal frame texture. -
Bake:
Arranging the lanterns on a tile or baking sheet so they are standing upright. Bake according to your clay package instructions (usually 275°F/135°C for 15-30 minutes). Let them cool completely.
Step 3: Painting & Assembly
-
Paint the Sun Pattern:
Using a very fine detail brush and brown acrylic paint mixed with a tiny bit of water, carefully paint the crisscross grid lines and the central sun burst icon on the lantern faces. A steady hand is key here. -
Seal (Optional):
To protect the paint and enhance the ‘glowing’ effect of the translucent clay, apply a thin coat of gloss glaze or UV resin over the lantern bodies. Cure or dry as directed. -
Create Loops:
Once dry, use your round-nose pliers to bend the excess wire coming out of the top of the lantern into a wrapped loop. Snip off any remaining wire. -
Prepare the Bracelet:
Lay out your gold chain bracelet flat on your workspace. Decide on the spacing for your five charms so they are evenly distributed. -
Attach Charms:
Open a jump ring (always twist sideways, don’t pull apart) and thread it through the loop on a lantern and a link on the bracelet. Close the ring securely. -
Final Adjustments:
Repeat for all five lanterns. Hold the bracelet up to ensure all charms hang at the correct length and orientation.
Make it Shine
Use glow-in-the-dark polymer clay instead of standard translucent. In daylight, it looks creamy white, but in the dark, your lanterns will actually light up just like the movie scene.
Now you have a whimsical accessory that carries a little bit of starlight with you wherever you go
Enchanted Castle Relief Tiles
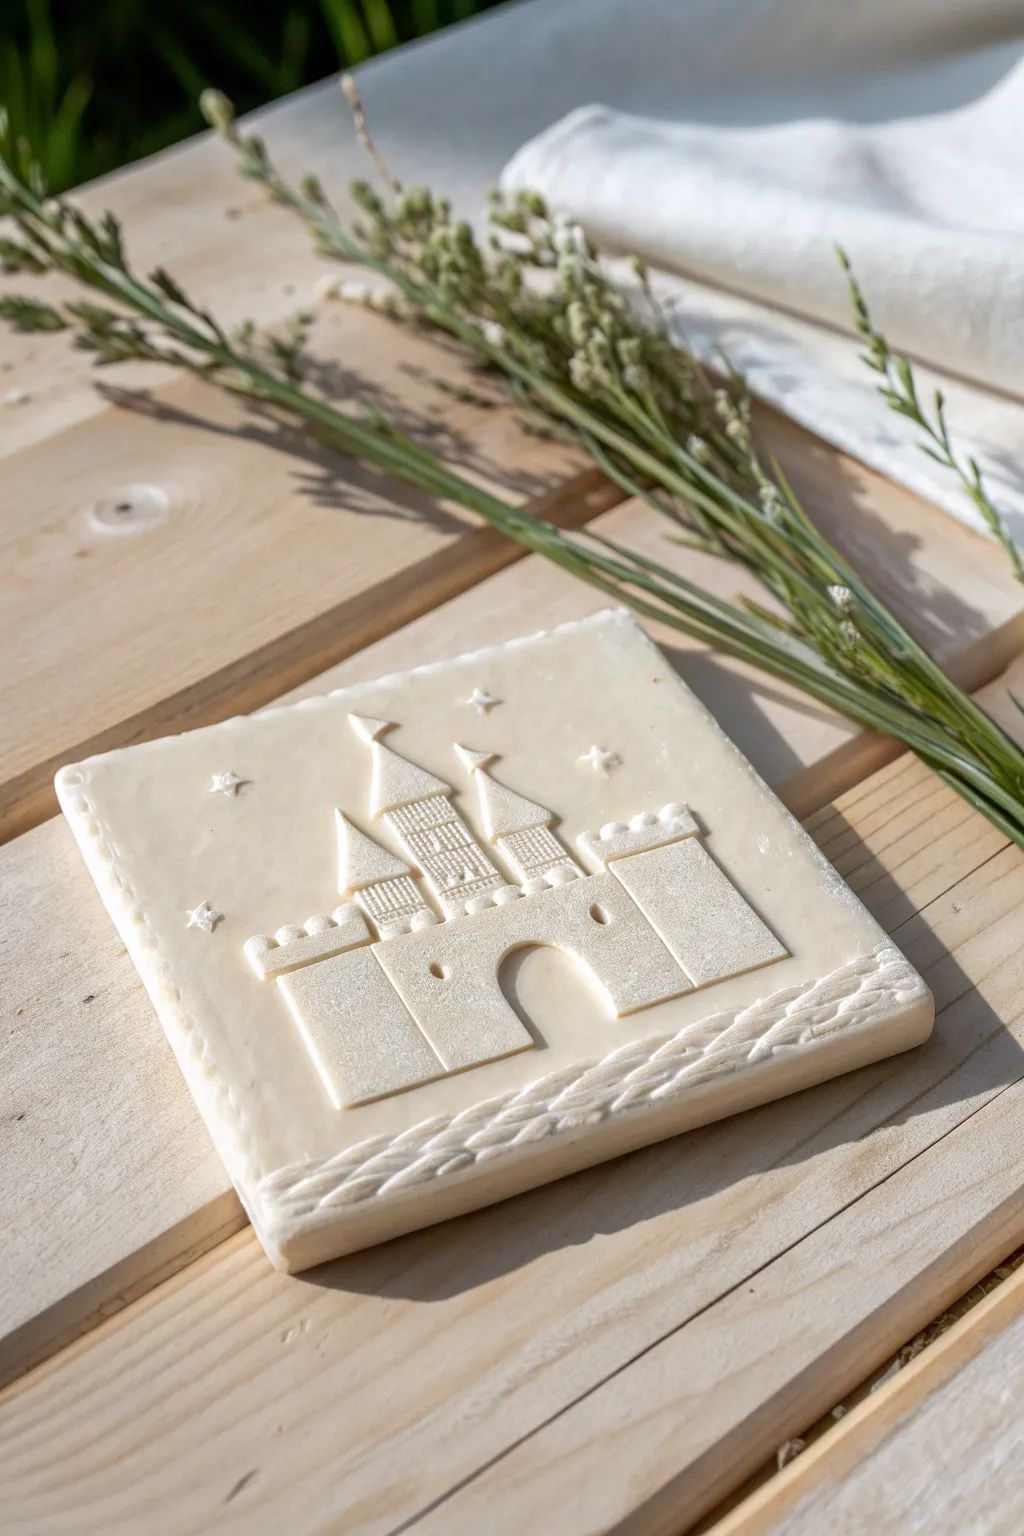
Capture the magic of the kingdom with this elegant bas-relief tile featuring a classic fairytale castle. The monochromatic cream finish gives it a sophisticated, sculpted look perfect for subtle Disney decor.
Detailed Instructions
Materials
- Polymer clay (white or translucent cream)
- Clay roller or pasta machine
- Square clay cutter (approx. 4×4 inches)
- Needle tool
- Small ball stylus tool
- Texture sheet or fine mesh (for tower details)
- Clean work surface or ceramic tile
- Flexible blade or craft knife
- Cornstarch (to prevent sticking)
- Oven (for baking polymer clay)
Step 1: Preparing the Base
-
Condition the clay:
Start by thoroughly kneading your cream-colored polymer clay until it is soft, pliable, and free of air bubbles. -
Roll the slab:
Roll out a smooth, even sheet of clay approximately 1/4 inch thick. This needs to be sturdy enough to support the added layers. -
Cut the square:
Using your square cutter or a ruler and craft knife, cut out a perfect square base. Smooth the edges with your finger to remove any sharp cut marks.
Smooth Operator
Use a tiny drop of baby oil on your finger to smooth out fingerprints on the raw clay before baking for a professional, glass-like finish.
Step 2: Building the Castle
-
Cut the main walls:
Roll a slightly thinner sheet of clay. Cut out the central main building block and the two side tower bases. Place them gently onto the square base, pressing lightly to adhere without distorting the shapes. -
Add the archway:
For the entrance, use a small circular cutter or your craft knife to carve an arched doorway out of the bottom of the central clay piece before attaching it. -
Texture the towers:
Create the tall, thin towers. Before attaching them, press a fine mesh or texture tool into the clay to create the brick-like pattern seen on the upper turrets. -
Assemble the turrets:
Attach the textured towers above the main walls. Cut small triangles for the rooftops and place them on top of the towers. -
Add battlements:
Roll a very thin snake of clay and cut tiny squares. Arrange these along the top edges of the lower walls to create the crenulated battlements. -
Refine the edges:
I like to use a silicone shaper tool here to gently blend the seams where the castle pieces meet the background tile, ensuring it looks like one solid carving. -
Create flag details:
Shape tiny, thin triangles of clay and gently curve them to look like waving flags. Attach these to the very peaks of the roofs.
Antique Finish
After baking, apply a wash of diluted brown acrylic paint and wipe it off quickly. The dark paint stays in the crevices, highlighting texture.
Step 3: Adding Details and Finishing
-
Add the rope border:
Roll two long, thin strands of clay. Twist them together to form a rope. Place this twisted rope along the bottom edge of the tile, pressing it firmly into place. -
Create starry sky:
Using a very small star cutter or by hand-cutting, place three or four tiny stars in the negative space above the castle. -
Indent details:
Take your small ball stylus and press tiny indentations into the stars to give them dimension. -
Final smoothing:
Check the entire piece for fingerprints. Lightly brush with a bit of cornstarch or baby oil if you need to smooth out any rough textures. -
Bake:
Bake the tile according to your polymer clay manufacturer’s instructions (usually 275°F for 15-30 minutes depending on thickness). -
Cool and clean:
Allow the tile to cool completely in the oven to prevent cracking. Once cool, you can lightly sand the edges if needed.
Display your miniature kingdom on a mantel or attach a magnet to the back for royal fridge decor
Rose-in-a-Dome Mini Sculptures
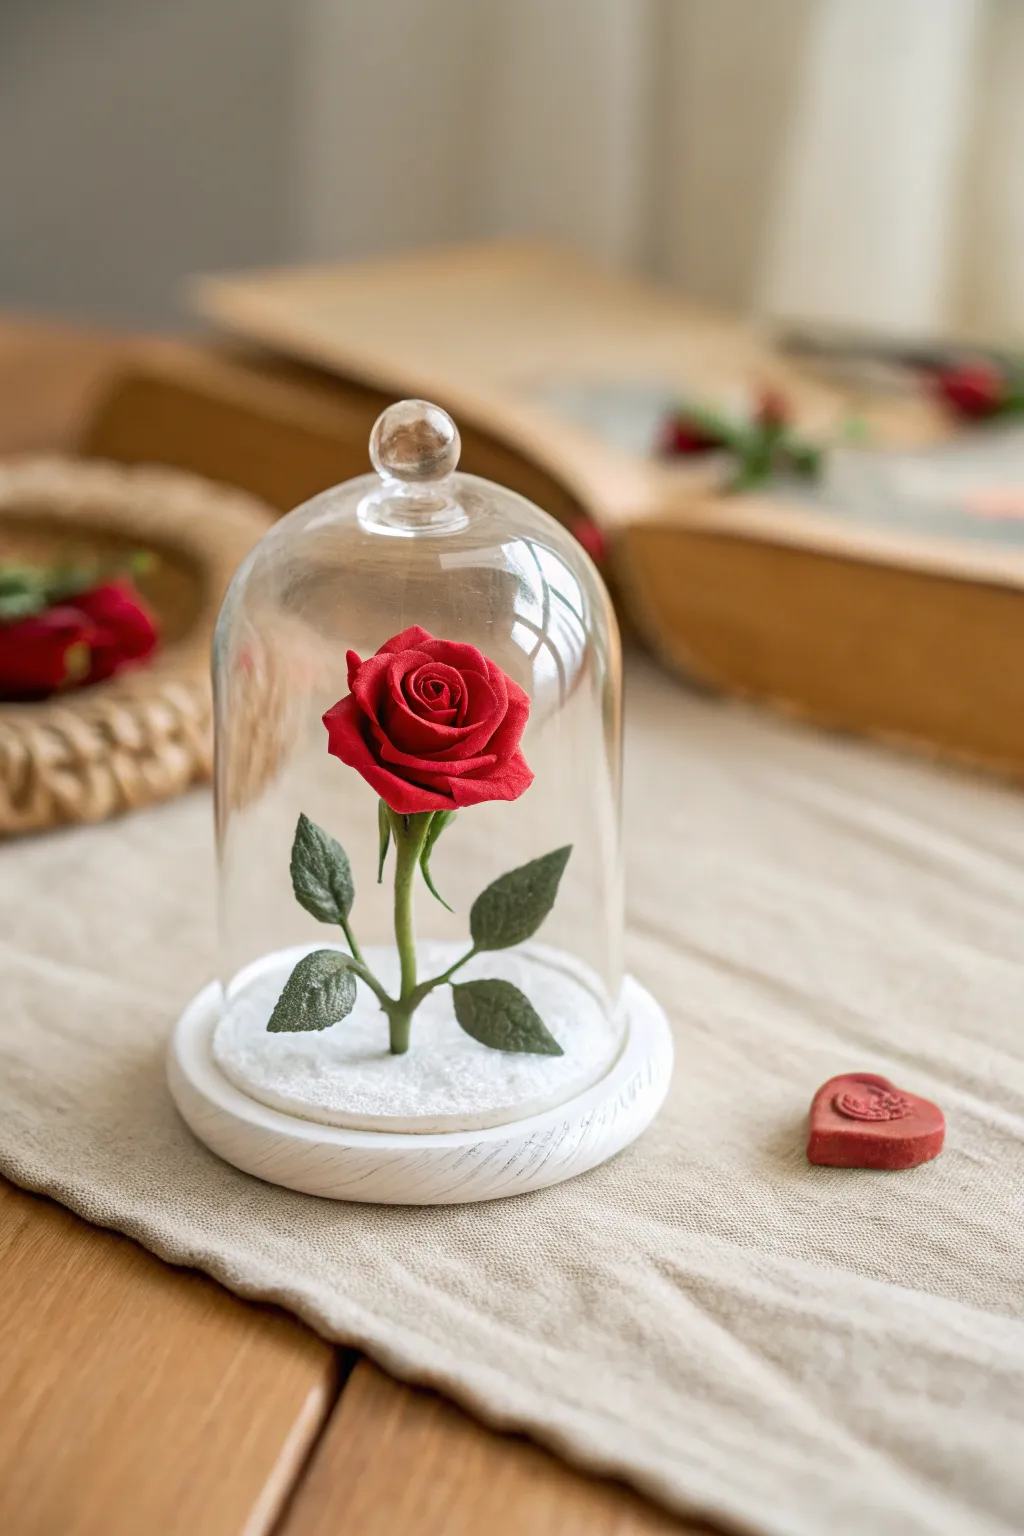
Capture the magic of a timeless fairytale with this delicate polymer clay sculpture. This project encases a perfectly sculpted red rose within a miniature glass bell jar, resting on a snowy white base for a romantic, wintery finish.
Step-by-Step Guide
Materials
- Red polymer clay (velvet or soft matte finish preferred)
- Green polymer clay (olive or forest green)
- White textured paste or white flocking powder
- Translucent liquid clay
- Floral wire (20-22 gauge)
- Miniature glass display dome with wooden base
- Basic sculpting tools (ball tool, needle tool)
- White acrylic paint (optional)
- UV resin (optional for dew drops)
- Small rolling pin
- Cutting blade
Step 1: Rose Construction
-
Prepare the center:
Begin by rolling a tiny teardrop shape of red clay for the rose bud center. Insert a piece of floral wire into the bottom of the teardrop to act as a handle and the eventual stem. -
Form the petals:
Roll out a thin sheet of red clay. Use a small circle cutter or your blade to cut out 9-12 small petal shapes. Flatten the edges of each petal between your fingers to make them paper-thin and delicate. -
Wrap the bud:
Take the first petal and wrap it tightly around the teardrop center so it overlaps itself. This creates the tight inner spiral characteristic of a rose. -
Layer the bloom:
Add the next three petals slightly looser than the first, placing them in a spiral pattern. Gently curl the top edges outward using a needle tool or toothpick to simulate a blooming flower. -
Final petal layer:
Apply the remaining petals to the outside, overlapping them as you go. Pinch the bottoms firmly to the base of the flower and flair the upper edges for a full, open look.
Step 2: Stem and Foliage
-
Create the calyx:
Roll a small ball of green clay and flatten it into a star shape. Pierce the center with the wire stem and slide it up to cup the bottom of the red rose. -
Cover the stem:
Roll a very thin snake of green clay. Coat the floral wire lightly with liquid clay, then slide the green snake onto the wire or wrap it around, smoothing the seams until the wire is completely hidden. -
Sculpt the leaves:
Shape three small teardrops of green clay. Flatten each one and use a needle tool or craft knife to impress a central vein and smaller side veins for texture. -
Bend the stem:
Give the wire stem a gentle, natural ‘S’ curve. The rose shouldn’t stand perfectly straight; a slight droop adds elegance. -
Attach leaves:
Press the leaves onto the lower section of the stem. I like to secure these with a tiny dab of liquid clay to ensure they don’t pop off during baking.
Petal Texture Tip
Before assembling, press your raw clay petals onto a piece of fine sandpaper or a silicone petal veiner. This adds a realistic floral micro-texture instead of leaving the clay perfectly smooth.
Step 3: Base and Assembly
-
Prep the wooden base:
If your wooden base is natural wood, paint it white or leave it raw depending on your preference. For the snow effect shown, verify the surface is clean. -
Mount the rose:
Drill a tiny hole in the center of the wooden base. Trim the wire stem to the correct height so the rose fits under the glass, then glue the wire into the hole. -
Add snowy texture:
Apply white texture paste or white clay mixed with liquid clay around the base of the stem. Use a stiff brush or tool to stipple the surface, creating a fluffy, snow-like appearance. -
Bake the clay:
Carefully place the wooden base with the sculpted rose (without the glass dome) into the oven. Follow the baking instructions on your specific brand of polymer clay. -
Cool and finish:
Once fully cooled, inspect the rose. If you want a dewy look, apply tiny dots of UV resin to a petal or leaf and cure. -
Bonus Heart:
Use leftover red clay to form a small heart shape. Stamp an initial or pattern into it if desired, bake it, and place it beside the dome as a cute accessory. -
Final enclosure:
Clean the glass dome thoroughly to remove fingerprints. Place it over the rose and into the groove of the base to complete your enchanted display.
Magical Glow
Hide a tiny LED light diode under the ‘snow’ on the base before baking (if heat safe) or install it underneath afterwards to make the rose glow magically in the dark.
This miniature masterpiece will look stunning on a bookshelf or as a centerpiece for a fairytale-themed gathering
Horned Headband Silhouette Clips

This elegant yet whimsical project combines the soft luxury of velvet with iconic mouse-ear geometry to create a unique coin purse or clutch. The deep amethyst fabric plays beautifully against the matte black frame, offering a sophisticated nod to Disney style that fits right into an adult wardrobe.
Detailed Instructions
Materials
- Polymer clay (black)
- Circle cutters (various sizes)
- Liquid polymer clay (black or clear)
- Semi-circular metal purse frame (clasp style)
- Rich purple velvet fabric
- Stiff interfacing or cardstock
- Fabric glue or heavy-duty craft adhesive
- Sandpaper (fine grit)
- Acrylic roller
- Craft knife
- Modeling tool (needle tip)
- Matte varnish (optional)
Step 1: Crafting the Clasp Frame
-
Condition the Clay:
Begin by thoroughly conditioning your black polymer clay until it is pliable and smooth. Warm clay is essential for preventing cracks during baking. -
Create the Base Arch:
Roll a thick snake of black clay and flatten it slightly to match the width and curve of your metal purse frame. Press it onto the exterior of the metal frame to get the shape, but remove it carefully to sculpt. -
Cut the Ears:
Roll out a slab of black clay approximately 1/4 inch thick. Use a small circle cutter to punch out two perfect circles for the ears. -
Refine the Edges:
Smooth the edges of your clay circles with your finger to remove any sharp cutting lines, giving them a softened, finished look. -
Attach Ears to Arch:
Position the two clay ears on top of your curved clay base. They should sit slightly off-center to mimic the clasp mechanism look. -
Secure the Bond:
Score the connection points and add a drop of liquid polymer clay to ensure the ears fuse permanently to the arch during baking. -
Bake the Structure:
Oven-cure the clay piece according to the manufacturer’s instructions. I usually tent foil over black clay to prevent scorching. -
Sand and Finish:
Once fully cooled, lightly sand any imperfections. If you want a pristine finish, apply a thin coat of matte varnish.
Glue Clean-up
If fabric glue seeps onto the velvet nap, wait for it to become tacky and gently roll it off with a rubber tool rather than wiping it wet.
Step 2: Constructing the Velvet Body
-
Draft the Template:
Trace the semi-circular shape of your metal purse frame onto a piece of cardstock to create a template for the fabric body. -
Cut the Interfacing:
Using your template, cut two semi-circles from stiff interfacing or cardstock. This provides the rigid structure needed inside the velvet. -
Prepare the Velvet:
Lay your purple velvet face down. Place the interfacing shapes on the back and trace around them, adding a generous 1/2 inch seam allowance. -
Wrap the Panels:
Cut out the velvet shapes. Apply fabric glue to the edges of the interfacing and fold the velvet seam allowance over tightly, ensuring the curved edge is smooth and wrinkle-free. -
Check the Fit:
Hold your two velvet-covered panels together. They should align perfectly to form a half-moon shape. -
Join the Panels:
Glue the two flat, straight bottom edges of the panels together securely, or stitch them with a hidden slip stitch if you prefer a textile finish.
Texture Twist
Before baking, press a piece of coarse sandpaper or a texture sponge into the black clay to give the ears a leather-like matte finish.
Step 3: Final Assembly
-
Prepare the Frame Channel:
Apply a strong adhesive or heavy-duty craft glue into the channel of the metal purse frame. -
Insert the Fabric:
Carefully push the curved edge of your velvet unit into the metal frame channel. Use a flat tool to tuck the fabric in deeply and evenly. -
Attach the Clay Decor:
Apply a strong industrial adhesive (like E6000) to the underside of your baked clay ‘ear’ arch. -
Final Placement:
Press the clay arch firmly onto the top of the metal frame, aligning it so the ears sit upright. Clamp or hold in place until the glue sets.
Display your charming mouse-eared clutch as a piece of decor or use it to hold your smallest treasures
Hidden Mouse-Head Cane Slice Mix
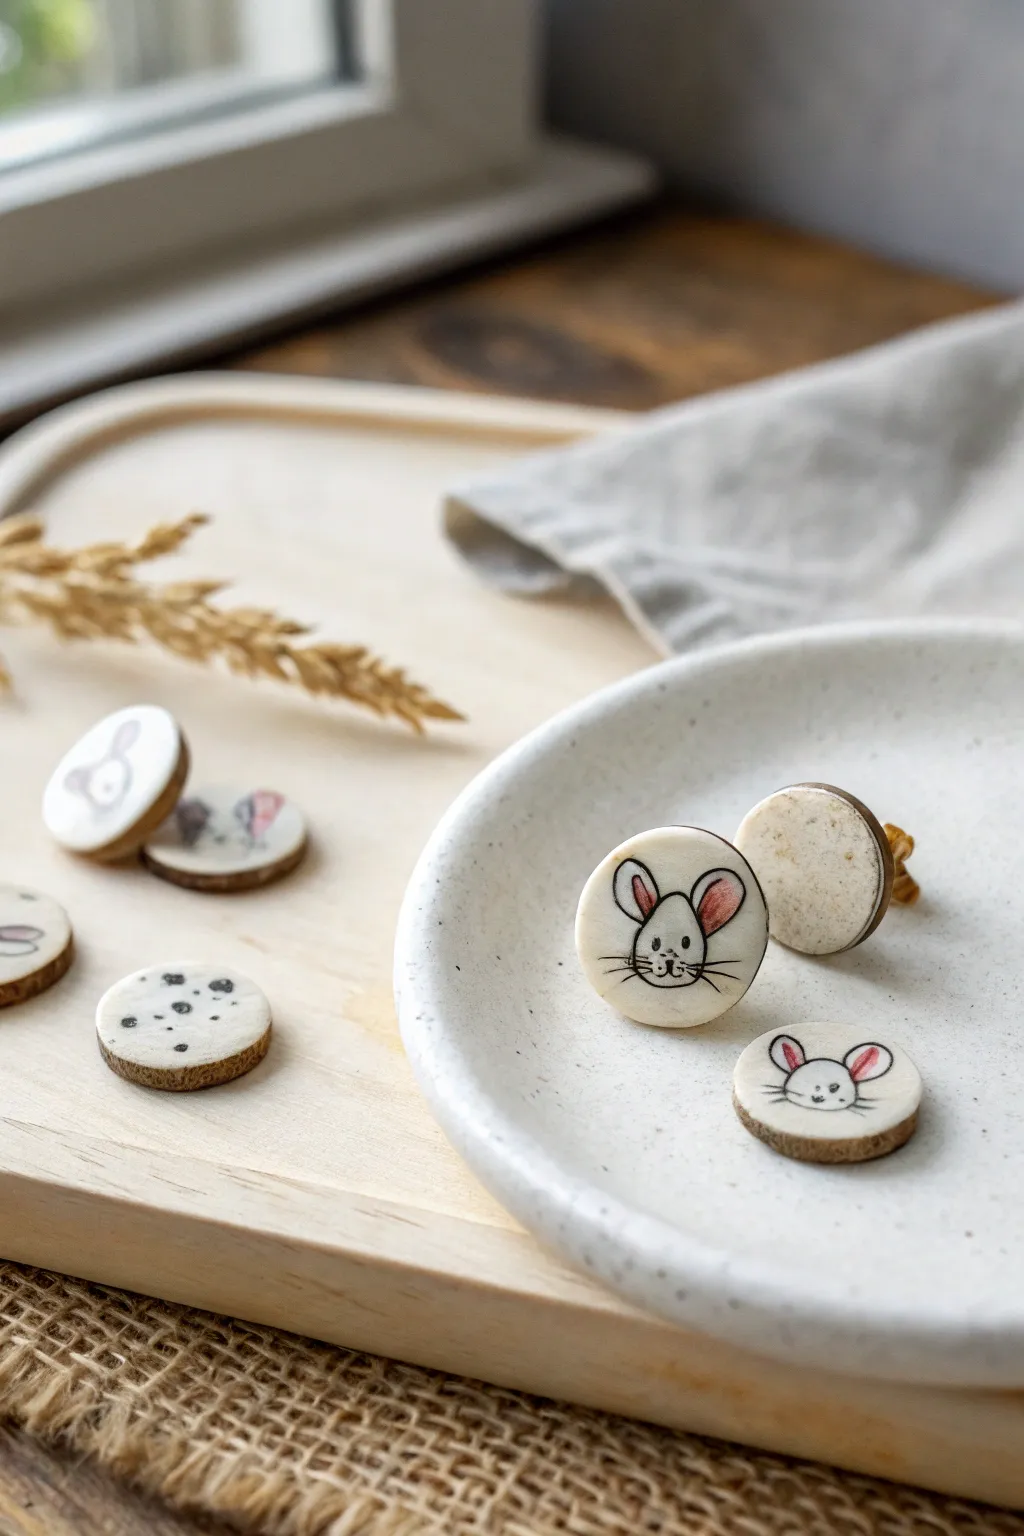
Create these adorable, understated mouse-themed discs that capture the charm of a sketchbook drawing on a ceramic-like surface. Perfect for stud earrings or small pendants, this project combines the simplicity of polymer clay with delicate hand-illustrated details.
Step-by-Step Guide
Materials
- White or translucent white polymer clay (e.g., Fimo Effect or Cernit Translucent)
- Speckled clay or ground vanilla bean/black pepper (optional for texture)
- Round clay cutter (approx. 1-1.5cm diameter)
- Rolling pin or pasta machine
- Fine-grit sandpaper (400-800 grit)
- Black fine-liner pen (permanent ink, e.g., Micron 01) or fine acrylic paint brush
- Pink colored pencil or chalk pastel
- Brown acrylic paint
- Water and paper towel
- UV resin or matte varnish
- Earring posts and superglue (if making earrings)
- Ceramic tile or baking sheet
Step 1: Base Preparation
-
Condition the Clay:
Begin by thoroughly conditioning your white polymer clay until it is soft and pliable. If you want the speckled ceramic look shown in the darker pieces, knead in a tiny pinch of ground black pepper or dried vanilla bean specks now. -
Roll the Sheet:
Roll your clay out into a uniform sheet about 3mm to 4mm thick. You want it substantial enough to look like a little ceramic tile but light enough for jewelry. -
Texturing (Optional):
For a more organic, stone-like feel, lightly press a piece of sandpaper or a textured sponge onto the surface of the clay sheet before cutting. -
Cut the Shapes:
Use your small round cutter to punch out several circles. If the clay sticks inside the cutter, gently push it out or use a piece of plastic wrap over the clay before cutting for a domed edge. -
Smooth the Edges:
Inspect the edges of each circle. Gently smooth away any fingerprints or rough cutting seams with your fingertip dipped in a tiny bit of cornstarch or water. -
Baking:
Place your clay discs on a ceramic tile or baking sheet lined with parchment paper. Bake according to the manufacturer’s instructions for your specific brand of clay—usually around 275°F (130°C) for 15-20 minutes.
Step 2: Illustration & Finishing
-
Cooling and Sanding:
Once baked, let the discs cool completely. If the surface is too slick, lightly scuff it with very fine sandpaper to give the pen sketches something to grip onto. -
Sketching the Outline:
Using a very fine black permanent marker or a detail brush with black acrylic paint, draw the mouse face. Start with an oval nose, add the vertical line down to the mouth, and then draw two large, rounded ears on top. -
Adding Details:
Draw the eyes—simple dots or small ovals work best for this style. Add whisker lines extending from the nose area. I like to keep the lines slightly loose and sketchy to mimic the reference image. -
Coloring the Ears:
Take a pink colored pencil or scrape a bit of pink chalk pastel into a powder. Apply the color gently to the inner ear area. If using pencil, draw lightly; if using pastel, apply it with a small brush or cotton swab. -
Creating the Faux-Ceramic Edge:
To mimic the darker, toasted edges seen in the photo, dip a finger or sponge in diluted brown acrylic paint. Gently rub it around the rim of the disc, let it sit for a moment, and wipe off the excess so only a stained effect remains. -
Sealing the Artwork:
Protect your drawing by applying a thin layer of matte varnish or UV resin. This is crucial because raw pencil and ink can smudge over time. -
Creating Variations:
Don’t just make faces—try making a few ‘abstract’ companion pieces with random black dots or smudge marks to create a mixed set like the one in the photo. -
Assembly:
Once the sealer is dry/cured, turn the discs over. Apply a drop of strong superglue or jewelry adhesive to the back and attach your earring posts or bail.
Ink Bleed Prevention
Does your ink feather on the clay? Apply a very thin layer of liquid polymer clay or matte varnish BEFORE drawing to create a sealed barrier for crisp lines.
Mix & Match Sets
Create a mismatched earring set: draw a full mouse face on one stud and just a pattern of ‘cheese holes’ or polka dots on the other for a fun look.
Enjoy wearing your charming, hand-sketched mouse accessories that look like tiny pieces of pottery.