
A simple clay sphere is basically the little black dress of the clay world—easy to start, and you can dress it up a hundred different ways. Here are my favorite sphere ideas to help you play with surface texture, carving, add-ons, and a few functional twists.
Chubby Animal Sphere Figurines
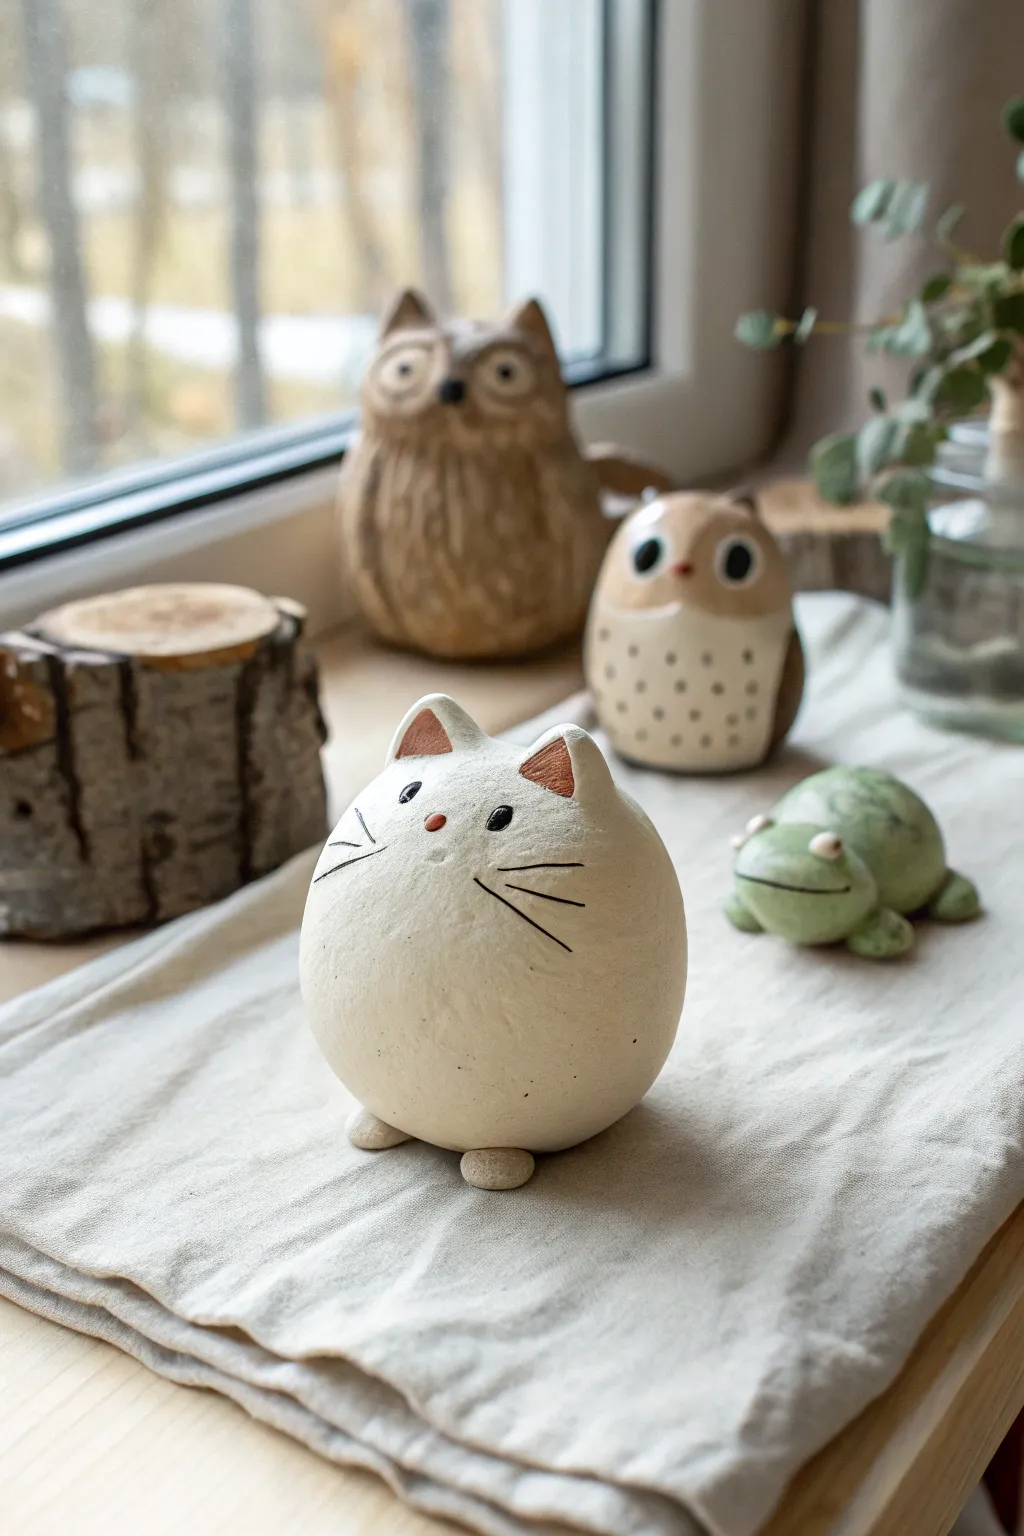
Embrace the charm of simplicity with this wonderfully round and chubby cat figurine. Its smooth, unglazed-style finish and minimal features make it a delightful addition to any windowsill or desk.
How-To Guide
Materials
- White polymer clay or air-dry clay (smooth texture)
- Black acrylic paint or fine-point black marker
- Terracotta/Red-brown acrylic paint
- Small ball tool or toothpick
- Fine detail paintbrush
- Aluminium foil (for the core)
- Smooth work surface
- Sandpaper (fine grit, 400-600)
Step 1: Forming the Body
-
Create the core:
Crumple a piece of aluminium foil into a tight ball, slightly smaller than a tennis ball. This saves clay and helps the sculpture dry or bake evenly without cracking. -
Prepare the clay:
Condition your white clay by kneading it until it is warm and pliable. Roll it into a smooth sheet about 1/4 inch thick. -
Cover the core:
Wrap the clay sheet around your foil ball. Gently massage the seams together until they disappear completely. Roll the ball between your palms to ensure it is perfectly spherical and smooth. -
Shape the standing base:
Tap the bottom of the sphere gently on your work surface to create a small flat spot so the cat doesn’t roll away. -
Add teeny feet:
Roll two very small, pea-sized balls of clay. Flatten them slightly into ovals and attach them to the ‘belly’ area right at the base, spaced slightly apart. Blend the seams at the back of the feet so they look integrated.
Step 2: Adding Features
-
Sculpt the ears:
Form two small triangles of clay. They should be thick but taper to a soft point. Using your thumb, gently press an indentation into the front center of each triangle to create the inner ear curve. -
Attach the ears:
Position the ears on top of the head, spaced widely apart to enhance the chubby look. Score the clay slightly where they join if using air-dry clay, or blend the seams downward with a tool for polymer clay. -
Check for smoothness:
Before baking or drying, run your finger over the entire piece. Use a tiny bit of water (for air-dry) or baby oil (for polymer) to smooth out any fingerprints. -
Cure the clay:
Follow your package instructions to bake or air-dry the figurine. If baking, I recommend tenting it with foil to prevent the white clay from scorching or yellowing. -
Post-cure sanding:
Once fully cooled or dry, use fine-grit sandpaper to gently buff away any remaining bumps, giving it that matte, stone-like texture.
Cracks Appearing?
If air-dry clay cracks while drying, mix a small amount of fresh damp clay with water to make a ‘slip’ paste. Fill the cracks, smooth it over, and let it dry again.
Step 3: Painting the Details
-
Paint the inner ears:
Mix a tiny amount of terracotta paint with water to make a glaze, or use it straight for a bolder look. Paint the triangular indentations inside the ears. -
Add the nose:
Using the back end of a small paintbrush or a dotting tool, place a single, small dot of the terracotta paint right in the center of the face for the nose. -
Dot the eyes:
Dip a ball tool or the handle end of a brush into black acrylic paint. Place two eyes wide apart, aligned slightly above the nose. Keep them small for a cute expression. -
Draw the whiskers:
This step requires a steady hand. Using your finest brush or a fine-point marker, draw three thin lines radiating outward from each cheek area. Start the stroke firmly and lift off quickly to get a tapered end. -
Protect the finish:
If you want to keep the matte, natural look, you can leave it unvarnished. Otherwise, apply a coat of matte artistic varnish to seal the paint without adding shine.
Make a Duo
Create a second, slightly smaller sphere cat to sit alongside this one. Paint its details in a different color, like grey or soft orange, to create a mismatched pair.
Now you have a serene little companion to keep you company on your desk


Minimalist Face Spheres
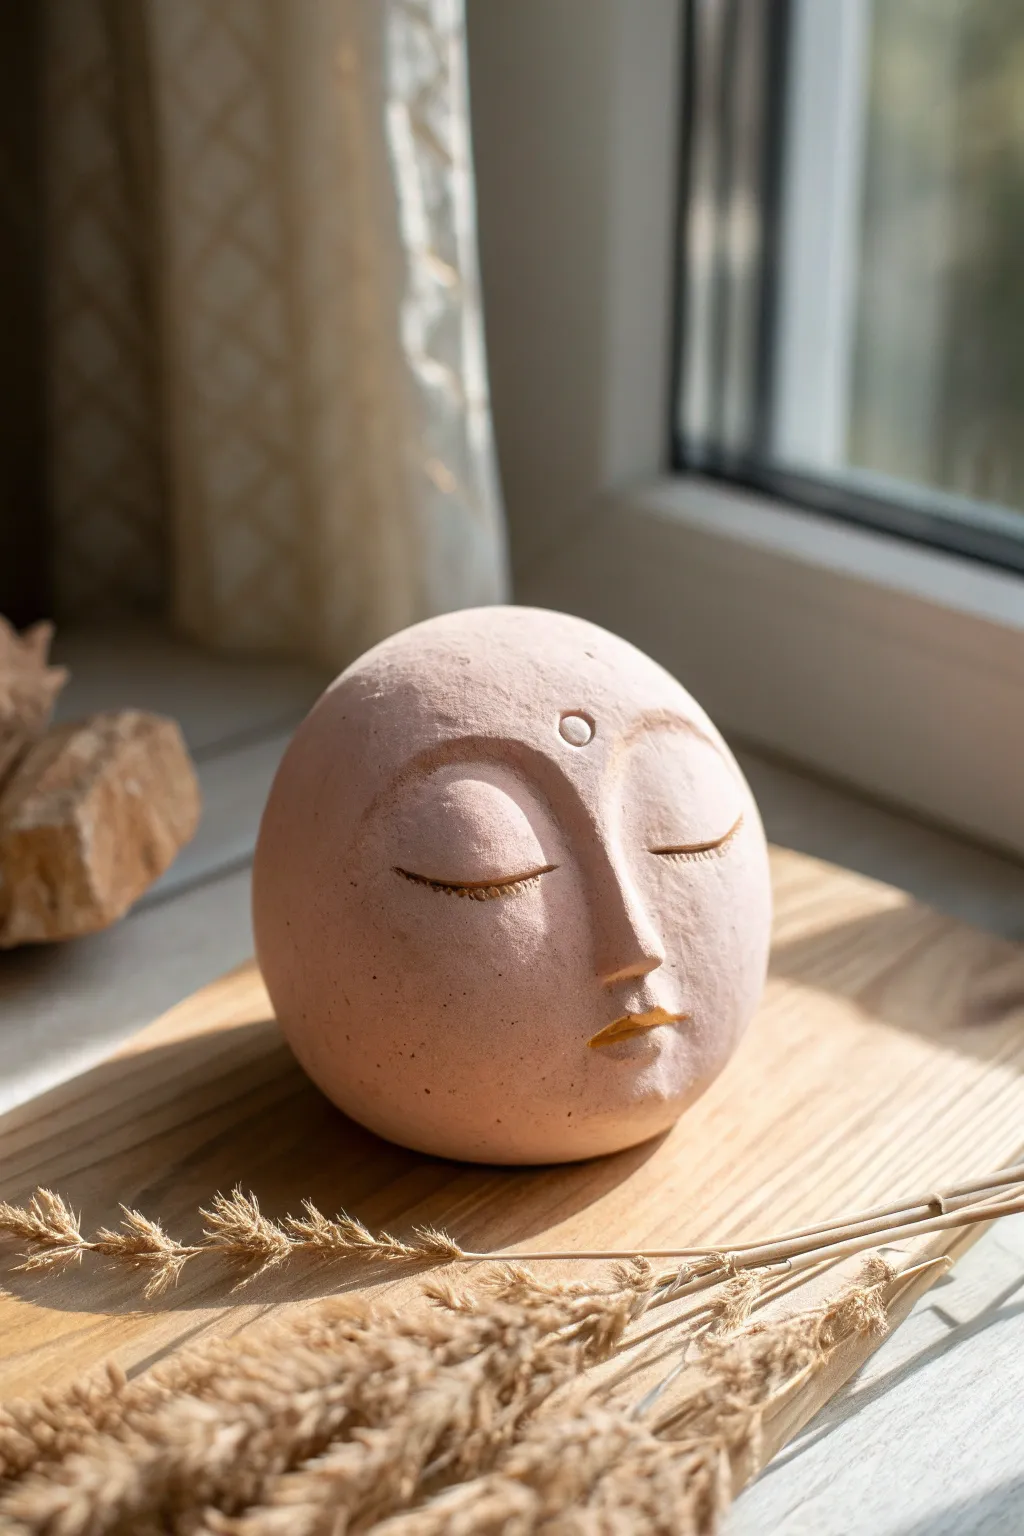
Capture a moment of zen with this minimalist clay sphere, featuring a gentle, sleeping face sculpted in relief. The textured, stone-like finish and soft pink hues give it an organic, ancient artifact feel perfect for calm spaces.
Step-by-Step Guide
Materials
- Air-dry clay (stone or terracotta color preferred)
- Small bowl of water
- Rolling pin
- Needle tool or toothpick
- Loop tool (small)
- Sponge
- Fine-grit sandpaper
- Soft paintbrush
- Matte acrylic paint (blush pink or terracotta)
- Matte varnish or sealant
Step 1: Forming the Base
-
Prepare the Clay:
Start by conditioning a large handful of air-dry clay. Knead it thoroughly until it’s warm and pliable to prevent cracks later on. -
Shape the Sphere:
Roll the clay between your palms to create a smooth, solid ball. It should be roughly the size of a large grapefruit or small cantaloupe. -
Tap the Base:
Gently tap the bottom of the sphere against your work surface. This creates a small flat spot so the head creates a stable rest and won’t roll away. -
Smooth the Surface:
Dip your fingers in a little water and glide them over the sphere to remove fingerprints and minor bumps. I find it helpful to let the sphere firm up for about 30 minutes before sculpting.
Cracks Appearing?
If small cracks appear while drying, mix a tiny bit of clay with water to make a paste (slip). Fill the cracks, smooth over, and let dry again away from drafts.
Step 2: Sculpting the Features
-
Map the Face:
Using your needle tool, very lightly sketch a vertical centerline. Mark the position for the nose bridge and the horizontal line where the eyes will rest. -
Add Material for the Nose:
Roll a small snake of clay and attach it to the center for the nose. Blend the edges seamlessly into the sphere using your thumbs, building up a prominent, straight bridge. -
Define the Brow:
Create the brow bone by pushing clay slightly outward from the center of the forehead, curving down to meet the nose bridge. It should look like a continuous ‘T’ shape. -
Carve the Eye Sockets:
Use your thumbs or a large loop tool to gently press indentations on either side of the nose. This creates the concave space for the eyelids. -
Sculpt the Eyelids:
Roll two flattened, half-moon shapes of clay. Score the back of them and the eye socket area, add a dab of water (slip), and press them into place to form closed, heavy eyelids. -
Detail the Lashes:
With a needle tool or knife, carefully incise a curved line along the bottom of the eyelid to separate the upper and lower lid. Add tiny touches along the lash line for texture. -
Form the Mouth:
Add a tiny amount of clay below the nose for the lips. Press a horizontal line into the center, then gently sculpt the upper lip into a cupid’s bow and round out the bottom lip. -
Add the Forehead Mark:
Roll a tiny ball of clay, flatten it into a small disc, and attach it to the center of the forehead, just above the brow line. Use a tool to press a small circular indentation into its center.
Gilded Touch
For a luxe look, apply gold leaf or gold paint to just the lips and the forehead dot after the main paint has dried.
Step 3: Finishing Touches
-
Refine and Texture:
Go over the entire piece with a damp sponge. Blur any harsh tool marks, but leave a slightly pitted texture to mimic natural stone. -
Drying Time:
Allow the sculpture to dry slowly away from direct heat or sunlight. This usually takes 24-48 hours depending on humidity. Rotate it occasionally for even drying. -
Sand Smooth:
Once bone dry, lightly sand the cheeks and nose to make them smoother than the rest of the ‘stone’ surface. Wipe away dust with a dry brush. -
Apply a Wash:
Water down your pink or terracotta acrylic paint significantly. Brush this wash over the sculpture, letting it settle into the crevices of the eyes and mouth. -
Wipe Back:
Immediately wipe the highest points (nose, forehead, cheeks) with a cloth. This leaves color in the shadows and texture, enhancing the 3D effect. -
Seal (Optional):
If desired, apply a thin coat of matte varnish to protect the surface without adding shine.
Place your finished sculpture near a window to let the changing daylight highlight its peaceful contours


Hedgehog And Porcupine Spike Spheres
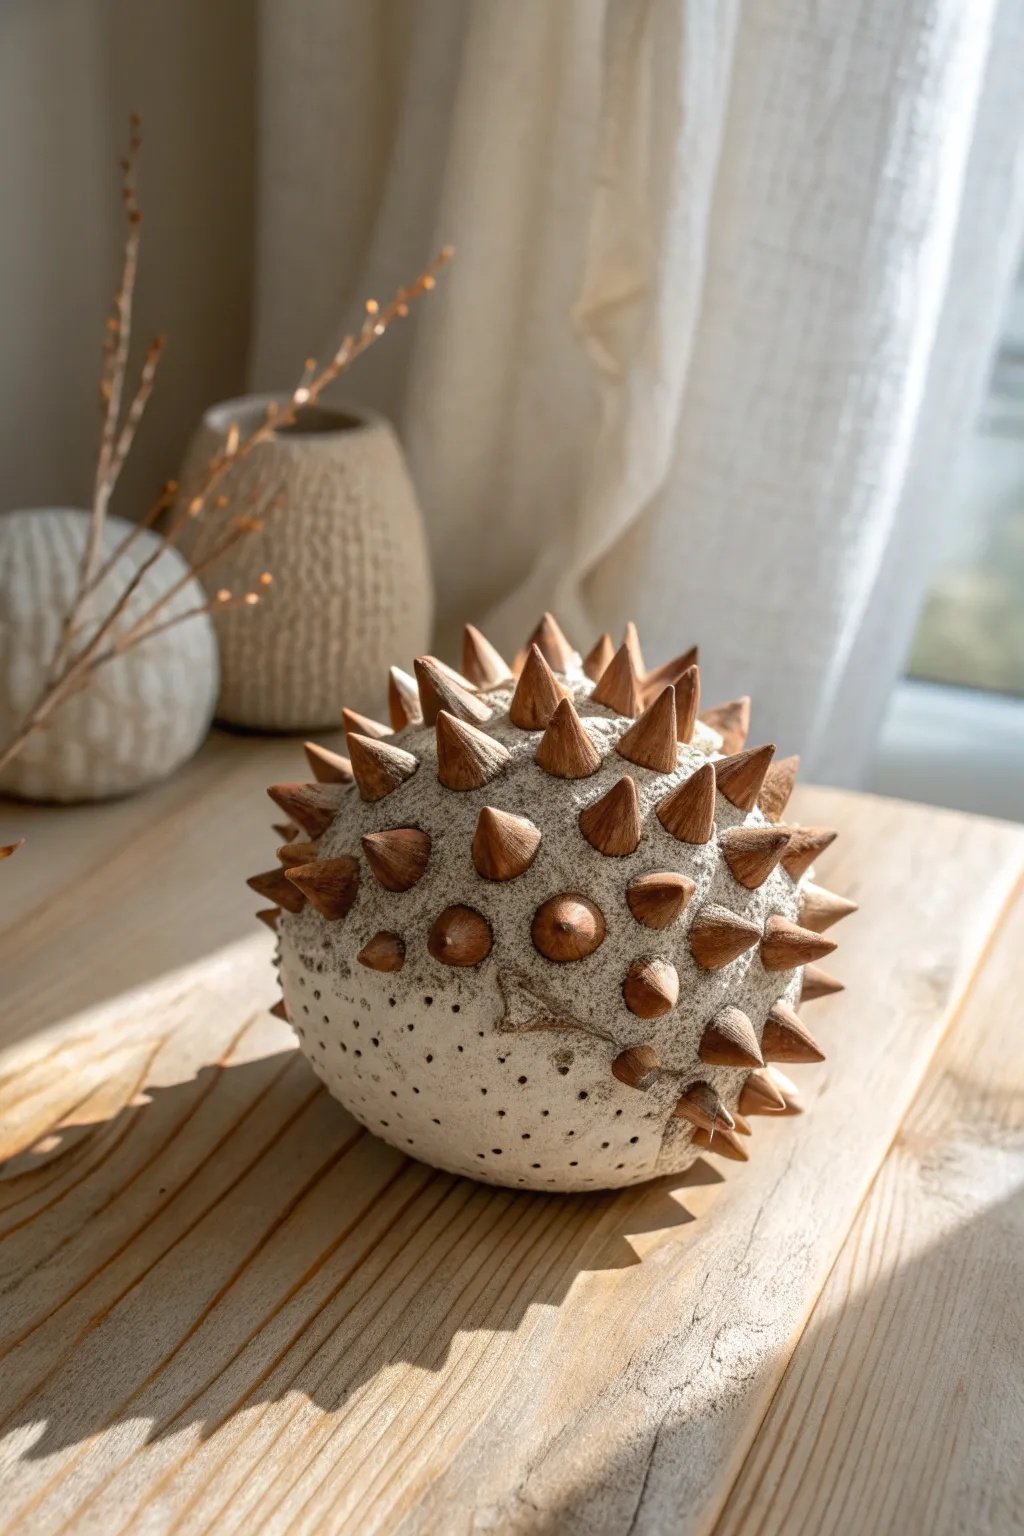
This charming, nature-inspired sculpture blends rough ceramic textures with sharp geometric accents to create a stylized porcupine or hedgehog form. It’s a fantastic project for exploring mixed media or practicing precision clay modeling with an organic twist.
Step-by-Step Tutorial
Materials
- White stoneware clay with grog (for texture)
- Wooden dowels (approx. 1/2 inch diameter) or pre-shaped wooden cones
- Sphere mold or two small bowls (or newspaper for an armature)
- Needle tool
- Sharpening tool (pencil sharpener or knife if using dowels)
- Small drill bit or toothpick
- Wood stain (walnut or oak)
- Acrylic paint (cream or off-white) if not firing clay
- Sponge
Step 1: Forming the Base
-
Prepare the clay:
Begin by wedging your white stoneware clay thoroughly to remove air bubbles. Since this project relies on a rough, sandy texture, a clay body with grog is ideal. -
Create the sphere:
Roll the clay into a solid ball, roughly the size of a grapefruit. If you want a hollow piece (recommended for firing), create two pinch pots and score/slip them together. -
Perfect the shape:
Roll the sphere gently on your work surface to smooth out the seam. Don’t aim for perfect smoothness; the organic, slightly lumpy surface adds to the rustic charm. -
Establish the face:
Decide which side will be the ‘front.’ Use your thumb to gently press a slight indentation or simply leave a smooth, un-textured area near the bottom to represent the animal’s face area.
Wood Spike Shrinkage
Clay shrinks as it dries! If inserting wood into wet clay, the clay will pull away. Make holes slightly larger than needed, and glue the wood in after the clay is fully dry.
Step 2: Creating the Spikes
-
Option A: Clay Spikes:
If you want an all-clay piece, roll small coils of clay and pinch one end into a sharp point. Make about 40-50 of these cones. -
Option B: Wooden Spikes (As Pictured):
For the mixed-media look shown, cut a wooden dowel into 1-inch segments. Use a pencil sharpener or whittling knife to taper one end of each segment into a sharp cone. -
Stain the wood:
If using wood, dip the sharpened cones into a walnut or dark oak wood stain. Wipe off excess and let them dry completely before attaching to the clay.
Cracks Around Spikes?
If using clay spikes and you see hairline cracks at the join, use a paintbrush to apply a slurry of vinegar and clay slip to fill the gaps while still green.
Step 3: Texturing and Assembly
-
Mark the spike placement:
Using a needle tool, lightly mark a grid or spiral pattern on the top two-thirds of the sphere where the spikes will go. -
Create insertion points:
Press a tool roughly the same diameter as your spikes into the clay at your marked points to create sockets. -
Secure the spikes:
If using clay spikes, score and slip them into the sockets. If using wood, insert them firmly into the soft clay. I like to twist them slightly as I push them in to ensure a tight fit. -
Add surface texture:
Take a rough sponge or a crumpled ball of foil and dab the clay surface between the spikes. This mimics the sandy, gritty texture seen in the photo. -
Detail the unevenness:
Intentionally leave rough patches or small clumps of clay around the base of the spikes to make them look naturally embedded rather than glued on.
Step 4: Finishing Touches
-
Create the belly pattern:
On the smooth bottom third of the sphere (under the spike line), use a small drill bit or a toothpick to poke a random pattern of small holes. -
Vary hole depth:
Make some holes slightly deeper and larger than others to create visual interest in the dotted pattern. -
Clean the face:
Smooth the ‘face’ area one last time with a slightly damp finger to contrast against the rougher texture of the body. -
Drying:
Let the piece dry slowly under plastic for at least 24 hours to prevent cracking, especially around the insertion points. -
Firing or Painting:
If using kiln-fire clay, remove wooden spikes before firing and glue them back in after. If using air-dry clay, simply let it fully cure. -
Final wash:
If the clay body isn’t textured enough, apply a light wash of sandy beige acrylic paint and dab it with a paper towel for that weathered stone look.
Place your finished piece near a window where the sunlight can cast dramatic shadows through the spikes


Planet And Moon Clay Spheres
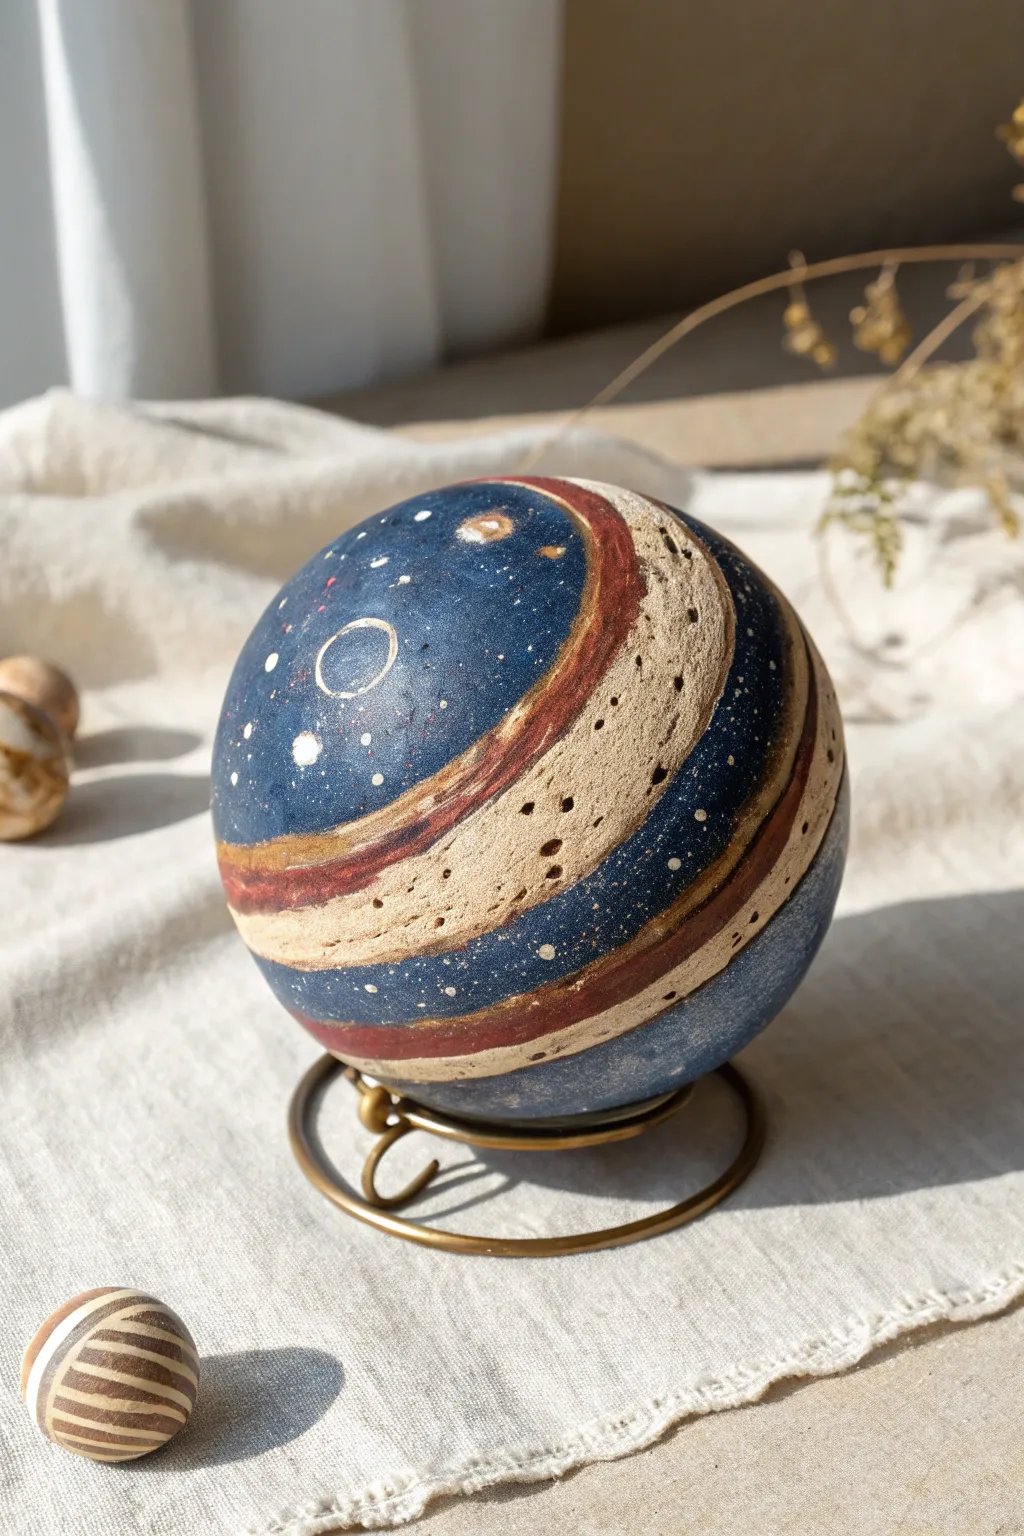
This striking clay sphere captures the beauty of a gas giant with its swirling bands of deep blue, beige, and oxidized red. Resting on a simple brass stand, the textured finish and speckled stars give it an ancient, cosmic artifact feel.
Detailed Instructions
Materials
- Air-dry clay or polymer clay (white or beige base)
- Acrylic paints (Navy blue, raw sienna/rust, cream, gold)
- Matte mod podge or matte varnish sealant
- Paintbrushes (Flat shader, small round, and an old toothbrush)
- Small bowl of water
- Sandpaper (fine grit)
- Brass or gold wire (12-14 gauge for the stand)
- Needle nose pliers
- Small sponge or stippling brush
Step 1: Forming the Base
-
Shape the sphere:
Start by conditioning your clay until it is pliable and smooth. Roll it between your palms to create a sphere about the size of a large orange. Take your time to smooth out any major lumps or creases. -
Add texture:
Instead of smoothing it perfectly, gently tap the surface with a rough sponge or a crumpled ball of aluminum foil. This slight pitting mimics the rocky or gaseous surface shown in the photo. -
Dry the clay:
Allow the clay to dry completely according to package instructions. For air-dry clay, this might take 24-48 hours. Rotate it occasionally so the bottom dries evenly. -
Light sanding:
Once hardened, give the sphere a very light sanding to knock down any sharp peaks from the texturing process, but keep the overall rough surface intact.
Uneven Paint Coverage?
If the clay texture makes it hard to get clean lines, don’t fight it. Let the paint naturally skip over the pitted surface to enhance the antique, weathered look of the planet.
Step 2: Painting the Atmosphere
-
Map out the bands:
Using a pencil, lightly sketch curved, diagonal lines around the sphere to define where the colored bands will go. These don’t need to be perfect circles; wobbly lines look more organic. -
Apply the beige bands:
Paint the thickest central bands with a cream or sandy beige acrylic paint. Dab the paint on rather than stroking it to enhance the texture of the clay. -
Add the deep blue:
Fill in the large polar areas and thin separating stripes with a rich navy blue. Use two coats if necessary to get an opaque, deep space color. -
Create the red dividers:
Paint thin ribbons of raw sienna or rust red bordering the beige bands. Blend the edges slightly into the beige while the paint is still wet for a weathered transition. -
Add dimension:
Mix a tiny bit of darker brown with water to create a wash. Lightly brush this over the beige areas and immediately wipe it back with a paper towel. This settles into the clay’s pores, creating depth.
Step 3: Cosmic Details
-
Spatter the stars:
Dilute a small amount of white paint with water. Dip an old toothbrush into the mixture, aim it at the blue sections, and run your thumb across the bristles to flick tiny speckles onto the surface. -
Paint larger stars:
Use a fine-point detail brush to add a few larger, deliberate white dots. You can also paint a simple open circle, like the one visible in the reference, to represent a crater or moon. -
Gold accents:
For a subtle shimmer, dry brush a tiny amount of gold paint along the edges where the red and blue meet. This catches the light beautifully. -
Seal the planet:
Once all paint is bone dry, coat the entire sphere with a matte varnish or Mod Podge. This protects the paint and unifies the finish.
Level Up: crater Effect
Before drying, use tools like straw ends or different sized pen caps to gently press distinct crater rings into the clay surface for added topography.
Step 4: Creating the Stand
-
Form the base ring:
Take your heavy-gauge brass wire and wrap it around a small cylinder (like a spice jar) to form a circle slightly smaller than your sphere. -
Create the support legs:
Bend the wire intended for the legs downwards and form three small loops or feet using your needle-nose pliers. I find it helpful to make the feet wide to ensure stability. -
Final assembly:
Adjust the wire loops until the stand sits flat on a table without wobbling. Place your painted planet gently into the wire cradle.
Display your new celestial body on a desk or shelf to add a touch of galactic wonder to your room

The Complete Guide to Pottery Troubleshooting
Uncover the most common ceramic mistakes—from cracking clay to failed glazes—and learn how to fix them fast.
Classic Hanging Ornament Spheres
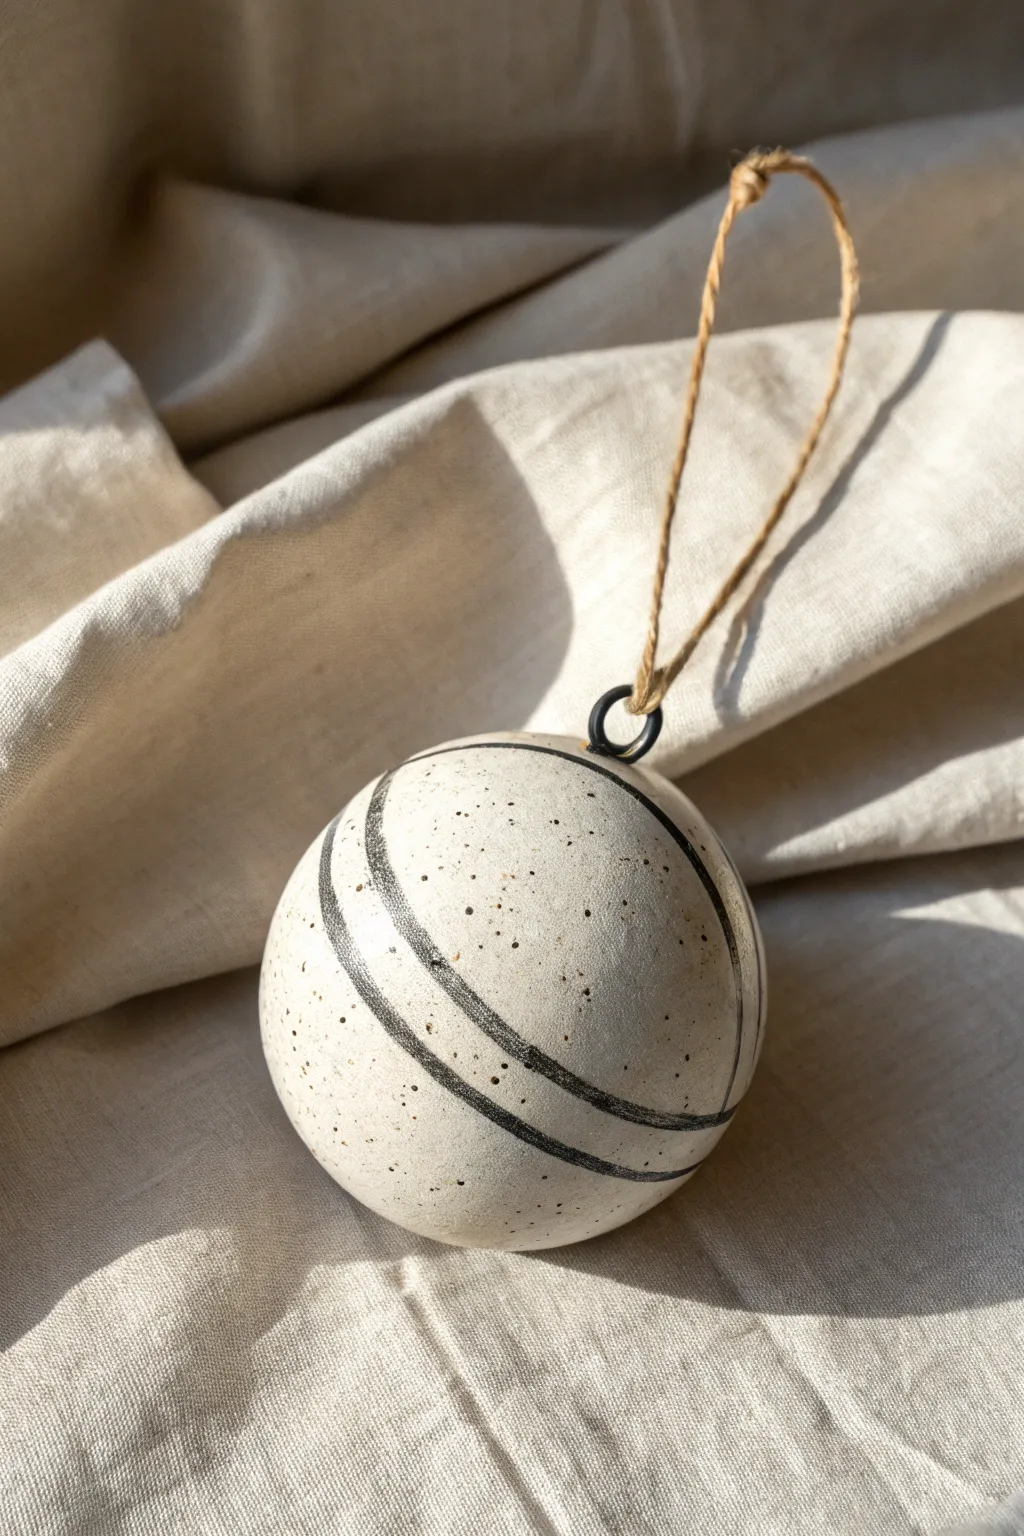
This project transforms simple clay into a sophisticated, modern ornament featuring organic speckling and clean geometric lines. The contrast between the raw, speckled finish and the dark, graphic stripes creates a timeless holiday decoration that feels both rustic and refined.
Step-by-Step Tutorial
Materials
- Speckled stoneware clay (white or cream)
- Hollow sphere mold (plaster or plastic) or two pinch pots
- Slip and scoring tool
- Rubber kidney tool or damp sponge
- Black underglaze
- Fine liner paintbrush
- Potter’s wheel or banding wheel
- High-temperature wire (nichrome)
- Clear matte glaze (optional)
- Jute twine
Step 1: Forming the Sphere
-
Prepare the Clay:
Start with a speckled stoneware clay body. Wedge the clay thoroughly to remove air bubbles and ensure the speckles are evenly distributed, which is crucial for achieving that textured stone look later. -
Create Halves:
If using a mold, press slabs of clay into two half-sphere molds. If hand-building, create two equal-sized pinch pots. Aim for a wall thickness of about a quarter-inch to ensure the ornament isn’t too heavy. -
Score and Slip:
Score the rim of both hemispheres aggressively with a needle tool or serrated rib. Apply a generous amount of clay slip to the scored areas to act as glue. -
Join and Seal:
Press the two halves together firmly. Use a wooden modeling tool or your thumb to drag clay across the seam, knitting the two pieces together until the join is completely invisible. -
Smooth the Surface:
Gently paddle the sphere to correct its shape if it became slightly oval during joining. Use a flexible metal rib or rubber kidney to smooth the surface, erasing any finger marks or tool lines. -
Make the Air Hole:
Using a needle tool, poke a small, discreet hole in the sphere. This is essential to prevent the trapped air from expanding and cracking the piece during firing.
Spin Control
Rest your painting hand on a steady object (like a stack of books) next to the banding wheel. This stabilizes your hand so the rotating wheel does all the work for perfect lines.
Step 2: Adding Hardware & Decoration
-
Insert the Wire Loop:
Fashion a small U-shape from high-temperature nichrome wire. Insert the legs of the ‘U’ into the top of the humid clay sphere, leaving just the loop exposed. Ensure the clay hugs the wire tightly so it stays secure after firing. -
Dry to Leather Hard:
Allow the sphere to dry slowly until it reaches a leather-hard state. It should be firm to the touch but still contain moisture. -
Center the Piece:
Place your sphere on a banding wheel. I find it helpful to use a small clay chuck or a jar ring to hold the round object steady while it spins. -
Load the Brush:
Dip a fine liner brush into black underglaze. The consistency should be like heavy cream—thick enough to be opaque but thin enough to flow smoothly off the brush. -
Paint the Stripes:
Spin the banding wheel with one hand while holding the brush steady against the surface with the other. Let the rotation of the wheel create the straight lines. Create two distinct groupings of parallel lines, varying the spacing slightly for visual interest. -
Refine the Lines:
If the lines look too perfect, that’s fine, but the charm of this piece is a slight hand-drawn quality. Don’t worry if the thickness varies microscopically as the sphere rotates. -
Clean Up:
Use a damp sponge to wipe away any unintentional smudges on the white clay, keeping the background pristine to let the speckles shine.
Geometry Play
Instead of horizontal stripes, try vertical meridians or intersecting grid lines. Varying the line weights or switching to navy blue underglaze can dramatically change the vibe.
Step 3: Firing and Finishing
-
Bisque Fire:
Once fully bone dry, bisque fire the ornament in a kiln according to your clay body’s specifications (usually Cone 04). -
Glazing Decision:
For the matte, stone-like finish shown in the photo, you can leave the exterior unglazed or apply a very thin coat of matte clear glaze. If leaving raw, you can sand it lightly with high-grit sandpaper after firing for a smoother touch. -
Final Fire:
Fire the piece a second time to the maturation temperature of your clay (typically Cone 5 or 6 for stoneware). This brings out the natural iron speckles in the clay body. -
Stringing:
Cut a 12-inch length of natural jute twine. Thread it through the metal loop and tie a secure knot at the end to create the hanger.
Hang your new sphere on a branch or in a window to enjoy the modern simplicity of your handcrafted ceramic art
Pierced Tea Light Sphere Lantern
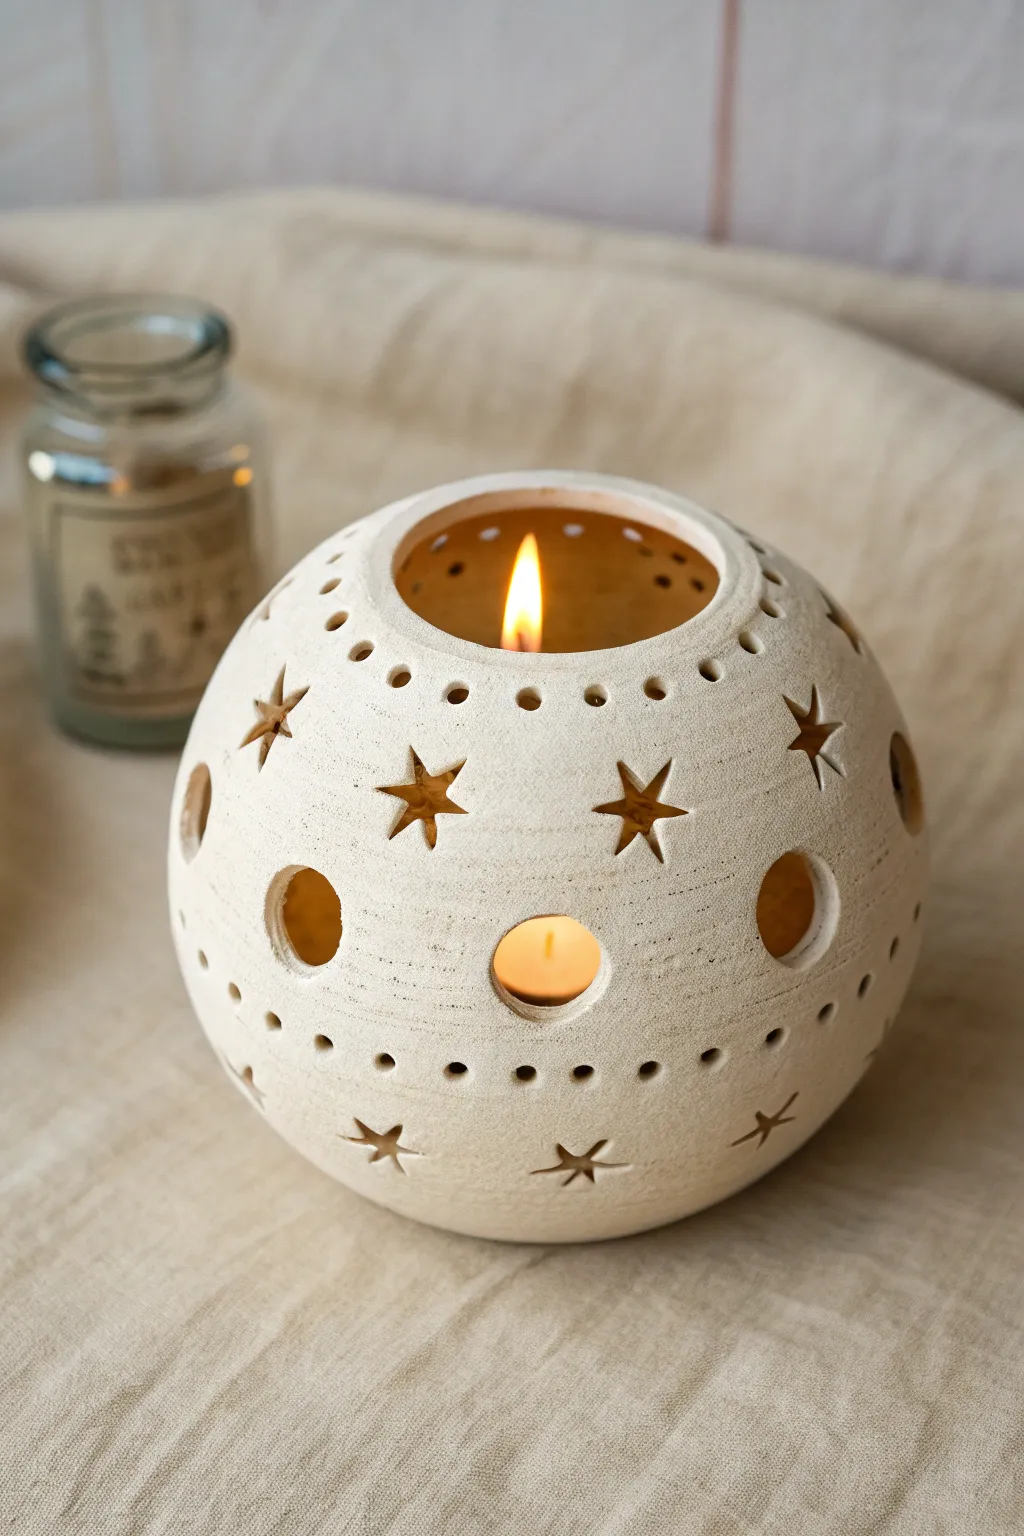
This charming clay sphere lantern brings a celestial glow to any corner with its delicate balance of cut-out stars and circles. The textured white clay and simple geometric patterns create a warm, artisanal piece perfect for holding a flickering tea light.
How-To Guide
Materials
- White earthenware or stoneware clay (grogged for texture)
- Two pinch pottery bowls (roughly same size)
- Scoring tool or serrated kidney
- Slip (clay and water mixture)
- Wooden paddle
- Circle cutters (various sizes)
- Star cutters (small and medium)
- Needle tool
- Sponge
- Sandpaper or green scrubby
- Tea light candle
Step 1: Forming the Sphere Base
-
Create two pinch pots:
Start by taking two equal balls of white clay. Press your thumb into the center of one ball and pinch the walls evenly as you rotate the clay, creating a hemispherical bowl shape. Repeat this process with the second ball to make a matching half. -
Score the edges:
Use a serrated tool or a fork to scratch up the rim of both pinch pots. This rough texture is crucial for a strong join. -
Apply slip and join:
Apply a generous amount of slip to the scored edges. Press the two halves together firmly, ensuring the rims align perfectly to enclose a pocket of air. -
Seal the seam:
Smear clay across the seam line, dragging clay from one side to the other until the join is completely invisible. I like to use a small wooden rib here to smooth out the transition. -
Paddle into shape:
Gently tap the joined form with a wooden paddle while rotating it. The trapped air inside acts like a balloon, providing resistance that helps you achieve a perfect spherical shape without collapsing the walls.
Don’t Collapse the Dome
If the sphere starts to dent while cutting, let the clay stiffen to a ‘leather hard’ state before continuing. Soft clay buckles easily under pressure.
Step 2: Carving and Piercing
-
Cut the top opening:
Decide which side of your sphere sits most stably. On the opposite side (the top), use a large circle cutter or a needle tool to cut a hole wide enough to easily insert a tea light—about 2-3 inches in diameter. -
Smooth the rim:
Use a damp sponge or your finger to round off the sharp edge of the top opening. This gives the piece a professional, finished look. -
Plan your pattern:
Lightly sketch spacing lines with a needle tool if you want precise symmetry, but a freehand approach adds organic charm. The design features alternating bands of pierce-work. -
Pierce the upper band:
Near the top rim, use a small drill bit or a tiny hole punch tool to create a ring of small dots. Keep them evenly spaced for a delicate collar effect. -
Cut the stars:
In the middle section of the sphere, use a small star-shaped clay cutter to punch out star shapes. Press the cutter gently but firmly through the wall, supporting the clay from the inside with a finger if you can reach, or just working carefully. -
Add large circles:
Interspersed or slightly below the stars, use a medium-sized circle cutter to pop out larger round holes. Save these clay dots for recycling. -
Create the lower band:
Mirror the top design by adding another band of small dots and perhaps a final row of stars near the base of the sphere. -
Refine the cutouts:
Once the clay has stiffened to leather hard, go back with a small tool or brush to clean up any clay crumbs or ragged edges inside the cutout shapes.
Clean Cuts Pro Tip
Wrap a piece of thin plastic wrap over the clay before pressing your cutters into it. This softens the edges of the cut and prevents little clay crumbs.
Step 3: Finishing Touches
-
Dry slowly:
Place the sphere under a loose sheet of plastic to dry slowly. This prevents the sphere from cracking due to uneven shrinkage, especially around the delicate cutouts. -
Bisque fire:
Once bone dry, fire the piece to bisque temperature (usually cone 04/06) in a kiln. -
Sand for texture:
Since the example image shows a raw, matte finish, you may choose not to glaze. Instead, lightly sand the bisque-fired piece with fine-grit sandpaper to achieve a smooth, stone-like texture. -
Final wipe down:
Wipe the sphere with a damp sponge to remove any sanding dust. -
Add light:
Place a tea light inside, dim the lights, and enjoy the starry projection.
Enjoy the cozy ambiance created by your handcrafted celestial luminary


What Really Happens Inside the Kiln
Learn how time and temperature work together inside the kiln to transform clay into durable ceramic.
Rattle Sphere With Hidden Sound
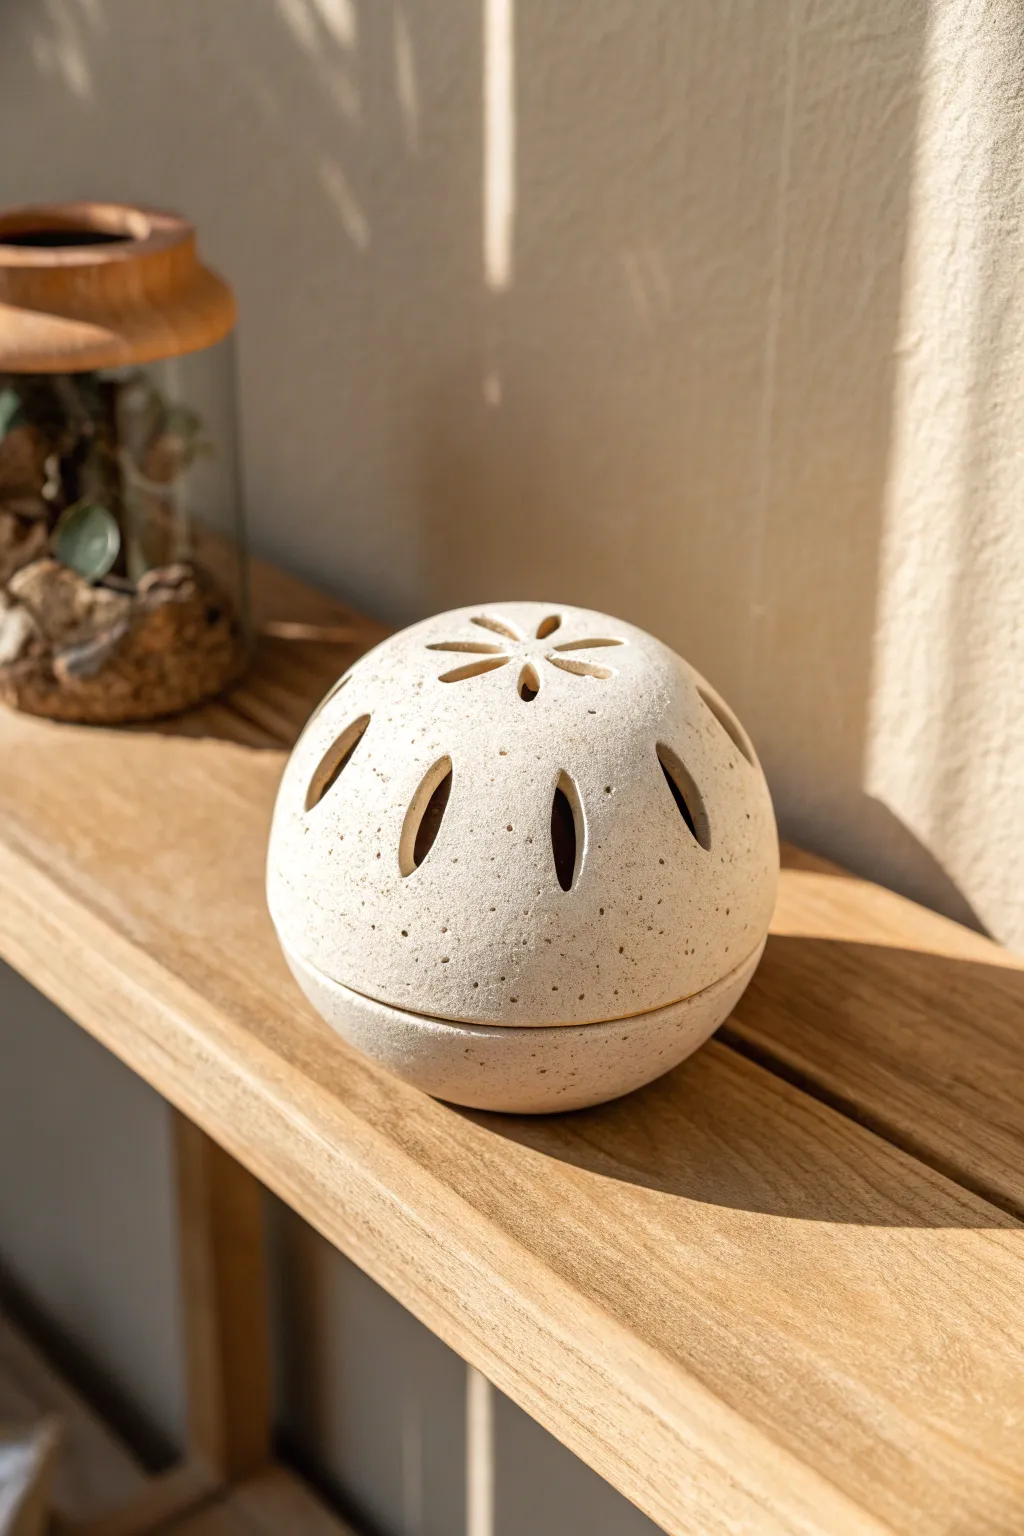
Create a soothing sensory object with this speckled clay rattle, featuring delicate cut-outs that allow sound to escape. The natural, stone-like texture and floral motifs make it a beautiful sculptural piece for any shelf.
Step-by-Step Guide
Materials
- Speckled buff stoneware clay (or polymer clay with granite effect)
- Spherical mold (styrofoam ball or plastic hollow sphere)
- Needle tool
- Small teardrop cutter (optional)
- Sponge
- Small clay beads or dried beans (for the rattle)
- Slip and scoring tool
- Modeling tool or smooth rib
- Plastic wrap
Step 1: Forming the Sphere Base
-
Roll out the clay:
Begin by rolling your speckled clay into a slab approximately 1/4 inch thick. You want it sturdy enough to hold its shape but thin enough to not be heavy. -
Prepare the mold:
Cover your spherical mold (like a Styrofoam ball) with plastic wrap to prevent sticking. -
Create two hemispheres:
Drape the clay slab over one half of the sphere mold, gently smoothing it down to conform to the shape. Trim the excess clay at the equator line. Repeat this to make a second matching hemisphere. -
Stiffen the clay:
Let the two clay halves sit on the molds until they are leather-hard. They need to be firm enough to handle without warping. -
Prepare the rattle elements:
While the shells dry, roll small balls of clay about the size of peas. If you are firing in a kiln, wrap these loosely in a small scrap of newspaper so they don’t fuse to the inside wall during firing.
Clean Cuts Every Time
Wait until the clay is firmly leather-hard before carving. If it’s too soft, the knife will drag and warp the intricate petal shapes.
Step 2: Carving and Assembly
-
Mark the design:
On the top hemisphere, lightly sketch your floral pattern with a needle tool. Mark a center point, then radiate six lines outward for the petals. -
Carve the top flower:
Using a sharp knife or loop tool, carefully cut out the petal shapes. Clean up the edges with a slightly damp brush to smooth any burrs. -
Carve the side details:
Around the curve of the top hemisphere, carve teardrop shapes pointed upward. Keep the spacing consistent for a balanced look. -
Insert the rattle sound:
Place your dried clay beads (or newspaper-wrapped clay balls) inside the bottom hemisphere. -
Score the edges:
Rough up the rim of both hemispheres using a scoring tool or fork. -
Apply slip:
Dab a generous amount of clay slip (liquid clay) onto the scored edges to act as glue. -
Join the halves:
Press the two hemispheres together firmly. Ensure the seam is tight. -
Smooth the seam:
I like to use a small coil of soft clay along the seam line, blending it upward and downward until the join is invisible. The sphere should look like one continuous piece. -
Refine the surface:
Use a finishing sponge to gently wipe down the entire sphere, exposing the grog or speckles in the clay body and softening the cut-out edges.
Step 3: Finishing Touches
-
Final drying:
Let the sphere dry slowly under loose plastic for a day to equalize moisture, then uncover it to dry completely. -
Bisque fire:
Fire the piece to bisque temperature (usually cone 04/06). -
Sanding (Optional):
Depending on your clay, you might want to lightly sand the bottom for stability. -
Final firing:
Fire correctly to maturity for your specific clay body. Do not glaze the inside to ensure the rattle sound remains crisp.
No Rattle Sound?
If using glaze, be extremely careful not to let drips enter the holes. Glaze can glue the internal beads to the wall, silencing the rattle mechanism.
Enjoy the gentle sound and organic beauty of your new handmade clay sphere
Textured Sphere Paperweights
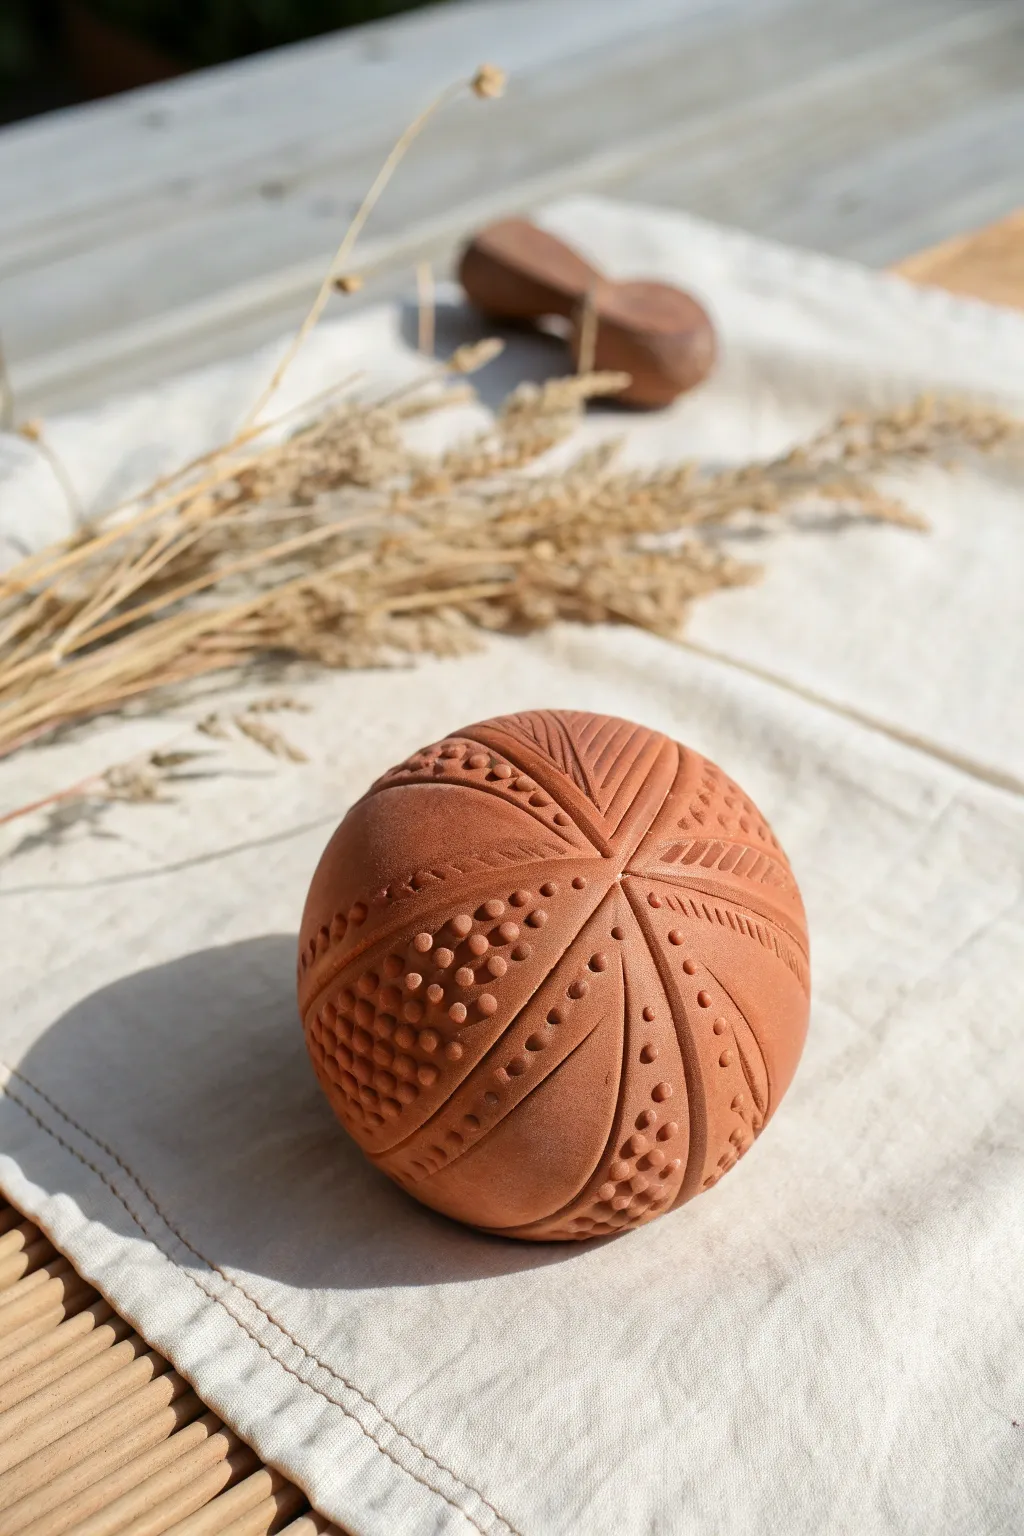
This project transforms a simple lump of red clay into a sophisticated, highly textural paperweight that begs to be touched. By combining deep carving lines with meticulous stippled dots, you achieve a geometric yet organic look reminiscent of sea urchins or seed pods.
Step-by-Step Tutorial
Materials
- Terracotta air-dry clay or kiln-fire clay
- Small rolling pin
- Needle tool or sharp carving point
- Small ball stylus tool (various sizes)
- Ribbon tool (narrow loop)
- Small bowl of water
- Soft sponge
- Canvas or cloth mat (for rolling)
Step 1: Forming the Base
-
Condition the clay:
Start by wedging your terracotta clay thoroughly to remove air bubbles. This is crucial for a sphere, as trapped air can cause cracks or explosions in a kiln. -
Shape the sphere:
Roll the clay between your palms or on your work surface to create a smooth, perfect ball. It should be roughly the size of a tennis ball or slightly larger. -
Refine the surface:
Use a slightly damp sponge to smooth out any fingerprints or uneven spots. Roll it gently on your canvas mat to ensure it stays perfectly round. -
Mark the center:
Gently press a needle tool into the very top center of the sphere. This tiny dot will be your guide for all radial lines.
Cracking Up?
If small cracks appear while drying, smooth a paste of vinegar and scrap clay (vinegar slip) into the fissures to seal them effectively.
Step 2: Carving the Framework
-
Plan the sections:
Visualize the sphere divided into segments, like an orange. Using the needle tool very lightly, sketch curved lines radiating from your top center point down the sides. -
Carve primary lines:
Take your ribbon tool or a sharp carving tool and slowly carve out the lines you just sketched. Make these grooves distinct and deep enough to separate the sections. -
Add secondary details:
Within some of the sections, carve thinner, parallel lines or angled hatching marks. Leave other sections blank for now, as these will be filled with dots. -
Smooth the grooves:
Run a damp finger or a small, wet paintbrush along the carved grooves to soften any sharp, crumbly edges left by the tool.
Burnished Finish
Before drying, rub the smooth (non-textured) sections with the back of a spoon to burnish them. This creates a beautiful natural shine after firing.
Step 3: Texturing with Dots
-
Prepare the slip:
Mix a tiny amount of your clay with water to create a thick paste (slip). You’ll need this to adhere the added texture if your clay is getting dry. -
Roll tiny balls:
I find it meditative to pinch off minuscule bits of clay and roll them into tiny spheres. You will need dozens of these, varying slightly in size. -
Apply the dots:
Score the surface of a blank section lightly. Dab a tiny bit of slip (or water) on the area, then press your tiny clay balls onto the surface. -
Create indentations:
Instead of adding clay, you can also create texture by pressing inward. Use your ball stylus to push rows of dots directly into the clay surface alongside your raised dots. -
Filling the fields:
Continue filling alternating sections with these raised bumps or pressed indents. Densely packed textures tend to look best for this style.
Step 4: Finishing Touches
-
Clean up:
Check the sphere from all angles. Use your sponge to gently wipe away any clay crumbs or sharp burrs created during the texturing process. -
Sign the bottom:
Flip the sphere gently and add your initials to the base. You might want to flatten the bottom just a hair so it doesn’t roll away easily. -
Drying:
Place the sphere on a drying rack. Rotate it occasionally over the next few days to ensure even drying, which helps prevent cracking. -
Final processing:
If using air-dry clay, allow it to cure completely before sealing with a matte varnish. If using firing clay, fire it to the recommended cone for terracotta.
Now you have a stunning, heavy piece of décor that brings an earthy warmth to any desk or shelf

TRACK YOUR CERAMIC JOURNEY
Capture glaze tests, firing details, and creative progress—all in one simple printable. Make your projects easier to repeat and improve.
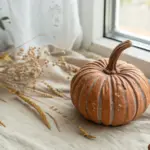
Sphere Bud Vase With Tiny Neck
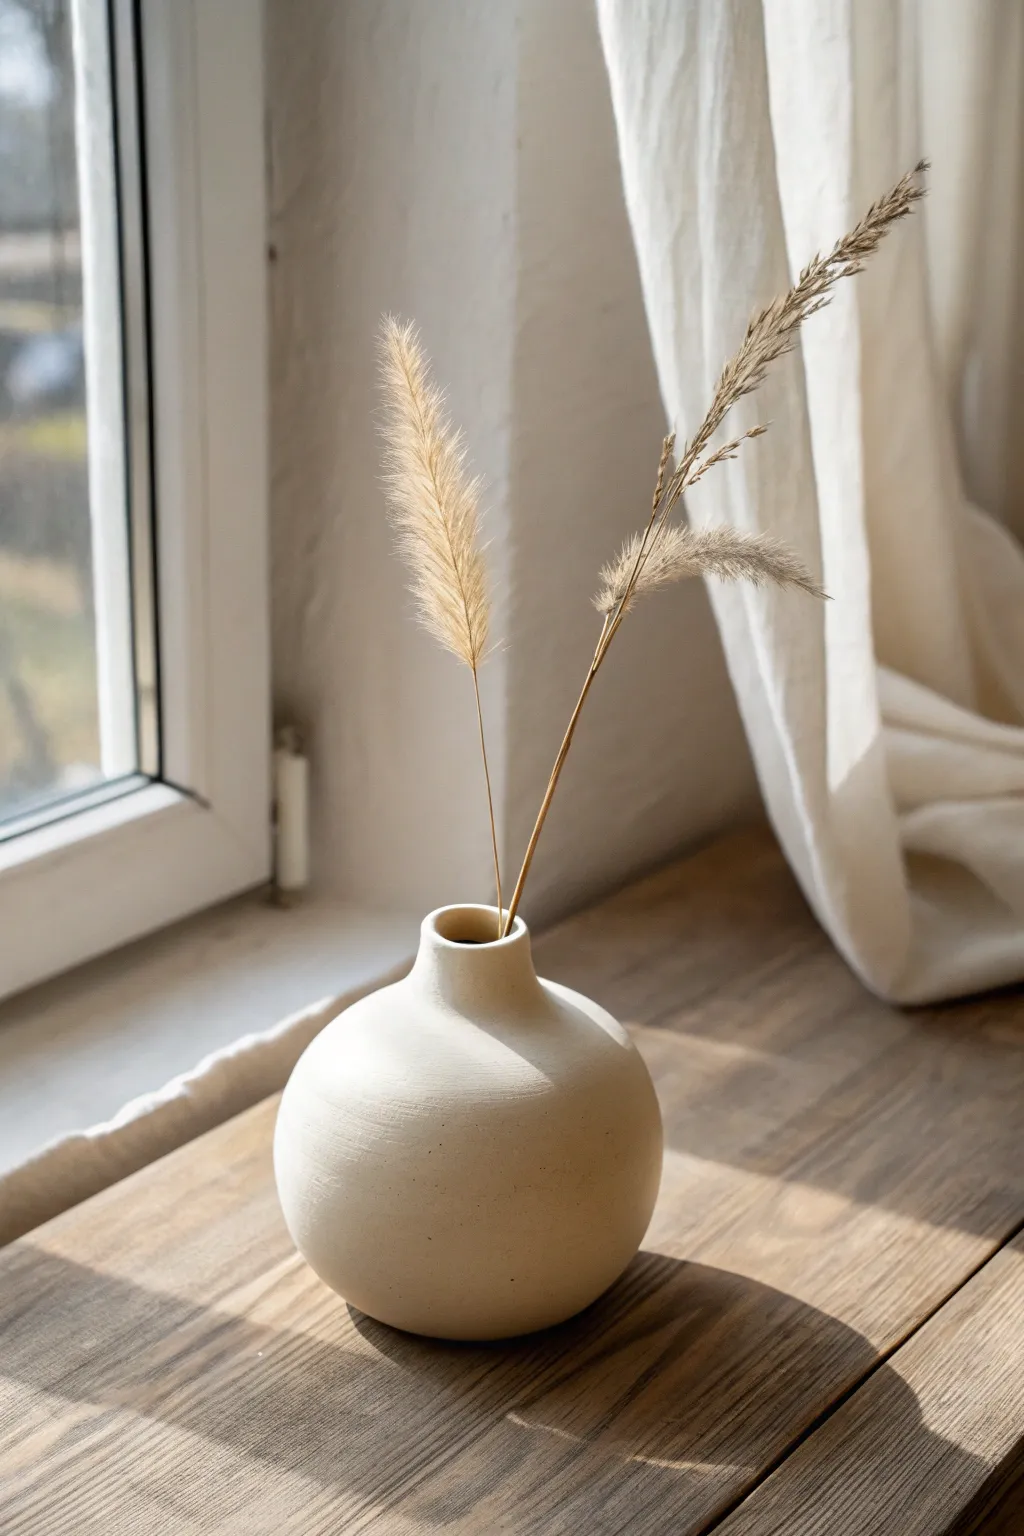
Embrace simplicity with this understated spherical bud vase, featuring a creamy matte finish and a delicate narrow neck perfect for displaying dried grasses. This project relies on pinch pot techniques to create a hollow, lightweight form that looks stunning on a sunny windowsill.
Detailed Instructions
Materials
- White stoneware or porcelain clay body (approx. 1 lb)
- Pottery sponge
- Pin tool or needle tool
- Flexible metal rib
- Wooden modeling tool or spoon
- Serrated rib or scoring tool
- Clay slip
- Soft paintbrush
- Matte white or transparent glaze (optional)
Step 1: Forming the Sphere
-
Prepare the Clay:
Start by wedging your clay thoroughly to remove air bubbles. Divide the clay into two equal balls, roughly the size of a tennis ball each. Pat them into nice, round shapes. -
Open the Pinch Pots:
Hold one ball in your non-dominant hand. Press your thumb into the center, stopping about a quarter-inch from the bottom. Gently pinch and rotate the clay to open it into a bowl shape, aiming for even wall thickness throughout. -
Refine the Halves:
Repeat with the second ball of clay. You should now have two identical bowl shapes. Use your thumb to smooth the interiors so they are uniform. -
Score and Slip:
Take a serrated rib or needle tool and score (scratch) the rims of both bowls vigorously. Apply a generous amount of clay slip to the scored areas. -
Join the Halves:
Press the two rims together firmly to form a hollow sphere. Wiggle them slightly to lock the clay particles together. Don’t worry about the seam looking messy right now; the most important part is a tight seal.
Step 2: Shaping and Smoothing
-
Seal the Seam:
Using your thumb or a wooden tool, drag clay across the seam line from one hemisphere to the other to knit the halves together. Do this all the way around until the line disappears. -
Compress and Round:
Gently paddle the sphere with a wooden spoon or a flat paddle to correct any lumpy areas and improve the roundness. In the trapped air pocket inside, the air pressure will help the sphere hold its shape while you work. -
Smooth the Surface:
Take your flexible metal rib. Bend it slightly and scrape it across the surface of the sphere while rotating it. This removes high spots and refines the curve. -
Create the Base:
Decide which side of the sphere looks best as the top. Gently tap the opposite side on your table to create a small flat spot so the vase won’t roll away.
Trapped Air Warning
When making hollow spheres, trapped air expands in the kiln and can cause explosions! Once the clay is stiff (leather hard), poke a tiny needle hole in the base to let air escape during firing.
Step 3: Adding the Neck
-
Open the Top:
Using a needle tool, cut a small circular hole (about the size of a dime) at the very top of your sphere. Remove the plug of clay. -
Make a Coil:
Roll a small, thick coil of clay, roughly the thickness of your pinky finger. Form it into a ring that matches the size of the hole you just cut. -
Attach the Coil:
Score and slip both the rim of the hole and the bottom of your coil ring. Place the ring on top of the hole. -
Blend the Neck:
Use a modeling tool to blend the clay from the coil downward onto the sphere’s body. I like to do the outside first, then carefully use a narrow tool to smooth the inside seam. -
Refine the Lip:
Pinch the coil gently upward to create the short neck. Use a damp sponge to smooth the rim, ensuring it is level and delicate. -
Final Surface Polish:
Once the clay is leather-hard, sponge the entire piece smooth. If you want that stone-like texture from the photo, you can gently dab the surface with the rough side of a scouring pad.
Level Up: Texture
Before the clay dries, gently press dried linen or canvas into the surface. The subtle fabric weave leaves an organic impression that catches the glaze beautifully.
Step 4: Finishing
-
Bisque Fire:
Allow the piece to dry slowly under plastic for a few days to prevent cracking, then specific firing instructions for your clay body (usually Cone 04 for bisque). -
Glaze Application:
Dip or brush on a matte white glaze. Alternatively, if your clay body is naturally white and beautiful, you can leave the exterior unglazed for a raw, earthy look. -
Final Fire:
Fire the piece again to the glaze temperature appropriate for your clay (e.g., Cone 5/6).
Once fired, find a sunny spot and add a few stems of pampas grass to complete the look
Little Sphere Planters With Drain Holes
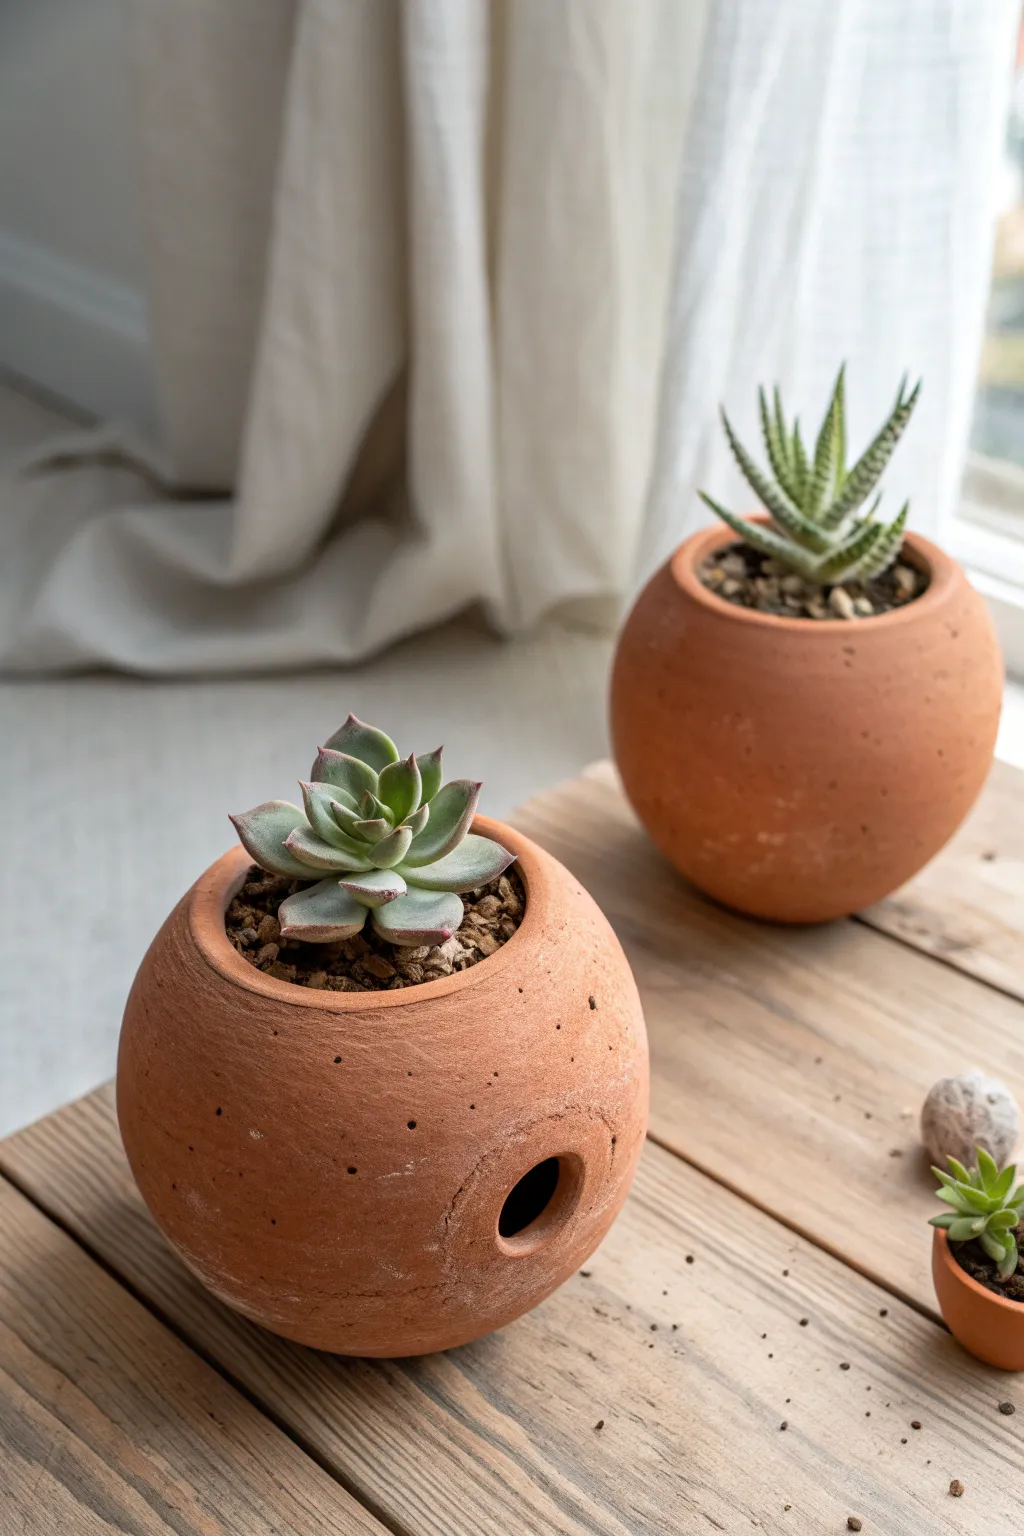
These charming, spherical planters bring a modern, geometric touch to your indoor garden with their smooth curves and natural clay finish. The design features a distinctive side-drainage hole that adds visual interest while keeping your succulents happy and healthy.
Step-by-Step
Materials
- Terracotta air-dry clay or kiln-fire clay
- Two large styrofoam balls (approx. 4-5 inches diameter)
- Plastic wrap or cling film
- Rolling pin
- Canvas cloth or clay mat
- Circular cookie cutter (approx. 1 inch diameter)
- Fettling knife or clay cutting tool
- Sponge and water
- Surform tool or rasp (optional)
- Potting soil and succulents
Step 1: Forming the Sphere Base
-
Prepare the Molds:
Wrap your styrofoam balls tightly in plastic wrap. This is a crucial step to prevent the clay from sticking to the foam and ensures you can remove the form later without damage. -
Roll the Slabs:
Roll out your clay onto a canvas cloth until it is an even thickness, roughly 1/4 to 3/8 of an inch thick. You want it substantial enough to hold the spherical shape but not too heavy. -
Drape the Clay:
Gently drape a slab of clay over one half of the styrofoam ball. Smooth it down with your hands, easing out any folds or wrinkles as you work toward the ‘equator’ of the ball. -
Trim the Excess:
Using your fettling knife, trim the clay right at the center line of the styrofoam ball. Repeat this process to create a second matching hemisphere. -
Stiffen the Forms:
Let these hemispheres sit for about 30-60 minutes until they achieve a ‘leather-hard’ state—firm enough to hold their shape but still pliable. -
Join the Halves:
Remove the styrofoam balls carefully. Score the edges of both hemispheres with a needle tool and apply a little water or slip (liquid clay). Press the two halves together firmly to create a hollow sphere.
Smooth Seams
Use a flexible metal rib tool to scrape across the joined seam in multiple directions. This blends the clay particles better than just smoothing with water.
Step 2: Sculpting and Refining
-
Seamless Seam:
Take a small coil of soft clay and press it into the seam where the halves meet. Smooth this out with your thumb or a rib tool until the join is completely invisible and the sphere looks like one solid piece. -
Create the Top Opening:
Decide where the top of your planter will be. Use your fettling knife to carefully cut a circular opening large enough for your plant’s root ball, typically about 2-3 inches wide. -
Add the Side Drain:
On the side of the sphere, somewhat lower than the midpoint, use your small circular cookie cutter to punch out a clean hole. This acts as both ventilation and a unique visual detail. -
Clean the Edges:
Dip your finger in water and run it along the cut rims of both the top opening and the side hole to soften any sharp angles. -
Texture the Surface:
For that rustic, porous look seen in the photo, gently tap the surface of the clay with a stiff-bristled brush or a scouring pad. I find this creates a nice, organic stone-like finish. -
Drying Phase:
Allow the sphere to dry slowly. Cover it loosely with plastic for the first day, then uncover it to let it dry completely over the next 2-3 days.
Preventing Cracks
If cracks appear while drying, the clay is drying unevenly. Slow the process down by keeping the sphere under a plastic tent, only opening it for an hour a day.
Step 3: Finishing Up
-
Sanding:
Once bone dry, take a fine-grit sandpaper or a sanding sponge to lightly buff the surface. Focus on erasing any lingering fingerprints or uneven bumps. -
Firing or Sealing:
If using kiln clay, bisque fire it according to the clay’s cone rating. If using air-dry clay, apply 2-3 coats of a matte waterproof sealant to the inside and outside to protect it from moisture. -
Final Planting:
Fill the bottom of the sphere with sandy succulent soil up to the hole, then nestle your succulent into the top opening just slightly below the rim.
Place your new geometric planters near a sunny window and enjoy the modern vibe they bring to your space
Air Plant Sphere Holders
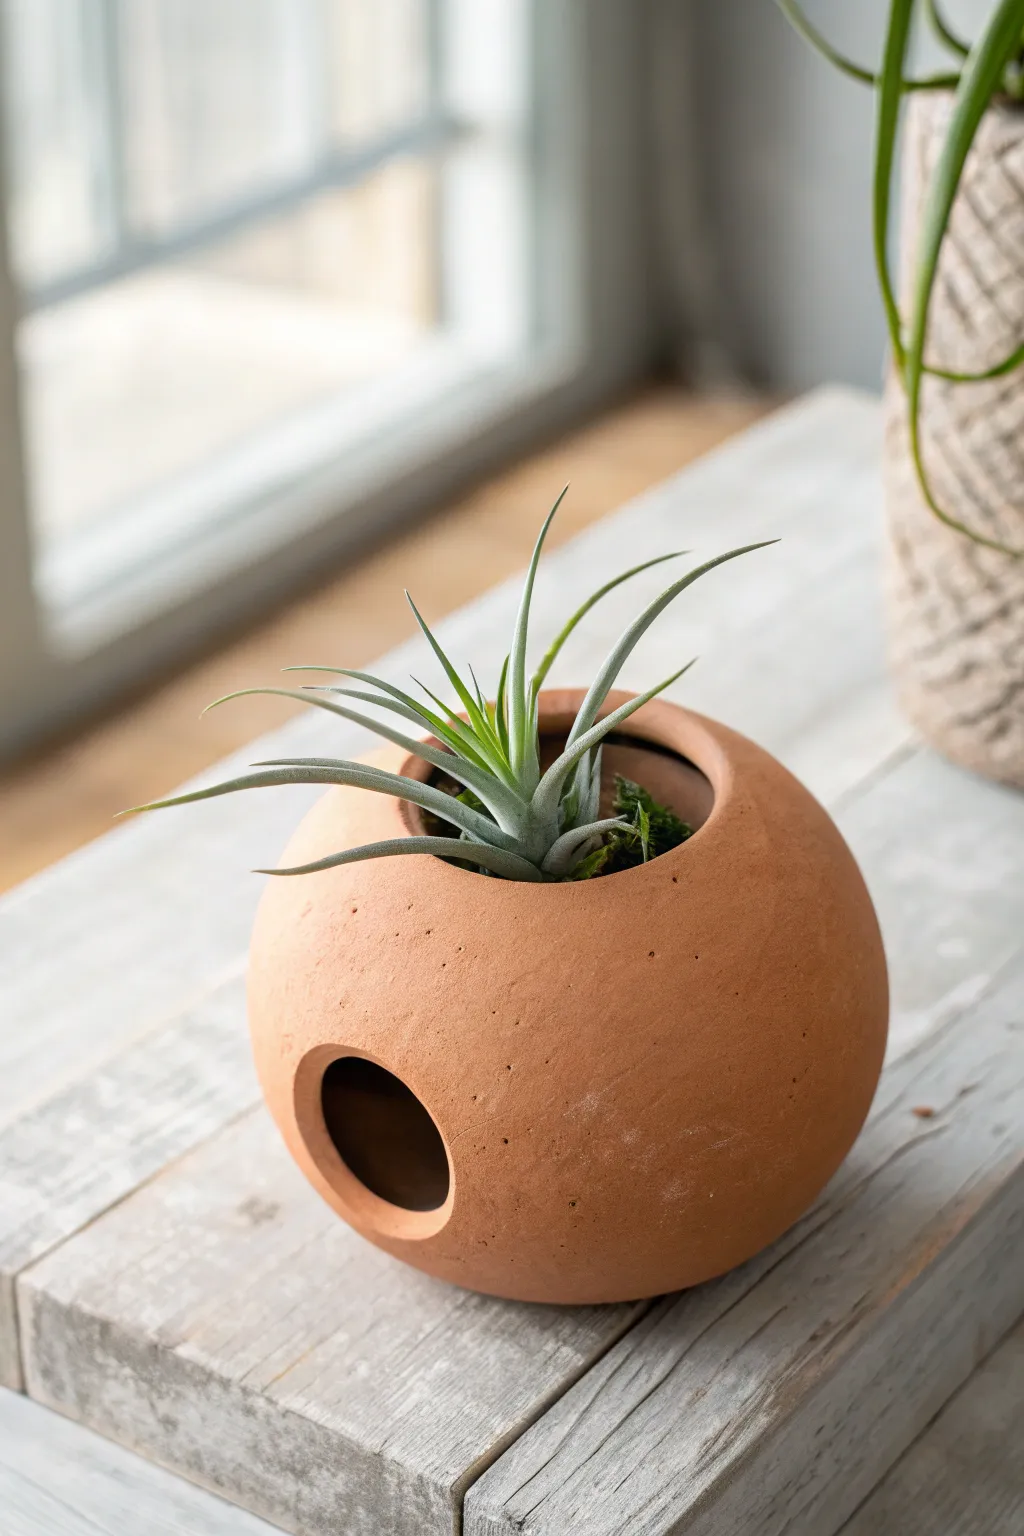
This minimalist clay sphere brings a touch of modern earthiness to any shelf with its warm terracotta tones and clean geometric form. Designed specifically for air plants, it features dual openings that provide crucial air circulation while framing your botanical display perfectly.
Step-by-Step Guide
Materials
- Terracotta-colored polymer clay or air-dry clay (approx. 1 lb)
- Styrofoam ball (3-4 inch diameter) or foil armature
- Rolling pin
- Two circular cutters (one large approx. 2 inches, one medium approx. 1 inch)
- Clay smoothing tool or sponge
- Needle tool
- Water (for smoothing)
- Fine-grit sandpaper
- Matte varnish (optional)
Step 1: Forming the Base
-
Prepare the Clay:
Begin by conditioning your clay thoroughly until it is soft and pliable. If you are using polymer clay, warm it in your hands; for air-dry clay, ensure it isn’t too dry. Roll it into a smooth, crack-free ball slightly larger than your intended armature. -
Flatten the Clay:
Using a rolling pin, flatten the clay into a thick, even sheet, approximately 1/4 inch thick. Aim for a consistent thickness to prevent cracking during the drying or baking process. -
Cover the Armature:
Drape the clay sheet over your styrofoam ball or foil armature. Gently press the clay onto the form, working from the center outward to smooth out any trapped air pockets. -
Seal the Seams:
Gather the excess clay at the bottom or back of the sphere. Trim roughly with scissors or a knife, then pinch the seams together tightly. Roll the sphere gently between your palms to meld the seams and recreate a perfect round shape.
Smooth Moves
Use a tiny amount of baby oil on your fingertips when smoothing polymer clay to eliminate fingerprints instantly.
Step 2: Sculpting Details
-
Cut the Top Opening:
Position your large circular cutter at the very top of the sphere. Press down firmly to cut the main opening where the plant will sit. Carefully lift the cutter and remove the clay circle. -
Create the Side Vent:
Select a spot on the side of the sphere, roughly halfway down. Use the smaller circular cutter to create a ‘window’ or vent. This adds visual interest and helps airflow reach the plant’s base. -
Refine the Edges:
Dip your finger or a sponge in a little water. Gently run it along the cut rims of both openings to soften the sharp angles. You want a smooth, finished look rather than a raw cut edge. -
Remove the Armature:
If you are using a styrofoam ball and air-dry clay, you may need to slice the sphere in half to remove the core and then rejoin it, or carefully dig the foam out if the clay is leather-hard. If using foil, use tweezers to pull the foil out through the large top hole. -
Smooth the Surface:
Inspect the exterior for any fingerprints or dents. Use a damp sponge to buff the entire surface, creating that clean, matte texture seen in the photo. -
Add Texture (Optional):
To mimic the natural stone look, you can lightly tap the surface with a stiff-bristled toothbrush or a crumpled ball of aluminum foil. This adds subtle pitting.
Hanging Hack
Before drying, poke two small holes near the top rim and thread twine through to turn this desk ornament into a hanging planter.
Step 3: Finishing and Styling
-
Dry or Bake:
Follow the manufacturer’s instructions for your specific clay. For air-dry clay, let it sit in a cool, dry place for 24-48 hours. For polymer clay, bake at the recommended temperature (usually 275°F) for about 30 minutes. -
Sand for Perfection:
Once fully cured or dry, take fine-grit sandpaper and gently sand any rough spots, focusing on the rims of the circles and the bottom where the seams were joined. -
Dust Clean:
Wipe the sphere down with a slightly damp cloth to remove all sanding dust. Ensure the interior is clean as well. -
Seal the Clay:
Apply a very thin coat of matte varnish if you want to protect the finish without adding shine. I find this helps keep the terra cotta color vibrant over time. -
Insert the Plant:
Select a medium-sized Tillandsia (air plant). Gently tuck its base into the sphere, allowing the leaves to spike upwards through the top opening.
Place your new clay vessel near a bright window and enjoy the modern, organic vibe it brings to your space
Stacked Sphere Totem Sculpture
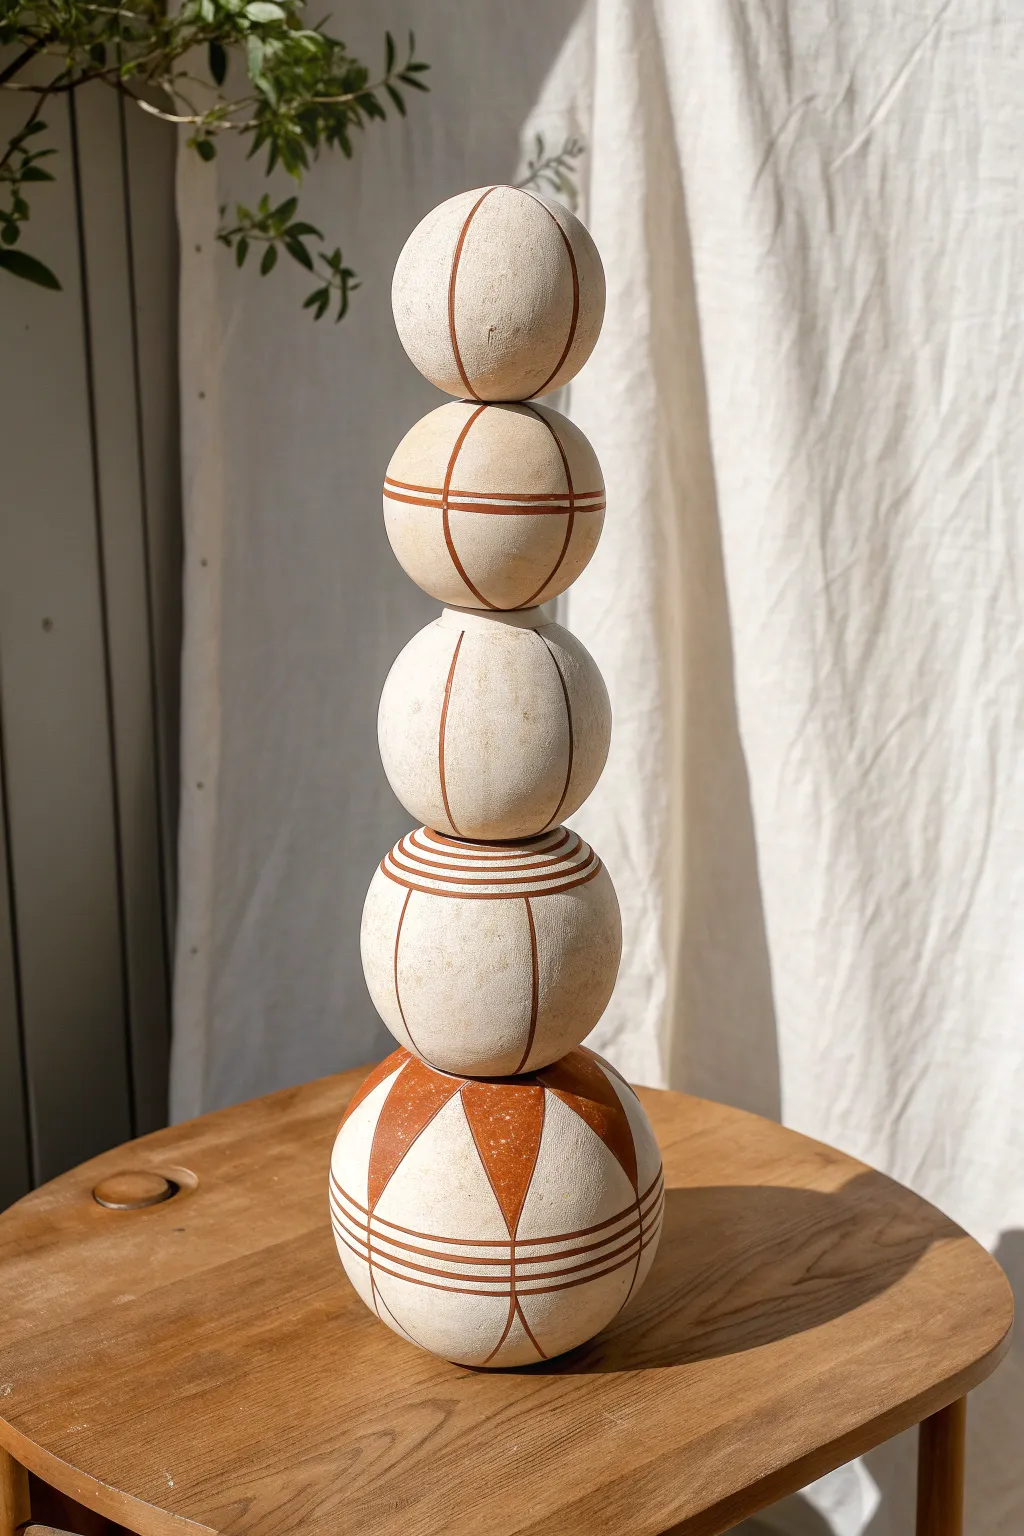
Bring an earthy, sculptural element into your home with this stunning stacked totem made of graduated clay spheres. Featuring precise red clay inlay patterns and a natural cream finish, this piece balances organic forms with geometric precision.
Step-by-Step
Materials
- White or cream stoneware clay (approx. 5-7 lbs)
- Red decorative slip or terra sigillata
- Sphere molds (various sizes) or pukai tools
- Pottery wheel (optional, creates cleaner spheres)
- Serrated rib tool
- Flexible metal rib
- Needle tool
- Carving tools (loop tool and V-gouge)
- Wood skewer or heavy gauge wire (for internal support)
- Sponge
- Fine grit sandpaper
Step 1: Forming the Spheres
-
Determine Size Graduation:
Plan for five spheres ranging from large (base) to small (top). A good scale is roughly 6 inches for the base, graduating down to 3 inches for the top. -
Throw or Handbuild Rough Shapes:
If using a wheel, throw enclosed forms for each size. If handbuilding, use pinch pot methods to create two hemispheres for each size, then score and slip them together to create hollow globes. -
Refine the Rounds:
Once the clay is leather hard, use a metal rib to smooth out any lumpy areas. Paddle the forms gently with a wooden paddle to ensure they are perfectly spherical. -
Flatten Contact Points:
Before the clay hardens too much, gently press the top of one sphere and the bottom of the next sphere against a flat surface. This creates small flat spots that enhance stability when stacking. -
Create the Vertical Channel:
Carefully pierce a hole vertically through the center of each sphere using a needle tool, followed by a wider hole cutter. This channel is crucial for the internal rod that will hold the stack together.
Clean Lines Pro-Tip
For the crispest inlay lines, let the red slip dry to ‘leather hard’ before scraping. If it’s too wet, it will smear; too dry, and it chips.
Step 2: Carving & Inlaying Design
-
Map the Base Design:
On the largest sphere, lightly sketch the triangular saw-tooth pattern around the upper hemisphere using a needle tool. Ensure the points are evenly spaced. -
Sketch Upper Patterns:
For the middle spheres, draw vertical meridian lines. On the second-to-top sphere, add a horizontal equator line to create a grid look. -
Carve the Grooves:
Using a V-tip carving tool or fine loop tool, carefully carve out the sketched lines. I find it helpful to keep the depth consistent—about 1/8th of an inch deep works well. -
Carve the Triangles:
For the large base triangles, use a wider loop tool to carve out the negative space completely, leaving a recessed area for the red color. -
Clean the Edges:
Go back over your carved lines with a damp sponge or a soft brush to remove any sharp burrs or clay crumbs. -
Apply Red Slip:
Generously paint the red slip or terra sigillata into the carved grooves and recessed triangles. Don’t worry if you paint outside the lines; we will clean it up later. -
Second Coat Application:
Allow the first coat of slip to dry until matte, then apply a second layer to ensure the red color is rich and opaque. -
Reveal the Clean Lines:
Once the slip is leather hard but not bone dry, use a metal rib or a slightly damp sponge to carefully scrape the surface of the sphere. This removes the excess slip from the high points, leaving crisp red lines in the recesses.
Step 3: Assembly & Finishing
-
Bisque Fire:
Allow all pieces to dry completely before loading them into the kiln for a bisque fire (typically Cone 04 or 06). Fire them separately, not stacked. -
Sand for Smoothness:
After firing, wet-sand the exterior of the white clay sections with fine-grit sandpaper to achieve that smooth, stone-like texture shown in the image. -
Final Stacking:
Thread a sturdy metal rod or wood dowel into a base plate (either wood or clay). Slide the spheres onto the rod one by one, starting from the largest. -
Secure the Top:
If the fit is loose, you can use a small amount of epoxy or museum wax between the spheres for extra security, though gravity usually does the trick.
Wobbly Stack Troubleshooting
If spheres won’t sit straight, use a rasp tool to gently grind the connection points flat after the bisque firing to correct the angle.
Place your sculpture near a window where shadows can play across the varied spherical surfaces throughout the day
Carved Mandala Relief Sphere
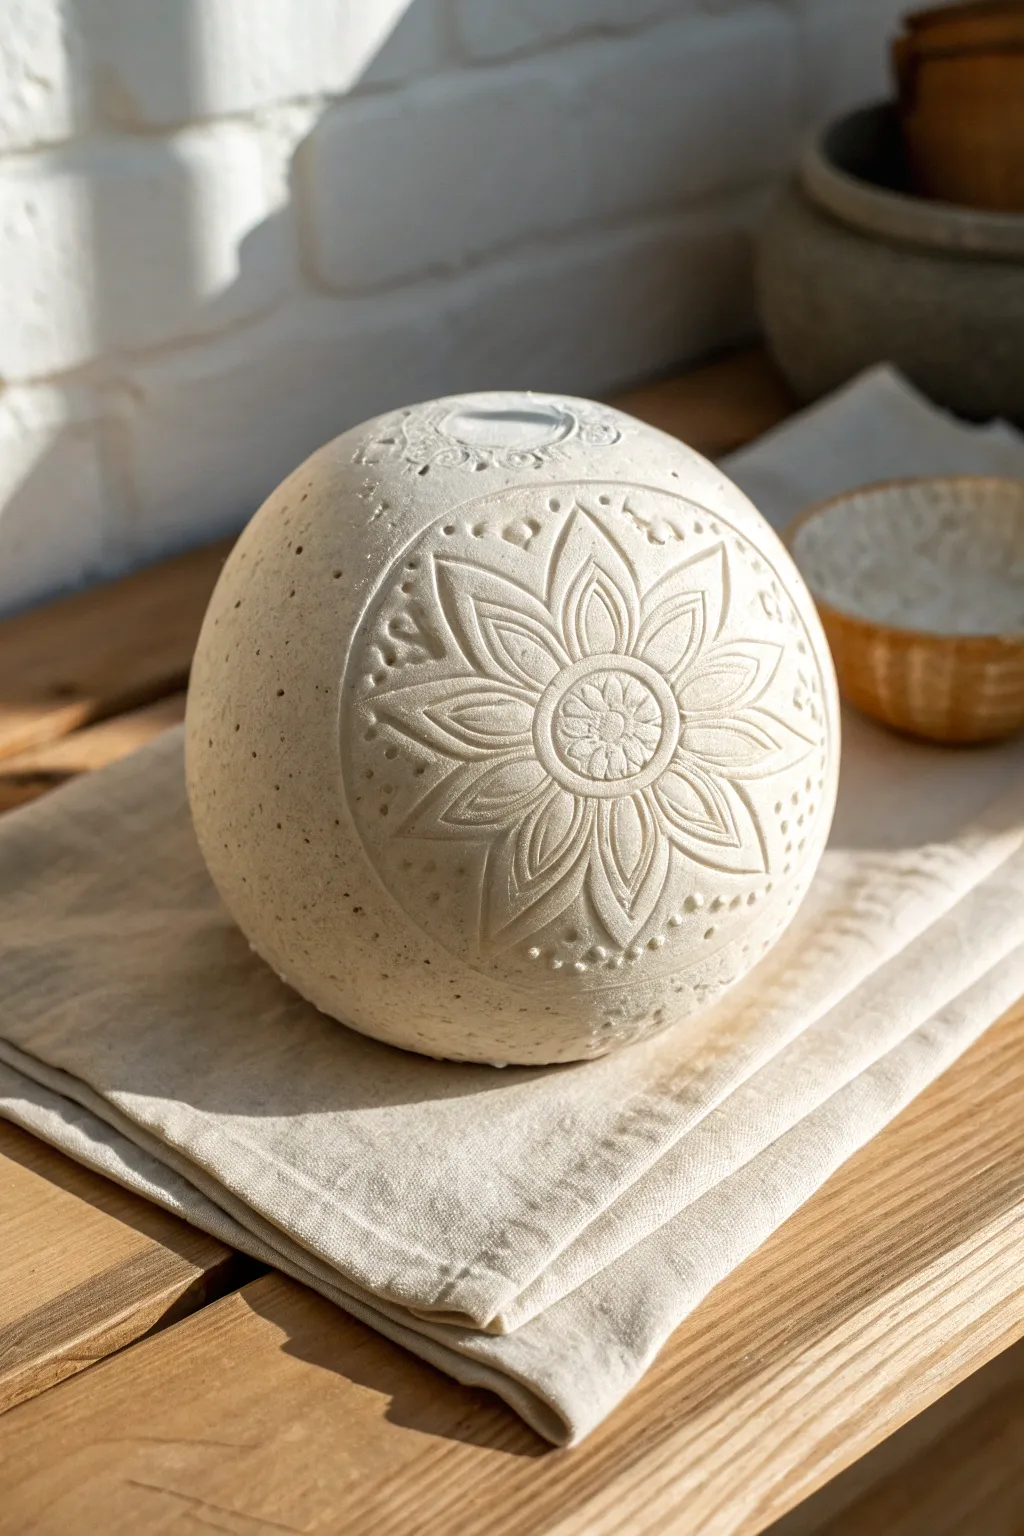
Transform a simple ball of clay into a meditative art piece featuring a carved floral relief. This soothing project results in a textured, stone-like sphere perfect for display on a shelf or desk.
How-To Guide
Materials
- White or cream air-dry clay (or polymer clay)
- Smooth foam ball (armature) approx. 4 inches
- Carving tools (needle tool, small loop tool)
- Small rolling pin
- Sponge and water bowl
- Fine-grit sandpaper
- Pencil lightly tracing
- Soft brush
Step 1: Forming the Base
-
Prepare the core:
Start with a Styrofoam ball to act as a lightweight armature if you’re using air-dry clay; this saves material and reduces drying time. If using polymer clay, foil makes a heat-safe core. -
Roll out the slab:
Condition your clay until soft and pliable. Use a rolling pin to create an even slab approximately 1/4 inch thick, ensuring it’s large enough to wrap around your sphere. -
Wrap the sphere:
Drape the clay slab over the ball. Gently smooth it down properly, working from the top down to eliminate air pockets between the core and the clay. -
Seal the seams:
Trim excess clay at the bottom and pinch the edges together. Use a little water on your finger to blend the seams until they disappear completely. -
Perfect the surface:
Roll the clay-covered ball gently between your palms or on a clean surface to ensure it is perfectly round. Use a damp sponge to smooth out any fingerprints or minor bumps. -
Initial drying phase:
Let the sphere sit for about 30-60 minutes. You want the clay to firm up to a ‘leather-hard’ state where it holds detail without squishing, but isn’t dry.
Cracks Appearing?
If small cracks appear while drying, mix a tiny bit of fresh clay with water to make a paste (slip). Fill the cracks, smooth over, and let dry again.
Step 2: Carving the Design
-
Mark the centers:
Using a needle tool, lightly mark the top poler of the sphere and equidistant points around the equator to help you center your mandalas. -
Draft the guide circles:
Lightly trace concentric circles around your center point using a compass or by tracing circular lids. This ensures your floral design stays symmetrical. -
Sketch the petals:
With a needle tool, very faintly sketch eight large, pointed petals radiating from the center. Add a second layer of smaller petals inside the first set. -
Carve the relief:
Using a small loop tool or V-gouge, carefully carve away the negative space around the petals. I find shallow, consistent scooping motions work best here. -
Deepen the petal details:
Use a modeling tool to press lines into the center of each petal, giving them a veined, leaf-like texture. -
Create the center floret:
Carve a small circular border in the absolute center. Inside this, press a small flower stamp or carve tiny individual petals manually. -
Add accent texture:
Use the tip of a small round tool to press indented dots around the outer perimeter of the mandala and in the negative spaces between petal tips. -
Texturize the sphere body:
For the rest of the sphere surface outside the mandala, gently stipple the clay with a stiff bristle brush or a tightly balled piece of foil to create a porous, stone-like texture.
Step 3: Finishing Touches
-
Clean up burrs:
Once you’ve finished carving, use a soft, dry brush to sweep away any little clay crumbs or “burrs” created during the carving process. -
Full dry:
Allow the piece to dry completely. For air-dry clay of this thickness, this usually takes 24 to 48 hours. Turn it occasionally so the bottom dries too. -
Sanding:
Once bone dry, take fine-grit sandpaper and very gently smooth the high points of the relief carving. This enhances the contrast between the smooth petals and the textured background. -
Sealing (Optional):
To protect your work, apply a matte varnish. This will keep the natural look while preventing dust from settling into the porous texture.
Add an Antique Look
After drying, apply a diluted brown acrylic wash over the carving. Wipe it back with a cloth immediately, leaving pigment only in the deep grooves.
Place your finished sphere on a linen napkin or wooden stand to enjoy the serene, handcrafted atmosphere it brings to your space
Geometric Faceted Sphere Look
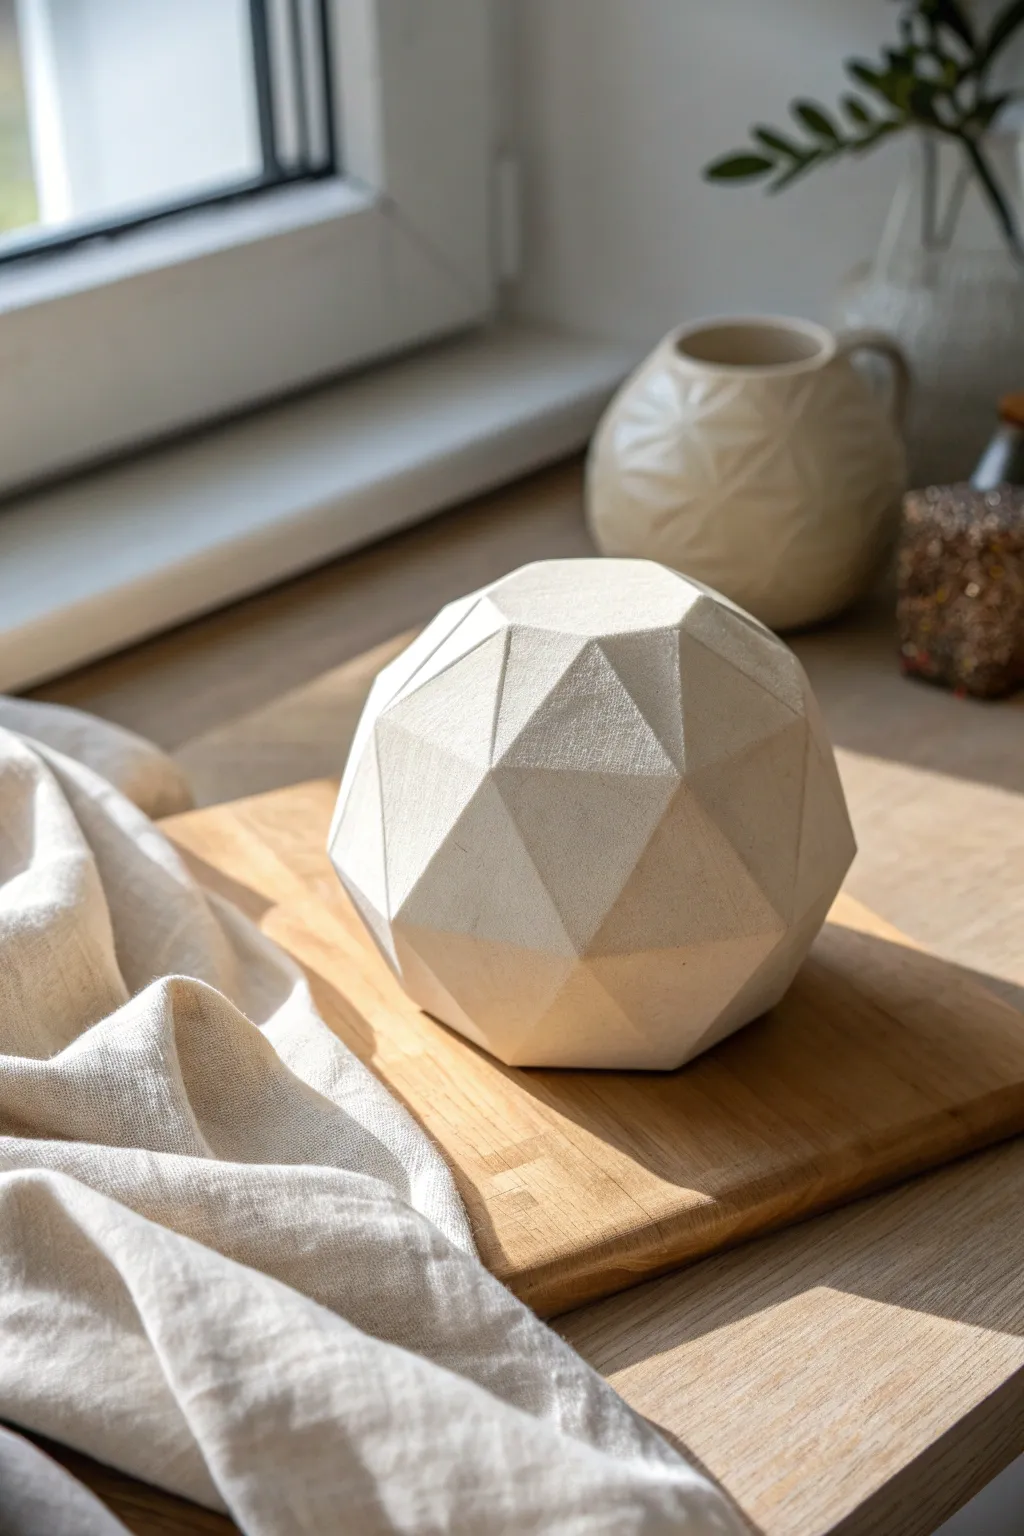
Achieve a stunningly modern sculptural piece with this faceted sphere project. The crisp, angular planes catch the light beautifully, creating a dynamic interplay of shadow and form that transforms simple clay into high-end decor.
Step-by-Step Tutorial
Materials
- Air-dry clay (white or light grey)
- Pottery wire or dental floss
- Rolling pin
- Fettling knife or rigid clay scraper
- Measuring tape (flexible)
- Fine-grit sandpaper (220 and 400 grit)
- Spherical mold (e.g., styrofoam ball or plastic ornament)
- Plastic wrap
- Bowl of water
- Sponge
Step 1: Forming the Base
-
Prepare the core:
If you want a lighter finished object, use a styrofoam ball or plastic ornament as your core. Wrap it tightly in plastic wrap to ensure the clay doesn’t stick permanently if the core needs to be removed, or simply to allow for shrinkage. -
Condition the clay:
Take a generous amount of air-dry clay and knead it thoroughly. You want to remove any air pockets and ensure the consistency is uniform and pliable. -
Roll a slab:
Roll your clay out into a thick slab, approximately 1/4 to 1/2 inch thick. This thickness provides enough depth for carving the facets later without exposing the core. -
Cover the core:
Drape the clay slab over your spherical core. Gently press and smooth the clay around the shape, trimming excess with your wire tool. Join seams by scoring and adding a bit of water or slip. -
Perfect the sphere:
Roll the clay-covered ball gently on your work surface to smooth out bumps. Wet your hands slightly to glide over the surface, creating a relatively smooth, round canvas for your faceting.
Step 2: Carving the Facets
-
Initial firming:
Let the sphere sit for about 30 to 60 minutes. The clay needs to be leather-hard—firm enough to hold a sharp edge when cut, but soft enough to slice through easily. -
Plan your first cuts:
Visualize a pattern of triangles or pentagons. I usually start at the very top to establish a central flat plane. -
Slice the first face:
Using a sharp fettling knife or a rigid scraper tool, slice off a thin section of the curved surface to create a flat plane. Keep the cut shallow; you can always go deeper. -
Create adjacent facets:
Make your next cut immediately adjacent to the first one. Angle the blade so the new plane connects to the previous one at a sharp, clean ridge. -
Work in rounds:
Continue cutting facets around the top section of the sphere, rotating the object as you go. Try to vary the size of the cuts slightly for a more organic, gemstone look, or keep them uniform for strict symmetry. -
Navigate the middle:
Move down to the ‘equator’ of the sphere. These cuts will likely be your largest. Ensure every new cut shares an edge with the cuts above it. -
Finish the base:
Carefully flip the sphere to access the bottom. Slice facets until the entire curved surface has been replaced by angular planes. -
Refine the edges:
Dip your finger in water and very lightly run it along the sharp ridges to remove any small clay burrs, but be careful not to round over the crisp angles you just carved.
Clean Cuts Only
Use a wire clay slicer pulled taut for long, flat cuts. Knives can sometimes drag or create a warped surface, whereas a wire creates a perfectly flat plane.
Step 3: Refining and Finishing
-
Slow drying:
Loosely cover the sphere with plastic wrap and let it dry slowly over 24-48 hours. Slow drying prevents the thick clay from cracking at the seams. -
Remove the core (optional):
If you left a small opening and want a hollow object, wait until the shell is fully rigid, then carefully puncture or pull out the core materials. -
Initial sanding:
Once bone dry, use 220-grit sandpaper to smooth the flat face of each facet. Place the sandpaper on a flat surface and rub the facet against it for true flatness is a trick I find useful. -
Sharpening corners:
Fold your sandpaper to get into the crevices between facets. Clean up the intersection points so they look sharp and defined. -
Final polish:
Switch to 400-grit sandpaper for a silky smooth finish. Wipe away all dust with a slightly damp sponge. -
Sealing:
Apply a matte sealant or varnish to protect the surface while maintaining that raw, stony aesthetic.
Stone Effect
Before drying, gently press coarse sandpaper into the wet clay surface. This imitates the texture of carved sandstone or concrete.
Place your geometric sphere near a window where shadows can dance across its many faces throughout the day
Texture Stamp Spheres For Rolling Patterns
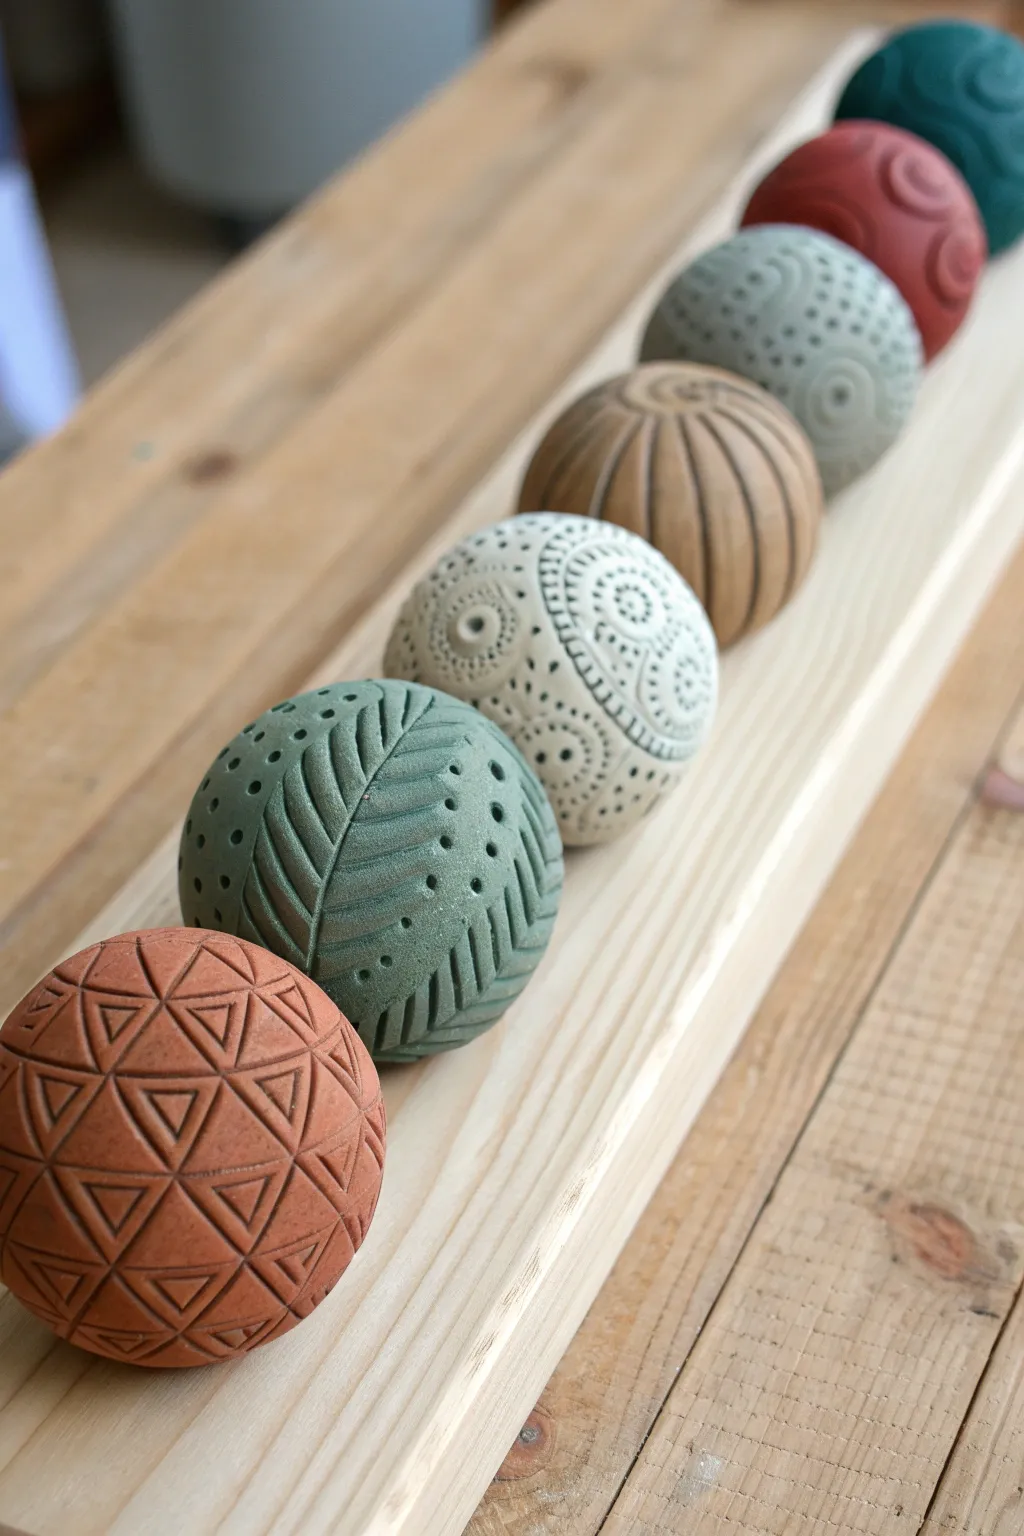
These tactile ceramic spheres are more than just decorative objects; they double as functional tools for rolling intricate patterns into slabs of soft clay. With designs ranging from geometric triangles to organic leaf motifs, creating a set offers a satisfying exploration of surface design.
Step-by-Step Guide
Materials
- Stoneware clay or polymer clay (depending on intended use)
- Spherical molds or hand-shaping skills
- Pin tool or needle tool
- Loop carving tools (various sizes)
- Small drill bit or hole punch tool
- Sponge
- Water
- Hard wooden board or ware board
- Metal rib scraper
Step 1: Forming the Base
-
Prepare the Clay:
Begin with a workable amount of clay, kneading it thoroughly to remove any air bubbles. Wedging is crucial here to ensure the sphere doesn’t crack during firing or baking. -
Shape the Sphere:
Roll the clay between your palms or on a table surface to create a smooth, round ball. Aim for a size that fits comfortably in your hand, roughly the size of a tennis ball or slightly smaller. -
Refine the Shape:
To get a truly perfect sphere, gently tap the ball with a wooden paddle or flat board while rotating it. This compresses the surface and rounds out any lumps. -
Smooth the Surface:
Use a damp sponge or a metal rib to smooth away any fingerprints or seams. The surface needs to change from ‘sticky’ to ‘leather hard’ before carving, so let the spheres rest for about 30 to 60 minutes until they hold their shape firmly.
Hollow it Out
To reduce weight and prevent kiln accidents, slice the sphere in half, hollow out the center, score and slip the edges, and rejoin them before carving.
Step 2: Carving the Patterns
-
Plan Your Design: Triangles:
For the first sphere (red/terracotta), lightly scratch a grid of triangles onto the surface with a needle tool. I find lightly marking the equator first helps keep the pattern even. -
Carve the Triangles:
Using a small loop tool, carve out the interior of every other triangle, creating a relief pattern. Keep the depth consistent so the impression it leaves later will be uniform. -
Design: Leaf Motif:
For the green sphere, use a needle tool to draw a long, curving central vein around the circumference. Then, carve angled lines radiating outward to mimic leaf veins. -
Add Texture with Punctures:
Enhance the leaf design by using a small drill bit or blunt tool to press small dots into the negative space between the leaves. -
Design: Intricate Dots:
On a white sphere, use tools with hollow circular tips (like a straw or specialized clay tool) to press uniform rings. Combine these with tiny needle-pricked dots to create lace-like bands. -
Design: Deep Grooves:
For the beige sphere, use a larger U-shaped loop tool. Carve deep, continuous vertical channels from pole to pole, mimicking the ridges of a melon or pumpkin. -
Design: Swirls:
For the red and teal spheres at the back, carve freehand spirals. Use a medium-sized loop tool to gouge out the clay, creating a raised spiral effect.
Flat Spots Forming?
If your sphere develops a flat bottom while drying, rest it on a piece of soft foam or in a small bowl lined with cloth to maintain the curve.
Step 3: Finishing and Firing
-
Clean Up Burrs:
Once the carving is complete and the clay is leather hard, gently brush away any ‘crumbs’ or clay burrs with a soft dry brush. Avoid using water now, as it might blur your crisp lines. -
Smoothing Edges:
Run your finger lightly over the carved ridges to ensure they aren’t sharp; you want them to imprint clay, not cut it. -
Bisque Fire (Ceramics):
If using ceramic clay, dry the spheres slowly over several days before bisque firing them in a kiln. Because they are thick, slow drying is essential to prevent explosions. -
Staining (Optional):
If you want the matte, colorful look in the photo, apply underglazes or oxides after the bisque fire to highlight the textures, then wipe back the excess with a sponge. -
Final Fire or Bake:
Complete the process with a final glaze firing (if using ceramic clay) or bake according to package directions (if using polymer clay).
Once fired and hardened, your textured spheres are ready to be rolled across fresh slabs of clay to create endless patterned impressions