I’m always amazed how a little polymer clay can turn into the coziest, most crave-worthy clay food sculptures you can hold right on your fingertip. Here are my favorite food sculpture ideas in clay, starting with the classics everyone loves and moving into the delightfully unexpected.
Mini Donuts With Sprinkle Toppings

Capture the sweetness of a bakery treat with this realistic polymer clay donut project. The key to this charming sculpture lies in the texturing of the fried dough and the glossy finish of the strawberry glaze.
Detailed Instructions
Materials
- Polymer clay (dough color: mix white, translucent, and a touch of yellow/ochre)
- Liquid polymer clay (translucent)
- Polymer clay in ‘frosting’ colors (bright pink)
- Pre-baked clay ropes (variegated colors for sprinkles)
- Texturing tools (old toothbrush, needle tool, coarse sandpaper)
- Chalk pastels (ochre, burnt sienna, orange)
- Soft paintbrush
- Gloss glaze or UV resin
- Circle cutter
- Small round cutter (or straw) for the hole
- Baking tile or parchment paper
Step 1: Shaping the Dough Base
-
Mix the Dough Color:
Begin by conditioning your polymer clay. To get a realistic pastry shade, I like to mix a large portion of white with translucent clay and just a tiny pinch of yellow ochre or beige. -
Form the Shape:
Roll the clay into a smooth, thick log and join the ends to form a ring, smoothing the seam completely so it disappears. -
Refine the Ring:
Alternatively, you can flatten a ball of clay into a thick disk and use a small circle cutter to remove the center, creating a perfect ring shape instantly. -
Soften the Edges:
If you used the cutter method, gently pat down the sharp cut edges with your fingertip to give the donut a softer, raised yeast-dough appearance. -
Create the Fried Texture:
Take a clean, old toothbrush or a crumpled ball of aluminum foil and tap it firmly all over the clay surface. This mimics the porous texture of fried dough. -
Add a Pale Line:
Use a needle tool or your finger to gently smooth out a thin horizontal line around the very center of the donut’s side. This represents the ‘fry line’ where the dough floats in oil and doesn’t brown as much.
Icing Running Too Fast?
If your liquid clay is too runny, let it sit on a piece of paper for 10 minutes to leech out excess oil, or mix in a tiny bit of cornstarch to thicken it up.
Step 2: Baking Effect & Glazing
-
Shade the Pastry:
Scrape some ochre and burnt sienna chalk pastels into a fine powder. Using a soft fluffy brush, gently dust the top and bottom of the donut, avoiding that central ‘fry line’ you created. -
Deepen the Color:
Add a second, lighter layer of darker brown pastel just on the very highest points to simulate uneven browning during frying. -
Prepare the Frosting:
Mix liquid polymer clay with a small amount of solid pink clay (or pink chalk pastel shavings). Stir until you have a consistency similar to thick honey or room-temperature icing. -
Apply the Glaze:
Carefully drizzle the pink mixture onto the top of the unbaked donut. Use a needle tool to guide the liquid down the sides slightly, creating natural drips. -
Make the Sprinkles:
If you haven’t already, take pre-baked thin snakelike ropes of colored clay and chop them into tiny bits with a craft blade to create jimmies. -
Decorate:
While the liquid clay is still wet, use tweezers to place individual sprinkles or gently drop a pinch over the wet icing. Press them down very lightly so they embed into the glaze. -
Final Bake:
Place your creation on a baking tile and bake according to your clay manufacturer’s specific instructions (usually 275°F/130°C for 15-30 minutes). -
Gloss the Icing:
Once fully cooled, brush a coat of gloss glaze or UV resin strictly over the pink icing areas. This makes the frosting look wet and sticky while keeping the dough matte and realistic.
Scented Variation
Mix a tiny drop of vanilla or strawberry fragrance oil into the clay before baking. The scent will release when the finished piece is warmed in hands.
You now have a permanent sweet treat that looks good enough to eat


Pizza Slices With Chunky Toppings
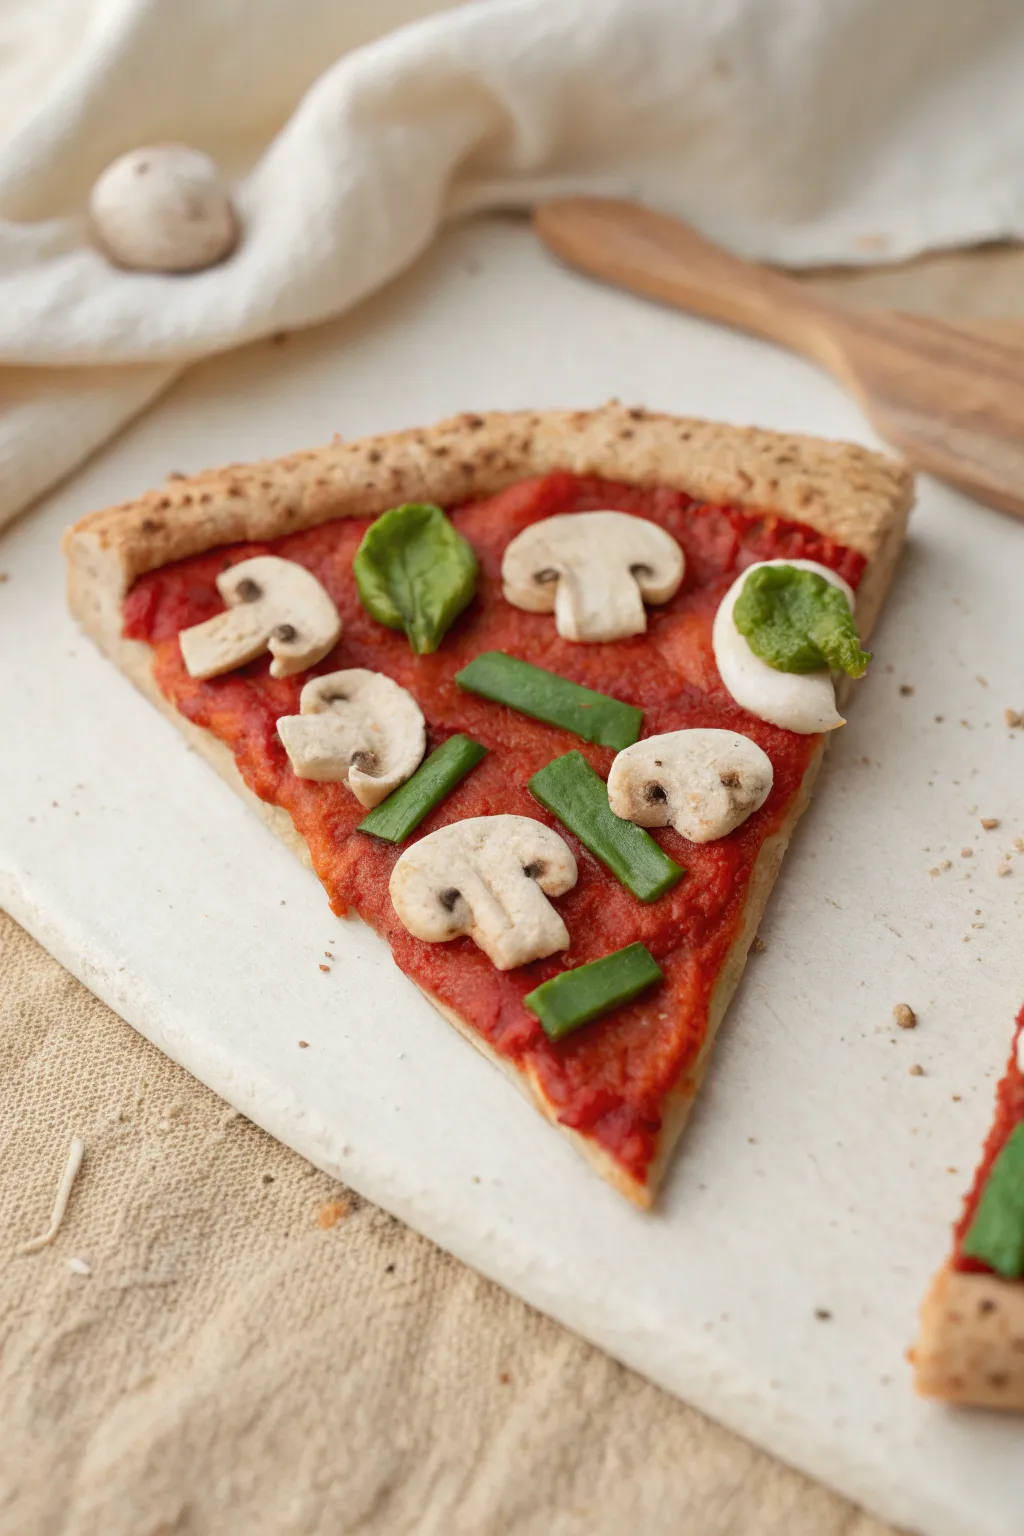
This project creates a charmingly chunky, slightly rustic pizza slice that looks good enough to eat but is designed for display. The focus is on achieving realistic texture in the crust and arranging oversized toppings like mushrooms and peppers for a playful, stylized look.
Step-by-Step
Materials
- Polymer clay (beige/tan for crust, deep red for sauce, white for mushrooms, dark green for peppers)
- Texturing tool (toothbrush or stiff bristle brush)
- Needle tool or toothpick
- Rolling pin
- Liquid polymer clay (translucent or red tinted)
- Pastel chalks (brown/orange) for shading
- Soft brush for pastels
- Craft knife or blade
- Baking sheet and parchment paper
Step 1: Forming the Base
-
Mix the dough color:
Start by conditioning your beige clay. If it looks too uniform, mix in a tiny speck of translucent or white clay to give it a more natural ‘doughy’ variance. -
Shape the wedge:
Roll the clay into a ball and flatten it slightly. Cut or mold this into a triangular wedge shape, approximately 3-4 inches long. -
Create the crust rim:
Roll a separate snake of beige clay and attach it to the wide end of your triangle. Blend the seam on the bottom side so it stays distinct on top. -
Texture the dough:
Use a toothbrush or stiff bristle brush to tap texture all over the crust rim and the exposed sides of the dough. This mimics the air pockets in baked bread. -
Pre-shade the crust:
Before adding sauce, lightly brush brown pastel chalk dust onto the raised crust rim to give it a baked appearance.
Step 2: Adding the Sauce
-
Prepare the sauce mixture:
Mix a small amount of deep red clay with liquid polymer clay until you have a thick, spreadable paste. I like to keep it slightly chunky rather than perfectly smooth. -
Spread the sauce:
Apply the red mixture onto the flat triangular area of your slice, leaving the crust rim clean. Use a needle tool to push it right up to the edge of the crust. -
Texture the sauce base:
Stipple the red surface gently with your needle tool to make it look like thick, simmered tomato sauce rather than a flat sheet.
Sticky Sauce?
If your liquid clay sauce is too runny and dripping off the sides, mix in a tiny bit more solid red clay to thicken the paste before spreading.
Step 3: Sculpting the Toppings
-
Make mushroom stems:
Roll small logs of white clay for the mushroom stems. Keep them fairly thick relative to the caps. -
Form mushroom caps:
Create small domes of white clay. Press the stems into the center of the domes to complete the mushroom shape. -
Slice the mushrooms:
Use your blade to slice the mushrooms in half vertically so they lay flat against the pizza. This creates that classic sliced mushroom silhouette. -
Add mushroom details:
Using a needle tool, gently scratch very tiny lines on the underside of the mushroom caps to mimic gills. -
Create pepper strips:
Roll out a flat sheet of dark green clay. Cut narrow, rectangular strips about 2-3mm wide and roughly 1cm long. -
Texture the peppers:
Slightly round the cut edges of your green strips with your finger so they don’t look too sharp. -
Sculpt basil leaves:
Take small pinches of green clay (perhaps a lighter shade if you have it) and flatten them into rough leaf shapes. Curl the edges slightly for a wilted, baked look.
Pro Tip: ‘Flour’ Dusting
Before baking, lightly brush a tiny amount of cornstarch or baby powder onto the very bottom of the crust for an authentic pizzeria flour finish.
Step 4: Assembly and Finish
-
Place the mushrooms:
Arrange your mushroom slices on the sauce. Press them down gently so they look embedded, not just floating on top. -
Arrange the peppers:
Place the green pepper strips in the gaps between mushrooms. Overlap one or two elements slightly for realism. -
Add texture to toppings:
Lightly dab a bit of brown pastel dust onto the tops of the mushrooms to make them look roasted. -
Final inspection:
Check the crust again; if you smashed the texture while handling the slice, re-tap it with your brush now. -
Bake the project:
Bake according to your clay manufacturer’s instructions. Usually, this is around 275°F (135°C) for 15-20 minutes depending on thickness.
Once cooled, your clay pizza slice is ready to serve as a whimsical paperweight or magnet


Stacked Burgers With Layered Fixings
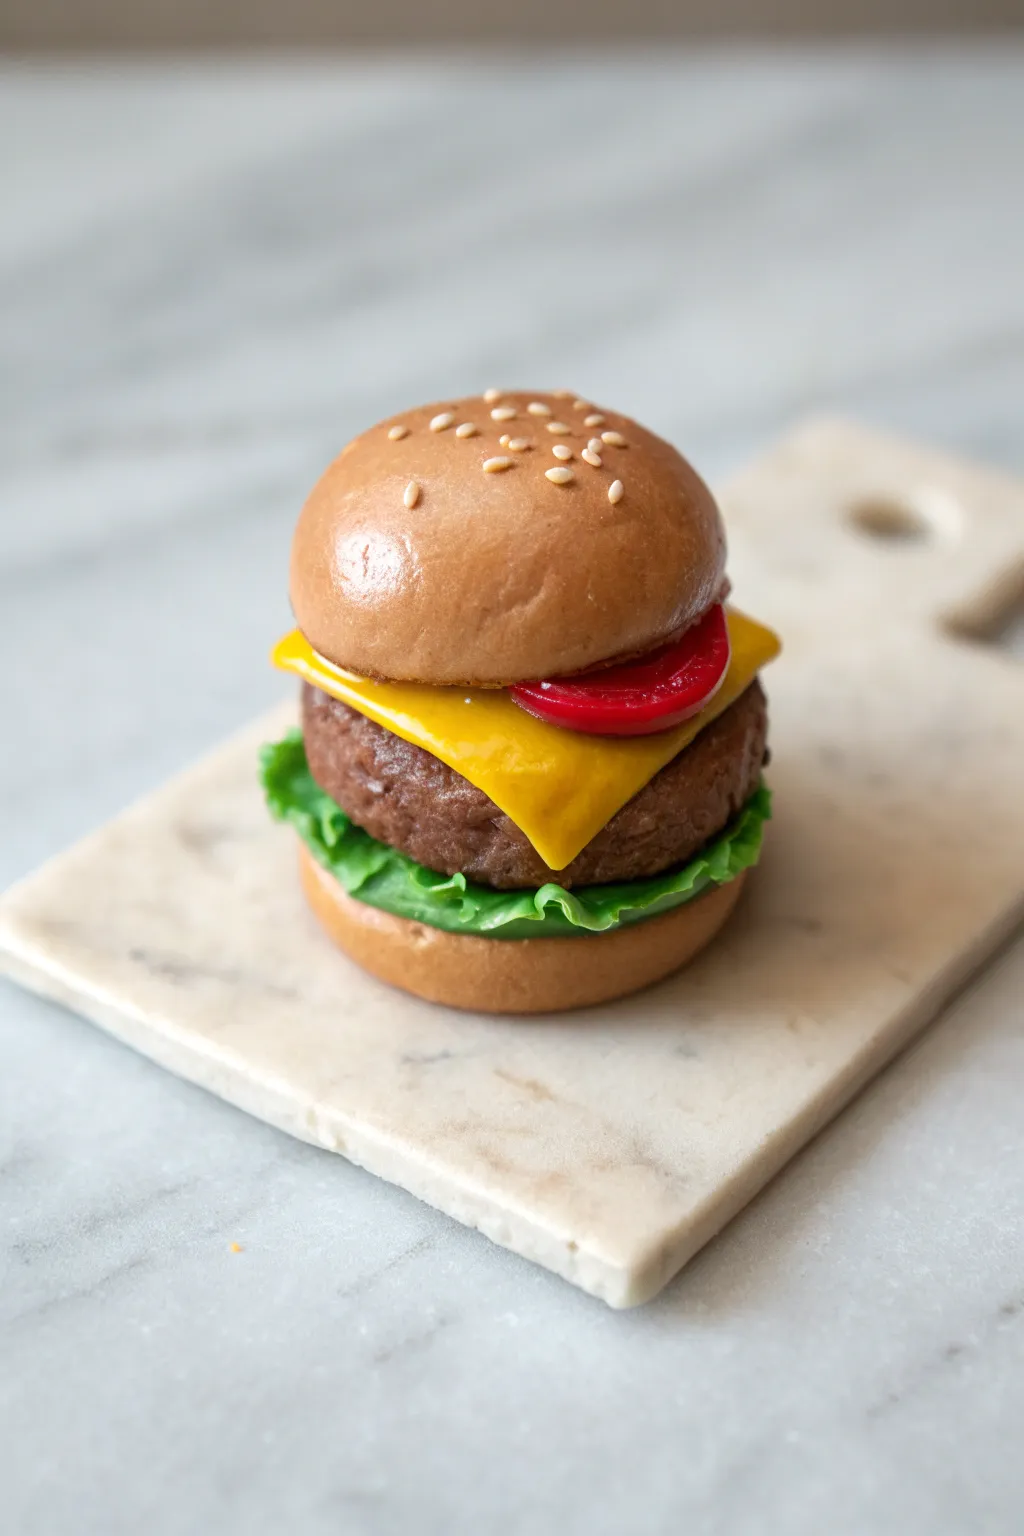
Capture the essence of a juicy cheeseburger in miniature form with this delightful polymer clay project. With textured buns, melting cheese, and fresh-looking lettuce, this realistic sculpture looks good enough to eat but is designed to sit charmingly on your shelf.
Step-by-Step Guide
Materials
- Polymer clay (tan/ochre, dark brown, yellow, bright red, translucent, green, white)
- Liquid polymer clay (translucent)
- Chalk pastels (orange, brown, red)
- Soft paintbrush for shading
- Texture tools (needle tool, ball tool, crumbled aluminum foil, stiff toothbrush)
- Rolling pin or clay machine
- Small round cutter (approx. 1 inch diameter)
- X-Acto knife or clay blade
- Gloss glaze (optional)
- Oven for curing
Step 1: Shaping the Buns
-
Mix the Bun Color:
Start by mixing translucent clay with a bit of white and a tiny touch of yellow and ochre. You want a pale dough color that will bake slightly transparent for realism. -
Form the Base:
Roll two balls of your bun mixture. Flatten one slightly for the bottom bun and shape the other into a dome for the top bun. -
Add Texture:
Gently press a stiff toothbrush or a ball of crumbled aluminum foil over the surface of both bun halves to mimic the texture of baked bread. Do this lightly so you don’t distort the shape. -
Shade the Crust:
Scrape some orange and brown chalk pastels into a fine powder. Using a soft dry brush, gently dust the top of the dome and the edges of the bottom bun to create a golden-brown baked effect. -
Apply Sesame Seeds:
Roll extremely tiny teardrops of white or light tan clay. Carefully press these onto the top bun, arranging them randomly but evenly.
Step 2: Creating the Fillings
-
Texture the Patty:
Mix dark brown clay with a tiny bit of red and translucent to create a meat color. Shape it into a thick disc that matches the diameter of your bun. -
Detail the Meat:
Poke the edges and surface of the patty repeatedly with a needle tool or stiff brush to create a rough, ground-meat texture. I prefer dragging the tool slightly to create little crevices. -
Craft the Lettuce:
Mix green clay with translucent clay. Roll it out very thinly and tear rough edges. Frill these edges by pressing them with a ball tool against your finger, then folding the clay slightly to create waves. -
Slice the Tomato:
Create a cane with a red outer circle and a segmented translucent red center, or simply shape a disc of red clay mixed with translucent. Slice a thin piece for your tomato layer. -
Melt the Cheese:
Mix yellow clay with a touch of orange. Roll it out into a thin sheet and cut a square. Gently stretch the corners downward so they will look like they are draping over the burger.
Fixing Flat Textures
If your bun texture disappears while handling, re-texture lightly with a toothbrush just before baking. Holding the piece by the filling layers helps avoid smudging the pastel shading on top.
Step 3: Assembly & Fishing Touches
-
Stack the Elements:
Place the bottom bun down first, followed by the folded lettuce leaf. Press the meat patty firmly onto the lettuce. -
Drape the Cheese:
Lay the cheese square over the patty. Use a sculpting tool to gently press the corners down against the meat, making it look melted and heavy. -
Add the Tomato:
Place the tomato slice on top of the cheese, positioning it slightly off-center so it peeks out interestingly. -
Top it Off:
Place the top bun on the stack. Press down gently to adhere all layers, but be careful not to squash your delicate textures. -
Secure the Layers:
If the clay feels dry, apply a tiny dab of liquid polymer clay between the layers to act as glue before baking. -
Bake:
Bake the burger according to your clay manufacturer’s instructions. Usually, this is around 275°F (130°C) for 15-30 minutes. -
Glaze:
Once cool, brush a little gloss glaze on the tomato edge and the very top of the bun if you want a buttery shine, but leave the bread texture mostly matte.
Level Up: Condiments
Mix liquid clay with red or yellow pigment to create realistic ketchup or mustard drips. Apply with a needle tool oozing out from under the bun for an extra juicy detail.
Display your tiny culinary creation on a miniature slate or plate to complete the illusion


Fruit Slices With Fresh Details
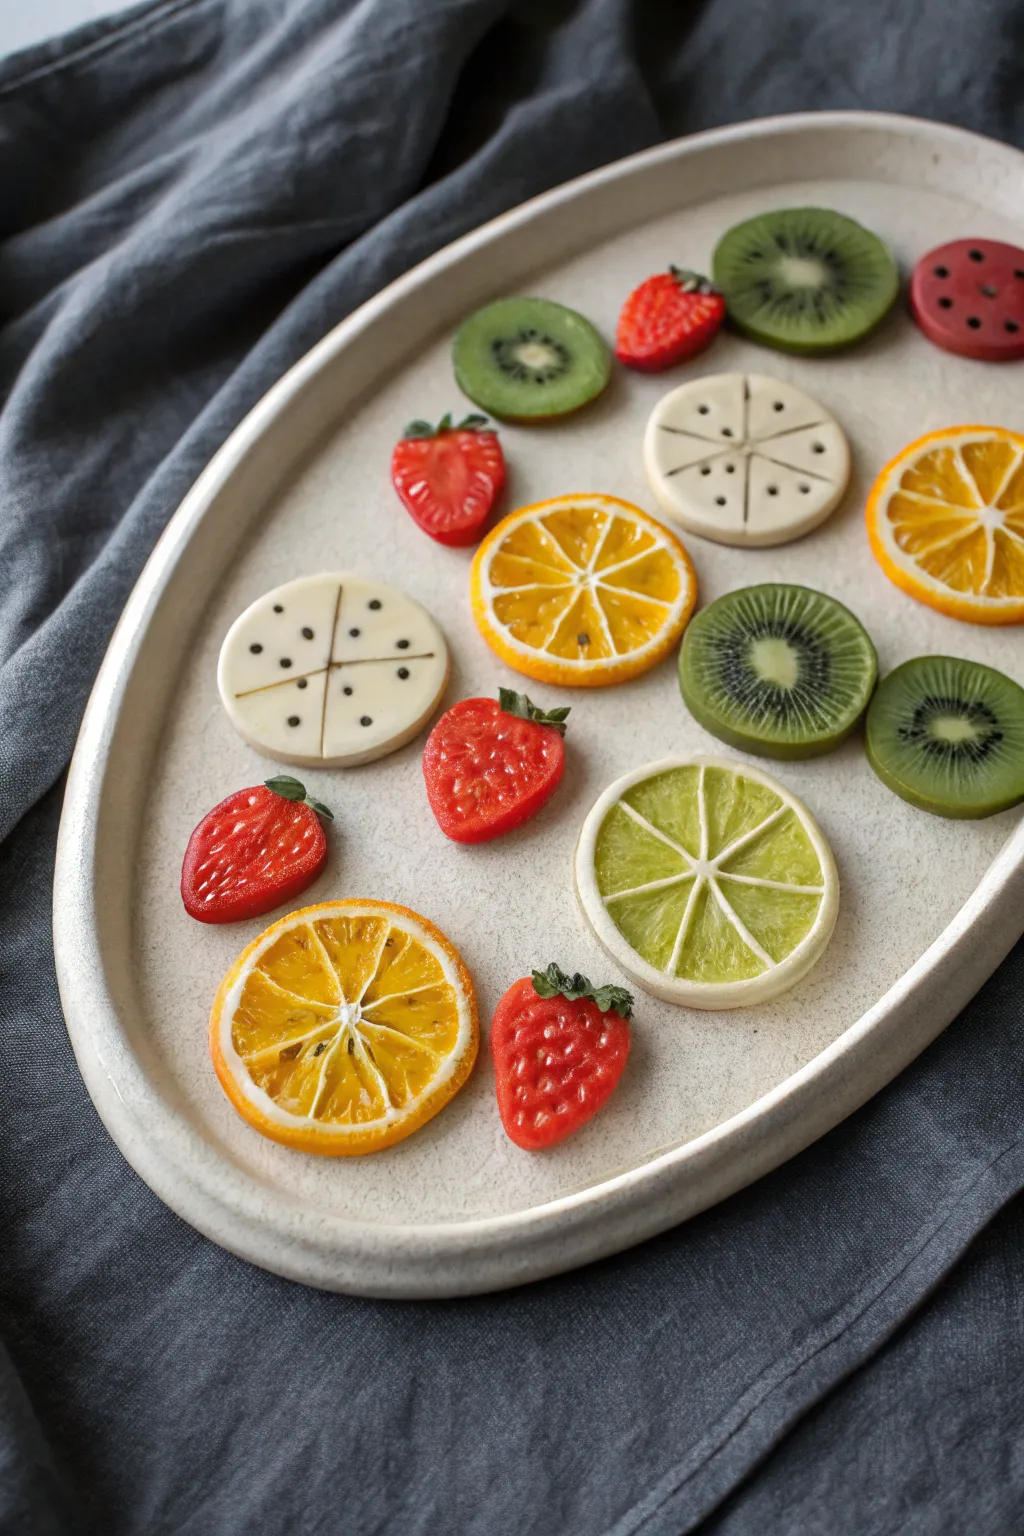
Transform vibrant polymer clay into a stunning assortment of lifelike fruit slices perfect for jewelry, miniature scenes, or decorative accents. This project combines translucency and texturing techniques to capture the juicy details of citrus, strawberries, and kiwis.
How-To Guide
Materials
- Polymer clay (translucent, white, yellow, orange, red, green, black)
- Liquid polymer clay (translucent)
- Acrylic rolling pin
- Precision craft knife or tissue blade
- Needle tool or dotting tool
- Small round cutters (various sizes)
- Pastel chalks (yellow, orange, green, red) for shading
- Gloss glaze or UV resin
- Fine-grit sandpaper
- Small paintbrush
Step 1: Citrus Slices (Orange, Lemon, Lime)
-
Prepare the translucent core:
Mix translucent clay with a tiny amount of colored clay (yellow for lemon, orange for orange). You want it to remain mostly see-through after baking. -
Create the segments:
Form the colored translucent mix into a log. Use a thin sheet of opaque white clay to wrap the log entirely. -
Assemble the cane:
Stretch the wrapped log carefully until it’s thinner, then cut it into 8 equal lengths. Arrange these pieces into a circle to form the wheel shape, placing a thin snake of white clay in the very center. -
Wrap the skin:
Wrap the entire wheel in a thicker sheet of white clay (the pith), followed by a final layer of colored opaque clay (yellow or orange) for the peel. -
Reduce to size:
Gently squeeze and roll the cane to reduce its diameter without distorting the pattern inside. Slice into thin, even discs using your tissue blade. -
Texture the pulp:
Use a needle tool to gently scratch tiny radiating lines into the translucent segments of each slice, mimicking juice vesicles.
Step 2: Kiwi Slices
-
Form the center:
Create a cylinder of light translucent yellowish-white clay for the kiwi core. -
Add the seeds:
Roll a sheet of translucent green clay. Sprinkle tiny specs of black clay or poppy seeds onto it, or poke holes and fill with black paint later. Wrap this seed layer around the core. -
Build the flesh and skin:
Wrap a thick layer of translucent green clay around the seed layer. Finish with a thin layer of brown clay mixed with a little green for the fuzzy skin. -
Slice and refine:
Reduce the cane and slice it. Use a needle tool to drag lines from the center outward to create the starburst pattern typical of kiwi flesh.
Chill Out
If your cane is getting squishy and distorting while you try to slice it, pop the clay in the refrigerator for 15 minutes. Firm clay slices much cleaner.
Step 3: Strawberries
-
Shape the base:
Mold opaque red clay into a teardrop shape that is flattened on the back (or both sides if making a slice). -
Add texture:
Use a small dotting tool to press indentations all over the surface for the seed pockets. -
Create the leaves:
Fashion tiny leaves from green clay using a craft knife and attach them to the top of the strawberry. -
Cut in half:
If making the sliced version shown, cut your strawberry shape in half vertically. Use white paint or a thin snake of white clay to create the inner white core pattern.
Make it Sparkle
Dust the fruit slices with clear micro-beads or fine glitter before the glaze dries to simulate a ‘sugared’ fruit candy look suitable for jewelry charms.
Step 4: Finishing Touches
-
Shade for realism:
Before baking, I like to brush a little shaved pastel chalk onto the edges of the fruit skins to give them a natural, ripening gradient. -
Bake:
Bake the pieces according to your polymer clay package instructions. Let them cool completely. -
Glaze:
Apply a coat of gloss glaze or UV resin specifically to the ‘juicy’ parts (the translucent segments), leaving the skins matte for contrast.
Arrange your freshly baked fruit slices on a tray or turn them into delightful summer accessories having captured a slice of freshness that lasts forever

The Complete Guide to Pottery Troubleshooting
Uncover the most common ceramic mistakes—from cracking clay to failed glazes—and learn how to fix them fast.
Melting Ice Cream Cones
Capture the fleeting delight of summer with this incredibly realistic ice cream sculpture. You’ll sculpt a detailed waffle cone and top it with texturized scoops that look like they are just beginning to melt in the sun.
Step-by-Step Guide
Materials
- Polymer clay (beige/tan for cone)
- Polymer clay (translucent white, pink, mint green)
- Liquid polymer clay (translucent)
- Textured rolling pin or waffle pattern mold
- Aluminum foil
- Needle tool
- Toothbrush or stiffness bristle brush
- Pastel chalks (browns, ochres)
- Gloss glaze
- Sculpting tools (ball styluses)
- Baking tile or oven-safe surface
Step 1: Crafting the Waffle Cone
-
Prepare the cone base:
Start by creating a cone shape out of aluminum foil. This acts as an armature to save clay and keep the sculpture lightweight. Ensure the top is flat where the ice cream will sit. -
Roll out the dough:
Condition your beige polymer clay until soft. Roll it out into a thin, even sheet, approximately 2-3mm thick. -
Texture the waffle pattern:
If you have a waffle texture mold, press the clay sheet firmly into it. If not, carefully score a diamond grid pattern deeply into the clay using a blunt knife or a ruler edge. -
Shape the cone:
Gently wrap your textured clay sheet around the foil armature. Trim away the excess clay where the edges meet. -
Seamless join:
Carefully blend the seam with a sculpting tool, trying to match up the grid lines so the waffle pattern looks continuous around the cone. -
Add baked realism:
Using a soft brush, dust the cone lightly with crushed brown and ochre chalk pastels. Focus on the raised grid lines to simulate that perfect golden-brown baked look.
Fixing the Slump
If your ice cream droops too much before baking, pop the sculpture in the fridge for 10 minutes to firm up the clay before putting it in the oven.
Step 2: Scooping and Sculpting
-
Mix your flavors:
Combine translucent white clay with small amounts of pink and mint green clay separately. The translucent base is key for that icy, realistic sheen. -
Form the scoops:
Roll two balls of clay, one pink and one mint. Mash them together slightly without fully blending the colors to create a swirled effect. -
Texture the ice cream:
Place the clay ball onto the cone. Use a toothbrush or a ball of crumpled foil to vigorously texture the surface. I like to tear bits of clay away with a needle tool to create those fluffy, frozen ridges. -
Create the ‘foot’:
Push the clay down over the rim of the cone. Shape irregular, rounded drips hanging over the edge to mimic melting. -
Simulate the melt:
Mix a small amount of liquid polymer clay with pink clay or chalk shavings to make a thick sauce. -
Drip application:
Carefully apply this liquid mixture over the solid clay drips and down the side of the waffle cone for a wet, glossy look. -
The puddled base:
Create a small, flat puddle of pink clay at the bottom of the cone where it rests on the surface. Blend the cone tip into this puddle so it stands upright securely.
Step 3: Finishing Touches
-
Baking:
Bake the sculpture according to your specific brand of clay’s temperature instructions. Usually, this is around 275°F (130°C) for 15-30 minutes. -
Cooling down:
Let the piece cool completely. The clay is fragile while hot, so resist the urge to touch it. -
Adding the shine:
Once cool, brush a coat of gloss glaze over strictly the ice cream portion and the melted drips. Leave the cone matte to maintain the contrast between the dry waffle and wet ice cream. -
Final details:
If desired, shave tiny bits of baked pink clay to sprinkle around the base as ‘crumbs’ for extra styling context.
Level Up: Sprinkles
Before baking, roll incredibly thin distinct snakes of colored clay, bake them briefly, chop them into tiny bits, and press them into the raw ice cream.
Display your unmelting masterpiece on a sunny shelf to confuse and delight your guests
Sushi Roll Variety Tray
Learn to sculpt a deceptively realistic sushi serving set using polymer or air-dry clay. This project features two classic hosomaki rolls and a textured uramaki roll served on a custom speckled tray, perfect for miniatures collections or faux food displays.
Step-by-Step Tutorial
Materials
- White polymer clay or air-dry clay
- Black clay (for nori)
- Translucent orange clay (for salmon/roe)
- Green clay (for avocado/cucumber)
- Cream or pale peach clay
- Rolling pin
- Needle tool or toothpick
- Toothbrush or texturing tool
- Black acrylic paint
- Matte varnish
- Craft knife
- Sandpaper
Step 1: Crafting the Speckled Tray
-
Condition and Flatten:
Begin with a large ball of white clay. Condition it well until pliable, then roll it out into a flat, even slab approximately 1/4 inch thick to form the base of your serving dish. -
Shape the Form:
Cut the slab into a rounded rectangle. Gently pinch up the edges all around the perimeter to create a shallow lip, smoothing the transition between the base and the rim with your thumb. -
Create the Speckles:
To achieve the stoneware look, dip a toothbrush into slightly watered-down black acrylic paint. Run your thumb over the bristles to flick tiny specks onto the wet clay surface. -
Final Texture:
Once the speckles are dry to the touch, lightly tap the surface with sandpaper or a stiff brush to remove any synthetic smoothness before baking or drying according to your clay’s instructions.
Rice Realism
For ultra-realistic rice, chop semi-translucent white clay into tiny grain-sized bits and press them together into a roll shape rather than just texturing a solid block.
Step 2: Sculpting the Hosomaki
-
Rice Texture:
Form a small cylinder of white clay. To mimic distinct rice grains, poke and tease the surface repeatedly with a needle tool until the clay looks fluffy and textured. -
Insert the Filling:
Use the handle of a paintbrush to create a deep indentation in the center of your rice cylinder. Fill this void with a small log of translucent orange clay, textured slightly to resemble fish. -
Wrap the Nori:
Roll out a very thin strip of black clay. Measuring the height of your rice roll, cut the strip and wrap it snugly around the exterior, overlapping the ends seamlessly. -
Refine the Edges:
Gently gently press the wrapped roll against your work surface to ensure the top and bottom are flat. Repeat these steps to create a second identical piece.
Sticky Nori?
If your black clay stains the white rice, chill the black clay slightly before rolling it out, or apply a light dusting of cornstarch to your hands before handling the white clay again.
Step 3: Sculpting the Uramaki
-
Prepare the Core:
For the inside-out roll, start with the filling. Create a tiny square block using a sliver of green clay (avocado) and white clay (cream cheese). -
Add the Rice Layer:
Roll out a thick sheet of white clay and texturize it heavily like rice. Wrap this entirely around your central filling block, smoothing the seam. -
Outer Coating:
Roll a very thin layer of pale peach or salmon-colored clay. Wrap this around the rice cylinder to create the fish topping layer. -
Rice Texture Touch-up:
Since handling the clay can flatten the details, go back over the white rice sections visible at the ends with your needle tool to restore the grainy look. -
Sesame Seeds:
Roll minuscule balls of black clay—smaller than a poppy seed. Press these gently onto the outer peach layer in a random pattern to simulate black sesame seeds.
Step 4: Finishing Touches
-
Cure the Sushi:
Bake or air-dry your sushi pieces according to the package directions. If baking polymer clay, keep an eye on the white clay to ensure it doesn’t scorch. -
Add Pits:
For the Uramaki sesame seeds, I like to use a tiny dotting tool to press the black seeds slightly into the peach clay so they don’t fall off later. -
Varnish:
Once fully cured and cool, apply a matte varnish to the rice and seaweed for a natural finish. Use a gloss varnish only on the ‘fish’ centers to make them look fresh and moist. -
Assembly:
Arrange the three sushi pieces on your speckled rectangular tray. You can use a dab of strong glue to secure them permanently if this is a display piece.
Display your completed sushi set on a table or shelf to add a whimsical culinary touch to your decor


What Really Happens Inside the Kiln
Learn how time and temperature work together inside the kiln to transform clay into durable ceramic.
Ramen Bowl With Noodles and Toppings
Recreate the comforting warmth of a steaming bowl of ramen with this detailed polymer clay sculpture. You’ll capture the textures of hand-pulled noodles, delicate broth, and a perfectly halved soft-boiled egg in a rustic ceramic-style bowl.
Step-by-Step Tutorial
Materials
- Polymer clay (white, translucent, yellow, green, brown, tan)
- Liquid polymer clay (translucent)
- Chalk pastels (orange, yellow, brown scales)
- Ceramic or glass bowl mold (or a large marble)
- Extruder tool with small round dye
- Detailing tools (needle tool, ball tool)
- Craft knife
- Gloss glaze or UV resin
- Fine paintbrush
- Aluminum foil
Step 1: Sculpting the Ceramic Bowl
-
Form the Base:
Start by conditioning a mix of white and tan clay to create a speckled, stoneware look. Add tiny flecks of black pepper or brown pastel dust into the clay for realistic ceramic speckling. -
Shape the Bowl:
Roll the clay into a ball, then flatten it slightly. Using your thumbs or a large ball tool, hollow out the center to form a deep bowl shape. Keep the walls somewhat thick to mimic the rustic pottery style in the photo. -
Create the Two-Tone Effect:
To achieve the dipped-glaze look, leave the bottom third of the bowl textured and matte. Smooth the upper two-thirds carefully with your finger and a bit of baby oil. -
Initial Bake:
Bake the empty bowl according to your clay package instructions (usually 275°F/130°C for 15 minutes) to set the shape before filling.
Cloudy Broth?
If your liquid clay broth looks too opaque after baking, use a heat gun for a few seconds while it’s still hot. This often clears up the translucency for a deeper soup look.
Step 2: Creating the Noodles and Broth
-
Mix Broth Color:
While the bowl cools, mix liquid polymer clay with a shaving of brown and orange chalk pastel. You want a translucent, amber-colored liquid that resembles soy-based broth. -
Extrude Noodles:
Condition a mix of white and translucent clay (about 1:1 ratio) for a cooked noodle look. Use a clay extruder with a small round disc to create long, continuous strands. -
Arrange the Base Noodles:
Squeeze a small amount of your liquid broth into the bottom of the baked bowl. Gently drop the extruded noodles into the liquid, letting them coil naturally. Don’t pack them too tight; you want them to look like they are floating. -
Fill the Bowl:
Add more liquid broth until the noodles are partially submerged, leaving the top loops exposed to catch the ‘light’.
Add Steam
Pull a tiny wisp of cotton from a cotton ball and glue it barely hovering over the bowl using a thin piece of wire or invisible thread to simulate rising steam.
Step 3: Crafting the Toppings
-
Sculpt the Egg Whites:
Roll two small balls of white clay and flatten them slightly into ovals. Press a smaller ball tool into the center of each to create a cavity for the yolk. -
Create the Yolks:
Mix yellow clay with a touch of translucent and orange. Roll small balls and place them into the egg white cavities. To get that jammy, soft-boiled texture, use a needle tool to rough up the center of the yolk slightly. -
Make Mushrooms:
make a small cane by wrapping a thin sheet of dark brown clay around a thick log of tan clay. Slice thin rounds from this cane. Use a tool to indent the sides slightly, creating the iconic mushroom cap shape. -
Chop Scallions:
Roll a very thin snake of green clay. Bake this snake separately for 5 minutes just to harden it slightly. Once cool, use a sharp blade to slice tiny, hollow-looking rings.
Step 4: Assembly and Finish
-
Placement:
Carefully place the two egg halves on the right side of the bowl, nesting them into the noodles. Tuck the sliced mushrooms just behind them. -
Garnishing:
I like to use a pair of tweezers for this part. Sprinkle the tiny scallion rings in a pile near the center, letting some fall into the broth. -
Final Bake:
Bake the entire piece again for the full duration recommended by your clay manufacturer to set the liquid clay and toppings. -
Glazing the Broth:
Once fully cooled, coat the liquid clay areas and the egg yolks with a high-gloss glaze or UV resin. This makes the soup look wet and oily. -
Glazing the Bowl:
Apply a semi-gloss glaze only to the upper, lighter section of the ceramic bowl, leaving the bottom tan section matte for that textured stoneware contrast.
Display your miniature masterpiece on a small woven coaster to complete the cozy presentation.
Bento Box Mini Meal Diorama
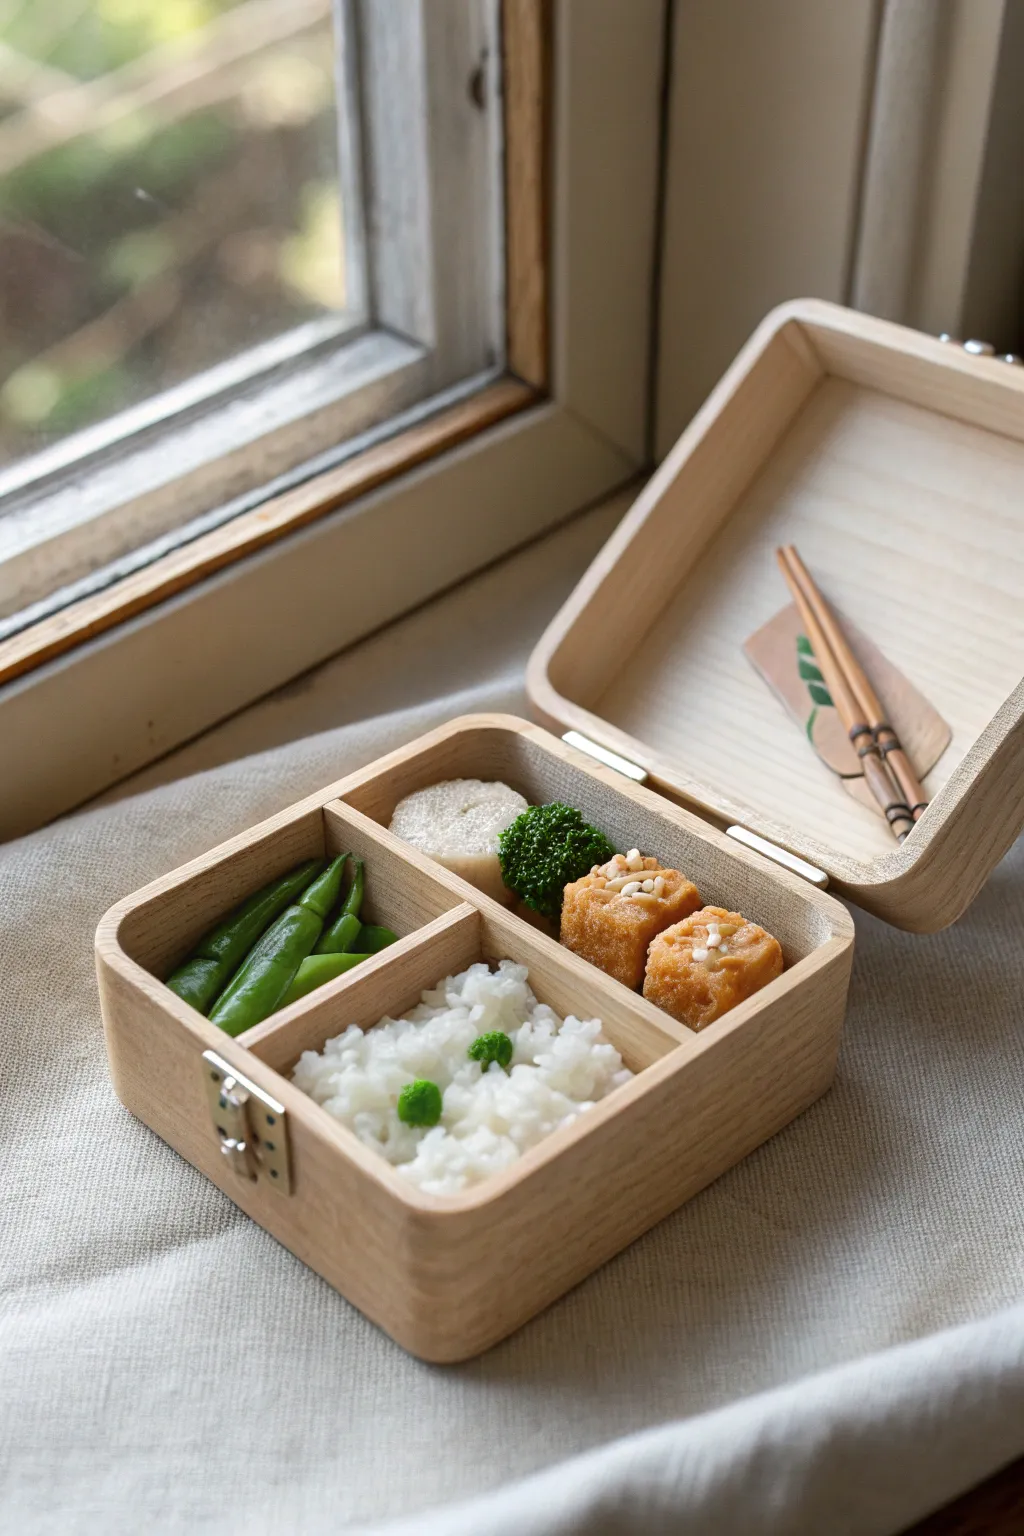
This charming project captures the essence of a tranquil lunch break with a miniature wooden bento box filled with hyper-realistic clay foods. The clean lines of the box contrast beautifully with the textures of the tiny rice grains and vegetables, making it a perfect display piece.
How-To Guide
Materials
- Polymer clay (whites, greens, tans, yellows, browns)
- Balsa wood or basswood sheets (2mm thick)
- Wood glue
- Liquid clay or translucent liquid sculpey
- Pastel chalks (browns, oranges) for shading
- Soft paintbrush for pastels
- Needle tool or toothpick
- Toothbrush or textured aluminum foil ball
- X-acto knife or craft knife
- Fine sandpaper
- Small hinges and latch (optional, jewelry findings)
- Gloss glaze (for sauce effect)
Step 1: Crafting the Wooden Box
-
Measure and cut base:
Cut a square base from your balsa wood roughly 2 inches by 2 inches. Sand the edges gently to remove any splinters. -
Cut the walls:
Cut four strips of wood for the outer walls. Their height should be proportional to the base, likely around 1 inch. Miter the corners at 45 degrees if you can, or simply butt them together for a simpler look. -
Assemble the box frame:
Glue the walls to the base and to each other using wood glue. Clamp gently or hold in place until the glue feels tacky enough to hold. -
Add internal dividers:
Cut smaller strips of wood to create the ‘T’ shape divider seen in the image. One long strip runs halfway, and a shorter strip connects it to the side wall. Glue these in place. -
Create the lid:
Fabricate a lid using the same dimensions as the base. You can add a small lip around the underside edge so it sits snugly on top of the box. -
Attach hardware detailed:
If you want a functional box, carefully glue tiny jewelry hinges to the back and a small latch to the front using super glue. Alternatively, simply prop the lid open for display.
Texture Pro Tip
For the most realistic broccoli, push the dark green clay through a fine mesh strainer first. Use the extruded ‘worms’ bunched together to form the florets.
Step 2: Sculpting the Food
-
Forming the rice grains:
This is the most time-consuming part. Roll tiny sausages of white translucent clay and chop them into rice grain sizes. Pile them into the largest compartment, pressing them down gently so they stick together. -
Adding texture to rice:
I like to use a needle tool to fluff up the top layer of ‘grains,’ making sure they look loose and fluffy rather than a solid block. -
Making the green peas:
Roll three or four tiny balls of bright green clay. Nestle them into your rice bed to add a pop of color. -
Sculpting the snap peas:
For the green vegetable compartment, roll green clay into pointed ovals. Use a knife to make a shallow indentation on the curved side to mimic the seam of a snap pea. -
Creating the fried tofu:
Mix tan and yellow clay to get a ‘fried’ color. Form two small cubes. Takes a toothbrush or a ball of crumbled foil and press it against the sides to create a porous, fried texture. -
Shading for realism:
Shave some orange and brown chalk pastels into a powder. Dry brush this lightly onto the edges and tops of the tofu cubes to simulate golden-brown frying marks. -
Adding tofu toppings:
Roll extremely tiny bits of white clay (for garlic or sesame) and press them onto the top center of the tofu cubes. -
Making the broccoli:
Form a small stalk from light green clay. For the florets, chop dark green clay into tiny crumbs and press them firmly onto the head of the stalk until it looks dense and textured. -
Arranging the components:
Place the snap peas in one small section, the broccoli next to it, and the tofu cubes in the final remaining spot. If they don’t stay, a drop of liquid clay acts as a great adhesive.
Step 3: Finishing Touches
-
Final bake:
Bake the entire piece (wood and clay together) according to your clay package instructions. The wood is safe in the oven at low clay-baking temperatures (usually 275°F/130°C). -
Glazing:
Once cool, brush a tiny bit of satin or gloss glaze onto the snap peas and the top of the tofu to make them look moist and appetizing. -
Tiny chopsticks:
Whittle a scrap of the balsa wood into two very thin sticks. You can paint the ends or wrap them with tiny strips of paper to mimic decorative holding bands.
Level Up: Sauces
Mix translucent liquid clay with brown chalk pastel or alcohol ink. Drizzle this ‘soy sauce’ carefully over the tofu or rice for an ultra-realistic finish.
Place your finished bento box near a natural light source to really show off those tiny, tasty details

TRACK YOUR CERAMIC JOURNEY
Capture glaze tests, firing details, and creative progress—all in one simple printable. Make your projects easier to repeat and improve.
Kawaii Food Friends With Tiny Faces
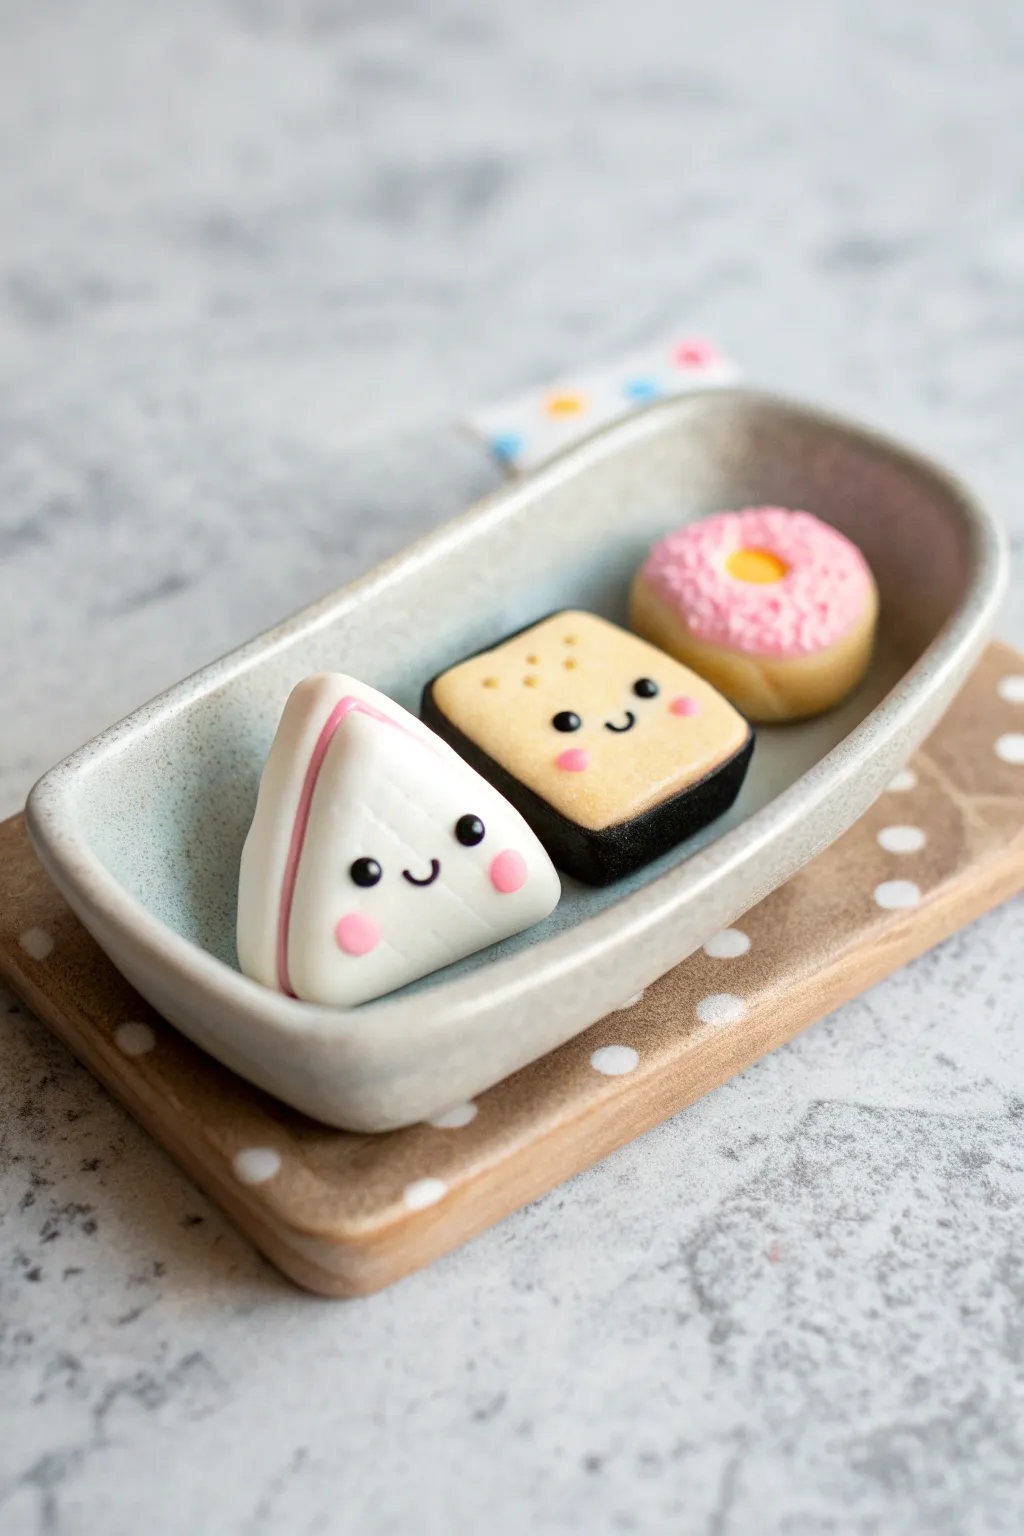
Create a charming set of three miniature food friends—a happy onigiri, a smiling cracker, and a sweet donut. These polymer clay sculptures feature simple shapes and adorable tiny faces that are perfect for beginners to practice their modeling skills.
Step-by-Step
Materials
- Polymer clay (white, beige/tan, black, pink, yellow)
- Clay sculpting tools (needle tool, dotting tool)
- Rolling pin or pasta machine
- Blade or craft knife
- Soft pastel chalks (pink, light brown) for shading
- Small paintbrush
- Oven for baking
- Glaze or varnish (optional)
Step 1: Sculpting the Onigiri
-
Shape the base:
Start with a ball of white polymer clay about the size of a marble. Gently flatten it and pinch the top into a soft point to form a rounded triangle shape. -
Add the filling detail:
Roll a very thin snake of pink clay. Press this vertically down the center of your triangle, flattening it slightly so it looks like a strip of filling peeking out. -
Wrap the filling:
Take two small balls of white clay, flatten them into teardrop shapes, and press them onto the sides of the triangle, slightly overlapping the pink strip, so it looks like the rice is wrapped around the filling. -
Add the face:
Using a small ball tool, make two indentations for eyes. Place tiny balls of black clay into these spots. Roll an impossibly thin thread of black clay for the smile and press it gently between the eyes. -
Blush cheeks:
Flatten two tiny discs of pink clay and press them under the eyes for rosy cheeks.
Keep it Clean
White clay picks up dust easily. Keep baby wipes nearby and clean your hands and tools thoroughly before handling the white clay for the onigiri.
Step 2: Crafting the Cracker Sandwich
-
Create the cracker:
Roll out beige clay to a medium thickness. cut a square shape with rounded corners. -
Texture the surface:
Using a needle tool, poke a pattern of small dots across the top surface to mimic the texture of a baked cracker. -
Add shading:
I like to brush a little scraped light brown pastel dust around the edges of the cracker to give it a toasted, baked look. -
Make the base:
Create a square of black clay the same size as your cracker but slightly thicker. This will be the seaweed or chocolate layer. -
Assemble and face:
Stack the beige cracker on top of the black base. Add black eye beads, a tiny black thread smile, and pink clay cheeks just like the onigiri.
Step 3: Making the Tiny Donut
-
Form the donut base:
Roll a ball of beige or light tan clay and flatten it slightly. Use a large ball tool to press a deep indentation in the center, not going all the way through, just creating the donut shape. -
Add the frosting:
Flatten a smaller ball of pink clay into a rough circle with wavy edges. Place this on top of your donut base and smooth it down so it looks like poured icing. -
Make the center hole:
Place a tiny yellow ball of clay into the center indentation to represent a custard filling or just a colorful center. -
Sprinkle texture:
Use a needle tool to scratch tiny lines all over the pink frosting to simulate texture or sprinkles.
Make Them Charms
Before baking, insert a small metal eye pin into the top of each figure. Once baked, you can attach jump rings to turn them into keychain charms or earrings.
Step 4: Finishing Touches
-
Final check:
Ensure all facial features are secure. If fingerprints are visible, lightly brush them away with a bit of baby oil or clay softener on your finger. -
Bake:
Bake your pieces according to the instructions on your specific brand of polymer clay. Let them cool completely before handling. -
Glaze:
For extra durability and shine, apply a coat of satin or matte varnish to your finished food friends.
Now you have a trio of adorable companions ready to brighten up your desk or shelf