Whenever I’m craving something cute but low-effort, I reach for air-dry clay and keep the shapes simple—because that’s where the easiest aesthetic clay ideas really shine. These are my go-to projects when you want that clean, modern look without needing fancy tools or advanced sculpting skills.
Organic Trinket Dish

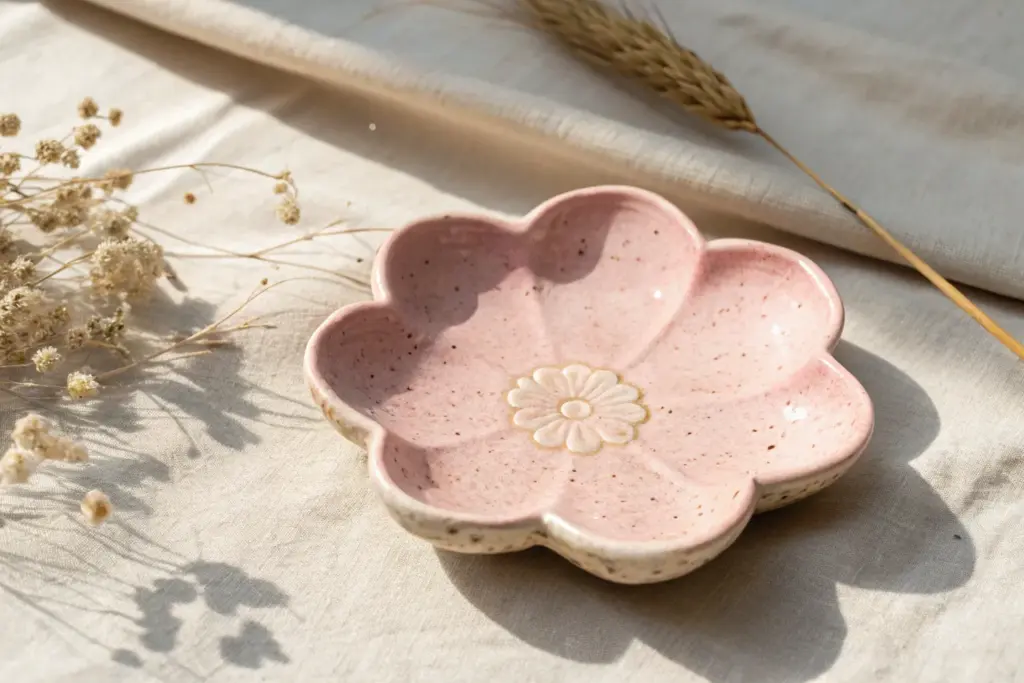
This elegant trinket dish combines a soft, organic shape with a luxurious touch of gold, making it the perfect spot for your favorite rings. The irregular, wavy edges give it a handcrafted charm that looks effortless and sophisticated.
Step-by-Step
Materials
- White polymer clay or air-dry clay
- Rolling pin or smooth glass jar
- Circle cutter or a round bowl (approx. 4-5 inches)
- Small bowl or sponge (for drying form)
- Craft knife
- Fine-grit sandpaper (400-600 grit)
- Liquid gold leaf or gold acrylic paint
- Fine detail paintbrush
- Gloss varnish or glaze
Step 1: Shaping the Clay
-
Condition the clay:
Start by warming up a small ball of white clay in your hands. Knead it until it is soft, pliable, and free of any cracks. -
Roll it out:
Place the clay on a clean, smooth surface. Use your rolling pin to flatten it into an even sheet, aiming for about 1/4 inch thickness. -
Cut the circle:
Place your circle cutter or an inverted bowl onto the clay sheet. Press down firmly to create a clean round shape, then lift away the excess clay. -
Smooth the edges:
Dip your finger in a tiny bit of water (if using air-dry clay) or baby oil (for polymer) and run it gently along the cut edge to soften any sharp corners. -
Create the wave:
Gently pinch and pull the edges of the circle upwards at random intervals. I like to push the rim in and out slightly to create that natural, floral-like undulation. -
Form the curve:
To give the dish its bowl shape, carefully place your clay circle inside a slightly larger bowl or on top of a curving sponge. Let gravity help settle the center while the edges stay lifted. -
Refine the texture:
While it’s in the form, use your thumb to gently smooth the inside surface. If you want a subtle texture, you can lightly press a piece of fabric into the drying clay, but for this smooth look, just keep smoothing with your finger.
Step 2: Drying and Refining
-
Dry or bake:
If using air-dry clay, leave it in the drying form for 24-48 hours. If using polymer clay, bake according to the package instructions (usually around 275°F/135°C for 15-30 minutes). -
Cool down:
Allow the piece to cool completely before handling it. It needs to be fully hardened before we can sand it. -
Sand the surface:
With fine-grit sandpaper, gently buff the rim and the interior curve. Focus on removing any fingerprints or sharp jagged bits on the waves. -
Wipe clean:
Use a slightly damp cloth or a soft brush to remove all the sanding dust. The surface must be perfectly clean for the gold to adhere.
Smooth Operator
Use a damp sponge to smooth air-dry clay before it dries. It acts like a ‘wet sand’ and reduces the amount of dusty sanding needed later.
Step 3: Golden Touches
-
Prepare the gold:
Shake your liquid gold leaf or gold paint well. You want the pigment to be rich and fully mixed. -
Paint the rim:
Load a fine detail brush with gold. Carefully drag the brush along the very edge of the uneven rim. -
Add ‘spillover’:
Don’t make the line too perfect. Allow the gold to naturally extend slightly thicker in some divots and thinner on peaks to emphasize the organic shape. -
Seal the dish:
Once the gold is completely dry, apply a coat of gloss varnish over the entire dish. This gives it that ceramic-like shine and protects your jewelry from scratching the clay. -
Final cure:
Let the varnish dry fully according to the bottle’s instructions before placing any jewelry inside.
Speckled Stone Effect
Mix black pepper or dried used coffee grounds into the white clay before rolling. This creates a trendy speckled pottery look without glaze.
Your new jewelry dish is ready to add a touch of handmade elegance to your bedside table


Minimal Ring Cone
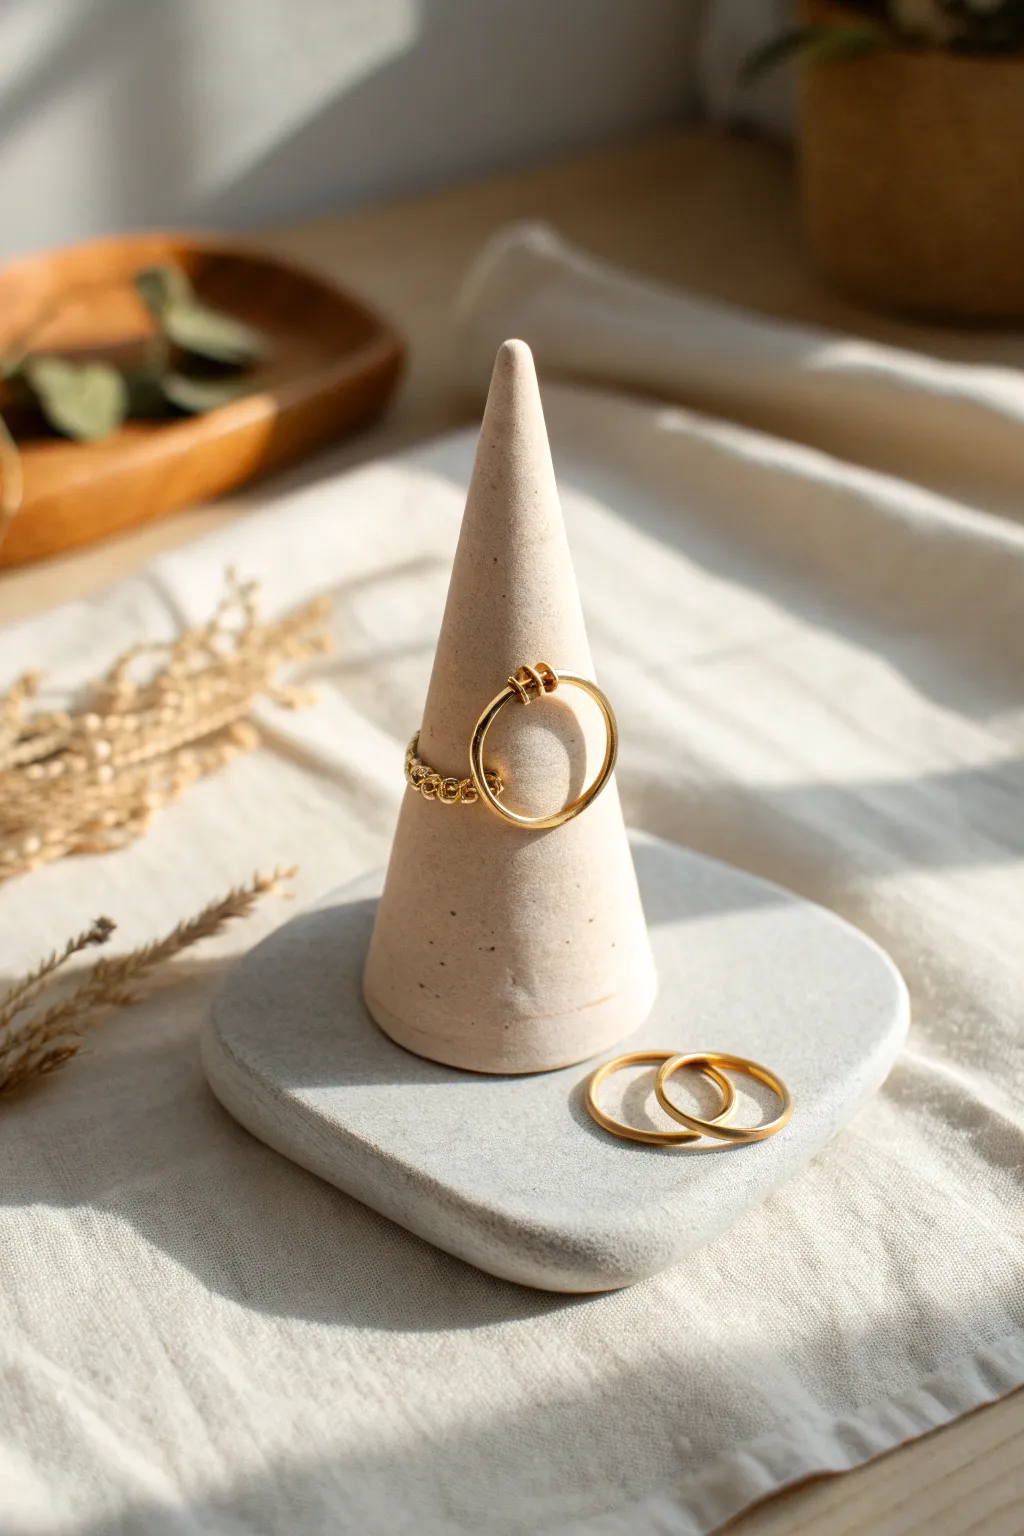
This minimalist ring cone combines a sleek conical form with a soft, organic base for a modern jewelry display. The subtle speckled texture mimics natural stone, giving your vanity a touch of earthy elegance without needing a kiln.
Step-by-Step Tutorial
Materials
- White polymer clay (cernit or fimo)
- Black pepper or dried coffee grounds (for speckles)
- Acrylic rolling pin
- Sharp clay blade or X-Acto knife
- Fine grit sandpaper (400 and 1000 grit)
- Baking sheet and parchment paper
- Oven (for curing)
- Ruler
Step 1: Preparation & Mixing
-
Condition the clay:
Begin by warming up a block of white polymer clay in your hands. Knead it thoroughly until it is soft, pliable, and free of cracks. -
Create the stone effect:
Flatten the conditioned clay into a pancake shape. Sprinkle a small pinch of ground black pepper or dried used coffee grounds onto the surface. -
Incorporate the texture:
Fold the clay over the speckles and knead again. Continue folding and rolling until the black specks are evenly distributed throughout the white clay, resembling granite or speckled ceramic.
Leaning Tower?
If your cone starts to droop while sculpting, pop it in the fridge for 10 minutes. The cold firms up the polymer clay, making it easier to refine the sharp point without it bending.
Step 2: Forming the Base
-
Roll the slab:
Using your acrylic roller, roll about half of your speckled clay into a thick, even slab, approximately 1/4 inch (6mm) thick. -
Cut the square:
Use your clay blade to cut a perfect square. A 3×3 inch size works well for a standard ring dish base. -
Soften the edges:
Use your finger to gently rub the sharp corners and cut edges of the square. You want to round them off significantly to match the soft, organic look in the photo. -
Smooth the surface:
Lightly glide your finger or a little cornstarch over the top surface to remove any fingerprints.
Step 3: Sculpting the Cone
-
Shape the rough form:
Take the remaining clay and roll it into a smooth ball, then begin rolling it back and forth on your work surface, applying more pressure to one side to create a teardrop or carrot shape. -
Refine the cone:
Stand the teardrop up on its flat end. Gently roll it between your palms while pulling upwards to elongate the tip. Aim for a height of about 3 to 4 inches. -
Flatten the bottom:
Press the bottom of the cone firmly onto your work surface to ensure it is perfectly flat and will stand straight up without wobbling. -
Check proportions:
Place the cone temporarily on the center of your square base to ensure the scale looks correct. The cone should look substantial but not overwhelm the base.
Gold Dip Luxe
Elevate the look by painting just the very tip of the cone or the rim of the base with liquid gold leaf or metallic acrylic paint after baking for a chic, high-end jewelry store vibe.
Step 4: Assembly & Finishing
-
Score the connection points:
Use a needle tool or toothpick to scratch a cross-hatch pattern on the bottom of the cone and the center of the square base where they will join. -
Join the pieces:
Press the cone firmly onto the center of the base. I like to use a blending tool or my finger to smooth a tiny amount of clay from the cone down onto the base to create a seamless, integrated seam. -
Final smoothing:
Do one last inspection for fingerprints or lint. Use a tiny drop of baby oil on your finger to smooth out any imperfections before baking. -
Bake:
Place the assembled structure on a parchment-lined baking sheet. Bake according to your polymer clay package instructions (usually 275°F/135°C for 15-30 minutes per 1/4 inch of thickness). -
Cool down:
Allow the piece to cool completely in the oven. Removing it while hot can cause cracking or warping. -
Sand for matte finish:
Once cool, wet-sand the piece under running water using 400 grit sandpaper to remove any shine, followed by 1000 grit for a velvety smooth, stone-like finish.
Now you have a chic, sculptural home for your favorite rings to rest


Flower-Shaped Coasters
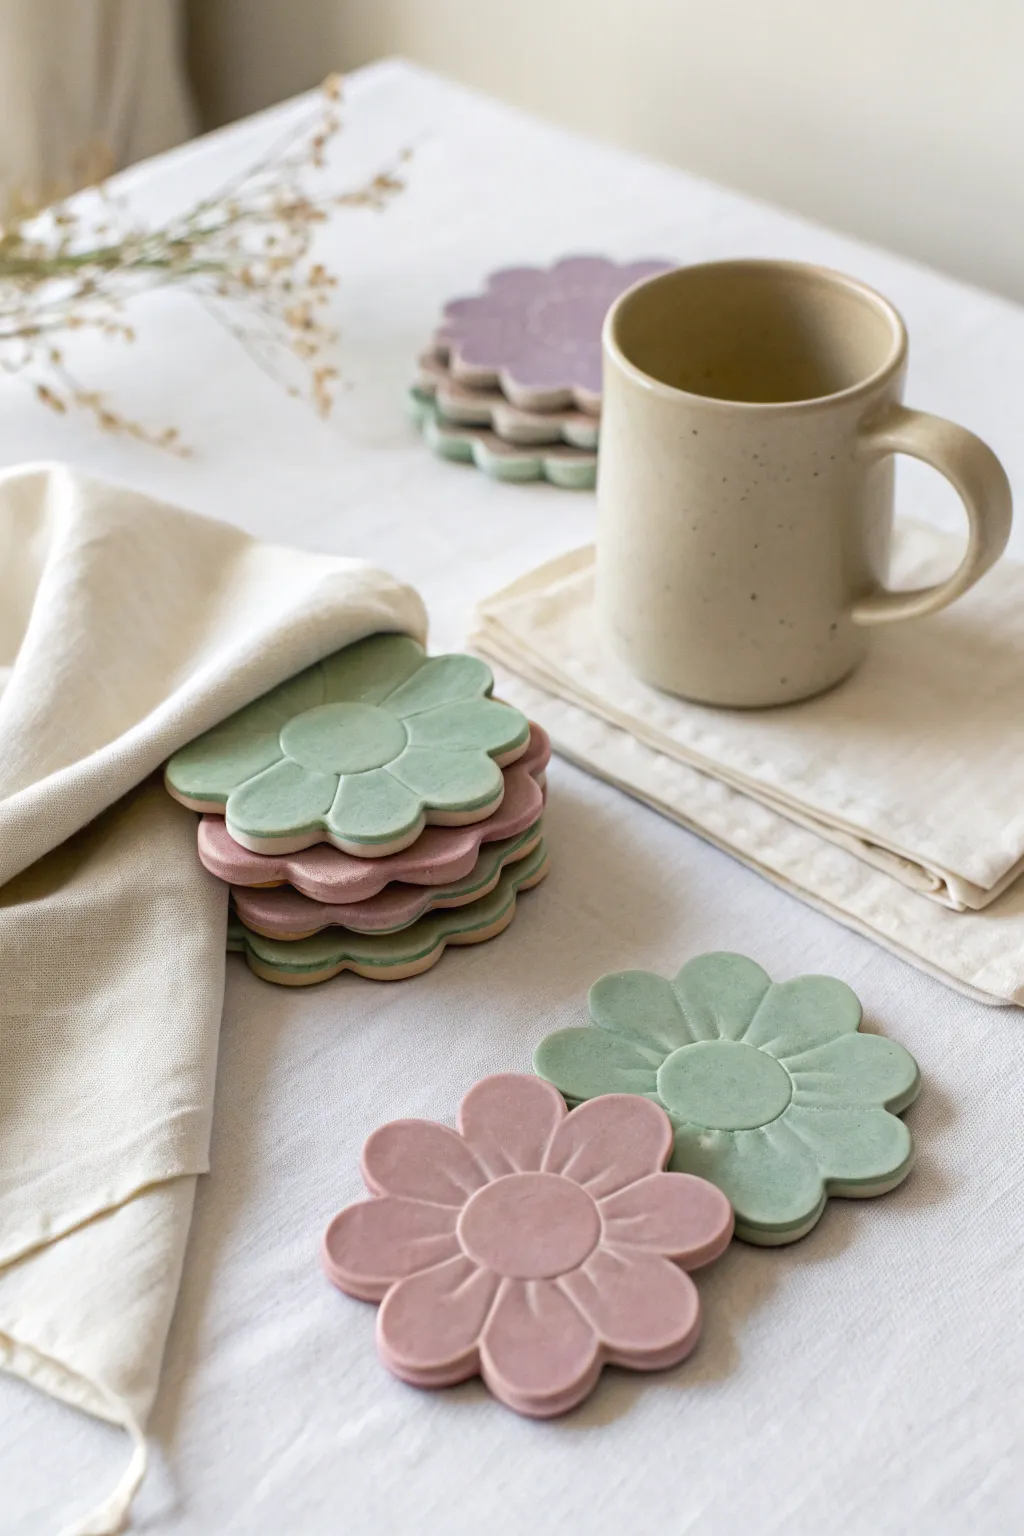
Bring a soft, whimsical touch to your coffee table with these charming flower-shaped coasters. Their matte pastel finish and simple petal design make them a perfect beginner-friendly project that looks effortlessly chic.
Step-by-Step
Materials
- Air-dry clay or polymer clay (white)
- Acrylic rolling pin
- Parchment paper or silicone mat
- Round cookie cutter (approx. 3.5 inches)
- Smaller round cutter or bottle cap (approx. 1 inch)
- Modeling tool or butter knife
- Sandpaper (fine grit)
- Acrylic paints (sage green, dusty pink, lavender)
- Matte sealant or varnish
- Paintbrushes
- Small bowl of water
Step 1: Shaping the Base
-
Prepare your workspace:
Lay down your parchment paper or silicone mat to prevent sticking. Take a handful of clay and knead it until it’s soft and pliable, ensuring there are no air bubbles trapped inside. -
Roll the slab:
Place the clay ball on your surface and roll it out evenly using the acrylic roller. Aim for a thickness of about 1/4 inch so the coasters are sturdy enough to hold a mug. -
Cut the main circle:
Use your large round cookie cutter to punch out a clean circle. If you don’t have a cutter, trace a wide rimmed glass or mug and cut around it with a craft knife. -
Mark the center:
Take your smaller round cutter or bottle cap and gently press it into the absolute center of the clay circle. Do not cut all the way through; you just want to create a clear indentation for the flower’s center.
Smooth & Even
Place two wooden rulers or stacked playing cards on either side of your clay while rolling. This acts as a depth guide to ensure your slab is perfectly level.
Step 2: Sculpting the Flowet
-
Divide the petals:
Using a modeling tool or the back of a butter knife, gently press indentations radiating from the center circle to the outer edge. Imagine a clock face to help space them evenly—start at 12, 6, 3, and 9, then fill the gaps. -
Shape the petal edges:
Use your fingers to gently pinch and round off the outer edge of each section between your lines. You want to transform the perfect circle into a scalloped flower shape. -
Detail the grooves:
Go back over your radiating lines with the modeling tool to deepen the separation between petals, giving the flower more dimension. -
Smooth imperfections:
Dip your finger in a little bit of water and run it over the edges and surface of the clay to smooth out any fingerprints or rough textures. -
Drying time:
Transfer the coaster to a flat, dry surface. Let it dry completely according to your clay package instructions. For air-dry clay, I usually flip them over halfway through drying to prevent warping.
Step 3: Finishing Touches
-
Sand for smoothness:
Once fully cured or dry, use fine-grit sandpaper to gently buff the edges and surface. Focus on smoothing out any sharp points on the scalloped edges. -
Mix your colors:
Mix your acrylic paints to achieve those dusty, muted tones. Add a touch of white to green for sage, or a bit of brown to pink for a dusty rose look. -
Apply the base coat:
Paint the entire top surface and sides of the coaster. Let the first coat dry completely before assessing if a second coat is needed for opaque coverage. -
Paint the bottom:
Once the top is dry, flip the coaster and paint the bottom to ensure a professional, finished look. -
Seal the deal:
Apply a coat of matte varnish or sealant over the entire piece. This is crucial to protect the clay from moisture when a sweaty glass sits on it.
Prevent Warping
If your air-dry clay starts curling up at the edges while drying, place a lightweight book on top of it (with parchment paper in between) once it’s semi-dry.
Now you have a lovely set of custom coasters ready to protect your surfaces with style


Cloud Catch-All Tray
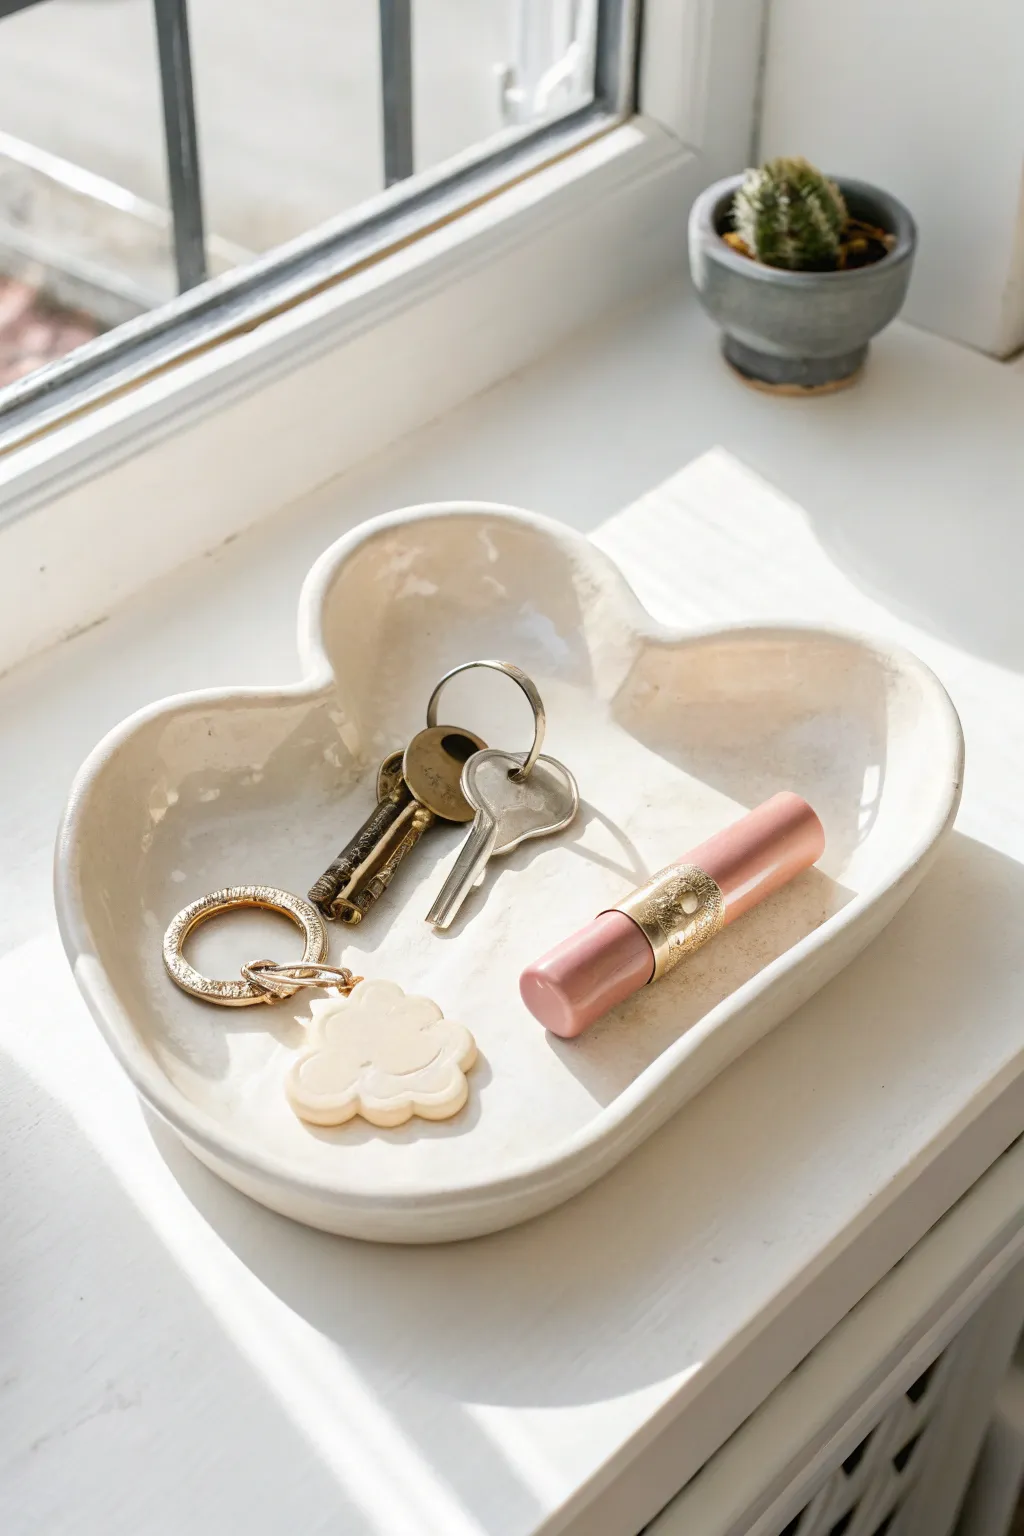
Keep your essentials organized in style with this charming cloud-shaped trinket dish. Its soft curves and glossy cream finish make it a minimalist yet whimsical addition to any entryway or nightstand.
Detailed Instructions
Materials
- Air-dry clay (white) or polymer clay
- Rolling pin
- Paper template of a cloud shape
- Craft knife or clay cutter
- Small bowl of water
- Sponge
- Fine-grit sandpaper
- White acrylic paint (if using air-dry clay)
- High-gloss varnish or distinct glaze
Step 1: Shaping the Cloud
-
Prepare your workspace:
Begin by laying down a mat or parchment paper to protect your surface. Take a generous handful of clay and knead it well until it feels soft and pliable, ensuring there are no air bubbles trapped inside. -
Roll out the slab:
Using your rolling pin, flatten the clay into an even slab. Aim for a thickness of about a quarter-inch—too thin and it might crack, too thick and it will look clunky. -
Cut the shape:
Place your cloud template gently onto the clay slab. Use your craft knife to trace around the paper, cutting cleanly through the clay. Remove the excess clay and set it aside for future projects. -
Smooth the edges:
Dip your finger in a little bit of water and run it along the cut edges of your cloud. This helps to round off sharp angles and erase any drag marks from the knife.
Cracks Appearing?
If small cracks form while drying, mix a tiny bit of fresh clay with water to make a paste (slip). Fill the cracks, smooth over, and let dry again.
Step 2: Forming the Dish
-
Turn up the rim:
Gently lift the edges of the cloud shape upwards with your fingertips. You want to create a raised rim to keep your keys and trinkets contained, while keeping the center flat. -
Refine the curve:
Work your way around the perimeter, pinching and smoothing the clay to create a seamless transition from the base to the rim. I find it helpful to support the outside wall with one hand while smoothing the inside with the other. -
Verify the height:
Check that the rim height is consistent all the way around. It should be just tall enough to catch items, roughly half an inch high. -
Final smoothing:
Take a slightly damp sponge and wipe the entire surface of the dish. This creates that professional, polished look before drying.
Step 3: Finishing and Glazing
-
Let it dry completely:
Allow your piece to dry for 24-48 hours. Flip it over halfway through the process so the bottom dries evenly with the top. -
Sand imperfections:
Once fully dry, use fine-grit sandpaper to gently buff away any rough spots on the rim or surface. Wipe away the dust with a dry cloth. -
Paint the base coat:
If your clay dried grayish or dull, apply two thin coats of creamy white acrylic paint. Let the first coat dry fully before adding the second to avoid streaks. -
Apply the gloss:
To achieve the ceramic look shown in the photo, finish with a thick coat of high-gloss varnish. This protects the tray and gives it that beautiful, light-reflecting shine.
Add Gold Accents
For an upscale look, paint just the very rim of the cloud with a metallic gold leaf paint before sealing it. The gold adds a lovely vintage touch.
Place your new tray on a sunny windowsill and enjoy that satisfying clink when you drop your keys in at the end of the day

The Complete Guide to Pottery Troubleshooting
Uncover the most common ceramic mistakes—from cracking clay to failed glazes—and learn how to fix them fast.
Tiny Bud Vase Set
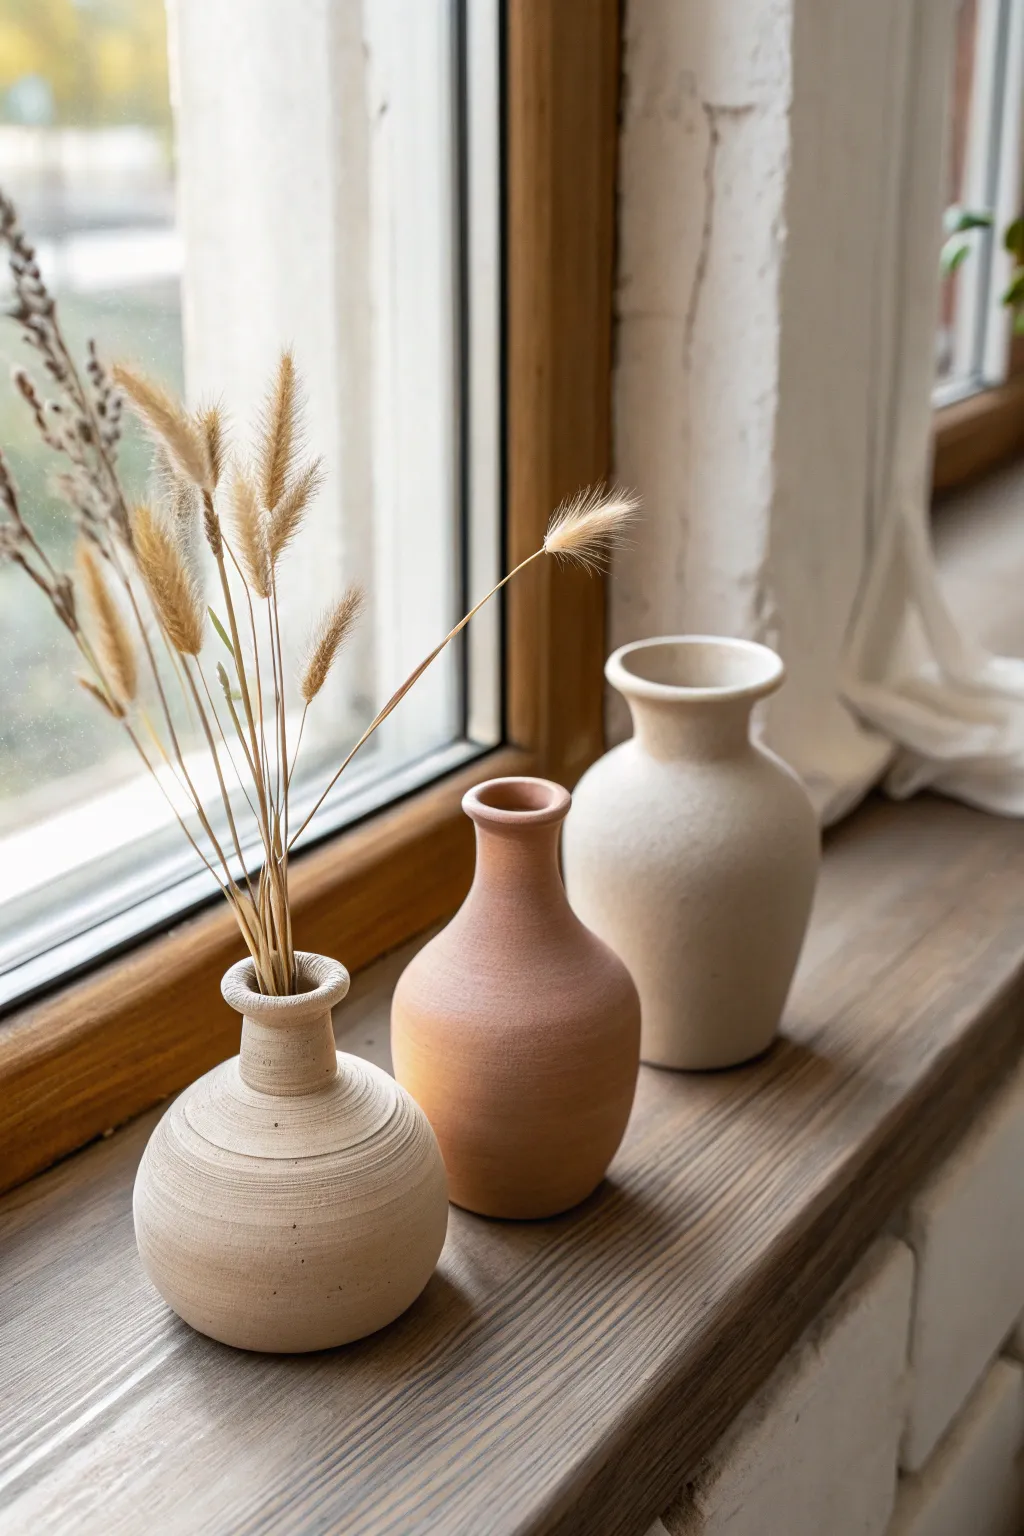
Create a serene, minimalist display with this set of three petite bud vases, each boasting its own unique silhouette and soft, matte texture. These pieces mimic the look of wheel-thrown pottery using hand-building techniques, perfect for bringing a touch of earthy warmth to any windowsill.
Step-by-Step Tutorial
Materials
- Air-dry clay (stone, terracotta, and white)
- Small rolling pin
- Pottery wire or dental floss
- Needle tool or toothpick
- Sponge
- Small bowl of water
- Sandpaper (fine grit)
- Matte acrylic varnish (optional)
- Clay carving tools (specifically a loop tool)
Step 1: Shaping the Bulbous Vase
-
Form the base:
Start with a ball of stone-colored clay about the size of a tennis ball. Roll it firmly between your palms to smooth out any cracks, then place it on your work surface -
Pinch the pot:
Insert your thumb into the center of the ball and gently pinch outward while rotating the clay to create a hollow sphere with thick walls. -
Close the top:
In the upper third of the sphere, gently collar the clay inward by circling it with your hands, narrowing the opening to create a shoulder. -
Create the neck:
Roll a small coil of additional clay, score and slip the area around the narrowed opening, and attach the coil to build the neck upwards. -
Refine the rim:
Add a final, slightly wider coil to the top edge to create a flared rim, blending the clay downward with your thumb for a seamless join. -
Add texture:
While spinning the vase slowly (a lazy susan works great if you have one), gently press a loop tool or the side of a credit card against the body to create the horizontal grooved lines seen in the reference.
Cracks Appearing?
If small cracks appear while shaping, your clay is too dry. Dip your finger in water and smooth over the crack immediately to seal it up.
Step 2: Creating the Terracotta Bottle & White Urn
-
Start the terracotta bottle:
Using terracotta-colored clay, form a taller, pear-shaped solid cone first, then use the pinch method combined with upward stroking to hollow it out. -
Elongate the neck:
Focus on pulling the clay upwards rather than outwards to get that slender, elegant neck profile, keeping the walls consistent in thickness. -
Smooth the surface:
Unlike the first vase, keep this texture smoother. Use a slightly damp sponge to wipe away fingerprints, but leave the natural grain of the clay visible. -
Form the white urn:
Grab your white clay and shape a wider base that tapers significantly toward the top, similar to a classic vase silhouette but in miniature scale. -
Define the lip:
Flare the opening of this white vase outwards more dramatically than the others, creating a wide, inviting mouth.
Step 3: Finishing Touches
-
Dry slowly:
Let all three vases dry loosely covered with plastic for the first 24 hours to prevent cracking, then uncover them to dry completely for another 1-2 days. -
Sand for texture:
Once fully dry, take your sandpaper and gently scuff the surfaces. This enhances that matte, stone-like aesthetic and removes any sharp burrs. -
Clean up dust:
Wipe the pieces down with a barely damp cloth or a dry paintbrush to remove the sanding dust. -
Seal (Optional):
If you plan to use fresh flowers, you must seal the interior with waterproof varnish. For dried grasses like the example, leaving the raw clay finish is perfectly fine.
Faux Stone Effect
Mix dried coffee grounds or cracked black pepper into white clay before shaping to create a speckled, granite-like organic texture.
Arrange your trio on a sunny ledge with some dried bunny tails or wheat for an effortless decorative moment
Simple Photo Holder Stand
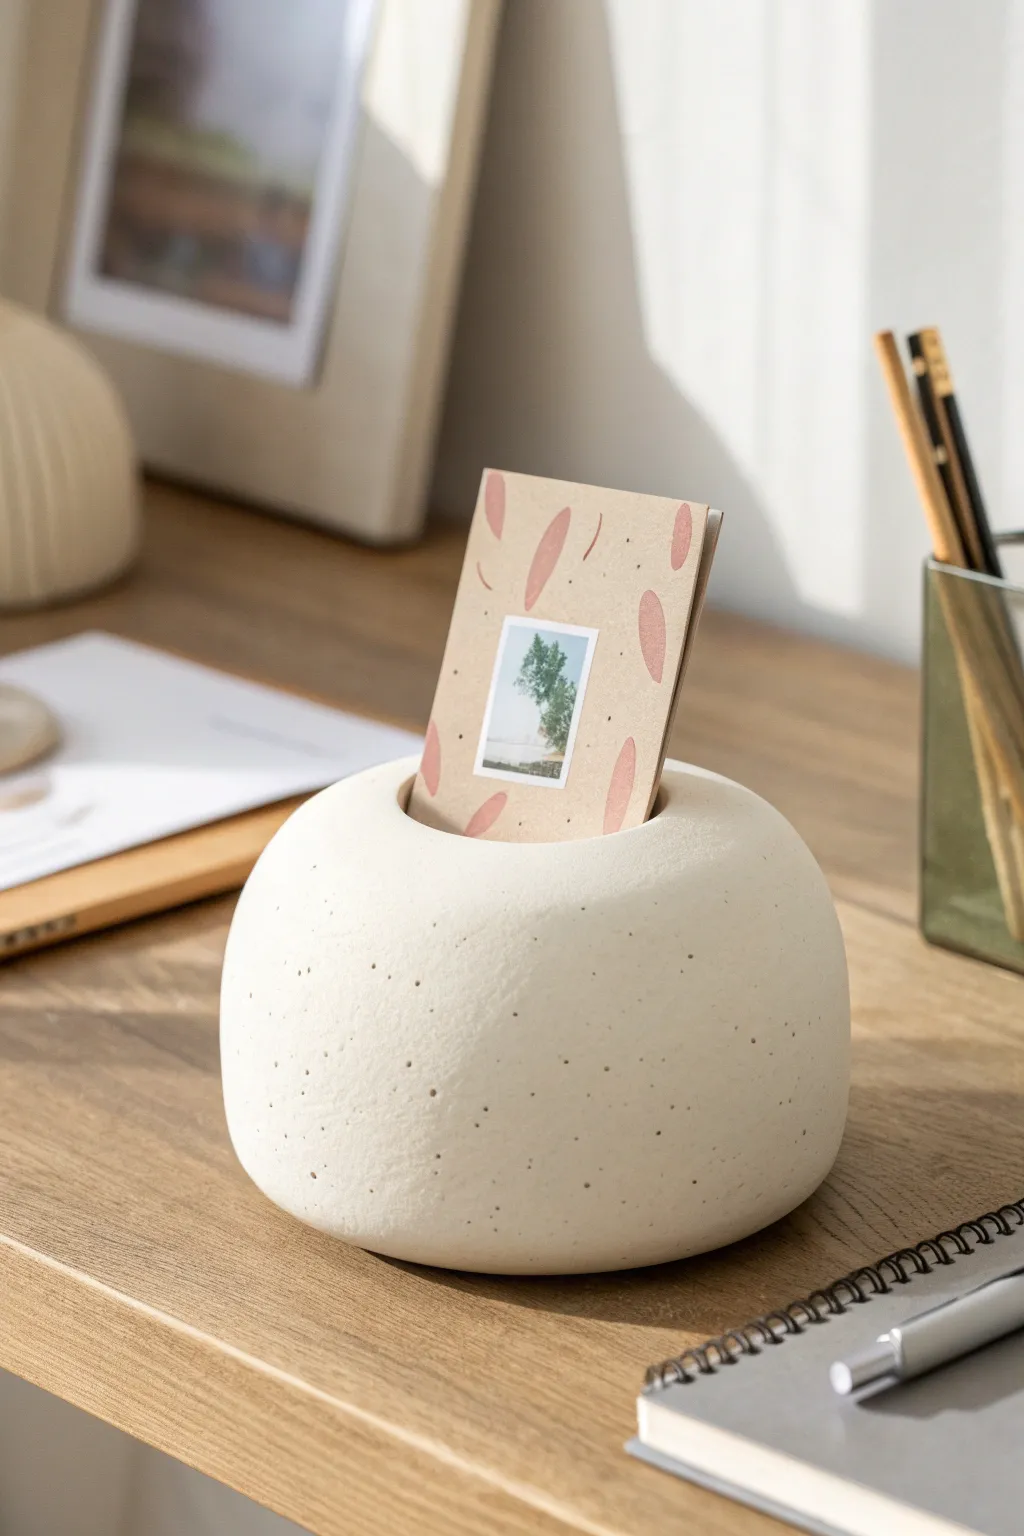
Create a calming, minimalist desktop accessory that mimics the look of natural stone. This smooth, rounded photo holder features a lovely speckled finish and a deep groove perfect for displaying your favorite polaroids or postcards.
Detailed Instructions
Materials
- White air-dry clay (or polymer clay)
- Black pepper or dried coffee grounds
- Rolling pin
- Wide craft stick or thick cardboard strip
- Water and sponge
- Fine-grit sandpaper (400-600 grit)
- Matte sealant or varnish
Step 1: Preparing the Clay
-
Condition the clay:
Start by taking a fist-sized amount of white air-dry clay. Knead it in your hands until it becomes warm, soft, and pliable, which helps prevent cracks later on. -
Add the speckles:
To achieve that organic speckled look without painting, sprinkle a pinch of coarse black pepper or dried coffee grounds directly onto the clay. -
Mix thoroughly:
Fold the clay over the speckles and knead repeatedly. Continue folding and pressing until the particles are evenly distributed throughout the entire ball.
Step 2: Shaping the Form
-
Form a sphere:
Roll the clay between your palms to create a smooth, tight ball. Aim for a shape that feels dense and solid. -
Flatten the base:
Set the ball on your work surface and gently press down on the top. You want to create a squat, rounded shape that looks like a river stone, not a pancake. -
Refine the curve:
Cup your hands around the sides to smooth out any sharp edges. The goal is a seamless, continuous curve from the top surface down to the base. -
Smooth the surface:
Dip your finger in a little water and run it over the clay to erase any fingerprints or small fissures.
Cracks appearing?
If small hairline cracks appear while drying, mix a tiny amount of fresh clay with water to make a paste (slip) and fill them in, then sand smooth once dry.
Step 3: Creating the Holder
-
Position the slot:
Identify the center of your stone shape. This is where your photo will sit, so ensure it looks balanced from all angles. -
Press the groove:
Take your craft stick (or a strip of thick cardboard) and press it vertically into the center of the clay. Push down about half an inch to create a secure slot. -
Wiggle for width:
Gently wiggle the stick back and forth just a tiny bit to widen the slot slightly. This ensures your card won’t get stuck, but don’t make it too loose. -
Fix the edges:
Pressing the stick might have raised the clay around the opening. Use a slightly damp finger or sponge to gently smooth these raised edges back down so the top remains perfectly round.
Make it Weighted
Before sealing base, bore a small hole in bottom, insert a heavy washer or coin, and patch with clay. This adds high-end heft to light air-dry clay.
Step 4: Finishing Touches
-
Initial dry:
Let the piece engage in its initial drying phase for about 24 hours. Keep it away from direct heat sources to prevent warping. -
Flip and dry:
After the first day, turn the stone over to let the bottom dry completely. This usually takes another 24 to 48 hours depending on humidity. -
Sand for smoothness:
Once bone dry, take your fine-grit sandpaper and gently buff the entire surface. I find doing this in circular motions creates that ultra-smooth, ceramic-like finish. -
Dust off:
Wipe the piece with a dry cloth or use a soft brush to remove all the white clay dust from sanding. -
Seal:
Apply a coat of matte varnish. This protects the clay and deepens the contrast of the speckles without making the object look unnaturally shiny.
Place your favorite memory in the slot and enjoy the minimal elegance it brings to your desk


What Really Happens Inside the Kiln
Learn how time and temperature work together inside the kiln to transform clay into durable ceramic.
Scalloped Tea Light Holder

This charming, petite bowl features a rhythmic scalloped edge and a raw, stone-like texture that feels effortlessly modern. It is the perfect size to nestle a standard tea light, casting a cozy glow over your coffee table books.
Step-by-Step
Materials
- Air-dry clay (stone effect or white)
- Rolling pin
- Circle cookie cutter (approx. 4-inch diameter)
- Small bowl or sphere (for molding shape)
- Sculpting tool or butter knife
- Small cup of water
- Fine-grit sandpaper
- Acrylic sealer (matte)
- Tea light candle
Step 1: Preparation & Base
-
Condition the Clay:
Start by taking a handful of air-dry clay. Knead it in your hands for a minute or two until it is warm, pliable, and free of any air bubbles. -
Roll it Out:
On a clean, flat surface or craft mat, roll out your clay to an even thickness of about 1/4 inch. Avoid making it too thin, as the scalloped edges need structural support. -
Cut the Circle:
Press your large circle cookie cutter firmly into the clay to create a clean disk. If you don’t have a cutter, trace around a bowl with a needle tool. -
Smooth the Edges:
Dip your finger in a little water and gently run it along the cut edge of your clay circle to remove any sharpness or stray crumbs.
Stone Texture Trick
Mix dried coffee grounds or black pepper into white clay before rolling. This creates an authentic, speckled stone look throughout the piece without needing paint.
Step 2: Shaping the Scallops
-
Center on Mold:
Take your small mold (a small bowl turned upside down or a styrofoam ball works well) and center your clay circle on top of it. Gently drape the clay down the sides. -
Create Vertical Indents:
Using the side of a sculpting tool or the handle of a paintbrush, press vertical indentations into the side of the clay at regular intervals. Spacing them about 3/4 inch apart usually looks best. -
Pinch the Ridges:
Between each indentation, gently pinch the clay outward to emphasize the ridge. This creates the ‘valley’ and ‘peak’ effect of the scallop shape. -
Refine the Rim:
Work your way around the top rim. Press down slightly in the center of each indentation to curve the top edge downwards, creating that wavy flower-petal silhouette. -
Adjust the Sides:
I find it helpful to look at the bowl from the side profile here; ensure the walls are rising somewhat vertically and not just splaying flat. -
Fit Check:
While the clay is still soft, gently press an unlit tea light into the center bottom just to ensure the base is flat enough and wide enough to hold it.
Make It a Set
Create a trio of these holders in varying heights by attaching a clay coil to the bottom of two bowls to act as pedestal stands.
Step 3: Adding Texture & Finishing
-
Stipple Texture:
To achieve the stone-like look in the photo, take an old toothbrush or a stiff bristle brush and tap it all over the exterior surface of the clay. -
Dry to Leather Hard:
Let the piece sit on the mold for about an hour until it is ‘leather hard’—firm enough to hold its shape but still cool to the touch. -
Remove From Mold:
Carefully pop the clay off the mold. Turn it right-side up and let it finish drying completely. This usually takes 24-48 hours depending on humidity. -
Sand Roughly:
Once fully dry, use fine-grit sandpaper to smooth out any unintentional bumps on the rim, but leave the main surface texture rough. -
Speckle Effect (Optional):
If you used plain white clay, you can flick a toothbrush loaded with watered-down brown or grey acrylic paint across the surface to mimic stone speckles. -
Seal the Piece:
Apply a coat of matte acrylic sealer to protect the clay from moisture and dust. -
Final Test:
Once the sealer is dry, place your tea light inside and enjoy the ambiance.
Light your candle and watch how the scalloped edges cast beautiful shadows on your table
Leaf-Imprint Mini Dish
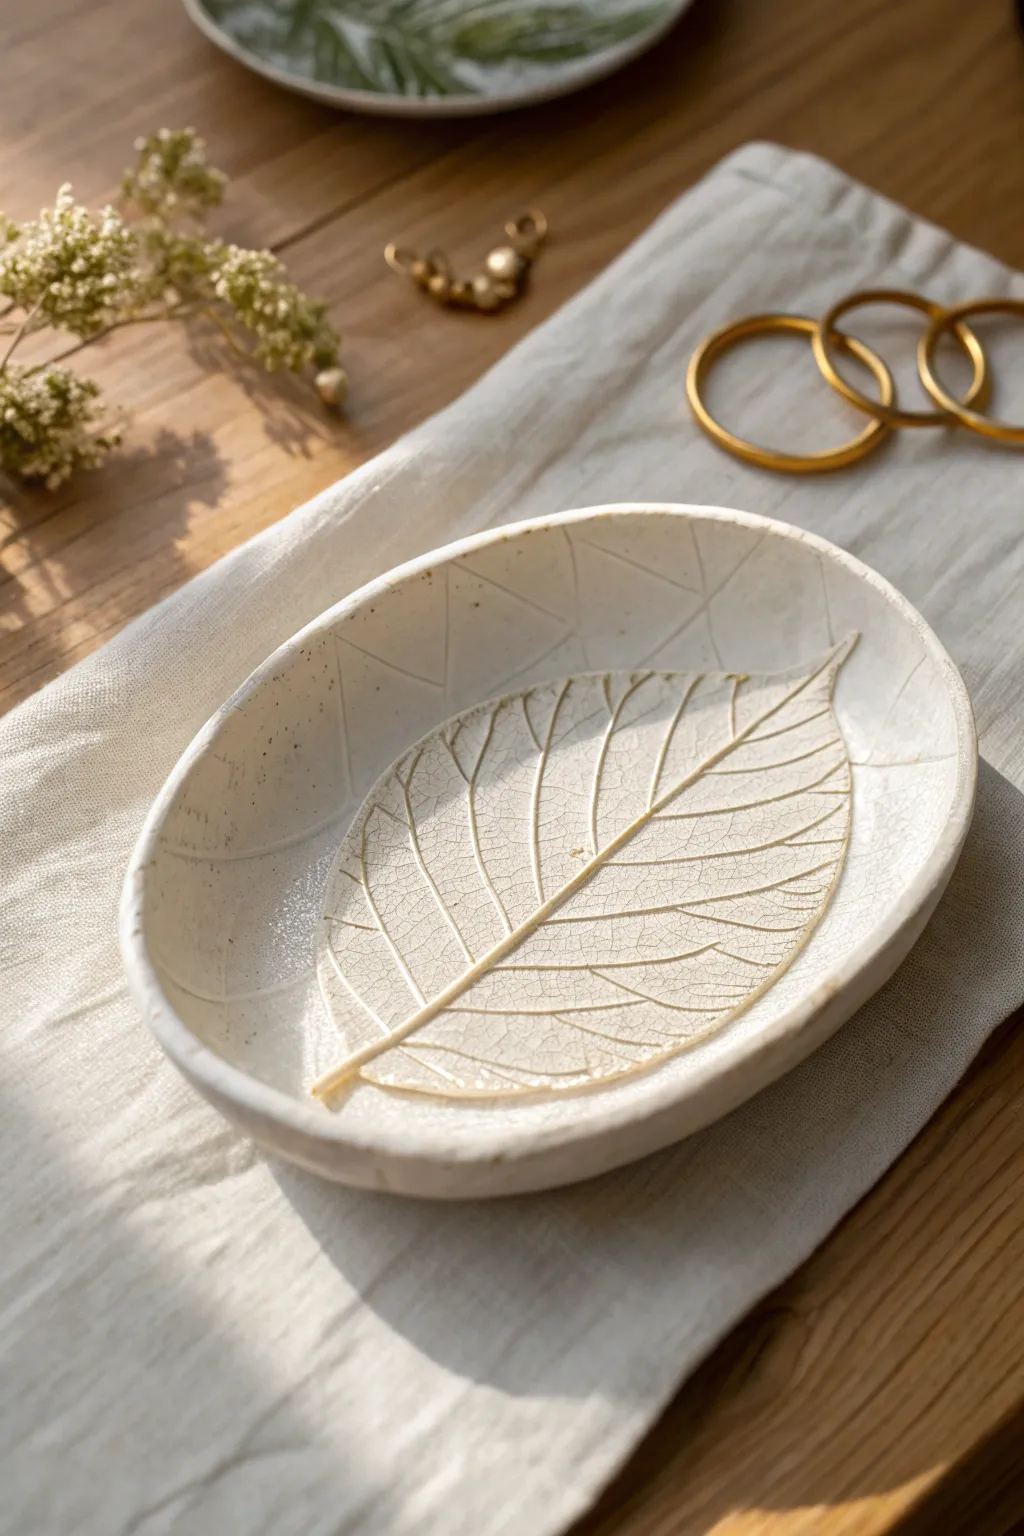
Capture the delicate veins of nature in a modern, functional piece. This oval tray combines organic botanical textures with a crisp geometric border for a stunning contrast.
Step-by-Step Tutorial
Materials
- Air-dry clay (white)
- Small rolling pin
- Oval template or cookie cutter (approx. 6 inches)
- Fresh leaf with prominent veins (e.g., hydrangea or camellia)
- Modeling tool or butter knife
- Fine-grit sandpaper
- Gloss varnish or sealant
- Small bowl of water
- Canvas mat or parchment paper
Step 1: Shaping the Base
-
Condition the clay:
Start by grabbing a handful of air-dry clay and kneading it in your hands until it feels warm and pliable, which prevents cracks later. -
Roll it out:
Place the clay on your canvas mat and roll it out to a uniform thickness of about 1/4 inch. Flip the slab occasionally to ensure it isn’t sticking. -
Cut the oval:
Lay your oval template onto the clay slab and trace around it with a knife, or press down firmly with your oval cutter. Remove the excess clay. -
Smooth the edges:
Dip your finger in a little water and run it along the cut edge to smooth out any roughness or sharp corners.
Step 2: Adding Texture
-
Position the leaf:
Place your chosen leaf face-down (vein side down) into the very center of the clay oval. -
Imprint the veins:
Gently roll your rolling pin over the leaf with firm, even pressure. I like to do one confident pass rather than rolling back and forth, to avoid double images. -
Reveal the design:
Carefully lift the leaf by the stem to reveal the skeleton structure stamped into the clay. -
Create the border:
Using a modeling tool or a dull knife, gently carve a triangle pattern along the inner rim of the oval, framing the leaf. -
Form the curve:
To give the dish its shape, gently lift the edges of the oval upwards. You can place the clay inside a shallow bowl lined with plastic wrap to help it hold this curved shape while drying.
Broken Veins?
If the leaf gets stuck in the clay, don’t peel it! Let the clay dry completely first; the dried leaf will usually flake off easily on its own.
Step 3: Refining and Finishing
-
Let it cure:
Allow the piece to dry completely for at least 24-48 hours. Keep it away from direct heat sources to prevent warping. -
Sand the imperfections:
Once bone dry, take fine-grit sandpaper and lightly buff the rim and underside to remove any lingering sharp edges. -
Clean dust:
Wipe the dish down with a slightly damp cloth or a dry brush to remove all white clay dust from the sanding process. -
Add speckles (optional):
For that earthy look shown in the photo, you can flick a tiny bit of watered-down brown paint onto the surface using a toothbrush. -
Seal the piece:
Apply a coat of gloss varnish to the entire surface. This protects the clay and makes that beautiful leaf texture pop.
Go Green
Mix a tiny amount of sage green pigment into your varnish for the leaf area only to give the impression of a fossilized plant.
Place your jewelry or trinkets inside and enjoy the simple elegance of your leaf dish

TRACK YOUR CERAMIC JOURNEY
Capture glaze tests, firing details, and creative progress—all in one simple printable. Make your projects easier to repeat and improve.
Checkerboard Pattern Tray
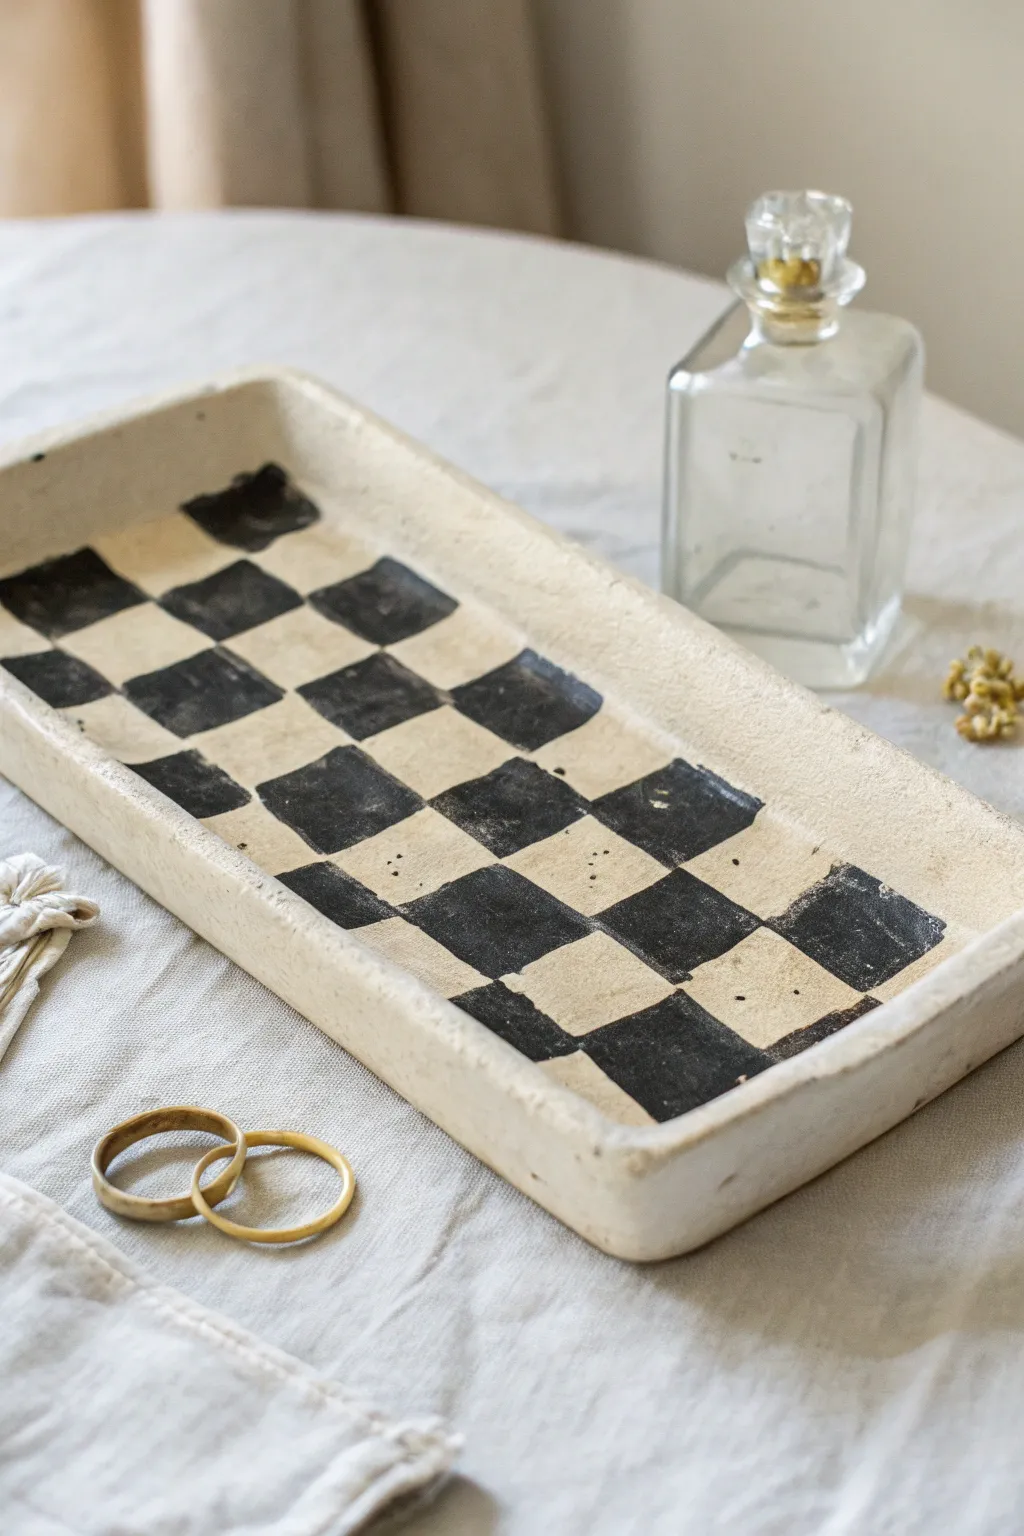
Bring a touch of playful sophistication to your vanity or coffee table with this hand-built rectangular tray. The charmingly imperfect checkerboard pattern and matte finish give it a warm, artisanal vibe that feels both modern and timeless.
Detailed Instructions
Materials
- Air-dry clay (white or cream)
- Acrylic rolling pin
- Clay knife or fettling knife
- Ruler
- Rectangular template (cardstock or paper)
- Small bowl of water
- Sponge
- Fine-grit sandpaper (220-400 grit)
- Acrylic paint (black)
- Flat shader brush (medium size)
- Pencil
- Matte varnish or sealant
Step 1: Shaping the Base
-
Condition the Clay:
Begin by taking a substantial chunk of air-dry clay and kneading it in your hands until it becomes warm, pliable, and free of cracks. -
Roll the Slab:
Place the clay on a smooth surface or canvas mat. Use your acrylic rolling pin to roll it out into a slab that is roughly 1/4 inch thick. Aim for an even thickness throughout. -
Cut the Base:
Place your rectangular template onto the slab. Using your clay knife, carefully cut around the template to create the flat base of your tray. -
Create the Walls:
Gather the excess clay and roll it into long, even coils (snakes). These should be slightly thicker than the base slab to form sturdy walls. -
Score and Slip:
Use your knife to make small potential hatch marks (scoring) around the top perimeter of the base slab. Do the same to the bottom of your clay coils. Dab a little water (slip) on the scored areas. -
Attach the Walls:
Press the coils firmly onto the edge of the base. If you need multiple coils to go all the way around, simply squish the ends together to join them seamlessly. -
Blend the Seams:
Use your thumb or a modeling tool to drag clay from the coil down onto the base, both on the inside and outside. I find this works best if you support the wall with your other hand to keep it vertical. -
Smooth the Surface:
Once the walls are blended and sturdy, use a slightly damp sponge to smooth out fingerprints, bumps, and rough edges. Gently round the corners for a softer look.
Cracked Clay?
Make a ‘slurry’ paste by mixing a small bit of clay with water until it’s like yogurt. Fill the crack, let it dry, then sand smooth.
Step 2: Finishing Touches
-
Dry Completely:
Allow the tray to dry slowly for 24-48 hours. Keep it away from direct heat sources to prevent cracking. -
Sand for Texture:
Once bone dry, take your fine-grit sandpaper and gently sand the entire piece. Focus on the rim and corners to ensure they feel nice to the touch, visual imperfections here add to the charm. -
Map the Grid:
Using a ruler and a light pencil touch, lightly mark out a grid on the interior floor of the tray. Don’t press too hard; you just need faint guidelines for your squares. -
Paint the Checks:
Dip your flat shader brush into the black acrylic paint. Begin filling in alternating squares of your grid. Freehanding the edges of the squares gives it that lovely organic feel seen in the photo. -
Second Coat:
Depending on the opacity of your paint, you may need a second coat on the black squares to get a deep, solid color. Let the first layer dry completely before re-applying. -
Seal the Tray:
Once the paint is fully cured, apply a thin layer of matte varnish over the entire piece. This protects the paint and seals the clay against minor moisture.
Pro Tip: Clean Lines
For the checkerboard, brace your painting hand against the table or your other hand. This stabilizes your brush strokes for straighter edges.
Now you have a stunning, minimal vessel ready to hold your jewelry or favorite trinkets
Cow Print Trinket Plate
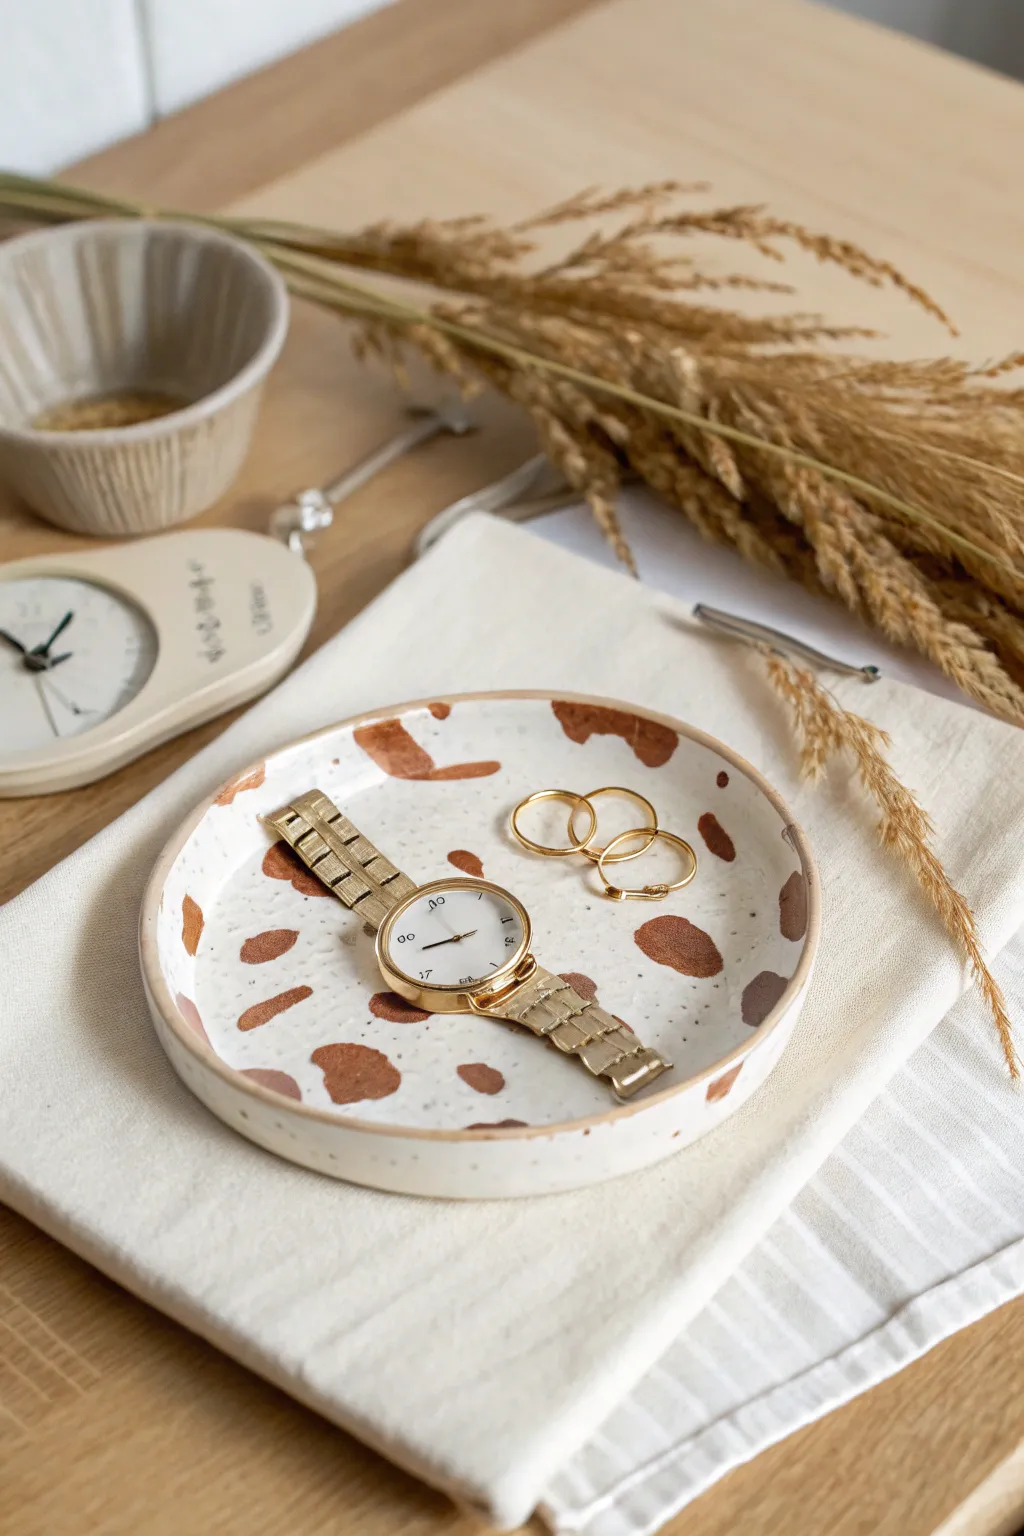
This charming, speckled trinket dish combines the warmth of terracotta tones with an organic, handmade shape. It’s the perfect stylish spot to drop your gold jewelry or watch at the end of the day.
Step-by-Step Tutorial
Materials
- Air-dry clay (white or cream)
- Acrylic rolling pin
- Circle template or bowl (approx. 5-6 inches)
- Craft knife
- Small bowl of water
- Sandpaper (fine grit)
- Acrylic paint (terracotta/burnt sienna)
- Brown speckled paint or brown ink (optional for speckling)
- Toothbrush (for speckling)
- Small paintbrush
- Gloss varnish or sealant
Step 1: Shaping the Base
-
Condition the clay:
Start by taking a handful of air-dry clay and kneading it in your hands until it feels soft, pliable, and free of air bubbles. If it feels a bit dry, add a drop of water. -
Roll it out:
Place the clay on a smooth surface or canvas mat. Use your acrylic rolling pin to roll it into an even slab, aiming for a thickness of about 1/4 inch. -
Cut the circle:
Place your bowl or circle template lightly onto the clay. Use a craft knife to trace around the edge, cutting out a perfect circle. Remove the excess clay. -
Smooth the edges:
Dip your finger in a little water and run it along the cut edge of the circle. This smooths out any harsh lines left by the knife. -
Form the rim:
To give the plate its depth, gently pinch the very edge of the circle upwards. Work your way around the circumference slowly, pinching and lifting to create a raised rim about half an inch high. -
Refine the shape:
Once the rim is raised, dampen your fingers again and smooth the transition between the base and the wall. The goal is a soft, organic curve rather than a sharp angle.
Cracking Up?
If you see tiny cracks forming while drying, mix a tiny bit of fresh clay with water to make a paste (slip) and fill them in, then sand smooth once dry.
Step 2: Adding Texture & Drying
-
Create the speckles:
Before the clay dries, create the subtle speckled texture. Dip an old toothbrush into watered-down brown paint or ink. Hold it over the wet clay and flick the bristles to spray fine mist-like dots across the surface. -
Let it dry:
Place your dish in a safe spot to dry. Air-dry clay usually takes 24-48 hours depending on humidity. Flip it over halfway through the process to ensure the bottom dries evenly. -
Sand imperfections:
Once the dish is bone dry and hard, take a piece of fine-grit sandpaper and gently buff away any rough spots on the rim or the underside.
Step 3: Painting & Finishing
-
Mix your color:
Prepare your ‘cow print’ color. Mix a burnt sienna or terracotta acrylic paint. You want a warm, earthy tone that contrasts nicely with the cream clay. -
Paint the spots:
Using a small paintbrush, paint organic, irregular shapes onto the dish. Think ‘blobby’ and random. Vary the sizes—some large islands, some tiny dots. -
Paint the rim:
Carefully paint a thin, uneven line along the top edge of the rim using the same terracotta color. This frames the piece beautifully. -
Dry the paint:
Allow the acrylic paint to dry completely. This usually only takes about 20 minutes. -
Seal the dish:
Apply a coat of gloss varnish or sealant over the entire top surface. This protects the paint and gives it that finished ceramic look. -
Final cure:
Let the varnish cure according to the bottle’s instructions before placing any heavy jewelry inside.
Make it Luxe
For a more expensive look, use gold leaf paint for the rim instead of brown. It adds a metallic pop that looks amazing with gold jewelry.
Your trendy, minimalist jewelry dish is now ready to organize your accessories in style
Terrazzo-Style Speckled Dish
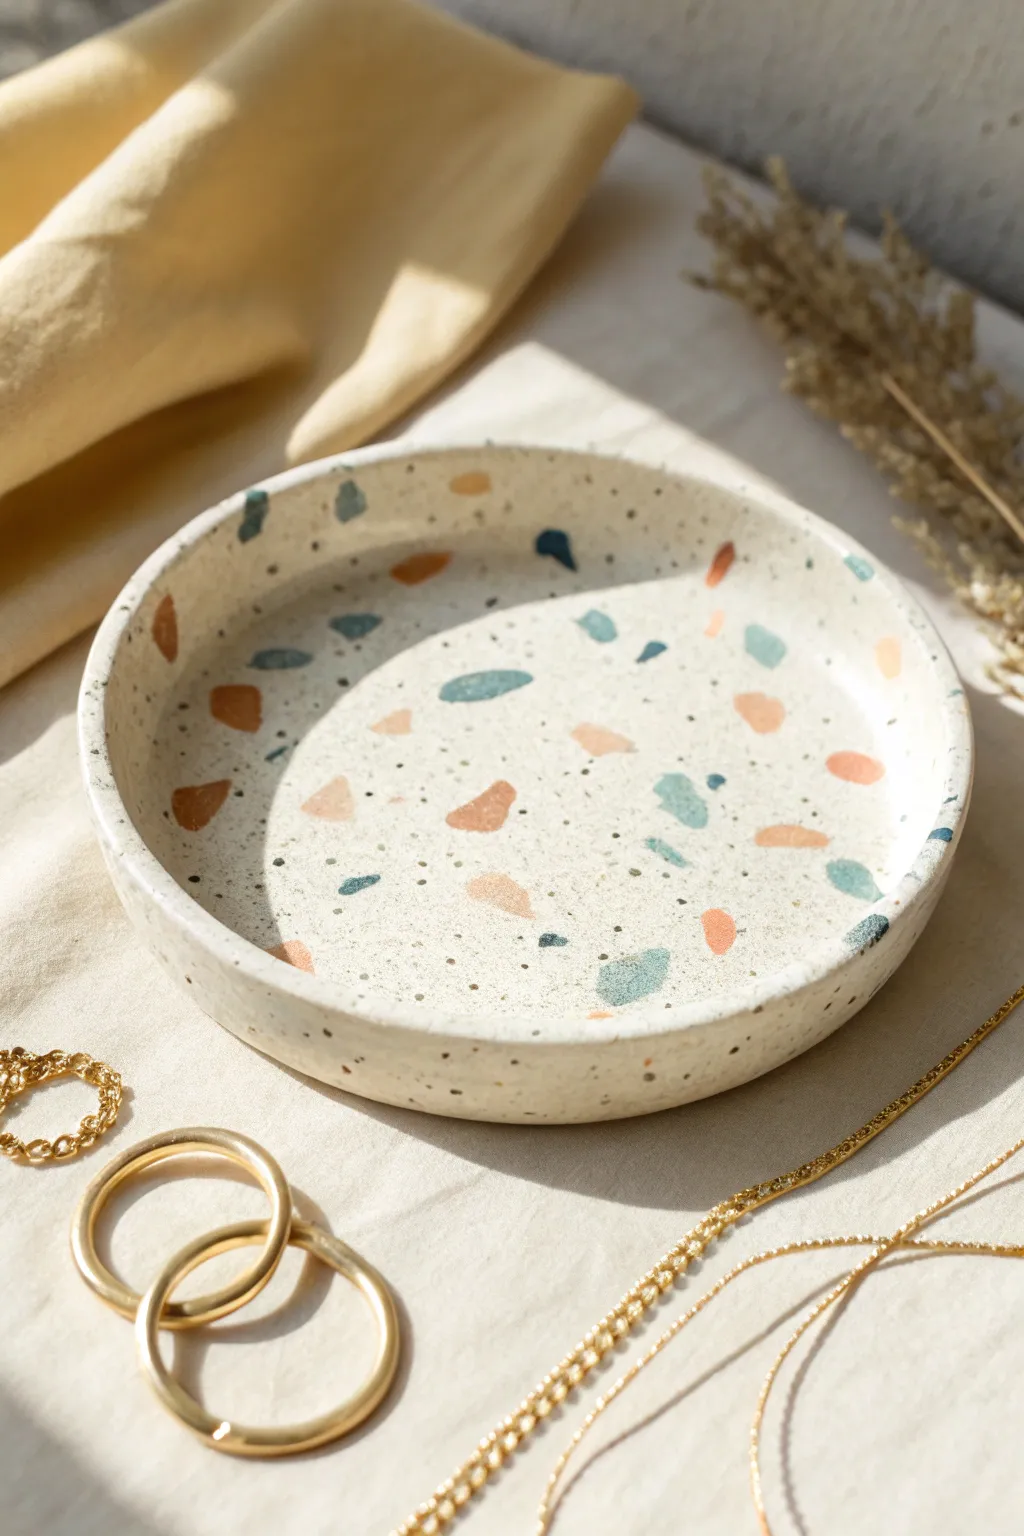
This trendy, modern trinket dish brings the classic Italian terrazzo floor aesthetic straight to your vanity. With its creamy base and playful pops of teal and terracotta, it creates the perfect minimalist home for your favorite rings and necklaces.
Detailed Instructions
Materials
- White or cream polymer clay (approx. 2oz)
- Small amounts of colored polymer clay (terracotta, teal, dark blue, beige)
- Black acrylic paint or black liquid clay
- Rolling pin or acrylic roller
- Round cookie cutter (approx. 4-5 inches)
- Craft knife or scalpel
- Old toothbrush or stiff bristle brush
- Parchment paper or ceramic tile
- Oven (for baking)
- Fine grit sandpaper (400 to 1000 grit)
- Matte or satin varnish (optional)
Step 1: Prepping the Chips
-
Condition the colors:
Start by warming up your small amounts of colored clay (terracotta, teal, blue, beige) in your hands until they are soft and pliable. -
Flatten the clay:
Roll each colored piece into a very thin sheet, roughly 1mm thick. -
Create the terrazzo chips:
Use your craft knife to chop these thin sheets into random, irregular shapes. Aim for varied sizes—some tiny triangles, some larger jagged shards—to create an authentic look. -
Set aside:
Keep these little piles of colorful confetti separate for now so you can distribute them intentionally later.
Step 2: Creating the Speckled Base
-
Condition the base clay:
Take your large block of white or cream clay and condition it thoroughly until it’s smooth and crack-free. -
Add the micro-speckles:
To get that sandy, stone-like texture, dip an old toothbrush into a tiny bit of black acrylic paint. Tap off the excess on a paper towel. -
Splatter the clay:
Gently flick the bristles with your thumb to spray a fine mist of black specks onto your ball of white clay. Knead the clay to fold these specks inside, creating a ‘granite’ effect throughout the dough. -
Roll out the slab:
Roll the speckled white clay into a flat, even slab about 1/4 inch thick. I find using guides or playing cards on either side of the roller helps keep the thickness perfectly even.
Smudged Chips?
If your colored chips smear while rolling them in, let the clay sit in the fridge for 10 minutes to firm up before that final roll. Harder clay holds crisp edges better.
Step 3: Assembling the Pattern
-
Scatter the chips:
Gently sprinkle your pre-cut colored chips onto the surface of your white slab. Don’t overthink the placement; randomness is key to the aesthetic. -
Embed the pattern:
Once you are happy with the coverage, take your rolling pin and gently roll over the slab again. You want to press the chips flush into the surface without distorting their shapes too much. -
Cut the base:
Use your large round cookie cutter to punch out the main circle for the dish bottom. -
Create the rim:
Gather the remaining scraps re-roll them into a long snake, then flatten it into a long strip. Alternatively, cut a fresh strip from the remaining slab if it’s long enough.
Add Some Shine
Mix just a pinch of gold leaf flakes into your ‘chips’ pile before pressing them in. When you sand it later, you’ll get metallic sparkles alongside the matte colors.
Step 4: Building and Finishing
-
Attach the rim:
Place the long clay strip around the circumference of your circle base. If your clay isn’t sticky enough, score the edges slightly or use a dab of liquid clay as glue. -
Blend the seams:
On the outside and inside, use a modeling tool or your fingertip to smudge the seam where the wall meets the base until it disappears completely. -
Final smooth:
Check the rim height is even all around and smooth out any fingerprints with a drop of baby oil. -
Bake:
Bake the piece according to your specific clay manufacturer’s instructions (usually 275°F for 15-30 minutes). -
Sand for clarity:
Once cool, this is the magic step: sand the surface under running water starting with 400 grit and moving to 1000 grit. This reveals the crisp edges of the colored chips and removes any haziness.
Place your new dish on your dresser and enjoy the modern, artistic touch it adds to your space
Beaded Edge Pinch Bowl

This elegant little trinket dish combines organic, hand-shaped charm with a touch of luxury. Featuring a glossy cream interior and a delicate heavy-beaded rim accented with gold, it makes the perfect resting spot for your favorite rings or dainty necklaces.
Step-by-Step Tutorial
Materials
- Air-dry clay or polymer clay (white or cream)
- Acrylic rolling pin
- Small bowl or sphere for molding (optional)
- Needle tool or toothpick
- Small sponge
- Gloss varnish or clear glaze
- Gold acrylic paint or liquid gold leaf
- Fine detail paintbrush
- Sandpaper (fine grit)
- Water for smoothing
Step 1: Shaping the Base
-
Prepare the Clay:
Start with a ball of clay roughly the size of a golf ball or slightly larger. Knead it in your hands until it is warm, pliable, and free of cracks. -
Form the Pinch Bowl:
Press your thumb into the center of the ball, leaving about a half-inch of thickness at the bottom. Gently pinch the walls between your thumb and fingers, rotating the clay as you go to thin out the sides evenly. -
Smooth the Shape:
Continue pinching until you have a shallow, open bowl shape. Aim for a consistent wall thickness of about 1/4 inch. If you want a perfectly round shape, you can gently press the clay into a small bowl lined with plastic wrap, but a freehand shape adds character. -
Level the Rim:
Place the bowl upside down on your work surface and gently tap it to level the rim. Alternatively, use a needle tool to trim any high spots for a relatively flat edge. -
Refine the Surface:
Dip your finger or a small piece of sponge in a tiny bit of water and smooth out any fingerprints or cracks on both the inside and outside surfaces.
Step 2: Adding the Beaded Details
-
Roll Tiny Spheres:
Pinch off very small amounts of clay and roll them into tiny spheres between your thumb and forefinger. You will need enough to go all the way around the rim, plus about 15-20 for the secondary row. -
Score and Slip:
If using air-dry clay, create tiny scratches on the bowl rim and dab a little water (slip) where the beads will go. For polymer clay, a tiny dot of liquid clay or translucent bake-and-bond works best. -
Attach the Rim Beads:
Place the tiny clay spheres side-by-side along the very top edge of the bowl. Press them down gently so they adhere but keep their round shape. -
Add the Lower Detail:
About half an inch below the rim, attach a second row of beads. Space these out much more widely than the rim beads—roughly an inch apart—to create the decorative studded look shown in the photo. -
Final Surface Smooth:
Give the main body of the bowl one last smoothing pass with your damp sponge to ensure the area around the beads is clean. -
Dry or Bake:
If using air-dry clay, let the piece dry for 24-48 hours until completely hard and white. If using polymer clay, bake according to the package instructions.
Beads Falling Off?
If your clay beads detach while drying, your clay was likely too dry when attaching. Reattach fallen beads with a strong superglue after the main bowl is completely finished and dry.
Step 3: Finishing Touches
-
Sand Imperfections:
Once fully cured or dry, gently sand any rough spots on the bottom or interior with fine-grit sandpaper. Wipe away the dust with a slightly damp cloth. -
Glaze the Interior:
Apply a coat of high-gloss varnish or glaze to the inside of the bowl only. This creates that beautiful milky, ceramic-like finish that contrasts with the matte exterior. -
Paint the Rim Gold:
Using a very fine detail brush, carefully paint each bead on the top rim with gold paint or liquid gold leaf. I find it easiest to rotate the bowl while steadying my hand on the table. -
Paint the Studs:
Move to the second row of spaced-out beads and paint these gold as well. Take your time to keep the gold only on the raised bumps, not the surrounding clay. -
Add a Matte Shield:
For durability, apply a matte varnish to the exterior of the bowl, sealing the unglazed clay and protecting your gold details without making the outside too shiny.
Pro Tip: Consistent Sizes
To get perfectly uniform beads, roll a long, thin ‘snake’ of clay first, then slice it into equal tiny segments before rolling each one into a ball.
Place your finished bowl on a bedside table to hold your daily jewelry essentials
Abstract Face Line Art Plaque
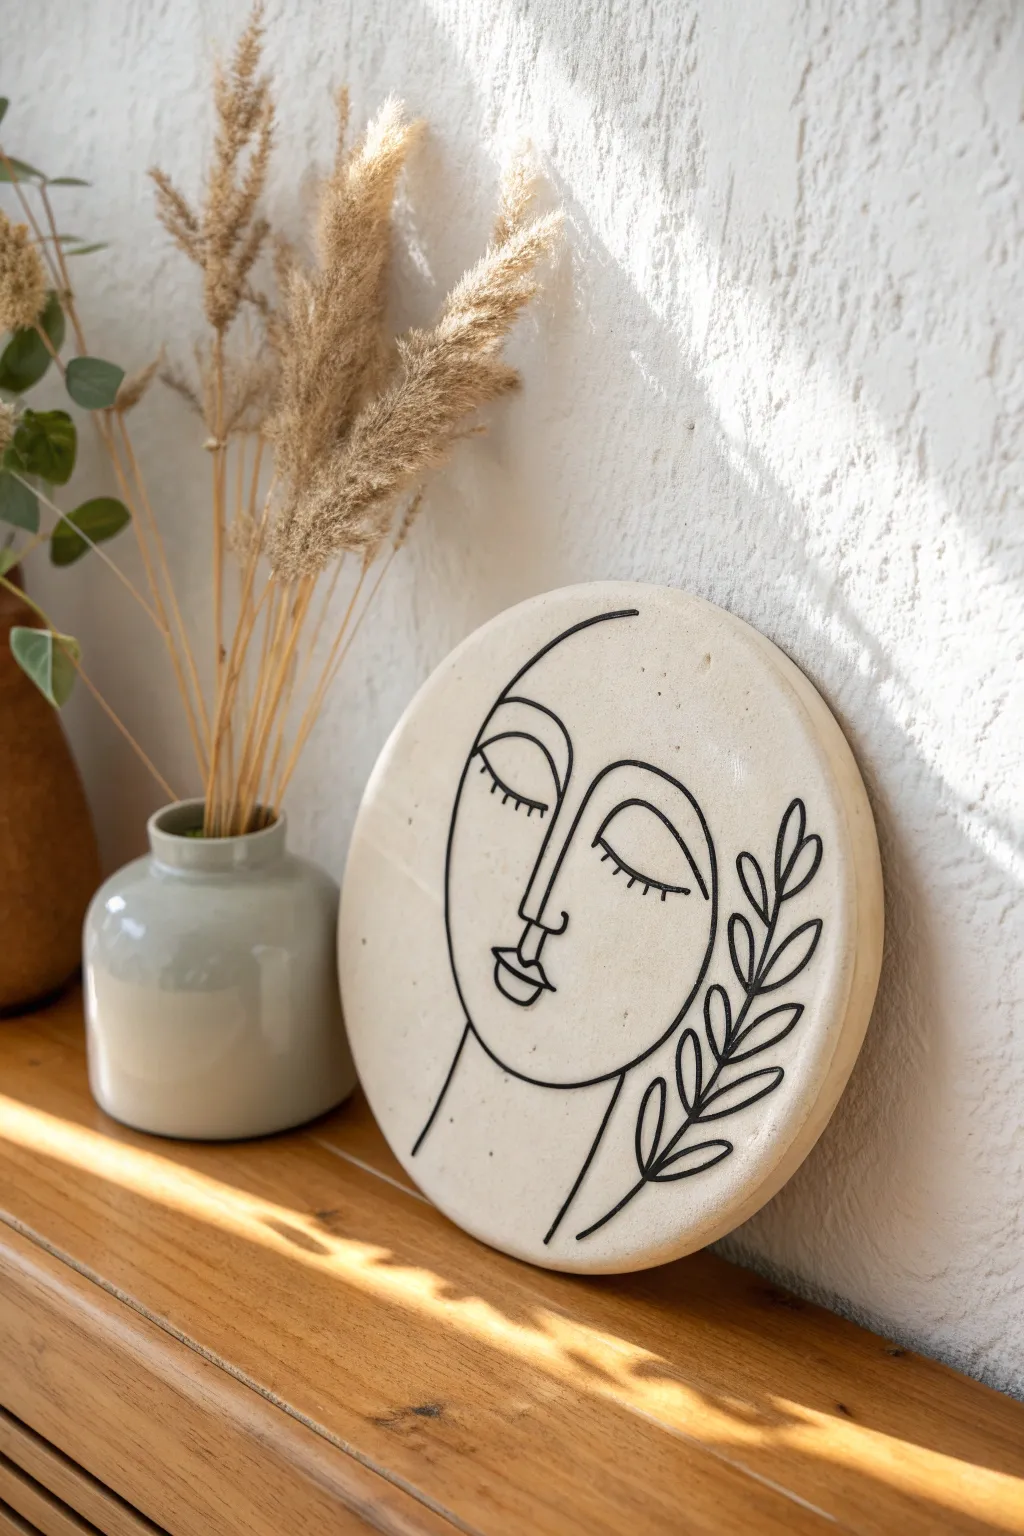
Capture the serene beauty of modern line art with this textured clay plaque. The contrast between the matte, creamy stone and the raised black lines creates a sophisticated sculptural piece perfect for a mantle or shelf.
Detailed Instructions
Materials
- Air-dry clay (white or cream)
- Round cookie cutter or bowl (approx. 6-8 inches)
- Rolling pin
- Parchment paper or canvas mat
- Black polymer clay (or black acrylic paint)
- Water in a small cup
- Clay carving tools or a toothpick
- Fine-grit sandpaper
- Matte sealant spray (optional)
Step 1: Base Preparation
-
Prepare your workspace:
Lay down your parchment paper or canvas mat to prevent the clay from sticking to your table. Take a substantial chunk of white air-dry clay and knead it until it is soft and pliable. -
Roll the slab:
Roll out the clay to an even thickness of about 1/4 to 1/2 inch. Keep the rolling pin moving in different directions to ensure it’s uniform. -
Cut the circle:
Place your round cutter or use an inverted bowl as a template on the clay. Cut a clean circle using a knife or the cutter itself. Lift away the excess clay. -
Smooth the edges:
Dip your finger in a little water and gently run it along the cut edge of the circle to smooth out any roughness or sharp debris. Let the base sit for about 20 minutes to firm up slightly before adding details.
Fixing Broken Lines
If a thin black coil breaks while you are placing it, don’t panic. Simply butt the two ends together on the clay surface and smooth the seam with the back of a spoon or tool.
Step 2: Creating the Design
-
Sketch the face:
Using a toothpick or a very light touch with a needle tool, lightly sketch your abstract face design onto the clay. Start with the U-shape of the chin, then add the long nose line and closed eyes. -
Prepare the black clay:
Condition your black clay (polymer works best for thin coils, but you can dye air-dry clay black too) until it is very soft. -
Roll thin coils:
Roll the black clay into very thin, deeply consistent snake-like coils. These will form your line art, so aim for the thickness of a thick rounded shoelace. -
Lay the main outline:
Begin placing the black coil over your sketched lines. I find it easiest to start with the main vertical line of the nose and forehead. -
Form the eyes:
Cut small sections of the coil for the curved eyelids. Place them carefully on the sketch marks. Add tiny, delicate pieces for the eyelashes. -
Add the lips:
Shape a small ‘M’ and a ‘U’ from the coils for the upper and lower lips and press them gently onto the base. -
Add the leaves:
On the right side of the face, place a long stem coil. Then, add small teardrop-shaped loops of black clay to create the leaves branching off. -
Secure the lines:
Once all black lines are positioned correctly, press them down gently but firmly so they bond with the white base. If using air-dry for both, a tiny dab of water acts as glue.
Add a Little Texture
Before drying, gently pres a piece of rough linen fabric or a stone onto the white background clay to give it an aged, authentic pottery texture.
Step 3: Refining and Drying
-
Blend connections:
Where two black lines meet (like the leaf stem), use a modeling tool to gently merge the clay so it looks like one continuous drawing. -
Check for flatness:
Ensure your base hasn’t warped during the decorating process. If edges have curled up, gently press them back down. -
Drying setup:
Move the plaque to a safe spot. Place a light book or board on top (with parchment in between) for the first few hours to encourage it to dry perfectly flat. -
Full dry time:
Let the piece dry for at least 24-48 hours. The clay will become lighter in color as the moisture evaporates. -
Sanding:
Once fully cured, use fine-grit sandpaper to smooth the white edges of the circle one last time. -
Seal (optional):
To protect the surface from dust, apply a light coat of matte sealant spray.
Place your finished artwork on a stand to add a modern touch to your decor
Two-Tone Color Block Cup
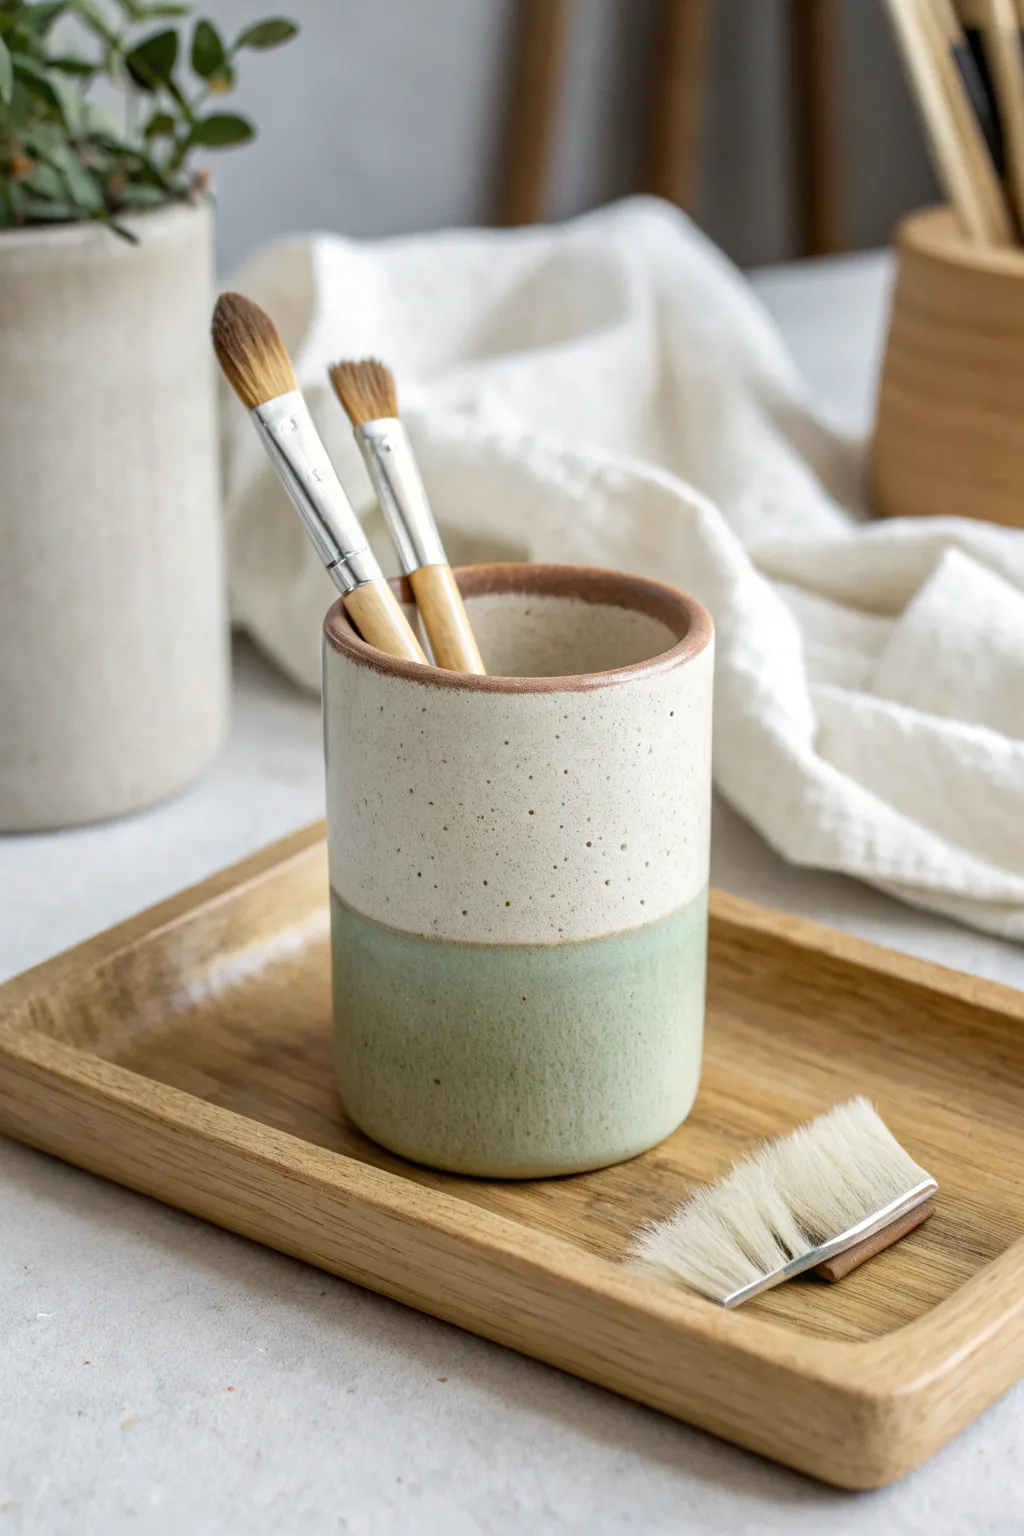
Embrace minimalist elegance with this two-tone ceramic cup featuring a soothing sage green base and a creamy, speckled upper half. Its simple cylindrical form and clean color blocking make it a perfect beginner-friendly project that yields sophisticated results.
Step-by-Step
Materials
- Stoneware clay (smooth or light speckle)
- Pottery wheel or rolling pin and slab guides
- Cylindrical mold (if hand-building)
- Fettling knife
- Rib tool (smooth wood or metal)
- Needle tool
- Sponge
- Sage green dipping glaze (matte)
- Creamy white speckled dipping glaze
- Wax resist emulsion
- Brush for wax resist
- Kiln access
Step 1: Forming the Cylinder
-
Prepare your clay:
Start with a ball of well-wedged stoneware clay, about 1-1.5 lbs depending on the desired size. Ensure there are no air bubbles. -
Choose your method:
You can either throw a cylinder on the wheel or slab-build one. For slab building, roll out the clay to a uniform 1/4 inch thickness. -
Cut the slab:
If hand-building, measure and cut a rectangle for the body and a circle for the base. Use a cylindrical mold or can to help gauge the size if needed. -
Construct the form:
Score the edges heavily and apply slip. Wrap the rectangular slab around to meet ends, or attach it to your wheel-thrown base if you threw a bottomless ring. -
Seam and smooth:
Join the seams firmly using your thumb or a wooden tool. If wheel throwing, pull the walls up to an even height, aiming for a straight-sided cylinder. -
Refine the surface:
Use a rib tool to smooth the exterior walls while the clay is leather hard. This step is crucial for that clean, modern look; I like to spend extra time here to remove any finger marks. -
Shape the rim:
Compress the rim with a piece of chamois or a damp sponge to make it rounded and durable. A well-rounded rim feels better to hold and drink from.
Clean Lines
For a super crisp line between glaze colors, use automotive striping tape to mask off the area before dipping. Peel it off immediately after dipping while wet.
Step 2: Bisque and Glazing
-
Dry and bisque fire:
Allow the cup to dry slowly and completely to the greenware stage. Fire it in the kiln to cone 04 (or your clay’s specific bisque temperature). -
Clean the bisque:
Wipe the fired piece with a damp sponge to remove any kiln dust, which can prevent glaze from adhering properly. -
First dip: Cream:
Stir your creamy white speckled glaze thoroughly. Hold the cup by the foot and dip the entire piece (or just pouring inside and out) to coat it fully. Let this layer dry completely. -
Measure the color block:
Decide where you want the color break to happen. The image shows the green section taking up the bottom third. You can make a small pencil mark as a guide; it will burn off in the kiln. -
Second dip: Sage Green:
This is the tricky part. Hold the cup upside down securely. Dip the rim straight down into the green glaze, but only submerging the top third (which will be the bottom of the cup). -
Actually, dip the bottom:
Correction for the image style: The GREEN is at the bottom. Hold the cup right-side up. Dip the bottom third into the sage green glaze. Alternatively, if you glazed the whole pot white first, you are layering green over white at the bottom. -
Create the raw rim:
To get that exposed clay rim seen in the photo, wipe the glaze off the very top lip with a damp sponge. Clean about 1/8th of an inch to reveal the clay body. -
Refine the rim transition:
Ensure the line where you wiped the glaze is clean and even. This exposed clay creates a beautiful frame for the interior glaze. -
Clean the foot:
Use a sponge or wax resist to ensure the very bottom of the cup (where it sits on the shelf) is free of glaze prevents sticking. -
Glaze fire:
Fire the piece again to the maturity temperature of your clay and glaze (typically cone 5 or 6 for stoneware). Let the kiln cool naturally before unloading.
Uneven Glaze Coat?
If the glaze looks too thick or runny, thin it slightly with water. A coat that is too thick will crawl or obscure the speckles. Aim for the consistency of heavy cream.
Now you have a stylish vessel ready to organize your art supplies or hold your morning coffee with handmade charm