If you’re craving projects that feel like pure joy, colorful clay is the quickest way I know to get there. These ideas are all about bold palettes, cute details, and that satisfying moment when your bright colors finally come together.
Rainbow Swirl Statement Earrings
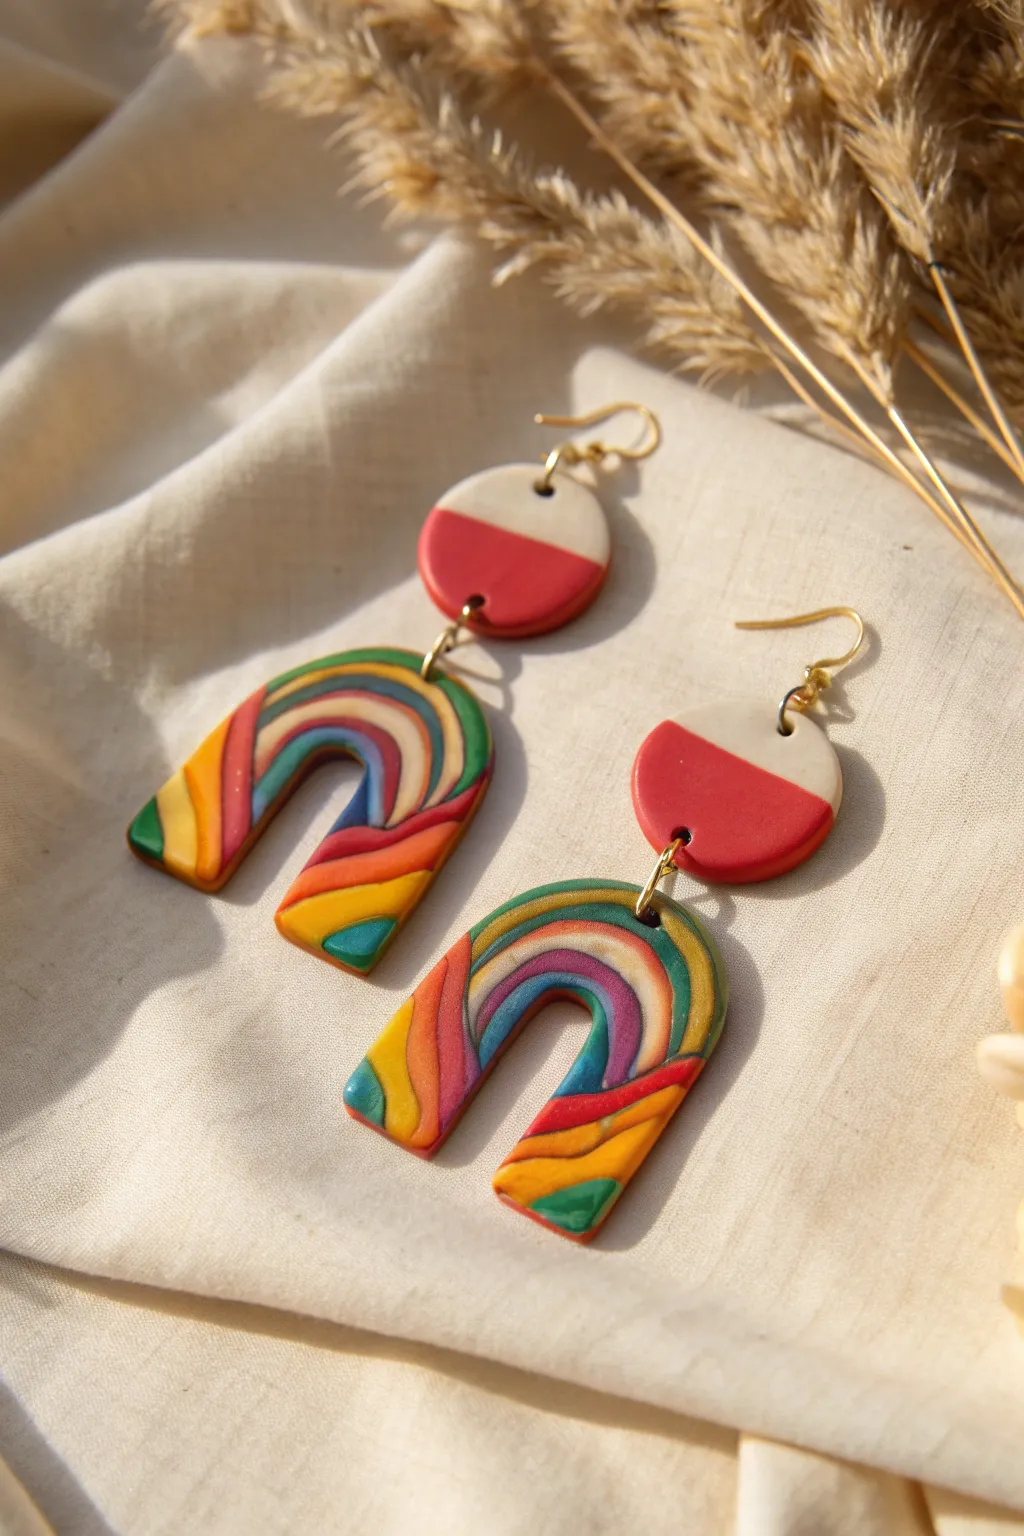
These vibrant statement earrings capture the joy of a rainbow in a sophisticated, wearable clay art piece. Featuring a bold two-tone stud and a mesmerizing marbled arch, they are the perfect way to add a pop of color to any neutral outfit.
Step-by-Step Guide
Materials
- Polymer clay (Red, Orange, Yellow, Green, Teal, Blue, Purple, White, Beige/Cream)
- Clay roller or pasta machine
- Circle cutters (various sizes)
- U-shaped arch cutter
- Flexible tissue blade
- Hand drill or needle tool
- Sandpaper (various grits)
- Gold jump rings (6-8mm)
- Gold earring hooks
- Jewelry pliers
Step 1: Creating the Marbled Slab
-
Condition the colors:
Begin by conditioning small amounts of your red, orange, yellow, green, teal, blue, and purple clay until they are soft and pliable. Roll each color into a thin snake or rope. -
Twist and combine:
Gather your colorful ropes and twist them together gently to create one thick, multi-colored log. Fold the log in half and twist again to encourage the colors to mingle without becoming muddy. -
Roll the slab:
Flatten your twisted log and run it through a pasta machine or use a clay roller to create a flat slab about 3mm thick. You should see distinct streaks of color running through the clay. -
Cut the arches:
Position your U-shaped cutter over the most interesting section of the swirl pattern. Press down firmly to cut out two arch shapes, ensuring you capture a good variety of colors in each piece. -
Smooth the edges:
Gently gently rub your finger along the cut edges of the arches to smooth out any harsh lines or burrs left by the cutter.
Smooth Seams
When joining the two half-circles, place a piece of parchment paper over them before rolling. This prevents fingerprints and ensures the seam is perfectly flush.
Step 2: Making the Geometric Tops
-
Prepare solid colors:
Roll out a small slab of red clay and a separate small slab of cream or beige clay, keeping them at the same thickness as your arches. -
Cut the circles:
Use a small circle cutter (about 1.5 cm diameter) to cut two circles from the red clay and two from the cream clay. -
Bisect the shapes:
Using your sharp tissue blade, slice each circle perfectly in half. I find wiping the blade with a baby wipe first helps prevent sticking. -
Assemble the tops:
Take one red half-circle and press it gently against a cream half-circle to reform a complete circle. Repeat this for the second earring so you have two two-tone discs. -
Secure the seam:
Gently roll over the seam with your acrylic roller to bond the two colors together. You can also smooth the back with a little liquid clay if the bond feels weak.
Step 3: Baking and Assembly
-
Drill holes:
Use a needle tool or small drill bit to poke a hole at the top center of each arch and at the bottom center of each circle (in the red section). Add another hole at the top of the circle (in the cream section) for the hook. -
Bake the clay:
Place all pieces on a ceramic tile or baking sheet lined with parchment paper. Bake according to your brand of clay’s instructions—usually around 275°F (130°C) for 30 minutes. -
Cool and sand:
Allow the pieces to cool completely. Once hard, use fine-grit sandpaper to buff the edges and surfaces for a professional, matte finish. -
Attach components:
Open a gold jump ring using two pairs of pliers. Thread it through the top of the arch and the bottom of the circle stud, then close the ring securely. -
Add the hooks:
Attach the earring hooks to the top hole of the circle component using a smaller jump ring or by opening the loop on the hook itself.
High Gloss Finish
coat your finished baked pieces with UV resin or a polyurethane gloss varnish. This makes the swirled colors pop even more and adds durability.
Wear your new rainbow creations with pride and enjoy the compliments on your handmade art


Fruit Slice Cane Charms
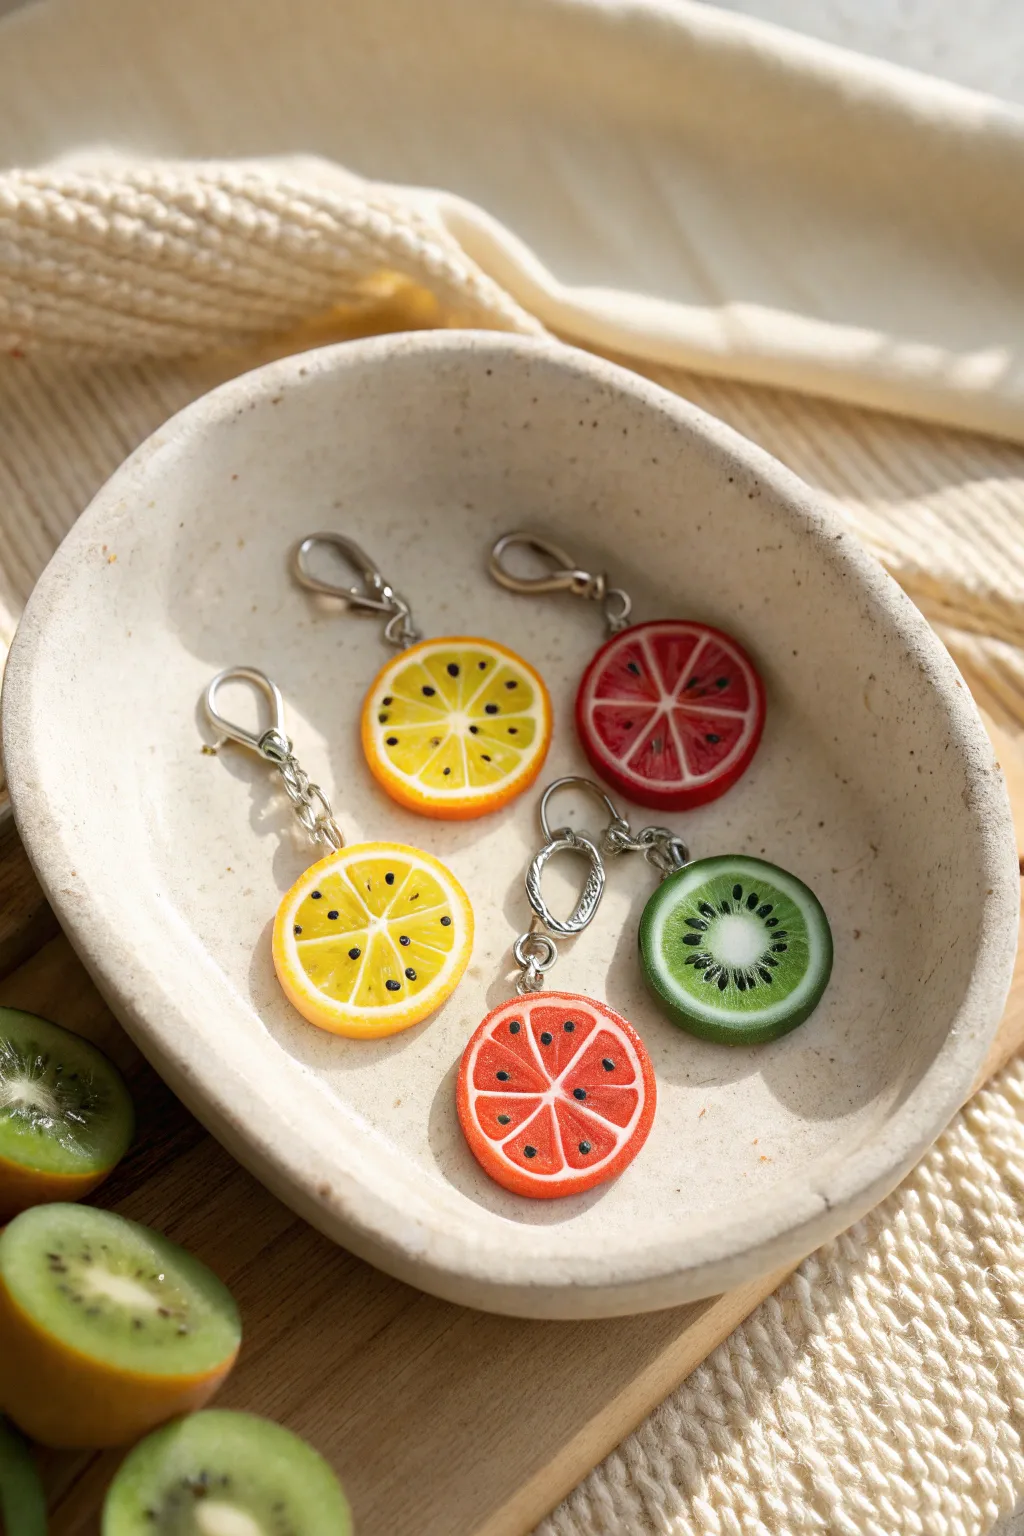
Brighten up your keyring or planner with these refreshing fruit slice charms that capture the translucent beauty of summer citrus and kiwi. Using simple cane techniques, you’ll create realistic fruit segments complete with tiny seeds and a textured rind.
Detailed Instructions
Materials
- Polymer clay (translucent white, opaque white, yellow, orange, red, green, black)
- Acrylic rolling pin
- Tissue blade or sharp clay knife
- Needle tool or toothpick
- Small round cutter (approx. 1 inch)
- Eye pins (silver tone)
- Jump rings (silver tone)
- Lobster clasp keychains
- Gloss varnish or UV resin
- Oven for baking
Step 1: Creating the Citrus Segments
-
Mix your fruit colors:
Start by mixing translucent clay with a very small amount of colored clay to create the juicy interior. For the lemon, mix yellow and translucent; for the orange, use orange and translucent; and for the ruby grapefruit, use red and translucent. The goal is a semi-transparent ‘jelly’ look. -
Form the segments:
Roll your colored translucent clay into a thick log, about 1 inch in diameter. Pinch one side of the log along its entire length to turn the round cylinder into a teardrop or wedge shape log. -
Prepare the pith:
Roll out a thin sheet of opaque white clay using your rolling pin or a pasta machine on a thin setting. This will act as the pith between the fruit segments. -
Wrap the wedge:
Wrap the teardrop-shaped log in the thin white clay sheet. Trim away any excess so the seams meet cleanly, but leave the very tip of the sharp edge exposed if preferred, or wrap entirely for a thicker pith look. -
Reduce the cane:
Gently squeeze and pull the wrapped log to elongate it, reducing its diameter while maintaining that teardrop shape. Cut this long cane into 6 to 8 equal lengths, depending on how many segments you want your fruit to have.
Step 2: Creating the Kiwi Cane
-
Form the center:
For the kiwi, start with a cylinder of white clay for the core. Wrap this white cylinder in a layer of translucent green clay mixed with a tiny bit of black clay ‘seeds’ or poppy seeds, or simply use plain translucent green now and paint seeds later. -
Add the flesh:
Wrap a thick layer of bright green clay around the seed/core layer. I find mixing a bit of translucent into the green helps it look juicier after baking. -
Final wrap:
Finish by wrapping the green cylinder in a thin sheet of light brown or beige clay for the fuzzy skin.
Cold Hands, Clean Cuts
Pop your raw clay canes in the fridge for 15 minutes before slicing. Firm clay resists squishing, giving you perfectly round slices without distortion.
Step 3: Assembling the Fruit Slices
-
Assemble citrus wheels:
Take your citrus wedge segments and arrange them in a circle, pointing the sharp edges inward toward a central point. The white ‘pith’ sides should be touching. -
Add the rind:
Fill the gaps in the center with a tiny snake of white clay if needed. Then, wrap the entire assembled circle in a generous layer of white clay, followed by a final thin layer of colored clay (yellow, orange, or green) to match the fruit type. -
Compress and slice:
Gently compress the large cane to ensure all layers are adhered. Use your tissue blade to slice thin, even coins from the cane—about 3-4mm thick. -
Texture the surface:
Use a needle tool to gently scratch tiny radiating lines or poke dots into the translucent segments. This mimics the fibrous texture of real fruit flesh. -
Add seeds:
For the kiwi and watermelon (if making), use a needle tool to press tiny indentations where seeds go. Roll extremely tiny specks of black clay and press them into these holes.
Make it Sparkle
Mix just a pinch of superfine iridescent glitter into your translucent fruit flesh clay. It won’t look glittery, but it will simulate juicy, glistening cells.
Step 4: Finishing Touches
-
Insert hardware:
While the clay is still raw, gently push an eye pin into the ‘rind’ at the top of each fruit slice. Secure it by smoothing the clay slightly around the entry point. -
Bake:
Bake the slices according to your polymer clay manufacturer’s instructions, usually around 275°F (130°C) for 15-20 minutes. Let them cool completely. -
Gloss it up:
Apply a coat of gloss varnish or UV resin to the fruit flesh area only. This makes the translucent clay pop and gives it that wet, fresh-cut appearance. -
Attach the clasp:
Once the varnish is dry, use pliers to open a jump ring. Loop it through the eye pin and the lobster clasp keychain, then close it securely.
Now you have a freshly picked assortment of fruit charms ready to sweeten up your accessory game


Kawaii Food Minis With Faces
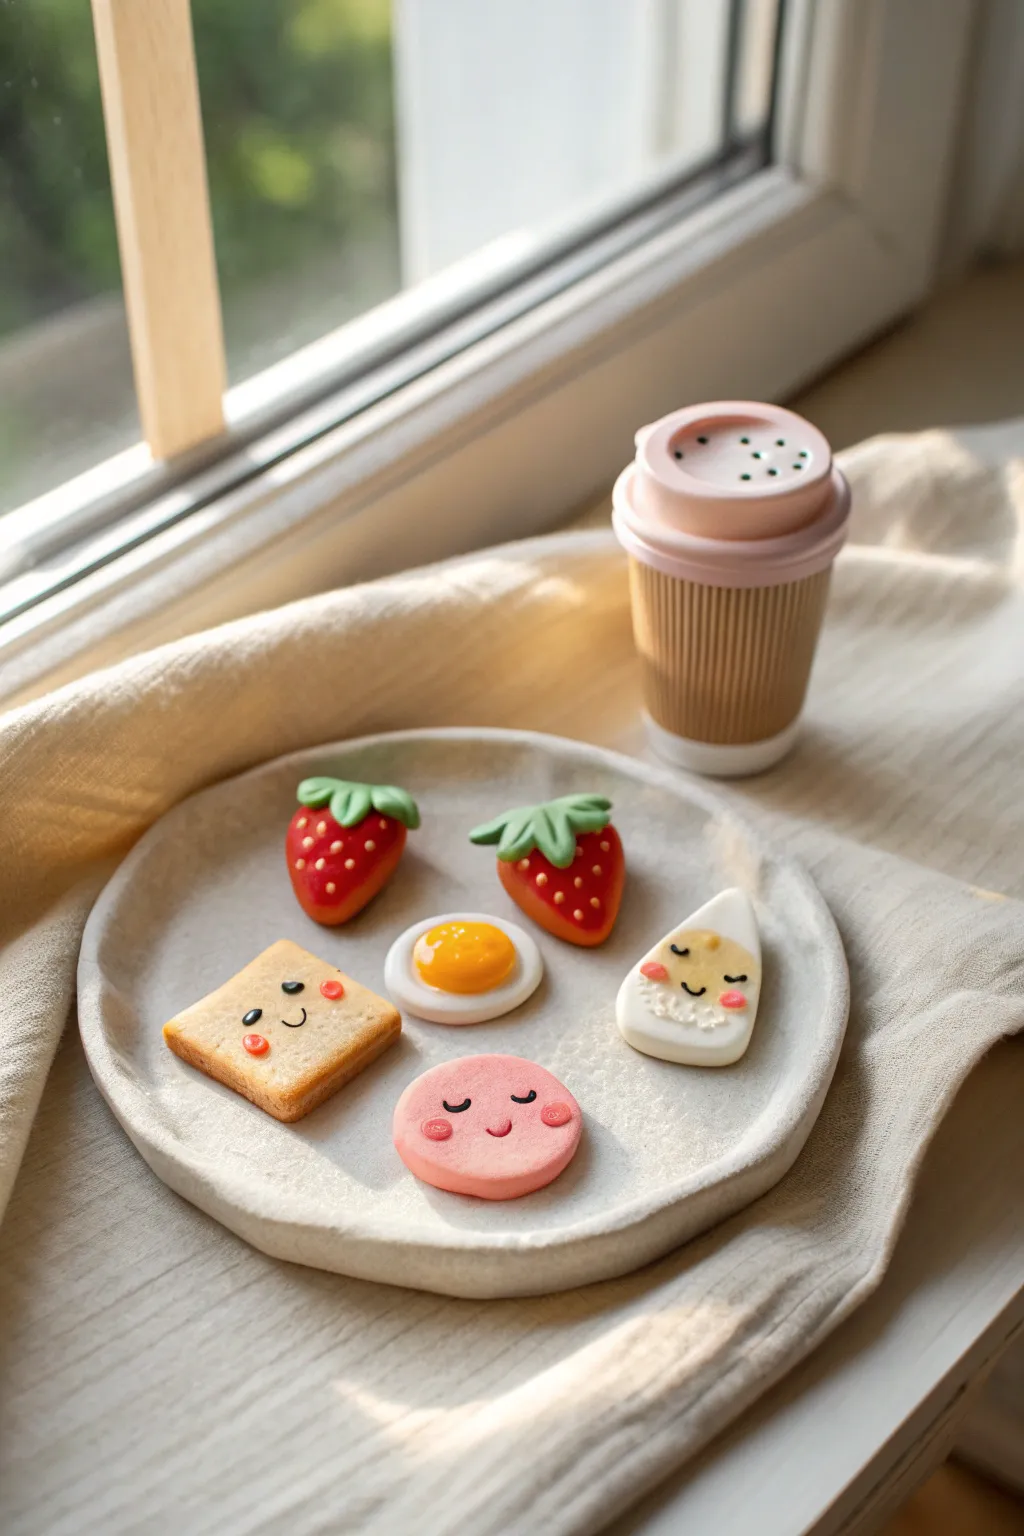
These adorable polymer clay miniatures transform a balanced breakfast into a charming display of kawaii characters. With simple shapes and sweetly painted expressions, you’ll create a tiny, delightful morning spread perfect for display.
Step-by-Step
Materials
- Polymer clay (red, green, white, yellow, tan, pink)
- Liquid polymer clay (translucent)
- Acrylic paints (black, pink, red)
- Small dotting tool or toothpick
- Fine detail paintbrush
- Soft pastel chalks (orange, brown/ochre)
- Sculpting tools (needle tool, ball tool)
- Texture sponge or toothbrush
- Gloss glaze (optional)
- Small rolling pin
Step 1: Sculpting the Strawberries
-
Shape the base:
Take two small balls of red clay and roll them into teardrop shapes, slightly flattening the backs if they will lie flat on a plate. -
Add seeds:
Using a needle tool, gently poke small indentations all over the red surface to mimic strawberry seeds. Keep them shallow and evenly spaced. -
Color the seeds:
For extra detail, you can fill these tiny holes with a minuscule amount of yellow or white clay, or simply wait to paint them later. -
Create the leaves:
Flatten a small piece of green clay. Cut out a small star or flower shape using a cutter or knife. Gently press this onto the top (wide end) of your strawberry, curling the tips upward slightly for realism.
Step 2: Creating the Breakfast Savories
-
Make the Toast:
Mix white and a tiny bit of yellow/tan clay to get a bread color. Roll it into a thick square slab. Use a toothbrush or texture sponge to gently tap the surface, giving it a porous, bread-like texture. -
Toast the edges:
I like to scrape some brown and orange soft pastel chalk into a powder. Brush this powder around the edges of your clay square to create a perfectly baked ‘crust’ effect. -
Form the Ham:
Roll out pink clay into a thick circle. Smooth the edges with your finger to round them off so it looks like a slice of bologna or ham. -
Sculpt the Egg:
Flatten a piece of white clay into an irregular, wavy circle for the egg white. Roll a smaller ball of yellow clay, flatten it slightly into a dome, and press it firmly into the center to make the yolk. -
Make the Cheese Wedge:
Shape a triangular piece of white or very pale yellow clay. Curve the corners so they feel soft and cartoon-like.
Smudged Paint?
If your acrylic paint lines are messy or too thick, quickly wipe them away with a damp Q-tip or a little rubbing alcohol before the paint dries, then try again.
Step 3: Adding the Kawaii Personality
-
Bake the clay:
Arrange all your pieces on a tile or baking sheet. Bake according to your brand of polymer clay instructions (usually 275°F/135°C for 15-30 minutes). Let them cool completely. -
Draft the faces:
Before painting, visualize where the eyes and mouths will go. The toast, ham, and cheese wedge need faces placed centrally. -
Paint the eyes:
Using a fine detail brush or toothpick dipped in black acrylic paint, create small curved lines for sleeping eyes or dots for open eyes. -
Add mouths:
Paint tiny ‘u’ shapes for smiles between the eyes. Keep the strokes extremely thin for that delicate kawaii look. -
Apply blushes:
Dip a dotting tool into pink paint. Place two small dots on the cheeks of the Toast, Ham, and Cheese characters. This rosy cheek effect is essential for the style. -
Paint strawberry seeds:
If you didn’t fill the seed holes earlier, use a toothpick to place tiny dots of yellow or light tan paint into the indentations. -
Gloss the yolk:
For a realistic touch, apply a coat of gloss glaze only to the yellow yolk of the egg to make it look sunny-side up and fresh. -
Make the coffee cup:
Roll tan clay into a cylinder. Wrap a textured strip (like corrugated paper or textured clay) around the middle. Add a pink lid shaped from a flattened circle with a rim.
Make Them Magnets
Glue small neodymium magnets to the back of each food item after baking. They make incredibly cute fridge décor to hold up your grocery lists.
Once arranged on a small trinket plate, your tiny breakfast friends are ready to brighten any desk or shelf


Pastel Macaron Bead Bracelet
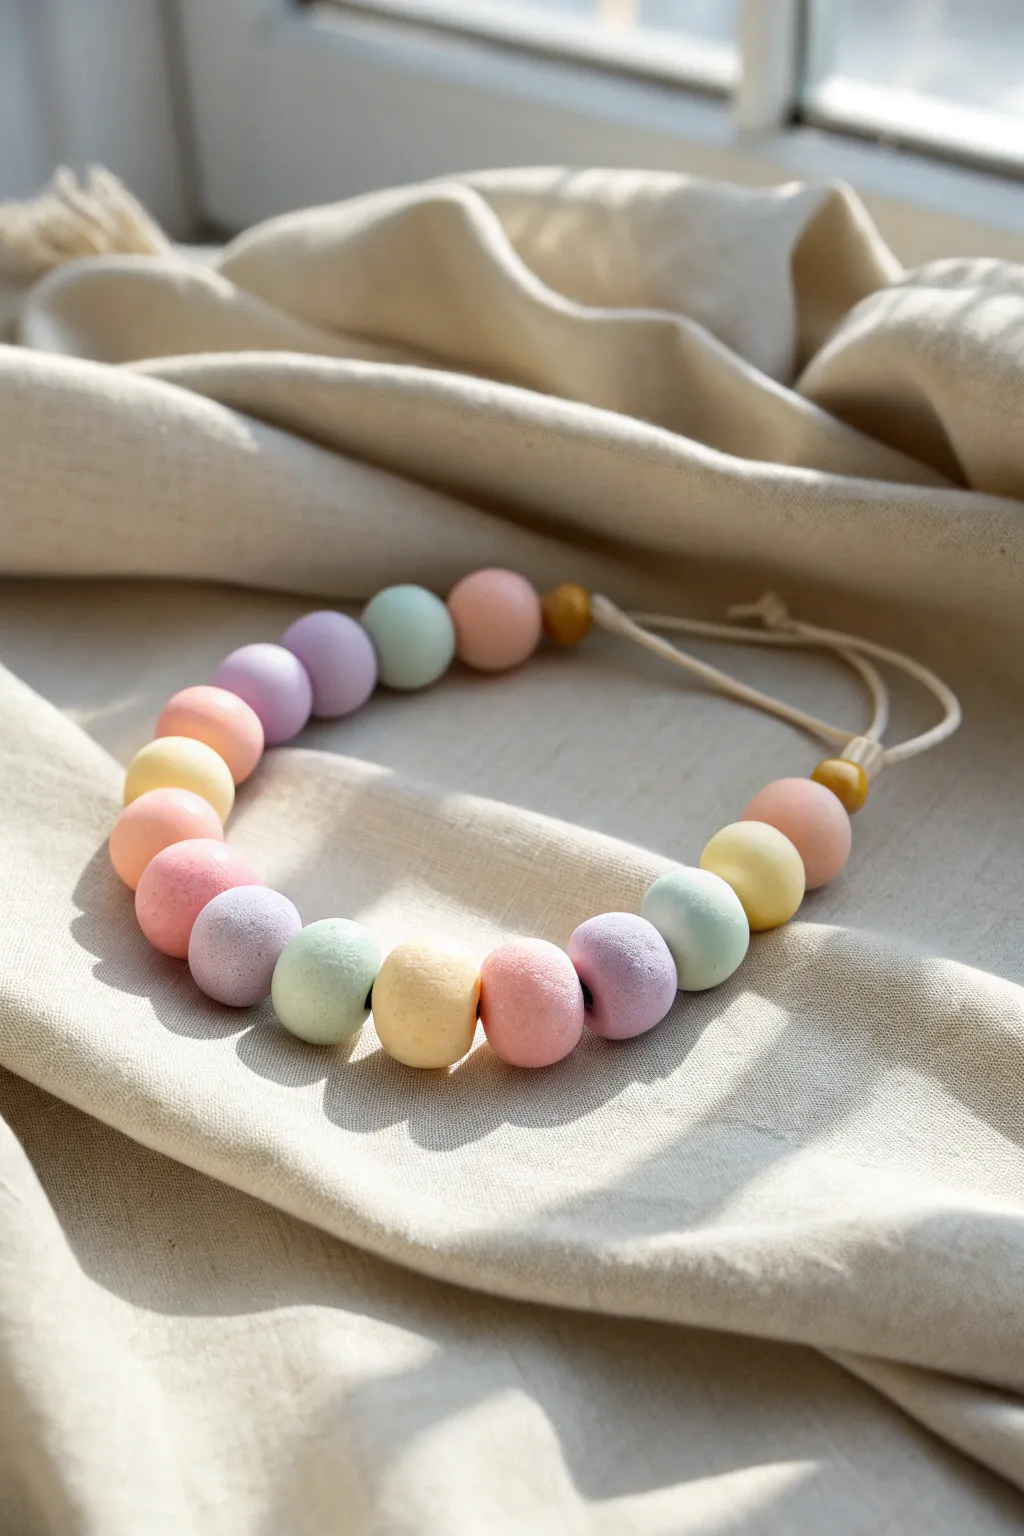
Soft, sugary shades blend beautifully in this handmade bead project, creating accessories that look good enough to eat. With a matte, chalky finish reminiscent of french macarons, this jewelry piece adds a sweet touch to any outfit.
How-To Guide
Materials
- Polymer clay (white, pink, yellow, blue, purple)
- Wooden skewers or thick toothpicks
- Cornstarch or baby powder (conditioning aid)
- Fine-grit sandpaper (400-600 grit)
- Cotton or hemp cord (1-2mm thickness)
- Small round cutter (optional, for uniform size)
- Oven and baking sheet
- Parchment paper
- Small wooden beads (for finishing)
Step 1: Mixing the Colors
-
Prepare your white base:
Start with a large block of white polymer clay. Condition it by kneading until it is soft and pliable. This will act as the base for all your pastel shades to ensure they stay light and airy. -
Create tiny pigment balls:
Take very small amounts of your saturated colors (pink, yellow, blue, purple). You need a ratio of about 1 part color to 10 parts white to get that true macaron pastel look. -
Blend the pastels:
Mix each colored bit separately with a chunk of white clay. Knead thoroughly until no streaks remain and you have a set of soft, uniform pastel balls. -
The marble test:
Check your colors against each other. If one looks too bright, add more white clay to tone it down until they all have the same visual ‘weight’ or intensity.
Smooth Surface Secret
Wear latex gloves or dust your fingertips lightly with cornstarch while rolling. This prevents your unique fingerprints from transferring onto the raw clay surface.
Step 2: Shaping the Beads
-
Portion the clay:
Roll each color into a thick log. Slice equal segments from the logs to ensure your beads will be roughly the same size. For total precision, you can use a small circle cutter on a flattened sheet of clay. -
Roll spheres:
Roll each segment between your palms to create smooth spheres. Don’t worry if they aren’t factory-perfect; a little handmade irregularity adds to the organic charm. -
Add texture (optional):
For that matte, powdery look shown in the photo, I sometimes roll the raw beads very lightly in cornstarch before piercing. This prevents fingerprints and adds a soft finish. -
Piercing the holes:
Hold a bead gently between your thumb and finger. Using a skewer, slowly twist through the center. Twisting prevents the bead from squishing into an oval shape. -
Widening the channel:
Once the skewer is through, wiggle it slightly to ensure the hole is wide enough for your cord, especially if you plan to use a thicker hemp rope. -
Refining the shape:
After piercing, the exit holes might look rough. Gently pat the ends of the bead to smooth any clay ridges back down.
Hole Distortion?
If your beads are getting squished while piercing, let the raw clay balls sit in the fridge for 15 minutes. The cold firms them up, making them easier to drill.
Step 3: Baking and Finishing
-
Prepare for baking:
Arrange the beads on a parchment-lined baking sheet. You can create a small accordion fold in the parchment to rest the beads on so they don’t develop flat spots. -
Bake:
Bake according to your clay manufacturer’s instructions (usually 275°F/135°C for 15-30 minutes). Do not overbake, or the pastels might darken or yellow. -
Cool down:
Let the beads cool completely in the oven with the door cracked. This gradual cooling makes the clay stronger. -
Sanding:
For an ultra-soft suede finish, lightly sand the beads under cool running water using fine-grit sandpaper. This removes any final fingerprints. -
Cleaning:
Wash the beads with a drop of dish soap to remove sanding dust and dry them thoroughly with a towel.
Step 4: Assembly
-
Cut the cord:
Cut a length of cotton or hemp cord about 30 inches long, depending on how low you want the necklace to hang. -
Stringing pattern:
Thread the beads onto the cord. Alternate colors randomly or create a repeating pattern like pink, yellow, blue, purple. -
The accent beads:
Add a small wooden bead or a contrasting gold clay bead at the very ends of your beaded section to act as stoppers. -
Tie the closure:
Tie a slip knot or a simple bow at the ends of the cord to allow for adjustable sizing.
Now you have a charming strand of pastel beads ready to wear or gift to a friend

The Complete Guide to Pottery Troubleshooting
Uncover the most common ceramic mistakes—from cracking clay to failed glazes—and learn how to fix them fast.
Sprinkle Confetti Trinket Dishes
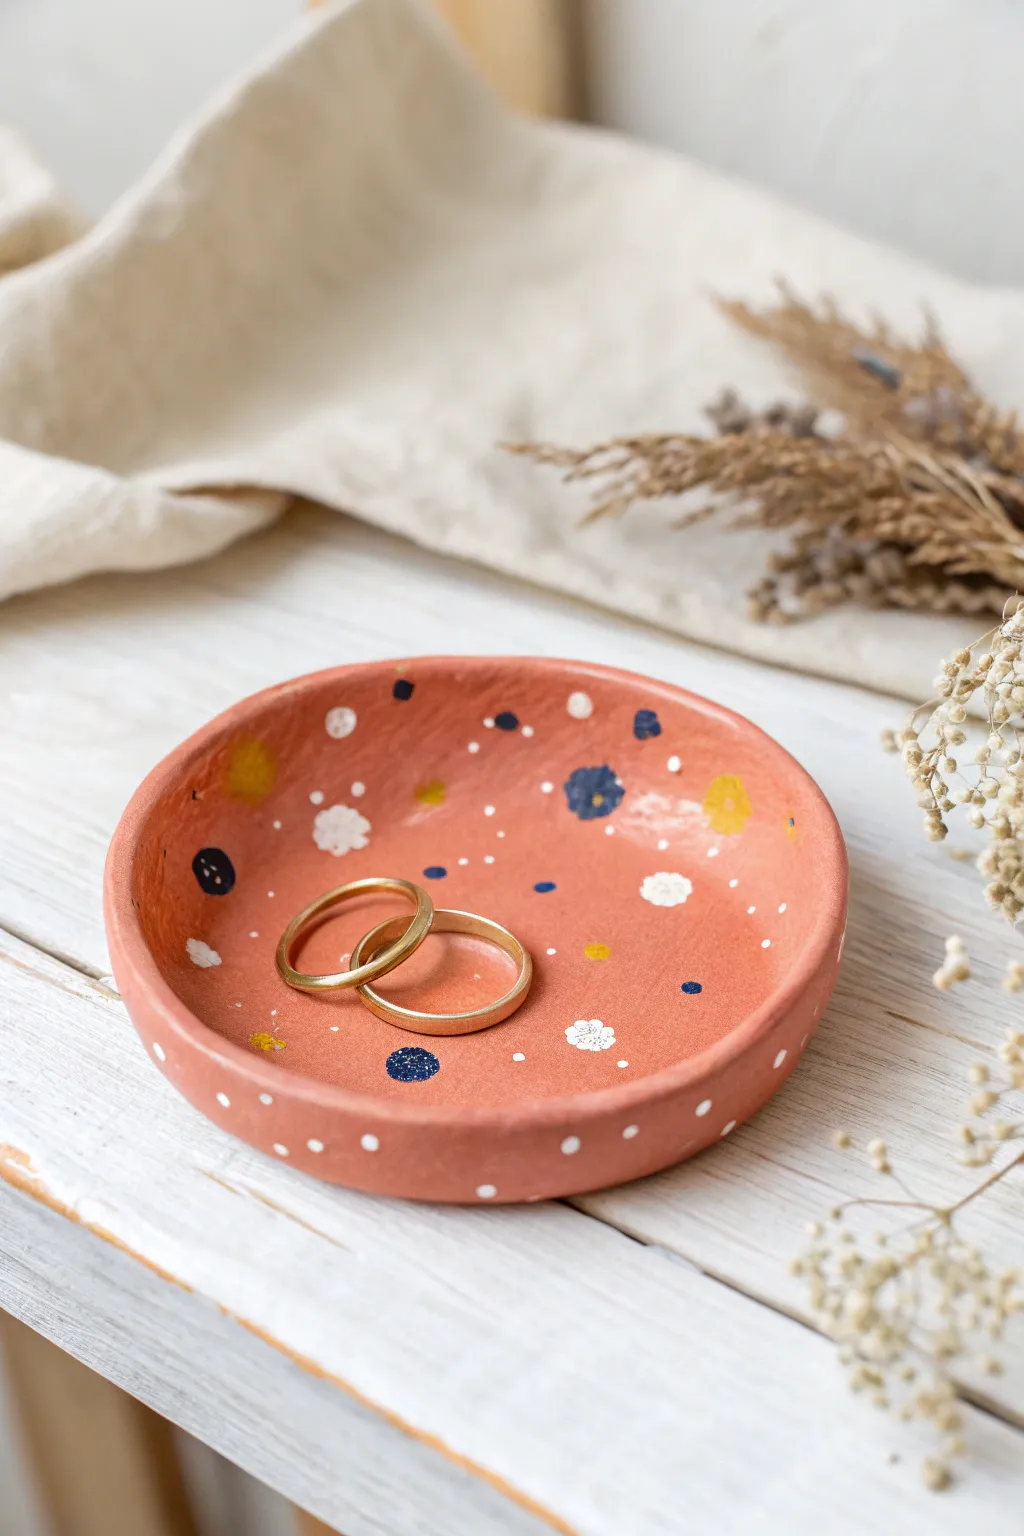
This charming, handmade trinket dish combines the warmth of terracotta-colored clay with playful pops of painted confetti. It’s the perfect size for housing your favorite rings and adds a sweet, artisanal touch to any bedside table.
Detailed Instructions
Materials
- Air-dry clay (terra cotta color) or polymer clay
- Rolling pin
- Circular template (small bowl or cookie cutter, approx. 4-5 inches)
- Small bowl for shaping (to slump the clay)
- Craft knife or clay tool
- Sponge and water (if using air-dry clay)
- Fine-grit sandpaper
- Acrylic paints (White, Navy Blue, Mustard Yellow)
- Fine detail paintbrush
- Dotting tool or toothpick
- Matte or satin clear sealant/varnish
Step 1: Shaping the Base
-
Condition the clay:
Start by kneading a handful of terracotta-colored clay until it is soft, pliable, and free of cracks. Warm hands help this process go faster. -
Roll it out:
On a clean, flat surface, roll the clay out to an even thickness of about 1/4 inch. Rotate the clay frequently to ensure it doesn’t stick to your work surface. -
Cut the circle:
Place your circular template onto the clay. Use a craft knife to trace around the edge and cut out a clean circle. -
Smooth the edges:
Dip your finger in a tiny bit of water (for air-dry clay) and gently run it along the cut edge to smooth out any sharpness or roughness. -
Form the curve:
Gently lift the clay circle and center it inside a small bowl to create a shallow, curved dish shape. Press it lightly so it takes the form of the bowl. -
Refine the rim:
While it’s in the bowl, create a slightly organic, imperfect rim by gently pinching or pressing the edges. The goal isn’t machine-perfect symmetry but a handmade feel. -
Let it dry:
Allow the clay to dry completely according to the package instructions. If using air-dry clay, I usually let it sit for 24-48 hours until it turns a lighter, chalky color. -
Sand for smoothness:
Once fully dry (and cured if using polymer), lightly sand any rough spots on the rim or surface with fine-grit sandpaper. Wipe away the dust with a damp cloth.
Step 2: Painting the Confetti
-
Analyze the pattern:
Look at the design before painting. It consists of small scattered dots and tiny floral-like clusters in white, navy, and mustard. -
Paint the large flowers:
Using your fine detail brush, paint small, irregular flower shapes. Make some white, some navy, and some mustard yellow. Space them randomly around the inside of the bowl. -
Add flower centers:
Once the flower shapes are dry, use a contrasting color to add a center dot. For example, add a yellow dot to a navy flower, or a navy dot to a white flower. -
Create the confetti dots:
Dip a dotting tool or the back end of a paintbrush into white paint. Dot the empty spaces between the flowers to create a ‘sprinkle’ effect. -
Decorate the rim:
Don’t forget the outside edge. Add small white dots along the outer rim and the exterior of the bowl for continuity. -
Add tiny details:
For extra texture, use the very tip of your smallest brush to add tiny clusters of three dots in white, mimicking baby’s breath or tiny seeds. -
Allow paint to cure:
Let all the paintwork dry completely for at least an hour to prevent smudging during the sealing phase. -
Seal the piece:
Apply a thin coat of matte or satin varnish over the entire dish. This protects the paint and gives the raw clay a finished look.
Cracks while Drying?
If small cracks appear as the clay dries, mix a tiny bit of fresh clay with water to make a paste (slip) and fill the cracks. Smooth over and let dry again.
Metallic Touch
Swap the mustard yellow paint for metallic gold acrylic. The shimmer will perfectly complement gold rings or jewelry placed in the finished dish.
Now you have a sweet spot to keep your treasures safe and stylish
Neon Marbled Catchall Bowls
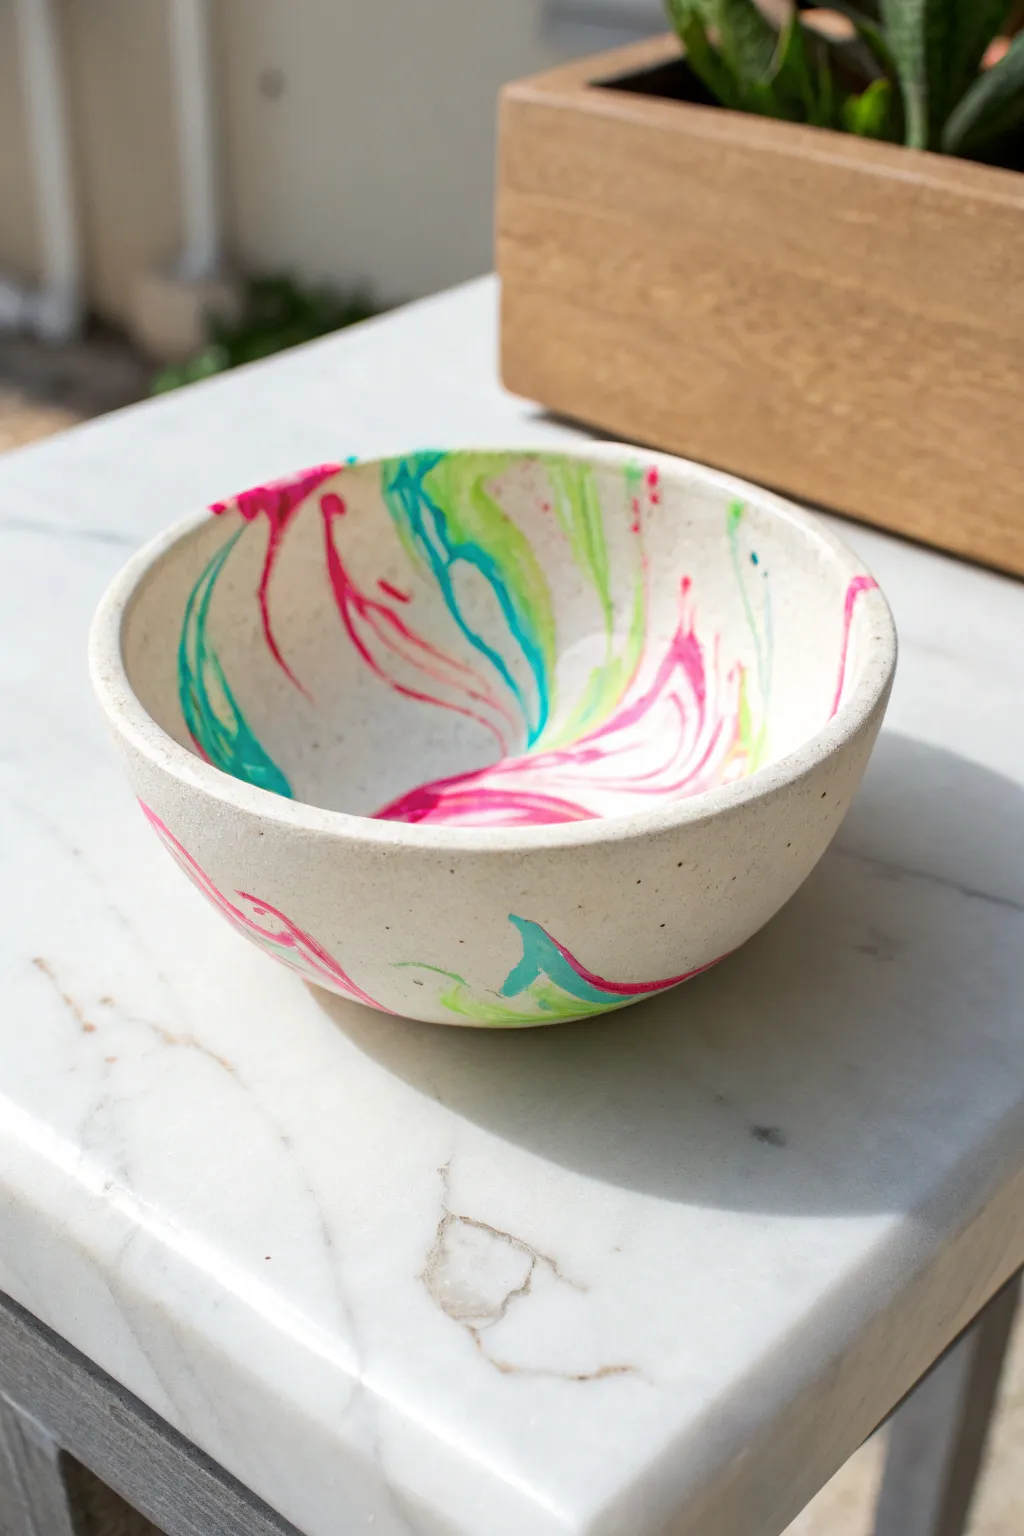
Brighten up your desk or bedside table with this vibrant catchall bowl, featuring electrifying swirls of neon pink, teal, and lime green against a neutral base. The mesmerizing marbled effect ensures no two bowls are ever exactly alike, giving you a truly one-of-a-kind functional art piece.
Step-by-Step Guide
Materials
- White air-dry clay or polymer clay
- Neon pink acrylic paint or clay pigment
- Neon teal acrylic paint or clay pigment
- Neon lime green acrylic paint or clay pigment
- Rolling pin
- Small bowl or mold (for shaping)
- Plastic wrap
- Sharp craft knife
- Sandpaper (fine grit)
- Glossy sealant or varnish
- Paintbrush
Step 1: Preparing the Clay
-
Base preparation:
Start by taking a large chunk of white clay, roughly the size of a tennis ball, and knead it until it is soft and pliable. -
Divide the clay:
Separate about one-quarter of the white clay and divide that smaller portion into three equal balls. -
Color mixing:
Add a few drops of neon pink paint or pigment to the first small ball and knead it thoroughly until the color is uniform. -
Repeat coloring:
Repeat the mixing process with the neon teal for the second ball and neon lime green for the third ball, adding more pigment if you want a bolder saturation. -
Create coils:
Roll each of the three colored clay balls into long, thin snake-like coils. -
Prepare the white base:
Flatten the remaining large ball of white clay slightly into a thick disc.
Don’t Overmix
Stop manipulating the clay the moment you see swirls you like. If you keep folding and rolling, the neon colors will blend into a grayish brown mess.
Step 2: Marbling the Pattern
-
Apply the colors:
Randomly lay the neon coils across the surface of the white clay disc, twisting and curving them as you place them down. -
Initial twist:
Pick up the entire mass of clay and gently twist it like a candy cane to begin incorporating the colors into the white base. -
Fold and roll:
Fold the twisted clay in half and roll it into a ball again. Be careful not to over-knead at this stage, or the colors will turn muddy instead of distinct swirls. -
Check the pattern:
Slice the ball in half with your craft knife to check the cross-section; if the marbling isn’t intricate enough, press the halves back together and twist one more time. -
Roll it out:
Using your rolling pin, roll the clay out into a flat slab about 1/4 inch thick. I like to rotate the clay periodically to keep the circle relatively even.
Step 3: Shaping and Finishing
-
Cut the circle:
Place a round template or bowl upside down on your clay slab and trace around it with a craft knife to get a perfect circle. -
Prepare the mold:
Take a cereal bowl or small mixing bowl and line the inside with plastic wrap to prevent sticking. -
Form the bowl:
Gently lift your clay circle and drape it inside the lined bowl, pressing lightly so it conforms to the curve without ruining the marble pattern. -
Drying time:
Allow the clay to dry completely according to the package instructions; for air-dry clay, this usually takes 24 to 48 hours. -
Remove and sand:
Once fully cured, pop the clay bowl out of the mold and gently sand the rim with fine-grit sandpaper to smooth out any rough or sharp edges. -
Seal the piece:
Apply a coat of glossy varnish or sealant to the entire surface to make the neon colors pop and protect the clay from moisture.
Add Some Sparkle
Mix a pinch of biodegradable glitter into the white clay base before adding the colored coils for a subtle, shimmering effect underneath the neon.
Now you have a stunning, modern spot to keep your keys and trinkets safe


What Really Happens Inside the Kiln
Learn how time and temperature work together inside the kiln to transform clay into durable ceramic.
Ombre Gradient Pendant Set
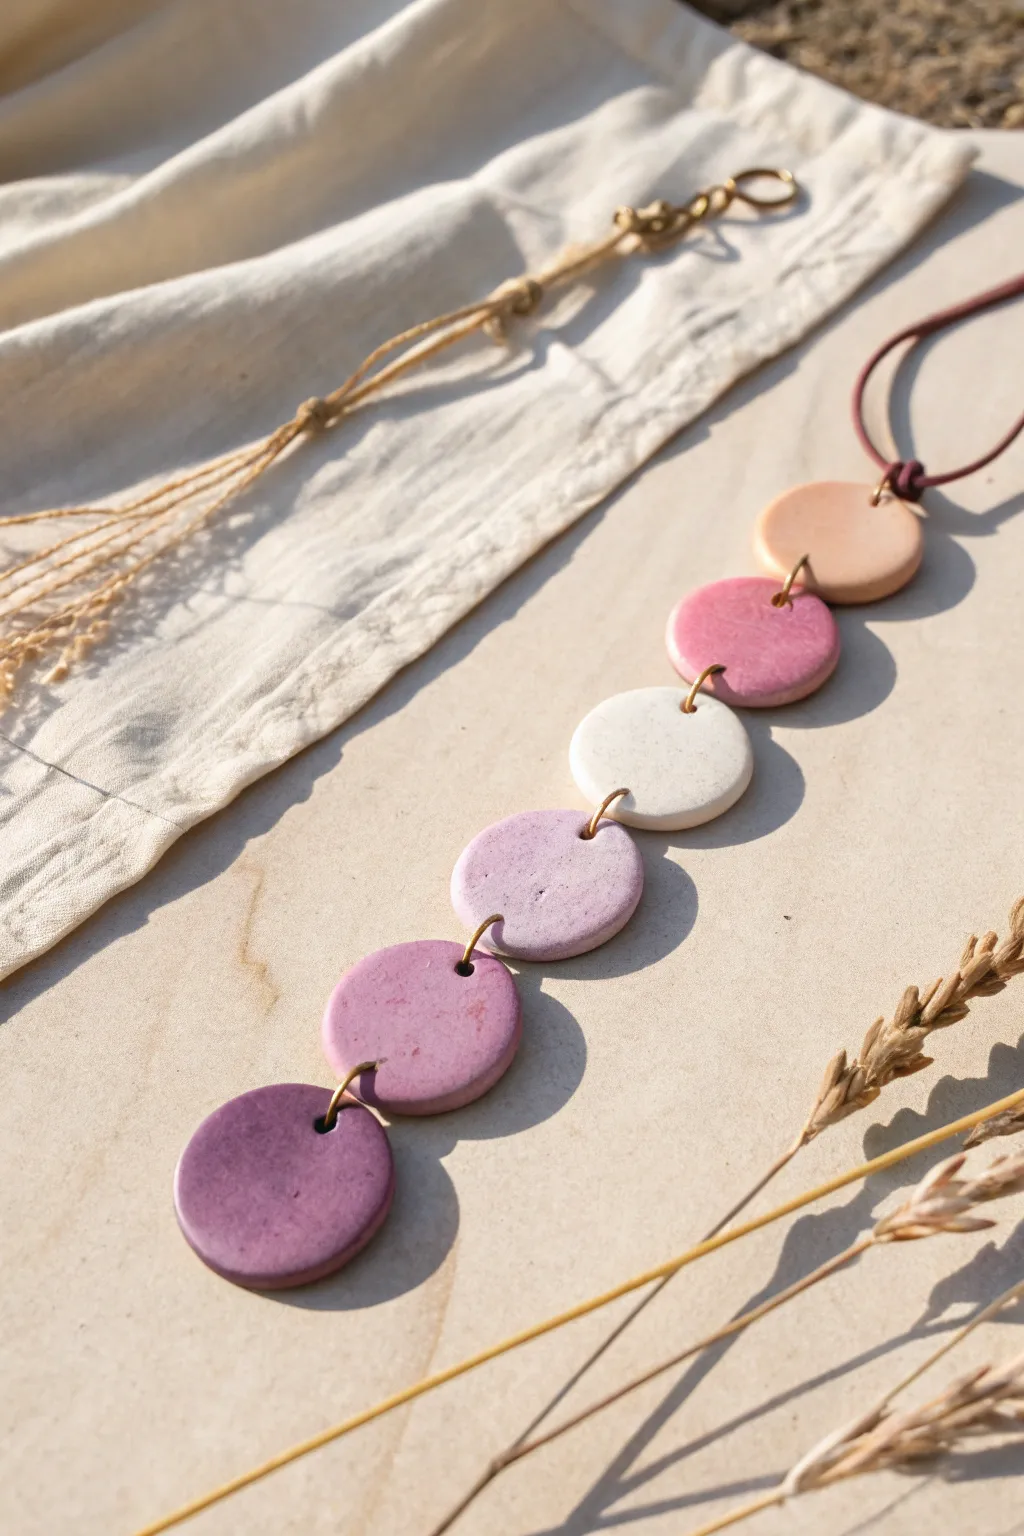
This stunning pendant set captures the soft beauty of a sunset with its graduating hues from deep plum to pale peach. The organic, slightly matte finish gives these clay circles a sophisticated, stone-like quality that pairs perfectly with natural linen textures.
How-To Guide
Materials
- Polymer clay (Deep purple, magenta, white, and translucent)
- Acrylic rolling pin or pasta machine
- Circle clay cutter (approx. 1 inch diameter)
- Small jump rings (gold or brass finish)
- Jewelry pliers (flat nose and round nose)
- Hand drill or needle tool
- Leather or waxed cotton cord (maroon or brown)
- Fine grit sandpaper (400-600 grit)
- Parchment paper or ceramic tile
Step 1: Color Mixing & Conditioning
-
Prepare the base colors:
Begin by conditioning your clay. You will need a distinct ‘darkest’ color (purple/plum) and a ‘lightest’ color (white or pale beige). Warm up the clay in your hands until it is pliable and smooth. -
Create the gradient palette:
To achieve the ombre look seen in the photo, you need five distinct shades. Start with a ball of pure plum clay for the bottom circle. For the next shade up, mix 3 parts plum with 1 part white. -
Mix the middle tones:
For the middle purple, mix equal parts plum and white. For the pinkish tone above that, I like to introduce a tiny bit of magenta into a mostly white mixture to shift the hue warmer. -
Finish with the lightest shade:
Finally, create the top peach/beige shade. Mix a very small amount of orange or brown into a large amount of white clay until you get a soft, natural tone. -
Check your gradient:
Line up your five balls of mixed clay in order. Make sure there is a visible, pleasing transition between each shade before rolling them out.
Stone Texture Trick
Mix in a pinch of ground black pepper or dried used coffee grounds into your lighter clay colors before rolling. This mimics faux granite perfectly.
Step 2: Shaping & Baking
-
Roll out the slab:
Using an acrylic roller or pasta machine, roll each color out to a uniform thickness, about 3-4mm roughly. You want them substantial enough to hold the jump rings but not too heavy. -
Add texture (optional):
If you want that slightly stone-like look, you can gently press a piece of sandpaper or a toothbrush onto the surface of the raw clay to remove the shiny plastic finish. -
Cut the circles:
Use your circle cutter to punch out one disc from each color. Use a piece of plastic wrap between the clay and the cutter if you want softly rounded edges, or cut directly for sharp edges. -
Smooth the edges:
Gently rub the edges of the circles with your finger to remove any stray bits of clay or sharp ridges created by the cutter. -
Pierce the holes:
Use a needle tool or toothpick to create holes in the clay. The bottom (plum) circle needs only one hole at the top. The top (peach) circle needs one hole at the bottom and a slightly larger hole at the top for the cord. The three middle circles need holes at both the top and bottom. -
Refine hole placement:
Ensure the holes are centered and about 2mm away from the edge so the clay doesn’t break later. Make sure the holes are wide enough to accommodate your jump rings. -
Bake the pieces:
Arrangement the circles on a ceramic tile or parchment-lined baking sheet. Bake according to your brand of clay’s instructions—usually around 275°F (135°C) for 30 minutes.
Step 3: Assembly
-
Sand and buff:
Once the pieces have cooled completely, wet sand the edges and surfaces lightly with fine-grit sandpaper if you want an ultra-smooth, matte finish. -
Open the jump rings:
Using two pairs of pliers, twist your jump rings open sideways (never pull them apart). This maintains their circular shape when closed. -
Connect the chain:
Starting from the bottom, thread an open jump ring through the plum circle and the bottom of the next lavender circle. Close the ring securely with pliers. -
Continue linking:
Repeat this process up the chain, ensuring careful color order: plum -> lavender -> pale purple -> textured white/gray -> peach. -
Attach the cord:
Cut a length of leather or waxed cord to your desired necklace length. Fold the cord in half to find the center loop. -
Secure the pendant:
Thread the folded loop of the cord through the single top hole of the peach circle. pull the loose ends of the cord through that loop to create a lark’s head knot, securing the pendant chain to the necklace.
Make it Metallic
After baking while the clay is still warm, rub a tiny amount of gold buffering wax onto the edges or surface for a chic, gilded ceramic look.
Now you have a beautifully articulated piece of wearable art that moves fluidly with you.
Tiny Rainbow Animal Crowd
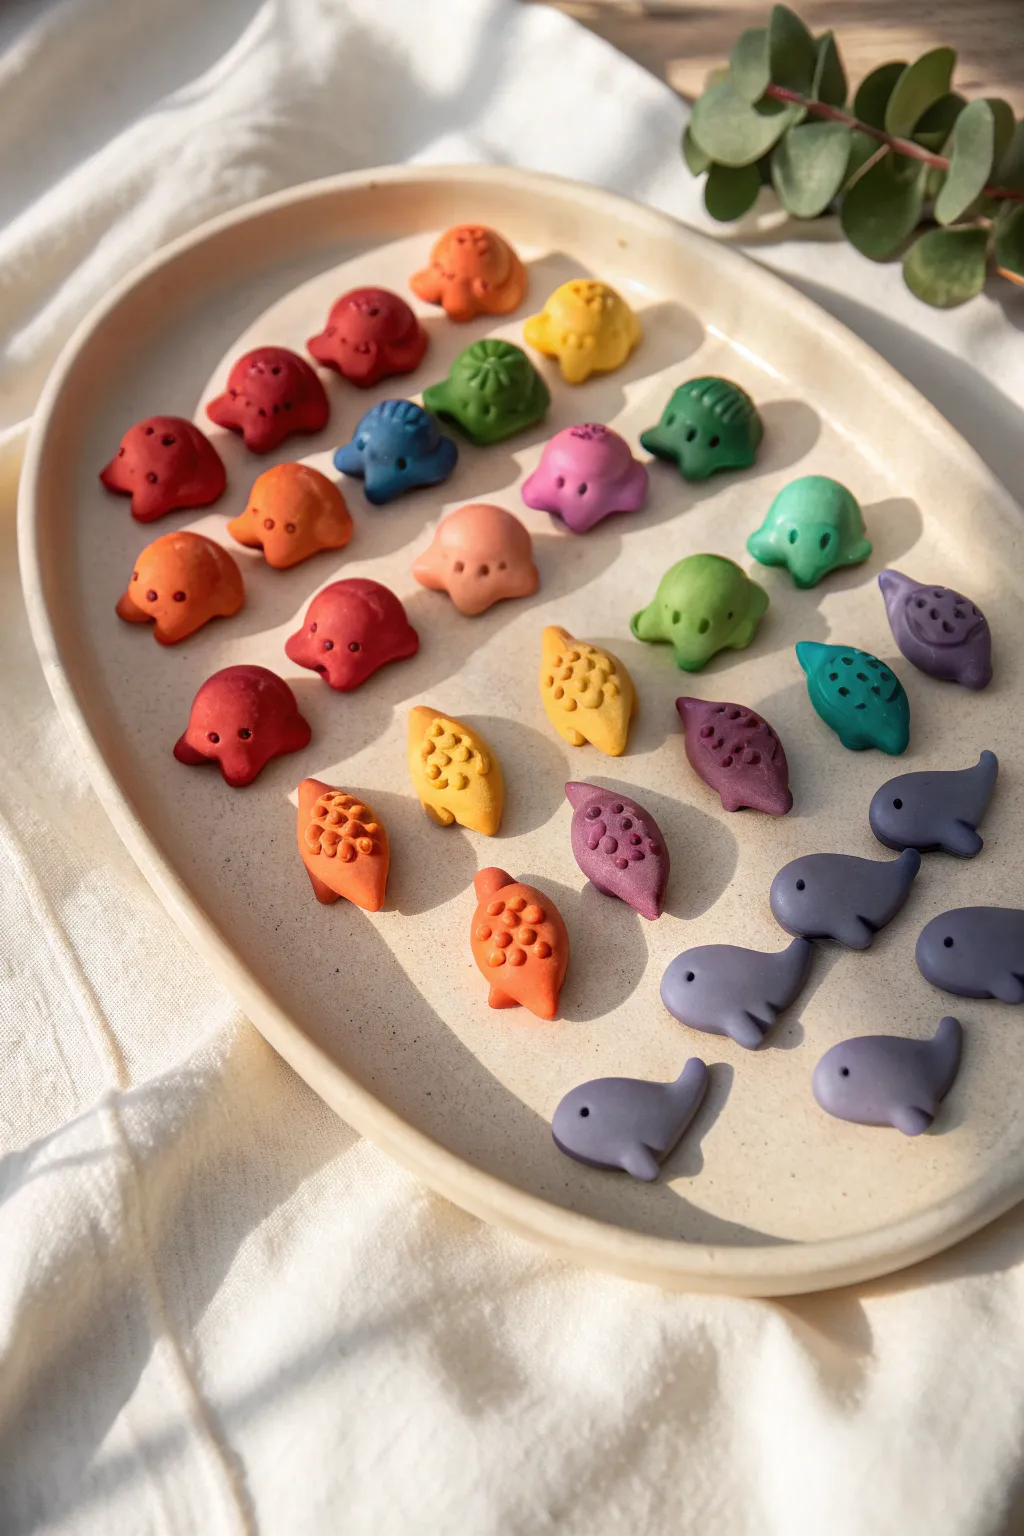
Create a delightful crowd of tiny, colorful friends to brighten up any desk or shelf. These simple, rounded animal shapes are perfect for using up polymer clay scraps and practicing consistent sizing.
Step-by-Step Guide
Materials
- Polymer clay in a full rainbow of colors (red, orange, yellow, green, blue, purple, pink)
- Black polymer clay or black acrylic paint for eyes
- Needle tool or a sharp toothpick
- Ball stylus tool (small)
- Parchment paper or a ceramic tile for working
- Oven for baking
- Gloss glaze (optional)
Step 1: Shaping the Blob Creatures
-
Portion the clay:
Begin by pinching off small, marble-sized amounts of clay in various colors. Roll each piece into a smooth, seamless ball between your palms to warm and condition it. -
Form the base shape:
Gently press the ball onto your work surface to flatten the bottom, creating a gumdrop or dome shape. Keep the top rounded and smooth. -
Add arm details:
Using your thumb and forefinger, gently pinch the lower sides of the dome to pull out two tiny, nubby arms or flippers. Smooth the join so they look organic. -
Texture the back:
For the textured variants shown in the image (like the yellow and orange ones), use a needle tool to press a pattern of small dots or scales into the top surface of the dome. -
Create the eyes:
Use a small ball stylus or needle tool to poke two small indentations for eyes low on the face. If you prefer paint, skip this indentation step.
Step 2: Sculpting the Tiny Whales
-
Prepare the whale shapes:
Roll balls of blue and purple clay, slightly larger than the previous blobs. I find slightly firmer clay works best here to hold the tail shape. -
Taper the body:
Roll one side of the ball into a tapered cone shape to form the tail section, leaving the other end bulbous for the head. -
Flatten and curve:
Press the shape down gently onto your surface. Curl the tapered tail section upward slightly to give the whale a swimming motion. -
Define the tail flukes:
Flatten the very tip of the tail and use a needle tool to cut a small ‘V’ notch in the center, creating the classic whale tail silhouette. -
Add side fins:
Roll tiny distinct teardrops of matching clay. Attach one to the visible side of the whale body, blending the seam with a silicone tool or your finger. -
Mark the eyes:
Place a single eye indentation on the side of the head using your stylus tool.
Dust Trouble?
Lint loves polymer clay. To avoid speckles, wipe your hands with a baby wipe or use hand sanitizer before switching between light and dark colors.
Step 3: Finishing Touches
-
Bake the clay:
Arrange all your creatures on a parchment-lined baking sheet or ceramic tile. Bake according to your specific clay brand’s instructions (usually 275°F/135°C for 15-30 minutes). -
Cool down:
Allow the pieces to cool completely inside the oven or on a wire rack. They will be fragile while hot. -
Paint the eyes:
If you plan to use paint, take a fine-tipped brush or toothpick dipped in black paint and carefully fill the eye indentations. -
Alternative clay eyes:
For a baked-in look, you can roll microscopic balls of black clay and press them into the eye sockets before baking. -
Apply glaze:
For a professional finish, brush a thin layer of gloss glaze over the cooled figurines to protect them and make the colors pop.
Make Them Magnets
Glue small neodymium magnets to the flat bottoms or backs of the baked figures create an adorable rainbow set for your refrigerator.
Arrange your completed menagerie on a ceramic dish or gift them to friends as tiny pocket charms

TRACK YOUR CERAMIC JOURNEY
Capture glaze tests, firing details, and creative progress—all in one simple printable. Make your projects easier to repeat and improve.
Bright Smiley Face Fridge Magnets
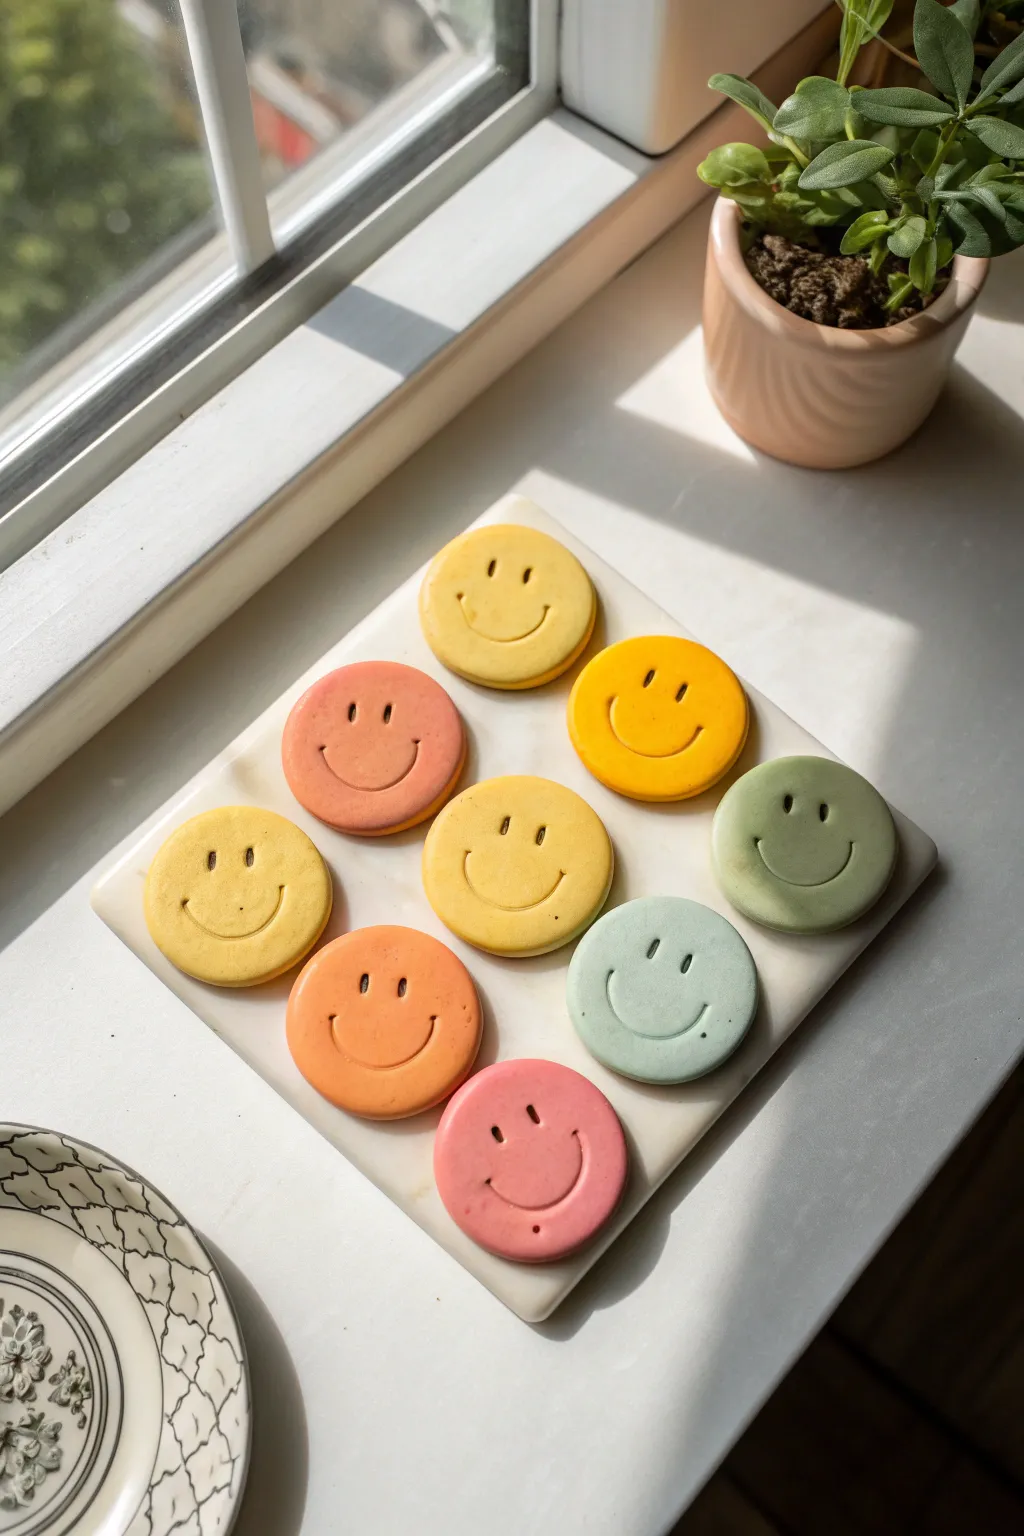
Bring a dose of cheerful energy to your fridge or magnetic board with these smooth, minimalist smiley face magnets. Their soft pastel rainbow palette and simple indented features create a modern, playful look that is deceptively easy to achieve.
Step-by-Step
Materials
- Polymer clay in pastel colors (butter yellow, golden yellow, peach, coral, light pink, mint, sage green)
- Round clay cutter (approx. 1.5 – 2 inches)
- Acrylic rolling pin or pasta machine
- Small ball stylus tool or dotting tool (for eyes)
- Needle tool or thin clay blade (for mouth)
- Parchment paper or ceramic tile
- Strong round craft magnets (ceramic or neodymium)
- Super glue or E6000 adhesive
- Oven (for baking)
- Cornstarch (optional, for non-stick)
- Fine-grit sandpaper (optional)
Step 1: Preparing the Clay Base
-
Condition the clay:
Start by taking small portions of each pastel color. Knead the clay thoroughly in your hands until it becomes soft, pliable, and warm. This conditioning step is crucial to prevent cracks later on. -
Roll out the slab:
Using your acrylic rolling pin, roll each color out onto a smooth surface or parchment paper. Aim for a uniform thickness of about 1/4 inch (6mm). If you want them perfectly even, use depth guides or playing cards stacked on either side of your roller. -
Cut the circles:
Press your round circle cutter firmly into the rolled clay. Give it a tiny wiggle to ensure it cuts all the way through, then lift it out. Gently push the clay circle out of the cutter if it sticks. -
Smooth the edges:
Inspect the edges of your clay circles. If there are any jagged bits or fingerprints, gently rub them smooth with your finger. I find that a tiny dab of cornstarch on my finger helps glide over the clay without leaving prints.
Sticky Fix
If your circle cutter keeps sticking to the clay, dip the cutting edge into cornstarch before each press. It acts as a release agent and brushes off easily.
Step 2: Sculpting the Faces
-
Mark the eye placement:
Decide where you want the eyes to sit. For a cute look, place them slightly wider apart and higher up on the circle. -
Create the eyes:
Take your small ball stylus or dotting tool and press straight down into the clay to create two vertical oval indentations. Don’t go all the way through; just create a deep, clean dimple. -
Outline the smile:
Using a needle tool or a flexible blade, lightly sketch a wide U-shape curve for the mouth to ensure you like the placement before committing. -
Deepen the smile:
Once you’re happy with the curve, retrace the line with slightly more pressure to create a clean, visible groove. You can also use the edge of a small spoon or a curved cutter to stamp the smile for a perfect arc. -
Add dimples:
At the very ends of the smile line, create tiny perpendicular ticks or small dots to give the face a definitive, finished expression. -
Clean up debris:
Check the face for any tiny crumbs of clay displaced by the tools. Use a soft brush or your finger to gently sweep them away.
Step 3: Baking and Assembly
-
Prepare for baking:
Transfer your finished circles onto a ceramic tile or a baking sheet lined with parchment paper. Ensure they are flat so they don’t warp during baking. -
Bake the clay:
Bake according to your specific brand of polymer clay instructions (usually around 275°F or 135°C for 15-30 minutes per 1/4 inch of thickness). Let them cool completely in the oven to prevent cracking. -
Sand (optional):
If there are any rough spots or fingerprints after baking, you can lightly wet-sand the surface with fine-grit sandpaper for a professional matte finish. -
Attach the magnet:
Flip the cooled clay pieces over. Apply a drop of strong adhesive like E6000 or super glue to the center of the back. -
Secure the backing:
Press a round magnet firmly into the glue. Let the adhesive cure fully (usually 24 hours for maximum hold) before sticking them to your fridge.
Glossy Upgrade
After baking, apply a coat of UV resin or glossy polyurethane varnish to make the magnets shiny and durable, giving them a ceramic-like appearance.
You have now created a cheerful set of magnets ready to hold your favorite photos and notes
Color-Blocked Mini Planters
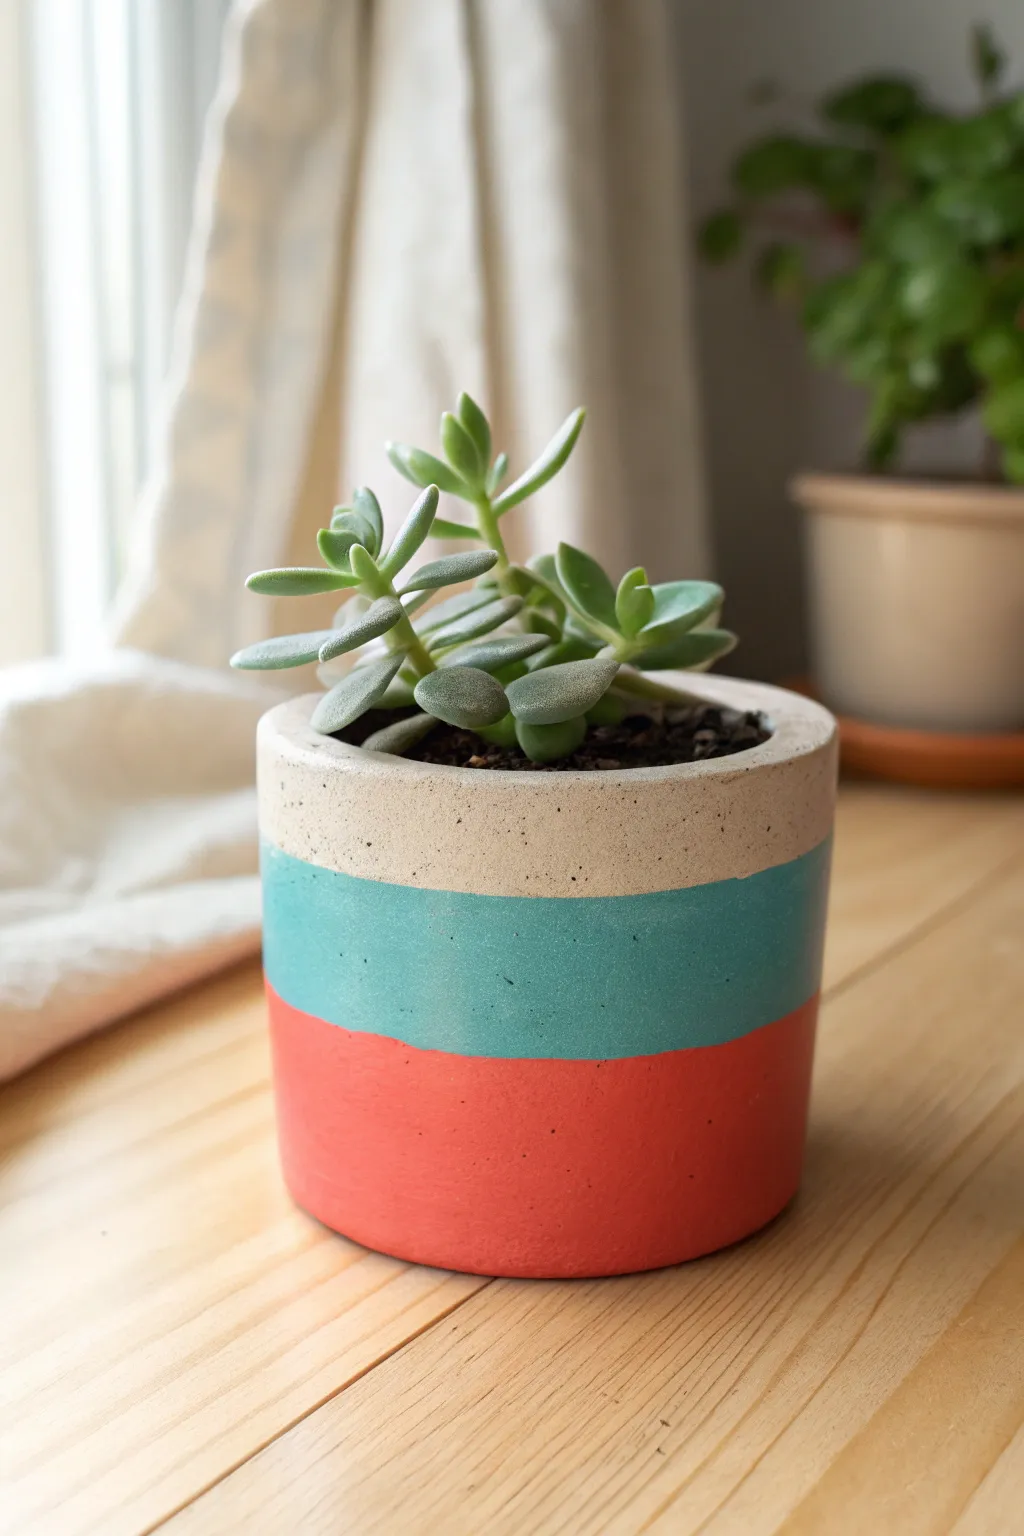
Bring a touch of modern geometry to your windowsill with this clean, color-blocked planter design. Using air-dry clay or polymer clay, you can mimic the look of custom stoneware while adding vibrant bands of teal and coral to brighten your plant collection.
Detailed Instructions
Materials
- White or sandstone-colored polymer clay (approx. 8 oz)
- Rolling pin or clay roller
- Small circular cookie cutter or jar lid (for the base)
- Rectangular template or ruler
- Craft knife
- Teal acrylic paint
- Coral or salmon-pink acrylic paint
- Painter’s tape or masking tape (low tack)
- Fine-grit sandpaper
- Matte varnish or sealant
- Small flat paintbrush
- Texture sponge (optional)
Step 1: Forming the Pot
-
Prepare the base:
Roll out a portion of your clay to about 1/4 inch thickness on a clean, flat surface. Use your circular cutter or jar lid to cut a perfect circle, which will serve as the bottom of your pot. -
Create the wall slab:
Roll out the remaining clay into a long, rectangular strip. Ensure the thickness matches the base (1/4 inch) for structural integrity. -
Size the strip:
Measure the circumference of your base circle. Trim your clay strip so that its length is just slightly longer than the circumference of the base, and trim the height to your desired pot depth. -
Add texture:
If you want that speckled, stone-like texture seen in the photo, gently press a coarse sponge or a piece of crumpled foil over the clay surface before assembling. I like to do this now while the clay is flat. -
Assemble the cylinder:
Wrap the clay strip around the circular base. Carefully join the two ends of the strip together, smoothing the seam with your finger or a clay tool until it disappears. -
Secure the bottom:
Flip the pot over and blend the seam where the wall meets the base circle. Smooth the clay downward to create a watertight seal. -
Final smoothing:
Check the rim of the pot. If it’s uneven, trim it gently with your craft knife or smooth it with a little water on your fingertip. -
Bake or dry:
Follow the manufacturer instructions for your specific clay. If using polymer clay, bake it in the oven; if using air-dry clay, let it cure fully for 24-48 hours.
Uneven Lines?
If paint bleeds under the tape, wait for it to dry completely. Then, gently scrape the excess away with a craft knife or use a small brush to touch up the line.
Step 2: Painting the Stripes
-
Sand for smoothness:
Once the pot is fully cured and cooled, lightly sand the exterior surfaces to remove any fingerprints or rough bumps, creating a pristine canvas for your paint. -
Tape the first line:
Measure about one-third of the way down from the top rim. Apply a strip of painter’s tape horizontally around the entire circumference of the pot, ensuring the edge is pressed down firmly. -
Apply the bottom color:
Paint the bottom third of the pot with your coral or salmon-pink acrylic paint. You may need two coats for full opacity. -
Paint the middle section:
Paint the middle section with your teal acrylic paint. Be careful not to paint above the tape line you set earlier. -
Refine the lines:
Wait for the paint to be dry to the touch. Carefully peel off the tape. To get the sharp line between the teal and coral, apply a new piece of tape over the dry coral paint and paint the teal section right up to it. -
Detail the top section:
Leave the top third of the pot unpainted to show off the natural clay color, creating that lovely speckled stone effect. -
Clean up edges:
If any paint bled under the tape, use a craft knife to gently scrape it away or touch it up with a tiny bit of paint. -
Seal the deal:
Apply a coat of matte varnish over the entire exterior. This protects the paint from water damage and gives the pot a finished, professional look. -
Add your plant:
Once the varnish is dry, pot your favorite small succulent inside and find a sunny spot for your new creation.
Faux-Ceramic Look
Mix black pepper or dried used coffee grounds into white clay before rolling it out to create realistic ‘speckles’ that mimic expensive ceramic stoneware.
Enjoy the satisfaction of seeing your greenery thrive in a pot you made yourself
Terrazzo-Style Coasters
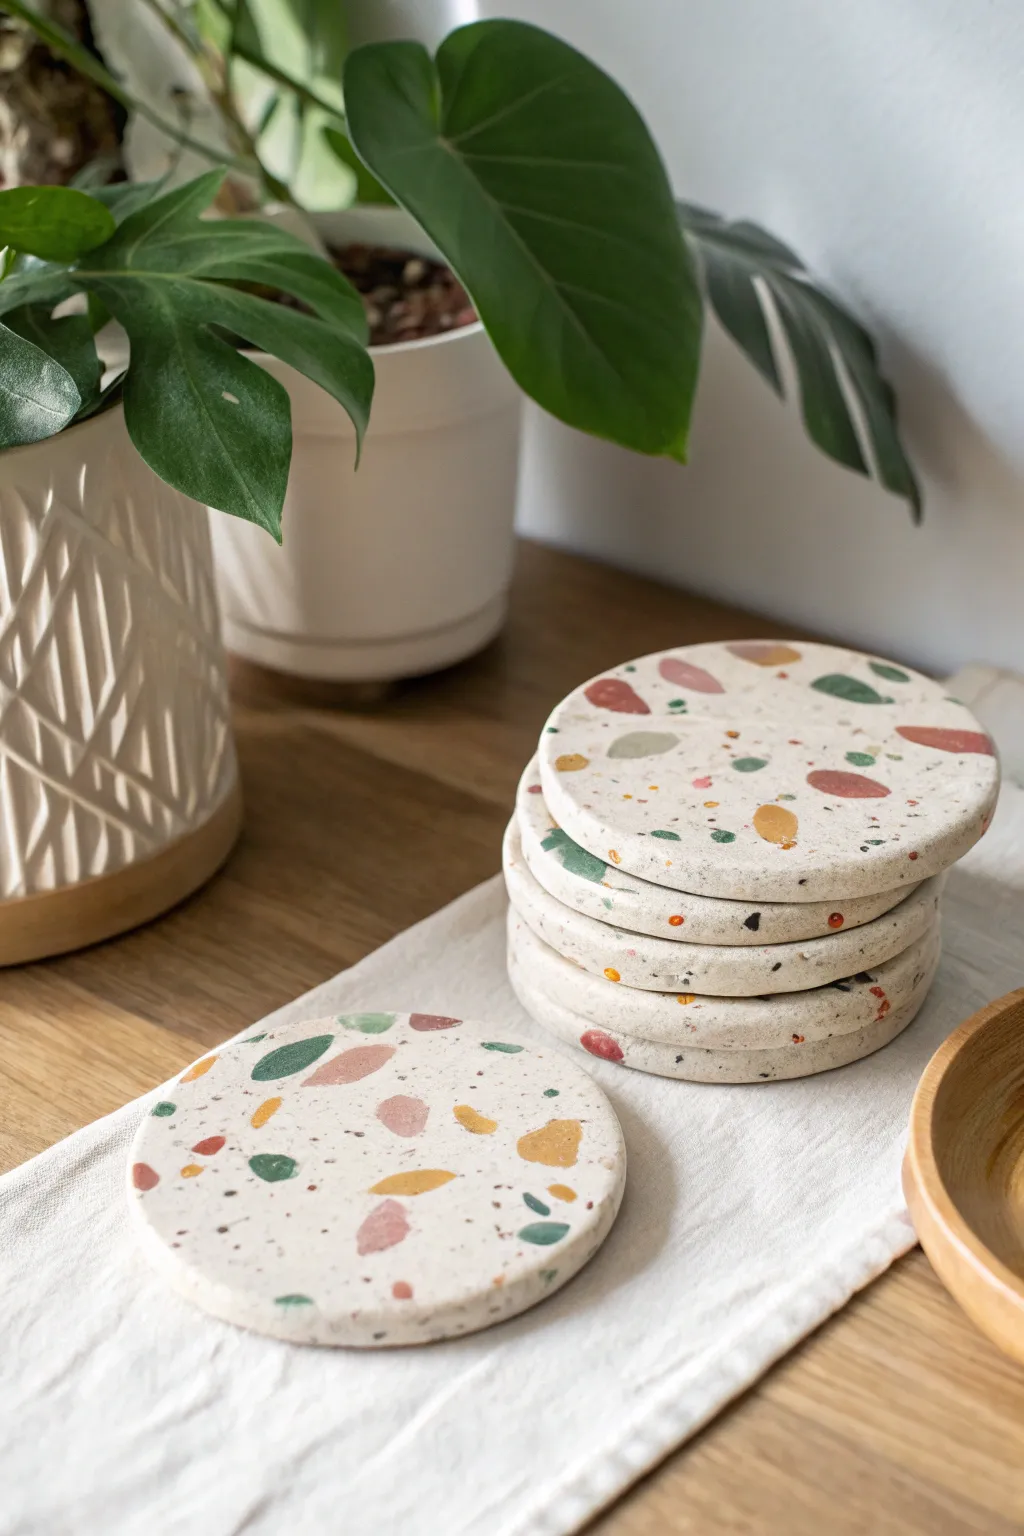
These sleek, modern coasters combine the timeless appeal of terrazzo with the fun of working with clay. Featuring a milky white base speckled with organic shapes of terracotta, sage green, and mustard yellow, they make a sophisticated addition to any coffee table.
How-To Guide
Materials
- White polymer clay (approx. 2 blocks)
- Small amounts of colored polymer clay (terracotta, sage green, mustard yellow, dark grey)
- Acrylic roller
- Round cookie cutter (approx. 3.5-4 inches)
- Parchment paper or ceramic tile work surface
- Craft knife or tissue blade
- Rolling guides or playing cards (optional, for even thickness)
- Fine-grit sandpaper (400, 600, and 800 grit)
- Matte finish varnish or polyurethane sealer
- Soft paintbrush
Step 1: Creating the Chips
-
Condition the colored clay:
Start by taking small amounts of your colored clays—terracotta, sage green, mustard yellow, and dark grey. Knead each color separately until it is soft and pliable. -
Roll thin sheets:
Using your acrylic roller, flatten each color into a very thin, organic sheet. The irregular edges are desirable here, so don’t worry about neatness. -
Slicing the terrazzo pieces:
With your craft knife or tissue blade, cut the thin colored sheets into small, random geometric shapes. Aim for a mix of sizes—some tiny specks and some larger, chunky shards. -
Pre-bake the chips (optional):
For sharper edges in your final design, you can briefly bake these thin chips for 5-10 minutes according to package directions. I like to do this to prevent the colors from smearing into the white base, but you can also use them raw for a softer look.
Smudged Colors?
If your colored chips are smearing into the white base while rolling, the clay is too warm. Pop the slab in the fridge for 10 minutes to firm it up before rolling again.
Step 2: Forming the Base
-
Condition the white clay:
Take your large blocks of white polymer clay and condition them thoroughly. This is the bulk of your coaster, so ensure it’s free of air bubbles and cracks. -
Roll the base slab:
Roll the white clay out onto your parchment paper until it is about 1/4 inch thick. Use rolling guides if you have them to keep the thickness perfectly uniform. -
Apply the chips:
Scatter your prepared colored chips onto the surface of the white clay slab. Don’t overthink the placement; random scattering usually produces the most authentic terrazzo effect. -
Embed the chips:
Gently run your acrylic roller over the slab again. Press down firmly enough to force the colored chips into the white clay until the surface is level and smooth. -
Check for gaps:
Look closely at your slab. If there are large empty white spaces, add a few more tiny colored specks and roll them in to balance the composition.
Add Texture
Mix some translucent clay or granite-effect clay into your white base for a more realistic stone look. You can also add dried tea leaves for tiny organic speckles.
Step 3: Cutting and Baking
-
Cut the circles:
Place your round cookie cutter onto the patterned slab. Press down firmly to cut out your coaster shapes. Create as many as your slab allows. -
Smooth the edges:
Carefully lift the excess clay away. Before moving the circles, gently smooth the cut edges with your fingertip to remove any harsh lines left by the cutter. -
Bake:
Transfer the parchment paper with the clay circles onto a baking sheet. Bake deeply according to the polymer clay manufacturer’s instructions (usually 275°F/135°C for 30-45 minutes depending on thickness) to ensure durability. -
Cool down:
Allow the coasters to cool completely on the baking sheet to firm up before handling.
Step 4: Finishing Touches
-
Wet sanding:
Once cool, dip your 400-grit sandpaper in water and sand the top surface in a circular motion. This reveals the crisp shapes of the embedded chips. -
Refining the surface:
Progress to 600-grit and then 800-grit sandpaper, keeping the paper wet. This process polishes the clay and removes any scratches, making the surface feel like stone. -
Wash and dry:
Rinse the coasters under tap water to remove all clay dust and dry them thoroughly with a lint-free towel. -
Seal (optional):
For extra protection against spills, apply a thin layer of matte varnish or polyurethane sealer. Let it dry completely according to the bottle instructions.
Now you have a stunning set of faux-stone coasters ready to protect your table in style
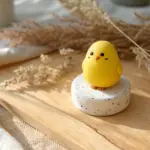
Abstract Blob Critters in Mixed Colors
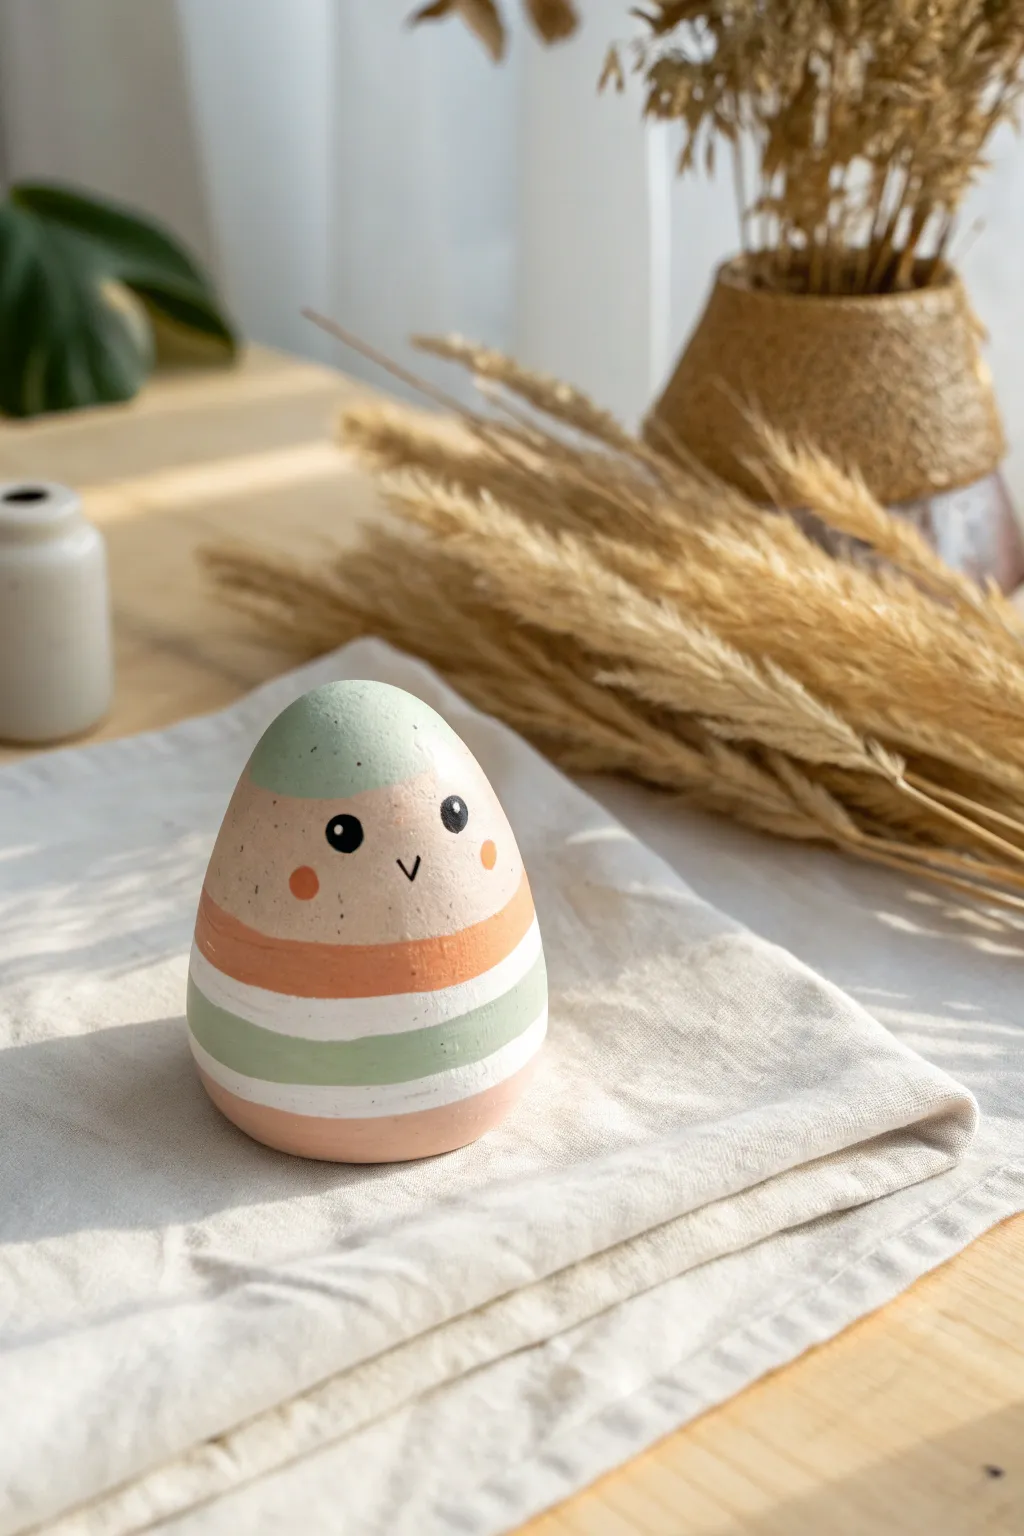
Bring a touch of whimsical minimalism to your desk or shelf with this adorable egg-shaped clay friend. Featuring soft pastel stripes and a sweet, simple face, this project is perfect for beginners looking to practice painting clean lines on curved surfaces.
How-To Guide
Materials
- Air-dry clay (white or terracotta)
- Acrylic paints (Mint Green, Peach/Salmon, White, Black, Cream/Beige)
- Small flat paintbrush (size 2 or 4)
- Fine detail paintbrush (size 0 or 00)
- Water cup and paper towels
- Fine-grit sandpaper (optional)
- Matte varnish or sealant
Step 1: Sculpting the Base
-
Condition the clay:
Start with a lump of air-dry clay about the size of a tennis ball. Knead it in your hands until it is soft, pliable, and free of cracks. -
Form a ball:
Roll the clay between your palms to create a smooth, perfect sphere. Press firmly to eliminate any hidden air bubbles. -
Shape the egg:
Gently gently roll one side of the sphere to taper it slightly, creating an egg-like shape with a wider base and a slightly narrower top. -
Flatten the bottom:
Tap the wider end of your egg onto your work surface. This creates a flat base so your critter will stand upright without wobbling. -
Smooth the surface:
Dip your finger in a tiny bit of water and rub it over the clay to smooth out any fingerprints or imperfections. Let the figure dry completely, usually for 24-48 hours depending on humidity.
Wobbly Lines?
If your stripes look shaky, use thin masking tape or washi tape to mask off the areas. Press the edges down firmly to prevent paint bleed.
Step 2: Painting the Design
-
Sand for smoothness:
Once fully dry, lightly sand the surface with fine-grit sandpaper if there are any rough bumps. Wipe away the dust with a damp cloth. -
Apply the base coat:
Mix a soft cream or beige color. Paint the upper half of the egg with this shade, providing a neutral background for the face. You might need two coats for full opacity. -
Paint the top cap:
Using mint green paint, carefully paint a rounded ‘cap’ on the very top of the head. I find rotating the egg while holding the brush steady helps get a cleaner curve. -
Create the orange stripe:
Mix a peach or salmon orange shade. Paint a thick band just below the middle of the egg. This defines the critter’s ‘shirt’ area. -
Add the white stripe:
Beneath the orange band, paint a crisp white stripe of similar thickness. Use your flat brush here to keep the edges relatively straight. -
Add the green stripe:
Paint another band using the mint green color below the white stripe. Try to keep the spacing consistent with the previous bands. -
Finish the bottom stripes:
Finish with another thin white stripe, followed by a final peach/salmon stripe at the very bottom base.
Smoother Finish
Mix a tiny drop of water into your acrylic paint. Thinner paint flows better on dry clay, reducing brush strokes for a cleaner look.
Step 3: Adding the Details
-
Paint the eyes:
Switch to your finest detail brush and black paint. Dot two small, solid circles on the beige section for the eyes. Space them fairly wide apart for a cuter look. -
Add eye sparkles:
Once the black dots are dry, use the very tip of a clean brush or a toothpick to add a tiny white dot reflecting light in each eye. -
Draw the beak:
Using the detail brush and black paint, draw a tiny ‘v’ shape between the eyes to create a simple beak. -
Add rosy cheeks:
Dip the back end of a paintbrush handle into the peach paint. Gently stamp a small dot under each eye to give your critter blushing cheeks. -
Seal the project:
Allow all paint to dry completely. Apply a coat of matte varnish to protect the paint and give the clay a finished, professional look.
Now you have a charming little desk buddy ready to keep you company while you work
Rainbow Checkerboard Tiles
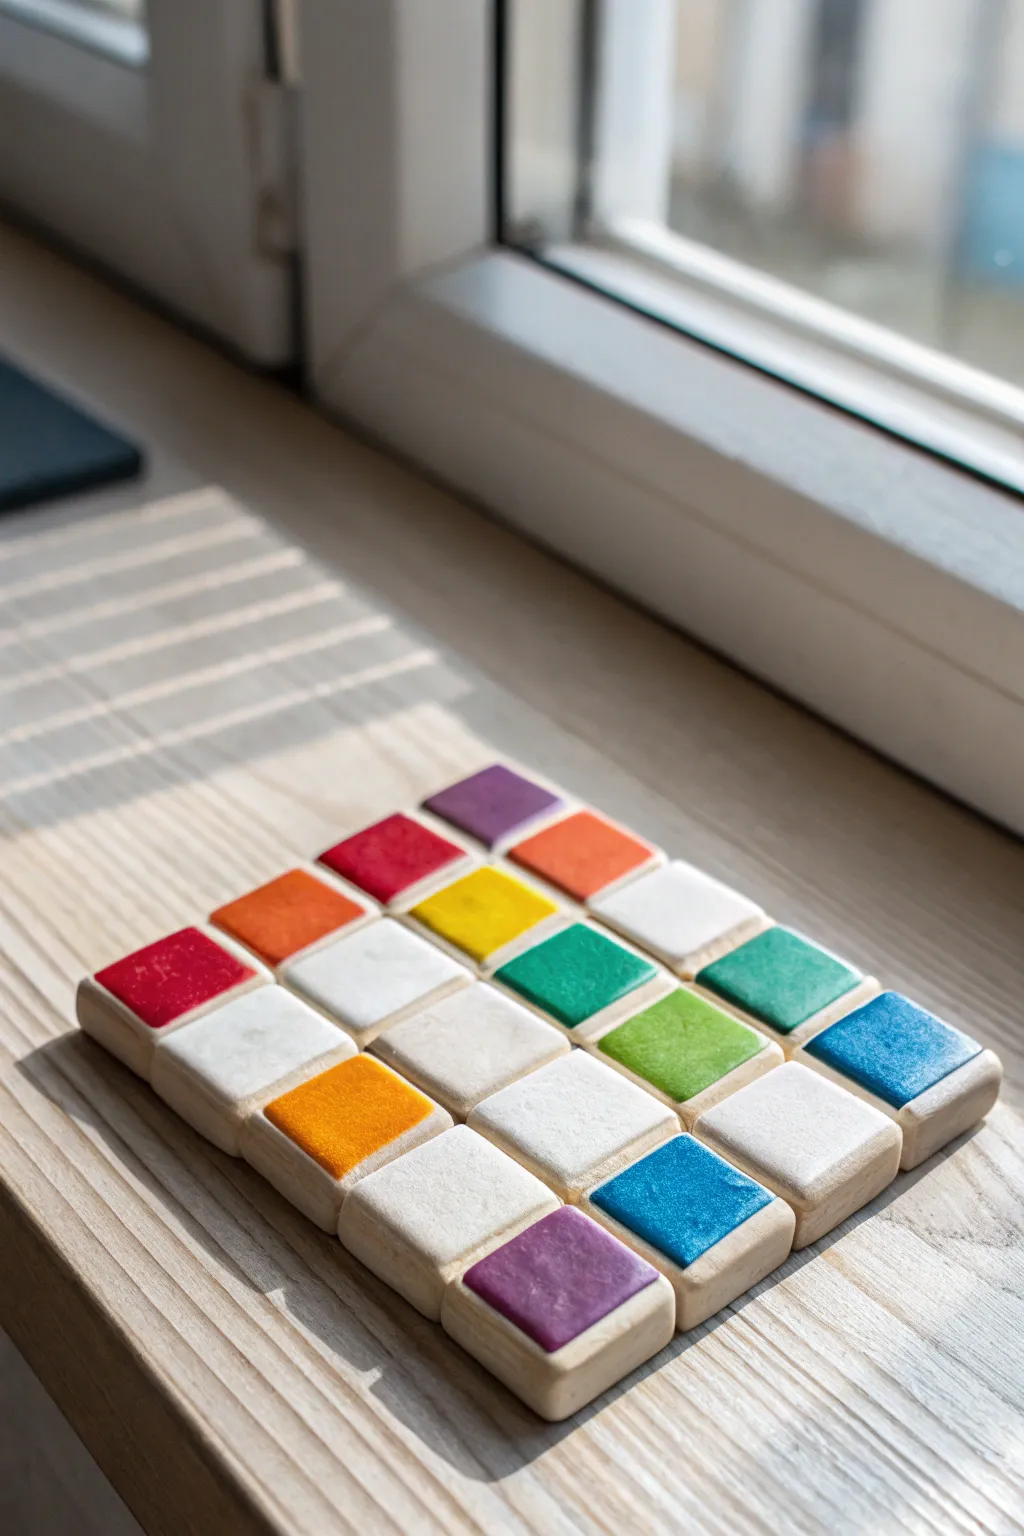
Brighten up your play area or coffee table with these charmingly tactile square tiles featuring vibrant clay insets. By combining natural wood bases with a smooth, colorful polymer clay finish, you’ll create a satisfyingly weighty set perfect for pattern play or coaster-making.
Step-by-Step Tutorial
Materials
- 25 Wooden square tiles (approx 1.5″ x 1.5″, unfinished)
- Polymer clay in rainbow colors (red, orange, yellow, green, blue, purple)
- White polymer clay
- Pasta machine or acrylic rolling pin
- Square clay cutter (slightly smaller than wooden tiles)
- Liquid polymer clay (bakeable adhesive)
- Craft knife
- Ruler
- Fine-grit sandpaper (400-600 grit)
- Baking sheet
- Parchment paper
- Matte or satin polymer clay varnish (optional)
Step 1: Preparing the Bases
-
Sand the Wood:
Begin by inspecting your wooden square bases. Use fine-grit sandpaper to smooth out any rough edges or splinters, paying special attention to the corners to ensure they are soft and rounded. -
Clean surface:
Wipe each wooden tile with a dry cloth or a slightly tack cloth to remove all sawdust. The surface needs to be completely clean for the clay to adhere properly later. -
Plan your Pattern:
Lay out your 25 tiles in a 5×5 grid. Decide on your color distribution. I prefer sketching this out quickly on paper so I know exactly how many squares of each color I need to mix.
Clean Edges Pro Tip
Wipe your clay cutter with a baby wipe or dip it in cornstarch before cutting each square. This prevents the clay from sticking to the metal and dragging the edges.
Step 2: Creating Clay Insets
-
Condition the Clay:
Start with your first color, kneading it in your hands until it’s soft and pliable. Warm clay is essential for a smooth surface without cracks. -
Roll Uniform Sheets:
Using a pasta machine on a medium setting or an acrylic roller with depth guides, roll the clay out into an even sheet about 1/8 inch thick. -
Cut Squares:
Use your square cutter to punch out shapes. If you don’t have a cutter the exact size you need, measure a template from cardstock and carefully cut around it with your craft knife. -
Soften Edges:
Gently tap the sharp cut edges of the clay square with your finger to round them slightly. This gives the finished piece a pillowy, soft look rather than a sharp, industrial one. -
Repeat for All Colors:
Clean your roller and work surface between every color switch to prevent staining, especially when moving to the white clay.
Step 3: Assembly and Baking
-
Apply Adhesive:
Squeeze a thin layer of liquid polymer clay onto the center of a wooden tile. Spread it slightly toward the edges but keep it away from the very rim to avoid oozing. -
Place the Clay:
Center your colored clay square onto the wooden base. Press down gently from the center outward to release any trapped air bubbles. -
Texture Check:
Inspect the surface. If you handled the clay too much, you might see fingerprints. Lightly brush over the clay with a little baby oil or cornstarch to smooth them away. -
Batch the Tiles:
Continue until all 25 tiles have their clay tops attached. Arrange them on a parchment-lined baking sheet. -
Bake:
Bake the tiles according to your clay manufacturer’s instructions (usually around 275°F or 130°C) for 15-20 minutes. Since wood is porous, it can safely go in the oven at these low temps. -
Cool Down:
Let the tiles cool completely on the baking sheet. The clay is fragile while hot and solidifies as it returns to room temperature.
Level Up: Magnetize It
Drill a shallow hole in the back of each wooden tile using a forstner bit and glue in a strong neodymium magnet to turn this set into a giant, interactive fridge puzzle.
Step 4: Finishing Touches
-
Final Sanding:
Once cool, give the wooden edges one last quick pass with very fine sandpaper if the heat raised the wood grain slightly. -
Seal (Optional):
For extra durability, secure the finish by brushing a thin coat of matte or satin varnish over the clay surface.
Enjoy arranging your beautiful new set of tactile color tiles
Colorful Alphabet Letter Charms
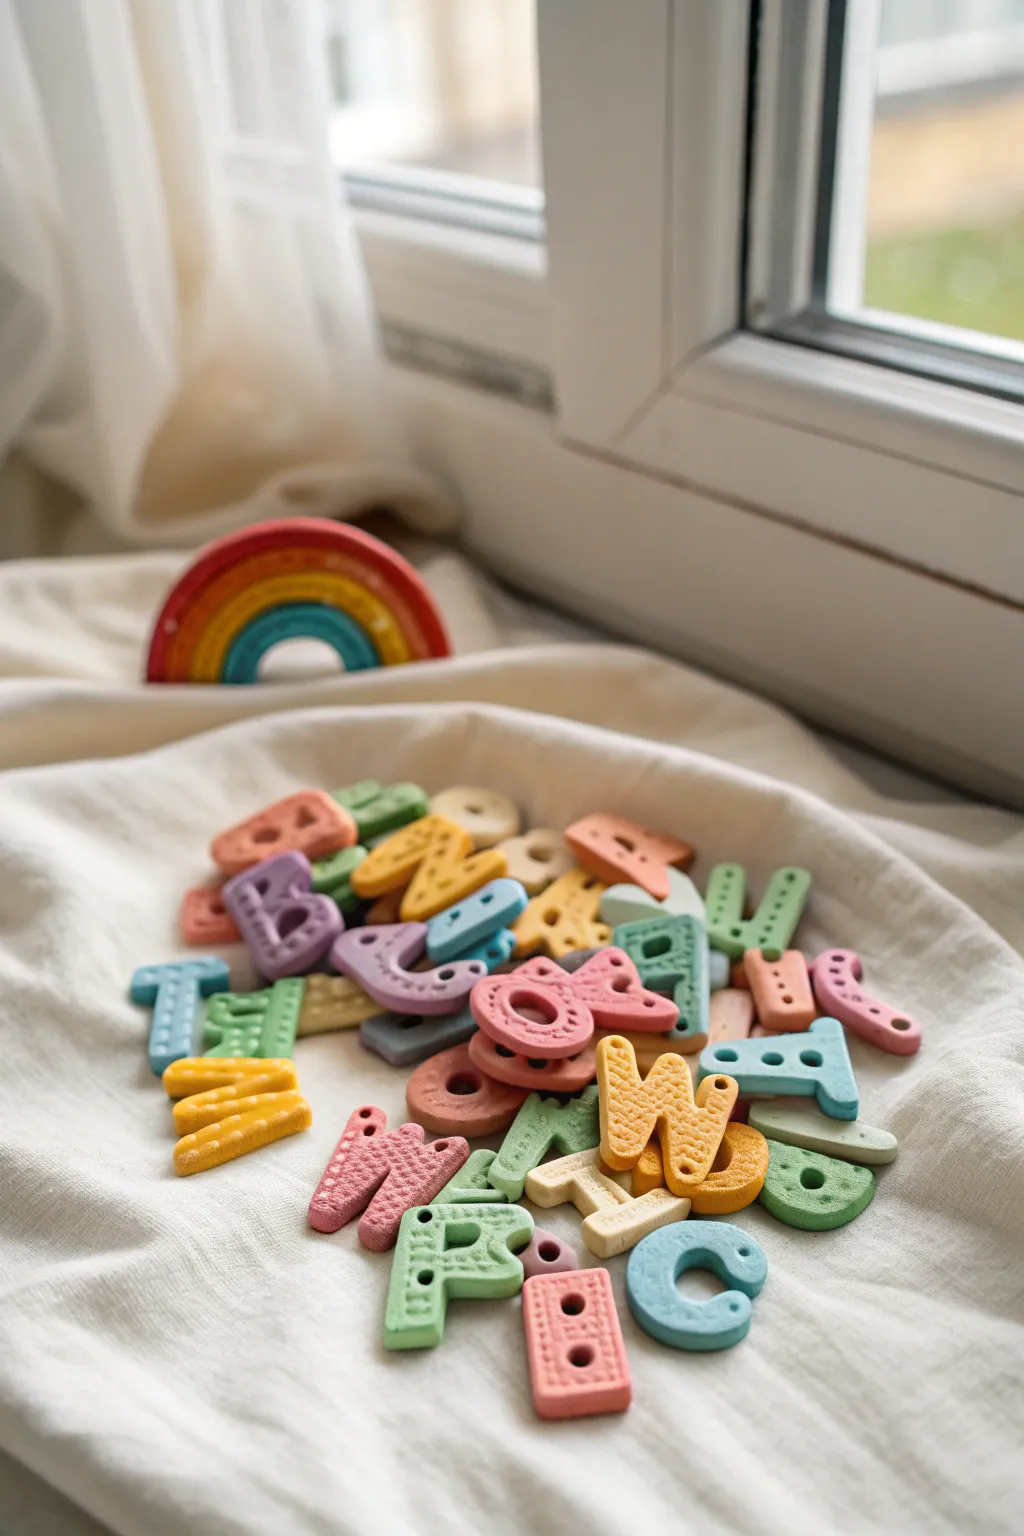
These delightful alphabet charms are bursting with color and tactile fun, perfect for personalizing gifts or learning play. Made from air-dry clay or polymer clay, each letter features unique stamped textures and a soft, matte finish that feels wonderful to hold.
Step-by-Step Guide
Materials
- Various colors of polymer clay (pastels and brights)
- Small alphabet cookie cutters (approx. 1-1.5 inch)
- Clay roller or acrylic rolling pin
- Texture tools (toothpicks, burlap, textured rollers, or clean combs)
- Parchment paper or a ceramic tile
- Clay slicing blade
- Oven for baking (if using polymer clay)
- Small round piping tip or straw (for larger holes)
- Fine grit sandpaper (optional)
Step 1: Preparing the Clay
-
Condition the clay:
Begin by selecting your color palette. You’ll want a mix of muted pastels like sage green and dusty rose, alongside brighter pops of yellow and teal. Knead each color in your hands until it becomes soft, pliable, and warm. -
Roll out slabs:
Place a ball of conditioned clay on your parchment paper or work surface. Using your acrylic roller, flatten the clay into an even slab. Aim for a thickness of about 1/4 inch (6mm) so the charms feel substantial and chunky. -
Apply texture first:
Before cutting out the shapes, add texture to the entire slab. Press a scrap of burlap gently into the surface for a fabric look, or lightly roll a textured pin over the clay. This ensures the pattern covers the letters edge-to-edge.
Clean Cuts Every Time
dip your cookie cutters into cornstarch or water before pressing into the clay. This acts as a release agent and prevents the clay from sticking inside tight corners.
Step 2: Shaping the Letters
-
Cut the shapes:
Press your alphabet cutters firmly into the textured slab. Give each cutter a little wiggle before lifting to ensure a clean cut. -
Remove excess clay:
Carefully peel away the surrounding clay skeleton, leaving the letters on the work surface. I find it easier to remove the scrap clay rather than trying to lift the delicate letters immediately. -
Detailing – The Dotted Look:
For letters like the ‘T’ or ‘C’ shown in the image, take a blunt tool or the end of a small paintbrush handle and press rows of small indents into the surface. Don’t go all the way through; just create dimples. -
Detailing – Cross-hatching:
On other letters, use a toothpick or clay needle to scratch fine grid lines. Create diagonal strokes in one direction, then cross them in the opposite direction for a woven appearance. -
Create holes:
Use a toothpick to poke holes vertically through the letters if you want to string them as beads. For larger decorative holes (like in the ‘A’ or ‘B’), use a small straw to punch out neat circles. -
Refine the edges:
Gently tap the sides of each letter with your finger to soften any sharp ridges left by the cutter. The goal is a smooth, rounded edge that looks friendly and soft.
Letters Stuck inside Cutter?
Don’t poke them out from the top as this dents the surface. Instead, gently blow through the top of the cutter to pop the clay out using air pressure.
Step 3: Baking and Finishing
-
Transfer to baking sheet:
If you worked on parchment paper, simply lift the whole sheet onto a baking tray. If not, carefully lift each letter with a clay blade to avoid distorting the shape. -
Bake the clay:
Bake the pieces according to your clay manufacturer’s instructions. Typically, this is around 275°F (135°C) for 15-30 minutes, depending on thickness. Do not overbake to preserve the pastel colors. -
Cool down:
Let the letters cool completely on the tray. Polymer clay is slightly fragile when hot but hardens fully as it returns to room temperature. -
Sand imperfections:
Once cool, inspect the edges. If there are any rough spots, lightly buff them away with fine-grit sandpaper or a nail file. -
Wash and dry:
Rinse the charms quickly in soapy water to remove any sanding dust or oily residue, then pat them dry with a lint-free cloth. -
Seal (optional):
The charm in the image has a natural matte finish, so no glaze is needed. However, if you want extra durability, you can apply a very thin layer of matte varnish.
Now you have a pile of custom alphabet charms ready for jewelry making or sensory play time
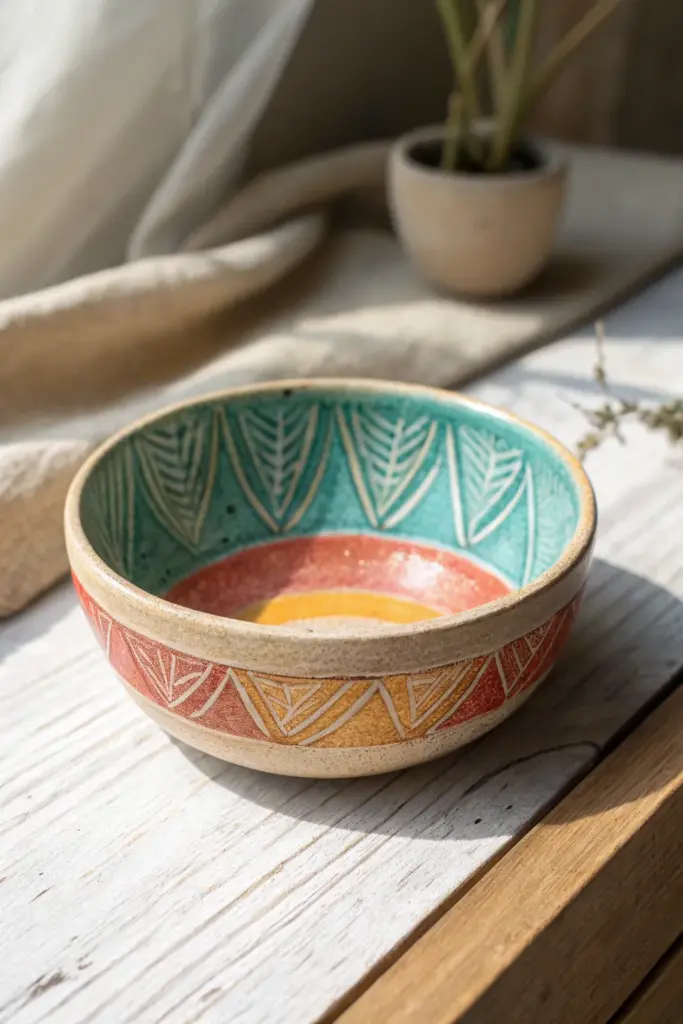
Carved Color Layers With Sgraffito
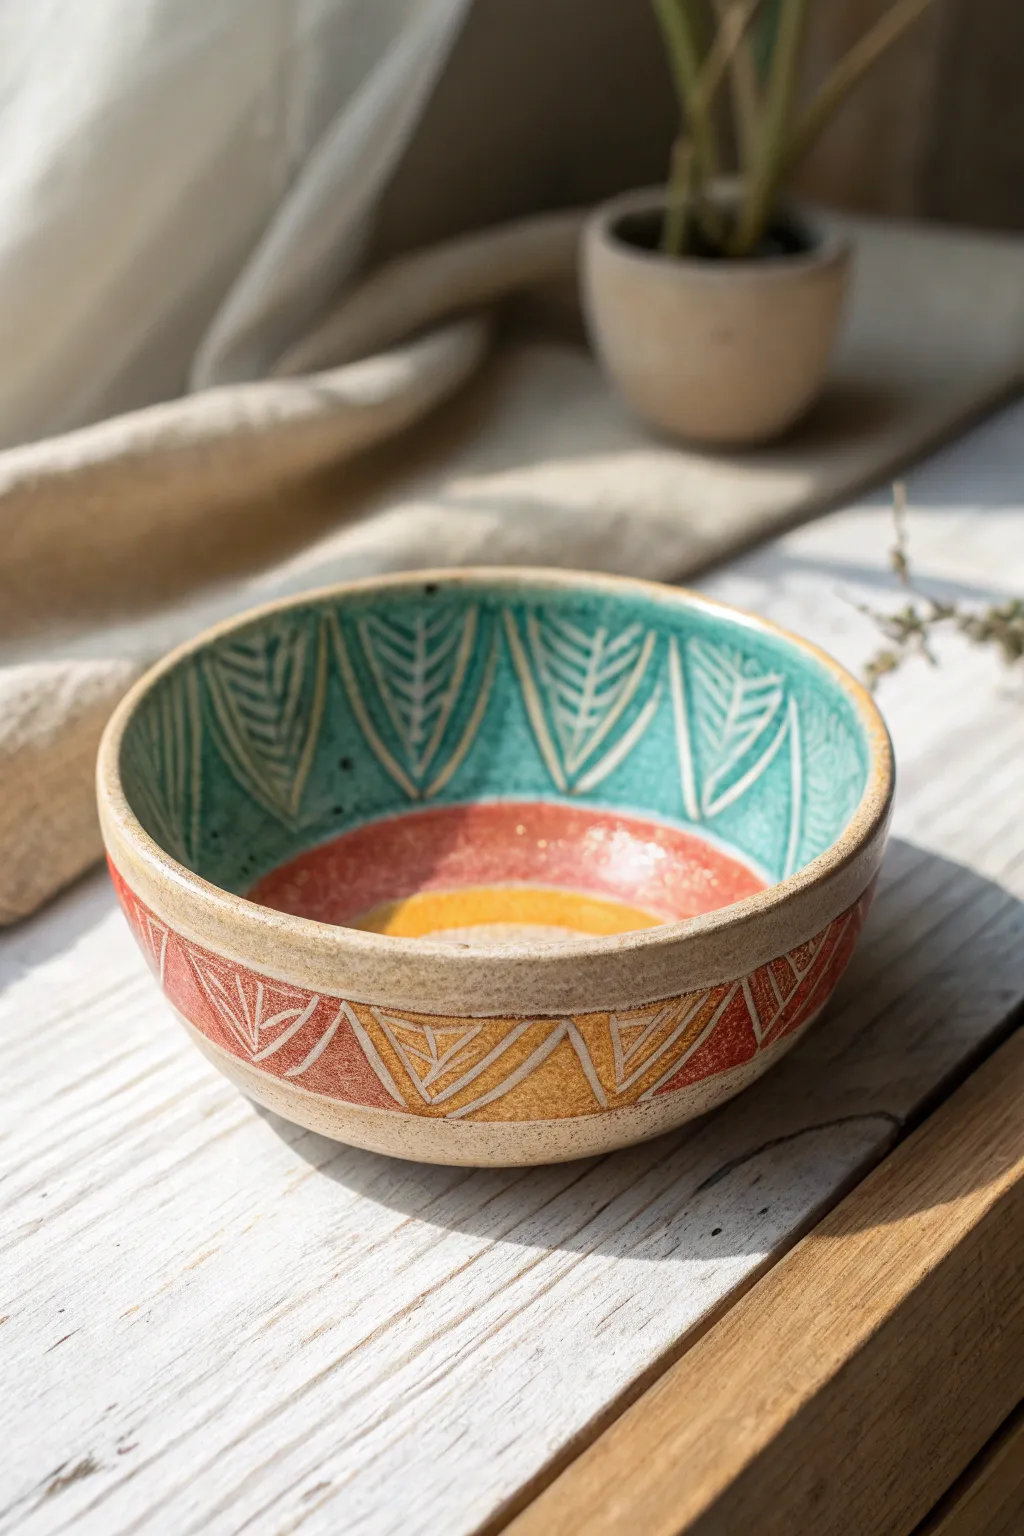
This project combines vibrant underglaze layers with the satisfying tactile technique of sgraffito to reveal the raw clay underneath. The result is a cheerful, folk-art inspired bowl featuring repeating leaf patterns and warm geometric bands.
Step-by-Step Guide
Materials
- Light-colored stoneware clay (smooth body)
- Pottery wheel (or hand-building tools)
- Underglazes: Teal/Turquoise, Rust Red/Coral, Golden Yellow
- Sgraffito tool (small loop or needle tool)
- Soft fan brush
- Clear transparent glaze
- Sponge and bucket of water
- Rib tool
- Pencil (optional)
Step 1: Forming the Base
-
Throw the shape:
Begin by centering your clay on the wheel and opening it up to form a simple, hemispherical bowl shape. Aim for walls that are about 1/4 inch thick to allow for safe carving later without cutting through. -
Refine the curve:
Use a rib tool on the interior to smooth the curve and compress the clay particles, ensuring a nice even surface for your future design. -
Dry to leather hard:
Allow the clay to dry slowly until it reaches a leather-hard state. It should be firm enough to handle without warping, but still cool to the touch and able to be carved. -
Trim the foot:
Flip the bowl over on the wheel and trim a clean, defined foot ring. Usually, I like to smooth the outside surface one last time with a slightly damp sponge to remove any grog that might catch the carving tool.
Chipped Edges?
If your carving tool is tearing the clay rather than slicing it, the clay is too dry. Mist it lightly with water, wrap it in plastic, and wait an hour before trying to carve again.
Step 2: Applying Color
-
Map out the zones:
Lightly sketch horizontal bands around the bowl using a pencil or a needle tool while the wheel spins slowly. You need a distinct interior rim section, an interior bottom, and an exterior band. -
Paint the interior rim:
Using a soft fan brush, apply 2-3 coats of teal or turquoise underglaze to the upper interior band. Let each coat dry to the touch before applying the next to ensure solid coverage. -
Paint the interior bottom:
Paint the center of the bowl with the rust red underglaze, transitioning into a smaller circle of golden yellow at the very bottom if you want that sun-burst effect. -
Paint the exterior band:
On the outside, apply the rust red underglaze to the main decorative band area. You can leave the very rim and the foot raw clay or paint them; here we see raw clay at the rim.
Step 3: Carving the Design (Sgraffito)
-
Plan spacing:
Visualize or lightly mark vertical divisions around the rim to space out your leaf motifs evenly. -
Carve the interior leaves:
Using your sgraffito tool, carve triangular leaf shapes into the teal band. Start with the outline of the triangle, then carve the central vein, and finally the angled veins branching off. -
Refine the lines:
Go over your lines gently to ensure you’ve cut through the underglaze entirely to reveal the creamy clay body underneath. Vary your pressure to create slightly thicker lines for the borders. -
Carve the exterior triangles:
On the exterior red band, carve a series of connected triangles. Alternate their orientation: one pointing up, one pointing down. -
Add exterior details:
Inside the upward-pointing triangles, carve the same leaf-vein pattern used on the interior. Fill the downward-pointing triangles with simple vertical lines or leave them solid red for contrast. -
Adding yellow accents:
If you wish, specific carved triangles on the exterior can be painted over with yellow underglaze now, or you can paint the yellow first and carve through it—this example shows distinct yellow triangles.
Make it Pop
For higher contrast, use a dark obsession clay body or apply a black underglaze wash into the carved lines after the bisque firing, then wipe back before clear glazing.
Step 4: Finishing
-
Clean up burrs:
Once the carving is totally dry, very gently brush away any clay crumbs or ‘burrs’ with a dry, soft brush. Don’t use water or you’ll smudge the design. -
Bisque fire:
Fire the piece to cone 04 (or your clay’s specific bisque temperature). -
Glaze application:
Dip the entire bowl into a clear, transparent glaze. Shake off excess gently to prevent pooling in the carved grooves. -
Final firing:
Glaze fire the piece to the maturity temperature of your clay body (likely Cone 5 or 6 for stoneware).
Enjoy using your new bowl for morning cereal or simply displaying it to show off those crisp carved lines