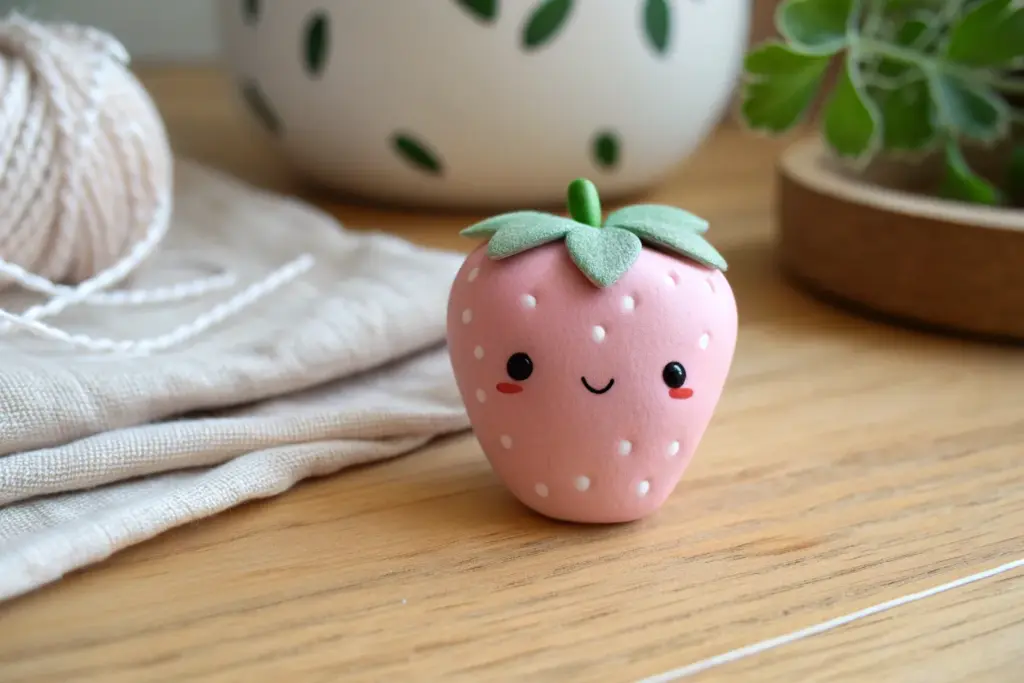
If you’re craving something quick, sweet, and totally doable, these DIY cute clay ideas are my go-to studio favorites. Think tiny shapes, simple faces, and little projects that turn into the kind of happy handmade stuff you’ll actually use.
Tiny Cute Clay Charms
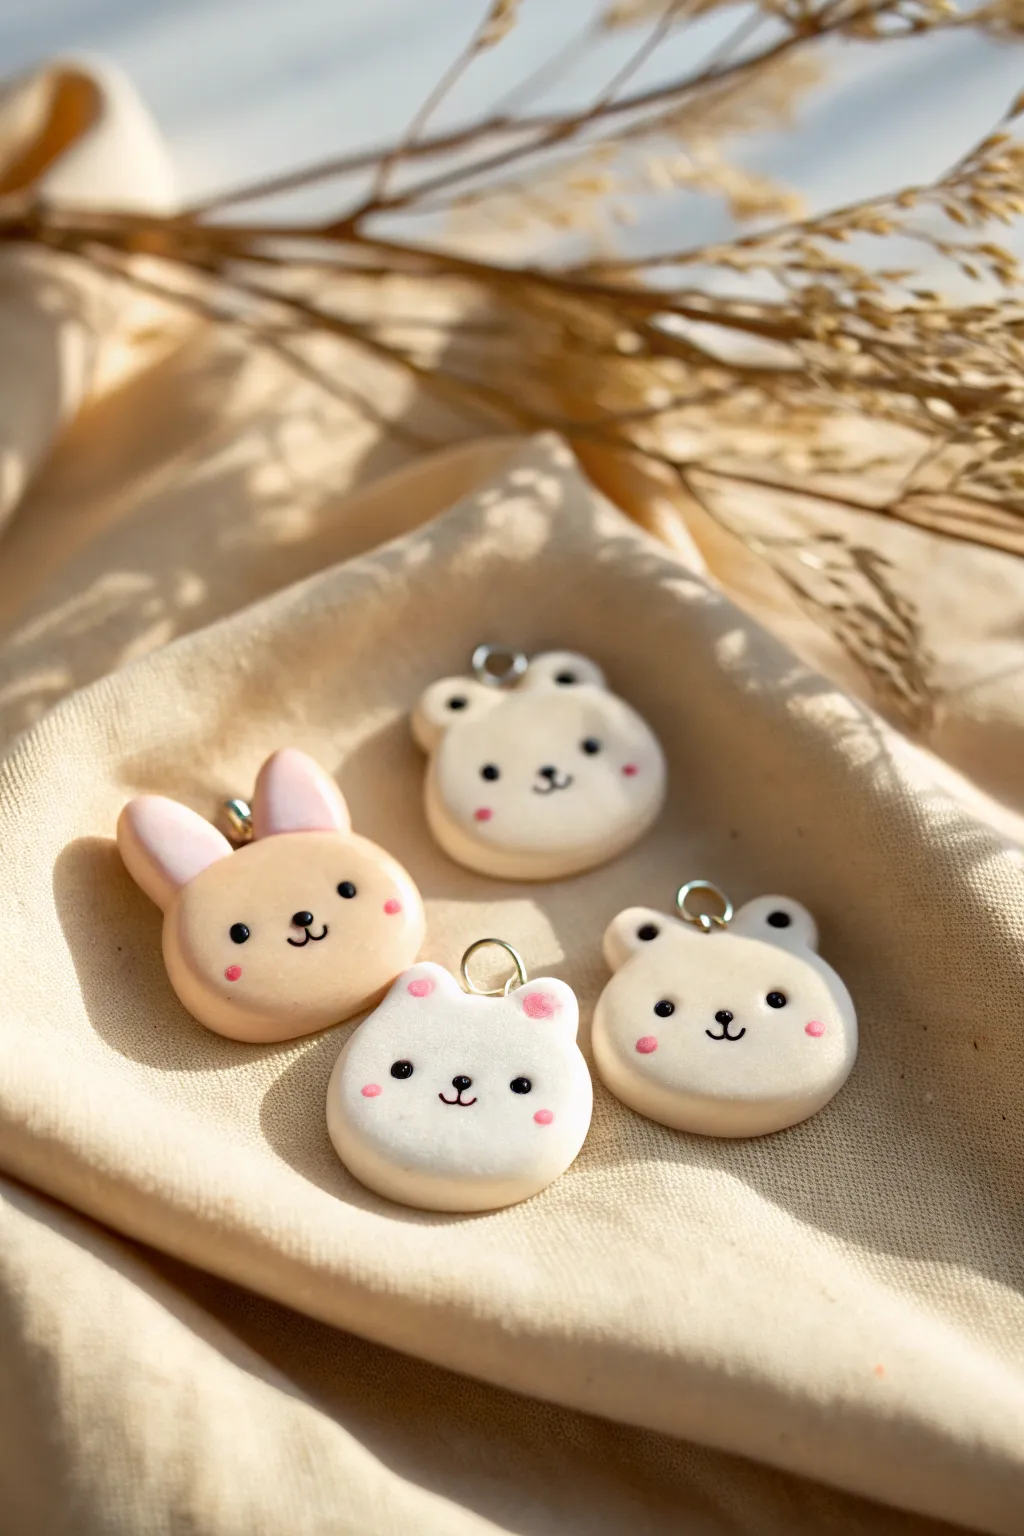
These adorable polymer clay charms feature simple, rounded animal faces that are perfect for beginners looking to make sweet gifts or jewelry. With their soft matte finish and tiny painted details, these bunnies and bears have a cozy, handmade charm.
Detailed Instructions
Materials
- Polymer clay (white, beige/tan, translucent)
- Acrylic rolling pin
- Small round cutter (approx. 1 inch)
- Dotting tools or ball stylus (various sizes)
- Black and pink acrylic paint
- Fine detail paintbrush (size 000 or similar)
- Silver screw eye pins
- Matte polymer clay varnish or glaze
- Baking tile or parchment paper
- Oven
Step 1: Prepping and Shaping the Base
-
Condition the clay:
Start by kneading your white and beige polymer clay separately until they are soft and pliable. If the white is too bright, mix in a tiny pinch of beige or translucent clay to achieve that milky, creamy look seen in the photo. -
Roll out the slab:
Using your acrylic rolling pin, roll the clay out to a thick, even sheet, roughly 1/4 inch thick. You want these charms to feel substantial and chubby, not flat like a coin. -
Cut the circles:
Use your small round cutter to punch out four circles. Gently smooth the sharp edges created by the cutter with your fingertip to give the charms a soft, rounded marshmallow appearance. -
Insert eye pins:
Carefully screw a silver eye pin into the top center of each circle. I find doing this before adding ears prevents squishing the final shape later.
Lint Attack?
White clay loves to attract dust. Keep a stash of wet wipes nearby to clean your hands often, and use a piece of scotch tape to lift stray lint off the raw clay before baking.
Step 2: Adding Ears and Details
-
Form the bear ears:
For the white bear/frog styles, roll two tiny balls of matching clay. Attach them to the top left and right of the circle, blending the seam slightly on the back so they stay secure. -
Shape the bunny ears:
For the tan bunny, roll two small tear-drop shapes of beige clay. Press them onto the top of the head. Use a small ball tool to make an indentation in the center of each ear. -
Add bunny pinks:
Roll tiny logs of pink clay (or deeply tinted pink polymer) and press them into the indentations of the bunny ears for the inner ear detail. -
Refine the surface:
Do a final check for fingerprints. You can lightly brush the surface with a little baby oil or cornstarch to smooth out any imperfections before baking. -
Bake the charms:
Place your charms on a ceramic tile or parchment-lined tray. Bake according to your brand of clay’s instructions—usually around 275°F (130°C) for 15–20 minutes. Let them cool completely.
Step 3: Painting the Faces
-
Paint the eyes:
Dip a small dotting tool or the end of a toothpick into black acrylic paint. Carefully dot two eyes onto the center of the face, spacing them somewhat widely for a ‘kawaii’ look. -
Draw the nose and mouth:
Using your finest detail brush, paint a tiny nose in the center between the eyes. Draw a small, simple ‘w’ shape or a straight line downwards to create the mouth. -
Add rosy cheeks:
Dip a larger dotting tool into pink paint. Dab it once on paper to remove excess paint, then stamp two soft pink circles on the cheeks. -
Add blush details:
For the white bear (bottom center), use the pink paint to dot the inner ears as well, tying the color palette together. -
Seal the piece:
Once the paint is fully dry, apply a thin coat of matte varnish. This protects the painted details and gives the clay that smooth, finished porcelain texture.
Turn it into Jewelry
Attach jump rings to the eye pins to hang these on a delicate chain necklace, or attach French hooks to make a matching pair of dangle earrings.
Now you have a set of sweet little companions ready to be worn or gifted


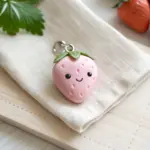
Kawaii Fruit Earrings Set
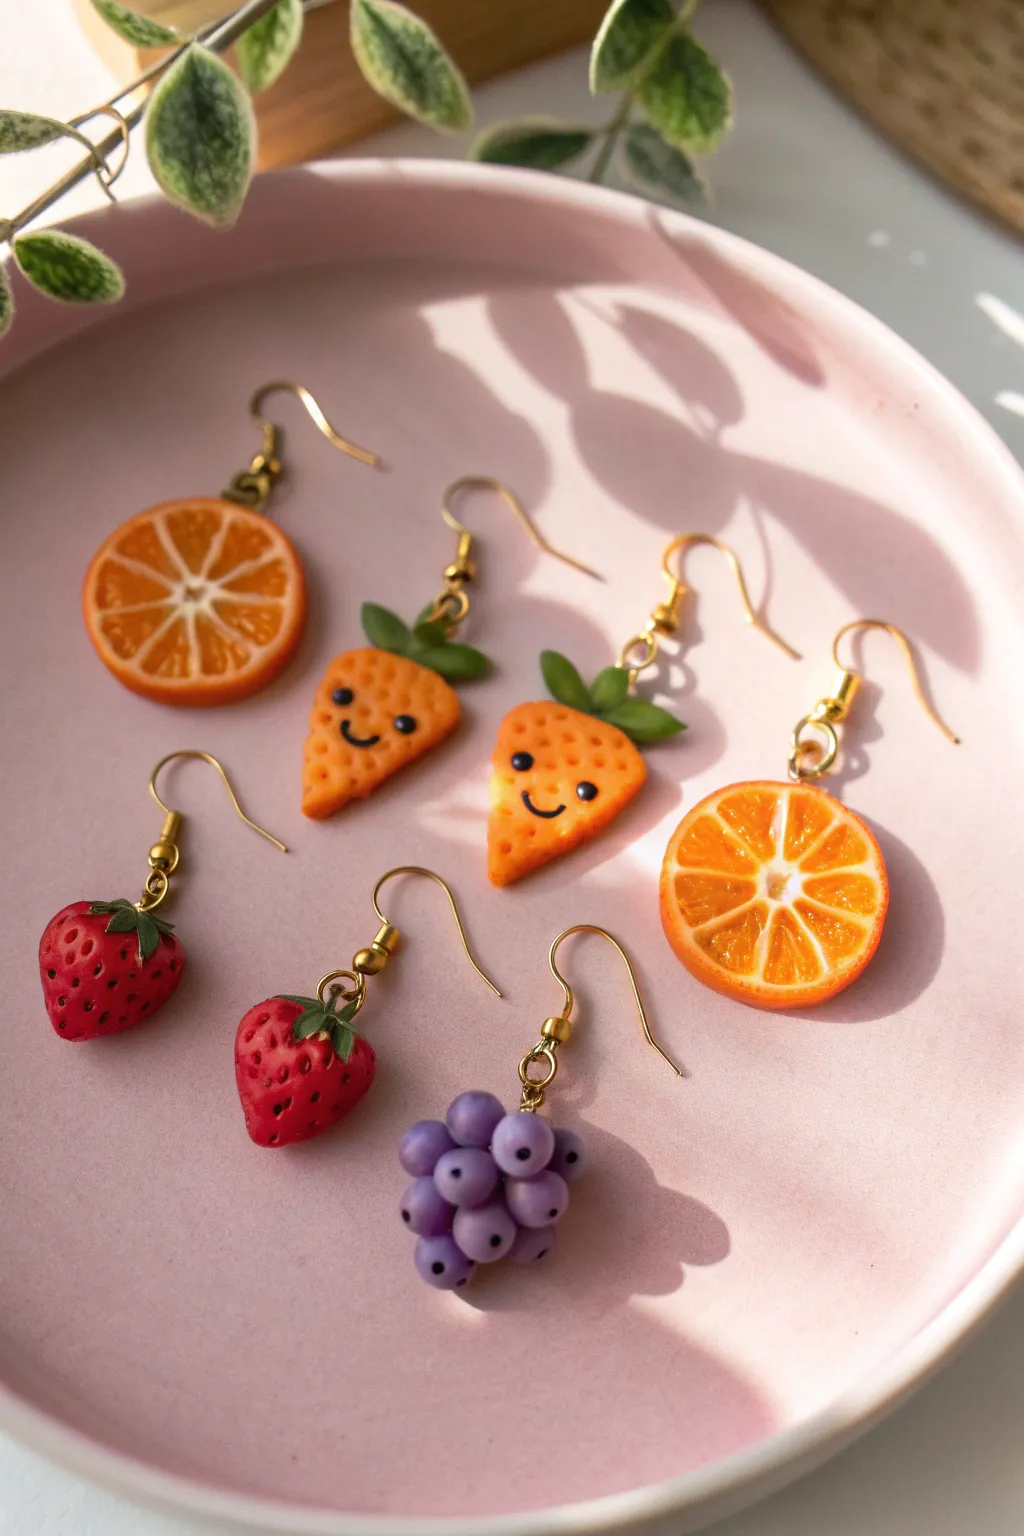
Brighten up any outfit with these adorable handmade polymer clay charms featuring vibrant orange slices, smiling carrots, luscious strawberries, and juicy grapes. This tutorial guides you through sculpting each miniature fruit into golden-hooked accessories that look good enough to eat.
Step-by-Step Guide
Materials
- Polymer clay (orange, translucent orange, green, red, purple, black)
- Liquid polymer clay (translucent)
- Caning blade or sharp craft knife
- Needle tool or toothpick
- Ball stylus tool
- Gold screw-eye pins (tiny)
- Gold earring hooks (fishhook style)
- Needle nose pliers
- Gloss glaze or UV resin (optional)
- Small paintbrush
- Oven for baking
Step 1: Sculpting the Orange Slices
-
Create the segments:
Mix orange clay with a little translucent clay for realism. Roll it into a log and cut it into 8 equal pie-slice wedges. -
Add white pith:
Roll very thin sheets of white or pale yellow clay. Place these distinct thin layers between each orange wedge to create the segmented look. -
Wrap the cane:
Reassemble the wedges into a cylinder. Wrap the entire log in a textured sheet of orange clay to mimic the peel. -
Slice and texture:
After chilling the log briefly to firm it up, slice two thin rounds. Use a needle tool to gently prick the surface of the fruit flesh for texture.
Sticky Fingerprints?
If you see fingerprints on your raw clay, lightly brush the surface with a tiny amount of baby oil or cornstarch before baking to smooth them out instantly.
Step 2: Crafting the Kawaii Carrots
-
Shape the base:
Form two triangular wedges from orange clay, rounding the corners slightly so they look like thick cheese slices or stylized carrots. -
Texture the surface:
Use a ball stylus to press indentations all over the front surface, giving it a porous, sponge-like look. -
Add the greenery:
Fashion three small teardrop shapes from green clay. Press them together at the top of the orange wedge to form the leafy stem. -
Give it a face:
Roll tiny distinct balls of black clay for eyes and press them into the textured surface. Roll a microscopic snake of black clay for the smile and curve it gently between the eyes.
Step 3: Forming the Strawberries & Grapes
-
Shape the strawberries:
Roll two balls of red clay and gently taper the bottoms to create a classic strawberry heart shape. -
Seed the berries:
Using a needle tool, poke shallow holes evenly around the entire surface to mimic seeds. -
Cap the berries:
Flatten a small ball of green clay and cut a star shape. Place this on top of the berry, curving the leaf tips downward. -
Assemble the grapes:
Roll many tiny spheres of purple clay in slightly different sizes. Cluster them together into a triangular bunch shape, pressing them gently so they adhere to one another.
Pro Tip: Cane Cutting
When slicing your orange canes, let the clay log sit in the fridge for 20 minutes first. Cold clay is firmer and won’t squish or deform under the blade.
Step 4: Assembly and Baking
-
Insert hardware:
Carefully screw or push a gold eye pin into the top center of each fruit charm. I find adding a dab of liquid clay on the pin helps secure it permanently. -
Bake:
Bake the pieces according to your polymer clay package instructions (usually 275°F/135°C for 15-30 minutes). Let them cool completely. -
Glaze (Optional):
For a juicy finish, coat the fruits with a thin layer of gloss glaze or UV resin, curing as required. -
Attach hooks:
Use needle nose pliers to open the loop on your earring hooks. Slide the eye pin of the fruit charm onto the hook and close the loop securely.
Enjoy wearing your fresh and fruity miniature art wherever you go


Chubby Animal Mini Figurines
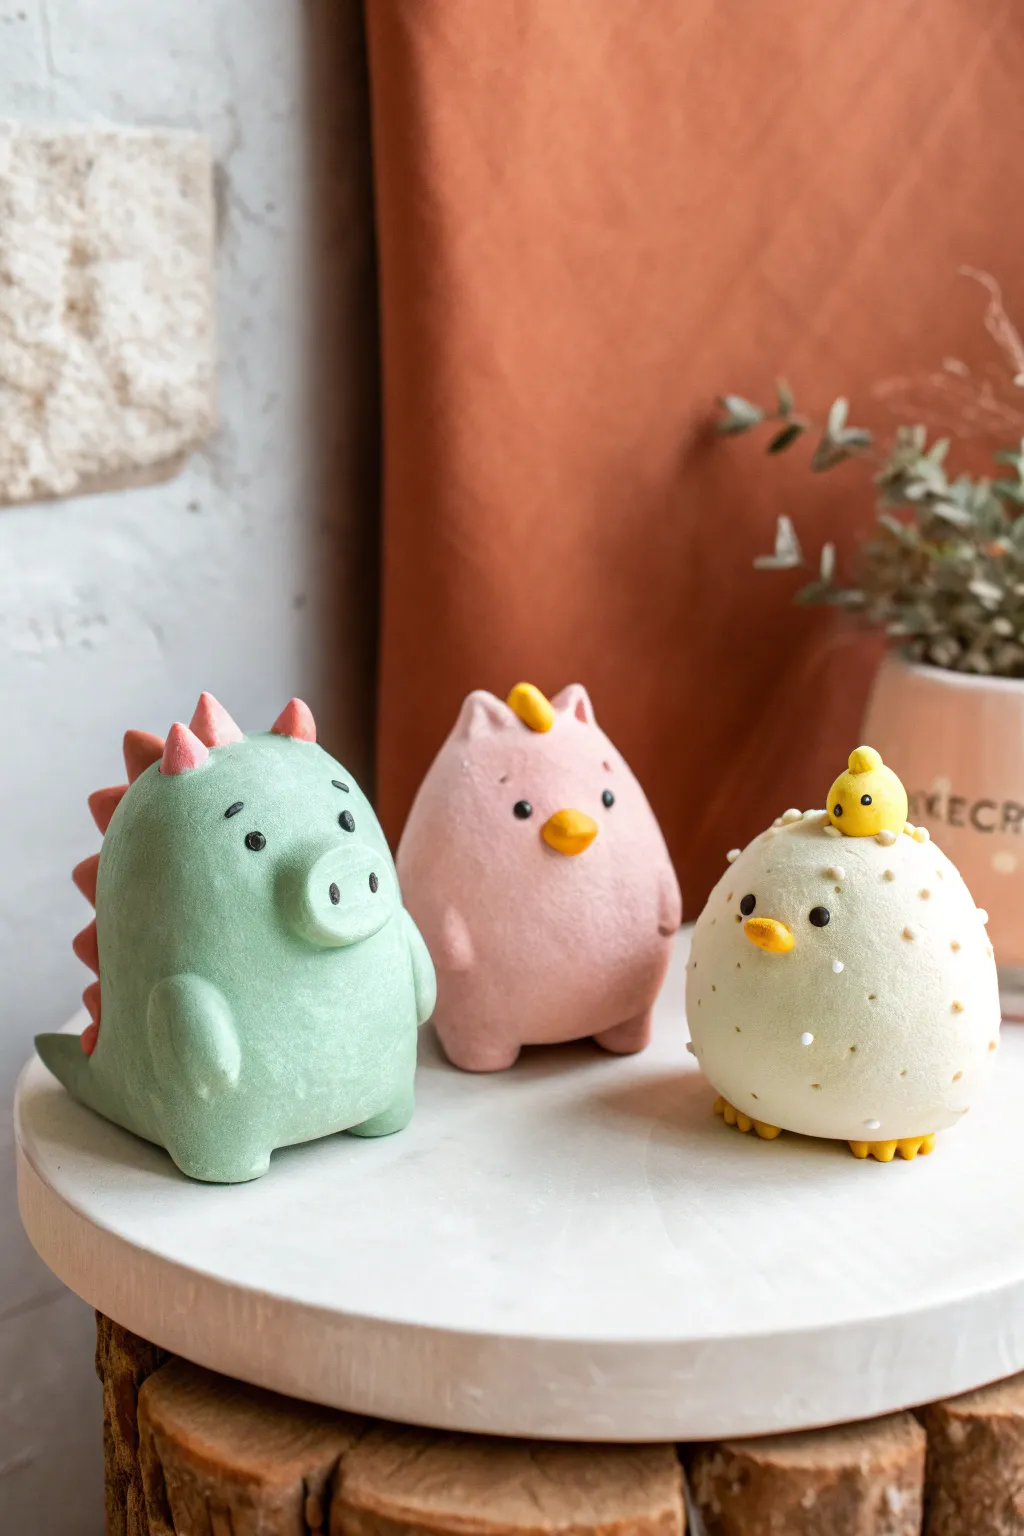
These delightfully chubby figurines have a soft, matte finish that almost looks edible, like sugary marshmallow treats. The trio includes a spiky green dinosaur, a pink piglet, and a round chick, all featuring simple, kawaii-style faces and rounded, huggable shapes.
Step-by-Step Guide
Materials
- Polymer clay or air-dry clay (colors: pastel green, pastel pink, cream/white, yellow, bright pink for spikes)
- Black clay or acrylic paint (for eyes)
- Basic clay sculpting tools (needle tool, ball stylus)
- Toothbrush or textured sponge (for texture)
- Aluminum foil (optional, for armature)
- Matte spray varnish or sealant
- Soft pastel chalks (optional, for shading)
Step 1: Shaping the Base Bodies
-
Core Structure:
Start by conditioning your clay until it is soft and pliable. For each animal, roll a large ball of clay about the size of a tangerine to form the main body. -
Creating the Dino Shape:
For the green dinosaur, gently flatten the bottom of your green sphere so it sits upright. Very subtly pinch the top area forward just a bit to hint at a snout area, but keep the overall shape very round and potato-like. -
Forming the Piglet:
Take your pink sphere and slightly taper the top third into a gentle pear shape, ensuring the bottom remains distinctively chubby and wide. -
The Chick Sphere:
The cream-colored chick is the easiest; simply keep it as a perfect, slightly flattened sphere. It should look like a little puffball. -
Adding Texture:
Before adding details, take a clean toothbrush or a textured sponge and gently tap it all over the surface of each body. This creates that soft, velvety texture that mimics a marshmallow or plush toy.
Step 2: Adding Animal Features
-
Dinosaur Spikes:
Roll tiny cones of pink clay for the dinosaur’s back. Press them in a row from the top of the head down to the tail area. Use a sculpting tool to blend the base of each spike into the green body so they don’t fall off. -
Dinosaur Snout:
Flatten a small oval of green clay and attach it to the front face area. Use a ball tool to indent two large nostrils. -
Piglet Ears and Arms:
Pinch two small triangles at the very top of the pink body for ears. Roll tiny sausage shapes for arms and press them flush against the sides of the body, blending the seams for a seamless look. -
Piglet Snout:
Add a small yellow triangle or oval for the beak/nose area. It gives a nice pop of contrasting color against the pink. -
Chick Texture:
Using a needle tool, poke tiny, shallow holes all over the cream body to simulate feathers. You can add tiny specks of darker clay or paint later to enhance this speckled egg look. -
Chick Beak and Feet:
add a tiny orange or yellow triangle for the beak. Underneath, add two small, flat orange feet, just peeking out from the round body.
Clean Hands, Clean Clay
Pastel clays show dust easily! Keep baby wipes nearby and clean your hands thoroughly when switching colors, especially before handling the cream chick.
Step 3: The Tiny Passenger
-
Mini Chick:
To make the tiny bird on the big chick’s head, roll a pea-sized ball of yellow clay. Add a microscopically small orange beak. -
Attachment:
Place the tiny yellow bird securely on top of the cream chick’s head. You might need a dab of liquid clay or water (if using air-dry) to ensure a strong bond.
Chubby Cheeks
Before baking, brush a tiny bit of red pastel chalk powder onto the cheek areas with a soft brush for a sweet, blushing effect.
Step 4: Finishing Touches
-
The Eyes:
Use tiny balls of black clay for the eyes. Place them wide apart to achieve that cute ‘derpy’ look. I find pressing them in slightly helps them stay put. -
Eyebrows:
Roll mostly invisible, hair-thin snake of black clay for tiny eyebrows on the dinosaur and pig to give them expression. -
Baking or Drying:
Follow the manufacturer instructions for your specific clay. If baking polymer clay, tent with foil to prevent scorching the light colors. -
Protective Coat:
Once fully cured and cooled, spray the figures with a matte varnish. Avoid glossy finishes, as the matte look is essential for the soft aesthetic.
Group your new friends together on a shelf or desk for an instant mood booster


Blushing Mushroom Desk Buddy
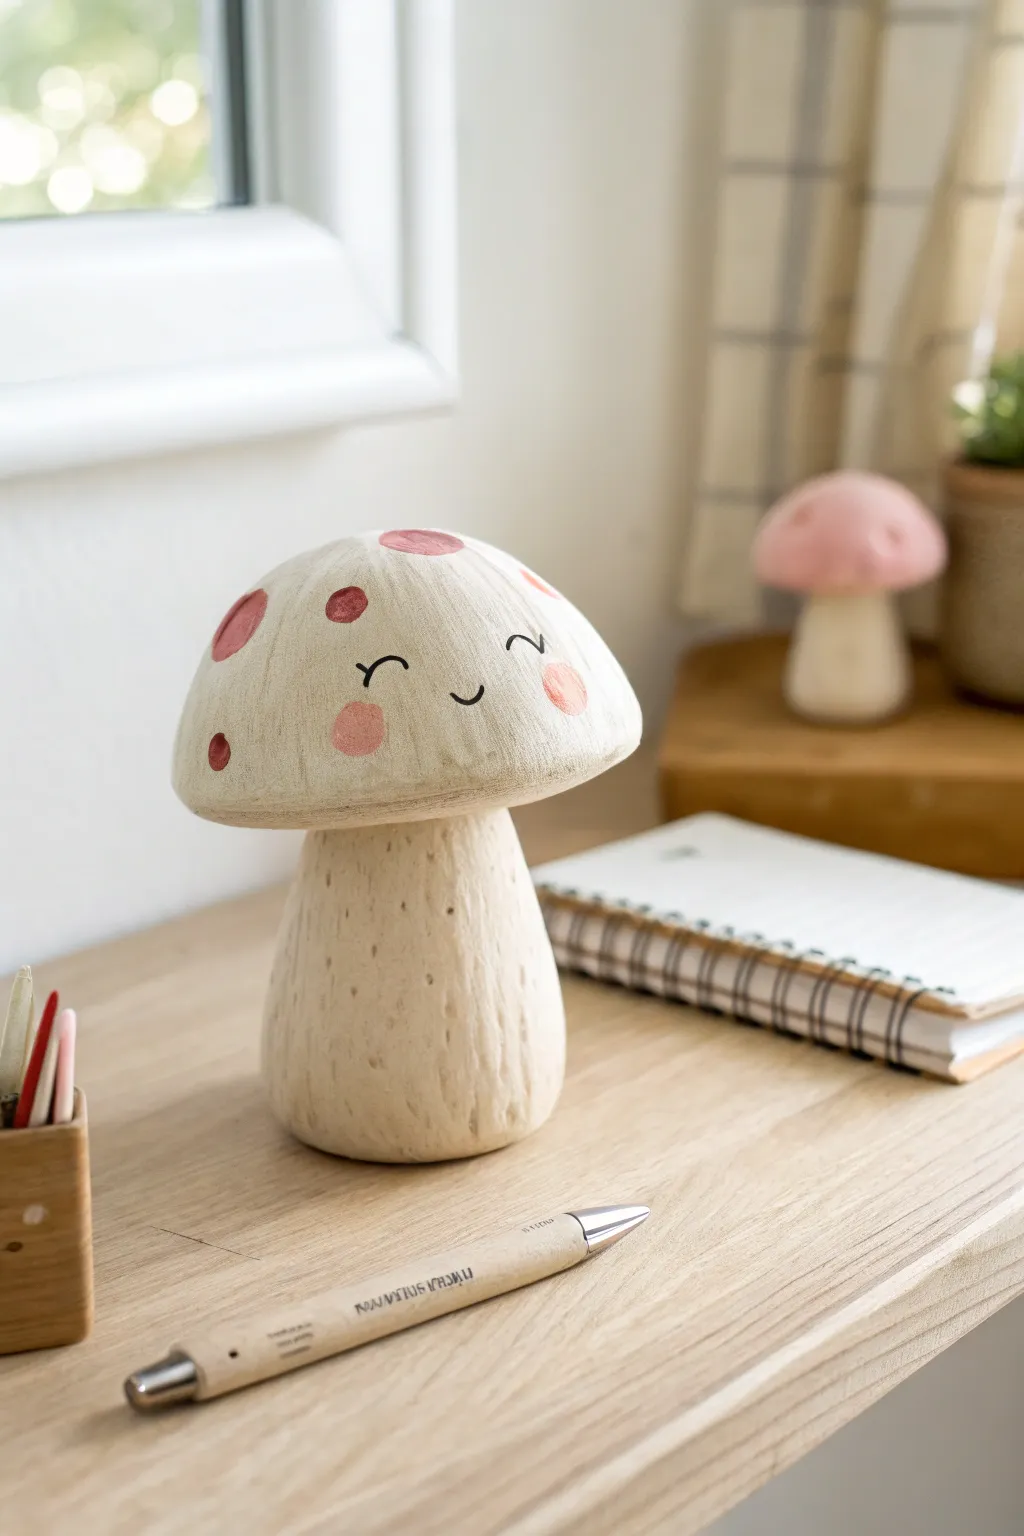
Brighten up your workspace with this adorable smiling mushroom figurine made from air-dry clay. Its gentle, textured finish and sweet painted face make it a charming, cottagecore-inspired companion for your desk.
How-To Guide
Materials
- Air-dry clay (white or natural)
- Aluminum foil
- Clay sculpting tools (needle tool, modeling tool)
- Acrylic paints (cream/off-white, dusty pink, deep red, brown/black)
- Paintbrushes (medium flat, fine detail)
- Water cup and paper towels
- Sandpaper (fine grit)
- Matte varnish or sealant
Step 1: Sculpting the Form
-
Create the armature:
Begin by crumpling aluminum foil into a broad, rounded cap shape and a thick, sturdy stem cylinder. This saves clay and keeps the figurine lightweight. -
Form the stem:
Roll out a slab of clay to about 1/4 inch thickness. Wrap it around your foil stem armature, smoothing the seam with a bit of water until it disappears. -
Shape the base:
Gently tap the bottom of the stem on your work surface to create a flat, stable base so your mushroom won’t wobble. -
Cover the cap:
Roll out another slab of clay and drape it over the foil cap armature. Trim the excess around the rim and curve the edges under slightly for a neat finish. -
Join the pieces:
Score the top of the stem and the underside of the cap with a needle tool. Apply a little water or slip (liquid clay) and press the parts firmly together. -
Blend the seam:
Use a modeling tool or your finger to smooth the clay where the stem meets the cap, ensuring a strong bond. I like to add a tiny snake of clay around the join to reinforce it before smoothing. -
Add texture:
Take a stiff brush or a texture tool and gently drag vertical imperfections along the stem and the top of the cap. This etched texture mimics the organic feel of real wood or mushroom fiber.
Smoother Surfaces
Use a little water on your fingertips while sculpting to smooth out fingerprints, but don’t over-wet the clay or it may crack.
Step 2: Painting & Details
-
Dry completely:
Let your mushroom air dry for at least 24-48 hours. It should feel room temperature to the touch, not cool. -
Sand imperfections:
Lightly sand any harsh bumps or sharp edges, but avoid sanding away the lovely texture you added earlier. -
Base coat:
Paint the entire mushroom with a cream or off-white acrylic paint. You may need two thin coats for opaque coverage. -
Add the wash:
Dilute a touch of light brown paint with plenty of water. Brush this wash over the textured areas and quickly wipe away the excess with a paper towel to highlight the grooves. -
Paint the spots:
Using a dusty pink or muted red, paint scattered circles on the mushroom cap. Keep them organic and slightly irregular rather than perfect polka dots. -
Create the cheeks:
Mix a soft pink color and dab two round distinct circles on the ‘face’ area of the cap for rosy cheeks. -
Draw the face:
With an ultra-fine brush and brown or black paint, carefully paint two curved lines for smiling closed eyes and a tiny ‘u’ for the mouth. -
Seal the work:
Once the paint is fully dry, apply a layer of matte varnish to protect your new friend and give it a unified finish.
Make it a Lamp
Sculpt the stem hollow and leave a hole at the bottom to place a battery-operated LED tea light inside for a glowing nightlight effect.
Place your happy mushroom on your desk and enjoy the cozy vibe it brings to your study sessions

The Complete Guide to Pottery Troubleshooting
Uncover the most common ceramic mistakes—from cracking clay to failed glazes—and learn how to fix them fast.
Cat-In-a-Cup Trinket Dish

Create this adorable feline friend to guard your rings and small treasures. This speckled cream dish features elegant gold detailing and sweet ears that pop out from the rim, mimicking the look of high-end ceramic ware.
Detailed Instructions
Materials
- Air-dry clay (white or cream)
- Small rolling pin
- Small bowl (approx. 3-4 inches diameter) to use as a mold
- Craft knife or scalpel
- Sponge
- Water
- Sandpaper (fine grit)
- Acrylic paint (cream/off-white)
- Acrylic paint (black or dark brown for speckling)
- Old toothbrush
- Gold leaf pen or fine gold paint marker
- High-gloss varnish or resin
- Soft paintbrushes
Step 1: Shaping the base
-
Prepare the clay:
Start by conditioning a ball of air-dry clay in your hands until it is smooth, warm, and pliable. This helps prevent cracks later on. -
Roll the slab:
Roll the clay out onto a smooth surface to an even thickness of about 1/4 inch. Lift and rotate the clay occasionally so it doesn’t stick to your work surface. -
Cut the circle:
Place your bowl upside down on the clay to use as a guide. Cut around the bowl with your craft knife, leaving yourself about an inch of extra margin for shaping. -
Form the ears:
Before lifting the circle, identify where the top of the head will be. Gently pull and pinch the clay outwards to form two triangles for the cat ears directly from the rim. Smooth the transition so it looks like one cohesive piece. -
Shape into the mold:
Carefully lift your clay sheet and place it *inside* your bowl mold. Gently press it against the bottom and sides to take the bowl’s curved shape. Ensure the ears are pointing upwards and resting against the rim of the mold. -
Smooth the edges:
Dip your finger in a little water and run it along the rim of the clay to smooth out any sharp edges or cutting marks. The goal is a soft, rounded lip.
Ceramic Look Pro Tip
For a true pottery feel, sponge on your base coat instead of brushing. The slight texture removes brush strokes and mimics fired clay perfectly.
Step 2: Refining and Drying
-
Initial dry time:
Let the clay sit in the mold for about 24 hours. Drying it inside the bowl ensures it keeps that perfect cup shape while gravity does the work. -
Remove and flip:
Once the clay is firm enough to hold its shape but not fully bone dry, pop it out of the mold. Flip it upside down gently to let the bottom dry completely. -
Sanding:
When the dish is bone dry and hard (usually 48-72 hours total), use fine-grit sandpaper to buff away any fingerprints or uneven spots on the surface and rim. -
Wipe down:
Use a slightly damp sponge or cloth to remove all sanding dust. This step is crucial for a smooth paint application.
Step 3: Decorating the dish
-
Base coat:
Paint the entire dish—inside and out—with a creamy off-white acrylic paint. You may need two coats for full opacity. -
Create the speckles:
Dilute a tiny amount of black or dark brown brown paint with water. Dip an old toothbrush into this mixture, aim it at the dish, and run your thumb across the bristles to flick tiny speckles onto the surface. -
Let speckles dry:
Allow the speckle layer to dry completely before moving on to the face details to avoid smudging. -
Draw the face:
With a steady hand, use your gold paint marker to draw two closed curved eyes with lashes. Add a small nose and a ‘w’ shape for the mouth. -
Add whiskers:
Draw three straight lines on each cheek area for whiskers. Keep the gold lines crisp and delicate. -
Gloss finish:
Once all paint is perfectly dry, apply a generous coat of high-gloss varnish or resin. This gives the dish that shiny, glazed ceramic look and protects the paint.
Fixing Cracks
If small cracks appear while drying, create a ‘slip’ by mixing a scrap of clay with water into a paste. Fill the crack, smooth it over, and let dry again.
Now you have a charming little spot to keep your jewelry safe and stylish
Heart Pocket Ring Dish
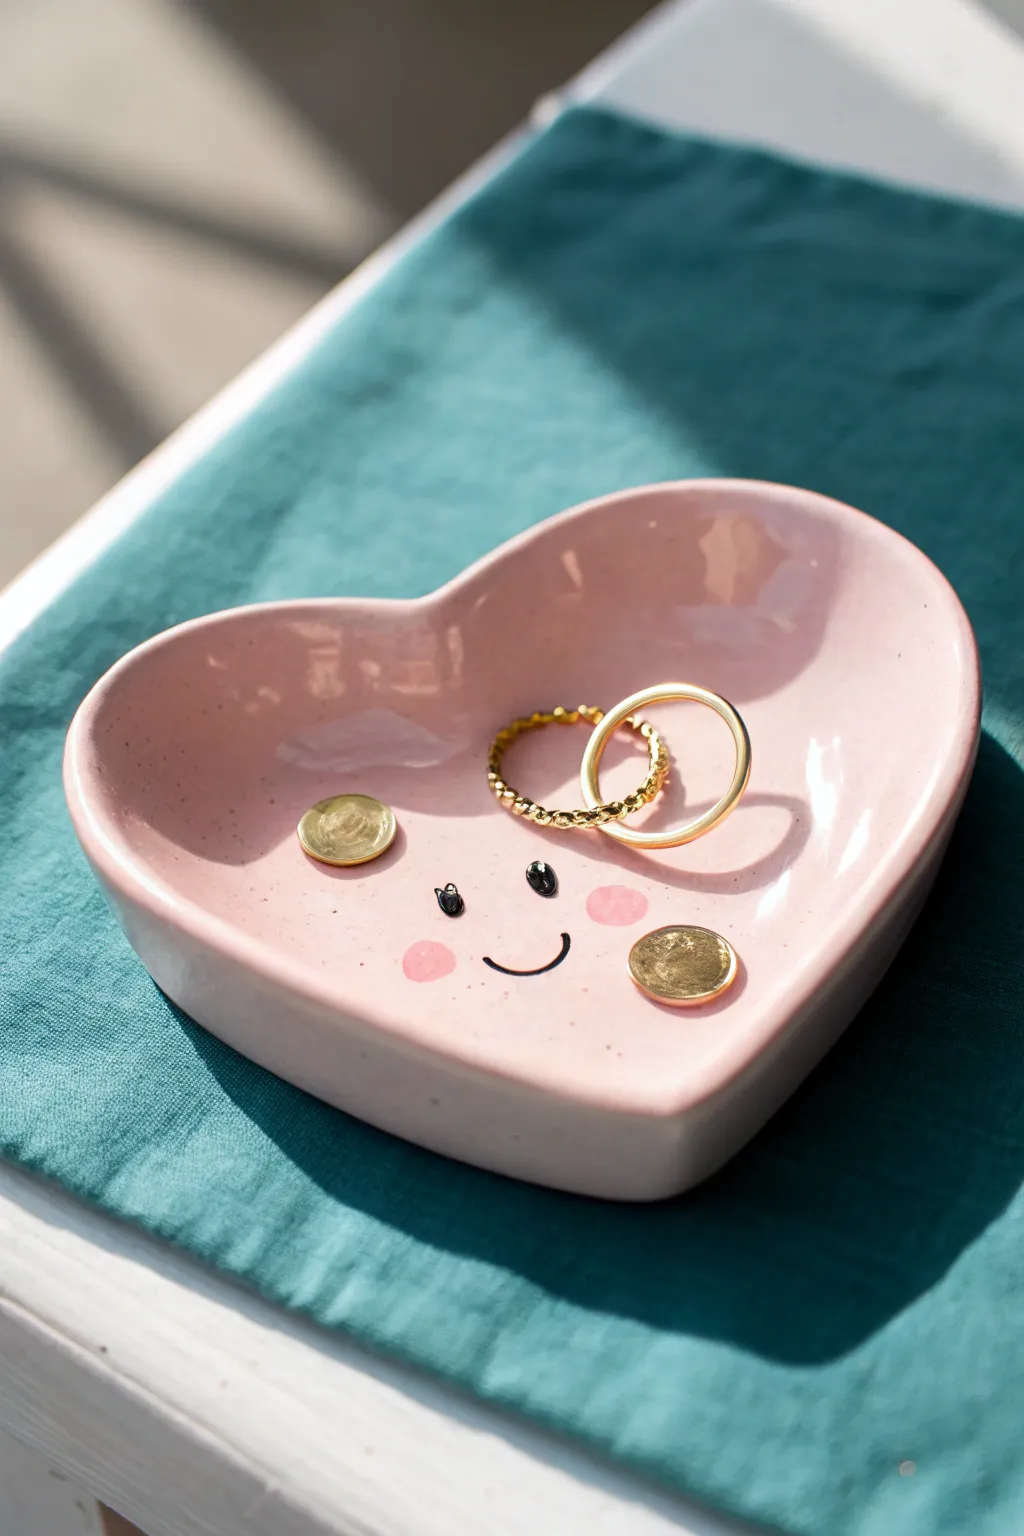
Keep your favorite jewelry safe in the sweetest way possible with this charming heart-shaped trinket dish. Modeled from polymer clay and finished with a blushing smiley face, it adds a touch of whimsy to any bedside table.
How-To Guide
Materials
- White polymer clay
- Light pink polymer clay (soft pastel shade)
- Heart-shaped cookie cutter (approx. 4 inches wide)
- Acrylic rolling pin
- Parchment paper or ceramic tile
- Small round ball tool or toothpick
- Fine-grit sandpaper (400 and 800 grit)
- Black acrylic paint
- Darker pink acrylic paint
- Fine detail paintbrush (000 size)
- Small round sponge dauber or Q-tip
- Glossy polyurethane varnish or glaze
- Oven (for baking)
Step 1: Shaping the Clay
-
Condition and Mix:
Begin by conditioning your light pink polymer clay until it is soft and pliable. If you want a speckled pottery effect like the original image, mix in a tiny pinch of black pepper or craft sand into the clay body. -
Roll Out the Base:
Place the clay on a sheet of parchment paper. Use your acrylic rolling pin to roll the clay out to a uniform thickness of about 1/4 inch (6mm). Ensure the surface is smooth and free of air bubbles. -
Cut the Shape:
Press your heart-shaped cookie cutter firmly into the clay. Give it a slight wiggle to ensure a clean cut, then remove the excess clay from around the outside. -
Soften the Edges:
Gently run your finger dipped in a little cornstarch or water around the raw cut edges of the heart to smooth them out, removing any sharp lines left by the cutter. -
Create the Curve:
To give the dish its bowl shape, gently lift the edges of the heart upward with your fingertips. I like to pinch the bottom point slightly and curve the rounded tops inward just a bit to create a cupped form. -
Refine the Form:
Check the symmetry of your curve. If you want a more uniform shape, you can gently rest the clay inside a small oven-safe bowl that is slightly larger than your heart cutout.
Uneven Rims?
If the edges warp while baking, sand the rim flat against a piece of sandpaper taped to a table. Move the heart in a figure-8 motion for an even finish.
Step 2: Baking and Smoothing
-
Bake:
Preheat your oven according to the manufacturer’s instructions on your specific package of clay (usually around 275°F or 130°C). Bake the dish for approximately 30 minutes to ensure durability. -
Cool Down:
Turn off the oven and open the door slightly, letting the dish cool down completely inside. This gradual cooling helps prevent cracking. -
Sand for Smoothness:
Once fully cool, dip the dish in water and use 400-grit wet/dry sandpaper to smooth any rough edges or fingerprints. Follow up with 800-grit for a silky finish. Rinse and dry thoroughly.
Step 3: Adding the Personality
-
Paint the Cheeks:
Dip a small sponge dauber or a Q-tip into the darker pink acrylic paint. Dab off most of the paint onto a paper towel, then gently stamp two round blush circles onto the lower half of the heart. -
Draft the Face:
If you’re nervous about freehanding, lightly mark the position of the eyes and smile with a pencil directly over the dried pink cheeks. -
Paint the Eyes:
Using a very fine liner brush and black acrylic paint, create two small oval shapes for eyes just above the cheeks. Add tiny eyelashes if desired. -
Add the Smile:
Paint a small, simple ‘U’ shape for the mouth centered between the cheeks. Keep the line thin and delicate for that cute minimal look. -
Highlight the Eyes:
Dip a toothpick into white paint and add a minuscule white dot to the upper corner of each black eye oval. This ‘catchlight’ brings the character to life. -
Seal the Dish:
Apply two to three thin coats of glossy polyurethane varnish or glaze over the entire dish. This seals the paint and gives the clay that polished ceramic appearance seen in the photo. -
Final Cure:
Let the glaze dry completely between coats according to the bottle instructions, usually waiting 24 hours before placing jewelry inside.
Make it Luxe
Paint the very rim of the heart with liquid gold leaf or a metallic gold marker before sealing. The gold accent adds an elegant contrast to the soft pink.
Enjoy styling your new adorable tray with your favorite rings and small treasures


What Really Happens Inside the Kiln
Learn how time and temperature work together inside the kiln to transform clay into durable ceramic.
Happy Face Fridge Magnets
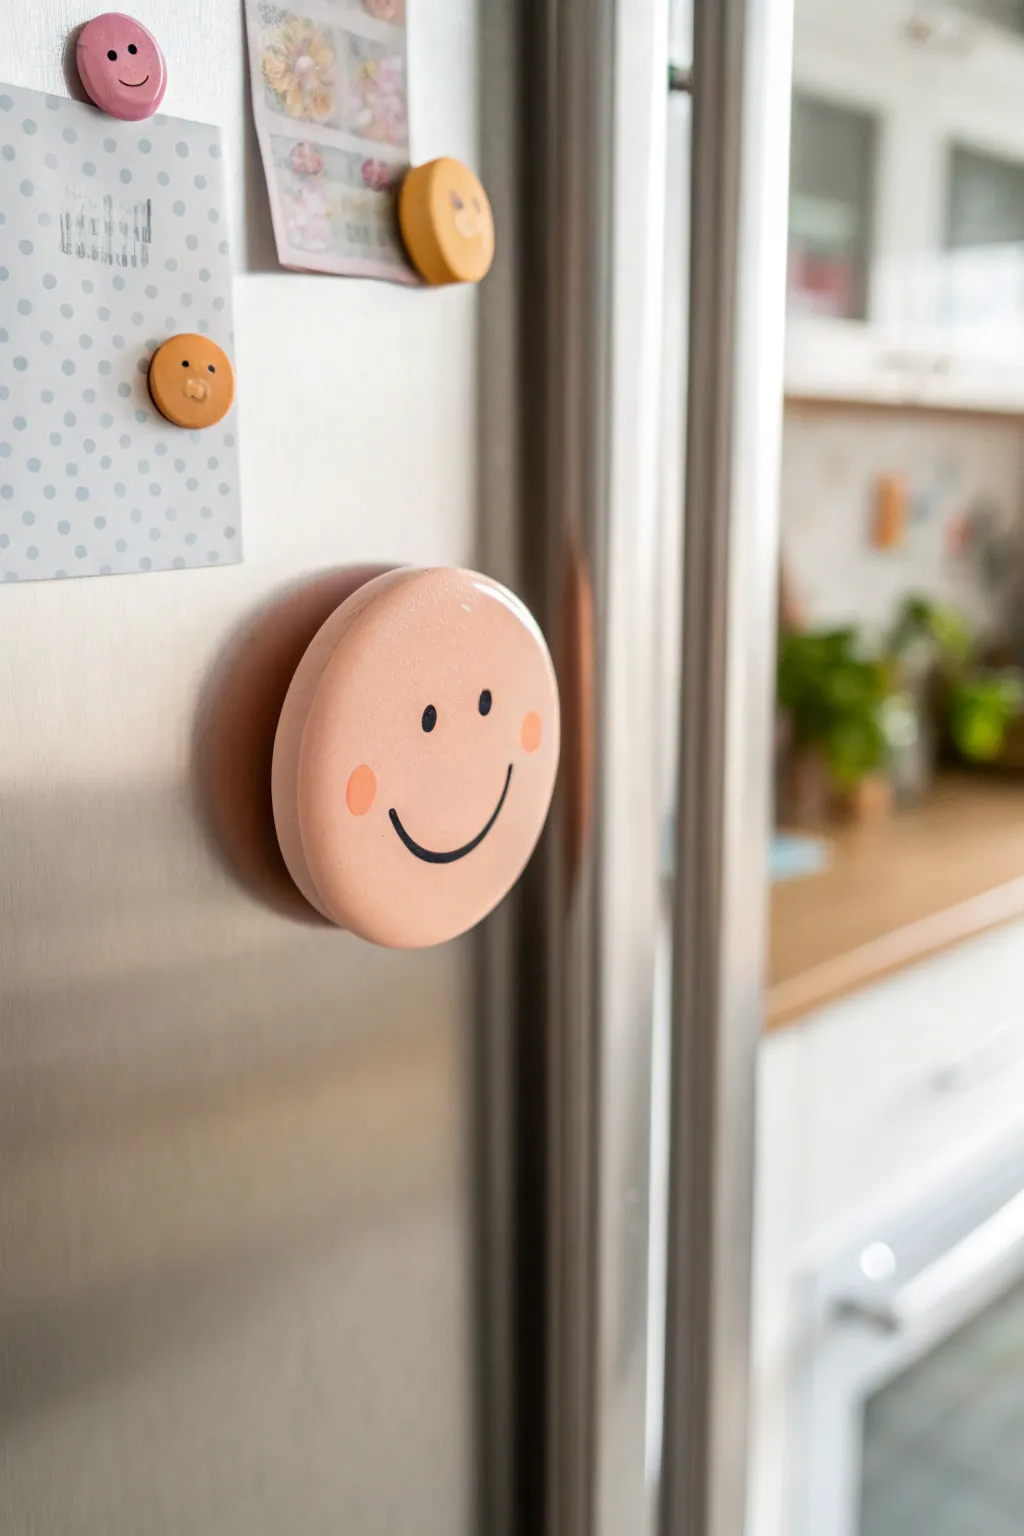
Brighten up your kitchen with these adorable, minimalist clay magnets that are sure to bring a smile to your face every time you reach for a snack. With their soft matte finish and sweet expressions, they add a touch of playful charm to any refrigerator door.
Step-by-Step Tutorial
Materials
- Polymer clay (peach, pink, yellow, orange)
- Black acrylic paint
- Pink acrylic paint (for cheeks)
- Fine detail paintbrush (size 0 or 00)
- Circle cookie cutter (approx. 2 inches)
- Rolling pin or pasta machine
- Baking sheet with parchment paper
- Strong round craft magnets
- Super glue or E6000
- Matte spray varnish (optional)
- Dotting tool or toothpick
Step 1: Shaping the Base
-
Condition the clay:
Start by taking a chunk of your peach or light pink polymer clay and kneading it in your hands until it becomes soft and pliable. This conditioning step is crucial to prevent cracks later on. -
Roll it out:
Using a rolling pin or a clay pasta machine, roll the clay out into a uniform sheet. Aim for a thickness of about 1/4 inch so the magnet feels substantial and sturdy. -
Cut the circles:
Press your round cookie cutter firmly into the clay sheet to punch out perfect circles. If the clay sticks inside the cutter, gently push it out from the back without distorting the shape. -
Soften the edges:
Run your finger lightly around the cut edge of the clay circle to smooth out any sharpness or roughness. I find that gently tapping the edge against the table helps round it off nicely for a softer look. -
Check surface:
Inspect the surface for any fingerprints or lint. Lightly buff them away with your fingertip or a tiny bit of cornstarch if needed.
Fixing Smudges
Make a mistake while painting the face? Don’t panic. Gently scrape off the wet paint with a toothpick or wipe it away quickly with a damp cotton swab before it dries.
Step 2: Baking and Cooling
-
Prepare for baking:
Place your clay circles onto a baking sheet lined with parchment paper. Leave a little space between each one to ensure even air circulation. -
Bake:
Bake the clay according to the manufacturer’s instructions on your specific package of polymer clay (usually around 275°F for 15-30 minutes). Do not overbake. -
Cool down:
Remove the tray from the oven and let the clay circles cool completely on the tray. They will harden as they cool, so don’t worry if they feel slightly flexible right out of the oven.
Mix It Up
Try making different expressions like a winking eye or a surprised ‘O’ mouth. You can also vary the sizes to create a whole family of magnet faces.
Step 3: Painting the Face
-
Draft the face:
Before committing with paint, you might want to lightly sketch the eyes and smile with a pencil to ensure everything is centered. -
Paint the eyes:
Dip your fine detail brush or a dotting tool into black acrylic paint. Create two small, vertical oval shapes for the eyes. Space them fairly wide apart for that cute, innocent look. -
Draw the smile:
Using the very tip of your detail brush, paint a thin, curved line for the smile securely between the eyes. Keep the line weight consistent. -
Add cheeks:
Mix a soft pink paint or use a straight pink shade. Dip a larger dotting tool, the back of a paintbrush, or even a Q-tip into the paint and stamp a round cheek on either side of the smile. -
Dry thoroughly:
Allow the paint to dry completely. This usually takes about 10-20 minutes depending on how thick the paint is. -
Seal (optional):
If you want extra protection, take the magnets outside and give them a light coat of matte spray varnish. This seals the paint and gives the clay a professional finish.
Step 4: Assembly
-
Prepare the back:
Flip the clay face over so the plain back is facing up. -
Apply glue:
Squeeze a small dot of strong adhesive like E6000 or super glue into the center of the back. -
Attach magnet:
Press a round craft magnet firmly into the glue. Hold it there for a few seconds to ensure a good initial bond. -
Final cure:
Let the glue cure fully according to the product instructions (often 24 hours for maximum strength) before placing it on your fridge.
Pop these on your fridge to hold up your grocery lists or favorite photos alongside a friendly face
Daisy Coasters With Cute Faces
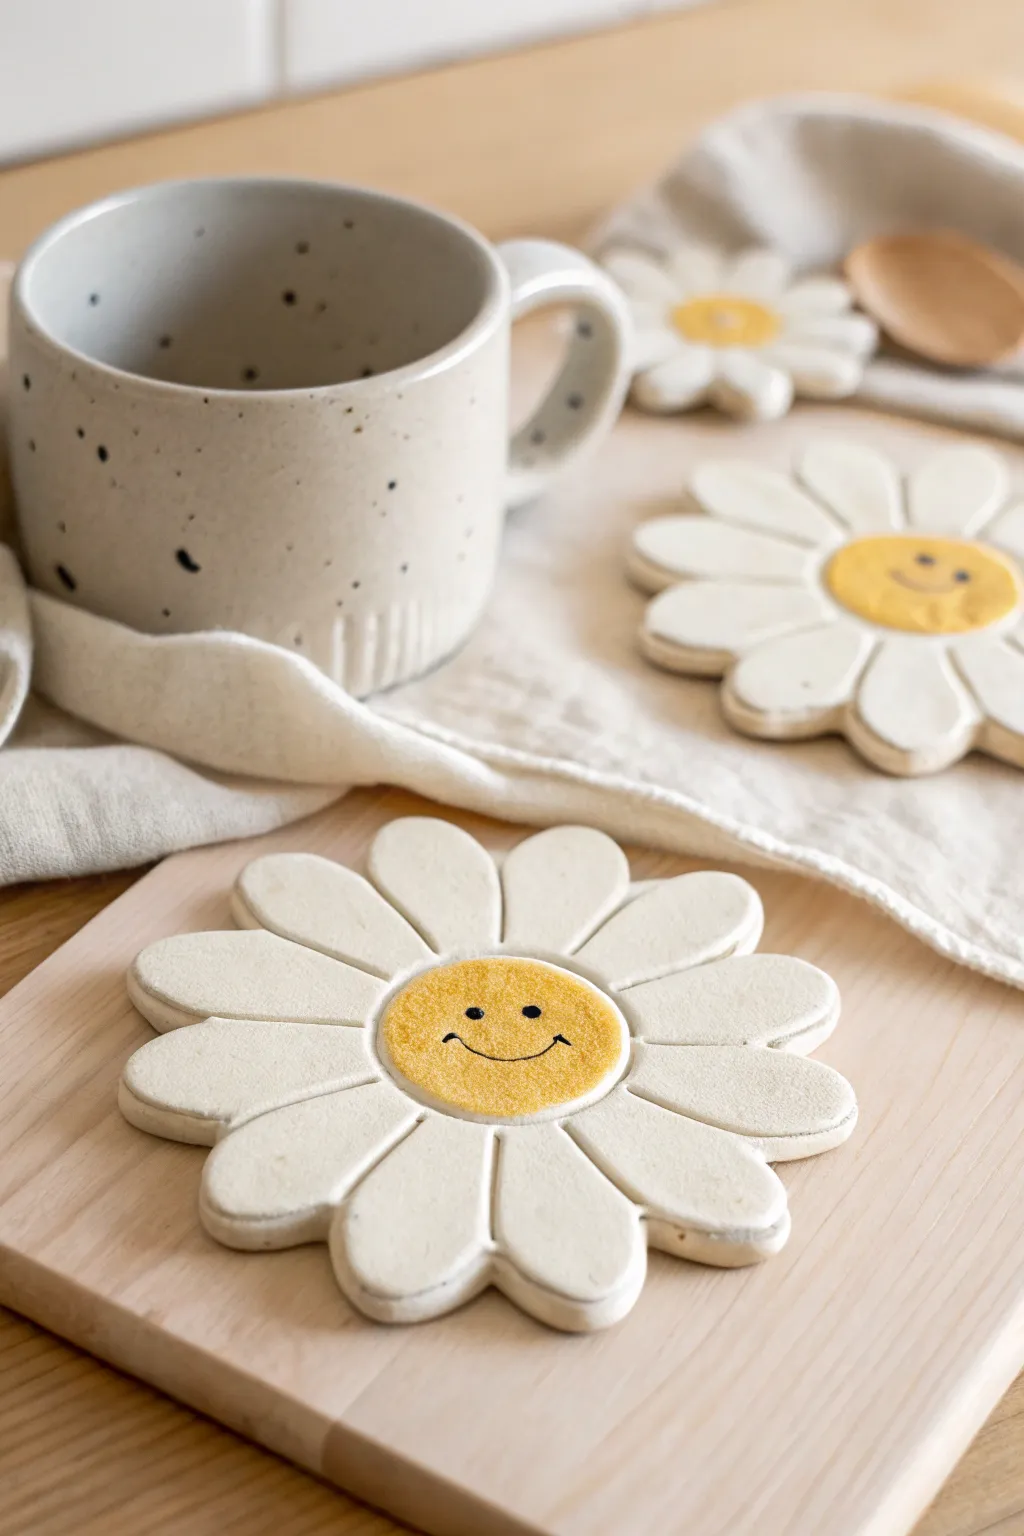
Brighten up your morning coffee routine with these cheerful flower-shaped coasters that are guaranteed to make you smile. With their soft white petals and cute happy faces, they add a perfect touch of whimsical charm to any table setting.
How-To Guide
Materials
- White paint dries air-dry clay (or polymer clay)
- Rolling pin
- Parchment paper or silicone mat
- Daisy flower cookie cutter (approx. 4-5 inches) or paper template
- X-Acto knife or clay tool
- Small round cutter or bottle cap (for the center)
- Sanding sponge or fine-grit sandpaper
- Acrylic paints: golden yellow and black
- Fine detail paintbrush
- Matte or satin waterproof varnish/sealer
- Small bowl of water (for smoothing)
- Round sponge applicator (optional)
Step 1: Shaping the Flower Base
-
Condition the clay:
Begin by taking a generous handful of white air-dry clay. Knead it in your hands for a minute or two to warm it up and ensure there are no air bubbles inside. -
Roll it out:
Place the clay on a sheet of parchment paper to prevent sticking. Use your rolling pin to flatten the clay into an even slab, aiming for a thickness of about 1/4 inch (6mm) so the coaster is sturdy. -
Cut the shape:
Press your large daisy cookie cutter firmly into the clay. If you don’t have a cutter large enough, print a flower shape, cut it out, place it on the clay, and carefully trace around it with an X-Acto knife. -
Clean the edges:
Remove the excess clay from around your flower shape. Dip your finger in a little bit of water and gently run it along the cut edges to smooth out any roughness or jagged bits. -
Add definition:
To make the petals look distinct like the ones in the photo, take a clay tool or the back of a butter knife and gently press an indentation between each petal, radiating slightly inward toward the center.
Smooth Surface Secret
Use a damp sponge to wipe the raw clay smoothly before it dries. This reduces the amount of sanding you’ll need to do later and keeps dust down.
Step 2: Creating the Center
-
Mark the center:
Take a small round cutter or a bottle cap and press it very lightly into the center of your flower. don’t cut all the way through; you just want to create a depressed circle guide for the yellow center. -
Texture the center (optional):
If you want the center to have a slightly different texture, you can gently tap the inner circle with a toothbrush or a ball of crinkled foil. -
Let it dry completely:
Place your clay coaster on a flat surface to dry. Air-dry clay usually takes 24-48 hours depending on humidity. Flip it over halfway through the drying process to prevent curling. -
Sand for smoothness:
Once bone dry, use a fine-grit sanding sponge to buff the edges and surface. This crucial step gives the coaster that professional, ceramic-like finish.
Make It a Set
Create a matching set by varying the expressions! Try a winking eye, a surprised ‘O’ mouth, or adding little pink cheeks with diluted paint.
Step 3: Painting and Sealing
-
Paint the center:
Dip a round sponge applicator or a medium brush into golden yellow acrylic paint. Fill in the center circle you marked earlier, dabbing the paint on for good coverage. You might need two coats. -
Sketch the face:
Before committing with paint, lightly sketch the smiley face onto the dry yellow center using a pencil. Keep the eyes wide apart and the smile simple for that ‘cute’ aesthetic. -
Paint the face details:
Using your finest detail brush and black acrylic paint, carefully trace over your pencil marks. Create two small dots for eyes and a u-shaped curve for the smile. I find holding my breath for a second helps steady my hand for these lines. -
Allow paint to cure:
Let the paint dry completely for at least an hour to ensure you don’t smear the black lines during the sealing process. -
Apply the first coat of sealant:
Brush a thin layer of waterproof matte or satin varnish over the entire top surface. This protects the clay from moisture, which is essential for a coaster. -
Seal the bottom and sides:
Once the top is dry to the touch, flip the coaster and seal the bottom and the edges. Repeat with a second coat on all sides for maximum durability.
Enjoy your delightful new coasters, perfect for holding your morning tea or gifting to a friend who needs a smile

TRACK YOUR CERAMIC JOURNEY
Capture glaze tests, firing details, and creative progress—all in one simple printable. Make your projects easier to repeat and improve.
Smiley Plant Pot Buddy
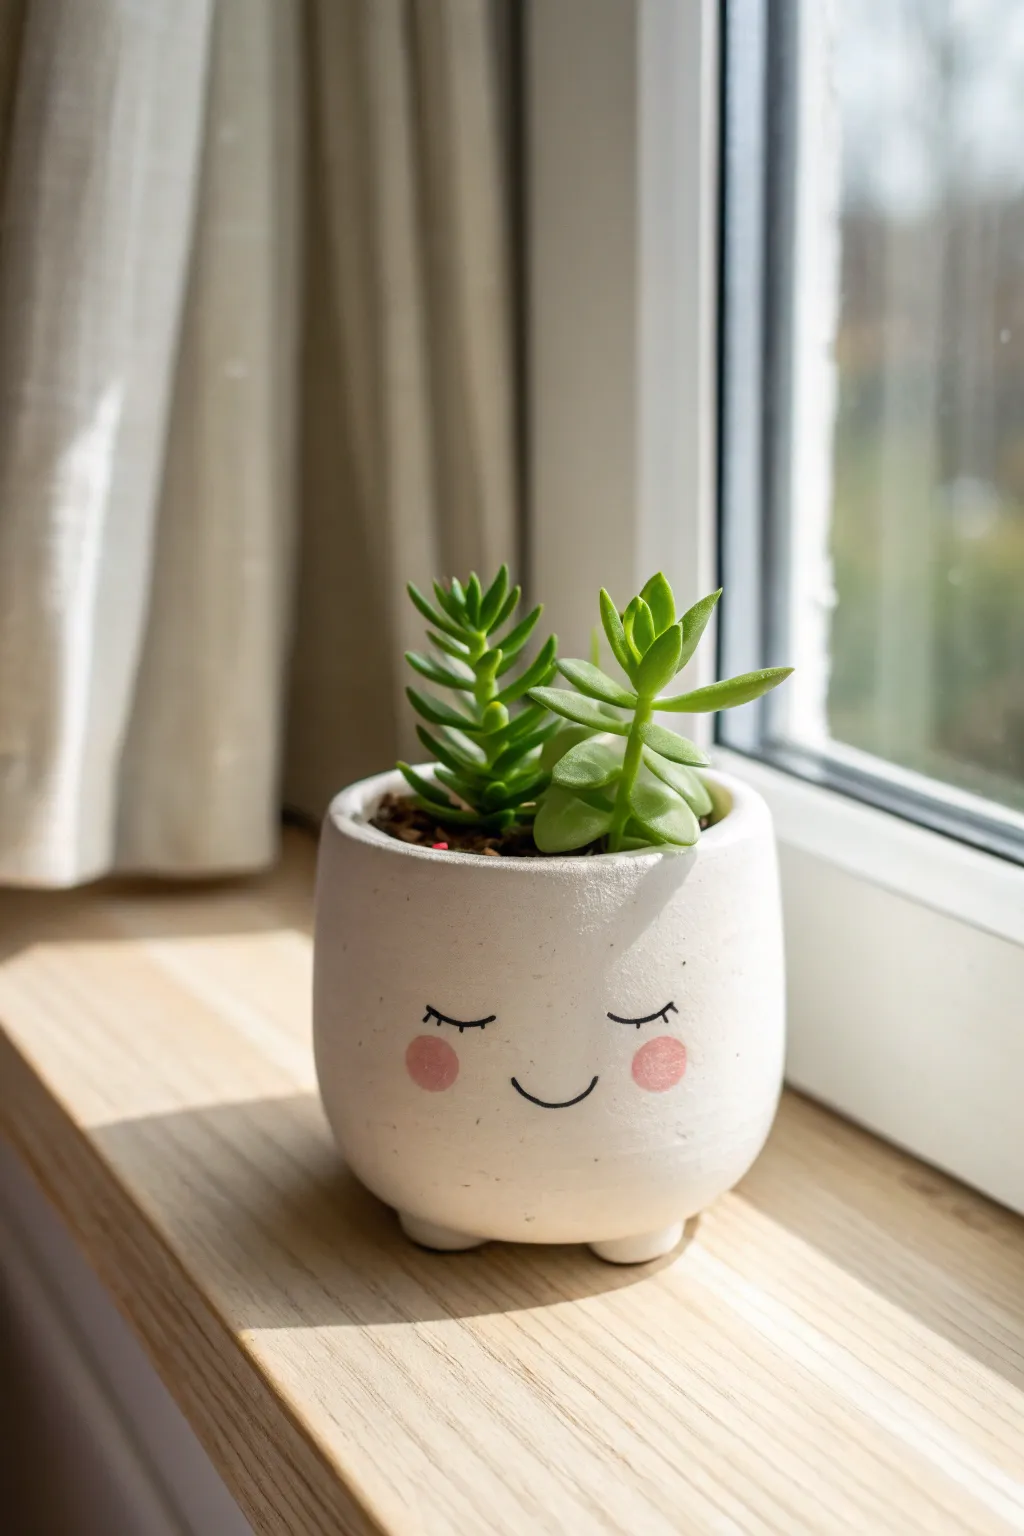
Brighten up any windowsill with this adorable, minimalistic succulent planter that radiates happiness. Hand-sculpted from white clay, this pot features sweet blushing cheeks and a peaceful, sleepy smile that pairs perfectly with vibrant greenery.
Step-by-Step Guide
Materials
- White polymer clay (or air-dry clay)
- Small rolling pin
- Circle cutter or craft knife
- Small bowl or jar (to use as a mold)
- Black fine-point acrylic paint marker or permanent marker
- Pink acrylic paint or soft pink pastel chalk
- Small paintbrush or cotton swab
- Sandpaper (fine grit)
- Varnish (matte or satin finish)
- Potting soil and small succulents
Step 1: Shaping the Pot Base
-
Condition the Clay:
Begin by kneading your white clay thoroughly until it is soft, pliable, and free of any air bubbles. If you are using polymer clay, the warmth of your hands will make it easier to work with. -
Roll the Slab:
Roll the clay out into a long, even strip that is roughly 1/4 inch thick. This thickness ensures the pot is sturdy enough to hold soil without cracking. -
Create the Base:
Cut a circle out of your rolled clay using a circle cutter or a jar lid as a template. This will serve as the bottom of your pot. -
Form the Walls:
Cut a long rectangular strip from the remaining rolled clay. The length needs to be slightly longer than the circumference of your base circle. -
Wrap and Connect:
Wrap the rectangular strip around the edge of the circle base. Gently press the seams together where the wall meets the base and where the two ends of the wall meet. -
Smooth the Seams:
Use your finger or a clay smoothing tool to blend the seams fully so they disappear. I like to support the inside of the wall with my other hand while I smooth the outside to keep the shape perfectly round. -
Refine the Rim:
Gently tap the rim of the pot to level it out, or use a craft knife to trim away any uneven excess for a clean, straight top edge.
Step 2: Adding Details & Baking
-
Sculpt the Feet:
Roll three small, equal-sized balls of clay. These will be the feet. Flatten the tops slightly so they attach securely. -
Attach the Feet:
Press the three balls onto the bottom of the pot in a triangular formation for stability. Blend the clay where the feet meet the base so they don’t pop off later. -
Add Drainage (Optional):
If you plan to plant directly into the pot, poke a small hole in the center of the bottom base to allow excess water to escape. -
Smooth the Surface:
Give the entire pot a final rub-down with a tiny bit of water (for air-dry clay) or baby oil (for polymer clay) to remove fingerprints and create a silky texture. -
Cure the Clay:
Bake the pot according to your clay package instructions if using polymer clay, or let it sit in a dry, safe spot for 24-48 hours if using air-dry clay. -
Sand Imperfections:
Once fully cured or dry, use fine-grit sandpaper to gently buff away any rough spots or sharp edges on the rim or seams.
Uneven Seams?
If you can’t get the wall seam invisible, use a tiny bit of clay ‘slurry’ (clay mixed with water/bonder) as a filler paste, then sand smooth after baking.
Step 3: Painting the Personality
-
Draw the Eyes:
Using a black fine-point marker or a very thin brush with black paint, carefully draw two downward-curved lines for the sleeping eyes. Make them symmetrical and add three tiny lashes to the outer corner of each eye. -
Add the Smile:
Draw a small, gentle ‘U’ shape centered below the eyes for the smile. Keep the line thin and simple for that minimalist look. -
Apply the Blush:
Dip a cotton swab or a dry brush into a tiny amount of pink paint (or pink pastel dust). Dab it gently onto the cheeks to create soft, round rosy spots. Less is more here; build the color up slowly. -
Seal the Project:
Apply a coat of waterproof satin or matte varnish over the entire pot, especially on the inside, to protect the clay from moisture when watering your plants. -
Planting Time:
Fill your new buddy with soil and tuck in your favorite succulents to complete the look.
Customize It
Before baking, you can add tiny triangular clay ears near the rim to turn your pot buddy into a sleepy cat, or long floppy ears for a bunny.
Now you have a charming little friend to keep your plants company on the windowsill
Chubby Animal Bookends
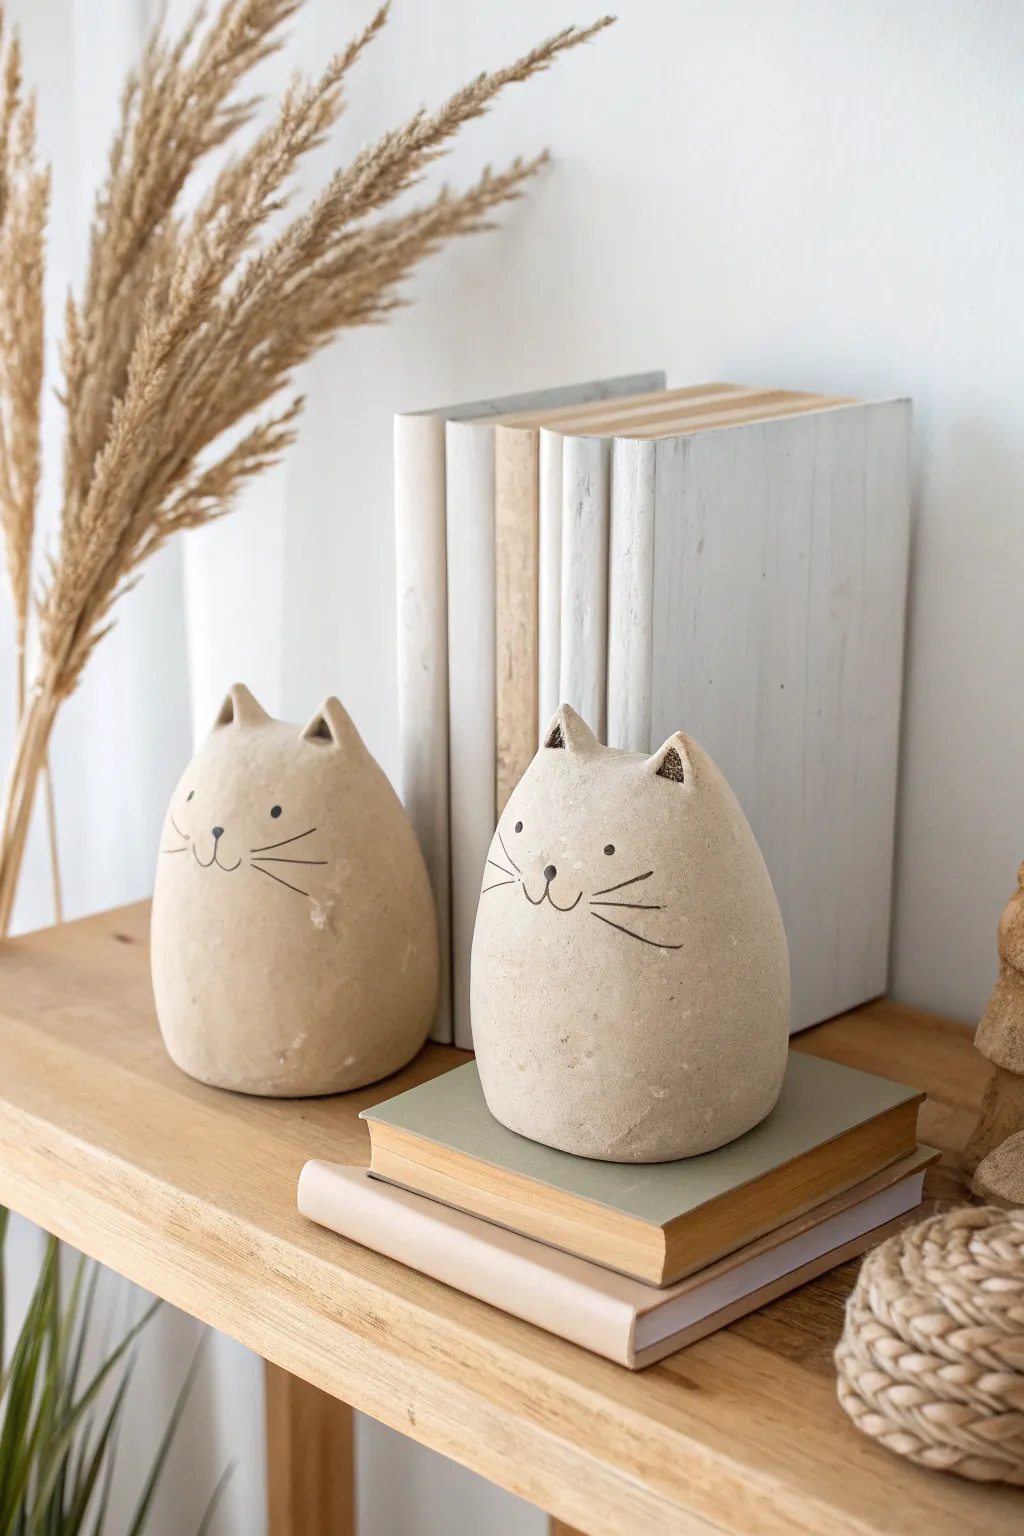
Bring a touch of minimalist whimsy to your bookshelf with these delightful cat bookends. Their soft, egg-like shape and neutral stone texture make them a charming and functional addition to any modern decor.
Step-by-Step Guide
Materials
- Air-dry clay (stone or white color)
- Aluminum foil
- Water in a small cup
- Pottery sponge or soft cloth
- Rolling pin
- Clay carving tools or a toothpick
- Fine-grit sandpaper
- Black acrylic paint or fine-tip black marker
- Small detail paintbrush
- Matte sealant spray
Step 1: Forming the Core
-
Prepare the foil base:
To save clay and reduce weight, crumple a large amount of aluminum foil into a tight, dense egg shape. create two of these cores, making sure they are roughly the same size and have a flattened bottom so they stand stably. -
Check stability:
Place your foil cores on a flat surface. Tap them gently to ensure they don’t rock or wobble; if they do, press the bottom firmly against the table to flatten it further.
Weighted base tip
If you need heavy-duty bookends, insert a clean, smooth rock or a small bag of sand inside the foil core before wrapping it in clay to add substantial weight.
Step 2: Sculpting the Body
-
Roll out the clay:
Take a large chunk of air-dry clay and roll it out into a slab about 1/4 inch thick. It needs to be large enough to completely wrap around one of your foil cores. -
Wrap the core:
Drape the clay sheet over the foil egg. Gently press and smooth the clay down around the form, trimming away any significant excess with a knife or clay tool. -
Seal the seams:
Where the clay edges meet, smudge them together firmly with your thumb. Dip your finger in a little water to help blend the seams until they disappear completely. -
Smooth the surface:
Using a slightly damp sponge, wipe over the entire surface of the clay egg to remove fingerprints and create a uniform texture. I find this step crucial for that polished, stone-like look.
Step 3: Adding Details
-
Shape the ears:
Pinch off two small triangles of clay for the ears. Attach them to the top of the head by scoring the clay (scratching crisscross lines) and adding a dot of water (slip) before pressing them on. -
Blend the ears:
Use a modeling tool or your finger to smooth the base of the ears into the main body so they look seamless and integrated, not just stuck on content. -
Check symmetry:
Place both cat shapes side-by-side. Make minor adjustments to the height or ear placement while the clay is still wet to ensure they look like a matching set. -
Create the texture:
If you want that speckled stone effect shown in the photo, you can gently dab the surface with an old toothbrush or a stiff bristle brush to create tiny pores. -
Drying time:
Allow the sculptures to dry completely in a cool, dry place. This usually takes 24-48 hours depending on humidity. Rotate them occasionally to ensure the bottom dries evenly.
Cracking clay?
Small surface cracks can appear as air-dry clay shrinks. Fix this by mixing a tiny bit of fresh clay with water to make a paste and filling the crack, then smooth it over.
Step 4: Finishing Touches
-
Sand imperfections:
Once fully bone dry, use fine-grit sandpaper to gently buff away any rough bumps or sharp edges, particularly around the bottom rim. -
Dust off:
Wipe the cats down with a dry cloth or use a soft brush to remove all the clay dust from sanding. -
Paint the face:
Using a very fine paintbrush and black acrylic paint (or a marker), carefully draw two small dots for eyes widely spaced apart. -
Add the nose and mouth:
Paint a small inverted triangle for the nose centered between the eyes, and draw a simple ‘w’ shape beneath it for the mouth. -
Draw whiskers:
Add three distinct whiskers on each cheek, extending outward. Keep lines thin and deliberate for a clean, minimalist style. -
Detail the ears:
Paint a small, dark triangle inside the ears to give them depth, or shade them slightly with a darker beige paint mixed with water. -
Seal the project:
Take the figurines to a well-ventilated area and spray them with a matte sealant to protect the clay and prevent the paint from smudging over time.
Place your new serene guardians on your shelf and enjoy the cozy vibe they bring to your reading nook