Whenever someone tells me they’re “not artistic,” I hand them a little lump of clay and we make something tiny and adorable in under an hour. These clay craft ideas for beginners are all about simple shapes, easy wins, and pieces you’ll actually want to use or gift.
Easy Pinch Pot Trinket Dish

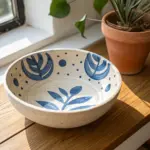
Embrace the imperfect beauty of handmade ceramics with this charming scalloped trinket dish. Its organic, wavy rim and rustic terracotta-painted edge give it a cozy, artisanal feel perfect for holding your favorite rings.
Step-by-Step Tutorial
Materials
- White air-dry clay or polymer clay
- Rolling pin
- Small bowl of water (for smoothing)
- Sandpaper (fine grit)
- Acrylic paint (terracotta or reddish-brown)
- Small detail paintbrush
- Matte sealant or varnish
Step 1: Shaping the Base
-
Prepare the clay:
Start with a ball of clay roughly the size of a golf ball or slightly larger depending on your desired dish size. Knead it in your hands to warm it up and make it pliable. -
Form the pinch pot:
Hold the ball in one hand and press your thumb into the center, creating an indentation. Don’t push all the way through. -
Pinch the walls:
Gently pinch the clay between your thumb and fingers, rotating the ball as you go. Work your way from the bottom up to thin out the walls evenly. -
Flatten the bottom:
Once you have a rough bowl shape, gently tap the bottom against your work surface to create a flat base so the dish sits explicitly stable. -
Widen the form:
Continue pinching and pulling gently outward to widen the dish. Aim for a shallow, open shape rather than a deep cup.
Smoother Finishes
For a super smooth surface, use a slightly damp sponge instead of just your fingers during the final smoothing step before drying.
Step 2: Creating the Scalloped Rim
-
Create the waves:
Using your index finger, gently press down on the rim at regular intervals to create indentations. Support the clay from the outside with your other hand. -
Refine the scallops:
Pinch the ‘peaks’ between the indentations slightly to define the wavy, scalloped edge. It doesn’t need to be mathematically perfect; an organic look is key here. -
Smooth the surfaces:
Dip your finger in a tiny bit of water and run it over the inside and outside of the bowl to smooth out fingerprints and cracks. I find a damp sponge also works wonders for this. -
Refine the edges:
Pay special attention to the rim, smoothing any sharp edges created during the scalloping process.
Cracking Woes?
If you see cracks forming as the clay dries, you can fill them with a ‘slip’ made of clay mixed with water, then smooth over.
Step 3: Finishing Touches
-
Let it dry:
Set your dish aside to dry completely. For air-dry clay, this usually takes 24-48 hours. If using polymer clay, bake according to the package instructions. -
Sand for smoothness:
Once fully cured or dry, use fine-grit sandpaper to gently buff away any remaining rough spots or unevenness on the surface. -
Paint the rim:
Dip a small detail brush into terracotta-colored acrylic paint. Carefully paint along the very top edge of the scalloped rim. -
Add the rustic effect:
While the paint is still wet, you can dab it lightly with a paper towel or sponge to soften the line and give it that weathered, partial-coverage look seen in the photo. -
Seal the dish:
Apply a coat of matte sealant or varnish over the entire dish to protect the clay and paint from wear and tear.
Step 4: Final Polish
-
Final dry:
Allow the sealant to dry completely in a dust-free area. -
Ready to use:
Your dish is now ready. Place it on your vanity or bedside table and arrange your favorite jewelry inside.
Enjoy the simple elegance of your new handmade jewelry holder


Classic Coil Bowl With Simple Lines
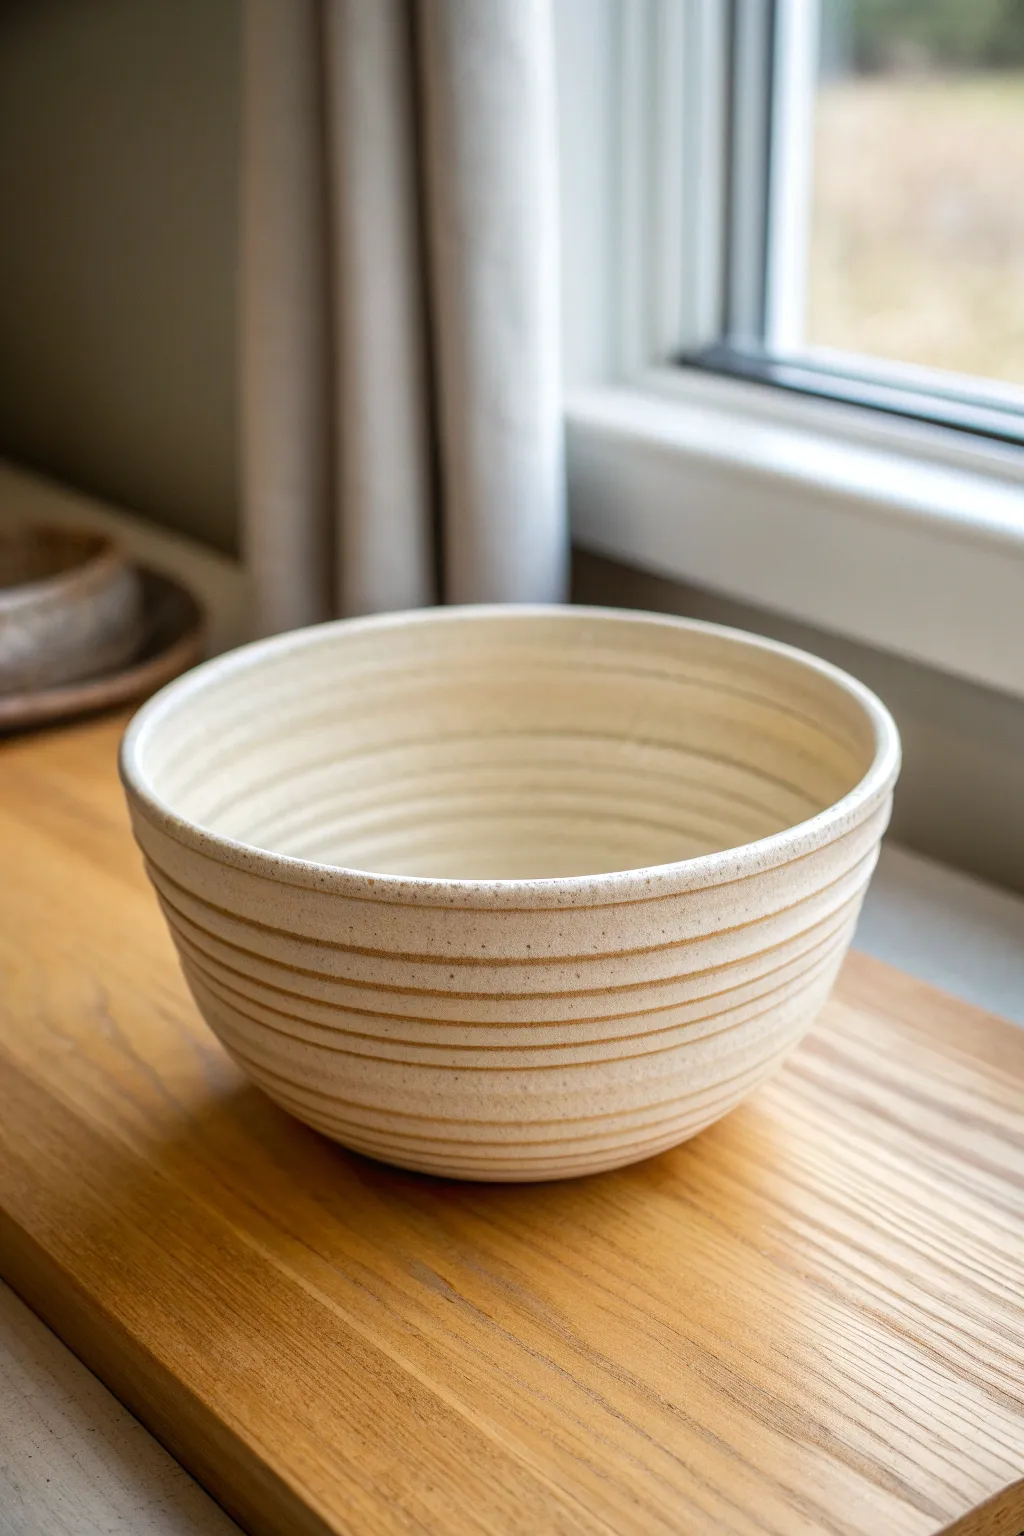
This elegant ceramic bowl features a soothing rhythm of horizontal grooves that mimic the look of wheel-thrown pottery while being entirely hand-built. Its speckled cream finish and distinct ridges create a tactile surface that feels both rustic and refined, perfect for fruit or serving.
Step-by-Step Guide
Materials
- Speckled stoneware clay (white or buff)
- Clay cutting wire or fishing line
- Rolling pin
- Canvas mat or wooden board
- Needle tool
- Scoring tool or old fork
- Slip (clay mixed with water to a yogurt consistency)
- Rib tool (wooden or silicone)
- Modeling tool with a rounded edge
- Sponge
- Clear matte glaze or satin white glaze
Step 1: Forming the Base
-
Prepare your clay:
Begin by wedging your speckled clay thoroughly to remove any air bubbles. This step is crucial for preventing cracks during firing. Aim for a smooth, pliable consistency. -
Roll the slab base:
Flatten a ball of clay with your hand, then use a rolling pin to create a slab about 1/4 inch thick. This will serve as the bottom of your bowl. -
Cut the circle:
Place a circular template (like a small plate or lid) onto the slab. Using your needle tool held vertically, trace around the template to cut out a clean circle. -
Score the edge:
Take your scoring tool or fork and rough up the outer 1/4 inch of the circle’s top surface. Apply a generous amount of slip to these scored marks.
Step 2: Building the Walls
-
Roll your coils:
Take a chunk of clay and roll it between your hands and the table to form a long snake. Aim for an even thickness, roughly the width of your pinky finger. -
Attach the first coil:
Place the coil directly on top of the scored edge of your base. When the ends meet, trim them at an angle for a seamless join, score, slip, and press together. -
Blend the interior:
Using your thumb or a modeling tool, drag the clay from the coil downwards onto the base on the *inside* of the bowl only. Smooth this connection completely so it’s invisible. -
Continue stacking:
Score and slip the top of your first coil. Add the next coil on top. I prefer to offset the start and stop points of each layer so the seams don’t line up vertically, which adds strength. -
Expand the form:
To create the widening bowl shape, place each new coil slightly further outward than the one below it. Keep checking the profile from the side to ensure the curve is even. -
Blend as you go:
After every 2-3 coils, stop to blend the coils together on the *inside* only. Use a rib tool to scrape and smooth the interior wall until it creates a continuous, smooth surface.
Uneven Walls?
If one side looks higher than the other, don’t just push it down. Use a needle tool to trim the rim level while spinning the bowl on a banding wheel, then re-smooth the lip.
Step 3: Refining and Grooving
-
Smooth the exterior lightly:
Once you have reached your desired height, gently smooth the exterior coils *just enough* so they adhere well, but don’t erase the definition completely yet. We want a relatively flat canvas for the grooves. -
Define the rim:
Use a damp sponge to compress and smooth the top rim. I like to round it over slightly so it’s pleasant to touch. -
Carve the grooves:
This is the signature step. Using a rounded modeling tool or the curved end of a loop tool, press gently into the exterior wall while rotating the bowl (or moving around it). Carve continuous horizontal lines spaced evenly from bottom to top. -
Deepen the texture:
Go over your lines again to ensure they are distinct. The grooves should look intentional and rhythmic. You can also replicate this texture on the upper inside rim if desired. -
Clean up crumbs:
Let the bowl dry to a leather-hard state. Once firm, use a stiff brush or a slightly damp sponge to wipe away any sharp little clay crumbs created by the carving tools. -
Drying:
Loosely cover the bowl with plastic to let it dry slowly over several days. Slow drying prevents the rim from warping.
Level Up: Oxide Wash
Before glazing, wipe a dark oxide wash (like iron oxide) into the grooves and sponge off the high points. This adds incredible depth and contrast to the lines.
Step 4: Finishing
-
Bisque fire:
Fire the piece in a kiln to cone 04 (or your clay’s specific bisque temperature). -
Glazing:
Dip or brush your bowl with a clear matte glaze, or a semi-transparent satin white. These glazes will pool slightly in the grooves, highlighting the texture and letting the clay speckles show through. -
Final fire:
Glaze fire the piece to the maturity temperature of your clay (commonly Cone 5 or 6 for stoneware).
Once fired, you’ll have a stunning, durable vessel ready to grace your table with its handmade charm.


Pressed Slab Coasters With Flowers

Capture the delicate beauty of nature with these charming clay coasters featuring pressed wildflowers and ferns. Their matte, stone-like finish and warm autumnal colors make them a perfect handmade addition to your coffee table.
Step-by-Step
Materials
- White or light beige air-dry clay (or polymer clay)
- Rolling pin
- Circle cookie cutter (approx. 3.5 – 4 inches)
- Fresh or pressed wildflowers, ferns, and stems
- Detail knife or needle tool
- Sandpaper (fine grit)
- Matte acrylic varnish or Mod Podge
- Small paintbrush
- Wax paper or canvas mat for rolling
Step 1: Preparing the Clay Base
-
Condition the clay:
Begin by taking a handful of your air-dry clay or polymer clay. Knead it thoroughly in your hands until it becomes soft, pliable, and free of any cracks. -
Roll out the slab:
Place the clay on a sheet of wax paper or a canvas mat to prevent sticking. Use your rolling pin to flatten the clay into a slab that is roughly 1/4 inch thick; you want them sturdy enough to hold a mug. -
Cut the circles:
Press your circle cookie cutter firmly into the slab. If you don’t have a cutter, you can trace around a wide-mouth jar lid with a detail knife for a clean edge. -
Smooth the edges:
Lift the excess clay away. Dip your finger in a tiny bit of water and gently run it around the circumference of each circle to smooth out any rough cutting lines or jagged bits.
Warping Warning
If your air-dry clay coasters curl up at the edges while drying, weigh them down gently with a heavy book placed over a piece of parchment paper.
Step 2: Creating the Botanical Design
-
Arrange your composition:
Before pressing anything, lay your plant materials lightly on top of a clay circle to test the layout. Try angling a fern leaf on one side and a small flower on the other for a balanced, organic look. -
Press the stems:
Once you are happy with the placement, gently press the stems and leaves into the clay with your fingertips. You want them to sit flush with the surface but not sink too deeply. -
Roll for texture:
For a more seamless impression, place a piece of wax paper over the coaster and lightly run your rolling pin over the botanicals once. This embeds them firmly into the clay slab. -
Remove or leave botanicals:
At this point, you have a choice. If you used fresh flowers that will brown, carefully peel them out now to leave a fossil-like impression that you can paint later. If using dried pressed flowers intended to stay, leave them embedded. -
Add detail color:
If you removed the plants (creating an impression style), use a small brush and watered-down acrylic paint in burnt orange and sage green to fill the depressions. If you left the plants in, you can skip this step.
Step 3: Finishing Touches
-
Let it dry:
Allow your coasters to dry completely. For air-dry clay, this usually takes 24-48 hours. I find flipping them over halfway through the drying process helps keep them perfectly flat. -
Bake if necessary:
If you opted for polymer clay, bake the coasters on a parchment-lined tray according to the specific temperature and time instructions on your clay package. -
Sand the surface:
Once fully cured or dry, inspect the edges. Use a piece of fine-grit sandpaper to buff away any remaining roughness on the rim for a professional feel. -
Apply sealant:
Protect your artwork from moisture by applying a coat of matte varnish or Mod Podge. Ensure you cover the botanical elements well to preserve their color. -
Seal the bottom:
Don’t forget to flip the coaster and apply a coat of sealant to the bottom side as well to prevent moisture absorption from spills. -
Final cure:
Let the varnish dry completely in a dust-free area before stacking your new coaster set or placing a hot drink on them.
Level Up: Gold Rim
For a chic upgrade, paint the outer rim of the dried coaster with liquid gold leaf or metallic paint before applying your final clear varnish coat.
Enjoy using your beautiful, nature-inspired coasters for your morning tea or evening relaxation time


Simple Ring Holder Cone
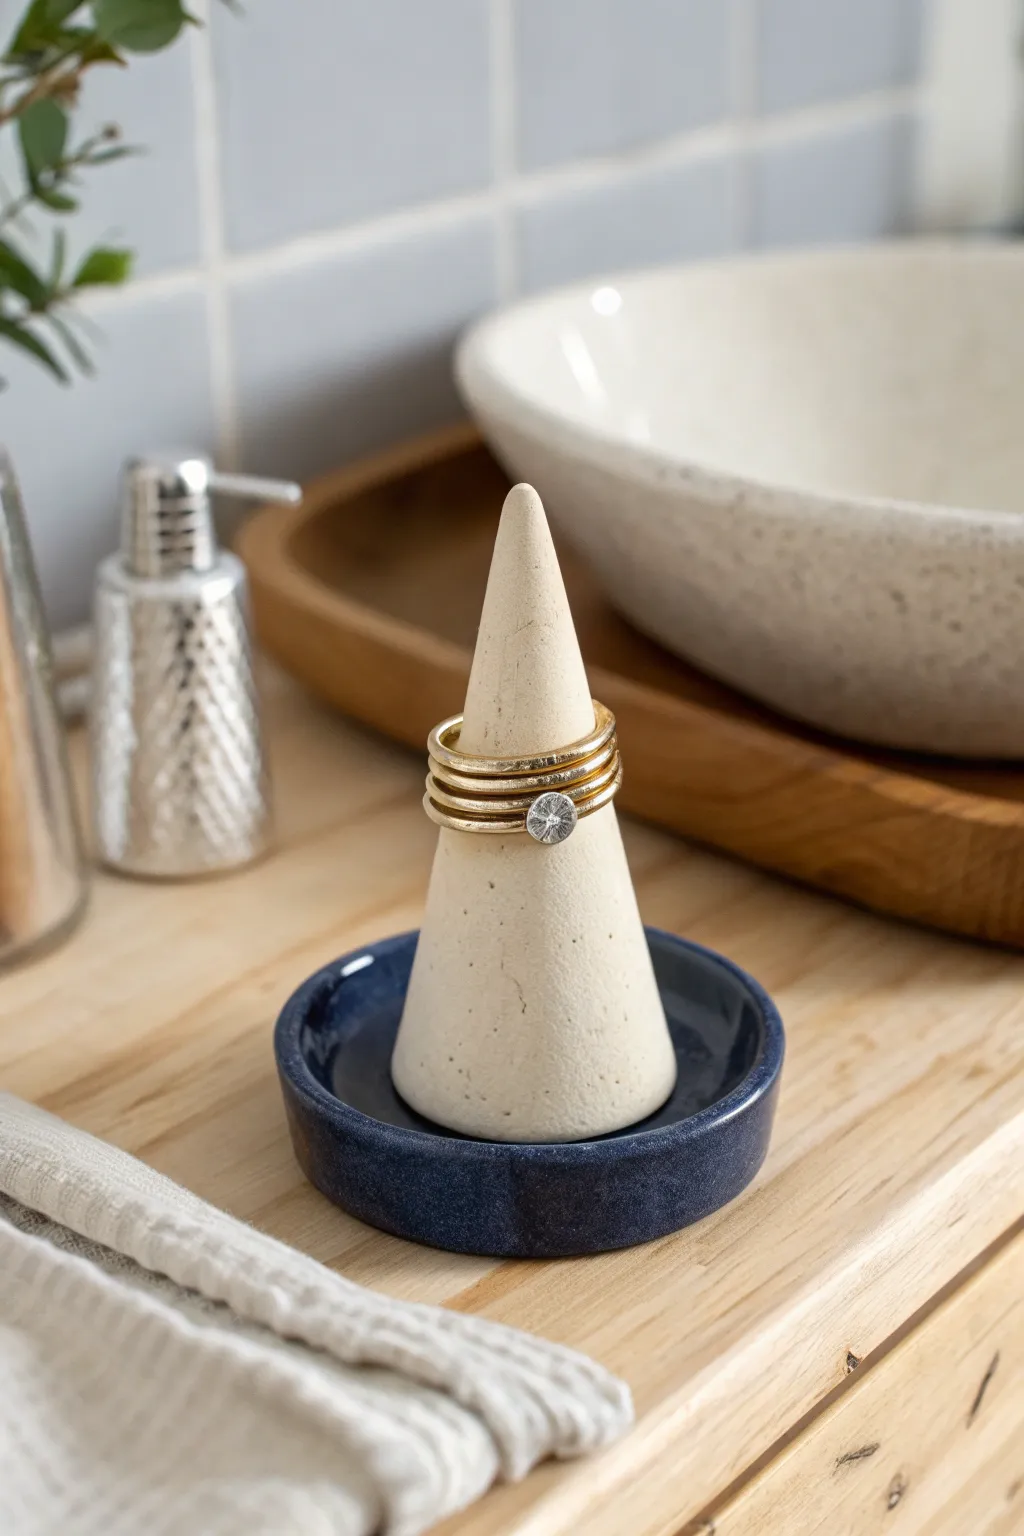
This elegant ring holder combines a natural, unglazed cone with a contrasting deep blue glazed base for a sophisticated, modern look. It’s the perfect beginner project to practice basic shaping and glazing techniques while creating something functional for your vanity.
Step-by-Step Tutorial
Materials
- Light-colored stoneware clay or polymer clay (oven-bake)
- Pottery wheel or rolling pin and flat surface
- Loop tool or clay knife
- Small sponge
- Cup of water
- Deep blue ceramic glaze (if using kiln-fire clay) or acrylic paint and gloss varnish (if using polymer clay)
- Paintbrush
- Sandpaper (fine grit)
- Kiln (if using stoneware)
Step 1: Shaping the Cone
-
Prepare the Clay:
Start with a ball of clay about the size of a golf ball. Wedge it thoroughly to remove air bubbles if you are using stoneware, or condition it in your hands until soft if using polymer clay. -
Roll a Coil:
Roll the ball on your work surface into a thick, short cylinder, preparing it for the cone shape. -
Form the Cone:
Using the palm of your hand, roll the cylinder back and forth while applying more pressure to one end. This will naturally taper the clay into a cone shape. -
Refine the Shape:
Stand the cone up on its flat base. Use your fingers to smooth out the sides, ensuring the taper is even and the point isn’t too sharp—you want a slightly rounded tip like the example. -
Flatten the Bottom:
Tap the base of the cone firmly against the table to ensure it is perfectly flat. This is crucial for stability later. -
Texture:
I like to leave the surface slightly matte or use a damp sponge to create a natural, stone-like texture rather than smoothing it to perfection.
Natural Speckles
To get the speckled look on the cone without special clay, mix in some coarse black pepper or dried coffee grounds into your polymer clay before baking.
Step 2: Creating the Dish Base
-
Roll a Slab:
Take a second, slightly larger ball of clay. Roll it out into a flat slab about 1/4 inch thick. -
Cut the Circle:
Use a round cutter or a knife guided by a small bowl to cut out a perfect circle, approximately 3-4 inches in diameter. -
Create the Rim:
Gently pinch the edges of the circle upwards to create a small rim. You want a shallow dish shape, just high enough to contain the cone. -
Smoothing the Rim:
Dip your finger in a little water and run it along the rim to smooth out any cracks or sharp edges. -
Dry Fit:
Place your cone inside the dish to check the proportions. The dish should cradle the cone with a little bit of space around the edges. -
Drying:
Allow both pieces to dry completely (bone dry) if using pottery clay, or prepare them for baking if using polymer clay.
Marbling Magic
Instead of a solid blue base, try marbling white and blue clay together for the dish to create an ocean-inspired wave pattern.
Step 3: Firing and Glazing
-
Bisque Fire / Bake:
Fire your pieces in a kiln to bisque temperature. If using polymer clay, bake according to the package instructions. -
Sand the Cone:
Once cool, lightly sand the cone if needed to mimic the matte, stone texture shown in the photo. Leave this piece unglazed (or unpainted) to maintain that natural beige look. -
Glaze the Dish:
Apply the deep blue glaze to the entire dish base. If using polymer clay, use a dark blue acrylic paint mixed with a little water for a wash, or solid paint for full coverage. -
Gloss Finish:
For the dish only: Apply a clear gloss glaze (and fire again) or a high-gloss varnish (for polymer clay). This creates the contrast between the shiny base and matte cone. -
Assembly:
Once everything is finished and dry, place the cone into the center of the dish. You can use a dab of strong adhesive (like E6000) to permanently attach the cone to the dish base if desired.
Now you have a chic, minimalistic jewelry stand ready to organize your favorite accessories

The Complete Guide to Pottery Troubleshooting
Uncover the most common ceramic mistakes—from cracking clay to failed glazes—and learn how to fix them fast.
Minimal Photo Holder With a Slot
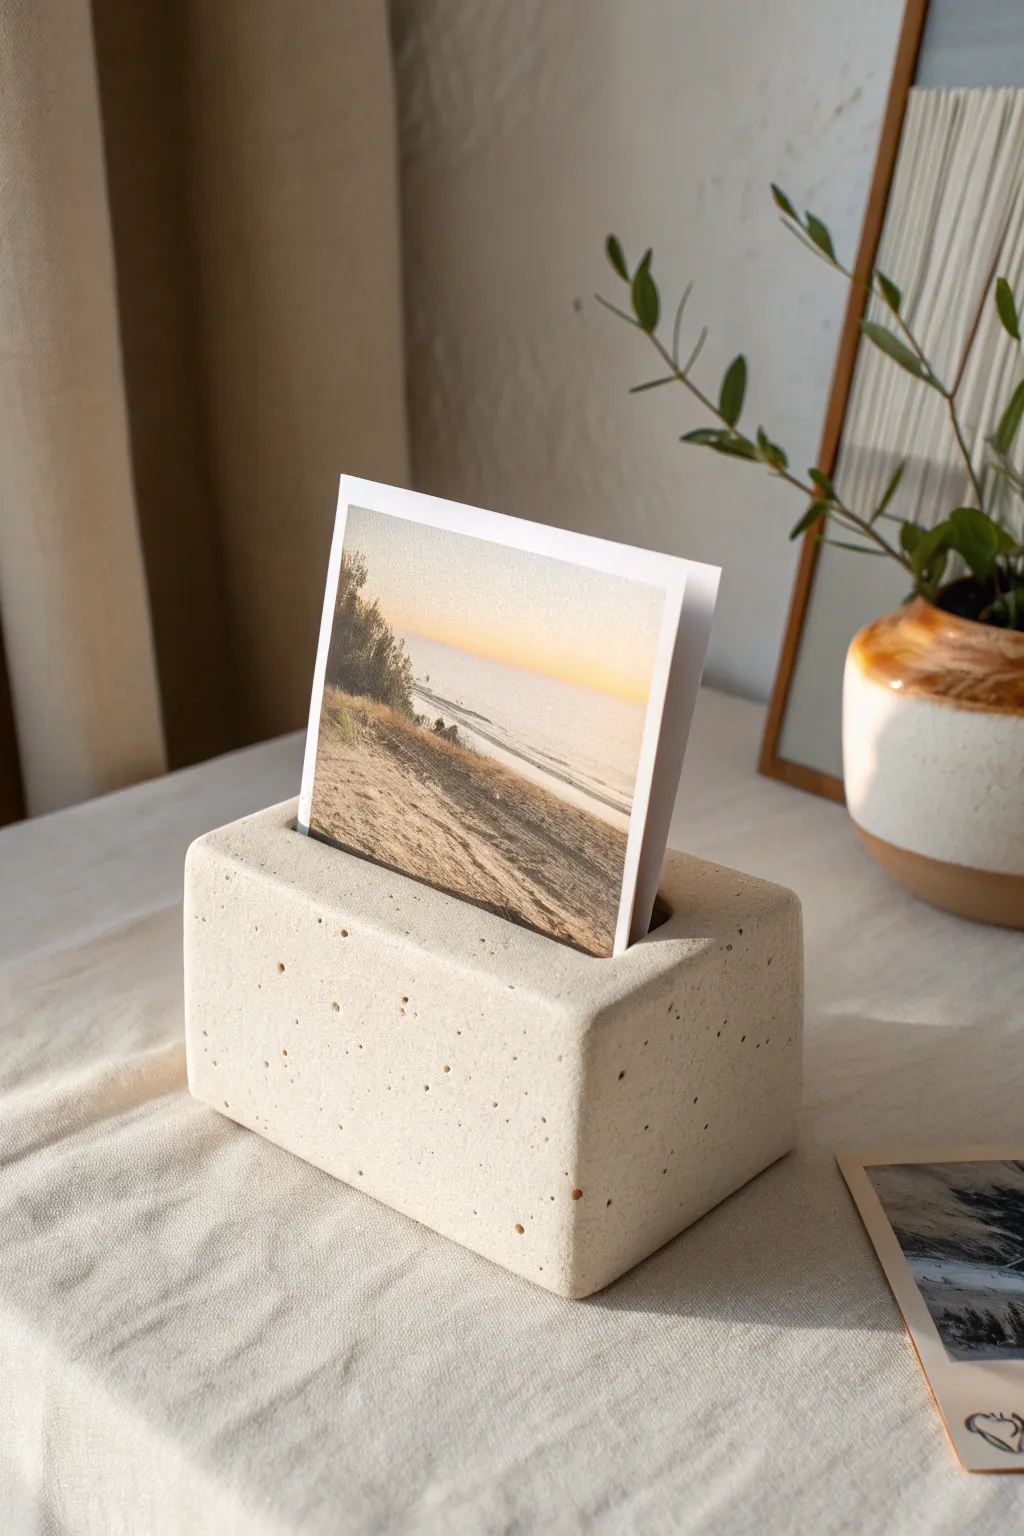
This minimalist photo holder mimics the raw, organic look of sandstone or terrazzo but is easily crafted from polymer or air-dry clay. Its solid rectangular form and speckled texture offer a modern way to display memories without distracting frames.
How-To Guide
Materials
- White polymer clay or air-dry clay (approx. 200-300g)
- Coarse black pepper or dried coffee grounds (for speckles)
- Fine brown sand (optional, for texture)
- Rectangle cookie cutter or a sharp blade
- Rolling pin
- Thick cardboard or a discarded plastic card (credit card thickness)
- Fine-grit sandpaper (400-600 grit)
- Smooth work surface (ceramic tile or glass)
- Ruler
Step 1: Preparing the Clay
-
Condition the Clay:
Begin by warming up your white clay in your hands. Knead it thoroughly until it is soft, pliable, and free of any cracks. -
Add Texture:
To achieve that natural stone look, flatten your clay slightly and sprinkle a generous pinch of coarse black pepper or dried coffee grounds onto the surface. If you want a grittier texture, add a small amount of fine brown sand as well. -
Mix Inclusions:
Fold the clay over the inclusions and knead again. Continue folding and rolling until the specks are evenly distributed throughout the entire block. I like to cut the clay in half occasionally to check if the inside is speckled too.
Step 2: Shaping the Block
-
Form the Base Shape:
Roll or pat the clay into a rough log shape. Since we are aiming for a solid block, you don’t want to roll it too thin. -
Refine the Rectangle:
Using your work surface and a flat tool (like a wide ruler or acrylic block), gently tap each side of the log to flatten it into a neat rectangular prism. Aim for dimensions around 4 inches long by 2 inches high and deep. -
Check Angles:
Ensure the bottom is perfectly flat so the holder sits stable. Use your blade to slice off a very thin layer from the bottom if needed to create a level foundation. -
Soften the Edges:
The example image features soft, not sharp, corners. Use your fingertips to gently rub and round over all the sharp edges and corners of your rectangular block for a cast-concrete aesthetic.
Stone Texture Tip
For a more realistic rock look, mix translucent clay with your white clay (50/50 ratio). This adds depth when baked.
Step 3: Creating the Slot
-
Mark the Center:
Use a ruler to lightly mark the center line along the top face of your block where the photo will sit. -
Insert the Spacer:
Take your piece of thick cardboard or an old plastic card. Press it firmly and evenly into the clay along your center line. Push it down about 0.5 to 0.75 inches deep. -
Wiggle for Width:
Gently wiggle the card forward and backward just a tiny fraction to ensure the slot is wide enough to hold a photo without bending it, but tight enough so it stands upright. -
Remove Spacer:
Carefully pull the card straight up and out. Inspect the slot opening; if the clay pulled up slightly at the edges, gently smooth it back down with your finger.
Slot Troubleshooting
If the slot closes up during baking/drying, re-insert your card or spacer immediately while the clay is still warm (polymer) or slightly damp (air-dry).
Step 4: Finishing
-
Final Surface Check:
Look over the block for any fingerprints. Buff them out lightly with a drop of water (if using air-dry clay) or baby oil (if using polymer clay). -
Cure or Dry:
Bake the polymer clay according to the package instructions (usually 275°F/130°C for 15-30 minutes per 1/4 inch thickness). If using air-dry clay, leave it in a cool, dry place for 24-48 hours. -
Sand for Stone Effect:
Once fully cured and cooled (or dry), use fine-grit sandpaper to lightly sand the entire surface. This removal of the top film exposes the pepper/sand inclusions more clearly, enhancing the faux-stone effect. -
Dust Off:
Wipe the piece down with a damp cloth to remove any sanding dust. Your minimal photo holder is now ready to use.
Place your favorite snapshot in the slot and enjoy your chic new desk accessory
Cute Alphabet Magnets for the Fridge
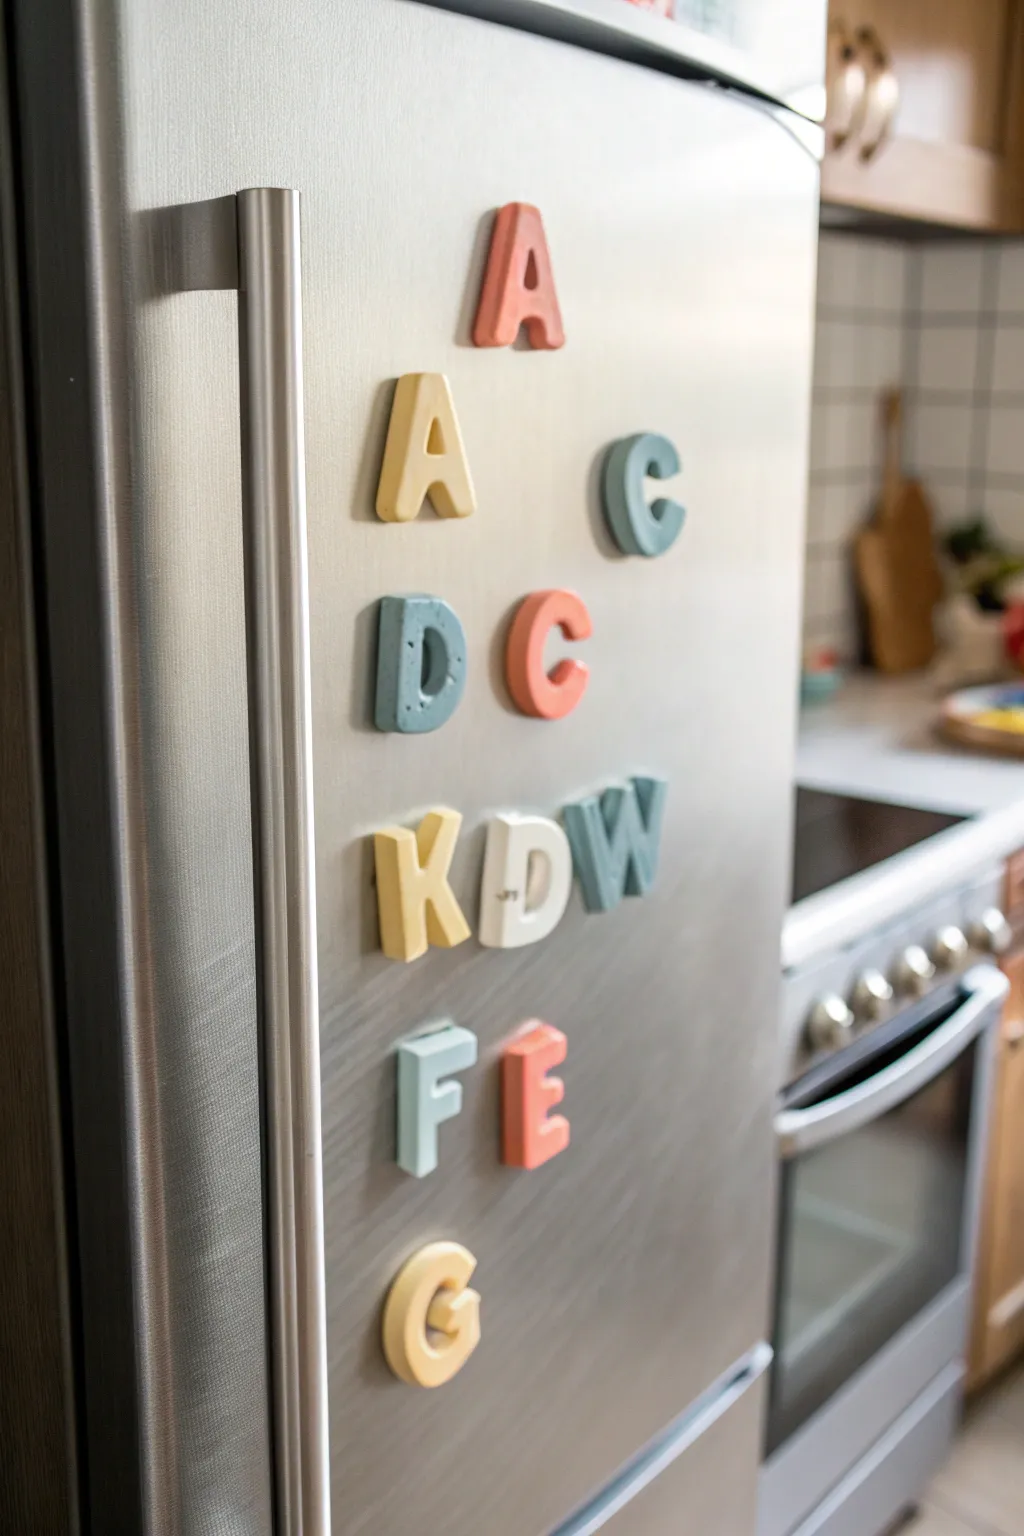
These charming, chunky alphabet magnets are the perfect beginner project to personalize your kitchen space with a modern, muted color palette. They have a lovely matte texture and raised edges that give them a professional, store-bought look straight from your own oven.
Step-by-Step Tutorial
Materials
- Polymer clay (in terracotta, mustard yellow, sage green, light blue, and white)
- Small alphabet cookie cutters (approx. 1.5 – 2 inches tall)
- Acrylic rolling pin or clay roller machine
- Parchment paper or a silicone baking mat
- Ceramic tile (optional, for baking)
- Small round neodymium magnets (approx. 6mm diameter)
- Strong craft glue (like E6000 or super glue gel)
- Fine-grit sandpaper (400 and 800 grit)
- Cornstarch (to prevent sticking)
- Soft brush
Step 1: Preparing the Clay
-
Clean your space:
Before unwrapping any clay, wipe down your work surface thoroughly to remove any dust or lint, which loves to stick to polymer clay. -
Condition the clay:
Start with your lightest color (white or cream). Knead the clay in your hands for several minutes until it becomes soft, pliable, and warm to the touch. -
Mix custom shades:
To achieve the muted, desaturated tones seen in the photo, mix a small amount of white or grey clay into your primary colors. For example, add a pea-sized amount of brown to yellow for that mustard look. -
Repeat for all colors:
Clean your hands between each color switch to avoid transferring pigment, working from lightest to darkest shades.
Stuck in the Cutter?
If clay won’t release from the cutter, gently blow through the top of the cutter or use a soft paintbrush handle to push it out from the back without denting the front.
Step 2: Cutting and Baking
-
Roll out the slab:
Using your acrylic roller, roll the clay out on parchment paper. You want a very thick slab for this project—aim for about 1/4 inch (6mm) thickness to make them chunky and durable. -
Dust the cutters:
Dip your alphabet cutter into a small bowl of cornstarch and tap off the excess. This prevents the clay from getting stuck inside the detailed corners of the letters. -
Cut the shapes:
Press the cutter firmly into the clay slab. Give it a tiny wiggle to ensure it has cut all the way through to the surface below. -
Remove the clay:
Peel away the excess scrap clay from around the letter first, leaving the letter on the work surface. -
Smooth the edges:
While the clay is raw, gently tap down any sharp ridges on the top edge with your finger to give it that soft, rounded look shown in the image. -
Embed the magnet (Method A):
If you want the magnets flush, press a magnet into the back of the raw letter gently to create an indentation, then carefully pop the magnet back out before baking. -
Transfer to baking surface:
Transfer the letters to a ceramic tile or baking sheet lined with parchment paper. I find baking directly on a tile keeps the backs perfectly flat. -
Bake carefully:
Bake according to your clay package instructions (usually 275°F/135°C). For this thickness, bake for at least 30 minutes to ensure strength. -
Cool down:
Let the letters cool completely in the oven with the door cracked open. This gradual cooling helps prevent cracks.
Smooth Surface Trick
Before cutting your shapes, place a sheet of plastic wrap over the clay slab. Press the cutter through the plastic. This creates incredibly smooth, rounded edges automatically.
Step 3: Finishing Touches
-
Sand imperfections:
Once fully cool, use the fine-grit sandpaper to buff away any fingerprints or rough edges on the sides of the letters. -
Wash the pieces:
Rinse the letters in cool water with a drop of dish soap to remove sanding dust and any cornstarch residue, then dry them thoroughly. -
Attach the magnets:
Apply a small dot of strong craft glue to the back of the letter (or into the indentation you made earlier). -
Press and hold:
Press the neodymium magnet into the glue. Hold it in place for 30 seconds to ensure a tight initial bond. -
Cure time:
Leave the magnets face down for 24 hours to let the glue fully cure before sticking them to your fridge.
Enjoy arranging your new custom alphabet set to leave fun notes for your family


What Really Happens Inside the Kiln
Learn how time and temperature work together inside the kiln to transform clay into durable ceramic.
Flat Heart Keychain Charms
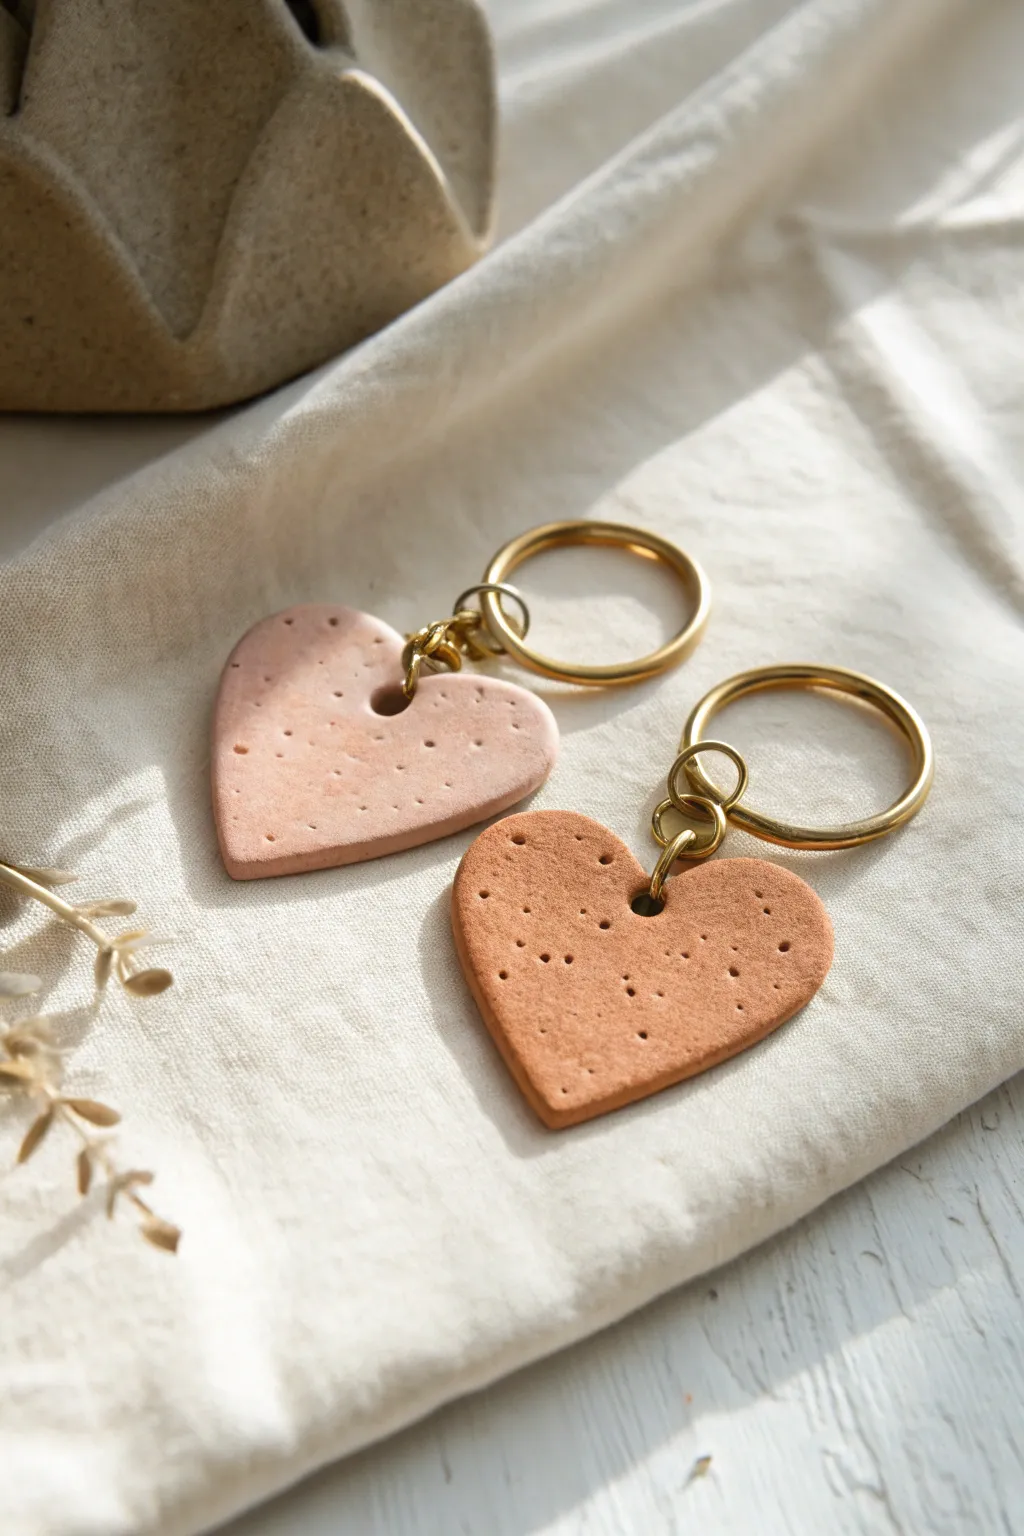
These charming, minimalist keychains feature a beautiful matte texture and subtle speckling that mimics natural stone or cookie dough. They are perfect beginner projects that result in durable, gift-worthy accessories with a lovely earthy aesthetic.
Step-by-Step Guide
Materials
- Polymer clay (terracotta or granite color and pale beige/blush)
- Black pepper or dried coffee grounds (for speckling)
- Acrylic roller or rolling pin
- Heart-shaped cookie cutter (approx. 1.5 – 2 inches)
- Parchment paper or ceramic tile
- Straw or small circular tool (for the hole)
- Needle tool or toothpick
- Gold split key rings (approx. 25mm)
- Gold jump rings (approx. 8mm and 10mm)
- Jewelry pliers (flat nose and round nose)
- Baking sheet
- Fine-grit sandpaper (optional)
Step 1: Preparing the Clay
-
Condition the clay:
Start by warming the polymer clay in your hands. Knead it thoroughly until it is soft, pliable, and free of cracks. If you are using two colors like the image, prepare each ball of clay separately. -
Create the speckled effect:
To achieve that organic, speckled look shown in the photo, flatten your clay slightly and sprinkle a pinch of ground black pepper or used (dried) coffee grounds onto it. I find that pepper gives cooler, smaller specks while coffee provides warmth. -
Integrate the texture:
Fold the clay over the speckles and knead it again until the particles are evenly distributed throughout the mass. Add more if you want a denser texture. -
Roll it out:
Place your clay on a sheet of parchment paper or a smooth ceramic tile. Using your acrylic roller, roll the clay out to an even thickness of about 1/4 inch (6mm). You want it thick enough to be sturdy but not circular.
Step 2: Shaping and Baking
-
Cut the shapes:
Take your heart-shaped cutter and press firmly into the rolled slab. Give it a tiny wiggle to ensure it cuts through completely, then lift the cutter. Peel away the excess clay surrounding the heart. -
Smooth the edges:
Dip your finger in a tiny bit of water (or baby oil for polymer clay) and gently run it along the cut edges of the heart to soften any sharp ridges left by the cutter. -
Create the surface texture:
The hearts in the image have a subtle, pitted texture. Gently tap the surface of the clay with a toothbrush or a crumpled ball of aluminum foil to add this organic finish without distorting the shape. -
Punch the hole:
Using a drinking straw or a small circular cutter, punch a hole near the top center of the heart lobe or the top dip. Make sure the hole isn’t too close to the edge to prevent breakage later. -
Final inspection:
Check for any fingerprints. If you see any, lightly buff them out with a gentle rubbing motion or re-texturize that spot slightly. -
Bake:
Transfer the parchment paper with the hearts to a baking sheet. Bake according to your clay manufacturer’s instructions. Usually, this is around 275°F (135°C) for 15-30 minutes per 1/4 inch of thickness. -
Cool down:
Once bakes, turn off the oven and let the clay cool down completely inside the oven or on a wire rack before handling. This ensures maximum strength.
Clean Cuts Pro-Tip
Before cutting your shape, place a layer of plastic wrap over the clay. Press the cutter down *over* the plastic. This creates soft, pillow-like beveled edges requiring zero sanding.
Step 3: Assembly
-
Sand edges (optional):
If the edges feel rough after baking, lightly sand them with fine-grit sandpaper under running water for a polished look. -
Prepare the jump rings:
Use two pairs of pliers to twist open a large jump ring. Remember to twist the ends away from each other (front to back) rather than pulling them apart horizontally. -
Attach the first ring:
Slide the open jump ring through the hole you created in the clay heart. Close the ring securely by twisting the ends back together with your pliers. -
Add the connector ring:
Open a second, slightly smaller jump ring. Loop this through the first jump ring you just attached to the heart. -
Secure the key ring:
Before closing that second jump ring, slide on the large gold split key ring. Now, close the jump ring securely using your pliers. -
Double check:
Give the keychain a gentle tug to ensure all jump rings are fully closed and there are no gaps where the charm could slip off.
Level Up: Essential Oils
Add a drop of essential oil to the terracotta clay before baking or onto the unfinished back after baking. Being porous, the clay acts as a passive diffuser for your keys.
Your speckled hearts are now ready to add a touch of handmade warmth to your keyring or bag
Beaded-Edge Mini Trinket Bowls
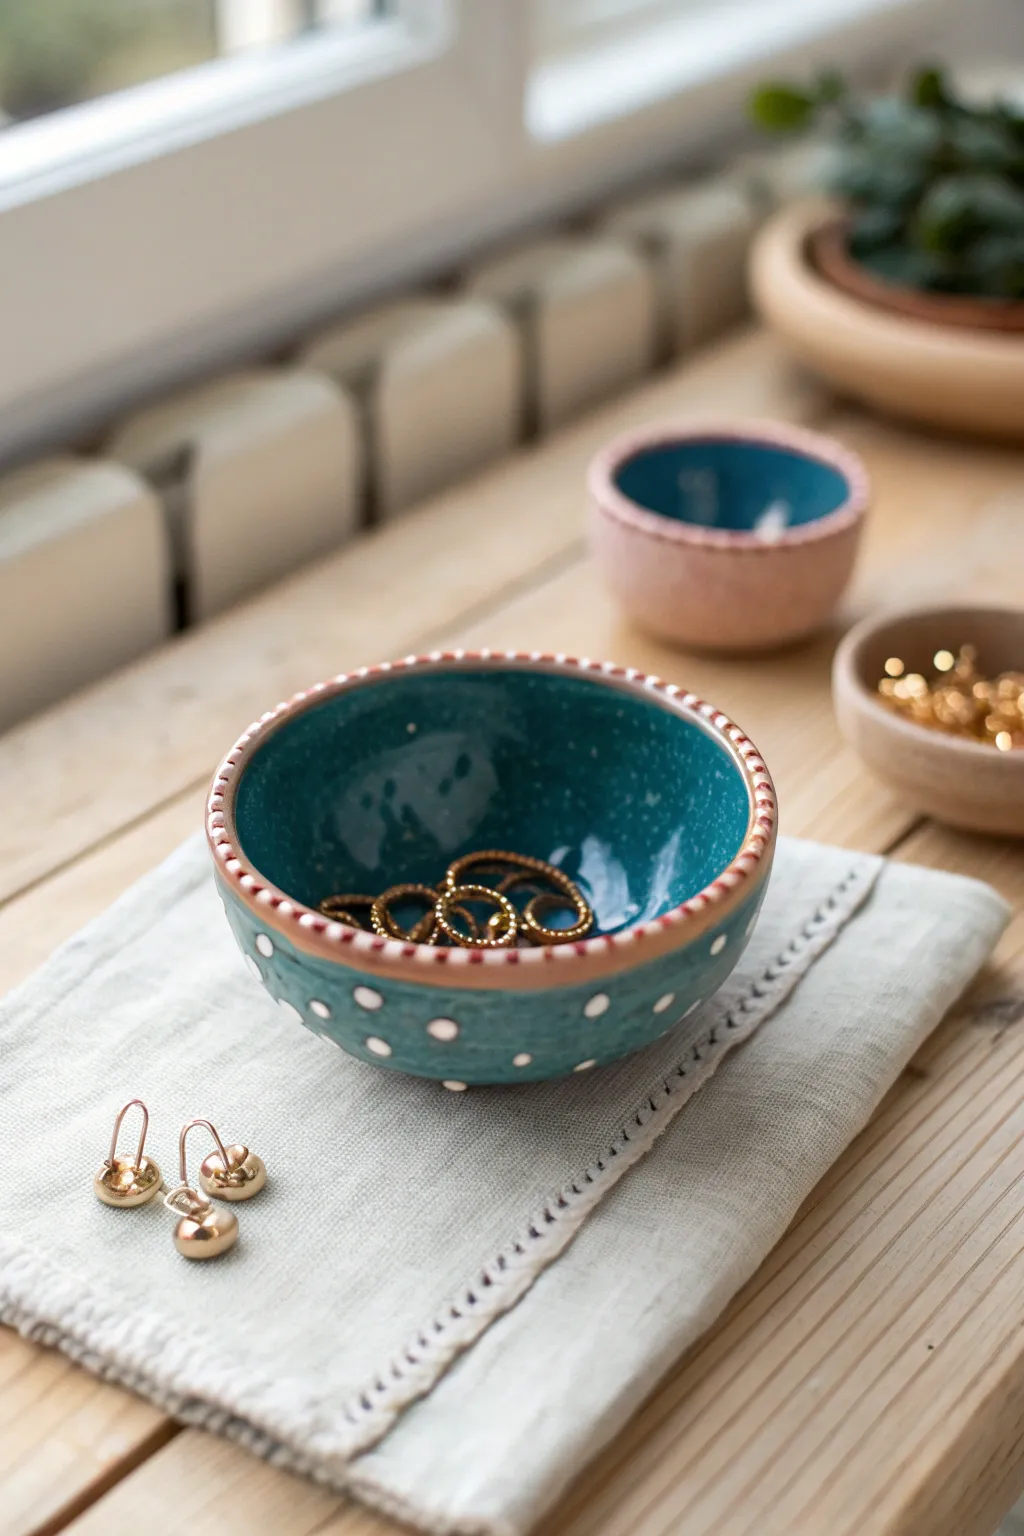
These delightful mini trinket bowls add a whimsical touch to any dresser or vanity with their charming beaded rims and playful polka dots. The combination of the deep teal glaze, crisp white details, and the tactile beaded edge creates a piece that feels both artisanal and totally approachable for beginners.
Step-by-Step Tutorial
Materials
- White tonal air-dry clay or polymer clay (oven-bake)
- Acrylic rolling pin
- Small bowl or foam half-sphere (to use as a mold)
- Plastic wrap (if using a rigid bowl mold)
- Clay knife or craft blade
- Pointed sculpting tool or toothpick
- Teal acrylic paint (glossy finish recommended)
- White acrylic paint
- Terracotta or warm beige acrylic paint (for the rim)
- High-gloss varnish or sealant
- Paintbrushes (flat shader and fine detail)
- Dotting tool or back of a paintbrush
- Water cup and paper towels
- Fine-grit sandpaper (optional)
Step 1: Forming the Bowl
-
Prepare the Clay:
Start by taking a ball of clay roughly the size of a tangerine. Knead it in your hands until it’s pliable and warm, which prevents cracking later on. -
Roll the Slab:
Using your acrylic rolling pin, roll the clay out into an even slab about 1/4 inch thick. Try to keep the thickness consistent so the bowl dries evenly. -
Cut the Circle:
Find a circular cutter or trace around a bowl that is slightly larger than your intended finished size. Use your clay knife to cut a clean circle from the slab. -
Shape the Form:
Drape your clay circle over your mold form. If you are using a rigid bowl as a mold, I prefer to line it with plastic wrap first so the clay pops out easily. Gently press the clay down to take the shape of the dome. -
Smooth the Surface:
Dip your finger in a little water and smooth out any fingerprints or rough textures on the clay surface while it’s still on the mold. -
Create the Beaded Rim:
Roll a very thin snake of clay, about the thickness of a piece of yarn. Carefully place this snake along the top rim of your bowl, blending the underside slightly to attach it securely. -
Texture the Rim:
Take your pointed sculpting tool or toothpick and gently press indentations into the added clay snake at regular intervals. This creates the ‘beaded’ looking edge featured in the design. -
Dry the Clay:
Allow the clay to dry completely according to the package instructions. For air-dry clay, this usually takes 24-48 hours; for polymer clay, bake as directed.
Step 2: Painting and Finishing
-
Sand Imperfections:
Once fully cured or dry, gently sand any rough spots or sharp edges with fine-grit sandpaper. Wipe away all dust with a barely damp cloth. -
Base Coat the Rim:
Paint the beaded rim area specifically with the terracotta or warm beige paint. This mimics the look of exposed raw ceramic. Let this dry. -
Apply the Teal Glaze:
Paint the entire interior and the exterior (below the rim) with your teal acrylic paint. You may need two coats for opaque coverage. -
Clean Up Edges:
If any teal paint got onto your terracotta rim, carefully touch it up now so there is a crisp separation between the rim color and the body color. -
Add Exterior Dots:
Using a dotting tool or the back end of a small paintbrush dipped in white paint, apply polka dots to the exterior of the bowl. Ideally, stagger them in diagonal rows for a balanced pattern. -
Create Rim Details:
Using a very fine detail brush and white paint, add short, vertical dashes between the ‘beads’ of the terracotta rim. This highlights the texture you created earlier. -
Seal the piece:
Once all paint is completely dry, apply a coat of high-gloss varnish. This protects the paint and gives the bowl that shiny, ceramic-glaze appearance seen in the photo.
Sticky Situation
If using air-dry clay, don’t let it dry on a rigid form for too long, or it might crack as it shrinks. Remove it from the mold when it’s leather-hard.
Pro Tip: Perfect Dots
For perfectly uniform polka dots, use a different size drill bit (flat end) or a nail art dotting tool. Test your dot size on paper first.
Place your favorite rings or earrings inside your new custom creation and enjoy the pop of color

TRACK YOUR CERAMIC JOURNEY
Capture glaze tests, firing details, and creative progress—all in one simple printable. Make your projects easier to repeat and improve.
Marbled Polymer Clay Stud Earrings
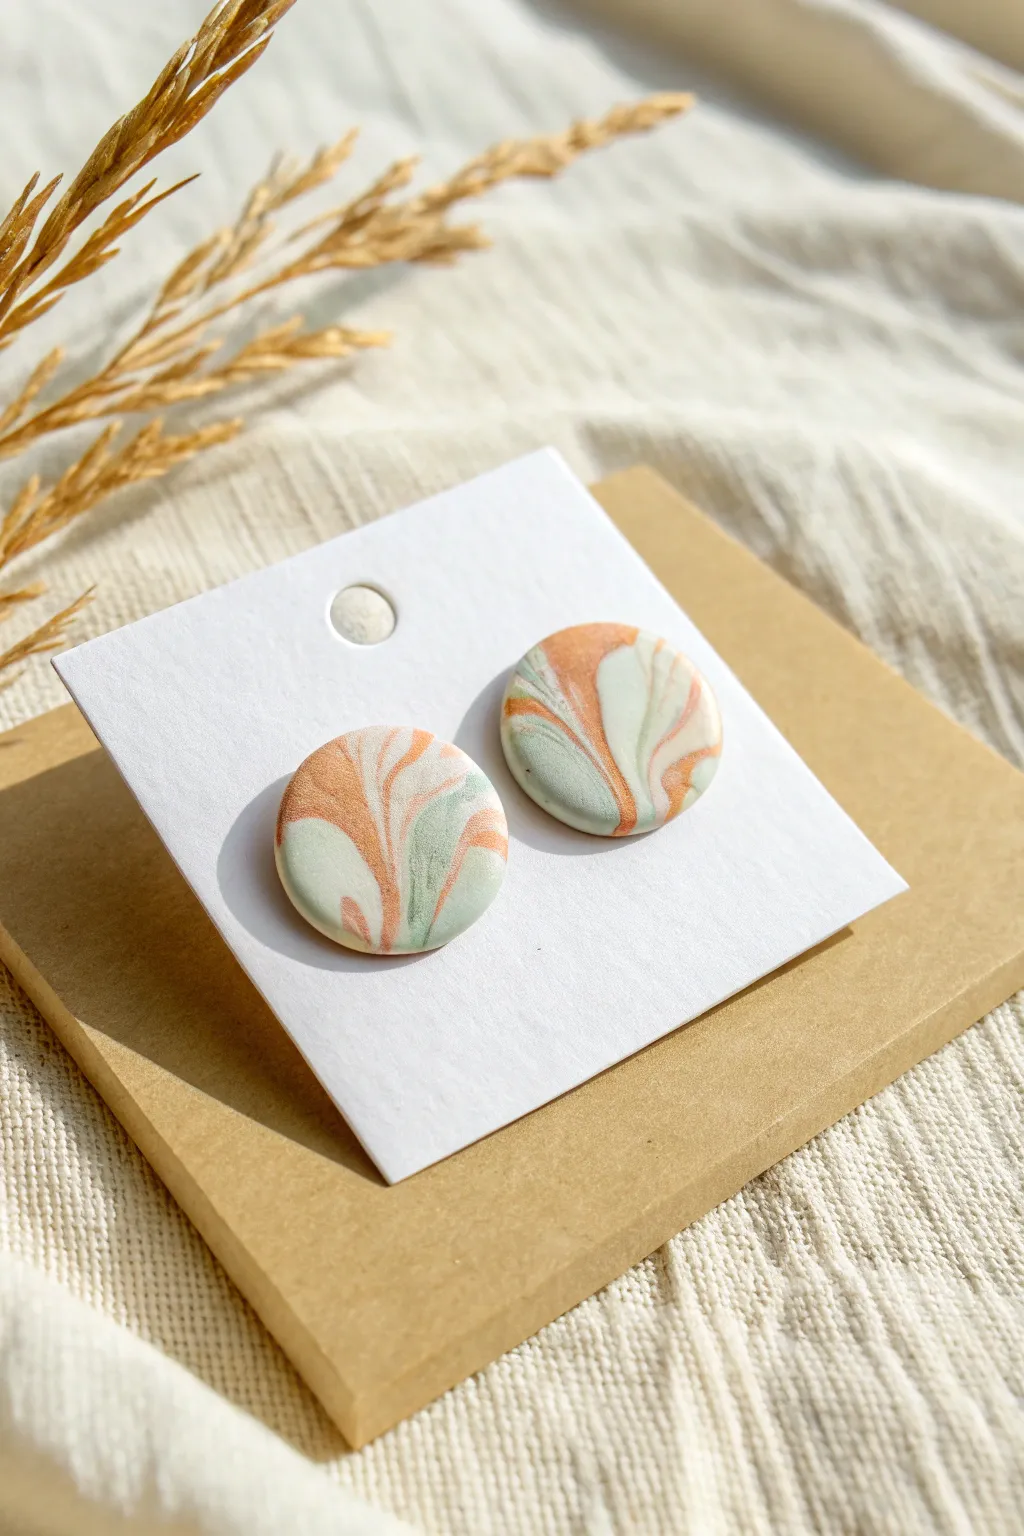
These elegant polymer clay earrings feature a dreamy swirl of sage green, terracotta, and soft white, mimicking the look of polished natural stone. The organic marbling technique ensures that every single pair is completely unique, making them perfect for personalized gifts or a special treat for yourself.
How-To Guide
Materials
- Polymer clay (Sage Green, Terracotta/Copper, White)
- Acrylic rolling pin or clay machine
- Small circle clay cutter (approx. 10-12mm)
- Tissue blade or X-Acto knife
- Ceramic tile or baking sheet
- Parchment paper
- Earring posts and backs (surgical steel or gold-plated)
- Super glue or strong jewelry adhesive
- Oven (for baking)
- Fine grit sandpaper (optional)
Step 1: Preparing the Clay
-
Condition the clay:
Start by warming up your three blocks of clay—white, sage green, and terracotta—by kneading them in your hands until they are soft and pliable. -
Create individual ropes:
Roll each color into a long, thin rope or snake. Aim for the ropes to be roughly the same length and thickness to keep the color proportions balanced. -
Form the main bundle:
Twist the three colored ropes together into one large, spiraled log. This is the foundation of your marble pattern. -
Roll and fold:
Gently roll the twisted log on your work surface to smooth it out into a single snake again. Then, fold this snake in half and twist it again. -
Repeat for marbling:
Repeat the rolling, folding, and twisting process 2 or 3 times. Be careful not to over-mix, or the colors will muddy together and become brown instead of defined swirls.
Clean Cuts Every Time
Before cutting your circles, place a piece of plastic wrap over the clay slab. Press the cutter down through the plastic for soft, rounded dome edges.
Step 2: Creating the Slab
-
Ball up the clay:
Once you are happy with the color distribution in your twisted log, squish it all together into a smooth ball. -
Flatten the slab:
Place the ball on your work surface or parchment paper. Using your acrylic roller, flatten the ball into a slab approximately 3mm thick. I like to rotate the clay slightly as I roll to keep the thickness even. -
Check the pattern:
Inspect your slab. If you don’t love the pattern on top, you can carefully slice off a thin layer with your tissue blade to reveal the pattern underneath.
Fingerprints Be Gone
If you see fingerprints on your raw clay before baking, lightly brush the surface with a tiny amount of baby oil or cornstarch to smooth them away.
Step 3: Cutting and Baking
-
Cut the shapes:
Position your small circle cutter over the most attractive parts of the marbled slab. Press down firmly to cut out your earring shapes. -
Clean the edges:
Gently lift the circles from the work surface. If there are any rough bits of clay on the edges, smooth them down lightly with your fingertip. -
Prepare for baking:
Place your cut circles onto a ceramic tile or a baking sheet lined with parchment paper. -
Bake the clay:
Bake the pieces according to the specific temperature and time directions on your package of polymer clay. Different brands vary, so read the label carefully. -
Cool down:
Allow the clay pieces to cool completely before moving them. They are fragile when hot but harden as they cool.
Step 4: Assembly
-
Sand the edges (Optional):
For a truly professional finish, use fine-grit sandpaper to buff the edges of your cooled clay circles until they are perfectly smooth. -
Glue the posts:
Turn the clay circles over so the back is facing up. Apply a small drop of jewelry glue to the flat pad of an earring post. -
Attach and set:
Press the glued post firmly onto the center of the clay back. Hold it for a few seconds to ensure initial adhesion. -
Final cure:
Let the glue cure fully according to the manufacturer’s instructions—usually 24 hours—before wearing them to ensure the bond is secure.
Pop these beauties on a card for a delightful handmade gift, or wear them to add an earthy touch to your outfit
Stacked Disc Pendant Charms
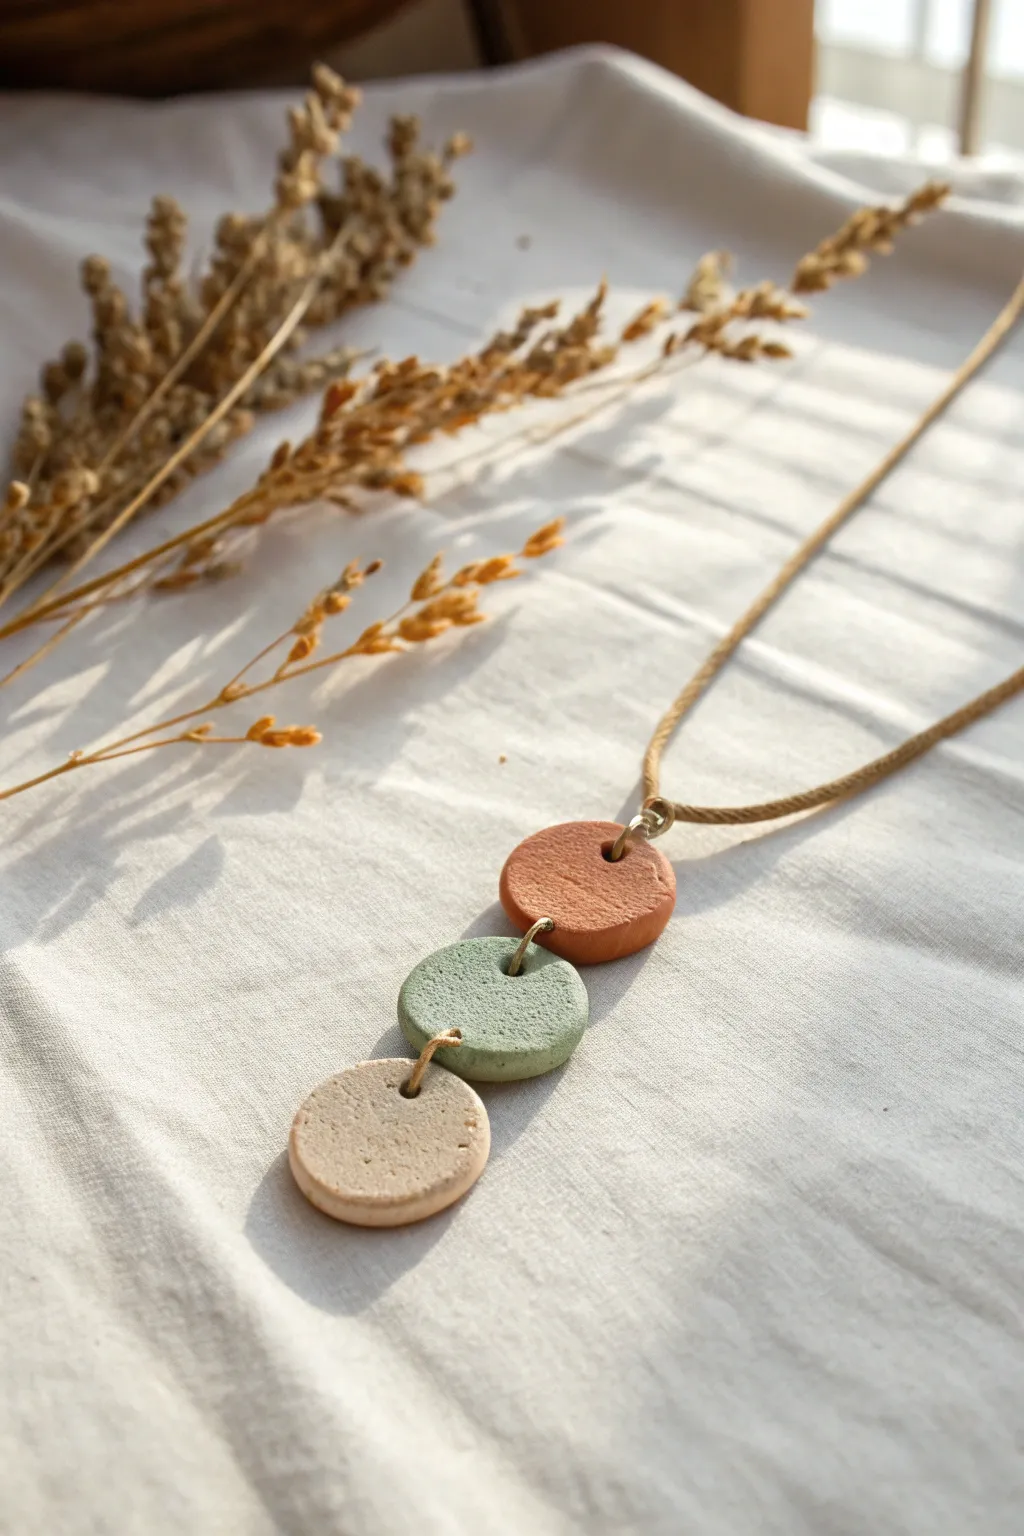
Create a stunning statement necklace that combines rustic charm with modern minimalism using simple clay techniques. This project features three textured discs in a warm, earthy gradient, linked together for elegant movement.
Step-by-Step Tutorial
Materials
- Polymer or air-dry clay (Terracotta/Rust, Sage Green, Beige/Sand)
- Small rolling pin or clay roller
- Circle cutters (approx. 1 inch or 2.5cm)
- Sandpaper or a rough stone (for texture)
- Toothpick or needle tool
- 3 large gold jump rings (6-8mm)
- Jewelry pliers (flat nose and round nose)
- Brown waxed cotton cord or suede lace
- Baking sheet and parchment paper (if using polymer clay)
- Matte varnish (optional)
Step 1: Shaping and Texturing
-
Condition the clay:
Begin by warming up your clay in your hands. Knead the terracotta, sage green, and beige clays separately until they are soft and pliable. -
Roll out the slab:
Take the terracotta clay first and roll it out onto a smooth surface until it’s about 1/4 inch (6mm) thick. You want these discs to have a bit of chunky substance to them. -
Add organic texture:
Before cutting, press a piece of coarse sandpaper or a clean, rough stone gently onto the surface of the clay slab. This gives the finished piece that beautiful, stone-like pitted look seen in the photo. -
Cut the circles:
Press your circle cutter firmly into the textured slab to create your first disc. Repeat this process for the sage green and beige clays so you have three identical circles. -
Create connection holes:
Use a toothpick or needle tool to poke a hole near the top edge of the terracotta disc. Wiggle the tool slightly to ensure the hole is large enough for your jump ring. -
Double-punch the middle piece:
For the green (middle) disc, you’ll need two holes: one at the very top and one directly opposite at the bottom. -
Prepare the bottom piece:
Pierce a single hole near the top edge of the beige disc. Smooth out any clay ridges created by the piercing tool with your fingertip. -
Refine the edges:
Gently tap the sides of the discs to soften the sharp cut edges, making them look more organic and tumbled.
Step 2: Curing and Assembly
-
Bake or dry:
Place your discs on a parchment-lined baking sheet. If using polymer clay, bake according to the package instructions (usually 275°F/135°C for 15-30 minutes). If using air-dry clay, let them sit for 24-48 hours. -
Cool down:
Allow the pieces to cool completely. I like to let them sit for an extra hour to ensure they are fully hardened before handling. -
Open the jump rings:
Using two pairs of pliers, twist your jump rings open laterally (front to back), rather than pulling them apart, to maintain their circle shape. -
Connect the bottom tier:
Slide one open jump ring through the hole in the beige disc and the bottom hole of the green disc. Close the ring securely with your pliers. -
Connect the top tier:
Use a second jump ring to connect the top hole of the green disc to the single hole of the terracotta disc. Close the ring. -
Attach the bail:
Insert the third jump ring through the top hole of the terracotta disc. This will serve as the bail for your cord. -
String the cord:
Thread your brown cord through the top jump ring. Determine your desired length and simply knot the ends, or attach a clasp if you prefer a more polished finish.
Natural Texture Hack
Don’t have sandpaper? Press a ball of aluminum foil or the bristles of an old toothbrush onto the damp clay to create realistic stone pitting.
Level Up: Speckled Effect
Mix a tiny pinch of black pepper or used dried coffee grounds into the beige clay before rolling it out to mimic real granite or ceramic speckling.
Wear your new earthy pendant with pride or gift it to a friend who loves nature-inspired jewelry
Round Animal Buddies From Basic Shapes
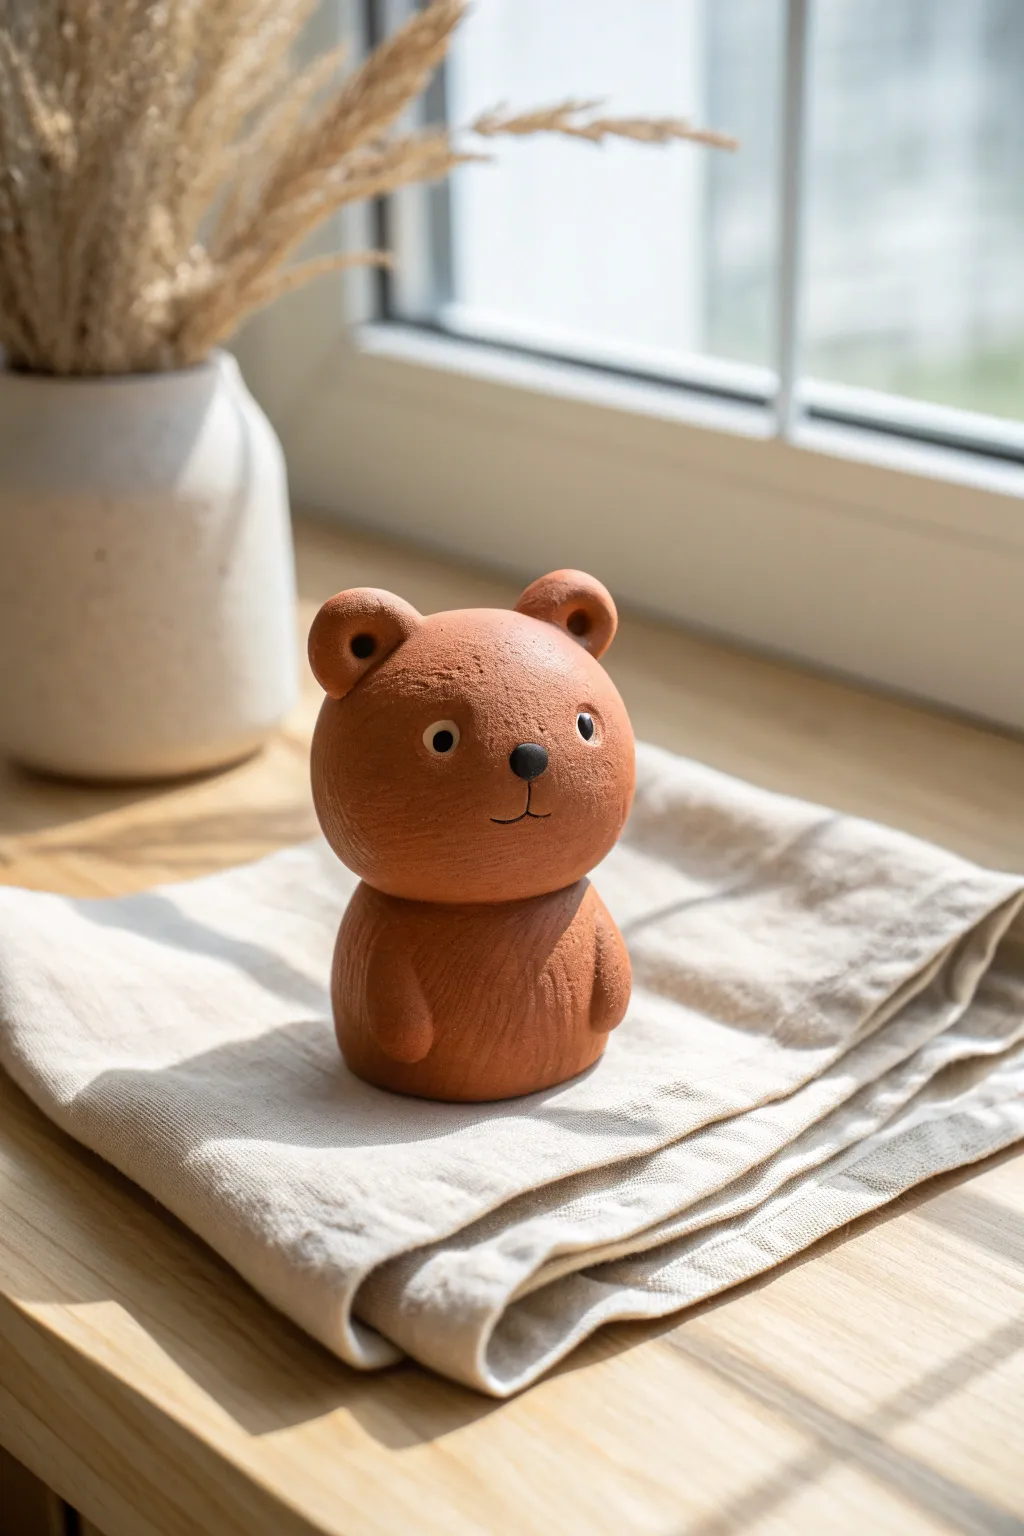
This adorable clay bear uses straightforward spherical construction to create a charming, minimalist figurine. With its warm terracotta tone and simple expression, it makes a perfect first project for mastering basic joining techniques.
How-To Guide
Materials
- Terracotta-colored air dry clay or polymer clay
- Rolling pin (acrylic or wooden)
- Needle tool or toothpick
- Small ball stylus tool
- Black acrylic paint
- White acrylic paint
- Fine detail paintbrush (size 000)
- Bowl of water (if using air dry clay)
- Slip (clay mixed with water) or liquid clay adhesive
- Soft sponge or brush for smoothing
Step 1: Forming the Body
-
Prepare the Clay:
Begin by conditioning your clay thoroughly until it is soft, pliable, and free of cracks. Warm clay is much easier to shape without fissures appearing. -
Roll the Head:
Pinch off a significant portion of clay and roll it between your palms to create a smooth, perfect sphere about the size of a tangerine. -
Shape the Torso:
Take a slightly smaller amount of clay to form the body. Roll it into a sphere first, then gently tap the bottom against your work surface to create a flat base so the bear sits securely. -
Flatten the Top:
Gently press down on the top of the body sphere to create a small flat area where the head will rest. This increases the contact surface for a stronger bond. -
Join the Parts:
Score (scratch) both the bottom of the head and the top of the body with your needle tool. Apply a dab of water/slip or liquid clay adhesive, then press the head firmly onto the body. I like to give it a little wiggle to ensure the air bubbles escape. -
Smooth the Seam:
Using your finger or a modeling tool, gently blend the clay from the head down to the body just at the back of the neck to secure the two pieces together permanently.
Step 2: Adding Features
-
Create the Ears:
Roll two small, pea-sized balls of clay. Check that they are equal in size before proceeding. -
Attach the Ears:
Slightly flattening one side of each ear ball, score the contact points on the head. Attach them near the top of the head, spaced widely apart. -
Detail the Ears:
Use the large end of your ball stylus or the back of a paintbrush to press a gentle indentation into the front center of each ear. -
Form the Arms:
Roll two small logs of clay about an inch long. Round off one end of each log to represent the paws. -
Attach the Arms:
Press the arms onto the sides of the body, blending the clay at the shoulder area into the torso so they don’t fall off. The rounded paw ends should rest slightly forward on the belly. -
Texture the Coat:
This is a key detail: Use a stiff bristled brush or a texture tool to lightly scratch vertical lines into the body and ears. This mimics the look of fur, but keep the face mostly smooth for contrast.
Smooth Operator
Before drying, dip your finger in water (or baby oil for polymer clay) and gently rub the face area. Removing fingerprints creates a professional finish.
Step 3: Finishing Touches
-
Sculpt the Nose:
Roll a tiny, lentil-sized ball of clay for the nose. Press it onto the center of the face, slightly lower than the midline. -
Mark the Mouth:
Use your needle tool to carefully incise a small vertical line coming down from the nose, splitting into a subtle inverted ‘V’ for the mouth. -
Indert Eye Sockets:
Use a small ball tool to press two shallow divots where the eyes will go. This adds depth to the expression. -
Dry or Bake:
Allow your piece to dry completely (24-48 hours for air dry) or bake according to your polymer clay package instructions. -
Paint the Nose:
Once hard, use your fine brush to paint the nose completely black. -
Paint the Eyes:
Paint two small black circles inside the eye divots you created earlier. Let the black paint dry fully before the next step. -
Add Highlights:
Dip the tip of a toothpick into white paint and place a tiny dot near the top of each black eye circle. This ‘catchlight’ brings the bear to life.
Forest Texture
Instead of a brush, press a piece of rough fabric or canvas against the wet clay body to create a woven, cozy texture instantly.
Set your new friend on a sunny windowsill to brighten up the room
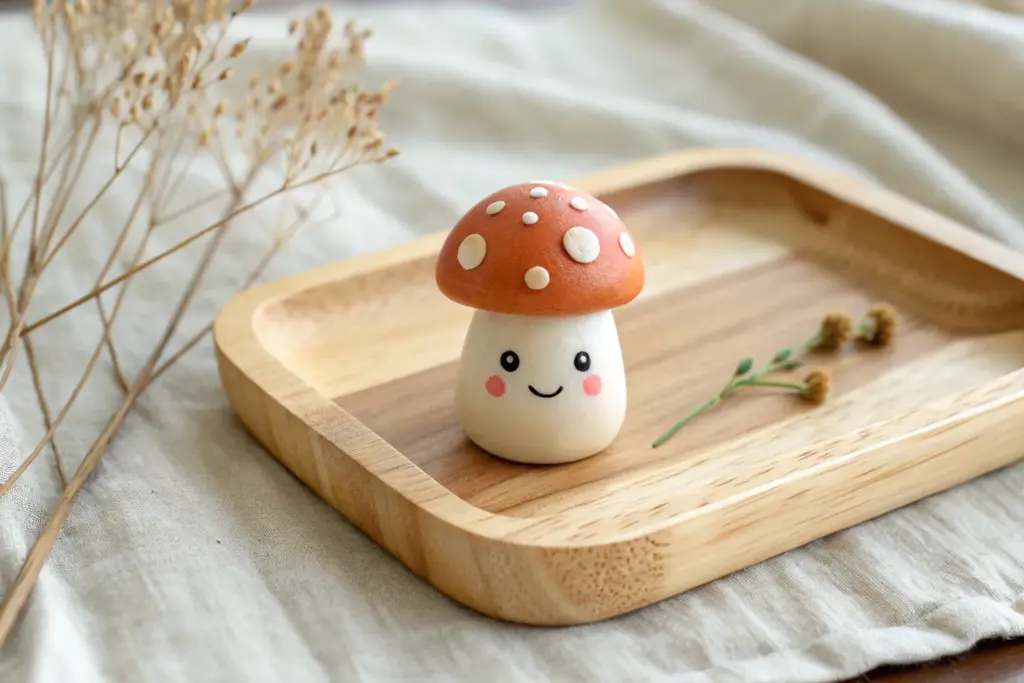
Textured Clay Mushrooms for Decor
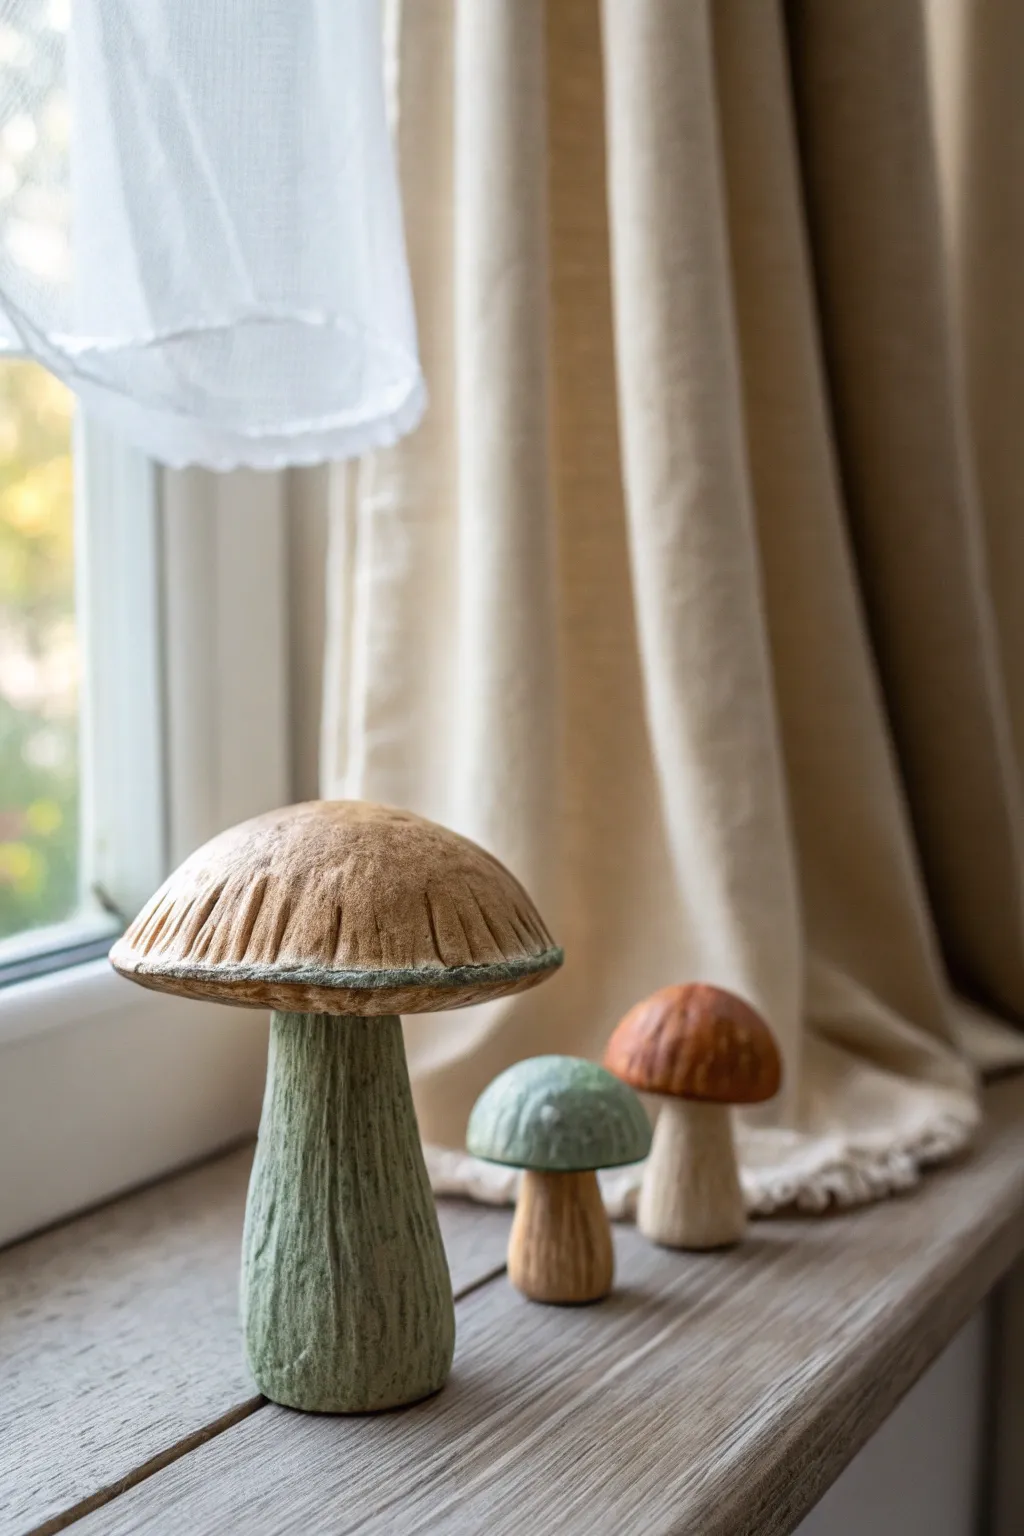
Bring a touch of woodland whimsy indoors with these charming clay mushrooms, perfect for lining a sunny windowsill or nestling among houseplants. Their distinct textures—from the ribbed caps to the wood-grain stems—make them look wonderfully organic and handcrafted.
Step-by-Step
Materials
- Air-dry clay (stone or white)
- Aluminum foil (for armature)
- Basic sculpting tools (needle tool, loop tool)
- Stiff bristle brush or old toothbrush
- Rolling pin
- Water in a small cup
- Acrylic paints (Tan, Sage Green, Dark Brown, Cream, Teal)
- Matte varnish or sealant
Step 1: Forming the Base Structure
-
Create the foil armature:
Start by crunching aluminum foil into the basic shapes of your mushrooms. Make a thick, sturdy cylinder for the stem and a separate dome shape for the cap. This saves clay and keeps the figurine lightweight. -
Roll out the clay:
Roll a sheet of air-dry clay to about 1/4 inch thickness. You don’t want it paper-thin, or it won’t hold the deep textures we’ll add later. -
Cover the stem:
Wrap the clay sheet around your foil stem cylinder. Smooth the vertical seam with a little water on your finger so it disappears completely. -
Cover the cap:
Drape a circle of clay over the foil dome. Smooth the clay down the sides and tuck the edges underneath, refining the mushroom cap shape. -
Attach the pieces:
Score the top of the stem and the underside of the cap with a needle tool (scratching hash marks). Add a dab of water or slip (clay mixed with water) and press the parts firmly together.
Cracking Issues?
If small cracks appear while drying, don’t panic. Mix a small amount of fresh clay with water to make a paste and fill the cracks, then smooth over.
Step 2: Texturing and Detailing
-
Create vertical stem texture:
Drag a sculpting tool or a stiff brush vertically up and down the stem. I like to make these lines fairly deep and uneven to mimic the look of bark or fibrous stalk material. -
Detail the large cap:
For the largest mushroom, use a tool to press radiating lines around the outer rim of the cap, giving it that classic ribbed mushroom gills appearance visible from the top. -
Add surface noise:
Gently tap the rest of the cap surface with a toothbrush or a crumpled ball of foil to remove smooth fingerprints and create an earthy, porous texture. -
Shape the smaller mushrooms:
Repeat the process for the smaller companions. Vary the shapes slightly; make the smallest one squat with a rounder cap for visual interest. -
Refine the edges:
Check the underside rim of the caps. You can make them uneven or slightly wavy to look more natural. -
Dry thoroughly:
Let the mushrooms dry completely. Depending on humidity and thickness, this usually takes 24-48 hours. Turn them occasionally to ensure even drying.
Step 3: Painting and Finishing
-
Base coat the stems:
For the large mushroom stem, mix a sage green with a little grey. Paint the entire stem, ensuring the paint gets into the deep texture grooves. -
Dry brush highlights:
Once the base is dry, dip a dry brush into a lighter creamy color. Wipe most of it off, then lightly brush over the raised areas of the stem to accentuate the texture. -
Paint the large cap:
Use a warm tan or light brown for the large cap. Apply a solid coat, then wash a darker brown into the ribbed recesses near the rim for depth. -
Color the smaller mushrooms:
For the medium mushroom, paint a reddish-brown cap and a cream stem. For the smallest one, use a muted teal or seafoam green for the cap and a natural brown for the stem. -
Add subtle distressing:
If the colors look too flat, water down a dark brown paint to create a wash. Brush it over the textured areas and wipe it back immediately with a paper towel, leaving shadow in the cracks. -
Seal the project:
Finish with a coat of matte varnish. Avoid glossy finishes, as the charm of this project relies on its natural, earthy matte look.
Go For Gold
For a magical twist, lightly dry-brush metallic gold paint onto just the very edges of the mushroom caps after the matte sealant has fully dried.
Arrange your trio on a ledge and enjoy the cozy forest vibe they create
Terrazzo-Speckle Trinket Tray
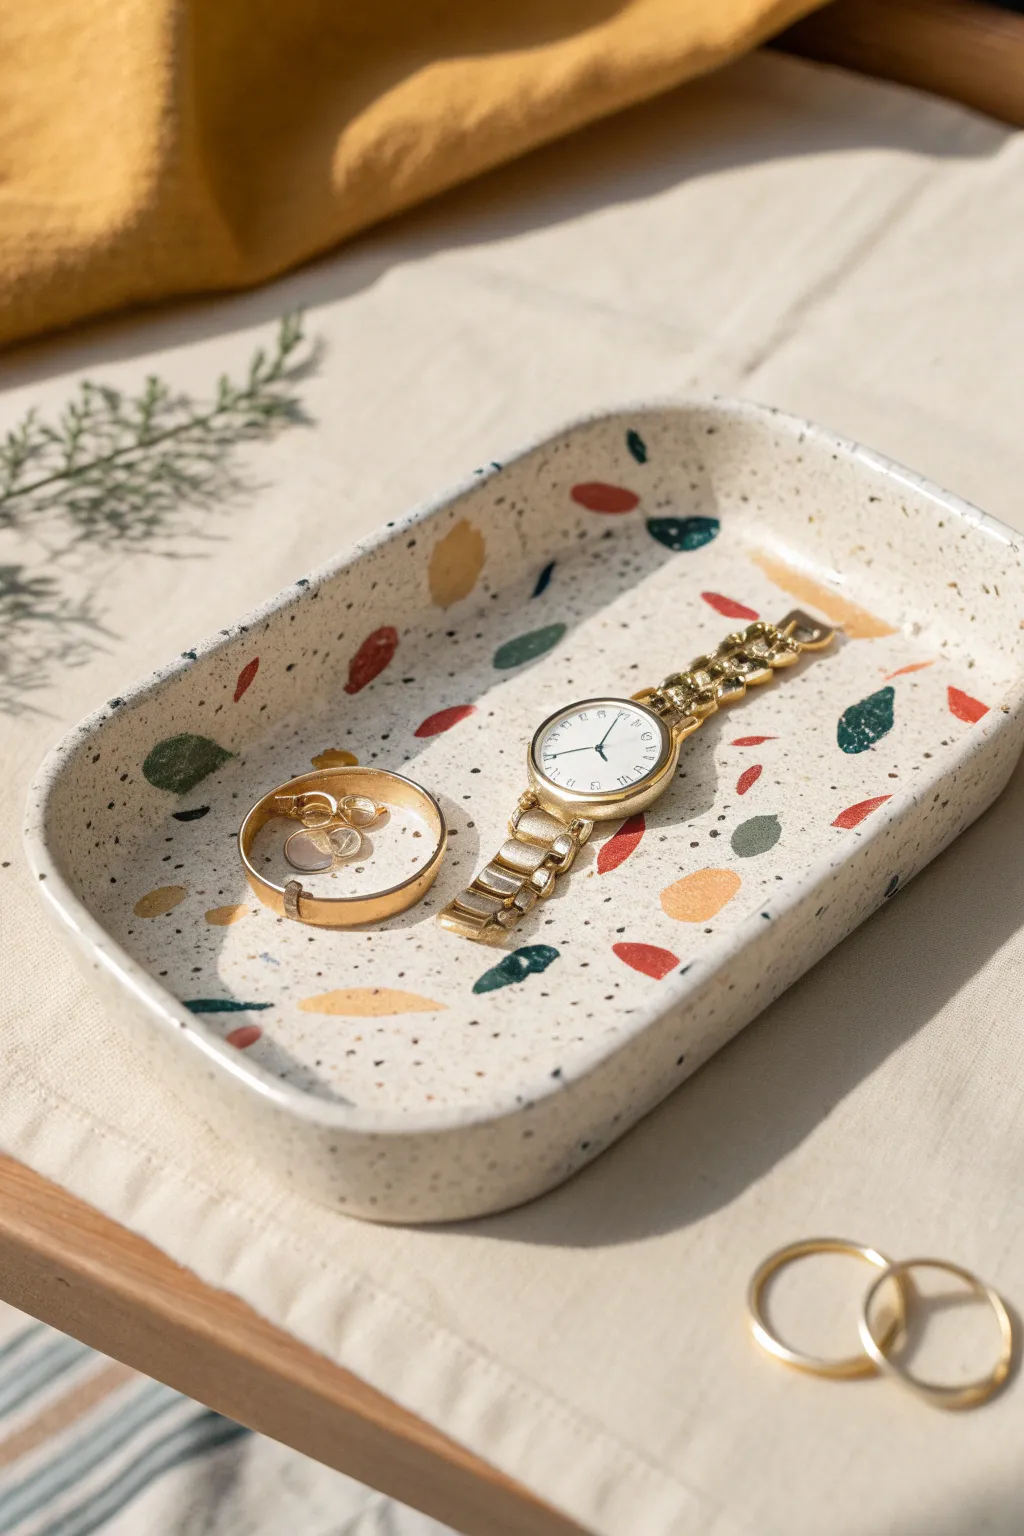
Achieve the high-end look of terrazzo stone right at home with this chic polymer clay project. This rectangular tray features a creamy, granite-like base studded with abstract chips of rust, teal, and mustard yellow for a sophisticated pop of color.
Step-by-Step Guide
Materials
- White polymer clay (2 packs)
- Granite or speckled effect polymer clay (or black glitter/sand)
- Colored polymer clay (Rust red, deep teal, mustard yellow)
- Acrylic rolling pin
- sharp craft knife or tissue blade
- Rectangular baking dish or metal form (for shaping)
- Cornstarch or baby powder (release agent)
- Fine grit sandpaper (400, 600, 1000)
- UV resin or gloss glaze (optional)
- Oven
Step 1: Prepping the Chips
-
Roll thin sheets:
Start by taking small amounts of your rust red, deep teal, and mustard yellow clay. Roll each color out into a very thin sheet, roughly 1-2mm thick. -
Bake or freeze:
To make cutting easier, you can either flash-bake these thin sheets for 5-10 minutes so they are hard, or pop them in the freezer for ten minutes to stiffen them up. -
Create the terrazzo:
Using your craft knife, chop these thin sheets into random, jagged shards. Aim for variety in size—some tiny specks and some larger, distinctive chunks. -
Set aside:
Separate your chips into piles. You don’t need to mix them yet; keeping them separate allows for more controlled placement later.
Step 2: Creating the Base
-
Condition the white clay:
Take your white polymer clay blocks and kneed them thoroughly until soft and pliable. This prevents cracking later. -
Add the speckle:
Mix in a small amount of granite-effect clay or a pinch of black glitter/sand into the white clay. Knead until you have a uniform ‘cookies and cream’ speckled texture throughout the dough. -
Roll the slab:
Roll your speckled white clay out into a thick, even slab, approximately 1/4 inch thick. This needs to be sturdy enough to act as the tray floor.
Smudged Colors?
If your terrazzo chips smear while rolling, your clay is likely too warm. Pop the slab in the fridge for 10 minutes before the final roll to keep edges crisp.
Step 3: Pattern & Shape
-
Apply the chips:
Scatter your colored chips onto the white slab. I like to press the larger pieces in manually to ensure a nice composition, then fill the gaps with smaller shards. -
Embed the pattern:
Once you are happy with the density of colors, gently roll over the slab with your acrylic roller again. You want to press the chips flush into the white base, creating a smooth surface. -
Cut the rectangle:
Use a ruler and your craft knife to cut a clean rectangle relative to the size of your mold. The depicted tray has widely rounded corners, so use a small circular cutter or freehand curved edges. -
Form the rim:
Roll a snake of the remaining speckled white clay. Flatten it into a long strip to create the side walls. -
Attach the walls:
Place the strip along the edge of your base rectangle on top. Blend the seams on the inside and outside using a modeling tool or your finger so the wall becomes one with the base. -
Prepare the mold:
Dust the bottom of a rectangular baking dish with cornstarch. This prevents the clay from sticking during the bake. -
Shape the tray:
Maximize the sloped shape by gently placing your clay creation into the dish, allowing the edges to curve upward slightly if you prefer a bowl-like effect, or keep it flat with vertical walls like a traditional tray. -
Smooth imperfections:
Before baking, do a final fingerprint check. Dip your finger in a little baby oil and smooth out any rough spots or seam lines.
Matte vs. Gloss
For a natural stone feel, skip the glaze and buff the clay vigorously with a piece of denim or a microfiber cloth after sanding.
Step 4: Finishing
-
Bake:
Bake according to your clay manufacturer’s instructions (usually 275°F/130°C for 15-30 minutes). Let it cool completely inside the oven to prevent thermal shock. -
Sand for stone effect:
Once cool, wet-sand the piece under running water. Start with 400 grit to reveal the crisp edges of the colored chips, then move to 1000 grit for a silky finish. -
Seal (Optional):
For a glossy ceramic look like the photo, apply a thin coat of UV resin or polyurethane gloss varnish.
Place your new tray on your dresser and enjoy organizing your jewelry on this modern piece of art
Cutout Suncatchers With Simple Shapes
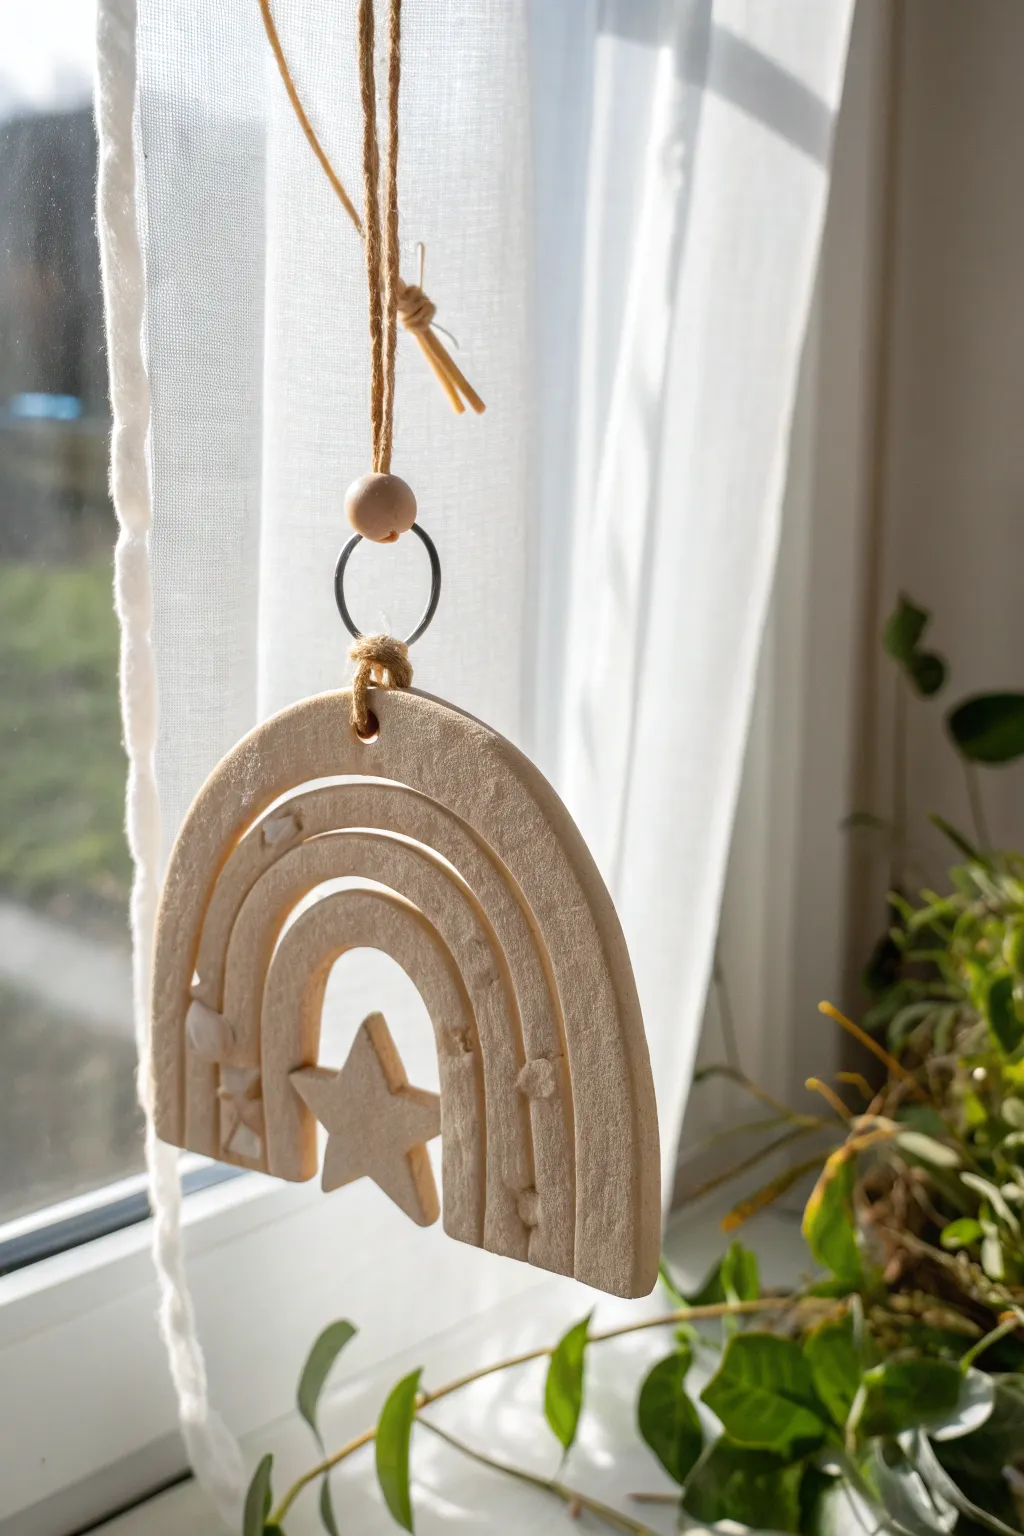
Embrace the beauty of natural textures with this minimalist clay hanging decoration. The soft light filtering through a window highlights the subtle grooved design and simple star cutout, making it a perfect beginner project that looks surprisingly high-end.
Detailed Instructions
Materials
- Air-dry clay (white or light beige)
- Rolling pin
- Parchment paper or canvas mat
- Sharp craft knife or clay needle tool
- Small star-shaped cookie cutter
- Round metal jump ring (approx. 1 inch)
- Jute twine
- Wooden bead
- Small bowl of water
- Fine-grit sandpaper
- Drinking straw or skewer (for the hole)
Step 1: Shaping the Clay Base
-
Prepare your workspace:
Lay down your parchment paper or canvas mat to prevent sticking. Take a handful of air-dry clay and knead it briefly until it is soft and free of cracks. -
Roll out the slab:
Using your rolling pin, roll the clay out to a consistent thickness of about 1/4 inch (6mm). If you have thickness guides or slats, use them here to ensure everything is even. -
Cut the outer arch:
If you don’t have a large arch cutter, you can easily hand-cut this shape. Lightly trace a large semi-circle onto the clay with a needle tool first. Once you are happy with the symmetry, cut the outer edge cleanly with your craft knife. -
Cut the inner arch:
Cut a smaller semi-circle out of the center to create the negative space at the bottom, leaving you with a thick rainbow-shaped slab.
Cracking Up?
If you see tiny cracks forming while the clay dries, mix a tiny bit of fresh clay with water to make a paste (slip) and smooth it over the crack with your finger
Step 2: Adding Detail and Texture
-
Scribe the grooves:
To create the look of three rainbow bands without separating the pieces, use a needle tool or a dull knife to score two curved lines following the shape of the arch. Press deeply enough to make a visible groove, but be careful not to cut all the way through. -
Smooth the grooves:
Dip your finger in a little water and gently run it along the grooves you just made. This softens the sharp edges and makes the bands look more organic. -
Create the star:
Roll out a small scrap piece of clay to the same thickness as your main arch. Use your small star cutter to punch out a shape. -
Attach the star:
Score the back of the star and the spot at the top-center of the inner cut-out heavily. Apply a dab of water (avoid making it too slippery) and press the star firmly into place so it hangs slightly into the negative space. -
Add texture marks:
Looking closely at the project, you’ll see small, random indentations. Use the back of a paintbrush or a small modeling tool to press subtle little dents or ‘chips’ into the surface for a rugged, stone-like feel. -
Make the hanger hole:
Use a straw to punch a clean hole at the very top center of the arch. Make sure it isn’t too close to the edge, or the clay might crack when hanging.
Level Up: Essential Oil
Since air-dry clay is porous, you can put a few drops of essential oil on the unpainted back of the finished piece to turn this suncatcher into a diffuser
Step 3: Finishing and Assembly
-
Dry thoroughly:
Let the piece dry flat on a wire rack or parchment paper for 24-48 hours. I find flipping it over halfway through the drying process helps prevent warping. -
Sand the edges:
Once fully cured and hard, take fine-grit sandpaper and gently smooth the outer edges and the inside of the cutout to remove any sharp burrs. -
Prepare the jump ring:
Open your large metal jump ring with pliers and loop it through the hole you created at the top of the arch. Close the ring securely. -
Attach the twine:
Cut a length of jute twine. Fold it in half and loop it through the metal jump ring using a lark’s head knot. -
Add the bead:
Thread both ends of the twine through a wooden bead. Slide the bead down until it sits just above the metal ring. -
Tie the top knot:
Tie a secure overhand knot further up the twine to create a hanging loop, trimming any excess length if desired.
Hang your new creation in a sunny window and enjoy the natural warmth it brings to your room