Whenever kids get their hands into Easter clay, the cutest things happen fast—think eggs, bunnies, and chicks in all the happy spring colors. I pulled together my favorite kid-friendly ideas that keep shapes simple, details doable, and results festive enough to display all season.
Bunny Face Egg Medallions
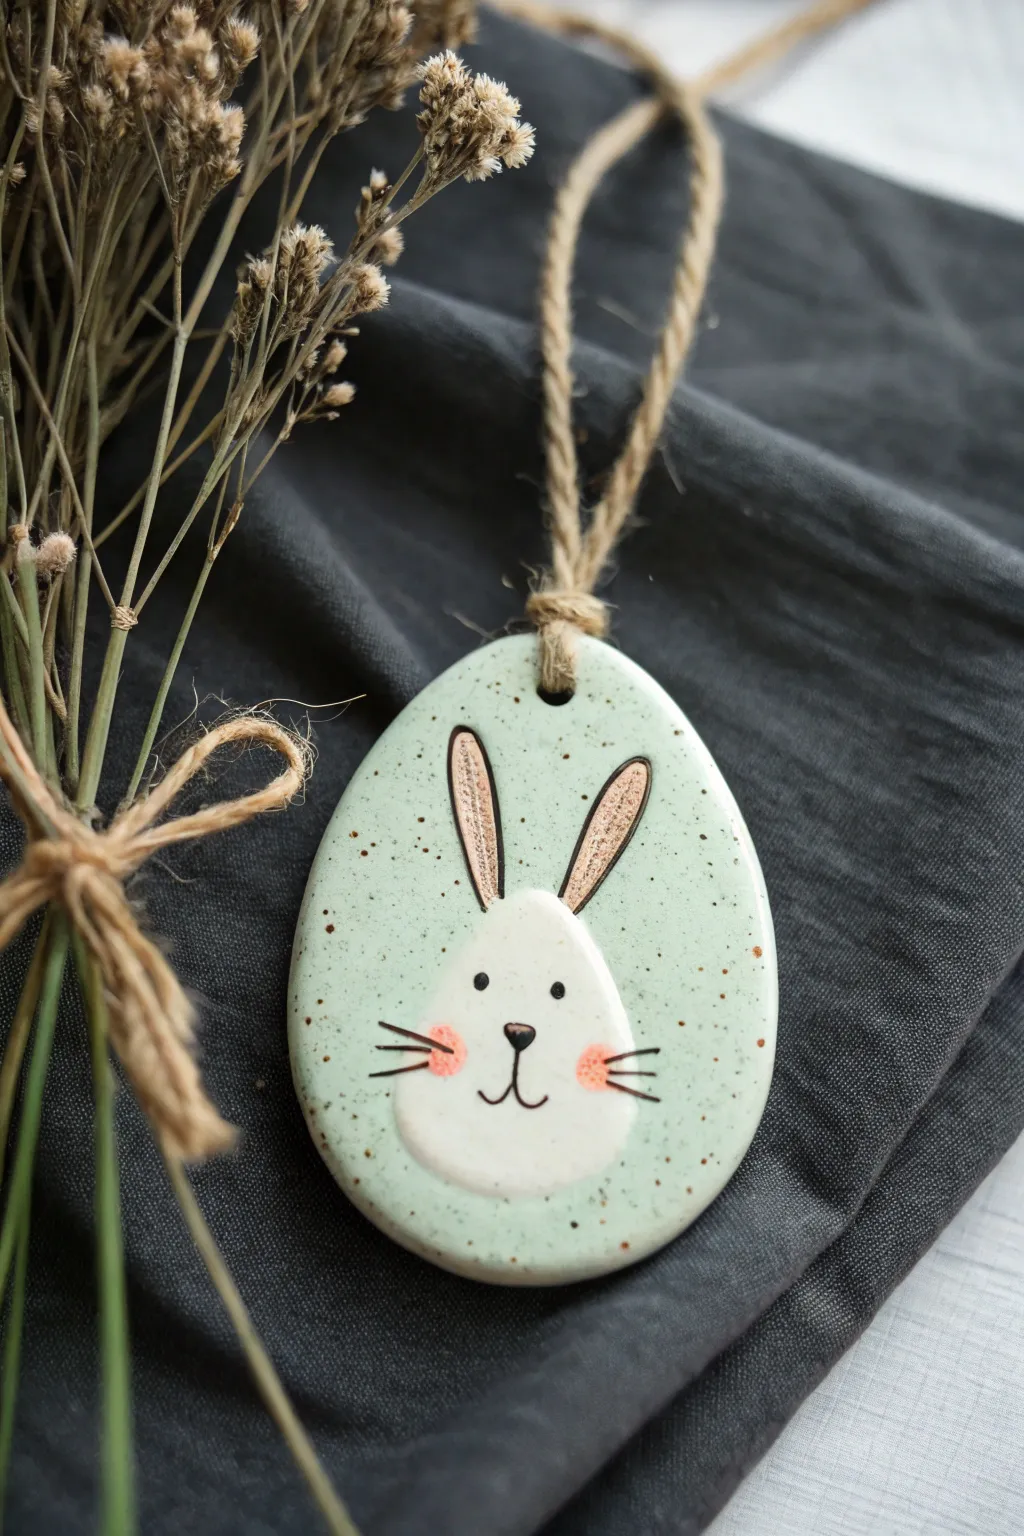
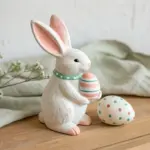
Capture the fresh spirit of spring with this adorable ceramic-style egg ornament featuring a sweet, smiling rabbit. The speckled pastel green finish gives it a charming, rustic pottery look that pairs perfectly with dried florals and natural decor.
How-To Guide
Materials
- Air-dry clay or polymer clay (white)
- Egg-shaped cookie cutter (approx. 3-4 inches)
- Rolling pin
- Straw or skewer (for hole punching)
- Sandpaper (fine grit)
- Acrylic paints: Pastel mint green, white, black, soft pink
- Small flat brush and fine liner brush
- Old toothbrush (for splashing)
- Brown acrylic paint (watered down) or brown ink
- Jute twine
- Gloss varnish or Mod Podge (optional)
Step 1: Shaping the Base
-
Roll the clay:
Begin by conditioning your clay until it is soft and pliable. Roll it out on a smooth surface to an even thickness of about 1/4 inch. -
Cut the shape:
Press your egg-shaped cookie cutter firmly into the clay. If you don’t have a cutter, print an egg template on paper, place it on the clay, and carefully trace around it with a craft knife. -
Smooth the edges:
Dip your finger in a little water and run it gently around the cut edges of the clay egg to remove any roughness or sharp debris. -
Create the hanging hole:
Use a drinking straw or a skewer to punch a clean hole near the top, centered on the narrower end of the egg. Make sure it’s not too close to the edge to prevent cracking. -
Dry the clay:
Allow the clay to dry completely according to the package instructions. For air-dry clay, I usually flip it over halfway through the drying process to ensure it stays flat. -
Sand for perfection:
Once fully cured, use fine-grit sandpaper to buff away any remaining imperfections on the surface or edges, creating a smooth canvas for your painting.
Uneven Speckles?
If your paint splatter blobs are too big, blot them immediately with a damp paper towel. Test your flicking technique on a scrap paper first to control the spray.
Step 2: Painting the Design
-
Apply the base coat:
Paint the entire front and sides of the egg with a pastel mint green acrylic paint. You may need two coats for full opacity, letting the first layer dry before applying the second. -
Create the speckles:
To get that ceramic glaze effect, dilute a small amount of brown paint with water. Dip an old toothbrush into the mixture, aim it at the egg, and run your thumb across the bristles to flick tiny speckles across the green surface. -
Outline the bunny:
Once the speckles are dry, lightly sketch a rounded triangle shape for the bunny’s head and two long ears in the lower center using a pencil. -
Fill the bunny face:
Paint the bunny silhouette solid white. This shape should be bulbous at the bottom for the cheeks and narrower at the top where the ears attach. -
Paint the inner ears:
Inside the white ear shapes, paint long, thin strips of soft pink or a muted beige-pink tone to resemble the inner ear. -
Add rosy cheeks:
using a very dry brush or a cotton swab with a tiny amount of pink paint, dab two soft circles onto the widest part of the white face area. -
Draw the features:
Switch to your finest liner brush and black paint. Carefully paint outlining lines around the ears, sticking to a sketchy, organic style rather than perfect geometric lines. -
Add the face details:
Paint two small dots for eyes, a small triangular nose, and a simple anchor shape for the mouth. Add three straight whiskers extending from the pink cheek areas on each side. -
Seal the piece:
Protect your artwork with a coat of gloss varnish. This enhances the colors and gives it that authentic fired-ceramic shine.
Step 3: Finishing Touches
-
Prepare the hanger:
Cut a length of jute twine, approximately 8-10 inches long. -
Loop and knot:
Fold the twine in half and thread the folded loop through the hole from the front to the back. Pass the loose ends through the loop and pull tight to secure it with a lark’s head knot. -
Final tie:
Tie the loose ends of the twine together in a simple knot at the top to create the hanger loop.
3D Texture
Make the bunny face pop by layering a thinly rolled piece of white clay onto the green base before drying, instead of just painting it on later.
Hang your charming little bunny medallion on a branch or gift it to bring a smile to someone’s spring season


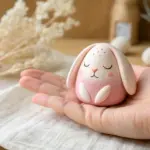
Pinch Pot Bunny Candy Bowl
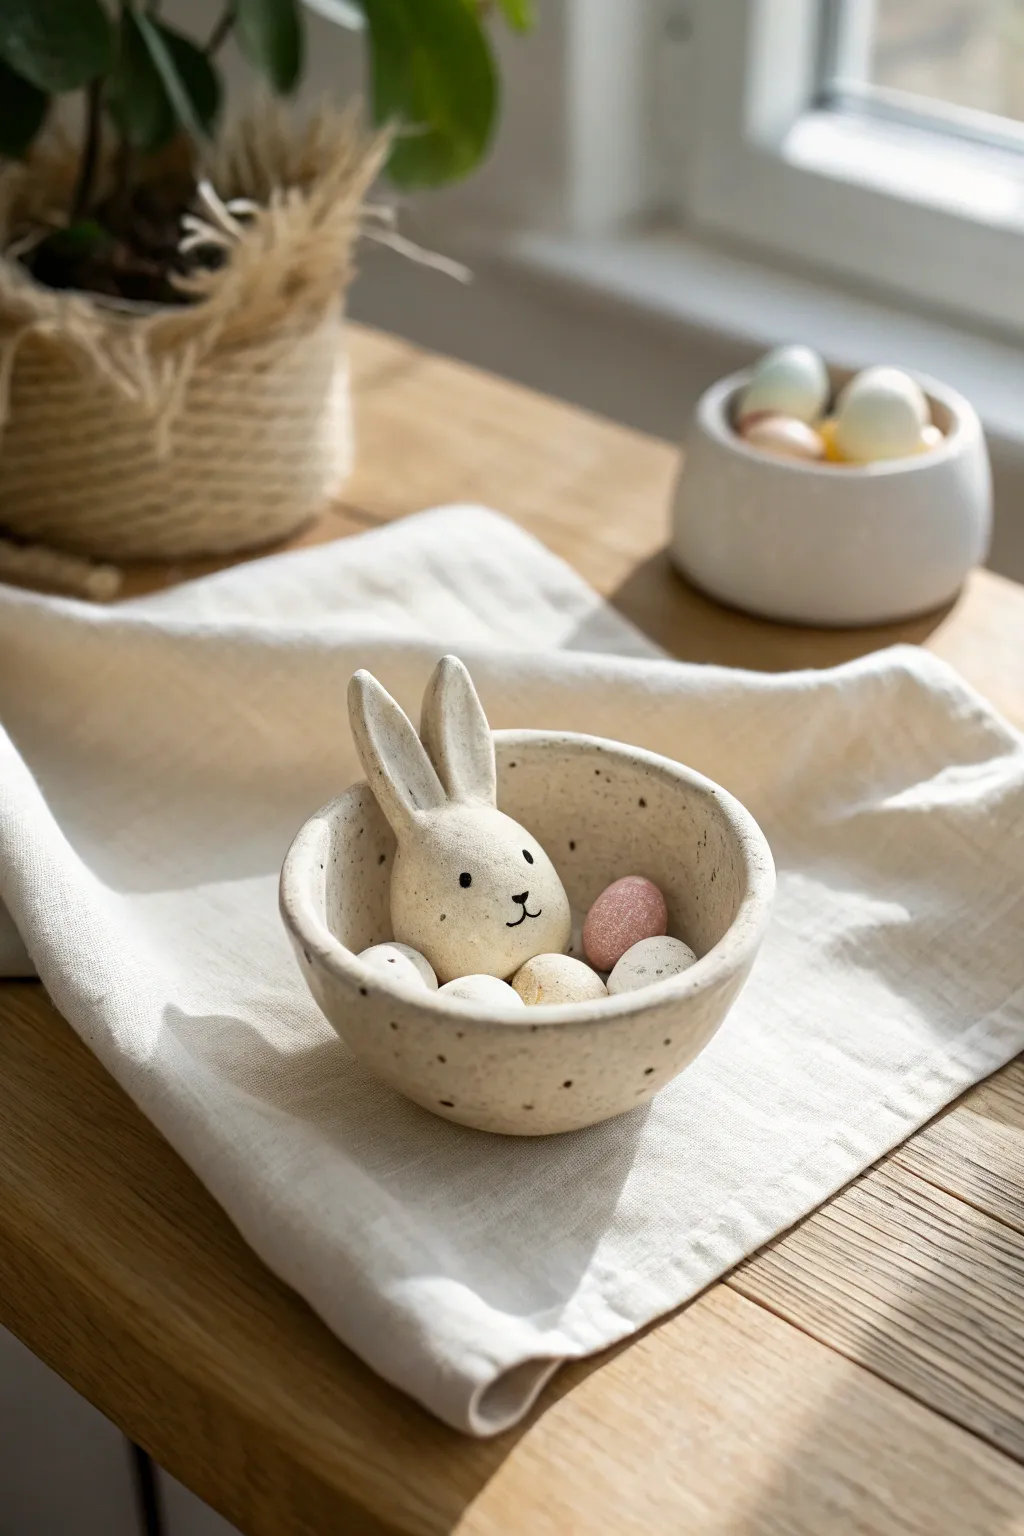
This adorable earthy bowl features a sweet rabbit peeking out from the center, ready to guard your favorite Easter treats. Its organic, speckled finish gives it the look of expensive stoneware, but it’s simple enough for kids to sculpt by hand.
Step-by-Step Guide
Materials
- Air-dry clay (creamy white or stone color)
- Small bowl of water
- Pottery sponge or soft cloth
- Rolling pin
- Plastic knife or clay sculpting tool
- Toothpick or needle tool
- Acrylic paint (black for details, brown/black for speckling)
- Stiff bristle brush or old toothbrush
- Matte varnish or sealant
Step 1: Shaping the Bowl Base
-
Prepare the Clay:
Start by grabbing a handful of air-dry clay roughly the size of a tennis ball. Knead it in your hands until it feels soft, warm, and pliable, working out any air bubbles. -
Form the Initial Ball:
Roll your conditioned clay into a smooth, round sphere between your palms. The smoother the ball is now, the easier it will be to form a crack-free bowl later. -
Create the Pinch Pot:
Hold the ball in your non-dominant hand. Gently unexpected your thumb into the center, stopping before you push through the bottom. Begin pinching the walls between your thumb and fingers. -
Shape the Walls:
Rotate the clay as you pinch, working your way up from the base to the rim. Aim for an even thickness of about a quarter-inch all around, keeping the shape hemispherical. -
Flatten the Base:
To ensure your candy bowl sits securely on the table, gently tap the bottom of the pot against your work surface to create a small, flat circular base. -
Smooth the Surfaces:
Dip your finger or a slightly damp sponge into water and run it over the clay. I find this creates a lovely smooth finish and erases any fingerprints or small cracks.
Cracks Appearing?
If small cracks form while drying, mix a tiny bit of clay with water to make a paste (slip) and fill them in before painting.
Step 2: Sculpting the Bunny
-
Form the Head:
Take a separate piece of clay, slightly smaller than a golf ball. Roll it into an egg shape, making one end slightly wider for the bunny’s cheeks. -
Make the Ears:
Roll two small logs of clay about an inch long. Flatten them gently and taper the ends to points to create the classic rabbit ear shape. -
Attach the Ears:
Score the top of the head and the bottom of the ears with a toothpick (make scratch marks). Add a dab of water (classic ‘slip and score’ method) and press the ears firmly onto the head. -
Blend the Seams:
Use a small clay tool or your finger to smooth the clay where the ears meet the head so they look like one solid piece rather than just stuck on. -
Position the Bunny:
Decide where you want your bunny to sit inside the bowl. Score the bottom of the bunny head and the corresponding spot inside the bowl. -
Secure the Head:
Press the head firmly into the bowl’s interior. Use a tool to smooth the clay at the base of the neck, blending it into the bowl’s floor for a seamless transition.
Make it Cozy
Create a ‘nest’ texture by scratching shallow, crisscrossing lines inside the bowl around the bunny base before the clay dries.
Step 3: Refining and Drying
-
Final Smoothing:
Do one last inspection. Use a tiny amount of water on your finger to smooth out any final bumps on the bunny’s face or the bowl’s rim. -
Drying Time:
Let the sculpture dry completely. This usually takes 24-48 hours depending on humidity. Rotate it occasionally so air reaches all sides.
Step 4: Adding the Speckled Finish
-
Painting the Face:
Once dry, use a fine-tip brush or a black paint pen to draw two small dots for eyes and a simple ‘Y’ shape for the nose and mouth. -
Prepare the Speckles:
Mix a small amount of brown or black acrylic paint with a few drops of water to create a thin, inky consistency. -
Splatter Technique:
Dip a stiff brush or old toothbrush into the thinned paint. Hold it over the bowl and flick the bristles with your thumb to spray tiny speckles over the entire piece. -
Seal the Project:
After the paint is fully dry, apply a coat of matte varnish. This brings out the clay’s natural color and protects your bowl from scratches.
Now your charming little bunny is ready to be filled with pastel chocolate eggs or jellybeans.


Pinch Pot Chick Snack Cup
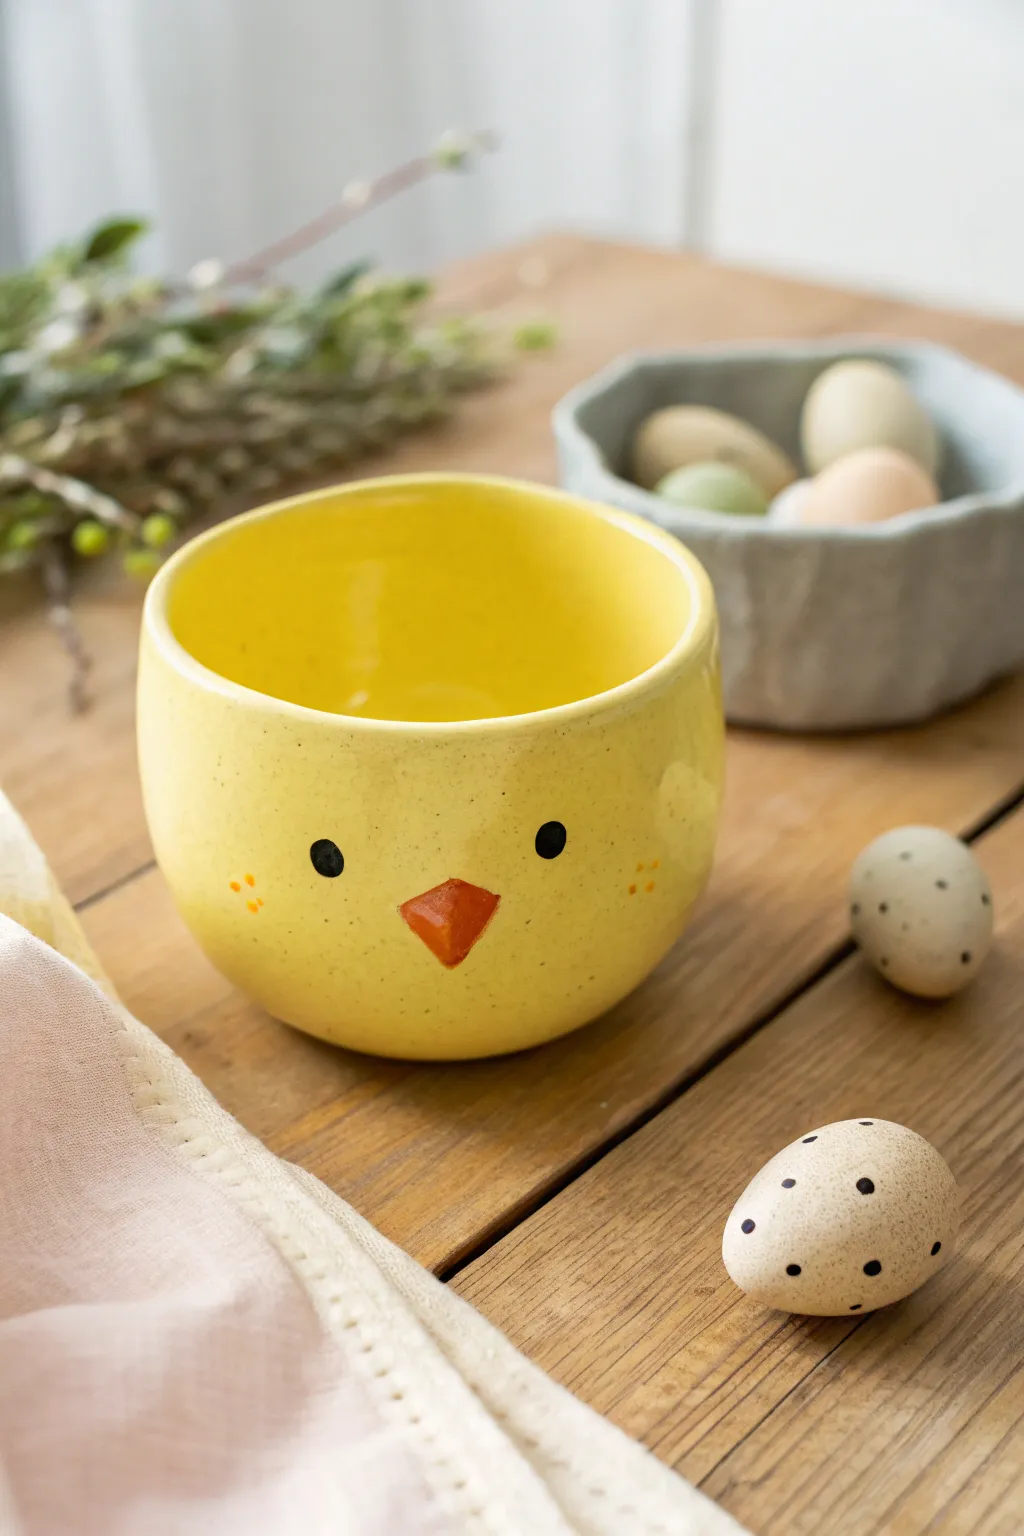
Brighten up your Easter treats with this adorable handmade ceramic cup painted to look like a little chick. Its gentle, rounded shape is perfect for holding tiny snacks, while the sunny yellow glaze and sweet painted face add plenty of character.
Detailed Instructions
Materials
- Air-dry clay or polymer clay (white)
- Small cup of water
- Rolling pin
- Sponge
- Clay sculpting tools (or a butter knife)
- Yellow acrylic paint (sunflower yellow)
- Orange acrylic paint
- Black acrylic paint
- Paintbrushes (flat brush and fine detail brush)
- Spray gloss varnish or sealant (food-safe sealant if using with real food)
Step 1: Shaping the Base
-
Prepare the Clay:
Start with a ball of clay roughly the size of a tennis ball. Knead it in your hands until it is smooth, pliable, and free of any large air bubbles. -
Open the Form:
Hold the clay ball in one hand and push your thumb firmly into the center about halfway down, creating an opening for your pot. -
Pinch the Walls:
Gently pinch the clay between your thumb and fingers, rotating the ball as you go. Work your way from the bottom up to thin out the walls evenly. -
Check Thickness:
Aim for a uniform thickness of about a quarter-inch throughout the walls to ensure it dries evenly without cracking. -
Flatten the Base:
Tap the pot gently on your table to flatten the bottom. This ensures your chick cup will sit steadily and not wobble when full of decorations. -
Refine the Shape:
Use your fingers to smooth out the curve of the walls. I like to gently push the rim slightly inward to give it a cupped, nest-like shape.
Fixing Cracks
If small cracks appear while drying, don’t panic! Mix a tiny bit of fresh clay with water to make a paste (slip) and fill the cracks, then smooth over.
Step 2: Smoothing and Drying
-
Smooth the Surface:
Dip your finger or a slightly damp sponge into water and run it over the clay to erase fingerprints and smooth out any small bumps. -
Level the Rim:
Run a wet finger along the top edge to round it off softly, ensuring there are no sharp or jagged bits left around the opening. -
Let it Dry:
Place your pot in a safe spot to dry completely. For air-dry clay, this usually takes 24 to 48 hours depending on humidity; rotate it occasionally for even airflow. -
Sand Imperfections:
Once fully dry, you can lightly sand any rough patches with fine-grit sandpaper for an extra professional finish before painting.
Make it a Set
Create a whole family by making different sized pots. Use jagged scissors to cut the top rim of one to make it look like a cracked eggshell
Step 3: Painting the Chick
-
Base Coat:
Paint the entire outside and inside of the cup with a bright sunflower yellow acrylic paint. You may need two to three thin coats for solid coverage. -
Speckle Effect:
To mimic the ceramic look in the photo, dilute a tiny bit of brown paint and flick it off an old toothbrush onto the cup for subtle speckles. -
Paint the Beak:
Using a small brush and orange paint, create an inverted triangle in the center of the cup’s face. Soften the top corners slightly so it looks like a natural beak. -
Add the Eyes:
Dip the handle end of a paintbrush into black paint and dot two circles on either side of the beak. This creates perfectly round, symmetrical eyes. -
Cheek Details:
With a very fine brush or toothpick, add three tiny orange dots under each eye to create cute little freckles or blush marks. -
Seal the Project:
Once the paint is completely dry, apply a coat of gloss varnish. Use a food-safe sealant like Mod Podge Dishwasher Safe specifically if you plan to put wrapped candies inside.
Fill your new little friend with colorful jellybeans or chocolate eggs to complete the look


Bunny Ear Ring Dishes
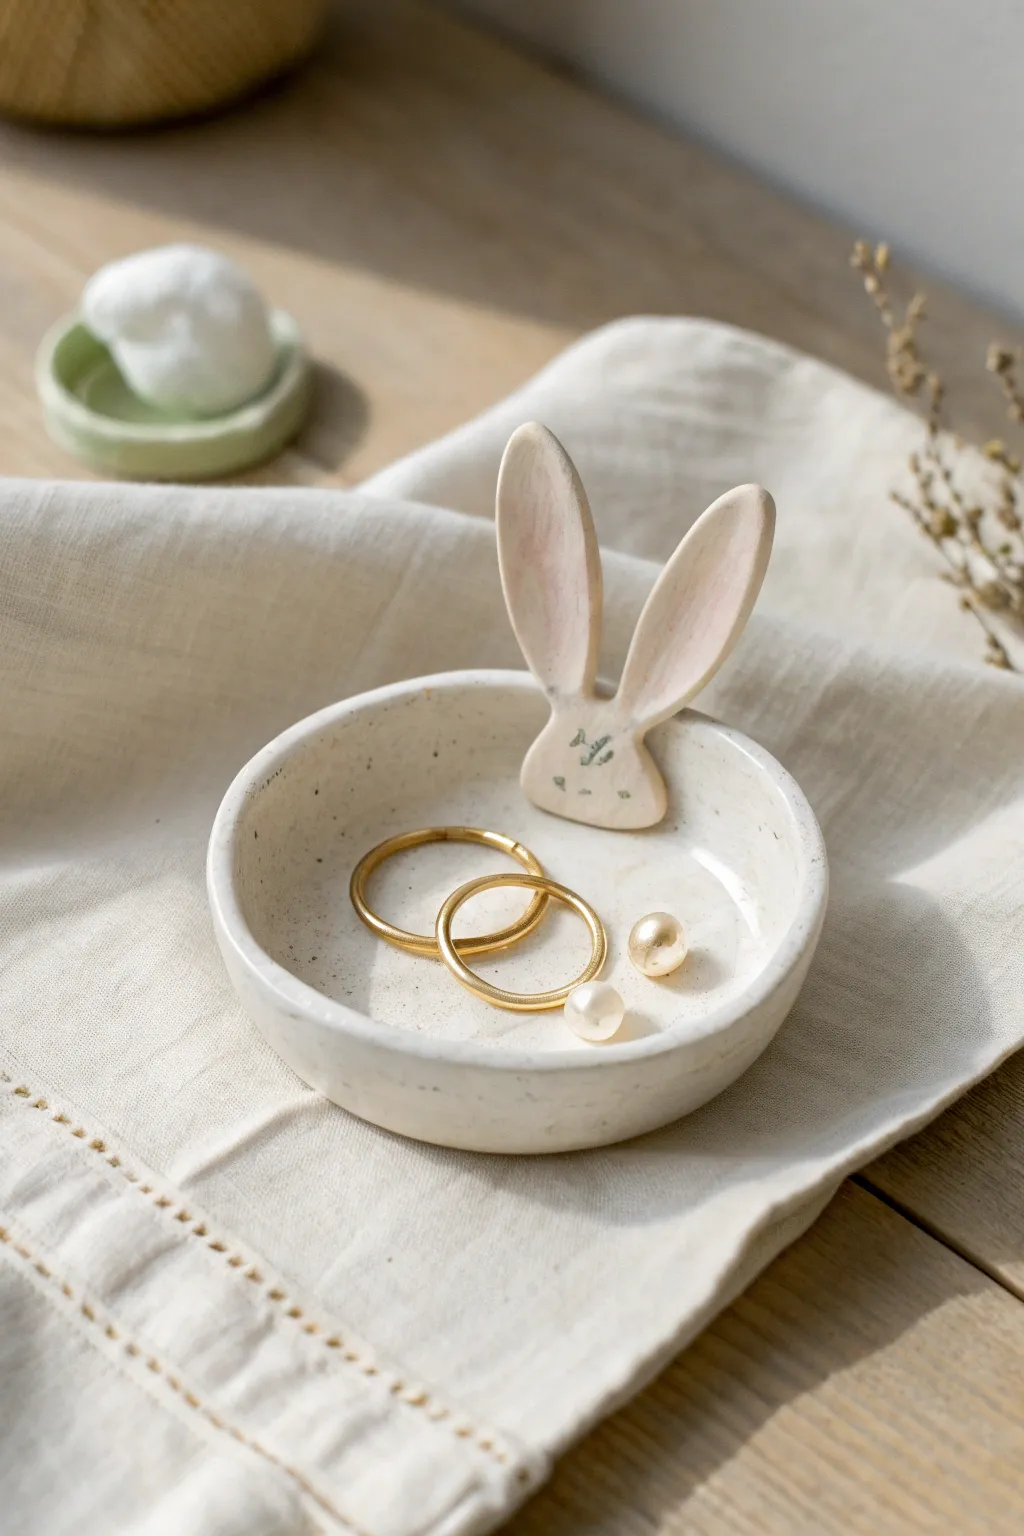
This elegant little jewelry dish features a minimalist bunny silhouette perched on the rim, perfect for holding your favorite rings and studs. The speckled clay finish and soft pastel details give it a modern, handmade ceramic look without needing a kiln.
Step-by-Step Tutorial
Materials
- Speckled polymer clay (like granite or oatmeal color)
- Small rolling pin
- Circle cookie cutter (approx. 3-4 inches)
- X-acto knife or clay blade
- Small bowl or curved baking form (oven-safe)
- Pink chalk pastel or mica powder
- Small soft paintbrush
- Dark green acrylic paint
- Fine detail brush or toothpick
- Oven
Step 1: Shaping the Base
-
Condition the clay:
Begin by warming up a ball of speckled polymer clay in your hands. Knead it thoroughly until it is soft, pliable, and free of any air bubbles. -
Roll the slab:
Roll the clay out onto a clean work surface until it is about 1/4 inch thick. Aim for an even thickness throughout to ensure the dish sits flat. -
Cut the circle:
Use your circle cookie cutter to punch out a clean round shape. If you don’t have a cutter, trace around a drinking glass with a needle tool. -
Smooth the edges:
Dip your finger in a tiny bit of water or baby oil and run it gently around the cut edge of the circle. This removes harsh lines and gives it that finished ceramic look. -
Create the curve:
Gently lift the clay circle and place it inside your small oven-safe bowl or draped over an overturned muffin tin. Press it lightly so it takes on a shallow dish shape.
Smooth Seams
When attaching the bunny head, use a rubber clay shaper tool to blend the clay at the seam invisibly. This makes the bond much stronger.
Step 2: Crafting the Bunny Decoration
-
Roll clay for the bunny:
Take a smaller piece of the remaining clay and roll it out slightly thinner than your base, perhaps 1/8 inch thick. -
Cut the bunny shape:
Using your X-acto knife, freehand cut a simple bunny head silhouette. You want a small oval-ish base for the head and two tall, elongated ears. -
Refine the ears:
Use your fingers to round off any sharp corners on the ears. I prefer to pinch the tips slightly to give them a softer, organic shape. -
Add pink shading:
Scrape a little pink chalk pastel onto a piece of paper to create dust. Use a soft, dry brush to gently apply this pink dust to the inner areas of the ears for a blushing effect. -
Attach the bunny:
Score the bottom of the bunny head and the spot on the dish rim where it will sit. Add a dab of liquid polymer clay or blend the clay together firmly to secure the bunny upright against the inner rim.
Step 3: Finishing Touches
-
Bake the project:
Place the bowl containing your clay dish into the oven. Bake according to the specific temperature and time instructions on your package of polymer clay. -
Cool completely:
Once baked, remove the project from the oven and let it cool completely before trying to remove the clay dish from the baking form. -
Paint the face:
Dip a fine detail brush or a toothpick into dark green acrylic paint. Carefully paint two tiny eyes (simple lines or dots) and a small nose. -
Add floral details:
If you like the look in the photo, add a tiny sprig of leaves or decoration on the bunny’s chest using the same green paint. -
Seal (Optional):
To protect the paint and give the dish a glossy ceramic shine, apply a coat of water-based polyurethane varnish or glaze.
Gold Rim Upgrade
After baking, paint the very top rim of the dish with metallic gold leaf paint for a chic, high-end jewelry store finish.
Now you have a sweet handmade spot to keep your treasures safe and organized

The Complete Guide to Pottery Troubleshooting
Uncover the most common ceramic mistakes—from cracking clay to failed glazes—and learn how to fix them fast.
Marbled Pastel Egg Charms
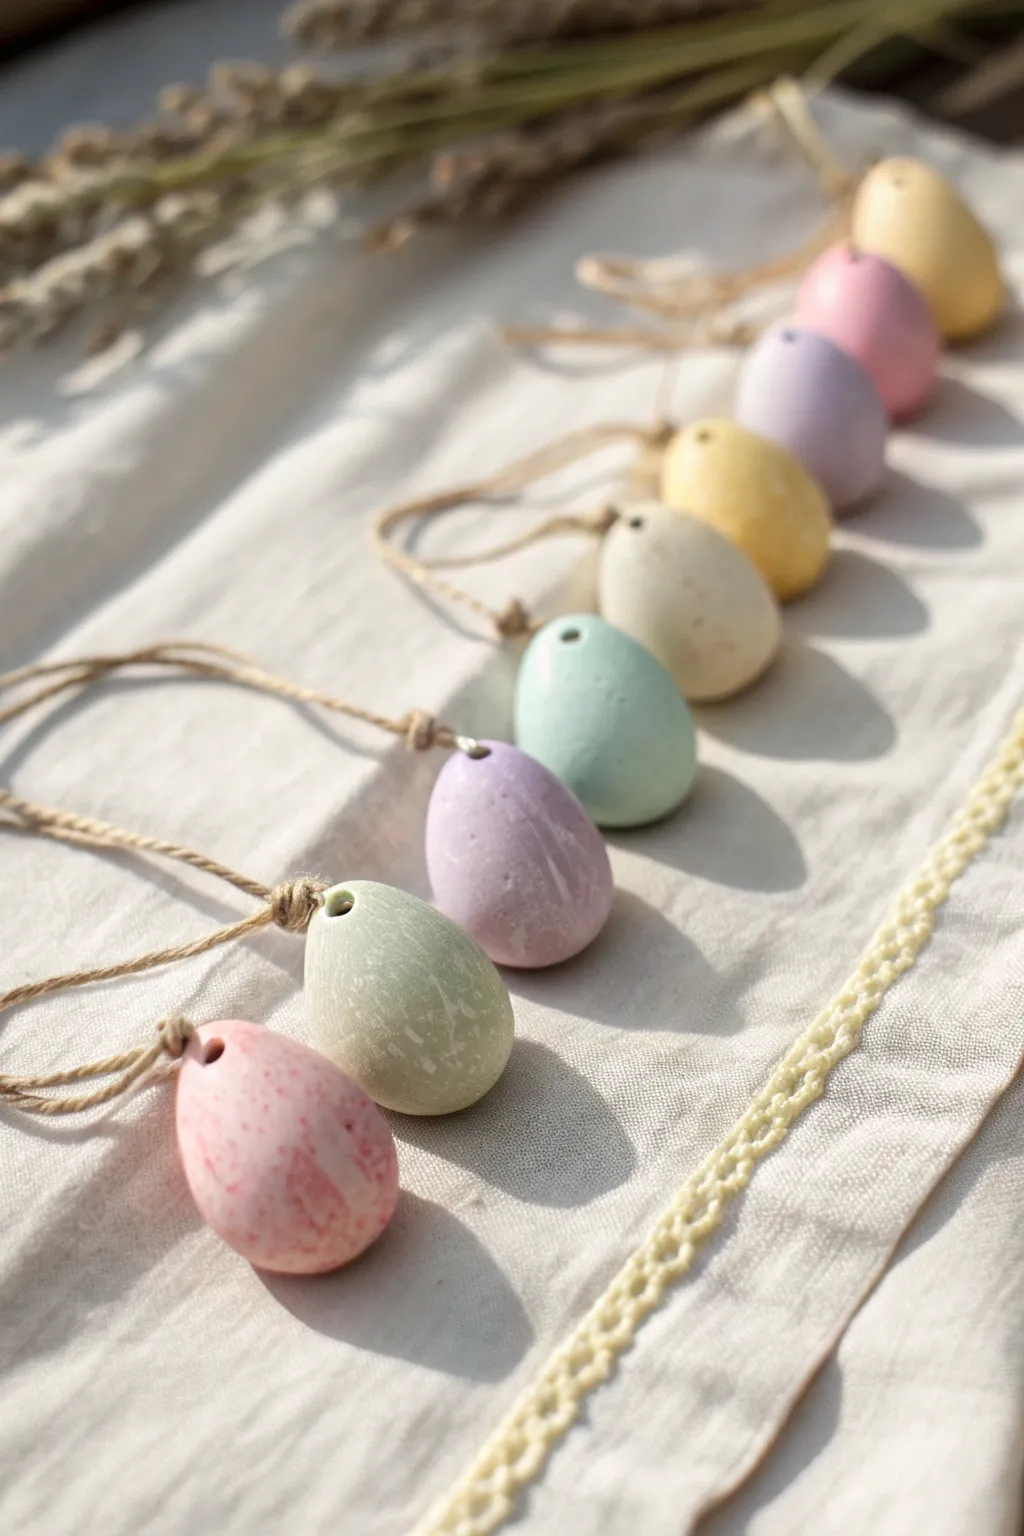
These delightful speckled egg charms capture the soft, dreamy hues of spring in a simple clay project perfect for little hands. With their gentle matte finish and rustic twine hangers, they make beautiful Easter tree ornaments or personalized gift tags.
Step-by-Step Tutorial
Materials
- White air-dry clay or polymer clay (white base)
- Acrylic paints (pastel pink, mint green, lavender, baby blue, yellow)
- Small bowl of water
- Toothpick or skewer
- Jute twine or rustic string
- Fine-grit sandpaper (optional)
- Disposable gloves (to keep hands clean)
- Old toothbrush or stiff bristle brush
- Darker paint (brown or grey) for speckling
- Clear matte varnish (optional)
Step 1: Mixing the Clay Colors
-
Prepare the portions:
Start by dividing your white clay into several equal portions, one for each pastel color you wish to create. Keep one portion pure white if you want variations in tone. -
Add the color:
Take a pea-sized amount of acrylic paint and flatten one clay ball. Place the paint in the center of the flattened clay. Fold the clay over to trap the paint inside. -
Knead thoroughly:
Knead the clay repeatedly until the color is fully distributed and uniform. If the clay feels sticky from the paint, let it sit for a few minutes or add a tiny bit more fresh clay. Repeat this for all your desired pastel shades—pink, green, lavender, blue, and yellow. -
Create a marbled effect (optional):
For a subtle marbled look like some of these eggs, stop kneading just before the color is perfectly uniform, leaving gentle streaks of white running through the pastel.
Step 2: Shaping the Eggs
-
Form a ball:
Pinch off a piece of colored clay about the size of a walnut. Roll it between your palms to create a smooth, crack-free sphere. -
Shape the taper:
Gently roll one side of the ball slightly more than the other against your palm or work surface to create an oval, egg-like taper. I find it helpul to cup my hands slightly to maintain the rounded bottom. -
Smooth imperfections:
Dip your finger in a tiny bit of water and gently smooth out any fingerprints or tiny cracks on the surface of the egg form. -
Pierce the hole:
Using a skewer or a toothpick, carefully poke a hole through the narrower top part of the egg. Wiggle the tool gently to ensure the hole is wide enough for your twine to pass through later. -
Check the hole exit:
Turn the egg over and make sure the exit hole is clean; smooth down any clay that may have pushed out.
Natural Texture
To mimic the stone-like texture in the photo, gently roll your finished damp egg over a piece of canvas fabric or heavy linen before drying. It imprints a subtle weave.
Step 3: Speckling and Finishing
-
Dry the eggs:
Allow the clay eggs to dry completely according to package instructions. For air-dry clay, this usually takes 24-48 hours. Turn them occasionally to ensure even drying. -
Refine the shape:
Once fully hard, you can use a fine-grit sandpaper to gently buff away any rough spots or fingerprints, giving the egg that lovely smooth stone-like texture. -
Prepare the speckle paint:
Mix a small amount of brown or grey acrylic paint with a few drops of water to create a fluid, ink-like consistency. -
Apply the speckles:
Dip an old toothbrush into the thinned paint. Hold it over your eggs and run your thumb across the bristles to flick tiny splatters of paint onto the surface. Practice on a paper towel first to control the spray. -
Let speckles dry:
Allow the paint speckles to dry completely. This creates that authentic bird’s egg appearance. -
Seal the surface (optional):
If you want extra durability, apply a thin coat of clear matte varnish. Avoid glossy finishes if you want to keep the natural, chalky look shown in the photo. -
Attach the twine:
Cut a length of jute twine or rustic string. Thread it through the hole at the top of the egg. -
Secure the loop:
Tie a secure knot close to the top of the egg or simply loop the ends together to create a hanger, trimming any excess string.
Cracking Clay?
If you see cracks forming as the clay dries, smooth a tiny bit of fresh, wet clay (slurry) into the fissure with your finger and let it dry again away from direct heat.
Hang your collection of pastel eggs on a branch for a stunning, minimalist Easter display
Bunny Footprint Keepsake Tiles
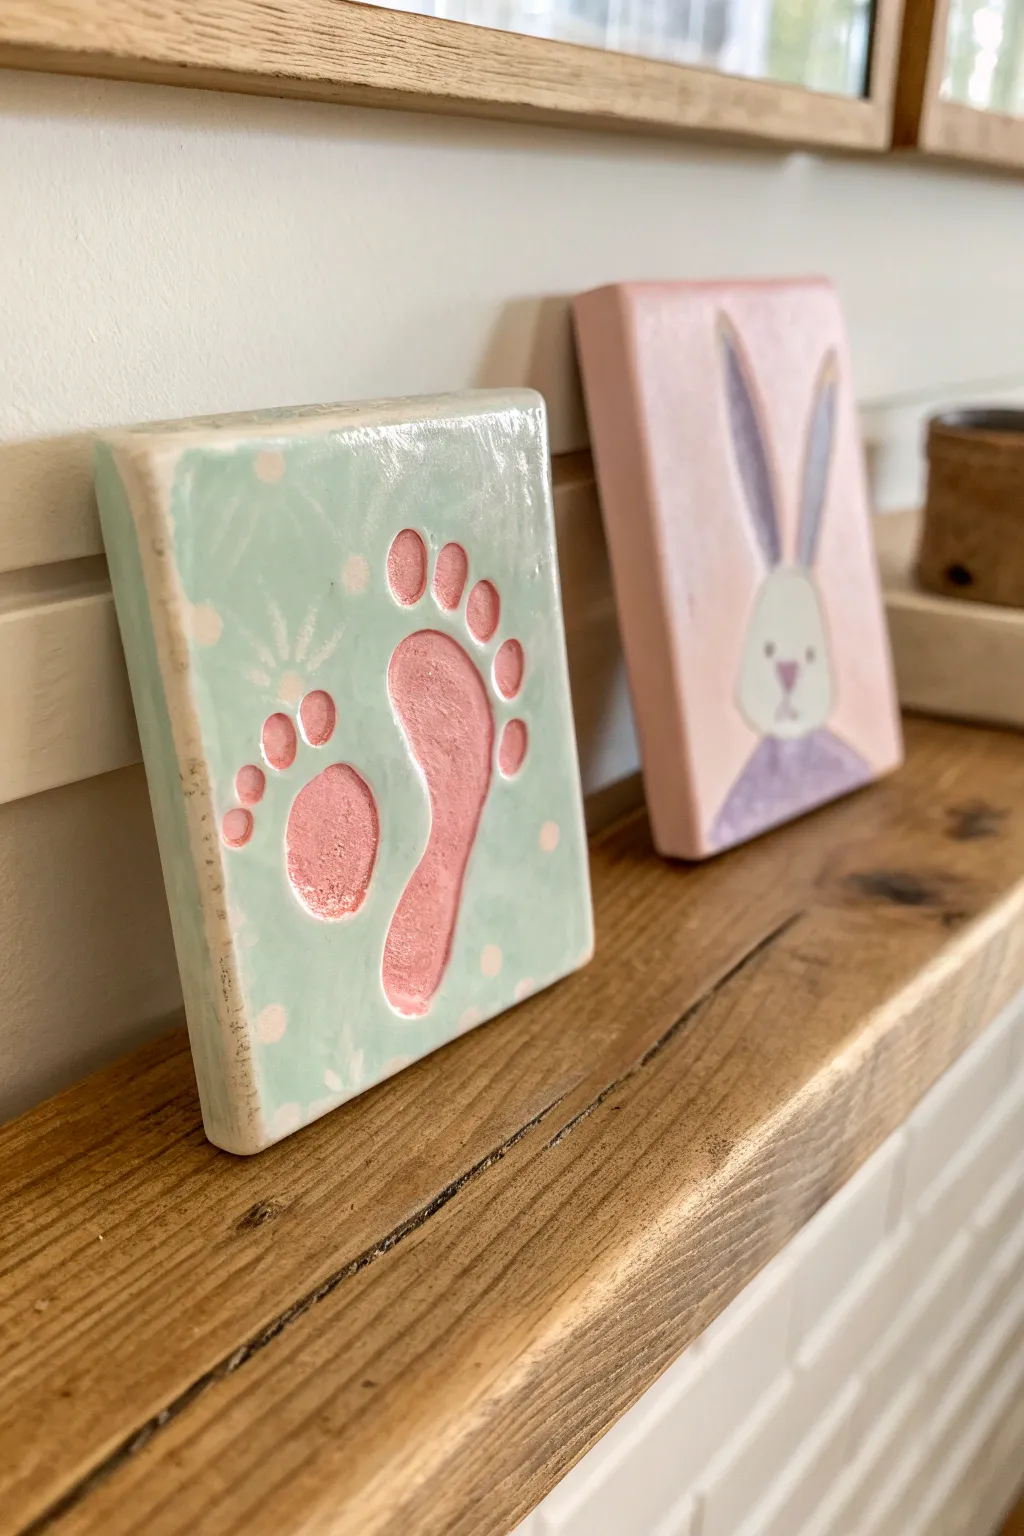
Capture the magic of Easter with these precious clay tiles that transform tiny footprints into a festive bunny design. Using soft pastels and simple imprinting techniques, this project creates a thick, substantial keepsake that looks lovely displayed on a mantle.
How-To Guide
Materials
- Air-dry clay (white) or polymer clay
- Rolling pin
- Knife or square clay cutter
- Pastel acrylic paints (mint green, soft pink, white)
- Small flat paintbrush
- Fine detail brush
- Sandpaper (fine grit)
- Gloss varnish or clear sealant
- Parchment paper or smooth work surface
- Small bowl of water (for smoothing)
Step 1: Shaping the Clay Base
-
Prepare the workspace:
Lay down a sheet of parchment paper on a flat surface to prevent the clay from sticking. This also makes moving the wet clay much easier later on. -
Condition the clay:
Take a generous handful of clay and knead it thoroughly until it is soft, pliable, and free of air bubbles or cracks. Warm clay is less likely to crack when stamped. -
Roll the slab:
Use a rolling pin to flatten the clay into a smooth slab. Aim for a substantial thickness, about 1/2 to 3/4 inch, to give the tile that chunky look seen in the photo. -
Cut the rectangle:
Using a sharp knife or a dedicated square cutter, trim the rough edges to create a clean, uniform rectangle. Keep the corners slightly soft rather than razor-sharp. -
Smooth the edges:
Dip your finger in a little water and gently run it along the cut edges and corners to round them off and remove any loose bits of clay.
Cracking Clay?
If small cracks appear while drying, mix a tiny bit of fresh clay with water to make a paste (slip) and smooth it into the cracks, then let dry again.
Step 2: Creating the Impressions
-
Position the foot:
For the bunny body, press a child’s foot (or a doll’s foot if practicing) firmly into the center-right of the clay rectangle. Press down evenly on the toes and heel to get a deep, clear impression. -
Create the toes:
To simulate bunny toes, use your thumb or a rounded tool to press three small indentations into the clay just to the left of the main footprint. Arrange them in a slight arc. -
Add the paw pad:
Press a larger, oval indentation below the three ‘toes’ to create the main paw pad. This completes the illusion of a bunny foot next to the human foot. -
Dry the tile:
Allow the clay to dry completely according to the package instructions. For a thick slab like this, I usually let it sit for at least 48 to 72 hours, flipping it occasionally to ensure even drying. -
Sand imperfections:
Once fully cured and hard, use fine-grit sandpaper to gently smooth out any rough textures on the surface or sharp ridges around the edges.
Step 3: Painting and Finishing
-
Apply base color:
Paint the entire surface of the tile, excluding the indented footprint areas, with a soft mint green acrylic paint. You may need two coats for opaque coverage. -
Paint the footprints:
Using a smaller brush, carefully fill the indented footprint, toes, and paw pad with a soft pink paint. Try to keep the edges crisp where the pink meets the green. -
Add polka dots:
Dip the end of a paintbrush handle or a dotting tool into white paint. Randomly stamp small dots around the background area to add texture. -
Paint flower details:
Using a fine detail brush and thinned white paint, create delicate starburst or flower shapes near the toes. Use quick, light strokes radiating from a center point. -
Distress the edges (optional):
For a rustic look, lightly sand the painted edges to reveal a bit of the white clay underneath, or dry-brush a tiny amount of white paint along the rim. -
Seal the project:
Finish by applying a coat of gloss varnish or clear sealant over the entire front of the tile. This protects the paint and gives it a ceramic-like sheen.
Name & Date It
Before the clay dries, use small letter stamps to imprint the child’s name and the year on the side or back of the tile for a true time-capsule effect.
Display your charming new tile on a shelf or gift it to grandparents as a forever memory of those tiny toes


What Really Happens Inside the Kiln
Learn how time and temperature work together inside the kiln to transform clay into durable ceramic.
Egg Hunt Token Coins
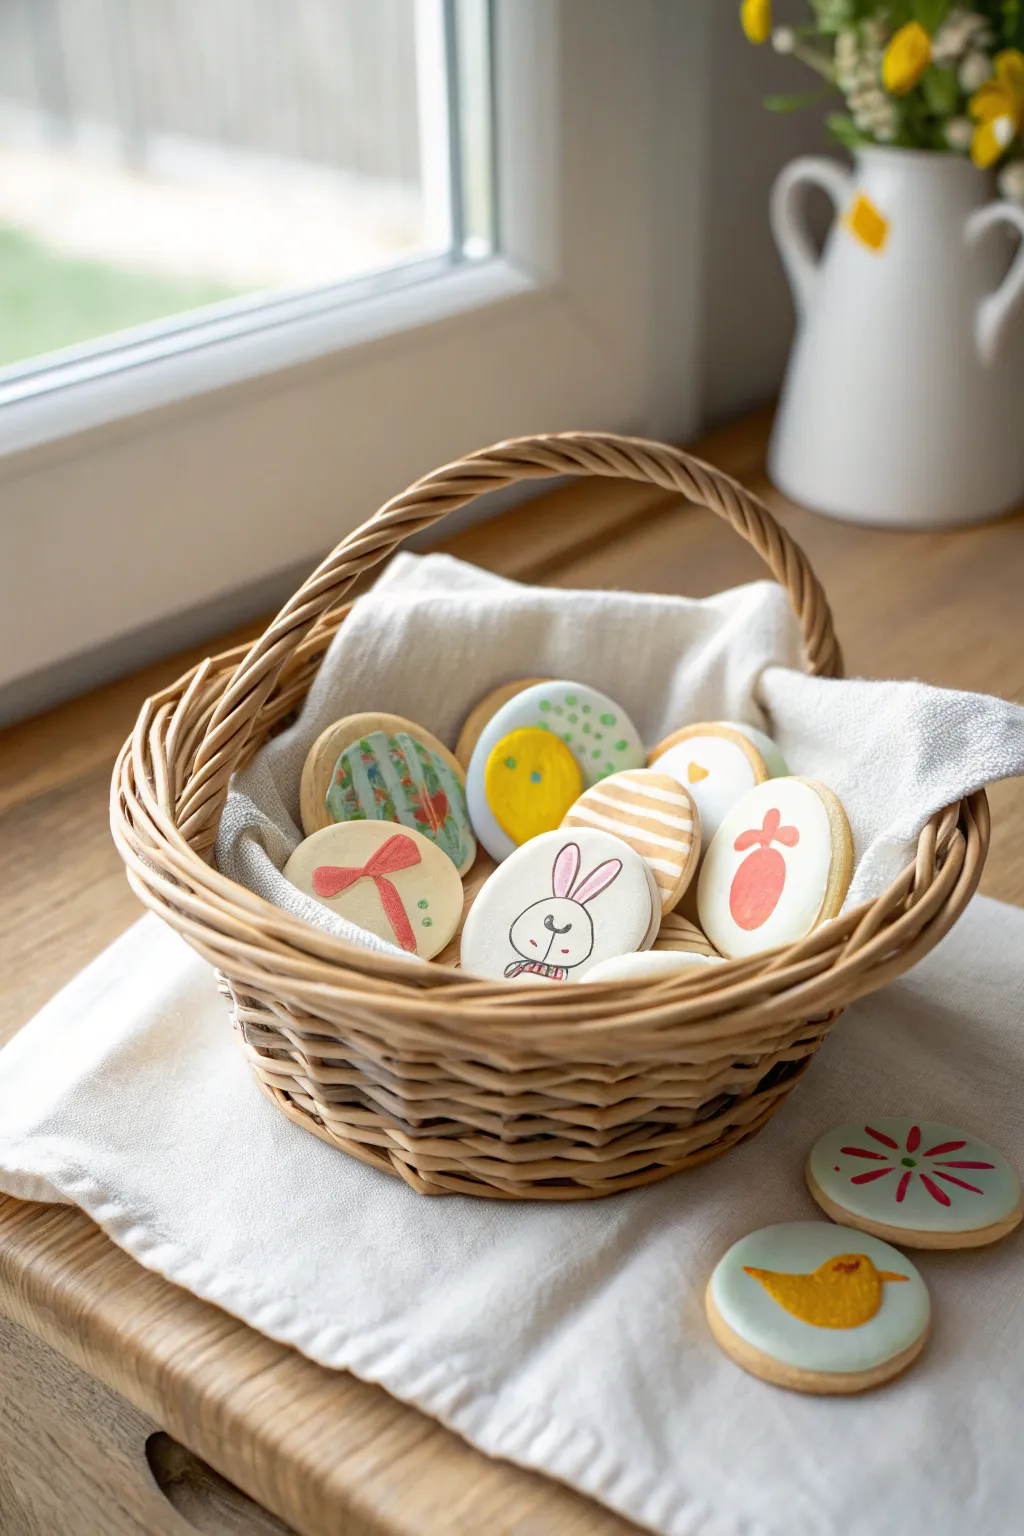
Transform your annual egg hunt with these charming, reusable clay tokens that look just like decorated sugar cookies. Featuring simple, whimsical illustrations like bunnies, chicks, and abstract eggs, they serve as perfect redeemable prizes or keepsake components for a festive basket.
Step-by-Step Guide
Materials
- Air-dry clay (white) or polymer clay
- Rolling pin
- Round cookie cutter (approx. 2-3 inches)
- Sandpaper (fine grit)
- Acrylic paints (pastels: pink, yellow, soft green, light blue, white)
- Fine detail paintbrushes (sizes 0 and 00)
- Black fine-tip permanent marker or micron pen
- Matte or satin sealant (optional but recommended)
Step 1: Shaping the Clay Coins
-
Condition the clay:
Begin by taking a handful of clay and kneading it in your hands until it becomes warm, soft, and pliable, which helps prevent cracks later. -
Roll it out:
Place the clay on a smooth surface or silicone mat. Use your rolling pin to flatten it to an even thickness of about 1/4 inch; you want them sturdy but not too heavy. -
Cut the shapes:
Press your round cookie cutter firmly into the clay to create perfect circles. Lift the cutter and gently pop the round out. -
Smooth the edges:
Dip your finger in a tiny bit of water and run it along the cut edges of the fresh clay to smooth out any sharpness or roughness. -
Dry completely:
Place the rounds on a drying rack or parchment paper. If using air-dry clay, let them cure for 24-48 hours, flipping halfway through. If using polymer clay, bake according to the package instructions. -
Sand for perfection:
Once fully hardened, I like to gently rub surface imperfections and rough edges with fine-grit sandpaper to create a silky canvas for painting.
Step 2: Creating the Base Layers
-
White base coat:
Paint the top surface of each coin with a layer of white acrylic paint. This acts as a primer and makes the pastel colors pop, mimicking royal icing. -
Paint background colors:
For designs that aren’t on white backgrounds (like the yellow chick or blue flower token), paint the entire circle with your chosen pastel base color now. -
Create the ‘icing’ look:
For the white tokens, ensure the white paint is thick and opaque. You might need a second coat after the first one dries completely.
Smooth Surface Hack
Can’t get your clay smooth? Roll your rolling pin over a sheet of plastic cling wrap placed on top of the clay to eliminate roller marks.
Step 3: Painting the Designs
-
Bunny design:
On a white token, use a very fine brush to paint two long, pink oval ears. Add a small pink nose dot in the center. -
Bunny details:
Once the pink ears are dry, use your black fine-tip pen to outline the ears, draw the rounded face, eyes, whiskers, and a little bowtie or collar at the bottom. -
Striped egg design:
Using a light mustard or gold paint, create horizontal stripes across a white token. Vary the thickness for a hand-drawn feel. -
Chick hatching design:
Paint a bright yellow oval shape. Once dry, add a jagged white line across the top to look like a cracked shell, or paint a blue ‘shell’ shape covering half the yellow oval. -
Floral and abstract patterns:
For the flower token, paint five red teardrop shapes pointing inward to a center point. Add green lines for stems or leaves. -
Ribbon gift design:
Paint a simple red cross or bow shape on a white background to mimic a wrapped present, adding small green dots for confetti if desired. -
Simple bird silhouette:
On a light blue or green background token, paint a simple yellow bird shape profile in the center.
Make Them Redeemable
Write different ‘prizes’ on the back of each token with a marker, such as ‘Stay up 15 mins late’ or ‘Pick the movie tonight’ for added fun.
Step 4: Finishing Touches
-
Final ink details:
Go back over any painted elements that need definition with your black pen, such as bird eyes or flower centers. -
Seal the tokens:
Once all paint and ink is 100% dry, apply a thin coat of matte or satin varnish to protect your artwork from wet grass during the hunt.
Now your custom tokens are ready to be hidden in the garden for a memorable and sustainable Easter celebration
Clay Egg Magnets for the Fridge
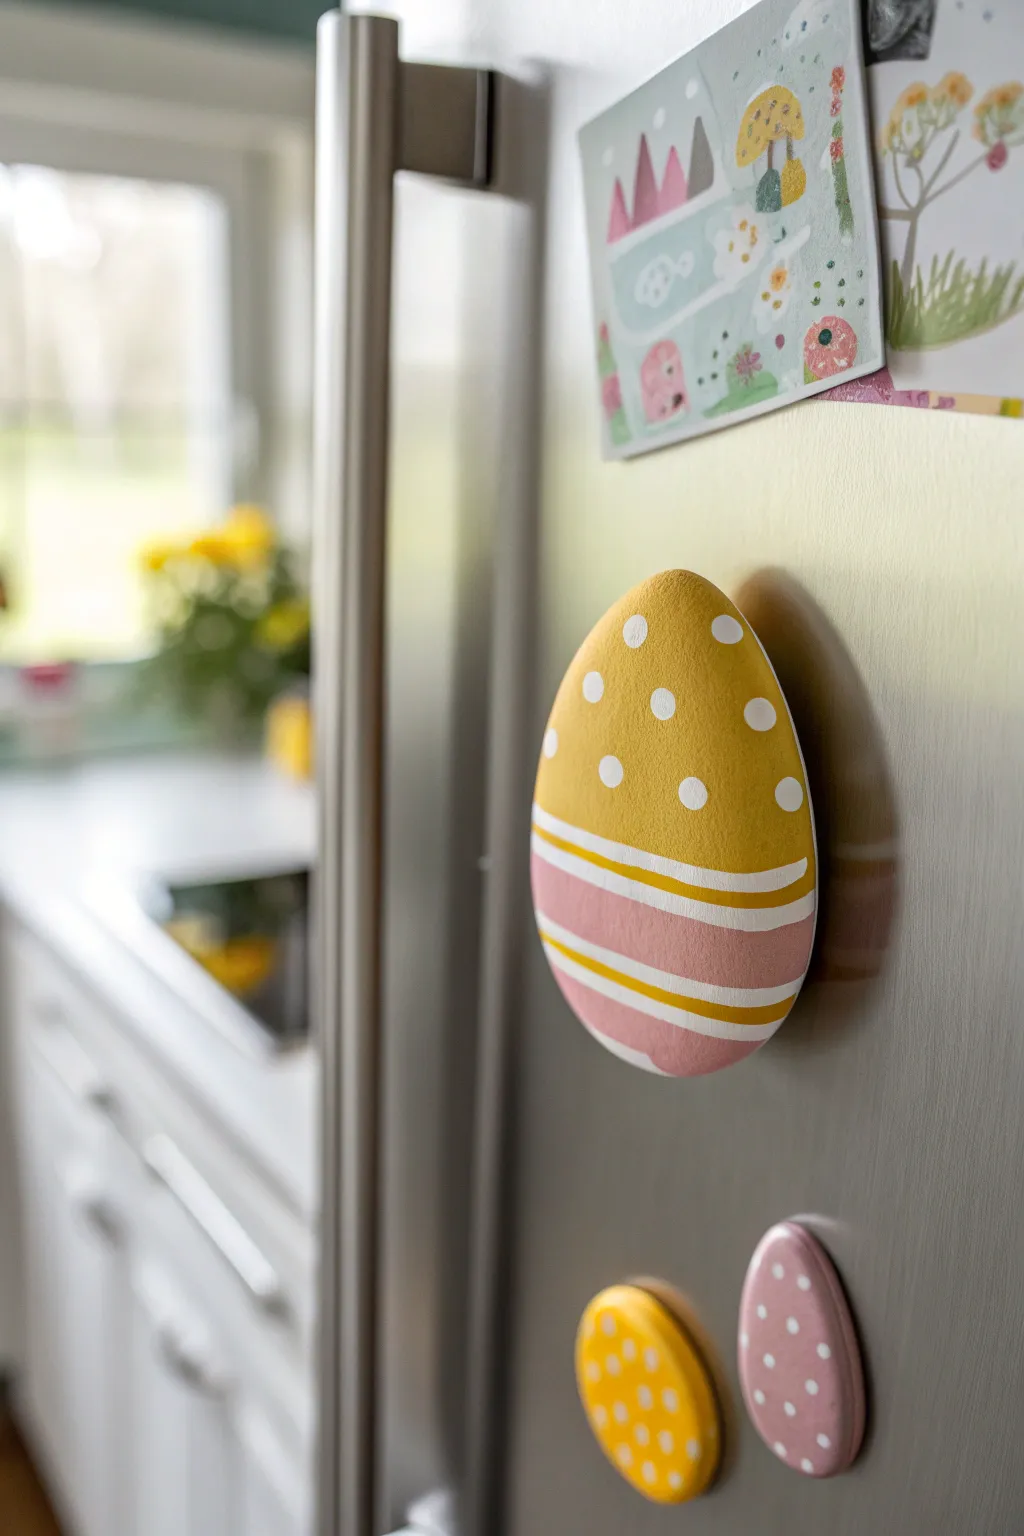
Brighten up your kitchen with these charming, hand-painted Easter egg magnets that stick right to your fridge door. Modeled with a smooth, slightly flattened surface, they offer the perfect canvas for classic holiday patterns like polka dots and stripes.
Detailed Instructions
Materials
- Air-dry clay (white)
- Small rolling pin
- Egg-shaped cookie cutter (medium size)
- Sandpaper (fine grit)
- Acrylic paints (mustard yellow, dusty pink, white)
- Small flat paintbrush
- Fine-tip detail brush or dotting tool
- Strong craft magnets (round)
- Strong craft glue (e.g., E6000 or hot glue)
- Matte sealant or varnish (optional)
Step 1: Shaping the Clay Base
-
Condition the clay:
Begin by kneading a handful of white air-dry clay until it is soft, pliable, and free of cracks. This ensures a smooth finished surface later. -
Roll it out:
Roll the clay out on a clean surface to an even thickness of about 1/4 inch. Avoid making it too thin, as the magnets need a sturdy base. -
Cut the shapes:
Press your egg-shaped cookie cutter firmly into the clay. If you don’t have a cutter, you can hand-mold an oval shape and flatten it gently. -
Smooth the edges:
Dip your finger in a little water and run it along the cut edges of the clay egg to remove any roughness or sharp bits left by the cutter. -
Dry thoroughly:
Place your clay eggs on a drying rack or parchment paper. Let them air dry completely according to package instructions, usually 24-48 hours. Flip them halfway through so the bottom dries evenly.
Fixing curling clay
If your egg edges start to curl up while drying, gently weigh them down with a heavy book placed over a sheet of parchment paper.
Step 2: Painting the Design
-
Sand imperfections:
Once fully dry, lightly sand the surface and edges with fine-grit sandpaper if there are any bumps. Wipe away the dust with a barely damp cloth. -
Block out the yellow:
Using the flat brush, paint the top two-thirds of the egg with a coat of mustard yellow acrylic paint. Create a clean horizontal line where the yellow ends. -
Add the pink base:
Paint the bottom third of the egg with the dusty pink shade. Leave a small gap of white clay showing between the yellow and pink sections if you want a natural white stripe, or plan to paint over it later. -
Apply a second coat:
Depending on your paint opacity, you might need a second coat of both yellow and pink to get that solid, matte look shown in the photo. Let this base layer dry completely. -
Paint the dividing stripes:
Using a fine brush and white paint, create the horizontal stripes. Paint a thick white band separating the yellow and pink sections. Add a second, thinner white stripe horizontally through the middle of the pink section. -
Add yellow details:
Take a very small amount of yellow paint and add a thin accent line inside the lower white stripe on the pink section for extra detail. -
Create the polka dots:
Dip the handle end of a paintbrush, a dotting tool, or a toothpick into white paint. Gently dot a random pattern of white spots over the yellow section of the egg. -
Let the design cure:
Allow all the paint work to dry fully. I usually give it at least an hour to ensure the dots don’t smear during the final steps.
Step 3: Finishing Touches
-
Seal the surface:
For longevity, brush on a thin layer of matte varnish or sealant. This protects the paint from chipping and makes the magnet easier to wipe clean. -
Attach the magnet:
Flip the egg over. Apply a strong dab of craft glue to the center of the back. -
Secure and dry:
Press a round magnet firmly into the glue. Let the adhesive cure overnight before placing your new art on the refrigerator.
Make it 3D
Before drying, gently press a patterned lace doily or textured fabric into the clay surface for a tactile, embossed finish under the paint.
Now you have a delightful set of custom decor to make your kitchen feel ready for spring

TRACK YOUR CERAMIC JOURNEY
Capture glaze tests, firing details, and creative progress—all in one simple printable. Make your projects easier to repeat and improve.
Bunny and Chick Spoon Rests
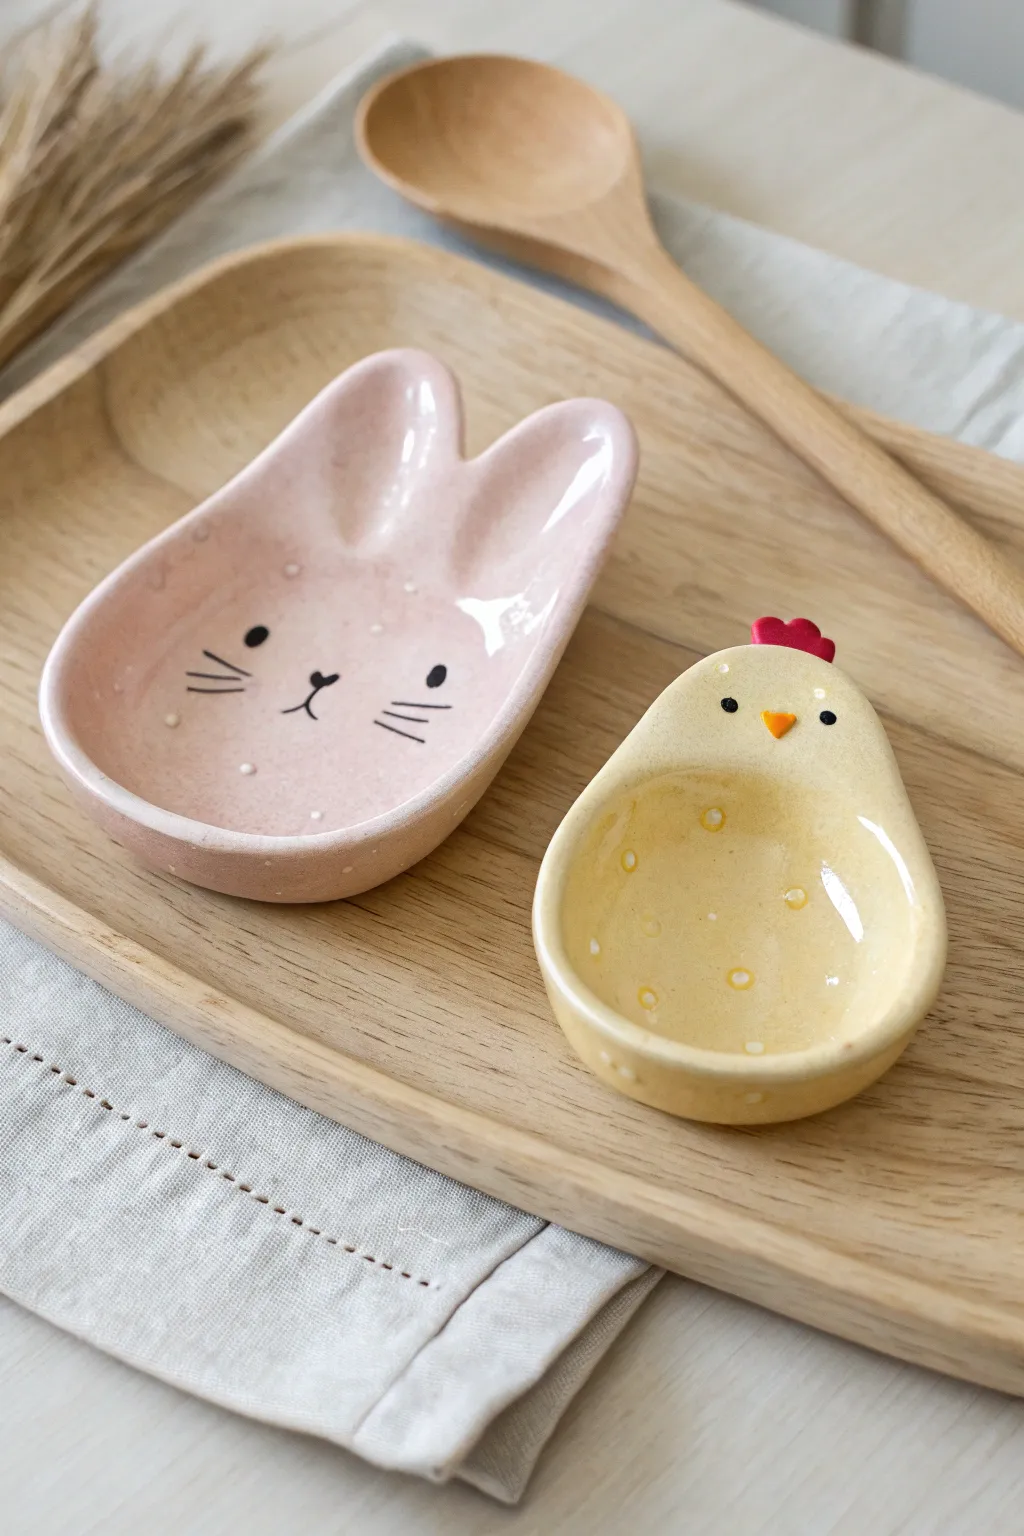
These adorable spoon rests double as festive Easter décor and practical kitchen helpers, featuring a sweet pink bunny and a sunny yellow chick. Crafted from clay and finished with a glossy sheen, they add a charming touch to any tabletop or stove.
Step-by-Step
Materials
- Air-dry clay or polymer clay (white)
- Rolling pin
- Clay sculpting tools or a butter knife
- Small bowl or sandpaper (for smoothing)
- Acrylic paints (pastel pink, pastel yellow, black, orange, red, white)
- Fine detail paintbrushes
- Glossy varnish or glaze (food-safe if actually resting eating spoons)
- Water cup (for smoothing air-dry clay)
- Parchment paper or craft mat
Step 1: Shaping the Clay Base
-
Roll out the slab:
Begin by kneading your clay until it is soft and pliable. Roll it out on parchment paper to an even thickness of about 1/4 inch. You want it sturdy enough to hold a spoon but not too chunky. -
Cut the bunny silhouette:
Use a sculpting tool or knife to cut out a rounded oval shape for the bunny’s face, adding two tall, slightly tapered ears at the top. Smooth the cut edges with a wet finger to remove any jagged bits. -
Cut the chick silhouette:
For the chick, cut a teardrop shape that is wider at the bottom and narrower at the top. This simple organic shape mimics a little nesting bird perfectly. -
Form the rim:
Gently pinch and lift the edges of both shapes upwards to create a shallow rim. This lip is crucial as it keeps spoon drips contained. Use your thumb to smooth the inside curve where the wall meets the base. -
Smooth the surfaces:
Take a moment to dip your finger in a little water (for air-dry clay) or baby oil (for polymer) and run it over the entire surface. Erase any fingerprints or cracks now, because they will show up under the paint later. -
Dry or bake:
If using air-dry clay, set the pieces aside in a safe spot for 24-48 hours until rock hard. I usually flip them hallway through so the bottom dries evenly. If using polymer clay, bake according to the package instructions and let cool completely.
Uneven Clay?
If your clay dries warped, don’t worry. You can glue a small circle of felt to the bottom of the spoon rest. This stabilizes it on the table and protects your furniture from scratches.
Step 2: Painting the Characters
-
Sand imperfections:
Once fully dry or cooled, lightly sand any rough edges with fine-grit sandpaper. Wipe away all dust with a slightly damp cloth or sponge before getting your paints out. -
Base coat: Bunny:
Paint the entire bunny shape with a soft pastel pink acrylic paint. You may need two coats for opaque, even coverage. Let the first layer dry completely before adding the second. -
Base coat: Chick:
Paint the chick shape with a cheerful, warm yellow. Just like the bunny, apply thin layers to avoid brush strokes, allowing drying time in between. -
Add the chick’s details:
Using a tiny brush, paint a small orange triangle beak near the top center. Add a small red heart or scalloped shape on top of the head for the comb. -
Paint the eyes:
Dip the handle end of a paintbrush into black paint to dot perfectly round eyes onto both animals. Place the bunny’s eyes wide apart and the chick’s closer to the beak. -
Bunny whiskers and nose:
With your finest brush, paint three thin black lines on each cheek for whiskers. Add a tiny heart-shaped nose in the center and a small vertical line dropping down from it. -
The speckled effect:
To get that speckled ceramic look, mix a little white paint with water. Dip a stiff brush (or toothbrush) into it and run your thumb across the bristles to lightly flick tiny white dots over the bunny and chick. -
Yellow dots on the chick:
If you look closely at the chick, it has extra texture. Paint subtle, slightly lighter yellow or white dots around the inner basin of the chick for added visual interest.
Step 3: Sealing and Finishing
-
Apply varnish:
Once the paint is bone dry, apply a coat of high-gloss varnish. This mimics the look of fired ceramic glaze and makes the colors pop. -
Second coat:
For extra durability, especially if these will be near kitchen messes, apply a second coat of varnish. Ensure you get into the corners where the rim meets the base. -
Final cure:
Let the varnish cure for at least 24 hours before using or gifting. Check your specific varnish bottle for cure times versus dry times.
Pro Tip: Food Safety
Most air-dry finishes aren’t food safe or dishwasher safe. Use these for dry goods or décor only, unless you use a specialized food-safe resin or glaze.
Enjoy displaying your sweet handmade animals in the kitchen this spring
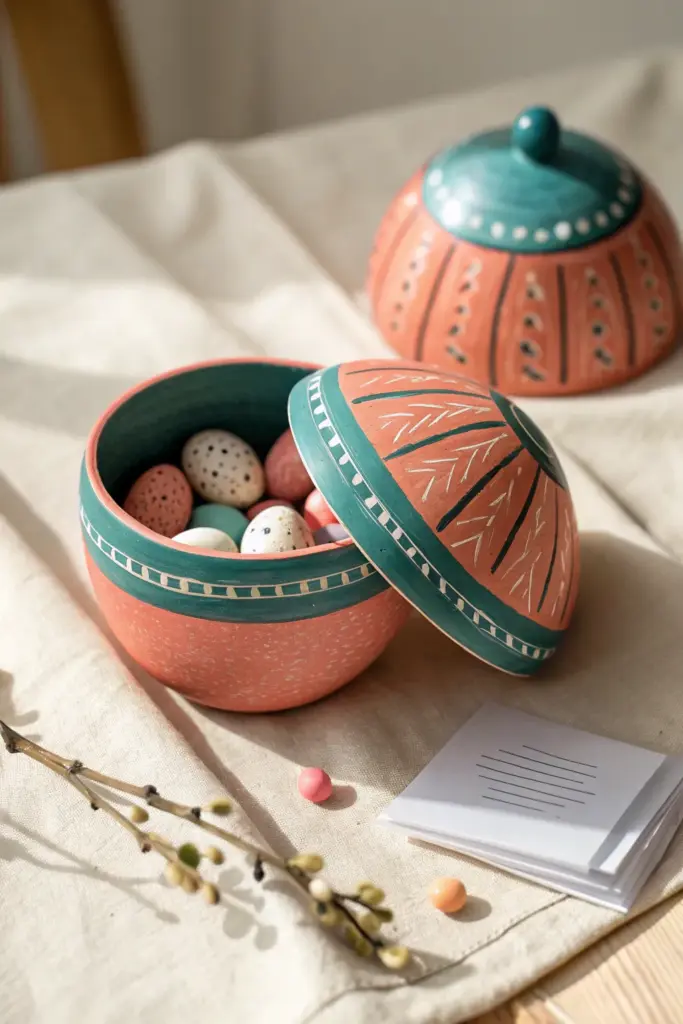
Surprise-Opening Egg Containers

These delightful clay vessels combine earthy terracotta tones with striking teal accents to create the perfect hiding spot for Easter treats. With their dome-shaped lids and folk-art inspired patterns, they make charming reusable gift boxes or seasonal decor pieces.
Step-by-Step Tutorial
Materials
- Air-dry clay (terracotta color preferred) or polymer clay
- Rolling pin
- Small bowl or sphere mold (for shaping)
- Craft knife or clay trimming tool
- Acrylic paints: Teal/dark turquoise, white, terracotta/orange
- Fine detail paintbrushes
- Medium flat paintbrush
- Sandpaper (fine grit)
- Water and sponge (for smoothing)
- Matte varnish or sealant
Step 1: Shaping the Vessel
-
Prepare the Clay:
Begin by conditioning your terracotta-colored clay until it is soft and pliable. Roll it out into a slab approximately 1/4 inch thick, ensuring an even surface. -
Form the Base Bowl:
Drape the clay sheet over a small bowl or a sphere mold to create the bottom half of your container. Gently press the clay against the form to smooth out any air bubbles, then trim the excess clay at the rim to create a clean, flat edge. -
Create the Lid:
To make the dome lid, repeat the previous process using the same mold, but trim the rim slightly shorter so the lid isn’t quite as deep as the base. -
Add a Handle:
Roll a small ball of clay and attach it firmly to the very top center of your lid using a bit of water (or slip, if using kiln clay) to act as a knob handle. -
Dry and Refine:
Allow both pieces to dry completely according to the package instructions. Once hard, use fine-grit sandpaper to smooth any rough edges, particularly around the rims where the lid meets the base.
Lid Won’t Fit?
If the lid slides off the base, roll a thin snake of clay and attach it to the inside rim of the LID pieces. This creates an inner lip that will sit securely inside the bottom bowl.
Step 2: Painting the Base Colors
-
Apply the Base Coat:
If your clay isn’t naturally terracotta-colored, paint the entire exterior of the bottom bowl in a warm terracotta or salmon-pink shade. I like to sponge this on for a natural texture. -
Paint the Rim Band:
Using your medium flat brush, paint a bold teal or turquoise band around the upper rim of the bottom bowl, extending about an inch down. Paint the inside of the bowl teal as well for a nice pop of color when opened. -
Paint the Lid Rim:
On the lid, paint a matching teal band around the bottom edge. This creates visual continuity when the pot is closed. -
Create Lid Segments:
Paint the very top of the lid (including the knob) in teal. Then, carefully paint thin vertical stripes connecting the top teal circle to the bottom rim band, dividing the terracotta section into segments.
Step 3: Adding Folk Art Details
-
Draft the Leaves:
In the terracotta segments on the lid, use a very fine brush and thin white paint to create delicate chevron or leaf-vein patterns. These should point upward toward the center knob. -
The Geometric Rim Pattern:
Along the teal band on both the lid and the base, paint a horizontal white line through the center. Add small vertical hash marks along this line to create a ‘ladder’ or ‘stitch’ effect. -
Detailing the Knob:
Add a ring of tiny white dots around the base of the knob handle to frame it. -
Speckling the Base:
To mimic the texture in the photo, dilute a small amount of white or light cream paint. Dip an old toothbrush or stiff brush into it and gently flick specks onto the lower terracotta portion of the main bowl. -
Final Seal:
Once all paint is completely dry, apply a coat of matte varnish. This protects your work and gives it a professional, finished ceramic look. -
Fill the Pot:
Place small speckled chocolate eggs or painted wooden eggs inside your new container to complete the surprise.
Rustic Texture Trick
Before the clay dries, gently press a piece of rough linen or canvas into the surface. This imitates the fabric texture seen in pottery and gives the paint more grip.
Enjoy displaying these charming handmade containers on your Easter table