
If you can roll a ball and pinch a little triangle, you can make easy clay figures that turn out surprisingly cute. I pulled together my favorite beginner-friendly figure ideas that use simple shapes, tiny details, and zero fancy sculpting skills.
Simple Dot-Eyed Clay Cat
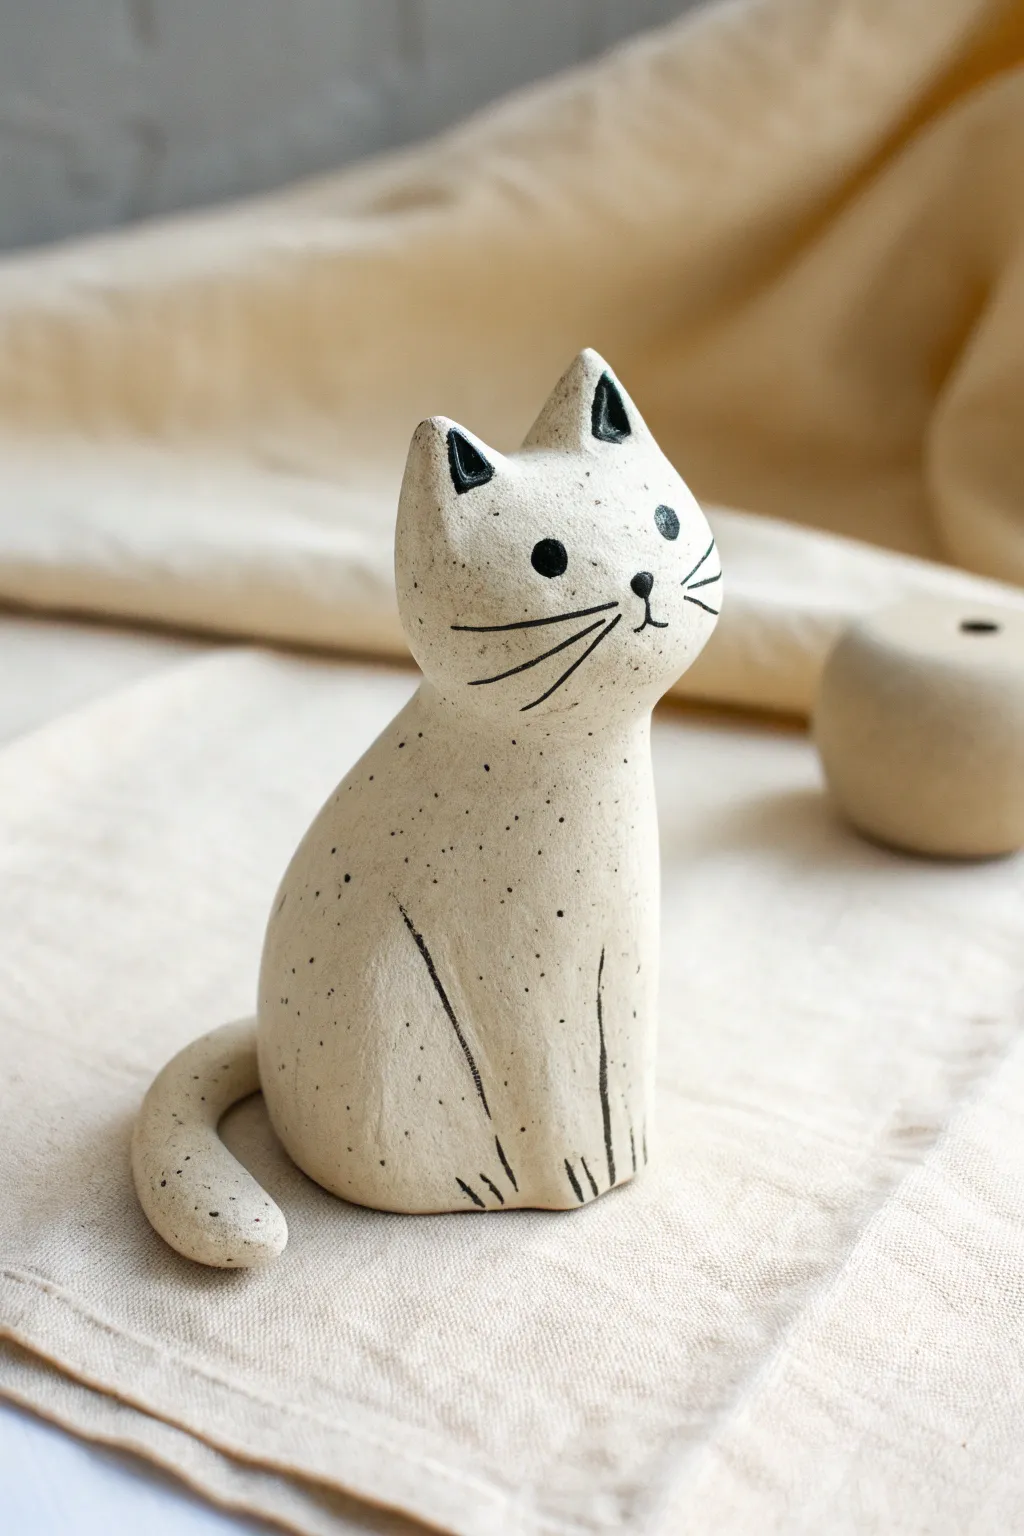
This charming, minimalist cat figurine captures a sweet personality with its simple form and speckled finish. It features a smooth, triangular head, delightful painted details, and a cozy curled tail that makes it the perfect little desk companion.
Step-by-Step
Materials
- Speckled pottery clay (or white air-dry/polymer clay with faux speckles)
- Black underglaze or acrylic paint
- Small fine-point paintbrush
- Bowl of water (for smoothing)
- Scoring tool or toothpick
- Potter’s needle tool
- Sponge
Step 1: Shaping the Body
-
Prepare the clay:
Start by wedging your speckled clay to remove air bubbles. This ensures a smooth finish and prevents cracking during firing or drying. -
Form the base:
Roll a medium-sized ball of clay into a teardrop shape. Flatten the bottom gently so it sits stably on your work surface; this will be the cat’s seated body. -
Elongate the neck:
Gently pinch and pull the thinner top of the teardrop upwards to create a slight neck area where the head will attach. -
Create the tail:
Roll a separate snake or coil of clay, tapering it slightly at one end. This should be long enough to wrap around the side of the cat’s body. -
Attach the tail:
Score the side of the body and the back of the tail where they will touch. Apply a little slip (clay water) and press the tail firmly against the body, curling the tip forward.
Wobbly Cat?
If the cat tips over, tap the bottom firmly on the table while the clay is still soft to create a completely flat base.
Step 2: Sculpting the Head
-
Shape the head:
Roll a smaller ball of clay and gently flatten it into a rounded triangle shape. The top corners will become the ears. -
Define the ears:
Pinch the top two corners of your triangle to sharpen them into distinct ear shapes. Smooth the edges so they aren’t too sharp. -
Attach head to body:
Score the top of the neck and the bottom of the head. Add slip, then press the head firmly onto the body. I like to wiggle it slightly to ensure a strong bond. -
Blend the seams:
Using your thumb or a modeling tool, drag clay from the neck up into the head and vice versa to eliminate the seam line. Smooth the area with a damp sponge. -
Refine the posture:
Tilt the head slightly upward to give the cat an inquisitive look. Check the silhouette from all sides to ensure the curves flow naturally.
Customize the Coat
Instead of speckles, use orange and black paint patches to create a calico, or grey stripes for a tabby.
Step 3: Painting & Finishing
-
Dry the piece:
Let the clay dry to a leather-hard state (if using ceramic clay) or fully dry (if using air-dry clay). This makes painting the fine details much easier. -
Paint the ears:
Using a fine brush and black underglaze (or acrylic), paint small black triangles inside the sculpted ears. -
Add the face:
Paint two solid black circles for eyes. Place them fairly wide apart. Add a small inverted triangle for the nose and a simple ‘w’ shape for the mouth below it. -
Draw the whiskers:
With a very steady hand, paint three long, thin whiskers radiating outward from each cheek area. -
Define the legs:
Instead of sculpting separate legs, suggest them with paint. Draw a thin, curved line on the chest to indicate a front leg, and add small vertical dashes at the bottom for paws. -
Final drying or firing:
Allow the paint or underglaze to dry completely. If using pottery clay, bisque fire and glaze with a clear matte or satin glaze before the final firing.
Enjoy your minimalist clay feline sitting quietly on your shelf


Chubby Clay Penguin

This charming, rotund penguin brings a touch of arctic wonder to your desk or shelf with its smooth, pebble-like finish and sweet expression. The minimalist design focuses on simple shapes, making it a perfect project for mastering the basics of clay sculpting.
How-To Guide
Materials
- Black polymer or air-dry clay
- White acrylic paint (or white clay)
- Small amount of brown or dark grey clay (for the beak)
- Small detail paintbrush
- Sculpting tools (needle tool and ball tool)
- Matte varnish (optional)
- Fine-grit sandpaper
Step 1: Forming the Body
-
Create the base shape:
Start with a generous amount of black clay. Roll it into a smooth ball between your palms to remove any cracks or lines. -
Shape the egg:
Gently taper the top of the ball to create a distinct egg shape. This will be the main body; you want the bottom to remain wide and heavy so the figure sits stably. -
Flatten the base:
Tap the bottom of your egg shape firmly against your work surface. This creates a flat bottom ensuring your penguin won’t wobble.
Step 2: Adding the Flippers & Feet
-
Form the wings:
Pinches off two equal, smaller pieces of black clay. Roll them into teardrop shapes, then flatten them gently between your thumb and forefinger to create the flippers. -
Attach the wings:
Press the rounded end of each flipper onto the sides of the body, about halfway down. Smooth the join using your thumb or a modeling tool so they look like they are growing out of the body, not just stuck on. -
Create the feet:
Roll two small balls of black clay and flatten them slightly into ovals. These will become the feet. -
Add toe details:
Using a needle tool or a dull knife, press two vertical indentations into the front of each foot oval to suggest toes. -
Attach the feet:
Place the feet under the front edge of the body. Press the body down gently onto them to secure the bond. If you are using air-dry clay, a dab of water helps here.
Fixing Cracks
If small cracks appear in the black clay as it dries, mix a tiny bit of fresh clay with water to make a paste and fill the gaps, then sand smooth.
Step 3: Creating the Face
-
Sculpt the beak:
Take a tiny amount of separate dark clay (or use black if you plan to paint it later). Roll a tiny cone shape. -
Attach the beak:
Position the beak in the center of the ‘face’ area, slightly higher than the midpoint of the sculpture. Press it on firmly. -
Smooth the surface:
Before curing or drying, give the entire sculpture a final check. Smooth out fingerprints by lightly brushing the clay with a tiny bit of water (for air-dry) or baby oil (for polymer). -
Cure or dry:
Let your sculpture dry completely if using air-dry clay (24-48 hours), or bake it according to the polymer clay package instructions.
Winter Scarf
Before baking, roll a thin snake of red or green clay and wrap it around the penguin’s neck, flattening the ends to look like a tiny knitted scarf.
Step 4: Painting & Finishing
-
Paint the belly:
I prefer to paint the white belly rather than using white clay to keep the black clay clean. Paint a large, elongated oval on the front, starting just under the beak and reaching down to the feet. -
Add texture:
While the white paint is still barely wet, you can use a dry brush to stipple it slightly, giving it a soft, feathery texture rather than a plastic look. -
Paint the eyes:
Using the handle end of a paintbrush, dip it in white paint and dot two circles above the beak. Let this dry. -
Add pupils:
Use a smaller tool or a toothpick dipped in black paint to add tiny dots inside the white eye circles. This brings the character to life. -
Detail the belly:
For a rustic look, use a very fine tip pen or a needle with a wash of brown paint to add tiny, sparse speckles on the white belly. -
Seal the work:
Once all paint is fully dry, apply a matte varnish to protect your penguin without making it too shiny.
Place your little penguin near a window or plant pot for a cute daily greeting


Tiny Clay Bunny With Long Ears

Embrace the charm of imperfection with this delightful rustic bunny figure. Featuring wonderfully exaggerated ears and a chubby, speckled body, this project captures a whimsical aesthetic perfect for spring decor.
Step-by-Step Tutorial
Materials
- White air-dry clay or polymer clay
- Small bowl of water (for smoothing)
- Needle tool or toothpick
- Small sculpting tool (spatula shape)
- Acrylic paint (black and soft pink)
- Fine-grit sandpaper (optional)
- Matte sealant spray
Step 1: Shaping the Base
-
Prepare the rough form:
Begin with a ball of clay roughly the size of a tangerine. Roll it firmly between your palms to remove cracks, then gently gently press it onto your work surface to create a flat bottom. -
Refine the body shape:
Unlike a realistic rabbit, we want a simple egg-like silhouette. Use your thumbs to push the clay upwards slightly, making the ‘chest’ area puffier while keeping the bottom heavy and stable. -
Smooth the surface:
Dip your finger in a tiny bit of water and run it over the clay to smooth out any fingerprints. The texture doesn’t need to be perfect; a slightly organic, hand-molded look adds to the rustic appeal. -
Add the feet:
Roll two very small balls of clay, about the size of peas. Flatten them slightly and press them firmly under the front of the body so they just peek out. Blend the clay seams at the back of the feet into the main body using your sculpting tool.
Pro Tip: Hidden Strength
Insert a toothpick halfway into the body and leave the top half exposed. Impale the ears onto this toothpick anchor to prevent them from breaking off later.
Step 2: Creating the Face
-
Attach the nose:
Take a tiny speck of clay and roll it into a triangle or oval. Press this gently into the center of the face area, slightly higher than the halfway point. You don’t need to blend this seam fully; let it sit like a button. -
Indent the eyes:
Using the head of a small paintbrush or a rounded tool, press two shallow divots into the clay on either side of the nose to mark where the eyes will go. -
Carve the whiskers:
Use your needle tool to carefully etch three lines on each cheek. I like to vary the length slightly so they don’t look too uniform. -
Add surface texture:
To mimic the weathered look in the photo, scratch a few random, short lines or ‘scars’ onto the body using the needle tool. This prevents the bunny from looking too manufactured.
Level Up: Speckled Effect
Before sealing, flick a stiff toothbrush loaded with diluted brown paint over the bunny to create a natural, stone-like speckled pottery texture.
Step 3: The Signature Ears
-
Form the ear logs:
Roll two cylinders of clay that are nearly as long as the body itself. They should be thicker at the bottom and taper gently toward the top. -
Flatten and shape:
Gently flatten the cylinders so they look like long surfboards. Use your thumb to create a shallow concave depression running down the center of each ear. -
Attach the ears:
Score (scratch) the top of the head and the bottom of the ears. Apply a drop of water or liquid clay to the scratched areas and press the ears firmly onto the head. -
Blend the seams:
This is crucial for stability. Use your spatula tool to drag clay from the base of the ear down onto the head, smoothing the joint completely so it looks like one solid piece. -
Pose the ears:
If the ears are heavy, they might droop. Prop them up with crumpled paper towels behind the bunny while the clay dries or bakes.
Step 4: Finishing Touches
-
Dry the piece:
If using air-dry clay, let it sit for 24-48 hours. If using polymer, bake according to the package instructions. Ensure it is bone dry before painting. -
Sand imperfections:
Once fully cured, use fine-grit sandpaper to knock down any sharp burrs or rough patches that distract from the shape. -
Paint the details:
Using a fine brush, paint the nose a soft, muted pink. Fill the eye divots with black paint, adding a tiny white dot for reflection if you wish. -
Enhance texturing:
Dilute a tiny drop of brown or grey, watery paint. Wash this over the whiskers and scratch marks, then quickly wipe it off with a paper towel. The dark pigment will stay in the crevices. -
Seal the work:
Finish with a matte spray sealant to protect your bunny without giving it an unnatural glossy shine.
Give your new little friend a spot on a sunny shelf or a wooden tray to show off its rustic charm


Easy Clay Frog Buddy
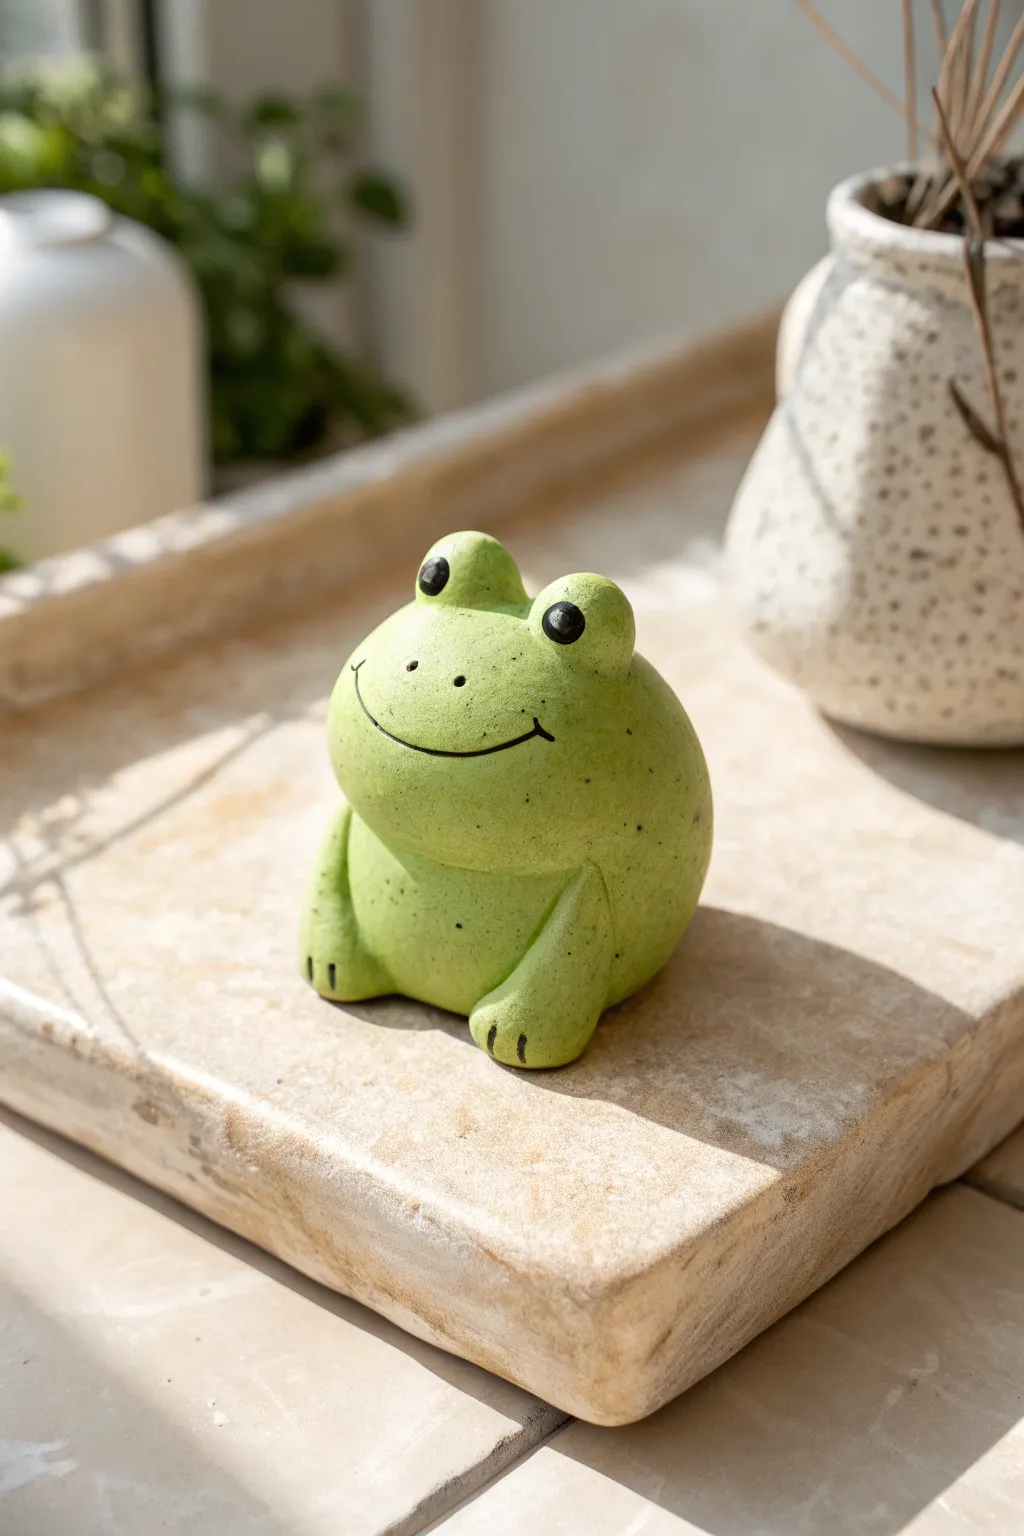
Create a cheerful, chubby little frog friend that brings a serene vibe to any windowsill or desk. This beginner-friendly project focuses on simple spherical shapes and a lovely speckled green finish to mimic a stoneware look.
Detailed Instructions
Materials
- Polymer clay (white or light beige)
- Acrylic paint (sage green, dark olive green or black)
- Speckled clay effect paint (optional) or splatter brush
- Ball stylus tool or end of a paintbrush
- Needle tool or toothpick
- Matte varnish or sealant
- Rolling pin
- Aluminum foil (for core armature)
Step 1: Shaping the Base
-
Create the core:
Start by crumpling a small ball of aluminum foil, roughly the size of a golf ball. Compressing it tightly helps save clay and keeps the figurine lightweight. -
Condition the clay:
Warm up your polymer clay in your hands until it is soft and pliable. If you are mixing colors to get a custom green, now is the time to blend them thoroughly. -
Cover the core:
Flatten a sheet of clay and wrap it completely around the foil ball. Roll it vigorously between your palms until the surface is perfectly smooth and round. -
Form the body shape:
Gently press the ball onto your work surface to create a flat bottom so it sits stably. Then, slightly taper the top half just a bit to define where the head area begins.
Step 2: Adding Froggy Features
-
Make the eyes:
Roll two small, equal-sized balls of clay. Place them on top of the head, spacing them slightly apart, and blend the bottom seams downward into the main body so they don’t look stuck on. -
Form the legs:
Roll two sausage shapes for the front legs. Flatten one end of each slightly to create the foot area. -
Attach the legs:
Press the legs onto the front of the body. The top of the leg should blend smoothly into the side of the body, while the foot rests flat on the surface. -
Define the toes:
Use a needle tool or a knife to gently press two or three indentations into the front of each foot to suggest toes. -
Create the smile:
Use a needle tool to carve a wide, curved smile across the face. Add tiny vertical tick marks at the very corners of the mouth for extra character. -
Add nostrils:
Poke two small holes between the eyes using a small dotting tool or toothpick to serve as nostrils.
Smooth Seams
Use a drop of baby oil or clay softener on your finger to smooth out fingerprints and blending lines before baking for a flawless finish.
Step 3: Baking and Painting
-
Bake the clay:
Bake your frog according to the manufacturer’s instructions on your clay package. Let it cool completely before painting. -
Base coat:
Paint the entire frog with a light sage or matcha green acrylic paint. You may need two thin coats for opaque coverage. -
Create texture:
I like to use an old toothbrush specifically for this step. Dip it in watered-down dark green or black paint and flick the bristles to spray fine specks across the body, imitating a ceramic glaze. -
Paint the eyes:
Use a small detail brush to paint the round eyes black. Add a tiny white dot in each eye for a highlight if you want a livelier expression. -
Highlight the smile:
Very carefully run a thin line of dark paint or a fine-tip marker inside the carved smile line and the toe indentations to make them pop. -
Seal the piece:
Finish with a coat of matte varnish. This removes the plastic look of the clay and unites the paint layers for a professional stone-like finish.
Speckle Splatter Mess
If your speckles are too big or runny, blot them immediately with a damp paper towel. Test your flicking technique on paper first.
Now you have a charming amphibian companion ready to brighten your shelf

The Complete Guide to Pottery Troubleshooting
Uncover the most common ceramic mistakes—from cracking clay to failed glazes—and learn how to fix them fast.
Round-Bodied Clay Dino
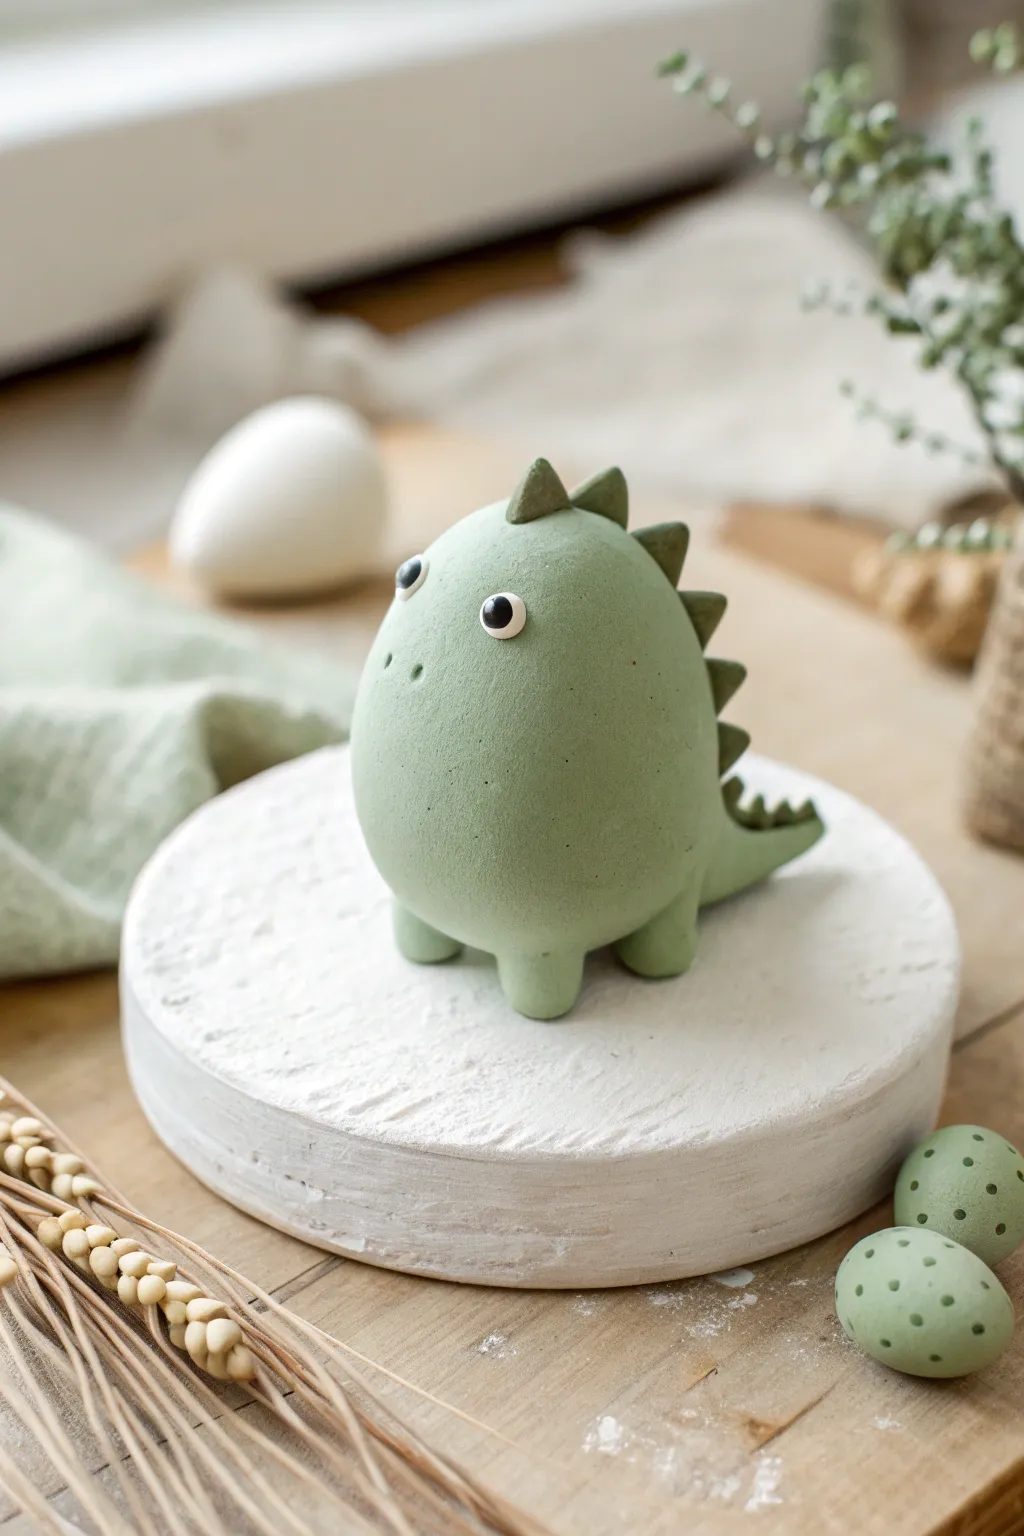
This adorable round-bodied dinosaur is the perfect starting point for clay beginners, featuring a smooth, matte finish and a charmingly simple expression. With no complex armatures or wireframes needed, you can focus purely on shaping and smoothing the clay to create a cute prehistoric companion.
How-To Guide
Materials
- Polymer clay or air-dry clay (sage green and dark green)
- Small amount of white and black clay for eyes
- Clay roller or smooth round jar
- Needle tool or toothpick
- Soft paintbrush for smoothing
- Creating mat or parchment paper
- Tiny ball tool (optional)
- Small blade or craft knife
Step 1: Shaping the Body
-
Condition the clay:
Begin by taking a large chunk of your sage green clay and kneading it thoroughly in your hands until it becomes warm, soft, and pliable. This prevents cracks later. -
Form the main shape:
Roll the green clay into a smooth ball between your palms. -
Create the egg shape:
Gently taper the top of the ball slightly to create a subtle egg shape, keeping the bottom wide and heavy so the figure sits consistently. -
Smooth the surface:
Check for any fingerprints. I find that lightly brushing the surface with a tiny bit of water (for air-dry) or baby oil (for polymer) helps erase these marks instantly. -
Shape the legs:
Roll four small, equal-sized balls of the same sage green clay for the feet. -
Attach the feet:
Press these four balls onto the bottom of the body. You can use a little pressure to flatten them so the dinosaur stands stable. -
Blend the seams:
Use a modeling tool or your finger to gently blend the clay from the legs upward into the body so they look like one continuous piece rather than stuck-on balls.
Cracking Clay?
If using air-dry clay, cracks usually happen if it dries too fast. Drape a slightly damp paper towel over your dino while it dries to slow the process down.
Step 2: Adding the Tail and Spikes
-
Form the tail:
Roll a small cone of sage green clay. Flatten the wide end slightly where it will join the body. -
Attach the tail:
Press the tail onto the lower back of the dinosaur. Like the legs, blend the seam carefully so the transition is invisible. -
Prepare the spikes:
Take your darker green clay and roll out a thin snake. Cut small triangular sections from this strip using your blade. -
Place the spikes:
Starting from the top of the head, gently press the triangular spikes in a row going down the center of the back, all the way to the tip of the tail. -
Secure the spikes:
Use a needle tool to gently nudge the bottom of each spike into the body clay to ensure a strong bond.
Make it a Set
Use leftover clay to make matching spotted eggs! Roll egg shapes and firmly press in tiny contrasting clay dots before smoothing them flat.
Step 3: Face and Finishing Touches
-
Create the eye sockets:
Use a small ball tool or the rounded end of a paintbrush to make two shallow indentations on the face where the eyes will sit. -
Make the eyes:
Roll tiny balls of white clay and place them into the sockets, pressing gently to flatten them. -
Add pupils:
Roll even tinier specks of black clay and place them onto the white circles. Placement is key here; placing them wide apart gives a cute, vacant look. -
Add nostrils:
Use a needle tool or toothpick to poke two tiny holes between the eyes for nostrils. -
Refine the texture:
If you want that matte, stone-like texture shown in the photo, gently tap the entire surface (avoiding the eyes) with an old toothbrush or a stiff bristle brush. -
Final smooth:
Do one last check for lint or dust specks, picking them off carefully with your needle tool. -
Cure or dry:
Bake according to your polymer clay package instructions or let your air-dry clay sit undisturbed for 24-48 hours.
Once fully cured, your little dino is ready to guard your desk or bookshelf with prehistoric cuteness
Tiny Clay Turtle With Shell Dots
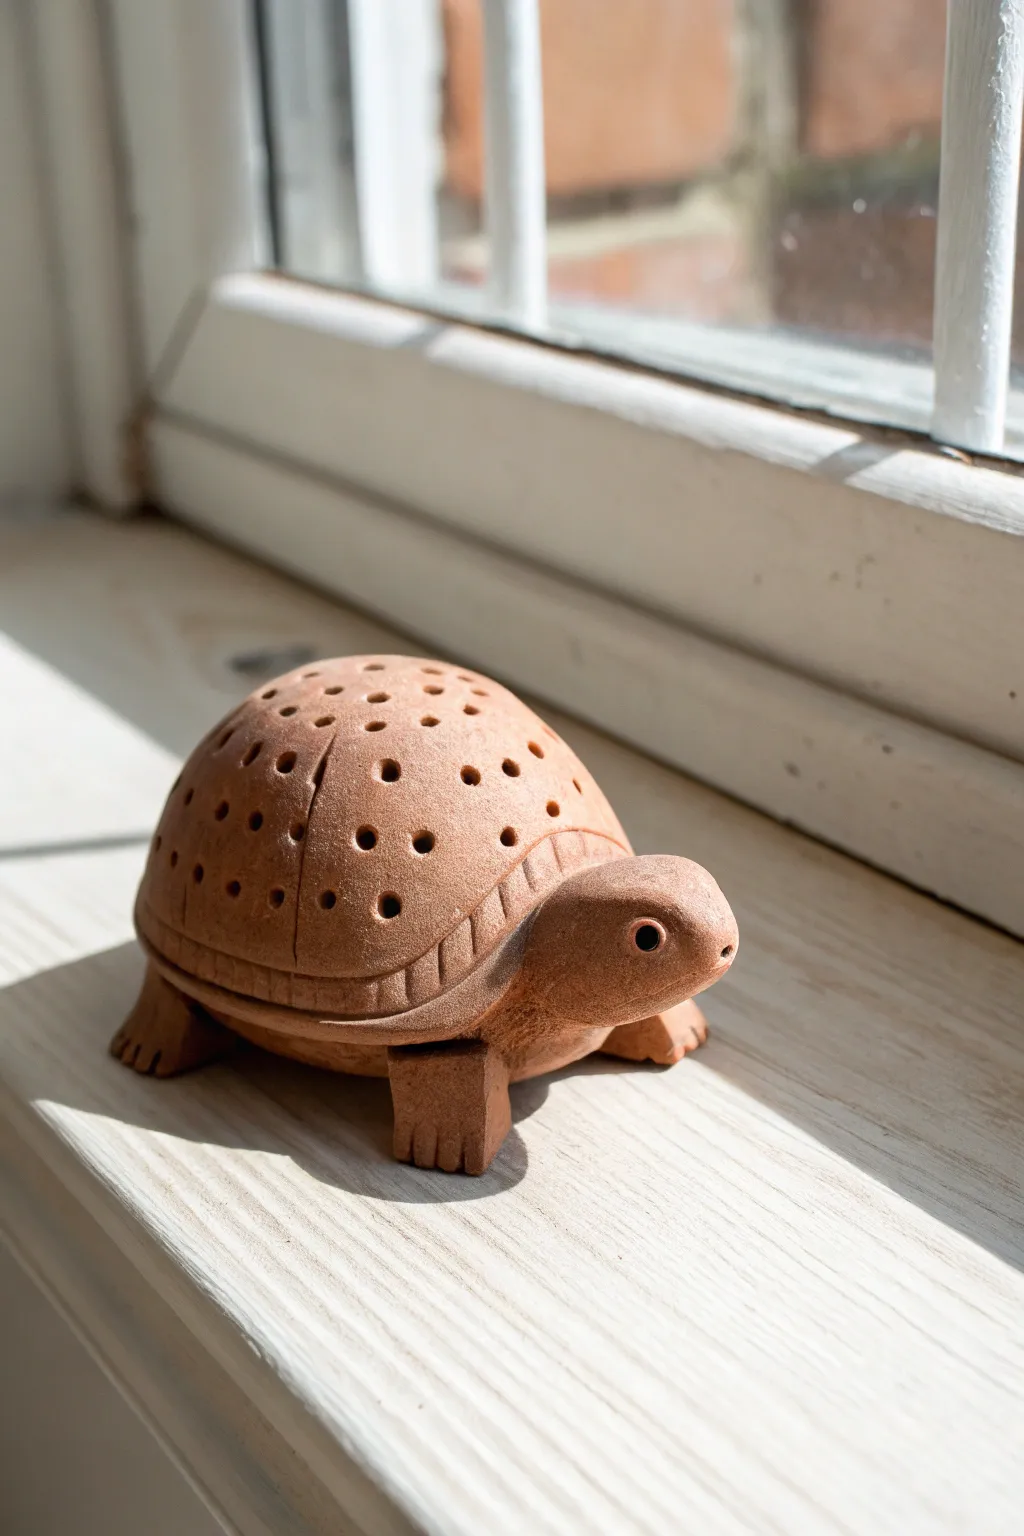
This charming little turtle features a classic terracotta finish and a whimsical shell dotted with tiny perforations. It makes for a delightful windowsill companion or a unique garden accent that looks surprisingly professional despite being simple to form.
Step-by-Step Guide
Materials
- Terracotta-colored air-dry clay (or polymer clay)
- Small rolling pin
- Modeling tool with a small round tip (or toothpick)
- Knife tool or clay blade
- Small bowl of water (for smoothing)
- Drinking straw (optional, for uniform holes)
- Fine grit sandpaper
Step 1: Shaping the Shell
-
Form the base:
Start with a ball of clay roughly the size of a tangerine. Roll it between your palms until it is smooth and free of cracks. -
Create the dome:
Gently press the ball onto your work surface to flatten the bottom while keeping the top rounded. You want a high dome shape, like an igloo or half-sphere. -
Hollow it out (optional):
If you want a lighter figurine or are using kiln-fire clay, gently pinch and hollow out the underside with your thumbs. For a solid air-dry piece, you can keep it solid but ensure it dries thoroughly. -
Define the rim:
Use your fingers to pinch a small, distinct rim around the bottom edge of the shell. This separates the ‘shell’ visual from the body that will go underneath.
Cracks Appearing?
If you see tiny cracks forming as the clay dries, mix a tiny bit of fresh clay with water to make a paste (slip) and paint it into the cracks with a brush.
Step 2: Creating the Body
-
Make the belly plate:
Roll out a slab of clay about 1/4 inch thick. Cut an oval shape that matches the footprint of your shell dome. -
Attach the shell:
Score (scratch) the bottom rim of your shell and the edge of the base plate. Add a dab of water (slip), and press the shell firmly onto the plate. Smooth the seam so it looks like one solid piece. -
Shape the legs:
Form four equal-sized rectangles or thick cylinders of clay. These should be sturdy enough to support the turtle’s weight. -
Attach the legs:
Press the legs onto the four corners of the underbelly. Flatten the bottoms so the turtle stands stable. -
Detail the toes:
Use your knife tool to press vertical lines into the front of each foot to simulate toes or claws.
Pro Tip: Hidden Scent
Since the shell has holes, leave the bottom hollow. You can place a small dried lavender sachet underneath the turtle to turn it into a decorative air freshener.
Step 3: Adding the Head
-
Form the head:
Roll a smaller ball of clay into a teardrop shape for the head and neck. The rounded end will be the face. -
Connect the head:
Score the clay at the front of the shell opening and the back of the neck. Press the neck firmly under the shell rim, blending the clay underneath for a strong bond. -
Shape the face:
Gently pinch the front of the face to create a slight snout. Use a small round tool to indent visible eye sockets. -
Add facial details:
Poke a small hole for the eye pupil (or insert a tiny bead if desired) and use a needle tool to create tiny nostrils at the very tip of the snout.
Step 4: Texturing the Shell
-
Mark the segments:
Using your knife tool, gently carve a curved line across the top of the shell to suggest separate shell plates. Don’t cut all the way through; just create a surface groove. -
Detail the rim:
Press faint, vertical lines all around the bottom rim of the shell to give it a segmented texture. -
Punch the dots:
Using a small straw or a round tool, press rows of holes into the upper shell. Vary the pattern slightly for an organic look—some close together, some further apart. -
Clean the holes:
If the clay pushes up around the holes, wait for it to dry slightly (about 15 minutes) and then smooth the bumps down with a damp finger. -
Final smoothing:
I prefer to dip my finger in water and give the entire piece a final rub-down to remove fingerprints before setting it aside to dry completely.
Once fully dry, your terracotta turtle is ready to patiently guard your windowsill or desk


What Really Happens Inside the Kiln
Learn how time and temperature work together inside the kiln to transform clay into durable ceramic.
Smiley Clay Mushroom Pal
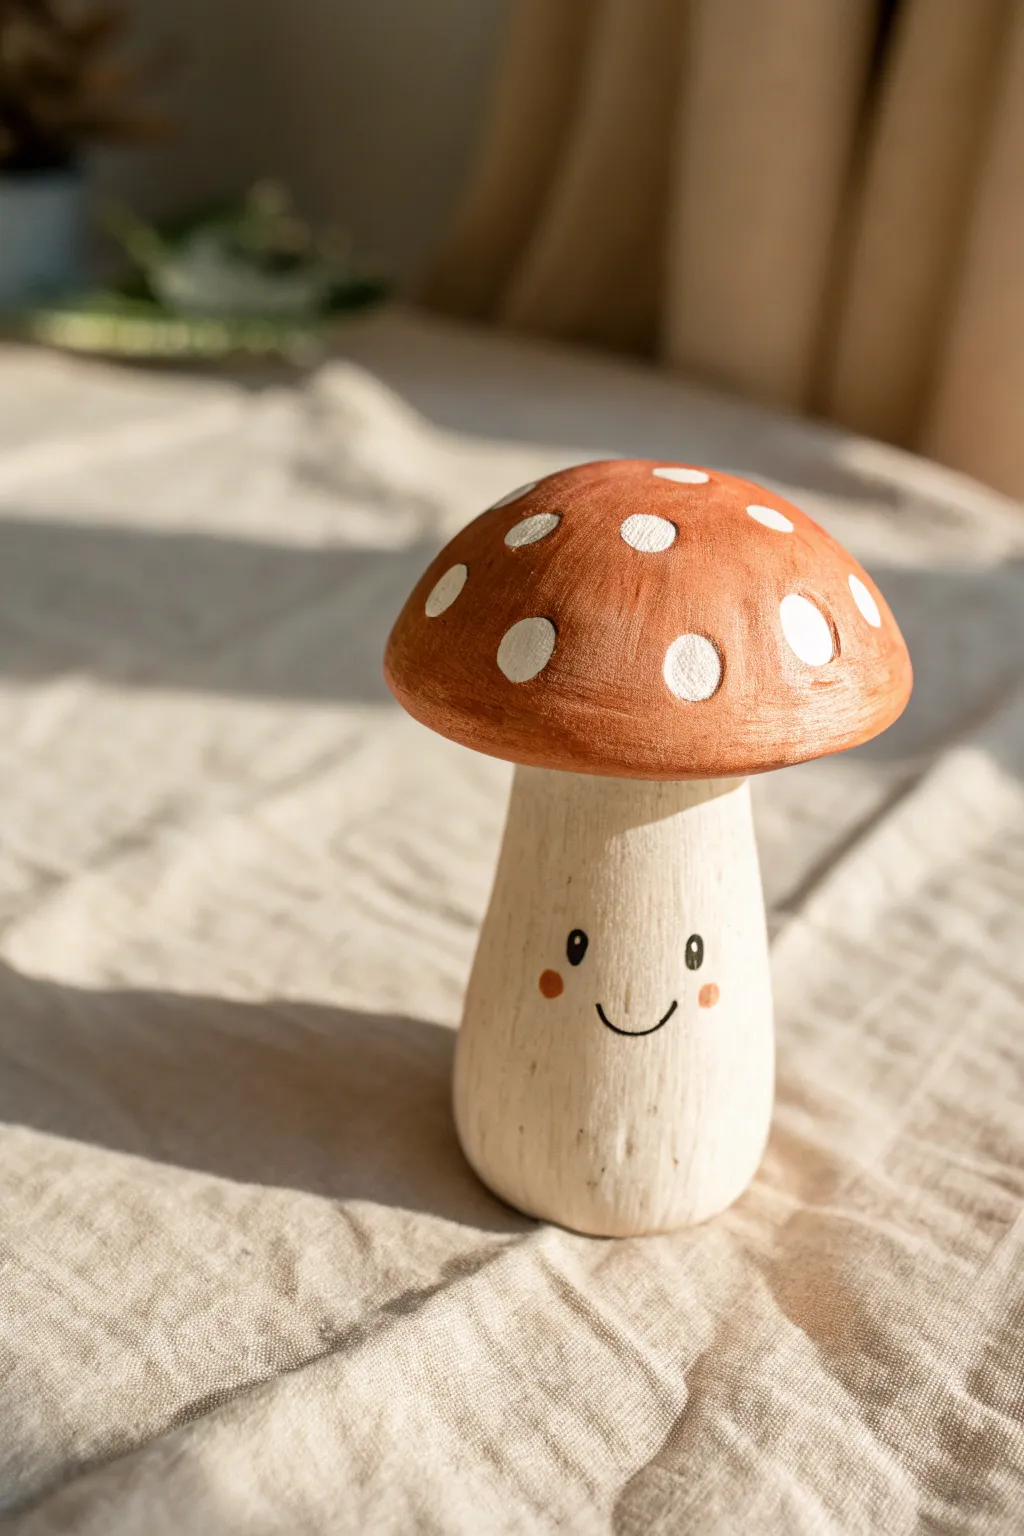
Bring a touch of forest whimsy to your desk with this adorable clay mushroom figure, featuring a charming hand-painted smile and classic spotted cap. This project combines simple sculpting shapes with easy painting techniques for a delightful, beginner-friendly result.
Step-by-Step
Materials
- Air-dry clay (white or terracotta)
- Acrylic paints (burnt orange/terracotta, cream/off-white, black, white)
- Small flat paintbrush
- Fine detail paintbrush
- Cup of water
- Aluminum foil
- Sculpting tools or a craft knife
- Sandpaper (fine grit)
- Matte varnish (optional)
Step 1: Sculpting the Form
-
Create the core:
Crumple a small piece of aluminum foil into a cylinder shape for the stem and a flattened dome shape for the cap. This saves clay and makes the figure lighter. -
Wrap the stem:
Roll out a slab of clay to about 1/4 inch thickness. Wrap it around your foil cylinder, blending the seam with your fingers until smooth. -
Shape the base:
Gently tap the bottom of the stem against your work surface to flatten it so it stands upright securely. Round off the bottom edges slightly for a soft look. -
Form the cap:
Cover the foil dome with another sheet of rolled clay. Smooth the surface with a little water on your finger to remove any cracks or fingerprints. -
Refine the edges:
Run your finger along the rim of the cap to create a clean, rounded edge. The underside should be relatively flat where it will join the stem. -
Connect the pieces:
Score (scratch) the top of the stem and the underside of the cap. Add a dab of water or liquid clay (slip) to the scratched areas. -
Secure the join:
Press the cap firmly onto the stem. Use a modeling tool to blend a small amount of clay from the underside of the cap down onto the stem to lock it in place. -
Dry partially:
Let the mushroom sit for about 24-48 hours until completely dry and hard. I find placing it near a sunny window speeds this up nicely. -
Sand for smoothness:
Once fully dry, lightly sand any bumps or rough fingerprints with fine-grit sandpaper, wiping away the dust with a slightly damp cloth.
Smooth Operator
Keep a small bowl of water nearby while sculpting. Dipping your finger in water and rubbing the clay is the secret to erasing fingerprints before drying.
Step 2: Painting the Details
-
Base coat the stem:
Mix white acrylic paint with a tiny drop of brown or yellow to create a warm cream color. Paint the entire stem, using vertical brush strokes to simulate a natural texture. -
Paint the cap:
Apply a burnt orange or terracotta color to the cap. You might need two coats to get full coverage over the white clay. -
Add the spots:
Dip a medium-sized round brush or the handle end of a paintbrush into white paint. Press gently onto the dry terracotta cap to create varying sizes of polka dots. -
Outline the face:
Using a very fine detail brush and black paint, carefully draw a simple ‘U’ shape for the smile about halfway down the stem. -
Add the eyes:
Paint two small black ovals for eyes just above the smile. Leave a tiny speck of unpainted space or add a white dot later for a highlight. -
Rosy cheeks:
Mix a little of your terracotta paint with white to make a soft pink-orange. Dab two small dots on either side of the smile for cheeks. -
Texture details:
If you want a rustic look, use a dry brush with a tiny amount of darker brown paint to lightly streak the bottom of the stem. -
Seal the piece:
Once all paint is thoroughly dry, apply a coat of matte varnish to protect your new friend and give it a finished professional look.
Woodland Trio
Make two smaller mushrooms with different shaped caps (one tall and pointy, one flat) to create a cute family cluster for your shelf.
Now you have a charming little forest guardian ready to brighten up your bookshelf or desk
Happy Clay Avocado Character
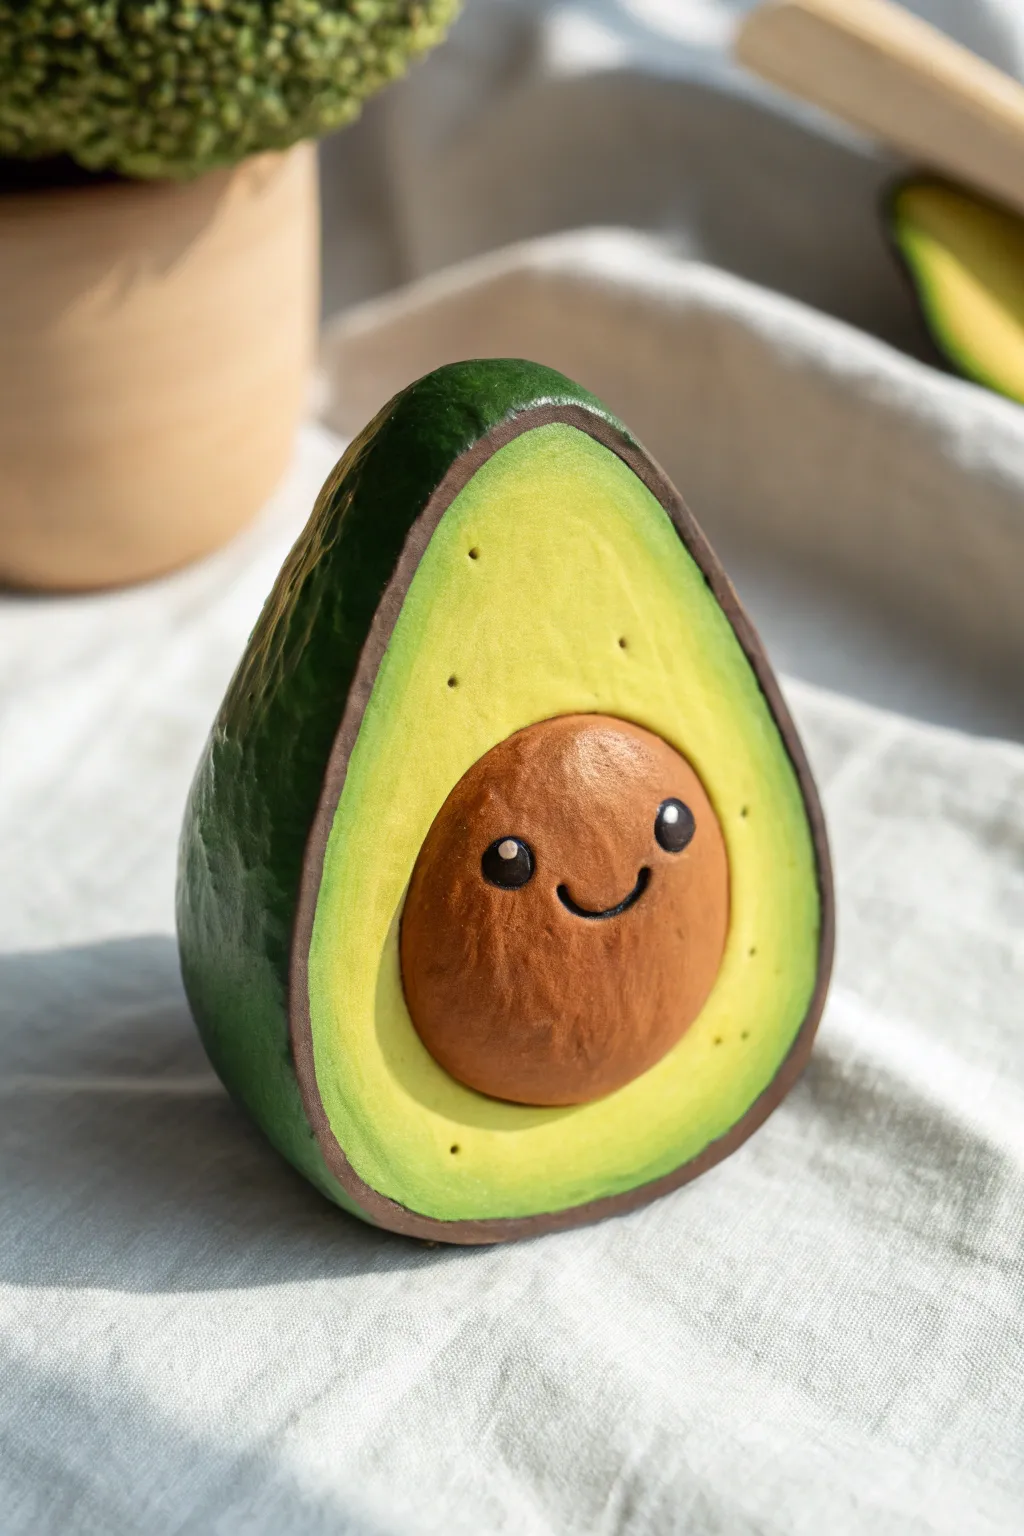
Create your own cheerful desk companion with this adorable clay avocado tutorial. This project features a textured dark green skin, a smooth gradient interior, and a lovable smiling pit.
Step-by-Step Tutorial
Materials
- Air-dry clay or polymer clay (white is best for painting)
- Acrylic paints: Dark green, lime green, yellow, light brown, dark brown, black, white
- Paintbrushes: Flat shader, small round, fine detail liner
- Sculpting tools (needle tool and smoothing tool)
- Aluminum foil (optional for core)
- Water cup and palette
- Clear matte varnish or sealant
Step 1: Sculpting the Form
-
Create the core:
Start by rolling a ball of clay roughly the size of a golf ball or slightly larger. If you want to save clay, you can crumple a small tight ball of aluminum foil and wrap the clay around it. -
Shape the avocado:
Roll the ball between your palms, applying slightly more pressure to the top half to create a teardrop shape. Flatten the bottom slightly so it can stand upright on its own. -
Add surface texture:
Using a crumpled piece of aluminum foil or a textured sponge, gently pat the entire outside surface of the tear-drop shape to mimic the bumpy skin of a real avocado. -
Carve the interior:
Use a modeling tool or a knife (carefully!) to slice off a flat, egg-shaped section from the front. This reveals the ‘inside’ flesh of the fruit. Smooth this flat area with your finger and a little water. -
Make the pit:
Roll a smaller ball of clay for the seed. Flatten the back of it so it sits flush. Press it gently onto the lower center of the flat area you just created. Blend the edges slightly if needed, but keeping it distinct looks nice too. -
Final details:
Using a needle tool, poke a few random, tiny shallow holes around the light green flesh area for realistic texture. Let the entire piece dry completely according to your clay’s package instructions.
Step 2: Painting the Fruit
-
Base coat the skin:
Once dry, paint the textured outer shell with a deep, forest green. You might need two coats to get into all those little bumps. -
Paint the rim:
Paint a thin border of dark brown around the edge where the skin meets the flesh. This creates a nice separation and mimics the oxidation line found on real avocados. -
Base coat the flesh:
Mix lime green with a generous amount of yellow. Paint the entire flat inner surface, avoiding the pit. I find starting with a lighter yellow-green makes the gradient easier. -
Add the gradient:
While the yellow-green is still slightly wet (or by glazing later), blend a darker lime green near the outer edges, fading into the yellow center. -
Color the pit:
Paint the round seed structure with a medium warm brown. Let it dry, then dry-brush a slightly lighter tan vertically across the center to give it roundness and texture.
Uneven Texture?
If the back skin texture looks too sharp or spiked after using foil, gently roll the handle of a paintbrush over it to press the sharp peaks down into soft bumps.
Step 3: Bringing it to Life
-
Paint the eyes:
Using your smallest detail brush or a dotting tool, place two black circles on the upper half of the pit for eyes. -
Add the smile:
With a fine liner brush and thinned black paint, draw a small, U-shaped smile connecting the space between the eyes. -
Add highlights:
Dip the tip of a toothpick or a very fine brush into white paint. Add a tiny white dot to the upper left corner of each eye to create that spirited twinkle. -
Seal the work:
Finish by applying a coat of matte varnish over the green parts and the pit to protect your paint job and unify the sheen.
Make it a Keychain
Insert a metal eye screw into the very top of the avocado before the clay dries. Once painted and sealed, you can attach a keyring to take your buddy anywhere.
Place your happy avocado on a shelf where its smile can brighten your day

TRACK YOUR CERAMIC JOURNEY
Capture glaze tests, firing details, and creative progress—all in one simple printable. Make your projects easier to repeat and improve.
Cute Clay Strawberry With Seed Dots
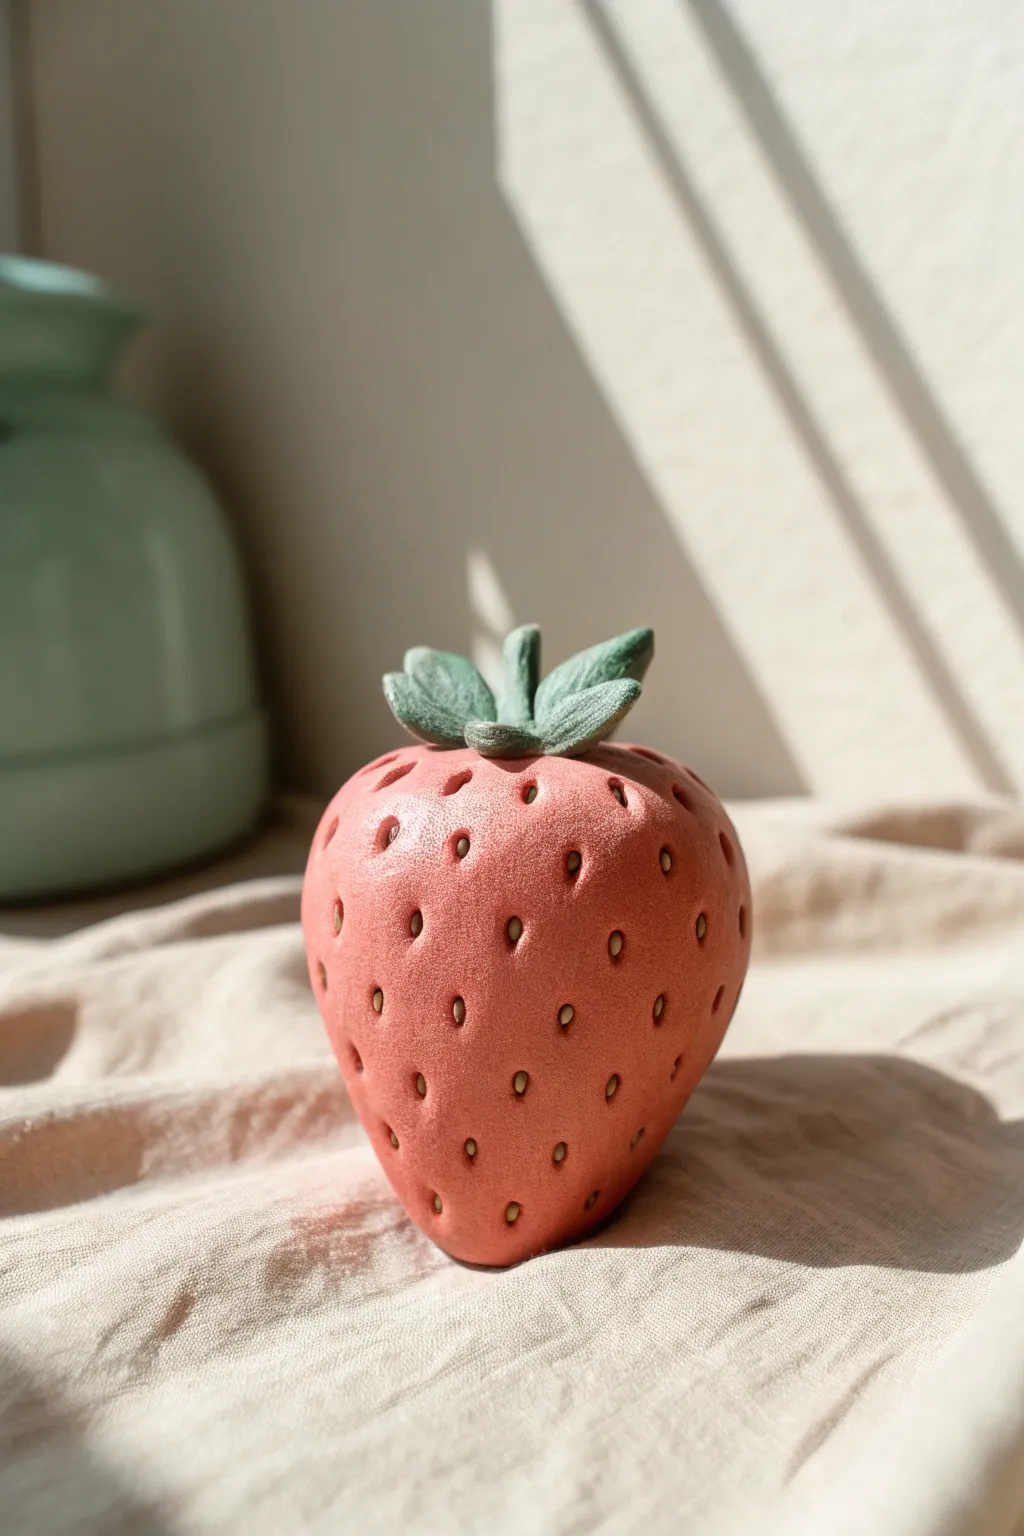
This charming clay strawberry captures the soft, matte texture of real fruit with delicate seed details and sculpted leaves. It makes for an adorable desk companion or a sweet addition to a play kitchen collection.
Detailed Instructions
Materials
- Polymer clay (dusty pink or muted red)
- Polymer clay (muted sage green)
- Acrylic paint (pale yellow or tan)
- Fine-point sculpting tool or toothpick
- Ball stylus tool (small)
- Soft toothbrush or texture sponge
- Clean work surface (ceramic tile or glass)
- Oven for baking
Step 1: Sculpting the Base
-
Condition the Clay:
Begin by warming the pink clay in your hands, kneading it thoroughly until it is soft, pliable, and free of cracks. -
Form the Basic Shape:
Roll the clay into a smooth ball about the size of a golf ball to start. -
Refine the Strawberry Body:
Gently taper the bottom half of the ball to create a rounded cone shape, keeping the top relatively flat and wide. -
Smooth the Surface:
Use your fingers to smooth out any fingerprints; for a really professional finish, I like to lightly roll it on the work surface to ensure symmetry. -
Add Subtle Texture:
Taking a clean, soft toothbrush or a texture sponge, very lightly tap the surface of the clay to remove the ‘plastic’ shine and give it a natural, organic skin texture.
Uneven Indentations?
If your seed pits look messy or raised at the edges, gently smooth the surface again with your finger or a piece of saran wrap before pressing the tool in to soften the edges.
Step 2: Creating the Seeds
-
Plan the Seed Layout:
Visualize a diagonal grid pattern for your seeds rather than placing them randomly. -
Make Indentations:
Using a small ball stylus tool (or the rounded end of a paintbrush), press gently into the clay to make small, tear-drop shaped indentations all over the strawberry body. -
Shape the Pits:
Angle your tool slightly upwards as you press, so the seed pit has a deeper bottom and a shallower top edge. -
Create the Seeds:
Roll tiny, almost microscopic specks of the pale yellow clay, or simply wait to paint them later; for this look, painting inside the dried indentations is often easier.
Step 3: Adding the Leaves
-
Prepare the Green Clay:
Condition your sage green clay and separate it into 5 or 6 small, equal parts. -
Shape Individual Sepals:
Roll each small green piece into a teardrop shape and flatten it between your fingers to form a leaf. -
Texture the Leaves:
Use a needle tool or toothpick to draw a central vein down the middle of each leaf. -
Attach the Leaves:
Press the wide end of each leaf onto the center of the strawberry’s flat top, arranging them in a star pattern so they radiate outward. -
Create the Stem:
Roll a small snake of green clay and place it right in the center where all the leaves meet, blending the clay at the base to secure it. -
Curve the Tips:
Gently lift and curl the tips of a few leaves upwards to give the greenery a dynamic, lifelike appearance.
Make it a Charm
Before baking, insert a metal eye pin deeply into the center of the stem. Once baked, you can attach a chain to turn your strawberry into a necklace or keychain.
Step 4: Finishing Touches
-
Baking:
Bake the piece according to your polymer clay package instructions (usually 275°F/135°C for 15-30 minutes per 1/4 inch thickness). -
Cooling:
Allow the strawberry to cool completely before determining if you want to add paint details. -
Painting Seeds:
If you didn’t use clay seeds, dip a toothpick into pale yellow or tan acrylic paint and carefully dot the center of each indentation.
Now you have a sweet, perennial fruit that will look fresh forever
Mini Clay Pumpkin Friend
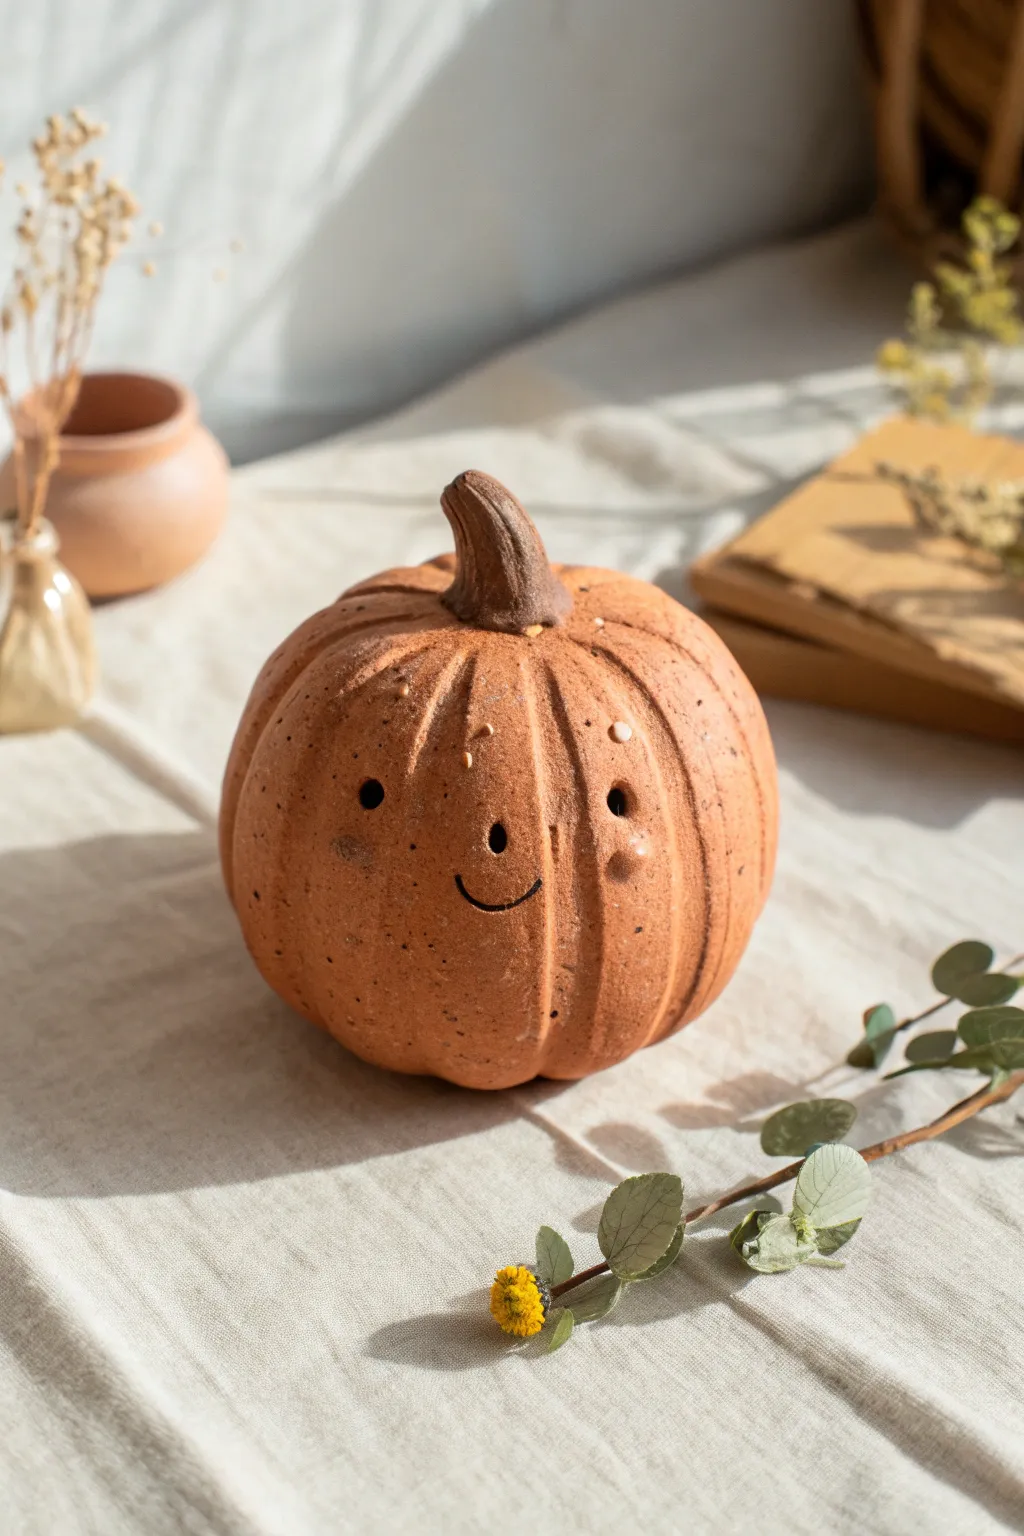
Bring the cozy charm of autumn indoors with this delightful clay pumpkin figurine. Featuring a rustic, speckled terracotta finish and an irresistibly sweet smile, this little gourd is perfect for adding a touch of personality to your seasonal decor.
Step-by-Step
Materials
- Terracotta-colored air-dry clay or polymer clay (speckled effect preferred)
- Dark brown clay (for the stem)
- Small sculpting tool or plastic knife
- Ball stylus or blunt pencil tip
- Fine-grit sandpaper (optional)
- Black acrylic paint or fine-point marker
- Toothpick or needle tool
- Water (for smoothing air-dry clay)
Step 1: Shaping the Base
-
Form the sphere:
Start by rolling a ball of terracotta-colored clay approximately the size of a tangerine. Roll it firmly between your palms until it’s smooth and free of major cracks. -
Flatten the bottom:
Gently tap the ball on your work surface to create a flat base. This ensures your pumpkin friend sits upright without wobbling. -
Create the depression:
Using your thumb, press down gently into the top center of the ball to create a shallow dip where the stem will eventually sit.
Cracking Clay?
If you see cracks forming while shaping air-dry clay, dip your finger in water and smooth them out immediately. For polymer clay, condition (knead) it longer to prevent cracking.
Step 2: Adding Texture and Details
-
Mark the segments:
Take your sculpting tool or the back of a plastic knife and start at the top center depression. Press down and drag the tool down the side of the sphere to the bottom to create a vertical groovy line. -
Complete the ribs:
Repeat this process around the entire circumference of the pumpkin. Aim for slightly uneven spacing to give it an organic, garden-grown feel rather than perfect symmetry. -
Smooth the ridges:
Use your finger (dipped in a little water if using air-dry clay) to gently soften the sharp edges of your indented lines. You want the pumpkin to look plump and rounded, not sharp. -
Add surface texture:
To mimic the speckled, rustic look in the photo, gently tap the surface with an old toothbrush or lightly poke random shallow holes with a needle tool. I find this creates a nice weathered effect.
Step 3: Creating the Face
-
Position the eyes:
Decide where the ‘front’ of your pumpkin is. Use a medium-sized ball stylus or the blunt end of a small paintbrush to press two distinct, round holes for the eyes. -
Make the mouth:
Use a needle tool or a very thin sculpting blade to carve a tiny, U-shaped smile just below the eyes. Pressing in slightly deep helps the expression stand out. -
Add a dimple:
For extra character, press a small indentation next to the smile to create a cheek or dimple effect.
Make it a Lantern
Before drying, use a straw to punch holes through the eyes and insert a small battery-operated LED wire inside the hollowed base for a glowing jack-o’-lantern effect.
Step 4: The Stem and Finishing
-
Shape the stem:
Take a small piece of dark brown clay and roll it into a thick, slightly tapered cylinder. Pinch the top slightly to make it look dried and cut. -
Attach the stem:
Press the wider bottom of the stem firmly into the depression you made earlier on top of the pumpkin. Create a slight curve in the stem for a jaunty look. -
Blend the seam:
Use a small tool to gently blend the clay at the base of the stem into the top of the pumpkin so it looks firmly attached. -
Bake or dry:
If using polymer clay, bake according to package instructions (typically 275°F/130°C for 15-30 minutes). If using air-dry clay, leave it in a dry spot for 24-48 hours. -
Highlight the smile:
Once fully cured or dry, use a very fine black marker or a thin brush with black acrylic paint to carefully trace the carved smile line, making it pop.
Place your new smiling friend on a shelf or windowsill to enjoy a bit of autumn warmth all year round
Puffy Cloud With Raindrop Friends
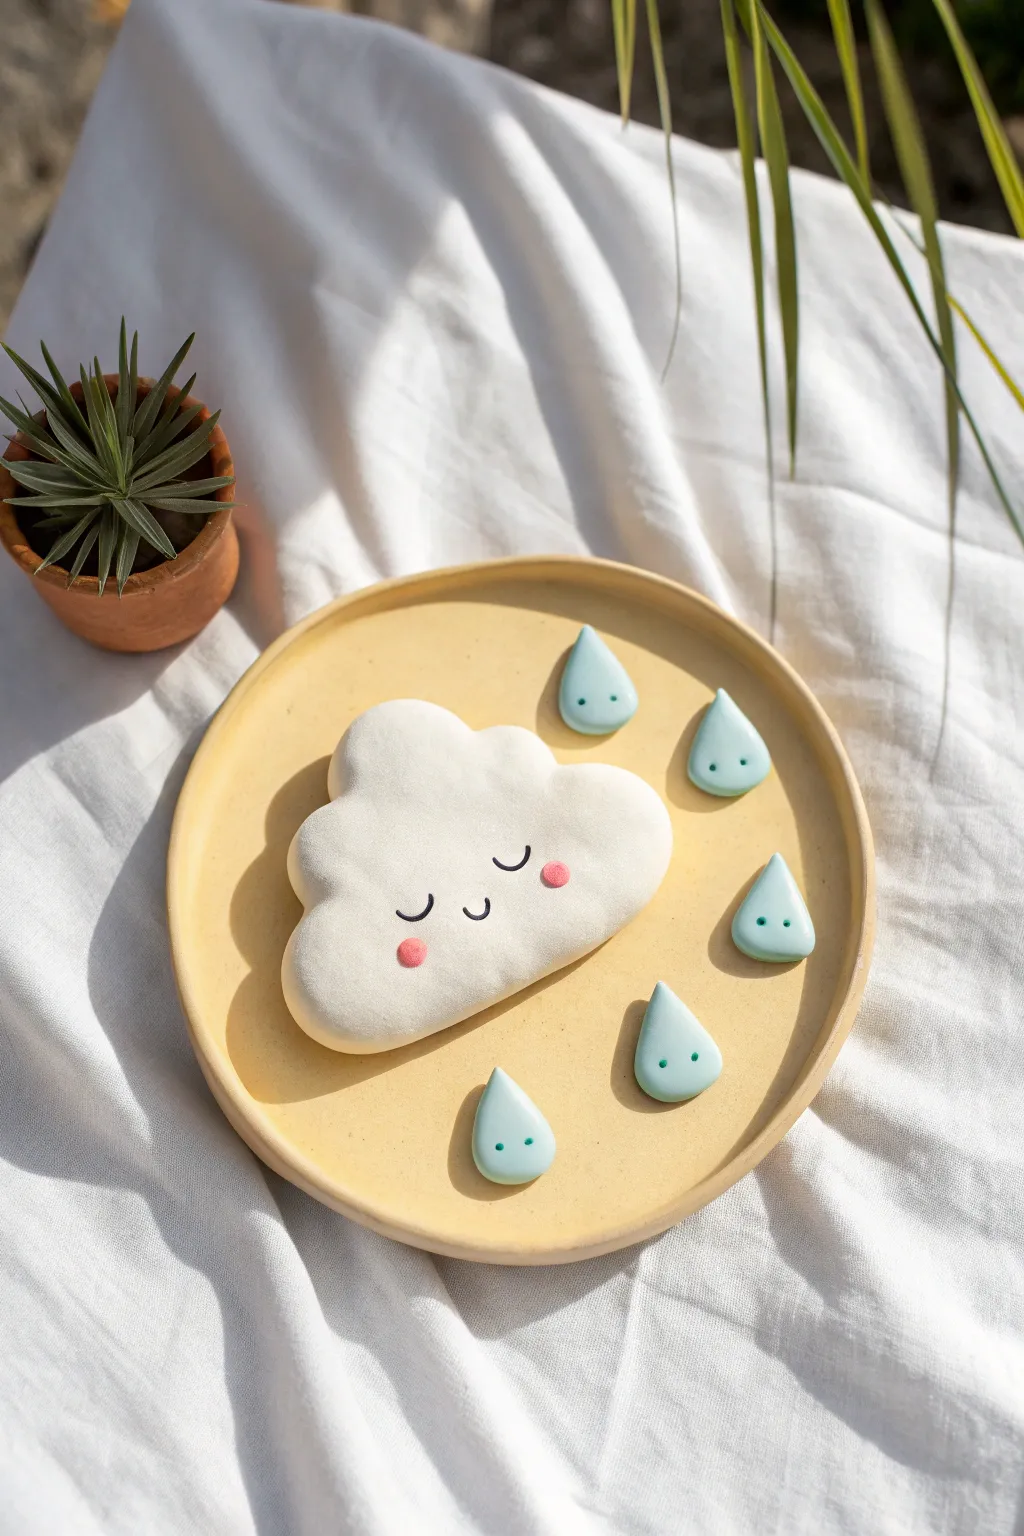
Brighten up your day with this adorable clay set featuring a serene, puffy cloud and its tiny raindrop companions. Perfect for beginners, this project combines simple shaping techniques with minimal face painting for a charming, kawaii-style result.
Step-by-Step Tutorial
Materials
- White polymer clay (or air-dry clay)
- Pastel blue polymer clay
- Soft pink polymer clay (tiny amount)
- Black acrylic paint
- Fine detail paintbrush (size 000)
- Rolling pin
- Cloud-shaped cookie cutter (optional)
- Needle tool or toothpick
- Ball tool (small)
- Smooth work surface (ceramic tile or silicone mat)
- Oven (if using polymer clay)
Step 1: Shaping the Cloud
-
Condition the clay:
Start by taking a generous amount of white clay and kneading it in your hands until it is soft, pliable, and free of any cracks. -
Form the base:
Roll the white clay into a smooth ball, then flatten it gently with your palm or a rolling pin until it’s about 1/2 inch thick. You want it to look puffy, not flat like a cookie. -
Create the edges:
Use your fingers to push and pinch the edges inwards to create rounded humps, mimicking a cloud shape. Alternatively, press a cloud cutter gently into the clay to mark the shape, then soften the sharp edges with your fingertips for that pillowy look. -
Refine the surface:
Check the surface for fingerprints. If you see any, lightly brush them away with a tiny bit of baby oil or cornstarch on your finger to get that porcelain-smooth finish.
Dirty clay?
White clay picks up lint easily. Keep wet wipes nearby to clean your hands often, or use a piece of scrap clay to pull dust off your hands before touching the white.
Step 2: Making the Raindrops
-
Prepare the blue clay:
Condition your pastel blue clay just like you did with the white. Divide it into five small, equal portions. -
Roll teardrops:
Take one blue portion and roll it into a ball. Then, roll just one side of the ball between your fingers and the table to taper it into a point, creating a classic teardrop shape. -
Flatten and shape:
Gently press the teardrop flat so it sits stably. Repeat this process for the remaining four pieces of blue clay. -
Add eye details:
Using a needle tool or toothpick, carefully poke two tiny holes side-by-side near the bottom rounded part of each raindrop. These indentations will act as the eyes.
Step 3: Creating the Cloud’s Face
-
Add rosy cheeks:
Take two minuscule balls of pink clay. Press them flat against the cloud’s surface, positioning them widely apart where you want the cheeks to be. -
Blend the cheeks:
Gently smooth the edges of the pink circles into the white clay so they look like flush spots rather than bumps on top. -
Bake or dry:
If using polymer clay, bake your pieces according to the package instructions (usually 275°F/130°C for 15-30 minutes). If using air-dry clay, let them sit for 24-48 hours until fully hardened.
Make it a Mobile
Before baking, carefully poke a hole through the top of the cloud and the tops of the raindrops. Thread fishing line through them after baking to create a hanging mobile.
Step 4: Painting and Finishing
-
Cool down:
Ensure the clay is completely cool (or dry) before starting the painting phase to prevent the paint from drying too fast on the brush. -
Paint the eyes:
Dip your fine detail brush into black acrylic paint. Carefully paint two ‘U’ shapes between the pink cheeks to create sleeping eyes. I find steadying my hand against the table helps significantly here. -
Paint the mouth:
Paint a matching smaller ‘U’ shape exactly in the center for the smiling mouth. -
Fill the raindrop eyes:
Use the very tip of your brush or a toothpick dipped in black paint to fill the tiny indented holes on the raindrops. -
Final coat:
Once the paint is completely dry, you can add a coat of matte varnish to protect your work, although the raw matte clay finish looks lovely on its own.
Now you have a sweet weather system to display on your desk or shelf
Little Star With Sleepy Face
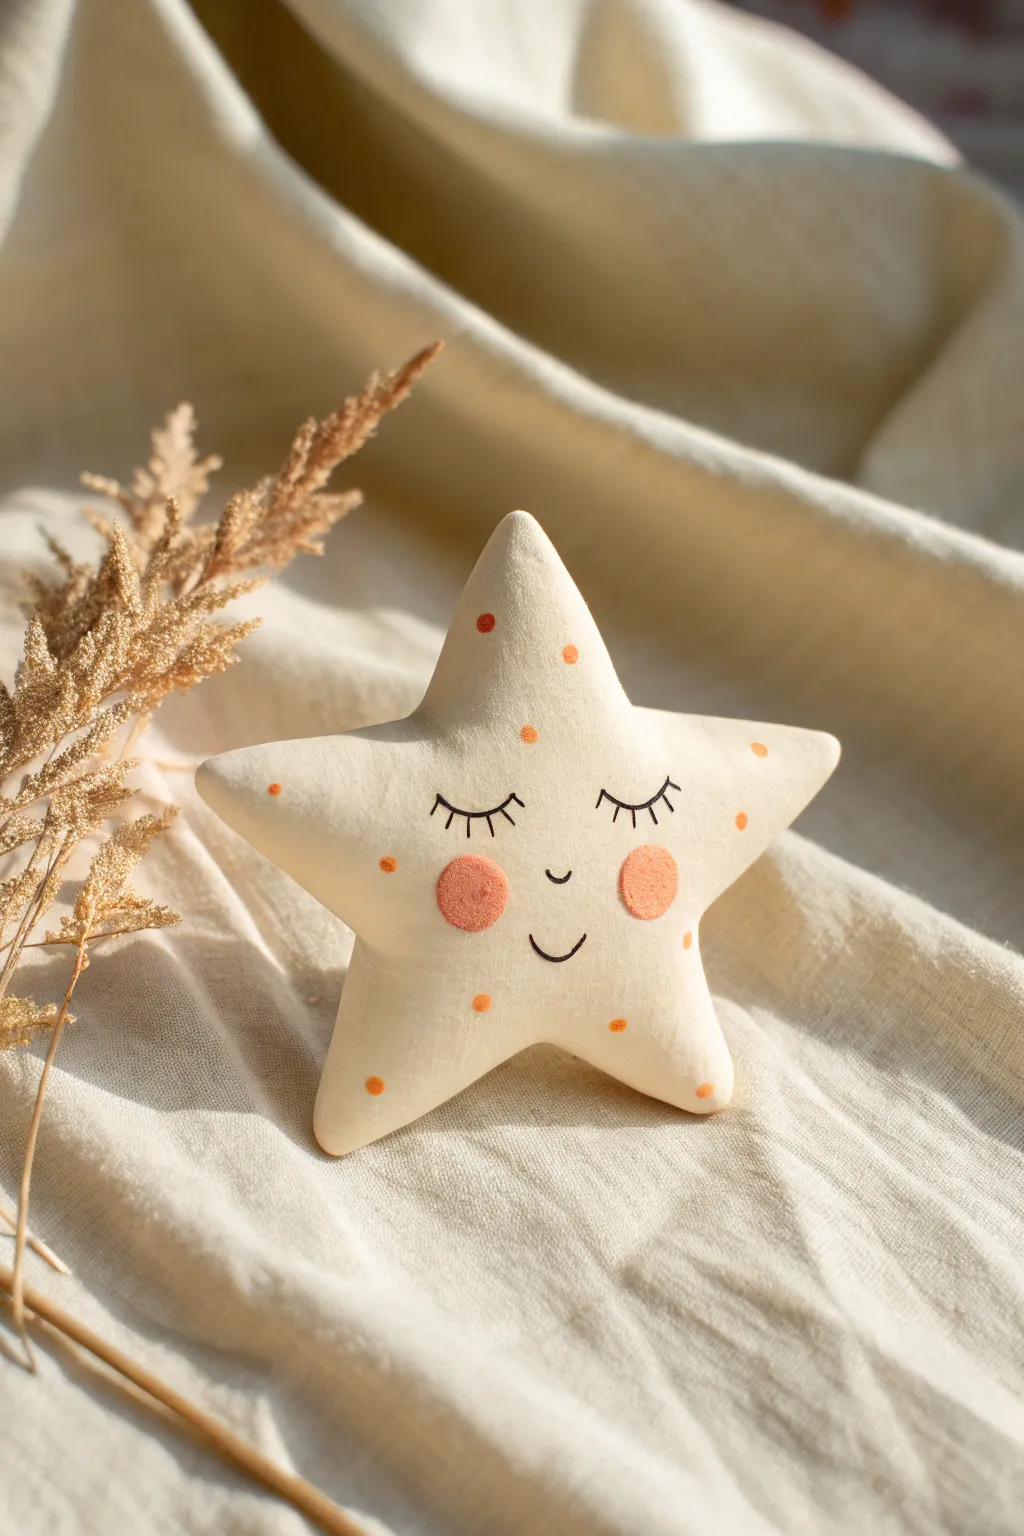
This charming, cream-colored clay star features a gentle sleepy face and sunny orange speckles, perfect for a nursery shelf or a calming desk companion. Its soft, rounded edges give it a plush, fabric-like appearance despite being made of firm clay.
How-To Guide
Materials
- White or cream air-dry clay (or polymer clay)
- Rolling pin
- Star-shaped cookie cutter (approx. 3-4 inches wide)
- Sandpaper (fine grit)
- Black fine-tip permanent marker or acrylic paint pen
- Peach or light orange acrylic paint
- Small round paintbrush
- Dotting tool or toothpick
- Matte spray varnish (optional)
Step 1: Shaping the Star
-
Condition the clay:
Begin by kneading a fist-sized ball of white or cream clay until it is warm, pliable, and free of cracks. -
Roll it out:
Roll the clay onto a smooth work surface to a thickness of about 1/2 inch. Keep it relatively thick to achieve that chubby, pillow-like look. -
Cut the shape:
Press your star-shaped cookie cutter firmly into the clay. Lift the cutter and gently push the clay star out. -
Softening the edges:
Dip your finger in a tiny bit of water and gently rub all the sharp edges created by the cutter. You want to round them off completely so the star looks soft and puffed. -
Smooth the surface:
Check for any fingerprints or dents. Lightly stroke the surface with a damp finger to ensure the face area is perfectly smooth for painting later. -
Drying time:
Set the star aside on a piece of parchment paper to dry. If using air-dry clay, this will take 24-48 hours; flip it halfway through to ensure even drying.
Pro Tip: Pillow Effect
To make the star look extra puffy, gently press the center of the star outward from the back while the clay is still wet, creating a slight dome shape on the front face.
Step 2: Adding the Details
-
Initial specific sanding:
Once fully dry, inspect your star. If there are any rough spots, gently buff them away with fine-grit sandpaper until the surface feels like smooth porcelain. -
Painting the cheeks:
Dip a small round brush into peach or light orange acrylic paint. Dab off most of the paint onto a paper towel until the brush is nearly dry. -
Stippling the flush:
Gently stipple two round circles in the middle of the star to create blushing cheeks. I find that tapping the brush creates a softer, more fabric-like texture than swiping. -
Adding freckles:
Using a dotting tool or the blunt end of a toothpick dipped in the same orange paint, place thicker, distinct dots scattered randomly across the star’s surface. -
Drawing the eyes:
With a black fine-tip marker or paint pen, carefully draw two downward-curving arcs just above the blush spots for the closed eyelids. -
Adding lashes:
Draw three or four small, straight lines radiating downward from each eyelid arc to create sleepy eyelashes. -
The tiny smile:
Draw a very small `u` shape directly between and slightly below the eyes for a nose, and a wider `u` shape below that for a subtle smile. -
Sealing the work:
To protect the paint and detailed lines, mist the star with a light coat of matte spray varnish. Avoid gloss, as the matte finish preserves the soft, dreamy aesthetic.
Troubleshooting: Cracking?
If small cracks appear while the clay dries, mix a tiny bit of fresh clay with water to make a paste (slip) and fill in the cracks, then smooth over with a finger.
Now you have a sweet, celestial friend ready to brighten up any quiet corner
Pocket-Sized Clay Ghost
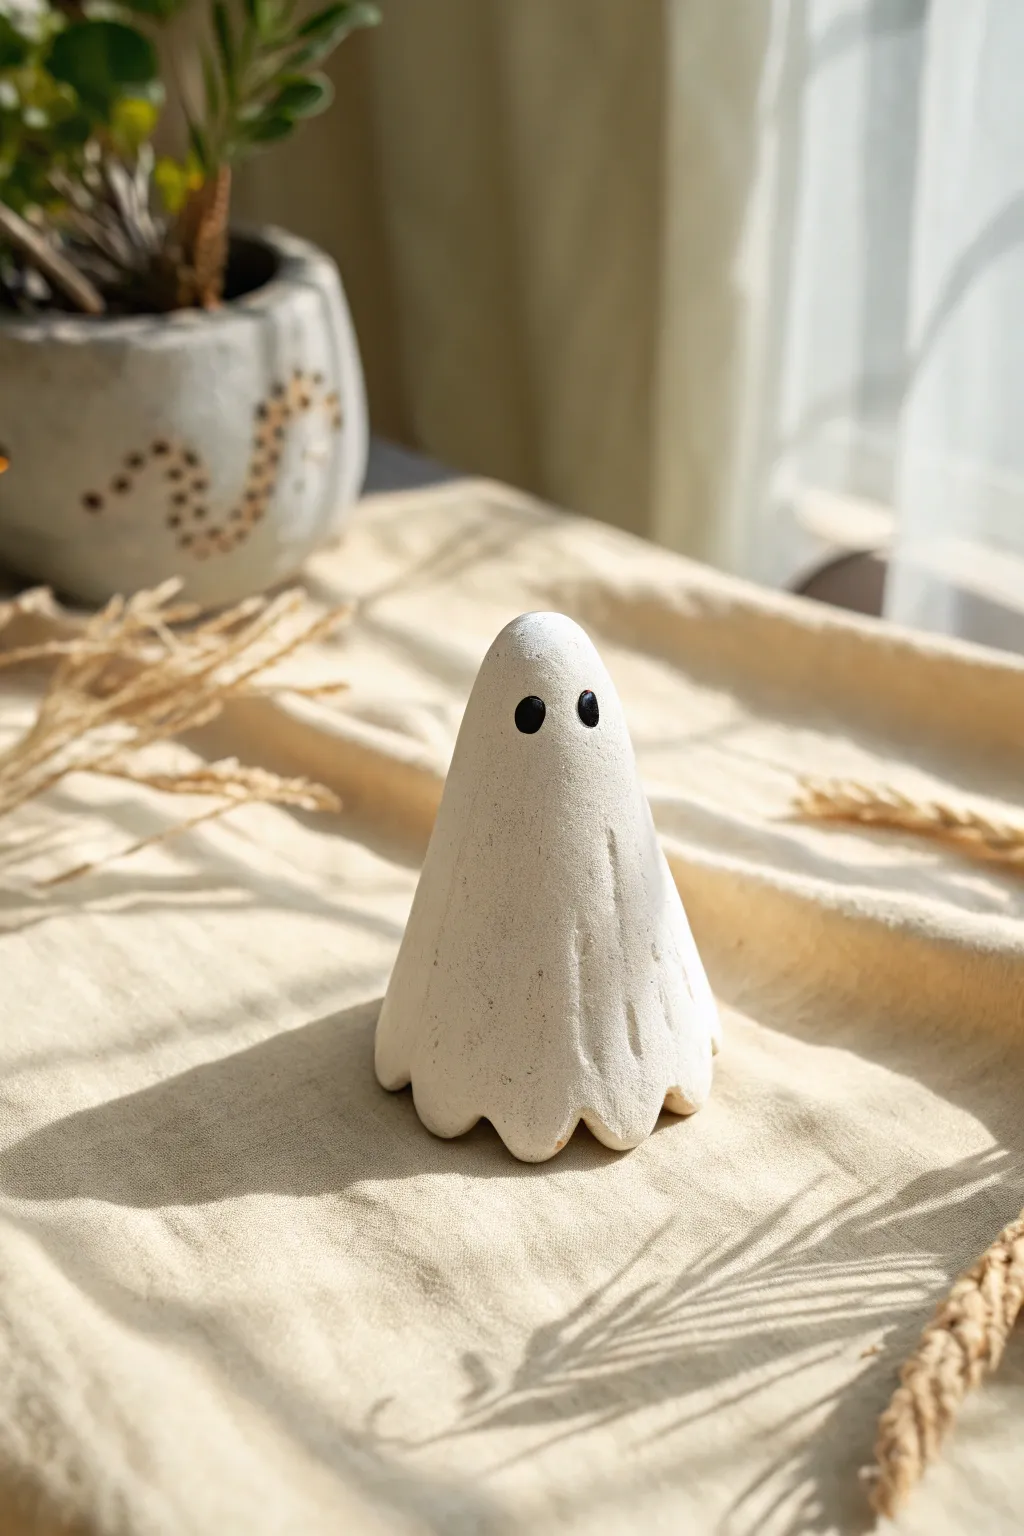
Create a charmingly minimalist spirit to sit on your shelf or windowsill. This petite phantom uses simple tools and basic hand-building techniques to achieve a rustic, matte texture that looks undeniably classic.
Step-by-Step
Materials
- White air-dry clay (or polymer clay)
- Small rolling pin
- Wooden sculpting tool or cocktail stick
- Black acrylic paint
- Small fine-point paintbrush
- Bowl of water (for smoothing)
- Foil or paper cone (for internal support, optional)
- Fine-grit sandpaper
Step 1: Shaping the Body
-
Condition the Clay:
Begin by kneading a golf-ball-sized amount of white clay until it is warm, soft, and pliable. Getting rid of any air bubbles now will prevent cracks later on. -
Roll a Cone:
Roll your clay ball into a smooth cone shape. It should be wider at the base and gently tapered toward a rounded top, like a Hershey’s Kiss but taller. -
Hollow the Base:
Gently press your thumb into the bottom of the cone to start hollowing it out. Rotate the piece in your hand, pinching the walls slightly to thin them out near the bottom. -
Create the Draped Look:
Instead of keeping the surface perfectly smooth, gently drag your fingers vertically down the sides. This creates subtle, elongated indentations that mimic the look of draped fabric. -
Refine the Head:
Smooth out the very top of the cone so it is rounded and seamless. I like to use a little water on my fingertip here to erase any fingerprints.
Step 2: Adding Details
-
Form the Ruffled Hem:
At the bottom edge of the ghost, pinch the clay gently between your thumb and forefinger at regular intervals. -
Curve the Edges:
Push the pinched sections slightly outward and curve the spaces between them inward. This creates the wavy, floating bottom edge characteristic of a classic sheet ghost. -
Add Texture Lines:
Using a wooden tool or a cocktail stick, lightly etch a few vertical lines into the ‘fabric’ folds you created earlier. Keep them shallow; you just want to suggest creases. -
Check the Stance:
Set the ghost down on a flat surface to make sure it stands straight. If it leans, gently tap the base against the table to level it out. -
Let it Cure:
Allow the figure to dry completely according to your clay package’s instructions. Air-dry clay usually takes 24-48 hours depending on thickness.
Cracks Appearing?
If you see hairline cracks while drying, mix a tiny bit of fresh clay with water to make a ‘slip’ paste. Rub this into the cracks and smooth it out with your finger.
Step 3: Finishing Touches
-
Sand for Texture:
Once fully dry, lightly scuff the surface with fine-grit sandpaper. This knocks down any sharp modeling marks and gives the ghost that stone-like, matte finish. -
Dust Off:
Wipe the figure down with a dry cloth or soft brush to remove the sanding dust. The surface needs to be clean for the paint to adhere properly. -
Position the Eyes:
Visualize where the eyes should go. Placing them slightly higher on the ‘head’ area usually makes the ghost look cuter and more alert. -
Paint the Eyes:
Dip a fine-point brush into black acrylic paint. Carefully paint two small, vertical ovals. Start small; you can always make them bigger, but it’s hard to make them smaller. -
Seal (Optional):
If you want to protect your ghost, apply a very matte varnish. Avoid glossy sealers if you want to maintain the rustic ease of the original reference.
Make it Glow
For a spooky surprise, use glow-in-the-dark polymer clay instead of white, or paint the finished figure with a layer of phosphorescent topcoat.
Place your little ghost in a patch of sunlight to enjoy its new home
Stacked Clay Snowman Trio
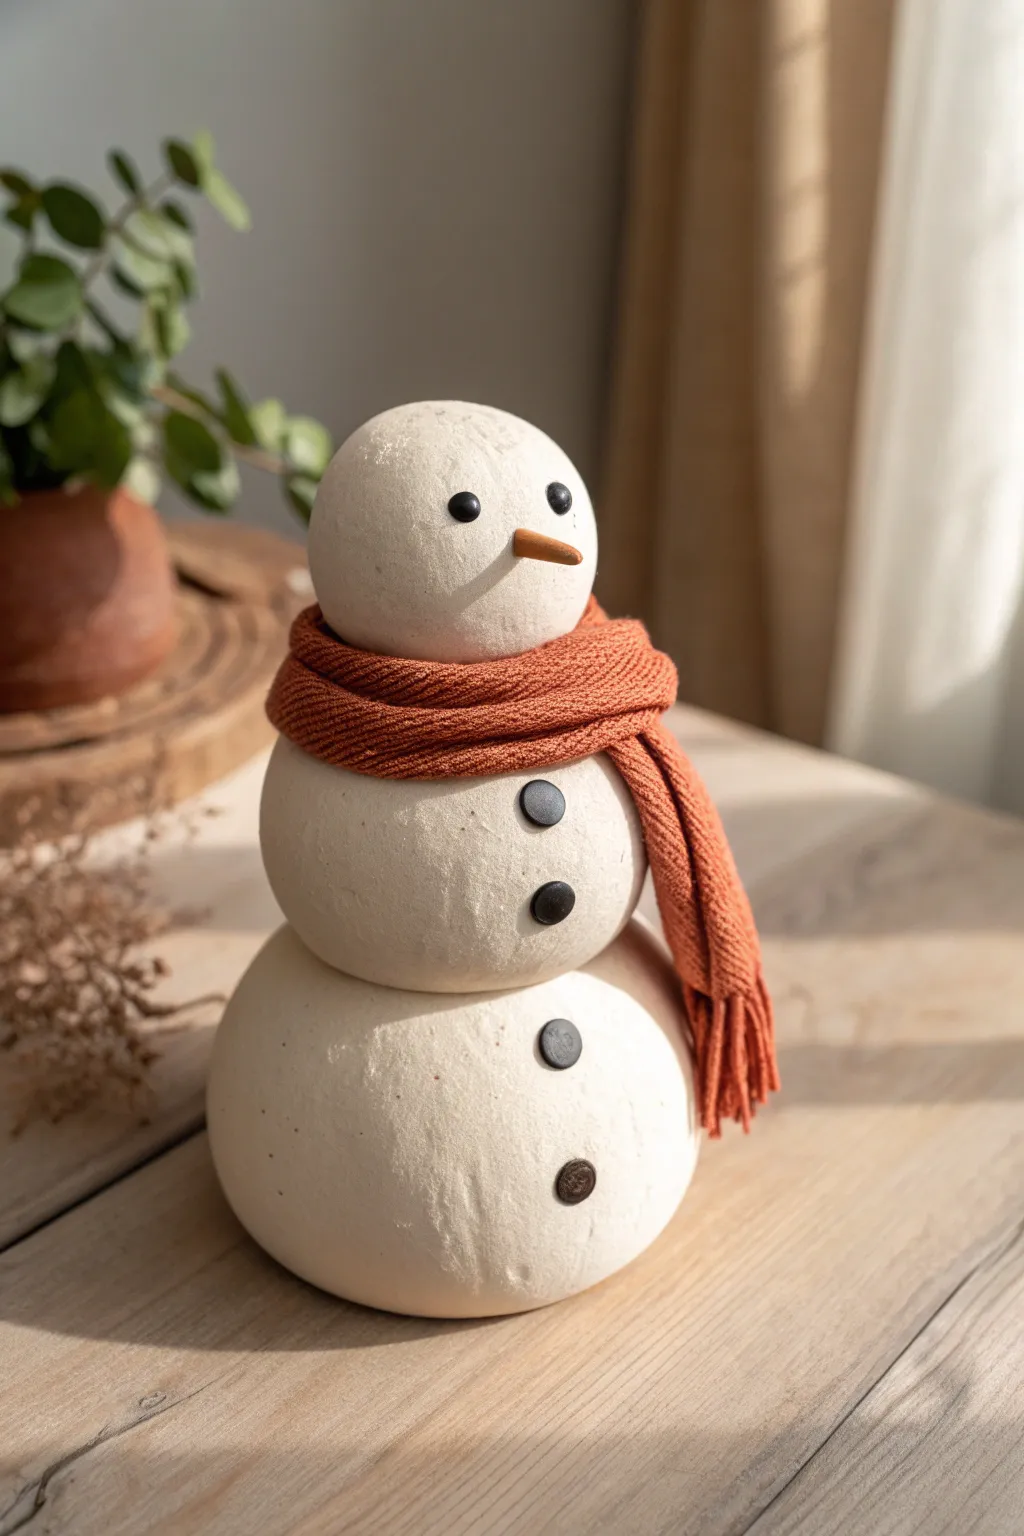
Bring the chill of winter inside with this charmingly rustic three-tiered snowman. Using simple air-dry clay and a touch of knitting or fabric scrap, you’ll create a textured, warm centerpiece perfect for a table or mantel.
Step-by-Step Guide
Materials
- White air-dry clay (textured or stony finish preferred)
- Small amount of orange clay (or orange paint)
- Black clay (or small black buttons/beads)
- Texturing tool or stiff bristle brush
- Toothpicks or wire armature
- Small strip of orange terra cotta knit fabric (or old sweater sleeve)
- Craft glue or slip
- Matte sealant spray
Step 1: Forming the Body
-
Prepare the base:
Start with a large ball of white air-dry clay for the base. Roll it firm and smooth, then gently tap the bottom against your work surface to create a flat area so it stands sturdily. -
Shape the middle section:
Roll a second ball, slightly smaller than the first. This will be the snowman’s torso. Check the proportions by stacking it briefly on the base; it should look supported but distinct. -
Create the head:
Roll the smallest ball for the head. It should be round and smooth, proportional to the other two sections. -
Add texture:
Before stacking permanently, take a stiff bristle brush or a texturing sponge and gently dab the surface of all three spheres. This gives the clay that stony, organic snow look rather than being perfectly smooth plastic.
Step 2: Assembly and Features
-
Connect the spheres:
Insert a toothpick or a piece of wire into the center of the base sphere. Apply a dab of clay slip or glue around the insertion point. -
Stack the torso:
Slide the middle sphere onto the toothpick, pressing it down gently onto the base. Ensure it’s centered but feels organic. -
Attach the head:
If your toothpick feels short, add another segment into the top of the torso. Slide the head onto the top, pressing gently to secure the stack. -
Make the carrot nose:
Roll a tiny piece of orange clay into a cone shape. I find rolling it between index fingers creates a nice, sharp point. Attach this to the center of the face with a dot of glue. -
Create the eyes:
take two tiny spheres of black clay. Flatten them slightly and press them into the clay face above the nose. You can also use small black beads if you prefer a shinier look. -
Construct the buttons:
Make four small flat discs from black clay—two for the middle section and two for the bottom base. Press these firmly into the white clay in a vertical line.
Cracking Clay?
If small cracks appear as the clay dries, mix a tiny bit of fresh clay with water to make a paste and smooth it into the fissures with your finger
Step 3: Finishing Touches
-
Let it dry completely:
Allow the clay to dry according to the package instructions. This usually takes 24-48 hours depending on the thickness. A slow dry helps prevent cracking. -
Prepare the scarf:
while the clay dries, cut a strip of orange knit fabric about 1 inch wide and 10 inches long. If you don’t have fabric, you can cut a strip from an old soc. -
Add fringe:
Use scissors to snip small vertical cuts into the ends of your fabric strip to create a fringed scarf look. -
Dress the snowman:
Once the clay is fully dry and hard, wrap the scarf around the neck area (between the head and torso). Tie a simple loop knot so one end hangs longer than the other. -
Adjust the drape:
Arrange the scarf so it looks natural and cozy, ensuring it doesn’t cover the buttons on the torso. -
Seal the piece:
Protect your snowman with a light coat of matte sealant spray. Avoid glossy sprays to maintain that natural, earthy stone texture.
Make it Sparkle
Mix white glitter into your texturing paint or mist the wet sealant with iridescent glitter to give the snowman a freshly fallen snow effect
Place your finished snowman near a window or festive display to enjoy his cozy winter vibes
Mini Clay Octopus With Curly Legs
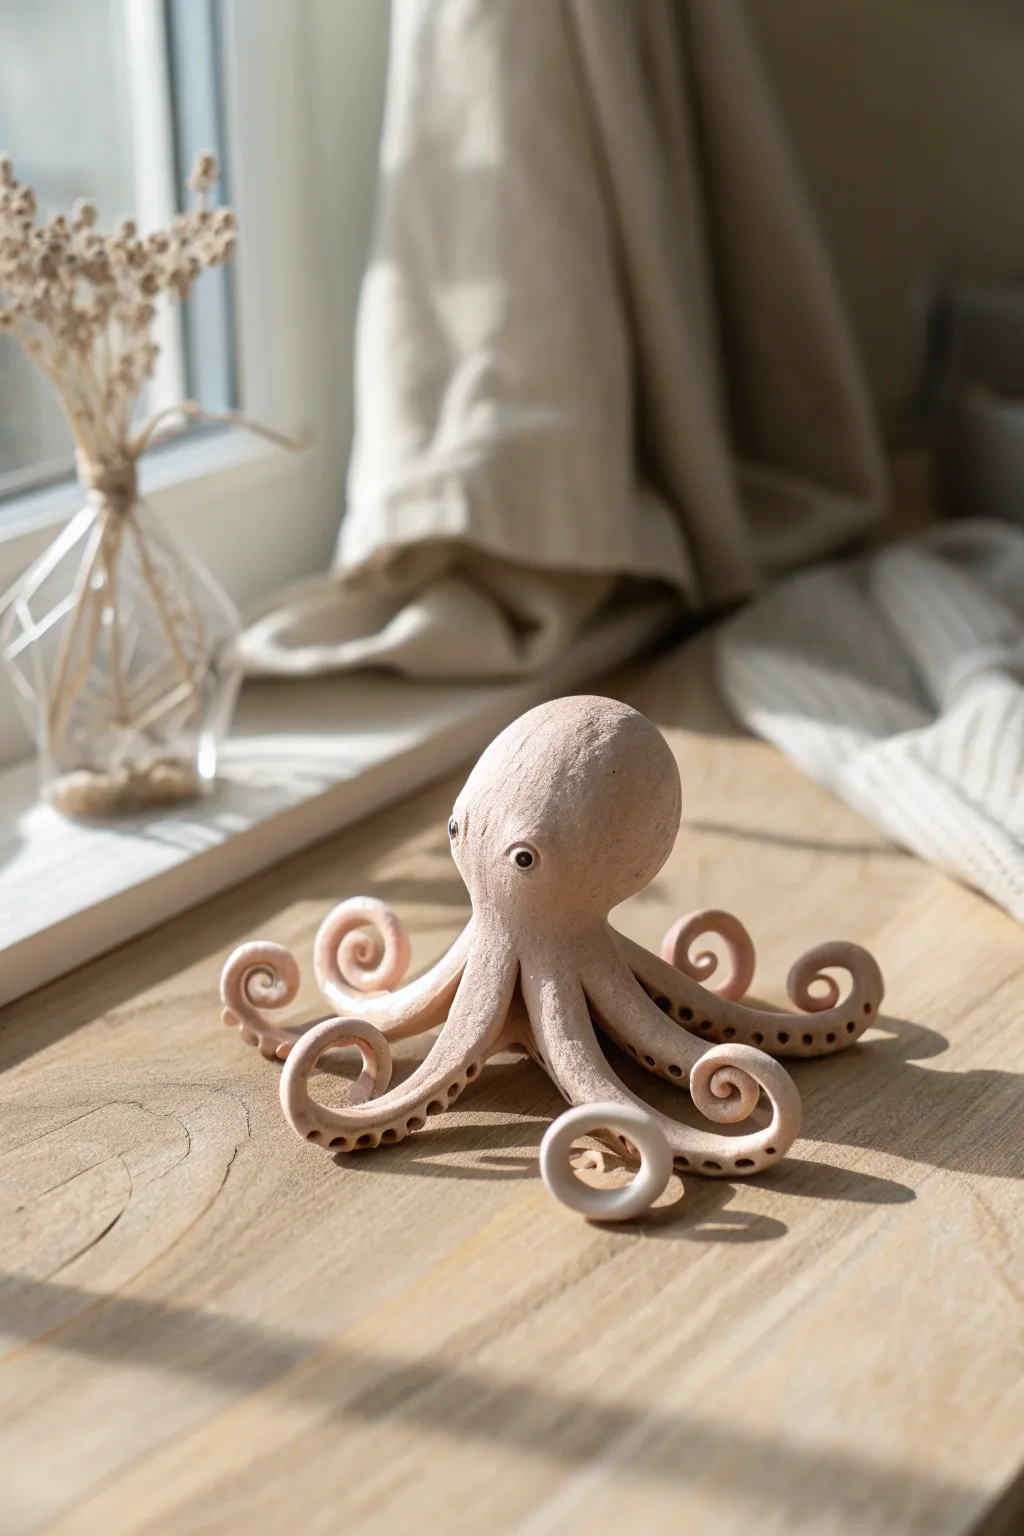
This charming little sea creature features a wonderfully textured finish and playful, curling tentacles that seem to dance across the table. Its natural beige tone and wide-set eyes give it a friendly personality perfect for decorating a desk or shelf.
Step-by-Step
Materials
- Polymer clay (beige or sand color, preferably with speckles for a stone effect)
- Small black glass beads or black clay for eyes
- Pointed sculpting tool or toothpick
- Ball stylus tool
- Rolling pin or pasta machine
- Aluminum foil (for the core)
- Soft brush (for texture)
- Oven for baking (if using polymer clay)
Step 1: Sculpting the Head
-
Form the foil core:
Creating a solid clay head can be heavy and hard to bake evenly, so start by crumpling a small piece of aluminum foil into a tight ball about the size of a walnut. This acts as a lightweight armature. -
Cover the core:
Condition your beige clay by kneading it until it’s soft and pliable. Flatten a portion into a pancake and wrap it completely around your foil ball, smoothing the seams until you have a seamless, egg-shaped dome. -
Refine the shape:
Gently roll the head between your palms to smooth out any fingerprints. You want the top to be slightly wider than the base, creating a subtle pear shape. -
Add texture:
To mimic the natural, stone-like appearance in the photo, take a stiff-bristled brush or a balled-up piece of aluminum foil and gently tap it all over the surface of the head. This removes the artificial smoothness of the clay.
Drooping Tentacles?
If the legs won’t hold their curl, your clay might be too warm. Pop the sculpture in the fridge for 10 minutes to firm it up before final positioning.
Step 2: Creating the Tentacles
-
Roll the logs:
Roll out eight long snakes of clay. Make them thicker at one end (where they will attach to the body) and tapers to a fine point at the other end. Aim for about 3-4 inches in length. -
Add suckers:
Before attaching them, turn each tentacle over. Use your small ball stylus to press a row of indentations along the underside of each clay snake to simulate the suckers. -
Attach the legs:
Flip the tentacles back over. Arrange them in a starburst pattern on your work surface and press the wide ends together in the center. Place your head piece centered on top of this junction and blend the clay from the head down into the legs using a sculpting tool so they are securely joined. -
Curl the tips:
This is the fun part where the personality shines. Take each tentacle and curl the tapered end upwards or sideways into a tight spiral. Vary the tightness and direction of the curls so the octopus looks dynamic and alive.
Step 3: Bringing It to Life
-
Position the eyes:
Find a spot about midway down the head for the eyes. Use a large ball tool to press two deep sockets, spacing them wide apart for a cute look. -
Insert the eyes:
Place a small bead of black clay or a glass bead into each socket. If you are using clay eyes, add a tiny speck of white clay as a highlight to make them sparkle. -
Final texture check:
Check your tentacles to see if you smoothed out too much texture while handling them. Re-texture gently with your brush or foil ball if needed. -
Prop for baking:
Because the legs are lifted and curled, they might sag in the oven. I like to tuck small bits of crumpled tissue or batting under the curled legs to support them while they bake. -
Bake:
Bake the sculpture according to the manufacturer’s instructions for your specific brand of polymer clay. Let it cool completely before moving it.
Oceanic Detail
Brush a light dusting of blue or teal mica powder or pastel chalk over the textured skin before baking to give it a subtle, underwater shimmer.
Once cooled, your little stone-textured octopus is ready to guard your treasures on the windowsill
Tiny Clay Sloth Hugging a Branch
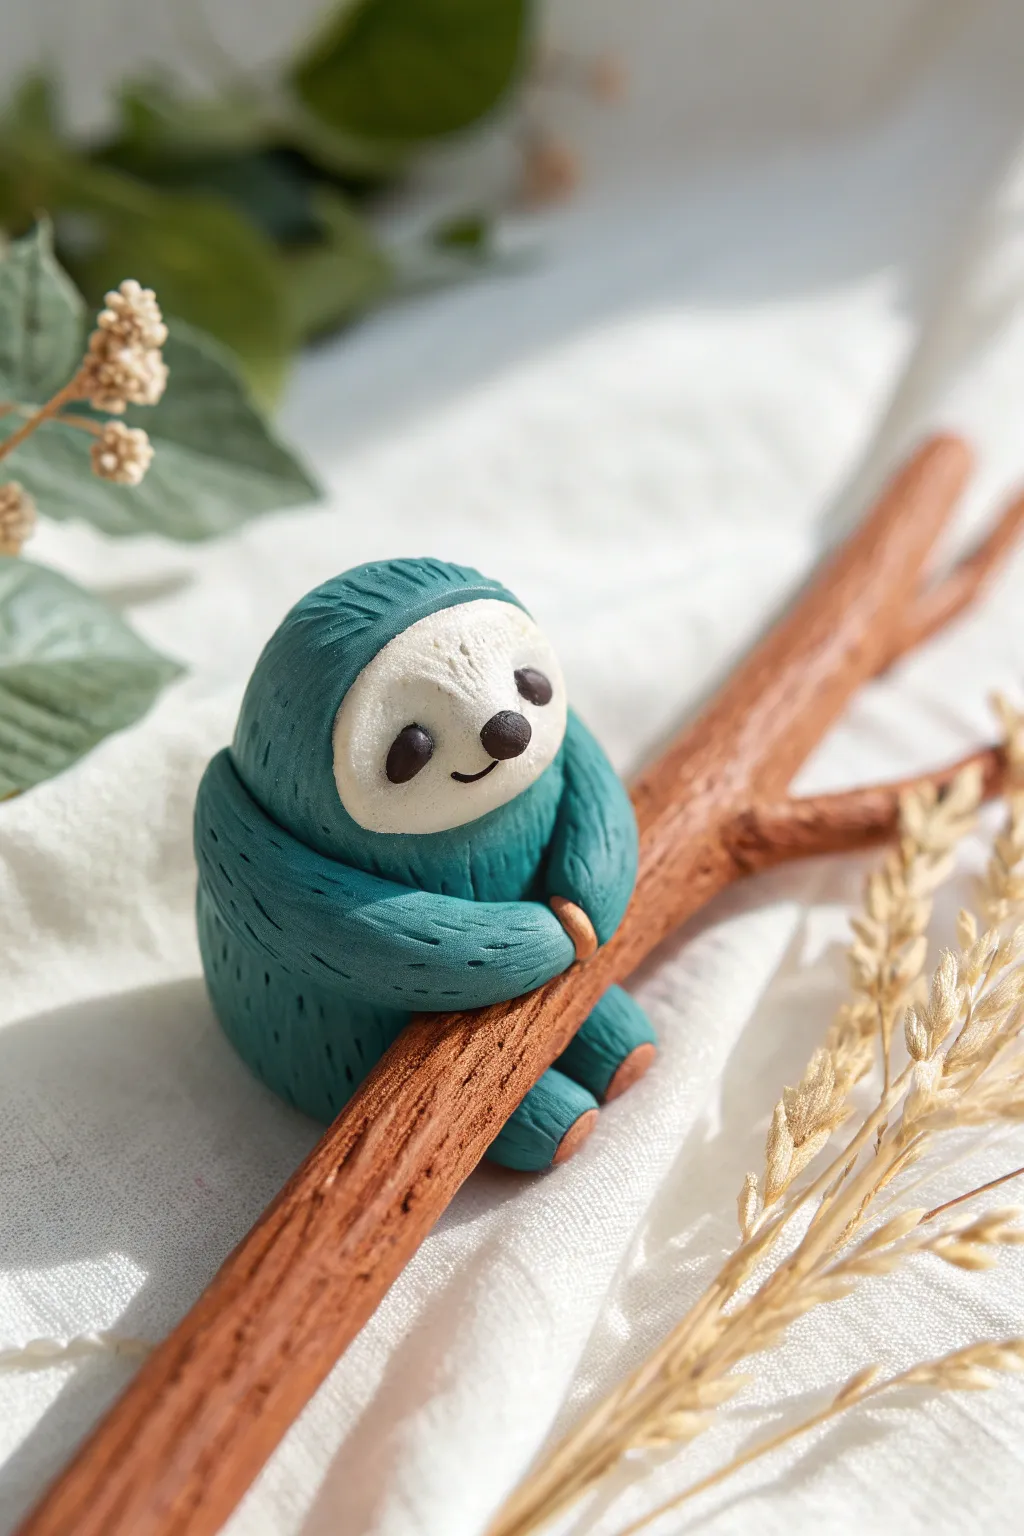
This adorable little slouch is the perfect companion for your desk or plant pot. With its textured teal fur and serene expression, this polymer clay sloth hugging a branch is a delightful beginner project that captures a peaceful moment in miniature form.
Step-by-Step Tutorial
Materials
- Polymer clay (Teal, Cream/White, Brown, Black)
- Needle tool or toothpick
- Small ball tool
- Texture tool (or toothbrush)
- Small aluminum foil armature (optional for the branch)
- Baking sheet and oven
Step 1: Shaping the Head and Body
-
Form the main body:
Start by conditioning your teal clay until it is soft and pliable. Roll it into a smooth egg shape, slightly flattening the bottom so it can sit upright -
Create the face recess:
Using your thumb, gently press a shallow indentation into the upper front part of the egg shape where the face will eventually go. -
Shape the face plate:
Take a small ball of cream or white clay and flatten it into a thick oval. Press this securely into the indentation you made on the teal body, smoothing the edges slightly so it looks integrated. -
Define the eye sockets:
Use a small ball tool to press two indentations into the cream face plate for the eyes. I like to space them slightly wide apart for a cuter look. -
Add the nose:
Roll a tiny speck of black clay into an oval and press it firmly between the eye sockets. -
Add the eyes:
Roll two small balls of black clay, slightly flatten them, and place them into the eye sockets. They should slant slightly downwards at the outer corners to create a sleepy, happy expression. -
Carve the smile:
Use your needle tool to carefully etch a simple hook-shaped smile extending from the nose to the right side of the face.
Step 2: Creating the Branch
-
Roll the branch log:
Condition your brown clay and roll it into a long, uneven snake. It doesn’t need to be perfectly straight; natural branches are wonky. -
Create a fork:
Make a smaller snake of brown clay and attach it to one end of the main branch to create a fork or twig extension. Blend the seams thoroughly with your finger or a tool. -
Texture the wood:
Drag a needle tool lengthwise along the brown clay to create deep grooves resembling bark texture. Vary the pressure to make it look organic. -
Position the branch:
Place the branch diagonally across the sloth’s tummy area, pressing it gently into the teal body so it stays in place.
Stay Clean!
White clay picks up lint easily! Keep baby wipes handy and clean your hands thoroughly before shaping the cream-colored face plate to ensure it stays pristine.
Step 3: Limbs and Finishing Touches
-
Form the arms:
Roll two teal clay sausages for the arms. They should be thicker at the shoulder and taper slightly at the wrist. -
Attach the arms:
Press the thicker ends onto the sloth’s shoulders. Wrap the arms forward so they look like they are hugging the branch. -
Add the paws:
Flatten tiny discs of brown clay and attach them to the ends of the arms to act as small paws resting on the wood. -
Form the legs:
Make two shorter, tear-drop shapes from teal clay for the legs. -
Position the legs:
Attach these to the bottom of the body. Angle them so the feet curl up onto the branch from underneath. -
Add foot pads:
Like the hands, add tiny brown discs to the tips of the feet for pads. -
Create fur texture:
Using a needle tool, make short, rhythmic scratches all over the teal parts of the body. Follow the direction the fur would naturally grow—down the back and around the limbs. -
Bake the piece:
Place your sloth on a baking sheet and bake according to your polymer clay package instructions. Let it cool completely before handling.
Turn it into Jewelry
Before baking, insert an eye screw into the top of the sloth’s head. Once baked, you can string it onto a necklace or use it as a cute keychain charm.
Now you have a peaceful little friend to hang around with you all day
Animal Face Pebble Figures Set
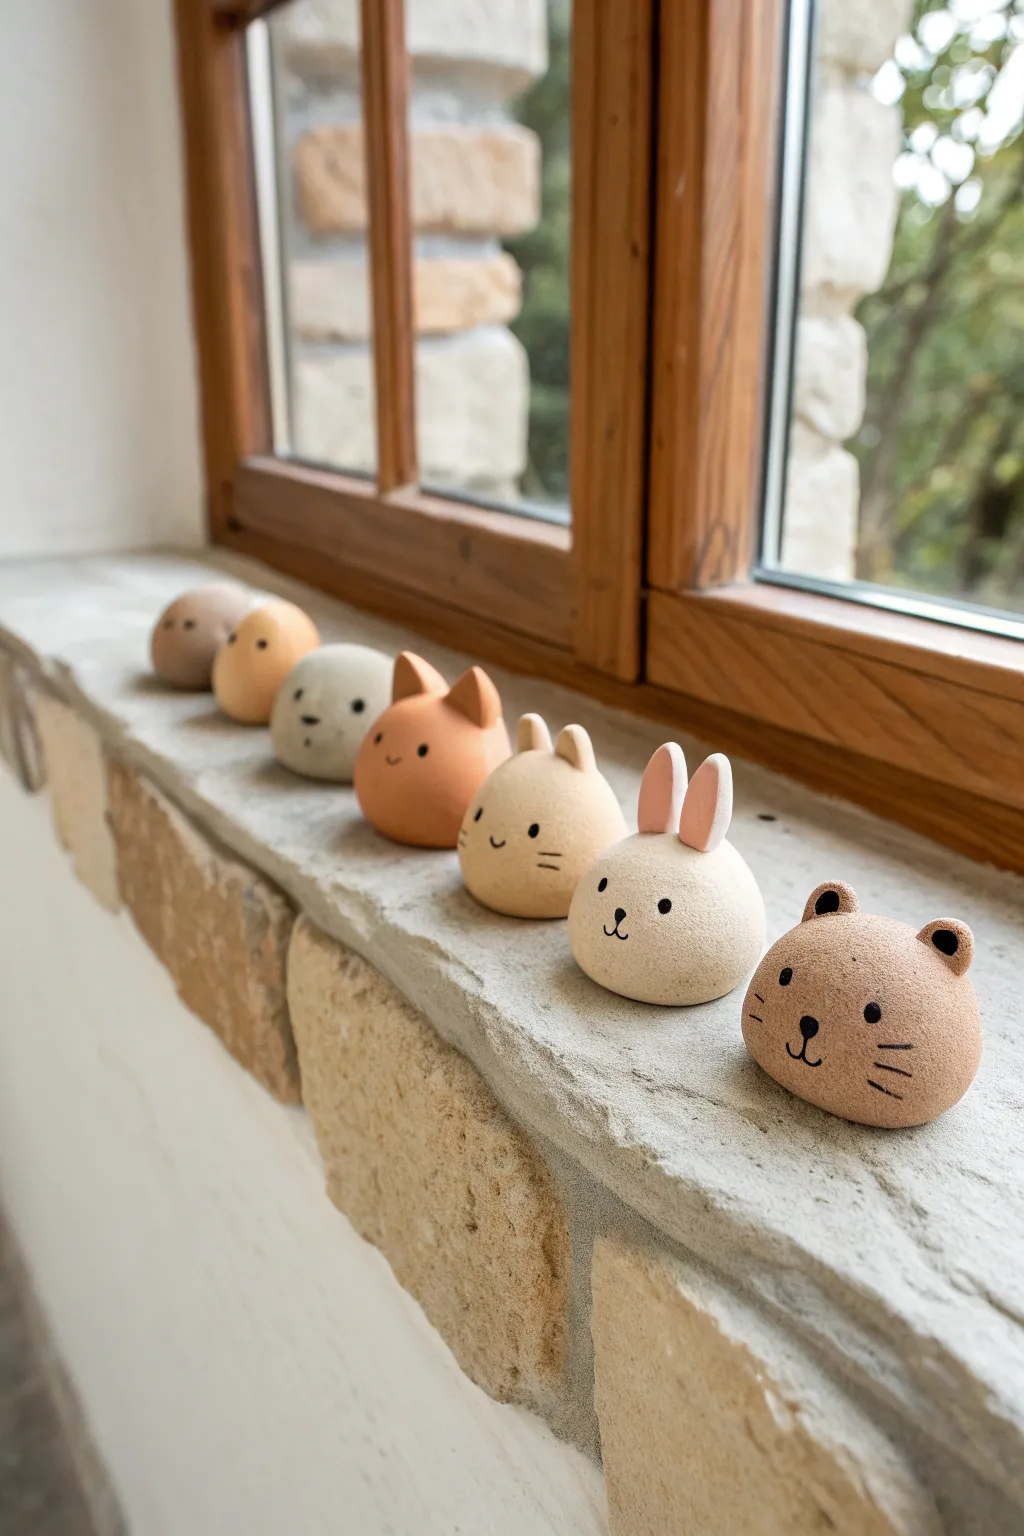
These charming minimal animal figures bring a touch of nature indoors with their earthy tones and sweet expressions. Modeled from simple round forms, this set creates a delightful gradient of forest friends perfect for lining a sunny windowsill.
Step-by-Step
Materials
- Air-dry clay (white or terracotta)
- Acrylic paints (beige, light brown, muted orange, cream, grey)
- Fine grit sandpaper
- Small bowl of water
- Fine detail paintbrush (size 0 or 00)
- Black fine-liner pigment pen (optional)
- Matte varnish or sealant
Step 1: Base Shaping
-
Portion the clay:
Start by dividing your clay into seven roughly equal portions, each about the size of a small tangerine or large walnut. -
Roll the spheres:
Roll each portion between your palms to create a smooth, tight ball. If the clay feels dry, dip your finger in water and smooth it over the surface to prevent cracks. -
Flatten the base:
Gently tap the bottom of each sphere onto your work surface to create a flat base so the figures will sit stable without rolling away. -
Refine the dome:
Use your palms to gently shape the top into a soft dome, ensuring the transition from the flat bottom to the rounded top is smooth rather than sharp.
Smooth Operator
To get that ultra-smooth ‘river stone’ look, dip your finger in water and polish the clay repeatedly before it dries. The smoother the raw clay, the less sanding needed later.
Step 2: Ear Sculpting
-
Form rabbit ears:
For the bunny, pinch two small ovals of extra clay. Flatten them slightly and use a dab of water to slip and score them onto the top of one domes, pressing the clay seams smooth. -
Create bear ears:
For the bear and mouse figures, roll tiny balls of clay. Press them gently into place on the head and use a modeling tool or your fingertip to blend the clay downwards into the main body. -
Shape fox ears:
For the fox, pinch triangular shapes directly from the top of the dome if possible, or attach separate triangles, keeping the points sharp and upright. -
Make subtle ears:
For the simpler creatures in the background, add barely-there nubs or leave them completely round for a seal-like appearance. -
Final smoothing:
Dip your finger in water one last time and polish all the surfaces to remove fingerprints. Let the figures dry completely for 24-48 hours.
Weight It Down
Before sealing the bottom, hollow out a small cavity and glue in a small washer or pebble. This adds satisfying weight and stability to your figures.
Step 3: Painting & Details
-
Sand imperfections:
Once fully dry, lightly gently buff the surface with fine grit sandpaper to remove any bumps or rough textures. -
Mix earthy tones:
Prepare a palette of muted, natural colors. I like to mix a little white into my browns and oranges to achieve that soft, pastel stone look seen in the photo. -
Apply base coats:
Paint each figure a solid color. Use a sandy beige for the rabbit, a warm terracotta for the fox, and various shades of grey and cream for the others. Two thin coats are better than one thick one. -
Add pink accents:
Mix a very pale pink and paint the inside of the rabbit’s ears. Keep this subtle and soft. -
Paint facial features:
Using your finest brush and black paint (or a pigment pen), add the faces. Place the eyes wide apart for cuteness. -
Detail the noses:
Paint small, inverted triangles or simple dots for noses. Connect the nose to a simple ‘w’ shape for the mouth on the animals that need it. -
Add whiskers:
For the cat, bear, and rabbit, add two or three tiny horizontal strokes on each cheek to represent whiskers. -
Protect the finish:
Finish with a coat of matte varnish to protect the paint and give the clay a unified, finished texture that mimics smooth stone.
Now you have a serene little family of forest creatures ready to watch over your home
Simple Figure Note or Photo Holder

This charming, chubby frog isn’t just a cute desk companion; he doubles as a helper to hold your important notes or favorite photos. With his natural, speckled finish and minimal features, he brings a calming, earthy vibe to your workspace.
How-To Guide
Materials
- Air-dry clay (stone, granite, or oatmeal color)
- Small wooden round slice (coaster size)
- Gold craft wire (16-18 gauge)
- Needle nose pliers
- Small black beads or black acrylic paint
- Sculpting tools (needle tool, modeling tool)
- Toothbrush or stiffness brush
- Water cup
- Strong craft glue (E6000 or similar)
- Small piece of heavy cardstock (for the tag)
Step 1: Shaping the Base Figure
-
Condition the Clay:
Start by kneading a generous handful of clay until it is warm and pliable. If you’re using plain white clay, you can mix in some coarse sand or cracked pepper now to achieve that natural speckled look shown in the photo. -
Form the Body:
Roll your clay into a smooth ball about the size of a tennis ball. Then, gently taper the top half slightly to create a pear shape, distinctively wider at the bottom for stability. -
Define the Head:
Using your thumb, gently press into the tapered top section to suggest a head area without creating a separate neck. The transition should be very smooth and chubby. -
Add the Eyes:
Roll two small marble-sized balls of clay. Attach them to the very top of the head using a bit of water and scoring (scratching up the surfaces). Smooth the seams downward so they blend seamlessly into the main body. -
Create the Legs:
For the hind legs, roll two thick, short sausages of clay. Press these onto the lower sides of the body, bending them slightly to look like thighs sitting on the ground. Blend the back edges into the body.
Stone Texture Trick
If you don’t have speckled clay, create the look by kneading used dried coffee grounds or black pepper into plain white clay before sculpting.
Step 2: Adding Details and Hardware
-
Shape the Feet:
At the end of each hind leg, pinch the clay slightly outward to form feet. Use a needle tool or knife to make small indentations for toes. -
Sculpt the Arms:
Roll two thinner coils for the arms. Attach them starting from the ‘shoulder’ area, curving them around the belly. Bring the hands together at the center of the stomach as if he is holding something. -
Refine the Face:
Use a modeling tool or the edge of a credit card to press a wide, gentle smile into the face. Make it slightly crooked for extra character. -
Insert Eyes:
Press your black beads firmly into the eye mounds you created earlier. If you prefer painting, wait until the clay is dry to paint glossy black circles. -
Texture the Skin:
Take a stiff toothbrush and gently tap it all over the surface of the frog. This removes fingerprints and enhances the stone-like texture. -
Prepare the Note Holder:
Cut a 5-inch length of gold wire. Using round-nose pliers, curl one end into a double loop (like a paperclip top) to hold a card. Create a small hook or bend at the bottom end for anchoring. -
Insert the Hardware:
Gently push the bottom of the wire into the frog’s joined hands. I find it helps to add a dab of glue to the wire tip before inserting it to ensure it stays put once dry.
Step 3: Final Assembly
-
Dry Completely:
Let your frog sit undisturbed for at least 24-48 hours. Air-dry clay shrinks slightly, so keep him away from direct heat to prevent cracking. -
Check Stability:
Once dry, check if the bottom is flat. If it wobbles, gently sand the base against a piece of fine-grit sandpaper until level. -
Mount to Base:
Apply a strong craft glue to the bottom of the frog and press him firmly onto the center of your wooden slice. This adds weight and elegance to the finished piece. -
Add the Note:
Cut a small rectangle from heavy cardstock. Punch a hole in the corner and thread it onto your gold wire loop to test the hold.
Loose Wire?
If the wire wobbles after the clay dries, pull it out gently, add a drop of superglue into the hole, and quickly reinsert the wire.
Now your stoic little frog is ready to keep your reminders safe