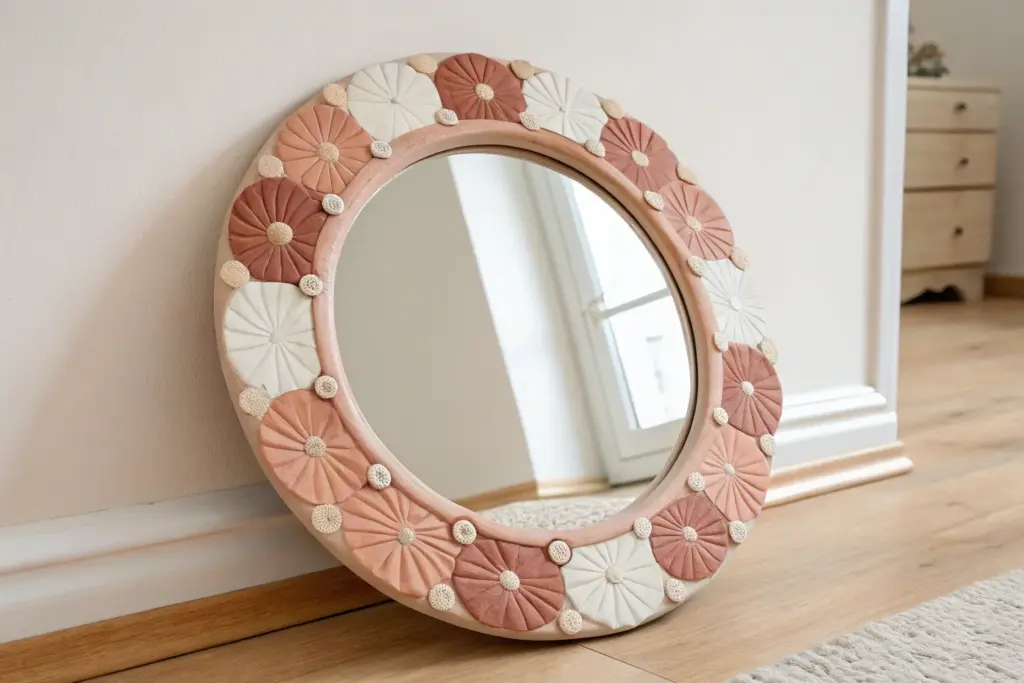
If you’ve got a plain mirror and a little air-dry clay or polymer clay, you’re basically holding a blank canvas. I love turning everyday mirrors into fun, personality-packed decor with a handmade clay mirror frame that feels totally you.
Daisy Chain Border with Tiny Spacer Dots
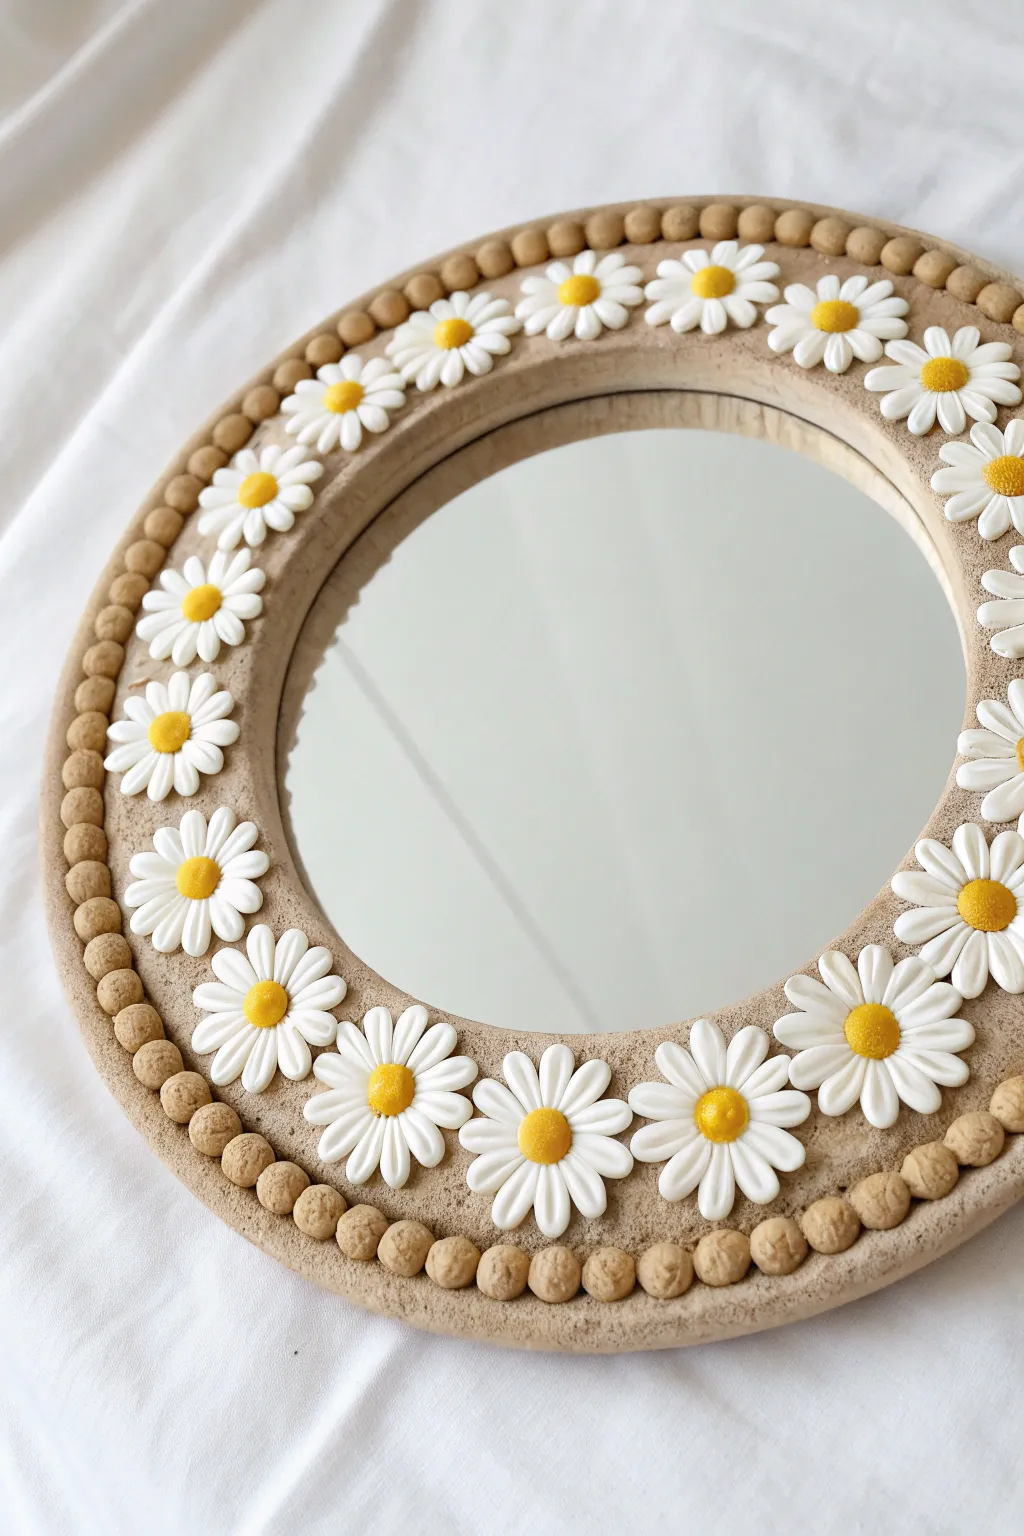
Bring the charm of a sun-drenched garden indoors with this delightful clay mirror project. Featuring a sandy, textured base adorned with pristine white daisies and a beaded border, this piece adds a soft, whimsical touch to any vanity or wall.
Step-by-Step
Materials
- Round mirror insert (approx. 6-8 inches)
- Air-dry clay (white)
- Acrylic paint (sandy beige, bright yellow, white)
- Rolling pin
- Small daisy plunge cutter or small petal cutter
- Detailing tool or toothpick
- Strong craft glue (E6000 or similar)
- Fine-grit sandpaper
- Matte varnish or sealant
- Soft texture sponge or toothbrush
- Palette knife or clay blade
Step 1: Base Construction
-
Prepare the Clay:
Start by conditioning a large chunk of air-dry clay. Knead it until soft and pliable to prevent cracks later. You can pre-tint your clay with a drop of beige acrylic paint now for a consistent base color, or paint it later. -
Roll the Slab:
Roll out the clay on a flat surface to an even thickness of about 1/4 inch. Ensure the slab is large enough to accommodate your mirror plus a wide border. -
Cut the Frame Shape:
Place your mirror gently onto the clay to mark the center. Cut a circle around the mirror leaving a border of approximately 1.5 to 2 inches width. Remove the inner circle where the mirror will eventually sit. -
Add Texture:
Before the clay dries, gently tap the entire surface of the frame with a dry sponge or an old toothbrush. This creates that lovely stone-like, sandy texture seen in the photo.
Clean Petals
If you are painting the background after attaching flowers, try masking the white petals with liquid masking fluid. It rubs off easily after painting, revealing pristine white clay underneath.
Step 2: Creating the Dots
-
Roll Tiny Spheres:
Take small pinches of clay and roll them into uniform spheres, about the size of a pea. You will need enough to line the entire outer edge of your frame. -
Texture the Dots:
Just like the base, give these little spheres a quick tap with your texturing tool so they match the rustic finish of the main frame. -
Attach the Border:
Score the outer edge of your frame and apply a tiny bit of water or liquid clay. Press the spheres gently onto the rim, spacing them snugly next to each other.
Step 3: The Daisy Chain
-
Cut Out Flowers:
Roll out a fresh, thin sheet of white clay. Use a daisy plunge cutter to punch out numerous flowers. If you don’t have a cutter, hand-form small teardrop shapes and arrange them in circles. -
Shape the Centres:
Roll tiny balls of clay for the flower centers. Press one gently into the middle of each daisy to fuse the petals together. -
Dry Fit Arrangement:
I always like to lay the flowers onto the frame before gluing to ensure the spacing looks even. Adjust them so they form a continuous ring just inside the beaded border. -
Adhere the Daisies:
Using a dab of water or slip, attach the flowers firmly to the textured base. Press down lightly on the center dot to secure them without flattening the petals. -
Petal Detailing:
Use a toothpick or knife tool to press a subtle line down the center of each petal for added realism. -
Pollen Texture:
Stipple the center of each flower with a needle tool or stiff brush to mimic the fuzzy texture of pollen.
Pastel twist
Instead of classic white daisies, paint the petals in soft pastel pinks, lilacs, or baby blues to create a dreamy, fairy-core aesthetic perfect for a nursery or cottage-style room.
Step 4: Finishing Touches
-
Let it Dry:
Allow the entire clay structure to dry completely for 24-48 hours. Turn it over halfway through if possible to ensure the back dries evenly. -
Paint the Base:
If you didn’t pre-tint the clay, paint the frame base and the outer dot border with a matte sandy beige acrylic paint. Use a small brush to get around the white petals carefully. -
Paint the Centers:
Paint the flower centers with a bright, sunny yellow. Keep the petals distinctively white; touch them up with white paint if any beige accidently encroached on them. -
Seal:
Apply a coat of matte varnish over the clay parts to protect the paint and texture. Avoid glossy finishes to keep the natural, earthy look. -
Attach Mirror:
Flip the frame over. Apply strong craft glue (like E6000) to the back rim of the mirror insert and press it firmly against the back of the clay frame opening. Let cure fully.
Now you have a charming, handcrafted mirror that captures the everlasting freshness of spring flowers


Mixed-Size 3D Blossoms for a Full Garden Look
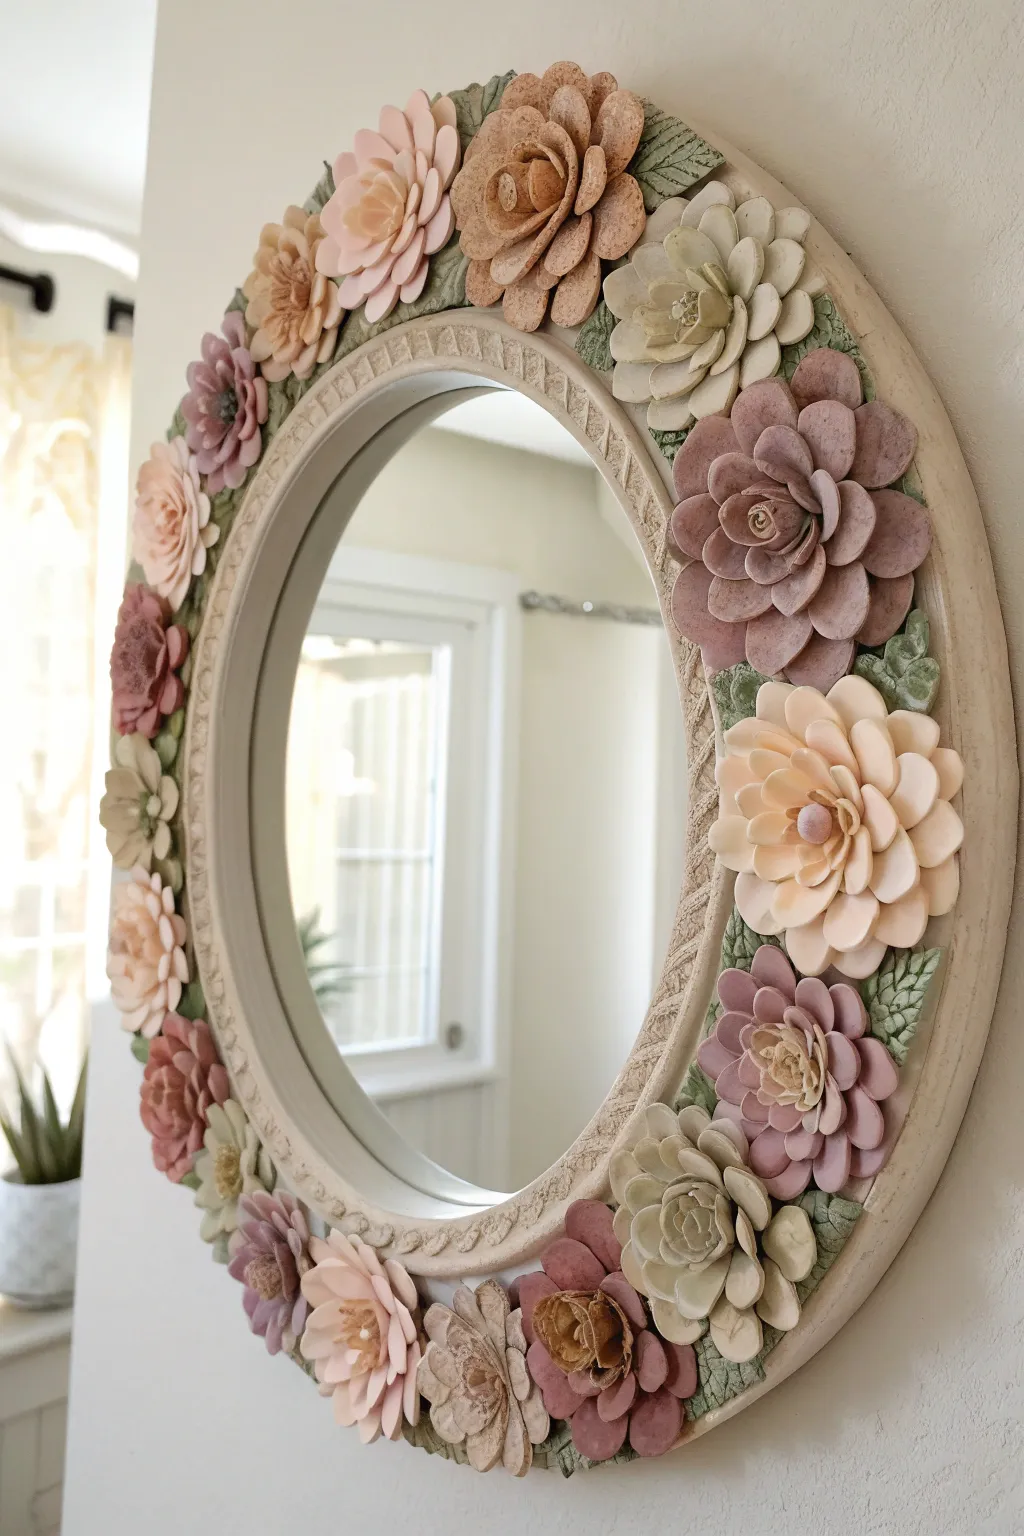
Transform a plain round mirror into a romantic garden statement piece using air-dry or polymer clay. By layering flowers of varying sizes and muted pastel tones around the rim, you create a deeply textured, three-dimensional frame that feels vintage and organic.
Step-by-Step Tutorial
Materials
- Round mirror with a wide, flat wooden or plastic frame (at least 2-3 inches wide)
- Air-dry paper clay or lightweight polymer clay (white)
- Acrylic paints (muted pinks, mauve, sage green, cream, beige)
- Clay sculpting tools (ball stylus, needle tool, plastic knife)
- Textured rolling pin or lace doily (optional for leaves)
- Strong craft glue (E6000 or heavy-duty wood glue)
- Matte spray sealant or brush-on varnish
- Small synthetic brushes (flat and detail)
- Sandpaper 220 grit
- Water cup and sponge
Step 1: Preparing the Base
-
Clean the surface:
Begin by thoroughly cleaning the mirror frame with alcohol or warm soapy water to remove any oils or dust. Scuff the surface lightly with sandpaper to give the clay and glue a better grip. -
Create a textured rim:
Roll out a long, thin snake of clay and flatten it slightly. Press this onto the inner edge of the mirror frame. Use a modeling tool carefully to imprint a repeated pattern, like small vertical lines or a braid effect, creating the decorative inner border seen in the example.
Keep it Lightweight
To prevent the mirror from becoming too heavy to hang, bulk out the centers of large flowers with crumpled aluminum foil before covering them with clay.
Step 2: Sculpting the Botanicals
-
Mix your colors (optional):
If using polymer clay, custom mix your muted palette now—dusty rose, sage green, and creams. If using air-dry clay, you will paint everything later, so proceed with white clay. -
Form the large focal flowers:
Start by making 3-5 large ‘dahlia-style’ blooms. Roll a small ball for the center, then create 15-20 teardrop-shaped petals. Flatten each petal slightly and curve the edges inward. -
Assemble the large blooms:
Attach the petals in concentric circles around the center ball. Use the back of a spoon or a ball tool to cup them upwards, giving the flower height and dimension rather than letting it lie flat. -
Create medium roses:
For the rose-style flowers, roll a thin ribbon of clay and coil it tightly for the center. Add individual flattened ovals around the coil, overlapping them slightly to mimic opening petals. -
Sculpt small filler flowers:
Make smaller, simple 5-petal blossoms. These are crucial for filling gaps. Press a small indentation in the center of each petal with a modeling tool for texture. -
Craft the leaves:
Roll out a sheet of clay and cut freehand leaf shapes. Use a needle tool to score vein lines. Pressing the clay onto a real leaf or a textured mat can add realistic veins instantly. -
Let the elements dry:
Allow all your sculpted pieces to dry completely on a flat surface. I find placing the curved flowers in an egg carton helps them hold their 3D shape while drying.
Gilded Edges
For a touch of elegance, gently rub a gold wax paste or metallic gold paint solely on the textured inner rim and the very tips of the flower petals.
Step 3: Assembly and finishing
-
Arrangement strategy:
Dry-fit your flowers on the frame before gluing. Place the largest blooms first at irregular intervals to balance the visual weight. -
Glue the base layer:
Glue down the leaves first, letting them peek out from where the flowers will sit. Use a generous amount of strong adhesive. -
Attach the main blooms:
Glue your large and medium flowers onto the frame, overlapping the leaves. Hold them in place for a few seconds to ensure the bond starts to set. -
Fill the gaps:
Tuck the smallest flowers into any empty spaces between the larger blooms. Use small balls of clay as risers underneath them if you need to elevate them to match the height of neighbors. -
Base painting (Air-Dry Clay only):
If you used white air-dry clay, paint the base of the frame a creamy off-white. careful not to get paint on the mirror glass (masking tape helps). -
Painting the flowers:
Paint each flower individually. Use watered-down acrylics (washes) to keep the look soft. Focus darker shades in the deep crevices of the petals and lighter shades on the tips. -
Highlighting:
Once the main colors are dry, dry-brush a tiny amount of cream or white paint onto the very edges of the petals and the textures of the leaves to make the details pop. -
Seal the work:
Spray the entire frame with a matte sealant. This protects the clay from humidity (especially important for bathrooms) and prevents the paint from chipping.
Hang your new floral masterpiece in a well-lit spot to watch the shadows play across the textured petals.


Funky Squiggle Frame in One Continuous Coil
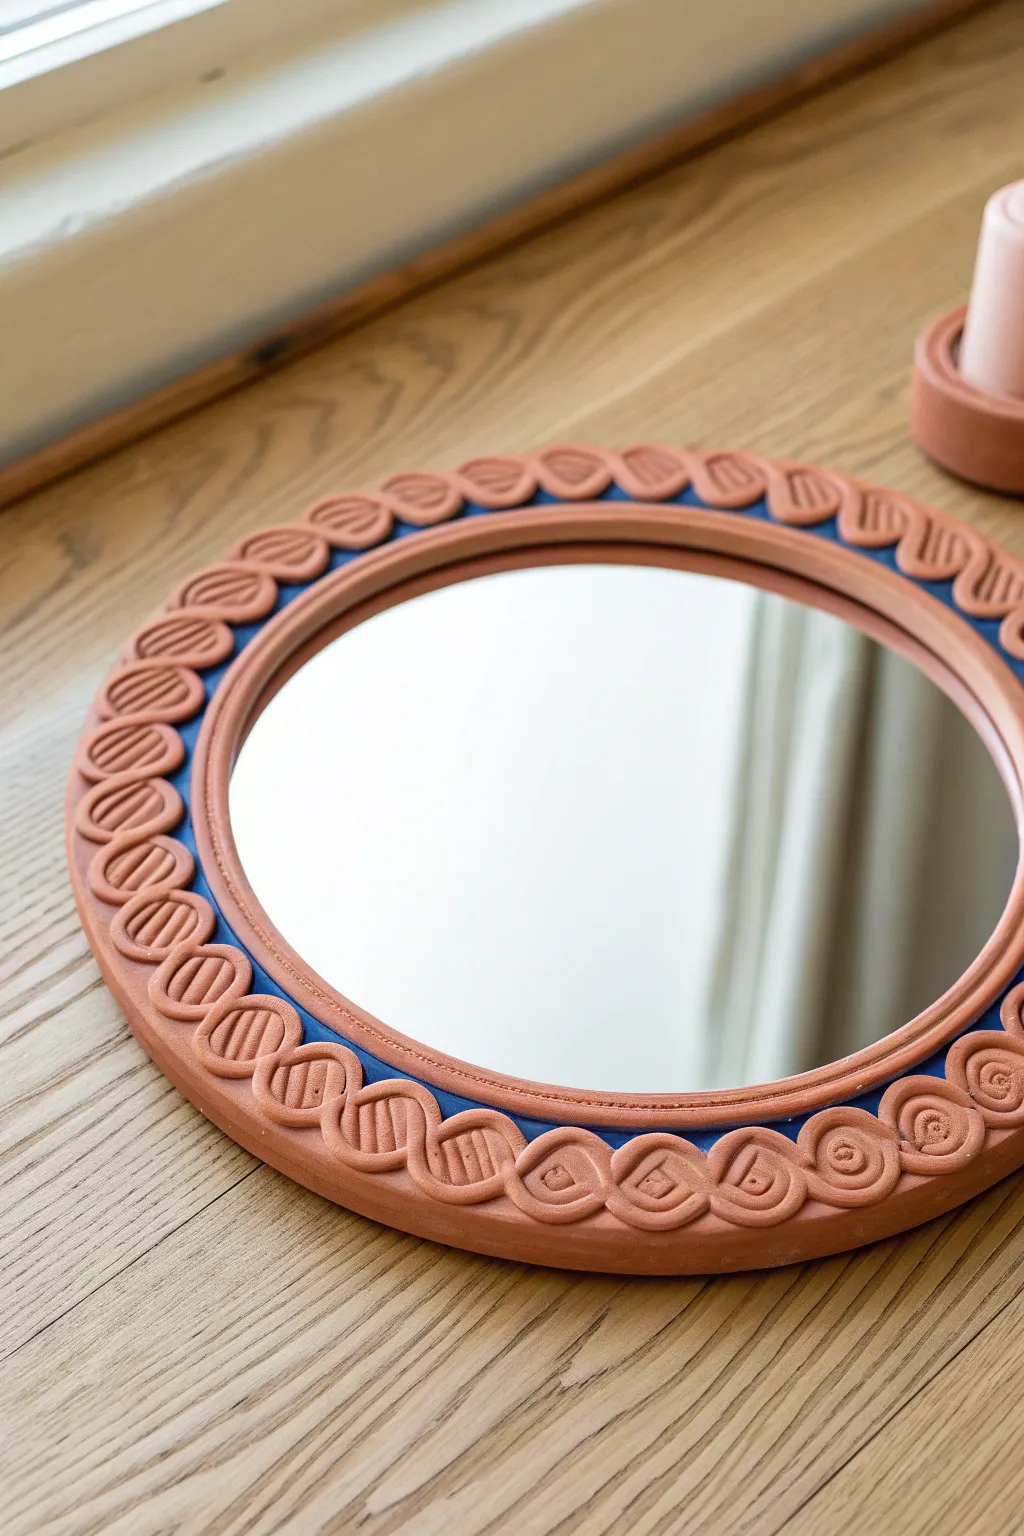
Transform a plain round mirror into a piece of funky, artisanal home decor using air-dry clay and a few simple stamping techniques. This project combines the warmth of raw terracotta tones with a striking pop of cobalt blue for a playful, textural statement piece.
How-To Guide
Materials
- Round mirror (approx. 8-10 inches diameter)
- Small round wooden or MDF backing board (2 inches wider than mirror)
- Terracotta colored air-dry clay (or polymer clay)
- Cobalt blue acrylic paint
- Paintbrush (flat/medium size)
- Strong craft glue (e.g., E6000)
- Rolling pin or clay roller
- Clay sculpting tools
- Stamping tools (popsicle sticks, pen caps, wire mesh)
- Polyurethane sealer or varnish (matte finish)
Step 1: Base Prep & Color Blocking
-
Prepare the backboard:
Begin with a sturdy wooden or MDF circle that is roughly two inches wider than your mirror glass. Ensure the surface is clean and dust-free. -
Create the blue border:
Paint the outer rim of the wooden board with cobalt blue acrylic paint. You don’t need to paint the center where the mirror will sit, just a wide band around the edge that will be visible beneath the clay. -
Paint a second coat:
Let the first coat dry completely, then apply a second layer of blue to ensure a rich, opaque background color. -
Attach the mirror:
Once the paint is fully dry, center your mirror glass on the board. Apply strong craft glue to the back of the mirror and press it firmly into place. Let this set while you prepare the clay.
Cracked Clay?
If hairline cracks appear while drying, mix a small amount of fresh clay with water to make a paste. Fill the cracks, smooth with a finger, and let dry again before sealing.
Step 2: Sculpting the Clay Frame
-
Roll the main snake:
Take a large chunk of terracotta clay and roll it into a very long, even snake. Aim for a thickness of about 3/4 inch. If the clay feels dry, I like to knead in a tiny drop of water first to prevent cracking. -
Create the squiggle shape:
Place the long snake onto a clean work surface. Gently manipulate it into a continuous ‘S’ curve or wave pattern. Try to keep the loops consistent in size. -
Flatten the coil:
Using your palm or a small roller, gently flatten the top of your squiggly snake. You want a flat surface for stamping, but keep some rounded dimension on the sides. -
Test the fit:
Carefully lift your flattened squiggle and curve it around the mirror to unsure it fits the circumference. You may need to add more clay or trim the excess to make the ends meet perfectly. -
Add the inner rim:
Roll a second, thinner snake of clay. Place this directly against the edge of the mirror glass to create a neat inner border. Press it down gently so it adheres to the backing board. -
Apply the squiggle layer:
Apply a generous amount of strong glue or slip (if using traditional clay) to the blue painted border. Carefully place your prepared squiggle coil onto the blue area, surrounding the inner rim.
Level Up: Glossy Contrast
Instead of a matte finish, use a high-gloss glaze only on the stamped spiral sections. This creates a cool texture contrast against the matte grid patterns.
Step 3: Detailing & Finishing
-
Stamp diagonal lines:
Using the edge of a sculpting tool or a popsicle stick, press diagonal parallel lines into every other loop of the squiggle. -
Stamp concentric swirls:
For alternating loops, press a spiral pattern into the clay. You can use a specialized stamp or carefully drag a rounded tool tip to draw the swirl manually. -
Add grid textures:
If you want variety like the original, press a small square object or wire mesh into a few random loops to create a waffle or grid texture. -
Smooth the joins:
Where the ends of your coils meet, gently smudge the clay together with a damp finger so the seam becomes invisible. -
Clean up edges:
Check the inner and outer edges of your clay work. Smooth away any fingerprints or rough spots with a slightly damp sponge or brush. -
Slow drying process:
Allow the mirror to dry flat in a cool, dry place. Avoid direct sunlight or heat, which can cause warping. This usually takes 24-48 hours depending on clay thickness. -
Seal the piece:
Once bone dry, apply a matte varnish to the clay parts. This protects the finish and deepens the terracotta color without making it look plasticky.
Hang your new mirror near a window to catch the light and show off those beautiful handmade textures


Scalloped Edge Frame for a Soft Retro Vibe
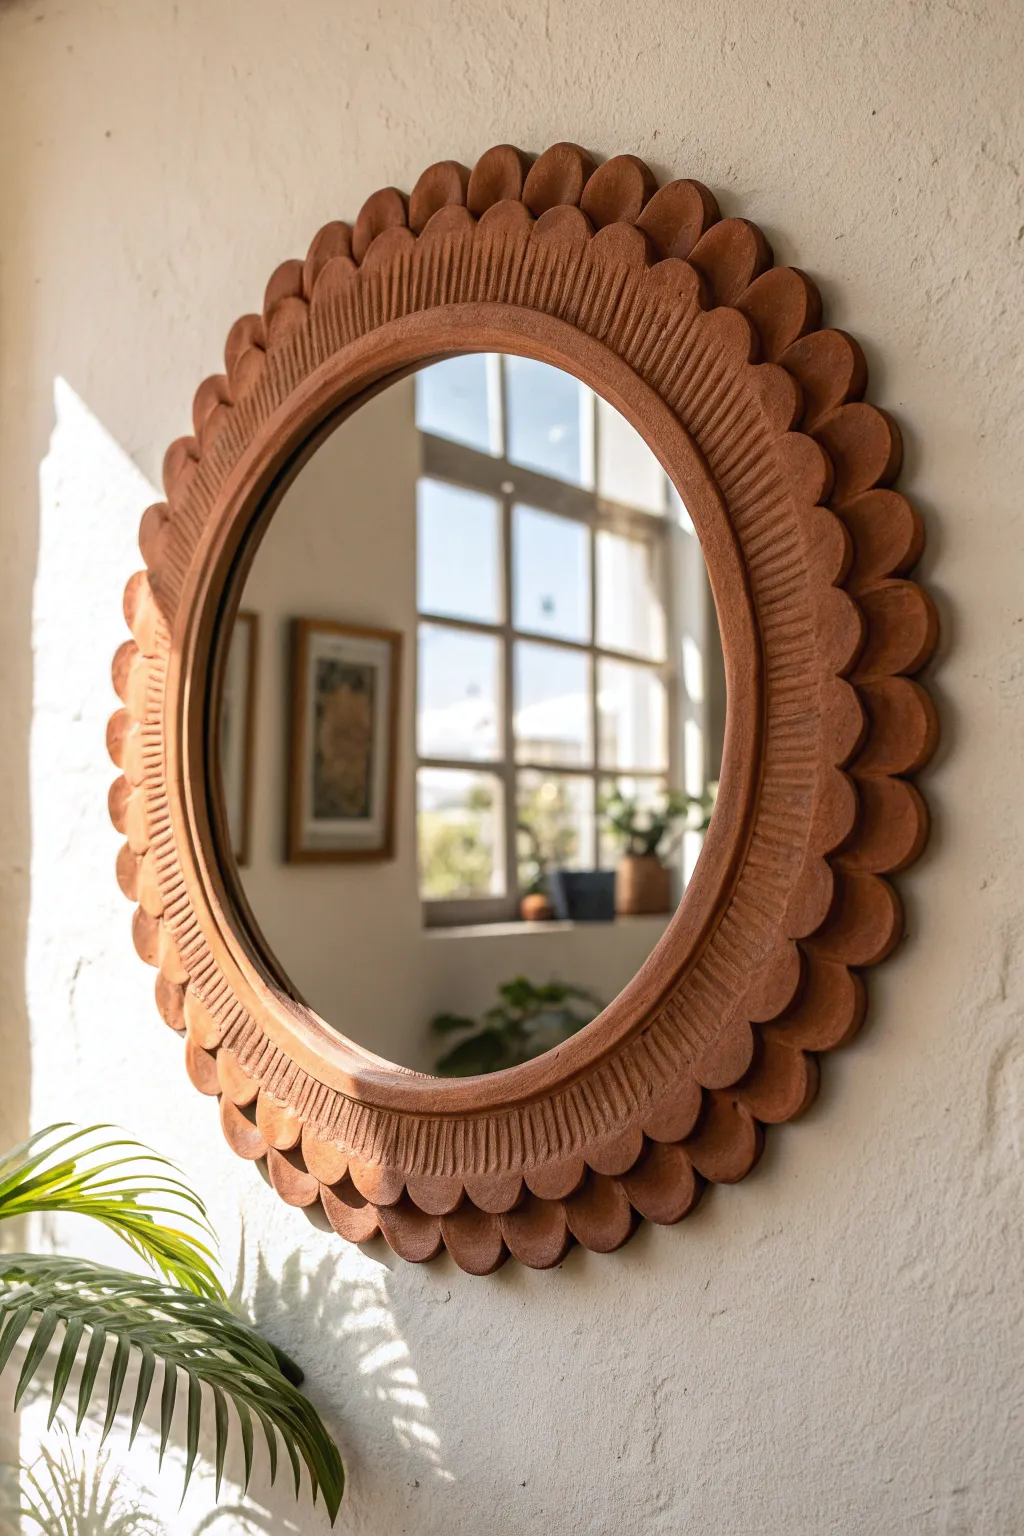
Enhance your reflection with this warm, bohemian-style mirror that features a double-layered scalloped edge. The rich terracotta tone and textural details give it a charming, handmade quality perfect for adding a soft retro vibe to any wall.
Step-by-Step Guide
Materials
- Round frameless mirror (approx. 12-16 inches diameter)
- Air-dry clay (terracotta color) or polymer clay
- Rolling pin
- Parchment paper or canvas mat
- Circle cookie cutter or small glass (approx. 2 inches diameter)
- Modeling tool or butter knife
- Texturing tool (comb or fork)
- Strong craft glue (e.g., E6000) or heavy-duty construction adhesive
- Slip (water and clay mixture, if using air-dry clay)
- Matte sealant spray or varnish
- Sandpaper (fine grit)
Step 1: Base Preparation
-
Prepare your workspace:
Cover your table with parchment paper or a canvas mat to prevent the clay from sticking. Ensure the mirror is clean and free of dust. -
Condition the clay:
Knead your terracotta clay thoroughly until it is soft, pliable, and free of cracks. This conditioning step is crucial for achieving a smooth finish later. -
Roll out the base coil:
Create a long, thick snake of clay. It needs to be long enough to wrap around the entire circumference of your mirror with a little overlap. -
Flatten the base:
Gently flatten this coil with your rolling pin until it is about 1/4 inch thick and 2 inches wide. This will form the foundation that sits directly on the mirror edge. -
Apply the foundation:
Lay the flattened strip around the perimeter of the mirror, overlapping the glass surface by about an inch. Trim the ends and smooth the seam together with a little water or slip so the join is invisible.
Crack Control
If hairline cracks appear while drying, don’t panic. Mix a tiny bit of fresh clay with water to make a thick paste and fill the cracks. Smooth it over and let it dry again.
Step 2: Creating the Scallops
-
Roll sheet for scallops:
Roll out a fresh slab of clay to a uniform thickness of roughly 1/4 inch. Creating an even thickness here ensures your scallops look professional. -
Cut the shapes:
Use your circle cutter to punch out numerous circles. You will need enough to border the entire mirror likely between 20 and 30 depending on sizing. -
Attach the first layer:
Score the back of each clay circle and the outer edge of your foundation strip. Apply a dab of slip or liquid clay, then press the circles onto the foundation, letting them overhang the edge to create the outer scallop silhouette. -
Build the second layer:
Cut another set of circles, perhaps slightly smaller if you want a graduated look, or cut the existing circles in half to create semi-circles. I find layering these directly over the gaps of the first layer creates a lovely depth. -
Blend the seams:
On the inner side where the scallops meet the foundation strip, use a modeling tool to gently blend the clay so it transitions smoothly without a harsh line.
Step 3: Adding Texture & Finishing
-
Create the inner ring:
Roll a thinner snake of clay and press it onto the inner edge of the frame, right where the clay visual ends and the mirror reflection begins. Flatten it slightly to create a defined inner border. -
Add radial texture:
using a texturing tool, a comb, or the side of a credit card, press consistent vertical lines into this inner ring. Work your way around the entire circle, keeping the spacing tight and uniform. -
Refine the edges:
Dip your finger in a little water and run it over all edges to smooth out any roughness or fingerprints. Pay special attention to the tips of the scallops. -
Allow to dry:
Let the mirror dry completely flat in a cool area away from direct sunlight. This slow drying process helps prevent warping and cracking. It may take 24-48 hours depending on humidity. -
Sand imperfections:
Once fully cured, use fine-grit sandpaper to gently buff away any remaining rough spots or sharp edges. -
Seal the piece:
Spray the clay frame with a matte sealant. This protects the porous material from moisture and dust while maintaining that raw, earthy terracotta look. -
Reinforce adhesion:
If the clay has separated slightly from the mirror glass during drying (which is common as clay shrinks), carefully apply strong clear adhesive like E6000 into the gap to secure it permanently.
Two-Tone Effect
For extra dimension, use a slightly lighter shade of clay for the inner textured ring. The subtle contrast highlights the radial lines beautifully.
Hang your new statement piece in a sunny spot and enjoy the warmth it brings to your space

The Complete Guide to Pottery Troubleshooting
Uncover the most common ceramic mistakes—from cracking clay to failed glazes—and learn how to fix them fast.
Bold Primary Color Flower Pop Frame
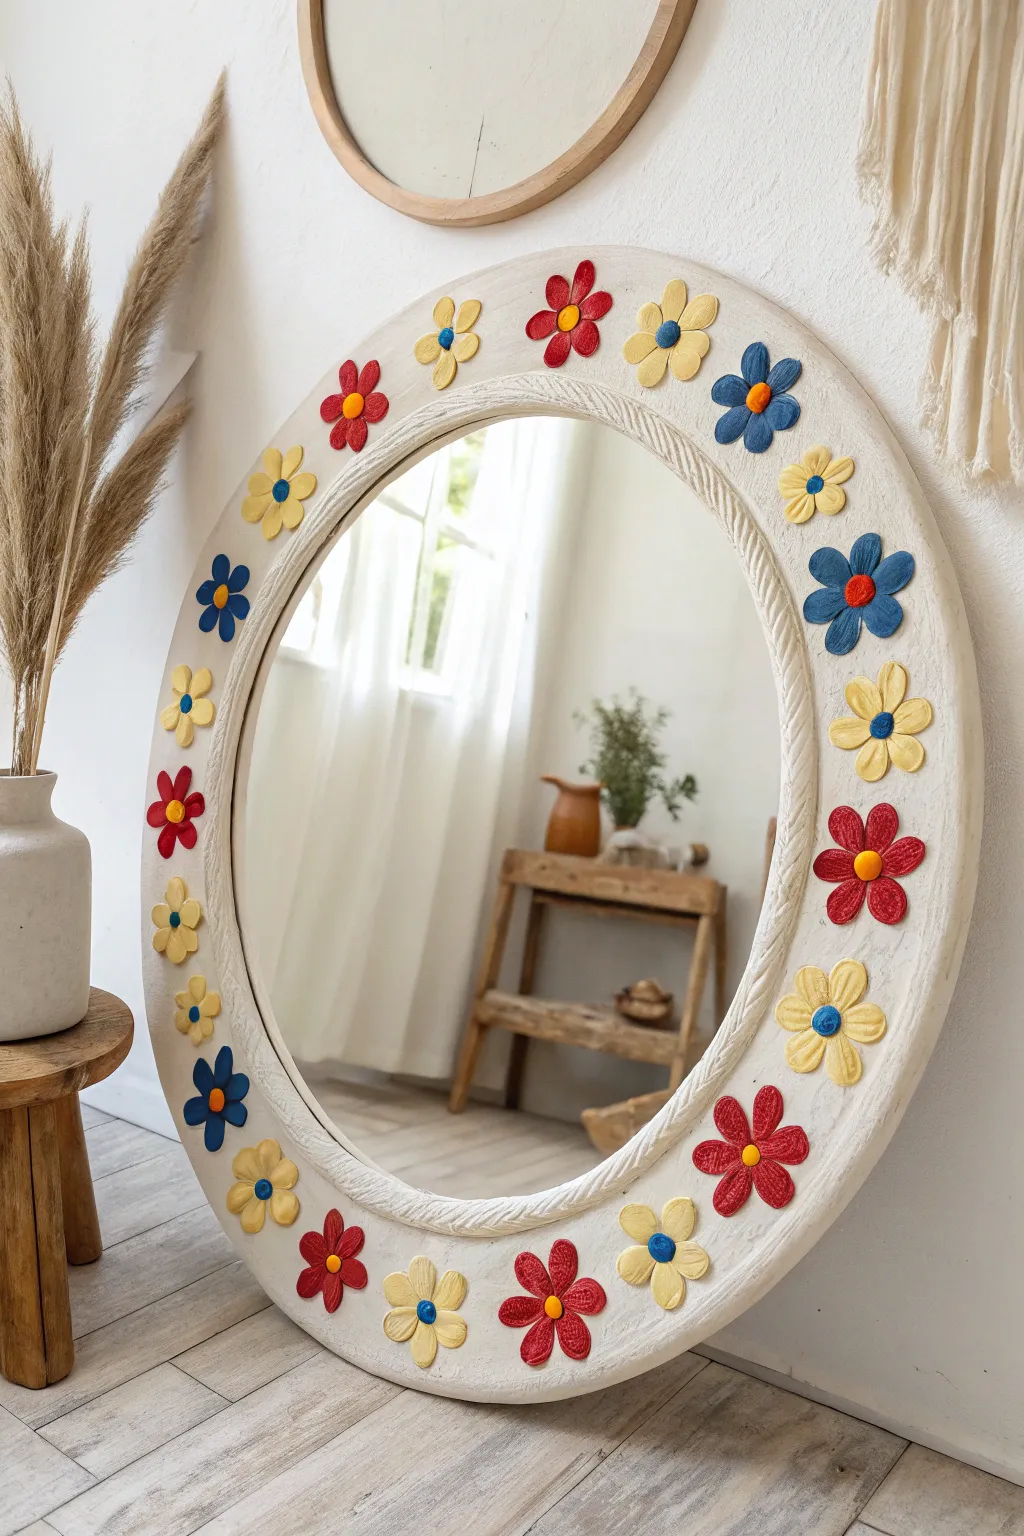
Transform a plain circular mirror into a cheerful statement piece with chunky, hand-sculpted clay flowers. This project embraces a playful aesthetic with primary colors and a textured, matte finish that feels both modern and whimsical.
Step-by-Step Tutorial
Materials
- Large circular mirror with a wide frame (wood or plastic)
- Air-dry clay (white)
- Acrylic paints (primary red, blue, yellow, and white)
- Matte finish sealant (spray or brush-on)
- Sculpting tools or a butter knife
- Rolling pin
- Strong construction adhesive (like E6000)
- Sandpaper (medium grit)
- Paintbrushes (medium flat and small detail)
- Cup of water
- Parchment paper
Step 1: Prepping the Base
-
Clean the surface:
Ideally, start with a wide-framed mirror. If your mirror frame is glossy, scuff it gently with sandpaper to help the adhesive bond later. Wipe it down with a damp cloth to remove any dust and let it dry completely. -
Create a texture base (Optional):
The mirror in the inspiration has a wonderfully textured, plaster-like white surface. To achieve this, mix a small amount of white acrylic paint with baking soda or use a texture paste. Apply a thin, uneven coat over the entire frame using a stiff brush or a sponge to create that stucco effect.
Smooth Moves
Work with wet fingers or a damp sponge when smoothing clay petals. It eliminates fingerprints and cracks before the clay dries, saving you tons of sanding time later.
Step 2: Sculpting the Blooms
-
Portion the clay:
Open your air-dry clay and pull off about 20-25 even-sized chunks for the flowers. You want them to be roughly the size of a golf ball or slightly smaller. I like to keep a damp towel over the unused clay so it doesn’t dry out while I work. -
Form the petals:
Take a portion of clay and roll it into a ball, then flatten it slightly into a thick disc. Use a sculpting tool or the back of a knife to press five indentations around the edge, pushing inward to define five separate petals. -
Refine the shape:
Gently pinch the outer edge of each petal to round them off. They shouldn’t be perfect; a handmade, slightly irregular look adds charm. Use your finger to make a small depression in the very center of the flower. -
Add the center:
Roll a small pea-sized ball of clay for the flower’s center. Dab a tiny drop of water into the depression you made and press the small ball firmly into place. Repeat this process until you have about 20 flowers. -
Create the twisted rope (Optional):
If your mirror has an inner lip, you can add a clay rope detail. Roll two long, thin snakes of clay and twist them together. Lay this along the inner edge of the mirror glass, pressing it gently to adhere to the frame. -
Dry the pieces:
Lay all your sculpted flowers on a sheet of parchment paper. Allow them to dry for at least 24-48 hours. Flip them over halfway through to ensure the bottoms dry completely.
Step 3: Adding Color
-
Paint the petals:
Once fully dry, it’s time to paint. Select about 6-7 flowers for each primary color: bold red, sunny yellow, and deep blue. Use a medium flat brush to paint the petals, getting into the crevices. -
Paint the centers:
For a pop of contrast, switch colors for the centers. Paint yellow centers on red and blue flowers, and perhaps a blue or orange center on the yellow flowers. Let the paint dry completely. -
Seal the flowers:
Give each flower a coat of matte sealant. This protects the clay and gives the paint a finished, professional look without making it too shiny.
Make it Baroque
Instead of primary colors, paint the frame gold and the flowers in soft pastels or pure white for a chic, sculptural relief look that resembles plaster molding.
Step 4: Assembly
-
Plan the layout:
Before gluing, lay your painted flowers onto the mirror frame to test the spacing. Alternate the colors (Yellow, Red, Yellow, Blue) to encourage the eye to travel around the circle. -
Glue them down:
Apply a generous dab of strong construction adhesive to the back of a flower. Press it firmly onto the frame and hold for a few seconds. Continue around the mirror, maintaining even spacing. -
Touch ups:
Once the glue is set, check for any white clay showing through that you missed. A tiny detail brush is perfect for fixing these little spots.
Hang your new mirror in a well-lit corner and enjoy the burst of color it brings to the room
Cloud Mirror with Puffy Raindrops
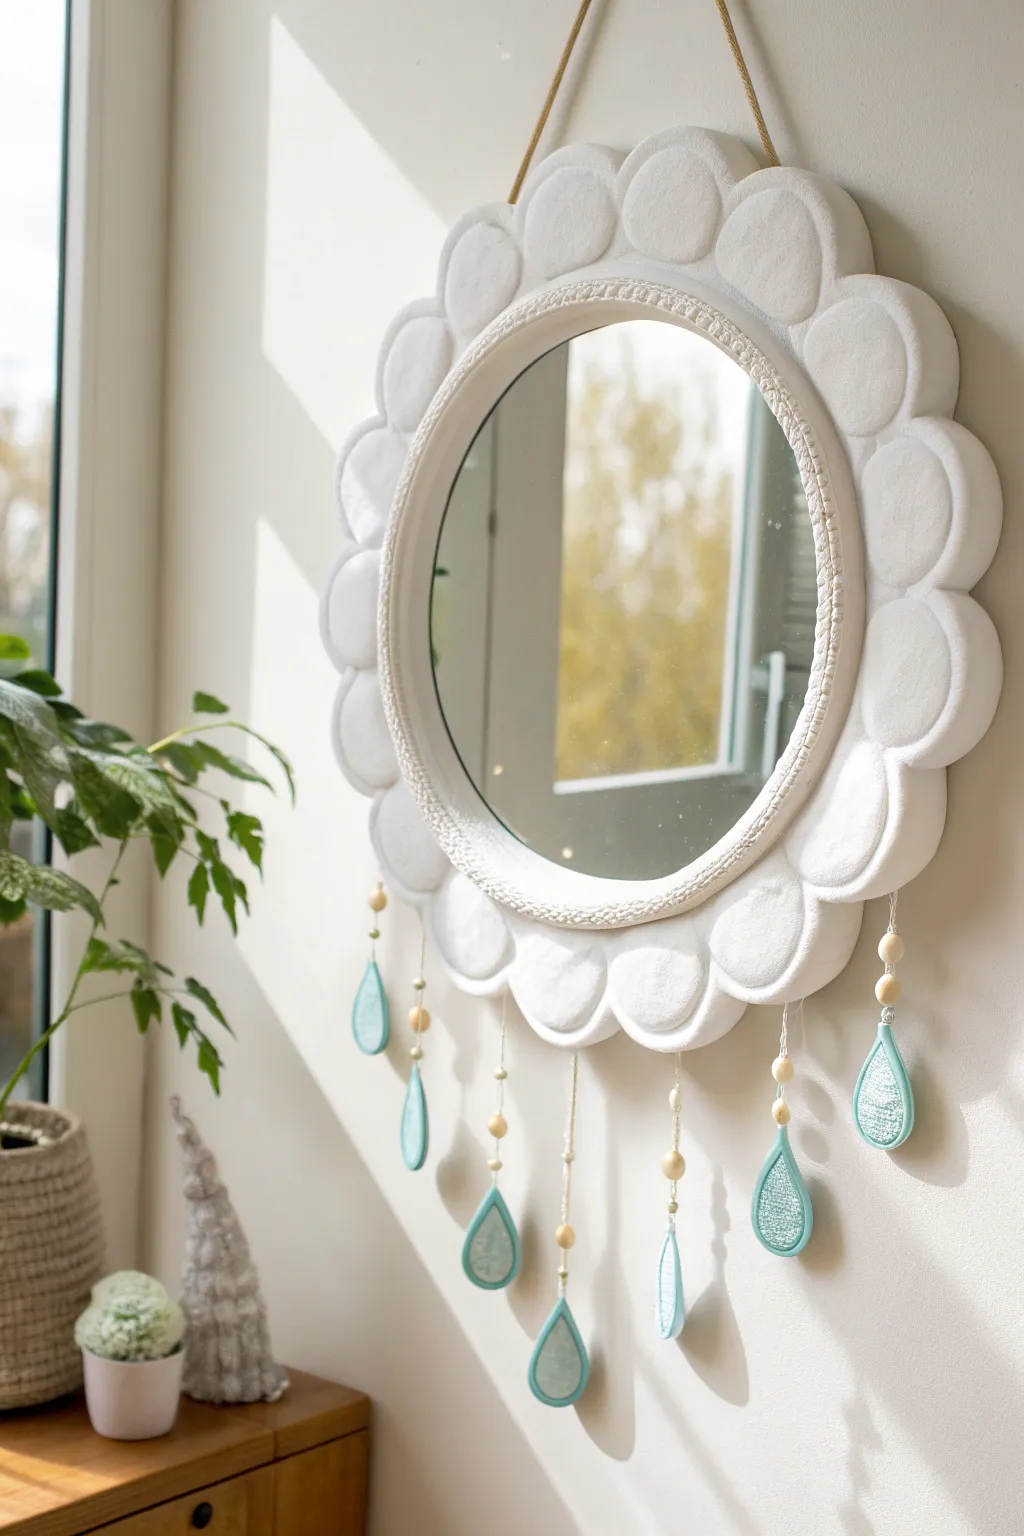
Bring the sweet serenity of a soft rain shower into your room with this textured clay project. Featuring a pillowy, scalloped frame and delicate blue raindrop charms, this mirror adds a gentle touch of dreaminess to any wall.
How-To Guide
Materials
- Round mirror insert (approx. 8-10 inches)
- Air-dry clay (white)
- Small wooden beads (natural finish)
- Cotton cord or twine (thin)
- Acrylic rolling pin
- Circle cutters (various sizes) or a drinking glass
- Sculpting tools (needle tool, smoothing sponge)
- Textured fabric or sandpaper (for imprinting)
- Light teal acrylic paint
- White acrylic paint
- Strong craft glue (E6000 or similar)
- Clear matte varnish (spray or brush-on)
- White decorative rope or gathered fabric trim
Step 1: Sculpting the Cloud Frame
-
Prepare the Base:
Roll out a large slab of white air-dry clay to about 1/4 inch thickness. Place your round mirror on top to use as a template, leaving at least 3 inches of clay border around the outside. -
Cut the Shape:
Using a needle tool, cut a large circle that is roughly 2-3 inches wider than your mirror. Remove the center clay circle so the mirror can eventually sit flush against the back, or create a ‘lip’ for it to rest in. -
Form the Puffs:
Roll almost egg-shaped balls of clay. You will need enough to encircle the entire frame. Flatten them slightly with the palm of your hand so they look like soft marshmallows. -
Attach the Puffs:
Score and slip the back of each clay puff and the front rim of your base circle. Press the puffs firmly onto the base, overlapping them slightly to create a seamless scalloped cloud edge along the perimeter. -
Smooth the Seams:
Dip your finger or a sponge in water and gently smooth the connections between the puffs so they look like one continuous cloud formation rather than individual balls. -
Add Texture:
To mimic the soft, fabric-like finish in the photo, gently press a piece of coarse fabric or sandpaper over the damp clay surface. This gives it a matte, velvety appearance instead of a slick shiny one.
Step 2: Creating the Raindrops
-
Shape the Drops:
Take small walnut-sized pieces of clay and flatten them into teardrop shapes. You will need about five to seven drops, depending on your spacing preference. -
Create Inner Definition:
Roll a smaller teardrop of clay for the center of each main drop. Gently press this smaller piece into the larger one, creating a raised border effect. -
Add Textile Texture:
Before the clay dries, press a textured tool or piece of burlap specifically into the *center* of the teardrop to give it that woven look seen in the reference. -
Make Holes:
Use a toothpick or needle tool to poke a hole through the very top tip of each raindrop for hanging strings later. Wiggle it slightly to ensure the hole is wide enough for your cord. -
Dry Completely:
Allow both the main cloud frame and the raindrops to dry fully. This usually takes 24-48 hours depending on humidity. Flip them halfway through to prevent warping.
Cracks happen!
If small cracks appear as the clay dries, simply mix a small amount of fresh clay with water to make a paste and fill them in like spackle.
Step 3: Assembly and Finishing
-
Paint the Drops:
Mix a soft teal color using white and a touch of green/blue acrylic. Paint the textured centers of the raindrops, leaving the raised borders white for contrast. -
Insert the Mirror:
Once the frame is dry, glue your round mirror securely to the back of the clay frame. Let the adhesive cure according to the package instructions. -
Add Inner Border:
To hide the seam where the mirror meets the clay, glue a length of white decorative rope or gathered fabric trim around the inner circumference of the mirror. This adds a lovely finished detail. -
String the beads:
Cut lengths of white cotton cord. Thread the cord through a raindrop, tie a knot, and then thread 2-3 wooden beads above it. Tie another knot above the beads to keep them in place. -
Attach Danglers:
Glue the tops of the cords to the *back* bottom edge of the cloud frame. Vary the lengths of the strings so the rain falls at different heights. -
Hang It Up:
Attach a sturdy D-ring hook or a loop of thick rope to the top back of the mirror for hanging.
Smoother Puffs
Use a damp makeup sponge to smooth out fingerprints on the clay puffs before drying. It works better than fingers for a flawless finish.
Now you have a serene piece of sky to brighten up your reflective space


What Really Happens Inside the Kiln
Learn how time and temperature work together inside the kiln to transform clay into durable ceramic.
Sunburst Rays in Bright Clay Strips

Bring warmth to any room with this stunning sunburst mirror that mimics the earthy tones of fired terracotta. By shaping durable polymer clay into precise, radiating rays, you’ll create a sophisticated piece of wall art that looks like high-end woodwork or ceramic.
Step-by-Step Tutorial
Materials
- Round mirror blank (approx. 10-12 inches)
- Wooden backing circle (2 inches wider than mirror)
- Terracotta or ‘Soufflé’ polymer clay (approx. 3-4 large blocks)
- Strong craft glue (E6000 or similar)
- Rolling pin or pasta machine
- Long blade clay tissue slicer
- Ruler or measured cutting mat
- Fine-grit sandpaper
- Matte spray varnish
- Circle cutter or bowl (matching mirror size)
- Heavy-duty picture hanging hardware
Step 1: Preparing the Base
-
Prepare the backing:
Begin by centering your mirror on the wooden backing circle. Use a pencil to trace the mirror’s outline onto the wood so you know exactly where the glass will sit later. -
Install hardware:
Flip the wooden backing over and install your heavy-duty hanging hardware now. It is much harder to do this securely once the delicate clay work is attached. -
Condition the clay:
Warm up your terracotta-colored polymer clay by kneading it thoroughly in your hands. You want it pliable and free of cracks before you start rolling.
Even Thickness Trick
Place two identical wooden rulers on either side of your clay while rolling. The rolling pin rests on the rulers, ensuring every single strip is exactly the same height.
Step 2: Crafting the Sunburst Rays
-
Roll the sheets:
Roll your conditioned clay into thick, even sheets. I suggest a thickness of about 1/4 inch (6mm) to give the rays substantial depth and durability. -
Measure the strips:
Using your ruler and a sharp blade, cut long, uniform strips. For the design shown, aim for strips that are roughly 3/4 inch wide and 4 inches long. -
Create the taper:
To achieve the radiating sunburst effect, each strip needs a slight taper. Cut a very narrow wedge off each side of the strip, making the inner end slightly narrower than the outer end. -
Refine the edges:
Smooth the cut edges of each ray with your finger to remove any sharp drag marks from the blade. This softened edge mimics the look of sanded wood. -
Make the inner ring:
Roll a long snake of clay and flatten it slightly to create the inner bezel. Form this around the pencil line you drew on the backing, creating a lip that will hold the mirror. -
Dry fit the design:
Before gluing or baking, arrange your tapered rays around the circle to ensure they fit snugly side-by-side without large gaps. Adjust the taper angles if necessary.
Step 3: Assembly and Finishing
-
Bake the components:
If you are strictly using polymer clay without a wood base, bake the pieces now according to package instructions. However, for this project, we will bake the clay pieces flat on a tile first to ensure they stay straight. -
Cool and sand:
Allow the baked clay rays to cool completely. Lightly sand any rough edges or uneven surfaces with fine-grit sandpaper for a professional finish. -
Attach the inner ring:
Glue the pre-baked inner ring onto the wooden backing first, aligning it perfectly with your pencil guide. -
Glue the rays:
Apply a strong adhesive like E6000 to the back of each clay ray. Press them onto the wooden backing, radiating outward from the inner ring. Hold each briefly to ensure initial tack. -
Manage the spacing:
Work in quarters (12, 3, 6, and 9 o’clock positions) first to keep the spacing even, then fill in the gaps between these main points. -
Seal the clay:
Once the glue is fully cured (usually 24 hours), take the frame outside and spray it with a matte varnish. This enriches the terracotta color and protects the surface from dust. -
Insert the mirror:
Apply adhesive to the center of the wooden backing, inside the clay ring. Carefully lower the mirror glass into place. -
Final clean up:
Wipe the mirror face clean with glass cleaner to remove any fingerprints or stray glue residue before hanging.
Gaps in the Circle?
If you reach the end of the circle and have a gap too small for a full ray, slightly sand the sides of the last 4-5 rays to make them narrower and distribute the space.
Hang your finished masterpiece in a sunny spot to let those warm clay tones really shine
Hearts and Stars Kidcore Collage Frame
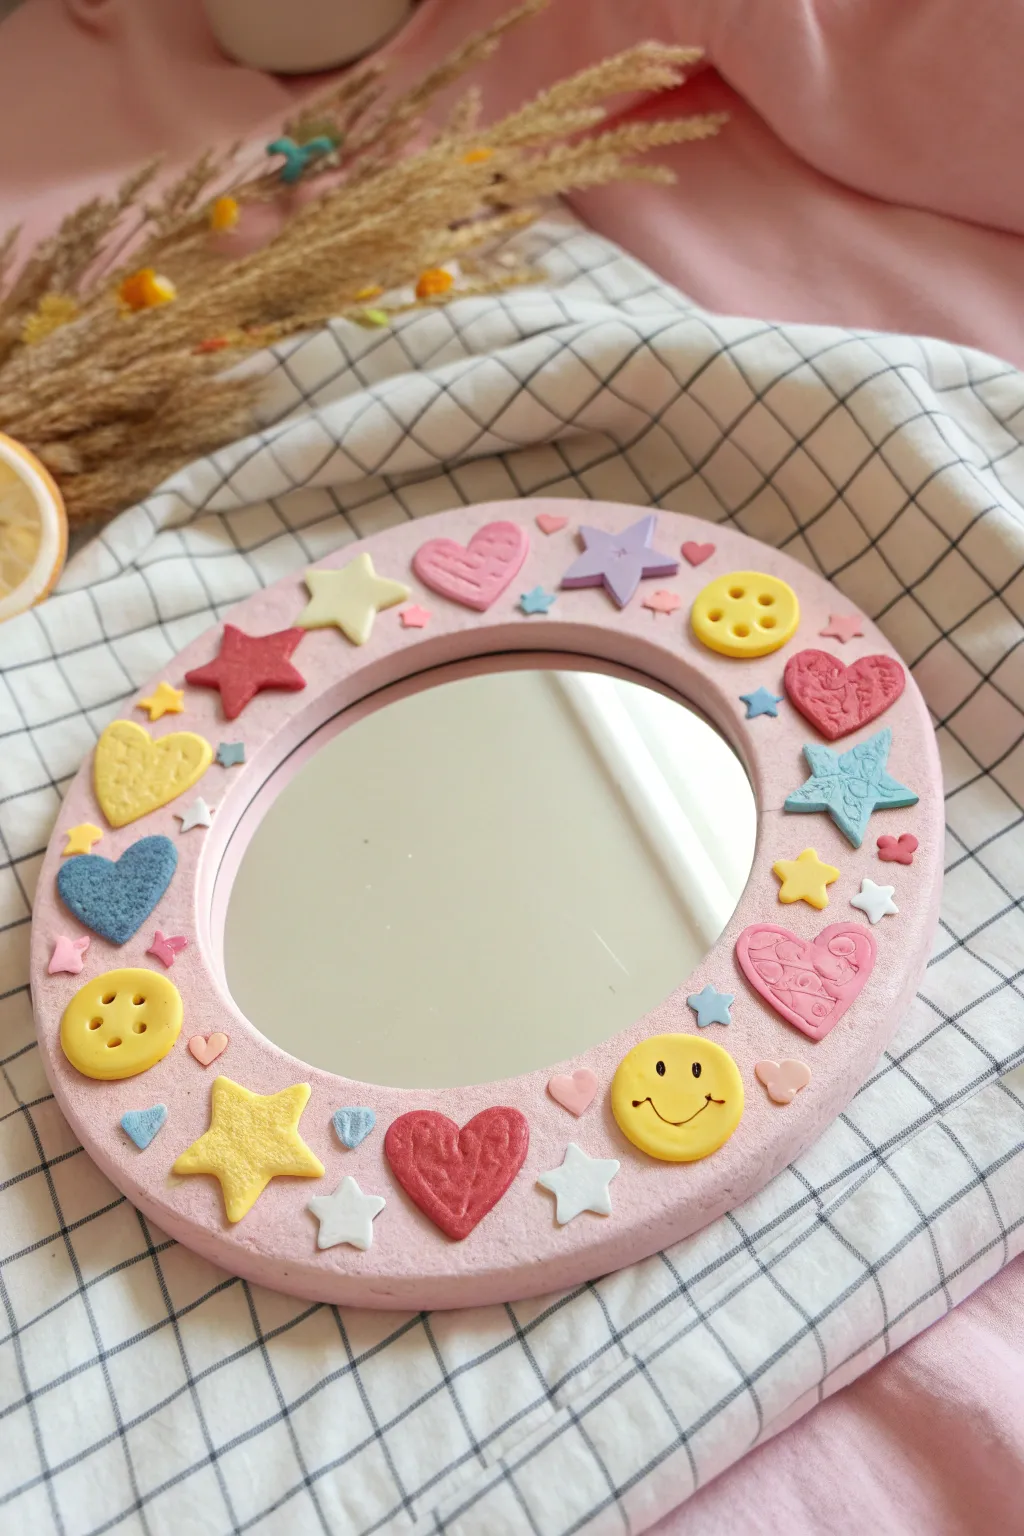
Indulge your inner child with this delightful DIY mirror featuring a playful collage of nostalgic motifs. This project combines soft pastel clay with vibrant primary accents to create a funky, texture-filled decor piece perfect for brightening up any corner.
Step-by-Step Guide
Materials
- Round wooden mirror frame (unfinished)
- Air-dry clay or polymer clay (pink, red, yellow, blue, purple, white)
- Acrylic paint (pale pink)
- Paintbrush (medium flat)
- Rolling pin
- Small shape cutters (stars, hearts)
- Sculpting tools or a toothpick
- Super glue or strong craft glue
- Black fine-tip marker or black acrylic paint
- Gloss varnish (optional)
Step 1: Prepping the Base
-
Frame Preparation:
Begin by ensuring your wooden mirror frame is clean and free of dust. If the surface feels rough, give it a quick sanding with fine-grit sandpaper. -
Base Coat:
Paint the entire wooden frame with pale pink acrylic paint. This will ensure that no wood shows through any gaps in your clay collage later. Let it dry completely.
Sticky Situation?
If using polymer clay, liquid clay (Bake & Bond) creates a stronger hold than super glue. Apply it to the raw clay backings and press onto the frame before baking the whole frame together.
Step 2: Sculpting the Charms
-
Conditioning Clay:
Start by kneading your various clay colors until they are soft and pliable. If you are using white clay to mix custom pastels, do this now by blending small amounts of pigment or colored clay into the white. -
Rolling Out:
Roll out your clay pieces on a clean surface to about a 3-4mm thickness. Uniform thickness helps everything look cohesive, though slight variations add charm. -
Cutting Hearts:
Use heart-shaped cutters to create several sizes. Make some in bright red, soft pink, and even blue. For the textured hearts, gently press a piece of lace or a texture mat into the clay before cutting the shape. -
Creating Stars:
Cut out star shapes in yellow, white, purple, and light teal. I like to use two different cutter sizes here—a standard size for the main stars and tiny cutters for filler stars. -
Making Buttons:
Use a small circle cutter (or a bottle cap) to punch out yellow circles. Use a smaller tool to press an indented rim inside the edge. Use a toothpick to poke four holes in the center to mimic a classic sewing button. -
Smiley Faces:
Cut yellow circles similar to the buttons. Use a sculpting tool or toothpick to gently carve a wide smile and poke two eyes. You can leave them indented or fill the indentations with black later. -
Texture Details:
Before the clay dries or bakes, add extra details. Use a needle tool to create ‘stitching’ marks on some hearts or small dots on the stars for visual interest. -
Curing:
If using polymer clay, bake the pieces according to package instructions (usually 275°F/130°C for 15-30 minutes). If using air-dry clay, set them aside on parchment paper to dry fully for 24 hours.
Make It Sparkle
Mix chunky holographic glitter into your varnish before sealing the clay pieces. It adds a magical, sticker-like quality that perfectly matches the kidcore aesthetic.
Step 3: Assembly and Finishing
-
Painting Details:
Once hardened, use a fine-tip black marker or a tiny brush with black paint to fill in the eyes and mouths of the smiley faces. -
Dry Fitting:
Lay your painted mirror frame flat. Arrange your hardened clay pieces loosely on top to plan the composition. Aim for a balanced mix of colors and shapes, ensuring large pieces are spaced out evenly. -
Gluing Large Pieces:
Lift one piece at a time, apply a dab of strong glue to the back, and press it firmly onto the frame. Start with the largest items: the big hearts, the main stars, and the smiley faces. -
Adding Medium Shapes:
Glue down the medium-sized elements like the buttons, blue hearts, and secondary stars, filling in the gaps between the larger focal points. -
Filling Gaps:
Take your tiniest clay stars and mini hearts and glue them into any remaining open spaces. You can let some hang slightly off the edge for a dynamic look. -
Sealing:
If you want a shiny, durable finish, brush a coat of gloss varnish over the clay pieces. Be careful not to get varnish on the mirror glass itself. -
Cleaning Up:
Once the glue and varnish remain dry, wipe the mirror glass with glass cleaner to remove any fingerprints or smudges.
Hang your new masterpiece and enjoy the smile it brings to your face every time you look in the mirror

TRACK YOUR CERAMIC JOURNEY
Capture glaze tests, firing details, and creative progress—all in one simple printable. Make your projects easier to repeat and improve.
Celestial Moon and Tiny Planet Accents
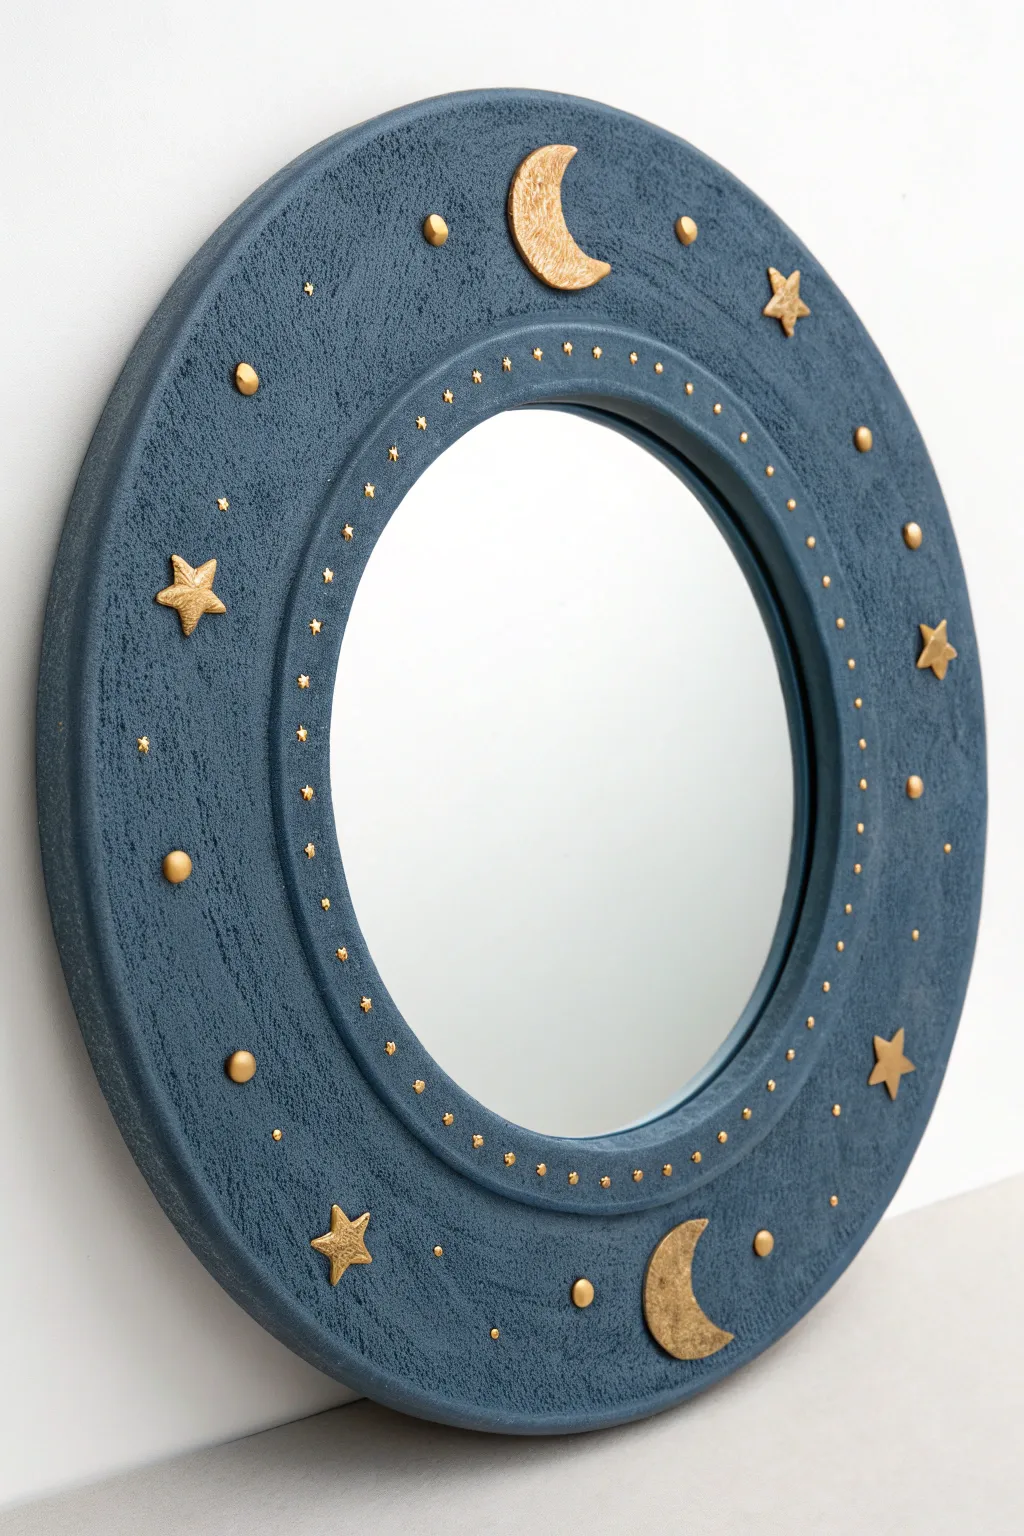
Transform a plain round mirror into a starry night sky with this textured clay project. The deep blue hue paired with metallic gold moons and stars creates a dreamy, dimensional piece perfect for any space enthusiast’s wall.
Step-by-Step
Materials
- Round mirror with a wide flat wooden or MDF frame (at least 2-3 inches wide)
- Air-dry modeling clay (white or terracotta)
- Rolling pin
- Star-shaped clay cutters (two sizes: small and medium)
- Circle cutters or a straw (for planets)
- Sculpting tool or knife
- PVA glue or heavy-duty craft glue
- Textured sponge or stiff-bristled brush
- Acrylic paint: Navy blue, Midnight blue, Metallic gold
- Paintbrushes (flat shader and fine detail brush)
- Matte varnish spray (optional)
Step 1: Prepping and Modeling
-
Prepare the base:
Clean your mirror frame thoroughly to remove any dust or grease. If the frame is very slick, give it a light sanding to help the clay and texture adhere better. -
Create the texture base:
Apply a layer of texture paste or a mixture of PVA glue and baking soda to the entire frame surface. While it’s wet, stipple it with a stiff brush or sponge to create a rough, stone-like surface. -
Roll out the clay:
While the base dries, roll out a slab of air-dry clay to about 1/4 inch thickness on a smooth surface. -
Cut the stars:
Use your star-shaped cutters to punch out several five-pointed stars. Gently pinch the points of the stars to make them sharper if the cutter blunted them. -
Sculpt the moons:
To make the crescent moons, use a large circle cutter to cut a round shape, then offset the cutter and cut again to slice out a crescent. Smooth the edges with a wet finger. -
Make the planets and dots:
Roll tiny balls of clay between your fingers to create the three different sizes of spheres seen in the design: large feature planets, medium accent dots, and tiny decorative specks. -
Texture the celestial bodies:
Before the shapes dry, lightly tap the surface of the moons and stars with a crumpled piece of aluminum foil to give them a cratered, moon-rock texture.
Clay Cracking?
If small cracks appear as the clay shapes dry, mix a tiny bit of fresh clay with water to make a paste and smooth it into the cracks with your finger.
Step 2: Assembly and Painting
-
Attach the main elements:
Using strong craft glue, adhere the moons and stars to the frame in a balanced pattern. I usually place the largest elements first—the moons at the top and bottom—to anchor the design. -
Add the inner ring:
Carefully glue the tiniest clay spheres in a precise circle around the inner edge of the mirror frame, spacing them evenly to create a decorative border. -
Fill the gaps:
Scatter the remaining medium and large clay spheres around the stars and moons to fill empty visual space. -
Dry completely:
Allow the entire assembly to dry for at least 24 hours, or until the clay is fully hardened and light in color. -
Base coat painting:
Paint the entire frame, including the clay shapes, with a coat of deep navy blue. Use your brush to work the paint into all the nooks and crannies of the texture. -
Second coat:
Apply a second coat of midnight blue to ensure solid coverage. Let this dry completely before moving to the metallic step. -
Gilding the shapes:
Dip a fine detail brush into metallic gold paint. Carefully paint just the raised clay elements—the moons, stars, and dots. -
Highlighting texture:
If you want extra dimension, dry brush a tiny amount of gold very lightly over the textured blue background to catch the high points, though a solid blue background makes the stars pop more. -
Clean up:
If any paint got onto the mirror glass, use a glass scraper or a damp cloth to wipe it away immediately. -
Seal:
Spray the frame with a matte varnish to protect the paint and clay from moisture, being careful to mask off the mirror glass with paper first.
Pro Tip: Inner Ring Alignment
For a perfect inner circle of dots, lightly trace a guideline with a pencil or compass on the frame before gluing down the tiny spheres.
Hang your celestial masterpiece in a spot where it can reflect light and add a touch of cosmic wonder to your room
Checkerboard Clay Tiles Around a Square Mirror
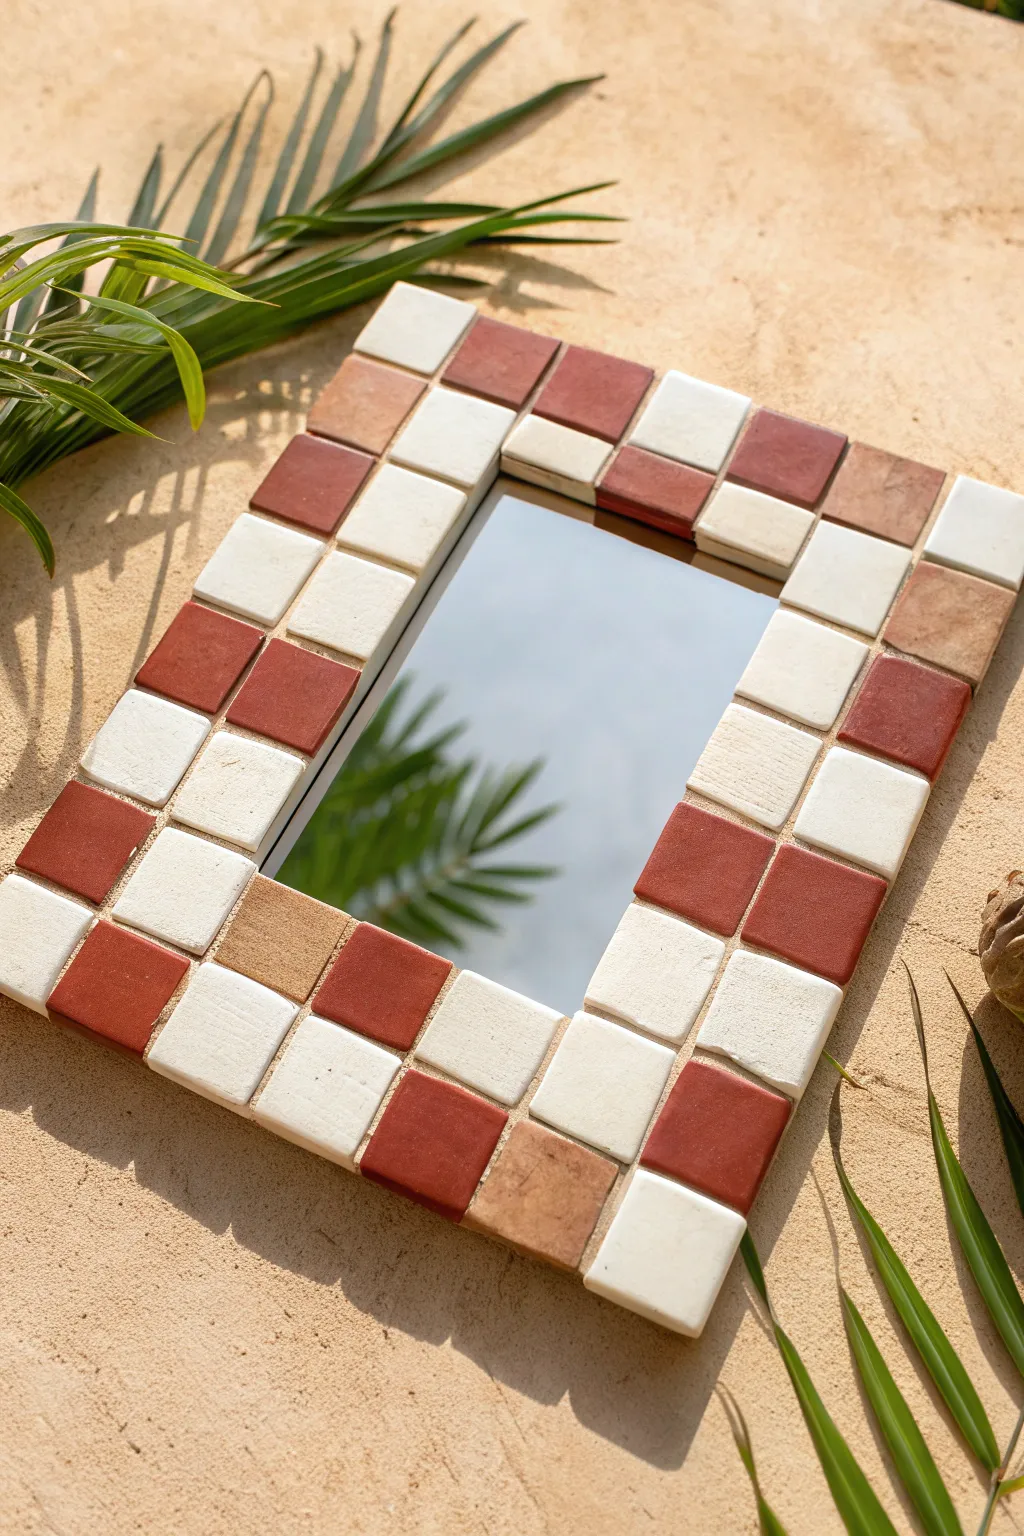
Bring the warmth of a Mediterranean villa into your home with this textured, geometric mirror. By creating your own clay tiles in earthy tones of terracotta, cream, and sand, you’ll achieve a bespoke, organic look that feels both modern and timeless.
Step-by-Step Tutorial
Materials
- Rectangular wooden mirror frame (with flat, wide surface)
- Air-dry clay (white and terracotta/red)
- Acrylic paint (beige/tan color)
- Rolling pin
- Square cookie cutter (approx. 1 inch, or matching frame width)
- Craft knife
- Sandpaper (fine grit)
- Strong craft glue (e.g., E6000 or heavy-duty wood glue)
- Clear matte varnish (optional)
- Small paintbrush
- Ruler
Step 1: Prepping the Tiles
-
Measure your frame:
Before touching the clay, measure the width of your mirror frame’s border. You need to ensure your square cutter is roughly half the width of the frame so you can fit two rows of tiles perfectly. -
Roll out the white clay:
Take a large chunk of white air-dry clay and roll it out on a flat surface to a consistent thickness of about 1/4 inch. Use guide sticks or spacers if you struggle with uneven rolling. -
Cut the white squares:
Using your square cutter, press firmly into the clay to create your first batch of tiles. You will need roughly half the total surface area covered in white, so cut generously. -
Roll out the terracotta clay:
Repeat the process with the terracotta-colored air-dry clay. Aim for the exact same thickness as the white tiles to ensure a flush surface later. -
Create the beige tone:
To get that third sandy-beige shade seen in the photo, I usually mix a small amount of terracotta clay into a larger ball of white clay until fully blended, creating a light tan marble effect. -
Cut colored squares:
Cut your terracotta and newly mixed beige squares. You won’t need as many beige ones—they act as lovely sporadic accents. -
Imperfect is perfect:
Don’t worry about razor-sharp edges. Gently tap the sides of each square with your finger to soften them slightly, mimicking tumbled stone.
Wobbly Tiles?
If your dried tiles are slightly warped and won’t lie flat, adhere them with a thicker layer of construction adhesive or silicone glue. The extra bulk underneath levels out the uneven bottoms.
Step 2: Drying and Refining
-
Dry the tiles:
Lay all your tiles on a flat surface lined with parchment paper. Let them dry completely for 24-48 hours, flipping them once halfway through to prevent warping. -
Sand the edges:
Once fully cured and hard, take each tile and quickly run the edges over fine-grit sandpaper. This ensures they fit snugly together without irregular bumps. -
Dry fit the layout:
Arrange the tiles loosely on your mirror frame without glue. Pattern them in a checkerboard style, mostly alternating red and white, but swapping in a beige tile randomly every few clusters for visual interest.
Step 3: Assembly
-
Start gluing corners:
Apply a dab of strong glue to the back of a corner tile and press it firmly onto the frame. Starting at the corners helps ensure your rows meet neatly. -
Work in sections:
Glue the tiles down row by row. Since hand-cut clay varies slightly, you might need to leave tiny, hair-line gaps between some tiles to keep the overall lines straight. -
Adjust as you go:
Step back frequently to look at the mirror from a distance. If a tile looks crooked, nudge it gently while the glue is still tacky. -
Clean up:
If any glue oozes up between the tiles, wipe it away immediately with a damp cloth or cotton swab before it hardens. -
Seal the surface:
For longevity, especially if this mirror mirrors is going in a bathroom, create a protective barrier. Brush a thin coat of clear matte varnish over the tiles to seal the clay without making it look plastic.
Go Glossy
Instead of a matte finish, use a high-gloss glaze or resin on just the terracotta tiles. The contrast between the shiny red and matte white creates a stunning, high-end textural effect.
Now hang your masterpiece and enjoy the handcrafted charm it adds to your reflection
Terrazzo Speckle Frame With Confetti Bits
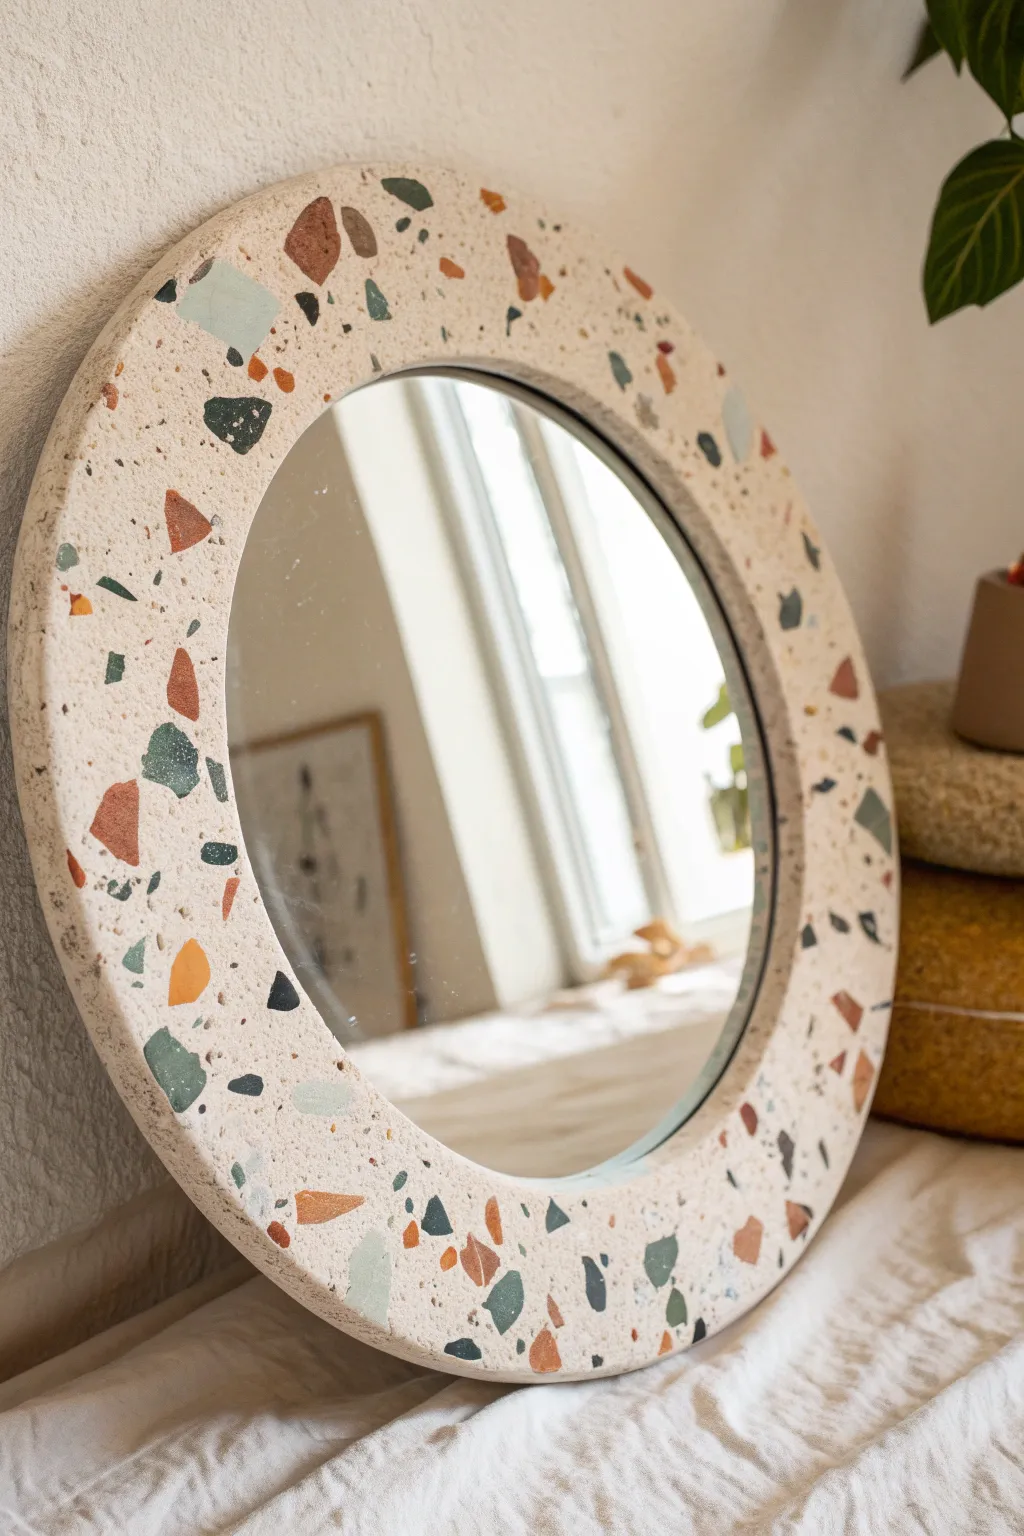
Bring the trendy look of Italian flooring to your vanity with this terrazzo-inspired mirror project. Using polymer or air-dry clay, you’ll create a creamy, stone-like base embedded with colorful, geometric ‘confetti’ fragments for a sophisticated finish.
Step-by-Step
Materials
- White or cream polymer clay (1 lb block)
- Small amounts of colored polymer clay (terracotta, slate blue, sage green, mustard yellow, black)
- Round mirror insert (approx. 8-10 inches)
- Clay rolling pin or acrylic roller
- Craft knife or clay slicer
- Circle cutter or bowl (slightly smaller than your mirror)
- Sandpaper (various grits from 400 to 1000)
- Strong craft adhesive (E6000 or similar)
- Parchment paper or silicone mat
- Oven
Step 1: Preparing the Confetti Chips
-
Flatten colors:
Begin by rolling out your colored clays individually. You want these sheets to be quite thin, about 1-2mm, as they will become the embedded chips. -
Bake the sheets:
Place your thin colored sheets on a parchment-lined baking tray. Bake them for a shorter duration than usual—about 10-15 minutes—just enough to harden them so they can be shattered. -
Create the chips:
Once the colored sheets are cool, break them apart. I find that chopping them irregularly with a craft blade creates the most authentic stone look, aiming for a mix of tiny specks and larger, angular chunks. -
Sort the pieces:
Separate your chips into piles. You don’t have to use them all, but having a good variety of sizes ready will make the mixing process smoother.
Clean The Slate
Wipe your clay tools with baby wipes between handling colored chips and white clay. Dark pigments can smear onto the white base and ruin the crisp terrazzo effect.
Step 2: Forming the Frame
-
Condition the base:
Take your large block of white or cream clay and condition it by kneading until it is soft and pliable. This is crucial to prevent cracks later. -
Mix in the confetti:
Flatten the white clay slightly and sprinkle a generous amount of your baked color chips onto it. Fold the clay over to trap them inside. -
Distribute the chips:
Knead the clay gently to distribute the chips throughout the block without crushing the white clay too much. You want the chips to be randomly dispersed. -
Roll out the slab:
Roll your terrazzo-mixed clay into a thick slab, approximately 1/2 inch thick through. Ensure the slab is wide enough to accommodate your mirror size plus the desired frame width. -
Cut the outer circle:
Place your mirror or a template on the clay to determine the size. Cut a large circle for the outer edge of the frame, leaving about 2-3 inches of border around where the mirror will sit. -
Cut the inner circle:
Carefully cut the inner circle where the mirror glass will eventually go. Make this hole slightly smaller than your actual mirror glass so the mirror can be mounted behind it (or exactly the size if mounting flush, but mounting behind is easier). -
Smooth the edges:
Use your finger or a little water (if using air dry) or baby oil (if polymer) to smooth the cut edges, softening any harsh knife marks.
Step 3: Revealing the Pattern
-
Surface check:
At this stage, many chips will be hidden under a thin layer of white clay. Don’t worry, the sanding phase will reveal them. -
Bake the frame:
Bake the frame according to the package instructions for the thickness of your clay. Ensure it lies perfectly flat on the baking sheet to avoid warping. -
Initial sanding:
Once fully cooled, start sanding the surface with lower grit sandpaper (around 400). This removes the top layer of white clay and exposes the colorful chips underneath. -
Fine sanding:
Progress to higher grits (800, then 1000) to smooth out scratches and create a matte, stone-like finish. Wipe away dust frequently with a damp cloth. -
Wash and dry:
Give the frame a final wash with soapy water to remove all clay dust and let it dry completely.
Level Up: Texture
For a more organic, raw stone feel, gently press a piece of coarse sandpaper or a textured sponge into the raw clay surface before baking, rather than sanding it perfectly smooth.
Step 4: Assembly
-
Apply adhesive:
Flip the clay frame over so the back is facing up. Apply a strong bead of E6000 or similar adhesive around the inner rim. -
Secure the mirror:
Press the mirror glass firmly onto the adhesive. I recommend placing a heavy book on top of the mirror while it cures to ensure a tight bond. -
Add a hook (optional):
If you plan to hang it, glue a mounting bracket to the back of the mirror or the clay frame itself, ensuring the glue is fully cured before hanging.
Once the glue has fully cured, you have a stunning, modern piece of decor ready to brighten your wall.
Mini Fruit Charms Dotted Around the Rim
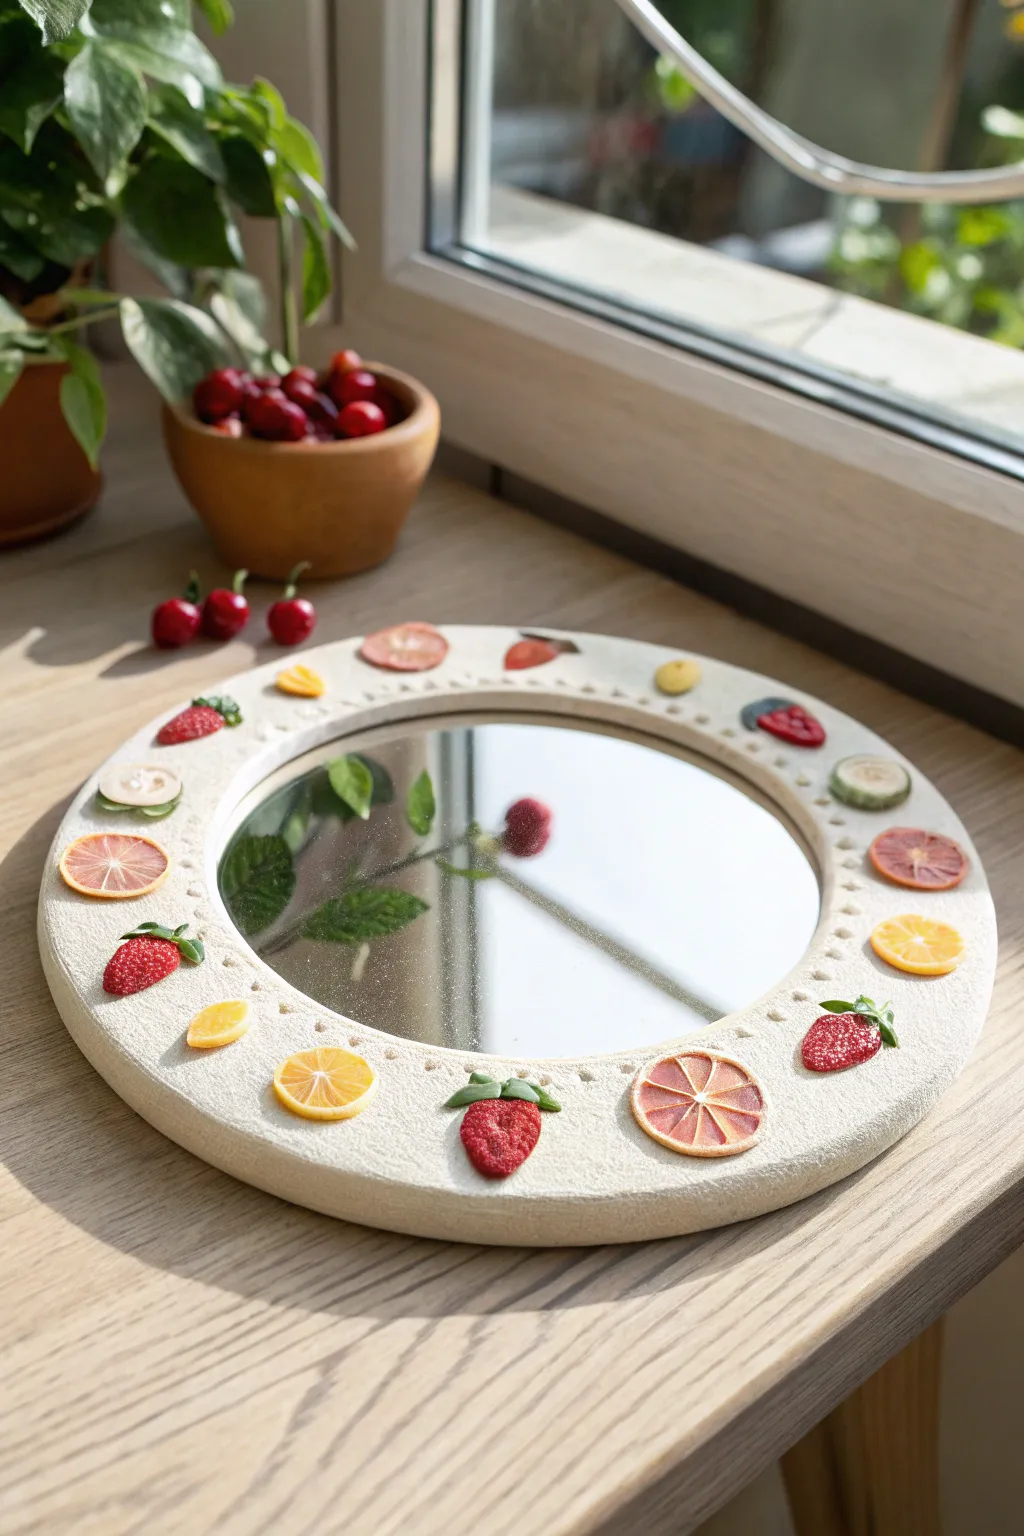
Bring the freshness of a summer market to your vanity with this charming textured clay mirror. Adorned with realistic miniature fruit slices, the thick, sandy-textured rim creates a delightful frame that feels both rustic and playful.
Step-by-Step Tutorial
Materials
- Round mirror insert (approx. 6-8 inches diameter)
- Air-dry clay (stone effect or white)
- Polymer clay (red, yellow, orange, translucent/white, green)
- Texture tool (toothbrush or stiff bristle brush)
- Liquid clay (TLS) or strong craft glue
- Rolling pin
- Precision craft knife
- Dotting tool or small ball stylus
- Fine-grit sandpaper
- Matte varnish (optional)
Step 1: Sculpting the Miniature Fruits
-
Create the Strawberry Cane:
Start by molding a teardrop shape of red polymer clay. For the core, mix a tiny amount of white into the red for a lighter shade. Wrap the core in the darker red, then gently roll it into a log. -
Add Strawberry Details:
Using a needle tool, create tiny indents all over the strawberry log for seeds. Attach small green clay leaves to one end before slicing the log into thin halves or whole berries. -
Assemble Citrus Canes:
For lemons and oranges, create tiny wedges of translucent yellow or orange clay wrapped in thin white clay ‘pith’. Arrange these wedges in a circle around a thin white center snake. -
Wrap and Reduce:
Wrap the assembled citrus segments in a final layer of colored ‘rind’ clay. Gently roll and squeeze the cane to reduce its diameter, then slice it into thin rounds using a sharp blade. -
Make the Kiwi:
Create a translucent green center with a white core. Surround this with darker green. Poke tiny holes for seeds and fill them with black clay specs if desired, then slice. -
Bake the Fruits:
Arrange all your fruit slices and whole berries on a tile or parchment paper. Bake according to your polymer clay package instructions (usually 275°F/135°C for 15-30 minutes) and let them cool completely.
Texture Trick
Mix a teaspoon of baking soda or fine sand into your white air-dry clay before rolling. This creates an authentic gritty stone texture without needing special effect clay.
Step 2: Forming the Mirror Base
-
Roll the Clay Base:
Take a large chunk of stone-effect or white air-dry clay. Roll it out into a thick, even snake about 1 inch in diameter, long enough to encircle your mirror insert. -
Secure the Mirror:
Place your mirror glass on a flat, non-stick surface. Wrap the clay coil around the mirror’s edge, overlapping the glass slightly to hold it in place. Join the ends of the coil seamlessly by blending with water. -
Flatten and Shape:
Gently press down on the clay ring to flatten it slightly, creating a wide surface for your decorations. Ensure the inner edge creates a clean lip over the mirror glass. -
Add Surface Texture:
To achieve that sandy, stone-like finish seen in the photo, stipple the entire surface of the wet clay with a stiff toothbrush or a texturing sponge. I find this hides fingerprints perfectly.
Scented Reflection
Add a few drops of lemon or orange essential oil into the air-dry clay during the kneading phase. The mirror will release a subtle citrus scent as it dries.
Step 3: Assembly and Finishing
-
Plan the Arrangement:
While the clay base is still soft and receptive, gently place your baked fruit charms around the rim to visualize the spacing. Aim for a balanced mix of colors. -
Embed the Charms:
Press each fruit slice gently into the wet clay so it sits flush or slightly raised. For the strawberries, press them in deeply enough that they feel integrated. -
Add Decorative Dots:
Use a small dotting tool to create patterns of tiny indentations in the clay between the fruit pieces. This adds a lovely embroidered detail to the rim. -
Secure the Inclusions:
Carefully remove each fruit piece one by one, add a drop of strong glue or liquid clay to the indentation, and place the fruit back in. This ensures they won’t pop out as the clay shrinks. -
Final Drying:
Allow the entire piece to dry undisturbed for at least 24-48 hours. Air-dry clay shrinks slightly, gripping the mirror. -
Clean and Seal:
Once fully dry, wipe the mirror glass clean with a damp cloth. You can seal the clay rim with a matte varnish to protect the texture without making it shiny.
Hang your fruity creation in a sunny spot to catch the light and brighten your morning routine
Mushroom and Leaf Cottage Border
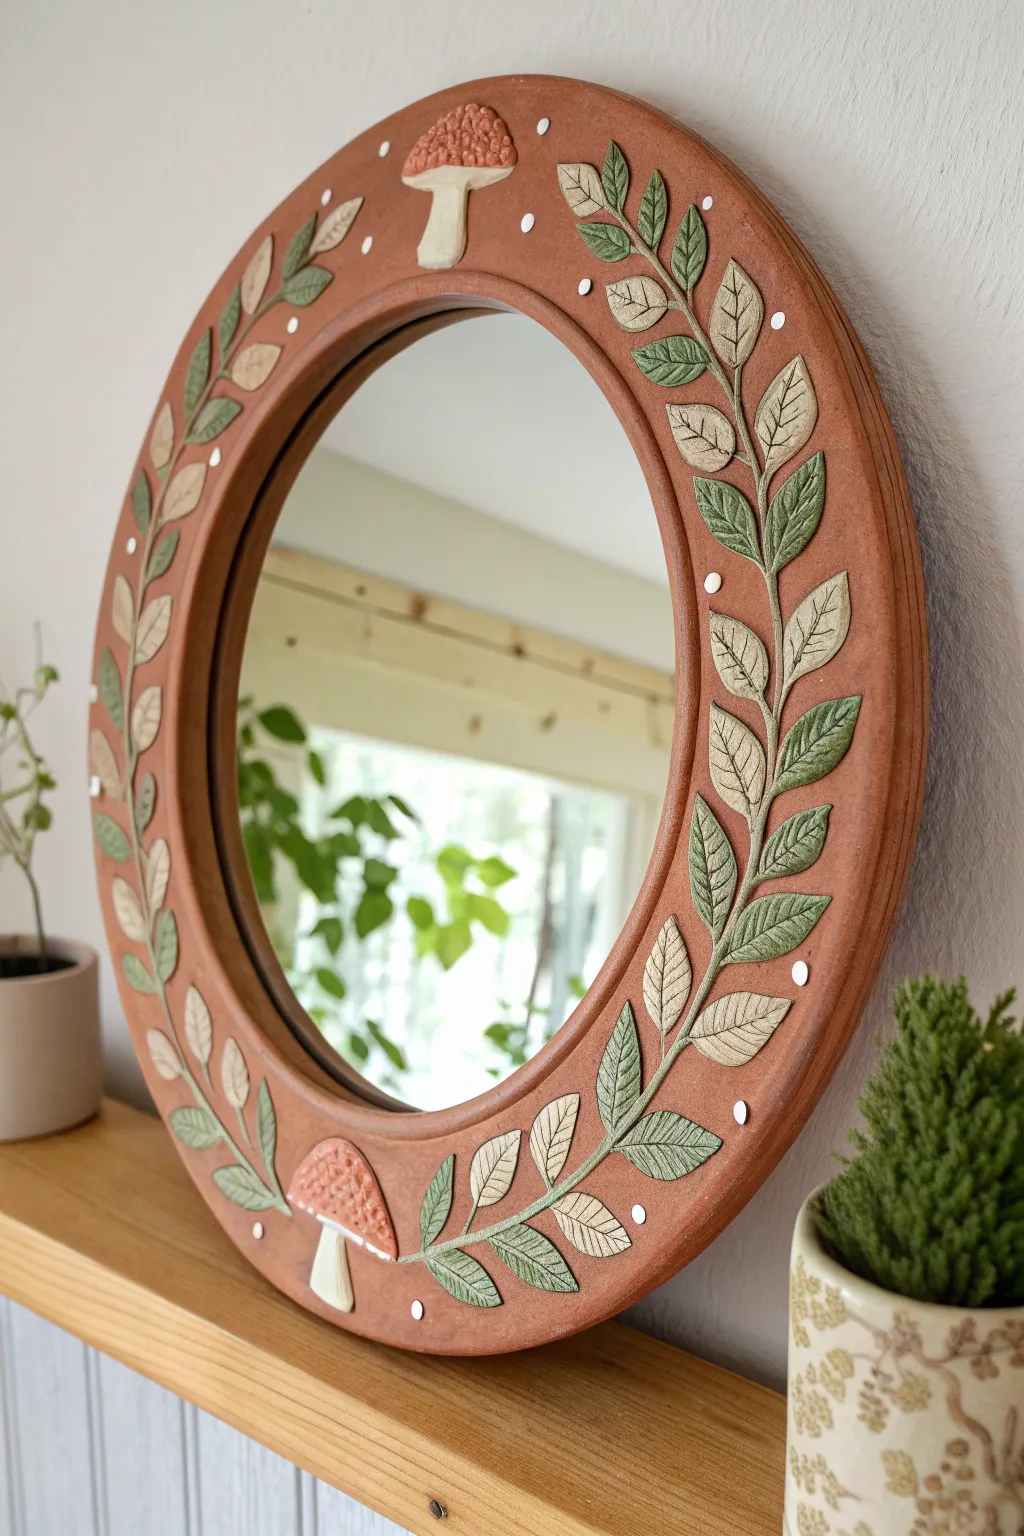
Bring the charm of a woodland cottage into your home with this earthy, nature-inspired mirror frame. Featuring sculpted terracotta leaves and whimsical toadstools, this project creates a warm, dimensional accent piece perfect for reflecting greenery.
Step-by-Step
Materials
- Round wooden mirror base/blank (approx. 10-12 inches diameter)
- Air-dry clay (terracotta color)
- Air-dry clay (white or light beige)
- Small round mirror (sized to fit the center hole)
- Acrylic paints (olive green, sage green, cream, burnt orange/red, white)
- Sculpting tools (needle tool, small ball stylus, clay knife)
- Leaf vein texture mat or real leaves (optional)
- Rolling pin
- Strong craft glue (e.g., E6000 or wood glue)
- Fine grit sandpaper
- Matte spray varnish
Step 1: Preparing the Base
-
Prep the surface:
If you are using a wooden frame blank, give it a quick sanding to ensure the glue will adhere properly. If you are starting from scratch, you can cut a donut shape out of sturdy plywood or MDF. -
Roll the base clay:
Roll out a large slab of terracotta-colored air-dry clay to about 1/4 inch thickness. It needs to be large enough to cover the entire face of your wooden frame. -
Apply the clay skin:
Identify the front of your frame and apply a thin layer of wood glue. Carefully lay the clay slab over the wood. Press it down gently to remove air pockets. -
Trim the edges:
Using a sharp clay knife, trim the excess clay from the outer and inner circles of the frame. Dip your finger in water and smooth the raw clay edges until they are rounded and polished.
Step 2: Sculpting the Foliage
-
Mix your clay tones:
To achieve the two-tone leaf effect shown in the image, keep some white clay separate, and tint a small portion of it with a tiny drop of green paint or mix it with terracotta clay to create a muted beige-green tone. You want sculpted elements, not just painted ones. -
Shape the leaves:
Pinch off small pieces of the light clay and roll them into teardrop shapes. Flatten them slightly with your thumb to form basic leaf shapes. Make plenty—you’ll need enough to circle almost the entire frame. -
Add vein details:
Use a needle tool or a dull knife to score a central vein down each leaf, followed by diagonal side veins. I find pressing gently rather than dragging the tool gives a cleaner line that mimics nature better. -
Create the vines:
Roll very thin, long snakes of the light clay. Arrange these on the terracotta base in curving, organic lines that encircle the mirror. Use a little water or slip (clay mixed with water) to glue them down. -
Attach the leaves:
Arrange your leaves along the vine stems using the slip-and-score method. Alternate the angles to make them look like growing foliage. Group them densely on the sides and taper them off near the top and bottom.
Cracked Clay?
If small cracks appear during drying, mix a loose paste of clay and water (slip) and fill the cracks like spackle. Smooth it with a damp finger and let dry again before painting.
Step 3: Adding Mushrooms and Finishing
-
Form the mushroom stems:
Using white clay, shape two thick, slightly curved rectangles for the stalks. Press them onto the frame—one at the very top (hanging down) and one at the bottom (growing up). -
Sculpt the caps:
Shape a semicircle of terracotta clay for the mushroom caps. Texture the surface by pressing the end of a small paintbrush handle or ball stylus repeatedly into the wet clay to create a pitted, spongy look. -
Add decorative dots:
Roll tiny spheres of white clay and press them flat into the terracotta background randomly around the leaves and mushrooms to act as decorative spores or pollen. -
Let it dry completely:
Allow the entire piece to dry for at least 24-48 hours. Air-dry clay shrinks as it dries, so keep it away from direct heat sources to prevent cracking. -
Painting the greens:
Once dry, paint the leaves. Use a sage green for some leaves and a creamy beige for others, or blend the two for variation. Keep the paint somewhat translucent to let the clay texture show through. -
Highlighting the texture:
Mix a dark wash (brown paint with lots of water) and brush it over the textured mushroom caps and leaf veins, then immediately wipe it off with a paper towel. This stays in the crevices and makes the details pop. -
Seal the piece:
Spray the entire frame with a matte varnish to protect the clay from humidity and dust. -
Install the mirror:
Flip the frame over and glue your round mirror glass to the back of the wood base using a strong adhesive like E6000. Let it cure fully before hanging.
Level Up: Functional Art
Turn this into a jewelry holder by embedding small wire hooks into the bottom of the clay rim while it’s still wet, perfect for hanging necklaces or keys.
Hang your new mirror near a window to catch the light and enjoy your handmade slice of the forest
Geometric Arch Frame That Feels Like a Portal
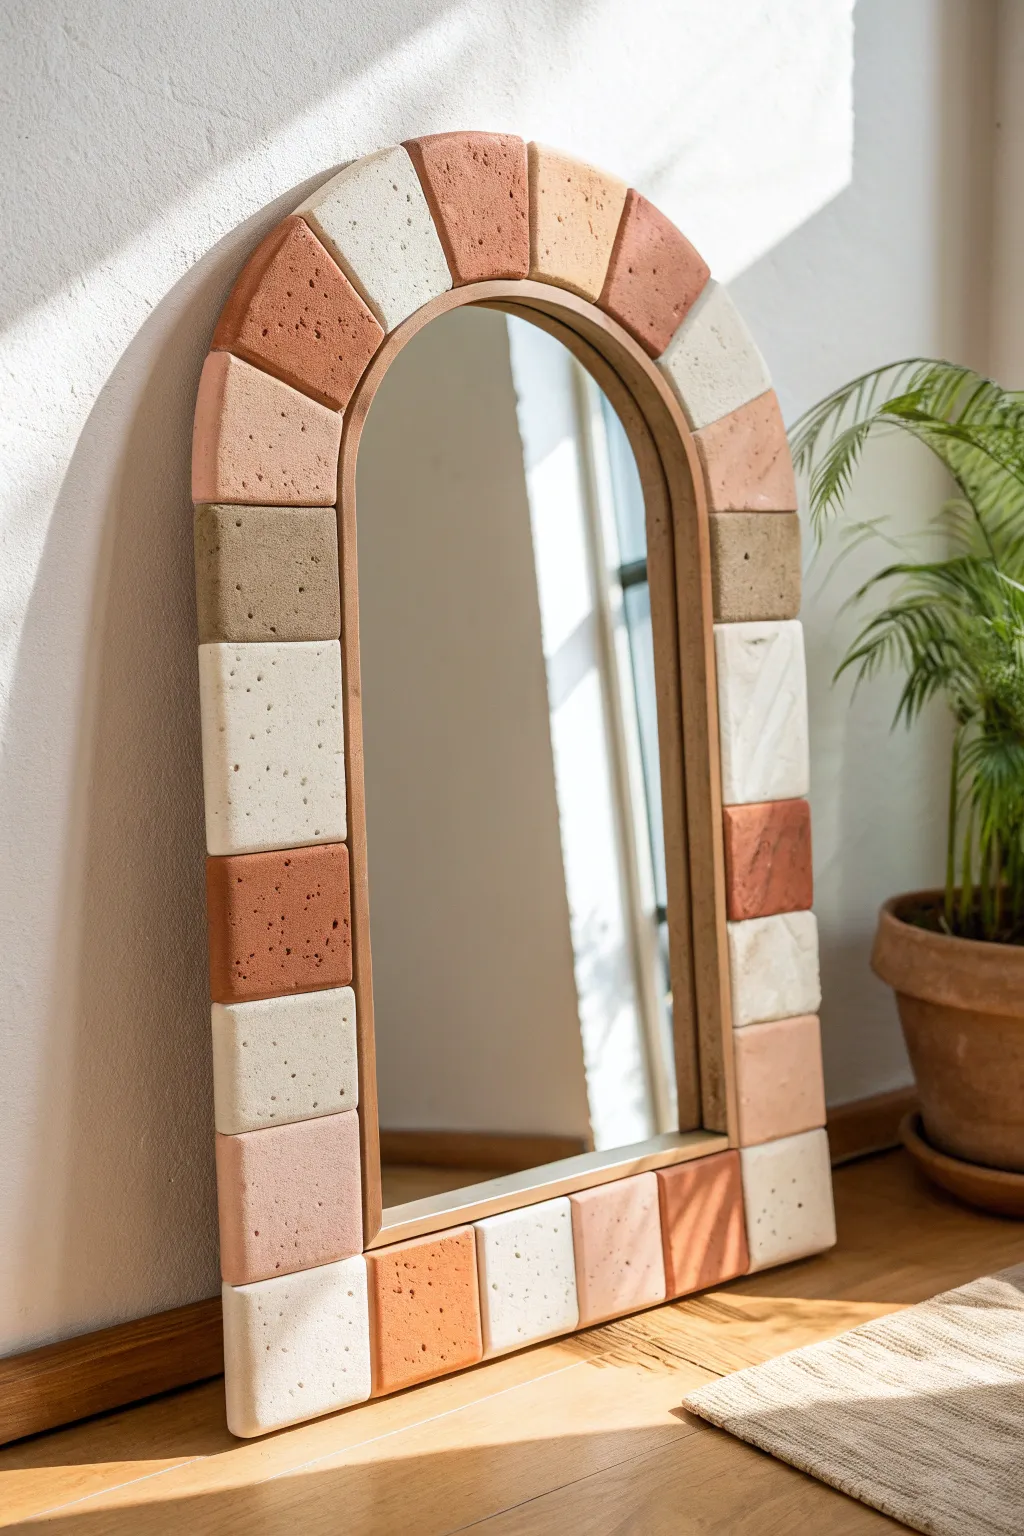
Transform a standard arched mirror into a sculptural statement piece with this chunky, terrain-inspired frame. Using air-dry clay to create faux stone blocks gives you that high-end artisanal look without the need for a kiln or heavy machinery.
How-To Guide
Materials
- Arched mirror (approximately 24-30 inches tall)
- White air-dry clay (3-4 large packs)
- Acrylic paints (terracotta, beige, sandstone, warm grey, white)
- Rolling pin
- Ruler and craft knife
- Heavy-duty construction adhesive (like E6000 or Liquid Nails)
- Fine grit sandpaper
- Old toothbrush or stiff bristle brush
- Aluminum foil
- Clear matte sealant spray
Step 1: Planning and Shaping the Blocks
-
Measure your mirror:
Lay your mirror flat on a large piece of paper or cardboard and trace its outline. This template will be crucial for sizing your clay blocks correctly. -
Calculate block sizes:
Decide on the width of your frame—about 3 to 4 inches looks substantial. Mark out segments along your traced perimeter; you’ll need rectangular blocks for the straight sides and wedge shapes (keystones) for the arch. -
Prepare the clay:
Condition your air-dry clay by kneading it until pliable. Roll it out into a thick slab, approximately 1 inch thick. You want these blocks to feel hefty and stone-like. -
Cut the straight blocks:
Using your ruler and craft knife, cut the rectangular blocks for the vertical sides of the mirror frame. Keep the edges relatively sharp but not perfect to mimic hand-cut stone. -
Cut the arch wedges:
For the curved top, cut trapezoidal wedge shapes. I place these cut pieces directly onto my paper template as I go to ensure the curve fits perfectly together without large gaps. -
Texturize the surface:
Before the clay dries, take an old toothbrush or a ball of crumpled aluminum foil and press it gently into the surface of each block. This creates a realistic, porous stone texture.
Step 2: Coloring and Drying
-
Pre-tinting technique:
For a more natural look, you can knead small amounts of acrylic paint directly into the wet clay before shaping. Create batches of terracotta, light beige, warm grey, and cream. -
Alternative painting method:
If you kept the clay white, wait for the blocks to dry completely (this usually takes 24-48 hours depending on thickness) and then paint them. Use watered-down acrylics to create a wash that settles into the texture. -
Create the speckle effect:
To achieve that spotted terrazzo or sandstone look seen in the photo, load a toothbrush with dark brown or black watered-down paint. Use your thumb to flick the bristles, spraying tiny specks over the dried blocks. -
Sand for finish:
Once fully dry, lightly sand the edges and faces of your blocks. This knocks down any sharp clay burrs and enhances the weathered stone aesthetic.
Cracked Clay Crisis?
Air-dry clay shrinks and can crack. Fix cracks by mixing a paste of fresh clay and water (‘slip’) and smoothing it into the fissure. Let dry and sand smooth.
Step 3: Assembly and Installation
-
Prep the mirror surface:
Clean the outer rim of your mirror glass thoroughly with rubbing alcohol. This ensures the adhesive bonds directly to the glass or frame beneath. -
Dry fit the layout:
Arrange all your finished clay blocks loosely on top of the mirror to finalize the pattern. Shuffle the colors around so you don’t have two identical tones touching. -
Glue the bottom blocks:
Start applying adhesive to the back of the bottom-most rectangular blocks. Press them firmly onto the mirror frame or edge, holding for a minute to secure. -
Work your way up:
Continue gluing up the sides, keeping the spacing tight. I prefer to do one side, then the other, meeting at the top. -
Install the arch:
Carefully glue the wedge pieces around the curve. If gravity is pulling them down, use painter’s tape to hold them in place against the mirror while the glue sets. -
Fill gaps (optional):
If you have noticeable gaps between blocks, you can leave them for a rustic look or fill them with a matching colored grout or extra clay for a seamless finish. -
Seal the work:
Finish by spraying the entire frame with a clear matte sealant. This protects the clay from moisture and prevents the paint from chipping over time.
Weight Reduction Tip
To keep the mirror light, bulk out the center of your thick clay blocks with a core of crumpled aluminum foil. This saves clay and creates a lighter frame.
Step back and admire your new geometric portal that brings a warm, architectural touch to your room
Abstract Face Line-Art Frame on One Side
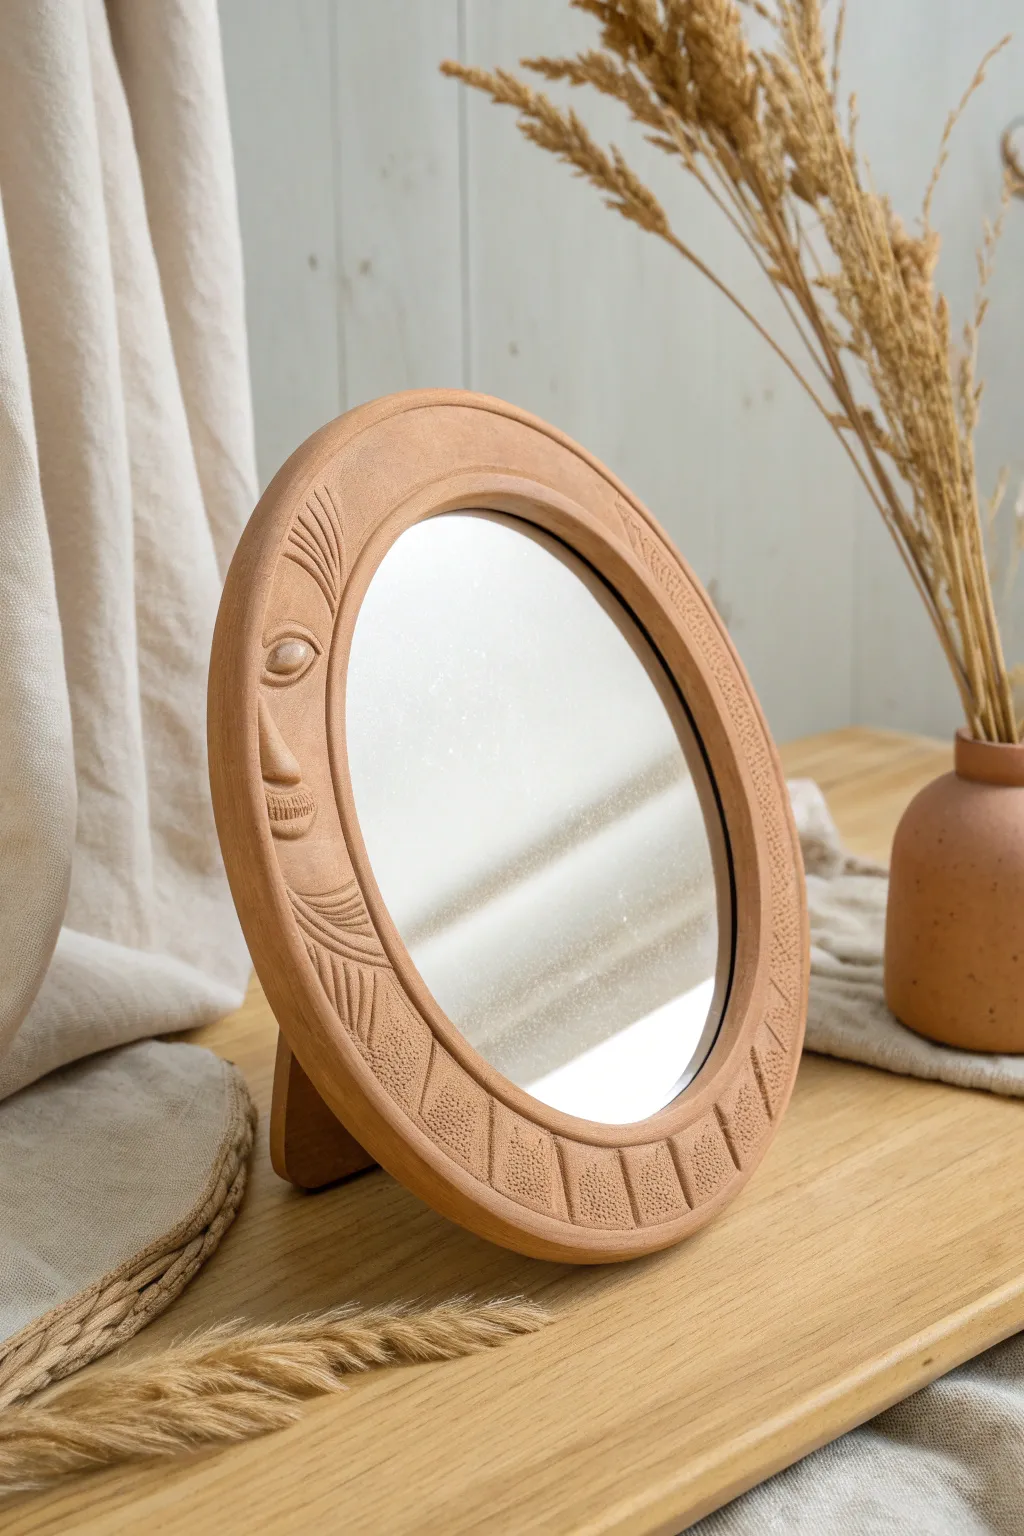
Embrace organic textures and artistic flair with this handcrafted mirror project. Using air-dry clay, you’ll sculpt a warm, terracotta-toned frame featuring a stylized face profile and geometric carvings for a sophisticated bohemian look.
Step-by-Step Guide
Materials
- Terracotta colored air-dry clay (approx. 1kg)
- Round craft mirror (approx. 6-8 inches diameter)
- Rolling pin
- Parchment paper or canvas mat
- Needle tool or toothpick
- Loop carving tool (small)
- Flat spatula tool
- Sponge
- Water cup
- Craft knife
- Sandpaper (fine grit)
- Matte spray varnish
Step 1: Base Construction
-
Prepare the workspace:
Lay down parchment paper or a canvas mat on a flat surface to prevent the clay from sticking. Tape the edges down so it doesn’t shift while you work. -
Form the base coil:
Take a large chunk of clay and roll it into a long, thick snake or coil. It needs to be long enough to wrap around the entire circumference of your chosen mirror with a little overlap. -
Flatten the coil:
Gently use your rolling pin to flatten the coil into a wide band. Aim for a width of about 1.5 to 2 inches and a consistent thickness of roughly half an inch. -
Size the frame:
Place your mirror face down on the clay to test the size. The inner edge of the clay should slightly overlap the mirror edge (so the mirror doesn’t fall through later), or you can plan to glue the mirror to the back. For this style, creating a flat ring is best. -
Join the ends:
Cut the ends of the clay strip at a 45-degree angle. Score the edges (make hash marks) with your needle tool, add a dab of water, and press the ends together firmly to close the circle. -
Smooth the shape:
Use a damp sponge or your fingers to smooth out the seam until it’s invisible. Refine the inner and outer circles to ensure they are perfectly round.
Smooth Operator
Keep a small bowl of water and a paintbrush nearby. Brushing water over your clay frequently acts like an eraser for fingerprints and keeps the surface professional.
Step 2: Sculpting the Face
-
Map out the design:
Lightly trace the profile of a face on the left side of the frame using a toothpick. Draw an almond shape for the eye, a curve for the nose, and simple lines for the lips. -
Build the nose:
Roll a small, thin tapered coil of clay. Score and slip the area where the nose bridge goes, then press this coil onto the frame to creating a raised, dimensional profile. -
Sculpt the eye:
Add a tiny ball of clay for the eyeball, then shape lids around it using small coils. Blend the edges seamlessly into the main frame using a modeling tool so it looks carved rather than stuck on. -
Carve the details:
Use your needle tool or a fine blade to carve the eyelashes and eyebrow hairs. I like to keep these lines flowing upward to mimic the organic feel of the reference image. -
Add texture to the lips:
Carve small vertical lines into the mouth area to suggest teeth or lip texture, keeping the style abstract and geometric.
Step 3: Finishing Details
-
Create the geometric border:
On the bottom right section of the frame, use a ruler or straight edge to lightly impress radial lines, creating segments like rays of sun. -
Texture the segments:
Inside every other segment, use a stippling motion with a stiff brush or a needle tool to create a dense, pitted texture. This contrasts beautifully with the smooth areas. -
Create a stand (Optional):
If you want the mirror to stand like the photo, shape a simple triangular wedge of clay. Flatten one side so it can be glued to the back of the frame later. -
Slow drying:
Let the clay dry slowly away from direct heat or sunlight for 24-48 hours. Turn it over halfway through to ensure the back dries evenly. -
Sanding:
Once bone dry, use fine-grit sandpaper to smooth any rough edges on the outer rim or unwanted bumps on the face. -
Assembly:
Use a strong adhesive like E6000 to attach the mirror to the back of your frame. If using a stand, glue it securely to the lower back. -
Seal:
Finish with a light coat of matte spray varnish to protect the clay from moisture while preserving that natural, earthy finish.
Faux Stone Look
Mix dried coffee grounds or fine sand into your clay before sculpting. This adds specks of texture, making your finished piece look like real carved sandstone.
Place your stunning new art piece on a vanity or shelf to add instant warmth and character to your room