Every new school year feels like a fresh sketchbook page, and I love capturing that energy with clay bead bracelets you can actually wear. Here are my favorite back to school bracelet ideas—classic ones first, then a few playful twists once you’re warmed up.
Classic Pencil Pattern Bracelet
Celebrate the start of the school year with this clever bracelet that mimics the iconic look of a No. 2 pencil. With segments of yellow, pink, silver, and wood tones, this accessory is a subtle yet stylish nod to classroom nostalgia.
Step-by-Step Tutorial
Materials
- Polymer clay in sunflower yellow, eraser pink, metallic silver or grey, beige/tan (wood tone), and black
- Elastic stretch cord (0.8mm or 1mm)
- Clay roller or pasta machine
- Square bead cutter or sharp craft knife
- Bead piercing pin or thick needle
- Oven for baking
- Super glue or jewelry adhesive
- Optional: Black acrylic paint and fine brush (for detailing the focal bead)
Step 1: Creating the Pencil Beads
-
Preparation:
Begin by conditioning each color of polymer clay until it is soft and pliable. This prevents cracking later on. -
Rolling out strands:
Roll each color into distinct logs or snakes. For this design, you’ll need the most of the tan/wood tone and the yellow, with smaller amounts of pink, silver, and black. -
Creating the square profile:
Instead of round beads, press your clay logs gently on four sides to create a long rectangular prism shape. This gives the beads that distinct faceted look seen in the photo. -
Cutting the segments:
Using your sharp blade, slice the logs into consistent bead sizes. Aim for a thickness of about 4-5mm to match the chunky heishi style shown. -
Making the focal bead:
Create one special white bead. If you want the text detail like the image, you can try transferring an image or painting tiny black text on it after baking. -
Piercing holes:
Carefully pierce the center of each unbaked bead with your bead pin. I find giving the pin a little twist as it goes in prevents the square shape from squishing. -
Baking:
Arrange your beads on a baking sheet or tile. Bake according to your specific clay brand’s instructions (usually 275°F/135°C for 15-30 minutes). -
Cooling down:
Allow the beads to cool completely before handling, as warm clay is still fragile.
Square Shape Secret
To keep perfect cube shapes while piercing, let the clay logs rest in the fridge for 15 minutes before slicing and piercing.
Step 2: Assembly
-
Measuring the cord:
Wrap the elastic cord loosely around your wrist and add about 4 inches of extra length for tying the knot. -
Planning the pattern:
Lay out your design on a bead board or towel. The pencil pattern relies on specific color blocking: wood tone, followed by yellow, then silver, then pink. -
Wood section:
Start by threading several beige/tan beads. These represent the sharpened wood part of the pencil. -
Lead tip:
Add one single black bead or dark grey bead to mime the graphite tip. -
Yellow body:
Thread a longer section of yellow beads. This is the main body of the pencil. -
Ferrule transition:
Add 2-3 silver or grey beads. This mimics the metal ferrule holding the eraser. -
Eraser end:
Finish the sequence with a few pink beads for the eraser. -
Repeating:
Continue this pattern around the bracelet, inserting your special focal bead wherever you prefer it to sit. -
Final check:
Wrap the strung beads around your wrist to check the fit. Add or remove a bead or two if needed for comfort. -
Securing the knot:
Tie a strong surgeon’s knot (right over left, left over right twice) and pull tight. -
Finishing:
Add a tiny drop of super glue to the knot, let it dry, and trim the excess cord ends closely.
Make It 3D
Make the pencil tip bead cone-shaped instead of square for a more realistic sharpened pencil effect.
Wear your new bracelet stacked with other colors for a fun, personalized back-to-school statement


Lined Notebook Paper Stripe Bracelet
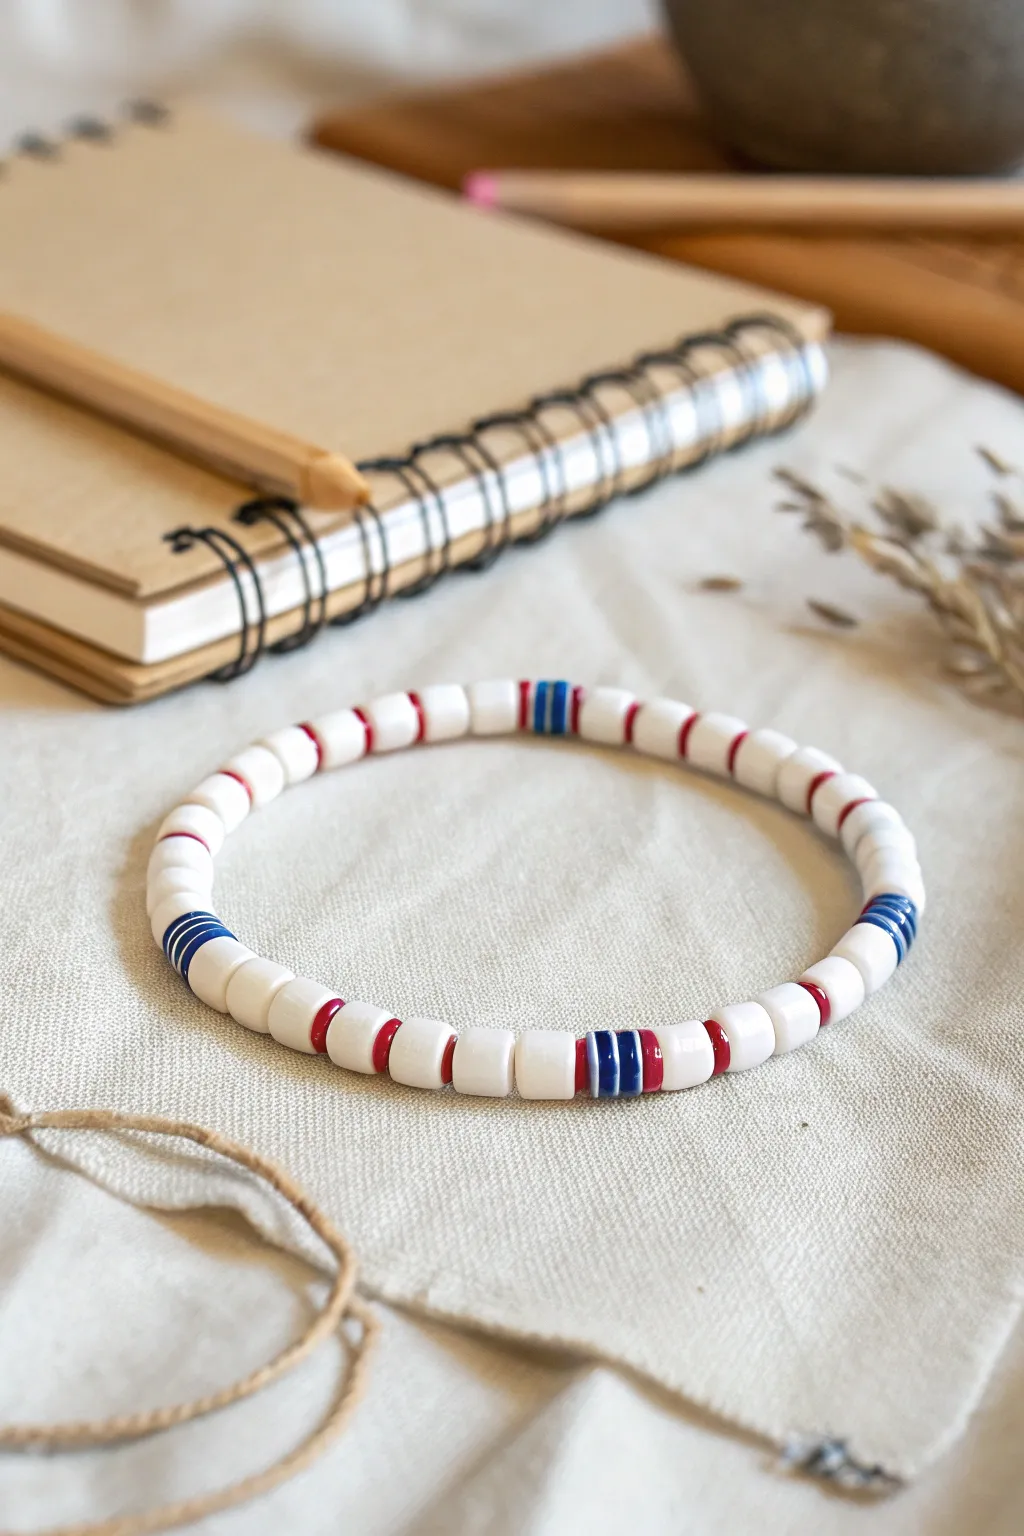
Capture the classic look of loose-leaf paper with this clever bracelet design. Using simple polymer clay heishi beads, the pattern mimics the red margin lines and blue header stripes of a fresh notebook page.
Step-by-Step Guide
Materials
- White polymer clay heishi beads (6mm)
- Red polymer clay heishi beads (6mm)
- Blue polymer clay heishi beads (6mm)
- Stretch cord (0.8mm or 1mm)
- Super glue or jewelry glue
- Scissors
- Bead stopper or tape
- Bead design board (optional)
Step 1: Preparation
-
Measure and cut:
Begin by cutting a length of stretch cord that is about 10-12 inches long. This gives you plenty of extra room for tying knots later without struggling with short ends. -
Secure the end:
Attach a bead stopper to one end of your cord. If you don’t have one, folded masking tape works perfectly to stop beads from sliding off while you work. -
Pre-stretch the cord:
Give your cord a few gentle tugs. Pre-stretching helps prevent the bracelet from sagging or loosening up immediately after you finish making it.
Pro Tip: Seamless Pattern
End your pattern in the middle of a white section. When you tie the knot, the two white halves join to form one full ‘page’ block, making the seam invisible.
Step 2: Creating the Pattern
-
Build the white base:
Start threading your white heishi beads. You want to create a substantial section of white to represent the main writing space of the paper. -
Check the length:
Add about 5 to 7 white beads initially, depending on how spaced out you want your ‘lines’ to be. -
Add the margin line:
Thread on a single red bead. This lone red bead represents the vertical margin line found on standard notebook paper. -
Continue the paper section:
Add another block of white beads, keeping the count consistent with your first section (e.g., another 5-7 beads). -
Add the header stripe:
Now, create the blue header section. Thread on three blue beads in a row. -
Insert the separator:
Place one white bead after the three blue ones to create a small gap in the pattern. -
Finish the header:
Add one more single blue bead. This combination (3 blue, 1 white, 1 blue) creates visual interest and mimics the reinforced holes or header lines of paper. -
Repeat the sequence:
Return to your main white block color. I usually check my wrist size here to estimate how many full pattern repetitions will fit. -
Maintain consistency:
Continue the pattern: White block -> Single Red -> White Block -> Blue/White Header sequence. Repeat until you reach the desired length.
Step 3: Finishing Up
-
Check the fit:
Wrap the beaded strand around your wrist to ensure it fits comfortably. It should be snug but not tight, as the beads take up some inner circumference. -
Tie the knot:
Remove the bead stopper and tie a surgeon’s knot. This is just like a standard square knot, but you loop the cord through twice on the first pass for extra grip. -
Tighten securely:
Pull the cords tight from all four directions (the two tail ends and the two bracelet sides) to compact the knot. -
Apply adhesive:
Dab a tiny drop of jewelry glue or super glue onto the knot. Be careful not to glue the beads to the cord, just the knot itself. -
Hide the knot:
Once the glue is tacky but not fully set, trim the excess cord ends and gently slide a nearby bead over the knot to conceal it.
Troubleshooting: Stiff Bracelet
If the finished bracelet feels stiff or kinks, you strung the beads too tightly. Leave a tiny gap (1-2mm) of cord exposed before knotting to allow flexibility.
Slip on your new accessory and enjoy that crisp back-to-school feeling all year round


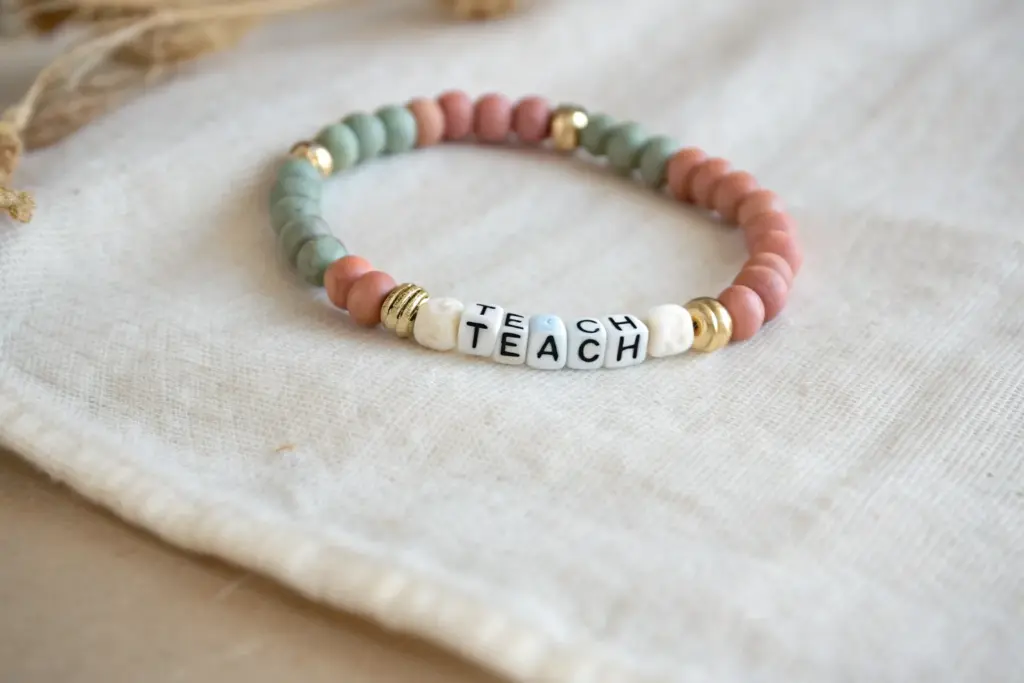
Apple Teacher Gift Bracelet
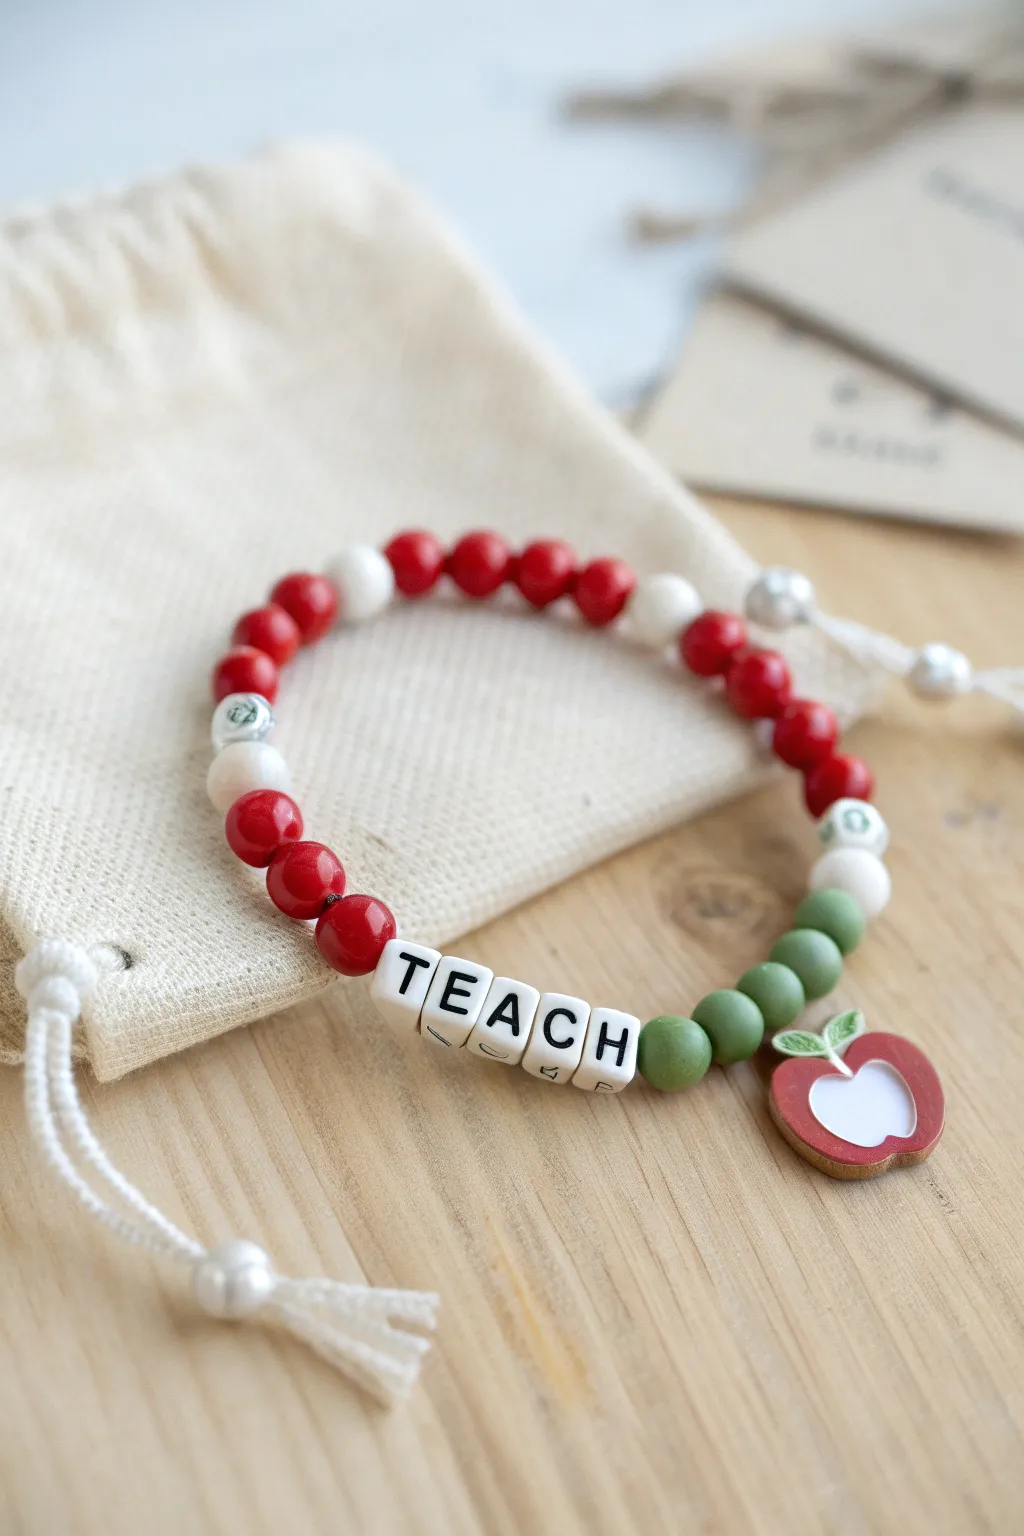
Show your appreciation with this charming beaded bracelet featuring classic school colors and a personalized touch. Combining red and green matte beads with a cute apple charm, this accessory makes for a thoughtful and stylish handmade gift for any educator.
Step-by-Step Tutorial
Materials
- Red wooden or matte acrylic beads (approx. 8mm)
- Green wooden or matte acrylic beads (approx. 8mm)
- White or cream spacer beads (approx. 8mm)
- Square white letter beads spelling ‘TEACH’
- Apple charm (enamel or resin) with a jump ring
- Two decorative focal beads (white with green floral pattern)
- Stretch cord (0.8mm or 1mm thickness)
- Jewelry adhesive or clear nail polish
- Scissors
- Bead stopper or decorative tape
- Pliers (optional, for the jump ring)
Step 1: Preparation & Bead Layout
-
Measure the cord:
Cut a piece of stretch cord about 10-12 inches long. This generous length gives you plenty of room to tie knots comfortably without risking the beads sliding off. -
Secure the end:
Place a bead stopper or a piece of tape on one end of the cord to prevent your design from spilling while you work. -
Pre-stretch the cord:
Give the elastic cord a few gentle tugs. Pre-stretching helps prevent the bracelet from loosening up or sagging shortly after it’s been worn. -
Sort your pattern:
Before threading, lay out your beads on a flat surface or bead board to visualize the spacing. The design splits into a red section on top and the letter/green section on the bottom.
Step 2: Stringing the Design
-
Thread the first focal bead:
Start by threading one of the decorative white floral beads onto the cord. This will act as a transition point between the color blocks. -
Create the red section:
String approximately 10 to 12 red beads. I find that alternating a white spacer bead near the center of this red block adds a nice visual break, but you can keep it solid red if you prefer. -
Add the second focal bead:
Finish the red section by threading the second decorative floral bead. This brackets the top half of the bracelet. -
Start the green section:
Thread two or three green beads next. These will lead into the central charm area. -
Attach the apple charm:
Thread the jump ring of your apple charm onto the cord. Ensure the charm is facing correctly relative to how the bracelet will hang. -
String the letters and remaining green:
Add about three more green beads, and then string your ‘TEACH’ letter beads. Make sure they are reading correctly from left to right. -
Complete the circle:
Add one final red bead after the letter block to complete the loop, checking the size against your wrist or a standard 7-inch measurement.
Knot Hiding Tip
If the hole of your adjacent bead is too small to hide the knot, finish the bracelet next to one of the larger floral beads or the letter beads, which often have wider drilled holes.
Step 3: Finishing Touches
-
Check the fit:
Bring the two ends together carefully to form a circle. If the bracelet looks too small, add an extra red or green bead near the floral spacers to maintain symmetry. -
Remove the stopper:
Carefully remove the tape or bead stopper while gripping the cord ends firmly so no beads escape. -
Tie the knot:
Tie a surgeon’s knot (which is essentially a square knot with an extra loop through) to secure the bracelet. Pull the elastic tight so the knot is compact. -
Secure with glue:
Apply a tiny dab of jewelry glue or clear nail polish directly onto the knot. Let this dry completely for a few minutes to ensure it won’t slip. -
Hide the knot:
Once dry, trim the excess cord ends close to the knot. Gently pull the cord to slide the knot inside the hole of the nearest large bead to hide it.
Personalize It
Swap the word ‘TEACH’ for the specific teacher’s name (like ‘MS JONES’) or the grade level (like ‘2ND GRADE’) to make the gift truly one-of-a-kind.
Place the finished bracelet in a small canvas pouch for a gift presentation that gets an A-plus for effort


School Spirit Color Stack

Show off your team pride with this classic, varsity-inspired bracelet stack featuring bold primary colors and wood-tone accents. By combining simple wooden or clay beads with a delicate gold chain layer, you create a balanced, collegiate look perfect for game days or everyday wear.
Step-by-Step
Materials
- 10mm round wood beads (navy blue)
- 10mm round wood beads (natural or light gold)
- 10mm round wood beads (deep red/crimson)
- 10mm round wood beads (white)
- Stretch cord (0.8mm or 1mm thickness)
- Jewelry glue or clear nail polish
- Scissors
- Gold ball chain bracelet (pre-made or DIY chain)
- Gold compass or coin charm
- 4mm jump ring
- Jewelry pliers
- Tape or bead stopper
Step 1: Planning Your Stack
-
Measure your wrist:
Before stringing any beads, wrap a piece of string around your wrist to find your comfortable fit, adding about half an inch for slack since these large beads take up inner circumference. -
Select your palette:
Gather your 10mm round beads. This specific look relies on blocked colors rather than patterns, so separate your Navy, Natural Gold, Red, and White beads into individual piles. -
Prepare the elastic:
Cut four lengths of stretch cord, each about 10-12 inches long. This generous length makes tying the final knots much easier than struggling with short ends. -
Secure the ends:
Place a piece of tape or a bead stopper at one end of each cord to prevent your beads from sliding off while you work.
Knot Security Tip
When hiding the knot inside a bead, choose a bead with a slightly larger hole. If the hole is too tight, forcing the knot inside can fray the elastic over time.
Step 2: Stringing the Bead Strands
-
Create the white strand:
Thread the white 10mm beads onto your first cord until the strands measure the length of your wrist circumference. I find it helpful to test the fit on my wrist before tying. -
Create the red strand:
Repeat the process with the crimson red beads. Ensure this strand is exactly the same length as the white one for a uniform stack. -
Create the natural gold strand:
String the natural wood-tone beads onto the third cord. These lighter beads act as a great neutral spacer between the darker colors. -
Create the navy strand:
Finally, string the navy blue beads onto the last cord to complete the four main color blocks of the school spirit stack. -
Pre-stretch the cords:
Before knotting, firmly pull on the ends of each cord to ‘pre-stretch’ the elastic. This crucial step prevents the bracelets from stretching out and becoming loose after the first few wears.
Step 3: Finishing the Beaded Bracelets
-
Tie the surgeon’s knot:
Remove the tape and tie a surgeon’s knot (right over left loop twice, pull tight; left over right loop once, pull tight) for maximum security. -
Secure with glue:
Dab a tiny drop of jewelry glue or clear nail polish directly onto the knot. Let it dry completely before trimming. -
Trim the excess:
Once dry, cut the excess cord tails close to the knot. -
Hide the knot:
Gently tug the cord so the knot slides inside the hole of the nearest bead, making the finish completely invisible.
Level Up: Locker Charm
Add a tiny personalized touch by attaching an initial charm or a graduation year charm (like ’24’) to the jump ring along with the compass for extra meaning.
Step 4: Adding the Gold Accent Layer
-
Prepare the charm:
Using two pairs of jewelry pliers, grip the 4mm jump ring on either side of the split. -
Open the ring:
Twist the pliers in opposite directions (one away from you, one toward you) to open the ring without distorting its circle shape. -
Attach the charm:
Slide your gold compass or coin charm onto the open jump ring. -
Connect to chain:
Loop the jump ring through a link in your delicate gold ball chain bracelet. The charm should dangle freely. -
Close the ring:
Use the pliers to twist the jump ring back into a closed position, ensuring the ends meet perfectly flush so the charm doesn’t slip off.
Slip all five bracelets onto your wrist to complete this textural, spirited look that’s ready for class

The Complete Guide to Pottery Troubleshooting
Uncover the most common ceramic mistakes—from cracking clay to failed glazes—and learn how to fix them fast.
“Class of” Year Bracelet
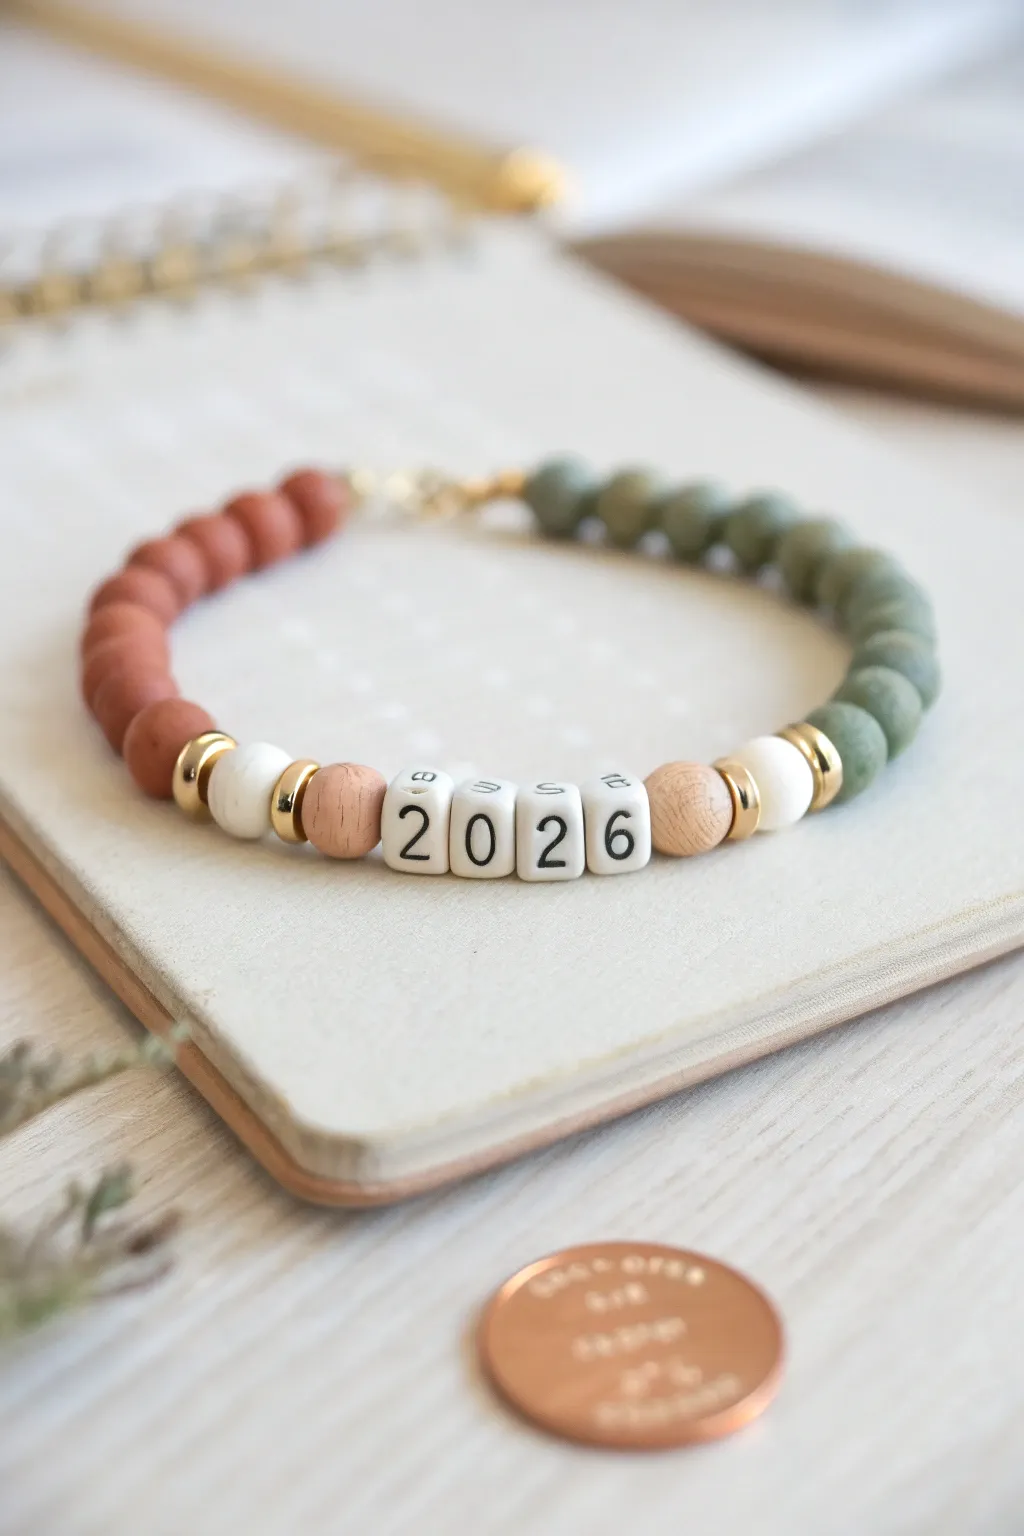
Celebrate your graduation year with this sophisticated, earthy bracelet design featuring matte clay beads and gold accents. This ‘Class of 2026’ piece moves away from bright primary colors for a more mature, collegiate look perfect for daily wear.
Step-by-Step Tutorial
Materials
- Matte round polymer clay beads (Terracotta/Rust color, approx. 6-8mm)
- Matte round polymer clay beads (Sage/Olive Green color, approx. 6-8mm)
- White or cream square letter/number beads (numbers ‘2’, ‘0’, ‘2’, ‘6’)
- Gold tone spacer rondelle beads (flat discs)
- Small round wooden beads (natural finish, approx. 6mm)
- Medium round wooden beads (white/cream finish, approx. 8mm)
- Strong elastic bead cord (0.7mm or 0.8mm)
- Jewelry glue or clear nail polish
- Scissors
Step 1: Planning and Preparation
-
Measure the wrist:
Before you cut anything, wrap the elastic cord loosely around your wrist to find the comfortable length. Add about 3-4 inches of extra slack on each end for tying knots later. -
Pre-stretch the cord:
Gently tug on your length of elastic cord a few times. This helps prevent the bracelet from stretching out and becoming loose immediately after you finish wearing it. -
Secure one end:
Place a piece of tape on one end of the cord or attach a binder clip. This acts as a stopper so your beads don’t slide right off while you are working. -
Lay out the pattern:
It helps to visually arrange your beads on a bead board or a piece of felt before stringing. Place your ‘2026’ (or your specific year) beads in the center, flanked by the wood and gold accents described below.
Step 2: Stringing the Design
-
Start the center sequence:
Begin by stringing the white number beads to spell out your year (e.g., 2, 0, 2, 6). Ensure they are all facing the correct direction so they read properly. -
Add right-side accents:
Immediately to the right of the ‘6’, thread on one small natural wood bead. -
Add the gold detail:
Next, slide on a gold spacer rondelle. These flat gold discs add a touch of shine that separates the textures. -
Add the white accent:
Thread on one of the larger white/cream wooden beads. Follow this immediately with another gold spacer rondelle. -
Fill the right side:
Now, fill the rest of the right side with the sage green matte clay beads. You’ll likely need about 8-10 beads depending on your wrist size. -
Mirror the accent on the left:
Go back to the other side of your year numbers. Next to the first ‘2’, simply thread on one small natural wood bead. -
Continue the left pattern:
Add a gold spacer rondelle, followed by a large white wooden bead, and then one final gold spacer rondelle. -
Fill the left side:
Finish stringing the left side using the terracotta/rust colored matte clay beads. Aim for the same number of beads used on the green side for symmetry, or adjust to fit your wrist perfectly.
Knot Keep Slipping?
If the elastic feels slippery, try coating the knot area with a little beeswax or using a textured crimp bead cover over the knot for a permanent hold.
Step 3: Securing the Bracelet
-
Check the fit:
Carefully lift the bracelet by both cord ends and wrap it around your wrist. It should sit comfortably without pinching or dangling too loosely. -
Tie the first knot:
Remove the tape or clip. Bring the two ends together and tie a simple overhand knot, pulling it tight against the beads to remove any gaps. -
Tie a surreal knot:
For extra security, tie a surgeon’s knot next. This is like a standard knot, but loop the thread through twice before pulling tight. I find this holds elastic much better than a standard square knot. -
Secure with glue:
Apply a tiny drop of jewelry glue or clear nail polish directly onto the knot. Let this dry for a few minutes to ensure it won’t slip. -
Hide the knot:
Once the glue is tacky or dry, trim the excess elastic ends close to the knot (but not too close!). Gently pull the bracelet so the knot slides inside the hole of one of the adjacent clay beads to hide it.
Make It Premium
Swap the polymer clay for real gemstone beads like Jasper or Aventurine. The natural stone weight makes the bracelet drape beautifully on the wrist.
Now you have a stylish memento to wear all school year long
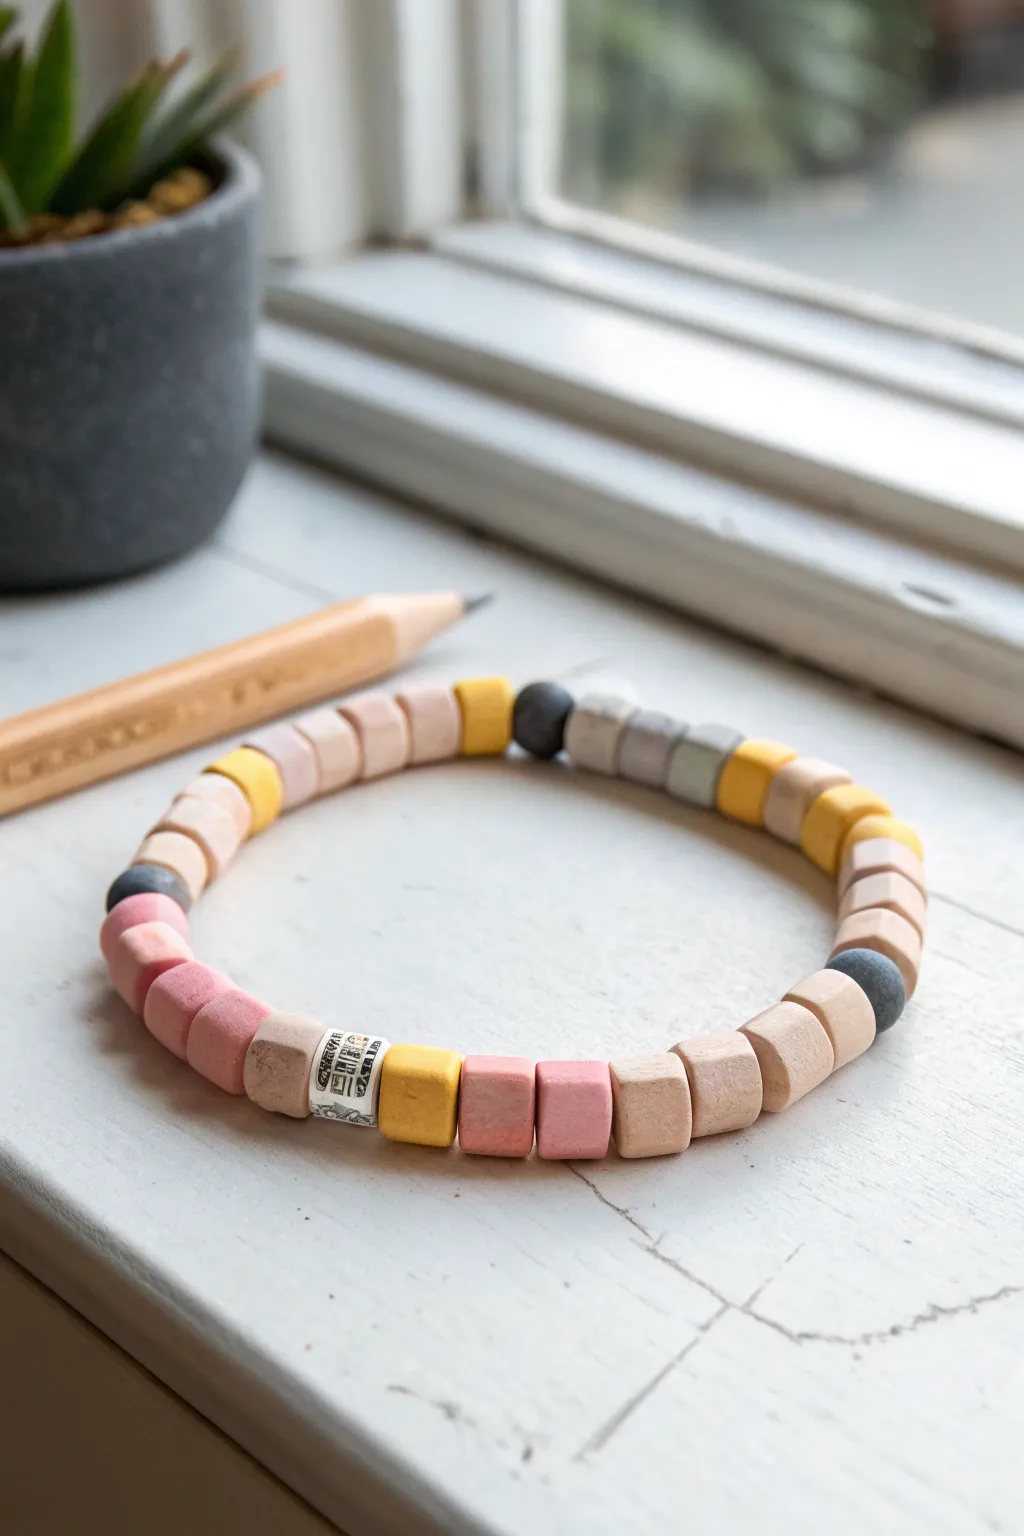
Crayon Box Color Block Bracelet
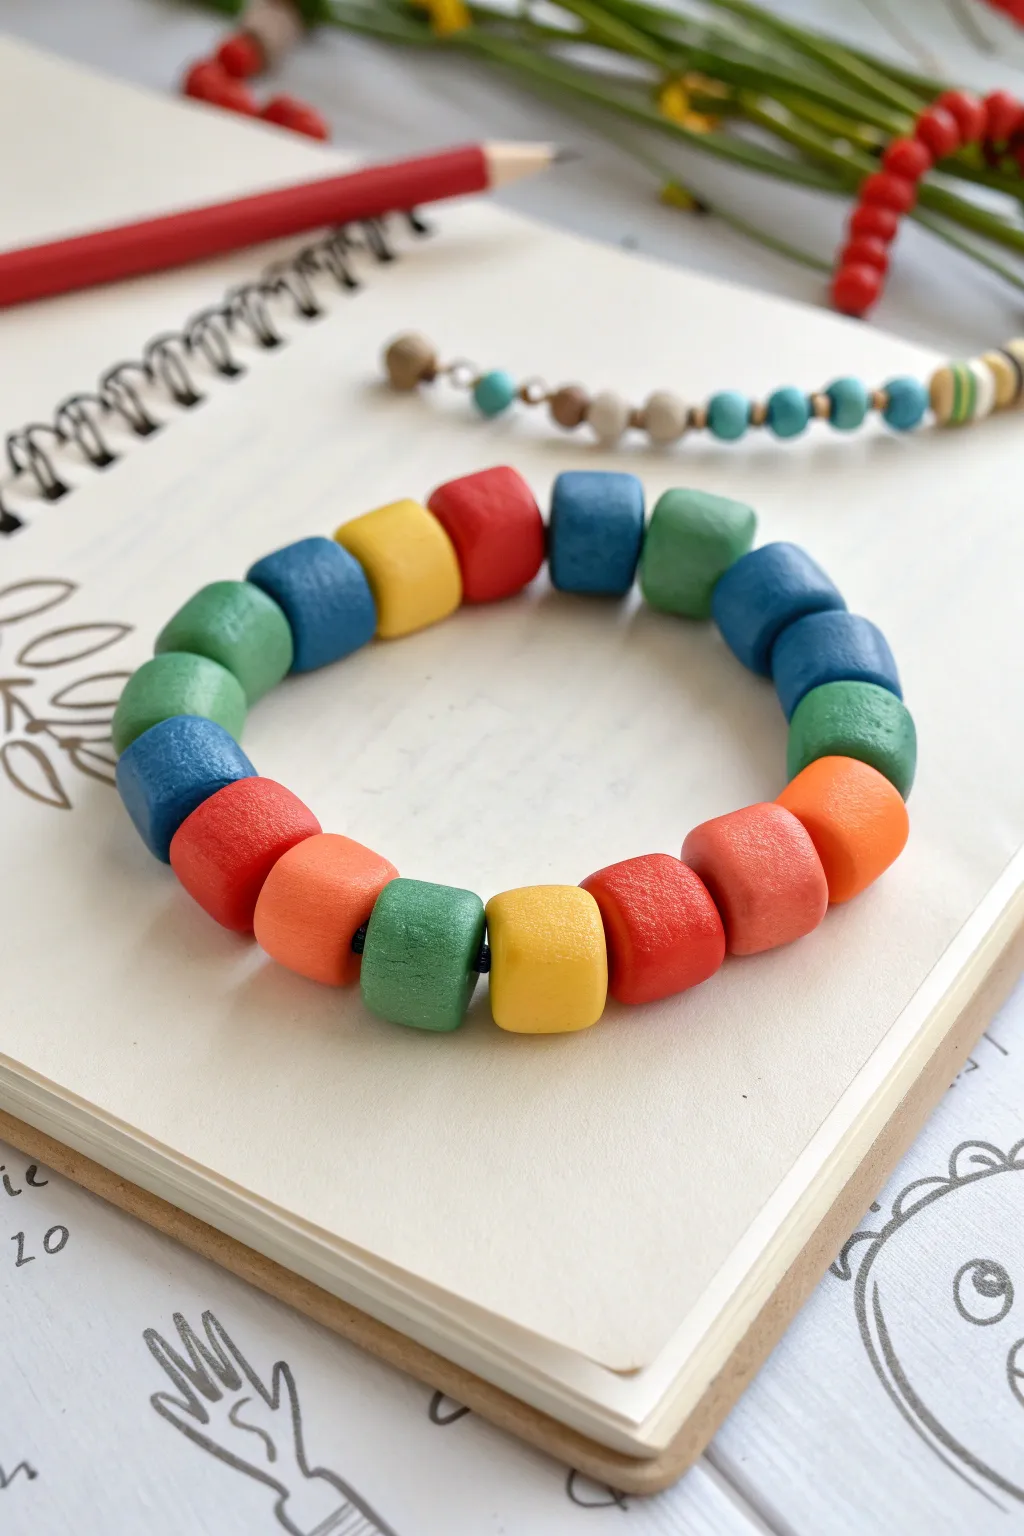
Capture the nostalgic joy of a fresh box of crayons with this vibrant, chunky bead bracelet. Hand-rolled clay beads in primary and secondary colors create a playful, tactile accessory perfect for back-to-school style.
Detailed Instructions
Materials
- Polymer clay (red, deep blue, yellow, green, orange, light blue)
- Elastic beading cord (black, 0.8mm or 1mm)
- Clay roller or acrylic rolling pin
- Tissue blade or clay knife
- Toothpick or bead piercing tool
- Ruler
- Baking sheet lined with parchment paper
- Oven
- Sandpaper (fine grit, optional)
- Super glue or jewelry glue
Step 1: Prepping and Shaping
-
Condition the Clay:
Begin by warming up your polymer clay. Take a small amount of each color—red, blue, green, yellow, orange, and light blue—and knead them individually in your hands until they are soft and pliable. This prevents cracking later. -
Roll Snakes:
Roll each color into a thick log or snake on your work surface. Aim for a diameter of about 1/2 inch (1.2 cm) for nice, chunky beads. -
Measure and Cut:
Using your tissue blade and ruler, cut the logs into equal segments to form cubes. I find that cutting them slightly longer than they are wide helps account for the squishing that happens during rolling. -
Form the Cubes:
Take a cut segment and gently press it against your work surface on all six sides to define the cube shape. -
Soften the Edges:
Gently roll the edges of the cube between your thumb and forefinger to round them off. You want a ‘soft square’ or pebble shape rather than sharp geometric corners.
Fingerprint Fix
To remove fingerprints before baking, brush the raw clay beads lightly with a little cornstarch or baby oil. This smooths the surface perfectly.
Step 2: Piercing and Baking
-
Pierce the Hole:
Hold a bead gently between your fingers so you don’t distort the shape. Push your toothpick or piercing tool through the center of one face. -
Check the Exit:
As the tool creates a slight bump on the opposite side, stop pushing. Withdraw the tool and insert it from the opposite side through that bump to ensure a clean, wide channel for the cord. -
Repeat for All Beads:
Continue shaping and piercing until you have enough beads for your wrist size. For an average bracelet, you’ll need about 16-18 beads depending on their size. -
Bake:
Arrange the beads on a parchment-lined baking sheet. Bake according to the manufacturer’s instructions on your clay package (usually around 275°F/135°C for 15-30 minutes). -
Cool Down:
Let the beads cool completely before handling. They are fragile when hot. -
Check for Sharp Spots:
Once cool, inspect the bead holes. If there are any sharp bits of clay sticking out, gently sand them away with fine-grit sandpaper.
Uneven Holes?
If your bead holes shrink during baking, re-drill them carefully with a small handheld twist drill bit while the clay is fully cooled and hard.
Step 3: Assembly
-
Plan Your Pattern:
Lay your beads out on the table to finalize your color order. The example uses a random mix, but you could do a repeating rainbow pattern if you prefer. -
String the Beads:
Thread the beads onto the black elastic cord. No needle is usually needed if your holes are wide enough, but a stiff piece of wire can help guide the cord if it frays. -
Check the Fit:
Wrap the strand around your wrist to check the sizing. Add or remove beads as necessary, keeping in mind the elastic will stretch. -
Tie the Knot:
Tie a secure surgeon’s knot (right over left, left over right). Pull it tight to secure the beads together. -
Secure and Trim:
Place a tiny drop of super glue on the knot for extra security. Once dry, trim the excess cord, tucking the knot inside a neighboring bead if possible.
Enjoy wearing your colorful new accessory or wrap it up as a thoughtful handmade gift


What Really Happens Inside the Kiln
Learn how time and temperature work together inside the kiln to transform clay into durable ceramic.
Chalkboard and Chalk Accent Bracelet
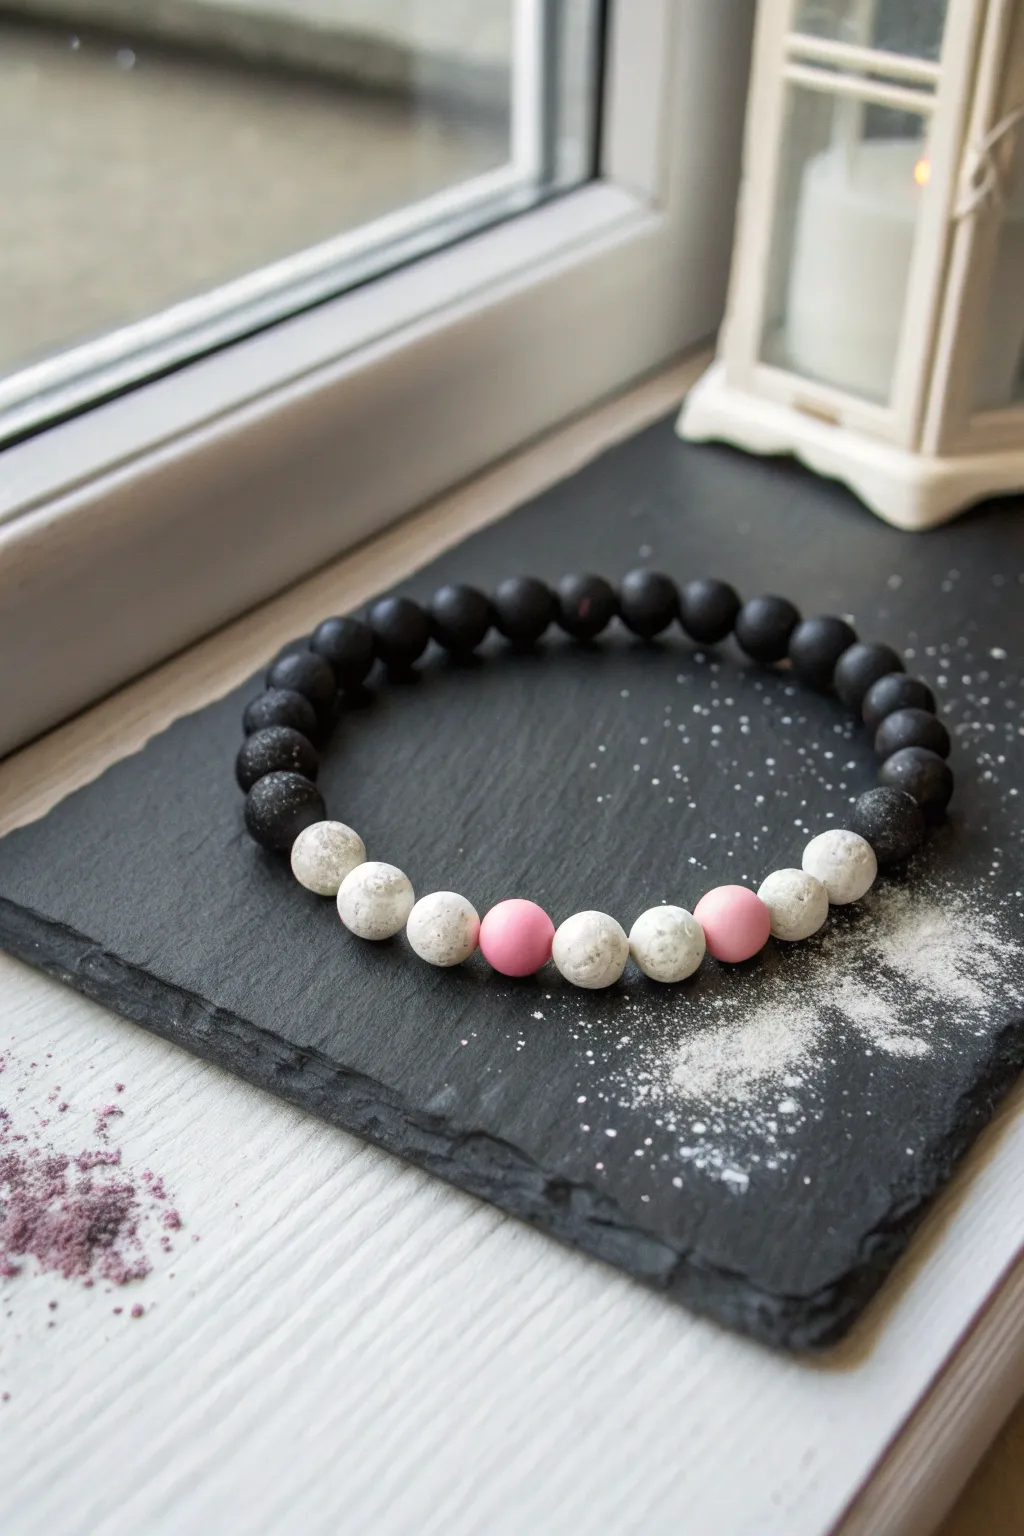
Capture the nostalgic vibe of a fresh chalkboard with this stylish polymer clay bead bracelet. Featuring matte black beads reminiscent of a blackboard, textured white “chalk” beads, and a pop of eraser pink, it’s a sophisticated nod to back-to-school season.
Step-by-Step Guide
Materials
- Black polymer clay (matte finish)
- White or granite-effect polymer clay
- Pink polymer clay (standard eraser pink)
- Stretch cord or elastic beading thread (0.8mm)
- Bead roller or acrylic block
- Toothpick or bead reamer
- Sandpaper or salt (for texture)
- Super glue or jewelry adhesive
- Scissors
Step 1: Creating the Beads
-
Prepare the black clay:
Condition your black polymer clay until it is soft and pliable. Roll it into a long, even log roughly the thickness of a pencil. -
Cut equal segments:
Using a tissue blade or craft knife, slice the black log into approximately 20 equal-sized pieces. These will become your main chalkboard beads. -
Roll the black beads:
Roll each black segment between your palms to form smooth, round spheres. Aim for a consistent size of about 8-10mm. -
Create the ‘chalk’ beads:
Repeat the process with white or granite-effect clay. You will need about 6 white beads. To mimic the dusty texture of chalk, roll the raw white beads gently over a piece of coarse sandpaper or sprinkle them lightly with salt (rinse after baking). -
Form the pink accents:
Condition the pink clay and roll two spherical beads of the same size as your black and white ones. Keep these smooth to resemble a fresh eraser. -
Pierce the holes:
Carefully pierce the center of each bead with a toothpick or bead pin. Give the tool a slight twist as you push through to prevent the bead from flattening.
Chalk Dust Effect
For an authentic chalkboard look, lightly dust your baked black beads with cornstarch before stringing, then wipe off the excess.
Step 2: Baking and Finishing
-
Bake the beads:
Arrange your beads on a baking sheet or tile. Bake according to the manufacturer’s instructions for your specific brand of clay—usually around 275°F (130°C) for 15-30 minutes. -
Cool down:
Let the beads cool completely before handling. If you used salt for texture on the white beads, rinse them under warm water now to dissolve the salt crystals. -
Matte finish:
The black beads look best with a matte finish. I like to lightly buff them with a piece of denim or very fine sandpaper if they came out too shiny, avoiding any gloss glaze.
Personalize It
Use alphabet beads instead of the pink accent beads to spell out a name, grade level, or school subject for a custom touch.
Step 3: Assembly
-
Measure your cord:
Cut a piece of stretch cord about 10-12 inches long. This gives you plenty of extra room for tying knots. -
Pre-stretch the cord:
Give the elastic a few firm tugs before stringing. This pre-stretching prevents the bracelet from sagging shortly after you make it. -
Start stringing:
Begin threading your black beads. String the majority of the black beads first to form the back of the bracelet. -
Add the textured section:
Add a few ‘chalk’ textured black beads (or just standard black ones) before transitioning. Then, thread one white bead. -
Create the pattern:
Continue the pattern: White, White, Pink, White, White, Pink, White, White. This creates the symmetrical focal point shown in the image. -
Close the loop:
Bring the ends of the cord together. Tie a surgeon’s knot (right over left, left over right, looping through twice on the second pass). -
Secure the knot:
Place a tiny drop of super glue or jewelry adhesive directly onto the knot. Pull the knot tight and let the glue dry for a moment. -
Hide the knot:
Trim the excess cord ends close to the knot, then gently tug the bracelet so the knot slips inside the hole of an adjacent bead.
Now you have a chic, handmade accessory that celebrates the fresh slate of a new school year
Sticky-Note Pastel Stack Bracelet
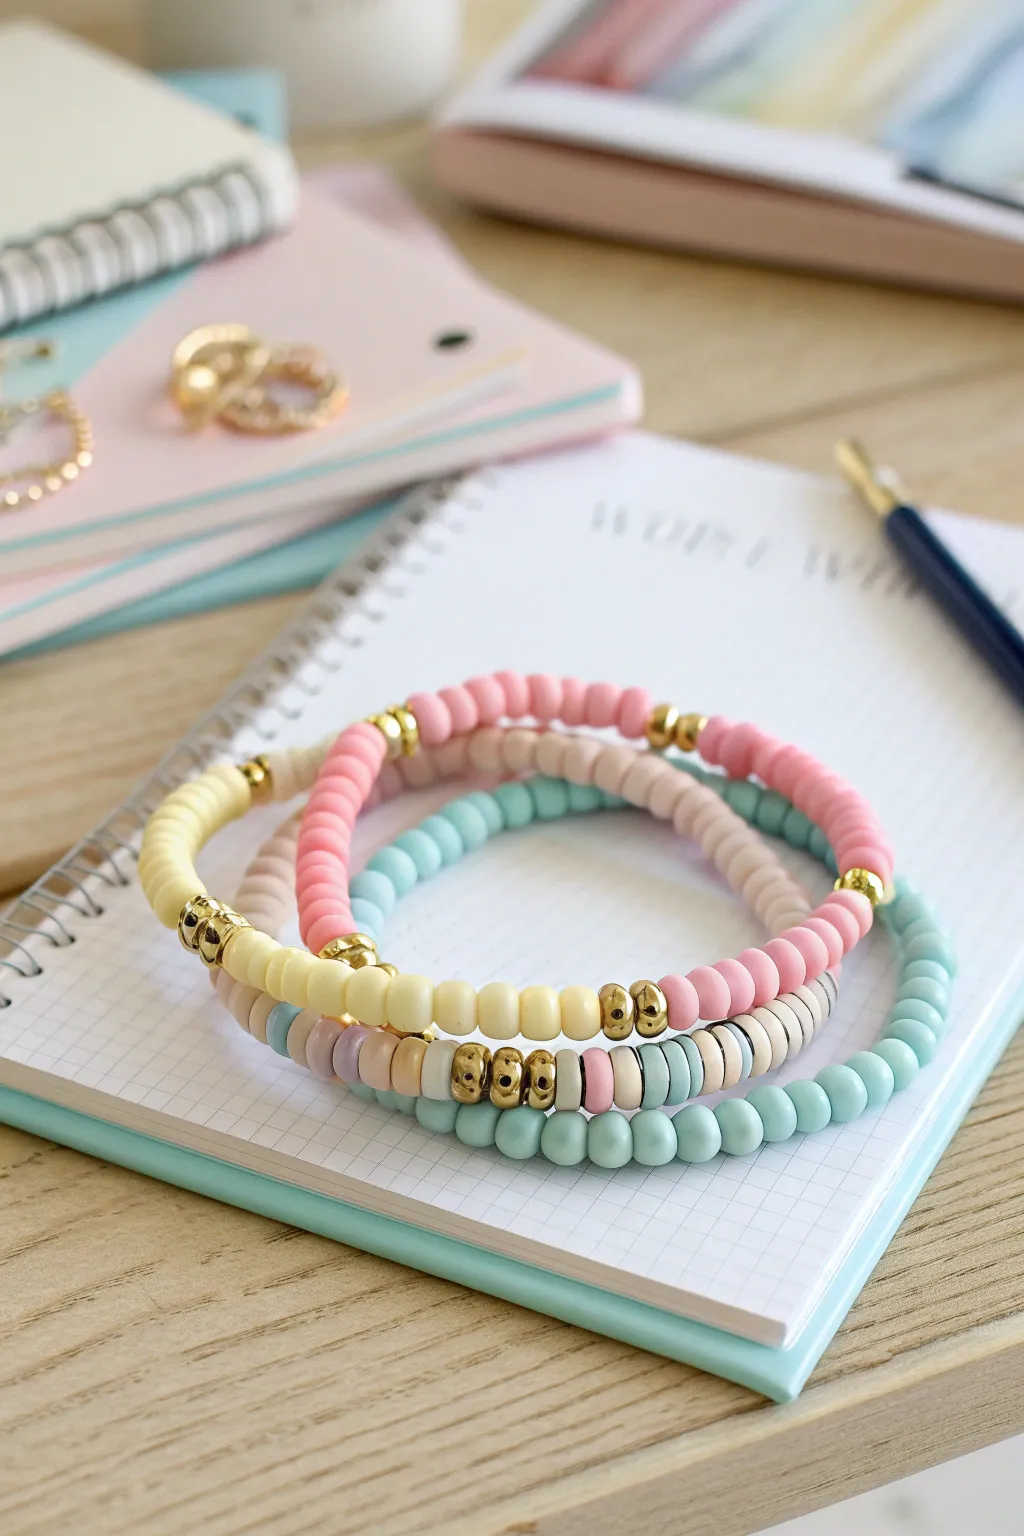
Embrace the organization vibes of a fresh planner with this coordinated stack of pastel bracelets. Mixing soft yellows, muted pinks, and seafoam greens with flashes of gold creates a polished look perfect for the first day back.
Detailed Instructions
Materials
- Polymer clay heishi beads (pastel yellow, light pink, mint/seafoam green, light beige)
- Gold spacer beads (small round balls, approx 3-4mm)
- Gold hexagon or flat disc spacer beads
- Elastic stretch cord (0.8mm or 1mm)
- Hypo-cement or jewelry glue
- Scissors
- Bead stopper or tape
Step 1: Planning Your Palette
-
Measure and cut:
Begin by wrapping the elastic cord loosely around your wrist to find your size, then add about 3-4 inches of extra length for knotting. Cut three separate strands of elastic. -
Secure the ends:
Attach a bead stopper or a piece of masking tape to one end of each elastic strand to prevent your beads from sliding off while you work. -
Sort your colors:
Separate your clay beads into piles. You will need a dominant color for each of the three bracelets: one yellow-focused, one pink-focused, and one mint-focused.
Clean Knot Tip
Use a bead adjacent to the knot that has a slightly larger hole (often the gold metal spacers work best for this) to easily pull the knot inside and hide it.
Step 2: The Pink & Cream Bracelet
-
Start the sequence:
Thread about 2 inches of solid pink clay beads onto your first elastic strand. -
Add gold accents:
Slide on three gold ball spacers in a row to create a shiny focal section. -
Switch colors:
Follow the gold beads with a long section of beige or cream clay beads, covering about half the bracelet’s length. -
Mirror the pattern:
Add another trio of gold ball spacers, then finish the rest of the strand with the initial pink color until you reach your desired length.
Level Up: Lettering
Replace the central gold section on the mint bracelet with white alphabet beads spelling words like ‘NOTES’, ‘STUDY’, or your initials for personalization.
Step 3: The Mint & Multicolor Bracelet
-
Create the base:
On the second strand, fill roughly two-thirds of the length with the mint or seafoam green beads. -
Prepare the varigated section:
For the focal point, you will create a striped pattern. -
Pattern the focal point:
Thread beads in a repeating pattern: 3 mint, 1 gold disc, 3 beige, 1 gold disc, 3 pink, 1 gold disc. I like to repeat this short sequence twice to make the section stand out. -
Close the loop:
Finish any remaining space with your mint beads so the patterned section sits opposite the knot.
Step 4: The Yellow & Pink Bracelet
-
Begin with yellow:
Load approximately 15-20 pastel yellow beads onto your final strand. -
Insert gold breaks:
Add a single gold ball spacer, then switch to pink beads for about an inch. -
Alternate sections:
Add another gold spacer, then switch back to yellow. Continue this color-blocking method around the entire bracelet. -
Check the fit:
Wrap this final strand around your wrist to ensure it sits comfortably with the other two. Add or remove a few beads if necessary.
Step 5: Finishing Touches
-
Pre-stretch the cord:
Before tying, give each bracelet a gentle tug to pre-stretch the elastic; this prevents it from loosening up later. -
Tie the knot:
Remove the bead stopper and tie a strong surgeon’s knot (right over left, left over right) on each bracelet. -
Secure with glue:
Dab a tiny drop of hypo-cement or jewelry glue specifically on the knot. Let it dry completely before touching it. -
Conceal the knot:
Once dry, trim the excess elastic tails close to the knot. If possible, gently tug the knot inside one of the nearest beads to hide it.
Stack them up on your wrist and enjoy your organized new accessory set

TRACK YOUR CERAMIC JOURNEY
Capture glaze tests, firing details, and creative progress—all in one simple printable. Make your projects easier to repeat and improve.
Ruler Stripe Bracelet

Celebrate the academic year with a minimalist, nature-inspired accessory that nods to classic classroom tools. This project combines the warmth of unfinished wood beads with crisp, hand-drawn black details reminiscent of old-school wooden rulers and measuring tapes.
How-To Guide
Materials
- Unfinished round wood beads (approx. 12mm or 14mm)
- Stretch cord (0.8mm or 1mm)
- Fine-point black permanent marker (or fine tip paint pen)
- Small piece of paper or cardstock (for testing)
- Scissor
- Super glue or jewelry cement (optional, for the knot)
- Clear matte sealer spray (optional)
Step 1: Planning and Preparation
-
Measure your wrist:
Before stringing, wrap a piece of string around your wrist to find your comfortable fit, then add about an inch to account for the bulk of the larger beads. -
Select your beads:
Lay out roughly 20-24 wooden beads. Inspect them for any rough patches or blocked holes that might snag your cord later. -
Sort the design pattern:
Decide on your pattern. Looking at the example, you’ll need three types of beads: plain wood, simple stripes, and complex ‘ruler’ or ‘dot’ patterns. -
Cut the cord:
Cut a length of stretch cord about 10-12 inches long. It’s always better to have too much cord than too little when trying to tie the final knot.
Step 2: Designing the Custom Beads
-
Practice your lines:
On a scrap piece of paper, practice drawing parallel lines and small dots with your permanent marker to get a feel for the ink flow. -
Create the heavy stripe beads:
Take 2-3 beads and draw a thick, single black band around the center. Rotate the bead slowly on a pencil or toothpick to keep the line steady and even. -
Create the ruler markings:
For the focal point beads, you’ll create vertical hash marks. Draw one long line from hole to hole, followed by a shorter line next to it, mimicking the specific look of inch or centimeter marks. -
Add numerical details:
If you have a very steady hand, add tiny numbers or groupings of dots between the lines to enhance that ‘measuring tape’ aesthetic seen in the photo. -
Create the dot pattern beads:
Select 2-3 more beads for the dot texture. Simply tap the tip of your marker against the wood in random or grid-like patterns. I find that varying the pressure slightly creates interesting size differences in the dots. -
Create double-band beads:
For variety, select a few beads to receive two thin parallel lines rather than one thick one. These act as great spacers. -
Let the ink set:
Allow all your decorated beads to dry completely for at least 10 minutes to prevent smudging during assembly. The ink creates a lovely stain effect on the raw wood. -
Optional sealing:
If you want the design to last longer against water or wear, give the decorated beads a light coat of clear matte sealer spray and let dry.
Steady Hands
Put the bead on a toothpick or skewer while drawing. This lets you rotate the bead smoothly without touching wet ink.
Step 3: Assembly and Finishing
-
Start stringing:
Begin threading your beads onto the stretch cord. Start with a few plain beads to hide the knot later. -
Arrange the focal section:
Thread your detailed ‘ruler’ and ‘dot’ beads in the center of the strand. Grouping the busiest patterns together creates a nice focal point. -
Balance the sides:
Flank the center section with your striped beads and fill in the rest of the length with the remaining plain wood beads. -
Pre-stretch the cord:
Before tying, give the ends of the cord a firm pull. This pre-stretching prevents the bracelet from becoming loose after you wear it for the first time. -
Tie the knot:
Tie a secure surgeon’s knot (right over left, left over right) and pull tight. -
Secure with glue:
Add a tiny dab of jewelry cement or super glue to the knot for extra security. Let it dry for a moment before trimming. -
Hide the knot:
Trim the excess cord tails and gently tug the bracelet to slide the knot inside the hole of the nearest bead.
Pencil It In
Use a yellow tint or watered-down acrylic paint on the ‘ruler’ beads before drawing lines for a true #2 pencil vibe.
Slip on your handcrafted bracelet and enjoy having a stylish reminder of creativity on your wrist all day long
Cafeteria Milk Carton Colors Bracelet
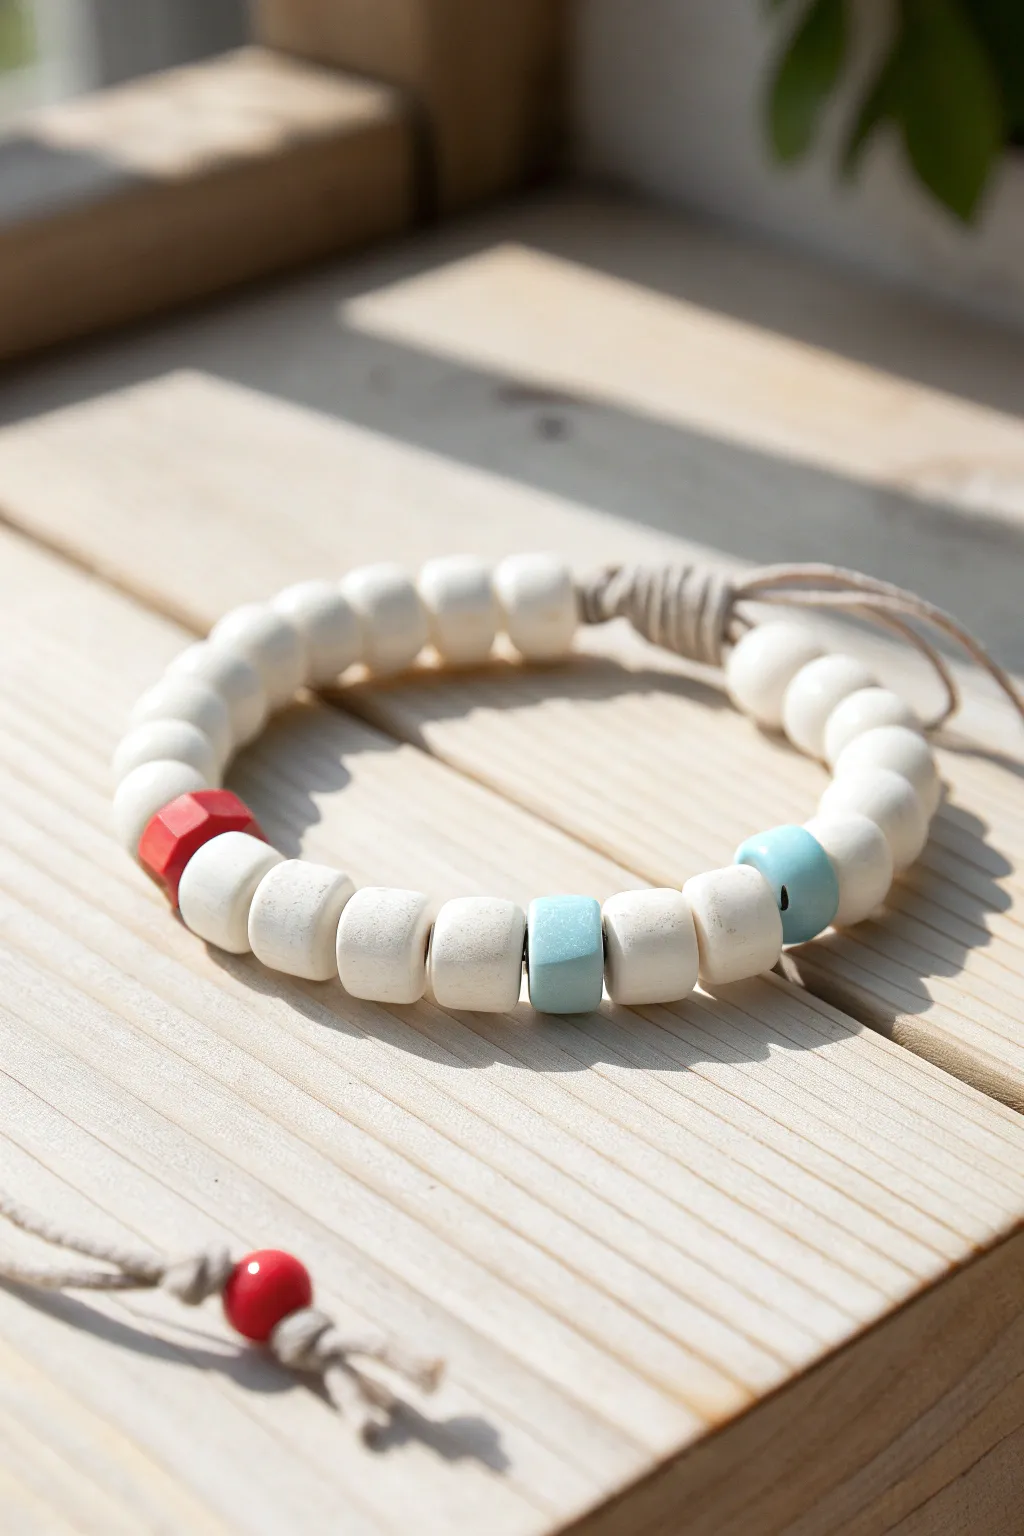
Channel the classic lunchroom aesthetic with this minimalist beaded bracelet featuring creamy whites and pops of primary colors. The chunky clay beads give it a satisfying, tactile feel that mimics the clean, simple design of a retro milk carton.
Step-by-Step Guide
Materials
- White polymer clay (approx. 2oz)
- Red polymer clay (small amount)
- Light blue polymer clay (small amount)
- Beige waxed cotton cord or hemp twine (1.5mm)
- Clay blade or craft knife
- Rolling pin or acrylic roller
- Toothpick or bead piercing pin
- Baking sheet with parchment paper
- Oven (for baking clay)
- Sandpaper (optional, fine grit)
Step 1: Forming the Beads
-
Condition the white clay:
Start by kneading the white polymer clay in your hands until it is soft and pliable. This warmth prevents cracking later. -
Roll a log:
Roll the conditioned white clay into a smooth, even log on your work surface. Aim for a thickness of about 1/2 inch (1.2 cm) diameter for that chunky look. -
Slice the discs:
Using your clay blade, slice the log into even segments. For this bracelet, you want them to be quite thick, almost like little marshmallows, about 1/4 to 1/3 inch wide. -
Create the blue accents:
Repeat the rolling process with a small amount of light blue clay. Create a log of the same diameter as the white one and slice off two beads of equal width. -
Shape the red accent:
Take a small piece of red clay and form it into a slightly more angular shape. Instead of a smooth cylinder, gently tap the sides to give it a hexagonal or faceted appearance, adding a unique texture to the focal point. -
Refine the edges:
Pick up each bead and gently smooth the cut edges with your fingertip to remove any harsh lines or fingerprints. -
Pierce the holes:
Using a toothpick or bead pin, carefully pierce a hole through the center of each bead. I find twisting the tool as you push through helps keep the bead round. -
Check hole size:
Ensure the hole is wide enough to accommodate your specific cord. If using thicker hemp, wiggle the toothpick a bit to widen the channel.
Step 2: Baking and Assembly
-
Bake the clay:
Arrange your beads on a parchment-lined baking sheet. Bake according to the manufacturer’s instructions for your specific brand of clay (usually 275°F/135°C for 15-30 minutes). -
Cool down:
Let the beads cool completely before handling. They are fragile when hot! -
Prepare the cord:
Cut a length of cord about 12 inches long. This gives you plenty of room for knotting. -
Start the pattern:
Begin stringing your beads. Thread on about 6-8 white beads to start one side of the bracelet. -
Add the red accent:
Slide on the faceted red bead next. -
Add the middle section:
Thread on two white beads, followed by one blue bead. Then add two more white beads, the second blue bead, and two more white beads. This creates the central pattern. -
Finish the main string:
Finish stringing with another 6-8 white beads until the bracelet fits comfortably around your wrist. -
Creating the closure:
Gather both ends of the cord together. Tie a simple overhand knot with both strands close to the last bead to secure them. -
Adjustable slide knot:
To make it adjustable like the photo, overlap the tail ends and tie a sliding knot (like a square knot or macrame knot) around the main strands using a separate short piece of cord. -
The final detail:
Tie a small knot at the very end of each cord tail to prevent fraying. For an extra touch, you can add a tiny red bead to one of the pull cords.
Unwanted Fingerprints?
If you see fingerprints on your raw clay beads, lightly brush them with a little baby oil or cornstarch before baking to smooth them out completely.
A Simpler Closure
Struggling with sliding knots? Just tie a loop on one end and a large knot on the other. Pass the knot through the loop for an easy, secure toggle clasp.
Enjoy wearing your new accessory that brings a cool, crisp pop of color to any outfit
Art Class Primary Palette Bracelet
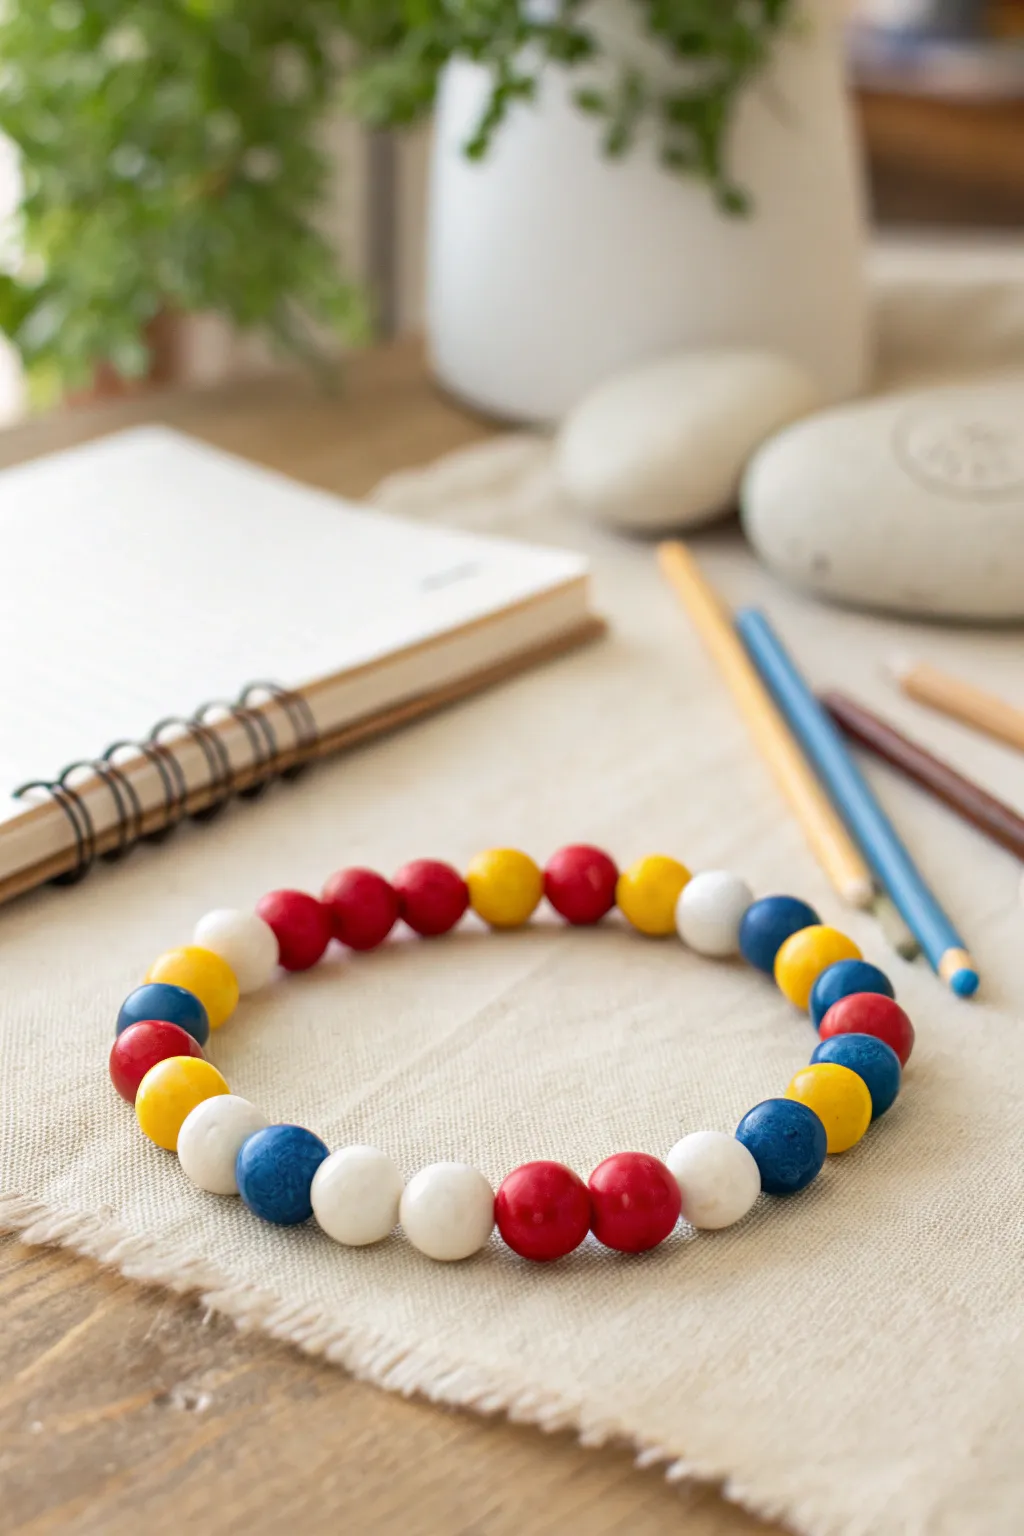
Celebrate the essential building blocks of color theory with this vibrant back-to-school accessory. Featuring bold red, blue, and yellow beads mixed with crisp white spacers, this chunky clay bead bracelet is a cheerful nod to art class creativity.
Detailed Instructions
Materials
- Polymer clay in Red, Royal Blue, Sunny Yellow, and White
- Elastic cord (0.8mm or 1mm thickness)
- Clay roller or pasta machine
- Small round bead cutter or straw (approx. 10mm diameter)
- Bead piercing pin or toothpick
- Baking sheet with parchment paper
- Super glue or jewelry cement
- Oven (for baking clay)
Step 1: Prepping the Clay
-
Condition the clay:
Start by warming up your polymer clay. Take a chunk of the red clay and knead it in your hands until it becomes soft and pliable. Repeat this process separately for the blue, yellow, and white clays to ensure they don’t crumble later. -
Clean hands between colors:
Since we are working with white and dark colors like blue, wash your hands or use a baby wipe between conditioning different colors. I always do white first to keep it pristine. -
Measure portions:
Pinch off roughly equal amounts of each color. Aim for enough clay to make about 6-8 beads of each color, although you might not use them all.
Step 2: Forming the Beads
-
Roll spheres:
Take a small pinch of conditioned clay and roll it between your palms to create a smooth ball. Aim for a diameter to match the photo, around 10mm to 12mm. -
Check for uniformity:
Place your rolled spheres next to each other. Adjust the size by adding or removing bits of clay until they all look roughly identical in size. -
Create the piercing hole:
Hold a clay sphere gently between your thumb and forefinger. Using your piercing tool or toothpick, carefully push through the center of the sphere. Rotate the bead slightly as you push to prevent flattening. -
Smooth the edges:
Sometimes the exit hole can be a bit rough. Use your finger to gently tap down any clay that poked out the other side, ensuring a smooth, round finish. -
Repeat for all colors:
Continue rolling and piercing until you have a full set of red, blue, yellow, and white beads. -
Bake the beads:
Arrange your beads on a baking sheet lined with parchment paper. Bake them according to the manufacturer’s instructions on your clay package (usually between 230°F and 275°F for 15-30 minutes). -
Cool down:
Let the beads cool completely before handling. They will be slightly soft when hot but will harden as they return to room temperature.
Fixing Smudges
If your white beads picked up lint or blue dye during rolling, dip a Q-tip in rubbing alcohol and gently wipe the raw bead before baking to clean it up.
Step 3: Assembly
-
Cut the cord:
Cut a piece of elastic cord about 10-12 inches long. This gives you plenty of extra room for tying the knot later. -
Pre-stretch the elastic:
Give the elastic cord a few firm tugs. This pre-stretching prevents the bracelet from loosening up permanently the first time you wear it. -
Plan your pattern:
Lay out your cooled beads on a table to mimic the random but balanced pattern seen in the image. Notice how colors group together occasionally—like two blues or two reds—rather than a perfect A-B-C-D pattern. -
Start stringing:
Begin threading the beads onto the elastic. I like to start with a white bead as it’s easier to hide the knot inside lighter colors sometimes. -
Check fit:
Wrap the strung beads around your wrist to check the size. Add or remove beads as needed until it fits comfortably without being too tight. -
Tie the knot:
Tie a secure surgeon’s knot (right over left, left over right) and pull tight. The elastic should stretch slightly as you tighten the knot. -
Secure with glue:
Add a tiny drop of super glue or jewelry cement directly onto the knot. Let it dry for a minute. -
Hide the knot:
Once dry, trim the excess elastic tail close to the knot. Gently pull the elastic so the knot slips inside the hole of the nearest bead, hiding it from view.
Gloss It Up
For that shiny ‘wet clay’ look seen in art studios, coat your finished baked beads with a thin layer of gloss polymer clay glaze.
Enjoy wearing your colorful new bracelet that brings a splash of artistic inspiration to your day