
Whenever I’m craving something calm and earthy at my bead table, I reach for green clay beads first. Here are my favorite green clay bead ideas—from classic, easy-to-copy patterns to a few creative twists that still feel totally wearable.
Sage and Cream Color Blocking

Embrace earthy elegance with this sage green and cream beaded bracelet, perfect for adding a touch of nature-inspired calm to your wrist. The combination of matte clay discs, smooth cream rounds, and textured gold accents creates a sophisticated pattern that looks high-end yet is simple to string together.
Detailed Instructions
Materials
- Sage green polymer clay heishi beads (approx. 6mm)
- Cream/off-white round beads (approx. 8mm, matte finish)
- Gold ridged spacer beads (approx. 6mm)
- Strong elastic cord (0.8mm or 1mm)
- Jewelry glue or clear nail polish
- Scissors
Step 1: Preparation
-
Measure your wrist:
Wrap a piece of string around your wrist to find your comfortable size, then add about half an inch for a comfortable fit that isn’t too tight. -
Cut the cord:
Cut a length of elastic cord about 10-12 inches long. This extra length makes tying the knot at the end much easier than working with a short tail. -
Pre-stretch the elastic:
Give your elastic cord a few gentle tugs. This pre-stretching helps prevent the bracelet from loosening up and sagging after you’ve worn it a few times. -
Secure the end:
Place a bead stopper or a piece of tape on one end of the cord to stop your beads from sliding off while you design your pattern.
Stringing Pro-Tip
Use a flexible beading needle with a collapsible eye. It makes threading the flat clay heishi beads significantly faster than trying to poke the cord through by hand.
Step 2: Stringing the Pattern
-
Start with the sage base:
Begin by threading on a substantial section of the sage green heishi beads. Aim for a section about 1.5 to 2 inches long to create the solid color block shown in the back of the design. -
Add a gold accent:
Slide on one gold ridged spacer bead. The texture on these adds a nice metallic pop against the matte clay. -
Place a cream bead:
Thread on one cream round bead. Make sure this bead is slightly larger than the clay discs to create dimension. -
Close the first accent:
Add another gold ridged spacer bead to frame the cream bead symmetrically. -
Create a green spacer section:
Thread on a small section of sage green heishi beads. About 5-8 beads is perfect here to separate the cream accents without overwhelming them. -
Repeat the accent cluster:
Repeat the pattern: one gold spacer, one cream round bead, and one gold spacer. -
Build the focal section:
Create a slightly longer green section (maybe 10-12 beads) and then repeat the gold-cream-gold cluster pattern two more times, separating them with short green sections. -
Check the length:
Wrap the beaded cord around your wrist to check the fit. If you need more length, add more sage green heishi beads to the end until it meets comfortably.
Level Up: Texture Play
Swap the plain cream bead for a freshwater pearl or a wooden bead. The organic irregularity of a pearl adds a luxe feel, while wood enhances the boho vibe.
Step 3: Finishing Touches
-
Tie the knot:
Remove the stopper and bring both ends together. Tie a standard surgeon’s knot: cross right over left and loop under, then left over right and loop under twice. -
Tighten securely:
Pull all four strands (the two tails and the two loop sides) gently but firmly to tighten the knot without snapping the elastic. -
Secure with glue:
Apply a tiny dab of jewelry glue or clear nail polish directly onto the knot. I find using a toothpick helps place the glue precisely without making a mess. -
Hide the knot:
While the glue is still tacky, gently slide a nearby bead (preferably one with a larger hole, like the cream round or gold spacer) over the knot to conceal it. -
Trim the ends:
Once the glue is fully dry, trim the excess elastic tails close to the bead, being careful not to cut the main cord.
Now you have a serene, nature-inspired accessory ready to stack or wear solo


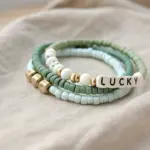
Green Ombre Gradient Stack
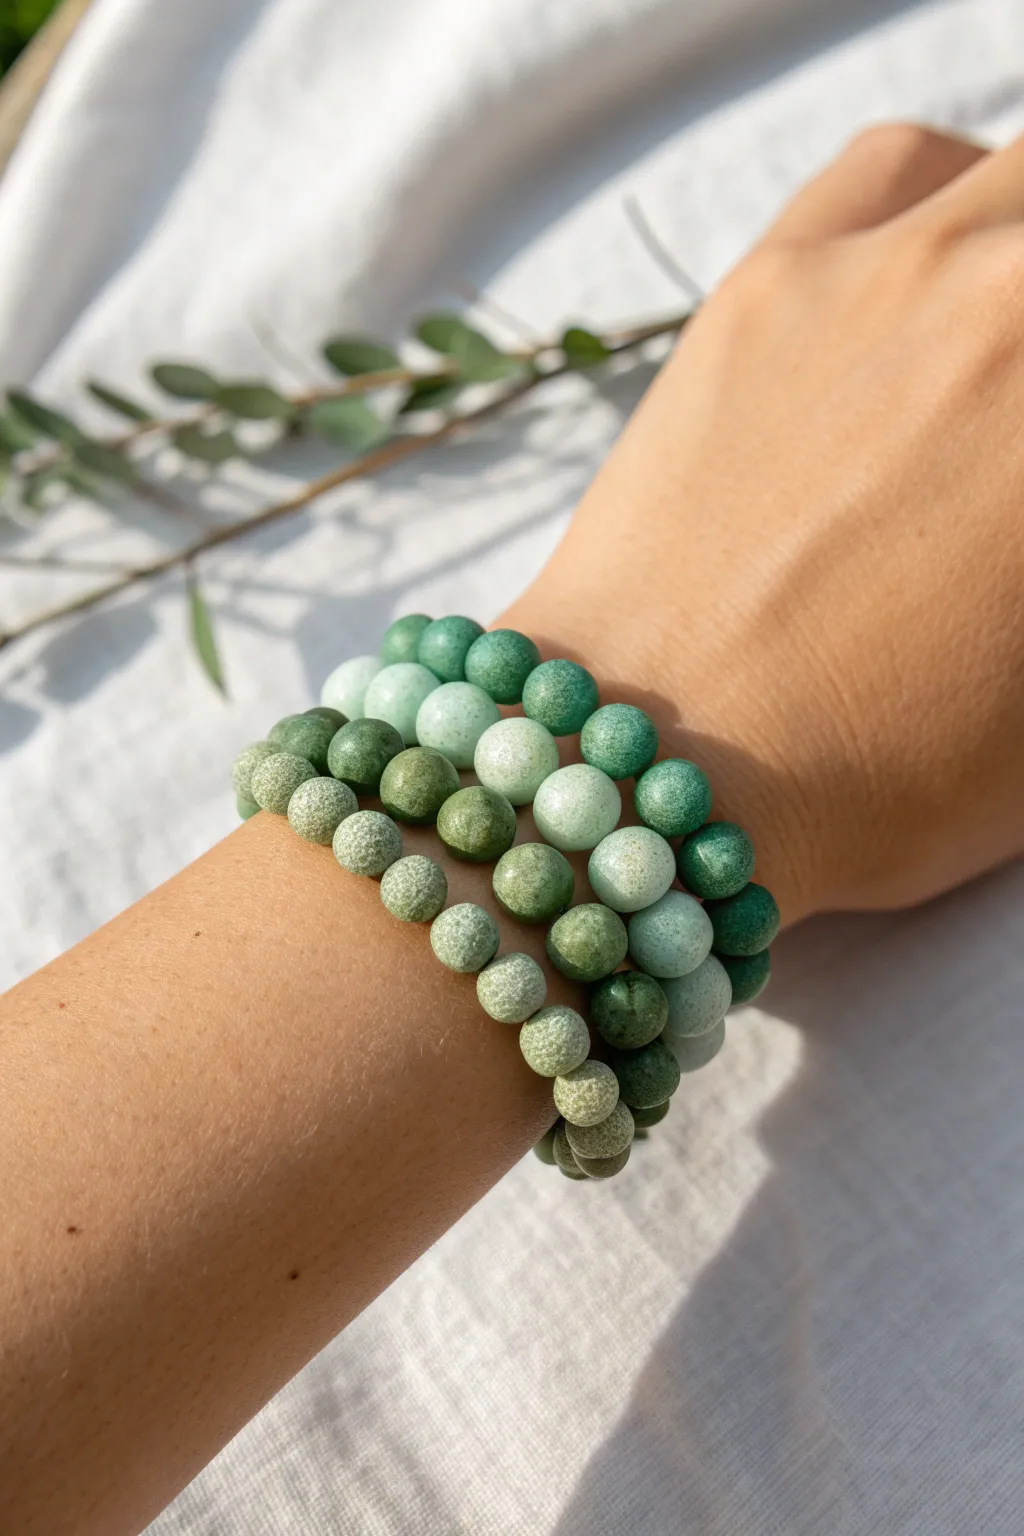
Capture the serene hues of nature with this stunning stack of beaded bracelets, featuring a soothing gradient of greens from pale mint to deep forest. This project creates a cohesive look by layering three separate strands of matte stone beads, each with slight variations in shade and texture.
Step-by-Step Guide
Materials
- 8mm matte green stone beads (variety of shades: mint, sage, emerald, forest green)
- Strong elastic cord (0.7mm or 0.8mm)
- Bead stopper or masking tape
- Scissors
- Hypo cement or clear jewelry glue
- Beading needle (optional, but helpful for elastic)
- Ruler or measuring tape
Step 1: Planning Your Ombre Design
-
Sort your beads:
Begin by laying out all your green stone beads on a bead board or soft cloth. Group them by color intensity: lightest pales, medium sage tones, and darkest forest greens. -
Separate into three piles:
Since this stack has three bracelets, create three distinct piles. One pile should focus on the lighter minty tones, the second on medium grassy shades, and the third on the darker, deeper greens. -
Create the gradient mix:
For a true ombre effect, don’t make each bracelet a solid block of color. Instead, mix a few medium beads into the light pile, and a few dark beads into the medium pile to create visual continuity between the strands. -
Measure your wrist:
Use a measuring tape to find your wrist circumference. Add about 0.5 to 1 inch to this measurement depending on how loose you like your fit. This will determine the length of your elastic.
Knot Hiding Trick
If a bead hole is too small to hide the knot, try reaming it slightly with a bead reamer tool, or simply enlarge the hole of just one bead using a small drill bit.
Step 2: Stringing the Bracelets
-
Cut the elastic:
Cut three pieces of elastic cord, each about 10-12 inches long. Having extra length makes tying the finishing knots much easier. -
Pre-stretch the cord:
Hold each piece of elastic firmly and give it a few gentle pulls. This pre-stretching step prevents the bracelet from sagging or stretching out permanently after you wear it. -
Secure the end:
Place a bead stopper or a piece of masking tape on one end of your first elastic cord to prevent beads from sliding off while you work. -
String the first strand:
Start with your lightest color mix. Thread the beads onto the elastic one by one. I find it helpful to vary the texture slightly if your bead mix includes both smooth and frosted finishes. -
Check the fit:
Wrap the strung beads around your wrist to check the size. Add or remove beads until the ends meet comfortably without gaps or tight squeezing.
Elastic Issues
If your elastic keeps shredding or breaking while tying, switch to a slightly thinner cord (0.5mm) or double up a very thin cord for better durability.
Step 3: Finishing and Stacking
-
Tie the knot:
Remove the bead stopper and bring the two ends of the elastic together. Tie a standard surgeon’s knot: cross right over left once, then left over right loops through twice. -
Tighten securely:
Pull all four strands (the two tail ends and the two bracelet sides) firmly to tighten the knot. You should feel the elastic stretch slightly as the knot secures itself. -
Apply adhesive:
Place a tiny dot of Hypo cement or clear super glue directly onto the knot. This ensures it won’t slip undone over time. -
Hide the knot:
Before the glue dries completely, gently pull the elastic so the knot slides inside the hole of an adjacent bead. This hides the mechanics for a professional finish. -
Trim excess cord:
Once the glue is dry, use sharp scissors to trim the excess elastic tails as close to the bead hole as possible without cutting the knot. -
Repeat for remaining strands:
Follow the same stringing and knotting process for your medium and dark green bead piles. -
Stack and wear:
Roll the finished bracelets onto your wrist one by one. Rolling prevents stretching, keeping your beautiful green gradient stack snappy and secure.
Enjoy the calming natural vibe your new bracelet stack adds to your daily outfits


Monochrome Greens, Different Shades
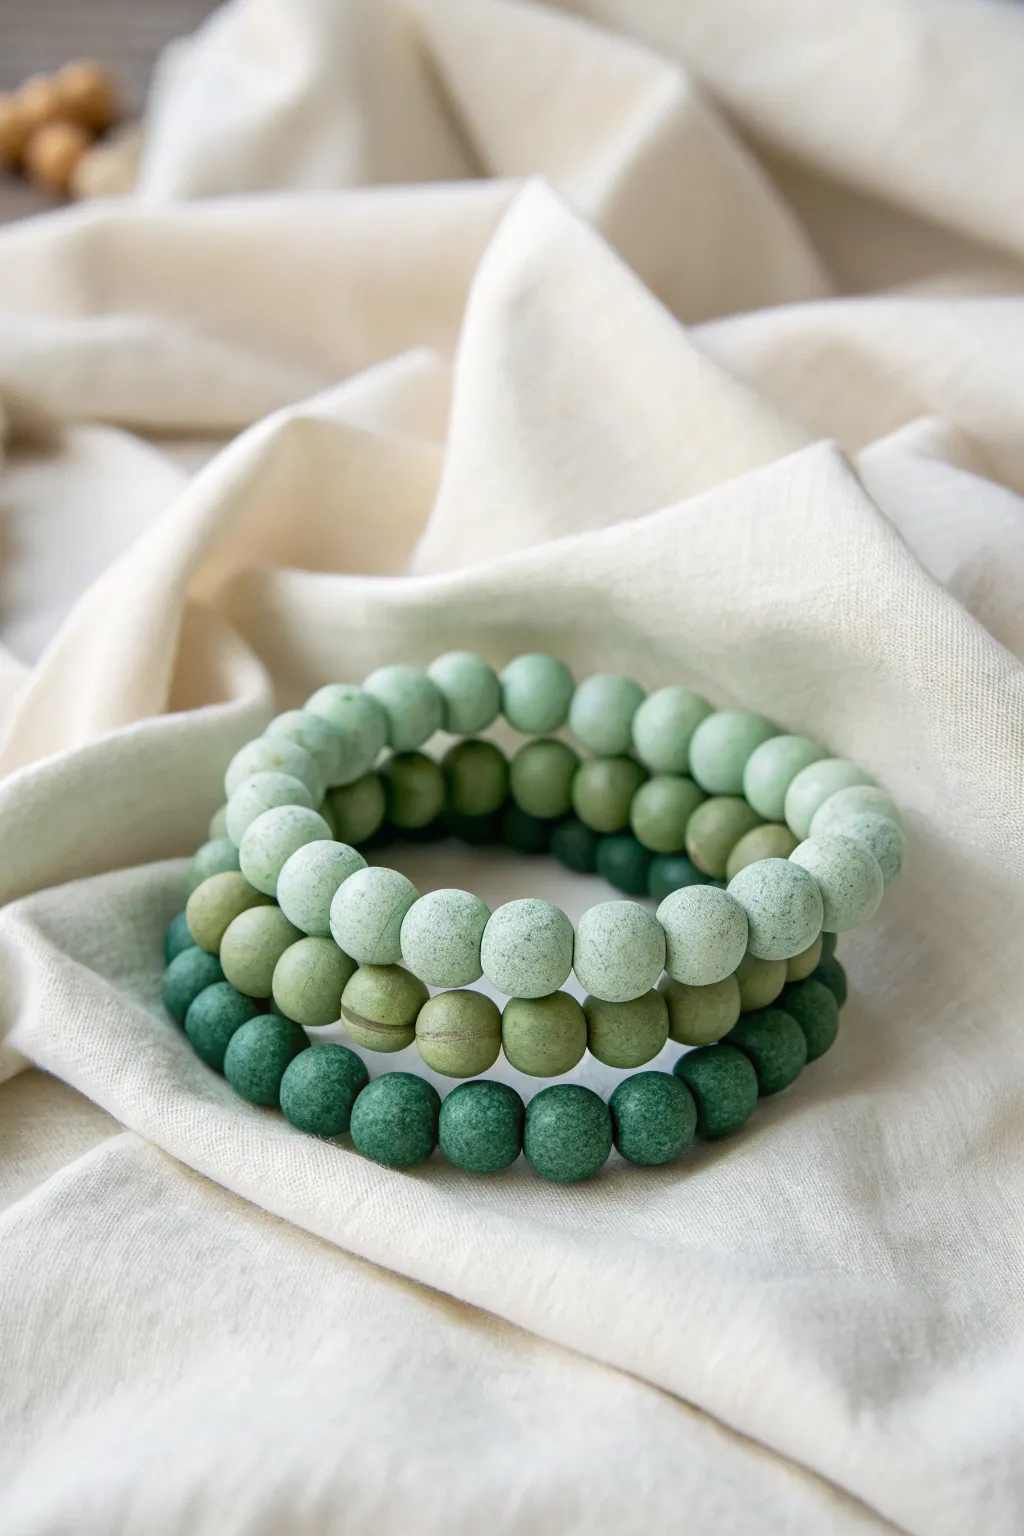
Capture the essence of nature with this set of four monochromatic green bracelets, showcasing a soothing gradient from airy mint to deep forest tones. The matte, textured finish of polymer clay beads gives this stack an organic, earthy feel perfect for everyday wear.
How-To Guide
Materials
- Polymer clay in four shades: white, mint green, olive green, and dark forest green
- Bead rolling tool or clear acrylic sheet
- Toothpicks or a bead piercing pin
- Elastic stretch cord (0.8mm or 1mm)
- Super glue or jewelry cement
- Baking sheet
- Parchment paper
- Fine-grit sandpaper (400-600 grit)
- Ruler
- Scissors
Step 1: Color Mixing and Prep
-
Establish the palette:
Begin by conditioning your polymer clay blocks until they are soft and pliable. You will need four distinct shades of green to create the gradient effect seen in the photo. -
Mix the lightest shade:
For the top bracelet (light mint), mix a large amount of white clay with a tiny pea-sized amount of mint green. Knead thoroughly until the color is uniform and pale. -
Create the mid-tones:
For the second bracelet, mix equal parts white and mint green to get a soft pastel sage. For the third bracelet, use the olive green straight from the package, or mute it slightly with a pinch of beige if it feels too vibrant. -
Prepare the darkest shade:
The bottom bracelet uses the deep forest green. If your green isn’t dark enough, I like to knead in a tiny speck of black to deepen the richness without changing the hue.
Step 2: Forming the Beads
-
Portion the clay:
Roll each color into a long, even log or snake shape. Use a ruler to cut the logs into equal segments to ensure all your beads end up the same size. -
Roll spheres:
Take each segment and roll it between your palms to create a rough ball. For a perfectly spherical finish, place the ball on your work surface and move a clear acrylic block or bead roller over it in a circular motion. -
Add texture:
To achieve the stone-like, matte look from the photo, gently roll the finished spheres over a piece of coarse sandpaper or dab them lightly with a stiff toothbrush before baking. -
Pierce the holes:
While the clay is still raw, gently twist a bead piercing pin or toothpick through the center of each sphere. Rotate the bead as you pierce to prevent flattening the shape.
Fixing Flat Beads
If your beads flatten while piercing, refrigerate the raw clay spheres for 10 minutes before making the holes to firm them up.
Step 3: Baking and Finishing
-
Bake the beads:
Arrangement the beads on a parchment-lined baking sheet. Bake according to the manufacturer’s instructions for your specific brand of clay—usually around 275°F (135°C) for 15-30 minutes. -
Cool down:
Allow the beads to cool completely in the oven with the door slightly ajar. This helps temper the clay and prevents cracking. -
Sand for matte finish:
Once cool, inspect the beads. If there are fingerprints or sharp edges near the holes, gently buff them with fine-grit sandpaper under running water. -
Measure the cord:
Wrap the elastic cord around your wrist to find the comfortable length, then add about 3 inches of excess for tying knots. Cut four pieces of this length.
Make It Terrazzo
Before rolling your final spheres, add tiny chopped bits of the darker green clay into the lighter mint clay for a speckled stone effect.
Step 4: Assembly
-
Pre-stretch the elastic:
Give your elastic cord a few firm tugs before stringing. This prevents the bracelet from stretching out permanently the first time you wear it. -
String the beads:
Thread the beads onto the cord, keeping the colors separated by bracelet. String enough beads so the bracelet fits snugly but comfortably around your wrist without gaps. -
Tie the knot:
Secure the ends with a surgeon’s knot (loop the end through twice before pulling tight). Pull the cord taut to secure the beads tightly together. -
Secure with glue:
Place a tiny drop of super glue or jewelry cement directly on the knot. Let it dry for a few seconds. -
Hide the knot:
Trim the excess cord ends close to the knot, then gently pull the cord so the knot slides inside the hole of the adjacent bead.
Enjoy styling your new handmade accessory stack with your favorite casual outfits


Forest Green With Gold Spacers
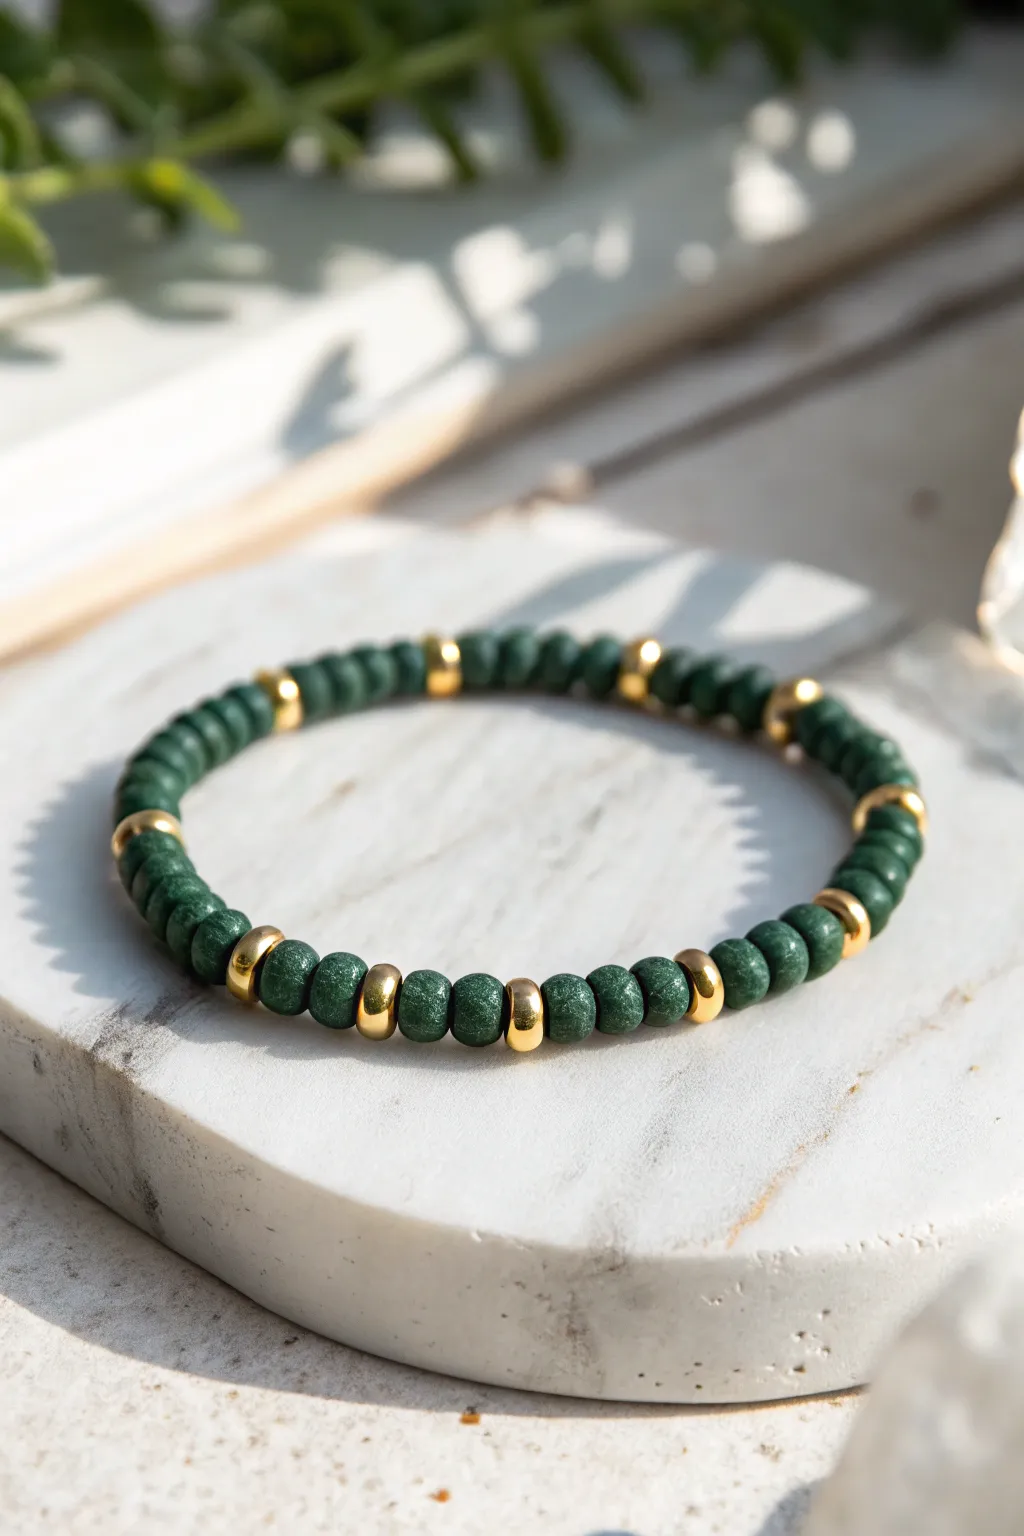
This sophisticated bracelet combines the earthy texture of deep forest green clay beads with the luxury of polished gold spacers. The rythmic pattern creates a timeless accessory perfect for stacking or wearing as a standalone statement piece.
Step-by-Step Tutorial
Materials
- Forest green Heishi polymer clay beads (6mm or similar)
- Small gold spacer beads (round or disc-shaped, 3-4mm)
- Elastic stretch beading cord (0.7mm or 0.8mm)
- Super glue or jewelry adhesive
- Scissors
- Bead stopper or binder clip
- Measuring tape
Step 1: Preparation
-
Measure your wrist:
Wrap a measuring tape comfortably around your wrist where you want the bracelet to sit. -
Calculate cord length:
Take your wrist measurement and add about 3-4 inches to account for tying the knot later. Cut your elastic cord to this total length. -
Pre-stretch the cord:
Gently pull tightly on the elastic cord several times. This pre-stretching prevents the bracelet from drooping or loosening immediately after you finish making it. -
Secure the end:
Attach a bead stopper or a simple binder clip to one end of the cord so your beads don’t slide off while you are working.
Knot Security Tip
When pulling the knot tight, stretch the bracelet cord slightly away from the knot simultaneously. This helps lock the elastic fibers together.
Step 2: Stringing the Pattern
-
Start the sequence:
Begin by threading three forest green clay beads onto the elastic cord. -
Add a spacer:
Slide one gold spacer bead onto the cord immediately after the three green beads. -
Establish the rhythm:
Continue this specific pattern: three green clay beads followed by one gold spacer. This 3:1 ratio gives the bracelet its balanced look. -
Check the fit:
Periodically wrap the beaded cord around your wrist to check the length. You want it to fit snugly but not dig into your skin. -
Adjust as needed:
If the pattern doesn’t end perfectly based on your wrist size, you can subtly adjust the final section to have two or four green beads, which is usually unnoticeable. -
Final bead placement:
Ensure your last bead strung is a green bead if your first bead was also green, or try to end with a gold spacer if your knot will be hidden inside a larger bead hole.
Level Up: Texture Mix
Swap the smooth gold spacers for hammered gold discs or faceted hex nuts for an industrial-chic twist on this classic design.
Step 3: Finishing Touches
-
Prepare to knot:
Remove the bead stopper carefully while holding both ends of the elastic cord securely. -
Tie the first knot:
Make a simple overhand knot and pull the ends gently to bring the beads together into a circle without bunching them too tightly. -
Secure with a surgeon’s knot:
Tie a surgeon’s knot (looping the end through twice instead of once) for extra security and pull it tight. -
Apply adhesive:
Place a tiny drop of super glue or jewelry cement directly onto the knot. I like using the tip of a toothpick for precision here so glue doesn’t get on the beads. -
Let it cure:
Allow the glue to dry completely according to the package instructions before trimming anything. -
Trim the excess:
Use sharp scissors to cut the excess cord tails close to the knot. -
Hide the knot:
Gently pull the elastic circle so the knot slides inside the hole of the nearest green bead, concealing it from view.
Enjoy the refined look of your new handmade bracelet on your next outing

The Complete Guide to Pottery Troubleshooting
Uncover the most common ceramic mistakes—from cracking clay to failed glazes—and learn how to fix them fast.
Mint, White, and Minimal Metallic
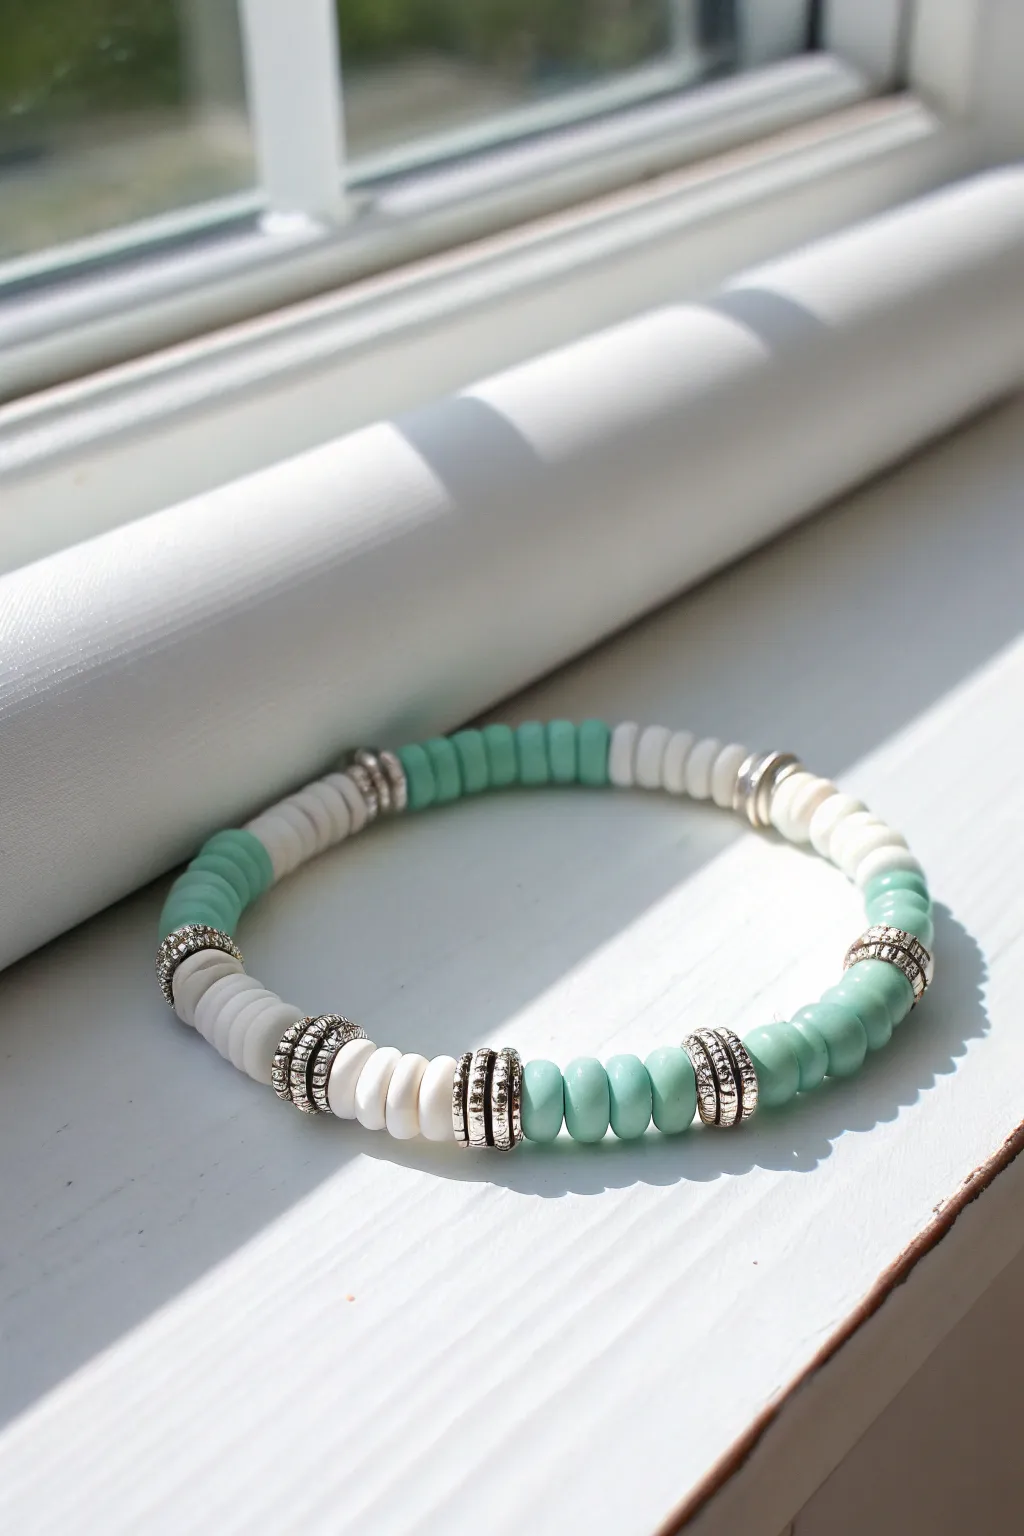
Embrace a fresh, summery vibe with this elegant bracelet that pairs soft mint green heishi beads with crisp white accents. Interspersed with textured silver spacers, it’s a perfect blend of casual beachy style and understated glamour.
How-To Guide
Materials
- 6mm mint green polymer clay heishi beads (disc beads)
- 6mm white polymer clay heishi beads (disc beads)
- Silver-plated textured spacer beads (wheels or rondelles), approx. 6-7mm
- 0.8mm clear elastic stretch cord
- Jewelry adhesive or super glue
- Scissors
- Bead stopper or tape
- Ruler or measuring tape
Step 1: Preparation & Planning
-
Measure your cord:
Cut a piece of elastic cord about 10-12 inches long. Having extra length makes tying the final knot much easier than struggling with short ends. -
Secure the end:
Attach a bead stopper to one end of the cord, or simply tape it down to your work surface so your beads don’t slide off while you work. -
Check your pattern:
The specific pattern shown uses blocks of color separated by metallic spacers. You will need seven silver spacers total for this design.
Step 2: Stringing the Beads
-
Start with mint:
Begin by stringing approximately 8 to 10 mint green heishi beads onto the elastic cord. -
Add first silver accent:
Slide on one silver textured spacer bead. These spacers add a lovely break in the matte texture of the clay. -
Create a white section:
String on a shorter segment of white beads. For this look, use about 5 to 6 white discs. -
Insert second spacer:
Follow the white section immediately with another silver spacer bead. -
The shorter mint section:
Add a small cluster of mint beads this time, aiming for about 5 beads to create variation in segment lengths. -
Third metallic touch:
Place your third silver spacer bead onto the cord. -
Major white section:
Thread on a longer section of white beads now, using roughly 8 to 10 discs to balance the design visually. -
Fourth silver spacer:
Add the next silver spacer after the long white section. -
Alternating pattern:
Continue this pattern around the wrist: a block of clay beads followed by a silver spacer. I usually alternate the lengths of the color blocks slightly to keep it organic. -
Check the fit:
Wrap the unfinished strand around your wrist. The ends should touch comfortably without stretching the cord yet. Add or remove clay beads from the final section to adjust the size.
Keep it Clean
White clay beads can pick up dirt from surfaces easily. Work on a clean bead mat or a white placemat to keep those snowy sections pristine while stringing.
Step 3: Finishing the Bracelet
-
Pre-stretch the cord:
Before tying, give the ends of the elastic a few gentle tugs. This pre-stretching prevents the bracelet from loosening up after the first time you wear it. -
Tie the knot:
Remove the bead stopper and tie a surgeon’s knot (right over left, left over right twice) to secure the circle. -
Secure with glue:
Apply a tiny drop of jewelry adhesive or super glue directly onto the knot. Be careful not to get glue on the surrounding clay beads. -
Hide the knot:
While the glue is still slightly tacky but not wet, slide one of the silver spacer beads (if the hole is large enough) or a clay bead over the knot to conceal it. -
Trim excess:
Once dry, use your scissors to snip off the excess elastic tails as close to the knot as possible without cutting the structural knot itself.
Knot Slipping?
If your elastic knot feels insecure, try using a GSM (gs hypo cement) style glue which has a precision tip, allowing you to get adhesive deep inside the knot fibers.
Slip on your new bracelet for an instant pop of color suitable for any season
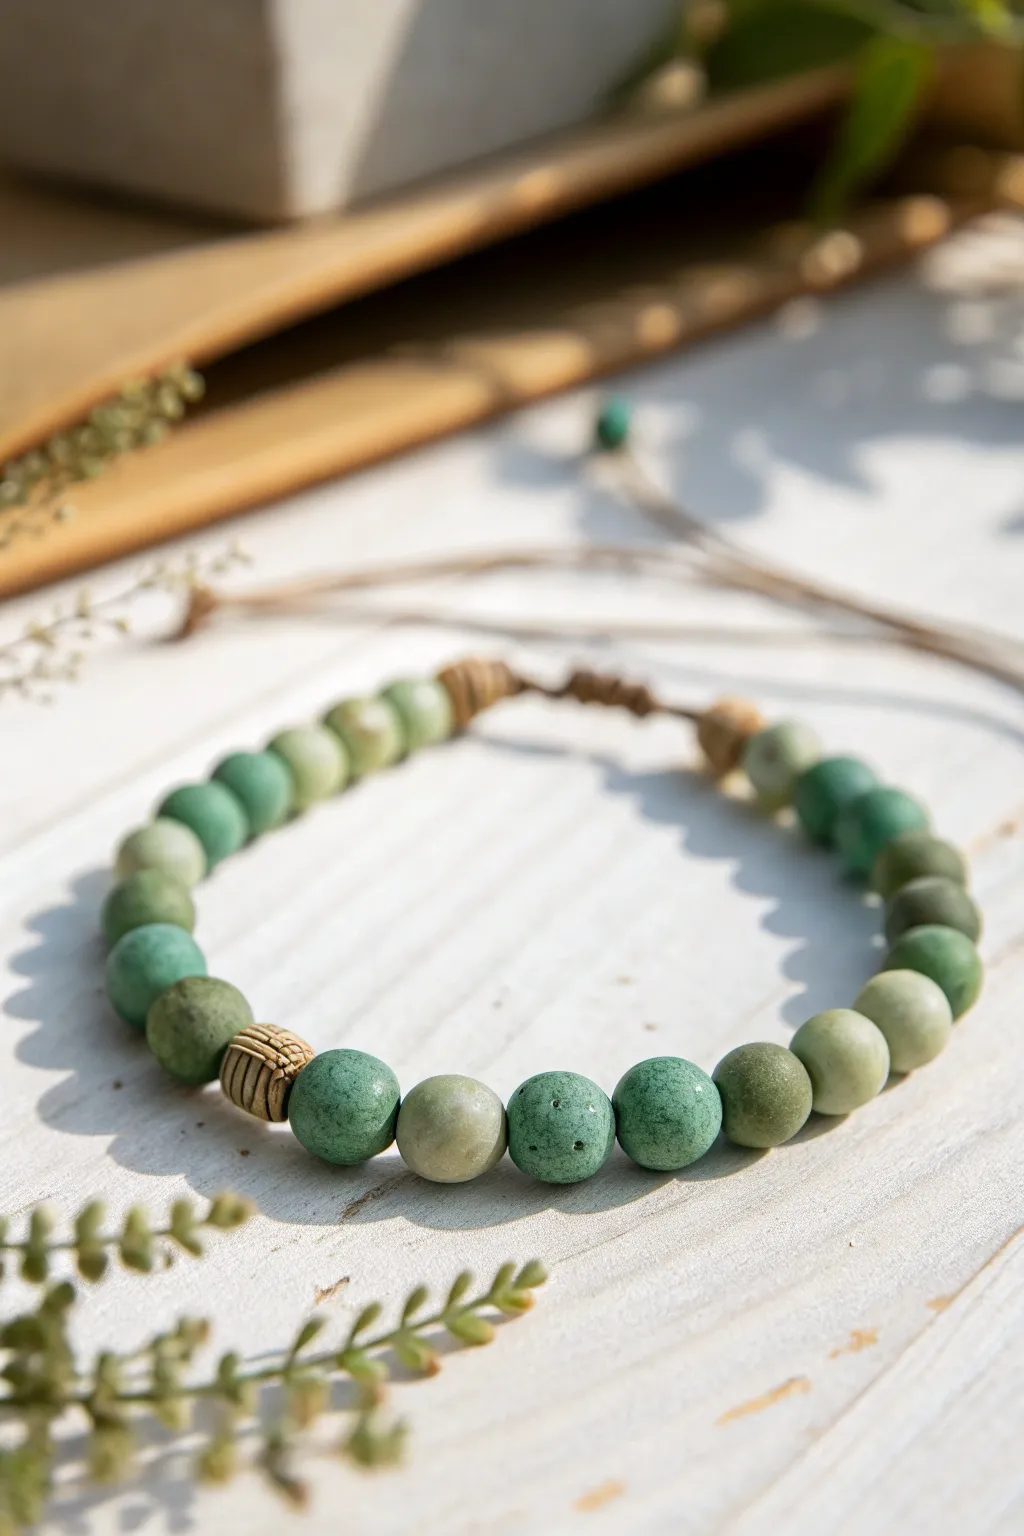
Olive Green and Earthy Neutrals
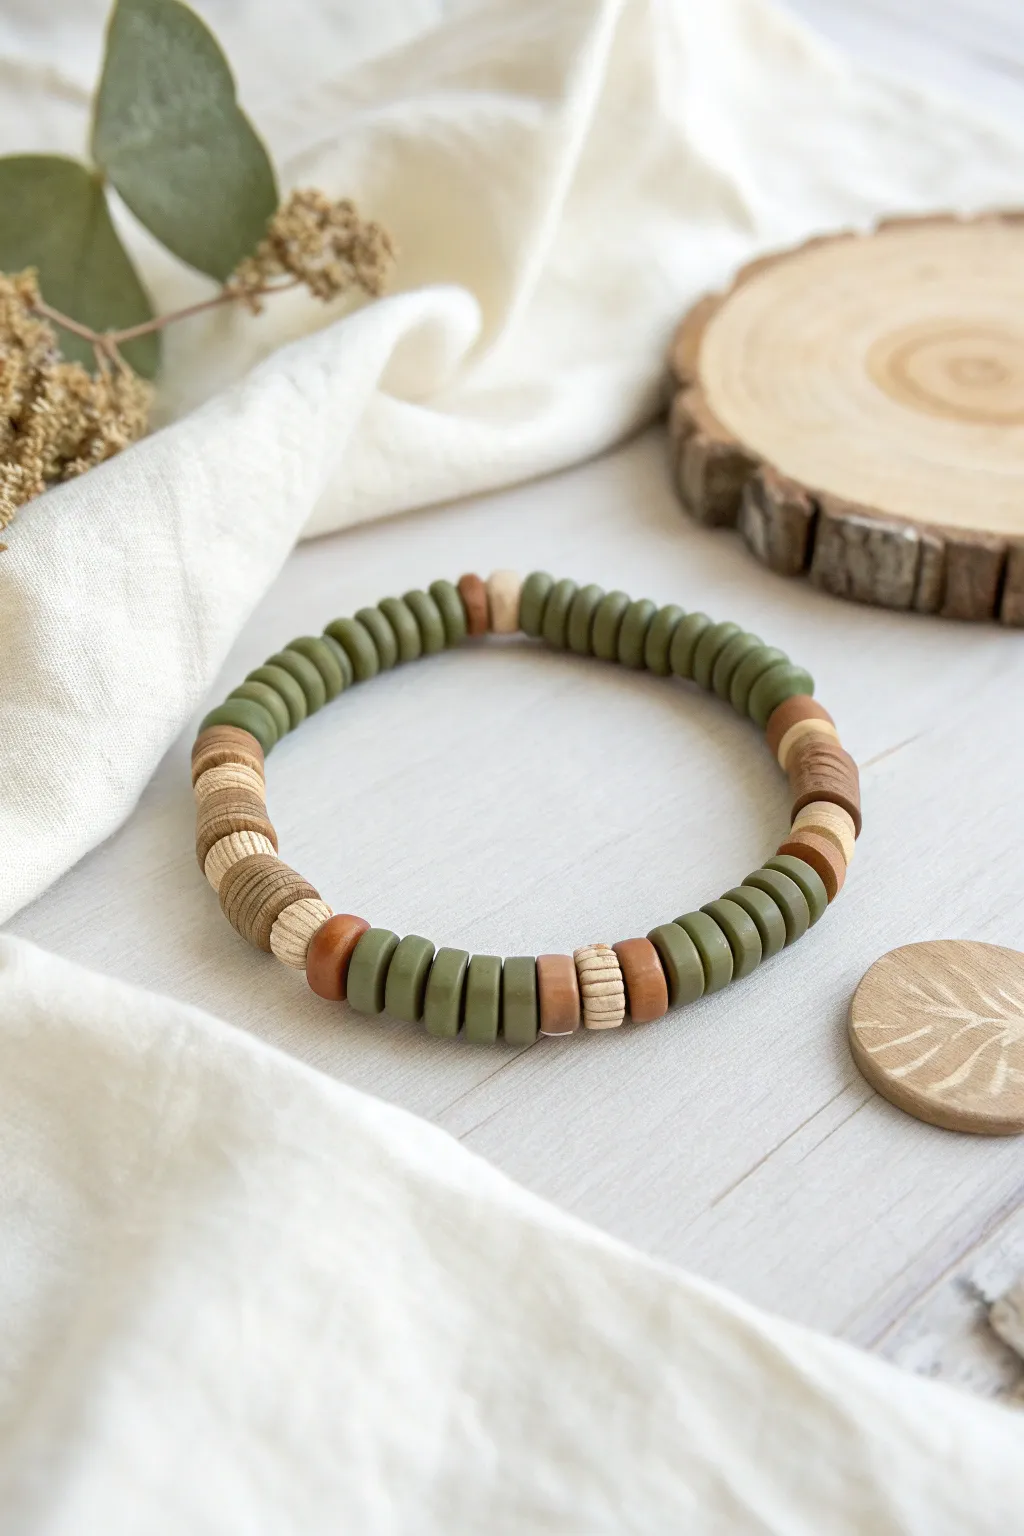
Embrace the soothing palette of nature with this textured bracelet, combining matte olive green clay beads with warm, earthy wooden accents. This design mimics the serene tones of a walk through the woods and pairs beautifully with everyday linen or denim.
Detailed Instructions
Materials
- Olive green polymer clay Heishi beads (approx. 6mm)
- Light unfinished wood washer beads
- Medium-tone wood spacer beads
- Dark wood rondelle beads
- Beveled or ribbed wooden spacer beads
- Strong elastic display cord (0.8mm or 1mm)
- Jewelry glue or clear nail polish
- Scissors
Step 1: Planning and Preparation
-
Measure your wrist:
Before you begin stringing, wrap a piece of string or a measuring tape around your wrist to determine your desired length. Add about half an inch to this measurement to ensure the bracelet fits comfortably without being too tight against the skin. -
Cut the elastic:
Cut a length of your elastic cord that is at least 4-5 inches longer than your target bracelet length. This extra length is crucial for tying a secure knot at the end without struggling. -
Pre-stretch the cord:
Give your elastic cord a few firm tugs. This is a vital step because it prevents the bracelet from stretching out and becoming loose shortly after you start wearing it. -
Layout your pattern:
Lay your beads out on a bead board or a piece of felt to visualize the pattern before stringing. This design relies on long sections of the green heishi beads broken up by varied wooden focal sections.
Knot Slipping?
If your elastic knot refuses to stay tight while tying, clamp the first loop with a binder clip to hold tension while you form the second loop.
Step 2: Creating the Pattern
-
Start with the main color:
Begin by stringing a solid section of the olive green clay heishi beads. Aim for a segment about 1.5 to 2 inches long to create a strong base for the design. -
First accent section:
Introduce your first wooden accent. A nice transition is to add a thin, rusty-brown wood spacer, followed by a ribbed light wood bead, and another rusty-brown spacer. -
Second green segment:
Return to the olive green heishi beads. Make this section slightly shorter than the first, perhaps around 1 inch, to create an asymmetrical, organic rhythm. -
The major focal point:
Now create the larger wooden section shown on the left of the image. slide on a sequence of mixed wood tones: alternating between flat washer-style wood beads and rounded dark wood beads. -
Varying texture:
Within this focal section, try stacking two or three identical wooden disks together. This mimics the look of the clay beads but adds a lovely grain texture. -
Third green segment:
Add another stretch of the olive green clay beads. I find that varying the lengths of green sections randomly looks more natural than measuring them perfectly equal. -
Final accent cluster:
Create one last small cluster of wooden beads. Use a light bead sandwiched between two medium-tone spacers to balance the colors from the other side of the bracelet. -
Check the length:
Wrap the strung beads around your wrist to check the fit. If gaps appear between beads, add just a few more green heishi discs until the ends meet comfortably.
Wood Bead Care
Rub a tiny amount of coconut oil or beeswax onto unfinished wooden beads to seal them and deepen their natural grain color.
Step 3: Finishing Touches
-
Tie the first knot:
Bring the two ends of the elastic cord together. Tie a simple overhand knot, pulling it tight so the beads sit snugly against each other without buckling. -
Secure with a surgeon’s knot:
Follow up with a surgeon’s knot (looping the elastic through twice before pulling tight) for extra security. Pull the cords firmly. -
Apply adhesive:
Dab a tiny drop of jewelry glue or clear nail polish directly onto the knot. This prevents the slick elastic from gradually working itself loose over time. -
Hide the knot:
While the glue is still tacky, carefully slide one of the beads (preferably a larger wooden one with a bigger hole) over the knot to conceal it. -
Trim the excess:
Once the glue is fully dry, trim the excess elastic tails close to the bead, being careful not to nick the main cord.
Wear your new earthy creation alone or stack it with gold bangles for a sophisticated bohemian vibe


What Really Happens Inside the Kiln
Learn how time and temperature work together inside the kiln to transform clay into durable ceramic.
Green and Black Graphic Stripes
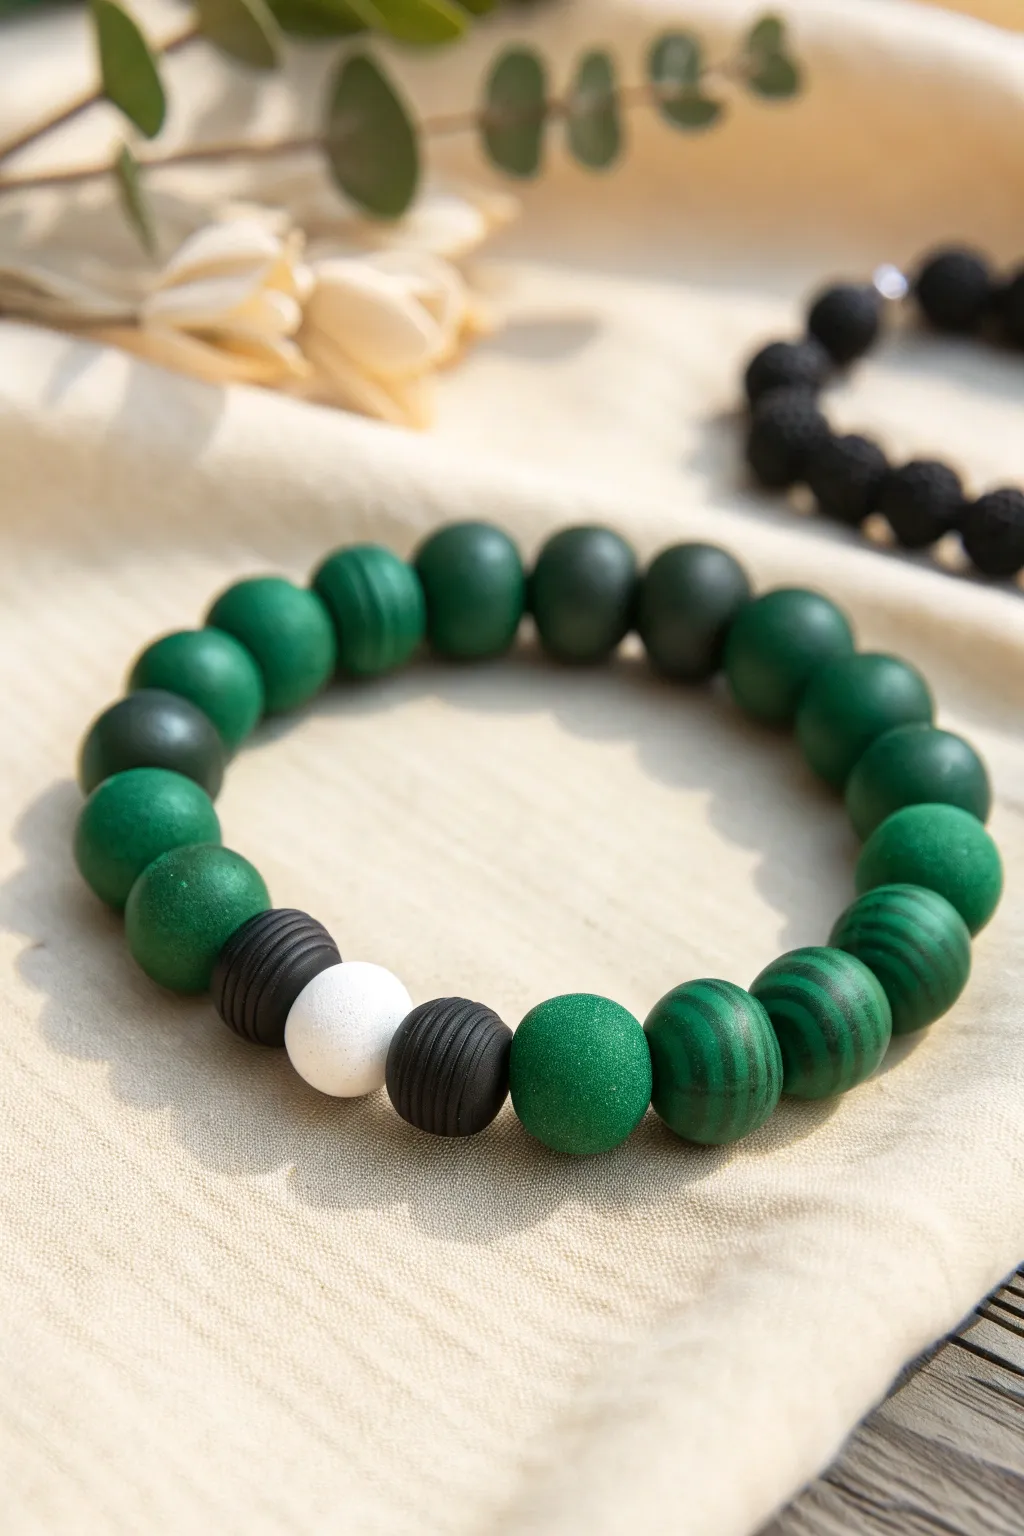
This sophisticated bracelet design combines the organic beauty of swirling faux-malachite patterns with stark graphic accents. By mixing matte textures with deep forest greens and striking monochrome details, you create a piece that feels both earthy and modern.
Step-by-Step
Materials
- Green polymer clay (forest green, emerald green, and light green)
- Black polymer clay
- White polymer clay
- Bead rolling tool or flat acrylic block
- Needle tool or thick toothpick (for piercing)
- Fine-grit sandpaper (optional)
- Elastic jewelry cord (0.8mm or 1mm)
- Jewelry glue (e.g., G-S Hypo Cement)
- Clay extruder (optional, for stripes)
- Tissue blade or sharp craft knife
- Oven for baking clay
Step 1: Creating the Faux Malachite Beads
-
Prepare the greens:
Start by conditioning three different shades of green clay: a deep dark green, a standard emerald, and a lighter leafy green. You want roughly equal amounts of each. -
Stack and roll:
Flatten each green color into a rough sheet. Stack them on top of each other, creating a sandwich of light, medium, and dark tones. -
Create the swirl:
Twist the stacked clay into a log, then fold it in half and twist again. Repeat this process—twisting, folding, and rolling—until fine streaks appear. Don’t overmix; you want defined lines, not a solid muddy green. -
Form the beads:
Cut equal-sized portions from your marbled log. Roll each portion between your palms or using an acrylic block to create perfectly round spheres. -
Pierce the holes:
Use your needle tool to carefully pierce a hole through the center of each bead. I like to twist the needle as I push to prevent the bead from distorting.
Fixing Distortion
If piercings squish your beads into ovals, let the clay rest for 30 minutes before piercing, or drill the holes after baking using a pin vise.
Step 2: Crafting the Solid Matte Beads
-
Condition solid green:
Take a block of solid emerald or forest green clay. Condition it well until it is pliable and smooth. -
Size and shape:
Portion out balls of clay that match the size of your malachite beads. Roll them into smooth spheres. -
Create texture (optional):
To achieve a matte, stone-like texture before baking, you can gently roll these beads over a piece of coarse sandpaper or sponge. This removes the plastic shine. -
Pierce the solids:
Create the central holes for stringing, ensuring the channel is wide enough for your elastic cord.
Variation Idea
Swap the white center bead for a metallic silver or gold spacer bead to give the bracelet a slightly more industrial, high-end jewelry feel.
Step 3: Making the Graphic Accent Beads
-
Form the white focal bead:
Roll a single sphere of white polymer clay. Keep this one slightly porous or textured if desired to contrast with the smoothness of the others. -
Create black ridges:
Roll two small balls of black clay. To create the ribbed texture shown in the image, gently roll the side of a needle tool or a fine-threaded screw horizontally around the circumference of the bead. -
Pierce accent beads:
Drill holes through the white bead and the two textured black beads carefully. -
Bake the batch:
Arrange all your green, black, and white beads on a baking sheet. Bake according to your clay manufacturer’s instructions (usually around 275°F/130°C for 15-30 minutes). -
Cool down:
Allow the beads to cool completely before handling. This hardens the clay and prevents fingerprints.
Step 4: Assembly
-
Plan the layout:
Lay your beads out on a mat. Place the white bead in the center, flanked by the two ribbed black beads. Arrange the solid green and faux-malachite beads in an alternating pattern for the rest of the loop. -
Stringing:
Cut a length of elastic cord about 12 inches long. Thread your beads onto the cord, following your planned pattern. -
Applying tension:
Pre-stretch your elastic slightly before tying. This prevents the bracelet from loosening up after the first few wears. -
Tying the knot:
Secure the bracelet with a surgeon’s knot (looping over twice instead of once on the first pass). Pull it tight. -
Secure and trim:
Add a tiny drop of jewelry glue to the knot. Let it dry, then trim the excess cord and tuck the knot inside one of the larger beads.
Wear your graphic green stack with neutral tones to let those deep malachite patterns really stand out
Green With Pearl-Like Neutrals
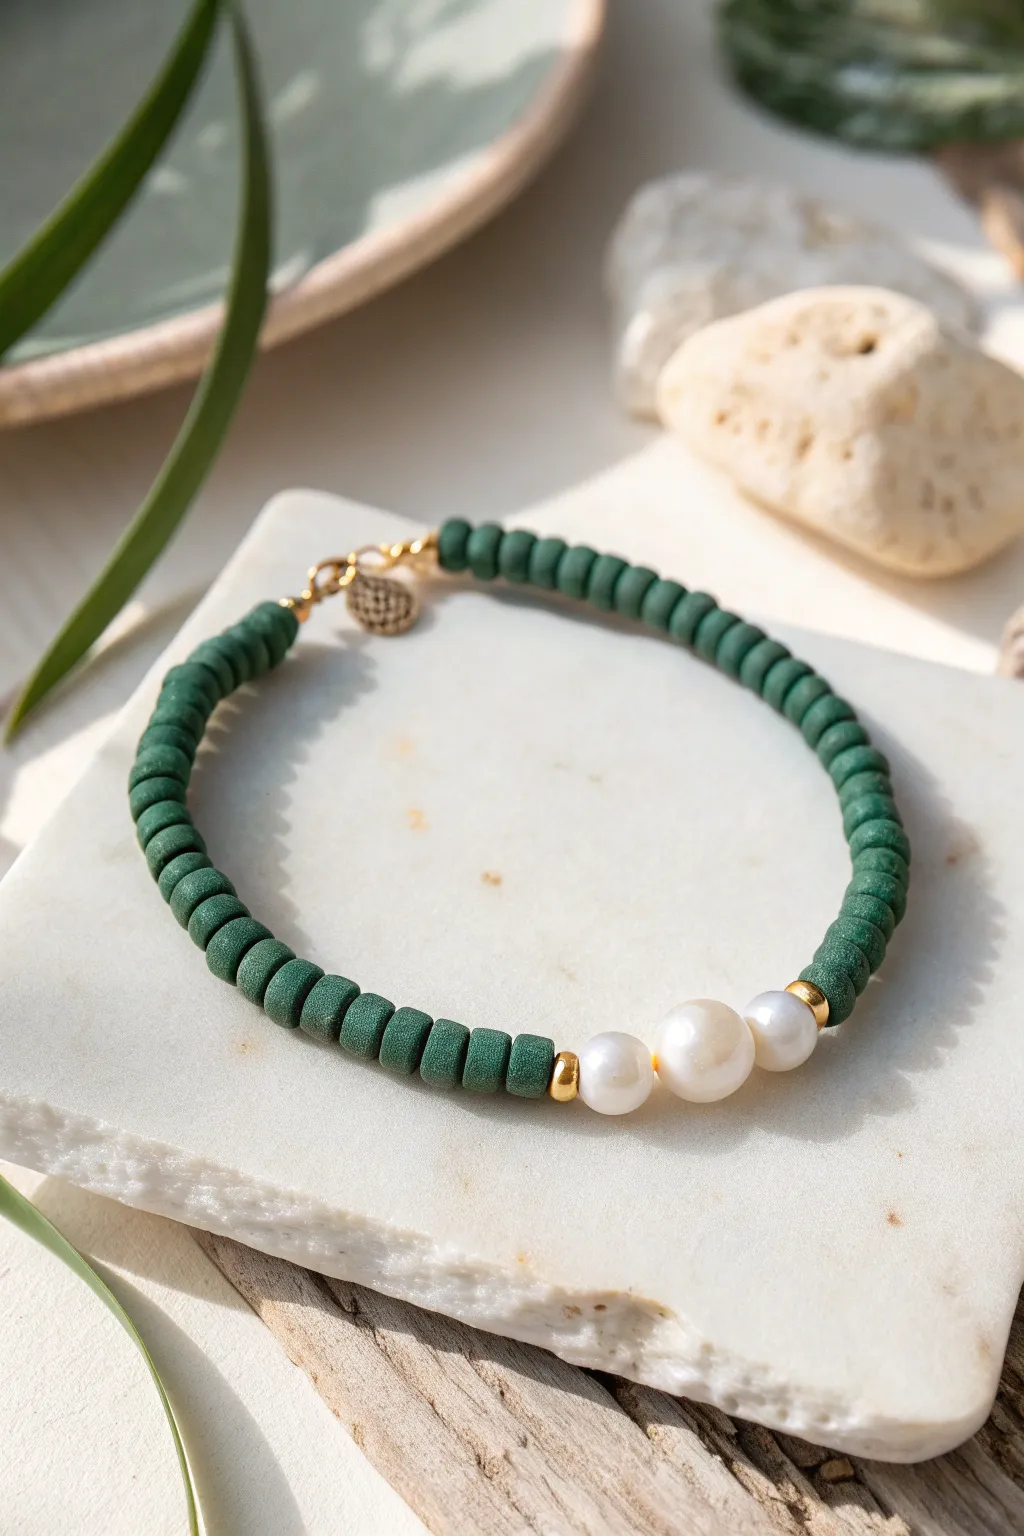
This sophisticated project marries the rustic, earthy texture of matte green clay heishi beads with the timeless luster of freshwater pearls. The contrast between the organic green tones and the creamy white pearls creates a balanced, nature-inspired accessory perfect for everyday wear.
How-To Guide
Materials
- Matte green polymer clay heishi beads (approx. 4-6mm)
- 3 freshwater pearls (oval or potato shape, approx. 6-8mm)
- 2 small gold spacer beads (round or flat disc)
- Gold beading wire or strong elastic cord (0.8mm)
- 2 gold crimp beads (if using wire)
- 2 gold wire guards (optional, for wire)
- Gold lobster clasp and jump ring
- Small gold logo tag or charm (optional)
- Jewelry pliers (flat nose and cutting pliers)
- Bead stopper or tape
Step 1: Planning and Preparation
-
Measure your wrist:
Start by measuring your wrist with a flexible tape measure. Add roughly 0.5 to 1 inch to this measurement depending on how loose you want the final fit to be. -
Cut the cord:
Cut a length of beading wire or elastic cord that is about 4 inches longer than your target length. This extra slack is essential for tying knots or securing crimps later without frustration. -
Secure the end:
Place a bead stopper or a piece of masking tape on one end of your cut cord. This ensures your beads won’t slide off while you are working on the design.
Step 2: Creating the Focal Point
-
Start the center sequence:
We will build the bracelet from the middle outwards to ensure symmetry. Pick up one small gold spacer bead and thread it onto the cord. -
Add the first pearl:
Slide on your first freshwater pearl. Look for pearls that have a slightly organic, uneven shape to match the natural vibe of the clay beads. -
Add the center pearl:
Thread the second pearl. I usually try to pick the largest of the three for this middle spot to create a subtle graduation in size. -
Finish the focal section:
Add the third pearl, followed immediately by the second gold spacer bead. Slide this entire group to the center of your cord length.
Pearl Selection Tip
Freshwater pearls have tiny holes. Use a bead reamer to gently widen them if your cord won’t pass through.
Step 3: Beading the Strand
-
Begin the green sections:
Start threading the green clay heishi beads onto one side of the gold spacers. You aren’t counting beads yet, just filling space. -
Fill the first side:
Continue adding green beads until that side covers about half of the remaining length needed for your wrist size. -
Secure and switch:
Place a temporary stopper (or just hold carefully) on the finished green side. Switch to the other side of the pearls. -
Fill the second side:
Thread green clay beads onto the second side. Periodically hold the two green sections together to ensure they are equal in length visually. -
Check the fit:
Wrap the unfinished strand around your wrist. The ends should almost touch, leaving just enough gap for the clasp hardware (about half an inch).
Level Up: Texture Mix
Swap the smooth gold spacers for faceted gold beads or tiny crystal rondelles to add extra sparkle next to the pearls.
Step 4: Finishing the Closure
-
Prepare the first crimp:
Remove your bead stopper. Thread a crimp bead onto the wire, followed by a wire guard (if using) and the jump ring. -
Loop and secure:
Thread the wire back through the crimp bead. Pull it tight so the loop is small but flexible, then use your flat nose pliers to squash the crimp bead flat. -
Hide the tail:
Trim the excess wire close to the crimp, or tuck a short tail back into the first few green beads for extra security. -
Attach the clasp:
On the other end of the bracelet, repeat the crimping process, but this time loop the wire through the small attachment ring of your gold lobster clasp. -
Add the charm:
If you have a decorative metal tag or charm, open a small jump ring with your pliers and attach it to the loop near the clasp for a professional finish.
Fasten your new bracelet and enjoy the blend of earthy tones and pearlescent shine on your wrist

TRACK YOUR CERAMIC JOURNEY
Capture glaze tests, firing details, and creative progress—all in one simple printable. Make your projects easier to repeat and improve.
Sage Daisy Accent Beads
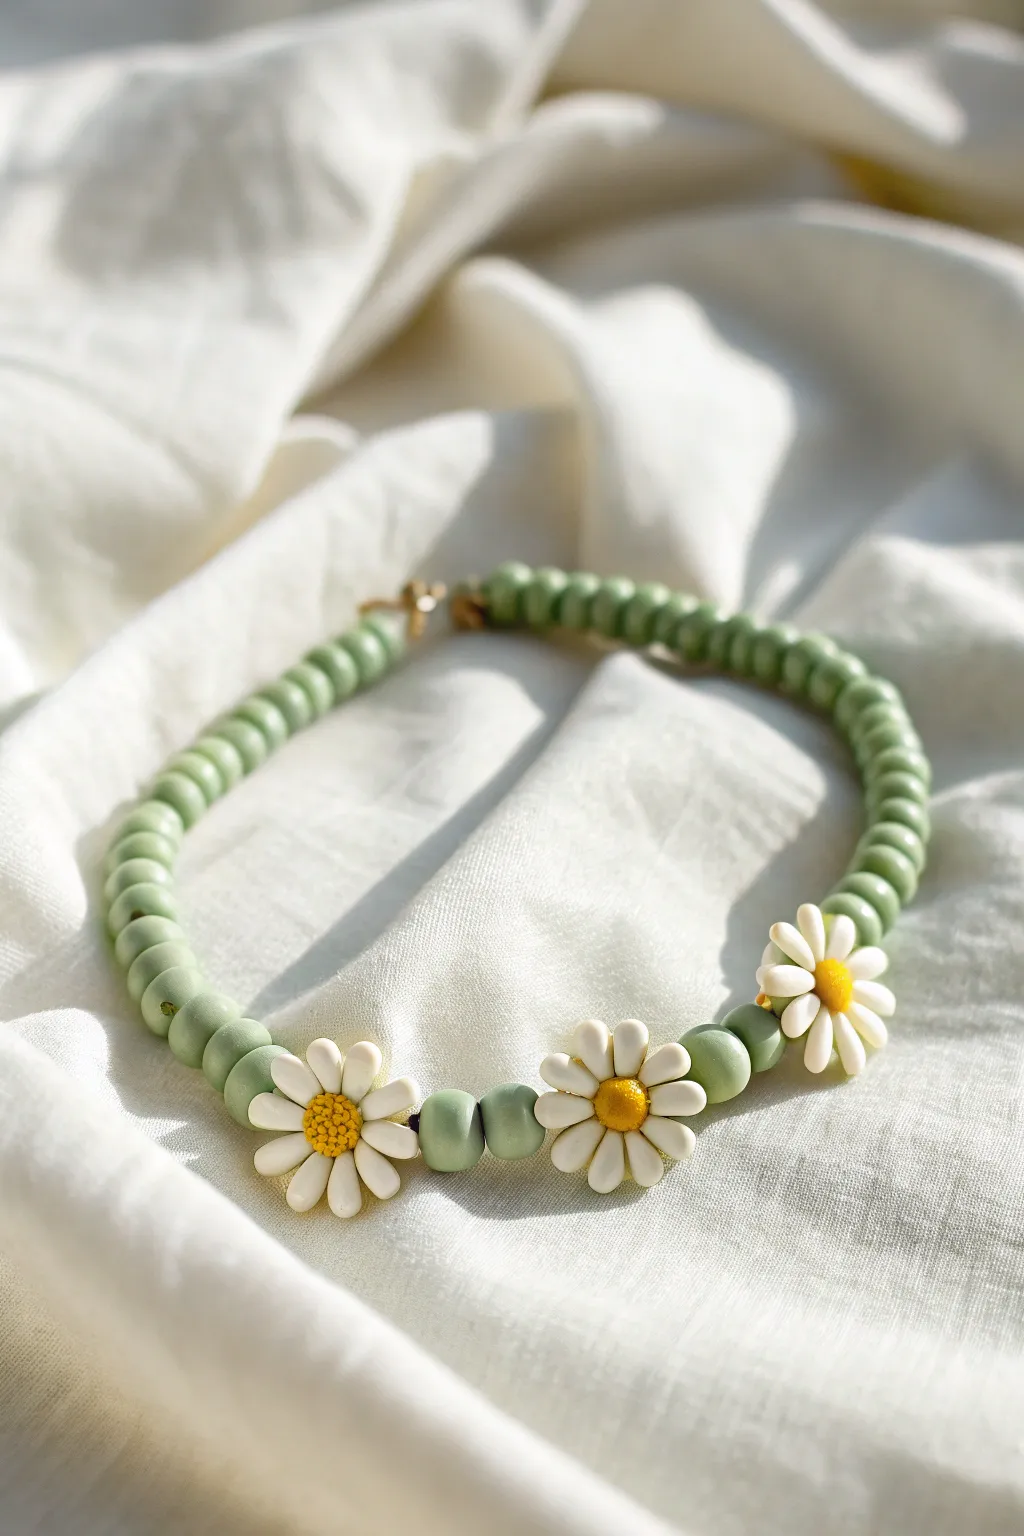
Embrace a touch of whimsy with this delicate beaded necklace featuring soft sage hues and charming daisy accents. The matte finish of the clay beads combined with the cheerful flowers creates a piece that feels both earthy and fresh.
Detailed Instructions
Materials
- Sage green polymer clay round beads (approx. 6mm or 8mm)
- Three white daisy flower beads with yellow centers (approx. 10-12mm)
- Beading wire or strong stretch cord (0.7mm recommended)
- Two crimp beads (gold or silver)
- Two wire guards (optional but recommended)
- Clasp (lobster claw or toggle) and jump ring
- Flat-nose pliers
- Wire cutters
- A bead stopper or piece of tape
Step 1: Setting the Pattern
-
Measure and Cut:
Begin by deciding on the desired length for your necklace. A standard choker length is usually around 14-16 inches. Cut your beading wire or stretch cord about 4 inches longer than your target length to give yourself plenty of room to work with the clasp. -
Secure the End:
To prevent beads from sliding straight off while you work, place a bead stopper on one end of your cord. If you don’t have a stopper, a simple piece of masking tape folded over the wire works perfectly well. -
Plan the Layout:
Before threading, lay out your beads on a flat surface or bead board. Place the three daisy beads in the center and arrange the sage green beads equally on either side. This visual check ensures your design is symmetrical before you commit.
Step 2: Stringing the Beads
-
Start the First Half:
Pick up the open end of your wire and begin threading the sage green clay beads. You’ll want to string exactly half of the total number of green beads you set aside for the main strand. -
Check Consistency:
Pause occasionally to inspect the clay beads. Since these are often handmade or organic in shape, remove any that are misshapen or significantly different in size to keep the strand looking uniform. -
Add the First Spacer:
Once the first section of green beads is on, slide on two additional sage beads that will sit directly next to the flowers. These act as spacers to cushion the floral accents. -
Thread the First Daisy:
Slide your first white daisy bead onto the wire. Ensure the flower is facing outward in the correct orientation so it sits flat against the skin when worn. -
Add Center Spacers:
Thread two sage green beads next. These will serve as the separator between the first and the middle flower. -
Place the Middle Daisy:
Add the second daisy bead. This is your centerpiece, so make sure it is the most perfect of your three flowers if there are any slight variations. -
Complete the Center Pattern:
Add two more sage green beads, followed by the third and final daisy bead. This completes the focal point of the necklace. -
Finish the Strand:
Thread the remaining sage green beads onto the wire to mirror the first side. Hold the two ends of the wire up to let the beads settle and ensure both sides are even in length.
Sticky Situation
If the holes in your clay beads are jagged or blocked with debris, use a bead reamer or a thick sewing needle to gently clear the path before stringing.
Step 3: Attaching the Clasp
-
Prepare the Crimp:
Remove the tape or bead stopper. Slide a crimp bead onto one end of the wire, followed by a wire guard (if using) and one half of your clasp. -
Loop and Secure:
Thread the wire back through the crimp bead to create a small loop holding the clasp. I like to pull it tight enough to be secure, but loose enough that the clasp has a little movement. -
Flatten the Crimp:
Use your flat-nose pliers to firmly squash the crimp bead flat. Give the wire a gentle tug to make sure it doesn’t slip. -
Trim Excess Wire:
Trim the short tail of the wire close to the crimp bead, or tuck any remaining length into the first adjacent green bead for a cleaner finish. -
Repeat for Second Side:
Repeat the crimping process on the other end of the necklace with the jump ring or the other half of your clasp. Be careful not to pull the main wire too tight, or the necklace will be stiff and won’t drape naturally.
Variation Idea
Swap the sage spacer beads between the flowers for small gold seamless rounds. It adds a tiny hint of sparkle that matches high-quality gold hardware.
Now you have a serene, nature-inspired accessory ready to pair with your favorite casual outfit
Marbled Green Swirl Beads
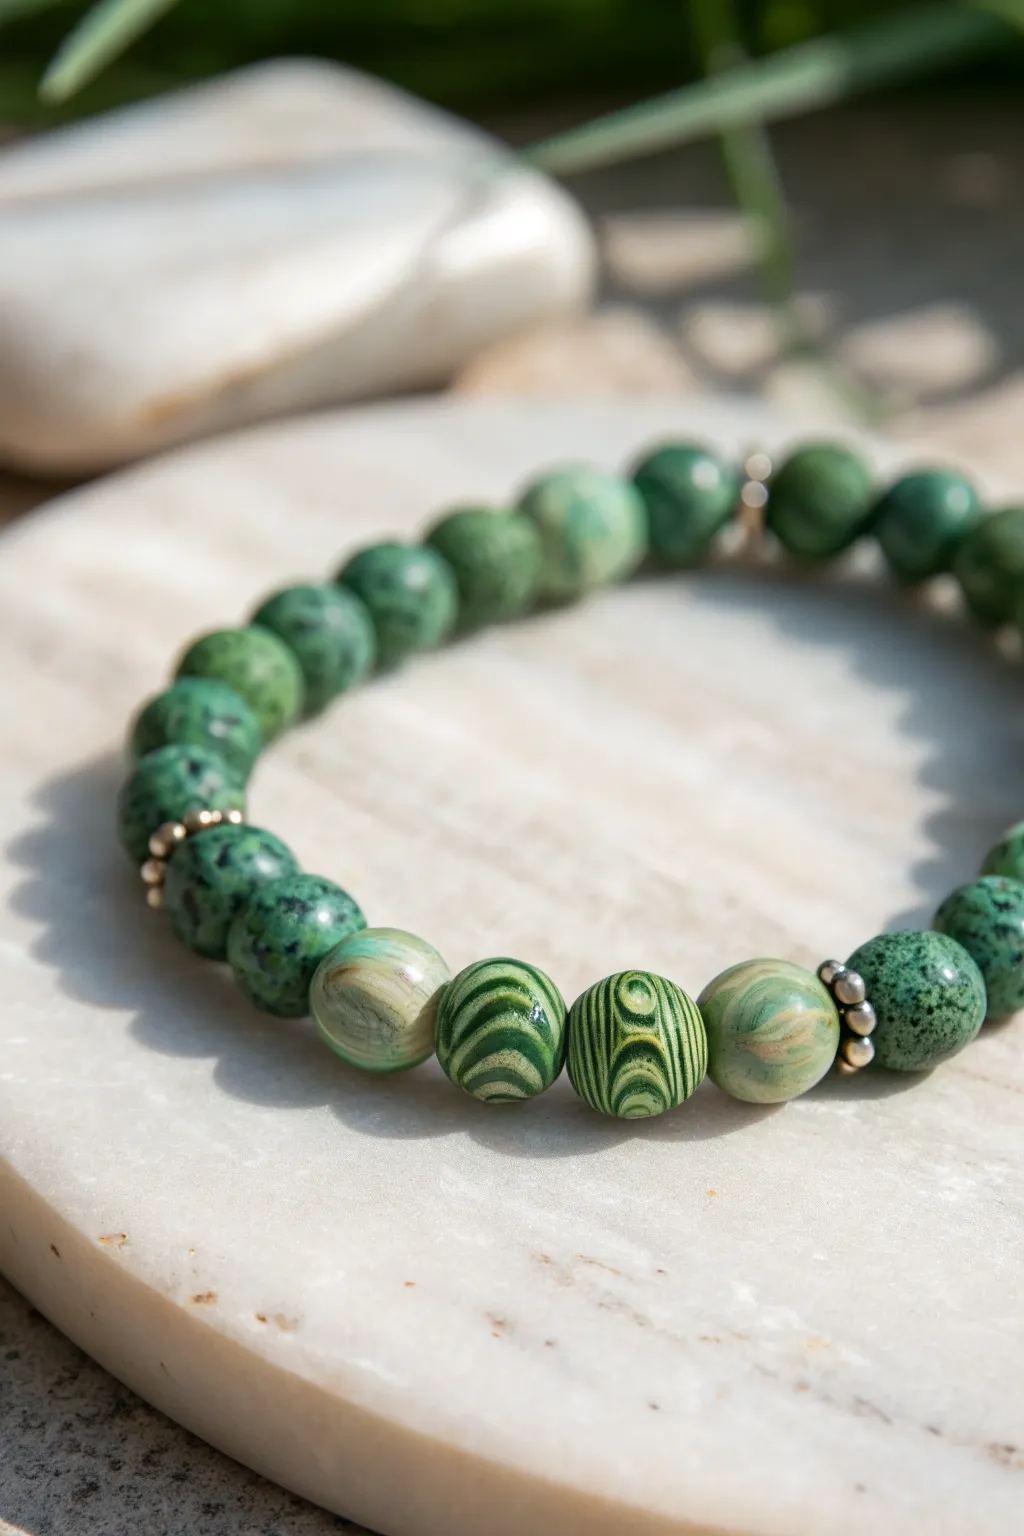
This elegant bracelet project combines the organic beauty of earthy speckles with bold, graphic swirls. By mixing techniques, you’ll create a sophisticated piece that mimics the look of high-end gemstones using accessible polymer clay.
Step-by-Step Tutorial
Materials
- Polymer clay (Dark Green, Leaf Green, translucent, and White/Cream)
- Acrylic roller or pasta machine
- Clay blade or tissue blade
- Needle tool or bead piercing pins
- Baking sheet and cardstock
- Wet/dry sandpaper (400, 600, 1000 grit)
- Buffing wheel or denim cloth
- Elastic jewelry cord (0.8mm or 1mm)
- Small gold or brass spacer beads (approx. 4mm)
- Black acrylic paint (optional for antiquing)
- Bead rack (optional)
Step 1: Creating the Malachite Swirl Canes
-
Prepare the Palette:
Begin by conditioning your clays. Create four distinct shades of green ranging from very pale (almost white with a hint of green) to deep forest green. You can achieve this by mixing dark green with increasing amounts of white. -
Stack the Sheets:
Roll each color into a thin sheet of equal thickness using your pasta machine on a medium setting or an acrylic roller. Stack these sheets on top of each other, alternating from lightest to darkest to create a gradient effect. -
Roll the Bullseye:
Roll the stacked sheet up jelly-roll style to create a log. -
Form the Pattern:
Gently compress and elongate the log. Cut it into 4 equal lengths and stack them into a 2×2 square block. Squeeze this block to fuse the pieces, distorting the circles slightly to make them look organic. -
Twist and Swirl:
Gently twist the entire log like a candy cane. This action creates the intricate, concentric interference patterns seen in the central beads. -
Cut the Beads:
Slice two segments from your twisted log to form the round focal beads. Roll them gently between your palms to smooth them into perfect spheres, taking care not to smear the pattern too much.
Step 2: Making the Marbled & Speckled Accent Beads
-
Mix the Speckled Stone Clay:
To make the darker, speckled beads that form the majority of the bracelet, take a chunk of dark green clay. Chop up very tiny bits of black or dark brown cured clay (or add coarse black pepper/sand for texture) and knead it in just enough to distribute the speckles without blending the color. -
Roll the Basic Beads:
Roll this speckled mixture into a long snake and cut equal-sized segments. Roll each segment into a smooth, round ball. You will need about 16-20 of these depending on your wrist size. -
Create the Light Marbled Beads:
For the two lighter beads flanking the swirl beads, loosely mix white clay with a small amount of pale green and translucent clay. Stop mixing before they fully blend to keep streaks of color visible. -
Shape the Flanking Beads:
Form two beads from this lighter marble mix, sizing them to match the malachite swirl beads.
Cold Hands, Clean Swirls
Chill your cane for 10 minutes before slicing. Warm clay smears easily, blurring those crisp malachite lines. A cold cane slices cleanly and preserves the detail.
Step 3: Piercing, Baking & Finish
-
Pierce the Holes:
Using a needle tool, carefully pierce a hole through the center of each raw bead. I find twisting the needle while pushing helps prevent the bead from flattening. -
Re-shape and Smooth:
After piercing, gently roll each bead one last time to correct any distortion from the needle. Ensure the holes remain open. -
Bake:
Arrange the beads on a bed of cornstarch or cardstock accordion folds to prevent flat spots. Bake according to your clay manufacturer’s specific temperature and time instructions—usually around 275°F (135°C) for 30-45 minutes. -
Sand and Buff:
Once fully cooled, wet sand the beads starting with 400 grit and working up to 1000 grit for a silky smooth stone-like finish. Buff them vigorously with a denim cloth or buffing wheel to bring out a natural sheen. -
Layout Design:
Lay out your design on a bead board or towel. Place the two malachite swirl beads in the very center, flanked by the lighter marbled beads. Fill the rest of the strand with the dark speckled beads. -
Insert Spacers:
Place the small metallic spacer beads between these transition points: on either side of the four-bead focal section, and perhaps sporadically within the dark bead section for added interest. -
String the Bracelet:
Thread your elastic cord through the beads, transferring your layout onto the proper string. -
Secure the Knot:
Pre-stretch your elastic slightly, then tie a surgeon’s knot (right over left twice, then left over right). Add a tiny dab of flexible super glue to the knot. -
Hide the Knot:
Gently pull the elastic until the knot slips inside the hole of one of the larger clay beads to hide it completely.
Glossy Gemstone Effect
Coat finished beads in UV resin or gloss varnish. It deepens the green contrast and mimics polished semi-precious stones perfectly.
Slip on your beautiful new bracelet and enjoy the custom blend of patterns you’ve created.
Mossy Speckled Terrazzo Greens
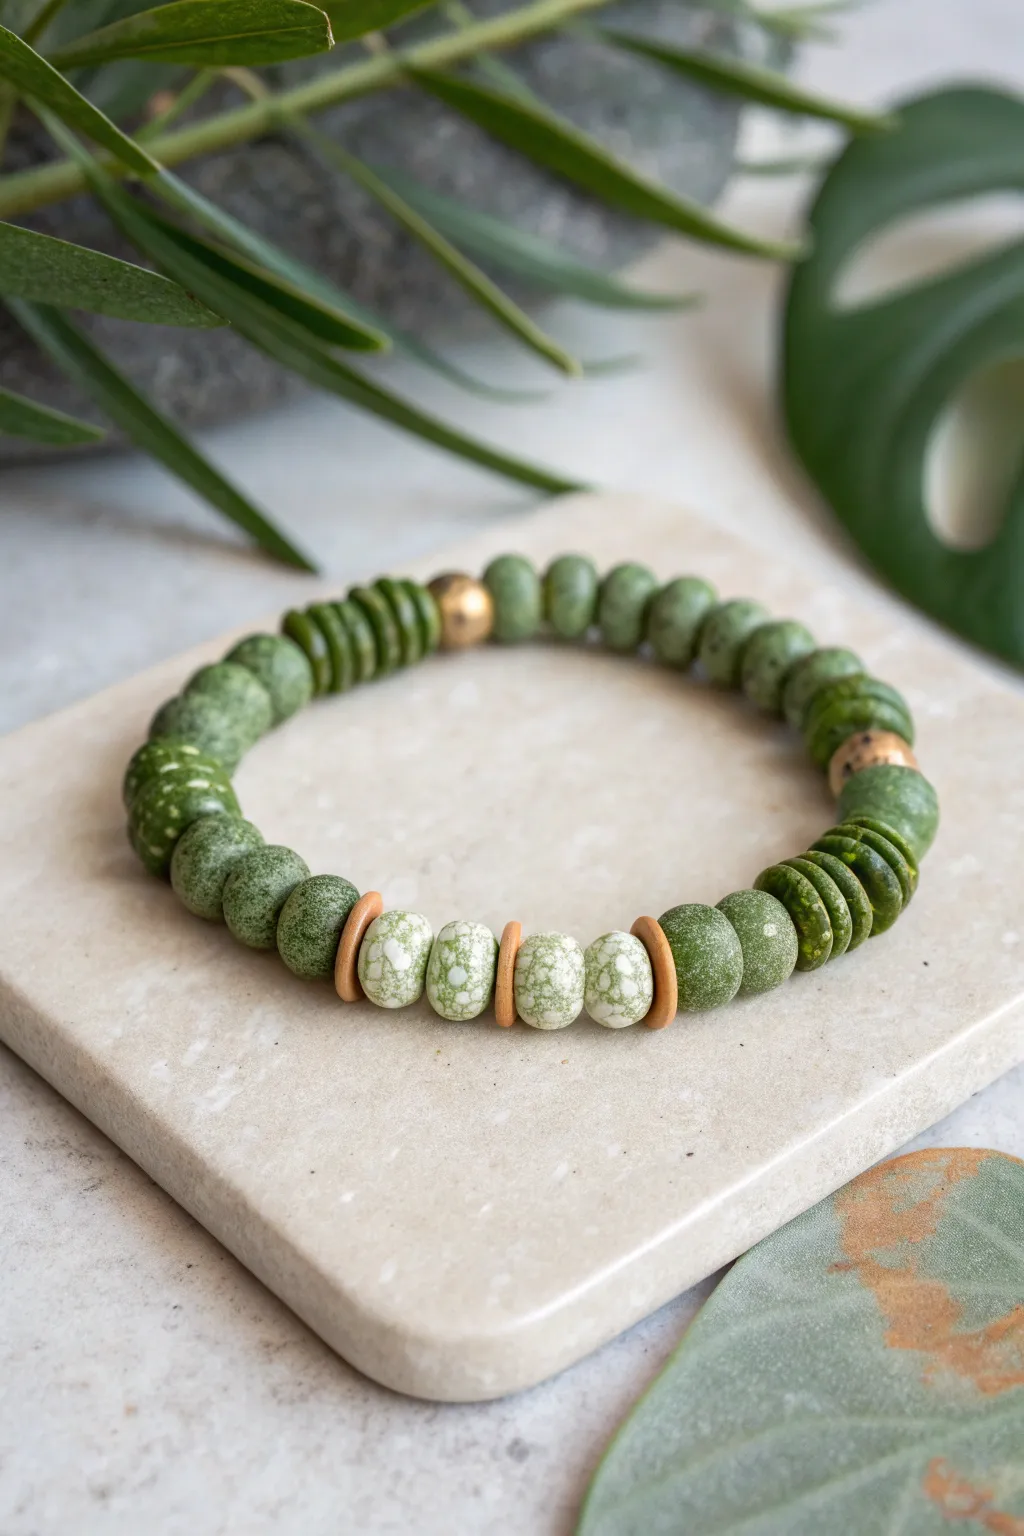
Capture the essence of a tranquil forest with this bracelet, featuring handmade clay beads in varied textures and shades of green. The combination of speckles, solid tones, and warm spacer accents creates a piece that feels both organic and modern.
Step-by-Step Guide
Materials
- Polymer clay (olive green, forest green, light sage, white, translucent)
- Acrylic paint (black and brown for speckling)
- Gold or bronze metal spacer beads
- Flat, disc-shaped wooden or clay spacer beads (terracotta color)
- Elastic stretch cord (0.8mm)
- Bead roller or acrylic block
- Toothbrush or stiff bristle brush
- Needle tool or bead piercing pins
- Oven for baking clay
- Super glue or jewelry knot cement
Step 1: Creating the Clay Blends
-
Base Green Mixing:
Start by conditioning your olive green clay until it is soft and pliable. This will form the bulk of the smoother, darker beads. -
Terrazzo Effect Mix:
To achieve the lighter speckled beads, mix white clay with a tiny pinch of light sage to create a very pale base. Finely chop tiny bits of dried dark green clay and mix them into this pale base for a subtle internal texture. -
Textured Green Mix:
For the distinctively textured medium-green beads, mix equal parts forest green and translucent clay. The translucent agent adds depth and makes surface texturing stand out more vividly.
Clean Edges Only
When piercing unbaked clay beads, refrigerate them for 10 minutes first. This hardens the clay slightly so it doesn’t squish out of shape when the needle pushes through.
Step 2: Forming and Texturing
-
Rolling Round Beads:
Take your olive green mixture and roll about 18-20 uniform spheres, aiming for roughly 8mm in diameter using your palms or an acrylic block for smoothness. -
Creating Disc Beads:
Using a darker forest green clay, roll small snakes and slice them thinly. Press these slices gently to create flat, organic disc shapes—you’ll need about 10-12 of these for the patterned sections. -
Forming the Focal Beads:
Use your pale terrazzo mix to roll four slightly larger focal beads for the center of the bracelet. -
Adding Speckles:
Dilute a drop of black and brown acrylic paint with water. Dip a toothbrush into the mixture and flick the bristles over your pale focal beads and some of the olive beads to create organic speckling. -
Surface Texturing:
For the medium-green beads, I like to gently roll them over a piece of coarse sandpaper or sponge before baking to imprint a natural, stone-like pitted texture. -
Piercing:
Use a needle tool to pierce a hole through the center of every bead. Twist the tool as you push through to prevent the bead from squashing. -
Baking:
Arrange all beads on a baking sheet lined with parchment paper. Bake according to your polymer clay package instructions (usually around 275°F/135°C for 30 minutes) and let them cool completely.
Step 3: Assembly
-
Design Layout:
Lay out your design on a bead board or soft cloth. Center the four pale speckled beads, separating them with the terracotta-colored flat spacers. -
Symmetry Check:
Flank the center section with your textured green beads, then transition into the disc beads grouped in small stacks, and finish the back with the smooth olive rounds. -
Incorporating Metal:
Place a gold or bronze metal bead as an accent where the bead style transitions, usually between the disc stack and the round beads. -
Stringing:
Cut a generic length of elastic cord (about 10 inches). Pre-stretch the cord by pulling it firmly a few times to prevent it from sagging later. -
Threading:
Thread all your beads onto the elastic cord following your layout, double-checking the pattern symmetry as you go. -
Knotting:
Bring the ends together and tie a surgeon’s knot (right over left twice, then left over right). Pull the knot tight, stretching the elastic slightly while you pull. -
Securing:
Add a tiny dab of super glue or jewelry cement to the knot for extra security. Allow it to dry for a minute before trimming the excess cord, tucking the knot inside a neighboring bead if the hole allows.
Matte Stone Finish
After baking, lightly sand the beads with ultra-fine sandpaper or buff with denim. This removes any fingerprints and gives the clay a realistic, matte stone finish.
Enjoy the earthy elegance of your new handmade bracelet, perfectly imperfect and ready to wear
Half-and-Half Two-Tone Greens
Capture the serene essence of half-and-half tones with this textured polymer clay bracelet. By blending sage, forest, and mossy greens, you’ll create a wearable piece that feels both organic and modern, perfect for everyday grounding.
Detailed Instructions
Materials
- Polymer clay in dark forest green
- Polymer clay in sage or pale olive green
- Polymer clay in translucent white (for mixing)
- Beige or tan polymer clay (for accent beads)
- Bead rolling tool or acrylic flat block
- Toothpick or bead drying rack
- Needle tool or thin awl
- Texture sponge or coarse sandpaper
- Waxed cotton or hemp cord (1mm, brown or tan)
- Sharp blade or clay slicer
- Oven for baking
Step 1: Mixing and Shaping Beads
-
Preparing the Greens:
Begin by conditioning your dark forest green and sage green clays separately until pliable. To achieve the subtle gradient seen in the photo, create a third mid-tone shade by mixing equal parts of the two green clays together. -
Portioning the Clay:
Roll each color—dark, mid-tone, and light—into logs of equal thickness. Use your blade to slice off small, uniform segments. You’ll want roughly 8-10 segments of each shade for a full bracelet. -
Rolling the Spheres:
Take each segment and roll it between your palms to form a smooth ball. For perfectly uniform spheres, I find it helpful to use a bead roller or gently swirl them under a flat acrylic block. -
Adding Texture:
To mimic the stone-like look in the image, gently roll the surface of your green beads over coarse sandpaper or dab them lightly with a texture sponge. This breaks up the plastic-like shine of raw clay. -
Creating the Focal Beads:
Using the beige or tan clay, form two slightly larger spheres. These will serve as your textured accent beads. -
Detailing the Accents:
With a needle tool or the dull side of a blade, impress lines into the beige beads. You can create a wrapped-cord effect by pressing parallel lines around the circumference, or a hatched pattern for interest. -
Piercing the Beads:
Carefully pierce a hole through the center of every bead using a needle tool. It’s best to twist the tool as you push through to avoid squashing the bead’s shape. -
Baking:
Arrange the beads on a baking sheet or skewer them on a bead rack suspended over a tray. Bake according to your clay manufacturer’s specific temperature instructions, usually for about 30 minutes to ensure durability.
Sticky Situation?
If clay gets too soft or sticky while rolling, place it in the fridge for 10 minutes. This firms it up, making it easier to handle without leaving deeper fingerprints.
Step 2: Assembly and Finishing
-
Cooling and Buffing:
Allow the beads to cool completely. If any fingerprints remain, you can gently buff the cured beads with a soft piece of denim, though the textured finish usually hides imperfections well. -
Layout Planning:
Lay your beads out on a mat. Arrange them in sections from darkest green to lightest green to create the visual ‘half-and-half’ effect, placing the textured beige accent beads as dividers between color transitions. -
Stringing the Beads:
Cut a length of cord, roughly 12 inches long. Thread your beads onto the cord in your planned order. -
Preparing for the Knot:
Center the beads on the cord. If the holes are large enough, you can tie a simple overhand knot on either side of the bead row to keep them stationary, or simply let them float freely. -
Creating the Closure:
Cross the two tail ends of the cord over each other to form a circle. You will need a separate, shorter piece of cord (about 5 inches) to create the sliding knot mechanism. -
Tying the Sliding Knot:
Using the short cord, tie a series of square knots (macramé technique) over the two crossed tail ends. Tie enough knots to make a band about 1 cm wide. -
Securing the Ends:
Trim the excess from the short knotting cord and dab the cut ends with a tiny drop of superglue to prevent unraveling. Be careful not to glue the sliding knot to the main cord. -
Finishing Touches:
Tie a small overhand knot at the very end of each tail cord to prevent them from slipping through the sliding closure. Trim any final excess length.
Go Natural
Mix black pepper or dried tea leaves into the green clay before rolling. This adds speckles and imperfections that make the beads look like genuine stone.
Slip on your new bracelet to add a touch of handcrafted calm to your daily outfit
Leaf-Imprint Green Clay Beads
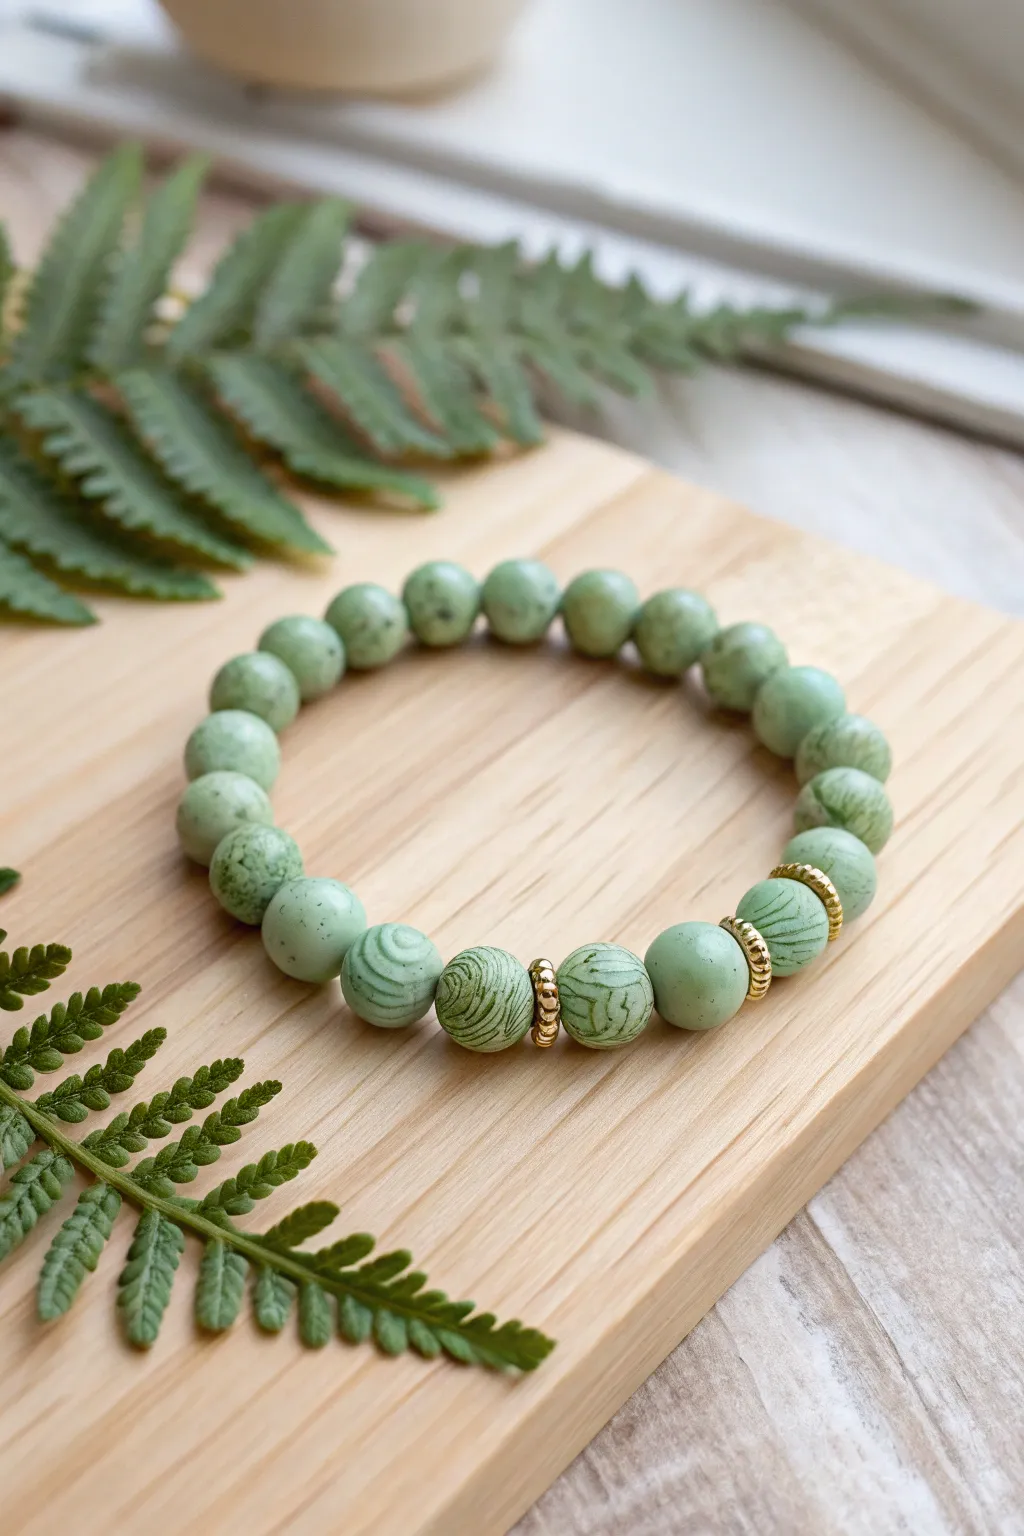
Embrace the tranquility of the forest with this DIY clay bracelet featuring a mix of smooth and textured beads. The soft sage green tone combined with organic leaf-like imprints creates a subtle, nature-inspired jewelry piece perfect for everyday wear.
Step-by-Step Guide
Materials
- Polymer clay (pale sage green)
- Acrylic paint (darker forest green)
- Gold spacer beads (heishi or disc style)
- Stretch cord or elastic jewelry string
- Bead rolling tool or acrylic block
- Toothpick or bead piercing pin
- Texture stamp, heavily veined leaf, or fingerprint texture tool
- Wet wipes or damp paper towel
- Oven and baking tray
- Gloss or matte varnish (optional)
Step 1: Preparing the Clay Beads
-
Condition the clay:
Start by warming the pale sage green polymer clay in your hands. Knead it thoroughly until it is soft, pliable, and free of any crumbly bits. -
Portion the clay:
Roll the clay into a long, even log or snake shape. Use a tissue blade or knife to slice the log into approximately 20-24 equal segments to ensure your beads will be uniform in size. -
Roll spheres:
Take each segment and roll it between your palms to create smooth, round spheres. For perfectly uniform spheres, you can use a bead rolling tool. -
Pierce the beads:
Gently twist a toothpick or piercing pin through the center of each sphere. I find that twisting while pushing helps prevent the bead from squishing out of shape.
Clean Bead Holes
Use a small hand drill or a bead reamer after baking to clean out the holes. This ensures the elastic sits smoothly and doesn’t fray against sharp clay edges.
Step 2: Adding Texture and Baking
-
Select feature beads:
Choose about 4 to 5 beads to be your textured focal points. These will be the ones that receive the special leaf-vein treatment. -
Apply texture:
Gently press your chose texture tool—whether it’s a rubber stamp with a swirl pattern, a real leaf with prominent veins, or a texture sheet—into the surface of these selected beads. Roll the bead slightly across the texture to cover most of the surface. -
Refine the shape:
If the texturing process distorted the roundness, very gently pat them back into a sphere shape without smoothing out the new pattern. -
Bake the beads:
Arrange all your beads (smooth and textured) on a baking tray or dedicated bead rack. Bake according to the manufacturer’s instructions on your specific package of polymer clay. -
Cool down:
Allow the beads to cool completely before handling them. They harden fully as they cool.
Paint Stripping?
If you wipe away too much paint during the antiquing step, just let it dry completely, re-apply the dark wash, and try wiping again with a lighter touch.
Step 3: Antiquing and Assembly
-
Prepare the wash:
Mix a small drop of water into a dab of dark forest green acrylic paint to create a thin wash. -
Apply the wash:
Brush this dark wash over the textured beads, ensuring the paint gets deep into the crevices and imprinted lines. -
Wipe back:
Immediately use a wet wipe or damp paper towel to gently wipe the surface of the bead. This removes the paint from the raised areas but leaves it in the cracks, highlighting the pattern. -
Seal (Optional):
If you want extra durability, apply a thin coat of matte or satin varnish to seal the paint, though bare clay often holds up well on its own. -
Plan the layout:
Lay out your design on a bead board. Alternate the textured beads with gold spacers to create a focal section, filling the rest of the loop with the smooth sage beads. -
String the beads:
Cut a length of stretch cord about 10-12 inches long. Thread your beads onto the cord following your planned pattern. -
Tie the knot:
Tie a secure surgeon’s knot (right over left, left over right, looped through twice) to close the bracelet. Pull it tight to ensure there are no gaps between beads. -
Secure and trim:
Add a tiny dot of jewelry glue or clear nail polish to the knot for extra security. Once dry, trim the excess cord and tuck the knot inside one of the bead holes.
Now you have a serene, nature-inspired accessory ready to complement any outfit.
Jade-Inspired Green and Cream Mix
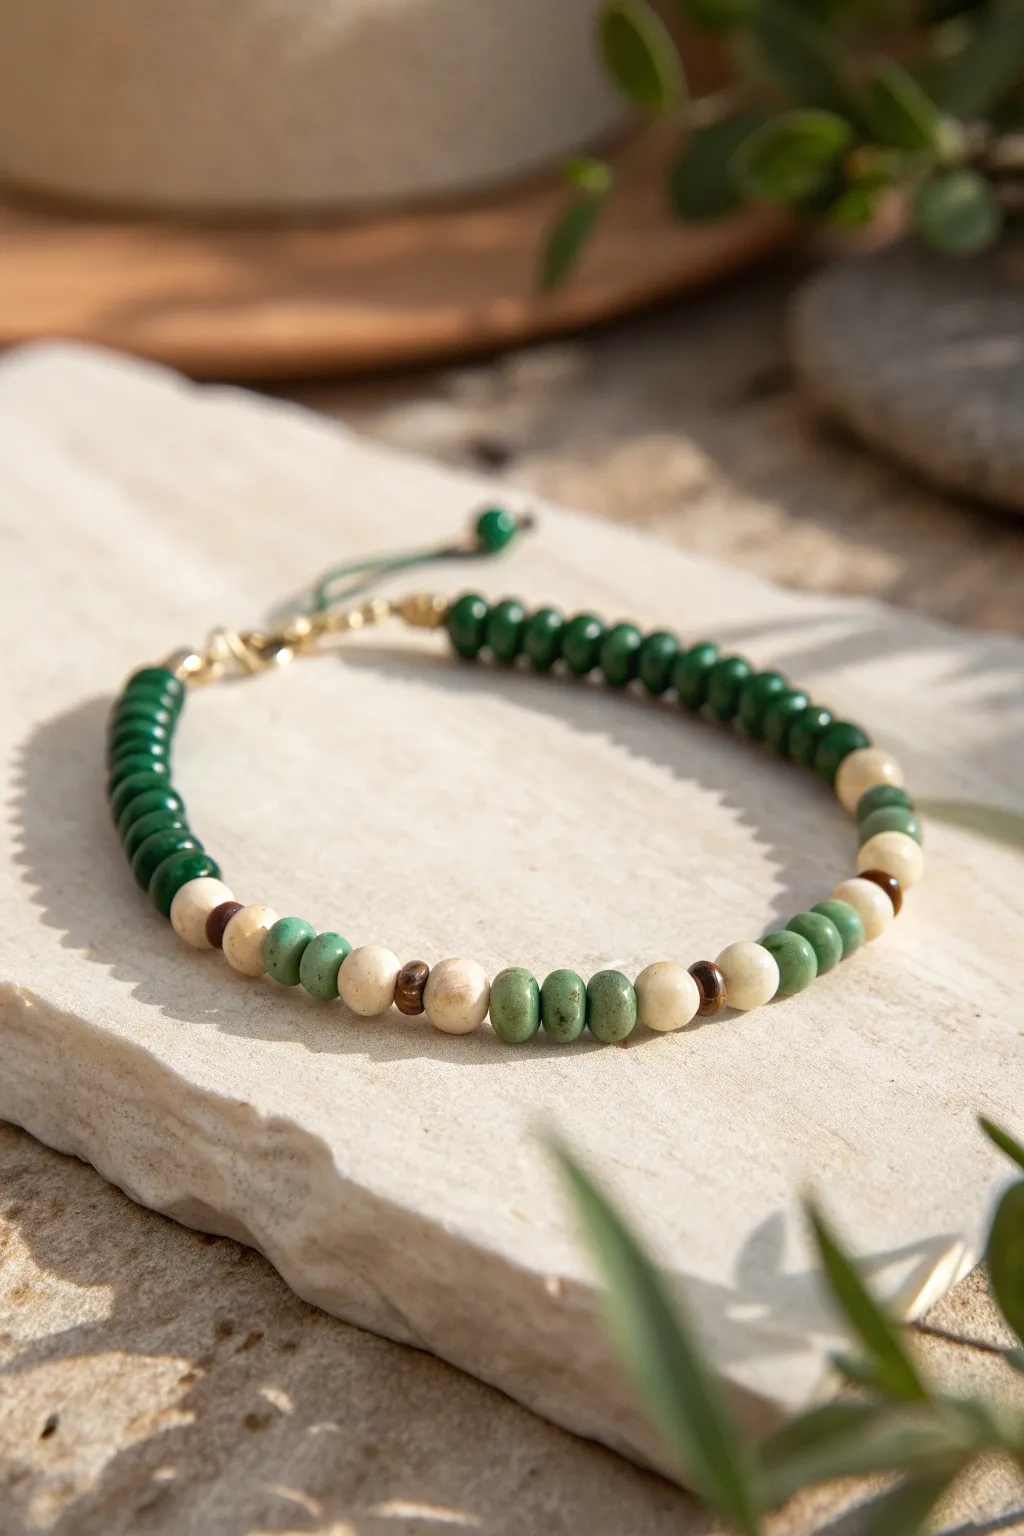
This serene bracelet captures the essence of a forest floor with its earthy mix of deep forest greens, soft sage, and creamy white tones. The irregular, organic shapes of the clay-style beads give it a wonderfully handcrafted, artisanal feel that pairs perfectly with casual linen outfits.
Step-by-Step
Materials
- Dark forest green heishi or rondelle beads (approx. 4-5mm)
- Cream or ivory rondelle beads (stone or clay, approx. 5-6mm)
- Sage or lighter jade green rondelle beads (approx. 5-6mm)
- Small dark brown wooden or copper spacer beads (2-3mm)
- Gold-tone crimp beads and crimp covers
- Gold-tone wire u-guard (wire guardian)
- Strong beading wire (e.g., Tiger Tail, 0.38mm or 0.45mm)
- Gold-tone lobster clasp
- Gold-tone jump ring or extension chain
- Adjustable sliding knot cord (optional alternative closure)
- Flat-nose pliers
- Wire cutters
Step 1: Planning the Pattern
-
Lay out the design:
Before restringing, lay your beads out on a bead board or a piece of felt. This prevents them from rolling away and lets you visualize the pattern. -
Establish the symmetry:
Notice the image shows a symmetrical design that transitions. The back section is solid dark green, while the front focal section alternates colors. Plan for roughly 3-4 inches of the dark green beads for the back half. -
Design the focal sequence:
For the front section, create a pattern that mimics natural stone variation. Arranging a sequence like: Cream – Brown Spacer – Sage Green – Sage Green – Cream – Brown Spacer – Sage Green – Sage Green creates a lovely rhythm. -
Check the length:
Measure your wrist and add about 1/2 to 3/4 inch for comfort. Adjust the length of the solid dark green section to fit your size requirements.
Stiff Bracelet Syndrome
If your finished bracelet feels stiff and won’t drape nicely, you likely pulled the wire too tight before crimping. Leave a tiny gap (about 1mm) of slack wire before crushing your final crimp.
Step 2: Stringing the Beads
-
Prepare the wire:
Cut a piece of beading wire about 10-12 inches long. This gives you plenty of extra room for finishing the ends without struggling. -
Start the strand:
Begin stringing from one end of your solid dark green section. Thread on all the dark forest green beads required for one side of the bracelet closure. -
Transition to the focal point:
Once your dark green section is strung (about half the total length), begin your patterned section. Slide on a cream bead, followed by a tiny brown spacer. -
Add sage accents:
Thread two of the lighter sage green beads next. These softer greens act as a bridge between the bright cream and dark forest tones. -
Complete the pattern repeat:
Continue this sequence: Cream bead, brown spacer, two sage beads, cream bead, brown spacer, two sage beads. Repeat this until the focal section covers the top curve of your wrist. -
Mirror the transition:
Finish the focal area symmetrically if desired, ending with a cream bead or brown spacer before transitioning back to any remaining dark green beads if your design calls for them.
Step 3: Finishing the Ends
-
Add crimp bead:
Slide a gold crimp bead onto the end of the wire, followed by a wire guardian (u-guard). Creating a loop with the wire guardian protects the wire from abrasion. -
Attach the clasp:
Slide the loop of your lobster clasp onto the wire guardian. Thread the wire tail back down through the crimp bead and pull it snug, but not too tight—the beads need room to move. -
Secure the crimp:
Use your flat-nose pliers or crimping pliers to flatten or fold the crimp bead securely. I always give a gentle tug here to ensure it’s holding firm. -
Hide the crimp:
Place a gold crimp cover over the flattened crimp bead and gently close it with pliers so it looks like a round gold bead. -
Finish the second side:
Repeat the crimping process on the other end of the bracelet, attaching a jump ring or extension chain instead of a clasp. -
Trim excess wire:
Thread the tail of the wire back through the first couple of beads for extra security, then trim the remaining wire flush with your cutters. -
Optional cord finish:
If you prefer the adjustable look seen in some stone bracelets, you can use waxed cord and finish with a macramé sliding knot instead of metal findings.
Natural Texture
To get that rustic look perfectly, avoid perfectly uniform beads. Mix in slightly irregular sizes or beads with matte finishes to mimic the organic feel of real jade and clay stones.
Now you have a beautifully earthy accessory ready to stack or wear solo
Mixed-Texture Green Bead Recipe
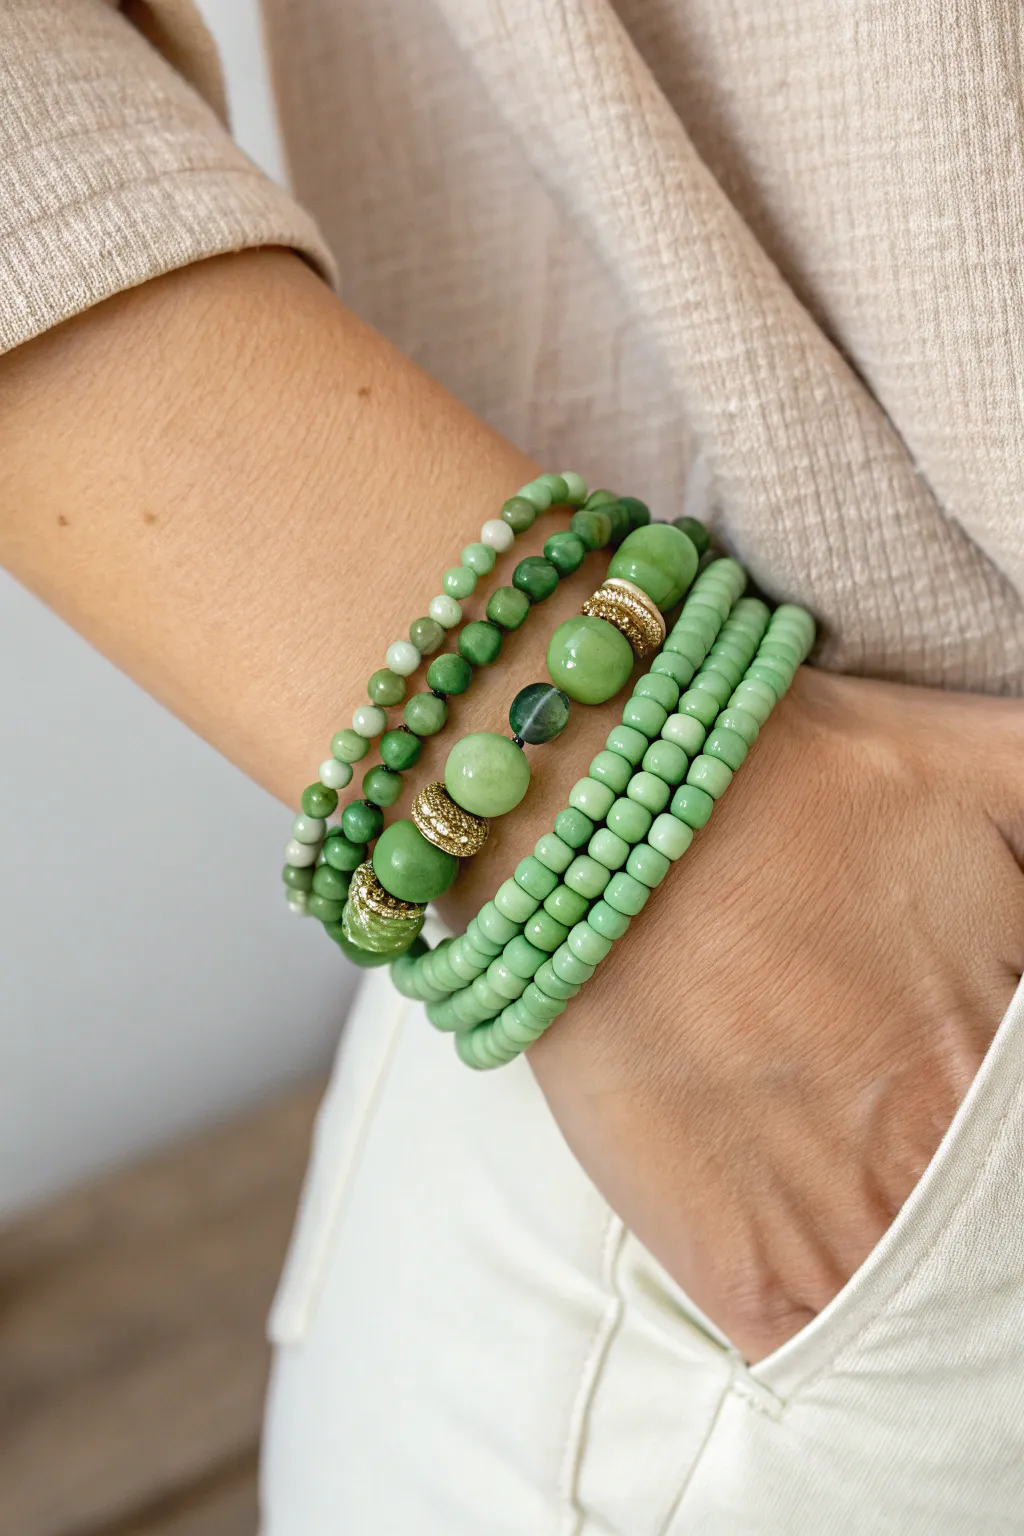
Capture the essence of a lush forest canopy with this stunning multi-strand bracelet stack that mixes finish and form. By combining matte polymer clay discs with polished gemstones and touches of gold, you create a sophisticated accessory that feels both organic and elegant.
How-To Guide
Materials
- Green polymer clay heishi beads (approx. 4-6mm)
- Polished jade or aventurine round beads (mix of 4mm, 6mm, 8mm, and 10mm)
- Faceted crystal rondelle beads in moss green
- Gold-tone rhinestone rondelle spacers
- Gold-tone pave ball accent beads
- Elastic beading cord (0.7mm or 0.8mm)
- Beading needle (collapsible eye)
- Super glue or jewelry cement
- Scissors
Step 1: The Clay Heishi Strands
-
Assess the Pattern:
Note that the bottom three strands in the stack are primarily uniform polymer clay heishi beads. Measure your wrist and cut three lengths of elastic cord, adding about 3 inches of allowance to each for tying. -
String the Base:
Thread your needle onto the first cord. Begin stringing the green clay heishi beads. These beads are flat and disc-like, creating a smooth, rope-like texture when stacked tightly. -
Check the Length:
Continue adding clay beads until the strand wraps comfortably around your wrist without pinching. It’s better to go slightly loose than too tight for a stack. -
Knot and Secure:
Remove the needle. Tie a surgeon’s knot (right over left, left over right) to secure the loop. Pull the elastic tight to ensure the knot holds. -
Glue the Knot:
Apply a tiny dot of super glue or jewelry cement directly to the knot. Let it dry completely before trimming the excess tail ends close to the knot. -
Repeat for Volume:
Repeat this entire process two more times to create a total of three matching green clay heishi bracelets. This forms the visual foundation of the stack.
Knot Slipping?
If your elastic knots unravel, pre-stretch the cord firmly before stringing. This removes slack and helps the knot bite into the material better.
Step 2: The Mixed Gemstone Strand
-
Prep the Gradient Strand:
Cut a new length of elastic cord for the most complex bracelet in the set—the mixed gemstone strand. -
Start Small:
Begin stringing with your smallest 4mm polished jade or aventurine beads. Thread about 10-12 of these to create the back section of the bracelet. -
Transition Sizes:
Switch to slightly larger 6mm round green beads. Add about 4 or 5 of these to start building visual weight towards the focal point. -
Add Texture:
Slide on a faceted crystal rondelle followed by a larger 8mm green stone bead. Repeat this small pattern (crystal, stone, crystal) to introduce sparkle. -
Place the Focal Beads:
Thread a gold rhinestone spacer, then a large 10mm polished green bead, and another gold spacer. This frames the largest beads beautifully. -
The Centerpiece:
In the very center, add a dark, mottled agate or darker jade bead, flanked by gold pave ball beads or textured gold spacers for maximum contrast. -
Mirror the Design:
I like to work symmetrically, so reverse your pattern now. Add the gold spacer, 10mm bead, and spacer combination, followed by the 8mm beads and crystals, tapering back down to the 6mm and 4mm beads. -
Final Adjustments:
Wrap the strand around your wrist to check the fit. If gaps remain, fill them with the smallest 4mm beads at the back of the design so the focal point stays centered on top of your wrist. -
Secure the Gemstone Strand:
Tie off this final bracelet with a strong surgeon’s knot, glue the knot securely, and trim the excess cord once dry. -
Hide the Knot:
Gently tug on the elastic to pull the knot inside one of the larger hole gemstone beads to conceal it for a professional finish.
Design Balance
Vary your shades of green slightly. Mixing mint, moss, and emerald hues prevents the stack from looking flat and adds organic depth.
Slip on your new stack and enjoy the rich textures and refreshing colors on your wrist