If you’re craving easy cute clay ideas that still feel like real little pieces of art, you’re in the right place. These are my go-to beginner-friendly projects when I want quick wins, sweet faces, and tiny details that make you grin.
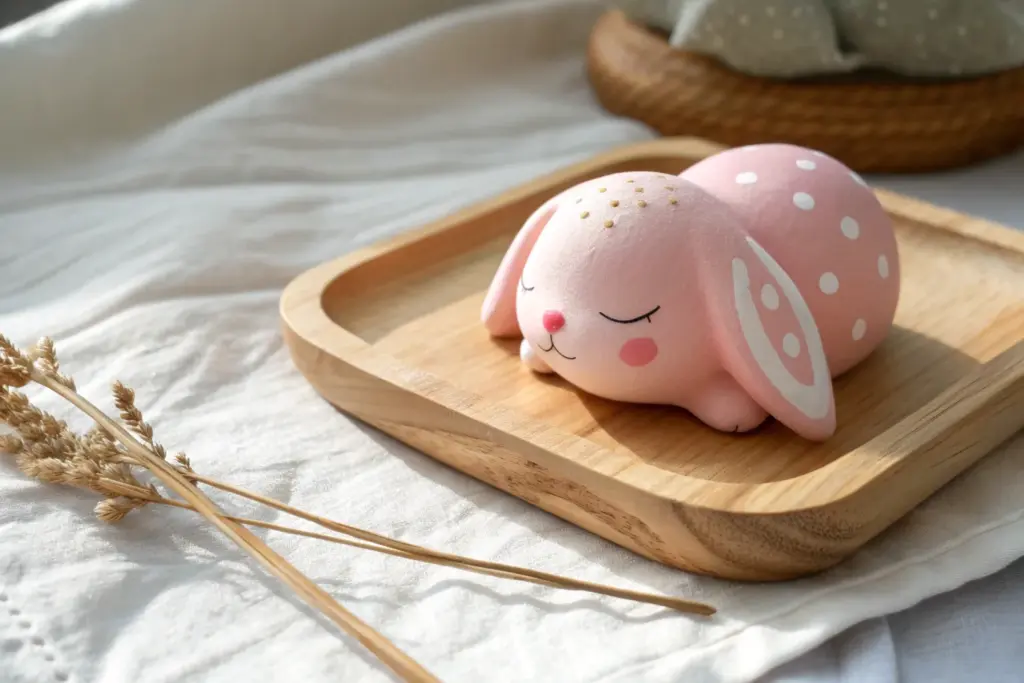
Chibi Animal Keychain Charms
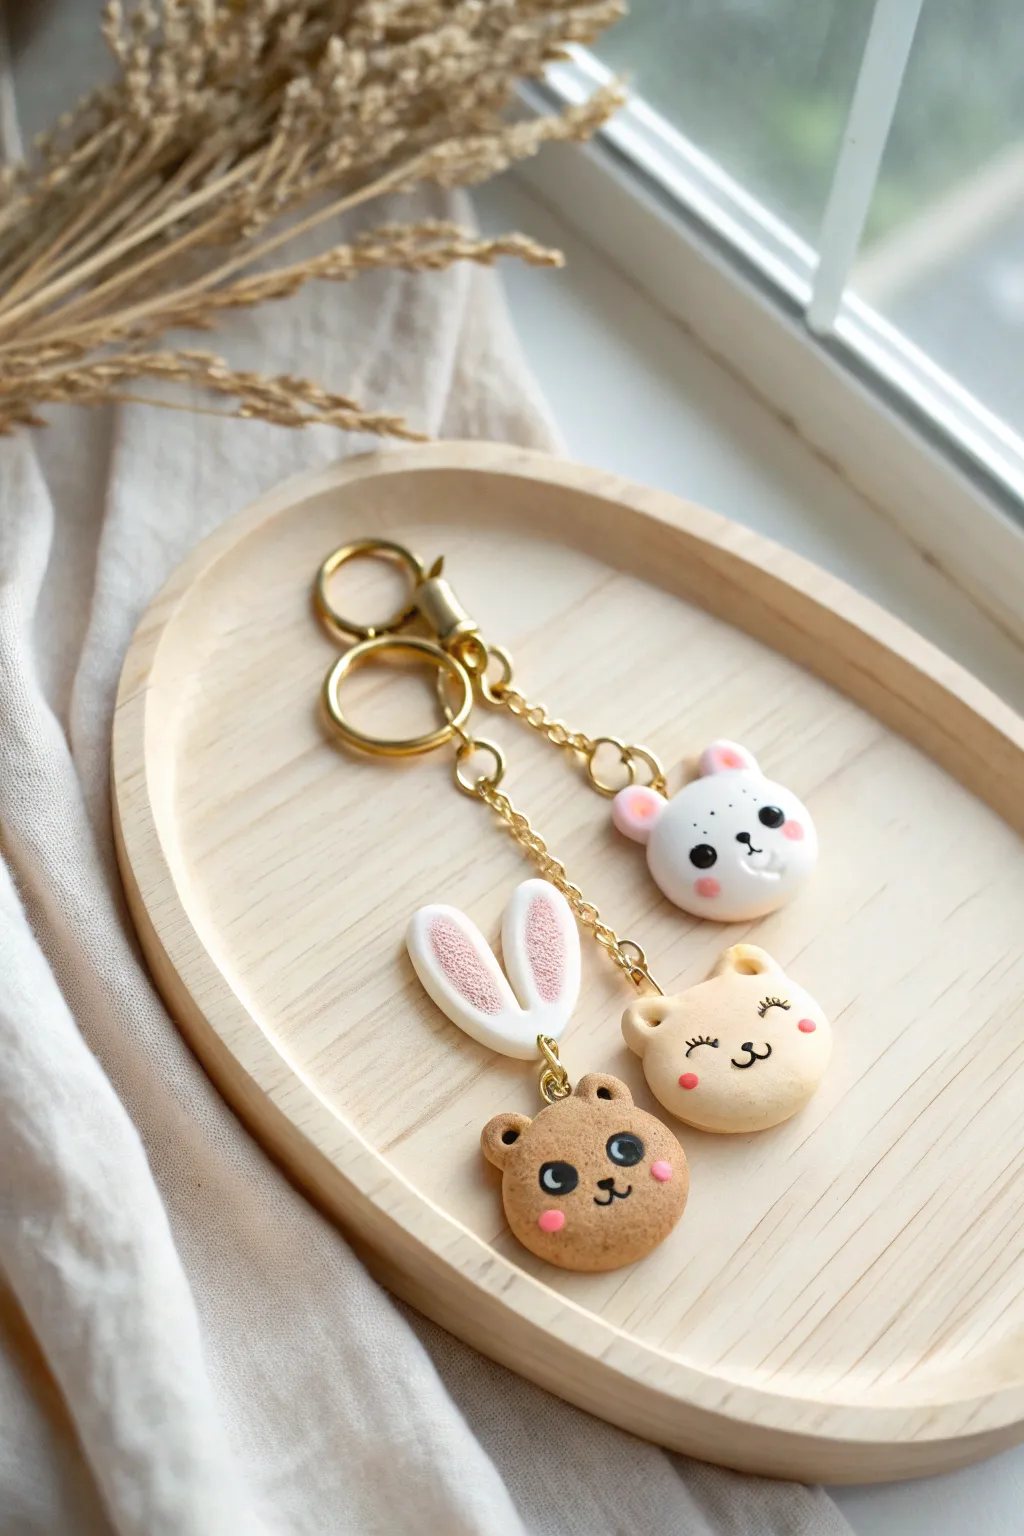
These adorable polymer clay charms feature sweet bear faces and a pair of detachable bunny ears, perfect for adding a touch of kawaii to your keys or bag. The soft pastel palette and simple expressions make this an ideal project for beginners looking to practice facial details.
How-To Guide
Materials
- Polymer clay (White, light cream/beige, light brown/tan, pink, black)
- Gold keychain hardware with chain links
- Gold eye pins (3 pieces)
- Jump rings (gold)
- Needle tool or toothpick
- Ball stylus tool
- Small circle cutter (optional, for uniform sizes)
- Soft pastel chalks (pink) and a small brush
- Gloss glaze or UV resin (optional, for eyes)
- Jewelry pliers (round nose and flat nose)
- Oven for baking clay
Step 1: Shaping the Base Heads
-
Prepare the clay:
Begin by conditioning your white, cream, and brown clay until soft and pliable. Roll three equal-sized balls of clay, roughly 1 inch in diameter, to serve as the main heads. -
Flatten slightly:
Gently press each ball down with your palm or an acrylic block to act as a flat ‘cookie’ shape rather than a perfect sphere. Smooth out any fingerprints. -
Create tiny ears:
For the white and cream heads, roll two tiny balls of the matching clay color. For the brown bear, roll two tiny brown balls. Flatten them slightly and press them onto the top left and right of each head. -
Blend the seams:
Using a silicone tool or your finger, gently blend the bottom of the ears into the head so they attached securely and look like one solid piece. -
Insert eye pins:
Pre-trim your eye pins if they are too long. Carefully insert an eye pin into the top center of each head. I like to add a tiny dot of liquid clay or Bake & Bond on the wire for extra security.
Step 2: Sculpting the Bunny Ears
-
Form the ears:
Roll two small logs of white clay, tapering them at the top to create a long bunny ear shape. Flatten them gently. -
Texture the inside:
Take a needle tool or stiff brush and gently stipple the center area of each ear to create a textured, furry look. -
Add pink shading:
Using a dry brush, dust a small amount of pink soft pastel powder into the textured center of the ears for a soft, blushed effect. -
Attach hardware:
Join the two ears together at the base. Insert a jump ring or eye pin directly into the clay between them so they can dangle later.
Clean Lines Pro-Tip
Before baking, use a cotton swab dipped in rubbing alcohol or acetone to gently wipe the clay surface. This removes lint, fingerprints, and smooths out tiny bumps.
Step 3: Adding Faces and Details
-
Add pink cheeks:
Roll tiny, flat discs of pink clay. Place them on the cheeks of all three faces. For the white and brown bears, place them slightly lower; for the cream bear, place them wider apart. -
Sculpt the snouts:
For the white head, add a tiny flattened oval of white clay in the center. For the brown bear, do the same with light tan clay. The cream bear does not need a separate snout piece. -
Create eyes (Open Style):
For the white and brown bears, roll small balls of black clay and press them onto the face. Add tiny specs of white clay as highlights to bring them to life. -
Create eyes (Closed Style):
For the cream bear, roll very thin snakes of black clay. Curve them into ‘U’ shapes with tiny lashes and press gently onto the face for a sleeping look. -
Add noses and mouths:
Place tiny black triangles for noses. Use thin snakes of black clay to form the mouth lines—simple hooks for the bears or a ‘3’ shape for the bunny. -
Bake the batch:
Place all charms on a tile or baking sheet. Bake according to your clay package instructions (usually 275°F/135°C for 15-30 minutes). Let them cool completely.
Loose Eye Pins?
If an eye pin slides out after baking, don’t panic. Pull it out completely, add a drop of super glue (cyanoacrylate) to the metal stem, and slide it back into the hole.
Step 4: Assembly & Finishing
-
Glaze the eyes:
Once cool, apply a tiny drop of UV resin or gloss glaze just to the open black eyes and noses to make them shine. -
Prepare the keychain:
Using your pliers, open the jump rings on your keychain hardware. -
Attach the main charms:
Attach the white and cream bears to the main chain at different heights for visual interest. -
Attach the bunny set:
For the bunny-ear look shown in the photo, attach the bunny ears to a chain link, then attach the brown bear to the bottom of the ears using a jump ring.
Now you have a set of sweet, customized friends ready to tag along on your daily adventures


Frog Mouth Toothbrush Buddy
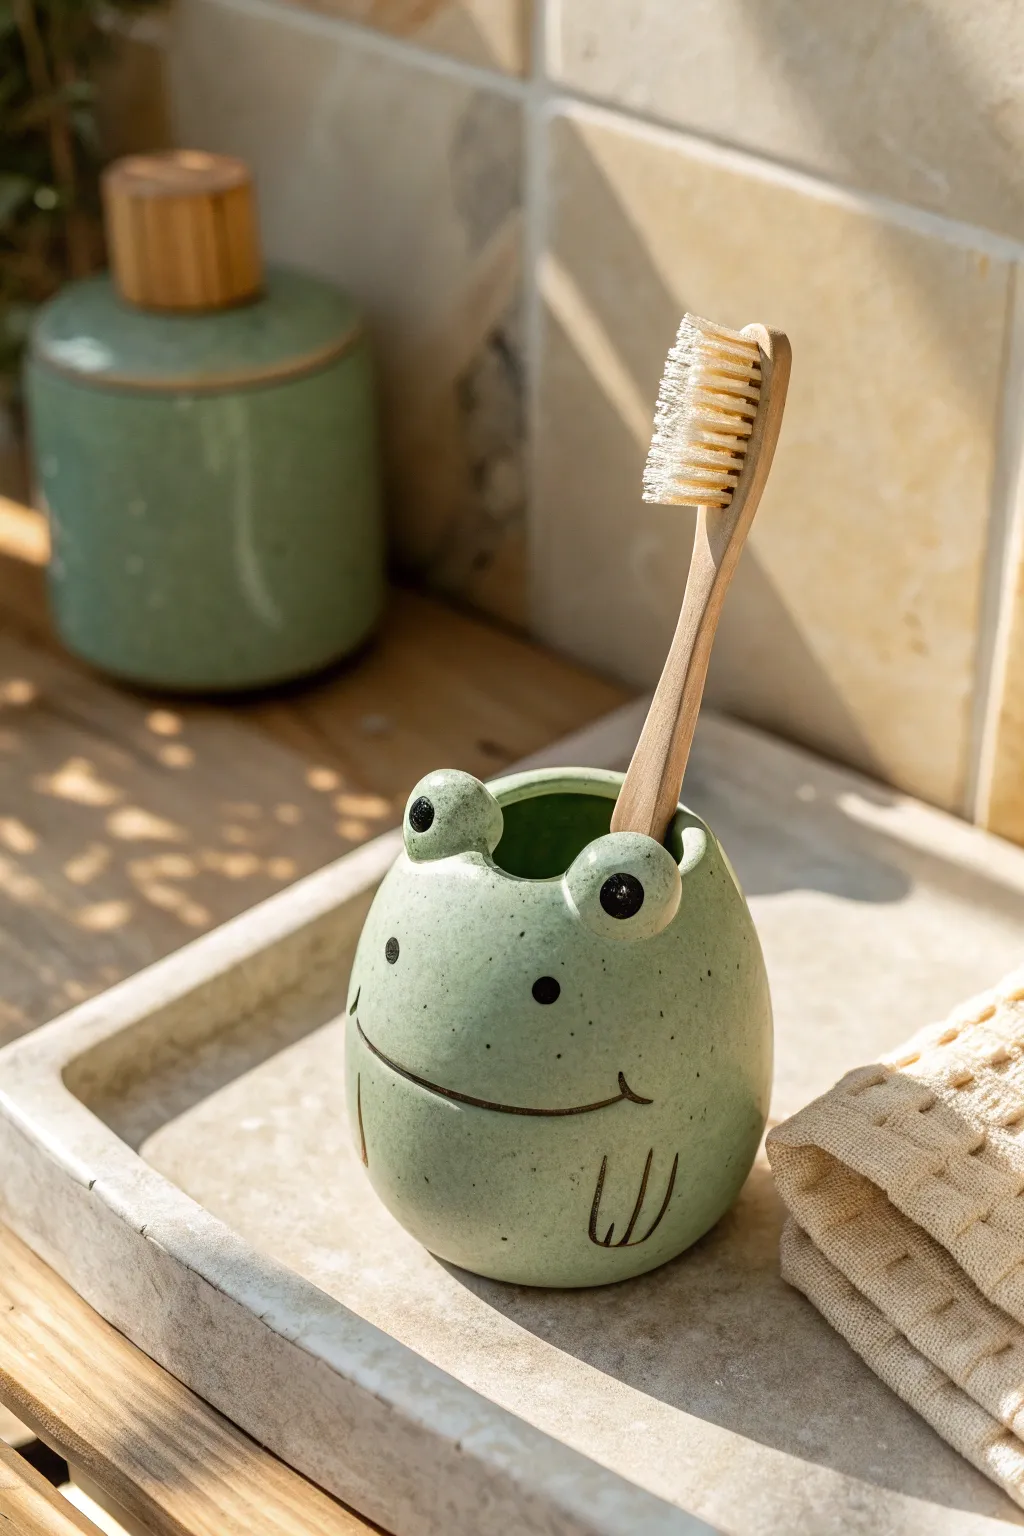
Brighten up your bathroom counter with this adorable frog-shaped toothbrush holder. With its speckled green finish and sweet little smile, this clay buddy is as functional as it is charming.
Detailed Instructions
Materials
- Air-dry clay or polymer clay (white)
- Wide-mouth toothbrush (for sizing)
- Acrylic paints (sage green, black, pink)
- Old toothbrush (for the spatter technique)
- Clay sculpting tools (specifically a ball tool)
- Water and sponge for smoothing
- Rolling pin
- High-gloss varnish or sealant
- Fine detail paintbrush
Step 1: Shaping the Frog Body
-
Create the base:
Start with a ball of clay roughly the size of a large orange. Roll it between your palms until it’s smooth and round, eliminating any major cracks. -
Form the egg shape:
Gently gently taper the top of the ball slightly so the overall form resembles a sturdy, wide egg. Flatten the bottom against your work surface so it stands upright without wobbling. -
Hollow the center:
Using your thumb, press straight down into the center of the egg shape to create the well for the toothbrush. The hole needs to be wide and deep enough to hold a toothbrush handle securely, about 2-3 inches deep. -
Widen the opening:
Gently pinch the walls of the opening to thin them out slightly, ensuring the rim is even. Smooth the interior walls with a bit of water on your finger. -
Add the eyes:
Roll two smaller balls of clay, about the size of large marbles. Score and slip the top rim of the body (if using air-dry clay) or simply press firmly (for polymer) to attach these balls on opposite sides of the opening. -
Refine the eyes:
Use a ball tool or the handle of a paintbrush to create slight indentations in the front center of each eye ball; this is where the pupils will go later. Blend the seams where the eyes meet the body so they look like one continuous piece. -
Smooth the surface:
Dip a sponge lightly in water and wipe down the entire sculpture. This removes fingerprints and creates that professional, smooth ceramic look.
Step 2: Decoration and Finishing
-
Dry or bake:
Follow the instructions for your specific clay type. If baking polymer clay, create a foil nest to keep the frog upright. If air-drying, let it sit for 24-48 hours in a cool, dry place. -
Base coat painting:
Once fully cured, paint the entire frog with a soft sage green acrylic paint. You may need two coats for full opacity, letting the first dry completely before adding the second. -
Create the speckled effect:
Here I prefer to mix a tiny drop of water into darker green or black paint. Dip an old toothbrush into this mixture and run your thumb across the bristles to flick tiny speckles all over the frog’s body. -
Paint the pupils:
Using a fine detail brush and black paint, fill in the indented circles on the eyes. Add a tiny white dot in each pupil for a ‘sparkle’ of life. -
Draw the face features:
With a very steady hand or a fine-tip paint marker, draw a wide, curved line for the smile that stretches across the belly. Add two small vertical lines at the ends of the smile. -
Add the cheeks and details:
Dab two small circles of black paint between the eyes and the mouth for nostrils or cheeks. Then, draw crude ‘U’ shapes near the bottom right to represent a little frog hand resting on its belly. -
Seal the piece:
Since this will live in a bathroom, sealing is crucial. Apply 2-3 coats of a high-gloss waterproof varnish. Pay special attention to the inside hole where water from the toothbrush might drip.
Waterproof Logic
Even with varnish, air-dry clay dissolves if soaked. For a truly waterproof holder, use polymer clay or line the inside hole with a small plastic tube or cap.
Lily Pad Coaster
Create a companion piece by rolling a flat slab of green clay into a lily pad shape. It acts as a cute coaster to catch drips and keeps your counter clean.
Place your new green friend by the sink and enjoy a smile every time you brush your teeth


Kitty Trinket Dish With Ears
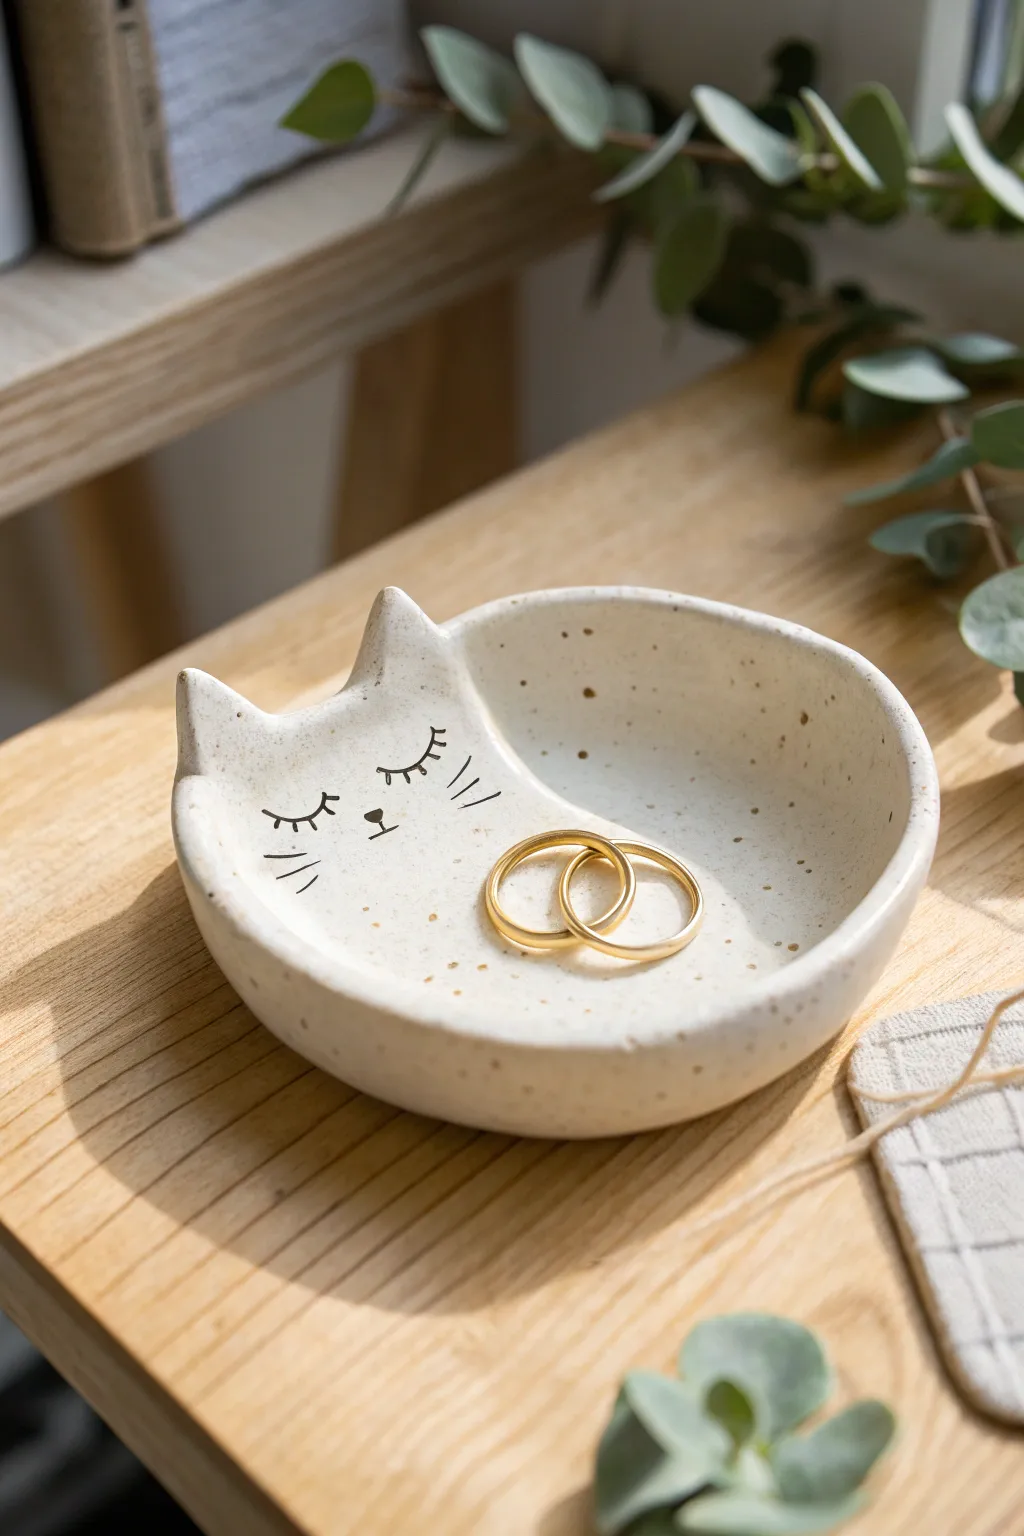
This adorable trinket dish blends minimalist design with a touch of whimsy, perfect for holding your favorite rings or earrings. The speckled clay finish and delicate painted face give it a high-end, handmade ceramic look without needing complex equipment.
Step-by-Step Guide
Materials
- Air-dry clay (white or cream)
- Speckle additive (or finely ground black pepper/coffee grounds)
- Small rolling pin
- Round bowl or cookie cutter (approx. 4-5 inches)
- Clay knife or craft blade
- Small bowl or sphere for molding
- Water and sponge
- Fine-grit sandpaper
- Fine-point black permanent marker or acrylic paint
- Clear varnish or sealant (gloss or matte)
- Sculpting tool or toothpick
Step 1: Prepping and Shaping the Clay
-
Prepare the speckled clay:
Start by taking a handful of white air-dry clay. If you don’t have pre-speckled clay, knead in a tiny pinch of faux speckles, coarse black pepper, or dry coffee grounds to achieve that trendy ceramic texture. -
Roll it out:
Roll the clay into a ball first to remove air bubbles, then flatten it onto a smooth surface. Use a rolling pin to create an even slab about 1/4 inch thick. -
Cut the base circle:
Place your round cookie cutter or a small bowl upside down on the clay slab. Use your craft knife to trace and cut out a perfect circle. -
Form the ears:
This is the fun part. Instead of cutting a perfect circle, you need to add the kitty’s ears. Locate the top section of your circle and gently push the clay outward from the inside edge to form two small triangles. -
Refine the silhouette:
Alternatively, you can cut two small triangles from your scrap clay. Score the bottom of the triangles and the top of the circle, dampen with water, and press them firmly together to attach. -
Blend the seams:
If you attached separate ears, use your finger or a sculpting tool to smooth the clay downward until the seam is completely invisible. The transition should be seamless. -
Smooth the edges:
Dip your finger in a little water and run it along the cut edges of the entire shape to round them off. You want a soft, finished look rather than a sharp, cut edge.
Step 2: Forming the Dish
-
Create the curve:
Gently lift your clay kitty shape. Place it inside a shallow bowl or atop a sphere mold to establish the cupped shape. Press gently so it takes the form of the mold. -
Refine the inner surface:
While it’s in the mold, check the inside surface. Use a slightly damp sponge to wipe away any fingerprints or imperfections. -
Let it dry:
Allow the dish to dry completely in a cool, dry place. This usually takes 24-48 hours depending on the thickness. Don’t rush this step or cracks may appear. -
Sanding:
Once fully cured and hard, remove the dish from the mold. Use fine-grit sandpaper to gently smooth any rough spots on the rim or the back.
Cracks while drying?
If you spot hairline cracks appearing as the clay dries, create a ‘slurry’ paste by mixing a tiny bit of clay with water. Smooth this into the cracks with your finger to patch them.
Step 3: Decorating and Finishing
-
Draft the face:
Before committing to ink, I like to lightly sketch the face placement with a pencil. Center the nose between the ears, but keep the features in the bottom half of the ‘face’ area. -
Draw the eyes:
Using a fine-point black marker or a very thin brush with black acrylic paint, draw two curved down-turned lines for closed, sleeping eyes. -
Add lashes:
Add three small dashes to the outer corner of each eye to create delicate eyelashes. -
Draw the nose and whiskers:
Draw a tiny inverted triangle for the nose. Add a short vertical line coming down from it, then draw three whiskers on each cheek, extending outward. -
Seal the piece:
To protect your work and give it that glazed ceramic feel, apply a coat of clear varnish. A satin or gloss finish works best to mimic real pottery. -
Final cure:
Let the varnish dry completely according to the manufacturer’s instructions before placing any jewelry in your new dish.
Pro Tip: Weights
To ensure the bottom stays flat while the edges curve up, place a small, light weight (like a coin) in the very center while it dries in the mold.
Now you have a charming little spot to keep your treasures safe


Smiley Face Mini Magnets
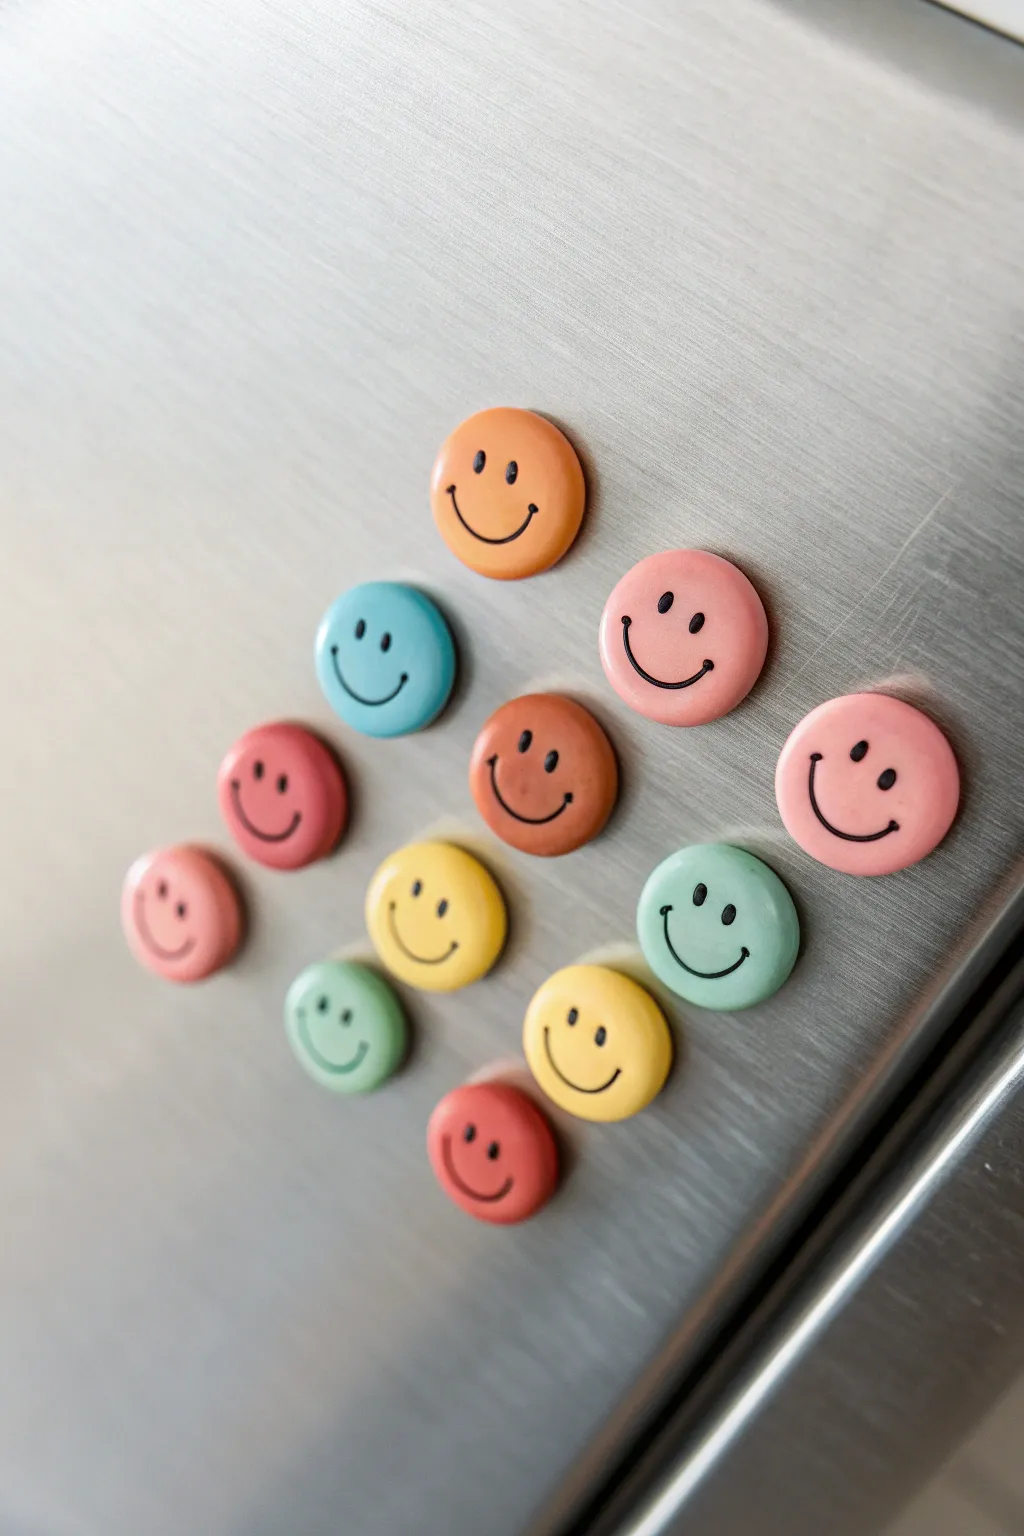
Brighten up your fridge or magnetic board with this cheerful collection of tiny, colorful smiley faces. These simple, rounded magnets offer a minimalist aesthetic that is both playful and incredibly functional for holding up photos and notes.
Step-by-Step Tutorial
Materials
- Polymer clay (various pastel and bright colors: orange, pink, yellow, blue, teal, red)
- Small round cutter (approx. 0.75 or 1 inch diameter)
- Acrylic rolling pin or pasta machine
- Black acrylic paint or fine-tip black permanent marker
- Small round magnets
- Superglue or heavy-duty craft glue
- Gloss or matte glaze (optional)
- Small detail paintbrush
- Baking sheet and parchment paper
- Oven
Step 1: Prepping Key Shapes
-
Condition the Clay:
Begin by selecting your color palette. You’ll need small amounts of orange, pink, yellow, light blue, teal, and a reddish tone. Knead each color individually until it is soft, pliable, and free of cracks. -
Roll It Out:
Using an acrylic rolling pin or a dedicated clay pasta machine, roll your conditioned clay into flat sheets. Aim for a thickness of about 1/4 inch (6mm) to ensure the magnets are sturdy but not too heavy. -
Cut the Circles:
Use your small round cutter to punch out circles from the various clay colors. If you don’t have a cutter, you can roll small balls of clay and gently flatten them with the bottom of a glass, though a cutter gives sharper edges. -
smooth the Edges:
After cutting, pick up each clay circle and gently run your finger around the perimeter. This softens the sharp cut edge slightly, giving it a more finished, store-bought look. -
Check for Imperfections:
Inspect the surface of each circle for fingerprints or lint. You can lightly smooth them out with a drop of baby oil on your fingertip or by gently rolling over the surface again with a piece of parchment paper on top.
Smudge Alert
If you make a mistake with the black paint, dip a Q-tip in rubbing alcohol or nail polish remover (if using acrylics) to quickly wipe it away before it sets.
Step 2: Baking and Assembly
-
Bake the Discs:
Place your clay circles on a parchment-lined baking sheet. Bake them according to your specific brand of polymer clay instructions (usually around 275°F/135°C for 15-30 minutes). I prefer to bake them slightly longer at a lower temp to prevent scorching light colors. -
Cool Down:
Once baked, remove the tray from the oven and let the clay discs cool completely. They will harden fully as they return to room temperature. -
Prepare the Magnets:
Flip all your cooled clay discs over so the back side is facing up. Prepare your superglue or strong craft adhesive. -
Attach Creating Backing:
Apply a small dot of glue to the center of each disc’s back side. Press a small round magnet firmly into the glue. Hold it for a few seconds to ensure an initial bond. -
Cure the Glue:
Allow the glue to dry completely according to the manufacturer’s directions before flipping them back over. This prevents the magnets from sliding off center.
Expression Mix-Up
Try varying the expressions by adding winking eyes, sticking-out tongues, or tiny glasses to create a whole family of distinct personalities.
Step 3: Adding Personality
-
Plan the Faces:
Before painting, visualize where the eyes and mouths will go. The style shown here uses wide-set vertical oval eyes and a simple U-shaped smile placed relatively low on the face. -
Paint the Eyes:
Using a very fine detail brush and black acrylic paint, or a fine-tip permanent marker, gently dab two small vertical ovals for the eyes. Keep them symmetrical and spaced slightly apart. -
Draft the Smile:
Carefully draw a thin, curved line for the smile beneath the eyes. Start from the left side and swoop down and up to the right. A steady hand is key here. -
Add Smile Cheeks:
To match the reference image, add tiny little tick marks at the very ends of the smile line. This small detail gives the face a cute, dimpled expression. -
Let Paint Dry:
Allow the paint or ink to dry completely. If you used acrylic paint, give it at least 20 minutes so you don’t accidentally smudge your work. -
Seal (Optional):
For extra durability, you can coat the face side with a thin layer of matte or gloss varnish. This protects the painted details from scratching over time.
Arrange your completed magnets in a pattern and enjoy the daily dose of cheer they bring to your kitchen

The Complete Guide to Pottery Troubleshooting
Uncover the most common ceramic mistakes—from cracking clay to failed glazes—and learn how to fix them fast.
Pastel Dino Desk Buddy
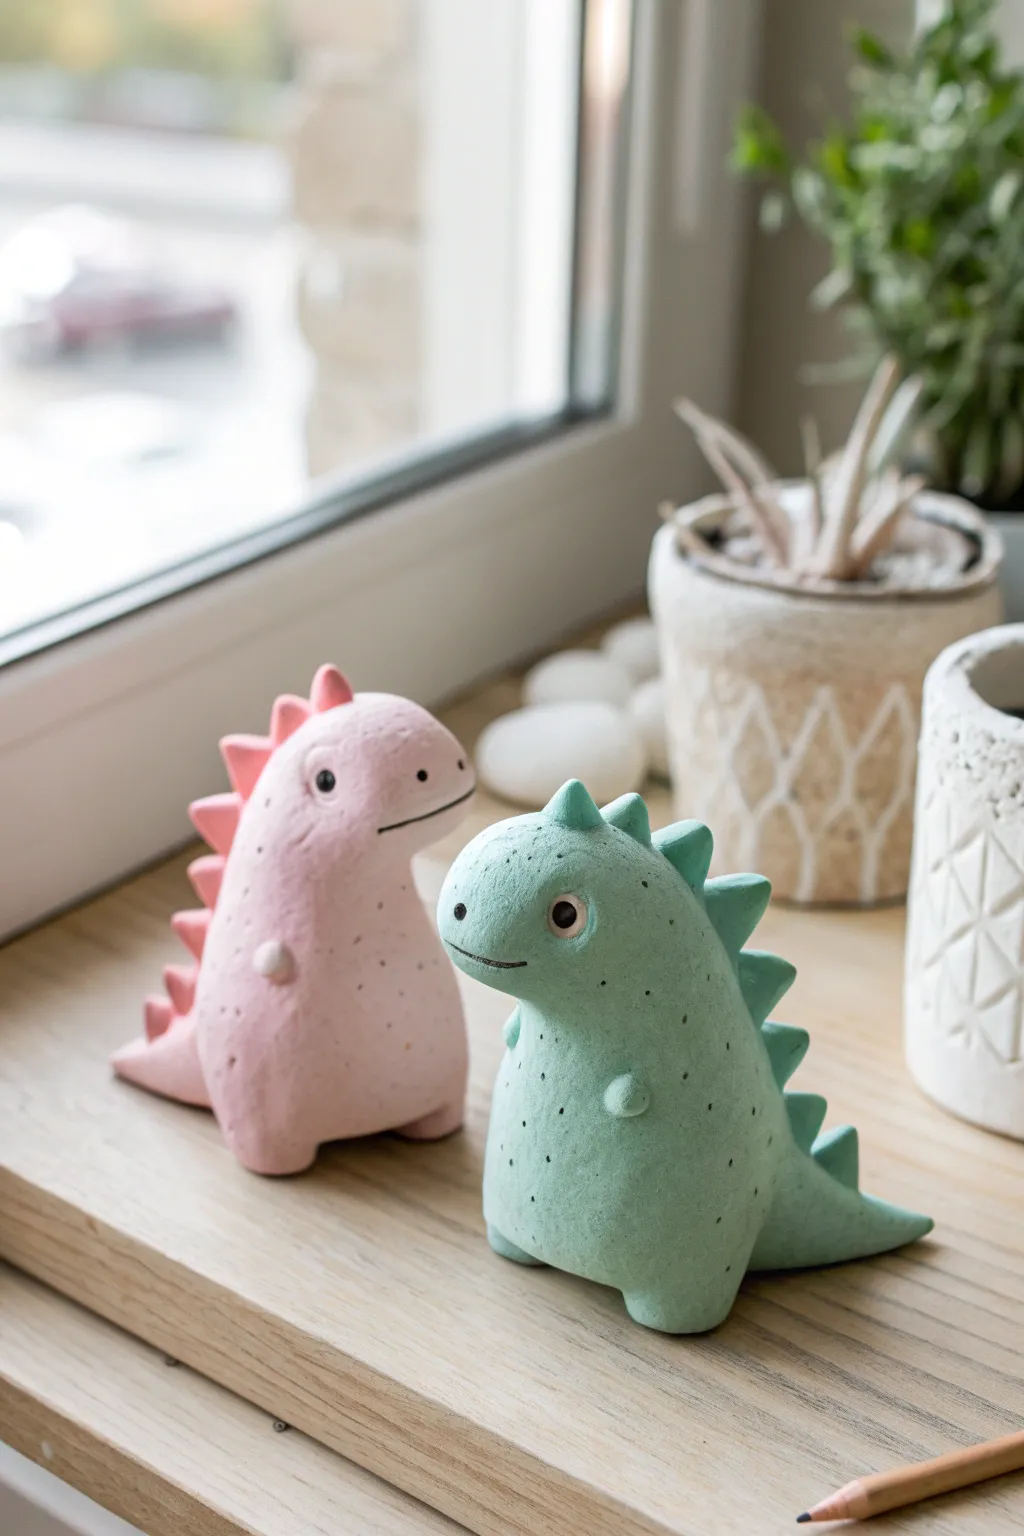
Create your own pair of prehistoric pals with these adorable, matte-finish clay dinosaurs. These minimalist figurines feature soft pastel tones and simple shapes, making them the perfect cheerful addition to a windowsill or desk.
How-To Guide
Materials
- Air-dry clay or polymer clay (white)
- Acrylic paints (pastel pink, mint green, black, dark grey)
- Fine-grit sandpaper
- Small rolling pin
- Sculpting tools (needle tool, smoothing tool)
- Water cup (for smoothing)
- Paintbrushes (soft bristle for base coat, fine detail brush)
- Matte spray varnish
Step 1: Shaping the Bodies
-
Prepare the Clay:
Start by conditioning your clay. If using air-dry clay, knead it slightly to remove air bubbles. Divide the clay into two equal fist-sized lumps, one for each dinosaur. -
Form the Torso:
Roll one lump into a smooth ball, then gently elongate it into a pear shape. This will be the main body. Flatten the bottom slightly so the figure stands stably on its own. -
Create the Head:
From the narrower top part of your pear shape, gently pull and curve the clay forward to form the snout. Smooth the transition so the neck flows seamlessly into the head. -
Add the Tail:
Pinch the clay at the rear bottom of the sculpture and pull it outwards to form a thick, short tail. Curve it slightly for a dynamic look and blend it back into the body. -
Refine the Shape:
Dip your finger in a little water and smooth out any fingerprints or cracks. Ensure the snout is rounded and friendly, and the back has a gentle curve.
Step 2: Adding Details
-
Make the Arms:
Roll two tiny tic-tac-sized pieces of clay. Attach them to the front of the body, just below the neck area. Blend the attachment points so they look like stubby little arms resting on the tummy. -
Sculpt the Spines:
Roll out a thin snake of clay or a small slab. Cut small triangles for the dinosaur’s back plates. You will need about 6-8 triangles, graduating in size from small to medium to small again. -
Attach the Spines:
Score the back of the dinosaur gently with a needle tool. Apply a tiny amount of water or liquid clay (if using polymer) and press the triangles in a row from the top of the head down to the tail. -
Add Eye Indentations:
Use a small ball tool or the smooth end of a paintbrush to press shallow indentations where the eyes will go. This adds dimension before painting.
Cracking Clay?
If surface cracks appear while air-drying, mix a small slurry of fresh clay and water. Fill the cracks, smooth over with a damp finger, and let it dry again.
Step 3: Finishing and Painting
-
Dry or Bake:
If using air-dry clay, let the figures dry for 24-48 hours until completely hard and white. If using polymer clay, bake according to the package instructions. -
Sand for Texture:
Once fully cured, use fine-grit sandpaper to gently smooth any rough bumps. The goal is a matte, slightly stone-like texture, so don’t polish it too aggressively. -
Base Color:
Paint the first dino entirely in pastel pink and the second in mint green. I prefer to apply two thin coats rather than one thick one to maintain the clay’s texture. -
Paint the Spines:
For the pink dino, mix a slightly darker or more intense pink for the spines. For the green dino, use a slightly deeper teal-green. Carefully paint the triangular plates. -
Detail the Face:
Using your finest brush and black paint, fill in the eye indentations. Add a small white dot in the upper corner of the eye for a highlight. Paint a thin, simple smile line. -
Add Texture Spots:
Dip a stiff brush or a toothpick into grey or diluted black paint. Add tiny, random speckled dots over the body to mimic a stone or eggshell texture. -
Seal the Work:
Finish with a matte spray varnish to protect the paint without making it shiny. This preserves that soft, velvety look.
Texture Trick
To get that specific porous look shown in the image, lightly tap the wet clay surface with a toothbrush or stiff sponge before it dries.
Place your new prehistoric friends near a light source to enjoy their sweet expressions throughout the day
Tiny Octopus Ring Holder
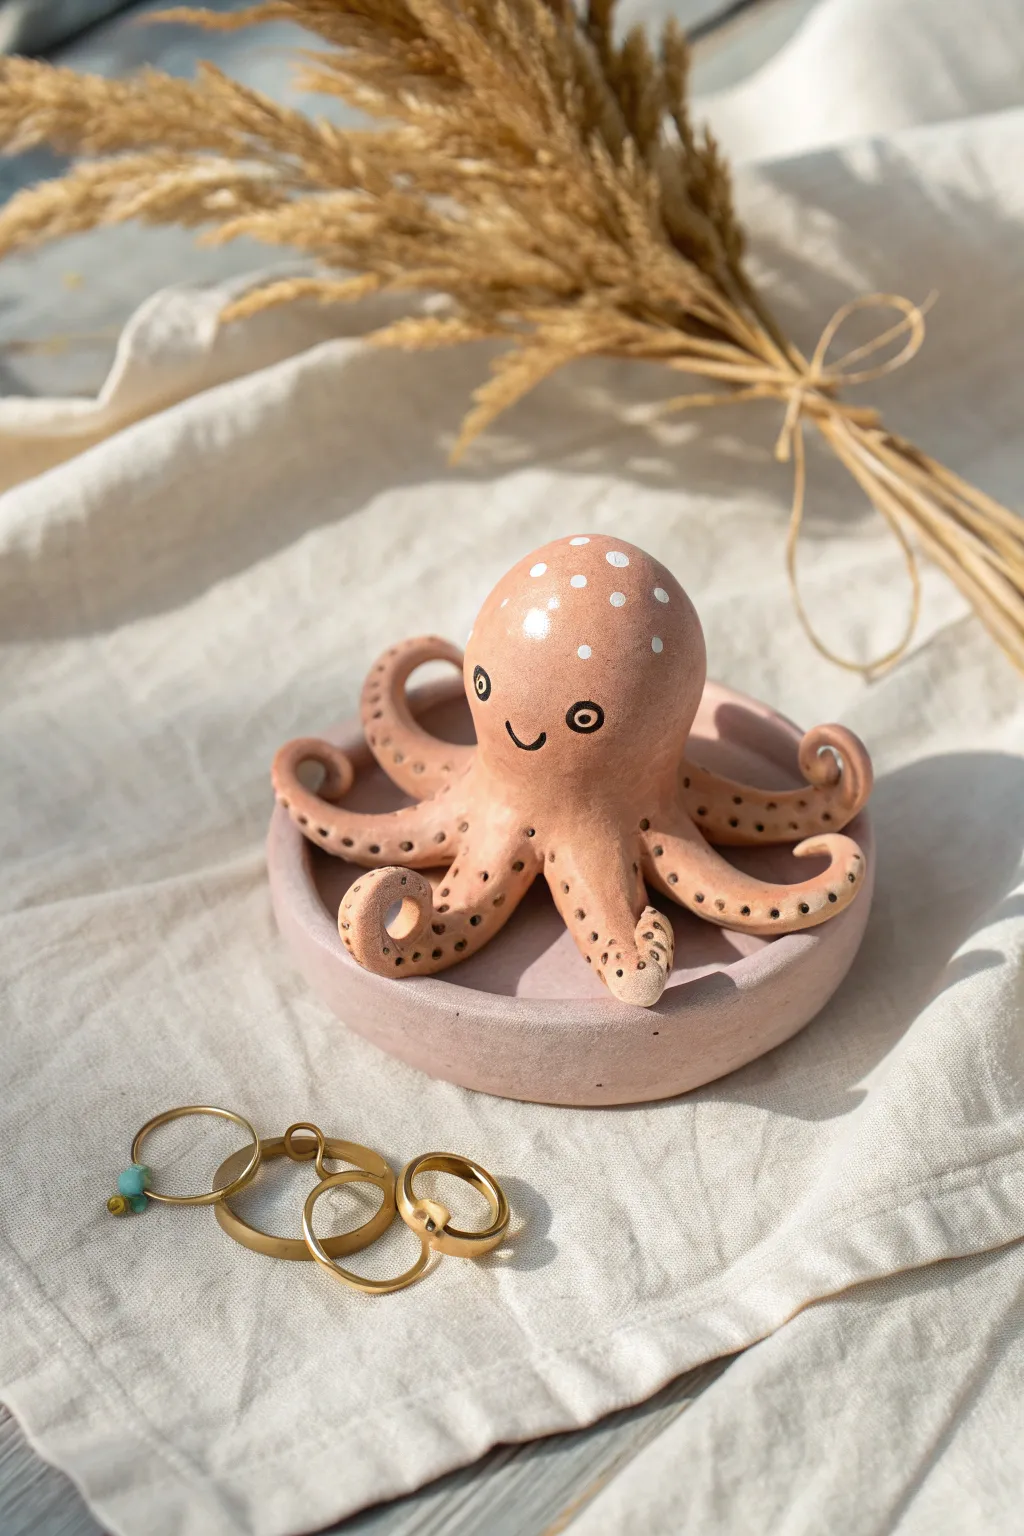
This adorable octopus ring holder combines functionality with whimsy, featuring a charming handcrafted clay friend perched atop a matching catch-all dish. The soft peach tone and simple painted details give it a sweet, modern look perfect for organizing your everyday jewelry.
Detailed Instructions
Materials
- Air-dry clay (or polymer clay)
- Acrylic rolling pin
- Clay carving tools or a toothpick
- Small bowl or jar lid (to use as a mold)
- Fine-grit sandpaper
- Acrylic paints: Peach/Terra Cotta, White, Black
- Fine detail paintbrush
- Water cup and palette
- Matte sealant or varnish
Step 1: Sculpting the Base Dish
-
Roll the clay:
Begin by conditioning a tennis-ball-sized amount of clay until it is soft and pliable. Roll it out into a flat sheet about 1/4 inch thick using your acrylic rolling pin. -
Cut the circle:
Find a circular object like a large cookie cutter or a bowl rim (approx. 4-5 inches wide) to cut a perfect circle from your clay sheet. -
Form the rim:
Take a long coil or ‘snake’ of clay and attach it to the outer edge of your base circle. Blend the seams thoroughly on both the inside and outside using your thumb or a modeling tool so it looks like one solid piece. -
Structure the shape:
Gently press the center of the dish down slightly to create a shallow curve. You can rest the clay circle inside a small bowl to help it hold a curved shape while drying.
Smooth Operator
Keep a small dish of water nearby while sculpting. Dip your finger in it to smooth out cracks instantly before the clay dries.
Step 2: Creating the Octopus
-
From the head:
Roll a smooth ball of clay about the size of a golf ball for the octopus’s head. Gently elongate it slightly into an egg shape. -
Make the tentacles:
Roll out eight tapered coils of clay for the legs. They should be thicker at one end (where they attach to the body) and curl into fine points at the tips. -
Attach legs to body:
Score and slip (scratch the surface and add water/liquid clay) the bottom of the head and the thick ends of the tentacles. Press the tentacles firmly onto the underside of the head. -
Shape the movement:
Curl the ends of the tentacles upwards or sideways to create a dynamic, wavy look. Ensure some tentacles curve enough to potentially hold a ring. -
Add suction cup details:
Using a small dotting tool or the blunt end of a toothpick, press tiny indentations along the underside of each tentacle to simulate suction cups. -
Secure to dish or keep separate:
You can now attach the octopus permanently to the center of your dish using the score-and-slip method, or leave it separate so it can sit freely. The example image shows the octopus sitting casually inside the dish. -
Dry completely:
Let your creation dry for 24-48 hours. I find it helpful to turn the pieces over halfway through so the bottoms dry evenly.
Step 3: Painting and Finishing
-
Sand imperfections:
Once fully dry, use fine-grit sandpaper to gently smooth out any fingerprints or rough edges on both the dish and the octopus. -
Base coat:
Paint the entire octopus and the dish with a soft peach or terra cotta acrylic paint. You may need two thin coats for full, opaque coverage. -
Adding texture dots:
Mix a slightly darker shade of brown-peach. Use a fine brush to dab small spots onto the curled tentacles, emphasizing the texture of the clay. -
Paint the face:
Using a very fine liner brush and black paint, add two circles for eyes. Once dry, add a tiny white dot in the center of the black for a highlight. Then, paint a small, U-shaped mouth. -
White spots:
Dip the back end of a paintbrush into white paint to stamp charming polka dots randomly across the top of the octopus’s head. -
Sanding for distress (optional):
For a rustic look, you can very lightly sand the painted surface in a few spots to let the raw clay texture peek through. -
Seal the piece:
Finish by applying a coat of matte varnish or sealant to protect your paint job and give the holder a finished, professional sheen.
Tentacles Falling Off?
If a leg breaks off during drying, don’t panic. Use a tiny dab of superglue or heavy-duty craft glue to reattach it seamlessly.
Place your favorite rings on the tentacles and enjoy your charming new desk companion.


What Really Happens Inside the Kiln
Learn how time and temperature work together inside the kiln to transform clay into durable ceramic.
Turtle Shell Secret Jewelry Box
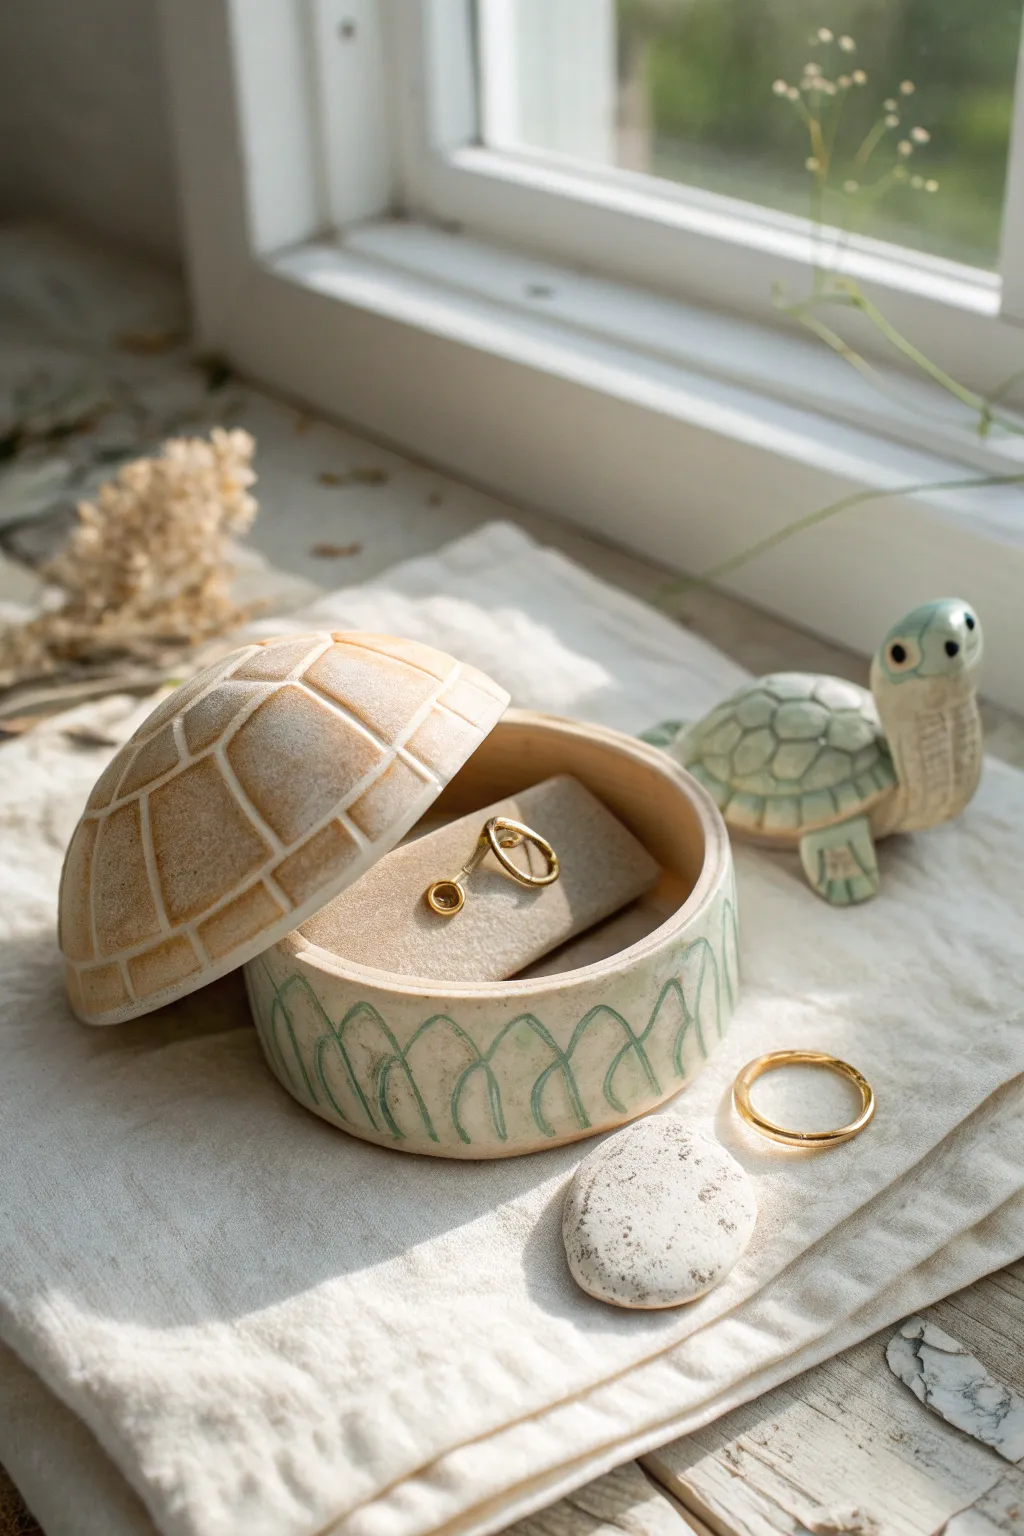
This whimsical jewelry box mimics the gentle curve of a turtle’s shell, complete with etched details and a soft, scalloped base pattern. It’s the perfect hidden spot for your smallest treasures, combining functional storage with an adorable, nature-inspired aesthetic.
Step-by-Step
Materials
- Air-dry clay or polymer clay (white or cream)
- Circle cutter or a round bowl (approx. 3-4 inches diameter)
- Needle tool or toothpick
- Rolling pin
- Small bowl (to use as a mold)
- Acrylic paints (pale sage green, sandy tan, cream)
- Fine detail paintbrush
- Medium flat paintbrush
- Small piece of beige felt or velvet
- Craft glue
- Gloss varnish or sealant
- Water cup and sponge (for smoothing)
Step 1: Shaping the Base
-
Roll the Slab:
Begin by rolling out a portion of your clay to a consistent thickness of about 1/4 inch. Ensure it’s smooth and free of air bubbles. -
Cut the Base:
Use your circle cutter or trace around a bowl to cut a perfect circle for the floor of your box. -
Create the Walls:
Roll a long strip of clay, roughly 1 inch wide and long enough to wrap around the circumference of your base circle. -
Attach the Walls:
Score and slip (scratching the surface and adding a bit of water or liquid clay) the edge of the base circle and the bottom edge of your strip. Press them together firmly to create the container walls. -
Blend the Seams:
Use your fingers or a modeling tool to smooth the seam where the wall meets the base, both inside and outside, until the join is invisible.
Clean Lines
When carving the shell pattern, let the clay firm up slightly (leather hard) before etching. This prevents the needle tool from dragging and creating jagged crumbs.
Step 2: Sculpting the Lid
-
Mold the Dome:
Roll out another slab of clay. drape it gently over the bottom of a small, overturned bowl to create a curved, dome shape. This will be your turtle shell lid. -
Trim the Edges:
While it is on the mold, trim the excess clay around the rim so it matches the diameter of your base container. -
Smoothing the Dome:
Use a damp sponge to gently smooth the surface of the dome, erasing any fingerprints or cracks. -
Etch the Shell Pattern:
With a needle tool, lightly carve the hexagonal turtle shell pattern into the damp clay. Start with a central shape and work your way out to the rim. -
Create the Lip:
Roll a very thin coil of clay and attach it to the *underside* of the lid’s rim. This creates a lip that will help the lid sit securely on the base without sliding off. -
Dry the Components:
Allow both the base and the lid to dry completely according to your clay package instructions. I usually let them sit for 24 hours to be safe.
Hidden Gem
Add a tiny sculpted turtle head and feet peeking out from under the lid’s rim for a more playful, figurative look.
Step 3: Decorating and Finishing
-
Base Painting:
Once dry, paint the interior of both the lid and base with a creamy off-white color for a clean finish. -
Paint the Exterior Base:
Paint the outside of the bottom container a solid cream color. Let it dry. -
Add Scallop Details:
Using a fine detail brush and pale sage green paint, draw delicate interlocking arches or scallops around the circumference of the base to mimic the decorative pattern shown. -
Paint the Shell:
Wash a diluted sandy tan paint over the lid. Wipe away excess with a paper towel so the darker pigment stays in the etched grooves, highlighting the shell pattern. -
Seal:
Apply a coat of gloss varnish to the entire outside of the box to protect the paint and give it a ceramic-like shine. -
Create the Cushion:
Cut a small rectangle of beige felt or velvet, roll it or fold it into a small pillow shape, and glue the bottom into the center of the box to hold rings or earrings.
Place your favorite ring on the cushion and enjoy your charming handmade treasure box
Food With Faces Mini Charms
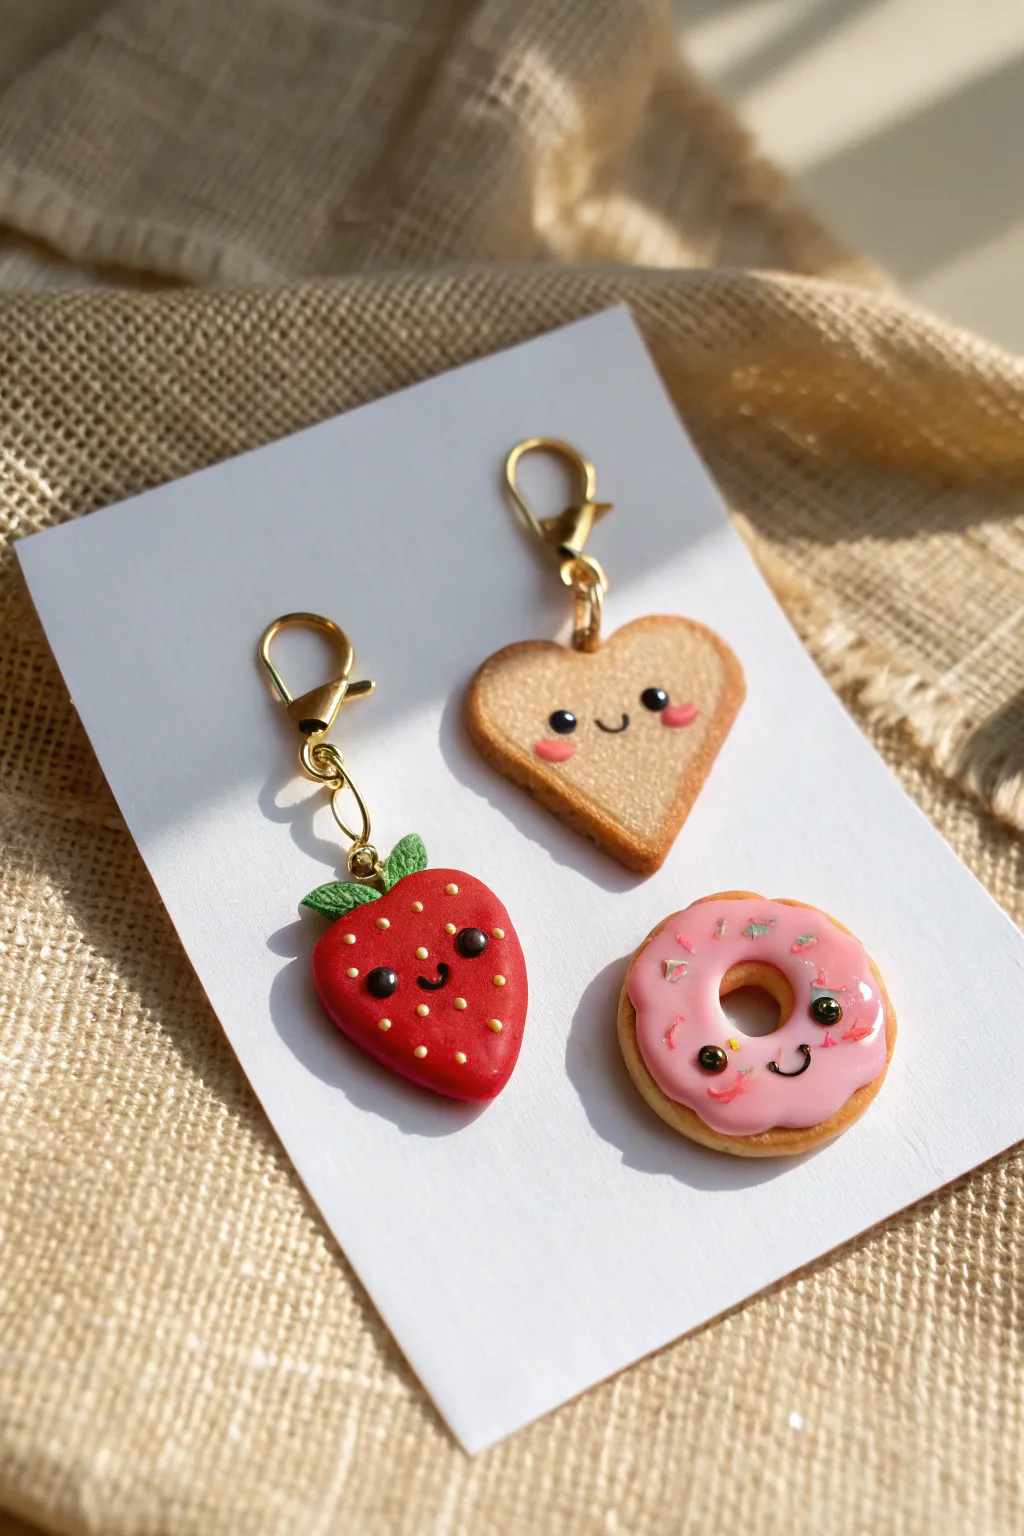
These adorable polymer clay charms transform simple snacks into smiling companions perfect for keychains or stitch markers. You’ll create a trio of sweet treats—a strawberry, a heart-shaped toast, and a sprinkled donut—each featuring tiny, expressive faces.
Step-by-Step Tutorial
Materials
- Polymer clay (red, tan/beige, pink, green, chocolate brown)
- Liquid polymer clay (translucent or white mixed with pink)
- Gold lobster clasps with jump rings
- Gold screw eye pins
- Dotting tools or ball stylus
- Needle tool or toothpick
- Soft pastels (brown, orange, pink) and a soft brush
- Gloss glaze (optional)
- Oven for baking
Step 1: Shaping the Happy Heart Toast
-
Mix the dough color:
Start by mixing translucent and white clay with a tiny bit of yellow and brown to create a realistic, light tan “baked dough” color. -
Form the heart:
Roll a small ball of the tan clay and flatten it slightly to about 1/4 inch thickness. Use a small heart cutter or shape it by hand by indenting the top and pinching the bottom into a point. -
Texture the surface:
Take an old toothbrush or a crumpled ball of aluminum foil and gently tap the entire surface of the heart to give it a realistic, bready texture. -
Create the crust:
Shave some brown and orange soft pastels into a powder. Using a soft paintbrush, gently dust the edges of the heart to simulate a golden-brown baked crust. -
Add the hardware:
If making a charm, carefully screw a gold eye pin into the top center of the heart.
Clean Clay Tip
Baby wipes are your best friend! Clean your hands and tools thoroughly between colors, especially before touching the light tan or white clay, to avoid stains.
Step 2: Sculpting the Sweet Strawberry
-
Shape the berry:
Condition a piece of bright red clay and roll it into a smooth ball. Gently taper one end to create a rounded cone or teardrop shape, flattening it slightly so it isn’t too bulky. -
Add seeds:
Using a needle tool or toothpick, poke small, shallow indentations all over the surface of the red clay to represent seeds. Alternatively, preserve tiny balls of yellow clay and press them into these holes. -
Make the leaves:
Take a small amount of green clay and flatten it. Cut out three or four tiny teardrop shapes. Press a needle tool into the center of each leaf to create a vein texture. -
Attach the greenery:
Press the leaves onto the top (wider end) of the strawberry, arranging them so they overlap slightly and curve downward. -
Insert eye pin:
Insert a gold eye pin securely through the center of the green leaves into the red body.
Dust Trouble?
If you notice lint or dust on your unbaked clay, dip a cotton swab in a little rubbing alcohol or baby oil and gently wipe the surface to remove the debris.
Step 3: Designing the Pink Donut
-
Form the base:
Use the same tan clay mix from the toast to roll a ball, flatten it slightly, and use a dotting tool to punch a hole through the center, smoothing the edges to form a donut ring. -
Shade the dough:
Dust the edges of the donut with the brown soft pastel powder to give it a baked appearance. -
Apply the icing:
Mix pink clay with liquid clay to create a frosting consistency, or roll out a very thin, jagged sheet of pink clay and drape it over the donut, smoothing it down to look like melted glaze. -
Add sprinkles:
Finely chop tiny bits of green, white, and dark pink clay to make sprinkles, then gently press them into the pink icing surface.
Step 4: Bringing Faces to Life
-
Create eye sockets:
For all three charms, use a small ball tool to make shallow indentations where the eyes will go. This helps the tiny clay balls sit securely. -
Place the eyes:
Roll tiny spheres of black clay and press them into the sockets. For extra cuteness, place them horizontally aligned and relatively wide apart. -
Add a smile:
Roll an incredibly thin snake of black clay. Cut a tiny ‘U’ shape and gently press it between the eyes using a needle tool. -
Apply blush:
Using a small applicator or pink pastel powder, dab tiny rosy cheeks just below the eyes on the toast and strawberry. -
Add highlights:
I prefer to use a white gel pen or a speck of white paint after baking to add the tiny sparkle reflection in the black eyes.
Step 5: Finishing Up
-
Bake:
Bake the pieces according to your clay manufacturer’s instructions, usually around 275°F (135°C) for 15-30 minutes. -
Glaze:
Once cool, apply a coat of gloss glaze to the strawberry, the donut icing, and the eyes of all characters to make them shine. -
Assemble:
Use pliers to open the jump rings on your lobster clasps and attach them to the eye pins on the strawberry and toast.
Now you have a set of adorable, smiling food charms ready to brighten up your accessories collection

TRACK YOUR CERAMIC JOURNEY
Capture glaze tests, firing details, and creative progress—all in one simple printable. Make your projects easier to repeat and improve.
Little Mushroom Friends
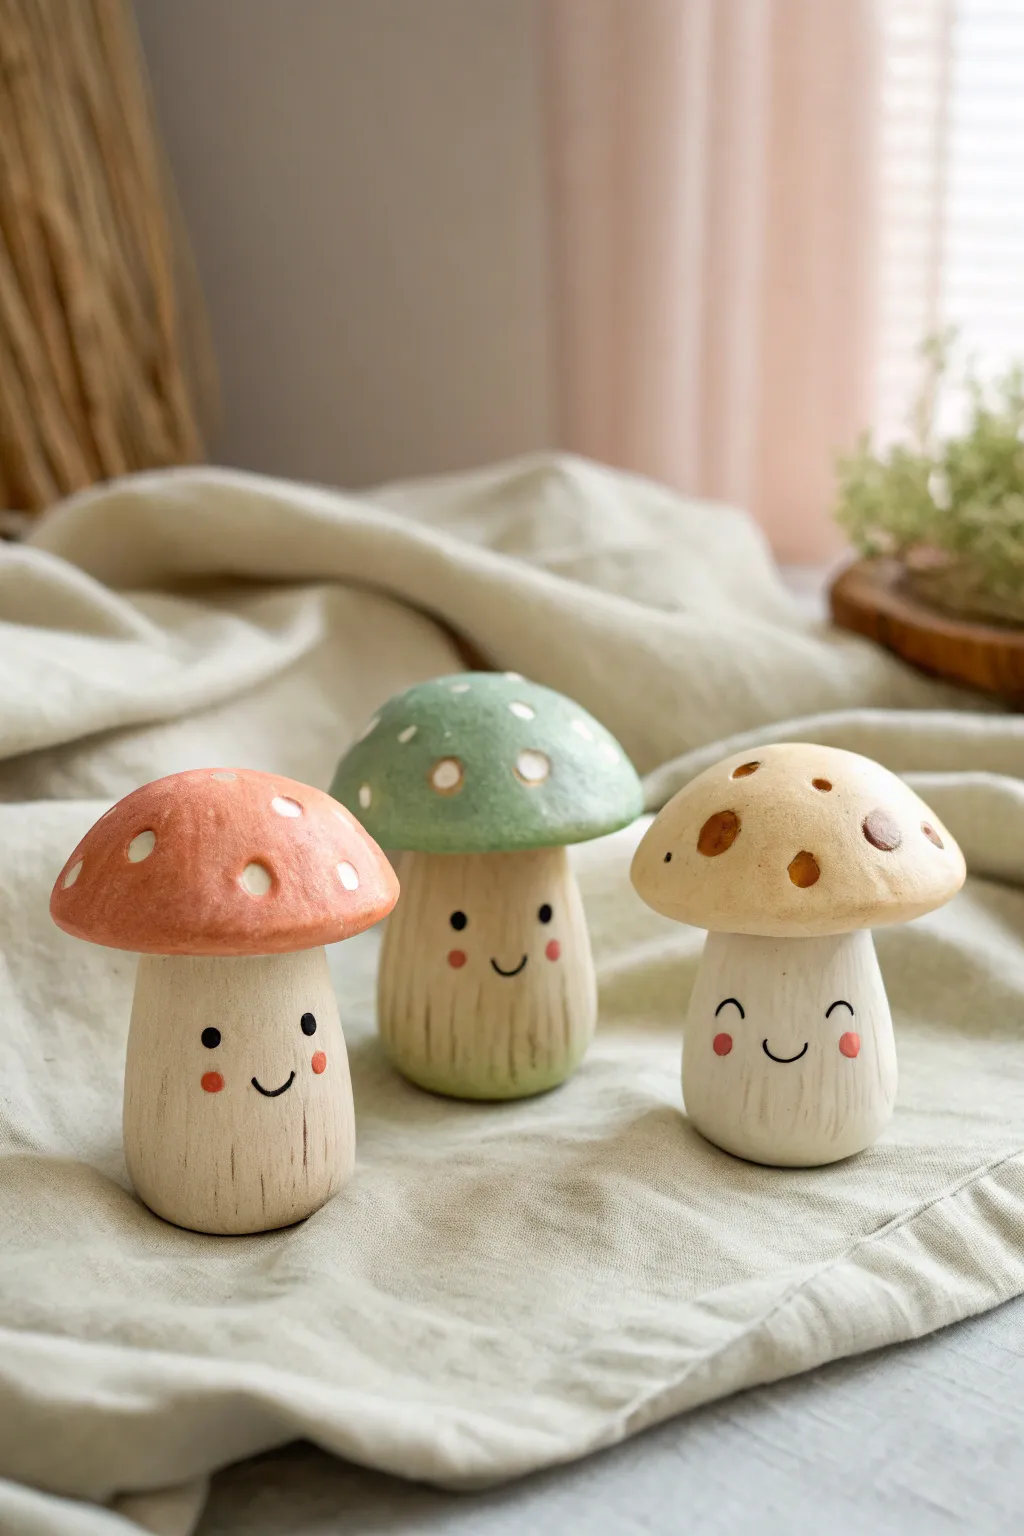
Bring a touch of forest magic to your desk or shelf with this trio of adorable, smiling clay mushrooms. Their rustic, textured finish mimics painted wood, making them feel like vintage toys carved by hand.
Step-by-Step Guide
Materials
- Air-dry clay or polymer clay (white or beige)
- Acrylic paints (muted coral/pink, sage green, cream/beige, black, dark brown)
- Fine-grit sandpaper
- Sculpting tools (needle tool or toothpick)
- Small paintbrush and a fine detail brush
- Ball stylus tool
- Matte varnish or sealant
- Aluminum foil (for armature)
- Water and a small sponge (for smoothing)
Step 1: Sculpting the Base Forms
-
Create the core:
Start by crumpling small pieces of aluminum foil into rough, thick cylinder shapes. This saves clay and keeps the mushrooms lightweight. -
Cover the stalk:
Roll out a thick sheet of clay and wrap it around your foil cylinder. Smooth the seam with a little water or by rubbing your finger over it until it disappears. -
Shape the stalk:
Gently taper the stalk so it’s slightly wider at the bottom, giving it a stable, chubby look. Flatten the bottom against your work surface so it stands perfectly straight. -
Form the cap:
Roll a ball of clay slightly larger than a golf ball. Use your thumb to create a deep indentation in the bottom center, forming a mushroom cap shape. -
Attach the cap:
Score the top of the stalk and the inside of the cap with a needle tool. Apply a tiny bit of water (or liquid clay if using polymer) and press the cap firmly onto the stalk. -
Smooth the transition:
Blend the clay slightly under the rim where they connect to ensure a strong bond, but keep the definition of the cap distinct.
Step 2: Adding Texture and Details
-
Etch wood grain:
Using a needle tool, gently drag vertical lines up the stalk. Keep these lines somewhat uneven and organic to simulate the bark or fibrous texture of a real mushroom stalk. -
Add cap imperfections:
For the spotted look, use a ball stylus to press shallow, circular divots into the top of the cap. Vary their sizes slightly for a natural appearance. -
Final smoothing:
Look over the piece for unwanted fingerprints. Lightly brush with a damp sponge to soften harsh edges while preserving your wood grain texture. -
Dry completely:
Let your mushrooms dry fully. If using air-dry clay, this may take 24-48 hours. If using polymer, bake according to the package instructions.
Cracking Clay?
If minor cracks appear in air-dry clay while drying, mix a tiny bit of fresh clay with water to make a paste and fill them in before painting.
Step 3: Painting and Finishing
-
Base coat the stalk:
Paint the stalk a creamy off-white or beige. I like to water down the paint slightly so it settles into the etched grooves, enhancing the texture. -
Paint the caps:
Choose your soft palette—sage green, muted coral, or warm beige—and paint the tops of the caps. Avoid painting into the indented spots if possible. -
Detail the spots:
Using a small brush, carefully fill the indented spots with a contrasting cream or light brown color. Don’t worry if the edges aren’t perfect; rustic is the goal. -
Enhance the texture:
Once the stalk paint is dry, use a ‘dry brush’ technique with very little light brown paint to lightly graze over the vertical lines, making the texture pop. -
Paint the face:
Using your finest detail brush or a black paint pen, draw two small, wide-set eyes. Add a simple U-shape smile between them. -
Add rosy cheeks:
Dip the end of a paintbrush handle or a large ball tool into pink paint and dot it onto the cheeks, just outside the smile line. -
Seal the work:
Finish with a coat of matte varnish to protect the paint and give the clay a smooth, finished feel without making it too shiny.
Make it a Trio
Make three mushrooms in different heights and cap widths. Varying the eye shapes (closed vs. open) gives each one a unique personality.
Now you have a trio of friendly forest dwellers ready to brighten any corner of your home
Cloud And Rainbow Wall Charm
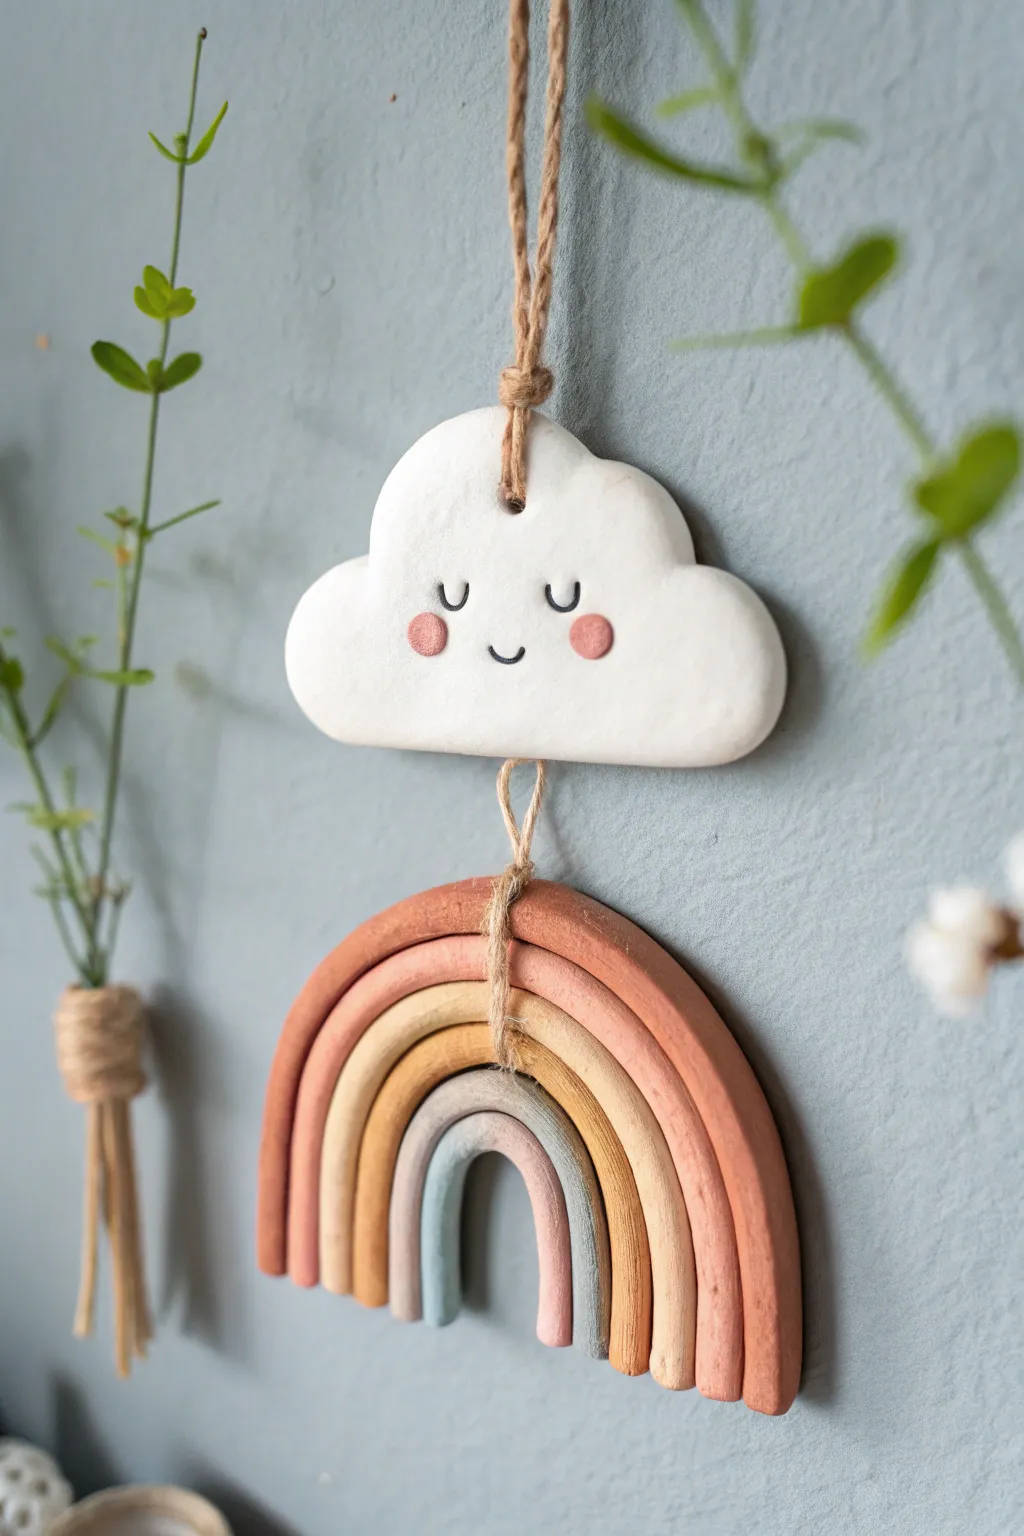
Bring a touch of sky-high charm to any room with this adorable hanging wall ornament. Combining a sweet, sleepy cloud face with muted, earthy rainbow arches creates a soothing piece of décor that looks wonderful in nurseries or cozy corners.
Detailed Instructions
Materials
- Air-dry clay (white)
- Acrylic paints (terracotta, peach, mustard yellow, beige, muted blue, black, pink)
- Rolling pin
- Cloud cookie cutter or paper template with craft knife
- Clay sculpting tools or a toothpick
- Jute twine
- Straw or small circular tool (for making holes)
- Fine-grit sandpaper
- Fine detail paintbrush
- Clear matte varnish (optional)
Step 1: Sculpting the Cloud
-
Condition the Clay:
Begin by taking a handful of air-dry clay and kneading it in your hands until it becomes soft, pliable, and free of cracks. -
Roll the Slab:
Use a rolling pin to flatten the clay into a smooth slab, aiming for a consistent thickness of about 1/4 inch so it’s sturdy but not too heavy. -
Cut the Cloud Shape:
Press a cloud-shaped cookie cutter into the slab. If you don’t have one, lightly trace a cloud shape onto the clay with a toothpick or place a paper template on top and carefully cut around it with a craft knife. -
Smooth the Edges:
Dip your finger in a little water and run it along the cut edges of the cloud to smooth out any roughness or sharp corners. -
Create Suspension Holes:
Using a straw or a small circular tool, punch a hole at the very top center of the cloud for hanging. Punch a second hole directly at the bottom center where the rainbow will attach.
Smooth Operator
To fix cracks while the clay is wet, use a tiny bit of water on your finger. If cracks appear after drying, fill them with a mix of fresh soft clay and water (slip).
Step 2: Forming the Rainbow
-
Roll Clay Coils:
Roll out five separate ropes or ‘snakes’ of clay. Try to keep them equal in thickness, roughly the width of a pencil or slightly thicker. -
Shape the Arches:
Curve the first rope into a tight U-shape to form the smallest inner arch. Place the subsequent ropes around this first one, building the rainbow outward layer by layer. -
Trim the Bottoms:
Once all five arches are nestled together, use a straight blade or knife to cut across the bottom of the rainbow, creating a sleek, straight line where legs end. -
Separate for Drying:
Here is the trick: while many rainbows are fused together, this mobile looks lovely with movement. Carefully separate the arches slightly or decide if you want to press them together into a solid piece. For this specific look, press them gently together so they fuse into one solid rainbow unit. -
Add the Connecting Hole:
Pierce a hole through the top center of the largest (outermost) arch. Ensure this hole is large enough for your twine to pass through later. -
Texture the Surface:
For an organic look, you can leave slight finger marks, or smooth it perfectly with water. Let all clay pieces dry flat for 24-48 hours until hardened.
Level Up: Texture Play
Before the clay dries, gently press a piece of lace or textured fabric into the cloud surface to give it a subtle, patterned relief before painting.
Step 3: Painting and Assembly
-
Sand Imperfections:
Once fully dry, lightly sand any rough edges on the cloud and rainbow using fine-grit sandpaper. -
Paint the Rainbow:
Paint each arch a different color. Start with the outermost arch in terracotta, then move inward with peach, mustard yellow, beige, and finally the muted blue center. Let the paint dry completely. -
Paint the Cloud Details:
Keep the cloud white. Using a fine detail brush and black paint, draw two small ‘U’ shapes for closed sleepy eyes and a tiny smile in the center. -
Add Rosy Cheeks:
Dip the tip of a round brush or a cotton swab into pink paint. Dab two soft circles onto the cloud’s cheeks for a blushing effect. -
Seal (Optional):
Apply a coat of matte varnish if you want to protect the paint and give the piece a finished look. -
Attach the Middle Twine:
Cut a short length of jute twine. Thread it through the bottom hole of the cloud and the top hole of the rainbow. Tie secure knots on the back side of each piece to link them together. -
Add the Hanger:
Cut a longer piece of twine, loop it through the top hole of the cloud, and tie a knot to create the main hanging loop.
Hang your cheerful creation on a hook or nail to brighten up your wall space
Sleepy Face Mini Planter
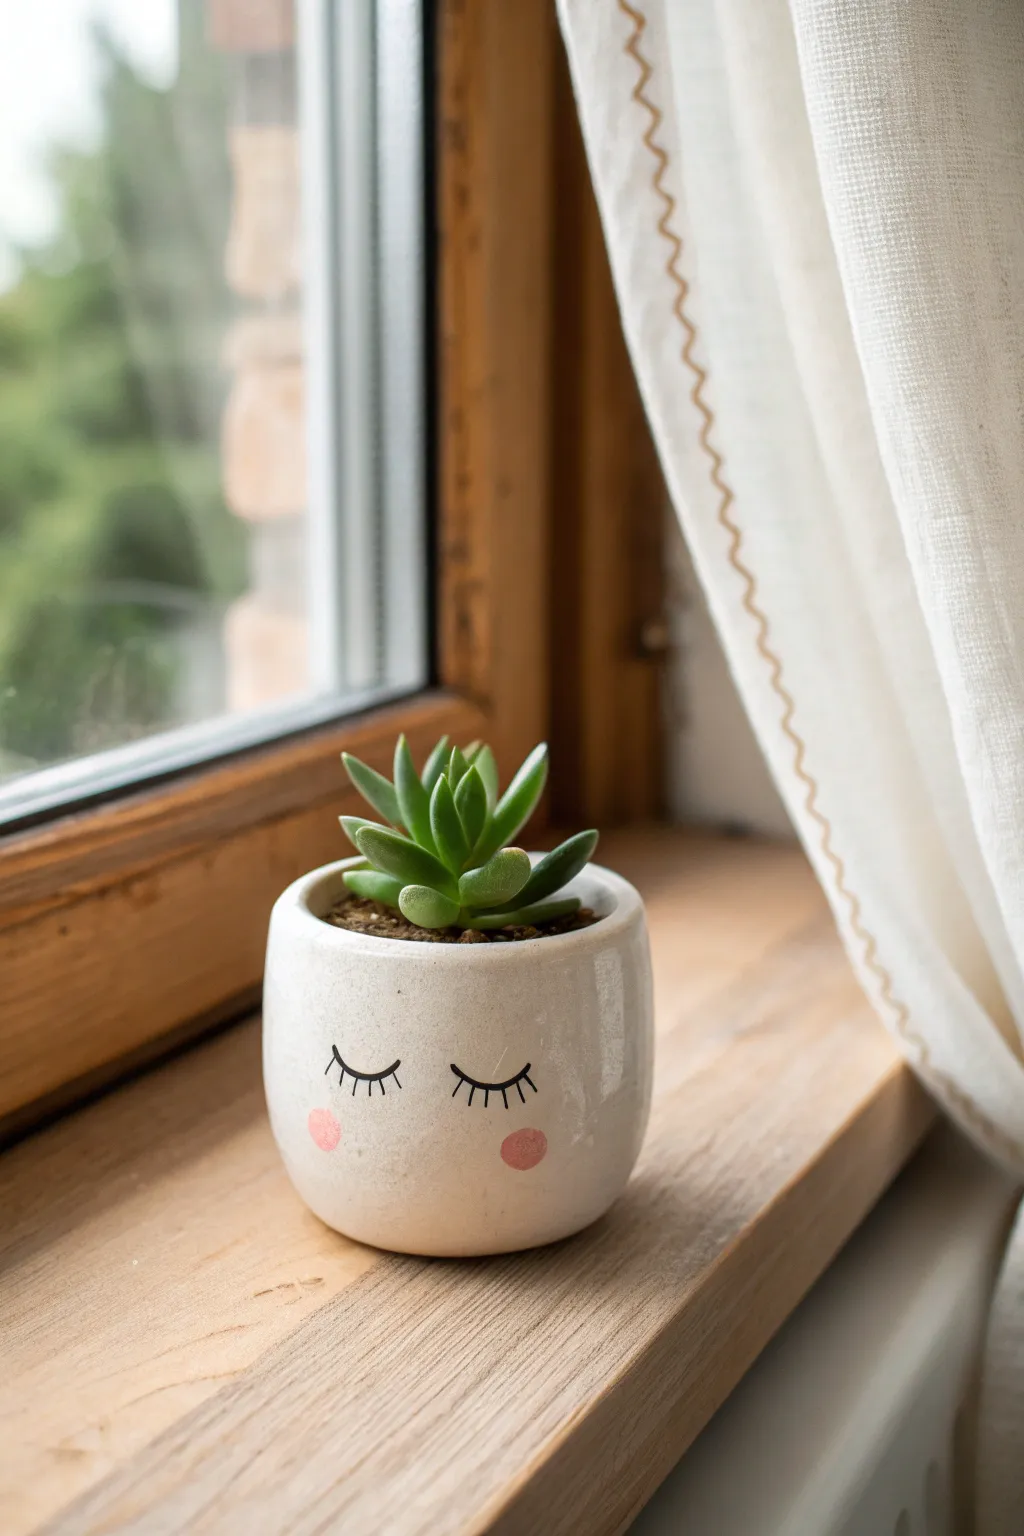
Transform a simple pinch pot into a charming character with this serene face design. The smooth white finish and minimalist details give it a modern, whimsical look perfect for brightening up any windowsill.
How-To Guide
Materials
- Air-dry clay (white) or polymer clay
- Rolling pin
- Circular cookie cutter or jar lid (approx. 3-4 inches)
- Small bowl of water (for smoothing)
- Sandpaper (fine-grit)
- Acrylic paint (white, black, soft pink)
- Paintbrushes (medium flat brush, fine detail brush)
- Gloss varnish or clear sealant
- Modeling tools or a butter knife
Step 1: Shaping the Vessel
-
Prepare the clay:
Start with a ball of clay roughly the size of a tangerine. Knead it in your hands until it is warm, pliable, and free of any air bubbles. -
Establish the base:
Flatten the ball slightly against your work surface to create a stable bottom. You want a flat base so the pot sits securely without wobbling. -
Open the form:
Press your thumb into the center of the ball, pushing down but stopping about a half-inch from the bottom. This creates the interior space for your plant. -
Pinch the walls:
Using your thumb on the inside and fingers on the outside, gently pinch and rotate the clay. Work your way from the bottom up to thin out the walls consistently. -
Refine the shape:
Aim for a cylindrical shape with slightly rounded bottom edges, similar to a teacup. Keep the walls about 1/4 inch thick for durability. -
Smooth the surface:
Dip your finger in a little water and run it over the exterior and rim to erase any fingerprints or cracks. The smoother the surface now, the cleaner the final paint job will look. -
Let it dry:
Allow the pot to dry completely. For air-dry clay, this usually takes 24-48 hours. If using polymer clay, bake according to the package instructions.
Water Warnings
Air-dry clay dissolves if it gets wet! Always use a plastic insert or thoroughly seal the inside with waterproof resin if you plan to water the plant directly.
Step 2: Finishing and Painting
-
Sand imperfections:
Once fully dry or baked and cooled, gently sand the exterior with fine-grit sandpaper. Focus on the rim and any bumps to get that ceramic-like finish. -
Apply the base coat:
Coat the entire outside and the inner rim with white acrylic paint. You may need two or three thin layers to get full, opaque coverage. -
Draft the face:
Lightly sketch the placement of the eyes and cheeks with a pencil. Position the eyes slightly lower on the pot—about halfway down—to increase the ‘cute’ factor. -
Paint the lashes:
Using your finest detail brush and black paint, carefully trace over your pencil lines. Create a downward curve for the closed lid and add 4-5 small vertical strokes for lashes. -
Add the cheeks:
Dip a round brush or a cotton swab into soft pink paint. Dab it gently into a circle below and slightly outside the eyes to create the blushing cheeks. -
Seal the work:
Once the paint is totally dry, apply a coat of gloss varnish. This mimics the glazed look of the photo and protects your artwork from moisture. -
Planting time:
Fill your new pot with a small amount of succulent soil and nestle your chosen plant inside. Since this is air-dry clay, use a plastic liner or keep the plant in a nursery pot inside to prevent water damage.
Add Texture
Before the clay dries, gently press a piece of lace or textured fabric into the back or sides of the pot for a subtle, tactile pattern that contrasts with the smooth face.
Now you have a peaceful little friend to keep your succulents company on the windowsill
Cute Icon Coasters
These delightful coasters add a touch of handmade whimsy to any coffee table, featuring simple raised and depressed motifs like stars, flowers, and paw prints. Crafted from air-dry clay, they offer a smooth, matte finish with soft pops of pastel color that highlight the imprinted designs.
Detailed Instructions
Materials
- White air-dry clay (or polymer clay)
- Rolling pin
- Circular cookie cutter (approx. 3.5-4 inches)
- Parchment paper or silicone mat
- Assorted stamps or found objects (star cutter, paw print stamp, small tube for smiley face)
- Sandpaper (fine grit)
- Acrylic paints (pastel pink, sage green, black)
- Small detail paintbrush
- Clear matte varnish or sealant
Step 1: Preparing the Bases
-
Condition the clay:
Begin by taking a substantial chunk of white air-dry clay and kneading it in your hands until it becomes warm, pliable, and free of cracks. -
Roll it out:
Place the clay on a sheet of parchment paper to prevent sticking. Use a rolling pin to flatten the clay to an even thickness of about 1/4 inch (6mm). If you want perfect uniformity, place two magazines or wooden slats of that thickness on either side of the clay to guide your rolling pin. -
Cut the shapes:
Press your circular cookie cutter firmly into the rolled clay. Create as many circles as you need for your set. Lift the excess clay away from the circles carefully. -
Smooth the edges:
Dip your finger in a tiny bit of water and run it gently around the circumference of each circle to smooth out any rough cuts or dragged clay from the cutter.
Step 2: Adding the Designs
-
Imprint the star:
For the star coaster, take a star-shaped cookie cutter (smaller than the circle). Press it gently into the center of the clay disc, but do not push all the way through—you only want an impression about halfway deep. -
Create the smiley face:
For the smiley face, find a circular object (like a large marker cap) to imprint the face outline. Use a smaller tool (like a straw end) for the eyes and a curved tool (or the edge of a spoon) to press in the smile. -
Stamp the paw print:
If making the green paw coaster, you can tint your clay first (see the painting phase) or stamp plain white clay now using a paw print stamp or by pressing your thumb for the pad and pinky finger for the toes. -
Form the flower:
For the flower design, use a small petal-shaped cutter or a modeling tool to press a radial pattern of petals around a central circle. Ensure the impressions are deep enough to hold paint later. -
Initial Drying:
Place the stamped coasters on a flat, clean surface to dry. I find flipping them over gently after about 12 hours helps them dry evenly and prevents curling. Let them dry completely, which usually takes 24-48 hours depending on humidity.
Clean Lines Tip
If your clay is sticking to your stamps, lightly dust the stamp or cutter with cornstarch or baby powder before pressing it into the wet clay.
Step 3: Finishing and Coloring
-
Sand for smoothness:
Once bone dry, take fine-grit sandpaper and very gently buff the edges and surface. Remove any fingerprints or rough spots, then wipe away the dust with a barely damp cloth. -
Mix the sage green:
To create the green paw print coaster look, mix sage green acrylic paint with a little white to soften it. Paint the entire surface of that specific coaster, ensuring the paint gets into the paw depressions. -
Paint the flower:
For the flower coaster, keep the base white. Mix a watery wash of pastel pink acrylic paint. carefully dab this into the petal depressions. The wash technique allows the texture to show through nicely. -
Detail the smiley face:
Using a very fine detail brush and black paint, carefully trace the indented lines of the smiley face eyes and mouth to make them pop against the white clay. -
Final sealing:
To protect your coasters from moisture (since they are for drinks!), apply 1-2 coats of a clear matte varnish or sealant over the entire top and sides. Allow the sealant to cure fully according to the bottle instructions.
Marbled Effect
Knead a small drop of colored acrylic paint into the white clay before rolling. twist the clay but don’t fully blend it to create a beautiful marble effect.
Stack your new set of custom coasters on a slate board or wrap them in twine for a perfect handmade gift
Mini House With Sweet Windows
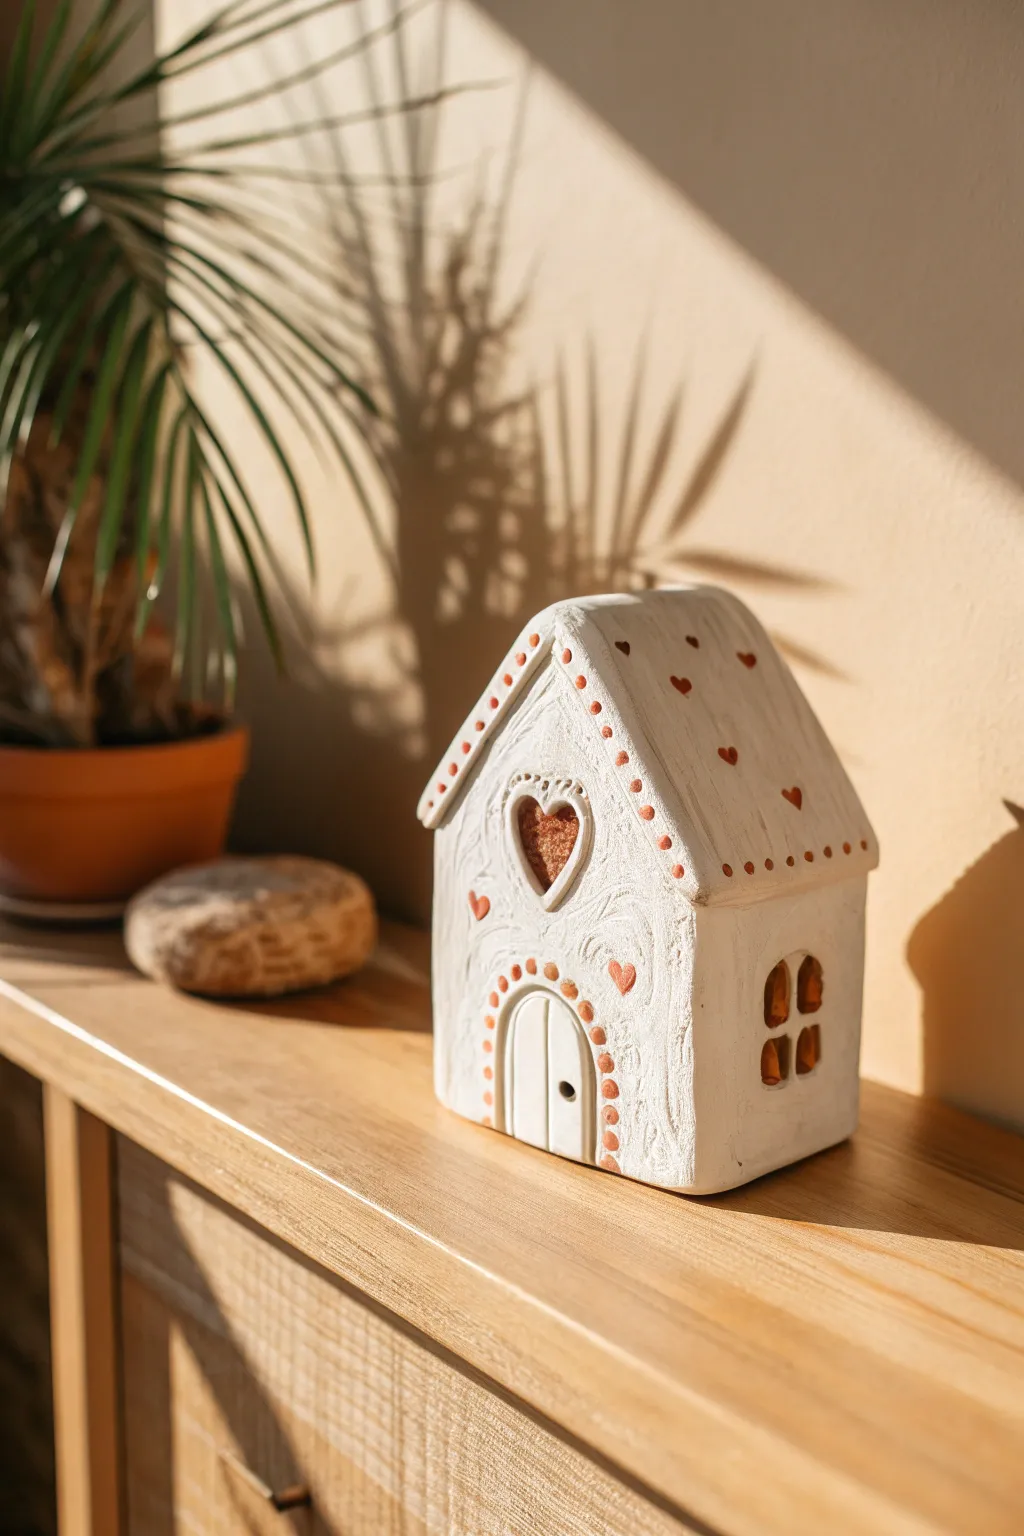
This adorable mini house brings a touch of fairytale charm to any shelf with its textured white walls, heart-shaped window, and sweet terracotta details. It’s perfect as a decorative tealight holder or simply a cute sculptural piece to brighten up your workspace.
How-To Guide
Materials
- White aesthetics air-dry clay or polymer clay
- Rolling pin
- Texture tool (or crumpled foil)
- Clay knife or X-Acto blade
- Small heart-shaped cutter (optional)
- Small round cutter or straw
- Terracotta or rust-colored acrylic paint
- Small detail paintbrush
- Ruler
- Sandpaper (fine grit)
- Slip (clay mixed with water)
Step 1: Constructing the Base
-
Roll your slabs:
Start by rolling out your white clay to an even thickness of about 1/4 inch. For consistent walls, I like to use wooden guide strips on either side of the rolling pin. -
Cut the walls:
Using a ruler and knife, cut out two rectangular side walls, a front facade with a peaked roof, and a matching back wall. Ensure the side walls are equal in height to the straight part of your front wall. -
Cut the roof panels:
Cut two rectangular slabs for the roof. Make sure they are slightly wider than the house to create an overhang and long enough to meet at the peak. -
Add surface texture:
Before assembling, gently press a crumpled ball of aluminum foil or a texture tool across the surface of the walls to give them a rough, stucco-like appearance.
Sagging Roof?
If your roof panels droop during assembly, verify your clay isn’t too wet. Prop up the roof overhangs with crumpled paper towels or sponges while it dries to hold the shape.
Step 2: Carving Details
-
Create the heart window:
On the front panel, use a heart cutter or freehand carefully with a knife to cut out a heart shape in the upper center. -
Shape the door:
Cut an arched doorway at the bottom center of the front panel. Save the piece you cut out; trim it slightly smaller so it can fit back inside the frame as a recessed door. -
Add side windows:
On the side walls, cut out two small arched windows. You can leave them open or add a thin clay cross later to create windowpanes. -
Detail the door:
Take the reserved door piece and score vertical lines to mimic wood planks. Poke a tiny hole for the doorknob.
Step 3: Assembly
-
Score and slip:
Score (scratch) the edges where the walls will meet and apply a little slip (clay water paste) to act as glue. -
Build the box:
Stand the walls up and press the corners together firmly. Smooth the inside seams with your finger or a tool to ensure structural integrity. -
Attach the roof:
Apply slip to the top angles of the front and back walls. Gently place your roof panels on top, pressing them together at the peak. -
Insert the door:
Place the textured door piece into the doorway, positioning it slightly further back than the wall surface for a dimensional look. Secure it with slip from the inside.
Make it Glow
Leave the bottom open (no floor slab) so you can easily place the finished house over a battery-operated LED tealight for a warm, cozy glow through the windows.
Step 4: Decoration & Finishing
-
Create the heart border:
Roll a very thin snake of clay. Outline the heart window with this coil, flattening it slightly against the wall for a decorative trim. -
Outline the door:
Repeat the process with another thin clay snake to create an architrave around the door frame. -
Dry completely:
Let the house dry fully according to your clay package instructions. This usually takes 24-48 hours for air-dry clay. -
Sand imperfections:
Once bone dry, lightly sand any sharp edges or rough seams for a polished look. -
Paint the details:
Using a fine brush and terracotta paint, carefully paint small hearts on the roof and front wall. Add dots along the roofline and archways. -
Final touches:
Paint the recessed heart window frame and the area around the door arch with the same terracotta color to make the details pop.
Now you have a charming little cottage to add a handmade touch to your decor
Kitty Ear Page Holder
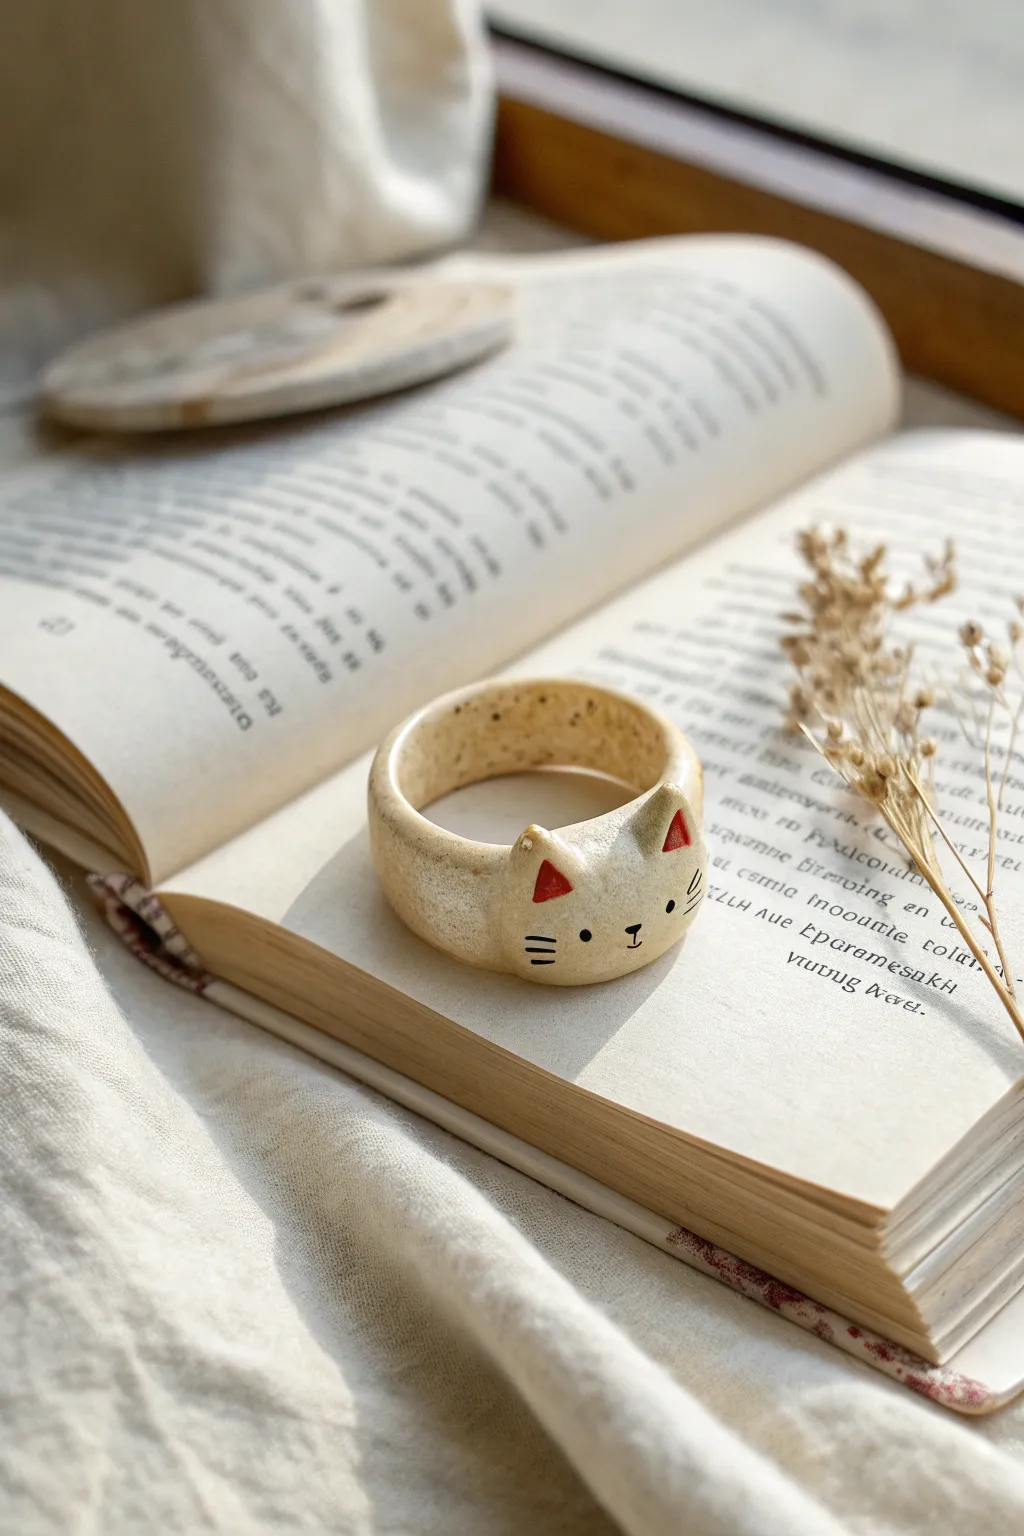
Keep your favorite novel open with ease using this charming kitty-shaped thumb ring. Crafted with a speckled clay finish and simple painted details, it’s a functional piece of art that makes reading even cozier.
How-To Guide
Materials
- Polymer clay (beige or granite effect)
- Acrylic paint (red, black)
- Fine detail paintbrush
- Rolling pin or pasta machine
- Measuring tape
- Craft knife
- Small dotting tool or toothpick
- Sandpaper (fine grit)
- Gloss or matte varnish (optional)
Step 1: Shaping the Base
-
Measure your thumb:
Wrap a strip of paper around your thumb to find the correct size, making sure it slides off the knuckle easily. Mark the length. -
Condition the clay:
Warm up your beige or speckled polymer clay by kneading it in your hands until it becomes soft and pliable. -
Create a strip:
Roll the clay out into a flat sheet, approximately 4-5mm thick. It needs to be sturdy enough to hold pages back. -
Cut to size:
Using your paper measurement, cut a rectangular strip of clay with your craft knife. Aim for a width of about 2cm. -
Form the ring:
Bring the two ends of the strip together to form a circle. Overlap the seams slightly or butt them together firmly. -
Smooth the seam:
Use your finger or a clay tool to blend the seam completely until it is invisible, ensuring the inside is smooth for comfort.
Step 2: Sculpting the Kitty
-
Prepare the ears:
Roll two very small balls of clay, then pinch them into triangles to form the cat ears. -
Attach the ears:
Place the ears on the top edge of the ring. Use a blending tool to smooth the clay from the base of the ears onto the ring body so they are securely attached. -
Refine the shape:
Gently shape the face area, ensuring the ears are symmetrical and slightly rounded at the tips for a soft look. -
Bake the clay:
Place the ring on a baking sheet or tile. Bake according to your clay manufacturer’s instructions (usually 275°F/135°C for 15-30 minutes). I prefer to bake slightly longer at a lower temp to prevent scorching. -
Cool and sand:
Let the ring cool completely. If there are any rough edges or fingerprints, gently sand them away with fine-grit sandpaper.
Smooth Operator
Before baking, brush a tiny amount of baby oil or clay softener over the surface to remove fingerprints and create a flawless, stone-like texture.
Step 3: Painting the Details
-
Mix your colors:
Prepare a tiny amount of red acrylic paint for the ears and black for the rocky features. -
Paint the inner ears:
Using your finest brush, carefully paint small red triangles inside the sculpted ear shapes. -
Dot the eyes:
Dip a dotting tool or a toothpick into black paint and create two small, widely spaced eyes. -
Draw the nose and mouth:
With the very tip of your brush or a fine marker, draw a tiny ‘Y’ shape or anchor shape between the eyes for the nose and mouth. -
Add whiskers:
Paint three short, horizontal lines on each cheek. Keep a steady hand to ensure the lines are crisp. -
Seal the piece:
Once the paint is fully dry, apply a coat of varnish to protect the details and give the ring a finished ceramic look.
Make it Yours
Try painting calico patches, tabby stripes, or a tuxedo pattern instead of plain beige to model the ring after your own real-life furry friend.
Slide this little companion onto your thumb and enjoy a hands-free reading experience
Ball-Stack Caterpillar Pencil Rest
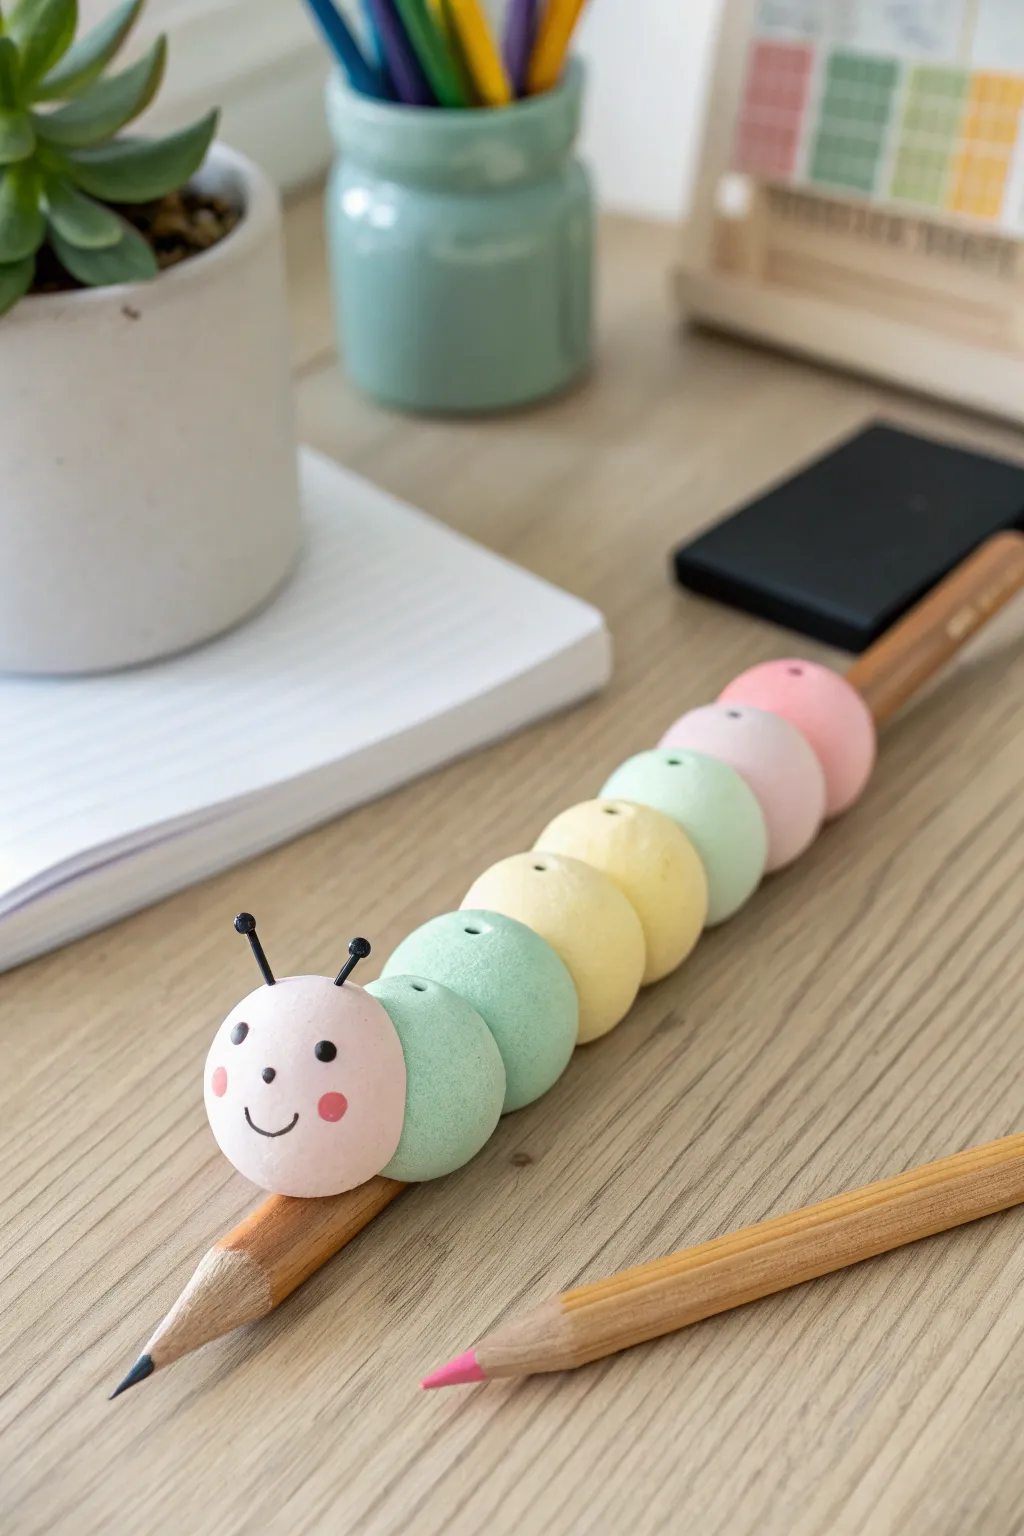
Transform a set of simple clay spheres into an adorable desk companion that keeps your favorite pencil right where you need it. This cheerful caterpillar features a soft pastel gradient and a sweet smiling face, making homework or sketching sessions a little more joyful.
Detailed Instructions
Materials
- Air-dry clay (white)
- Acrylic paints (pastel pink, mint green, soft yellow)
- Fine grit sandpaper
- Small paintbrush
- Black wire or jewelry wire (thin gauge)
- Black acrylic paint or fine-tip black marker
- Pencil (for sizing)
- Super glue or strong craft glue
- Toothpick or needle tool
- Matte varnish (optional)
Step 1: Shaping the Segments
-
Portion the clay:
Start by pulling off seven small pieces of white air-dry clay. You’ll need one piece slightly larger for the head and six pieces of roughly equal size for the body segments. -
Roll spheres:
Roll each piece of clay between your palms to create smooth, tight spheres. Aim for balls that are about the diameter of a large marble or a gumball. -
Create the heavy curve:
Before the clay hardens, arrange the balls in a line on your workspace. Gently press them together so they flatten slightly at the contact points, but don’t glue them yet. Curve the line of balls slightly to give the caterpillar a wiggle shape. -
Form the channel:
Take a standard pencil and press it firmly along the top center of the arranged spheres. You need to create a consistent groove or channel running down the back of the caterpillar where the pencil will eventually rest. -
Pierce the head:
While the clay is still soft, use a toothpick or needle tool to poke two small holes appearing at the top of the head sphere. These will hold the antennae later. -
Pierce the segments:
Add a single small hole near the top of each body segment using your needle tool. This mimics the look of wooden beads and adds a nice texture detail. -
Let it dry:
Separate the spheres slightly so they don’t stick together permanently yet, and let them dry completely according to your clay’s package instructions—usually 24 to 48 hours for this thickness.
Smooth Grooves
To keep the pencil groove smooth while drying, lay a piece of plastic wrap over the wet clay, then press the pencil down. This prevents the wood texture from stamping into the clay.
Step 2: Adding Color & Assembly
-
Smooth the surface:
Once fully dry, lightly sand any rough spots or fingerprints with fine-grit sandpaper to ensure a professional finish. -
Paint the head:
Paint the head sphere with a soft pastel pink acrylic paint. You may need two thin coats for opaque coverage. -
Paint the body gradient:
Paint the body segments to create a pattern. Following the image, paint the first two body segments mint green, the next two soft yellow, and the final two a variant of pink or light coral. -
Dry the paint:
Allow all the paint layers to dry completely before handling the pieces again. -
Glue the segments:
Apply a strong craft glue or super glue to the contact points of the spheres. Reassemble them in the curved shape you formed earlier, ensuring the pencil groove aligns perfectly across the top. -
Paint the face:
Using a very fine paintbrush or a black marker, draw two small dots for eyes and a simple U-shape smile on the pink head sphere. I find a toothpick dipped in paint makes the best dot eyes. -
Add rosy cheeks:
Dip the back end of a paintbrush into a slightly darker pink paint and stamp two small circles on either side of the smile for blushing cheeks. -
Make the antennae:
Cut two short lengths of black wire (about 1.5 cm long). If possible, create a tiny knot or add a drop of black glue to the tip to make the little ball on top. -
Attach antennae:
Dip the bottom ends of your wire pieces into a tiny bit of glue and insert them into the pre-drilled holes on the head. -
Seal the piece:
Finish by brushing a coat of matte varnish over the entire caterpillar to protect the paint and give it a finished, ceramic-like look.
Rainbow Bright
Make a longer caterpillar with more segments to hold colored pencils! Use a full rainbow gradient (ROYGBIV) for the body balls to organize your drawing tools by hue.
Now you have a charming little friend to keep your desk organized and your pencil ready for the next big idea
Critter Desk Calendar With Number Blocks
This adorable desk accessory combines functionality with charm, featuring a happy beige frog perched atop perpetual calendar blocks. Clean lines and neutral tones make it a perfect minimalist addition to any workspace.
Step-by-Step
Materials
- Polymer clay (beige/sand color)
- Small amount of white and black clay (for eyes/facial details)
- Two 1.5-inch wooden cubes
- Brown acrylic paint (light cocoa or taupe)
- Fine detail paintbrush or paint pen
- Sculpting tools (ball styluses, needle tool)
- Rolling pin or pasta machine
- Baking sheet and parchment paper
- Matte varnish (optional)
Step 1: Sculpting the Frog
-
Prepare the Body:
Condition your beige clay until soft and pliable. Roll a smooth ball approximately 1.5 inches in diameter for the body, then gently flatten the bottom so it sits flush against a flat surface. -
Shape the Head:
Roll a slightly smaller ball for the head. Press it gently onto the body piece, blending the seam slightly at the back if you want a unitary look, or leave it distinct for that stacked toy aesthetic seen in the photo. -
Form the Thighs:
Create two small marble-sized balls of beige clay. Flatten them into thick discs and press them onto the lower sides of the body to form the large frog thighs. -
Add the Feets:
Roll two tiny ovals and flatten them slightly. Press these onto the front of the body, just below the belly area, to create the resting front paws. -
Create Eye Mounds:
Roll two small balls of beige clay. Press them firmly onto the top of the head, spacing them slightly apart to create the prominent eye sockets characteristic of frogs. -
Detail the Eyes:
Flatten tiny discs of white clay and place them onto the eye mounds. Add even smaller dots of black clay for the pupils, placing them centered or slightly cross-eyed for a cute expression. -
Sculpt the Smile:
Using a needle tool or a small blade, carefully press a wide, curved smile into the face. I find adding a tiny vertical line at the corners accentuates the cheekiness. -
Add Chest Detail:
Roll very small balls of lighter beige or white clay, flatten them paper-thin, and press two or three onto the chest area as polka-dot details if desired. -
Bake carefully:
Place your finished frog on a parchment-lined baking sheet. Bake according to your clay manufacturer’s instructions (usually 275°F for 15-30 minutes per 1/4 inch thickness). Let it cool completely.
Wobbly Frog?
If the frog’s head feels too heavy or unstable before baking, insert a small piece of toothpick or wire between the head and body to act as an internal armature.
Step 2: Creating the Calendar Blocks
-
Prime the Wood:
Ensure your wooden blocks are sanded smooth. If the wood is very dark or rough, apply a thin coat of white acrylic paint or gesso as a base to help the numbers stand out. -
Plan the Numbers:
For a standard perpetual calendar, you need specific numbers on specific blocks. Block 1 needs: 0, 1, 2, 3, 4, 5. Block 2 needs: 0, 1, 2, 6, 7, 8 (the 6 doubles as a 9). -
Sketch the Digits:
Lightly pencil the numbers onto the faces of the blocks. Use a simple, elegant serif font to match the reference image. Keep the sizing consistent, centering each number. -
Paint the Numbers:
Using your fine detail brush and brown paint, carefully trace over your pencil lines. A paint pen can offer more control here if you aren’t confident with a brush. -
Correction and Cleanup:
If you make a mistake, let the paint dry completely, then sand it off gently or paint over it with white before trying again. Clean edges define the look. -
Seal the Wood:
Once the paint is fully dry, apply a coat of matte varnish to the wooden blocks to protect the numbers from wear and tear. -
Final Assembly:
No glue is needed! Simply arrange your blocks to the correct date and perch your baked frog critter happily on top to oversee your schedule.
Make it a Set
Sculpt varying toppers for different seasons—like a pumpkin for October or a snowman for December—that can be swapped out on the same blocks throughout the year.
Enjoy keeping track of your days with this charming little amphibian friend