Clay skulls are one of those projects that instantly feel iconic, whether you go classic sugar skull or something moody and modern. I love how the same skull base can turn into a whole collection just by switching up shape details and surface decoration.
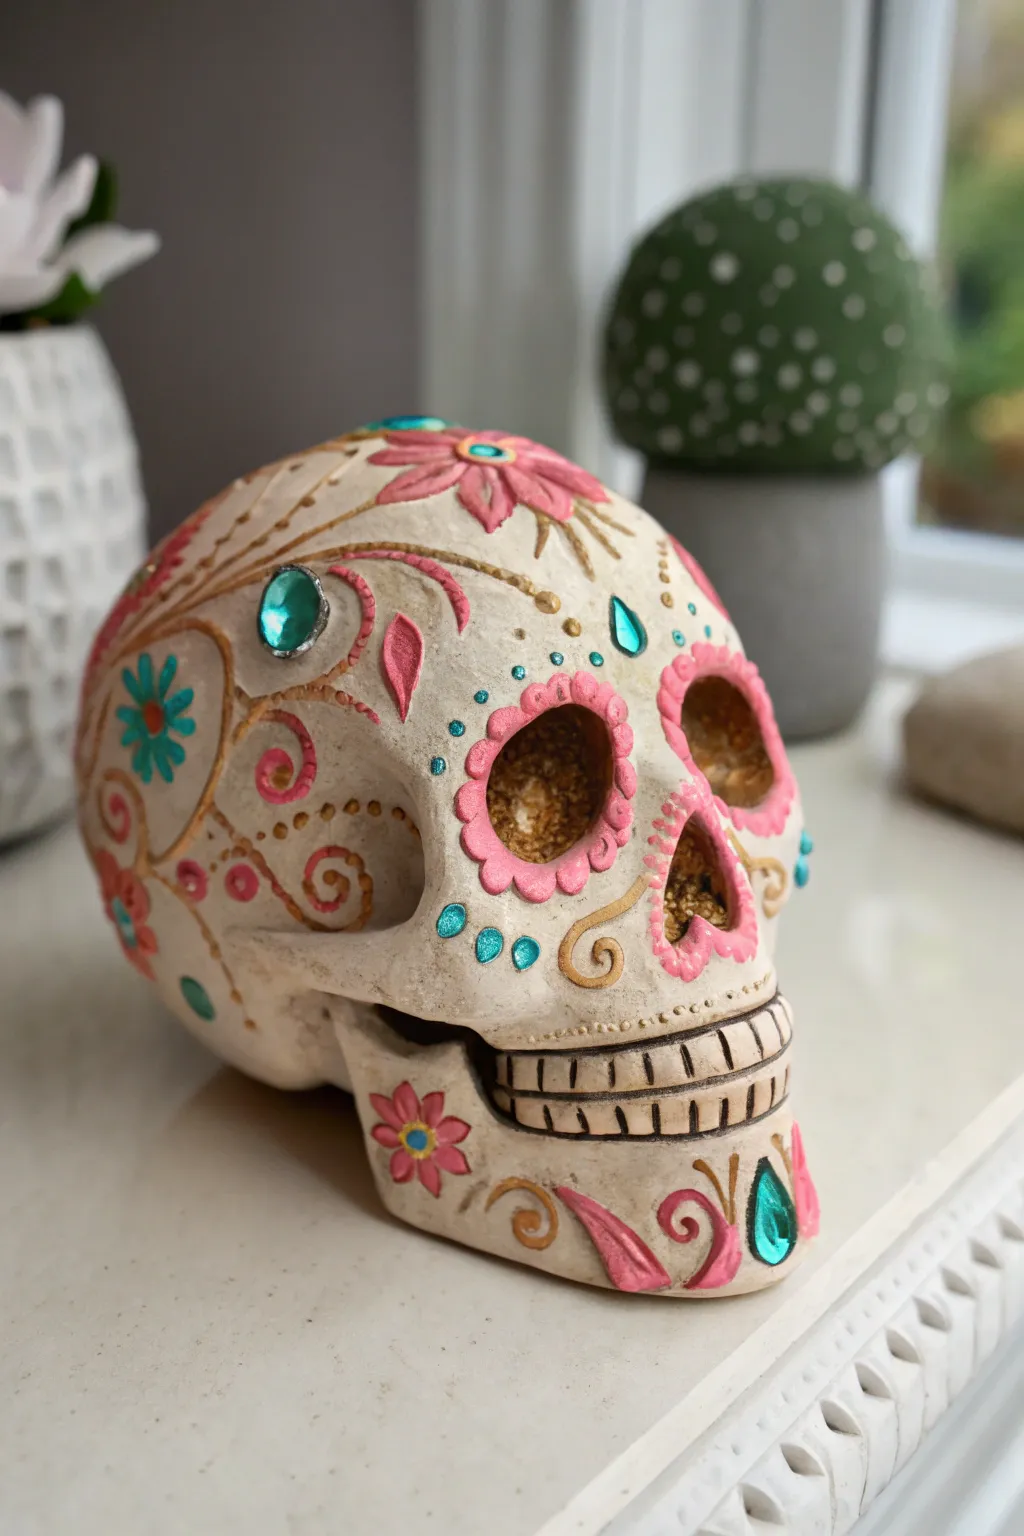
Classic Sugar Skull With Floral Motifs
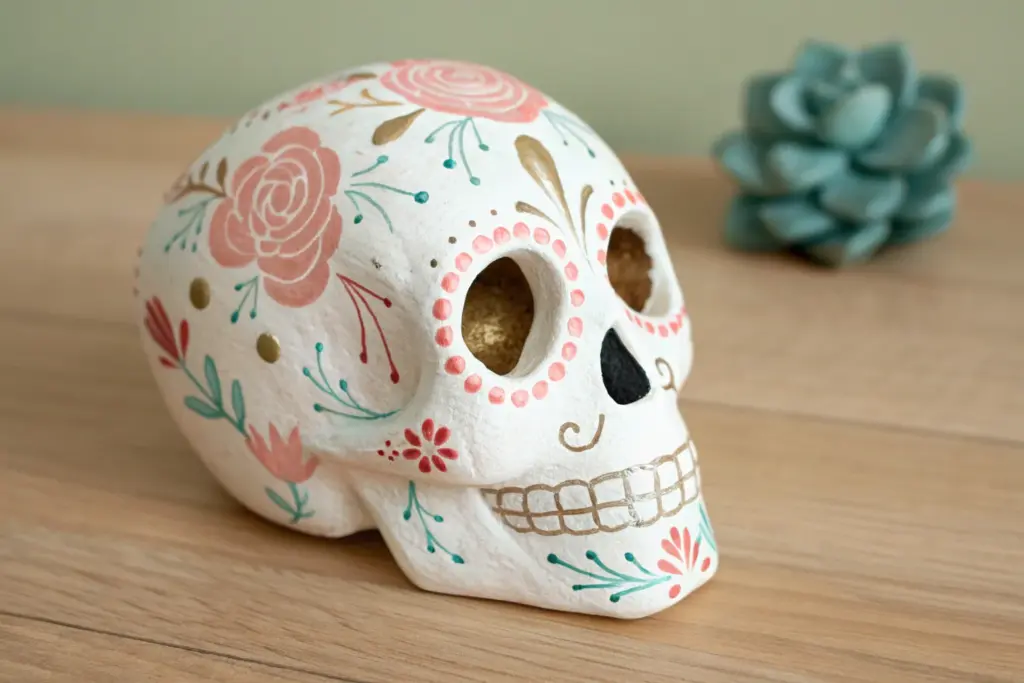
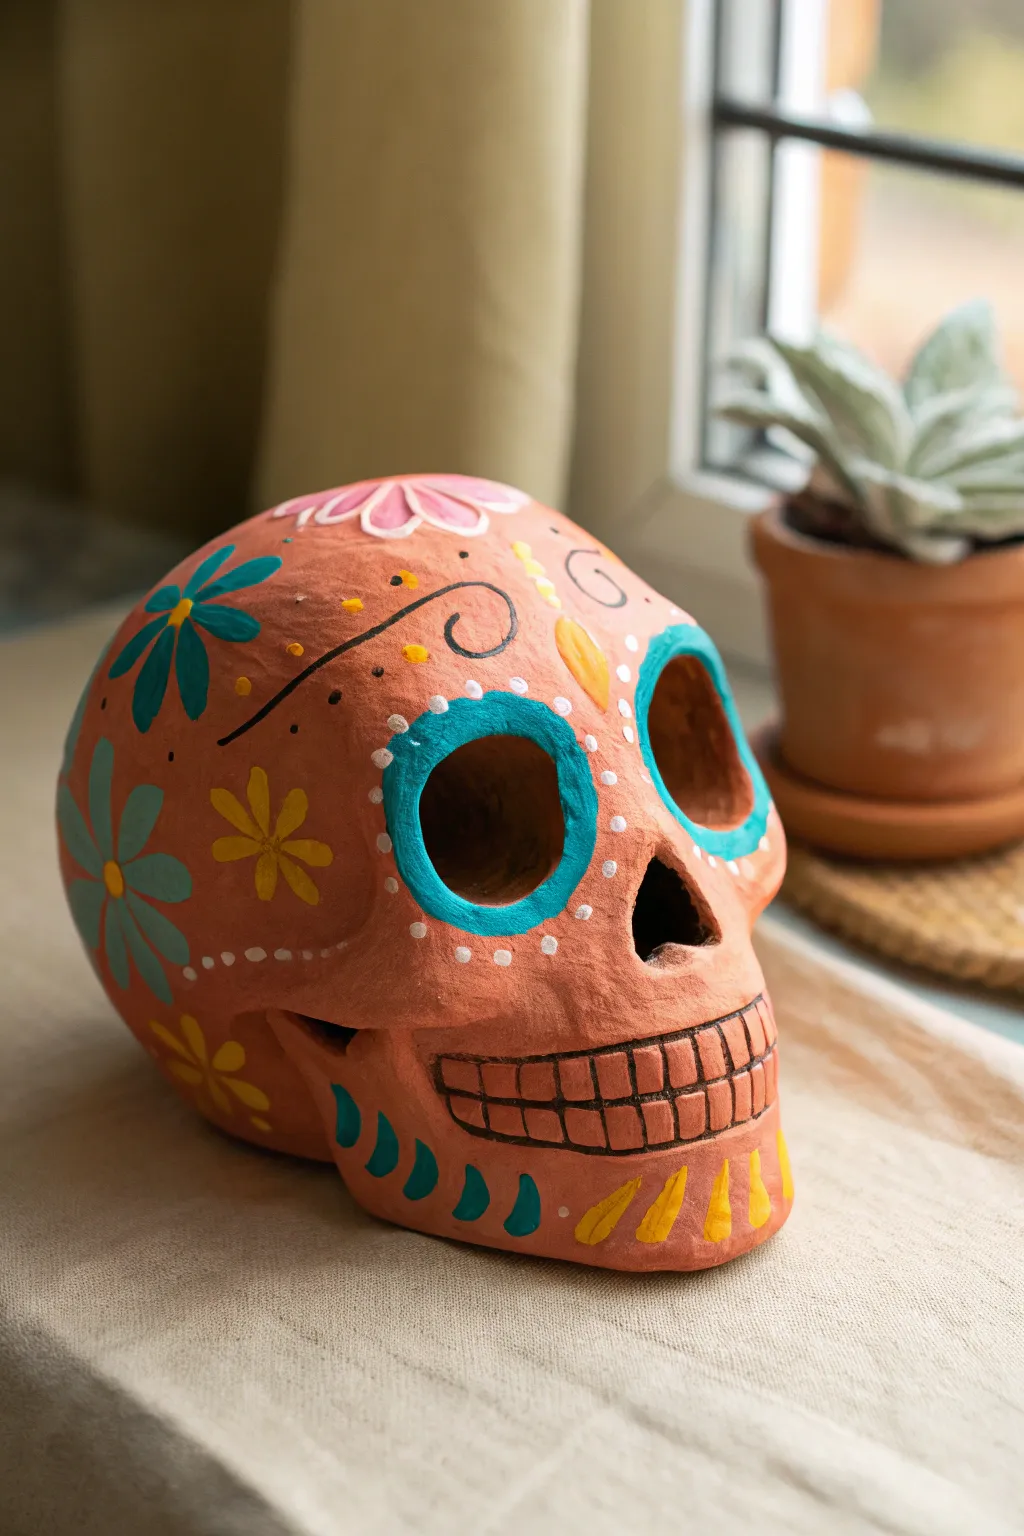
Embrace the vibrant tradition of Día de los Muertos with this beautifully handcrafted clay sugar skull. Featuring delicate floral vines, a classic rose cheek, and intricate dotted detailing, this piece makes for a stunning seasonal decoration.
Step-by-Step
Materials
- White or light gray air-dry clay (approx. 500g)
- Small bowl of water
- Sculpting tools (needle tool, loop tool)
- Acrylic paints (Red, Green, Yellow, Pink, Black, Teal)
- Fine detail paintbrushes (sizes 0 and 2)
- Small sponge (optional for smoothing)
- Clear matte or satin varnish
Step 1: Sculpting the Base
-
Form the cranium:
Start by rolling a large ball of clay into a smooth sphere for the upper part of the skull. Gently elongate the bottom slightly to hint at where the jaw will attach. -
Add the jaw:
Take a smaller lump of clay and flatten it into a thick, rounded block shape. Attach this to the bottom front of your sphere to create the jaw and chin area, blending the clay seams together until invisible. -
Indent the eye sockets:
Using your thumbs or a large loop tool, press firmly into the center of the face to create two deep, large hollows for the eyes. Aim for a slightly inverted teardrop shape rather than a perfect circle. -
Shape the nose cavity:
Directly below and between the eyes, form an upside-down heart shape for the nose cavity. I find using a small loop tool helps carve this out cleanly without distorting the surrounding area. -
Refine the cheekbones:
Add small snakes of clay beneath the eye sockets to build up the cheekbones, smoothing them seamlessly into the skull so they protrude naturally. -
Smooth the surface:
Dip your fingers or a small sponge into water and gently rub the entire surface of the skull to remove fingerprints and tiny bumps. A smooth canvas is essential for the painting phase. -
Dry completely:
Let the sculpture dry for 24-48 hours. Turn it occasionally so the bottom dries evenly. The clay should turn a lighter white color when fully cured.
Cracks happen
If small cracks appear during drying, make a ‘slip’ by mixing a little clay with water into a paste. Fill the cracks, smooth over, and let dry again.
Step 2: Painting the Details
-
Base coat the sockets:
Since the natural clay isn’t pure white, you may want to paint the whole skull white first. Once dry, paint the inside of the nose cavity with teal paint. Paint the interior of one eye socket pink and the other teal for a colorful contrast. -
Outline the teeth:
Using a very fine brush and black paint, draw a long horizontal line across the mouth area. Add short vertical lines along it to create individual rectangular teeth. -
Create the eye dots:
Dip the handle end of a paintbrush into pink paint and stamp a ring of uniform dots around the rim of both eye sockets. This creates the classic sugar skull frame. -
Paint the cheek rose:
On the right cheek, paint a solid red scalloped circle. Once dry, use a lighter red or thin white line to swirl a spiral inside, mimicking rose petals. -
Draw the greenery:
With a thin brush and dark green paint, sweep a long, curving vine starting from the temple and draping down the side of the skull. Add small leaf shapes branching off the main stem. -
Add floral buds:
At the ends of your vines or near the top of the skull, paint small teardrop shapes in yellow and orange to represent closed flower buds. -
Chin details:
Paint a yellow leafy branch extending horizontally across the chin area. Add a small pink five-petaled flower at the corner of the jaw to balance the design. -
Final forehead touches:
Add a few pink dots or small decorative clusters on the forehead above the nose cavity to fill any empty space. -
Seal the work:
Once all paint is thoroughly dry, apply a coat of clear matte or satin varnish to protect the design and give the skull a finished, professional look.
Add relief
Instead of just painting, try sculpting the flower petals and vines with tiny bits of clay and attaching them before drying for a 3D textured effect.
Place your finished skull near a window or as a centerpiece to celebrate the season with style


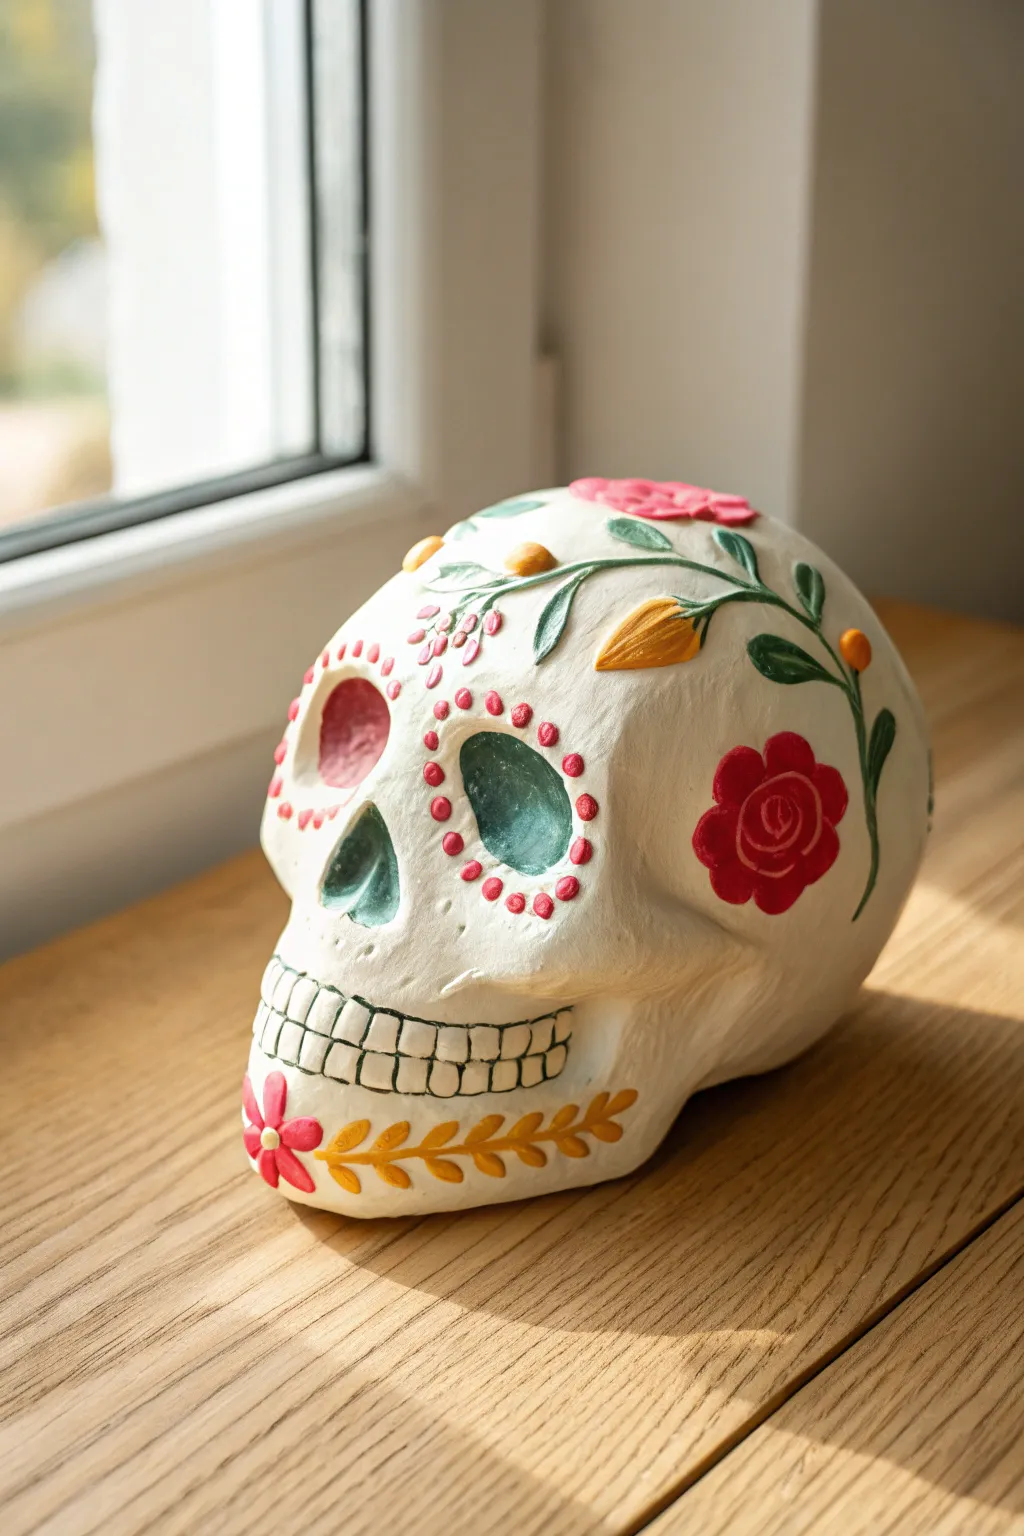
Day of the Dead Color Palette Skull
Embrace the warmth of traditional pottery with this vibrant sugar skull design painted directly onto a terra cotta base. The combination of matte clay tones with bright teal and yellow accents creates a striking yet earthy homage to Día de los Muertos traditions.
Detailed Instructions
Materials
- Bisque ceramic or terra cotta skull (approx. 6 inches tall)
- Acrylic craft paints (Terra cotta/Burnt Orange, Teal/Turquoise, Bright Yellow, Black, White, Pastel Pink)
- Flat shader brushes (medium and small)
- Fine liner brush (00 or 000 size)
- Dotting tool or toothpick
- Pencil with eraser
- Matte spray varnish (optional)
Step 1: Base Preparation
-
Clean surface:
Begin by wiping down your ceramic skull with a slightly damp cloth to remove any dust or oils that might prevent paint adhesion. -
Apply base coat:
Using a medium flat brush, paint the entire skull with terra cotta or burnt orange acrylic paint. If your skull is already terra cotta, you can skip this, but painting it ensures an even, matte finish. -
Apply second coat:
Let the first layer dry completely. Apply a second coat of the terra cotta color to ensure refined opacity, especially in the deep crevices of the eye sockets and nose cavity.
Brush Technique Tip
For sharper petal tips on the flowers, load your round brush and twist it to a fine point on your palette before touching the skull surface.
Step 2: Facial Features
-
Paint eye rings:
Lightly sketch large circles around the eye sockets with a pencil. Use a small flat brush and teal paint to fill in these wide rings, carefully going up to the edge of the hollow socket. -
Line the eyes:
Once the teal is dry to the touch, use a lighter teal or mix a touch of white into your turquoise. Create a scalloped edge around the outer rim of the eye circles using a fine liner brush. -
Darken the cavities:
Paint the inside of the nose cavity and the deep interior of the eye sockets with black paint to create depth. -
Create the mouth:
Using a fine liner brush and black paint, draw a horizontal line across the mouth area. Add vertical lines to create the grid of the teeth, extending slightly beyond the jawline.
Step 3: Floral Details
-
Side flowers:
On the left temple, paint a large flower. Start with a yellow center, then use your small flat brush to stroke teal petals radiating outward. I like to press the brush down and pull inward to get that teardrop petal shape. -
Secondary blooms:
Add a smaller flower lower on the cheek using a lighter teal or dusty blue color for the petals and a yellow center. -
Top blossom:
On the very top of the cranium, paint a large, flat flower shape using pastel pink. Add white highlights to the tips of these petals for dimension. -
Jaw details:
Along the jawline, paint small teal teardrop shapes pointing upwards, alternating with yellow dashes on the chin area.
Glow Up
Mix a tiny amount of glow-in-the-dark medium into the white paint used for the dots. The skull will look traditional by day but reveal a ghostly outline at night
Step 4: Fine Accents
-
Forehead swirls:
With your finest liner brush and black paint, add two swirling flourishes on the forehead, mirroring the curve of the eye sockets. -
Highlight dots:
Dip a dotting tool or the back of a paintbrush into white paint. Add a ring of small dots around the teal eye circles. -
Diamond detail:
Paint a small, elongated yellow diamond shape between the eyes on the forehead. -
Stamen details:
Using the very tip of your liner brush and black paint, add tiny lines or dots to the centers of your flowers. -
Line the cheeks:
Add a row of white dots curving from the bottom of the eye socket toward the back of the skull to emphasize the cheekbone. -
Final touches:
Inspect your design for any uneven edges. Use the terra cotta base color to clean up any mistakes.
Display your handcrafted skull on a mantel or amongst candles to add a festive touch to your celebration


Heart-Eye Calavera Skull
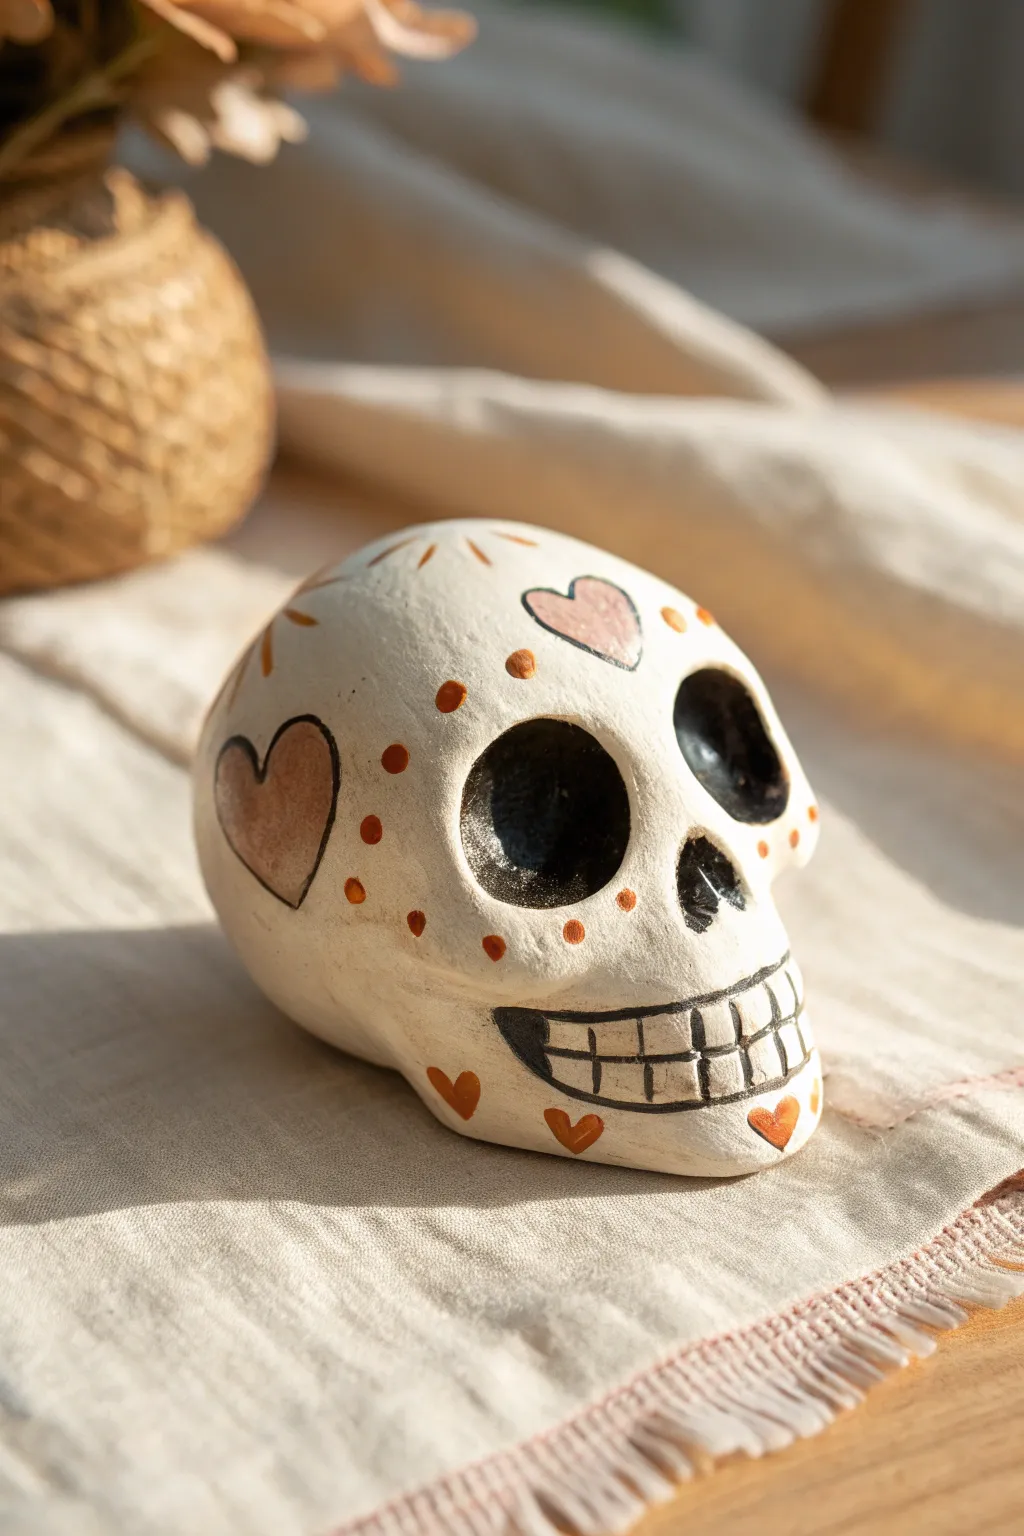
This charming decorative skull features a soft, matte white finish adorned with simple, rustic heart motifs and warm earth tones. It strikes a balance between traditional Day of the Dead iconography and modern minimalist decor.
How-To Guide
Materials
- Air-dry clay (white) or polymer clay
- Sculpting tools (needle tool, small ball tool)
- Acrylic paints (matte white, burnt orange, dusty rose, black)
- Fine-grit sandpaper
- Detail paintbrushes (liner brush and small round brush)
- Water and sponge for smoothing
- Matte varnish (optional)
Step 1: Sculpting the Base Form
-
Form the cranial sphere:
Begin by rolling a large ball of clay into a smooth sphere for the upper cranium. Ensure there are no cracks by smoothing the surface with a damp finger or sponge. -
Shape the face:
Flatten the front slightly and pull the clay downward to create the jaw area, blending it seamlessly into the sphere so it becomes one cohesive, pear-like shape. -
Define the eye sockets:
Use your thumbs or a large ball tool to press deep, large indentations for the eye sockets. They should be prominent and roughly circular, sitting well above the midline of the face. -
Carve the nasal cavity:
Using a small sculpting tool, create an upside-down heart shape or triangular cavity for the nose located centrally between the bottom of the eye sockets. -
Refine the jawline:
Pinch the sides of the jaw gently to define the cheekbones and ensure the chin area is slightly squared off but still rounded at the corners. -
Smooth the surface:
Dip a sponge in water (if using air-dry clay) or baby oil (for polymer) and run it over the entire skull to remove fingerprints. Let the clay dry or bake according to package instructions completely.
Fixing Wobbly Lines
If your painted details look shaky, use a clean, damp brush or a toothpick to gently scrape away acrylic paint errors while they are still semi-wet.
Step 2: Creating the Matte Surface
-
Sand for imperfections:
Once fully cured or dried, gently use fine-grit sandpaper to remove any bumps or rough patches. I find focusing on the jawline helps the final paint job look much cleaner. -
Base coat application:
Apply two to three coats of matte white acrylic paint. Allow each layer to dry fully before applying the next to ensure an opaque, ceramic-like finish. -
Paint the hollows:
Using black acrylic paint, fill in the eye sockets and the nasal cavity completely. Keep your edges crisp where the black meets the white surface.
Step 3: Painting the Details
-
Draft the heart outlines:
With a very fine liner brush and black paint, outline a large heart on the side of the head and a smaller heart on the forehead. Keep the lines thin and sketch-like. -
Fill the large hearts:
Mix a dusty rose color by combining white with a touch of red and brown. Fill in the center of the outlined hearts, leaving a slight gap near the black outline for a rustic look. -
Add orange accents:
Using burnt orange paint, add small details. Paint tiny hearts along the jawline and simple dots around the eye sockets to frame them. -
Create the sunbursts:
Use the same burnt orange or a golden yellow to paint simple dashed lines radiating from the forehead features or the back of the skull, resembling small sunbursts. -
Draft the mouth:
Paint a long, curved horizontal black line across the jaw area for the mouth opening. Add vertical lines to create the teeth segments. -
Refine the teeth:
Thicken the vertical lines slightly and add a horizontal line through the middle of the mouth strip to separate the top and bottom teeth. -
Add final dot details:
Using the back end of a paintbrush dipped in orange paint, add symmetrical dots along the cheekbones and forehead for texture. -
Apply protective finish:
If desired, brush on a layer of matte varnish to protect the paint without adding unwanted shine, preserving the earthy, clay feel.
Hollow It Out
For a lighter skull, form your clay around a crumpled foil core. This saves clay and speeds up drying time significantly.
Place your finished Calavera on a shelf or among fall decor to enjoy its handmade charm


Metallic Accents on a Dark Skull
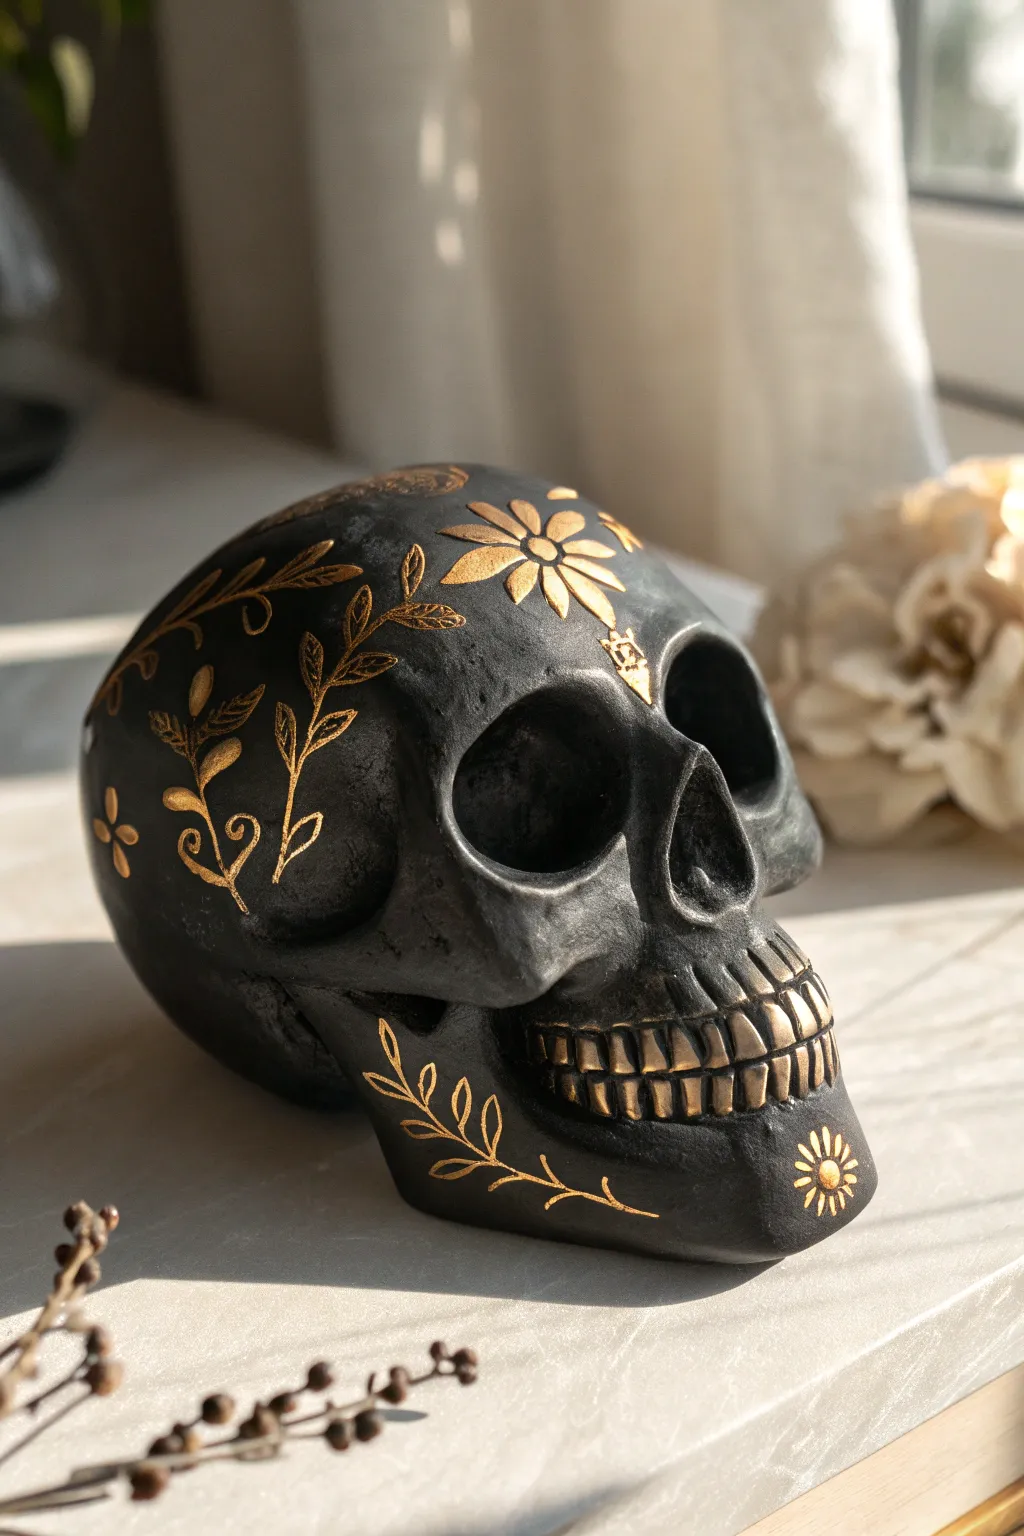
Transform a plain clay or ceramic skull into a striking piece of home decor with this elegant high-contrast design. The matte black finish provides a deep, velvety background that makes the delicate gold leaf detailing and floral patterns truly pop.
Step-by-Step Guide
Materials
- Bisque ceramic or air-dry clay skull
- Matte black acrylic paint (high pigment)
- Wide flat paintbrush
- Fine liner brush (size 0 or 00)
- Liquid gold leaf or metallic gold enamel paint
- Gold leaf sizing (optional, if using real leaf)
- Soft charcoal pencil (white or grey)
- Matte varnish spray
Step 1: Base Preparation
-
Clean surface:
Begin by wiping down your clay skull with a slightly damp cloth to remove any dust or oils. If you sculpted this yourself from air-dry clay, ensure it has cured for at least 48 hours before proceeding. -
Apply base coat:
Using a wide flat brush, apply a generous coat of matte black acrylic paint. Work the paint into the deep recesses of the eye sockets, nose cavity, and between the teeth first to ensure no white spots remain. -
Smooth coverage:
Once the tricky areas are covered, paint the smooth surfaces of the cranium and jaw. Use long, even strokes to minimize texture. Let this first coat dry for about 20 minutes. -
Second coat:
Assess the opacity. I usually apply a second coat to get that deep, velvety void look. Ensure the finish is completely matte and consistent before moving on. -
Seal (Optional):
If your black paint feels chalky or unstable, a very light mist of matte varnish now can create a better surface for the gold work, preventing it from soaking in too much.
Fixing Wobbly Lines
Made a mistake with the gold? Quickly dip a clean brush in rubbing alcohol and gently wipe the wet paint away. If it has dried, paint over the error with matte black.
Step 2: Drafting the Design
-
Sketch placement:
Take a soft white charcoal pencil and very lightly sketch the main elements of your floral design. Start with a large daisy-like blossom on the forehead, slightly off-center. -
Add vining:
Draw winding stems trailing down the temples and wrapping around the cheekbones. Keep the lines loose and organic. -
Chin details:
Sketch a smaller leaf branch sweeping across the lower jaw, and place a tiny sunburst or flower motif on the center of the chin. -
Review sketch:
Step back and look at the composition. The charcoal lines are easy to wipe away with a damp Q-tip if you need to adjust the balance.
Step 3: Gilding the Details
-
Prepare the gold:
Shake your liquid gold leaf or metallic enamel thoroughly. The metallic particles settle quickly, so you need a consistent suspension for maximum shine. -
Paint the petals:
Using your fine liner brush (size 0), carefully fill in the petals of the main forehead flower. Press the brush down near the center and lift as you pull outward to create a tapered petal shape. -
Stem work:
For the vines, use the very tip of the liner brush. Keep your hand steady and pull the brush toward you to create smooth, flowing lines rather than jagged ones. -
Leaf details:
Add small leaves to the vines. I like to vary the pressure—press down for the belly of the leaf and lift sharply for the tip. -
Teeth highlighting:
Carefully paint the individual teeth with the gold. Don’t paint the gaps between them; leave those black to maintain definition and depth. -
Chin accents:
Paint the laurel branch on the jawline and the small starburst on the chin, ensuring the lines remain crisp. -
Clean up:
Once the gold is fully dry (give it at least an hour), use a clean, slightly damp brush or cloth to gently wipe away any visible white charcoal sketch lines.
Level Up: Gemstones
Enhance the luxury feel by gluing tiny black Swarovski crystals or flat-back pearls into the center of the gold flowers for subtle texture and sparkle.
Step 4: Finishing
-
Check for gaps:
Inspect the gold coverage. If the black is showing through the metallic paint, carefully dab a second layer on the specific areas needed for solid coverage. -
Final seal:
To protect the gold from tarnishing over time, spray the entire piece with a matte varnish. Do this in light misting layers so the liquid doesn’t pool and dull the metallic shine.
Place your finished skull near a natural light source to see the beautiful contrast catch the sun

The Complete Guide to Pottery Troubleshooting
Uncover the most common ceramic mistakes—from cracking clay to failed glazes—and learn how to fix them fast.
Flat Relief Skull Plaque
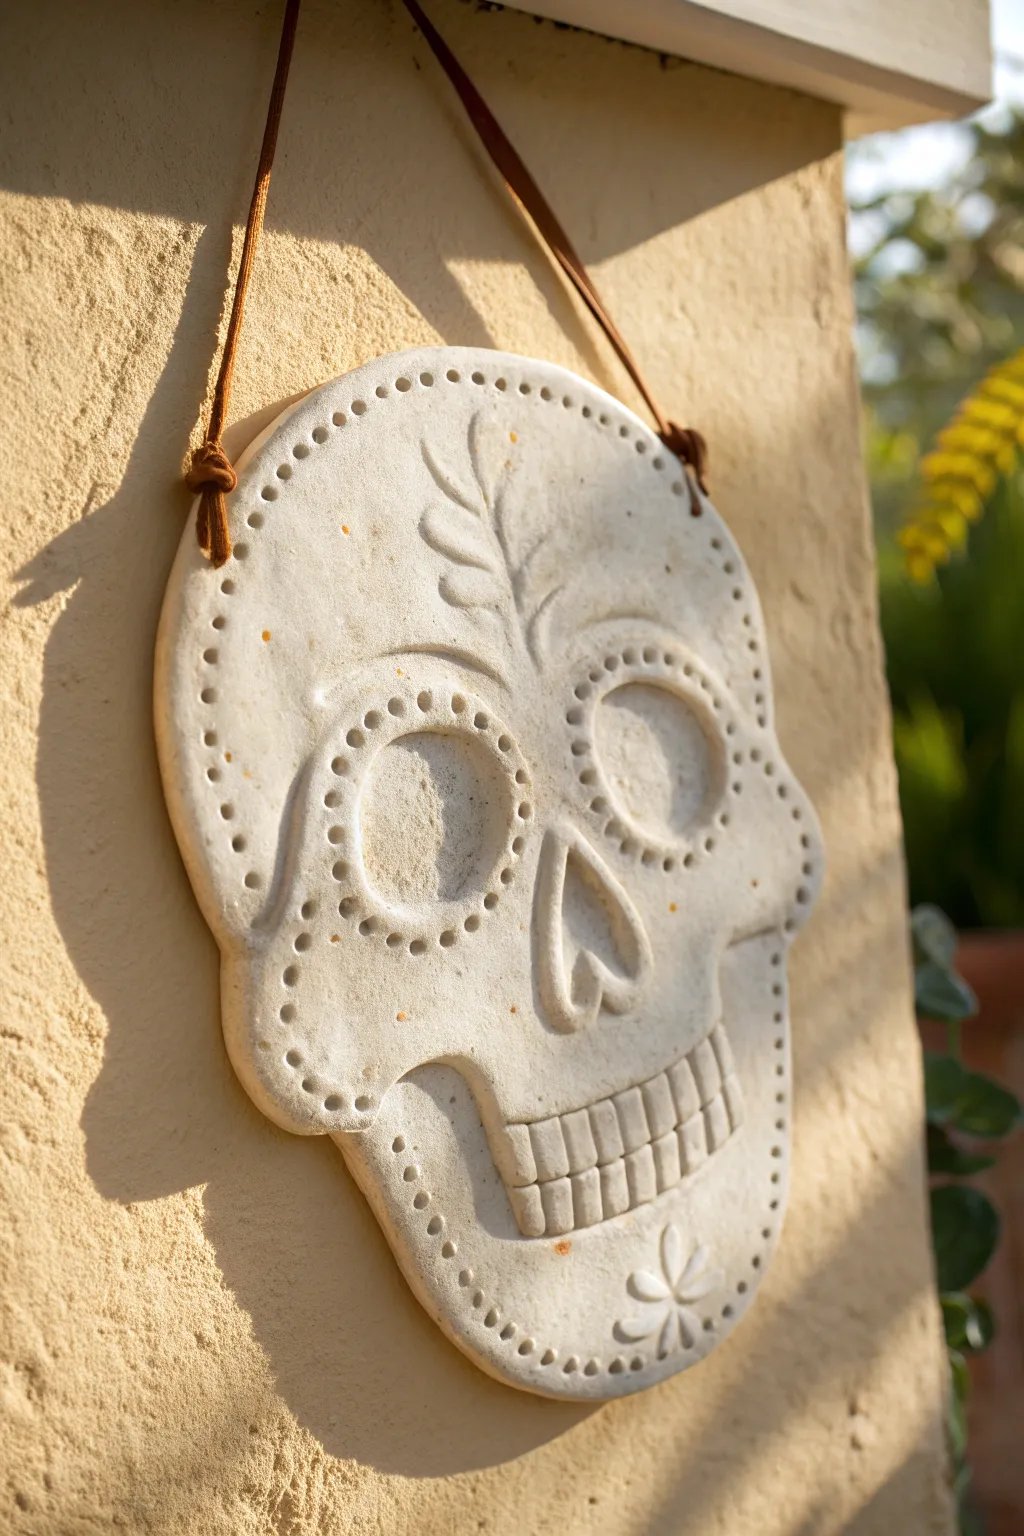
Create a stunning piece of wall art with this flat relief skull plaque, perfect for year-round decor or Day of the Dead celebrations. The finished project features a smooth, bone-colored finish with delicate etched details and a charming punched border pattern.
How-To Guide
Materials
- White air-dry clay or polymer clay
- Rolling pin
- Parchment paper or clay mat
- Skull template (printed on paper)
- Craft knife or scalpel
- Needle tool or toothpick
- Small ball stylus tool
- Water and sponge (for smoothing)
- Leather cord or twine
- Clear matte sealant spray (optional)
- Fine grit sandpaper
Step 1: Shaping the Base
-
Prepare your workspace:
Lay down your parchment paper or non-stick mat to prevent the clay from sticking to your table. If using heavy air-dry clay, taping the paper down helps keep everything flat. -
Roll out the slab:
Take a generous handful of clay and knead it until pliable. Roll it out into an even slab, aiming for a thickness of about 1/4 to 1/2 inch. Avoid going too thin, as the relief needs some structural integrity. -
Cut the outline:
Place your paper skull template gently onto the clay slab. Using a craft knife, carefully trace around the perimeter to cut out the basic skull shape. Remove the excess clay and smooth the cut edges with a damp finger to remove any sharpness. -
Create hanging holes:
Before the clay starts to dry, use a straw or a large tool to punch two holes near the top edges of the skull’s forehead. Make sure they are even and not too close to the edge to support the weight later.
Step 2: Sculpting Relief Details
-
Define the eye sockets:
To create the sunken eye effect, gently press your thumbs into the clay where the eyes should be. Don’t push all the way through; imply depth by creating shallow, smooth depressions. -
Sculpt the nose cavity:
Roll a small snake of clay into a ‘V’ shape and attach it to the center of the face. Blend the outer edges into the main slab so it looks like a raised bone structure, leaving the center hollow. -
Outline the cheekbones:
Use a modeling tool or your thumb to press slightly below the eye sockets, raising the cheekbone area. This subtle topography gives the piece its dimensional relief look. -
Smooth everything out:
Dip a small sponge or your finger in water and gently run it over the entire surface. You want to eliminate distinct fingerprints and create a unifying, smooth bone-like texture before adding the fine details.
Cracks happen!
If small cracks appear during drying, make a ‘slurry’ paste by mixing a tiny bit of clay with water. Fill the crack, smooth it over, and let it dry again.
Step 3: Etching and Texturing
-
Punch the border pattern:
Using a small ball stylus or the blunt end of a paintbrush, press a series of dots around the entire perimeter of the skull. Try to keep the spacing consistent for a polished look. -
Detail the eyes:
Continue the dotted pattern by pressing a circle of dots around each eye socket. This adds a decorative, sugar-skull aesthetic without needing paint. -
Carve the forehead motif:
With a needle tool, lightly sketch a leafy branch or vine growing up the center of the forehead. Once you are happy with the placement, carve slightly deeper to make the lines permanent. -
Sculpt the teeth:
Use a flat-edged tool to press vertical lines into the jaw area to define individual teeth. Then, etch a horizontal line across them to separate the top and bottom rows. -
Add chin details:
At the bottom of the chin, press the side of a tool or use a stamp to create a simple star or flower pattern. It balances the design nicely against the forehead leaf.
Make it antiqued
After drying, rub a diluted brown acrylic wash over the skull and wipe it back immediately. The paint will stay in the dots and lines, highlighting the texture.
Step 4: Finishing Touches
-
Final drying phase:
Let the piece dry completely according to your clay’s instructions. I prefer to flip the piece over halfway through drying so the back gets air exposure, which helps prevent warping. -
Sand and soften:
Once fully dry, take fine-grit sandpaper and gently buff the edges and surface. Focus on any burrs created by the dotting tool to ensure the final piece feels smooth to the touch. -
Seal (Optional):
For durability, especially if hanging outdoors, apply a clear matte spray sealant. This protects the porous clay from moisture and dust. -
Attach the cord:
Cut a length of leather cord. Thread each end through the holes from the front to the back and tie secure knots on the front side, leaving the loop loose for hanging.
Find the perfect sunny spot on your patio wall to hang your new creation and enjoy the play of shadows in the relief work
Mini Skull Magnets or Pins
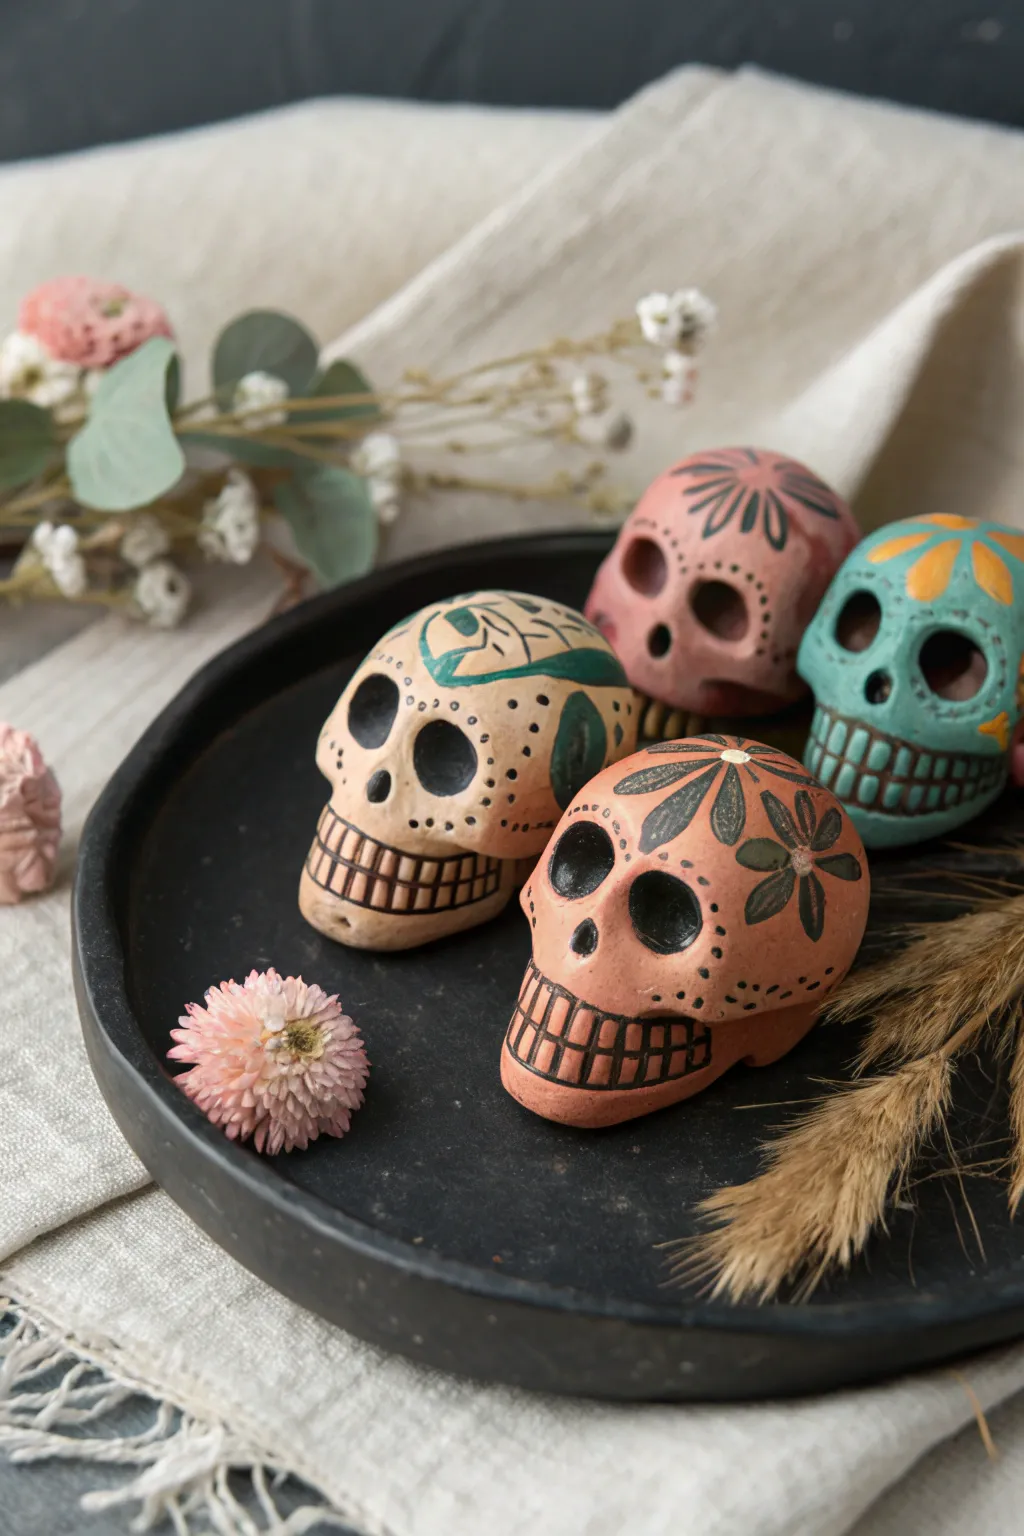
These charming, palm-sized clay skulls capture the festive spirit of Día de los Muertos with their earthy tones and botanical motifs. Perfect for turning into magnets or decorative pins, each mini sculpture features unique floral designs painted in a natural, matte finish.
Step-by-Step Guide
Materials
- Air-dry clay (terra cotta or white/stone color)
- Sculpting tools (needle tool, small ball tool)
- Acrylic paints (matte finish: teal, terracotta, cream, dusty pink, leaf green, mustard yellow, black)
- Fine detail paintbrushes (sizes 0 and 00)
- Water cup and paper towels
- Strong craft glue (E6000 recommended)
- Round ceramic magnets or pin backs
- Matte spray varnish (optional)
Step 1: Sculpting the Base Form
-
Shape the Cranium:
Start with a ball of clay roughly the size of a walnut or a golf ball. Roll it between your palms until it is smooth and free of cracks. Gently press it onto your work surface to create a flat back, which is essential for attaching a magnet later. -
Form the Jaw:
Pinch the lower third of the ball slightly to elongate it into a jaw shape rather than a perfect circle. You want a subtle, rounded square shape at the bottom to distinguish the jawline from the cheekbones. -
Define the Eye Sockets:
Using your thumbs or a large ball tool, press firmly into the center of the face to create two deep, oval depressions for the eye sockets. Smooth the edges of these sockets with a little water on your finger so they aren’t sharp. -
Sculpt the Nasal Cavity:
Just below and between the eyes, use a smaller tool or the end of a paintbrush to press in an upside-down heart or triangle shape for the nose hole. -
Refine the Drying shape:
Check the profile of your skull. I like to gently push the forehead forward slightly to give it a more rounded, realistic dimension. Set the clay aside to dry completely on a wire rack for 24-48 hours, turning occasionally for even drying.
Smooth Operator
Before drying, dip a finger in water and smooth out any fingerprints on the clay. A smooth surface makes painting fine lines much easier later.
Step 2: Base Painting
-
Select your Palette:
Choose earthy, muted tones for the base colors. Mix your acrylics to achieve a stone cream, a dusty rose pink, a deep terracotta, and an oxidized teal blue. -
Apply the Base Coat:
Paint the entire surface of each dried clay skull with its chosen base color. You may need two coats to get a solid, opaque finish. Let the first coat dry completely before adding the second. -
Darken the Cavities:
Using black acrylic paint and a small brush, carefully fill in the deep recesses of the eye sockets and the nose cavity. This creates immediate depth and contrast.
Step 3: Adding the Flourish
-
Draft the Teeth:
Using a very fine brush or even a black fine-tip paint pen, draw a horizontal line across the jaw area. Draw small vertical lines intersecting it to create the grid-like appearance of teeth. -
Paint the Forehead Flower:
On the forehead, paint a central floral motif. For the terracotta skull, paint a six-petal flower in dark green. On the teal skull, use mustard yellow for the petals. Start from the center and pull your brush outward for a petal shape. -
Add Botanical Vines:
For the cream skull, paint sweeping green vines that curve over the top of the cranium. Keep your brush strokes loose and organic. -
Detail the Cheeks:
Add smaller floral elements or simple dots to the cheekbones. On the pink skull, simple radiating lines near the temples add a nice geometric touch. -
Stippling Textures:
Using the very tip of your smallest brush or a toothpick dipped in black paint, add tiny stippled dots around the eye sockets or along the brow line. This adds a traditional folk art texture. -
Seal the Work:
Once the paint is fully cured, apply a light coat of matte spray varnish. Avoid glossy finishes to keep the earthy, ceramic look. -
Attach Hardware:
Turn the skull over. Apply a generous dab of strong craft glue to the flat back and press your magnet or pin backing firmly into place. Let it cure overnight before using.
Make it Antique
Mix a tiny drop of brown paint with water to make a thin wash. Brush over the dried paint and wipe off immediately for an aged, vintage look.
Now you have a set of handcrafted calaveras ready to bring a touch of tradition to your space


What Really Happens Inside the Kiln
Learn how time and temperature work together inside the kiln to transform clay into durable ceramic.
Bow, Hat, or Headpiece Skull
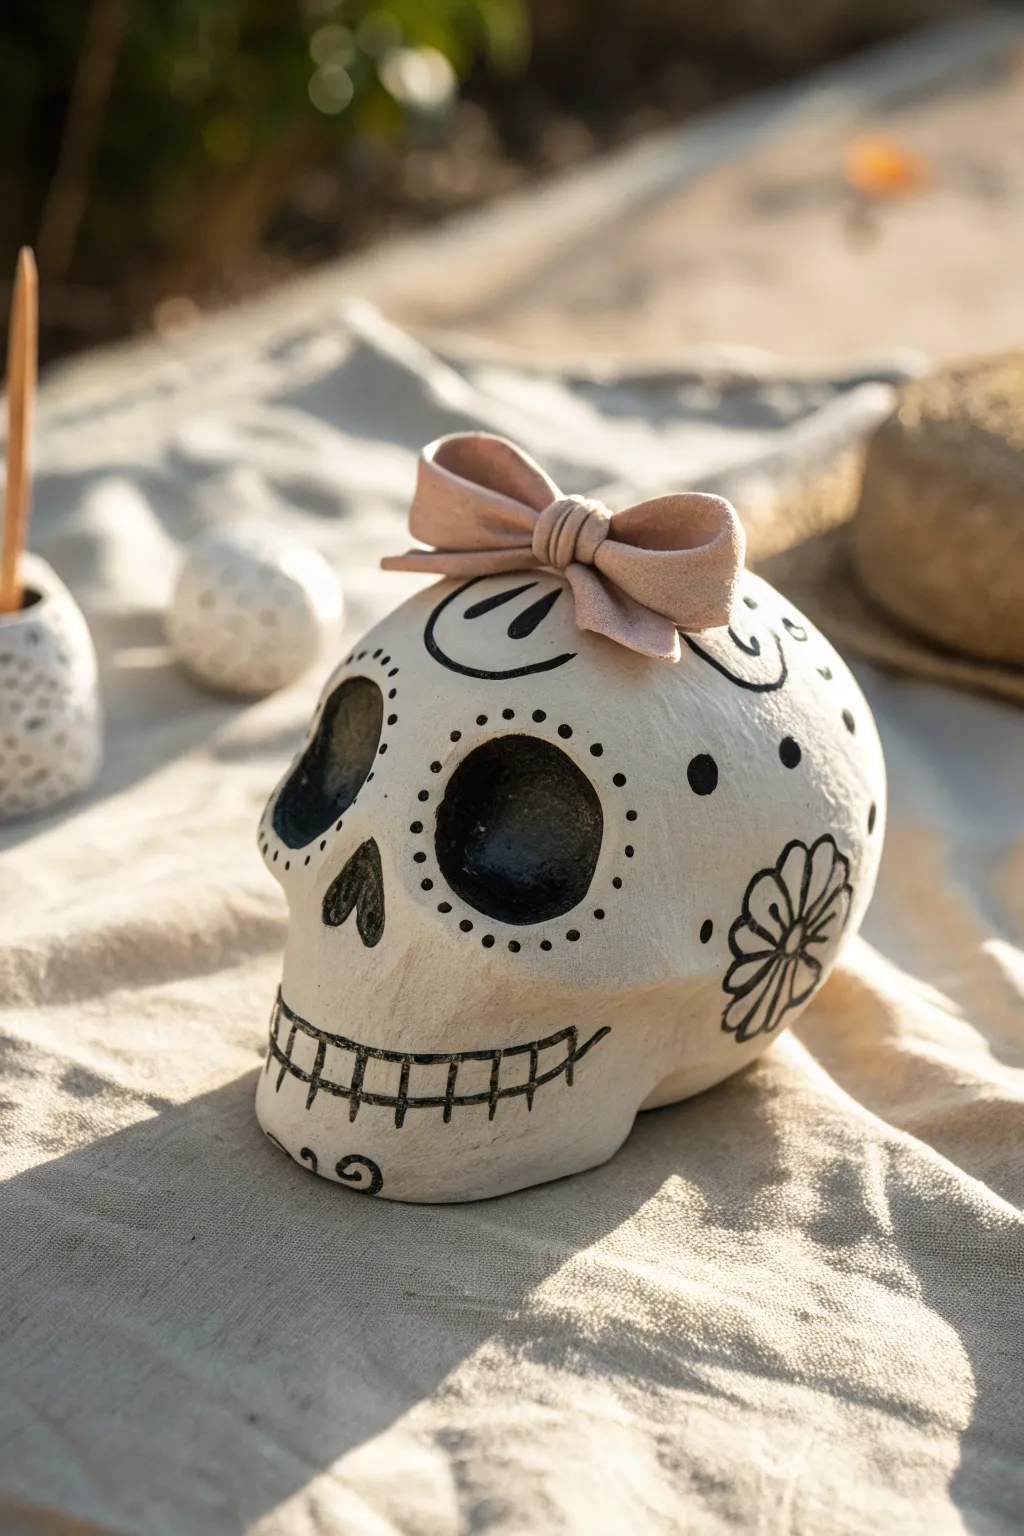
This charming project combines simplistic line work with texture for a Day of the Dead inspired piece that feels modern and approachable. With a matte white finish, bold black details, and a soft fabric bow, this skull makes for sophisticated, not scary, seasonal decor.
Step-by-Step Tutorial
Materials
- Air-dry clay or polymer clay (white)
- Clay sculpting tools
- Acrylic paint (matte white and carbon black)
- Fine detail paintbrush (size 0 or 00)
- Medium flat paintbrush
- Soft beige felt or microsuede fabric
- Hot glue gun and glue sticks
- Fine-grit sandpaper
- Pencil
Step 1: Sculpting the Base
-
Form the cranium:
Start with a large ball of clay slightly smaller than your fist. Smooth out any major cracks with a little water if you are using air-dry clay. -
Shape the face:
Gently pinch and pull the lower half of the sphere downwards to create the jawline and chin area, flattening the sides slightly to simulate temples. -
Define eye sockets:
Use your thumbs or a large ball tool to press deep, large craters for the eye sockets. They should be slightly oval-shaped and prominent. -
Carve the nose:
Press an upside-down heart shape into the center of the face, located just between and slightly below the eye sockets. -
Refine the jaw:
Smooth the jawline so it is distinct from the cranium but still connected. I like to make the chin slightly rounded for a softer look. -
Dry completely:
Allow your clay skull to cure fully according to the package directions. For air-dry clay, this usually takes 24-48 hours.
Don’t Rush the Line Work
Thin your black paint slightly with a drop of water. This helps the paint flow smoothly off the brush for crisp lines without blotching.
Step 2: Painting and Details
-
Sand for smoothness:
Once dry, lightly sand the surface with fine-grit sandpaper to remove any fingerprints or rough bumps. -
Apply base coat:
Paint the entire skull with matte white acrylic paint. You may need two coats to get an opaque, chalky finish. -
Sketch the design:
Using a pencil very lightly, draw the outline of the mouth, the flower on the cheek, and the decorative dots around the eyes. -
Paint the sockets:
Fill in the eye sockets and the nose cavity with solid black acrylic paint. Ensure the edges are crisp. -
Add eye details:
Using your fine detail brush, paint small black dots tracing the outer rim of the eye sockets. -
Create the mouth:
Paint a long horizontal line across the jaw area, curving up slightly at the ends. Add vertical cross-hatch lines to create the stitched teeth look. -
Draw the cheek flower:
On the side of the jaw, paint a simple five-petal flower outline with a center dot. Keep the lines thin and steady. -
Add final flourishes:
Paint a small swirl on the chin and two curved lines on the forehead to frame where the bow will sit.
Step 3: The Finishing Touch
-
Cut the fabric:
Cut a strip of beige felt or microsuede about 6 inches long and 1 inch wide for the main loops, and a tiny strip for the center knot. -
Form the bow:
Fold the ends of the long strip into the center to form two loops and secure with a dab of hot glue. -
Add the center knot:
Wrap the small strip around the middle of the bow to hide the seam, pulling tight to pinch the bow shape, and glue it in back. -
Attach to skull:
Apply a generous dot of hot glue to the top center of the skull and press the bow firmly in place.
Add Subtle Dimension
Before painting details, lightly brush a watered-down gray wash into the indentations of the eyes and temples to create soft, realistic shadows.
Now you have a stylish, handcrafted skull that brings a soft touch to your seasonal display
Jeweled Sugar Skull With Mixed Media Sparkle
Transform a plain ceramic or clay skull into a vibrant celebration of life with careful painting and gem application. This project combines raised texture techniques with metallic accents and dimensional jewels for a sophisticated take on traditional Día de los Muertos folk art.
Step-by-Step Guide
Materials
- Bisque ceramic or air-dry clay skull (blank)
- Acrylic paints (pastel pink, teal/turquoise, black, cream/bone)
- Metallic gold paint
- Puffy paint or dimensional fabric paint (gold and pink)
- Craft glue or gem adhesive
- Assorted flat-backed rhinestones (large turquoise teardrops, small rounds)
- Fine detail brushes
- Medium flat brush
- Gold glitter (fine)
- Clear matte sealer spray
Step 1: Base Preparation
-
Prime the Surface:
Begin by coating your skull with a cream or bone-colored acrylic paint. If your base material is very white, mixing a tiny drop of brown into white paint creates that natural, aged ceramic look seen in the photo. Let this base coat dry completely. -
Darken the Features:
Using a small brush, carefully paint the inside of the eye sockets and the nose cavity. While black is traditional, using a deep metallic gold inside the sockets adds a warm, reflective glow that helps the glitter adhere later. -
Add Glitter Depth:
While the paint inside the eye sockets is still tacky, sprinkle a pinch of fine gold glitter into the deepest parts. This creates a subtle shadow and sparkle that mimics the photo’s texture.
Gem Sliding?
If heavy gems slide down vertical surfaces, let the glue get tacky for 30-60 seconds before placing the gem. Lay the skull on a soft towel or pillow to keep the surface flat while drying.
Step 2: Floral Details
-
Outline the Bloom:
Around each eye socket, lightly sketch a flower shape with a pencil. Paint these ‘petals’ using a soft pastel pink acrylic. You’ll want the paint to be opaque, so two thin coats are better than one thick glob. -
Create the Crown:
On the very top center of the head, paint a large, multi-petaled flower in the same pink hue. Extend long, flowing leaves and vines down the sides of the skull using a thin liner brush and gold paint. -
Side Florals:
Paint smaller turquoise flowers on the temples or sides of the skull to balance the color palette. Simple five-petal shapes work best here. -
Add Dimension:
Once the flat paint is dry, use pink dimensional (puffy) paint to outline the eye flowers. This raised edge gives the skull a tactile, high-end finish similar to sugar piping.
Step 3: Gold Accents & Linework
-
Scrollwork:
Using your finest brush or a gold paint pen, draw swirling scroll designs on the cheeks and jawline. Keep your hand steady but fluid; imperfections add to the folk-art charm. -
Define the Teeth:
Paint the teeth area with your base bone color, then use a very watered-down black or dark brown paint to create thin lines between the teeth. This ‘wash’ technique settles into crevices for natural shading. -
Gilded Highlights:
Add gold dots and accents around your turquoise flowers and along the major scroll lines. I like to use the wrong end of a paintbrush dipped in gold paint to make perfectly round dots. -
Chin Decoration:
Don’t forget the chin! Paint small pink flourishes and a central gold scroll to anchor the design at the bottom.
Level Up
Use actual gold leaf instead of metallic paint for the eye sockets and larger scrollwork. The erratic texture of the leaf adds an authentic, aged relic feel that paint can’t match.
Step 4: Jeweling
-
Forehead Gem:
Select a large turquoise teardrop gem. Apply a small dot of strong craft glue to the center of the forehead area, amidst your gold scrollwork, and press the gem firmly in place. -
Eye Accents:
Place smaller matching turquoise gems around the outer corners of the eyes or within your painted leafy vines to act as sparkling buds. -
Chin Sparkle:
If you have a teardrop gem left, place it inverted on the chin, nestled between the painted pink flourishes. -
Final Sealing:
Once all paint and glue are completely cured (give it a few hours), mist the entire piece with a clear matte sealer. This protects the paint from chipping and knocks back any unwanted plastic shine from the acrylics.
Display your beautiful creation on a mantle or shelf where it can catch the light

TRACK YOUR CERAMIC JOURNEY
Capture glaze tests, firing details, and creative progress—all in one simple printable. Make your projects easier to repeat and improve.
Geometric Pattern Skull
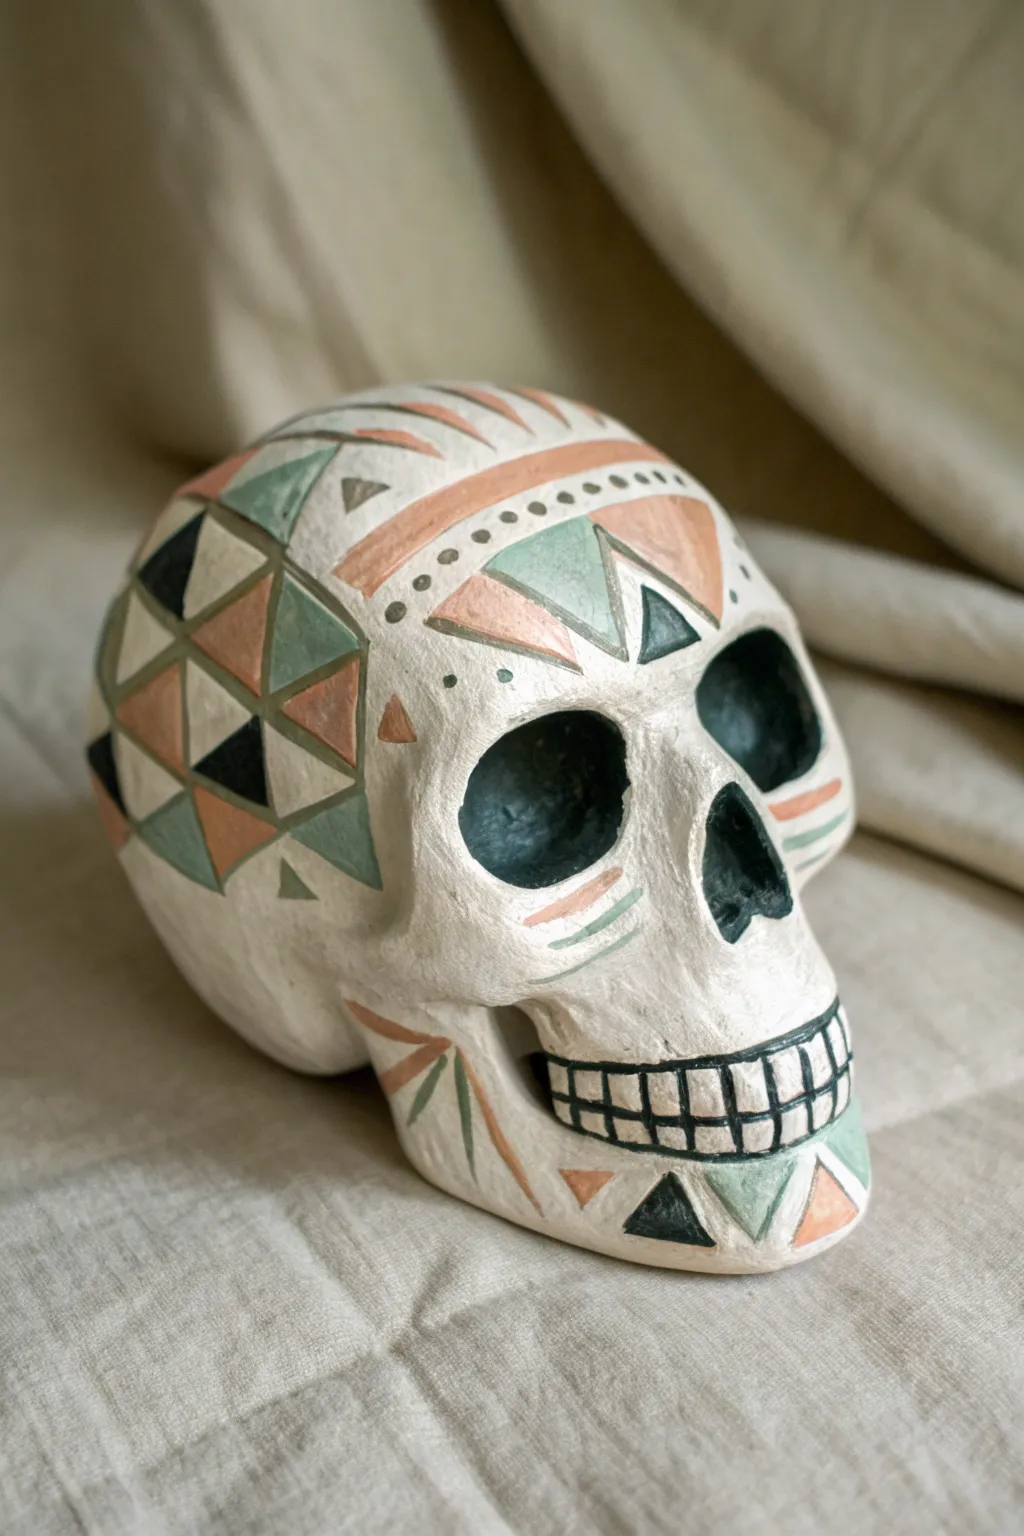
Transform a simple skull form into a modern decor piece using a soft, earthy color palette and striking geometric shapes. This design combines precise triangles with organic lines for a sophisticated look that fits perfectly in a contemporary bohemian home.
Detailed Instructions
Materials
- Paper mache or ceramic skull blank (approx. 5-7 inches)
- Acrylic craft paints: Cream/Off-white, Salmon/Peach, Sage/Seafoam Green, Black
- Flat shader brushes (small and medium)
- Fine liner brush or detail brush
- Pencil and eraser
- Ruler or straight edge (flexible tape measure works best)
- Matte finish sealant spray
- Palette or small plate for mixing
- Water cup and paper towels
Step 1: Preparation and Base Coat
-
Clean the surface:
Wipe down your skull blank with a dry cloth to remove any dust or debris. If using a ceramic gloss blank, give it a light sanding first to help the paint adhere. -
Apply the base color:
Paint the entire skull with the Cream or Off-white acrylic paint. This creates a uniform, warm canvas. -
Wait and layer:
Let the first coat dry completely. Apply a second coat to ensure opaque, streak-free coverage, paying attention to the deep sockets and teeth area.
Step 2: Drafting the Design
-
Sketch the forehead arch:
Using a pencil very lightly, draw a curved line across the forehead that mimics a headband shape. Above this line, sketch upward-radiating rays or elongated triangles. -
Map out the cheek triangles:
On the side of the skull, draw a large triangle cluster. Start with a central point and expand outward, creating a tesselated pattern of smaller triangles interlocked together. -
Mark the eye details:
Sketch simple triangles above and below the eye sockets to frame them. Add horizontal lines on the cheekbones. -
Draft the chin pattern:
Draw a series of alternating triangles along the chin and jawline, keeping the spacing relatively even.
Wobbly Lines?
Don’t panic if your triangles aren’t perfect. Use a flat-edge brush loaded with your base cream color to ‘erase’ and straighten edges after the color dries.
Step 3: Painting the Geometric Shapes
-
Paint the Salmon sections:
Load a small flat brush with your Salmon/Peach paint. Fill in specific triangles on the cheek geometric pattern, distributing the color so no two salmon shapes touch directly. -
Add warmth to the forehead:
Use the same Salmon color to paint thick, curved bands across the forehead and small accents near the jaw. -
Apply the Sage Green:
Switch to clean brush and the Sage Green paint. Fill in the adjacent triangles on the cheek grid and add the triangular accents above the eye sockets. -
Incorporate Black accents:
Using the Black paint, fill in the remaining triangles in your cheek pattern. This high contrast color anchors the design, so place these shapes thoughtfully. -
Paint the eye sockets and nose:
Use a medium brush to fill the deep eye sockets and nasal cavity with solid black. Get deep into the crevices for a hollow, realistic effect.
Pro Tip: Masking Tape
For ultra-crisp geometric lines on the flatter parts of the skull, use small strips of washi tape or painters tape to mask off your triangles before painting.
Step 4: Fine Details and Finishing
-
Detail the teeth:
With a fine liner brush and black paint, carefully outline the teeth grid. Draw a horizontal line through the center of the mouth, then vertical lines to separate individual teeth. -
Add decorative dots:
Dip the non-brush end of a paintbrush handle into black or dark grey paint. Dot a line of consistent circles across the forehead band you painted earlier. -
Create fine lines:
Using your thinnest liner brush, add thin radiating lines (like sun rays) at the top of the skull and small accent strokes on the cheekbones. -
Clean up edges:
I usually go back with the base Cream color and a tiny brush to touch up any geometric lines that got a little wobbly. -
Dry completely:
Allow the skull to sit for at least an hour to ensure all thick layers of paint are fully cured. -
Protect the work:
Take the skull to a well-ventilated area and apply a light coat of matte clear spray sealant to protect the paint from chipping and dust.
Now you have a stylish geometric accent piece ready for your shelf or mantel display
Pop Art Checkerboard Skull
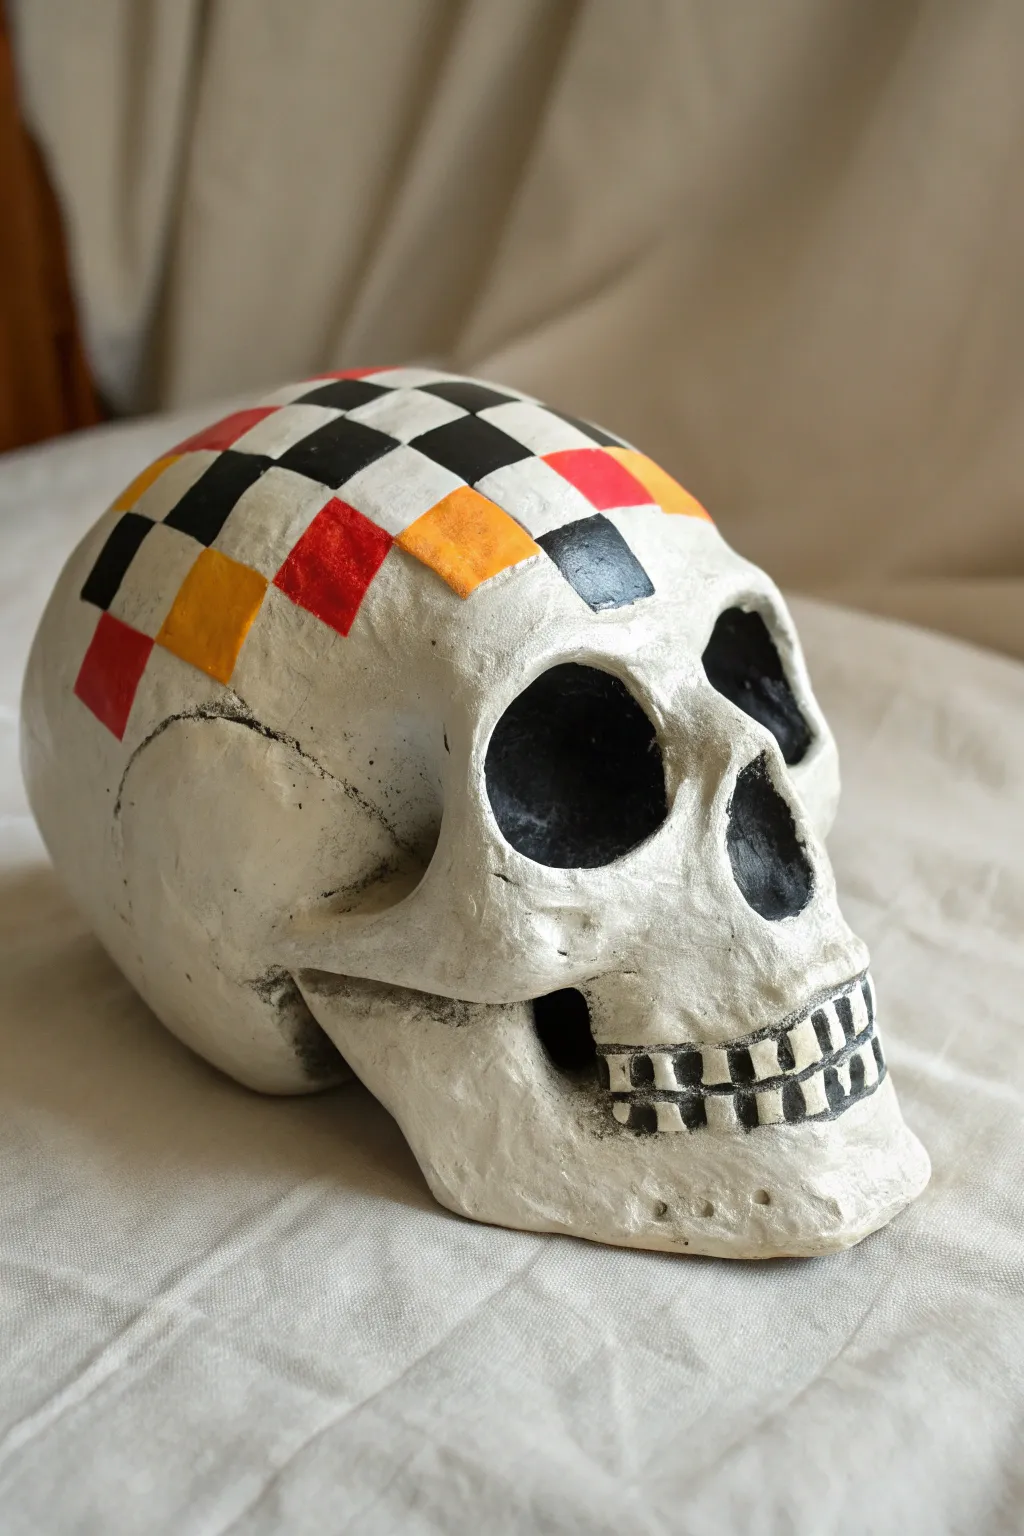
This striking project combines the classic anatomical form of a skull with the bold, graphic energy of pop art. By applying a vibrant checkerboard pattern to the cranium and stylized teeth, you transform a spooky icon into a modern statement piece.
Step-by-Step Tutorial
Materials
- Bisque ceramic or papier-mâché skull blank
- Gesso or white acrylic primer
- Acrylic paints (Titanium White, Mars Black, Bright Red, Cadmium Orange)
- Pencil (HB or lighter)
- Flexible sewing tape measure
- Flat shader brushes (small and medium)
- Small round detail brush
- Matte or satin varnish
Step 1: Base Preparation
-
Prime the surface:
Begin by coating your skull with a layer of white gesso or primer. Even if the skull is already white, this ensures a toothy surface that grabs the paint well and unifies the texture. -
Base coat application:
Once the primer is fully dry, apply two thin coats of Titanium White acrylic over the entire skull. Allow the first coat to dry completely before adding the second to avoid lifting the paint.
Wobbly Lines?
If your hand isn’t steady enough for freehand painting, cut small squares of masking tape or painter’s tape to block off the grid before applying your colors.
Step 2: Mapping the Grid
-
Find the center line:
Using a flexible sewing tape measure, find the center point of the skull’s forehead and lightly mark a straight line running back over the curve of the cranium. -
Draw the grid:
Sketch a grid pattern lightly in pencil over the top dome of the skull. The squares should be roughly 1.5 to 2 centimeters wide. Don’t worry if the squares distort slightly near the edges; the curve makes this natural. -
Outline the pattern area:
Decide where your checkerboard field will stop. This design looks best if it fades out or stops abruptly midway down the sides and back, rather than covering the entire head.
Step 3: Painting the Features
-
Fill the cavities:
Switch to Mars Black paint and a medium round brush. Carefully fill in the eye sockets and the nasal cavity. Paint deep into the recesses to create a true sense of void. -
Detail the jaw:
Using a smaller brush, paint the shadowy areas behind the jawbone and the space between the jaw and cheekbone black to add depth. -
Stylize the teeth:
Instead of individual realistic teeth, paint a horizontal black line across the center of the mouth area. Then, paint vertical black lines to create a grid that implies the separation of teeth. -
Fill the tooth gaps:
Carefully paint every other square in your tooth grid black, creating a mini checkerboard effect on the mouth itself.
Pro Tip: Curved Grid
When drawing the grid on the round skull, visualize the lines like longitude and latitude on a globe. Let them curve slightly to follow the form rather than forcing straight lines.
Step 4: Applying Color
-
Plan your palette:
Select your color pattern. I prefer to alternate black squares with colored ones to keep high contrast. -
Paint the black squares:
Use a small flat shader brush to fill in the black squares of your cranial grid first. This establishes the structure of the design. -
Add red accents:
Fill selected remaining squares with Bright Red. You don’t need a strict pattern here; placing them randomly creates a more dynamic look. -
Add orange accents:
Fill the remaining empty squares with Cadmium Orange. If the orange looks translucent, let it dry and add a second coat for opacity. -
Refine edges:
Go back with a tiny detail brush and touch up any wobbly lines between the squares with white or black paint to make the grid crisp.
Step 5: Finishing Touches
-
Antiquing (Optional):
If you want a grittier look, mix a tiny amount of black paint with water to make a thin wash. Lightly brush this into the cracks and recessed areas of the bone, then wipe it away immediately with a paper towel. -
Seal the work:
Once all paint is bone dry (give it at least 24 hours), apply a coat of matte or satin varnish to protect the surface and even out the sheen.
Now display your modern art artifact on a shelf or mantle for a conversation starter
Drippy Glaze Look Skull (Painted Effect)
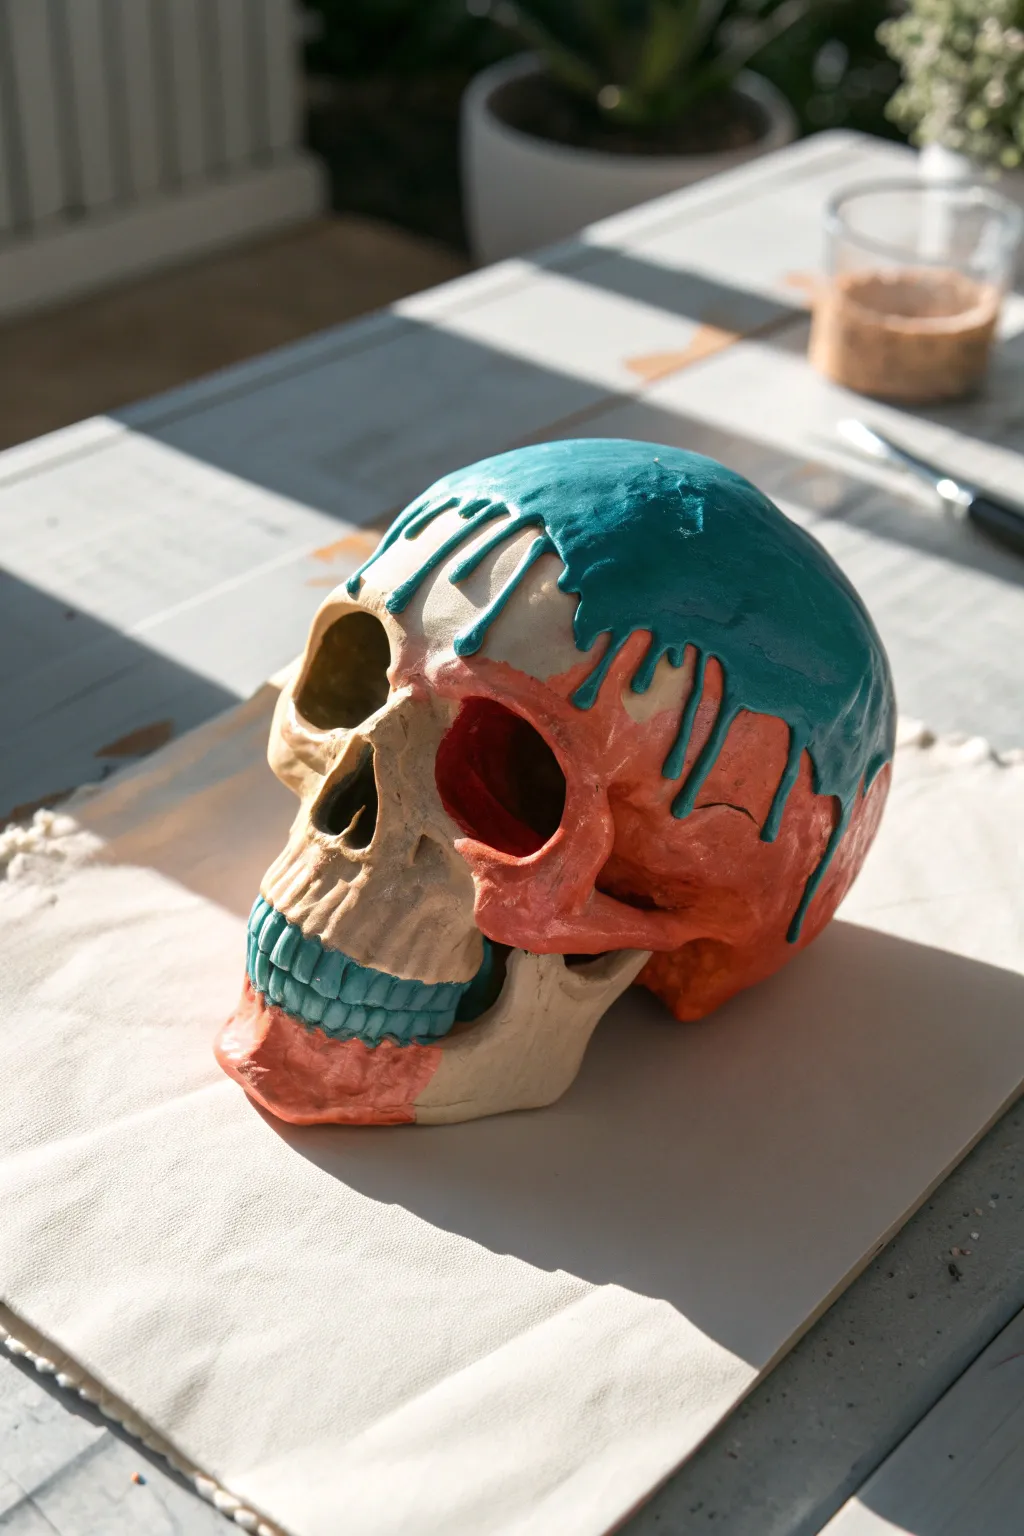
Transform a plain ceramic or clay skull into a piece of modern art with this bold, drippy glaze effect. The contrasting teal and coral tones create a vibrant pop against the natural bone color, giving the piece a seemingly melting, dynamic appearance.
Step-by-Step Guide
Materials
- Bisque ceramic skull or air-dry clay skull (fully dried)
- Acrylic paints: Teal/Turquoise, Coral/Salmon, Cream/Bone White
- Pouring medium or fabric medium (to thin paint for drips)
- High-gloss varnish or clear glaze
- Small detail brush
- Medium flat brush
- Squeeze bottles or pipettes (optional)
- Palette or mixing cups
- Paper towels and water cup
Step 1: Base Preparation
-
Clean the surface:
Wipe down your skull with a slightly damp cloth to remove any dust or oils that might prevent the paint from adhering properly. -
Mix the bone base:
On your palette, mix a generous amount of cream paint with a tiny dot of brown or beige to create a natural, aged bone color. -
Apply the base coat:
Paint the entire skull with your bone mixture using the flat brush. Ensure you get into the eye sockets and crevices. -
Dry thoroughly:
Let this base layer dry completely before moving on to the color application to prevent muddying the hues.
Step 2: Creating the Drip Effect
-
Prepare the pouring texture:
Mix your teal paint with a pouring medium (or a little water) until it has the consistency of melted ice cream. It needs to flow but not be watery. -
Load the teal:
Using a brush overloaded with paint, or a squeeze bottle, apply a thick pool of teal paint directly onto the crown of the skull. -
Guide the drips:
Gently push the excess paint over the edges of the forehead and cranium so it naturally runs down. Don’t overwork it; let gravity do the shaping. -
Paint the teeth:
While the top dries, carefully paint the teeth teal using your small detail brush. I find it helpful to keep the brush fairly dry here to avoid pooling in the gums. -
Prepare the coral mix:
Mix your coral or salmon paint with the pouring medium, aiming for the same thick, fluid consistency as the teal. -
Apply the coral patch:
Choose a section on the side of the skull, covering the cheekbone and temple area, and apply the coral paint. -
Create side drips:
Add extra coral paint near the top of this painted section and tilt the skull slightly to encourage drips to run down the cheek and jawline. -
Chin detailing:
Dab a small amount of coral paint onto the chin area, blending the edges slightly so it looks purposeful but organic. -
Connect the colors:
Ensure the teal drips and the coral patches meet or overlap slightly in some areas for a cohesive look.
Gravity Guide
If your paint isn’t dripping naturally, use a toothpick to physically pull a bead of paint downward. This kickstarts the flow without needing to add more liquid.
Step 3: Finishing and Sealing
-
Check for gaps:
Look closely at the deep recesses, like the nose cavity and eye sockets. If you want them darker, add a wash of diluted brown or black paint inside for depth. -
Let the drips set:
Because the paint application was thick to create the drips, allow the skull to dry for at least 24 hours in a dust-free area. -
Re-whiten exposed bone:
If any drips went where you didn’t want them, carefully paint over the mistake with your original bone white color. -
Apply varnish:
Brush a coat of high-gloss varnish over the colored drip areas to make them look wet and glaze-like. -
Matte the bone:
Keep the bone-colored areas matte (or apply a matte varnish) to create a striking texture contrast against the glossy drips.
Metallic Twist
Swap the bone-colored base for a matte charcoal or black, and use metallic gold or copper paints for the dripping sections to create a luxe, gothic look.
Step 4: Optional Enhancements
-
Highlighting drips:
Once the varnish is dry, add tiny dots of white paint to the fattest part of the drips to simulate extreme light reflection.
Now you have a striking, modern sculpture that perfectly balances creepy and colorful for your display
Skull Family Set for a Group Display
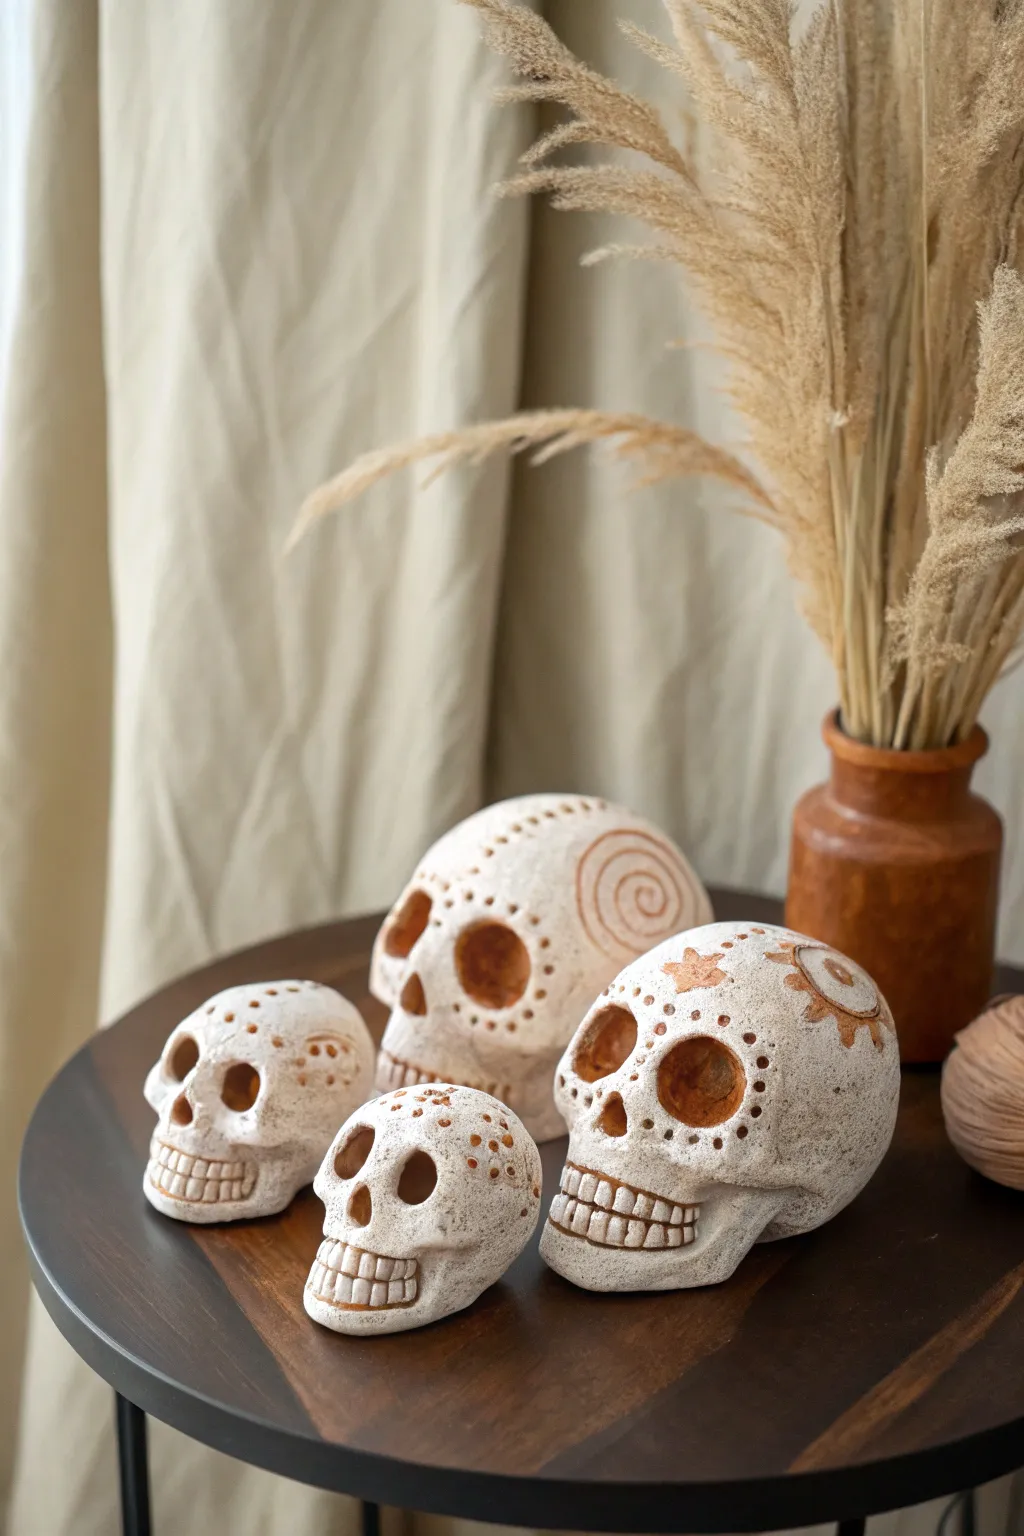
Create a unified yet unique set of decorative clay skulls that brings a touch of handcrafted elegance to your seasonal decor. This project uses air-dry clay to achieve a textured, rustic finish with warm brown accents etched directly into the design.
Detailed Instructions
Materials
- White air-dry clay (approx. 2-3 lbs)
- Clay sculpting tools (loop tool, needle tool)
- Small bowl of water
- Brown acrylic paint (burnt sienna or raw umber)
- Paper towels or soft rag
- Fine grit sandpaper
- Paintbrushes (small detail and medium shader)
- Rolling pin (optional, for slab work)
- Aluminum foil (for armatures)
Step 1: Sculpting the Base Forms
-
Prepare the Foil Cores:
To save clay and reduce drying time, crumple aluminum foil into four tight balls of varying sizes. Aim for one large, two medium, and one small core to represent the different family members. -
Cover with Clay:
Flatten pieces of air-dry clay into pancakes about 1/4 inch thick. Wrap these sheets fully around each foil ball, smoothing the seams together with a little water until you have four seamless egg-like shapes. -
Shape the Jawlines:
Gently pinch and pull the lower third of each clay ball to define the jaw and chin area. I prefer to keep the backs rounded while flattening the face area slightly to create a canvas for the features. -
Define the Eye Sockets:
Using your thumbs or a large ball tool, press deeply into the clay where the eyes should be. Rotate your tool to widen the sockets, making them large and expressive characteristic of sugar skulls. -
Sculpt the Nose Cavity:
Press an upside-down heart or triangular shape between the eye sockets. Use a small loop tool to scoop out a bit of clay here to create depth without poking through to the foil.
Step 2: Adding Details & Texture
-
Carve the Teeth:
Use a needle tool or small knife to score a horizontal line across the jaw area for the mouth. Vertically score lines to create individual teeth, then use a tool to slightly round the edges of each tooth for a more organic look. -
Create Patterned Holes:
Using a needle tool or a small drill bit (hand-held), poke decorative holes around the eyes and on the forehead. Vary the patterns on each skull—dots over eyebrows for one, concentric circles for another. -
Etch Surface Designs:
Lightly carve surface designs like swirls, sunbursts, or flower petals onto the forehead and cheeks. These shouldn’t go all the way through the clay, just deep enough to catch the paint later. -
Smooth the Surface:
Dip your finger in water and gently run it over the entire skull to remove harsh fingerprints or jagged edges. Leave a little texture if you want an aged stone appearance. -
Let Dry Completely:
Set the skulls in a dry, well-ventilated area. Depending on humidity and clay thickness, this can take 24 to 48 hours. Turn them occasionally to ensure even drying.
Keep it Proportional
When shaping the skull, remember the eyes are roughly in the middle of the vertical height, not near the top. This simple placement rule makes the skull look realistic.
Step 3: Painting & Antiquing
-
Sand Imperfections:
Once fully dry, use fine-grit sandpaper to buff away any unintentional rough spots, paying attention to the jawline and the back of the skull. -
Apply the Base Wash:
Dilute your brown acrylic paint with water until it’s very runny. Brush this wash over the entire skull, ensuring it gets into every carved line, eye socket, and tooth crevice. -
Wipe Back the High Points:
Immediately take a damp paper towel or rag and wipe the paint off the surface. The brown paint will remain in the recessed areas (eyes, nose, etched designs), revealing the pattern while leaving the surface mostly white. -
Darken the Sockets:
Go back in with undiluted brown paint and darken the deep recesses of the eye sockets and the nose cavity to create dramatic contrast. -
Highlight the Teeth:
If the teeth became too dark during the wash, use a small brush with white paint (or the original clay color) to carefully highlight the front of each tooth, making them pop. -
Buff with Wax (Optional):
For a subtle sheen that mimics polished bone or ceramic, apply a thin layer of clear wax or matte varnish over the finished piece.
Cracks Happens
If small cracks appear during drying, mix a small amount of fresh clay with water to make a paste (slip) and fill the crack. Smooth it over and let it dry again.
Now you have a charmingly rustic family of skulls ready to arrange on a shelf or centerpiece table