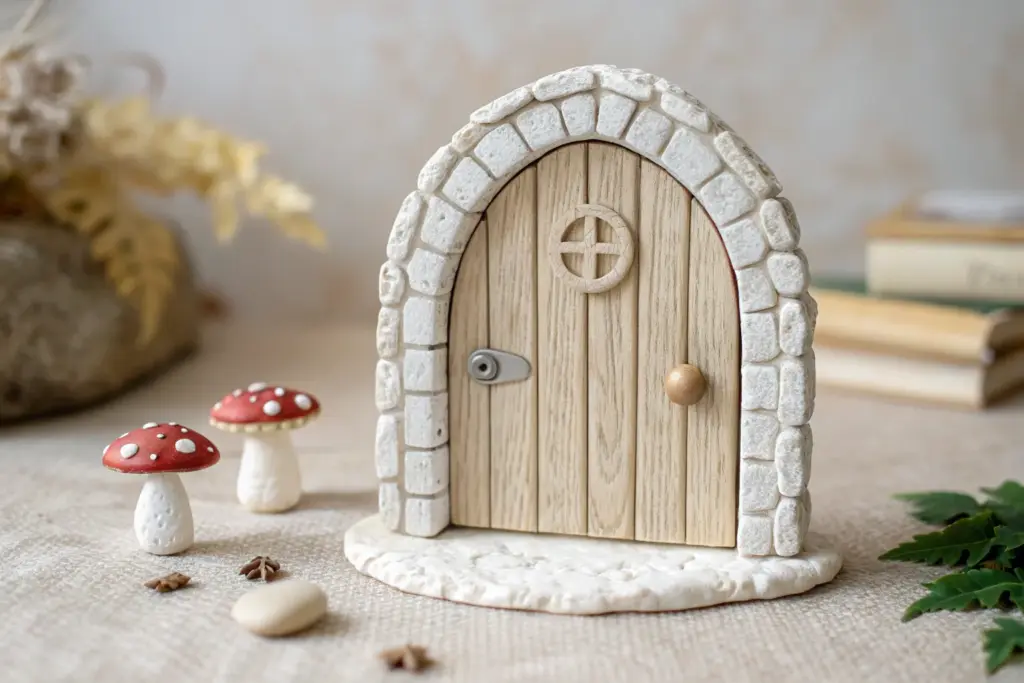
There’s something ridiculously satisfying about making a tiny clay door that looks like it’s been there forever, tucked into a tree root or hidden behind ivy. These clay door ideas are all about storytelling—cozy textures, magical details, and that “who lives here?” feeling.
Classic Faux Wood Plank Fairy Door
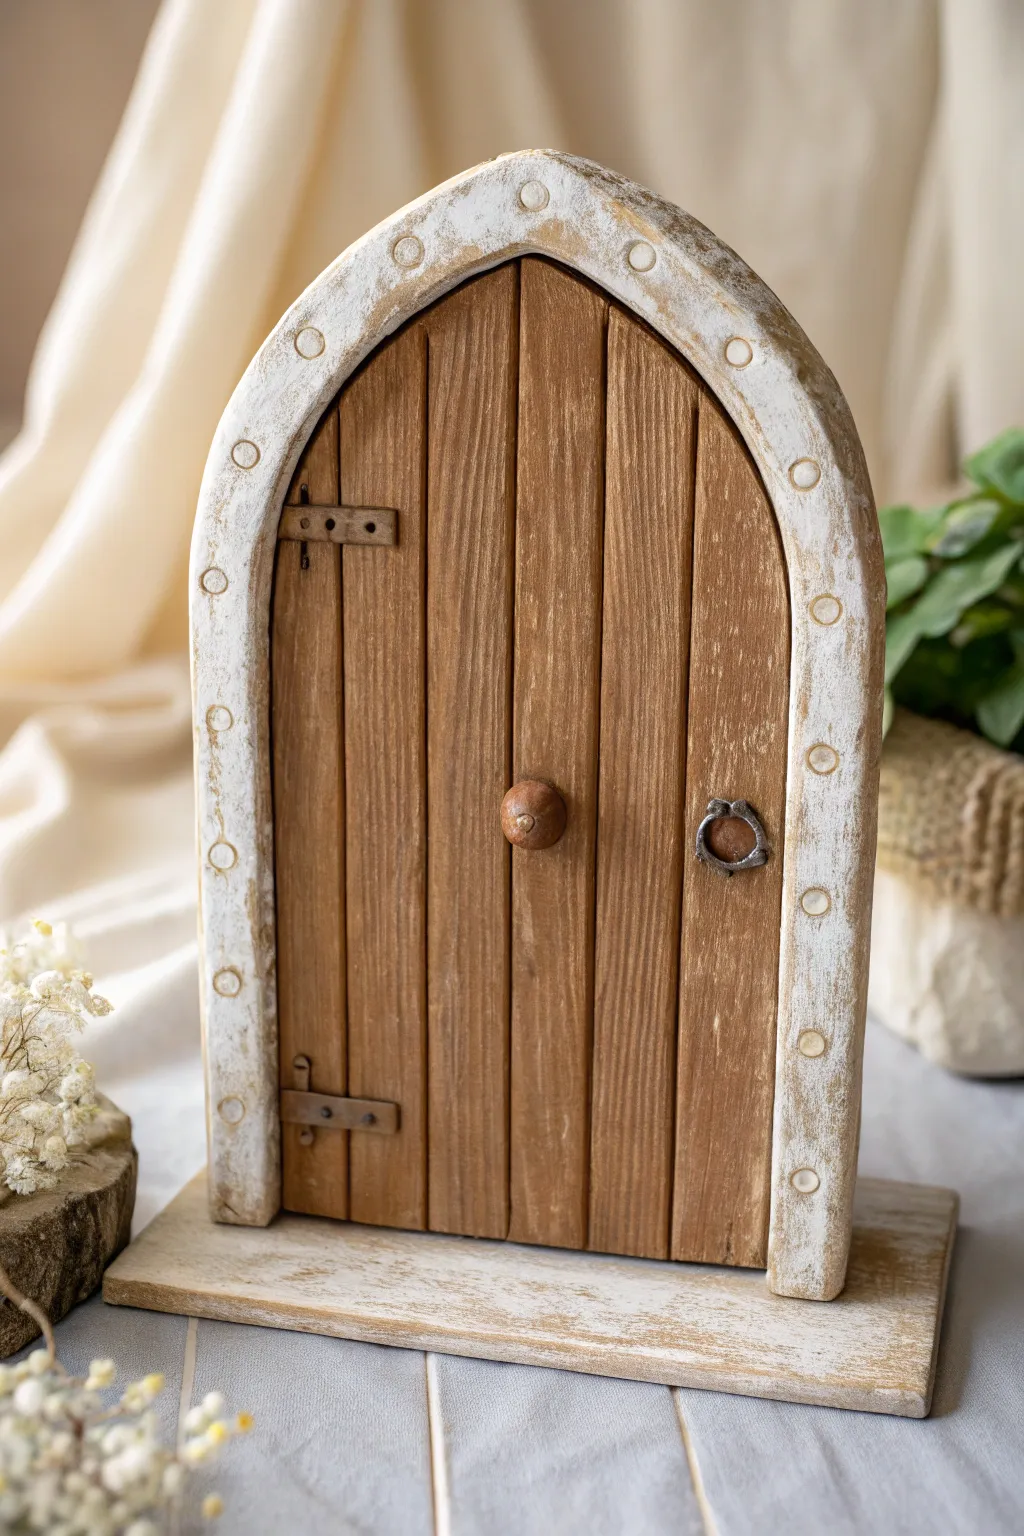
Transport your garden or bookshelf to a magical realm with this charming DIY fairy door featuring a convincing faux-wood finish. The distressed white frame and antique-style hardware give it the look of a long-forgotten entrance waiting to be discovered.
How-To Guide
Materials
- Polymer clay (brown, white, black, translucent)
- Acrylic paints (burnt umber, raw sienna, ivory, metallic silver/bronze)
- Clean work surface or ceramic tile
- Rolling pin or pasta machine
- Needle tool or toothpick
- Small blade or craft knife
- Coarse sandpaper or old toothbrush (for texturing)
- Small ball stylus tool
- Liquid clay or PVA glue
- Matte varnish
Step 1: Constructing the Base and Frame
-
Roll the base:
Begin by rolling out a medium-thick slab of scrap or white clay to serve as your backing. Cut it into a pointed arch shape (resembling a Gothic window) using your craft knife. This will be the hidden foundation. -
Create the frame:
Roll a long snake of white clay and flatten it slightly to creating a strip about 1/2 inch wide. Carefully drape this around the curved edge of your base arch to form the door frame. -
Detail the frame:
Using a small circular cutter or the end of a straw, impress evenly spaced circles along the center line of the white frame. Press gently to create a decorative indented pattern without cutting all the way through. -
Texture the stone:
Tap an old toothbrush or a ball of crinkled aluminum foil all over the white frame to give it a rough, weathered stone texture. This removes the ‘plastic’ look of the clay.
Step 2: Crafting the Wood Planks
-
Prepare the wood clay:
Mix brown clay with a tiny amount of black and translucent clay to get a deep, organic wood tone. Roll this into a flat sheet, slightly thinner than your frame. -
Cut the planks:
Place the brown sheet inside the frame area. Use a blade to score deep vertical lines, dividing the door into individual vertical planks. -
Add wood grain:
Drag a needle tool or stiff wire brush down each plank to carve in wood grain lines. Vary the pressure to create natural-looking grooves and knots. -
Create the threshold:
Form a rectangular slab of white clay for the bottom step. Texture it heavily to look like worn stone or wood, ensuring it is wider than the door frame itself. -
Assemble the structure:
Attach the door upright onto the threshold using liquid clay or by scoring and slipping the raw clay surfaces together.
Clay Too Soft?
If your clay gets sticky or mushy while detailing the wood grain, pop it in the fridge for 15 minutes. Cooling it down creates a firmer surface that holds fine details much better.
Step 3: Hardware and Finishing Touches
-
Sculpt the hinges:
Roll thin strips of dark grey or black clay. Cut two rectangular strap shapes for the left side hinges and press them horizontally across the door frame and the first plank. -
Add hinge details:
Use a needle tool to poke tiny holes or add tiny dots of clay to resemble rivets or nails on the hinges. -
Form the handle:
Roll a simplistic ring and a small mounting plate from the dark clay. Attach this to the right side of the door to mimic a wrought-iron pull ring. -
Make the doorknob:
Roll a small ball of brown clay for the central knob. Press it gently into the center of the door. -
Bake carefully:
Bake the entire piece according to your polymer clay package instructions. I usually tent foil over the top to prevent the protruding parts from scorching.
Realistic Grain
Don’t make your wood lines perfectly straight. Slight wobbles and occasional knots made by twisting the needle tool create a much more convincing organic timber effect.
Step 4: Painting and Weathering
-
Apply a dark wash:
Once cool, mix burnt umber acrylic paint with water. Brush this wash over the entire wood section, letting it seep into the grooves, then wipe away the excess with a paper towel to highlight the grain. -
Weather the frame:
Dry brush a mixture of ivory and light brown paint over the white frame and threshold. Focus on the edges to make it look chipped and aged. -
Highlight the metal:
Dab a tiny amount of metallic silver or bronze paint onto the hinges and door handle to give them an antique iron sheen. -
Seal the work:
Protect your miniature masterpiece with a coat of matte varnish, avoiding the metal parts if you want them to remain slightly shiny.
Place your finished door against a tree trunk or baseboard to invite a little magic into your home


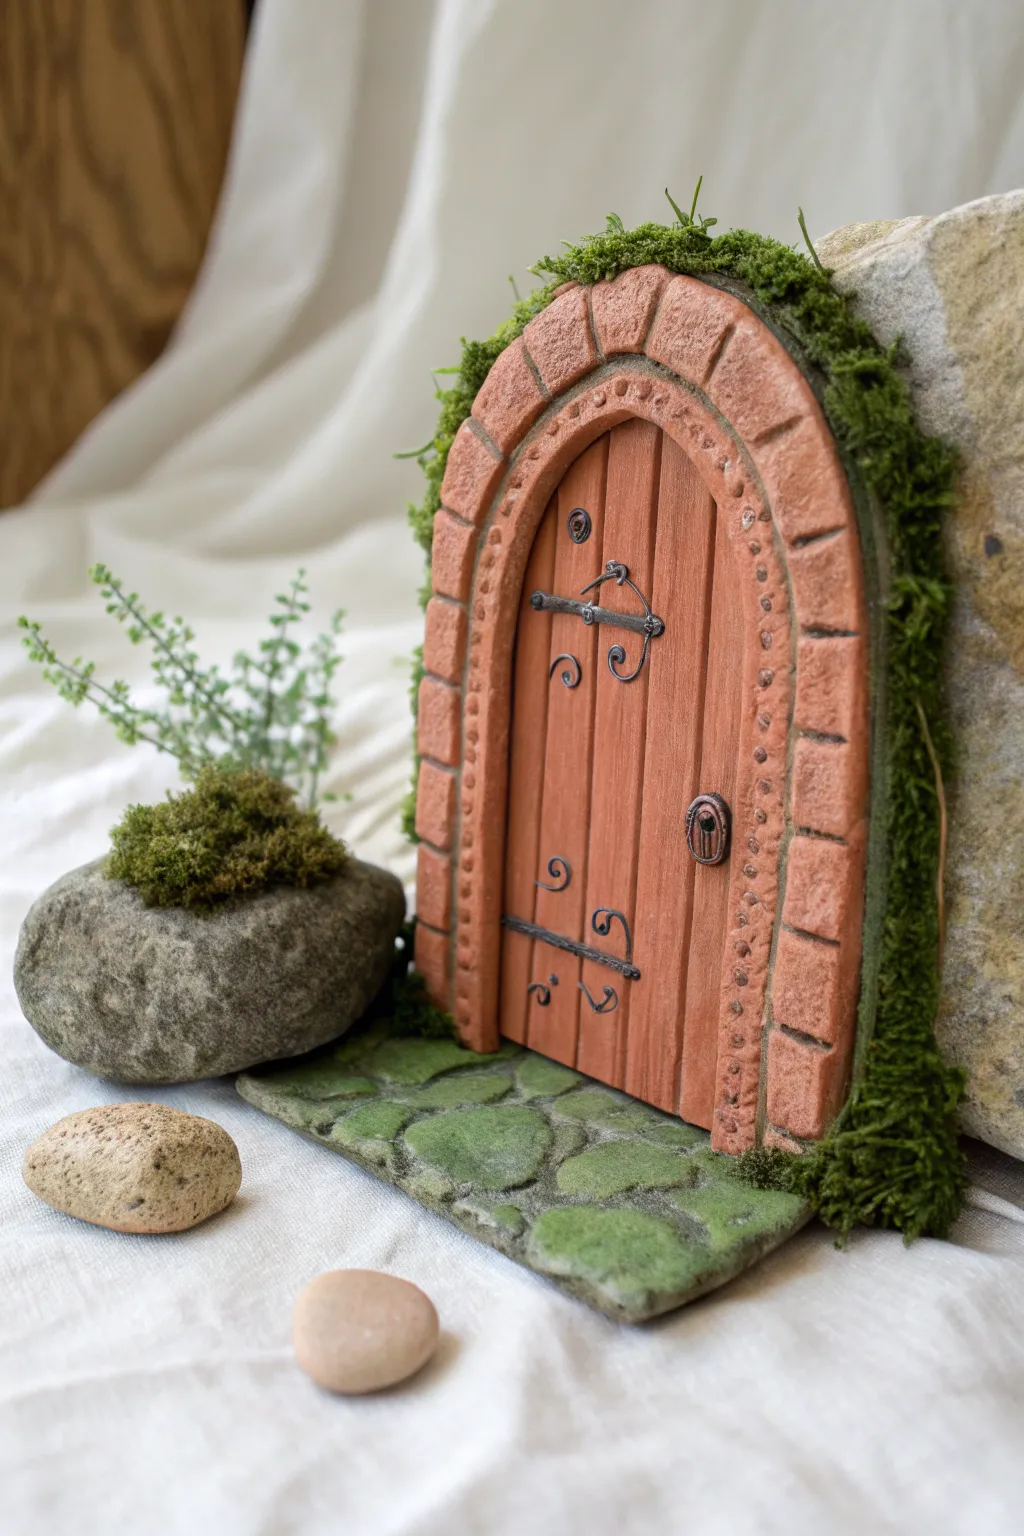
Round Hobbit-Style Clay Door
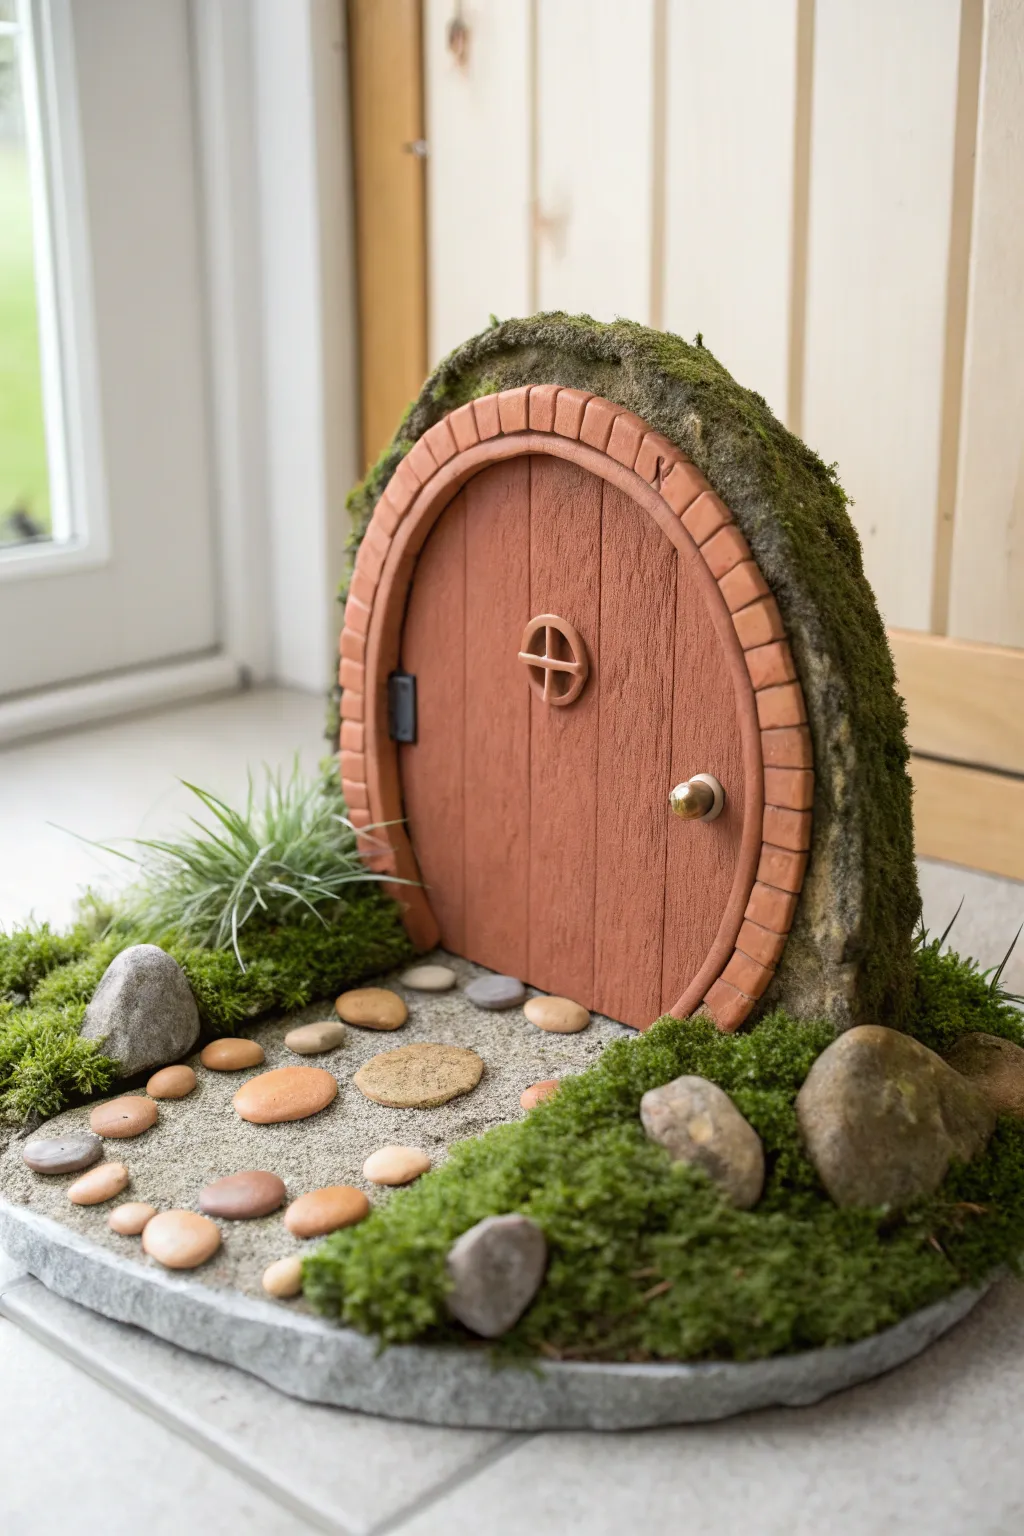
Transport your garden or shelf to Middle-earth with this enchanting miniature round door project. This delightful scene features a wood-textured clay door framed by faux bricks and mossy stones, creating a welcoming entryway for tiny visitors.
Step-by-Step
Materials
- Polymer clay (terracotta/brick red, brown, dark grey)
- Large flat stone or sturdy wooden base (oval or rectangular)
- Aluminum foil
- Liquid clay or bake-and-bond
- Texture tools (needle tool, toothbrush, stiff brush)
- Small pebbles and river stones (varied sizes)
- Decorative sand or fine grit
- Preserved moss (sheet moss and tufts)
- Acrylic paints (black, brown, green, cream)
- Craft glue or strong adhesive (E6000)
- Clay roller or pasta machine
- Small gold bead or ball of gold clay (for doorknob)
- Sculpting tools
Step 1: Building the Stone Structure
-
Form the Core:
Begin by crumpling aluminum foil into a large, upright arch shape. This will serve as the armature for the stone wall surrounding the door. Ensure the back is flat so it can stand upright against a wall or tree. -
Cover with Clay:
Roll out a sheet of dark grey clay, about 1/4 inch thick. Apply liquid clay to the foil armature, then drape the grey clay over it, smoothing the seams to completely cover the foil. -
Texture the Stone:
Use a crumpled ball of foil or a stiff toothbrush to vigorously texture the grey clay. Press unevenly to mimic the pitted, rugged surface of natural rock.
Stay Grounded
To prevent the heavy arch from tipping over, glue a heavy metal washer or a large flat rock underneath the finished base for invisible counterweight.
Step 2: Crafting the Signature Door
-
Cut the Door Shape:
Roll out a slab of brown clay. Use a large circle cutter or a bowl rim to cut a perfect circle that fits comfortably within your stone arch face. -
Add Wood Grain:
Using a needle tool, score vertical lines down the door to represent wooden planks. I like to add wobbly grain lines and small knots between the planks for a weathered, rustic look. -
Create the Brick Arch:
Roll a snake of terracotta or brick-red clay. Flatten it slightly into a long strip that can wrap around the top half of your door. -
Detail the Bricks:
Attach the strip around the upper curve of the door. Use a blade to press indentations every half-inch to separate individual ‘bricks.’ Texture these lightly with a toothbrush. -
Install the Hardware:
Fashion a small round window frame with a crossbar using thin snakes of brown clay and place it in the upper center. Press a small gold bead or a ball of gold clay on the right side for the doorknob. Create a tiny rectangle of black clay for the hinge on the left. -
Assemble the Facade:
Press the finished door assembly firmly into the center of your grey stone display. Ensure the edges bond well; use liquid clay if necessary.
Step 3: Creating the Landscape Base
-
Prepare the Base:
Take your large flat stone or wooden base. If using clay for the base instead, roll out a large grey oval slab and texture the edges to look like rough slate. -
Baking:
Bake the door structure and the base (if it’s clay) according to the manufacturer’s instructions. Usually, this is around 275°F (135°C) for 15-30 minutes depending on thickness. Let everything cool completely. -
Attach the Structure:
Once cool, use strong adhesive to glue the upright stone arch onto the back edge of your horizontal base. -
Lay the Path:
Spread a layer of craft glue down the center of the base leading to the door. Sprinkle fine sand over the glue to create a dirt path. -
Place Stepping Stones:
Glue flat, smooth river stones into the sand path in a meandering pattern. I suggest arranging them dry first to get a spacing that feels pleasant before committing with glue.
Cozy Glow
Before baking, hollow out a small cavity behind the window area. After finishing, tuck a tiny battery-operated LED fairy light inside for a warm evening glow.
Step 4: Finishing Touches
-
Distress the Door:
Mix a very watery wash of black acrylic paint. Brush it over the door and bricks, then immediately wipe it off with a towel. The dark paint will stay in the grooves, highlighting the wood/brick texture. -
Add Greenery:
Apply dabs of glue to the ‘stone’ arch and the sides of the base. Press clumps of preserved sheet moss onto the arch to make it look overgrown. -
Tuft the Grass:
Fill in the areas on either side of the sandy path with more lush moss. You can even tuck in small plastic grass tufts or air plants for variety in texture. -
Final Polish:
Check for any loose bits of moss or sand. If desired, dry-brush a little light grey paint onto the dark stone arch to highlight the rocky texture.
Place your completed portal in a quiet corner to invite a little magic into your home

Stone Frame With Cobblestone Border
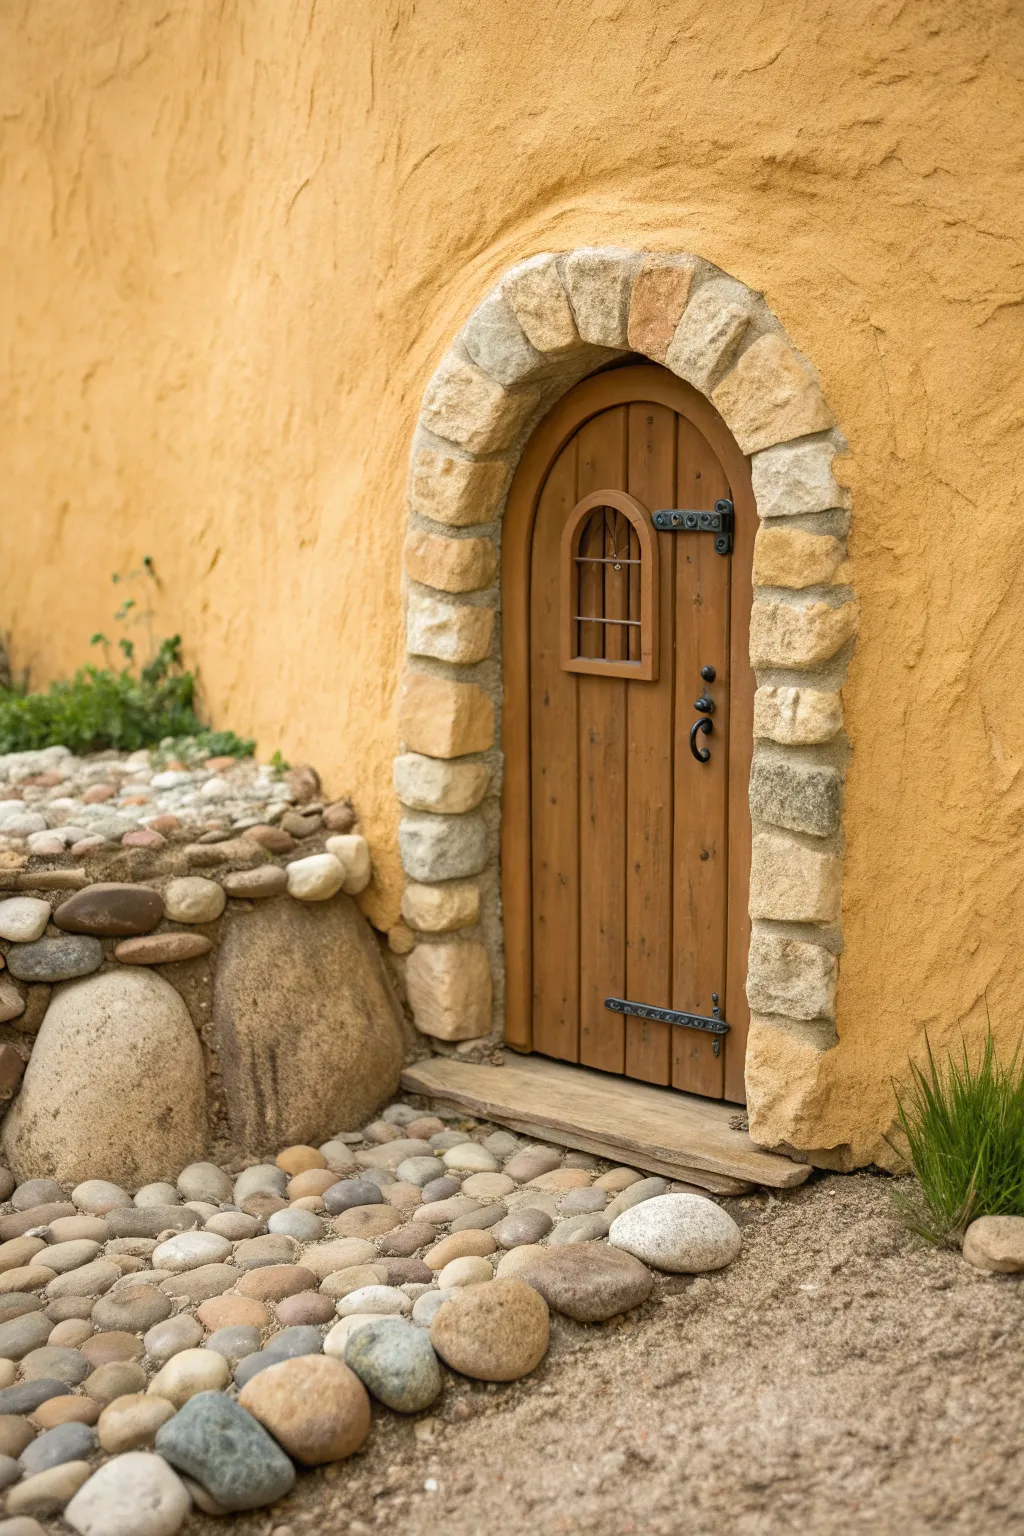
Bring a touch of fantasy to your garden or home corner with this charming clay and stone door project. Featuring a warm ochre finish, a rustic wooden door, and a natural stone archway, this piece creates the illusion of a cozy underground dwelling.
How-To Guide
Materials
- Plywood backing board (approx 24″ x 36″)
- Chicken wire or metal lath
- Staple gun and staples
- Cob mix (sand, clay subsoil, straw, water) or premixed earthen plaster
- Natural stones (palm-sized for the arch, smaller pebbles for the details)
- Cedar or pine planks (for the door)
- Wood stain (medium oak or walnut)
- Small decorative blacksmith hardware (hinges, handle)
- Black wire or thin dowels (for window grille)
- Stone adhesive or mortar
- Trowel and sponge
- Ochre or yellow masonry pigment
Step 1: Building the Frame and Door
-
Cut the Base:
Cut your plywood backing into a large arch shape or a rectangle, depending on whether you want a freestanding prop or a wall insert. This will support the weight of the clay and stones. -
Assemble the Wooden Door:
Cut cedar or pine planks vertically to fit a smaller interior arch shape. Secure them together on the back using two horizontal battens and diagonal bracing screws. -
Create the Window:
Using a jigsaw, cut a small arched window opening in the upper third of the wooden door. Frame it with thin molding strips for depth. -
Install Window Bars:
Cut short lengths of thick black wire or thin wooden dowels painted black. Insert them vertically and horizontally into the window frame to create a grille, gluing them securely in place. -
Stain the Wood:
Apply a medium oak or walnut stain to the entire wooden door assembly. Wipe away excess and let it dry completely to achieve that aged, rustic look. -
Add Hardware:
Screw on the decorative hinges and door handle. I like to position the hinges slightly unevenly to enhance the handmade, storybook feel.
Cracking Clay?
If your clay wall cracks as it dries, the mix was likely too wet or dried too fast. Mist the cracks with water and rub fresh clay mix into them to seal.
Step 2: Masonry and Stone Arch
-
Prep the Wall Surface:
Staple chicken wire or metal lath securely over the plywood area surrounding where the door will sit. This gives the clay mixture something to grip onto. -
Mount the Door:
Fix the finished wooden door centrally onto the plywood base. Ensure it’s secured tightly from the back so it doesn’t wobble. -
Select Arch Stones:
Sort through your stones to find rectangular or wedge-shaped pieces. You want stones that naturally curve around the door frame. -
Set the Stone Arch:
Apply a thick layer of mortar or stone adhesive around the wooden door frame. Press the stones into the mortar, creating a beautiful voussoir arch. Start from the bottom on both sides and meet at the keystone in the top center. -
Grout the Stones:
Fill the gaps between the arch stones with mortar. Use a wet sponge to wipe the stone faces clean before the mortar sets.
Step 3: Clay Application and Landscaping
-
Mix the Cob:
Combine your clay soil, sand, and straw with water. Add the ochre pigment during the mixing phase to achieve that warm, sunny yellow color seen in the photo. -
Apply the Base Layer:
Trowel the clay mixture onto the wire mesh surrounding the stone arch. Push it firmly through the mesh to ensure a mechanical bond. -
Texture the Wall:
Once the wall forms a nice bulk, smooth the surface with a trowel but leave slight undulations. This mimics the organic, hand-built look of a cob house. -
Create the Threshold:
Place a flat, wide piece of timber or a flat stone at the base of the door to serve as the threshold. -
Lay the Cobblestone Path:
Prepare a bed of sand or mortar in front of the threshold. Press smooth, round river stones into the bed, keeping them tight together to form a pathway. -
Install Retaining Wall (Optional):
If building this into a slope, stack larger boulders to the side of the door and backfill with soil to create a small retaining wall terrace. -
Final Polish:
Brush off any loose dirt or mortar crumbs. If intended for outdoors, seal the wood and masonry with a clear, matte weather-resistant sealer.
Add Glow
Place a small, battery-operated LED lantern or tea light behind the window grille. It creates a warm, inviting glow in the evening.
Now you have a magical entryway ready to spark imagination in any garden or room corner


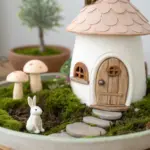
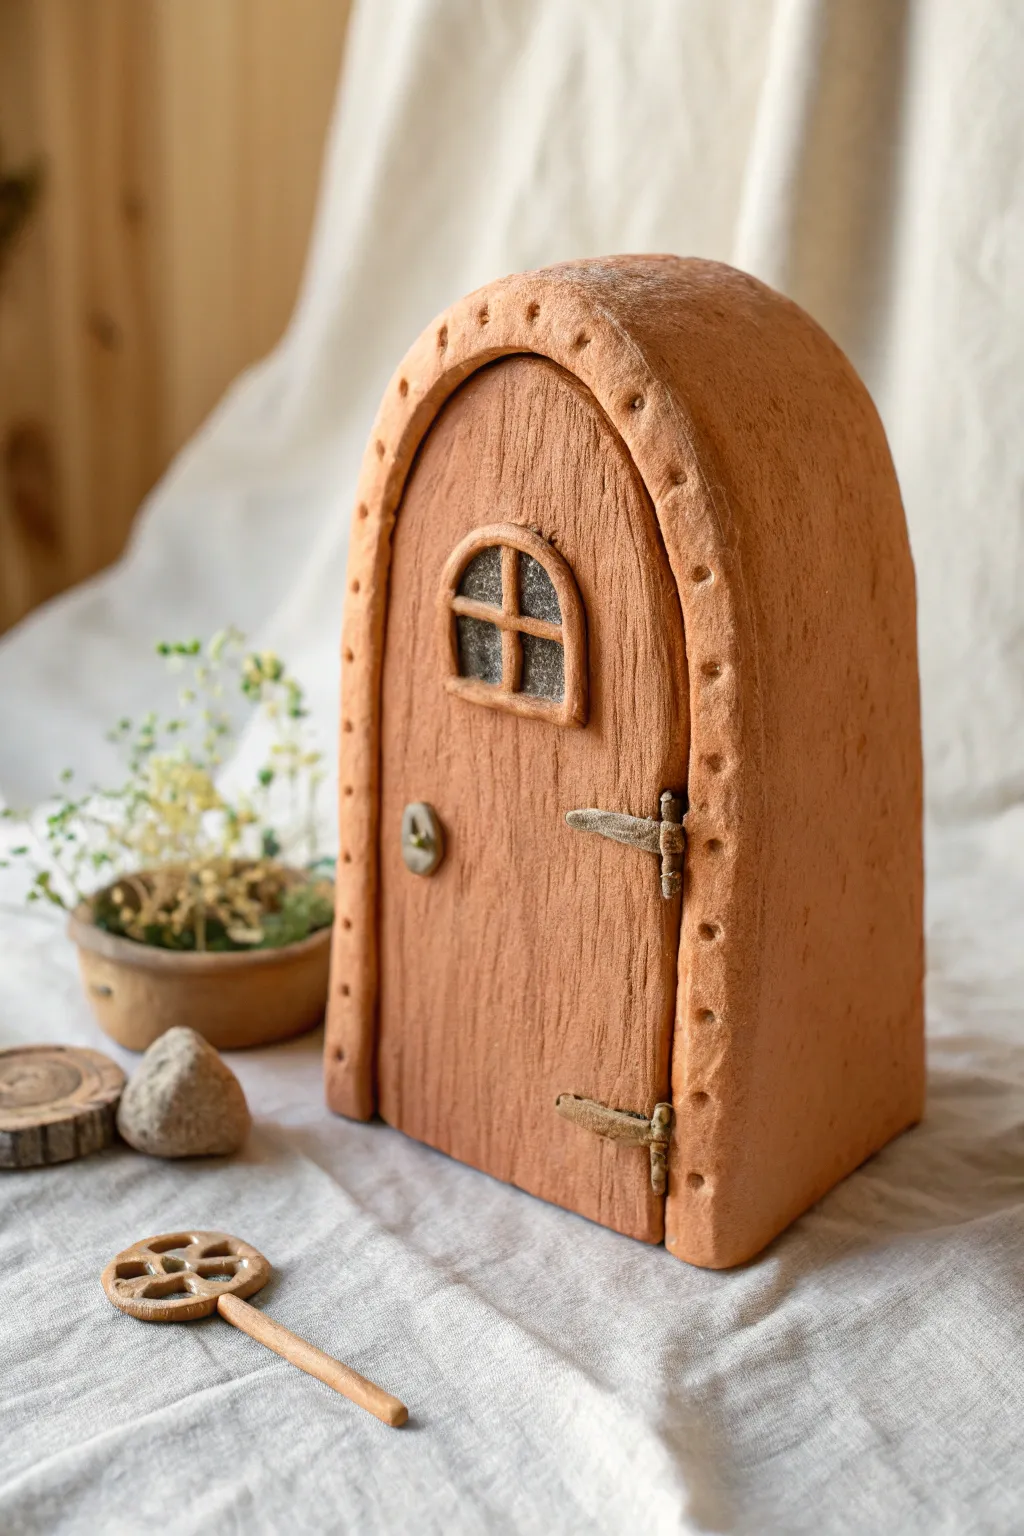
Arched Woodland Door With Mushroom Steps
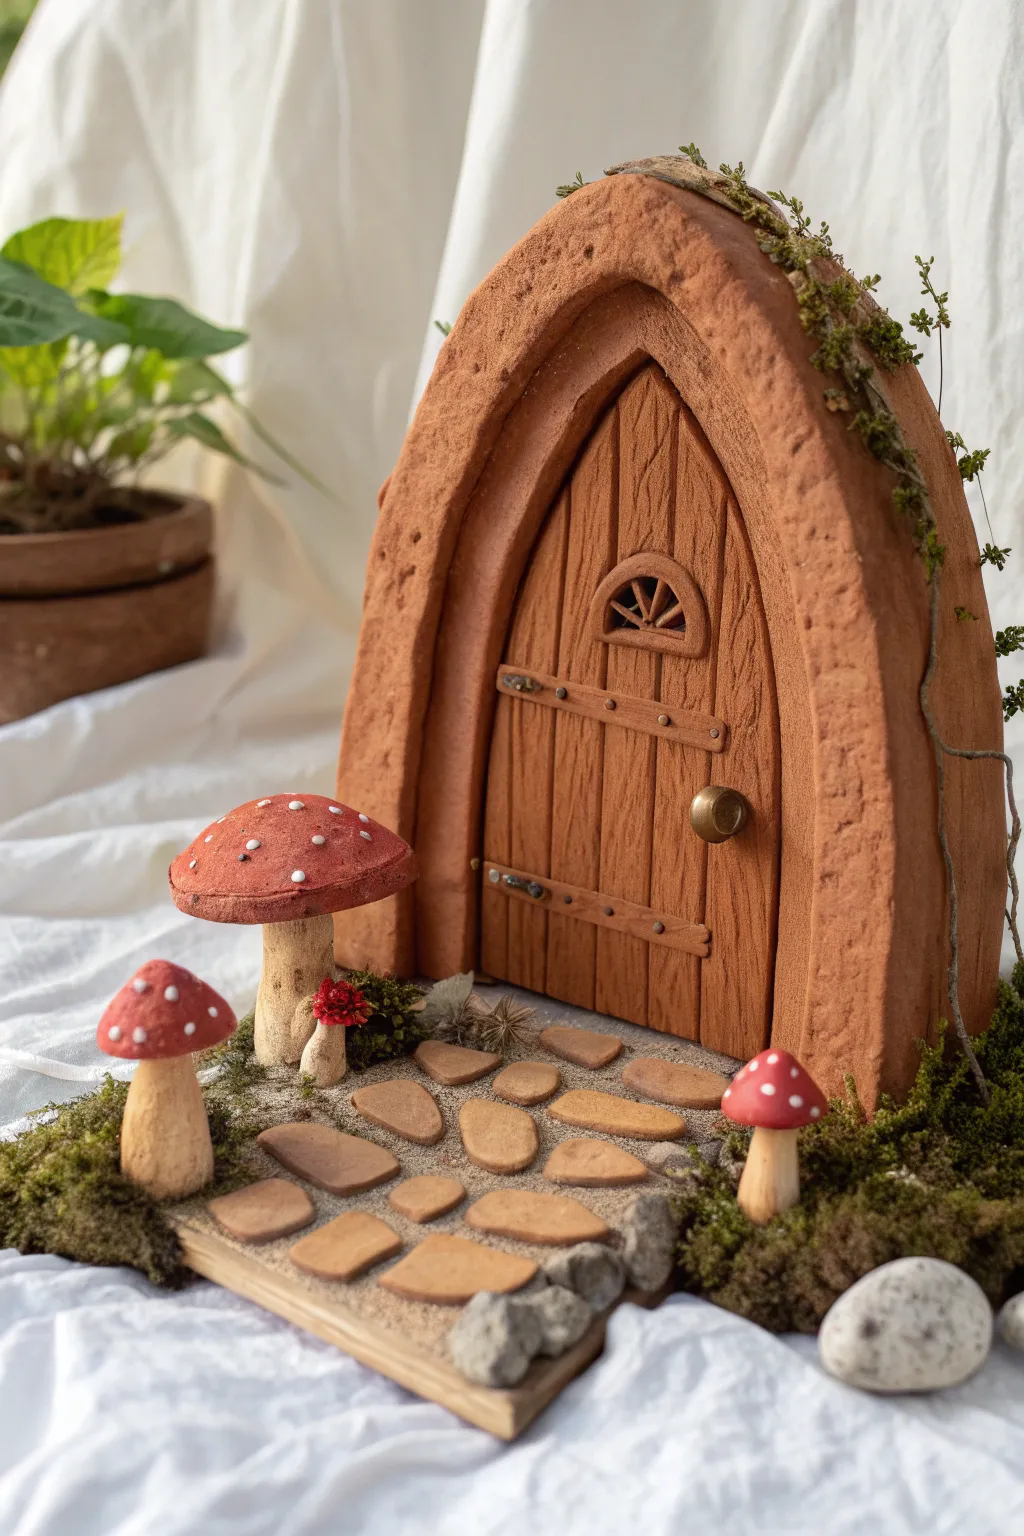
Bring a touch of magic to your shelves with this charming arched fairy door, featuring realistic wood grain textures and whimsical mushroom accents. The project combines structured clay work with organic mossy details for a cozy, forest-floor feel.
Step-by-Step
Materials
- Terracotta-colored polymer clay (or air-dry clay painted later)
- Light beige polymer clay (for mushrooms/stones)
- Red acrylic paint and white acrylic paint
- Textured rolling pin or real wood bark/stone for stamping
- Sculpting tools (needle tool, ball stylus)
- Small craft knife
- Gold clay or small gold bead (for doorknob)
- Dried moss and faux greenery
- Sand or textured sandstone paste
- Translucent liquid clay or strong craft glue
- A smooth wooden base or tile
Step 1: Sculpting the Doorway
-
Prepare the base:
Roll out a slab of terracotta clay to about 1/4 inch thickness. Cut out a high, pointed arch shape for your main door panel. I like to lightly score vertical lines to guide the wood grain texture. -
Add wood texture:
Use a needle tool or a sculpting knife to carve deep, irregular vertical lines into the door panel to mimic wooden planks. Add knots and swirls for a rustic, aged look. -
Create the stone arch:
Roll a thick snake of terracotta clay and flatten it slightly. Drape this over the door panel to form the heavy arched frame. Press it gently to adhere. -
Texturize the stone:
For that sandy, stone-like finish on the arch, press a piece of sandpaper, a rough stone, or a toothbrush vigorously into the clay surface. The texture should be much rougher than the wood grain. -
Install the window:
Shape a small semi-circle from clay and attach it near the top of the door. Use your knife to cut out small pie-slice sections, leaving thin strips of clay to represent the window pane bars.
Cracks happen
If the clay arch cracks during baking, fill the fissure with a mix of liquid clay and scrap clay, then bake again briefly to seal it.
Step 2: Hardware and Details
-
Attach hinges:
Roll two thin strips of clay for the hinges. Press them horizontally across the door planks. Use a needle tool to poke tiny holes or indents to simulate nails. -
Add the doorknob:
Roll a small ball of gold clay (or paint a clay ball gold later) and press it firmly onto the right side of the door. -
Form the stepping stones:
Using light beige clay, shape several flat, irregular ovals to act as paving stones. Texture them slightly so they aren’t perfectly smooth. -
Sculpt the mushrooms:
Create thick stems from beige clay and wide, curved caps from terracotta or red clay. Press the caps onto the stems, blending the clay where they join for a solid hold.
Realism hack
Rub a tiny bit of dark brown pastel chalk powder into the wood grooves before baking to make the grain pop without painting.
Step 3: Assembly and Finishing
-
Bake the components:
Place your door, stepping stones, and mushrooms on a baking sheet. Follow the specific temperature and time instructions for your brand of polymer clay. -
Paint details:
Once cool, paint the mushroom caps red (if not using colored clay) and add tiny white dots. You can also dry-brush the wood grain with a darker brown paint to enhance the depth. -
Prepare the ground:
Apply a layer of glue to your wooden base. Sprinkle fine sand or apply a sandstone texture paste to create a pathway area leading to the door. -
Position the stones:
Press the baked stepping stones into the wet glue or texture paste, arranging them in a natural, winding path toward the entrance. -
Install the door:
Glue the finished door upright at the end of the path. You may need to prop it up from behind while the glue sets. -
Add nature elements:
Glue clumps of dried moss around the base of the door and tucked between the stepping stones. Place the mushrooms in clusters among the moss. -
Climb the vines:
Twist thin strands of faux greenery or glue bits of moss up the side of the stone arch to make it look like nature is reclaiming the structure.
Place your finished door against a wall or shelf backing to invite mysterious woodland guests into your home

The Complete Guide to Pottery Troubleshooting
Uncover the most common ceramic mistakes—from cracking clay to failed glazes—and learn how to fix them fast.
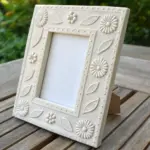
Vines and Tiny Flowers Climbing the Frame
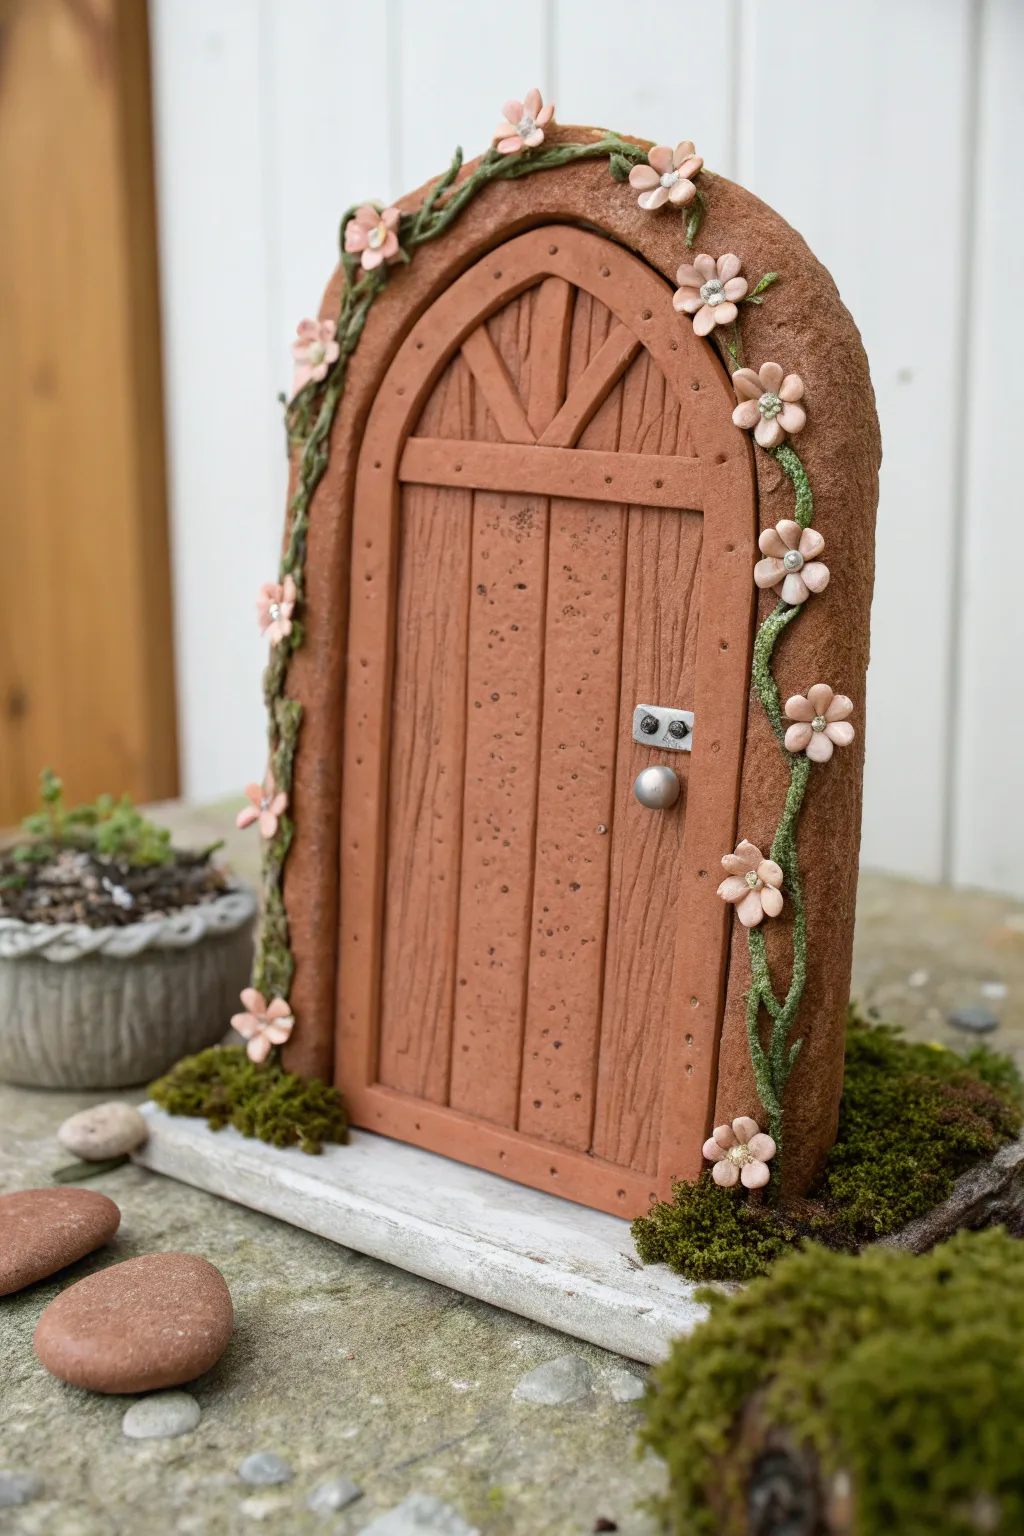
Transform simple clay into an enchanting entryway for garden sprites with this vine-wrapped fairy door project. The warm, terracotta-colored finish contrasts beautifully with delicate pink blooms and winding greenery, creating a charming piece for any shelf or garden nook.
Detailed Instructions
Materials
- Terracotta-colored polymer clay (or air-dry clay + reddish-brown acrylic paint)
- Green polymer clay (for vines)
- Light pink polymer clay (for flowers)
- Silver metallic clay or small bead (for doorknob)
- Textured rolling pin or wood grain texture mat
- Pointed sculpting tool or toothpick
- Ball stylus tool
- Craft knife
- Liquid clay adhesive (e.g., Bake and Bond)
- Small rhinestones or silver glitter (optional flower centers)
- Faux moss
Step 1: Constructing the Door Base
-
Prepare the main slab:
Begin by rolling out a thick slab of your terracotta-colored clay, about 1/4 inch thick. This will form the sturdy backing and frame of the door. -
Cut the arch shape:
Use a paper template or freehand a tall arch shape with your craft knife. It should have a rounded top and a flat bottom. Smooth the cut edges with your finger to remove any sharpness. -
Create the inner panels:
Roll out a slightly thinner sheet of the same terracotta clay. Cut a smaller arch shape that fits inside the first one, leaving a wide border for the frame. -
Add wood grain texture:
Before attaching the inner piece, texture it heavily to look like wood planks. Use a texture mat or drag a pointed tool vertically to create deep, uneven grooves. -
Define the planks:
Use the back of your knife to press deeper vertical lines, separating the ‘wood’ into distinct vertical planks. Don’t forget to add a few horizontal cross-beams near the top and bottom for a rustic look. -
Assemble the door:
Apply a thin layer of liquid clay to the center of your large base slab. Press the textured wood-grain panel firmly into the center, leaving the smooth outer rim exposed as the stone frame. -
Add texture to the frame:
Take a toothbrush or a crumpled ball of aluminum foil and press it repeatedly into the outer border. This gives it a porous, stone-like texture that contrasts with the wood grain.
Vines Won’t Stick?
If your thin green vines keep falling off the frame before baking, try scoring the surface of the frame slightly with a needle tool to create ‘tooth’ for the clay to grab onto.
Step 2: Hardware and Decoration
-
Install the hinges and knob:
Fashion a small rectangle from silver clay or paint a tiny piece of cardstock silver. Press it onto the right side of the door. Add a small ball of silver clay (or a bead) for the doorknob on top of this plate. -
Add nail details:
Using your smallest ball stylus or a needle tool, prick tiny holes along the cross-beams and around the door frame to mimic nail holes or rivets.
Step 3: The Vines and Flowers
-
Roll the vines:
Take your green clay and roll it into extremely thin, snake-like coils. Vary the thickness slightly to make them look organic. -
Attach the greenery:
Apply a trail of liquid clay up the sides of the door frame. Gently press your twisted green vines onto the frame, winding them upwards and letting them cross over each other naturally. -
Form the petals:
Roll tiny balls of light pink clay—about the size of peppercorns. Flatten each one into a teardrop shape to create individual petals. -
Assemble the blooms:
Arrange five petals in a circle directly onto the vines where you want a flower. Press the center points together gently with a small tool to secure them. -
Detail the centers:
Press a tiny indentation into the center of each flower. You can add a speck of silver clay, a rhinestone, or just leave it indented for texture. -
Bake the project:
Follow the baking instructions for your specific brand of polymer clay accurately. Usually, this means 275°F (135°C) for about 30 minutes, but check your package. -
Finish the scene:
Once cool, glue the door to a small flat stone or wood base if desired. Surround the bottom with bits of faux moss to make it look like it’s growing out of the earth.
Level Up: Weathering
After baking, apply a diluted wash of brown acrylic paint over the wood area. Wipe it off quickly with a damp cloth; paint will stay in the grooves, making the wood grain pop.
Now you have a whimsical portal ready to welcome magic into your home.
Bright Painted Fantasy Door With Aged Wash
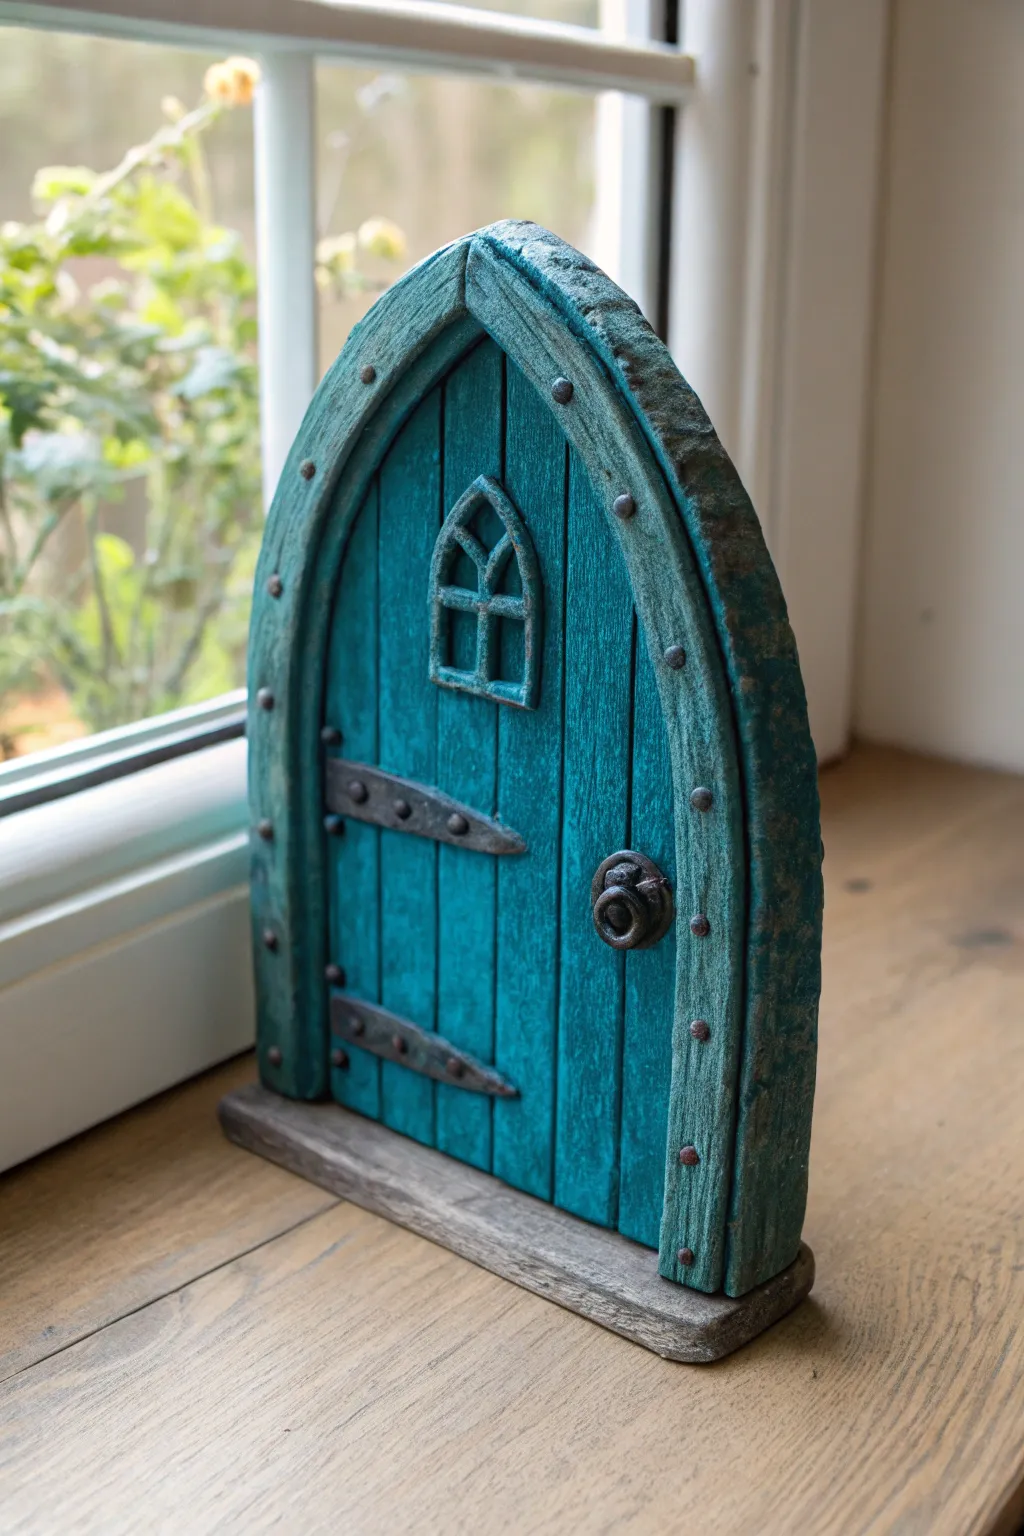
Bring a touch of magic to your shelves with this charming freestanding fairy door. Featuring a vibrant teal wood-grain finish contrasted against rugged faux stone, this project uses clever texturing and washes to create a convincing aged look.
Step-by-Step Tutorial
Materials
- Polymer clay (grey, white, and teal/blue)
- Aluminum foil
- Rolling pin or pasta machine
- Texture tools (toothbrush, needle tool, crumpled aluminum foil ball)
- Hobby knife or clay blade
- Acrylic paints (black, dark brown, teal, lighter aqua)
- Small paintbrushes
- Clear matte varnish or sealant
- Liquid clay (optional for bonding)
Step 1: Forming the Base Structure
-
Create the core:
Start by crumpling a tight ball of aluminum foil and shaping it into a flattened archway. This saves clay and keeps the door lightweight yet sturdy. -
Cover the back:
Roll out a sheet of scrap or grey clay approximately 1/4 inch thick. Lay your foil form onto this and trim the clay to match the arch shape, smoothing the edges slightly over the sides. -
Prepare the wood canvas:
Roll out a sheet of teal clay. If you don’t have the exact shade, mix blue with a touch of green and white. Lay this over the front of the foil core, trimming the excess.
Stone Texture Trick
For ultra-realistic stone, mix a tiny pinch of coarse black pepper or sand into your grey clay before sculpting
Step 2: Sculpting Wood and Stone Details
-
Add wood grain:
Using a needle tool or a blunt knife, carve vertical lines into the teal clay to represent wooden planks. Remember to vary the spacing slightly for a natural look. -
Deepen the grain texture:
Between the main plank lines, gently scratch tinier, wavy lines to mimic rough wood grain texture found in old timber. -
Form the stone frame:
Roll a long, thick snake of grey clay. Flatten it slightly and press it firmly around the curved outer edge of the door to create the stone archway. -
Texture the stone:
Use a ball of crumpled aluminum foil or a rough rock from your garden to press texture into the grey frame. I find rolling the foil over the clay creates the most realistic pitted surface. -
Add the threshold:
Create a distinct rectangular slab of grey clay for the bottom step. Texture it similarly to the arch and press the main door structure firmly onto this base. -
Create the window:
Form a small arch of teal clay and place it near the top center. Use thin snakes of grey clay to outline the window and create the cross-pane details. -
Add hardware details:
Fashion two horizontal strap hinges and a small ring handle using dark grey or black clay. Add tiny balls of clay to represent the rivets or bolts on the hinges and the stone frame.
Make it Glow
Cut out the clay window area completely before baking and glue a piece of yellow acetate behind it later for a lit-from-within look
Step 3: Painting and Finishing
-
Bake the piece:
Bake your clay creation according to the manufacturer’s instructions for the brand of clay you used. Let it cool completely before painting. -
Apply a dark wash:
Water down black acrylic paint until it’s very thin. Generously brush this over the entire piece, ensuring it gets into all the wood grooves and stone pits. -
Wipe back:
Before the wash dries, quickly wipe the surface with a damp paper towel or sponge. This leaves darkness in the crevices while revealing the base colors on the high points. -
Dry brush the wood:
Dip a dry brush into a lighter aqua or light blue paint. Off-load most of the paint on a paper towel, then lightly whisk it over the teal planks to highlight the texture. -
Dry brush the stone:
Repeat the dry brushing technique using a light grey or off-white paint on the stone frame and threshold to make the rock texture pop. -
Paint the hardware:
Use a metallic iron or dark silver paint to carefully touch up the hinges, handle, and rivets, giving them a heavy, forged metal appearance. -
Seal the work:
Protect your paint job with a coat of matte varnish. This removes any unnatural shine from the acrylics and unifies the finish.
Place your finished door against a wall or tree trunk to invite delightful new visitors into your home


What Really Happens Inside the Kiln
Learn how time and temperature work together inside the kiln to transform clay into durable ceramic.
Mini Window Cutout With Simple Lattice
This charming freestanding fairy door features a classic arched design with a prominent faux-wood texture and a tiny lattice window. Modeled to look like baked terracotta, this piece adds a magical touch to any shelf or garden nook.
Detailed Instructions
Materials
- Terracotta-colored air-dry clay or polymer clay
- Gray or bronze-colored clay (for hardware)
- Aluminum foil (for the core)
- Rolling pin
- Clay sculpting tools (needle tool, texture brush)
- Small piece of clear plastic or transparency sheet (optional, for window glass)
- Wire mesh or sponge (for stone texture)
- Acrylic paints (browns, black, gray)
- Matte varnish
Step 1: Shaping the Base Structure
-
Form the armature:
Crumple aluminum foil into a solid, smooth arch shape. This will be the core of your door structure, saving clay and reducing weight. Compressing it tightly is key for a sturdy base. -
Cover with clay:
Roll out a thick sheet of terracotta-colored clay. Drape it over your foil armature, smoothing the seams at the back or bottom where they won’t be seen. -
Refine the shape:
Using your hands or a flat tool, smooth the clay surface to ensure the arch is symmetrical and the sides are vertical. -
Texture the exterior:
Lightly tap a sponge or a crumpled ball of foil over the outer archway (the ‘stone’ part) to give it a rough, organic masonry texture.
Clean Lines
To get perfectly sharp edges on the window lattice, chill your clay snakes in the fridge for 10 minutes before cutting and placing them.
Step 2: Creating the Door Detail
-
Define the door inset:
Use a modeling tool or knife to carve a deep recessed line following the curve of the arch. This separates the outer frame from the inner wooden door. -
Add wood grain:
On the inner section, use a needle tool or stiff brush to drag long, vertical lines down. Vary the pressure to create deep grooves and shallow scratches that mimic old timber. -
Carve the window frame:
In the upper third of the door, lightly outline a small arch for the window. Roll out a thin snake of clay to build the raised frame around this outline. -
Add the lattice:
Roll very thin threads of clay. Place one horizontally and one vertically inside the window frame to create a four-pane lattice. Press the edges gently to blend them into the frame. -
Create the window ‘glass’:
For the window panes, you can press a small piece of textured plastic into the clay before baking, or paint the inside dark gray later. Stippling the inner clay with a rough brush gives it a frosted glass look.
Make it illuminate
Cut a hole through the back of the foil core before cladding. After baking, you can insert a small battery-operated tea light to make the window glow.
Step 3: Hardware and Trim
-
Add decorative studs:
Using a small ball tool or the end of a paintbrush, press shallow dimples evenly spaced along the outer edge of the arch frame. -
Form the hinges:
Switch to your gray or bronze clay. Shape two small, flat triangles. Attach them to the right side of the door, one near the top and one near the bottom, extending from the frame onto the wood. -
Detail the hinges:
Use a needle tool to score a line where the hinge ‘bends’ and add tiny dots for nail heads. -
Attach the handle:
Form a small oval plate from gray clay and attach it to the left side. Add a tiny rounded bit on top for the handle or knob. -
Sculpt the key:
With leftover clay, shape a separate oversized key. I find making a simple circle with a cross inside for the head creates a nice rustic look.
Step 4: Finishing Touches
-
Dry or bake:
Follow the instructions for your specific clay type to harden the piece. If using kiln clay, ensure it is completely dry before firing. -
Apply a wash:
Mix a very watery dark brown or black acrylic paint. Brush it over the entire piece, getting into the cracks. -
Wipe back:
Immediately wipe the surface with a damp cloth or paper towel. The dark paint will stay in the wood grain and hinge details, making the texture pop. -
Dry brush highlights:
Take a dry brush with a tiny amount of lighter terracotta or tan paint. Lightly dust the raised areas of the wood and stone to add dimension. -
Seal the piece:
Coat the finished door with a matte varnish to protect the paint and give the clay a finished, professional sheen.
Place your finished door on a shelf or among potted plants to invite a little magic into your home
Crescent Moon Window Night Door
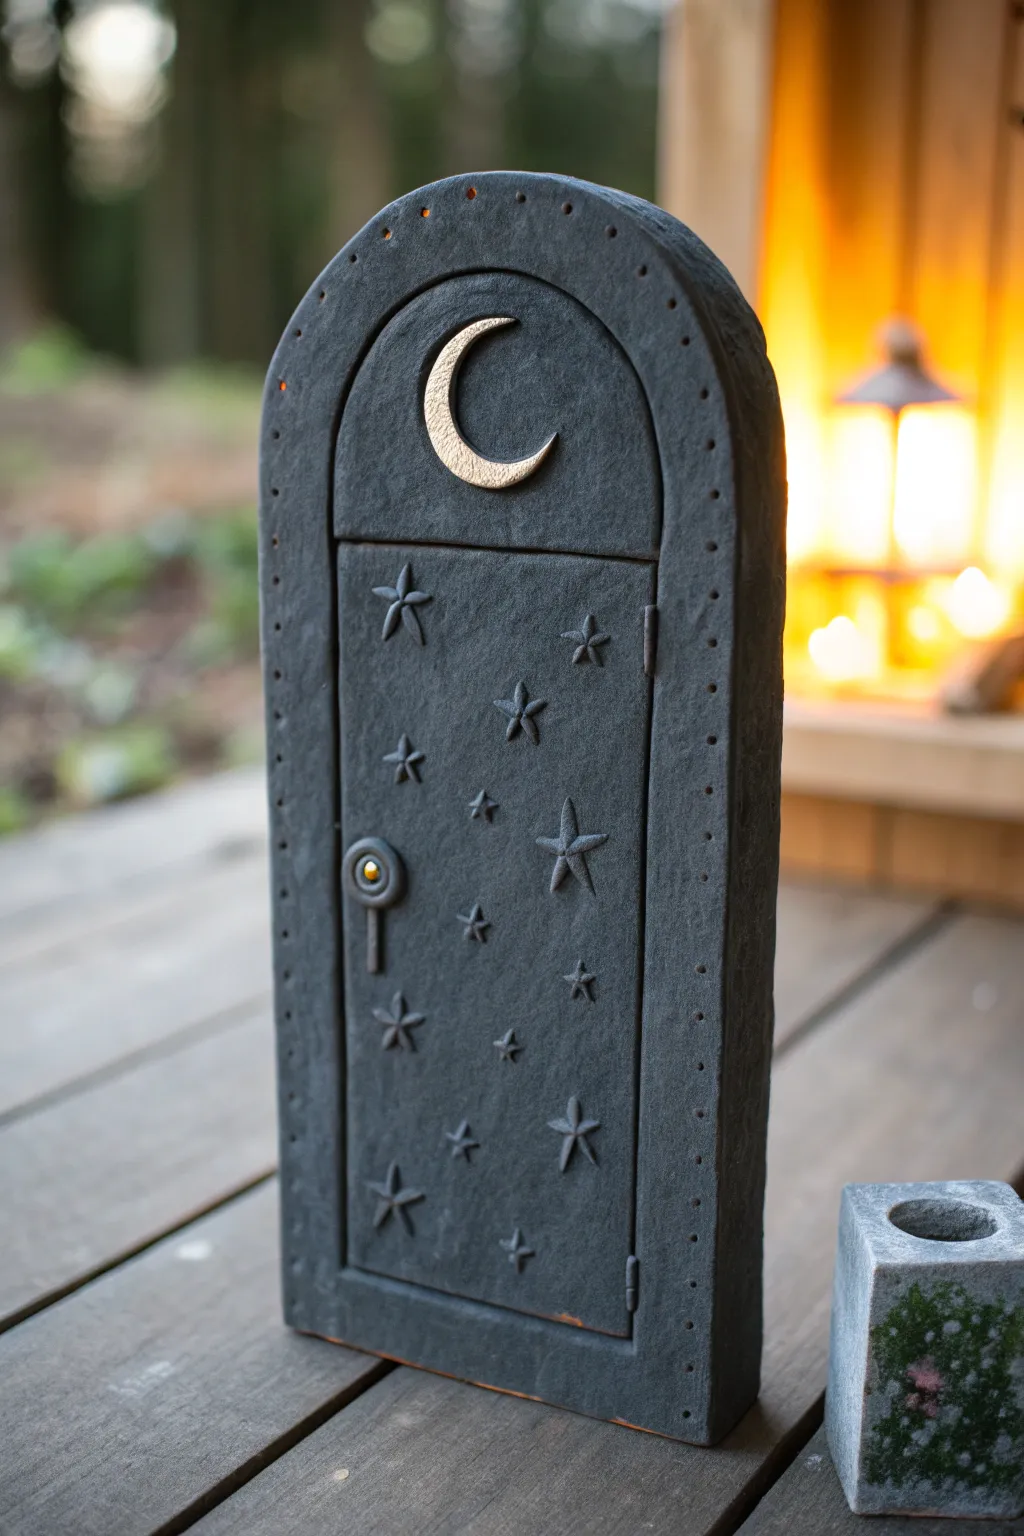
Summon a touch of celestial mystery with this enchanting fairy door, featuring a slate-like finish and a golden crescent moon. The scattered star reliefs and arched silhouette create the perfect entryway for magical visitors in your garden or on a shelf.
How-To Guide
Materials
- Polymer clay (black or dark grey)
- Polymer clay (gold or metallic yellow)
- Rolling pin or clay machine
- sharp craft knife or scalpel
- Texture sponge or stiff brush
- Small star cutters (various sizes) or star plunger cutters
- Needle tool or toothpick
- Round cutter or cap (for the moon)
- Small bead or ball tool
- Black acrylic paint (optional, for touch-ups)
- Matte varnish
Step 1: Shaping the Structure
-
Prepare the base slab:
Condition your black clay thoroughly until it’s pliable. Roll it out into a thick, even slab, approximately 1/4 inch thick. This needs to be sturdy enough to stand on its own once baked. -
Cut the arch shape:
Create a paper template for an elongated arch shape to ensure symmetry. Place it on the clay and cut around it with your craft knife to form the main body of the door frame. -
Define the door separation:
Using a ruler and a modeling tool, gently press a horizontal line about one-third of the way down from the top arc. This separates the ‘window’ area from the main door panel. -
Create the inner frame:
Slightly recessed from the outer edge, score a line all the way around the inner shape to create the illusion of a door jamb. You can gently press the inner section down slightly to make the frame pop out. -
Add stone texture:
Take a texture sponge, a crumpled ball of foil, or a stiff brush and firm press it all over the black clay. This breaks up the smooth plastic look and gives it that heavy, slate-stone appearance.
Step 2: Celestial Details
-
Form the crescent moon:
Roll out a small piece of gold clay. Use a round cutter to cut a circle, then shift the cutter slightly to the side and cut again to create a perfect crescent moon shape. -
Texture the moon:
Before attaching it, give the moon a cratered texture by gently pressing sandpaper or a rough stone against it. Place it centrally in the upper arch section of the door. -
Create the stars:
Roll a thin sheet of the black clay. Use small star plunger cutters to punch out several stars in varying sizes. If you don’t have cutters, you can carefully cut star shapes with your scalpel. -
Attach the stars:
Arrange the stars randomly on the lower door section. Press them gently onto the base so they adhere but remain raised in relief against the background. -
Make the handle:
Roll a tiny ball of black clay and flatten it slightly into a disc. Add a tiny dot of gold clay to the center for a metallic rivet look. Place this on the left side of the door. -
Indent the keyhole:
Directly below the handle disc, use a needle tool to drag a short vertical line downwards to mimic an old-fashioned keyhole mechanism.
Clean Edges Pro-Tip
Use a piece of plastic wrap over the clay before cutting with your cookie cutters. This creates a beautiful, domed pillow effect on the edges of your stars and moon instead of sharp, flat cuts.
Step 3: Finishing Touches
-
Detail the border:
using a specific tool like a blunt needle or a small ball tool, press a series of evenly spaced dots along the entire outer rim of the arch frame. Keep the spacing consistent for a polished look. -
Add hinges:
Roll two tiny, thin snakes of black clay. Attach them to the right side of the door seam—one near the top and one near the bottom—to represent small barrel hinges. -
Review edges:
Smooth out any rough cutting marks on the very outside edge of the door slab with your finger or a little bit of baby oil. -
Bake the project:
Place your door on a ceramic tile or baking sheet. Bake according to the manufacturer’s instructions for your specific brand of polymer clay (usually around 275°F/130°C for 15-30 minutes). -
Cool and seal:
Allow the piece to cool completely. Once cool, brush on a coat of matte varnish to protect the surface and unify the sheen without making it look glossy or plastic.
Level Up: Glow Effect
Swap the gold clay moon for glow-in-the-dark polymer clay. During the day it looks white, but at night your fairy door will guide visitors with a soft, magical luminescence.
Place your finished door against a tree trunk or skirting board to invite a little wonder into your home

TRACK YOUR CERAMIC JOURNEY
Capture glaze tests, firing details, and creative progress—all in one simple printable. Make your projects easier to repeat and improve.
Magical Hardware: Hinges, Ring Knocker, Keyhole
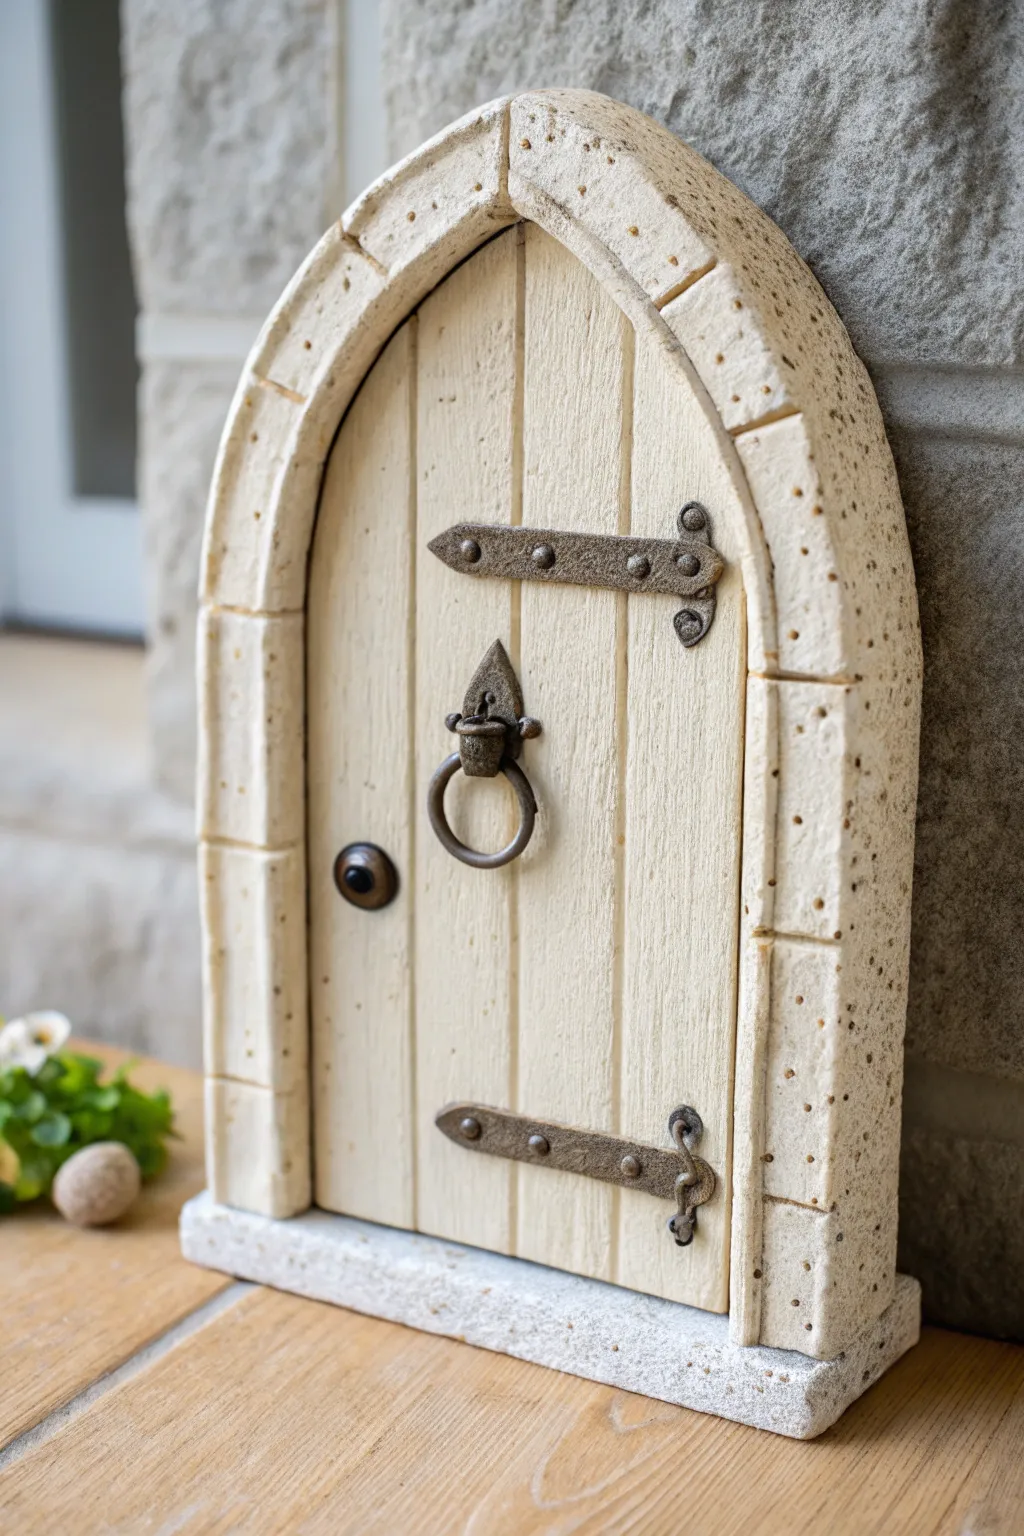
Bring a touch of magic to your garden or bookshelf with this charming clay fairy door, featuring realistic faux-stone masonry and rustic iron-look hardware. The secret to its believability lies in the careful texturing of the wood grain and the metallic finish on the hinges and knocker.
Detailed Instructions
Materials
- Polymer clay (cream/beige for stone, light fan/brown for wood)
- Black polymer clay (for hardware)
- Metallic waxes or acrylic paint (bronze, pewter, rusty orange)
- Texturing tools (needle tool, toothbrush, crumpled foil)
- Clay roller or pasta machine
- Craft knife
- Liquid clay or PVA glue
- Matte varnish
Step 1: Constructing the Base and Door
-
Roll the wood planks:
Start by conditioning your light tan clay. Roll it out into a sheet about 1/4 inch thick. Use a craft knife to cut a tall, rounded arch shape for the main door panel. -
Score the planks:
Using a needle tool or the back of your knife, score deep vertical lines down the door to simulate separate wooden planks. Don’t be afraid to make them slightly uneven for a rustic look. -
Texture the wood grain:
Take a stiff wire brush or a crumpled ball of aluminum foil and drag it lightly down the length of the planks. This creates fine, organic wood grain lines.
Stone Texture Trick
Press actual coarse sandpaper against the raw ‘stone’ clay. The grit leaves a perfect, realistic masonry surface without needing fancy tools.
Step 2: Building the Stonework Arch
-
Form the stone blocks:
Roll out a thick snake of cream-colored clay. Flatten it slightly so it creates a rectangular strip, wide enough to frame your door. -
Assemble the frame:
Wrap this strip around the curved edge of your wooden door piece. Press it gently to adhere, using a little liquid clay as ‘mortar’ between the door and the frame if necessary. -
Define the stones:
Use a blunt tool to press indentations into the frame at regular intervals, creating the look of individual stone blocks. Ensure the top center features a distinct keystone. -
Weather the stone:
Aggressively texture the stone surface by pressing a toothbrush or raw rock into the soft clay. This pockmarked texture mimics aged limestone beautifully. -
Create the threshold:
Form a rectangular block for the base step. Texture it similarly to the arch and attach it to the bottom of the door assembly.
Make it Ancient
Dilute dark green acrylic paint with water and wash it into the crevices of the stone and wood base to simulate centuries of moss growth.
Step 3: Sculpting the Magical Hardware
-
Shape the hinge straps:
Roll out thin strips of black clay. Cut two long, pointed strap shapes for the hinges. Secure them horizontally across the door, one near the top and one near the bottom. -
Detail the hinges:
Add tiny flattened balls of black clay onto the straps to simulate rivets or bolts. Use a needle tool to poke a small indentation in the center of each rivet. -
Form the hinge barrels:
Create small cylinder shapes and attach them to the frame side of the hinges. Add a small ‘pin’ detail connecting the strap to the frame, ensuring it looks mechanically functional. -
Create the escutcheon plate:
Shape a small diamond or teardrop piece of black clay for the door knocker’s base plate and attach it to the center of the door. -
Attach the knocker ring:
Roll a small snake of black clay into a ring. Fashion a small loop or hook on the base plate to hold the ring, allowing it to hang naturally. I find pre-baking the ring for 5 minutes helps it hold its shape while attaching. -
Install the peephole:
Press a small disk of black clay onto the lower left side of the door. Press a glossy bead or a rounded tool into the center to create a ‘glass’ peephole effect.
Step 4: Finishing Touches
-
Bake the project:
Bake the entire piece according to your clay manufacturer’s instructions. Let it cool completely before painting. -
Dry brush the stone:
Dip a dry brush into a tiny amount of darker beige or grey paint. Lightly dust the textured surface of the stones to highlight the pitted details. -
Metallize the hardware:
Using your finger or a small sponge, rub metallic bronze or iron wax (like Gilders Paste) over the raised areas of the black hardware. This gives it that heavy, cast-iron appearance. -
Seal the work:
Apply a coat of matte varnish to the wood and stone to protect the surface, leaving the hardware with its metallic sheen.
Place your finished portal against a tree trunk or skirting board and wait for new neighbors to move in
Tiny Mail Slot and Mini Mailbox Door
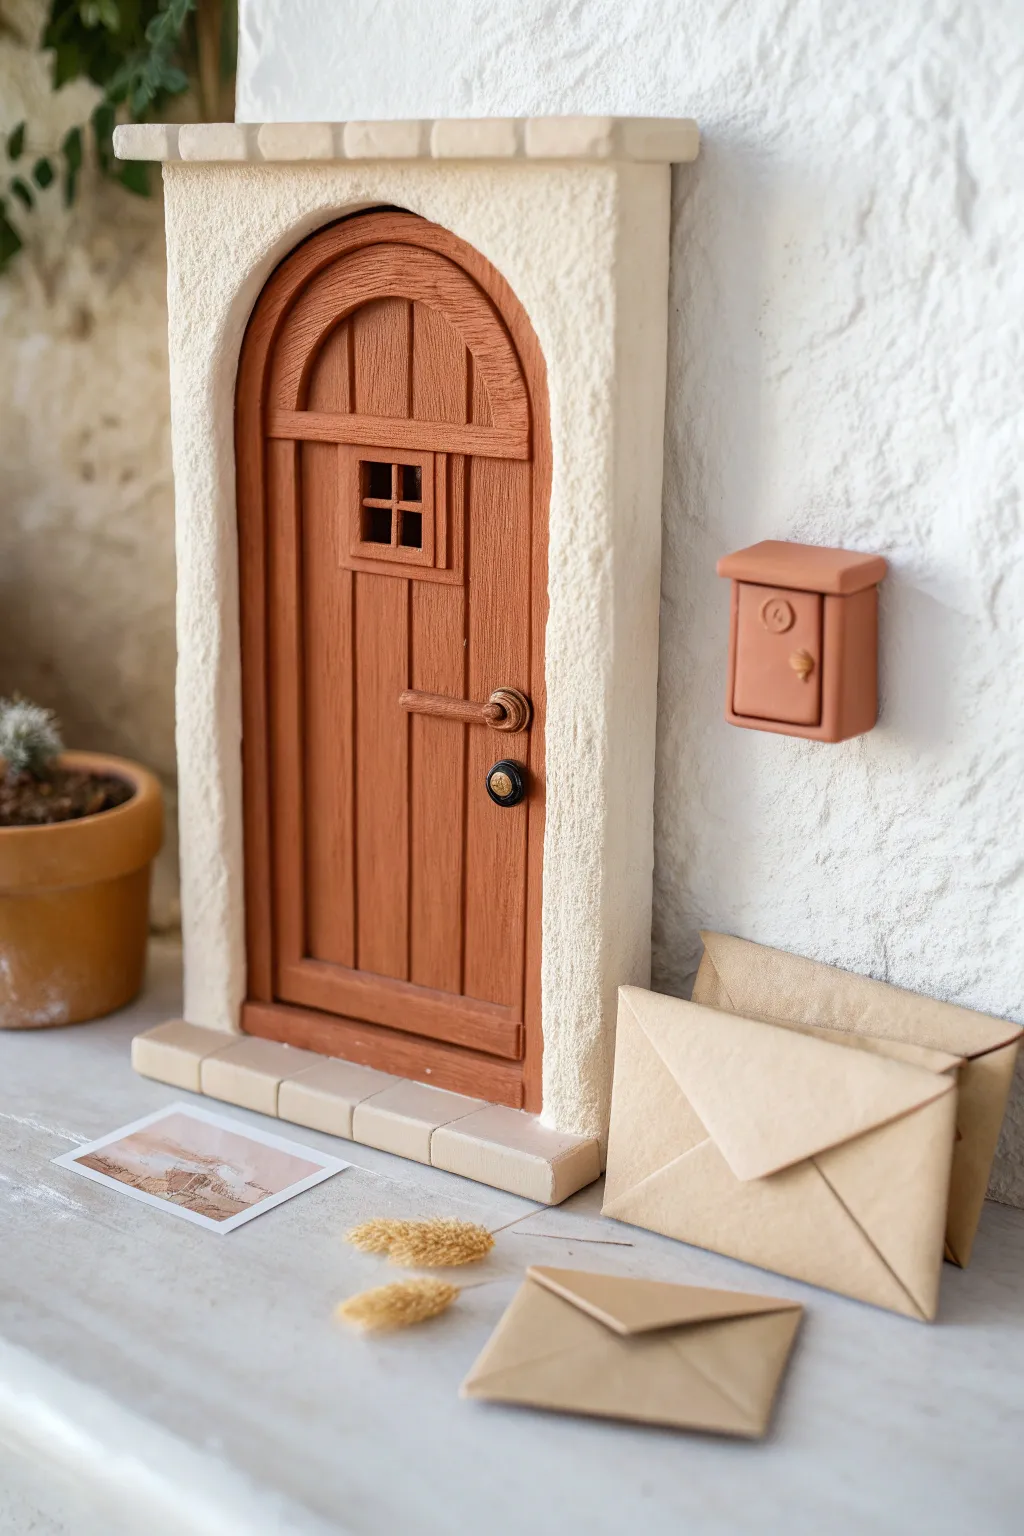
This whimsical miniature door project combines rustic charm with tiny details, featuring a convincing wood-grain texture and a sweet, perfectly-scaled mailbox. It creates an inviting entryway for tiny guests, complete with miniature correspondence waiting to be collected.
Step-by-Step Guide
Materials
- Polymer clay (terracotta/brown, cream/white, black, gold)
- Clay roller or pasta machine
- Texture tools (needle tool, toothbrush, sandpaper)
- Craft knife or scalpel
- Liquid polymer clay (optional)
- Acrylic paints (brown wash, white)
- Small paintbrush
- Super glue
- Gloss glaze (optional for hardware)
Step 1: Constructing the Frame
-
Base preparation:
Roll out a thick slab of cream-colored clay (about 1/4 inch thick) to form the base structure. Cut a tall rectangle for the door frame, then carefully cut out an arch shape from the center where the door will sit. Keep the removed arch piece – you’ll use it later. -
Texturing the stone:
To mimic the stucco or stone texture shown, vigorously press a stiff toothbrush or a ball of crumpled aluminum foil all over the surface of the cream frame. Don’t be afraid to make deep impressions for a realistic rough look. -
Adding the lintel:
Cut a thin strip of the same cream clay, slightly wider than the frame width. Place this across the top of the frame to create a decorative lintel or roof overhang. -
Detailing the bricks:
Using a needle tool or the back of a knife, gently score vertical lines into the top lintel strip to simulate individual rectangular stones or bricks. Soften the edges with your finger. -
Creating the threshold:
Cut another strip of cream clay for the bottom step. Score this strip into square tile shapes and attach it to the base of the frame, pressing firmly to bond the seams.
Step 2: Crafting the Wooden Door
-
Shaping the door:
Take the terracotta-colored clay and roll it slightly thinner than the frame. Use the arched hole you cut earlier as a template to cut the door shape, making it just slightly smaller so it fits deeply into the recess. -
Wood grain texture:
Use a needle tool to scratch long, vertical lines into the door surface. Vary the pressure to create deep grooves between ‘planks’ and lighter scratches for the wood grain itself. -
The crossbar:
Cut a horizontal strip of terracotta clay and attach it about one-third of the way down from the top of the arch. texture this piece with horizontal grain lines to distinguish it. -
Adding the window:
Create a tiny square frame from thin clay snakes. Place this in the center of the upper door section. Fill the inside with a tiny black square of clay for depth, then add a cross of clay strips for the windowpane. -
Shading for realism:
Before baking, you can lightly dust the grooves with dark brown pastel chalk or wait until after baking to apply a watered-down brown acrylic wash. I usually prefer the wash as it settles nicely into the crevices.
Clean Cuts Pro Tip
Chill your rolled clay sheets in the fridge for 10 minutes before cutting. This firms up the clay so your knife doesn’t drag or distort the straight lines of the door planks.
Step 3: The Tiny Accessories
-
Making the mailbox:
Form a small rectangular block of terracotta clay. Add a slightly larger, thin slab on top for the lid. Use your needle tool to scribe a rectangle on the front for the door and a small circle for a logo or emblem. -
Hardware details:
Roll extremely tiny balls of black clay and press them flat to create the door knob plate. Do the same with gold clay for the handle itself and the tiny mailbox latch. -
Handle assembly:
Roll a small snake of terracotta clay for the door handle. Gently curve it and attach it to the door, pressing the ends flat to simulate mounting brackets. -
Baking:
Arrange all your pieces on a baking tile. Bake according to your polymer clay manufacturer’s instructions (usually 275°F/130°C for 15-30 minutes). Let them cool completely. -
Final assembly:
Once cool, glue the door into the frame recess. Attach the mailbox to the side of the doorframe or directly to the wall if mounting separately. -
Paper correspondence:
Cut small rectangles from brown kraft paper. Fold them into envelope shapes and glue the flaps down. Use a fine-tip pen to add tiny scribble lines for addresses.
Level Up: Aged Look
After baking, dry brush a tiny amount of white or grey paint onto the textured stone frame. It highlights the raised ‘stucco’ texture and makes the entrance look weathered and real.
Place your finished door against a skirting board or bookshelf to create a secret entrance for the imagination
Tree-Trunk Root Door With Bark Texture
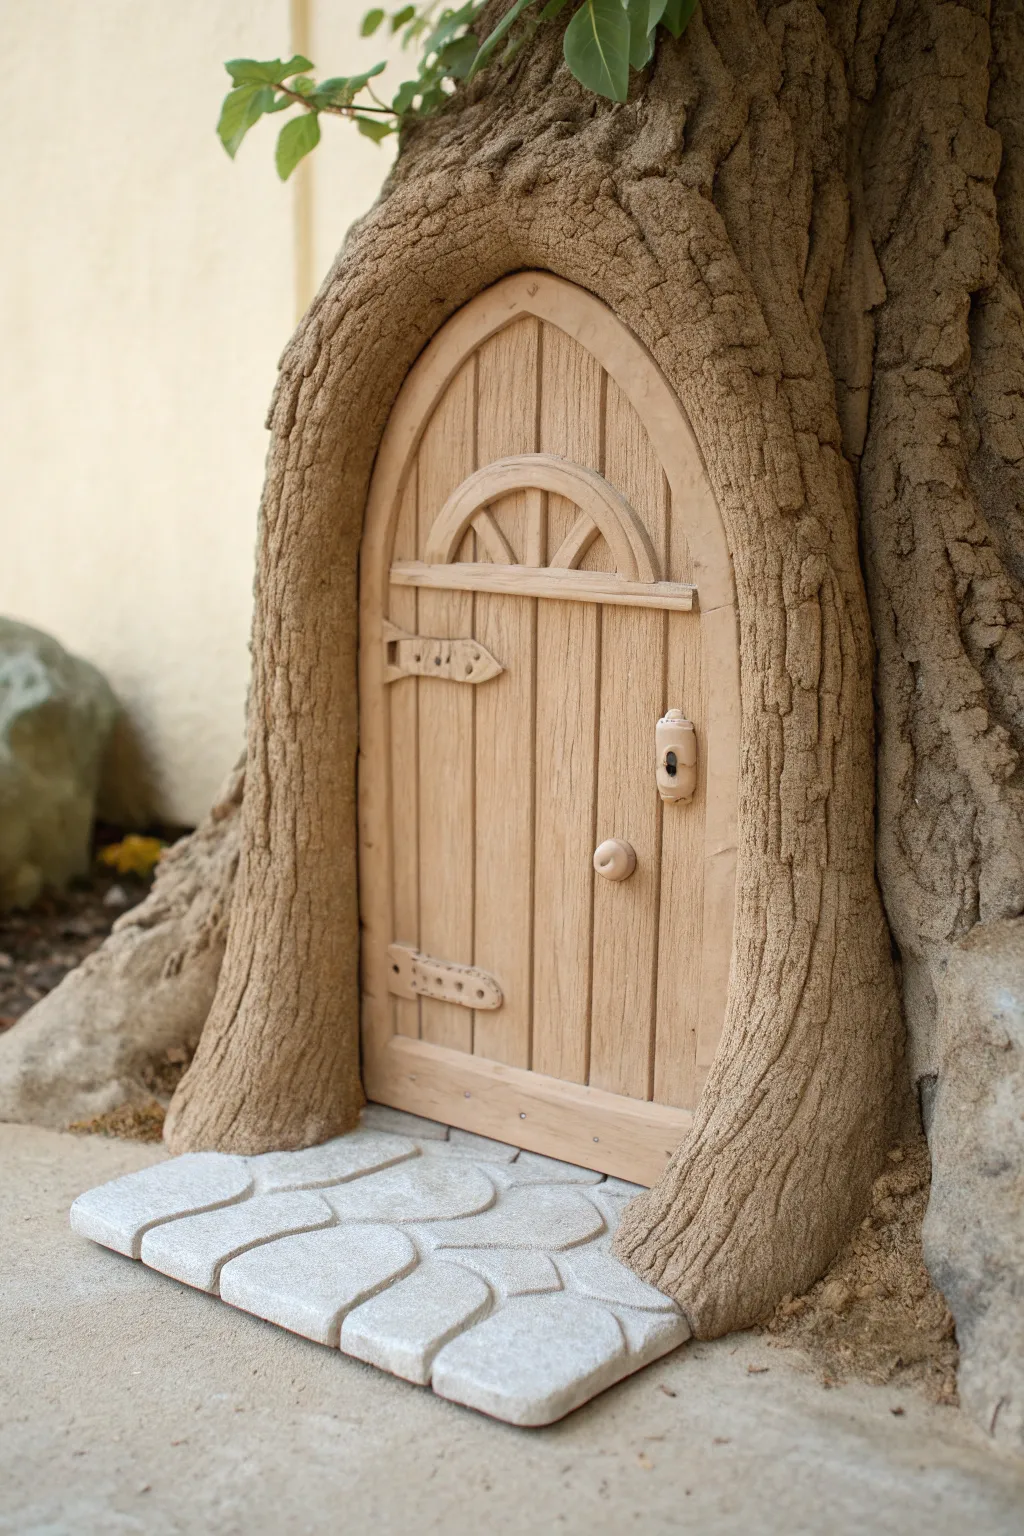
Transform a simple blob of clay into an enchanting entryway that seems to grow right out of an ancient tree. This project focuses on realistic textures, combining smooth, paneled wood effects with rugged, deeply grooved bark for a striking contrast.
Detailed Instructions
Materials
- Polymer clay or air-dry clay (terra cotta and beige/wood colors)
- Aluminum foil (for the core structure)
- Sculpting tools (needle tool, small ball stylus, clay knife)
- Texture tools (wire brush or stiff toothbrush)
- Rolling pin
- Acrylic paints (browns, creams, greys)
- Matte varnish or sealant
- Sandpaper
Step 1: Building the Foundation
-
Form the core:
Crumple a large piece of aluminum foil into a rough mound shape. This will act as the structural support for your tree trunk so you don’t use too much clay and the piece remains lightweight. -
Create the door slab:
Roll out a slab of beige or light brown clay to about 1/4 inch thickness. Use a template or freehand cut an arched door shape that fits nicely against your foil mound. -
Apply the bark base:
Cover the foil mound with a thick layer of darker brown clay, overlapping the edges of your door slab slightly to make it look recessed. Ensure the clay is thick enough (at least 1/2 inch) to carve deep textures later.
Step 2: Detailing the Wooden Door
-
Scribe the planks:
Using a needle tool or the back of a knife, gently press vertical lines into the door slab to simulate wooden planks. Don’t make them perfect; slight wobbles add character. -
Add wood grain:
Lightly drag a wire brush or scratch distinct grain lines into each individual plank for a realistic timber texture. -
Frame the door:
Roll thin snakes of clay and flatten them to create the arched door frame. Place these over the plank seams at the top edge. -
Construct the window arch:
Create a semi-circle piece and place it near the top of the door. Add small strips for the window panes and a horizontal strip below it for the sill. -
Install hardware:
Sculpt tiny shapes for hinges and a door handle from the same clay. Attach them to the door, pressing small indentations to mimic nail heads.
Clay Cracking?
If using air-dry clay, cracks often appear as it shrinks. To fix, mix a small amount of fresh clay with water to make a paste (slip) and fill the cracks, then smooth it out.
Step 3: Sculpting the Bark & Stone
-
Carve primary grooves:
Using a sculpting tool, carve deep, vertical, wavy channels into the thick brown clay surrounding the door. Follow the natural flow of how roots would grow around an opening. -
Create bark flaking:
Use a small loop tool or spacing tool to undercut some of the bark ridges, making them look like peeling, aged wood. -
Texture the surface:
Press a stiff toothbrush or a real rock into the bark clay to remove any smooth fingerprints and add organic micropores. -
Pave the entryway:
Roll out a small slab of light grey or white clay for the base. Cut irregular, rounded stone shapes and press them together closely to form a cobblestone path leading to the door. -
Refine the edges:
Smooth the edges where the roots meet the ground so the piece sits flat.
Realistic Bark Tip
Use a piece of actual tree bark from your garden to stamp texture directly into the clay. This transfers natural, random patterns better than any tool.
Step 4: Finishing Touches
-
Bake or dry:
Follow the specific instructions for your clay type to cure the piece. If using polymer, ensure your oven temperature is accurate to prevent scorching. -
Base coat painting:
Once cool or dry, apply a wash of diluted darker brown acrylic paint over the bark areas to settle into the deep grooves. -
Dry brushing:
I prefer to use a very dry brush with a lighter tan color to tickle the raised edges of the bark, instantly making the texture pop. -
Detail paint:
Paint the hinges dark iron or black, and give the stone path a light grey wash to define the cracks between stones. -
Seal the work:
Apply a matte varnish to the entire piece to protect it, avoiding glossy finishes to keep the natural, rustic appearance.
Place your finished door against a skirting board or garden tree to invite a little magic into your home
Fairy Garden Door With Mossy Stone Step
Transport your garden to a magical realm with this charming polymer clay door featuring realistic brickwork and a weathered wood finish. Complete with moss-covered stone steps, this miniature portal is the perfect whimsical addition to any fairy garden setup.
Step-by-Step Tutorial
Materials
- Polymer clay (terracotta, brown, grey, green)
- Acrylic rolling pin
- Sculpting tools (needle tool, small ball stylus)
- Blade or craft knife
- Texture sheet (stone or sandpaper)
- Black acrylic paint
- Silver metallic paint or rub-on wax
- Liquid clay (TLS)
- Preserved moss or artificial flocking
- Super glue
- Aluminum foil
Step 1: Door & Frame Structure
-
Create the base:
Begin by rolling out a medium-thick slab of terracotta-colored polymer clay. Cut an arched shape about 4 inches tall to serve as the main door and frame backing. -
Form the wood planks:
Roll out a slightly thinner slab of the same terracotta clay. Cut a smaller corresponding arch shape to fit inside the door frame area. Use a needle tool to score vertical lines to mimic individual wooden planks. -
Texture the wood:
Add realistic wood grain by gently dragging a wire brush or dragging the needle tool in wobbly lines down the planks. I like to add a few knots by pressing a small ball tool into the clay and swirling it slightly. -
Build the brick arch:
Roll a long snake of terracotta clay and flatten it into a strip. Wrap this around the curved top edge of your door base. Use a blade to press indentations every half-inch to define individual bricks. -
Detail the bricks:
Texture the surface of each brick by tapping it with a stiff toothbrush or a crumpled ball of aluminum foil to give it a rough, masonry look. -
Add the inner trim:
Roll a very thin snake of clay and line the gap between the brick arch and the wooden door. Use a small stylus to poke evenly spaced holes perfectly along the trim for a decorative dotted effect.
Stone Texture Trick
Before baking the stone step, press real coarse salt into the surface. After baking, wash the salt away with water. It leaves behind perfect, pitted crater textures.
Step 2: Hardware & Steps
-
Make the hinges:
Roll tiny strands of black clay (or paint clay later) into thin strips. Shape them into scrolling bracket designs and press them horizontally across the door planks. -
Add the handle:
Form a small oval of clay for the handle plate and a tiny loop for the ring pull. Attach this to the right side of the door. -
Sculpt the stone step:
Take a lump of grey clay and flattening it into a rectangular base that fits the width of your door. Use your thumb to press uneven indentations, creating the look of varied flagstones. -
Texture the stones:
Press a real rock or coarse sandpaper onto the grey clay to give it an authentic stone texture. -
Bake the project:
Place all pieces on a ceramic tile or baking sheet. Bake according to the manufacturer’s instructions for your specific brand of clay (usually 275°F for 15-30 minutes). Let cool completely.
Step 3: Finishing Touches
-
Wash with paint:
Water down black acrylic paint until it’s very thin. Brush this flexible wash over the entire door—especially the brick and wood grooves—then immediately wipe off the surface with a paper towel. This leaves dark shadows in the cracks to enhance depth. -
Highlight hardware:
Apply a tiny amount of silver metallic wax or paint to the raised areas of the hinges and handle to simulate weathered iron. -
Make the mossy wash:
Mix green acrylic paint with a little clear liquid clay or glaze. Dapple this mixture onto the grey stone steps, focusing on the crevices between the ‘stones’ to look like creeping moss. -
Apply the step:
Glue the finished door to the back edge of the stone step base so it stands upright. -
Add real moss:
For the final organic touch, glue strands of preserved craft moss around the outer edge of the brick archway, covering any seams and softening the silhouette.
Make it Magical
Add a tiny glow-in-the-dark bead inside the keyhole or hidden among the moss. At night, it will create a mysterious, magical glint suggesting someone is home.
Now find a quiet corner against a tree root or large rock to install your new entryway and wait for the visitors to arrive
Marbled Clay Door for a Mystical Look
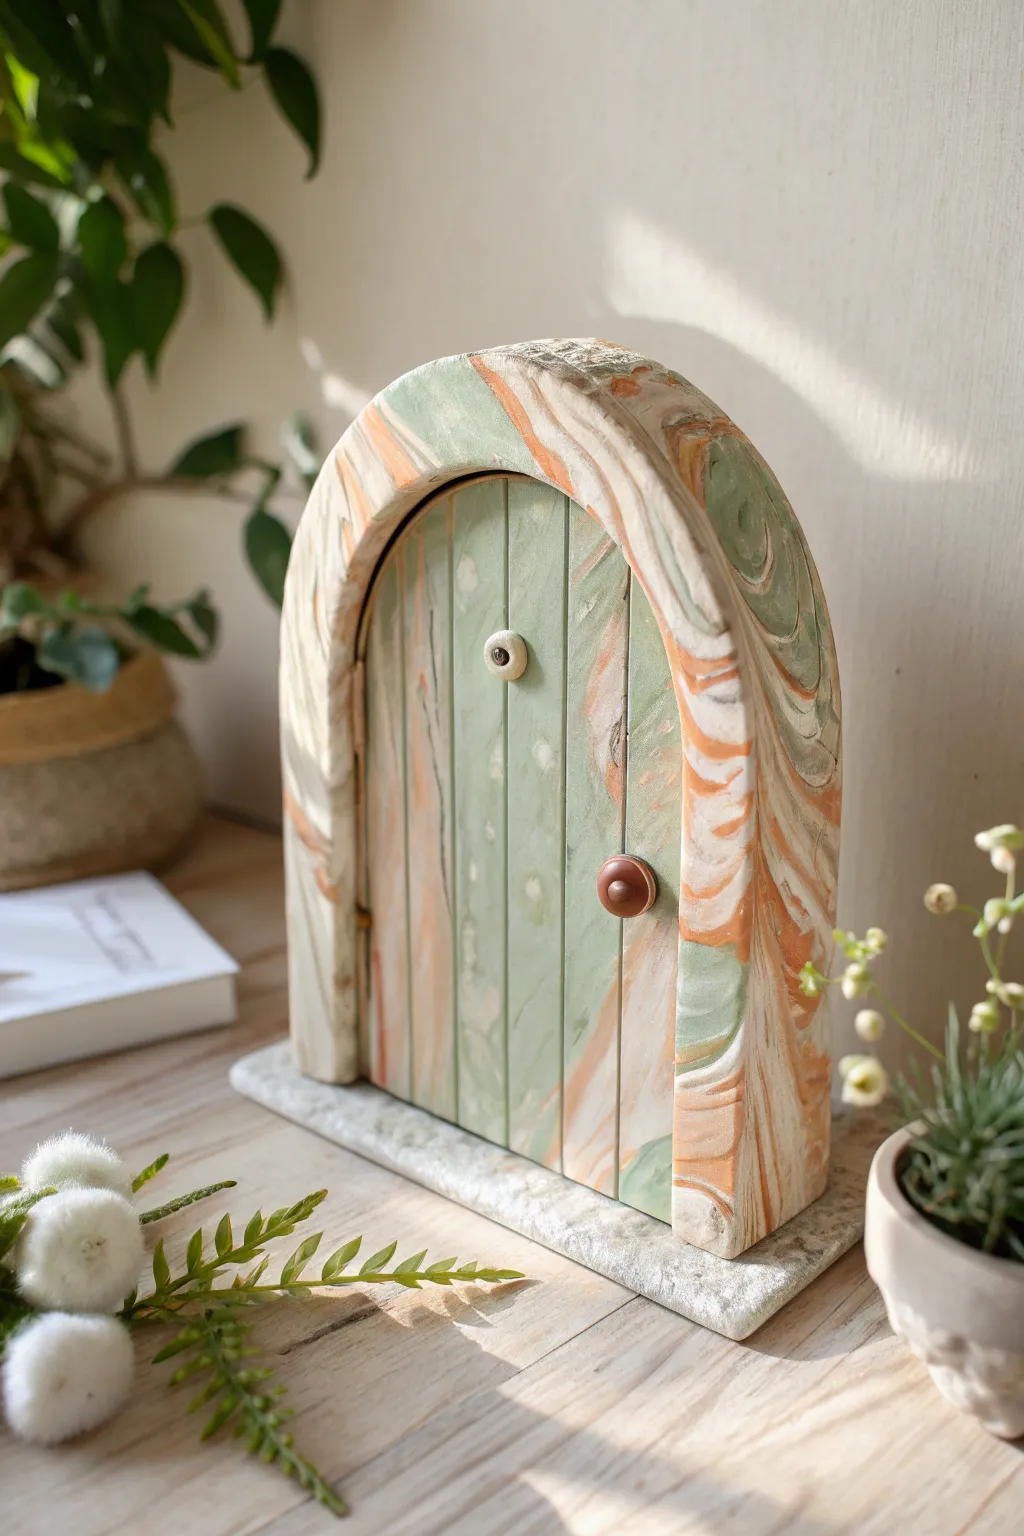
Create a magical entryway for your garden sprites with this stunning marbled clay door. By combining muted greens, warm oranges, and soft creams, you’ll achieve a natural, agate-like finish that feels both ancient and whimsical.
Step-by-Step
Materials
- Polymer clay (Sage Green, Terracotta, White/Cream, Translucent)
- Small metal or wood base (rectangle)
- Clay cutting blade or craft knife
- Rolling pin or pasta machine
- Pointed sculpting tool or toothpick
- Small round cutter (for the eye/peephole)
- Brown polymer clay (for the knob)
- Liquid clay or bake-and-bond adhesive
- Oven for baking
Step 1: Marbling the Clay
-
Condition the colors:
Begin by softening your blocks of sage green, terracotta, white, and translucent clay. Knead them individually until they are pliable and warm. -
Wait to form logs:
Roll each color into a long, snake-like log. Make the white and sage logs slightly thicker than the terracotta to balance the final color palette. -
Twist and combine:
Gather all the logs together into one thick bundle. Twist them tightly like a candy cane to start blending the colors. -
Fold and roll:
Fold the twisted log in half and roll it out again. Repeat this ‘fold, roll, twist’ process about 3-4 times. Be careful not to over-mix; you want defined streaks. -
Create the slab:
Once the marbling looks organic, roll the clay out into a flat slab about 1/4 inch thick. This will serve as your primary building material.
Muddy Colors?
If your colors are turning brown or gray, you are over-mixing. Stop twisting sooner! You want distinct stripes of color, not a homogeneous blend.
Step 2: Constructing the Door
-
Cut the arch shape:
Using a paper template or freehand, cut a tall U-shape from your marbled slab. This forms the thick outer frame of the door. -
Form the inner door:
Cut a slightly smaller U-shape that fits snugly inside the frame. This piece will be the actual door part. -
Add wood grain texture:
On the inner door piece, lightly drag a pointed tool or toothpick vertically to create groove lines, mimicking wooden planks. -
Construct the frame depth:
Cut a long strip of marbled clay and wrap it around the outer edge of the frame to give it substantial thickness and a 3D blocky look. -
Assemble the pieces:
Place the inner door panel inside the frame. Since I prefer a solid structure, I apply a thin layer of liquid clay to the edges where they meet to ensure a strong bond.
Make It Glow
Mix glow-in-the-dark powder into the white clay before marbling. Your mystical door will softly illuminate the garden path at night.
Step 3: Adding Details & Finishing
-
The peephole:
Roll a tiny ball of white clay and flatten it slightly on the upper center of the door. Press a smaller black or dark brown bead into the center to create an ‘eye’ peephole. -
The doorknob:
Create a flattened sphere from brown clay and attach it to the right side of the door. Add a smaller dot in the center for detail. -
Mount on the base:
Cover your rectangular base with a thin sheet of gray or marbled clay to look like a stone step. Press the assembled door firmly onto this base. -
Texture the base:
Use a crumpled ball of aluminum foil or a toothbrush to texture the base, making it look like rough-hewn stone. -
Final inspection:
Smooth out any fingerprints with a drop of baby oil on your finger before baking. -
Bake the project:
Bake according to your polymer clay manufacturer’s instructions (usually 275°F for 15-30 minutes). Let it cool completely inside the oven to prevent cracking.
Place your finished door against a tree trunk or on a bookshelf to invite a little everyday magic into your home
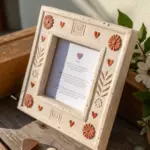
Patchwork Tile Door With Stamped Patterns
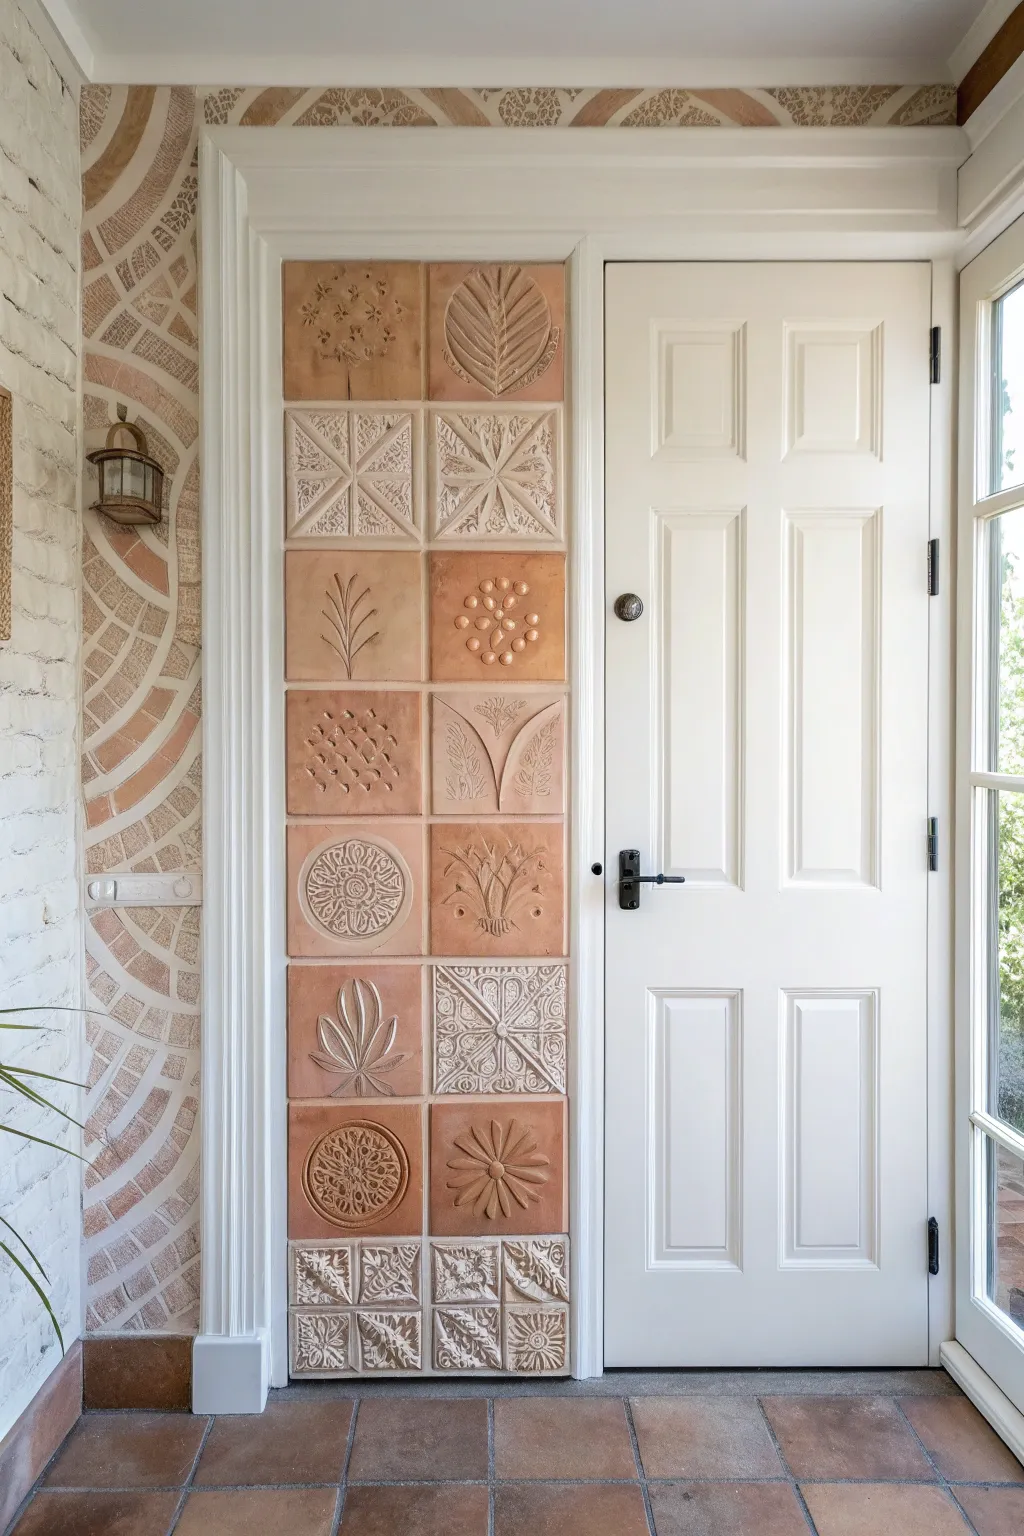
Transform a plain entryway by creating a custom vertical panel of hand-stamped clay tiles that adds warmth and artistic flair. This project combines the rustic charm of terracotta with intricate relief patterns for a welcoming, artisan-crafted look.
Step-by-Step Tutorial
Materials
- Air-dry clay (terracotta color)
- Air-dry clay (white or cream color)
- Rolling pin
- Square cookie cutter or tile cutter (4×4 or 6×6 inch)
- Two guide strips (wood slats, 1/4 inch thick)
- Assorted stamps (leaf veins, floral designs, geometric blocks)
- Texture tools (stylus, combs, found objects like burlap)
- Sandpaper (fine grit)
- Construction adhesive or heavy-duty tile glue
- Matte clear sealant spray
- Grout (optional, sand-colored)
- Ruler and level
Step 1: Crafting the Clay Tiles
-
Prepare your workspace:
Set up a clean, flat surface covered with canvas or parchment paper to prevent sticking. Place your two wooden guide strips parallel to each other, slightly wider than your desired tile width, to ensure an even thickness when rolling. -
Roll out the slab:
Take a portion of terracotta clay and knead it briefly to remove air bubbles. Place it between the guide strips and roll it flat with your rolling pin until the rolling pin rests on the wood strips, creating a perfect uniform slab. -
Cut the base shapes:
Use your square cutter or a knife and ruler to cut out your tile squares. For the specific look in the image, you will need a mix of plain terracotta tiles and white clay tiles. Create enough to fill the vertical space next to your door, plus a few extras for practice. -
Stamp the designs:
While the clay is still fresh and soft, press your stamps firmly into the surface. Vary the pressure: deep impressions for the central motifs (like the large leaves or sunbursts) and lighter touches for background textures. -
Create variation:
Don’t make every tile identical. For some, use stylus tools to hand-carve lines like the wheat stalk design. For others, like the textured geometric squares, press a fabric or textured mat into the clay before cutting the final square shape. -
Refine the edges:
Once stamped, the edges might have flared out slightly. Gently pat them back into a square shape with a flat tool or your fingers to ensure they will fit together tightly later. -
Dry the tiles:
Transfer the tiles to a wire rack to air dry. I prefer to flip them over once a day to prevent warping. This process can take 24-48 hours depending on humidity.
Warped Tiles?
If tiles curl while drying, slightly dampen the concave side with a sponge and place a heavy book on top (with parchment paper in between) to flatten them back out.
Step 2: Finishing and Installation
-
Sand imperfections:
Once fully bone-dry, lightly sand the edges and surface to remove any sharp burrs or rough spots. Wipe away the dust with a barely damp cloth. -
Apply a sealant:
Spray all tiles with a matte clear sealant. This step is crucial before installation as it prevents the porous clay from absorbing adhesive or dirt over time. -
Plan the layout:
Lay your finished tiles on the floor in your desired pattern. Alternate the terracotta and cream tiles to create a checkerboard or patchwork effect, ensuring the stamped patterns are distributed visually. -
Prepare the wall:
Clean the vertical strip of wall next to your door frame. Use a level and a pencil to mark a plumb vertical line where the outer edge of the tiles will sit. -
Install the bottom tile:
Apply a generous amount of heavy-duty construction adhesive to the back of your first tile. Press it firmly against the wall at the bottom, using the floor (or baseboard) and your pencil line as a guide. -
Stack upwards:
Continue gluing tiles one by one, working your way up. Place spacers (like coins or tile spacers) between them if you want a grouted look, or butt them tightly together for the rustic look shown in the image. -
Secure while curing:
Use painter’s tape to hold the tiles in place against the wall while the adhesive cures, preventing them from sliding down. Leave this for the time recommended on your adhesive package. -
Grout (optional):
If you left gaps, pipe a sand-colored grout into the joints and wipe smooth with a sponge. If you butted them tightly, you can skip this step.
Antique Wash
Mix a tiny bit of dark brown acrylic paint with water. Brush over the dried texture and wipe off immediately. The dark color stays in the crevices to highlight the pattern.
Step back and admire how this textural feature creates a sophisticated, custom focal point for your home entrance
Winter Fairy Door With Snow and Icicles
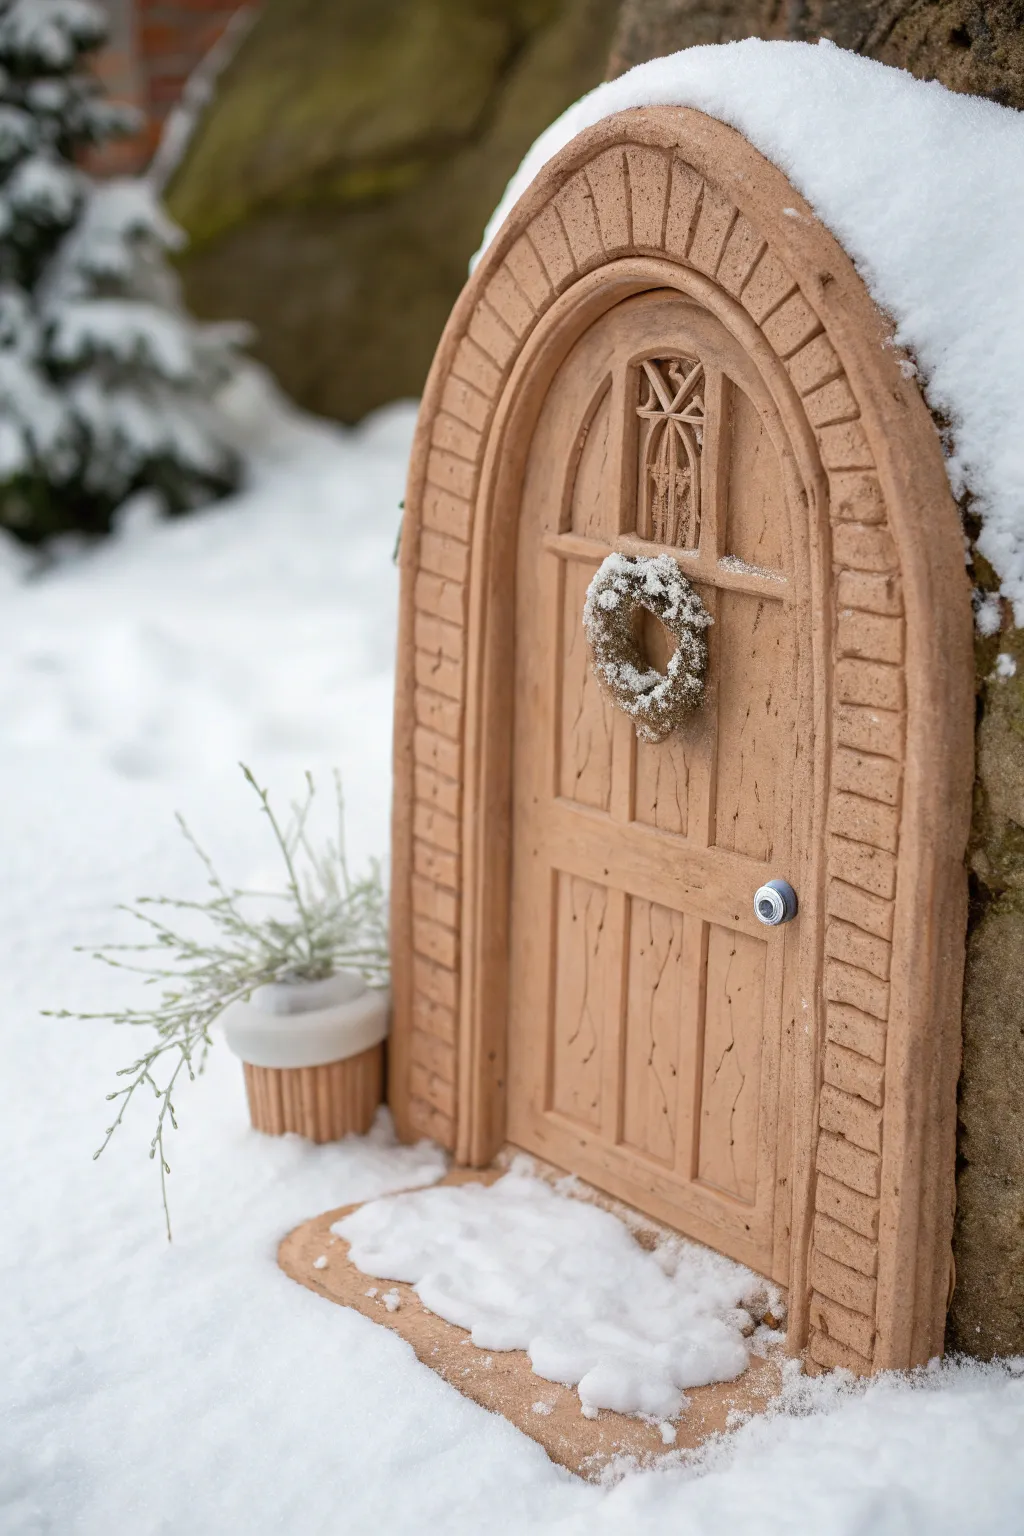
Transform a simple slab of clay into a magical winter portal with this charming fairy door project. Featuring realistic wood grain textures and a classic arched brick frame, this durable piece looks equally enchanting nestled indoors on a bookshelf or waiting outside in the snow.
Detailed Instructions
Materials
- Terracotta-colored polymer clay or air-dry clay (approx. 500g)
- Small rolling pin
- Cutting blade or craft knife
- Sculpting tools (needle tool, small ball stylus)
- Texture tools (or a stiff-bristled toothbrush)
- Small round cutter (for the doorknob)
- Silver acrylic paint and fine brush
- Miniature wreath (store-bought or handmade from moss)
- Small piece of clear acrylic sheet (optional for window)
- Clay adhesive or heavy-duty glue
- Matte varnish (for outdoor protection)
Step 1: Shaping the Base and Frame
-
Roll the main slab:
Begin by conditioning your terracotta clay until it’s pliable. Roll it out into a smooth, even slab that is approximately 1/4 inch thick. This will form the sturdy backplate of the entire door structure. -
Cut the arch shape:
Use a paper template or freehand a tall arch shape on the clay. Cut the outline cleanly with your craft knife. Smooth the raw edges with your fingertip to remove any sharp burrs. -
Create the door frame:
Roll a snake of clay and flatten it slightly into a long strip about 1/2 inch wide. Carefully lay this strip along the outer curved edge of your base arch to create the raised door frame. Trim any excess at the bottom. -
Texture the bricks:
Using a needle tool or the back of a craft knife, press horizontal lines into the raised frame strip to mimic mortar lines. Add smaller vertical lines between them so the pattern resembles stacked cut stone or bricks. -
Detail the stone surface:
To make the bricks look weathered and realistic, gently tap the surface with a stiff toothbrush or a texturing sponge. I like to focus on the edges of each brick to make them look hand-hewn.
Step 2: Adding Door Details
-
Define the door shape:
Inside the brick arch, use a needle tool to incise a slightly smaller arch. This separation line creates visual depth between the door itself and the surrounding stonework. -
Engrave wood grain:
Draw vertical lines down the center panel to represent wooden planks. Use a sculpting tool to carve wiggly, organic lines and occasional knots into each ‘plank’ to create a convincing wood grain texture. -
Create the window inset:
Cut a small rectangle near the top of the door. You can either remove the clay entirely to put a clear backing later, or simply recess the clay within this rectangle to create a false window. -
Add window lattice:
Roll extremely thin threads of clay. Arrange them inside the window rectangle in a decorative crisscross or gothic arch pattern. Press them gently to adhere. -
Form the doorknob:
Cut a very small circle of clay or roll a tiny ball and flatten it slightly. Press this onto the right side of the door. Use a needle tool to add a tiny indentation in the center representing a keyhole. -
Add horizontal rails:
Cut two thin strips of clay and place them horizontally across the door—one below the window and one near the bottom—to act as the structural wooden rails of the door.
Uneven Bricks?
Don’t worry if your brick lines are crooked! Using a loose, varying pressure when carving actually makes the stone look more ancient and weathered rather than manufactured.
Step 3: Finishing Touches & Setting
-
Bake or dry:
If using polymer clay, bake according to the manufacturer’s temperature instructions (usually 275°F/135°C for 15-30 minutes). If using air-dry clay, allow it to dry fully for 24-48 hours. -
Paint the hardware:
Once cool and dry, use a fine detail brush to paint the doorknob with silver acrylic paint. A second coat may be needed for a shiny, metallic finish. -
Apply a wash (optional):
To enhance the textures, dilute brown acrylic paint with water. Brush it over the entire piece and immediately wipe it off with a rag. The dark paint will stay in the crevices of the wood grain and bricks. -
Attach the wreath:
Apply a dab of strong glue to the center of the door, just below the window. Press your miniature moss wreath firmly into place. -
Seal for weather:
Coat the entire door (except the wreath) with a matte exterior varnish. This steps is crucial if you plan to place your door outside in the elements. -
Create the doorstep:
Use leftover clay to form a flat, irregular shape to serve as the front step. Texture it like stone and place it under the door once installed. -
Create the matching pot:
Roll a small cylinder of clay and score vertical lines into the sides for a ribbed texture. Create a smooth rim for the top. Once dry/baked, ‘plant’ a few sprigs of faux greenery inside.
Winter Magic
Mix baking soda with white glue and white paint to create a fluffy ‘snow’ paste. Dab this mixture onto the top of the arch, the wreath, and the doorstep for a permanent snowy look.
Now you have a charming entryway ready to welcome winter visitors to your garden
Underwater Mermaid Door With Shell Details
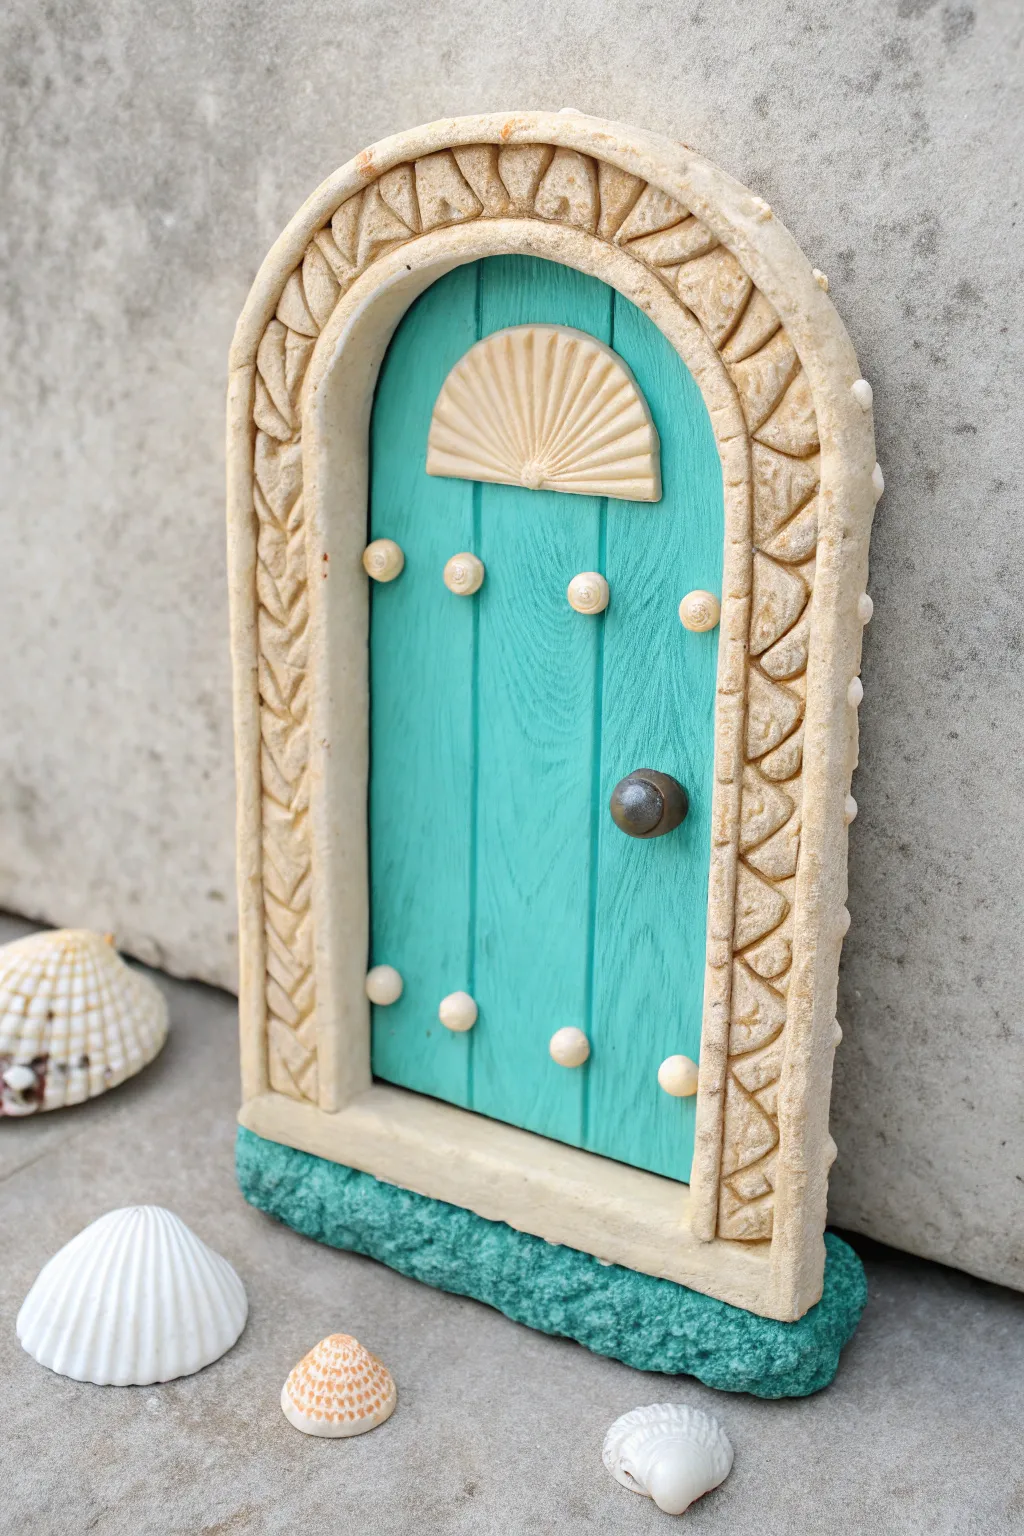
Transport your garden or shelf to the ocean floor with this enchanting miniature mermaid door, featuring a vibrant teal entryway framed by detailed stonework. The textured finish and seashell accents create a whimsical underwater feel perfect for any fairy tale corner.
Step-by-Step
Materials
- Polymer clay (Cream/Beige, Teal/Turquoise, Dark Grey)
- Small rolling pin
- Clay sculpting tools (needle tool, ball stylus)
- Texture sheet or rough stone/sandpaper for texturing
- Small seashell mold (fan shell shape)
- Tiny faux pearls or small white beads
- Super glue or liquid clay
- Acrylic paint (optional, for enhancing wood grain)
- Blade or craft knife
- Aluminum foil (for core structure)
Step 1: Building the Foundation
-
Form the Base:
Start by shaping a sturdy block of foil into a rough arch shape. This saves clay and keeps the door lightweight. Roll out a thick slab of cream-colored clay and drape it over your foil form to create the main backing. -
Create the Door Slab:
Roll out your teal clay to about 1/4 inch thickness. Cut it into an arch shape slightly smaller than your cream backing, ensuring it fits neatly in the center. -
Texture the Wood:
Before attaching the teal slab, use a needle tool to score vertical lines down the length of the clay to mimic wooden planks. Add lighter, shorter scratches between these lines for a realistic wood grain effect. -
Attach the Door:
Press the textured teal arch firmly onto the center of your cream backing. I like to use a little liquid clay here to ensure a permanent bond between the two colors.
Sticky Situation?
If your clay is too soft and sticky to hold the stone texture, pop it in the fridge for 10 minutes. Cooling firmly sets the clay, making carving easier.
Step 2: Constructing the Archway
-
Roll the Frame:
Roll two long snakes of cream clay. Flatten them slightly with your roller so they become rectangular strips, roughly 1/2 inch wide. -
Inner Frame Layer:
Drape the first strip around the teal door to create the inner jamb. Smooth the connection points where it meets the backing. -
Outer Stone Arch:
Layer the second, slightly thicker strip over the first to create the outer arch. This adds depth and dimension to the stonework. -
Carve the Stones:
Use a dull blade or sculpting tool to press varying geometric shapes into the outer arch. Create a pattern of triangles and trapezoids to simulate cut stone blocks. -
Add Stone Texture:
Gently press a piece of rough sandpaper or a stiff bristle brush against the cream clay arch to give it a weathered, sandy limestone appearance.
Texturing Tip
To get that pitted, sandy texture on the cream stone, press a real piece of coral or a clean rock from the garden directly onto the raw clay.
Step 3: Decorative Details
-
Sculpt the Fanlight:
Take a small ball of cream clay and press it into a fan-shaped seashell mold. If you don’t have a mold, shape a semi-circle and use a needle tool to score radiating lines from the center bottom. -
Place the Fanlight:
Attach the seashell shape to the top center of the teal door, just under the arch. -
Add Door Studs:
Roll eight tiny balls of cream clay or use small faux pearls. Press four into the top section of the door across the ‘planks’ and four near the bottom for decorative hardware. -
Install the Doorknob:
Roll a small ball of dark grey or metallic clay. Press it onto the right side of the door to serve as a rusty iron handle. -
Create the Sea Floor Base:
Mix some teal clay with scrap clay or sand to create a rough, dark turquoise mixture. Form a lumpy, textured base at the bottom of the door to look like ocean sediment or coral. -
Texture the Base:
Stipple the base vigorously with a stiff brush or ball of foil to make it look like porous sea rock or sponge.
Step 4: Finishing Touches
-
Check Adhesion:
Go over all your attached pieces–studs, fanlight, and handle–to ensure they are pressed firmly into the base clay. -
Bake:
Bake the project according to your polymer clay package instructions. Usually, this is around 275°F (135°C) for 30 minutes per 1/4 inch of thickness. -
Cool and Enhance:
Once cool, you can optionally brush a very diluted brown acrylic paint over the cream stone and wipe it off quickly to highlight the carved textures.
Place this little portal in your garden or on a bookshelf to invite sea sprites into your home
Hidden Key Door With Secret Compartment Vibe

Create an enchanting, freestanding miniature doorway that looks like a portal to a hidden world straight out of a fairy tale. With its realistic weathered stone texture and aged wood finish, this polymer clay project doubles as a charming desk ornament or a magical addition to a bookshelf.
How-To Guide
Materials
- Polymer clay (white or beige for stone, brown for wood)
- Aluminum foil (for the core)
- Rolling pin or pasta machine
- Sculpting tools (needle tool, exacto knife, ball stylus)
- Texturing tools (stiff toothbrush, crumpled foil, sandpaper)
- Acrylic paints (black, dark brown, umber, white, cream)
- Small paintbrushes (fine tip and flat shader)
- Matte varnish or sealant
- Small wire or jewelry findings (for hinges and handle)
- Super glue
Step 1: Forming the Structure
-
Build the core foundation:
Start by crumpling aluminum foil into a block shape that is slightly smaller than your desired finished size. This saves clay and keeps the sculpture lightweight. Create a tall arch shape with a flat bottom base for stability. -
Cover with base clay:
Roll out a sheet of white or beige polymer clay to about 1/4 inch thickness. Wrap this entirely around your foil armature, smoothing the seams with your fingers or a clay tool until the surface is uniform. -
Define the door inset:
Using a blade or a flat sculpting tool, press into the front of exactly where the door will go to create a recessed area. You want to push the clay back about 1/4 inch deep to create the illusion of a thick stone frame surrounding the wooden door.
Fixing Soft Details
If your wood grain or stone texture starts blurring while you handle the piece, pop it in the fridge for 10 minutes to firm up the clay, then re-texture.
Step 2: Sculpting the Details
-
Create the stone arch:
Roll a long, thin snake of clay and flatten it slightly. Press this around the outer edge of your archway to create the decorative border. Use a needle tool to impress small dots or indentations along this trim for a patterned look. -
Texture the stone:
Take a stiff toothbrush or a ball of crumpled foil and aggressively tap it all over the white/beige clay frame. This creates a porous, realistic limestone or sandstone texture. -
Craft the wooden door plank:
Roll out a sheet of brown clay and cut it to fit the recessed space you made earlier. Before inserting it, score deep vertical lines to simulate separate wooden planks. -
Detail the wood grain:
With a needle tool, scratch wavy, organic lines into the brown clay to mimic wood grain. I prefer to vary the pressure here so some grain lines are deeper than others. -
Add the window trim:
Roll tiny snakes of brown clay to create the semi-circle window frame at the top of the door. Add vertical spokes to create the fanlight design, pressing them gently onto the door surface. -
Install the door:
Place the detailed door slab into the recess. For that ‘slightly ajar’ look seen in the photo, angle one side outward slightly rather than pressing it flat against the back. -
Fashion the hardware:
Twist tiny pieces of wire to make hinge loops and press them into the gap between the door and the frame. Create a tiny clay handle or use a small bead for the doorknob.
Step 3: Painting and Finishing
-
Bake the piece:
Bake the sculpture according to your clay manufacturer’s instructions. Usually, this is around 275°F (135°C) for 15-30 minutes depending on thickness. Let it cool completely. -
Base coat the darks:
Mix a watery wash of black and dark brown acrylic paint. Brush this over the entire piece, getting into every crevice, wood grain line, and stone pore. -
Wipe back the wash:
Before the paint dries, use a damp paper towel to wipe the surface. The dark paint will stay trapped in the textures, instantly aging the piece. -
Dry brush the stone:
Dip a dry brush into cream or off-white paint, dab off the excess on a paper towel, and lightly graze it over the stone areas. This highlights the texture created by the toothbrush. -
Highlight the wood:
Repeat the dry brushing technique on the door using a lighter tan color to make the wood grain pop. -
Seal the work:
Finish by applying a coat of matte varnish to protect the paint and eliminate any unnatural shine.
Make it a Locket
Create a hollow space behind the door before baking and attach the door with real metal hinges so it can actually open to reveal a tiny secret message.
Place a vintage key nearby to complete the mysterious scene and enjoy your handcrafted portal