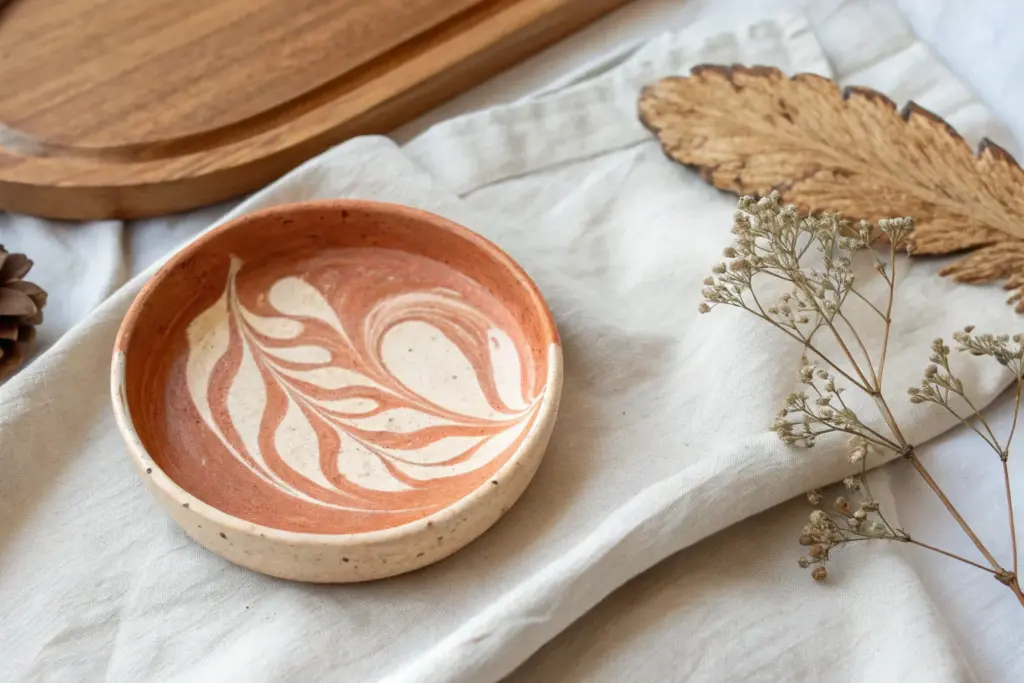
Whenever I need a quick win in the studio, I reach for air dry clay and make a little dish that actually gets used every single day. These air dry clay dish ideas are my go-to favorites—starting with the classics and ending with a few playful shapes that still feel totally doable.
Classic Round Trinket Dish
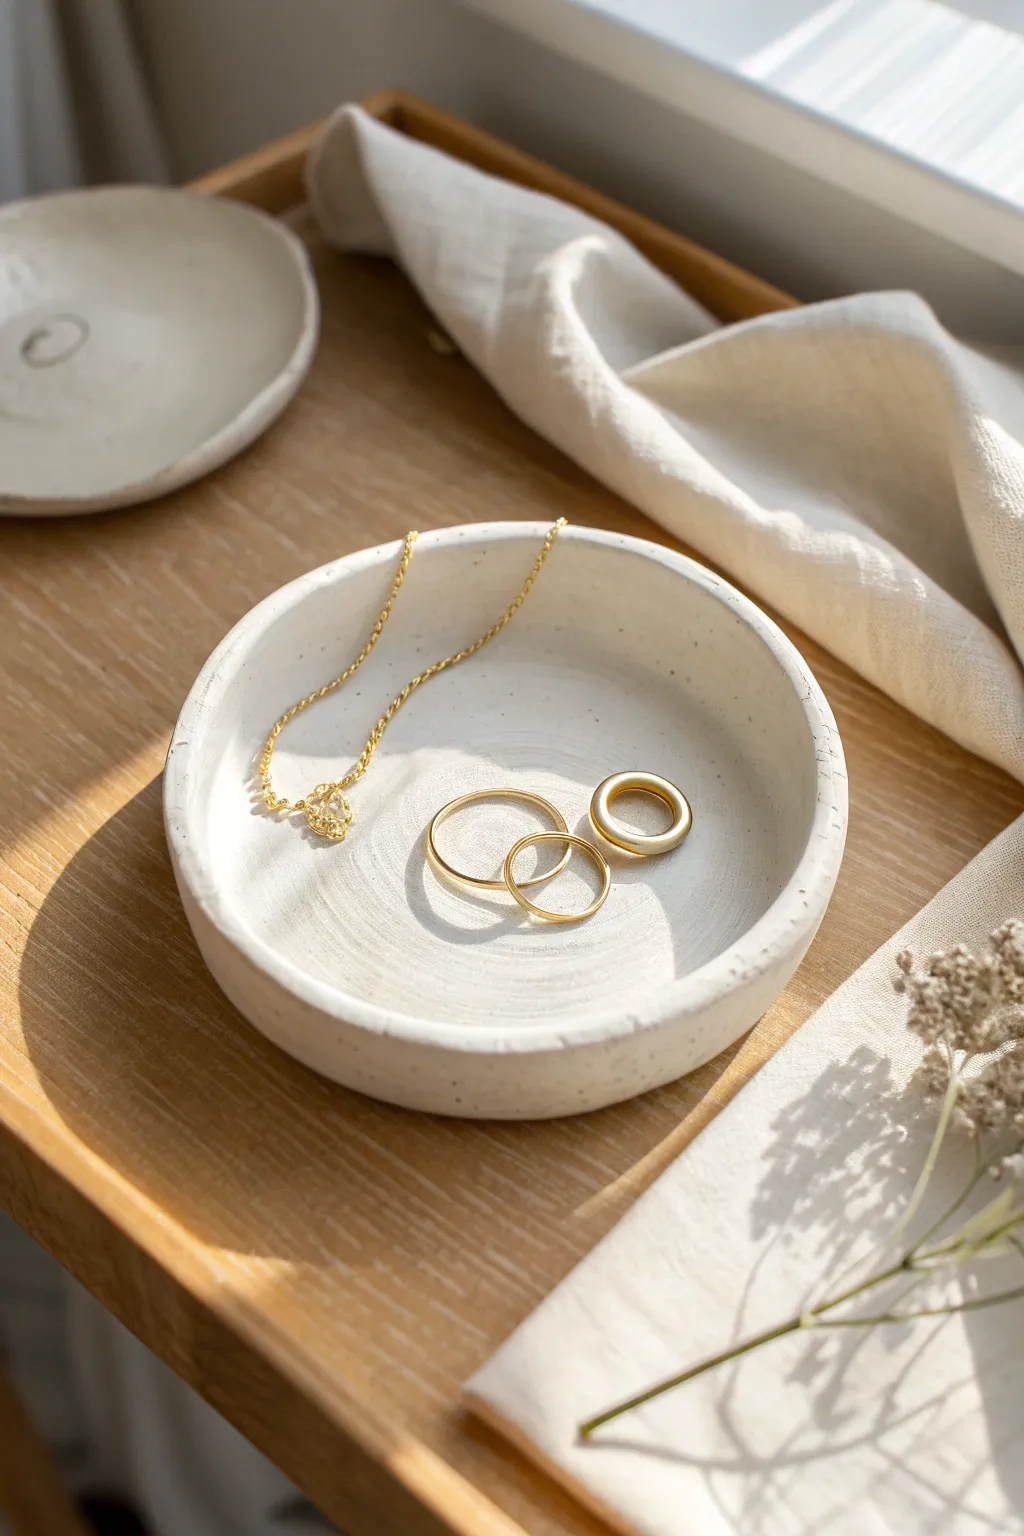
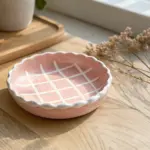
Embrace the beauty of simplicity with this understated, classic round trinket dish. Its soft, matte white finish and subtle speckled texture make it the perfect resting place for your favorite gold jewelry pieces.
Step-by-Step Guide
Materials
- White classic air dry clay
- Rolling pin or smooth glass jar
- Circle cutter or circular template (bowl/mug) and craft knife
- Small bowl or dish (to use as a mold)
- Water in a small cup
- Fine-grit sandpaper (400-600 grit)
- Black acrylic paint or black pepper (for creating speckles)
- Old toothbrush (for spattering)
- Matte varnish or sealant
- Sponge or soft paintbrush
Step 1: Shaping the Clay
-
Condition the Clay:
Start by taking a handful of white air-dry clay. Knead it thoroughly in your hands to warm it up and make it pliable, smoothing out any initial cracks. -
Roll it Out:
Place your clay on a smooth, non-stick surface. Use a rolling pin to flatten the clay into a sheet. Aim for an even thickness of about 1/4 inch (approx 5-6mm) to ensure sturdiness without being too bulky. -
Cut the Circle:
Place your circular template or bowl upside down on the rolled clay. Using a sharp craft knife held vertically, carefully trace around the edge to cut out a perfect circle. -
Smooth the Edges:
Dip your finger into a little bit of water and run it gently along the cut edge of your clay circle. This eliminates any sharp cuts or burrs and gives the rim a soft, finished look. -
Form the Dish:
Take your cut clay circle and gently drape it into your mold bowl. I like to use a bowl slightly larger than my clay circle so it curves naturally without deep folding. -
Refine the Shape:
Press the clay gently against the bottom and sides of the mold to ensure it takes the shape. Be careful not to press too hard, or you might leave fingerprints or thin out the clay too much. -
Dry the Clay:
Leave the clay inside the mold for about 24 hours until it’s firm enough to hold its shape. Then, carefully remove it from the mold and let it air dry completely for another 24-48 hours, flipping it occasionally for even drying.
Step 2: Finishing Touches
-
Sanding for Smoothness:
Once the dish is bone dry, take your fine-grit sandpaper and gently sand the rim and the surface. Focus on smoothing out any uneven areas or fingerprints that occurred during molding. -
Dusting Off:
Wipe the dish down with a very slightly damp cloth or a dry soft brush to remove all the clay dust from sanding. A clean surface is crucial for the next steps. -
Creating the Speckle Mixture:
To achieve that subtle speckled look, mix a tiny drop of black acrylic paint with water until it’s quite thin and inky. Alternatively, for a natural texture, you can knead coarse black pepper into the clay during the very first step. -
Splattering the Design:
Dip an old toothbrush into your watered-down black paint. hold it over the dish and run your thumb across the bristles to flick tiny droplets onto the surface. Practice on a piece of paper first to control the density. -
Let the Paint Dry:
Allow the speckled paint droplets to dry completely. This usually takes only about 15-20 minutes since the droplets are so fine. -
Apply Sealant:
To protect your dish and give it that finished ceramic feel, apply a coat of matte varnish. Use a soft brush and apply thin, even strokes to avoid pooling. -
Second Coat:
Once the first coat is dry to the touch, apply a second coat of varnish for extra durability. Ensure you cover the rim and the underside as well. -
Final Cure:
Let the varnish cure according to the manufacturer’s instructions (usually 24 hours) before placing any jewelry inside.
Natural Speckles
Instead of painting speckles later, try kneading used (dried) coffee grounds or black pepper directly into the wet clay before rolling it out for an organic texture.
Warped Edges?
If the edges curl up while drying, gently weigh the center down with a small bag of rice or sand during the first 12 hours of the drying process.
Now you have a chic, modern spot to organize your daily treasures


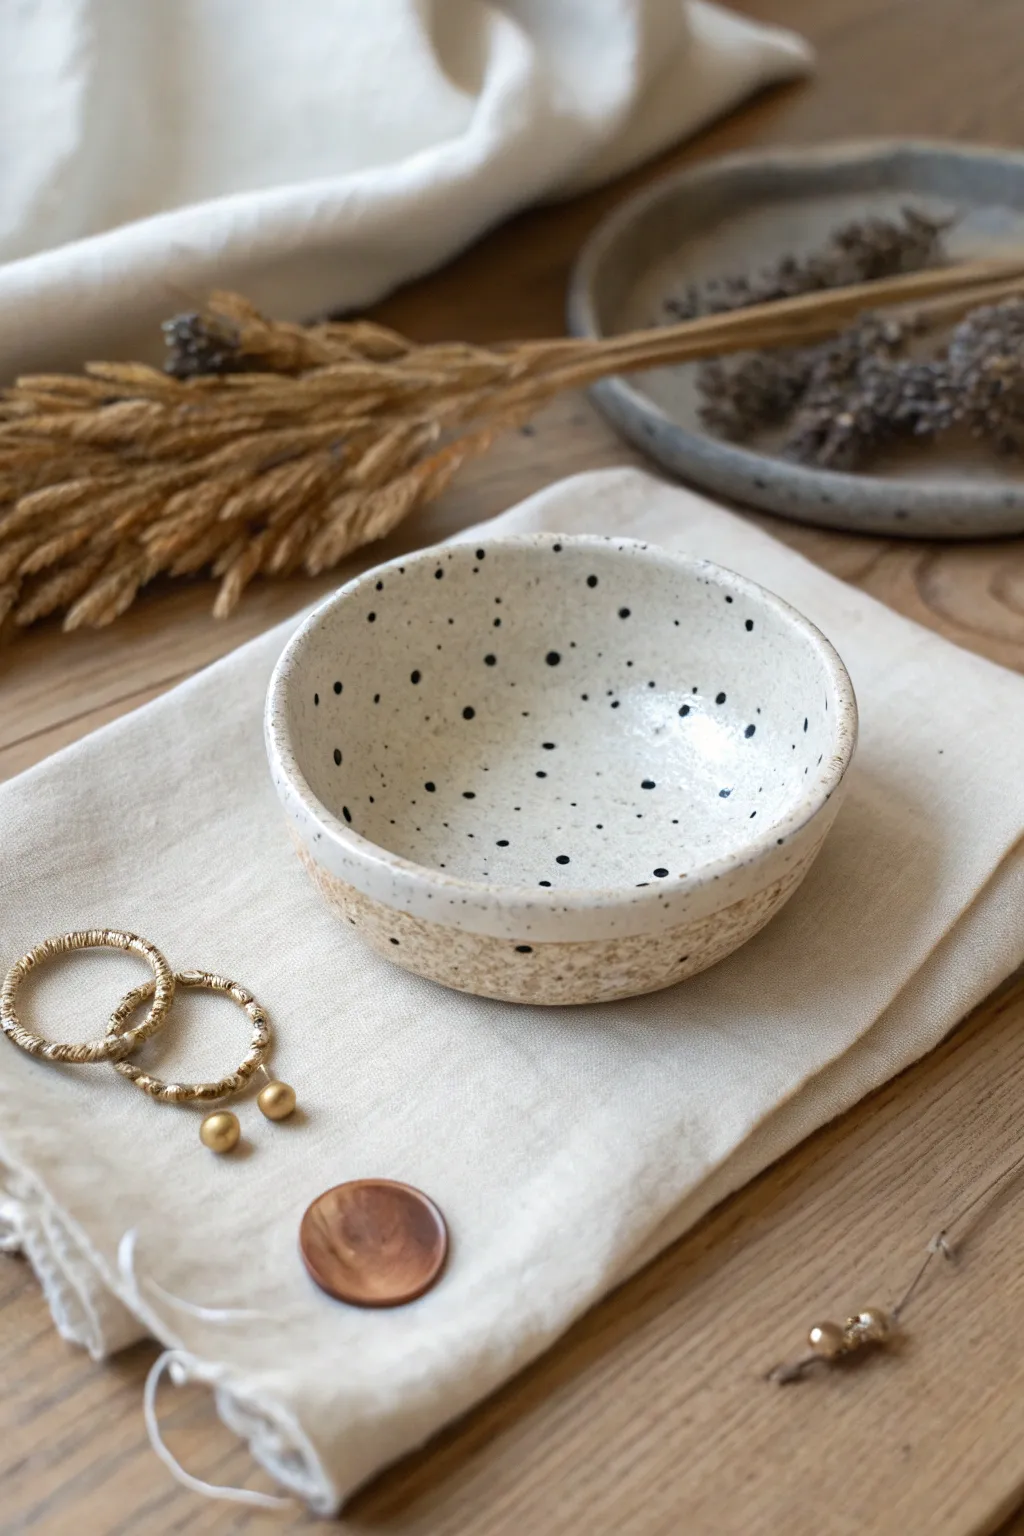
Soft Pinch-Pot Ring Dish

Embrace the beauty of imperfection with these charmingly rustic pinch pots, perfect for keeping your everyday jewelry close at hand. The soft, uneven edges and subtle speckling mimic the look of high-fired stoneware without needing a kiln.
Step-by-Step
Materials
- White air-dry clay (e.g., DAS or Crayola)
- Acrylic rolling pin (optional)
- Small bowl of water
- Medium-grit sandpaper
- Fine-grit sandpaper
- White acrylic paint (warm or cream tone)
- Black or brown acrylic paint (for speckles)
- Old toothbrush
- High-gloss varnish or sealant
- Soft paintbrush
- Sponge
Step 1: Shaping the Form
-
Prepare the clay:
Start by taking a lump of air-dry clay roughly the size of a golf ball. Knead it in your hands for a minute to warm it up and ensure it’s pliable and free of air bubbles. -
Form a ball:
Roll the clay between your palms until you have a smooth, round sphere. Try to smooth out any major cracks at this stage with a drop of water. -
Start the pinch:
Hold the ball in one hand and press your thumb into the center, creating a deep indentation but not piercing through the bottom. This acts as the anchor for your pot. -
Expand the walls:
Gently pinch the clay between your thumb and fingers, rotating the ball as you go. Work your way from the bottom center up towards the rim, thinning the walls evenly. -
Flatten the base:
Once the basic bowl shape is formed, gently tap the bottom of the dish against your work surface. This creates a flat, stable base so the finished dish won’t wobble. -
Create the organic rim:
Instead of smoothing the rim perfectly, use your fingers to gently manipulate the edge. Press down slightly in some areas and pull up in others to create that soft, wavy, organic silhouette seen in the photo. -
Smooth the surface:
Dip your finger in a tiny bit of water and run it over the interior and exterior surfaces to fuse any surface cracks. Don’t use too much water, or the clay will become sludge-like. -
Let it dry:
Place your dish in a safe spot to air dry. This typically takes 24-48 hours depending on humidity. Rotate it occasionally to ensure even drying.
Cracks Appearing?
If small cracks appear during drying, don’t panic. Mix a tiny bit of fresh clay with water to make a paste (slip) and fill the cracks, then sand smooth once dry.
Step 2: Refining and Decorating
-
Sand for smoothness:
Once the clay is bone dry and hard, use medium-grit sandpaper to remove any sharp peaks or rough patches. Switch to fine-grit sandpaper for a silky finish. -
Wipe clean:
Use a slightly damp sponge or cloth to wipe away all the clay dust. This step is crucial for smooth paint application. -
Apply base color:
Paint the entire dish with a warm white or cream acrylic paint. Apply two to three thin coats for opaque coverage, letting each layer dry before adding the next. -
Prepare the speckle mix:
Dilute a small amount of black or dark brown acrylic paint with water until it has an inky, fluid consistency. -
Flick the speckles:
Dip an old toothbrush into the diluted paint. Hold the brush over the dish and run your thumb across the bristles to flick tiny speckles onto the surface. Practice on a scrap paper first to control the spray. -
Protect the speckles:
Allow the paint to dry completely. The speckles must be totally dry, or they will smear during the next step. -
Seal the piece:
Apply a high-gloss varnish to the entire dish. This gives it that ceramic-like shine and protects the clay from moisture. -
Add a second coat:
I usually add a second coat of varnish for extra durability and a deeper gloss, ensuring the finish looks just like glazed pottery.
Pro Tip: Weighted Drying
To keep the bottom perfectly flat while drying, place a small, flat object (like a coin or metal washer) inside the center of the bowl to weigh it down gently.
Place your ring dish on a bedside table or vanity for a lovely handmade touch to your daily routine


Slab Dish With Scalloped Edge
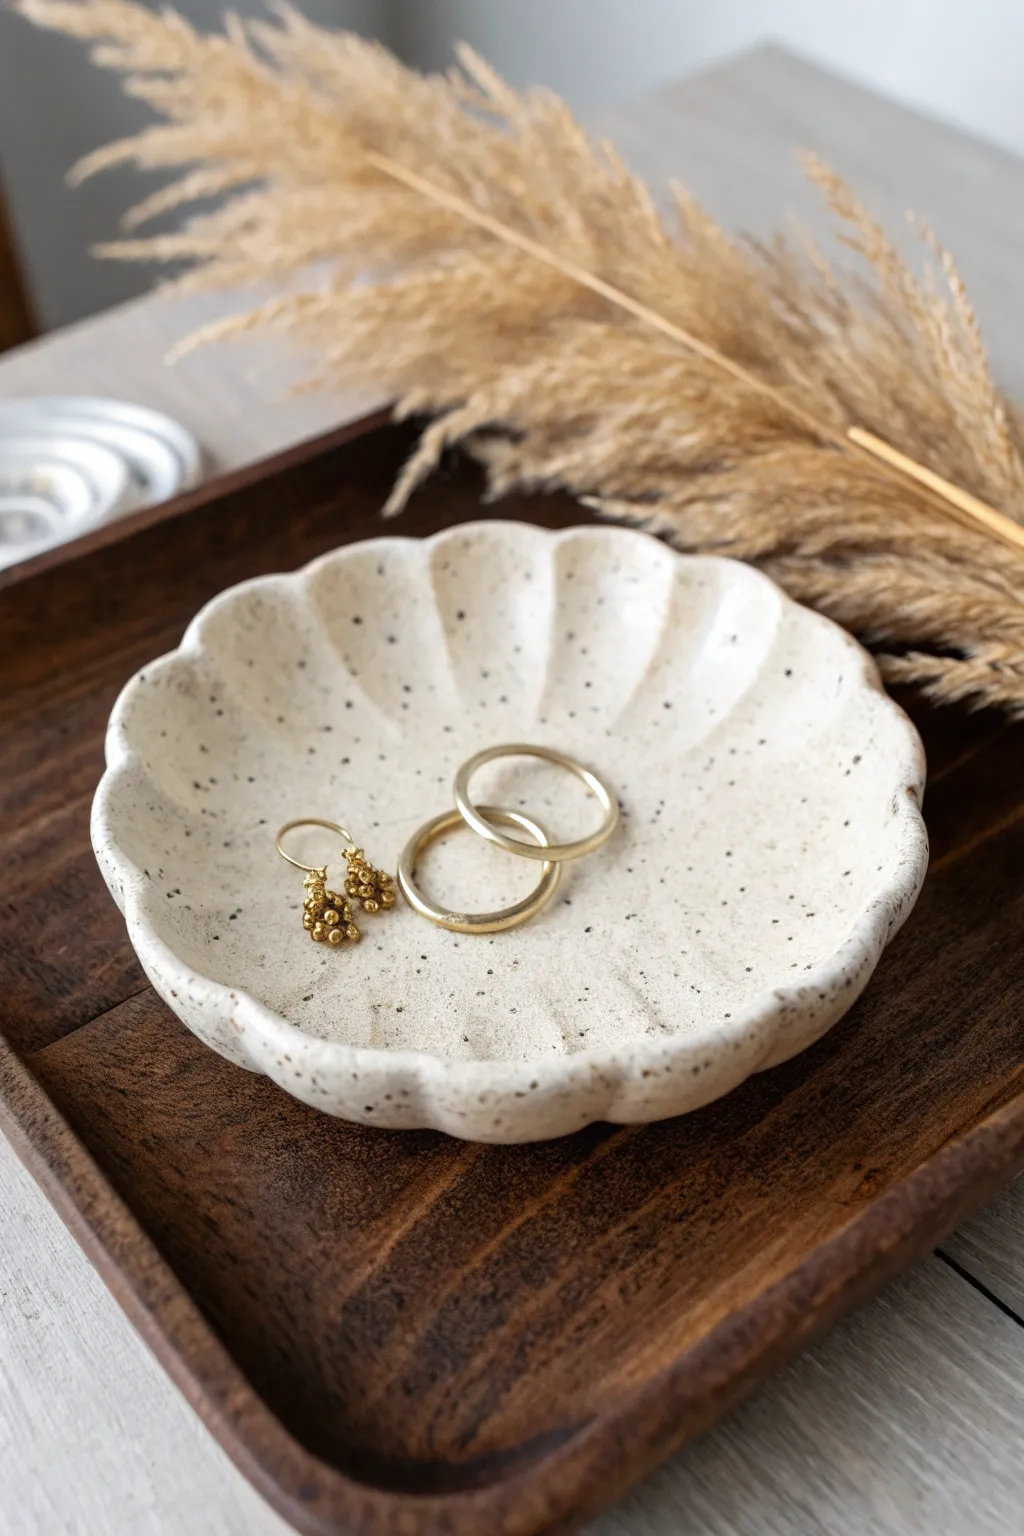
Create a sophisticated catch-all for your favorite rings and trinkets with this petal-inspired design. The scallop edges and faux-ceramic speckled finish give it an upscale, handmade pottery vibe without needing a kiln.
How-To Guide
Materials
- White air dry clay (approx. 200g)
- Acrylic rolling pin
- Canvas mat or parchment paper
- Round cookie cutter (approx. 4-5 inches) or a bowl to trace
- Fettling knife or clay craft knife
- Small bowl for shaping (drying form)
- Sponge and water cup
- Balsa wood circle or large dowel (optional for stamping)
- Fine grit sandpaper (220 grit)
- Acrylic paint: Cream/Off-white, Black, Brown
- Old toothbrush
- Glossy varnish or sealant
Step 1: Prepping constraints & Rolling
-
Condition the clay:
Begin by taking a handful of air dry clay and kneading it in your hands until it feels warm and pliable. This removes air bubbles and prevents cracks later on. -
Roll the slab:
Place the clay on your canvas mat or parchment paper. Using the acrylic rolling pin, roll the clay out evenly until it is about 1/4 inch thick. Try to keep the thickness consistent across the entire slab. -
Cut the base circle:
Press a large round cookie cutter firmly into the clay. If you don’t have a cutter large enough, place a bowl upside down on the clay and carefully trace around it with your craft knife to cut out a perfect circle.
Keep it Clean
Use a baby wipe to clean your hands before shaping the white clay. Dust or lint shows up easily, and keeping hands clean ensures a pristine base for painting.
Step 2: Shaping the Scallops
-
Mark the divisions:
Imagine the circle is a clock face. Lightly mark 12 points around the edge to guide where your scallops will go, ensuring they are relatively evenly spaced. -
Create the petal curves:
Using your thumb or the rounded end of a tool, gently press into the edge of the clay between your marks to create an indent. This pushes the clay outward on either side, naturally forming the scalloped ‘petal’ shape. -
Refine the edges:
Dip your finger in a tiny bit of water and smooth the raw edges of each scallop. You want them to look soft and rounded, not sharp or jagged from the cutting phase. -
Add texture (Optional):
To mimic the fluted look seen in some pottery, you can gently press a dowel or a balsa wood rod radially from the center out to the indentation of the scallop, creating a subtle valley between the petals. -
Form the bowl shape:
Carefully lift your clay circle and place it inside your drying bowl. Allow gravity to gently curve the sides upward. Press the center down slightly so the dish will have a flat bottom.
Step 3: Drying & Finishing
-
Initial dry:
Let the dish dry inside the mold for 24 hours. Placing it in a cool, dry spot away from direct sunlight helps prevent warping. -
Flip and finish drying:
Once the top feels leather-hard, carefully remove it from the bowl and flip it upside down on a drying rack. Let it dry for another 24-48 hours until completely bone dry and white. -
Sand for smoothness:
Take your fine grit sandpaper and gently sand the rim and any rough spots on the surface. Wipe away the clay dust with a slightly damp cloth or sponge. -
Base coat painting:
Mix a warm cream or off-white acrylic paint. I like to apply two thin coats rather than one thick one, letting it dry fully between layers, to get that smooth ceramic look. -
Create the splatter mix:
dilute a small amount of black or dark brown acrylic paint with water until it has an inky, fluid consistency. -
Apply the speckles:
Dip an old toothbrush into the diluted paint. Hold it over the dish and run your thumb across the bristles to flick tiny specks onto the surface. Practice on a paper towel first to control the spray. -
Seal the piece:
Once the paint is fully dry, apply a coat of glossy varnish. This not only protects the clay from moisture but gives it the signature shine of glazed stoneware.
Fixing Cracks
If small hairline cracks appear while drying, mix a tiny bit of fresh clay with water to make a paste (slip) and fill the crack. Smooth it over and sand once dry.
Place this lovely little dish on your vanity or bedside table to add a touch of organic warmth to your decor


Leaf-Imprint Botanical Dish
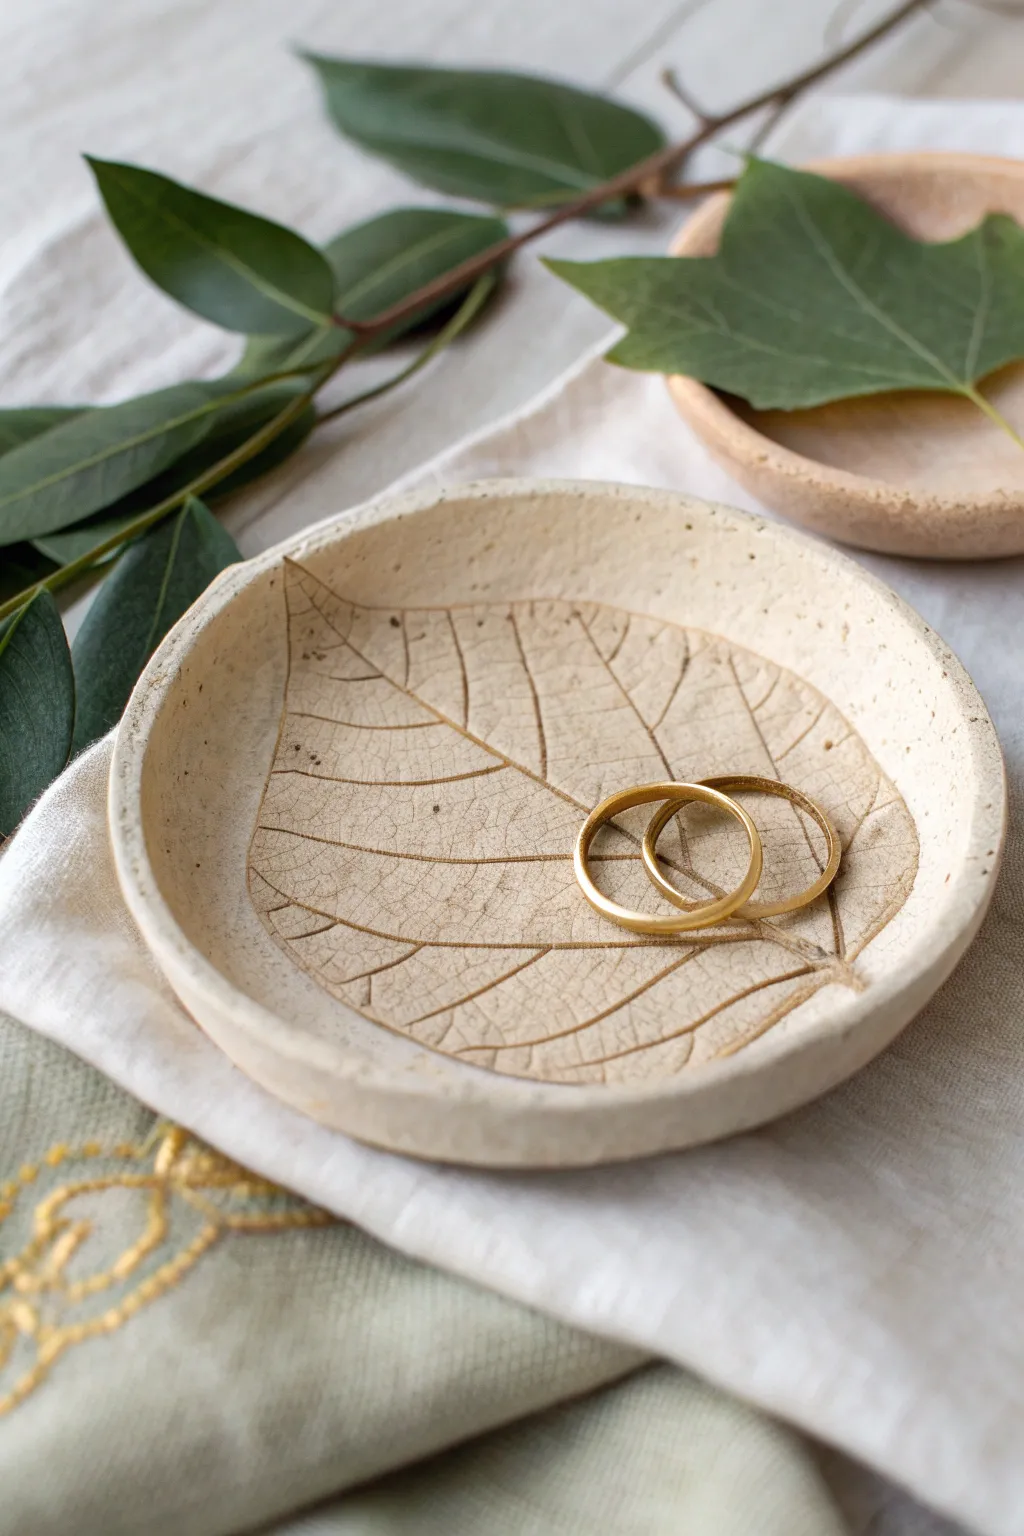
Capture the delicate veins of nature forever in this elegant, minimalist trinket dish. Using a real leaf as a stamp, you’ll create a sophisticated, textured piece perfect for holding rings or small jewelry.
Step-by-Step
Materials
- White air-dry clay (smooth texture)
- Fresh leaf with prominent veins (e.g., hydrangea, grape, or large ivy)
- Rolling pin or smooth glass jar
- Small bowl (for shaping)
- Craft knife or scalpel
- Fine-grit sandpaper (200-400 grit)
- Bowl of water
- Sponge
- Matte varnish or acrylic sealer (optional)
- Canvas or parchment paper (work surface)
Step 1: Preparation & Impression
-
Prepare the Clay:
Begin by taking a handful of white air-dry clay and kneading it briefly to warm it up and remove air bubbles. Form it into a smooth, crack-free ball. -
Roll out the Slab:
Place the clay ball on a piece of canvas or parchment paper to prevent sticking. Using your rolling pin, roll the clay out evenly until it is approximately 1/4 inch thick throughout. -
Position the Leaf:
Select your fresh leaf. Place it vein-side down onto the center of your clay slab. The vein side usually has the most texture, which is crucial for a crisp print. -
Create the Imprint:
Gently roll over the leaf with the rolling pin. Apply firm, even pressure to embed the leaf into the clay without making the slab too thin. Do this in a single pass if possible to avoid ghost images. -
Remove the Leaf:
carefully peel the leaf away by the stem to reveal the intricate impression left behind. If any small pieces of leaf stick, gently lift them out with a tweezer or needle tool.
Step 2: Shaping & Refining
-
Cut the Circle:
Place a round bowl or circular cookie cutter over the imprinted area to frame the leaf design nicely. Use your craft knife to trace around the object and cut out a perfect circle. -
Smooth the Edges:
Dip your finger in a little bit of water and run it along the cut edge of the clay circle. This smooths out any sharpness or burrs left by the knife. -
Form the Curve:
To give the dish its shape, gently lift the clay circle and place it inside a small, shallow bowl. Let the clay slump naturally into the curve of the bowl. -
Initial Drying:
Allow the clay to dry inside the bowl for about 12-24 hours. Placing it in a draft-free area helps prevent warping. -
Remove from Mold:
Once the clay is visibly lighter in color and holds its shape firmly, pop it out of the bowl. Place it upside down on a drying rack to let the bottom dry completely. -
Full Cure:
Let the dish dry for another 24-48 hours until it is bone dry and hard to the touch.
Vein-Side Down
Always place the leaf with the bumpy, prominent veins facing down into the clay. The top side of leaves is usually too smooth to leave a detailed mark.
Step 3: Finishing Touches
-
Sand the Rim:
Take your fine-grit sandpaper and gently sand the rim of the dish to make it perfectly smooth. I find holding the sandpaper flat on the table and rubbing the dish rim against it works best for an even finish. -
Refine the Surface:
Lightly sand the back and any rough spots on the interior, being careful not to sand away the delicate leaf veins. -
Dust Off:
Wipe the dish down with a very slightly damp sponge or a dry brush to remove all sanding dust. -
Optional Sealing:
For protection, brush on a thin layer of matte varnish. This keeps the natural, raw look seen in the photo while protecting the clay from moisture.
Antique Wash
Mix a tiny drop of brown acrylic paint with water. Brush it over the dry texture and wipe it back immediately with a cloth to darken just the deep veins.
Now you have a serene, nature-inspired dish ready to cradle your most precious trinkets

What Really Happens Inside the Kiln
Learn how time and temperature work together inside the kiln to transform clay into durable ceramic.
Lace-Texture Vintage Dish
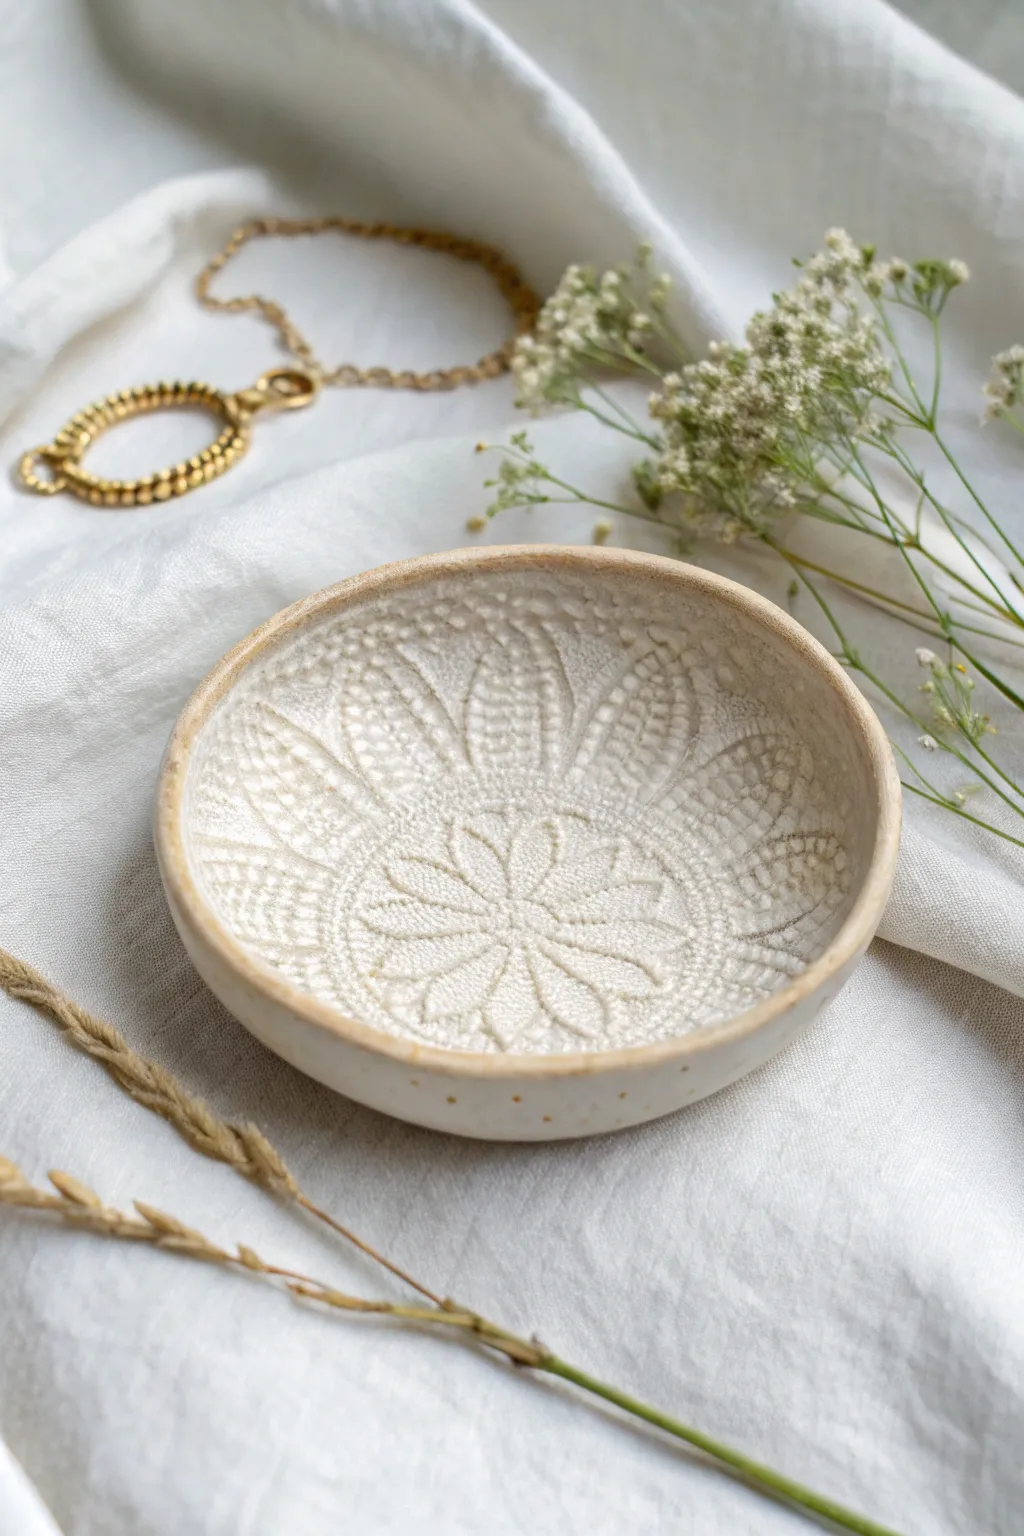
Capture the elegance of antique lace with this charming air dry clay dish, perfect for holding your favorite jewelry pieces. Its subtle, creamy tones and intricate texture create a timeless heirloom look without the need for a kiln.
How-To Guide
Materials
- White or cream air dry clay
- Rolling pin
- Vintage lace doily or textured fabric (with a radial floral pattern)
- Small bowl or round cookie cutter (approx. 4-5 inches)
- Small bowl for shaping (drying form)
- Sponge and water
- Fine grit sandpaper
- Acrylic paints (Cream, White, Pale Ochre/Brown)
- Matte or satin sealant/varnish
- Paintbrushes
- Craft knife
Step 1: Shaping the Base
-
Prepare the clay:
Begin by grabbing a handful of air dry clay and kneading it in your hands until it becomes warm, pliable, and free of air bubbles or cracks. -
Roll it out:
Place the clay on a smooth surface or a silicone mat. Use your rolling pin to flatten it to an even thickness of about 1/4 inch (6mm). -
Check for imperfections:
Look closely at the surface. If you see any small cracks or uneven spots, smooth them out gently with a slightly damp finger before moving on.
Clean Imprints
Dust your lace doily lightly with cornstarch before placing it on the clay. This prevents the fabric from sticking and ensures the pattern lifts off cleanly.
Step 2: Adding Texture & Cutting
-
Place the lace:
Lay your lace doily or textured fabric directly onto the rolled clay. Center the floral pattern carefully, as this will act as the focal point of your dish. -
Imprint the design:
Using the rolling pin, roll firmly over the lace once. Apply consistent, steady pressure to endure the deep details of the pattern transfer into the clay without shifting the fabric. -
Reveal the pattern:
I love this part—slowly peel back the lace to reveal the intricate raised design left behind in the clay. -
Cut the circle:
Position your round cutter or a guide bowl over the most attractive part of the pattern. Press down or trace around it with a craft knife to cut out a clean circle. -
Smooth the edges:
Dip your finger in a tiny bit of water and run it along the cut edge of the circle to soften any sharp corners.
Gold Accents
For a more luxurious look, swap the brown rim for liquid gold leaf or metallic gold paint. It adds a stunning shine that catches the light beautifully.
Step 3: Forming and Drying
-
Creating the curve:
Lift the clay circle gently and place it inside a small bowl to give it a curved shape. Ensure the patterned side is facing up. -
Refine the shape:
Press gently into the bottom of the bowl to ensure the clay sits evenly, but be careful not to squash your beautiful texture. -
Let it dry:
Allow the clay to dry completely in the bowl. This usually takes 24-48 hours depending on humidity. Rotate it occasionally so air reaches all sides. -
Sand imperfections:
Once fully dry and hard, remove the dish from the mold. Use fine-grit sandpaper to gently smooth the rim or any rough spots on the underside.
Step 4: Finishing Touches
-
Initial wash:
Mix a very watery wash of cream or off-white acrylic paint. Brush this over the entire dish to give it a uniform base color. -
Highlighting the texture:
To mimic the aged look in the image, use a dry-brush technique with white paint. Lightly brush over the raised parts of the pattern to make them pop against the cream background. -
Antique rim effect:
Mix a pale ochre or light brown paint. Carefully paint the very rim of the dish to create a subtle, vintage border. -
Adding speckles:
Flick tiny droplets of the ochre paint onto the outside/underside of the dish using a stiff brush or toothbrush for a speckled ceramic effect. -
Seal the piece:
Protect your work by applying two coats of matte or satin varnish, allowing proper drying time between coats.
Now you have a delicate, vintage-inspired piece ready to cradle your treasures or gift to someone special
Stamped Geometric Pattern Dish
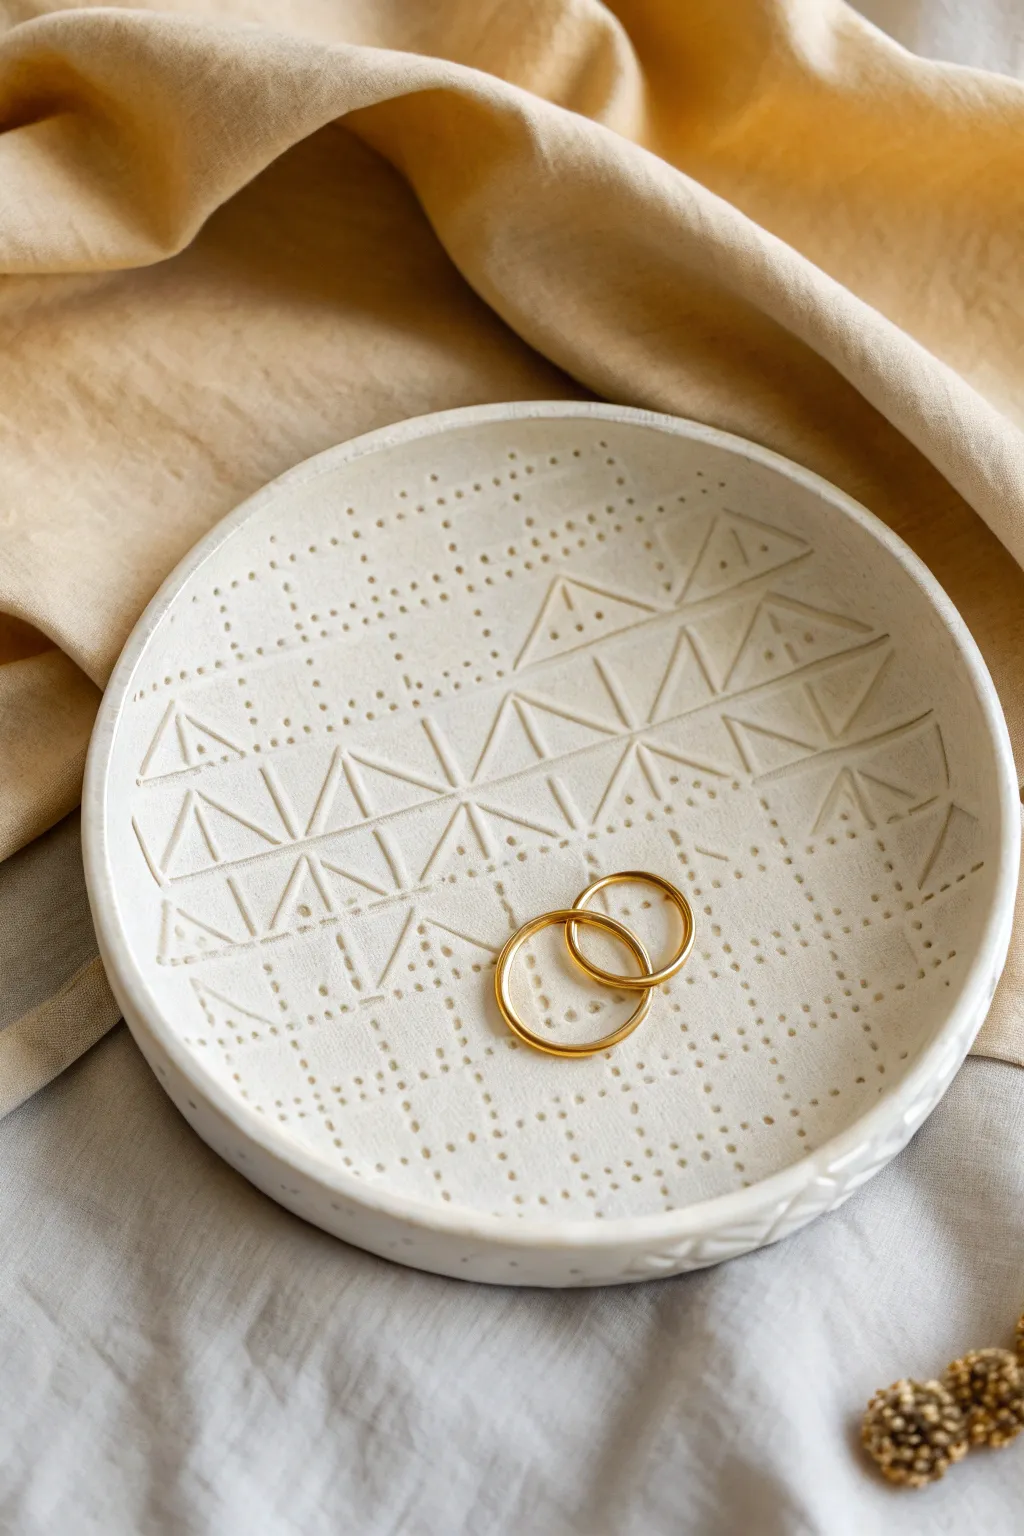
This minimalist clay dish features a striking geometric pattern created with simple stamping techniques, perfect for holding your favorite rings or earrings. The textured surface and matte white finish give it an earthy, modern bohemian vibe that looks effortless yet sophisticated.
Step-by-Step Guide
Materials
- White air dry clay
- Rolling pin or smooth glass jar
- Circle cutter (or a bowl and knife)
- Small bowl (for shaping)
- Sandpaper (fine grit)
- Wooden skewer or toothpick
- Butter knife or clay tool
- Small sponge and water
- Matte spray varnish (optional)
Step 1: Preparation & Shaping
-
Condition the clay:
Begin by grabbing a handful of air dry clay and kneading it in your hands to warm it up. This conditioning makes the clay pliable and helps prevent cracks later on. -
Roll it out:
Place the clay on a smooth surface or canvas mat. Use your rolling pin to flatten the clay evenly until it is about 1/4 inch thick. Try to keep the thickness consistent across the entire slab. -
Cut the circle:
Place your circle cutter (or an overturned bowl) onto the clay slab. Press down firmly to cut your base shape. If using a bowl, trace around the edge carefully with a knife and remove the excess clay. -
Smooth the edges:
Dip your finger in a little bit of water and run it along the cut edge of the circle. This smooths out any sharpness or jagged bits left from the cutting process.
Step 2: Creating the Pattern
-
Mark horizontal guides:
Before stamping, lightly pressing a ruler into the clay to create faint horizontal guidelines can help keep your pattern straight, though I prefer to freehand it for a more organic look. You want to create distinct bands for different textures. -
Create the triangle band:
Using a dull butter knife or a flat clay tool, gently press a zigzag line across the center of the dish. Connect the points to form a row of triangles. Press deeply enough to see the impression, but not so hard you cut through. -
Duplicate the zigzag:
Repeat this process directly below the first band to create a second, parallel row of geometric zigzags or triangles. This creates the central focal point of the design. -
Add vertical details:
Inside the triangles or between the zigzag lines, press small vertical lines using the edge of your tool. This adds complexity to the geometric band. -
Start the stippling:
Take your wooden skewer or a toothpick. Beginning at the top section above your geometric bands, press the blunt end into the clay to create rows of small dots. -
Vary the dot pattern:
Don’t aim for machine-perfect rows. Create a texture field by poking dots in rough horizontal lines, leaving some spaces slightly wider than others to enhance the handmade aesthetic. -
Fill the bottom section:
Repeat the stippling process on the bottom section of the dish, below your geometric bands. Fill this area entirely with the dot texture. -
Refine the rim:
If you like, add a few small dots or tiny pressed lines along the very rim of the circle to frame the design.
Clean Lines Tip
Use a credit card or rigid plastic card instead of a knife to press your triangle lines. It creates a very consistent, deep, and straight impression without dragging the clay.
Step 3: Drying & Finishing
-
Form the curve:
Carefully lift your clay circle and place it inside a shallow bowl. Gently press the center down so the clay takes on the curved shape of the bowl. This creates the dish form. -
Texture check:
While the clay is in the bowl, check your pattern. If lifting the clay smoothed out any lines, gently re-press them now while the clay is still soft. -
Let it dry:
Leave the dish in the bowl to dry for at least 24 hours. Placing it in a cool, dry spot away from direct sunlight helps prevent warping. -
Remove and flip:
Once the top feels dry and stiff, carefully remove the dish from the bowl and flip it over. Let the bottom side dry for another 12-24 hours to ensure all moisture has evaporated. -
Sand edges:
Once fully cured and hard, take fine-grit sandpaper and gently rub the rim to remove any sharp spots or roughness. Wipe away the dust with a barely damp cloth. -
Seal the piece:
To protect your jewelry dish, spray a light coat of matte varnish over the surface. This keeps the clay looking natural but prevents it from absorbing moisture or oils.
Cracking Up?
If small cracks appear while drying, mix a tiny bit of fresh clay with water to make a paste (slip) and smooth it into the cracks with your finger, then let dry again.
Now you have a beautifully textured dish ready to display your favorite rings on your bedside table


The Complete Guide to Pottery Troubleshooting
Uncover the most common ceramic mistakes—from cracking clay to failed glazes—and learn how to fix them fast.
Marbled Color-Swirl Dish
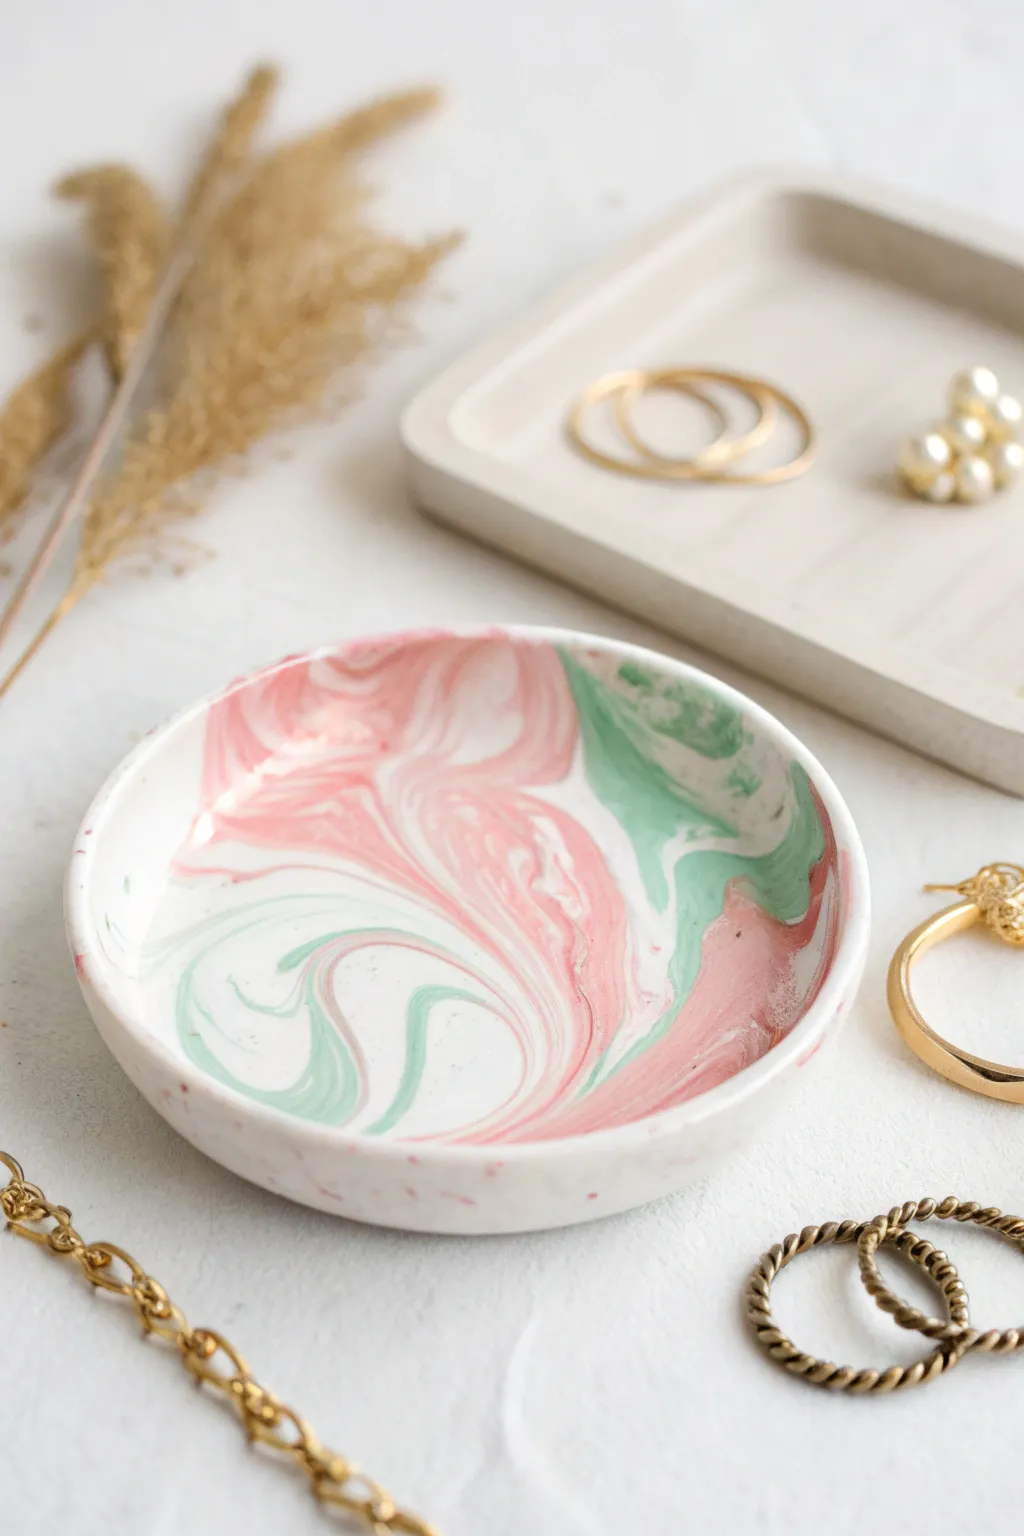
Create a stunning, high-end looking jewelry catchall using nothing but air dry clay and a simple marbling technique. The soft pink and mint green swirls dance across a white background, giving this piece a sophisticated, modern ceramic feel without the need for a kiln.
Detailed Instructions
Materials
- White ceramic air dry clay
- Acrylic paint (pastel pink, mint green)
- Rolling pin
- Clay cutting tool or craft knife
- Small bowl or round cookie cutter (for sizing)
- Sandpaper (fine grit)
- Small sponge
- Gloss varnish or sealant
- Plastic wrap or parchment paper
Step 1: Preparing the Clay
-
Portion the clay:
Start by grabbing a handful of white air dry clay, roughly the size of a tennis ball. Knead it well until it is soft, pliable, and free of cracks. -
Create color bases:
Pinch off two smaller pieces of clay, each about the size of a large marble or walnut. These will become your colored sections. -
Add the paint:
Flatten one small ball and add a drop of pastel pink acrylic paint into the center. Fold the clay over the paint to trap it inside. -
Knead the color:
Knead the small ball continuously until the pink color is fully uniform throughout the clay. Repeat this process with the second small ball using mint green paint. Be prepared for messy fingers here.
Don’t Overmix!
Stop twisting your clay snakes sooner than you think. If you knead too much, the colors will blend into a single muddy hue instead of distinct, beautiful marble veins.
Step 2: Marbling and Shaping
-
Form snakes:
Roll your large white ball and your two smaller colored balls into long, thin logs or ‘snakes’ roughly the same length. -
Twist them together:
Gather the three logs and twist them together into one large rope. Fold this rope in half and twist it again. -
Create the marble pattern:
Mash the twisted rope back into a ball, but don’t over-knead it. You want the distinct colors to remain separate rather than blending into a muddy gray. I find stopping just before you think it’s ready usually yields the best swirl. -
Roll out the slab:
Place the marbled ball on parchment paper. Using a rolling pin, roll it out into a flat slab about 1/4 inch thick. Rotate firmly as you roll to ensure even thickness. -
Cut the circle:
Place your round template (a bowl or cookie cutter) onto the most attractive part of the marbled pattern. Cut around it with a craft knife to get a perfect circle. -
Smooth the edges:
Dip your finger in a little bit of water and gently run it along the cut edge of the circle to smooth out any roughness or jagged bits.
Step 3: Forming and Finishing
-
Shape the curvature:
Gently lift your clay circle and place it inside a slightly larger shallow bowl lined with plastic wrap. This will act as a mold to give your dish its curved shape. -
Press into shape:
Lightly press the clay into the bottom of the bowl mold, ensuring it takes on the curved form without flattening the ridges of the rim too much. -
Initial dry:
Let the dish sit in the mold for about 24 hours until it holds its shape on its own. -
Remove and fully dry:
Remove the semi-dry dish from the mold and place it on a wire rack. Let it air dry completely for another 24 to 48 hours. It should feel room temperature to the touch, not cool. -
Sand for perfection:
Once fully dry, take fine-grit sandpaper and gently buff the edges and any bumps on the surface to get a professional, smooth finish. -
Clean dust:
Wipe away all sanding dust with a slightly damp sponge or cloth. -
Seal the piece:
Apply a coat of gloss varnish to the entire dish. This brings out the vibrancy of the pink and green swirls and protects the clay from moisture.
Gold Rim Upgrade
For an extra fancy touch, use a small paintbrush to apply liquid gold leaf or gold acrylic paint to just the rim of the dish after the varnish has dried.
Place your new ring dish on your nightstand and enjoy the splash of color it adds to your jewelry collection
Minimal Line-Painted Dish

Achieve that high-end ceramic look without a kiln using this simple air dry clay project. This dish features a creamy speckled base with elegant, hand-painted black arches, perfect for holding your everyday rings and earrings.
How-To Guide
Materials
- Air dry clay (white)
- Acrylic rolling pin
- Bowl (for use as a mold)
- Craft knife or clay tool
- Sandpaper (fine grit)
- Acrylic paint (cream/off-white and black)
- Fine detail paintbrush
- Medium flat paintbrush
- Gloss or matte varnish (sealant)
- Small sponge (optional)
- Water cup
Step 1: Shaping the Clay
-
Prepare the clay:
Start by taking a handful of air dry clay and kneading it in your hands until it becomes soft, pliable, and free of cracks. -
Roll it out:
Place the clay on a clean, flat surface. Use your acrylic rolling pin to roll it out to an even thickness of about 1/4 inch. If you want a perfectly circular shape later, try to roll it mostly round now. -
Cut the circle:
Place a bowl upside down onto the clay to use as a template. Trace around the rim with a craft knife to cut out a perfect circle. -
Smooth the edges:
Dip your finger in a little water and run it along the cut edge of the clay circle. This smooths out any sharpness or jagged bits left by the knife. -
Form the bowl shape:
Lift your clay circle carefully and drape it inside a bowl that has the curvature you want. Gently press it down so it takes the shape of the mold. -
Dry the form:
Leave the clay inside the bowl to dry for at least 24 hours. Placing it in a warm, dry spot helps speed this up, but don’t use direct heat or it might crack. -
Remove and flip:
Once the clay is firm enough to hold its shape but not fully bone dry, carefully pop it out of the mold. Flip it over so the bottom can air out and dry completely for another 24 hours.
Pro Tip: Steady Hands
Rest your pinky finger on the dry center of the bowl while painting the arches. This stabilizes your hand and gives you much better control over the curve.
Step 2: Sanding and Base Coat
-
Sand until smooth:
When the dish is bone dry and hard, take your fine-grit sandpaper and gently sand the rim and the interior surface. You want to remove any fingerprints or bumps for a professional finish. -
Clean dust:
Wipe the dish down with a slightly damp cloth or a dry brush to remove all the clay dust before painting. -
Mix the base color:
Mix white acrylic paint with a tiny drop of brown or yellow to create a warm, creamy off-white shade. -
Apply the base coat:
Paint the entire dish, inside and out, with your cream mixture. I usually do two thin coats rather than one thick one to avoid brush strokes. -
Add speckles (optional):
To mimic the stoneware look in the photo, you can flick a toothbrush with thinned brown paint over the dish, or just rely on the natural texture of the clay.
Step 3: painting the Design
-
Plan the arches:
Visualize where your three arch clusters will go. They should be spaced somewhat evenly around the interior curve of the bowl. -
Paint the first arch:
Using a fine detail brush and black acrylic paint, draw the largest, outermost arch first. Keep your hand steady and let the curve of the bowl guide your stroke. -
Fill the inner lines:
Paint two smaller arches nesting inside the first one. Don’t worry if the lines are slightly shaky; the hand-painted ‘wabi-sabi’ look adds to the charm. -
Repeat the pattern:
Rotate the bowl and paint the remaining two sets of arches. Try to keep the spacing between the lines relatively consistent. -
Let paint cure:
Allow the black paint to dry completely. If you made any mistakes, you can carefully touch them up with the cream base color after the black is dry.
Troubleshooting: Cracking?
If small cracks appear during drying, mix a small amount of fresh clay with water to make a paste (slip) and fill in the cracks, then sand smooth once dry.
Step 4: Sealing
-
Apply varnish:
Finish the project by applying a coat of clear varnish (gloss or matte, depending on your preference) to seal the paint and protect the clay from moisture. -
Final dry:
Let the varnish cure according to the bottle’s instructions before placing any jewelry inside.
Now you have a chic, modern catch-all dish that looks like expensive stoneware.

TRACK YOUR CERAMIC JOURNEY
Capture glaze tests, firing details, and creative progress—all in one simple printable. Make your projects easier to repeat and improve.
Speckled Splatter-Finish Dish
Bring the high-end look of wheel-thrown speckle pottery to your home using simple hand-building techniques. This tutorial guides you in creating a faux-stone effect complete with varied textures and a splatter finish that mimics professional firing.
Detailed Instructions
Materials
- White or light grey air-dry clay
- Rolling pin
- Circular cookie cutter or bowl (approx. 4-5 inches)
- Small bowl (for acting as a mold)
- Sandpaper (medium and fine grit)
- Acrylic paint (white, cream, black)
- Stiff bristle brush (e.g., old toothbrush)
- Soft synthetic brush
- Glossy varnish or sealant (water-based polyurethane recommended)
- Sponge
- Coarse sand or dried coffee grounds (for texture)
Step 1: Preparing the Faux-Stone Clay
-
Texture mixing:
Begin by taking a handful of your air-dry clay and kneading in a teaspoon of coarse sand or dried coffee grounds. This creates the gritty, authentic stone look visible on the bottom of the finished bowl. -
Conditioning:
Knead the clay thoroughly until the texture materials are evenly distributed. If the clay feels dry, dampen your hands slightly, but avoid making it sticky. -
Rolling out:
Roll your clay out on a flat surface to an even thickness of about 1/4 inch. Lift and rotate the clay occasionally to prevent sticking.
Cracking Up?
If hairline cracks appear while drying, mix a small slurry of clay and water (slip) and fill them in with a brush. Sand smooth once dry before painting.
Step 2: Shaping the Form
-
Cutting the circle:
Use your circular cutter or trace around a small bowl to cut out a perfect circle from your rolled clay slab. -
Mold preparation:
Find a small bowl to use as a slump mold. Line the inside with plastic wrap or dust it lightly with cornstarch to ensure easy release later. -
Slumping:
Gently lift your clay circle and press it into the lined bowl. Smooth it down from the center outward, ensuring it takes the curve of the mold without trapping air bubbles. -
Rim refinement:
While the clay is in the mold, gently run a damp finger along the rim to round off any sharp edges left by the cutter. You want a soft, organic lip. -
Initial drying:
Let the clay sit in the mold for about 24 hours until it’s firm enough to hold its shape but still slightly cool to the touch. -
Demolding:
Carefully remove the bowl from the mold and peel away the plastic wrap. Let it air dry completely on a wire rack for another 24-48 hours until bone dry.
Gold Rim Upgrade
Paint the very edge of the rim with liquid gold leaf or metallic acrylic paint before sealing for a chic, gilded pottery aesthetic.
Step 3: Refining and Painting
-
Sanding:
Once dry, use medium-grit sandpaper to smooth out any major bumps. Switch to fine-grit paper for the rim and inside surface, but leave the bottom exterior slightly rough to highlight that stone texture we added. -
Base coat mixing:
Mix white acrylic paint with a tiny drop of cream to get an off-white, ceramic glaze color. You want it to look like milky pottery, not stark printer paper. -
Painting the dipped look:
Paint the inside of the bowl and extend the paint over the rim, coming down about half an inch on the outside. This mimics a dipped glaze line. Apply 2-3 coats for opacity. -
Creating the bottom wash:
For the bottom, unpainted section, water down a little brown or beige paint into a thin wash. Dab this over the textured clay to settle into the crevices, then wipe the surface with a paper towel. This enhances the ‘stone’ look.
Step 4: The Speckled Finish
-
Splatter preparation:
Water down a small amount of black acrylic paint until it has an inky consistency. Cover your workspace with newspaper—this part gets messy. -
Applying speckles:
Dip a stiff bristle brush or toothbrush into the black mixture. Hold it over the bowl and run your thumb across the bristles to flick tiny droplets onto the white painted areas. Vary your distance for different dot sizes. -
Cleanup:
If any large accidental blobs land, quickly dab them with a damp Q-tip. Let the speckles dry completely. -
Sealing:
Apply two coats of high-gloss varnish to the white, speckled areas to simulate a fired glaze. For the bottom textured section, use a matte varnish or leave it raw for tactile contrast.
Place your new dish on your dresser to hold jewelry or coins and enjoy the modern, handmade charm
Gold-Toned Rim Accent Dish
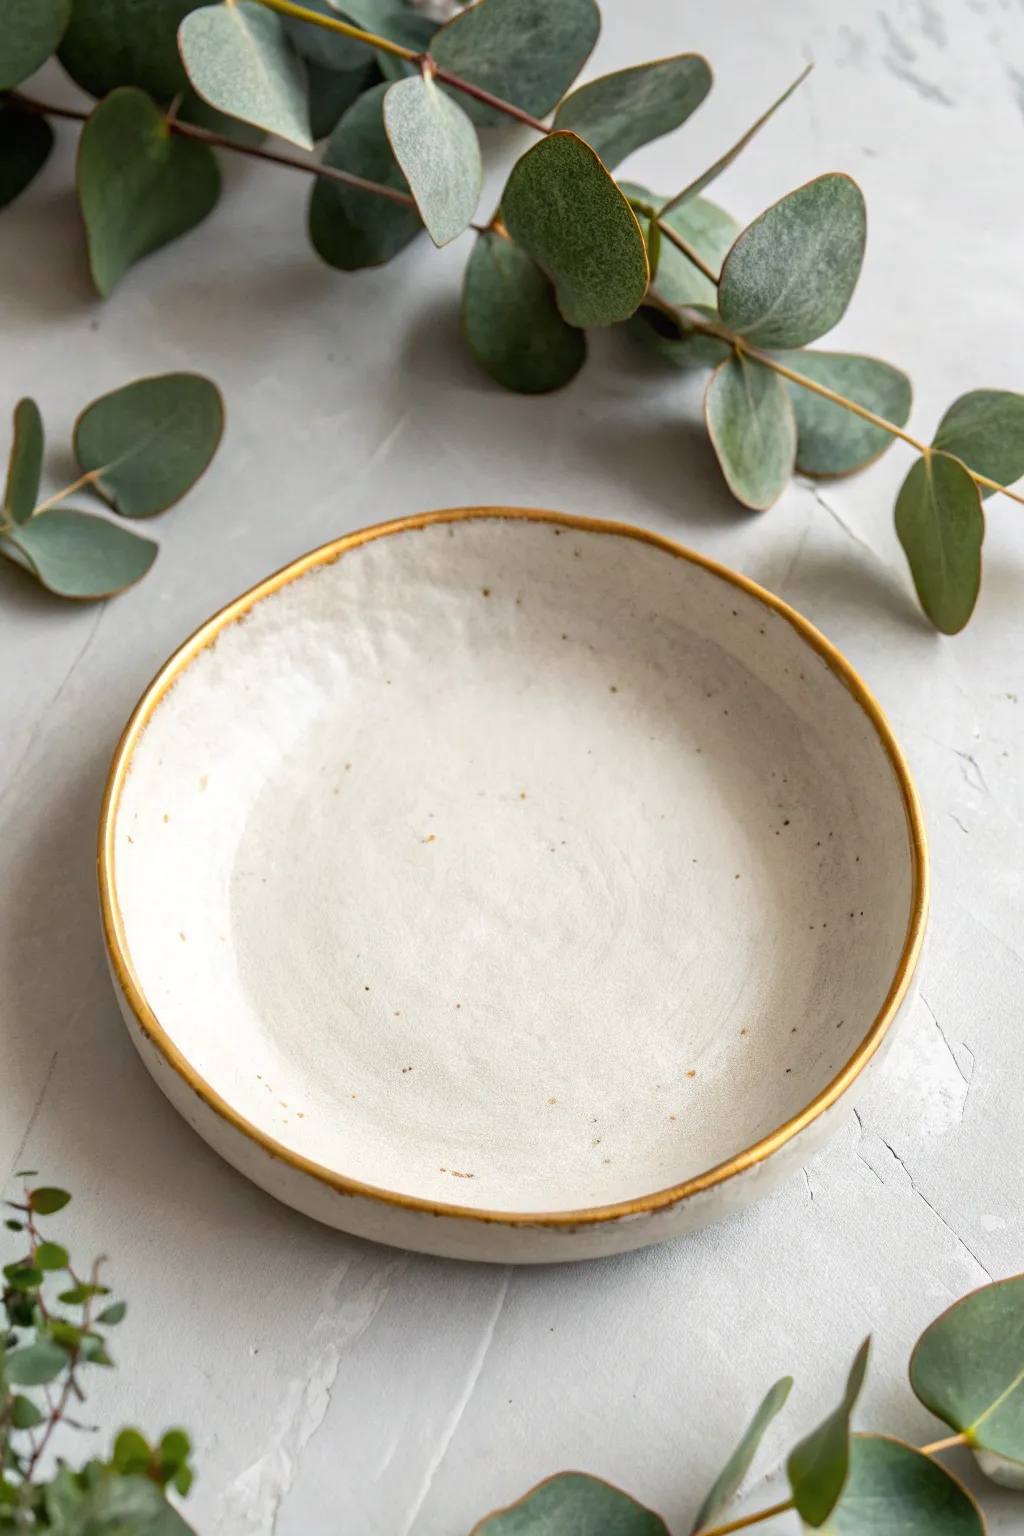
This elegant trinket dish combines the organic, hand-formed charm of air-dry clay with a sophisticated metallic touch. The speckled white finish and irregular gold rim create a high-end ceramic look without the need for a kiln.
How-To Guide
Materials
- White air-dry clay
- Rolling pin
- Bowl for use as a mold
- Seran wrap or cling film
- Sandpaper (fine grit)
- White acrylic paint (warm white or cream)
- Brown or beige acrylic paint (for speckles)
- Liquid gold leaf or metallic gold acrylic paint
- Small fine-tip paintbrush
- Old toothbrush
- Sponge sealant or varnish (matte or gloss)
Step 1: Forming the Base
-
Condition the Clay:
Begin by taking a handful of white air-dry clay and kneading it in your hands until it becomes soft, pliable, and free of cracks. -
Roll It Out:
Place the clay on a smooth surface or canvas mat. Use a rolling pin to flatten it into an even circle, aiming for a thickness of about 1/4 inch. -
Cut the Shape:
Find a circular template (like a cereal bowl) slightly larger than your desired finished size. Place it upside down on the clay and cut around it with a craft knife. -
Smooth the Edges:
Dip your finger in a little water and run it along the cut edge of the circle to smooth out any sharpness or roughness from the knife. -
Prepare the Mold:
Take a bowl that has a nice curve and cover the inside with cling film or saran wrap. This prevents sticking and makes removal easy. -
Shape the Dish:
Gently lift your clay circle and press it inside the lined bowl. I like to press gently from the center outwards to ensure it takes the bowl’s curve without trapping air bubbles. -
Create Organic Texture:
Instead of smoothing it perfectly, use your fingertips to lightly press indentations into the inner surface to give it that handmade, hammered look shown in the photo.
Smooth Operator
Use a damp sponge instead of sandpaper to smooth the dry clay. This prevents dust and creates a porcelain-like finish.
Step 2: Drying and Refining
-
Initial Drying:
Leave the clay in the mold for about 24 hours until it holds its shape firmly but isn’t fully bone dry. -
Remove and Finish Drying:
Carefully lift the clay dish out of the mold using the cling film. Remove the film and place the dish on a wire rack to let air circulate underneath until completely dry and hard (usually another 24-48 hours). -
Sanding:
Once fully dry, use fine-grit sandpaper to gently smooth the rim. You want to keep the irregular, organic wave, but remove any sharp shards or rough crumbs.
Step 3: Painting and Detailing
-
Base Coat:
Apply a coat of warm white or cream acrylic paint to the entire dish. This seals the clay surface and provides a uniform background color. -
Create the Speckles:
Dilute a tiny amount of brown or beige acrylic paint with water. Dip an old toothbrush into this mixture. -
Apply Speckles:
Hold the toothbrush over the dish and run your thumb across the bristles to flick tiny droplets onto the surface. Practice on paper first to control the spray density. -
Seal the Dish:
Once the paint is dry, apply a layer of matte or gloss varnish to protect the surface. This step is crucial before adding the gold to prevent it from bleeding into the porous clay. -
Gild the Rim:
Dip a fine-tipped brush into liquid gold leaf or metallic gold paint. Carefully paint along the very edge of the rim. -
Detailed Edge:
Let the brush naturally waiver slightly to follow the organic bumps of the rim. Bring the gold just slightly over onto the inner lip of the bowl for better visibility. -
Final Cure:
Allow the gold paint to cure fully according to the manufacturer’s instructions before using the dish for jewelry or decor.
Warping Woes
If the bottom puffs up while drying, place a small, light beanbag or weight in the center during the initial drying phase.
Place your finished dish on a bedside table or vanity to add a touch of handmade luxury to your daily routine
Monogram Initial Trinket Dish
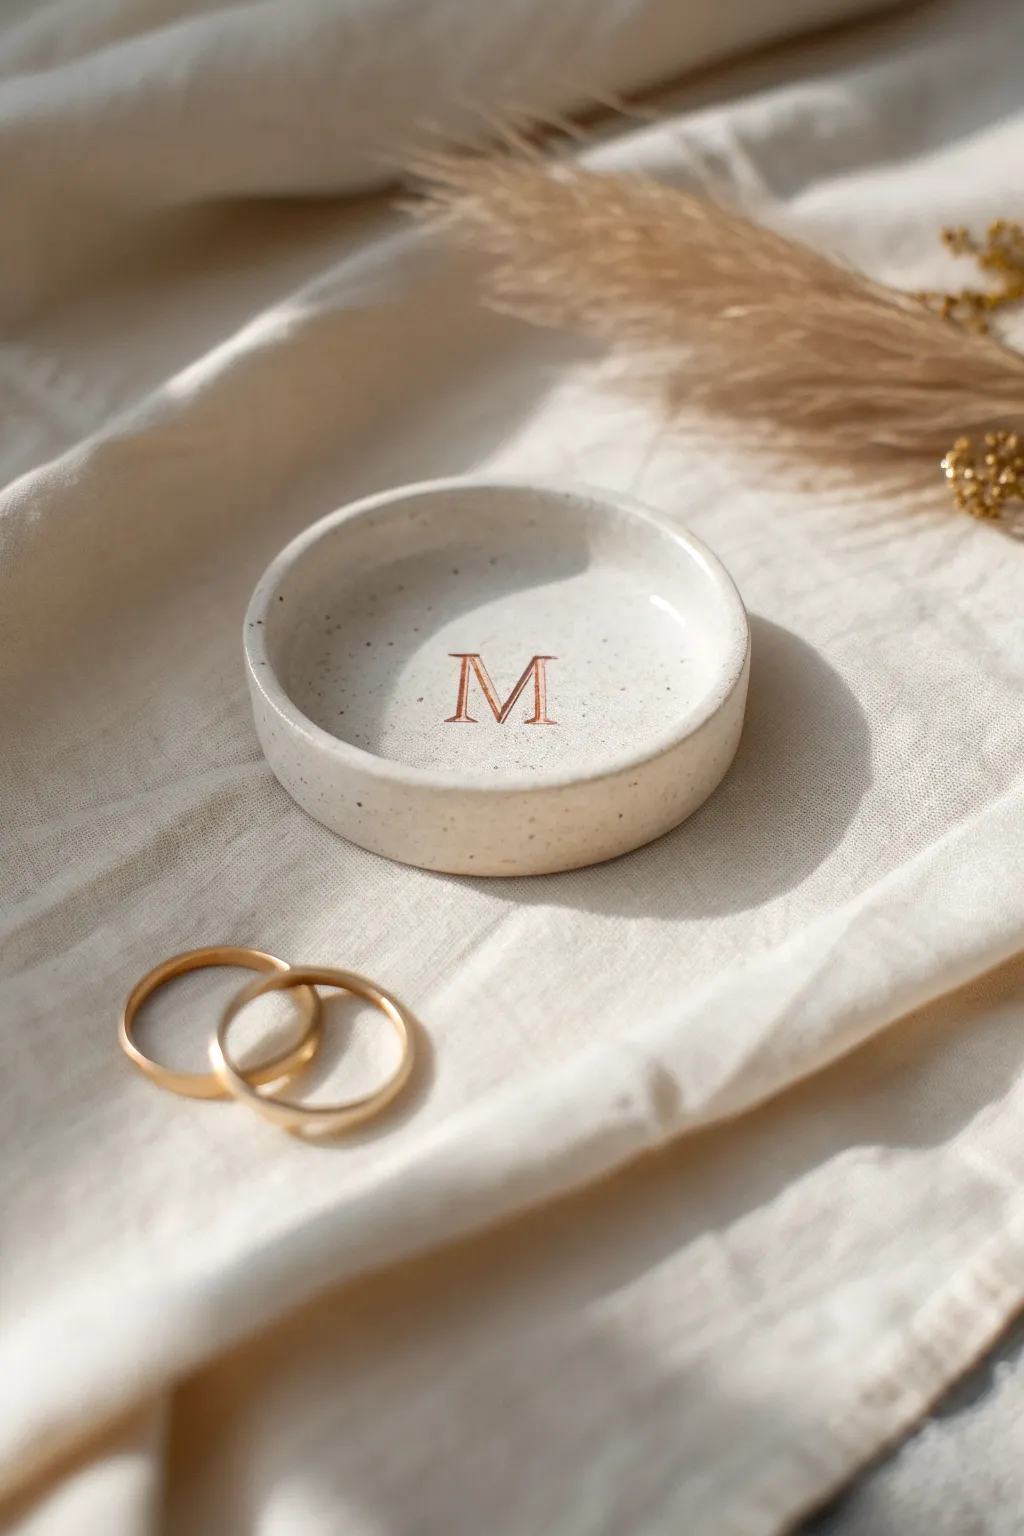
This elegant trinket dish combines a minimal speckled finish with a luxurious touch of copper-gold stamping. It is the perfect size for holding your most precious rings and features a clean, straight-sided rim that gives it a modern, professional ceramic look without needing a kiln.
Step-by-Step Tutorial
Materials
- White or cream air dry clay
- Rolling pin
- Circle cookie cutter (approx. 3-4 inches)
- Small letter stamp set (serif font)
- Metallic copper or rose gold acrylic paint
- Fine detail paintbrush
- Fine grit sandpaper
- Matte or satin sealant/varnish
- Toothbrush or splatter brush
- Brown watercolor or diluted acrylic paint
- Cup of water
- Smooth work surface/mat
- X-acto knife or clay tool
Step 1: Shaping the Clay Body
-
Condition the clay:
Begin by taking a handful of white air dry clay and kneading it in your hands until it is warm, pliable, and free of cracks. -
Roll it out:
Place the clay on your smooth work surface. Use your rolling pin to flatten the clay to an even thickness, aiming for about 1/4 inch thick. -
Cut the base:
Press your circle cookie cutter firmly into the rolled clay to create a perfect disc. Peel away the excess clay from the outside. -
Create the walls:
Roll a separate snake or coil of clay that is long enough to go around the circumference of your circle. Flatten this long strip slightly with your rolling pin to create a ribbon shape. -
Attach the rim:
Score the outer edge of your base disc and the bottom edge of your clay ribbon with a knife. Dab a little water on the scored areas. -
Blend the seam:
Wrap the ribbon around the base, pressing it gently into place. Use your finger or a modeling tool to smooth the seam on the inside and outside until the transition is invisible and the walls stand straight up. -
Smooth the surface:
Dip your finger in a tiny bit of water and run it along the top rim and inside surfaces to remove any fingerprints or imperfections.
Clean Lines Trick
To get that perfectly sharp rim shown in the photo, lightly sand the top edge flat against a piece of sandpaper placed on your table after the clay is fully dry.
Step 2: Stamping and Finishing
-
Stamp the monogram:
While the clay is still soft, position your letter stamp in the exact center of the dish. Press down firmly to create a deep, clean impression, then lift straight up. -
Initial drying:
Set the dish aside in a cool, dry place. Let it dry for at least 24-48 hours until it is completely hard and turns a lighter white color. -
Sanding:
Once fully dry, take your fine grit sandpaper and gently buff the rim and sides to ensure they are perfectly smooth. -
Paint the monogram:
Using a very fine detail brush, carefully fill the impressed letter with metallic copper or rose gold acrylic paint. Take your time to stay within the lines. -
Create the speckle effect:
Dilute a small drop of brown watercolor or acrylic paint with plenty of water. Dip a toothbrush into the mixture. -
Apply speckles:
Hold the toothbrush over the dish and run your thumb across the bristles to flick tiny droplets of paint onto the surface. I suggest practicing on a scrap piece of paper first to get the density right. -
Let paint dry:
Allow the metallic paint and the speckled droplets to dry completely. -
Seal the piece:
Apply a coat of matte or satin varnish over the entire dish to protect the clay and the paintwork from moisture and wear.
Cracking Clay?
If you see tiny cracks forming while drying, smooth a tiny amount of fresh clay paste (clay mixed with water) into the cracks with your finger, let dry, and sand smooth.
Place your favorite rings inside your new personalized dish and enjoy the chic, handmade touch it adds to your dresser
Heart-Shaped Jewelry Dish
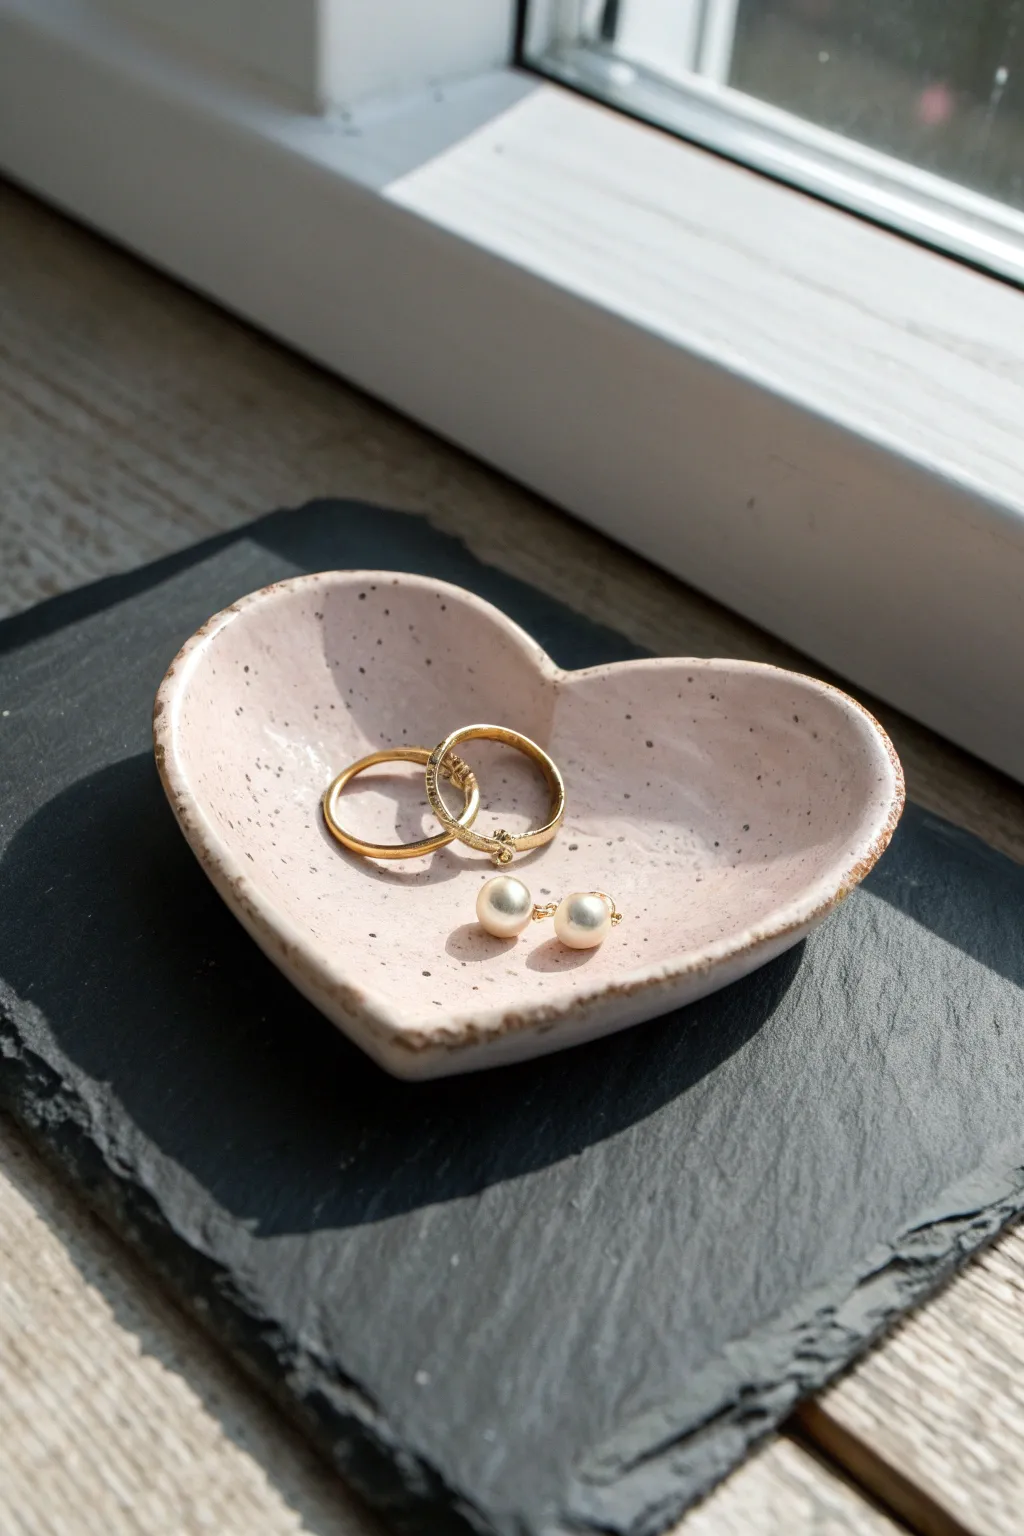
Capture the charm of handmade ceramics without a kiln using this delightful air dry clay project. This heart-shaped dish features a faux-speckled glaze effect and a rustic, gilded rim, perfect for holding your favorite rings and studs.
How-To Guide
Materials
- White air dry clay
- Rolling pin
- Heart-shaped cookie cutter (medium size)
- Small bowl or sponge (to use as a drying form)
- Sandpaper (fine grit)
- Acrylic paint (pale pink or blush)
- Acrylic paint (dark brown or black)
- Acrylic paint (metallic gold or bronze)
- Old toothbrush
- Glossy varnish or sealant (water-based)
- Small soft paintbrush
- Water and a small bowl
- Craft knife or clay tool
Step 1: Shaping the Clay
-
Condition the clay:
Begin by taking a handful of white air dry clay and kneading it in your hands until it becomes soft, pliable, and free of cracks. -
Roll it out:
Place the clay on a smooth surface or craft mat. Use your rolling pin to flatten it into an even sheet, aiming for a thickness of about 1/4 inch (6mm). -
Cut the shape:
Press the heart-shaped cookie cutter firmly into the clay. Give it a little wiggle to ensure a clean cut, then remove the excess clay from around the outside. -
Smooth the edges:
Dip your finger in a little water and run it gently along the cut edges of the heart to smooth out any sharp angles or burrs left by the cutter. -
Add texture (optional):
If you want the rim to look slightly rustic like the example, you can gently tap the very edge with a texture tool or a crumpled piece of foil, though keeping it smooth works beautifully too. -
Form the curve:
Carefully lift the clay heart and place it inside a shallow bowl or atop a curved sponge. Gently press the center down so the edges curl upward, creating a dish shape. -
Let it dry:
Leave the dish in its mold to dry completely. This usually takes 24-48 hours depending on humidity; flip it over halfway through once the top is firm to let the bottom dry evenly.
Splatter Control
Place the dish inside a cardboard box before flicking paint to contain the mess. The distance of the brush changes the dot size—closer makes larger spots.
Step 2: Painting and Finishing
-
Sand imperfections:
Once fully dry and hard, inspect your dish. Use fine-grit sandpaper to buff away any rough spots or fingerprints, wiping away the dust with a barely damp cloth afterward. -
Apply the base color:
Paint the entire surface (top and bottom) with your pale pink acrylic paint. You may need two coats for full opacity, letting the paint dry completely between layers. -
Prepare the speckles:
Dilute a small drop of dark brown or black acrylic paint with water until it has an inky consistency. -
Flick the speckles:
Dip the bristles of an old toothbrush into the diluted paint. Point the brush at the dish and run your thumb across the bristles to flick tiny splatters onto the surface. Practicing on scrap paper first is something I always recommend. -
Create the rustic rim:
Dip a small brush or even your fingertip into the metallic bronze or gold paint. Lightly dab it along the very rim of the heart, allowing it to look imperfect and slightly uneven. -
Add rim texture:
While the metallic paint is wet, you can dab a tiny bit of the dark brown over random sections of the gold to give it an aged, burnt-clay aesthetic. -
Seal the dish:
Wait for all paint layers to be bone dry. Apply a coat of glossy varnish to the entire piece to mimic a ceramic glaze and protect your jewelry from scratching the paint. -
Final cure:
Let the varnish cure according to the bottle’s instructions before placing any jewelry inside.
Warping While Drying?
If the clay lifts or warps unevenly, weigh the center down with a small bag of rice or beans while it dries in the bowl form.
Now you have a lovely, custom catch-all that looks like wheel-thrown pottery.
Cloud-Shaped Little Dish
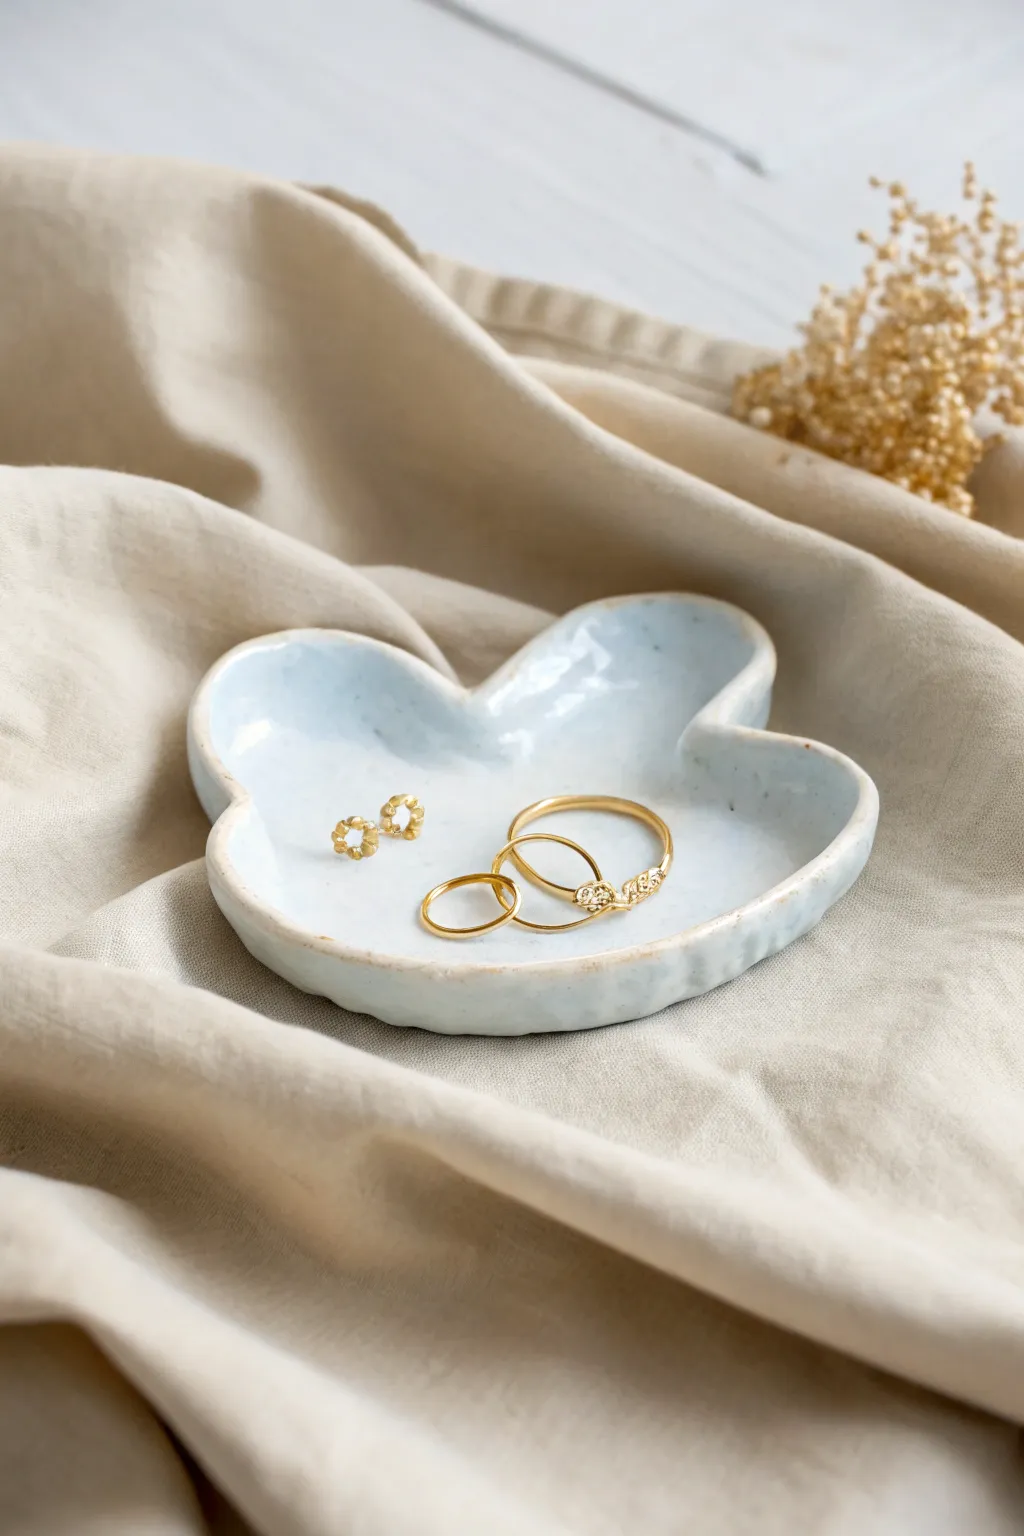
This whimsical cloud-shaped trinket dish is the perfect landing spot for your daily jewelry essentials. Featuring a soft, milky blue glaze effect and an organic crimped edge, it brings a touch of sky-high calm to any bedside table.
Detailed Instructions
Materials
- White gloss air dry clay
- Rolling pin
- Cloud-shaped cookie cutter (or parchment paper template)
- Craft knife
- Small bowl of water
- Fine grit sandpaper
- Pale blue acrylic paint
- White acrylic paint
- High-gloss varnish or sealant
- Soft synthetic paintbrushes
- Sponge or foam dabber
Step 1: Shaping the Cloud
-
Condition the clay:
Begin by taking a handful of air dry clay and kneading it in your hands until it feels warm and pliable. This removes air bubbles and prevents cracking later on. -
Roll it out:
Using a rolling pin, flatten the clay on a smooth surface or canvas mat. Aim for an even thickness of about 1/4 inch (6mm) to ensure the dish feels substantial but not chunky. -
Cut the shape:
If you have a large cloud cookie cutter, press it firmly into the slab. Alternatively, lightly trace a cloud shape onto the clay using a needle tool or knife and cut it out freehand for a more organic look. -
Soften the edges:
Dip your finger into a small bowl of water and run it along the cut edges of your cloud. Smoothing these raw edges now saves a lot of sanding time later. -
Create the curvature:
Here I prefer to gently lift the edges of the cloud upwards with my thumbs while pressing the center down slightly, creating a shallow bowl shape. -
Form the rim:
Pinch the very edge of the clay slightly to create a defined lip. The dish in the image has a slightly uneven, hand-formed rim, so don’t worry about perfection here.
Smoother Curves
To get a perfectly curved bottom without flat spots, let your clay dry while resting inside a shallow curved bowl lined with plastic wrap.
Step 2: Refining and Drying
-
Initial smoothing:
Use a damp sponge to wipe the entire surface of the dish, removing any fingerprints or small imperfections. -
Dry the dish:
Place your cloud dish in a safe spot to dry for 24-48 hours. Turn it over halfway through the process to ensure the bottom dries evenly. -
Sand for smoothness:
Once fully cured and hard, take a piece of fine-grit sandpaper and gently buff the entire surface. Pay special attention to the rim to ensure it feels soft to the touch. -
Clean dust:
Wipe the dish down with a slightly damp cloth or paper towel to remove all the sanding dust before you start painting.
Step 3: Painting and Glazing
-
Mix the base color:
Mix a large amount of white acrylic paint with a tiny drop of pale blue. You want a very subtle, almost milky sky-blue cololr rather than a bright cyan. -
Apply the first coat:
Paint the entire top surface of the dish. Use long, smooth strokes to minimize brush marks. -
Add dimension:
While the paint is still slightly wet, dab a little pure white paint into the center of the cloud shape and blend it outwards. This creates that soft, dreamy gradient seen in the photo. -
Paint the underside:
Once the top is dry, flip the dish and paint the bottom a solid milky blue or plain white. -
Speckle effect (optional):
To mimic the ceramic look in the photo, you can flick a toothbrush dipped in diluted grey or brown paint across the surface for tiny speckles. -
Seal the deal:
Apply a coat of high-gloss varnish. This is crucial for achieving the shiny, ceramic-like finish that makes the dish look professional. -
Second coat of gloss:
Let the first coat dry completely, then add a second layer of gloss varnish for extra durability and shine.
Fixing Cracks
If small cracks appear as it dries, mix a tiny bit of fresh clay with water to make a paste (slip) and fill the cracks, then sand smooth once dry.
Enjoy styling your delicate new dish with your favorite gold rings or earrings
Hand-Shaped Palm Catch-All Dish
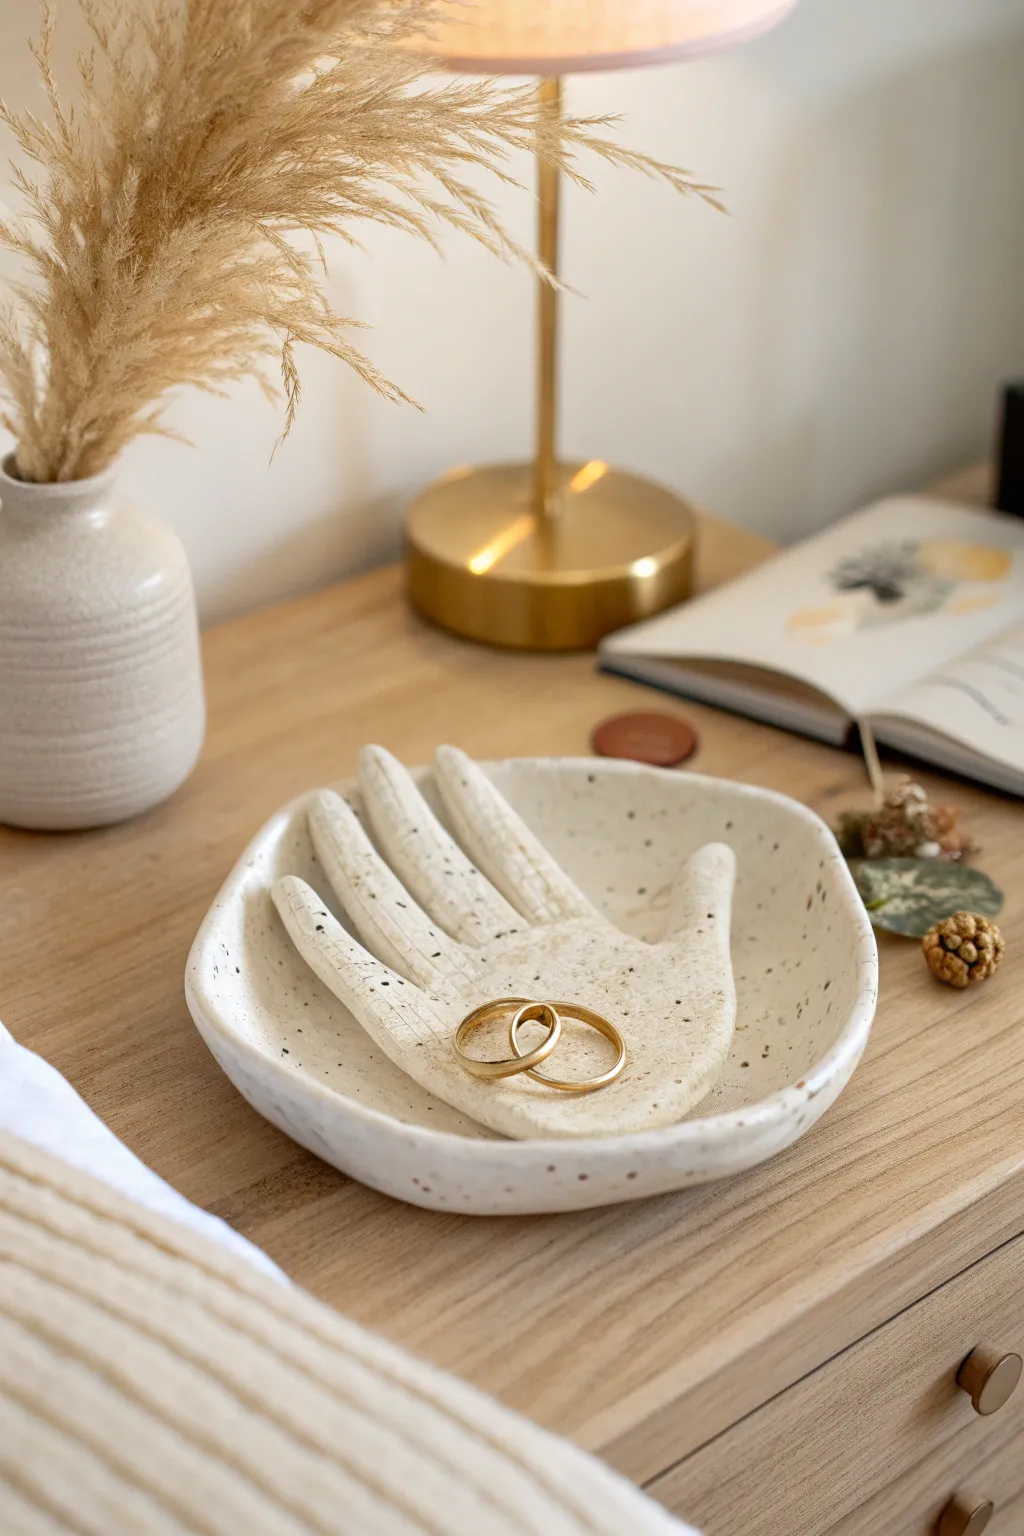
This unique catch-all features a beautifully sculpted hand resting inside a shallow bowl, perfect for cradling your most precious jewelry. The speckled stone finish gives it an organic, high-end ceramic look without needing a kiln.
Step-by-Step
Materials
- White air-dry clay (approx. 500g)
- Rolling pin
- Small kitchen knife or clay knife
- Small bowl (for use as a mold)
- Plastic wrap
- Cup of water
- Sponge or paintbrush
- Fine-grit sandpaper
- Medium-grit sandpaper
- Acrylic paint (cream/off-white)
- Acrylic paint (dark brown/black)
- Old toothbrush
- Matte finish varnish or sealant
Step 1: Sculpting the Base
-
Roll the base slab:
Start by taking a large chunk of clay and rolling it out on a flat surface to about 1/4 inch thickness. Aim for a rough circle shape. -
Cut the organic circle:
Using your knife, cut an imperfect circle or soft organic oval shape about 6-7 inches in diameter. Don’t worry about perfect symmetry; the waviness adds charm. -
Prepare the mold:
Line your small bowl with plastic wrap to prevent sticking. The bowl should have a gentle curve. -
Form the dish:
Gently lift your clay circle and place it inside the lined bowl. Press it down lightly so it takes the curved shape, smoothing the edges with a bit of water on your finger.
Step 2: Creating the Hand
-
Roll clay for the hand:
Roll out a second piece of clay, slightly thicker than the base, to about 1/3 inch thickness. -
Trace and cut:
Lightly trace your own hand (fingers together) or sketch a stylized hand shape onto the clay using a toothpick. Cut it out carefully with your knife. -
Refine the fingers:
Dip your finger in water and smooth all the sharp cut edges of the hand. Round off the fingertips to make them look soft and natural. -
Score and slip:
Use your knife to scratch cross-hatch marks (scoring) on the bottom of the wrist area and the spot in the center of the bowl where the hand will sit. Dab a little water (slip) on both scored areas. -
Attach the hand:
Press the hand firmly into the center of the bowl. Sculpt the wrist into the bowl’s surface so they blend seamlessly together. -
Shape the palm:
Gently curve the fingers upward slightly to create a cupped ‘palm’ shape that will hold items securely.
Cracked Up?
If small hairline cracks appear during drying, mix a small amount of fresh wet clay with water to make a paste and fill the cracks, then sand smooth once dry.
Step 3: Finishing Touches
-
Initial dry:
Let the piece dry like this for 24-48 hours. Keep it away from direct heat to prevent cracking. -
Release and refine:
Once firm, remove the dish from the bowl and peel off the plastic wrap. Let the bottom dry completely. -
Sand it smooth:
Use medium-grit sandpaper to remove major bumps, then switch to fine-grit for a silky finish. I recommend doing this outside or wearing a mask. -
Base coat:
Paint the entire piece with an off-white or cream acrylic paint. Two thin coats are better than one thick one. -
Speckle effect:
Dilute a tiny bit of dark brown or black paint with water. Dip an old toothbrush into it, and flick the bristles with your thumb to spray tiny speckles over the dish. -
Seal:
Once the paint is fully dry, apply a matte varnish to protect the clay from moisture and scratches.
Make it Luxe
Once the speckles are dry, use gold leaf paint to create a thin, gilded rim around the edge of the bowl for an extra touch of elegance.
Place it on your nightstand and enjoy having a designated spot for your daily treasures
Eye-Shaped Charm Dish
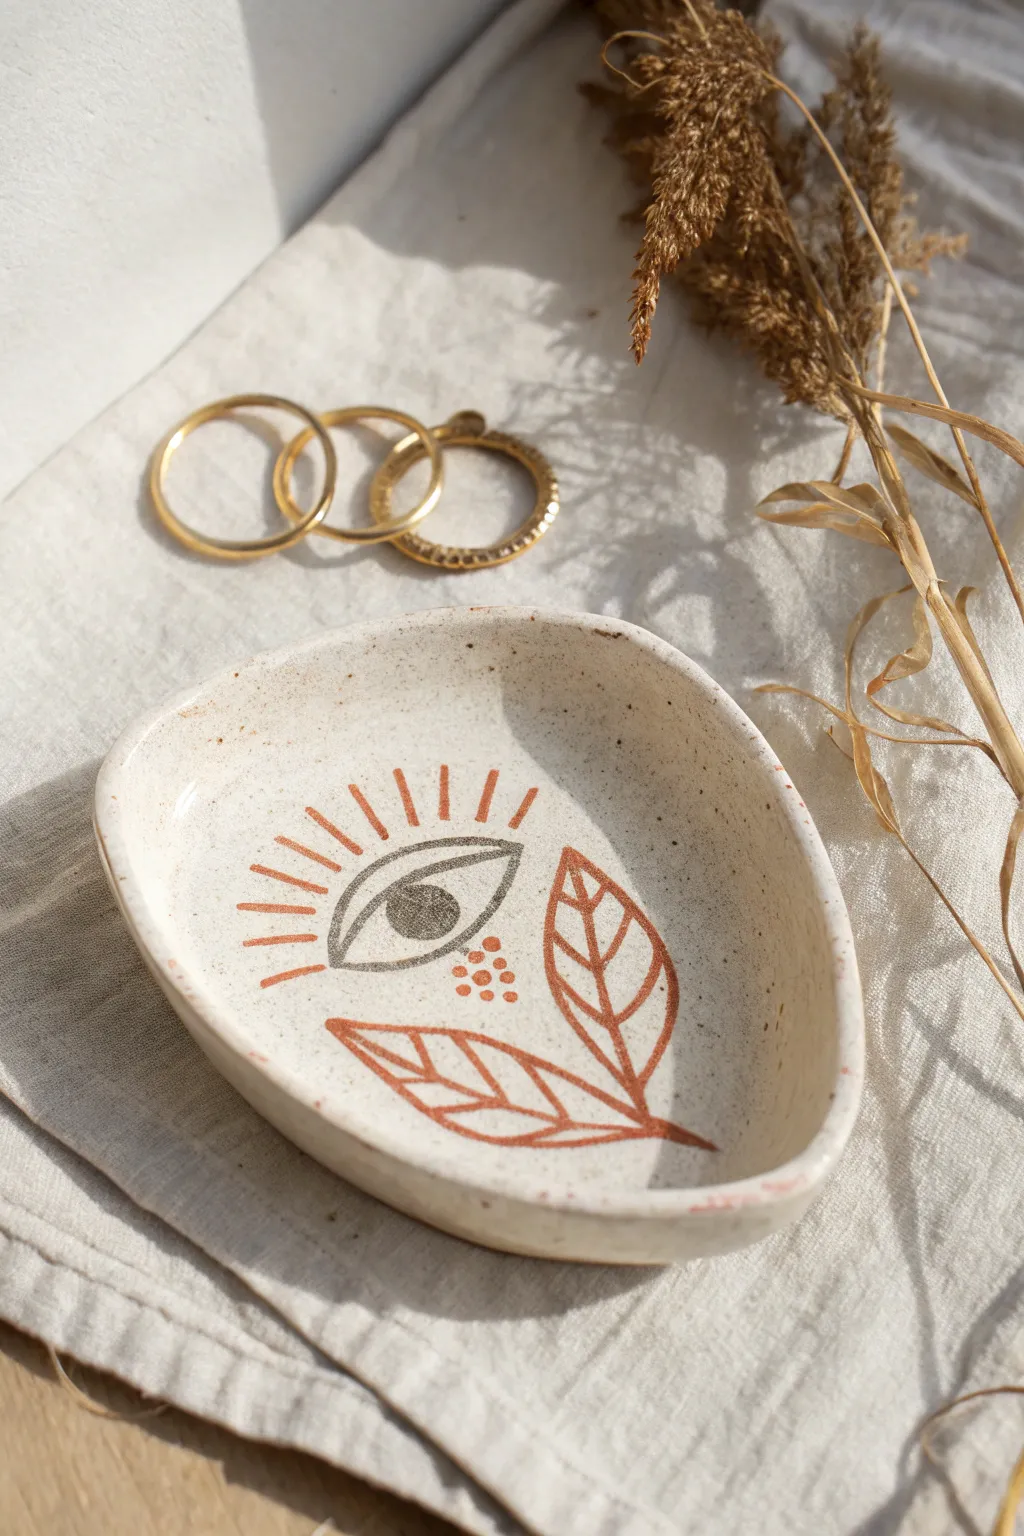
Embrace the mystical with this charming teardrop-shaped dish, perfect for holding your favorite rings or dainty treasures. Crafted from speckled clay and featuring a simple, hand-painted eye and botanical motif, this piece adds a touch of bohemian magic to any vanity.
Step-by-Step Guide
Materials
- Air-dry clay (stone or speckled effect preferred)
- Rolling pin
- Craft knife or clay needle tool
- Small bowl of water
- Fine-grit sandpaper
- Acrylic paints (burnt orange/terracotta, slate grey/black)
- Fine-point detail paintbrush
- Gloss or matte varnish/sealer
- Parchment paper or canvas mat (for working surface)
Step 1: Shaping the Base
-
Condition the clay:
Start by taking a handful of clay, about the size of a lemon. Knead it in your hands for a minute or two to warm it up and make it pliable, ensuring there are no air bubbles trapped inside. -
Roll out the slab:
Place your clay on a piece of parchment paper to prevent sticking. Use your rolling pin to flatten the ball into an even slab, aiming for a consistent thickness of about 1/4 inch. -
Cut the shape:
Using a needle tool or craft knife, freehand cut a rounded, organic triangular or teardrop shape. It doesn’t need to be geometrically perfect; the slightly wonky shape adds to its handmade charm. -
Smooth the edges:
Trace your finger dipped in a little water along the cut edges to soften any harsh lines or ragged bits left by the knife.
Step 2: Forming the Dish
-
Lift the sides:
Gently lift the edges of your clay slab upwards with your fingers creating a shallow wall. I like to cup the clay in my palm to encourage a natural curve. -
Pinch and smooth:
Go around the perimeter, lightly pinching the rim to define the height. Use your thumb to smooth the interior curve where the wall meets the base so it’s a seamless transition. -
Refine the rim:
The rim in the photo is slightly uneven and organic. Gently tap the rim with a flat finger to avoid sharp edges, but don’t worry about making it perfectly level. -
Dry partially:
Let the dish sit for about 24-48 hours until it is bone dry. Flip it over halfway through the drying process to ensure the bottom dries evenly and doesn’t warp.
Cracks happen!
If small hairline cracks appear while drying, don’t panic. Make a ‘slip’ paste of wet clay and water, fill the crack, smooth it over, and let it dry again.
Step 3: Refining and Painting
-
Sand the surface:
Once fully dry, take your fine-grit sandpaper and gently sand the rim and any rough spots on the surface. Wipe away the dust with a barely damp cloth or dry brush. -
Paint the eye outline:
Using your fine detail brush and slate grey paint, carefully paint the almond outline of the eye in the center left of the dish. Keep your hand steady and your lines thin. -
Add the pupil:
Fill a circle inside the eye with the same grey paint. Make sure it’s centered but leaves space for the white of the eye on either side. -
Paint the rays:
Switch to your terracotta or burnt orange paint. Paint short, radiating lines extending outward from the top eyelid to create the sunburst effect. -
Create the leaves:
On the right side, paint two large leaves emerging from a single stem point near the bottom. Outline the leaf shapes first with the orange paint. -
Add leaf veins:
Carefully paint a central line down each leaf and add small diagonal veins branching off. Light pressure on the brush is key here for thin lines. -
Add decorative dots:
Beneath the eye, add a playful cluster of small orange dots to balance the composition between the eye and the leaves. -
Seal the dish:
Allow the paint to dry completely. Finally, apply a coat of varnish over the entire dish (top and bottom) to protect the clay and give it a finished look. Let it cure according to the varnish instructions.
Make it Luxe
Use a liquid gold leaf pen to trace the rim of the dish after sealing to give it an expensive, gilded pottery studio look.
Now you have a serene little sanctuary for your jewelry that looks like a boutique find
Terrazzo-Style Confetti Dish
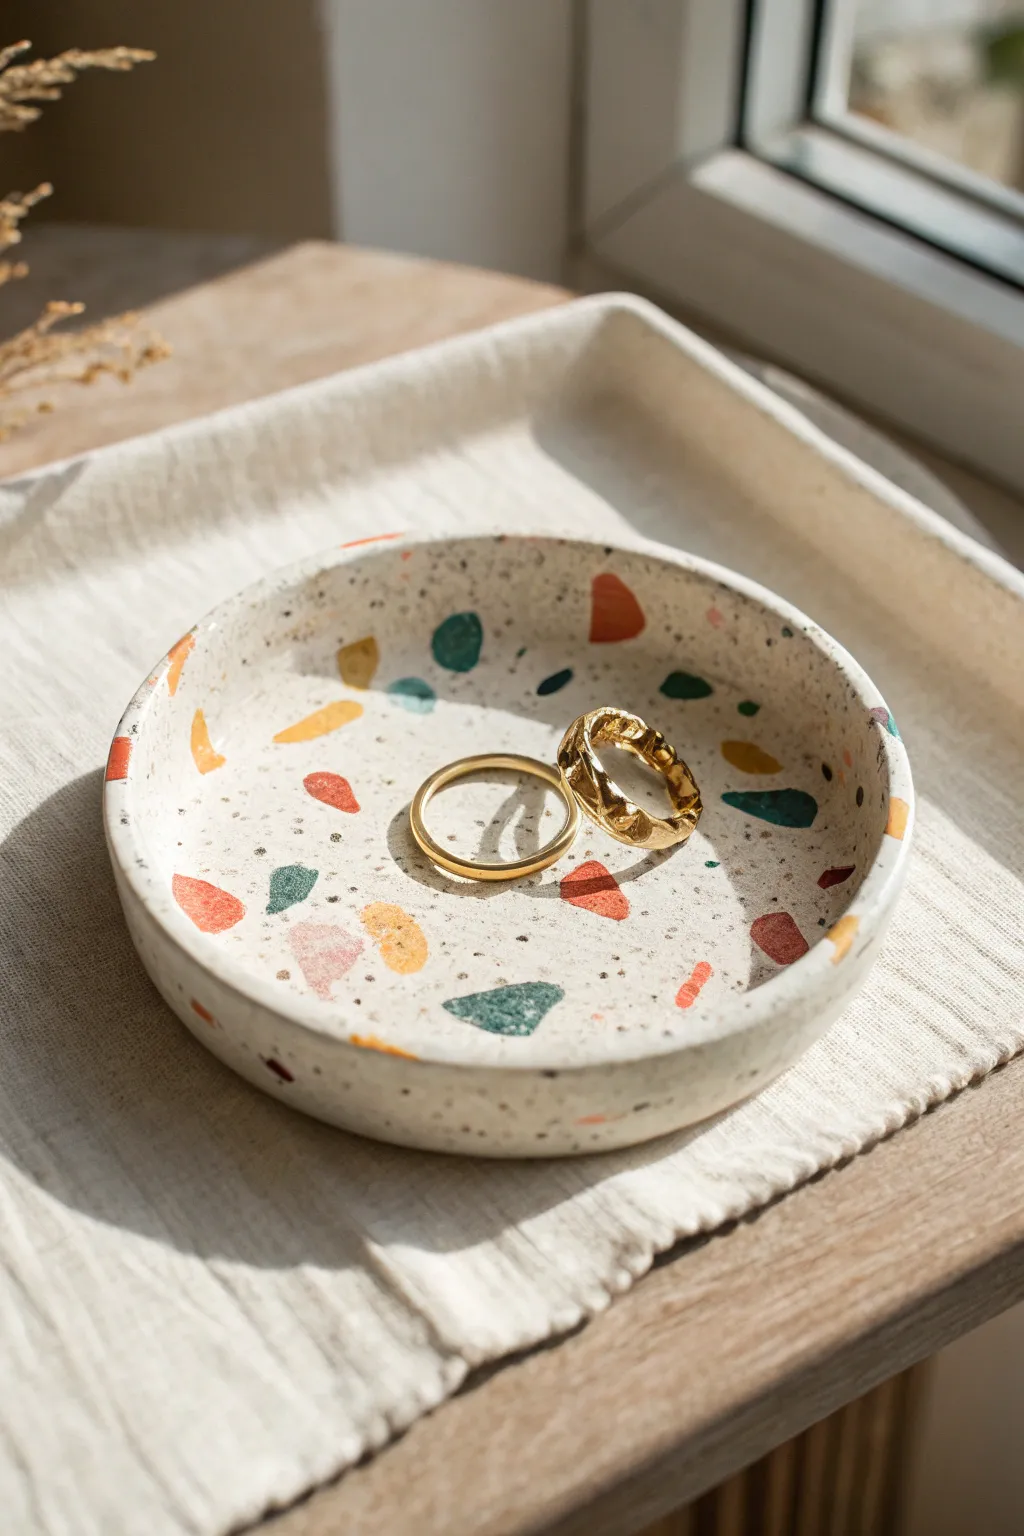
This trendy, speckled dish brings a modern pop of color to any vanity or bedside table. By embedding colorful clay chips directly into a white base, you create a faux-stone terrazzo effect that looks professionally ceramic but is surprisingly simple to make at home.
Step-by-Step
Materials
- White or cream air dry clay
- Air dry clay in assorted colors (terracotta, teal, mustard, sage)
- Acrylic rolling pin
- Sharp craft knife or clay blade
- Small bowl or circular cutter (approx. 4-5 inches)
- Larger bowl (for shaping)
- Sandpaper (fine grit)
- Glossy varnish or sealant
- Small brush for sealing
- Plastic wrap
- Clean work surface or silicone mat
Step 1: Preparing the Confetti
-
Roll Colored Clay:
Begin by taking small pinch-sized amounts of your colored clays. Roll each color out individually until they are very thin, roughly the thickness of cardstock. -
Create Chips:
Use your fingers to tear these thin sheets into random, irregular shapes. You want a mix of tiny specks and slightly larger, jagged pieces to mimic real stone aggregate. -
Let Them Set:
Set these colored chips aside on your work surface for about 10-15 minutes. Allowing them to dry just slightly makes them easier to handle and less likely to smear during the rolling process.
Step 2: Building the base
-
Condition Base Clay:
Take a large handful of your white or cream air dry clay. Knead it in your hands until it is warm, pliable, and free of any cracks. -
Initial Roll:
Roll out the white clay into a slab that is about 1/4 inch thick. Aim for an even surface, but don’t worry about the edges being perfect yet. -
Apply Confetti:
Randomly scatter your prepared colored chips onto the white slab. Don’t be afraid to overlap a few or leave some areas sparse for a natural look. -
Embed the Chips:
Take your rolling pin and gently roll over the slab again. Apply enough pressure so the colored chips are pressed flush into the white base, creating a smooth, unified surface. -
Flip and Repeat:
I like to carefully flip the slab over and add a few chips to the bottom side as well, so the dish looks finished from every angle. Roll it smooth again.
Clean Rolling
Wipe your rolling pin with a damp cloth between passes. Colored clay residue can stick to the pin and accidentally smear onto the white “grout” areas, muddying the design.
Step 3: Shaping and Drying
-
Cut the Circle:
Place your circular cutter or a small bowl upside down on the clay slab. Use your craft knife to trace around it, cutting out a clean, perfect circle. -
Smooth the Rim:
Dip your finger in a little bit of water and run it along the cut edge of the circle to smooth out any roughness or sharp corners. -
Form the Dish:
Pick up your clay circle and gently place it inside your larger shaping bowl. Use gravity to let it sink into a curved shape, or press it gently against the bottom. -
Refine the Shape:
Ensure the rim is even and the curve is consistent. If the clay is sticking, you can line the bowl with plastic wrap first. -
Slow Dry:
Leave the dish in the bowl to dry. Air dry clay shrinks as it dries, so check it occasionally. Let it sit for 24-48 hours until completely hard and white.
Warped Edges?
If the edges curl while drying, place a light weight (like a small bag of rice) in the center of the dish during the first few hours of drying to keep the bottom flat.
Step 4: Finishing Touches
-
Sand for Smoothness:
Once bone dry, take your fine-grit sandpaper and lightly sand the entire surface. This is crucial—it reveals the crisp edges of your colored chips and removes any haziness. -
Dust Off:
Wipe the dish thoroughly with a slightly damp cloth or a dry brush to remove every speck of clay dust before sealing. -
Apply Varnish:
Brush on a coat of glossy varnish. This will make the terrazzo colors pop and gives the dish a ceramic-like sheen. -
Final Cure:
Allow the varnish to dry completely according to the bottle instructions before placing your jewelry inside.
Now you have a chic, speckled catch-all perfect for holding your favorite rings.
Mini Nesting Dish Set
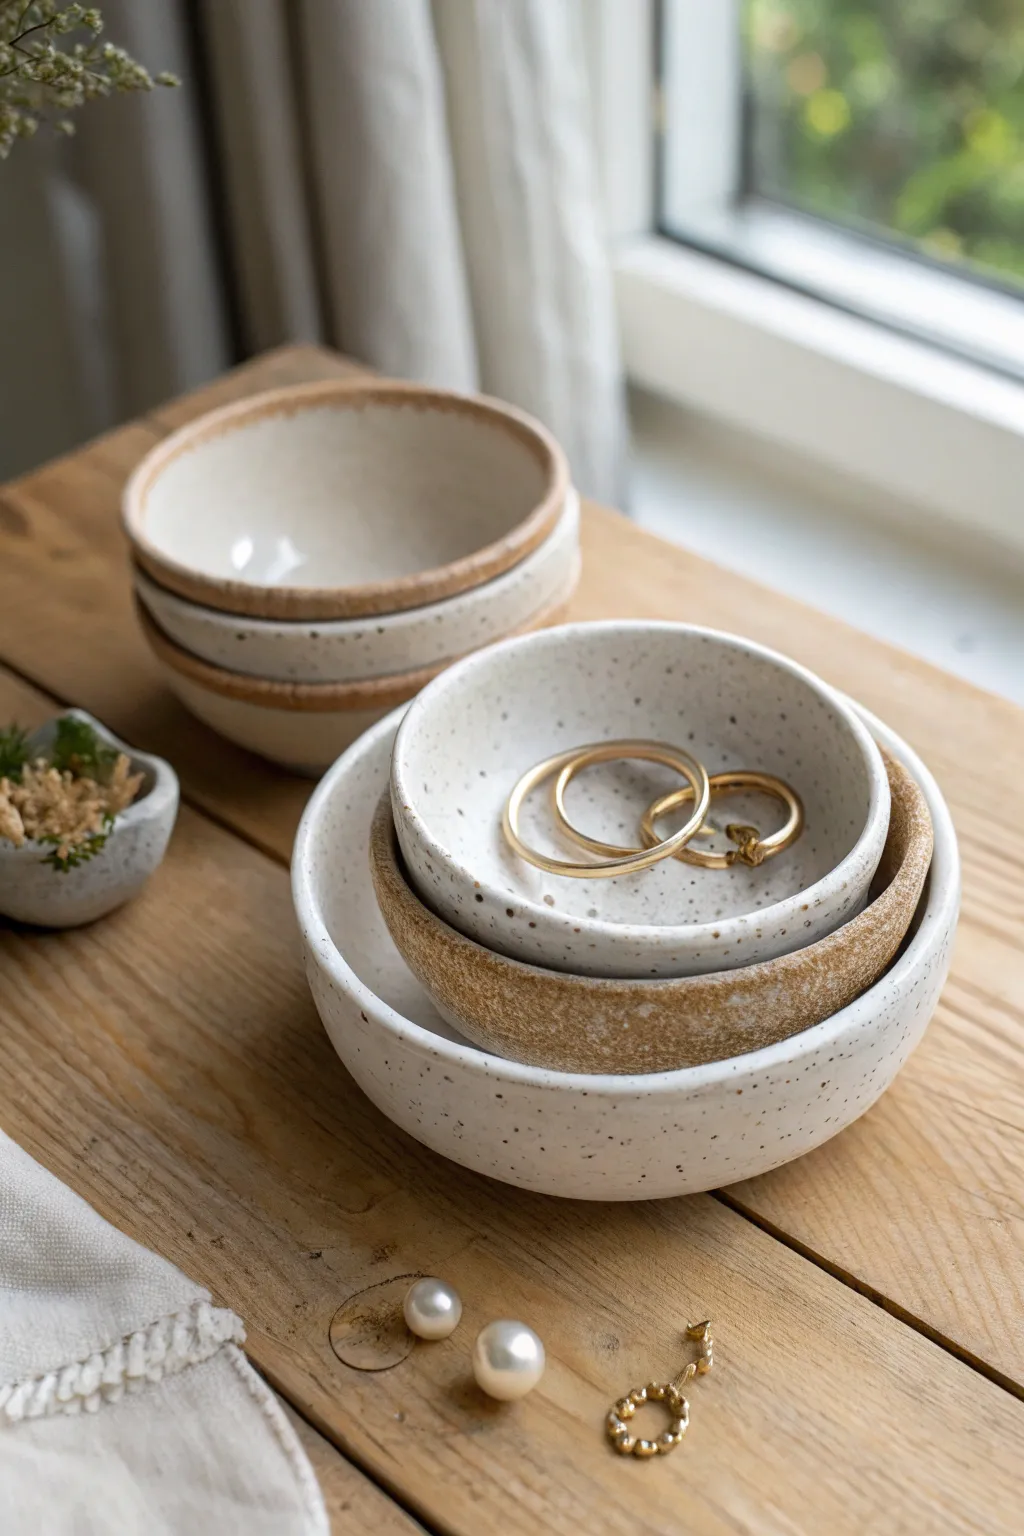
Achieve the high-end look of fired pottery without a kiln using this clever air dry clay technique. These nesting dishes feature a beautiful contrast between a smooth, speckled faux-glaze interior and a rustic, textured raw edge.
Detailed Instructions
Materials
- White or light grey air dry clay
- Rolling pin
- Nested circular cookie cutters or bowls (for templates)
- Small bowls acting as molds (various sizes)
- Sandpaper (fine and medium grit)
- Acrylic paint (warm white, cream/beige, dark brown)
- Glossy varnish or glaze (polyurethane or resin)
- Old toothbrush
- Sponge or textured foam
- Plastic wrap
- Water and small cup
Step 1: Shaping the Dishes
-
Prepare the workspace:
Cover your work surface with canvas or parchment paper to prevent sticking. Gather three bowls of graduating sizes to use as molds; cover the exterior of each mold with a tight layer of plastic wrap to ensure easy release later. -
Roll the clay:
Take a portion of air dry clay and warm it up in your hands until pliable. Roll it out to an even thickness of about 1/4 inch (approx. 5-6mm). Try to keep the thickness consistent, as this mimics thrown pottery. -
Cut the circles:
Using circular cutters or tracing around templates, cut out three circles of increasing sizes. You want these circles to be slightly larger than the molds you prepared, so the clay can drape down the sides. -
Form the shape:
Center a clay circle over your plastic-wrapped mold. Gently press the clay down over the curve, smoothing it with your thumbs to hug the shape. Don’t pull too hard, or the clay might thin out at the rim. -
Refine the rim:
While the clay is still wet, use a wet finger or a damp sponge to smooth the lip of the bowl. For the rustic look shown in the image, keep the rim slightly rounded but substantial, rather than sharpening it to a knife-edge. -
Initial Drying:
Let the clay sit on the molds for about 2-4 hours until it holds its shape but isn’t fully dry. Carefully pop them off the molds, peel away the plastic, and let them finish drying right-side up. This prevents cracking as the clay shrinks. -
Sand for perfection:
Once bone dry (usually 24-48 hours), use medium grit sandpaper to smooth any bumps on the exterior. Switch to fine grit for the interior to get that super-smooth, glazed ceramic feel. Wipe away all dust with a slightly damp cloth.
Fixing Cracks
Cracks happen! Mix a slurry of fresh clay and water (slip) to fill the crack. Let dry, then sand smooth. Repeat if the crack reappears as it dries.
Step 2: Faux Glazing & Finishing
-
Base coat – Rustic Exterior:
Mix a warm beige or light tan acrylic paint. Paint the exterior of the middle bowl (and the rims of the others if desired) to create that raw, sandy stoneware appearance found on the middle bowl in the set. -
Interior Base:
Paint the interior of all bowls and the exterior of the top and bottom bowls with a warm white or cream acrylic. Apply 2-3 thin coats for opaque coverage, letting each layer dry completely. -
Create the texture:
For the textured brownish rims seen on the middle bowl, sponge a little dark tan paint lightly over the beige base coat. This adds visual depth and mimics the gritty texture of unglazed clay. -
The splatter technique:
Dilute a tiny amount of dark brown paint with water until it’s inky. Dip an old toothbrush into this mixture. I usually test this on scrap paper first—run your thumb over the bristles to flick tiny specks onto the white painted areas. -
Control the speckles:
Aim for a random, organic distribution of specks. If you get a blob that is too big, quickly dab it up with a damp q-tip. Let the paint dry completely. -
Glossing for realism:
Apply a high-gloss varnish or glaze to the white, speckled areas. This is the secret to making it look like ceramic. I prefer two thick coats here to build up that glass-like shine. -
Matte contrast:
For the ‘raw’ beige exterior parts, use a matte varnish instead of gloss. This textural contrast between the shiny interior and matte exterior creates a convincing pottery illusion.
Rim Gold
Take these to a luxury level by painting just the very top rim with liquid gold leaf or metallic gold paint after the varnish has fully dried.
Stack your new faux-ceramic bowls on a vanity or coffee table for an instantly chic display spot for your jewelry