
When you want a gift that feels truly handmade and one-of-a-kind, a little clay sculpture always lands with extra heart. Here are my favorite clay sculpture gift ideas that balance cute and useful, and you can pull them off with air-dry clay or polymer clay.
Personalized Pet Mini Sculpture

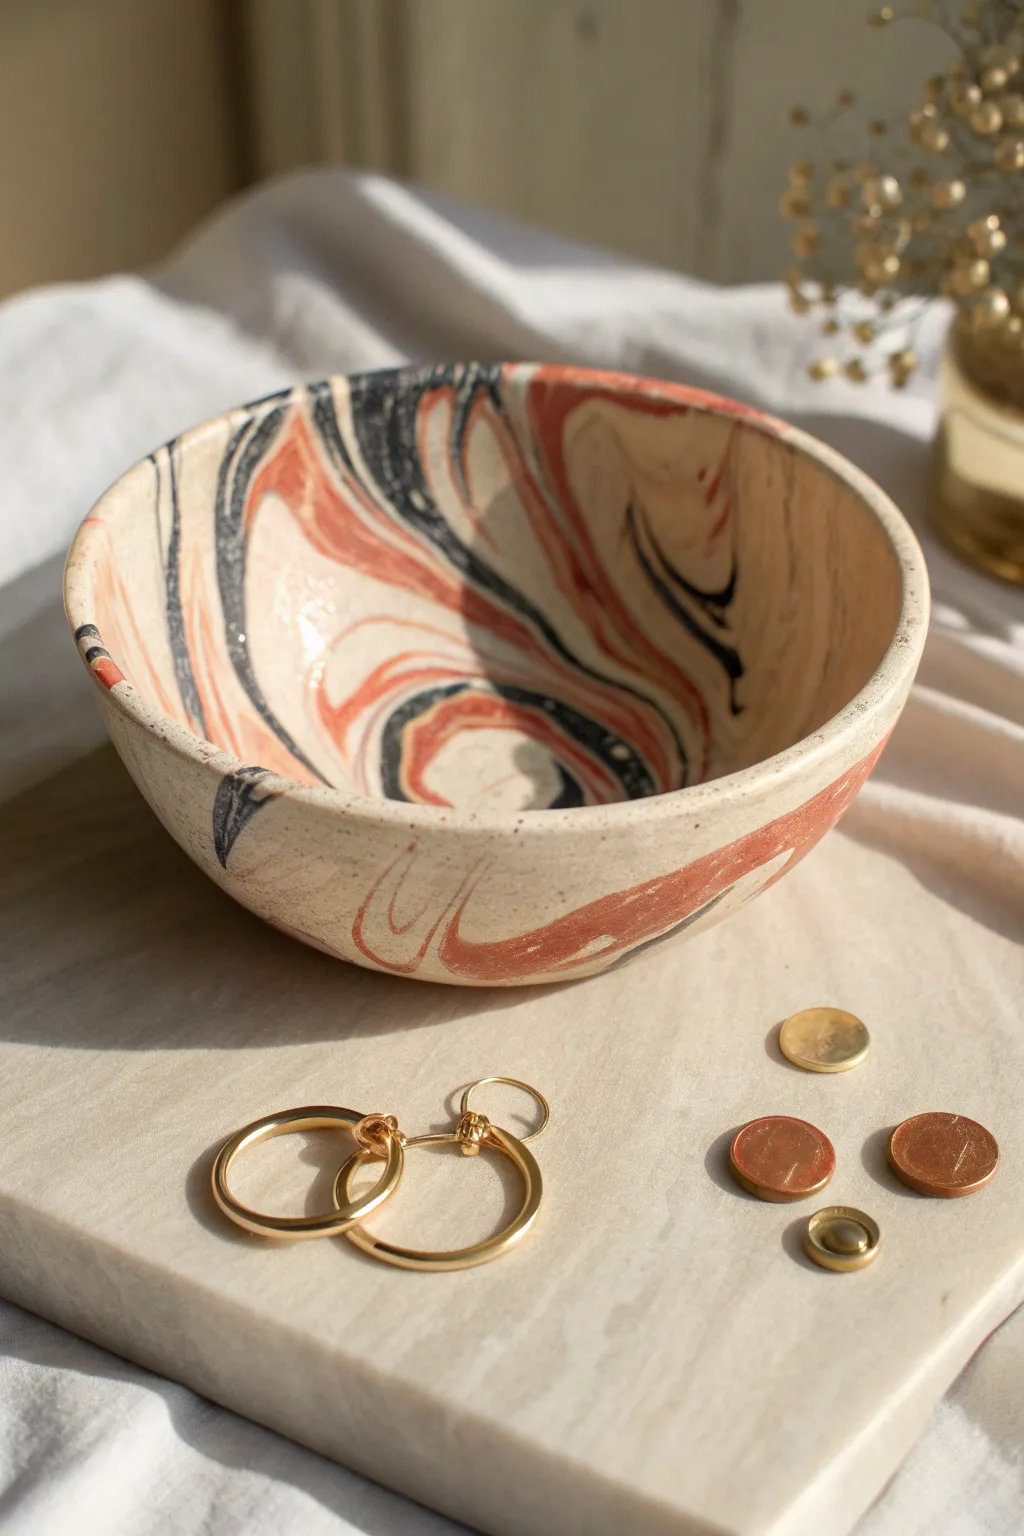
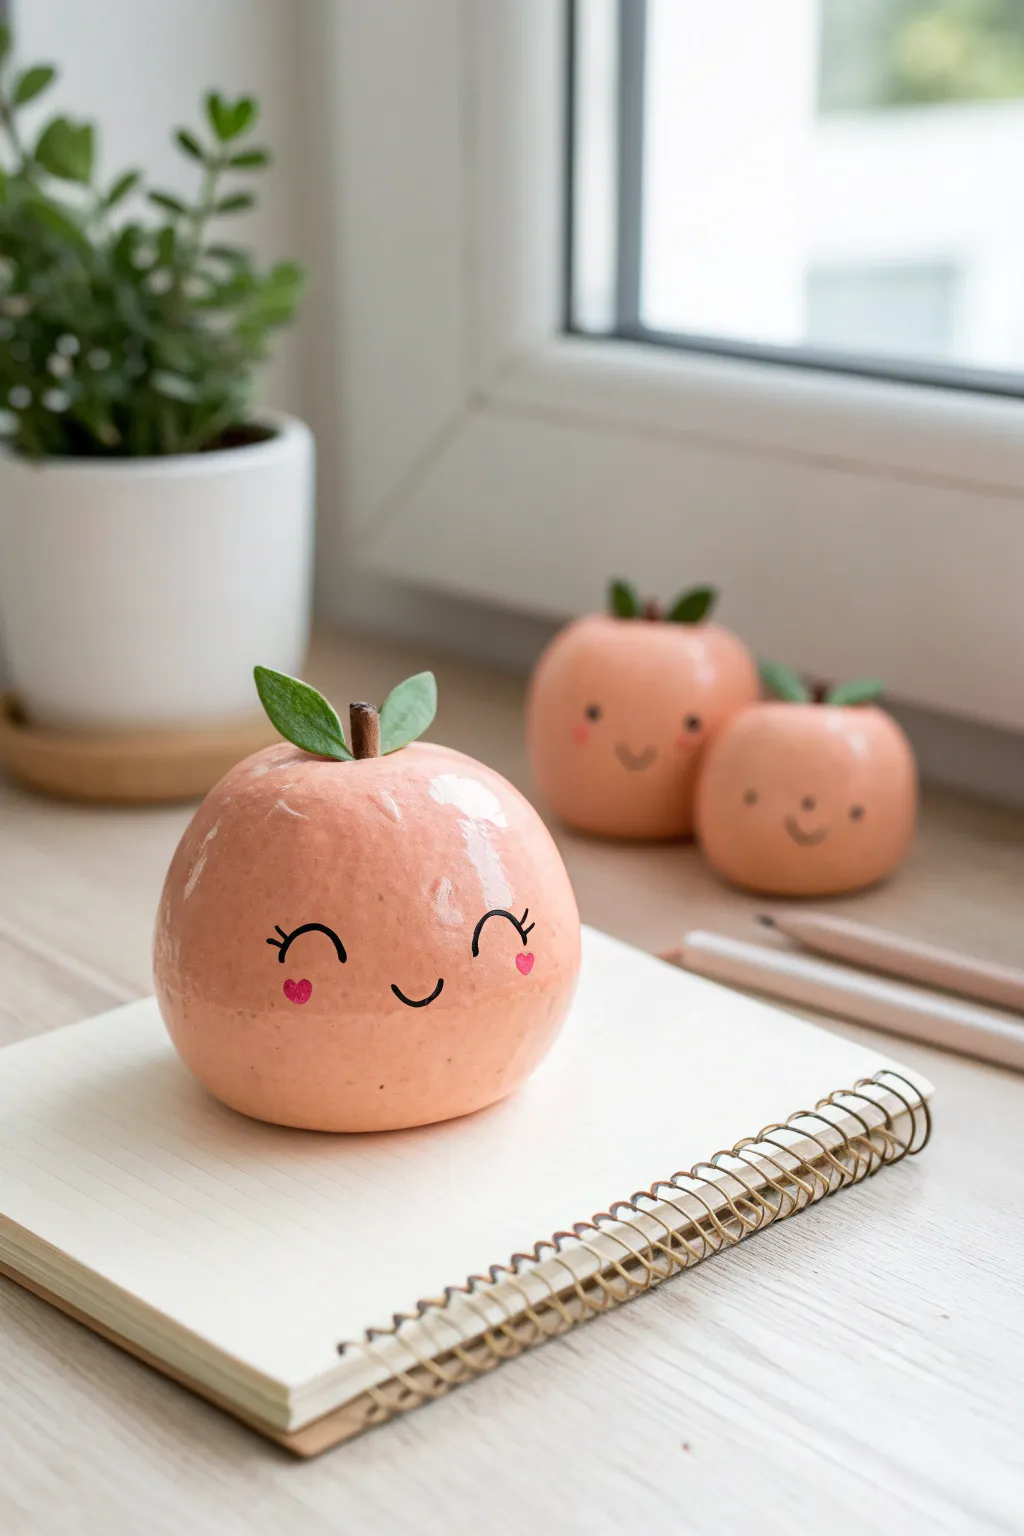
Capture the charm of a beloved feline companion with this warm, terracotta-style clay set featuring a smiling cat sculpture perched on an imprinted trinket dish. The matte, earthy finish gives it a timeless, artisanal look that makes for a heartwarming handmade gift.
Step-by-Step
Materials
- Terracotta-colored air-dry clay (or polymer clay)
- Small rolling pin
- Modeling tools (needle tool, smoothing tool)
- Small cup of water (for smoothing)
- Actual leaves or flower stems (for imprinting)
- Round cookie cutter (approx. 4 inches)
- Fine-grit sandpaper
- Acrylic matte varnish (optional)
Step 1: Sculpting the Cat
-
Form the base body:
Start with a ball of clay roughly the size of a golf ball. Roll it into a smooth pear shape, slightly flattening the bottom so it sits securely without tipping. -
Shape the head:
Take a smaller piece of clay, roughly a third of the size of the body, and roll it into a round ball. Gently press this onto the tapered top of your pear shape. -
Merge the forms:
Using your thumb or a modeling tool, drag clay from the neck area down onto the body and vice versa to create a seamless connection. Smoothing this join is crucial so the head doesn’t pop off later. -
Pinch the ears:
Pinch two small, triangular shapes from the top of the head. I like to use my thumb to gently press an indentation into the front of each ear to give them depth. -
Add the tail:
Roll a small snake of clay for the tail. Attach it to the lower back of the body, wrapping it slightly around the side, and blend the seams thoroughly. -
Define the legs:
Use a modeling tool to gently carve shallow lines into the front of the body to suggest front paws sitting neatly together, rather than attaching separate pieces. -
Create the face:
Add a tiny, lentil-sized piece of clay for the nose. Use a needle tool to etch two curved ‘U’ shapes for sleeping eyes and three whiskers on each cheek. -
Smooth the surface:
Dip your finger in a little water and gently rub the entire sculpture to remove fingerprints and create that soft, stone-like texture.
Cracks Appearing?
If you see hairline cracks while drying, mix a tiny bit of fresh clay with water to make a paste (slip) and fill the cracks immediately, then smooth.
Step 2: Creating the Base Dish
-
Roll out the slab:
Roll out a portion of clay until it is about 1/4 inch thick. Ensure the surface is even and free of air bubbles. -
Imprint the botanical design:
Before cutting the circle, gently press fresh stems or leaves into the clay surface. Roll over them once lightly with the rolling pin to embed the texture, then carefully peel them away. -
Cut the circle:
Use your round cookie cutter to punch out the base of the dish, centering your botanical imprint to your liking. -
Form the rim:
Roll a long, thin snake of clay. Score and slip (scratch and wet) the outer edge of your clay circle, then lay the coil on top to form a rim. -
Blend the rim:
Blend the coil onto the base on both the inside and outside seams until it looks like one solid piece of pottery. -
Create a personalized token:
With leftover clay, roll a small coin-sized disc. Use letter stamps to imprint a name or date, adding a decorative rim if desired.
Pro Tip: Textures
For a rustic, rough stone texture, gently tap the surface of the damp clay with an old toothbrush or a stiff stipple sponge before drying.
Step 3: Finishing Touches
-
Construct the scene:
Place your cat onto the center (or slightly off-center) of the dish. While you can glue it later, scoring and slipping it now creates a permanent bond. -
Final smooth:
Do a final check for any rough edges or stray clay bits, smoothing them down with a damp brush. -
Drying:
Let the piece air dry for 24-48 hours away from direct sunlight to prevent cracking. Turn it occasionally if possible for even drying. -
Sanding and sealing:
Once fully dry, lightly sand any sharp edges. A coat of matte varnish will protect the clay while keeping the natural look.
This simple yet expressive project creates a peaceful little corner wherever it sits


Marbled Trinket Bowl
Create a stunning statement piece for your vanity with this marbled trinket dish, featuring natural swirls of terracotta, cream, and charcoal. The organic movement of the coloured clay makes every single bowl a completely unique work of art.
Step-by-Step
Materials
- Polymer clay or air-dry clay (Cream/White, Terracotta/Rust, and Black)
- Acrylic rolling pin
- Medium-sized oven-safe bowl (to use as a mold)
- Craft knife or clay slicer
- Sandpaper (fine grit)
- Clear gloss glaze or varnish
- Soft paintbrush
- Parchment paper
Step 1: Preparing the Clay
-
Condition the base:
Start by taking a large chunk of your cream or white clay. Knead it thoroughly in your hands until it becomes soft, warm, and pliable. -
Prepare accent colors:
Repeat the conditioning process with smaller amounts of the terracotta and black clay. You’ll want a ratio of roughly 70% base color to 30% accent colors. -
Create snakes:
Roll each color into long, thin snake-like coils on your work surface. Make the white coils thick and the colored coils quite thin for a balanced look. -
Bundle the coils:
Gather all your clay snakes together, twisting them into one large rope. Fold this rope in half and twist it again. -
Marbling technique:
Roll the twisted rope into a smooth ball, then roll it back out into a snake. Repeat this ‘twist, fold, roll’ process 3-4 times. Stop before the colors muddy together; you want distinct striations.
Step 2: Shaping the Bowl
-
Form a slab:
Squash your marbled ball onto a piece of parchment paper. Using your acrylic rolling pin, flatten it into a consistent slab about 5mm thick. -
Check the pattern:
Look at both sides of your slab. Often, the underside reveals a more dynamic marble pattern, so choose your favorite side to be the interior of the bowl. -
Cut the circle:
Place a circular template (or a bowl rim) lightly onto the slab. Use your craft knife to trace around it, cutting out a perfect circle. -
Smooth the edges:
Dip your finger in a little water (for air-dry clay) or baby oil (for polymer) and gently run it along the cut edge to soften any sharpness. -
Mold the shape:
Take your oven-safe bowl mold and turn it upside down. Gently drape your clay circle over the bottom of the bowl. -
Secure the form:
Press the clay lightly against the mold to ensure it takes the shape, but be careful not to squash the marbling or leave deep fingerprints.
Clean Cuts
Chill your rolled clay slab in the fridge for 10 minutes before cutting the circle. Firm clay doesn’t drag against the knife, giving you a sharper rim.
Step 3: Finishing Touches
-
Curing or Drying:
If using polymer clay, bake according to the package instructions (usually 275°F/135°C for 15-30 mins). If using air-dry clay, leave it on the mold for 24-48 hours until fully hard. -
Remove from mold:
Once fully cured and cooled (or dried), carefully pop the clay bowl off the mold. It should release easily. -
Sand for smoothness:
Take your fine-grit sandpaper and gently buff the rim and the exterior of the bowl. This removes any tiny bumps and gives it a professional finish. -
Wipe down:
Use a slightly damp cloth or paper towel to wipe away all the sanding dust. The surface needs to be perfectly clean for the glaze. -
Apply varnish:
Dip your soft brush into the clear gloss glaze. Apply a thin, even coat to the inside of the bowl first. -
Seal the exterior:
Once the inside is dry to the touch, flip the bowl and glaze the outside. I prefer two thin coats over one thick one to prevent drips. -
Final cure:
Let the varnish dry completely according to the manufacturer’s time, usually overnight, before placing any jewelry inside.
Gold Rim Upgrade
After glazing, paint the very edge of the rim with liquid gold leaf or a gold paint pen. It adds a touch of luxury that highlights the swirling colors.
Now you have a chic, custom-made vessel perfect for holding your favorite rings or loose change


Flower-Shaped Jewelry Dish
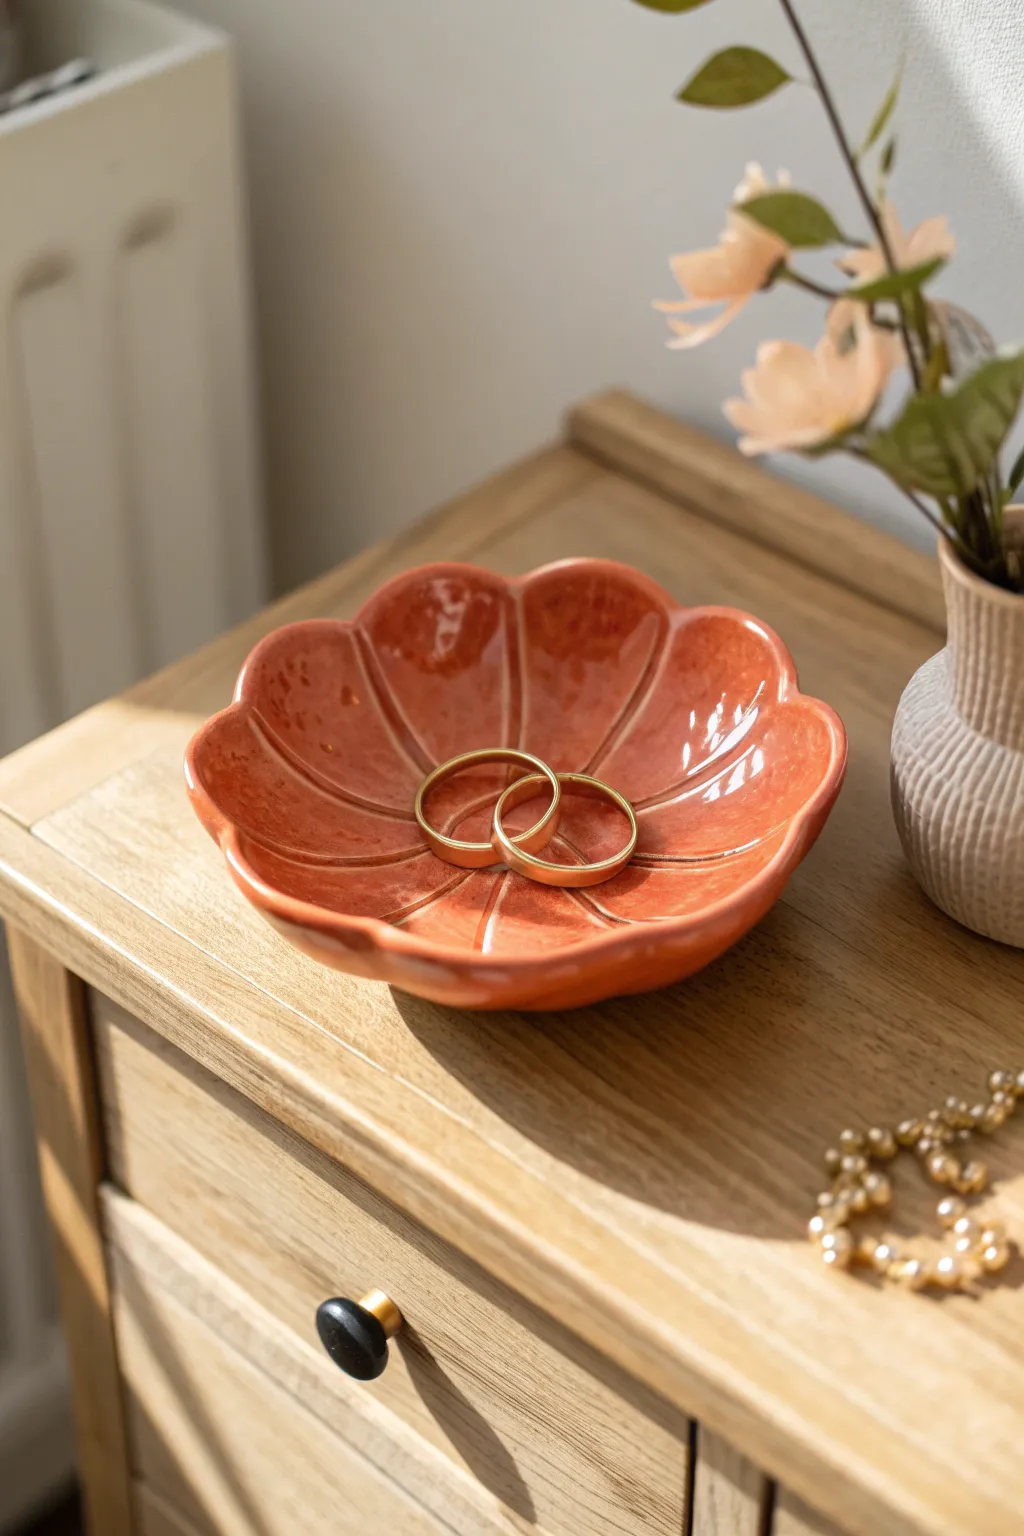
This charming, flower-shaped dish is the perfect resting place for everyday rings and trinkets, featuring a warm terracotta hue and a glossy, ceramic-like finish. Its gentle scalloped edges and subtle radial lines create an organic, petal-like feel that looks elegant on any nightstand.
Step-by-Step Guide
Materials
- Air-dry clay (terracotta color preferred) or polymer clay
- Rolling pin
- Small bowl (approx. 4-5 inches diameter) to use as a mold
- Plastic wrap
- Modeling tool or dull butter knife
- Needle tool or toothpick
- Fine-grit sandpaper
- Glossy varnish or glaze (food-safe if necessary)
- Soft synthetic paintbrush
- Circle cutter or a round template (approx. 5 inches)
Step 1: Shaping the Flower Base
-
Prepare the Clay:
Start by conditioning your clay. If using air-dry clay, knead it briefly to remove air bubbles. Roll it out into an even slab, approximately 1/4 inch thick. Aim for a consistent thickness to prevent warping during drying. -
Cut the Circle:
Using a large circle cutter or by tracing around a round template, cut a clean circle about 5 inches in diameter from your slab to serve as the base of the dish. -
Mark the Center:
Gently press a small indentation in the very center of your circle to guide your symmetry, but don’t poke all the way through. -
Define the Petals:
Imagine a clock face on your clay circle. Use your needle tool to make small tick marks at 12, 3, 6, and 9 o’clock. Then, add two evenly spaced marks between each of those main points to create 12 sections. -
Scallop the Edges:
Use your fingers or a modeling tool to gently press inwards at each mark you made on the rim, creating a scalloped, wavy edge. Smooth the curves so they look like rounded petals.
Fix Cracks Fast
If tiny cracks appear while drying air-dry clay, mix a small amount of fresh clay with water to make a paste (slip) and fill the cracks, then sand smooth once dry.
Step 2: Adding texture and Form
-
Impress Radial Lines:
Take your dull knife or modeling tool and gently press lines radiating from the center point out to the indents of your scalloped edge. These lines should be deep enough to see but shouldn’t cut the clay. -
Refining the Shape:
Go back over your impressed lines and soften the edges with your fingertip and a little water (for air-dry clay) to ensure there are no sharp burrs. -
Prepare the Mold:
Take your small bowl and line the inside with plastic wrap. This prevents the clay from sticking and makes removal much easier later. -
Form the Dish:
Carefully lift your clay flower and place it inside the lined bowl. Gently press the center down so it curves upward naturally, taking on the concave shape of the bowl. -
Adjust the Petals:
While in the bowl, ensure your scalloped edges are still distinct. You can gently push them back into shape if the transfer flattened them slightly.
Gold Rim Glamour
For an elevated look, paint the very edge of the rim with liquid metallic gold leaf paint after the main glaze has dried completely.
Step 3: Finishing Touches
-
Initial Drying:
Allow the clay to dry inside the bowl for at least 24 hours. This sets the curved shape. If using polymer clay, bake according to package instructions with the oven-safe bowl. -
Remove and Full Dry:
Once rigid enough to hold its shape, carefully remove the specific plastic wrap and clay from the bowl. Let it air dry completely for another 24-48 hours. I find flipping it over halfway helps the bottom dry evenly. -
Sand for Smoothness:
When bone dry, inspect the edges. Use fine-grit sandpaper to gently smooth away any roughness or sharp points on the scallops, creating a professional finish. -
Clean the Surface:
Wipe away all sanding dust with a slightly damp cloth or a dry soft brush. A clean surface is vital for a glassy finish. -
Apply the Glaze:
Apply a thick, even coat of high-gloss varnish or glaze. This mimics the look of kiln-fired ceramic. Ensure finish pools slightly in the depressions to enhance depth. -
Second Coat:
Let the first coat dry fully, then add a second or even third coat for that ultra-shiny, wet look seen in the photo.
Now you have a beautiful, handmade piece ready to hold your favorite rings or to give as a thoughtful gift


Tiny Bud Vase Magnet
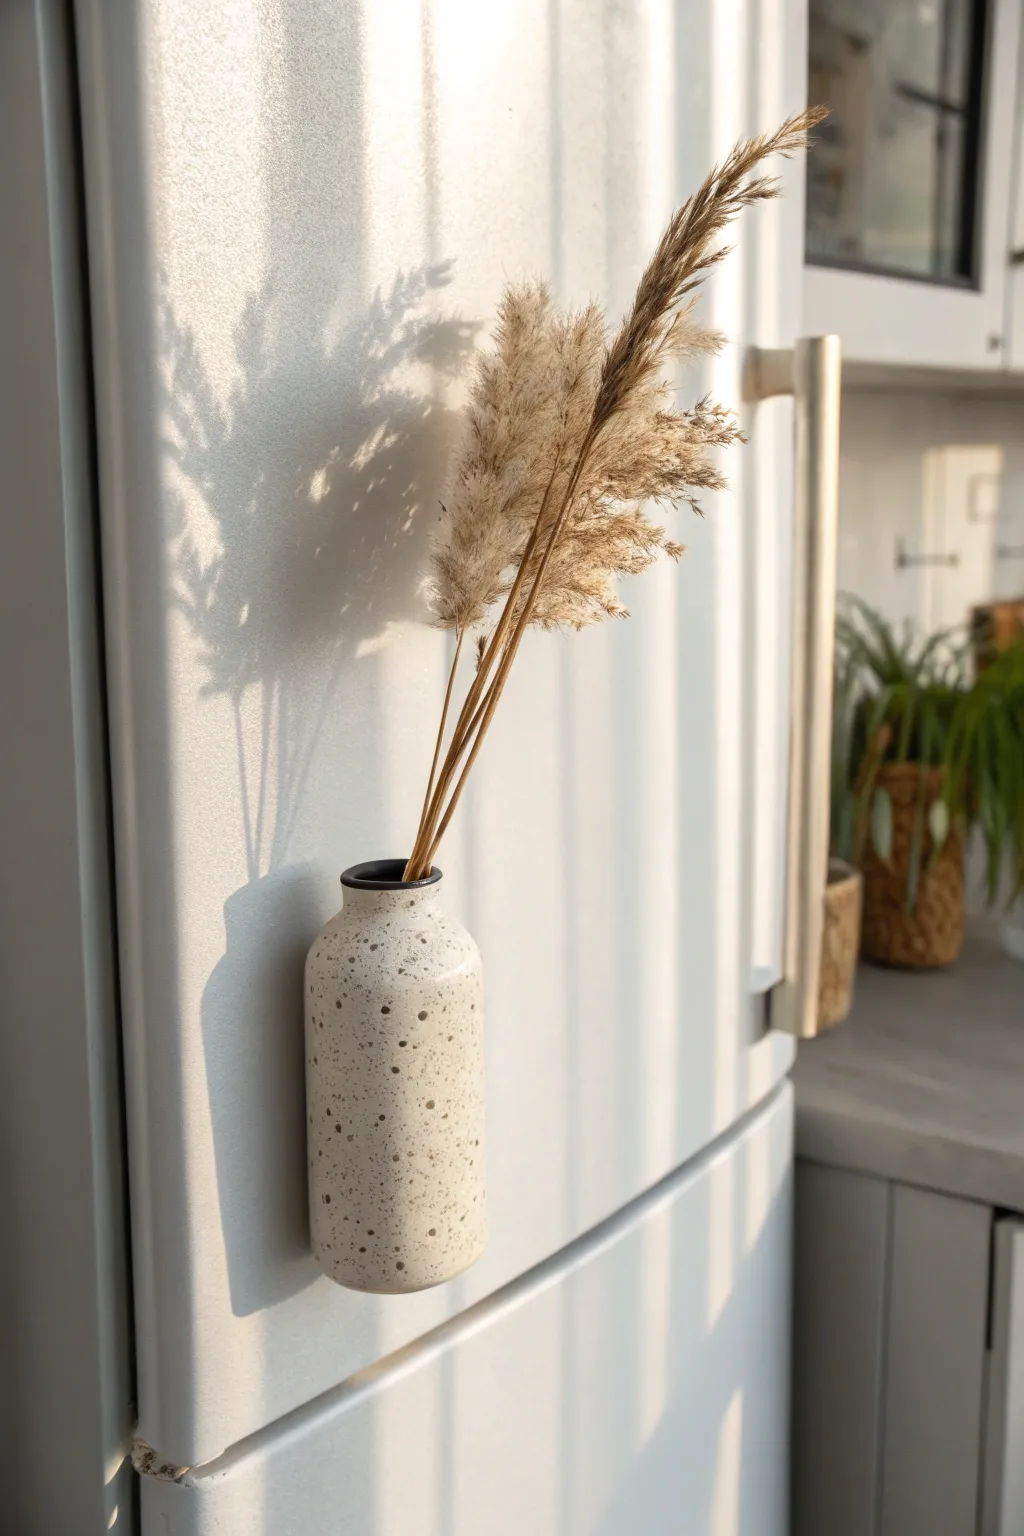
Bring a touch of organic minimalism to your refrigerator with this charming miniature vase, designed specifically to hold dried stems. The finish uses a speckled clay or glaze effect to mimic the look of natural stone, making it a sophisticated yet functional piece of kitchen decor.
Step-by-Step
Materials
- White stoneware clay or polymer clay (white/granite effect)
- Rare earth magnet (strong)
- E6000 adhesive or strong epoxy
- Rolling pin
- Small cylinder form (like a wooden dowel or marker casing)
- Needle tool
- Smoothing sponge
- Speckled white glaze OR white acrylic paint and black paint + toothbrush
- Black glaze or dark paint (for the rim)
- Clear matte varnish (if using polymer/acrylics)
Step 1: Forming the Vase Body
-
Condition the Clay:
Begin by working your chosen clay in your hands until it is pliable and warm. If using polymer clay, ensure there represent no air bubbles. -
Create a Base Slab:
Roll out a small portion of clay to about 1/4 inch thickness. Use a small round cutter or knife to cut a circle approximately 1 inch in diameter for the vase bottom. -
Form the Cylinder:
Roll out a rectangular slab of clay, roughly 3 inches tall and wide enough to wrap around your chosen cylinder tool. -
Assemble the Tube:
Wrap the rectangular slab around your cylinder form (dowel/marker). Score and slip the edges if using ceramic clay, or blend the seam smooth with your finger if using polymer. -
Attach the Bottom:
Place the clay tube onto your base circle. Carefully blend the clay from the walls down into the base so the seam disappears completely. -
Shape the Shoulder:
Gently gently pinch the top 1/2 inch of the cylinder inward to create a tapered neck. You want a distinct shoulder that narrows into a smaller opening.
Magnet Sliding?
If the filled vase slides down the fridge, the magnet isn’t strong enough. Use neodymium magnets, or glue a small strip of grippy rubber to the vase back.
Step 2: Refining and Surface Design
-
Flatten the Back:
While the clay is still workable, gently press the back side of the vase against a flat surface. This creates a flush area for the magnet to sit later. -
Refine the Rim:
smooth the opening of the vase. I like to slightly flare the heavy rim outward just a tiny bit to give it a finished, thrown-pottery look. -
Create the Magnet Recess:
Using a tool slightly larger than your magnet, press a shallow indentation into the flat back of the vase. This ensures the magnet sits flush rather than protruding. -
Initial Smoothing:
Use a damp sponge (ceramic) or baby oil (polymer) to smooth away any fingerprints or harsh tool marks. -
Fire or Bake:
If using ceramic clay, bisque fire now. If using polymer clay, bake according to the package instructions and let cool completely.
Step 3: Decorating and Finishing
-
Apply Base Color:
If your clay wasn’t already the desired color, paint or glaze the body with a creamy off-white. For ceramics, apply your speckled white glaze now. -
Create the Speckles:
If painting: Dilute a small amount of black or dark brown paint. Dip a toothbrush into it and flick the bristles to spray fine speckles across the vase surface. -
Detail the Rim:
Paint a very thin, precise line of black or dark bronze around the very top rim of the vase aperture for contrast. -
Final Coat and Assembly:
For ceramics, glaze fire. For polymer projects, apply a matte varnish to seal the paint. Once fully cured/dry, glue the magnet into the rear recess using strong adhesive.
Natural Texture
Mix actual coarse black pepper or dried coffee grounds into polymer clay before baking to create realistic stone-like speckles without painting.
Pop in a few springs of dried ornamental grass and enjoy your new functional art piece

The Complete Guide to Pottery Troubleshooting
Uncover the most common ceramic mistakes—from cracking clay to failed glazes—and learn how to fix them fast.
Sweet Animal Succulent Planter
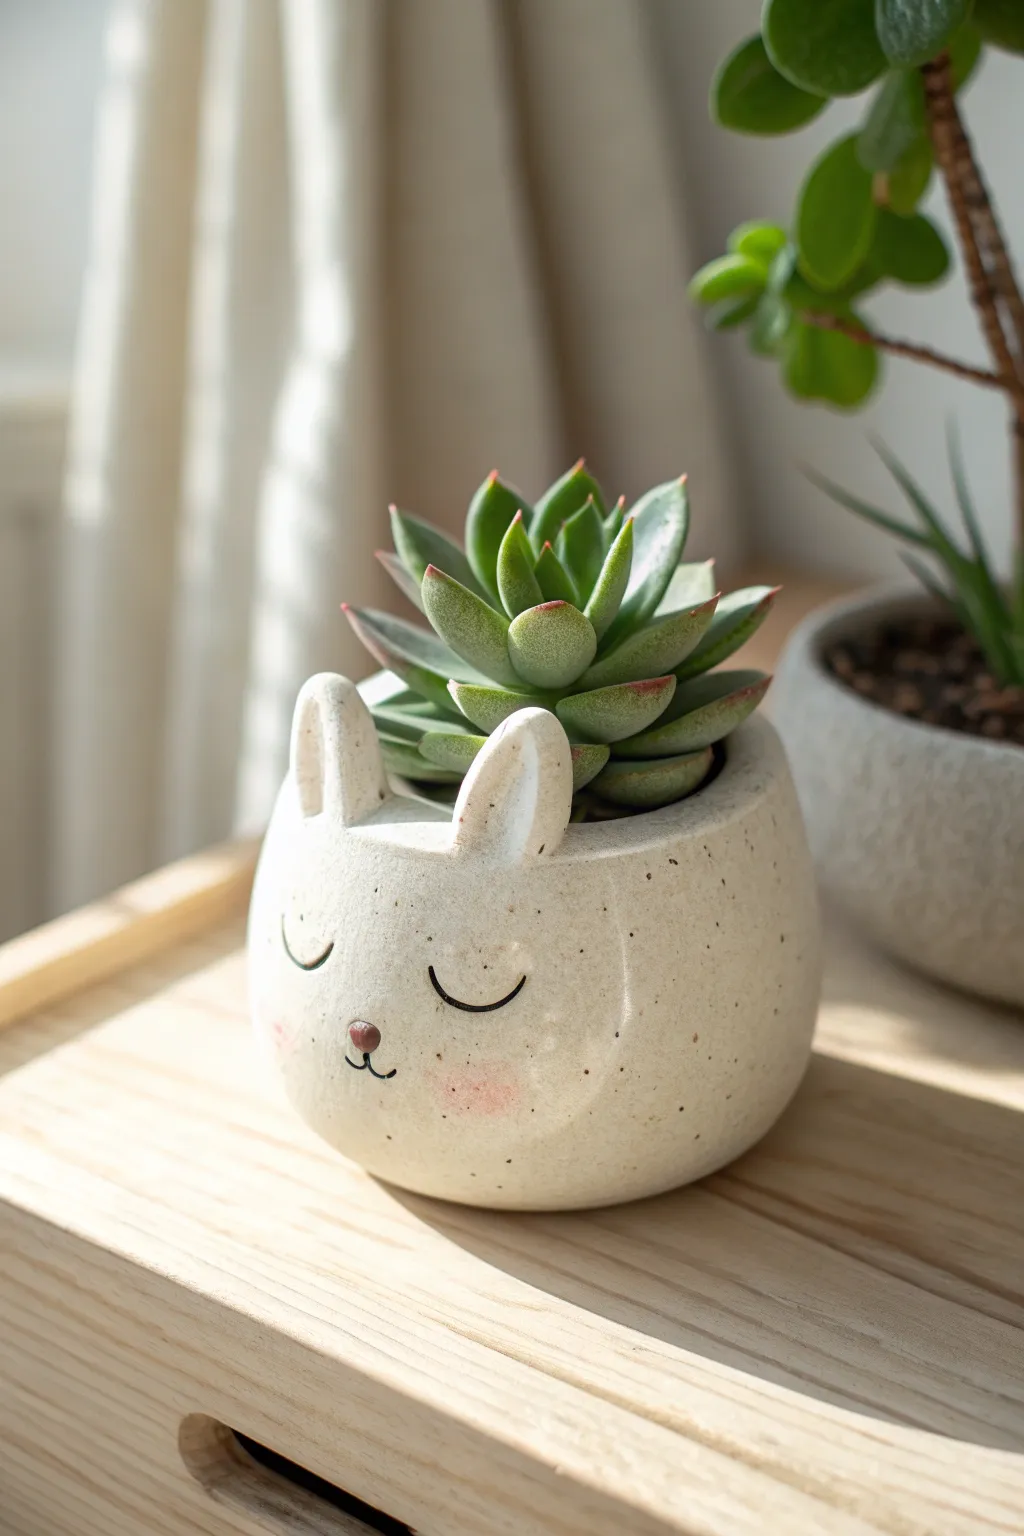
Bring a touch of sleepy sweetness to your windowsill with this adorable bunny planter project. Crafted from speckled clay to mimic natural stoneware, this small, round pot features delicate ears and a peacefully painted face, perfect for holding a rosette succulent.
Step-by-Step Guide
Materials
- White or light-colored polymer clay (or speckled stoneware clay if firing)
- Speckled clay add-in (glitter/sand) or faux stone spray paint
- Rolling pin
- Small spherical mold (like a Styrofoam ball or round bowl)
- Modeling tools (or a toothpick)
- Craft knife
- Water or liquid clay (for joining)
- Black acrylic paint
- Pink chalk pastel or blush
- Small fine-point paintbrush
- Matte varnish
- Small succulent and potting soil
Step 1: Shaping the Base
-
Prepare the Clay:
Begin by conditioning your white clay until it is soft and pliable. If you want that natural speckled look shown in the photo, kneed in a very small amount of black pepper or craft sand now. -
Roll the Slab:
Roll the clay out into a uniform slab, approximately 1/4 inch thick. Aim for a consistent thickness to ensure even drying or baking later. -
Form the Pot Body:
Drape the clay slab over your round mold or Styrofoam ball. Gently smooth the clay down the sides to create a half-sphere shape, trimming away excess from the bottom to create a stable, flat base. -
Refine the Rim:
Carefully remove the mold. Use your fingers or a dampened sponge to smooth the top rim of the pot, ensuring it’s slightly rounded rather than sharp. -
Check Stability:
Set the pot on your work surface. If it wobbles, gently tap the bottom against the table to flatten it further until it sits perfectly still.
Step 2: Adding Character
-
Shape the Ears:
Roll two small balls of clay and flatten them into elongated ovals. Pinch one end of each oval to create a tapered ear shape. -
Create the Ear Indents:
Use a modeling tool or the back of a paintbrush to gently press an indentation into the center of each ear, giving them depth and dimension. -
Attach the Ears:
Score the bottom of the ears and the rim of the pot where they will attach. Apply a dab of liquid clay or water (depending on your clay type) and press the ears firmly onto the front rim. -
Blend the Seams:
Use a small silicone tool or your finger to smooth the clay where the ears meet the pot, blending the seam until it is invisible so the ears look integral to the shape. -
Sculpt the Nose:
For the nose, roll a tiny, darker piece of clay (or paint a bump later) into a small triangle. Press this gently onto the front center of the pot face. -
Smooth the Surface:
Give the entire piece a final check. Dip a finger in a little rubbing alcohol (for polymer) or water and buff away any fingerprints or rough textures.
Natural Texture Hack
Mix dried coffee grounds or cracked black pepper into white polymer clay before sculpting to instantly mimic expensive speckled ceramic stoneware.
Step 3: Finishing Touches
-
Cure the Clay:
Bake or fire your clay according to the manufacturer’s specific instructions. Allow the pot to cool completely inside the oven to prevent cracking. -
Paint the Sleeping Eyes:
Using a very fine liner brush and black acrylic paint, carefully paint two curved ‘U’ shapes for the closed eyes. Add tiny eyelashes if you like, but keep lines thin. -
Add Cheery Cheeks:
Scrape a little pink chalk pastel into dust. Use a dry, soft brush to gently buff this powder onto the cheek area for a soft, airbrushed blush effect. -
Detail the Mouth:
Paint a very small ‘w’ shape beneath the nose to create the mouth, connecting it to the nose with a tiny vertical line. -
Protect the Piece:
Once the paint is fully dry, apply a coat of matte spray varnish to seal the surface and protect the painted details from water damage. -
Planting:
Nestle your succulent into the pot with a bit of soil, arranging the leaves to look like a spiky crown between the bunny ears.
Wobbly Ears?
If the ears droop while baking, support them from behind with a small wedge of crumpled aluminum foil or tissue paper until the clay hardens.
Now you have a charming little companion ready to brighten up your desk space
Stacked Candle Holder Totem
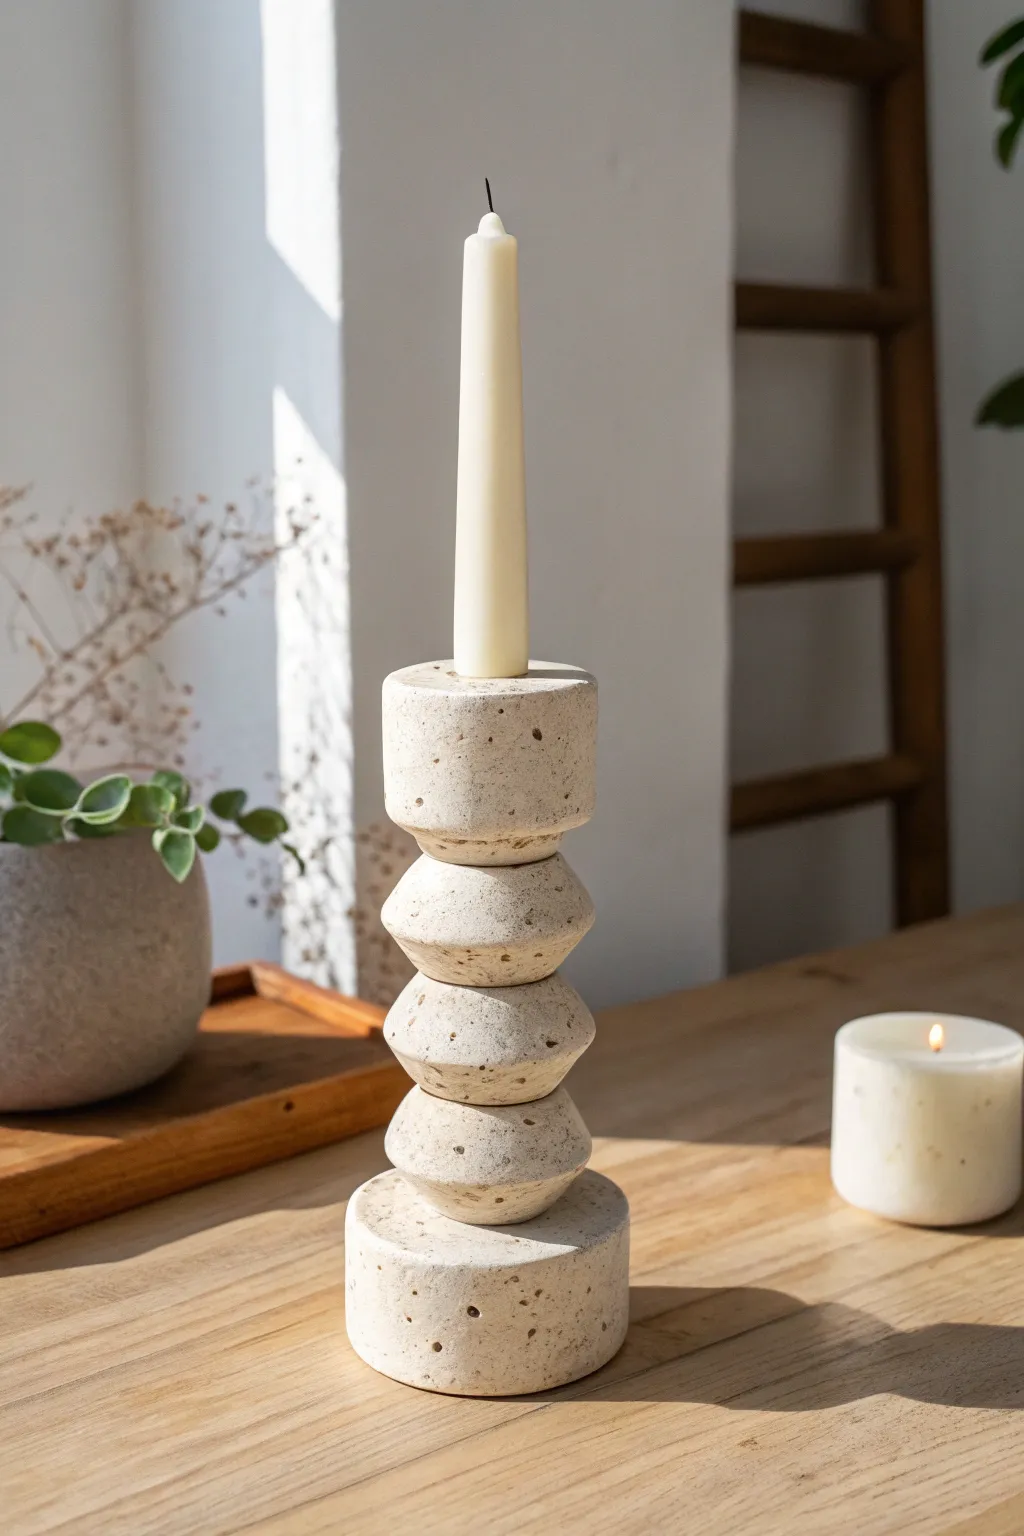
This architectural candle holder mimics the look of carved travertine or sandstone but is surprisingly achievable with clay. Its geometric stack of shapes creates a modern, sculptural centerpiece perfect for a tapered candle.
How-To Guide
Materials
- Air-dry clay (stone or white color)
- Acrylic rolling pin
- Circle cutters (various sizes)
- Clay knife or fettling knife
- Needle tool
- Slip (clay mixed with water)
- Coarse sandpaper or sanding sponge
- Coffee grounds or speckled sand (optional for texture)
- Wooden dowel (matches candle width)
- Matte spray varnish
Step 1: Shaping the Segments
-
Prepare the clay:
Begin by conditioning your clay. If you want that realistic speckled stone look shown in the photo, knead a small amount of dried coffee grounds or sand into the clay body before shaping. -
Cut the base cylinder:
Roll out a thick slab of clay, roughly 1 inch deep. Use your largest circle cutter to punch out a round base. Alternatively, hand-shape a cylinder and flatten the top and bottom on your work surface. -
Refine the base:
Roll the edges of the cylinder on the table to ensure the sides are perfectly vertical. The base needs to be the widest and heaviest piece for stability. -
Form the middle beads:
Roll three balls of clay of equal size. These shouldn’t be perfect spheres but rather slightly flattened spheroids. -
Create the faceted edges:
Gently pinch the equator of each clay ball to create a ridge, then flatten the top and bottom poles slightly. This creates that ‘bicone’ or faceted bead shape seen in the center of the stack. -
Make the top cylinder:
Create a final cylinder for the top, similar to the base but slightly taller and narrower. Ensure the top surface is perfectly flat. -
Size the candle hole:
Take your actual candle or a dowel of the same diameter and press it firmly into the center of the top cylinder. Twist slightly as you pull it out to create a clean socket about 1 inch deep.
Stone Texture Secret
Don’t smooth the clay too perfectly. Leaving small pockmarks and using a coarse sponge to dab the surface creates a faux-travertine texture.
Step 2: Assembly and Finish
-
Center the holes:
To ensure your totem is straight, use a long, thin dowel or skewer. Pierce a vertical hole through the center of every piece you’ve made: the base, the three beads, and the bottom of the top holder. -
Score and slip:
Score the top of the base and the bottom of the first bead with a needle tool. Apply slip (clay glue) generously to both surfaces. -
Stack the totem:
Thread the pieces onto your central skewer one by one, pressing them firmly together at the slippped joints. The skewer acts as an internal spine while the clay is wet. -
Align the segments:
Stand back and check the silhouette. Gently nudge the beads so their ridged equators are parallel. I like to rotate the entire piece on a lazy susan to spot any leaning. -
Remove the spine:
Once the pieces are joined but before they fully harden, carefully twist and remove the central skewer (unless you want to leave it in for permanent structural support, in which case, ensure it doesn’t block the candle hole). -
Slow drying:
Let the sculpture dry slowly under a loose plastic bag for 24-48 hours. Slow drying prevents cracks between the stacked sections. -
Sand for stone texture:
Once bone dry, sand the surface vigorously. This is crucial for the ‘stone’ look—you want to reveal those coffee grounds or sand speckles and soften any fingerprints. -
Clean the dust:
Wipe the entire piece down with a slightly damp sponge to remove clay dust and bring out the contrast in the speckles. -
Seal the surface:
Finish with a coat of matte spray varnish. This protects the clay without adding an artificial shine, keeping that raw stone aesthetic.
Marble Effect
Twist two different mild earth-tone clays together before shaping to create a subtle, natural marble vein running through your totem.
Place a taper candle in your new holder and enjoy the warm, grounding atmosphere it brings to the room


What Really Happens Inside the Kiln
Learn how time and temperature work together inside the kiln to transform clay into durable ceramic.
Minimal Loop Incense Holder
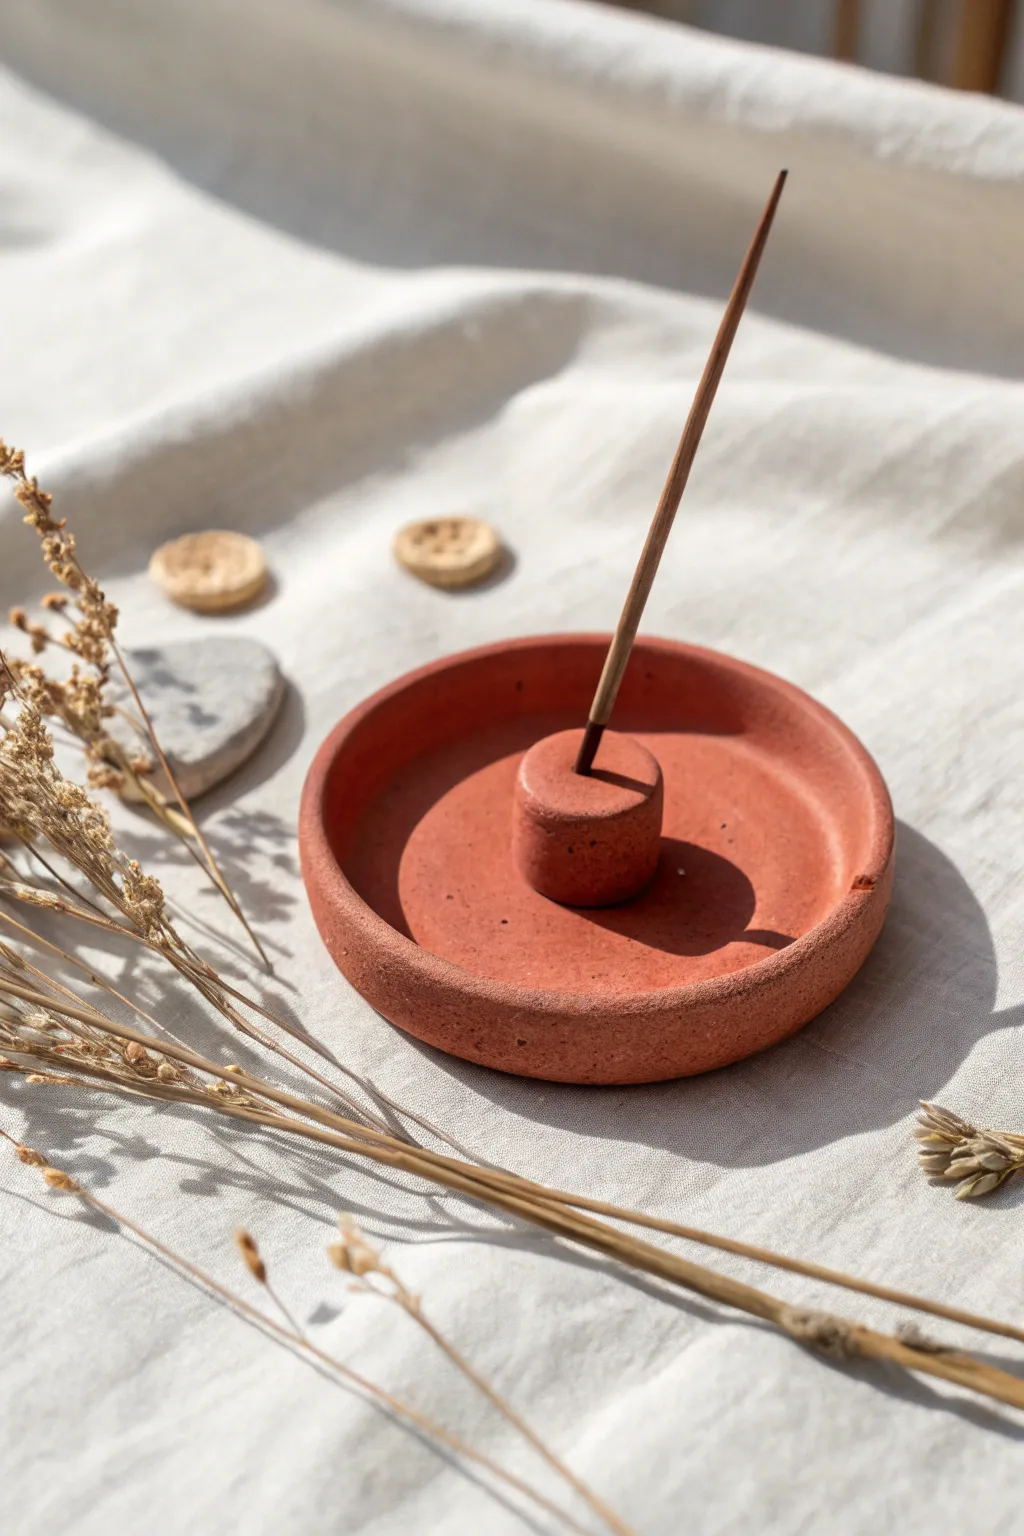
Embrace simplicity with this warm, terracotta-toned incense holder that features a clean geometric design. The central cylinder and shallow dish create a functional yet modern sculpture perfect for holding your favorite scents.
Detailed Instructions
Materials
- Terracotta-colored polymer clay or air-dry clay
- Rolling pin
- Circle cookie cutter (approx. 3-4 inches diameter)
- Small circle cutter or bottle cap (approx. 0.75-1 inch diameter)
- Craft knife
- Dowel or wooden skewer (slightly thicker than your incense sticks)
- Fine-grit sandpaper
- Small bowl of water (if using air-dry clay)
- Acrylic matte varnish (optional)
Step 1: Forming the Base
-
Condition the clay:
Begin by taking a generous amount of your terracotta clay and kneading it in your hands. You want it to be pliable and warm, free from any cracks or stiff spots. -
Roll the slab:
Place the clay on a smooth work surface. Use your rolling pin to flatten it into an even slab, aiming for a consistent thickness of about 1/4 inch. -
Cut the main circle:
Press your large circle cutter firmly into the specific area of the slab with the smoothest texture. Lift the cutter and peel away the excess clay from the outside. -
Smooth the edges:
Run your finger gently around the circumference of the circle to soften the sharp cut edge. If you are using air-dry clay, dipping your finger in a little water helps create a flawless finish here.
Cracking Up?
If air-dry clay cracks while drying, mix a tiny bit of fresh clay with water to make a paste (slip). Fill the cracks, smooth it over, and let dry again.
Step 2: Creating the Rim
-
Prepare a coil:
Take the excess clay you removed earlier and roll it into a long, thin snake or coil. It should be long enough to go around the entire perimeter of your base circle. -
Attach the coil:
Place the coil directly on top of the outer edge of your base circle. Gently press it down so it adheres. -
Blend the seam:
Using a modeling tool or just your thumb, smear the clay from the inside of the coil down onto the base to lock them together. I like to do this slowly to ensure there are no visible gaps. -
Refine the wall:
Pinch the coil upward slightly to create a low vertical wall. Smooth the outside and inside with fingers or a damp sponge until it looks like one solid piece rather than a coil attached to a base.
Speckled Stone Effect
Knead roughly ground black pepper or dried used coffee grounds into the clay before rolling. This creates a faux-stone speckled texture once dry.
Step 3: The Central Holder
-
Cut the center piece:
Roll out a small piece of clay, but keep this one much thicker—about 1/2 inch to 3/4 inch thick. Use your small circle cutter to punch out a thick cylinder. -
Position the cylinder:
Place this small cylinder exactly in the geometric center of your dish. Score the bottom of the cylinder and the spot on the dish where it will sit to create a better bond. -
Secure the center:
Press the cylinder down firmly but carefully so you don’t distort the shape. Use a small tool to blend the very bottom edge of the cylinder into the dish floor for stability. -
Create the hole:
Take your wooden skewer or dowel and poke a hole straight down into the center of the cylinder. Don’t go all the way through the base dish; stop when you feel resistance. -
Check the angle:
Wiggle the stick slightly to ensure the hole is wide enough for an incense stick, and double-check that it stands straight or at your preferred slight angle.
Step 4: Finishing Touches
-
Final smoothing:
Give the entire piece one last inspection. Rub out any fingerprints with a tiny amount of water or baby oil depending on your clay type. -
Texture application (optional):
To achieve the stony look in the photo, gently tap the surface with a stiff bristle brush or a crumpled ball of foil to remove the ‘plastic’ sheen. -
Drying or baking:
If using air-dry clay, let it sit in a cool, dry place for 24-48 hours. If using polymer clay, bake according to the package temperature instructions. -
Sand the imperfections:
Once fully cured and hard, use fine-grit sandpaper to buff away any sharp bits on the rim or base. -
Seal (Optional):
While the raw matte look is beautiful, you can apply a very thin coat of matte varnish if you want to protect the surface from ash stains over time.
Now place your finished holder on a sunny surface and enjoy the calm atmosphere it brings to your space
Modern Photo and Note Stand
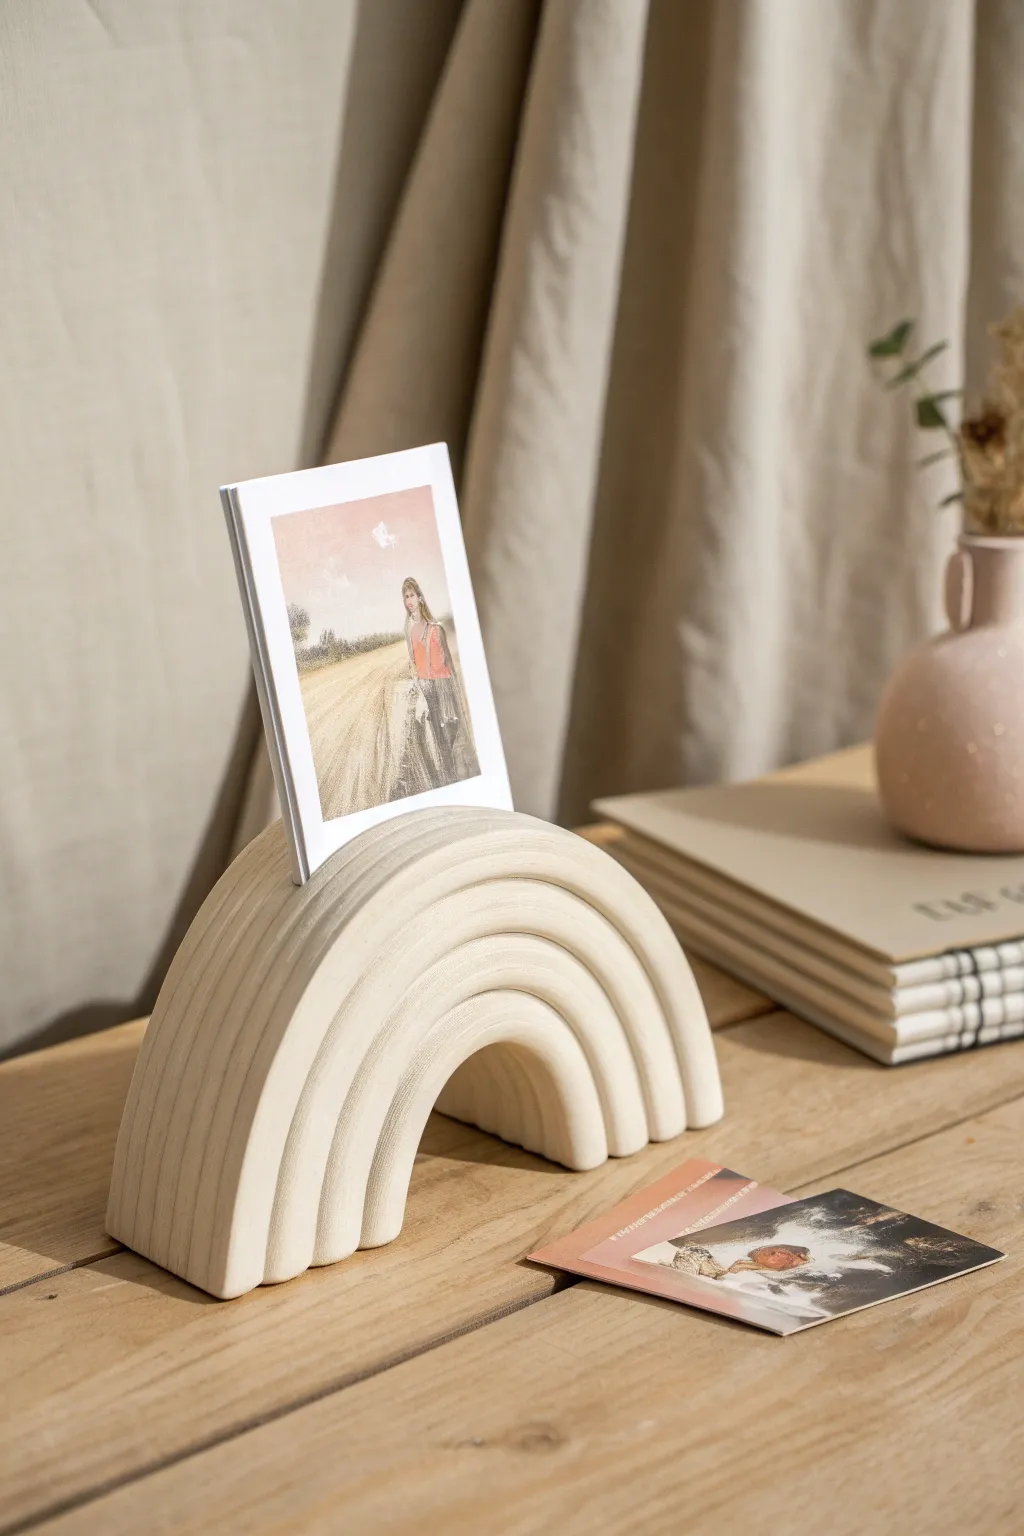
This minimalist, arch-shaped photo holder combines organic warmth with clean, modern lines. Its natural beige tone and fluted texture make it a sophisticated desk accessory for displaying cherished memories.
Step-by-Step
Materials
- Air-dry clay (white or natural stone color)
- Clay roller or rolling pin
- Ruler
- Sharp clay knife or craft blade
- Cardboard or stiff paper (for template)
- Scissors
- Loop tool (medium round)
- Small sponge
- Water cup
- Fine-grit sandpaper (220 and 400 grit)
- Matte spray varnish (optional)
Step 1: Shaping the Arch
-
Prepare your clay:
Begin by conditioning a large block of air-dry clay. Knead it thoroughly until it is warm and pliable, removing any air bubbles that could cause cracking later. -
Roll the slab:
Roll the clay out into a thick, uniform slab. You want this quite substantial, approximately 1.5 to 2 inches thick, to ensure the stand is stable and can support itself. -
Create a template:
Sketch a semi-circle arch shape onto a piece of cardboard to use as your guide. The dimensions should be about 6 inches wide at the base and 4 inches tall. -
Cut the basic form:
Place your template on the clay slab. Using a sharp clay knife, slice straight down through the clay to cut out the arched shape. Keep your blade perpendicular to the table for clean, vertical sides. -
Smooth the edges:
Dip your finger in a little water and run it along the cut edges. Smooth down any sharp corners or dragging marks left by the knife.
Clean Lines Pro-Tip
Wipe your loop tool clean after every single carving stroke. Clay buildup on the tool is the number one cause of messy, jagged ridges.
Step 2: Carving the Fluting
-
Mark the guide lines:
Using a ruler and a needle tool or toothpick, lightly score parallel curved lines across the face of the arch. These will guide your carving tool to ensure the ridges are symmetrical. -
Carve the first channel:
Take a medium-sized round loop tool. Starting at the bottom left base of the arch, drag the tool steadily along your first guideline up over the curve and down to the other side. -
Deepen the ridges:
Repeat this motion, carving parallel channels side-by-side. I find that doing shallow passes first and then going deeper helps maintain control. -
Refine the surface:
Once the ridges are carved, use a slightly damp sponge to gently soften the sharp peaks of the clay ridges without losing their definition. -
Create the photo slot:
At the very apex of the arch, use your clay knife to cut a thin, deep slit. It should be slightly angled backward to hold the photo upright, and about 0.5 inches deep.
Slumping Arch?
If the clay sags while drying, prop the center of the arch up with a crumpled ball of aluminum foil or paper towel to support the shape until it hardens.
Step 3: Finishing Touches
-
Initial Drying:
Let the sculpture sit for about 24 to 48 hours in a cool, dry place. Turn it onto its back occasionally so the bottom dries evenly. -
Sand the flat sides:
Once fully dry, take your 220-grit sandpaper and sand the front and back flat faces of the arch to ensure they are perfectly smooth. -
Refine the ridges:
Fold a small piece of sandpaper to get inside the carved grooves. Gently sand away any burrs or rough patches inside the fluting. -
Final polish:
Switch to 400-grit sandpaper for a final pass over the entire piece. This will give the raw clay a satiny, professional finish. -
Seal the piece:
To protect against dust and fingerprints, apply a light coat of matte spray varnish in a well-ventilated area.
Now you have a timeless display piece ready to showcase your favorite postcard or photograph

TRACK YOUR CERAMIC JOURNEY
Capture glaze tests, firing details, and creative progress—all in one simple printable. Make your projects easier to repeat and improve.
Stamped Initial Fridge Magnets
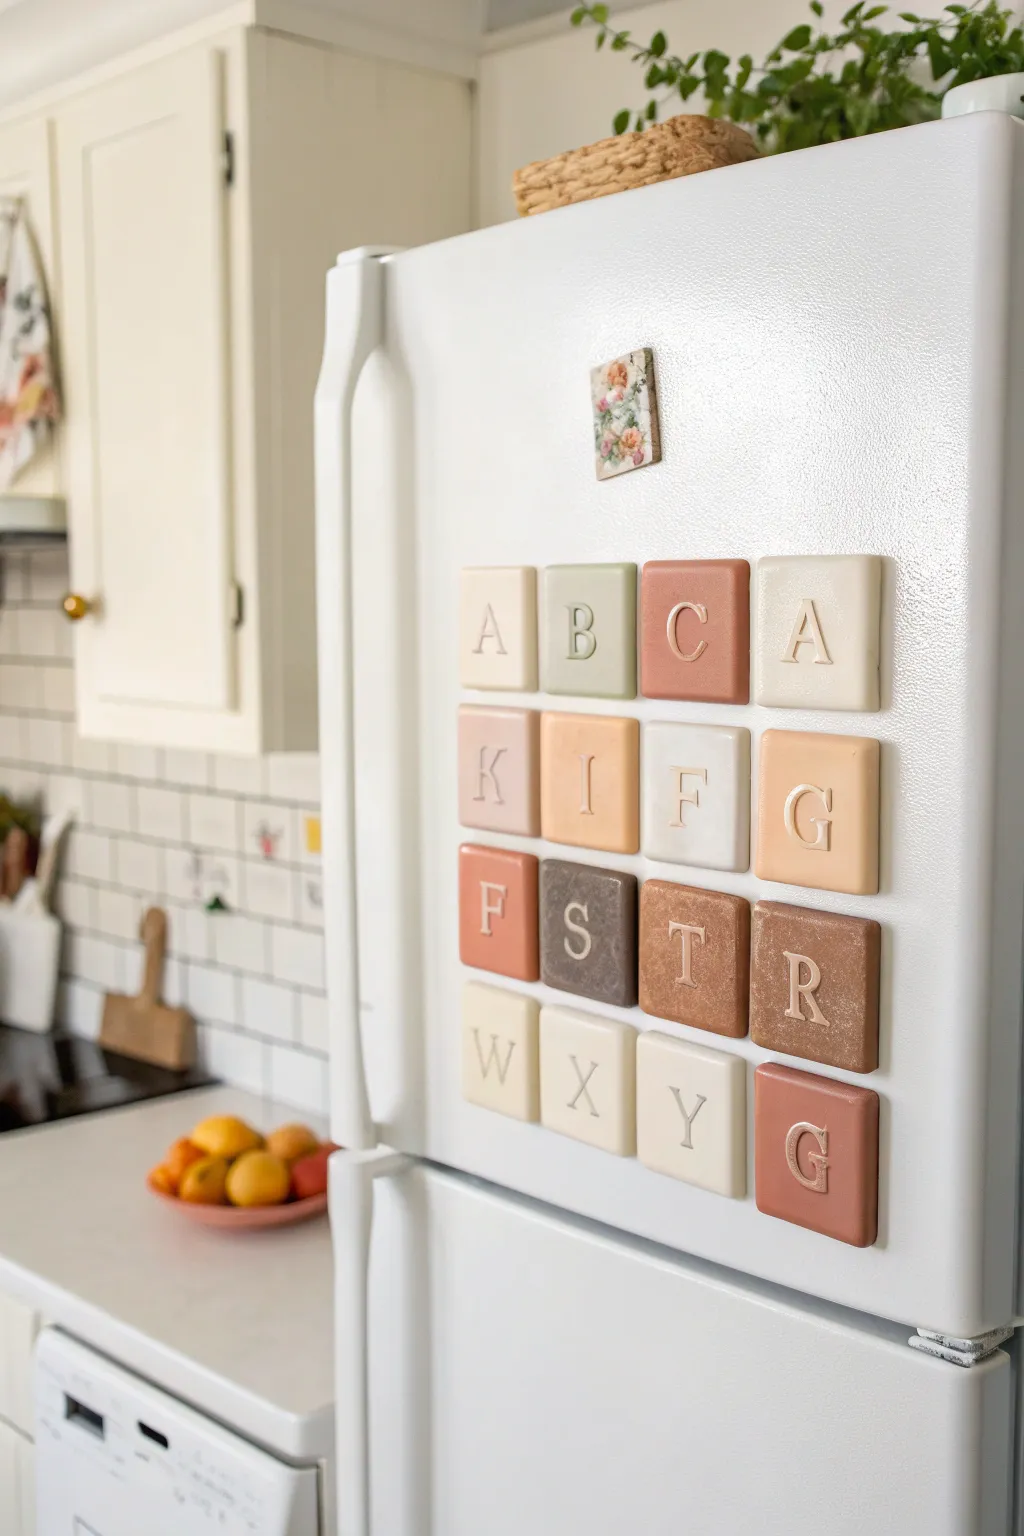
These sleek, minimalist magnets turn a humble refrigerator door into a personalized typographic display. Using a palette of muted earth tones and crisp serif stamps, you’ll create functional art that feels both modern and handmade.
Step-by-Step Tutorial
Materials
- Polymer clay (in cream, terracotta, sienna, sage green, and taupe)
- Square clay cutter (approx. 1.5 – 2 inches)
- Acrylic roller or rolling pin
- Parchment paper or smooth work surface tile
- Alphabet stamp set (large serif font)
- Strong round craft magnets
- Strong adhesive (E6000 or super glue gel)
- Cornstarch or baby powder (as a release agent)
- Oven and baking sheet
- Sandpaper (fine grit, optional)
- Matte spray varnish (optional)
Step 1: Preparing and Shaping
-
Condition the Clay:
Begin by warming up your polymer clay in your hands. Knead each color separately until it is soft and pliable. If you want custom shades like the muted peach or light sage in the photo, mix your colors now until fully blended. -
Roll Out the Slab:
Place your conditioned clay on parchment paper. Using your acrylic roller, roll the clay out to a consistent thickness of about 1/4 inch (6mm). This thickness is crucial so the magnet has enough visual weight and durability. -
Cut the Squares:
Press your square cutter firmly into the clay slab to create your shapes. If you don’t have a cutter, use a ruler and a sharp craft knife to measure and slice precise squares. Carefully peel away the excess clay from around your shapes. -
Smooth the Edges:
Gently run your fingertip along the cut edges of each square to soften any sharp corners or clay burrs. I prefer to do this before stamping to avoid distorting the letters later.
Stamp Release Trick
If you don’t have cornstarch, simply dip your stamp into water before pressing into the clay. The moisture creates a barrier, preventing sticking without leaving powdery residue.
Step 2: Stamping and Baking
-
Prep the Stamps:
Select the letters you wish to use. Lightly dust the face of each stamp with a tiny bit of cornstarch or baby powder. This acts as a release agent and prevents the stamp from getting stuck in the raw clay. -
Impress the Letters:
Position your stamp in the exact center of a clay square. Press down firmly and evenly, but doesn’t go all the way through the clay. Lift the stamp straight up to reveal a crisp impression. -
Repeat for All Tiles:
Continue stamping all your squares. If any edges distorted slightly during the pressure of stamping, gently nudge them back into a perfect square shape with your fingers or a flat tool. -
Bake the Pieces:
Transfer the parchment paper with your squares onto a baking sheet. Bake according to your polymer clay manufacturer’s specific instructions (usually around 275°F/135°C for 15-30 minutes). -
Cool Down:
Remove the tray from the oven and allow the clay tiles to cool completely before handling. They will harden fully as they return to room temperature.
Step 3: Finishing Touches
-
Sand Imperfections:
Once cool, inspect the edges. If there are any rough spots, lightly sand them with fine-grit sandpaper under running water to keep dust down. -
Highlight the Letter (Optional):
For a subtle pop, you can rub a tiny bit of metallic wax or diluted acrylic paint into the recessed letter, then wipe the surface clean. This emphasizes the deeper impression, though the plain look is equally elegant. -
Clean the Backs:
Wipe the back of each tile with a little rubbing alcohol or a damp cloth to remove any oily residue from the clay. This ensures the glue will bond strongly. -
Attach the Magnets:
Apply a pea-sized drop of strong adhesive, like E6000, to the center of the back of the tile. Press your round magnet into the glue. -
Set and Dry:
Leave the magnets face down to dry for at least 24 hours to ensure a permanent bond before placing them on your fridge. -
Seal (Optional):
If these will be in a high-traffic spot, give them a light coat of matte spray varnish to protect the surface from fingerprints and grease.
Fixing Distorted Squares
If stamping warps the square shape, place two rulers or straight edges against opposite sides of the tile while you press the stamp to act as a containing wall.
Now you have a stylish set of custom magnets ready to organize your notes or spell out fun messages
Terrazzo Coaster Set
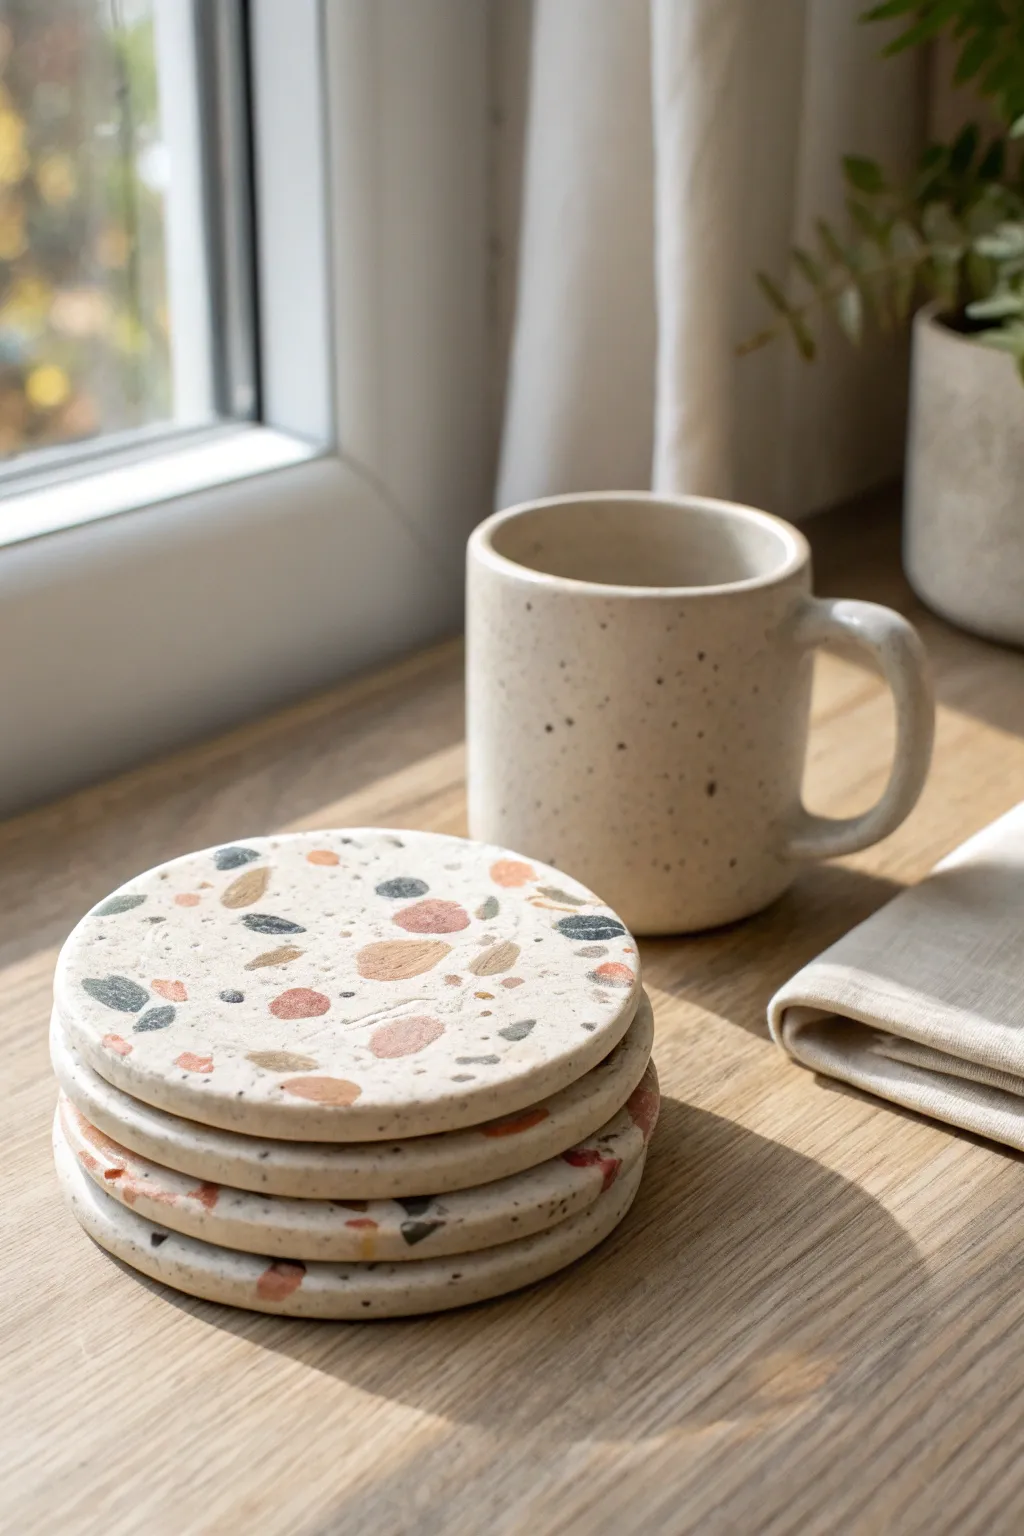
These sleek and earthy coasters bring the timeless appeal of Italian terrazzo right to your coffee table minus the heavy construction work. Using polymer clay, you can mimic the speckled, polished stone look with a blend of neutral tones and warm accents, creating a functional yet stylish gift.
Step-by-Step
Materials
- White or translucent white polymer clay (base)
- Small amounts of colored polymer clay (terracotta, slate blue, mustard yellow, dark grey, beige)
- Acrylic roller or pasta machine
- Circle cutter (approx. 3.5 – 4 inches)
- Blade or X-Acto knife
- Parchment paper
- Sandpaper (grits: 400, 600, 1000, 2000)
- Bowl of water (for sanding)
- Matte varnish or resin (optional)
- Oven
Step 1: Prepping the Chips
-
Conditioning colors:
Start by conditioning your small amounts of colored clay—terracotta, slate blue, mustard, dark grey, and beige. You want them soft and pliable. -
Creating the mosaic sheets:
Roll each color out into a very thin sheet, roughly 1mm thick. The thinner these sheets are, the more delicate your final terrazzo chips will look. -
Baking the ‘stones’:
Place these thin colored sheets on parchment paper and bake them for about 10–15 minutes according to the package instructions. Baking them first is the secret to getting crisp, distinct shards rather than smeared colors. -
Chopping the clay:
Once the baked sheets have cooled completely, chop them into irregular pieces using your blade. Vary the sizes from tiny specks to slightly larger, chunky shards to create visual interest.
Step 2: Forming the Base
-
Preparing the white clay:
Take a large block of white or translucent white clay. Condition it thoroughly until it is warm and soft. -
Rolling the slab:
Roll the white clay out into a thick slab, approximately 1/4 inch (6mm) thick. This needs to be substantial enough to act as a sturdy coaster. -
Adding the chips:
Scatter your chopped, baked colored chips generously over the surface of the raw white clay. Don’t be afraid to overlap them slightly or pile them up. -
Embedding the chips:
Use your acrylic roller to firmly press the chips into the white base. I like to roll in multiple directions to ensure the chips settle deeply and flush with the surface. -
Smoothening surface:
If the surface looks uneven, keep rolling until the chips are fully embedded and the top feels relatively smooth to the touch.
Warped Edges?
If your coaster curls up during baking, you can re-heat it briefly and place a heavy ceramic tile on top while it cools down to flatten it out again.
Step 3: Cutting and Baking
-
Cutting the creates:
Place your circle cutter onto the slab. Press down firmly to cut out your coaster shapes. Wiggle the cutter slightly before lifting to release the clay cleanly. -
Refining edges:
Gently smooth the cut edges with your fingertip to remove any harsh lines left by the cutter, being careful not to distort the circle shape. -
Final bake:
Place the raw coasters on a parchment-lined baking sheet. Bake for 30–45 minutes at the temperature recommended by your clay manufacturer. Ensure they are fully cured for durability. -
Cooling down:
Allow the coasters to cool completely on a flat surface. Placing a heavy book on top while cooling can ensure they stay perfectly flat.
Make it Luxe
Mix a small amount of gold leaf flakes into your pile of colored chips before pressing them into the white base for a glamorous, high-end stone effect.
Step 4: Finishing Touches
-
Wet sanding initiation:
Begin the wet sanding process with 400 grit sandpaper. Dip the paper and coaster in water and sand in circular motions to reveal the sharp edges of the embedded chips. -
Progressive sanding:
Move up to 600, then 1000, and finally 2000 grit sandpaper. Rinse the coaster between each grit change. This process polishes the surface to a professional, stone-like feel. -
Buffing:
Dry the coasters thoroughly with a soft cloth. Vigorously rub the surface with a piece of denim or a microfiber cloth to bring out a natural sheen. -
Sealing (Optional):
If you want extra protection against drink spills, apply a very thin layer of matte varnish, though a well-sanded surface often repels water naturally.
Stack your finished set and wrap them in twine for a handmade gift that feels both modern and personal
Braided Keychain Charm
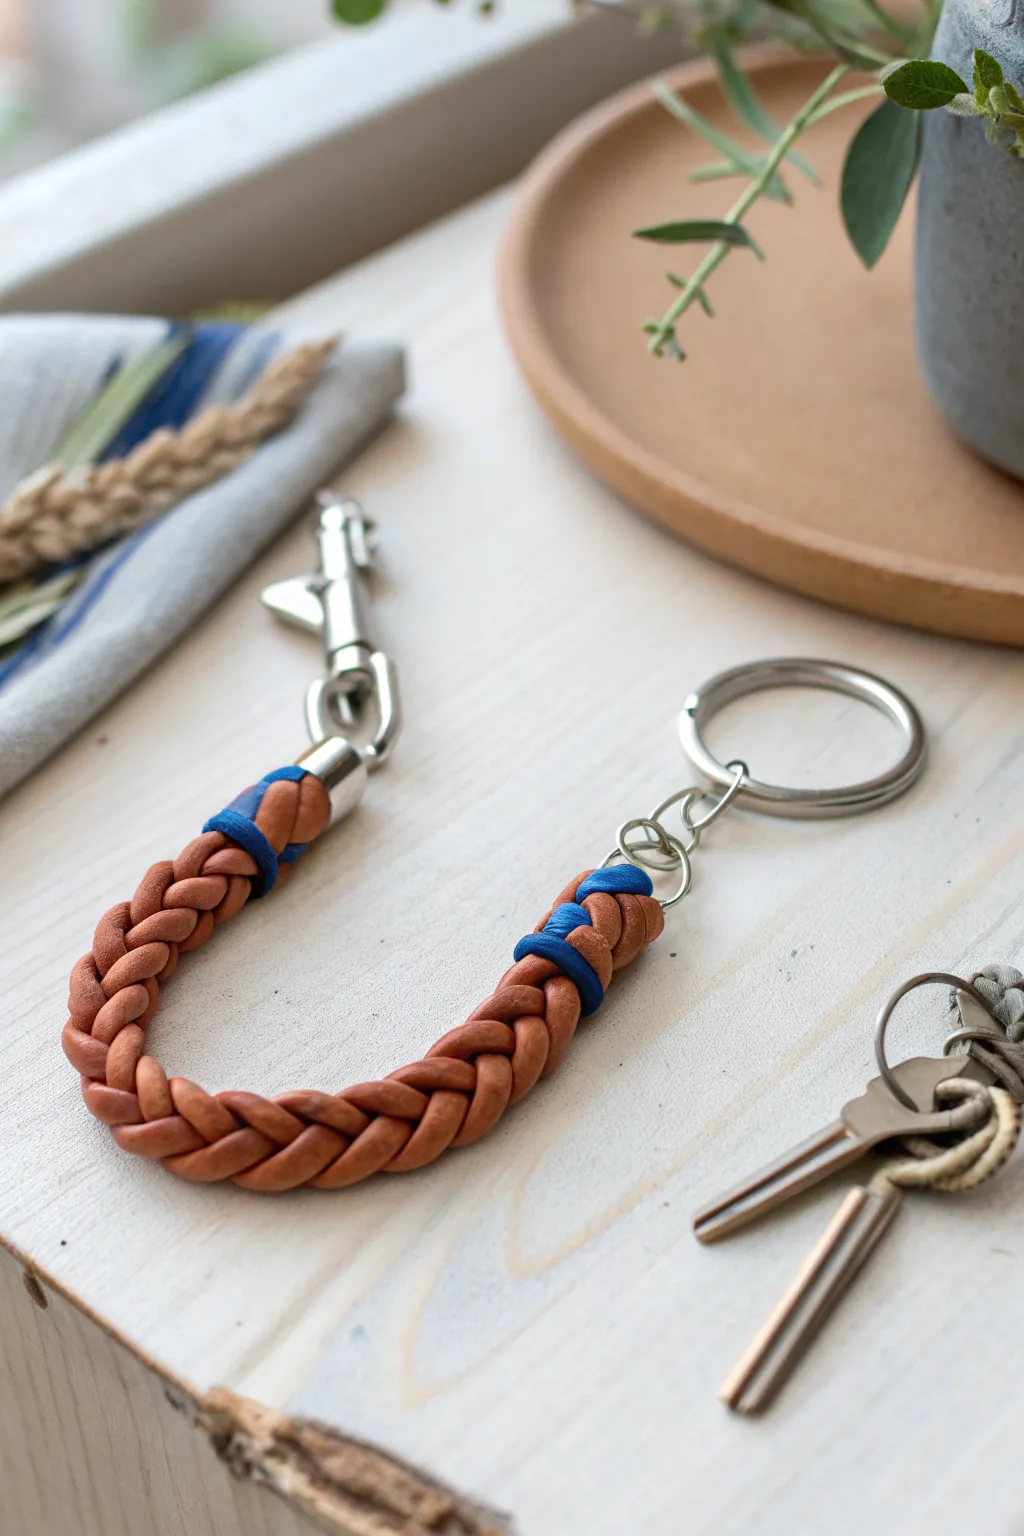
Recreate the classic look of a braided leather fob using durable polymer clay for a surprisingly realistic effect. This sturdy keychain combines warm terracotta tones with bright blue accents for a sophisticated, handmade gift.
Detailed Instructions
Materials
- Polymer clay (terracotta/tan color)
- Polymer clay (royal blue)
- Clay extruder or rolling tool
- Liquid polymer clay (clear or matching tan)
- Metal key ring with chain
- Metal swivel snap hook
- Silver end cap (sized to fit braid thickness)
- Jump rings
- Pliers
- Craft knife or tissue blade
- Oven
- Cardstock or thin cardboard
Step 1: Preparing the Strands
-
Condition the clay:
Start by warming the terracotta-colored polymer clay in your hands until it becomes soft and pliable. Since we need long strands, the clay must be conditioned well to prevent cracking during the braiding process. -
Create even coils:
Roll out three long snakes of equal thickness. For the most professional look, I highly recommend using a clay extruder with a medium circle disc, which ensures every strand is perfectly uniform. -
Measure the length:
Ensure your strands are at least 8-10 inches long. The braiding process consumes a lot of length, and it is much better to trim excess than to run short.
Cracking While Braiding?
If the clay creates tiny fissures as you braid, it wasn’t conditioned enough. Add a drop of clay softener or baby oil and knead it longer before re-rolling.
Step 2: Braiding and Shaping
-
Secure the start:
Pinch the three top ends of your clay strands together firmly. You can tape this end to your work surface to provide tension while you work. -
Braid firmly:
Begin a standard three-strand braid. Keep your tension consistent but gentle; pulling too hard can stretch the clay and make the strands thin out unevenly. Keep the braid tight for a realistic leather-grain look. -
Form the loop:
Once you have about 5-6 inches of braid, gently bend it into a U-shape. Bring the two unbraided ends together to see how they meet. -
Trim the ends:
Use your craft knife to slice off the messy ends cleanly. Cut both sides of the U-shape so they are flush and will fit neatly inside your metal end cap. -
Connect the ends:
Apply a small dab of liquid polymer clay to the raw cut ends and press them together firmly to create a continuous loop shape. Smooth the seam slightly, though it will be covered later.
Texture It Up
Before baking, gently roll a piece of denim or coarse sandpaper over the terracotta strands. This imitates the pore texture of real leather.
Step 3: Adding Accents
-
Adding the blue detail:
Roll out a very thin snake of the royal blue clay. This should be significantly thinner than your main braid strands. -
Wrap the connection points:
Take the blue strand and wrap it tightly around the braid near where the metal cap will sit. Do this on both sides of the loop for symmetry, pressing the ends into the underside of the braid to hide them. -
Bake the piece:
Place your clay loop on cardstock (to prevent shiny spots) and bake according to your clay manufacturer’s instructions, usually around 275°F (135°C) for 30 minutes. Let it cool completely.
Step 4: Assembly
-
Attach the hardware:
Once cool and hard, insert the joined ends of your clay loop into the metal end cap. Secure it with a strong two-part epoxy glue for maximum durability. -
Install the snap hook:
Using your pliers, attach the swivel snap hook to the loop on the metal end cap. Ensure the jump ring is closed tightly. -
Attach the keyring:
On the other side, slip a jump ring through the natural gap in the clay braid curve (or carefully drill a small hole if your braid is very tight). Connect the keyring and chain to this point. -
Final check:
Give all metal connections a gentle tug to ensure they are secure and the clay is firmly bonded to the cap.
Clip this sturdy charm onto your bag or keys to enjoy a touch of artisan style every day
Bookend Pair With Bold Shapes
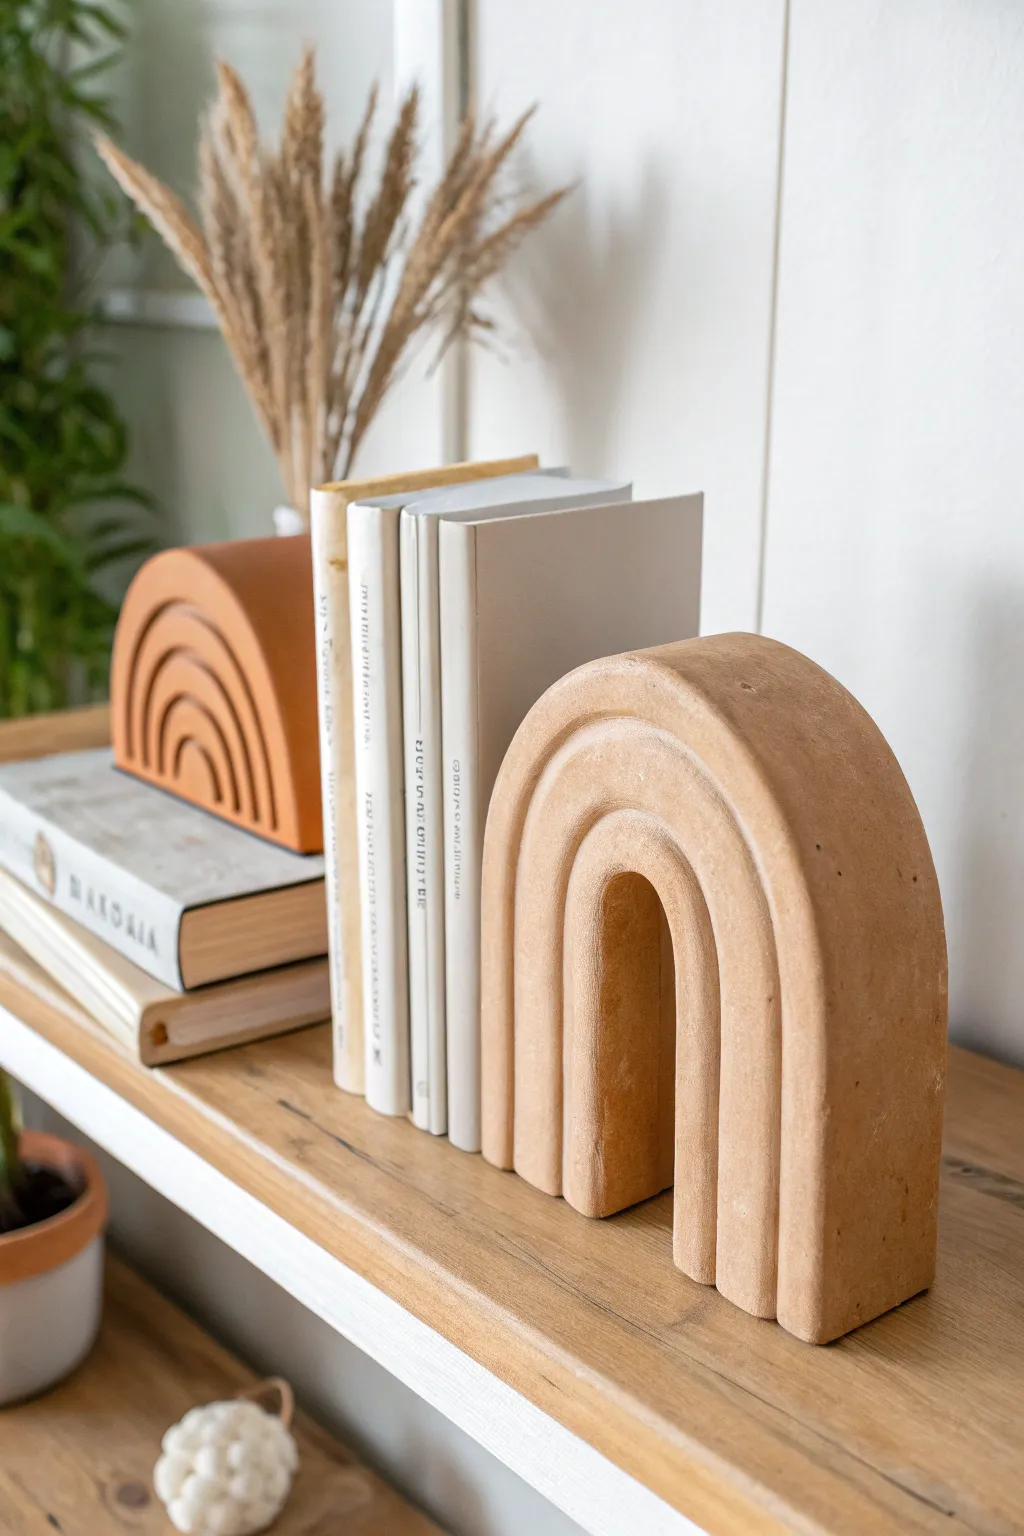
Bring a touch of modern sculpture to your bookshelf with these geometric arch bookends made from durable air-dry clay. Their sturdy weight and sleek curves make them a functional statement piece that adds warmth and organization to any reading nook.
Step-by-Step Guide
Materials
- White or terracotta air-dry clay (approx. 2kg)
- Thick rolling pin
- Sharp clay knife or X-Acto blade
- Metal or wooden ruler
- Cardboard or stiff cardstock (for templates)
- Bowl of water
- Sponge
- Fine-grit sandpaper (220 and 400 grit)
- Non-slip pads or cork sheet
- Acrylic sealer (matte finish)
Step 1: Preparing the Shape
-
Design the template:
First, create a template on your cardboard. Draw a rectangle that is roughly 6 inches tall and 4 inches wide. Round off the top edge completely to create a perfect semi-circle arch shape. Cut this out. -
Plan the interior arches:
Within your main template, draw smaller concentric arches to serve as guides for where the grooves will go, ensuring even spacing for that distinct rainbow look. -
Condition the clay:
Take a large chunk of clay and knead it thoroughly on a clean surface. It needs to be warm and pliable to prevent cracks later. -
Roll the slab:
Roll the clay out into a very thick slab, ideally focused on depth rather than width. You want a block roughly 2 to 2.5 inches thick to ensure the bookend has enough weight to hold books upright.
Weight It Down
If you are concerned your air-dry clay is too light for heavy books, embed a few clean, heavy stones or metal washers into the center of the wet clay slab before cutting your final shape.
Step 2: Sculpting the Arch
-
Cut the primary shape:
Place your cardboard template against the thick slab. Using your sharp knife, cut vertically straight down around the template to create a thick arch block. -
Smooth the edges:
Dip your fingers in water and run them over the cut edges to smooth out any drag marks from the knife. Ensure the bottom is perfectly flat by tapping it gently against the table. -
Mark the grooves:
Using your template or a light touch with a modeling tool, gently trace the concentric arch lines onto the front face of the clay block. -
Carve the first channel:
Using a loop tool or the rounded end of a paintbrush, begin carving out the clay between the arched lines. I find it helpful to start shallow and gradually go deeper. -
Define the relief:
Continue carving until you have defined distinct ridges. The goal is to create a ‘stepped’ or ribbed effect, where each rainbow stripe is raised clearly from the one next to it. -
Refine the inner void:
Use a knife to cut away the innermost arch completely, creating the negative space ‘tunnel’ at the bottom center of the bookend. -
Smooth the channels:
Use a damp sponge or a wet finger to smooth the inside of the carved channels and the edges of the ridges. Sharp edges can chip easily, so a soft bevel is ideal.
Step 3: Finishing Touches
-
Slow drying:
Set the piece aside to dry in a cool area away from direct sunlight. Because the clay is thick, rotate it occasionally to ensure airflow reaches all sides. -
Initial wait time:
Allow at least 48 to 72 hours for drying. The clay should turn a lighter color and feel room room-temperature, not cool to the touch. -
Sand the surfaces:
Once bone dry, use 220-grit sandpaper to remove any major bumps or fingerprints. Follow up with 400-grit for a silky smooth finish. -
Seal the piece:
Apply a coat of matte acrylic sealer to protect the clay from moisture and dust without altering its natural stone-like appearance. -
Add grip:
Cut a piece of cork or attach non-slip rubber pads to the bottom of the bookend. This protects your shelf and keeps the heavy clay from sliding away from the books.
Speckled Stone Look
Before drying, mix dried tea leaves or heavy black pepper into the wet clay. Once sanded, these specks reappear, mimicking the look of real granite or stoneware.
Now you have a timeless set of bookends ready to support your favorite novels with artistic flair
Mini Room Scene Shadow Box

Capture the cozy charm of a mid-century modern living room in miniature form with this detailed shadow box project. Using polymer clay, wood scraps, and a deep frame, you’ll build a tiny sanctuary complete with a plush sofa and gallery wall.
Detailed Instructions
Materials
- Deep wooden shadow box frame (approx. 8×8 inches)
- Polymer clay (terracotta, green, white, gray, beige)
- Balsa wood or basswood sheets (various thicknesses)
- Miniature fabric scraps (pink upholstery, patterned cotton)
- Thick cardstock or mat board
- Thin wooden dowel (lamp post)
- Small wooden bead (lamp shade holder)
- White paper or thin cardstock (lamp shade)
- Fabric stiffener or white glue
- Acrylic paints (wood stain colors)
- Super glue and tacky glue
- Fabric felt (green for rug)
- X-acto knife and cutting mat
- Fine sandpaper
Step 1: Building the Frame and Walls
-
Prepare the box:
If you aren’t building the frame from scratch, remove the glass from a store-bought shadow box. Sand the interior surfaces lightly to help your glue adhere better. -
Create the walls:
Cut pieces of white mat board or sturdy cardstock to fit perfectly against the back and side walls of your box. This creates a clean, bright ‘drywall’ look for your room. -
Secure the backdrop:
Glue the back and side panels into the frame using tacky glue. ensure the seams are tight so no wood frame shows through the corners.
Glue Stains?
Use tiny dots of super glue gel rather than liquid. If glue seeps onto the fabric, dab it immediately with a damp cloth, or cover the mistake with a well-placed throw pillow.
Step 2: Constructing the Furniture
-
Sofa frame base:
Cut balsa wood to create the skeleton of your sofa: a rectangular seat base, a backrest, and two armrests. Glue these together and let dry completely. -
Upholstery foam:
Wrap the wooden sofa structure in thin batting or felt to give it softness. You don’t want the wood edges to look sharp under the fabric. -
Fabric application:
Carefully wrap your pink fabric around the padded frame. Use fabric glue or hot glue on the underside and back where it won’t be seen. pay special attention to folding distinct, crisp corners. -
Adding legs:
Cut four small dowel pieces or carve wood scraps into tapered legs. Stain them a light oak color and glue them to the sofa base. -
Sewing pillows:
Cut tiny squares of patterned fabric. Fold and glue the edges inward to make no-sew pillows, stuffing them lightly with cotton or clay scraps before sealing. -
Lamp assembly:
Cut a dowel to height for the floor lamp. Glue a flat wooden square as the base. For the shade, roll a strip of white paper into a cone or cylinder and attach it to the top of the dowel using a small angled piece of wire or a wooden bead.
Level Up: Lighting
Drill a tiny hole behind the lamp shade and thread a wired micro-LED through the wall. Hide the battery pack on the back of the frame for a working floor lamp.
Step 3: Clay Plants and Pots
-
Forming the pots:
Using white and terracotta polymer clay, shape four small cylinders. I like to texture one to look like a woven basket and keep the others smooth and modern. -
Sculpting the snake plant:
Roll green clay into thin ropes and flatten them into tall, pointed leaves. Add lighter green streaks for realism and press them into a pot. -
Creating the cactus:
Shape a small green nub for the cactus. Use a needle tool to create vertical ribs and tiny prick marks all over the surface. -
Making the leafy plant:
Create a main stem from wire covered in brown cay. Attach tiny, flattened teardrop shapes of green clay as leaves. -
Baking the clay:
Bake all your clay pieces according to the package instructions. Once cool, glue the plants into their respective pots if they weren’t baked together.
Step 4: Gallery Wall and Assembly
-
Miniature frames:
Cut very thin strips of balsa wood. Miter the corners at 45 degrees to create six tiny identical square frames. -
Creating the art:
Print out or hand-paint tiny abstract or botanical art on paper. Glue these images behind your wooden frames. -
Final arrangement:
Glue the green felt rug to the floor first. Position and glue the sofa on top, then place the lamp and plants around it to balance the composition. -
Hanging the art:
Using tweezers, glue your framed art to the back wall in a grid pattern. Ensure they are level, as crooked art will throw off the realism. -
The finishing touch:
Fold a tiny piece of white paper to look like a book or magazine and glue it casually onto the rug.
Place your finished shadow box on a shelf or desk where the tiny details can be admired up close
Cute Desk Buddy Figurines
Brighten up any workspace with these adorable, smiling fruit figurines that bring a touch of summer cheer to your desk. With their soft peach glaze and cheerful expressions, these clay sculptures make perfect paperweights or encouraging study companions.
Step-by-Step Guide
Materials
- Air-dry clay (white)
- Acrylic paints: Peach/Light Orange, Dark Brown, Green, Black, Pink
- Clear high-gloss varnish or sealant
- Sculpting tool or toothpick
- Small rolling pin
- Fine-point paintbrush (size 0 or 00)
- Medium paintbrush
- Water and sponge for smoothing
- Aluminum foil (optional, for core)
Step 1: Sculpting the Base
-
Prepare the core:
Start by crumpling a small ball of aluminum foil about the size of a golf ball or slightly smaller. This saves clay and helps the figurine dry more evenly. -
Cover with clay:
Roll out a slab of air-dry clay to about 1/4 inch thickness. Wrap this evenly around your foil core, pressing and smoothing the seams until you have a perfect sphere. -
Shape the fruit:
Gently roll the sphere between your palms to smooth it out. Then, press the top and bottom slightly to flatten them, giving it that classic apple or peach shape, rather than a perfect ball. -
Create the indentation:
Using your thumb or the rounded end of a paintbrush, press a deep indentation into the center of the top. This is where the stem and leaves will sit later. -
Smooth the surface:
Dip your finger or a small sponge in water and run it over the clay to remove any fingerprints or cracks. Getting the surface glass-smooth now creates a better finish for the glaze later.
Cracks appeared?
Make a ‘slip’ by mixing a bit of fresh clay with water to create a paste. Fill any cracks with this paste, smooth it over with a wet finger, and let it dry again before painting.
Step 2: Adding Details
-
Form the stem:
Roll a very tiny snake of clay, about half an inch long and the thickness of a matchstick. Cut it to size and gently press it into the center of your top indentation. -
Make the leaves:
Take two small pea-sized amounts of clay and flatten them into teardrop shapes. Pinch the pointed ends to define the leaf shape. -
Attach the leaves:
Score the base of the leaves and the area next to the stem with a toothpick. Add a drop of water as ‘glue’ and press the leaves firmly into place, curving them slightly upward for a perky look. -
Drying time:
Set your figurine aside to dry completely. Depending on humidity and thickness, this usually takes 24-48 hours. Turn it over occasionally so the bottom dries evenly.
Step 3: Painting and Finishing
-
Base coat:
Paint the entire body of the fruit with your peach or light orange acrylic paint. Apply 2-3 thin coats for full opacity, letting each layer dry before adding the next. -
Paint the details:
Carefully paint the stem dark brown and the leaves a vibrant green. Use a steady hand to avoid getting these colors on the peach body. -
Draft the face:
Lightly sketch the facial features with a pencil first to ensure they are centered and symmetrical. I like to place the eyes fairly wide apart for a cuter look. -
Paint the expression:
Using your finest brush and black paint, trace over your pencil lines. Create curving arches for squeezed-shut happy eyes and a small ‘u’ shape for the smile. -
Add eyelashes:
Add two tiny ticks to the outer corner of each eye for eyelashes. This adds extra personality to the character. -
Blush those cheeks:
Dip the back end of a paintbrush into pink paint and dot it onto the cheeks. Or, paint tiny hearts for an even sweeter expression. -
Apply varnish:
Once all paint is bonedry, apply a generous coat of high-gloss varnish. This protects the paint and gives the fruit that shiny, glazed ceramic appearance seen in the photo.
Get the Look
For a varied ‘organic’ look, don’t mix your peach paint perfectly. Leave slight streaks of yellow or pink in the mix to mimic the natural skin variance of real fruit.
Set your new little friend on your desk to keep you company while you work
Mix-and-Match Wall Tile Relief
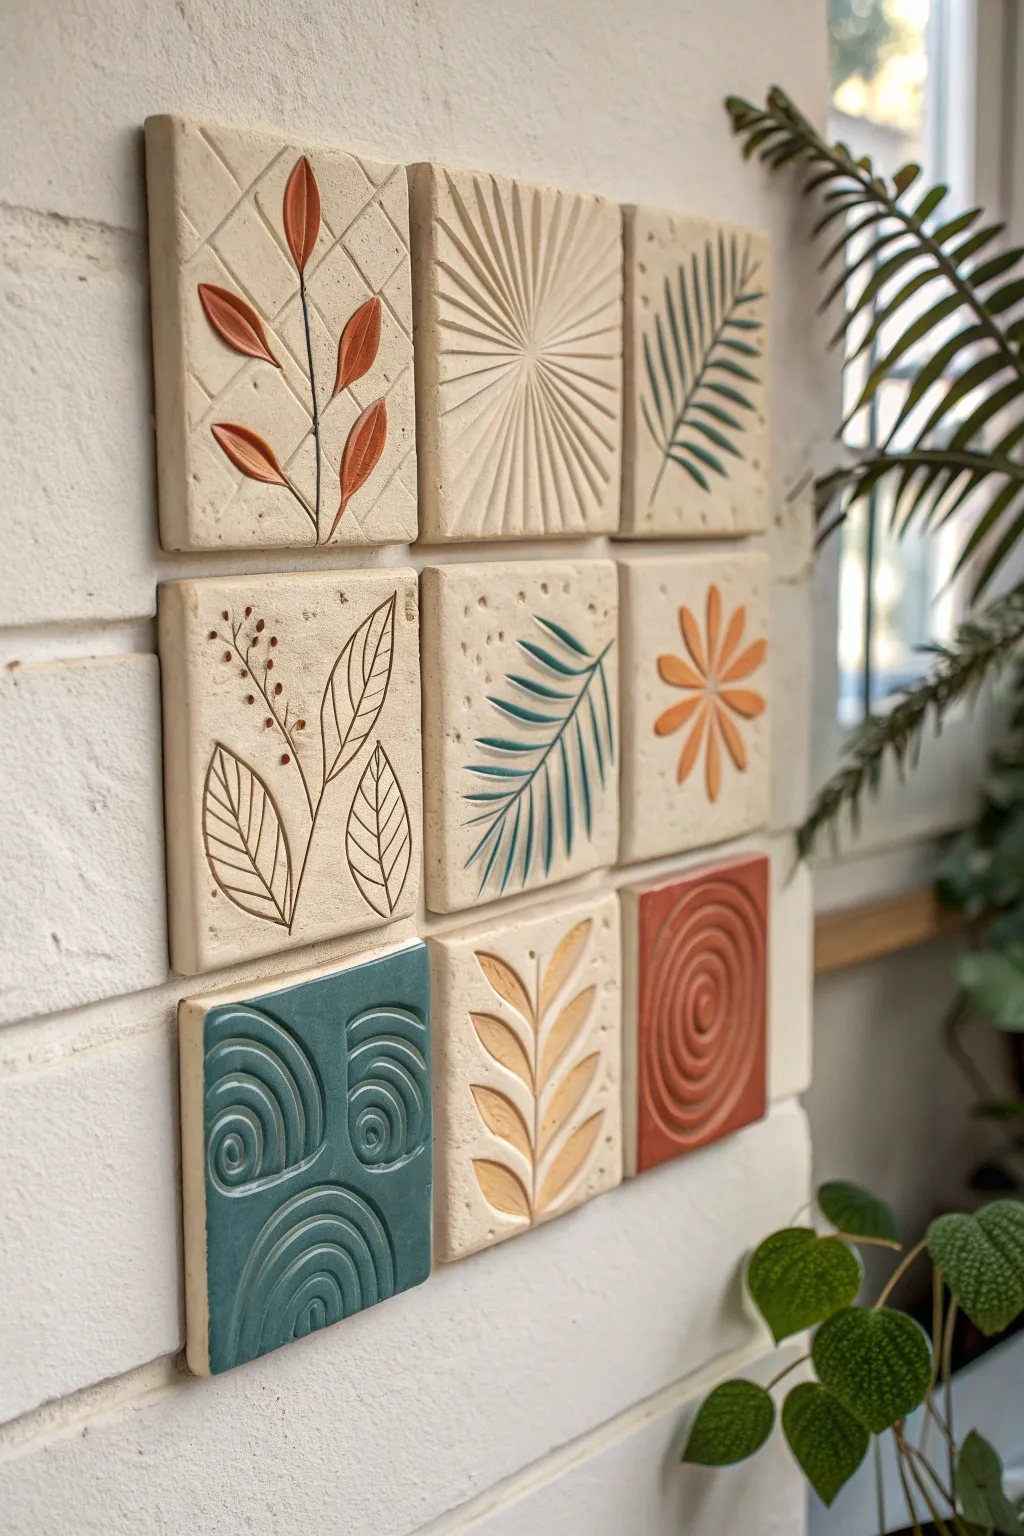
Create a stunning gallery wall feature with this set of nine handcrafted relief tiles, blending natural clay textures with touches of teal, terracotta, and botanical greens. This mix-and-match grid allows you to explore various carving and glazing techniques in one cohesive project, perfect for adding an organic, earthy touch to any room.
How-To Guide
Materials
- Stoneware clay (buff or white speckle)
- Clay slab roller or rolling pin with guide sticks
- Square tile cutter (4×4 or 6×6 inch) or ruler and needle tool
- Carving tools (loop tools, needle tool, sgraffito tool)
- Underglazes (terracotta, teal, forest green, mustard yellow)
- Small stiff-bristled brushes
- Sponge
- Clear matte or satin glaze
- Kiln (or access to a firing service)
- High-strength tile adhesive or mounting tape
Step 1: Slab Preparation & Shaping
-
Roll the slab:
Start by wedging your clay thoroughly to remove air bubbles. Roll out a large slab that is consistent in thickness, aiming for about 3/8 of an inch. Using guide sticks on either side of your rolling pin ensures every tile will be the exact same depth. -
Cut the squares:
Using a square tile cutter or a ruler and needle tool, cut out nine identical squares. If you want a 3×3 layout like the example, ensure your squares are true right angles. -
Smooth the edges:
Run a damp sponge or your finger along the sharp cut edges of each tile to soften them slightly. This prevents the clay from becoming dangerously sharp after firing. -
Stiffen the clay:
Place the tiles on a ware board covered with canvas or newspaper. Let them dry to a ‘leather hard’ state. They should be firm enough to hold their shape when handled but soft enough to carve into without chipping.
Warping Woes?
To prevent corners from curling up while drying, flip the tiles over gently once a day and dry them slowly under a loose sheet of plastic for the first 48 hours.
Step 2: Carving the Designs
-
Plan the layout:
Lightly sketch your designs onto the leather-hard clay using a needle tool. Aim for a mix of patterns: some geometric (like the sunburst), some organic (leaves and flowers), and abstract swirls. -
Carve the negative space:
For designs like the sunburst or abstract swirls, use a small loop tool to carve away the clay, creating deep grooves. The depth difference is what makes the relief pop. -
Incise line drawings:
For the delicate leaf outlines (like the center-left tile), use a sharp needle tool or sgraffito tool to scratch the design into the surface without removing large chunks of clay. -
Sculpt raised elements:
For the petals and leaves that appear embossed (like the top-left tile), carve down the background area around the shape, leaving the leaf itself raised. I like to smooth the edges of the raised leaf with a rubber rib to make it look soft. -
Texturizing:
Add subtle texture to the background of certain tiles (like the center flower) by gently pressing a coarse sponge or sand into the clay surface before it dries too much.
Level Up: Texture Pop
Use a dark wash (black iron oxide or dark stain) over the textured backgrounds and wipe it back. This will settle into the tiny pits and make the carving visually deeper.
Step 3: Glazing & Firing
-
Bisque fire:
Once bone dry, fire the tiles to cone 04 (or your clay body’s bisque temperature). This hardens the clay and prepares it for glazing. -
Apply inlay color:
For the fine line drawings (like the bottom-center leaf), apply underglaze into the grooves. Let it dry slightly, then wipe the surface with a damp sponge, leaving color trapped only in the lines. -
Paint relief areas:
Using a small brush, carefully paint the raised elements—like the terracotta petals or the teal geometric shapes—with three coats of underglaze for solid coverage. -
Full coverage blocks:
For the solid color tiles (like the bottom-left teal and bottom-right red swirl), brush underglaze over the entire surface. Ensure the color gets deep into the carved recesses. -
Clear coat:
Apply a thin layer of clear matte or satin glaze over the colored areas to seal them and enhance the color depth. You can leave the raw clay areas unglazed for a nice textural contrast. -
Glaze fire:
Fire the tiles a second time to the maturation temperature of your clay and glaze (typically Cone 5 or 6 for stoneware). -
Mounting:
Once cool, arrange your grid on the floor to finalize the orientation. Use strong mounting tape or framing adhesive to attach them directly to the wall, or glue them onto a backing board for easier hanging.
Step back and admire how the light plays across the different depths of your new ceramic installation