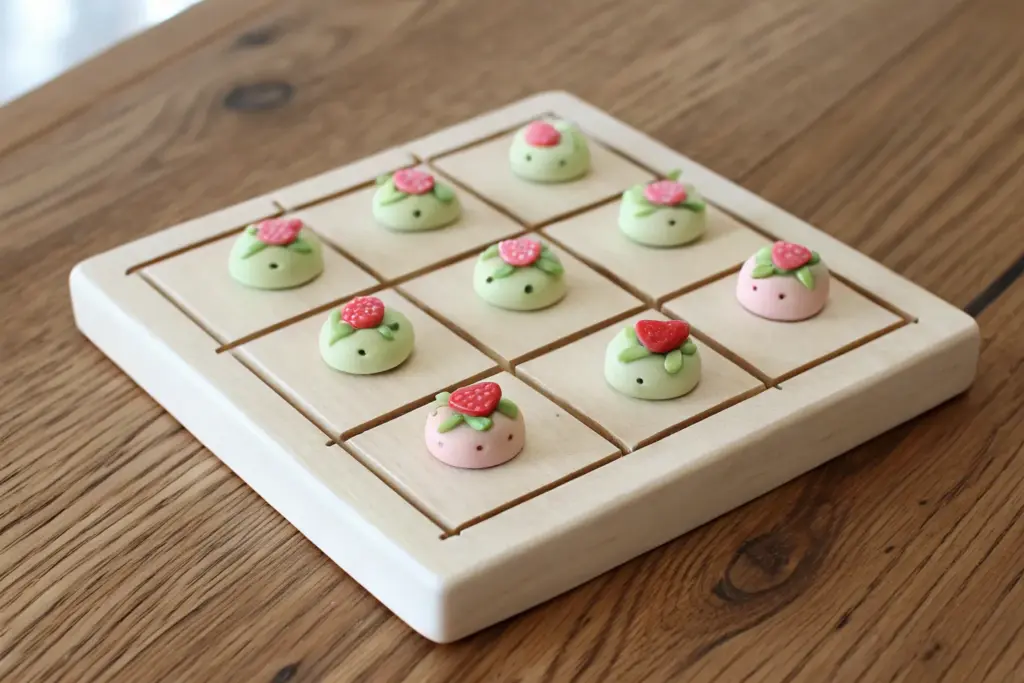
I love taking a simple tic tac toe game and turning it into a tiny piece of cute clay decor you’ll actually want to leave out on the table. Here are my favorite themed board-and-token combos that stay beginner-friendly but still feel extra charming.
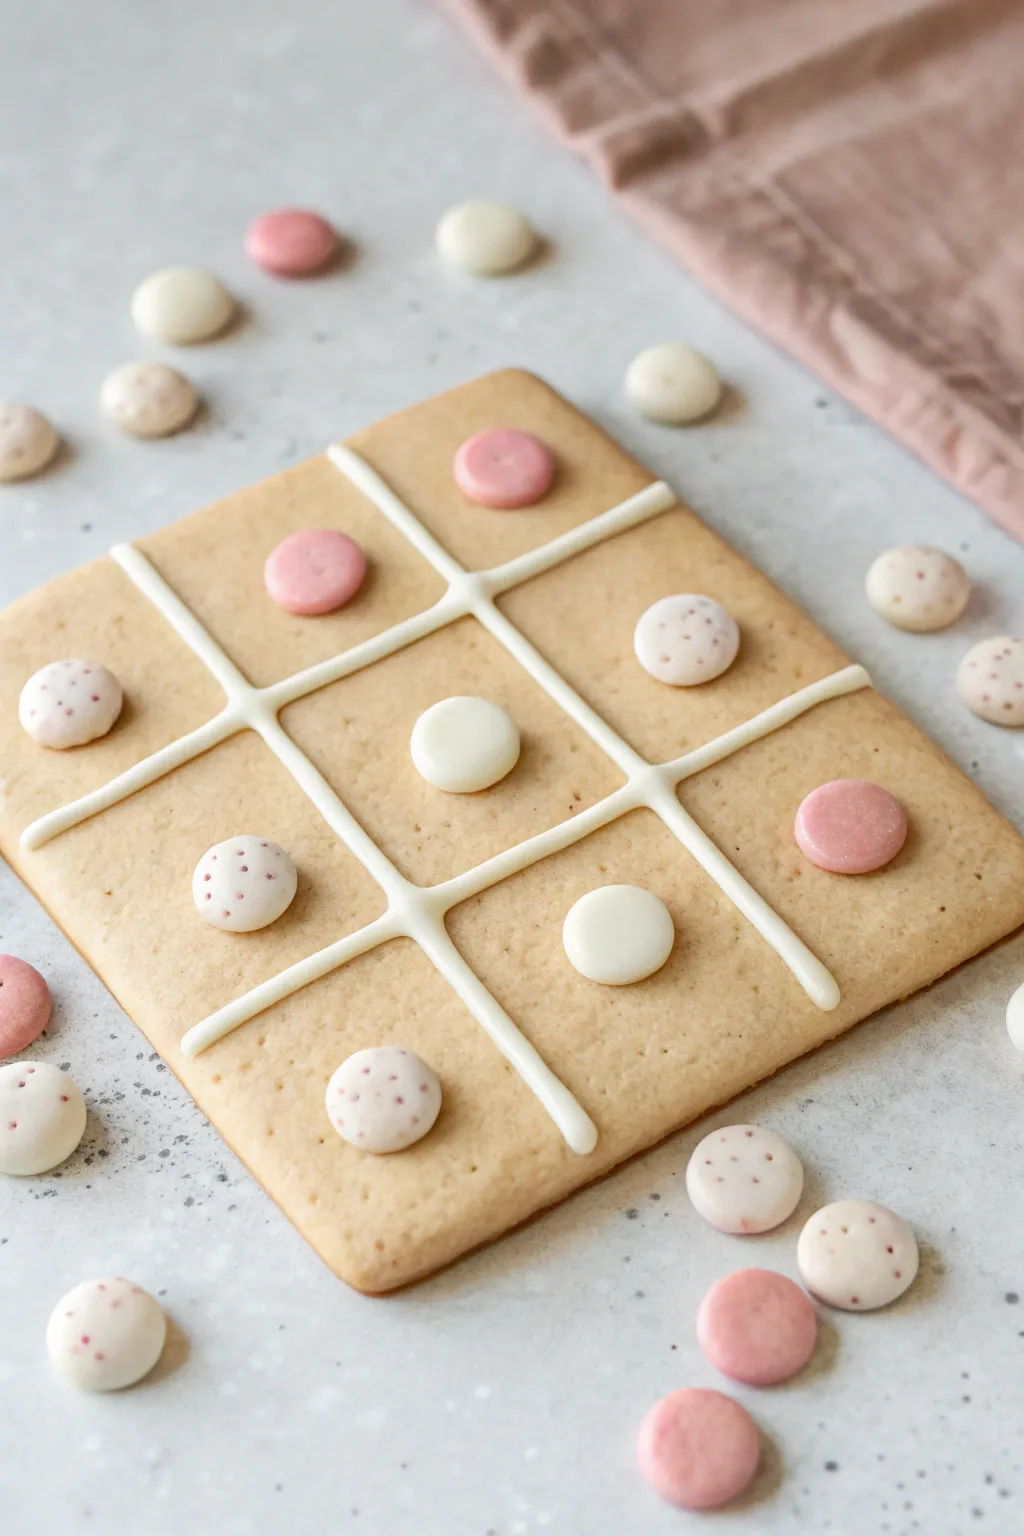
Pastel Hearts vs. Stars Set
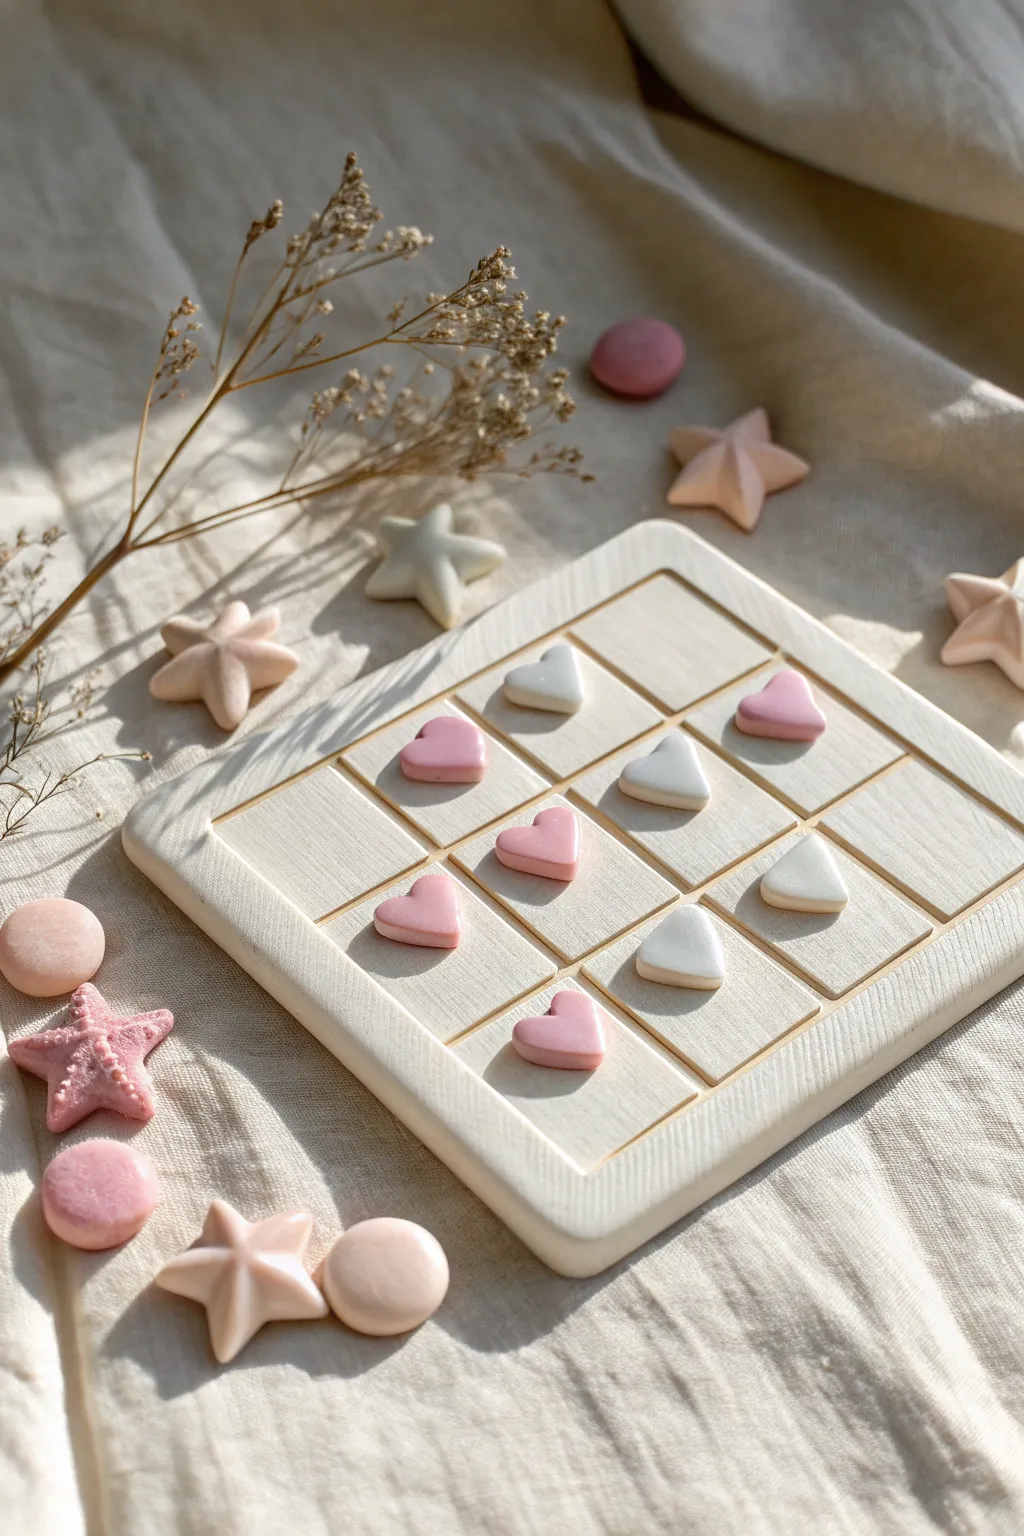
Create a dreamy and delicate gaming set with soft pastel tones and minimalist clay shapes. This project combines a simple wooden or clay grid base with handcrafted hearts and stars for a functional piece of art that looks adorable on any coffee table.
Step-by-Step
Materials
- Polymer clay (white, soft pink, peach/beige)
- Square wooden plaque (approx. 6×6 inches) or additional white clay for base
- Rolling pin or clay roller
- Square clay cutter or craft knife
- Miniature heart cutter (approx. 1 inch)
- Miniature star cutter (approx. 1 inch)
- Sandpaper (fine grit)
- Gloss or matte glaze (optional)
- Ruler
- Pencil
- Sculpting tool or toothpick
- Super glue (if using wooden base overlay)
- Baking sheet and parchment paper
Step 1: Crafting the Game Pieces
-
Condition the Clay:
Begin by kneading your white and soft pink polymer clay separately until it becomes soft and pliable. This prevents cracks during baking. -
Mix Custom Shades:
To achieve the muted, natural aesthetic seen here, I like to mix a tiny amount of beige or peach into the pink to warm it up, and a small bit of translucent clay into the white for a milky finish. -
Roll the Sheets:
Roll out the white clay to a thickness of about 1/4 inch (6mm). Repeat the process with your pink clay mixture. Uniform thickness is key for fair game play. -
Cut the Hearts:
Use your mini heart cutter to stamp out five heart shapes from the pink clay. Press firmly and wiggle slightly before lifting to get a clean edge. -
Cut the Stars:
Use the star cutter to create five star shapes from the white clay. If you don’t have a star cutter, you can cut triangles or simply make white hearts for a ‘Hearts vs. White Hearts’ theme like the board shown. -
Soften the Edges:
Gently tap the edges of each cut shape with your fingertip to round them off slightly. This removes the harsh ‘cookie cutter’ look and makes them pleasant to hold.
Uneven Board?
If your large clay square warps while baking, glue a piece of felt to the bottom or attach small rubber feet to the corners to stabilize it on the table.
Step 2: Constructing the Board
-
Prepare the Base Clay:
Roll out a large slab of white clay, roughly 1/4 inch thick. This will form the top layer of your game board. -
Cut the Main Square:
Using a ruler and craft knife, cut a precise 5×5 or 6×6 inch square from the white slab. Double-check your measurements to ensure it is perfectly square. -
Mark the Grid:
Lightly press your ruler into the soft clay to mark out a 3×3 grid. Measure carefully so each inner square is identical in size. -
Deepen the Lines:
Using a sculpting tool or the back of a knife, deepen these grid lines. You want distinct grooves that separate the play zones, similar to grouting tiles. -
Texture the Surface (Optional):
For a wood-grain effect like the reference, lightly drag a coarse brush or sandpaper in one direction across the surface before baking. -
Create a Border Frame:
Roll a long snake of white clay or cut thin strips. Attach these around the outer perimeter of your square grid to create a raised border, blending the seams on the underside.
Level Up: Magnetize It
Embed small neodymium magnets into the back of the pieces and the center of each grid square before baking for a travel-friendly set that snaps into place.
Step 3: Finishing Touches
-
Bake Components:
Place your board and all game pieces on a parchment-lined baking sheet. Bake according to your brand of polymer clay instructions (usually 275°F/135°C for 15-30 minutes). -
Cool Down:
Allow everything to cool completely in the oven with the door slightly ajar. This gradual cooling helps prevent warping. -
Sand for Smoothness:
Once cool, use fine-grit sandpaper to buff away any fingerprints or sharp edges on both the board and the playing pieces. -
Mounting (For Wooden Base):
If you want extra stability, glue your baked clay grid onto a pre-cut wooden square plaque. This gives the board a lovely visual weight. -
Final Surface Treatment:
Leave the clay matte for a natural stone look, or apply a very thin layer of matte varnish to protect the surface from oils and dust over time.
Arranging your new pastel pieces on the board creates such a satisfying, cohesive aesthetic


Minimal Round Dish With Raised Grid
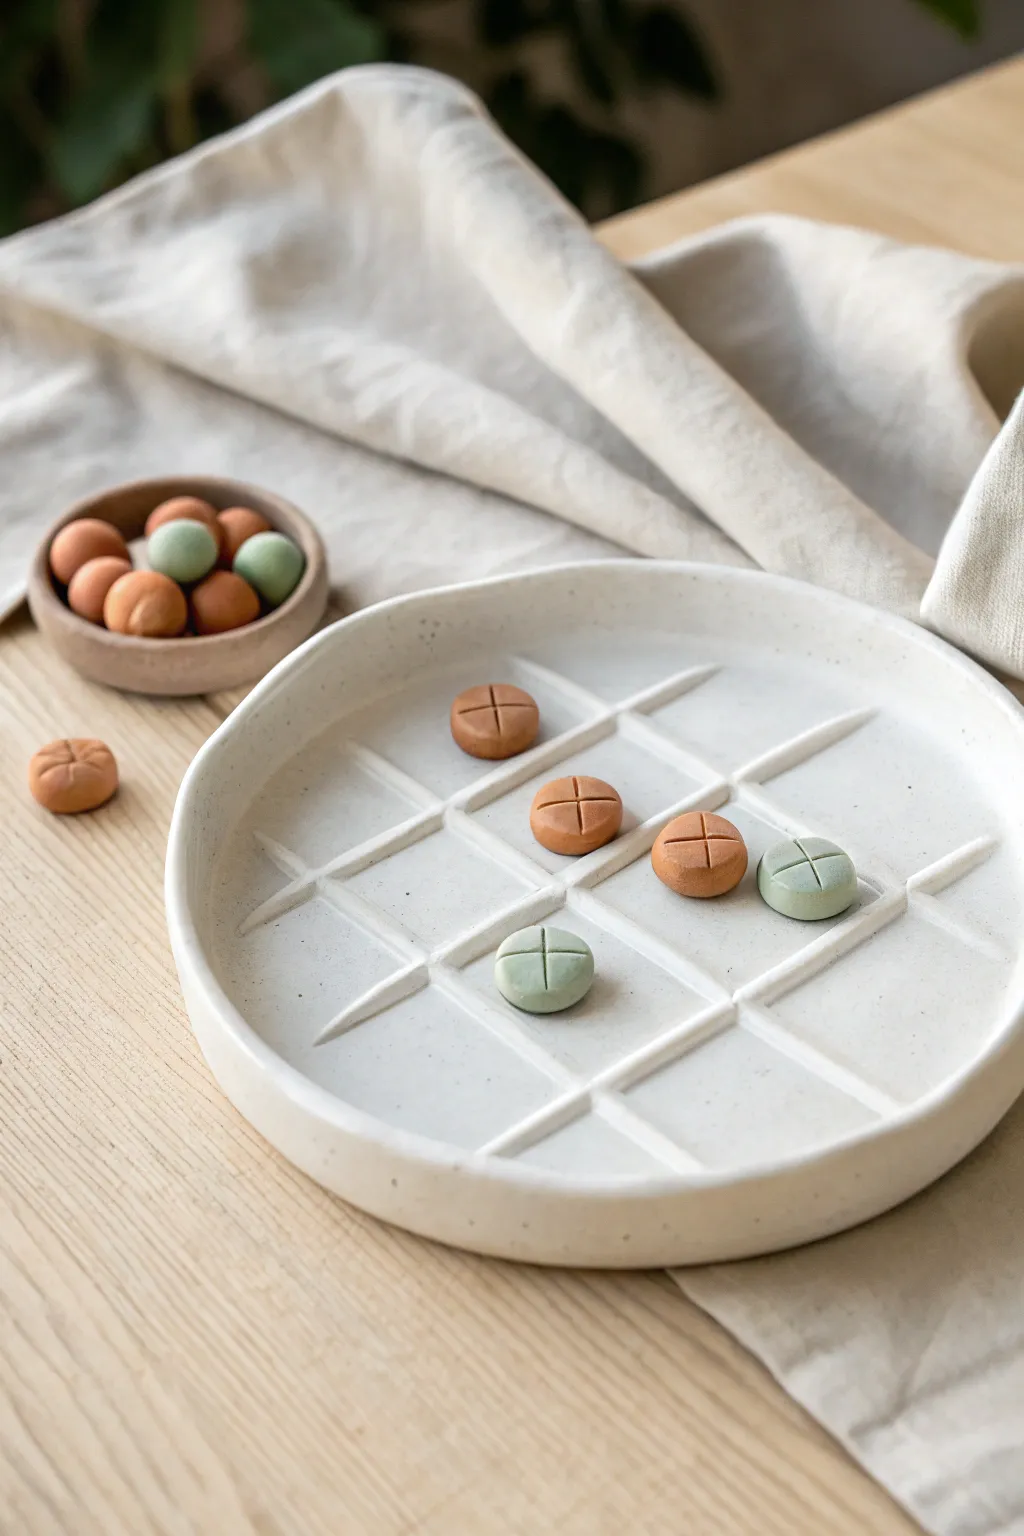
This sophisticated take on the classic tic-tac-toe board features a sleek, round dish with a raised grid design instead of painted lines. The earthy, muted tones and tactile game pieces make it a stunning coffee table accent even when play isn’t in session.
Step-by-Step Tutorial
Materials
- Air-dry clay (white or light grey)
- Acrylic rolling pin
- Circle template or bowl (approx. 8-9 inches)
- Clay knife or craft blade
- Ruler
- Slip (clay mixed with water)
- Fine grit sandpaper
- Acrylic paints (terracotta brown, sage green)
- Matte varnish or sealant
- Small paintbrush
- Modeling tool or toothpick
Step 1: Forming the Base Dish
-
Roll the slab:
Begin by conditioning your air-dry clay until it’s pliable. Roll it out into a smooth, even slab that is approximately 1/4 inch thick. Rotate the clay frequently to prevent sticking. -
Cut the circle:
Place your circle template or a large bowl onto the clay slab. Use your clay knife to trace around the edge, cutting out a perfect circle for your game board base. -
Create the rim:
Roll a long snake of clay, slightly thinner than a pencil. Score the outer edge of your clay circle and the snake, apply a little slip, and attach the snake around the circumference to create a raised rim. -
Smooth the edges:
Using a wet finger or a damp sponge, blend the rim into the base so the seam disappears completely. The transition should be seamless, creating a shallow dish shape.
Grid Geometry
Use a square playing card or a sticky note as a spacer when laying out your grid lines. This guarantees perfectly even squares without needing to constantly measure with a ruler.
Step 2: Creating the Grid
-
Measure the grid:
Lightly mark the center of your dish. Using a ruler, measure and lightly mark where your grid lines will go to form the standard # shape. Ensure the squares are large enough to hold your game pieces comfortably. -
Prepare grid coils:
Roll out very thin, uniform coils of clay for the grid lines. These should be thinner than the outer rim to keep the look delicate. -
Attach vertical lines:
Cut two segments of coil for the vertical lines. Score the base where you marked your lines, apply slip, and gently press the coils down. Trim the ends where they meet the rim. -
Attach horizontal lines:
Repeat the process for the two horizontal lines. Where the lines cross, you can either gently overlap them and smash them down or cut the horizontal coils into smaller segments to fit between the vertical rails for a cleaner look. -
Refine the grid:
Use a small modeling tool to smooth the base of the grid lines onto the dish floor. I find running a damp brush along the edges of the coils helps them adhere without looking messy.
Step 3: Making the Pieces
-
Roll spheres:
Roll 10 small balls of clay, aiming for them to be roughly the size of a large marble, ensuring they fit nicely within your grid squares. -
Flatten slightly:
Gently press each ball down onto your work surface to create a flattened bottom and a slightly domed top, resembling a small button. -
Mark the X:
Using a knife or a thin modeling tool, press a cross or ‘plus’ sign into the top of every single piece. This unifies the design while color will distinguish the teams. -
Optional bowl:
If you have extra clay, pinch a rudimentary small bowl to hold the game pieces when they aren’t on the board.
Speckled Stone Effect
To mimic the ceramic look in the photo, flick a toothbrush loaded with diluted brown or grey paint over the finished white dish to create tiny, subtle speckles before sealing.
Step 4: Finishing Touches
-
Dry thoroughly:
Let all components dry completely. Air-dry clay usually takes 24-48 hours depending on thickness and humidity. Flip the board occasionally to prevent warping. -
Sand for smoothness:
Once bone dry, take your fine-grit sandpaper and gently sand the rim, the grid lines, and the game pieces to remove any fingerprints or sharp edges. -
Paint the pieces:
Divide your game pieces into two groups of five. Paint one set in a warm terracotta or brown shade and the other in a soft sage green. Leave the main dish unpainted or seal it with a clear coat for a natural stone look. -
Seal the project:
Apply a coat of matte varnish to the entire board and all game pieces. This protects the clay from moisture and gives the set a finished, professional quality.
Place your new game set on a side table to invite friendly competition in style


Sugar Cookie Board With Icing Lines
Recreate the sweet nostalgia of baking with this clever polymer clay tic-tac-toe set designed to look just like a freshly baked sugar cookie. The realistic cookie texture and glossy “icing” lines make for a delightful and durable game board.
How-To Guide
Materials
- Polymer clay (translucent, white, ecru/beige)
- Soft pastel chalks (oranges, browns, yellow ochre)
- Liquid polymer clay (translucent and white)
- Square cookie cutter (approx. 4-5 inches)
- Small round piping tip or small circular cutter (approx. 0.5 inch)
- Sanding sponge or old toothbrush
- Aluminum foil
- Paintbrush
- Needle tool
- Rolling pin or pasta machine
Step 1: Baking the Base
-
Mix the dough color:
Start by mixing translucent, white, and a small amount of ecru clay. The goal is a light, unbaked dough color; the translucent clay is key for achieving a realistic bakery depth rather than a flat plastic look. -
Form the slab:
Roll out your mixed clay to a thickness of about 1/4 inch. It should be thick enough to be sturdy but not so thick it warps easily. -
Cut the shape:
Use your large square cutter to punch out the main board shape. If you don’t have a cutter large enough, create a paper template and cut around it with a craft knife. -
Soften the edges:
Gently tap the cut edges with your finger to round them off slightly. Real cookies don’t have sharp, 90-degree corners, so this softening adds immediate realism. -
Create texture:
Scrunch up a ball of aluminum foil and roll it gently over the entire surface of the clay. Follow up with a sanding sponge or stiff toothbrush to create smaller pores and imperfections. -
shade the cookie:
Scrape some yellow ochre, orange, and light brown pastel chalks into jars. Use a soft brush to dust the edges of the square with the darker brown, fading into yellow ochre towards the center to mimic browning in an oven. -
Bake the base:
Bake the square slab according to your clay manufacturer’s instructions. Let it cool completely before moving to the next phase.
Sticky Icing?
If your liquid clay icing is too runny and spreads out, mix in more solid white clay or a tiny bit of cornstarch to thicken it into a stiff paste before piping.
Step 2: The Game Pieces
-
Mix piece colors:
Prepare white clay for the ‘O’ pieces. For the ‘X’ equivalents (shown here as pink), mix a small amount of red or pink into white clay to get a soft pastel shade. -
Cut the rounds:
Roll your clay out thinner than the base (about 1/8 inch). Use the small round cutter to punch out roughly 10 pieces total (5 of each color) to have spares. -
Texture the pieces:
Just like the base, texture these small rounds with your foil ball or toothbrush. For the speckled pieces, you can mix in tiny flecks of pink clay or paint specks on after texturing. -
Pre-bake pieces:
Bake these small pieces for a short duration (about 15 minutes) just to set them so they are easier to handle.
Pro Tip: Realistic texture
For the speckles on the white pieces, mix in actual ground spices like cinnamon or nutmeg for a hyper-realistic ‘spiced cookie’ look.
Step 3: Icing and Assembly
-
Prepare the icing:
Mix liquid polymer clay with a chunk of solid white clay to create a thick paste. It should have the consistency of royal icing—thick enough to hold a line but smooth enough to pipe. -
Mark the grid:
Lightly score a tic-tac-toe grid onto your cooled cookie base using a ruler and a needle tool. This guides your piping so the lines stay straight. -
Pipe the lines:
Transfer your ‘icing’ mixture into a small syringe or a plastic bag with a tiny corner snipped off. Carefully pipe two vertical and two horizontal lines over your score marks. -
Clean up intersections:
If the icing blobs where the lines cross, use a needle tool to gently drag the liquid clay and smooth the intersection while it’s still wet. -
Glaze the pieces (optional):
To make the game pieces look like glazed candies or M&Ms, coat them with a thin layer of translucent liquid clay or a gloss glaze. -
Final bake:
Place the board (with the wet icing lines) back into the oven. Bake for another 15-20 minutes to set the liquid clay lines permanently.
Once cooled, you have a charming, inedible treat that’s perfect for coffee table decor or a quick game


Waffle Board With Butter vs. Berries
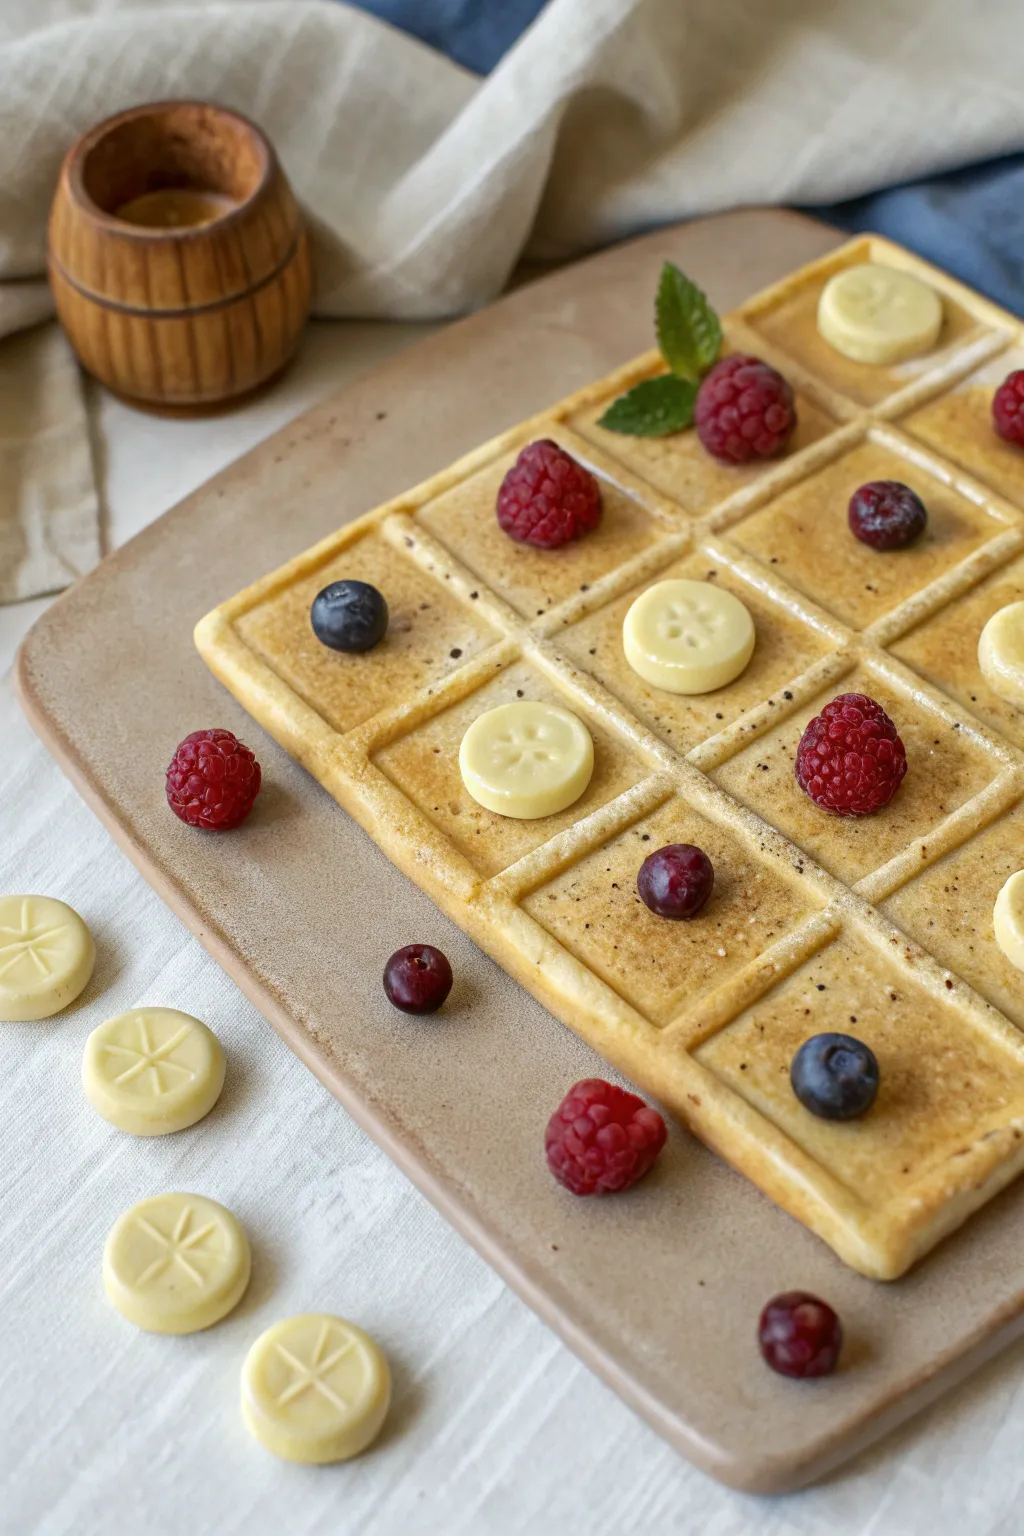
Transform polymer clay into a delicious-looking breakfast game set that’s too cute to eat. This realistic waffle board comes complete with sculpted berries and pat-of-butter game pieces for a whimsical twist on the classic strategy game.
Step-by-Step Guide
Materials
- Polymer clay (translucent, white, beige/ecru, red, dark purple, dark blue)
- Liquid polymer clay (translucent)
- Chalk pastels (orange, light brown, dark brown)
- Soft paintbrush for shading
- Clay roller or pasta machine
- Square waffle texture tool or a dull knife/ruler
- Small round cutter
- Needle tool or toothpick
- Small ball tool
- Sandpaper (fine grit)
- Polyurethane gloss varnish (optional)
- Sculpting tools
Step 1: Creating the Waffle Board
-
Mix the batter color:
Start by mixing beige clay with a small amount of white and translucent clay. The translucent clay adds that realistic ‘cooked dough’ depth rather than a flat plastic look. -
Form the base:
Roll your mixed clay out into a thick, even square slab about 1/4 inch thick. Smooth the edges with your finger to soften any sharp cuts. -
Create the grid:
Use a dull knife or a long ruler to press a 3×3 grid into the slab. Press deeply to create distinct ‘waffle pockets’ but be careful not to cut all the way through. -
Texture the pockets:
Inside each square depression, lightly press a piece of sandpaper or a texture sponge to mimic the airy texture of baked waffle batter. -
Pre-shade the waffle:
Scrape some orange and light brown chalk pastel into distinct piles of powder. Use a soft brush to dust the toasted colors onto the raised grid lines, leaving the pockets lighter.
Step 2: Sculpting the ‘Butter’ Pieces
-
Mix the butter tone:
Combine white clay with a tiny pinch of yellow and a significant amount of translucent clay. You want a creamy, pale yellow that isn’t neon. -
Cut the rounds:
Roll the clay into a thick log or sheet and use a small round cutter to punch out five circle pieces. These should be slightly smaller than your waffle grid squares. -
Emboss the pattern:
Use a needle tool to gently scribe a star or snowflake pattern into the top of each butter pat. This mimics decorative butter molds or banana slice centers. -
Soften edges:
Gently tap the sharp top edges of each round with your finger to give them a slightly melted, organic appearance.
Sticky Situation?
If your clay gets too soft and sticky while rolling tiny berry balls, place it in the fridge for 10 minutes. Cold clay holds fine detail much better during sculpting.
Step 3: Sculpting the Raspberry Pieces
-
Prepare berry colors:
Mix red clay with a touch of translucent and a speck of purple for a realistic raspberry hue. For variety, you can mix a few dark blue ones for blueberries. -
Form base cones:
Ideally, shape five small cone shapes out of scrap clay to serve as the core for your raspberries. -
Create drupelets:
Roll many tiny little balls of your red clay mixture. Starting at the bottom of the cone, press these tiny balls onto the core, working your way up to cover it completely. -
Hollow the center:
Use a ball tool to gently indented the top center of the raspberry where the stem would have been attached. -
Dust for realism:
Lightly brush a tiny bit of white cornstarch or baby powder onto the berries to simulate the natural bloom found on fresh fruit.
Pro Tip: Realistic Texture
Use a clean toothbrush to gently tap the surface of the waffle ridges before baking. This micro-texture grabs the chalk pastel shading better than smooth clay.
Step 4: Finishing Touches
-
Bake the set:
Place the board and all ten playing pieces on a tile or parchment paper. Bake according to your specific clay brand’s temperature and time instructions. -
Add ‘syrup’ shading:
Once cool, use a darker brown chalk pastel to shade the deepest corners of the waffle grid to create dimension. -
Simulate syrup (optional):
Mix liquid polymer clay with brown chalk pastel or alcohol ink. Carefully drip small amounts into the corners of the waffle pockets if you want a sticky syrup look, then bake again briefly to set. -
Final leaf details:
If desired, sculpt small green mint leaves using translucent green clay and texture them with a needle tool. Bake these separately and glue them on as permanent board decoration.
Now you have a charming, permanent breakfast scene that doubles as a fun logic game for your coffee table

The Complete Guide to Pottery Troubleshooting
Uncover the most common ceramic mistakes—from cracking clay to failed glazes—and learn how to fix them fast.
Donut Board With Sprinkles vs. Glaze Drops

This charming project reimagines the classic tic-tac-toe board as a rustic ceramic plate filled with bite-sized donut playing pieces. The soft pastel palette and realistic glaze finish give these clay treats an irresistible, freshly-baked appeal.
Step-by-Step Tutorial
Materials
- Air-dry clay or polymer clay (white or beige)
- Rolling pin
- Circle cutters (large for plate, small for donuts)
- Small straw or detail tool (for donut holes)
- Craft knife
- Sandpaper (fine grit)
- Acrylic paints (cream, pastel pink, soft yellow, mint green, lavender, white)
- Glossy varnish or resin (for the glaze effect)
- Matte sealant (for the plate)
- Thin wooden dowels or clay strips (for the grid)
- Strong craft glue
Step 1: Sculpting the Base
-
Prepare the Clay:
Begin by conditioning a large ball of white or beige clay until it is pliable and smooth. Roll it out into a thick, even slab, approximately 1/4 inch thick. -
Cut the Plate Shape:
Use a large circle cutter or trace around a salad plate to cut out the base shape. Smooth out the edges with a little water on your finger to remove any ragged bits. -
Form the Rim:
Gently curve the outer edge of the circle upwards to create a slight lip, mimicking the shape of a stoneware plate. You can pinch it gently or press it against a real plate (lined with plastic wrap) to hold the shape while drying. -
Create the Grid Lines:
You have two options here: either roll out very thin ‘snakes’ of clay to form the grid, or use thin wooden dowels. If using clay strips, lay them gently onto the plate in a hash-tag pattern (#). Press them down firmly so they adhere to the base. -
Refine the Surface:
I like to take a damp sponge and lightly texture the surface of the plate to give it a speckled, handmade pottery feel. Ensure the grid lines are straight and the intersections are clean before setting it aside to dry completely.
Sticky Situation?
If your clay grid lines are cracking as they dry, try scoring the plate surface first and using a slip (water + clay mix) as glue to bond them better.
Step 2: Baking the Donuts
-
Sizing the Dough:
While the board dries, roll out small balls of clay for the donuts. Aim for a diameter of about 1 inch—small enough to fit comfortably inside the grid squares. -
Shaping the Rings:
Flatten each ball slightly into a thick disc. Use the end of a small straw or a sculpting tool to punch a hole directly in the center of each disc to create the classic donut shape. -
Softening Edges:
Donuts shouldn’t have sharp edges. Use your fingertips to gently round off the inner and outer rims so they look puffy and risen. -
Make Extras:
You will need at least 5 donuts for each player (10 total is safe), but make a few extras just in case one gets lost or you want to test your paint colors first. -
Final Dry:
Allow all the clay pieces to cure fully according to your clay package instructions (air drying usually takes 24-48 hours; baking polymer clay takes 15-30 minutes).
Step 3: Decoration & Glazing
-
Base Coat:
Once dry, sand any rough spots. Paint the plate base in a warm, speckled oatmeal or stone color. You can achieve the speckled look by flicking a toothbrush loaded with diluted brown paint over the cream base. -
Painting the Donuts:
Paint the bottom half of each donut a golden-brown ‘dough’ color. Let this dry before moving on to the toppings. -
Applying the ‘Icing’:
Mix your pastel acrylics. Paint the top half of the donuts in various flavors—pale pink, creamy yellow, soft mint, and lavender. Let the paint come down the sides slightly unevenly to look like dripped icing. -
Adding the Grid:
If you used wooden dowels for the grid, glue them onto the plate now. Paint them to match the plate color or leave them natural for contrast. -
The Glossy Finish:
This is the secret to realism. Apply a thick coat of high-gloss varnish or UV resin ONLY to the ‘iced’ portion of the donuts. This mimics the shine of real sugar glaze. -
Sealing the Board:
Finish the board itself with a matte spray sealant to protect the paint while maintaining that natural, unglazed pottery aesthetic.
Sprinkle Surprise
Before the gloss varnish dries, drop real polymer clay ‘sprinkles’ or microbeads onto the wet glaze for added texture and a pop of fun color.
Now you have a delightful, zero-calorie dessert game that looks good enough to eat on your coffee table
Cat vs. Fish Character Board
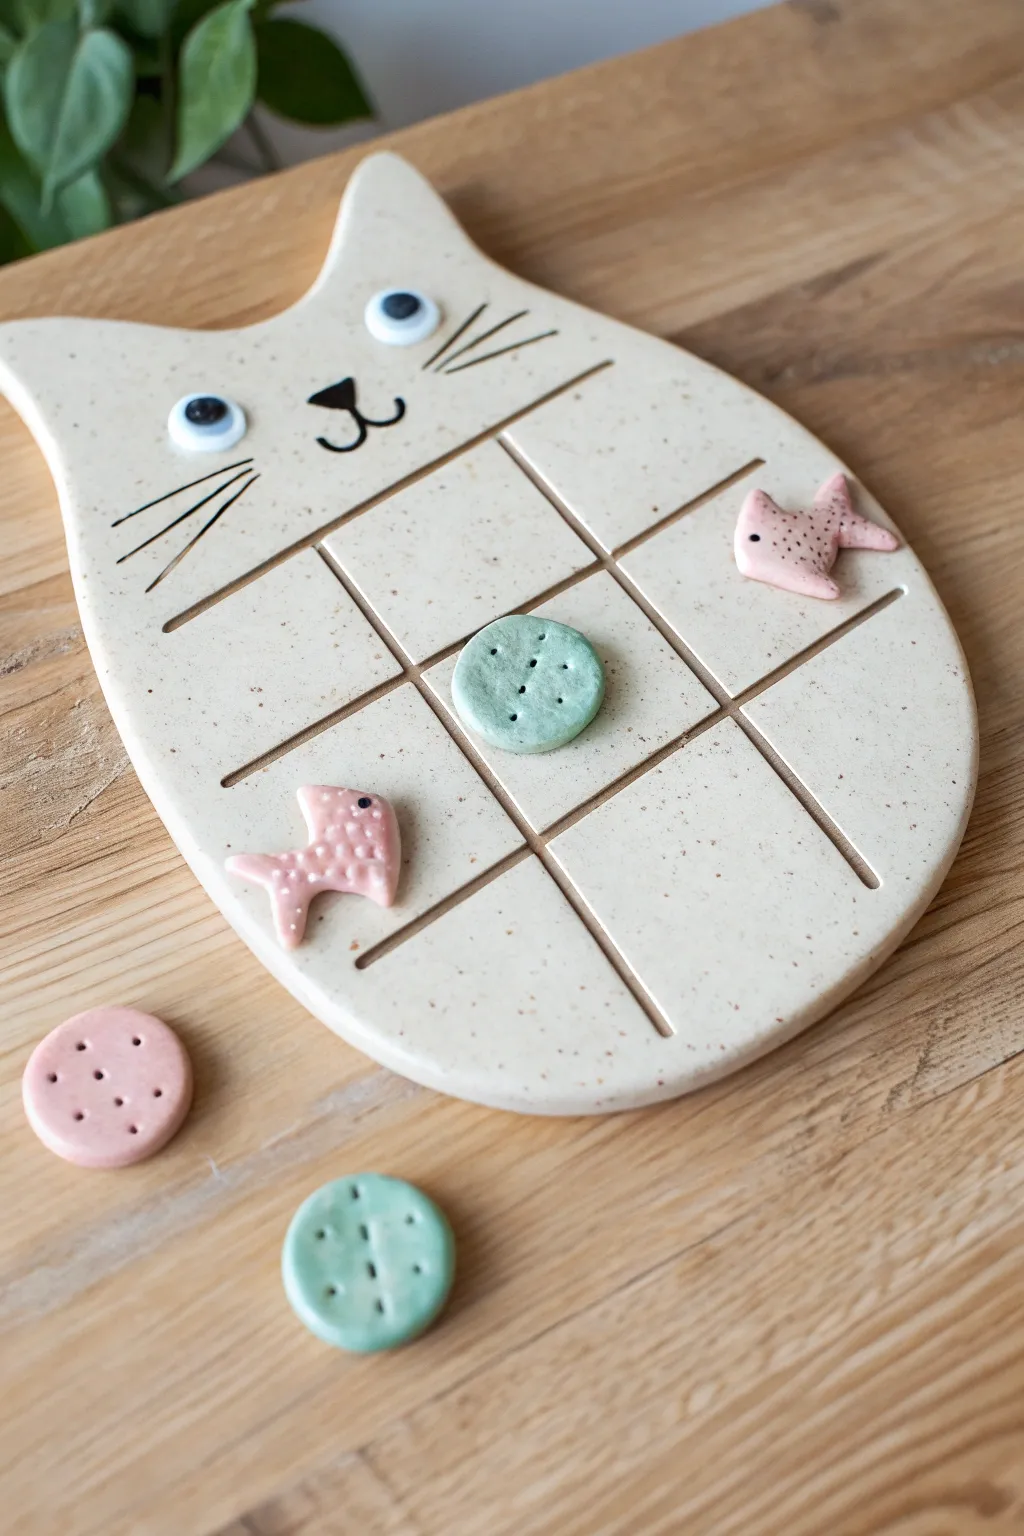
Bring a playful feline twist to your game nights with this adorable hand-sculpted tic-tac-toe set. Featuring a speckled ceramic-look cat board and cute fish-versus-yarn playing pieces, this project is functional art at its sweetest.
Detailed Instructions
Materials
- Polymer clay (white or beige, pink, mint green)
- Speckled clay inclusions (e.g., ground pepper or faux granite clay)
- Rolling pin
- Clay carving tools or a wooden skewer
- X-Acto knife
- Googly eyes (small)
- Super glue
- Black acrylic paint
- Fine-point paintbrush
- Gloss glaze or varnish
Step 1: Sculpting the Cat Board
-
Prepare the Base Clay:
Start by conditioning a large block of white or beige polymer clay until it is soft and pliable. To achieve that lovely speckled pottery look seen in the photo, kneed in a very small amount of faux granite clay or even coarse black pepper. -
Roll the Slab:
Roll the clay out onto a clean surface to a thickness of about 1/4 inch. You want it thick enough to be sturdy but not so heavy that it takes forever to bake. -
Shape the Cat Face:
Use a knife or clay cutter to cut out a large oval shape that tapers slightly at the top. Gently pull and shape two triangles at the top corners to form the cat’s ears, smoothing the transitions with your finger. -
Create the Grid:
Using a ruler and a clay tool, lightly mark a 3×3 grid in the center of the cat’s face. Once you are happy with the spacing, press the tool deeper to create distinct grooves that will hold the pieces. -
Add Facial Features:
With a needle tool or skewer, etch three whiskers onto each cheek. Carve a small ‘train track’ nose and mouth shape in the center, just above the grid lines.
Sticky Situation?
If your clay sticks to the table while rolling, roll it out on a piece of parchment paper or wax paper instead. You can then lift the paper directly onto the baking sheet.
Step 2: Creating the Game Pieces
-
Form the Fish:
Condition some pink clay and roll it into a thin sheet. Cut out five small fish shapes. You can use a tiny cutter or freehand this with your knife by cutting teardrops and adding triangular tails. -
Texture the Fish:
Using the tip of a needle tool or a small dotting tool, press tiny indentations all over the fish bodies to simulate scales. Don’t forget to poke a tiny eye hole. -
Make the Yarn Balls:
Switch to your mint green clay (or pink for variety) to make the opposing pieces. Roll five small balls of clay and flatten them slightly into thick discs, roughly the size of a large coin. -
Add Yarn Texture:
Take your needle tool and press a cross or ‘plus’ sign into the center of each disc. Add four small dots in each quadrant of the cross to mimic the look of a button or stylized yarn ball. -
Bake Everything:
Arrange the cat board and all ten game pieces on a baking sheet lined with parchment paper. Bake according to your specific clay brand’s instructions (usually 275°F for 15-30 minutes).
Magnets Mode
Make this a travel game by gluing small strong magnets into the back of the pieces and embedding washers or magnets into the board before baking.
Step 3: Finishing Touches
-
Cool and Clean:
Let all pieces cool completely before handling. If there are any rough edges on the board, you can gently sand them down with fine-grit sandpaper. -
Paint the Details:
Dip a fine paintbrush into black acrylic paint. Carefully fill in the etched whiskers, the nose, and the mouth lines on the cat board to make them pop against the pale clay. -
Define the Fish Eyes:
Use a toothpick or the very tip of your brush to add a tiny dot of black paint to the eye of each pink fish piece. -
Attach the Googly Eyes:
Once the paint is dry, apply a tiny drop of super glue to the back of two googly eyes and adhere them to the cat’s face, spacing them widely for that goofy, lovable expression. -
Seal the Project:
Apply a coat of satin or matte varnish to the entire board and pieces. This protects the paint and gives the clay a finished, professional ceramic feel.
Set up your grid and see who wins the first round of cat versus fish


What Really Happens Inside the Kiln
Learn how time and temperature work together inside the kiln to transform clay into durable ceramic.
Lily Pad Board With Frogs vs. Mushrooms
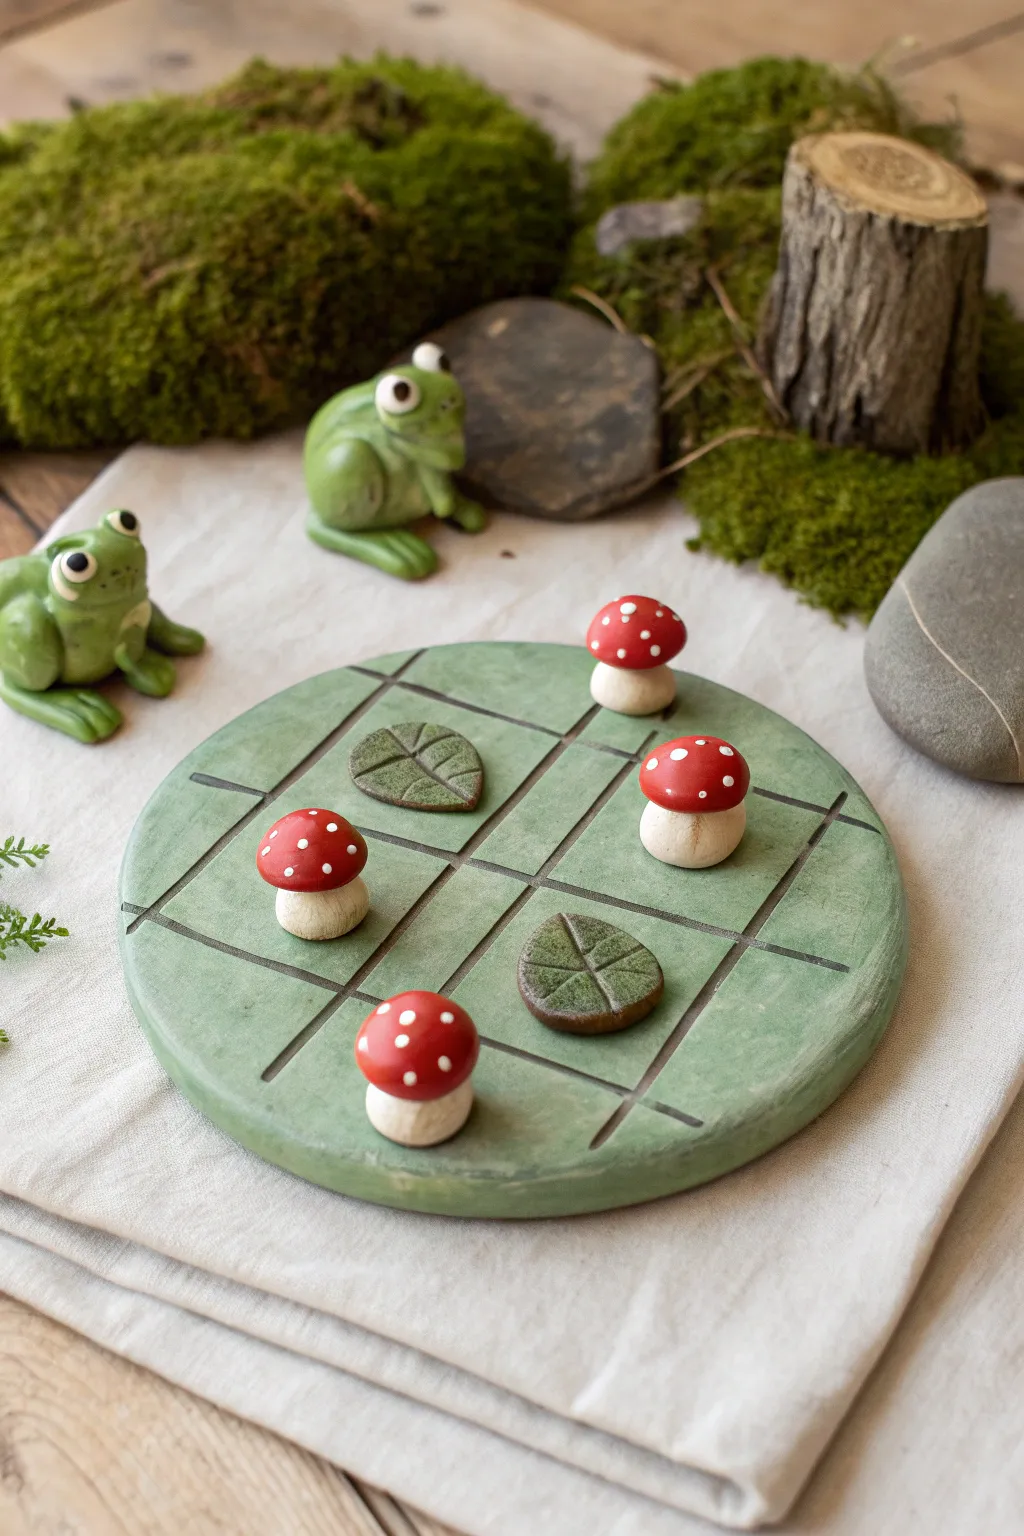
Turn game night into a woodland adventure with this enchanting clay tic-tac-toe set. Featuring a simple green slab board, toadstool tokens, and leaf markers, this project is perfect for beginners looking to create functional decor.
Step-by-Step Tutorial
Materials
- Polymer clay (green, red, white, brown)
- Acrylic roller
- Circle cutter (approx. 6 inches) or a bowl guide
- X-acto knife or clay blade
- Ball stylus tool
- Needle tool
- Aluminum foil (for frog armatures)
- Black glass seed beads (for frog eyes)
- Gloss glaze (optional)
Step 1: Sculpting the Forest Board
-
Condition the base clay:
Begin by thoroughly kneading a large block of moss-green polymer clay. If you want a more natural, stony look like the reference, try mixing in a tiny bit of white or translucent clay but don’t blend it fully, leaving subtle swirls. -
Roll out the slab:
Use an acrylic roller to flatten the clay into a thick, even slab, approximately 1/4 inch thick. Ensuring consistent thickness helps prevent cracking during baking. -
Cut the circle:
Place your large circle cutter or an inverted bowl onto the clay and cut out your round base. Smooth the edges with your finger to remove any sharp cut lines. -
Create the grid:
Lightly score a tic-tac-toe grid (two vertical lines, two horizontal lines) into the surface using a ruler and a needle tool first to check spacing. Once satisfied, use a clay blade or the back of a knife to press deeper, wider grooves.
Clean Cuts Pro Tip
Before cutting your main circle or grid lines, lay a sheet of plastic wrap over the clay. Cutting through the plastic creates soft, rounded beveled edges rather than sharp, harsh ones.
Step 2: Crafting the Game Pieces
-
Form mushroom stems:
Roll white clay into a thick log and cut five equal segments. Shape them into short, stout stems with slightly flattened bottoms so they stand upright easily. -
Add mushroom caps:
Roll five balls of red clay, flattening the bottoms to create hemispheres. Press these onto your white stems. I find a tiny drop of liquid clay here helps secure the bond permanently. -
Dot the mushrooms:
Take tiny pinches of white clay, roll them into microscopic balls, and flatten them onto the red caps to create the classic toadstool spots. -
Shape the leaf tokens:
For the opposing team, create five balls of green clay, slightly darker than your board. Flatten them into ovals and pinch one end to form a leaf shape. -
Detail the leaves:
Use a needle tool or knife to press a central vein and branching side veins into each leaf token. You can brush a little brown pastel dust on them for an ‘autumn’ feel.
Step 3: Sculpting the Frog Mascots
-
Build the body armature:
Crunch a small piece of aluminum foil into a teardrop shape. This saves clay and keeps the frogs lightweight. -
Cover with clay:
Sheet out bright green clay and wrap it around your foil core, smoothing the seams until you have a seamless frog body shape. -
Add legs:
Roll two thick logs for hind legs. Bend them into a ‘V’ shape and attach them to the sides of the body, blending the clay at the hip joint. -
Create the face:
Attach two small balls of white clay to the top of the head. Press a black seed bead into the center of each for the pupils. -
Final frog details:
give the frogs a wide mouth using a needle tool and attach tiny front arms resting on the ground or their knees.
Level Up: Texture
Before baking, gently press a piece of real sandpaper or a coarse sponge against the green board surface. This adds a realistic stone or mossy texture compared to smooth clay.
Step 4: Baking and Finishing
-
Bake the set:
Place all pieces on a parchment-lined baking sheet. Bake according to your clay package instructions (usually 275°F for 15-30 minutes per 1/4 inch of thickness). -
Cool down:
Let the pieces cool completely in the oven with the door slightly ajar to prevent thermal shock cracks. -
Optional glaze:
If you want a wet look on the mushrooms or frog eyes, apply a thin coat of gloss glaze. Leave the board matte for a more earthy texture.
Set up your board on a cozy table and enjoy a whimsical game of strategy.
Paw Print Board With Bones vs. Balls
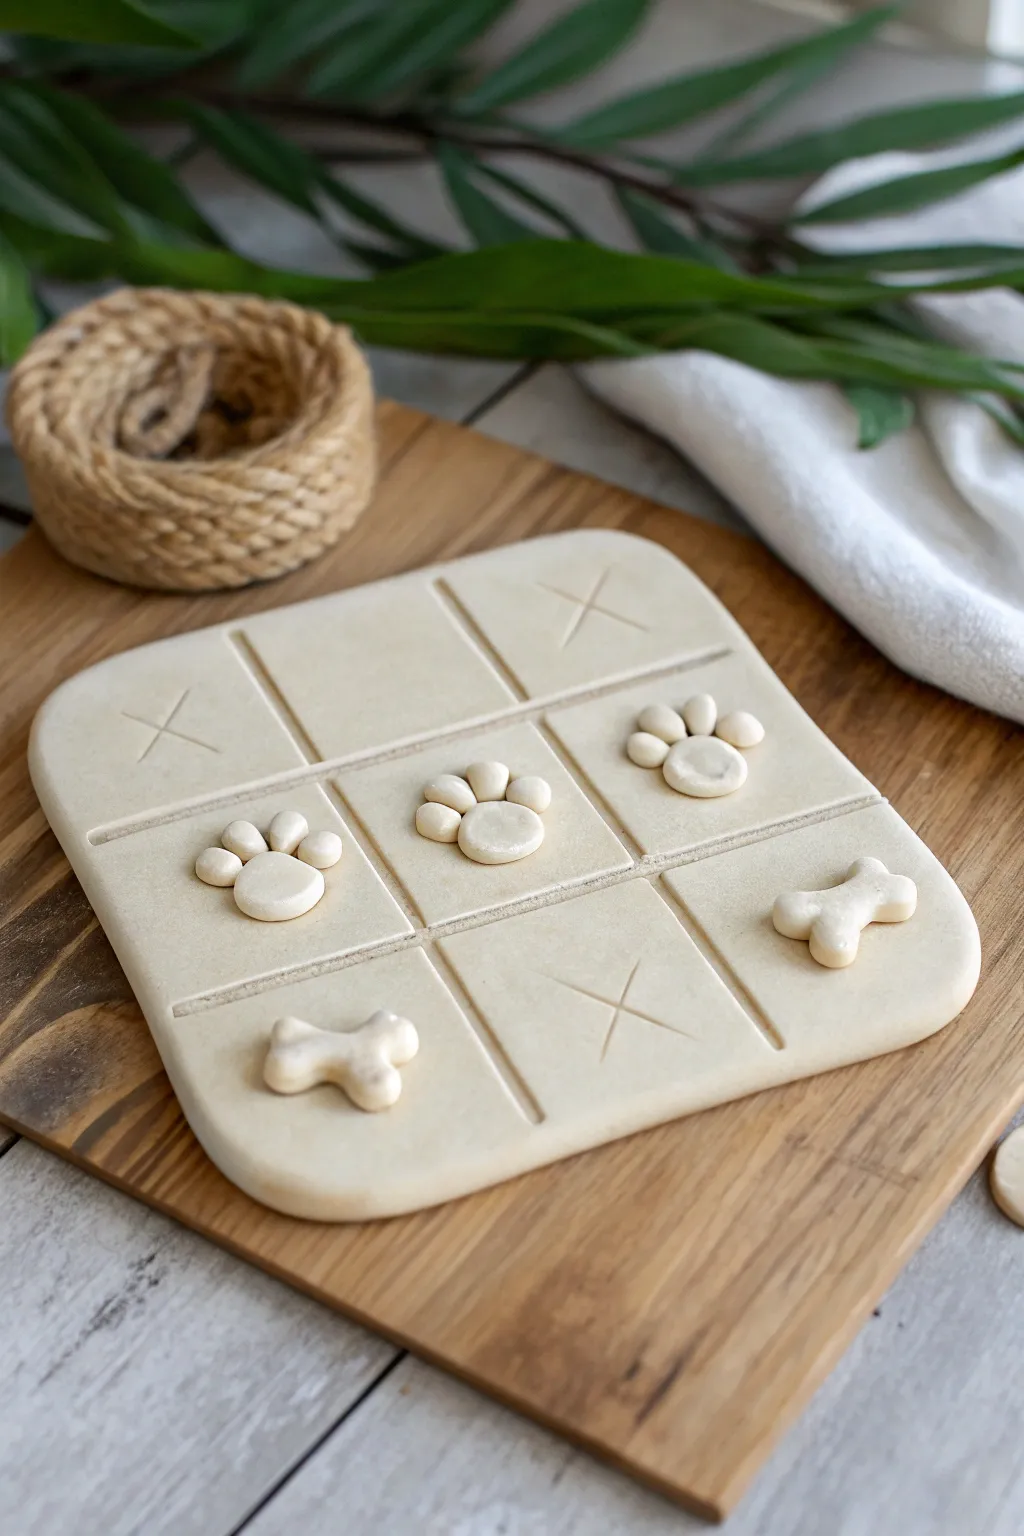
Treat your favorite pet lover to this adorable handmade gaming set, featuring a minimalist paw print theme. This project uses smooth, creamy clay to create a waffle-style grid board complete with tiny bones and paw pads as the playing pieces.
Step-by-Step
Materials
- Air-dry clay or polymer clay (white or cream)
- Rolling pin
- Square cookie cutter (approx. 4-5 inches) or a craft knife/ruler
- Modeling tools (ball stylus, needle tool)
- Ruler or straight edge
- Fine-grit sandpaper
- Parchment paper (for working surface)
- Small cup of water (for smoothing)
Step 1: Shaping the Board Base
-
Roll the main slab:
Begin by conditioning a large ball of clay until it is soft and playable. Roll it out on parchment paper to an even thickness of about 1/4 inch to ensure a sturdy base. -
Cut the square:
Using a large square cookie cutter or a ruler and craft knife, cut out a perfect square for your game board. Gently soften the sharp corners with your finger to give it the rounded look shown in the photo. -
Mark the grid lines:
Take a long ruler or the dull side of a knife and gently press it into the clay to create the tic-tac-toe grid. You need two vertical lines and two horizontal lines. -
Deepen the grooves:
Go back over your impressed lines with a modeling tool to widen and deepen them slightly, making the separation between squares distinct but not cutting all the way through. -
Add ‘X’ markers:
Select three of the squares on your grid (like the top left, top right, and bottom center) and lightly carve a thin ‘X’ into the surface using a needle tool or small knife tip.
Smooth Operator
Keep a baby wipe handy while working. Wiping your tools frequently prevents dried clay crumbs from marring the smooth surface of your paw pads.
Step 2: Sculpting the Playing Pieces
-
Form the paw pads:
Roll three medium-sized balls of clay for the main paw pads. Press them gently onto the board in a diagonal line (from center-left to center-right) to adhere them permanently as the ‘O’ placement. -
Add toe beans:
For each main pad, roll three tiny spheres of clay. Attach them above the larger pad to create the toes, blending the seams slightly at the bottom with a dab of water. -
Sculpt bone shapes:
Roll two small logs of clay for the bone pieces. Use a ball stylus or your finger to indent the ends of each log, creating the classic heart-shaped bone ends. -
Place the bones:
Position the bones onto the remaining empty squares (bottom left and middle right). Press them down gently so they bond with the base board. -
Create loose game pieces (Optional):
If you want the game to be playable rather than decorative, sculpt five separate paw pieces and five bone pieces off the board and let them dry individually instead of attaching them. -
Final smoothing:
Dip your finger in a tiny bit of water and lovingly smooth out any fingerprints or rough edges on the paw pads and bones. I find this really helps give that professional, seamless finish.
Step 3: Drying and Finishing
-
Initial drying:
Place the board on a flat surface away from direct heat to dry. If using air-dry clay, flip it carefully after 24 hours to let the bottom breathe. -
Sanding edges:
Once the clay is fully hardened, use fine-grit sandpaper to gently buff the outer edges of the square board for a super smooth feel. -
Dusting off:
Wipe the entire piece with a slightly damp cloth or a dry brush to remove any clay dust from the sanding process. -
Sealing the clay:
Apply a thin layer of matte varnish or sealant to protect the surface from dirt and moisture, keeping that clean, natural clay look.
Make It Color
Mix a tiny drop of beige or brown acrylic paint into your white clay before sculpting to create a ‘cookie dough’ color effect without painting later.
Now you have a charming, decorative game board perfect for display on a coffee table or shelf

TRACK YOUR CERAMIC JOURNEY
Capture glaze tests, firing details, and creative progress—all in one simple printable. Make your projects easier to repeat and improve.
Tiny Garden Tile With Ladybugs vs. Daisies
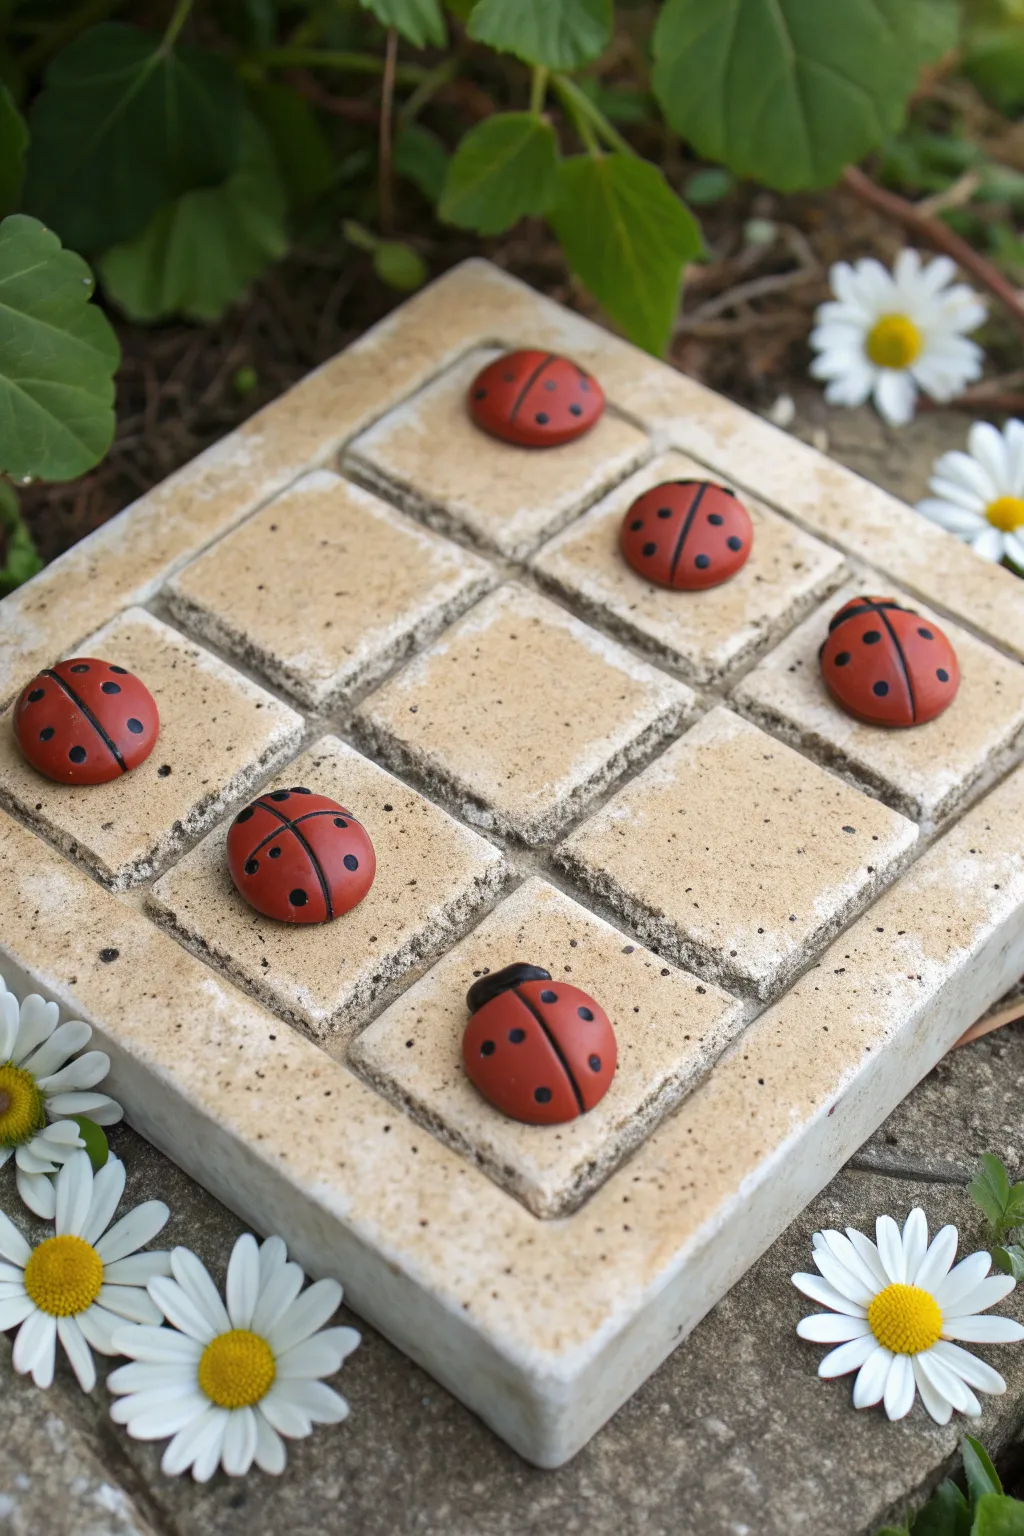
Transform your garden patch or patio table into a playground with this charming stone-look tic-tac-toe set. Featuring a rugged, textured playing board and hand-painted ladybug markers, this project blends durable outdoor materials with whimsical painted details.
Step-by-Step Tutorial
Materials
- Air-dry clay or polymer clay (stone color or white)
- Square cookie cutter or knife
- Ruler
- Sponge or stiff bristle brush (for texturing)
- Smooth river pebbles or rounded clay balls (approx. 1 inch)
- Acrylic paints (red, black, white, yellow)
- Fine detail paintbrush
- Matte outdoor varnish or sealant
- Sandpaper (fine grit)
- Sculpting tool with a flat edge
Step 1: Sculpting the Board
-
Form the base slab:
Begin by rolling out a thick slab of clay, aiming for a square shape approximately 6×6 inches and about 1 inch thick. Keep edges slightly rounded rather than sharp to mimic natural pavers. -
Create the grid lines:
Use a ruler to lightly mark out a 3×3 grid on the surface. Instead of cutting all the way through, use a flat-sided sculpting tool to press deep grooves along these lines, creating distinct raised square tiles. -
Add faux stone texture:
To give the board that weathered concrete look, take a coarse sponge or a stiff bristle brush and dab it firmly all over the surface. I like to pay extra attention to the corners of the ’tiles’ to make them look worn. -
Refine the edges:
Smooth out any sharp burrs on the outer sides with a little water on your finger, ensuring the board looks like a single cast piece. -
Dry the base:
Allow the board to dry completely according to your clay’s instructions. If using air-dry clay, flip it occasionally to prevent warping.
Natural Texture
Press a real rock into your wet clay board repeatedly to transfer authentic stone pitting and flaws.
Step 2: Creating the Ladybugs
-
Select your stones:
Choose 5 to 6 smooth, round pebbles that fit comfortably inside the grid squares. Alternatively, roll balls of clay and flatten the bottoms slightly so they sit stable. -
Base coat:
Paint the entire surface of each pebble with a deep, opaque red acrylic paint. You may need two coats to fully cover the stone’s natural color. -
Draw the center line:
Once the red is dry, use a fine brush with black paint to draw a straight line down the center of the ladybug to divide the wings. -
Add the head:
Paint a small semi-circle at the top of the line for the head. You can leave it solid black or add tiny white dot eyes later. -
Dot the wings:
Carefully dab black dots onto the red wings. Vary the placement slightly on each bug to give them individual character. -
Create the daisy opponents:
For the second player set (not pictured but necessary for the game), paint 5 other stones white with yellow centers to mimic the surrounding flowers.
Wobbly Lines?
If painting straight lines on curved rocks is hard, use thin masking tape or a guided edge.
Step 3: Finishing Touches
-
Wash the board:
Mix a very watery wash of brown or grey acrylic paint. Brush this over the dried clay board, letting the pigment settle into the texturing and grid grooves. -
Wipe back:
Immediately wipe the high points of the board with a damp cloth/paper towel. This leaves the dark color in the crevices, highlighting the stone texture. -
Seal the project:
Apply a coat of outdoor-grade matte varnish to both the board and the painted pebbles to protect them from moisture and UV fading. -
Setup:
Place the board on a flat stone or patio table and surround it with fresh daisies to complete the garden scene.
Now you have a durable, adorable game set ready for sunny afternoons in the garden
Cloud Board With Suns vs. Raindrops
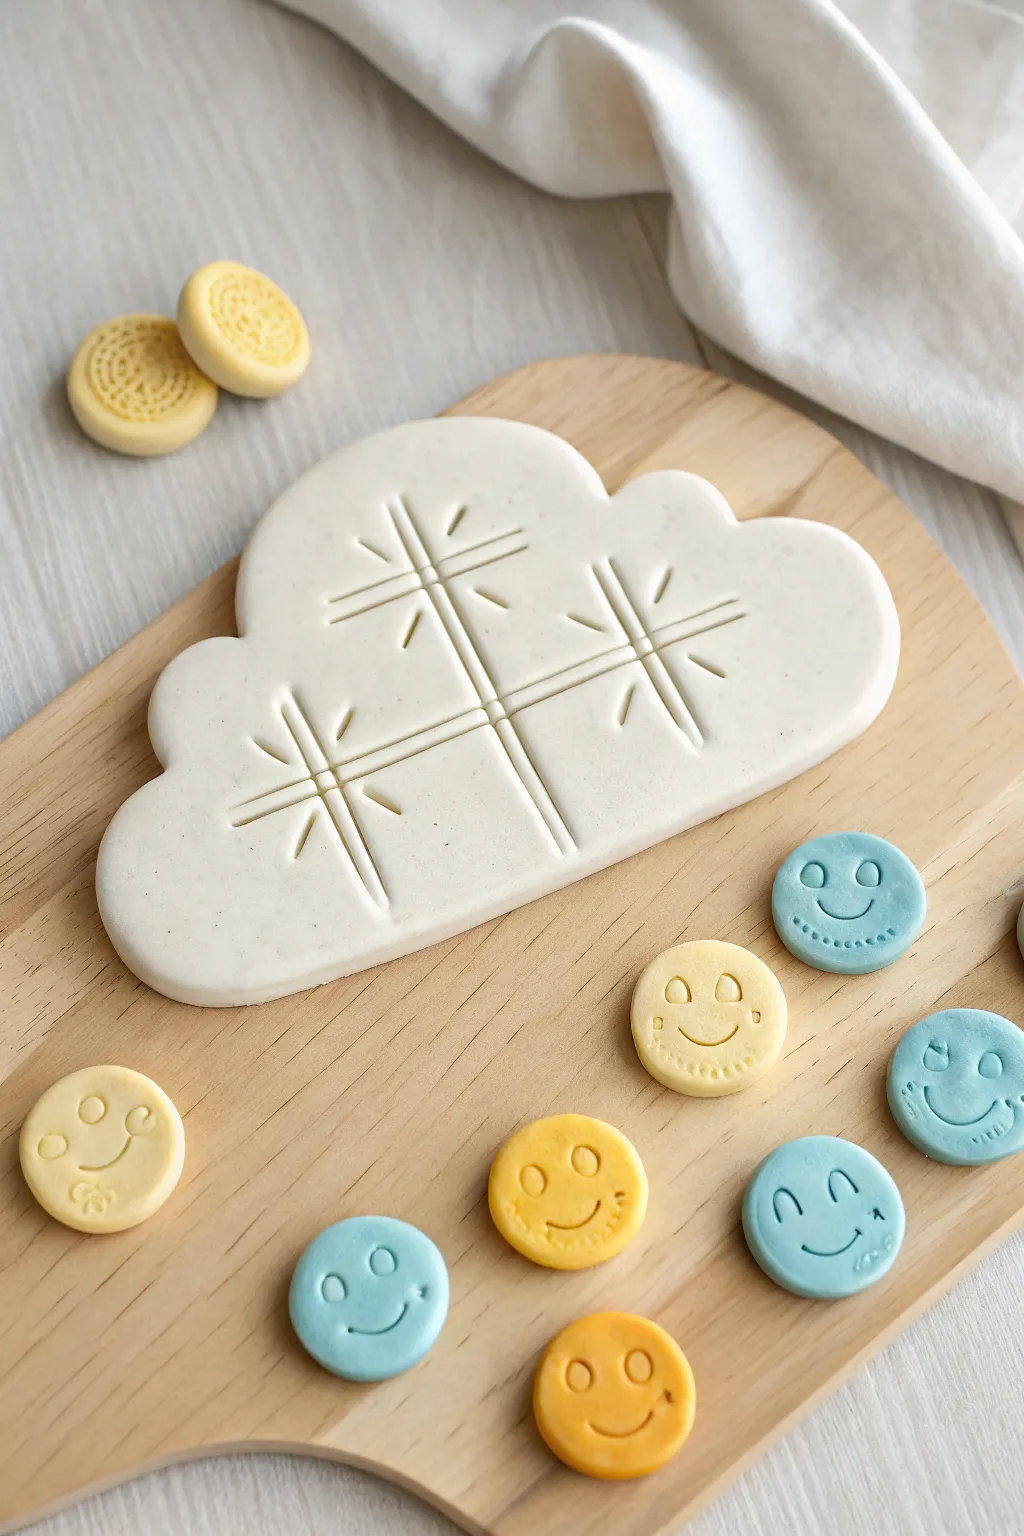
Brighten up game night with this adorable polymer clay tic-tac-toe set featuring a fluffy white cloud board and cheerful sun and raindrop game pieces. The minimalist design with its playful etched grid makes for a charming tabletop decoration even when you aren’t playing.
How-To Guide
Materials
- White polymer clay (approx. 4-6 oz)
- Pastel yellow polymer clay
- Pastel blue polymer clay
- Rolling pin or acrylic roller
- Cloud-shaped cookie cutter (large) or X-Acto knife and paper template
- Needle tool or toothpick
- Small round cutter (approx. 1 inch)
- Small circle stamps or tools for smiley faces (like small straw ends)
- Baking sheet
- Parchment paper
- Fine grit sandpaper (optional)
- Matte sealant/varnish (optional)
Step 1: Shaping the Cloud Board
-
Condition the Clay:
Start by kneading the white polymer clay in your hands until it becomes soft, pliable, and free of cracks. Warm clay is much easier to shape and less prone to tearing. -
Roll Out the Base:
Using an acrylic roller, flatten the white clay into a consistent slab about 1/4 inch thick. Aim for a thickness that feels sturdy, as this will act as your game board. -
Cut the Cloud Shape:
If you have a large cloud cookie cutter, press it firmly into the slab. Alternatively, I like to sketch a cloud shape on paper, cut it out, place it on the clay, and carefully trace around it with an X-Acto knife. -
Smooth the Edges:
Gently run your finger along the cut edges of the cloud to soften any sharp corners or clay burrs, giving it that soft, puffy appearance.
Step 2: Etching the Grid
-
Mark the Grid Lines:
Visualize a standard tic-tac-toe grid (two vertical lines, two horizontal lines) in the center of your cloud. Use a ruler to lightly impress where these lines will go to ensure they are straight. -
Deepen the Grooves:
Use a needle tool or a dull knife to press deeper into your guide marks. Instead of a single thin line, create double partial lines or slightly wider grooves to define the playing spaces clearly. -
Add Starburst Details:
To mimic the style in the photo, add small decorative dashes radiating from the grid intersections. These little ‘sparkles’ give the board a bit of extra magic.
Sticky Situation?
If your clay sticks to the table or cutter, dust the surface lightly with cornstarch before rolling. It acts as a release agent and washes off after baking.
Step 3: Creating the Game Pieces
-
Prepare Colored Clay:
Condition the pastel yellow and blue clays separately. Roll each color out to a slightly thinner slab than the board, roughly 1/8 to 3/16 inch thick. -
Cut Out Tokens:
Use a small round cutter to punch out five yellow circles and five blue circles. Wiggle the cutter slightly before lifting to ensure a clean release. -
Add Smiley Faces:
Using a small curved tool (like a cut straw or clay sculpting tool), press a smile into the lower half of each circle. Use a smaller round tool to impress two eyes above the smile. -
Texture the Suns (Optional):
For the yellow sun pieces, you can gently texture the edges or add tiny impressed dots around the perimeter to distinguish them further, though a simple smooth face works just as well. -
Detail the Raindrops (Optional):
For the blue pieces, you can pinch the top of the circle slightly to suggest a droplet shape, or keep them round as ‘blue sky’ markers.
Level Up: Magnet Mode
Glue small round magnets to the back of the board and each piece after baking. Now you have a functional fridge magnet game for the kitchen!
Step 4: Baking and Finishing
-
Prepare for Baking:
Transfer the cloud board and all ten game pieces onto a baking sheet lined with parchment paper. Ensure the board is perfectly flat so it doesn’t warp. -
Bake the Clay:
Bake according to your clay manufacturer’s instructions (typically 275°F for 15-30 minutes depending on thickness). Do not overbake, or the white clay may discolor. -
Cool Down:
Once baked, remove the tray from the oven and let everything cool completely on the pan. The clay hardens fully as it cools. -
Sand Rough Spots:
If there are any fingerprints or rough edges, lightly buff them away with fine-grit sandpaper under running water. -
Seal:
For durability, apply a thin coat of matte varnish to the board and pieces. This will protect the white clay from getting dirty over time.
Set up your grid and get ready for a sunny afternoon of strategy
Seashell Board With Stars vs. Shells
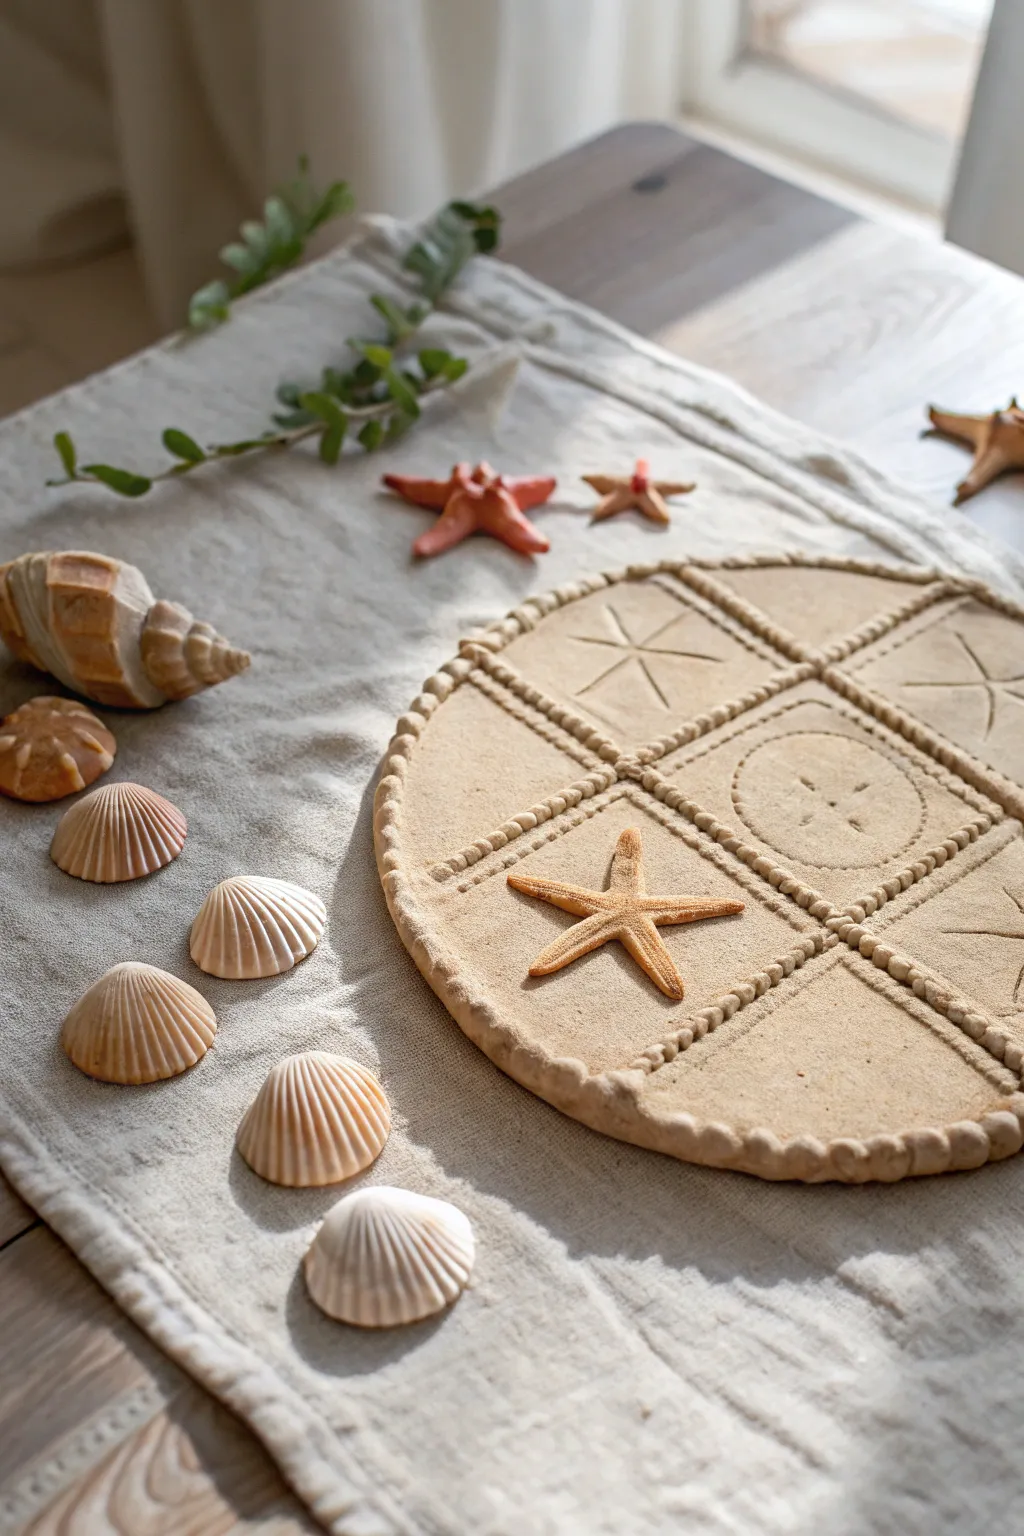
Bring the beach indoors with this charming clay board game that doubles as seaside decor. Using simple sculpting techniques and texture, you’ll create a sandy-hued playing surface with integrated grid lines and beautiful marine motifs.
Step-by-Step Tutorial
Materials
- Air-dry clay (sand-colored or white to be painted)
- Rolling pin
- Fettling knife or clay cutter
- Round circular template (plate or cake pan)
- Small sculpting tools (needle tool, small ball stylus)
- Real starfish (optional, for reference or texture)
- Canvas mat or parchment paper
- Small shallow bowl of water
- Fine grit sandpaper
Step 1: Base Construction
-
Prepare the workspace:
Lay down your canvas mat or parchment paper to prevent the clay from sticking to your table. If using air-dry clay, keep a damp cloth nearby to keep your hands clean. -
Roll the slab:
Take a large portion of clay and roll it out into an even slab, approximately 1/4 to 1/2 inch thick. Ensure the thickness is consistent to prevent warping during drying. -
Cut the circle:
Place your circular template over the rolled clay. Using your fettling knife held vertically, trace around the template to cut a clean, perfect circle for the board base. -
Smooth the edges:
Dip your finger lightly in water and run it along the cut edge of the circle to smooth out any roughness or sharp debris from the knife.
Natural Texture
For an authentic beach look, mix a small amount of real fine sand directly into your clay body before rolling it out. This adds a subtle grit that looks amazing.
Step 2: Grid & Texture
-
Mark the grid lines:
Lightly score the clay surface to mark out a standard 3×3 tic-tac-toe grid. Use a ruler to ensure your lines are straight and the nine spaces are relatively equal in size. -
Roll small coils:
Roll out very thin, long snakes of clay. Cut these into tiny segments and roll each segment into a small, uniform ball—you will need many of these to create the beaded look. -
Apply the beaded border:
Score the outer rim of your circle and brush on a little water or slip. Press the small clay balls side-by-side all the way around the perimeter to create a decorative beaded edge. -
Create the grid dividers:
Repeat the process for the internal grid lines. Apply a line of slip over your scored grid marks and carefully press rows of the tiny clay balls into place to define the nine playing squares.
Warping Fix
If the edges of the board start lifting while drying, place a lightweight board on top of the piece (sandwiching it) to gently force it to dry flat.
Step 3: Sculpting Motifs
-
Add texture to the field:
Before sculpting the symbols, you might want to gently press a piece of coarse fabric or a dry sponge onto the flat areas of the board to give it a realistic, sandy texture. -
Sculpt the starfish marks:
In the squares designated for ‘X’ moves (or just for decoration as shown), use a needle tool to drag and etch a simple five-point star shape into the clay. -
Refine the stars:
Deepen the center lines of the stars with your sculpting tool to give them dimension, mimicking the look of a fossil imprint. -
Create sand dollar marks:
For the ‘O’ squares, lightly press a circle into the center. Inside this circle, press five small teardrop shapes pointing inward to create the classic sand dollar flower pattern. -
Add a 3D starfish element:
I like to sculpt one raised 3D starfish for visual interest. Form a small star shape from fresh clay, add tiny texture holes with a needle tool, and slip-and-score it onto one of the grid intersections or squares.
Step 4: Finishing
-
Slow drying:
Place the board in a cool, dry area away from direct sunlight. To prevent curling edges, loosely drape a plastic sheet over it for the first 24 hours to slow the drying process. -
Sand imperfections:
Once fully dry (which may take 2-3 days), gently use fine-grit sandpaper to smooth any sharp peaks on the beaded lines or rough patches on the edges. -
Optional color wash:
If your clay dried too white, mix a very watered-down brown acrylic paint and wash it over the piece, wiping it back immediately with a rag to leave color only in the textures.
Now you have a timeless, beach-inspired game board ready for display or play
Wood Slice Board With Acorns vs. Pinecones

Bring the forest floor indoors with this charming nature-inspired game board set on a rustic wood slice. Using simple twine for the grid and painted acorns as playing pieces, this project creates a cozy, interactive centerpiece perfect for autumn.
Step-by-Step Guide
Materials
- Large wood slice (approx. 8-10 inches diameter)
- Natural jute twine
- Real acorns (caps attached) or polymer clay equivalent
- Green acrylic paint (olive or moss shade)
- Small flat paintbrush
- Hot glue gun and glue sticks
- Brown polymer clay (for the leaf pieces)
- Clay sculpting tool or toothpick
- Scissors
- Clear matte sealer (optional)
Step 1: Preparing the Game Board
-
Select the base:
Choose a wood slice that is flat and mostly smooth on the top surface. If it’s rough, give it a light sanding with fine-grit sandpaper to ensure the playing pieces sit level. -
Measure the grid:
Lay two pieces of twine vertically and two horizontally across the wood slice to visualize your grid spacing. You want nine relatively equal spaces, leaving a nice border of wood visible around the edge. -
Cut the twine:
Once you are happy with the placement, cut your four strips of twine. Leave them slightly longer than the wood slice for now—we will trim them later for a cleaner look. -
Place vertical lines:
Apply a very thin line of hot glue where your first vertical string will go. Carefully press the twine into the glue, pulling it taut so it forms a straight line. Repeat for the second vertical string. -
Place horizontal lines:
Glue the two horizontal strings perpendicular to the first set, creating the classic hash symbol. Press firmly at the intersections where the strings cross to secure them. -
Trim the edges:
Once the glue is fully cooled and hard, use sharp scissors to snip the excess twine ends. Aim to cut them flush with the edge of the wood slice so they don’t dangle over the bark.
Loose String?
If twine ends fray after cutting, dab a tiny drop of clear glue on the tip and twist it with your fingers to seal it immediately.
Step 2: Creating the Game Pieces
-
Clean the acorns:
If using real acorns, wipe them down with a damp cloth to remove dirt. If using clay, sculpt five simple acorn shapes and texture the caps. -
Paint the first team:
Select five acorns to be your ‘X’ team (or simply the green team). Painting just the nut portion while leaving the cap natural creates a lovely contrast. Apply a coat of olive green acrylic paint. -
Dry and touch up:
Let the first coat dry completely. If the natural brown of the shell shows through too much, I usually add a second thin coat for better coverage. -
Prep the natural team:
Select five distinct natural acorns for the opposing team. Ensure their caps are glued on securely, as they tend to pop off over time. -
Form clay leaves:
Take small balls of brown polymer clay and flatten them into tiny oak leaf shapes. These will serve as markers or decorative elements for the board. -
Add leaf details:
Using a clay tool or a toothpick, gently press a central vein and smaller branching veins into each clay leaf for realistic texture. -
Bake the clay:
Bake the clay leaves according to the package instructions. Once cool, you can leave them as decoration or glue one to the wood slice as a permanent accent. -
Seal the pieces:
To protect your paint from chipping during intense tic-tac-toe matches, give the painted acorns a quick spray with a clear matte sealer.
Make it Magnetic
Glue small magnets to the bottom of the acorns and bury magnets under the twine intersections for a travel-ready board.
Set out your woodland board on a coffee table and challenge a friend to a game
Space Board With Planets vs. Rockets
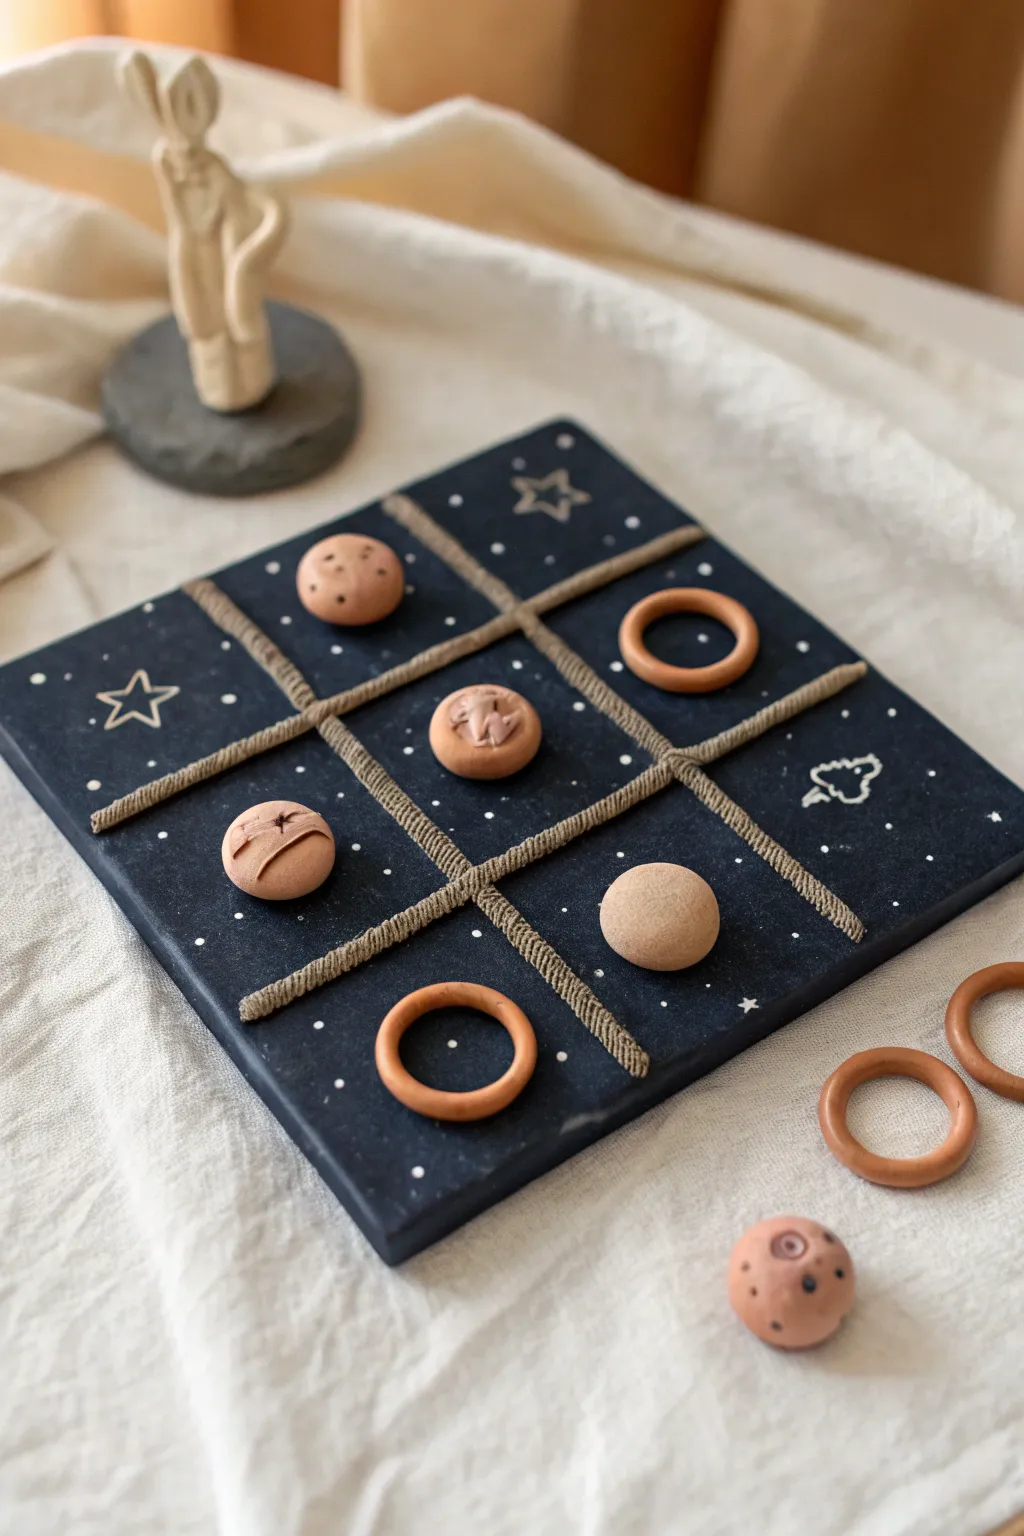
Blast off into a galaxy of fun with this celestial take on a classic game. Featuring a deep blue, star-studded board and textured terracotta clay pieces, this handmade set brings the mystery of space right to your coffee table.
Step-by-Step Tutorial
Materials
- Square wooden board or thick MDF base (approx. 8×8 inches)
- Air-dry polymer clay (terracotta color)
- Acrylic paint: Navy blue, black, white
- Jute twine or thin rustic rope
- Strong craft glue or hot glue gun
- Paintbrushes: Large flat brush and fine detail brush
- Sculpting tools (or a toothpick and a small round object for texturing)
- Matte varnish or sealant (optional)
- Sandpaper
Step 1: The Galactic Base
-
Prepare the Board:
Begin with your square wooden base. If the edges are rough, give them a quick sanding to ensure a smooth finish. Wipe away any dust with a slightly damp cloth. -
Mix the Night Sky:
Create a deep, midnight blue by mixing navy acrylic paint with a touch of black. You want a color that feels like infinite space, not just blue. -
Apply the Base Coat:
Paint the entire top surface and the sides of the board with your midnight blue mixture. Let this layer dry completely, then add a second coat for solid, opaque coverage. -
Splatter the Stars:
Dip a stiff brush or an old toothbrush into white acrylic paint. Run your thumb across the bristles to flick tiny specks of ‘stardust’ across the dark background. Keep the spray random for a natural look. -
Detail Constellations:
Using your finest detail brush and white paint, hand-paint a few larger five-point stars and tiny dots to represent distant planets. You can even sketch a small shooting star or a simple rocket shape in the corners.
Clay Cracking?
If your clay cracks while drying, fill the fissures with a mix of fresh clay and water (slip). Smooth it over and let it dry again.
Step 2: Sculpting the Pieces
-
Condition the Clay:
Take your terracotta-colored air-dry clay and knead it until it is soft and pliable. This prevents cracks from forming later. -
Form the ‘O’ Pieces (Saturn’s Rings):
Roll out five sausages of clay of equal thickness. Loop them into circles, blending the seam together smoothly with your finger and a drop of water so the join is invisible. -
Form the ‘X’ Pieces (Planets):
Instead of traditional X shapes, simple spheres or domes work best for the opposing team. Roll five balls of clay and flatten the bottoms slightly so they sit stable on the board. -
Texture the Planets:
I like to use the end of a paintbrush to gently press small craters into the planet pieces. You can also press lines or swirls into the clay to mimic planetary surfaces. -
Create a Mascot (Optional):
If you have leftover clay, try sculpting a tiny astronaut figure to stand guard on the sidelines, just like the one watching over the board in the photo. -
Dry the Clay:
Set all your clay pieces aside on a piece of parchment paper. Allow them to dry fully according to the package instructions, which usually takes 24 to 48 hours.
Glow in the Dark
Mix glow-in-the-dark powder into your white paint for the stars. The galaxy will light up when you play at night
Step 3: Grid & Assembly
-
Plan the Grid:
Once the painted base is fully dry, lightly mark out a tic-tac-toe grid (two vertical lines, two horizontal lines) using a pencil. Aim for equal spacing to create nine uniform squares. -
Cut the Rope:
Measure your jute twine against the board. Cut four lengths of twine that fit exactly from edge to edge of your board. -
Glue the Vertical Lines:
Apply a thin bead of strong craft glue along your vertical pencil marks. Press two lengths of twine into the glue, holding them in place for a moment to ensure they stick. -
Glue the Horizontal Lines:
Repeat the process for the horizontal lines. When crossing over the vertical ropes, press down firmly so the intersection points bond well. -
Seal the Deal:
To protect your painted design and clay pieces, apply a coat of matte varnish over the board and the dried clay tokens. This prevents chipping during heated matches.
Now your space-themed game is ready for its maiden voyage
Tea Time Board With Teabags vs. Sugar Cubes
This charming, monochrome game set features a soft, limestone-like finish with custom game pieces that resemble delicate sugar cubes and stamped tea biscuits. It’s an elegant twist on the classic game that brings a cozy, café aesthetic to your coffee table.
Step-by-Step
Materials
- White air-dry clay (smooth texture)
- Terra cotta or brown air-dry clay (for the ‘tea biscuits’)
- Rolling pin
- Circular clay cutter or plate (approx. 8-inch diameter)
- Small circular stamps or textured buttons
- Scalpel knife or clay tool
- Ruler
- Fine-grit sandpaper
- Small bowl of water
- Matte sealant spray
Step 1: Creating the Base Board
-
Roll the main slab:
Begin by conditioning the white air-dry clay until it is pliable. Roll it out into a flat, even slab, aiming for a consistent thickness of about 1/4 inch to ensure durability. -
Cut the circular shape:
Place your circular cutter or a dining plate onto the rolled clay. Carefully trace around it with your scalpel knife to cut out a perfect circle. Remove the excess clay. -
Form the rim:
Roll a long, thin snake of white clay. Score the outer edge of your circular base and apply a small amount of water (clay slip). Press the snake gently onto the edge to create a raised rim, smoothing the seam with your finger or a tool so it looks like one solid piece. -
Create the grid lines:
Roll four thinner snakes of white clay for the grid. Use your ruler to measure and cut them to fit inside the rim. -
Attach the grid:
Arrange the four strands in a standard tic-tac-toe hashtag pattern (#). Score the base where the lines will sit, add slip, and gently press the strips down. Ensure the intersections are neat and square. -
Smooth and refine:
Use a damp sponge or your finger to smooth out any fingerprints or rough edges on the rim and grid lines. The goal is a matte, stone-like surface.
Uneven Grid?
If your grid lines warp while drying, place a lightweight book on top of the board (with wax paper in between) during the first few hours of drying to keep everything flat.
Step 2: Sculpting the Sugar Cube Pieces (‘X’)
-
Cut linear strips:
Roll out a small amount of white clay, slightly thicker than the board base. Cut narrow strips approximately 1/4 inch wide. -
Assemble the crosses:
Cut the strips into small segments. Create five ‘X’ shapes by overlapping two segments. I find it helps to gently press the center intersection to bond them without flattening the arms. -
Soften the edges:
Once assembled, gently tap the ends of each X to blunt them, giving that soft, pillowy sugar-cube appearance rather than sharp geometric lines.
Stone Texture
To get that speckled, realistic stone look, mix a tiny pinch of used coffee grounds or cracked pepper into your white clay before rolling out the initial slab.
Step 3: Crafting the Tea Biscuit Pieces (‘O’)
-
Roll the brown clay:
Using the terra cotta or brown clay, roll small balls about the size of a large marble. -
Stamped impressions:
Press each ball flat into a disc shape. Use a textured button or a small patterned stamp to press a design into the center, mimicking the look of an embossed shortbread cookie. -
Alternative pieces:
For variety, you can create round white ‘sugar tablets’ by rolling white clay into balls and pressing a small indentation into the center with the back of a paintbrush, as seen in the finished example.
Step 4: Finishing Touches
-
Dry thoroughly:
Allow all pieces and the board to dry completely. This usually takes 24-48 hours depending on humidity. Flip the pieces occasionally to ensure even drying. -
Sand for texture:
Once fully dry, take fine-grit sandpaper and very gently buff the surface of the board. This removes any final imperfections and enhances the faux-stone texture. -
Seal the set:
Ideally outdoors or in a ventilated area, spray the entire set with a matte sealant. This protects the clay from moisture and stains without adding an unnatural glossy shine.
Enjoy your lovely new game set during your next quiet afternoon tea
Citrus Slice Board With Seeds vs. Segments
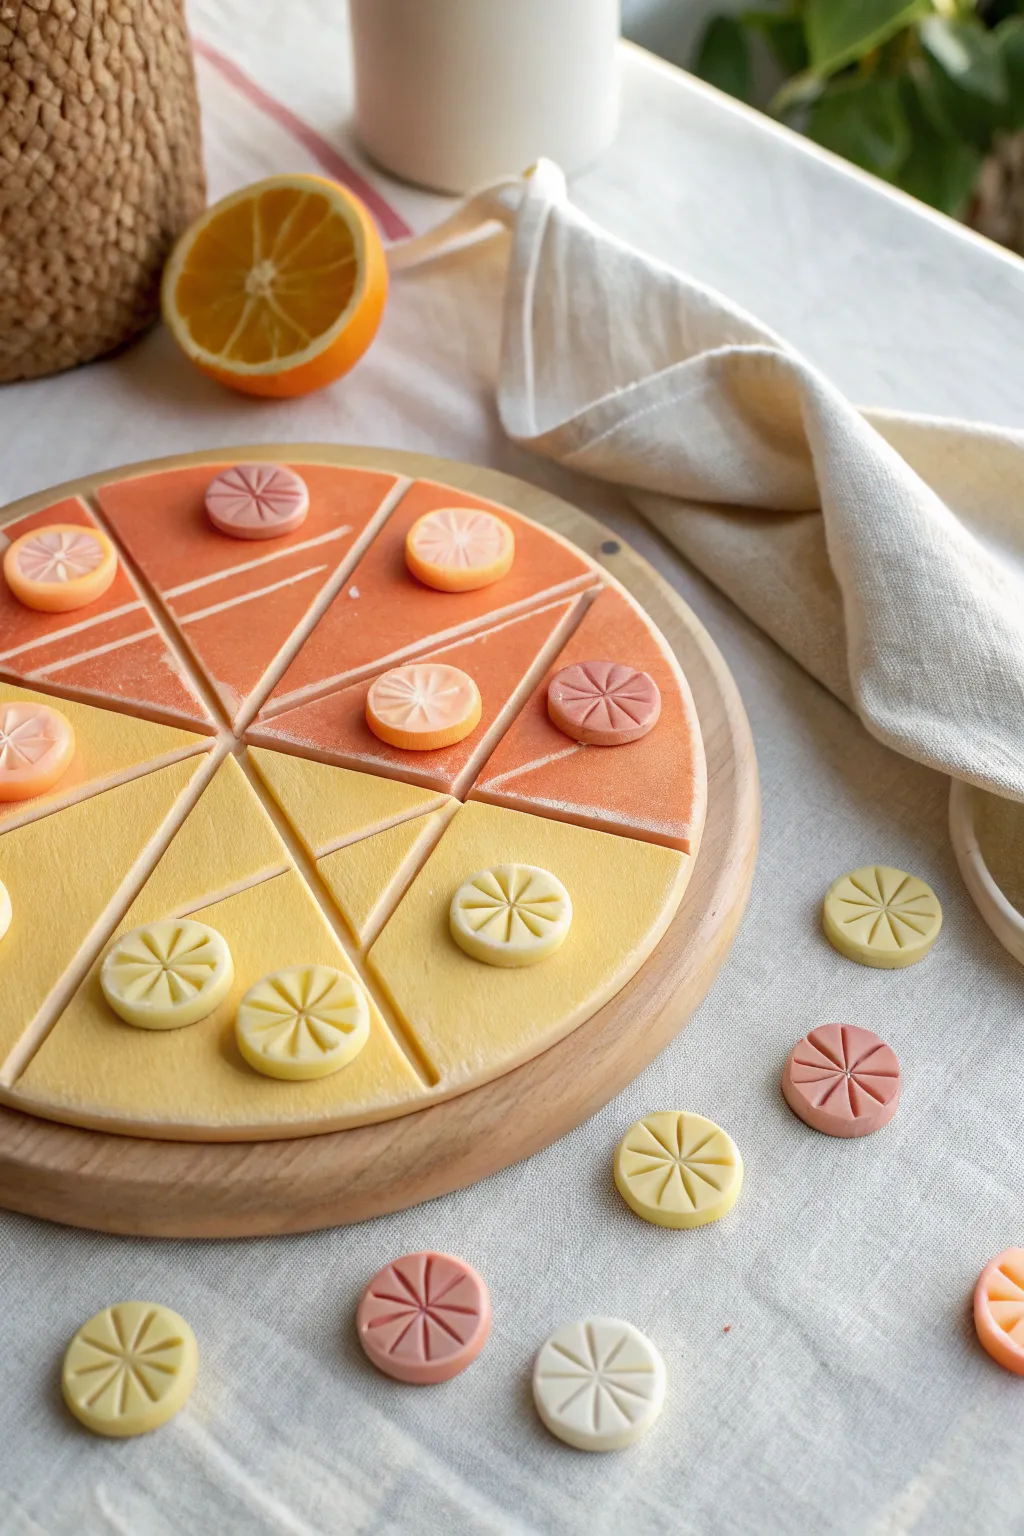
Brighten up your game night with this adorable citrus-themed tic-tac-toe set, featuring a segmented fruit slice board that doubles as a puzzle. The vibrant gradient of oranges and yellows creates a sunny aesthetic perfect for summer crafting.
Step-by-Step Tutorial
Materials
- Air-dry clay or polymer clay (white base)
- Acrylic paints (bright yellow, orange, deep red, white)
- Rolling pin
- X-Acto knife or sharp clay blade
- Round cookie cutter (approx. 8-9 inches)
- Small round cutter (approx. 1 inch)
- Ruler
- Fine grit sandpaper
- Matte or satin varnish
- Small flat paintbrush
- Detailing needle tool or toothpick
- Wooden round board (optional, for base display)
Step 1: Shaping the Board Base
-
Roll the main slab:
Start by conditioning your clay until it’s pliable. Roll it out into a large, even slab about 1/4 inch thick. Ensuring an even thickness is crucial so the game pieces sit flat later. -
Cut the circle:
Place your large round cutter or a template on the clay and cut out a perfect circle. This will form the main body of your citrus slice board. -
Create the segments:
Using a ruler, lightly mark the center point. Slice the circle into 8 equal wedges, like slicing a pizza. Separate them slightly so they don’t stick back together while drying. -
Smooth the edges:
Dip your finger in a little water (for air-dry clay) or baby oil (for polymer) and gently run it along the cut edges of each wedge to soften the sharp corners. -
Dry or bake:
Follow the instructions for your specific clay type to harden the wedges. If using air-dry clay, flip them occasionally to prevent warping.
Step 2: Crafting the Playing Pieces
-
Cut the small tokens:
Roll out a fresh slab of clay, slightly thinner than your board pieces. Use the small 1-inch cutter to punch out at least 10 circles (5 for each player). -
Detail the segments:
On each small circle, use a needle tool or knife to press a ‘star’ or asterisk pattern into the center, creating the look of fruit segments and pith. -
Refine the shape:
Gently press down on the edges of the small circles to dome them slightly, giving them a more organic, fruit-slice appearance. -
Final harden:
Allow these small game pieces to dry or bake completely alongside any remaining board pieces.
Clean Lines Hack
Use drafting tape to mask off areas when painting the white ‘pith’ lines on the wedges. This ensures crisp, straight lines without needing a super steady hand.
Step 3: Painting the Gradient
-
Mix the yellow tones:
Create a palette of sunny yellows. Mix a base bright yellow with a touch of white for a creamy lemon look. Paint half of the large wedges (4 pieces) and 5 of the game tokens in this shade. -
Mix the orange tones:
For the other half, mix orange with a tiny bit of red and white to create a soft grapefruit or blood orange hue. Paint the remaining 4 wedges and 5 tokens. -
Add the gradient effect:
While the base coat is still slightly tacky, I like to dry-brush a lighter shade (white mixed with the base color) near the center points of the wedges to mimic the lighter pith area. -
Paint the segment lines:
Using a very fine brush and off-white paint, carefully add thin white lines on the orange wedges to mimic the fibrous membrane of the fruit. -
Detail the tokens:
For the small tokens, use a wash of darker color inside the impressed lines to make the segment design pop, wipe away excess surface paint immediately.
Magnetic Travel Board
Embed small magnets into the clay wedges and game pieces before drying, then attach them to a metal tin for a travel-friendly version that won’t slide around.
Step 4: Assembly and Finish
-
Surface sanding:
Once the paint is fully dry, very lightly sand the surface if there are any rough brush strokes, giving it a smooth, worn finish. -
Seal the project:
Apply a coat of matte or satin varnish to all pieces. This protects the paint from chipping during play and enhances the colors. -
Arrange the board:
Place the wedges back into a circular formation, alternating colors or grouping them as desired, ready for a game.
Enjoy the satisfying clink of clay pieces as you challenge a friend to a fresh game on your new board
Lidded Trinket Box Board With Built-In Storage
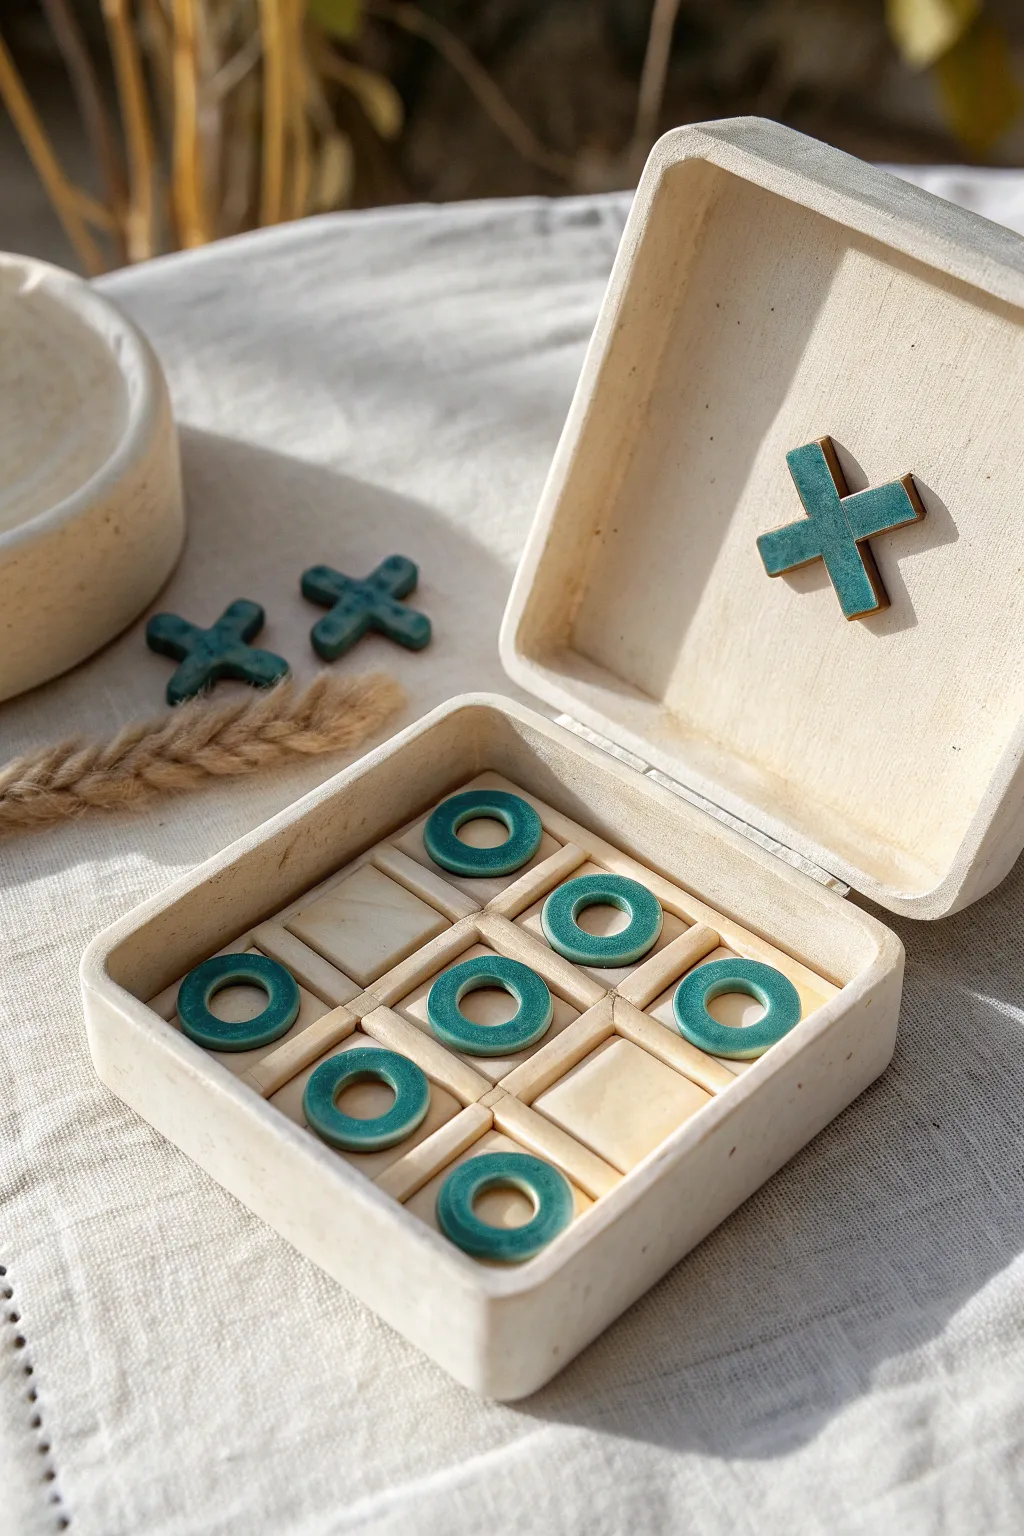
This charming project reimagines a classic game as a stylish, portable ceramic set perfect for coffee table decor. The clever design features a built-in grid within a lidded box, ensuring your game pieces stay safe and organized between matches.
Step-by-Step Guide
Materials
- Air-dry clay or polymer clay (white/cream color)
- Square lidded wooden box (unfinished) or clay to sculpt one
- Rolling pin
- Clay knife or craft knife
- Small circular cookie cutters (two sizes)
- X-Acto knife
- Teal or sea-green specialized ceramic glaze (or acrylic paint + high gloss varnish)
- Fine-grit sandpaper
- Water and sponge for smoothing
- Ruler
- Pottery kiln (if using firing clay) or oven (if polymer)
Step 1: Crafting the Box Base
-
Prepare the base:
If you are starting with an unfinished wooden box, sand it lightly. If creating entirely from clay, roll out a slab about 1/4 inch thick. Cut five squares: one for the base and four for the sides. -
Assemble the structure:
If building from scratch, score and slip the edges of your clay squares to join them, creating a box shape. Smooth the seams with a little water on your finger so they disappear completely. -
Measure the grid:
Measure the interior of your box base. Divide the length by three to determine the spacing for your Tic-Tac-Toe grid lines. -
Create the dividers:
Roll out thin snakes or strips of clay to act as the grid dividers. These should be height-consistent and slightly lower than the box rim. -
Install the grid:
Place your clay strips into the box in a hashtag (#) pattern. Gently press them into the bottom and side walls to secure them, smoothing the connection points with a sculpting tool. -
Refine the lid:
Ensure your lid fits snugly over the base. If you made a clay box, construct a matching lid with a slight lip to keep it secure. -
Add lid detail:
I like to add a decorative element here by attaching a large ‘X’ or ‘O’ permanently to the underside or top of the lid for a custom touch.
Step 2: Making the Game Pieces
-
Cut the circles:
Roll out a fresh slab of clay. Use your larger circular cutter to punch out five discs, then use the smaller cutter in the exact center to create ring shapes for the ‘O’ pieces. -
Sculpt the crosses:
For the ‘X’ pieces, cut small strips of clay. Cross two strips and blend the center join so it is seamless. Trim the ends so they fit comfortably within the grid squares you created earlier. -
Smooth edges:
With a damp sponge or finger, carefully round off the sharp edges of every game piece. This makes them pleasant to hold and gives that professional ceramic finish. -
Dry or bake:
Follow the instructions for your specific clay type. Allow the box and pieces to air dry completely or bake them in the oven to harden.
Clean Lines
Use a damp brush to clean up any glaze that accidentally gets on the bottom of your game pieces so they sit flat.
Step 3: Glazing and Finishing
-
Sand imperfections:
Once hard, gently sand any rough spots on the box or pieces using fine-grit sandpaper. -
Apply color:
Paint the ‘X’ and ‘O’ pieces with a teal or sea-green glaze. The slight variation in color thickness mimics the look of reactive pottery glazes. -
Finish the box:
Leave the box structure fundamentally unpainted to highlight the natural clay texture, but apply a clear matte sealant to protect it from dirt and oils. -
Gloss the pieces:
If using acrylics instead of real glaze, apply a thick layer of high-gloss varnish to the colored game pieces. This contrast between the matte box and glossy pieces is crucial for the final look. -
Final assembly:
Let everything cure fully before placing the pieces inside. The glossy teal against the matte cream background creates a beautiful, tactile contrast.
Magnetic Closure
Embed small neodymium magnets into the corners of the box rim and lid while the clay is wet for a satisfying snap closure.
Now you have a timeless game set that doubles as a minimalist art piece for your home
Glow Accent Night Garden Set
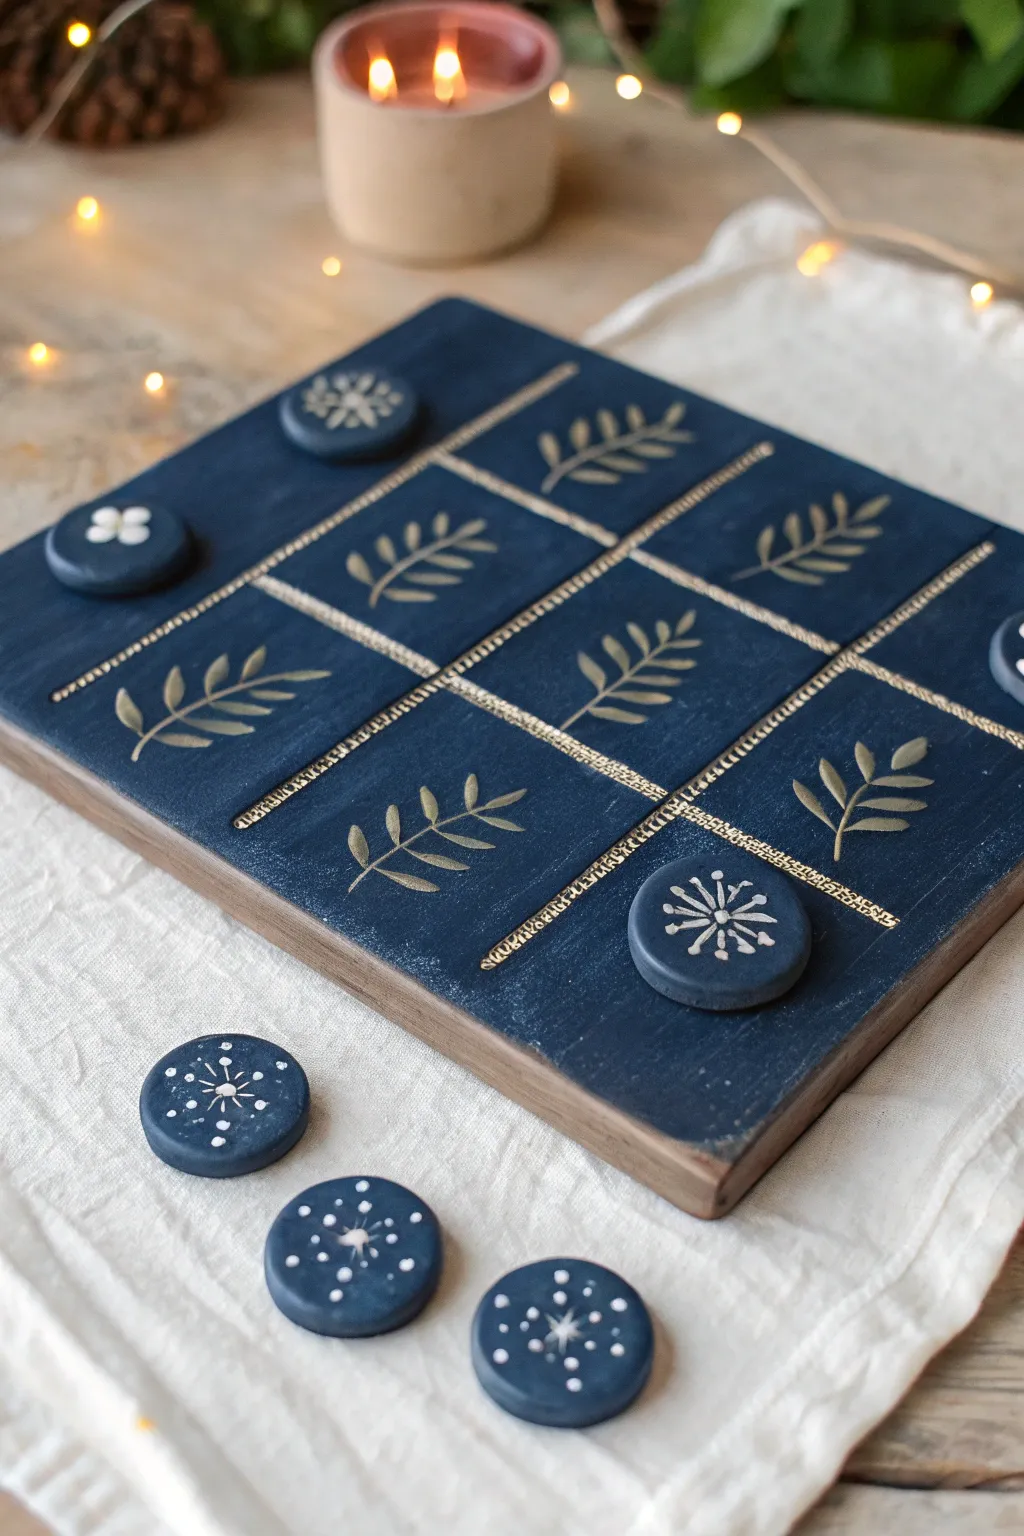
This elegant game board transforms a classic pastime into a sophisticated decor piece, featuring a deep navy finish adorned with shimmering gold botanical accents. The matching clay tokens, stamped with delicate winter motifs, make it perfect for cozy game nights by candlelight.
Step-by-Step
Materials
- Square wooden board (approx. 8×8 or 10×10 inches)
- Air-dry clay or oven-bake polymer clay
- Acrylic paint: Deep Navy Blue, Metallic Gold, Titanium White
- Circular cookie cutter or small bottle cap
- Flat paintbrush (medium width)
- Fine detail paintbrush (0 or 00 size)
- Gold embroidery floss or thin gold wire
- Strong craft glue or E6000
- Matte varnish or sealant
- Pencil and ruler
- Sandpaper (fine grit)
Step 1: Preparing the Board Base
-
Sand the surface:
Begin with your square wooden board. Give the top surface and edges a quick sanding with fine-grit sandpaper to remove any rough spots or splinters, ensuring a smooth canvas for your paint. -
Apply the base coat:
Using a flat brush, paint the entire top and sides of the board with deep navy blue acrylic paint. Apply long, even strokes in the direction of the wood grain. -
Add a second coat:
Once the first layer is completely dry to the touch, apply a second coat of blue to achieve a rich, opaque finish. I like to let this dry overnight to ensure it’s perfectly set before handling. -
Measure the grid:
Use a ruler and a light pencil touch to mark out a standard 3×3 tic-tac-toe grid. Measure carefully so each of the nine squares is equal in size.
Grid Precision Tip
Instead of gluing wire, you can use thin metallic washi tape or gold leaf tape for the grid lines. It’s self-adhesive and creates a perfectly straight, shimmering line instantly.
Step 2: Creating the Grid & Botanicals
-
Attach the grid lines:
Cut four lengths of gold embroidery floss or gold wire slightly shorter than the width of the board. Glue these down over your pencil lines to create the raised grid texture shown in the photo. -
Start the leaf stems:
Dip your fine detail brush into metallic gold paint. In the center of each grid square, paint a single curved line to serve as the central stem of your botanical design. -
Add the leaves:
Paint small, almond-shaped leaves extending from the stems. Keep the leaves angled upward and spaced slightly apart for an airy, organic look. -
Layer the gold:
The gold paint might look sheer on the first pass. Wait for the leaves to dry, then carefully re-paint them to make the metallic pigment pop against the dark blue background.
Step 3: Crafting the Game Pieces
-
Roll out the clay:
Roll your clay out on a smooth surface to a thickness of about 1/4 inch. Try to keep the thickness uniform so the pieces feel substantial. -
Cut the tokens:
Use a small circular cutter to punch out at least 10 circles (5 for each player, plus a spare or two). Smooth the edges with a wet finger to remove any jagged clay bits. -
Cure the clay:
If using polymer clay, bake according to the package instructions. If using air-dry clay, let the pieces sit in a dry area for 24-48 hours until hardened completely. -
Paint the tokens:
Paint the top and sides of each clay circle with the same deep navy blue used on the board. You will likely need two coats for full coverage. -
Design player one:
Select 5 tokens for the first set. Use the fine brush and white paint to create a snowflake or starburst pattern: paint a central dot, lines radiating outward, and tiny dots at the tips. -
Design player two:
For the opposing set, create a different white design, such as a simple four-petal flower or a distinct geometric star, ensuring the two players’ pieces are easily distinguishable. -
Seal the set:
Once all paint is fully dry, apply a coat of matte varnish over the board and the tokens. This protects the painted designs from chipping during intense gameplay.
Level Up: Texture
Before baking or drying your clay tokens, press a stamp or lace into the surface. The paint will settle into the impressions later, adding beautiful tactile dimension to the pieces.
Place your finished board on a coffee table and enjoy a stylish round of strategy by the fire