When I’m craving that slow, satisfying rhythm of building form by form, I always come back to clay coil vessels. Here are my favorite clay coil vessel ideas, starting with the classic shapes everyone loves and ending with a few studio “wow” experiments.
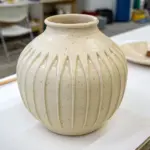
Classic Round Coil Bowl
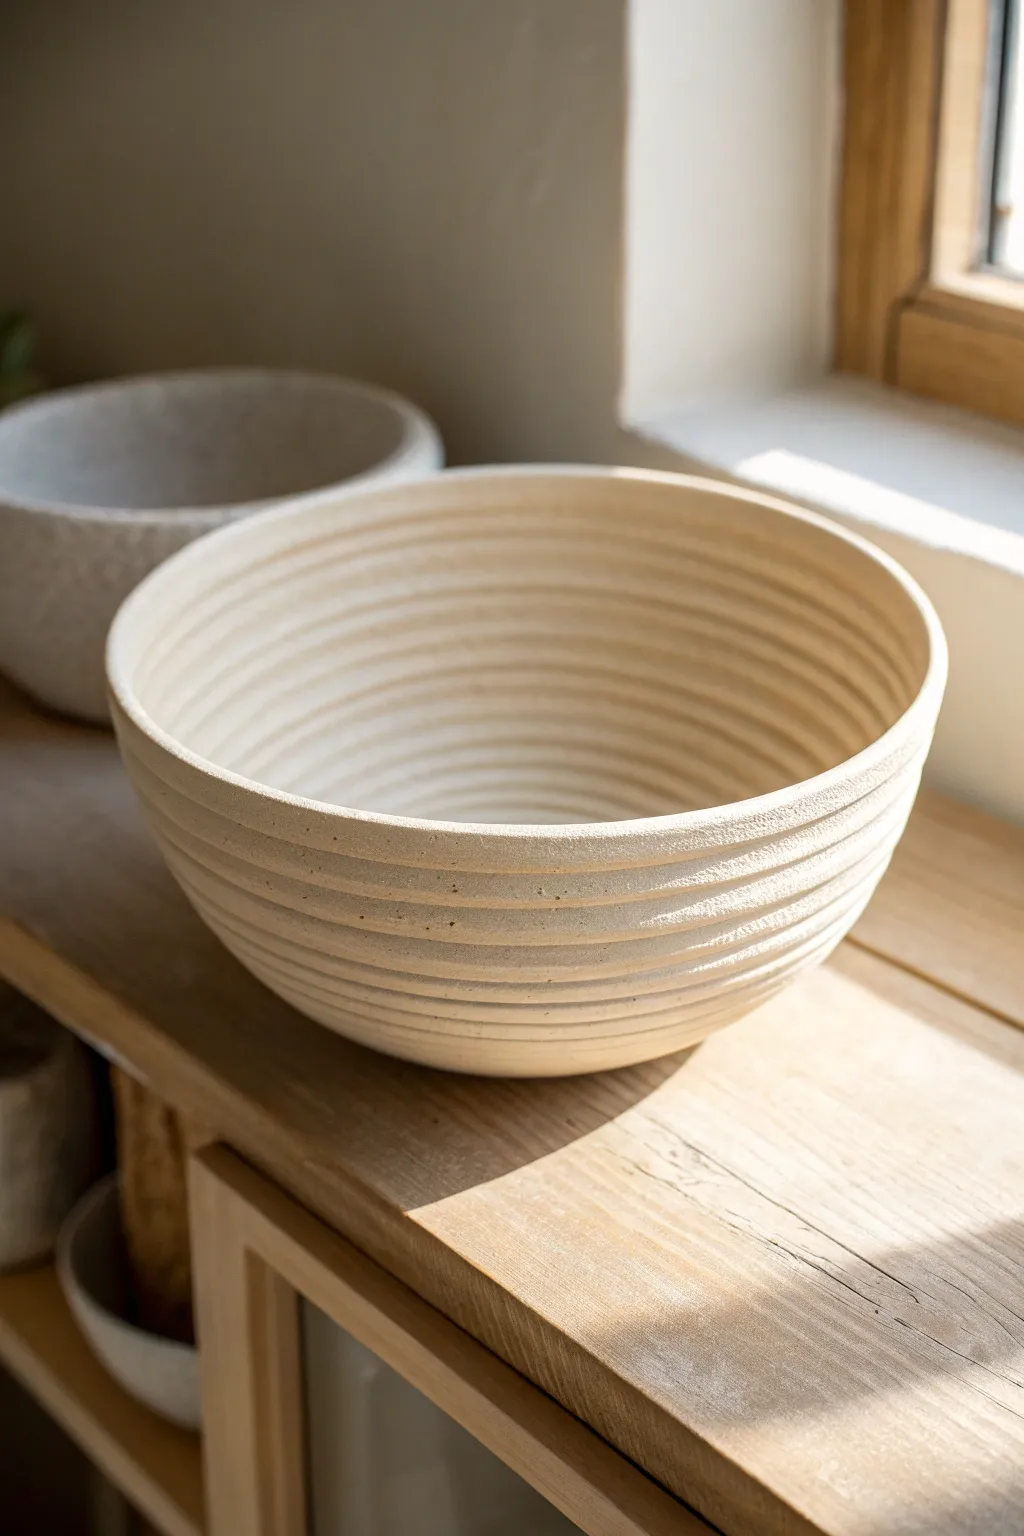
Embrace the timeless beauty of hand-building with this minimalist coil bowl, featuring a serene, rounded form and subtle textural ridges. The creamy white stoneware clay and exposed coil lines catch the light beautifully, creating a vessel that feels both rustic and refined.
Step-by-Step Tutorial
Materials
- Light-colored stoneware clay (white or cream)
- Pottery wheel or banding wheel (optional but helpful)
- Clay scoring tool or serrated kidney
- Slip (clay mixed with water)
- Wooden modeling tool
- Sponge
- Canvas mat or wooden board
- Wire cutter
- Clear matte glaze (food safe if using for food)
Step 1: Base Construction
-
Prepare the workspace:
Set up your canvas mat or wooden board. If you have a banding wheel, place your board on top to make rotating the piece easier while you work. -
Create the base:
Take a handful of clay and flatten it into a pancake shape about 1/2 inch thick. You can use a rolling pin for uniformity, but hand-patting gives it character. -
Cut the circle:
Use a needle tool or knife to cut a perfect circle roughly 4–5 inches in diameter. This will serve as the bottom of your bowl. -
Score the edge:
Rough up the outer rim of your base circle using a scoring tool or a fork. Apply a small amount of slip to these score marks to act as glue.
Seamless Interior Tip
Use a flexible rubber kidney rib on the inside while supporting the outside with your hand. This compresses the clay wall for strength and creates a perfectly smooth inner surface.
Step 2: Coiling and Building
-
Roll your first coils:
Take a workable chunk of clay and roll it back and forth on your table until you have a long, snake-like coil. Aim for a thickness similar to your pinky finger. -
Attach the first ring:
Place the coil directly onto the scored edge of the base. Gently press it down to ensure good contact without squashing the round shape of the coil. -
Blend the interior:
Using your thumb or a wooden modeling tool, smear the inside of the coil down onto the base to fuse them completely. This seals the bottom so it won’t leak or crack. -
Build upward:
Roll more coils and stack them one on top of the other. Score and slip between every layer to ensure a strong bond. -
Shape the flare:
To create the gentle bowl shape, place each new coil slightly further outward than the one below it. This will widen the vessel gradually as it rises. -
Smoothing the inside:
After every 2-3 layers, pause to smooth the interior completely flat. You want the inside to be seamless while the outside retains the texture. -
Controlling the contour:
Once you reach the halfway height, start stacking the coils directly vertically rather than outward. This creates the gentle curve depicted in the reference image.
Step 3: Refining and Finishing
-
Address the exterior:
Unlike the smooth interior, we want to keep the coil definition on the outside. Use a damp sponge to gently wipe the exterior coils, softening sharp edges without erasing the grooves. -
Refine the rim:
When you reach the desired height, add one final coil. Instead of leaving it round, gently pinch it or use a damp chamois cloth to smooth it into a slightly tapered, rounded lip. -
Initial drying:
Let the bowl dry slowly under a loose plastic sheet for a day to reach a leather-hard state. This prevents warping. -
Clean up the foot:
Flip the leather-hard bowl over and use a trimming tool to tidy up the bottom connection point if it looks messy. -
Bisque fire:
Once bone dry, fire the piece in a kiln to bisque temperature (usually cone 04-06). -
Glazing:
Dip or brush the bowl with a clear matte glaze or a very light satin white. This highlights the shadows in the coil ridges rather than covering them up. -
Final firing:
Fire the piece again to the maturation temperature of your specific clay and glaze.
Level Up: Oxide Wash
Before glazing, wipe a light iron oxide wash over the outside and sponge it off. The oxide will stay in the deep coil grooves, accentuating the horizontal lines.
Now you have a stunning, functional bowl that celebrates the simple rhythm of the making process

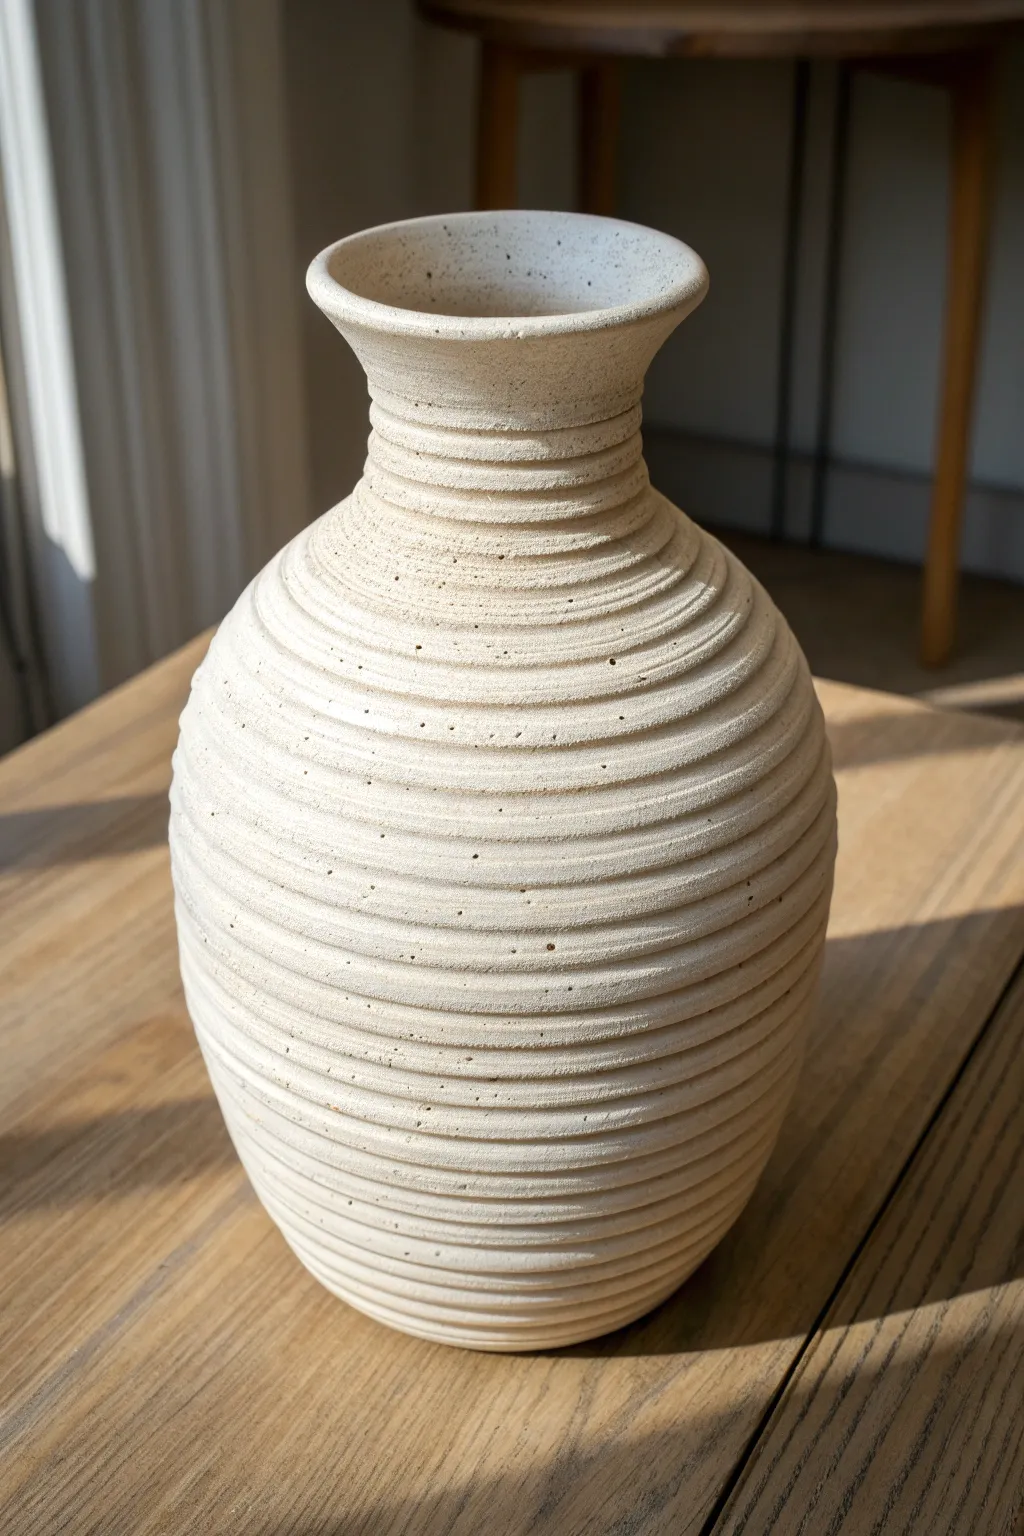
Straight-Sided Coil Vase
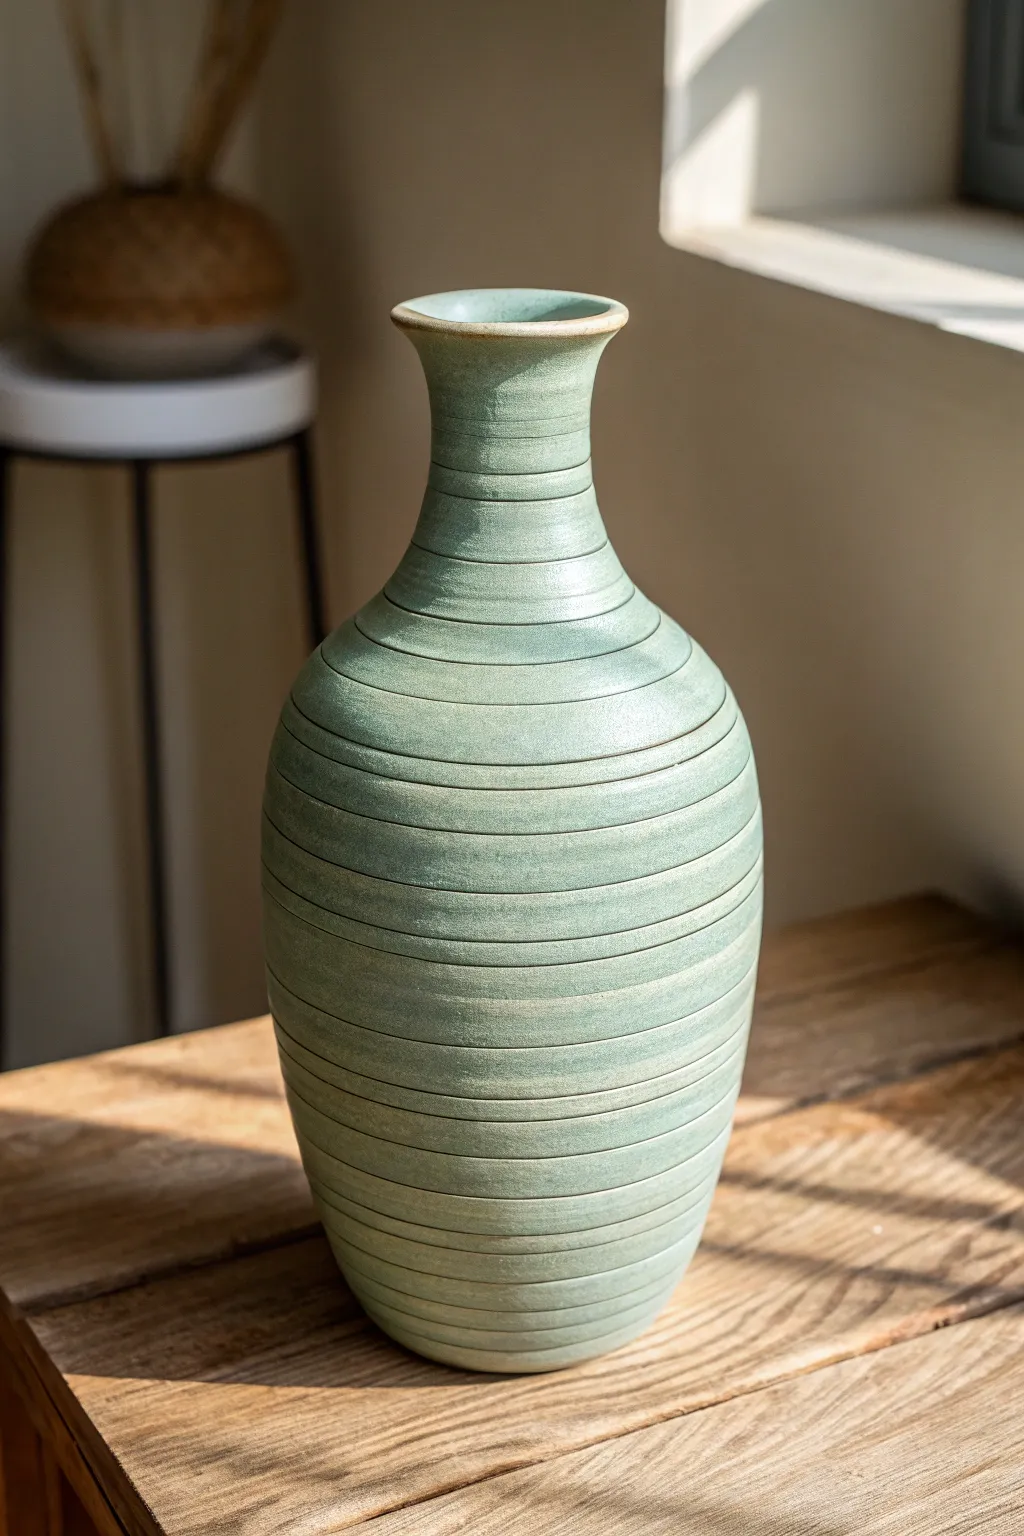
Embrace the rhythmic beauty of exposed construction with this tall, elegant coil vessel. The gentle horizontal ridges create a tactile surface that catches the light beautifully, while the soothing celadon green glaze enhances the organic feel of the clay.
How-To Guide
Materials
- Stoneware clay (smooth is best for uniform ridges)
- Clay scoring tool or fork
- Slip (clay and vinegar/water mixture)
- Wooden modeling tool
- Metal or rubber rib tool
- Sponge
- Turn-table (banding wheel)
- Rolling pin or slab roller
- Celadon glaze
Step 1: Building the Foundation
-
Prepare the base:
Begin by rolling out a slab of clay approximately 1/4 inch thick. Use a circular template or a jar lid to cut out a perfect circle, about 4-5 inches in diameter, to serve as the sturdy foot of your vase. -
Roll your coils:
Roll out several long, even coils of clay. Aim for a thickness similar to your pinky finger. I find it helpful to roll out 4-5 coils at a time and keep them under plastic so they don’t dry out while waiting. -
Score and slip:
Take your scoring tool and roughen the outer edge of your base. Apply a generous amount of slip. Score the underside of your first coil and press it firmly onto the base. -
Blend the interior:
As you stack the first few coils, use your thumb or a wooden tool to smear the clay from the coil down onto the layer below on the *inside* of the pot only. This bonds the structure while leaving the outside ridges visible.
Bumper Crop
Use an extruder tool if you have one. It creates perfectly uniform coils, which makes stacking the walls much faster and ensures the exterior ridges look consistent.
Step 2: Creating the Belly
-
Stack for width:
To create the swelling belly of the vase, place each new coil slightly further out than the one below it. This requires a gentle touch; support the outside with one hand while smoothing the inside. -
Maintain the ridge:
Unlike traditional smoothing, you want to keep the horizontal lines distinct on the exterior. Use a damp sponge to gently run along the seam to soften it without erasing the definition. -
Refine the curve:
Step back frequently to check the symmetry. If one side is leaning, gently push it back into alignment while the clay is still plastic. The belly should reach its widest point about halfway up the form. -
Compress the walls:
As the walls grow higher, gently paddle the exterior with a flat wooden tool if the shape becomes too lumpy. This tightens the form without completely losing the coil texture.
Sagging Walls?
If the clay starts to buckle under its own weight, stop building immediately. Use a heat gun or hair dryer on low to simulate drying for a few minutes to stiffen the varied walls.
Step 3: Tapering the Neck
-
Stack inward:
Once you’ve reached the desired width, begin placing coils slightly inward. This transition needs to be gradual to avoid collapsing the walls. -
Support the weight:
As the neck narrows, the clay below bears more weight. You may need to let the bottom section stiffen to a ‘leather hard’ state before adding the final neck coils to prevent sagging. -
Form the straight neck:
When the opening is about 2.5 inches wide, stack the remaining coils directly vertically to create the tall, straight chimney neck seen in the artwork. -
Flare the rim:
For the final coil, attach it securely and then use your wet fingers to gently flare the very top edge outward, creating a delicate lip.
Step 4: Finishing and Glazing
-
Clean the lines:
Once the piece is leather hard, use a wooden tool to gently re-trace or deepen any coil lines that got smudged during construction. Uniformity is key here. -
Slow drying:
Cover the vase loosely with plastic to dry slowly. Fast drying can cause cracks, especially at the coil seams. -
Bisque fire:
Fire the piece in a kiln to cone 04 (or your clay’s specific bisque temperature). -
Apply glaze:
Pour a translucent celadon or pale green glaze inside the vase, swirl to coat, and pour out. Then, dip or brush the exterior. I prefer dipping to get an even coat that breaks beautifully over the ridges. -
Wipe the foot:
Clean any glaze off the bottom of the pot with a wet sponge to prevent it from sticking to the kiln shelf. -
Final firing:
Glaze fire the piece to the temperature required by your specific clay and glaze combination.
Place your finished vase near a window where the natural light can highlight the rhythmic texture of your work


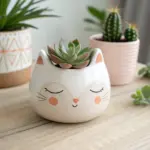

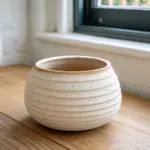
Coil Planter With Little Feet
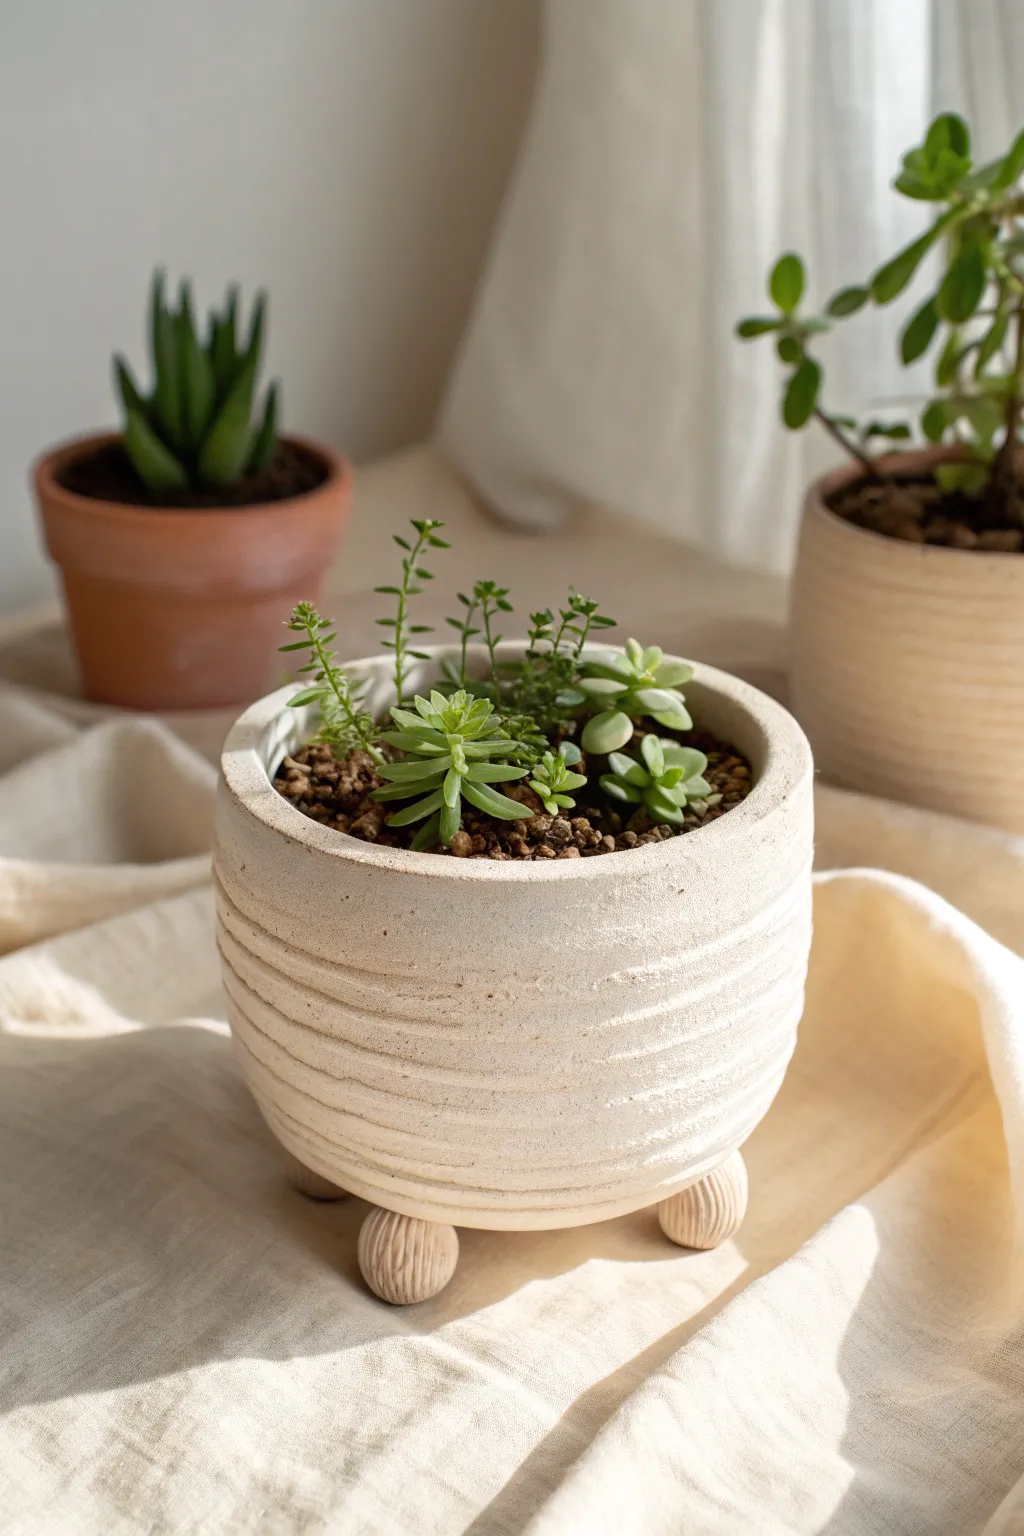
Elevate your succulent collection with this delightful coil planter that stands on three adorable spherical feet. The textured, unglazed finish gives it a raw, organic look that beautifully complements the greenery.
Step-by-Step
Materials
- Stoneware or earthenware clay (groggy clay works best for texture)
- Clay scoring tool or fork
- Slip (clay mixed with water)
- Wooden rib or smoothing tool
- Sponge
- Rolling pin (optional)
- Canvas work surface or ware board
- Needle tool
Step 1: Creating the Base and Coils
-
Prepare the base:
Start by rolling out a slab of clay to about 1/4 inch thickness. Use a round cutter or the lip of a bowl to trace and cut out a circle roughly 4 to 5 inches in diameter. This will be the floor of your pot. -
Roll your coils:
Take a chunk of clay and roll it back and forth on your canvas with the palms of your hands. Aim for even snakes of clay, roughly the thickness of your pinky finger. -
Score and slip the base:
Using your scoring tool, rough up the outer edge of your circular base. Dab a little slip onto the scratched area. This acts as the glue for your first coil. -
Build the first layer:
Gently place your first coil on the slipped edge of the base. When the ends meet, cut them at an angle and smooth them together so the seam disappears. -
Commit to the connection:
Use your thumb or a wooden tool to smudge the clay from the coil down onto the base on the inside of the pot. This ensures a strong bond.
Wobbly Pot?
If your pot rocks after adding feet, gently tap the high foot down while the clay is still soft. If dry, sand the bottom of the largest foot until level.
Step 2: Building the Walls
-
Stacking upwards:
Score the top of the first coil and add a layer of slip. Place the second coil directly on top. Repeat this process, stacking coil upon coil until you reach a height of about 3 or 4 inches. -
Managing the shape:
Since this pot has a slightly rounded, bowl-like belly, place your coils slightly outward for the first few layers, then stack them slightly inward near the top to curve the form back in. -
Smooth the interior:
Every two or three layers, pause to smooth the inside walls with your fingers or a rib. I find it much easier to do this as I go rather than waiting until the pot is tall and narrow. -
Refine the exterior texture:
For this specific project, we want to keep the coil definition visible but softened. Run a damp sponge or a soft rib gently over the outside to blur the lines between coils without erasing them completely. -
Add the horizontal grooves:
To mimic the specific texture in the photo, create faint horizontal striations. While the pot is on a banding wheel (or spinning it manually), lightly drag a serrated kidney tool or a stiff brush horizontally across the clay.
Step 3: Adding the Feet
-
Shape the feet:
Roll three equal-sized balls of clay, each about 1 inch in diameter. Roll them firmly in your palms to ensure they are smooth and dense. -
Pre-texture the feet:
Before attaching, gently tap the balls onto a textured surface or lightly score them vertically to match the subtle lines seen on the feet in the image. -
Mark placement points:
Turn your pot upside down. Mark three equidistant points on the bottom of the base where the feet will go. Think of it like a triangle shape to ensure stability. -
Attach the feet:
Aggressively score both the contact point on the pot and the top of each clay ball. Apply a generous amount of slip. Press the balls firmly onto the base. -
Blend carefully:
Use a modeling tool to smooth the clay from the top of the ball onto the pot base, hiding the seam. Be careful not to flatten the spherical shape of the foot too much. -
Leveling check:
Flip the pot right-side up and gently drop it a tiny bit onto the table to level the feet. Let the pot dry slowly under loose plastic to prevent the legs from cracking off.
Make it Shine
Instead of leaving it raw, apply a transparent glaze only to the inside to make it waterproof, keeping the exterior matte and earthy.
Once fired, fill your new vessel with gritty soil and your favorite succulents for a perfect windowsill display


Lidded Coil Jar With Gallery Rim
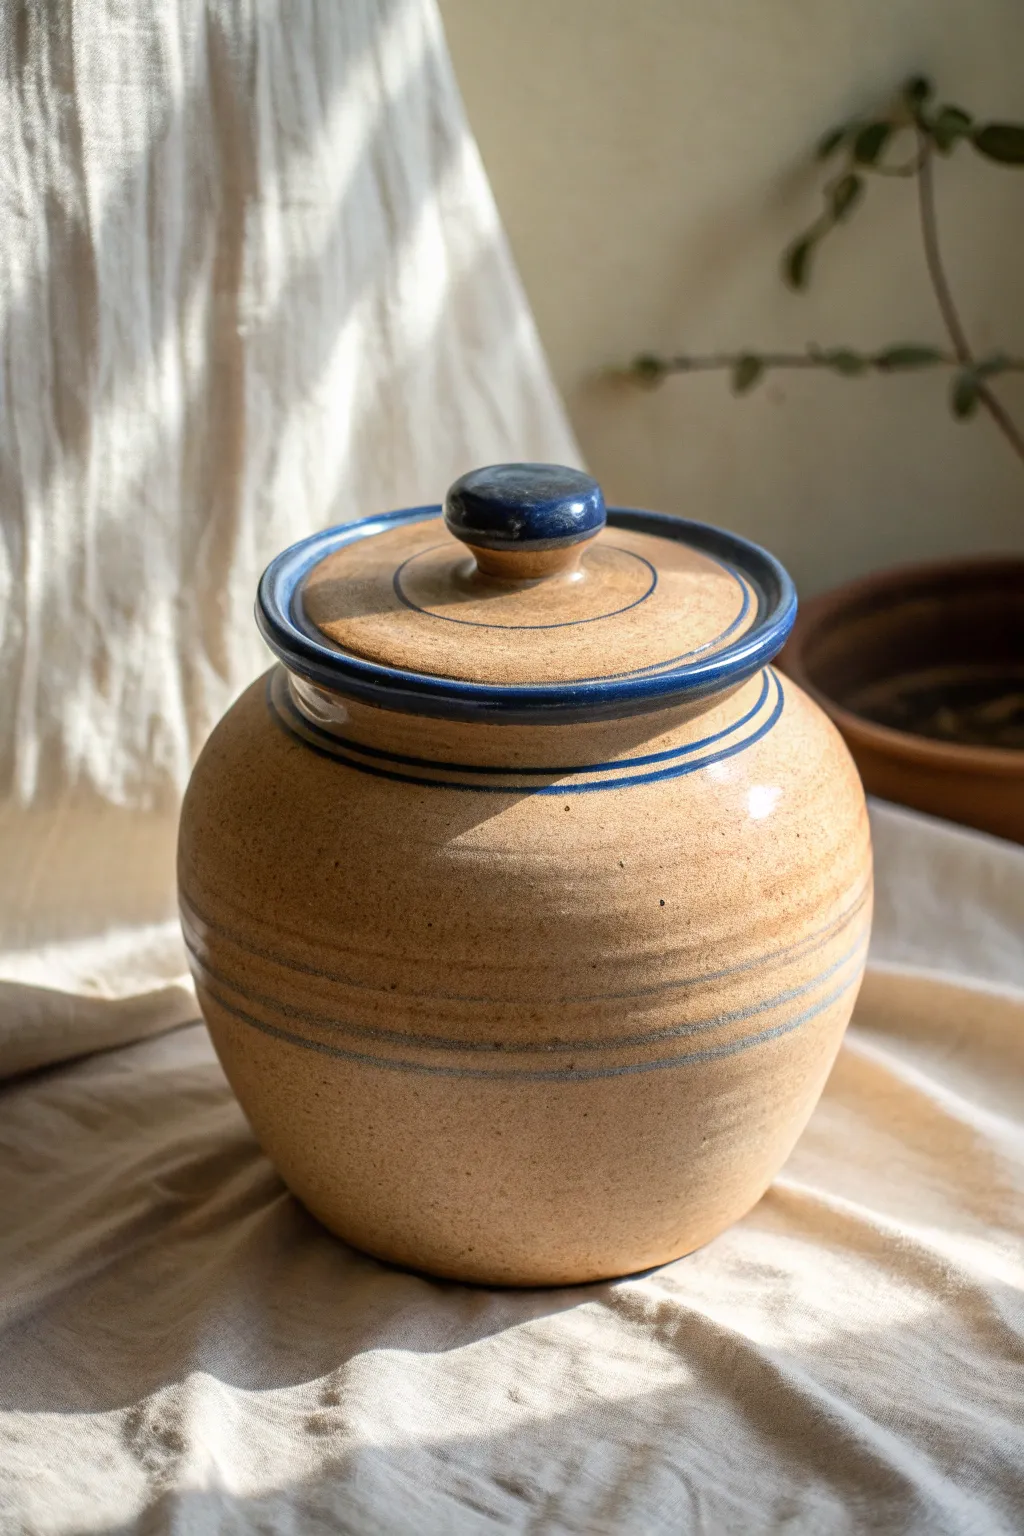
This charming, bulbous jar proves that coil building can achieve elegant, symmetrical forms with just a little patience. The piece features a distinct gallery rim to hold a fitted lid and is finished with a warm speckled clay body accented by classic cobalt blue details.
Step-by-Step Guide
Materials
- Speckled stoneware clay (mid-fire)
- Scoring tool or serrated rib
- Slip (clay mixed with water)
- Wooden modeling tool
- Metal or rubber rib
- Needle tool
- Sponge
- Cobalt oxide wash or blue underglaze
- Clear glaze (zinc-free recommended for best blue)
- Paintbrush (liner or bamboo brush)
- Potter’s wheel or banding wheel (optional but helpful)
Step 1: Building the Base and Body
-
Create the floor:
Start by rolling out a slab of clay about 3/8-inch thick. Cut a perfect circle approximately 5 inches in diameter for your base. Place this on a banding wheel if you have one. -
Roll your coils:
Roll out several long, even coils of clay, aiming for the thickness of your index finger. Keep them covered with plastic so they don’t dry out while you work. -
Attach the first layer:
Score and slip the outer edge of your base. Lay your first coil on top of the scored area. Using your thumb or a wooden tool, smear the clay from the coil down onto the base on the inside to seal it firmly. -
Build outward:
Continue adding coils, scoring and slipping between each layer. As you build the first few inches, place each new coil slightly to the outside of the one below it to create the bulbous, widening belly of the jar. -
Smooth firmly:
After every 3-4 coils, pause to smooth the walls. Support the outside with one hand while smoothing the inside coils together with a rib. Then, smooth the exterior to hide the coil lines completely. -
Taper inward:
Once you reach the widest point of the belly, begin placing your coils slightly toward the inside of the previous layer. This will bring the form back in to create the shoulder and neck.
Step 2: Forming the Gallery and Lid
-
Construct the gallery:
At the rim, add a thick final coil. Instead of just smoothing it, use your fingers to pinch a ‘step’ or shelf into the inside edge. This recessed ledge, called a gallery, is where the lid will sit. -
Measure for the lid:
Use calipers or a ruler to measure the exact diameter of the gallery shelf you just created. This measurement determines the size of your lid. -
Create the lid slab:
Roll a small slab slightly larger than your measurement. Cut it into a circle that fits perfectly into the gallery shelf. It’s helpful to cut it just a hair larger and trim it down until it fits snugly. -
Shape the lid:
Place the lid slab on a foam mat or in your hand and gently press the center to give it a slight dome shape—creates a nicer profile than a flat disc. -
Add the knob:
Roll a small ball of clay for the knob. Score and slip the center of the lid, attach the ball, and shape it into a comfortable button shape.
Keep it round
Step back often! When building a round coil pot, look at it from above and the sides continuously to ensure it isn’t becoming oval or lopsided.
Step 3: Surface Decoration and Glazing
-
Incise lines:
While the pot is leather-hard, put it on a banding wheel. Hold a needle tool steady against the lower belly and spin the wheel to carve parallel horizontal grooves into the clay. -
Bisque fire:
Allow the jar and lid to dry slowly and completely before bisque firing to cone 04 (or your clay’s specification). -
Apply blue accents:
Using a steady hand and a liner brush, paint cobalt oxide wash or blue underglaze directly onto the raised rim of the jar, the rim of the lid, the knob, and into the incised grooves you carved earlier. -
Wipe back groove color:
If you painted the grooves, take a slightly damp sponge and wipe across the surface. This cleans the high points but leaves the blue definition inside the carved lines. -
Glaze and final fire:
Dip or brush a clear glaze over the entire piece (except the foot ring and the contact points where the lid touches the gallery). Fire to the maturity temperature of your clay body.
Try a flange instead
Can’t master the gallery rim? Make a flat rim instead, and add a small coil ring to the underside of the lid to keep it from sliding off.
Once fired, this classic vessel is ready to store anything from tea leaves to your favorite trinkets

What Really Happens Inside the Kiln
Learn how time and temperature work together inside the kiln to transform clay into durable ceramic.
Coil Mug With Chunky Handle
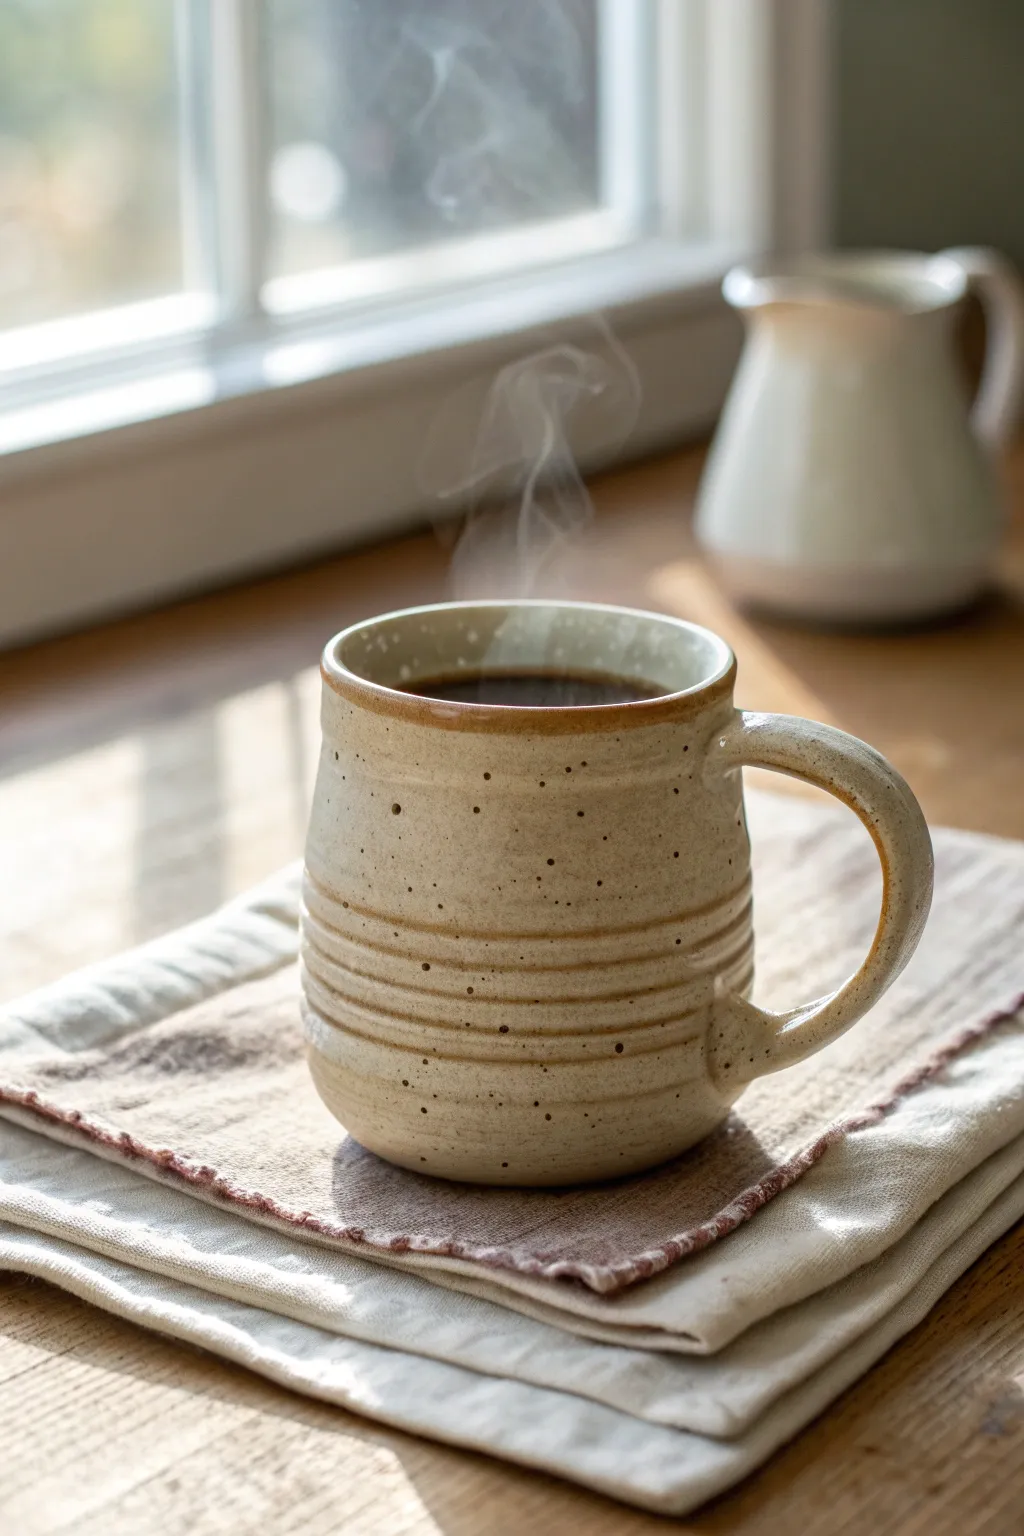
Capture the cozy essence of a quiet morning with this sturdy, handcrafted coil mug. Featuring distinct horizontal ridges that highlight the making process and a comfortable, chunky handle, this vessel is finished in a warm, speckled oatmeal glaze.
Step-by-Step
Materials
- Stoneware clay (speckled or buff)
- Pottery wheel or banding wheel
- Rolling pin
- Clay knife or needle tool
- Serrated rib or scoring tool
- Slip (clay mixed with water)
- Wooden modeling tool
- Sponge
- Speckled oatmeal or cream glaze
- Kiln
Step 1: Base and Body Construction
-
Prepare the base:
Roll out a slab of clay to about 1/4 inch thickness. Use a circular cookie cutter or a needle tool to cut a 3.5-inch circle for the base of your mug. -
Make the coils:
Roll out several long, even snakes of clay, approximately the thickness of your pinky finger. Keeping them uniform ensures the walls will rise evenly. -
Score and slip:
Deeply score the outer edge of your circular base and the bottom of your first coil. Apply slip generously to the scored areas to create a strong bond. -
Lay the first coil:
Place the first coil onto the base, pressing down firmly. Join the ends of the coil by cutting them at an angle and smoothing them together. -
Blend the interior:
Using your thumb or a wooden tool, smear the clay from the coil down onto the base on the inside only. This seals the bottom without ruining the exterior texture. -
Build the walls:
Continue stacking coils one on top of another. Score and slip between every layer. As I build, I like to gently pinch the coils together to ensure there are no air gaps. -
Shape the profile:
As you stack, guide the coils slightly outward for a bulging belly, then taper them slightly inward as you reach the rim to create that classic mug silhouette. -
Refine the exterior texture:
Leave the coil lines visible on the lower two-thirds of the mug to create the ribbed texture. Gently soften the distinct lines with a damp finger, but don’t smooth them away completely. -
Smooth the rim:
For the top inch of the mug, blend the coils completely on the outside to create a smooth band for drinking. Use a wet sponge or a chamois cloth to round off the lip comfortably.
Cracks between coils?
If horizontal cracks appear during drying, your coils weren’t joined well enough. Use a wooden tool to compress the joints deeper on the inside next time.
Step 2: Handle and Finishing
-
Chunky handle pull:
Take a distinct lump of clay and roll it into a thick, short carrot shape. Flatten it slightly so it feels substantial in the hand. -
Attach the handle:
Score and slip the attachment points on the mug and handle. Press the handle firmly onto the side, blending the clay thoroughly into the body of the mug to prevent cracking. -
Shape the curve:
Guide the handle into a simple C-curve, ensuring there is enough room for your fingers. The handle should look robust and grounded. -
Dry slowly:
Cover the mug loosely with plastic. Slow drying is crucial for coil pots to prevent separation at the seams. Let it dry to bone dry over several days. -
Bisque fire:
Fire the mug in the kiln to cone 04 (or your clay’s specific bisque temperature). -
Glazing:
Dip the mug into a speckled oatmeal or warm cream glaze. Ensure the inside is fully coated. Wipe the foot of the mug clean with a sponge. -
Rim effect:
If desired, layer a slightly darker, brownish glaze just on the very rim. This will break over the edge during firing for that toasted look. -
Final firing:
Glaze fire the piece to the maturity temperature of your clay and glaze (typically cone 5 or 6 for stoneware).
Add specks to plain clay
If you don’t have speckled clay, mix granular manganese or iron filings into your plain clay body before rolling coils for that rustic spotting.
Once cooled, fill your new handmade mug with hot coffee and enjoy the tactile comfort of the coil ridges
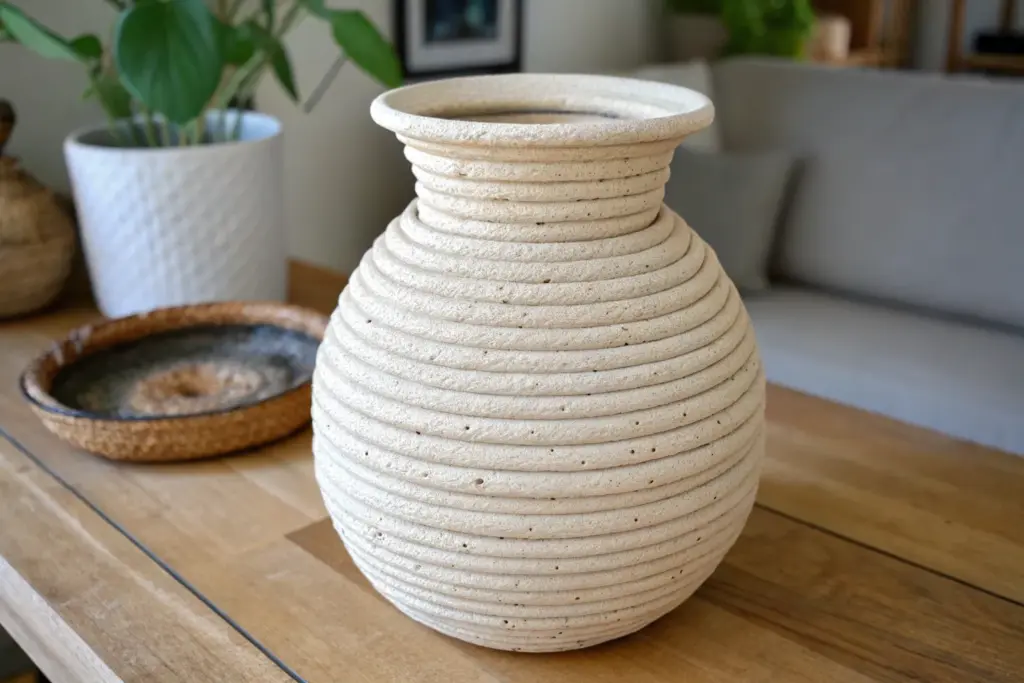
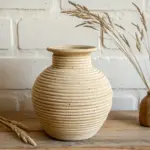
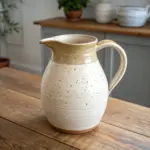
Narrow-Neck Water Jar Shape
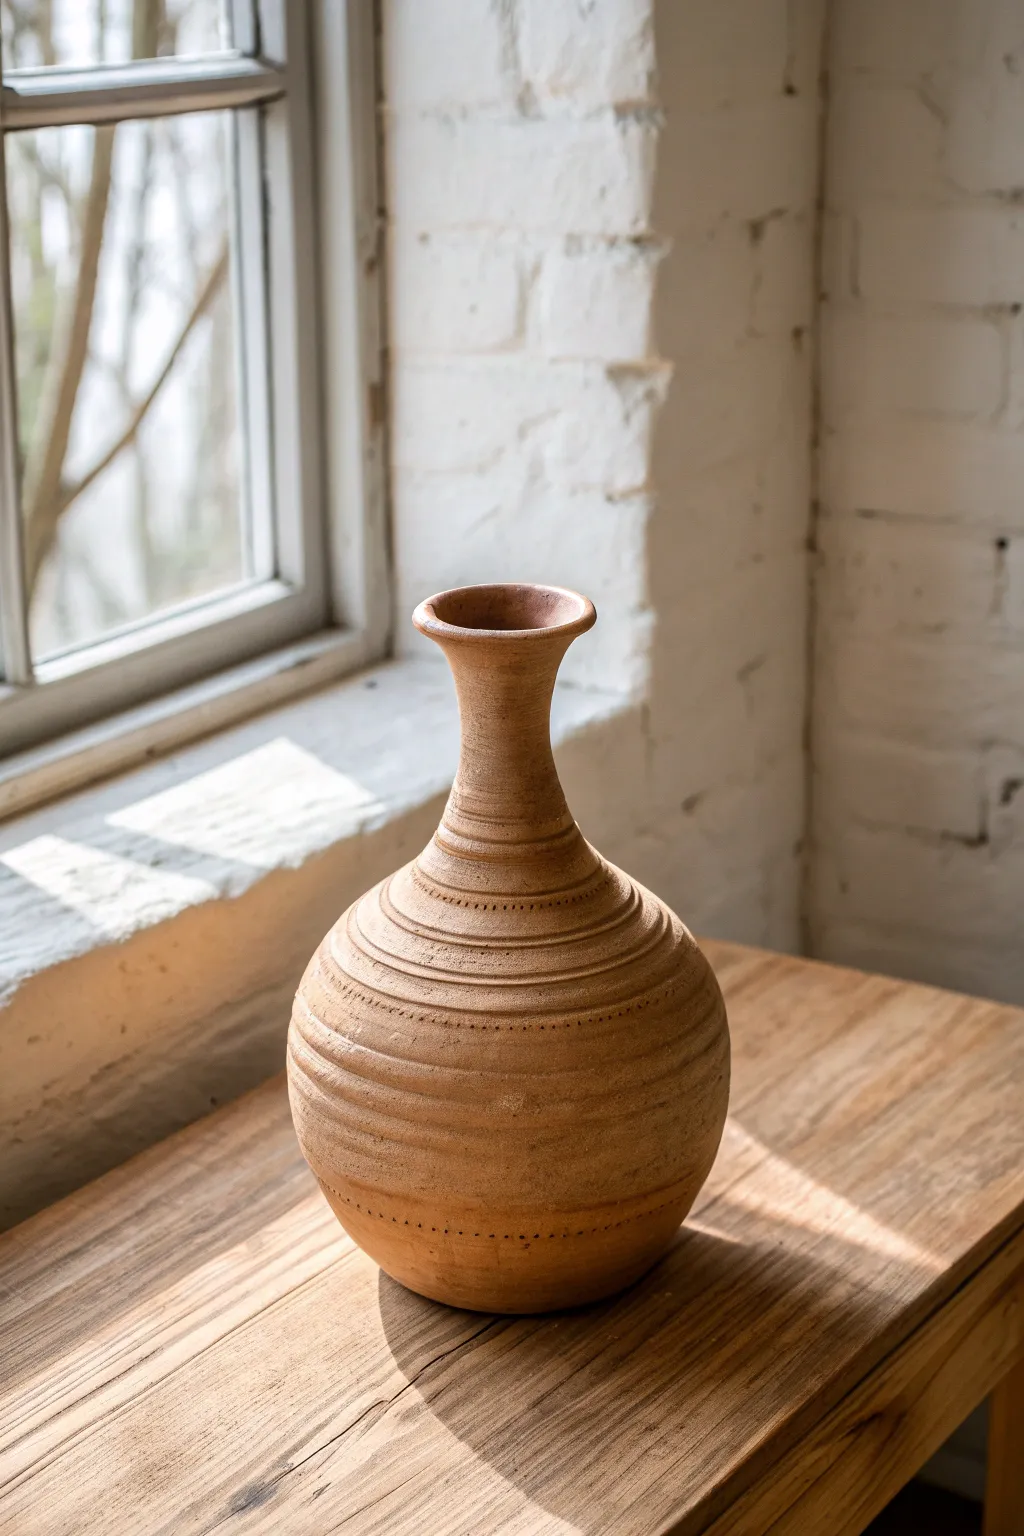
This project centers on building a classic water jar silhouette featuring a pleasingly round body that tapers gracefully into a slender, flared neck. The textured, unglazed surface highlights the natural beauty of the clay, enhanced by rhythmic horizontal grooves and delicate dotted accents.
Step-by-Step Guide
Materials
- Earthenware or stoneware clay (terracotta color recommended)
- Scoring tool or serrated rib
- Slip (clay mixed with water)
- Wooden modeling tool
- Needle tool
- Sponge
- Wire cutter
- Flat work board or banding wheel
Step 1: Forming the Base
-
Create the heavy base:
Start with a ball of clay about the size of a large orange. Flatten it onto your work board or banding wheel to create a thick disc, approximately 4 inches in diameter and half an inch thick. -
Roll your first coils:
Roll out several snake-like coils of clay on a table. Aim for an even thickness, roughly the width of your pinky finger. Keeping them consistent now saves smoothing time later. -
Start the upward curve:
Score the outer edge of your base and apply a dab of slip. Lay your first coil on top of the edge. Rather than stacking directly vertical, place the coil slightly outward to begin expanding the belly of the pot. -
Blend the seams:
Use your thumb or a wooden tool to smudge the clay from the coil down onto the base on the inside. Then, do the same on the outside, merging the coil downward to create a seamless wall.
Sagging Walls?
If the belly starts slumping as you build outward, stop adding coils. Let the clay firm up for 30-60 minutes (stiff leather hard) before adding more weight.
Step 2: Building the Belly
-
Expand the form:
Continue stacking coils, placing each one slightly further out than the last. This outward stepping increases the volume of the vessel’s body. Remember to score, slip, and blend every single layer thoroughly. -
Refine the curve:
As the belly gets wider, use a metal or wooden rib on the inside of the pot to push the walls outward, rounding the form while supporting the outside with your other hand. -
Reach the widest point:
Once you have achieved a nice, bulbous shape, stack one or two coils directly vertically to stabilize the width before you begin to close the form. -
Taper inward:
Now, begin placing coils slightly inward toward the center. This reverses the curve and starts to close the shoulder of the pot. Work gradually so the walls don’t collapse.
Step 3: Constructing the Neck
-
Narrow the opening:
Continue the inward taper until the opening is quite small, roughly 2-3 inches wide. This transition area is the vessel’s shoulder. -
Build the vertical neck:
Change your coil placement to stack vertically again to create the cylinder of the neck. Build this up about 3 to 4 inches high. -
Flare the rim:
For the final coil at the very top, place it slightly outward to create a gentle flare or lip. Smooth this rim with a damp sponge for a soft, finished look.
Master the Texture
Don’t try to make the horizontal lines perfectly straight. Slight wobbles in your carving imitate the organic, hand-turned feel of ancient pottery.
Step 4: Texturing and Finishing
-
Smooth the surface:
Before adding texture, ensure the exterior is relatively smooth. I often use a slightly damp sponge to wipe away harsh fingerprints, though a little irregularity adds to the rustic charm. -
Carve horizontal grooves:
Using a wooden modeling tool or the edge of a loop tool, carve shallow horizontal rings around the body and neck. Vary the spacing—some close together, some further apart—to mimic faint wheel-thrown lines. -
Add dotted details:
With a needle tool or a small blunt stick, press tiny holes or dots into the clay in bands. Follow the horizontal grooves you just made to keep the pattern orderly. -
Dry slowly:
Because the neck is narrow and the belly represents a large trapped air space, cover the piece loosely with plastic to let it dry very slowly. This helps prevent cracking at the seam lines. -
Bisque fire:
Once bone dry, fire the vessel in a kiln. Since the goal is a matte, raw look, you can leave the exterior unglazed or apply a simple matte wash before the final firing.
Once fired, this vessel brings an ancient, grounded warmth to any sunlit windowsill


The Complete Guide to Pottery Troubleshooting
Uncover the most common ceramic mistakes—from cracking clay to failed glazes—and learn how to fix them fast.
Exposed-Coil Ribbed Vase
Embrace the natural rhythm of hand-building with this beautifully textured vase that celebrates the process of creation. By leaving the horizontal coils exposed and partially smoothed, you’ll achieve a modern, ribbed silhouette with a raw, earthy finish.
How-To Guide
Materials
- Stoneware clay (speckled or sand-coloured works best)
- Clay scoring tool or serrated rib
- Slip (clay and water slurry)
- Wooden modeling tool
- Metal rib or smooth stone
- Sponge
- Kiln for firing
Step 1: Building the Base
-
Prepare the slab:
Start by rolling out a circular slab of clay about 1/2 inch thick to serve as your base. This sets the footprint for your vessel, so ensure it is well-compressed and smooth. -
Roll your coils:
Prepare several coils of clay in advance. Aim for a consistent thickness, roughly the width of your pinky finger. Keeping them under a damp cloth prevents them from drying out as you work. -
Score and slip:
Score the outer edge of your circular base and apply a generous amount of slip. This creates the ‘glue’ strong enough to hold your walls as they rise. -
Lay the first coil:
Place your first coil directly on top of the scored edge. Press it down gently to adhere it without flattening the attractive roundness of the exterior. -
Blend the interior:
Using your thumb or a wooden tool, smear the clay from the coil downward onto the base *only on the inside*. Leaving the outside untouched is crucial for that ribbed look.
Step 2: Shaping the Vessel
-
Build outward:
As you add subsequent coils, place each one slightly further out than the one below it. This will cause the walls to flare outward, creating the belly of the vase. -
Join as you go:
Score and slip between every single layer. After placing a coil, blend the interior seam downward fully smooth, ensuring the wall is solid despite the exterior texture. -
Monitor the curve:
Continue building outward until you reach the widest point of the vase’s belly. This usually takes about 6-8 inches of height depending on your coil size. -
Begin tapering in:
Now, start placing each new coil slightly inward from the one below. This transition should be gradual to create a gentle shoulder leading up to the neck. -
Refine the ridges:
While the clay is still plastic but firm enough to hold shape, run a damp finger or a soft sponge very lightly over the exterior coils. You want to soften any sharp crumbles without erasing the definition.
Cracking Coils?
If your coils are cracking as you bend them into a circle, your clay is too dry. Sprritz your coil with water or wrap it in a damp paper towel for 5 minutes before trying again.
Step 3: Forming the Neck and Rim
-
Create the neck:
Once the shoulders have narrowed sufficiently, stack the next few coils directly vertically on top of each other. This creates the straight cylinder for the neck. -
Flare the rim:
For the final two or three coils, angle them slightly outward again to create the flared lip. This mimics a traditional amphora shape and gives the piece balance. -
Smooth the lip:
Use a wet chamois or sponge to compress and smooth the very top rim. This area should be comfortable to the touch and completely seamless, unlike the ribbed body. -
Clean the exterior:
I like to use a stiff brush or a serrated rib to gently clean up any slip that oozed out onto the exterior ridges, preserving the deep shadows between the coils. -
Dry slowly:
Cover the vase loosely with plastic for the first day or two. Because the walls vary in thickness due to the ridging, slow drying is essential to prevent cracks. -
Bisque fire:
Once bone dry, bisque fire the piece to prepare it for glazing or leaving raw. -
Finish:
For the look in the photo, glaze only the interior with a liner glaze to make it watertight, leaving the raw speckled clay on the outside exposed. Fire to maturity.
Level Up: Oxide Wash
Brush a dark oxide wash (like iron oxide) over the exterior and wipe it back with a sponge. The dark color will stay trapped in the coil crevices, exaggerating the texture.
Enjoy the timeless, tactile quality this handcrafted vessel brings to your space
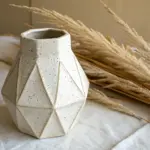
Corrugated Coil Texture Pot
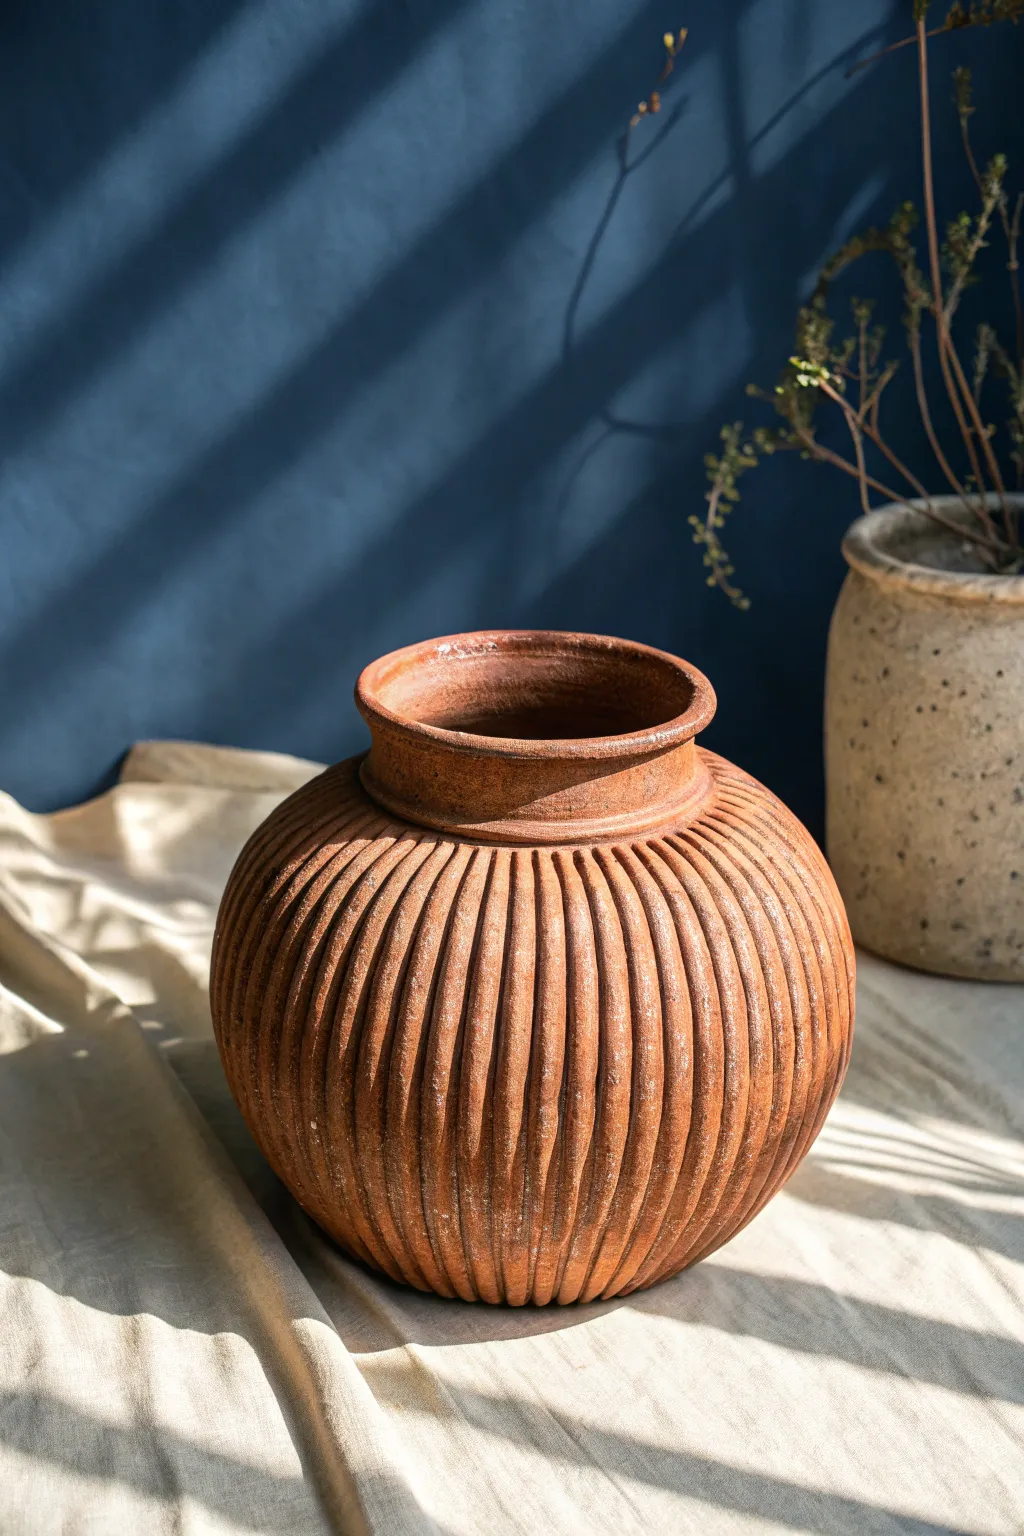
This project celebrates the earthy beauty of structured clay, creating a vessel that feels both organic and architectural. By building a robust form and carving defined ribs, you’ll achieve a stunning, pumpkin-like volume with a rich tactile surface.
Detailed Instructions
Materials
- Terracotta or stoneware clay (grogged)
- Banding wheel
- Serrated rib or scoring tool
- Wooden modeling tool
- Large loop tool (U-shaped)
- Sponge
- Cutting wire
- Red iron oxide wash (optional)
Step 1: Building the Bulbous Form
-
Create the base:
Start by flattening a ball of clay into a disk about 4 inches wide. Place this on your banding wheel to serve as the foundation. -
Roll your coils:
Roll out several consistent ropes of clay, aiming for the thickness of your thumb. Keeping them uniform now makes building much smoother. -
Begin the belly:
Score the outer edge of your base and attach your first coil. Stack subsequent coils slightly outward with each layer to expand the width of the pot. -
Blend for strength:
As you stack, firmly smear the clay from the top coil down onto the one below it. I prefer to smooth the inside completely for structural integrity while leaving the outside slightly rough for now. -
Close the form:
Once the belly reaches your desired width, begin stacking the coils slightly inward to taper the shape back toward the center. -
Add the collar:
When the opening is about 4-5 inches wide, stack two or three final coils vertically (not tapered) to create the distinct neck rim seen in the photo. Smooth this rim into a thick, sturdy band. -
Refine the surface:
Using a rib tool, smooth the entire exterior of the pot. The goal isn’t a perfect polish, but a symmetrical, even canvas. The walls should be fairly thick (about 1/2 inch) to accommodate the carving later.
Sticky Situation
If your loop tool drags or chatters, the clay is too dry. Mist the surface with water and wrap it in plastic for an hour to rehydrate surface before trying again.
Step 2: Carving the Corrugation
-
Wait for leather hard:
Let the pot dry until it is leather hard—stiff enough to hold its shape but soft enough to carve without chipping. This is crucial for crisp ribs. -
Map the verticals:
Lightly sketch vertical lines from the bottom of the neck to the base using a needle tool or wooden skewer. Space them evenly to act as guides for your texture. -
Carve the channels:
Using a U-shaped loop tool, carve down the lines you drew. Drag the tool from just below the neck collar all the way to the bottom. This removes a strip of clay and creates the ‘valley’ between the ribs. -
Deepen the relief:
Go over the channels again if necessary. The deeper you carve, the more pronounced the raised ‘ribs’ will appear. -
Clean the neck:
Use a wooden modeling tool to clean up the junction where the vertical ribs meet the horizontal neck collar. This transition should be sharp and deliberate. -
Soften the edges:
Take a damp (not soaking) sponge and gently wipe over the ribs. You want to round off the sharp carved edges to achieve that soft, weathered look shown in the image.
Ribbed & Ready
To exactly match the reference, try putting a darker clay stain or glaze in the carved grooves before firing, leaving the raised ribs lighter to emphasize the volume.
Step 3: Finishing Touches
-
Slow drying:
Loosely cover the pot with plastic to let it dry very slowly. Because the wall thickness varies slightly due to the ridges, slow drying prevents cracking. -
Optional antique finish:
After bisque firing, apply a red iron oxide wash and wipe it back with a sponge. The oxide will stay in the deep crevices, enhancing the corrugated effect.
Once fired, fill your new textured vessel with dried branches to capture that perfectly rustic studio mood.

TRACK YOUR CERAMIC JOURNEY
Capture glaze tests, firing details, and creative progress—all in one simple printable. Make your projects easier to repeat and improve.
Spiral Coil Bowl Base
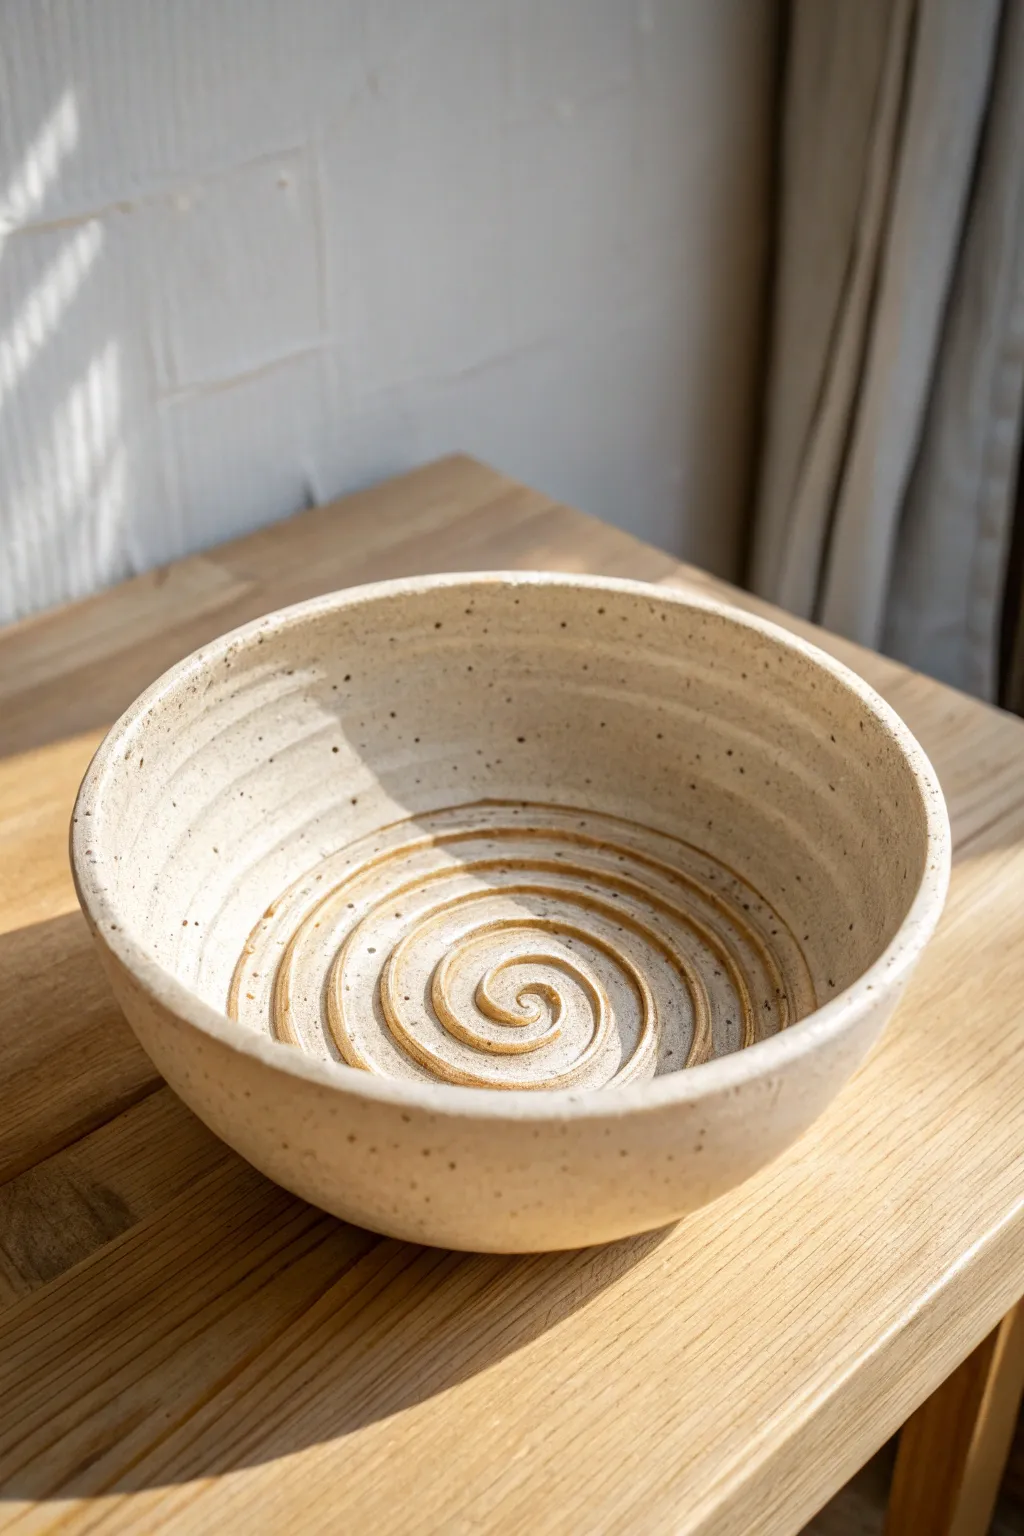
This handmade ceramic bowl features a mesmerizing spiral design at its base that ripples outward, capturing the organic beauty of coil building. With a lightly speckled clay body and a soft matte finish, it makes a perfect centerpiece or fruit bowl for a rustic table setting.
Step-by-Step
Materials
- Speckled stoneware clay (mid-range cone 5/6)
- Pottery wheel (optional, see notes for hand-building)
- Rib tool (wood or rubber)
- Needle tool
- Sponge
- Wire cutter
- Clear matte glaze
- Kiln access
Step 1: Forming the Spiral Base
-
Preparing the clay:
Begin by thoroughly wedging about 3-4 pounds of speckled stoneware clay to remove any air bubbles. This ensures the coil pattern will be consistent and crack-free. -
Rolling a long coil:
Roll out a long, even snake of clay about the thickness of your finger. You want this to be quite long to spiraled continuously for the center. -
Creating the spiral:
Starting from the center, tightly wind the coil into a flat disc directly on your bat or work surface. Press the coils gently together as you wind so they adhere, but don’t smooth them out completely just yet. -
Securing the base:
Once your spiral base reaches about 4-5 inches in diameter, gently compress the top surface with a rib tool to flatten it slightly without erasing the spiral definition. Flip it over and smooth the *underside* completely to ensure structural integrity.
Cracks in the coil?
If the spiral separates during drying, your clay was too dry or not scored enough. Fix small hairline cracks with a tiny bit of vinegar and slip before bisque firing.
Step 2: Building the Walls
-
Adding wall height:
Attach a new coil to the outer edge of your spiral base. Score and slip this connection well. Begin stacking coils upward and slightly outward to create the bowl’s slope. -
Blending the coils:
As you build up the walls, blend the clay coils together on the *outside* of the bowl for strength. I like to leave the inside texture somewhat visible initially to serve as a guide for the final throwing or smoothing. -
Refining on the wheel:
If using a wheel, center your rough coil pot and begin to throw the walls thinner. Use a rib tool on the inside to smooth the walls while being careful not to disturb the spiral pattern at the very bottom. -
Creating the interior texture:
To mimic the look in the photo, you don’t want a perfectly glass-smooth interior wall. As you pull the walls up, leave subtle throwing rings or rib marks that echo the spiral energy of the base. -
Shaping the rim:
Finish the rim by compressing it with a chamois or sponge. It should be slightly rounded and smooth to the touch. -
Drying:
Cut the bowl from the bat with a wire tool. Let the piece dry slowly under plastic to the leather-hard stage to prevent warping.
Pro Tip: Texture Pop
After glazing but before firing, gently wipe the raised ridges of the spiral with a damp sponge. This thins the glaze on the high points, creating more contrast.
Step 3: Trimming and Finishing
-
Trimming the exterior:
Once leather hard, flip the bowl over and trim the exterior. Remove excess weight from the bottom and clean up the curve so it transitions smoothly from the base. -
Smoothing the surface:
Use a damp sponge to wipe down any sharp grogs or rough spots on the rim and exterior. The goal is a clean, modern finish that lets the clay speak for itself. -
Bisque firing:
Allow the bowl to become bone dry (this may take several days). Fire it to bisque temperature (usually Cone 04) in the kiln.
Step 4: Glazing
-
Applying the glaze:
For this project, the glaze should be subtle. Pour a transparent or milky white matte glaze inside the bowl. Pour it out quickly to ensure a thin, even coat that won’t obscure the clay’s speckles. -
Revealing the spiral:
The glaze naturally pools slightly in the recesses of the spiral base. This variation in thickness is crucial—it turns the physical texture into a visual highlight. -
Cleanup:
Wipe the foot (bottom edge) of the bowl clean with a wet sponge to prevent it from sticking to the kiln shelf. -
Final firing:
Fire the piece to maturity (Cone 5 or 6 depending on your clay). Once cooled, sand the bottom foot if necessary.
Once fired, fill your new bowl with fruit and enjoy the beautiful rhythm of the spiral base
Braided Coil Rope Rim

Embrace rusticity with this beautiful clay vessel that mimics the look of natural fiber rope wrapped around a smooth pot. The contrast between the sleek, spherical body and the highly textured braided neck and base creates a stunning, organic centerpiece.
Step-by-Step Guide
Materials
- Buff stoneware clay (smooth body)
- Pottery wheel (optional, can be hand-built)
- Needle tool
- Scoring tool (or fork)
- Slip (clay and water slurry)
- Wooden modeling tool
- Sponge
- Cutting wire
- Kiln
Step 1: Forming the Base Vessel
-
Prepare the Clay:
Wedge about 3-4 lbs of buff stoneware clay thoroughly to remove air bubbles. This clay body choice is key for that natural, sandy finish shown in the photo. -
Center and Open:
Center your clay on the wheel head. Open the clay up, keeping the floor relatively narrow to achieve that bulbous shape. -
Pull the Walls:
Pull up the walls into a cylinder first. Ensure the walls are even, leaving the rim slightly thicker than usual to support the added coils later. -
Shape the Belly:
Using a rib on the outside and your hand on the inside, gently push the belly of the pot outward to create a round, spherical form. Keep the neck somewhat wide. -
Refine the Surface:
Smooth the central belly area with a metal or rubber rib to remove all throwing lines. This smooth negative space is crucial for the final design.
Fixing Cracks
If the heavy rope coils start pulling away from the pot during drying, dampen the area with vinegar and re-compress gently to seal the crack.
Step 2: Creating the Faux Rope Coils
-
Roll Long Coils:
Roll out several long, even coils of clay on a table. Aim for a thickness of about a 1/2 inch (roughly pinky-finger thickness). -
Twist the Coils:
Take two clay coils and gentle twist them around each other to create a two-ply rope effect. Repeat this until you have enough length to wrap the base and neck. -
Score the Base:
Use your scoring tool to scratch the bottom third of your leather-hard vessel’s exterior. Apply a generous amount of slip to the scored area. -
Apply the Base Rope:
Starting from the very bottom, press your twisted clay rope onto the slipped area. Wind it upwards, spiraling around the pot until the bottom third is covered. -
Blend Invisible Seams:
Where the rope ends meet or where you need to add a new length, cut them at an angle and blend the clay together carefully so the twist looks continuous. -
Score the Neck:
Repeat the scoring and slipping process on the upper shoulder and neck of the vessel. -
Apply the Neck Rope:
Attach the twisted clay coils to the neck, stacking them roughly 3 or 4 rows high depending on your pot’s height. Press firmly to ensure adhesion.
Step 3: Finishing Touches
-
Compress the Rim:
For the actual lip of the pot (above the rope section), use a wet chamois or sponge to round it off smoothly. It should look like a separate, clean ring sitting atop the rope. -
Detail the Twist:
Go back over your rope coils with a wooden modeling tool. Deepen the grooves of the twists to make them look sharp and realistic. -
Clean Up:
Wipe away any excess slip that may have squished out onto the smooth belly area. The transition between rope and smooth clay needs to be crisp. -
Slow Dry:
Cover the pot loosely with plastic. Because you have thick added coils on a thinner wall, slow drying is essential to prevent cracking. -
Bisque Fire:
Once bone dry, bisque fire the piece to cone 04. -
Glaze or Wash:
To maintain the look in the image, leave the exterior unglazed or apply a very thin iron oxide wash to highlight the rope texture. Glaze the interior for functionality if holding water. -
Final Fire:
Fire to the maturity temperature of your specific clay body (likely cone 5 or 6).
Add Variety
Try twisting three thinner coils together for a more complex braid, or alternate the direction of the twists for a chevron pattern.
Now you have a timeless vessel that balances texture and simplicity beautifully
Wavy Coil Rim Bud Vase
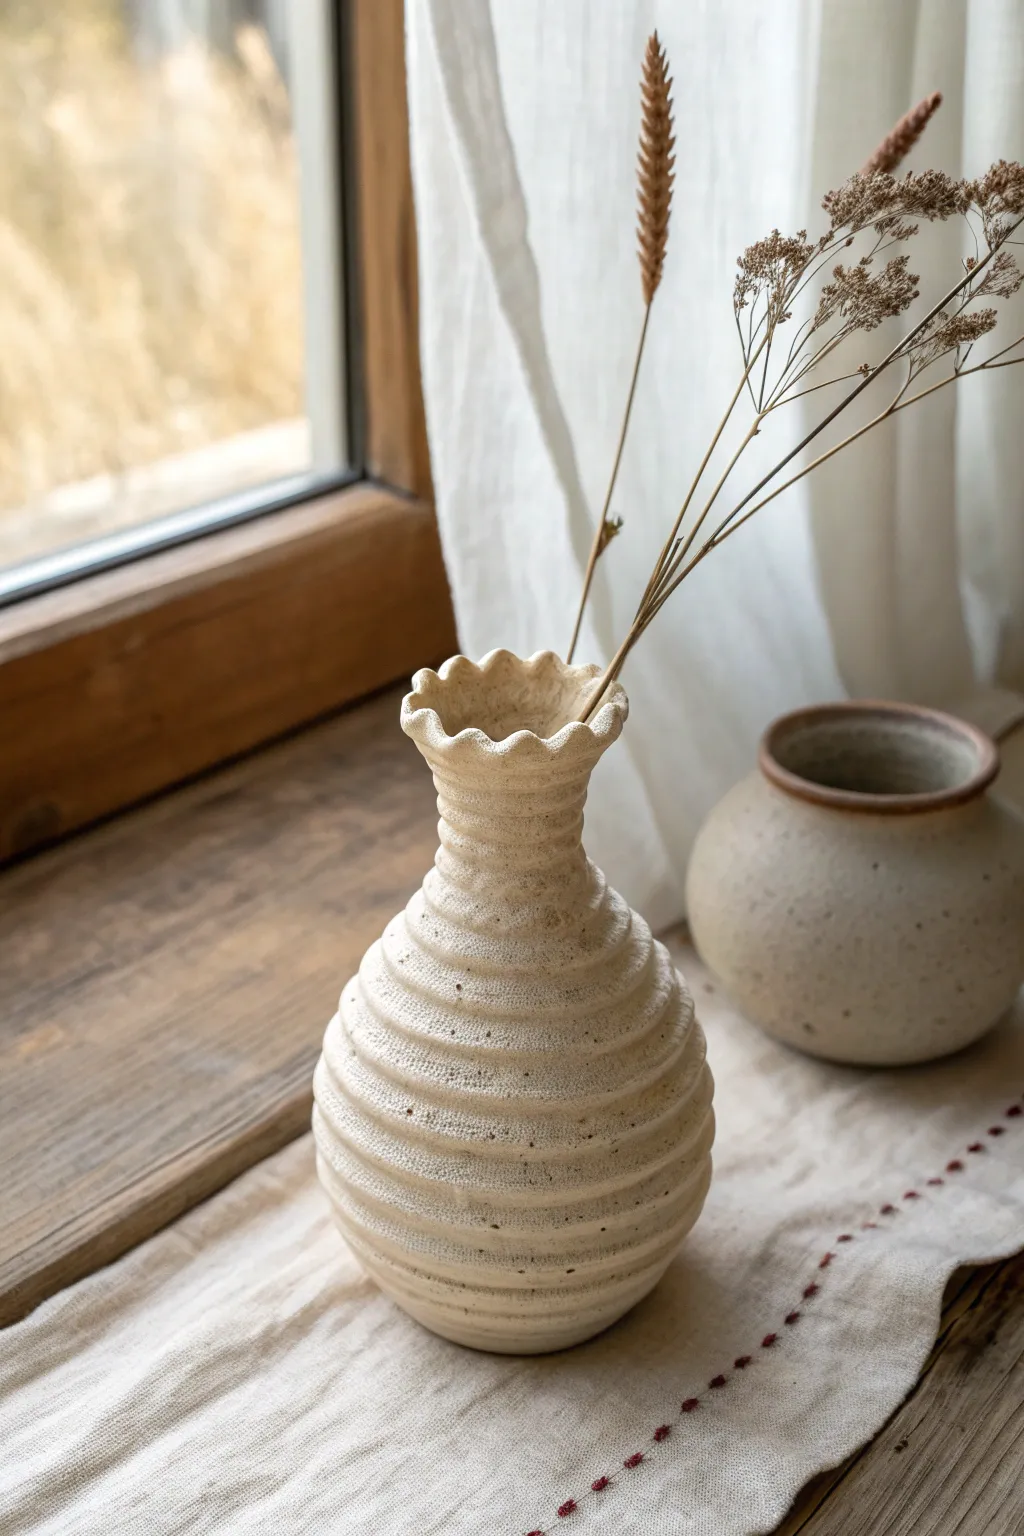
This rustic bud vase combines the ancient charm of exposed coil pottery with a playful, wavy rim. Its textured, ribbed surface and creamy speckled glaze create a warm, organic feel perfect for displaying dried grasses or simple stems.
Step-by-Step
Materials
- Stoneware clay (speckled or buff)
- Pottery wheel (optional, can be hand-built)
- Clay scoring tool or serrated rib
- Slip (clay and water slurry)
- Wooden modeling tool
- Sponge
- Cutting wire
- Cream/white matte glaze (speckled finish recommended)
- Kiln for firing
Step 1: Forming the Base
-
Prepare the Clay:
Begin by wedging about 1-1.5 lbs of stoneware clay to remove air bubbles and ensure a uniform consistency. -
Construct the Floor:
Roll out a small slab or flatten a ball of clay to create a circular base roughly 2.5 inches in diameter. This will support the swelling belly of the vase. -
Roll the Coils:
Roll out several long, even ropes (coils) of clay, aiming for the thickness of your pinky finger. Keep them covered under plastic so they don’t dry out while you work.
Step 2: Building the Body
-
Attach the First Layer:
Score the outer edge of your base and the underside of your first coil. Apply slip, then press the coil firmly onto the base to start the wall. -
Build Up and Out:
Continue adding coils, stacking each slightly outward from the one below it to create the widening belly shape. Smooth the *interior* seams completely for structural integrity, but leave the exterior coils largely untouched to maintain the ribbed look. -
Refine the Exterior:
While we want the coil texture visible, you should gently run a damp sponge or finger over the exterior grooves to soften any sharp edges and ensure they are well-bonded. -
Curve Inward:
Once you reach the widest point of the vase (the belly), begin stacking the next few coils slightly inward to taper the form toward the neck. -
Form the Tall Neck:
Stack the final few coils vertically to create a straight neck section. This should be narrower than the belly, giving the vase its elegant bud shape.
Fixing Gaps
If you see light through the coils as you build, don’t panic. Push a small pellet of soft clay into the gap from the inside and smooth it thoroughly to seal the hole without ruining the outer texture.
Step 3: Creating the Wavy Rim
-
Add the Final Coil:
Place one last coil at the very top, flaring it outward ever so slightly. Ensure this connection is secure. -
Pinch the Scallops:
Using your thumb and forefinger, gently pinch the rim at regular intervals. Push the clay outward with one finger while supporting the inside with two fingers to create the rhythmic, wavy depressions. -
Smooth the Edge:
Use a damp chamois or a very soft sponge to gently round over the top lip of the rim so the waves feel soft to the touch, not sharp.
Texture Twist
For more visual interest, try lightly stamping the clear exterior coil lines with a textured paddle or a piece of rough canvas before the clay hardens to add micro-texture over the ribs.
Step 4: Drying and Firing
-
Slow Drying:
Cover the vase loosely with plastic and let it dry slowly for a few days to prevent cracking between the coils. Uncover it once it reaches leather hard. -
Bisque Fire:
Once bone dry, fire the piece in the kiln to cone 04 (or your clay’s specific bisque temperature). -
Glazing:
Dip the fired vessel into a matte cream or warm white glaze. If your clay isn’t naturally speckled, choose a glaze with iron speckles suspended in it to mimic the look in the photo. -
Glaze Cleanup:
Wipe the bottom of the vase strictly clean of any glaze to prevent it from sticking to the kiln shelf. -
Final Firing:
Fire the vase a final time to the maturity temperature of your clay and glaze (typically cone 5 or 6 for stoneware).
Place your finished vase near a window where the natural light can highlight the rhythmic shadows of the coils
Two-Neck Coil Vessel
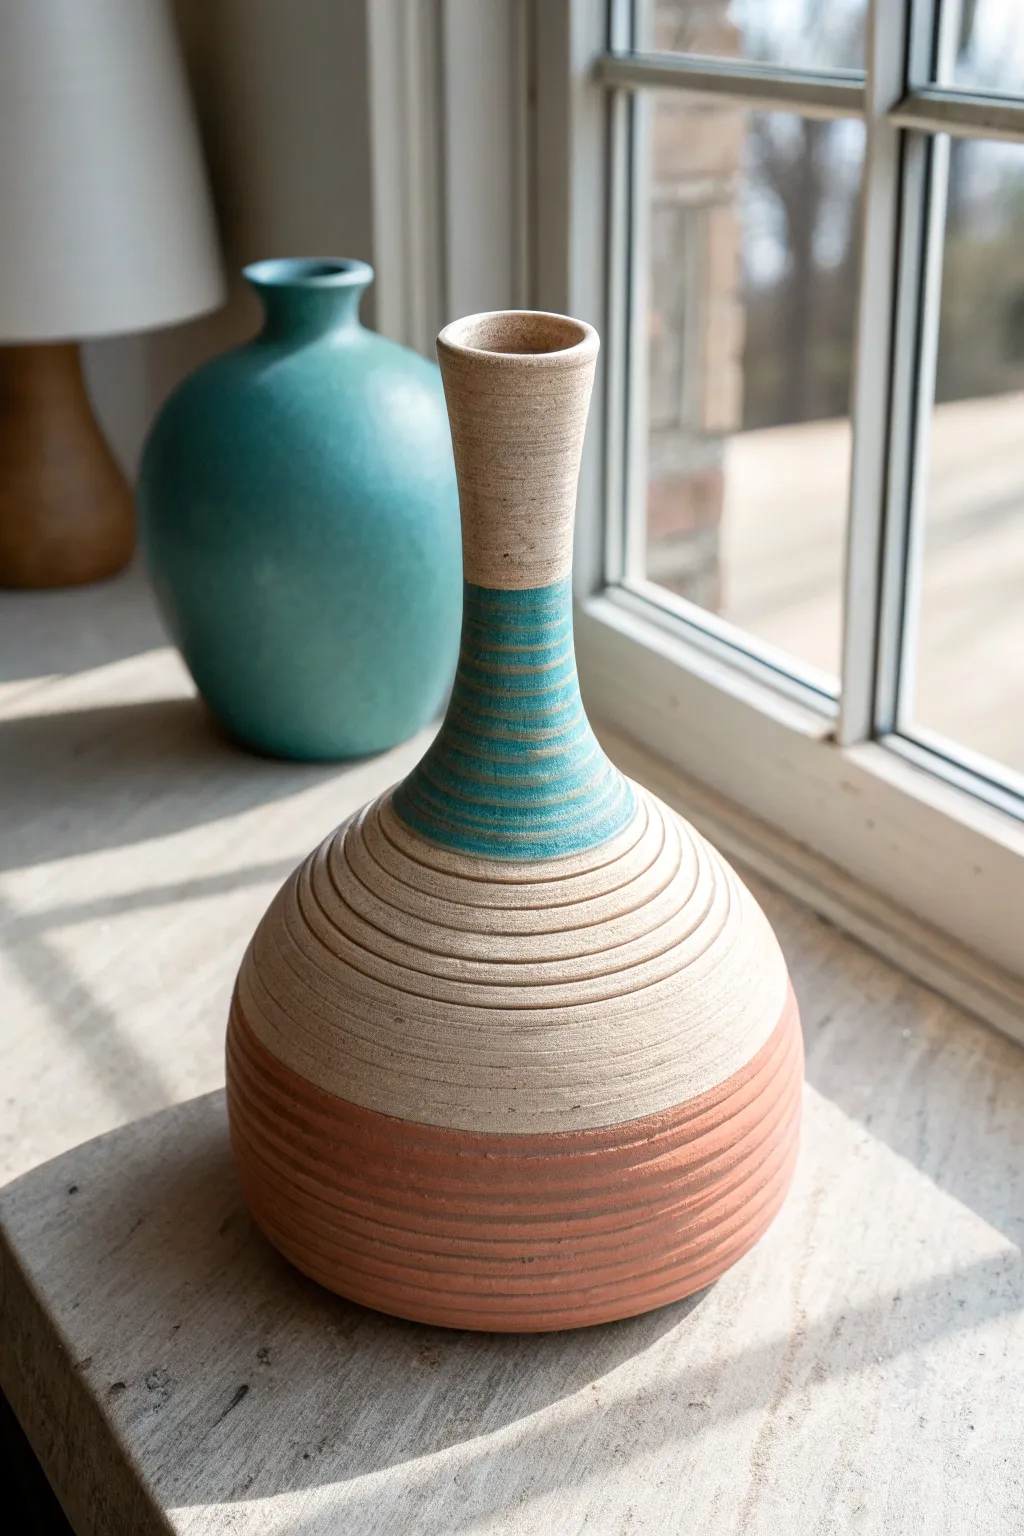
This elegant vessel combines the ancient technique of coil building with a modern, minimalist silhouette. The distinct horizontal ridges create a tactile surface that is beautifully highlighted by bands of teal and earthy terracotta glaze.
How-To Guide
Materials
- Stoneware clay (smooth or fine grog)
- Clay scoring tool or serrated rib
- Slip (clay mixed with water)
- Wooden modeling tool
- Metal kidney rib
- Turntable or banding wheel
- Teal matte glaze
- Terracotta or rust-colored matte glaze
- Sponge
- Cutting wire
Step 1: Building the Base
-
Create the slab floor:
Start by rolling out a slab of clay about 1/4 inch thick. Cut a circle approximately 5 inches in diameter to serve as the sturdy footprint of your vase. -
Roll your coils:
Prepare a batch of coils by rolling clay on a table. Aim for a consistent thickness, roughly the size of your pinky finger. Keep them covered with plastic so they don’t dry out. -
Attach the first ring:
Score the outer edge of your base and apply a bit of slip. Place your first coil on top of this scored area. Smooth the inside seam downward to bond it completely to the floor. -
Build outward:
add subsequent coils, stacking them slightly toward the outside of the previous ring to widen the form. This creates the bulbous belly of the vase. -
Texture the exterior:
Instead of smoothing the outside perfectly flat, use your finger or a rounded tool to gently define the gap between each coil, enhancing the horizontal ridge effect seen in the photo. I find that accentuating these lines now saves time later.
Wobbly Neck Problem?
If the long neck starts slumping while building, stop and let the clay stiffen for 30 minutes. You can also use a heat gun briefly to firm up the lower walls.
Step 2: Forming the Neck
-
Transition to inward slope:
Once the belly reaches about 6 inches in height, begin stacking your coils slightly toward the inside. Do this gradually to create a smooth, curved shoulder rather than a sharp angle. -
Refine the shoulder:
As the opening narrows, support the outside with one hand while smoothing the interior seams. It gets harder to reach inside as you go higher. -
Build the vertical neck:
When the opening is roughly 2 inches wide, stop tapering inward and stack coils directly vertically. Continue this strictly vertical stacking for about 4-5 inches to create the elongated neck. -
Flare the rim:
For the final coil, flare it outward very slightly to create a delicate lip. Smooth this rim with a damp sponge or chamois for a professional finish.
Clean Lines Pro Tip
Use automotive detailing tape instead of standard masking tape for glazing. It stretches around curves better and creates a crisper, tighter seal against glaze bleeds.
Step 3: Surface & Glazing
-
Refine the ridges:
Once the pot is leather-hard, use a wooden tool to clean up the horizontal grooves. They should be distinct and rhythmic. -
Bisque fire:
Allow the piece to dry slowly and completely before bisque firing it in the kiln according to your clay body’s specifications. -
Zone glazing – bottom:
Using masking tape or wax resist, mark off the bottom third of the vessel. Paint or dip this section with the terracotta-colored matte glaze to achieve the warm, earthy base. -
Zone glazing – neck detail:
Apply the teal glaze in a band around the lower part of the neck. You can freehand this for an organic look or use wax resist for sharp lines. Leave the sections between the glazes raw to show the natural clay body. -
Final fire:
Glaze fire the piece to the appropriate cone temperature. The unglazed areas will vitrify to a beautiful sandy beige.
Place your finished vase near a window where natural light can play across the beautiful coil texture
Flattened Coil Canteen Form
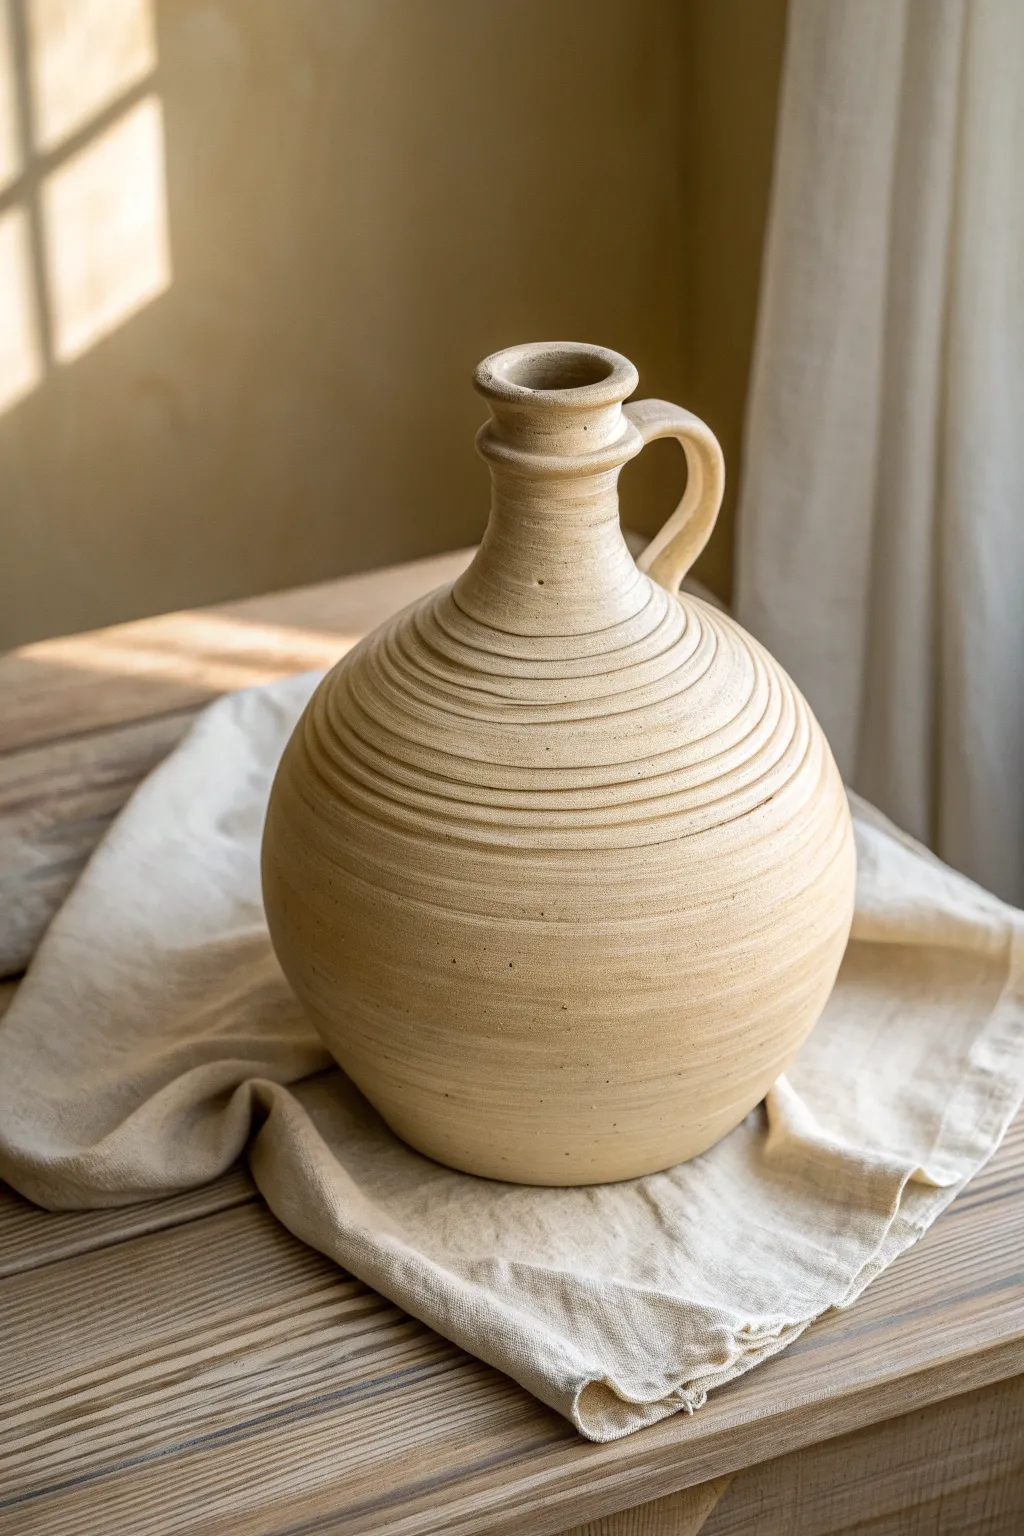
This elegant vessel combines the timeless technique of coil building with a refined, wheel-thrown aesthetic to create a textured canteen shape. The prominent horizontal ribs and narrow neck give it a distinct, classic character that feels both ancient and modern.
Detailed Instructions
Materials
- Stoneware clay (buff or beige firing)
- Scoring tool or serrated rib
- Slip or vinegar
- Rolling pin or slab roller
- Wooden modeling tools
- Sponge
- Loop tool (for trimming)
- Cutting wire
- Banding wheel
Step 1: Forming the Base
-
Create the base slab:
Start by rolling out a circular slab of clay about 3/8 inch thick. Cut it into a perfect circle, approximately 4-5 inches in diameter, to serve as the foot of your jug. -
Prepare the first coil:
Roll out a thick coil of clay. Score and slip the outer edge of your base slab thoroughly to ensure a strong connection. -
Attach the first ring:
Lay the coil onto the scored edge of the base. Blend the clay downwards onto the base on the inside to seal the seam, but leave the outside unblended for now if you want to maintain a ribbed look, or smooth it completely for a seamless start.
Step 2: Building the Belly
-
Build outward:
Continue adding coils, stacking each one slightly outward from the center to expand the form. This will create the swelling belly of the canteen. -
Smooth the interior:
After every 2-3 coils, stop to smooth the interior walls completely. Supporting the wall from the outside with one hand while smoothing the inside is crucial to prevent the form from collapsing. -
Define the ribs:
For the exterior, instead of smoothing completely, use a wooden modeling tool or your thumb to gently compress the coils together while leaving the horizontal seam visible. This creates that distinct ribbed texture seen in the photo. -
Round the curve:
Once you reach the widest point of the belly (about 6-7 inches high), begin stacking your coils slightly inward to close the form back up. -
Draft the shoulder:
Continue stacking inward more aggressively now to form the shoulder. The opening should narrow significantly as you approach the neck.
Keep it Steady
Use a banding wheel while building. Spinning the pot frequently helps you spot asymmetry early and keeps your coil thickness even around the circumference.
Step 3: Refining the Neck and Handle
-
Form the neck:
When the opening is about 2 inches wide, stack coils vertically to build a straight neck cylinder, rising about 3 inches high. -
Smooth the neck:
Unlike the body, smooth the neck coils significantly on the outside to create a cleaner transition, or keep the ribbing subtle. Create a flared or rolled rim at the very top for a finished pouring edge. -
Accentuate the texture:
With the form complete, place the pot on a banding wheel. hold a rounded wooden tool against the exterior grooves and slowly spin the wheel to sharpen and deepen the horizontal lines. -
Pull a handle:
Pull a small, sturdy strap handle from a lug of clay. It should be proportionate to the neck—not too heavy. -
Attach the handle:
Score and slip the attachment points: one just below the rim on the neck, and the other on the shoulder of the vessel. Press the handle firmly into place, creating a graceful ear-shaped curve. -
Clean up connections:
Use a small brush with a tiny bit of water to clean up any excess slip around the handle joints. I personally like to use a soft rubber rib here to compress the join without leaving finger marks.
Make it Ancient
Rub iron oxide wash into the ribbed grooves and wipe it back with a sponge before glazing. This highlights the texture and gives an aged, excavated look.
Step 4: Finishing and Firing
-
Dry slowly:
Cover the piece loosely with plastic to let it dry very slowly. Uneven drying can cause cracks where the coils join. -
Bisque fire:
Once bone dry, bisque fire the piece to cone 04. -
Glaze application:
Apply a matte beige or sand-colored glaze. A dip or spray application works best to ensure the glaze gets into the ribbed grooves without obscuring them. -
Final firing:
Glaze fire to the temperature recommended for your specific clay body and glaze choice.
Display your finished canteen with some dried branches or let it stand alone as a sculptural statement piece.
Coil Vessel With Cutout Windows
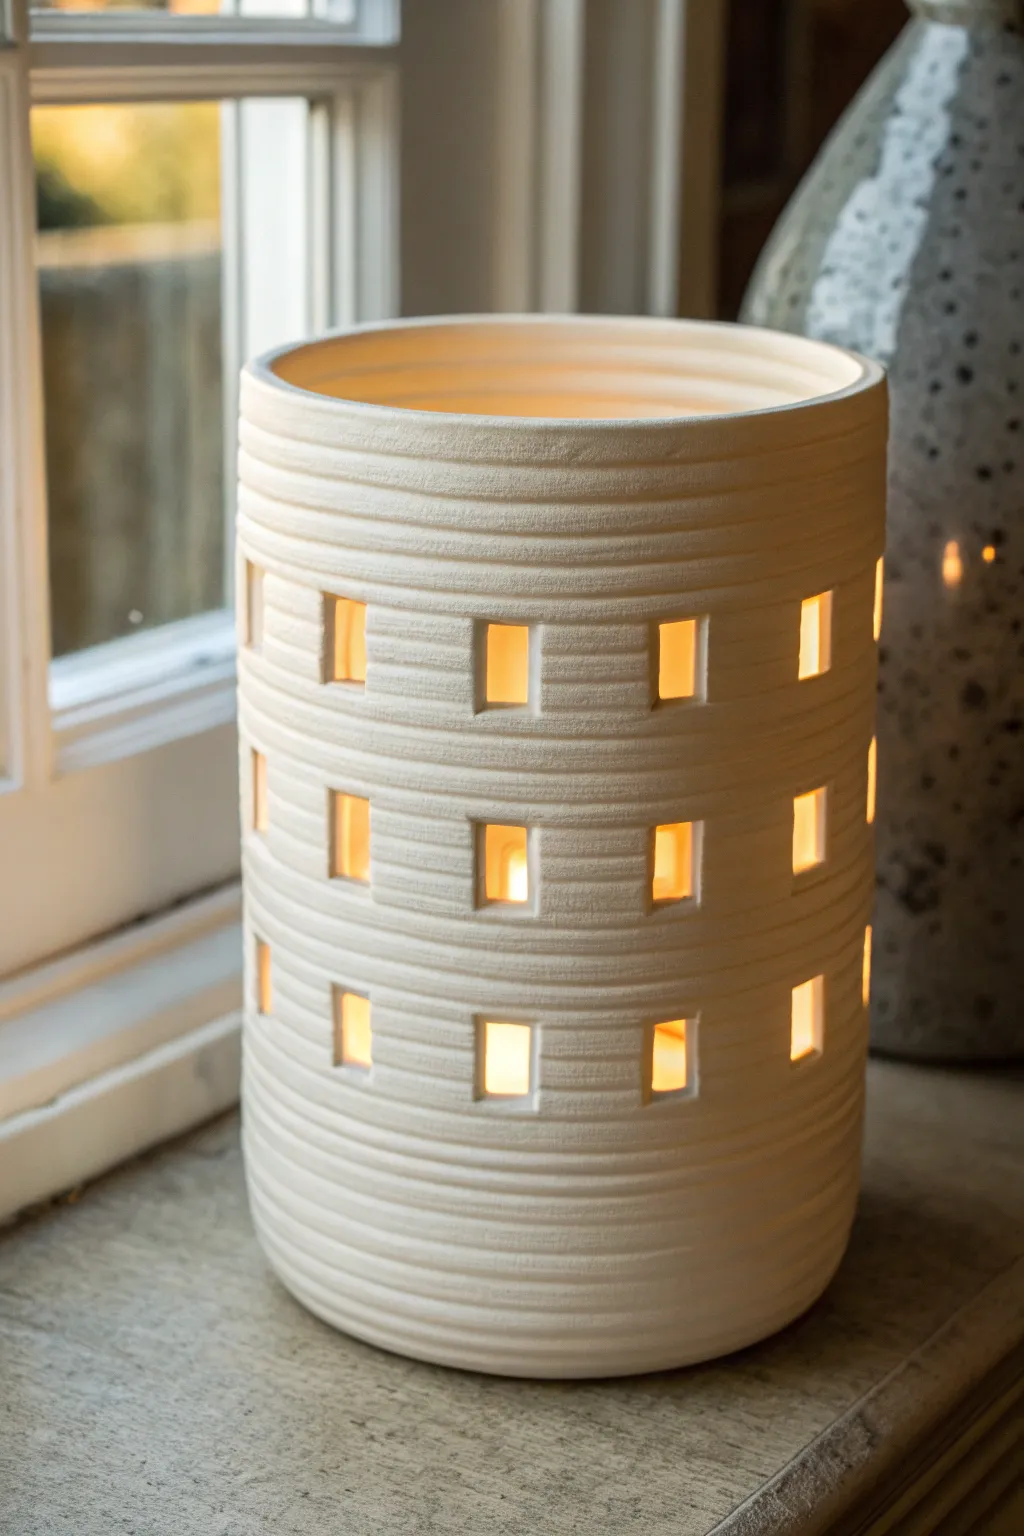
This project combines the rustic charm of exposed coil pottery with architectural precision, creating a glowing cylinder perfect for tealights or LED pillars. The resulting vessel features rhythmic horizontal ridges and disciplined rows of cutout windows that cast warm, inviting shadows.
Step-by-Step
Materials
- White stoneware or porcelain clay (grog-free for smoother cutting)
- Clay extruder (optional but helpful for consistent coils)
- Rolling pin and guide sticks
- Slip and scoring tool (or serrated rib)
- Fettling knife or X-Acto knife
- Small rectangular clay cutter (or a template)
- Sponge and bucket of water
- Wooden modeling tool
- Cylindrical form (like a PVC pipe or large oatmeal container) for support
Step 1: Base Construction
-
Roll the base:
Begin by rolling out a slab of clay to approximately 1/4 inch thickness. Use a circular template or a jar lid to cut a perfect circle for the floor of your vessel. -
Prepare the coils:
Roll out a significant number of coils. I find that using an extruder guarantees even thickness, but hand-rolling works if you are mindful about consistency. Aim for coils about equal in thickness to a standard pencil. -
Score and slip:
Score the outer edge of your base circle and apply a dab of slip. Score the bottom of your first coil and attach it firmly to the base. -
Build the wall:
Continue stacking coils one on top of another. Between each layer, score the top of the previous coil and the bottom of the new one, applying slip to create a strong bond.
Wobbly Walls?
If your cylinder starts sagging during the build, stop immediately. Use a heat gun or hair dryer lightly to firm up the lower coils before adding more weight to the top section.
Step 2: Refining and Smoothing
-
Smoothing the interior:
As the wall grows, stop every few inches to blend the coils together on the *inside* only. Use a wooden modeling tool or your finger to smear the clay downwards, sealing the gaps while leaving the exterior ridges intact. -
Check vertical alignment:
Ensure your cylinder is rising straight up rather than flaring out. Using a straight-sided object like a ruler against the side can help you gauge straightness. -
Finishing the rim:
Once you reach the desired height (about 8-10 inches), add your final coil. Instead of leaving it round, gently flatten the very top with a damp sponge for a finished look.
Step 3: Creating the Windows
-
Leather hard stage:
This is crucial: allow the vessel to dry to a ‘leather hard’ state. The clay should be firm enough to handle without warping but soft enough to cut easily. -
Mapping the grid:
Lightly sketch horizontal and vertical guidelines on the exterior surface using a needle tool to plan where your windows will sit. Spacing is key for that symmetrical look. -
Cutting the windows:
Using a small rectangular cutter or a steady hand with an X-Acto knife, punch out the windows. Support the wall from the inside with your hand as you press through. -
Cleaning edges:
Once the cutouts are removed, use a slightly damp brush or your finger to smooth the sharp edges of the window frames without rubbing away the coil texture.
Glow Up
Before firing, try gently carving the *interior* wall behind the uncut sections to make the clay thinner. This creates a translucent effect when a candle is lit inside.
Step 4: Firing
-
Slow drying:
Cover the piece loosely with plastic to ensure slow, even drying. This prevents the coils from separating or cracking. -
Bisque fire:
Fire the piece to cone 04 (or your clay’s specific bisque temperature). -
Glazing choice:
For the look in the image, apply a matte white glaze. Or, leave it unglazed if using a high-quality white porcelain that vitrifies beautifully. -
Final firing:
Glaze fire the vessel according to your clay body’s specifications.
Place a tea light inside and enjoy the geometric patterns of light dancing on your walls
Patchwork Colored-Coil Vessel
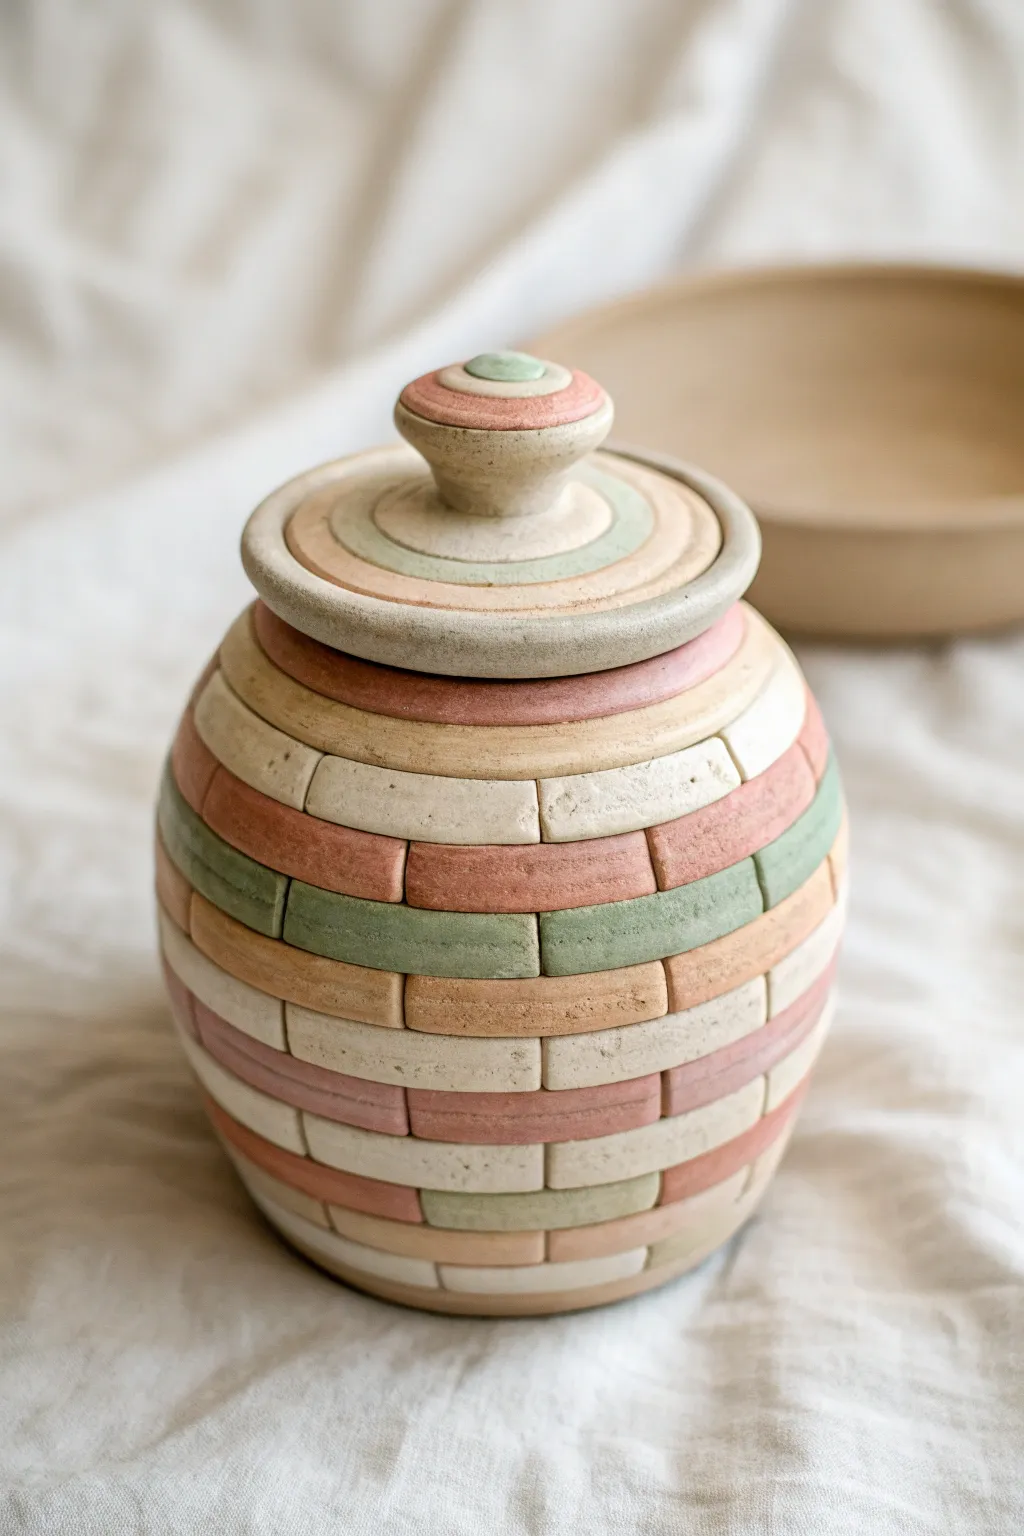
This charming vessel takes a traditional coil pot and reimagines it with a structured, architectural twist. By stacking short segments of multi-colored clay like masonry, you create a soft, textured jar that feels both ancient and refreshingly modern.
Detailed Instructions
Materials
- Polymer clay or air-dry clay (tan, sage green, muted pink, cream/white)
- Clay knife or straight blade
- Rolling pin or pasta machine
- Small circular cutter (for the base)
- Scoring tool (needle tool or toothpick)
- Slip (clay/water slurry) if using pottery clay
- Liquid clay or bake-and-bond (if using polymer clay)
- Smooth work surface or mat
- Sponge or smoothing rib
Step 1: Preparing the ‘Bricks’
-
Mix your palette:
Begin by conditioning your clay. You want a soft, earthy palette: a warm tan, a muted sage green, a dusty rose pink, and a creamy white. If you are mixing colors, do this now to ensure consistency. -
Roll out coils:
Roll each color into long, even snakes. Aim for a thickness of about 1/4 inch to 1/2 inch. Using a pasta machine or guides with your rolling pin can help keep the thickness uniform. -
Flatten the coils:
Gently press down on the coils with a flat object or lightly roll over them once to create a rectangular cross-section rather than a round one. This helps them stack like bricks. -
Cut into segments:
Using your straight blade, chop these flattened coils into short segments. Vary the lengths slightly between 1 and 2 inches to mimic a random stone pattern. Keep your colors separated in piles.
Slumping Walls?
If the jar starts to sag or bulge while building, the clay is too soft. Stuff the inside lightly with paper towels or plastic wrap for support and let it firm up for an hour before continuing.
Step 2: Building the Body
-
Create the base:
Roll out a slab of the tan clay and cut a circle about 3 to 4 inches in diameter. This will be the foundation of your jar. -
Lay the first course:
Score the edge of your base. Begin placing your brick segments around the perimeter. Alternate colors randomly—place a pink next to a white, then a green. Use slip or liquid clay between joints to secure them. -
Stagger the joints:
For the second layer, ensure the vertical seams don’t line up with the layer below. Place the center of a new brick directly over the seam of the two bricks beneath it, just like masonry. -
Shape the belly:
As you build upward, slightly angle the bricks outward to create the wider belly of the jar. Continue alternating colors. I find it helpful to step back every few layers to check the profile. -
Taper the neck:
Once you pass the middle point (about 3-4 inches high), begin angling the bricks slightly inward to narrow the opening. Continue until the jar is roughly 6 inches tall. -
Smooth the interior:
While the outside maintains the brick texture, use your thumb or a modeling tool to gently smear the clay coils together on the *inside* of the pot. This reinforces the structure without ruining the exterior look.
Step 3: The Lid and Finishing
-
Measure the opening:
Measure the inner diameter of your jar’s rim. Roll a solid slab of tan clay slightly larger than this opening. -
Form the flange:
On the underside of the lid slab, add a small ring of clay that fits inside the jar’s neck. This flange will keep the lid from sliding off. -
Create the concentric top:
On top of the lid slab, attach a smaller circle of green clay, then a smaller circle of tan, and finally a tiny button of pink on top. Smooth the edges down to create a stepped, conical shape. -
Refine the texture:
Use a sponge or finger to soften any sharp edges on the bricks. You want them to look tumbled and worn, not machine-cut. -
Final cure:
If using polymer clay, bake according to the package instructions (usually 275°F for 15-30 mins). If using ceramic clay, let it dry slowly under plastic before bisquing.
Texture Twist
Before cutting your segments, gently roll the clay coils over a piece of canvas or sandpaper. This creates a subtle, stony grit on the surface of your ‘bricks’ for added realism.
Now you have a decorative storage jar that doubles as a piece of architectural art for your shelf
Sculptural Coil Sea-Creature Jar
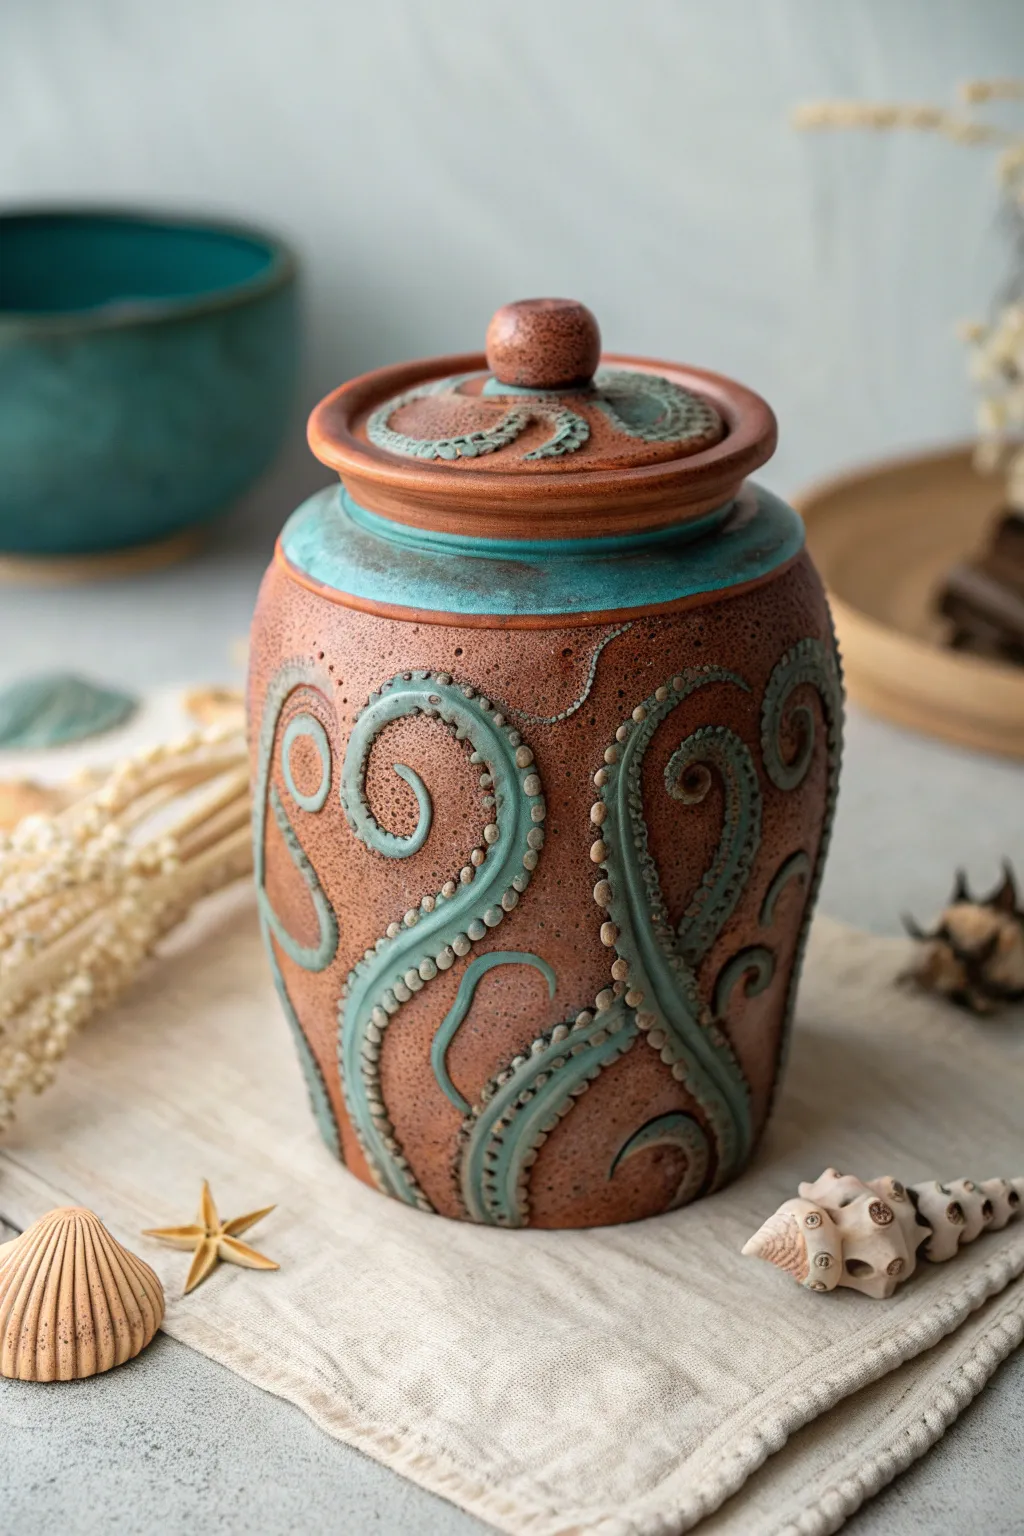
Embrace the fluid beauty of the ocean with this striking lidded jar, featuring sculptural tentacles winding their way across a rustic, speckled surface. The contrast between the warm, earthy clay body and the oxidized turquoise glaze creates a stunning artifact that feels like sunken treasure.
Step-by-Step Guide
Materials
- Speckled stoneware clay (mid-fire)
- Pottery wheel (or materials for hand-building coils)
- Needle tool
- Scoring tool or serrated rib
- Slip (clay mixed with water)
- Small loop tool or carving tools
- Multiple small clay coils (for tentacles)
- Modeling tool with a small round tip (for suction cups)
- Turquoise or patina green glaze
- Clear or matte finish glaze (optional)
- Wax resist
- Paintbrushes
- Sponge
Step 1: Forming the Base Vessel
-
Prepare the Clay:
Begin by wedging about 2-3 lbs of speckled stoneware clay to remove air bubbles. This clay body is essential for achieving that sandy, beach-like texture seen in the final piece. -
Throw or Build the Jar Body:
Center your clay on the wheel and open it up. Pull the walls to create a cylindrical shape that gently swells in the middle and tapers slightly at the shoulder. If you prefer hand-building, use the coil method to build up this rounded silhouette, smoothing the inside and outside as you go. -
Create the Gallery and Rim:
At the rim, careful pressure is needed to split the clay or fold it to create a gallery—the recessed ledge where the lid will sit. Ensure the rim above the gallery is smooth and sturdy. -
Throw the Lid:
Using a smaller amount of clay (about 1 lb), throw a lid that fits your gallery measurements perfectly. Always measure twice with calipers! Add a small, rounded knob to the center while throwing, or attach a hand-built one later when leather hard. -
Trim and Refine:
Once the jar and lid are leather hard, trim away excess weight from the bottom of the jar and the underside of the lid. Smooth the surfaces with a rubber rib to prepare them for sculpting.
Suction Cup Pro-Tip
Make tiny balls of clay and press them onto the tentacle coil BEFORE using your tool to indent them. This makes the suction cups raised and 3D rather than just indented holes.
Step 2: Sculpting the Sea Life Details
-
Roll Tentacle Coils:
Roll out several long, tapered coils of clay. These don’t need to be perfectly uniform; natural variation adds to the organic feel. Keep them moist under plastic so they don’t crack. -
Map the Flow:
Lightly trace varying S-curves and swirling lines onto the jar’s surface with a needle tool to plan where your tentacles will flow. -
Attach the Tentacles:
Score the traced lines and the back of your coils thoroughly. Apply slip and press the coils firmly onto the jar, curving them to follow your guide lines. I find twisting the ends slightly gives them a more active, writhing appearance. -
Blend the Edges:
Use a modeling tool to verify the coils are fully adhered. You can blend the underside of the coil into the jar body for a seamless transition, but leave the top side rounded for dimension. -
Add Suction Cups:
Using the small round-tipped tool, press a row of indentations into the center of each attached coil. Create a consistent rhythm of small, circular depressions to mimic suction cups. -
Decorate the Lid:
Repeat the process on the lid, attaching smaller coil segments appearing to emerge from the center knob or wrapping around the rim. -
Slow Dry and Bisque Fire:
Loosely cover the piece with plastic to ensure the added coils dry at the same rate as the jar body. Once bone dry, bisque fire the piece to cone 04.
Level Up: Hidden Treasure
Glaze the interior of the jar with a deep, glossy ocean blue. When opened, the contrast between the rough, matte exterior and the shiny, dark interior adds a stunning surprise.
Step 3: Glazing and Finishing
-
Wax Resist:
Apply wax resist to the bottom of the jar, the intense gallery ledge, and the rim of the lid where it touches the jar to prevent them from fusing during firing. -
Apply Base Color:
For the warm, toasted finish, leave the main body unglazed if your clay body self-glazes or has a nice color (like the speckled clay shown). Alternatively, wipe on a very thin iron oxide wash and sponge it back off to highlight the texture. -
Glaze the Tentacles:
Carefully paint a turquoise or patina green glaze directly onto the raised tentacle coils. Let the glaze pool slightly in the suction cup indentations to accentuate the texture. -
Accent the Shoulder:
Paint a band of the same turquoise glaze around the shoulder of the jar, just below the neck. This creates a cohesive visual break between the lid and the body. -
Final Fire:
Glaze fire the piece to the temperature recommended for your specific clay and glaze combination (usually cone 5 or 6 for stoneware).
Once fired, fill your jar with dried sea oats or keep it empty as a standalone sculpture that brings the mystery of the deep sea into your home
Open Ring Coil Vessel Sculpture
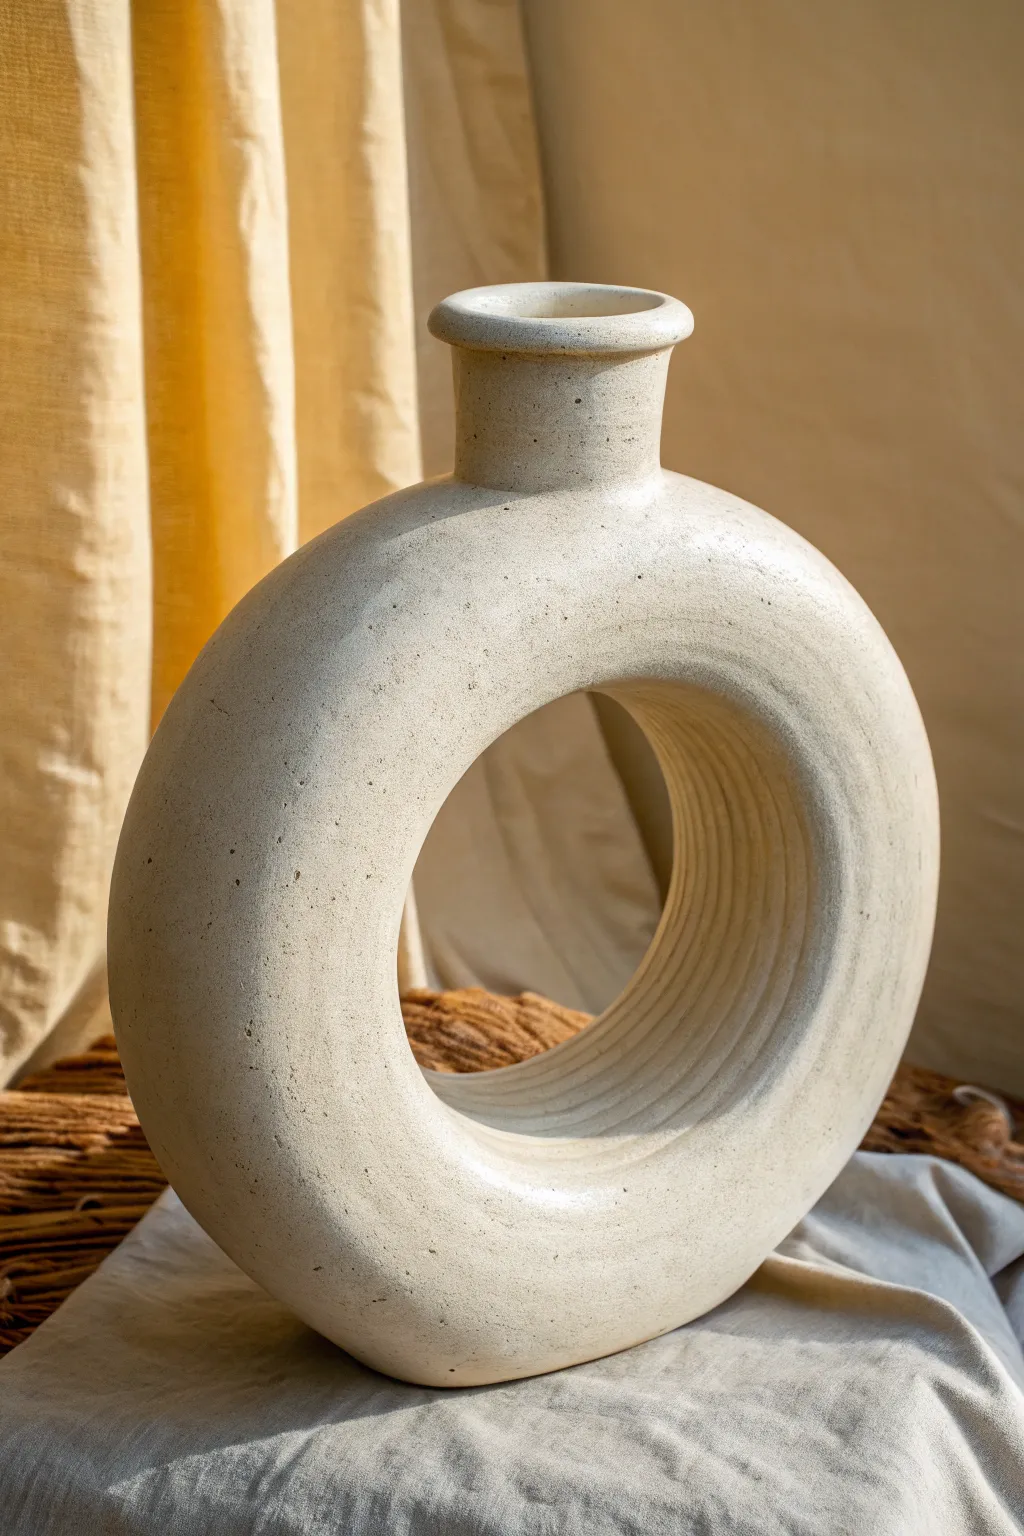
This striking ceramic donut vase balances organic texture with modern geometry, featuring a smooth outer silhouette and visible coil details within the open center. Its sculptural form makes it a perfect standalone art piece, even without flowers.
How-To Guide
Materials
- Stoneware clay (speckled or buff)
- Scoring tool (or fork)
- Slip (clay mixed with water)
- Wooden modeling tool
- Metal kidney rib
- Rubber kidney rib
- Sponge
- Rolling pin (optional)
- Canvas work surface
- Matte white or transparent glaze
Step 1: Forming the Base Ring
-
Roll primary coils:
Begin by rolling out several thick, consistent snakes of clay, roughly 3/4-inch in diameter. You’ll need enough to construct the entire circumference of the ring. -
Create the foundation:
Form your first coil into a circle on your canvas. This will be the bottom of the donut shape. Join the ends by cutting them at an angle, scoring, slipping, and smoothing the seam. -
Build upward:
Stack the next coil directly on top of the first. Score the top of the base coil and the bottom of the new coil, apply slip, and press firmly to join. -
Widen the form:
To create the bulging sides of the ring, place subsequent coils slightly toward the outside of the previous row. This expands the shape outward. -
Smooth the interior:
Here is where you make a stylistic choice. For the look in the photo, leave the interior coil lines visible but gently compress them with your finger or a tool to ensure a strong bond without erasing the texture. -
Smooth the exterior:
On the outside surface, use a wooden tool or your thumb to drag clay from the upper coil down to the lower one, completely blending the seams. -
Refine the exterior curve:
Use a metal kidney rib to scrape and smooth the outside wall as you build. This compression aligns the clay particles and creates that perfectly rounded silhouette. -
Close the curve:
Once you reach the widest point of the donut, begin placing coils slightly toward the inside. This tapers the form back inward to close the top of the ring. -
Seal the ring:
When the opening at the top becomes small enough, bridge the gap with your final coils. Ensure the very top is sealed completely if you want a continuous circle, but leave a small hole where the neck will attach.
Slumping Shapes?
If the ring starts to sag under its own weight, stuff the inside temporarily with crumpled newspaper or plastic bags to support the arch while you continue building.
Step 2: Adding the Neck and Finishing
-
Construct the neck:
Roll a small slab or use 2-3 small coils to build a vertical cylinder. This creates the spout. Usually, about 1.5 to 2 inches in height is sufficient for this scale. -
Attach the neck:
Score and slip the attachment point on top of your ring body. Press the neck cylinder firmly into place. -
Form the rim:
Roll a very thin coil and attach it to the top rim of the neck. Flare it outward slightly with your fingers to create a soft, rounded lip. -
Final smoothing:
I prefer to wait until the clay is leather hard for this step. Use a damp sponge and a soft rubber rib to polish the exterior one last time, erasing any remaining tool marks or fingerprints. -
Dry slowly:
Loosely cover the vessel with plastic to let it dry slowly. Ring shapes effectively have two ‘walls’ drying at different rates, so rushing this can cause cracking. -
Bisque fire:
Fire the piece to cone 04 (or your clay body’s specifications) once it is bone dry. -
Glaze application:
Dip or brush on a matte white or jagged speckled glaze. If you used a speckled clay body, a semi-transparent white glaze is ideal to let the iron spots show through. -
Final firing:
Glaze fire the piece to the final temperature required for your specific clay and glaze combination.
Pro Tip: Interior Texture
Run a wet finger or a round modeling tool along the interior coils after joining. This creates the uniform ‘grooved’ look seen in the photo without sealing them flat.
Place your finished vessel near a window to let the light play across the contrasting textures