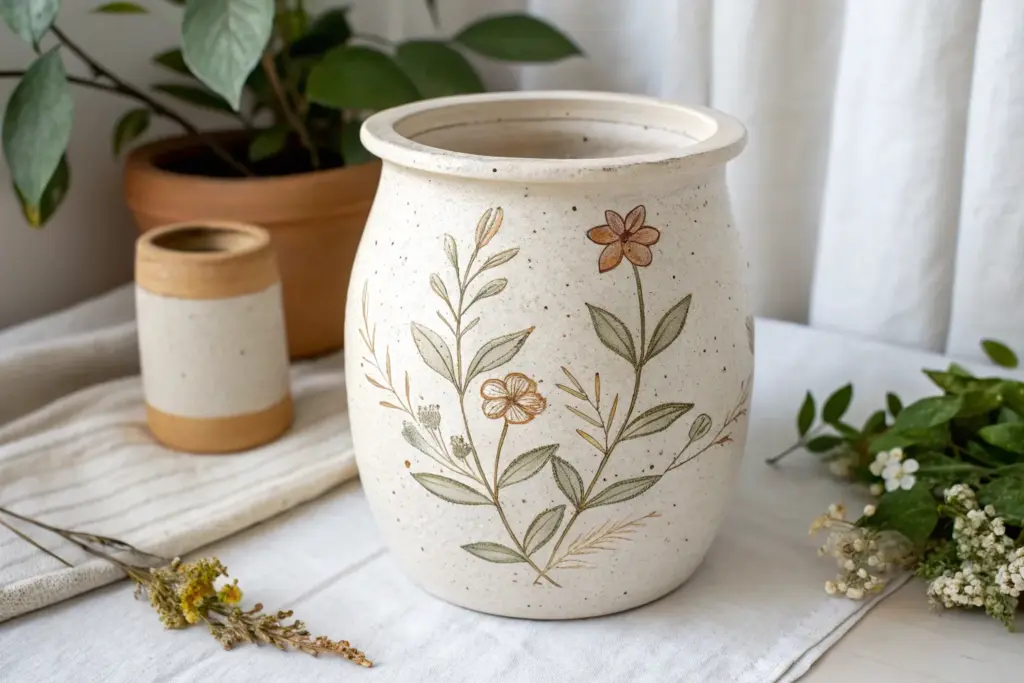
If you’re craving air-dry clay projects that actually work as cute flower pots and vases, I’ve got a bunch of studio-favorite DIY ideas for you. These are all kiln-free, totally doable at home, and made to show off succulents, air plants, and fresh-cut stems in a way that feels handmade and special.
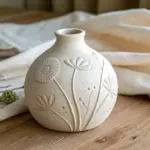
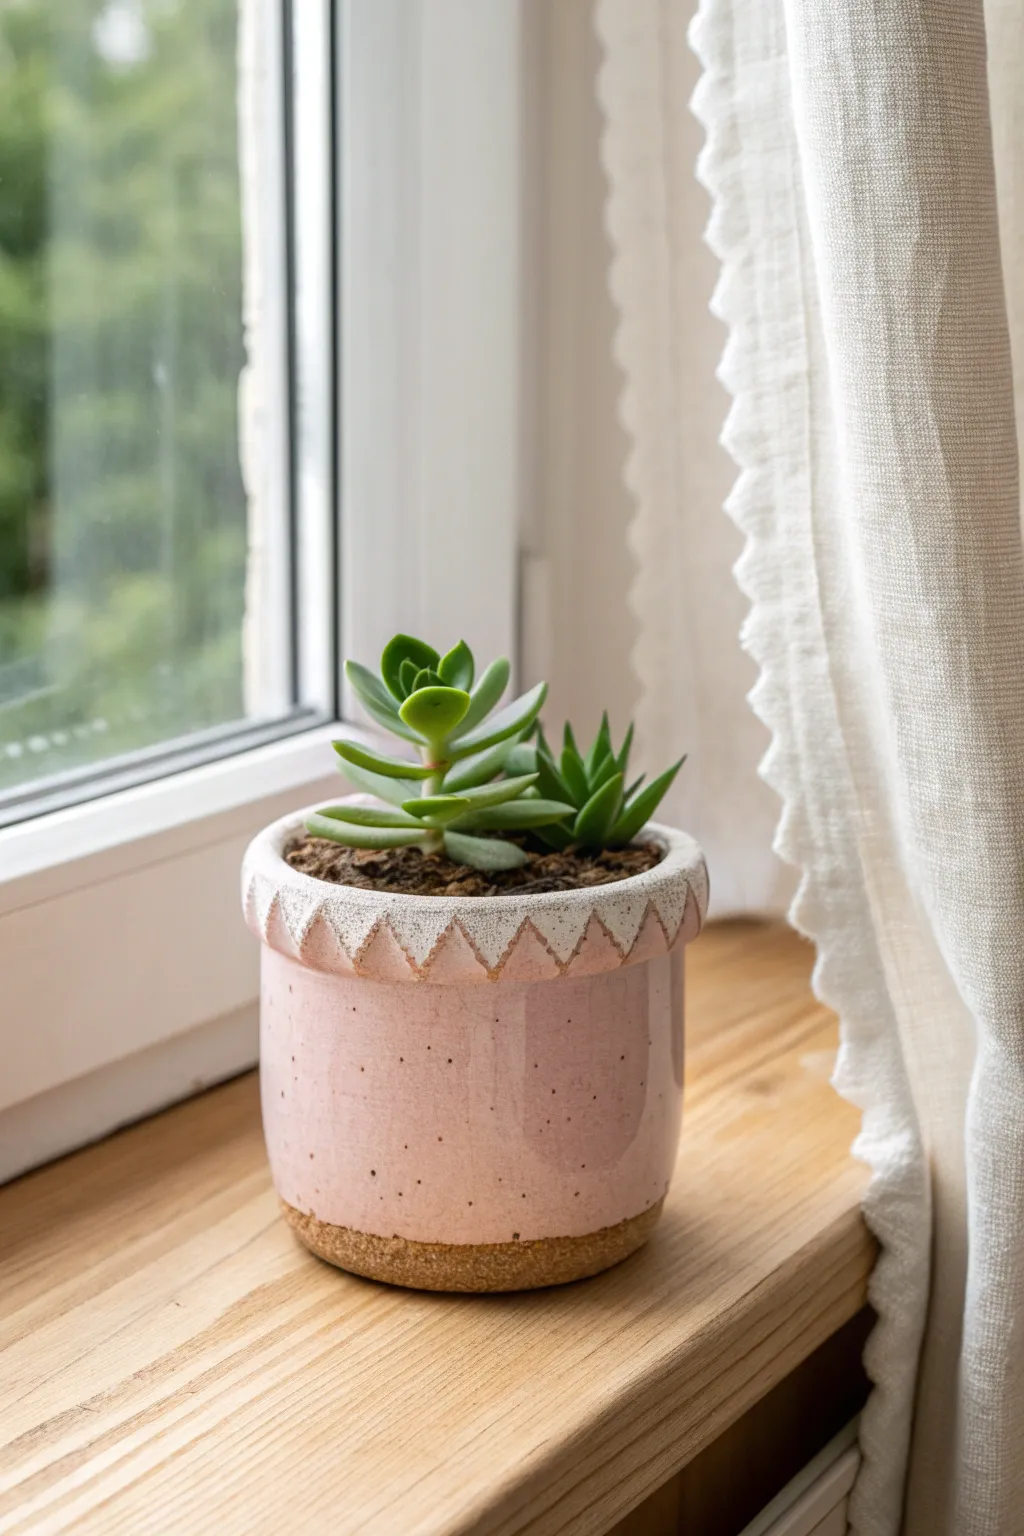
Classic Pinch-Pot Mini Planter
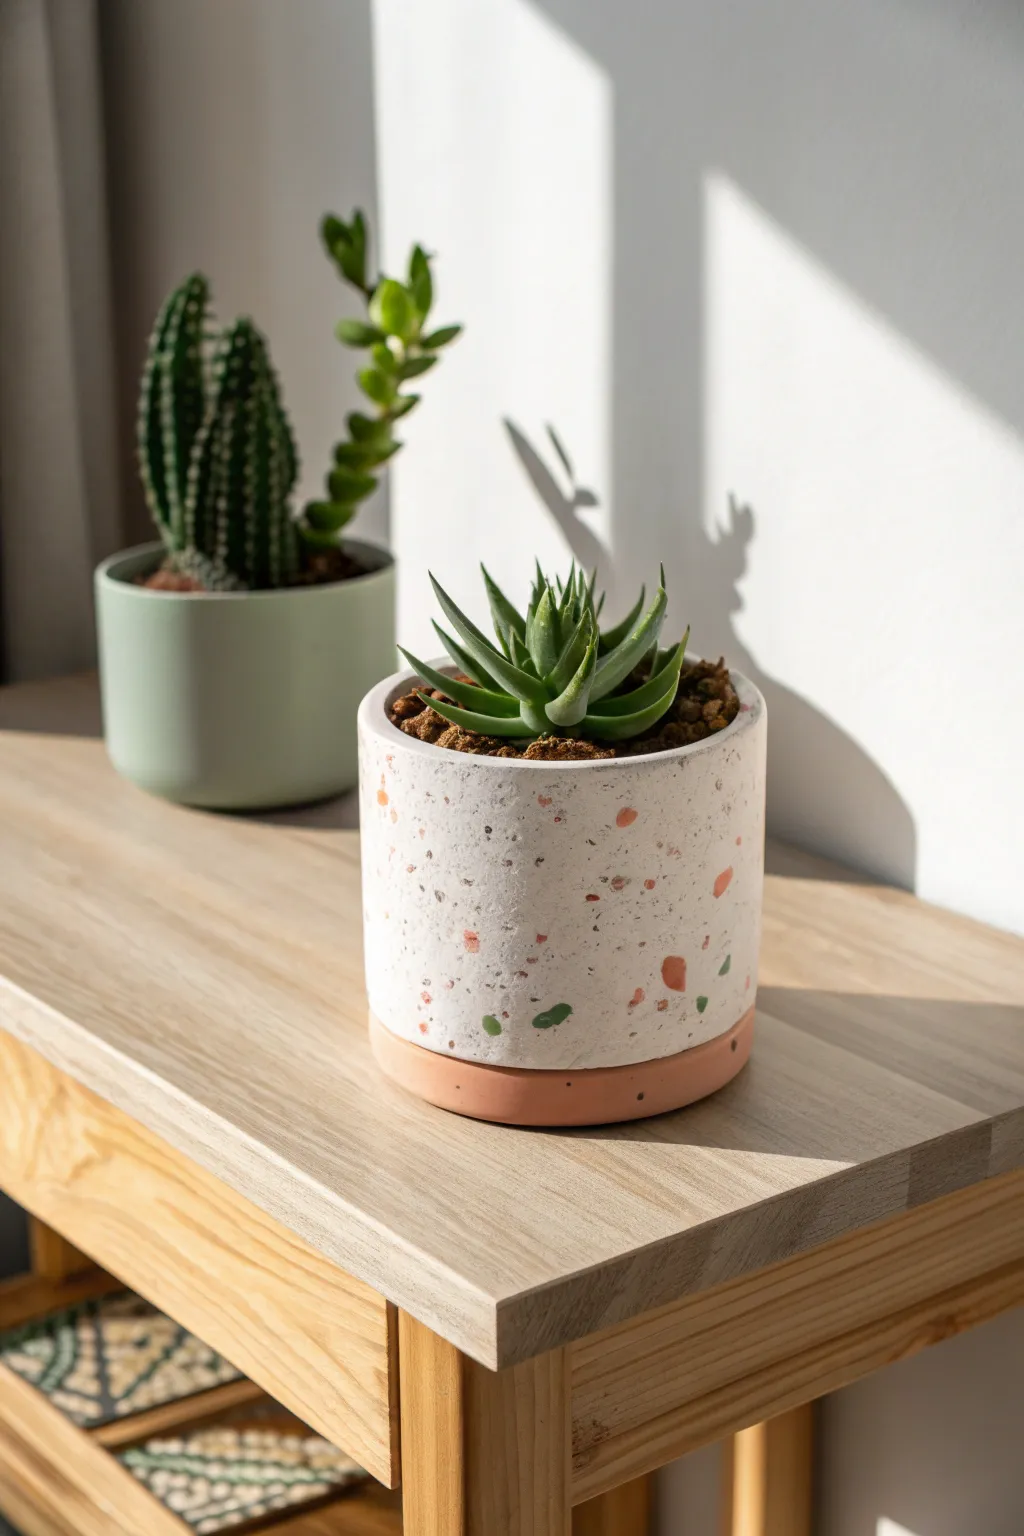
This charming mini planter combines the organic feel of a classic pinch pot with a beautifully rustic, stone-like texture. Its two-toned finish, featuring a raw white upper and a subtle grey base, is perfect for housing small succulents on a sunny windowsill.
How-To Guide
Materials
- White AIR DRY clay (approx. 300g)
- Small bowl of water
- Rolling pin (optional)
- Stylus tool or toothpick
- Course sandpaper or a stiff bristle brush
- Grey acrylic paint
- Matte sealant or varnish
- Potting soil and small succulent
Step 1: Shaping the Base
-
Prepare the Clay:
Start by taking a tennis-ball-sized amount of white air-dry clay. Knead it in your hands for a minute until it is warm and pliable, smoothing out any initial cracks. -
Form a Ball:
Roll the clay between your palms or on your work surface until you have a smooth, perfect sphere. This symmetry is crucial for an even pot. -
Begin the Pinch:
Hold the sphere in your non-dominant hand. Gently press your dominant thumb into the center of the ball, pushing down about three-quarters of the way, being careful not to push through the bottom. -
Shape the Walls:
Using your thumb on the inside and fingers on the outside, gently pinch and rotate the clay. Move from the bottom upward, thinning the walls significantly as you go. -
Refine the Curve:
Aim for a rounded, bowl-like shape rather than straight vertical walls. Bring the rim in slightly at the top to create that cozy, enclosed look seen in the photo. -
Flatten the Bottom:
Once you are happy with the shape, gently tap the pot on your table to flatten the bottom so it sits securely without wobbling. -
Add Texture:
Instead of smoothing the exterior perfectly, use a stiff bristle brush or a piece of crumpled foil to tap texture into the clay surface. This gives it that rugged, stone-like appearance. -
Smooth the Rim:
Use a little water on your finger to run along the very top edge. We want the rim to look finished, contrasting slightly with the textured body.
Cracks while drying?
Mix a tiny bit of fresh clay with water to create a paste (slip). Fill the cracks with this paste and smooth over with a damp finger, then let dry again.
Step 2: Finishing Details
-
Initial Drying PHASE:
Let the pot sit for about 24-48 hours until it is completely bone dry. It should turn a chalky white color and feel room temperature to the touch. -
Refining the Surface:
If the texture feels too sharp or aggressive, lightly sand the exterior with coarse sandpaper to knock back the peaks while keeping the rustic look. -
Mix the Bottom Tone:
Mix a very watery wash of grey acrylic paint. You want this to look like a stain rather than a heavy coat of opaque paint. -
Paint the Base:
Apply the grey wash to the bottom third of the pot. Don’t use masking tape; paint a freehand line to maintain the organic, handmade aesthetic. -
Distress the Grey:
Before the grey wash fully dries, wipe some of it back with a paper towel. This helps it settle into the texture grooves, emphasizing the stone effect. -
Create Speckles:
Dip an old toothbrush into slightly watered-down brown or dark grey paint. Run your thumb over the bristles to flick tiny speckles onto the white portion of the pot for extra realism. -
Seal the Interior:
Crucial step: Apply at least two coats of a waterproof varnish or sealant to the inside of the pot. Air-dry clay will dissolve if it gets wet, so it must be sealed well. -
Optional Drainage Hole:
If you plan to water heavily, drill a small hole in the dry base (carefully!) or simply use this as a cachepot for a plastic nursery pot. -
Final Coat:
Apply a matte varnish to the exterior to protect the paint and texture without making it look glossy or plastic.
Use real stone texture
Before the clay dries, roll a real rock with an interesting surface over the outside of your pot to imprint authentic geological patterns.
Place your favorite little succulent inside and enjoy the calm, natural vibe your new planter brings to the room


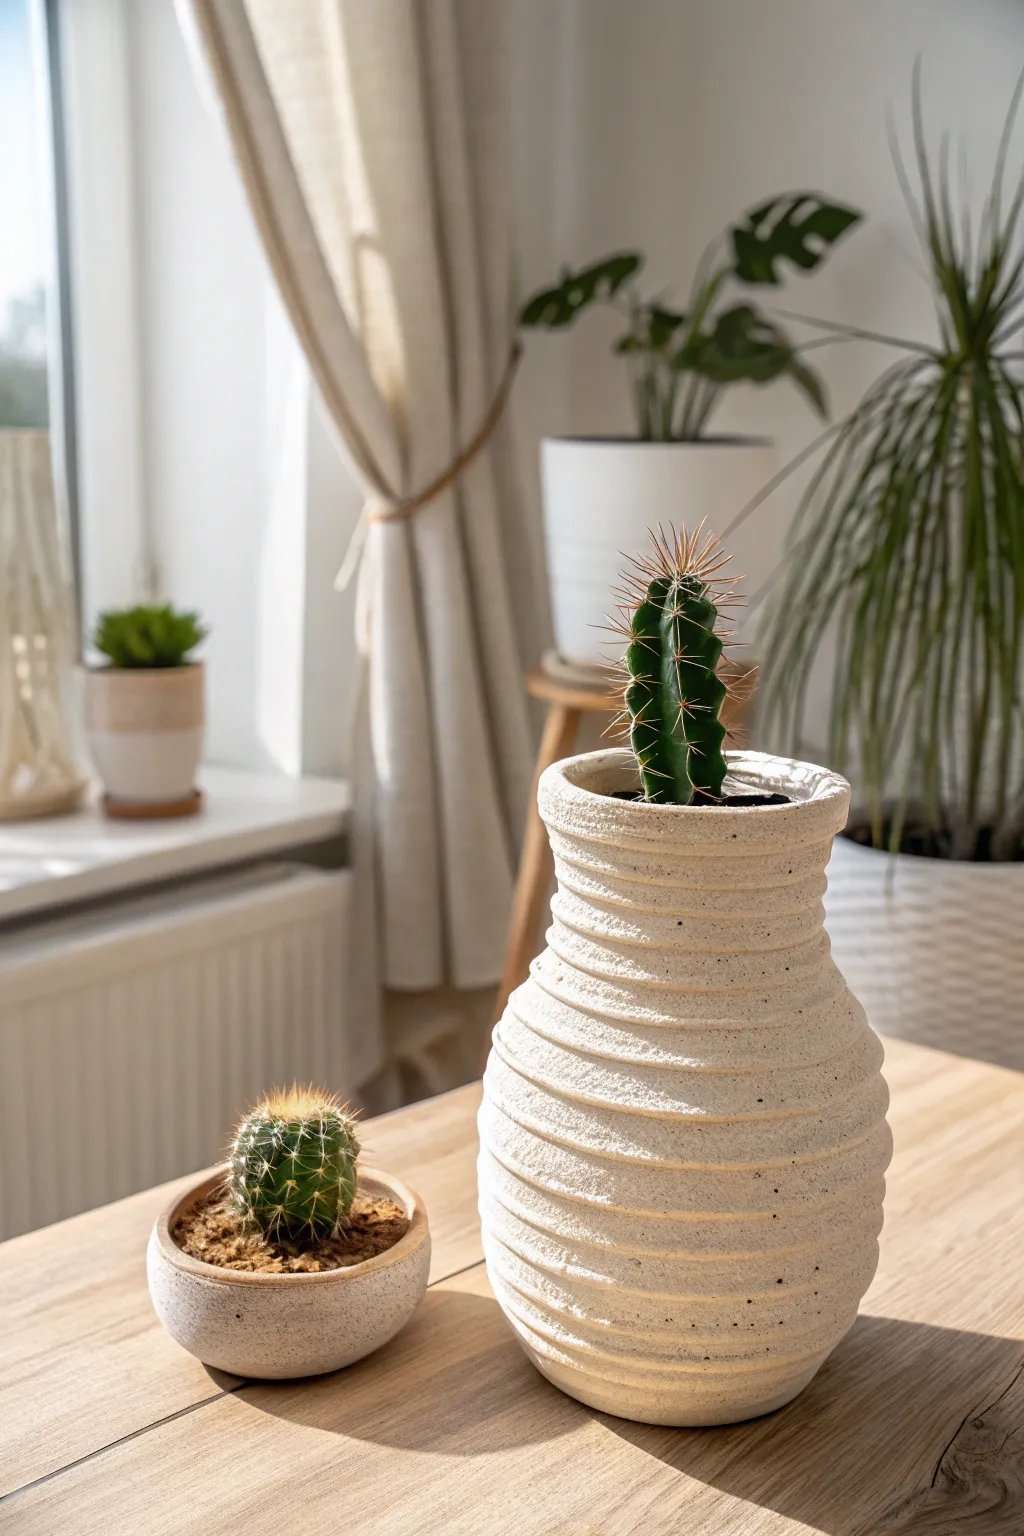
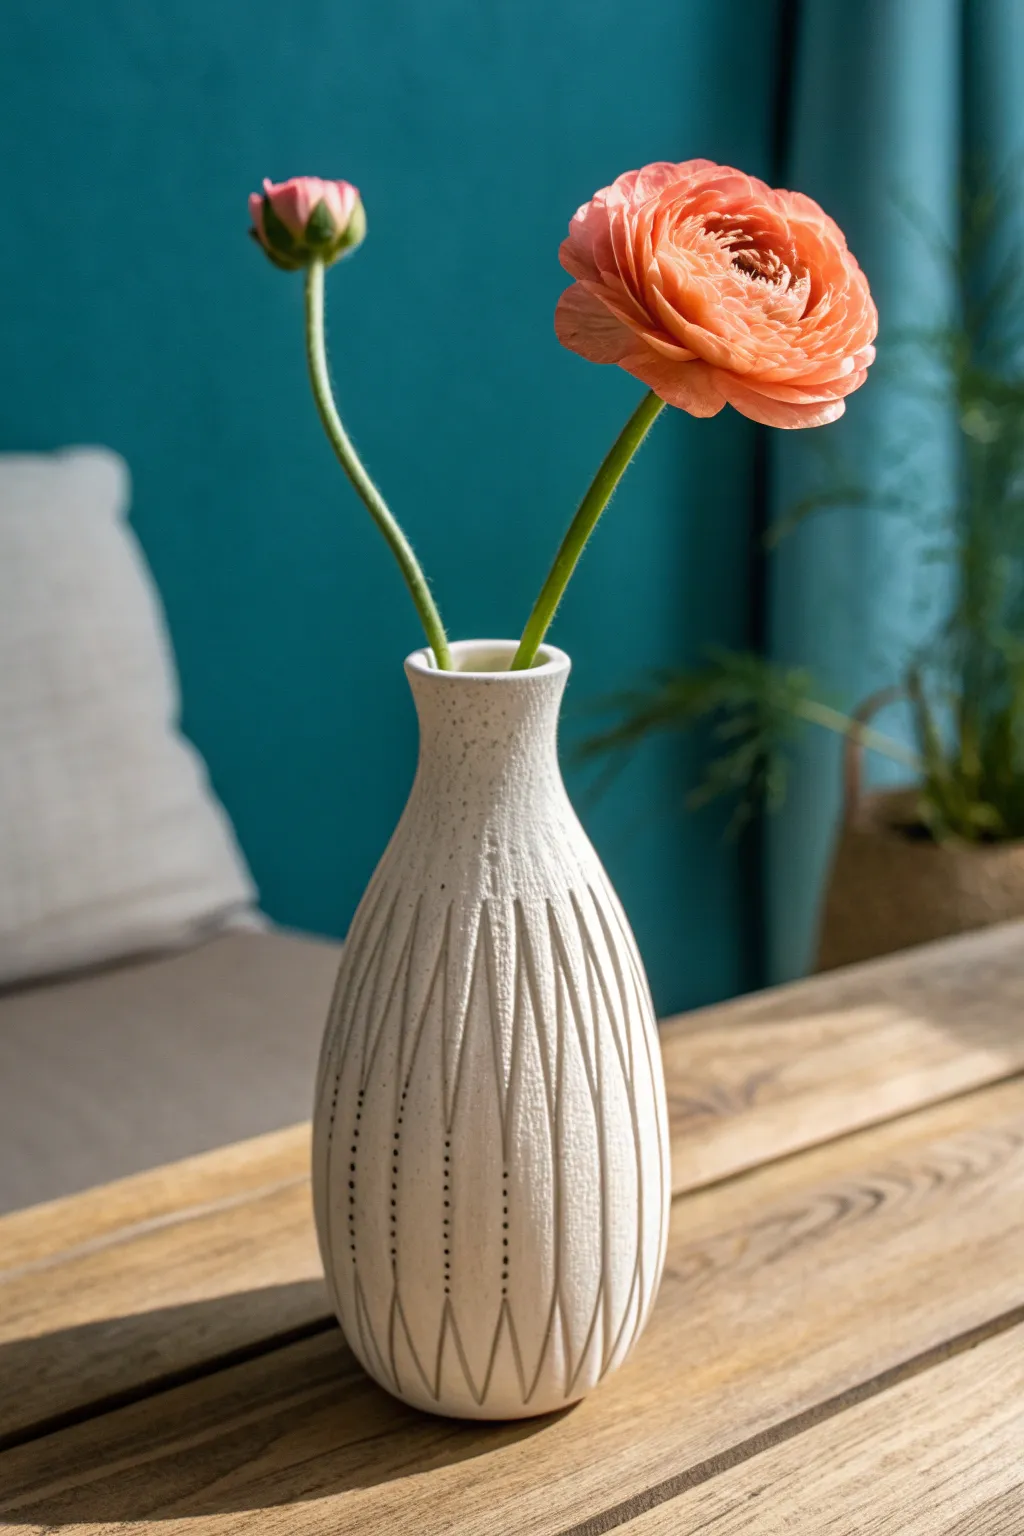
Clean Cylinder Bud Vase
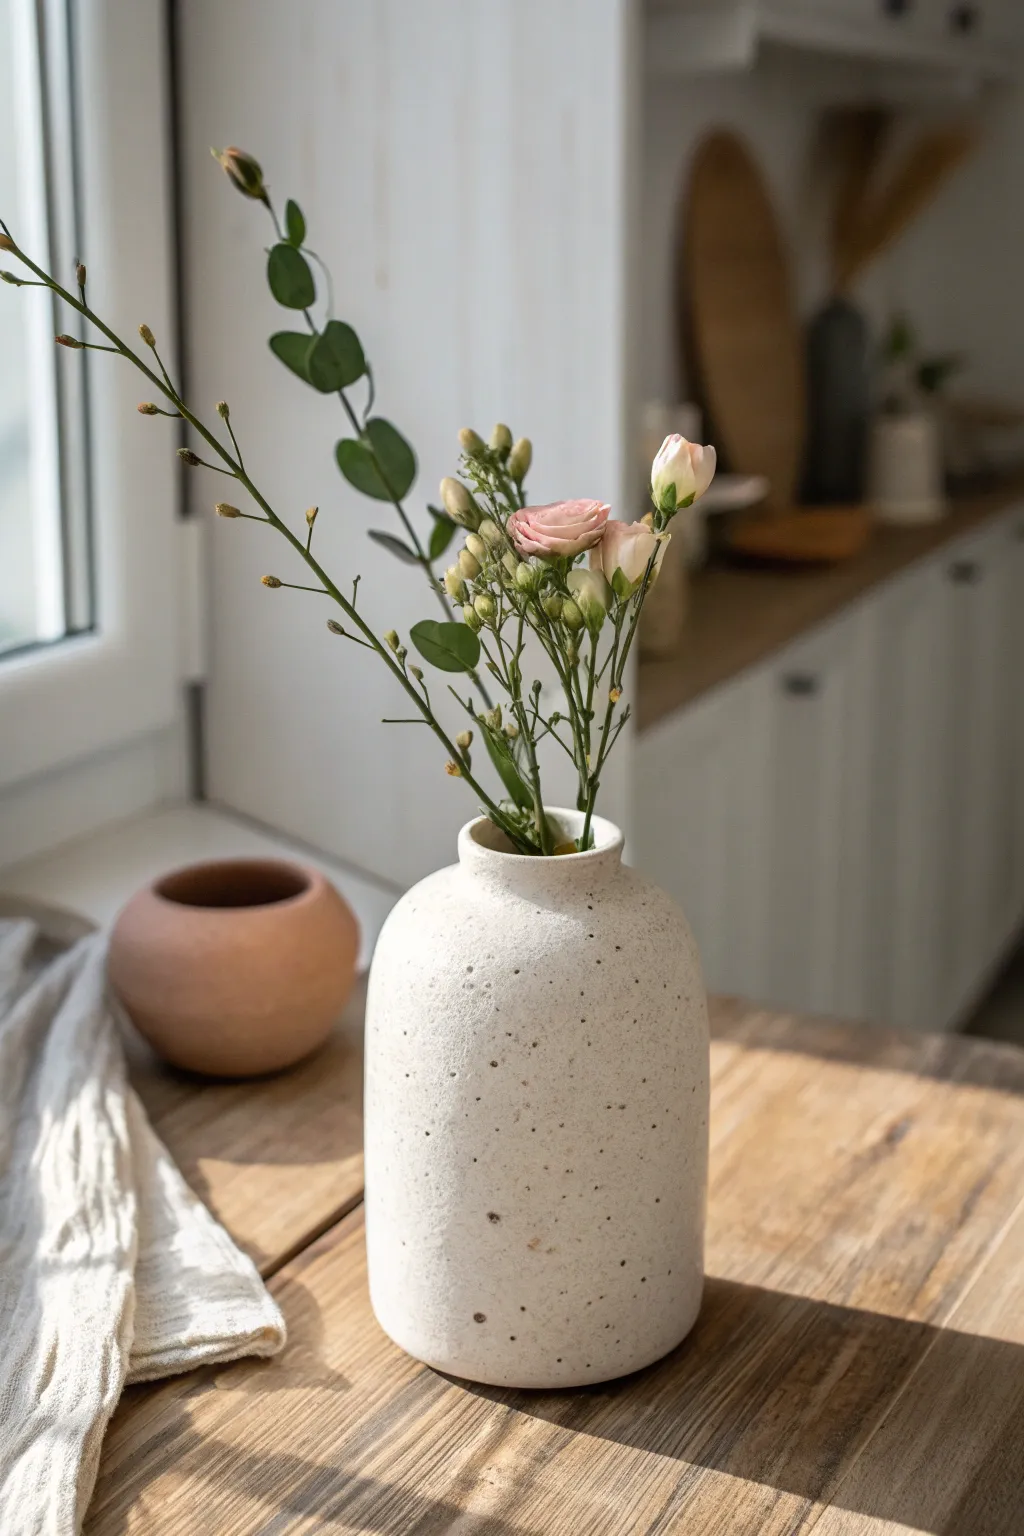
Recreate the high-end look of wheel-thrown speckled pottery using accessible air dry clay. This cylinder bud vase features a gentle sloping shoulder and a faux-stone texture that adds organic warmth to any window sill.
Step-by-Step Tutorial
Materials
- White or cream air dry clay (approx. 1 lb)
- Acrylic rolling pin
- Empty glass bottle (for use as an armature/mold)
- Clay knife or craft knife
- Slip (clay mixed with water)
- Small sponge
- Black pepper or dried coffee grounds (for speckling)
- Water bowl
- Sandpaper (fine and medium grit)
- Matte spray varnish or sealant
- Waterproof sealer (like polyurethane or resin, if using fresh flowers)
Step 1: Preparing the Clay Body
-
Incorporate the Texture:
Begin by taking a substantial chunk of white air dry clay. To achieve that convincing stone effect, sprinkle a generous pinch of coarse black pepper or dried coffee grounds onto the clay. -
Knead the Clay:
Fold the clay over the speckles and knead thoroughly. Continue folding and pressing until the particles are distributed evenly throughout the mass. If the clay feels dry, mist it lightly with water. -
Roll the Slab:
Place the clay on a smooth work surface or canvas mat. Use your acrylic roller to flatten the clay into a long, rectangular slab, aiming for a consistent thickness of about 1/4 inch. -
Cut the Base:
Place your glass bottle armature on the leftover clay slab and trace around the bottom with your knife to create a circular base. Set this disc aside.
Step 2: Building the Form
-
Size the Wall:
Wrap your clay slab loosely around the glass bottle to measure the circumference. Trim the slab so the ends overlap slightly, and cut the height to match your desired vessel size, leaving an inch extra at the top for the neck. -
Form the Cylinder:
Wrap the trimmed slab around the bottle. Score the overlapping edges (scratch cross-hatch marks) and apply a dab of slip. -
Seal the Seam:
Press the edges together firmly. Use a modeling tool or your thumb to smooth the clay over the seam until it disappears completely. I find sliding a wet finger vertically down the join helps blend it best. -
Attach the Base:
Score and slip the bottom edge of your cylinder and the outer edge of your base disc. Press the cylinder onto the base and smooth the clay downward to fuse the two pieces seamlessly. -
Shape the Shoulders:
Gently slide the clay upward on the bottle so the top portion extends past the bottle’s shoulder. Carefully curve the clay inward, narrowing the opening to create the sloped shoulder effect. -
Form the Neck:
Add a small coil of clay to the narrowed opening if needed to build up a distinct vertical rim. Smooth this into the shoulder so it looks like one continuous piece. -
Refine the Rim:
Dip your finger in water and run it around the top rim to round off any sharp edges. The lip should look soft and substantial, not thin or sharp. -
Remove the Armature:
Once the clay has stiffened slightly (usually after 30-60 minutes), carefully slide the glass bottle out. Do not let the clay fully dry on the bottle, or it may crack as it shrinks.
Cracks appearing?
If hairline cracks appear while drying, mix a small paste of clay and vinegar. Fill the crack, smooth it over, and cover with plastic to slow the drying process again.
Step 3: Finishing Touches
-
Initial Drying:
Let the vase dry slowly away from direct heat or sunlight. Cover it loosely with plastic wrap for the first 24 hours to ensure even drying and prevent warping. -
Sand for Texture:
Once completely bone dry (24-48 hours), use medium-grit sandpaper to smooth out any bumps or fingerprints. The sanding process will also reveal more of the speckled inclusions. -
Refine the Surface:
Switch to fine-grit sandpaper for a final polish. Wipe away all clay dust with a slightly damp sponge or tack cloth. -
Seal the Exterior:
Apply a matte spray varnish to the exterior. This protects the faux-stone finish without making it look glossy or plastic. -
Waterproofing (Crucial Step):
Since air dry clay dissolves in water, pour a waterproof sealer (like resin or a specialized pot sealer) into the vase. Swirl it to coat the entire interior and let it cure fully before adding water and flowers.
Use Dried Spices
Don’t have black sand? Coarsely ground black pepper or used dry coffee grounds create an incredibly realistic speckled ceramic effect when sanded back.
Now you have a stunning, minimalist vase that brings a touch of modern craft to your home decor


Coil-Built Flower Pot With Soft Ridges
This elegant vessel combines the ancient charm of coil construction with a contemporary silhouette, perfect for showcasing structural succulents. The finished piece features a distinctive ribbed texture that is smoothed just enough to feel modern while retaining its handmade character.
Step-by-Step Guide
Materials
- Air dry clay (white or light stone color)
- Clay roller or rolling pin
- Circle cutter or bowl (for base)
- Small cup or jar (water container)
- Slip (clay mixed with water)
- Sponge
- Plastic wrap
- Mod Podge or waterproof sealant
- Sanding block (fine grit)
- Speckled stone spray paint (optional)
Step 1: Forming the Base
-
Prepare the Clay:
Begin by kneading a fist-sized ball of air dry clay to warm it up and remove any air pockets. This conditions the clay and makes it less prone to cracking later. -
Roll the Slab:
Roll this ball out into an even slab, aiming for a thickness of about 1/4 to 1/2 inch. You don’t want the base too thin, as it needs to support the height of the walls. -
Cut the Base:
Use a circle cutter or simply trace around a small bowl to cut out a perfect circle. This will serve as the foundation of your pot. Smooth the edges with a damp finger. -
Create Slip:
In the small cup, mix a little bit of clay with water until it reaches a paste-like consistency. This ‘slip’ acts as the glue for your coils.
Step 2: Building the Coils
-
Roll the First Coil:
Break off a chunk of clay and roll it between your palms or on the table into a long snake. Aim for an even thickness, roughly the width of your pinky finger. -
Attach the First Layer:
Score the outer edge of your base circle with a fork or tool, apply a dab of slip, and lay the first coil directly on top of the rim. -
Blend the Interior:
Using your thumb or a modeling tool, firmly smudge the clay from the coil down onto the base on the *inside* of the pot only. This seals the seam without ruining the outer ridge texture. -
Continue Building Up:
Repeat the process: roll a coil, score the top of the previous row, apply slip, and place the new coil. I find it helpful to look at the profile often to ensure it’s rising straight. -
Shape the Belly:
To create the gentle curve seen in the photo, slighty offset each coil outward for the first few layers to widen the pot, then gradually offset them inward to narrow the neck. -
Create the Neck:
Once you have narrowed the form, stack the final two or three coils vertically straight up to create a defined rim. Maintain the same coil thickness for visual consistency.
Cracks Appearing?
If you see small cracks forming while drying, mix a tiny amount of vinegar into your slip paste. This ‘magic mud’ fills fissures perfectly and bonds stronger than water alone.
Step 3: Finishing Touches
-
Smooth the Inside:
Use a damp sponge to smooth out the entire interior surface. A smooth interior structure provides better support for the walls as they dry. -
Refine the Ridges:
Dip your finger in water and run it gently along the exterior grooves. You don’t want to erase the lines, but rather soften the sharp edges to get that organic, stone-like look. -
Drying Process:
Cover the pot loosely with plastic wrap for the first 24 hours to let it dry slowly. Then, remove the plastic and let it air dry completely for another 2-3 days until hard and white. -
Sanding:
Once bone dry, use a fine-grit sanding block to gently knock down any sharp burrs or uneven spots on the rim, being careful not to sand away your coil texture. -
Seal for Safety:
Since air dry clay isn’t waterproof, coat the interior with several layers of waterproof sealant or resin. Allow it to cure fully before adding soil. -
Faux Stone Effect:
For the speckled look in the image, you can lightly mist the dry pot with a textured stone spray paint or flick diluted black acrylic paint onto the surface using an old toothbrush.
Pro Tip: Even Walls
To keep your vase symmetrical, place your base on a lazy susan or a piece of paper you can easily rotate. Turning the work constantly allows you to spot uneven areas immediately.
Now you have a stunning, textured vessel ready to house your favorite drought-tolerant plant


Simple Tapered Vase With Tiny Neck
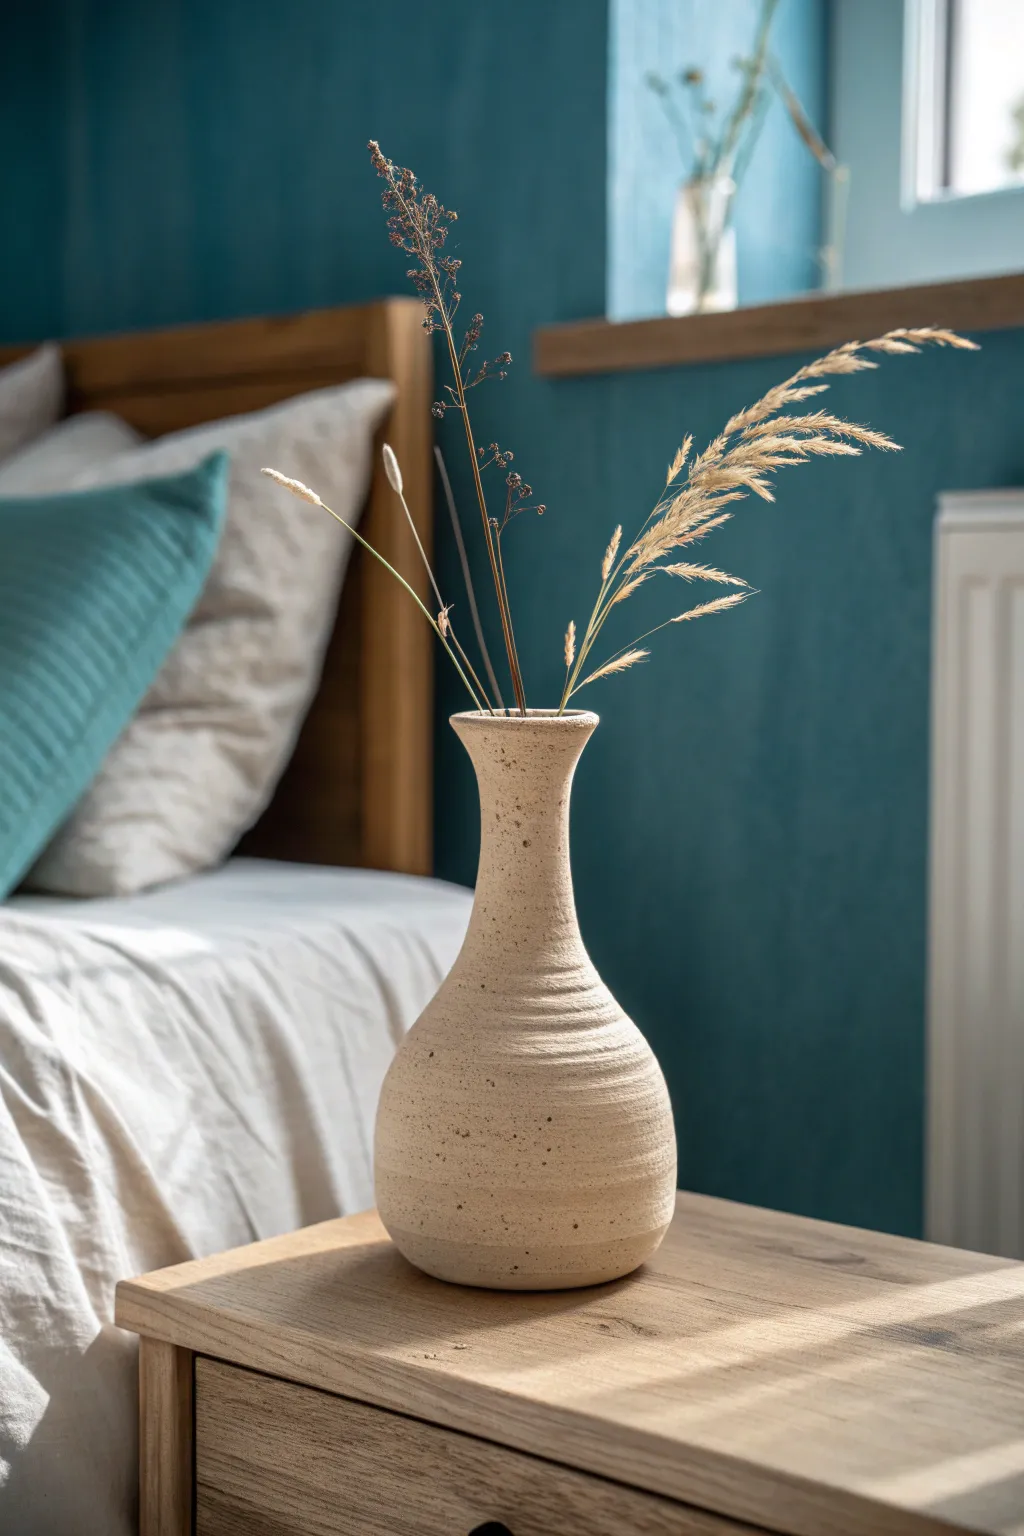
This elegant bud vase features a calming tapered silhouette and a lovely speckled stone texture, perfect for holding delicate dried grasses. Its organic shape and subtle horizontal ridges bring a touch of earthy serenity to any bedside table or shelf.
Step-by-Step
Materials
- Air dry clay (white or light grey)
- Small rolling pin
- Clay cutting tool or knife
- Small bowl of water
- Sponge
- Assorted dried spices (coarse black pepper, dried basil, or nutmeg) for speckling
- Sandpaper (fine grit)
- Matte acrylic varnish or sealant
- Empty plastic bottle or glass jar (tall and thin) to use as an armature
Step 1: Preparing the Speckled Clay
-
Condition the Clay:
Begin by taking a generous amount of air dry clay and kneading it in your hands to warm it up. This makes the clay more pliable and less prone to cracking later on. -
Add Texture:
To achieve that natural, stony look, flatten your clay slightly and sprinkle in your dried spices. I find that coarse black pepper works wonderfully for a granite effect. -
Incorporate the Flecks:
Fold the clay over the spices and knead thoroughly until the speckles are evenly distributed throughout the entire batch of clay.
Cracks Appearing?
Mix a small amount of clay with water to create a ‘slip’ paste. Fill any cracks with this paste, smooth it over with your finger, and let it dry again.
Step 2: Building the Form
-
Create the Base:
Roll a ball of clay about the size of a tangerine and flatten it into a thick disc for the base of your vase. It should be sturdy enough to support the walls. -
Prepare Coils:
Roll out several long, even snakes of clay, keeping them about the thickness of your pinky finger. Consistency here helps ensure even walls. -
Start Coiling:
Place your first coil on the outer edge of the base disc. Score the surfaces (scratch them up a bit) and add a dab of water to join the coil securely to the base. -
Build Upward:
Continue stacking coils on top of one another. As you stack, slightly expand the circumference to create a bulbous, rounded bottom section. -
Smooth the Interior:
After every few coils, use your finger or a modeling tool to blend the coils together on the *inside* of the vase. This structural integrity is crucial. -
Taper the Neck:
Once the body is roughly halfway up, begin placing your coils slightly inward with each layer. This will start to narrow the form into that elegant bottleneck shape. -
Elongate the Top:
Continue adding smaller coils vertically to extend the long, thin neck. Flare the very top lip outward just slightly for a classic finished rim.
Pro Tip: Structuring
For the tall, thin neck, you can form the clay around a cardboard tube or toilet paper roll to keep it from collapsing while you work. Remove before drying.
Step 3: Refining and Texture
-
Smooth the Exterior:
Using a slightly damp sponge, gently wipe the outside of the vase to blend the coils. Don’t smooth them completely flat; you want to leave subtle horizontal ridges visible. -
Define the Ridges:
If the coiling lines became too faint during smoothing, use a clay tool or the edge of an old credit card to gently re-etch soft horizontal grooves around the belly and neck. -
Final Shape Check:
Step back and look at the silhouette. Gently push or pull the clay while it’s still damp to ensure the neck is straight and the body is symmetrical. -
Drying Phase:
Place the vase in a cool, dry spot away from direct sunlight. Let it dry slowly for 24-48 hours. Rotate it occasionally so air reaches all sides evenly.
Step 4: Finishing
-
Sand Imperfections:
Once fully bone dry, use fine-grit sandpaper to smooth out any sharp jagged bits on the rim or base, but be careful not to sand away your intentional ridge texture. -
Enhance the Speckles:
Assess the surface. If the drying process obscured your spice speckles, you can splatter a tiny bit of watered-down brown paint using a toothbrush for extra texture. -
Seal the piece:
Apply two thin coats of matte acrylic varnish to protect the clay. This won’t make it waterproof for fresh flowers, but it keeps the dried arrangement safe.
Now you have a serene, minimalist vessel ready to display your favorite dried botanicals

The Complete Guide to Pottery Troubleshooting
Uncover the most common ceramic mistakes—from cracking clay to failed glazes—and learn how to fix them fast.
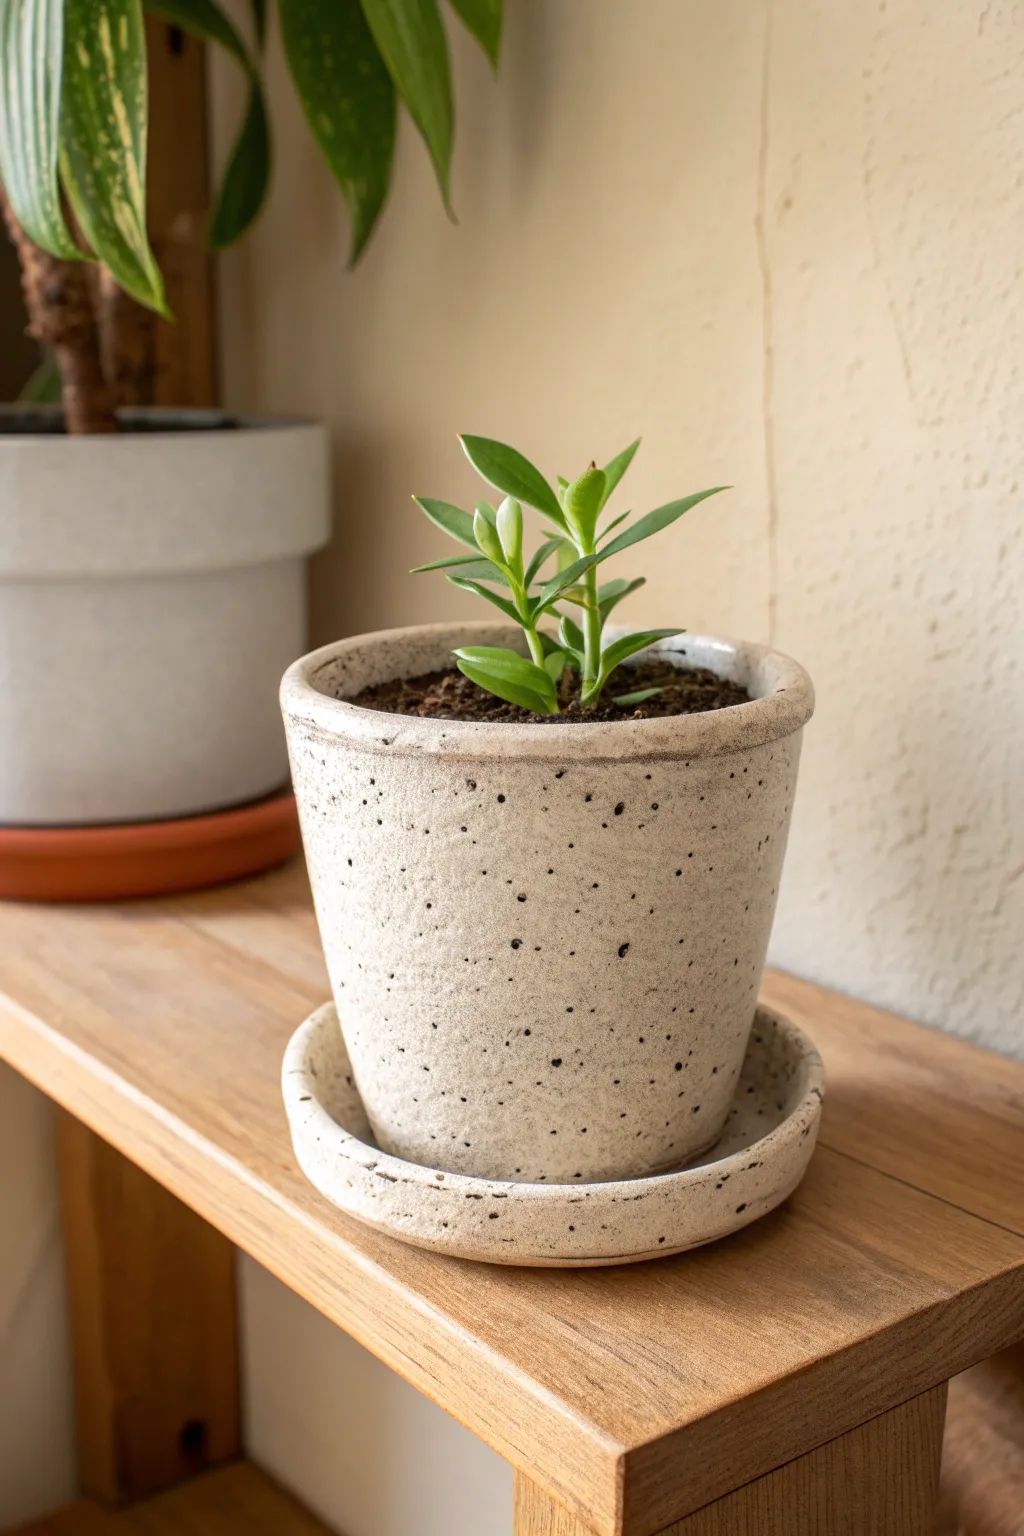
Shallow Succulent Bowl Planter

This elegant, low-profile planter perfectly mimics the look of raw stone or cast concrete. With its wide rim and textured finish, it provides a stunning home for a mixed arrangement of your favorite succulents.
Detailed Instructions
Materials
- Air dry clay (white or stone-colored)
- Large plastic mixing bowl (as a mold)
- Rolling pin
- Parchment paper or canvas mat
- Sponge
- Water
- Texturing brush (old stiff toothbrush or bristle brush)
- Craft knife
- Fine sandpaper
- Acrylic sealer (matte finish)
Step 1: Preparation and Molding
-
Prepare your template bowl:
Find a large kitchen mixing bowl with a rounded bottom to use as your slump mold. Turn it upside down and cover the exterior with cling wrap, smoothing out as many wrinkles as possible to prevent deep creases in your clay. -
Condition the clay:
Take a generous block of air dry clay and knead it thoroughly. You want the clay to be warm and pliable, which helps prevent cracks from forming later during the drying process. -
Roll out the slab:
Place the clay between two sheets of parchment paper or on a canvas mat. Using a rolling pin, roll it out into a large, even circle. Aim for a thickness of about 1/4 to 1/2 inch—this thickness is crucial for the structural integrity of a wider bowl. -
Drape the clay:
Carefully lift your clay circle and drape it over the cling-film-covered bowl. Let gravity do the initial shaping, then gently press the clay against the mold with your palms, ensuring it follows the curve without stretching it too thin. -
Trim the rim:
Once the clay is settled, use a craft knife or a needle tool to trim the excess clay around the base of the mold to create an even, level rim. I like to rotate the bowl on a lazy susan while holding the knife steady for a perfect line.
Natural Speckling Hack
Knead a small amount of dried coffee grounds or black pepper into the wet white clay. When it dries, you will get tiny, natural-looking speckles that look just like real stone aggregate.
Step 2: Texturing and Refining
-
Create the stone texture:
While the clay is still wet, take a damp sponge and gently dab the surface to remove any fingerprints. Then, use an old toothbrush or a stiff bristle brush to stipple the surface. This creates that realistic, porous limestone look seen in the photo. -
Smooth the edge:
Dip your finger in a little water and run it along the cut rim of the bowl to soften the sharp angle. You want it to look refined but slightly organic, not mechanically sharp. -
Partial drying:
Allow the clay to dry on the mold for 24 hours. Don’t rush this part; removing it too early can cause the wide shape to warp or collapse. -
Remove from mold:
After the exterior feels firm, carefully lift the clay shell off the plastic bowl. Peel away the cling wrap from the inside. -
Texture the inside rim:
Since the top inch of the inside will be visible above the soil line, use your stiff brush to continue the stone texture onto the inner rim for a cohesive look. -
Add drainage (optional):
If you plan to plant directly (rather than using a nursery pot insert), carefully drill or carve a small hole in the center bottom now, while the clay is leather-hard but not bone dry.
Prevent cracking
If you see hairline cracks forming while drying, create a ‘slurry’ paste by mixing clay scraps with water. Smooth this paste into the cracks with your finger, then texture over it.
Step 3: Finishing Touches
-
Final drying:
Place the bowl right-side up on a wire rack to allow air circulation underneath. Let it dry completely for another 24-48 hours until the clay turns a lighter, chalky white. -
Sand imperfections:
If there are any rough burrs on the rim, use fine-grit sandpaper to gently smooth them down. Be careful not to sand away your ‘stone’ texture. -
Seal the interior:
This step is vital for longevity. Apply 2-3 coats of a waterproof sealant or varnish to the interior of the bowl to protect the clay from moisture during watering. -
Seal the exterior:
Apply a matte acrylic sealer to the outside. A matte finish is key to maintaining that raw, concrete aesthetic; a glossy finish would ruin the natural stone effect. -
Plant:
Fill with a gritty succulent soil mix and arrange your plants, finishing with a top dressing of neutral-colored pebbles to complete the look.
Enjoy the serene, organic touch this handmade planter brings to your sunniest windowsill
Textured Speckled Stoneware-Look Pot
Recreate the sophisticated look of high-end ceramic stoneware using simple air dry clay and a clever painting technique. This project results in a durable-feeling pot with a beautiful, sandy texture and distinctive black speckles that mimic kiln-fired clay.
Step-by-Step
Materials
- Air dry clay (white or light grey)
- Clay roller or rolling pin
- Craft knife or clay cutter
- Small bowl or cylinder for use as a mold
- Sandpaper (medium and fine grit)
- Acrylic paint (cream/off-white, black, brown)
- Baking soda or fine sand
- Old toothbrush
- Matte spray sealant or waterproof varnish
- Sponge or foam brush
- Water and small cup
Step 1: Sculpting the Base Form
-
Roll the clay slab:
Begin by conditioning your air dry clay until it is soft and pliable. Roll it out into a long rectangle approximately 1/4 inch thick. Ensuring an even thickness here is key for a stable pot. -
Cut the base:
Use your chosen cylinder mold (like a jar or a can) to trace a circle onto the clay slab. Cut this circle out with your craft knife; this will serve as the bottom of your pot. -
Create the walls:
Cut a long rectangular strip from your rolled clay that is tall enough for your desired pot height and long enough to wrap around the circular base. -
Assemble the cylinder:
Wrap the rectangular strip around the circular base. Join the ends of the strip together by scoring the edges (making small scratches) and adding a dab of water to create ‘slip’ before pressing them firmly together. -
Smooth the seams:
Use your finger and a little water to smooth out the vertical seam where the walls meet, blending the clay until the join is invisible. Do the same for the bottom seam where the wall meets the base. -
Form the rim:
I like to create a slightly thicker, rolled rim to mimic the reference image. Gently fold the very top edge of the clay outward and smooth it down to create a distinct lip around the top. -
Create the saucer:
Roll out a fresh piece of clay and cut a circle slightly larger than your pot’s base. Roll a thin snake of clay and attach it to the rim of this circle to create the raised edge of the saucer, blending the seams smoothly. -
Let it dry:
Place both pieces in a dry area away from direct sunlight. Allow them to dry completely for at least 24-48 hours until the clay turns stark white and feels hard.
Cracks while Drying?
Mix a tiny bit of fresh clay with water to make a paste (slip). Fill the crack, smooth it over, and let it dry again before sanding.
Step 2: Refining and Painting
-
Sand imperfections:
Once fully dry, use medium grit sandpaper to smooth out any large bumps or uneven areas. Switch to fine grit sandpaper to soften the rim and the edges of the saucer. -
Mix the textured base coat:
Mix a cream or off-white acrylic paint with a teaspoon of baking soda or very fine sand. This creates the gritty, stone-like texture seen in the photo. -
Apply the base color:
Using a sponge or foam brush, dab the textured paint mixture all over the exterior and interior rim of the pot and saucer. The dabbing motion enhances the stone effect better than brushing. -
Add a second coat:
Allow the first layer to dry, then apply a second coat if needed to ensure the clay is completely opaque and the texture is uniform. -
Prepare the speckle paint:
Dilute a small amount of black or dark brown acrylic paint with water until it has an inky, fluid consistency. -
Apply the speckles:
Dip an old toothbrush into the watered-down black paint. Hold the brush near the pot and run your thumb across the bristles to flick tiny splatters of paint onto the surface. Practice on paper first to control the spray. -
Seal the project:
Because air dry clay is porous, sealing is crucial. Apply two to three coats of a matte waterproof varnish or spray sealant to protect the finish. -
Waterproofing check:
If you plan to put a real plant inside, ensure the interior is heavily sealed with a waterproof resin or use a plastic liner pot, as air dry clay will deteriorate if kept constantly wet.
Level Up: Aged Look
Before speckling, do a light wash with diluted brown paint near the rim and bottom, wiping most away, to create a subtle aged patina.
Now you have a stunning faux-stoneware vessel that brings an organic touch to your shelf


What Really Happens Inside the Kiln
Learn how time and temperature work together inside the kiln to transform clay into durable ceramic.
Scalloped Rim Flower Pot
This adorable planter combines a glossy pink finish with a raw, textured base for a modern two-tone look. The delicate white scalloped rim adds a sweet, handmade touch that frames your succulents perfectly.
Step-by-Step Tutorial
Materials
- Air dry clay (white or terracotta)
- Rolling pin
- Craft knife or clay cutting tool
- Small circular cookie cutter (or bottle cap)
- Small bowl or jar (to use as a mold)
- Plastic wrap
- Water and sponge
- Acrylic paint (soft pink)
- High-gloss varnish or resin
- Sandpaper (fine grit)
- Texture tool or stiff brush (optional)
Step 1: Forming the Base
-
Prepare your mold:
Select a small bowl or jar that matches the size you want for your pot. Wrap the outside fully in plastic wrap, tucking the excess inside the rim to keep the surface smooth. -
Roll the clay slab:
Roll out a portion of air dry clay until it is an even thickness, roughly 1/4 inch thick. Aim for a long rectangular strip that is tall enough to cover the sides of your mold, plus a circle for the base. -
Cut the pieces:
Using the base of your mold as a guide, cut a circle for the bottom of the pot. Then, cut a rectangular strip long enough to wrap around the circumference of the mold with a slight overlap. -
Texture the bottom strip:
Before assembling, identify the bottom inch of your rectangular strip. I like to tap this area with a stiff brush or a textured sponge to create the rough, cork-like appearance seen at the base of the finished pot. -
Assemble the cylinder:
Wrap the clay strip around your plastic-covered mold. Score and slip the overlapping edges, blending the seam thoroughly with your fingers or a modeling tool until it disappears. -
Attach the base:
Place the circular clay piece on the bottom of the mold. Score the edges where it meets the cylinder walls, apply a little water, and blend the clay together to form a seamless seal.
Cracking Issues?
If small cracks appear as the clay dries, mix a small amount of fresh clay with water to create a paste (slip) and fill the cracks. Smooth it over with a finger and let dry again.
Step 2: Creating the Scalloped Rim
-
Make the scallop strip:
Roll a smaller snake of white clay and flatten it into a thin ribbon, or cut a thin strip from leftover slab clay. This will become the decorative rim. -
Cut the pattern:
Use a small knife to cut a zig-zag or triangular pattern along one edge of the strip. Alternatively, use a small round cutter to cut half-circles for a rounded scallop look, though the image shows pointed triangular cutouts. -
Attach the rim:
Moisturize the top edge of your pot with a little water. Gently press the scalloped strip onto the outer rim, ensuring the points face downward. -
Define the detail:
Use a needle tool or toothpick to gently press vertical indentations between each scallop point to enhance the texture. -
Smooth and dry:
Smooth out any fingerprints with a slightly damp sponge. Let the pot dry on the mold for at least 24 hours until leather hard to prevent warping. -
Remove mold and finish drying:
Carefully slide the pot off the mold and peel away the plastic wrap. Allow it to dry completely for another 24-48 hours until it is fully white and hard.
Step 3: Painting and Glazing
-
Tape off the base:
Apply painter’s tape or masking tape just above the textured bottom section. This preserves the raw, earthy look of the base while you paint the upper section. -
Apply pink paint:
Paint the middle section of the pot with soft pink acrylic paint. Apply 2-3 coats for opaque coverage, letting each coat dry in between. -
Paint the rim:
Carefully paint the scalloped rim white if your clay isn’t naturally bright white, or simply leave it natural if you used white clay. You can add a very subtle wash of cream paint to highlight the texture. -
Add speckles (optional):
To mimic the ceramic look, dip a toothbrush in diluted brown or grey paint and flick faint speckles over the pink section. -
Seal with gloss:
Once the paint is fully dry, apply a thick coat of high-gloss varnish or a thin layer of resin over the pink section and the white rim. Do not varnish the rough base. -
Waterproofing step:
Since air dry clay isn’t waterproof, coat the inside of the pot generously with a waterproof sealer or resin if you plan to put real plants inside.
Make it Shimmer
Mix a tiny pinch of gold mica powder into your high-gloss varnish before applying it. This gives the glaze a subtle, expensive-looking ceramic shimmer in the sunlight.
Now you have a charming, high-end looking planter ready to brighten your windowsill
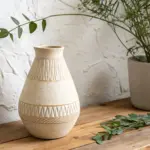
Carved Line Pattern Vase
Achieve a high-end ceramic look without a kiln using this satisfying air-dry clay project. The elongated bottle shape features a minimalist carved pattern that mimics the texture of natural stone.
Detailed Instructions
Materials
- White air-dry clay (approx. 500g)
- Glass bottle or jar (to use as a mold format)
- Rolling pin
- Fettling knife or clay cutter
- Carving tool or loop tool
- Needle tool or toothpick
- Water and sponge
- Speckled stone spray paint (or white acrylic + toothbrush for splattering)
- Matte spray varnish
Step 1: Building the Form
-
Prepare your workspace:
Lay down a canvas cloth or non-stick mat to prevent the clay from sticking to your table. Knead the clay briefly until it is pliable and smooth. -
Roll out the slab:
Roll your clay out into a large, even rectangle, aiming for about 1/4 inch thickness. Ensure the slab is wide enough to wrap fully around your chosen glass bottle mold. -
Wrap the mold:
Place your glass bottle in the center of the clay slab. Carefully lift the clay and wrap it around the bottle, pressing the edges together where they meet. -
Join the seam:
Cut off any excess overlap with a knife. Score the touching edges (make small scratches), add a dab of water, and press them firmly together. Smooth the seam with your finger or a damp sponge until it disappears. -
Shape the neck:
If your bottle narrows at the neck, gently press the clay inward to follow that curve. If you want a narrower neck than the bottle allows, build the neck separately by rolling a coil and attaching it to the top rim. -
Refine the surface:
Using a slightly damp sponge, wipe down the entire exterior to remove fingerprints and ensure a uniform surface. Let the vase sit for about 30-60 minutes to firm up slightly (leather hard) before carving.
Crack Control
If you see small cracks forming while drying, mix a small amount of clay with water to make a paste (slip) and fill them in immediately, then smooth over.
Step 2: Carving the Design
-
Plan your lines:
Lightly sketch vertical lines from the shoulder of the vase almost to the bottom using a needle tool. Spacing them somewhat evenly helps, but slight irregularity adds organic charm. -
Carve the grooves:
Using a small loop tool or V-gouge, carve out the vertical lines you just sketched. Make the cuts deepest in the center and tapered at the top and bottom ends. -
Create the taper:
Pay special attention to the bottom of the lines; try to make them meet in V-shapes or points near the base to mimic the design in the photo. -
Add dotted details:
Select a random vertical section between your carved lines. Use a needle tool to poke a straight column of small holes or dots for added texture. -
Initial drying:
Allow the clay to dry until it is quite firm but not bone dry. Carefully slide the glass bottle out if you plan to waterproof the inside later, or leave it in if it will be a permanent liner. -
Sand edges:
Once fully dry (usually 24-48 hours), use fine-grit sandpaper to gently smooth the rim and soften the sharp edges of your carved lines.
Step 3: Finishing Touches
-
Apply base texture:
To get that speckled stone look, apply a coat of stone-texture spray paint. Alternatively, paint the vase an off-white color first. -
Create speckles manually:
If painting by hand, mix a tiny amount of black or dark grey paint with water. Dip an old toothbrush in it and flick the bristles to spray fine speckles over the vase. -
Seal the piece:
Finish with a matte spray varnish to protect the surface and the paint job. Since air-dry clay isn’t water-tight, always use a glass insert or dried flowers.
Use Color Washes
Dilute acrylic paint heavily with water and brush it into the carved grooves, then wipe the surface clean. The dark color will stay in the recesses to highlight the pattern.
Place near a bright window to let the shadows play across your beautiful carved textures

TRACK YOUR CERAMIC JOURNEY
Capture glaze tests, firing details, and creative progress—all in one simple printable. Make your projects easier to repeat and improve.
Stamped Botanical Texture Planter
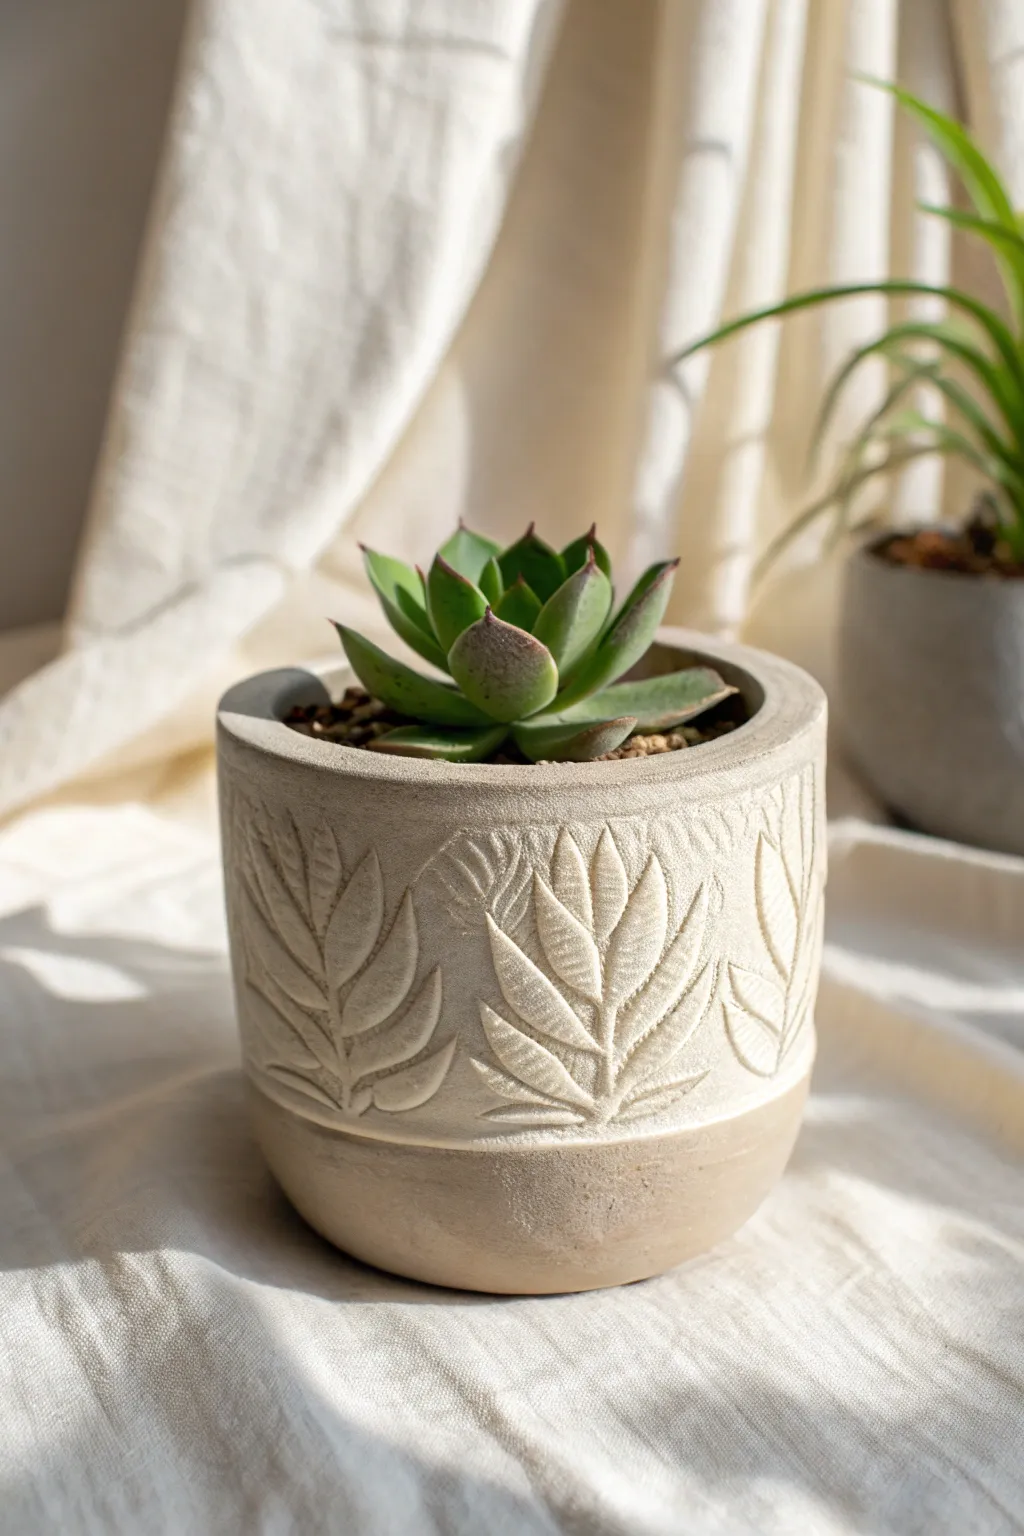
Bring a touch of nature indoors with this elegant, textured planter that mimics the look of high-end ceramic ware. The design features a raised botanical relief pattern that wraps beautifully around the pot, catching the light in a soft, organic way.
Step-by-Step
Materials
- White polymer clay or pottery clay
- Rolling pin
- Cylindrical container (like an empty oatmeal canister or tin can) to use as a mold
- Clay carving tools or a linoleum cutter
- Leaf stamps or actual sturdy leaves (fern or similar)
- Small sponge
- Sandpaper (fine grit)
- Clear sealant or matte varnish
- Parchment paper
Step 1: Preparing the Base
-
Prepare your workspace:
Lay down a sheet of parchment paper on a smooth surface. This prevents the clay from sticking and makes it easier to move later without distorting the shape. -
Roll out the slab:
Take a large ball of white clay and roll it out into a long, rectangular slab. Aim for a consistent thickness of about 1/4 inch (6mm) to ensure the pot is sturdy but not too heavy. -
Measure and cut:
Wrap your parchment paper loosely around your chosen cylindrical mold to determine the circumference. Cut the clay slab to this length, adding a tiny bit of overlap, and trim the height to your desired pot size. -
Create the texture:
Before assembling the cylinder, it’s time to add the design. While the clay is flat, use a specialized leaf stamp or specialized wood sculpting tool to press the botanical pattern into the upper two-thirds of the slab. Press firmly enough to leave a deep impression but not so hard you cut through. -
Refine the edges:
Use your fingers or a little water to smooth any rough edges created by the stamping process. The contrast between the textured top and the smooth bottom strip is key to this look.
Clean Impressions
Dust your stamps or carving tools with a tiny bit of cornstarch before pressing into the clay. This acts as a release agent and prevents the clay from getting stuck in the detailed crevices.
Step 2: Assembling the Pot
-
Wrap the cylinder:
Carefully pick up the clay slab and wrap it around your cylindrical mold. I find it easiest to keep the parchment paper between the mold and the clay so it slides off easily later. -
Seal the seam:
Where the two ends of the clay meet, score the edges with a tool (make scratch marks), add a little water or slip, and press them together firmly. Smooth the seam with your finger or a modeling tool until it disappears. -
Create the base:
Roll out a separate, smaller circle of clay for the bottom of the pot. Place your wrapped cylinder on top of it and trace around the edge to get the perfect size. -
Attach the base:
Score and slip the bottom edge of the cylinder and the edge of the base circle. Press them together gently, smoothing the clay upwards from the base to the wall to create a watertight seal. -
Add drainage (optional):
If you plan to plant directly into this pot, use a straw or tube to poke a hole in the center of the base while the clay is still soft.
Cracking Seams?
If the vertical seam starts to crack as it dries, dampen the area slightly and fill the crack with a soft paste made of clay and water, then smooth it over immediately.
Step 3: Finishing Touches
-
Refine the rim:
Run a damp sponge or your finger along the top rim of the pot to round it off. A smooth, thick rim gives the piece a professional, finished look. -
Initial dry:
Let the pot sit and stiffen up for a few hours. Once it can hold its own weight without sagging, carefully slide the inner mold out. -
Full cure:
Allow the clay to dry completely according to the package instructions. This usually takes 24-48 hours depending on humidity and thickness. -
Create the two-tone look:
The image shows a subtle color difference at the bottom. You can achieve this by lightly sanding the bottom third of the pot to expose the raw clay texture, or by applying a very diluted wash of beige acrylic paint to just the bottom section. -
Highlight the texture:
To make the leaf pattern pop, you can lightly brush a white or cream wash over the textured area, then wipe the surface with a damp cloth. The paint will stay in the recesses, emphasizing the relief. -
Seal the refined piece:
Apply two coats of a matte varnish or sealant to the inside and outside. This protects the clay from moisture and gives it that soft sheen seen in the photo.
Now you have a stunning, custom planter ready to house your favorite succulents
Two-Tone Dip-Painted Pot
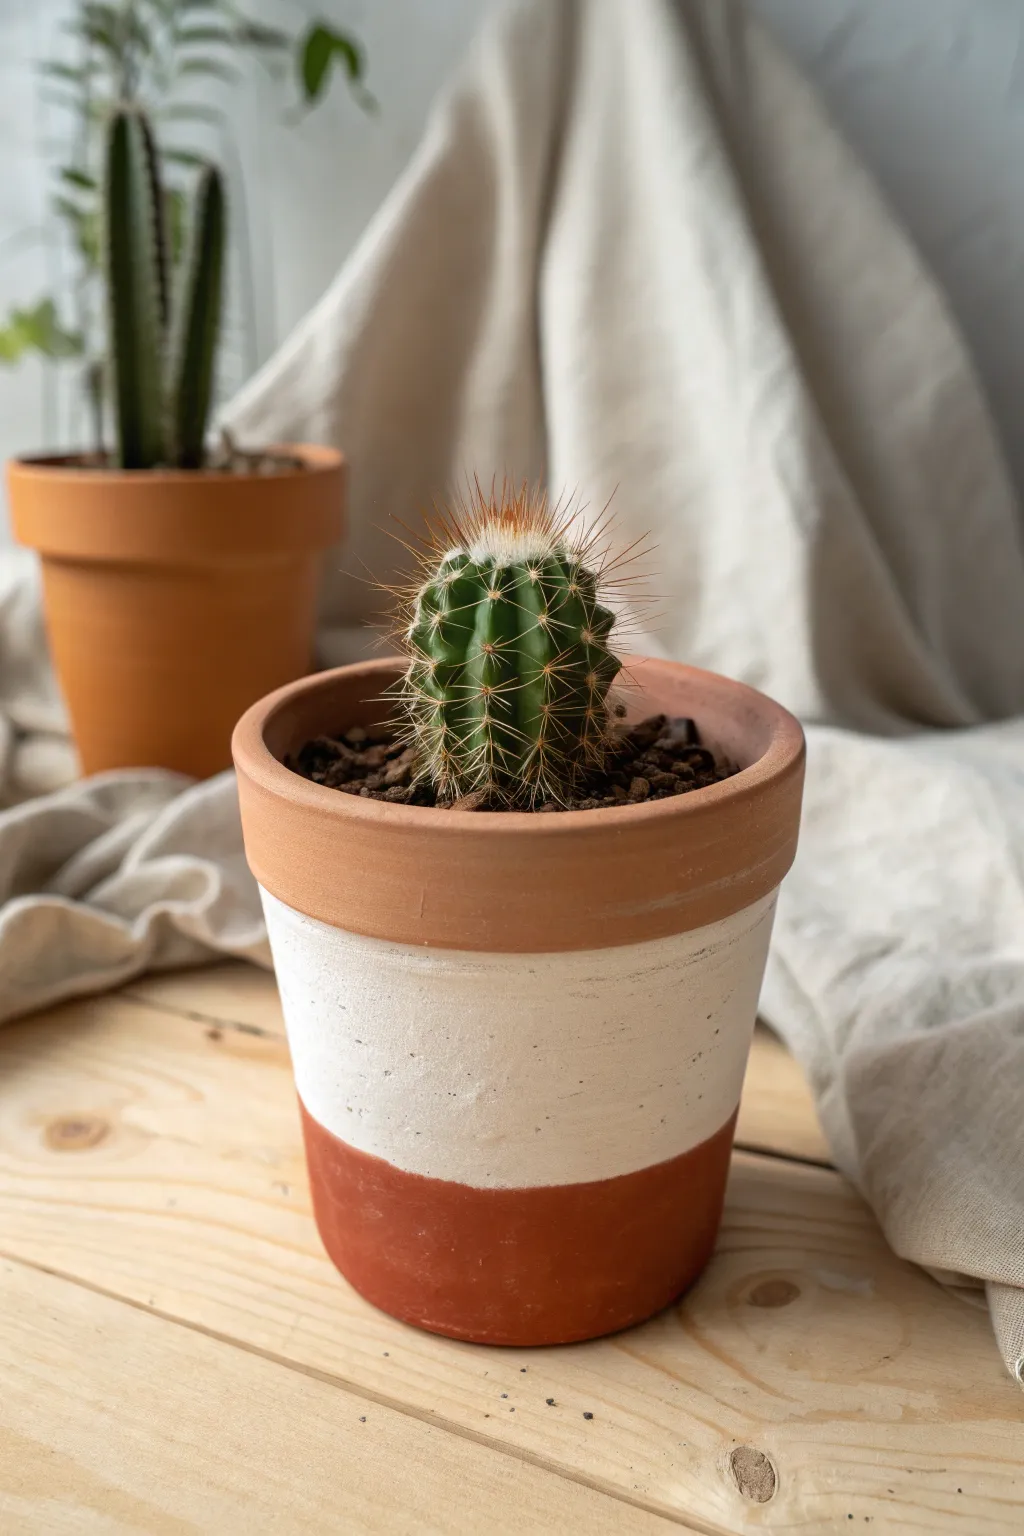
Transform a plain terracotta pot into a modern, minimalist home for your succulents with this simple painting technique. The crisp white band creates a striking contrast against the warm clay, giving your plant display an instant stylish upgrade.
Detailed Instructions
Materials
- Small terracotta pot (clean and dry)
- White matte acrylic paint or chalk paint
- Paintbrush (medium flat brush recommended)
- Painter’s tape or masking tape
- Small cactus or succulent
- Cactus potting mix
- Small gravel or pebbles (optional drainage)
- Clean cloth
Step 1: Preparation
-
Clean surface:
Before you begin, ensure your terracotta pot is completely clean and free of dust or price sticker residue. -
Wipe down:
Give the pot a quick wipe with a slightly damp cloth and let it dry fully; terracotta is very porous and needs to be dry for the tape to stick. -
Plan the band:
Visualize where you want your white section to be. In this design, we are leaving the top rim and the very bottom base as natural terracotta.
Seal the deal
For better durability, spray a clear matte sealer over the white painted section before untaping to protect it from water stains.
Step 2: Taping the Design
-
Tape the top line:
Cut a length of painter’s tape and apply it just under the rim of the pot. Press it down firmly, especially around the curve, to ensure a sharp paint line later. -
Measure the bottom:
Decide on the width of the bottom terracotta band—about an inch usually looks balanced for small pots. -
Tape the bottom line:
Apply a second strip of painter’s tape around the lower section of the pot to mask off the base area. -
Seal edges:
Run your fingernail or a credit card edge firmly along the tape edges where you will be painting to prevent bleed-through.
Step 3: Painting
-
First coat:
Using a matte white acrylic or chalk paint, apply an even coat to the area between the two tape lines. -
Brush direction:
Use horizontal brush strokes that follow the curve of the pot for the smoothest finish. -
Dry time:
Allow the first layer to dry completely. This usually takes about 20-30 minutes, depending on your paint thickness. -
Second coat:
Apply a second coat to ensure opaque coverage so no orange clay shows through the white. -
Optional third coat:
For a very solid, plaster-like look, you might want to add a third thin layer once the second is dry.
Uneven lines?
If paint bled under the tape, wait for it to dry fully, then gently scrape the excess away with a craft knife or fingernail.
Step 4: Finishing Touches
-
Remove tape:
Carefully peel off the painter’s tape while the final coat is still slightly tacky to avoid chipping the dry paint. -
Clean up lines:
If there was any minor bleeding, you can gently scrape it away with a craft knife or touch it up with a damp q-tip. -
Let cure:
Let the pot sit for a few hours to ensure the paint fully hardens before handling heavily.
Step 5: Planting
-
Add drainage:
Place a small amount of gravel or a pottery shard over the drainage hole at the bottom. -
Add soil base:
Fill the pot about one-third full with specialized cactus or succulent potting mix. -
Position plant:
I like to gently loosen the roots of the cactus before placing it in the center of the pot. -
Backfill:
Fill the remaining space with soil, gently pressing down around the base of the cactus to secure it.
Place your newly refreshed pot on a bright windowsill and enjoy the clean, modern look
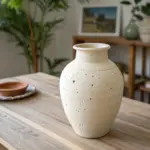
Terrazzo-Style Planter Finish
Transform simple air dry clay into a chic, speckled home for your favorite succulent. This project mimics the high-end look of traditional terrazzo using a clever technique with colored clay chips embedded in a clean white base.
Step-by-Step Tutorial
Materials
- White or light grey air dry clay
- Acrylic paints (terracotta, bright orange, forest green, light pink)
- Rolling pin
- Craft knife or clay blade
- Small cylindrical container or jar (to use as mold)
- Parchment paper
- Fine-grit sandpaper (220 and 400 grit)
- Gloss or matte varnish/sealer
- Small bowl of water
- Clay sculpting tools (optional)
Step 1: Creating the Terrazzo Chips
-
Preparing colored clay:
Pinch off three or four small walnut-sized pieces of your white air dry clay. You will need separate pieces for each color of chip you want to create. -
Mixing the colors:
Knead a generous drop of acrylic paint into each clay ball. Aim for a terracotta orange, a softer pinkish-red, and a distinct green. Keep kneading until the color is uniform throughout the clay. -
Flattening the colored clay:
Roll each colored ball out very thinly onto parchment paper, aiming for a thickness of about 1-2mm. The thinner the clay, the easier it will be to incorporate later. -
Drying the sheets:
Let these thin colored sheets sit out until they are leather-hard or fully dry. I find that letting them dry completely makes them easier to shatter into crisp chips. -
Making the chips:
Once dry, crumble or cut the colored clay sheets into small, irregular fragments. Vary the sizes from tiny specks to slightly larger chunks, but keep them generally under 5mm.
Step 2: Forming the Planter Base
-
Rolling the main slab:
Take a large block of white air dry clay and roll it out into a rectangular slab about 0.5cm thick. Ensure it’s long enough to wrap around your chosen cylindrical mold. -
Embedding the chips:
Sprinkle your colored clay chips generously over the surface of the white slab. Press them gently into the clay with your fingers so they stick. -
Integrating the pattern:
Use your rolling pin to firmly roll over the slab again. This forces the chips flush with the white clay surface and ensures they are securely embedded. -
Cutting to size:
Trim the slab into a clean rectangle that will fit perfectly around your mold, ensuring the edges are straight for a seamless join. -
Wrapping the mold:
Wrap the clay rectangle around your cylinder mold (cover the mold in parchment paper first for easy removal). Join the seam by scoring the edges, adding a little water, and blending the clay together until smooth. -
Adding the base:
Roll a circular piece of white clay for the bottom. Attach it to your cylinder walls by scoring and smoothing the clay on the inside and outside seams to create a watertight seal.
Broken Chips?
If chips fall out while sanding, mix a tiny bit of white clay paste (clay + water) to glue them back in, let dry, and sand again.
Step 3: Finishing Touches
-
Initial drying:
Allow the pot to dry slowly for 24-48 hours. Keep it away from direct heat sources to prevent cracking. -
Optional saucer creation:
While the pot dries, create a simple shallow dish from clay colored with terracotta paint. This serves as the saucer shown at the base of the pot. -
Sanding to reveal:
Once fully dry, sand the exterior of the pot vigorously with coarse sandpaper. This is the magic step where you scrape away the top layer of white clay to clearly reveal the colorful chips underneath. -
Polishing:
Switch to a fine-grit sandpaper to smooth out scratches and give the surface a professional, stone-like finish. -
Sealing:
Apply 2-3 coats of a waterproof varnish or sealant inside and out to protect the clay from moisture when you water your plant.
Go Geometric
Instead of random shards, use tiny cookie cutters or a straw to cut precise geometric shapes for your colored inserts.
Place your favorite succulent inside and enjoy the pop of color on your shelf
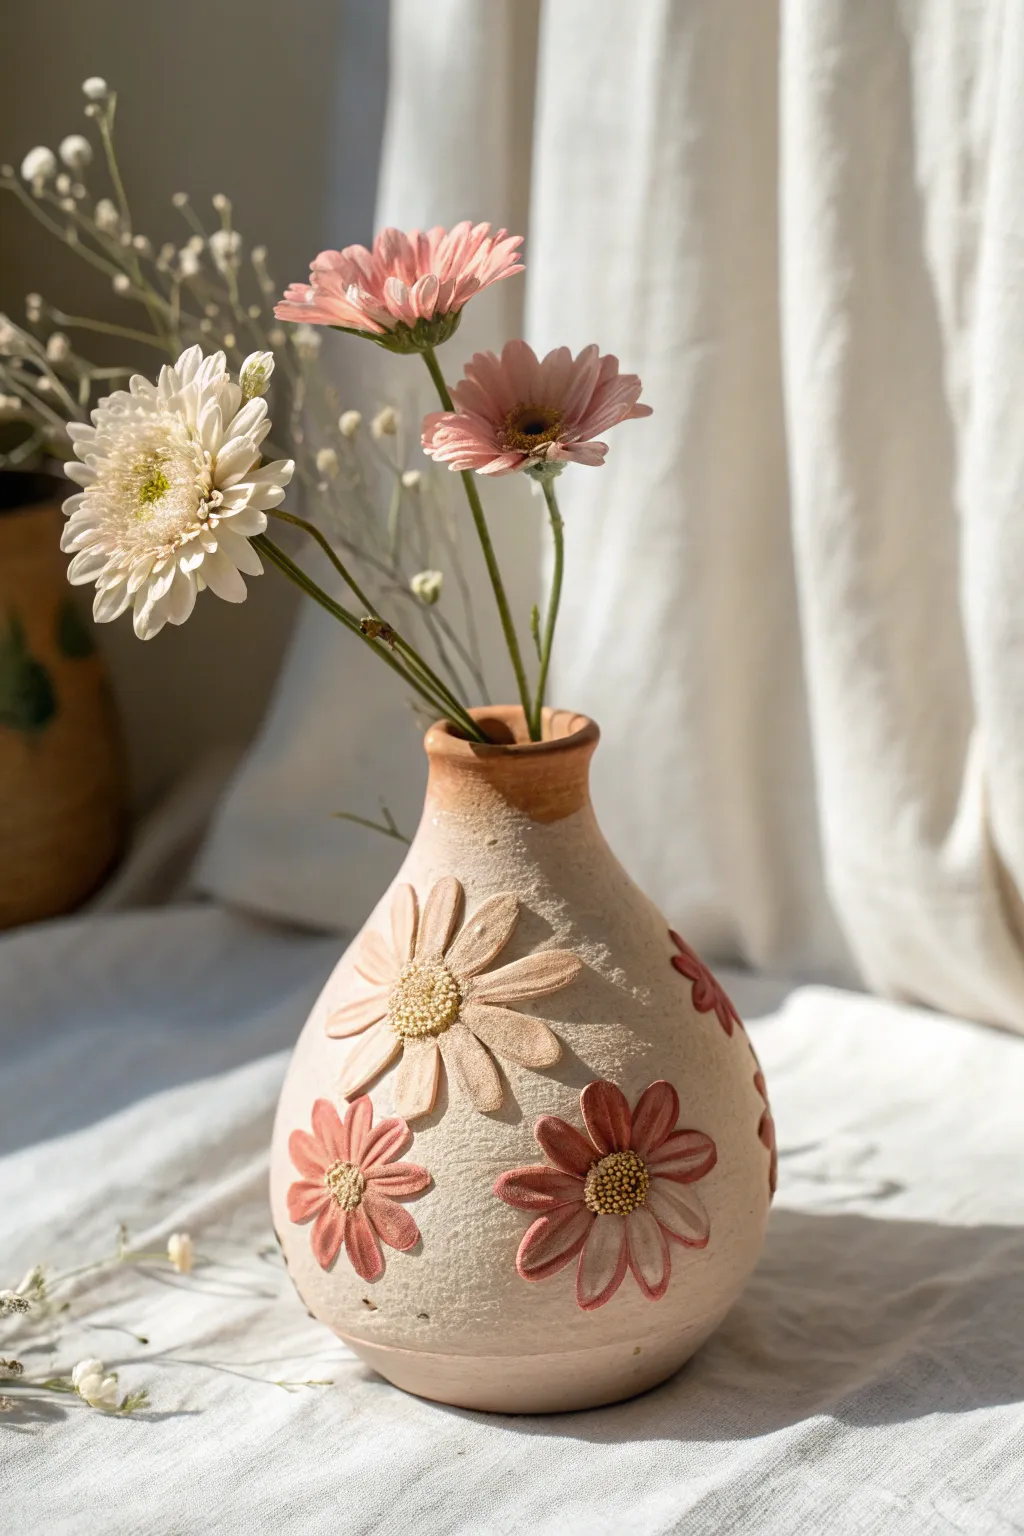
Marbled Clay-Look Bud Vase
Achieve the high-end look of wheel-thrown agateware using simple air dry clay and a clever painting technique. This project transforms a basic clay vessel into an elegant, organically patterned bud vase that looks stunning on a windowsill.
Step-by-Step Guide
Materials
- White stone air dry clay (approx. 500g)
- Small rolling pin
- Pottery sponge or soft foam sponge
- Bowl of water
- Clay sculpting tools (rib tool and needle tool)
- Metallic gold acrylic paint
- Light taupe or beige acrylic paint
- Detail paintbrush (size 2 or 4)
- Fine-grit sandpaper (220 grit)
- Matte finish clear sealant spray
Step 1: Forming the Base
-
Prepare the clay:
Begin by wedging your air dry clay to remove any air bubbles. Roll it into a smooth, crack-free sphere about the size of a large orange. -
Create the pinch pot:
Push your thumb into the center of the sphere, stopping about a half-inch from the bottom. Gently pinch and rotate the clay to open up the walls, creating a hollow bowl shape. -
Shape the belly:
Continue pinching upward, keeping the belly of the vase wide. Smooth the interior walls with a damp sponge to keep the thickness even typically surrounding 1/4 inch. -
Narrow the neck:
As you work towards the top, gently collar the clay inward. Use both hands to squeeze the opening smaller, guiding the clay into a narrow, vertical neck. -
Refine the rim:
Use a damp sponge or your fingers to smooth the rim of the vase. I like to slightly flare the very top lip outward for a traditional ceramic look. -
Smooth the surface:
Use a rib tool or a damp sponge to glide over the exterior. Remove any fingerprints or deep dents, aiming for a relatively smooth canvas for your faux marbling. -
Let it dry:
Place the vase in a cool, dry spot away from direct sunlight. Allow it to dry completely for 24-48 hours until it turns bone white and feels room temperature to the touch.
Step 2: Faux Marbling & Finish
-
Sand imperfections:
Once fully dry, gently sand the exterior with fine-grit sandpaper. Focus on any rough patches on the belly or neck to create a professional, polished finish. -
Map the swirls:
Visualize where your marble veins will flow. The goal is organic, vertical movement that follows the curve of the vase, starting wide at the bottom and converging near the neck. -
Paint the first vein:
Dip your brush into the metallic gold paint. Paint a wavy, organic line from the base up to the neck. Vary the pressure to make the line thick in some spots and thin in others. -
Add secondary tones:
While the gold is still slightly wet, pick up a small amount of taupe paint. Paint a second line right next to the gold, allowing them to slightly blend and streak together for a natural variety. -
Create the marble pattern:
Repeat this process around the vase, drawing ‘V’ shapes or inverted teardrop shapes with the paint. Leave plenty of the white clay exposed to serve as the background color. -
Feather the edges:
If a line looks too harsh, use a slightly damp, clean brush to feather the edges of the paint outward, softening the transition into the white clay. -
Seal the vase:
Once the paint is completely dry, spray the entire vase with a matte clear sealant. This protects the clay surface and gives the paint a unified sheen. -
Final cure:
Let the sealant cure according to the manufacturer’s instructions before inserting dried stems or grasses.
Cracks happen
If hairline cracks appear while drying, mix a tiny bit of fresh clay with water to make a paste (slip). Fill the crack, smooth it over, and let it dry again.
Make it watertight
Air dry clay isn’t waterproof. To use fresh flowers, insert a small glass test tube or plastic vial inside the neck to hold the water safely.
Place your warm, earthy vase near a window to catch the light on those gold accents
Faux Glazed Glossy Vase
Recreate the sophisticated look of wheel-thrown pottery using simple air dry clay and a clever two-tone painting technique. This project results in a charming, bulbous vase with a high-gloss finish that mimics kiln-fired glaze, perfect for holding lightweight dried blooms.
Step-by-Step
Materials
- Air dry clay (white)
- Small glass jar or bottle (to use as an internal armature)
- Rolling pin
- Clay sculpting tools or a butter knife
- Sponge and water
- Sandpaper (medium and fine grit)
- Acrylic paints (white, beige/cream, and dusty pink)
- High-gloss varnish or dimensional glaze (like Mod Podge Super Gloss or Triple Thick)
- Small round paintbrush
- Medium flat paintbrush
- Palette for mixing
Step 1: Sculpting the Form
-
Prepare the armature:
Select a small glass bottle or jar to serve as the waterproof core of your vase. Clean and dry it thoroughly to ensure the clay adheres well, though the clay will shrink slightly around it as it dries. -
Roll out the clay:
Take a large handful of air dry clay and condition it by kneading until pliable. Roll it out into a slab approximately 1/4 inch thick. You want it thick enough to hide the jar shape but not so heavy it sags. -
Wrap the base:
Cut a circle for the bottom of your jar and press it onto the glass. Then, cut a rectangular strip large enough to wrap around the body of the jar. Wrap the clay around, joining the seams by scoring the edges and smoothing them together with a little water. -
Shape the bulbous body:
To achieve that classic round pottery shape, add extra coils of clay around the middle section of the jar. Blend these coils upwards and downwards into the base layer to build volume, creating a rounder, belly-like silhouette that extends wider than the original glass jar. -
Form the neck:
Taper the clay gently as you move up towards the neck of the bottle. Smooth the clay over the rim of the glass so the armature is completely hidden. Use wet fingers to ensure the transition from the wide body to the narrow neck is gradual and organic. -
Add texture:
While the clay is still damp, place the vase on a banding wheel or simply rotate it slowly on the table. Hold a modeling tool or your finger against the surface as you turn it to create faint, horizontal ridges. These subtle spiral grooves mimic the throw lines seen on wheel-turned pottery. -
Smooth and dry:
Use a slightly damp sponge to soften any harsh fingerprints or jagged edges. Set the vase aside to dry completely. This usually takes 24-48 hours depending on thickness and humidity; I like to rotate it occasionally so it dries evenly.
Smooth Seams Tip
Use a little vinegar instead of water when blending clay seams. It breaks down the clay slightly, creating a slip that acts like strong glue for invisible joins.
Step 2: Painting and Glazing
-
Sand for perfection:
Once fully dry, lightly sand the surface. Start with medium grit to knock down any bumps, then finish with fine grit for a smooth ceramic feel. Wipe away all dust with a tack cloth or slightly damp paper towel. -
Base coat:
Mix a warm cream or beige acrylic paint. Apply a solid base coat over the entire vase. It may need two coats for full opacity; let the paint dry completely between layers. -
Paint the bottom section:
Keep the bottom half of the vase in the cream color to represent raw or white-glazed clay. You can add very subtle horizontal streaks of white to enhance the hand-thrown texture visual. -
Add the pink dip effect:
Mix a dusty pink shade. Paint the top half of the vase, letting the edge where the pink meets the cream be slightly organic and soft, rather than a hard taped line. This mimics a dip-glazing technique. -
Create speckles:
Dilute a tiny bit of white paint with water. Dip a toothbrush or stiff brush into it and flick tiny droplets onto the surface to create a speckled, stoneware effect. -
Add faux glaze drips:
Using a small round brush and thick white paint, add a few small, raised dots or ‘drips’ near the color transition line or scattered randomly. These will look like interesting glaze imperfections once sealed. -
Apply the gloss finish:
This is the magic step. Apply a thick, even coat of high-gloss varnish or Triple Thick glaze. This specific product is crucial for achieving that wet-look, ceramic shine shown in the image. -
Final cure:
Let the varnish cure untouched for at least 24 hours to harden fully and achieve maximum shine before arranging your flowers.
Cracks while drying?
Mix a ‘slurry’ of fresh clay and water into a paste. Fill the cracks generously, let dry, and sand smooth. Repeat if needed until the surface is flawless.
Now you have a stunning faux-ceramic vase ready to display your favorite dried botanicals
Pedestal Pot For Extra Height
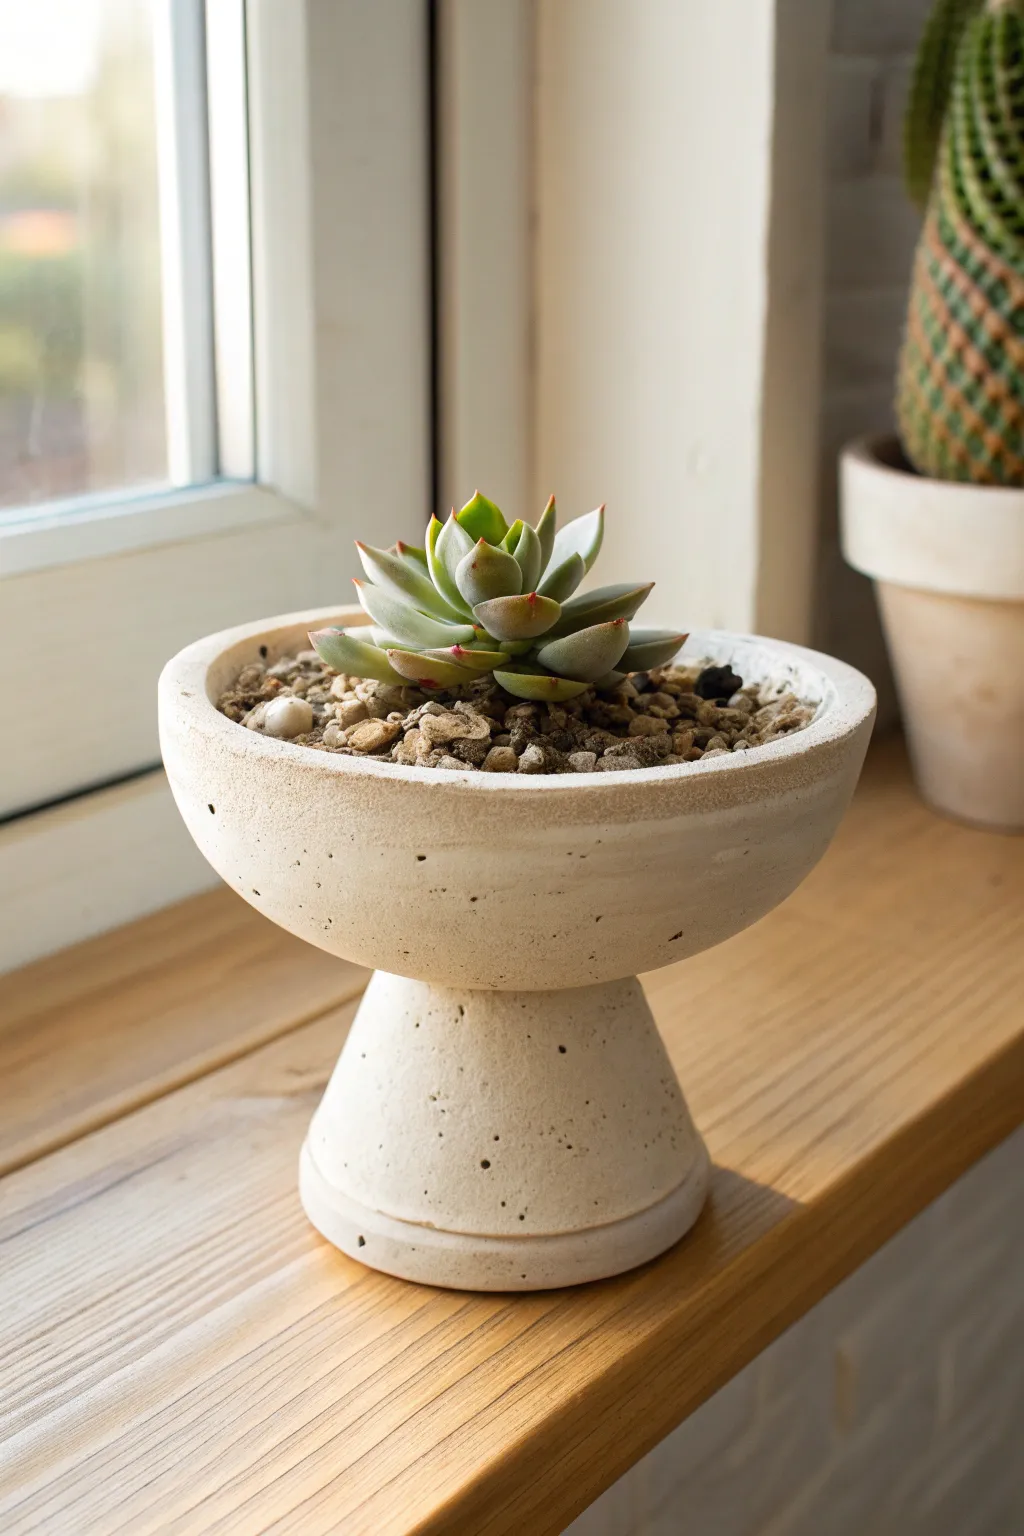
Elevate your succulent collection literally and stylistically with this sleek pedestal pot. The design mimics the look of high-end ceramic or concrete stoneware, offering a sophisticated beige finish and a delightful speckle texture.
Detailed Instructions
Materials
- White or natural air dry clay (approx. 1kg)
- Wide bowl (to use as a mold)
- Small cup or cone (to use as a pedestal mold)
- Rolling pin
- Plastic wrap
- Parchment paper
- Clay knife or craft blade
- Scoring tool or old toothbrush
- Slip (clay mixed with water)
- Sanding sponge (medium grit)
- Acrylic paint (cream/beige, black, brown)
- Water-based sealant or varnish (matte)
- Stiff bristle brush (for splattering)
Step 1: Shaping the Pedestal Base
-
Prepare the pedestal mold:
Select a small, sturdy cup or a conical object to serve as the base form. Wrap it significantly with plastic wrap to ensure the clay doesn’t stick later. -
Roll out the clay:
Roll out a slab of clay on parchment paper to an even thickness of about 1/4 inch. You want it sturdy enough to hold weight. -
Cut the strip:
Measure the height of your base mold and cut a rectangular strip of clay slightly wider than that height and long enough to wrap around the circumference. -
Wrap the form:
Wrap the clay strip around your covered mold. Where the ends meet, cut through both layers at an angle to create a seamless bevel joint. -
Seal the seam:
Score the edges, apply a little slip, and press them together firm. Smooth the seam with your finger or a damp sponge until it disappears. -
Add the footer:
Roll a small coil of clay and attach it to the bottom of the pedestal to create the flared footing seen in the reference. Flatten it slightly so the pot stands stable.
Smooth Operator
dip your finger in water and run it over the clay edges before drying. This reduces sanding time later and prevents sharp, brittle rims.
Step 2: Creating the Bowl
-
Mold the bowl:
Take a larger kitchen bowl and line the inside with plastic wrap. This will define the shape of your planter. -
Form the vessel:
Roll out a larger circle of clay and gently press it into the lined bowl. Trim the excess clay at the rim with your knife for a clean, flat edge. -
Texture the rim:
Use a slightly damp sponge to smooth the rim, rounding it slightly so it isn’t sharp or jagged. -
Initial drying:
Allow both pieces (the base on its mold and the bowl in its mold) to dry for about 24 hours until they are leather-hard and hold their shape independently.
Faux Concrete Look
Mix a teaspoon of baking soda into your beige acrylic paint. It creates a fluffy, gritty texture that looks exactly like real concrete when dry.
Step 3: Assembly and Finish
-
Connect the pieces:
Remove the molds. Center the bowl on top of the pedestal. Mark the connection circle lightly with a tool. -
Score and slip:
Aggressively score inside the marked circle on the bowl and the top rim of the pedestal. Apply a generous amount of slip. -
Bonding:
Press the pieces together firmly. Use a small coil of clay on the underside (where the pedestal meets the bowl) to reinforce the joint, blending it smooth. -
Drainage hole:
If you plan to plant directly inside, use a straw or drill bit to poke a drainage hole through the center of the bowl and down into the hollow pedestal. -
Full cure:
Let the assembled piece dry completely for another 24-48 hours. I find flipping it upside down halfway through helps the bottom dry evenly. -
Sanding:
Once bone dry, sand the entire surface with a sanding sponge to remove fingerprints and achieve that smooth, stone-like texture. -
Base coat painting:
Paint the entire pot with a cream or warm beige acrylic paint. Two thin coats are better than one thick one. -
Create the stone effect:
Mix a tiny amount of water with black and brown paint. Dip a stiff brush in it and flick the bristles to splatter tiny specks across the surface, mimicking stone. -
Final seal:
Apply two coats of matte waterproof varnish to protect the clay from moisture, especially on the inside.
Place your favorite succulent inside and enjoy the modern elegance this handmade piece brings to your windowsill
Face Planter With Minimal Features
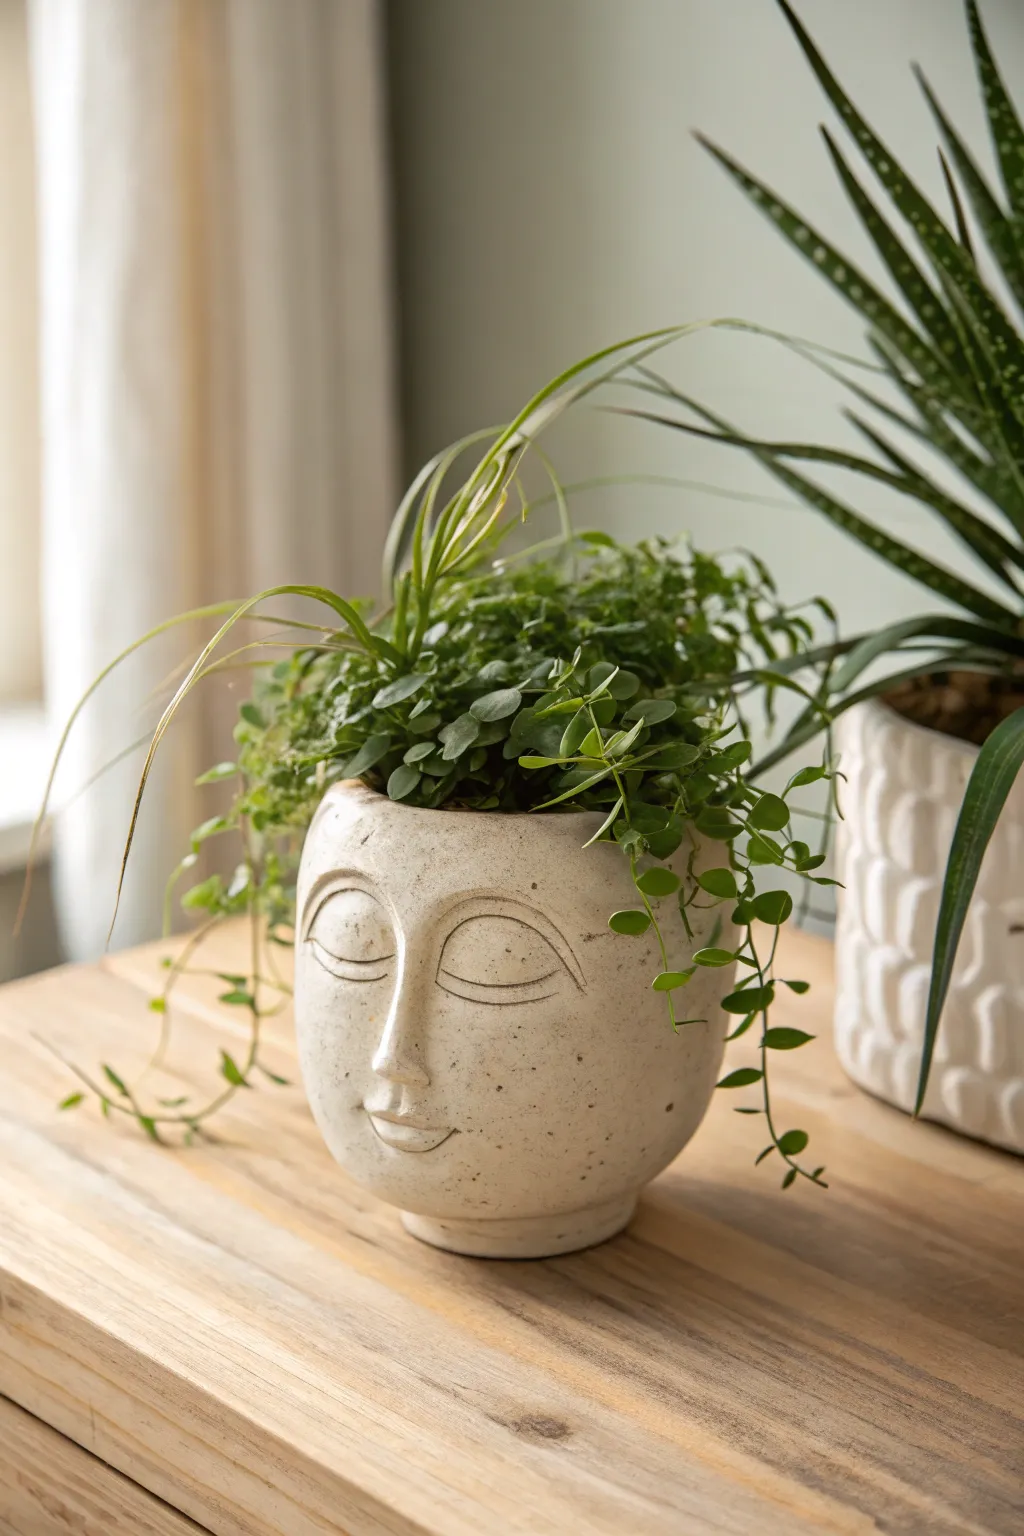
Bring a sense of calm to your plant collection with this serene, sleeping face planter that captures a peaceful, meditative expression. The smooth, stone-like finish and minimalist features give it a sophisticated, modern ceramic look without needing a kiln.
How-To Guide
Materials
- White or stone-colored air-dry clay (approx. 1kg)
- Rolling pin
- Small bowl or existing pot (to use as a mold)
- Clay sculpting tools (needle tool, loop tool)
- Plastic wrap
- Sponge and water bowl
- Fine-grit sandpaper (220 grit)
- Acrylic sealer or matte varnish
- Toothbrush (for texturing)
Step 1: Forming the Base
-
Prepare the mold:
Select a bowl or pot that has the rounded shape you want for your planter. Wrap the outside fully in plastic wrap, tucking the excess inside, to ensure the clay doesn’t stick to the form. -
Roll your slab:
Roll out a large portion of clay until it is about 1/4 inch thick. You want it substantial enough to hold weight but not so thick that it takes forever to dry. -
Wrap the form:
Drape the clay slab over your plastic-wrapped mold. Gently press it against the sides, smoothing out any major folds or wrinkles with wet fingers. -
Trim the excess:
Use a needle tool or knife to trim the clay at the bottom (which is currently the top) to create a flat rim. Also, ensure the base is flat so the pot sits level when flipped over. -
Smooth the surface:
Take a damp sponge and gently wipe the entire surface to remove fingerprints and create a uniform canvas for the face.
Step 2: Sculpting the Features
-
Add the nose:
Roll a small pyramid or cone shape of clay. Score the back of it and the center of the pot face, add a dab of water (slip), and press it firmly into place. Smooth the edges down into the pot so there are no visible seams. -
Shape the nostrils:
Use a small rounded tool to gently indent the bottom of the nose shape to suggest nostrils without making deep holes. -
Create the eyelids:
Roll two thin coils of clay and curve them into semi-circles. Attach these symmetrically on either side of the nose bridge to form the heavy, closed eyelids. -
Define the lash line:
Use a needle tool or a thin modeling tool to press a gentle, curving line directly underneath the eyelid additions. This creates the illusion of the lash line meeting the cheek. -
Add eyebrows:
Roll two very thin snakes of clay. Attach them high above the eyes in high arches to give the face a peaceful, open expression. Blend the edges slightly so they look raised but integrated. -
Form the mouth:
Add a small, flattened oval of clay below the nose. Use a sculpting tool to carve a horizontal line across it, curving up slightly at the ends for a faint smile. -
Refine the lips:
I prefer to use a damp brush here to soften the mouth lines, ensuring the lips look full but the expression remains subtle.
Natural Speckle
Mix dried coffee grounds or black pepper into your white clay before rolling it out. This mimics the speckled ceramic glaze seen in the photo perfectly.
Step 3: Finishing Touches
-
Add stone texture:
Dip an old toothbrush in water and flick it lightly against the clay, or tap the bristles gently onto the surface to create a pitted, stone-like texture. -
Initial drying:
Let the clay sit on the mold for about 24 hours until it is leather-hard and holds its shape on its own. -
Remove the mold:
Carefully slide the interior bowl or pot out, peeling away the plastic wrap. Let the pot continue to dry, now exposed on both sides, for another 24-48 hours. -
Sand imperfections:
Once fully dry and chalky white, use fine-grit sandpaper to smooth out any rough edges on the rim or sharp points on the nose. -
Seal the pot:
Apply two coats of a matte acrylic varnish or sealant. This is crucial for air-dry clay planters to protect them from moisture.
Cracking Clay?
If cracks appear while drying, mix a small amount of clay with vinegar into a paste and fill the cracks immediately. Smooth over with a damp finger.
Place a nursery pot inside your new creation and enjoy the peaceful vibe it brings to your shelf
3D Flower-Appliqué Vase
Bring a touch of perpetual spring into your home with this textured air-dry clay vase featuring charming raised floral details. The combination of the rough, stone-like base and delicate painted petals creates a sophisticated yet handcrafted aesthetic perfect for holding dried stems.
Step-by-Step Tutorial
Materials
- Air-dry clay (white or terra cotta)
- Glass bottle or jar (to use as an armature)
- Rolling pin
- Clay carving tools or a blunt knife
- Texturing tool (old toothbrush or stiff sponge)
- Acrylic paints (beige/sand, terracotta, dusky pink, yellow, white)
- Small paintbrushes (fine tip and flat)
- Sandpaper (medium grit)
- Water and a small bowl
- Matte varnish or sealant
- Sponge dabber (optional)
Step 1: Forming the Base
-
Prepare the Armature:
Select a glass bottle or jar that has the general shape you want for your vase. Since air-dry clay isn’t waterproof, using a glass core allows you to put real flowers in water later if you wish, though this design is best for dried florals. Ensure the glass is clean and dry. -
Roll out the Clay:
Take a large chunk of air-dry clay and condition it by kneading until it’s pliable. Roll it out into a flat sheet, roughly 1/4 inch thick, ensuring it’s large enough to wrap around your chosen glass vessel. -
Wrap and Seal:
Carefully wrap the clay sheet around the glass bottle. Use your fingers to smush the seam together where the clay meets. I like to dip my finger in a little water to smooth this join so it becomes invisible. -
Shape the Neck:
Mold the clay up towards the neck of the bottle. If your base bottle has a wide mouth, you can gently pinch the clay inwards to create that tapered, narrow neck look seen in the photo. Smooth the transitions with wet fingers. -
Create Texture:
Before the clay dries, take an old toothbrush or a stiff sponge and firmly tap it all over the surface of the vase. This stippled action creates a beautiful, stone-like texture rather than a perfectly smooth finish.
Slip & Score Secret
Never skip scoring! Scratching cross-hatch marks on both surfaces before joining with water acts like Velcro, ensuring your heavy 3D flowers won’t pop off once the clay shrinks during drying.
Step 2: Adding Floral Appliqués
-
Form the Petals:
Pinches of clay are all you need here. Roll small balls of clay, then flatten them into elongated teardrop shapes to form individual petals. You will need 8-10 petals for each flower. -
Attach the Petals:
Score the back of each petal and the spot on the vase where you want to place it. Dab a little water (slip) on the scored areas and press the petals onto the vase in a radial pattern to form a flower. -
Sculpt the Details:
Use a modeling tool to gently press a line down the center of each petal for a realistic effect. Smooth the edges where they touch the vase slightly so they look integrated but still raised. -
Add Flower Centers:
Roll a small ball of clay for the center of each flower. Press it flat into the middle of the petals. Using a needle tool or toothpick, prick the center repeatedly to create a dense, pollen-like texture. -
Dry Completely:
Allow the vase to dry for at least 24-48 hours. It should be uniform in color and hard to the touch. Rotate it occasionally so all sides dry evenly.
Faux-Ceramic Speckle
For a true speckled pottery look, mix a tiny pinch of dried coffee grounds or black pepper into your clay before rolling it out, or flick diluted brown paint onto the finished base with a toothbrush.
Step 3: Painting and Finishing
-
Base Coat:
Mix a sandy beige color using white and a touch of brown acrylic paint. Apply this all over the vase, including the flowers, to create a uniform canvas. A sponge dabber works well here to get paint into the textured crevices. -
Highlight Texture:
Once the base is dry, use a technique called dry-brushing with a very light cream or white paint. lightly brush over the textured surface to catch the high points, making that stone effect pop. -
Paint the Petals:
Select your flower colors—dusky pinks, terracotta, and warm beige. Carefully paint the petals of each flower. You can leave a small rim of the base color showing at the edges for a more natural, blended look. -
Detail the Centers:
Paint the textured centers of the flowers with a mustard yellow or golden ochre paint. Use a fine brush to dab the color on, ensuring it doesn’t flood the texture holes you made earlier. -
Shoulder Accent:
Paint a band of warm terracotta or brown around the rim and upper neck of the vase. Blend it downwards slightly with a damp brush or sponge for a soft, ombré transition rather than a strict line. -
Seal the Work:
Finish with a coat of matte varnish. This protects the paint and clay from humidity and dust, ensuring your beautiful new vase lasts a long time.
Fill your new creation with dried daisies or baby’s breath and enjoy the handcrafted warmth it brings to your space
Clay Vase Cover For A Hidden Water Cup
Transform a simple glass jar into a stunning piece of rustic décor with this cleverly designed clay sleeve. Featuring organic textures and a soft, geometric pattern in muted terra cotta tones, this vase cover offers the high-end look of handmade pottery without needing a kiln.
How-To Guide
Materials
- Tall drinking glass or cylindrical glass vase (to serve as the hidden form)
- Air dry clay (white or cream)
- Acrylic rolling pin
- Sharp craft knife or clay needle tool
- Small cup of water (for slip and smoothing)
- Medium-grit sandpaper
- Acrylic paint (muted terra cotta/dusty pink)
- Small flat paintbrush
- Ball stylus tool or the end of a paintbrush handle
- Clear matte varnish or sealant (spray or brush-on)
Step 1: Forming the Base Cylinder
-
Prepare the Clay:
Begin by conditioning a large block of air dry clay, kneading it until it is soft, pliable, and free of air bubbles. You want a smooth consistency that won’t crack easily when bent. -
Roll out a Slab:
Using your acrylic rolling pin, roll the clay out into a long, rectangular slab. Aim for an even thickness of about 1/4 inch throughout to ensure stability. -
Measure the Form:
Lay your hidden glass container on its side against the rolled clay to measure. You need a rectangle high enough to cover the glass and long enough to wrap completely around it with a slight overlap. -
Cut to Size:
Use your craft knife and a straight edge (like a ruler) to cut a precise rectangle based on your measurements. Remove the excess clay. -
Wrap the Glass:
Stand the glass upright and carefully wrap the clay slab around it. The glass acts as a permanent support structure, so wrap it snugly but don’t fuse the clay *to* the glass yet. -
Seal the Seam:
Where the clay edges meet, score both sides with a needle tool and apply a little water. Press the edges together firmly and smooth the seam down with your thumb or a modeling tool until it disappears.
Pro Tip: Seamless Blending
If your seam is stubborn, mix a tiny bit of clay with water to make a paste (slip). Spackle this into the crack and smooth it out for an invisible join.
Step 2: Adding Texture and Detail
-
Create the Surface Texture:
To achieve that hammered artisan look, gently press your fingertips or the back of a spoon into the clay surface repeatedly. Do this all over the exterior for an organic, uneven finish. -
Carve the Geometric Band:
About one-third of the way up from the bottom, use a needle tool to lightly sketch a horizontal band. Inside this band, carve a row of connecting triangles pointing upwards. -
Add Beaded Detail:
Roll small, pea-sized balls of scrap clay. Score a line just below your triangle band, dampen it, and press these small balls in a row to create a raised, beaded texture. -
Refine the Rim:
Smooth the top rim of the clay so it slightly curls over the edge of the glass inside, hiding the glass from view. Use a wet finger to ensure this edge is soft and rounded. -
Allow to Dry:
Let the vase sit in a cool, dry place for 24-48 hours. I find rotating it every few hours helps it dry evenly and prevents warping around the glass core.
Level Up: Faux Glaze Effect
Mix a clear gloss medium into your acrylic paint for the triangle section only. This mimics the look of fused ceramic glaze against the matte raw clay body.
Step 3: Finishing Touches
-
Sand Roughly:
Once fully dry and hard, take your medium-grit sandpaper and lightly sand any sharp burrs or overly rough patches, focusing on the rim and the seam area. -
Paint the Pattern:
Dip a small flat brush into your muted terra cotta or dusty pink acrylic paint. Carefully fill in the carved triangles, keeping the paint inside the lines for a crisp, inlaid look. -
Highlight the Texture:
You can also lightly dry-brush a tiny amount of the pink paint over the raised beaded row to make the texture pop. -
Seal the Project:
Since air dry clay isn’t waterproof, apply two coats of clear matte varnish to the entire exterior. This protects the finish from accidental splashes when you’re watering your flowers.
Now you have a chic vessel ready to display your favorite dried botanicals or fresh eucalyptus stems