If you love making things that fit on a fingertip, tiny polymer clay is basically your happy place. These small projects are quick, super satisfying, and perfect for turning into mini charms, jewelry, or little desk buddies.
Smiley Toast and Egg Mini Charms
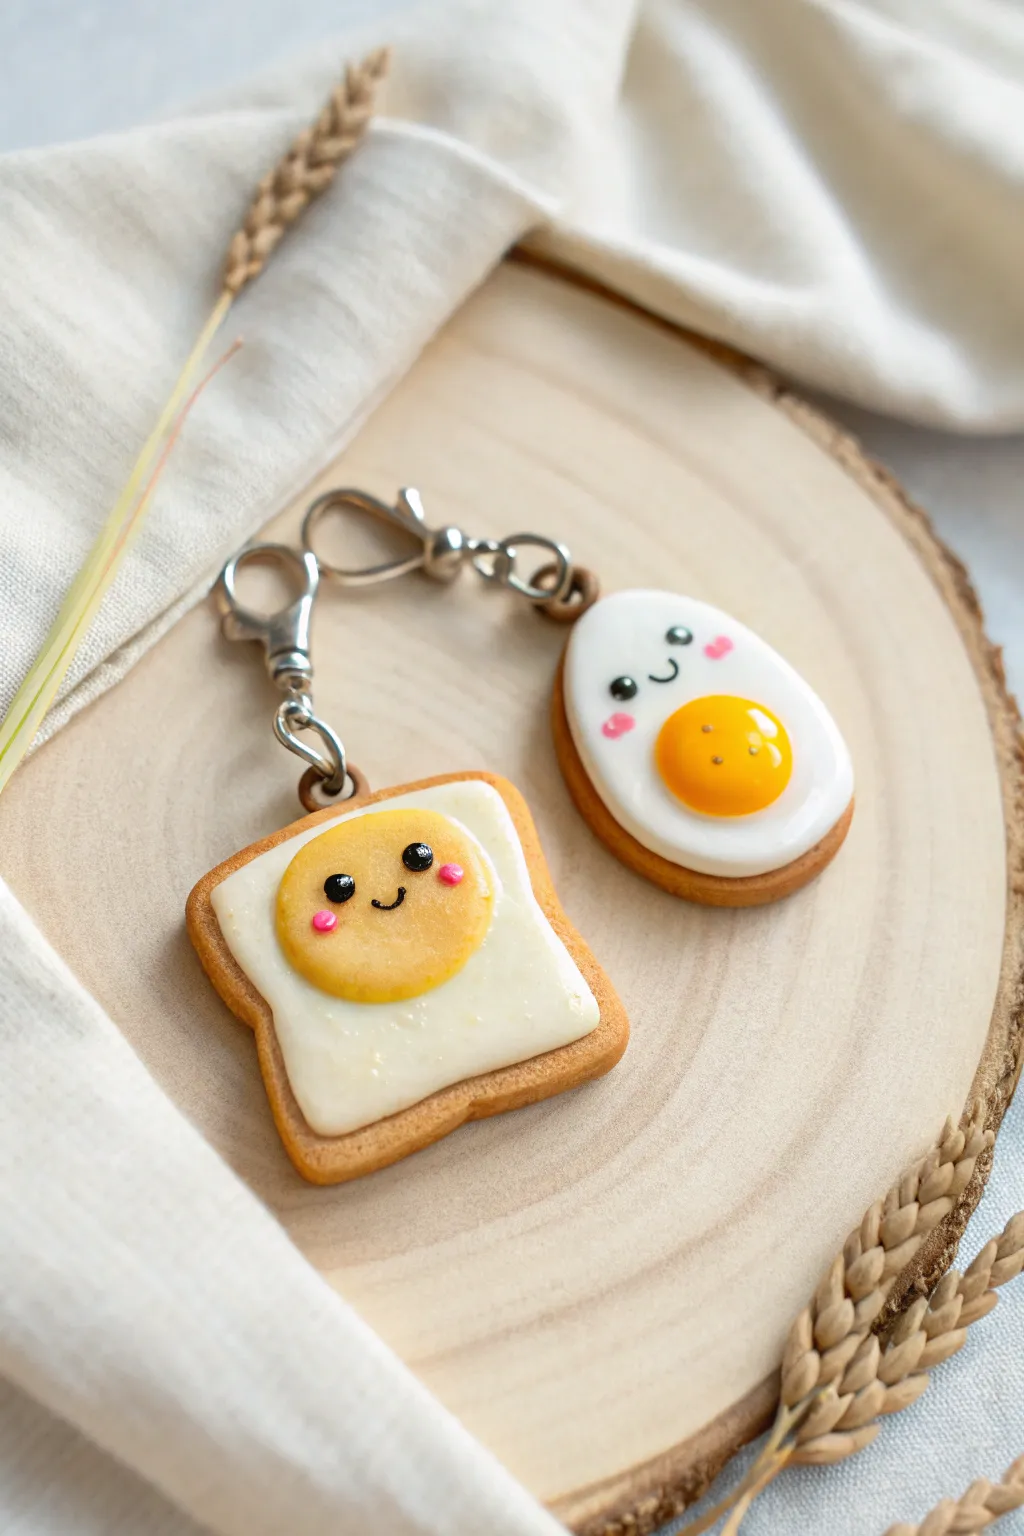
Brighten your keychain collection with this adorable duo of breakfast classics featuring a smiling fried egg and a cheerful egg-on-toast. These polymer clay charms combine realistic food textures with sweet kawaii faces for a project that looks good enough to eat.
Detailed Instructions
Materials
- Polymer clay (white, translucent white, sunny yellow, tan/beige)
- Black polymer clay or black acrylic paint
- Pink polymer clay or soft pastel chalk
- Liquid polymer clay (Fimo liquid or Translucent Liquid Sculpey)
- Soft pastel chalks (orange, brown, yellow ochre)
- clay roller or pasta machine
- Small round cutter (approx 1 inch)
- Square cutter (approx 1 inch) or craft knife
- Needle tool or toothpick
- Ball tool (small and large)
- Eye pins or screw eyes
- Gloss glaze or UV resin
- Small paintbrush
- Sandpaper or texture sponge (optional)
Step 1: Prepping and Base Shapes
-
Mix the perfect colors:
Begin by conditioning your clay. For the toast, mix tan with a tiny bit of translucent to get a baked bread look. For the egg white, use plain white. For the yolk, mix sunny yellow with a touch of orange for depth. -
Shape the toast slice:
Roll out your tan clay to about 4-5mm thickness. Cut a square shape. Use your fingers to gently round the bottom corners and indent the top edge slightly to create the classic bread loaf shape. -
Create the bread texture:
Use a toothbrush or a crumpled ball of aluminum foil to gently tap all over the surface and sides of your toast slice. This texturing prevents the clay from looking like plastic and mimics real bread pores. -
Shade the crust:
Scrape some brown and orange soft pastel chalk into a powder. Using a dry paintbrush, gently dust the edges of the toast to simulate a baked crust. I like to concentrate the darker brown on the very outer rim for realism. -
Form the standalone egg base:
Roll out a separate piece of tan clay, slightly thinner than the toast, into an oval shape. This will be the backing for the fried egg charm to give it stability and a ‘cooked bottom’ look. Texture the edges similarly to the toast.
Step 2: Cooking the Eggs
-
Create the egg whites:
flatten a ball of white clay into an irregular, organic oval shape. Make two of these—one for the toast and one for the standalone charm. Ensure the edges are smooth and slightly rounded, not sharp. -
Attach whites to bases:
Press one white oval onto the center of your toast slice. Press the second white oval onto the tan oval backing you made earlier. Gently smooth them down so they adhere well without squishing the texture underneath. -
Make the indentations:
Use a large ball tool or your fingertip to create a shallow, smooth depression in the center of both egg whites where the yolk will sit. This helps the yolk look integrated rather than just stuck on top. -
Add the yolks:
Roll two balls of your yellow clay mix. Place one into each indentation and flatten them gently into domes. They should be prominent but not perfect spheres.
Clean Clay Pro-Tip
White clay attracts dust like a magnet! Keep a scrap piece of ‘waste clay’ nearby to roll in your hands periodically, picking up dust before you handle your pristine white egg shapes.
Step 3: Faces and Hardware
-
Plan the expressions:
Decide where your faces will go. For the toast, the face is on the yolk itself. For the standalone egg, the face sits on the upper part of the white. Use a needle tool to lightly mark positions if needed. -
Make the eyes:
Roll extremely tiny snakes of black clay and slice off minute discs for eyes. Position them carefully. If you find clay too fiddly, you can bake first and paint these on later with acrylics. -
Add the smiles:
Roll a very thin thread of black clay for the mouths. Curve it into a ‘U’ shape and gently press it onto the clay with a needle tool between the eyes. -
Apply rosy cheeks:
Using a small dotting tool or toothpick, apply two tiny dots of pink clay or pink acrylic paint just below the eyes on the outside. -
Insert hardware:
Before baking, screw an eye pin into the top center of each charm. For security, I sometimes add a touch of liquid clay or bake-and-bond to the unexpected end of the pin before inserting. -
Bake carefully:
Bake your pieces according to your clay manufacturer’s instructions (usually 275°F/130°C for 15-30 minutes). Watching the oven prevents browning on the white parts.
Level Up: Bacon Buddy
Roll marbleized dark red and white clay into a strip, ruffle it for a wavy texture, and attach it next to the egg on the toast for a complete breakfast plate charm.
Step 4: Finishing Touches
-
Glaze for shine:
Once cooled, apply a coat of gloss glaze or UV resin specifically to the ‘egg’ parts (white and yolk). This makes them look freshly cracked and slimy, while keeping the toast matte for contrast. -
Add reflection:
For that extra kawaii sparkle, paint a tiny white dot in the eyes (if you painted them black) or use a white gel pen after the glaze is dry. -
Assembly:
Use jump rings to attach your finished charms to lobster clasps or keychain rings.
Now you have a charming pair of breakfast friends ready to hang on your bag or keys


Mini Donut Stud Earrings
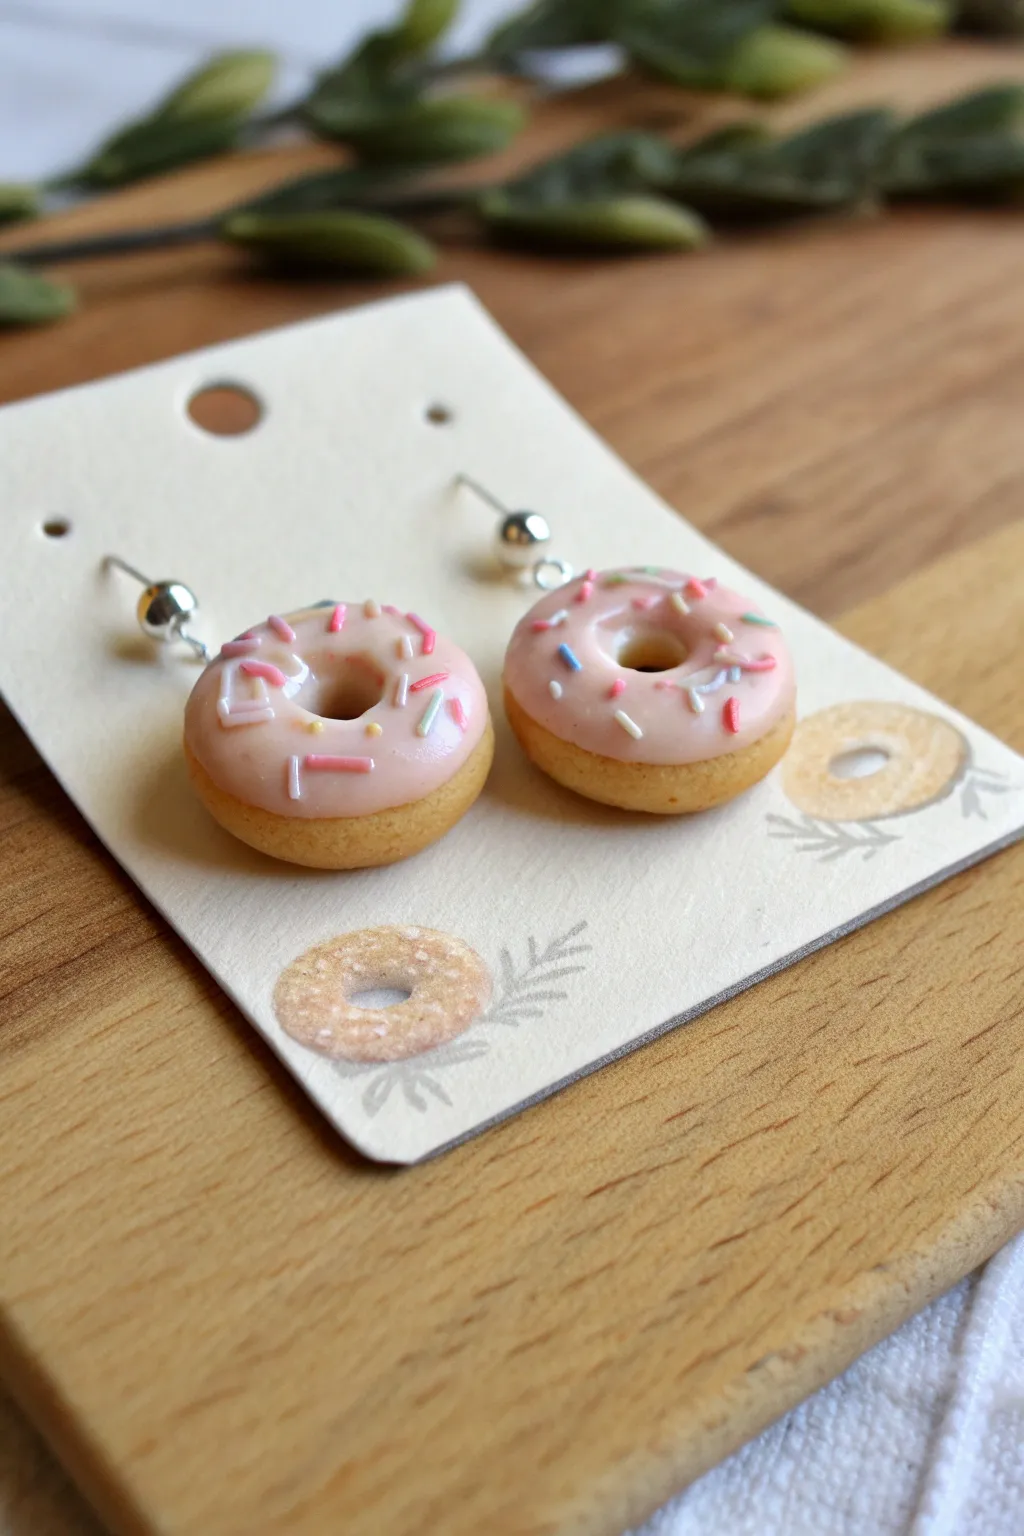
These miniature donut earrings look good enough to eat with their golden-brown dough and glossy pink icing. Perfect for beginners in polymer clay, this project transforms tiny bits of clay into a delightful wearable treat complete with realistic sprinkles.
Step-by-Step Tutorial
Materials
- Polymer clay in beige/light ochre (dough color)
- Polymer clay in pastel pink (frosting)
- Small amounts of blue, white, yellow, and dark pink clay (sprinkles)
- Liquid polymer clay or TLS (Translucent Liquid Sculpey)
- Clean ceramic tile or glass work surface
- Pointed detailing tool or toothpick
- Soft pastel chalks in yellow ochre and warm brown
- Small paintbrush
- Gloss varnish or UV resin
- 2 small silver screw eyes
- 2 ear wires (French hooks)
- Jewelry pliers
- Oven for baking
Step 1: Shaping the Dough Base
-
Mix dough color:
Start by conditioning your beige clay until it is soft and pliable. If the color looks too flat, I like to mix in a tiny speck of translucent clay to give it a more realistic baked-good depth. -
Form spheres:
Roll two equal-sized balls of clay, each about 1cm (0.4 inches) in diameter. These will become the base of your donuts. -
Flatten precisely:
Gently press each ball down onto your work surface with your thumb until it forms a thick, rounded disc shape. -
Make the chemical hole:
Use the handle end of a paintbrush or a detailing tool to press a hole through the exact center of each disc. Wiggle the tool slightly to widen the hole and smooth the inner edges so it looks natural, not drilled. -
Texture the dough:
Gently tap the surface of the clay with a toothbrush or crumpled aluminum foil to create a subtle baked dough texture, focusing on the sides where the frosting won’t cover.
Donut Shape Pro-Tip
To avoid flattening the bottom of your donut while you work, rest the unbaked clay on a small piece of curved cardstock or rounded plastic wrap while applying the frosting.
Step 2: Baking Realism
-
Prepare shading powder:
Scrape your yellow ochre and warm brown soft pastels into a fine powder using a craft knife. -
Apply the bake:
Dip a soft brush into the pastel powder and gently dust the donuts. Focus the darker brown on the outer edges and the bottom to mimic how a real donut browns in the fryer.
Step 3: Frosting and Decorating
-
Create liquid frosting:
Mix a small amount of pink clay with liquid polymer clay in a small container or on a tile. Mash and stir until you have a consistency similar to thick honey or real donut glaze. -
Apply the glaze:
Carefully dab the pink mixture onto the top of your donuts using a toothpick or small tool. Let it drip naturally slightly over the sides just a tiny bit, but don’t cover the whole thing. -
Smooth the icing:
Use the tip of a needle tool to drag the liquid clay into a smooth circle around the center hole, ensuring the dough underneath is still visible in the very middle. -
Make sprinkles:
Roll extremely thin snakes of blue, white, yellow, and dark pink clay. You want these to be hair-thin. -
Cut the sprinkles:
Bake these thin snakes for just 3-5 minutes so they harden. Once cool, chop them into tiny bits using a craft blade to create realistic cylindrical sprinkles. -
Add the toppings:
Using tweezers or a slightly damp toothpick, pick up the sprinkles and press them gently into the wet pink frosting. Scatter them randomly for a natural look. -
Insert hardware:
Screw the tiny silver screw eyes directly into the top of the unbaked donut. The threading will grip the raw clay.
Level Up: Scented Jewelry
Mix a tiny drop of vanilla or strawberry fragrance oil into the liquid clay frosting mixture before applying. Your donuts will smell as sweet as they look.
Step 4: Finishing Up
-
Bake carefully:
Bake the donuts according to your clay manufacturer’s instructions (usually 275°F/130°C for 15-20 minutes). If you used liquid clay, ensure your oven temperature is accurate to prevent scorching. -
Cool down:
Let the donuts cool completely before handling them. The liquid clay frosting is fragile while hot. -
Secure the pin:
Once cool, gently tug the screw eye. If it feels loose, unscrew it, add a drop of superglue, and screw it back in. -
Add shine:
Paint a layer of gloss varnish or UV resin ONLY over the pink frosting area. This makes the glaze look wet and sugary while keeping the dough matte. -
Assemble:
Use your jewelry pliers to open the loop on the ear wires, slide on the donut’s screw eye loop, and close securely.
Now you have a delicious-looking accessory ready to wear or gift to a friend with a sweet tooth


Fruit Slice Cane Pendants
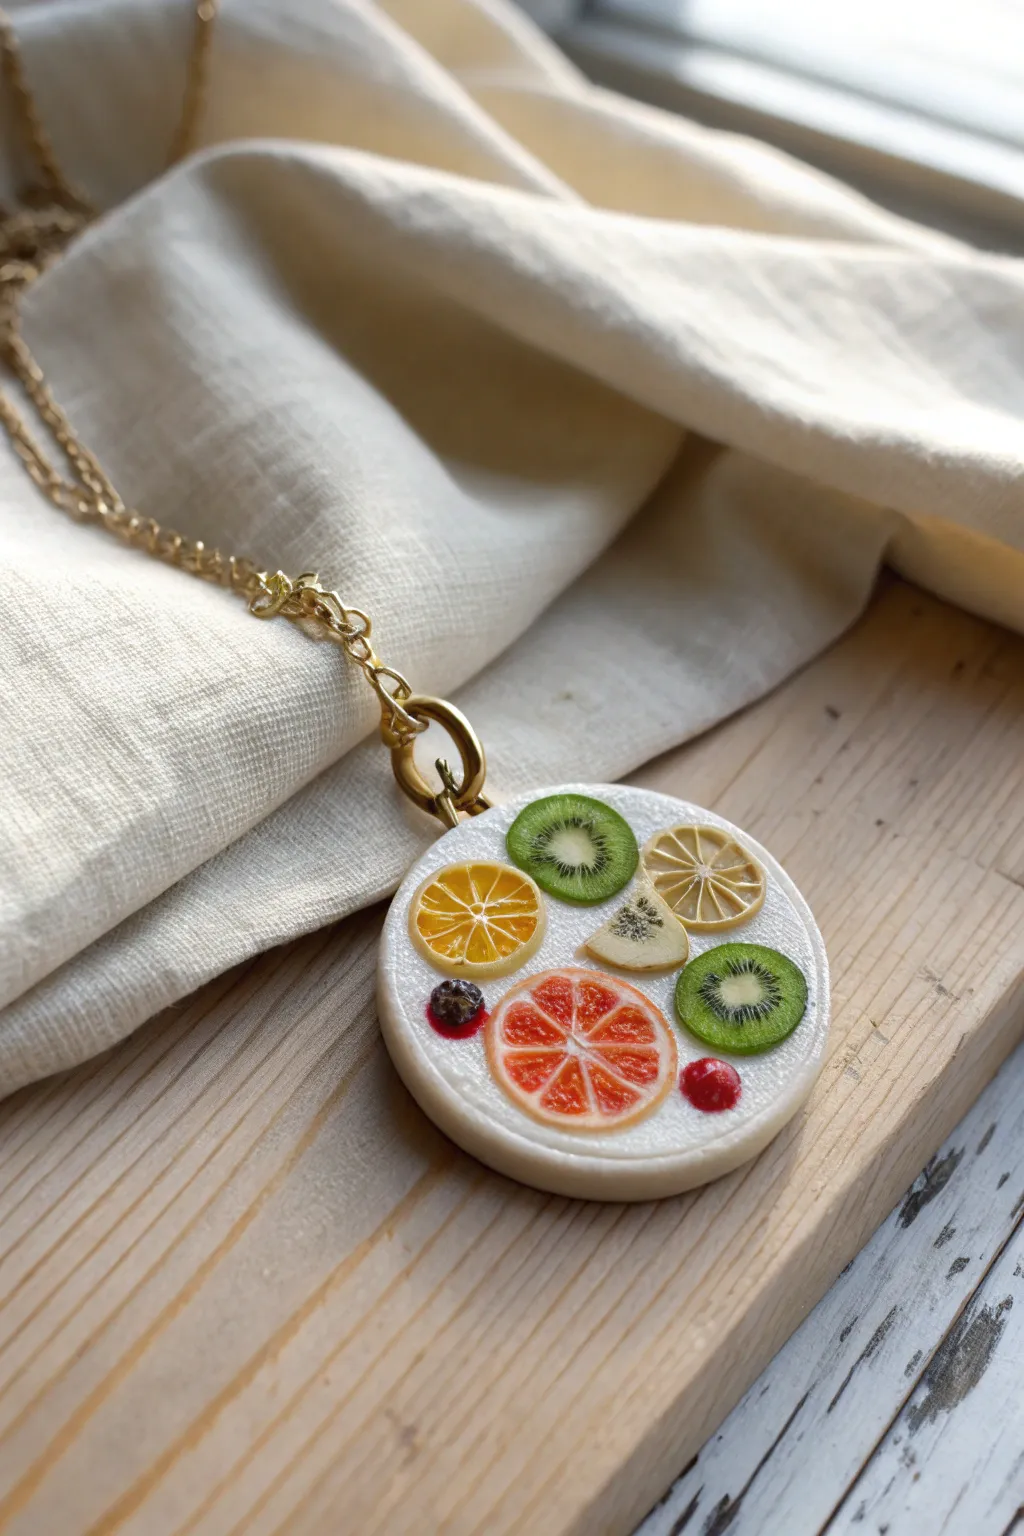
Capture the freshness of summer with this charming polymer clay pendant featuring an assortment of miniature citrus and kiwi slices. Using translucent clay canes creates a realistic, juicy effect against a crisp, white textured background.
Step-by-Step
Materials
- White polymer clay
- Pre-made polymer clay fruit canes (orange, lemon, lime, ruby red grapefruit, kiwi)
- Translucent liquid polymer clay
- Small round clay cutter (approx. 1.5 inches)
- Texture sponge or toothbrush
- Needle tool or toothpick
- Red and purple clay (tiny scraps for berries)
- Gloss varnish or UV resin
- Gold jump ring and jewelry bail
- Gold chain necklace
- X-Acto knife or tissue blade
- Rolling pin or pasta machine
Step 1: Base Preparation
-
Condition the Clay:
Begin by thoroughly conditioning your white polymer clay until it is soft and pliable. Roll it out into a smooth sheet about 4mm to 5mm thick; you want enough thickness to support the embedded fruit slices without warping. -
Cut the Shape:
Use your round cutter to punch out a perfect circle. If the edges look a bit sharp or dragged, gently smooth them with your fingertip to create a nice, rounded finish akin to a ceramic token. -
Texture the Surface:
Take a texture sponge, or even a clean old toothbrush, and gently tap it all over the top surface of the white circle. This creates a subtle, porous texture that resembles a cake or tart base and prevents the piece from looking too sterile. -
Add Attachment Point:
Using a needle tool, carefully pierce a hole near the top edge of the circle for the jump ring. Make sure the hole is large enough for your hardware but not so close to the edge that the clay might tear.
Step 2: Fruit Assembly
-
Slice the Canes:
Using a very sharp tissue blade, slice your fruit canes as thinly as possible. You will need two kiwi slices, one orange slice, one lemon slice, one grapefruit slice, and a wedge of lime. Try to keep the thickness uniform for a level surface. -
Arrange the Composition:
Place the largest slice, the ruby red grapefruit, near the bottom center. I find starting with the biggest element anchors the design. -
Add Greenery:
Position the two kiwi slices on opposite sides—one at the top center and one on the lower right—to balance the color palette. -
Fill the Gaps:
Nestle the yellow lemon slice on the upper right side and the orange slice on the left side. Cut a smaller wedge from a lime or white fruit cane and fit it into the central space to complete the mosaic. -
Embed the Slices:
Once you are happy with the arrangement, gently press the slices down into the white base. You can use your roller lightly over the top to ensure they are flush with the surface, or press firmly with your thumb. -
Create Tiny Berries:
Roll tiny spheres of red and purple clay to mimic berries. Place a red one near the grapefruit and a purple cluster on the opposite side. Use a needle tool to poke a small indentation in the center of the purple berry for realism.
Slice It Right
Chill your unbaked fruit canes in the refrigerator for 20 minutes before slicing. This hardens the clay slightly, preventing the design from smushing for crisp, paper-thin cuts.
Step 3: Finishing Touches
-
Bake the Pendant:
Place the pendant on a ceramic tile or baking sheet lined with parchment paper. Bake according to your specific clay brand’s instructions (usually 275°F/130°C for 15-30 minutes). Let it cool completely. -
Apply Gloss:
To make the fruit look juicy and vibrant, carefully apply a coat of gloss varnish or UV resin specifically to the fruit slices and berries. You can leave the white background matte for a nice contrast. -
Cure the Resin:
If using UV resin, cure it under a UV lamp for a few minutes. If using varnish, allow it to dry fully in a dust-free area. -
Assemble Jewelry:
Open a sturdy gold jump ring using two pairs of pliers. Thread it through the hole you made earlier. -
Attach the Bail:
Connect a gold bail or a secondary jump ring to the first one, then thread your gold chain through to complete the necklace.
Seed Detail
After baking, use a fine-tip black paint marker to re-dot any seeds on the kiwi or watermelon slices that might have faded, adding extra pop and definition.
Wear your fresh and fruity creation proudly as a sweet accent to any outfit


Tiny Milk Carton Keychain Charm
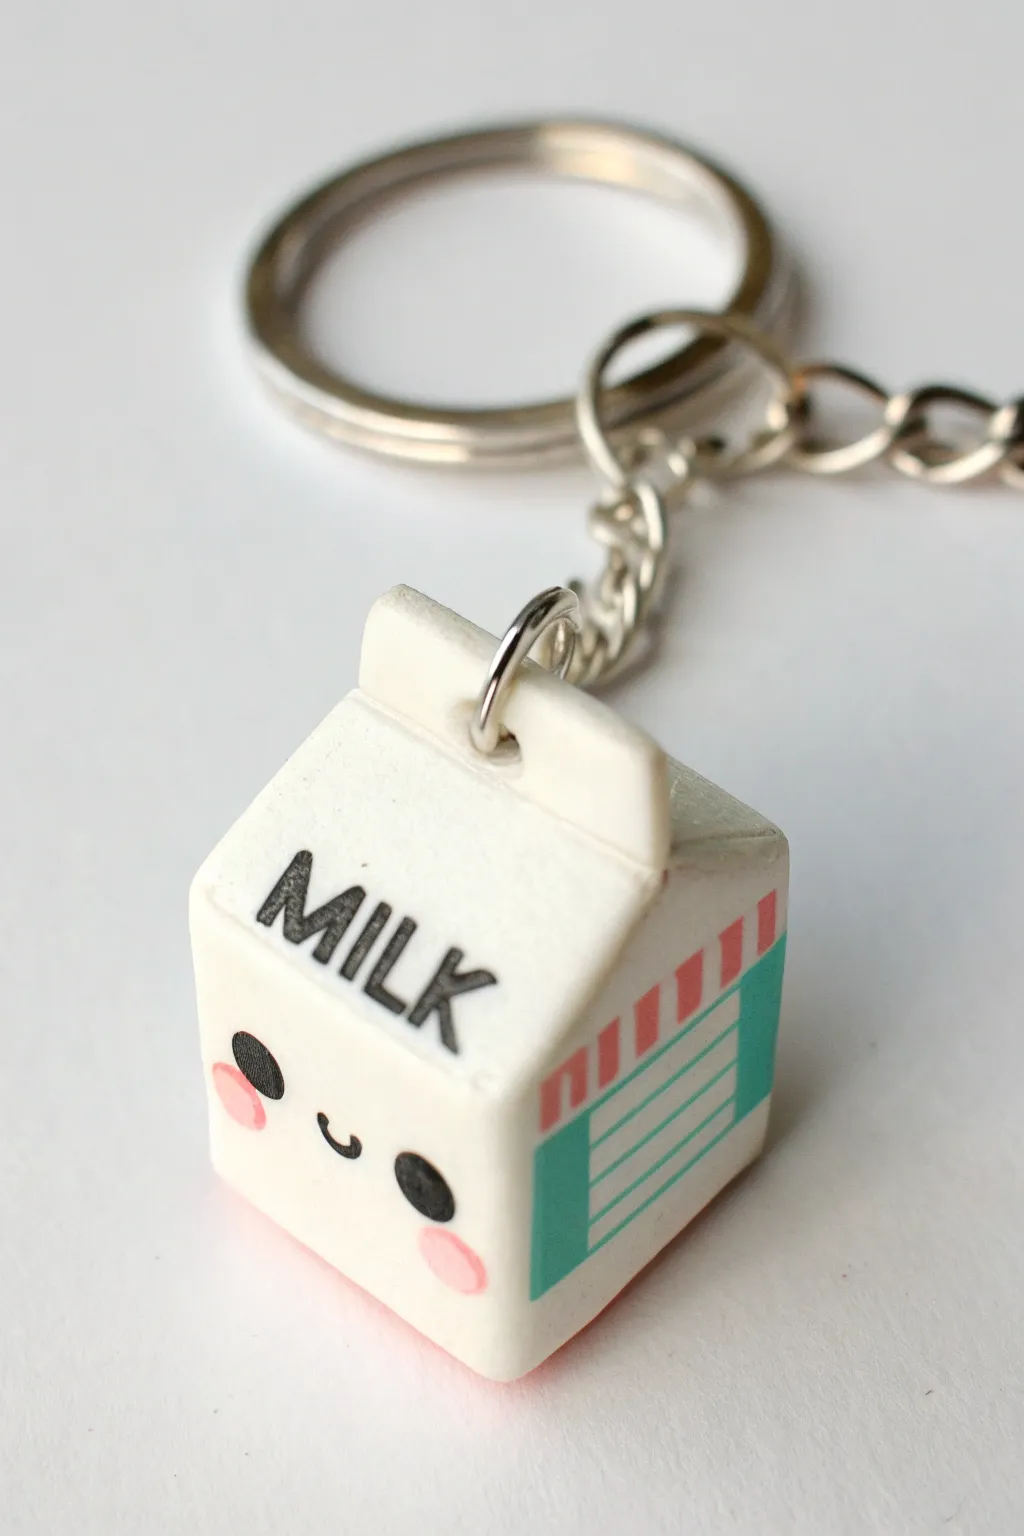
This adorable miniature milk carton charm puts a sweet, kawaii spin on a classic grocery item. With its tiny painted details and durable metal hardware, it’s the perfect way to accessorize your keys or backpack.
Step-by-Step Tutorial
Materials
- White polymer clay
- Rolling pin or clay machine
- Precision craft knife or X-Acto blade
- Needle tool or awl
- Headpin or screw eye pin
- Black acrylic paint
- Pink acrylic paint
- Pastel teal/mint acrylic paint
- Fine detail paintbrush (size 000 or 0000)
- Polymer clay glaze or UV resin (optional gloss)
- Jump rings and keychain hardware
- Key ring pliers
- Wet wipes (for keeping clay clean)
- Oven for baking
Step 1: Shaping the Carton Base
-
Condition the Clay:
Begin by thoroughly conditioning your white polymer clay until it is soft and pliable. This prevents cracks later on. -
Form a Block:
Shape the clay into a solid rectangular block. It should be roughly 2 cm wide and 2.5 cm tall, though you can adjust the scale to your preference. -
Refine the Sides:
Press the block gently against your work surface on each of the four sides to ensure they are flat and the corners are relatively sharp. -
Create the Roof Pitch:
Using your fingers, gently pinch the top 1/3 of the block to create a triangular roof shape, just like a real milk house. Don’t seal the very top ridge yet.
Clean Lines Hack
Use a piece of masking tape to mask off the area for the teal rectangle before painting. This ensures your edges are perfectly straight and crisp.
Step 2: Adding the Seals
-
Flatten a Strip:
Roll out a small, thin sheet of white clay. It should be about 1-2mm thick. -
Cut the Ridge:
Cut a strip from this sheet that is the same width as your milk carton. This will be the sealed top ridge. -
Attach the Ridge:
Place the strip along the very top edge of the pitched roof. Gently blend the bottom of the strip onto the slanted roof sides so it looks like one cohesive piece. -
Add the Side Triangles:
Cut two tiny triangles from your thin sheet and press them onto the sides of the roof pitch to replicate the folded-in sides of a carton. -
Detailing the Fold:
Use a needle tool to gently press an indentation where the roof meets the main box body, defining the separation.
Flavor Swap
Change the color palette to strawberry pink or chocolate brown and write ‘BERRY’ or ‘CHOCO’ for different milk flavors.
Step 3: Hardware and Baking
-
Insert the Eye Pin:
Trim an eye pin to the correct length. Dip the end in a tiny bit of liquid clay or translucent liquid Sculpey (optional) for extra grip, and push it straight down into the center of the top ridge. -
Smooth Fingerprints:
Before baking, gently rub the entire surface with a small amount of baby oil or cornstarch to remove any fingerprints or dust specks. -
Bake:
Bake the piece according to your specific clay brand’s instructions (usually 275°F/135°C for about 15-20 minutes depending on thickness). -
Cool Down:
Allow the clay to cool completely before moving on to painting. It hardens fully as it cools.
Step 4: Painting the Kawaii Details
-
Paint the Label Block:
Mix a pastel teal color and paint a rectangular block on the lower right side of the carton relative to the front face. -
Add Decorative Stripes and Text:
Using pink paint, add small diagonal stripes above the teal block. Once dry, use your finest brush and diluted black paint to carefully write ‘MILK’ diagonally across the front face. -
Draw the Face:
Using a dotting tool or the back of a paintbrush, place two black dots for eyes. Use your fine liner brush to paint a tiny ‘u’ shape for the smile between them. -
Add Blush:
Dip a toothpick or small dotting tool into pink paint and add two rosy cheeks right under the eyes for that classic kawaii look. -
Seal the Charm:
Once the paint is completely bone dry, apply a coat of satin or gloss glaze to protect the paint from scratching off. -
Assemble Keychain:
Open a jump ring with your pliers, loop it through the eye pin on the carton and the loop of your keychain hardware, then close it securely.
Your tiny milk carton is now ready to tag along on your daily adventures

What Really Happens Inside the Kiln
Learn how time and temperature work together inside the kiln to transform clay into durable ceramic.
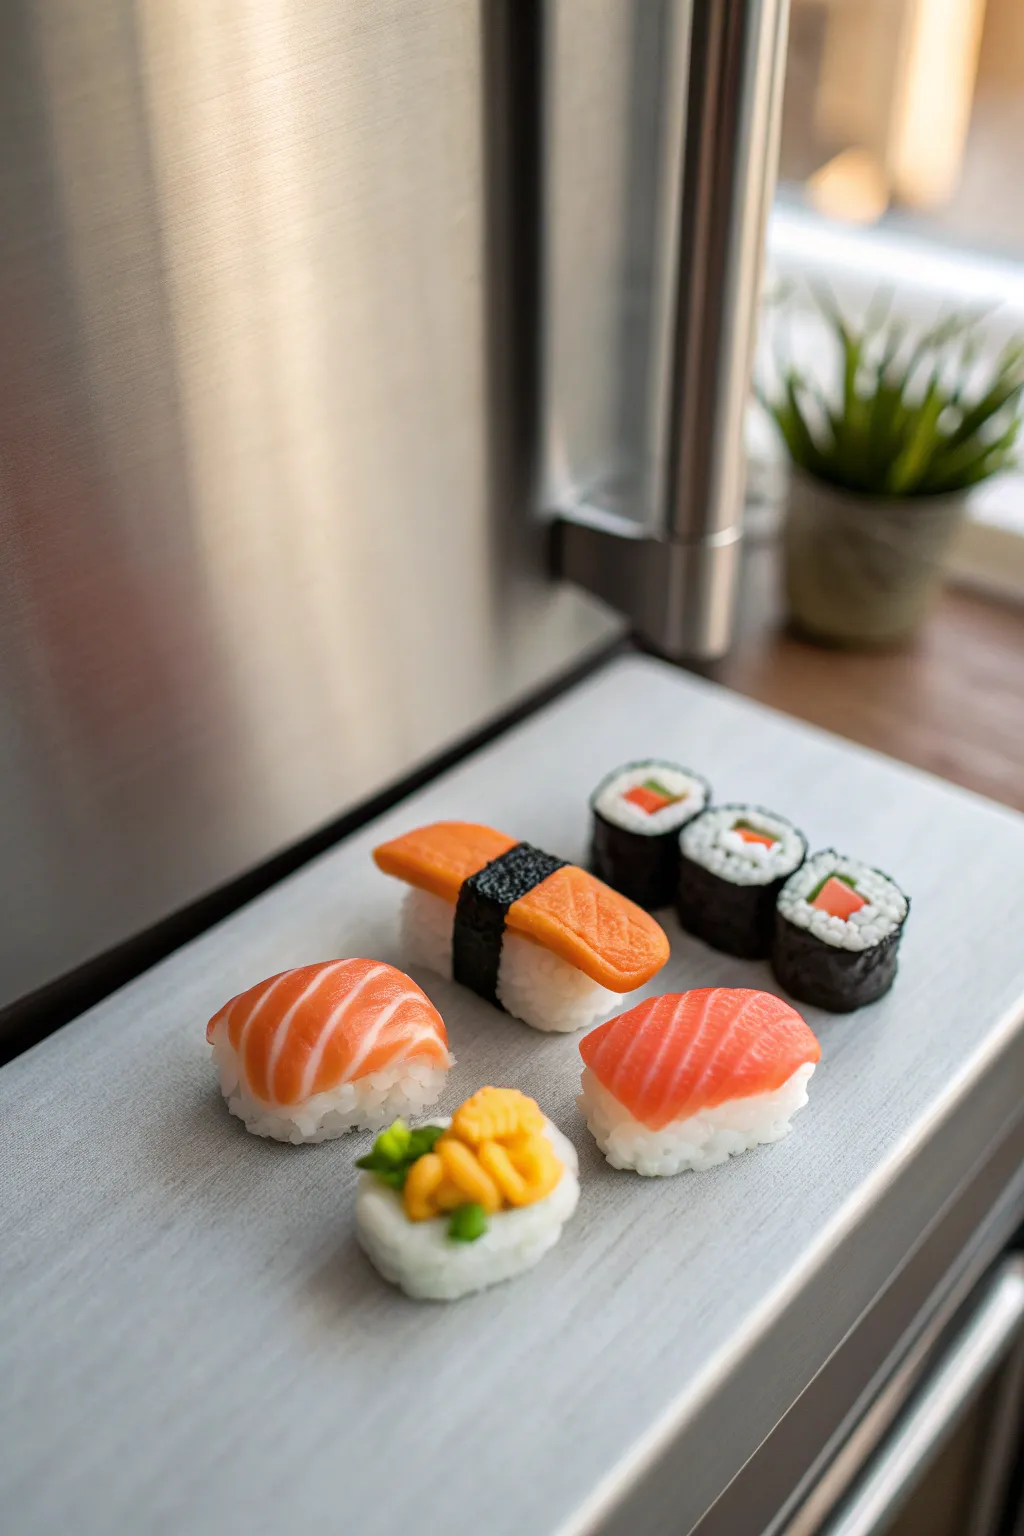
Tiny Sushi Magnet Set
Transform your fridge into a tiny Japanese restaurant with these adorable sushi magnets. This project replicates the texture of rice and fresh fish using translucent clays and simple texturing techniques for a hyper-realistic finish.
Step-by-Step Tutorial
Materials
- White polymer clay
- Translucent polymer clay
- Orange polymer clay
- Yellow polymer clay
- Black polymer clay
- Green polymer clay
- Old toothbrush or stiff bristle brush
- Needle tool
- Basic clay sculpting tools (blade, roller)
- Small round neodymium magnets based on the size of your sushi
- Superglue or heavy-duty craft glue
- Gloss glaze or polyurethane varnish
Step 1: Preparing the ‘Rice’
-
Mix the rice color:
Combine a large chunk of translucent clay with a very small amount of white clay. You want a semi-translucent, sticky-looking rice color, not stark opaque white. -
Form the rice bases:
Shape the clay into small, rectangular blocks with rounded corners for the nigiri, and small cylinders for the makizushi (rolls). Keep the tops slightly flattened. -
Texture the rice:
Using an old toothbrush or a stiff brush, tap firmly all over the surface of your clay blocks. This creates the illusion of individual rice grains packed together. -
Refine the grains:
If the texture looks too uniform, use a needle tool to pick at the clay slightly, defining individual ‘grains’ here and there for realism.
Step 2: Creating the Toppings (Nigiri)
-
Mix the salmon color:
Blend translucent clay with a small amount of orange and a tiny speck of red. The result should look like raw fish—sort of a jelly-like peach/orange. -
Layer the salmon pattern:
Create a ‘cane’ by stacking thin sheets of your salmon mixture with paper-thin sheets of plain white clay. Gently compress this stack. -
Slice the salmon:
Cut slices from your stack vertically. When laid flat, these slices will show the characteristic white fat stripes of salmon sashimi. -
Assemble the nigiri:
Drape a slice of your faux salmon over the textured rice block. Gently press down the edges so it hugs the rice form. -
Make the tamago (egg):
Mix yellow clay with a bit of orange for a rich egg color. Shape a rectangular slab and texture the sides simply with a needle tool to mimic cooked egg layers. -
Add the nori belt:
Roll out black clay as thin as paper. Cut a strip and wrap it around the center of the egg sushi to secure it to the rice.
Freshness Factor
Don’t glaze the black ‘nori’ seaweed. Real dried seaweed is matte. Contrast between matte seaweed and glossy fish makes it realistic.
Step 3: Crafting the Rolls (Maki) & Gunkan
-
Prepare the roll fillings:
Roll tiny snakes of green (cucumber), orange (carrot or salmon), and white clay. -
Wrap the filling:
Create a layer of your ‘rice’ clay and wrap it around your center filling snakes. Then, wrap a thin layer of black clay (nori) around the outside. -
Texture the cut roll:
Slice the cylinder into magnet-sized discs. Use your needle tool to re-texture the white clay on the cut face to look like rice grains again. -
Form the Uni (Sea Urchin) Gunkan:
Make a small oval rice base. Wrap a strip of black clay around the perimeter so it stands higher than the rice, creating a cup. -
Add the Uni topping:
Mix a mustard-yellow/orange color. Create tiny, irregular teardrop shapes and pile them inside the nori cup. Texture them slightly to look soft.
Deluxe Platter
Make a tiny wooden board from balsa wood to glue your sushi onto, creating one large magnet instead of several small individual ones.
Step 4: Finishing Up
-
Bake the clay:
Bake your pieces according to the clay manufacturer’s instructions (usually around 275°F/135°C for 15-30 minutes). -
Gloss for freshness:
Once cool, apply a coat of gloss glaze ONLY to the fish, egg, and roe. Leave the rice and nori matte. This makes the fish look wet and fresh. -
Attach the magnets:
Flip the sushi over. Use a dot of superglue to attach a strong neodymium magnet to the bottom of each piece. Press firmly and let dry.
Stick these on your fridge and enjoy the charm of your perpetual sushi platter
Mini Avocado Half Charms
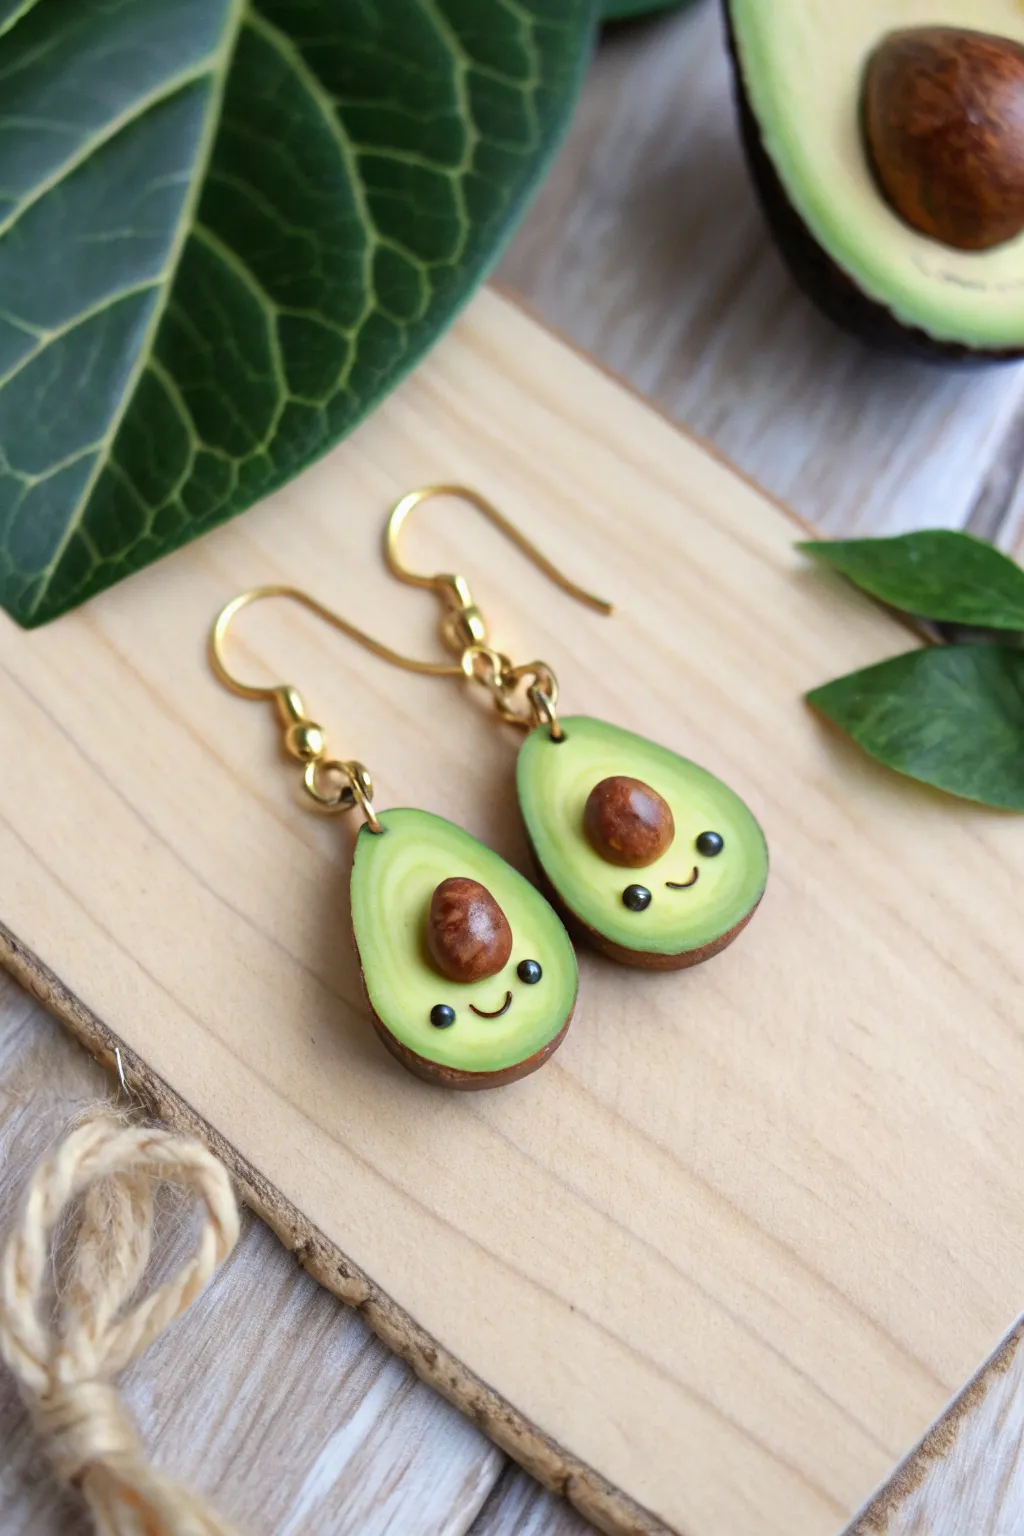
Transform tiny lumps of clay into adorable smiling avocado halves with these charming earrings. They balance realistic skin textures with a sweet kawaii expression, making them a perfect whimsical accessory.
Step-by-Step
Materials
- Green polymer clay (avocado flesh tone)
- Dark brown polymer clay (skin tone)
- Medium brown polymer clay (pit tone)
- Black polymer clay or black acrylic paint
- Liquid polymer clay (Translucent)
- Headpins or eye pins (gold)
- Earring hooks (gold)
- Needle tool or toothpick
- Small ball tool
- Texture sponge or sandpaper
- Soft pastel chalks (dark green, brown)
- Fine detail paintbrush
- Gloss glaze (optional)
Step 1: Shaping the Avocado Base
-
Reference material:
Before starting, verify you have two equal-sized balls of the light green clay to ensure your earrings match perfectly in size. -
Form the pear shape:
Roll each green ball into a smooth teardrop shape, flattening it slightly to create the signature avocado silhouette. Keep the top slightly narrower than the bottom. -
Create the skin layer:
Roll out a thin sheet of dark brown clay. It should be thin enough to look like skin but sturdy enough to hold the green form. -
Wrap the avocado:
Gently wrap the dark brown sheet around the curved back and sides of your green teardrops. Trim away any excess flush with the flat front face. -
Texture the skin:
Using a piece of sandpaper or a rough texture sponge, gently press into the dark brown skin to create a realistic, bumpy avocado texture.
Step 2: Adding the Pit and Face
-
Prepare the pit indentation:
Use a large ball tool or your thumb to make a smooth, shallow indentation in the lower center of the light green face. -
Form the pit:
Roll a small ball of medium brown clay into an oval. I prefer to make this slightly protruding so it looks like a healthy, ripe pit. -
Secure the pit:
Add a tiny drop of liquid clay into the indentation and press the brown pit firmly inside. -
Shading for realism:
Shave a little dark green soft pastel into a powder. With a dry brush, gently dust the outer edges of the light green face to create a gradient ripening effect. -
Create eye sockets:
Use a small ball tool or needle tool to make two tiny indents for the eyes below the pit. -
Add the eyes:
Roll two microscopic balls of black clay and press them into the eye sockets. Alternatively, you can paint these on after baking. -
Make the smile:
Roll an incredibly thin snake of black clay for the mouth. Curve it into a ‘U’ shape and gently press it onto the face between the eyes.
Clean Clay Tip
Keep baby wipes nearby to clean your hands between colors. Light green clay easily picks up lint and dark pigment from the brown skin clay.
Step 3: Assembly and Finishing
-
Insert hardware:
Trim an eye pin to an appropriate length. Dip the end in liquid clay and insert it vertically into the top center of the avocado. -
Bake the pieces:
Place your avocados on a tile or baking sheet. Bake according to your clay manufacturer’s instructions (usually 275°F/135°C for 15-30 minutes). -
Cooling down:
Allow the pieces to cool completely before handling them to ensure the clay hardens fully. -
Glazing the pit:
For a fresh look, apply a small dot of gloss glaze only to the brown pit and the tiny black eyes. -
Attach findings:
Using pliers, open the loop on your earring hooks and attach them to the eye pins on your cooled avocado charms.
Heart-Pit Variation
Instead of a round pit, shape the brown clay into a tiny heart for a Valentine’s Day version, or make one avocado ‘pitless’ so the pair fit together.
Enjoy wearing your cheerful, tiny produce creations


The Complete Guide to Pottery Troubleshooting
Uncover the most common ceramic mistakes—from cracking clay to failed glazes—and learn how to fix them fast.
Micro Cookies and Crackers Bite Set
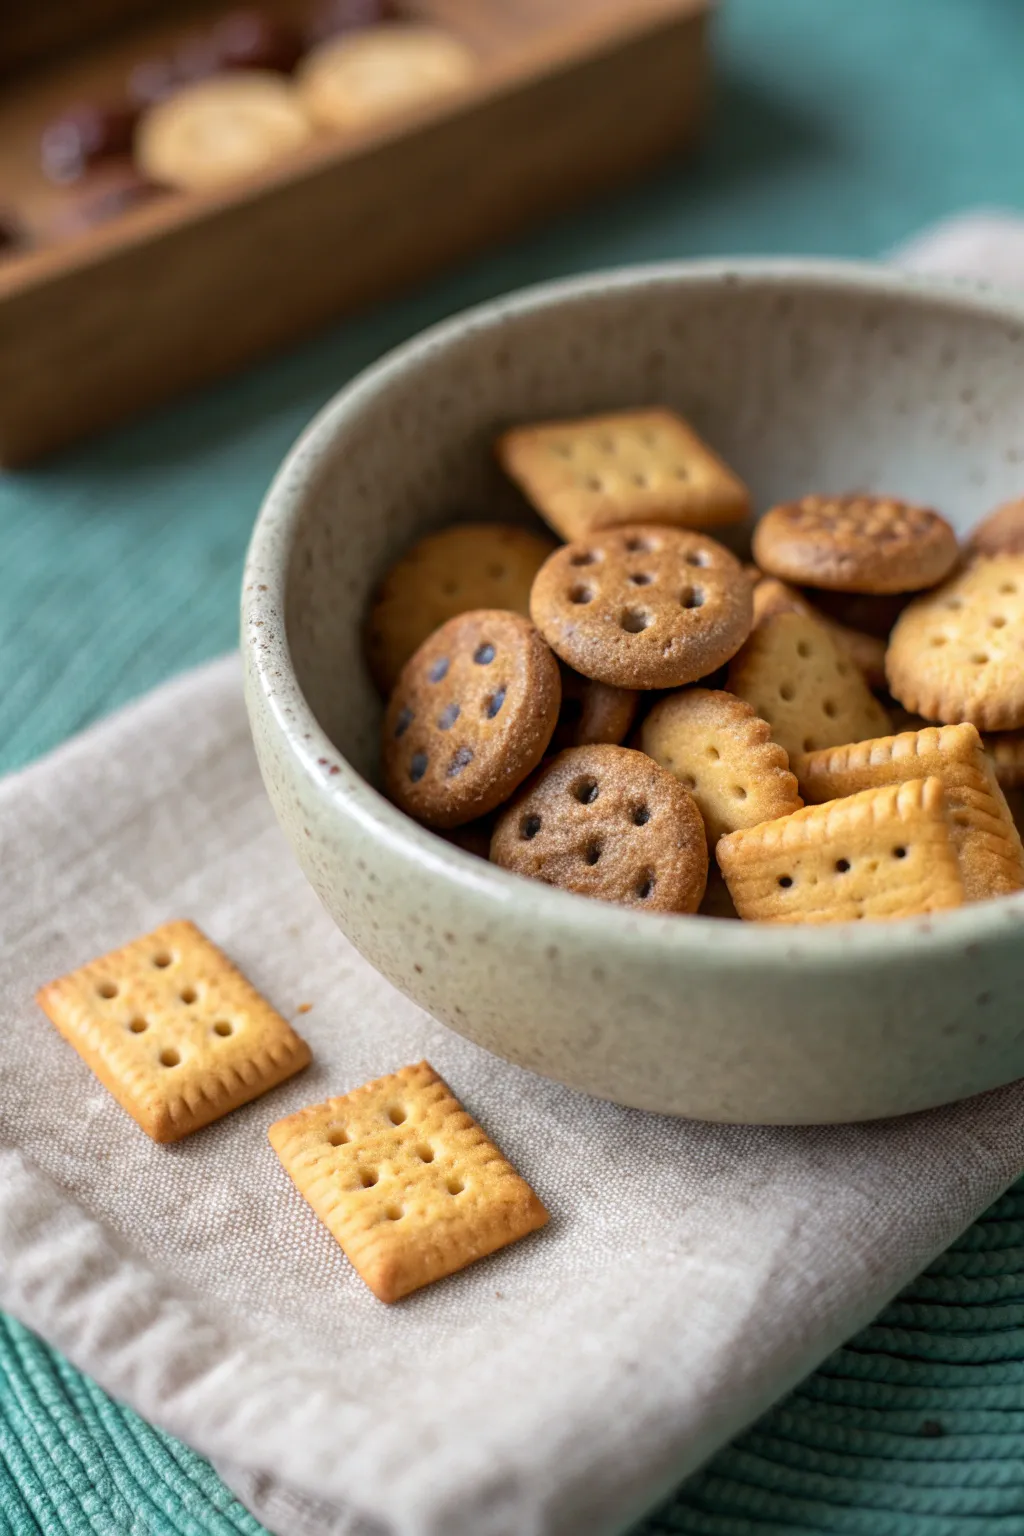
Create a delightful assortment of hyper-realistic micro cookies and crackers that look fresh from the oven but fit in the palm of your hand. This polymer clay project focuses on mastering texture and shading to achieve that perfect golden-baked finish.
How-To Guide
Materials
- Polymer clay (Ecru, White, Translucent, and a tiny bit of Yellow Ochre)
- Soft pastels (Yellow Ochre, Burnt Sienna, Burnt Umber)
- Liquid polymer clay or bake and bond
- Small round piping tip (or a straw)
- Needle tool and dotting tools
- Clean toothbrush or stiff paintbrush
- Razor blade or craft knife
- Ceramic or glass bowl (optional, for display)
- Small soft paintbrush for shading
- Oven for baking
Step 1: Mixing the Dough
-
Create the Base Color:
Start by mixing equal parts Ecru and Translucent clay. Adding translucent clay gives the cookies a realistic depth rather than a flat, plastic look. -
Adjust the Tone:
Add a very small pinch of White to lighten the dough, and a speck of Yellow Ochre clay if you want a richer, buttery dough color. Condition the mix thoroughly.
Fixing “Fuzzy” Texture
If the toothbrush texture looks too messy or fuzzy, lay a piece of cling film over the clay before pressing the toothbrush down. This softens the imprint.
Step 2: Shaping the Round Cookies
-
Forming the Shape:
Roll a small snake of clay and slice off equal segments. Roll these into balls and flatten them gently with your finger to create thick coins. -
Adding Texture:
Gently tap the surface of each cookie with a clean toothbrush. This mimics the rough crumb of a baked digestive biscuit. -
Creating the Holes:
Use a needle tool or a very fine dotting tool to poke a symmetrical pattern of holes into the surface. Don’t press all the way through; just create deep indentations. -
Dark Chip Variations:
For the darker speckled cookies, mix a tiny bit of brown clay into a small portion of your dough, not fully blended, to create a marbled or poppyseed effect before shaping.
Step 3: Crafting the Rectangular Crackers
-
Rolling the Sheet:
Roll out a portion of your clay significantly thinner than the round cookies. A pasta machine is helpful here, but a roller works fine. -
Cutting Rectangles:
Use your razor blade to cut small, precise rectangles. I typically aim for about 1cm by 1.5cm for a nice scale. -
Scalloping the Edges:
To get that classic cracker look, gently press the side of a needle tool or a smooth tool handle into the edges of the rectangle to indent them slightly, creating a wavy perimeter. -
Surface Detailing:
Press a larger dotting tool into the center of the cracker to create structural dimples, then texture the surface lightly with sandpaper or your toothbrush.
Texture Pro Tip
Use actual coarse sandpaper (60 grit) to press texture onto the back of the cookies. It gives the bottom that realistic, flat-baked grid look.
Step 4: The Baking Effect (Shading)
-
Preparing Pastels:
Scrape your soft pastels (Yellow Ochre, Burnt Sienna, Burnt Umber) into fine piles of powder on a piece of paper. -
Base Browning:
Using a soft brush, dust the Yellow Ochre over all the unbaked cookies to give them a warm glow. -
Focusing the Heat:
Apply the Burnt Sienna primarily to the edges of the cookies and the raised areas of the texture. This mimics where a real oven would brown them first. -
Charred Accents:
Use the Burnt Umber extremely sparingly on just the very outside corners of the rectangular crackers or the bottom rims of the round ones for a ‘well-baked’ look.
Step 5: Baking and Finishing
-
Arranging for Bake:
Place your creations on a piece of parchment paper or a ceramic tile. -
Baking:
Bake according to your clay manufacturer’s instructions (usually 275°F/130°C for 15-30 minutes). Watch closely so the thin edges don’t burn. -
Cooling:
Allow the cookies to cool completely before handling, as they can be brittle while warm. -
Matte Varnish (Optional):
I usually leave them raw for texture, but if you want to seal the pastels, dab on a very thin layer of matte varnish to preserve the chalky finish.
Fill a tiny dish with your new treats and enjoy the sweet satisfaction of miniature baking
Mini Succulent in a Tiny Pot
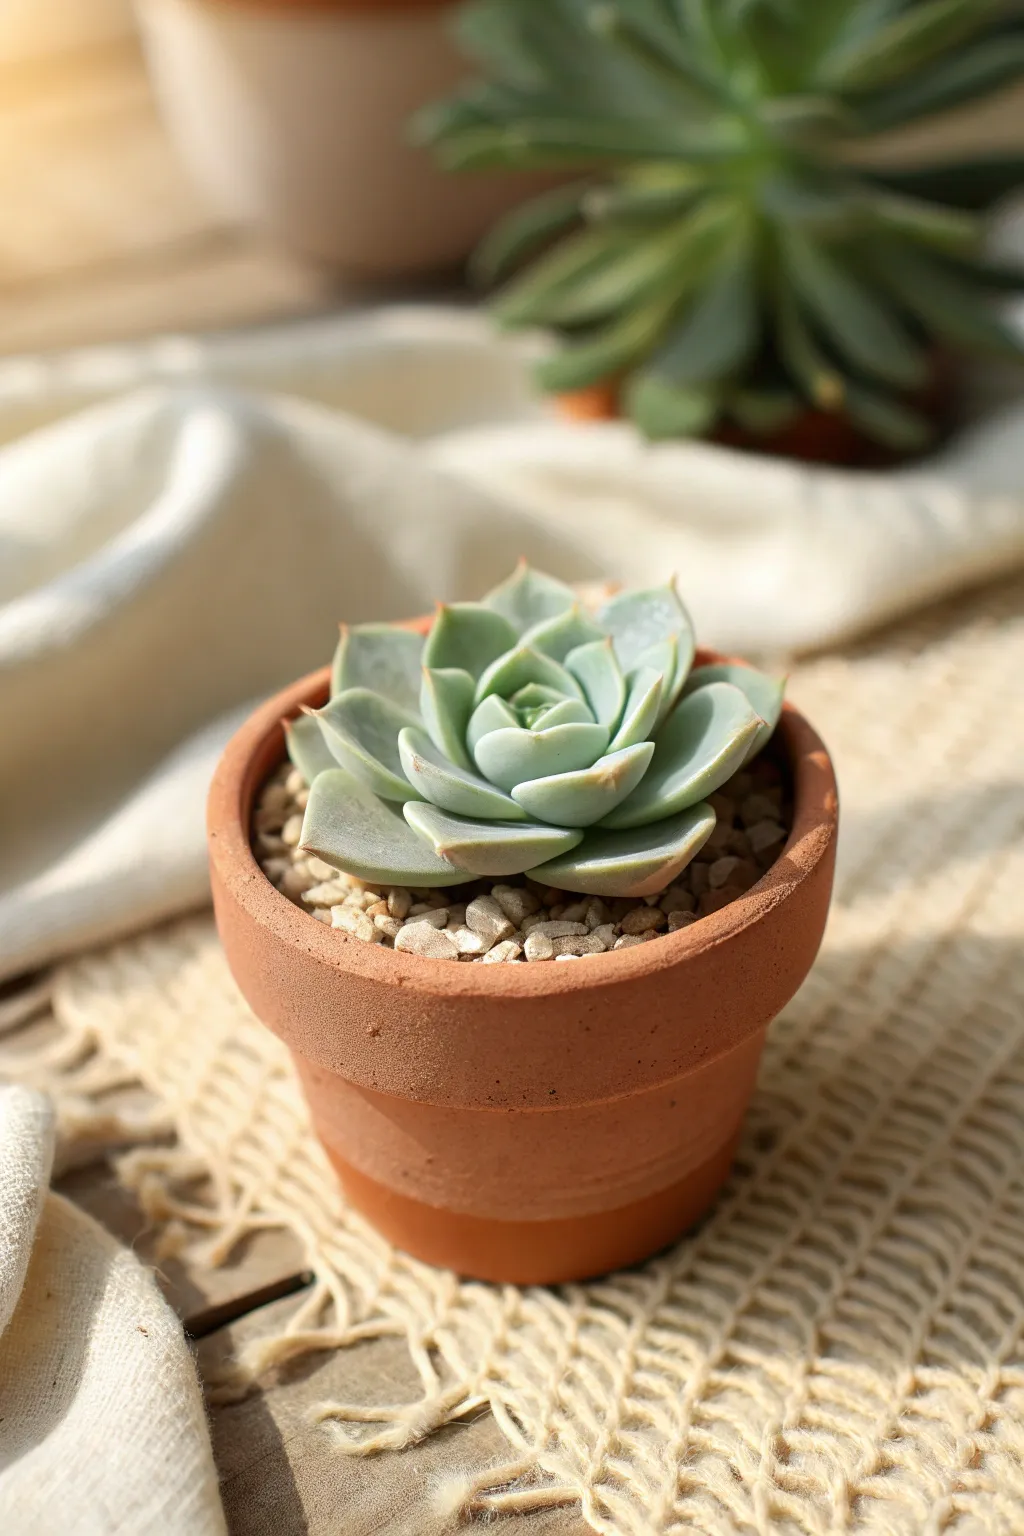
Capture the delicate beauty of nature with this hyper-realistic polymer clay succulent nestled in its own miniature terracotta pot. The pale blue-green rosettes and tiny pebble soil create a calm, organic vibe perfect for a desk accessory or dollhouse garden.
Detailed Instructions
Materials
- Polymer clay (terracotta/burnt orange for the pot)
- Polymer clay (pale sage green, translucent, and white for the plant)
- Polymer clay (beige/tan for soil)
- Coarse sand or tiny decorative pebbles
- Liquid polymer clay (Bake & Bond)
- Pastel chalks (soft pink/blush)
- Small paintbrush
- Ball stylus tool
- Needle tool
- Craft knife
- Oven for baking
Step 1: Sculpting the Pot
-
Base construction:
Start by conditioning the terracotta-colored clay until soft. Roll a medium-sized ball and flatten the bottom to create a stable base for your pot. -
Shaping the body:
Use your thumb or a large ball tool to press into the center of the ball, creating a hollow cup shape. Ideally, you want the walls to angle slightly outward like a classic planter. -
Refining the rim:
Roll a thin snake of the same terracotta clay. Wrap this around the top edge of your pot to create the signature rim, smoothing the seam down onto the main body with your finger or a tool. -
Texture application:
To mimic the porous texture of real clay, gently tap the exterior with a toothbrush or a piece of actual sandpaper. This removes fingerprints and adds realism.
Fixing Flat Leaves
If your leaves droop too much during assembly, prop them up with tiny bits of tissue paper or cornstarch. Remove these props carefully after baking.
Step 2: Creating the Succulent Leaves
-
Mixing the perfect green:
Mix sage green clay with a significant amount of white and a touch of translucent clay. This creates that powdery, realistic succulent look rather than a flat, plastic green. -
Preparing the leaves:
Roll your green mix into a thin log. Slice off about 15-20 small pieces, varying them in size from tiny (for the center) to slightly larger (for the outer leaves). -
Shaping the teardrops:
Roll each slice into a ball, then pinch one end to form a teardrop shape. -
Flattening:
Gently press each teardrop flat. Use your finger to curve the wider end slightly upward, creating a shallow spoon shape. -
Adding the points:
Pinch the very tip of the wide end to create the characteristic sharp point found on Echeveria leaves. -
Blushing the tips:
Before assembling, use a dry paintbrush to dust the very tips of the leaves with soft pink pastel chalk. This mimics the sun-stressed tips of real succulents.
Make It a Charm
Before baking, screw a tiny eye pin into the center of the succulent rosette. Once baked, attach a jump ring to turn your mini plant into a cute necklace or keychain.
Step 3: Assembly & Finishing
-
Filling the pot:
Place a ball of scrap clay or beige soil-colored clay inside the pot to fill it up, leaving just a little space below the rim. -
Starting the rosette:
Take your smallest leaves and arrange three of them in a tight triangle in the center of the soil, tips pointing up. -
Building layers:
Work outward in concentric circles, placing the medium leaves in the gaps between the previous layer’s leaves. I find using a needle tool helps position them without squishing the shapes. -
Final leaf layer:
Add the largest leaves for the outermost ring, angling them more horizontally so the rosette looks open and blooming. -
Adding texture to the soil:
Brush a layer of liquid polymer clay onto the exposed soil clay around the base of the plant. -
Adding the pebbles:
Carefully sprinkle your coarse sand or tiny pebbles onto the liquid clay, using a tool to push them snugly around the succulent base. -
Baking:
Bake the entire piece according to your clay manufacturer’s instructions (usually 275°F/130°C for 15-30 minutes). Let it cool completely before handling.
Place your tiny creation on a windowsill and enjoy a plant that never needs watering

TRACK YOUR CERAMIC JOURNEY
Capture glaze tests, firing details, and creative progress—all in one simple printable. Make your projects easier to repeat and improve.
Tiny Cactus Trio Planters
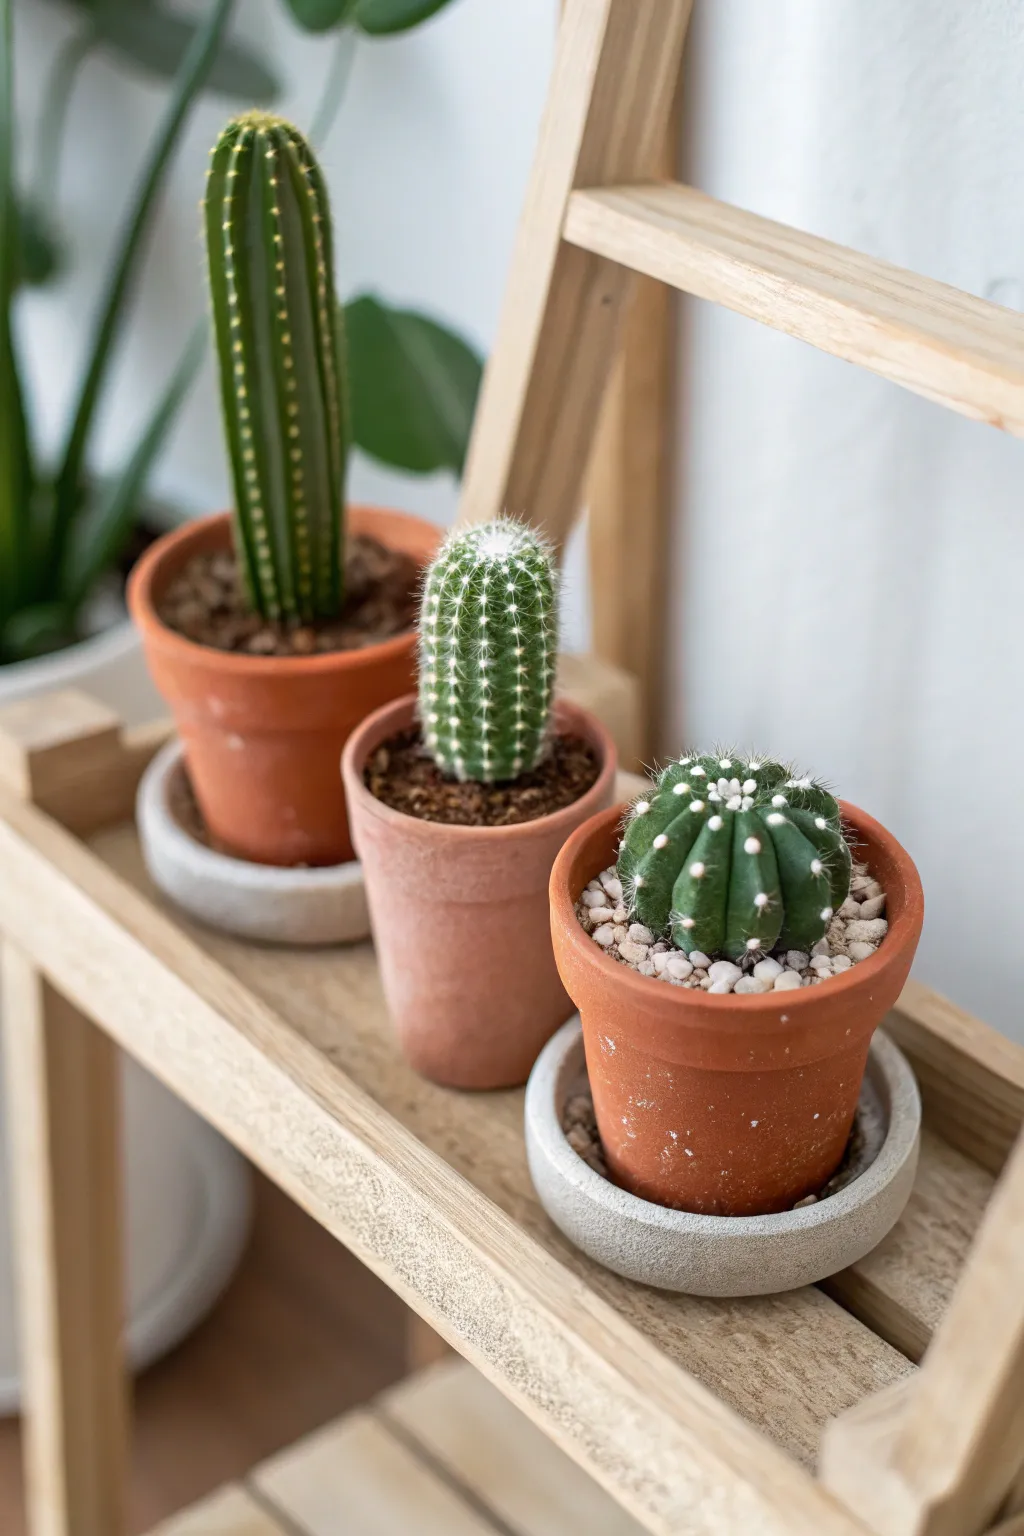
Bring a touch of desert charm to your desk with these surprisingly realistic miniature cacti sculpted from polymer clay. This project focuses on texture and subtle coloring to mimic nature, creating three distinct species that never need watering.
Step-by-Step Guide
Materials
- Polymer clay (terracotta, various greens, white)
- Liquid polymer clay (optional)
- Texturing tools (needle tool, stiff toothbrush, ball tool)
- Chalk pastels (brown, white, dark green)
- Soft paintbrushes
- Miniature gravel or coarse sand
- Craft knife or scalpel
- Aluminum foil
- Gloss glaze (optional)
Step 1: Sculpting the Terracotta Pots
-
Condition the Clay:
Start by thoroughly kneading your terracotta-colored polymer clay until it’s soft and pliable. If the color is too bright, mix in a tiny speck of brown to earth it down. -
Form the Pot Bases:
Roll three balls of clay, roughly 1 inch in diameter. Using your thumb and forefinger, pinch and rotate the clay to form a tapered cylinder shape with a flat bottom. -
Create the Pot Rims:
Roll a thin snake of terracotta clay. Flatten it slightly and wrap it around the top edge of your pots. Blend the seam at the back and smooth the underside of the rim onto the pot body. -
Texture the Pots:
To make them look like aged ceramic, gently tap the surface with a stiff toothbrush or a crumpled ball of aluminum foil. This removes the plastic shine. -
Hollow the Centers:
Use a ball tool to press a deep indentation into the center of each pot. You don’t need to hollow it out completely, just enough to seat the cactus.
Step 2: Creating the Cacti
-
Mix Custom Greens:
For realism, I like to mix different shades of green clay. Create a deep forest green for the tall cactus, a medium olive for the middle one, and a slightly brighter green for the round barrel cactus. -
Sculpt the Tall Columnar Cactus:
Roll a cylinder of deep green clay. Use a ruler or the back of your knife to press vertical indents down the sides to create the ribs. -
Shape the Middle Cactus:
Form a shorter, wider cylinder. Press many small vertical lines close together to create a dense ribbed texture. -
Form the Round Barrel Cactus:
Roll a perfect sphere of the brighter green clay. Press deep grooves from the top center down to the bottom, creating distinct bulbous sections. -
Detail the Spines – Tall Cactus:
Use a needle tool to poke tiny holes along the ridges. Roll incredibly thin threads of white clay, cut them into microscopic bits, and press them into the holes. Alternatively, perform this step with white paint after baking. -
Detail the Spines – Round Cactus:
For the round cactus, place tiny dots of white clay at the center of each ribbed section to mimic the woolly areoles. -
Add Soil Texture:
Fill the top of the pots with dark brown clay. texture it aggressively with a needle tool to look like dirt.
Needle Tool Secret
Instead of rolling tiny clay spines, try cutting bristles from a cheap white paintbrush and inserting them into the unbaked clay.
Step 3: Assembly and Finishing
-
Combine Parts:
Press your sculpted cacti firmly onto the ‘soil’ within the pots. You can use a drop of liquid polymer clay as glue to ensure a strong bond. -
Add Realistic Shadows:
Using a dry soft brush, dust dark green chalk pastel into the crevices of the cacti ribs. This creates depth and dimension. -
Dust the Pots:
Brush a little white chalk powder onto the sides of the terracotta pots to simulate salt deposits and aging found on real clay pots. -
Adding Gravel:
Press actual miniature gravel or coarse sand into the clay soil around the base of the round cactus for accurate texture contrast. -
Bake the Project:
Place your trio on a tile and bake according to your clay manufacturer’s instructions (usually 275°F for 15-30 minutes). -
Final White Highlights:
Once cool, use a tiny brush to dry-brush a very small amount of white acrylic paint onto the spines of the middle cactus to make them pop.
Make it a Mini Garden
Sculpt a shallow, rectangular wooden tray out of light tan clay to hold all three pots together as a complete window display.
Arrange your tiny garden on a windowsill where the light can catch the textures you created
Mini Mushroom and Leaf Charms
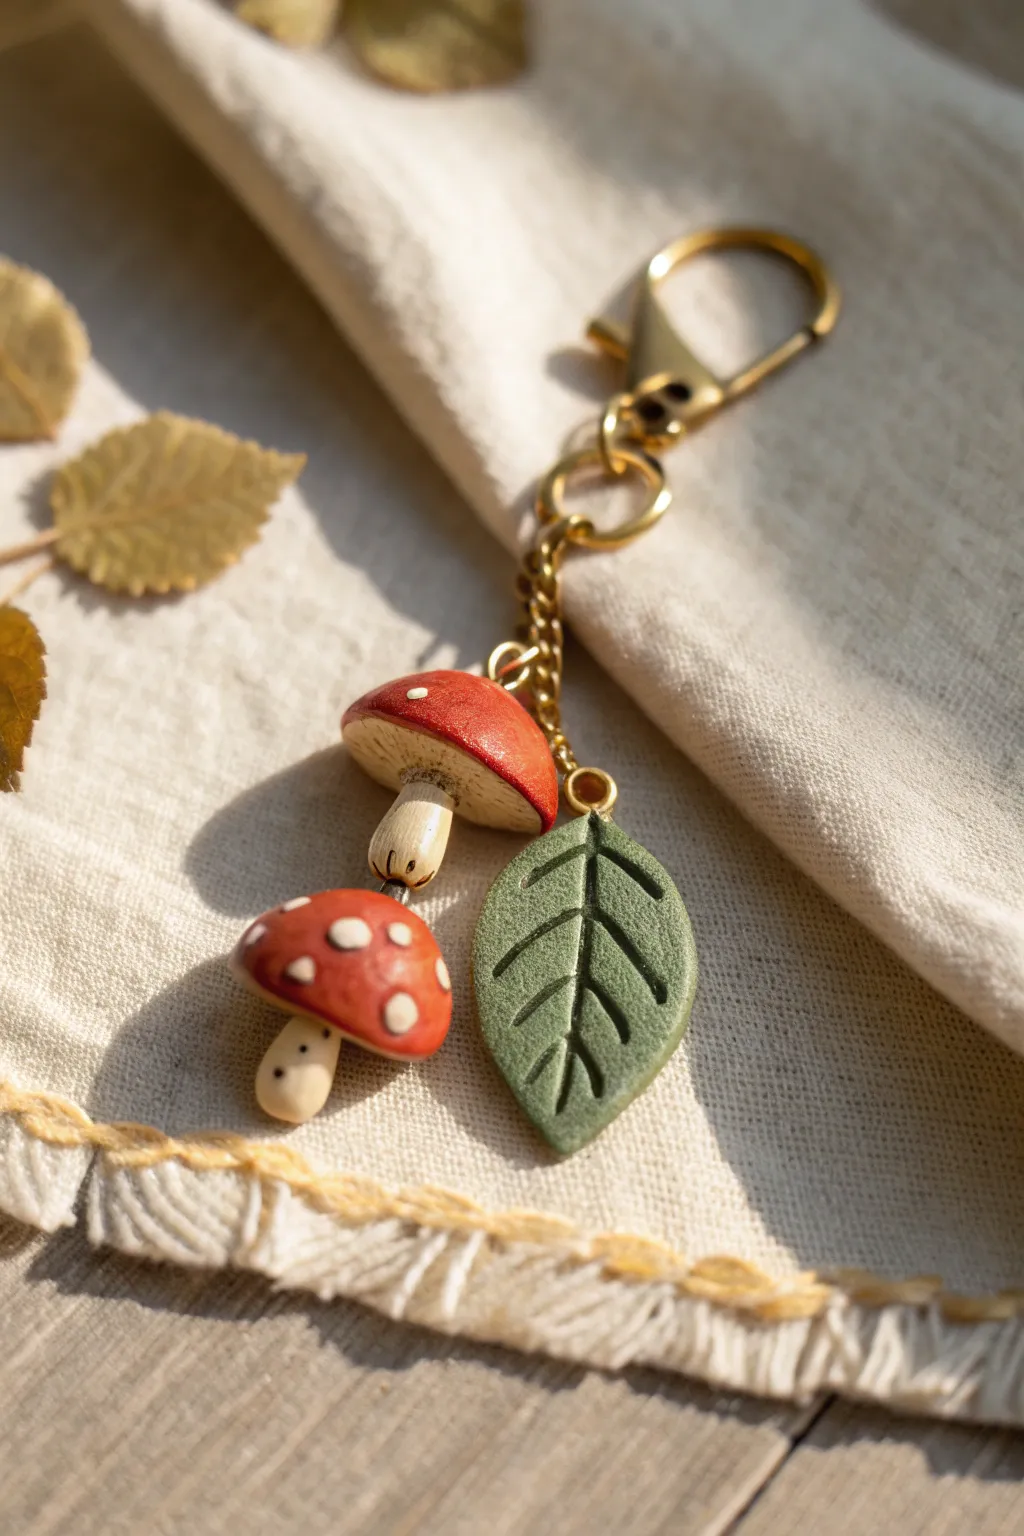
Capture the essence of a woodland walk with this charming mushroom and leaf keychain. The textured details and warm earthy tones make these polymer clay miniatures feel like tiny treasures plucked straight from the forest floor.
Detailed Instructions
Materials
- Polymer clay in deep red, antique white (or beige), and muted olive green
- Sculpting tools (needle tool, ball stylus)
- Texture sponge or sandpaper
- Gold eye pins (3)
- Gold jump rings
- Gold chain and lobster clasp keychain finding
- Acrylic paint (brown or burnt umber for antiquing)
- Small paintbrush
- Paper towel
- Gloss or matte varnish (optional)
- Jewelry pliers
- Oven for baking
Step 1: Sculpting the Mushrooms
-
Prepare the clay:
Condition your deep red and antique white clay until it is soft and pliable. If the white is too bright, you can mix in a tiny speck of brown to warm it up. -
Form the caps:
Roll two balls of red clay, one slightly larger than the other. Flatten the bottom of each ball against your work surface to create a dome shape, smoothing the top with your fingertip to remove any fingerprints. -
Texture the gills:
Turn the red domes over. Take a small amount of white clay and flatten it onto the underside of the cap. Use a needle tool to score fine lines radiating from the center to the edge, creating the mushroom gills. -
Create the stems:
Roll two small snakes of white clay for the stems. Make them slightly bulbous at the bottom for a natural look. Press the tops gently onto the gills of your caps. -
Add the spots:
Roll tiny, irregular bits of white clay. Press these flattened dots onto the red caps. Don’t worry about perfect circles; irregular shapes look more organic. -
Insert eye pins:
Trim your eye pins to an appropriate length. Gently push one pin through the top center of each mushroom cap, going down into the stem. Ensure the loop sits flush against the red clay.
Step 2: Crafting the Leaf
-
Shape the leaf base:
Condition the olive green clay. Roll it into a small teardrop shape and flatten it to about 3mm thickness. -
Add surface texture:
Before sculpting details, press a coarse sponge or a piece of sandpaper gently onto the clay surface to give it a realistic, matte plant texture. -
Carve the veins:
Using a needle tool or a dull knife tool, press a central vein line down the middle of the leaf. Add diagonal veins branching off from the center to the edges. -
Refine the edges:
Use your finger to gently smooth the cut edges so they aren’t too sharp. You can pinch the tip slightly to give it a curled, natural appearance. -
Add the hardware:
Insert an eye pin into the top of the leaf (the wider end). Sometimes I like to add a drop of liquid clay or bake-and-bond on the pin shaft for extra security.
Natural Texture Hack
Gently roll a real leaf onto your green clay before cutting the shape. This transfers authentic vein patterns instantly.
Step 3: Baking and Assembly
-
Bake the pieces:
Arrange your charms on a tile or baking sheet. Bake according to your clay manufacturer’s instructions (usually around 275°F or 130°C for 15-30 minutes). Let them cool completely. -
Apply an antique wash:
Dilute brown acrylic paint with a little water. Brush this wash over the cooled charms, getting into the gill lines and leaf veins. Immediately wipe off the excess surface paint with a paper towel, leaving the dark pigment only in the crevices. -
Clean the stems:
If the wash made the white stems too dark, use a damp Q-tip or a baby wipe to clean the high points, keeping them bright while leaving the ‘dirt’ near the base. -
Varnish (optional):
For durability, you can apply a thin coat of matte varnish to the leaf and satin varnish to the mushroom caps. -
Cut the chain:
Cut two small lengths of gold chain. Make one slightly longer than the other so the charms will hang at different heights. -
Attach the mushrooms:
Using two pairs of pliers, open a jump ring and attach the larger mushroom to the longer chain segment. Repeat for the smaller mushroom on the shorter chain. -
Final assembly:
Open a larger jump ring or the loop on your keychain finding. Slide on the leaf charm directly, followed by the two chain segments holding the mushrooms. Close the ring securely.
Make it Sparkle
Mix a tiny pinch of gold mica powder into the green clay or brush it lightly over the textured mushroom caps for a magical forest vibe.
Enjoy carrying a little piece of the enchanted forest with you wherever you go
Tiny Strawberry Jam Jar Charm
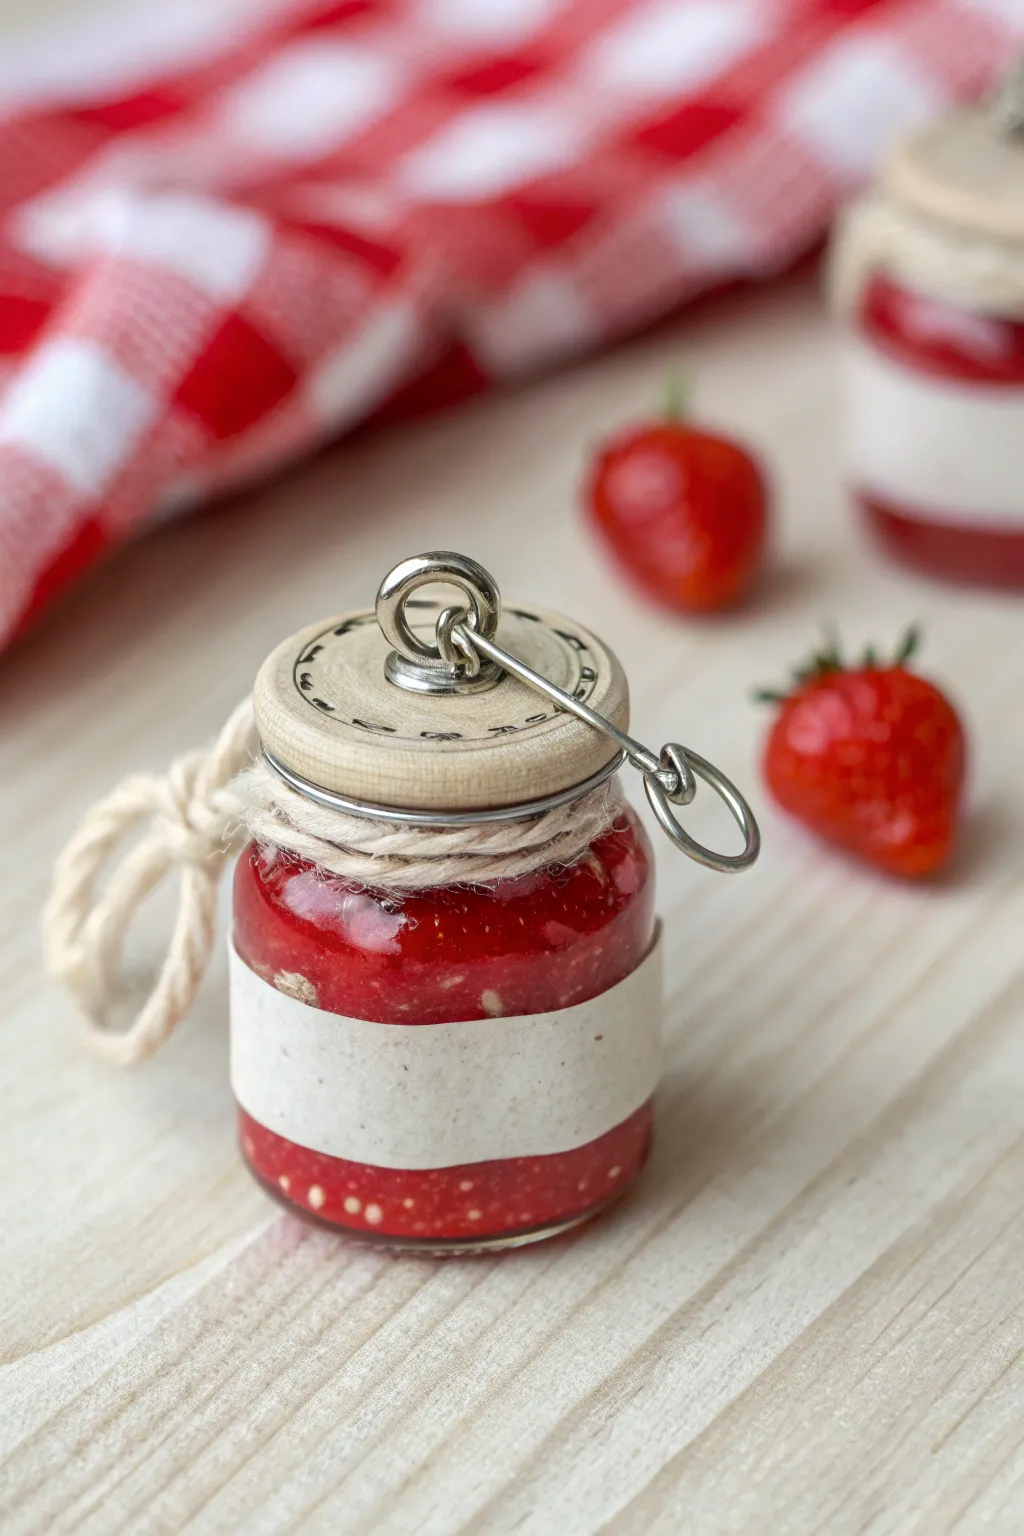
Capture the sweetness of summer with this adorable miniature strawberry jam jar charm. Filled with a realistic, translucent fruit mixture and topped with a rustic wooden lid, this tiny treasure fits perfectly on a necklace or keychain.
Step-by-Step Guide
Materials
- Miniature glass jar (approx. 2cm)
- Translucent liquid polymer clay (e.g., Fimo Liquid or Sculpey TLS)
- Red alcohol ink or glass paint
- Red polymer clay (very small amount)
- White/beige polymer clay (for the seeds)
- Tan/beige polymer clay (for the lid)
- Brown acrylic paint
- Fine-tipped paintbrush
- Small piece of beige paper or masking tape
- Jute twine or thin hemp string
- Eye screw (silver tone)
- Super glue or strong craft glue
- Gloss varnish (optional)
- Needle tool or toothpick
- UV resin (optional, for sealing)
Step 1: Preparing the Jam Mixture
-
Mix the base:
Squeeze a generous amount of liquid polymer clay into a small mixing cup or on a tile. You’ll need enough to fill your miniature jar almost to the neck. -
Tint the ‘jam’:
Add one drop of red alcohol ink to the liquid clay. Stir gently until you have a rich, translucent red color that resembles strawberry syrup. If it’s too pale, add another half-drop, but keep it transparent. -
Create strawberry chunks:
Take a tiny pinch of solid red polymer clay and chop it into microscopic irregular bits using a craft knife. These will act as the fruit chunks suspended in the jam. -
Make the seeds:
Roll a minuscule amount of white or beige clay into a super-thin snake, then chop it into tiny specks. Include these specks and the red chunks into your liquid red mixture and stir well.
Cloudy Jam Fix
If your liquid clay looks milky after baking, you likely used too much solid clay pigment. Next time, stick strictly to translucent alcohol inks for that clear, jelly-like transparency.
Step 2: Filling and Baking
-
Fill the jar:
Carefully pour or scoop the red mixture into your miniature glass jar. I find using a toothpick helps guide the liquid down without smearing the neck. -
Pop air bubbles:
Tap the jar gently on your work surface to release trapped air. Pop any stubborn surface bubbles with a needle tool. -
First bake:
Place the open jar in your oven and bake according to the liquid clay instructions (usually around 275°F/130°C) for about 15 minutes to set the jam.
Seed Realism
Instead of clay, try mixing real poppy seeds or crushed dried spices like paprika into the liquid clay for incredibly realistic, organic textures inside the jar.
Step 3: Creating the Rustic Lid
-
Form the lid base:
Condition a ball of tan polymer clay. Flatten it into a thick disc that is just slightly larger than the opening of your glass jar. -
Texture the wood:
Use a needle tool to scratch concentric circles and slight grain lines into the top and sides of the disc to simulate a turned wooden lid. -
Insert hardware:
Gently screw the metal eye screw into the center of the raw clay lid. Remove it, add a tiny dot of liquid clay or glue to the hole, and screw it back in to ensure a permanent bond after baking. -
Paint details:
Using a very fine brush and diluted brown acrylic paint, carefully highlight the etched grain lines and add small decorative dashed lines around the rim for a rustic look. -
Second bake:
Place the clay lid on top of the cooled glass jar (or bake separately if you prefer) and bake again for the full duration recommended for your brand of solid clay.
Step 4: Assembly and Finishing Touches
-
Secure the lid:
Once everything is cool, use super glue to permanently attach the clay lid to the glass jar rim if it wasn’t bonded during baking. -
Add the twine:
Cut a short length of thin jute twine. Wrap it around the neck of the jar, just under the lid, and tie a small, tight knot or bow. Secure the knot with a dab of glue so it doesn’t unravel. -
Create the label:
Cut a thin strip of beige paper or masking tape. It should be wide enough to look like a label but narrow enough to show off the jam above and below it. -
Attach the label:
Wrap the paper strip around the belly of the jar. Use craft glue to secure the ends at the back. -
Optional glaze:
For extra shine and durability, you can brush a thin layer of gloss varnish over the clay lid, avoiding the metal hardware.
Now you have a charming miniature preserve to sweeten up your accessory collection
Mini Pumpkin Patch Desk Minis
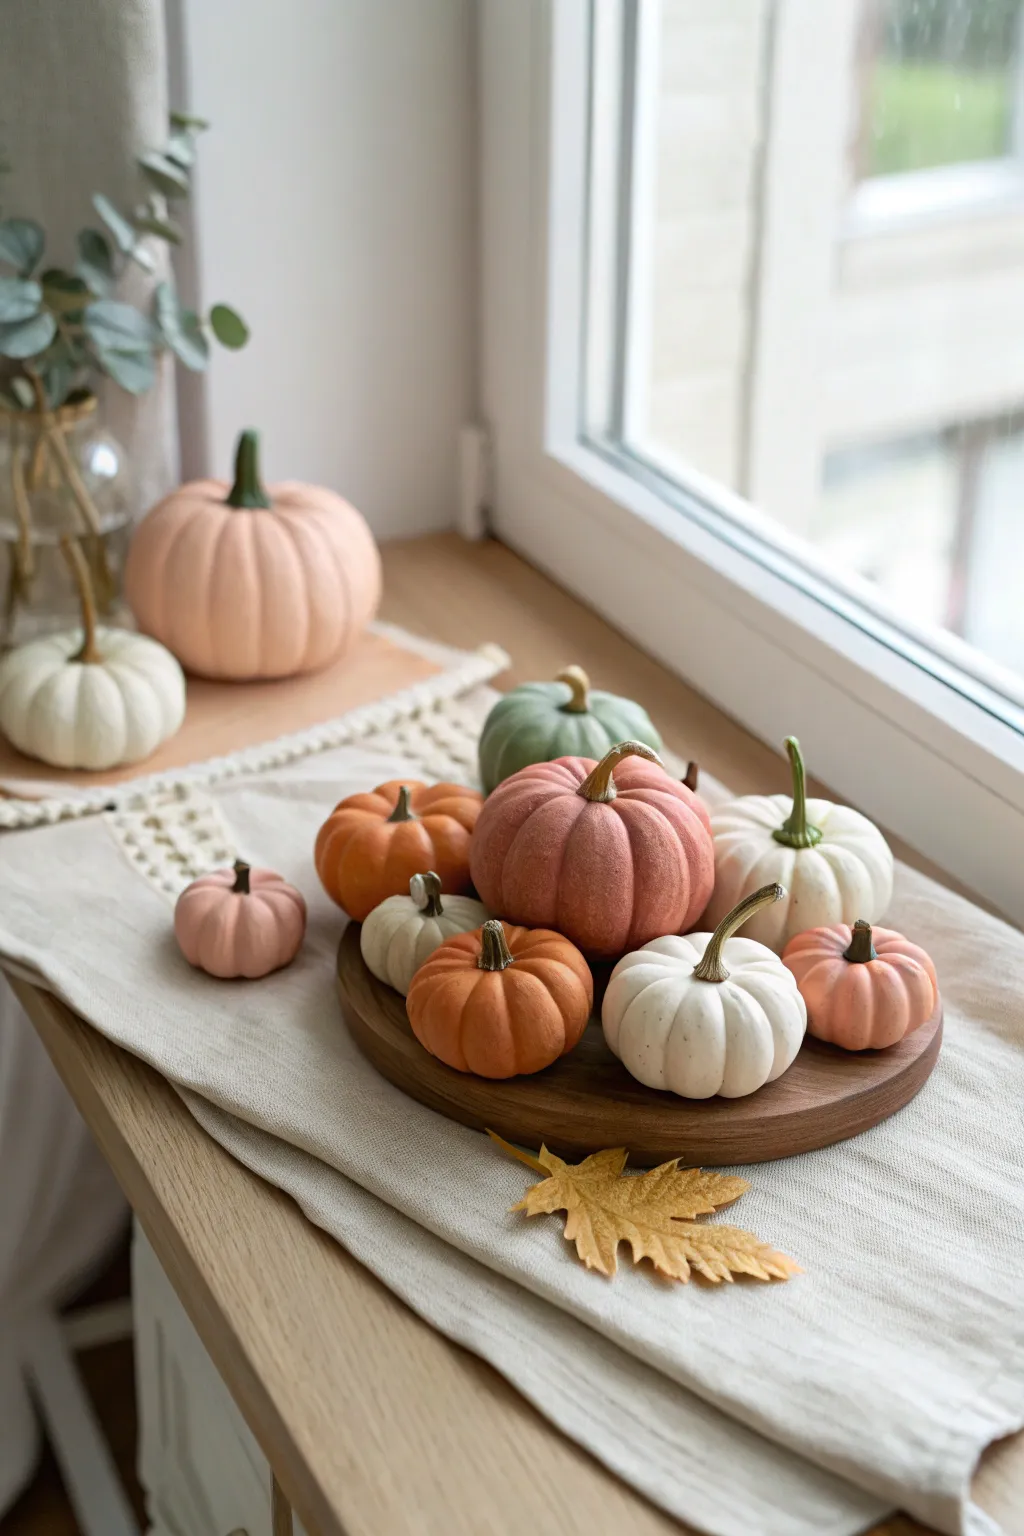
Bring the cozy charm of a pumpkin patch right to your desk with these realistic, miniature polymer clay pumpkins. Featuring a sophisticated palette of sage, blush, and cream, these tiny sculptures add a subtle touch of fall without overwhelming your decor.
Step-by-Step Tutorial
Materials
- Polymer clay (white, translucent, earthy orange, blush pink, sage green)
- Needle modeling tool
- Small ball stylus tool
- Soft pastel chalks (browns, burnt sienna, moss green)
- Small soft paintbrush
- Acrylic paint (dark brown/black green for stems)
- Fine detail brush
- Aluminum foil (optional for bulk)
- Matte varnish
Step 1: Color Mixing and Prep
-
Create custom shades:
Start by conditioning your clay. For that sophisticated look, we want muted tones rather than bright primaries. Mix a small amount of white into your orange for a soft terracotta, and blend sage green with a touch of translucent clay for a realistic rind effect. -
Mix the perfect blush:
For the pink pumpkins shown in the image, mix a standard pink with plenty of white and a tiny pinhead-sized dot of brown to desaturate it. This prevents it from looking like bubblegum. -
Prepare the stems:
Mix a dark, earthy green clay for the stems. I usually mix green, brown, and a touch of black. Set this aside for later.
Step 2: Shaping the Bodies
-
Form the base sphere:
Roll a piece of conditioned clay into a smooth ball. Vary the sizes between 1 inch and 2 inches to match the assortment in the photo. Slightly flatten the ball by pressing it gently onto your work surface. -
Create the segments:
Using a needle tool or a dull knife edge, press vertical indentations from the center top to the center bottom all around the sphere. These lines define the pumpkin’s ribs. -
Round the ribs:
Gently press your finger or a large ball tool into the ‘valleys’ of the indentations you just made to smooth them out. You want the segments to look puffy and round, not sharp. -
Indent top and bottom:
Use a medium ball stylus to press a deep indentation into the top center where the stem will go. Make a smaller, shallower indentation on the bottom.
Realism Trick
Mix a tiny amount of translucent clay into your main colors (about 1 part translucent to 4 parts color). This creates a ‘waxy’ depth that mimics real pumpkin rind.
Step 3: Texturing and Shading
-
Apply shading powder:
Scrape a little powder from your soft pastel chalks. Using a soft dry brush, dust a darker shade of the pumpkin’s color (or a soft brown) into the vertical creases. This adds instant depth and realism. -
Highlight the tops:
For the lighter pumpkins, lighter white pastel dust on the very tops of the ribs can help them look sun-bleached and natural. -
Add skin texture:
If you want a rustic look, gently tap the surface with an old toothbrush or a piece of sandpaper to remove fingerprints and add a natural skin texture.
Fixing Flat Spots
If your pumpkins develop flat bottoms from sitting on the baking tray, bake them on a bed of polyester batting or cornstarch to cradle their round shape.
Step 4: Stem and Details
-
Shape the stem:
Take a tiny snake of your dark stem clay. Roll one end slightly thinner than the other. Twist it slightly to give it a dried, organic look. -
Attach the stem:
Press the fatter end of the stem into the top indentation of the pumpkin. You can use a tiny drop of liquid clay or bake-and-bond for extra security. -
Blend the connection:
Use a needle tool to drag tiny bits of the stem clay down onto the pumpkin skin, mimicking how a real stem grows out of the fruit. -
Texture the stem:
Score vertical lines heavily into the stem with your needle tool. Real pumpkin stems are quite fibrous and rough.
Step 5: Baking and Finishing
-
Bake the batch:
Place your pumpkins on a ceramic tile or baking sheet. Bake according to your clay manufacturer’s instructions, typically at 275°F (135°C) for 30 minutes per 1/4 inch of thickness. -
Cool down:
Allow them to cool completely in the oven. This annealing process makes the clay stronger. -
Final dry brushing:
Once cool, use a tiny amount of off-white acrylic paint on a dry brush to highlight the ridges of the stem and the high points of the pumpkin ribs. -
Seal the work:
Apply a thin coat of matte varnish. Avoid glossy finishes, as real pumpkins have a satin or matte skin. This protects the pastel shading from rubbing off.
Arrange these charming little gourds on a wooden coaster or windowsill for instant seasonal atmosphere
Tiny Ghost With a Mini Pumpkin
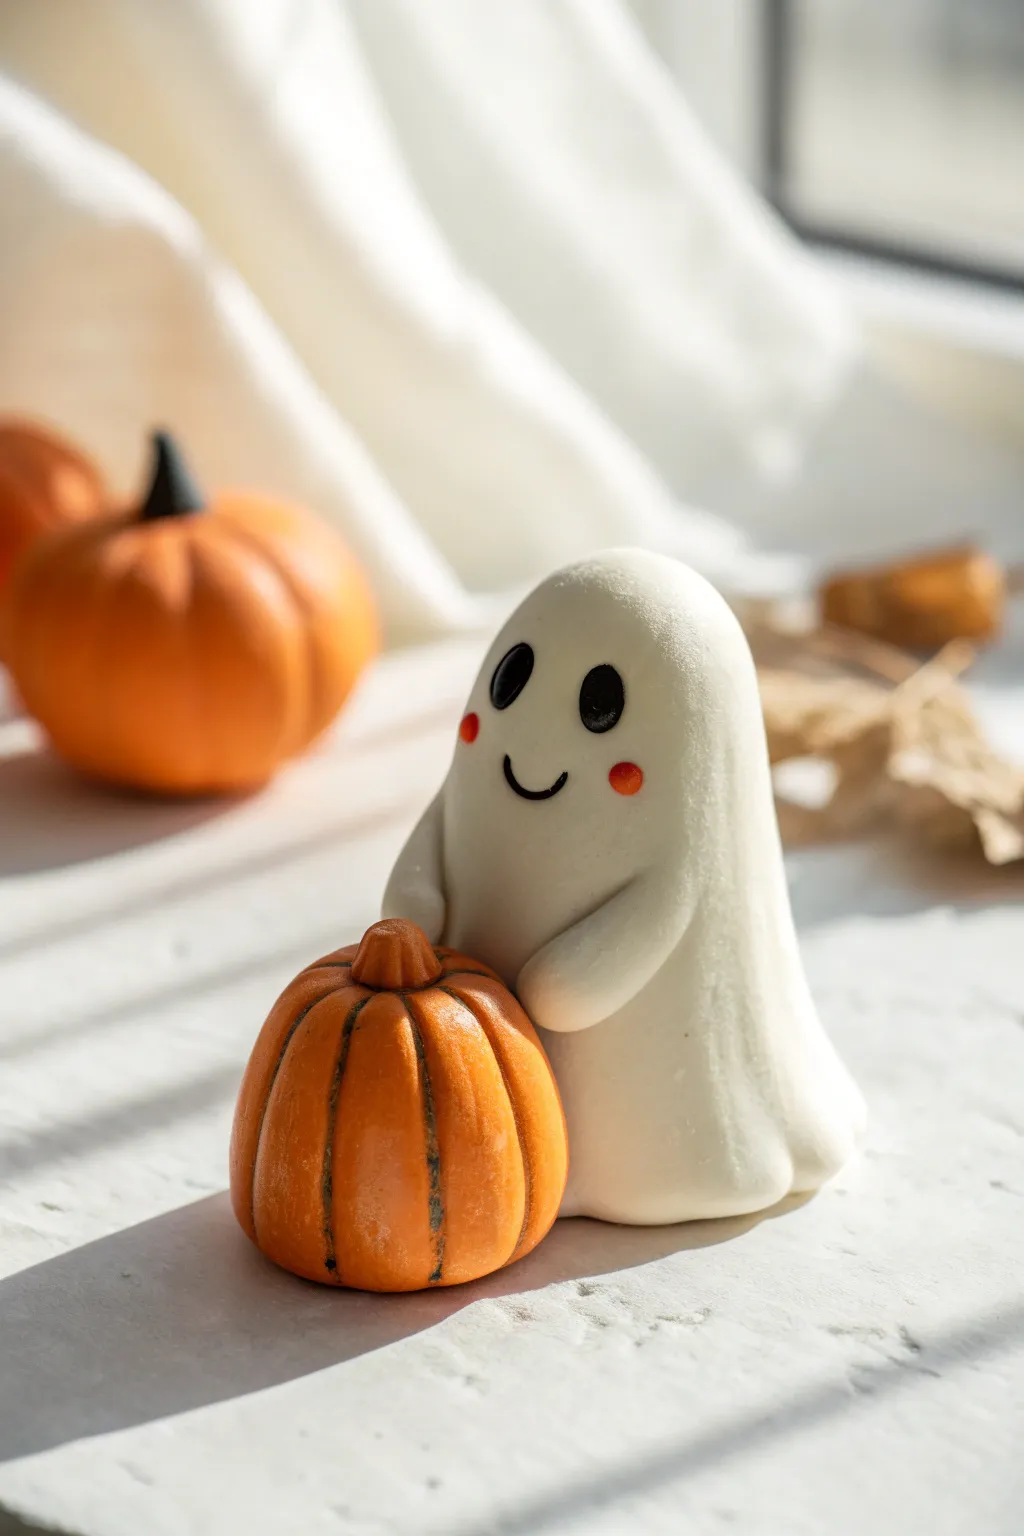
Capture the spirit of Halloween with this adorable polymer clay duo featuring a smooth, friendly ghost cradling a mini pumpkin. The clean white finish and charming red cheeks make this a perfect desk companion or seasonal decoration.
Detailed Instructions
Materials
- White polymer clay
- Orange polymer clay
- Black polymer clay
- Translucent liquid clay (Bake & Bond)
- Small ball stylus or dotting tool
- Needle tool or toothpick
- Acrylic roller or pasta machine
- Red soft pastels (or blush)
- Small soft paintbrush
- Blade or craft knife
- Wet wipes (essential for white clay)
Step 1: Shaping the Ghost
-
Clean hands first:
Before touching the white clay, scrub your hands thoroughly and wipe down your work surface. White clay picks up every speck of dust, so starting clean is crucial. -
Form the body base:
Roll a smooth ball of white clay about the size of a walnut. Gradually shape this into a tapered cone or gumdrop shape, keeping the bottom flat so it stands on its own. -
Create the head:
Round out the top of the cone shape to form a smooth, domed head. The transition from head to body should be seamless, with no neck indentation. -
Add movement to the base:
Gently pinch and pull the very bottom edges of the ghost outward slightly to create the look of a flowing sheet. Use your fingers to soften any sharp edges. -
Form the arms:
Create two small, equal-sized logs of white clay for the arms. They should be slightly teardrop-shaped. -
Attach the arms:
Press the wider end of each arm onto the ghost’s sides, blending the clay where it joins the body so it looks like one solid piece. Curve the rounded ends forward as if the ghost is reaching out to hold something.
Keep it Clean
White clay shows dust easily. Keep a scrap of spare white clay nearby and roll it in your hands periodically—it acts like a magnet, pulling dust off your skin before you touch the main project.
Step 2: Making the Pumpkin
-
Create the pumpkin sphere:
Roll a ball of orange clay slightly smaller than the ghost’s lower body. Slightly flatten the top and bottom to get that classic pumpkin shape. -
Indent the stem area:
Use a ball tool to make a small indentation in the center of the top where the stem will sit. -
Sculpt the ribs:
Take a needle tool or the back of a craft knife and gently press vertical lines around the pumpkin, running from top to bottom. These ribs give the pumpkin its realistic segments. -
Texture the surface:
For a rustic look, you can lightly stipple the surface of the orange clay with a stiff brush or a piece of sandpaper, avoiding the deep rib lines. -
Add the stem:
Mix a tiny bit of orange with a speck of brown or use pure orange for the stem. Roll a tiny cylinder, press it into the top indentation, and use a needle tool to create vertical texture lines on it. -
Shade the pumpkin:
I like to scrape a little brown or dark orange pastel into a powder. Dry brush this powder into the vertical crevices of the pumpkin to add depth and dimension.
Step 3: Assembly and Details
-
Connect the figures:
Place a tiny drop of liquid clay or Bake & Bond inside the curve of the ghost’s arms. Gently press the pumpkin into place so the ghost appears to be holding it securely. -
Add the eyes:
Press two small indentations into the ghost’s face with a ball tool. Roll two tiny ovals of black clay and press them into these sockets. The oval shape makes the vertical ‘surprised’ look more expressive. -
Create the smile:
Roll an incredibly thin snake of black clay. Cut a tiny U-shape segment and gently press it onto the face between the eyes to create a sweet, simple smile. -
Apply the blush:
Shed some red soft pastel into a fine powder. Using a small, soft brush, gently dab rosy cheeks beneath the eyes. Build the color slowly rather than adding too much at once. -
Final smooth:
Do a final check for fingerprints. Because this ghost is so smooth, you can use a tiny bit of baby oil on your finger to gently buff away any prints before baking. -
Bake:
Bake the figurine according to your clay package directions (usually 275°F/135°C for 15-30 minutes per 1/4 inch thickness). Let it cool completely before handling.
Glow Up
Swap the standard white clay for glow-in-the-dark polymer clay. Your ghost will look cute during the day, but when the lights go out, it will have an eerie, spectral green glow perfect for Halloween.
Now you have a charming little phantom friend ready to haunt your shelf with cuteness
Mini Lily Pads for Fairy Ponds
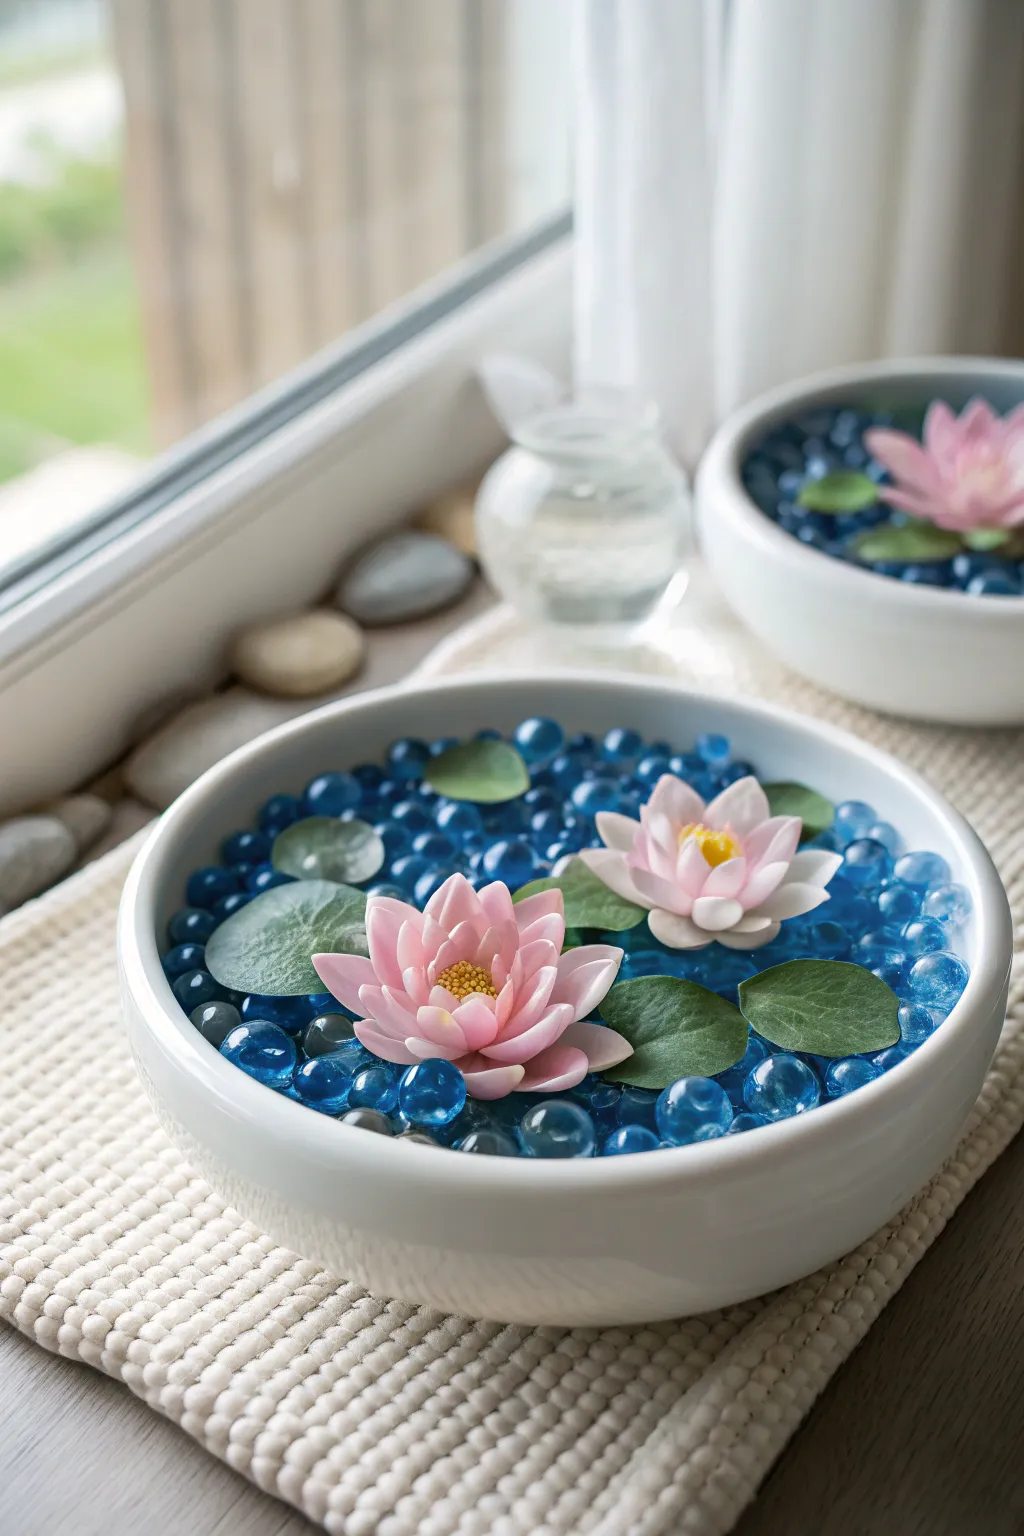
Bring a sense of serenity to your space with these delicate faux water lily ponds. Using polymer clay and vibrant blue glass fillers, you’ll create a permanent, peaceful water feature that never needs watering.
How-To Guide
Materials
- White or light pink polymer clay
- Deep pink or magenta polymer clay (for shading)
- Yellow polymer clay
- Green polymer clay (muted/sage tone)
- Translucent liquid polymer clay
- Small ball stylus tool
- Needle tool
- Curved scissors or clay blade
- Chalk pastels (dark pink and yellow)
- Small paintbrush
- Oven-safe baking tile
- Gloss varnish or UV resin (optional)
- Two shallow white ceramic bowls
- Blue glass marbles or blue hydrogel beads
Step 1: Sculpting the Lotus Flowers
-
Prepare the Clay:
Condition your white clay until it is soft and pliable. Mix in a tiny amount of pink to create a very pale, blush base color. -
Form Petal Teardrops:
Roll small balls of the blush clay, about the size of a pea. Pinch one end of each ball to form a teardrop shape. -
Flatten the Petals:
Place a teardrop on your palm and press your thumb into the center to flatten it, curving the edges slightly upward to mimic a cupped petal shape. -
Create Size Variations:
Repeat this process to make about 15-20 petals per flower. Make three sizes: small for the center, medium for the middle, and slightly larger for the outer ring. -
Shade the Petals:
Scrape some dark pink chalk pastel into a powder. With a dry brush, gently dust the pointed tips and the very base of each petal to add depth. -
Assemble the Center:
Start with the smallest petals. Arrange 3-4 of them in a tight circle, pressing their bases together. I like to use a drop of liquid clay here to ensure they bond well. -
Add Middle Layers:
Attach the medium petals around the center cluster, offsetting them so they sit in the gaps of the previous row. -
Finish the Outer Ring:
Add the largest petals for the final layer, pressing them gently downwards so the flower looks open and blooming. -
Make the Stamen:
Roll a small ball of yellow clay and flatten it slightly. Texture the surface rapidly with a needle tool to create a fuzzy, pollen-like look. -
Insert Stamen:
Place the textured yellow disk into the very center of your flower. Use the ball tool to press it firmly into the petal bases.
Drooping Petals?
If petals flop while building, rest the flower in a small curved piece of foil or an egg carton cup while baking to hold the shape.
Step 2: Creating the Leaves
-
Condition Green Clay:
Mix green clay with a touch of white or grey to achieve a realistic, muted sage tone described in the materials. -
Cut Leaf Shapes:
Roll the clay out thinly. Cut circles or broad ovals. For a lily pad look, cut a small ‘V’ notch into one side of the circle. -
Texture the Leaves:
Lightly press a piece of sandpaper or a texture sponge onto the leaves to give them a natural, matte finish rather than a smooth plastic look. -
Shape for Dimension:
Gently stretch the edges of the leaves with your fingers so they aren’t perfectly flat. Give them a slight wave.
Step 3: Baking and Assembly
-
Bake the Pieces:
Place all flowers and leaves on your baking tile. Bake according to your brand of clay’s instructions (usually 275°F/135°C for 15-30 minutes). -
Cool and Varnish:
Let the pieces cool completely. If you want a ‘wet’ look, brush a thin layer of gloss varnish onto the petals, but keep the leaves matte. -
Prepare the Pond:
Clean your white ceramic bowls. Fill them nearly to the brim with your blue glass marbles or hydrogel beads. -
Arrange the Scene:
Nestle the baked leaves onto the surface of the beads. Place the lotus flowers on top or slightly overlapping the leaves so they appear to be floating.
Realistic Water Effect
Use different shades of blue beads mixed with clear ones to create depth and shimmer that mimics real sunlight hitting water.
Place your finished lotus bowls near a sunlit window to enjoy the sparkle of the faux water garden
Tiny Dollhouse Tea Set Pieces
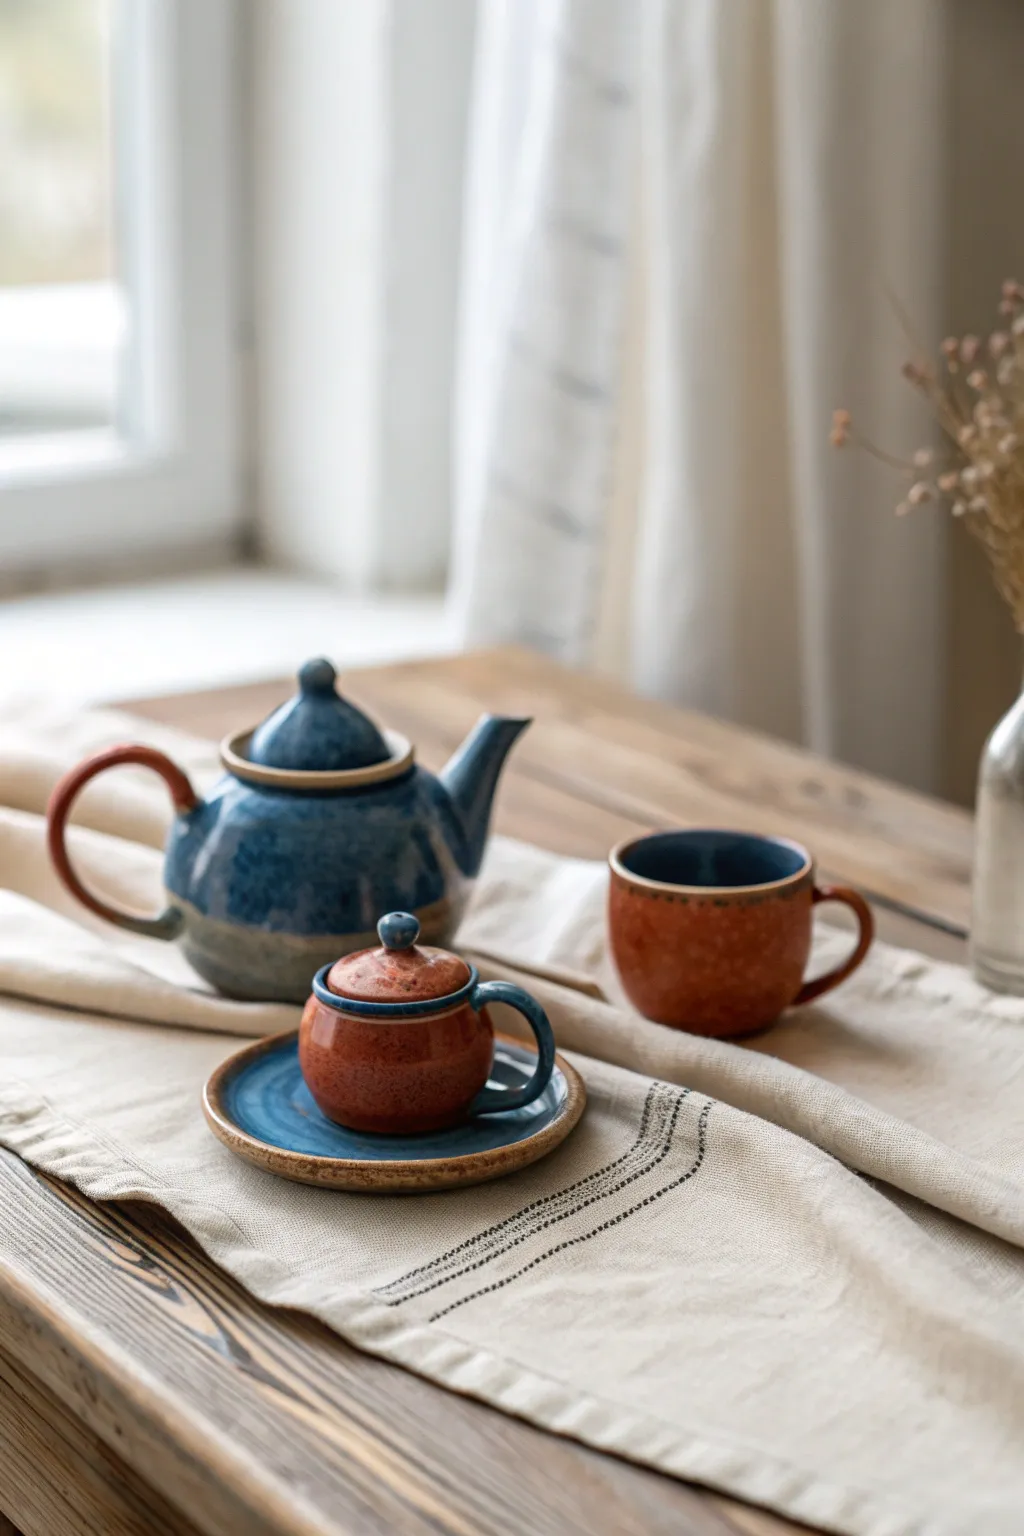
Create a charmingly small tea set with a distinct rustic flair, combining earthy terracotta tones with deep denim blue glazes. The speckled finish gives these tiny polymer clay pieces the authentic look of hand-thrown pottery.
Detailed Instructions
Materials
- Polymer clay (terracotta/rust orange color)
- Polymer clay (translucent white)
- Liquid polymer clay (Fimo or Sculpey)
- Chalk pastels (dark blue, black, brown)
- Gloss glaze (polyurethane or UV resin)
- Needle tool
- Ball stylus tools (various sizes)
- X-acto knife
- Small paintbrush
- Sandpaper (fine grit)
Step 1: Shaping the Teapot
-
Base Formation:
Start by conditioning a marble-sized ball of terracotta clay. Gently pinch and roll it into a squat, rounded bulb shape slightly wider at the bottom to form the main body of the teapot. -
Adding the Spout:
Roll a small snake of clay, tapering one end. Curve it gently into an S-shape. Use your needle tool to blend the thicker end firmly onto the upper third of the teapot body, smoothing the seam until invisible. -
Structuring the Handle:
Create a thinner snake of terracotta clay. Attach it opposite the spout, forming a large, distinct loop. The handle should have a generous curve, mimicking the photo’s ‘ear’ shape. -
Lid Details:
Press a small indentation into the top of the pot. Roll a tiny cone shape for the lid and place it into the depression. Add a miniscule ball on top for the knob.
Step 2: Creating the Cup and Pot
-
Forming the Cup:
Roll a pea-sized ball of terracotta clay. Press a medium ball stylus into the center to hollow it out, keeping the walls relatively thick to match the rustic pottery style. -
Cup Handle:
Attach a very small, thin C-shaped coil to the side of the cup. Use the tip of your needle tool to blend the contact points securely. -
Sugar Bowl Base:
Make a slightly smaller version of the teapot body but keep it rounder. Flatten the bottom gently so it sits stable. -
Sugar Bowl Lid:
Create a separate, slightly flattened dome that fits the top of the sugar bowl. Add a tiny spherical knob to the center. -
The Saucer:
Flatten a small disk of clay. Use the back of a paintbrush or a large ball tool to gently indent the center, creating a slight rim around the edge.
Uneven is Authentic
Don’t stress about perfect symmetry. Rustic pottery is handmade, so slight wobbles in the rim or handle shape actually make the miniature look more realistic and charming.
Step 3: Texturing and Baking
-
Speckling Effect:
Shave a very small amount of black and brown chalk pastel into a fine dust. Mix this sparingly into a bit of translucent liquid clay to create a dirty wash. -
Applying Texture:
Stipple this wash onto the raw clay pieces using an old stiff brush. This creates the ‘stone’ texture visible in the unglazed sections. -
First Bake:
Bake all pieces according to your clay package instructions (usually 275°F/130°C for 15-20 minutes). Let them cool completely.
Sticky Handles?
If tiny handles keep drooping or won’t stick, try using a drop of ‘Bake and Bond’ or liquid clay as glue. You can also pre-bake the handles for 5 minutes before attaching.
Step 4: Glazing and Finishing
-
Mixing the Blue Glaze:
Mix liquid polymer clay with shaved dark blue chalk pastel. I like to add a tiny touch of black to deepen the tone so it looks like ceramic glaze. -
Glazing the Teapot:
Point your paintbrush carefully and apply the blue mixture to the top half of the teapot, the lid, and the spout. Leave the bottom third and the handle as raw terracotta. -
Glazing the Small Pot:
Apply the blue mixture to the handle and a small rim detail, leaving the main body orange. For the saucer, paint the interior circle blue. -
Glazing the Cup:
Paint the inside of the cup blue. Carefully paint the outer rim blue as well, letting the line be slightly organic and uneven. -
Final Cure:
Bake the pieces again for 10-15 minutes to set the liquid clay ‘glaze’ layer. -
High Gloss Finish:
Once cool, coat ONLY the blue painted areas with a high-gloss polyurethane varnish or UV resin. This mimics the shine of fired ceramic glaze while keeping the orange parts matte.
Arrange your tiny ceramic collection on a linen scrap to complete the cozy farmhouse vignette
Stackable Mini Animal Head Tokens
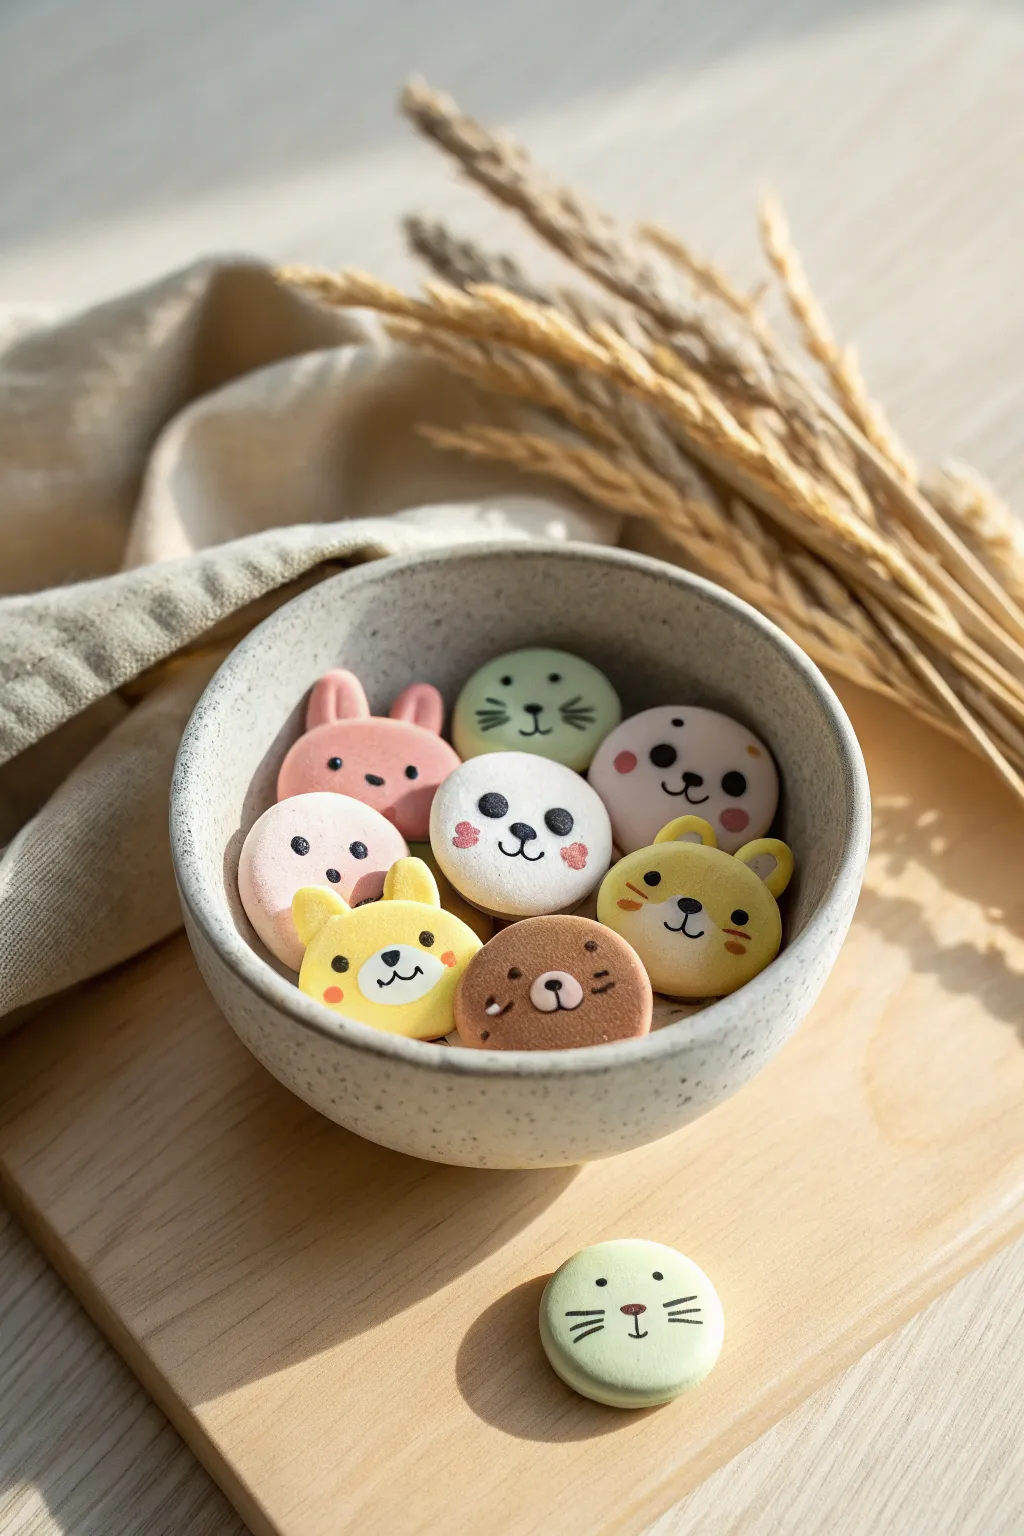
These adorable, stackable animal tokens are perfect for board games, magnets, or simply as pocket-sized companions. With their soft matte finish and simple geometric faces, they capture a charming minimalistic aesthetic.
Step-by-Step
Materials
- Polymer clay (white, pastel pink, pale yellow, brown, mint green, grey)
- Circle cutters (approx. 1 inch diameter)
- Acrylic rolling pin
- Parchment paper or ceramic tile
- Ball stylus tool (small)
- Needle tool or toothpick
- Black acrylic paint or fine-point posca marker
- Pink soft pastel chalk (for cheeks)
- Small paintbrush
- Matte varnish or polyurethane sealer
- Oven for baking
Step 1: Base Shaping
-
Condition the clay:
Begin by warming up your clay colors in your hands until they are soft and pliable. You’ll need separate balls for your base colors: pink for rabbits, yellow for tigers, brown for bears, white for seals, and mint for cats. -
Roll universal sheets:
Using your acrylic roller, roll each color out onto parchment paper to a uniform thickness of about 4-5mm. Use playing cards stacked on either side of your roller as depth guides if you struggle with evenness. -
Cut the circles:
Use your circle cutter to punch out the main head shapes. Create as many as you like of each color. Smooth the cut edges gently with your finger to round them off slightly so they look like soft cookies.
Clean Edges Pro Tip
Before baking, use a bit of baby oil or clay softener on your finger to smooth out any fingerprints or lint. This ensures the matte finish looks professional and flawless.
Step 2: Adding Ears and Features
-
Forming rabbit ears:
For the pink rabbit, roll two small logs of pink clay. Flatten them slightly into long ovals and press them firmly onto the top edge of the pink circle. Use a silicone tool to blend the seam at the back. -
Adding bear and tiger ears:
Roll tiny balls of clay matching the head color (brown or yellow). Press these onto the top sides of the circles. Use your ball stylus to create a small indentation in the center of each ear for depth. -
Creating the seal snout:
The white seal tokens (and the mint cat) get their distinct look from being perfectly round without external ears, but adding a tiny flattened oval of white clay in the lower center creates a cute snout area. -
Baking step:
Arranging your tokens on a tile or parchment-lined baking sheet. Bake according to your clay manufacturer’s instructions (usually 275°F/135°C for 15-30 minutes). Let them cool completely before decorating.
Step 3: Painting Faces
-
Drafting the faces:
If you’re nervous about painting directly, lightly sketch the eyes and mouth placement with a pencil. Aim for wide-set eyes to maximize the cute factor. -
Painting the eyes:
I prefer using a dotting tool or the end of a paintbrush dipped in black acrylic paint to stamp perfectly round eyes. Keep them solid black for a graphic look. -
Drawing mouths and noses:
Use a super fine detail brush or a fine-point paint marker to draw the tiny ‘W’ shaped mouths, triangular noses, and whiskers. The mint cat needs three straight whiskers on each cheek. -
Adding tiger stripes:
For the yellow tiger tokens, paint three small horizontal stripes on the forehead and two on each cheek using a brown or dark orange paint.
Level Up: Magnets
Glue a strong neodymium magnet into the back of each token before or after baking. They turn your fridge into a cute, modular zoo that holds up photos.
Step 4: Finishing Touches
-
Blushing cheeks:
Scrape a little pink soft pastel chalk into a powder. Use a dry, soft brush to gently dust rosy cheeks onto your animals right below the eyes. This dry application gives a soft, airbrushed look. -
Sealing the work:
Once the paint is fully dry, coat each token with a layer of matte varnish. This protects the paint and the pastel blush while maintaining that soft, biscuit-like texture shown in the photo.
Stack them up in a little bowl or scatter them across your desk for an instant mood booster
Mini Shaker Charm “Sprinkle Jar”
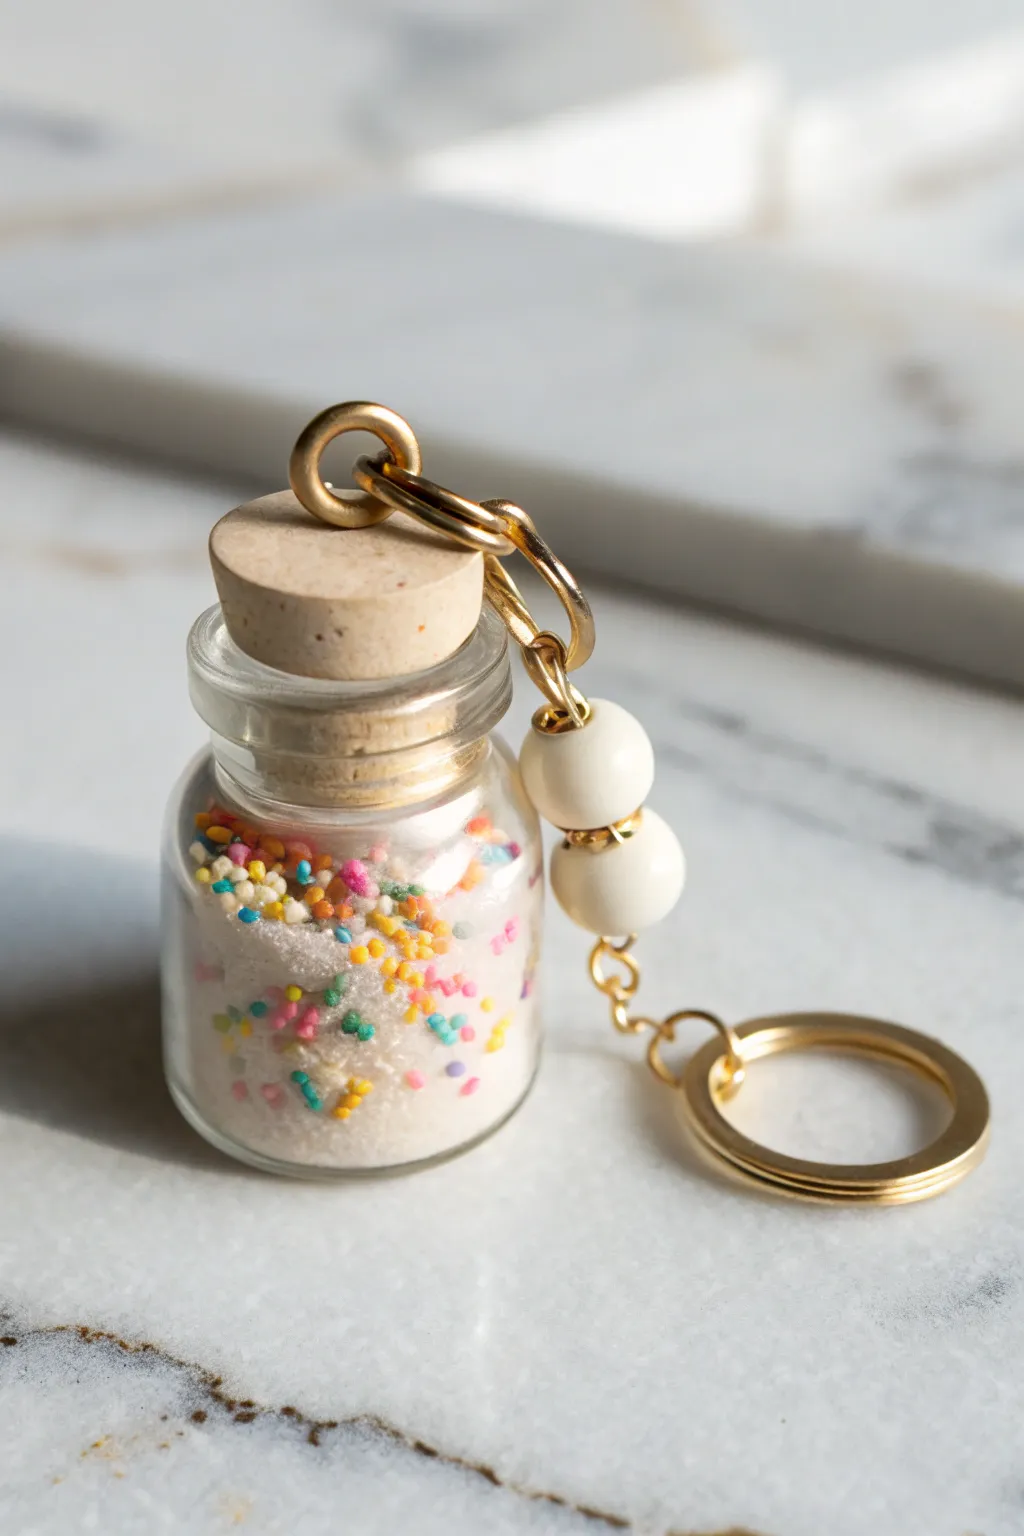
Capture the sweetness of baking in a tiny, portable charm that shakes and rattles with delight. This adorable miniature jar is filled with faux sugar and handmade rainbow sprinkles, making it a perfect accessory for bakers and candy lovers alike.
Step-by-Step Guide
Materials
- Small glass vial with cork stopper (approx. 1-1.5 inches)
- White polymer clay (for the ‘sugar’)
- Assorted colors of polymer clay (red, orange, yellow, green, blue, pink)
- Extruder tool with small circle disc (optional, but helpful)
- Liquid polymer clay (bakeable adhesive)
- Gold screw eye pin
- Two white beads (wooden or plastic)
- Gold jump rings (approx. 4-6mm)
- Gold split ring keychain
- Needle nose pliers
- Super glue or E6000
- Cheese grater or fine sandpaper
- Oven for baking
Step 1: Making the Filler
-
Create the clay sprinkles:
To make the tiny nonpareils, condition small amounts of your colored clays. Roll them into incredibly thin snakes by hand, or use a clay extruder with a small hole disc for uniform thickness. -
Bake the sprinkle strands:
Place these long, thin strands on a tile or baking sheet. Bake them according to your clay manufacturer’s instructions, usually at 275°F (130°C) for about 15 minutes. They need to be fully cured to be hard enough to chop. -
Chop the sprinkles:
Once the strands are cooled, use a sharp craft blade to chop them into tiny bits. Aim for equal sizes to mimic real sprinkles—the smaller, the better for this scale. -
Prepare the faux sugar:
For the ‘sugar’ base, take a block of baked white polymer clay (scrap clay works great here). Grate it against a fine cheese grater or rub it against coarse sandpaper to create white dust and crumbs. -
Mix the mixture:
Combine your white clay ‘sugar’ dust with the colored sprinkle bits in a small bowl. Adjust the ratio until you have a festive, colorful mix that looks like spilled baking ingredients.
Step 2: Assembling the Charm
-
Prepare the cork:
Take the cork stopper out of your glass vial. Gently screw the gold eye pin into the center of the top of the cork. If the cork feels brittle, you can pre-poke a hole with a needle. -
Secure the pin:
Unscrew the eye pin, dip the threads in a tiny drop of super glue or E6000, and screw it back into the cork to ensure it never pulls out. -
Fill the jar:
Using a small paper funnel or a folded piece of paper, carefully pour your sugar-sprinkle mixture into the glass vial until it’s about three-quarters full. -
Seal the bottle:
Apply a thin rim of invisible super glue or craft adhesive around the sides of the cork stopper. Press the cork firmly into the glass neck to seal the contents inside permanently. -
Let it dry:
Allow the adhesive on the cork to dry completely before attaching any hardware to prevent the cork from popping out under tension.
Static vs. Shakeable
To freeze the contents in place (static), mix the filler with UV resin or liquid clay inside the jar and cure. For a shaker, leave dry!
Step 3: Adding the Hardware
-
Attach the first jump ring:
Using two pairs of pliers, twist open a gold jump ring. I find loop-closing pliers help prevent scratching the metal here. Loop it through the eye pin on your cork and close it securely. -
Create the bead link:
If you are using beads like in the photo, thread two white beads onto a separate eye pin or head pin. Create a loop at the top of this pin using round-nose pliers. -
Connect the components:
Attach the bead link to the jump ring on the cork. Then, use another jump ring to connect the top of the bead link to your main gold keychain ring. -
Final check:
Give all your jump rings a final inspection to ensure they are closed flush so the chain doesn’t slip apart.
Bakery Theme Upgrade
Sculpt a tiny polymer clay croissant or donut and attach it as a separate charm onto the chain alongside the jar.
Now you have a sweet little shaker charm that adds a pop of color to any set of keys