Whenever couples sit down with clay together, the piece ends up holding a little bit of both of you. These clay making ideas for couples are all about sweet “two halves of a whole” symbolism you can actually hold, use, and keep close.
Interlocking Puzzle Piece Charms
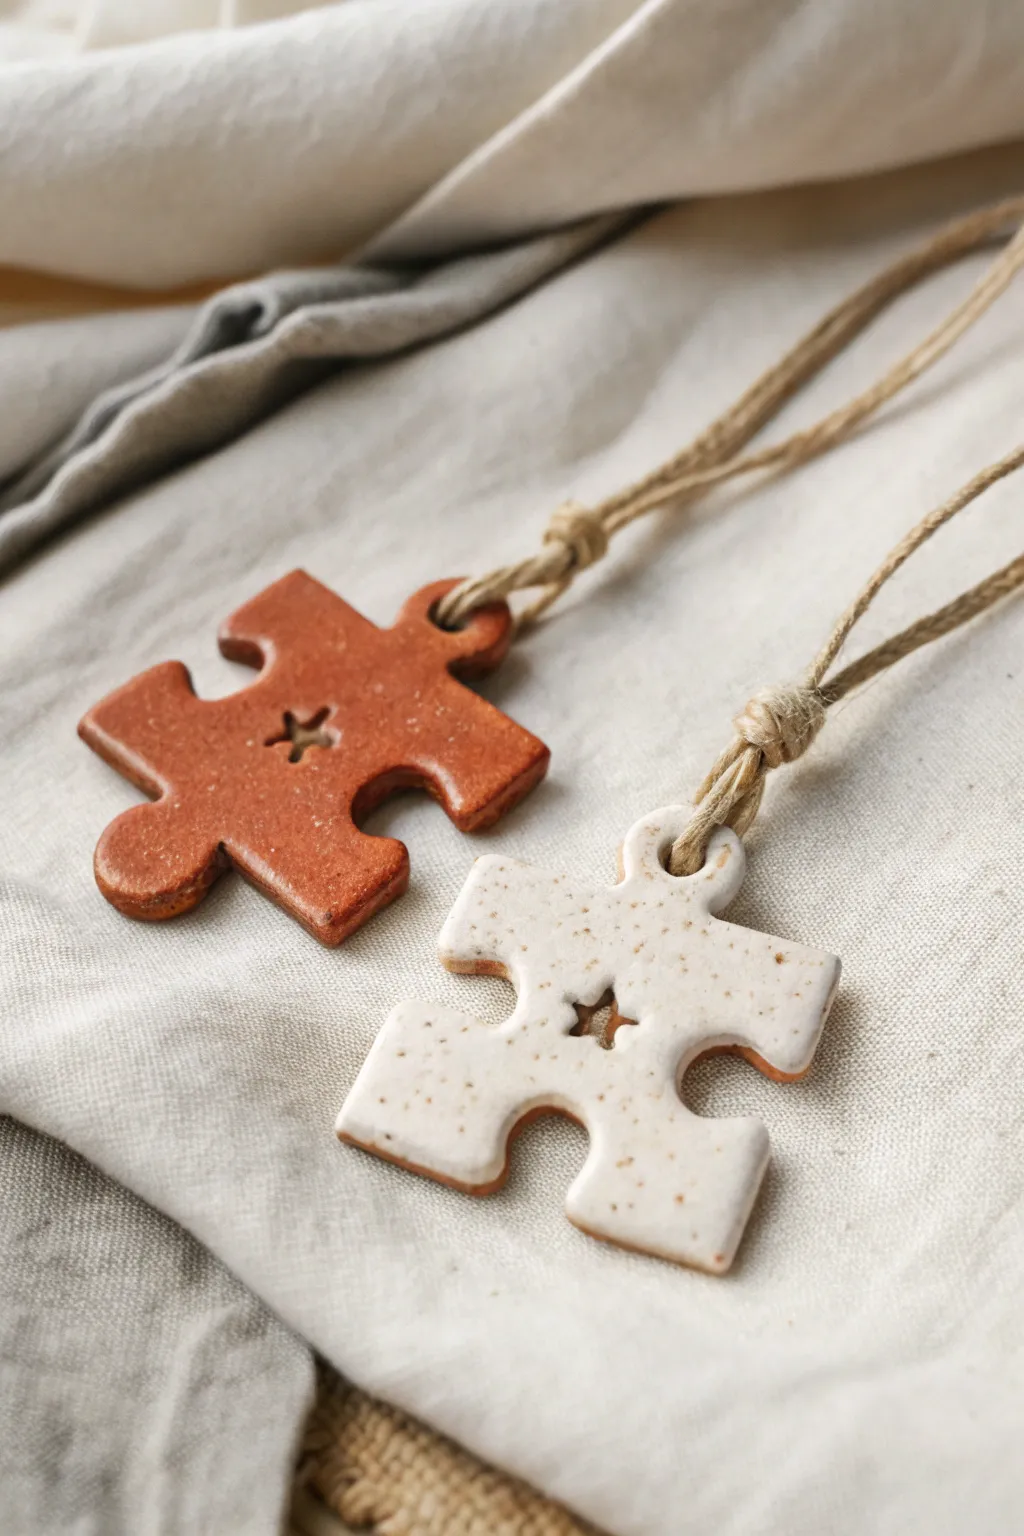
Celebrate your connection with these charming, rustic puzzle piece pendants that fit perfectly together. Crafted from speckled clay and glazed with contrasting earthy tones, they make for a sentimental keepsake or a thoughtful gift to share.
How-To Guide
Materials
- Polymer clay or air-dry clay (terracotta and white/speckled)
- Puzzle piece cookie cutter (or a printed template and craft knife)
- Small star-shaped mini cutter (or a star stamp)
- Rolling pin
- Parchment paper or clay mat
- Straw or cocktail stick (for the hanging hole)
- Gloss varnish or clear sealant (if using air-dry clay)
- Sandpaper (fine grit)
- Hemp twine or leather cord
- Acrylic paints (if using white clay and painting instead of colored clay)
- Ceramic glaze (if using kiln-fire clay)
Step 1: Shaping the Pieces
-
Prepare your workspace:
Lay down a sheet of parchment paper or a silicone clay mat to prevent sticking. This ensures a smooth work surface and makes lifting the delicate shapes easier later. -
Condition the clay:
Take a small ball of your chosen clay—the image shows one reddish-brown terracotta piece and one creamy white speckled piece. Knead the clay in your hands until it is soft, pliable, and free of cracks. -
Roll it out:
Use your rolling pin to flatten the clay to an even thickness of about 1/4 inch (6mm). If you want them to feel sturdy like the photo, don’t roll them too thin. -
Cut the puzzle shapes:
Press your puzzle piece cookie cutter firmly into the clay. If you don’t have a cutter, outline a real puzzle piece lightly on the clay surface and carefully cut around it with a craft knife. -
Create the matching set:
Repeat with the second color of clay. Check that the two pieces actually interlock or look good side-by-side before moving on. -
Add the central star:
Using a tiny star-shaped cutter, punch a hole directly in the center of each puzzle piece. If you lack a cutter, you can freehand a star indentation with a needle tool. -
Make the hanging hole:
Use a drinking straw or a thick cocktail stick to poke a hole near the top edge of one of the puzzle ‘outies.’ Wiggle it slightly to ensure the hole is large enough for your twine to pass through later. -
Smooth the edges:
Dip your finger in a little water (for air-dry clay) or baby oil (for polymer) and gently run it along the cut edges. This softens any sharp corners for a professional finish.
Clay cracked while drying?
For air-dry clay, small cracks can be filled with a ‘slip’ made of clay mixed with a little water. Smooth over the crack, let dry, and sand.
Step 2: Firing and Finishing
-
Dry or bake:
Follow the instructions for your specific clay. For air-dry clay, let the pieces sit undisturbed for 24-48 hours. for polymer clay, bake in the oven according to the package temperature. -
Sand for perfection:
Once fully cured or dried, inspect your edges. Take a piece of fine-grit sandpaper and lightly buff away any remaining roughness or burrs. -
Apply finish or glaze:
To achieve the glossy look in the photo, apply a coat of gloss varnish or clear sealant. If you used real ceramic clay, this is the stage where you would apply a clear glaze and fire it a second time. -
Let it cure:
Allow the varnish or glaze to dry completely. I usually prop them up on a wire rack so the coating doesn’t pool at the bottom. -
Cut the cord:
Cut two lengths of hemp twine or rustic cord, each about 24 inches long, depending on your preferred necklace length. -
Attach the cord:
Fold one piece of twine in half. Push the folded loop through the hole in the puzzle piece from front to back. -
Secure with a lark’s head knot:
Thread the loose ends of the twine through the loop you just pushed through the hole and pull tight. This creates a secure, neat knot right at the pendant. -
Add a secondary knot:
Tie a simple overhand knot about an inch above the pendant connection to mimic the rustic style shown in the reference image.
Personalize It
Before drying, stamp your initials or a significant date on the back of each piece for a hidden sentimental message.
Wear your matching necklaces with pride or gift the other half to someone special.


Matching Mini Mugs for Two
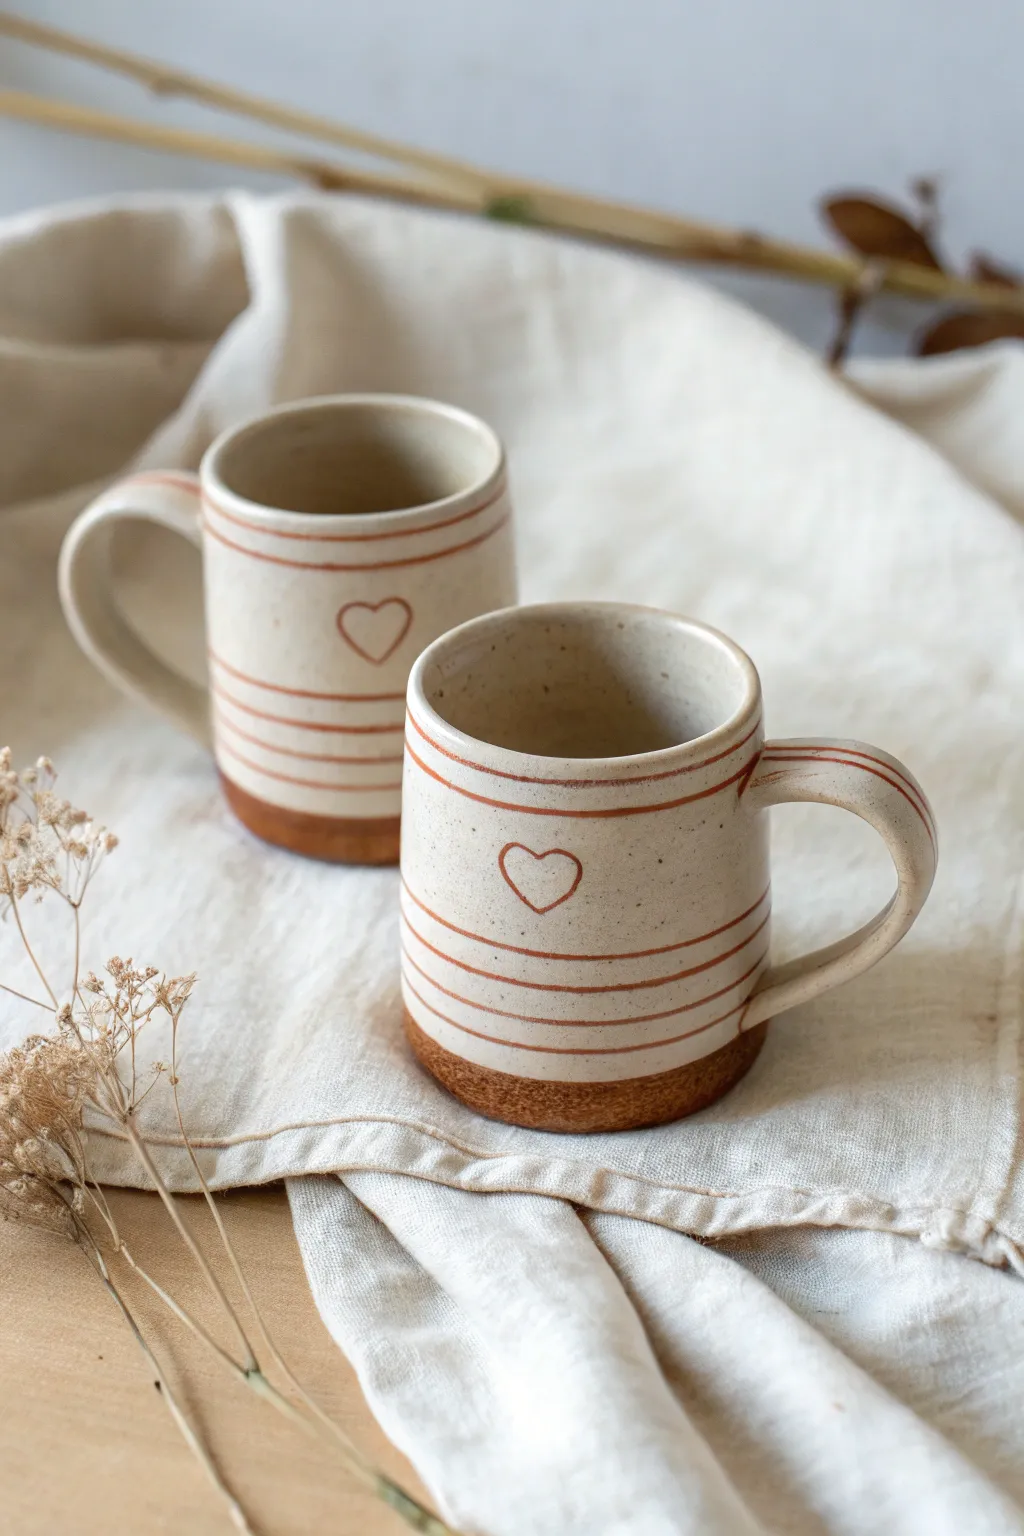
Create an adorable set of matching vessels that are perfect for sharing espresso or tea with your special someone. These wheel-thrown or hand-built mugs feature exposed raw clay bases and charmingly simple hand-painted terra cotta details.
How-To Guide
Materials
- Speckled stoneware clay (approx. 1 lb per mug)
- Pottery wheel (or slab roller/pin for handbuilding)
- Wooden throwing ribs
- Wire cutting tool
- Trimming tools
- Scoring tool and slip
- Red iron oxide wash or terra cotta underglaze
- Small liner brush
- Banding wheel
- Clear or white satin glaze (food safe)
Step 1: Forming the Body
-
Prepare your clay:
Wedge your clay thoroughly to remove air bubbles. For these mini mugs, start with two balls of clay weighing about 3/4 lb to 1 lb each. -
Center and open:
Throw the clay on the wheel, centering it firmly. Open the center and pull the floor flat, leaving it slightly thicker than usual if you plan to trim a foot later. -
Pull the walls:
Pull the walls up into a straight cylinder. Aim for a height of about 3–4 inches. Keep the rim slightly thick and rounded for comfortable sipping. -
Refine the shape:
Use a wooden rib against the outside while supporting the inside to straighten the walls and remove throwing lines. You want a smooth canvas for your stripes later. -
Define the base:
Use a wooden knife or angled tool to undercut the bottom edge slightly, creating a crisp line where the mug meets the bat.
Step 2: Handles and Trimming
-
Dry to leather hard:
Allow your cylinders to dry until they are firm but still cool to the touch (leather hard). This usually takes a day covered loosely with plastic. -
Trim the foot:
Place the mug upside down on the wheel, center it, and trim the excess clay from the bottom. Create a distinct, gritty texture on the bottom inch—this area will remain unglazed. -
Pull a handle:
Pull a strap of clay for the handle. For this design, aim for a classic ‘ear’ shape that is wide enough for two fingers. -
Attach the handle:
Score the mug wall and the handle attachment points deeply. Apply slip, press the handle firmly into place, and smooth the seams with a damp sponge or modeling tool.
Steady Hands
Rest your painting hand on a heavy jar or stack of books while spinning the banding wheel. This anchor point is the secret to getting those perfectly crisp, parallel lines.
Step 3: decorating & Glazing
-
Bisque fire:
Once bone dry, fire the mugs to cone 04 (or your clay body’s bisque temperature). -
Apply wax resist:
Paint a band of wax resist around the bottom 3/4 inch of the mug. This preserves the raw, toasted clay look seen in the photo. -
Glaze the interior:
Pour a white or cream satin glaze inside the mug, roll it around to coat, and pour out the excess. Wipe the rim clean. -
Glaze the exterior:
Dip the exterior of the mug into the same white/cream glaze, stopping right at your wax line. Let this dry completely. -
Paint the stripes:
Place the mug on a banding wheel. Using a fine liner brush and red iron oxide wash (or terra cotta underglaze), hold your hand steady and spin the wheel to create the horizontal rings over the dry glaze. -
Add the heart:
Freehand a simple heart outline in the center of the cylinder using the same oxide or underglaze. I like to keep this line thin and delicate to match the stripes. -
Stripe the handle:
Carefully paint two parallel lines running down the length of the handle to tie the design together. -
Final firing:
Load the kiln and glaze fire to cone 5/6 (or your clay’s maturation point). The oxide will fuse with the glaze during this firing.
Make it a Set
Create a matching small creamer jug using the same stripe pattern but with an inverted heart (point facing up) for a playful variation.
Now you have a charming set of handmade mugs ready for your next cozy coffee date


Nesting Trinket Dishes That Form One Shape
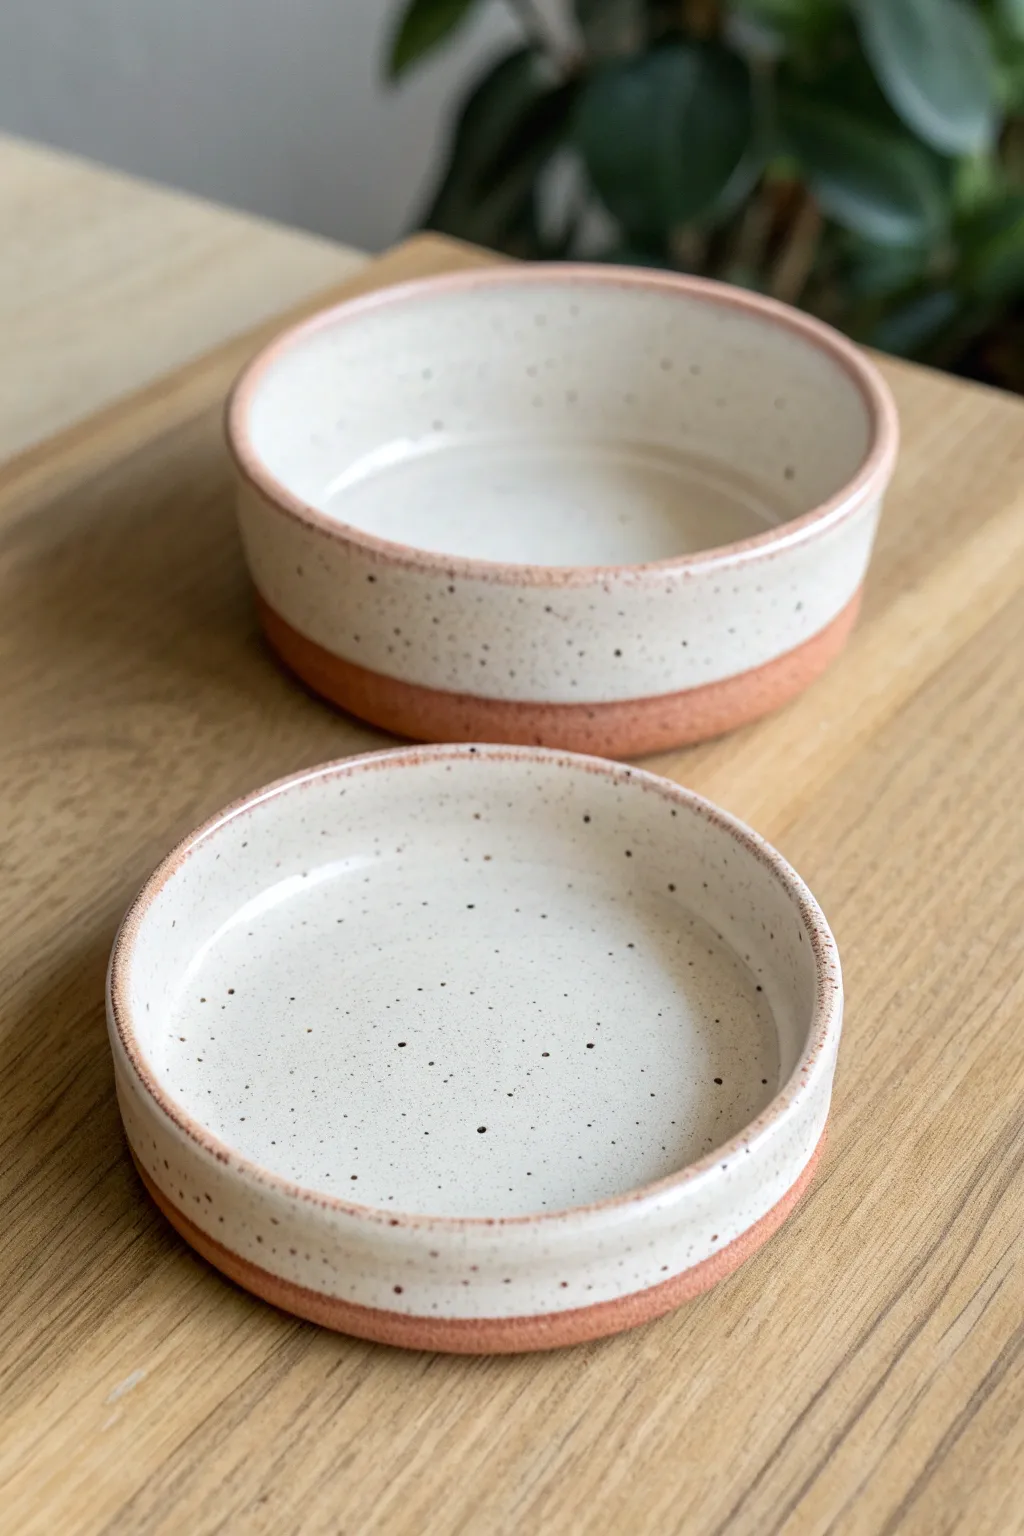
Create a harmonious pair of nesting dishes that balance raw, earthy warmth with a smooth, speckled finish. This project guides you through throwing two perfectly proportioned forms—a deep bowl and a shallow tray—that stack together as a cohesive functional sculpture.
Step-by-Step
Materials
- Speckled clay body (buff stoneware or similar)
- Pottery wheel
- Throwing tools (sponge, needle tool, rib)
- Wire cutter
- Loop trimming tools
- Calipers (optional but recommended for sizing)
- Creamy matte white glaze
- Wax resist
- Sponge for smoothing
- Kiln access
Step 1: Throwing the Base Forms
-
Prepare your clay:
Wedge two balls of speckled clay. For the taller bowl, use slightly more clay (about 1.5 lbs) than for the shallow tray (about 1 lb), ensuring they are free of air bubbles. -
Center the first ball:
Place the larger ball on the wheel head and center it firmly. Since we are making a flat-bottomed nesting set, widen your base to about 4-5 inches depending on your desired final size. -
Open the floor:
Open the clay down to within a quarter-inch of the bat. Compress the floor thoroughly with a flat rib or your fingers to prevent S-cracks later during firing. -
Pull the walls for the bowl:
Pull the walls up vertically to a height of about 2.5 to 3 inches. Keep the walls straight and cylindrical with a distinct 90-degree angle from the floor. -
Check diameter:
Before cutting, measure the outer diameter of the bowl’s rim with calipers. You will use this measurement to match the second piece. -
Throw the shallow tray:
Repeat the centering and opening process with the second ball of clay, matching the base width of the first piece. -
Shape the low rim:
Instead of pulling height, gently raise a low wall about 0.75 inches high. Use your caliper measurement to ensure the rim diameter matches the bowl perfectly. -
Refine the rims:
Use a chamois or sponge to round off the lips of both vessels. A uniform, rounded rim is crucial for visual continuity between the two pieces.
Step 2: Trimming and Refining
-
Dry to leather hard:
Allow both pieces to dry slowly until they are leather hard—firm enough to hold their shape but soft enough to carve. -
Center for trimming:
Invert the bowl on the wheel head and secure it with lugs of clay. Bring the excess clay off the bottom edges using a sharp loop tool. -
Define the foot:
Trim a clean, flat bottom rather than a traditional foot ring for this modern look. I like to create a subtle undercut or notch just above the base to separate the glazed area from the raw clay. -
Match the profiles:
Trim the shallow tray in the same manner. Stack them gently while trimming to ensure the outer walls align vertically when one is placed atop the other. -
Smooth the surface:
Burnish the unglazed portions slightly with a rib to compress the speckles and create a smooth tactile finish on the raw clay.
Uneven Rim Sizes?
If the pieces don’t stack perfectly after firing, use a diamond sanding pad under running water to gently grind the rim of the larger vessel until they sit flush.
Step 3: Glazing and Firing
-
Bisque fire:
Load the bone-dry pieces into the kiln for a bisque fire (usually Cone 04) to prepare them for glazing. -
Apply wax resist:
Paint a straight line of wax resist along the bottom 1/3 of the exterior on both pieces. This will keep the red clay exposed and ensure a crisp glazing line. -
Glaze the interiors:
Pour your creamy white glaze into the interiors of both vessels, swirl quickly to coat, and pour out the excess. Wipe any drips immediately. -
Dip the exteriors:
Holding the piece by the dry foot, dip the exterior into the glaze upside down just until the glaze meets your wax line. Hold for three seconds and lift. -
Clean up:
Use a damp sponge to wipe away any glaze beads that formed on the waxed area or the bottom of the foot. -
Final glaze fire:
Fire the pieces to maturity (likely Cone 5 or 6 depending on your clay body). Ensure they aren’t touching in the kiln.
Clean Lines Pro-Tip
Instead of freehanding the wax resist, put the pot back on the wheel. Spin the wheel slowly and hold your brush steady against the spinning pot for a perfect line.
Stack your finished set on a side table to admire how the raw clay warmth compliments the cool glazed interior.


Two Ring Cones That Make a Heart
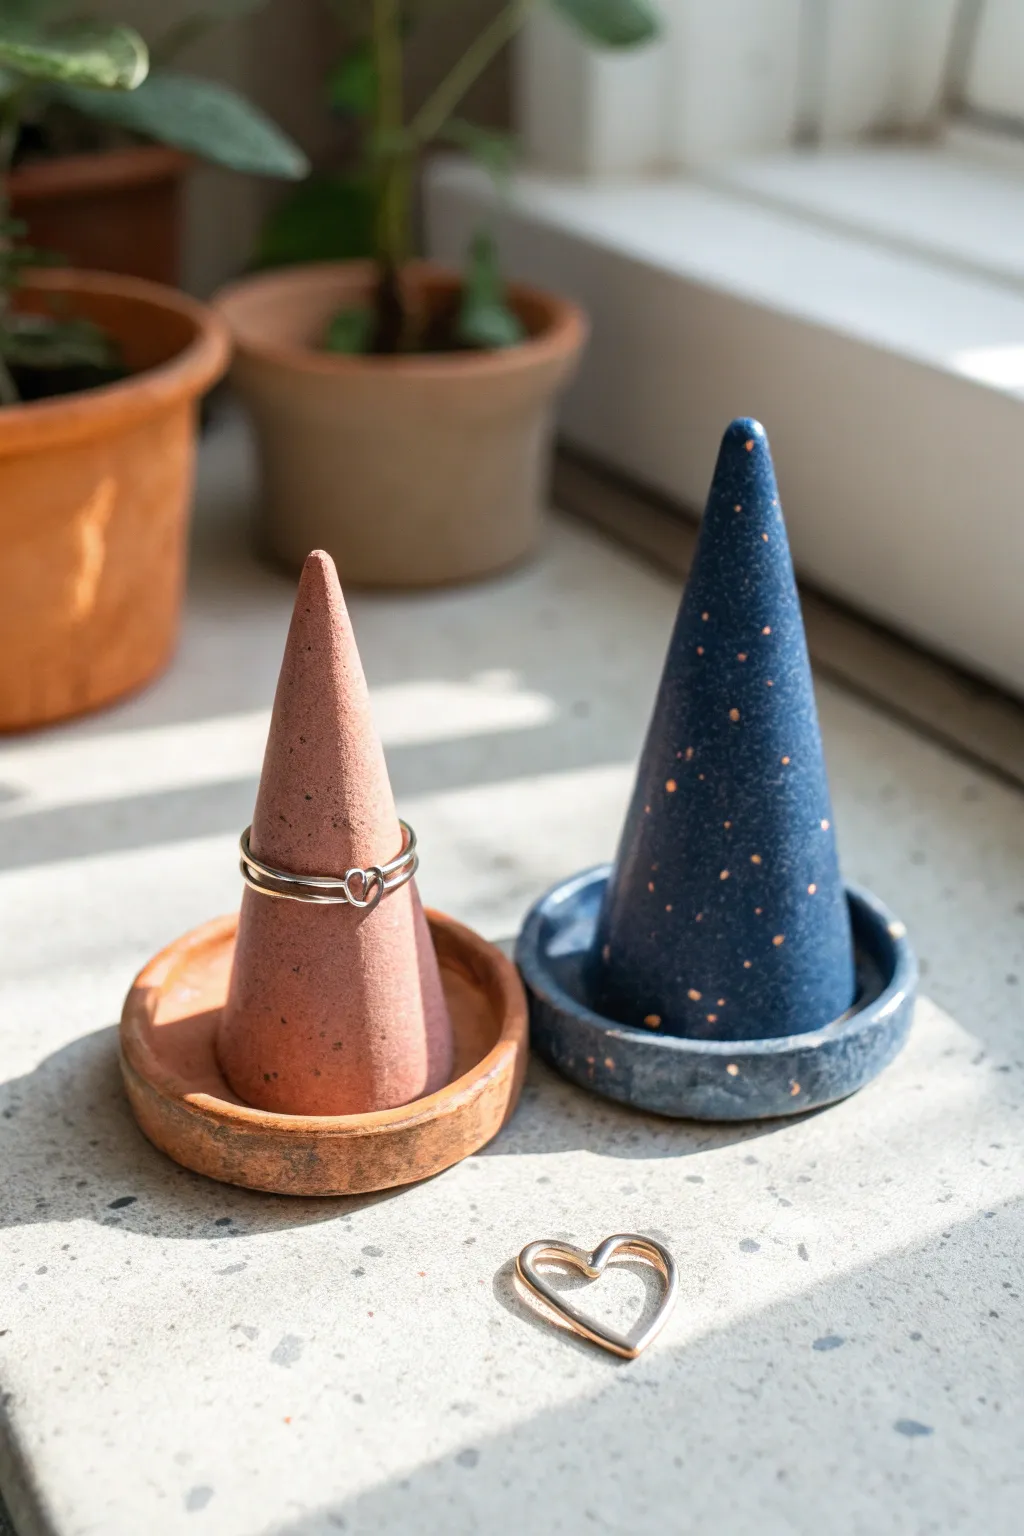
These charming ring cones are designed as a pair, featuring a terra cotta-inspired cone and a deep starry blue counterpart. Each sits in its own catch-all dish, perfect for holding small trinkets or matching heart charms.
How-To Guide
Materials
- Polymer clay (Terra cotta color and Navy Blue color)
- Speckled clay mixture or faux granite clay (optional for texture)
- Gold acrylic paint
- Small paintbrush (detail brush)
- Rolling pin
- Circular cookie cutter or jar lid (approx. 3-4 inches)
- Clay knife or X-Acto blade
- Fine grit sandpaper
- Baking sheet
- Parchment paper
- Gloss glaze (optional)
Step 1: Shaping the Base Dishes
-
Condition the terra cotta clay:
Begin by selecting your terra cotta colored clay. Massage and knead it in your hands until it becomes soft and pliable, which prevents cracking later. -
Roll out the slab:
Roll the clay out on a smooth surface to an even thickness of about 1/4 inch. If you want that speckled look seen in the photo, mix in a tiny amount of black pepper or dark clay crumbs before rolling. -
Cut the circles:
Use your circular cutter or a jar lid to stamp out two circles. This tutorial focuses on making one of each color, so repeat the conditioning and rolling process with your navy blue clay for the second dish. -
Create the rim:
For each circle, gently pinch the outer edge upward to create a slight lip. Smooth the clay with your finger so the transition from the base to the rim is seamless.
Uneven Cone Tips?
If your cone tips keep bending or looking wonky, insert a toothpick into the center of the cone before baking for internal support.
Step 2: Forming the Cones
-
Prepare clay for the cones:
Roll two balls of clay, one terra cotta and one navy blue. Each ball should be roughly the size of a golf ball or slightly larger depending on how tall you want your cones. -
Roll into a taper:
Place the ball on your work surface and roll it back and forth while applying more pressure to one side. This will naturally start to form a cone shape. -
Refine the shape:
Stand the cones up. They should be tall and slender but stable at the base. Gently tap the base on the table to flatten it perfectly so it will sit flush inside the dish. -
Smooth the surface:
Run your finger lightly over the surface of the cones to remove any fingerprints. For the navy cone, I like to ensure the tip is slightly rounded rather than dangerously sharp.
Make it Romantic
Before baking, use a needle tool to carve half a heart into the base of each cone so they form a full heart when placed side-by-side.
Step 3: Assembly and Baking
-
Position the cones:
Place each cone into the center of its matching colored dish. Press down firmly to adhere them. -
Secure the bond:
To make sure they stay put, take a tiny snake of matching clay, wrap it around the base of the cone where it meets the dish, and blend it smooth with a sculpting tool or your fingertip. -
Pre-bake check:
Check your work for any lint or dust. Smooth out any final imperfections with a drop of baby oil on your finger if needed. -
Bake the project:
Place your pieces on a baking sheet lined with parchment paper. Bake according to your clay package instructions (usually 275°F for 15-30 minutes per 1/4 inch thickness). -
Cool down:
Let the pieces cool completely on the baking sheet before handling them. The clay hardens fully as it cools.
Step 4: Decorative Finishes
-
Add the stars:
Dip a very fine detail brush or a toothpick into gold acrylic paint. On the navy blue cone, gently dab small, irregular dots to mimic a starry night sky. -
Detail the rim:
Using a dry brush technique, lightly brush a small amount of dark paint or brown wax onto the terra cotta dish rim to give it that weathered, rustic gardening pot look. -
Sand for texture:
Once the paint is dry, you can lightly sand the navy dish with fine-grit sandpaper to reveal some of the clay underneath, giving it a stone-like texture similar to the photo. -
Seal the piece:
If you want a glossy finish like the navy saucer rim in the image, apply a thin coat of polyurethane varnish or glaze. Leave the terra cotta one matte for realism.
Place your new ring holders on a sunny windowsill or nightstand to keep your jewelry safe and organized

The Complete Guide to Pottery Troubleshooting
Uncover the most common ceramic mistakes—from cracking clay to failed glazes—and learn how to fix them fast.
Fingerprint Heart Pendant Pair

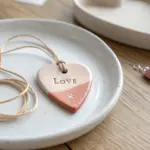
These elegant, rustic heart pendants are more than just jewelry; they are a tangible way to keep a piece of your loved one close. Made from speckled sand-colored clay, one pendant features a deep fingerprint impression while the other showcases a textured heart inlay, creating a complementary pair.
Step-by-Step Guide
Materials
- White or cream speckled stoneware clay (air-dry or kiln-fire)
- Rolling pin or slab roller
- Heart-shaped cookie cutter (approx. 2 inches wide)
- Small heart-shaped cutter (approx. 0.5 – 0.75 inches)
- Piece of textured fabric (lace or coarse woven fabric)
- Straw or small circular cutter (for the cord hole)
- Sponge and water
- Fine grit sandpaper
- Brown waxed cotton cord or leather cord
Step 1: Prepping the Base
-
Roll the Slab:
Begin by wedging your clay to remove air bubbles. Roll it out into an even slab that is roughly 1/4 inch thick. You want it substantial enough to hold an impression but not too heavy. -
Cut the Hearts:
Using your main heart-shaped cookie cutter, punch out two identical heart shapes from the slab. Remove the excess clay around them carefully so you don’t distort the edges. -
Smooth the Edges:
Dip your finger or a small sponge in a little water and gently run it along the cut edges of both hearts. This softens the sharp angles left by the cutter for a more professional finish. -
Create Hanging Holes:
Use a straw or a small circular tool to punch a hole at the top center of each heart, right between the two arches. Make sure the hole is large enough to accommodate your cord.
Cracked Edges?
If edges crack while pressing the fingerprint, smooth them instantly with a damp finger. If the clay is too dry, spritz lightly with water before pressing.
Step 2: Creating the Impressions
-
The Fingerprint Heart:
Select which partner will provide their fingerprint. Have them press their thumb firmly into the center of the first heart pendant. Press deep enough to capture the unique whirls, but not so hard that you punch through the clay. -
Wiggle for Release:
Gently rock the thumb slightly before lifting it straight up to ensure a clean release without dragging the clay. -
The Textured Inlay Heart:
For the second pendant, position the smaller heart cutter in the center and press down about halfway through the clay thickness. Do not cut all the way through. -
Remove Inner Clay:
Carefully scoop out the clay from inside the small heart indentation using a sculpting tool, creating a recessed area. -
Create Texture Patch:
Take a small scrap of clay and press your textured fabric or lace firmly into it. I prefer using a piece of burlap for that distinct woven look seen in the photo. -
Fit the Inlay:
Cut a small heart from this textured scrap using the small cutter. Score the back of this piece and the inside of the recessed area on the pendant, add a dab of water or slip, and press the textured heart into the recess.
Step 3: Finishing and Assembly
-
Drying Time:
Place both pendants on a flat board to dry. To prevent curling, you can place a light weight or a board on top of them once they are leather hard. -
Sanding:
Once completely bone dry (usually 24-48 hours), use fine-grit sandpaper to gently smooth out any rough spots on the back or edges. Be careful not to sand away the fingerprint details. -
Firing or Sealing:
If using kiln clay, fire according to the manufacturer’s instructions. If using air-dry clay, apply a matte varnish to seal and protect the piece. -
Prepare the Cord:
Cut two lengths of brown waxed cotton cord or leather string, each about 24 inches long (or your desired necklace length). -
Attach the Pendant:
Fold one cord in half to create a loop. Push the loop through the hole in the pendant from front to back. -
Secure the Knot:
Pass the loose ends of the cord through the loop and pull tight. This creates a lark’s head knot that sits securely at the top of the heart. -
Final Tie:
Tie the loose ends of the cord together using a simple overhand knot or a sliding knot mechanism to complete the necklace.
Make the Detail Pop
After firing or drying, rub a little dark acrylic paint or oxide into the fingerprint and fabric texture, then wipe the surface clean to highlight the grooves.
Wear your matching hearts as a daily reminder of your connection and the afternoon you spent creating together.
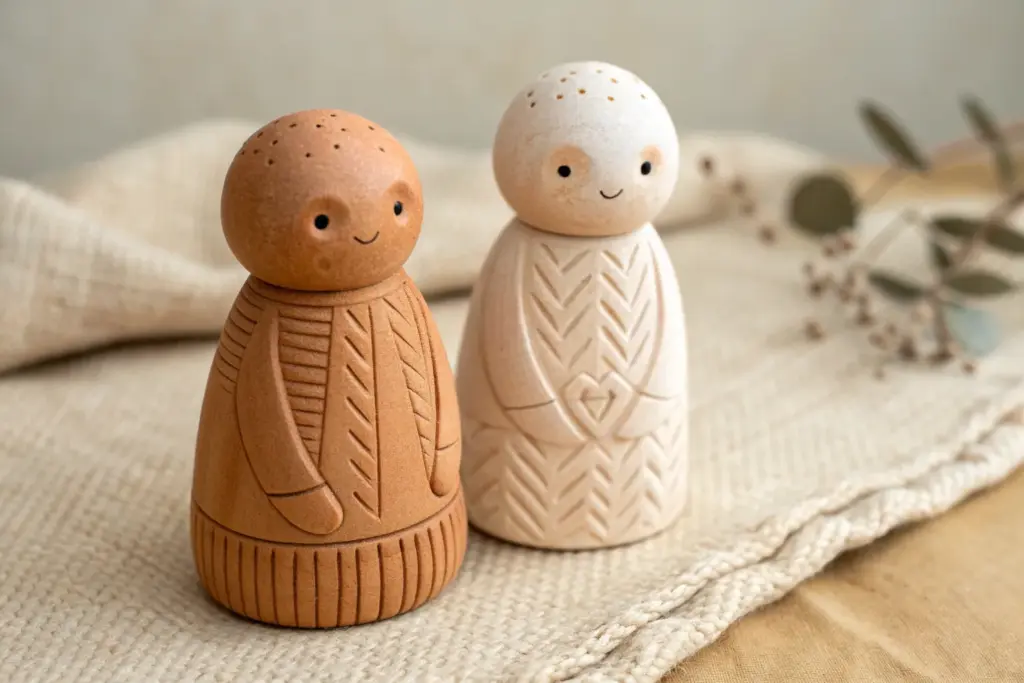
Custom Couple Figurines (Simple and Cute)
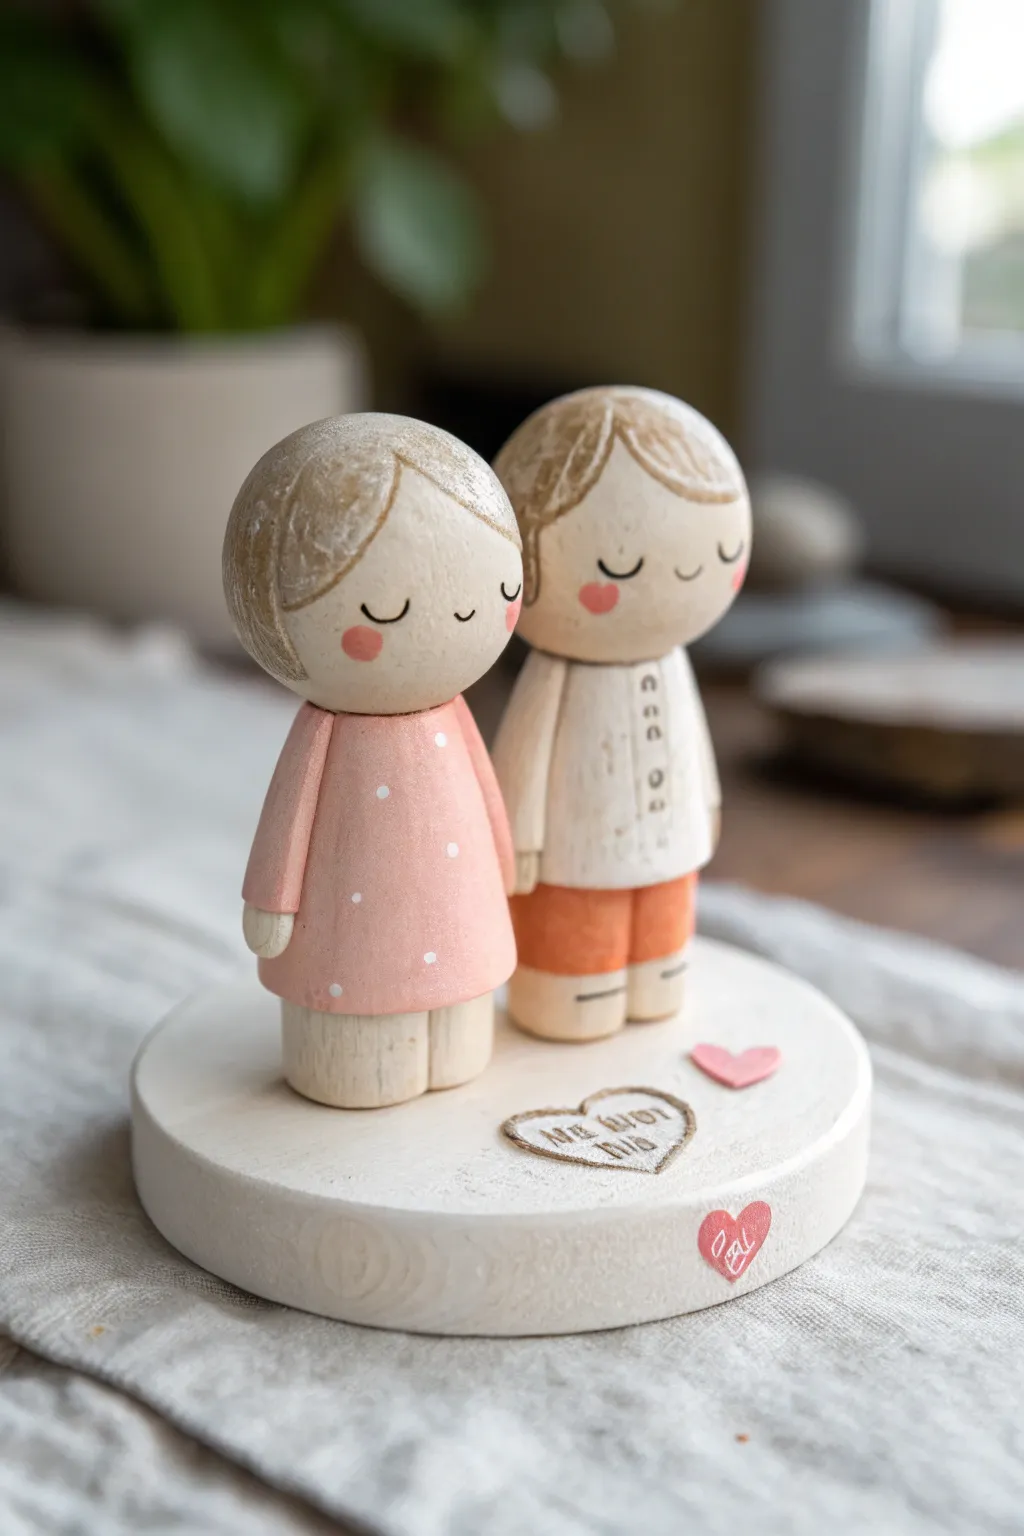
Capture love in miniature form with these adorable wooden peg dolls standing proudly on a custom base. With their minimalist painted features and soft pastel colors, this keepsake makes for a charming wedding topper or a heartfelt anniversary gift.
How-To Guide
Materials
- Two unfinished wooden peg dolls (one dress shape, one straight cylinder shape)
- Round wooden disc base (approx. 3-4 inches diameter)
- Acrylic paints: flesh tone, soft pink, white, warm orange, light brown
- Fine detail paintbrushes (including a liner brush)
- Dotting tool or toothpick
- Pencil with eraser
- Fine-grit sandpaper
- Wood glue or super glue
- Matte spray varnish or sealer
- Fine-tip black marker or pyrography pen (optional)
Step 1: Preparation & Base Coats
-
Sand and smooth:
Begin by lightly sanding your wooden peg dolls and the round base with fine-grit sandpaper. This removes any rough grain and ensures your paint goes on buttery smooth. -
Map out the design:
Using a pencil, very lightly sketch the hairline, the collar of the shirt, the dividing line for the pants, and the hem of the dress. Keep the lines faint so they are easy to cover later. -
Skin tone application:
Paint the round head portion of both dolls with your chosen flesh tone acrylic paint. You may need two thin coats for full coverage, letting the first dry completely before adding the second. -
Paint the female figure’s dress:
Mix a soft, muted pink. Paint the entire body of the dress-shaped doll, carefully following the neckline curve you sketched. Extend the paint to create little ‘sleeves’ near the shoulders. -
Paint the male figure’s outfit:
Paint the top cylinder section white for the shirt. Once dry, paint the bottom half a warm, muted orange for the trousers. Create a clean line where the shirt meets the pants.
Fixing Wobbly Lines
If your painted lines aren’t crisp, wait for the paint to dry fully. Then, use a toothpick to gently scrape away the excess paint. You can ‘erase’ mistakes this way without ruining the base coat.
Step 2: Adding Details & Features
-
Create the hair:
Using a light brown or tan paint, carefully fill in the hair shapes. For the female doll, swoop the paint across the forehead for bangs. For the male doll, create a slightly tousled look with short vertical strokes. -
Add hair texture:
Once the base hair color is dry, mix a slightly lighter shade of brown (or white) and use your finest brush to paint thin, wispy lines to suggest individual strands and texture. -
Polka dot pattern:
Dip a dotting tool or a toothpick into white paint. Gently press tiny dots onto the pink dress in a random, scattered pattern. Keep the pressure light to ensure the dots stay small and delicate. -
Shirt details:
Using a very dilute grey or light brown paint on a liner brush, paint a vertical line down the center of the white shirt. Add three or four tiny dots next to the line to represent buttons. -
Paint the faces:
With a fine black marker or extremely fine brush with black paint, draw two small arched ‘U’ shapes for sleeping eyes and a tiny curve for the smile on each face. Place these low on the face for extra cuteness. -
Rosy cheeks:
Dip a small brush into pink paint and wipe almost all of it off on a paper towel. Gently dab two oval shapes onto the cheeks of both dolls for a subtle blush effect.
Step 3: Base Assembly & Finishing
-
Prepare the stand:
Paint the round wooden base white or leave it natural wood, depending on your preference. If painting, give it a solid coat and let it dry. -
Add the inscription:
Draw or paint a heart outline near the front edge of the base. Inside, write a name, date, or short phrase like ‘Me & You’. You can do this with brown paint to mimic a wood-burned look, or use an actual wood-burning tool if you have one. -
Small decorative accents:
Paint a few tiny pink hearts scattered on the base around where the dolls will stand. -
Seal the project:
Once all paint is completely dry, take the dolls and base outside and spray them with a matte varnish. This protects the paint from chipping and gives a professional finish. -
Final assembly:
Apply a strong wood glue or super glue to the bottom of the peg dolls. Press them firmly onto the base, slightly off-center or centered as desired, and hold for 30 seconds until secure.
Level Up: 3D Elements
Make tiny accessories using air-dry clay, like a flower bouquet or a tiny hat. Glue these onto the painted wood dolls before the final varnish step for added texture and personality.
Now you have a timeless little keepsake to display on a shelf or mantle


What Really Happens Inside the Kiln
Learn how time and temperature work together inside the kiln to transform clay into durable ceramic.
Cuddling Bear Couple on a Heart Base
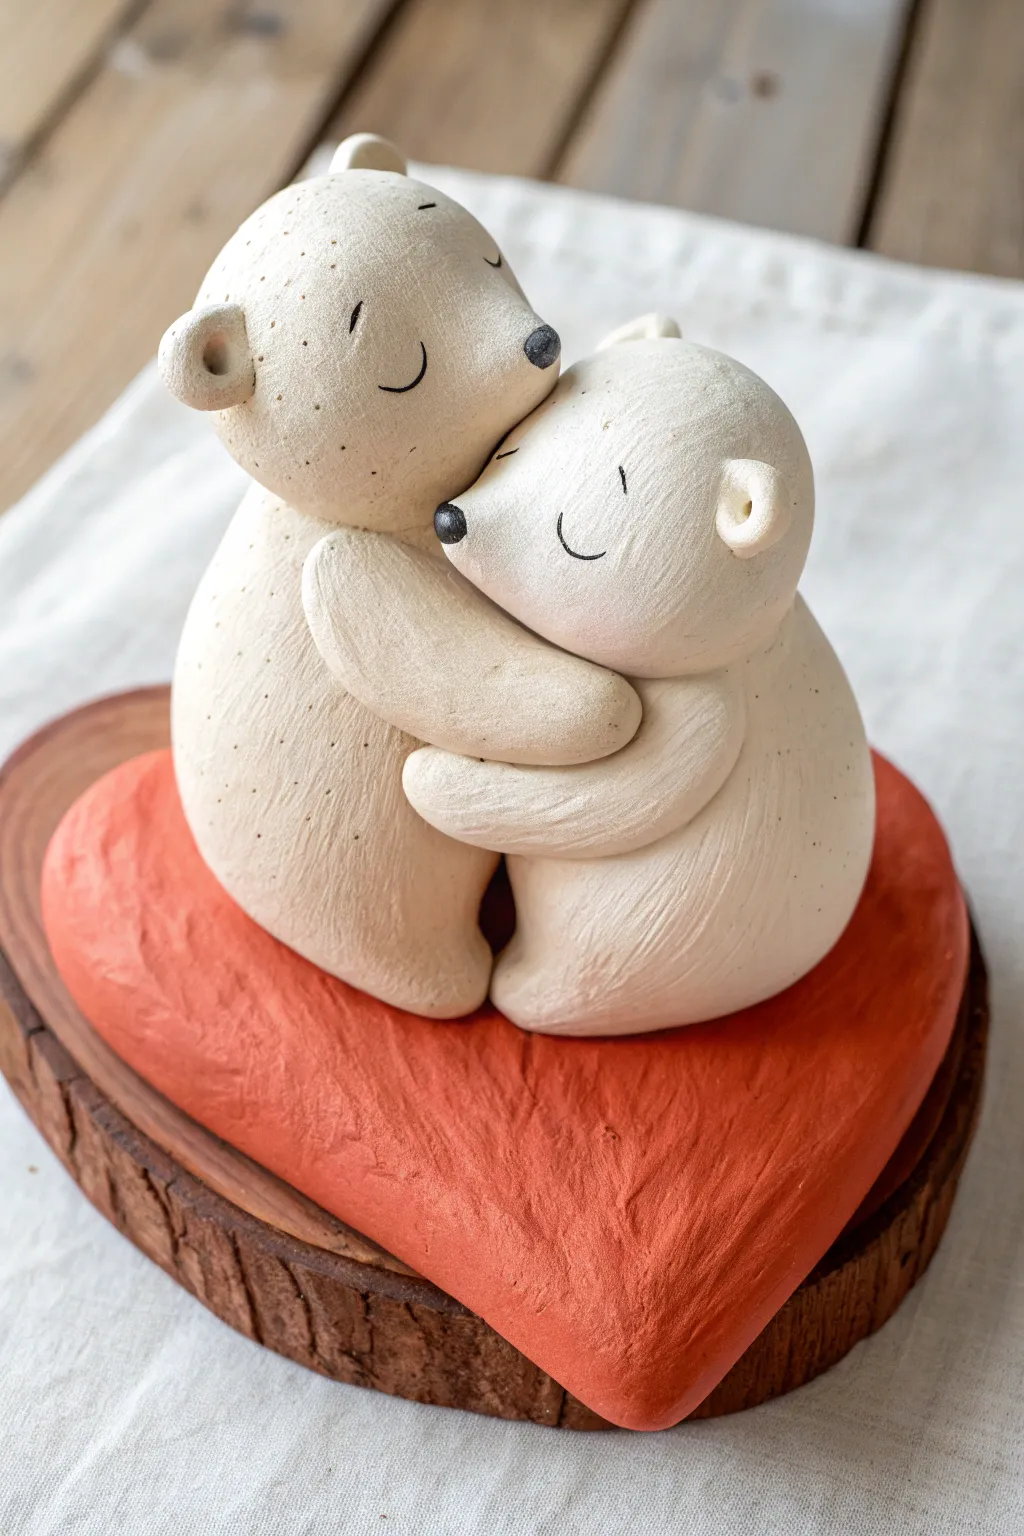
Celebrate love with this adorable keepsake featuring two stylized polar bears sharing a warm embrace atop a vibrant red heart. This project uses simple shapes and textures to create a charming, rustic finish perfect for beginners or seasoned sculptors.
How-To Guide
Materials
- White air-dry clay or polymer clay (approx. 500g)
- Red acrylic paint (or red clay if implied)
- Black acrylic paint
- Wooden log slice base (approx. 4-6 inches diameter)
- Sculpting tools (needle tool, smoothing tool, small sponge)
- Fine grit sandpaper
- Water cup (for smoothing)
- Rolling pin
- Strong craft glue (e.g., E6000 or wood glue)
- Clear matte varnish suitable for clay
Step 1: Base Preparation
-
Form the heart foundation:
Begin with a large ball of clay and flatten it slightly. Using your hands or a rolling pin, shape this into a thick heart that fits comfortably on your wooden slice. Aim for a thickness of about 1 inch to give the bears a solid platform. -
Texture the heart:
To mimic the rustic look in the photo, don’t smooth the heart perfectly. Use a stiff brush or a crumpled ball of aluminum foil to gently press texture into the surface before the clay dries. -
Shape the heart curve:
Make sure the top surface of the heart is slightly rounded rather than completely flat, which adds volume and softness to the final piece.
Texturing Tip
For that distinct speckled look on the bears’ fur visible in the photo, lightly flick a toothbrush loaded with watered-down brown paint over the dried white clay.
Step 2: Sculpting the Bears
-
Create the bodies:
Roll two tear-drop shapes from white clay. One should be slightly larger (the hugging bear) and one slightly smaller (the one being hugged). Flatten the bottoms so they sit stable on your work surface. -
Position the embrace:
Place the two bodies together so their bellies are touching. I recommend doing a dry fit first to ensure the angle implies a tight hug. -
Add the heads:
Roll two rounded balls for heads, slightly elongating the snout area. Attach them to the tapered tops of the tear-drop bodies. Use a little water or slip (clay and water mix) to blend the seams at the neck so it looks like one solid piece. -
Sculpt the arms:
For the larger bear, roll two long sausage shapes and attach them starting from the shoulder area, wrapping them around the smaller bear. Smooth the clay where the arm meets the body to create a seamless transition. -
Complete the hug:
For the smaller bear, create smaller arms that rest gently against the larger bear’s chest or waist. The key is making the limbs look soft and rounded, not rigid. -
Attach the ears:
Make tiny balls of clay and press a small indentation into each center. Attach these to the top sides of the heads, blending the back edges into the skull for strength. -
Detail the faces:
Using a needle tool or a dull pencil, gently scribe curved lines for the closed eyes and a small curve for the smiles. Keep the expressions simple to maintain the minimalist style. -
Refine the texture:
Before the clay sets, lightly stipple the bear bodies with a toothbrush or stiff brush to create a fur-like texture. This hides fingerprints and adds realism.
Make it Personal
Before the red heart dries, carve your initials and a date into the side or bottom edge using a needle tool for a hidden romantic personalization.
Step 3: Painting and Assembly
-
Dry the components:
Allow your heart base and the bear sculpture to dry completely according to your clay manufacturer’s instructions. Air-dry clay usually takes 24-48 hours. -
Paint the heart:
Paint the textured heart base with a rich, matte red acrylic paint. You may need two coats to get full opacity. Let it dry fully. -
Paint facial details:
Using a very fine brush and black paint, carefully fill in the eye slits and the mouth lines. Paint a small black oval on the tip of each snout for the nose. -
Add subtle blush:
This is a fun trick: dip a brush into pink paint (or watered down red), wipe almost all of it off on a paper towel, and gently dry-brush rosy cheeks onto the bears. -
Mount the sculpture:
Apply strong glue to the bottom of the bear couple and press firmly onto the dried red heart. Then, glue the red heart securely to the center of the wood slice. -
Seal the piece:
Finish by applying a coat of clear matte varnish over the entire sculpture to protect the paint and detailed texture.
Place your warm bear couple on a shelf or mantle as a testament to your craft and affection
Matching Chubby Desk Pets (Pick Your Two Animals)
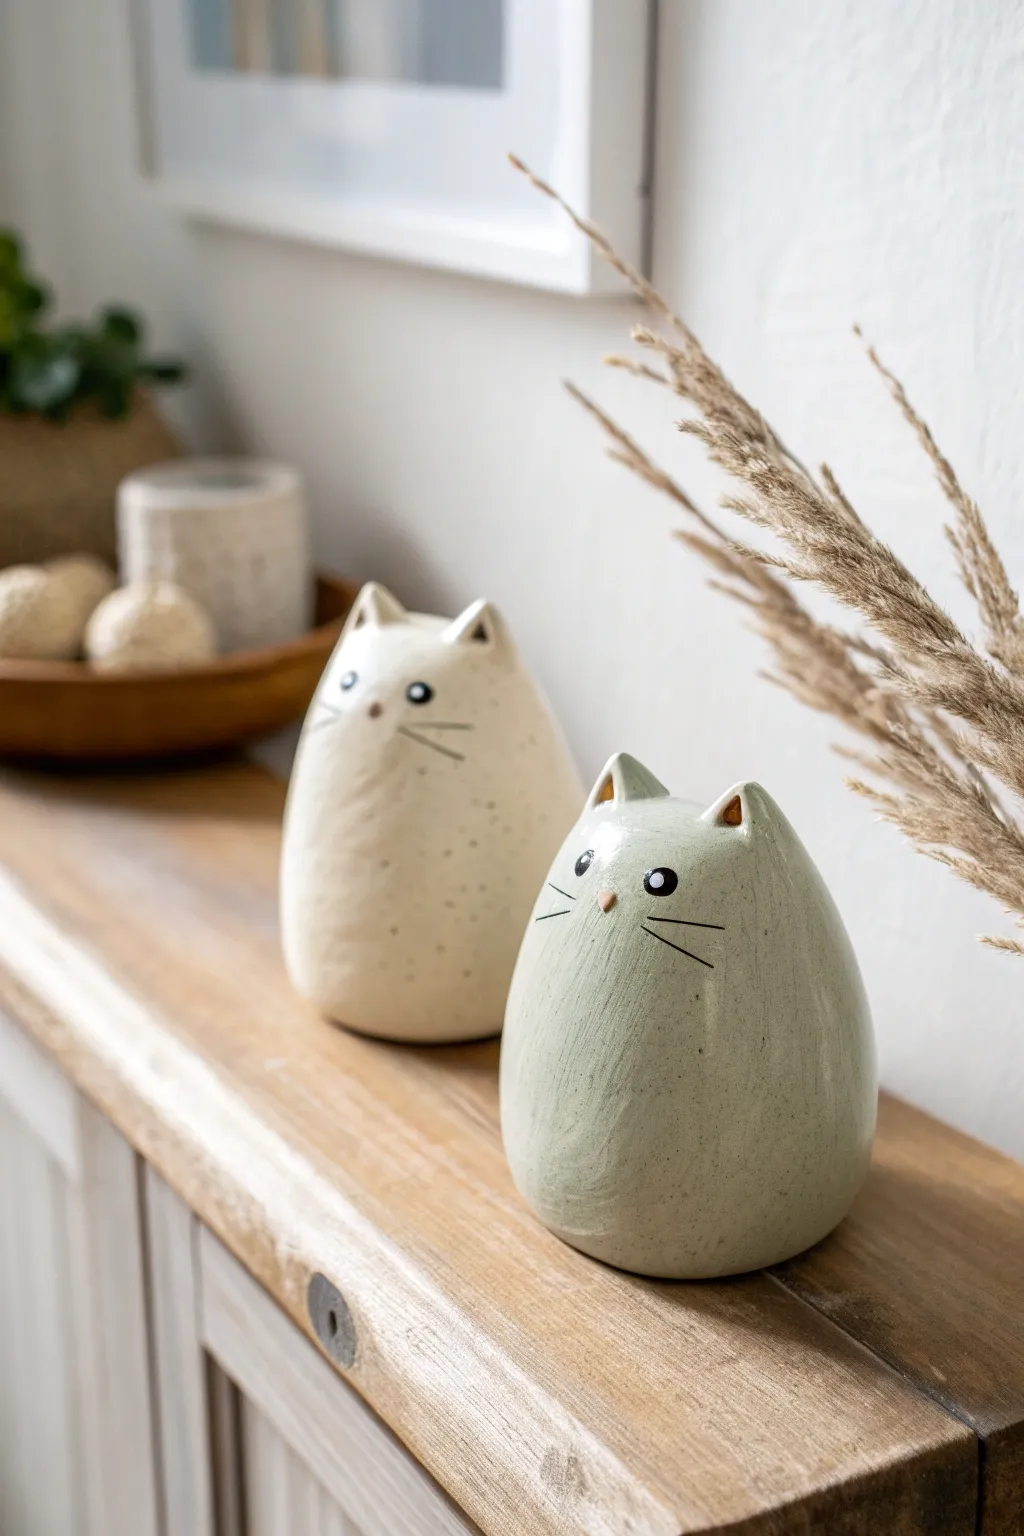
These delightfully round and glossy cat figurines are the perfect collaborative project, featuring a minimalist egg shape with sweet, simple faces. They achieve their charm through organic forms and soft, speckled glazing that looks wonderful on any desk or shelf.
Detailed Instructions
Materials
- White stoneware or polymer clay (oven-bake)
- Pottery tools (needle tool, sponge, rib tool)
- Slip (if using ceramic clay)
- Underglazes (Black, Cream, Sage Green)
- Clear glossy glaze
- Small detail paintbrush
- Rolling pin
- Water cup
- Kiln access (or oven if using polymer)
Step 1: Forming the Bodies
-
Prepare the clay:
Start with two equal-sized balls of clay, roughly the size of a large orange each. Wedge the clay thoroughly to remove air bubbles if using stoneware, or condition it well in your hands if using polymer clay. -
Shape the base:
Gently roll the ball on your work surface to smooth it out. Then, using cupped hands, begin to taper the top slightly to create a heavy-bottomed egg shape. You want the base to be wider than the top for that classic ‘chubby’ look. -
Flatten the bottom:
Tap the bottom of your egg shape firmly against the table. This creates a flat, stable base so your figurine won’t wobble. Ensure the silhouette sits upright and slightly proud. -
Smooth the surface:
Take a damp sponge (or your finger with a little water/baby oil) and smooth out any fingerprints or bumps. The charm of these cats lies in their sleek, uninterrupted curves.
Keep it clean
Wipe your tools often. White clay shows every speck of dust or colored lint, so keep a dedicated clean sponge for the final smoothing.
Step 2: Sculpting the Features
-
Pinch the ears:
At the narrower top of the egg, visualize where the ears should go. Gently pinch up two small triangles of clay directly from the main body. Do not attach separate pieces; pinching them creates a stronger, more seamless look. -
Refine the ear shape:
Use your fingers to smooth the transition between the head and the ears. Use a small modeling tool to create a tiny indentation inside each ear for depth. -
Add the nose:
Roll a tiny, lentil-sized piece of clay into a triangle. Score and slip the area (for ceramic) or simply press it (for polymer) onto the center of the face, about one-third of the way down from the ears. -
Dry or Bake (Stage 1):
If using ceramic clay, wrap your pieces loosely in plastic to dry slowly to a ‘leather hard’ state. If using polymer clay, you can proceed directly to painting or bake now according to package instructions if you prefer painting on a hard surface.
Step 3: Decorating and Glazing
-
Bisque fire:
For ceramics, fire your bone-dry pieces in a bisque kiln. Once cooled, wipe them down with a damp sponge to remove dust. -
Apply base color:
Paint one cat with a cream underglaze and the other with a sage green underglaze. Apply 2-3 coats for opaque coverage. I like to let the first coat dry completely before adding the next to avoid streaks. -
Paint the eyes:
Using your finest detail brush and black underglaze (or acrylic for polymer), paint two small circles for eyes. Leave a tiny negative space white dot, or add a white dot on top later, to create the ‘glint’ in the eye. -
Draw the details:
carefully paint three thin whiskers on each cheek using the very tip of your brush. Add a tiny outline to the nose if desired, or paint the nose a soft pink or terracotta color. -
Add speckles (optional):
To mimic the speckled stoneware look on the cream cat, flick a toothbrush loaded with diluted brown paint or underglaze over the body. Keep the splatters subtle. -
Apply clear glaze:
Once the underglaze is fully dry, dip the entire piece in a clear glossy glaze (for ceramics) or apply a gloss varnish (for polymer). -
Final fire:
For ceramics, glaze fire the pieces to the appropriate cone temperature. For polymer clay, ensure your varnish is dry and set.
Uneven bottom?
If your cat wobbles after drying but before firing, gently sand the bottom in a figure-8 motion on a piece of sandpaper to level it out.
Now you have a pair of adorable, low-maintenance pets that add a touch of whimsy to your workspace

TRACK YOUR CERAMIC JOURNEY
Capture glaze tests, firing details, and creative progress—all in one simple printable. Make your projects easier to repeat and improve.
Love Note Tiles That Complete a Quote
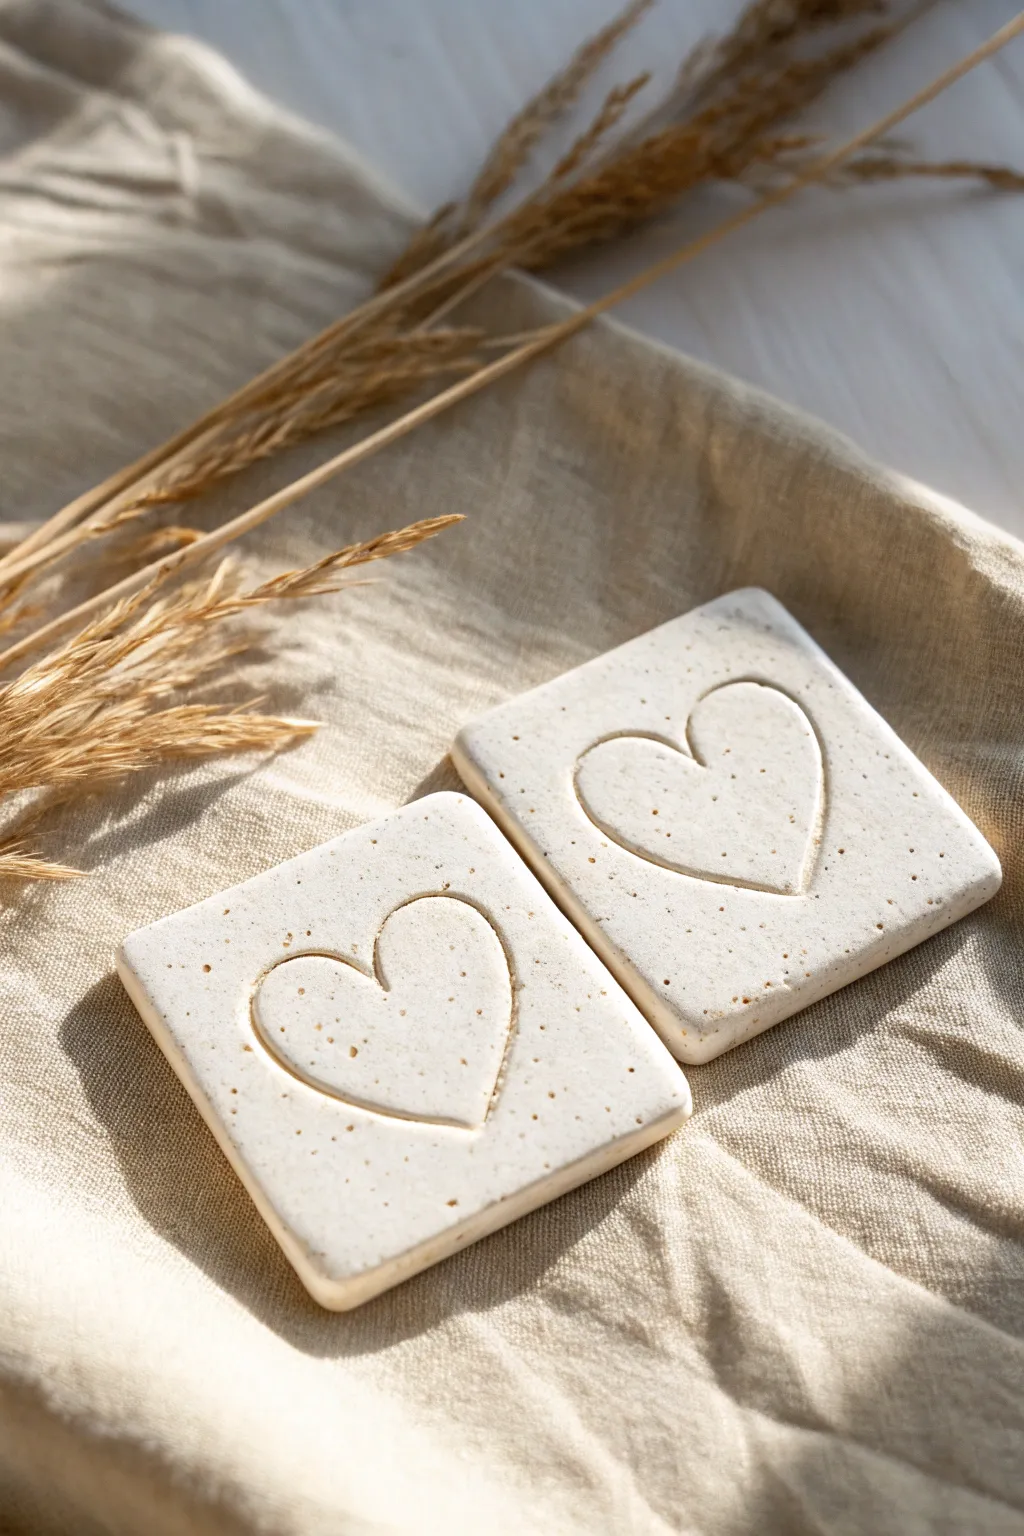
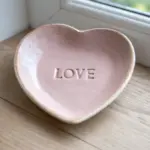
These simple, modern ceramic-style coasters feature a speckled cream finish and deeply debossed hearts. Perfect for a minimalist aesthetic, they make a lovely shared activity for couples looking to create functional decor together.
Step-by-Step Tutorial
Materials
- White polymer clay or air-dry clay (approx. 200g)
- Speckle inclusions: ground black pepper or dried coffee grounds
- Rolling pin or acrylic roller
- Two 5mm thick guide strips (optional, for even thickness)
- Square cookie cutter (approx. 3-4 inches) or craft knife/ruler
- Heart-shaped cookie cutter (slightly smaller than square)
- Fine-grit sandpaper (400-600 grit)
- Parchment paper or clay mat
- Small sponge and water (if using air-dry clay)
Step 1: Preparing the Clay
-
Condition the base:
Begin by warming up your white clay in your hands. Knead it thoroughly until it is soft, pliable, and free of any air bubbles. -
Create the speckles:
Flatten the conditioned clay slightly and sprinkle a pinch of ground black pepper or very fine dried coffee grounds onto the surface. I like to start with a tiny amount and add more gradually to avoid over-darkening the clay. -
Incorporate the texture:
Fold the clay over the speckles and knead continuously. Keep folding and rolling until the tiny specks are evenly distributed throughout the entire block, mimicking a natural stoneware look.
Clean Cuts Pro Tip
Place a piece of cling film over the clay before pressing your square cutter down. This creates a pillowy, rounded edge rather than a sharp, harsh cut.
Step 2: Shaping the Tiles
-
Set up your workspace:
Lay down a sheet of parchment paper or a clean clay mat to prevent sticking. If you have thickness guides, place them on either side of your working area. -
Roll the slab:
Place your speckled clay ball in the center and roll it out into an even slab. Aim for a thickness of about 5-6mm (1/4 inch) to ensure the tiles feel substantial. -
Cut the squares:
Using your square cutter, press firmly into the slab to cut two identical squares. If you are using a knife and ruler, measure carefully to ensure 90-degree corners. -
Smooth the edges:
Before moving on, gently run your finger along the cut edges of the squares. Soften sharp corners slightly to give the piece a more finished, handmade ceramic feel.
Step 3: Debossing the Design
-
Position the heart:
Take your heart-shaped cutter. Instead of cutting all the way through, you will use it as a stamp. center it visually on the first tile. -
Press the impression:
Gently press the heart cutter down into the clay about halfway through the thickness of the tile. Apply even pressure so the line depth is consistent. -
Remove the tool:
Lift the cutter straight up to avoid distorting the shape. If the clay lifts with the cutter, use a sewing needle to gently release it before pulling away completely. -
Repeat for the second tile:
Repeat the debossing process on the second square. Try to match the pressure and placement of the first tile so they look like a matching set. -
Refine the lines:
Inspect the heart impression. If the edges of the groove look rough, smooth them very gently with a silicone sculpting tool or a fingertip dipped in a tiny bit of water (for air-dry clay) or baby oil (for polymer).
Sticky Cutter Fix
If your heart cutter keeps pulling up the clay, dust the cutting edge very lightly with cornstarch (cornflour) or dip it in water before pressing it in.
Step 4: Finishing Touches
-
Final inspection:
Check the surface for accidental fingerprints or dust. Lightly buff them away before curing. -
Cure or dry:
If using polymer clay, bake according to package instructions (usually 275°F/135°C for 15-30 mins). If using air-dry clay, allow the tiles to dry on a wire rack for 24-48 hours, flipping them occasionally to prevent warping. -
Sand the edges:
Once fully cured and cooled (or dried), take your fine-grit sandpaper and gently sand the outer edges and corners. This ensures the coaster is smooth to the touch. -
Seal (Optional):
For extra durability, especially if using as coasters, apply a thin layer of matte varnish or glaze to seal the surface against moisture.
These minimalist tiles are ready to hold your morning coffee or serve as a sweet reminder on your desk