Polymer clay is one of my favorite ways to add personality to a space without needing a full room makeover. If you’re craving cute, modern, or totally whimsical accents, these polymer clay decor ideas are perfect little projects to make your home feel more you.
Terrazzo-Style Coasters
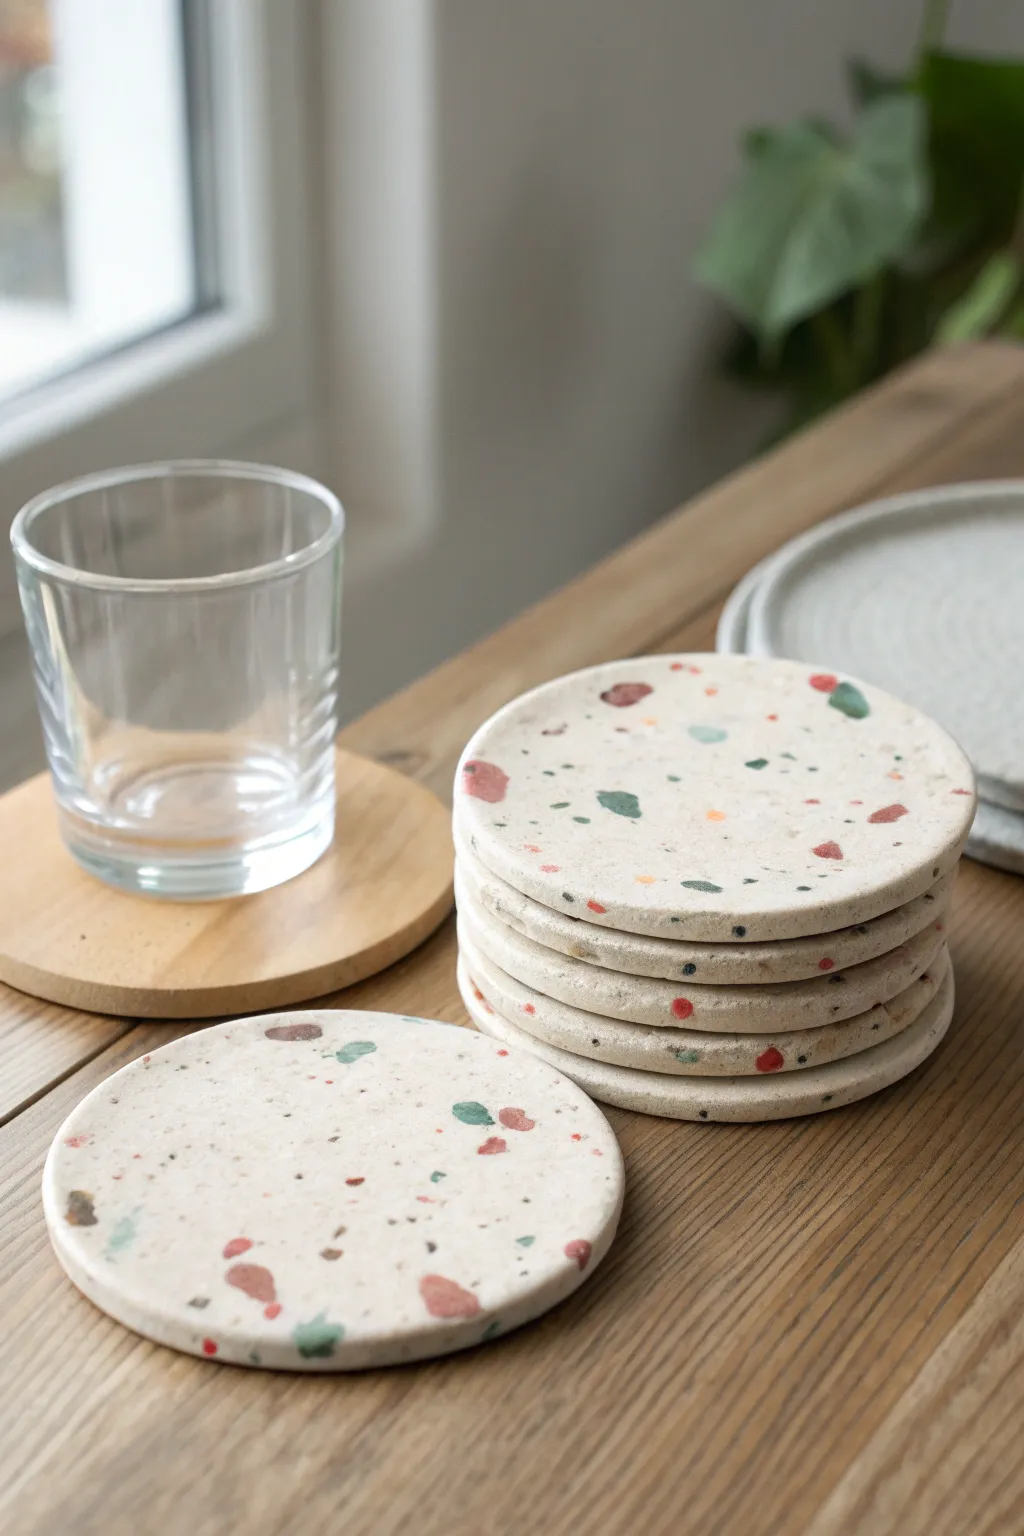
Bring the trendy, architectural look of terrazzo into your home with these chic polymer clay coasters. Featuring a matte, stone-like finish and playful pops of rust, sage, and navy chips, this project is deceptively easy to master.
Step-by-Step Guide
Materials
- White or beige polymer clay (base color)
- Various colored polymer clays (rust, sage green, navy, mustard)
- Acrylic rolling pin or pasta machine
- Round cookie cutter (approx. 4 inches) or jar lid
- Craft knife or tissue blade
- Parchment paper or baking tile
- Fine-grit sandpaper (400, 600, and 1000 grit)
- Optional: UV resin or matte polyurethane varnish
Step 1: Preparing the Terrazzo Chips
-
Condition the colors:
Start by conditioning small amounts of your colored clays (rust, sage, navy, mustard). Knead them until soft and pliable. -
Roll thin sheets:
Roll each colored clay into a very thin sheet. If using a pasta machine, aim for the second to thinnest setting. If rolling by hand, try to get them paper-thin. -
Bake the sheets:
Place these thin colored sheets on parchment paper and bake them for just 10-15 minutes at the manufacturer’s recommended temperature. They need to be hard enough to chop. -
Cool and chop:
Once cooled, break the baked sheets into irregular shards. Use your tissue blade to chop them into various sizes—some tiny specks and some larger, chunky geometric pieces.
Step 2: Creating the Base
-
Condition the base clay:
Take a large block of your white or beige base clay. Condition it thoroughly until it is completely smooth and free of air bubbles or cracks. -
Initial rolling:
Roll the base clay out into a thick slab, roughly 1/4 inch thick. It doesn’t need to be perfect yet, just a solid working surface. -
Add the chips:
Scatter your chopped baked chips onto the raw base slab. I like to press them down gently with my fingers first to ensure they stick before rolling. -
Embed the chips:
Use your acrylic roller to firmly roll over the slab again. This pushes the baked chips into the raw clay, creating a flush surface. -
Multi-directional rolling:
Roll vertically and horizontally to prevent the slab from distorting too much in one direction. Continue until the surface is smooth and the chips are fully integrated.
Chip Distribution Secret
Don’t just sprinkle chips randomly. Place larger “hero” chips intentionally first, then fill gaps with finer “dust” chips for a balanced, professional look.
Step 3: Shaping and Baking
-
Cut the shapes:
Place your large round cutter onto the slab. Press down firmly and give it a little wiggle to separate the shape from the excess clay. -
Refine the edges:
Carefully lift the circle. Use your finger to gently smooth the raw edges, removing any sharp lips created by the cutter. -
Final bake:
Place your raw coasters on a ceramic tile or baking sheet lined with parchment. Bake according to package directions, usually 30-45 minutes. Longer baking makes the clay stronger. -
Cool under weight:
As soon as they come out of the oven, place a heavy book on top of the cooling coasters to ensure they stay perfectly flat.
Hexagonal Twist
Instead of circles, use a hexagonal tile cutter. Once baked, these geometric coasters can nest together on your table for a modern, honeycomb centerpiece effect.
Step 4: Finishing Touches
-
Initial sanding:
Once fully cool, begin sanding the surface under running water with 400 grit sandpaper. This reveals the sharp edges of the chips and removes the hazy top layer of clay. -
Refining the surface:
Progress to 600 grit and then 1000 grit sandpaper. Sanding underwater keeps dust down and prevents scratches. -
Buffing:
Dry the coaster thoroughly. Rub it vigorously with a piece of denim or a microfiber cloth to create the soft, matte sheen seen in the photo. -
Sealing (Optional):
The clay is naturally water-resistant, but for extra protection against coffee stains, you can apply a thin layer of matte varnish.
Enjoy styling your table with these modern, durable pieces that look like real stone


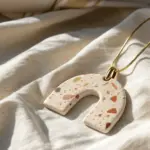
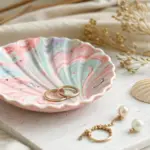
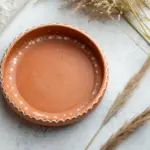
Marbled Trinket Dish
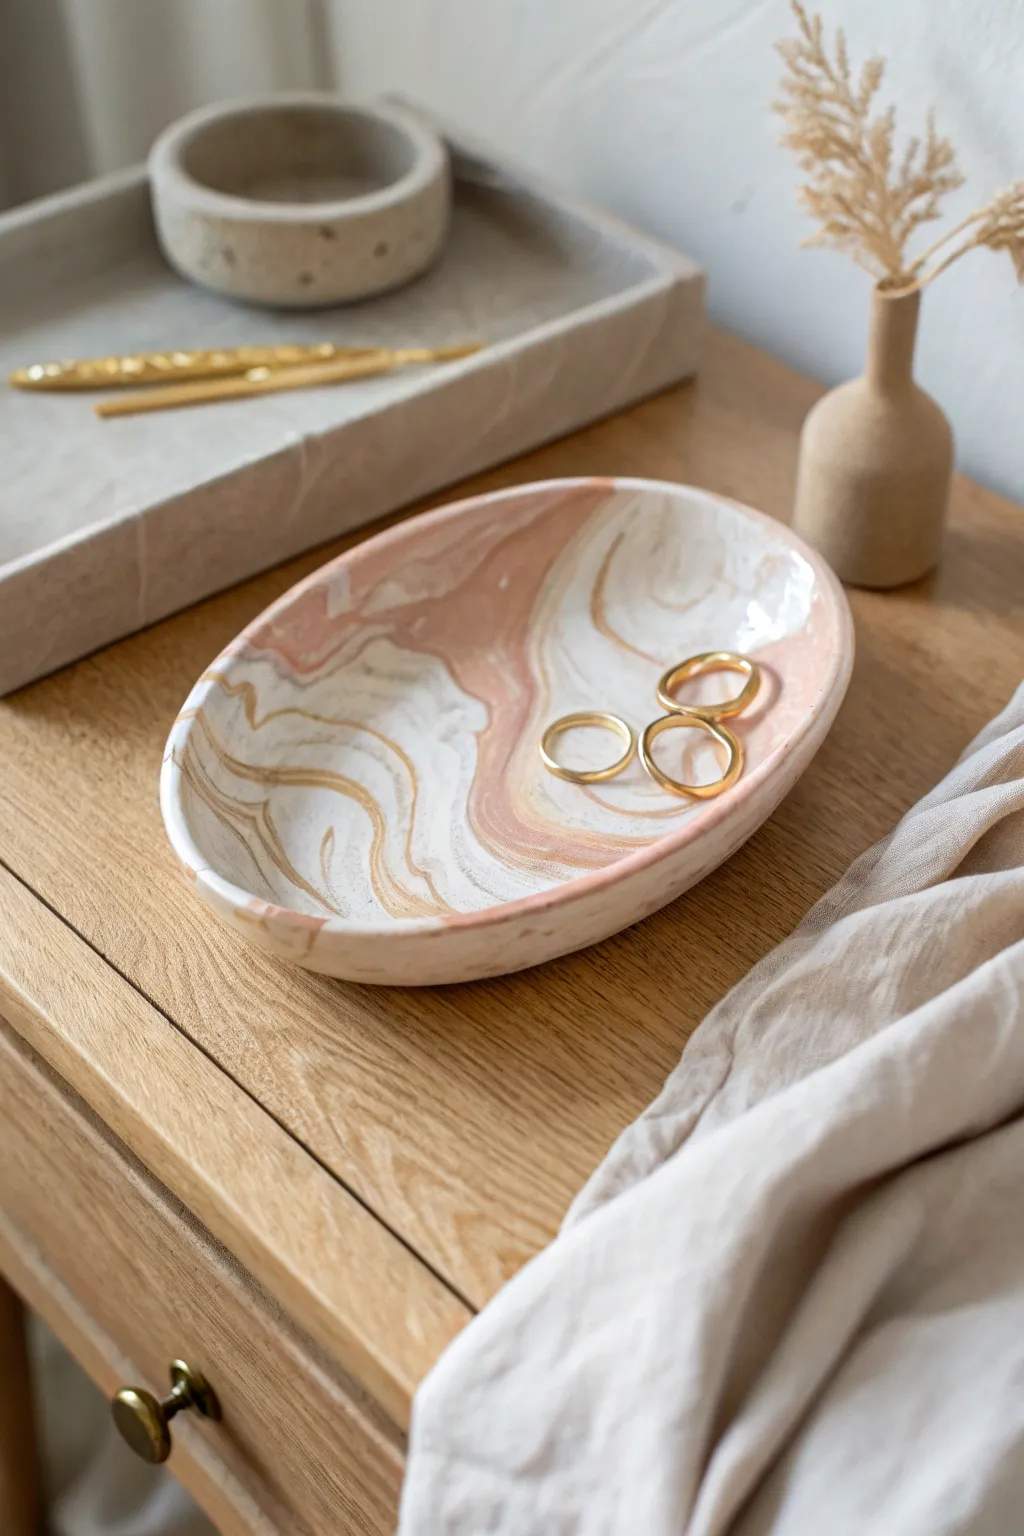
This elegant trinket dish combines swirls of blush pink, white, and metallic gold for a sophisticated, organic look. Perfectly sized for your daily jewelry, this faux-stone piece adds a touch of modern luxury to any bedside table or vanity.
Step-by-Step
Materials
- White polymer clay (approx. 2 oz)
- Blush pink or terracotta polymer clay (approx. 1 oz)
- Metallic gold polymer clay (approx. 0.5 oz)
- Acrylic rolling pin
- Oval clay cutter or paper template with craft knife
- Smooth work surface (ceramic tile or glass mat)
- Oven-safe bowl or curved baking form
- Fine grit sandpaper (400 and 800 grit)
- Gloss glaze or polyurethane varnish (optional)
- Soft paintbrush
Step 1: Creating the Marble Patterns
-
Condition the clay:
Start by kneading each block of clay—white, pink, and gold—separately until they are soft and pliable. This warmth is crucial prevents cracking later. -
Roll snakes:
Roll each color into several long, thin snakes about the thickness of a pencil. Since white is our dominant color, make twice as many white snakes as pink, and keep the gold snakes slightly thinner. -
Twist together:
Gather all your clay snakes into one large bundle. Twist the bundle tightly from both ends, like you are wringing out a towel, until the colors start to spiral around each other. -
Fold and roll:
Fold the twisted log in half, then roll it smooth into a single log again on your work surface. This begins the blending process. -
Repeat the twist:
Twist the new log again. Repeat the folding, rolling, and twisting process 2-3 times. Be careful not to over-mix, or the colors will turn muddy instead of distinct marble veins. -
Form a ball:
Squish your marbled log into a tight ball. Roll it in your palms to ensure there are no air pockets hidden inside.
Gold Leaf Trick
Want more sparkle? Press small flakes of gold leaf onto the clay slab *before* the final rolling. It embeds into the surface beautifully.
Step 2: Shaping and Baking
-
Roll out the slab:
Place the ball on your work surface. Using your acrylic roller, roll the clay out evenly to about 1/4 inch thickness. Rotate the clay frequently to keep a round shape and prevent sticking. -
Check the pattern:
Examine your slab. If you don’t love the pattern on the top, flip it over; the other side often hides a beautiful surprise design. -
Cut the oval:
Place your oval cutter or paper template onto the nicest section of the marbled slab. Press down firmly with the cutter or trace around your template with a sharp craft knife to cut out the dish shape. -
Smooth the edges:
Dip your finger in a tiny bit of water or cornstarch and gently run it along the cut edge of the oval to smooth out any harsh lines or jagged bits. -
Form the curve:
Gently lift your clay oval and drape it inside an oven-safe bowl or over a curved baking form. Press lightly so it takes the shape of the container without distorting your oval. -
Bake the dish:
Place the bowl with the clay inside into a preheated oven. Bake according to your brand of clay’s instructions (usually 275°F/135°C for 15-30 minutes). -
Cool completely:
Once baked, remove from the oven and let the clay cool completely inside the bowl. Removing it while hot can cause warping.
Step 3: Finishing Touches
-
Sand the edges:
I like to take the cured dish to a sink and wet-sand the edges. Start with 400 grit sandpaper to level the rim, then switch to 800 grit for a silky smooth finish. -
Paint the rim (optional):
For extra shine, dip a fine brush into the gloss glaze and paint just the rim, or coat the entire inside of the dish to make the gold veins pop. -
Final dry:
Let the glaze dry fully according to the bottle instructions before placing any jewelry into your new dish.
Fixing Fingerprints
If you see fingerprints on your raw clay, lightly brush the surface with a little baby oil or clay softener before baking to smooth them away.
Enjoy styling your vanity with this chic, custom-made piece tailored to your own color palette


Minimal Geometric Catchall Tray
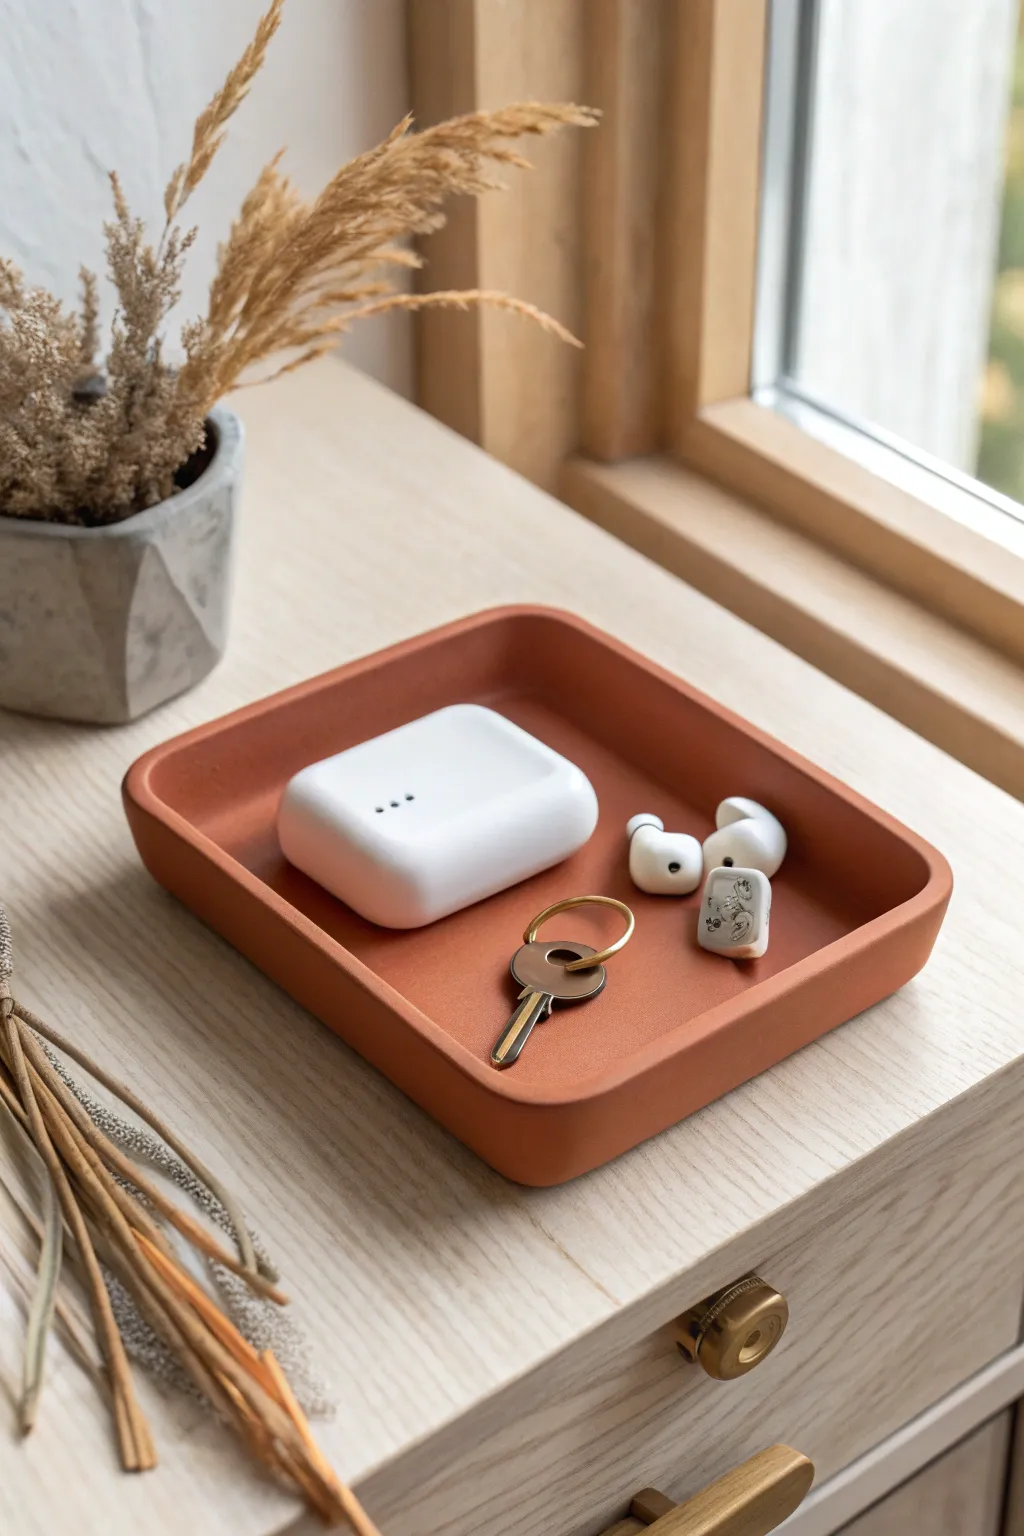
Bring warmth and organization to your entryway with this sleek, minimalist tray that perfectly mimics the matte look of terracotta pottery. Its soft, rounded corners and rich earthy tone make it a sophisticated home for your daily essentials like keys and earbuds.
How-To Guide
Materials
- Terracotta or burnt sienna polymer clay (approx. 4-6 oz)
- Acrylic roller or pasta machine
- Tissue blade or rigid clay slicer
- Square cookie cutter (approx. 4-5 inches) or a paper template
- Sandpaper (wet/dry, multiple grits: 400, 600, 1000)
- Cornstarch or baby powder (for release)
- Smooth ceramic tile or glass work surface
- Ruler
- Oven thermometer
Step 1: Preparing the Base
-
Condition the clay:
Begin by thoroughly conditioning your terracotta-colored polymer clay. Knead it in your hands until it is warm, pliable, and free of any air bubbles or crumbly texture. -
Roll out a thick slab:
Roll the clay out into a uniform sheet using your acrylic roller or pasta machine. Aim for a thickness of about 1/4 inch (6mm) to ensure the tray feels substantial and durable. -
Cut the square base:
Dust your work surface lightly with cornstarch to prevent sticking. Using a large square cutter or a paper template with a tissue blade, cut out a perfect square. A 5×5 inch size works well for small accessories. -
Round the corners:
Instead of leaving the corners sharp, use a small circular cutter or the cap of a marker to gently round off each of the four corners. This gives the tray that modern, soft geometric look seen in the photo. -
Smooth the edges:
Dip your finger in a tiny bit of water or baby oil and run it along the cut edges of the base to smooth out any roughness from the blade.
Seamless Strength
Use liquid polymer clay (Bake & Bond) lightly between the base and the wall strip before pressing them together; it acts like glue for an unbreakable bond.
Step 2: Building the Rim
-
Create the rim strip:
Roll out a long snake of clay and then flatten it into a long ribbon using your roller. You want this ribbon to be exactly the same thickness as your base (1/4 inch) and about 3/4 inch tall. -
Cut a clean edge:
Use your ruler and blade to trim the long ribbon so it has perfectly straight, parallel top and bottom edges. This ensures the tray walls will be even height all the way around. -
Attach the first side:
Place the ribbon on top of the base’s edge, aligning the outer faces flush. Press down firmly to adhere the raw clay together. I usually like to score the connection points slightly with a needle tool first for extra grip. -
Wrap the perimeter:
Continue wrapping the ribbon around the curved corners of the base. Take your time at the curves to prevent the clay from stretching too thin or buckling. -
Join the seam:
Where the ends of the ribbon meet, slice through both overlapping layers with a sharp blade at a 45-degree angle. Remove the excess bits and press the two angled edges together for a seamless join.
Step 3: Refining and Finishing
-
Blend the seams:
Use a clay modeling tool or the back of your fingernail to drag clay from the wall down onto the base on the inside and outside. This ‘knitting’ process is crucial for structural integrity. -
Smooth the transition:
Once the seams are knitted, use your finger to smooth the clay back out perfectly. The join between the wall and the floor of the tray should become invisible, looking like one solid piece. -
Level the top rim:
Flip the tray upside down gently onto your smooth tile. Press down lightly to ensure the top rim is perfectly flat and level. -
Final texture check:
Before baking, inspect the surface for fingerprints. Buff them out gently with a little cornstarch on your fingertip or a soft brush. -
Bake carefully:
Bake the tray according to your clay manufacturer’s instructions, usually at 275°F (135°C) for about 45-60 minutes. Use an oven thermometer to ensure accuracy, as scorching will ruin the terracotta color. -
Cool slowly:
Let the tray cool completely inside the oven with the door slightly ajar. Sudden temperature changes can sometimes cause cracking in larger flat pieces. -
Wet sand for matte finish:
Once cool, wet sand the entire piece under running water. Start with 400 grit to remove imperfections, move to 600, and finish with 1000 grit for that ultra-smooth, matte ‘fired ceramic’ feel.
Warped Bottom?
If the base isn’t flat after baking, place a heavy book on the still-warm tray immediately after removing it from the oven to flatten it as it cools.
Now you have a chic, functional piece of decor ready to keep your daily items beautifully organized


Decaled-Look Faux Ceramic Tile Set
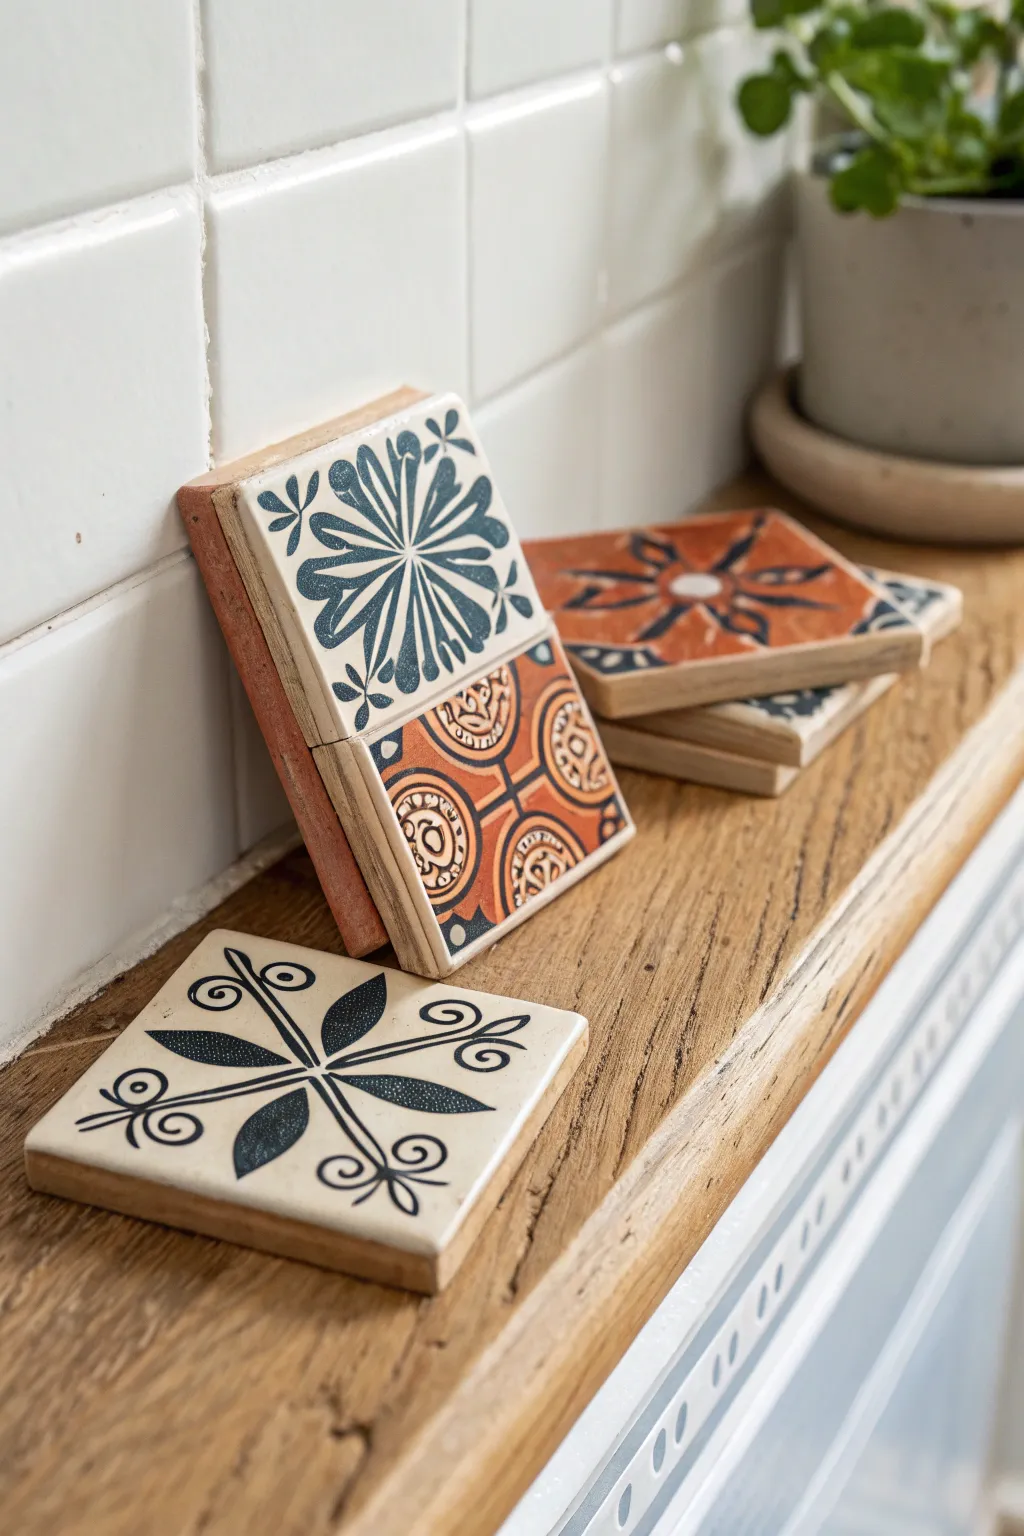
These charming coasters mimic the look of hand-painted ceramic tiles with stunning accuracy, featuring vibrant geometric patterns on a crisp white background. By combining polymer clay with wood, you achieve a delightful mix of rustic warmth and modern graphic appeal.
Step-by-Step Tutorial
Materials
- White polymer clay (approx. 2oz per coaster)
- Square wooden coaster blanks or thick plywood squares (4×4 inches)
- Liquid polymer clay (translucent or white)
- Texture sheet or rubber stamp with geometric/tile pattern
- Acrylic paints (navy blue, terra cotta/rust orange)
- Small foam roller or flat brush
- Sharp craft knife or tissue blade
- Sandpaper (medium and fine grit)
- Water-based polyurethane varnish or resin (optional for waterproofing)
- Pasta machine or rolling pin
- Baby wipes or damp cloth
Step 1: Preparing the Clay Base
-
Condition the Clay:
Begin by thoroughly conditioning your white polymer clay until it is soft and pliable. Run it through your pasta machine on the thickest setting to create a uniform slab. -
Create the Surface:
Cut the clay slab into squares slightly larger than your wooden blanks. I like to make them about 1/4 inch larger regarding width and height to account for shrinkage or trimming later. -
Prepare the Wood:
Sand your wooden squares briefly to ensure a smooth surface. Apply a very thin layer of liquid polymer clay to the top of the wood; this acts as the adhesive. -
Mount the Clay:
Carefully place the white clay slab onto the wood base. Use a roller to gently press it down, starting from the center and working outwards to eliminate any trapped air bubbles. -
Trim the Edges:
Using a sharp tissue blade, slice downwards flush against the wooden edge to trim away the excess clay. Clean up the edges with your finger to smooth the transition between clay and wood.
Paint Smearing?
If paint stains the white clay during wiping, your clay might be too porous. Try a light sanding after baking but BEFORE painting to seal the surface slightly.
Step 2: Creating the Design
-
Imprinting the Pattern:
Press a clean texture sheet or rubber stamp firmly into the raw clay. Ensure the impression is deep enough to hold paint but not so deep it reaches the wood. -
Alternative Transfer Method:
If you don’t have stamps, you can use a toner transfer technique or hand-carve a design using a needle tool for a more organic feel. -
First Bake:
Bake the wood and clay squares according to the clay manufacturer’s instructions (usually 275°F for 15-30 minutes). Yes, wood is safe in the oven at these low temperatures. -
Cooling Down:
Allow the tiles to cool completely before proceeding to the painting stage. The clay needs to be hard to handle the paint application.
Make it Functional
Glue a sheet of cork or adhesive felt pads to the bottom of the wooden base. This prevents the wood from scratching your table surface.
Step 3: Adding Color & Finish
-
Applying the Paint:
Pour a small amount of navy blue or terra cotta acrylic paint onto a palette. Using a brush, flood the indented areas of your stamped design. -
Wiping the Surface:
Before the paint dries completely, take a damp baby wipe or cloth wrapped tight around your finger and gently wipe the surface. This removes paint from the raised areas while leaving it in the recesses. -
Refining the Look:
If you wipe away too much, simply re-apply paint and wipe again. Use a precision cotton swab for tight corners. -
Drying Time:
Let the acrylic paint dry fully for at least an hour to ensure it won’t smudge during the sealing process. -
Sanding for Smoothness:
For an ultra-smooth ‘ceramic’ feel, lightly wet-sand the surface with fine-grit sandpaper (1000 grit or higher) to remove any paint haze. -
Sealing the Tile:
Apply a coat of water-based polyurethane varnish or a thin layer of resin to the top. This protects the paint and gives it that glossy, fired-glaze appearance. -
Final Cure:
Let the varnish cure according to the bottle instructions. Once dry, your faux ceramic tiles are ready to display.
The mix of wood and clay creates a durable, stylish piece perfect for any coffee table

The Complete Guide to Pottery Troubleshooting
Uncover the most common ceramic mistakes—from cracking clay to failed glazes—and learn how to fix them fast.
Abstract “Wavy” Vase Wrap
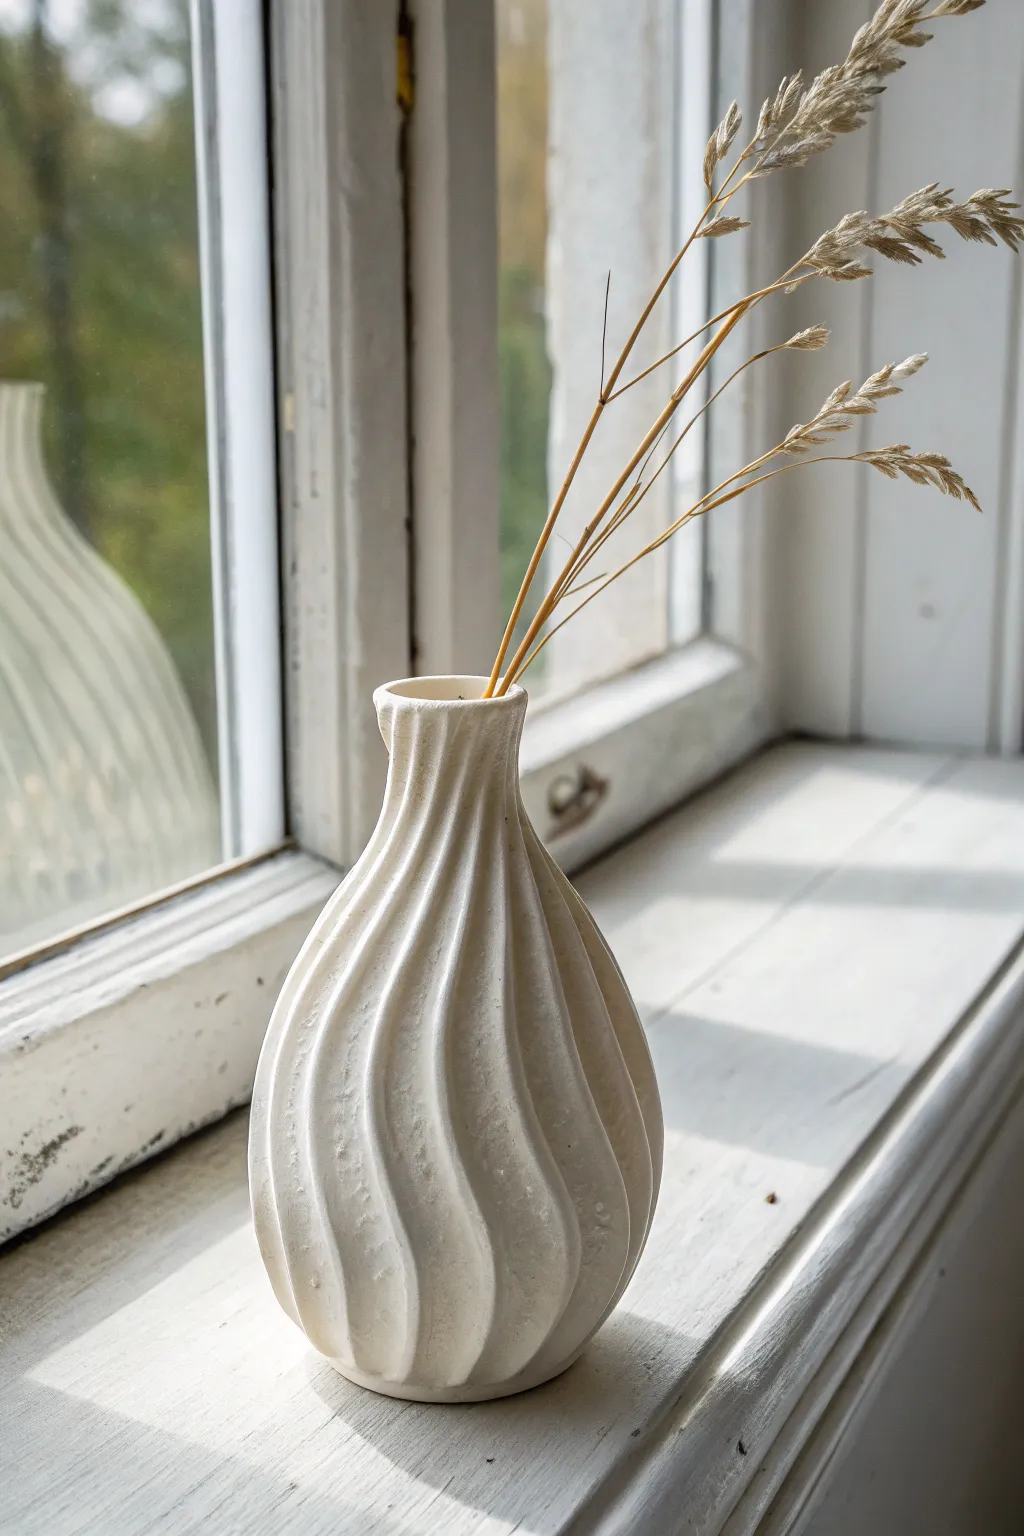
Transform a plain glass cylinder or thrifted vase into a piece of modern sculptural art featuring an elegant, organic wave pattern. This technique uses polymer clay to create sophisticated, sweeping ridges that mimic the look of high-end ceramic studio pottery.
Step-by-Step
Materials
- White or cream polymer clay (approx. 2-3 blocks depending on vase size)
- Small glass vase or cylinder (heat-safe)
- Polymer clay adhesive or liquid clay
- Rolling pin or pasta machine
- Cutting blade or craft knife
- Sculpting tool with a rounded edge
- Sandpaper (fine grit)
- Baking sheet and foil
- Oven
Step 1: Preparation and Base Layer
-
Clean the glass:
Start by thoroughly washing your glass vessel with soap and water to remove any grease or thrift store stickers. Wipe it down with rubbing alcohol to ensure a perfectly clean surface for adhesion. -
Condition the clay:
Begin kneading your white or cream polymer clay until it is soft, warm, and pliable. Proper conditioning is crucial to prevent cracks later. -
Roll the base sheet:
Roll out a portion of your conditioned clay into a thin, even sheet, approximately 2-3mm thick. This will form the foundation that covers the glass. -
Apply adhesive:
Brush a thin layer of liquid polymer clay or bake-and-bond adhesive all over the exterior of the glass vase. -
Wrap the vase:
Carefully wrap the clay sheet around the vase, smoothing it down as you go to release any trapped air bubbles. Trim the excess at the seam and blend the edges together with your finger or a smoothing tool so the join is invisible.
Step 2: Creating the Spiral Texture
-
Prepare the coils:
Roll out several long, even snakes of clay. These should be slightly thicker than a pencil—about 1cm in diameter is a good starting point. -
Plan the spiral:
Visualize the diagonal flow of the ridges. You want them to curve gently from the bottom rim up to the neck. -
Attach the first ridge:
Press one clay coil onto the vase at a diagonal angle, starting at the bottom and winding it upwards. I find it helpful to look at the vase from above to ensure the curve feels natural. -
Blend the edges:
Using a rounded sculpting tool or your thumb, smooth the edges of the coil onto the base layer. You want to eliminate the hard line where the coil meets the base, creating a seamless, raised hump. -
Repeat the pattern:
Place the next coil parallel to the first, leaving a gap of about 1-2cm between them. Repeat this process until the entire circumference is covered in diagonal ridges. -
Refine the valleys:
Use a smooth, rounded tool to deepen the ‘valleys’ between the ridges. The goal is a fluid, undulating surface rather than stuck-on stripes. -
Shape the rim:
Mold the clay at the top rim so it slightly curves inward, covering the glass lip completely for a finished look. -
Add texture (optional):
For a stone-like appearance, gently dab the surface with a coarse sponge or crumpled aluminum foil. This removes fingerprints and adds organic character.
Seamless Smoothness
Dip your finger in a tiny bit of baby oil or clay softener while blending the ridges. It acts like a lubricant, melting away fingerprints instantly.
Step 3: Finishing Touches
-
Bake the vase:
Place the vase on a foil-lined baking sheet. Bake according to your clay manufacturer’s instructions—usually around 275°F (130°C) for 30 minutes per 1/4 inch of thickness. -
Cool down:
Turn off the oven and let the vase cool down inside completely. Rapid cooling can sometimes cause the glass to crack or the clay to separate. -
Sanding:
Once cool, use fine-grit sandpaper to gently smooth out any rough spots or lingering fingerprints on the ridges. -
Final Wash:
Rinse the vase quickly under water to remove sanding dust and let it air dry completely before styling.
Air Pocket Alert
If a bubble appears in the base layer during baking, prick it with a pin while the clay is still warm and gently press the air out to flatten it.
Now you have a stunning, textured vessel ready to hold your favorite dried botanicals or fresh blooms.
Incense Holder With Bold Shapes
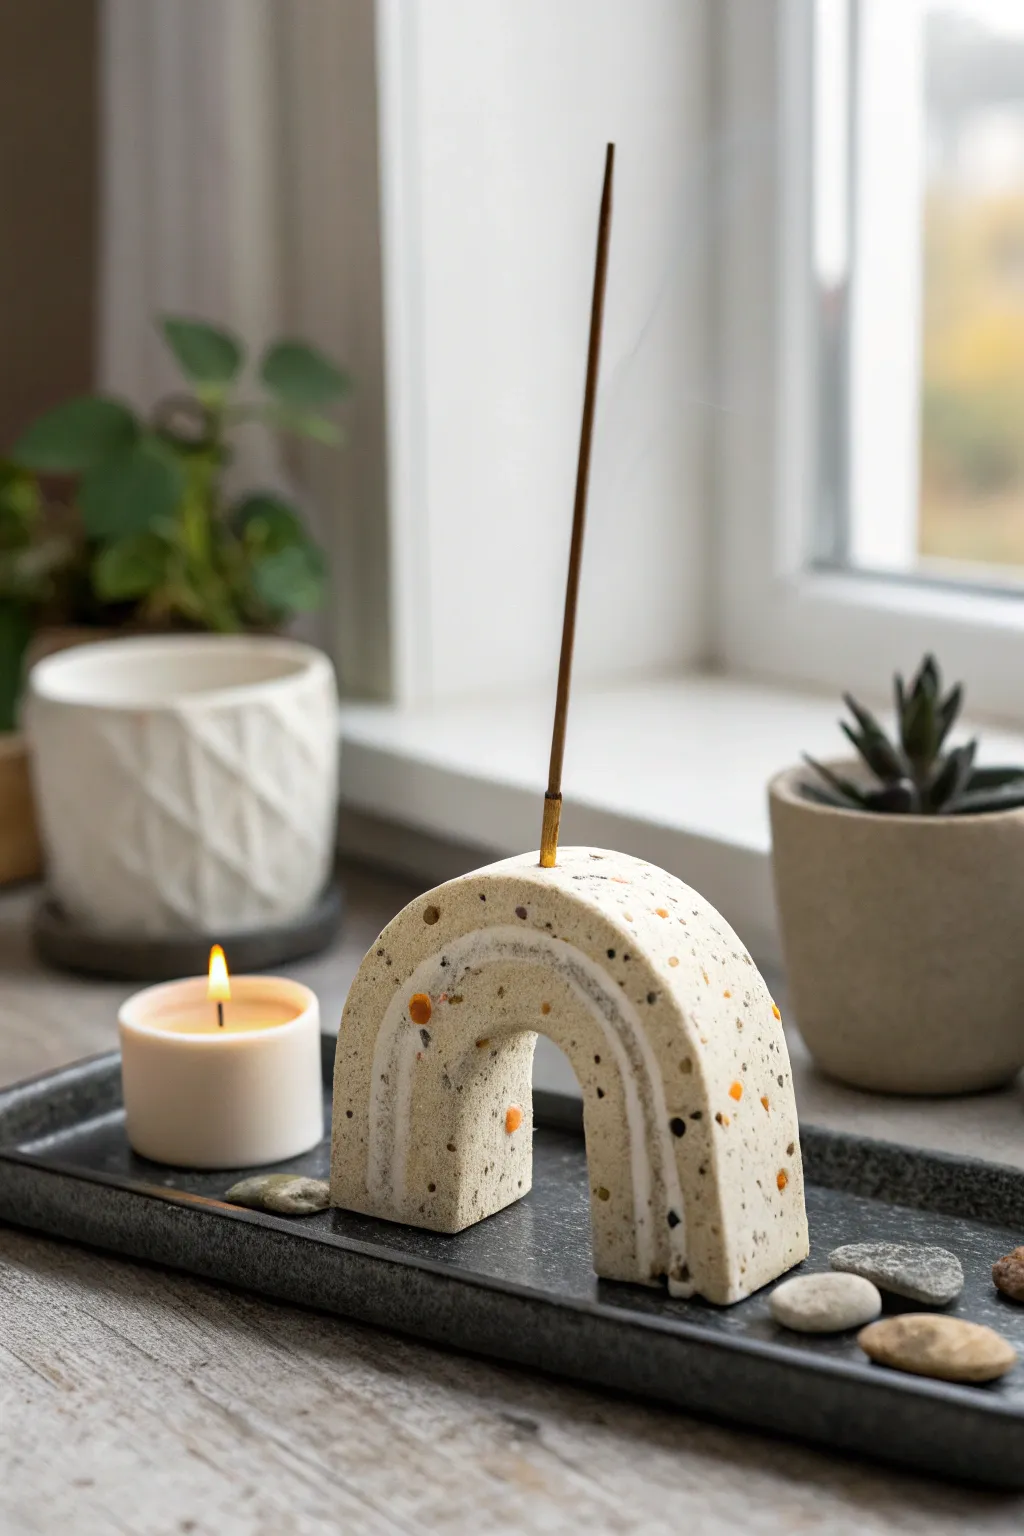
Bring a touch of modern minimalism to your space with this arch-shaped incense holder featuring a faux-stone terrazzo effect. The subtle inlaid lines add architectural interest, making it as much a sculpture as it is a functional home accessory.
Step-by-Step
Materials
- Polymer clay (cream or beige as base)
- Polymer clay (black and orange for inclusions)
- Polymer clay (white for stripes)
- Acrylic rolling pin
- Tissue blade or sharp craft knife
- Round cookie cutter or drinking glass (approx. 4-inch diameter)
- Smaller round cutter (for the inner arch)
- Needle tool or incense stick
- Fine-grit sandpaper (400 to 1000 grit)
- Varnish or sealant (optional)
- Oven for baking
Step 1: Preparing the Terrazzo Clay
-
Chop the inclusions:
Begin by taking small amounts of your black and orange polymer clay. Use your craft knife to chop them into tiny, irregular angular pieces. They should look like coarse sand or small gravel; variety in size makes the stone effect more realistic. -
Condition the base:
Condition your cream or beige clay thoroughly until it is soft and pliable. Flatten it out into a thick pancake. -
Mix in the chips:
Sprinkle your chopped colored clay chips over the flattened base clay. Fold the base clay over to sandwich the chips inside. -
Integrate the pattern:
Roll the clay into a log, twist it, and fold it again. Repeat this process a few times to distribute the chips evenly throughout the block without blending the colors into mud. -
Create the slab:
Using your acrylic roller, roll the terrazzo mixture out into a thick, even slab. Aim for a thickness of about 3/4 inch to ensure the holder is heavy enough to be stable.
Smudged Colors?
If your terrazzo chips start streaking during rolling, your clay might be too warm. Pop the clay in the fridge for 10 minutes to firm it up before slicing or rolling again.
Step 2: Shaping the Arch
-
Cut the outer curve:
Use your large round cutter or a guide to cut a semi-circle shape from your thick slab. Use your tissue blade to cut the straight bottom edge cleanly. -
Cut the inner arch:
Using the smaller round cutter, remove a semi-circle from the center of the bottom edge to create the rainbow or bridge shape. Smooth the cut edges with your finger to remove harsh lines. -
Prep the inlay channels:
Take a carving tool or the edge of a clean credit card and gently press two curved grooves into the front face of the arch. These channels should follow the curve of the arch. -
Create the white stripes:
Roll out a very thin snake or thin sheet of white polymer clay. If using a sheet, slice extremely thin strips. -
Inlay the stripes:
Carefully press the white clay into the grooves you created. Use the roller to gently flatten the face of the arch again so the white lines become flush with the terrazzo surface. -
Clean the surface:
If the white clay smudged slightly, don’t panic; we will sand it later. Ensure the overall shape is symmetrical and stands upright on its own.
Step 3: Finishing Touches
-
Pierce the hole:
Find the exact center of the top of the arch. Using a needle tool or the end of an actual incense stick, press a hole straight down. Make sure it’s deep enough to hold a stick securely but doesn’t poke through to the inner arch. -
Widen slightly:
I prefer to wiggle the tool slightly to make the hole just a hair wider than the stick, as clay can shrink microscopically during baking. -
Bake:
Place your piece on a baking sheet or ceramic tile. Bake according to the manufacturer’s instructions for your specific brand of clay (usually around 275°F/130°C for 30 minutes per 1/4 inch of thickness). -
Cool down:
Let the piece cool completely in the oven with the door open to prevent cracking from thermal shock. -
Sand for stone effect:
Once cool, wet-sand the piece under running water. Start with 400 grit to reveal the inner chips of the terrazzo and make the surface flush, then move to higher grits for a smooth finish. -
Seal (optional):
If you want a glossy look or extra protection, apply a thin layer of polymer clay varnish, though the matte sanded look mimics real stone best.
Pro Tip: Clean Cuts
For the sharpest geometric edges on your arch, wipe your tissue blade with a little baby oil or cornstarch before cutting to prevent the clay from dragging.
Light your favorite scent and watch the smoke drift gently around your new handmade centerpiece


What Really Happens Inside the Kiln
Learn how time and temperature work together inside the kiln to transform clay into durable ceramic.
Plant Pot Charm Band
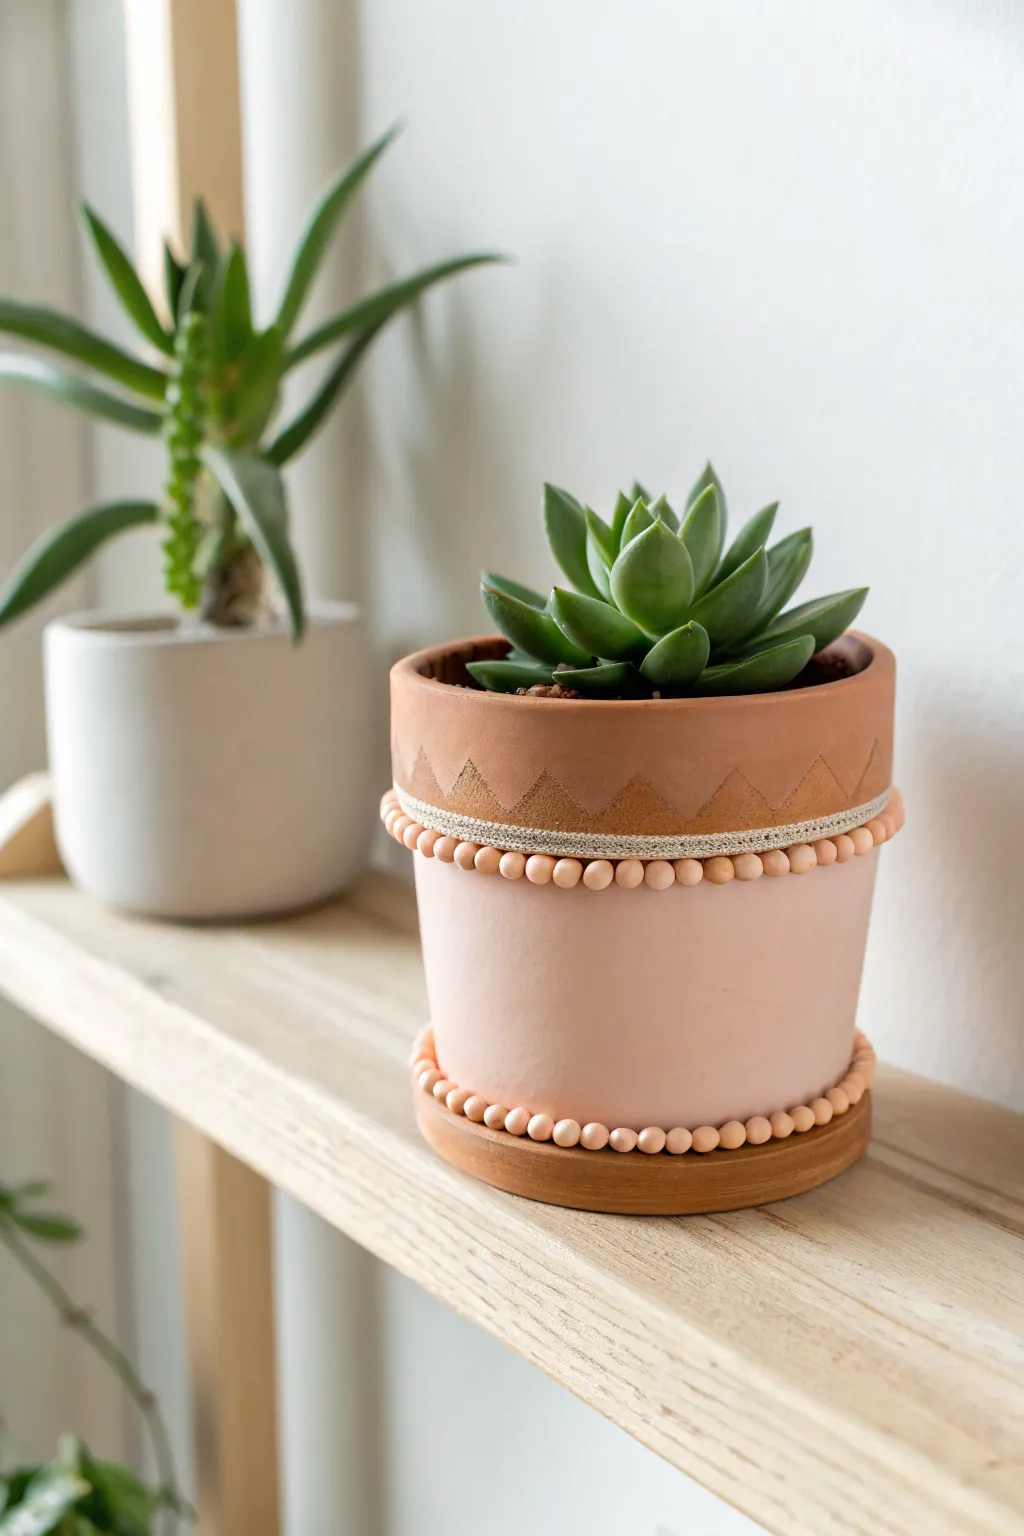
Transform a standard terracotta planter into a stylish, bohemian accent piece with this simple polymer clay upgrade. By combining soft pastel paint with custom-made clay beads, you’ll create a textured band that adds instant charm to any succulent display.
Step-by-Step Tutorial
Materials
- Standard terracotta pot with saucer
- Polymer clay (peach or light terracotta color)
- Acrylic paint (soft pastel pink or blush)
- Acrylic paint (matching terracotta color, optional)
- Narrow woven trim or burlap ribbon (approx. 1/4 inch wide)
- Strong craft glue (E6000 or similar)
- Paintbrush (flat shader)
- Painter’s tape
- Baking sheet and parchment paper
- Oven (for curing clay)
Step 1: Prepping and Painting the Pot
-
Clean surface:
Begin by wiping down your terracotta pot with a damp cloth to remove any dust or debris. Let it dry completely to ensure the paint adheres properly. -
Tape off the rim:
Apply a strip of painter’s tape around the circumference of the pot, positioning it just below the natural rim where the pot widens. Press down firmly to seal the edge. -
Paint the base:
Using a flat brush, apply your soft pink acrylic paint to the lower section of the pot below the tape line. Use long, horizontal strokes for a smooth finish. -
Second coat:
Allow the first coat to dry for about 20 minutes. If the terracotta is still showing through, apply a second coat for opaque coverage. -
Detail the rim:
While the base dries, look at the unpainted upper rim. Using a small detail brush and water-thinned terracotta paint (or just water if the clay is dark enough), paint a subtle zig-zag pattern around the top edge.
Consistent Sizing Trick
To get perfectly identical beads, roll your clay into a sheet with a rolling pin and use a very small round cutter (like a straw) to punch out equal volumes before rolling.
Step 2: Creating the Clay Accents
-
Condition the clay:
Take a portion of your polymer clay and knead it in your hands until it becomes soft and pliable. This conditioning step prevents cracks during baking. -
Roll a snake:
Roll the conditioned clay into a long snake with an even thickness of about 1/4 inch on your work surface. -
Cut equal segments:
Use a clay blade or knife to slice the snake into equal segments. Consistency is key here, so try to keep them as uniform as possible. -
Form the beads:
Roll each small segment between your palms to create perfect little spheres. You will need enough beads to encircle the pot twice—once for the middle band and once for the base. -
Bake the beads:
Arrange all your clay spheres on a parchment-lined baking sheet. Bake them according to the specific temperature and time instructions on your clay package. Let them cool completely before handling.
Step 3: Assembly and Finishing
-
Remove tape:
Once the paint on the pot is fully dry, carefully peel away the painter’s tape to reveal a crisp line. -
Attach trim:
Glue a strip of your narrow woven trim or burlap ribbon directly over the transition line where the paint meets the raw terracotta. Cut the ends so they meet neatly at the back. -
Glue the top bead band:
Apply small dots of strong craft glue along the bottom edge of the trim you just attached. Press the baked clay beads into the glue one by one, creating a continuous row that sits right on that paint line. -
Secure the beads:
Hold the beads in place for a few seconds if necessary to ensure they don’t slide down before the glue sets. I find it helps to do this section in quarters, letting the glue grab before rotating. -
Create the base border:
Apply a line of glue around the very bottom edge of the pot, just above where it would touch the saucer. Attach a second row of clay beads here to mirror the top design. -
Final dry:
Allow the adhesive to cure fully overnight before potting your succulent. This ensures the decorations are permanent and won’t shift when you water the plant.
Pattern Play
Instead of solid colored clay, marble two colors together (white and terracotta) before rolling your beads to add visual texture to the band.
Now you have a charming, custom planter that perfectly frames your greenery with a touch of handmade elegance
Wall-Mounted Mini Planter Relief
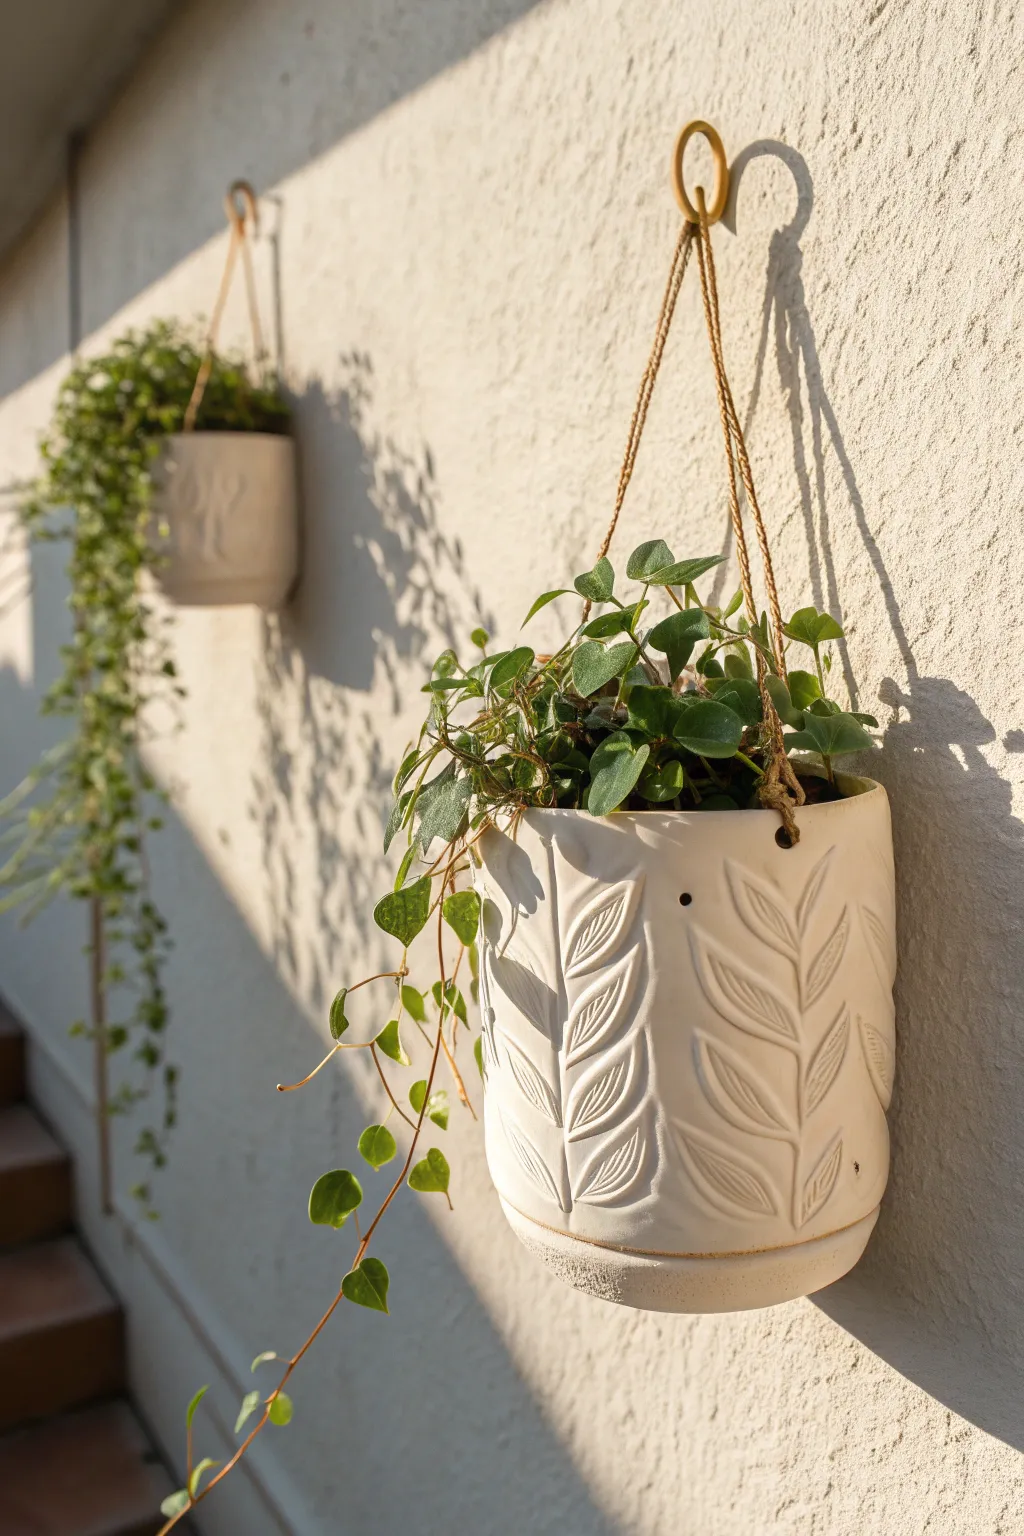
Transform a basic ceramic vessel into a piece of artisanal decor with this simple polymer clay relief technique. The result is a stunning, textured planter that mimics high-end pottery with its matte white finish and organic leaf motifs.
Detailed Instructions
Materials
- Inexpensive smooth ceramic or plastic pot (straight-sided works best)
- White or translucent polymer clay
- Rolling pin or acrylic roller
- X-acto knife or clay blade
- Needle tool or toothpick
- Liquid polymer clay (Bake & Bond)
- White matte spray paint (primer & paint in one)
- Fine-grit sandpaper
- Jute twine for hanging
- Oven
Step 1: Prepping the Canvas
-
Select your vessel:
Choose a heat-safe ceramic pot or a glass jar as your base. Ensure the surface is clean, dry, and free of any oils or stickers. -
Condition the clay:
Warm up your block of polymer clay in your hands, kneading it until it is soft and malleable. This prevents cracking later. -
Roll a thin sheet:
Use your rolling pin or acrylic roller to flatten the clay into a sheet about 1/8 inch thick. Try to keep the thickness consistent. -
Cut leaf shapes:
Freehand cut long, simple almond or lanceolate leaf shapes using your craft knife. You will need roughly 12-16 leaves depending on your pot size.
Clay peeling off?
If clay leaves lift after baking, pop them off completely. Apply super glue (cyanoacrylate) to the back of the piece and press it back onto the pot for a permanent hold.
Step 2: Creating the Relief
-
Apply adhesive:
Smear a very thin layer of liquid polymer clay onto the back of your first clay leaf. This acts as the glue to bond the raw clay to the pot. -
Position the stem:
Start by placing a thin snake of clay as a central ‘stem’ running vertically up the pot for the leaves to attach to. -
Attach the leaves:
Press the leaves onto the pot, angling them upwards from the central stem in pairs. Gently smooth the edges down with your finger so they merge slightly with the surface. -
Add vein details:
Using a needle tool, carefully press a central vein line down the middle of each leaf. -
Create texture:
Make small, angled indentations branching off the central vein to resemble the ribbing of a leaf. I find pressing firmly but dragging lightly creates the cleanest lines. -
Repeat the pattern:
Continue this process, creating vertical columns of leaf patterns around the circumference of the pot. Leave about an inch of space between each column. -
Smooth imperfections:
Check for any fingerprints or rough edges. A dab of baby oil on your finger can help smooth these away before baking.
Make it stone-like
Instead of plain white paint, use a ‘stone effect’ spray paint in a light beige or granite tone. The textured specks will hide any unevenness in your clay work.
Step 3: Finishing Touches
-
Bake the project:
Place the pot in a cold oven and set it to the temperature recommended on your clay package (usually 275°F/130°C). Bake for 30 minutes. -
Cool down:
Turn the oven off and crack the door, letting the pot cool slowly inside to prevent thermal shock to the ceramic base. -
Sand the surface:
Once fully cool, lightly sand any sharp bits on the clay leaves using fine-grit sandpaper for a professional finish. -
Spray paint:
Take the planter outside and apply several light coats of matte white spray paint. This unifies the clay and the pot into a single ceramic-look piece. -
Add hanging holes:
If your pot doesn’t have holes, use a masonry bit to drill 3 holes near the rim. If you used a plastic liner inside a decorative pot, drill through that instead. -
String it up:
Cut three equal lengths of jute twine. Thread them through the holes and knot securely on the inside. -
Gather the top:
Bring the three strings together at the top and knot them around a brass ring or simply loop them together for hanging.
Hang your new creation in a sunny spot and enjoy the custom shadows the relief pattern casts on your wall

TRACK YOUR CERAMIC JOURNEY
Capture glaze tests, firing details, and creative progress—all in one simple printable. Make your projects easier to repeat and improve.
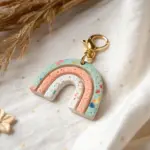
Moon Phase Garland Decor

Bring the magic of the night sky indoors with this striking moon phase garland. Crafted from black polymer clay with a subtle shimmer, each celestial pendant adds a touch of modern mysticism to your wall decor.
Step-by-Step Tutorial
Materials
- Black polymer clay (preferably with granite or glitter effect)
- Rolling pin or pasta machine
- Circle cookie cutters (approx. 2-inch diameter)
- Small moon-shaped cutter (optional)
- Acrylic rolling tool or craft knife
- Gold or silver acrylic paint
- Fine detail paintbrush or dotting tool
- Jute twine or hemp cord
- Straw or cocktail stick for holes
- Baking sheet and parchment paper
- Oven (for curing)
- Gloss varnish (optional)
Step 1: Clay Preparation & Cutting
-
Condition the Clay:
Begin by kneading your black polymer clay until it is soft and pliable. If you are using plain black clay, you can mix in a pinch of fine black or silver glitter for that starry night effect seen in the photo. -
Roll it Out:
Roll the clay into a slab that is roughly 1/4 inch thick. A pasta machine creates the most even finish, but a standard acrylic roller works just fine as long as you maintain consistent pressure. -
Cut the Circles:
Use your circle cutter to punch out roughly 7 to 9 circles. These will form the base for your full moons and gibbous phases. -
Shape the Crescents:
To make the crescent moon end pieces, cut a circle first, then use the same cutter to bite a curve out of the side of that circle, leaving a perfectly arched crescent shape. -
Smooth the Edges:
Before baking, gently run your finger along the cut edges of each shape to smooth away any sharp ridges or loose bits of clay. This professional touch makes a huge difference.
Step 2: Creating the Holes
-
Find Center:
Carefully identify the top center of each clay piece. You want them to hang straight, so alignment is key. -
Punch the Holes:
Using a straw or a cocktail stick, press a hole through the top of each shape. Make sure the hole is wide enough to accommodate your jute twine later. -
Double-Check Size:
Give the straw a tiny wiggle to ensure the hole is clean and won’t close up during baking.
Clean Edges Tip
Does your clay stick to the table? Roll it out on a piece of wax paper or a ceramic tile to prevent distortion when lifting the shapes.
Step 3: Baking & Cooling
-
Prepare for Baking:
Lay your moon shapes flat on a baking sheet lined with parchment paper. -
Bake:
Follow the heating instructions on your specific brand of polymer clay packaging. Typically, this is around 230°F to 275°F for 15-30 minutes. -
Cool Down:
Once baked, remove the tray from the oven and let the pieces cool completely. They will harden fully as they return to room temperature.
Fingerprint Fix
If you see fingerprints on the raw clay before baking, lightly brush the surface with a tiny amount of baby oil or cornstarch to smooth them out.
Step 4: Painting & Assembly
-
Add Celestial Details:
Using a very fine brush and gold or silver acrylic paint, add small details to the full circles. You might paint tiny stars, dots, or small crescent shapes to represent the changing phases. -
Create Texture:
For a speckled galaxy look, you can dip an old toothbrush in white paint and flick it gently over the surface. -
Let Paint Dry:
Allow the paint to dry completely. If you want extra durability or shine, apply a thin coat of gloss varnish now. -
Measure the Twine:
Cut a length of jute twine or hemp cord, measuring where you plan to hang it so you have plenty of extra length on the ends. -
Attach the Moons:
Thread the twine through the hole of your first piece. Tie a simple overhand knot at the top to secure the clay piece in place so it doesn’t slide. -
Space Them Out:
Move about 3-4 inches down the twine and repeat the process with the next moon phase. Arrange them in order: crescent, gibbous, full moon, gibbous, crescent. -
Final Adjustments:
Once all pieces are strung and knotted, trim any excess twine from the knots if desired, leaving loops at the far ends for hanging.
Now your handmade galaxy is ready to hang, adding a peaceful and rhythmic energy to your space
Knot-Style Paperweight
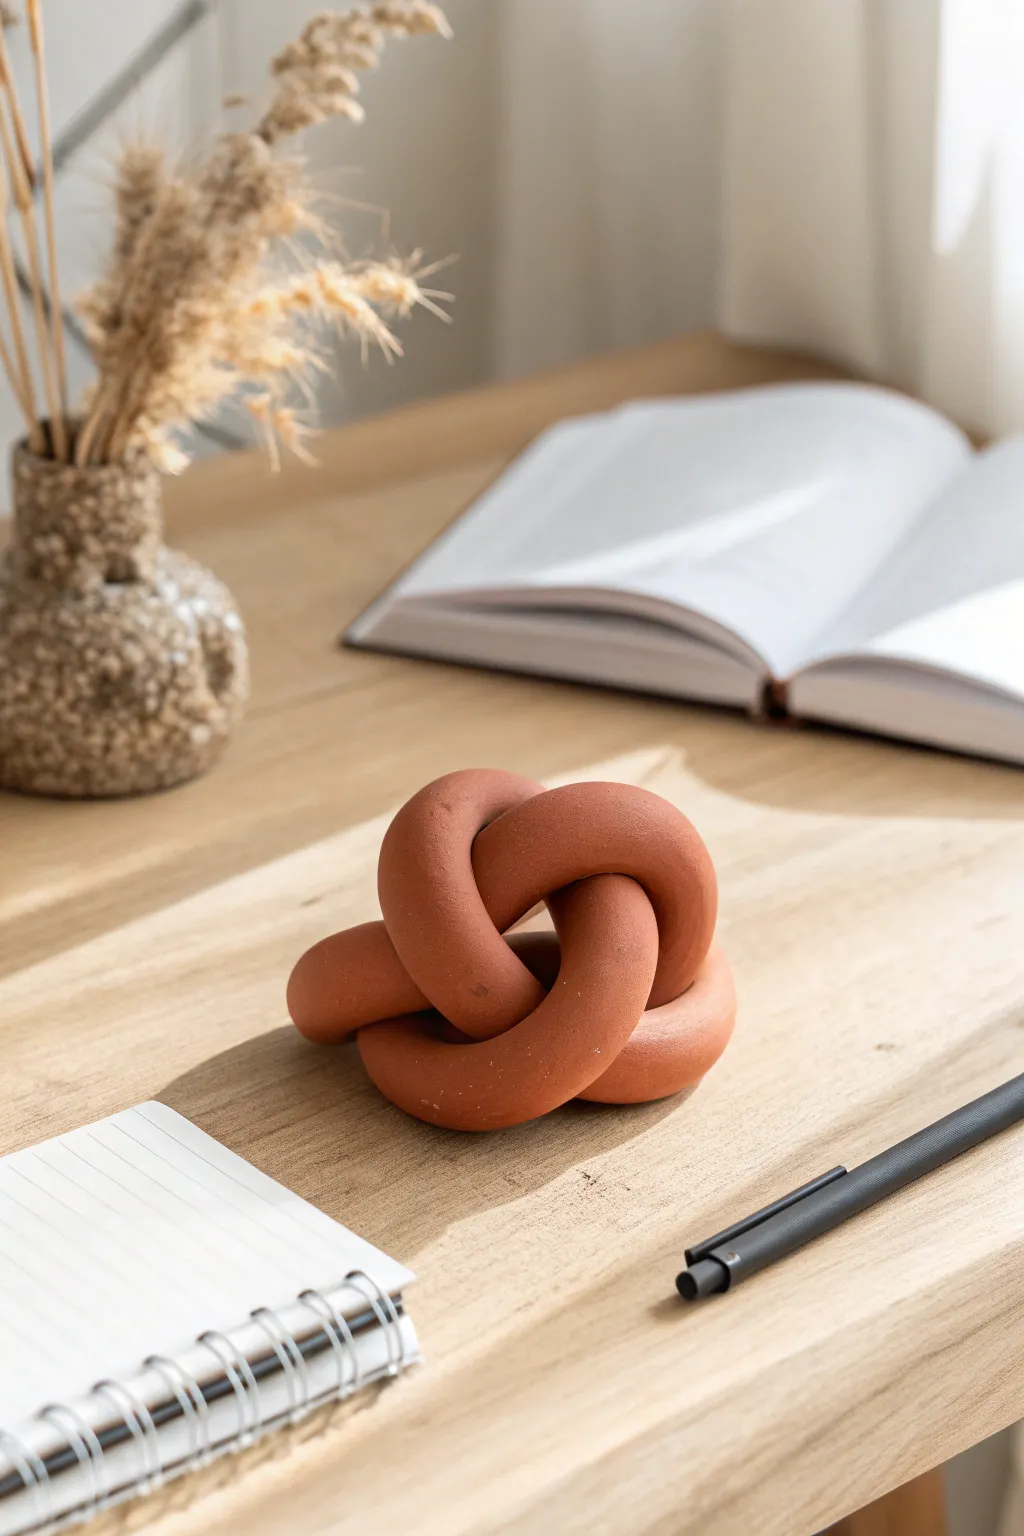
Bring an organic, sculptural element to your workspace with this modern chain knot paperweight. The matte terracotta finish and chunky, winding form create a sophisticated look that feels far more expensive than the simple polymer clay used to make it.
Step-by-Step Guide
Materials
- Terracotta-colored polymer clay (approx. 4-6 oz)
- Acrylic rolling pin or large glass jar
- Clean work surface (ceramic tile or glass mat)
- Craft knife or clay blade
- Aluminum foil
- Fine-grit sandpaper (400 and 600 grit)
- Oven
- Optional: Matte varnish spray
Step 1: Preparation & Rolling
-
Condition the clay:
Start by taking a large block of terracotta polymer clay and warming it up in your hands. Knead and twist it repeatedly until it becomes completely pliable and free of cracks. -
Create the core snake:
Roll the clay into a thick log. To keep the finished piece lighter and save clay, I sometimes create a snake of compressed aluminum foil first to use as a core, but for a solid, heavy paperweight feel, stick to solid clay. -
Lengthen the coil:
Place the log on your work surface and roll it back and forth using your palms or an acrylic rolling pin. Aim for a consistent snake about 1 inch thick and roughly 18-20 inches long. -
Smoothing the surface:
Inspect the clay snake for any air bubbles or heavy fingerprints. Gently smooth them out with your thumb or roll it lightly against the table again to ensure a perfectly cylindrical shape.
Keep it Clean
Terracotta clay shows lint easily! Wipe your work surface and wash your hands thoroughly before rolling. Keep a piece of scotch tape handy to dab away any dust motes.
Step 2: Forming the Knot
-
Start the loop:
Take one end of your clay snake and create a simple, large loop on the table, crossing the ‘tail’ end over the main body of the snake. -
Weave the first pass:
Bring the long end of the snake up and through the center of the loop you just created. Don’t pull it tight; you want a loose, open structure. -
Continue the weave:
Guide the remaining length of the snake over the outer edge of the loop and tuck it back underneath the section that is crossed over. Think of it like tying a loose pretzel. -
Connect the ends:
Bring the two ends of the snake together. They should meet naturally if the knot is loose enough. Trim the ends at an angle with your craft knife to maximize the surface area for joining. -
Seal the seam:
Press the cut ends firmly together. Use your finger or a clay modeling tool to smear the clay across the seam line, blending it until the joint is invisible. -
Adjust the shape:
Gently push and pull the loops to make the knot look uniform. Ensure there are visible gaps between the ‘links’ so it looks like a continuous, airy structure rather than a compressed ball.
Faux Stone Texture
Before baking, mix a teaspoon of coarse black pepper or dried coffee grounds into the clay. When you sand it later, the speckles will appear, mimicking real stone.
Step 3: Finishing
-
Pre-bake smoothing:
Take a moment to check for fingerprints one last time. You can use a tiny bit of baby oil on your finger to lightly buff away any stubborn marks before baking. -
Bake the project:
Place the knot on a baking sheet or ceramic tile. Bake according to your specific clay package instructions—usually around 275°F (130°C) for 30-45 minutes given the thickness of the form. -
Cool down:
Let the knot cool completely inside the oven by cracking the door slightly. This gradual cooling helps prevent cracks in thicker clay pieces. -
Initial Sanding:
Once fully cooled, dampen your 400-grit sandpaper and lightly sand the entire surface under running water. This wet-sanding technique removes any shine and gives that high-end ceramic texture. -
Final Polish:
Follow up with 600-grit sandpaper for an ultra-smooth finish. Rinse off the clay dust and let the piece dry thoroughly. -
Optional Protection:
If you want to protect the surface from future scuffs, apply a very light coat of matte spray varnish, though leaving it raw preserves the authentic terracotta feel.
Place your finished knot atop a stack of books or holding down loose papers for an instant touch of artisanal warmth
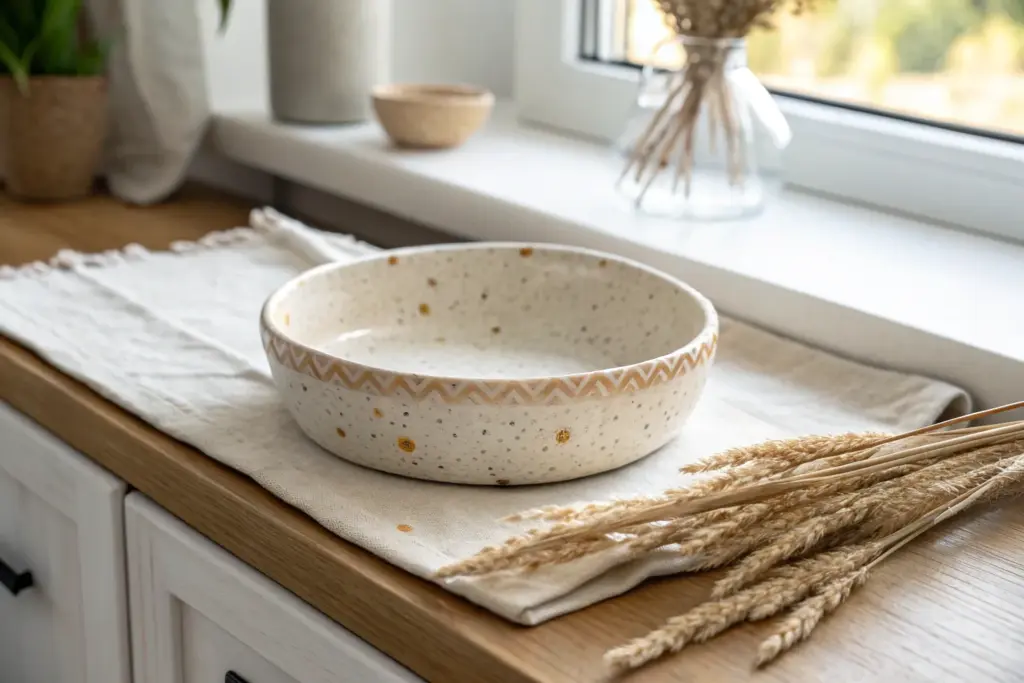
Faux Stone Pebble Dish
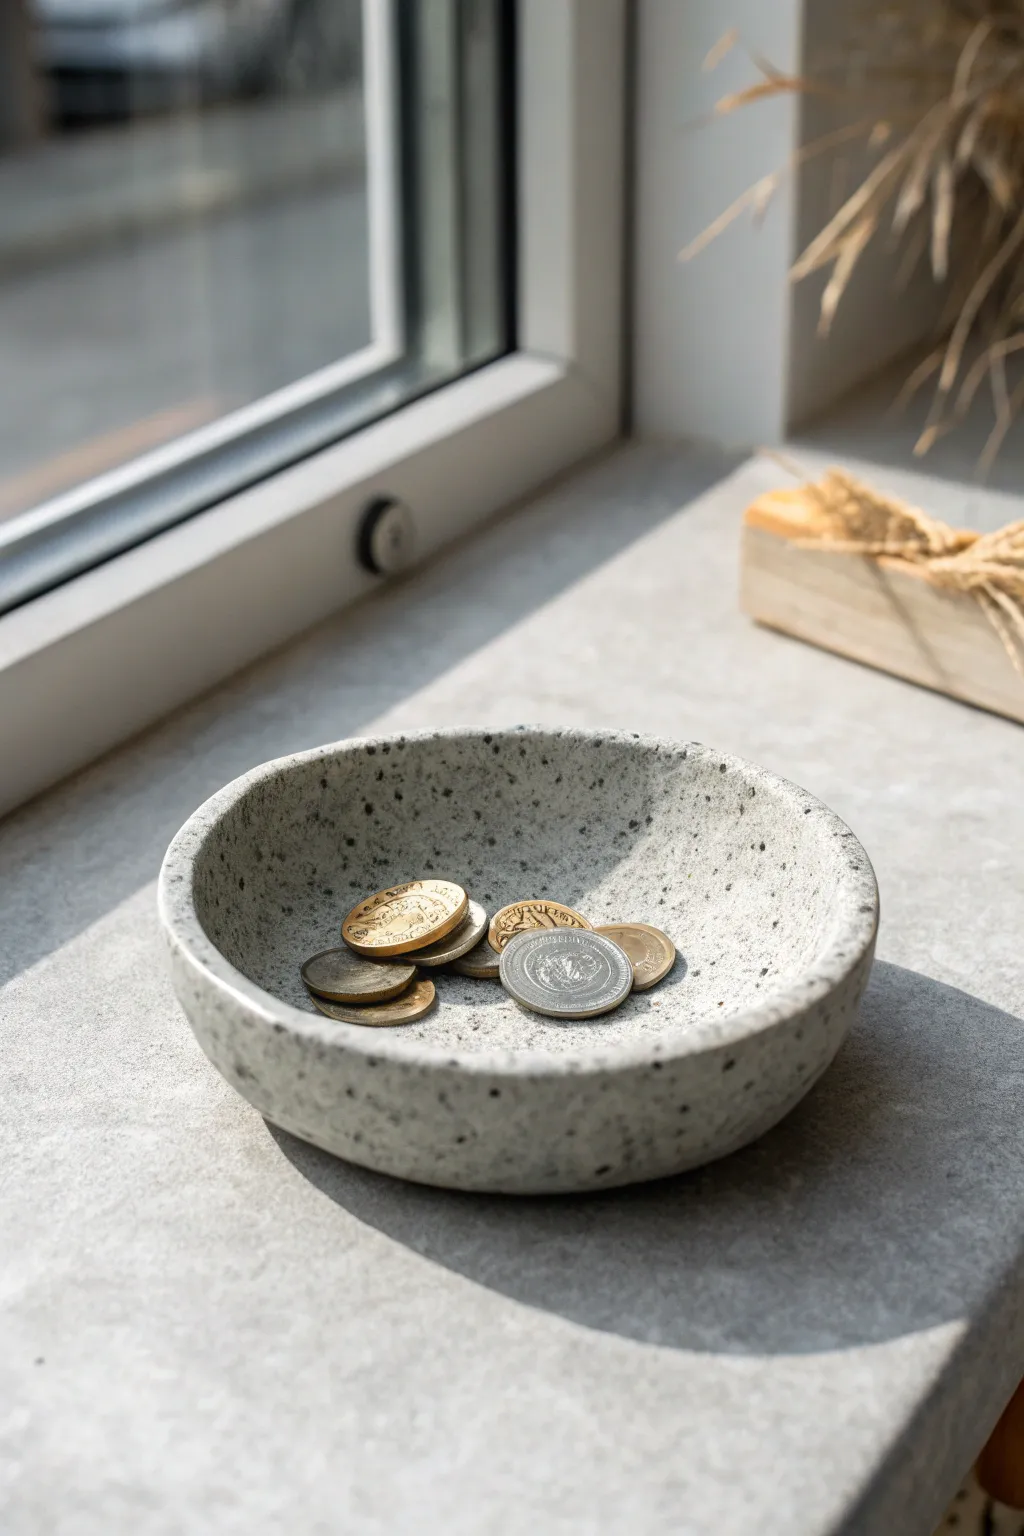
Transform humble polymer clay into an elegant, high-end decor piece with this surprisingly simple faux stone technique. This minimalist dish mimics the heavy, organic look of granite or concrete, perfect for holding jewelry or spare change by the window.
Step-by-Step
Materials
- White polymer clay (approx. 2oz)
- Translucent polymer clay (approx. 1oz)
- Black pepper (ground)
- Dried oregano or tea leaves (optional, fine)
- Black acrylic paint or black alcohol ink
- Rolling pin or acrylic roller
- Small bowl or round cutter (approx. 4-5 inches)
- Oven-safe glass bowl (to use as a mold)
- Fine grit sandpaper (400-800 grit)
- Matte finish varnish (optional)
Step 1: Mixing the Faux Stone
-
Base Preparation:
Begin by conditioning the white polymer clay until it is soft and pliable. Knead it thoroughly in your hands to warm it up. -
Adding Translucency:
Mix in the translucent clay with the white clay. A ratio of about 2 parts white to 1 part translucent adds a realistic depth that pure white clay lacks. -
Adding the Speckles:
Flatten the clay mixture into a pancake shape. Sprinkle a generous amount of ground black pepper onto the surface. -
Adding Texture:
For more organic variation, you can also add a pinch of dried oregano or tea leaves. This creates different sized inclusions. -
Incorporating the Inclusions:
Fold the clay over the spices and knead thoroughly. Continue folding and kneading until the specks are evenly distributed throughout the entire block. -
Optional Tinting:
If you want a grayer concrete look rather than white granite, add the tiniest drop of black paint or alcohol ink and knead until the color is solid gray.
Natural Stone Texture
Before baking, gently roll a real rock over the surface of your clay. This imprints genuine organic divots and texture that is hard to fake by hand.
Step 2: Forming the Dish
-
Rolling Out:
Roll the clay into a ball, then use your roller to flatten it into a sheet about 1/4 inch thick. Don’t make it too thin, as you want the rim to look substantial like real stone. -
Adding Surface Texture:
Take a coarse piece of sandpaper or an old toothbrush and gently tap the surface of the clay sheet to give it a porous, stony texture. -
Cutting the Shape:
Place your cutting template (a bowl or round cutter) onto the clay and cut out a perfect circle. -
Smoothing Edges:
Run your finger gently along the cut edge to soften the sharp angle. A slightly rounded lip looks more like tumbled stone. -
Shaping:
I like to gently drape the clay circle inside a small oven-safe bowl. Press it down lightly so it takes the curved shape of the bowl. -
Refining the Form:
Ensure the clay is centered in the bowl so the rim height is even all the way around.
Step 3: Baking and Finishing
-
Baking:
Bake the clay inside the glass bowl according to the manufacturer’s instructions (usually 275°F/135°C for 15-30 minutes). -
Cooling:
Let the piece cool completely inside the mold before trying to remove it to prevent warping. -
Sanding:
Once cool, use wet sandpaper (start with 400 grit) to smooth any rough spots on the rim. Sanding will also expose more of the pepper specks. -
Final Wash:
Rinse the dish under water to remove sanding dust and dry it thoroughly. -
Sealing:
Apply a thin coat of matte varnish if you want extra protection, though leaving it raw preserves the realistic stone texture best.
Fixing Plaque Effects
If you see ‘plaques’ or fingernail moon shapes in the clay after baking, try sanding deeper. Sometimes these are just surface tension marks from rolling.
Place your new faux granite dish in a sunny spot to catch the light and enjoy its natural charm