A plain terracotta flower pot is basically a blank canvas, and I never get tired of how quickly it can turn into real decor. Here are my favorite clay flower pot decorating ideas, starting with the classics and easing into the fun, quirky transformations.
Classic Painted Terracotta Pot Stripes
Transform a basic terracotta pot into a piece of modern home decor with this soft pastel stripe design. The combination of mint green, blush pink, and crisp white creates a calming, spring-like feel that perfectly frames any small succulent.
Step-by-Step Guide
Materials
- Small terracotta pot with saucer
- White acrylic paint (priming base)
- Mint green acrylic paint
- Blush pink acrylic paint
- Wide flat paintbrush (1-inch foam or bristle)
- Painter’s tape or crafting tape (various widths)
- Matte finish clear sealant spray
- Small succulent and potting soil
Step 1: Preparation & Base Coat
-
Clean the surface:
Begin by wiping down your terracotta pot with a damp cloth to remove any dust or debris from the store. Let it dry completely. -
Mix your base white:
Squeeze out a generous amount of white acrylic paint. If the paint feels too thick, you can thin it slightly with a drop of water for smoother coverage. -
Apply the first coat:
Paint the entire exterior of the pot white using your wide flat brush. Don’t forget to paint the top inch of the inside rim where soil won’t cover. -
Let it dry:
Allow the first coat to dry for about 20-30 minutes. Terracotta is porous, so the first layer often soaks right in. -
Apply the second coat:
Add a second coat of white to ensure a solid, opaque background. This white layer will act as the separating lines between your colored stripes later. -
Dry thoroughly:
Let this white base coat cure completely for at least an hour. If the paint is even slightly tacky, the tape in the next step will pull it off.
Step 2: Creating the Stripes
-
Mask off the rim:
Place a strip of painter’s tape horizontally around the pot, just below the rim. Press the edges down firmly with your fingernail to prevent bleed-through. -
Create the stripe gaps:
Apply two more parallel strips of tape around the body of the pot. These tape lines will become the thin white separators you see in the finished project. -
Check spacing:
You should now have three exposed horizontal sections: a top band (for mint), a middle band (for pink), and a bottom band (for mint). Adjust the tape until the sections look fairly even. -
Paint the top band:
Using a smaller flat brush, carefully fill the top exposed section with your mint green paint. Brush horizontally with the direction of the tape. -
Paint the bottom band:
Paint the bottom exposed section with the same mint green shade. I find it helps to hold the pot by placing your hand inside it to avoid smudging. -
Paint the middle band:
Rinse your brush thoroughly (or grab a fresh one) and fill the middle section with the blush pink paint. -
Apply a second coat:
Pastel colors can streak, so once the first layer is dry to the touch, apply a second coat to all three colored bands for a solid, creamy finish.
Bleeding Lines?
If paint bleeds under the tape, try sealing the tape edges with a thin layer of the *base* color (white) first. This fills any gaps before you apply the color.
Step 3: Finishing Touches
-
Remove the tape:
Here is the critical moment: pealing the tape. Do this while the paint is still slightly damp, not fully hardened, to get the cleanest line. Pull slowly at a 45-degree angle. -
Touch up edges:
If any paint bled under the tape, use a very fine detail brush and a bit of white paint to tidy up the separating lines. -
Paint the saucer:
While the pot dries, decide if you want to paint the saucer. The example keeps it natural terracotta to ground the design, which I think adds a nice warmth. -
Seal the project:
Once fully dry (give it overnight to be safe), take the pot outside and spray it with a matte clear sealant. This protects the paint from water damage when you water your plant. -
Pot your plant:
Fill with succulent soil and gently nestle your green succulent inside.
Pro Tip: Rubber Bands
For curved pots where tape wrinkles, try using wide rubber bands as your masking lines. They snap tight against the curve and create perfect, straight guides.
Place your new striped planter on a bright windowsill to let those pastel colors pop against the sunlight


Cheerful Polka Dot Flower Pots
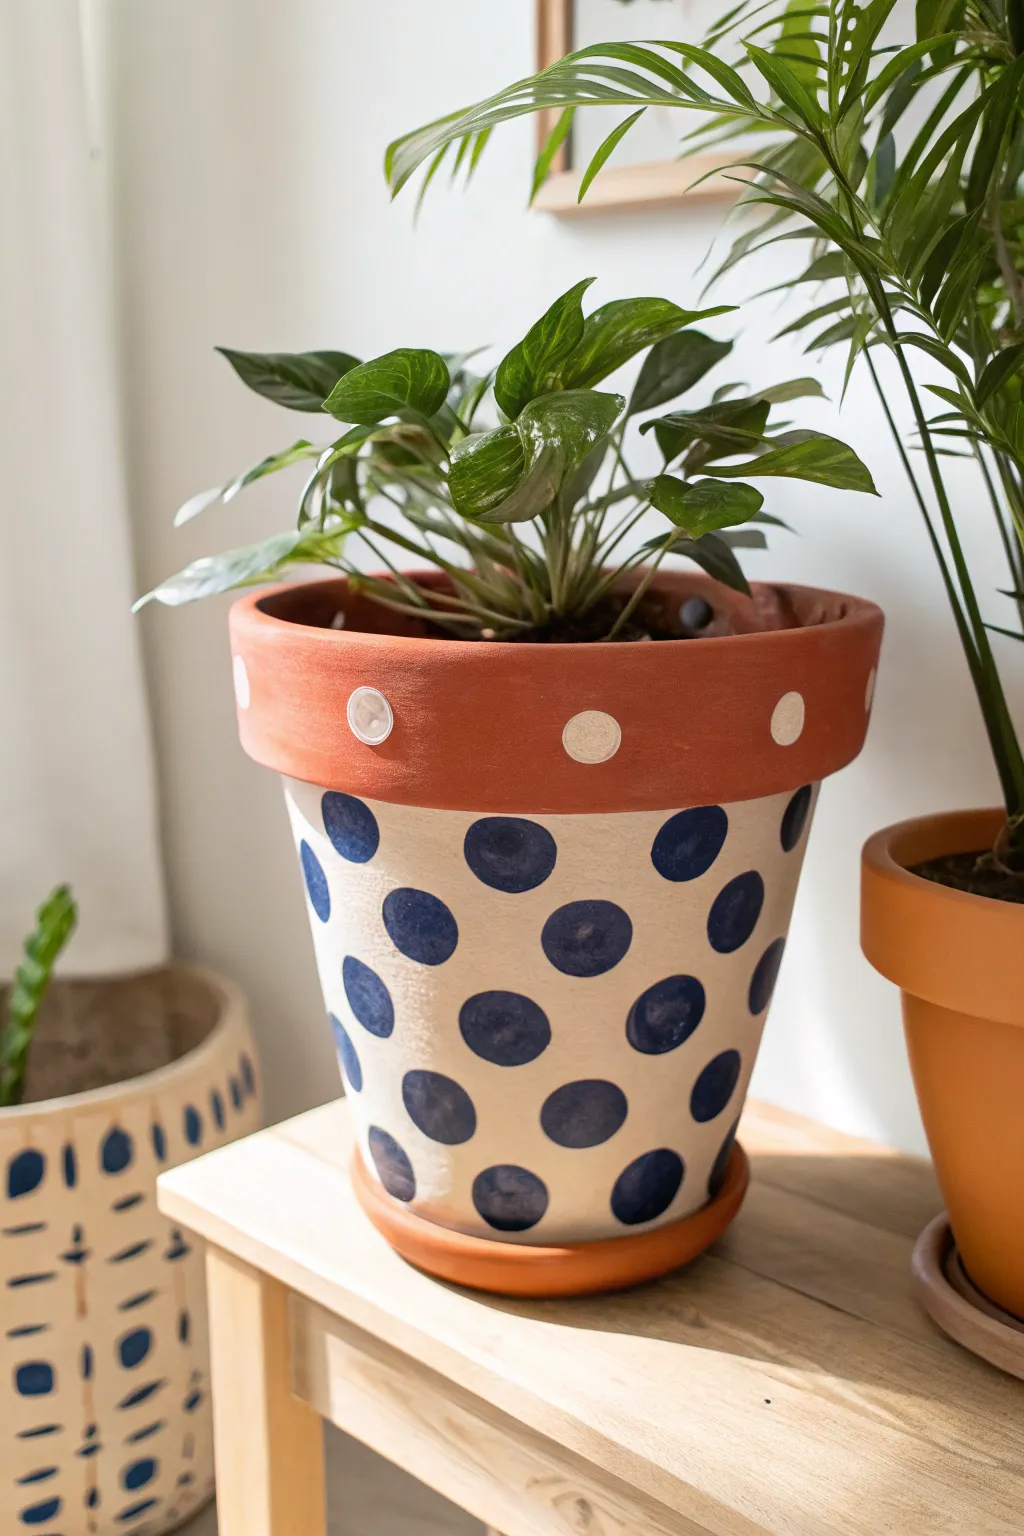
Transform a standard terracotta planter into a bright, eye-catching home for your greenery with this simple painting technique. The crisp white background paired with hand-painted indigo dots creates a cheerful, modern look that pops against the natural clay rim.
Step-by-Step
Materials
- Terracotta pot with saucer (standard rim style)
- White acrylic paint (weather-resistant preferred)
- Indigo or navy blue acrylic paint
- Painter’s tape or masking tape (1 inch width)
- Round foam pouncer brushes (medium size for blue dots)
- Small round paintbrush (fine tip)
- Medium flat paintbrush
- Pencil
- Small circular stencil (optional, for rim dots)
- Clear acrylic sealer (spray or brush-on, matte finish)
- Damp cloth or sponge
Step 1: Preparation & Base Coat
-
Clean the pot:
Before starting, wipe down your terracotta pot and saucer with a damp cloth to remove any dust or loose clay particles. Let it dry completely so the paint adheres properly. -
Protect the rim:
Apply a strip of painter’s tape just below the protruding rim of the pot. Press the edges down firmly with your fingernail to prevent the white paint from bleeding onto the terracotta you want to keep natural. -
First white layer:
Using your medium flat brush, apply a coat of white acrylic paint to the main body of the pot below the tape line. Don’t worry if it looks streaky; terracotta is very absorbent. -
Dry and repeat:
Allow the first coat to dry for about 15-20 minutes. Apply a second—and possibly third—coat of white paint until you achieve a solid, opaque coverage where the orange clay doesn’t show through. -
Remove the tape:
While the final coat is still slightly tacky (but not wet), carefully peel off the painter’s tape. This helps ensure a crisp line between the painted body and the natural rim. -
Touch up edges:
If any white paint bled under the tape, use a damp Q-tip immediately to wipe it away, or cover it with a tiny bit of orange-brown paint later.
Uneven Circles?
If your foam pouncer slides and smears the circle, let the paint dry completely. Then, paint over the mistake with white paint to ‘erase’ it before trying again.
Step 2: Creating the Polka Dots
-
Load the pouncer:
Pour a small amount of indigo blue paint onto a palette or paper plate. Dip your round foam pouncer into the paint, but dab it a few times on a clean part of the plate to remove excess paint. This prevents globs. -
Start the bottom row:
Press the foam pouncer gently onto the white surface near the bottom edge of the pot. Twist it ever so slightly as you lift to keep the circle sharp. -
Space the dots:
Continue adding blue dots around the bottom perimeter, leaving about a dot’s width of space between each one to keep the pattern balanced. -
Create the middle row:
For the next row up, position your blue dots in the spaces between the dots below (a staggered or brick-lay pattern). This creates that classic, cohesive polka dot look. -
Finish the top row:
Add your final row of blue dots near the top edge of the white section, maintaining the staggered spacing. Let the blue circles dry completely. -
Hand-painting corrections:
If your foam pouncer left any uneven edges or transluscent spots, I usually go back in with a small round brush and a little extra blue paint to perfect the circles.
Paint Consistency Tip
Terracotta sucks moisture out of paint instantly. Mix a tiny drop of water into your acrylics on the palette to help the paint flow smoother and reduce brush strokes.
Step 3: Detailing the Rim
-
Pencil the rim dots:
For the natural terracotta rim, you need smaller white dots. Sketch small circles lightly with a pencil, centering them vertically on the rim band. -
Paint the rim dots:
Using a small round brush and white paint, carefully fill in your penciled circles. You may need two thin coats here to make the white stand out against the raw clay. -
Clean up spacing:
Ensure these white dots are spaced somewhat evenly, though a little variation adds to the handmade charm.
Step 4: Sealing & Finishing
-
Apply sealer:
Once all paint is bone dry (give it at least an hour), apply a clear acrylic sealer over the entire outside of the pot. This protects the design from water damage when you water your plants. -
Don’t forget the saucer:
If you want the saucer to match, you can paint the rim orange or leave it natural, but make sure to seal it as well so it doesn’t absorb standing water. -
Final cure:
Let the sealer cure for 24 hours before adding soil and your favorite plant.
Now your custom planter is ready to add a splash of fun pattern to your windowsill or patio table


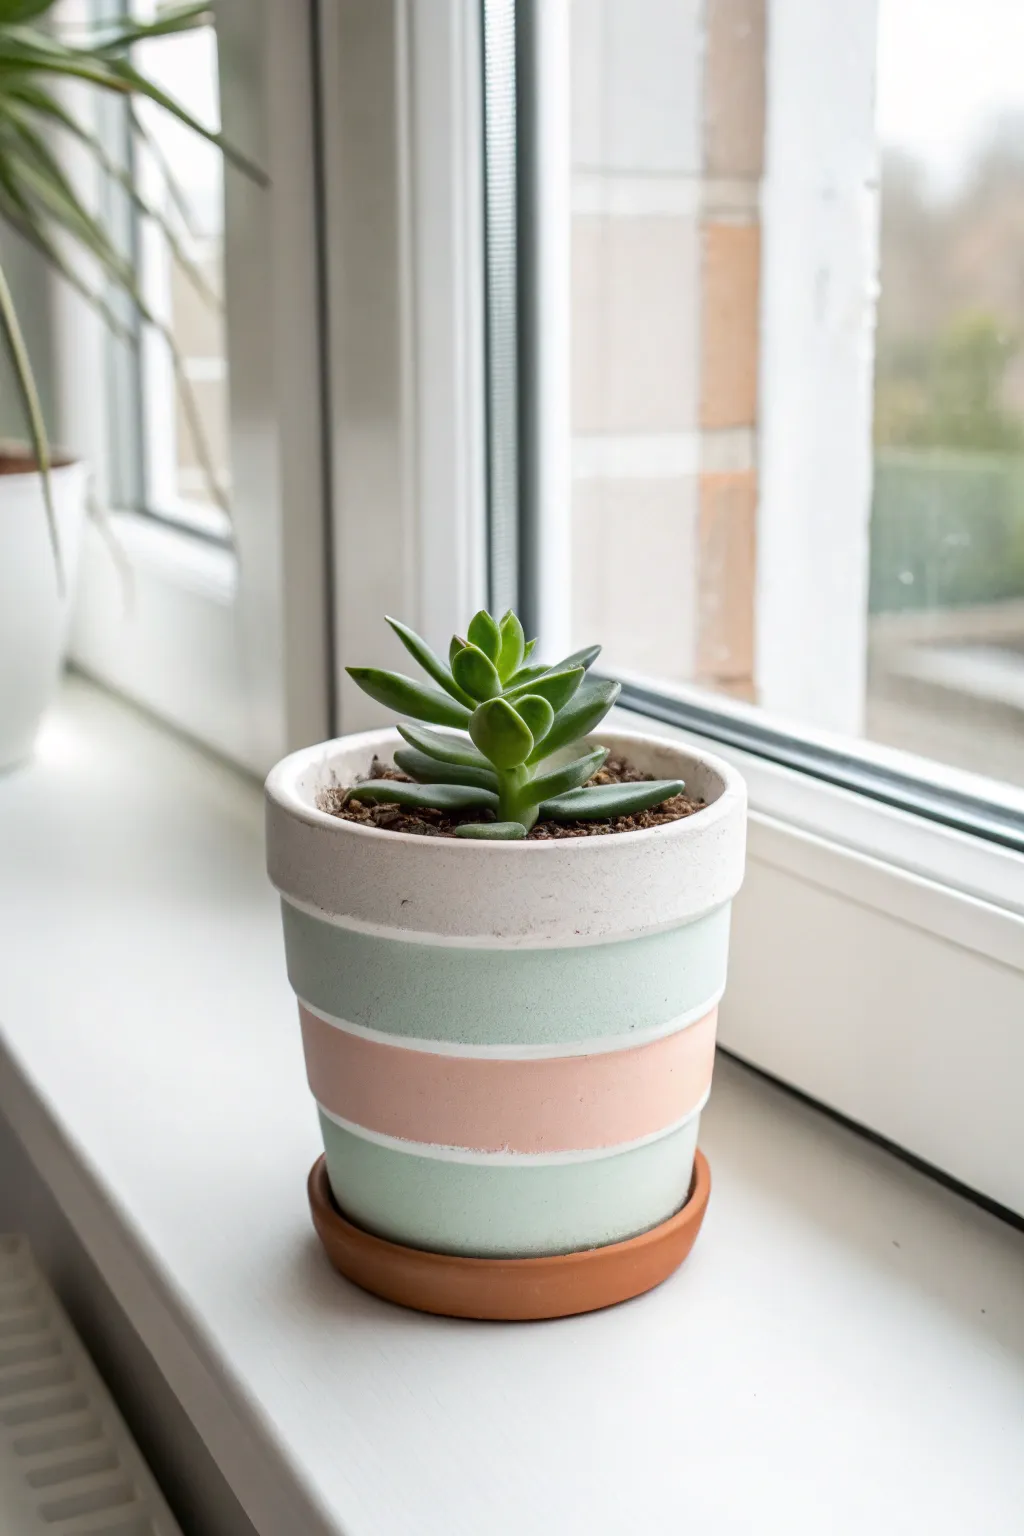
Modern Color-Blocked Clay Pots
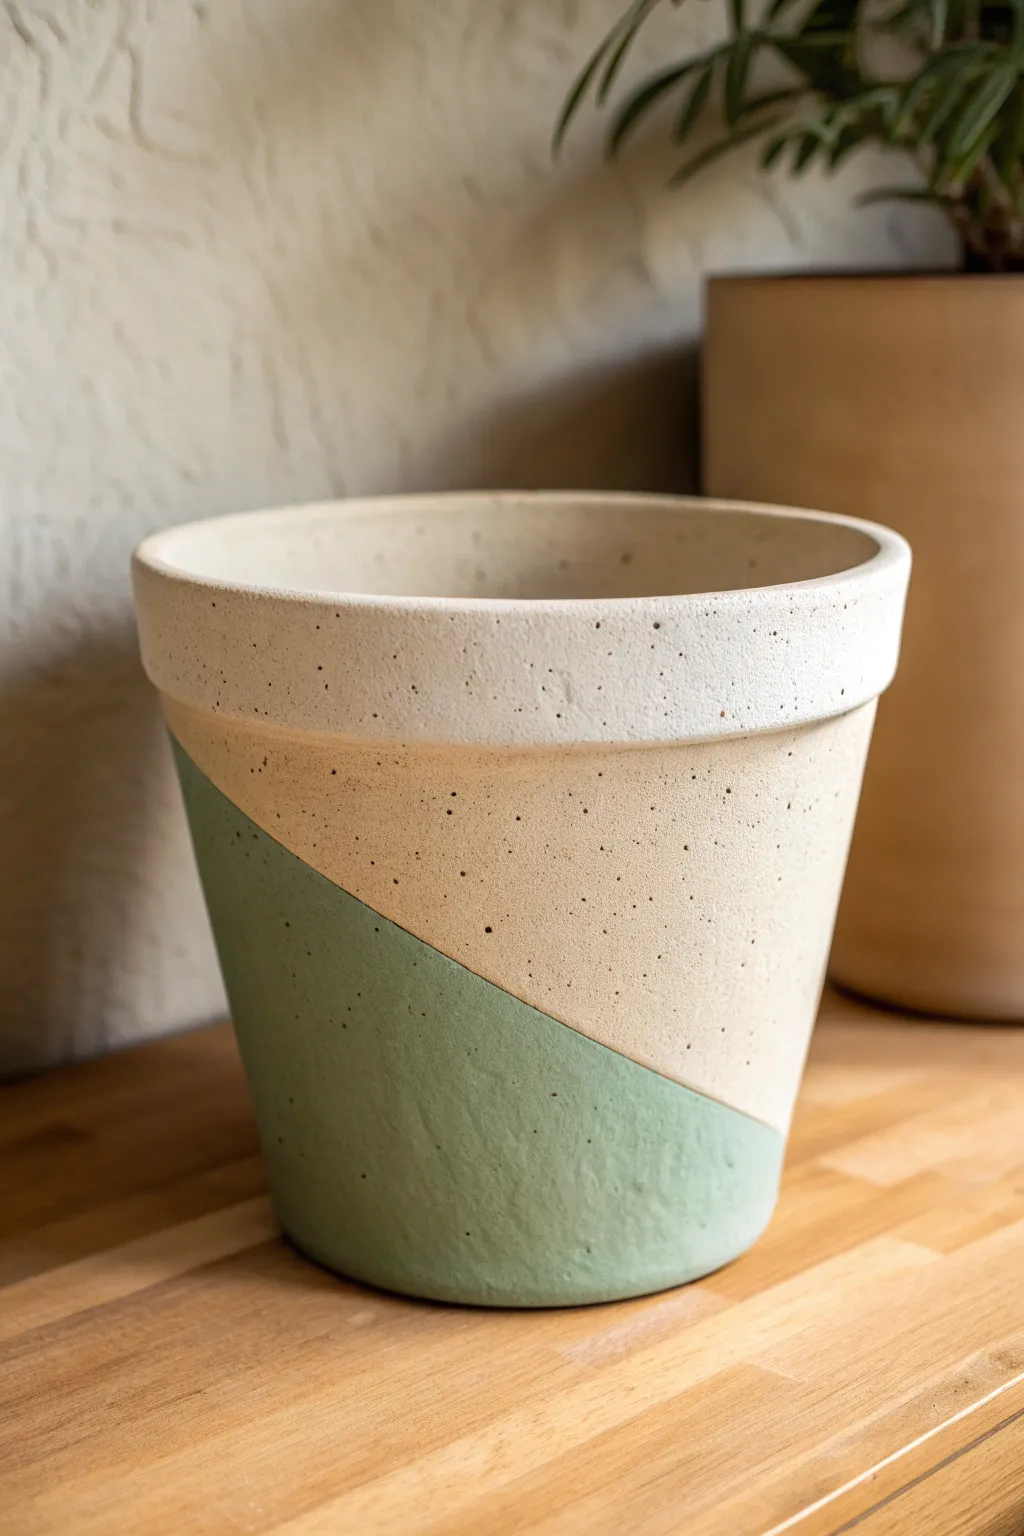
Transform a plain terracotta vessel into a modern statement piece with this diagonal color-blocking technique. The combination of earthy sage green, sandy beige, and a speckled finish mimics the high-end look of glazed ceramic stoneware.
Detailed Instructions
Materials
- Standard terracotta pot (clean and dry)
- Acrylic craft paint: Sage green
- Acrylic craft paint: Sandy beige or tan
- Acrylic craft paint: Warm white or cream
- Acrylic craft paint: Dark brown or black (for speckling)
- Painter’s tape (low tack)
- Medium flat paintbrush
- Small stiff-bristled brush or old toothbrush
- Matte clear sealant spray
- Cardboard box or drop cloth
- Water cup and paper towels
Step 1: Preparation & Base Coat
-
Clean surface:
Ensure your terracotta pot is thoroughly cleaned and completely dry. Any lingering dust will prevent the paint from adhering properly. -
Paint the rim:
Using your medium flat brush, apply the warm white or cream paint to the top rim of the pot. Extend the color down just slightly past the rim’s lower edge. -
Let it dry:
Allow this first layer to dry completely. Terracotta absorbs moisture quickly, so the first coat might look streaky; apply a second coat if needed for solid coverage.
Step 2: Color Blocking
-
Map the diagonal:
Once the rim is dry, visualize a sharp diagonal line across the body of the pot. Place a strip of painter’s tape starting high on one side and angling steeply downward to the bottom edge. -
Seal the tape edge:
Press the tape down firmly with your fingernail. I find that running a barely-damp finger over the edge helps activate the seal and prevents paint bleed. -
Apply the beige:
Paint the upper section (above the tape line) with your sandy beige color. Don’t worry about the rim; just paint up to the crease where the rim meets the body. -
Paint the lower section:
Apply the sage green paint to the area below the tape. Brush away from the tape edge initially to minimize the risk of forcing paint underneath it. -
Apply second coats:
Let the first layers of beige and green dry to the touch, then apply a second coat to ensure rich, opaque color. -
Remove tape:
While the second coat of paint is still slightly tacky (not fully cured), carefully peel back the painter’s tape at a 45-degree angle to reveal a crisp line.
Sticky Situation
To prevent peeling previous layers, stick the painter’s tape to your shirt or pants first, then peel it off. This removes some tackiness, making it safer for fresh paint.
Step 3: The Speckled Effect
-
Prepare the speckle mix:
Dilute a small dollop of dark brown or black paint with a few drops of water until it reaches an ink-like consistency. -
Test the spatter:
Dip a stiff brush or old toothbrush into the thinned paint. Test your flicking technique inside a cardboard box first to gauge the spray pattern. -
Apply speckles:
Hold the brush about 6-8 inches from the pot and use your thumb to flick the bristles, spraying tiny droplets across the entire surface. -
Vary density:
Rotate the pot carefully to ensure even coverage, but allow some randomness. The goal is to mimic natural clay imperfections. -
Correct mistakes:
If a droplet lands too large or smears, quickly dab it gently with a dry paper towel to lift it before it sets.
Fuzzy Lines?
If paint bled under the tape, wait for it to dry fully. Then, use a small angled brush and the original base color to carefully touch up the line
Step 4: Finishing Touches
-
Full dry time:
Allow the entire pot to dry for at least 2-3 hours to ensure the speckles are rock hard. -
Seal the exterior:
Take the pot outdoors or to a well-ventilated area. Apply a light, even coat of matte clear sealant spray. -
Seal the interior (optional):
If you plan to plant directly into the pot, seal the inside as well to prevent moisture from bubbling your beautiful paint job from the inside out.
Once sealed and dry, your custom planter is ready to add a sophisticated, modern touch to your shelf


Easy Stenciled Pattern Flower Pot
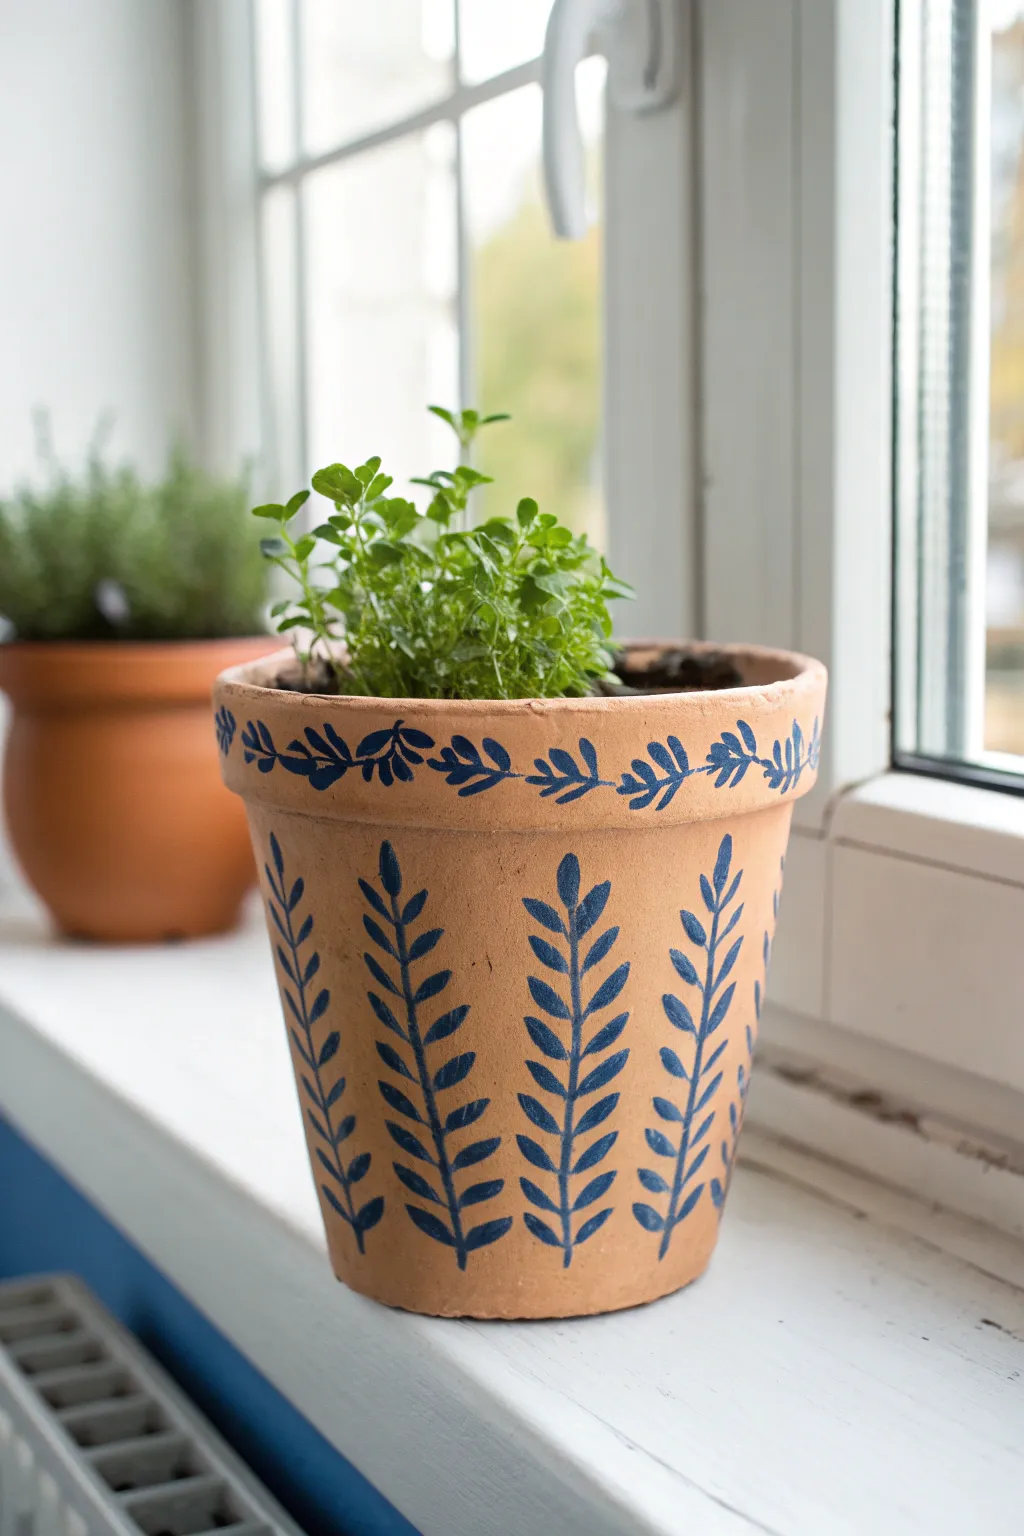
Transform a standard clay pot into a piece of Mediterranean-inspired decor with this simple painting project. The deep blue vine motifs create a striking contrast against the warm terracotta, resulting in a planter that looks hand-crafted and expensive.
Step-by-Step
Materials
- Terracotta flower pot (cleaned and dried)
- Deep cobalt blue acrylic craft paint
- Small round paintbrush (size 2 or 3)
- Leaf stencil (flexible adhesive type works best) OR masking tape
- Small stencil brush or sponge pouncer
- Paper plate or palette
- Clear matte acrylic sealer spray
- Paper towels
- Pencil (optional for marking spacing)
Step 1: Preparation & Planning
-
Clean the surface:
Ensure your terracotta pot is completely clean and dry. If it is an old pot, scrub away any mineral deposits or dirt, as paint won’t adhere well to dust. -
Plan the rim pattern:
Visualize the horizontal band around the rim. The design consists of a continuous vine running horizontally with small leaves branching off top and bottom. You can lightly mark the center line of the rim with a pencil to keep your design straight. -
Plan the body pattern:
For the main body of the pot, the design features vertical leafy branches standing upright. Decide how many branches you want around the circumference; usually, 6-8 branches spaced evenly works well for a medium pot.
Step 2: painting the Rim
-
Load your brush:
Squeeze a small amount of cobalt blue acrylic paint onto your palette. Dip your small round brush or stencil sponge lightly; you don’t want it dripping wet. -
Start the horizontal vine:
If using a stencil with a horizontal vine pattern, adhere it to the rim. Dab the paint gently over the stencil using an up-and-down motion to prevent bleeding under the edges. -
Freehand option using brush:
To recreate the organic look in the photo freehand, paint a thin, continuous horizontal line around the center of the rim. This acts as the main stem. -
Add leaves to the rim:
Using the small round brush, press down and lift up to create small tear-drop leaf shapes along the horizontal stem. Alternate them, placing one pointing up, then one pointing down, moving along the vine. -
Connect the leaves:
Connect each leaf to the main stem with a very tiny, delicate stroke so they look naturally attached.
Brush Technique Tip
Make a teardrop leaf easily: Press the brush down firmly to make the wide base, then drag and lift swiftly to create the sharp tip.
Step 3: Decorating the Main Body
-
Mark vertical guides:
Lightly mark vertical lines with a pencil where each large branch will go to ensure they remain straight up and down. -
Paint the central stems:
Paint a long, thin vertical line from the bottom of the pot up to just below the rim. I find it easiest to pull the brush from the rim downwards to get a consistent line. -
Start the bottom leaves:
Starting at the base of your vertical stem, paint pairs of leaves. Press the belly of the brush down to create the wide part of the leaf, then lift as you pull outward to create the point. -
Work upwards:
Continue painting pairs of leaves moving up the stem. Angle them slightly upward, like a fern or wheat stalk. -
Vary the size:
Keep the leaves relatively uniform in size, but allow slight variations to maintain that charming hand-painted aesthetic. The leaves near the very tip can be slightly smaller. -
Repeat the pattern:
Move to the next vertical guide line and repeat the process until all vertical branches are complete around the entire pot. -
Let it dry:
Allow the blue paint to dry completely. Acrylics on terracotta dry fast, usually within 20-30 minutes.
Fixing Mistakes
Smudged a leaf? Wait for the acrylic to dry completely, then gently scrape it off with a craft knife or sandpaper before repainting.
Step 4: Finishing Touches
-
Inspect and touch up:
Look over your design. If any leaves look too thin, you can go back and add simple second coat or widen them slightly. -
Erase guide lines:
Once you are 100% sure the paint is dry, gently erase any visible pencil marks with a soft eraser. -
Seal the pot:
Take the pot to a well-ventilated area. Spray a light, even coat of clear matte acrylic sealer over the entire outside. This protects the design from water damage when you water your plants.
Now you have a beautifully patterned planter ready to showcase your favorite herbs or flowers

The Complete Guide to Pottery Troubleshooting
Uncover the most common ceramic mistakes—from cracking clay to failed glazes—and learn how to fix them fast.
Soft Ombré Fade Terracotta Pot
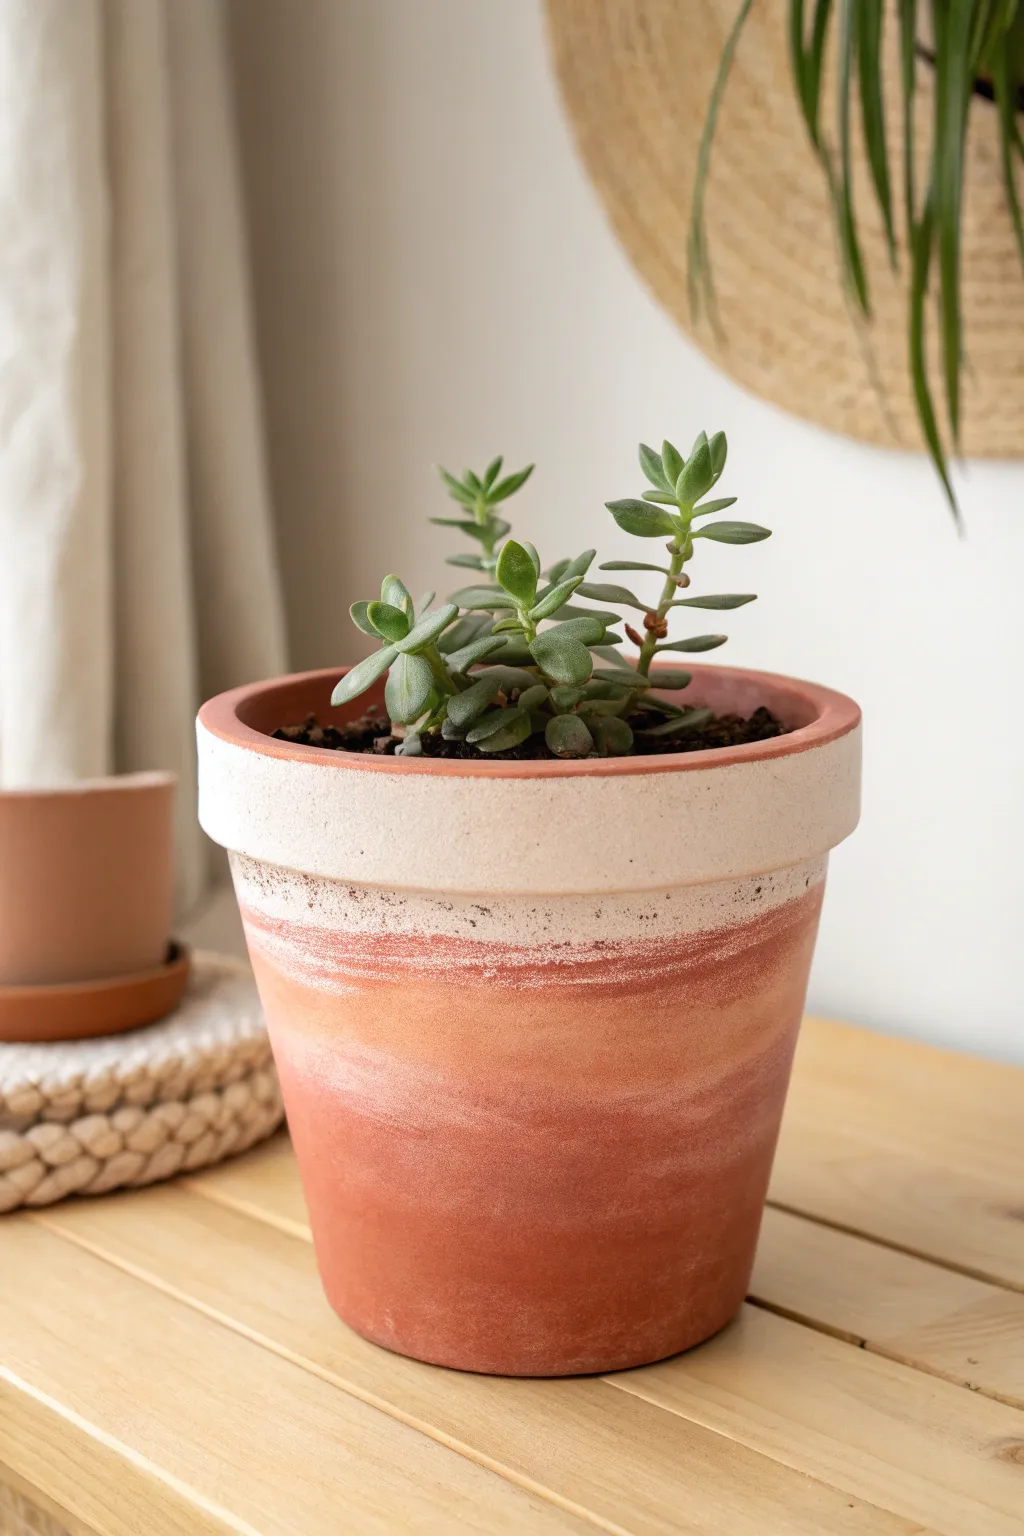
Capture the soft, hazy look of a coastal sunset with this delicate ombré technique. By blending white acrylic paint into the natural terracotta, you’ll create a seamless, dreamy fade that instantly modernizes a classic clay planter.
Detailed Instructions
Materials
- Terracotta pot (clean and dry)
- White acrylic paint (matte finish)
- Peach or light ochre acrylic paint (optional, for warmer tones)
- Medium flat paintbrush
- Small sea sponge or makeup sponge
- Paper plate or palette
- Cup of water
- Paper towels
- Matte clear sealant spray
Step 1: Preparation and Base Rim
-
Clean surface:
Ensure your terracotta pot is completely free of dust and stickers. Wipe it down with a damp cloth and let it dry fully before starting. -
Whiten the rim:
Load your flat brush with undiluted white acrylic paint. Apply a solid, opaque coat around the entire upper rim of the pot. -
Wrap the rim:
Carry the paint over the top edge and just slightly down into the inside of the pot (about an inch) to ensure a finished look even when filled with soil. -
Second coat:
Allow the first coat on the rim to dry for about 10-15 minutes. Apply a second coat if the terracotta color is still showing through too strongly.
Sponge It Smooth
Use a damp makeup wedge sponge to tap over the wet paint transitions. The fine pores of the sponge create a much smoother, airbrushed gradient than a brush can alone.
Step 2: Creating the Ombré Fade
-
Prepare the gradient mix:
On your paper plate, mix a small amount of white paint with a drop of water to thin it slightly. If you want a warmer glow like the example, mix a tiny dot of peach or ochre into the white. -
Start the transition:
Just below the solid white rim, begin brushing your thinned white mixture horizontally. Ideally, you want this band to be semi-opaque. -
Dry brush technique:
Remove most of the paint from your brush onto a paper towel until the bristles are almost dry. -
Drag downward:
Starting from the wet edge of your transition band, drag the brush downward using quick, light vertical strokes. -
Soften the line:
Using a slightly damp sponge, lightly dab exactly where the solid white rim meets the faded section to blur any harsh lines. -
Create the lower fade:
Dip your sponge into the very watery paint residue. Blot it almost dry, then gently sponge the middle section of the pot. -
Feather out:
As you move closer to the bottom third of the pot, use less pressure and less paint, allowing the natural heavy orange of the clay to dominate. -
Horizontal texturing:
To mimic the striations seen in the photo, take a nearly dry stiff brush and lightly sweep it horizontally across the faded sections. This adds that weathered, organic texture. -
Correcting heavy spots:
If you apply too much white paint near the bottom, simply wipe it back quickly with a damp paper towel before it sets to reveal the terracotta underneath.
Step 3: Finishing Touches
-
Dry completely:
Let the pot sit for at least an hour to ensure all layers of paint are thoroughly dry. -
Seal the work:
Take the pot outdoors and spray it with a matte clear coat. This protects your paint from water damage when you water your plants. -
Planting:
Once the sealer is dry, add your potting soil and succulent to complete the look.
Add Metallic Streaks
For a luxe twist, dry-brush a very faint layer of metallic gold paint right where the white fades into the terracotta for a sun-kissed shimmer effect.
This serene, customized planter brings a gentle warmth to your indoor garden shelf
Minimal Botanical Line Art Flower Pot
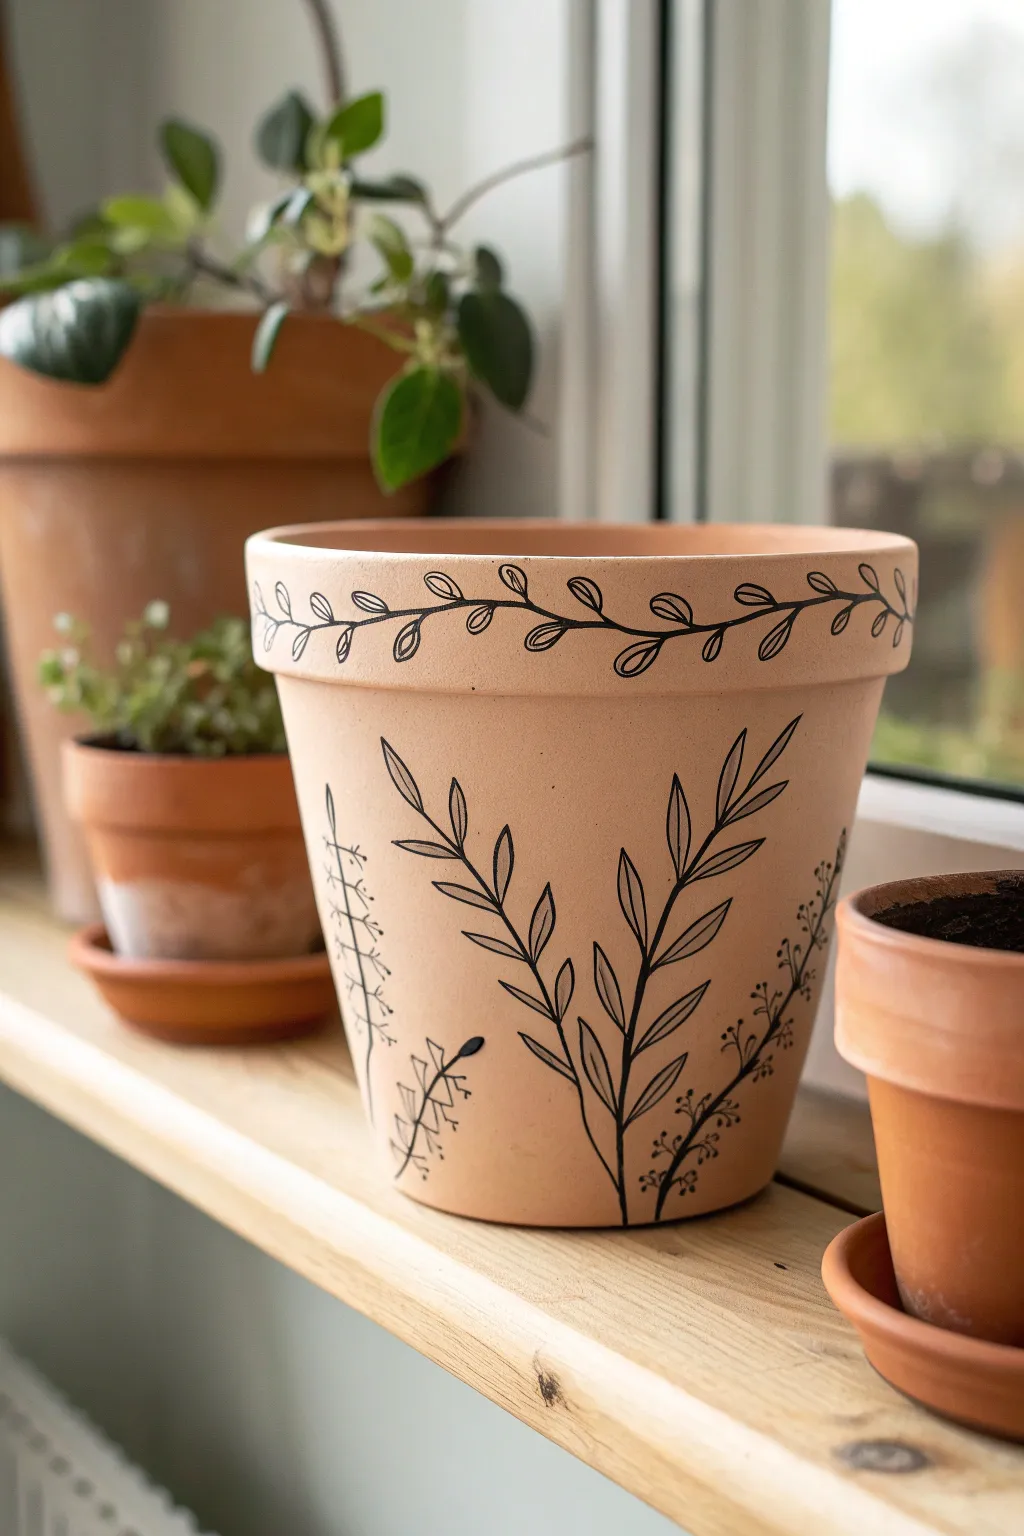
Transform a plain terracotta vessel into a piece of modern art with nothing but a steady hand and some high-contrast black ink. This botanical line art design adds a sophisticated, airy touch to your indoor garden without overwhelming the natural beauty of the clay.
How-To Guide
Materials
- Terracotta pot (clean and dry)
- Black oil-based paint marker (fine tip)
- Black oil-based paint marker (medium tip)
- Pencil (HB or lighter)
- White eraser
- Paper towel or rag
- Clear matte spray sealer (optional)
- Rubbing alcohol
Step 1: Preparation
-
Clean surface:
Before starting any design work, ensure your terracotta pot is completely free of dust and oils. Wipe the entire exterior surface with a cloth dampened with rubbing alcohol and let it dry fully. -
Center planning:
Visualize the pot in quadrants. You’ll want to place the main, largest botanical stems on the ‘front’ face. Lightly mark the vertical center line with your pencil to help guide the symmetry of the main stalks.
Oops! Smudged Ink?
If you smudge oil paint while wet, quickly dab it with a Q-tip dipped in rubbing alcohol. If it has dried, you can gently scrape it off terra cotta with a craft knife.
Step 2: Drafting the Design
-
Sketch the rim vine:
Start with the rim. Lightly pencil a continuous wavy line that circles the entire upper lip of the pot. This will be the central stem for your vine design. -
Add rim leaves:
Along your wavy pencil line, sketch simple, alternating oval leaves. Keep them relatively small and evenly spaced so the pattern flows naturally around the circumference. -
Draft the main stems:
Moving to the main body of the pot, sketch three to four long, vertical lines radiating upward from the base. Curve them slightly outward as they rise to create a natural, organic feel. -
Fill in main foliage:
On the central stems, draw long, lance-shaped leaves. These should be paired (opposite each other) or alternating, pointing upward at a sharp angle like fern fronds or olive branches. -
Add accent flora:
To fill the empty space between the large leafy stems, sketch thinner, more delicate wildflower stems. Draw tiny circles or small dashes along these lines to represent buds or smaller leaves, adding variety to the visual texture.
Make It Pop
For a bolder look, fill in just the leaves on the rim with solid black ink. This creates a stronger visual frame at the top that contrasts beautifully with the airy lines below.
Step 3: Inking the Art
-
Trace the rim vine:
Using your medium-tip black paint marker, carefully trace over the wavy vine line on the rim first. I sometimes find it easier to rotate the pot on a lazy susan or a towel while doing this to keep the line steady. -
Ink the rim leaves:
Switch to your fine-tip marker for the leaves on the rim. Outline each oval leaf carefully. You can add a tiny center vein line inside some leaves for extra detail, or leave them open for a cleaner look. -
Anchor the base:
Using the medium-tip marker, trace the bottom-most part of your main stems on the pot body, ensuring they look like they are emerging from the very bottom edge. -
Trace main stalks:
Follow your vertical pencil lines up the pot with the medium marker. Use smooth, confident strokes rather than short, sketchy ones to get that clean illustrative look. -
Define the large leaves:
Outline the lance-shaped leaves. Pay attention to where the leaf connects to the stem; a slight thickening at the joint adds realism. -
Detail the leaves:
Draw single, clean lines down the center of each large leaf. Don’t worry if the line breaks slightly; imperfection adds to the hand-drawn charm. -
Ink the delicate stems:
Switch back to the fine-tip marker for the wildflower accents. These lines should be thinner than the main foliage to push them visually into the background. -
Finish small details:
Add the tiny buds or berries on the accent stems using the fine tip. A simple dot or a tiny ‘V’ shape works perfectly here.
Step 4: Finishing Touches
-
Dry time:
Let the paint marker dry completely. Oil-based markers can take a bit longer than water-based ones, so give it at least 20-30 minutes to avoid smudging. -
Erase guidelines:
Once the ink is bone dry, gently erase any visible pencil marks with your white eraser. be careful not to rub too hard over the painted areas. -
Seal (Optional):
If this pot will live outdoors or in a humid spot, spray it with a matte clear coat to protect your line work from moisture and fading.
Now you have a stylish home for your favorite greenery that looks like it came from a boutique shop


What Really Happens Inside the Kiln
Learn how time and temperature work together inside the kiln to transform clay into durable ceramic.
Speckled Terrazzo-Inspired Terracotta Pot
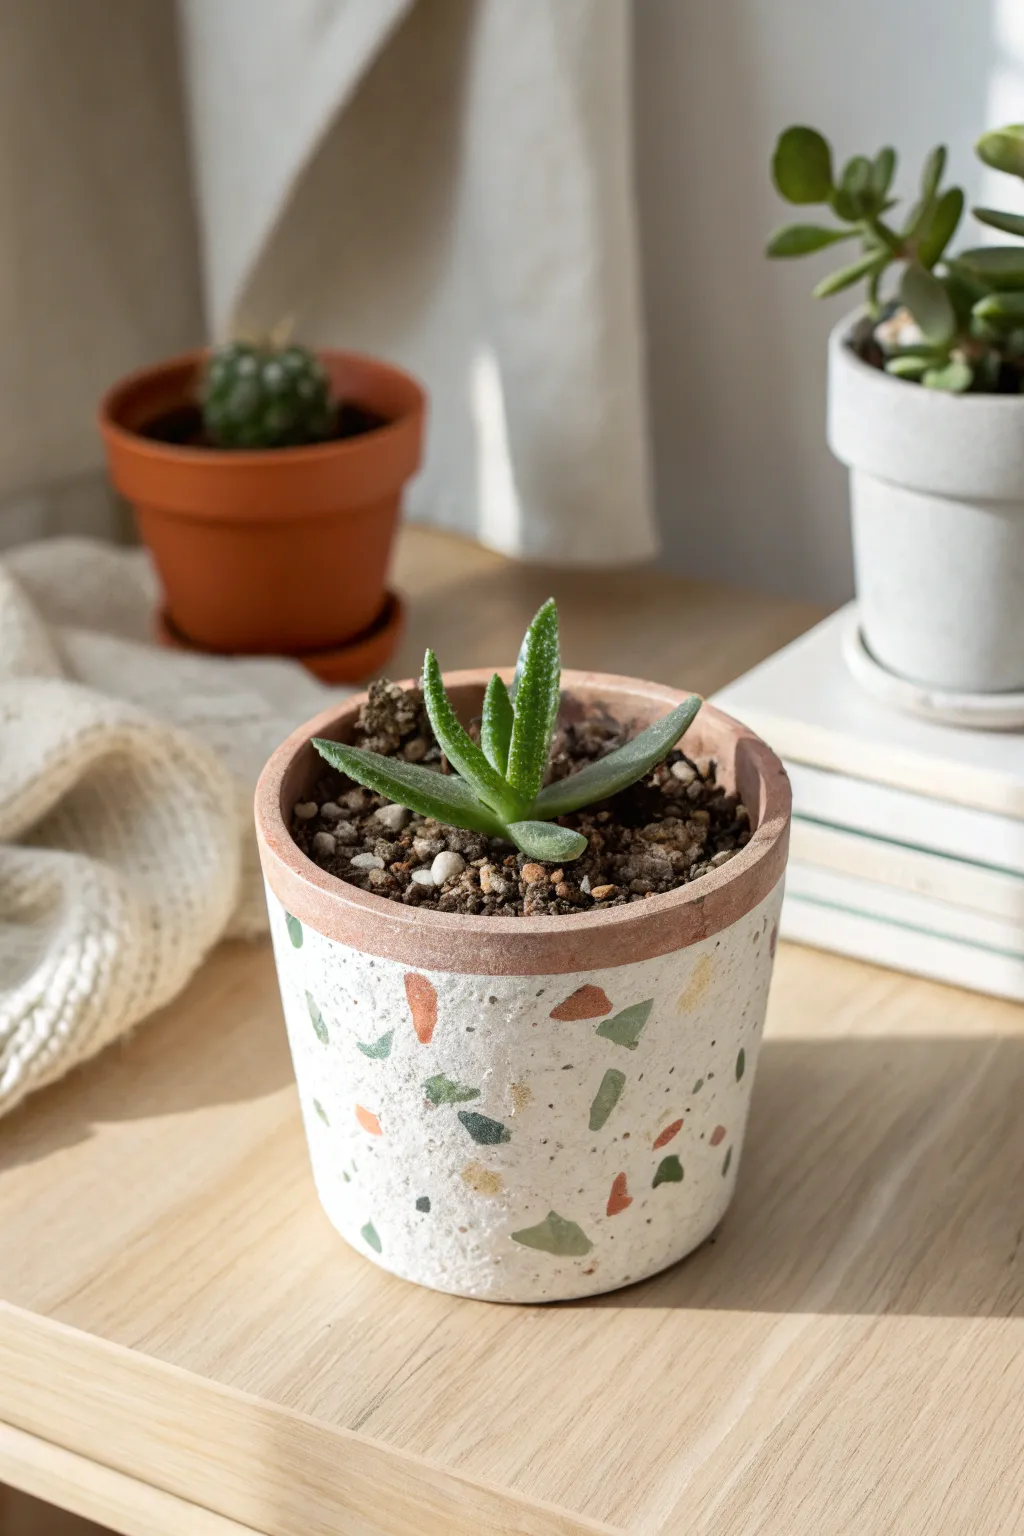
Transform a plain terracotta pot into a trendy piece of home decor with this clever paint technique. By layering irregular shapes of color over a textured base, you can mimic the high-end look of terrazzo stone for a fraction of the cost.
Step-by-Step Tutorial
Materials
- Terracotta pot (4-6 inch diameter)
- White acrylic paint (matte finish)
- Baking soda or plaster of paris
- Acrylic paints in earth tones (terracotta, sage green, mustard yellow, dark grey)
- Small flat paintbrush
- Fine detail paintbrush
- Palette or paper plate
- Painter’s tape
- Matte spray sealer or Mod Podge
Step 1: Preparation and Base Coat
-
Clean the surface:
Begin by wiping down your terracotta pot with a damp cloth to remove any dust or manufacturing residue. Let it dry completely. -
Create the textured mix:
To mimic the gritty feel of stone, mix your white acrylic paint with a teaspoon of baking soda. You want a consistency that is thick but still spreadable, similar to fluffy frosting. -
Apply the tape guide:
Place a strip of painter’s tape around the top rim of the pot. This preserves the natural clay color at the top for a nice contrast against the painted design. -
Paint the base layer:
Using the flat brush, apply your textured white paint mixture to the body of the pot below the tape line. Use dabbing motions rather than long strokes to enhance the stone-like texture. -
Add a second coat:
Allow the first layer to dry for about 20 minutes. If the terracotta color is still showing through, dab on a second coat for full opacity. -
Remove the tape:
Carefully peel off the painter’s tape while the second coat is still slightly tacky to ensure a crisp, clean line.
Paint Peeling?
If the tape pulls up paint, score the edge gently with a craft knife before peeling. Ensure the terracotta is totally dry before the base coat.
Step 2: Painting the Terrazzo Pattern
-
Prepare your palette:
dispensed small amounts of your accent colors onto your palette. For this look, aim for a muted, earthy palette: sage tones, burnt orange, ochre, and charcoal. -
Study the shapes:
Real terrazzo features random, irregular shards. Avoid perfect circles or squares; instead, think of triangles with softened corners and jagged polygons. -
Start with the dominant color:
Dip your fine detail brush into the sage green paint. randomly paint 5-7 medium-sized irregular shapes around the pot. Rotate the pot as you go to ensure even spacing. -
Add warmth:
Clean your brush and switch to the terracotta/orange paint. Add smaller angular shapes in the empty spaces between the green shards. -
Fill with remaining colors:
Continue the process with your mustard yellow and dark grey paints. Vary the sizes, making some tiny specks and some larger chunks. -
Refine the pattern:
Step back and look at the pattern as a whole. I sometimes find bare spots that need just a tiny dot of grey or orange to balance the composition. -
Let the design cure:
Once you are happy with your pattern, let the pot sit undisturbed for at least an hour to ensure all thick paint blobs are fully dry.
Add Dimension
For a hyper-realistic stone look, splatter tiny flecks of thinned grey paint over the finished design using an old toothbrush before sealing.
Step 3: Finishing Touches
-
Seal the artwork:
To protect your design from water damage when watering your plant, apply a coat of matte sealer. A spray sealer works best to avoid smearing your hard work. -
Final dry:
Let the sealer cure according to the manufacturer’s instructions before potting your plant.
Now you have a stylish vessel ready to house your favorite succulents
Marbled Swirl Painted Flower Pot
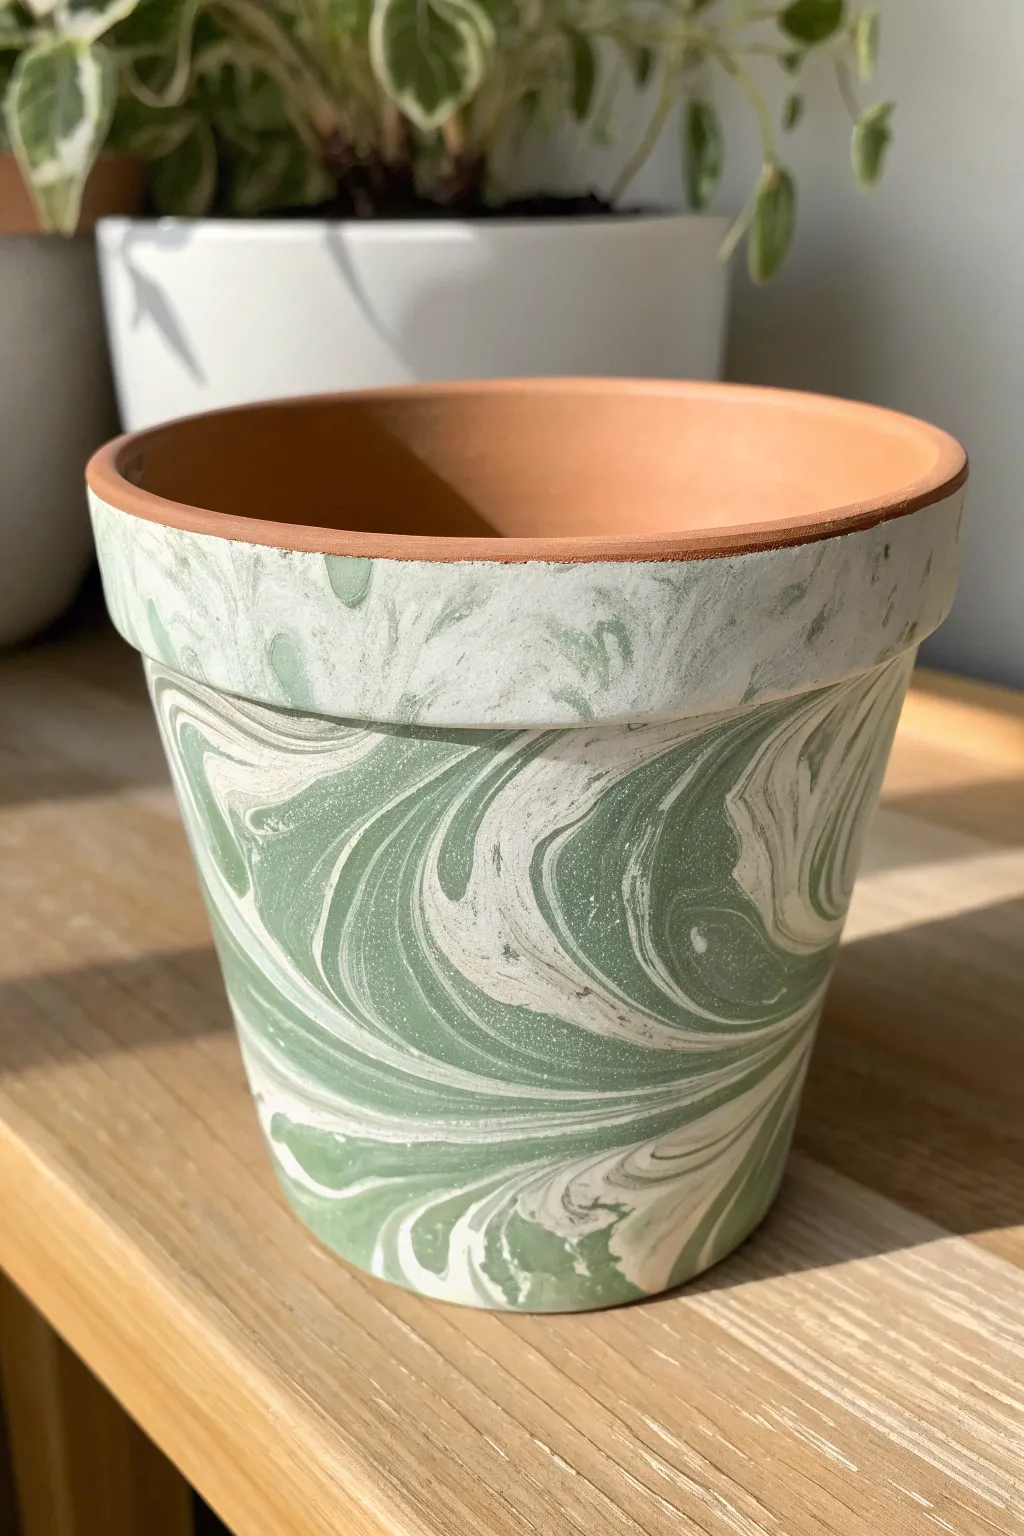
Transform a basic terracotta pot into a chic, high-end planter with this mesmerizing hydro-dipping technique. The swirling sage green and white patterns mimic the look of natural agate or marble for a modern, organic finish.
How-To Guide
Materials
- Terracotta pot (clean and dry)
- White acrylic paint (base coat)
- Sage green acrylic paint (marbling)
- White acrylic paint (marbling)
- Painter’s tape
- Large plastic bin or bucket (deep enough to submerge pot)
- Water at room temperature
- Stirring stick or skewer
- Clear acrylic sealer spray (matte finish)
- Sponge brush or flat synthetic brush
- Disposable gloves
Step 1: Preparation & Base Coat
-
Clean the surface:
Ensure your terracotta pot is completely free of dust or sticker residue. Wipe it down with a damp cloth and let it dry fully before starting. -
Protect the inside:
If you want to keep the inside natural terracotta for plant health, place a piece of painter’s tape just below the inner rim. -
Apply the white base:
Using a sponge brush, paint the entire exterior of the pot with white acrylic paint. This creates a bright canvas so the colored marble effect pops. -
Paint the rim:
Include the rim in your base coat, painting up to the top edge but leaving the very top lip bare if you prefer that distinct terracotta stripe shown in the photo. -
Let it dry completely:
Allow the base coat to dry thoroughly. I usually give this about an hour, as you don’t want the base coat to lift when it hits the water later.
Paint Sinking?
If acrylics sink to the bottom, try thinning them slightly with water before pouring, or ensure you aren’t pouring from too high up. The water temp matters too—aim for lukewarm.
Step 2: Creating the Marble Dip
-
Prepare the dipping station:
Fill your plastic bin with room temperature water. Make sure it’s deep enough to submerge the pot up to its rim without hitting the bottom. -
Add the first color:
Shake your sage green acrylic paint well. Pour or drip a generous amount onto the surface of the water. -
Add the second color:
Immediately drivel white paint onto the water’s surface, aiming for the gaps between the green paint. -
Create the swirl:
Use a skewer or the end of a paintbrush to gently swirl the floating paints together. Don’t overmix; you want distinct ribbons of color, not a blended murky light green. -
Check consistency:
The paint should float on top. If it sinks immediately, your paint might be too heavy or the water too cold.
Add Some Glam
For a luxe touch, drizzle a tiny bit of metallic gold paint into your water swirl. The gold veins will separate beautifully against the matte green and white.
Step 3: The Dip & Seal
-
Gear up:
Put on your disposable gloves. This part gets messy, and you don’t want green fingerprints on your finished white rim. -
Position the pot:
Hold the pot by the inside or the drain hole if possible, or grip deeply inside the rim. -
Execute the dip:
Slowly lower the pot into the water at a slight angle. Rotate the pot as you push it down to wrap the floating paint around the exterior surface. -
Submerge to the rim:
Continue pushing down until the water level reaches just below the rim’s top edge. -
Clear the surface:
Before pulling the pot out, gently blow on the water surface or use a paper towel to move excess floating paint aside so it doesn’t double-coat the pot on exit. -
Lift and inspect:
Pull the pot out and inspect your design. If there are bare spots, you can do a quick second dip in a specific area, but usually one pass is best. -
Initial drying:
Set the pot upside down on a protected surface or drying rack to let excess water drip off. -
Final cure:
Allow the pot to dry for at least 24 hours. The acrylic needs to fully bond to the base coat. -
Seal the deal:
Once fully dry, take the pot to a well-ventilated area and spray it with a clear matte acrylic sealer. This protects the finish from water damage when you water your plants.
Now you have a stunning custom planter ready to showcase your favorite greenery

TRACK YOUR CERAMIC JOURNEY
Capture glaze tests, firing details, and creative progress—all in one simple printable. Make your projects easier to repeat and improve.
Floral Decoupage Clay Flower Pot
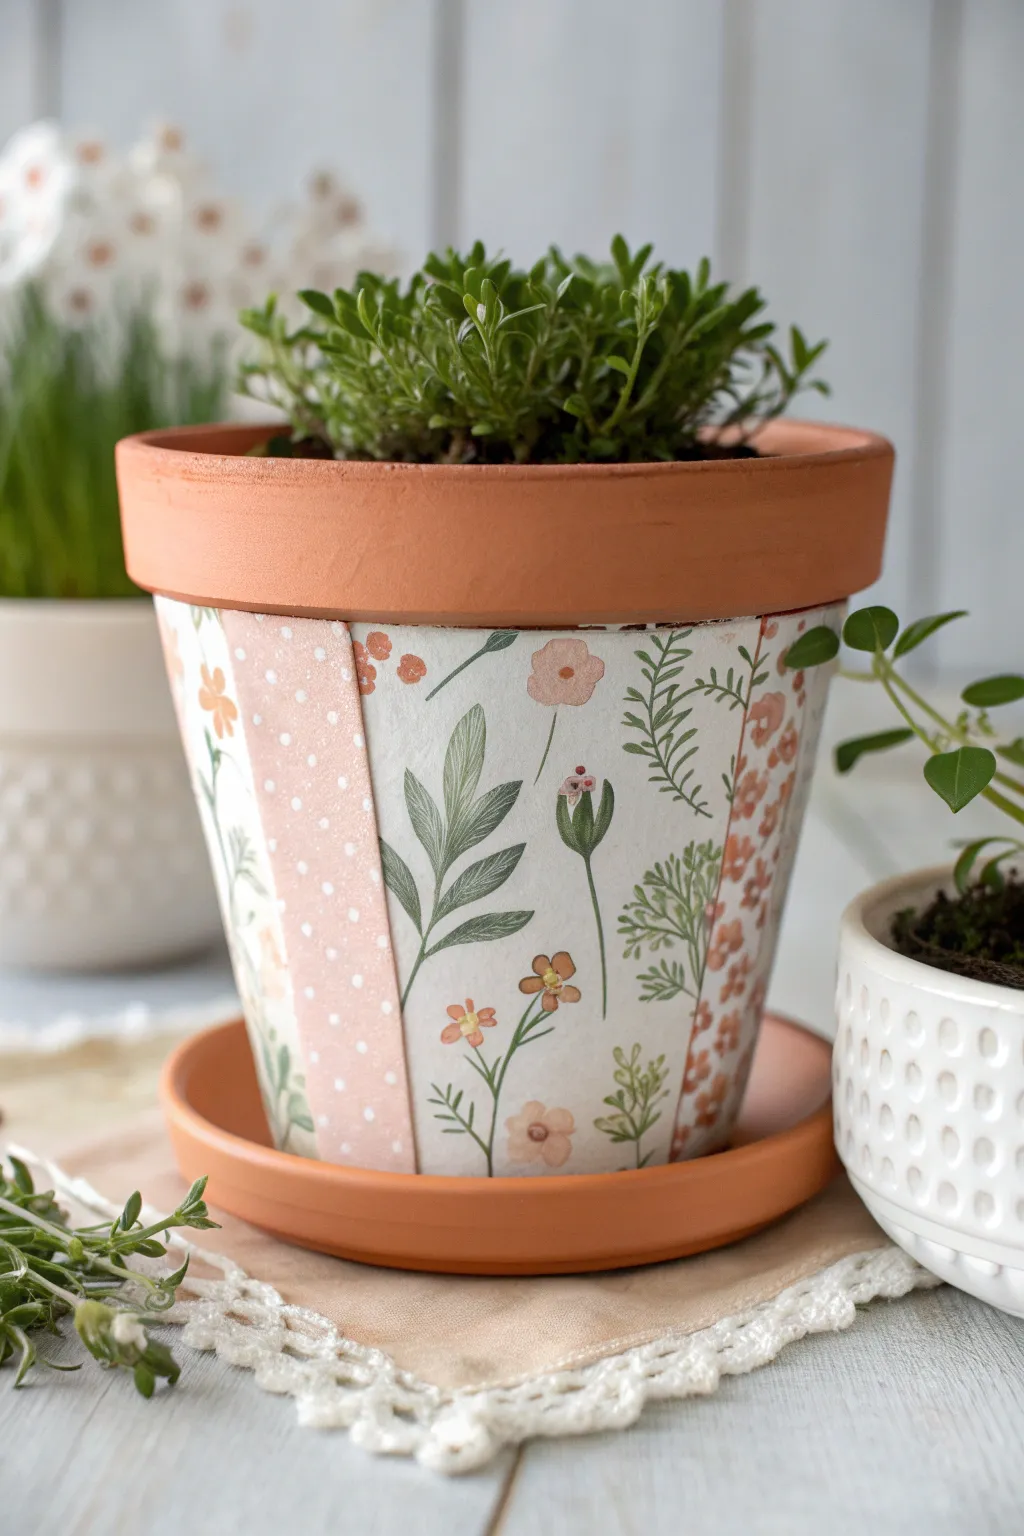
Transform a plain terra cotta vessel into a charming botanical display using decoupage techniques. This project combines vintage floral prints with soft polka dot patterns for a beautifully textured, collaged look that brightens any windowsill.
Step-by-Step Guide
Materials
- Standard terra cotta pot (4-6 inch diameter) with matching saucer
- White acrylic craft paint
- Foam sponge brush
- Flat paintbrush (medium width)
- Decoupage medium (like Mod Podge Matte)
- Floral print paper napkins, tissue paper, or thin decoupage paper
- Polka dot patterned paper (complementary soft pink/peach tone)
- Scissors or a craft knife
- Ruler
- Pencil
- Sandpaper (fine grit)
- Matte spray sealer (optional but recommended)
Step 1: Preparation and Base Coat
-
Clean the surface:
Begin by wiping down your terra cotta pot with a damp cloth to remove any dust or manufacturing residue. Let it dry completely. -
Prime the surface:
Using a foam sponge brush, apply a layer of white acrylic paint to the exterior of the pot, stopping just under the rim. You want the classic clay rim to remain exposed for contrast. -
Add a second coat:
Once the first layer is dry to the touch, apply a second coat of white paint. This ensures the bright colors of your paper pop rather than getting muddied by the orange clay underneath. -
Paint the saucer:
Don’t forget the saucer base; paint the inside rim white if you plan to cover it, or leave it natural like the example image for a cohesive look. -
Smooth the texture:
If your paint has ridges, lightly sand it with fine-grit sandpaper after it has fully cured to create a smooth canvas for adhesion.
Wrinkle Rescue
If stubborn wrinkles appear while smoothing thin paper, wet your finger slightly with the medium and gently circle the area to flatten it, or embrace the texture for a vintage, aged look.
Step 2: Preparing the Designs
-
Select your patterns:
Choose a main floral pattern featuring greenery and small blooms, along with a secondary geometric pattern like the pink polka dots shown here. -
Separate paper layers:
If you are using decorative napkins, carefully peel away the bottom white plies so you are left only with the single printed top layer. -
Measure vertical strips:
Measure the height of the painted area on your pot (from the bottom edge to just under the rim). -
Create tapered strips:
Cut your decorative paper into vertical strips. Because the pot is tapered (wider at the top), frame your strips as slight trapezoids—wider at the top and narrower at the bottom—so they fit snugly side-by-side. -
Dry fit the layout:
Hold your paper pieces against the pot to check sizing. Arrange them so you alternate between wide floral panels and narrower accent strips like the pink dots.
Step 3: Application Process
-
Apply medium to the pot:
Brush a thin, even layer of decoupage medium onto a section of the white-painted surface where your first strip will go. -
Place the first strip:
Gently lay your first floral paper strip onto the wet medium. Start from the top edge (under the rim) and smooth it downward. -
Smooth out bubbles:
Using your finger or the flat brush, gently press from the center of the paper outward to release trapped air bubbles. Be careful not to tear thin paper. -
Add the accent strip:
Apply more medium next to the floral piece and place your pink polka dot strip. It’s okay if they slightly overlap by a millimeter to prevent gaps. -
Continue the pattern:
Repeat this process, alternating paper designs until the entire white section of the pot is covered. -
Address the bottom edge:
If there is excess paper hanging off the bottom of the pot, wait for it to dry slightly, then trim it flush with a craft knife or sand the edge downward to tear the excess cleanly away.
Rim Refinement
For a more polished finish, paint the top rim in a soft sage green or pale pink that matches a color in your floral paper instead of leaving it raw natural clay.
Step 4: Sealing and Finishing
-
Seal the design:
Once the paper is fully dry, apply a generous top coat of decoupage medium over the entire papered surface to protect it. -
Clean the rim:
If you accidentally got paint or glue on the unpainted clay rim, use a damp cloth or a piece of sandpaper to clean it up for a crisp line. -
Final cure time:
Allow the pot to cure for at least 24 hours. The medium will turn clear as it dries, revealing the beautiful texture of the paper. -
Waterproofing:
Finish with a coat of matte spray sealer, which adds extra durability against moisture when you water your plants.
Now your custom-crafted pot is ready to give your favorite houseplant a stylish new home
Twine-Wrapped Rim Terracotta Pot Detail
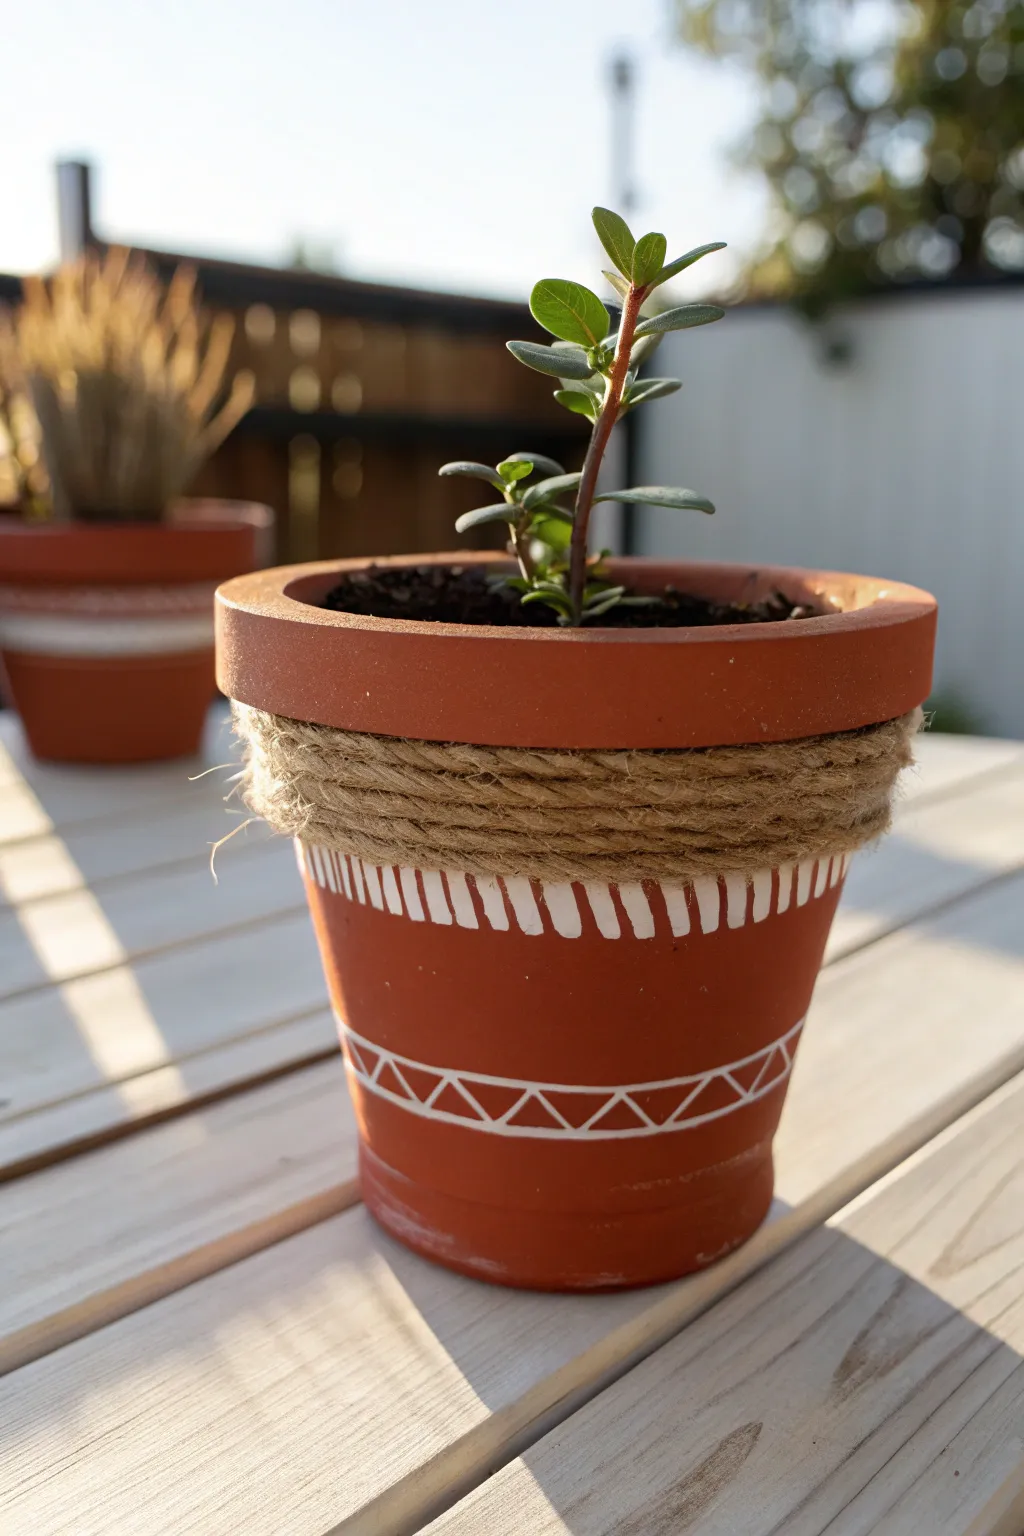
Transform a standard terracotta planter into a stylish boho accent piece with just a bit of paint and twine. This project combines rustic texture with geometric patterns for a clean yet earthy look that perfectly highlights small succulents or herbs.
Step-by-Step Tutorial
Materials
- Standard terracotta pot (4-6 inch diameter)
- White acrylic paint (outdoor craft paint recommended)
- Thick jute twine or natural rope (approx. 3-4mm thickness)
- Hot glue gun and clear glue sticks
- Fine-tip paintbrush (size 0 or 1 round brush)
- Ruler or measuring tape (optional)
- Pencil
- Damp cloth
- Clear matte sealant spray (optional)
Step 1: Preparation and Planning
-
Clean the surface:
Begin by wiping down your terracotta pot with a damp cloth to remove any dust or oils. Let it dry completely, as moisture will prevent the paint and glue from adhering properly. -
Mark your guidelines:
Decide where your rope section will sit. In this design, the rope wraps around the neck, just below the rim. Lightly mark the top and bottom boundary of where you want the jute to go with a pencil to keep your winding straight.
Step 2: Adding the Texture
-
Start the twine:
Apply a small dab of hot glue to the back of the pot, just under the rim. Press the raw end of your jute twine firmly into the glue to secure it. -
Wrap the first layer:
Begin winding the twine horizontally around the pot. Keep the twine pulled taut and push each new loop snugly against the rim above it to prevent gaps. -
Continue winding:
Keep wrapping the twine downwards, applying a small dot of hot glue every few inches to keep the coil stable. I find it helpful to rotate the pot rather than moving the twine around it. -
Create the band:
Continue until you have a band of twine about 1 to 1.5 inches thick. Ensure the rows are tightly packed so no terracotta shows through between the strands. -
Secure the end:
Once you reach the desired thickness, cut the twine. Apply a final dab of hot glue and tuck the cut end neatly underneath the last row or towards the back of the pot to hide it.
Clean Lines Trick
For the crispest horizontal rings, place the pot on a lazy susan. Hold your brush steady in one spot and slowly spin the turntable to paint a perfect circle.
Step 3: Painting the Design
-
Plan the upper stripes:
Directly beneath your twine wrapping, you will paint a series of vertical dashes. You can freehand this for a rustic look, or use a pencil to lightly mark even spacing around the circumference. -
Paint the vertical dashes:
Load your fine-tip brush with white acrylic paint. Paint short, vertical strokes—about half an inch long—creating a fringe-like pattern right under the rope. -
Check consistency:
Try to keep the width of your strokes consistent, but don’t worry about perfection; slight variations add to the handmade charm. Let this ring dry for about 10 minutes. -
Mark the lower pattern:
Move down about 1.5 to 2 inches from your vertical dashes. Use a pencil to draw two parallel horizontal lines around the pot, spaced about half an inch apart. This will house your zig-zag pattern. -
Paint the parallel rings:
Carefully paint over your pencil lines with the white paint to create two thin, solid white rings encircling the lower half of the pot. -
Draw the zig-zags:
Inside the two parallel rings, use the fine-tip brush to paint a continuous zig-zag line. Connect the top ring to the bottom ring with sharp diagonal strokes to create triangles. -
Clean up edges:
If any paint lines look too thin or faint, go over them a second time once the first coat is dry to make the white pop against the clay.
Glue Gun Strings?
Hot glue can leave messy wisps. Wait for them to cool completely, then rub them away briskly with an old toothbrush or a rough cloth.
Step 4: Finishing Touches
-
Erase guidelines:
Once the paint is fully dry (wait at least an hour), use a clean eraser to gently remove any visible pencil marks. -
Seal the pot:
If you plan to keep this pot outdoors, take it outside and spray a light coat of clear matte sealant over the painted areas to protect your design from water damage. -
Add your plant:
Fill the pot with suitable soil and pot your favorite succulent or small plant to complete the look.
Now you have a charming, custom planter that fits perfectly on any sunny windowsill or patio table
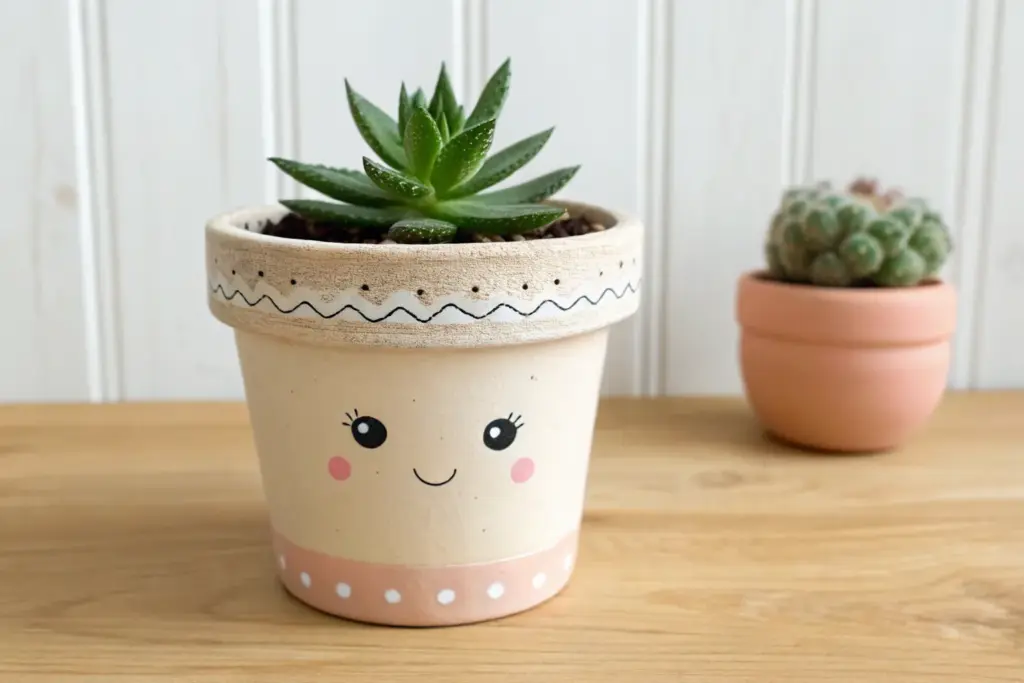
Cute Face Planter Terracotta Pot
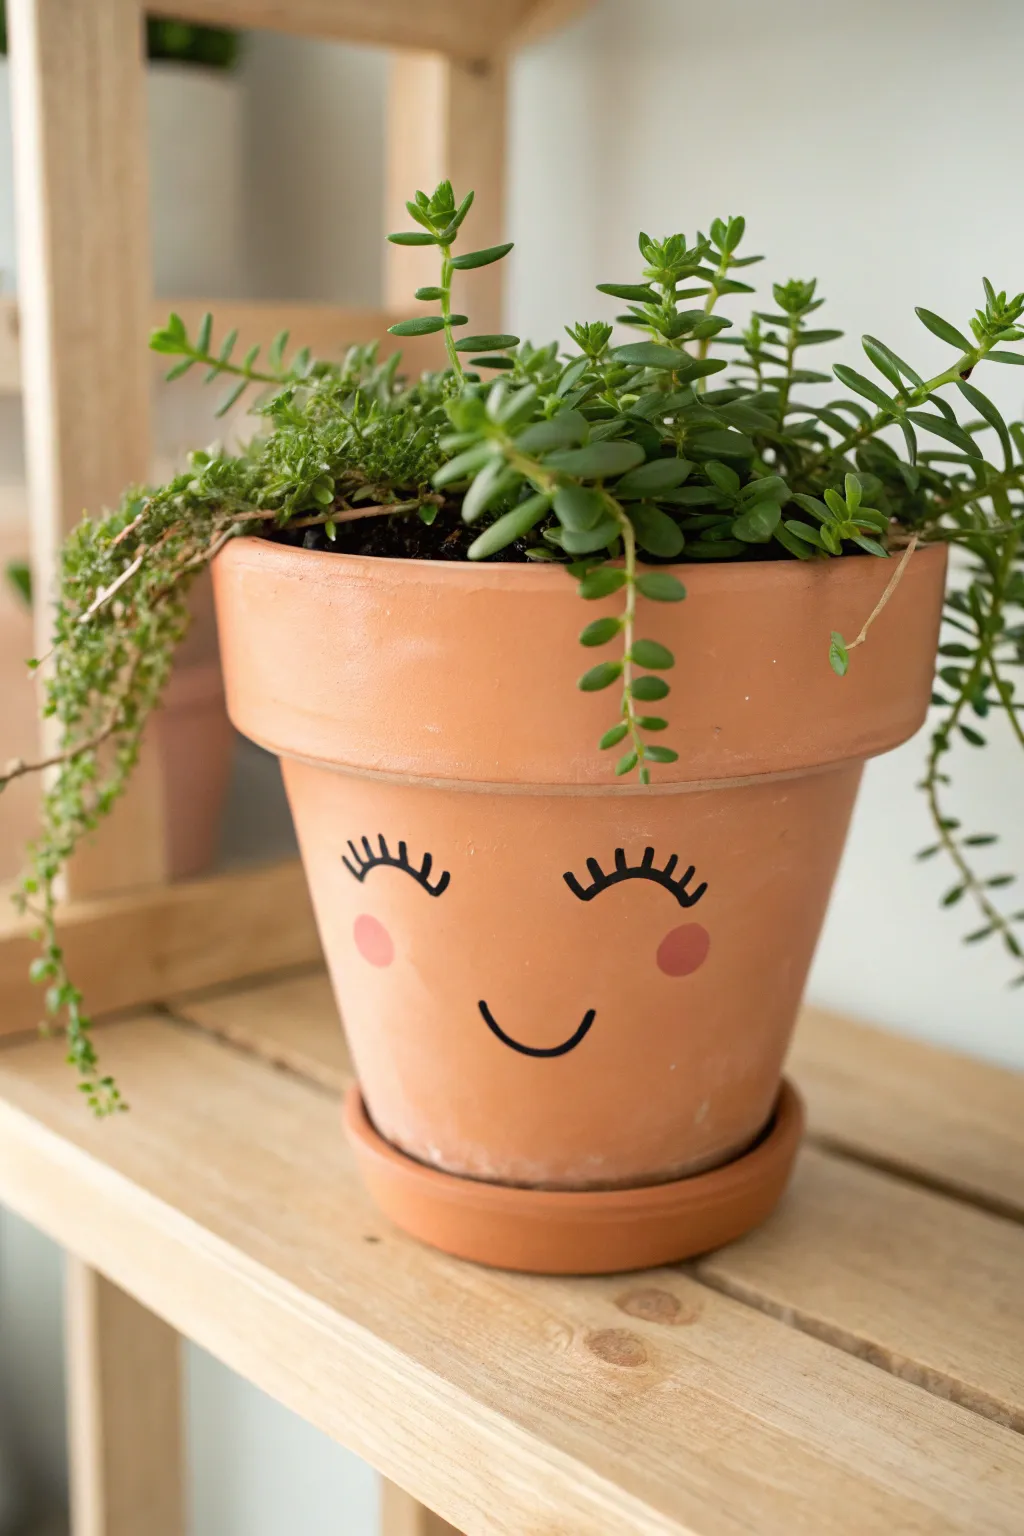
Transform a plain terracotta pot into a charming character with just a few simple strokes of paint. This project features a happy, sleepy expression with fluttery eyelashes and rosy cheeks that instantly adds personality to your indoor garden.
Step-by-Step Guide
Materials
- Standard terracotta pot (4-inch to 6-inch size recommended)
- Matching terracotta saucer
- Soft pink acrylic paint (pastel shade)
- Black acrylic paint or black permanent paint marker
- Small round sponge dauber or size 8 round paintbrush
- Fine liner paintbrush (size 0 or 00) if using paint
- Paper plate or palette
- Pencil with eraser
- Clear matte spray sealer (optional)
Step 1: Preparation
-
Clean the surface:
Before starting, ensure your terracotta pot is completely clean and dry. Wipe it down with a damp cloth to remove any clay dust or retailer stickers, as these will prevent the paint from adhering properly. -
Sketch the face:
Using a pencil, lightly sketch the placement of the face features. Draw two U-shapes for the closed eyes roughly halfway down the pot’s side. -
Mark cheeks and mouth:
Mark the spots for the cheeks just below the outer corners of the eyes. Then, draw a gentle upward curve for the smile centered between the cheeks. -
Check symmetry:
Take a step back and look at your pencil marks. Adjust the positioning now while it’s easy to erase so the face looks balanced and centered on the curve of the pot.
Paint Bleeding?
If the black paint bleeds into the clay’s pores, the paint was too watery. Let it dry, sand gently, and retry with thicker paint or a paint marker.
Step 2: Painting the Features
-
Load the eyelashes tool:
If you are using a paint marker, shake it well and test the flow on a scrap paper. If you are using acrylic black paint and a brush, create a small puddle of paint on your palette and thin it slightly with a drop of water for smoother lines. -
Paint the eye arches:
Carefully trace over your pencil lines for the main closed eyelid arches. Keep consistent pressure to ensure the line width stays uniform. -
Add the lashes:
Add five or six small, straight lines radiating upward from each eye arch. Make the center lashes slightly longer than the ones on the edges for a fluttery effect. -
Draw the smile:
Trace the smile line you sketched earlier. A quick, confident stroke usually produces a smoother curve than moving too slowly. -
Prepare the rosy cheeks:
Pour a small amount of the pastel pink paint onto your palette. If you are using a round sponge dauber, tap it into the paint and off-load the excess onto paper so it isn’t dripping. -
Stamp the cheeks:
Press the sponge dauber firmly onto the cheek marks you sketched. Lift straight up to create a perfect circle. If painting by hand with a brush, carefully outline the circle first and fill it in, smoothing out brushstrokes. -
Second coat for cheeks:
Terracotta is very porous and absorbs paint quickly. Once the pink is touch-dry (about 10 minutes), dab on a second layer of pink to make the color pop against the orange clay.
Add Freckles
Give your planter more character by adding tiny white or brown dots across the nose area to create a cute freckled look.
Step 3: Finishing Touches
-
Clean up sketches:
Once all paint is completely dry (wait at least an hour to be safe), use your eraser to gently remove any visible pencil marks that weren’t covered by paint. -
Seal the artwork:
To protect your face design from water damage when watering your plant, take the pot outside and apply a light coat of clear matte spray sealer over the painted area. -
Pot your plant:
Fill the pot with soil and your chosen plant. A trailing succulent, like the String of Pearls or Sedum shown in the image, looks like crazy green hair falling around the face.
Place your new smiling friend on a bright shelf where it can greet you every morning
Fruit-Themed Terracotta Flower Pots
Transform a plain terracotta pot into a berry-sweet home for your favorite succulent. With its vibrant red base and playful white speckles, this design captures the essence of a ripe strawberry in a charming and minimalist way.
Step-by-Step Guide
Materials
- Small terracotta pot (approx. 4-inch diameter)
- Acrylic paint: Bright red (crimson or strawberry red)
- Acrylic paint: White (titanium white)
- Flat paintbrush (medium size)
- Round paintbrush (small size) or a dotting tool
- Water cup and palette/paper plate
- Paper towels
- Matte or satin acrylic sealer (spray or brush-on)
- Potting soil and a small succulent
Step 1: Preparation and Base Coat
-
Clean the surface:
Before you begin, wipe down your terracotta pot with a damp cloth to remove any dust or manufacturing residue. Let it dry completely so the paint adheres properly. -
Pour your base color:
Squeeze a generous amount of bright red acrylic paint onto your palette. You want a shade that really pops, like a ripe summer strawberry. -
Paint the exterior:
Using your medium flat brush, apply the red paint to the entire outer surface of the pot, including the rim. Use smooth horizontal strokes to minimize brush marks. -
Paint the inner rim:
Don’t forget to paint the top inch or two inside the pot. This ensures that once the soil is added, the original clay color won’t peek through near the plant. -
Dry and assess:
Allow the first coat to dry for about 20 minutes. Terracotta is porous and soaks up paint quickly, so you will likely need a second coat for a truly opaque, solid red finish. -
Apply the second coat:
Paint a second layer of red over the same areas. This deepens the color and hides any streaks. Let this base coat dry completely—I usually give it at least an hour to be safe.
Uneven Dots?
If a dot looks messy or smudged, let it dry completely. Then, use a tiny brush to paint over the mistake with your red base color before re-dotting with white.
Step 2: Adding the Polka Dot Detail
-
Prepare the dots:
While your red base is drying, pour a small amount of titanium white acrylic paint onto your palette. To get crisp dots, ensure the paint isn’t too watery. -
Choose your tool:
For the dots, you can use the handle end of a paintbrush, a dedicated dotting tool, or a small round brush. The handle end of a brush is my favorite trick for perfectly uniform circles. -
Plan the rim pattern:
Start with the rim of the pot. Dip your tool into the white paint and place dots evenly spaced around the circumference. Try to keep them centered on the rim band. -
Start the body pattern:
Move down to the main body of the pot. Place your first row of dots just below the rim. Space them out so they sit essentially beneath the gaps of the rim dots, creating a staggered effect. -
Continue the pattern:
Add subsequent rows of white dots, maintaining that staggered, diagonal alignment. This mimics the seed pattern on a real strawberry. -
Check consistency:
Reload your tool with white paint frequently. If the dots start looking faint or transparent, you can carefully dab a second layer of white over them once the first touches are dry. -
Allow to cure:
Let your polka dot design dry completely. Because the dots might be thicker than the base coat, give this step plenty of time.
Seed Detail
Make it look even more like a strawberry by mixing a tiny drop of yellow into your white paint for the seeds, or painting small teardrop shapes instead of circles.
Step 3: Finishing and Planting
-
Seal the pot:
To protect your artwork from water damage during watering, apply a coat of matte or satin sealer over the entire painted surface. This also prevents the paint from bubbling later. -
Let the sealer set:
Wait for the sealer to dry according to the manufacturer’s instructions, ensuring it is no longer tacky to the touch. -
Add soil:
Fill your pot about halfway with a well-draining potting mix suitable for succulents. -
Plant your green top:
Nestle your succulent into the center of the pot. An Echeveria with pointed leaves works beautifully here because it resembles the leafy green calyx (the top) of a strawberry. -
Top it off:
Fill in the remaining space around the roots with more soil, gently pressing down to secure the plant. Brush off any loose dirt from the rim to reveal your clean red edge.
Your juicy little strawberry pot is now ready to brighten up any windowsill or shelf
Stacked Tiered Flower Pot Display

Transform ordinary terracotta pots into a chic, vertical garden centerpiece with a simple paint-dipped aesthetic. This tiered display uses a clever varying application of creamy white and sage green paints to create a clean, modern look perfect for showcasing small succulents.
Step-by-Step Tutorial
Materials
- 3 Small terracotta pots (approx. 4-inch diameter)
- 1 Small terracotta saucer (to match the bottom pot)
- White matte acrylic paint or chalk paint
- Sage green matte acrylic paint or chalk paint
- Blue painter’s tape (various widths)
- Foam paint brushes or flat synthetic brushes
- Small gravel or pebbles (for drainage and spacing)
- Cactus/Succulent soil mix
- Assorted small succulents (e.g., Echeveria, Sedum)
- Strong craft glue or construction adhesive (optional, for stability)
Step 1: Preparation & Taping
-
Clean the terracotta:
Begin by wiping down all your terracotta pots and the saucer with a damp cloth to remove any dust or manufacturing residue. Let them dry completely before applying any tape. -
Design the top pot:
For the top tier, you want a white body with a natural rim. Apply painter’s tape carefully around the outside of the pot, just under the rim’s lip. Press the edges down firmly to prevent paint bleed. -
Design the middle pot:
For the middle tier, reverse the look. Tape off the main body of the pot right below the rim, leaving just the upper rim exposed for painting. You can cover the rest of the pot with paper or a plastic bag taped in place to protect it from stray drips. -
Design the bottom pot:
The bottom pot features a subtle sage green accent. Similar to the middle pot, tape off the main body right under the rim, leaving only the thick band of the rim exposed.
Clean Lines Secret
Before painting, run a debit card or fingernail firmly over the tape edge to ensure a perfect seal. This prevents the watery paint from bleeding into the clay’s texture.
Step 2: Painting
-
Paint the top pot body:
Using your foam brush, apply the white paint to the body of the top pot (below the rim). Brush in horizontal strokes for a smooth finish. I like to do a thin first coat to seal the clay. -
Paint the middle pot rim:
Apply the white paint to the rim of the middle pot. Ensure you get into the crevices under the lip but try not to paint the inside unless you want that look. -
Apply the green accent:
Mix your sage green paint well and apply it to the rim of the bottom pot. This adds a lovely, earthy grounding color to the stack. -
Apply second coats:
Once the first layer is dry to the touch (usually 20-30 minutes), apply a second coat to all painted areas. This ensures distinct, opaque blocks of color. -
Remove tape:
While the second coat is still slightly tacky (not fully cured), carefully peel away the painter’s tape at a 45-degree angle. This helps create a crisp, sharp line. -
Allow to cure:
Let all pots dry completely for at least a few hours, or overnight, to ensure the paint hardens and won’t scratch during stacking.
Step 3: Assembly & Planting
-
Prepare the base:
Place the saucer on your workspace. Fill the bottom (green-rimmed) pot with soil, leaving about an inch of space from the top. You don’t need to fill it completely to the brim yet. -
Stack the second tier:
Nest the middle (white-rimmed) pot directly into the soil of the bottom pot. Press it down firmly so it feels stable. If you want a permanent structure, you can run a bead of adhesive around the bottom edge of this pot before setting it in, but soil usually holds it well enough for gentle handling. -
Adding soil to the middle:
Fill the exposed ring of space in the bottom pot with more soil if needed, and then fill the middle pot with soil, again stopping an inch from the top. -
Stack the top tier:
Place the top (white-bodied) pot into the soil of the middle pot. Ensure the tower looks straight from a distance. -
Planting the pockets:
Now for the fun part. Plant your small succulents into the exposed soil rings of the bottom and middle pots. Use a spoon or chopsticks to help guide roots into the tight spaces. -
Planting the crown:
Plant your focal succulent or a taller arrangement in the very top pot. A taller jade or trailing sedum looks fantastic here. -
Top dressing:
Carefully sprinkle small gravel or pebbles over any exposed soil. This gives the project a finished, professional look and helps keep the soil moisture consistent.
Wobbly Tower?
If the pots feel unstable, insert a wooden dowel or strong chopstick through the drainage holes of all three pots (if they align) into the soil to act as an internal spine.
Place your new tiered garden in a sunny spot and enjoy the clean, architectural beauty of your handcrafted display