If you’re in that middle school clay sweet spot, mugs are the perfect mix of practical and totally personality-packed. These middle school clay mug ideas are my tried-and-true prompts for keeping construction beginner-friendly while still getting those “I made this!” results.
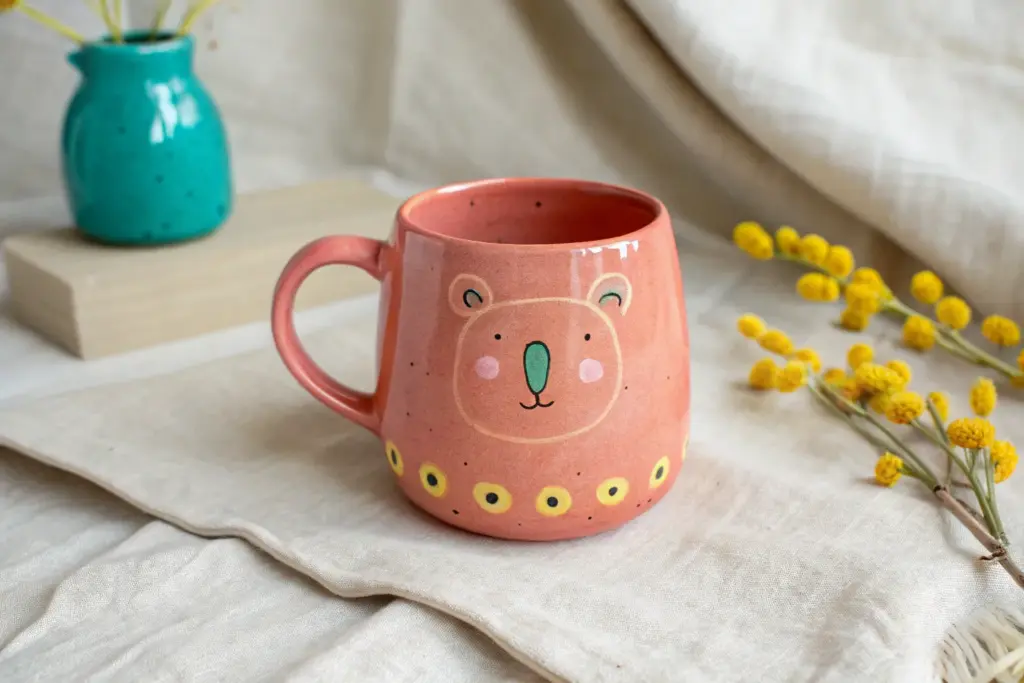
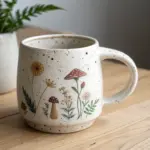
Classic Slab-Built Starter Mug
Learn to construct a perfectly cylindrical mug using basic slab-building techniques that mimic the clean lines of wheel-thrown pottery. This project features a stunning contrast between a vibrant turquoise glaze and the warm, earthy tones of exposed stoneware at the rim and base.
Step-by-Step Tutorial
Materials
- Stoneware clay body (smooth, speckled buff recommended)
- Wooden rolling pin
- Two wooden thickness strips (1/4 inch thick)
- Fettling knife or needle tool
- Scoring rib or serrated kidney tool
- Slip (clay mixed with water)
- Straight edge or ruler
- Cylindrical form for template (like a cardboard oatmeal container or PVC pipe)
- Sponge
- Turquoise/Teal glossy glaze
- Wax resist (optional)
Step 1: Creating the Slab Body
-
Roll out the clay:
Begin by wedging your clay to remove air bubbles, then flatten it slightly with your palm. subtle first-person perspective, I like to place the clay between two guide strips to ensure a perfectly even thickness as I roll. -
Cut the rectangle:
Using your ruler and fettling knife, cut a long rectangle. The height determines your mug depth (6-7 inches is standard), and the length should be enough to wrap around your chosen cylinder template with a slight overlap. -
Bevel the edges:
To create a seamless join, cut the short ends of your rectangle at opposite 45-degree angles. This allows the clay to overlap cleanly without creating a thick lump at the seam. -
Form the cylinder:
Carefully lift your slab and wrap it into a vertical cylinder shape. Score the beveled edges thoroughly to rough them up, apply a generous amount of slip, and press the angled ends firmly together. -
Reinforce the seam:
Support the wall from the inside with one hand and smooth the exterior seam with a wooden rib or your thumb. Repeat on the inside to ensure the join is invisible and strong.
Step 2: Attaching the Base and Handle
-
Cut the floor:
Roll out a small slab for the base. Place your clay cylinder on top of it and trace around the bottom with a needle tool, then cut out the circle. -
Attach the bottom:
Score and slip both the bottom edge of your cylinder wall and the outer ring of your base circle. Press them together firmly. -
Smooth the connection:
Use a small coil of clay on the interior seam where the wall meets the floor to strengthen the bond. Smooth it out completely with a damp sponge or modeling tool. -
Pull or roll a handle:
Create a strap for the handle by rolling a coil and flattening it slightly, or pulling it wet for a more organic feel. Curve it into a ‘C’ shape and let it stiffen slightly. -
Attach the handle:
Score and slip the attachment points on the mug body and the handle ends. Press the handle on firmly, smoothing the clay around the joints so it looks like it grew out of the mug.
Pro Tip: Seamless Texture
Before rolling your cylinder, lightly smooth the slab with a soft rubber rib. This compresses the clay particles and gives you a flawless canvas that makes the glaze application look super professional.
Step 3: Refining and Glazing
-
Refine the rim:
Once leather hard, use a slightly damp sponge to round off the rim. This mug features a distinctive exposed rim, so make sure the clay feels smooth against the lips. -
Clean the foot:
Clean up the bottom edge of the mug. You can use a rasp tool to create a slight undercut or definition at the base, mimicking a trimmed foot ring. -
Bisque fire:
Allow the mug to dry slowly and completely before firing it in the kiln to bisque temperature (usually Cone 04). -
Wax the accents:
To achieve the look in the photo, apply wax resist carefully to the very top rim (about 1/8 inch) and the bottom half-inch of the mug exterior. This prevents glaze from sticking to these areas. -
Dip or brush glaze:
Dip the mug into a vibrant turquoise or teal glaze. Alternatively, brush on 3 even coats. The wax will repel the glaze, leaving those earthy clay bands exposed. -
Wipe clean:
Use a damp sponge to wipe away any tiny beads of glaze that might sit on top of the waxed areas to ensure a crisp line. -
Glaze fire:
Fire the mug again to the maturation temperature of your clay and glaze (often Cone 5 or 6 for stoneware) to finish the piece.
Troubleshooting: Warped Rim
If your cylinder goes oval during handling, gently squeeze it back into round immediately. If it’s stubborn, let it stiffen slightly with a paper cup inside to act as a temporary scaffolding.
Enjoy your morning coffee in a vessel that feels both modern and hand-crafted


Pinch Pot Mug With a Coil Rim
This project combines two fundamental hand-building techniques to create a mug that looks surprisingly like it was thrown on a wheel. The result is a charming, textured vessel with a cozy, rounded belly and a smooth, professional-looking rim.
Step-by-Step Guide
Materials
- Stoneware clay (speckled or buff preferred)
- Fettling knife
- Serrated rib tool or fork (for scoring)
- Slip (clay mixed with water)
- Wooden modeling tool
- Rubber kidney rib
- Sponge
- Rolling pin (optional)
- Glazes: Glossy Cream, Celadon Green, Iron Wash (optional)
Step 1: Forming the Base
-
Start with a sphere:
Begin with a ball of clay roughly the size of a large orange. Pat it into a smooth, round sphere in your hands. -
Create the pinch pot:
Push your thumb into the center of the sphere, stopping about a half-inch from the bottom. Gently pinch and rotate the clay to open up the walls. -
Shape the belly:
Continue pinching until you have a uniform wall thickness. Aim for a specific shape: wide at the bottom and slightly curving inward at the top, like a fishbowl. -
Flatten the bottom:
Tap the pot gently on your table to create a stable, flat foot so the mug won’t wobble.
Step 2: Adding Height and Texture
-
Roll a coil:
Roll out a snake of clay about the thickness of your pinky finger. Ensure it is long enough to circle the rim of your pinch pot. -
Score and slip:
Score the top rim of your pinch pot and one side of the coil using a serrated rib or fork. Apply slip generously to the scored areas. -
Attach the coil:
Place the coil on the rim. Support the wall with one hand while using your thumb to smudge the coil downward onto the pinch pot body, blending the seam thoroughly on the inside. -
Add exterior texture:
On the outside, you don’t need to smooth perfectly. Instead, use a wooden tool or your finger to drag horizontal grooves around the belly of the mug to mimic wheel-thrown ridges. -
Smooth the interior:
I like to use a slightly damp sponge or rubber rib on the inside to make sure the surface is seamless and ready for drinking.
Rim Separation?
If the coil separates during drying, your clay was likely too dry. Score deeper next time and use more slip. For now, fill the crack with vinegar-soaked clay.
Step 3: Handle and Finishing
-
Pull or roll a handle:
Create a strap for the handle. You can roll a thick coil and flatten it slightly, creating a comfortable oval cross-section. -
Shape the curve:
Bend the strip into a graceful ‘ear’ shape. Hold it up to the mug to check the proportions before attaching. -
Attach firmly:
Score and slip the contact points on both the handle and the mug body. Press firmly to attach, smoothing the clay connection points with a wooden tool. -
Dry slowly:
Cover the mug loosely with plastic to let it dry slowly. This prevents the handle from cracking away from the body as the clay shrinks. -
Bisque fire:
Once bone dry, fire the piece to bisque temperature (usually cone 04).
Iron Oxide Wash
To get that toasted look near the bottom, wipe a very diluted Iron Oxide wash over the texture lines before dipping your main glaze.
Step 4: Glazing
-
Wax the bottom:
Apply wax resist to the very bottom and partially up the foot to leave a tailored, unglazed line. -
Dip the base color:
Dip the entire mug into a creamy white or oatmeal glaze. This highlights the speckles in the clay body. -
Add the rim accent:
Once the base coat is dry to the touch, dip just the top 1-2 inches of the rim into a translucent celadon or light teal glaze. -
Glaze fire:
Fire the mug to maturity (likely cone 5/6 depending on your clay). The overlapping glazes will melt together to create that soft transition.
Now you have a handmade mug ready for your favorite warm beverage


Easy D-Handle Comfort Mug
Master the art of contrast with this sturdy, cylinder-style mug that features a classic exposed clay base and a creamy speckled glaze. The prominent ‘D’ handle offers exceptional comfort and adds a geometric balance to the straight-walled design.
Detailed Instructions
Materials
- Stoneware clay (speckled or buff)
- Rolling pin
- Canvas mat or slab roller
- Cylinder form or PVC pipe (approx. 3-4 inch diameter)
- Fettling knife
- Serrated rib or scoring tool
- Slip (clay mixed with water)
- Wooden modeling tool
- Sponge
- Cream or white speckled glaze (glossy or satin)
- Wax resist (optional)
- Kiln
Step 1: Forming the Body
-
Roll the Slab:
Begin by rolling out a medium-sized piece of stoneware clay into a slab. You want an even thickness of about 1/4 inch throughout. If you are rolling by hand, flip the clay often to ensure it doesn’t stick to your canvas. -
Cut the Rectangle:
Using a straightedge and your fettling knife, cut a clean rectangle from your slab. The height should be around 4 to 5 inches, and the length should be enough to wrap around your cylindrical form with a slight overlap. -
Prepare the Base:
Roll a small separate piece of clay for the bottom. Place your cylinder form onto this clay and trace around it to cut a perfect circle that matches the diameter of your mug body. -
Bevel the Edges:
On your rectangular slab, cut the short ends at a 45-degree angle (beveling) so they will fit together seamlessly when wrapped. This creates a stronger joint than a simple butt joint. -
Assemble the Cylinder:
Wrap the rectangular slab around your form. Score the beveled edges, apply slip, and press them firmly together. While the form is still inside, smooth the seam on the outside with a wooden rib. -
Attach the Base:
Score and slip the bottom edge of your cylinder and the top edge of your circular base. Press them together firmly. I like to use a thin coil of clay on the interior seam to reinforce the connection, blending it until smooth.
Straight Wall Success
Use a PVC pipe wrapped in newspaper as a mold. It ensures perfectly straight walls and slides out easily when the clay stiffens.
Step 2: Creating the D-Handle
-
Pull or Roll a Coil:
For the comfortable D-handle, either pull a thick strap of clay or roll a coil that is slightly flattened. It should be proportional to your mug, about 5/8 inch thick. -
Shape the ‘D’:
Curve the clay strip into a ‘D’ shape. The vertical part of the D will attach to the mug wall, while the curve provides the grip. Let this stiffen slightly on a board so it holds its shape. -
Attach the Handle:
Score and slip the attachment points on both the mug body and the handle ends. The top attachment should be near the rim, and the bottom attachment roughly 2 inches below it. -
Blend the Seams:
Press the handle onto the mug firmly. Use a wooden tool to blend the clay from the handle onto the mug body, ensuring there are no cracks. Smooth the connection points with a damp sponge. -
Dry Slowly:
Cover the mug loosely with plastic to let it dry slowly to the leather-hard stage. This prevents the handle from pulling away as it shrinks.
Step 3: Glazing and Finishing
-
Bisque Fire:
Once bone dry, fire the mug in the kiln to bisque temperature (usually cone 04 or 06). Inspect for any sharp burrs and sand them lightly if needed. -
Mask the Bottom:
To achieve the two-tone look, measure about 1.5 to 2 inches up from the bottom. Apply wax resist to this lower section and the entire exterior bottom. Alternatively, simply be very careful when dipping. -
Glaze the Interior:
Pour your cream speckled glaze into the inside of the mug, swirl it around to coat completely, and pour out the excess. Wipe the rim clean immediately with a damp sponge. -
Dip the Exterior:
Hold the mug by the foot (or using tongs) and dip the top portion into the glaze. Stop dipping right at the line where you want the raw clay to show. If you didn’t use wax, this requires a steady hand. -
Clean Up:
If any glaze dripped onto the raw clay section or the bottom of the foot, wipe it away cleanly with a sponge. The unglazed clay will toast to a warm red-brown in the kiln. -
Glaze Fire:
Fire the mug to the final maturity temperature for your clay and glaze (typically cone 5 or 6). This will melt the specks in the glaze and vitrify the exposed clay base.
Handle Separation?
If the handle cracks at the join during drying, wrap the join tightly with plastic strip while the rest dries to equalize moisture.
Enjoy your morning coffee in a mug that perfectly balances rustic texture with modern design


Funny Face Expression Mug
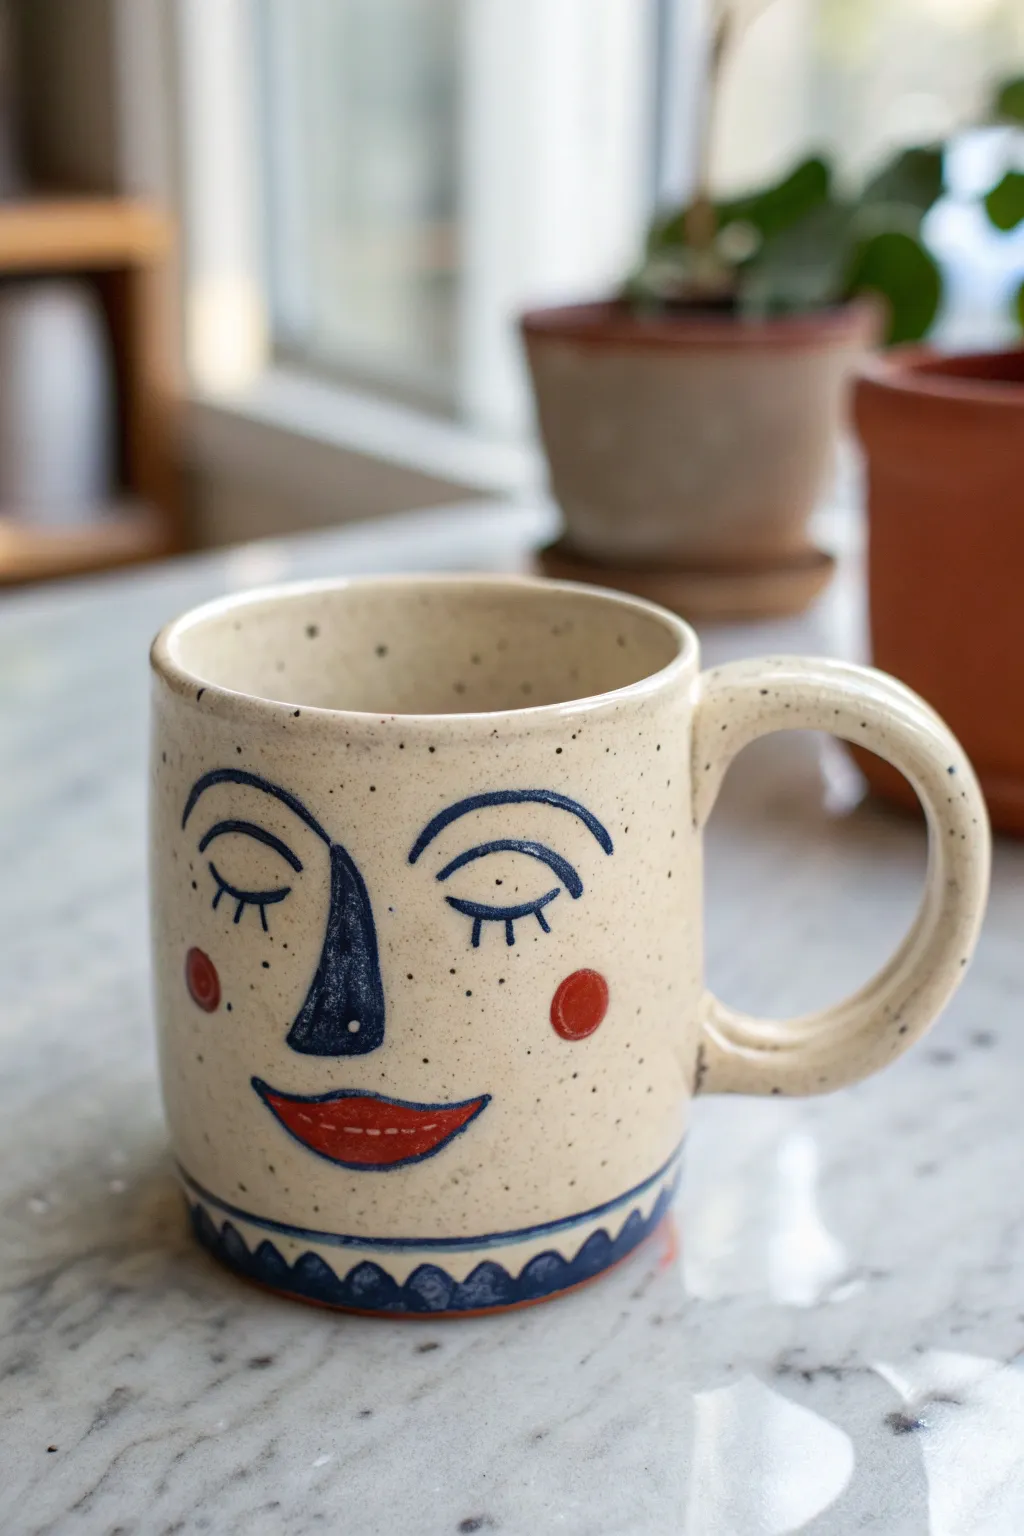
Capture a moment of zen with this charming ceramic mug featuring a peaceful, stylized face. The design combines simple line work with bold pops of color on a speckled clay body, perfect for a cozy warm drink.
Step-by-Step Tutorial
Materials
- Speckled buff stoneware clay
- Rolling pin and guide sticks (approx. 1/4 inch)
- Needle tool and fettling knife
- Scoring tool or serrated rib
- Clay slip/slurry
- Cylindrical form for template (or a paper template)
- Blue underglaze (specifically a cobalt blue)
- Red underglaze
- Fine detail paintbrush
- Medium round paintbrush
- Clear glossy glaze
- Sponge
Step 1: Building the Mug Body
-
Prepare the slab:
Begin by wedging your speckled clay to remove air bubbles, then roll it out into an even slab using your rolling pin and guide sticks. You want a consistent thickness of about 1/4 inch. -
Cut the rectangle:
Measure and cut a rectangle from your slab. For a standard mug, 10-11 inches long by 4-5 inches tall is usually a good size. -
Form the cylinder:
Gently curve the slab into a cylinder. Bevel the short ends at 45-degree angles to create a stronger, more seamless overlap. -
Join the seam:
Score the beveled edges thoroughly and apply slip. Press the ends together firmly. I like to support the inside wall with one hand while smoothing the outside seam with a rib to make it disappear. -
Add the base:
Place your cylinder on a fresh piece of slab. Trace around the bottom with a needle tool, leaving a tiny bit of extra width. -
Attach the bottom:
Score and slip both the bottom of the cylinder and the edge of the base circle. Press them together, then smooth the excess clay upward onto the wall to seal the join.
Clean Lines Pro Tip
If you don’t trust your freehand painting, try using a slip-trailing bottle with a fine metal tip to apply the blue lines. It acts like a pen for very consistent width.
Step 2: Handle and Refinement
-
Pull the handle:
create a handle by pulling a thick coil of clay with wet hands, tapering it slightly. Curve it into a ‘C’ ear shape and set it aside to stiffen until it’s ‘leather hard’. -
Smooth the shape:
While the handle sets, refine your mug body. Use a damp sponge to smooth the rim so it’s comfortable for drinking. -
Attach the handle:
Score and slip the contact points on both the mug and the handle. Press the handle firmly onto the mug body, blending the clay at the attachment points for a seamless look.
Step 3: Painting the Face
-
Sketch lightly:
Once the mug is leather hard, very lightly sketch the face design with a pencil. The graphite will burn off in the kiln, so don’t worry about mistakes. -
Line the eyes:
Using a fine detail brush and blue underglaze, paint the curved eyebrows and the closed eyelids. Add small vertical dashes for the eyelashes. -
Paint the nose and cheeks:
Outline a long, triangular nose shape in blue, connecting it to the left eyebrow. Fill it in with a textured, slightly uneven wash of blue. Then, add two solid red circles for cheeks. -
Detail the mouth:
Paint a gentle smile shape with red underglaze. Once the red is dry, outline the lips with a thin blue line to make them pop. -
The bottom pattern:
Paint a blue scallop pattern around the very bottom edge of the mug. Fill in the semicircles with blue underglaze. -
Final border:
Add a thin blue line just above the scallop pattern to frame the design.
Level Up: Texture
Before painting the nose, scratch the clay inside the nose outline slightly with a needle tool. The blue underglaze will pool in the scratches for a cool denim-like effect.
Step 4: Firing
-
Bisque fire:
Allow the mug to dry completely to the bone-dry stage. Fire it in the kiln to cone 04 (bisque). -
Glaze application:
Dip the entire bisqued mug into a clear glossy glaze. This will seal the clay and make the speckles and underglaze colors vibrant. -
Final fire:
Fire the mug again to the maturation temperature of your clay (usually cone 6 for stoneware).
Enjoy your morning coffee with a calm companion that smiles back at you

The Complete Guide to Pottery Troubleshooting
Uncover the most common ceramic mistakes—from cracking clay to failed glazes—and learn how to fix them fast.
Goofy Monster Mug With 3D Eyes
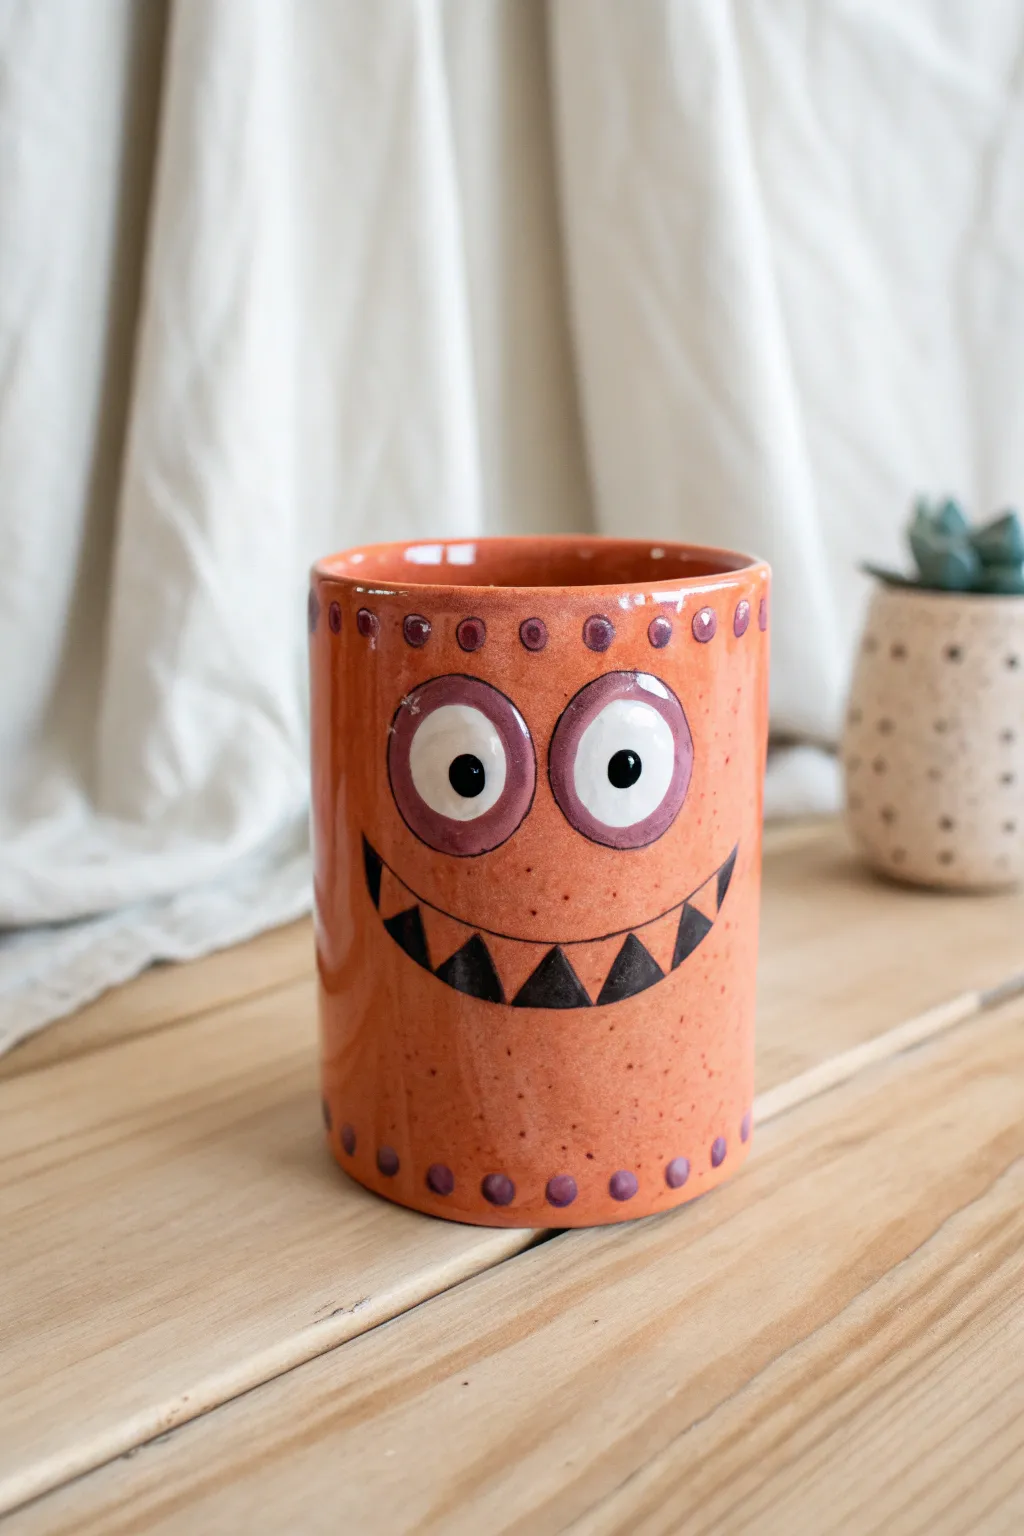
This cheerful ceramic mug features a bright orange glaze, oversized cartoon eyes, and a toothy grin perfect for brightening up your morning routine. With its simple cylindrical shape and playful painted details, it’s a fantastic project for learning underglaze decoration techniques.
Step-by-Step Guide
Materials
- Low-fire white clay body
- Rolling pin and wooden slats (3/8 inch thickness)
- Fettling knife
- Slip and scoring tool
- Cylindrical form or rolling tube (for support)
- Underglazes: Bright Orange, vivid Purple, Black, and White
- Small round paintbrushes
- Clear transparent glaze
- Sponge and water bucket
Step 1: Building the Cylinder
-
Roll the slab:
Begin by wedging your white clay to remove air bubbles. Using wooden slats as guides, roll out a smooth slab of clay about 3/8 inch thick. -
Cut the rectangle:
Measure and cut a long rectangle from your slab. The length should be the circumference of your desired mug width plus a little extra for overlap, and the height is up to you—around 4-5 inches works well. -
Form the wall:
Wrap the clay rectangle around a cylindrical form or simply curl it into a tube shape. Score and slip the vertical seam thoroughly, pressing the ends together firmly to create a strong join. -
Attach the base:
Roll a small separate piece of clay for the floor. Place your cylinder on top, trace around it, and cut out the circle. Score and slip the bottom of the cylinder and the edge of the circle, then press them together. -
Smooth the seams:
Use a wooden modeling tool or your finger to smooth the inside and outside seams until they are invisible. Reinforce the inside bottom seam with a thin coil of clay if necessary. -
Refine the rim:
Run a damp sponge or chamois over the top rim to ensure it is rounded and comfortable for drinking. Let the mug dry to a leather-hard state before decorating.
Stamp Master
Use the back end of different sized paintbrushes or even drill bits to create perfectly uniform dots for the rim decoration without sketching.
Step 2: Painting the Monster Face
-
Apply base color:
Once leather hard, brush 2-3 coats of bright orange underglaze over the entire exterior of the mug. I find that alternating the brush direction between coats helps prevent streaking. -
Outline the eyes:
Dip a medium round brush into purple underglaze. Paint two large, connected circles near the top third of the mug to serve as the background for the eyes. -
Paint the eye whites:
Using white underglaze, paint slightly smaller circles inside the purple ones. You may need 3 coats here to ensure the white is opaque enough to cover the orange layer beneath. -
Add pupils:
Take a small detail brush with black underglaze and carefully paint a small dot in the center of each white eye. Add a tiny speck of white highlight inside the black dot to bring the character to life. -
Draw the smile:
Using a thin liner brush and black underglaze, paint a long, curved line for the mouth that stretches almost the full width of the face. -
Fill the teeth:
Paint a series of small, sharp triangles hanging down from the mouth line. Fill these triangles in completely with black underglaze to create the gap-toothed look. -
Add decorative dots:
Dip the handle end of a paintbrush into the purple underglaze. Stamp a row of dots evenly spaced around the very top rim and the very bottom edge of the mug. -
Bisque fire:
Allow the mug to dry completely to the bone-dry stage. Load it into the kiln for a bisque firing (usually cone 04) to set the clay and underglaze.
Streaky White?
White underglaze over dark colors can be tricky. Let each layer dry completely before adding the next to avoid dragging the underlying orange paint.
Step 3: Glazing and Finishing
-
Apply clear glaze:
Once the bisque firing is complete, wipe the mug with a damp sponge to remove dust. A dip or brushing of clear transparent glaze should be applied over the entire piece (inside and out) to seal it and make it food safe. -
Wipe the foot:
Use a sponge to wipe any glaze off the very bottom of the mug so it doesn’t fuse to the kiln shelf. -
Final firing:
Fire the mug a final time to the temperature required by your clear glaze (often cone 05 or 06 for low fire) to achieve that glossy, finished shine.
Now you have a quirky, custom companion for your cocoa.
Leaf-Stamped Texture Nature Mug
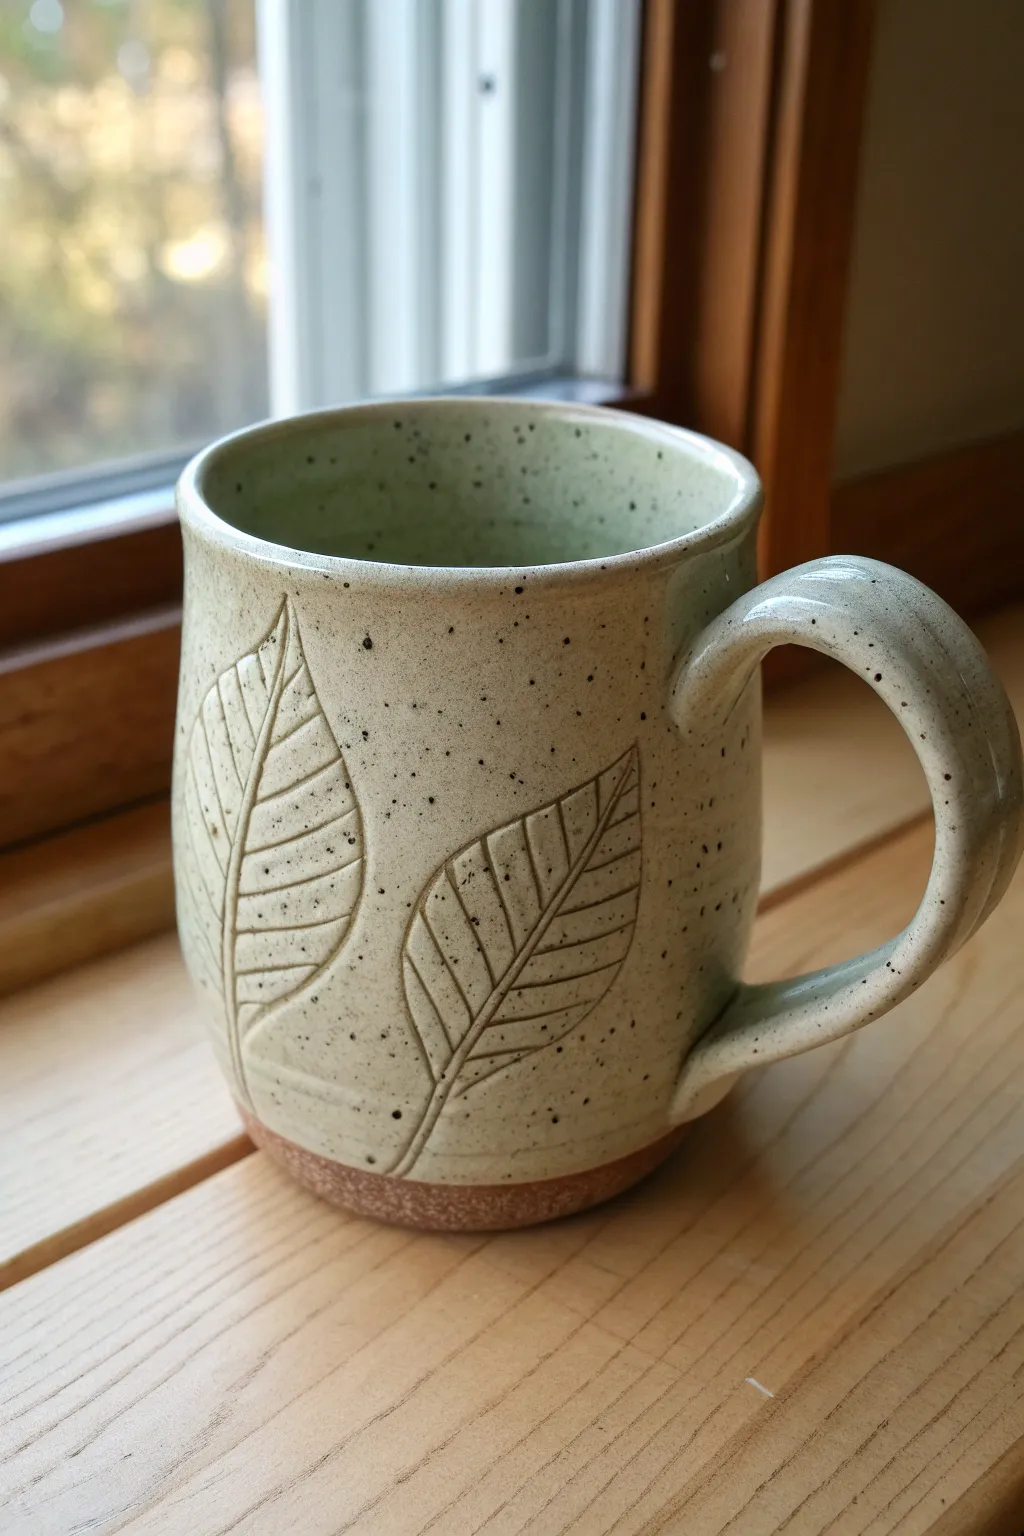
Bring the outdoors in with this beautiful, speckled ceramic mug featuring deep, organic leaf impressions. The contrast between the creamy, speckled glaze and the raw clay base gives it a professional, earthy finish that feels great in your hands.
Step-by-Step
Materials
- Stoneware clay (speckled or reddish body)
- Small wooden rolling pin or slab roller
- Carving tool or needle tool
- Leaf template (paper or real leaves)
- Scoring tool (serrated rib or needle tool)
- Slip (clay and water mixture)
- Sponge
- Cream/white speckled glaze (stoneware safe)
- Kiln
- Paintbrush
Step 1: Slab Construction
-
Roll the slab:
Begin by rolling out a medium-sized slab of clay to an even thickness, about 1/4 inch thick. Aim for a long rectangle that is tall enough for your desired mug height and long enough to wrap around your form. -
Cut the rectangle:
Using a ruler and a needle tool, cut a clean rectangle from your slab. A good starting size for a middle school project is roughly 4 inches high by 10-11 inches long. -
Bevel the edges:
Cut the shorter ends of your rectangle at a 45-degree angle. Bevel one side inward and the other outward so they will overlap seamlessly when you form the cylinder. -
Score and slip:
Roughen the beveled edges with your scoring tool and apply a generous amount of slip. This ‘glue’ is crucial for a strong seam that won’t crack during firing. -
Form the cylinder:
Gently curve the slab into a tube shape. Overlap the beveled edges and press them firmly together. Support the wall from the inside with one hand while smoothing the outside seam with the other. -
Create the base:
Roll a small separate piece of clay for the floor. Place your cylinder on top of it and trace around the bottom with a needle tool, leaving a tiny bit of extra width. -
Attach the base:
Score and slip the bottom edge of the cylinder and the outer rim of the base circle. Press them together firmly and use a modeling tool to blend the clay across the seam until it is invisible.
Step 2: Adding the Leaf Texture
-
Identify placement:
Decide where you want your leaves to sit. I like to place them slightly off-center from where the handle will go so they are visible while drinking. -
Outline the shape:
Place your paper template or direct reference against the leather-hard clay. Use a needle tool to faintly trace the outline of two large, pointed leaves. -
Carve the border:
Using a small loop tool or carving tool, carefully carve just inside your traced line to create a recessed border. This makes the leaf shape pop out slightly from the rest of the surface. -
Indent the veins:
Draw the central vein of the leaf with firm pressure using a dull pencil or a modeling tool. Then, press in the diagonal veins branching off the center. You want deep grooves that the glaze will pool into. -
Smooth the edges:
Use your finger or a slightly damp sponge to soften any sharp crumbles of clay created by the carving. Smooth edges feel much better on a finished mug.
Cracking Seams?
If your seams are cracking as they dry, try compressing the join more firmly with a wooden rib. Always dry mugs upside down initially to keep rim tension even.
Step 3: Handle & Finishing
-
Pull a handle:
Roll a coil and slightly flatten it, or pull traditional handle from a lug of wet clay. Shape it into a curve that resembles a question mark or a half-ear shape. -
Attach the handle:
Wait until the handle is leather hard (stiff but shapeable). Score and slip the attachment points on the mug and handle, then press firmly into place. -
Clean and dry:
Wipe down the entire piece with a barely damp sponge to smooth any fingerprints. Let the mug dry slowly under plastic for a day before uncovering it to dry completely for the bisque fire. -
Wax the base:
After the bisque firing, apply wax resist to the bottom inch or so of the mug. This creates that lovely unglazed ‘boot’ at the bottom shown in the photo. -
Glaze application:
Dip or brush a cream-colored speckled glaze over the entire mug (except the waxed bottom). Ensure the glaze gets into the leaf veins but isn’t so thick it obscures the texture. -
Final wipe:
Wipe the bottom rim clean one last time to protect your kiln shelf and fire the mug to the temperature required by your clay and glaze.
Level Up: Real Texture
Instead of carving, press a real leaf with prominent veins (like a hydrangea or oak leaf) directly into the soft clay slab before rolling it into a cylinder.
Enjoy using your new favorite handmade mug for your morning beverage


What Really Happens Inside the Kiln
Learn how time and temperature work together inside the kiln to transform clay into durable ceramic.
Cactus and Desert Relief Mug
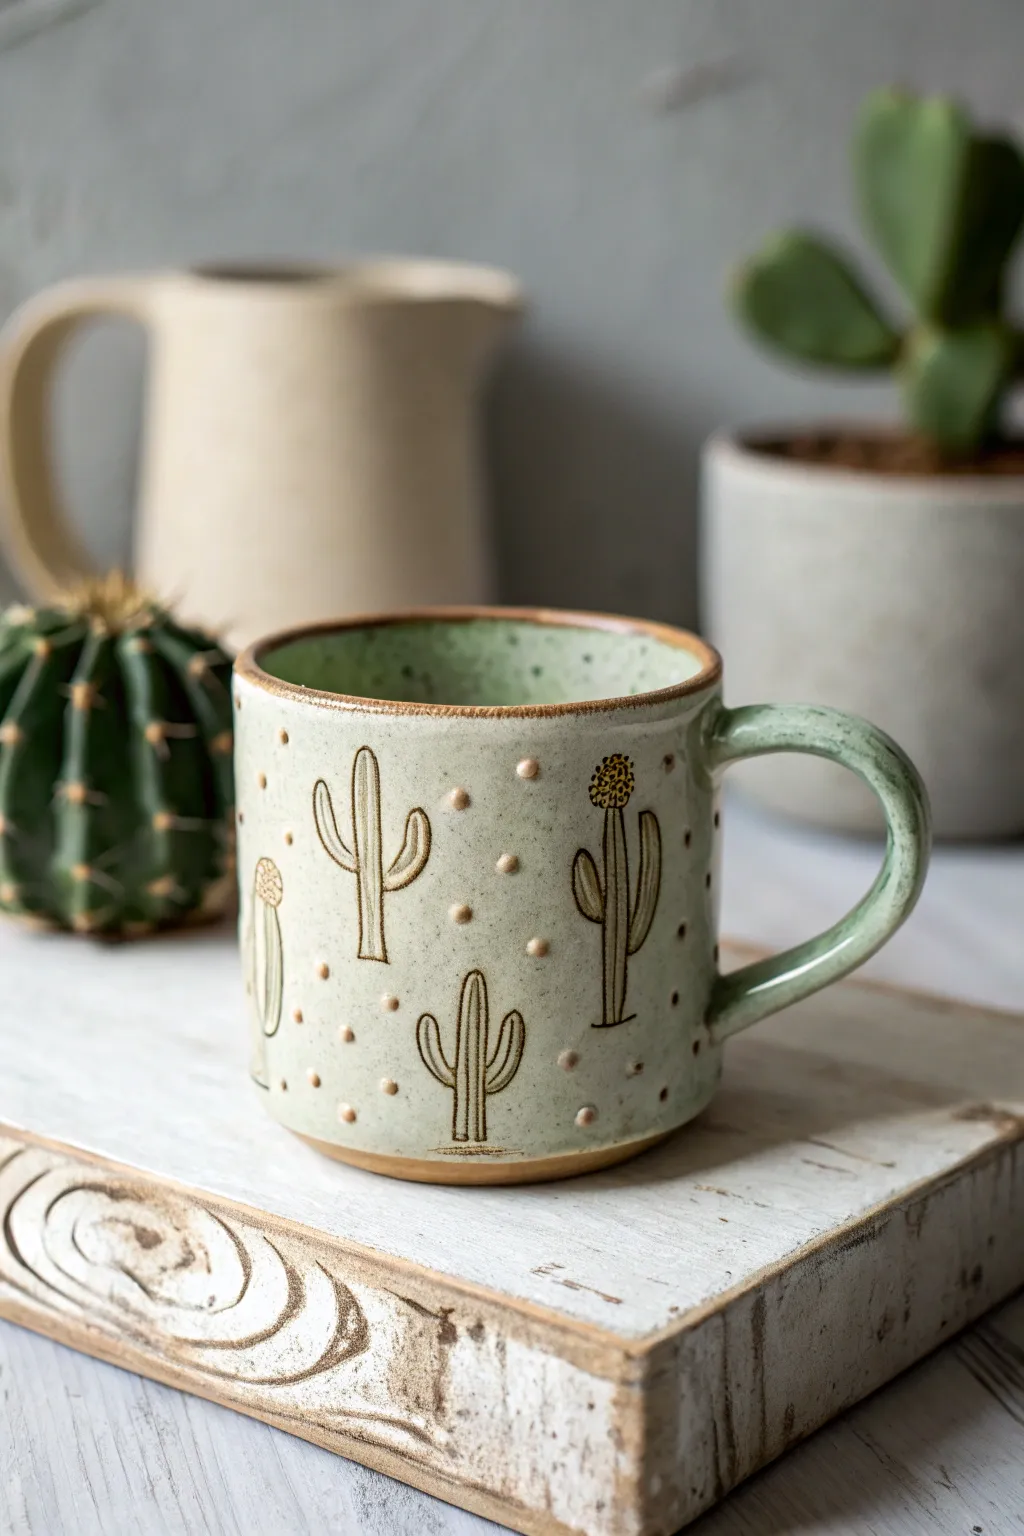
This charming handmade mug captures the essence of the Southwest with its soothing sage green glaze and whimsical cactus illustrations. By combining slab building with sgraffito carving techniques, you’ll create a functional piece of art that feels as warm and earthy as the desert landscape itself.
Step-by-Step Guide
Materials
- Stoneware clay (smooth body preferred)
- Rolling pin and guide strips (canvas covered)
- Rectangular template (approx. 12″ x 5″)
- Circular template (for base)
- Needle tool or fettling knife
- Serrated rib or scoring tool
- Slip (clay mixed with water)
- Sponge
- Loop tool or handling tool (for handle)
- Underglaze (dark brown or black)
- Speckled sage green glaze (semi-translucent)
- Fine-point carving tool or sgraffito tool
- Small paintbrush
- Wooden modeling tool
Step 1: Building the Form
-
Roll the slab:
Begin by rolling out a smooth slab of clay to an even thickness, about 1/4 inch. Using guide strips on either side of your rolling pin ensures the wall of your mug will be perfectly uniform. -
Cut the components:
Place your rectangular template on the slab and cut around it cleanly with a fettling knife. Don’t forget to cut out a circular base using your round template from the remaining clay. -
Bevel the edges:
On the short sides of your rectangle, cut a 45-degree angle (bevel) on opposite faces. This allows the clay to overlap seamlessly when you roll it into a cylinder. -
Score and slip:
Rough up the beveled edges with a serrated rib and apply a generous amount of slip. Carefully curve the slab into a cylinder, matching the beveled edges together. -
Secure the seam:
Press the seam firmly but gently. I like use a wooden tool on the inside and a rib on the outside to compress the joint until it disappears. -
Attach the base:
Score the bottom edge of your cylinder and the outer rim of your circular base. Apply slip, place the cylinder on top, and use a modeling tool to smooth the clay from the base up onto the wall to lock it in. -
Smooth the exterior:
Use a slightly damp sponge to wipe down the entire mug, softening any sharp edges at the rim and ensuring the surface is smooth specifically for the carving step later.
Clean Lines
If your carved lines look messy with clay burrs, don’t brush them away while wet! Wait until the clay is bone dry, then lightly rub with a stiff brush or finger.
Step 2: Adding the Handle
-
Pull or roll a handle:
Create a coil or pull a strap of clay for the handle. Aim for a thickness that feels comfortable to grip, tapering slightly if desired. -
Shape the curve:
Bend the clay into a ‘C’ or question mark shape and let it stiffen slightly on a table for about 15 minutes so it holds its form during attachment. -
Attach firmly:
Score and slip the attachment points on both the mug body and handle ends. Press them together firmly, blending the clay with a small wooden tool to ensure there are no cracks.
Make It Bloom
Add a pop of color by painting small yellow or pink flower buds on the tops of the cacti using underglaze before the bisque firing.
Step 3: Decoration & Glazing
-
Apply underglaze outlines:
Once the mug is leather hard, use a fine brush to paint the outlines of various cacti shapes—saguaro, barrel, and pear cactus—using dark brown underglaze. -
Carve the details (Sgraffito):
Using a sharp needle tool or sgraffito tool, gently scratch through the underglaze lines to refine the shapes. Carve vertical lines inside the cacti to represent the ribs. -
Add texture dots:
Take tiny bits of soft slip or very small balls of clay and adhere them to the surface between the cacti to create raised ‘polka dots’ or desert textural elements. -
Carve cactus spines:
With your finest tool, make tiny ticks or scratches along the vertical ribs of your cacti to look like needles. -
Initial firing (Bisque):
Allow the mug to bone dry completely (this usually takes several days) before firing it in the kiln to bisque temperature (Cone 04). -
Wax resist application:
Apply wax resist over your painted and carved cactus designs if you want the raw clay texture to show through, or simply proceed carefully with the glaze. -
Glaze application:
Dip the mug into a speckled sage green glaze. If you didn’t wax the designs, wipe the glaze gently off the raised texture dots and cactus drawings with a damp sponge so the dark underglaze shows through. -
Final firing:
Fire the mug a final time to the glaze maturity temperature (usually Cone 5 or 6 for stoneware) to melt the glaze into that glossy, speckled finish.
Now fill your beautiful desert-themed mug with favorite warm drink and enjoy the handmade comfort.
Bold Sgraffito Pattern Mug
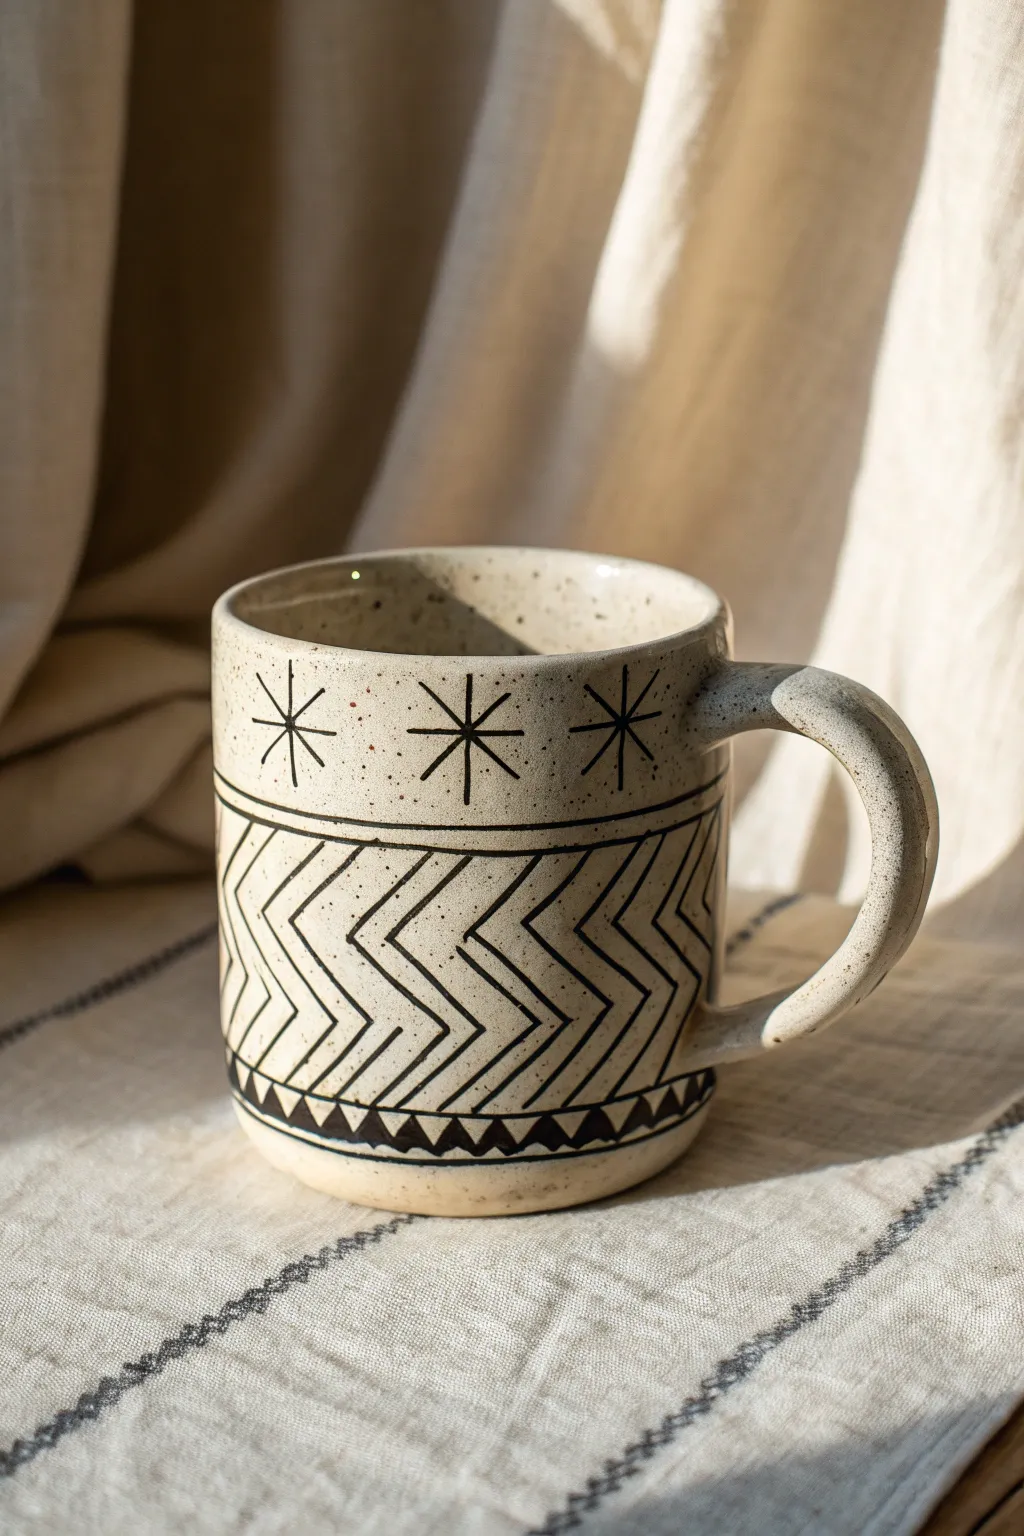
Master the art of sgraffito with this bold, graphic mug design that features striking chevron patterns and rustic starbursts. By carving through a layer of black underglaze, you’ll reveal the natural clay body beneath for a timeless, high-contrast look.
Step-by-Step
Materials
- Stoneware clay (speckled or buff)
- Black underglaze
- Clear transparent glaze
- Rolling pin and guide strips (optional)
- Needle tool
- Rib tool
- Loop carving tool (sgraffito tool)
- Sponge
- Slip
- Scoring tool (or serrated rib)
- Paintbrush (soft bristle)
Step 1: Building the Form
-
Roll the slab:
Start by rolling out a medium slab of stoneware clay to about 1/4 inch thickness. If you want that rustic speckle shown in the photo, choose a speckled buff clay body. -
Cut the rectangle:
Measure and cut a long rectangle that will become the body of your mug. A standard size is roughly 4 inches tall by 10-11 inches long. -
Texture the surface (optional):
If you want a smoother surface for carving, run a rib tool gently over the clay to compress it. For a handmade feel, leaving minor imperfections is perfectly fine. -
Form the cylinder:
Stand the rectangle up and curve it into a cylinder. Score the short ends thoroughly and apply a generous amount of slip. -
Join the seam:
Press the scored ends together firmly. Use your thumb or a wooden tool to smudge the clay across the seam on both the inside and outside until the join is invisible. -
Attach the base:
Roll a small circle for the base. Score and slip the bottom edge of your cylinder and the edge of the circle, then join them. Trim specific excess clay. -
Pull a handle:
Pull a strap of clay for the handle, tapering it slightly. Curve it into a ‘C’ shape and let it stiffen slightly on a table before attaching it. -
Attach the handle:
Score and slip the attachment points on the mug body and the handle. Press firm to attach, blending the clay into the body for a seamless connection.
Keep it Sharp
Sgraffito works best when clay is leather hard—like cheddar cheese firmness. If it’s too soft, lines get mushy; too dry, and the clay chips.
Step 2: Applying Sgraffito Design
-
Leather hard stage:
Allow the mug to dry slowly to a sturdy leather-hard stage. The clay should be firm enough to hold its shape but soft enough to carve into. -
Apply underglaze:
Paint a band of black underglaze around the bottom section and the top rim section where you plan to carve. I usually do 2-3 coats for solid opacity. -
Sketch the zones:
Using a very light touch with a needle tool, lightly scratch two horizontal lines around the mug to divide the design space into three sections: top stars, middle chevrons, bottom triangles. -
Carve the dividing lines:
Using a loop tool, carve firmly along those horizontal guidelines. You are removing the black underglaze (if applied there) or creating deep grooves to define the bands. -
Draw the stars:
In the top band, use a fine-point carving tool or needle tool to scratch in the starbursts. Draw a vertical line, a horizontal line, and two diagonal lines crossing in the center. -
Draft the zig-zags:
For the large middle section, lightly scratch a zig-zag guide line first. This ensures your chevrons will meet up correctly at the back. -
Carve the chevron pattern:
Fill the middle section with parallel chevron (zig-zag) lines. Carve deeply enough to create a physical texture, not just a surface mark. -
Add bottom details:
Along the very bottom edge, paint a solid band of black underglaze if you haven’t yet. Once dry, carve out small triangles to create a geometric border, leaving the black triangles raised. -
Clean up crumbs:
Use a large, soft dry brush to gently sweep away all the little clay crumbs (burrs) created by carving. Don’t use water or you’ll smudge the design.
Step 3: Finishing
-
Bisque fire:
Once bone dry, bisque fire the mug to Cone 04. This sets the shape and the underglaze. -
Clear glaze application:
Dip the entire mug into a clear transparent glaze. Alternatively, brush on three even coats of clear brushing glaze. -
Final wipe:
Wipe the very bottom (foot) of the mug with a damp sponge to remove any glaze so it doesn’t stick to the kiln shelf. -
Glaze fire:
Fire the mug to the maturity temperature of your clay body (likely Cone 5 or 6 for stoneware).
Smudged Lines?
If you accidentally smudge black underglaze onto the raw clay areas, simply scratch or scrape that top layer off with a clean ribbon tool to reveal fresh clay.
Enjoy sipping from your custom geometric mug, knowing the beautiful texture was carved by your own hand

TRACK YOUR CERAMIC JOURNEY
Capture glaze tests, firing details, and creative progress—all in one simple printable. Make your projects easier to repeat and improve.
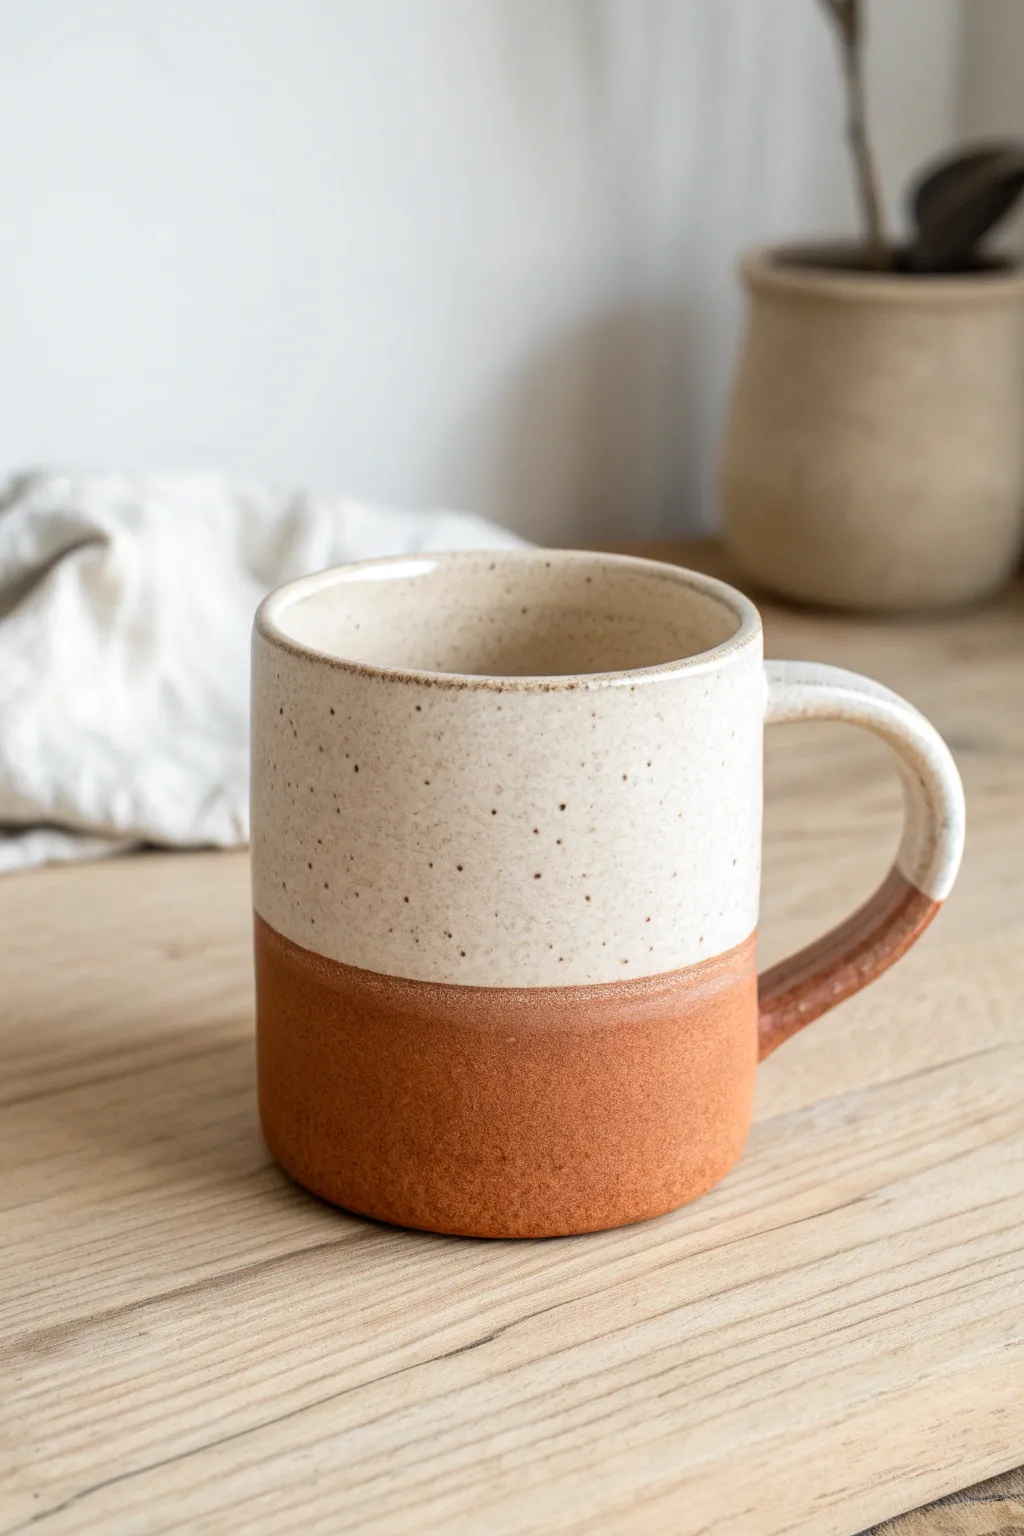
Personalized Initial Medallion Mug
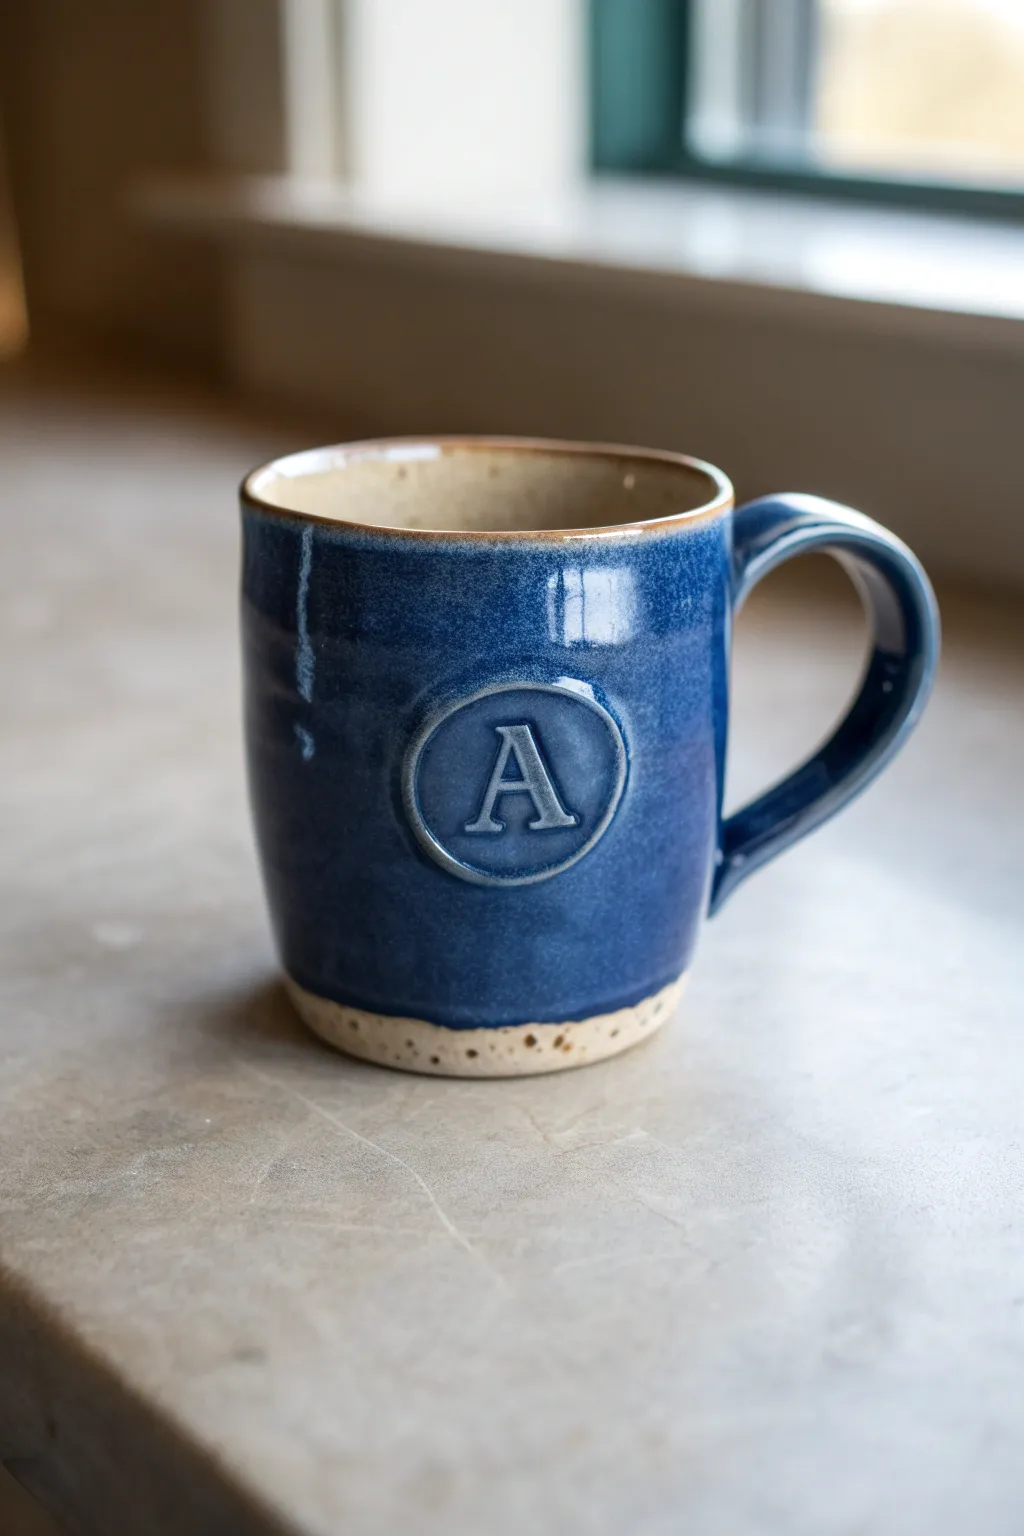
This project combines fundamental slab-building techniques with a touch of personalization to create a sturdy, professional-looking mug. The deep blue glossy glaze contrasts beautifully with the raw speckled clay foot, making the medallion focal point really pop.
Step-by-Step Guide
Materials
- Speckled stoneware clay body (cone 5 or 6)
- Rolling pin and guide strips (canvas covered)
- Rectangular template (approx 12×5 inches)
- Needle tool
- Fettling knife
- Score and slip tool (serrated rib)
- Clay slip
- Small round cookie cutter or bottle cap
- Alphabet stamp set (or carving tool)
- Wooden modeling tool
- Deep glossy blue glaze (food safe)
- Wax resist
- Sponge
Step 1: Forming the Main Cylinder
-
Roll the Slab:
Begin by rolling out your speckled clay on a canvas surface. Use guide strips to ensure an even thickness of about 1/4 inch across the entire slab. -
Cut to Size:
Lay your rectangular template over the slab. Using your fettling knife, cut out the main body of the mug, saving the excess clay for the handle and base. -
Bevel the Edges:
To create a seamless join, cut the short ends of your rectangle at a 45-degree angle in opposite directions so they will overlap perfectly when rolled. -
Form the Cylinder:
Score the beveled edges thoroughly and apply a generous amount of slip. Curl the clay into a cylinder and press the seam together firmly. -
Smooth the Seam:
Support the inside of the wall with one hand while using a wooden tool or rib on the outside to compress and smooth the seam until it disappears.
Crack Prevention
If your handle cracks away from the mug while drying, you likely attached wet clay to dry clay. Wrap the whole mug tightly in plastic for 2 days to equalize moisture.
Step 2: Adding the Base and Medallion
-
Cut the Floor:
Roll a small piece of clay for the base. Place your cylinder on top of it and trace around the bottom with a needle tool, then cut out the circle. -
Attach the Base:
Score and slip both the bottom edge of the cylinder and the edge of the base circle. Press them together firmly and use a wooden tool to blend the clay upward for a strong seal. -
Create the Medallion:
Roll a small scrap of clay slightly thinner than the mug wall. Use a small round cutter to punch out a perfect circle. -
Stamp the Initial:
Press your chosen letter stamp firmly into the center of the clay circle. If you don’t have stamps, you can carefully carve the letter with a needle tool. -
Attach the Medallion:
Score the back of the medallion and the spot on the mug wall where you want it to sit. Slip and press it on, then gently smooth the outer edge of the circle onto the mug so it looks integrated, not just stuck on.
Step 3: Handle and Finishing
-
Pull or Roll a Handle:
Create a strap for the handle. I prefer pulling the clay with water to align the particles, but you can also roll a coil and flatten it slightly. -
Shape the Curve:
Let the handle stiffen slightly into a ‘C’ shape before attaching. It should look large enough to fit two or three fingers comfortably. -
Attach the Handle:
Score and slip the attachment points on the mug and handle. Press firmly to join, blending the clay where it meets the body for structural integrity. -
Clean and Dry:
Use a damp sponge to smooth the rim and remove any sharp rough spots. Let the mug dry slowly under loose plastic to prevent the handle from cracking. -
Bisque Fire:
Fire the bone-dry mug in the kiln to cone 04/06 for the bisque firing.
Level Up: Rim Accent
After dipping in the blue glaze, dip the very top rim into a second, lighter glaze color (like white or oatmeal) to create a beautiful drippy reaction at the lip.
Step 4: Glazing
-
Wax the Foot:
Paint a line of wax resist about 1/2 inch up from the bottom of the mug and cover the entire bottom. This creates the raw clay look shown in the image. -
Dip and Pour:
Pour the glossy blue glaze into the inside of the mug, swirl, and pour out. Then, holding the mug by the waxed foot, dip the exterior into the glaze bucket. -
Check the Medallion:
Ensure the glaze pools slightly around the raised circle but doesn’t obscure the letter. You can gently rub the high points of the letter with a finger to thin the glaze there, highlighting the initial. -
Final Fire:
Fire the mug to maturity (likely cone 5 or 6 depending on your clay) to achieve that deep, melted glossy finish.
Enjoy using your custom mug for hot cocoa or gifting it to a friend
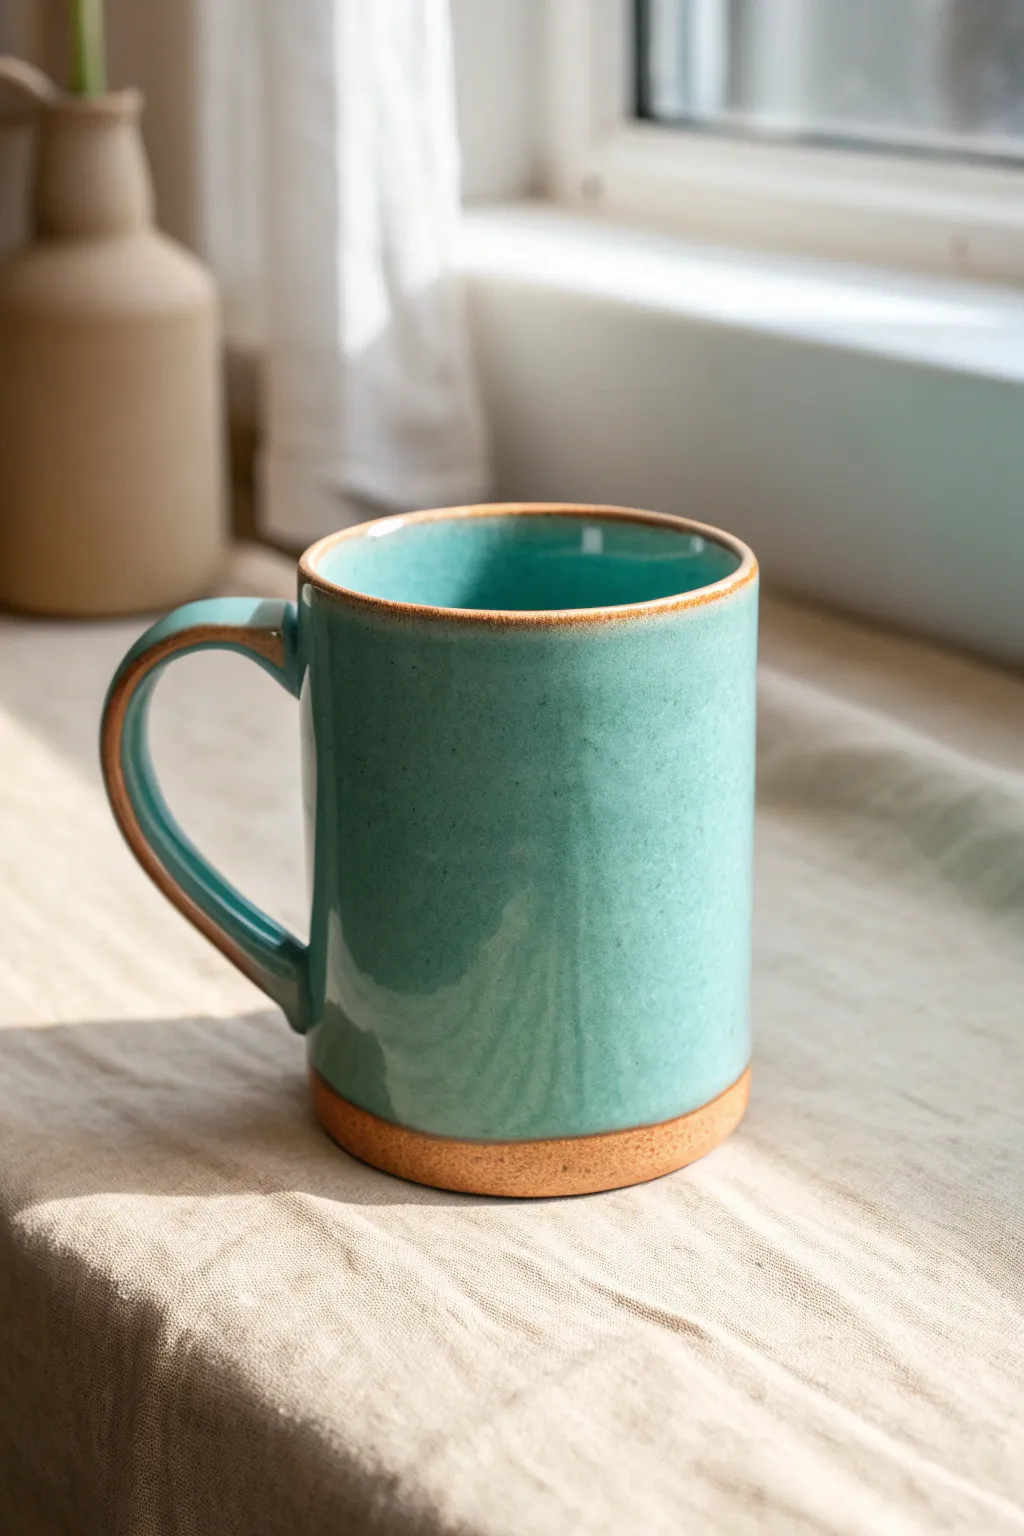
Simple Two-Color Glaze Mug
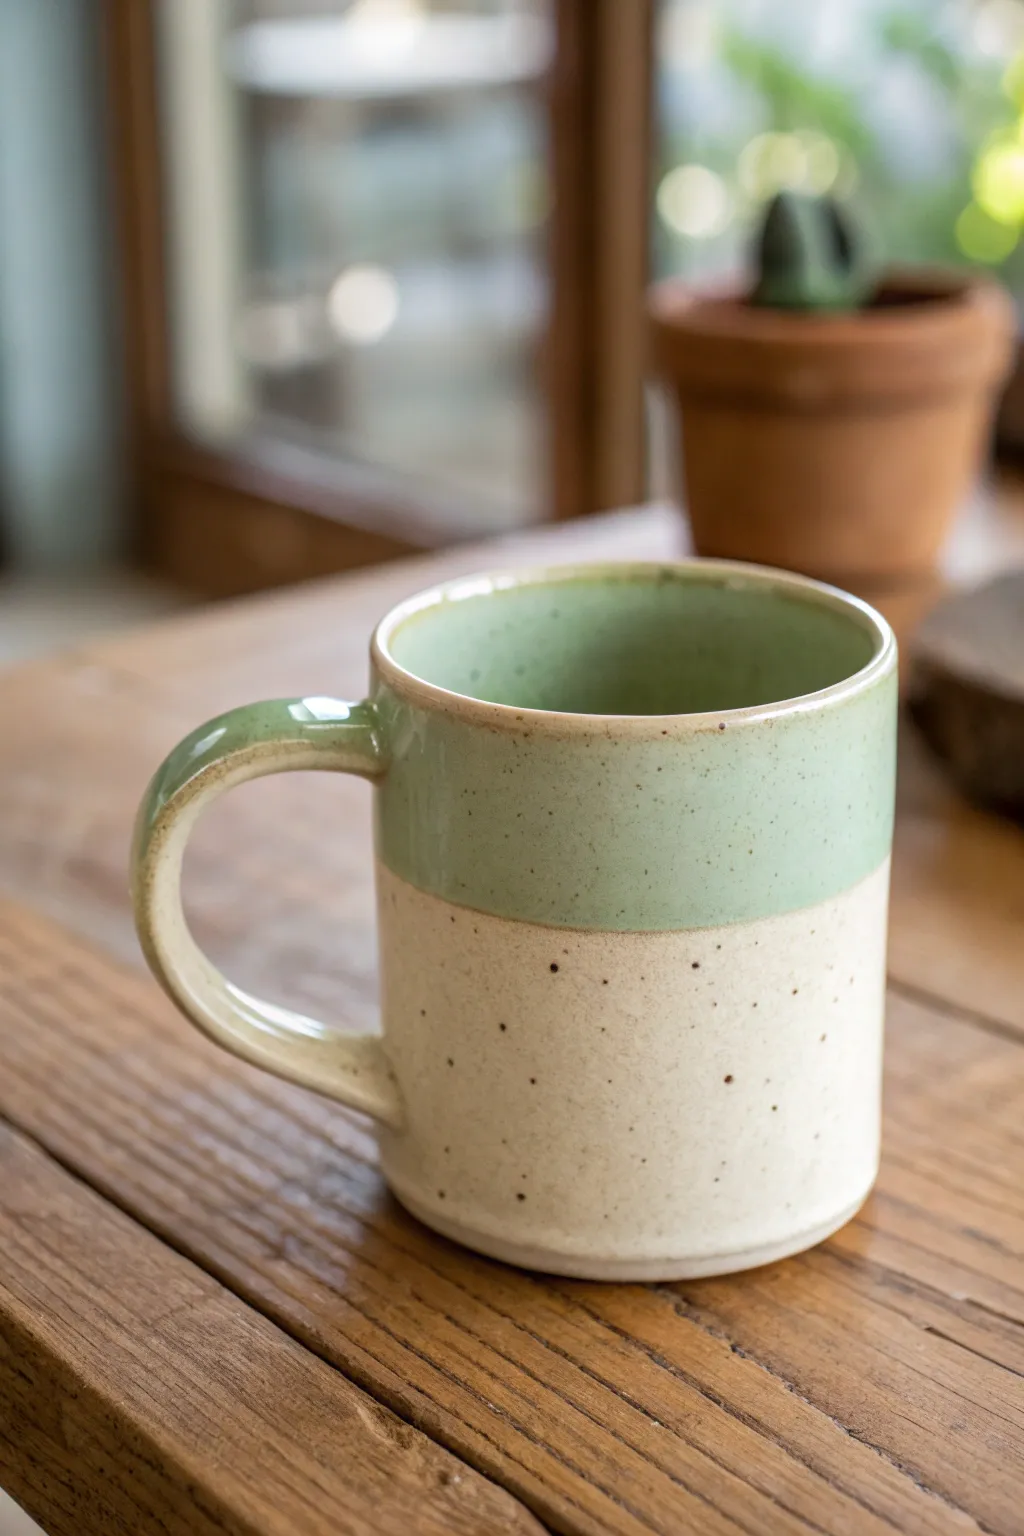
This project features a clean, straight-sided form that showcases the beauty of a simple two-color dip. The contrasting glossy mint green rim against the raw, speckled lower body creates a modern, earthy aesthetic perfect for any kitchen.
Step-by-Step
Materials
- Stoneware clay (speckled or buff)
- Pottery wheel (or slab roller/rolling pin for hand-building)
- Needle tool
- Wire cutter
- Rib tool (metal or wood)
- Sponge
- Trimming tools
- Scoring tool or fork
- Slip (clay and water slurry)
- Mint green glaze (glossy, semi-opaque)
- Clear glaze (optional, for the interior)
- Wax resist (liquid or crayon)
- Kiln
Step 1: Forming the Body
-
Center the clay:
Begin with about 1 pound of wedged speckled clay. Throw it forcefully onto the center of the wheel head and use wet hands to cone it up and down until it runs perfectly smooth and centered. -
Open the vessel:
Drill your thumbs into the center of the mound, leaving about a half-inch for the base. Pull the clay outward to establish a flat, wide floor for the mug. -
Pull the walls:
Using a steady pincer grip, pull the walls upward. Unlike a tapered cup, aim for a straight cylinder shape. Keep your pressure consistent to ensure the walls are an even thickness from bottom to top. -
Refine the shape:
Take a metal rib tool and hold it against the outside of the spinning cylinder while supporting the inside. This removes throwing lines and creates that perfectly smooth, straight profile seen in the photo. -
Smooth the rim:
Use a chamois or a tightly folded strip of plastic to compress the rim. It should be rounded and comfortable for drinking, not sharp. -
Cut:
Run a wire cutter under the base to release it, then carefully set the cylinder aside to leather-hard.
Clean Lines
Wait until the glaze is completely dry before removing any masking tape. Pull the tape away at an angle to prevent chipping the glaze edge.
Step 2: Handle & Trimming
-
Trim the foot:
Once the clay is stiff enough to handle without warping (leather-hard), center the mug upside down on the wheel. Trim away excess weight from the bottom and carve a shallow foot ring. -
Pull a handle:
Grab a separate lump of clay and pull a strap-like handle using plenty of water. The handle in the photo has a nice C-curve and is slightly tapered. Lay it on a board to stiffen into an arch. -
Attach the handle:
Score the mug body and handle ends where they will meet. Apply slip generously. Press the handle firmly onto the mug, starting at the top attachment point and then the bottom. -
Clean the distinct join:
Wipe away excess slip with a damp sponge or brush. Unlike pulled-from-the-pot handles, this style shows a distinct connection point, so smooth the seam but keep the handle defined. -
Slow drying:
Cover the mug loosely with plastic to ensure the handle and body dry at the same rate. This prevents cracking. Once bone dry, bisque fire the piece.
Go Geometric
Instead of a horizontal dip, try dipping the mug at a 45-degree angle for a diagonal glaze line, or do two dips in different colors that overlap.
Step 3: Glazing Technique
-
Clean the bisque:
Wipe the fired mug with a damp sponge to remove any kiln dust, which can cause glaze crawling. -
Wax the bottom:
Apply wax resist to the bottom foot ring and about 1/4 inch up the side if you want a very clean bottom edge. Let the wax dry completely. -
Glaze the interior:
Pour your chosen liner glaze (clear or the same mint green) into the mug, swirl it to coat the entire inside, and pour it out quickly. Wipe any drips off the rim immediately. -
Prepare the dip line:
This design relies on a crisp horizontal line. You can freehand the dip, or for precision, wrap masking tape firmly around the middle of the mug to act as a resist guide. -
Perform the exterior dip:
Hold the mug strictly by the base (or use a dipping tong). In one smooth motion, dip the mug upside down into the mint green glaze, stopping exactly halfway down the body. Hold for 3 seconds, then lift straight up. -
Clean the handle:
Notice how the handle is glazed only on the top half? Using a brush or sponge, carefully wipe away any glaze that dripped onto the lower part of the handle or the bare clay section of the body. -
Final check:
If you used tape, peel it off gently once the glaze is powdery dry. If the line is ragged, tidy it up by scraping softly with a fettling knife. -
Glaze fire:
Load the kiln, ensuring the unglazed bottom doesn’t touch the shelf. Fire to the maturity temperature of your clay and glaze (likely Cone 5 or 6 for stoneware).
Enjoy your morning coffee knowing you crafted this beautiful vessel by hand
Raised Polka Dot Candy Mug
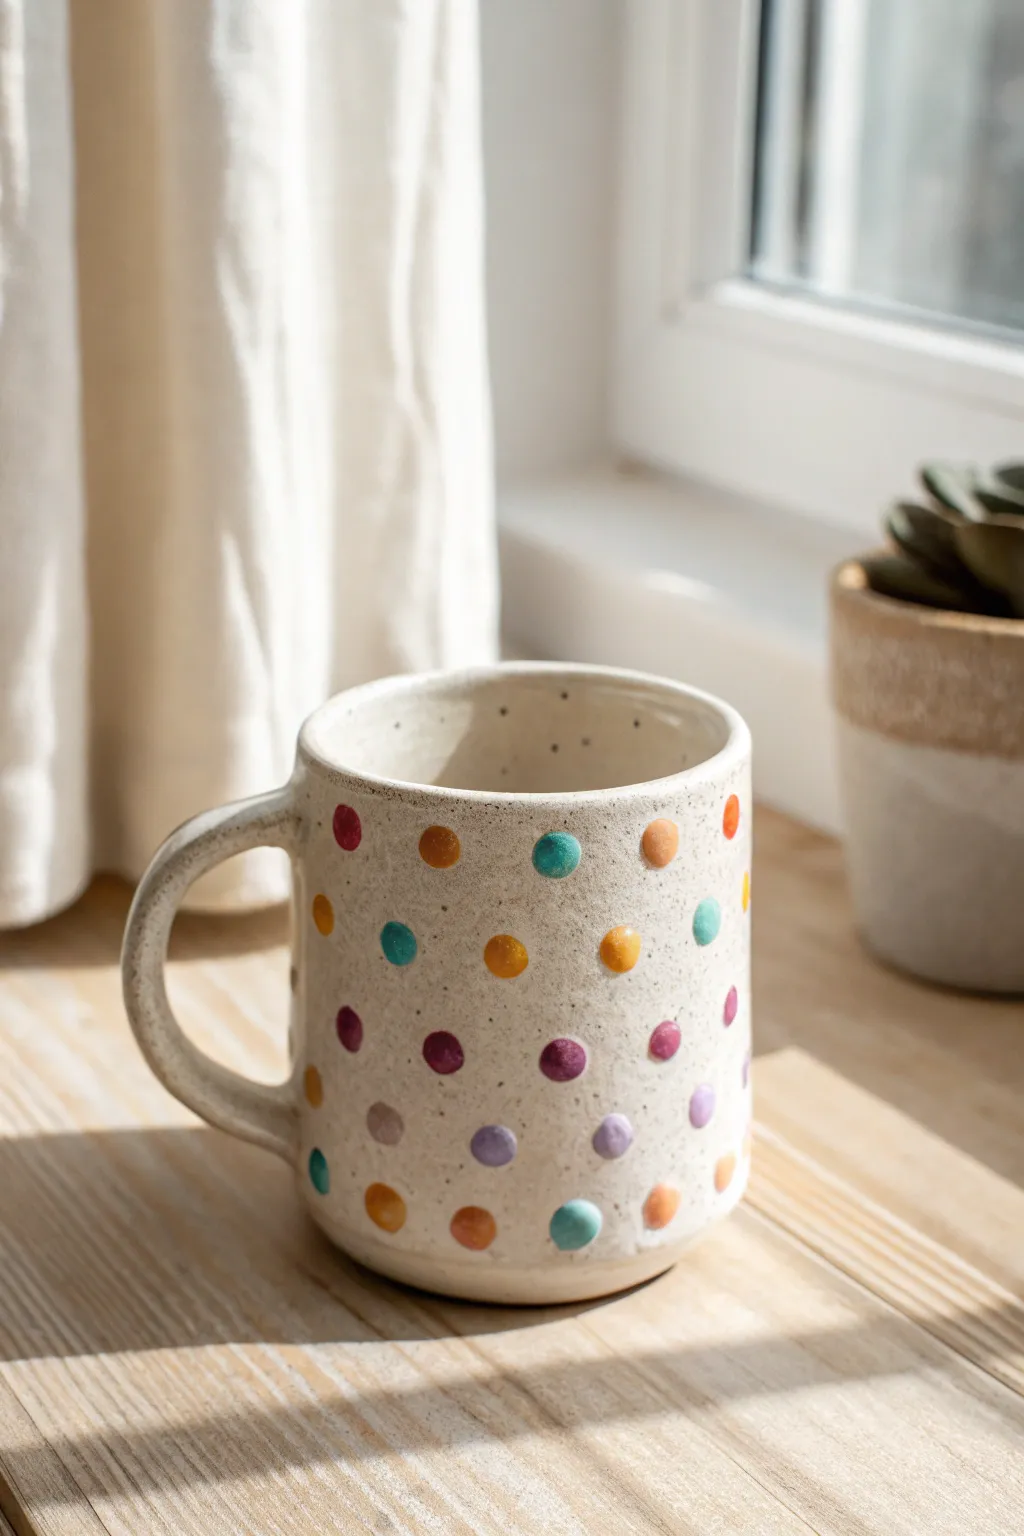
Brighten up your morning routine with this playful mug featuring raised, candy-like polka dots that add delightful texture and color. The speckled cream glaze gives it a cozy, handcrafted feel, while the colorful buttons pop with vibrant personality.
How-To Guide
Materials
- White stoneware clay body
- Rolling pin
- Two wooden guide slats (approx. 1/4 inch thick)
- Needle tool or fettling knife
- Rib tool (kidney shaped)
- Scoring tool (or fork)
- Slip (clay mixed with water)
- Sponge
- Underglaze colors (red, orange, yellow, pink, purple, teal, blue)
- Speckled cream or white glaze (food safe)
- Small round paintbrush
- Kiln
Step 1: Fomring the Mug Body
-
Prepare the slab:
Begin by wedging your white stoneware clay to remove air bubbles. Place the clay between two wooden guide slats and use your rolling pin to create a smooth, even slab about 1/4 inch thick. -
Cut the rectangle:
Using a ruler and your needle tool, measure and cut a rectangle from the slab. A good size for a standard mug is approximately 12 inches long by 4.5 inches tall, but you can adjust based on your desired mug size. -
Bevel the edges:
Carefully cut a 45-degree angle on the two shorter ends of your rectangle. Make sure the angles are cut in opposite directions so they will overlap seamlessly when rolled into a cylinder. -
Score and slip:
Rough up the beveled edges with your scoring tool and apply a generous amount of slip. This ‘glue’ is crucial for a strong bond that won’t crack during firing. -
Create the cylinder:
Gently curve the slab into a cylinder shape, pressing the scored ends together firmly. Support the wall from the inside with one hand while smoothing the seam on the outside with a rib tool. -
Add the base:
Roll out a small piece of leftover clay and place your cylinder on top of it. Trace around the bottom with a needle tool, then score and slip both contact surfaces before joining the floor to the walls.
Dots falling off?
If dots pop off as they dry, your clay was likely too dry when attaching. Use plenty of slip and score deeply. Only attach ‘wet’ clay to ‘leather hard’ clay.
Step 2: Adding the Handle and Details
-
Pull a handle:
Roll a coil or pull a traditional handle from a lug of clay. I find that letting the handle stiffen up for about 20 minutes before attaching it makes it much easier to shape properly. -
Attach the handle:
Score and slip the attachment points on both the mug and the handle. Press firmly to attach, blending the clay with your thumb or a modeling tool to ensure a secure connection. -
Smooth the lip:
Use a damp sponge (not soaking wet) to run over the rim of the mug. This ensures the drinking edge is rounded and comfortable for the user. -
Create the ‘candy’ dots:
Roll many tiny balls of clay, roughly the size of peas. You will need about 40-50 small spheres depending on how dense you want your pattern to be. -
Flatten the dots:
Gently press each clay ball onto a flat surface to flatten the back side, creating a small dome shape resembling a candy button. -
Attach the dots:
Score and slip the back of each dot and the spot on the mug where it will go. Press them onto the exterior surface in staggered rows or a random confetti pattern. -
Slow drying:
Cover the finished greenware loosely with plastic to let it dry slowly and evenly. This prevents the handle or dots from pulling away as the clay shrinks.
Pro Tip: Clean Rims
After glazing, always double-check the rim. If the glaze is too thick there, it can run or feel sharp. A quick wipe with a sponge ensures a smooth sip.
Step 3: Glazing and Finishing
-
Bisque fire:
Once bone dry, fire the mug in the kiln to cone 04 (or your clay body’s bisque temperature). -
Paint the dots:
Using a small brush, carefully paint each raised dot with underglaze. Use a variety of colors like teal, mustard, pink, and purple to mimic the look in the photo. Apply 2-3 coats for opacity. -
Wax resist (optional):
To keep the candy colors crisp, you can carefully dab a little wax resist over each painted dot. This prevents the top glaze from clouding the colors. -
Apply the main glaze:
Dip the entire mug into a clear or semi-opaque speckled cream glaze. If you didn’t use wax resist, gently wipe the glaze off the tops of the colored dots with a damp sponge. -
Final firing:
Fire the mug a second time to cone 5 or 6 (check your glaze and clay specifications) to vitrify the clay and melt the glaze into a smooth, glossy finish.
Enjoy sipping your favorite beverage from your new, cheerfully textured mug
Carved Wave Texture Ocean Mug
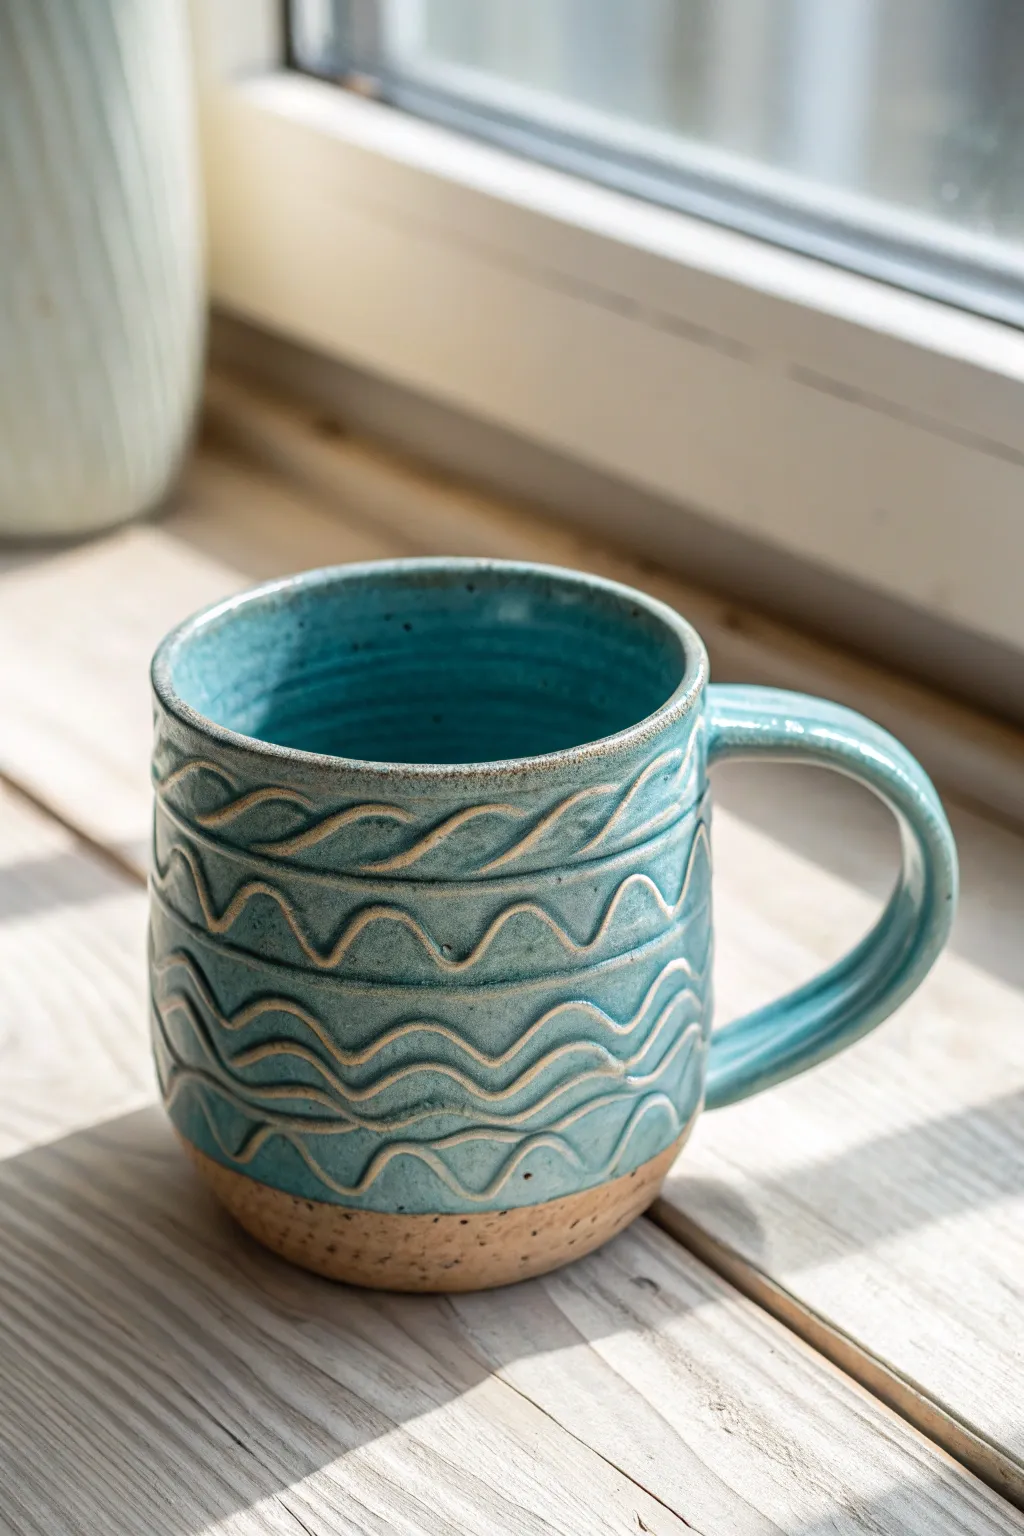
Capture the rhythm of the sea with this stunning slab-built mug featuring deeply carved wave patterns and a smooth turquoise glaze. The contrast between the glossy blue glaze and the raw, speckled clay base gives this piece a professional, coastal finish perfect for intermediate potters.
Step-by-Step Guide
Materials
- Speckled Stoneware Clay
- Rolling Pin and Thickness Strips (1/4 inch)
- Fettling Knife or Needle Tool
- Loop Tool or Sgraffito Tool (for carving)
- Scoring Tool or Serrated Rib
- Slip (clay and water slurry)
- Cylindrical Form or PVC pipe (for shaping)
- Sponge
- Turquoise/Teal Cone 5/6 Glaze
- Brush for glazing
Step 1: Slab Construction
-
Roll the Slab:
Begin by wedging your speckled stoneware clay to remove air bubbles. Roll it out into an even slab using your rolling pin and 1/4 inch thickness strips to ensure consistency. Use a rib tool to smooth the surface texture. -
Cut the Rectangle:
Measure and cut a rectangular strip approximately 4 inches high and 10-11 inches long (depending on your desired mug diameter) using a ruler and a fettling knife. Save the excess clay for the base and handle. -
Bevelling the Edges:
Cut the two short ends of your rectangle at a 45-degree angle. These beveled edges will overlap and join together to create a seamless cylinder wall. -
Connect the Cylinder:
Score the beveled edges aggressively and add slip. Wrap the slab around your cylindrical form or PVC pipe, overlap the scored ends, and press firmly to join them. Smooth the seam inside and out until it’s invisible. -
Attach the Base:
Place your cylinder on the remaining slab and trace a circle for the base. Cut out the circle, score and slip the bottom edge of the cylinder and the base, then join them. Use a modeling tool to blend the clay upwards from the base to the wall.
Step 2: Design and Handle
-
Shape the Handle:
Pull a strap of clay or roll a coil for the handle. Shape it into a ‘C’ or ear shape and let it set up until it’s firm enough to hold its shape but soft enough to attach. -
Attach the Handle:
Score and slip the attachment points on the mug and the handle. Press the handle firmly onto the mug body, blending the clay at the joints for a strong connection. Check that the handle is aligned vertically. -
Initial Surface Outline:
Lightly sketch your wave pattern onto the leather-hard cylinder using a needle tool. Create oscillating, horizontal wavy lines that wrap around the entire form. -
Carving the Texture:
This is my favorite part—using a loop tool, carefully carve out the clay following your sketched lines. Vary the depth slightly to create a ripple effect, but be careful not to carve too thin. -
Refining the Rim:
Use a damp chamois or sponge to smooth the rim of the mug. It should be rounded and comfortable for drinking. -
Slow Drying:
Cover the mug loosely with plastic to let it dry slowly to the bone-dry stage. This helps prevent the handle from cracking as the clay shrinks.
Glaze Crawling?
If glaze pulls away from carved spots, you likely have dust in the grooves. Wipe bisque ware thoroughly with a damp sponge before glazing to ensure adhesion.
Step 3: Glazing and Finishing
-
Bisque Fire:
Fire the mug in a kiln to bisque temperature (usually Cone 04). Once cool, wipe the bisque ware with a damp sponge to remove any dust. -
Wax the Base:
Apply a coat of liquid wax resist to the bottom inch of the mug (the ‘foot’) and the underside. This creates the raw clay look shown in the image and prevents glaze from adhering where you don’t want it. -
Glaze Application:
Dip the mug or brush on your turquoise glaze. If brushing, I usually apply 3 coats, letting each dry in between. The glaze should fill the carved grooves, which will create darker pools of color in the kiln. -
Wipe the Line:
If your wax resist wasn’t perfect, use a damp sponge to wipe a clean line around the bottom so the glaze stops neatly above the raw clay base. -
Glaze Fire:
Place the mug in the kiln for the final glaze firing (Cone 5 or 6, depending on your clay and glaze). The heat will melt the glaze, highlighting the beautiful texture you carved.
Level Up: Oxide Wash
Before glazing, wipe a dark oxide (like iron oxide) into the carved lines and sponge off the high points. This adds dramatic depth beneath the blue glaze.
Enjoy your morning beverage in a mug that carries the spirit of the ocean
Patchwork Texture Tile Mug
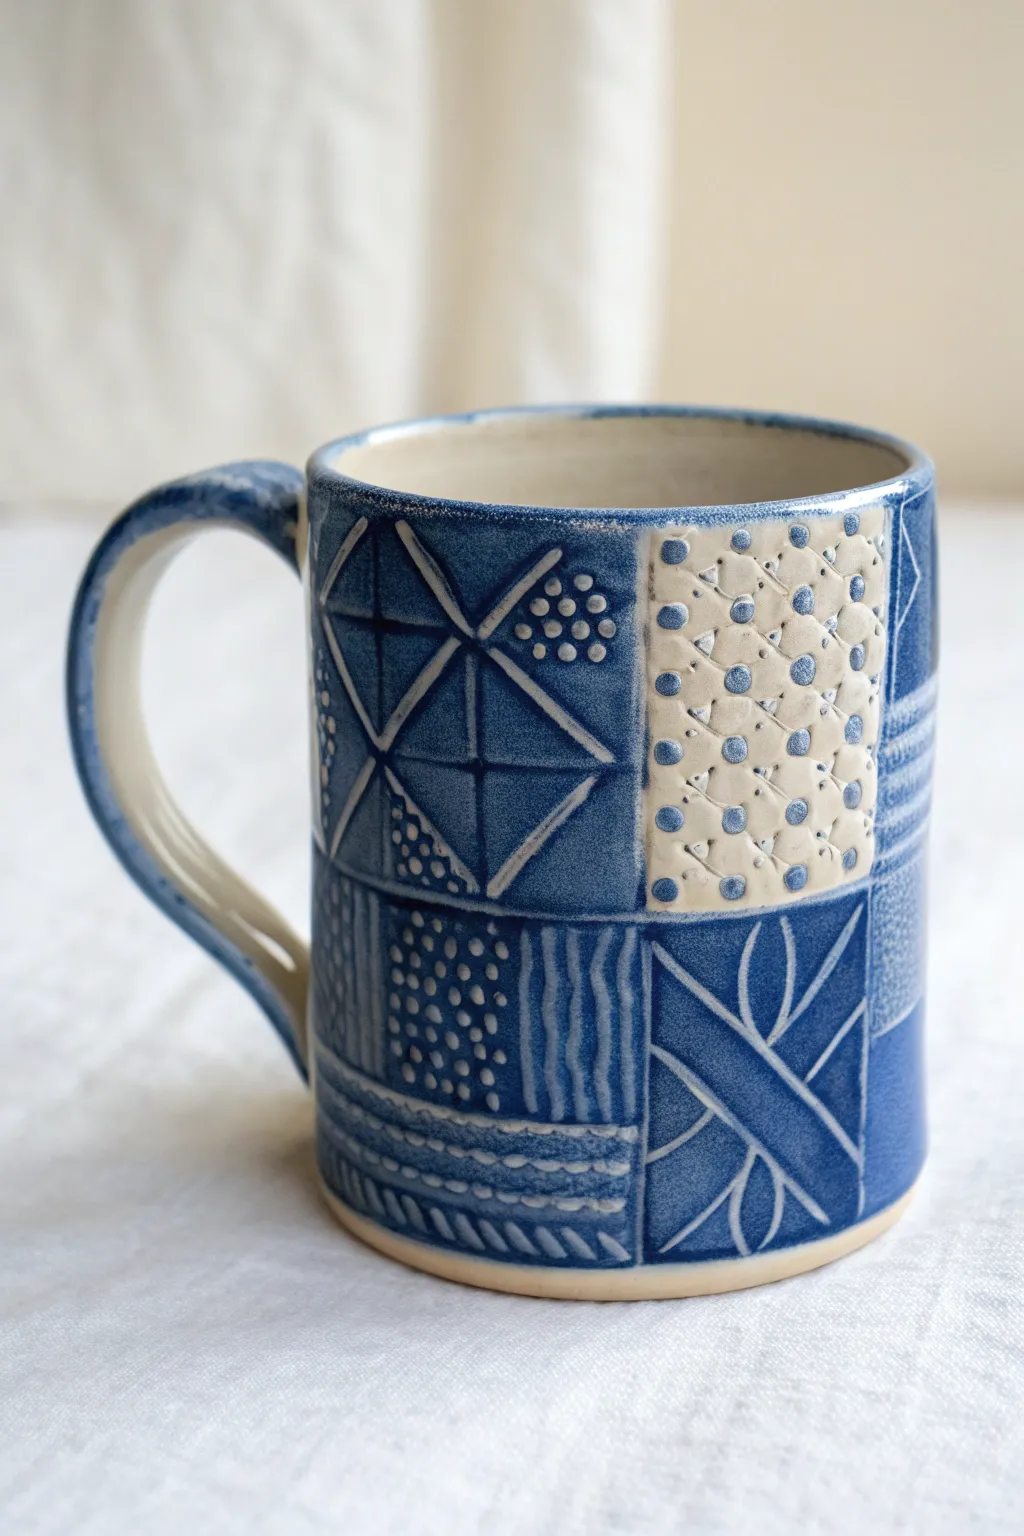
This project combines slab building with surface design to create a deeply textured, tactile mug that feels like a cozy quilt. By dividing the surface into squares and rectangles, you can explore various geometric patterns using sgraffito or stamping techniques, all unified by a classic blue and white glaze scheme.
Step-by-Step Tutorial
Materials
- Stoneware clay
- Rolling pin
- Canvas mat or cloth
- Mug template (rectangular slab)
- Ruler
- Pin tool or needle tool
- Fettling knife
- Scoring rib or serrated rib
- Slip (clay and water mixture)
- Wooden sculpting tool
- Loop tool (small)
- Dark blue underglaze
- Clear transparent glaze
- Small sponge
- Paintbrushes
- Various texture tools (stamps, pen caps, fabric)
Step 1: Building the Form
-
Roll the Slab:
Begin by rolling out a wedge of clay on your canvas mat until it is about 1/4 inch thick. Aim for an even thickness throughout to ensure your mug wall is sturdy but elegant. -
Cut the Shape:
Place your rectangular template onto the slab. Using your fettling knife, cut around the template to get the main body of the mug. Save the excess clay for the base and handle. -
Form the Cylinder:
Gently curve the slab rectangle into a cylinder. Be careful not to crack the clay; if it feels stiff, you might need to dampen it slightly with a sponge. -
Join the Seam:
Score the short ends of the rectangle where they will meet. Apply slip, overlap the edges slightly, and press them firmly together. Use a wooden tool to blend the seam inside and out until it is invisible. -
Add the Base:
Roll a small piece of clay for the base. Place your cylinder on top of it and trace around the bottom with a needle tool. Score and slip both the bottom edge of the cylinder and the new base circle, then attach them securely.
Uneven Walls?
If your cylinder is wobbling or looks oval, stuff the inside lightly with crumpled newspaper while you work on the outside. This supports the shape while you press and carve.
Step 2: Designing the Patchwork
-
Map the Grid:
Using a ruler and a needle tool, lightly scratch a grid of squares and rectangles onto the surface of your leather-hard mug. This doesn’t need to be perfectly symmetrical; a mix of sizes adds visual interest. -
Create Texture Zones:
Select a few squares to be deeply textured. Press stamps, fabric, or found objects (like the end of a marker) into the clay to create raised dots or patterns. Leave other squares smooth for now. -
Attach the Handle:
Pull or roll a strap of clay for the handle. Shape it into a curve that fits your hand comfortably. Score and slip the attachment points on the mug and handle, then press it on firmly, blending the clay to smooth the connection. -
Bisque Fire:
Let the mug dry slowly under plastic for a day, then uncover until bone dry. Fire the piece to bisque temperature (usually Cone 04) in the kiln.
Level Up: Pattern Play
Try alternating positive and negative space. In one square, carve thin white lines on blue. In the next, carve away most of the blue to leave thin blue lines on white.
Step 3: Glazing and Sgraffito
-
Apply Underglaze:
Paint 2-3 coats of dark blue underglaze over the entire exterior of the mug. Ensure you get the underglaze into all the stamped textures you created earlier. -
Carve the Designs:
Once the underglaze is dry to the touch, use a small loop tool or sgraffito tool to carve through the blue layer. Carve geometric lines, Xs, and triangles into the smooth squares to reveal the white clay body underneath. -
Reveal the Texture:
For the stamped/textured squares, use a damp sponge to wipe away the surface underglaze gently. This technique, called mishima or inlay, leaves the blue color deep in the recesses while revealing the high points of the texture. -
Glaze the Interior:
Pour clear glaze or a simple white liner glaze into the inside of the mug. Swirl it around to coat completely and pour out the excess. -
Seal the Exterior:
Apply a coat of clear transparent glaze over the entire outside of the mug. This seals the underglaze and makes the surface food-safe and shiny. -
Final Fire:
Place the mug in the kiln for the final glaze firing (temperature depends on your specific clay and glaze, often Cone 5 or 6).
Once fired, fill your new geometric masterpiece with hot cocoa and enjoy the tactile experience of your handmade art.
Tri-Foot Base Adventure Mug
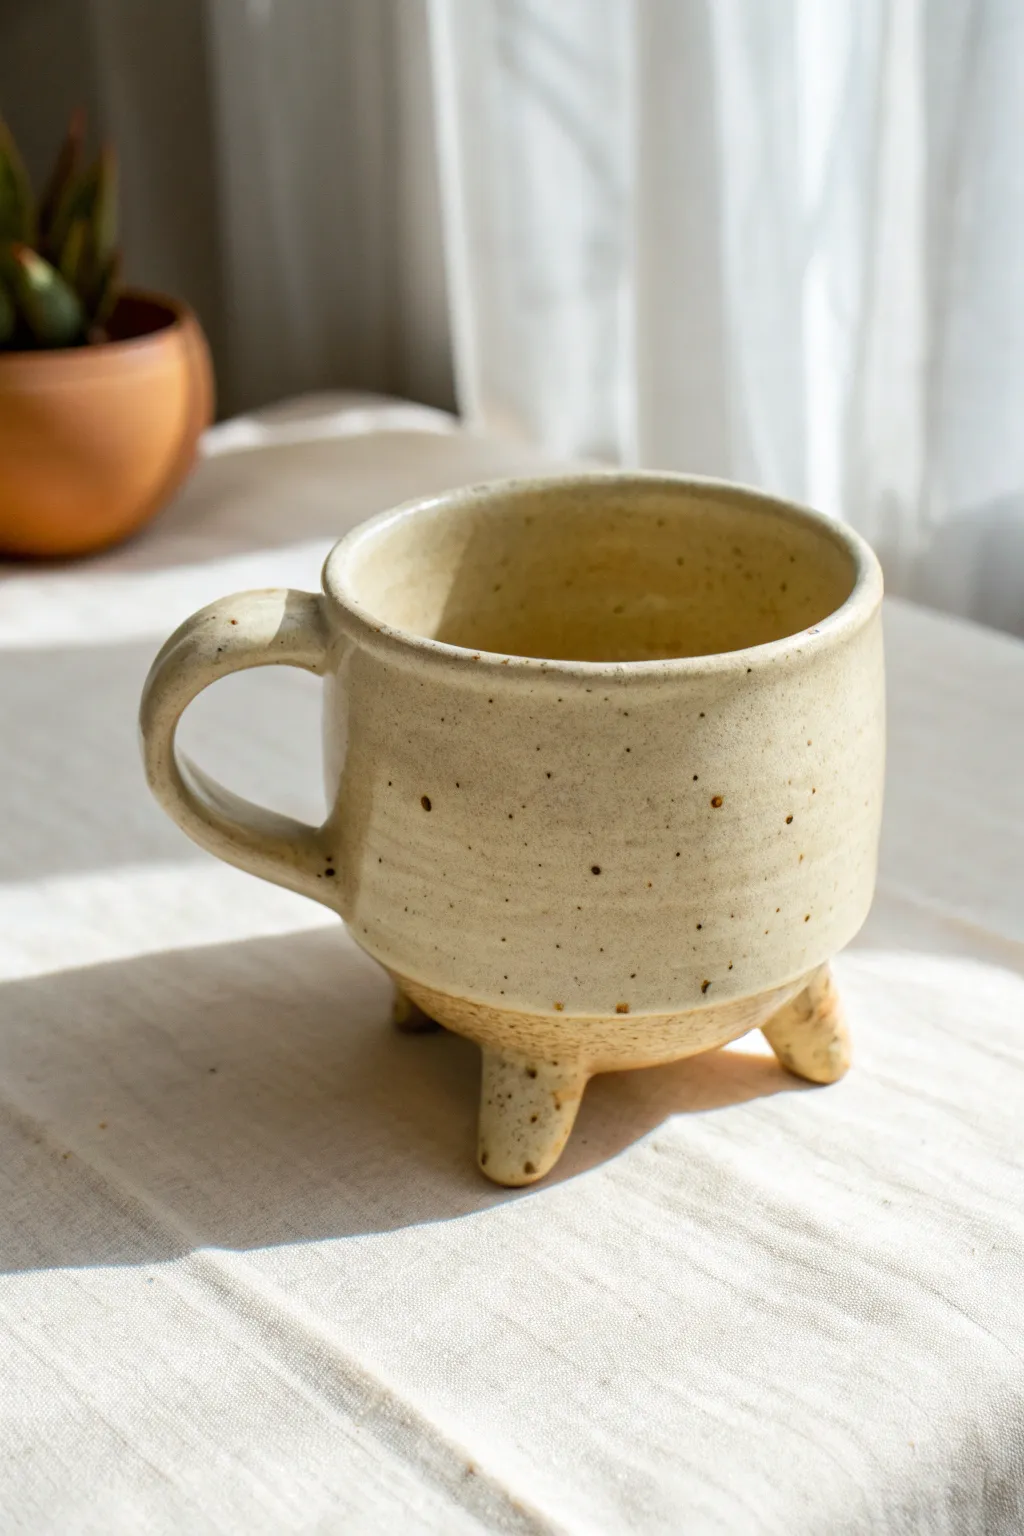
Elevate your standard pinch pot mug—literally—by adding a whimsical tripod base that gives the piece a distinctive silhouette and personality. This project combines simple hand-building techniques with a speckled glaze finish to create a sturdy, functional vessel that looks as good as it feels to hold.
Detailed Instructions
Materials
- Stoneware clay (speckled or buff)
- Small rolling pin
- Fettling knife
- Serrated rib or scoring tool
- Slip (clay mixed with water)
- Wooden modeling tool
- Sponge
- Speckled cream or oatmeal glaze
- Kiln
Step 1: Forming the Body
-
Prepare the Clay:
Start with a ball of well-wedged clay about the size of a large orange. Pat it into a smooth sphere to remove any major irregularities. -
Open the Pinch Pot:
Push your thumb into the center of the ball, stopping about a half-inch from the bottom. This thicker bottom is crucial because we will be attaching feet later. -
Shape the Walls:
Gently pinch and rotate the clay, working from the bottom up. Aim for an even wall thickness of about 1/4 inch. Keep the shape fairly cylindrical but allow the belly to round out slightly for that cozy look. -
Smooth the Rim:
Once you have your desired height, use a damp sponge to compress and smooth the rim. A rounded rim is much more pleasant to drink from than a sharp one.
Wobbly Mug?
If the mug rocks after adding feet, place a small wooden board on top of the rim while the clay is soft. Check level, then gently press down to force all three feet to touch the table evenly.
Step 2: Creating the Footer Feet
-
Form the Feet:
Roll three small balls of clay, each about the size of a large grape or hazelnut. Tap them slightly on the table to flatten one side. -
Mark the Placement:
Flip your pinch pot upside down. Gently mark three spots in a triangle formation on the base where you want the feet to sit. Ensure they are spaced evenly for stability. -
Score and Slip:
Using your serrated rib, deeply score the marked spots on the mug and the flat side of your clay feet. Apply a generous dab of slip to both surfaces. -
Attach and Secure:
Press the feet firmly onto the base. Use a modeling tool to blend the clay from the feet onto the mug body, ensuring there are no seams left behind. -
Level the Mug:
Flip the mug right-side up and gently tap it on the table. This pressure ensures the feet are level and the mug won’t wobble.
Texture Time
Before the clay dries, gently press a piece of canvas or burlap against the outside walls. The glaze will break beautifully over this subtle texture, highlighting the speckles even more.
Step 3: Handle and Finishing
-
Pull a Handle:
Roll a thick coil or pull a strap of clay for the handle. For this style, I find a slightly thicker, C-shaped handle balances the visual weight of the feet perfectly. -
Attach the Handle:
Score and slip the attachment points on both the mug and the handle. Press firm to attach, smooth the seams with a tool or your thumb, and clean up excess slip with a damp sponge. -
Slow Dry:
Cover the mug loosely with plastic to let it dry slowly to the leather-hard stage, then uncover to bone dry. This prevents the handle or feet from cracking away from the body. -
Bisque Fire:
Fire the bone-dry mug in the kiln to cone 04 (or your clay body’s bisque temperature). -
Wax the Feet:
Before glazing, carefully apply wax resist to the bottom of the three feet. This stops the glaze from sticking to the kiln shelf. -
Glaze Application:
Pour a speckled cream or oatmeal glaze inside the mug, roll it around to coat, and pour out the excess. Then, dip the outside of the mug into the glaze bucket. -
Clean Up:
Use a sponge to wipe any stray glaze off the very bottom of the feet where you applied wax. -
Final Fire:
Glaze fire the piece to the recommended temperature for your clay and glaze combination (usually cone 5 or 6 for stoneware).
Now you have a charming, footed mug ready for your favorite warm beverage
Faceted Gem-Style Slab Mug
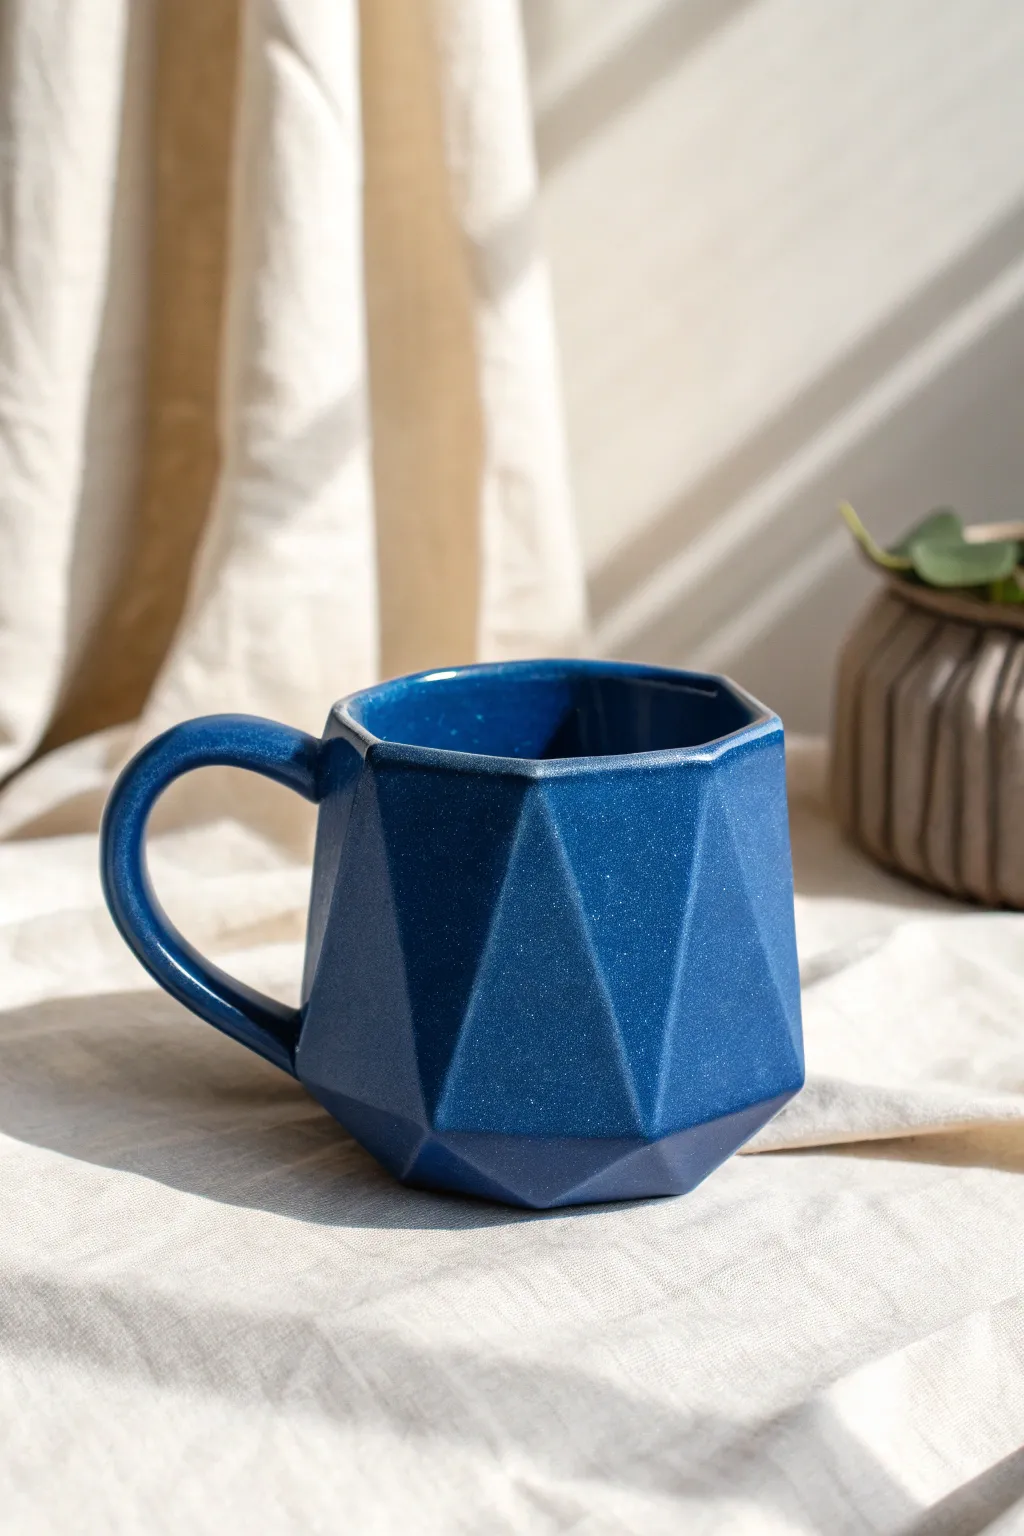
Ditch the traditional cylinder and create a striking, faceted mug that looks like a polished gemstone. This project uses precise slab building techniques to construct a modern, angular vessel that feels satisfyingly chunky in your hand.
Step-by-Step
Materials
- Stoneware clay (smooth body recommended)
- Template (paper or cardstock)
- Rolling pin
- Slab sticks (1/4 inch thickness)
- Fettling knife or X-Acto tool
- Scoring tool or serrated rib
- Slip (clay and water mixture)
- Smooth work surface (canvas or ware board)
- Sponge
- Paintbrush for glazing
- Dark blue speckled glaze (glossy)
Step 1: Preparing the Slabs and Templates
-
Design your template:
Before touching clay, sketch a pattern of triangles on paper. You will need a strip of these triangles that connect edge-to-edge to form the wall of the mug, plus a hexagon or octagon shape for the base that matches the width of your wall sections. -
Roll the slab:
Roll out a smooth, even slab of clay using your rolling pin and guide sticks. Aim for a consistent 1/4-inch thickness; you want it sturdy enough to hold the sharp angles without collapsing. -
Smooth the surface:
Compress the slab on both sides with a damp sponge or a soft rib. I find this step crucial because it removes canvas texture and aligns the clay particles to prevent warping later. -
Cut the shapes:
Lay your paper templates gently onto the clay. Using your fettling knife, cut out the main wall strip and the geometric base. Keep your knife perpendicular to the table for straight, clean edges.
Sagging Walls?
If your geometric walls are flopping over, the clay is too wet. Let your slabs stiffen up to ‘soft leather hard’ before assembling so they can support their own weight.
Step 2: Assembling the Form
-
Bevel the edges:
For the sharpest corners, cut a 45-degree bevel on the short vertical ends of your wall strip where they will join together to form a loop. -
Score the clay:
Rough up the edges you plan to join—specifically the vertical seam of the wall and the entire bottom edge—using your scoring tool. -
Apply slip:
Dab a generous amount of slip onto all scored areas. It acts as the glue that will bond your geometric walls together. -
Form the walls:
Stand the wall strip up and curve it around to meet itself. Press the beveled ends firmly together to create the main faceted cylinder shape. -
Attach the base:
Score the top of your geometric base piece and place the wall cylinder on top of it. Press down gently to secure the connection. -
Reinforce the seams:
On the inside of the mug, roll a tiny coil of clay and press it into the bottom seam where the wall meets the floor. Smooth it out completely so it becomes invisible.
Define the Shine
Use a metal rib to gently scrape the flat planes of the mug before firing. This burnishing effect makes the facets ultra-smooth and helps the glaze break beautifully over the edges.
Step 3: Refining and Handle
-
Sharpen the facets:
Use a flat tool or a paddle to gently tap the exterior planes of the mug. This emphasizes the ‘gem’ look by sharpening the creases between the triangular sections. -
Pull a handle:
Pull a traditional handle form from a carrot-sized lump of clay. Alternatively, roll a coil and flatten it slightly for a more modern look that matches the mug’s aesthetic. -
Shape the ear:
Bend the handle into a ‘C’ or ear shape and let it stiffen slightly on the table until it can hold its own curve. -
Attach the handle:
Score and slip the attachment points on both the handle and the mug wall. Press firmly to attach, ensuring the handle is straight. -
Clean up:
Wipe down the rim with a damp sponge to make it comfortable for drinking. Smooth away any rough slip gobs around the handle joints.
Step 4: Glazing
-
Bisque fire:
After the mug is bone dry, load it into the kiln for a bisque firing. -
Wax the bottom:
Apply wax resist to the bottom of the mug to prevent glaze from fusing it to the kiln shelf. -
Apply glaze:
Dip the mug or brush on a deep, speckled blue glaze. A glossy finish works best here as it catches the light on the different facets, enhancing the gem effect. -
Glaze fire:
Fire the mug a final time according to your clay and glaze temperature instructions.
Now you have a stunning, modern mug ready for your favorite hot drink
Optical Illusion Line Mug
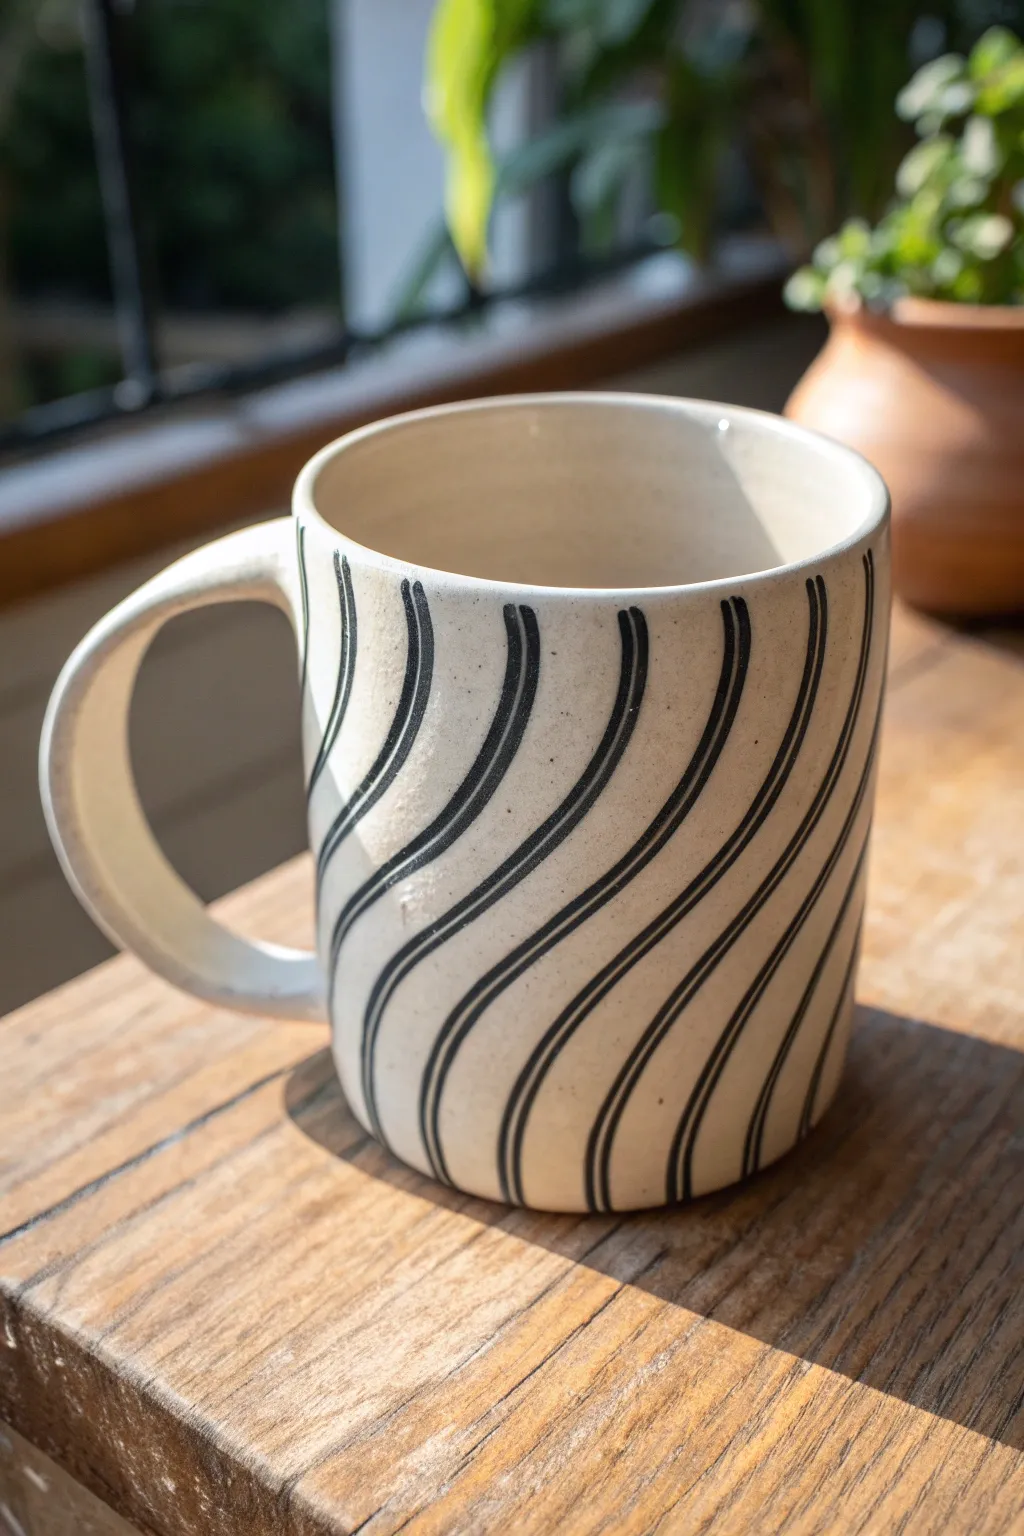
Create a sense of movement on your clay vessel with this optical illusion design featuring rhythmic, wavy black lines. This project combines simple hand-building or wheel-throwing techniques with bold, graphic surface decoration to make a mug that looks like it’s twisting in space.
Step-by-Step Guide
Materials
- Stoneware clay of choice
- Pottery wheel (optional)
- Rolling pin and guide strips (if hand-building)
- Fettling knife
- Serrated rib and smoothing rib
- Scoring tool
- Slip
- Black underglaze
- Small round paintbrush (size 2 or 4)
- Clear transparent glaze
- Sponge
Step 1: Forming the Mug Body
-
Choose your method:
You can either throw a cylinder on the wheel or slab-build one. If hand-building, roll out a 1/4 inch thick slab of clay. -
Cut the slab:
Cut a rectangle roughly 10 inches long by 4 inches high for a standard mug size, plus a circle for the base. -
Join the walls:
Score and slip the short edges of the rectangle, then curve them together to form a cylinder. Smooth the seam thoroughly inside and out so it disappears. -
Attach the base:
Score and slip the bottom of your cylinder and the edge of your base circle. Press them together firmly and blend the clay using a modeling tool or your finger to ensure a watertight seal. -
Refine the shape:
Use a damp sponge or a smooth rib to clean up the rim and walls. Aim for a slightly straight-walled profile, as this makes the optical illusion effect more pronounced later.
Steady Hands Pro-Tip
Can’t get smooth curves? Rest your painting elbow on the table and place the mug on a banding wheel. Spin the wheel slowly while holding your brush still against the clay.
Step 2: Adding the Handle
-
Pull or roll a handle:
Create a coil or pull a strap of clay for the handle. For this distinctive look, form a ‘C’ shape that is thick at the attachment points and tapers comfortably in the middle. -
Dry to leather hard:
Allow both your mug body and handle to stiffen to a leather-hard state. This is crucial—if the clay is too wet, the mug will warp when you attach the handle. -
Attach the handle:
Score and slip the contact points on both the mug and handle. Press the handle firmly onto the side of the mug, blending the clay into the body for a seamless connection.
Step 3: Painting the Illusion
-
Clean the surface:
Wipe the entire mug with a slightly damp sponge to remove any dust or grog, creating a smooth canvas for your painting. -
Start the first wave:
Using a small round brush and black underglaze, paint a single, diagonal S-curve starting from the top rim and sweeping down to the bottom. Keep your wrist loose to get a fluid line. -
Establish the pattern:
Paint a second line parallel to the first one. Spacing is key here; leave about a finger’s width of the raw clay showing between the lines. -
Continue the rhythm:
Work your way around the mug, adding parallel curved lines. I like to rotate the banding wheel slowly while painting to help maintain the momentum of the curves. -
Adjust line thickness:
Notice how the lines in the example aren’t perfectly uniform? Varying the pressure on your brush slightly creates organic thickness, which adds to the handmade charm. -
Navigate the handle:
When you reach the handle, continue the lines as if they pass underneath it. Paint carefully around the handle attachments but don’t paint onto the handle itself. -
Clean up edges:
If any lines look messy or smudged, let the underglaze dry completely, then gently scratch away the excess with a needle tool or a clean, stiff brush.
Level Up: Carved Texture
Instead of just painting the black lines, try carving shallow grooves into the clay first (sgraffito style), then fill them with black underglaze for a tactile finish.
Step 4: Bisque and Glaze
-
Bisque fire:
Once bone dry, fire the mug to bisque temperature (usually cone 04) to harden the clay and set the underglaze. -
Apply clear glaze:
Dip the entire mug into a clear, transparent glaze. This will seal the clay and make the cream color glossy while keeping the black lines sharp and visible. -
Final firing:
Fire the mug again to your clay body’s maturity temperature (e.g., cone 5 or 6). Ensure the bottom is wiped clean of glaze before loading the kiln.
Enjoy your morning coffee while getting lost in the mesmerizing twists of your new favorite mug
Symbolic Story Scene Mug
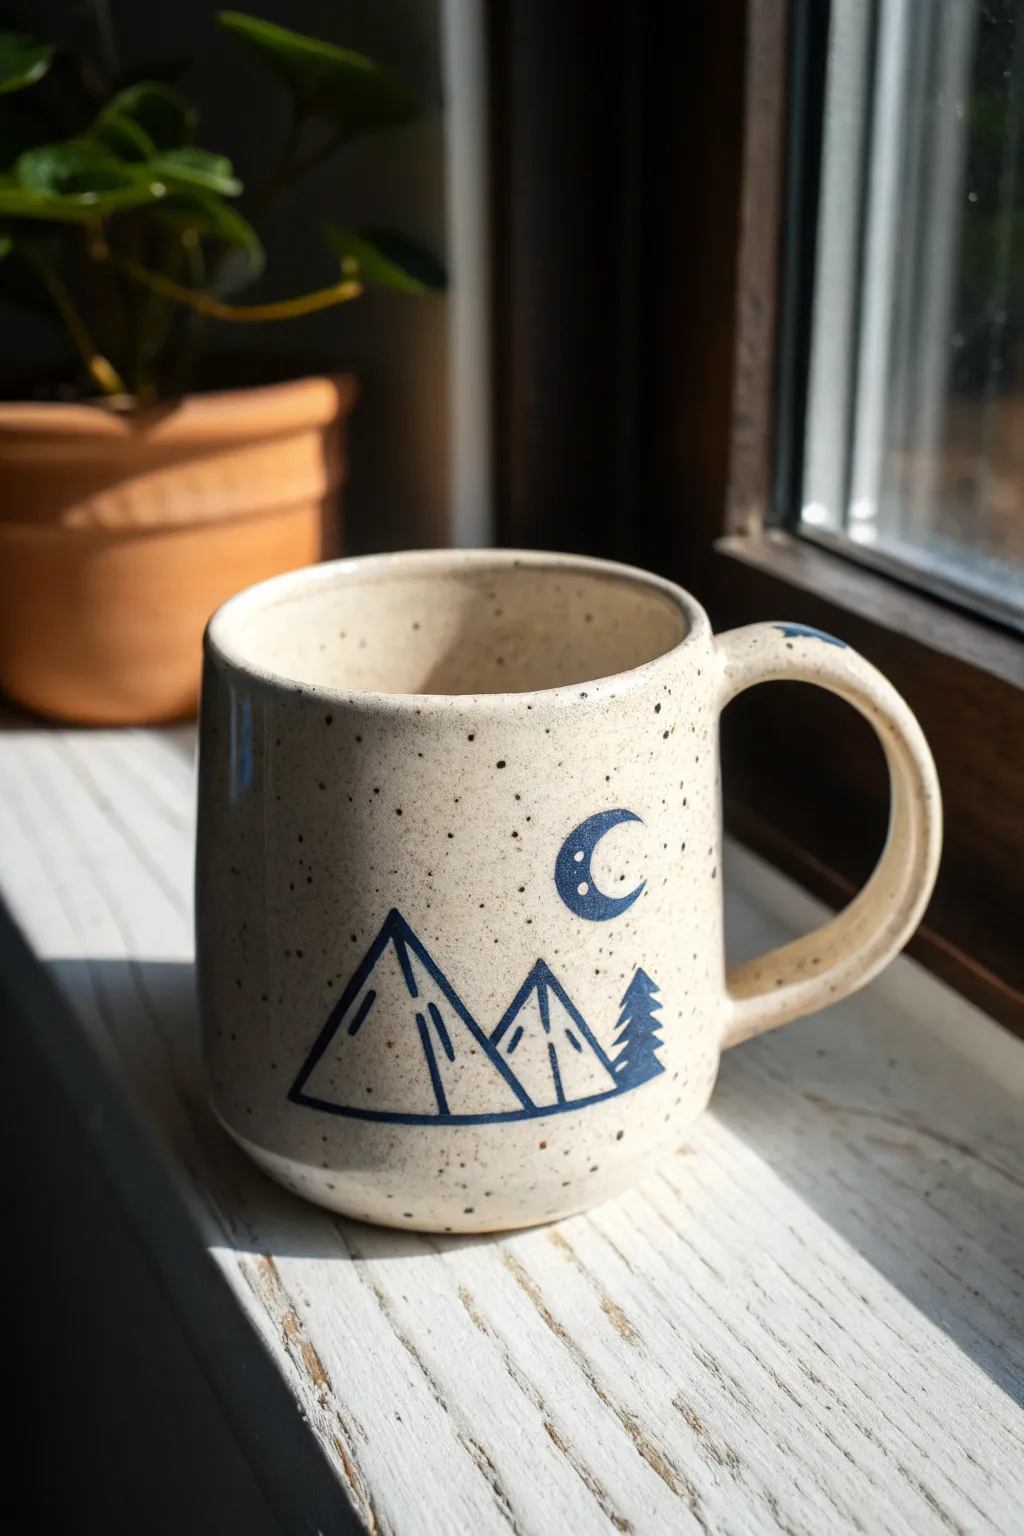
This charming mug features a simple, hand-painted silhouette of mountains and a moon against a speckled cream background. The clean lines and rustic finish give it a cozy, campfire-ready aesthetic perfect for your favorite warm drink.
Step-by-Step
Materials
- White or buff stoneware clay (approx. 1 lb)
- Slab roller or rolling pin with guide sticks
- Bisque mold or cylindrical form (like a PVC pipe)
- Scoring tool (serrated rib or needle tool)
- Slip (clay and water mixture)
- Clay knife or fettling knife
- Sponge
- Underglaze pencil or fine brush
- Dark blue or black underglaze
- Speckled white glaze (or clear glaze if using speckled clay)
- Kiln
Step 1: Rolling and Forming the Cylinder
-
Prepare the slab:
Start by wedging your clay to remove air bubbles. Roll it out into a smooth, even slab that is approximately 1/4 inch thick. Using guide sticks helps ensure the thickness is consistent across the whole piece. -
Cut the rectangle:
Measure and cut a rectangle from your slab. A standard mug assumes a rectangle about 4 inches high and 11 inches long, but you can adjust this based on the size of your cylinder mold. -
Texture the surface (optional):
If you want the outside to have a specific texture, gently roll a texture mat or fabric over the slab before forming. For the smooth look in the photo, simply rib the clay with a smooth kidney tool to compress the particles. -
Wrap the cylinder:
Wrap the clay rectangle around your cylindrical form or mold. Be careful not to stretch the clay too thin as you wrap. -
Join the seam:
Where the two ends meet, cut them at a 45-degree angle (bevel cut) to create more surface area for the join. Score both beveled edges heavily and apply slip. -
Seal the wall:
Press the scored edges together firmly. Use a wooden modeling tool to smooth the seam on both the inside and outside so it becomes invisible.
Smudged Lines?
If your underglaze lines look messy on the bisque, lightly sand them off with fine-grit sandpaper instead of washing, which can push pigment into the pores.
Step 2: Adding the Base and Handle
-
Attach the floor:
Roll a small piece of slab for the floor. Place your cylinder on top of it, trace the circle, and cut it out. Score and slip both the bottom edge of the cylinder and the edge of the floor circle, then press them together. -
Refine the shape:
Once the floor is attached, use a sponge to smooth the connection point. Gently paddle the outside to give it a slight curve if you want a softer shape rather than a straight pipe. -
Pull the handle:
Roll a thick coil or pull a strap of clay for the handle. Shape it into a ‘C’ or ear shape, ensuring it is thick enough to hold the weight of a full mug. -
Attach the handle:
Wait until the handle is leather hard (stiff but still damp). Score and slip the contact points on both the mug body and handle ends. Press firmly to attach, blending the clay with a small tool to ensure a strong bond.
Level Up: Wax Resist
Paint your mountain design using wax resist over the raw bisque. Then, dip the whole mug in a dark glaze. The wax resists the glaze, leaving the mountains the color of the bare clay.
Step 3: Decoration and Glazing
-
First firing:
Let the mug dry slowly under plastic to prevent warping. Once bone dry, fire it in the kiln to bisque temperature (usually cone 04). -
Outline the design:
On your bisque-fired mug, lightly sketch your mountain scene. Draw two overlapping triangles for the peaks, a small pine tree silhouette, and a crescent moon. Using a specialized underglaze pencil helps keep lines crisp. -
Paint the details:
Using a very fine liner brush and dark blue underglaze, paint over your sketch lines. Add vertical lines inside the mountains to suggest slopes and dimension. Fill in the crescent moon, leaving two small negative-space circles for ‘craters.’ -
Clean up mistakes:
If you smudge the underglaze, let it dry for a moment and then gently scrape it away with a craft knife or a stiff, damp brush. -
Apply the glaze:
Dip or brush on a speckled white glaze. If your design is delicate, ensure the glaze isn’t too thick, or it might obscure the drawing. I prefer a glaze that is semi-opaque to let the clay body warmth show through slightly. -
Final firing:
Wipe the foot of the mug clean with a sponge so it doesn’t stick to the kiln shelf. Fire the mug to the glaze’s recommended temperature (often cone 6).
Enjoy your morning coffee or tea with a view of the mountains every single day